Whenever I need quick, juicy color with that dreamy soft blending, I reach for chalk pastels. These ideas lean into the medium’s best tricks—smudging, bold layers, and lots of glowing color (especially on black paper).
Northern Lights Glow Study
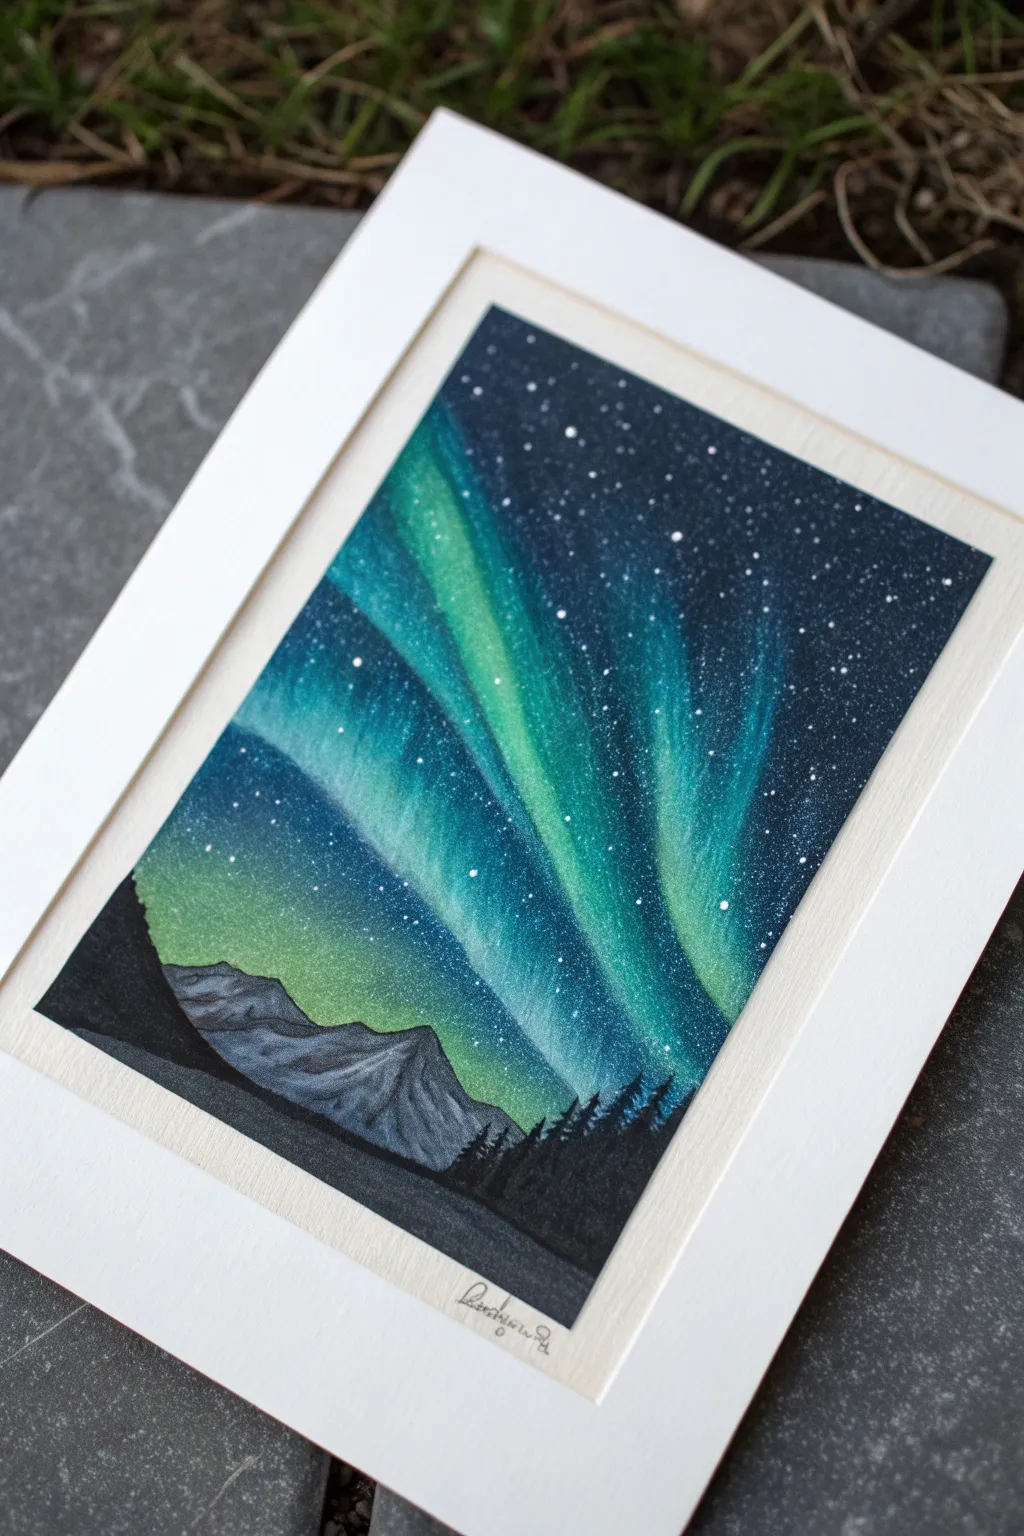
Capture the ethereal beauty of the northern lights with the soft blending power of chalk pastels. This project focuses on vibrant gradients against a dark sky, anchored by a dramatic mountain silhouette.
Step-by-Step Guide
Materials
- Black pastel paper or cardstock (textured)
- Soft chalk pastels (Dark Blue/Indigo, Teal, bright Green, White, Black, Grey)
- Paper towels or blending stumps
- Fixative spray (workable)
- White gel pen or white gouache paint on a toothbrush
- Masking tape
- Pencil (H or HB)
Step 1: Setting the Stage
-
Secure the Borders:
Begin by taping down all four edges of your black paper to a drawing board or table. This creates a crisp, professional white border once removed and holds the paper steady while you blend. -
Sketch the Horizon:
Using a pencil very lightly, draw a faint line for the horizon about one-quarter of the way up from the bottom. Outline the rough jagged shapes of the mountain range on the left side.
Step 2: Creating the Aurora
-
Lay Down the Base Glow:
Start with your brightest green pastel. Draw wide, sweeping curves starting from the horizon line and reaching upward toward the top right corner. These don’t need to be perfect lines; think of them as ribbons. -
Add Teal Accents:
Layer a teal or turquoise color right next to the green streaks, letting them overlap slightly. This adds depth to the light curtains. -
Deepen the Sky:
Take a dark indigo or deep blue pastel and fill in the rest of the sky around your green ribbons. Be generous with the pigment here; the black paper helps, but you want a rich, velvety night sky. -
Initial Blend:
Using your finger or a paper towel, gently blend the green and teal areas first. Stroke in the direction of the light (upwards) to keep the vertical movement alive. -
Blend the Sky:
Now blend the dark blue sections. When you reach the edge where the blue meets the green, use a light touch to smudge them together, creating a soft transition rather than a hard line. -
Intensify the Lights:
The first blend often dulls the colors. Go back over the centers of your aurora ribbons with the bright green and a touch of white pastel to make them truly glow. -
Add Vertical Streaks:
Using the sharp edge of a white or very pale green pastel, make quick, upward flicking motions within the aurora bands to simulate those iconic vertical light pillars.
Keep It Clean
Keep a damp cloth nearby to wipe your fingers between colors. Smudging dark blue into your bright green aurora will instantly muddy the glow effect.
Step 3: The Landscape
-
Mountain Base:
Fill in the mountain shape with a medium grey pastel. Don’t worry about details yet, just get the solid shape covered. -
Shadows and Contrast:
Imagine the light coming from the aurora. Use black pastel to shadow the right side of the mountain peaks, away from the strongest light source. -
Mountain Highlights:
Use white or light grey to highlight the ridges and peaks facing the aurora. Blend these gently with a stump to make the mountains look snowy and rugged. -
Silhouette the Foreground:
Below the mountains, fill the remaining ground area with solid black pastel to create a stark contrast.
Muddy Sky Fix
If your sky colors look dull or grey, you likely over-blended. Apply a fresh layer of bright pigment on top and gently press it in without rubbing back and forth.
Step 4: Details & Finish
-
Draw the Trees:
Use a sharp edge of your black pastel or a black charcoal pencil to draw the treeline. Create small, jagged spikes on the right side of the foreground to suggest pine trees. -
Refine Tree Details:
Add tiny horizontal scribbles to the tree spikes to imply branches. These should be pure silhouette against the glowing sky. -
Starry Night:
For the stars, you can dot them on with a white gel pen. Alternatively, I like to flick white gouache from an old toothbrush for a more random, natural scatter. -
Final Fixative:
Once you are happy with the intensity of colors, take the drawing outside and spray a light coat of fixative to prevent the dust from moving. -
The Reveal:
Carefully peel away the masking tape. Pull the tape away from the center of the drawing to ensure you don’t rip the paper surface.
Now you have a stunning night scene ready to be framed and displayed


Starry Night With Soft Halos
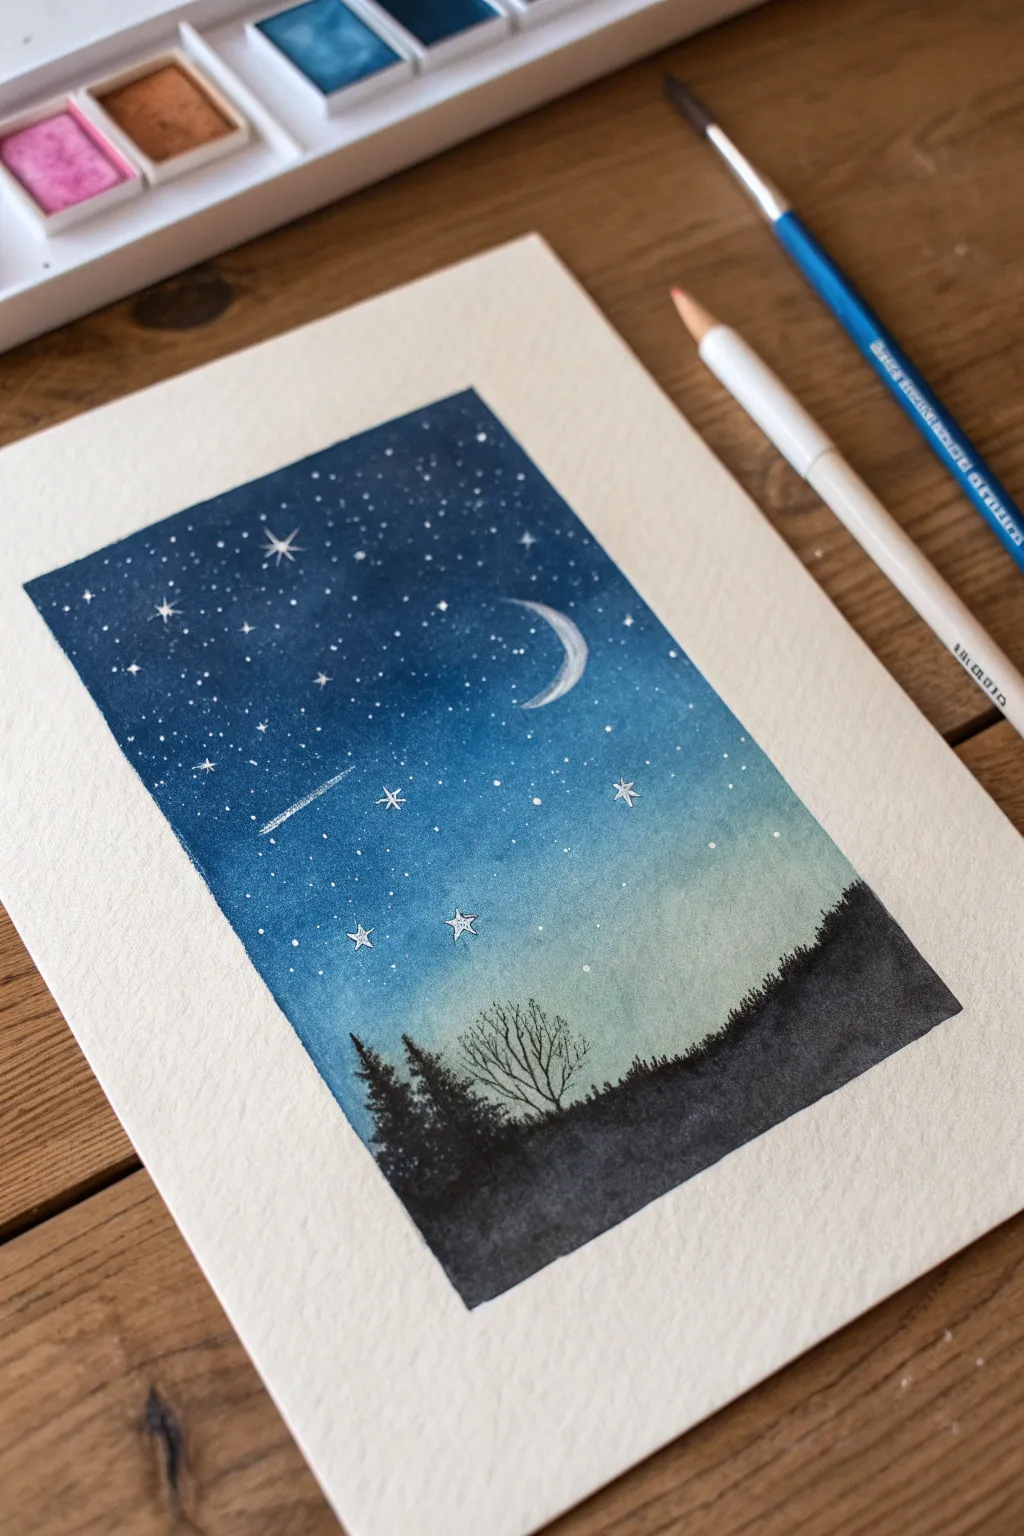
This serene painting captures the magic of a clear night with a deep indigo sky fading into a soft teal horizon. Using simple watercolor gradients and masking techniques, you can create a dreamy celestial scene complete with twinkling stars and a glowing crescent moon.
Step-by-Step Tutorial
Materials
- Cold press watercolor paper (300 gsm recommended)
- Painter’s tape or masking tape
- Watercolors: Indigo (or Payne’s Gray), Prussian Blue, Turquoise, and Black
- White gouache or white gel pen
- Round watercolor brushes (size 8 or 10 for washes, size 0 or 2 for details)
- Paper towels
- Two jars of water (one for clean, one for dirty)
- White colored pencil (optional)
Step 1: Preparing the Sky Gradient
-
Tape the Edges:
Secure your watercolor paper to a board or table using painter’s tape on all four sides. This creates that crisp, clean white border seen in the example and prevents the paper from buckling too much. -
Wet on Wet Base:
Using your large round brush primarily filled with clean water, wet the entire rectangular area of the paper. You want an even sheen, not puddles. -
Apply the Deepest Blue:
Load your brush with a saturated Indigo or Payne’s Gray. Start painting at the very top of the paper, moving horizontally back and forth. Let the pigment flow freely. -
Transition to Mid-Tones:
While the top strip is still wet, clean your brush slightly and pick up Prussian Blue. Blend this just below the indigo, allowing the colors to bleed into each other naturally. -
Fading to Teal:
Rinse your brush so it holds mostly diluted Turquoise or a light Teal. Paint the lower third of the sky, blending it upwards into the blue. The bottom most part should be very pale, almost transparent. -
First Drying Phase:
Let this gradient layer dry completely. The paper should be flat and warm to the touch before you proceed to the next steps.
Soft Moon Glow
Before painting the white moon, use a damp Q-tip to gently lift a tiny bit of blue paint where the moon will go. This creates a natural, soft halo effect around it.
Step 2: Painting the Foreground
-
Mix Your Black:
For the silhouette, use a dense black watercolor or mix Indigo with a dark brown to create a chromatic black. It needs to be opaque enough to cover the sky background. -
Block in the Hill:
Paint an uneven, organic line across the bottom inch or two of your paper to represent the ground. Fill in the area below this line completely with your black mix. -
Add Texture:
While the black strip is still wet, you can tap in a little more pigment or a drop of water to create subtle texture in the ground, suggesting uneven terrain. -
Paint Small Trees:
Switch to your smallest detail brush (size 0 or 2). Along the top edge of the black hill on the right side, dab small vertical strokes to suggest distant grass or low bushes. -
Create the Pine Trees:
On the left side, paint two or three distinct pine trees. Draw a thin vertical line for the trunk, then use stippling motions to add branches that get wider towards the bottom. -
Add the Bare Tree:
Paint a delicate, leafless tree in the center-left. Use the very tip of your brush and light pressure to create thin, wispy branches reaching upwards into the teal sky.
Step 3: Celestial Details
-
The Crescent Moon:
Using opaque white gouache or a white gel pen, carefully draw a crescent moon shape in the upper right quadrant. If using gouache, you can water it down slightly to make it look semi-transparent. -
Splatter Stars:
Cover the black bottom area with a scrap piece of paper to protect it. Load a brush with slightly diluted white gouache, hold it over the sky, and tap the handle against another brush to spray fine mist-like stars. -
Hand-Painted Stars:
Use your white gel pen or detail brush to add larger specific stars. Dot them randomly, clustering a few for visual interest. -
Twinkling Effects:
Select a few of your larger white dots and draw tiny four-point crosses through them to make them look like they are sparkling. -
Falling Star:
Add a shooting star by drawing a small white line that tapers off into a broken dash, angling it downwards across the deep blue section. -
Final Reveal:
Wait until every element is bone dry. Then, slowly and carefully peel away the painter’s tape at a 45-degree angle to reveal your clean, professional edges.
Make It Magical
Use metallic silver or pearlescent watercolor for the shooting star and the larger twinkling stars. They will catch the light beautifully when viewing the art from an angle.
Frame your tiny masterpiece or paste it into a bullet journal for a nightly dose of calm.


Silhouette Tree Against a Colorful Sky
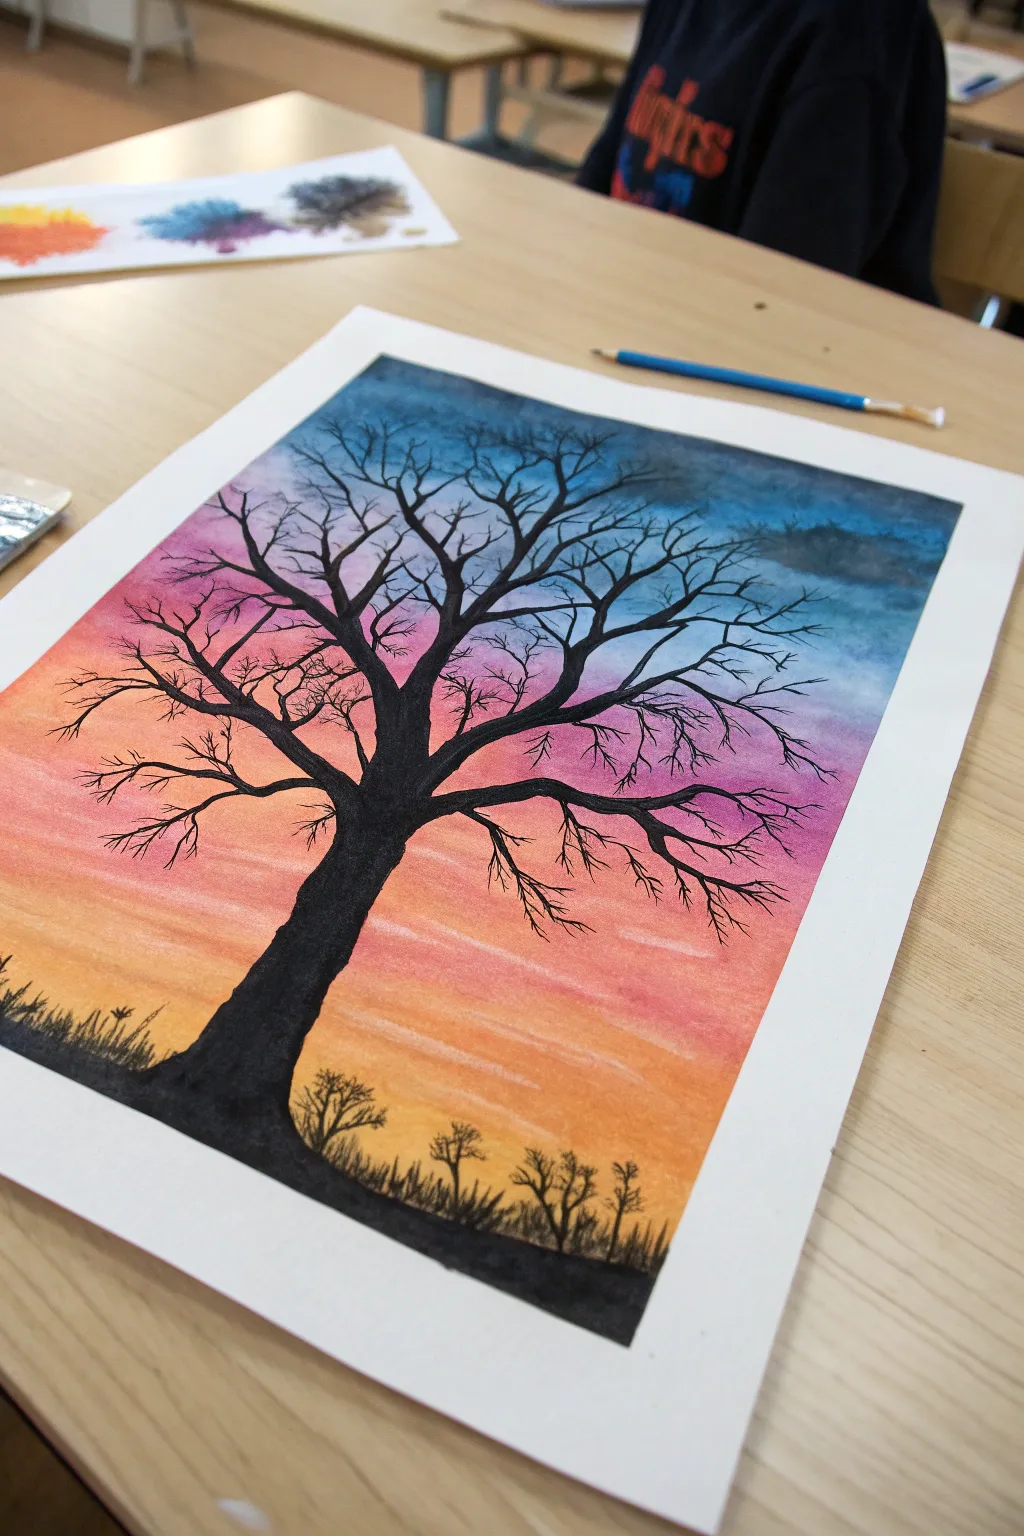
Capture the stark beauty of winter branches against a vibrant twilight sky with this evocative chalk pastel project. By blending warm oranges into cool blues, you will create a stunning gradient backdrop for a detailed black silhouette tree.
Step-by-Step
Materials
- White mixed-media or pastel paper (thick, heavy tooth)
- Soft chalk pastels (bright orange, light orange, pink/magenta, light blue, dark blue, black)
- Black charcoal pencil or pastel pencil (for fine details)
- Tissue or paper towel (for blending)
- Drafting tape or masking tape
- Fixative spray (optional)
Step 1: Setting the Sky Gradient
-
Tape the borders:
Begin by taping down all four edges of your paper to your work surface. This keeps the paper flat while you work and, perhaps more satisfyingly, leaves you with a crisp, clean white border when you peel it off at the end. -
Lay down the horizon:
Starting at the bottom third of the paper, use your brightest orange chalk pastel to color a horizontal band. Don’t press too hard yet; just get the pigment on the paper. -
Add warm transition tones:
Directly above the orange, apply a band of light orange or peach, followed by a layer of pink or magenta. Scribble these colors back and forth horizontally, allowing them to overlap slightly. -
Introduce the cool tones:
As you move past the halfway point of the paper, switch to a light blue. Gently blend this into the top of the pink section. The meeting point might turn slightly purple, which adds a natural dusk effect. -
Deepen the sky:
Finish the top quarter of the page with a darker, rich blue. This creates the illusion of the night sky creeping in from above. -
Blend the gradient:
Using a tissue or your fingers, gently rub the colors horizontally. Start from the lightest orange and work your way up to the blue to avoid dragging dark pigments down into your sunset. Aim for a smooth, seamless fade between hues.
Smudged Skies?
If your blue sky looks muddy where it meets the orange, use a clean eraser to lift the mixed distinct color, then re-apply a layer of pink or purple as a buffer zone between warm and cool tones.
Step 2: Creating the Clouds
-
Add wispy clouds:
Take a clean corner of a tissue and lightly lift some pigment away in horizontal streaks near the orange and pink sections. Alternatively, add faint strokes of white or pale yellow pastel to suggest thin, stretching clouds. -
Add shadow clouds:
In the darker blue upper section, use a dark grey or slightly darker blue pastel to smudge in some organic, uneven cloud shapes. Keep these soft and out of focus.
Add Winter Detail
To turn this into a snowy scene, use a white gel pen or white acrylic paint to dot tiny stars in the blue sky or add snow caps to the black branches.
Step 3: Drawing the Silhouette
-
Draft the trunk:
Switch to your black pastel. Start at the bottom left-center of the page and draw a thick, solid trunk that leans slightly to the right. The base should be wide and taper as it goes up. -
Branch out main limbs:
Split the trunk into two or three major branches. I like to make these thick and gnarled, ensuring they reach well into the blue section of the sky. -
Fill the silhouette:
Color in the trunk and main branches completely with black. Press firmly to ensure the silhouette is opaque and stands out starkly against the colorful background. -
Add secondary branches:
From your main limbs, draw thinner branches extending outward and upward. Let your hand shake slightly to give them a natural, organic crookedness. -
Refine with pencil:
For the tiniest twigs at the very ends, switch to a black charcoal or pastel pencil. This allows for sharp, delicate lines that a blocky chalk stick can’t achieve. -
Create the dense canopy:
Keep adding fine lines until the upper part of the tree looks dense and intricate. Let lines cross over each other to create a web-like effect.
Step 4: Grounding the Scene
-
Anchor the tree:
At the base of the trunk, extend the black pigment horizontally to create a small hill or ground line. This grounds the tree so it doesn’t look like it’s floating. -
Add distant vegetation:
along the horizon line, draw tiny, vertical scribbles or small tree shapes using your black pencil. These should be much smaller than the main tree to indicate distance. -
Suggest grass:
Flick the pencil upward quickly along the ground line to simulate tall blades of grass or weeds in the foreground. -
Final clean up:
Carefully blow away any loose pastel dust. Peel off the tape slowly, pulling away from the center of the artwork to reveal your crisp edges.
Now you have a striking high-contrast landscape that balances vibrant color with bold structure


Layered Mountains at Dusk
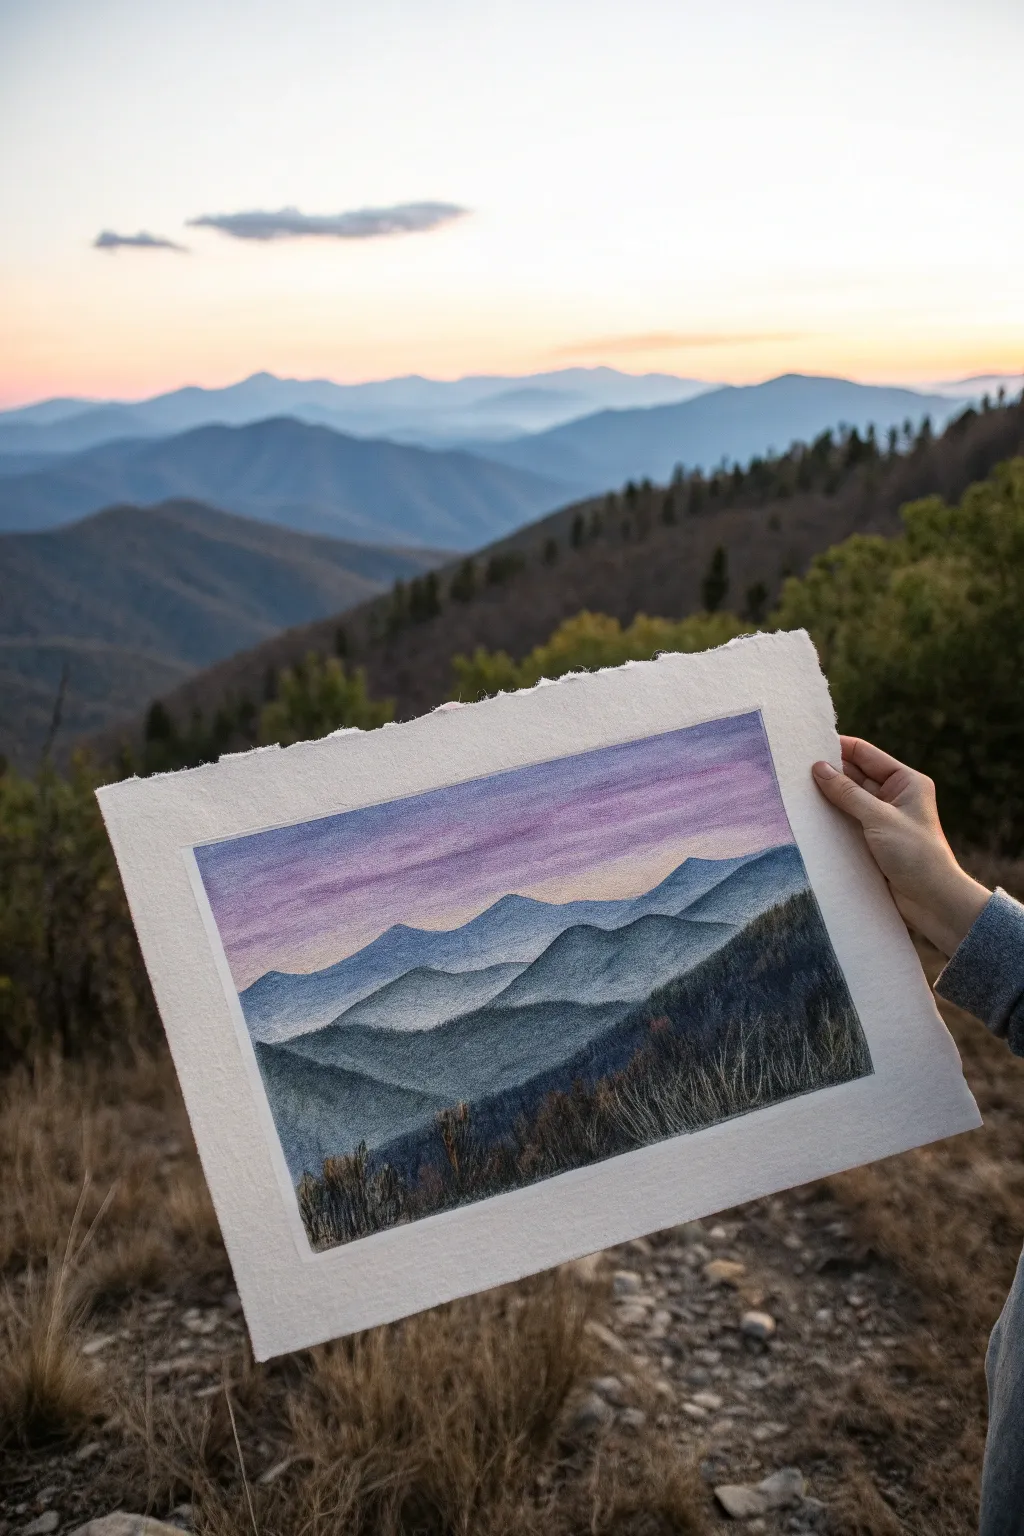
Capture the serene beauty of mountain ridges fading into a soft twilight sky with this layered chalk pastel project. Using atmospheric perspective, you will stack cool blues and deep greens against a warm sunset gradient.
Step-by-Step Guide
Materials
- High-quality textured paper (deckle edge optional)
- Soft chalk pastels (set including indigo, ultramarine, teal, violet, peach, white)
- Hard pastel pencils (dark charcoal or black) for foreground details
- Painter’s tape or drafting tape
- Paper towels or blending stumps
- Fixative spray (workable)
Step 1: Setting the Scene
-
Prepare your paper:
Begin by taping off a clean rectangular border on your paper. If you want the rustic look shown in the photo, gently tear the outer edges of your paper beforehand to create a deckled effect, but keep the inner taped rectangle crisp. -
Sketch the ridgelines:
Using a very light grey or pale blue pastel, faintly sketch the undulating curves of the mountain ranges. Start high for the furthest range and work downward, overlapping the lines to create five or six distinct layers.
Muddy colors?
If layers look muddy, spray a light coat of workable fixative between the sky and mountains. This stops the colors from smearing into each other.
Step 2: The Sunset Sky
-
Lay the base gradient:
Start at the very top of the sky area with a medium violet or purple pastel. As you move downward toward the first mountain ridge, transition into a soft pink and finally a pale peach or cream color right above the mountains. -
Blend the sky:
Use a clean finger or a soft paper towel to blend these horizontal bands of color together. Aim for a seamless transition where the purple melts into the pink without harsh lines. -
Add cloud wisps:
Take a white or very pale grey pastel and scumble thin, horizontal streaks across the upper purple section to suggest high-altitude clouds. Keep these subtle and soft.
Step 3: Distant & Middle Mountains
-
Furthest ridge:
Select a pale, dusty blue pastel. Fill in the most distant mountain range. Because it is furthest away, the pigment should be light and airy, blending slightly with the sky color at the very edge. -
Second layer:
Move to the next ridge down. Choose a slightly cooler, truer blue. Fill in the shape, ensuring distinct separation from the ridge behind it by making the top edge crisp. -
Third layer:
Deepen your color choice to a medium denim blue. As you fill this layer, add a tiny touch of teal or green to start introducing earth tones, but keep the overall impression blue. -
Creating haze:
For these distant layers, gently smudge the bottom of each mountain section into the top of the one underneath it before adding the new color. This mimics the mist often seen in valleys.
Add golden hour
Lightly graze a bright orange or gold pastel along just the top edges of the middle mountain ridges to catch the last rays of the setting sun.
Step 4: Foreground Depth
-
Darker valleys:
For the fourth and fifth layers, switch to deep indigos and forest greens. Press harder with the pastel stick to get opaque, rich coverage. The darkest values should be at the bottom of the shape. -
Texture the slopes:
Don’t blend these lower layers as smoothly as the sky. Use the side of the pastel stick to create a rougher texture that suggests trees and uneven terrain. -
The closest hill:
Fill the final, bottom-most section with your darkest charcoal gray or black mixed with deep green. This anchors the composition.
Step 5: Detailed Finish
-
Foreground grasses:
Using a sharp black or dark brown pastel pencil, draw rapid, upward strokes along the bottom ridge to create the look of dried grasses and thin tree branches silhouetted against the hills. -
Refine edges:
Check the tops of your mountain ridges. If any got messy during blending, use a sharp edge of your pastel or a hard pastel pencil to redefine the crests. -
Remove tape:
Slowly peel away the painter’s tape at a 45-degree angle to reveal the crisp white border surrounding your landscape.
Frame your piece with a wide mat to show off those lovely deckled edges
BRUSH GUIDE
The Right Brush for Every Stroke
From clean lines to bold texture — master brush choice, stroke control, and essential techniques.
Explore the Full Guide
Ocean Waves With Foamy Highlights
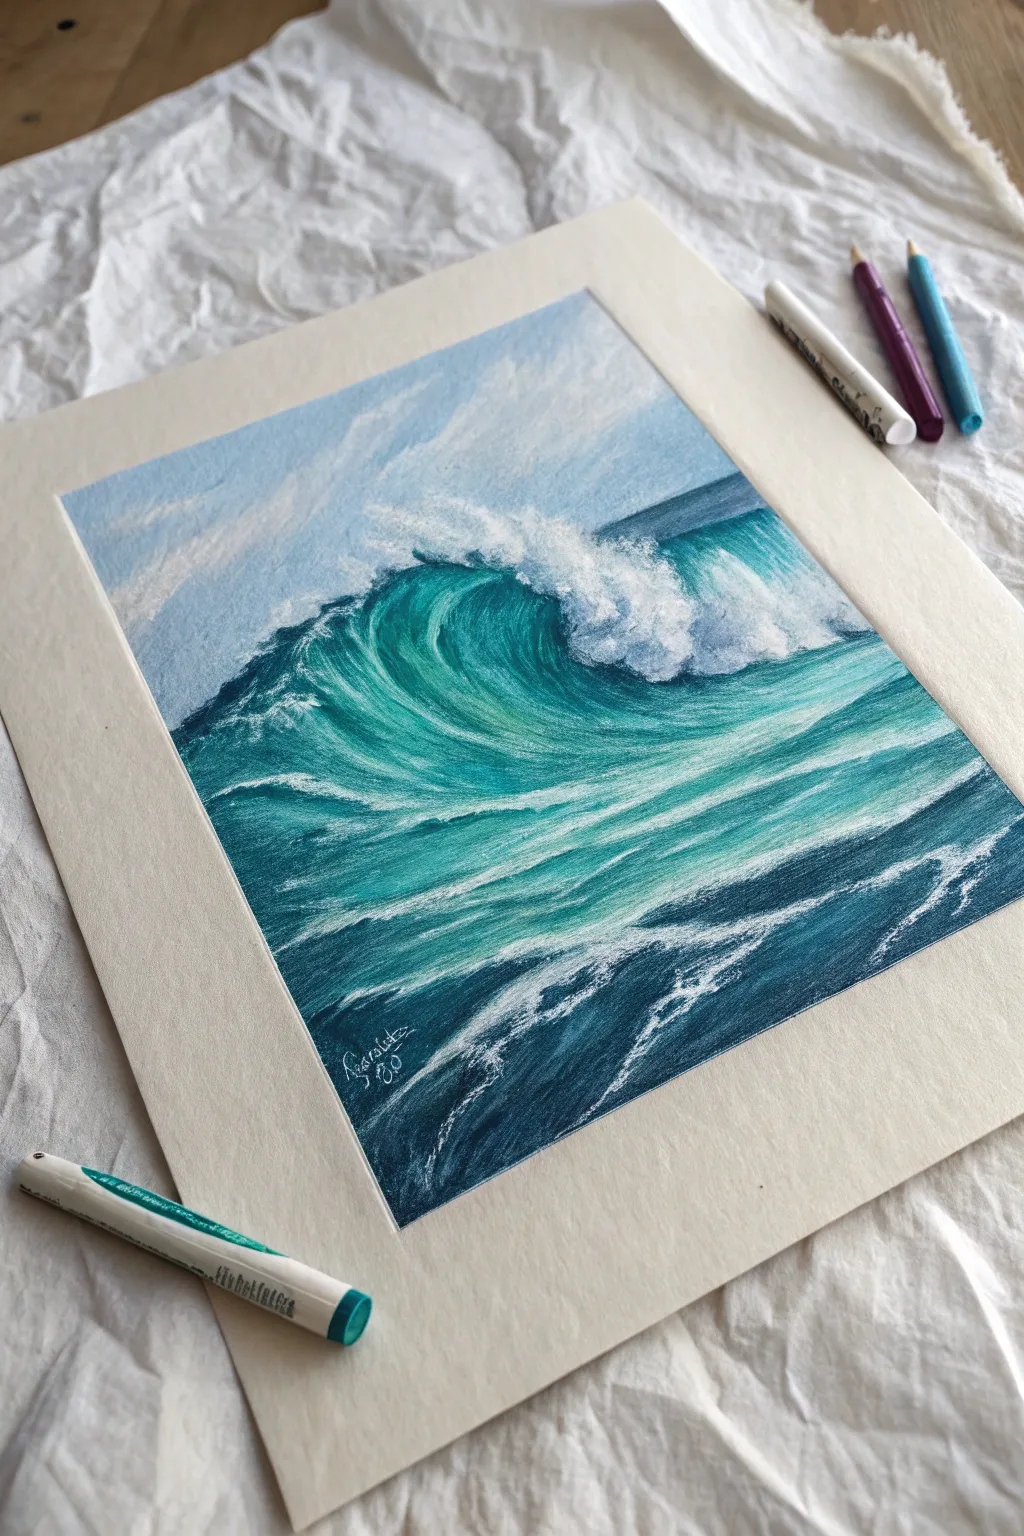
Capture the powerful movement of the ocean with this vibrant chalk pastel study of a crashing wave. You will learn to layer rich teals and blues to create depth before adding the dramatic, bright white foam that brings the scene to life.
Detailed Instructions
Materials
- Textured pastel paper (light beige or cream)
- Chalk pastels (dark Prussian blue, teal, turquoise, cyan, white, cloud grey)
- Pastel pencils (white, dark blue) for fine details
- Paper blending stump or tortillon
- Fixative spray
- Masking tape (for clean borders)
Step 1: Setting the Scene
-
Tape the borders:
Begin by taping down the edges of your paper to a board with masking tape. This creates the crisp, clean white border seen in the final piece. -
Sketch the outline:
Lightly sketch the main curve of the wave and the horizon line using a light grey or pale blue pastel pencil. Keep lines faint so they don’t show through later. -
Block in the sky:
Using the broad side of a pale blue chalk stick, fill in the sky area. Add touches of white and very light grey cloud shapes, blending them softly with your finger for an out-of-focus background effect.
Step 2: Building the Deep Water
-
Apply the darkest shadows:
Start at the bottom right corner and the area directly under the curling lip of the wave. Apply your dark Prussian blue heavily here. This establishes the deepest shadows. -
Layer the mid-tones:
Moving upward into the face of the wave, transition into a deep teal. Overlap slightly with the dark blue to ensure a smooth gradient later. -
Add the translucent lighter water:
For the upper part of the wave’s curve (where the sun hits through the water), apply vibrant turquoise and cyan. This drastic color shift creates the effect of translucency. -
Blend the base layer:
Use your fingers to rub the pigment into the paper tooth. Blend the dark blues into the teals, following the curved direction of the water. Avoid blending horizontally; follow the wave’s arc.
Muddy Colors?
If your white foam looks blue or grey, the bottom layer of pastel is mixing with it. Spray a workable fixative over the blue layers and let it dry before applying the white on top.
Step 3: Creating Texture and Movement
-
Add directional strokes:
Once the base is blended, take a sharpened teal pastel stick or pencil and draw distinct, curved lines following the shape of the barrel. These represent the water stretching as it curls. -
Develop the foreground water:
In the flat water area at the bottom, use horizontal strokes of dark blue and teal. Leave some gaps or lighter areas where the sea foam will sit later. -
Deepen the contrast:
Revisit your darkest shadows under the wave lip. If blending dulled them, re-apply the dark blue to ensure high contrast against the bright water.
Make it Sparkle
For a magical touch, scrape a x-acto knife lightly over a white pastel stick above the paper. The falling dust will create ultra-fine mist and sparkle effects on the wave.
Step 4: The Foamy Highlights
-
Start the main crash:
Using a soft, bright white chalk pastel, aggressively apply pigment where the wave breaks at the top. Use a stippling or tapping motion to mimic exploding water droplets. -
Create the spray mist:
Smudge the bottom edge of the white crash slightly upward and outward into the sky to create a misty spray effect. -
Draw the sea foam trails:
Take a white pastel pencil for precision. Draw the webbing of foam that trails behind the wave on the left side, following the curve of the water. -
Add foreground ripples:
Use the white pencil to create zig-zag foamy patterns on the flat foreground water. Vary the pressure: press harder for thick foam, softer for dissipating bubbles. -
Refine the lip:
Sharpen the edge where the white foam meets the teal water. A crisp edge here makes the water look wet and sharp. -
Final highlights:
Add tiny flecks of pure white over the darkest blue areas in the foreground to represent splashing droplets catching the light.
Step 5: Finishing Touches
-
Sign and peel:
Sign your name in the dark corner with a white pencil. carefully peel away the masking tape at a 45-degree angle to reveal your clean edges. -
Protect the work:
Take the drawing outside and spray a light coat of fixative to prevent the thick chalk layers from smudging or falling off.
Now you have a dynamic seascape ready to be framed and displayed
Tulips With a Glue Resist
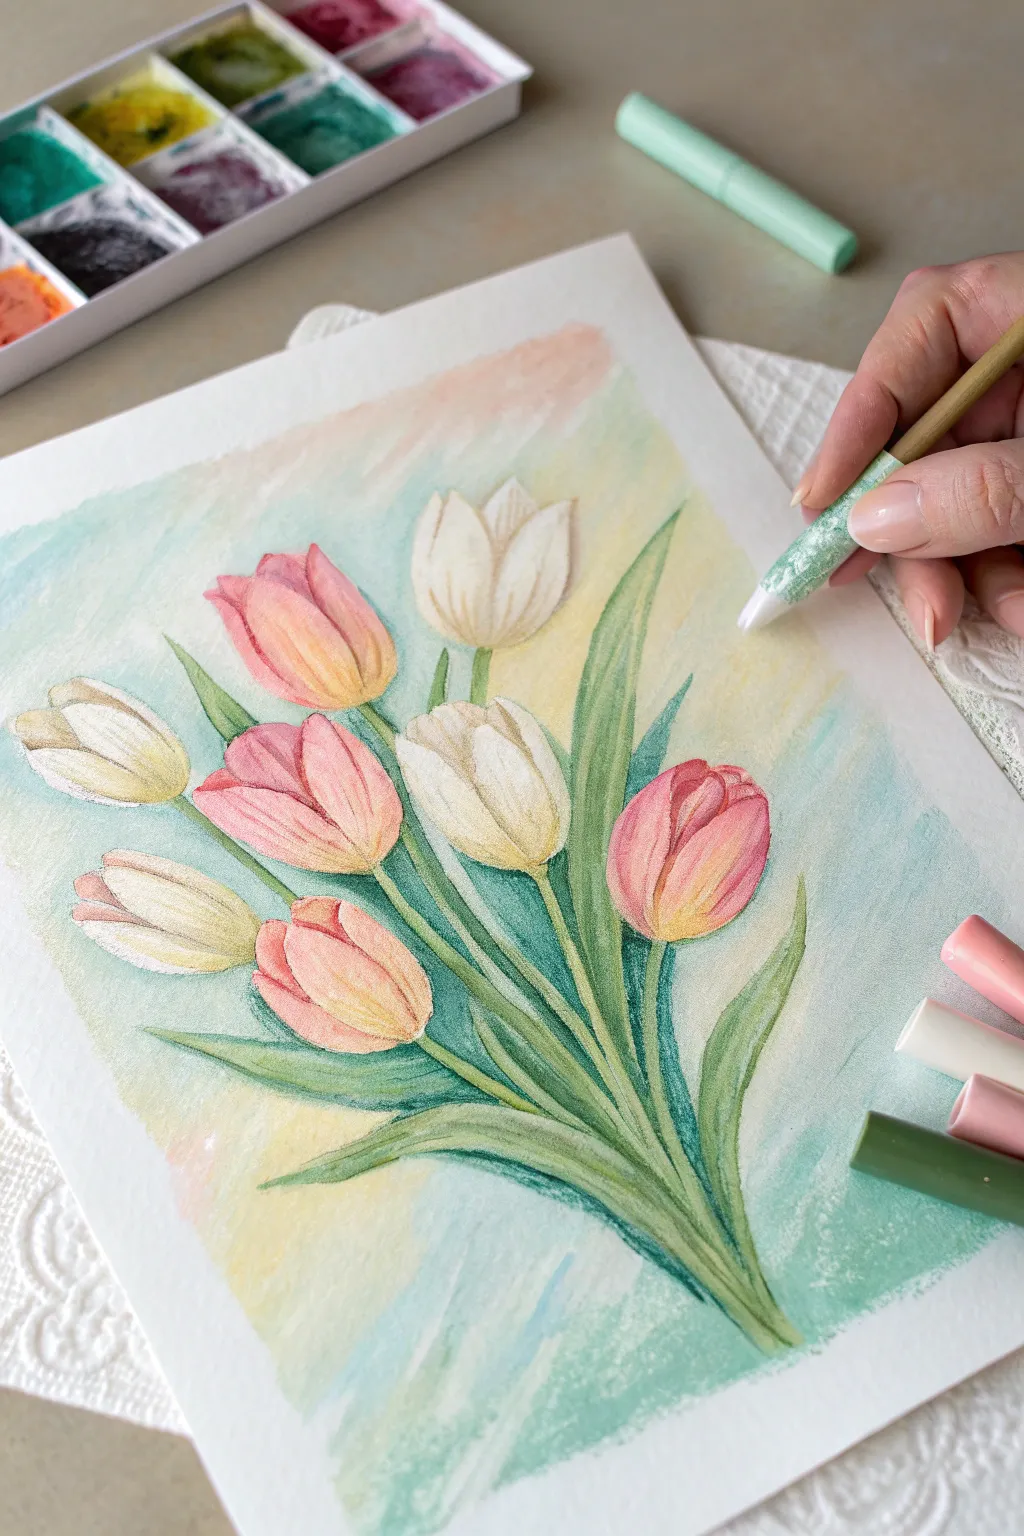
Create a stunningly textured floral piece using the classic resist technique with a soft, chalky twist. By outlining your tulips with glue first, you create a barrier that keeps your pastel edges crisp and adds a beautiful, raised dimension to the finished bouquet.
How-To Guide
Materials
- Heavyweight watercolor paper or mixed media paper
- White school glue (pva) with a fine tip nozzle
- Soft chalk pastels (box set with pinks, peaches, greens, yellows, blues)
- Pencil for sketching
- Fixative spray (optional but recommended)
- Cotton swabs or blending stump (tortillon)
- Paper towels or soft cloth for cleaning fingers
Step 1: Planning and Resist
-
Light Sketch:
Begin by lightly sketching the arrangement of your tulip bouquet with a pencil. Draw about seven or eight tulip heads in various stages of bloom—some closed and some slightly open. Add long, slender leaves weaving between the stems. -
Glue Outline:
Take your white school glue and carefully trace over your pencil lines. The goal is a steady, thin line of glue. Squeeze the bottle gently to maintain a consistent flow. -
Define Petals:
Ensure you outline the individual petals within the flower heads, not just the outer silhouette. This internal detail will be crucial for separating colors later. -
Dry Completely:
This is the most critical patience step. Let the glue dry completely until it is clear and hard to the touch. This usually takes several hours or overnight; if you rush this, the pastels will smudge into wet glue.
Glue Flow Tip
Test your glue flow on scrap paper first. If the lines are too thick, try attaching a fine-line applicator tip or letting the glue dry slightly to shrink before painting.
Step 2: Coloring the Flowers
-
Base Flower Colors:
Once the glue is dry, start coloring the tulip petals. Select a soft creamy white for three of the tulips and a warm peachy-pink for the others. Fill the spaces between the dried glue lines. -
Adding Gradients:
For the pink tulips, apply a deeper pink at the base of the petals and blend it upward into a lighter peach or yellow at the tips. I like to use my finger to smudge these transitions for a smooth gradient. -
Shading White Tulips:
White tulips aren’t just stark white. Add subtle touches of pale yellow or very light grey at the base of the petals to give them roundness and depth. -
Highlighting:
Use a bright white pastel stick to add highlights to the tops of the petals where the light would hit. The glue lines act as a fence, making it easy to color right up to the edge without going over.
Step 3: Leaves and Stems
-
Green Base:
Color the stems and leaves with a mid-tone green. Apply the pastel in the direction of growth—long, sweeping strokes from bottom to top. -
Deepening Shadows:
Layer a darker hunter green or cool blue-green near the bottom of the bouquet and where leaves overlap. This creates the illusion of depth in the dense part of the bunch. -
Leaf Highlights:
Take a lime green or pale yellow pastel and run it along the one side of the leaves to suggest a light source from the left or right.
Dusty Lines?
If pastel dust is stubbornly sticking to the glue lines and won’t brush off, a regular white plastic eraser can gently lift the pigment off the dried glue without damaging the paper.
Step 4: Background and Finish
-
Background Patches:
Choose background colors that complement the flowers—soft sky blue, pale yellow, and a touch of the peach used in the flowers. Scribble these loosely around the bouquet. -
Soft Blending:
Use a tissue or your clean fingers to blend the background colors together, creating a dreamy, out-of-focus effect. Avoid blending into your crisp green leaves. -
Cleaning Edges:
If any pastel dust has settled on top of your dried glue lines, gently wipe them with a slightly damp cotton swab or simply brush them off with a clean, dry brush to reveal the bright white resist lines again. -
Final Polish:
Review the drawing for contrast. Darken the deepest shadows in the leaves or petals one last time to make the colors pop against the soft background.
Now you have a vibrant, textured botanical artwork that captures the fresh energy of spring tulips

PENCIL GUIDE
Understanding Pencil Grades from H to B
From first sketch to finished drawing — learn pencil grades, line control, and shading techniques.
Explore the Full Guide
Winter Cabin Under a Night Sky
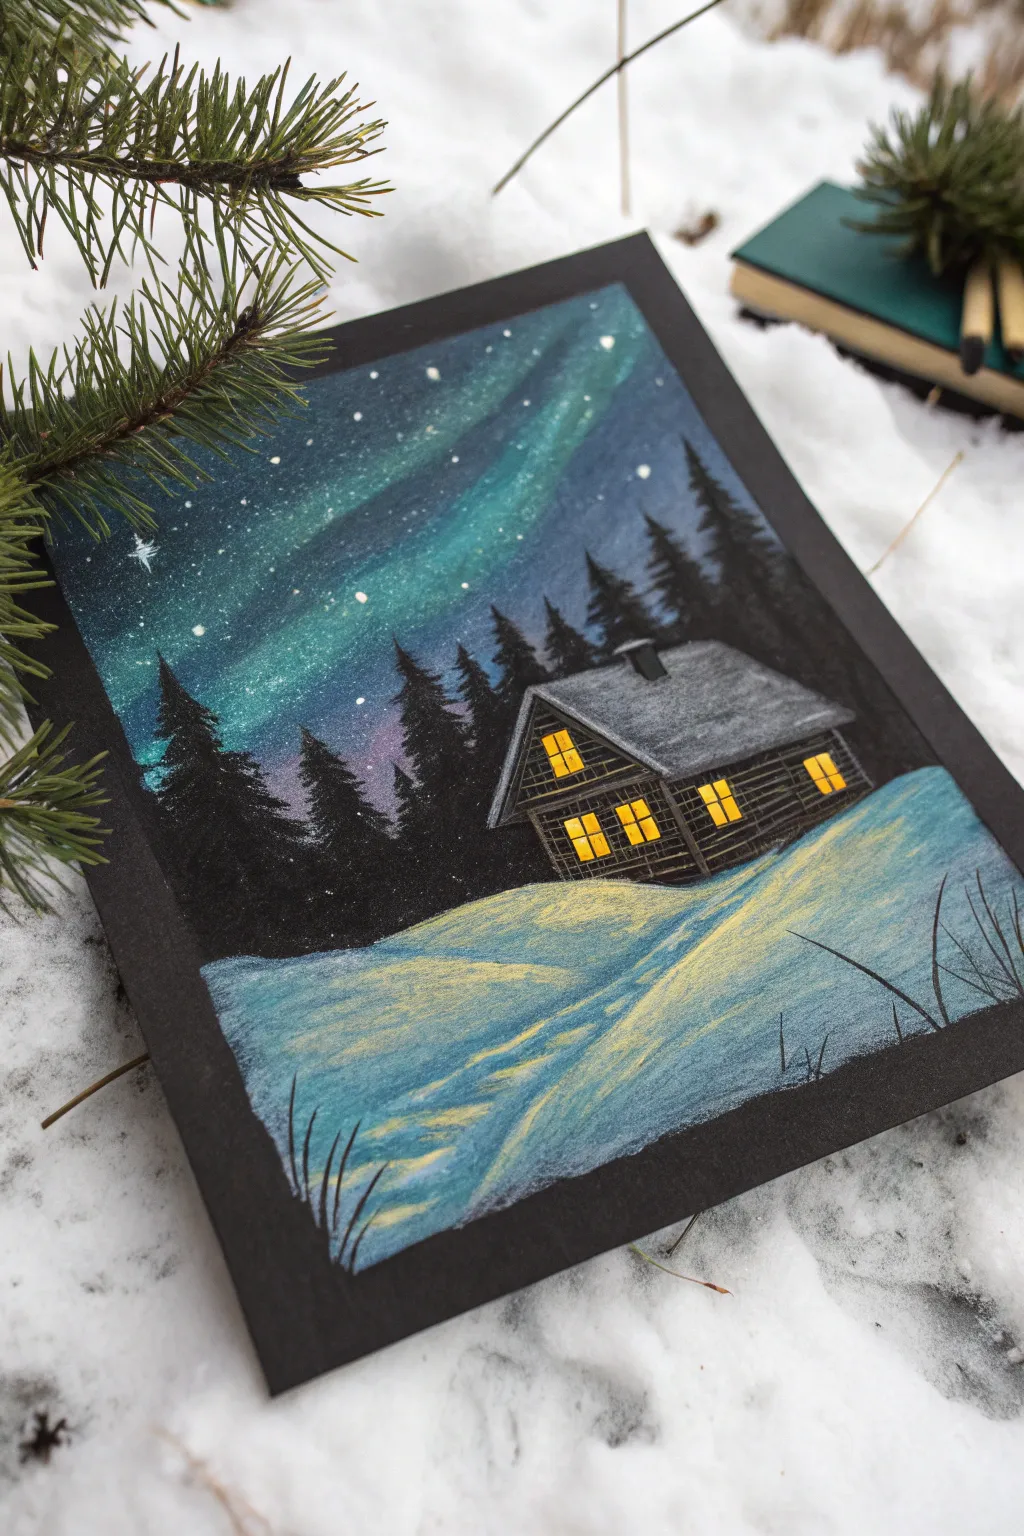
Capture the magic of a silent winter night with this vibrant chalk pastel scene on black paper. Contrasting the deep darkness with glowing windows and dancing auroras creates a striking, luminous effect that pops off the page.
Detailed Instructions
Materials
- Black construction paper or pastel paper (heavyweight recommended)
- Soft chalk pastels (white, teal/turquoise, dark blue, yellow, orange, dark cooler green, brown, black)
- White gel pen or white acrylic paint pen
- Paper towel or blending stump (tortillon)
- Graphite pencil (optional for sketching)
- Fixative spray (optional)
Step 1: Setting the Sky
-
Define the horizon:
Begin by lightly marking a slope across the bottom third of your black paper to separate the snowy ground from the sky. Don’t worry about being perfect; snow drifts are naturally uneven. -
Create the aurora base:
Take a teal or turquoise pastel and draw broad, sweeping vertical strokes in the upper sky area. Let the strokes curve slightly to mimic the waving motion of the northern lights. -
Add depth to the sky:
Fill in the gaps around the teal with a dark blue pastel, blending it slightly into the black paper to create a fade. Add a touch of purple near the horizon line for a magical twilight feel. -
Soften the lights:
Using your finger or a paper towel, gently smudge the teal pastels upward. This diffuses the hard lines and gives the aurora that classic ghostly glow against the dark paper. -
Sprinkle the stars:
Use a white gel pen or a very sharp white pastel to dot tiny stars throughout the sky. Vary the pressure to create stars of different brightness, adding a larger cross-shape for a twinkling ‘North Star’ effect.
Smudgy Windows?
If black dust muddies your yellow windows, clean them with a kneaded eraser before reapplying fresh yellow. Always do the bright yellow lights last to keep them crisp.
Step 2: Building the Cabin and Trees
-
Outline the cabin:
In the middle ground, use a light grey or white pastel to barely sketch the outline of a simple cabin with a slanted roof. Keep the lines faint so they are easy to cover later. -
Establish the tree line:
Using a black pastel (or charocoal), draw the silhouettes of pine trees behind the cabin. Start with a vertical line for the trunk, then zig-zag downward to create the branches. -
Layer the forest:
Make the trees denser and darker near the ground to obscure the horizon line. You can overlap them to create a sense of a thick, deep forest. -
Structure the cabin walls:
Fill in the cabin walls with dark brown strokes. Add horizontal black lines over the brown to simulate the texture of log siding. -
Form the roof:
Color the roof with a mix of grey and white to show snow accumulation. Add a small chimney silhouette on top. -
Illuminate the windows:
Draw four small rectangles for windows—two on the main floor and two smaller ones in the attic. Fill them solidly with bright yellow pastel. -
Add window details:
Take an orange pastel and lightly edge the yellow windows to make the light look warm. Use a sharp black pastel or pencil to draw a cross in each window for the panes.
Step 3: The Snowy Foreground
-
Base layer for snow:
Fill the bottom foreground area with white pastel, using horizontal strokes that follow the curve of the hill. Leave some of the black paper showing through for texture. -
Add shadow and definition:
Lightly blend in some light blue into the white snow, especially at the bottom corners and away from the cabin. This creates cool shadows typical of moonlight on snow. -
Cast the cabin light:
I like to take the yellow pastel and drag it diagonally from the cabin windows down across the snow. This reflection ties the house to the landscape. -
Blend the light path:
Gently smudge the yellow streaks into the white snow so it looks like a soft glow rather than yellow stripes. -
Final nature details:
Using a sharp black pastel or charcoal pencil, sketch a few thin, wispy blades of grass poking out of the snow in the immediate foreground corners.
Try This Twist
Create a ‘smoke’ effect from the chimney using a cotton swab with a tiny amount of grey pastel, swirling it gently upward into the sky for an extra cozy lived-in look.
Step back and admire how the warm windows glow against the cool winter night you have created
Animal Silhouette With a Neon Aura
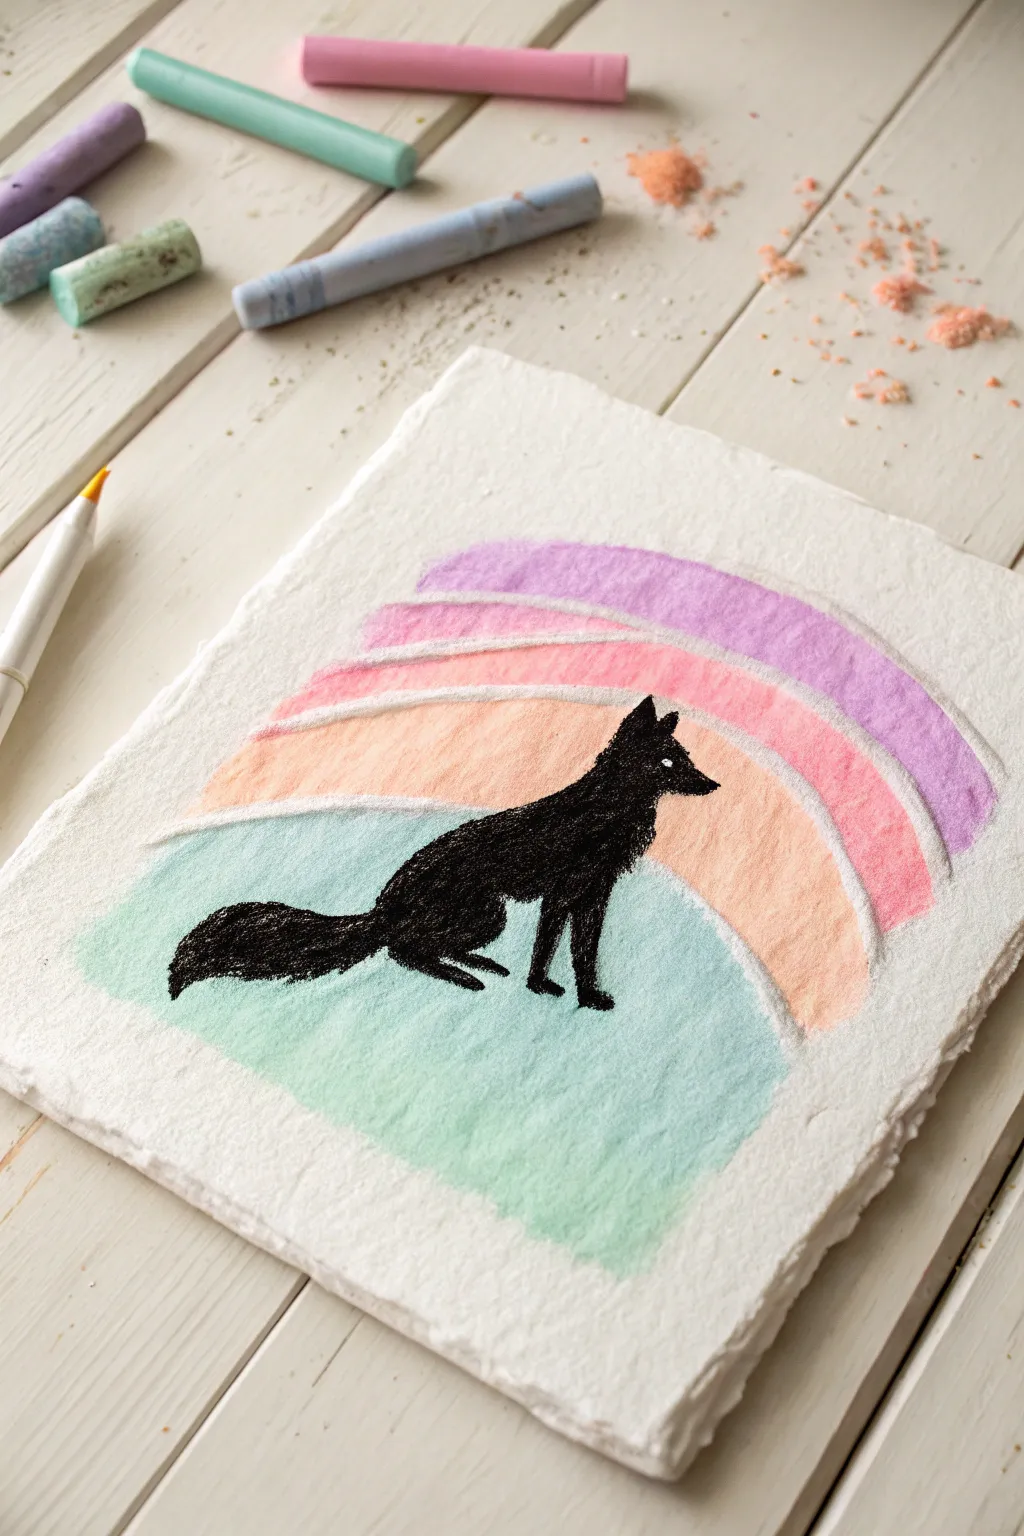
This charming project combines the softness of muted pastels with the bold contrast of a stark black silhouette. The rough texture of handmade paper adds a lovely organic feel to the clean lines of the rainbow aura.
Step-by-Step Guide
Materials
- Thick handmade cotton paper or cold-press watercolor paper
- Soft chalk pastels (mint green, peach, pink, light purple)
- Black pastel pencil or charcoal pencil
- Compressed black charcoal stick (for filling larger areas)
- Clean fingers or paper blending stumps
- Workable fixative spray
- Masking tape (optional)
Step 1: Creating the Background Aura
-
Prepare the workspace:
Lay your handmade paper on a flat, clean surface. Since chalk pastels create dust, it’s wise to place a protective sheet underneath your work. -
Sketch the base curve:
Using your mint green pastel, lightly draw a wide, gentle arch near the bottom third of the paper. This will serve as the ground and the first layer of your aura. -
Fill the green section:
Turn the pastel on its side and gently fill in the area beneath your arch line with the mint green. Don’t press too hard; let the texture of the paper show through slightly. -
Blend the first layer:
Use a clean finger to gently rub the green pigment into the paper fibers. Rub in circular motions to create a smooth, cloudy effect, but keep the top edge relatively crisp. -
Add the peach layer:
Select a soft peach or light orange pastel. Draw a second arch directly above the green one, following the same curve. Make this band about an inch thick. -
Fill and soften:
Fill in the peach band. When blending this layer, be careful not to mix it too much into the green below, as this can create muddy colors. A tiny gap of white paper between colors can look quite stylish. -
Apply the pink arch:
Take a soft pink pastel and create the third arch above the peach one. Follow the established curve, keeping the width consistent with the previous layer. -
Blend the pink:
Smooth out the pink pigment with a clean finger or a fresh blending stump. I prefer using my pinky finger for these smaller bands to maintain control. -
Finish with purple:
Draw the final, largest arch using a light lavender or purple pastel. This top band frames the entire composition. -
Final background blending:
Blend the purple layer. Once finished, blow away any loose dust. You might want to spray a very light coat of workable fixative now to prevent the colors from smudging while you draw the silhouette.
Smudge Control
Place a scrap piece of paper under your hand while drawing the black silhouette. This acts as a bridge, preventing your palm from dragging across the soft pastel background colors.
Step 2: Drawing the Silhouette
-
Outline the fox:
Using a black pastel pencil or a sharpened piece of charcoal, lightly sketch the outline of the sitting fox. Position it so the body is centered and the head breaks into the upper colors. -
Refine the shape:
Define the pointed ears, the sharp snout, and the bushy tail that wraps around the side. The silhouette should look alert and seated. -
Fill the black interior:
Switch to a compressed black charcoal stick or press firmer with your black pastel to fill in the body. You want a deep, solid black to contrast against the soft background. -
Detail the fur texture:
Near the edges of the tail and chest, use short, flicking strokes with the pencil to suggest fur texture rather than a perfectly smooth line. -
Add the eye:
Leave a tiny pinprick of white paper for the eye, or if you’ve covered it, use a white pastel pencil or white gel pen to add a small dot. This brings the fox to life. -
Clean up edges:
Check the edges of your rainbow arches. If the black dust has settled on the pastels, use a kneaded eraser to gently lift it off. -
Review contrast:
Step back and look at the drawing. If the black looks grey in areas, apply another layer of charcoal to ensure it is pitch black. -
Seal the artwork:
Take the artwork outside or into a well-ventilated area and spray it with a final coat of fixative to protect your beautiful creation from smearing.
Starry Night Option
Use a white gel pen to add tiny dots and stars inside the colored bands of the rainbow. This transforms the aura into a magical galaxy effect behind the fox.
Now you have a striking piece of art that balances vivid color with deep contrast, ready to display on a shelf or desk


Butterfly Symmetry Smudge Print
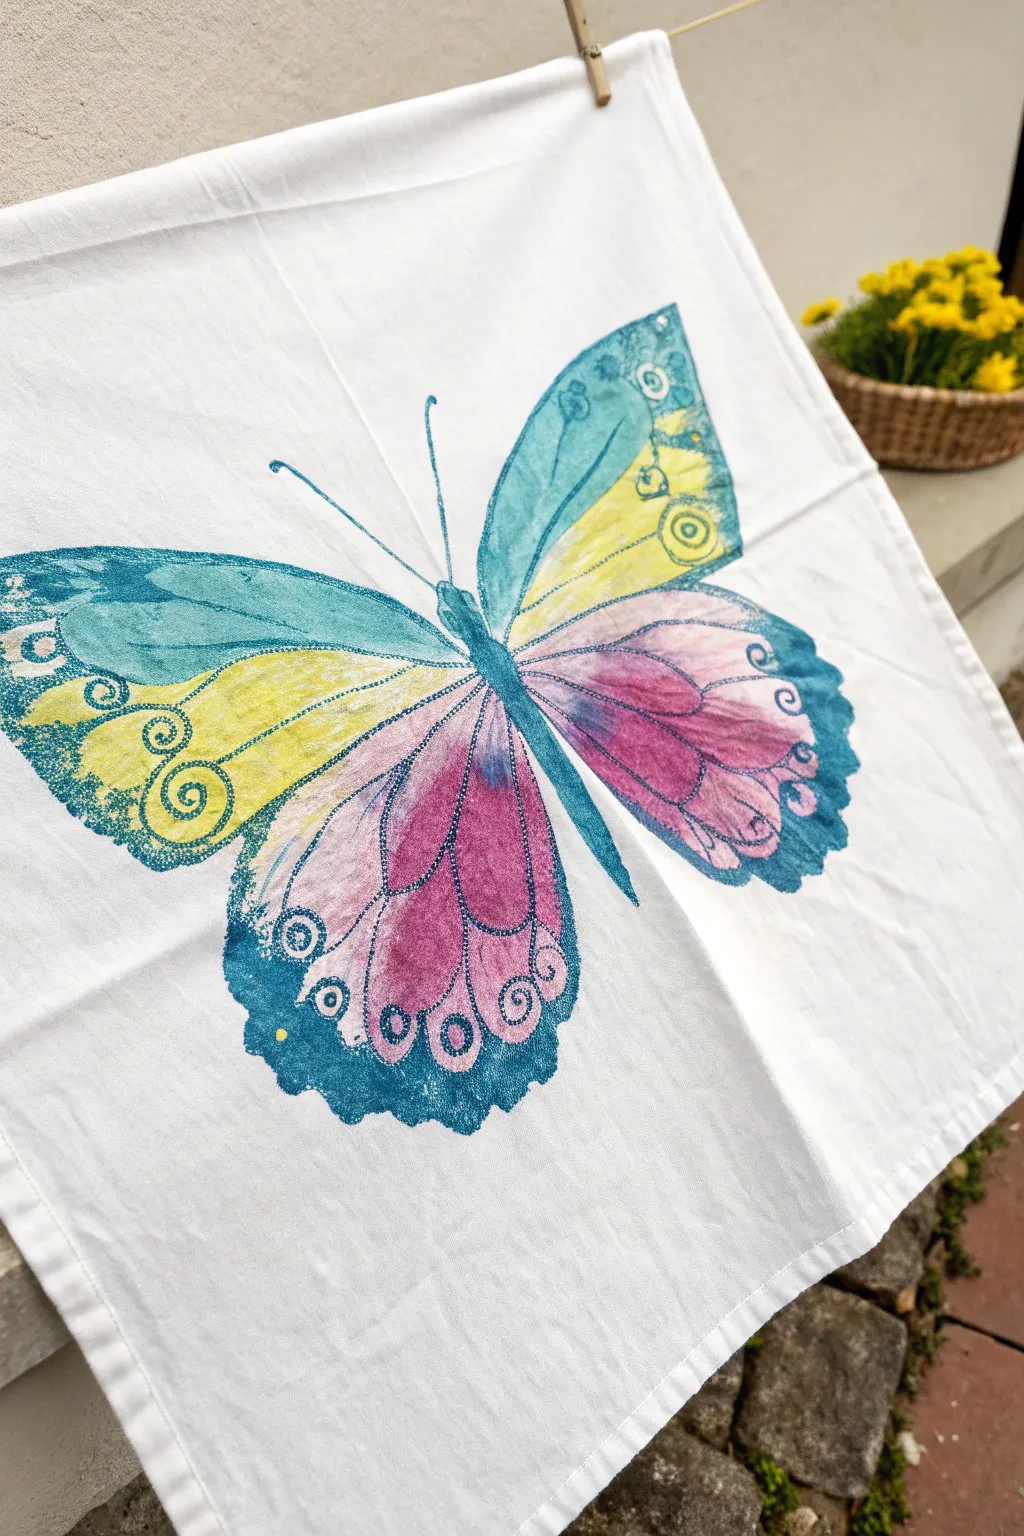
Transform a simple tea towel into a piece of functional art with this magical symmetry printing technique. Using the vibrant dust of chalk pastels, you’ll create a soft, watercolor-like butterfly design that mirrors perfectly on both sides.
Step-by-Step
Materials
- White cotton tea towel or fabric square (pre-washed)
- Chalk pastels (soft pastels, not oil pastels)
- Piece of paper (printer paper or construction paper)
- Pencil
- Scissors
- Iron and ironing board
- Parchment paper (baking paper)
- Fixative spray (optional, for fabric)
Step 1: Preparing the Stencil
-
Fold your paper:
Start by taking a piece of standard paper and folding it cleanly in half to create a crisp crease down the center. -
Sketch the wing:
On one side of the folded paper, use your pencil to draw half of a butterfly shape. Start from the fold and draw the upper and lower wings, keeping the design simple and bold. -
Cut the template:
Keeping the paper folded, carefully cut along your pencil line. When you unfold it, you should have a perfectly symmetrical butterfly shape. -
Position the paper:
Unfold your tea towel and lay it on a flat, hard surface. Place your paper butterfly stencil underneath the layer of fabric where you want the design to appear. You should be able to see the outline of the paper through the cloth.
Step 2: Applying the Chalk
-
Trace the spine:
Using a dark teal or blue chalk pastel, draw a thick, heavy line directly on the fabric to create the butterfly’s central body. Press firmly to lay down plenty of pigment. -
Outline the wings:
Switching colors as desired, trace the outline of the wings directly on the fabric, using the paper stencil underneath as your guide. I like to use a deep teal for the outer edges to frame the vibrant colors inside. -
Fill the top sections:
Color in the top sections of the wings with teal and yellow chalk. Don’t worry about being perfectly neat; the smudging process will blend everything beautifully. -
Add lower wing details:
Fill the lower wing sections with pinks and purples. Apply the chalk thickly—the more dust you have on the fabric, the better the final print will look. -
Add decorative swirls:
Draw spirals, dots, and scallops inside the wings using a contrasting dark color. These details give the butterfly its whimsical character.
Chalk Too Faint?
If the transfer is too light, dampen the fabric very slightly with a spray bottle before folding and rubbing. The moisture helps grab the pigment.
Step 3: Smudging and Setting
-
Fold the fabric:
Carefully remove the paper stencil from underneath. Fold the fabric in half so the chalk design folds onto the blank side of the towel, matching up the butterfly’s centerline. -
Rub to transfer:
Using the side of your hand or a spoon, rub firmly over the folded fabric where the butterfly is. This friction transfers the chalk dust from one side to the other, creating the symmetrical print. -
Unfold and reveal:
Gently open the towel to reveal your full butterfly. The transfer will be softer and more textured than your original drawing, creating a lovely vintage look. -
Refine the details:
If any lines are too faint on the transferred side, you can lightly touch them up with your pastels to balance the image. -
Prepare to heat set:
Place a sheet of parchment paper over the entire design to protect your iron from the loose chalk dust. -
Iron the design:
Set your iron to a high cotton setting (no steam). Press the iron over the parchment paper for about 3-5 minutes to heat-set the pigment into the fibers. -
Draw the antennae:
Once the main body is set, you can use a fine-tip fabric marker or a sharp pastel edge to draw two delicate antennae extending from the head. -
Final clean up:
Shake the towel gently outdoors to remove any excess loose dust that didn’t bond with the fabric.
Level Up: Embellish
After heat setting, use heavy embroidery thread to stitch over the main outlines. A simple running stitch in matching colors adds amazing texture.
Hang your new art piece in the kitchen or garden and enjoy the soft splash of color it brings to your space
Tape-Resist Geometric Sky
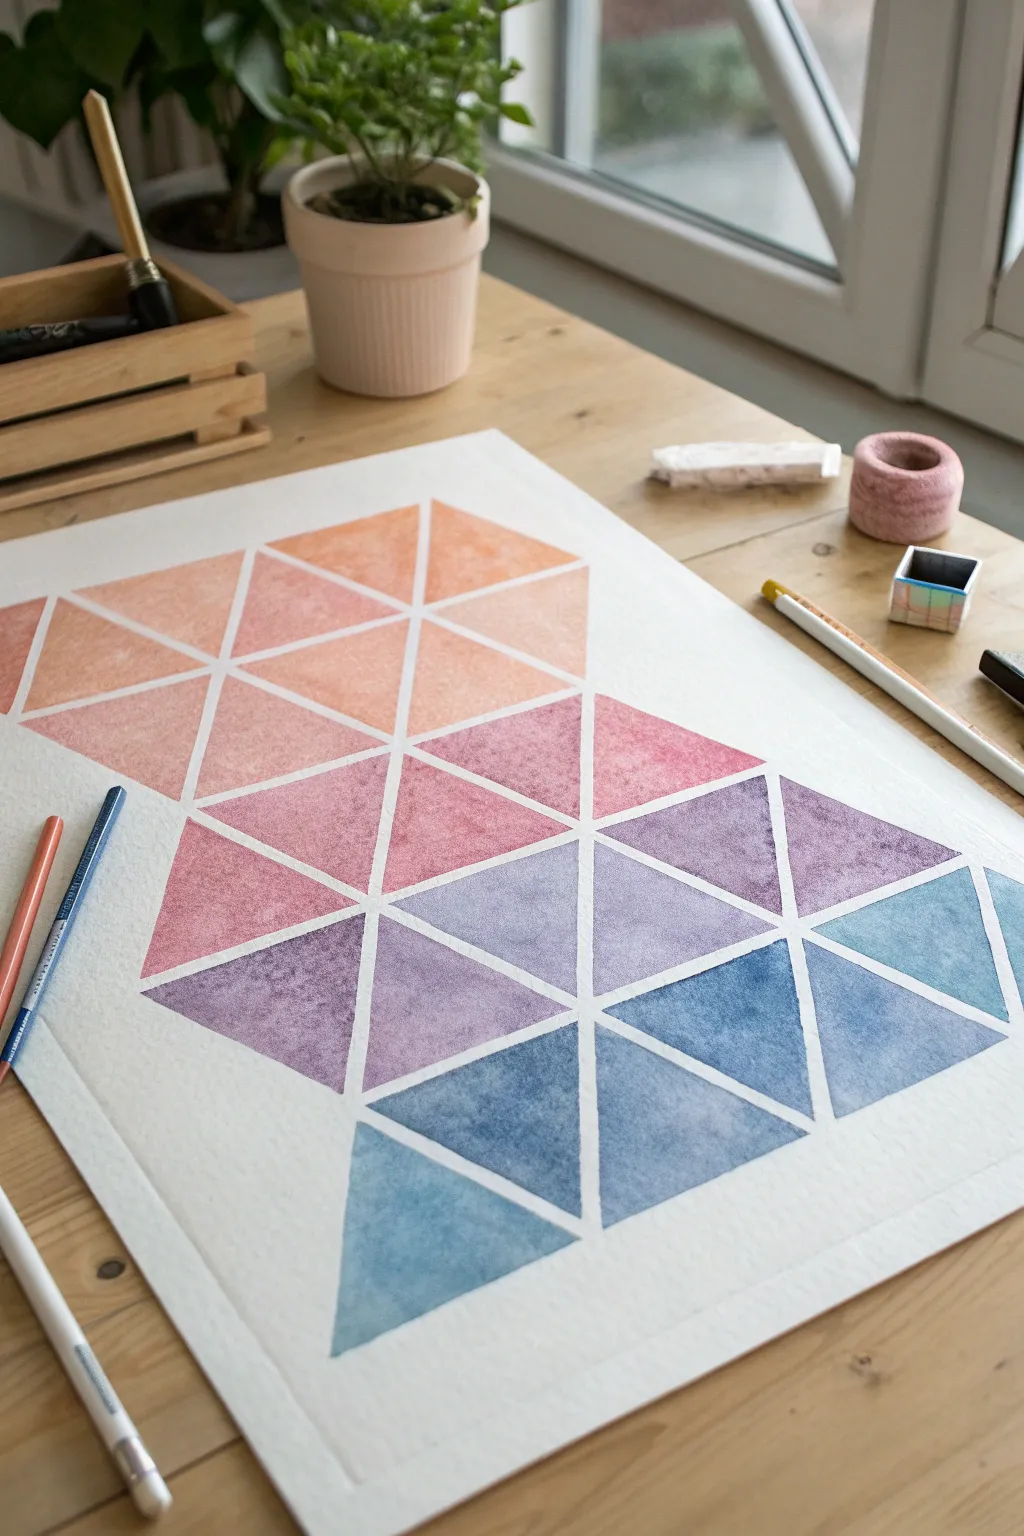
Create a stunning, modern piece of wall art using simple geometric shapes and a soothing color gradient. This project combines the precise lines of drafting tape with the soft, blendable texture of chalk pastels to create a look that feels like stained glass or a fragmented sunset.
How-To Guide
Materials
- Large sheet of mixed media or watercolor paper (A3 or larger)
- Drafting tape or painter’s tape (1/4 inch width is ideal)
- Set of chalk pastels (soft pastels)
- Ruler or straight edge
- Pencil
- Cotton pads, tissues, or blending stumps
- Fixative spray (optional but recommended)
- Eraser
Step 1: Planning the Layout
-
Prepare your workspace:
Clear a large, flat surface like a dining table. Lay down your paper and tape the corners down gently to the table to prevent it from sliding while you work. -
Lightly sketch the grid:
Using a ruler and a very light pencil touch, draw a large grid of triangles. You can do this by drawing horizontal parallel lines first (spaced about 3-4 inches apart), and then diagonal lines that intersect to form the triangles. -
Define the outer shape:
Decide on the overall silhouette of your design. In the example, the triangles form a somewhat vertical, cascading shape rather than filling the entire rectangular page. Erase any grid lines outside your desired shape.
Step 2: Applying the Tape Resist
-
Tape the lines:
Carefully run lines of drafting tape over your pencil marks. Ensure the tape is long enough to cross the intersections fully. -
Create sharp intersections:
Pay special attention to where the tape strips cross. Press down firmly at these junctions to ensure no pastel dust can sneak underneath later. -
Seal the edges:
Run your fingernail or a bone folder along the edges of all the tape strips to create a tight seal against the paper texture.
Sticky Tape Woes?
If your tape is tearing the paper upon removal, stick it to your clothes (jeans work best) once or twice before applying it to the paper. This reduces the tackiness for a safer release.
Step 3: Adding Color
-
Select your palette:
Choose a gradient of colors. The example moves from warm peach and coral at the top, transitioning into mauves and purples, and finishing with cool blues and teals at the bottom. -
Start at the top:
Take a peach or light orange pastel and color heavily inside the top triangles. Don’t worry about staying perfectly inside the lines since the tape protects the borders. -
Blend the first layer:
Use a cotton pad or your finger to rub the pigment into the paper, creating a smooth, solid wash of color. -
Transition to the middle:
Move to the next row of triangles. Apply a dusty pink or mauve color. I like to overlap the colors slightly if I want a smoother gradient, but for this geometric look, keeping distinct blocks of color works best. -
Deepen the tones:
As you move downwards, switch to purple tones. Apply the pastel thickly to get a rich saturation. -
Complete the gradient:
Finish the bottom triangles with shades of denim blue and teal. Ensure the coverage is consistent so the texture matches the top sections. -
Clean up excess dust:
Blow away any loose pastel dust that is sitting on top of the tape. You don’t want this dust to streak across your white lines when you peel the tape.
Pro Tip: Textured Depth
Don’t over-blend the pastels perfectly smooth. Leaving a little bit of the paper’s grain visible adds a beautiful, organic texture that contrasts nicely with the sharp geometric white lines.
Step 4: The Reveal
-
Begin peeling:
Slowly peel back the tape at a 45-degree angle alongside the paper. Do not pull straight up, as this can tear the paper fibers. -
Remove tape carefully:
Work slowly from one side to the other. Seeing the crisp white lines emerge from the colorful chaos is the most satisfying part of the process. -
Touch up edges:
If any pastel dust managed to smudge into a white line, use a small, clean eraser or an eraser shield to gently lift it away and restore the sharp edge. -
Set the artwork:
Take the artwork outside or into a well-ventilated area and lightly mist it with a workable fixative to prevent the chalk from smudging over time.
Once the fixative is dry, your vibrant geometric sky is ready to be framed or displayed as a centerpiece in your room
Faux Stained Glass Pastel Panels
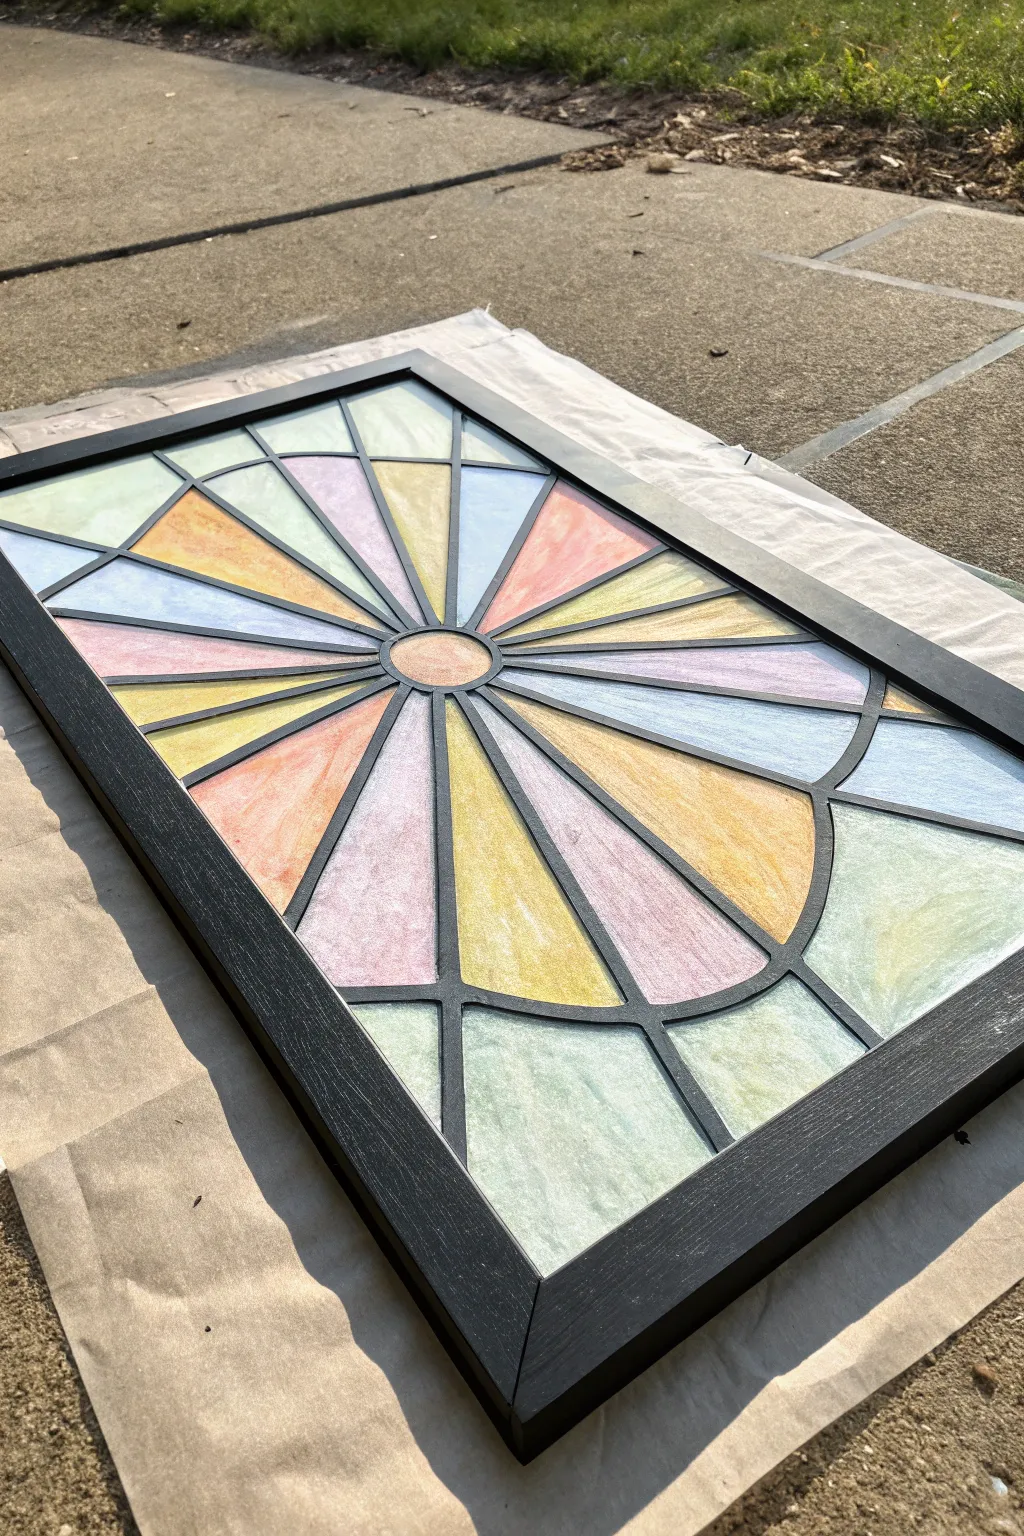
Transform a simple picture frame into a luminous piece of faux stained glass art using the soft texture of chalk pastels. This project captures the glow of a sunburst window without the need for soldering or glass cutting.
Step-by-Step Tutorial
Materials
- Large wooden picture frame with glass insert (black, approx. 18×24 inches)
- Black liquid lead gallery glass paint or black puff paint
- Chalk pastels (various colors: pinks, yellows, blues, greens)
- Heavyweight white paper or poster board sized to the frame
- Pencil
- Ruler
- Large circular object or compass
- Fixative spray (matte finish)
- Black acrylic paint (optional, for frame touch-ups)
- Paper towels and glass cleaner
Step 1: Designing the Lead Lines
-
Prepare the workspace:
Remove the glass and backing from your frame. Clean the glass thoroughly with glass cleaner to remove any fingerprints or dust, then set it aside safely. -
Draft the center:
Lay your white paper or poster board on a flat surface. Find the exact center and trace a small circle (about 3-4 inches in diameter) using a cup or compass to act as your sunburst hub. -
Draw the radiating beams:
Using a ruler, draw straight lines extending from the center circle to the outer edges of the paper. Space them out to create ‘wedges’ of varying widths for visual interest. -
Add visual breaks:
Sketch a few curved lines intersecting the rays near the top and bottom corners to mimic traditional glass paneling details. -
Align the glass:
Place your clean glass pane directly over your sketch on the white paper. You should be able to see the pencil lines clearly through the glass. -
Apply the faux leading:
Carefully trace over your pencil lines directly onto the glass using black gallery glass liquid leading or puff paint. Keep the pressure steady to ensure an even, raised line. -
Create the frame border:
Run a bead of the liquid leading along the extreme perimeter of the glass where it will sit inside the frame. This ensures no gaps appear later. -
Allow to cure:
Let the painted glass dry completely undisturbed, preferably overnight. The lines must be hard and dry before you proceed to assembly.
Lines look shaky?
If your liquid leading lines are uneven, let them dry completely, then slice off the bad section with a razor blade. It peels right off the glass so you can try again.
Step 2: Applying the Pastel Color
-
Color the paper base:
Return to your sketched paper (step away from the wet glass). You will apply the color to the *paper*, not the glass itself. Select a ‘ray’ section and fill it substantially with chalk pastel. -
Blend the pigment:
Use your finger or a paper towel to rub the chalk dust into the paper, creating a soft, clouded texture. Don’t worry about staying perfectly inside the lines, as the black leading on the glass will hide messy edges. -
Create gradients:
I find that mixing two colors in a single section creates a more realistic glass effect. Try blending yellow into orange, or blue into purple for depth. -
Fill the canvas:
Continue coloring each section, alternating warm and cool tones. Leave the color somewhat translucent and textured rather than opaque for a better light effect. -
Seal the artwork:
Take the paper outside or to a ventilated area and spray it lightly with a matte fixative. This prevents loose chalk dust from eventually falling onto the glass.
Make it glow
For a true light-box effect, swap the heavy paper for vellum or drafting film. Place a small LED strip light behind the frame to illuminate the colors from within.
Step 3: Final Assembly
-
Clean the non-painted side:
Once your glass leading is fully cured, clean the *underside* (the smooth side) of the glass one last time to ensure crystal clarity. -
Sandwich the layers:
Place the glass back into the frame with the raised ‘lead’ lines facing outward (towards the viewer). Place your colored pastel paper directly behind the glass, facing forward. -
Secure the backing:
Add the frame backing board and secure the clips or glazier points. The pressure will press the paper against the glass, making the black lines on the glass delineate the colored sections on the paper perfectly. -
Touch ups:
Inspect the frame itself. If the black frame has scuffs, dab a little black acrylic paint on them to match the pristine look of your new art piece.
Hang your masterpiece near a window or light source to see those colors truly shine
Color-Block Abstract Portrait
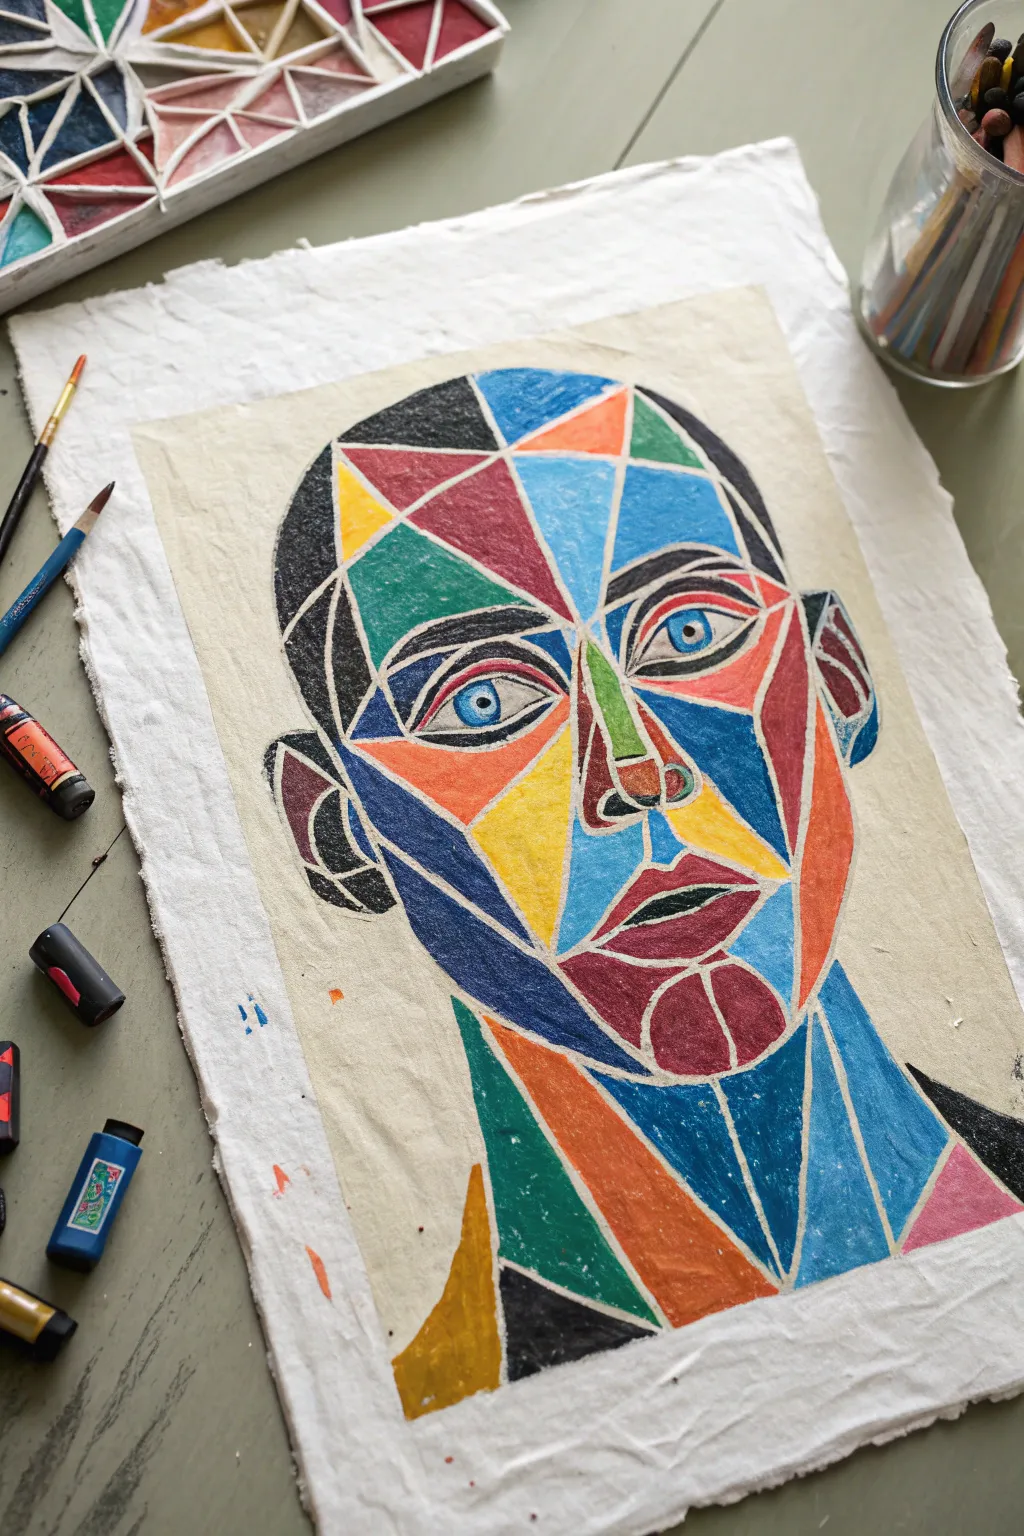
Transform a standard portrait into a striking mosaic of color and shape with this bold chalk pastel project. Using a ‘stained glass’ effect, you will break facial features into geometric planes, creating a modern and vibrant piece of art.
Step-by-Step
Materials
- High-quality chalk pastels (soft pastels)
- Thick, textured paper (handmade cotton rag or mixed media paper recommended)
- Graphite pencil (HB or B)
- Painter’s tape or masking tape
- Ruler (clear plastic is best)
- Fixative spray (workable or final)
- Fine-point eraser (like a mono zero) or kneaded eraser
- Paper towels or blending stumps
Step 1: Preparation and Sketching
-
Secure the paper:
Begin by taping down your textured paper to a flat, hard surface. This prevents the paper from shifting while you work and creates a clean border if you choose to tape over the edges. -
Draft the basic outline:
Using a light hand and your graphite pencil, sketch the large oval shape of a head, a neck, and the shoulders on the page. Don’t worry about details yet; just get the placement centered. -
Map facial features:
Lightly sketch the placement of the eyes, nose, mouth, and ears. These should be fairly realistic in proportion, even though we will abstract them later. -
Geometric subdivision:
This is the most crucial step. Use your ruler to draw straight or slightly curved lines across the face, dissecting the natural curves into sharp triangles and polygons. Ensure the eyes and mouth retain their basic readable shapes within these new geometric boundaries. -
Define the grid:
Go over your geometric lines to make sure you have distinct sections. Think of this as creating the ‘lead’ framework for a stained glass window. Every part of the face and neck should be part of a closed shape.
Step 2: Applying Color
-
Plan your palette:
Select a variety of cool tones (blues, teals) for the shadowed side of the face and warm tones (oranges, yellows, reds) for the highlighted areas. This contrast helps create dimension even in an abstract style. -
Start filling shapes:
Begin coloring the individual geometric shapes. Press firmly with the pastel to get rich, opaque coverage. I prefer to start with the eyes to establish the focal point immediately. -
Create the white borders:
As you color, leave a very thin gap of uncolored paper between each shape. This negative space forms the white ‘grout’ lines that define the style. If you accidentally color over a line, you can lift the pigment later with an eraser, but trying to preserve it now is easier. -
Vary adjacent colors:
Ensure that no two touching shapes are the exact same color. For example, if a cheek triangle is bright yellow, make the adjacent triangle orange or blue. This emphasizes the fragmented look. -
Detailing features:
For the eyes and lips, use smaller triangle shapes or sharp curves. Use bright blue and white for the irises to make them pop against the skin tones. -
Shading within shapes:
While most shapes should be solid blocks of color, you can add slight gradients inside larger shapes (like the forehead triangles) by blending two analogous colors, such as red fading into dark pink.
Clean Lines Hack
If you struggle to keep the white lines clean, draw your grid with a white wax crayon or oil pastel first. The chalk pastel will resist the wax, preserving your lines automatically.
Step 3: Refining and Finishing
-
Fill the neck and shoulders:
Continue the geometric pattern down to the neck. Use darker greens, blues, and blacks here to visually push the neck back and support the head. -
Clean the lines:
Take your fine-point eraser or the sharp edge of a standard eraser and clean up the white lines between the color blocks. This crisp separation is what makes the image look sharp rather than messy. -
Deepen the blacks:
Use a black pastel chalk to fill in areas that need deep contrast, such as the hair, the pupil of the eye, and the deep shadows under the ear/jawline. The black anchors the bright colors. -
Dust off excess:
Gently tap the paper vertically or blow lightly to remove loose pastel dust. Do not brush it with your hand, or you will smear the pigments across your clean white lines. -
Final fixative:
Take the artwork to a well-ventilated area and spray a light coat of fixative. This will darken the colors slighty but ensures the chalk won’t smudge off the page.
Add Metallic Flair
Once the fixative is dry, use a gold or silver paint marker to trace over specific white dividing lines. This adds a shimmering, cloisonné-like effect to the portrait.
Step back and admire how simple geometric shapes have come together to form a complex and expressive face
City Skyline Reflections at Night
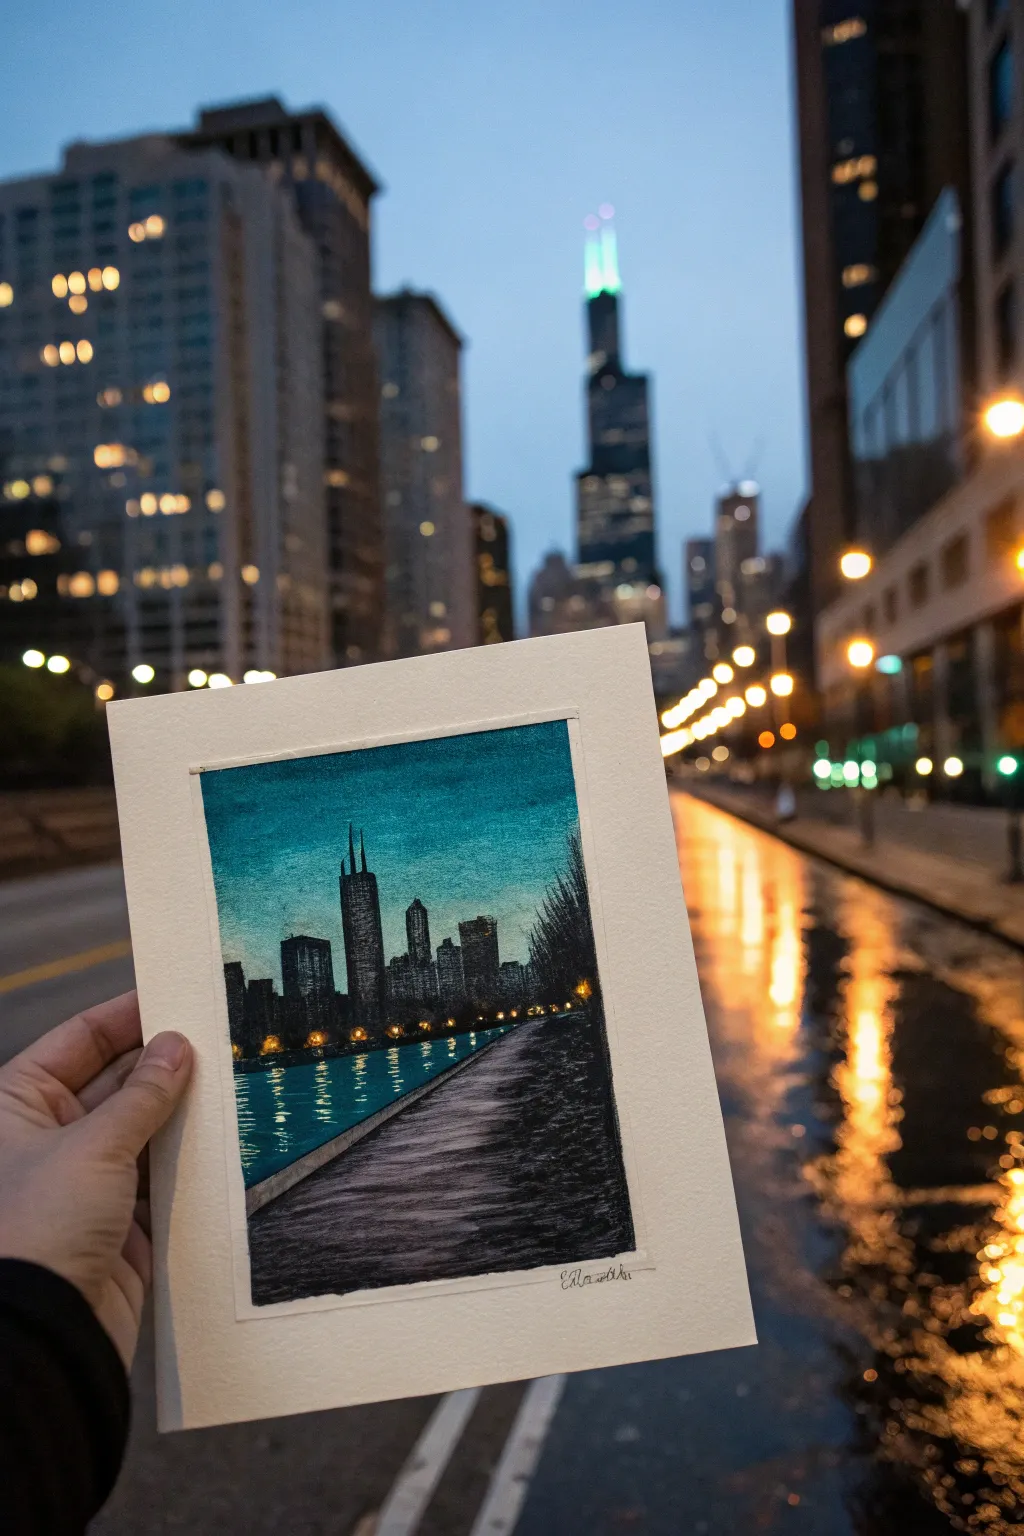
Capture the moody ambiance of the Windy City with this atmospheric chalk pastel piece featuring deep silhouettes and shimmering water reflections. The stark contrast between the bright teal sky and the charcoal buildings creates a dramatic urban nightscape on textured paper.
Step-by-Step
Materials
- Thick pastel paper or dark toned charcoal paper (grey or black works well)
- Soft chalk pastels (teal, prussian blue, black, white, bright yellow)
- Black compressed charcoal stick or charcoal pencil
- Painter’s tape or artist tape
- Paper stump or blending tool
- Fixative spray (workable)
Step 1: Setting the Sky Gradient
-
Tape your borders:
Begin by taping the edges of your paper to a hard backing board. This creates the crisp white border seen in the example and keeps the paper flat while you work. -
Establish the horizon:
Lightly sketch a straight horizontal line about one-third of the way up from the bottom of the page. This will separate your skyline from the water. -
Apply the base sky color:
Starting from the top of the paper, apply a rich teal or turquoise pastel heavily. Bring this color down, fading slightly as you approach the horizon line. -
Deepen the upper sky:
Layer a darker Prussian blue or very dark teal over the top inch of the sky to create a vignette effect, suggesting the depth of the night atmosphere. -
Brighten the horizon:
Just above your horizon line, blend a very light teal or a touch of white into the existing color. This creates a glow where the city lights meet the atmosphere. -
Blend smoothly:
Use your fingers or a paper towel to blend the sky colors horizontally. You want a seamless gradient from the dark top to the lighter horizon.
Smudge Control
Black charcoal dust migrates easily. Keep a scrap sheet of paper under your hand while determining the walkway details to prevent dragging black dust into your pristine teal sky.
Step 2: Building the Silhouette
-
Outline the skyscrapers:
Using a charcoal pencil or the sharp edge of a black pastel, outline the city skyline. Pay attention to the distinctive twin antennas of the Willis Tower (formerly Sears Tower) as the focal point. -
Fill in the buildings:
Fill the silhouette shapes completely with black charcoal or compressed pastel. Press firmly to get a dense, opaque black that contrasts sharply with the sky. -
Add shore details:
To the right side, sketch simpler, darker shapes representing trees or shore embankments. These should be looser and less geometric than the skyscrapers. -
Create the walkway:
Draw diagonal lines emanating from the bottom right corner towards the center left to form the perspective of the paved walkway. -
Texture the pavement:
Lightly stroke gray or dirty white pastel over the walkway area, letting the paper texture show through to simulate concrete.
Make it Shine
For the brightest streetlights, dampen the tip of your yellow pastel slightly before applying. This creates a paint-like consistency that sits vividly on top of the dark colors.
Step 3: Reflections and Highlights
-
Base water color:
Fill the water area (bottom left) with the same teal tone used in the sky, but keep it slightly darker and rougher. -
Add the shoreline wall:
Draw a distinct diagonal line separating the water from the walkway. Shade the vertical face of the wall with dark gray or black. -
Dot the city lights:
Take a sharp yellow pastel and place small, precise dots along the base of the skyline. These are the streetlamps. -
Create water reflections:
Directly under the yellow streetlamp dots, draw vertical, slightly wiggly lines into the water using the same yellow pastel. Press harder near the source and lift off as you go down. -
Enhance water highlights:
Add a few horizontal streaks of light blue or white in the water to suggest ripples catching the ambient light. -
Final walkway shading:
Darken the right side of the walkway with charcoal to create a shadow cast by the trees or embankment. -
Reveal the border:
Carefully peel away the painter’s tape at a 45-degree angle to reveal your clean edges.
Now you have a stunning miniature cityscape that captures the glow of urban nights
Foggy Forest Using Pastel Dust
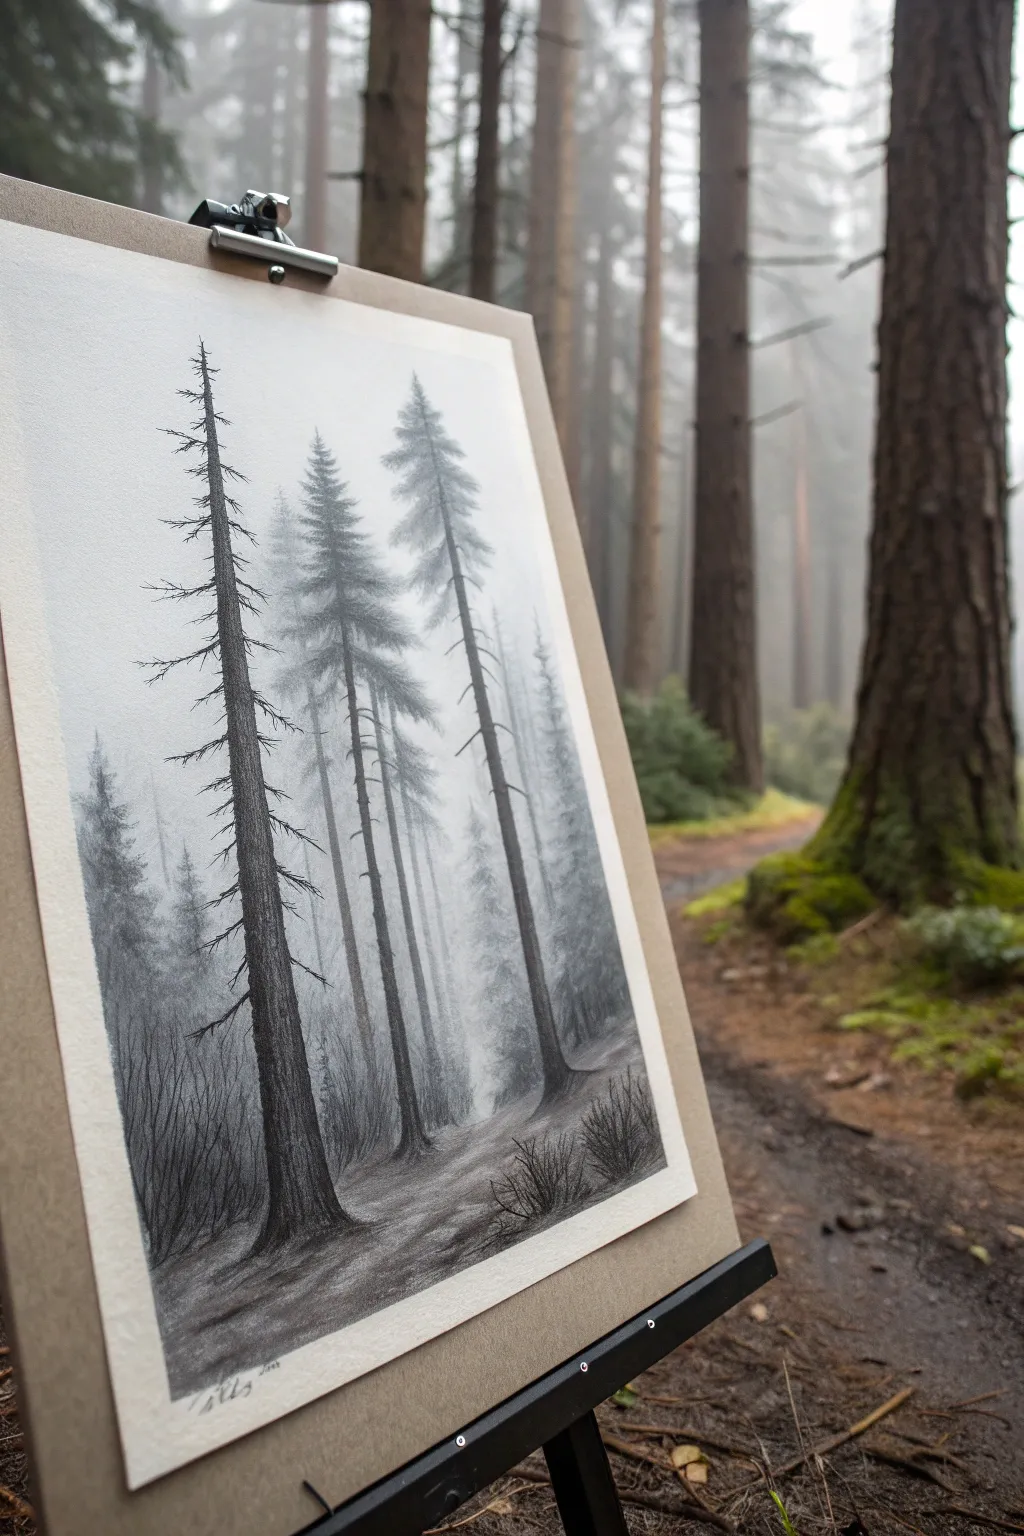
Capture the serene silence of a fog-laden woodland with this atmospheric study in greyscale. By layering pastel dust and creating soft contrasts, you’ll build a depth that makes the trees feel as though they are fading into the mist.
Detailed Instructions
Materials
- Grey toned paper or textured drawing paper
- Soft vine charcoal
- Compressed charcoal sticks (hard and soft)
- Black pastel pencil
- White pastel stick or charcoal white
- Sandpaper block (for creating dust)
- Soft blending brushes (makeup brushes work well)
- Paper stumps (tortillons)
- Kneadable eraser
- Workable fixative
Step 1: Setting the Atmosphere
-
Prepare the dust:
Begin by rubbing a soft vine charcoal stick and a white pastel stick against a sandpaper block. Collect the resulting fine powder into two separate small piles or containers. -
Establish the background tone:
Using a large, soft blending brush, pick up a small amount of the greyish mix (mostly white dust with a touch of charcoal). Gently buff an even, hazy layer over the entire paper used for the sky and distant background. -
Create the heavy fog:
Dip your finger or a clean cloth into the white pastel dust. Apply this more heavily near the bottom third of the page where the distant trees usually disappear into the mist, blending upwards to create a gradient.
Step 2: Building the Distant Forest
-
Sketch the distant ghosts:
Use a stick of vine charcoal to very lightly sketch vertical lines for the furthest trees. These should be faint; press hardly at all. -
Soften the lines:
Take a clean blending stump and rub over these distant trunks. We want them to look out of focus, almost merging with your grey background. -
Add faint foliage:
With the side of the vine charcoal, scumble in rough hints of branches. Don’t draw individual needles yet; just suggest the conical shapes of fir trees in the distance. -
Veil with dust:
Brush a another very light layer of the white/grey dust mix over these distant trees to push them further back visually.
Smudge Control
If you accidentally smudge the pristine white fog areas with charcoal fingers, dab the spot with a clean kneadable eraser rather than rubbing, which grinds the dark pigment in deeper.
Step 3: The Mid-Ground Trees
-
Darken the values:
Select two or three trees to bring closer. Use a compressed charcoal stick here for a slightly darker grey. draw the vertical trunks, making them slightly thicker than the ghost trees. -
Texture the mid-ground:
Using short, horizontal strokes, indicate the texture of the bark. I find it helpful to vary the pressure so the lines aren’t perfectly uniform. -
Draw clearer branches:
Add branches that droop slightly downwards, characteristic of pines. Keep the details sparse near the bottom where the fog is thickest.
Make it Moody
For a darker, rainier mood, swap the white pastel dust for a cool grey pastel dust. This changes the ‘weather’ of the drawing instantly from morning mist to heavy storm clouds.
Step 4: The Hero Tree & Foreground
-
Place the focal point:
Choose a spot on the left third of the paper for the dominant foreground tree. Use a sharp black charcoal pencil or hard compressed charcoal to draw a strong, dark vertical line. -
Render detailed bark:
Work up the trunk with vertical shading and erratic, jagged marks to mimic rough bark. Press firmly to achieve deep blacks, providing high contrast against the foggy background. -
Add detailed branches:
Draw sharp, brittle-looking branches extending from the main trunk. Let the tips of the branches disintegrate slightly where they get thinner. -
Develop the forest floor:
At the base of the trees, use horizontal sweeping motions with the charcoal stick to suggest uneven ground. Darken the immediate foreground heavily. -
Plant foreground bushes:
Use the charcoal pencil to sketch small, scratchy shrubs in the bottom right corner. Use quick, upward flicks for stems. -
Final highlights:
Take a sharp corner of a white pastel or a white charcoal pencil. Add tiny touches of light to the edges of the foreground bark and the tips of the nearest bushes to separate them from the shadows.
Step back and admire how the simple dust has transformed into a deep, breathing forest landscape
Wet-Brush Pastel Wash Experiment
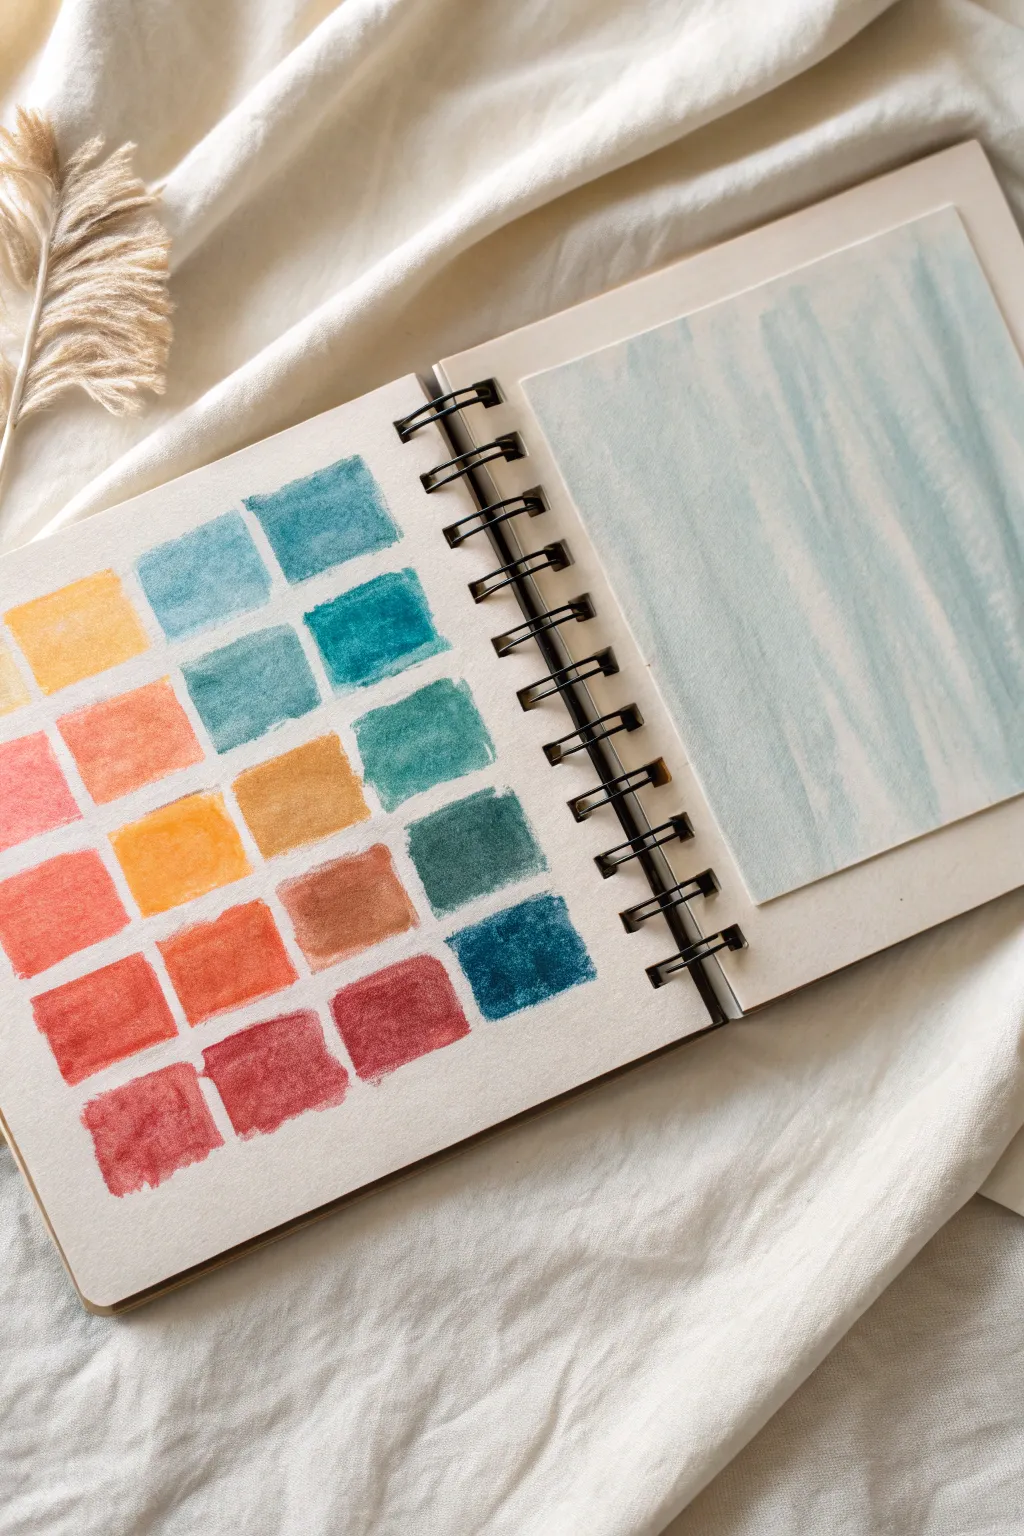
This project explores the delicate interplay between chalk pastels and water, transforming dry pigment into vibrant, painterly swatches. You will create a satisfying color grid alongside a serene, washed-out background page that invites further creativity.
Step-by-Step
Materials
- Spiral-bound mixed media or watercolor sketchbook (approx. A5 or square)
- Set of soft chalk pastels (warm and cool tones)
- Flat shader brush (size 6 or 8)
- Wide wash brush or hake brush
- Cup of clean water
- Paper towels
- Artist tape (optional)
- Scrap paper for testing
Step 1: Preparing the Color Grid
-
Map out the grid:
On the left page of your sketchbook, lightly visualize a grid pattern. You don’t need to draw lines; just aim for about four columns and five or six rows. The charm lies in the hand-painted, slightly organic edges, so let go of perfectionism here. -
Load the brush:
Dip your flat shader brush into clean water, wiping the excess slightly on the rim. The brush should be damp but not dripping. -
Compacting pigment:
Instead of drawing on the paper, rub your damp brush directly onto the stick of your first pastel color (a deep red or berry tone). Twirl it gently to pick up a thick slurry of pigment. -
Paint the first swatch:
Starting at the bottom left corner, press the brush onto the paper to create a square roughly 1 inch by 1 inch. I like to start with the darkest reds at the bottom and work my way up. -
Complete the red row:
Rinse your brush thoroughly. Pick up the next shade of red or orange and paint the next square to the right of the first one. Continue this until the bottom row is filled with warm, reddish tones. -
Transition to orange:
Moving up to the next row, switch to orange and yellow-orange pastels. Repeat the wet-brush technique, keeping the squares aligned vertically with the ones below.
Step 2: Building the Gradient
-
Introduce earth tones:
For the middle rows, mix in some ochre and burnt sienna tones. If your set is limited, you can mix colors by picking up two different pastel colors on the same wet brush. -
Shift to cool colors:
As you move higher up the page, clean your water cup if it’s getting muddy. Begin using teals and light blues for the upper-middle section. -
Create teal variations:
Paint a row of teal and turquoise squares. Vary the opacity by adding more or less water; some squares can be dense and others more transparent. -
Finish with sky blues:
For the top row, use your lightest blues and perhaps a touch of yellow for a sunny corner. Let the water pool slightly at the edges of the squares to create that characteristic watercolor ‘bloom’ as it dries. -
Dry the grid:
Allow the left page to dry completely before closing the book. The chalky texture will return slightly as the moisture evaporates.
Muddy colors?
If your swatches look dull, your water is likely too dirty. Change your rinse water frequently, especially when switching between the warm reds and the cool blue tones to keep pigments bright.
Step 3: The Washed Page
-
Prepare the right page:
You can either paint directly on the right page or, as shown in the image, cut a slightly smaller piece of watercolor paper to mount later. This adds a nice dimensional effect. -
Wet the surface:
Using your wide wash brush, coat the entire paper surface with clean water. It should be glistening but not forming puddles. -
Apply the wash:
Rub your wet wash brush against a light blue or cool grey pastel stick. Swiftly sweep the color across the wet paper in long, vertical strokes. -
Soften the streaks:
Before the wash dries, use a clean, damp brush to gently blend out any harsh lines, creating a soft, misty texture similar to a cloudy sky. -
Mounting (if applicable):
If you painted on a separate sheet, use double-sided tape or glue to center it on the right-hand sketchbook page once fully dry.
Add texture
Once the swatches are bone dry, use the original dry pastel sticks to draw scribbles or outlines over the squares. This emphasizes the contrast between the wet wash and dry texture.
Now you have a beautiful color reference spread that captures the versatile nature of wet chalk pastels


Have a question or want to share your own experience? I'd love to hear from you in the comments below!