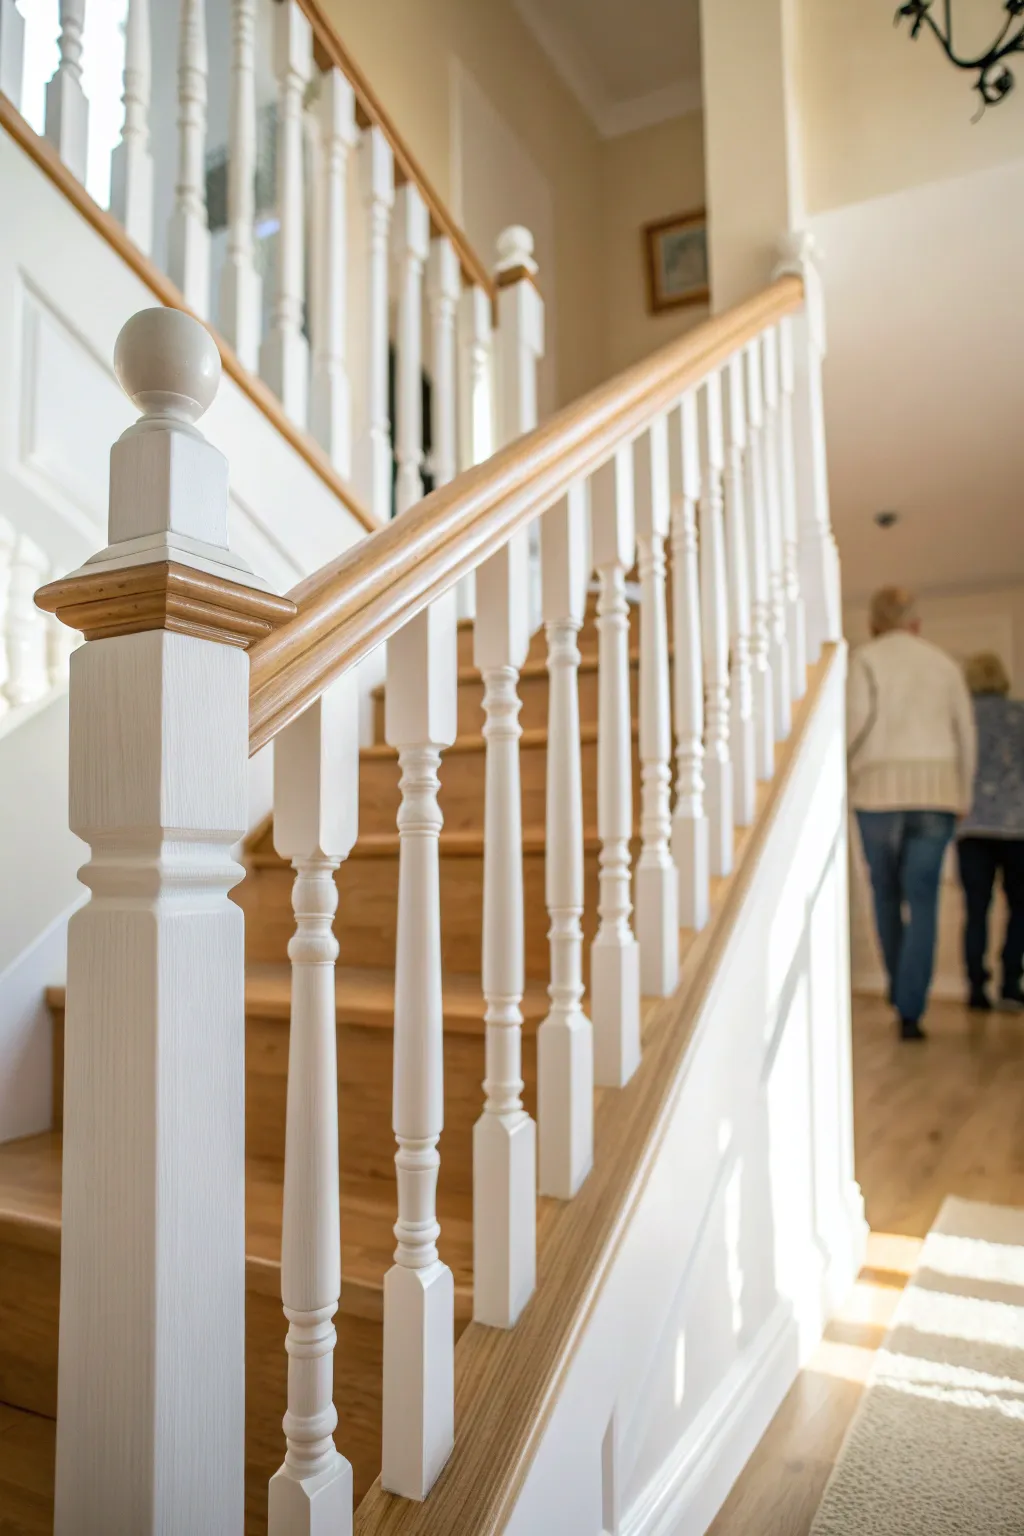
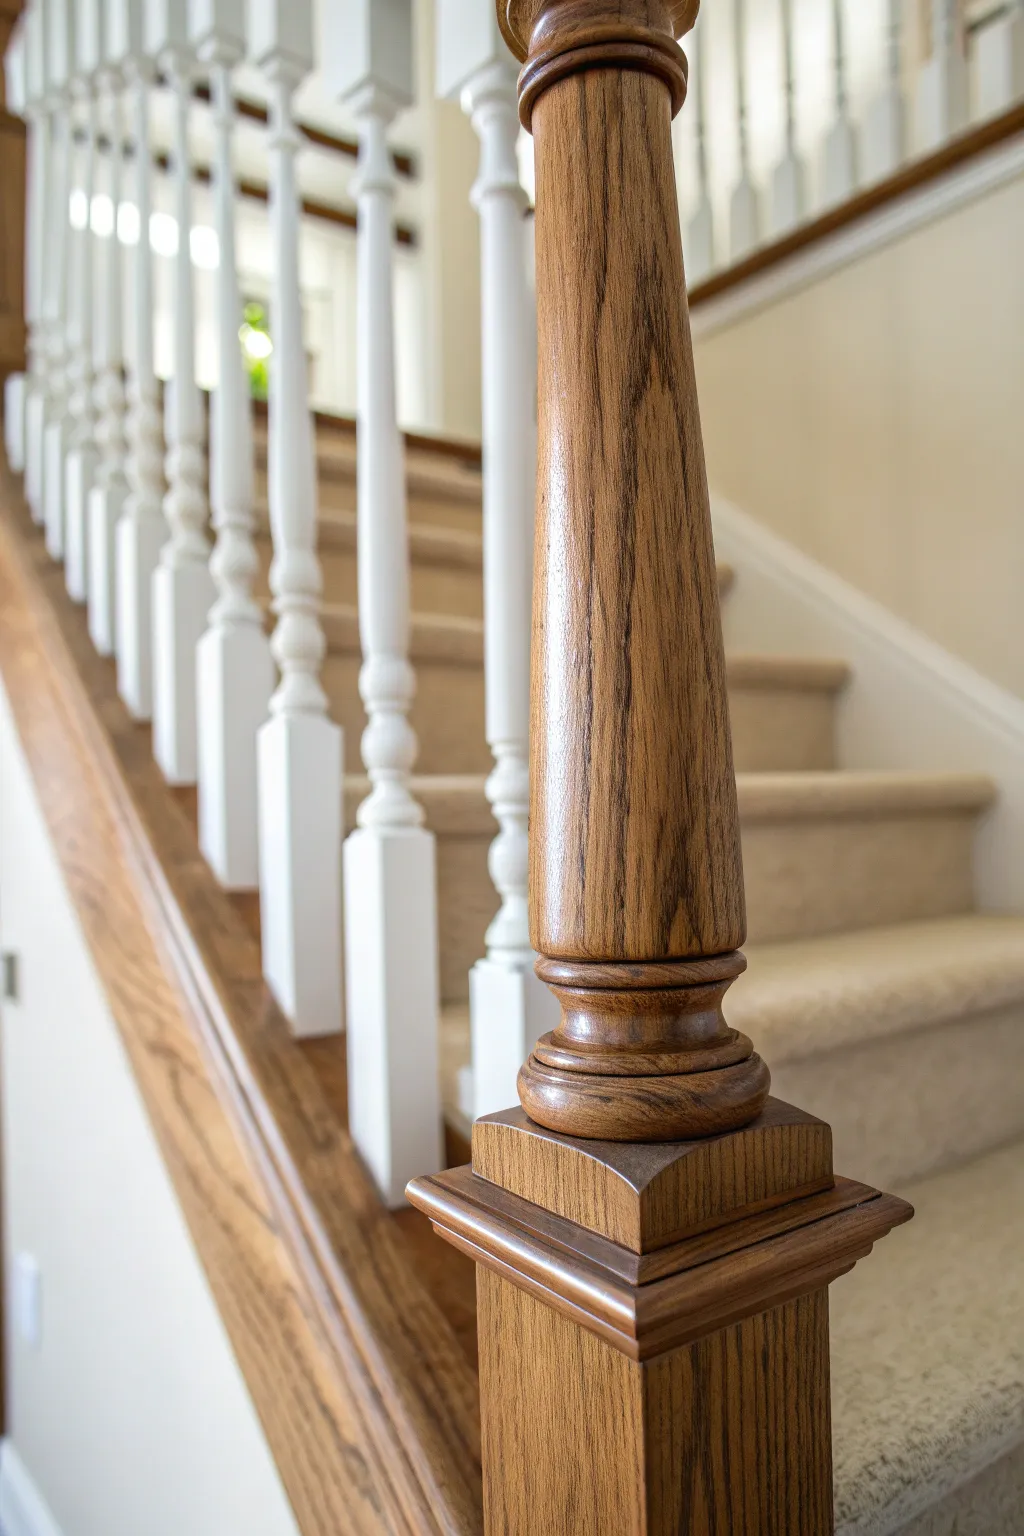
When I want a serious home makeover without ripping anything out, I go straight for painting staircase spindles—it’s wild how much lighter and newer a stairway can feel. Here are my favorite staircase spindle paint ideas, starting with the classic looks and drifting into the artsy, studio-fun options.
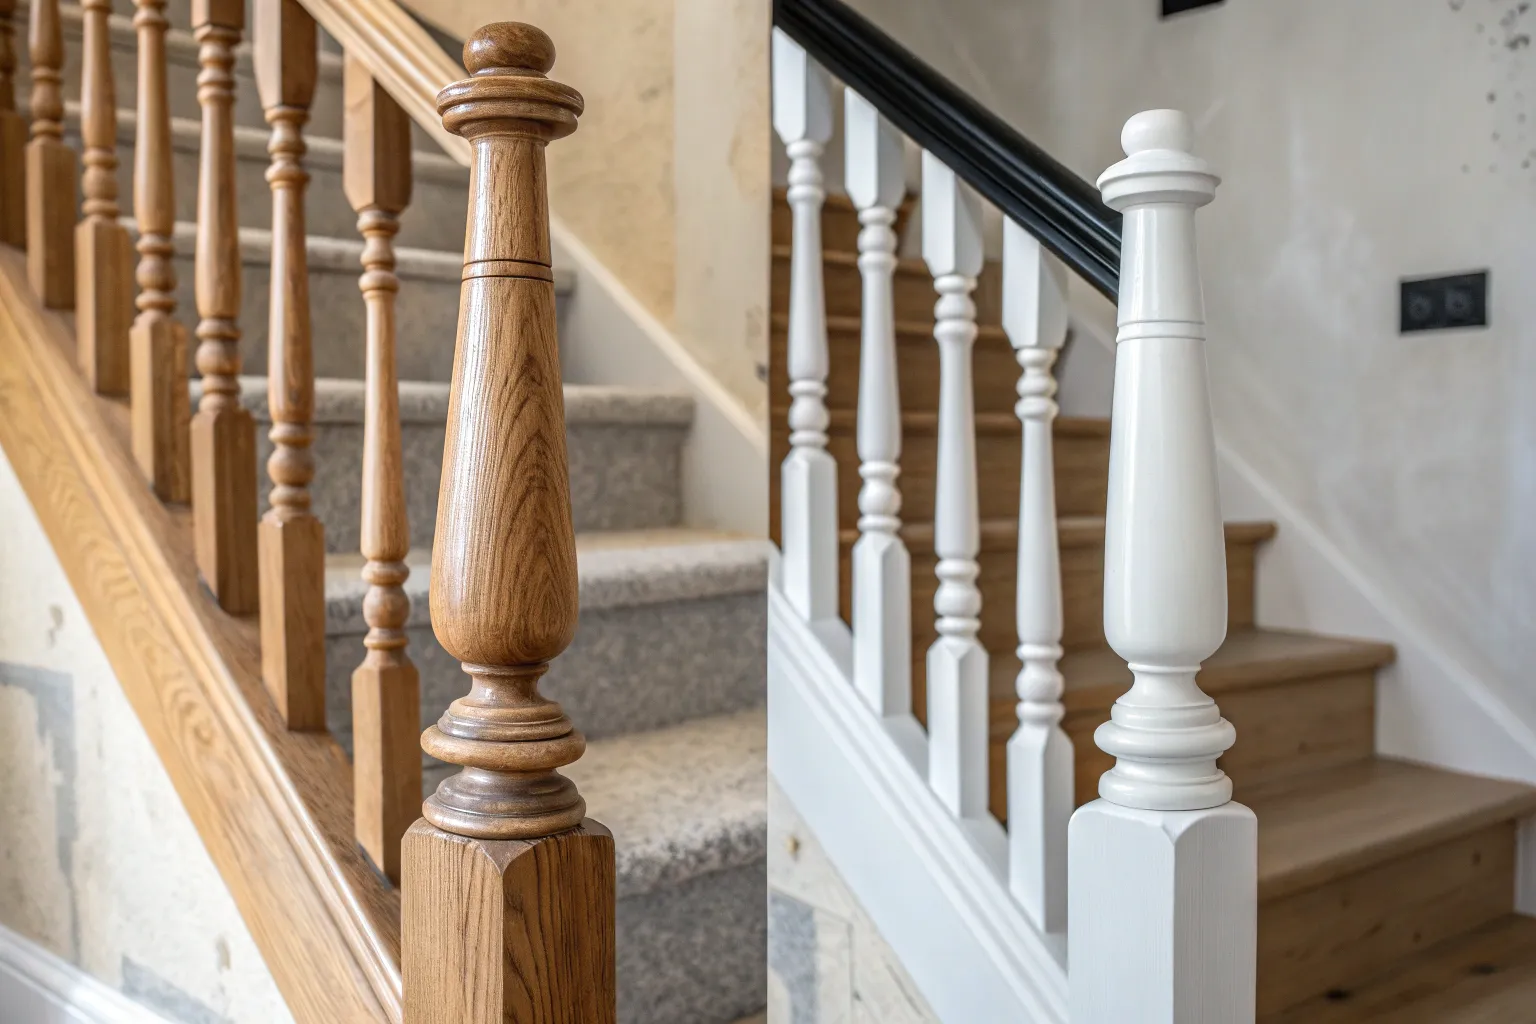
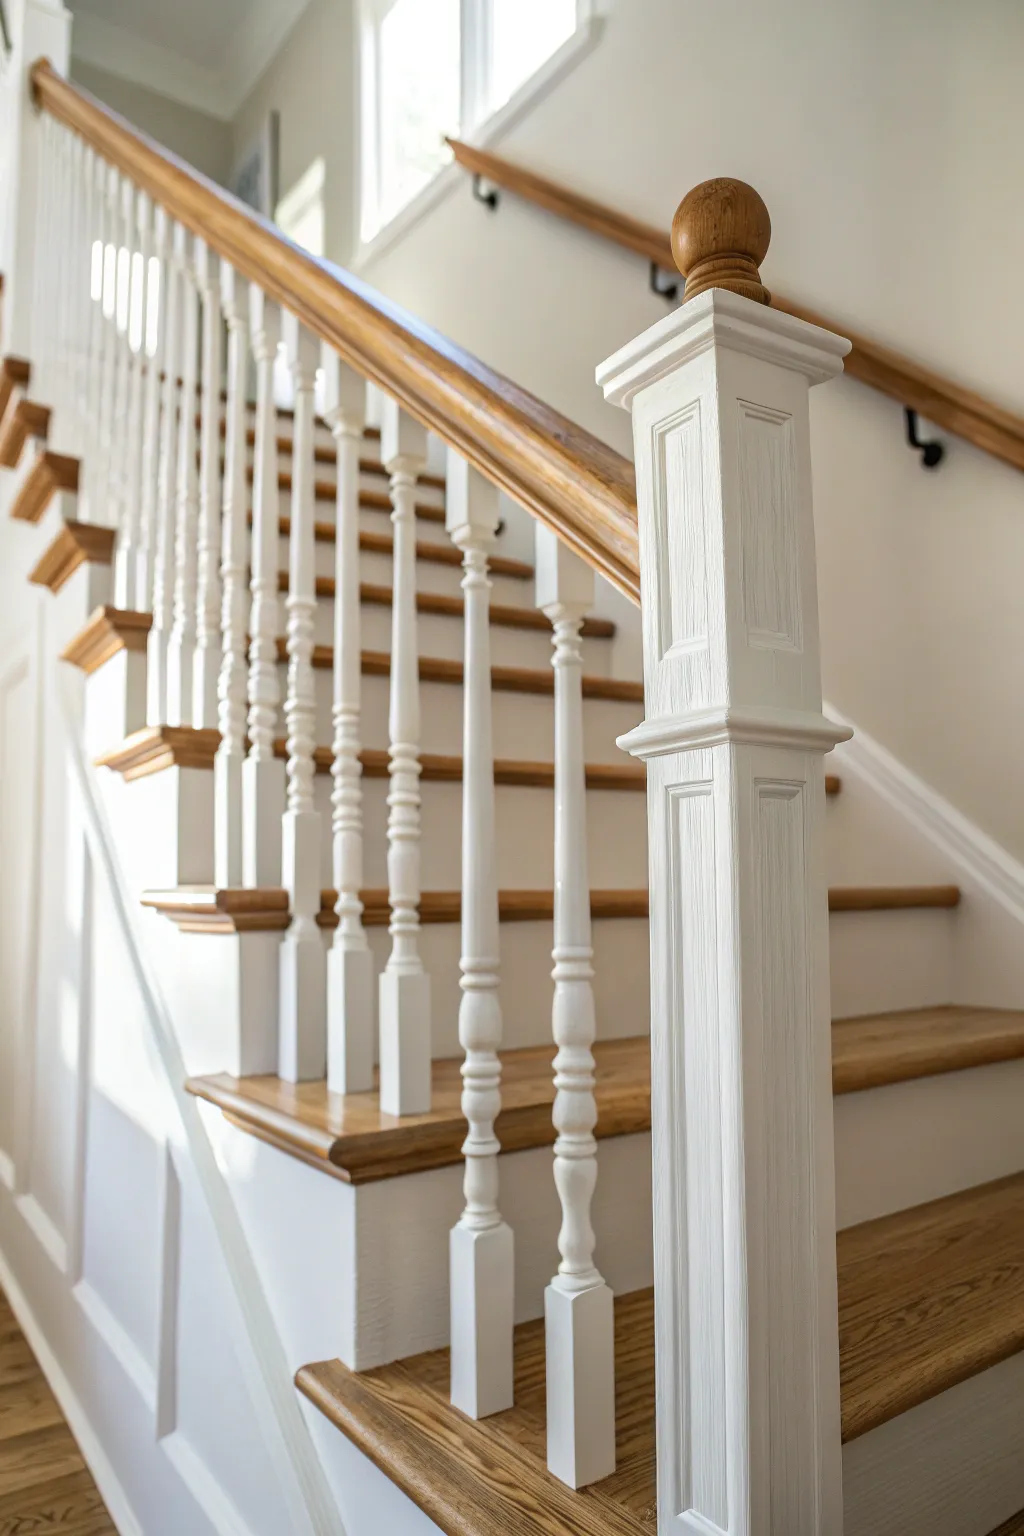
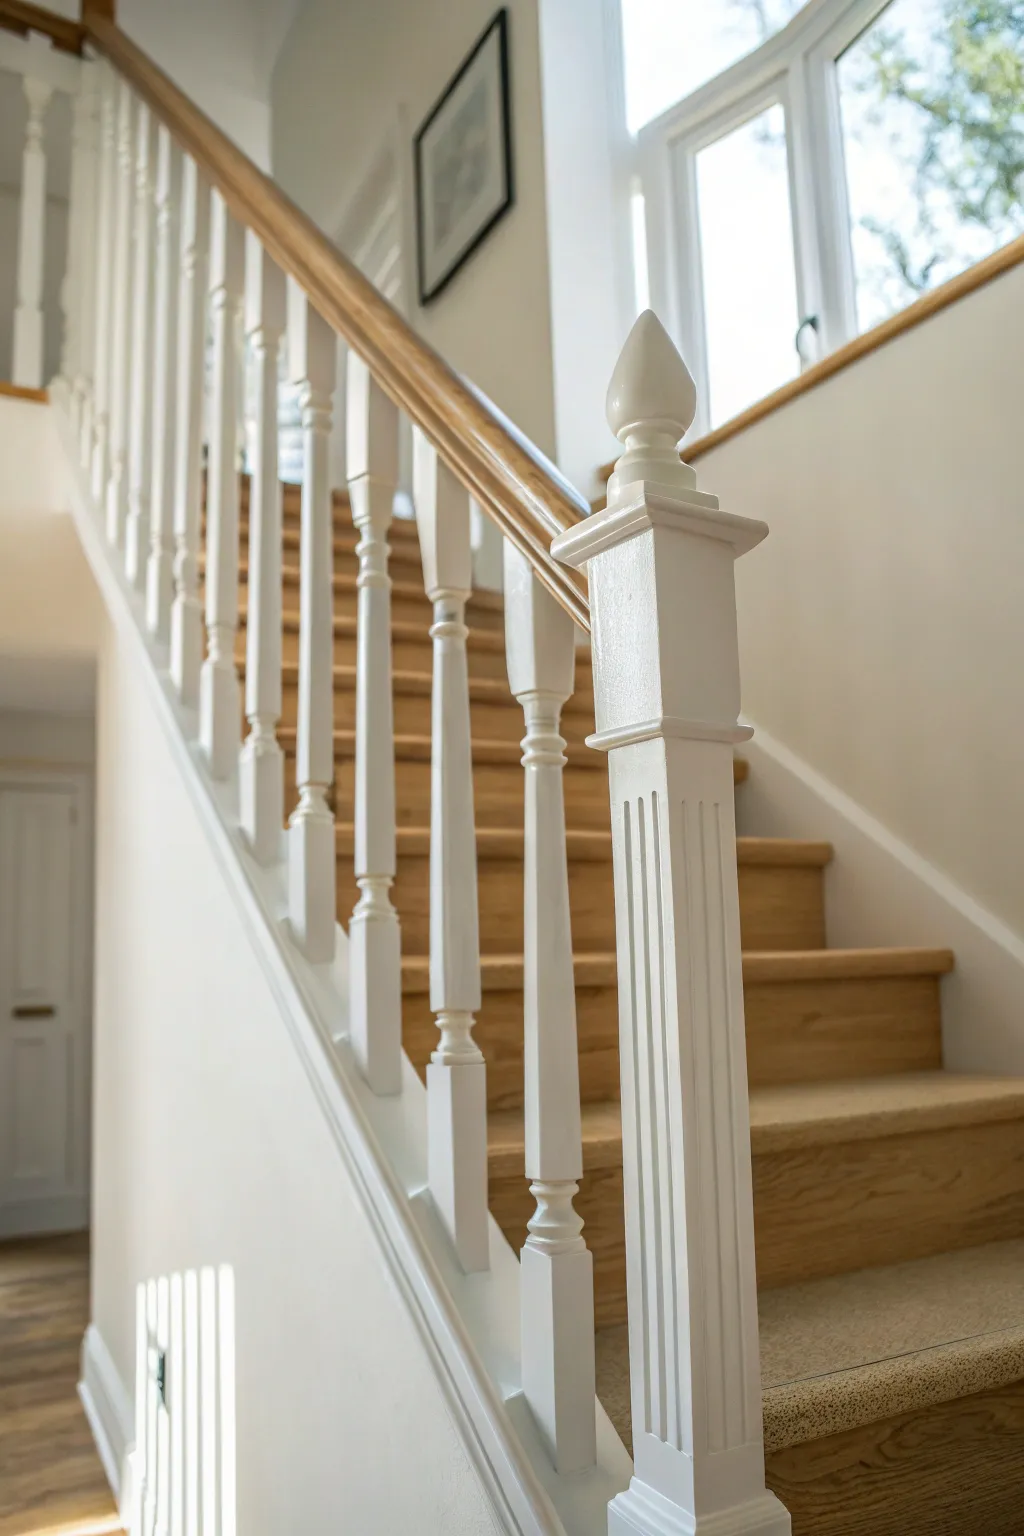
Classic Crisp White Spindles
Transform a dated or dark staircase into a bright, architectural feature with this classic white spindle makeover. The contrast between the crisp white balusters and the warm, natural wood handrail creates an elegant, timeless look that instantly modernizes any hallway.
How-To Guide
Materials
- High-quality furniture enamel or trim paint (Satin or Semi-Gloss finish, White)
- Stain-blocking primer (oil-based recommended for raw wood or stained surfaces)
- Sandpaper (120 and 220 grit)
- Liquid deglosser (optional but helpful)
- Painter’s tape (high adhesion)
- Drop cloths or plastic sheeting
- Sash brush (1.5 to 2 inch angled)
- Small foam roller (optional for flat surfaces)
- Tack cloth
- Wood filler (if needed)
- Caulk and caulk gun (paintable acrylic latex)
Step 1: Preparation & Cleaning
-
Protect the Area:
Begin by thoroughly covering your floors and steps with drop cloths. Use painter’s tape to meticulously mask off the wooden treads where they meet the spindles and the handrail above. Press the tape edges down firmly with a putty knife to prevent bleed-through. -
Clean the Surfaces:
Wipe down all spindles, the newel post, and stringers with a degreasing cleaner or a TSP substitute to remove oils, dust, and hand grime. Let everything dry completely before moving on. -
Inspect and Fill:
Check the wood for deep scratches or dents. Fill any imperfections with wood filler, slightly overfilling the hole to account for shrinkage. Allow the filler to dry according to the package instructions. -
Sanding:
Using 120-grit sandpaper, scuff sand the existing finish on the spindles. You don’t need to strip it to bare wood, just dull the shine to give the primer something to grip. I find that flexible sanding sponges work best for getting into the curves and turnings of the spindles. -
Remove Dust:
Vacuum the spindles and the surrounding area thoroughly. Wipe everything down with a tack cloth to pick up every last speck of fine dust, ensuring a smooth finish later. -
Deglossing (Optional):
If the previous finish was very glossy or hard to sand perfectly in the crevices, wipe on a liquid deglosser. This chemical step helps ensure adhesion in those tight spots.
Sticky Situation
Use a painting handle or holder for your paint cup. Holding a heavy can while balancing on stairs is risky; a small handheld cup prevents spills on your new treads.
Step 2: Priming
-
Apply Primer:
Stir your stain-blocking primer well. Using your angled sash brush, apply a coat of primer to all spindles, newel posts, and risers if you are painting them too. Work from top to bottom on each spindle. -
Watch for Drips:
Keep a close eye on the intricate turnings of the spindles as you prime. Drips love to hide in these curves. Smooth them out immediately with your brush. -
Let Dry:
Allow the primer to dry fully. Refer to the manufacturer’s drying times, but usually, overnight is best to ensure it hardens properly. -
Light Sanding:
Once dry, lightly sand the primed surfaces with 220-grit sandpaper. This knocks down any raised grain or brush marks. Wipe away the dust with a fresh tack cloth. -
Caulking Gaps:
Run a thin bead of paintable caulk along any gaps where the spindles meet the treads or the handrail. Smooth it with a wet finger for a seamless look. This small detail makes the final job look professionally installed.
Step 3: Painting
-
First Coat Application:
Open your white enamel paint. Dip your angled brush about an inch into the paint and tap off the excess. Apply the first coat to the spindles using long, smooth strokes, working with the grain of the wood. -
Handle the Curves:
For the turned or detailed sections, dab the paint into the crevices first, then smooth it out with lighter strokes to avoid pooling. Don’t overload your brush here. -
Consistent Direction:
Maintain a ‘wet edge’ by painting one spindle at a time before moving to the next. Finish painting the newel post and stringers last to avoid accidentally brushing against wet spindles. -
Drying Time:
Let the first coat dry for at least 4-6 hours, or as recommended on your paint can. Resist the urge to touch it or recoat too soon. -
Second Light Sanding:
For that ultra-smooth furniture finish, very lightly scuff the first coat with 220-grit paper or a fine sanding sponge. This is quick—just a couple of passes per spindle. Tack cloth off the dust again. -
Final Coat:
Apply your second and final coat of paint. Focus on even coverage and checking for any missed spots or thin areas. I like to keep a good light source handy to reflect off the wet paint so I can spot any holidays. -
Clean Up Edges:
While the paint is still slightly tacky (but not wet), carefully peel away the painter’s tape at a 45-degree angle. This prevents the dried paint from bridging and peeling off with the tape. -
Cure:
Allow the paint to cure fully for several days before cleaning or subjecting the stairs to heavy traffic. The finish will harden significantly over the first week.
Modern Twist
For a subtle designer touch, paint the handrail a deep charcoal or pure black instead of staining it, creating a sharp monochromatic contrast with the white spindles.
Enjoy the fresh, airy feeling your newly brightened staircase brings to your home entry


Black Handrail With White Spindles
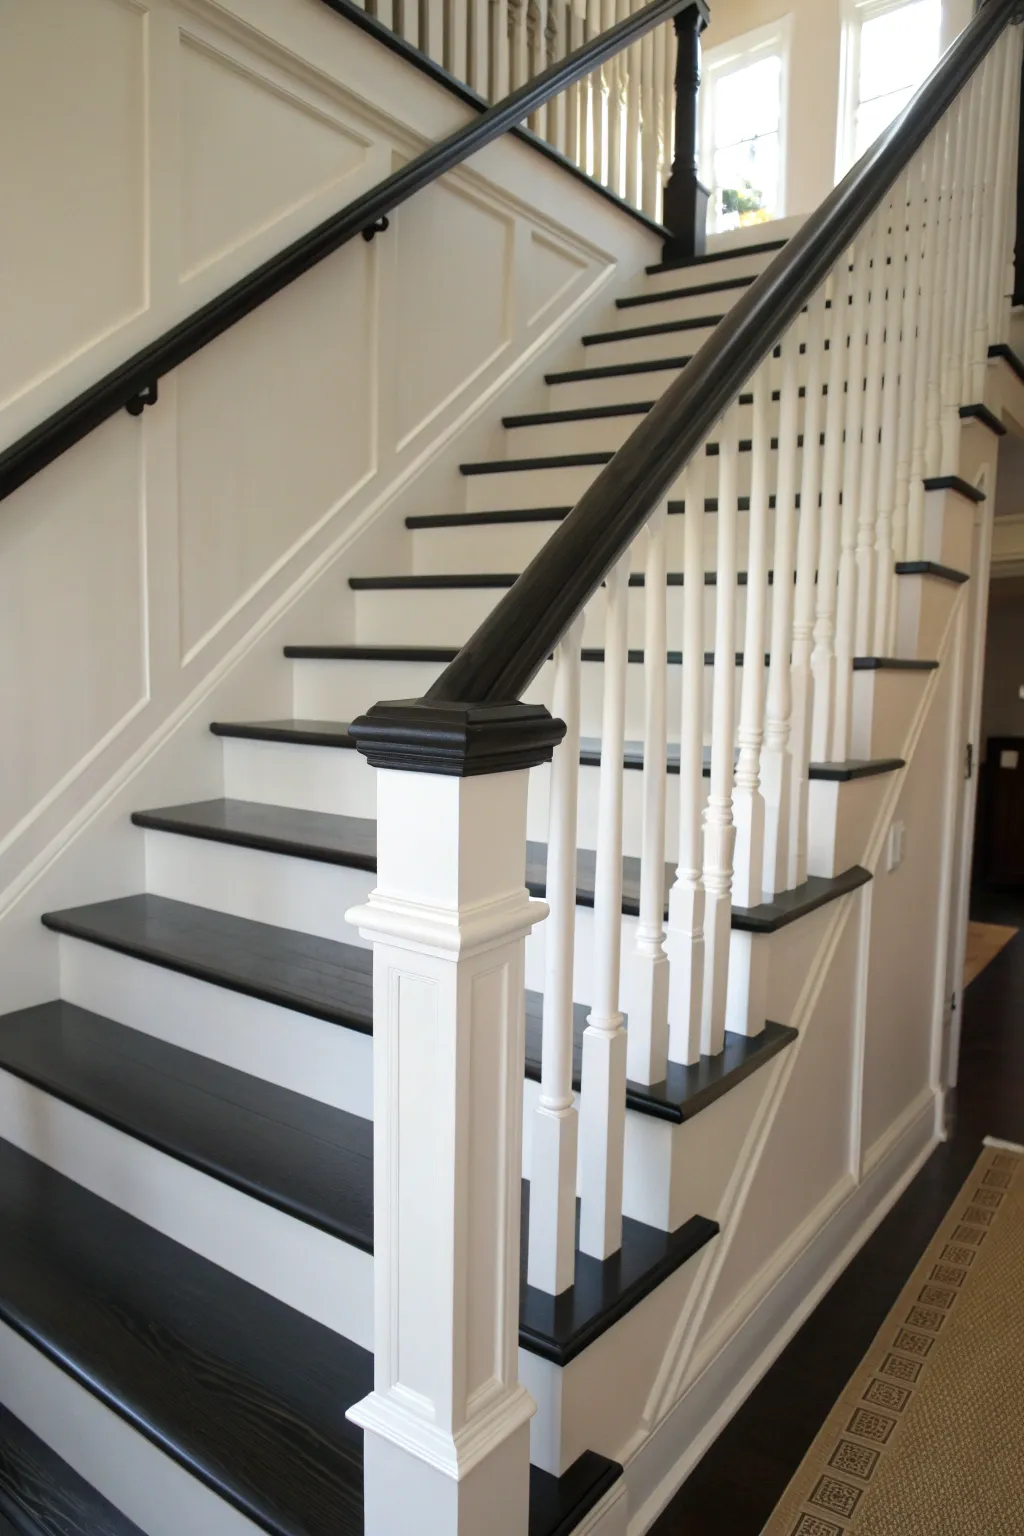
Transform a tired staircase into a stunning focal point with this high-contrast makeover featuring crisp white spindles and rich black accents. The classic combination of dark treads and handrails against white risers creates an elegant, architectural feel that instantly modernizes any hallway.
Detailed Instructions
Materials
- Sander (orbital or mouse sander preferred)
- Sandpaper (80, 120, and 220 grit)
- Liquid deglosser (if painting over old finish)
- Painter’s tape (high quality)
- Rosin paper or drop cloths
- Stain-blocking primer (oil-based recommended for woodwork)
- White semi-gloss enamel paint (for trim/spindles)
- Black gel stain or high-performance enamel paint (for handrail/treads)
- Polyurethane topcoat (satin or semi-gloss)
- Angled sash brush (2 inch)
- Foam brushes
- Wood filler
- Tack cloths
Step 1: Preparation & Sanding
-
Create a clean workspace:
Begin by protecting your floors and surrounding walls. Tape down rosin paper on the floors at the base of the stairs and lay drop cloths over any furniture nearby to catch dust. -
Clean everything thoroughly:
Scrub the entire staircase—spindles, rails, treads, and risers—with a degreasing cleaner to remove years of hand oils and dirt. Let it dry completely. -
Sand the existing finish:
Using 80-grit sandpaper, sand down the clear coat on the handrails and treads. You want to break completely through the old shiny finish to raw wood if you plan to stain. -
Refine the surface:
Switch to 120-grit and then 220-grit sandpaper to smooth out the wood grain on the treads and handrail. Wipe away all dust with a tack cloth between grit changes. -
Scuff sand the spindles:
Since the spindles and risers will be painted white, you don’t need to strip them to bare wood. Just give them a good scuff sanding with 120-grit to help the primer adhere.
Bleed-Through Blues
If yellow spots appear through your white primer, stop immediately! You need a shellac-based primer (like BIN) to seal in those stubborn wood tannins before continuing with your topcoat.
Step 2: Painting the White Elements
-
Prime the woodwork:
Use a high-quality stain-blocking primer on the spindles, risers, and newel post base. I find oil-based primer works best here to prevent old wood tannins from bleeding through the white paint. -
Apply the first coat of white:
Once the primer is dry and lightly sanded, apply your first coat of white semi-gloss enamel. Start with the spindles, working from the top down to catch drips. -
Don’t forget the stringers:
While painting the spindles, also paint the skirt board (stringer) running along the wall and the outer edge of the staircase structure to match. -
Finish the risers:
Paint the vertical risers white. Use steady strokes and ensure full coverage, but watch out for pooling paint in the corners where the tread meets the riser. -
Second coat for durability:
After the specified drying time, utilize fine sandpaper to knock down any bumps, wipe clean, and apply a second coat of white enamel for a deeply solid finish.
Stain Application Tip
When applying dark gel stain, use a sock over your hand like a mitt. It gives you incredible control around the curves of the handrail, much better than a stiff brush.
Step 3: Darkening Rails & Treads
-
Tape off the white work:
Once your white paint has cured for at least 24-48 hours, carefully apply painter’s tape to the base of the spindles and the risers to protect them from the dark stain or paint. -
Apply the dark finish:
Using a foam brush or a high-quality bristle brush, apply your black gel stain or black enamel paint to the handrail. Gel stain is great for control as it doesn’t drip as easily. -
Coat the treads:
Move onto the treads, applying the dark finish carefully. If you are staining, work in sections and wipe off excess according to the product instructions to achieve that deep, opaque look. -
Check for consistency:
Ensure the color saturation on the treads matches the handrail. You might need a second or third coat of stain or paint to get that true, deep black tone.
Step 4: Sealing & Protection
-
Remove tape carefully:
Score the edge of the tape with a utility knife before pulling it up to ensure you don’t peel any dry paint along with it. -
Touch up edges:
With a tiny artist’s brush, touch up any spots where the black and white meet. A crisp line here is the secret to a professional look. -
Seal the treads:
Apply 3-4 coats of high-traffic polyurethane to the treads. This is crucial for safety and durability. Lightly sand with very fine grit between coats for a smooth feel. -
Seal the handrail:
Finish by applying 2 coats of poly to the handrail. This protects it from ring scratches and hand oils, keeping that black finish looking fresh for years.
Step back and admire how this striking contrast completely redefines the entrance of your home


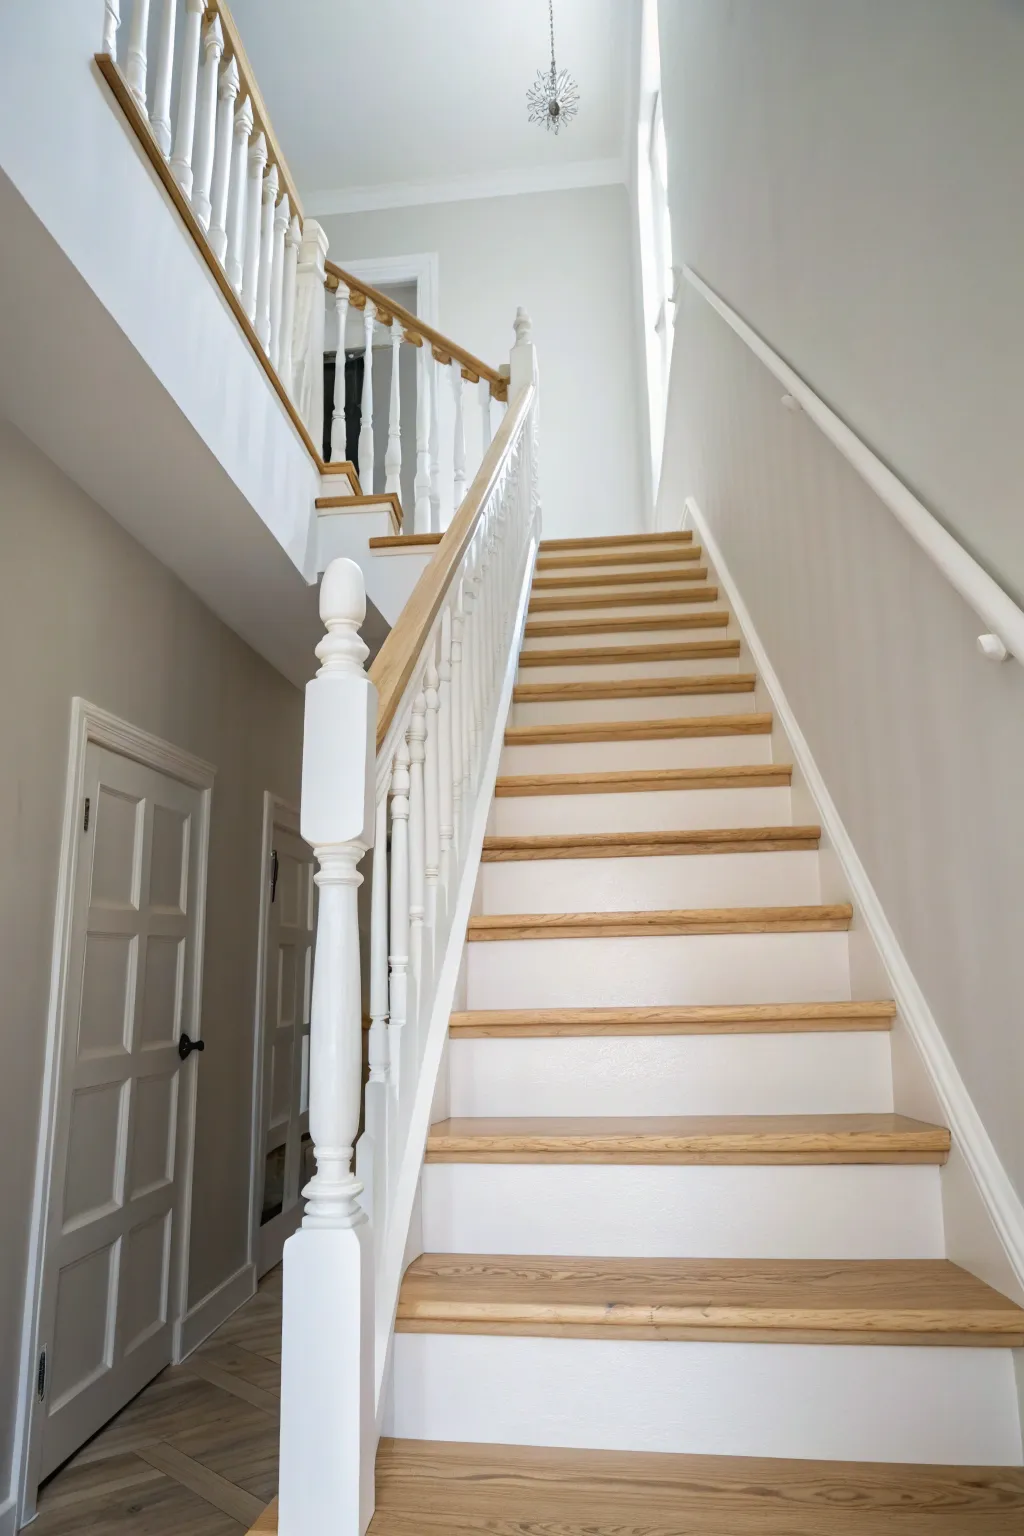
White Spindles With Warm Wood Treads
Transform a dated or unfinished staircase into a classic architectural feature with this high-contrast makeover. By pairing crisp semi-gloss white paint with warm, honey-toned oak treads, you create a sophisticated look that feels both traditional and fresh.
Step-by-Step Guide
Materials
- Sandpaper (80, 120, and 220 grit)
- Wood filler or spackling compound
- Painter’s tape (automotive grade or delicate surface recommended)
- Tack cloth
- Stain blocking primer (oil-based preferred for bare wood)
- High-quality semi-gloss or satin enamel paint (White)
- Gel stain or penetrating wood stain (Warm Oak or Honey tone)
- Polyurethane topcoat (Satin or Semi-gloss)
- Small angled sash brush (1.5 – 2 inch)
- Foam brushes (for staining)
- Drop cloths
- Liquid deglosser (optional)
Step 1: Preparation & Sanding
-
Clean surfaces thoroughly:
Before sanding, wipe down the entire staircase with a degreaser or TSP substitute to remove oils and dirt. This prevents grinding grime into the wood grain. -
Sand the spindles and risers:
Using 120-grit sandpaper, break the surface gloss on the existing finish of the spindles, newel post, and risers. You don’t need to strip it to bare wood if you are painting, just scuff it up enough for the primer to bite. -
Sand the treads and handrail:
Since these will be stained, you must sand them down to bare wood. Start with 80-grit to remove old finish, then progress to 120-grit. Finish with 220-grit for a smooth, furniture-grade feel. A palm orbiter sander works best for the flat treads. -
Fill imperfections:
Inspect the spindles and risers for dents or nail holes. Fill them with wood filler. Once dry, sand the filled spots flush with the surrounding surface. -
Remove dust:
Vacuum the entire area thoroughly, getting into the corners of the steps. Wipe everything down with a tack cloth to capture even the finest dust particles.
Sticky Situation
If your painter’s tape pulls up finish when removed, you likely left it on too long or the surface wasn’t fully cured. Use a hairdryer on low heat to loosen the adhesive.
Step 2: Staining & Sealing Wood Elements
-
Tape off painted areas:
Carefully apply painter’s tape to the edges of the spindles and risers where they meet the treads. Press the tape down firmly with a putty knife to prevent bleed-through. -
Apply the stain:
Using a foam brush or lint-free rag, apply your chosen warm oak stain to the treads and handrail. Work in the direction of the grain. I like to do every other step first so I can still walk up the stairs while they dry. -
Wipe excess stain:
After the stain has penetrated for 5-15 minutes (check your can’s instructions), wipe off the excess with a clean rag. The longer you leave it, the darker the color. -
Let dry and seal:
Allow the stain to dry completely, usually overnight. Apply a thin coat of polyurethane. Let it dry, lightly sand with 220-grit, remove dust, and apply a second coat for durability.
Brush Mastery
For round spindles, buy a ‘painting mitt’ or use your hand inside a plastic bag covered by an old sock. Dip the sock-hand in paint and wipe it onto the spindle for fast coverage.
Step 3: Painting Spindles & Risers
-
Tape off stained wood:
Once the clear coat on the treads is fully cured (give it at least 24-48 hours), tape off the treads and underside of the handrail to protect your new stain work. -
Prime the surfaces:
Apply a coat of stain-blocking primer to the spindles, risers, stringers, and the newel post. This is crucial to prevent tannins or old stains from bleeding through your white topcoat. -
Inspect and sand primer:
Once the primer is dry, you might see raised grain or brush marks. Give it a quick, light sanding with 220-grit paper and wipe clean with a tack cloth. -
Paint the difficult areas first:
Using your angled sash brush, start painting the detailed turned parts of the spindles. Don’t overload your brush; intricate turnings are prone to drips. -
Paint the flat surfaces:
Move onto the flat sections of the newel post, the risers, and the stringers. Use long, smooth strokes to minimize brush marks. -
Apply second coat:
Allow the first coat to dry according to the manufacturer’s time. Apply a second coat for full, opaque coverage and a professional sheen. -
Remove tape:
Carefully peel away the painter’s tape while the final coat is still slightly tacky. Pull the tape away at a 45-degree angle to get a crisp, clean line.
Step 4: Final Touches
-
Touch up:
Inspect your edges. If any paint bled onto the stained wood, gently scrape it off with a plastic scraper or fingernail. If stain got on the white, use a small artist’s brush to dab white paint over the mistake. -
Install the newel cap:
If your newel post has a separate wood cap like the one pictured, stain and seal it separately, then glue or screw it into place as the final crowning detail.
Enjoy the classic contrast of your beautifully refreshed staircase every time you walk by


All-Black Spindles for Moody Drama
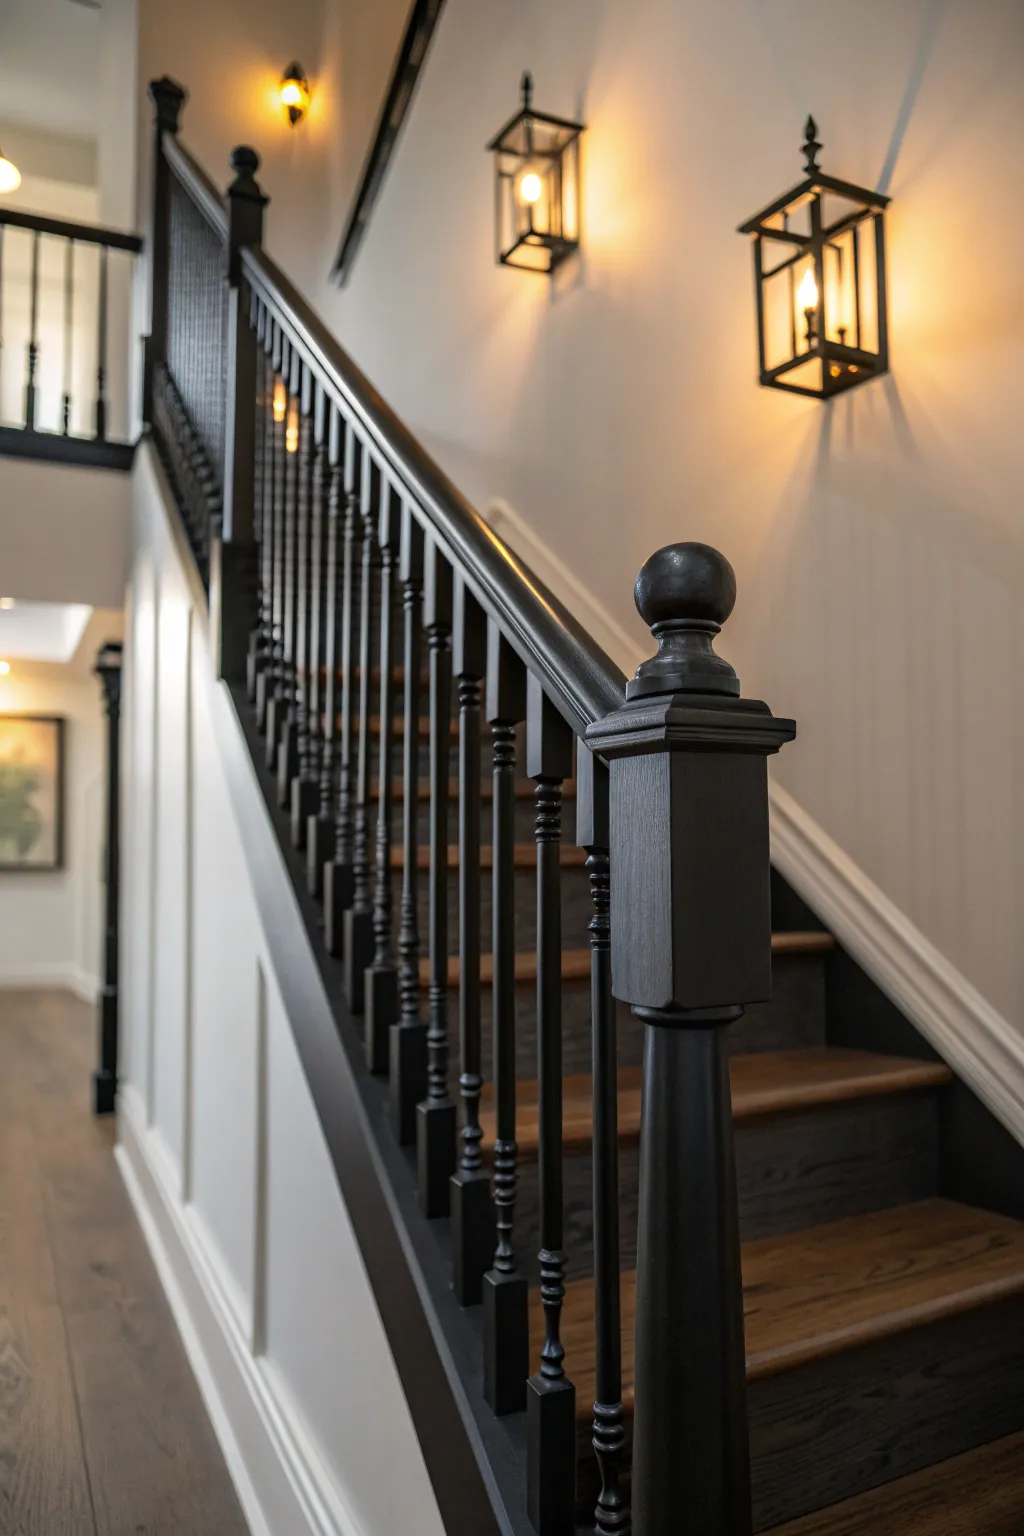
Transform a standard staircase into a striking architectural feature with this high-contrast, all-black spindle makeover. This project delivers a sophisticated, moody aesthetic that beautifully bridges the gap between classic structure and modern design.
Step-by-Step Tutorial
Materials
- High-quality deglosser or liquid sander
- 220-grit sandpaper & sanding sponges
- Tack cloths
- Painter’s tape (multi-surface)
- Rosin paper or drop cloths
- High-adhesion stain-blocking primer
- Self-leveling enamel paint (Satin or Semi-Gloss finish in Black)
- 1.5-inch angled sash brush
- 4-inch foam roller & tray
- Small artist brush
- Wood filler (if repairs are needed)
- Caulk (paintable, for gaps)
Step 1: Preparation & Cleaning
-
Surface protection:
Begin by meticulously protecting your floors. Lay down rosin paper on the stair treads and secure the edges firmly with painter’s tape to prevent slipping and paint seepage. -
Clean the area:
Wipe down every spindle, the handrail, and the newel posts with a degreasing cleaner to remove years of hand oils and dust. -
Fill imperfections:
Inspect the woodwork for dings or deep scratches. Fill these with wood filler, letting it dry completely before proceeding. -
Sanding strategy:
Scuff sand all surfaces using 220-grit sandpaper. For the turned details of the spindles, flexible sanding sponges are much easier to maneuver than flat paper. -
Deglossing:
Instead of sanding down to bare wood, which is labor-intensive on spindles, use a liquid deglosser. Apply it with a lint-free rag to ensure the new paint bonds to the old finish. -
Dust removal:
Vacuum the entire staircase thoroughly. Detailed vacuuming is crucial here; follow up with a tack cloth to capture remaining fine dust particles.
Sticky Situation?
If paint peels when removing tape, the paint bridged the gap. Always score the edge with a sharp blade before pulling tape to break that seal cleanly.
Step 2: Priming & Caulking
-
Tape specific areas:
Apply painter’s tape where the spindles meet the stair treads and handrail if those areas won’t be painted black, though for this look, we are painting the handrail too. -
Apply primer:
Using an angled sash brush, apply a coat of high-adhesion primer. Don’t worry about full opacity here; you just want a grippy base for the black topcoat. -
Check for drips:
Spindles are notorious for drips. Keep a close eye on the crevices and smooth out any pooling primer immediately. -
Caulk the gaps:
Once the primer is dry, run a thin bead of paintable caulk along the seams where the spindles meet the base or handrail for a seamless, professional look.
Step 3: Painting the Finish
-
First coat application:
Start applying your black enamel paint. I find it best to start at the top of the staircase and work down to avoid brushing up against wet paint. -
Brush technique:
Use the 1.5-inch angled brush for the turned parts of the spindles. Apply paint sparingly to avoid runs, working it into the curves. -
Smoothing the flats:
On the square sections of the newel posts or flat areas of the handrail, use a small foam roller to achieve a smooth, stroke-free finish. -
Dry time:
Allow the first coat to dry according to the manufacturer’s instructions. Dark colors often require longer drying times to cure properly. -
Light sanding:
Very lightly hand-sand the first coat with 320-grit paper or a fine sanding sponge to knock down any nibs, then wipe clean with a tack cloth. -
Second coat:
Apply the second coat of black enamel, maintaining a wet edge to blending brush strokes. This coat will provide the true depth of color. -
Detail check:
Inspect the work with a flashlight. Black paint can hide missed spots in shadows, so look closely at the undersides of the handrail and spindle curves. -
Remove tape:
Score the edge of the painter’s tape with a utility knife before the paint fully cures to prevent peeling, then slowly pull the tape away at a 45-degree angle.
Pro Tip: Liquid Sandpaper
Don’t skip the liquid deglosser step. Curves are hard to hand-sand perfectly, and chemical deglossers ensure paint sticks to those tricky crevices.
Step back and admire how this bold change redefines the entire character of your entryway
BRUSH GUIDE
The Right Brush for Every Stroke
From clean lines to bold texture — master brush choice, stroke control, and essential techniques.
Explore the Full Guide
Charcoal Spindles for Softer Contrast
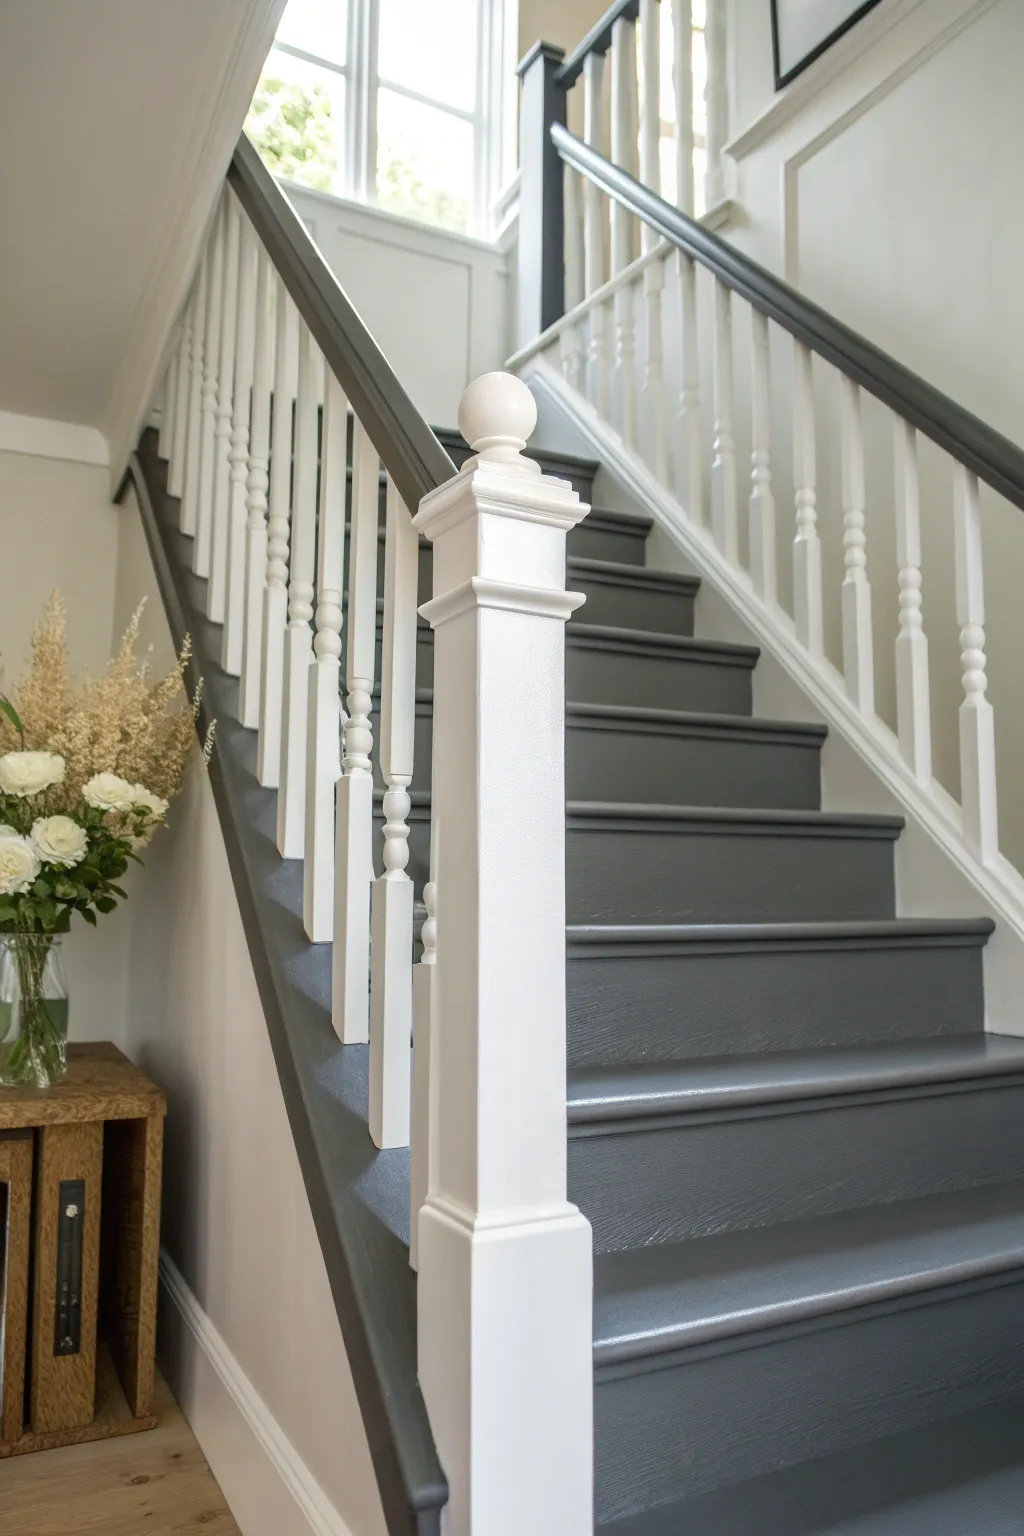
Transform your entryway with this sophisticated, high-contrast look that pairs crisp white spindles with deep charcoal treads. This project modernizes a traditional staircase, creating a durable and striking focal point for your home.
Step-by-Step Guide
Materials
- Sanding block (120 and 220 grit)
- Chemical deglosser (optional but recommended)
- Painter’s tape (frog tape works best for sharp lines)
- Wood filler
- Caulk and caulking gun
- Canvas drop cloths
- High-quality primer (stain-blocking)
- Semi-gloss enamel paint (Pure White)
- Floor enamel paint (Charcoal/Dark Grey)
- 2-inch angled sash brush
- 4-inch foam roller
- Tack cloth
- Cleaning supplies (bucket, mild detergent)
Step 1: Preparation & Cleaning
-
Clear and clean:
Remove any existing carpet, staples, or tack strips if your stairs aren’t already bare wood. Wash the entire staircase thoroughly with warm soapy water or a degreaser to remove years of foot oil and dirt. -
Fill imperfections:
Inspect the treads and risers for nail holes or deep scratches. Fill these with wood filler, slightly overfilling to account for shrinkage, and let it dry completely. -
Caulk gaps:
For a professional finish, run a thin bead of paintable caulk along the seams where the risers meet the treads and where the stringer meets the wall. Smooth it with a wet finger. -
Scuff sand:
Using 120-grit sandpaper, thoroughly sand all surfaces including the spindles, handrail, and treads. You don’t need to strip it to bare wood, just remove the glossy finish so the new paint adheres. -
Degloss and clean:
Wipe away all dust with a tack cloth. I find that following up with a liquid deglosser ensures the best possible bond, especially in the tight corners of the spindles.
Sticky Situation?
If the tape pulls up fresh paint, score the edge gently with a utility knife before peeling. Always pull the tape at a 45-degree angle away from the painted edge.
Step 2: Painting the White Elements
-
Prime the woodwork:
Apply a coat of stain-blocking primer to the spindles, risers, stringers, and newel posts using your angled sash brush. This prevents old wood tannins from bleeding through your white paint. -
First coat on spindles:
Once the primer is dry and lightly sanded with 220-grit paper, start painting the spindles with your semi-gloss white enamel. Use long vertical strokes to minimize brush marks. -
Paint the risers:
Paint the vertical risers and the side stringers white. Don’t worry too much about getting white on the treads, as those will be painted dark later, but try to keep it relatively neat. -
Second white coat:
Apply a second coat of white enamel to all these surfaces for full coverage and durability. -
Paint the newel post:
Finish the white section by painting the main newel post, paying special attention to the decorative cap and trim details. -
Allow to cure:
Let the white paint cure for at least 24 hours before applying tape. This is crucial to prevent peeling later.
Add Texture
Mix a non-slip additive into the final coat of floor enamel for the treads. This adds invisible grip, making the stairs safer for socks and pets without changing the color.
Step 3: Painting the Treads & Rails
-
Tape off white areas:
Carefully apply painter’s tape to the bottom of the white risers and around the base of the spindles where they meet the treads. -
Seal the tape:
Run a credit card or putty knife firmly over the tape edge to prevent the dark paint from bleeding under it. -
Cut in the treads:
Using a clean angled brush, cut in the charcoal floor enamel around the edges of the treads and the handrail brackets. -
Roll the treads:
Use a small 4-inch foam roller to apply the charcoal paint to the flat surfaces of the treads. This provides a smooth, durable finish without brush strokes. -
Paint the handrail:
While the treads perform their first stage of drying, paint the handrail in the matching charcoal tone using a brush. -
Apply second dark coat:
After the recommended recoat time, apply the second and final coat of charcoal enamel to the treads and handrail. -
Remove tape:
Carefully peel off the painter’s tape while the final coat is still slightly tacky (not fully dry) to ensure a razor-sharp line.
Enjoy the dramatic transformation of your entryway as the dark treads ground the space against the airy white spindles
Soft Greige Spindles to Warm Things Up
Transform your staircase into an architectural statement by applying a soft, washed greige finish to your spindles and newel posts. This technique highlights the natural wood grain while adding a contemporary warmth that feels both airy and grounded.
Step-by-Step
Materials
- High-quality wood cleaner/degrease (e.g., TSP substitute)
- Fine-grit sandpaper (180 to 220-grit)
- Tack cloths
- Painter’s tape (delicate surface)
- Small angled sash brush (1.5 inch)
- Greige wood stain or glaze (e.g., a mix of grey and beige)
- Matte or satin clear topcoat (water-based polyurethane)
- Drop cloths
- Lint-free rags
- Stir sticks
Step 1: Preparation is Key
-
Protect the Surroundings:
Before opening any cans, lay down drop cloths on your stairs and hallway floor. Use painter’s tape to carefully mask off the stair treads and the underside of the handrail if you aren’t refinishing that part. -
Clean the Wood:
Thoroughly clean the spindles and newel post with a degreaser or TSP substitute to remove hand oils and old wax. This is crucial for adhesion. -
Sand for Texture:
Using fine-grit sandpaper, gently scuff all surfaces of the spindles and post. You aren’t trying to remove all previous finish, just giving the new product something to grip. -
Remove Dust:
Vacuum the stairs thoroughly to catch the bulk of the sanding dust. Follow up by wiping every nook and cranny with a tack cloth to ensure a perfectly smooth base.
Step 2: Applying the Wash
-
Mix Your Finish:
If you are using a semi-transparent stain or a paint wash (paint diluted with water), stir it thoroughly. A greige tone works best when it’s sheer enough to see the grain. -
Test on a Hidden Spot:
I always recommend testing your color on a small, inconspicuous area first. This lets you determine how many coats you’ll need for that perfect soft opacity. -
Start with the Spindles:
Begin painting the spindles first, starting from the top and working your way down. Use the angled sash brush to get into the decorative turnings without pooling. -
Work in Sections:
Paint 2-3 spindles at a time. Apply the wash, then quickly wipe off any excess with a lint-free rag if you are aiming for a more stained look, or leave it for a more painted opacity. -
Tackle the Newel Post:
Once the spindles are underway, paint the large newel post. Use long, vertical strokes on the flat sections to mimic the wood grain direction. -
Check for Drips:
constantly inspect the turning points and crevices of the spindles. Gravity loves to pull paint into these spots, creating unsightly drips.
Uneven Color Absorption?
If the wood absorbs the stain unevenly, apply a pre-stain wood conditioner first. This helps regulate how the wood drinks in the color for a uniform look.
Step 3: Finishing Touches
-
Allow to Dry:
Let the first coat dry completely according to the manufacturer’s instructions. This usually takes 2-4 hours for water-based products. -
Assess Coverage:
Look at the finish in natural light. If the wood looks too raw or the color is uneven, apply a second thin coat using the same technique. -
Light Light Sanding:
Once fully dry, you might feel the grain has raised slightly. Run a very fine sanding sponge over the surfaces to knock down any roughness. -
Apply Topcoat:
To protect the finish from daily wear, brush on a clear, matte, water-based polyurethane. A matte finish keeps the look natural and not plasticky. -
Seal the Turnings:
Pay extra attention when sealing the decorative turned parts of the post and spindles, as these collect dust and need a smooth seal for easy cleaning. -
Remove Tape:
Carefully score the edge of the painter’s tape with a craft knife before peeling it away to prevent pulling up any dried finish.
Pro Tip: The Brush Matters
Invest in a high-quality angled synthetic sash brush. The angle allows precise control in the tight corners where spindle meets tread.
Enjoy the serene and updated atmosphere your new staircase brings to the home

PENCIL GUIDE
Understanding Pencil Grades from H to B
From first sketch to finished drawing — learn pencil grades, line control, and shading techniques.
Explore the Full Guide
Spindles Matched to the Wall Color
Achieve a high-end, custom look by painting your staircase spindles and newel posts to perfectly match your wall color. This monochromatic approach creates a serene, airy atmosphere that instantly modernizes a hallway while highlighting beautiful architectural details through texture rather than contrast.
Step-by-Step Guide
Materials
- High-quality interior trim paint (satin or semi-gloss finish) color-matched to walls
- Stain-blocking primer (oil-based or high-adhesion latex)
- Sandpaper (120 and 220 grit)
- Tack cloth
- Painter’s tape (delicate surface)
- Canvas drop cloths
- Sash brush (1.5 to 2 inch)
- Small foam roller (optional for flat surfaces)
- Wood filler
- Caulk and caulk gun
- Degreasing cleaner (TSP substitute)
Step 1: Preparation
-
Clear and protect:
Begin by removing any carpet runners or hardware if possible. Lay down canvas drop cloths to protect the staircase treads and flooring below. Secure the edges with painter’s tape to prevent slipping. -
Clean thoroughly:
Scrub the spindles, newel post, and base rails with a degreasing cleaner to remove years of hand oils and dirt. This step is crucial for paint adhesion, so don’t rush it. -
Inspect and fill:
Look closely for any dents, deep scratches, or nail holes in the woodwork. Fill these imperfections with wood filler, leaving it slightly mounded to allow for shrinkage as it dries. -
Sand surfaces:
Once the filler is dry, sand all surfaces to be painted using 120-grit sandpaper. You need to scuff up the existing finish to give the new paint ‘teeth’ to grab onto. I find flexible sanding sponges work best for the curved details of the turnings. -
Remove dust:
Vacuum the stairs thoroughly to remove sanding dust. Follow up by wiping everything down with a tack cloth to pick up the finest particles that the vacuum missed. -
Tape off areas:
Carefully apply painter’s tape to the areas you want to keep natural wood, specifically the handrail and the stair treads. Press the edges of the tape down firmly with a putty knife to prevent paint bleed.
Step 2: Priming
-
Apply caulk:
Run a thin bead of finish caulk into any gaps where the spindles meet the handrail or base rail for a seamless look. Smooth it with a wet finger and let it dry completely. -
First coat of primer:
Apply a coat of stain-blocking primer to all the spindles and posts. If your wood is dark or knotty, an oil-based primer is your safest bet to prevent tannins from bleeding through later. -
Check for drips:
As you prime, constantly check for drips and runs, especially in the crevices of the turned spindles. Smooth them out immediately with your brush. -
Light sanding:
Allow the primer to dry fully according to the manufacturer’s instructions. Verify it is dry, then lightly sand everything again with 220-grit sandpaper to ensure a buttery smooth base. -
Wipe clean:
Do a final pass with the tack cloth to remove the fine dust from this second sanding.
Pro Tip: The Reach
Painting the back of spindles is tricky. Use a small inspection mirror to check the unseen sides of the spindles against the wall to ensure total coverage.
Step 3: Painting
-
Mix your paint:
Stir your satin or semi-gloss paint thoroughly. It should be the exact shade as your walls but with a more durable sheen suitable for high-traffic woodwork. -
Paint the difficult spots:
Start painting the intricate turned sections of the spindles first. Dab paint into the crevices and brush it out to avoid pooling. -
Paint flat areas:
Move to the squared sections of the spindles and the larger flat faces of the newel post. Use long, smooth vertical strokes to minimize brush marks. -
Dry and recoat:
Let the first coat dry for the recommended time (usually 4-6 hours). Apply a second coat using the same method, watching carefully for coverage consistency. -
Remove tape:
While the final coat is still slightly tacky (not wet, but not fully cured), carefully peel off the painter’s tape at a 45-degree angle. This helps ensure a crisp line without pulling up dried paint.
Level Up: Gloss Contrast
Use the exact same color as the wall but choose a high-gloss finish for the woodwork. The play of light will make the architectural details pop.
Step back and admire how the matching tones create a seamless flow that makes your hallway feel significantly larger and brighter
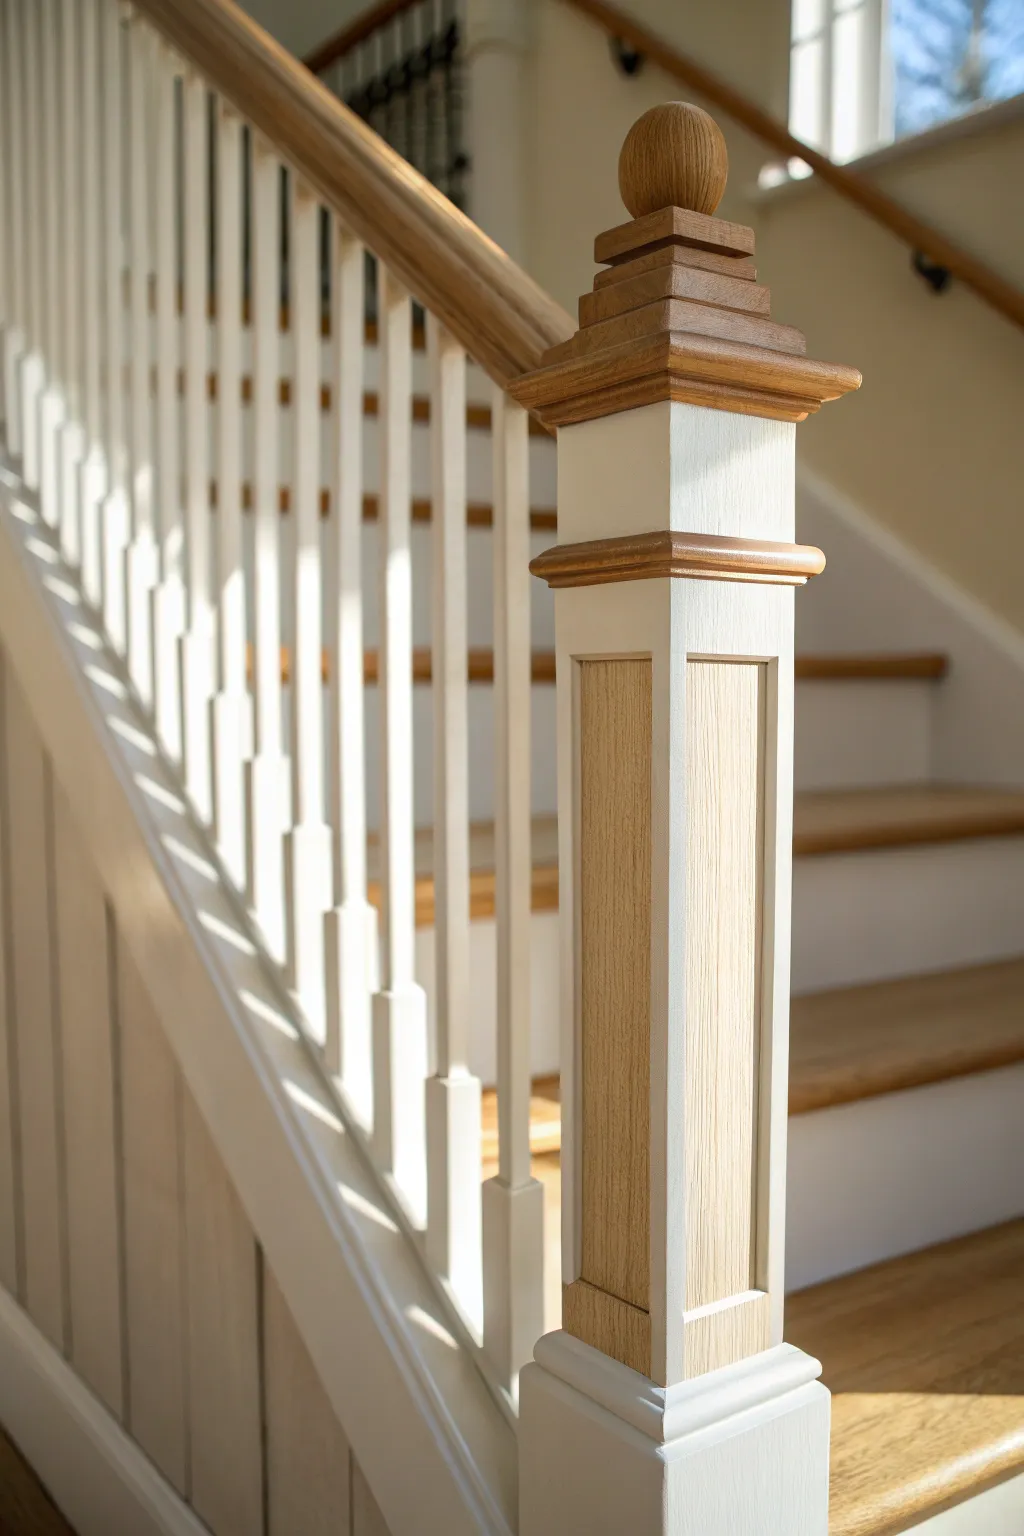
Contrasting Newel Posts to Frame the Spindles
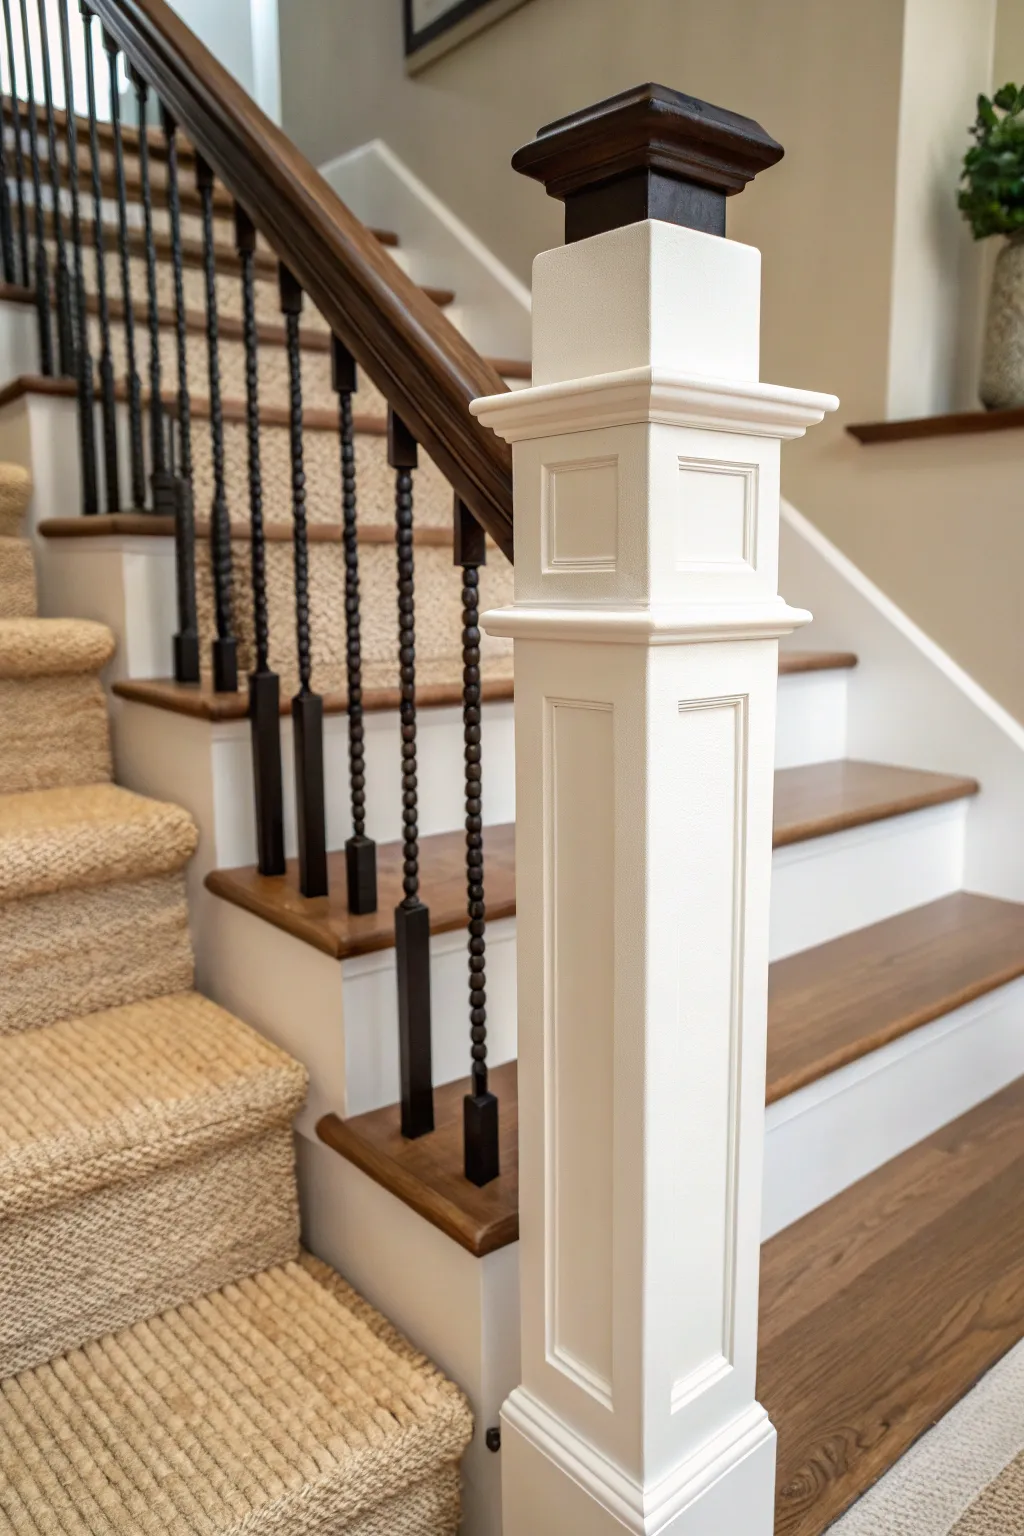
This elegant update transforms a standard staircase by pairing a crisp white newel post with contrasting iron-look spindles and warm wood tones. The result is a timeless, sophisticated frame that draws the eye upward and highlights the architectural details.
Step-by-Step
Materials
- High-grit sandpaper (220-grit)
- Painter’s tape (delicate surface)
- Liquid deglosser or TSP substitute
- High-quality interior trim primer (oil-based preferred)
- Interior semi-gloss or satin enamel paint (White)
- Gel stain (Espresso or Dark Walnut)
- Polycrylic topcoat or polyurethane
- Small angled sash brush (1.5 inch)
- Mini foam roller
- Drop cloths
- Tack cloth
- Wood filler (if repairing old holes)
Step 1: Preparation & Cleaning
-
Protect the area:
Begin by laying down drop cloths on the stairs and floor. Use painter’s tape to meticulously mask off where the newel post meets the floor or tread, and where the handrail meets the wall. -
Clean surfaces:
Wipe down the newel post, handrail, and cap with a TSP substitute or deglosser to remove hand oils and grime. This step is crucial for adhesion. -
Fill imperfections:
Inspect the white newel post area for any dings or nail holes. Fill these with wood filler, let dry, and sand flush. -
Sand for adhesion:
Lightly scuff sand the newel post body and the wood handrail/cap with 220-grit sandpaper. You aren’t trying to remove all the old finish, just creating a tooth for the new layers. -
Remove dust:
Vacuum the area thoroughly, then wipe everything down with a tack cloth to remove microscopic dust particles.
Bleeding Lines?
If stain bleeds under tape onto the white primer, don’t panic. Let it dry fully, then lightly sand that spot. Touch it up with a tiny artist brush and your white primer before the final topcoat.
Step 2: Staining the Accents
-
Mask the post:
If your newel post cap is separate from the body (as seen in the project), tape off the top edge of the white post section to protect it from stain. -
Apply gel stain:
Using a foam brush or rag, apply a dark gel stain (like Espresso) to the handrail and the newel cap. I find working in small sections prevents the stain from drying too tacky before you can wipe it. -
Wipe back:
After letting the stain sit for 3-5 minutes, wipe off the excess with a clean, lint-free cloth. Wipe in the direction of the wood grain. -
Seal the wood:
Once the stain is fully cured (check the can instructions, usually 24 hours), apply two coats of clear polyurethane or polycrylic to protect the handrail and cap.
Step 3: Painting the Newel Post
-
Retape for paint:
Remove the tape protecting the white areas. Now, tape off the newly stained wood cap and the floor/tread base. -
Prime the surface:
Apply a coat of high-quality bonding primer to the main body of the newel post. Use an angled brush to get into the panel recesses and molding details. -
Smooth the primer:
Once the primer is dry, quickly run your 220-grit sandpaper over it to knock down any brush ridges, then wipe with a tack cloth. -
First coat of white:
Apply your first coat of white semi-gloss enamel. Use the angled brush for corners and molding profiles first. -
Roll the flat faces:
While the brushed edges are wet, use a mini foam roller on the flat vertical faces of the post for a smooth, furniture-grade finish. -
Apply second coat:
Allow the first coat to dry completely according to manufacturer times, then repeat the brush and roll process for a solid, opaque coverage.
Add Dimension
To make the newel post look even more substantial, consider adding thin trim molding to the flat recessed panels before painting. It creates a deeper shadow line and custom look.
Step 4: Finishing Touches
-
Remove tape:
Carefully score the edge of the painter’s tape with a utility knife before pulling it up. This prevents the dried paint from peeling off with the tape. -
Address the spindles:
If your spindles are wood but you want the iron look shown, paint them with a flat black or oil-rubbed bronze paint using a small artist’s brush. -
Final inspection:
Check for any paint bleed onto the stained areas. You can carefully scrape these away with a fingernail or touch up with a tiny bit of stain.
Enjoy the dramatic and refreshing focal point your new staircase brings to the entryway


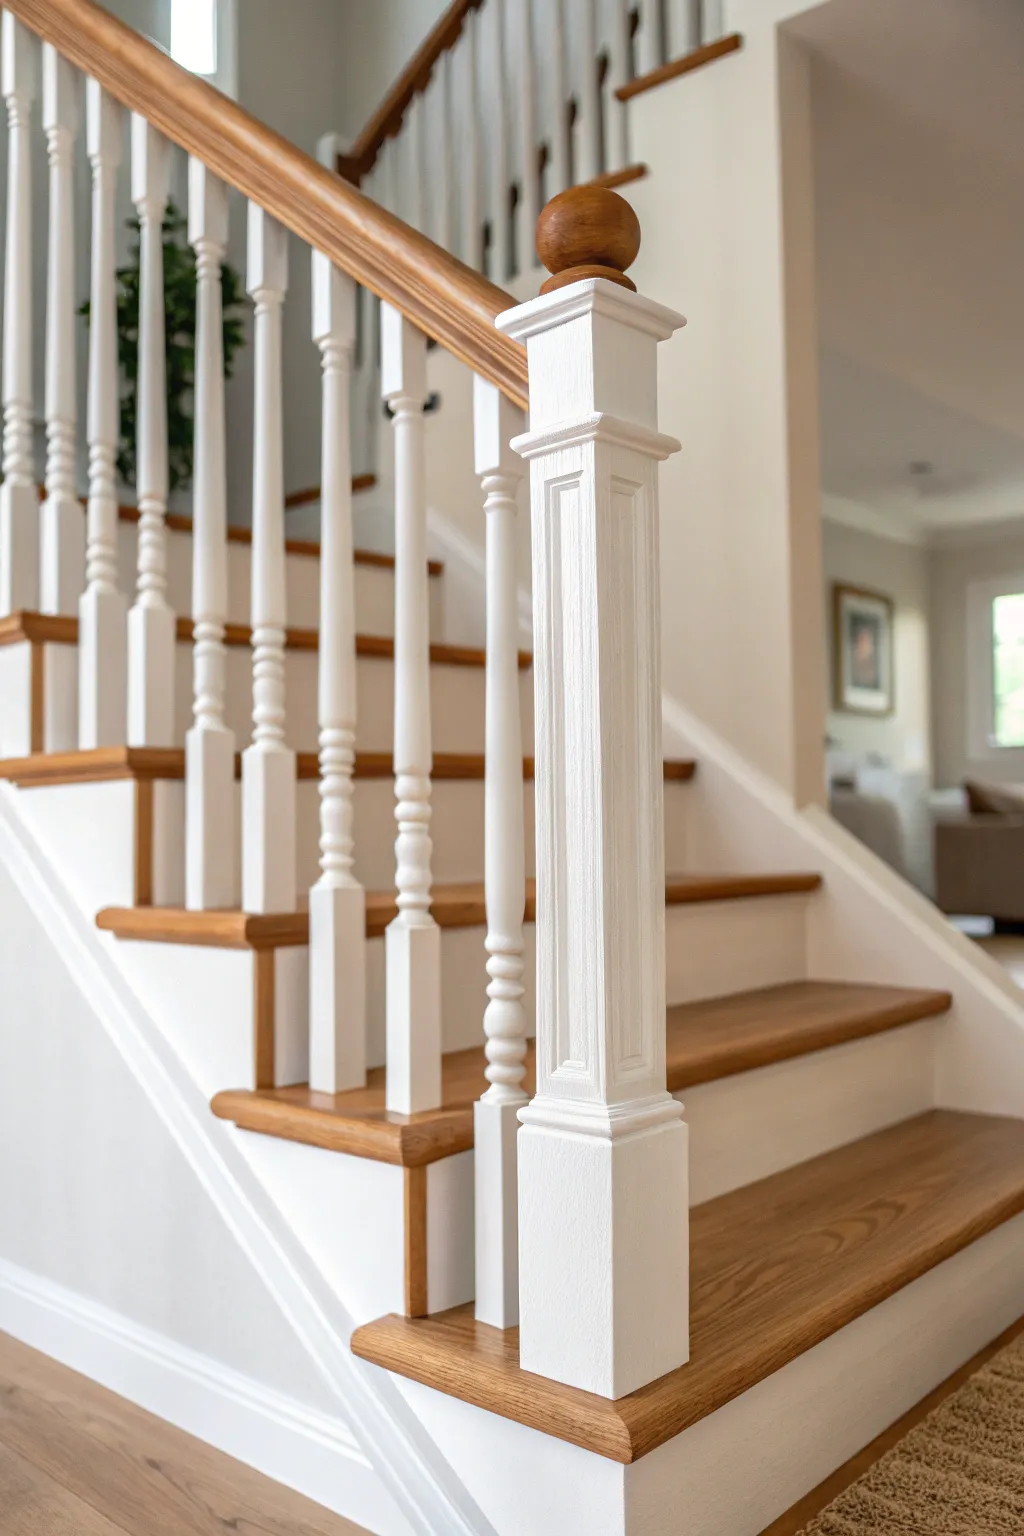
Painted Risers That Echo the Spindles
Achieve a timeless and upscale look by coordinating crisp white spindles with matching risers against warm wooden treads. This project transforms a standard staircase into a bright architectural feature that guides the eye upward.
Detailed Instructions
Materials
- High-quality wood primer (oil-based recommended)
- White semi-gloss or satin interior trim paint
- Sandpaper (120 and 220 grit)
- Painter’s tape (delicate surface)
- Wood filler
- Caulk and caulk gun
- Tack cloth
- Sangled sash brush (1.5 to 2 inch)
- Small foam roller (optional for risers)
- Drop cloths
Step 1: Preparation
-
Clean surfaces:
Begin by thoroughly cleaning the spindles, newel posts, and risers with a degreaser or TSP substitute to remove oils and dirt. -
Fill imperfections:
Inspect the wood for any dents or nail holes. Apply wood filler to these spots, slightly overfilling to allow for shrinkage. -
Sand the wood:
Once the filler is dry, sand all surfaces to be painted with 120-grit sandpaper. This scuffs the existing finish to help the new paint adhere. -
Smooth the finish:
Follow up with a light sanding using 220-grit paper to ensure a silky smooth base, then wipe everything down with a tack cloth to remove every speck of dust. -
Protect the treads:
Carefully apply painter’s tape to the wooden treads where they meet the risers and around the base of the spindles. Press the edges down firmly to prevent bleed-through. -
Caulk the seams:
Run a thin bead of paintable caulk along the seams where the risers meet the skirt board or where spindles meet the rail for a seamless look.
Step 2: Painting the Spindles
-
Prime the spindles:
Apply a coat of high-quality primer to the spindles and newel post base. Use your sash brush to get into the turned details and grooves. -
Handle the details:
Be patient with the intricate curves of the spindles; light, multiple coats are better than one thick coat to avoid drips. -
Apply first coat:
Once the primer is dry and lightly sanded, apply the first coat of white semi-gloss paint. Start from the top and work your way down. -
Second coat application:
Allow the first coat to dry completely according to the can’s instructions, then apply a second coat for full opacity and durability.
Loose Tape Lines?
If paint bleeds under the tape, don’t panic. Wrap a damp cloth around a putty knife and gently scrape the excess wet paint off the tread, or use a razor blade once dry.
Step 3: Painting the Risers
-
Prime the risers:
Using a brush for edges and potentially a small roller for the flat centers, prime the stair risers. -
Cut in the edges:
brush the white paint carefully along the taped edges of the treads and the skirt boards. -
Fill the center:
Paint the main face of the riser. I find long, horizontal strokes help level the paint and minimize brush marks. -
Build coverage:
Apply a second coat to the risers once the first is dry. Risers take occasional scuffs from shoes, so this second layer is crucial for protection. -
Remove tape:
While the final coat is still slightly tacky (not fully cured), slowly peel back the painter’s tape at a 45-degree angle to ensure a crisp line. -
Touch ups:
Inspect your work for any seepage or missed spots. Use a small artist’s brush for tiny touch-ups near the tread or handrail.
Smooth Operator
Add a paint conditioner like Floetrol to your water-based paint. It slows drying time, allowing brush strokes to level out for a sprayed-on look.
Enjoy the fresh, cohesive brightness your newly painted staircase brings to your hallway
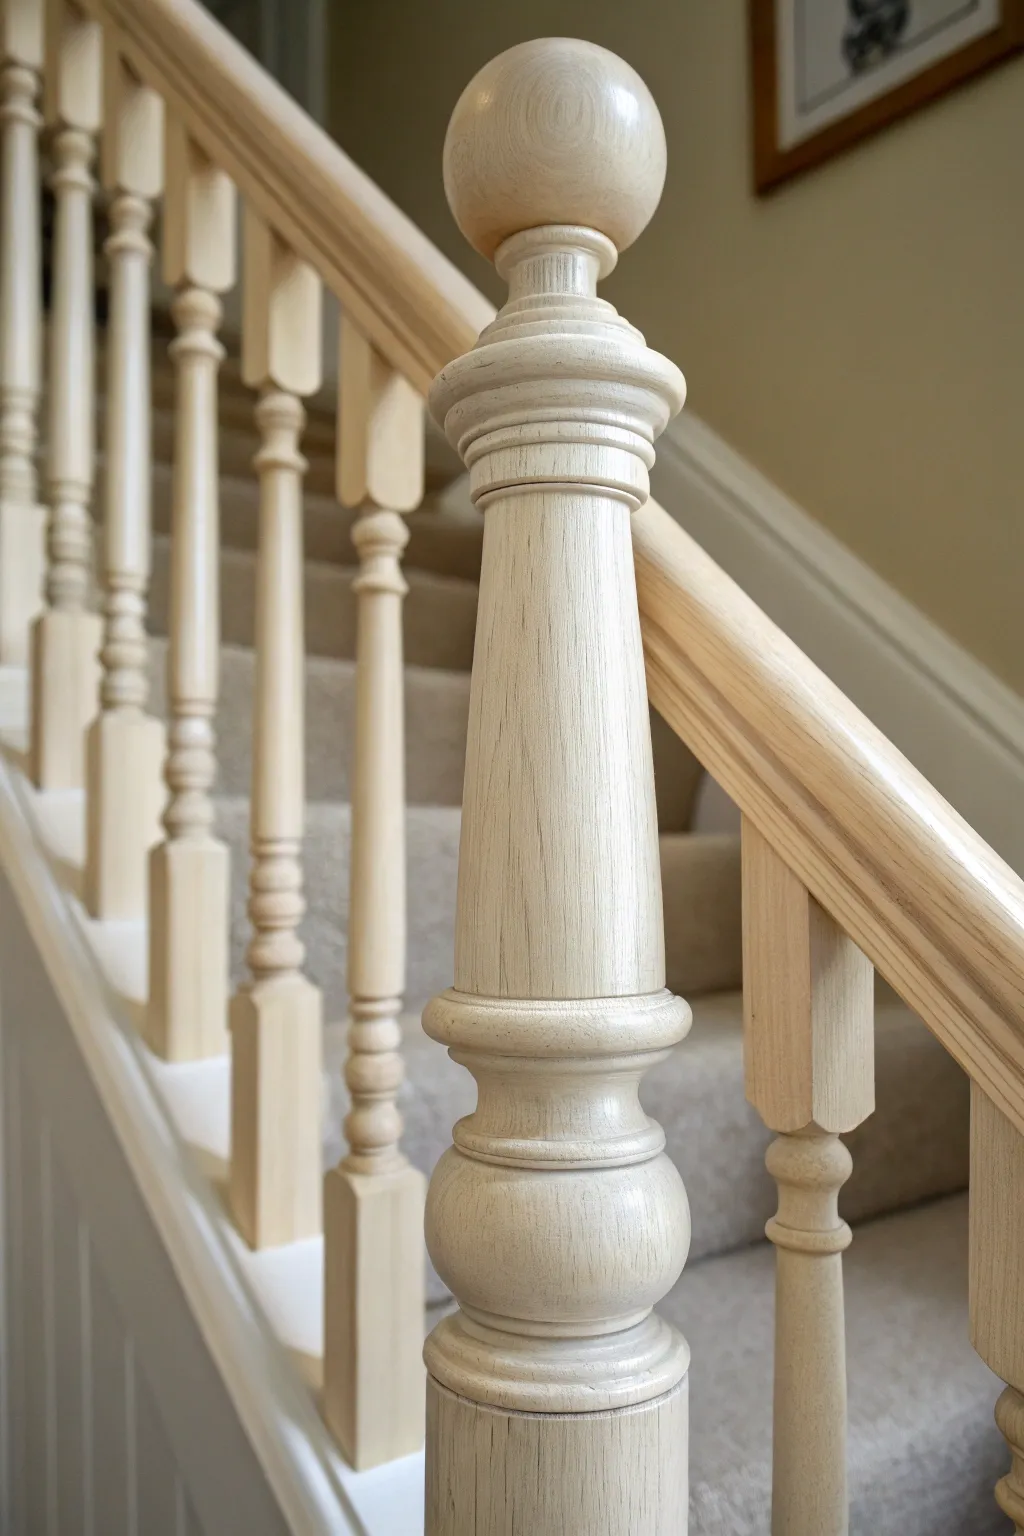
Sheen Choices That Change the Whole Vibe
This tutorial guides you through achieving that ultra-modern, ‘unfinished’ Scandinavian look on your staircase spindles while keeping the wood protected. The secret lies in using a specialized flat matt varnish that prevents yellowing and maintains the raw timber aesthetic.
How-To Guide
Materials
- 120-grit sandpaper
- 180-grit sandpaper
- 240-grit sandpaper
- Tack cloths
- Water-based flat matt varnish (non-yellowing formula)
- High-quality synthetic bristle brush (2-inch)
- Small angled sash brush (1-inch) for details
- Masking tape (low tack)
- Stir stick
- Drop cloths
- Vacuum cleaner with brush attachment
Step 1: Preparation & Sanding
-
protect the area:
Begin by laying down drop cloths to protect your carpet and flooring. Use low-tack masking tape to carefully cover the edges of the steps where the carpet meets the wood, as well as the underside of the handrail if you plan to keep that a different tone. -
initial sanding:
Take your 120-grit sandpaper and give every spindle and the newel post a thorough sanding. You need to remove any old shiny varnish, dirt, or handling marks. Always sand in the direction of the wood grain to avoid scratching the surface. -
refining the surface:
Switch to 180-grit sandpaper for a second pass. This smooths out the fibers raised during the first sanding. Pay special attention to the turned details on the spindles; I find wrapping the sandpaper around a small dowel helps get into those curves without flattening them. -
final smoothing:
Finish the sanding process with 240-grit paper. This creates a surface that feels like glass. This step is crucial for that premium, furniture-grade finish shown in the photo. -
dust removal:
Vacuum the spindles thoroughly using a brush attachment. Follow up by wiping everything down with a tack cloth to catch the microscopic dust that the vacuum missed. Any dust left behind will be trapped in the finish forever.
Invisible Finish Tip
To keep the wood looking truly raw, use a varnish specifically labeled ‘dead flat’ or ‘natural.’ Standard matt can sometimes still have a slight milky sheen.
Step 2: Applying the Finish
-
stir the product:
Open your water-based flat matt varnish. Stir it gently but thoroughly with a stick. Do not shake the can, as this introduces air bubbles that will ruin the clear, invisible effect we are aiming for. -
first coat application:
Dip your 2-inch synthetic brush about a third of the way into the varnish. Apply a thin, even coat to the flat sections of the newel post first. Work with the grain, keeping a wet edge to avoid lap marks. -
detail work:
Switch to the 1-inch angled sash brush for the intricate turned sections of the spindles. Apply the varnish sparingly here—you don’t want it pooling in the crevices of the design. -
drying time:
Allow the first coat to dry completely according to the manufacturer’s instructions. This usually takes about 2-4 hours for water-based formulas, but check your specific can. -
de-nibbing:
Once dry, the wood grain will likely have ‘raised’ slightly, feeling rough. Lightly hand-sand specifically with the 240-grit paper just to knock off these nibs. Do not sand hard; just skim the surface. -
clean up dust again:
Wipe the spindles down with a fresh tack cloth to remove the fine white powder created by the de-nibbing process. -
second coat:
Apply the second coat of flat matt varnish just as you did the first. Be vigilant about checking for drips on the underside of the turned details before the varnish sets. -
final inspection:
After the second coat dries, inspect the finish in good light. For high-traffic staircases, I sometimes add a third coat to the handrail and newel post cap for extra durability, as these areas get touched the most.
Level Up: Whitewash
Want it paler? Apply a diluted white stain (1 part white paint to 4 parts water) before sealing. Wipe it off immediately for a sun-bleached driftwood effect.
Now you can enjoy the natural warmth of the timber knowing it is protected against everyday wear
Primer Tricks for Stained-to-White Spindles
Achieving that crisp, flawless white finish on previously stained spindles requires specific preparation, especially when contrasting against a rich oak newel post. This project focuses on the vital priming techniques needed to block tannins and ensure your white paint stays bright and adheres perfectly for years to come.
Step-by-Step Tutorial
Materials
- TSP substitute (heavy-duty cleaner)
- Medium grit sanding sponges (100 and 150 grit)
- Painter’s tape (delicate surface)
- Liquid deglosser (optional but recommended)
- Oil-based blocking primer (white)
- High-quality acrylic-alkyd trim paint (white, semi-gloss)
- Small angled sash brush (1.5 inch)
- Mini foam rollers for spindles (optional)
- Tack cloths
- Drop cloths
Step 1: Preparation and Protection
-
Clean Thoroughly:
Before sanding, wipe down every spindle with a TSP substitute solution. Years of hand oils and floor polish can wreak havoc on primer adhesion, so scrub diligently to remove surface grime. -
Scuff Sanding:
Using a 100-grit sanding sponge, scuff all surfaces of the spindles. The goal isn’t to remove the old stain completely but to dull the glossy finish. Sponges are perfect here as they mold around the turned curves more easily than stiff paper. -
Remove Dust:
Vacuum the stairs and spindles thoroughly. Follow up by wiping everything down with a tack cloth to capture microscopic dust particles that could create a gritty finish. -
Tape Off Areas:
Apply painter’s tape carefully where the spindles meet the stained treads and the darker handrail. Press the edges of the tape down firmly with a putty knife to prevent paint bleed. -
Liquid Deglosser:
For extra insurance, specifically in the tight crevices of the turned wood, distinctively wipe on a liquid deglosser. This creates a chemical bond for the primer in areas your sandpaper might have missed.
Bleed-Through Blues?
If stubborn tannins keep showing through after two primer coats, switch to a spray shellac primer for spot-treating. It’s the ultimate sealer for impossible stains.
Step 2: The Critical Primer Coat
-
Select the Right Primer:
Do not skip this: use an oil-based blocking primer. Water-based primers will often allow wood tannins to bleed through, turning your white spindles yellow over time. -
Apply Primer:
Brush the primer onto the spindles, starting from the top and working down. Use thin coats to avoid drips collecting in the turned grooves of the wood. -
Check for Bleed-Through:
Once dry, inspect the spindles. If you see pinkish or yellowish stains coming through the white primer, apply a second coat of the oil-based primer to those specific spots. -
Soft Sand:
Oil-based primers can dry with a slightly rough texture. Lightly run a 220-grit sanding sponge over the primed spindles to smooth them out, then wipe away the dust with a fresh tack cloth.
Step 3: Painting the Finish
-
First Top Coat:
Stir your acrylic-alkyd hybrid paint gently to avoid air bubbles. Using your 1.5-inch sash brush, apply the first coat of white paint. I prefer these hybrid paints because they cure as hard as oil but clean up with water. -
Watch the Drips:
Keep a close eye on the ornate crevices. Gravity tends to pull paint down into these rings; check back 10 minutes after painting a section to smooth out any pooling paint. -
Dry Time:
Allow the first coat to dry fully according to the manufacturer’s instructions. Painting over tacky paint will result in brush drag and a poor finish. -
Second Top Coat:
Apply the second and final coat of white paint. This coat provides the true depth of color and the protective sheen needed for high-traffic areas. -
Remove Tape:
While the final coat is still slightly tacky (not wet, but not fully cured), carefully peel away the painter’s tape at a 45-degree angle to ensure a crisp line against the stained wood. -
Touch Ups:
Inspect the transition points where the white spindle meets the stained tread. If any white paint managed to seep under the tape, carefully scrape it off the stained wood with a plastic razor blade or thumbnail before it cures hard.
Smooth Operator
Between paint coats, instead of sandpaper, try buffing the spindles with a crumpled brown paper bag. It smooths nibs without scratching the finish.
Now you can enjoy the stunning contrast of your bright, modern spindles against the classic warmth of the wood
Crisp Tape Lines at Rail and Floor
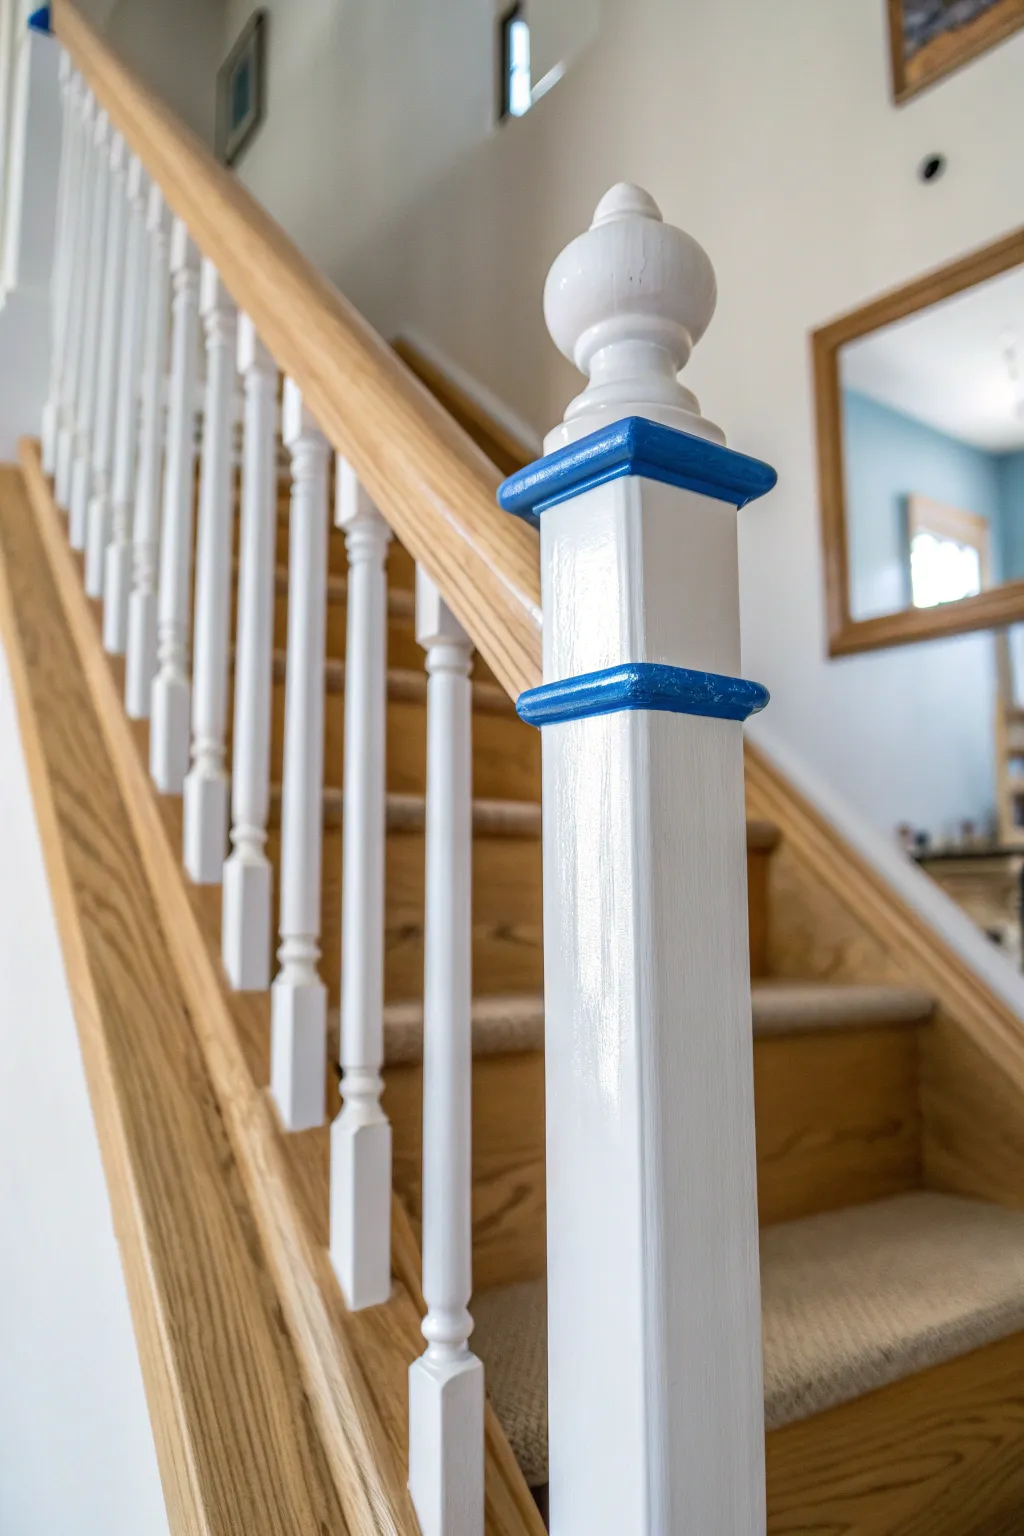
Transform a standard staircase newel post into a subtle statement piece by adding crisp, colorful bands against a classic white finish. This project demonstrates how precise taping can create a custom look that elevates the architectural detail of your stairs.
How-To Guide
Materials
- High-grit sandpaper (220-grit)
- Tack cloth
- High-quality painter’s tape (frog tape or similar precision tape)
- White semi-gloss enamel paint (trim paint)
- Cobalt blue high-gloss or semi-gloss enamel paint
- 1.5-inch angled sash brush
- Small flat artist’s brush (optional for touch-ups)
- Putty knife or credit card
- Drop cloths
Step 1: Preparation and Base Coat
-
Clean surface:
Begin by thoroughly cleaning the newel post to remove any oils, hand grease, or dust using a mild degreaser or TSP substitute. -
Sand lightly:
Once dry, scuff-sand the entire post with 220-grit sandpaper to give the surface ‘tooth’ for adhesion, focusing on grooves and the turned top piece. -
Remove dust:
Wipe away all sanding residue with a tack cloth to ensure a perfectly smooth starting surface. -
Protect surroundings:
Lay drop cloths on the stairs and apply tape to the floor and handrail where they meet the newel post to protect the wood finish. -
Paint base white:
Apply the first coat of white semi-gloss enamel to the entire post, including the areas you plan to paint blue later. -
Apply second coat:
Allow the first coat to dry completely according to the can’s instructions, then sand very lightly and apply a top coat of white for full coverage. -
Let cure:
I prefer to let this white base layer cure for at least 24 to 48 hours before applying tape over it, as fresh paint can peel easily.
Bleed Prevention
Before painting the blue, brush a tiny bit of the white base color over the tape edge first. This seals the gap, so any bleed is white-on-white, leaving a perfect line.
Step 2: Creating the Blue Bands
-
Identify accent zones:
Locate the horizontal decorative moldings on the square upper block of the post where the blue bands will go. -
Apply top tape line:
Carefully run a strip of high-quality painter’s tape right along the top edge of the molding detail. -
Apply bottom tape line:
Run a corresponding strip of tape along the bottom edge of the molding, isolating the raised band area. -
Seal the tape edges:
Press down firmly on the tape edges using a putty knife or credit card to prevent any paint bleed-under. -
Paint the blue:
Using a small amount of cobalt blue paint on your brush, fill in the space between the tape lines. Avoid overloading the brush. -
Add second layer:
After the first blue coat is dry to the touch, apply a second thin coat to ensure a rich, opaque color. -
Remove tape promptly:
While the expected final coat is still slightly tacky (not fully dry), slowly peel back the tape at a 45-degree angle away from the fresh paint. -
Inspect margins:
Check your lines immediately; if any white paint peeled or blue paint bled, use a damp cloth for wet mistakes or a tiny artist brush for dry touch-ups. -
Final cure:
Allow the accent stripes to cure completely before touching the post, ensuring the finish hardens for durability.
Pro Tip: Sheen Choice
Use a semi-gloss or high-gloss finish for high-traffic areas like banisters. It stands up better to hand oils and is much easier to wipe clean than satin or eggshell paints.
Enjoy the fresh, custom look these colorful accents bring to your entryway
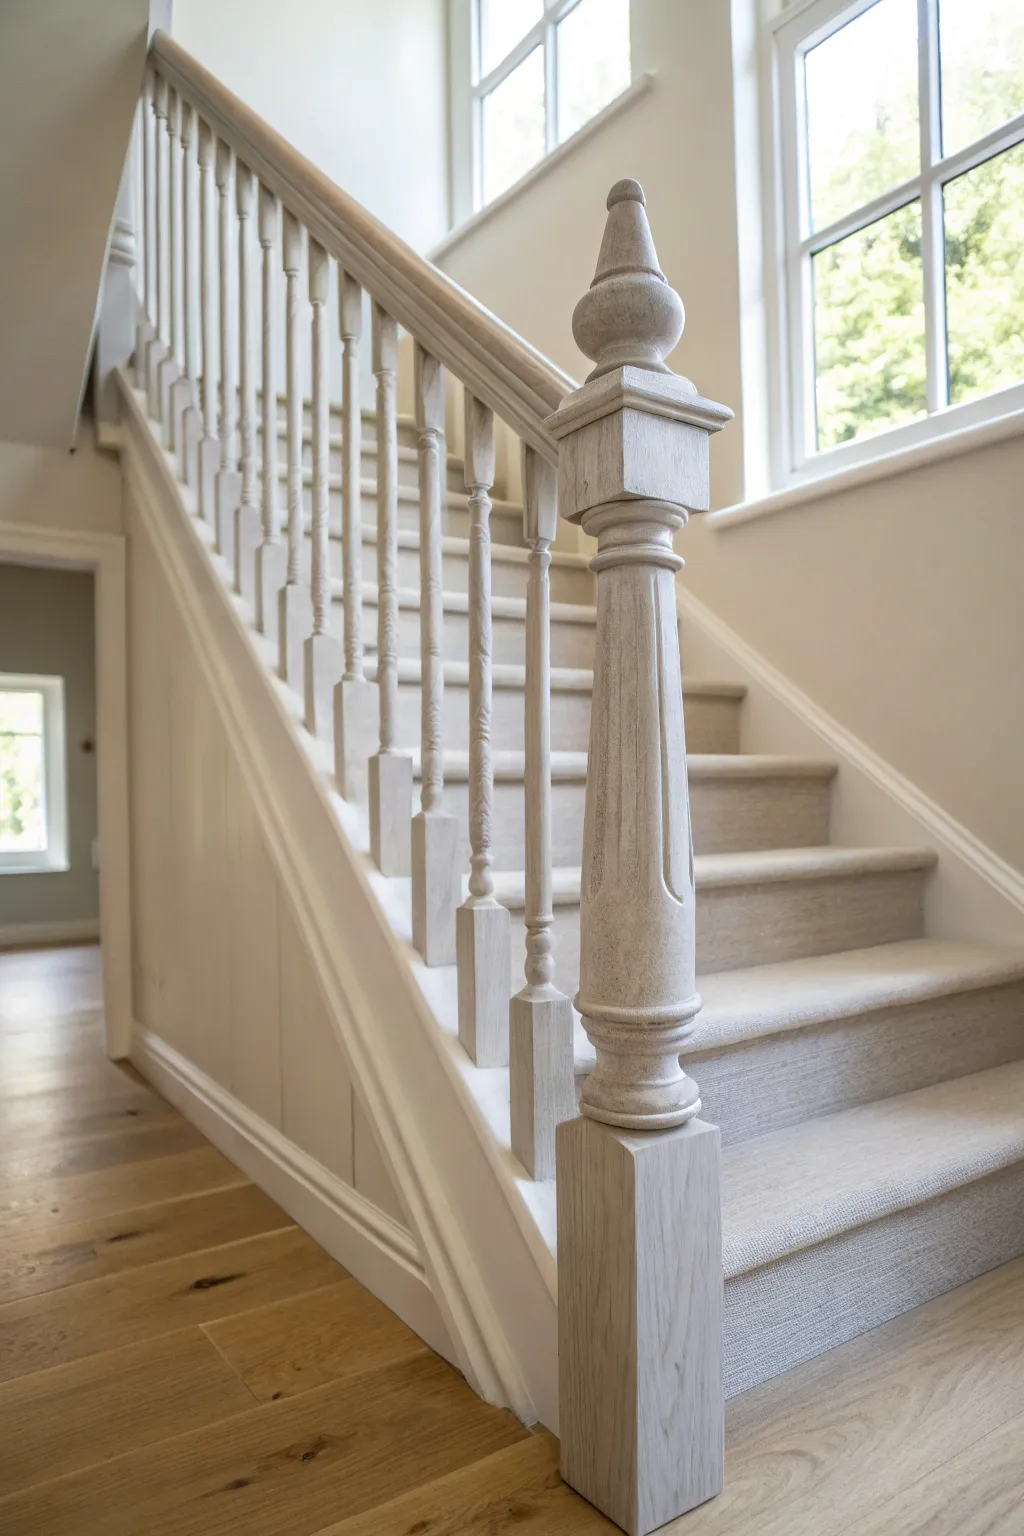
Turned Spindles: Painting the Curves Without Drips
This project transforms standard wooden staircase spindles into an elegant feature by highlighting the natural grain with a soft, whitewashed finish. The result is a light, airy aesthetic that brightens the stairwell while maintaining the warmth and texture of the original wood.
Step-by-Step Guide
Materials
- Chemical wood stripper (gel or paste based)
- Plastic putty knife
- Steel wool (coarse and fine grades)
- Sandpaper (120, 180, and 220 grit)
- Sanding sponges (medium and fine)
- White tinted wood stain or watered-down white latex paint
- Water-based matte polyurethane
- Synthetic bristle brushes (angled sash brush and flat brush)
- Clean lint-free rags
- Painter’s tape
- Canvas drop cloths
- Safety gear (gloves, respirator mask, eye protection)
- Mineral spirits or water (for cleaning based on finish type)
Step 1: Preparation and Stripping
-
Protect the Surroundings:
Before touching the wood, lay down canvas drop cloths over your stairs and hallway. Use painter’s tape to meticulously mask off where the spindles meet the floor, the treads, and the handrail to prevent any chemical or sanding damage. -
Apply Chemical Stripper:
Since turned spindles have complex curves, sanding alone is difficult. Generously apply a gel-based chemical stripper to the spindles using an old brush. Work on 2-3 spindles at a time so the product doesn’t dry out. -
Wait for Reaction:
Allow the stripper to sit according to the manufacturer’s suggested time, usually between 15 to 30 minutes. You should see the old finish beginning to bubble or lift away from the wood surface. -
Scrape the Flat Areas:
On the square bottom and top sections of the spindles, use a plastic putty knife to gently scrape away the sludge. Plastic is crucial here to avoid gouging the soft wood underneath. -
Tackle the Turned Details:
For the curved, turned sections, use coarse steel wool dipped in a little stripper. Twist the wool around the curves, using a flossing motion to get into the crevices and remove the old varnish. -
Neutralize and Clean:
Once the bulk of the finish is removed, wipe down every spindle with mineral spirits and a clean rag to remove any chemical residue. Let the wood dry completely for at least 24 hours.
Step 2: Sanding and Refining
-
Initial Sanding:
Begin sanding the square sections with 120-grit sandpaper. For the turned sections, flexible sanding sponges are your best friend—they conform to the shape without flattening the decorative ridges. -
Refine the Grain:
Progress to 180-grit sandpaper over the entire surface. This step is critical for removing any remaining stain spots and smoothing out scratches from the stripping process. -
Final Polish:
Finish with a quick pass of 220-grit sandpaper. Vacuum the spindles thoroughly using a brush attachment, then wipe them down with a tack cloth to ensure absolutely no dust remains in the detailed grooves.
Drip Disaster?
If paint pools in the deep crevices of the spindle, don’t wipe it! Use a dry, empty chip brush to soak up the excess liquid gently without smearing the surrounding finish.
Step 3: Applying the Whitewash Finish
-
Mix Your Whitewash:
You can use a pre-mixed white pickling stain, or create your own by mixing white water-based paint with water (try a 1:1 ratio initially). Test this mixture on a hidden area or scrap wood to ensure opacity. -
Apply the Wash:
Using a synthetic brush or a rag, apply the whitewash mixture to one spindle at a time. Work from the top down to catch any drips immediately. -
Wipe Back Excess:
Almost immediately after applying, wipe the spindle with a clean, dry lint-free rag. This pushes the white pigment into the wood grain while revealing the natural wood tone underneath. -
Inspect Coverage:
Check for pooling in the crevices of the turned details. I find using a dry, dry brush to feather out these deep grooves helps prevent unmistakable white blobs from forming. -
Layering (Optional):
If you want a whiter look, let the first coat dry completely and repeat the application and wipe-off process. For the subtle look in the image, one coat usually suffices.
Level Up: Ceral Look
To emphasize the grain even more, apply a clear wax followed by a white liming wax into the pores. Buff off the surface wax for a stunning ‘cerused’ oak effect.
Step 4: Sealing and Protection
-
Select the Topcoat:
Choose a water-based polyurethane with a matte or satin finish. High gloss will look artificial and hide the delicate whitewash effect you just created. -
Apply First Sealer Coat:
Brush on a thin, even layer of polyurethane. Watch carefully for drips on the underside of the curved details—gravity is the enemy here. -
Light Sanding:
Once the first coat is dry (usually 2-4 hours), lightly sand with 320-grit sandpaper or very fine steel wool to knock down any raised grain. Wipe away the dust. -
Final Coat:
Apply a second and final coat of polyurethane. Remove the painter’s tape slowly while the finish is still slightly tacky to ensure a clean, crisp edge.
With your freshly brightened staircase complete, the entire hallway will feel more open and inviting.
Color-Dipped Spindle Bases
This project transforms a standard staircase into a crisp, modern feature by pairing bright white spindles with warm wood treads and accents. The result is a clean, classic look that highlights architectural details like the newel post finial and spindle turnings.
Step-by-Step Tutorial
Materials
- Sandpaper (120 and 220 grit)
- Painter’s tape (high-quality edging tape)
- Wood stain (medium oak or matching existing floors)
- White semi-gloss enamel paint (trim paint)
- Stain-blocking primer
- Polyurethane topcoat (satin or semi-gloss)
- Angled sash brush (2 inch)
- Small artist brush or foam brush
- Drop cloths
- Tack cloth
- Wood filler (stainable)
Step 1: Preparation & Sanding
-
Clear and clean:
Begin by removing any carpet runners or staples if present. Clean the entire staircase thoroughly with a degreaser or TSP substitute to remove oils and dirt. -
Sand the surfaces:
Sand the treads, handrail, and the round finial on the newel post down to bare wood using 120-grit sandpaper if you plan to re-stain them. For the painted areas (spindles, risers, and newel post base), scuff sand gently to dull the glossy finish. -
Detail sanding:
Use folded pieces of sandpaper to get into the grooves of the turned spindles and the recessed panels of the newel post. This ensures the primer bonds properly. -
Dust removal:
Vacuum up all sawdust, then wipe everything down with a tack cloth. Any remaining dust will leave a gritty texture in your final finish.
Bleeding Lines?
If paint bleeds under tape onto your stained treads, wrap a damp cloth around a putty knife and gently scrape/wipe the wet paint away immediately.
Step 2: Staining the Accents
-
Protect the paintable areas:
Use painter’s tape to protect the areas you intend to paint white where they meet the wood sections. Be precise around the base of the newel post finial. -
Apply the stain:
Apply your chosen wood stain to the treads, the handrail, and the newel post finial using a cloth or foam brush. Work in the direction of the grain. -
Wipe away excess:
After letting the stain penetrate for the manufacturer’s recommended time (usually 5-15 minutes), wipe away the excess with a clean, lint-free rag. -
Seal the wood:
Once the stain is fully dry, apply two to three coats of polyurethane to the stained areas. Sand lightly with 220-grit paper between coats for a smooth finish.
Color-Block Twist
Instead of leaving the newel decorative finial stained wood, consider painting the very bottom square base of each spindle black for a modern dipped look.
Step 3: Painting the Spindles & Risers
-
Tape off the stained wood:
Once the clear coat has fully cured (give it at least 24 hours), tape off the stained treads and the base of the finial to protect them from paint splatters. -
Prime the surfaces:
Apply a coat of stain-blocking primer to the spindles, risers, and the square body of the newel post. This prevents old wood tannins from bleeding through your white paint. -
Check for imperfections:
After priming, check for any gaps or holes. Fill nail holes with wood filler and caulk gaps between the riser and tread for a seamless look. -
First coat of white:
Using an angled sash brush, apply the first coat of white semi-gloss enamel. Start from the top of the spindles and work your way down to avoid drips ruining your lower work. -
Paint the newel post:
Paint the square newel post, paying special attention to the routed details on the side panels. A smaller brush helps prevent paint pooling in the corners. -
Second coat application:
Apply a second coat of white paint to ensure full coverage and a durable finish. I always find that two thin coats look better than one thick, drippy one. -
Remove tape:
Carefully score the edge of the painter’s tape with a utility knife before pulling it up. This prevents the tape from peeling up your fresh paint. -
Touch-ups:
Inspect your edges where the white paint meets the stained wood. Use a small artist brush to fix any bleed-through or missed spots.
Now you can step back and admire how a fresh coat of paint completely revitalizes your entryway
Ombre Fade Up the Spindles
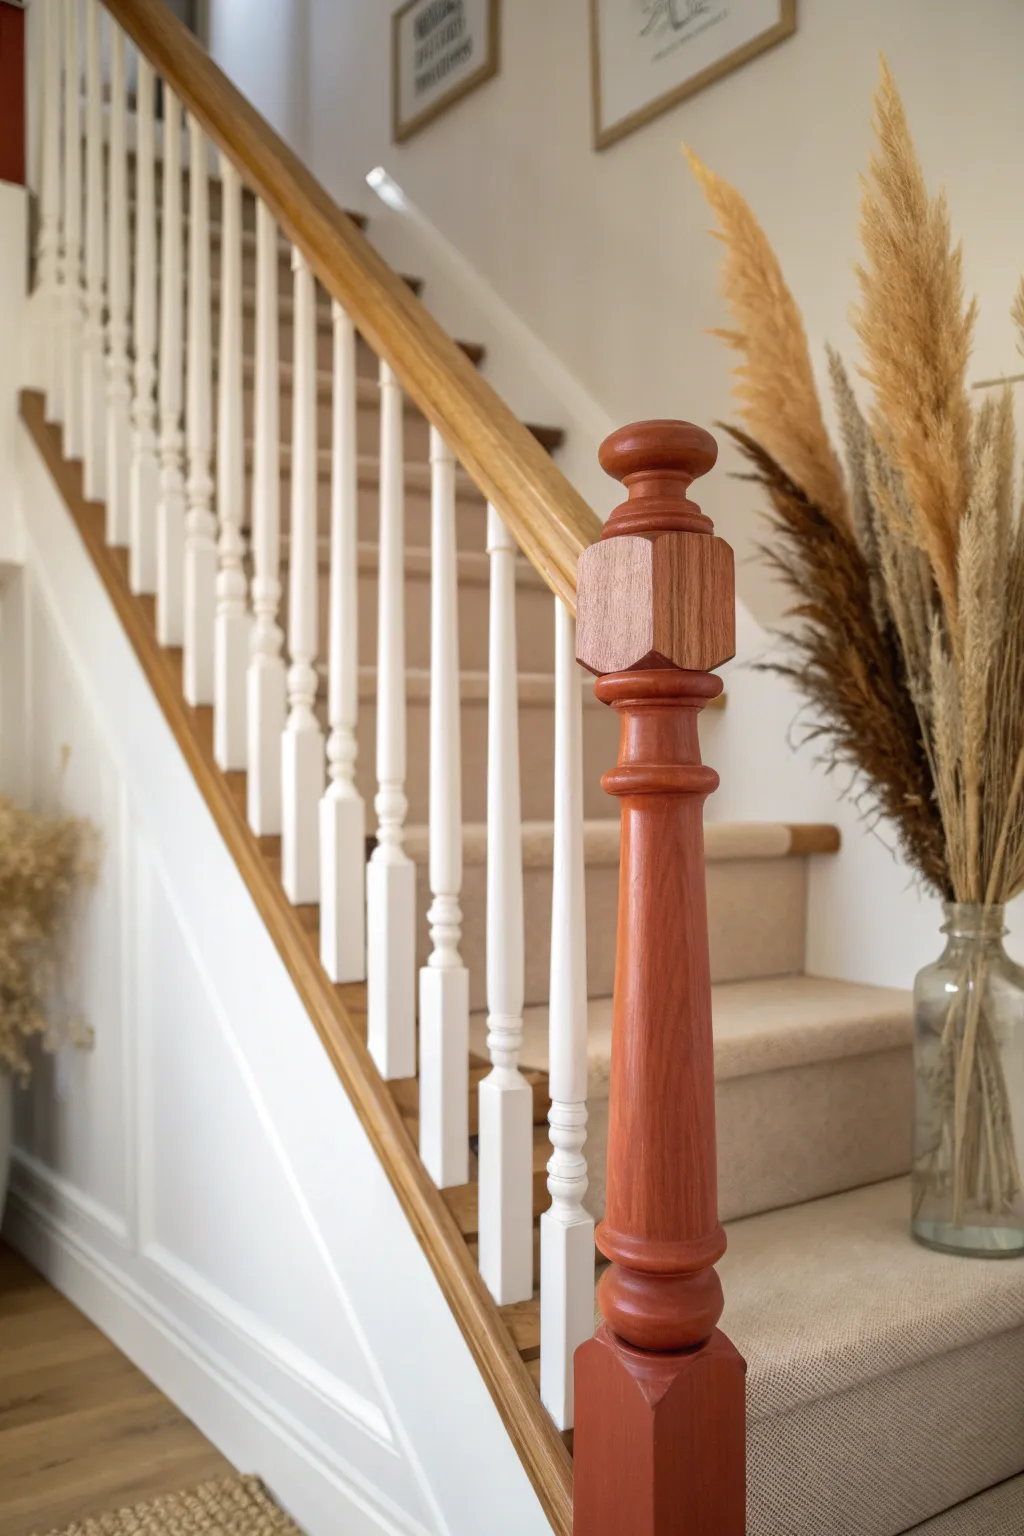
Upgrade a standard staircase by painting the newel post a rich terracotta hue while keeping the spindles crisp white. This high-contrast look draws the eye immediately to the architectural details and adds warmth to neutral hallways.
Step-by-Step Guide
Materials
- Fine-grit sandpaper (180-220 grit)
- Tack cloth or damp lint-free rag
- Painter’s tape (high-quality)
- Wood primer suitable for glossy surfaces
- High-quality interior wood paint (White)
- High-quality interior wood paint (Terracotta/Red-Brown)
- 1.5-inch angled sash brush
- Small foam roller (optional for flat sections)
- Drop cloths
- Small craft brush
Step 1: Preparation & Sanding
-
Protect the area:
Begin by laying down drop cloths to protect your floor and the stair runner. If your carpet is tacked down close to the spindles, slide thin cardboard or a dedicated carpet guard under the wood to catch drips. -
Clean surface:
Thoroughly clean the newel post and all spindles with a degreasing cleaner to remove hand oils and dirt, then let them dry completely. -
Scuff sand:
Lightly sand all surfaces you plan to paint using 180-220 grit paper. The goal isn’t to remove old paint entirely but to create a rough ‘key’ for the new paint to grip. -
Remove dust:
Wipe away every speck of sanding dust using a tack cloth. This step is crucial for a smooth finish, as leftover dust causes a gritty texture. -
Tape edges:
Carefully apply painter’s tape along the handrail where it meets the spindles and newel post, ensuring a sharp seal to prevent bleed-through.
Brush Maintenance Tip
Wrap your brush in plastic wrap or a sandwich bag between coats. This keeps the bristles moist and saves you from washing the brush out while waiting for paint layers to dry.
Step 2: Priming & Painting White Spindles
-
Prime spindles:
Apply a bonding wood primer to the white spindles first. Use long, even strokes and watch out for pooling in the turned grooves of the wood. -
First coat of white:
Once the primer is dry, paint the first coat of white on the spindles. An angled sash brush works best for getting into the curves. -
Smoothing coat:
After the proper drying time, inspect for drips, sand lightly if needed, and apply the second coat of white for full, opaque coverage.
Step 3: The Feature Newel Post
-
Isolate the post:
Ensure the adjacent white railings or steps are fully dry, then tape them off if you feel unsteady, though cutting in by hand often yields better results on curves. -
Prime newel post:
Apply primer to the newel post, covering the turned sections and the square block base completely. -
Cut in the base:
Using your terracotta color, carefully paint around the base where the post meets the carpet or floor. -
Color the details:
Paint the intricate turned sections of the newel post. I find using a smaller brush helps prevent paint from clogging the detailed grooves here. -
Paint the block:
Finish the first coat by painting the square top block and flat sides with long vertical strokes to minimize brush marks. -
Second coat:
Allow the first coat to dry fully according to the can instructions, then apply a second rich coat of terracotta to deepen the color. -
Remove tape:
While the final coat is still slightly tacky (not soaking wet, but not fully cured), gently peel away the painter’s tape at a 45-degree angle. -
Touch ups:
Use a small artist’s craft brush to fix any tiny imperfections where the two colors meet or near the carpet line.
Paint Bleeding?
If paint bleeds under the tape, wait for it to fully dry. Then, re-tape the line slightly over the mistake and paint over it with the correct color for a crisp edge.
Step back and admire how a single pop of color can completely transform the character of your staircase entrance
Subtle Stripes on Square Spindles
This elegant update transforms a standard staircase by highlighting the natural beauty of the wood grain against crisp white paint. Instead of painting the entire newel post, this technique preserves the recessed panels and top cap in a warm oak finish for a sophisticated, two-tone look.
Step-by-Step Tutorial
Materials
- Sandpaper (120, 220, and 320 grit)
- Painter’s tape (high quality, delicate surface)
- Stainable wood filler (optional)
- Wood stain (matches existing treads)
- Clear protective topcoat (polyurethane or lacquer)
- High-quality white trim paint (semi-gloss or satin)
- Primer (bonding primer recommended)
- Small angled sash brush (1.5 inch)
- Foam brushes or staining sponges
- Tack cloths
- Razor blade or utility knife
Step 1: Preparation & Stripping
-
Assess the surface:
Begin by inspecting your newel post. If it is currently fully painted, you will need to strip the paint from the recessed panels and the top cap to reveal the bare wood underneath. -
Sand the recessed panels:
Using 120-grit sandpaper, carefully sand the inside of the recessed rectangular panels. Use a sanding block to stay flat, avoiding rounding over the sharp edges where the panel meets the frame. -
Sand the cap and trim:
Sand the decorative top cap and the small molding piece below it down to bare wood. The goal is to remove all old finish so the new stain absorbs evenly. -
Clean the surface:
Vacuum up all sawdust from the crevices. Wipe the entire post down with a tack cloth to ensure absolutely no dust remains before moving to the next phase.
Step 2: Staining & Sealing
-
Mask the frame:
Apply painter’s tape to the raised white areas immediately surrounding the wood panels and the cap. This protects the areas we plan to paint later. -
Apply stain:
Using a foam brush or rag, apply your chosen wood stain to the recessed panels and the top cap. Wipe away excess stain after a few minutes to reveal the grain. -
Let it dry:
Allow the stain to dry completely according to the manufacturer’s instructions, usually overnight. -
Seal the wood:
Apply a clear protective topcoat over the stained areas. I prefer a water-based polyurethane here because it dries clear and doesn’t yellow over time. -
Light sanding between coats:
Once the first coat is dry, lightly scuff it with 320-grit sandpaper, wipe clean, and apply a second coat of sealer for a durable finish.
Use Liquid Masking
For tricky corners inside the recessed panel, try a liquid masking fluid (often used in watercolor painting) instead of tape. It peels off rubbery and clean once dry.
Step 3: Painting the Framework
-
Reverse mask:
Once the clear coat has fully angered (wait at least 48 hours), carefully tape over the newly finished wood panels and the wood cap to protect them from paint splatter. -
Prime the frame:
Apply a bonding primer to the rest of the newel post—the corners, the base, and the vertical styles—as well as the spindles. -
Paint the first coat:
Using your angled sash brush to cut in close to the taped edges, apply your high-quality white trim paint. Use long vertical strokes to minimize brush marks. -
Paint the spindles:
While the post dries, paint the individual square spindles. Work from top to bottom on each spindle to catch any drips before they dry. -
Sand and recoat:
Lightly sand the primed and painted surfaces with 220-grit paper to smooth out imperfections. Wipe away dust, then apply your final coat of white paint. -
Remove tape:
While the final coat is still slightly tacky (or immediately after finishes drying), slowly peel away the painter’s tape at a 45-degree angle.
Bleeding Lines?
If paint bleeds under the tape onto the wood, seal the tape edge with a thin layer of the *wood’s clear coat* first. This fills any gaps before you apply the white paint.
Step 4: Finishing Touches
-
Cleanup edges:
If any paint seeped onto your stained wood, very gently scrape it away with a razor blade or use a damp cloth wrapped around a putty knife. -
Inspect seams:
Check the transition line where the white paint meets the stained wood. If the line isn’t crisp, you can use a tiny artist’s brush to touch up the white paint.
Now step back and admire how the natural wood accents add warmth and character to your freshly painted staircase
Metallic Highlights on Spindle Details
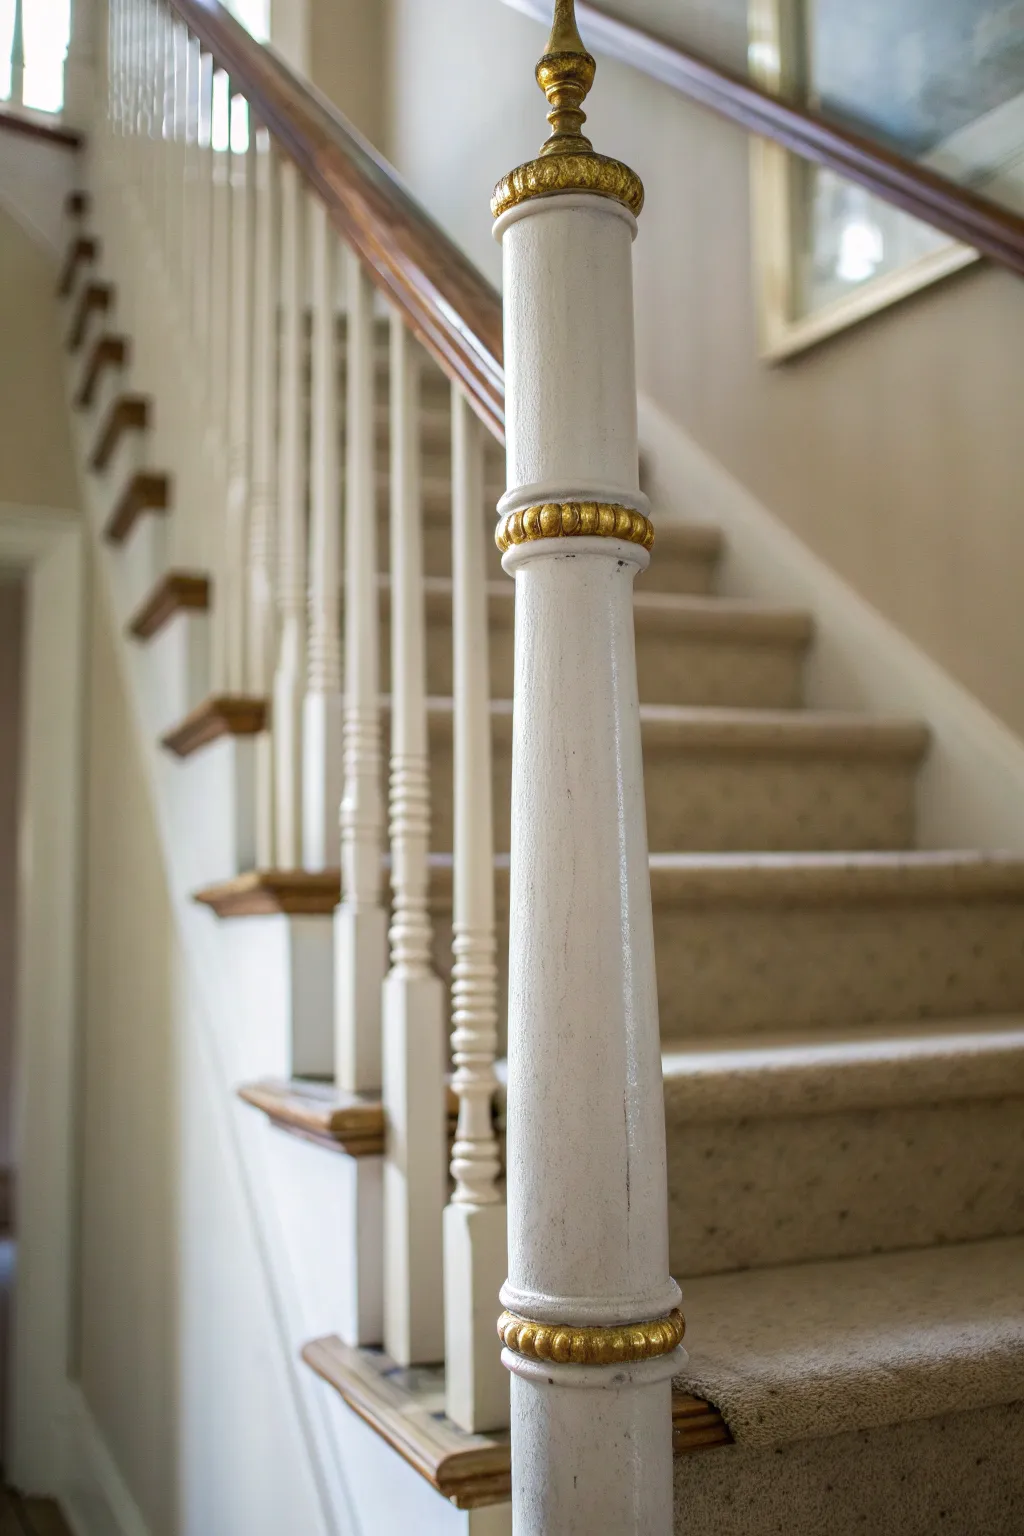
Transform a standard painted newel post into a statement piece with just a touch of metallic flair. This project focuses on highlighting the architectural details—specifically the turned rings and finial—with rich gold paint to add a sophisticated, custom look to your staircase.
Step-by-Step
Materials
- High-quality white interior semi-gloss enamel paint
- Liquid gold leaf or metallic gold acrylic paint (oil-based provides the best shine)
- Small flat-bristled artist brush (size 4 or 6)
- Small round detail brush (size 0 or 1)
- Painter’s tape (delicate surface)
- Fine-grit sandpaper (220-grit)
- Tack cloth
- Rubbing alcohol
- Cotton swabs (for cleanup)
Step 1: Preparation and Base Coat
-
Clean the surface:
Begin by thoroughly cleaning the newel post to remove oils, handprints, and dust. A mixture of mild dish soap and warm water works well, but ensure you dry it completely afterward. -
Sand for adhesion:
Lightly scuff the entire surface of the post, paying special attention to the curved details where paint can pool. Use 220-grit sandpaper to create a ‘tooth’ for the new paint without damaging the wood shape. -
Remove dust:
Wipe away all sanding residue using a tack cloth. Any leftover dust will create a gritty texture in your finish. -
Tape off adjacent areas:
Protect your floor, carpet, and the stained handrail with painter’s tape. Press the edges down firmly to prevent bleed-through. -
Apply the white base:
Paint the entire post with white semi-gloss enamel. Use smooth, long strokes for the vertical sections and carefully dab into the crevices of the turned details. -
Inspect and recoat:
Allow the first coat to dry fully according to the manufacturer’s instructions. If the old color is showing through, apply a second coat for a pristine, solid white finish. -
Wait for full cure:
This is crucial: Let the white base paint cure for at least 24 to 48 hours before attempting the gold detail work. Painting over soft paint can cause dragging or peeling.
Step 2: Applying the Gold Accents
-
Select the highlight areas:
Identify the raised rings, bands, or the finial tip you want to accentuate. In the example, notice how only the convex (outward curving) beadings are gold, while the concave grooves remain white. -
Prepare the gold paint:
Shake your liquid gold leaf or metallic paint vigorously. The metallic pigments settle quickly, so you need them well-suspended for an even shine. -
Load the brush sparingly:
Dip your small flat brush into the gold paint. Wipe excess off on the rim; you want a ‘dry brush’ feel to prevent drips running down the white post. -
Paint the main bands:
Hold your brush horizontal to the ring. Carefully drag the brush along the raised carving. I find steadier hands by resting my pinky finger against a dry part of the post for support. -
Refine the edges:
Switch to your tiny round detail brush to neaten the edges of the gold bands where they meet the white wood. Go slowly and breathe steadily. -
Correct mistakes immediately:
If you slip, quickly wipe the stray gold with a damp cotton swab (water for acrylics, mineral spirits for oil-based) before it sets. -
Layer for opacity:
Metallic paints is often semi-transparent. Let the first gold layer dry for an hour, then apply a second coat to achieve that deep, rich luster shown in the photo. -
Highlight the finial:
Finish by painting the top finial. Work from the top down so you don’t smudge your work, coating the intricate curves carefully. -
Add texture (Optional):
To mimic the slightly antiqued look in the photo, you can dab a tiny bit of darker glazing medium into the deep crevices of the gold bands while wet, though solid gold looks just as striking. -
Final dry time:
Remove the painter’s tape carefully. Let the gold details cure for several days before allowing anyone to touch or grab the newel post.
Steady Hand Trick
Rest your painting hand on a ‘mahl stick’ (or a simple wooden dowel) propped against the floor or a step. This bridges the gap and stops your hand from shaking during detail work
Antique Glaze
For a vintage look, rub a tiny amount of dark umber wax over the dried gold paint. It settles in the grooves, making the gold detailing pop even more
Now you have a stunning, high-end focal point for your entryway that looks custom-designed


Have a question or want to share your own experience? I'd love to hear from you in the comments below!