If you’ve got a plain plywood subfloor, you’re sitting on a blank canvas that can look totally intentional with paint. Here are my favorite painted plywood floor ideas, starting with the classics and drifting into the artsy, studio-style experiments.
Solid Color, Clean and Modern
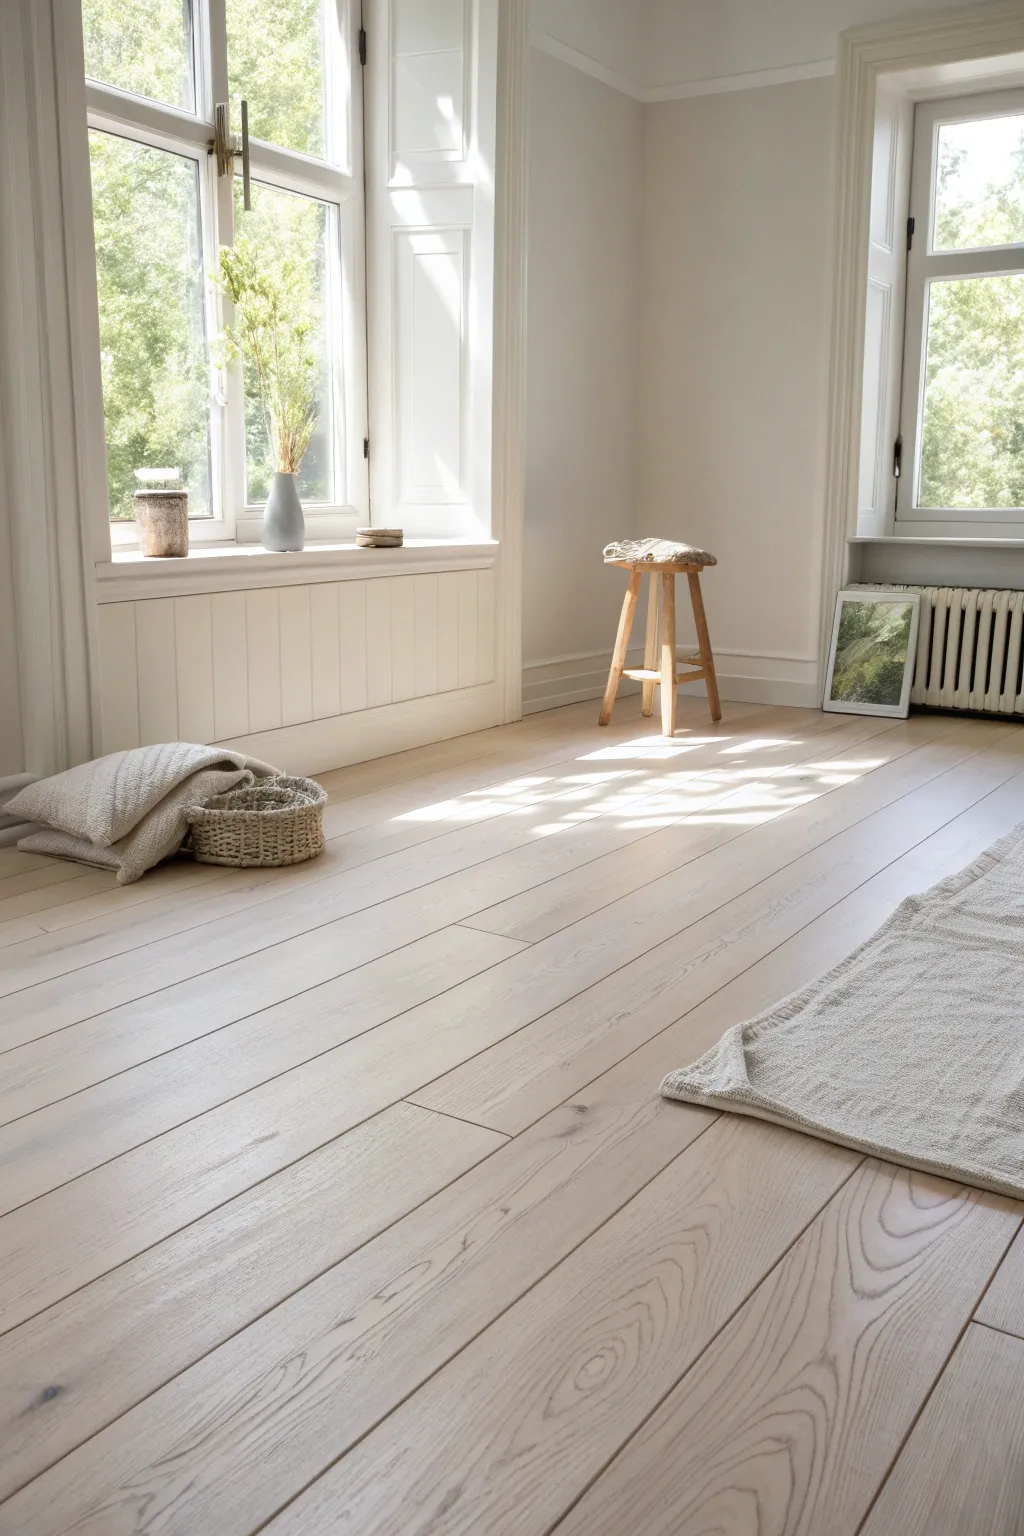
Transform basic plywood subflooring into a stunning, light-filled feature that rivals high-end hardwoods. This technique uses a custom whitewash blend to soften the wood grain while keeping a clean, modern aesthetic perfect for brightening any space.
Detailed Instructions
Materials
- High-grade plywood sheets (ACX or cabinet grade, birch or pine)
- Circular saw or table saw
- Pry bar (for removing baseboards)
- Wood filler (stainable)
- Sandpaper (80, 120, and 220 grit)
- Orbital sander
- Pole sander
- Tack cloth or vacuum
- White latex paint (flat or matte)
- Water (for diluting paint)
- Large mixing bucket
- Wide synthetic bristle brush (4-6 inch)
- Lint-free rags
- Water-based polyurethane (matte or satin finish)
- Lambswool applicator or synthetic pad
Step 1: Preparation and Plank Creation
-
Clear and clean:
Begin by removing all furniture and carefully prying off existing baseboards if you plan to reinstall them later. Ensure the subfloor is clean, dry, and level. -
Cut the planks:
Rip your plywood sheets into wide planks. For the look in the photo, rip them into 6-inch or 8-inch strips. I find that varied lengths help mimic real hardwood, so cut some planks shorter than full length. -
Check the edges:
Lightly sand the cut edges of each plank to remove splinters. A quick pass with 120-grit paper prevents rough seams later. -
Install the flooring:
Lay your planks using construction adhesive on the back and finishing nails every 6-8 inches. Stagger the seams row by row to avoid a grid pattern. -
Fill the holes:
Once installed, go over every nail head with a small amount of stainable wood filler. Let this dry completely according to the package instructions.
Step 2: Sanding and Conditioning
-
Rough sanding:
Using a floor sander or a powerful orbital sander, go over the entire floor with 80-grit sandpaper to level out any uneven joints and remove excess filler. -
Medium sanding:
Switch to 120-grit paper for a second pass. This smooths out the deep scratches from the first round. -
Final polish:
Finish with a 220-grit sanding pass. This is crucial for that ultra-smooth, modern feel. The wood should feel soft to the touch. -
Deep clean:
Vacuum specifically along the seams to pull out dust. Follow up with a tack cloth to remove every last particle, as dust will mar your whitewash finish.
Sticky Situation?
If your whitewash looks blotchy as it dries, the wood might be absorbing unevenly. Lightly sand the dark spots and re-apply a drier rag with just a hint of wash to blend it out.
Step 3: Whitewashing
-
Mix the wash:
In your bucket, mix white latex paint with water. Start with a 1:1 ratio for a semi-opaque look like the photo. If you want more grain showing, add more water. -
Test a scrap:
Apply your mixture to a piece of scrap plywood. Let it dry to ensure the opacity is exactly what you want before touching the main floor. -
Apply sections:
Work in small sections of 3-4 planks at a time. Brush the whitewash mixture on with the grain using your wide brush. -
Wipe back:
Immediately after applying, gently wipe the wet paint with a lint-free rag. This pushes pigment into the grain while removing excess from the surface. -
Feather edges:
Keep a wet edge as you move across the room to avoid lap marks where dried punch meets wet paint. -
Dry thoroughly:
Allow the whitewash to dry for at least 24 hours. Plywood is thirsty and needs time to release the moisture from the wash.
Pro Tip: Grain Direction
Always brush and wipe in the direction of the wood grain, not across it. This emphasizes the natural pattern and elongates the look of the room.
Step 4: Sealing and Protecting
-
First coat of poly:
Stir your water-based polyurethane gently (don’t shake, or you’ll get bubbles). Apply a thin, even coat using a lambswool applicator. -
Sand between coats:
Once the first coat is dry (check the can, usually 2-4 hours), lightly hand-sand with 220-grit paper to knock down any raised grain. -
Clean dust:
Wipe away the sanding dust with a damp cloth or tack cloth before proceeding. -
Repeat sealing:
Apply at least two more coats of polyurethane, repeating the light sanding process between them. Three coats minimum ensures durability for high-traffic areas. -
Final cure:
Let the final coat cure for at least 48-72 hours before placing furniture back into the room. Light foot traffic is usually okay after 24 hours.
Now you have a bright, airy foundation that completely transforms the feeling of your interior space


Classic Checkerboard Squares
Transform plain plywood subflooring into a stunning design feature with this timeless checkerboard pattern. By leaving alternating squares unpainted, you let the natural wood grain warth shine through for a rustic, airy feel.
Step-by-Step
Materials
- Plywood sheet flooring (sanded smooth)
- Black porch and floor paint (latex or oil-based)
- Water-based polyurethane floor sealer (matte or satin)
- Painter’s tape (high quality)
- Framing square or large ruler
- Measuring tape
- Pencil
- Chalk line (optional but helpful)
- Paint roller with smooth nap
- Small angled paintbrush
- Vacuum and tack cloth
- Palm sander with 120 and 220 grit paper
Step 1: Preparation & Mapping
-
Clear and clean the surface:
Begin with a completely clear floor. Remove any existing carpet, staples, or debris. Vacuum thoroughly, getting into every corner and crevice. -
Sand the plywood:
Using a palm sander with 120-grit paper, sand the entire plywood surface to remove splinters and rough patches. Follow up with a 220-grit pass for a furniture-smooth finish. -
Remove dust:
Vacuum up all the sanding dust. Wipe the entire floor with a tack cloth or a slightly damp rag to ensure no fine particles remain, as these will ruin your paint finish. -
Determine your square size:
Decide on the scale of your checkers. 12-inch or 18-inch squares are standard choices. Divide your room’s width and length by your chosen size to see how they will fit. -
Find the center point:
Measure to find the exact center of the room. It is usually best to start your pattern from the center and work outward so the cut squares at the edges are symmetrical. -
Mark the grid lines:
Using a long straight edge, measuring tape, and pencil, lightly draw your entire grid on the floor. A chalk line can speed up this process for larger rooms, but double-check your measurements frequently.
Bleeding Lines?
If paint bleeds under the tape, let it dry fully. Then, carefully scrape the excess paint away with a razor blade or sand it off the wood square before sealing.
Step 2: Taping & Painting
-
Mark the black squares:
Before you grab any tape, lightly mark an ‘X’ with a pencil inside every square that will be painted black. This simple step saves you from the headache of accidentally painting the wrong square later. -
Tape the first set of squares:
Apply painter’s tape along the *outside* lines of the squares you intend to paint first. You won’t be able to paint adjacent black squares at the same time because the tape needs to occupy the space of the unpainted square. -
Seal the tape edges:
Press the tape down firmly. I like to run a credit card or putty knife over the tape edge to prevent bleed-under. -
Paint the first batch:
Using your roller, fill in the exposed squares with black floor paint. Use the angled brush for edges near walls. Apply thin, even coats rather than one thick gloop. -
Remove tape while wet:
Carefully peel up the painter’s tape while the paint is still slightly wet. Pulling at a 45-degree angle away from the paint usually gives the crispest line. -
Let it dry completely:
Allow these squares to dry fully according to the paint can’s instructions. Do not rush this, or the tape for the next round will peel up your fresh work. -
Tape the remaining squares:
Once dry, tape off the second set of black squares. This time, the tape will go over the dry wood and potentially interact with the corners of your painted squares, so be gentle. -
Paint the second batch:
Repeat the painting process for the remaining marked squares. Ensure you get solid coverage that matches the first set. -
Remove final tape:
Remove the tape carefully and let the entire floor cure for at least 24 hours.
Border Design Idea
Instead of cutting the squares off at the wall, create a solid black or wood border around the perimeter to frame the checkerboard neatly like a rug.
Step 3: Sealing & Protection
-
Clean gently:
Wipe the floor gently to remove any pencil marks that might still be visible on the unpainted wood squares. -
Apply first coat of sealer:
Using a clean roller or applicator pad, apply a water-based polyurethane sealer over the entire floor—both the painted and raw wood squares. -
Sand lightly between coats:
Once the first coat is dry, very lightly hand-sand with high-grit paper to knock down any grain raise, then wipe clean. -
Finish with top coats:
Apply 2-3 additional coats of polyurethane for durability, allowing proper drying time between each layer.
Now you have a durable, custom floor that adds incredible character for a fraction of the cost of hardwood


Bold Stripes That Stretch the Room
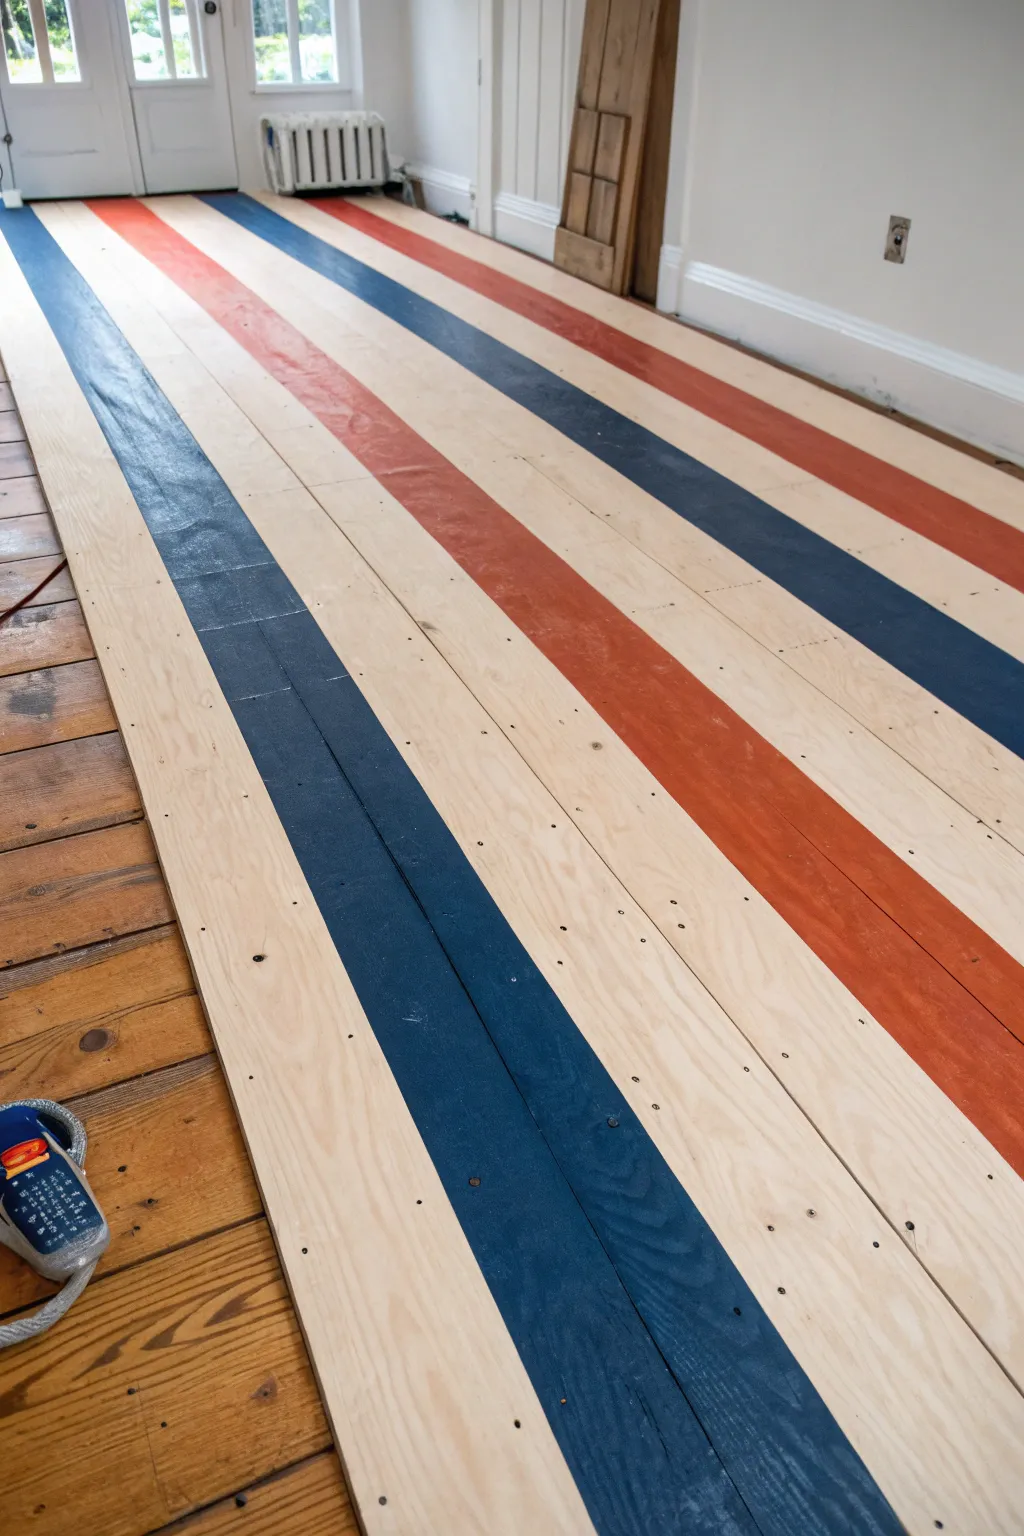
Transform plain plywood subflooring into a statement feature with this bold, linear design that visually lengthens any hallway or room. By combining natural wood tones with deep navy and warm terracotta stripes, you achieve a classic Americana look that feels both rustic and refined.
How-To Guide
Materials
- Sanded plywood sheets (installed)
- Painter’s tape (2-inch width or wider)
- Navy blue porch and floor paint
- Terracotta/burnt orange porch and floor paint
- Clear water-based polyurethane (floor grade)
- Paint roller with extension pole
- High-quality angled sash brush
- Measuring tape
- Chalk line or long straight edge
- Pencil
- Vacuum and tack cloth
- Wood filler (optional)
Step 1: Preparation & Mapping
-
Clean the surface:
Begin by thoroughly vacuuming the installed plywood floor to remove all sawdust and debris. Follow up by wiping everything down with a tack cloth to ensure the surface is perfectly dust-free for the tape and paint. -
Fill visible voids:
If your plywood has large knot holes or gaps between sheets that you want to hide, fill them with wood filler now. Since this design embraces a rustic look, you can skip this if you prefer the raw character of the wood. -
Sand the surface:
Once any filler is dry, give the entire floor a quick scuff sand with 120-grit sandpaper; this helps the paint adhere better and smooths out rough patches. -
Plan your stripe pattern:
Decide on the width of your stripes based on the width of your plywood planks. In the example, the colored stripes occupy roughly the width of a single floor plank (about 6–8 inches), separated by wider sections of natural wood. -
Mark the lines:
Using a measuring tape, mark the edges of your stripes at the top and bottom of the room. A chalk line is incredibly helpful here to snap long, straight guides from one end of the room to the other.
Step 2: Taping & Sealing
-
Apply painter’s tape:
Run your painter’s tape along the OUTSIDE of the lines you want to paint. This is crucial: the tape should cover the areas that will remain natural wood, leaving the future stripe area exposed. -
Press the edges:
Firmly press down the edges of the tape with a credit card or a putty knife. You want a tight seal to prevent paint from bleeding under the tape onto the natural wood sections. -
Seal the tape edge:
For razor-sharp lines, I like to brush a tiny amount of clear matte medium or clear sealer along the edge of the tape first. This seals any microscopic gaps so that if anything leaks through, it’s clear rather than colored paint.
Bleed-Through Blues?
If paint bled under the tape, let it dry completely. Then, gently scrape the excess off the raw wood with a razor blade or sand that specific spot lightly before sealing.
Step 3: Painting the Stripes
-
Paint the navy stripes:
Open your navy blue porch and floor paint. Using a roller for speed or a brush for texture, fill in the designated navy rows. Apply thin, even coats rather than one thick gloop. -
Address the edges:
Use your angled sash brush to carefully cut in the paint near the wall baseboards where a roller can’t reach effectively. -
Paint the terracotta stripes:
While the navy dries, switch to a fresh roller or brush and apply the terracotta/orange paint to its designated rows. Be mindful not to splatter onto the dry navy or tiled areas. -
Apply a second coat:
Allow the first coat to dry according to the paint can’s instructions (usually 4-6 hours). Once dry to the touch, apply a second coat to both the blue and orange stripes for full, opaque coverage. -
Remove the tape:
This is the satisfying part: peel up the painter’s tape while the second coat is still slightly tacky (not soaking wet, but not fully cured). Pull the tape at a 45-degree angle away from the wet paint to get a crisp edge.
Rugged Aesthetic
For a vintage look, lightly sand the painted stripes before sealing. This distresses the color, making the floor look like it’s been walked on for decades.
Step 4: Finishing & Protection
-
Let the paint cure:
Allow the stripe paint to cure for at least 24 hours before moving to the sealing step. The paint needs to be hard enough to withstand the sealer application. -
Clean again:
Before sealing, do one last gentle vacuum or tack cloth wipe to catch any dust that settled while the paint was drying. -
Apply the first coat of sealer:
Using a wide, clean applicator pad or roller, apply a coat of clear water-based polyurethane over the ENTIRE floor—both painted stripes and natural wood. -
Sand lightly between coats:
Once the first coat of poly is dry, very lightly hand-sand with 220-grit sandpaper to knock down any raised grain, then wipe away the dust. -
Final coat:
Apply at least two more coats of polyurethane, allowing proper drying time between each. This protects the raw wood from stains and keeps the painted stripes from chipping under foot traffic.
Enjoy the classic, elongated look your new striped floors bring to the hallway.


Harlequin Diamonds for Instant Drama
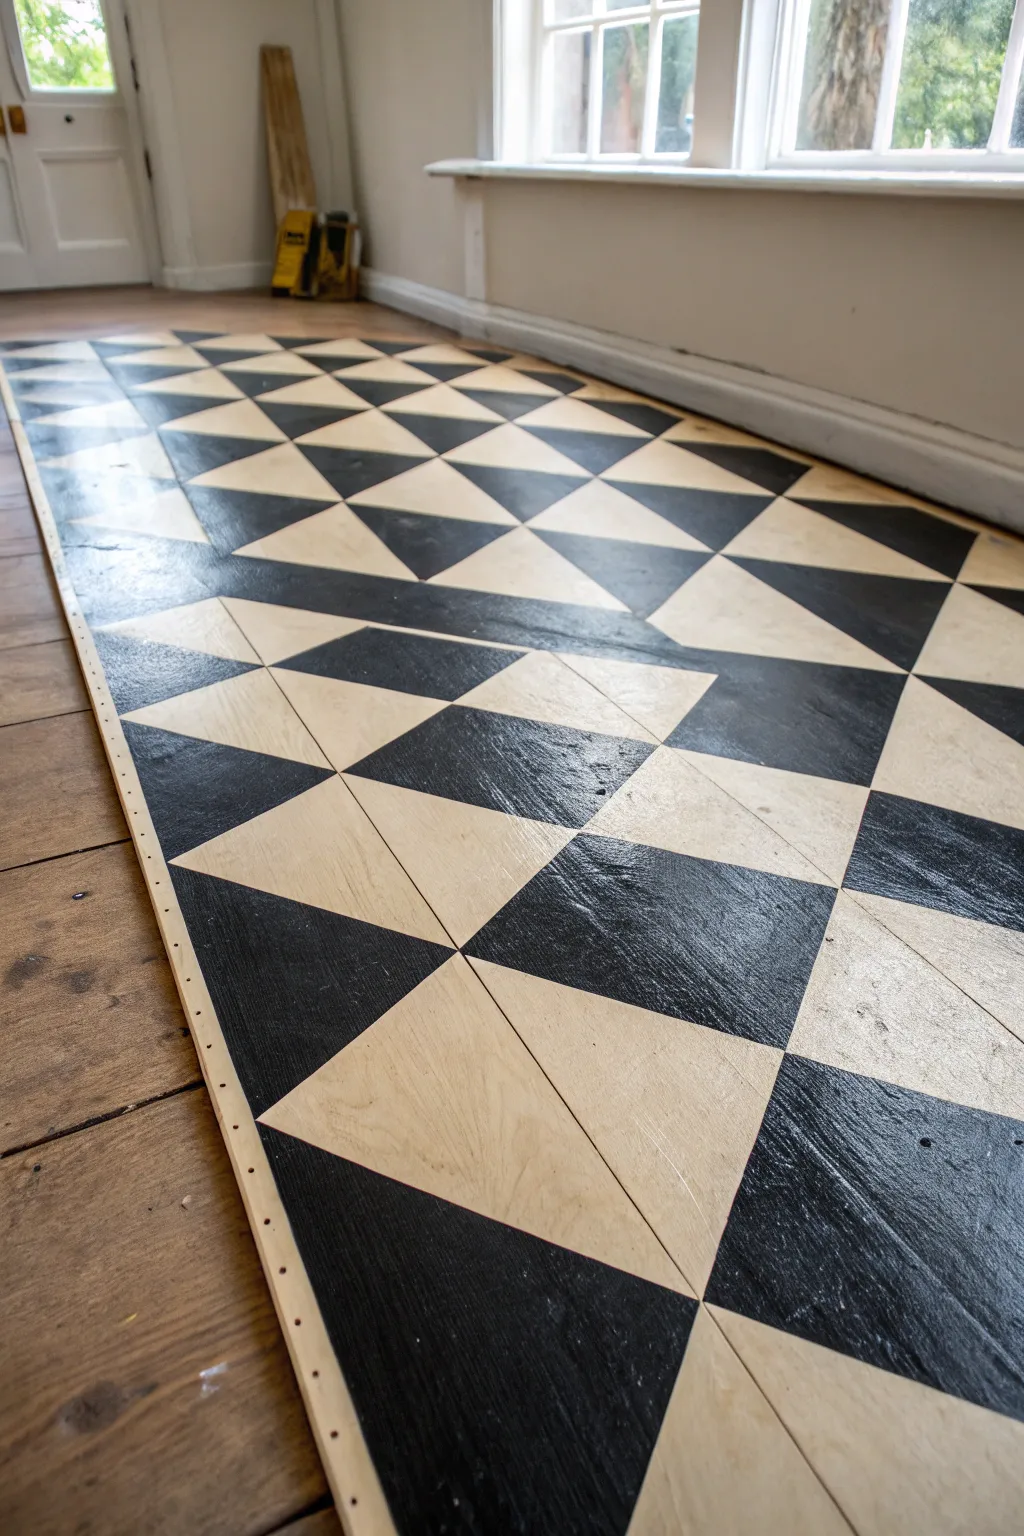
Transform a plain plywood subfloor into a dramatic focal point with this bold, monochromatic harlequin pattern. By painting a ‘rug’ directly onto the wood, you add instant architectural interest and moody elegance without the cost of high-end tiling.
Step-by-Step Tutorial
Materials
- Plywood subfloor (sanded and clean)
- Black floor paint (satin or semi-gloss)
- White or cream floor paint (satin or semi-gloss)
- Painter’s tape (high quality, 1-inch and 2-inch)
- Chalk line or laser level
- Pencil
- Straight edge or long ruler
- Speed square
- Small foam roller
- Detail paintbrush
- Polyurethane floor sealer (water-based)
Step 1: Preparation and Mapping
-
Assess the Surface:
Before laying down a single drop of paint, ensure your plywood is smooth. Sand down any rough splinters or raised grain, then vacuum thoroughly. Wipe the surface with a tack cloth to remove microscopic dust. -
Define the Perimeter:
Decide on the dimensions of your painted ‘runner.’ Use a tape measure and a straight edge to mark the rectangular boundary of the area you want to paint. -
Tape the Border:
Apply painter’s tape along the outside edge of your pencil lines to create a crisp border. Press the tape down firmly to prevent bleed-under. -
Prime the Base:
Roll on two coats of your lighter base color (white or cream) over the entire rectangular area. Let this dry completely overnight—a solid cure is crucial for the taping steps to follow.
Step 2: Drafting the Diamond Grid
-
Mark the Center Line:
Find the exact center width of your painted rectangle. Snap a chalk line or draw a light pencil line down the entire length to act as your spine. -
Determine Diamond Size:
Decide how tall and wide you want your diamonds. A common size is 12×24 inches for an elongated look. Make tick marks along your center line at your chosen height intervals. -
Cross-Hatch the Pattern:
From each center tick mark, measure out to the sides to mark the widest points of the diamonds. Use a long straight edge to connect these points, drawing diagonal lines that form a grid of X’s across your floor. -
Fill the Gaps:
Continue drawing these diagonal parallel lines until the entire rectangular area is filled with a uniform diamond grid. Double-check your measurements with a speed square to keep angles consistent.
Bleeding Lines?
If you missed sealing the tape and paint bled, don’t panic. Let it dry fully, re-tape the clean line, and paint over the mistake with the opposing color.
Step 3: Painting the Pattern
-
Outline the Black Zones:
This is the trickiest part: identify which diamonds will be black. Mark them lightly with a piece of tape or a small ‘B’ in pencil so you don’t get confused while painting. -
Tape for Sharp Edges:
Tape off the edges of your ‘black’ diamonds. You won’t be able to tape them all at once because the tape lines will overlap wet paint zones. Start by taping every *other* row of diamonds. -
Seal the Tape:
I always rub the tape edge firmly with a credit card or spoon. Then, lightly brush a tiny amount of the *base* color (white) over the tape edge. This seals the tape so the black paint won’t bleed underneath. -
Apply First Black Coat:
Using a small foam roller or brush, fill in the exposed diamond shapes with black paint. Work from the center outward to avoid stepping in wet paint. -
Remove Tape While Damp:
Carefully peel back the tape while the black paint is still slightly tacky. Pulling it at a 45-degree angle helps ensure a razor-sharp line. -
Dry and Repeat:
Allow the first set of diamonds to dry completely. Then, tape off the remaining diamonds that still need to be painted black and repeat the painting process.
Level Up: Aged Look
For a vintage vibe, lightly sand the dried black paint in high-traffic areas before sealing to reveal bits of wood or white base beneath.
Step 4: Finishing Touches
-
Touch Up Imperfections:
Once all tape is removed and the floor is dry, inspect your lines. Use a small artist’s brush to carefully fix any bleeds or wobble in the points. -
Clean the Surface:
Gently wipe the floor with a damp cloth to remove any residual chalk lines or pencil marks that are still visible in the lighter sections. -
Apply Sealer:
Roll on a clear, water-based polyurethane topcoat. This protects your hard work from scuffs and foot traffic. -
Second Coat of Sealer:
Lightly sand with fine-grit paper after the first coat of sealer dries, then wipe clean and apply a second coat for a durable, professional finish.
Enjoy the dramatic flair your new geometric floor brings to the room
BRUSH GUIDE
The Right Brush for Every Stroke
From clean lines to bold texture — master brush choice, stroke control, and essential techniques.
Explore the Full Guide
Two-Tone Perimeter Frame
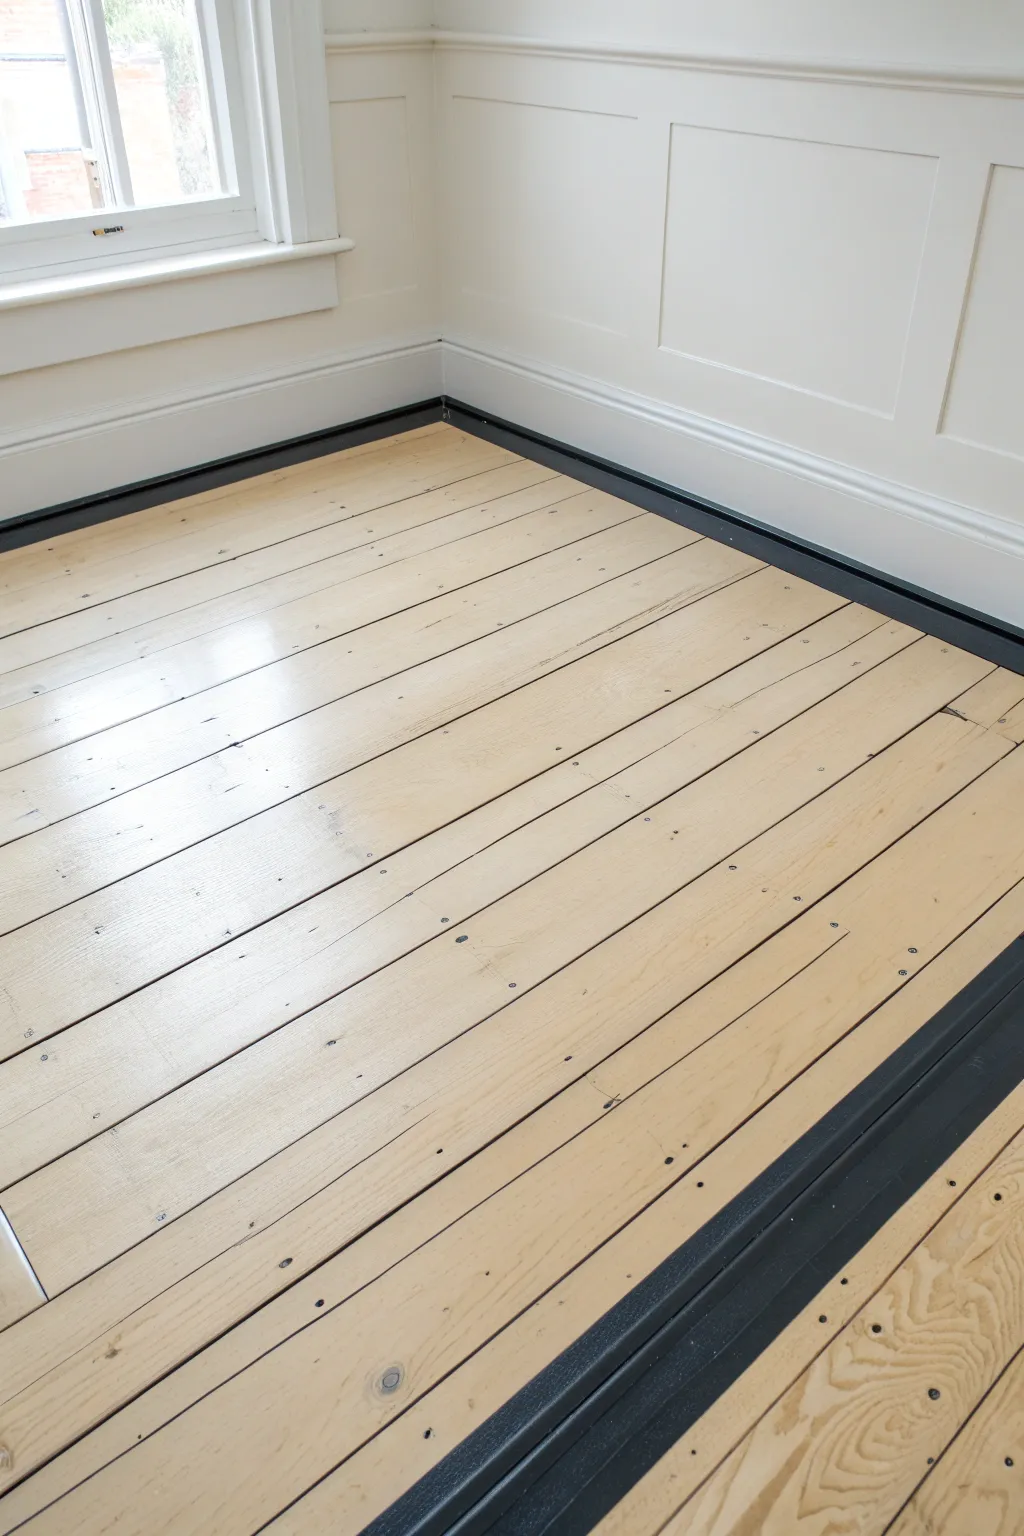
Elevate simple wooden floorboards with a striking, high-contrast border that frames the room beautifully. This two-tone technique adds architectural interest and a tailored, custom look without the need for expensive rugs.
How-To Guide
Materials
- Sanded wooden floorboards (pine or plywood)
- Painter’s tape (high-quality, multi-surface)
- Measuring tape
- Pencil
- Dark floor paint (charcoal or black)
- Clear polyurethane floor varnish (satin or matte)
- Angled sash brush (2-inch)
- Standard paint brush or mini roller
- Sandpaper (120 and 220 grit)
- Vacuum and tack cloth
- Wood filler (optional)
Step 1: Preparation and Planning
-
Prepare the surface:
Begin with a clean slate by ensuring your floorboards are freshly sanded and free of old varnish. If you have significant gaps or holes, fill them with wood filler now and sand smooth once dry. -
Clean thoroughly:
Vacuum the entire room meticulously to remove all sanding dust. -
Wipe down:
Follow up by wiping the boards with a tack cloth or a slightly damp microfibre cloth to ensure the surface is completely debris-free. -
Determine border width:
Decide on the width of your dark border. A width between 3 to 5 inches usually looks proportional; aim for a width that roughly matches or slightly exceeds the width of a single floorboard for visual balance. -
Mark the perimeter:
Using your measuring tape and pencil, measure out from the skirting board at regular intervals around the entire room. -
Apply the tape:
Run a long strip of high-quality painter’s tape connecting your pencil marks. Press the tape edge down firmly to prevent paint bleed. -
Seal the tape edge:
I like to run a fingernail or a putty knife along the tape edge closest to the wall to create a super-tight seal against the wood grain.
Step 2: Painting the Dark Border
-
Cut in the edges:
Using an angled sash brush, carefully paint the dark colour along the edge where the floor meets the skirting board. -
Fill the border:
Use a mini roller or flat brush to fill in the rest of the border area, painting right up to (and slightly over) the masking tape. -
Apply second coat:
Allow the first coat to dry according to the manufacturer’s instructions, then apply a second coat for rich, opaque coverage. -
Remove tape:
While the second coat is still slightly tacky (not fully dry), carefully peel back the painter’s tape at a 45-degree angle to reveal a crisp line. -
Let it cure:
Allow the dark paint to cure fully, ideally overnight, before moving on to the sealing phase.
Bleed-Proof Lines
Before painting the dark color, brush a thin layer of clear matte varnish over the tape edge. This seals the tape, meaning any seepage is clear, leaving your colored line razor sharp.
Step 3: Sealing and Finishing
-
Light sanding:
Give the unpainted centre boards a very light scuff with 220-grit sandpaper if the grain rose during cleaning, then remove the dust. -
First coat of varnish:
Apply a coat of clear polyurethane floor varnish over the entire floor, including the painted border. This seals the paint and protects the raw wood. -
Dry and assess:
Let the first coat dry completely. Run your hand over it; if it feels rough, lightly sand with fine grit paper and wipe clean. -
Final coats:
Apply two more coats of clear varnish, allowing adequate drying time between each. This ensures durability for high-traffic areas. -
Final cure:
Wait at least 24-48 hours before walking on the floor with shoes or moving furniture back in.
Corner Details
Instead of a simple square corner, try adding a small decorative ‘Greek Key’ notch or an inset square at each corner of the room for a more intricate, high-end design feature.
Enjoy the dramatic transformation of your space with this sleek, custom-painted floor border
Patchwork Blocks That Use Seams
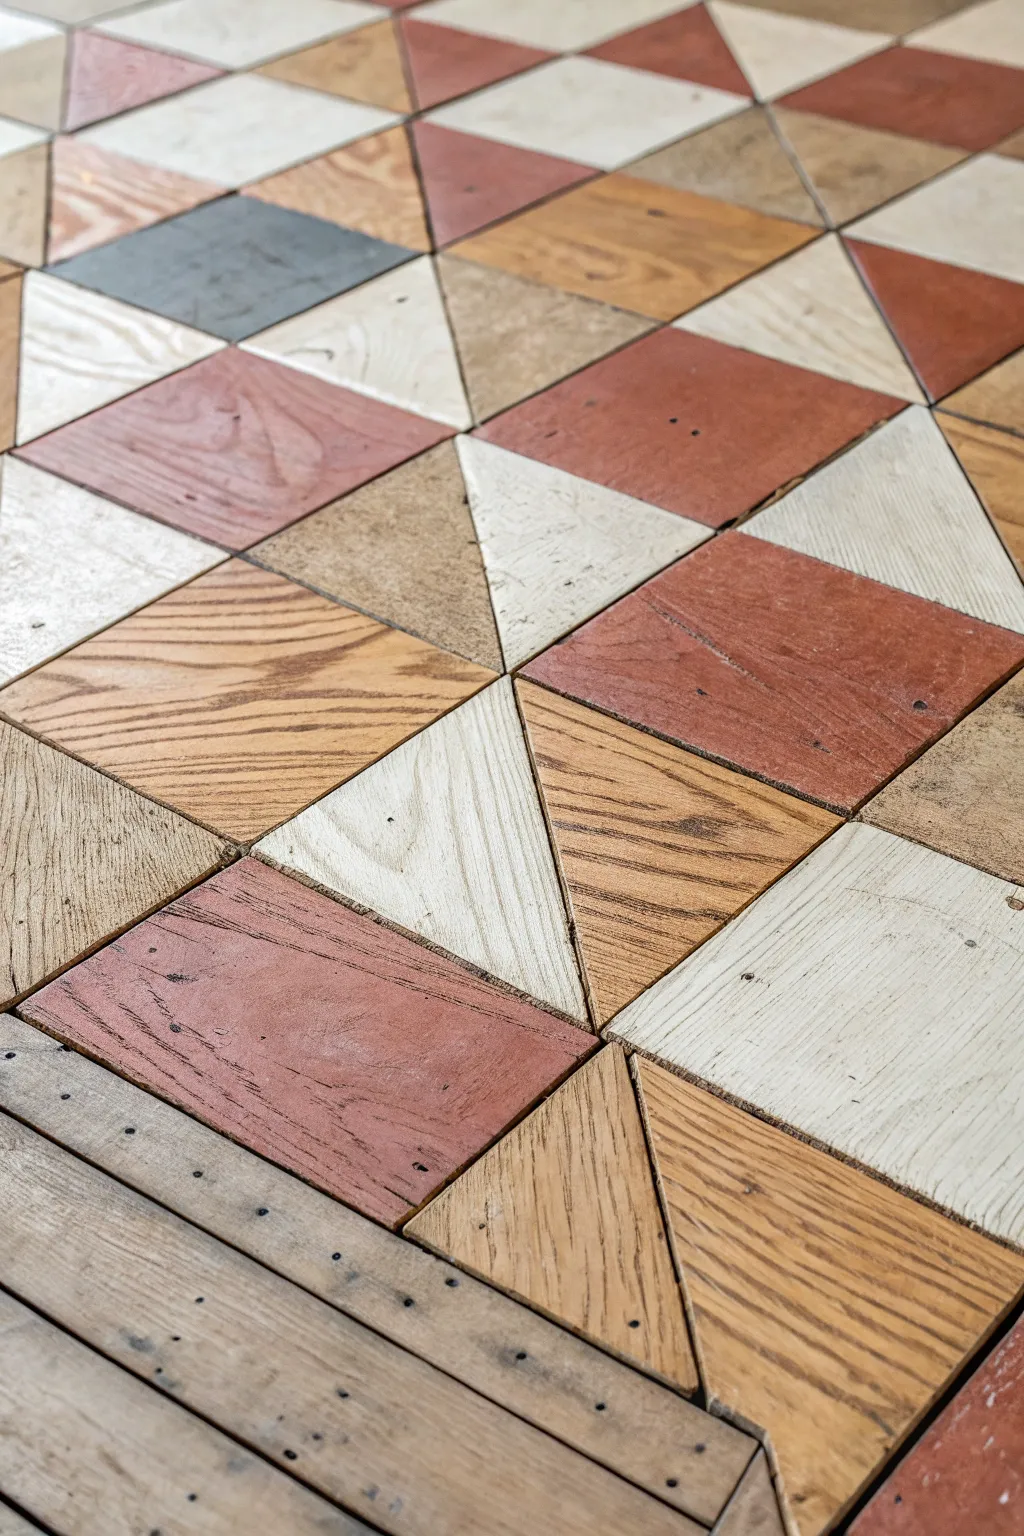
For a rustic, bohemian look that transforms subflooring into a work of art, this geometric patchwork floor is a stunning solution. By cutting plywood sheets into precise triangles and alternating stains, you can create a cozy quilt-like pattern that celebrates the natural grain of the wood.
Step-by-Step Tutorial
Materials
- Sheets of high-quality plywood (birch or pine)
- Circular saw or table saw
- Miter saw (optional but helpful for angles)
- Orbital sander with 120 and 220 grit sandpaper
- Wood stain in multiple shades (e.g., reddish-brown, grey, oak)
- White-wash or diluted white paint
- Construction adhesive (heavy duty)
- Pin nailer or finish nails
- T-square and long metal ruler
- Chalk line
- Clear polyurethane floor sealer (matte or satin finish)
Step 1: Preparation & Cutting
-
Prep the subfloor:
Ensure your room’s existing subfloor is completely clean, level, and dry. Any large bumps or nails sticking up need to be hammered down or sanded flush so your new plywood tiles sit flat. -
Decide on dimensions:
Standardize your tile size before making a single cut. A 12-inch equilateral triangle is a manageable size that creates a nice diamond pattern when paired, but scale this according to your room size. -
Rip plywood strips:
Using your table saw or circular saw with a guide, cut your large plywood sheets into long strips. The width of these strips should match the height of your intended triangles. -
Set your angle:
Adjust your miter saw or table saw miter gauge to exactly 60 degrees. This precise angle is crucial for equilateral triangles that fit together snugly without large gaps. -
Cut the triangles:
Feed your plywood strips through the saw, flipping the board after each cut to produce your triangles. Cut significantly more than you think you need to account for mistakes or pieces with bad knots. -
Sand the edges:
Briefly run sandpaper over the cut edges of each triangle to remove splinters. I like to do a quick pass on the face of the tiles now, too, to open up the wood grain for staining.
Gaps are uneven?
Don’t panic! Mix some sawdust from your cuts with wood glue to create a perfectly color-matched filler for any larger-than-expected gaps between triangles.
Step 2: Staining & Sorting
-
Create your palette:
Select 3-4 different finish tones. For the look in the photo, you’ll need a reddish-brown stain, a natural golden-oak stain, a diluted white paint (whitewash), and a darker grey-blue stain. -
Stain in batches:
Separate your wood triangles into four piles. Apply your stains with a rag or brush, wiping off excess after a few minutes to let the grain show through. Leave one pile completely raw or sealed with just clear coat for contrast. -
Whitewash technique:
For the white tiles, mix white latex paint with water (about 1:1 ratio). Brush it on and immediately wipe it back so it doesn’t look like solid plastic—you want that wood warmth to peek through. -
Allow to cure:
Let all your tiles dry completely according to the manufacturer’s instructions. Stacking them while wet will ruin the finish, so spread them out.
Step 3: Installation
-
Mark the center:
Find the center of your room and snap a chalk line. It is critical to start in the middle and work your way out to the walls so the pattern remains symmetrical. -
Dry fit a section:
Before gluing, lay out a large section of tiles dry. Shuffle the colors around to ensure a random ‘quilt’ distribution where no two identical colors touch each other. -
Apply adhesive:
Apply a zigzag of heavy-duty construction adhesive to the back of your first central triangle. Press it firmly onto the subfloor aligned with your chalk line. -
Pin in place:
Secure the tile with a few pin nails while the glue sets. These tiny holes add to the rustic character, so don’t worry about hiding them. -
Work outwards:
Continue gluing and pinning tiles, working in small clusters. Keep the gaps between tiles tight, but don’t force them; slight variations are part of the plywood charm. -
Cut edge pieces:
When you reach the walls, you will likely need to cut your triangles into smaller shapes to fit. Measure each gap individually, cut the piece, stain the cut edge if necessary, and install.
Use a spacer jig
Tape a coin or a thin shim to your workspace. Use this as a spacer when laying tiles to ensure consistent, tiny gaps for natural wood expansion.
Step 4: Finishing
-
Final smooth sanding:
Once the adhesive has cured (usually 24 hours), verify the floor is level. If any corners are sticking up, gently sand them down flush, being careful not to sand through your stain color. -
Clean thoroughly:
Vacuum the floor meticulously. Use a tack cloth to remove every speck of dust—any debris left behind will be permanently trapped in your sealer. -
Seal the floor:
Apply a durable, clear polyurethane floor sealer. Use smooth, overlapping strokes. Satin or matte finishes hide imperfections better than high gloss. -
Apply additional coats:
Lightly sand with fine grit sandpaper between coats, wipe clean, and apply 2-3 more layers of sealer for a durable surface that can withstand foot traffic.
Step back and admire how simple plywood pieces have come together to form a warm, custom floor with genuine character.

PENCIL GUIDE
Understanding Pencil Grades from H to B
From first sketch to finished drawing — learn pencil grades, line control, and shading techniques.
Explore the Full Guide
Simple Dot Grid for Subtle Texture
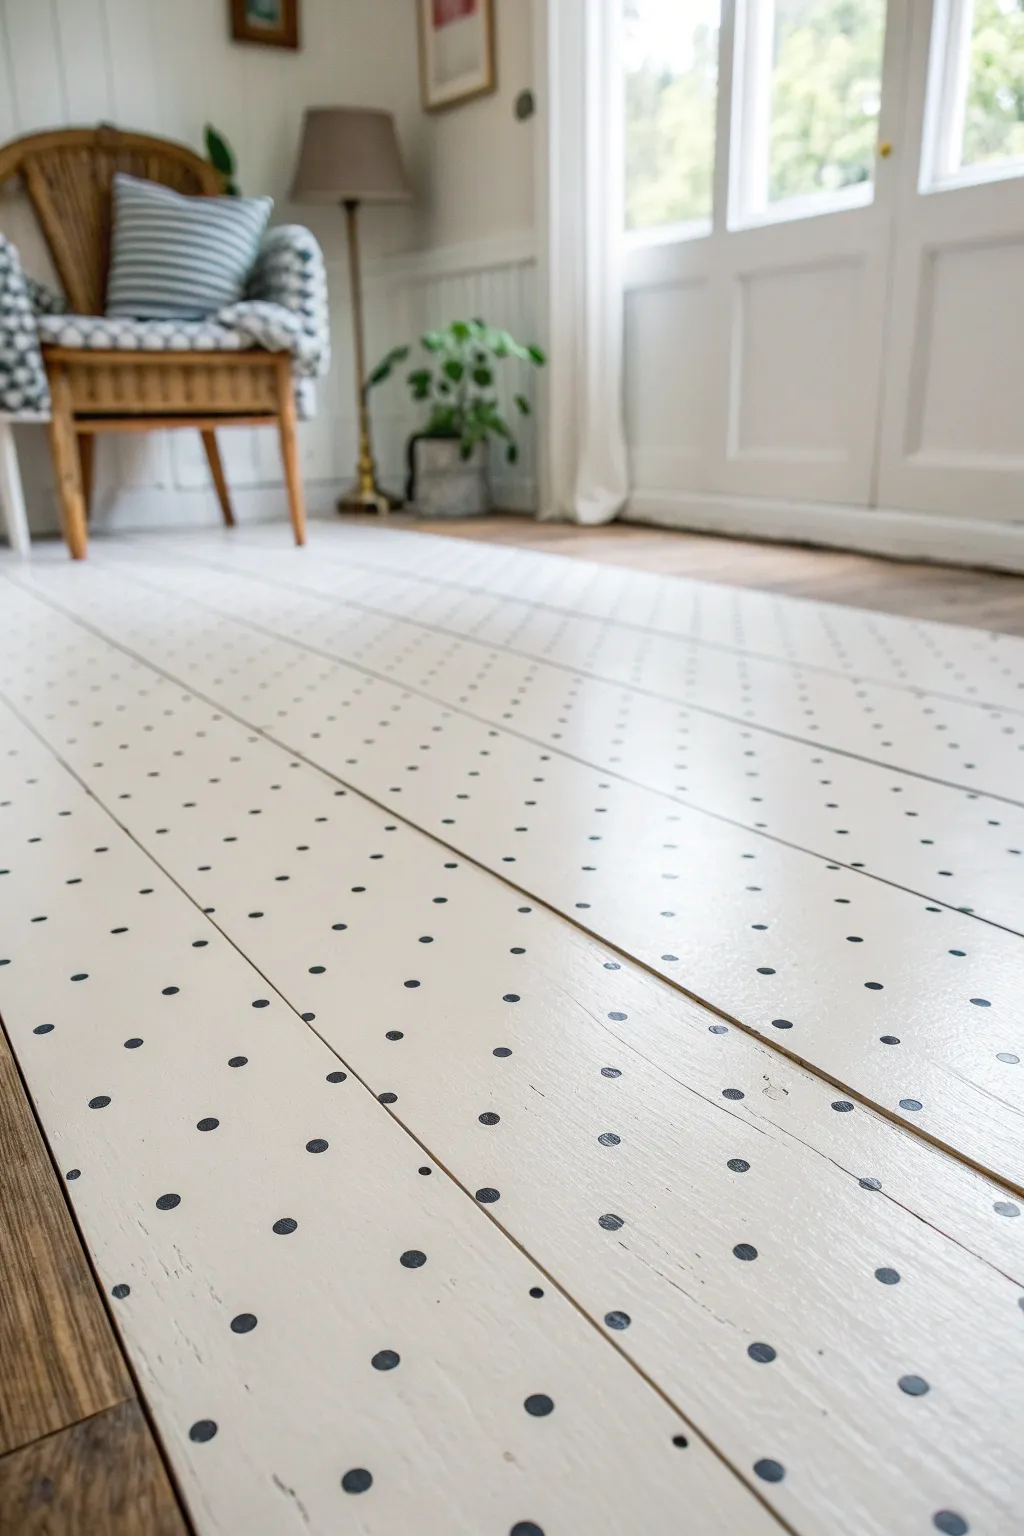
Transform builder-grade plywood into a charming, cottage-style feature with just a bit of paint and patience. This simple grid of dots adds subtle texture and whimsy to a room without overwhelming the space, creating a custom look on a budget.
Step-by-Step
Materials
- Plywood subfloor or sheets (sanded smooth)
- White or cream floor paint (porch & patio formula recommended)
- Black or dark grey acrylic paint
- High-density foam roller and tray
- Paintbrush (for edges)
- Measuring tape
- Long straight edge or level
- Pencil
- Round foam pouncer (approx 0.5 – 0.75 inch diameter)
- Clear water-based polyurethane floor sealer
- Sandpaper (220 grit)
- Tack cloth
Step 1: Preparation and Base Coat
-
Clean the surface:
Before even touching a paint can, ensure your plywood floor is impeccably clean. Sweep thoroughly and vacuum every crevice to remove dust and debris. -
Light sanding:
Run a 220-grit sandpaper lightly over the wood to smooth out any rough patches or splinters, then wipe everything down with a tack cloth to remove the fine dust. -
Cut in edges:
Using your paintbrush, apply the base color around the perimeter of the room where the roller won’t reach. -
Roll the first coat:
Pour your creamy white floor paint into a tray. Use a high-density foam roller to apply a smooth, even layer across the floor, working your way out of the room. -
Dry and repeat:
Allow the first coat to dry completely according to the manufacturer’s instructions, usually 4-6 hours. Apply a second coat to ensure solid opacity and durability. -
Full cure:
Let the base coats cure for at least 24 hours before starting the pattern work. You want the surface hard enough to walk on gently without scuffing.
Stamp Master Tip
Rotate your wrist slightly when lifting the foam pouncer. This prevents the suction effect that often leaves a raised ridge of paint around the dot’s edge.
Step 2: Creating the Grid Pattern
-
Plan your grid:
Decide on the spacing for your dots. A standard 6-inch or 8-inch grid works well. I find sketching a quick layout on paper first helps visualize the density. -
Mark reference lines:
Starting from the most visible wall or the center of the room, use a pencil and a long straight edge to very lightly mark small tick marks where your grid lines will intersect. -
Test your pouncer:
Dip your round foam pouncer into the black paint. Dab it onto a scrap piece of paper or cardboard several times to offload excess paint and ensure you aren’t getting drips. -
Start stamping:
Begin in a far corner. Press the foam pouncer straight down onto your first pencil mark, twist it ever so slightly to ensure coverage, and lift straight up. -
Reload frequently:
Reload your sponge every 2-3 dots to keep the color saturation consistent. Don’t worry if they aren’t identical; slight variations add to the hand-painted charm. -
Check alignment:
Periodically stand back and squint at the floor to ensure your rows look straight visually. Adjust your spacing slightly if needed as you move across the planks. -
Manage the planks:
If your floor has distinct plank seams like the photo, treat each plank individually, centering the dot pattern within the board width for a cohesive look.
Level Up: Color Play
For a funkier vibe, swap the black paint for a muted sage green or terracotta, or alternate colors every other row for a playful vintage gingham effect.
Step 3: Sealing and Finishing
-
Fix mistakes:
If a dot smudges, wipe it immediately with a damp cloth. For dried mistakes, touch up with a small artist brush and your base color paint. -
Let dots cure:
Allow the black dots to dry fully, ideally overnight, so they don’t smear during the sealing process. -
Seal the deal:
Apply a coat of clear water-based polyurethane using a clean roller. This protects your hard work from foot traffic and makes cleaning easier. -
Second seal:
Once the first coat of sealer is dry to the touch, apply a second coat for maximum durability. -
Final cure:
Wait at least 48 to 72 hours before placing furniture back into the room to allow the finish to cure completely hard.
Enjoy your fresh, stylish floor that looks high-end but costs pennies on the dollar to create
Ombre Fade Across the Room
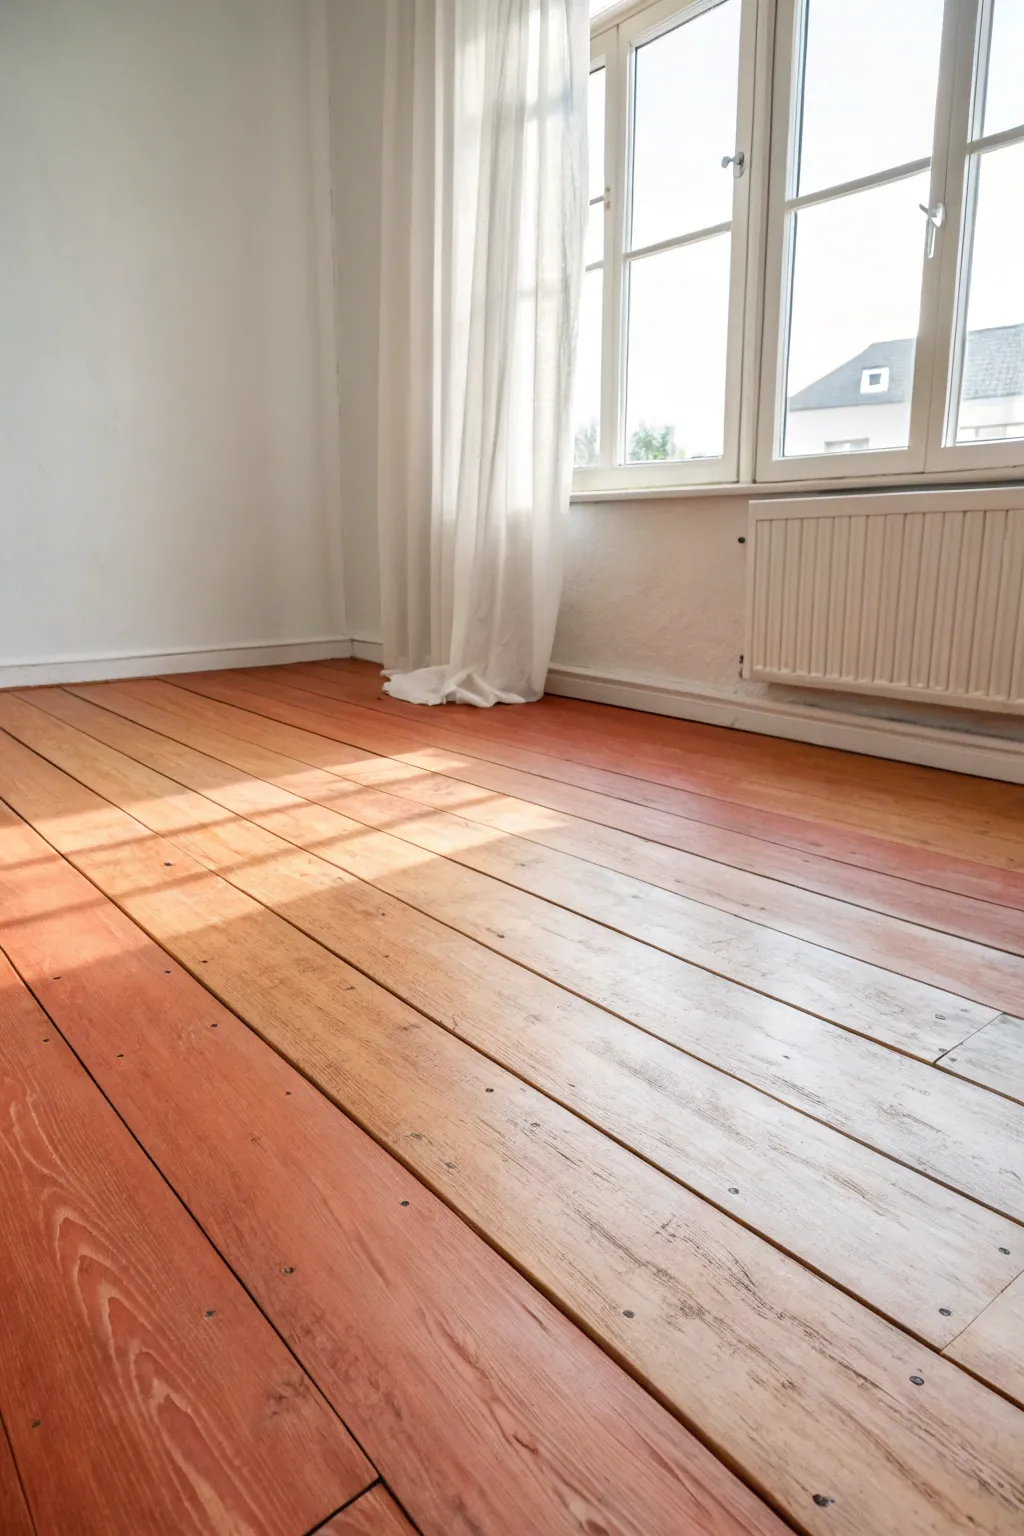
Transform ordinary wooden floorboards or plywood into a stunning work of art that mimics the warmth of a setting sun. This project uses a wash technique to create a seamless gradient from deep, earthy terracotta to a pale, natural wood tone, adding depth and a designer touch to any room.
Step-by-Step Guide
Materials
- Sanded wooden floorboards or plywood subfloor
- Water-based wood stain or latex paint (Terracotta/Red Clay color)
- Water-based wood stain or latex paint (White or Pale Cream)
- Clear matte or satin polyurethane floor sealer
- Water (for diluting)
- Small mixing buckets or plastic containers
- Wide synthetic bristle brushes (4-inch)
- Clean, lint-free rags
- Painter’s tape
- Sandpaper (220-grit)
- Vacuum and tack cloth
Step 1: Preparation & Planning
-
Clear and clean:
Remove all furniture from the room. Thoroughly vacuum the floor to remove every speck of dust. -
Sand the surface:
If your floor has an old finish, sand it down to bare wood. For unfinished plywood, give it a light sanding with 220-grit paper to smooth out roughness. -
Tape the edges:
Apply painter’s tape along the baseboards to protect your walls from accidental splashes or brush marks. -
Final wipe down:
Wipe the entire floor with a damp tack cloth to capture any remaining fine dust. A clean surface is crucial for a smooth gradient.
Uneven Blending?
If you see harsh lines where colors meet, keep a spray bottle of water handy. Mist the drying line lightly to reactivate the water-based paint, then rub with a clean cloth to soften the transition.
Step 2: Creating the Wash Mixtures
-
Mix the dark wash:
In a bucket, dilute your terracotta paint or stain with water. Aim for a ratio of about 1 part paint to 2 parts water. It should be runny, like milk, not thick like syrup. -
Mix the light wash:
In a second bucket, do the same with your white or cream paint. This transparency allows the wood grain to show through. -
Create a middle tone:
In a third container, mix equal parts of your dark wash and light wash. I like to have this ready to help bridge the gap between the two extremes. -
Test on scrap:
Apply your washes to a scrap piece of wood or an inconspicuous corner to ensure the opacity level is to your liking.
Step 3: Applying the Ombre Effect
-
Start with the dark side:
Begin on the side of the room you want to be darkest. Work in sections of 2-3 boards at a time. Brush on the dark terracotta wash. -
Wipe back excess:
Immediately wipe the wet wash with a lint-free rag. This pushes the pigment into the grain and prevents it from looking like opaque plastic. -
Move to the transition zone:
As you move toward the center of the room, dip your brush into the middle-tone mixture. Blend it slightly into the wet edge of the dark section. -
Feather the edges:
Use long, sweeping brush strokes to feather the darker color into the lighter area. Keep the transition irregular and organic rather than a straight line. -
Apply the light wash:
Continue across the room, gradually switching to your white or cream wash mixture for the far side. The goal is a barely-there tint on the lightest end. -
Refine the gradient:
Step back and look at the floor. If the transition looks too harsh, dampen a rag with water and gently rub the boundary line to blur the colors together. -
Let it dry completely:
Allow the floor to dry for at least 24 hours. Don’t walk on it while it’s still tacky.
Add a Geometric Twist
Before sealing, dry-brush a faint metallic gold or copper paint lightly over just the darkest boards. It catches the light and adds a subtle shimmer to the ‘sunset’ effect of the floor.
Step 4: Sealing and Protection
-
First coat of sealer:
Stir your clear polyurethane gently (don’t shake it, bubbles are the enemy). Apply a thin, even coat over the entire floor using a wide brush or applicator pad. -
Light sanding:
Once the first coat is dry (check the can for times), lightly scuff the surface with 220-grit sandpaper to knock down any raised grain. -
Clean the dust:
Vacuum up the white sanding dust and wipe with a tack cloth again. -
Final coat:
Apply a second (and optionally third) coat of polyurethane. This seals the ombre design and protects the wood from foot traffic. -
Make the room habitable:
Allow the final topcoat to cure for a full 48-72 hours before moving furniture back onto your beautiful new floor.
Now you have a warm, custom floor that captures the feeling of golden hour permanently in your home


Color-Blocked Zones for Work and Rest
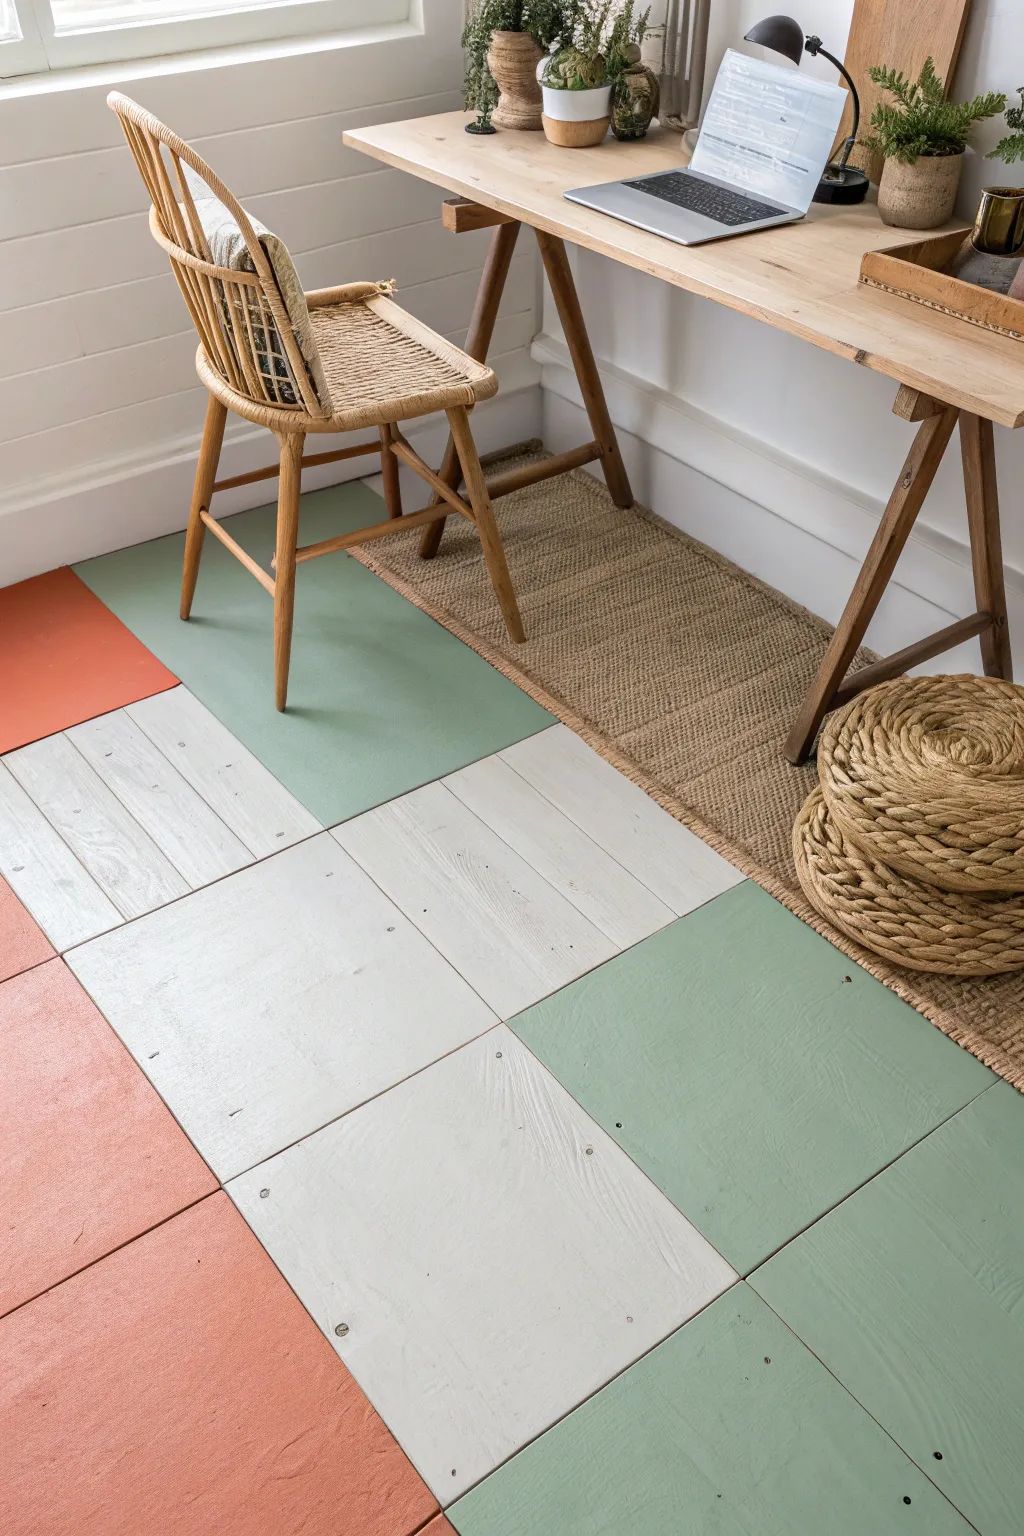
Transform builder-grade plywood subfloors into a modern design statement with this geometric color-blocked technique. Using a palette of sage green, terracotta, and creamy white, you’ll create a durable and stylish surface that defines different zones in your workspace.
Detailed Instructions
Materials
- 4×8 sheets of sanded plywood (1/2″ or 3/4″ thickness)
- Circular saw or table saw
- Orbital sander with 120 and 220-grit sandpaper
- Heavy-duty construction adhesive
- Brad nailer with 1.5″ brad nails
- Wood filler
- Paint primer suitable for wood floors
- Porch and Floor Enamel paint (Sage Green)
- Porch and Floor Enamel paint (Terracotta)
- Porch and Floor Enamel paint (Creamy White)
- Painter’s tape (1.5″ width)
- Paint rollers (smooth surface) and extension pole
- Angled sash brush for edges
- Water-based polyurethane sealer (matte finish)
- Tape measure
- Chalk line
Step 1: Prep and Installation
-
Measure twice, cut once:
Begin by calculating the square footage of your room to determine how many plywood sheets you need. Cut your 4×8 plywood sheets into uniform 24-inch squares (or your preferred dimension) using a table saw or circular saw for precise, straight edges. -
Sand for smoothness:
Before installation, give each square a quick pass with 120-grit sandpaper to remove any rough splinters or factory markings. This is much easier to do outside or in a garage than once they are glued down. -
Layout the grid:
Snap a chalk line down the center of the room to establish a straight guide. Dry fit a row of squares first to ensure your cutting was accurate and to plan how the edges of the room will look. -
Adhere the squares:
Apply heavy-duty construction adhesive to the back of a plywood square in a zig-zag pattern. Press it firmly onto the subfloor, aligning it with your chalk line. -
Secure with nails:
Use a brad nailer to shoot nails into the corners and center of each square to hold it tight while the glue sets. Keep the nails slightly recessed. -
Fill the gaps:
Once the floor is installed, use wood filler to cover all nail holes. For the seams between boards, you can choose to fill them for a seamless look or leave them open for a more rustic, tiled appearance. I prefer leaving the seams distinct to emphasize the geometric grid. -
Final sanding:
Run an orbital sander with 220-grit paper over the entire floor, focusing on leveling out any slight height differences between squares and smoothing the wood filler.
Clean Edges Pro Tip
If using tape for the seams, seal the tape edge with a tiny bit of the base color first. This blocks paint bleed and ensures your lines are razor sharp.
Step 2: Planning the Pattern
-
Clean the surface:
Vacuum the floor thoroughly to remove all sawdust, then wipe it down with a tack cloth or slightly damp rag. Any dust left behind will ruin the paint finish. -
Prime the wood:
Roll on a coat of high-quality wood primer. Plywood is thirsty and will soak up paint unevenly without this step. Let the primer dry completely according to the can’s instructions. -
Map your colors:
Sketch your pattern on paper first. Decide where your blocks of terracotta, sage, and white will go. You can create zones—like a green area for the desk—or a random scatter pattern. -
Mark with tape:
Place a small piece of painter’s tape on each square with a letter (G for Green, T for Terracotta, W for White) to correspond with your plan. This simple step prevents confusing mistakes once you start painting.
Level Up: Faux Effects
Mix a clear glazing medium into your top layer of paint to create a translucent ‘pickled’ effect that highlights the plywood’s natural grain pattern.
Step 3: Painting and Sealing
-
Paint the first color:
Start with your lightest color, the creamy white. Remove the temporary tape markers as you go, and use a roller to apply the paint to the designated squares. Use an angled brush to carefully cut in along the edges where the square meets a different color. -
Apply the accent colors:
Move on to the sage green and terracotta squares. Since you are painting individual squares, painter’s tape along the seam lines can help keep edges crisp, but a steady hand and a good angled brush often work faster. -
Second coat:
Allow the first coat to dry for at least 4-6 hours. Apply a second coat to ensure rich, opaque color coverage, especially on the darker terracotta squares. -
Check for visible grain:
If you want a more washed look where the wood grain shows through (like visible in the photo), you might stop at one coat or thin your paint slightly with water. For a solid block look, stick to two full strength coats. -
Seal for durability:
Once the paint has cured for at least 24 hours, apply a clearer water-based polyurethane. Pour it into a tray and apply it with a clean roller. -
Build layers:
Apply at least three coats of polyurethane. Floors take a lot of abuse from foot traffic and chair legs. Lightly sand with very fine (320-grit) sandpaper between sealant coats for a professional, buttery-smooth finish.
Enjoy your custom, hard-wearing floor that brings a splash of artistic color to your daily routine
Hand-Painted Botanical Lines Over Plywood
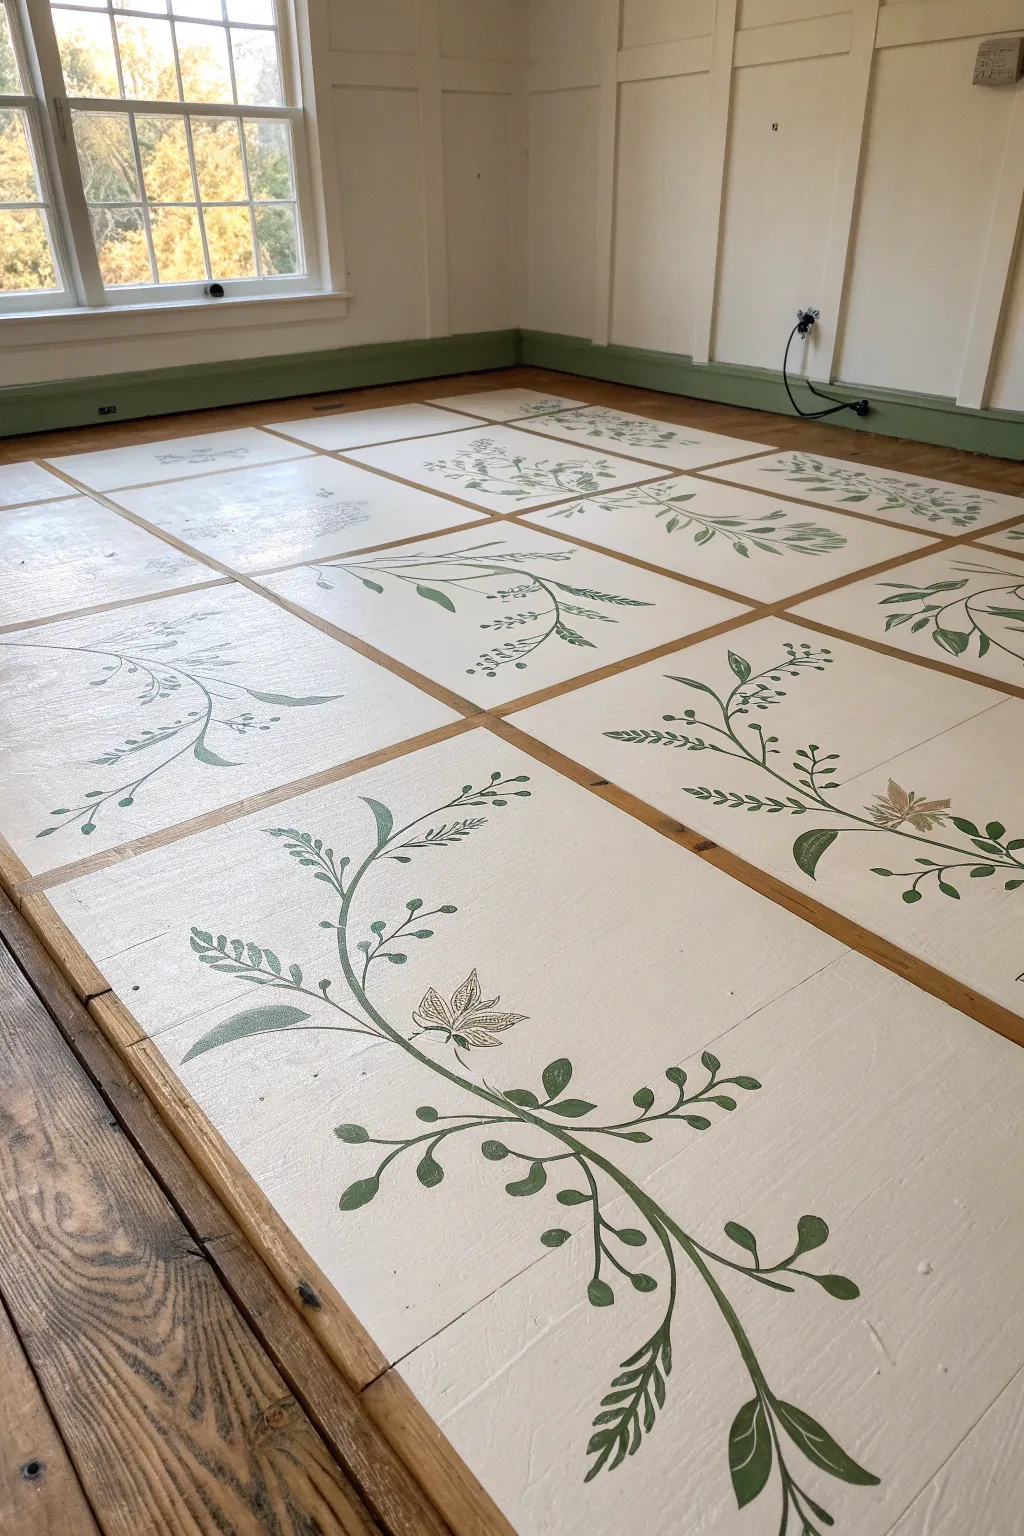
Transform ordinary plywood subflooring into an elegant, custom masterpiece using alternating grid lines and breezy, hand-painted vines. This project brings a fresh, garden-inspired feel indoors, celebrating the imperfect beauty of hand-stenciled or freehand greenery against a clean white canvas.
Step-by-Step Guide
Materials
- Plywood sheets (finish grade preferred)
- White or cream floor paint (porch & patio grade)
- Green acrylic paints (Deep olive, sage, and forest green)
- Metallic gold or bronze paint pen (optional for accents)
- Thin wooden lattice strips or battens (approx 1/4 inch thick)
- Wood glue and pin nails
- Medium-grit sandpaper
- Clear water-based polyurethane sealer (matte or satin)
- Fine-tip artist brushes
- Small roller and tray
- Pencil and large ruler
- Reference botanical sketches
Step 1: Prepping the Canvas
-
Sand the surface:
Begin by thoroughly sanding your plywood floor to remove any splinters or rough patches. You want a surface smooth enough for painting delicate lines but with enough tooth to hold the primer. -
Clean the dust:
Vacuum every bit of dust from the sanding process, then wipe it down with a damp tack cloth to ensure a pristine base. -
Install grid strips:
Lay out your grid pattern using the wooden lattice strips. Adhere them to the floor using wood glue and secure with pin nails to create distinct rectangular sections, framing each future painting. -
Prime the rectangles:
Using a small roller, apply a high-quality primer to the plywood rectangles between your wooden strips, being careful not to get too much paint on the strips themselves if you want to keep them natural.
Step 2: Laying the Base Color
-
Apply the white base:
Roll two smooth coats of white or cream floor paint into each rectangular section. Allow the first coat to dry completely before applying the second to ensure solid, opaque coverage. -
Clean the edges:
If any white paint smeared onto your wooden divider strips, gently wipe it away immediately or scrape it off carefully once dry to maintain sharp, clean lines. -
Let it cure:
Allow the base coat to cure for at least 24 hours. A harder surface will make the detailed painting steps much easier and prevent the tackiness from grabbing your brush.
Natural Flow Tip
Don’t aim for perfect symmetry. Real vines have unexpected kinks and varying leaf spacing. Rotate your body as you paint to naturally create different curves.
Step 3: Painting the Botanicals
-
Sketch the flow:
Lightly sketch a sweeping curve with a pencil in the first square to serve as the main stem of your vine. Vary the direction of the curve in each square to create a sense of organic movement across the floor. -
Paint the main stem:
Load a round brush with a mix of sage and olive green. With a steady hand, paint over your pencil stem line, tapering the pressure at the end to create a finer point. -
Add secondary branches:
From the main stem, pull smaller curved lines outward. I like to alternate the sides these branches extend from to keep the plant looking balanced but natural. -
Create the leaves:
Using a slightly darker forest green, press down with your brush and lift quickly to create tear-drop shaped leaves along the branches. Vary the sizes—some small near the tips, larger near the base. -
Detail with fine lines:
Switch to your finest brush or a paint pen to add delicate veins inside the larger leaves or tiny tendrils curling off the ends of branches. -
Incorporate accents:
For visual interest, paint a small, abstract flower or seed pod shape in a lighter metallic tone like gold or bronze near the center of a few vines, just like the subtle star-shaped bloom in our inspiration image. -
Repeat the process:
Move to the next square, rotating the orientation of your vine. The goal is for the floor to look like a scattered garden, not a repetitive stamp, so embrace slight variations.
Protect Your Knees
Painting a floor is hard on the body! Use high-quality knee pads or a thick gardening mat. It keeps you comfortable so your hand remains steady for intricate lines.
Step 4: Sealing and Finishing
-
Erase pencil marks:
Once the green paint is fully dry, gently erase any visible pencil sketch lines that didn’t get covered by paint. -
Seal the deal:
Apply a coat of clear water-based polyurethane over the entire floor, including the wood strips. Use a matte or satin finish to avoid excessive glare that might hide your handiwork. -
Sand between coats:
Lightly sand the first coat of sealer with fine-grit sandpaper once dry, wipe away the dust, and apply a second coat for durable protection against foot traffic. -
Final cure:
Let the final topcoat cure for the full time recommended by the manufacturer (often several days) before walking on it or placing furniture.
Now you have a durable, custom floor that brings the serenity of a garden walk right into your living space
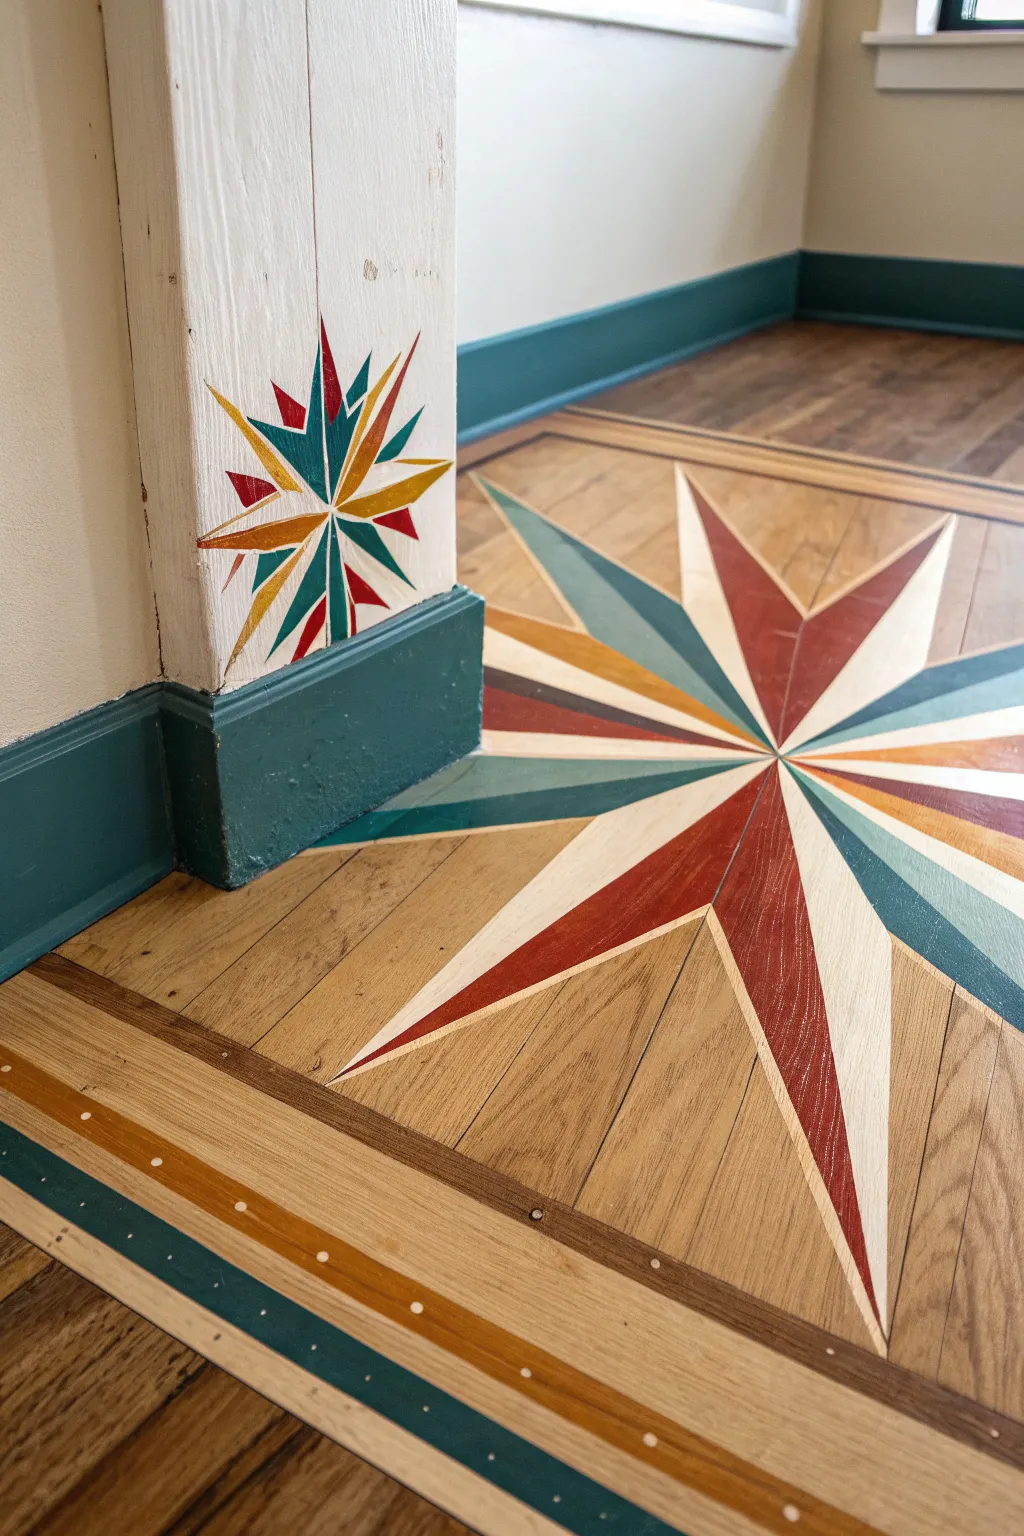
Radiating Starburst Lines From a Corner

Transform a plain plywood subfloor into a show-stopping feature with this clever faux marquetry technique. By using paint to mimic wood inlays in a classic compass rose design, you achieve the high-end look of intricate carpentry for a fraction of the cost.
Step-by-Step
Materials
- High-quality sanded plywood floor (or prepared wood subfloor)
- Sandpaper (120 and 220 grit)
- Primer (stain-blocking)
- Floor paints in cream, rust-red, teal/blue-green, mustard yellow
- Painter’s tape (various widths, including fine line tape)
- Ruler and straight edge
- Chalk line or pencil
- Protractor or angle finder
- Small foam roller
- Artist brushes (angled sash and fine linear)
- Polyurethane floor sealer (clear satin or matte)
- Knee pads
Step 1: Planning and Base Work
-
Assess the surface:
Begin by ensuring your plywood floor is completely clean, flat, and sanded smooth. Fill any large knots or screw holes with wood filler and sand flush once dry to create an ideal canvas. -
Establish the center:
Determine where you want the center of your starburst to land. If it’s a corner accent like the image, measuring equal distances from the walls helps, but sometimes I prefer to just eyeball the focal point so it feels right in the room’s flow. -
Mark the perimeter:
Use a pencil and long straight edge to draw the square or rectangular border that will frame your starburst. This defines the ‘rug’ area for your design. -
Draft the star beams:
From your center point, draw 8 primary radiating lines (North, South, East, West, and the diagonals in between). Then, marks points along these lines to define the tips of your star points. -
Connect the points:
Connect the tips back to the inner angles to form the classic kite shapes of a compass star. Accuracy is key here, so double-check your angles.
Bleed-Through Blues?
If paint seeps under your tape, don’t panic. Once dry, use a small artist brush and the background color to carefully touch up the line. A sharp razor can also gently scrape away tiny errors on bare wood.
Step 2: Painting the Floor Design
-
Tape the first color set:
Mask off the sections for your first color, likely the cream or off-white. Apply tape firmly along the pencil lines, pressing the edges down with a credit card to prevent bleed-through. -
Apply the first color:
Using a small brush or mini foam roller, paint the cream sections. Two thin coats are always better than one thick coat for durability. -
Tape and paint adjacent colors:
Once the first color is bone dry, carefully remove the tape. Re-tape to expose the next sections—the rust red or teal segments. Paint these sections, alternating colors to create the dimensional 3D effect shown in the photo. -
Add the border details:
Move to the outer perimeter. Use varying widths of painter’s tape to create the striped border. Paint the base bands in cream or wood tone, then add the decorative dots using the back end of a drill bit or a round paintbrush handle dipped in paint. -
Create the wood grain effect (optional):
If you want the unpainted sections to look like clear wood, you can leave the plywood exposed; however, adding a light wood stain or a wash of diluted brown paint can unify the background tone before sealing.
Step 3: Matching the Column Accent
-
Transfer the specific design:
For the vertical post, scale down your compass star design. Draw a smaller, multi-pointed star on the face of the column, ensuring it sits just above the baseboard. -
Paint the column details:
Use fine artist brushes to fill in the star on the wood column. Replicate the same color palette (teal, red, yellow) used on the floor to tie the room together visually. -
Paint the base molding:
To ground the space, paint the baseboards and column trim in the deep teal color. This creates a bold frame for your lighter floor design.
Graining Tool Magic
For a more realistic marquetry look, run a rubber wood-graining tool through the wet paint of the star points. This mimics the direction of real wood grain radiating from the center.
Step 4: Sealing and Protection
-
Weather the finish:
If you want the ‘worn’ look seen in the photo, lightly scuff the fully dried paint with 220-grit sandpaper, focusing on edges where natural wear would occur. -
Clean thoroughly:
Vacuum up every speck of dust and wipe with a tack cloth. Any debris left behind will be permanently trapped in the sealer. -
Apply clear coat:
Apply at least 3-4 coats of a high-traffic floor polyurethane. Allow ample drying time between coats according to the manufacturer’s instructions to ensure a finish that withstands footsteps.
Now you have a stunning, customized floor that anchors the room with classic nautical flair


Have a question or want to share your own experience? I'd love to hear from you in the comments below!