When you want 4th of July face paint that looks festive fast, the trick is leaning on bold shapes in red, white, and blue. I pulled together my favorite easy designs that read “holiday” right away, even if you’re painting on a wiggly kid (or a friend who won’t sit still).
One Big Star With Dot Confetti
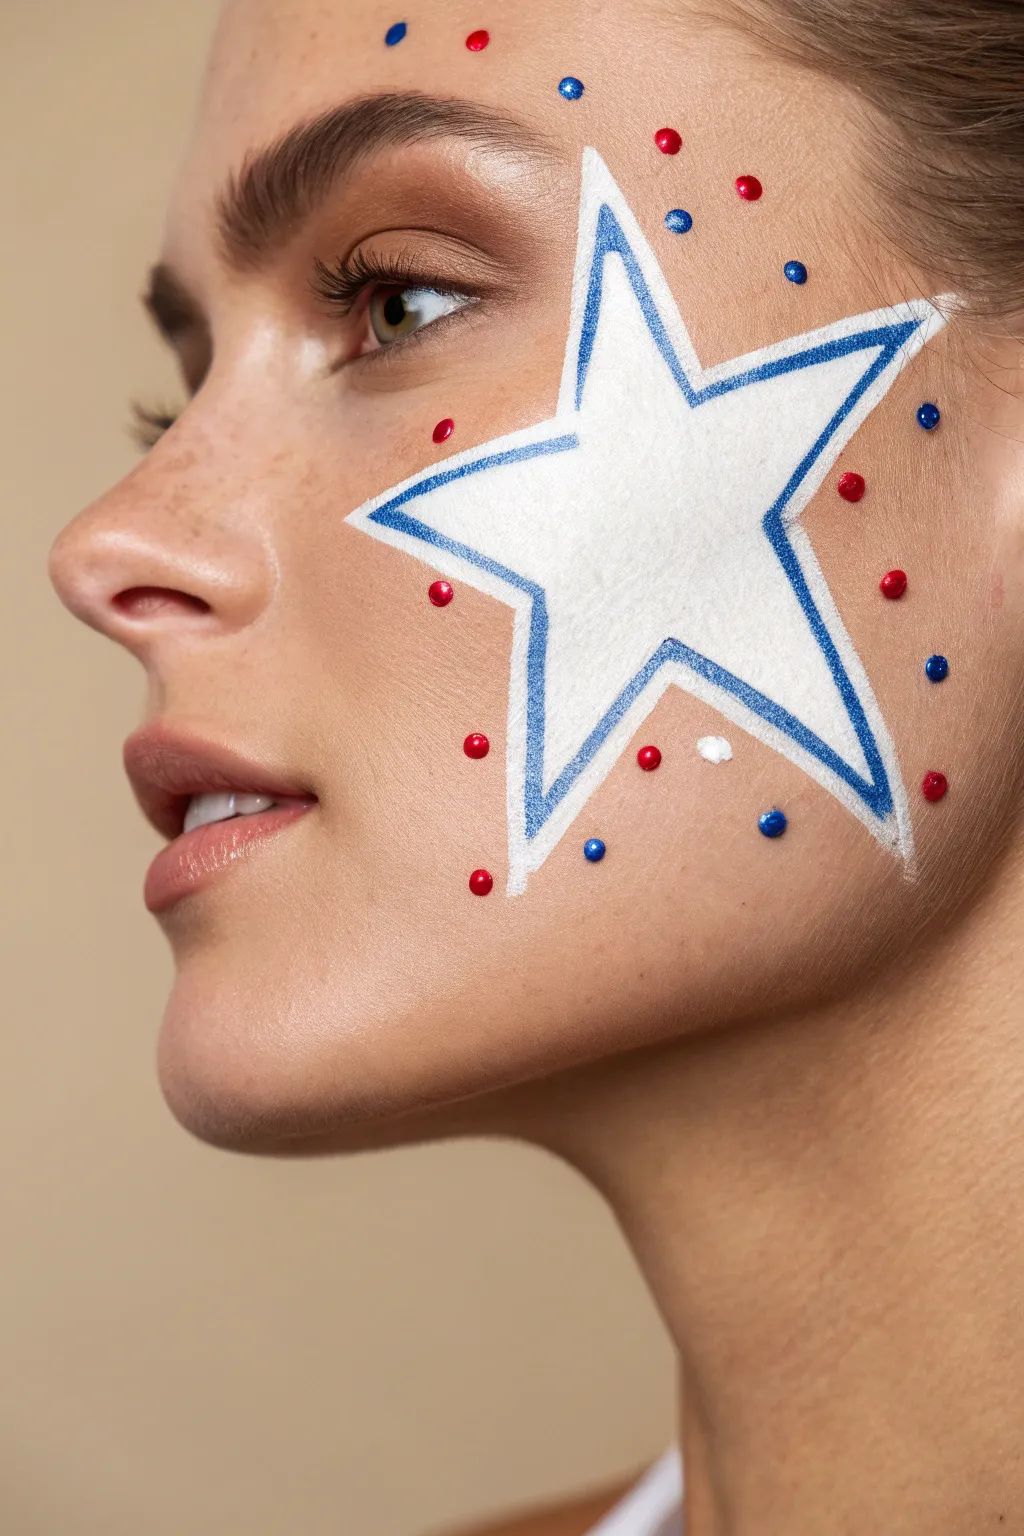
Make a bold patriotic statement with this striking single-star design featuring a crisp white base and a delicate blue inner border. Surrounded by festive red and blue dots, this look brings the feeling of holiday confetti right to your cheek.
Step-by-Step Tutorial
Materials
- White face paint (water-activated or cream)
- Blue face paint
- Red face paint
- Medium flat brush or filbert brush
- Fine liner brush (size 0 or 1)
- Small round brush or dotting tool
- Cup of water
- Paper towels
- Makeup sponge (optional for base)
Step 1: Painting the Star Base
-
Map the points:
Visualize where the five points of your star will go on the cheek. Using a very lightly loaded brush with white paint, place five tiny dots to mark the tips of the star: one high on the cheekbone towards the eye, two angled down towards the jaw, and two stretching back towards the ear and hairline. -
Connect the outline:
Load your medium flat brush with white face paint. Connect your guide dots with straight, confident lines to form the basic outline of the five-pointed star. Ensure the lines are crisp. -
Fill the center:
Once the outline is established, fill in the entire shape with white paint. Use smooth strokes to ensure an opaque, solid coverage without streaks. -
Refine the edges:
Go back over the outer edges of the star with your flat brush to sharpen the points and straighten any wobbly lines. The star should look clean and geometrical. -
Let it set:
Allow the white base layer to dry completely for a minute or two. This is crucial so the blue paint doesn’t bleed into the white later.
Step 2: Adding the Definition
-
Prepare the blue paint:
Load a fine liner brush with blue face paint. Make sure the consistency is inky—smooth enough to flow easily but pigmented enough to show up clearly. -
Start the inner border:
Starting at one of the inner corners of the star, paint a thin blue line just inside the white edge. Keep a small, even gap of white showing between your blue line and the actual edge of the star. -
Follow the shape:
Continue painting this inner border, following the contours of the star’s points. Move slowly to keep the line width consistent. -
Sharpen the tips:
When you reach the tips of the star with your blue line, flick the brush gently to create a sharp point that mirrors the outer white point. -
Connect the lines:
Ensure all your blue lines connect cleanly at the inner angles of the star. I find resting my pinky finger on the chin helps steady my hand for these precise connections. -
Check for gaps:
Look over your blue outline. If the paint skipped anywhere or looks too faint, carefully retrace that section to make the color bold.
Clean Lines Secret
To get super sharp points on your star, use a pointed cotton swab dipped in micellar water or makeup remover to clean up the edges after painting the white base.
Step 3: Creating the Confetti
-
Load red paint:
Clean your small round brush or pick up a dotting tool and load it with bright red face paint. The paint should be thick enough to hold a round shape. -
Apply red dots:
Press the brush tip gently onto the skin around the star to create scattered red dots. Place some near the eye, some on the cheek, and a few trailing back towards the ear. -
Vary spacing:
Try not to make the pattern too uniform; random spacing looks more like falling confetti. Keep them roughly the same size for a cohesive look. -
Switch to blue:
Clean your brush thoroughly or switch tools, then load up with the same blue paint used for the star’s outline. -
Apply blue dots:
Fill in the empty spaces between the red dots with blue dots. Place a few near the forehead and jawline to expand the design area slightly. -
Add forehead accents:
For extra flair, add just one or two dots (maybe one red, one blue) slightly higher up on the forehead or temple area to balance the composition. -
Final dry:
Give the entire design a moment to dry completely before touching or setting with a spray to prevent smudging.
Sparkle Upgrade
Before the dots dry completely, press a small flat rhinestone or a pinch of cosmetic glitter onto the center of a few dots for a 3D sparkling effect.
Now you are ready to celebrate with a clean, classic design that stands out in any crowd


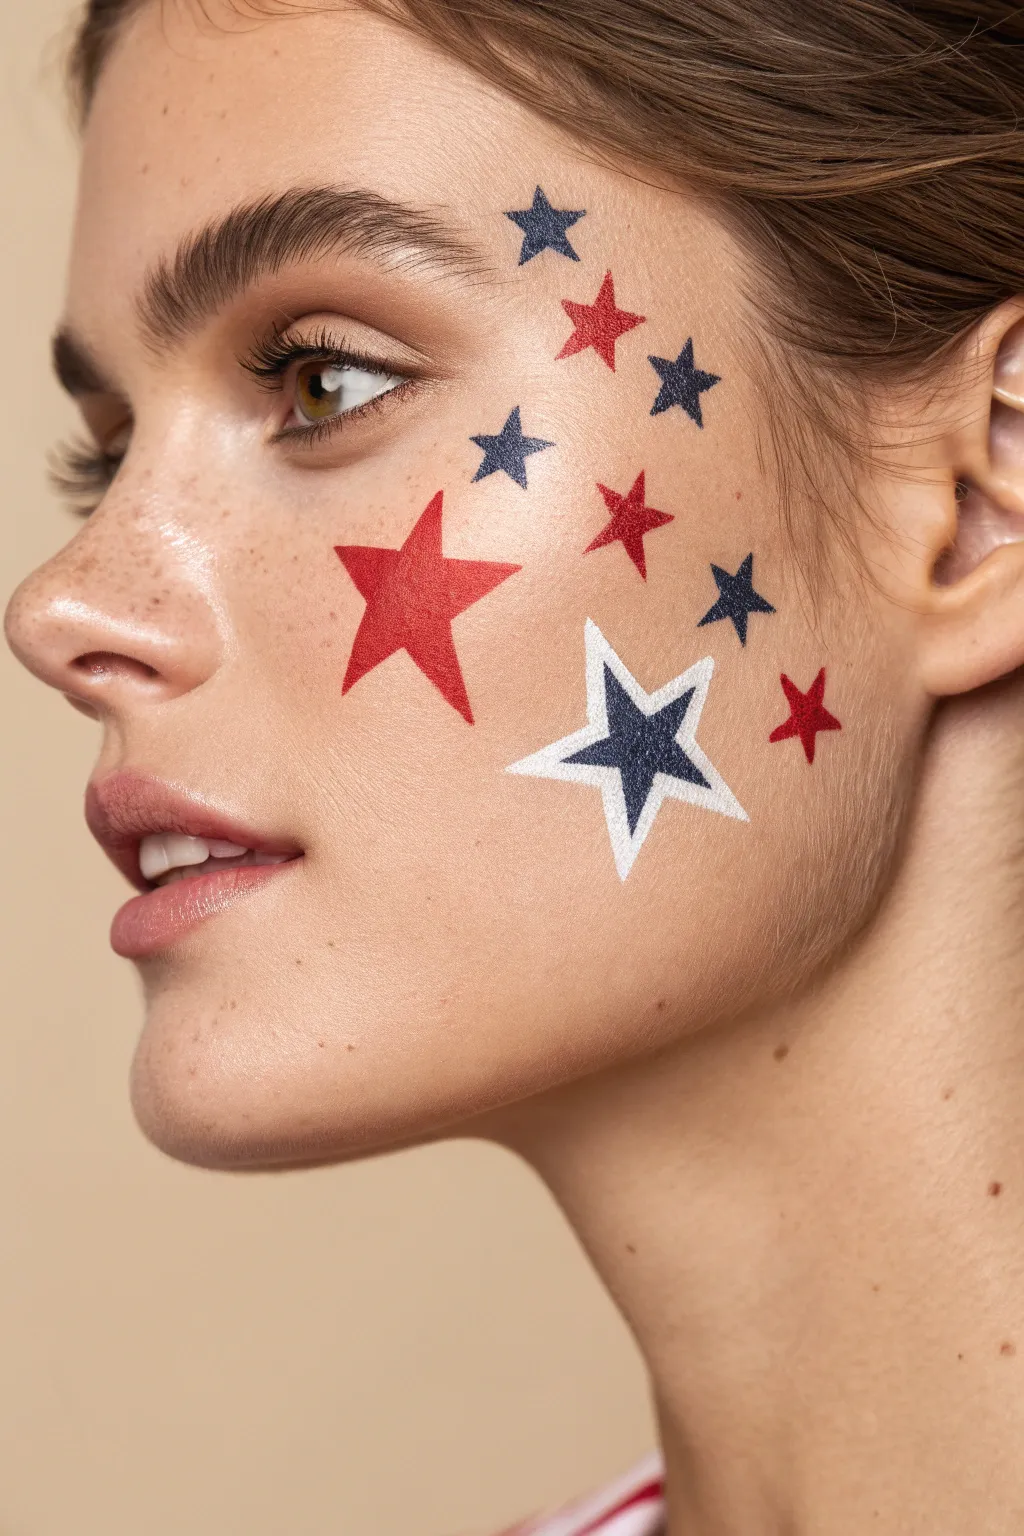
Tiny Star Cluster at the Temple
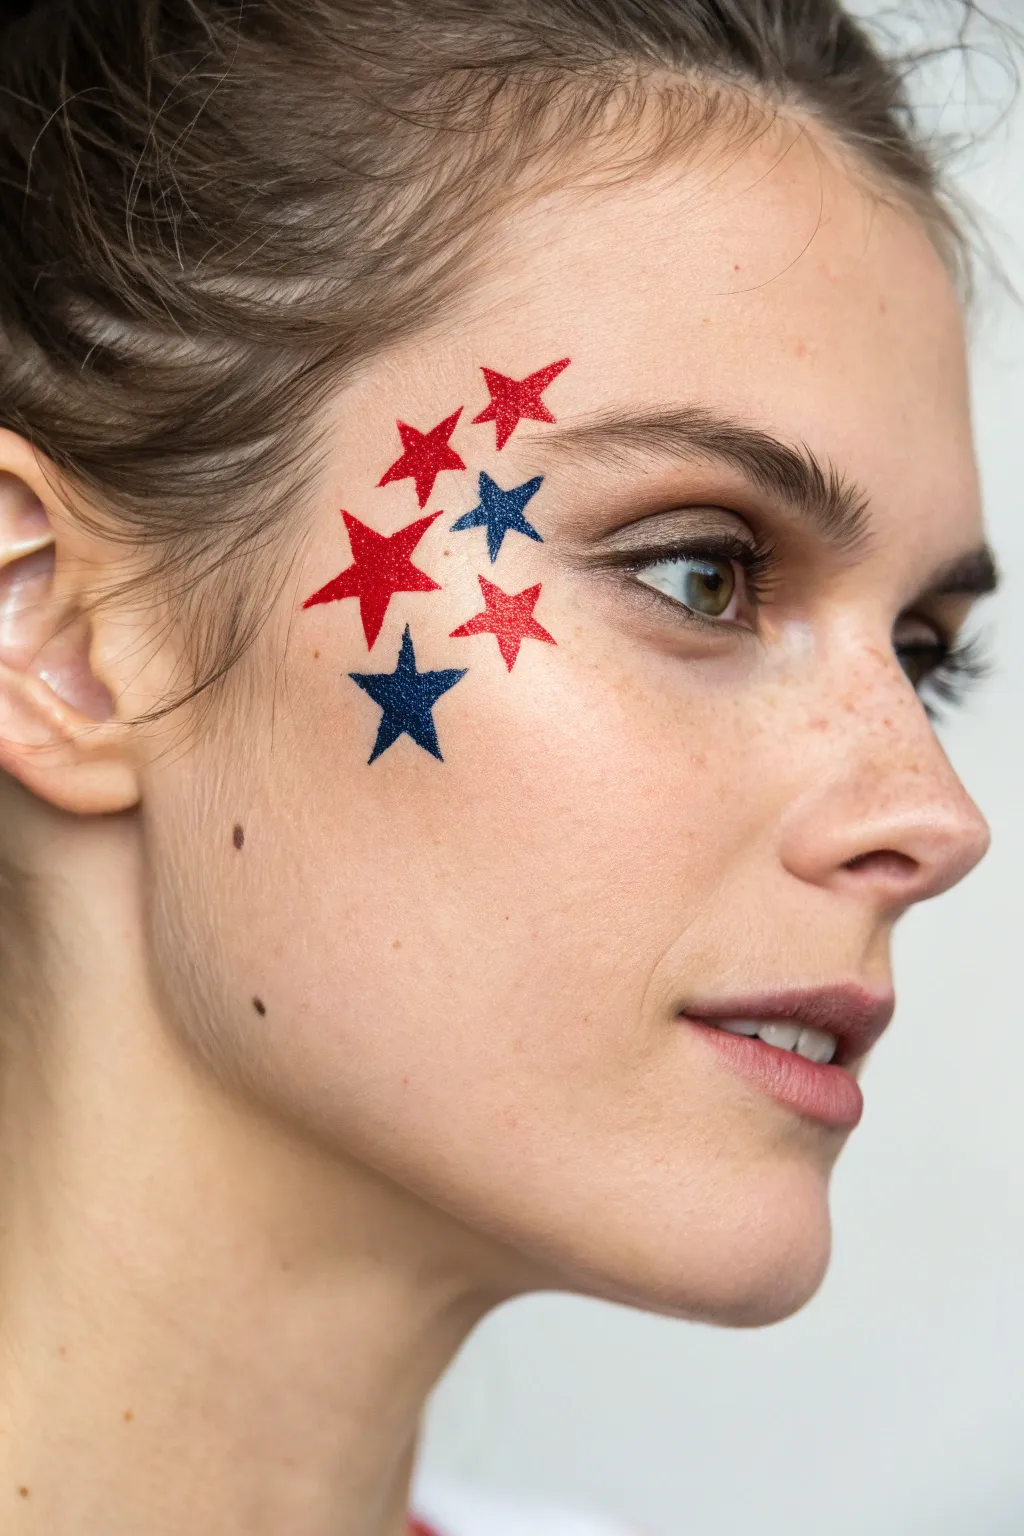
Add a dazzling touch of patriotism to your holiday look with this simple yet striking face paint design. This cluster of six glittering stars sits perfectly on the temple, offering a festive accent that’s easier to create than it looks.
Step-by-Step
Materials
- Red cosmetic glitter gel or face paint
- Blue cosmetic glitter gel or face paint
- Small flat synthetic brush (size 2 or 4)
- Fine liner brush (size 0 or 00)
- Makeup styling spray/setting spray (optional)
- Makeup remover wipes
- Small adhesive star stencils (optional)
Step 1: Preparation
-
Clean the canvas:
Begin with clean, dry skin on the temple and upper cheekbone area. Avoid applying heavy moisturizers or oils right where you plan to paint, as this can cause the makeup to slide. -
Map out placement:
Visualize an arc shape following the natural curve from the eyebrow tail down towards the top of the cheekbone. This is where your star cluster will flow.
Use Stencils
Struggling with hand-painting symmetrical stars? Use small adhesive star stickers as stencils. Stick them on, paint over them, and peel away for a negative space look, or paint inside a cutout stencil.
Step 2: Painting the Red Stars
-
Load your brush:
Dip your small flat brush into the red glitter gel or face paint. Ensure the brush is coated but not dripping. -
The first anchor star:
Paint the largest red star just below the tail of the eyebrow. Start with the inverted ‘V’ for the top point, then fill in the remaining four points. -
Refining the points:
Switch to your fine liner brush to pull the tips of the star outward, making them sharp and crisp rather than rounded. -
Top corner star:
Paint a slightly smaller red star above the first one, closer to the hairline. Angle it slightly differently to create dynamic movement. -
Lower accent star:
Add a third red star below and slightly behind the first anchor star. This creates a diagonal line of red that guides the eye.
Smudged Points?
If your star points look messy, don’t wipe the whole thing off. Wait for it to dry completely, then use a tiny brush with concealer to ‘cut’ the edge and sharpen the shape back up.
Step 3: Adding the Blue Stars
-
Clean your tools:
Thoroughly clean your brushes to avoid mixing purple tones, or switch to a fresh set of brushes for the blue color. -
The central blue star:
Nestle a small blue star into the space between your top two red stars. I find that tucking it close creates a cohesive cluster effect. -
Sharpening blue edges:
Use the liner brush to ensure the blue points are distinct and don’t muddy the nearby red paint. -
The bottom anchor:
Place a bold, medium-sized blue star at the very bottom of the cluster, sitting right on the high point of the cheekbone. -
Check balance:
Step back and look in the mirror. You should have a total of five stars currently painted. -
Final filler star:
Add the last small blue star roughly in the center of the arrangement, filling any awkward gaps between the larger red and blue shapes.
Step 4: Finishing Touches
-
Clean up edges:
Dip a cotton swab in a tiny bit of makeup remover to carefully wipe away any smudges or fix star points that became too thick. -
Intensify glitter:
If your paint is sheer, carefully dab a second layer of glitter gel directly onto the center of each star for maximum sparkle. -
Let it set:
Allow the design to dry completely for about 3-5 minutes. Try to keep your face relatively still during this time to prevent creasing. -
Lock it in:
Close your eyes and mist a lightweight setting spray over the area to ensure your stars stay put during festivities.
Now you have a sparkling, star-spangled accent ready for the celebration


Simple Firework Burst on the Cheek
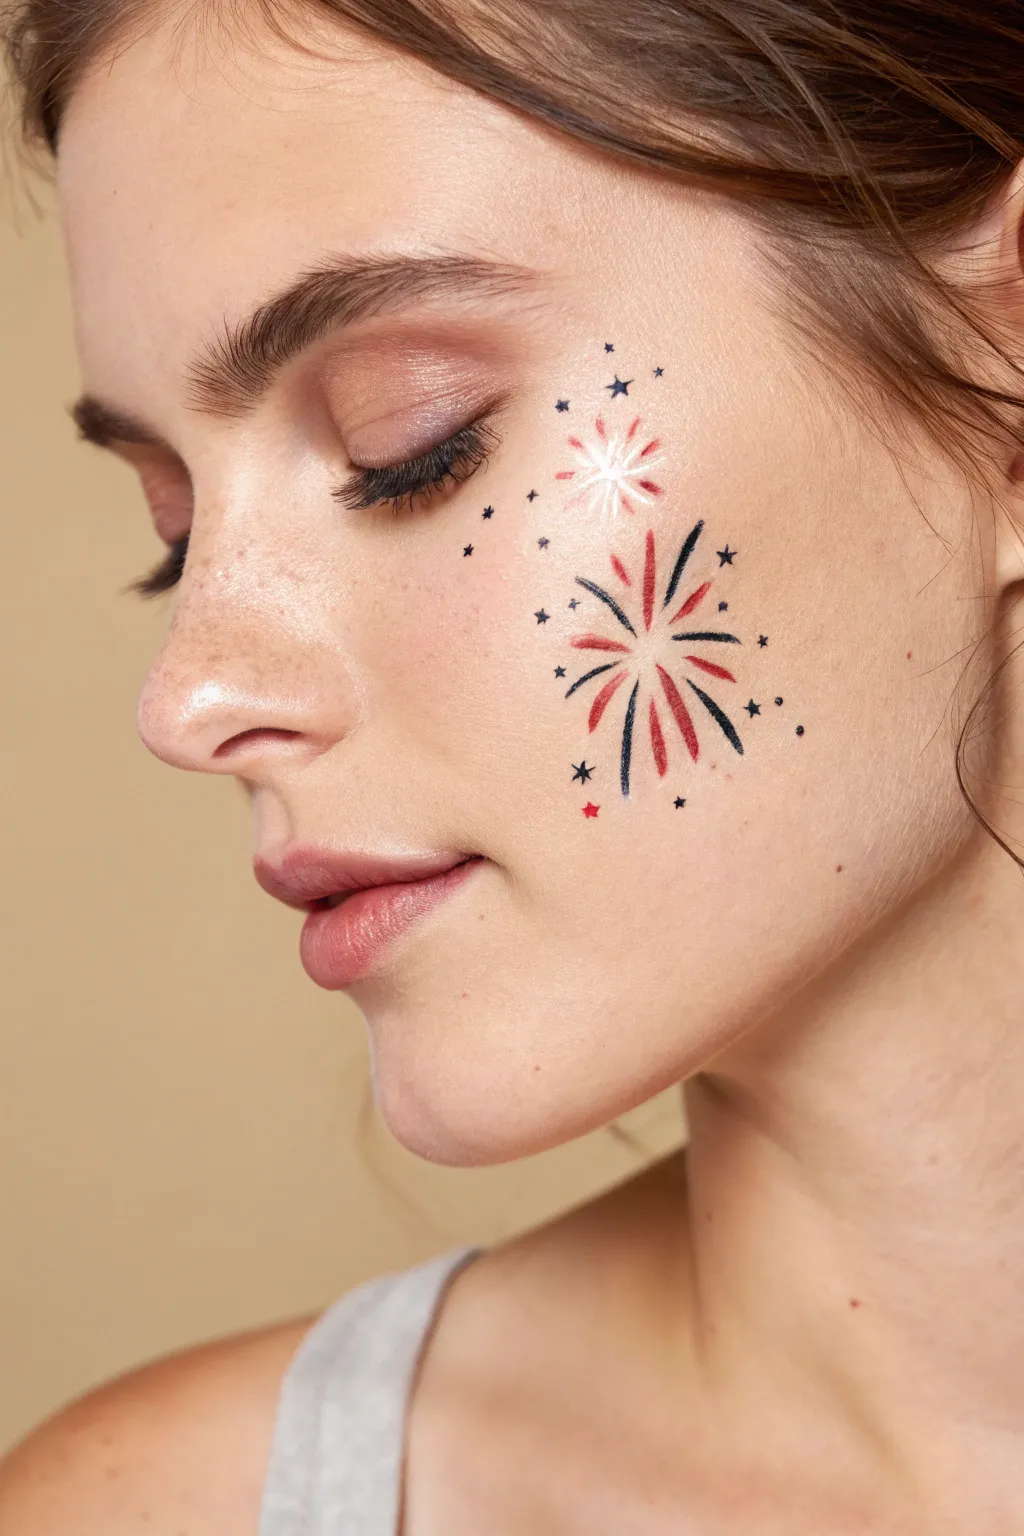
Celebrate Independence Day with this elegant yet festive face paint design featuring stylized fireworks bursting on the cheek. The combination of classic red, white, and blue creates a sophisticated look that captures the magic of a July 4th night sky.
Detailed Instructions
Materials
- Red face paint (water-activated or cream)
- Blue face paint (navy or dark blue)
- White face paint
- Fine round brush (size 1 or 2)
- Detail liner brush (size 0 or 00)
- Small cup of water
- Paper towels
- Makeup setting spray (optional)
Step 1: Painting the Main Burst
-
Establish the center:
Locate a central point on the apple of the cheek where your main firework will originate. Visualizing this invisible dot helps keep the symmetry of the explosion. -
Create red rays:
Load your fine round brush with red face paint. Starting from that invisible center point, flick the brush outwards to create thin, tapering lines. -
Vary the lengths:
Paint about six to eight red rays of varying lengths; make some quite short and others longer to mimic an exploding effect. -
Switch to blue:
Rinse your brush thoroughly or switch to a clean one. Load it with dark blue or navy paint creating a creamy consistency. -
Add blue rays:
Paint blue rays in the gaps between the red lines. Ensure these also originate from the center but angle them slightly differently to create fullness. -
Taper the strokes:
When painting these rays, press down at the start and lift up quickly at the end of the stroke to get that sharp, pointed tail. I find this flicking motion is key to a dynamic look. -
Layering details:
If there remain any large gaps, add tiny, shorter strokes of red or blue near the center to make the core of the firework look dense.
Clean Lines Only
If your lines look fuzzy or too thick, your brush likely has too much water. Dab the bristles on a paper towel to remove excess moisture before picking up paint.
Step 2: Adding the Secondary Burst
-
Position the second firework:
Move slightly higher up on the cheekbone, closer to the outer corner of the eye, for the smaller secondary burst. -
Paint white sparks:
Using a clean detail brush loaded with white paint, create a smaller starburst shape. Use very short, quick flicks radiating outward. -
Add red accents:
Clean the brush and pick up a small amount of red. Intersperse tiny red lines between the white sparks to give this upper firework a two-tone effect. -
Brighten the center:
Place a solid white dot right in the middle of this upper burst to make it look like it’s glowing intensely.
Precision Point
Roll your wet brush on the palette or the back of your hand while loading paint. This brings the bristles to a super-sharp needle point for crisp lines.
Step 3: Starlight and Embellishments
-
Scatter small stars:
Reload your brush with the dark blue paint. Paint tiny five-point stars randomly around the perimeter of the main firework. -
Add micro-stars:
For variety, paint a few even smaller stars that look like simple crosses or asterisks (*). -
Incorporate dots:
Using the very tip of your detail brush or a dotting tool, place tiny blue dots around the outer edges of the design to represent fading embers. -
Add a red star:
Choose one spot, perhaps near the bottom of the main burst, to paint a single small red star for a pop of unexpected color. -
Final touches:
Check the balance of your design. If one side looks empty, add a few more tiny black or blue dots to even out the composition without overcrowding it. -
Set the makeup:
Once the paint is fully dry, you can lightly mist the area with a setting spray to prevent smudging during festivities.
Enjoy showing off your patriotic spirit with this dazzling design that lights up your smile


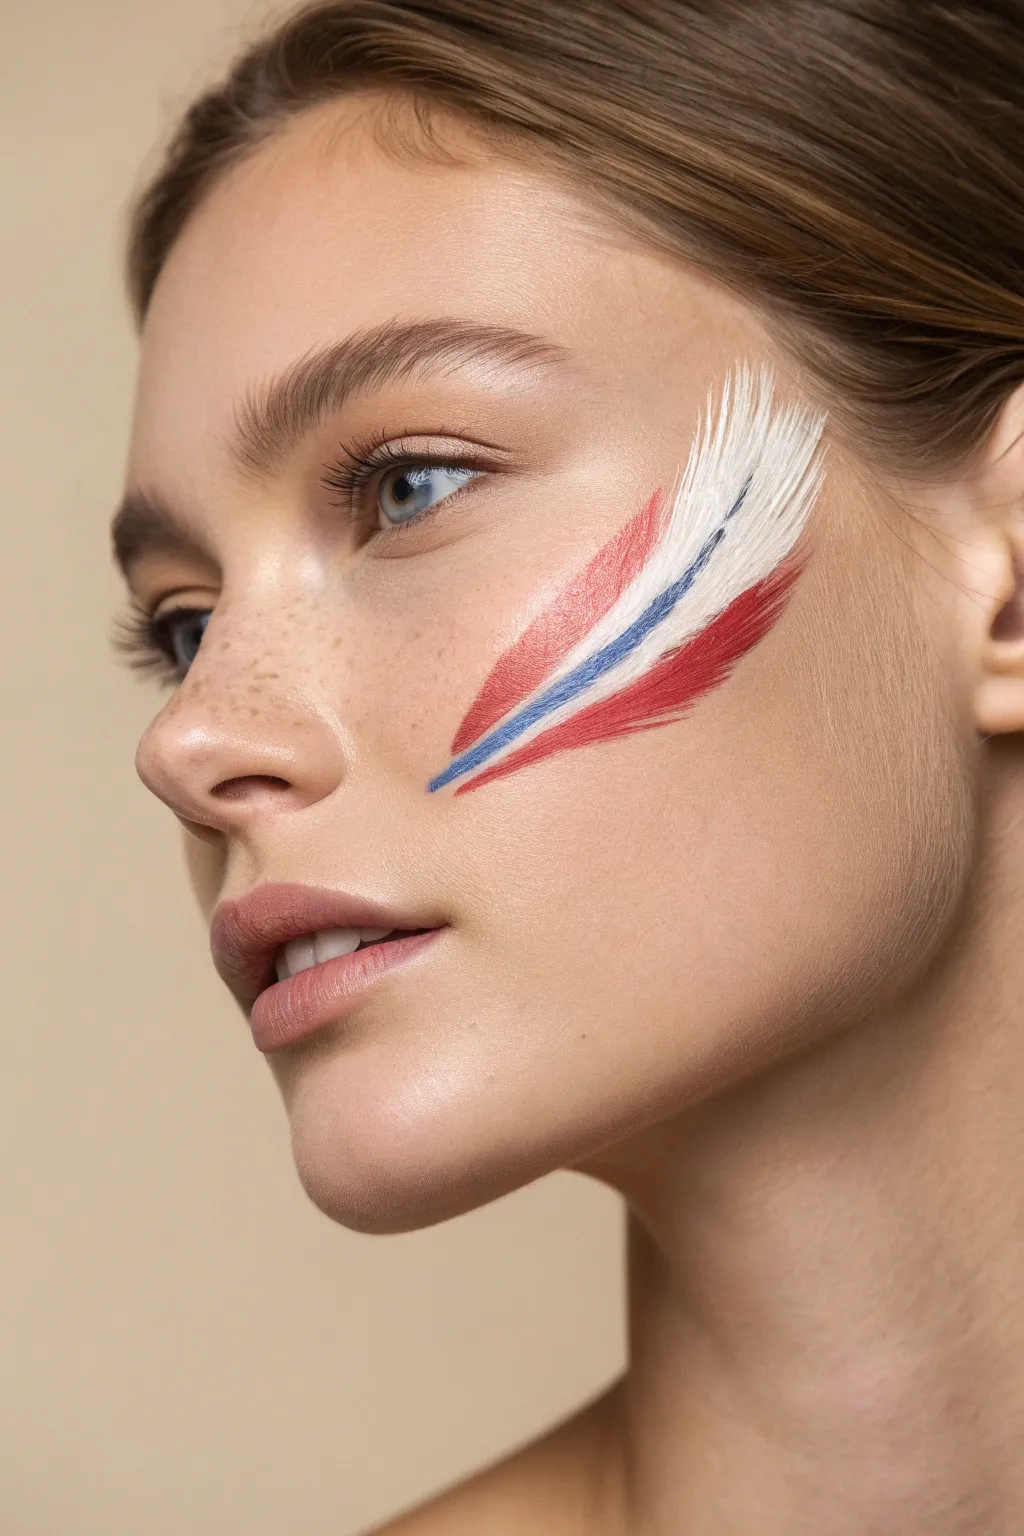
Sparkler Swirl With Star Tips
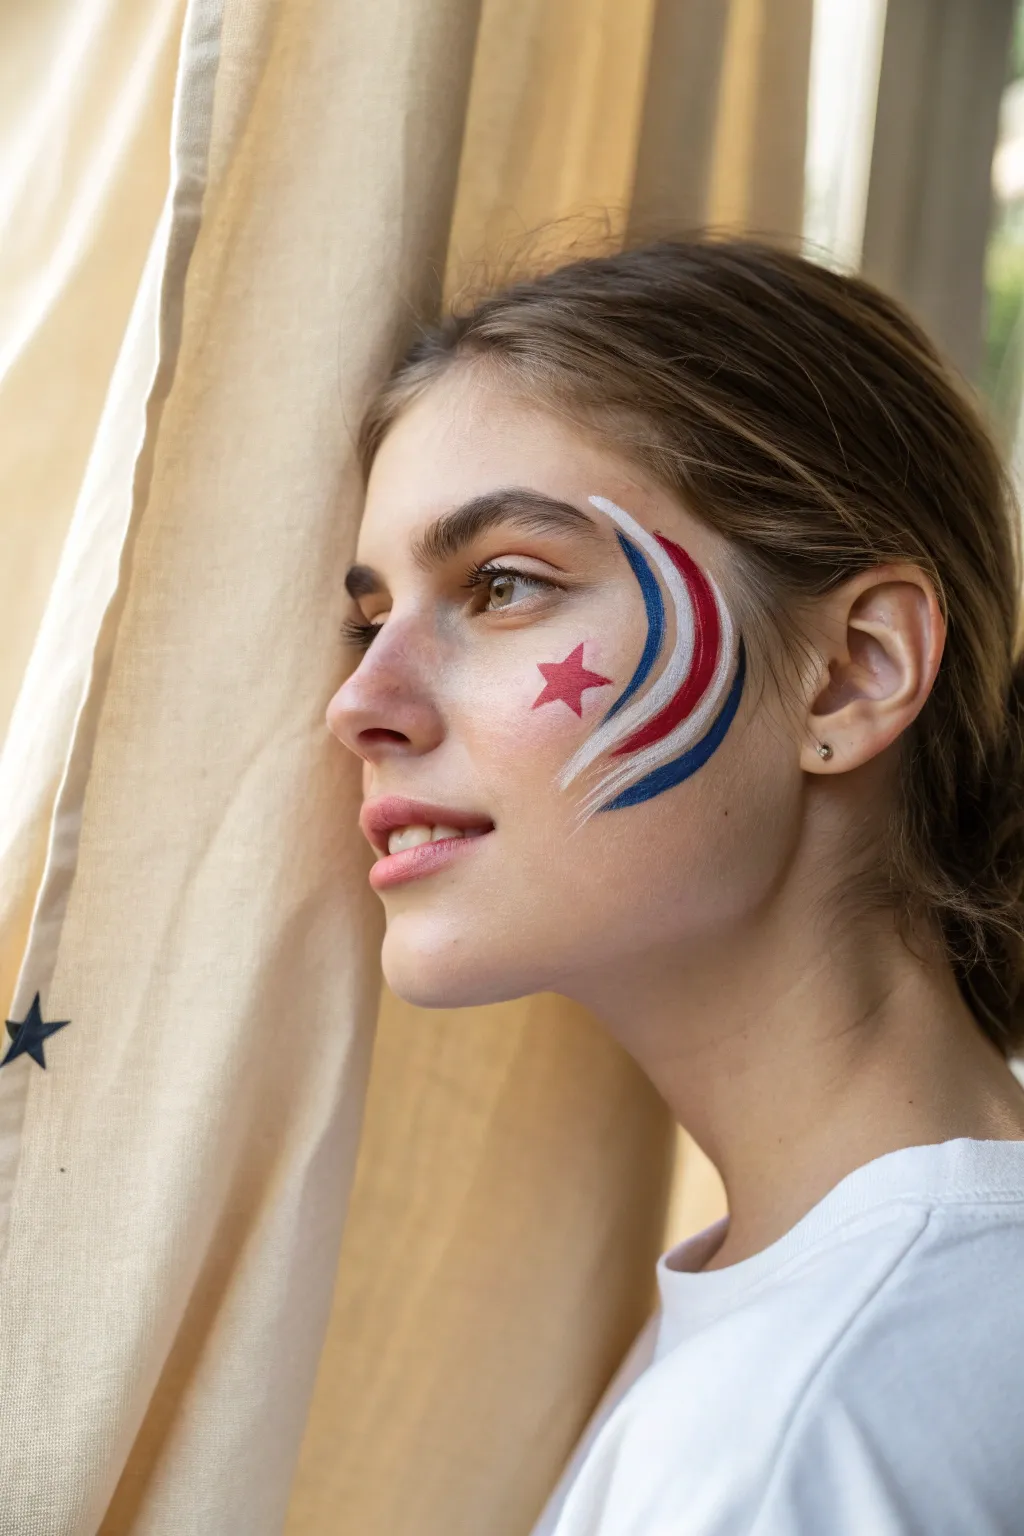
Capture the spirit of Fourth of July fireworks with this elegant and minimalist face paint design. The sweeping red, white, and blue curves perfectly contour the cheekbone, while a classic red star adds a patriotic focal point.
Step-by-Step Guide
Materials
- White face paint (water-activated)
- Red face paint (water-activated)
- Dark blue face paint (water-activated)
- Medium round brush (size 4 or 6)
- Small round brush (size 2)
- Small angle brush (optional)
- Cup of clean water
- Paper towels
- Cosmetic sponge (for clean up)
Step 1: Preparation
-
Clean the skin:
Start with a clean, dry face. Ensure the cheek area is free of oils or heavy lotions to help the water-activated paint adhere smoothly without sliding. -
Activate the white paint:
Dip your medium round brush into the water and then swirl it into the white face paint until you achieve a creamy consistency, similar to melted ice cream.
Step 2: Creating the Swooshes
-
Paint the central white curve:
Visualize a ‘C’ shape curving around the outer eye area. Start your stroke near the temple and sweep downward in a confident curve that ends on the cheek, tapering off as you lift the brush. -
Clean and load red:
Rinse your brush thoroughly in water and wipe it on a paper towel. Load it with the red face paint, ensuring the bristles are fully coated but not dripping. -
Add the inner red curve:
Place your brush just inside the initial white curve. Paint a red swoosh that mirrors the white one but sits slightly forward on the face, closer to the nose. -
Taper the red ends:
As you finish the red stroke, gently twist the brush while lifting it off the skin. This creates a sharp, professional-looking blended tip. -
Load the blue paint:
Clean your brush completely again. Load it with the dark blue paint. I find that a slightly drier text for dark colors prevents them from bleeding into the lighter ones. -
Paint the outer blue curve:
Start this stroke behind the white line, closer to the ear. Follow the same curvature, hugging the white line closely without touching it to keep the colors crisp. -
Add the bottom blue accent:
Load a small amount of blue again. Paint a shorter, secondary blue swoosh underneath the main curves, starting near the jawline area and sweeping upward to meet the main design’s tail.
Wobbly Lines?
If your curves look shaky, it’s often because the movement was too slow. Try practicing the swoosh motion on your arm first; speed creates smoother lines.
Step 3: The Star Accent
-
Switch brushes:
Switch to your small round brush (size 2) for better control over the detailed star shape. -
Load red for the star:
Create a creamy consistency with the red paint again. You want the paint to flow easily but be opaque. -
Position the star:
Locate a spot just in front of the swooshes, high on the cheekbone below the outer corner of the eye. -
Paint the top point:
Paint a small inverted ‘V’ shape for the top point of the star. -
Paint the side points:
Extend two horizontal lines outward from the base of your top point to create the arms of the star. -
Finish the bottom legs:
Connect the side points down to two bottom points, meeting in the middle to complete the five-point star outline. -
Fill it in:
Gently fill in the center of the star with red paint, smoothing out any brushstrokes for a solid, vibrant look.
Sharp Points
To get razor-sharp tails on your swooshes, press down firmly at the start of the stroke and gradually lift the brush tip off the skin as you end the motion.
Step 4: Finishing Touches
-
Refine the edges:
If any lines look shaky, use a damp (clean) angle brush or a clean damp cotton swab to gently tidy up the edges of your swooshes. -
Set the look:
Allow the design to dry completely for about 60 seconds before moving or touching the face to prevent smudging.
Now you are ready to show off your festive, patriotic flair at the parade or picnic
BRUSH GUIDE
The Right Brush for Every Stroke
From clean lines to bold texture — master brush choice, stroke control, and essential techniques.
Explore the Full Guide
Star Stencil Look Without a Stencil
Achieve a crisp, sticker-like finish for your 4th of July celebration with this freehand face painting technique. This design layers sharp, geometric stars in patriotic red, white, and navy blue directly onto the cheek for a festive yet sophisticated look.
Step-by-Step Tutorial
Materials
- Water-activated face paint (Red, Navy Blue, White)
- Fine liner brush (size 0 or 00)
- Small flat definer brush or angled brush
- Cup of water
- Paper towels
- Setting spray (optional)
- Micellar water and q-tips (for cleanup)
Step 1: Preparation & Base Stars
-
Prep the skin:
Ensure the face is clean and dry. If the subject is wearing foundation or moisturizer, make sure it is fully set with powder so the face paint adheres properly without sliding. -
Load the red paint:
Dip your fine liner brush into water and swirl it into the red face paint. You want a creamy, ink-like consistency that flows off the brush easily but isn’t drippy. -
Outline the large red star:
Locate the center of the cheekbone. Visualize a five-point star shape. Lightly dot five points where the tips of the star will be. -
Connect the points:
Using the fine liner brush, connect your dots to create the outline of a large star. Try to keep your hand steady for sharp, straight lines. -
Fill the red star:
Switch to a small flat brush or continue with the liner to fill in the red star completely. Allow this to dry for a minute. -
Add a small red star:
Near the temple area, higher up on the cheek, use the fine liner to paint a much smaller, solid red star. -
Create a tiny red accent:
Paint a third, very small red star lower down on the cheek, towards the jawline, balancing the composition.
Wobbly Lines?
If your hands are shaking, rest your pinky finger gently on the model’s face (use a powder puff to avoid smudging) to anchor your hand while painting detail work.
Step 2: Adding the Navy Stars
-
Clean and load brush:
Thoroughly rinse your brushes. Load your fine liner with navy blue face paint, aiming for that same creamy consistency. -
Top blue star:
Position a small blue star high on the cheekbone, just under the outer corner of the eye. Outline and fill it carefully. -
Middle blue star:
Place a medium-sized blue star between the large red star and the top small red star. Keep the edges as crisp as possible. -
Lower blue star:
Paint another small blue star below the large red one, slightly towards the ear. -
Temple accent:
Add one final tiny blue star near the eyebrow tail to elongate the design upward.
Add Some Sparkle
While the paint is still wet, gently tap fine cosmetic glitter onto the center of the red stars to add a festive shimmer that catches the light.
Step 3: The Feature Star & Details
-
Map the layered star:
For the complex star with the white outline, choose a spot on the lower cheek. First, paint a solid white star shape slightly larger than you want the final blue center to be. -
Refine white edges:
I like to use a clean, slightly damp angled brush to tidy up the edges of the white paint while it is still sem-dry if the lines aren’t perfectly straight. -
Let it dry completely:
Wait until the white star is bone dry. This is crucial to prevent the blue from mixing with the white and turning light blue. -
Paint the inner blue star:
Load your smallest detail brush with navy blue. Carefully paint a smaller blue star directly inside the dried white star, leaving a consistent white border visible around all edges. -
Sharpness check:
Examine the points of all your stars. If any tips look rounded, use the very tip of your liner brush with a tiny amount of paint to drag the color out to a needle-sharp point. -
Cleanup:
Dip a cotton swab in micellar water to clean up any smudges or to sharpen the outer edges of any stars that look a bit wobbly. -
Set the look:
Once all paint is dry, lightly mist with a setting spray to help the design last through the festivities.
Wear your patriotic stars with pride and enjoy the celebration
Ribbon Swooshes and Tear-Drop Accents
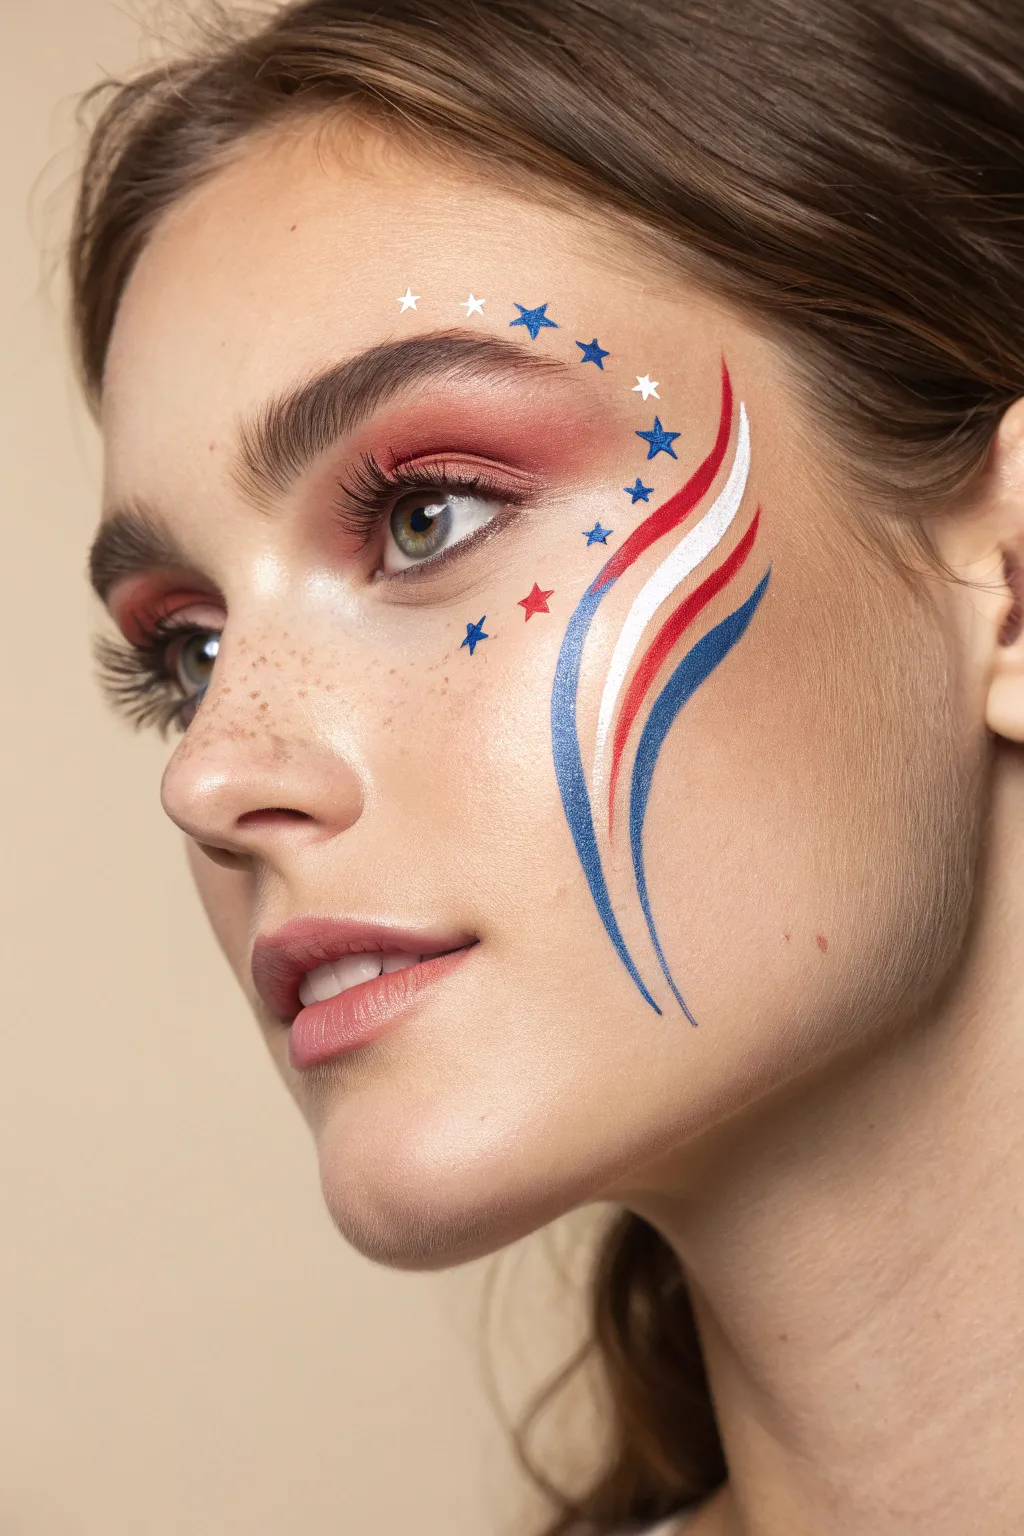
Capture the spirit of Independence Day with this elegant and festive look featuring sweeping ribbons of red, white, and blue alongside a constellation of tiny stars. It combines soft, warm-toned eyeshadow with bold, graphic lines for a style that feels both polished and playful.
Step-by-Step
Materials
- Water-activated face paint (Red, White, Royal Blue)
- Round brushes (sizes 2 and 4)
- Fine liner brush (size 0 or 00)
- Warm terracotta or reddish-brown eyeshadow
- Fluffy eyeshadow blending brush
- Small eyeshadow packing brush
- Optional: Setting spray
- Micellar water and Q-tips for cleanup
Step 1: Setting the Base
-
Prep the canvas:
Begin with a clean, moisturized face. If you are applying foundation, do so now and set it lightly with translucent powder to ensure a smooth surface for the paint. -
Create the eye look:
Dip your fluffy brush into a warm terracotta or rust-red eyeshadow. Sweep this color generously across the entire eyelid, blending it upwards into the crease and softly towards the brow bone for a diffused wash of color. -
Deepen the definition:
Using a smaller packing brush, apply the same eyeshadow along the lower lash line, connecting it to the upper shadow at the outer corner to frame the eye completely.
Step 2: Painting the Ribbons
-
Mix your paint:
Activate your red face paint with a little water until it reaches a creamy, ink-like consistency that flows easily without being drippy. -
First red swoosh:
Load a size 4 round brush with the red paint. Start near the temple, just outside the eyebrow tail. Press down to create width, then curve downward along the cheekbone, lifting the brush at the end to taper the line into a sharp point near the jawline. -
Add the white ribbon:
Clean your brush thoroughly or switch to a fresh size 4 brush. Load it with white paint and paint a second swoosh right next to the red one, following the exact same curve. Allow the lines to touch slightly or leave a hairline gap depending on your preference. -
The blue anchor:
Using royal blue paint, create the third and final ribbon swoosh outside the white one. This line should hug the curve of the white line, extending slightly further down the cheek for a flowing, elegant effect. -
Refine the tails:
If your ribbon ends aren’t sharp enough, use a wet Q-tip or a clean angled brush with a tiny bit of remover to carve out crisp, pointed tails at the bottom of the swooshes.
Shaky Hands?
Rest your pinky finger against your cheek as a stabilizer while painting the fine details of the stars. This anchors your hand and gives you much cleaner lines.
Step 3: Applying the Stars
-
Start the constellation:
Switch to your fine liner brush (size 0 or 00). Load it with the royal blue paint. Paint a small, five-pointed star just above the center of the eyebrow. -
Follow the arch:
Paint a second blue star slightly larger near the arch of the brow, and a third one near the tail of the brow. I like to rotate the angle of each star slightly so they look like they are twinkling. -
Add white accents:
Rinse your liner brush and load it with white paint. Paint tiny ‘sparkle’ stars (four points) or small five-point stars interspersed between the blue ones above the eyebrow. -
Scatter downward:
Continue adding a few small stars drifting down from the temple area towards the cheek, nestled near the top of your ribbon swooshes. -
The red accent:
To tie the look together, paint a single, small red star just below the outer corner of the eye, floating in the negative space between the eye and the start of the ribbons. -
Add a tiny blue star:
Place one final, tiny blue star near the red one on the upper cheek to balance the cluster.
Pro Tip: Custom Curve
Visualize the letter ‘S’ when painting the ribbons. A gentle S-curve flatters the cheekbone structure more than a straight diagonal line.
Step 4: Finishing Touches
-
Check symmetry:
Step back and look at the overall flow. If any star points look dull, you can carefully re-touch them with the very tip of your liner brush. -
Mascara application:
Finish the eye makeup with a coat of mascara on both top and bottom lashes to define the eyes against the warm shadow. -
Lock it in:
Close your eyes tightly and mist the face paint lightly with a setting spray to prevent the designs from smudging during celebrations.
Enjoy your vibrant and patriotic new look for the holiday festivities

PENCIL GUIDE
Understanding Pencil Grades from H to B
From first sketch to finished drawing — learn pencil grades, line control, and shading techniques.
Explore the Full Guide
Heart Filled With Stars and Stripes
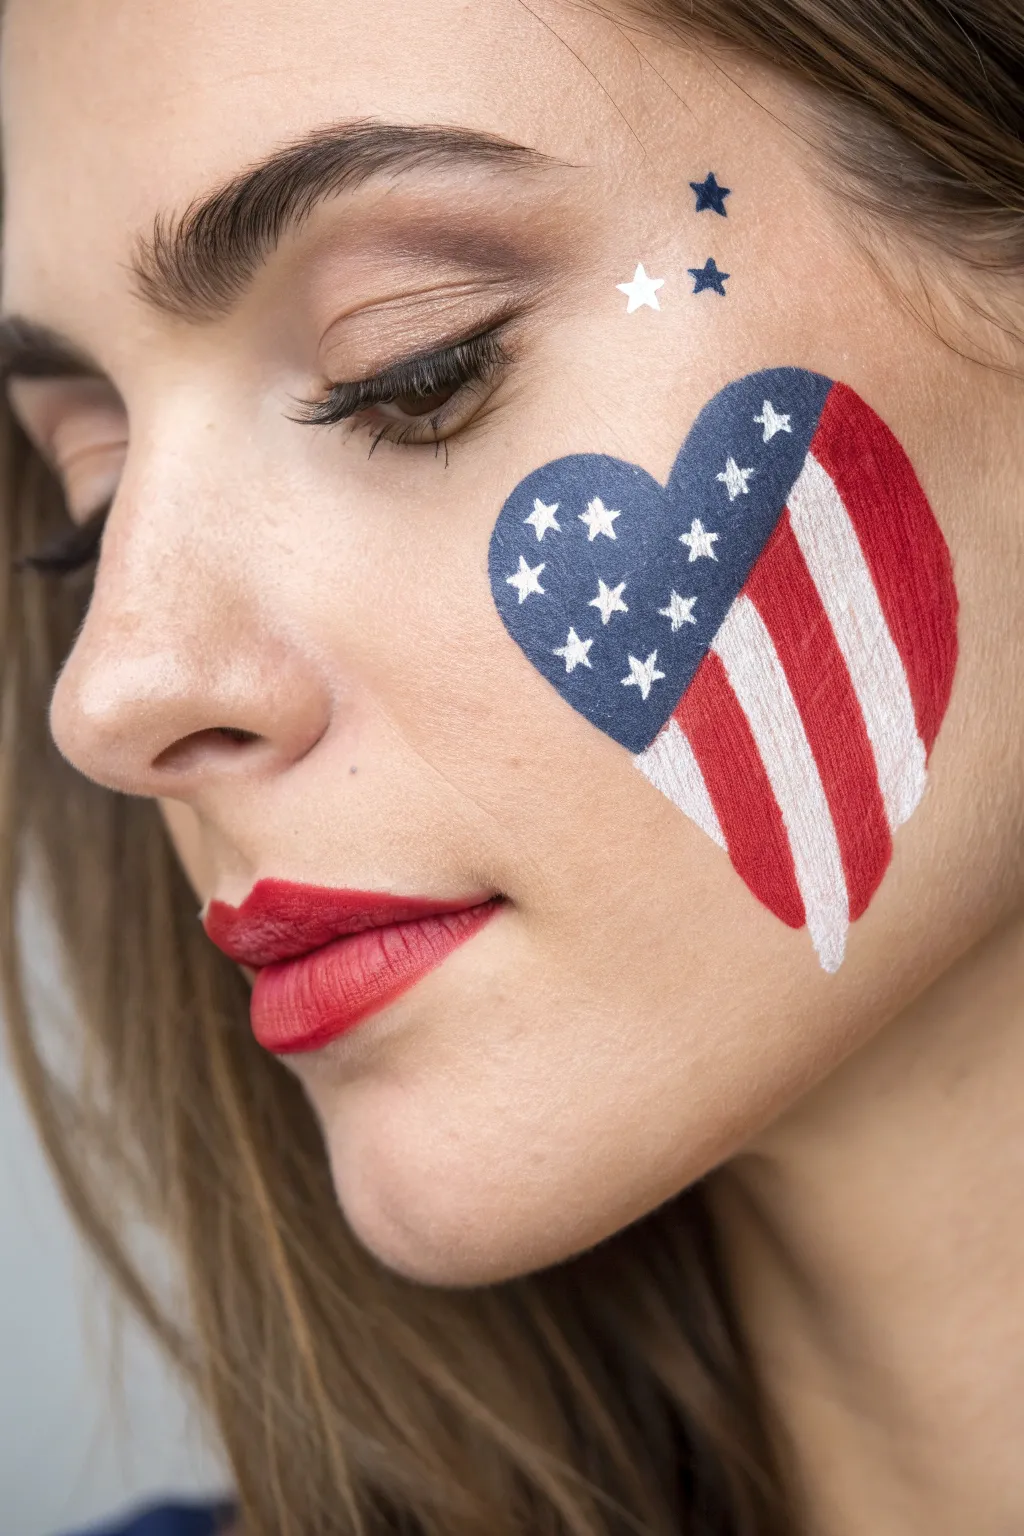
This classic design transforms a simple heart shape into a festive emblem of American pride. It’s an elegant yet playful way to wear the stars and stripes, perfect for parades or backyard barbecues.
How-To Guide
Materials
- High-quality face paint (Royal Blue, Bright Red, Opaque White)
- Medium flat brush (approx. 1/2 inch) for filling
- Fine round detail brush (size 1 or 2) for outlines and stars
- Small cup of water
- Paper towels
- Optional: Cosmetic glitter or setting spray
Step 1: Shaping the Heart
-
Visualize placement:
Begin by deciding where the heart will sit on the cheekbone. Aim for the high point of the cheek, slightly angled towards the ear for a flattering look. -
Light white outline:
Load your fine round brush with a very watery white paint. Sketch the outline of a large heart; keep the lines faint so they are easy to cover later. -
Sectioning the design:
Draw a curved line inside the heart, starting from the top dip and curving down towards the left side of the bottom point. This creates the ‘blue field’ area on the left and the ‘stripes’ area on the right.
Smudge Control
Face paint dries fast! If you make a mistake, don’t rub it. Use a damp cotton swab to lift the mistake like an eraser.
Step 2: The Starry Blue Field
-
Fill the blue:
Using your medium flat brush, load it generously with royal blue face paint. Fill in the left section of the heart completely. -
Clean the edges:
Turn the brush on its edge to carefully neaten the curve of the heart’s hump and the inner curve where it meets the future stripes. -
Painting stars:
Switch back to the fine detail brush with opaque white paint. Paint small, five-pointed stars over the dried blue paint. -
Star technique:
If painting full stars is tricky, I sometimes just make small ‘x’ shapes with a vertical line through them for a simplified star effect. -
Floating stars accent:
For extra flair, add two or three tiny stars floating above the eyebrow or near the temple area, using blue and white paints for variety.
Step 3: Earning Your Stripes
-
Painting white stripes:
Clean your flat brush thoroughly. Load it with white paint and draw thick, vertical curved lines following the contour of the heart’s right side. -
Spacing is key:
Leave gaps between your white strokes where the red paint will go. It’s better to paint white first to avoid pink smudges. -
Adding red stripes:
Load the flat brush with bright red paint. Carefully fill in the gaps between the white stripes. -
Refining the bottom point:
Bring all the red and white stripes together neatly at the bottom point of the heart. -
Final touch-ups:
Use a steady hand with the fine brush to sharpen the outer edges of the heart where the stripes end, ensuring a crisp silhouette. -
Lip coordination:
To complement the look, apply a matte red lipstick that matches the red face paint tone.
Glitter Finish
While the paint is slightly tacky, tap cosmetic-grade silver glitter onto the white stripes for a sparkling firework effect.
Now you are ready to celebrate with a patriotic style that is sure to turn heads
USA Letters With Tiny Stars
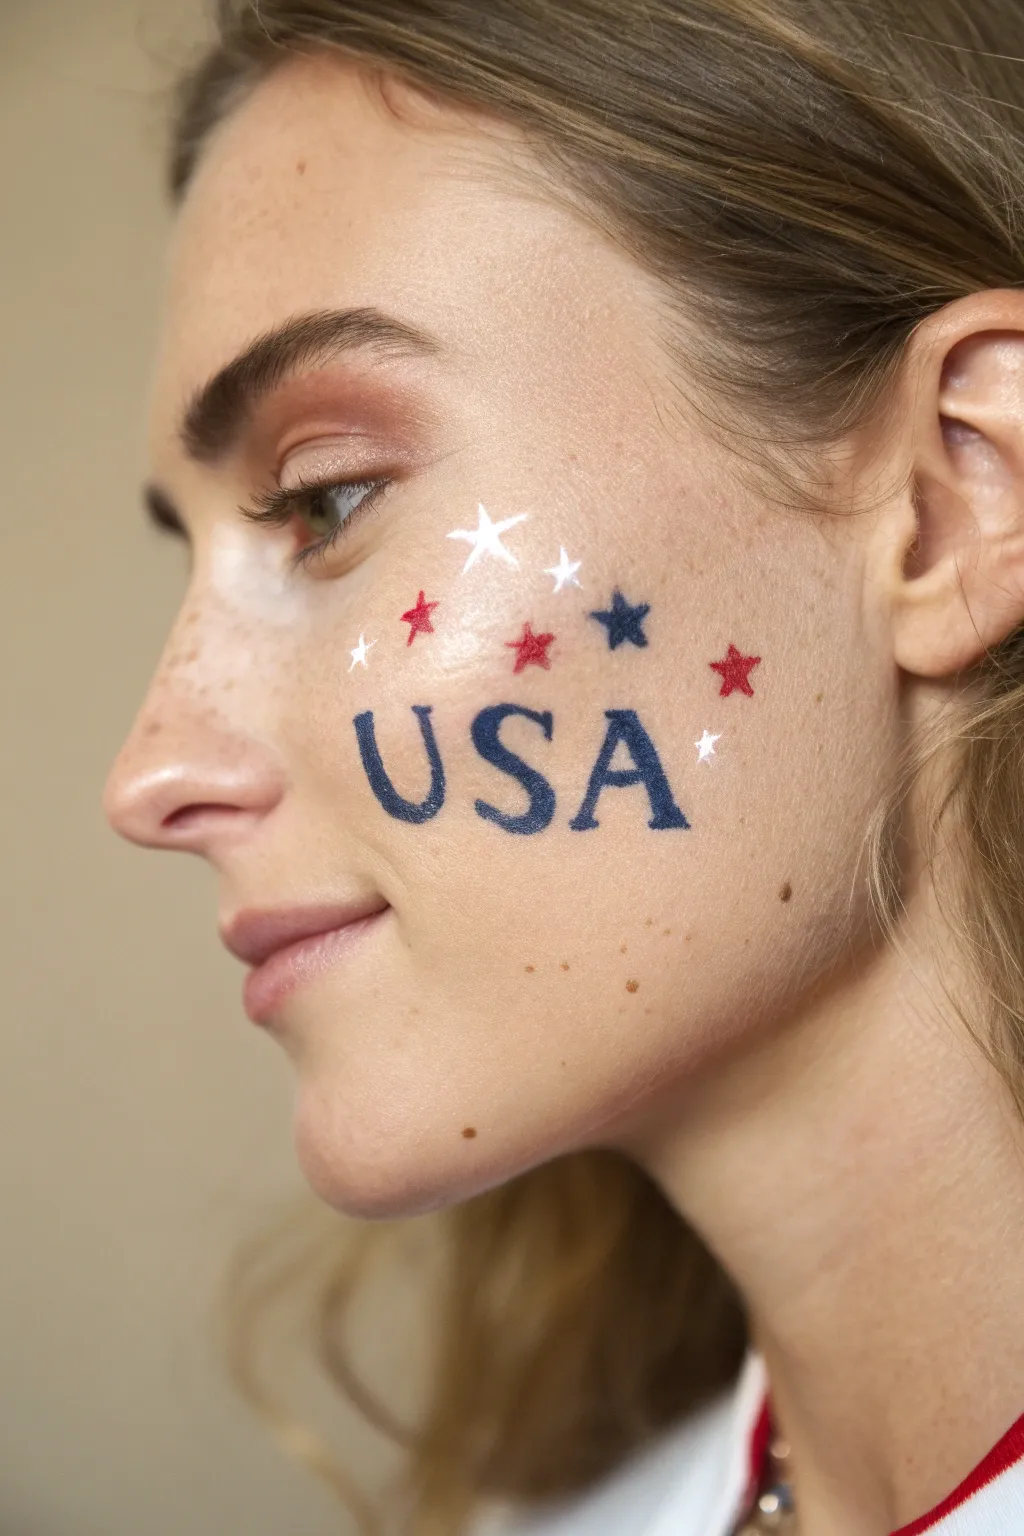
Celebrate Independence Day with this classic yet striking face paint design featuring bold serif lettering surrounded by a constellation of patriotic stars. The look is clean and minimalist, making it a perfect quick addition to your holiday outfit without needing a full-face base.
Step-by-Step Tutorial
Materials
- Navy blue face paint (water-activated or cream)
- Bright red face paint
- White face paint
- Fine liner brush (size 0 or 00)
- Small flat brush or angled brush (optional for lettering)
- Small cup of water
- Paper towels
- Setting spray (optional)
Step 1: Preparation
-
Clean the canvas:
Start with a clean, dry face. If the skin is oily, a quick wipe with a gentle toner helps the paint adhere better. -
Activate the paint:
Dip your brush in water and swirl it into your navy blue face paint until you achieve a creamy, ink-like consistency.
Step 2: Lettering
-
Outline the ‘S’:
Begin in the center of the cheek area with the letter ‘S’. Using your fine liner brush, carefully sketch the central curve first to ensure it sits right on the apple of the cheek. -
Thicken the ‘S’:
Go back over the ‘S’, adding thickness to the main curves while keeping the ends slightly thinner for a serif font look. -
Paint the ‘U’:
Move to the left of the ‘S’ to paint the ‘U’. Start with the left vertical stroke, curve broadly at the bottom, and bring it up to match the height of the ‘S’. -
Add serifs to the ‘U’:
Add small horizontal lines (serifs) to the top of both vertical stems of the ‘U’ for that classic typeface style. -
Paint the ‘A’:
On the right side of the ‘S’, paint the ‘A’. Create an inverted ‘V’ shape, ensuring the legs are widely spaced enough to look balanced. -
Finish the ‘A’:
Draw the horizontal crossbar for the ‘A’ and add small feet (serifs) at the bottom of the two legs. -
Refine edges:
Check your lettering for any uneven edges. Use a slightly damp clean brush to wipe away any mistakes or sharpen the lines.
Fixing Smudges
If a line goes rogue, wait for it to dry completely. Then, use a damp cotton swab to gently lift the mistake off without smearing it into the skin
Step 3: Starry Details
-
Placement strategy:
Visualize where your stars will go; you want them scattered around the top curve of the letters, almost like they are floating upwards. -
White stars first:
Clean your fine liner brush thoroughly and load it with white paint. Paint a medium-sized 5-point star above the ‘S’. -
White star clusters:
Add a smaller white star slightly higher up, and a tiny twinkle star (just a cross shape) near the ‘U’. -
Red stars:
Switch to red paint on a clean brush. Paint a medium red star to the right of the letters, near the hairline. -
Small red accents:
Add a tiny red star nestled between the white stars above the ‘U’ and ‘S’. Add one more small red star floating above the center of the design. -
Blue stars:
Reload your brush with the navy blue. Place a solid blue star to the right, slightly above the ‘A’. -
Tiny sparkles:
Using the very tip of your finest brush and white paint, add a few microscopic dots or tiny cross-stars in empty spaces to make the design twinkle.
Add Some Glitz
Before the paint fully dries, press a tiny cosmetic rhinestone into the center of the largest stars for a 3D sparkling effect
Allow the paint to set for a minute before heading out to enjoy the fireworks


Liberty Crown Mini Forehead Design
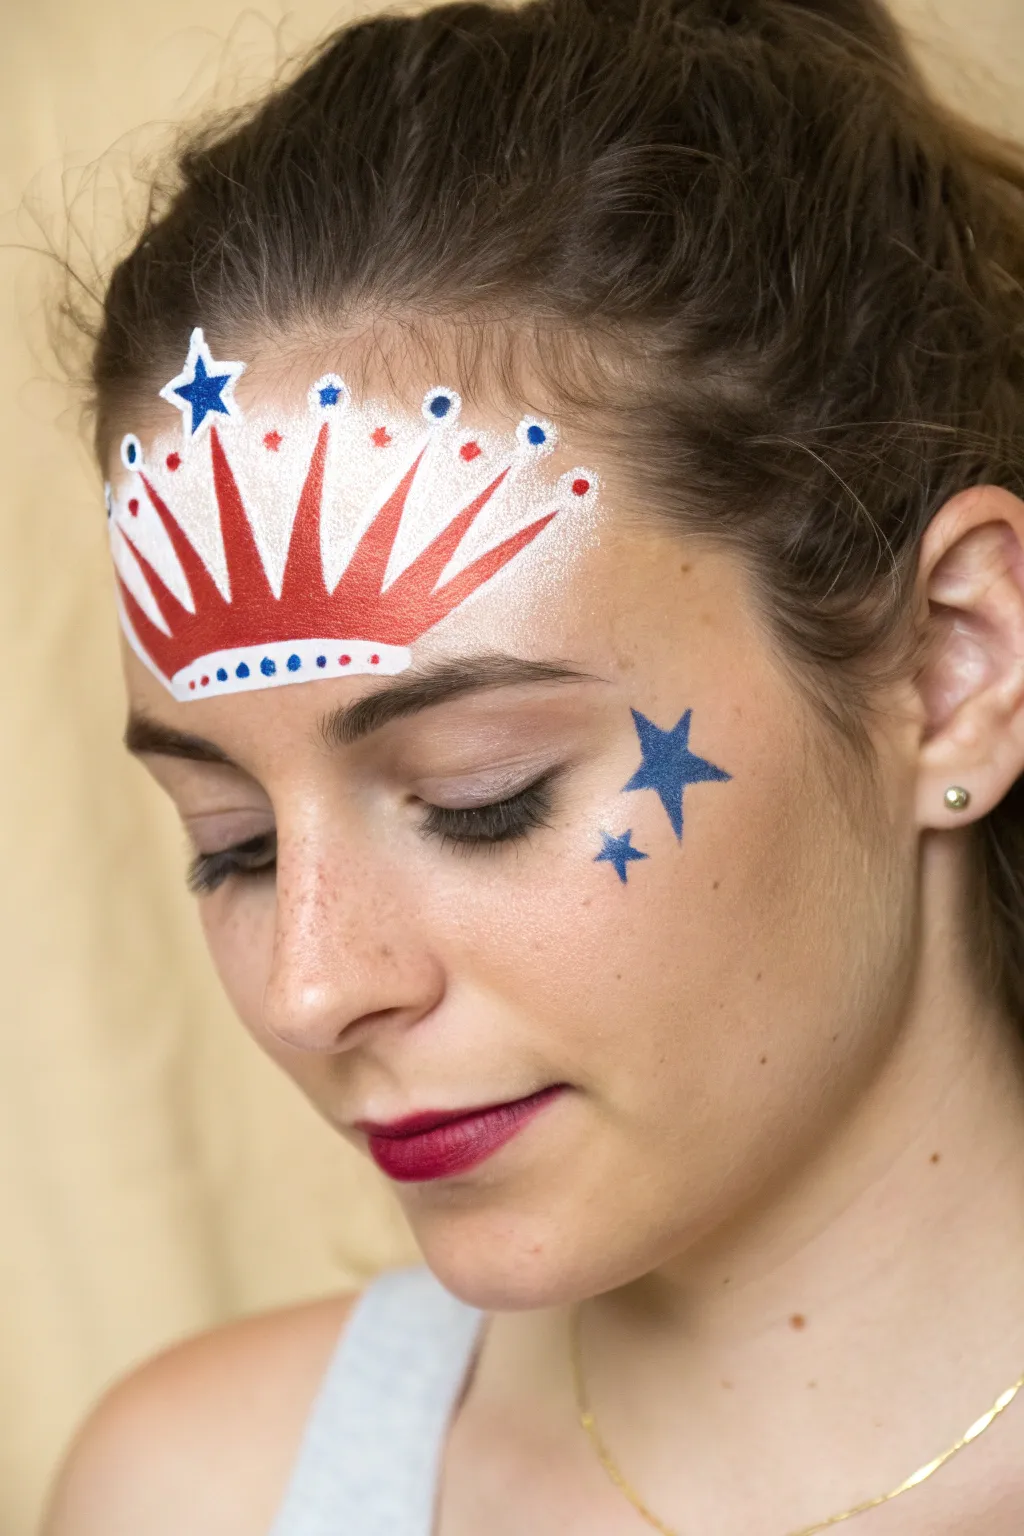
Channel the spirit of the Statue of Liberty with this elegant yet simple forehead crown design. Using the classic patriotic palette, this look combines sharp lines and celestial accents for a festive 4th of July style.
How-To Guide
Materials
- High-density face paint (Red, White, Royal Blue)
- Round brush (size 2 or 3)
- Thin liner brush (size 0 or 1)
- Small cup of water
- Paper towel
- Cosmetic glitter (optional)
Step 1: Painting the Crown Base
-
Outline the band:
Start with your white face paint and a round brush. Paint a gently curved horizontal band across the lower forehead, just above the eyebrows, curving slightly upward at the ends. -
Draft the spikes:
Using the same white paint, draw five triangular spikes rising from the band. Make the center spike the tallest, with the two on either side slightly shorter, and the outer two the shortest. -
Fill in the white:
Fill in the entire shape with white paint to create a solid, opaque base. Let this dry completely so the red layer on top doesn’t turn pink. -
Define the red border:
Switch to red face paint on a clean round brush. Carefully outline the entire crown shape, tracing around the white band and up the sides of each spike. -
Create the red rays:
Inside each white spike, paint a thinner red triangle that starts at the base and tapers up toward the tip, leaving a white border visible on all sides. -
Detail the band:
Paint a thin red line along the very bottom edge of the white band to frame the design.
Smudge Control
If the red paint bleeds into the white, let it dry fully, then paint a fresh layer of white over the mistake before reshaping the red line.
Step 2: Adding Blue Accents
-
Paint the main star:
Load a thin liner brush with royal blue paint. Paint a prominent five-pointed star at the very tip of the tallest, central spike. -
Add floating dots:
Using the tip of your round brush handle or a dotting tool, place a blue dot at the tip of each of the four remaining spikes. -
Add decorative points:
Between the tips of the spikes, add tiny red dots floating in the empty space for extra flair. -
Decorate the headband:
Along the white band at the base of the crown, paint a row of small, alternating blue and red dots. I usually start from the center and work outward to keep the spacing even.
Step 3: Cheek Decoration
-
Position the cheek stars:
Load your round brush with royal blue paint again. Locate a spot high on the cheekbone, below the outer corner of the eye. -
Paint the large star:
Paint a medium-sized five-pointed star on the cheekbone. Tilt the star slightly so it looks like it’s rising. -
Add the small star:
Paint a significantly smaller blue star just below and slightly behind the first one. -
Add sparkle (optional):
While the paint is still slightly tacky, you can gently press a bit of cosmetic glitter onto the blue stars or the white parts of the crown for a shimmering finish. -
Final touches:
Check for any smudges or uneven lines and clean them up with a slightly damp cotton swab or a bit of concealer.
Glitter Glam
For a fireworks effect, tap loose silver glitter over the wet blue stars on the cheek, or outline the crown spikes with liquid glitter liner.
Now you are ready to illuminate the festivities with your patriotic new look
Eagle Feather Sweep in Patriotic Colors
This elegant face paint design transforms a simple flag motif into a sophisticated, feather-like sweep along the cheekbone. It combines soft, wispy strokes of red, white, and blue to create a look that is both artistic and unmistakably patriotic.
Step-by-Step Tutorial
Materials
- High-quality water-activated face paint (Red, White, Royal Blue)
- Round synthetic brush (size 4 or 6)
- Fine liner brush (size 1)
- Small cup of water
- Paper towels
- Setting spray (optional)
Step 1: Preparation and Base
-
Clean canvas:
Begin with a clean, dry face. Use a gentle cleanser to remove any oils or moisturizer from the cheek area to ensure the water-activated paint adheres properly and lasts longer. -
Load the brush:
Dip your medium round brush into water and swirl it into the white face paint. You want a creamy consistency, similar to melted ice cream—not too drippy, but wet enough to glide smoothly. -
Map the curve:
Visualize a curve starting from the top of the ear and sweeping down towards the corner of the mouth. This will be the general flow of your feather design.
Pro Tip: Texture Trick
Use a slightly drier brush (less water, more paint) for the top layers. This creates a ‘scrubby’ texture that naturally looks like individual feather barbs.
Step 2: Painting the Feathers
-
First white strokes:
Starting near the temple hairline, use the white paint to create flicking motions outward and downward. Press the brush down firmly at the start of the stroke and lift it quickly as you flick to create tapering, wispy ends. -
Build the white layer:
Continuing with white, add more of these feathery flicks, moving slightly lower down the cheek. These strokes should form the upper, brightest part of the wing shape. -
Clean and switch:
Rinse your brush thoroughly in the water cup and dry it on a paper towel. Now, load the brush with the red face paint, maintaining that creamy consistency. -
Add the red tier:
Below the area where you placed the white strokes, begin adding red flicks. Follow the same sweeping curve, ensuring the strokes are parallel to the white ones. -
Blend the edges:
Allow the red strokes to slightly overlap the bottom edge of the white section. I like to do this while the paint is still barely damp so the colors look cohesive without turning pink. -
Bottom red details:
Add a final layer of red strokes at the very bottom of the design, tapering them sharply towards the center of the cheek to define the lower edge of the ‘wing’. -
Switch to blue:
Clean your brush completely again. Load it with the royal blue paint. This color needs to be vibrant, so ensure your brush is well-saturated. -
The blue accent:
Paint a thin, sweeping line of blue strokes right between the main white section and the red section. This acts as a striking separator. -
Add directionality:
Make sure the blue strokes follow the exact same directional flow as your red and white feathers, flicking outward toward the nose.
Level Up: Glitter Glam
While the paint is still tacky, tap a cosmetic-grade iridescent glitter over the white section. It catches the light beautifully and adds a festive sparkle.
Step 3: Refining Texture
-
Switch to liner brush:
Pick up your fine liner brush (size 1) and load it with a little more white paint. -
Highlight the blue:
Carefully add tiny, hair-thin white flicks on top of the blue section. This creates depth and makes the blue look more integrated into the feathery texture. -
Sharpen the tips:
Use the liner brush with the respective colors to sharpen any feather tips that look too blunt. Pull the paint out into very fine points. -
Check symmetry (optional):
If you are painting both sides of the face, step back and check that the placement is roughly symmetrical, though organic variations are perfectly fine. -
Dry completely:
Let the design air dry for about 2-3 minutes. Avoid touching the face or smiling too widely during this time to prevent cracking. -
Seal the look:
If you plan on wearing this outdoors, lightly mist a makeup setting spray over the area from a distance to lock the design in place.
Enjoy your sophisticated Independence Day look that combines artistry with celebration
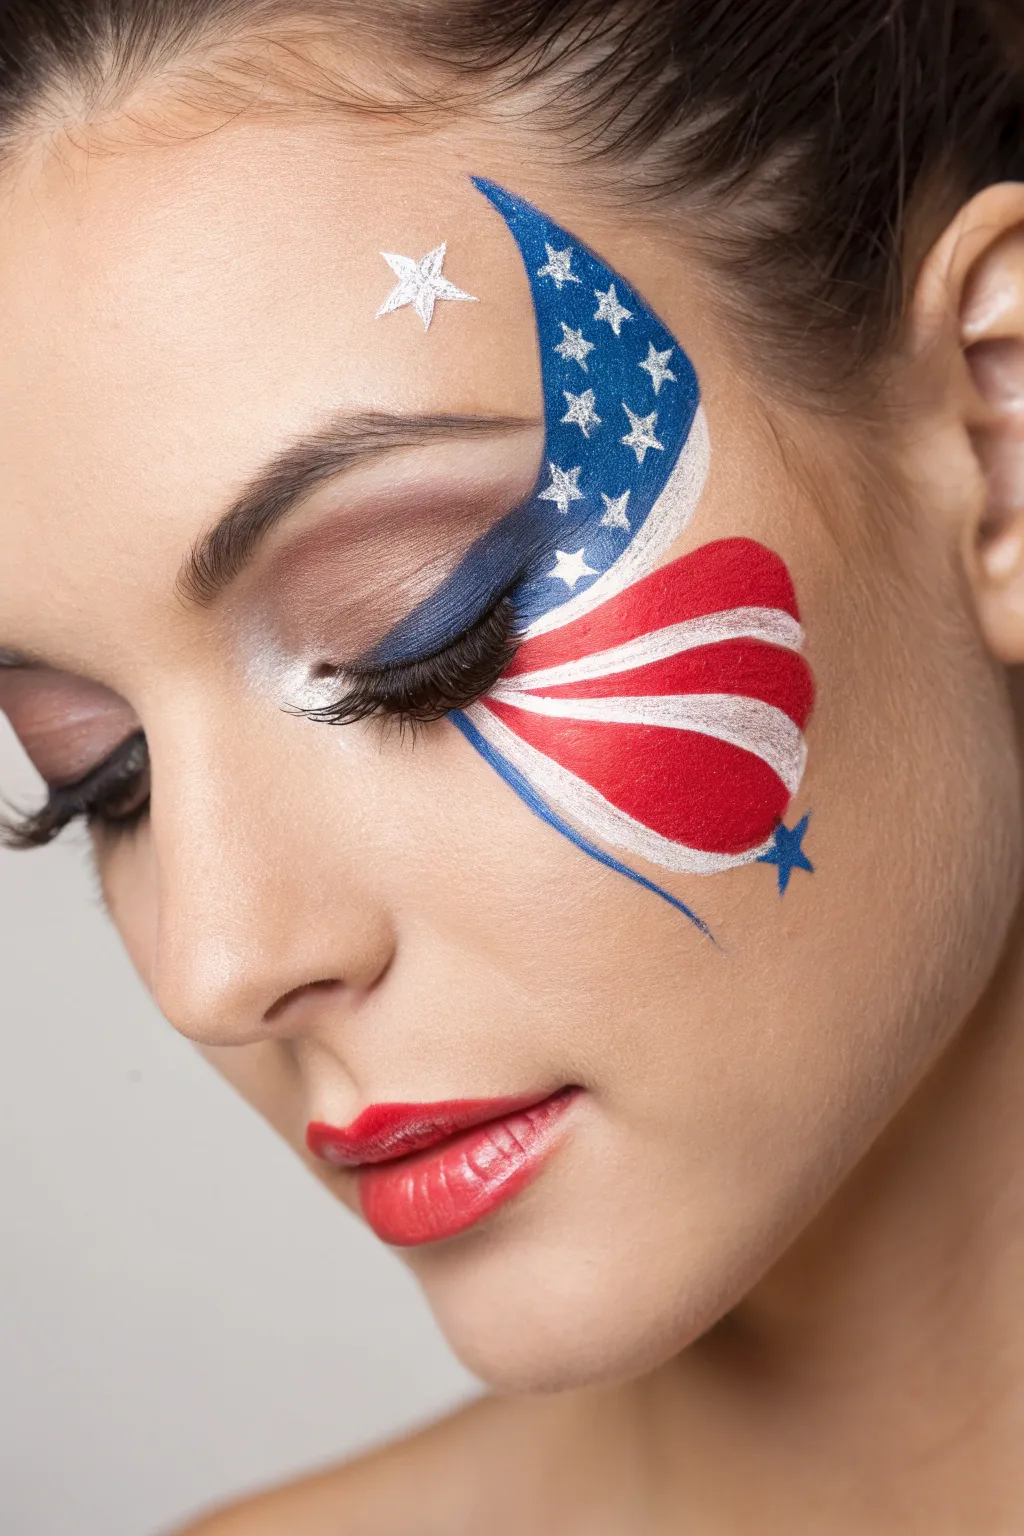
Patriotic Butterfly Eye Wings

Transform your look with this elegant, butterfly-inspired design that swoops dramatically around the eye. Combining classic American flag motifs with soft, petal-like shapes creates a stunning profile perfect for Independence Day celebrations.
How-To Guide
Materials
- White face paint (water-activated)
- Red face paint (water-activated)
- Dark blue face paint (water-activated)
- Metallic silver or pearl white eyeshadow
- Soft brown contour powder or eyeshadow
- Small flat brush (for stripes)
- Fine liner brush (for stars and outlines)
- Medium round brush
- Fluffy blending brush
- Mascara or false eyelashes
- Setting spray (optional)
Step 1: Base and Eyeshadow
-
Prime the Eyelid:
Start with clean skin. Apply a wash of metallic silver or pearl white eyeshadow to the inner corner of your eye, blending it halfway across the lid to create a luminous base. -
Define the Crease:
Using a fluffy blending brush, sweep a soft brown eyeshadow into the crease and outer corner of the eye. Blend this outward toward the temple to give the eye depth and structure before adding the graphic elements. -
Line the Lasso:
Use a small angled brush or liner brush with dark blue paint to create a dramatic cat-eye wing. Extend the wing sharply upward, following the natural angle of your lower lash line.
Steady Hands
Rest your pinky finger gently on the model’s cheek while painting fine details like the stars. This anchors your hand and prevents shakiness.
Step 2: The Starry Wing
-
Map the Upper Shape:
Load a medium round brush with dark blue face paint. Starting from the tip of your eyeliner wing, curve a bold swoosh upwards over the eyebrow, tapering off high on the forehead. -
Fill the Blue Field:
Thicken this upper blue line into a crescent moon shape that hugs the brow bone and temple. Ensure the coverage is solid and opaque. -
Paint Tiny Stars:
Switch to your finest liner brush and white paint. Carefully dab small five-pointed stars onto the blue section while it’s dry. I find that varying the size of the stars adds a nice sense of dimension. -
Add the Solo Star:
Paint a slightly larger, singular white star directly onto the skin just above the inner portion of your eyebrow, disconnected from the main design.
Glitter Upgrade
While the paint is still slightly wet, tap cosmetic-grade holographic glitter over the blue section to make the stars sparkle in the sunlight.
Step 3: The Striped Petals
-
Outline the Petals:
With a fine brush and white paint, lightly sketch the outline of three large, petal-like shapes curving downward from the outer corner of the eye toward the cheekbone. -
Fill with Red:
Use a flat brush loaded with red paint to fill in the body of these petal shapes. Leave a thin gap between them or paint over them, knowing we will define them with white later. -
Add White Separation:
Once the red feels tacky or dry, use opaque white paint to draw crisp, dividing lines between the red sections. Curve these lines to emphasize the roundness of the shape. -
Highlight the Edges:
Run a clean white line along the top edge of the red section, separating it from the blue wing above, and along the bottom edge to frame the design.
Step 4: Finishing Details
-
Connect the Elements:
Using the dark blue paint and a liner brush, draw a very thin, curved line that extends from the bottom of the red petals, swooping gently down the cheek to create movement. -
Add a Blue Accent Star:
Paint a small, sharp blue star at the outer tip of the red petal section to balance the design. -
Apply Mascara:
Finish the eye makeup with generous coats of black mascara or apply a pair of fluttery false lashes to match the drama of the face paint. -
Lip Color:
Complete the look with a shimmering red or coral lipstick that complements the red tones in your face paint.
Now you are ready to show off your patriotic spirit with this artistic flair


Have a question or want to share your own experience? I'd love to hear from you in the comments below!