A plain umbrella is basically a ready-made круг canvas, and painting one turns everyday rain gear into wearable art. I’m sharing my favorite umbrella painting ideas—starting with the classics you’ll actually want to carry, then easing into the playful, show-stopping designs.
Raindrops and Cloud Motifs
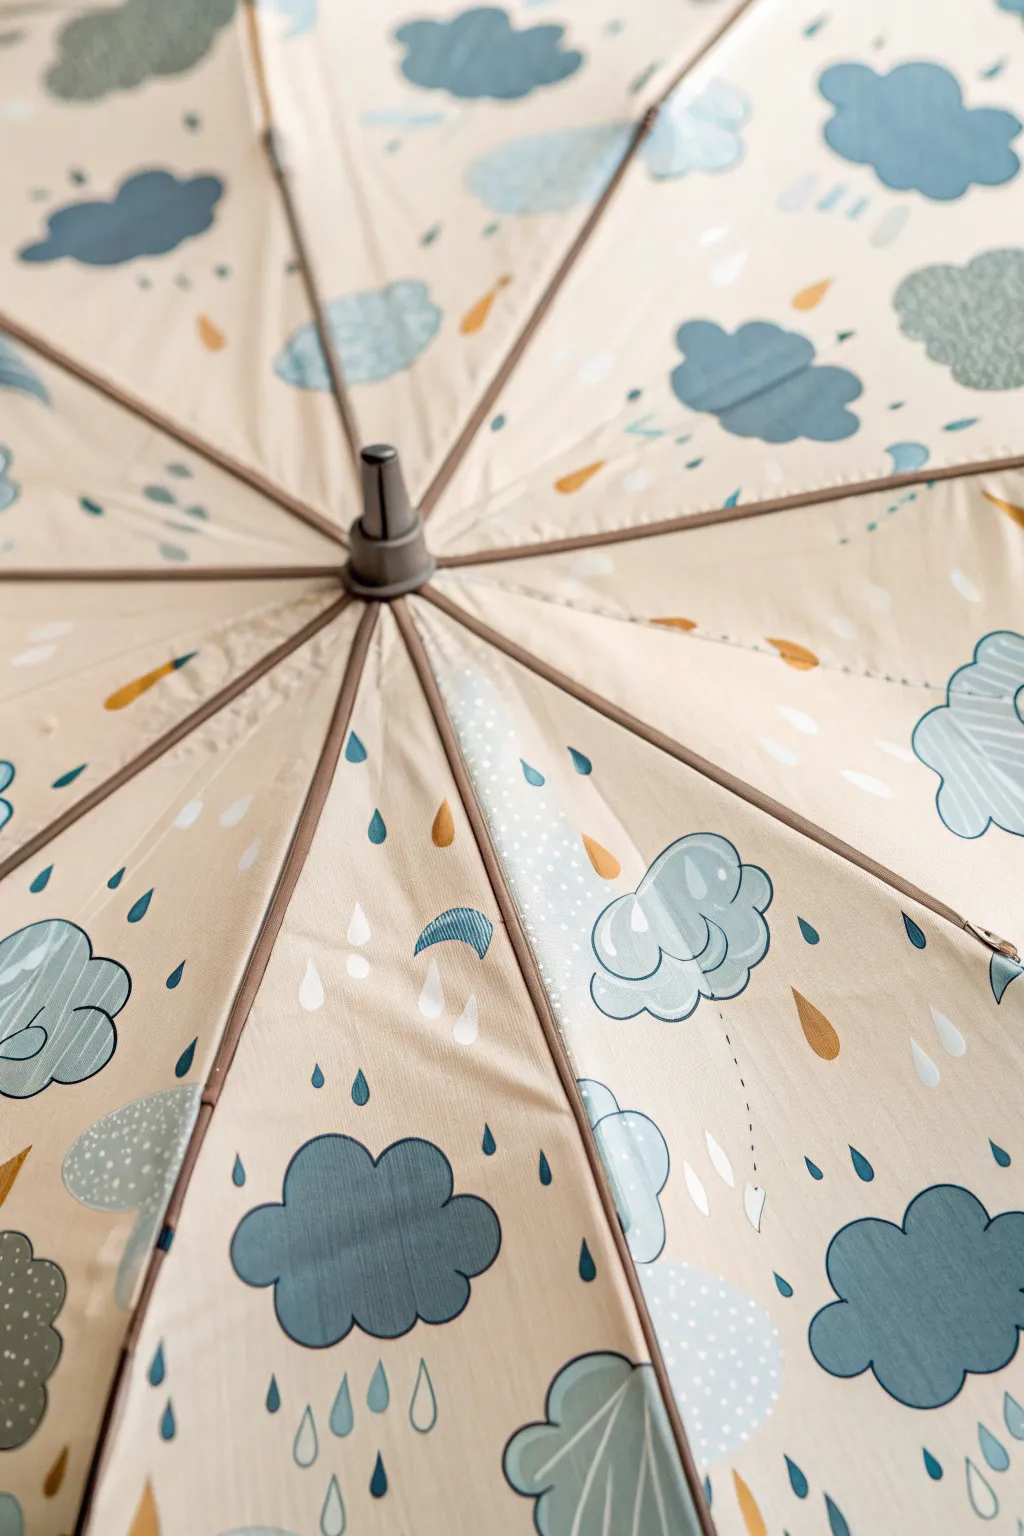
Transform a plain beige umbrella into a sky-full of charm with this playful cloud and raindrop design. The soft blue tones mixed with pops of mustard yellow create a cozy, illustrative look that makes rainy days feel a little brighter.
Step-by-Step Guide
Materials
- Solid beige or cream-colored umbrella (polyester or nylon)
- Fabric medium
- Acrylic paints (colors: Payne’s grey, muted teal, white, slate blue, mustard yellow)
- Round synthetic brushes (sizes 2, 4, and 6)
- Fine liner brush (size 0 or 00)
- Black fabric marker or permanent waterproof fine-point pen
- Pencil or white chalk pencil for sketching
- Paper towels
- Hairdryer (optional, for speeding up drying)
Step 1: Planning and Sketching
-
Prepare the surface:
Begin by opening your umbrella fully and ensuring the fabric is taut and clean. If it’s brand new, you might want to wipe it down with a damp cloth to remove any factory stiffeners, then let it dry completely. -
Mix your colors:
Prepare your palette by mixing acrylic paints with fabric medium according to the bottle’s ratio (usually 2:1 paint to medium). Create a few shades of blue: a deep storm blue, a soft pastel teal, and a barely-there ice blue. -
Map out the clouds:
Using a chalk pencil, lightly sketch large, fluffy cloud shapes scattered randomly across the panels. Vary the sizes significantly—some should be large feature clouds, while others are mere wisps.
Use Tape for Spacing
To prevent smearing wet paint as you rotate the umbrella, paint alternating panels (e.g., all odd numbers) first. Let them dry, then paint the even ones.
Step 2: Painting the Clouds
-
Fill solid dark clouds:
Select your slate blue or storm blue mixture. Using a size 6 round brush, paint in several of the larger cloud shapes with solid color, ensuring smooth edges. -
Add textured light clouds:
For the lighter grey or teal clouds, try a scumbling technique. Load your brush with a small amount of paint and rub it into the fabric in a circular motion to create a semi-transparent, textured look. -
Create patterned clouds:
Leave some cloud silhouettes unpainted for now, or paint them solid white. Once dry, you can add details like tiny polka dots (using the back of a brush handle) or striped patterns in a contrasting blue. -
Outline doodle clouds:
For a whimsical touch, don’t fill in every cloud. Use your fine liner brush with dark grey or black paint to simply outline a few cloud shapes, adding little loops or swirls inside to suggest fluffiness.
Step 3: Adding Rain and Details
-
Paint standard raindrops:
Around the clouds, paint classic tear-drop shapes. Use your various blue mixes to create depth, scattering them in clusters rather than a uniform grid. -
Add golden accents:
Mix a warm mustard yellow with fabric medium. Paint small, sharp raindrop shapes or tiny dashes interspersed among the blues. This pop of warmth is crucial to the design’s balance. -
Incorporate open drops:
Just like the clouds, leave some raindrops as outlines. Use your fine liner brush or a black fabric marker to draw open tear-drops, which adds a hand-drawn sketchbook feel. -
Draw directional lines:
Using the waterproof pen or fine liner, draw tiny dashed lines trailing from the bottom of some clouds, suggesting movement or light rain.
Fixing Stiff Paint
If the dried paint feels too crackly or stiff, you likely didn’t use enough fabric medium. Gently sand the rough spot with fine grit paper and recoat with a proper mix.
Step 4: Finishing Touches
-
Layering details:
Once your solid clouds are bone dry, go back in with a white or light blue paint. Add highlights to the tops of the dark clouds or paint distinct internal lines to define the ‘bumps’ of the cloud. -
Clean up edges:
Inspect your shapes. If any paint bled slightly, use the waterproof marker to add a definitive outline, turning the mistake into a stylistic choice. -
Heat set the design:
Allow the umbrella to dry open for at least 24 hours. To make it truly waterproof, use a hairdryer on high heat over each painted section for a few minutes to cure the fabric medium.
Now you have a custom accessory that makes waiting for the bus in a downpour feel a little more artistic


Simple Polka Dots All Over
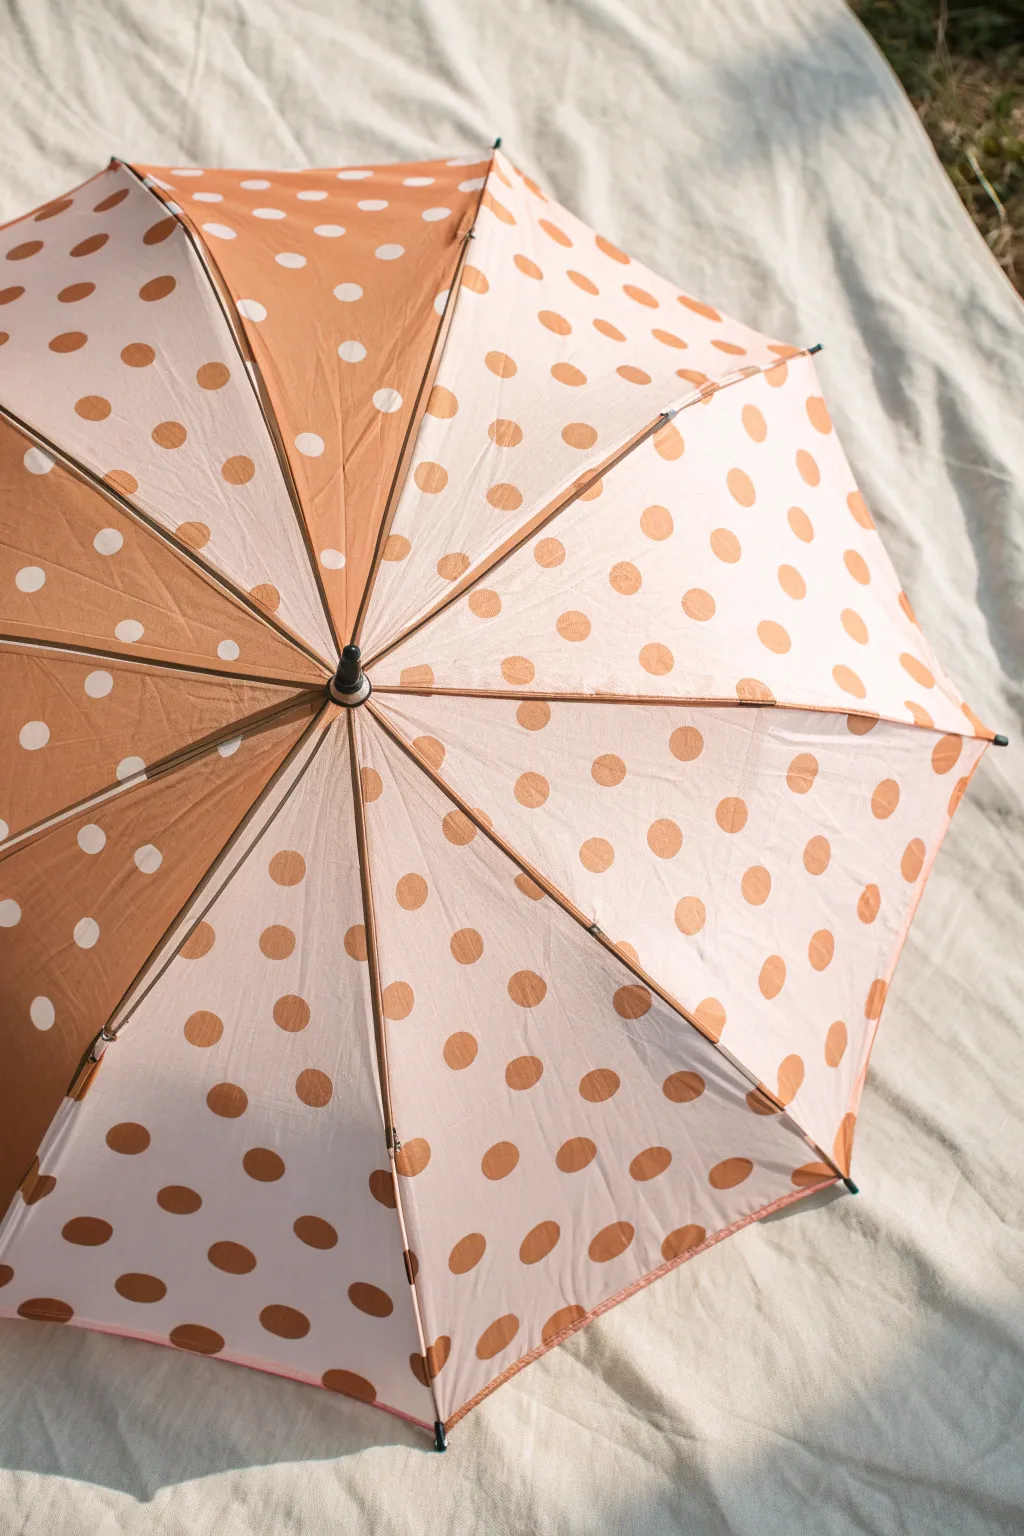
Transform a plain umbrella into a chic, vintage-inspired accessory with this alternating polka dot design. The alternating panels of caramel brown and creamy white create a playful yet sophisticated pattern that looks lovely rain or shine.
Step-by-Step Tutorial
Materials
- Solid colored umbrella (white or light cream works best for the base)
- Fabric paint or acrylic paint mixed with textile medium
- Caramel brown paint color
- White fabric paint (opaque)
- Round foam pouncers (approx. 1-inch diameter)
- Small palette or paper plate
- Painter’s tape or masking tape
- Flat paintbrush (medium size)
- Cardboard scraps or drop cloth
Step 1: Preparation & Base Color
-
Set up your workspace:
Find a well-ventilated area and lay down a drop cloth. Fully open the umbrella and secure it so it doesn’t roll away; leaning the handle against a wall or heavy box can help keep it upright. -
Plan your panels:
Identify the natural sections of the umbrella divided by the metal ribs. You will be painting alternating panels in different color schemes, so mentally mark every other panel as ‘dark’ and the remaining ones as ‘light’. -
Mask the ribs:
Carefully apply painter’s tape along the metal ribs and the center centerpiece to protect them from stray paint marks. Run your fingernail along the tape edge to ensure a tight seal. -
Paint the dark panels:
Mix your caramel brown paint with the textile medium according to the bottle instructions. Using the flat paintbrush, fill in every other panel completely with this brown shade. -
Ensuring opacity:
If the original umbrella color shows through the brown paint, let the first coat dry for about 20 minutes and apply a second coat for a rich, solid finish. -
Let the base dry:
Allow the brown panels to dry completely. This is crucial before moving on to the dots to prevent smudging. It usually takes about an hour, depending on humidity.
Clean Circle Tip
If your foam pouncer creates bubbles, smooth the paint on the palette with a flat brush before dipping the sponge. This prevents ‘crater’ dots.
Step 2: Creating the Dots
-
Load the pouncer:
Pour some caramel brown paint onto your palette. Dip your round foam pouncer into the paint, then dab it off slightly on a scrap piece of cardboard to ensure an even coating without drips. -
Dot the light panels:
On the unpainted (light cream) panels, press the brown-loaded pouncer firmly onto the fabric. Twist it slightly back and forth before lifting to get a crisp circle edge. -
Establish a pattern:
I find it helpful to start with a row of dots near the outer rim and work my way inward toward the center handle, staggering the rows to create a classic polka-dot layout. -
Switch to white paint:
Clean your pouncer thoroughly or grab a fresh one. Load it with opaque white fabric paint. Test it on cardboard first to make sure the brown paint is gone. -
Dot the dark panels:
Move to the panels you previously painted brown. Apply the white dots over the dry brown base using the same firm pressing and twisting motion. -
Check density:
Step back occasionally to look at the overall pattern. Try to keep the spacing of the white dots similar to the spacing of the brown dots for a cohesive look. -
Touch up edges:
Use a small detail brush to fix any dots that aren’t perfectly round or to fill in areas where the foam pouncer might have missed a spot due to the fabric’s texture.
Step 3: Finishing Touches
-
Remove tape:
Once all dots are applied, slowly peel off the painter’s tape while the paint is still slightly tacky to avoid pulling up dried flakes. -
Full dry time:
Leave the umbrella open to dry in a dust-free area for at least 24 hours. This ensures the paint bonds properly to the fibers. -
Heat set the paint:
If your specific fabric paint requires heat setting, use a hairdryer on high heat, moving it slowly over each panel for a few minutes to lock in the design.
Make It Pop
Add a third color element by painting a thin border along the bottom edge of the umbrella in a contrasting color like sage green or burnt orange.
Now you have a charming custom umbrella ready for your next rainy day stroll


Crisp Stripes With Tape
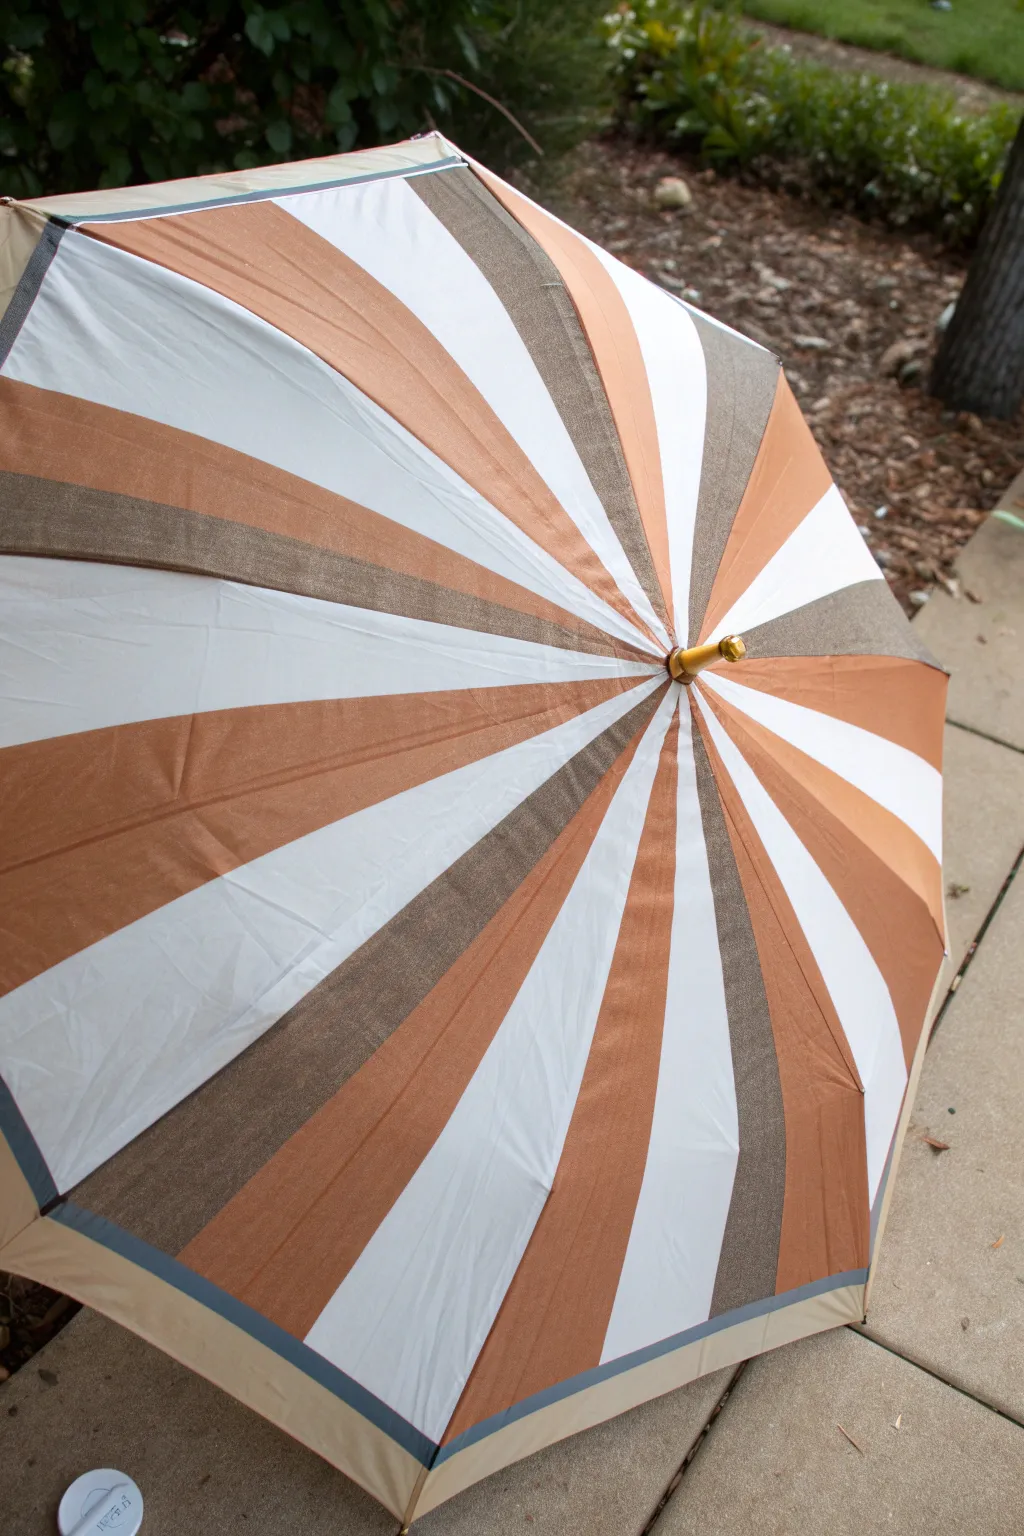
Transform a plain white umbrella into a stunning sunburst of metallic bronze and warm terracotta using nothing but tape and patience. This geometric design looks complex but relies on a simple repeating pattern that creates an elegant, high-end finish perfect for sunny strolls.
Step-by-Step
Materials
- Plain white or cream umbrella (nylon or polyester)
- Painter’s tape (various widths: 1-inch and 2-inch)
- Fabric medium
- Acrylic craft paint (Terracotta/Burnt Orange)
- Metallic acrylic paint (Bronze or Antique Gold)
- Flat paintbrushes (1-inch width)
- Small round brush (for touch-ups)
- Plastic drop cloth or newspaper
- Measuring tape
- Pencil or fabric chalk
Step 1: Preparation & Mapping
-
Set up your workspace:
Open the umbrella fully and secure it in a way that allows you to walk around it. I find that wedging the handle between heavy objects or into an outdoor patio table stand works best. -
Clean the surface:
Wipe down the umbrella fabric with a damp cloth to remove any dust or manufacturing residue. Let it dry completely before starting. -
Analyze the panels:
Count the natural ribs of your umbrella. Most have 8 panels. This project relies on subdividing those existing panels to create the narrow stripes. -
Mark the center lines:
Using a flexible measuring tape, find the exact center of one fabric panel at the bottom edge. Mark this lightly with a pencil. Draw a light line connecting this mark to the top ferrule (the center tip) of the umbrella. -
Repeat marking:
Repeat the center-marking process for every panel on the umbrella. These guide lines will ensure your stripes radiate perfectly from the center.
Step 2: Taping the Design
-
Tape the ribs:
Apply strips of painter’s tape directly over the metal ribs. This protects the hardware and creates one of your ‘white’ negative space stripes. -
Create the first color zone:
Using your pencil center lines as a guide, place two strips of tape on either side of that line. The space between these two pieces of tape will become your central wide stripe. -
Add secondary tape lines:
Place additional tape lines to create the narrower borders. Look at the reference image: you want a wide section for the orange, followed by a taped-off ‘white’ gap, followed by a narrow section for the metallic paint. -
Seal the edges:
Run your fingernail or a credit card firmly along every edge of the tape. This is crucial for achieving those crisp lines and preventing paint bleed on the fabric.
Bleed Blocker
Before applying color, paint a thin layer of the *base* color (white) or clear medium over the tape edges. This seals the tape, so any bleed is invisible.
Step 3: Painting
-
Mix the paint:
Mix your acrylic paints with fabric medium according to the bottle instructions (usually a 2:1 ratio). This ensures the paint remains flexible and doesn’t crack when the umbrella folds. -
Apply the Terracotta:
Start with the widest stripe sections. Use a flat brush to apply the terracotta orange paint, brushing from the center outwards toward the rim for a smooth stroke. -
Apply second coat:
The orange might look streaky at first. Allow it to dry to the touch, then apply a second coat for solid, opaque coverage. -
Paint the Metallic stripes:
Using a clean brush, apply the metallic bronze paint to the narrower designated stripes. Metallic paints often need a little extra mixing to ensure the shimmer particles are evenly distributed. -
Double check coverage:
Hold the umbrella up to a light source if possible. If you see light shining through the painted areas unevenly, add a thin third coat. -
Create the heavy border:
Paint a solid, thick band around the entire bottom rim of the umbrella in the dark metallic shade to anchor the design.
Level Up: Ombré Effect
Instead of a solid orange stripe, blend yellow into the orange near the center top for a sunset gradient effect that radiates outward.
Step 4: Finishing Touches
-
Remove tape:
Carefully peel off the tape while the final coat of paint is still slightly tacky. Pulling slowly at a 45-degree angle helps keep the lines sharp. -
Fix imperfections:
If any paint bled under the tape, use a small round brush and a bit of white paint (or the original umbrella color) to tidy up the edges. -
Dry completely:
Leave the umbrella open to dry for at least 24 hours. Do not close it until the paint is fully cured to prevent sticking.
Step out into the rain or sun with pride, knowing you’ve created a custom accessory that’s as stylish as it is functional


Loose Watercolor-Style Florals
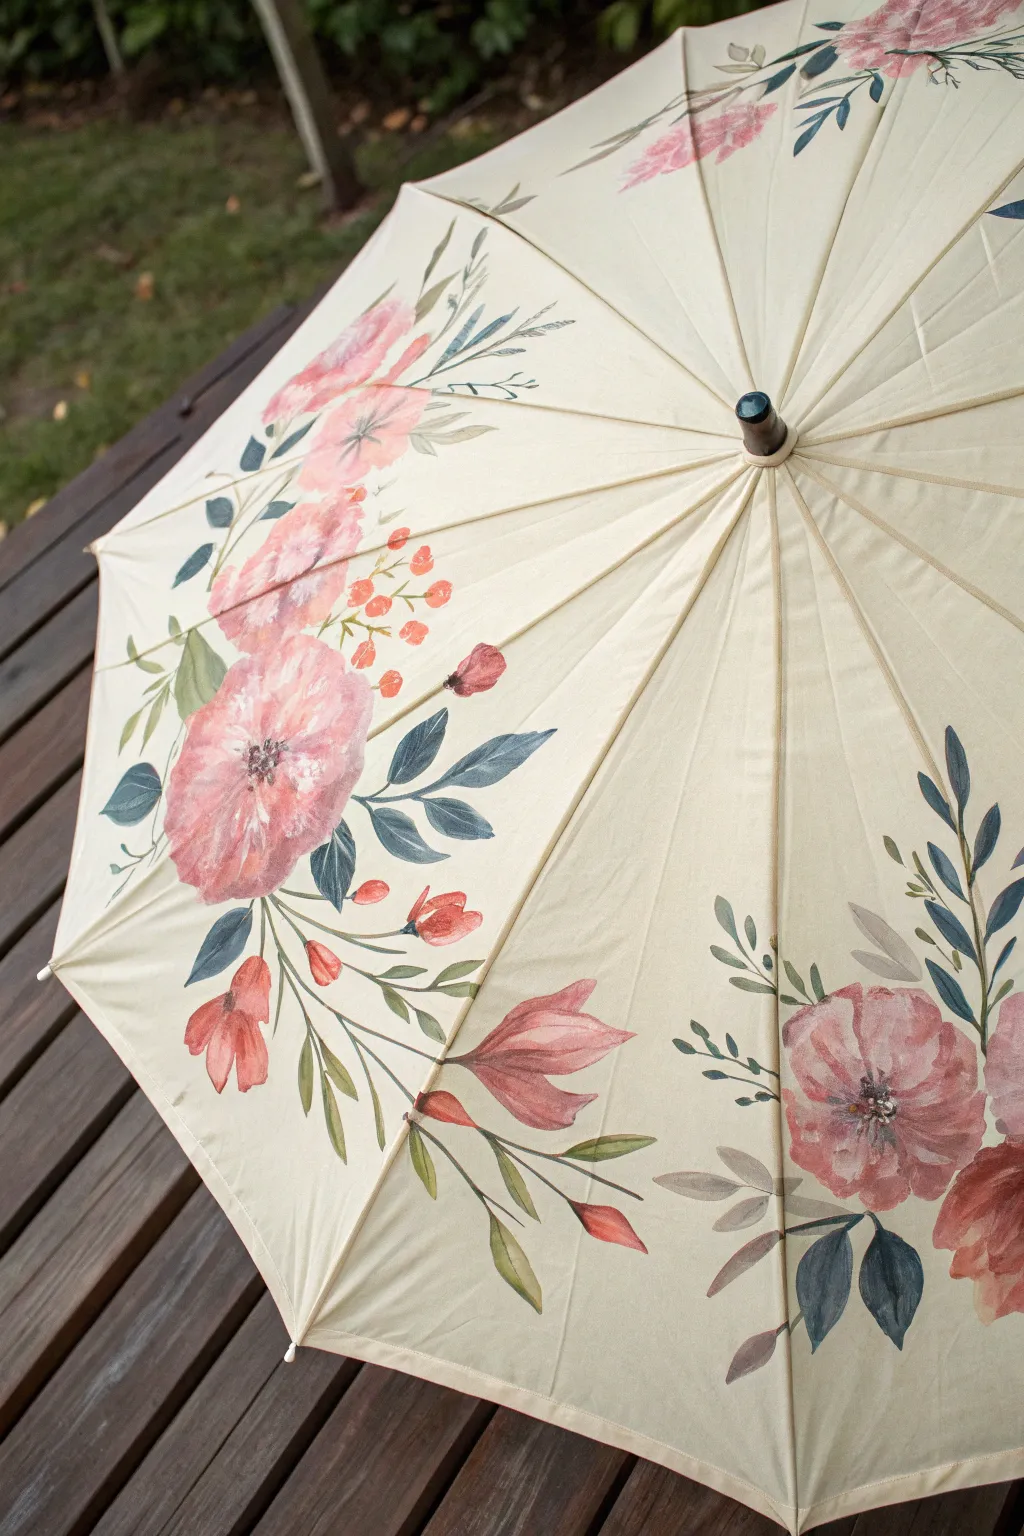
Transform a plain cream umbrella into a blooming garden with this soft, painterly technique. By diluting fabric paints, you’ll achieve the translucent, layered look of watercolors while ensuring your art remains waterproof and durable.
How-To Guide
Materials
- Light cream or beige polyester/nylon umbrella
- Soft-body fabric paints (Magenta, Red, warm Pink, Sage Green, Deep Blue/Green, White)
- Textile medium (essential for dilution)
- Assorted synthetic brushes (Round #4, Round #8, and a Filbert or Flat for larger petals)
- Mixing palette with deep wells
- Container of water
- Paper towels
- Pencil or disappearing fabric marker
Step 1: Preparation and Sketching
-
Set up your workspace:
Open the umbrella fully and secure it in a way that it won’t roll away—placing the handle inside a heavy jar or bucket works perfectly. Ensure you are working in a well-lit area. -
Plan the composition:
Observe the image: the flowers are clustered near the edge of the panels, growing inward, rather than centered. Visualize large blooms anchoring the design with smaller buds and leaves trailing off. -
Sketch the layout:
Using a pencil or disappearing fabric marker, very faintly sketch the rough circles where your main flowers will go. Don’t worry about petals yet; just place the general shapes to balance the design across opposing panels.
Step 2: Blocking not the Main Blooms
-
Mix the base pink:
Combine your warm pink fabric paint with a generous amount of textile medium and a drop of water. You want a consistency like heavy cream—thin enough to glide but not so watery it bleeds uncontrollably. -
Paint the first petals:
Using the #8 Round brush, load the brush with the pink mix. Start from the center of a flower and press the belly of the brush down and pull outward to create loose, organic petal shapes. -
Soften the edges:
While the paint is still wet, dip a clean, damp brush into water and gently run it along the outer edges of the petals to feather them out, creating that watercolor bleed effect. -
Add depth variations:
Mix a slightly darker shade using magenta and textile medium. While the first layer is tacky but not dry, drop this darker color into the center of the flower and let it naturally spread outward. -
Create smaller buds:
For the smaller reddish clustering buds (like berries), use the tip of a smaller round brush with a mix of red and orange. Dot these loosely around the main flower clusters.
Bleeding Lines?
If paint spreads too fast on the nylon, your mix is too watery. Let it dry, then paint over it with a thicker mix (less water, more medium). A hair dryer can stop a run instantly.
Step 3: Painting the Foliage
-
Mix your greens:
Prepare two shades of green: a light sage for the primary leaves and a deeper blue-green for contrast. Mix them with textile medium to maintain transparency. -
Paint the main leaves:
Using the Filbert brush or a large Round brush, paint broad leaves tucking behind the pink flowers. Use a ‘press and lift’ motion: press down for the wide part of the leaf and lift as you drag to create a point. -
Add blue-green accents:
Intersperse the sage leaves with darker, blue-green foliage. I find that painting ‘floating’ leaves—leaves not directly attached to a stem—adds a wonderful sense of movement and looseness. -
Connect with stems:
Switch to your #4 Round brush. With a very diluted brownish-green mix, draw thin, sweeping lines to connect your buds and leaves to the main cluster. Keep your wrist loose to avoid stiff lines.
Pro Tip: Transparency
To get the true watercolor look shown here, never use paint straight from the tube. Always mix it with textile medium (approx 1:1 ratio) to increase translucency without losing adhesion.
Step 4: Details and Definition
-
Layer the main flowers:
Once the initial pink base is dry to the touch, mix a more opaque white-pink shade. Paint a few smaller, distinct petal shapes near the center of the blooms to create a sense of layers and fullness. -
Add the centers:
Using a fine detail brush and dark brown or black paint, add tiny stippled dots in the very center of the open flowers. These resemble stamens and ground the flower. -
Highlight the stamens:
Add a few tiny dots of white on top of the dark center dots to make them pop. -
Refine the leaves:
If any leaves look too flat, add a quick stroke of the darker green down the center vein, or along one side, to suggest shadow. -
Check balance:
Step back and look at the umbrella as a whole. Add small stray petals or tiny leaves in empty spaces to balance the composition if one side feels heavier than the other.
Step 5: Finishing and Setting
-
Allow to cure:
Let the umbrella sit open in a safe place for at least 24 hours. The thickest parts of the paint need to dry completely. -
Heat set the design:
Once fully dry, use a hair dryer on high heat (hold it a few inches away) to blast each painted section for several minutes. This helps bond the fabric paint to the synthetic fibers.
Now you have a stunning, hand-painted accessory that turns a rainy day into a personal art exhibit
BRUSH GUIDE
The Right Brush for Every Stroke
From clean lines to bold texture — master brush choice, stroke control, and essential techniques.
Explore the Full Guide
Branch-and-Leaves Along the Ribs
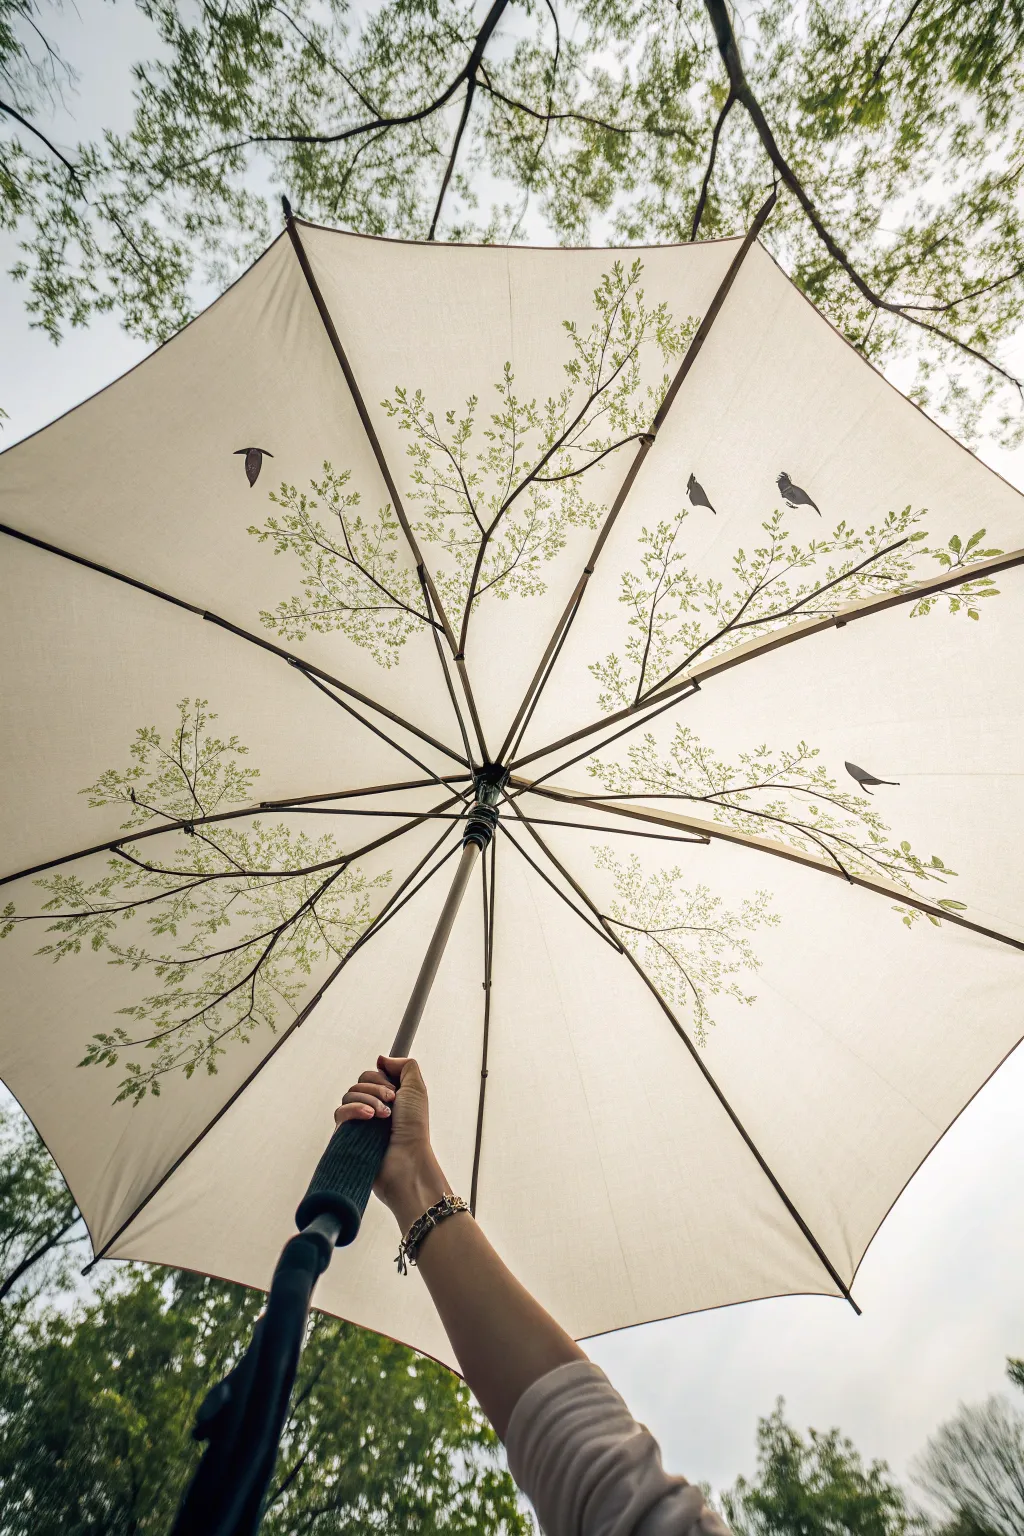
Transform a plain umbrella into a personal sky view with this delicate branch and leaf design painted directly onto the inner fabric. The artwork uses the umbrella’s natural structure to create tree limbs that stretch overhead, complete with tiny silhouetted birds for a touch of life.
Step-by-Step Tutorial
Materials
- Light-colored umbrella (cream or white, nylon or polyester)
- Fabric medium
- Acrylic paints (dark brown, olive green, sap green, black)
- Fine liner brushes (size 0 and 00)
- Small flat brush
- Palette or mixing plate
- Chalk or disappearing fabric marker
- Water cup and paper towels
Step 1: Preparation and Planning
-
Open and secure:
Begin by fully opening your umbrella and securing it so it doesn’t wobble. You can rest the handle in a heavy vase or ask a friend to hold it steady while you sketch, though working with it upside down on a table often works best for painting. -
Map the branches:
Using a piece of chalk or a disappearing fabric marker, lightly sketch your main branch lines. Plan for the heavier branches to originate near the metal ribs and tips, growing inward and spreading across the panels. -
Mix your medium:
Mix your dark brown acrylic paint with fabric medium according to the bottle’s instructions (usually a 1:1 or 2:1 ratio). This step is crucial ensures the paint remains flexible and doesn’t crack when the umbrella folds.
Fixing Blotches
If you accidentally drop a blob of paint where it shouldn’t be, quickly turn it into a falling leaf or a distant bird. Don’t wipe it, or it will smear.
Step 2: Painting the Structure
-
Main branches:
Load a fine liner brush with your fabric medium mixture. Start painting the thickest parts of the branches, following the metal ribs of the umbrella as a guide for the main trunks. -
Extend the reach:
Pull the paint outward from the ribs into the center of the fabric panels. Use a shaky hand intentionally here; nature isn’t perfectly straight, and slight wobbles make the bark look more realistic. -
Add secondary twigs:
Switch to your smallest size 00 brush. Extending from your main brown lines, paint much thinner, delicate twigs that crisscross slightly. I find that lifting the brush pressure at the very end of the stroke creates a nice tapering effect. -
Let it set:
Allow the brown skeleton of your tree to dry completely before moving on to the foliage. This prevents the green from muddying your crisp branch lines.
Seasonal Shift
Change the vibe by swapping green leaves for pink dabs to create cherry blossoms, or use burnt orange and yellow for an autumn canopy.
Step 3: Adding Life and Detail
-
Mix leaf greens:
Prepare two shades of green on your palette: an olive tone and a brighter sap green, both mixed with fabric medium. Having two shades adds depth and mimics light filtering through leaves. -
Stipple the foliage:
Using the very tip of a small round brush or the fine liner, dab small clusters of leaves along the thinnest twigs. Keep the dots irregular and grouped rather than evenly spaced. -
Layering density:
Concentrate more leaf clusters near the outer edges of the canopy design (the part furthest from the center pole) to simulate the fullness of a tree crown. -
Vary the color:
While the first green is still slightly wet, dab in the second green shade. Let them blend slightly on the fabric for a soft, natural transition. -
Paint the birds:
Mix black acrylic with fabric medium. Choose two or three open spots in the ‘sky’ of the umbrella panels where there are no branches. -
Bird silhouettes:
Paint simple V-shapes or slightly more detailed bird silhouettes. Ensure the wings look like they are in motion, banking or gliding. -
Clean up edges:
Check your lines. If any branch looks too abrupt, extend it slightly with a whisper-thin line.
Step 4: Finishing Touches
-
Dry thoroughly:
Leave the umbrella open to dry for at least 24 hours. Do not close it, as the paint might stick to itself even if it feels dry to the touch. -
Heat set:
Once fully cured, use a hair dryer on high heat to blow over the painted areas for a few minutes. This heat-setting process helps bond the fabric medium permanently.
Enjoy your private view of nature every time you open your umbrella against the rain
Fruit Slice Illusion From Above
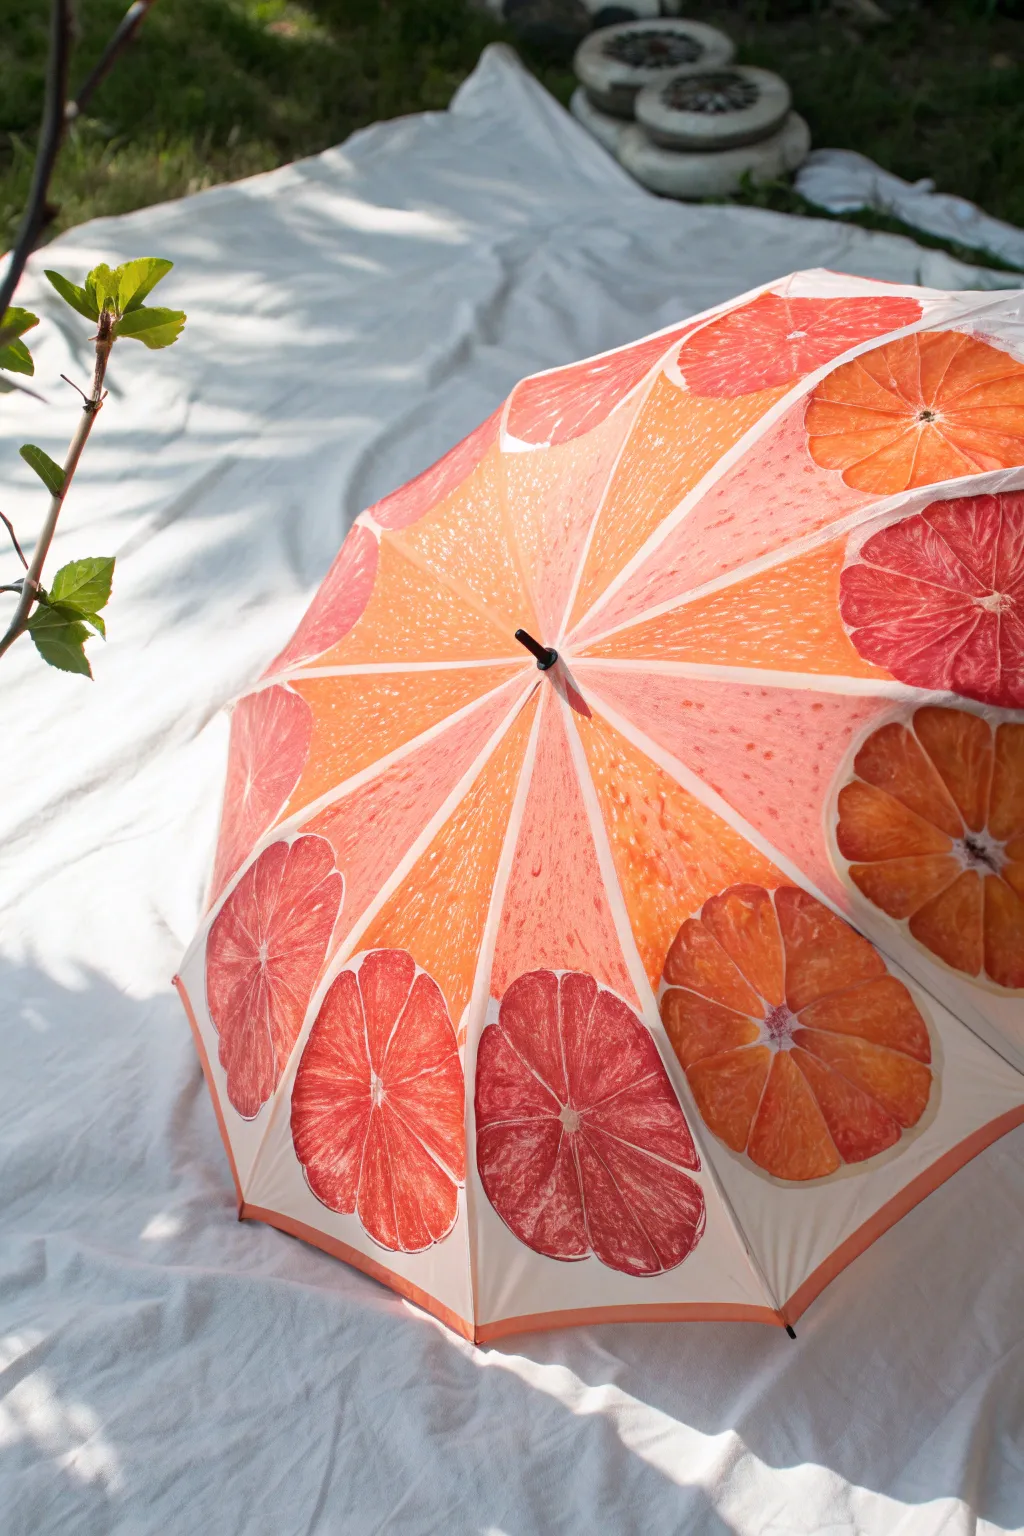
Transform a plain white umbrella into a vibrant, juicy masterpiece that mimics the refreshing look of sliced grapefruit and blood oranges. This project uses radiating segments and translucent layering to create a stunning, summery fruit illusion.
Step-by-Step
Materials
- Solid white polyester umbrella
- Fabric medium
- Acrylic paints (bright orange, ruby red, titanium white, golden yellow)
- Wide flat synthetic brush (1-2 inch)
- Medium round brush
- Fine liner brush
- Pencil or chalk fabric marker
- Ruler or straight edge
- Plastic drop cloth
- Jar for water and paper towels
Step 1: Planning the Segments
-
Prepare the workspace:
Since paintings umbrellas requires them to be open, find a spacious area and lay down a plastic drop cloth to catch any drips. Fully open your white umbrella and secure it. -
Mix your base colors:
Mix your acrylic paints with fabric medium according to the bottle instructions (usually 1:1 or 2:1). Prepare two main shades: a ruby red for grapefruit and a deep golden orange for the blood orange sections. -
Map the central star:
Using a pencil and ruler, lightly mark the center point near the ferrule (the top tip). Draw straight lines extending from the center down the middle of each umbrella panel, stopping about 8 inches from the edge. This creates the ‘pith’ lines.
Sticky Situation
If the umbrella fabric sticks together after closing, your paint layers were too thick. Dust the painted areas lightly with talcum powder or cornstarch before folding it up to prevent sticking.
Step 2: Painting the Fruit Flesh
-
Lay the base coat:
Starting with the grapefruit sections, use your wide flat brush to paint triangular wedges radiating from the center. Leave a thin white gap between each painted wedge to represent the white pith lines. -
Create texture:
While the paint is still wet, dab it gently with a dry paper towel or a dry brush. This lifts small spots of pigment, mimicking the natural, uneven texture of citrus vesicles. -
Alternate colors:
Switch to your orange mixture. Paint alternating panels or sections with this color to create visual variety, maintaining those thin white gaps between all colored areas. -
Fade edges:
As you paint down toward the rim, let the paint brush run slightly dry. A rougher, less opaque edge here looks more organic than a hard stop.
Step 3: Adding the Rim Slices
-
Outline the circles:
Around the bottom parameter of the umbrella, sketch large half-circles or slight ovals using your chalk marker. These will be the cross-section fruit slices. -
Fill the slice shapes:
Paint the interior of these circles with your red or orange mixtures. Leave a distinct 1/2 inch white border around the very edge to act as the peel. -
Define the segments:
Dip a medium round brush into pure titanium white (mixed with medium). Paint the internal ‘spokes’ of the fruit slices, dividing the circles into 8-10 triangular sections. -
Add the core:
Paint a small, fuzzy white star or irregular circle in the center of each fruit slice where the segments meet.
Zesty Twist
Add variety by painting a few slices as lemons (bright yellow) or limes (zesty green). You can also splash watered-down white paint across the top for a ‘fresh juice spray’ effect.
Step 4: Detailing and Sealing
-
Paint the seeds:
Using a fine liner brush and a slightly darker shade of your fruit color (created by adding a touch of red or brown), paint tiny tear-drop shapes near the center of the slices for seeds. -
Enhance the pith:
Go back over the long radiating lines from the center of the umbrella with fresh white paint to crispen up any edges that got messy. -
Add juicy highlights:
Mix a very watery white glaze. I find that lightly streaking this over the darkest parts of the fruit flesh adds a glistening, wet look. -
Paint the rinds:
Along the very outer curved edge of your painted slices, add a thin line of deep orange or dark pink to define the outer skin of the fruit. -
Let it cure:
Leave the umbrella open to dry completely for at least 24-48 hours. Most fabric mediums require heat setting, so once dry, blast it for a few minutes with a hair dryer on high heat.
Now you have a refreshing canopy that creates its own sunshine on a rainy day

PENCIL GUIDE
Understanding Pencil Grades from H to B
From first sketch to finished drawing — learn pencil grades, line control, and shading techniques.
Explore the Full Guide
Galaxy Night Sky Canopy
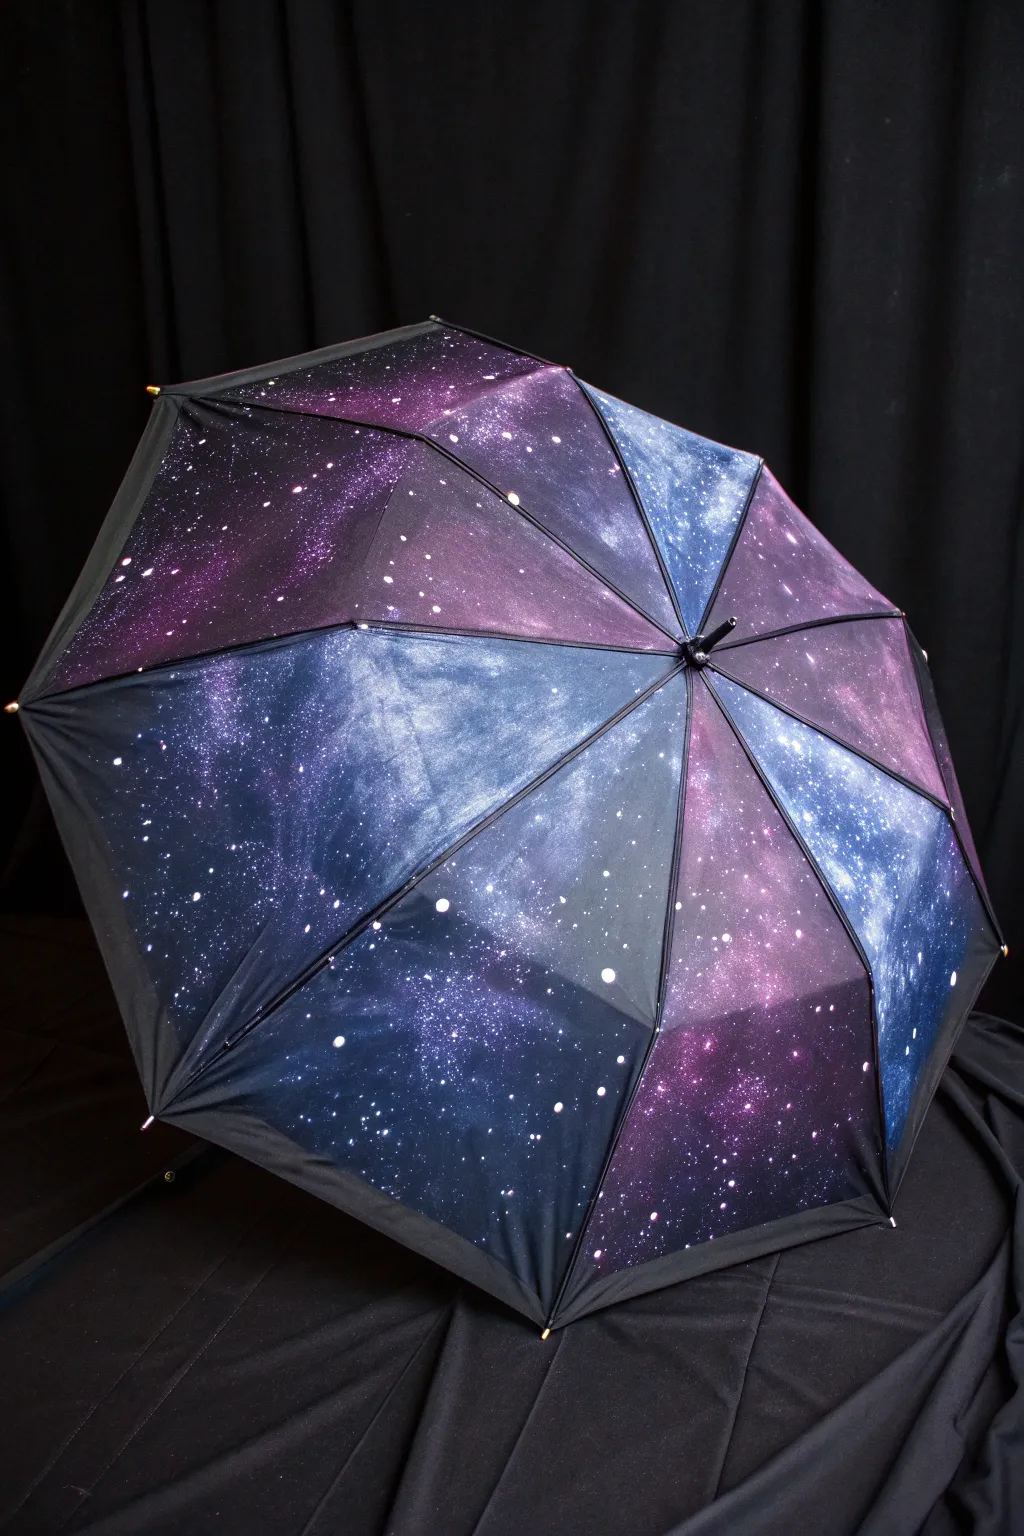
Turn a rainy day into a celestial experience with this stunning galaxy-themed umbrella. By layering translucent acrylics and flickering white stars over a dark canopy, you’ll create a breathtaking depth that mimics the night sky.
Step-by-Step Tutorial
Materials
- Solid black umbrella (nylon or polyester)
- Fabric medium
- Acrylic craft paints (Violet, Magenta, Cobalt Blue, Navy Blue, Titanium White)
- Sea sponge or kitchen sponge
- Stiff bristle toothbrush
- Plastic palette or paper plates
- Water cup
- Painter’s tape (optional)
- Cardboard scraps
Step 1: Preparation
-
Prepare your workspace:
Open the umbrella fully and set it on a drop cloth or old newspapers. Painting an open umbrella can be tricky, so make sure you have plenty of room to move around it. -
Mix the medium:
Mix your acrylic paints with fabric medium according to the manufacturer’s ratio (usually 2:1 paint to medium). This ensures the paint remains flexible when the umbrella opens and closes, preventing cracks. -
Protect hardware:
If you want to keep the metal tips (ferrules) or the center cap clean, wrap small pieces of painter’s tape around them now.
Step 2: Painting the Nebulas
-
Load the sponge:
Dampen your sea sponge slightly and wring it out completely. Dip a corner into your darkest blue (Navy) mixed with fabric medium. -
Create the base clouds:
Dab the sponge onto the fabric in random, cloud-like clusters. Don’t cover the whole umbrella; leave plenty of the original black showing for contrast. Use a light pouncing motion to keep the edges soft. -
Layering violet tones:
While the blue is still tacky or just after a quick dry, switch to a clean part of the sponge and load it with Violet. Sponge this color partially over the navy sections and partially onto the black, blending the edges softly. -
Adding brightness:
In the centers of your purple and blue clouds, sponge on small amounts of Magenta and Cobalt Blue. These brighter colors create the ‘glow’ of the nebula gases. -
Highlighting:
Mix a tiny drop of Titanium White into your light blue or magenta. Dab this very sparingly into the absolute center of the brightest nebula clusters to create depth and intensity. -
Softening transitions:
If any paint edges look too harsh, take a mostly clean, damp sponge and gently pat the perimeter of the painted areas to fade them back into the black fabric. -
Drying time:
Let this base layer dry completely. I like to wait about an hour here to ensure the colors don’t muddy when we add the stars.
Sponge Tactics
Use a natural sea sponge rather than a synthetic kitchen sponge. The irregular holes create much more realistic, organic cloud textures than uniform synthetic pores.
Step 3: Creating the Stars
-
Prepare star paint:
Dilute Titanium White paint with a small amount of water until it has the consistency of heavy cream or ink. It needs to flow easily off a brush. -
The flicking technique:
Dip an old stiff toothbrush into the thinned white paint. Test on a piece of cardboard first: run your thumb across the bristles to flick a spray of fine dots. -
Apply distant stars:
Hold the toothbrush about 12 inches away from the umbrella surface and flick the bristles. Move around the entire canopy, creating a dense field of tiny, distant stars across both painted and unpainted areas. -
Adding major stars:
Dip the handle of a paintbrush or a toothpick into undiluted white paint. Gently dot specific brighter stars onto the canvas, focusing on the lighter nebula areas. -
Creating constellations:
For added detail, paint a few distinct crosses or larger dots to represent major stars or planets. You can even map out real constellations if you’re feeling precise.
Glow in the Dark
Mix glow-in-the-dark powder or fabric paint into your white star mixture. During the day it looks normal, but at night your personal galaxy will actually shine.
Step 4: Finishing Touches
-
Remove tape:
Carefully peel off any tape you applied to the metal tips or cap. -
Full cure:
Allow the umbrella to remain open and dry for at least 24 hours. This curing time is crucial for the fabric medium to bond properly. -
Heat setting (Optional):
If your fabric medium requires heat setting, use a hair dryer on a hot setting to blow over the painted areas once they are fully dry.
Now you have a portable piece of the cosmos ready to unfold whenever the weather turns grey
Tropical Leaves and Bold Shapes
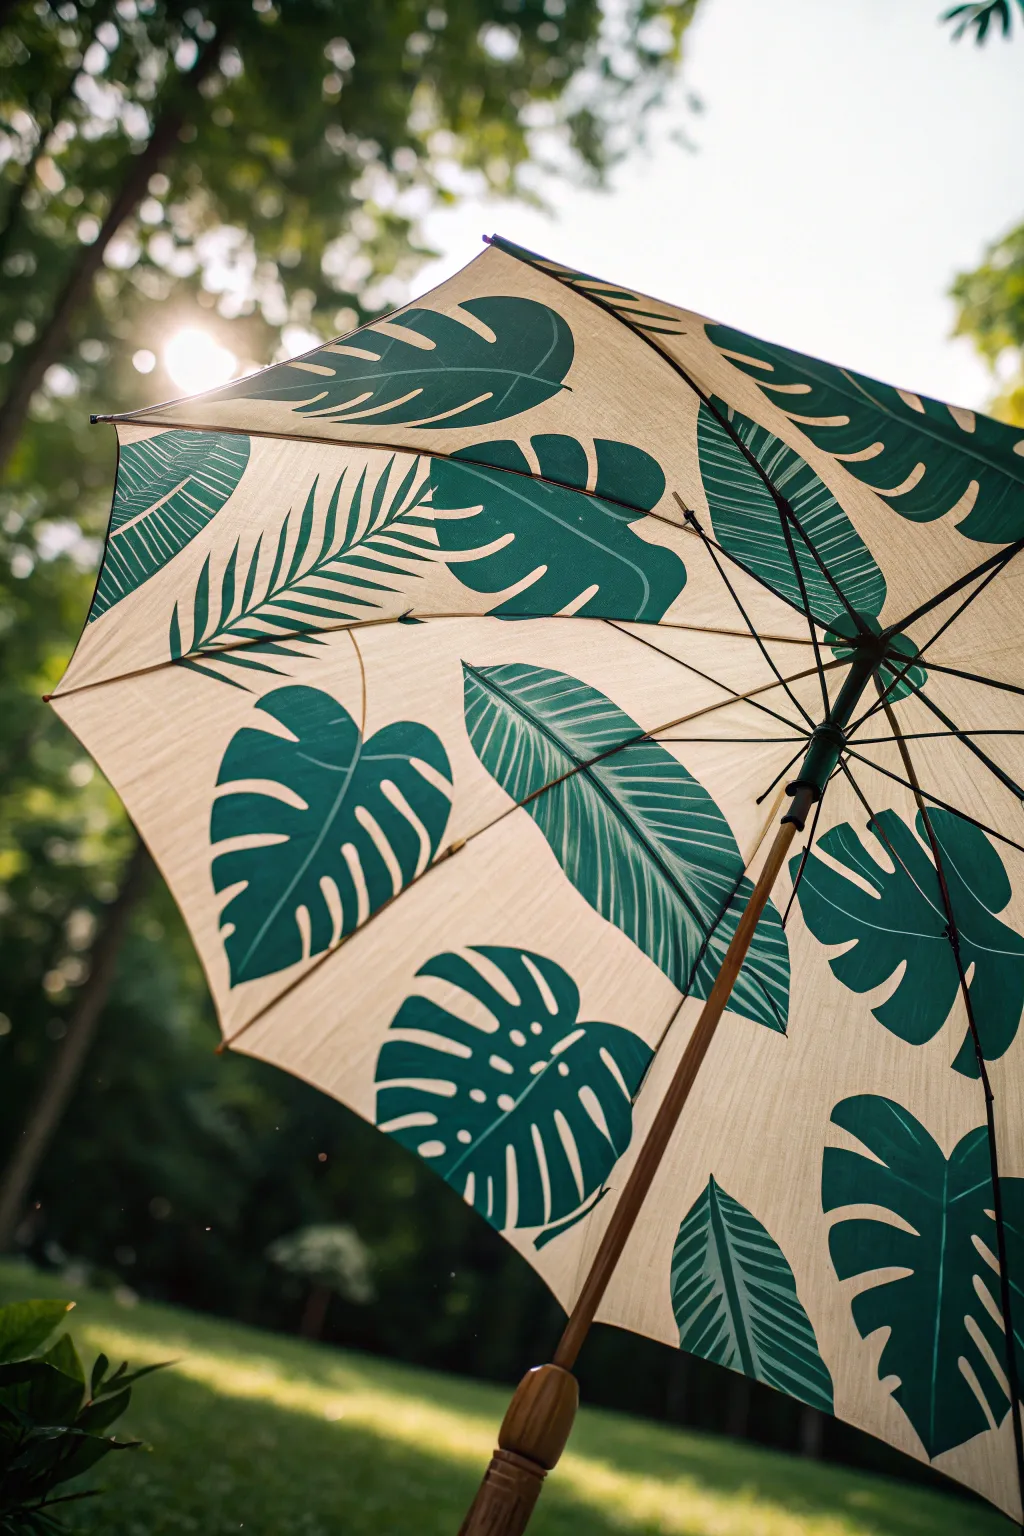
Transform a plain light-colored umbrella into a lush botanical statement piece with this bold tropical leaf design. The pattern combines sweeping palm fronds and iconic monstera leaves in deep green for a sophisticated, nature-inspired look that brightens even the rainiest days.
Step-by-Step
Materials
- Light beige or cream-colored fabric umbrella
- Fabric medium
- Acrylic paint (Deep Phthalo Green, Sap Green, and a touch of Black)
- Flat shader brushes (sizes 8 and 12)
- Round detail brush (size 2)
- Chalk or a disappearing fabric ink pen
- Cardboard or leaf stencils (optional)
- Painter’s tape or scrap paper
- Palette for mixing
Step 1: Planning and Preparation
-
Open and inspect:
Open your umbrella fully and secure it so it stays open. Check for any dust or lint on the fabric and gently wipe it down with a dry cloth if needed. -
Sketch the layout:
Using a piece of chalk or a disappearing fabric ink pen, lightly sketch out the positions for your largest leaves first. Space them out irregularly across the panels to create a natural, organic flow rather than a rigid grid. -
Vary the leaf types:
Alternate between two main leaf shapes: the broad, split-leaf Monstera style and the elongated, feathery palm or banana leaf style. Draw some leaves crossing over the rib lines of the umbrella to help the design feel continuous.
Clean Lines Pro Tip
If you struggle with steady hands, cut shapes out of freezer paper. Iron the glossy side onto the umbrella fabric to create a temporary stencil, then peel off after painting.
Step 2: Painting the Base Shapes
-
Mix your green:
On your palette, mix your fabric medium with the acrylic paints according to the medium’s instructions (usually 1:1 or 2:1). Combine Deep Phthalo Green with a small amount of Sap Green and just a tiny dot of Black to achieve that rich, dark jungle green seen in the photo. -
Outline the Monstera:
Starting with a size 8 flat brush, carefully paint the outline of your first Monstera leaf. Be sure to include the characteristic deep notches and oval holes (fenestrations) within the leaf body. -
Fill in the Monstera:
Switch to the larger size 12 flat brush to fill in the body of the leaf. Use smooth, confident strokes, ensuring the paint saturates the fabric weave but doesn’t drip through heavily to the other side. -
Outline the Palm leaves:
Move on to your long palm-style leaves. Outline the central vein (midrib) first, then paint the long, pointed lobes extending outward. These leaves should have smoother edges compared to the Monstera’s cutout look.
Level Up: Hidden details
Paint tiny ladybugs or bright tree frogs on just one or two leaves using red or bright green paint. It adds a delightful ‘Easter egg’ surprise for anyone looking closely.
Step 3: Adding Details and Texture
-
Refine the edges:
Once your base shapes are filled, use the small round brush to sharpen any fuzzy edges. Crisp, clean lines are essential for that graphic, printed look. -
Add vein details:
For the palm leaves, use a very fine liner brush or the edge of your flat brush to create thin, pale lines or ‘negative space’ lines if you planned ahead. Alternatively, mix a slightly lighter shade of green and paint thin veins on top of the dark green once it’s tacky. -
Create texture:
On the longer leaves, use a dry-brush technique near the center vein. Wipe most of the paint off your brush and drag it lightly from the center outwards to mimic the natural striations of a banana leaf. -
Check for gaps:
Spin the umbrella slowly and look for any large empty spaces that feel unbalanced. I sometimes like to add just the tip of a leaf peeking in from the bottom edge to fill these voids without overcrowding the design.
Step 4: Finishing Touches
-
Paint the stems:
Don’t forget the stems! Use your round brush to paint thin, curved stems connecting your leaves naturally towards the center or disappearing off the edge. -
Let it cure:
Allow the umbrella to remain open and dry completely for at least 24 hours. Fabric paint needs this time to bond properly with the fibers. -
Heat set:
Once fully dry, use a hairdryer on high heat to go over each painted section for a few minutes. This heat-setting process ensures your beautiful botanical design won’t wash away in the first rain shower.
Now you are ready to walk through the rain under your own personal canopy of green


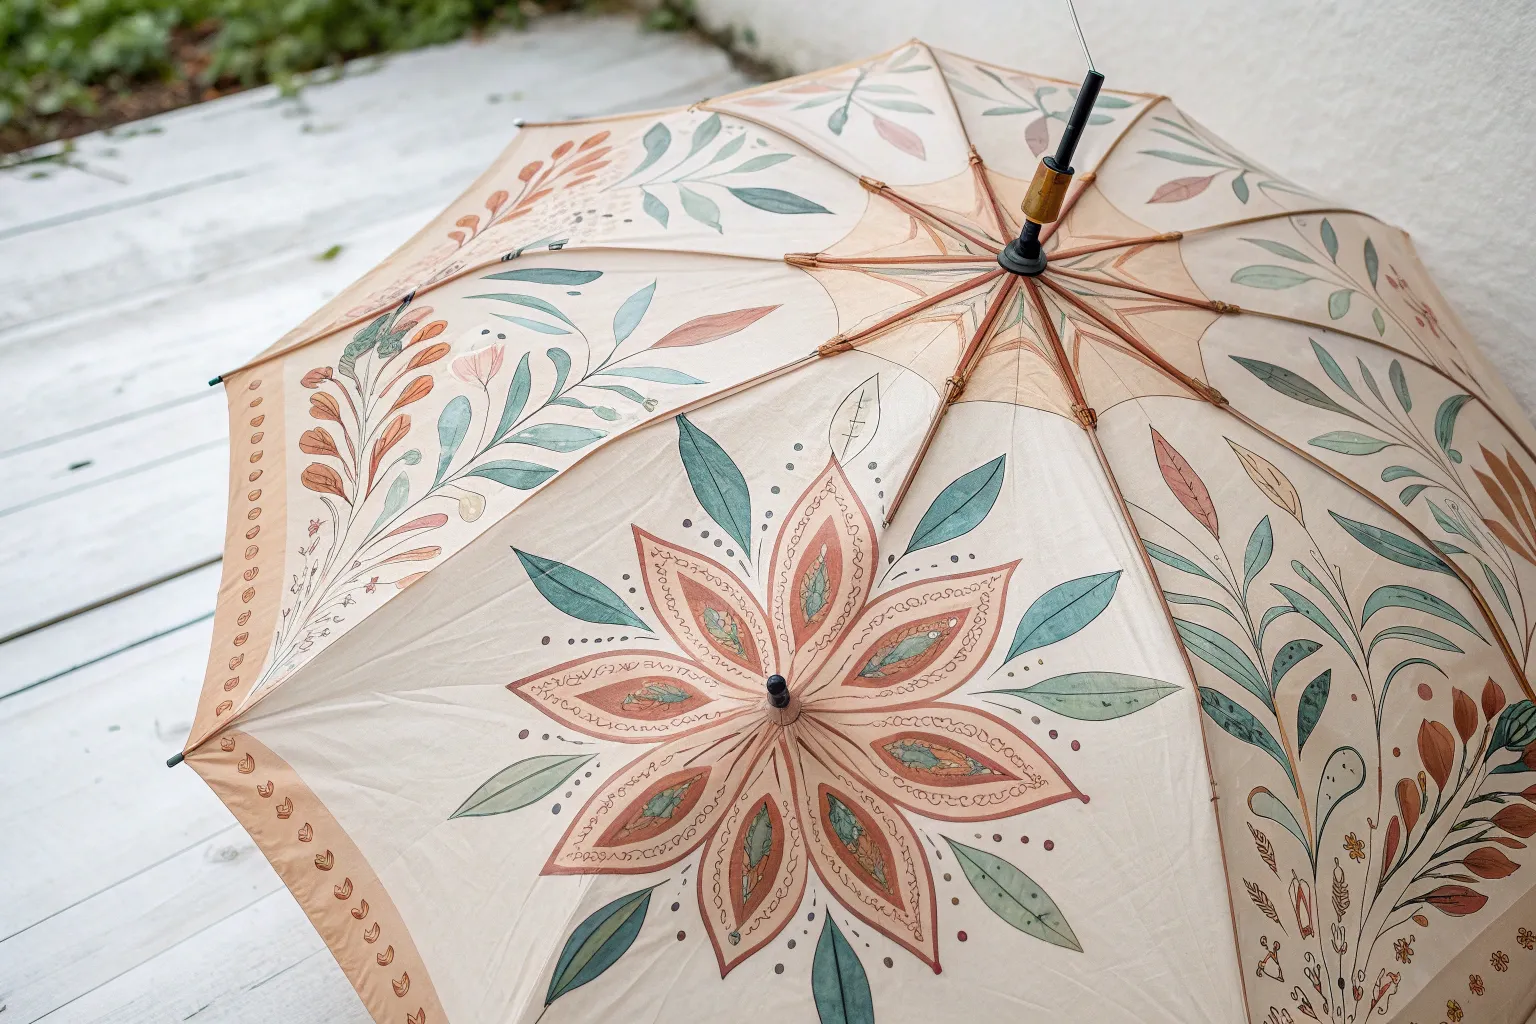
Center-Out Mandala Pattern
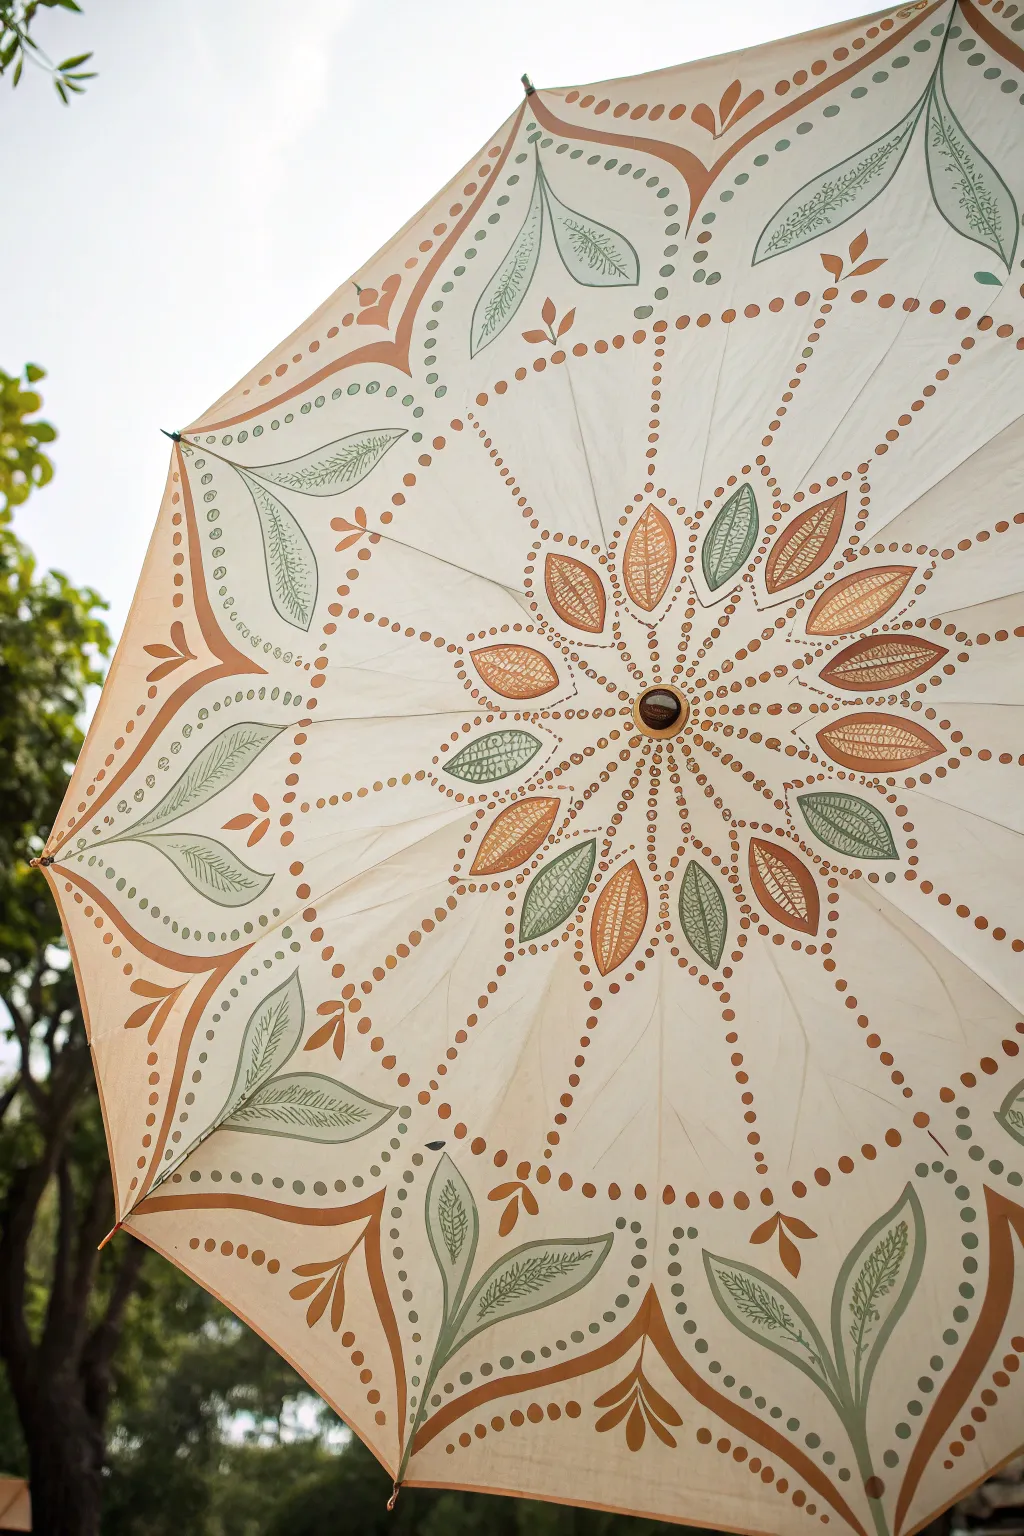
Transform a plain white umbrella into a stunning bohemian accessory with this nature-inspired mandala design. Using warm terracotta, deep browns, and sage greens, you’ll build a rhythmic pattern of leaves and dots that radiates beautifully from the center.
How-To Guide
Materials
- Light-colored umbrella (white or cream, polyester or nylon)
- Fabric medium
- Acrylic paints (Terracotta/Burnt Orange, Dark Brown, Sage Green)
- Round synthetic brushes (sizes 2, 4, and 6)
- Small dotting tool or the back of a paintbrush
- Chalk or a watercolor pencil (light gray)
- Palette for mixing
- Damp cloth for mistakes
Step 1: Preparation and Center Design
-
Prepare the surface:
Open the umbrella fully and secure it so it doesn’t spin while you work. If your fabric is wrinkled, you might want to steam it lightly, but ensure it is completely dry before painting. -
Mix your paints:
Mix each of your acrylic colors with fabric medium according to the bottle’s instructions (usually 1:1 or 2 parts paint to 1 part medium). This ensures the paint flexes with the fabric without cracking. -
Mark the center guidelines:
Using a piece of chalk or a watercolor pencil, lightly draw consecutive circles radiating from the center ferrule (the cap at the very top). Spacing them about 1-2 inches apart helps keep your mandala symmetrical. -
Paint the first ring:
Starting right at the metal center cap, use a size 2 brush and the dark brown paint to create a ring of tiny dots. Follow this immediately with a ring of slightly larger dots.
Step 2: Creating the Inner Mandala
-
Outline the central petals:
Sketch a ring of small leaf or petal shapes around the center dots. You want roughly 12-16 petals depending on your umbrella’s ribs. Try to center a petal over each rib and one in between. -
Fill the alternating petals:
Paint every other petal with the sage green mixture. For the remaining petals, use the terracotta paint. Leave a very thin unpainted border inside the shape for a lighter look, or fill them solid if you prefer. -
Add vein details:
Once the base colors are touch-dry, use your finest brush and the off-white background color (or just dilute the paint slightly with water for transparency) to paint delicate veins inside each leaf shape. -
Create the dotted connectors:
Using the dark brown paint and a dotting tool, create lines of dots that radiate outward from between the petals, forming ‘V’ shapes that guide the eye to the next layer.
Use The Ribs
Don’t eyeball the spacing! Use the metal ribs of the umbrella as your primary guides. They divide the surface perfectly, so anchor your main pattern elements on the ribs first.
Step 3: Expanding the Pattern
-
Draft the large outer leaves:
About midway down the umbrella canopy, sketch large, sweeping leaf shapes. These should be significantly bigger than the center petals, curving gracefully toward the rim. -
Paint the large sage leaves:
Fill these larger outlines with the sage green paint. Use the #6 brush for broad strokes, tapering to a fine point at the leaf tip. -
Add the terracotta flourishes:
Between the large green leaves, paint bold terracotta curved shapes or ‘brackets’ that frame the green leaves. This creates the alternating color rhythm seen in the photo. -
Detail the large leaves:
Return to the green leaves. Using the dark brown paint and a thin liner brush, paint a central stem and intricate branching veins inside each green leaf. -
Incorporate the dot chains:
Connect your large leaves and terracotta shapes with long, curving chains of brown dots. Vary the size of the dots—start larger near the shapes and get smaller as the line extends.
Stiff Fabric?
If the painted areas feel too stiff or crunchy, you didn’t use enough fabric medium. For this project, you can’t fix it now, but gently flexing the fabric can help soften it up.
Step 4: Rim and Finishing Touches
-
Design the border:
Near the edge of the umbrella, create a final border pattern. Paint repeating arches or scallops using the terracotta paint to frame the entire design. -
Add corner accents:
At the very tips of the umbrella ribs, add small sprigs or three-leaf motifs in sage green to anchor the design to the structure. -
Review and refine:
Step back and spin the umbrella slowly. Look for any uneven spacing. I like to fill any awkward empty gaps with a solitary floating dot or small starburst. -
Set the details:
Double-check your dot work. If any dots look flat, add a tiny highlight of white on top of them to make them look like beads. -
Allow to cure:
Leave the umbrella open to dry for at least 24 hours. If your fabric medium requires heat setting, use a hair dryer on a low setting or iron the back of the fabric carefully once fully dry.
Now you have a functional piece of art that makes even the rainiest days feel warm and stylish
One Pattern Per Panel
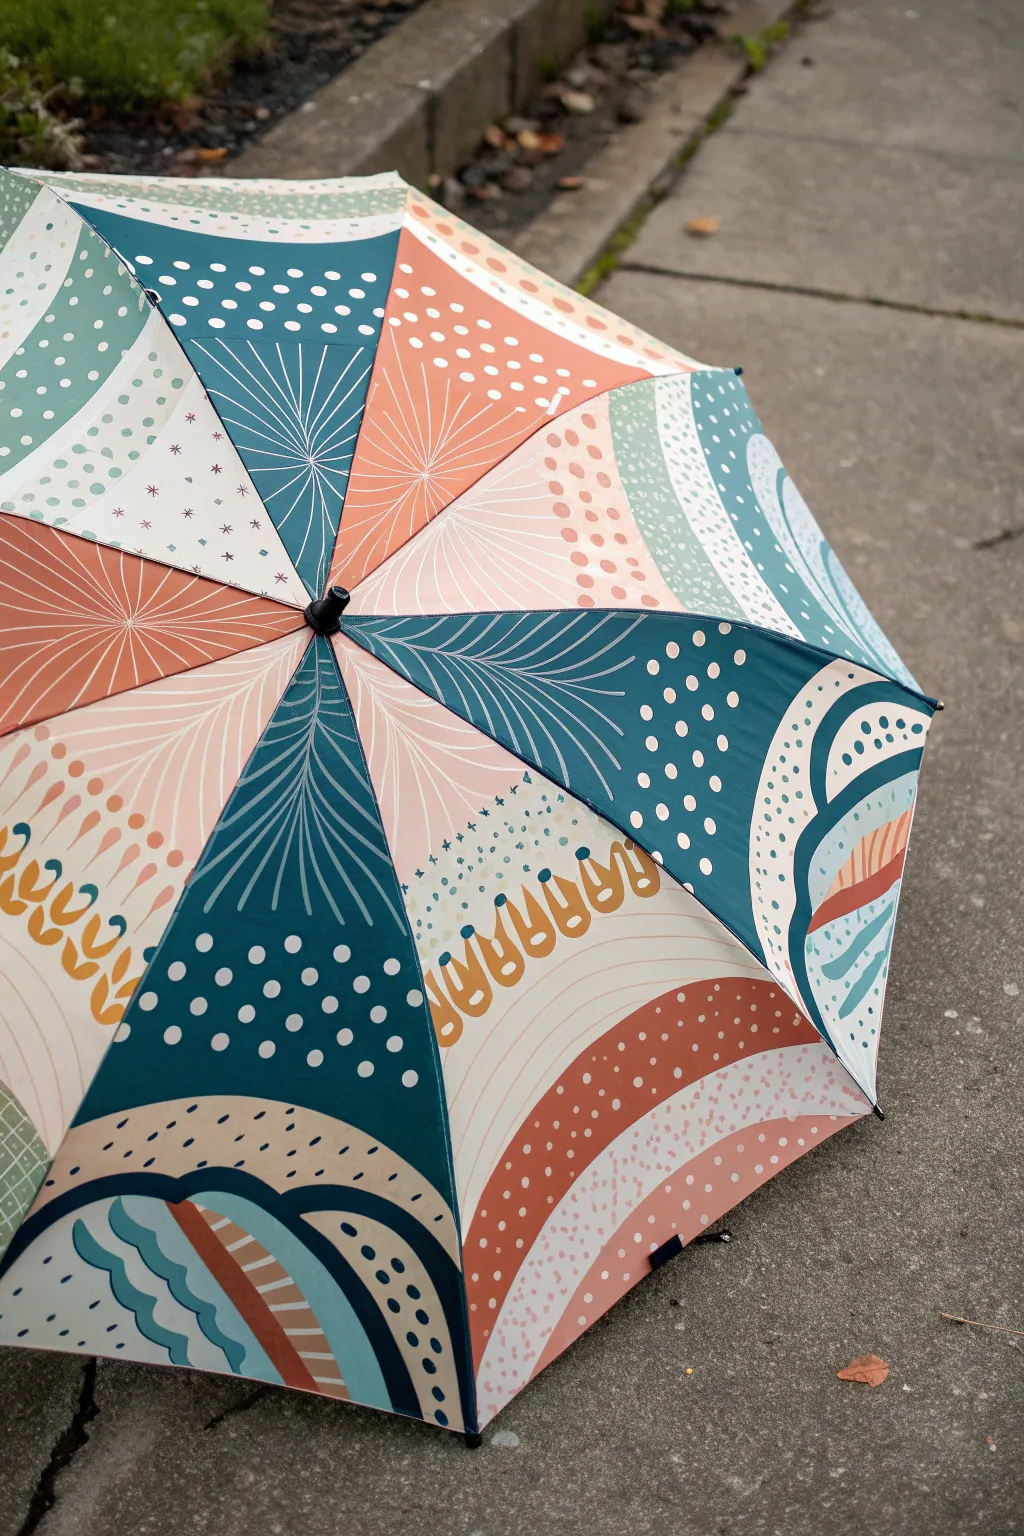
Transform a plain umbrella into a walking piece of modern art by dedicating each triangular panel to a unique geometric pattern. This design blends muted tones of teal, terracotta, and mustard with organic shapes like radiating lines, arches, and stippled textures for a cohesive yet varied look.
Step-by-Step Guide
Materials
- Plain, light-coloured umbrella (cream or white works best)
- Fabric medium
- Acrylic paints (Teal, Terracotta/Coral, Mustard Yellow, Cream/White, Navy Blue)
- Assorted paintbrushes (flat brush for filling, fine liner brush for details)
- Painter’s tape or masking tape
- Chalk or a disappearing fabric marker
- Mixing palette
- Water cup and paper towels
Step 1: Preparation and Planning
-
Set up your workspace:
Since painting an umbrella can be awkward, open it fully and place it on a protected surface. If possible, secure the handle in an upright position (like in a heavy vase with stones) so the canopy stays taut and accessible. -
Mix your medium:
Mix your acrylic paints with fabric medium according to the bottle’s instructions (usually a 1:1 or 2:1 ratio). This ensures the paint remains flexible and doesn’t crack when you open and close the umbrella later. -
Plan your palette:
Prepare four distinct mixtures: a deep teal, a soft terracotta, a pale cream, and a mustard yellow. Keep a small amount of navy blue aside for high-contrast accents later.
Step 2: Painting the Base Layers
-
Tape off sections:
Select a few non-adjacent panels to start with. Use painter’s tape to mask the metal ribs so you keep distinct, crisp edges between the fabric sections. -
Apply solid blocks:
Paint large shapes first. For example, on one panel, paint a large teal triangle at the bottom (rim) and a terracotta triangle near the top (ferrule). Leave negative space in between. -
Block out arches:
On a different panel, use a flat brush to paint wide, sweeping arches in cream or pale peach tone. Let these base shapes dry completely before adding any details on top. -
Create the split panel:
For the panel with the large central starburst, paint the entire wedge in a solid color like terracotta or teal, or leave it the base color of the umbrella if it matches your cream tone.
Use a Template
Sketch your designs on paper triangles first. This helps you balance the colors across the whole canopy before you commit paint to fabric.
Step 3: Adding Geometric Details
-
Draw the starbursts:
Using a fine liner brush and contrasting paint (cream on teal, or teal on terracotta), utilize the ferrule (the top point) as your center. Paint thin lines radiating outward toward the rim, stopping about halfway down the panel. -
Add floating dots:
For the panels with polka dots, dip the handle of a paintbrush into your paint. Stamp dots in random or grid-like clusters over a contrasting background color. -
Layering the arches:
Return to your arch-filled panel. Paint smaller, concentric arches inside the larger ones using different colors. I like to add a row of small dashes or dots following the curve of the arch for texture. -
Paint the ‘leaf’ veins:
On a solid teal panel, use a very light blue or cream paint to create a stylized leaf veins pattern. Draw a central spine and curved lines branching out to the sides.
Stiff Fabric?
If the dried paint feels too crunchy, you didn’t use enough fabric medium. Gently sand the painted area with fine-grit sandpaper to soften it up.
Step 4: Intricate Accents
-
Tiny stars and crosses:
Look for empty spaces in your lighter panels. Use your finest brush to paint tiny ‘plus’ signs or eight-point asterisks to mimic a starry sky pattern. -
The abstract garden:
Create the panel with the U-shapes. Paint repeating ‘U’ shapes in mustard yellow and terracotta, arranged in rows. Add small loops or dots above them to suggest abstract flowers. -
Dashed lines:
Add visual interest to solid blocks of color by painting dashed lines along the edges or following the curve of the umbrella’s shape. -
Clean up borders:
Once all panels are painted, carefully peel back any tape. If any paint bled onto the ribs or adjacent panels, touch it up with a small brush and the appropriate background color.
Step 5: Finishing
-
Dry thoroughly:
Leave the umbrella fully open to dry for at least 24 hours. The fabric medium needs time to cure properly. -
Heat set:
To make the design permanent and waterproof, blast the painted sections with a hair dryer on high heat for a few minutes per panel, keeping the dryer moving to avoid scorching the fabric.
Now you are ready to brighten up even the gloomiest rainy days with your custom creation
Storybook Scenes Across Wedges
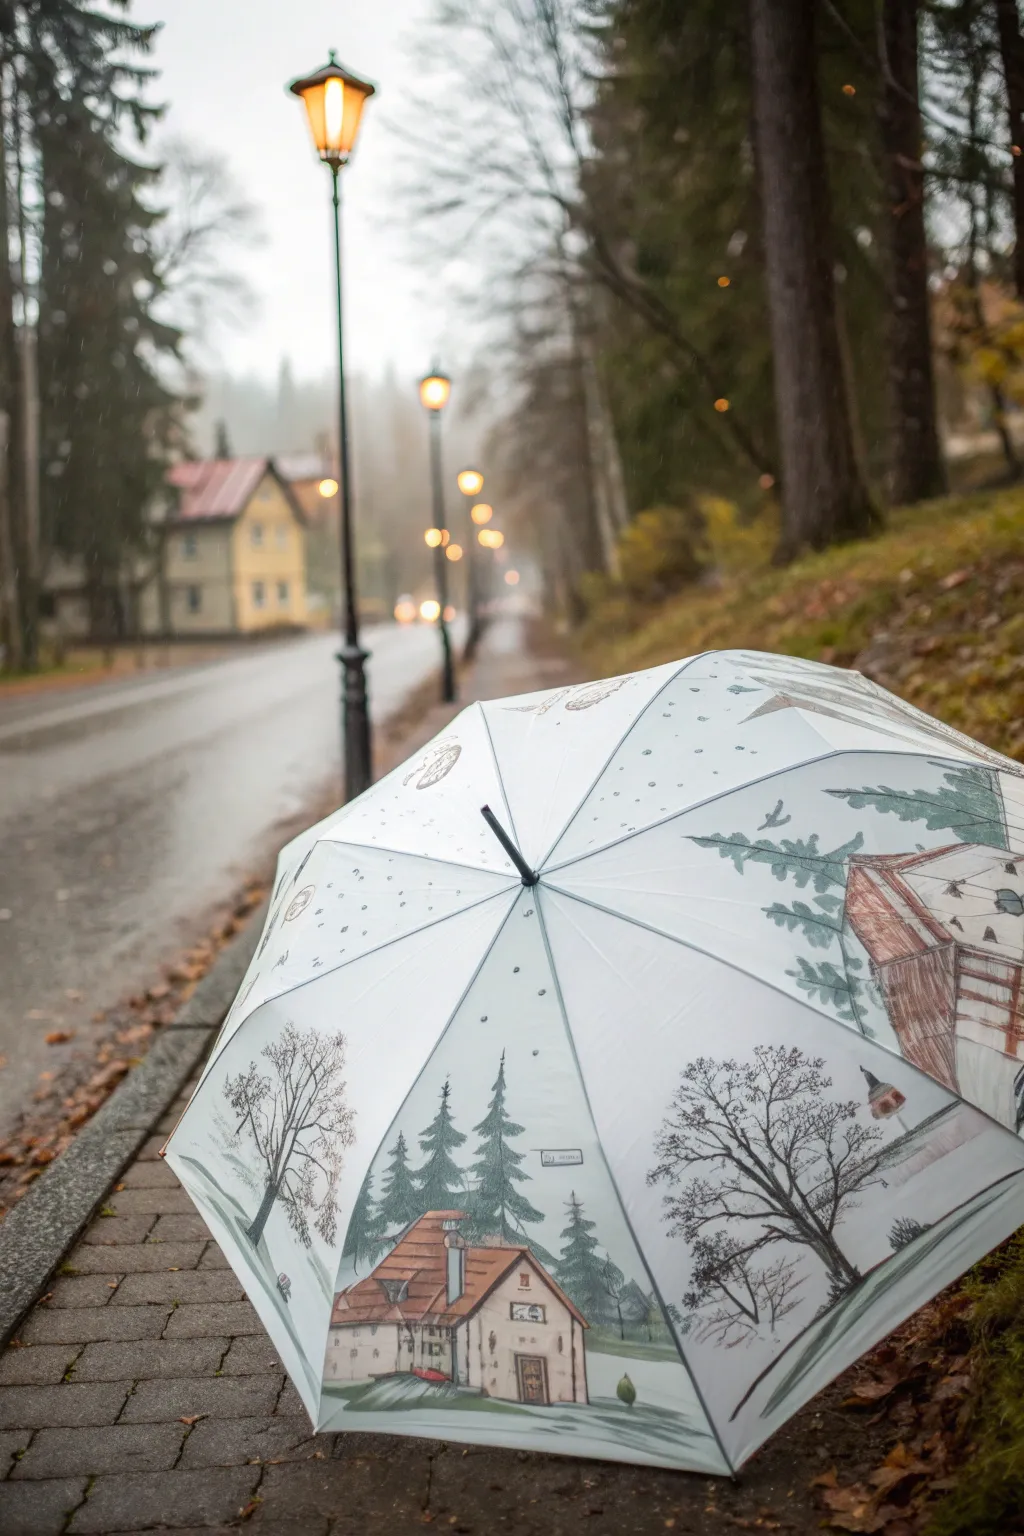
Transform a plain white umbrella into a charming narrative piece featuring cozy cottages and frosty pines. This project uses fabric-safe paints to create a durable, wearable storybook scene that brightens even the rainiest days.
Detailed Instructions
Materials
- White or light-colored umbrella (nylon or polyester)
- Fabric medium
- Acrylic paints (various colors: browns, greens, grey, black, tiny bit of red)
- Permanent waterproof marker (fine tip, black)
- Pencil or white charcoal pencil
- Assorted brushes (fine liner, small flat, medium round)
- Palette or paper plate
- Water cup and paper towels
- Hairdryer (optional, for speeding up drying)
Step 1: Planning and Sketching
-
Prepare the Canvas:
Open the umbrella fully and set it on the floor or a large table where it won’t roll away. Wipe the panels down with a slightly damp cloth to remove any factory dust, then let it dry completely. -
Map the Villages:
Visualize your storybook layout. Instead of one continuous image, plan for individual vignettes on each wedge-shaped panel. Some panels can feature large houses, while others might just have a cluster of trees. -
Sketch the Outlines:
Using a pencil, lightly sketch the main shapes directly onto the fabric. Focus on simple architectural forms: pitched roofs, chimneys, and square windows. Keep the pencil pressure extremely light so it doesn’t smear later. -
Add Natural Elements:
Sketch tall, triangular pine trees flanking the houses and bare, branching deciduous trees in the foreground. Vary the sizes to create a sense of depth.
Paint Bleeding?
If paint bleeds into the nylon fibers, your mix is too watery. Use less water and rely on the fabric medium for flow. Let a bleed dry, then cover it with opaque white paint.
Step 2: Painting the Architecture
-
Mix Fabric Paint:
Mix your acrylic paints with fabric medium according to the bottle’s instructions (usually a 1:1 or 2:1 ratio). This step is crucial preventing the paint from cracking when the umbrella folds. -
Base Coat the Houses:
Using a small flat brush, fill in the walls of the cottages with a diluted cream or soft beige. The fabric will absorb the first layer quickly, so you may need a second coat for opacity. -
Roof Details:
Mix a warm brown or terracotta shade for the roofs. Paint the roof areas, being careful to stay within your pencil lines. Applying the paint slightly thinner here can give it a nice watercolor-like wash effect. -
Adding Windows and Doors:
Once the walls are dry to the touch, use a fine liner brush with dark brown or grey paint to define the windows and doors. I find it helpful to anchor the hand holding the brush against the umbrella shaft for stability.
Pro Tip: Perspective
Make the umbrella fully immersive by painting larger trees near the bottom rim and smaller houses near the top ferrule to exaggerate the perspective.
Step 3: Adding Landscape and Atmosphere
-
Paint the Pines:
Mix a deep forest green. Using a rougher, older brush can be great here—dab and stipple the paint to create the texture of pine needles on the trees behind the houses. -
Detail deciduous Trees:
Switch to your finest liner brush and black paint (mixed with plenty of medium for flow). Paint the spindly, reaching branches of the bare trees in the foreground. Let the branches taper off into nothingness. -
Ground the Scene:
Mix a watery grey-green wash. Sweep this color lightly under the houses and trees to create the ground. This prevents your buildings from looking like they are floating in white space. -
Winter Foliage:
If you want a snowy look, don’t paint the ground white (since the umbrella is white). Instead, use light blue-grey shadows to suggest snow banks around the base of the houses.
Step 4: Inking and Finishing Touches
-
Outline for Definition:
Once the paint is thoroughly dry, take your waterproof permanent marker. Carefully outline the roofs, walls, and major tree trunks. This graphic line gives the project that distinct ‘storybook illustration’ style. -
Add Texture:
Use the pen to add small architectural details like shingles on the roof, bricks on the chimney, or wood grain on the doors. Use quick, hatching motions. -
Atmospheric Elements:
For a magical touch, dip the wrong end of a paintbrush into light grey or silver paint. Dot small specks across the upper parts of the panels to simulate falling snow or stars. -
Heat Setting:
Let the umbrella cure for at least 24 hours. To permanently set the paint, use a hairdryer on high heat, moving slowly over each painted section for a few minutes.
Now you have a functional piece of art ready to make the next rainy walk a little more magical
City Skyline Around the Edge
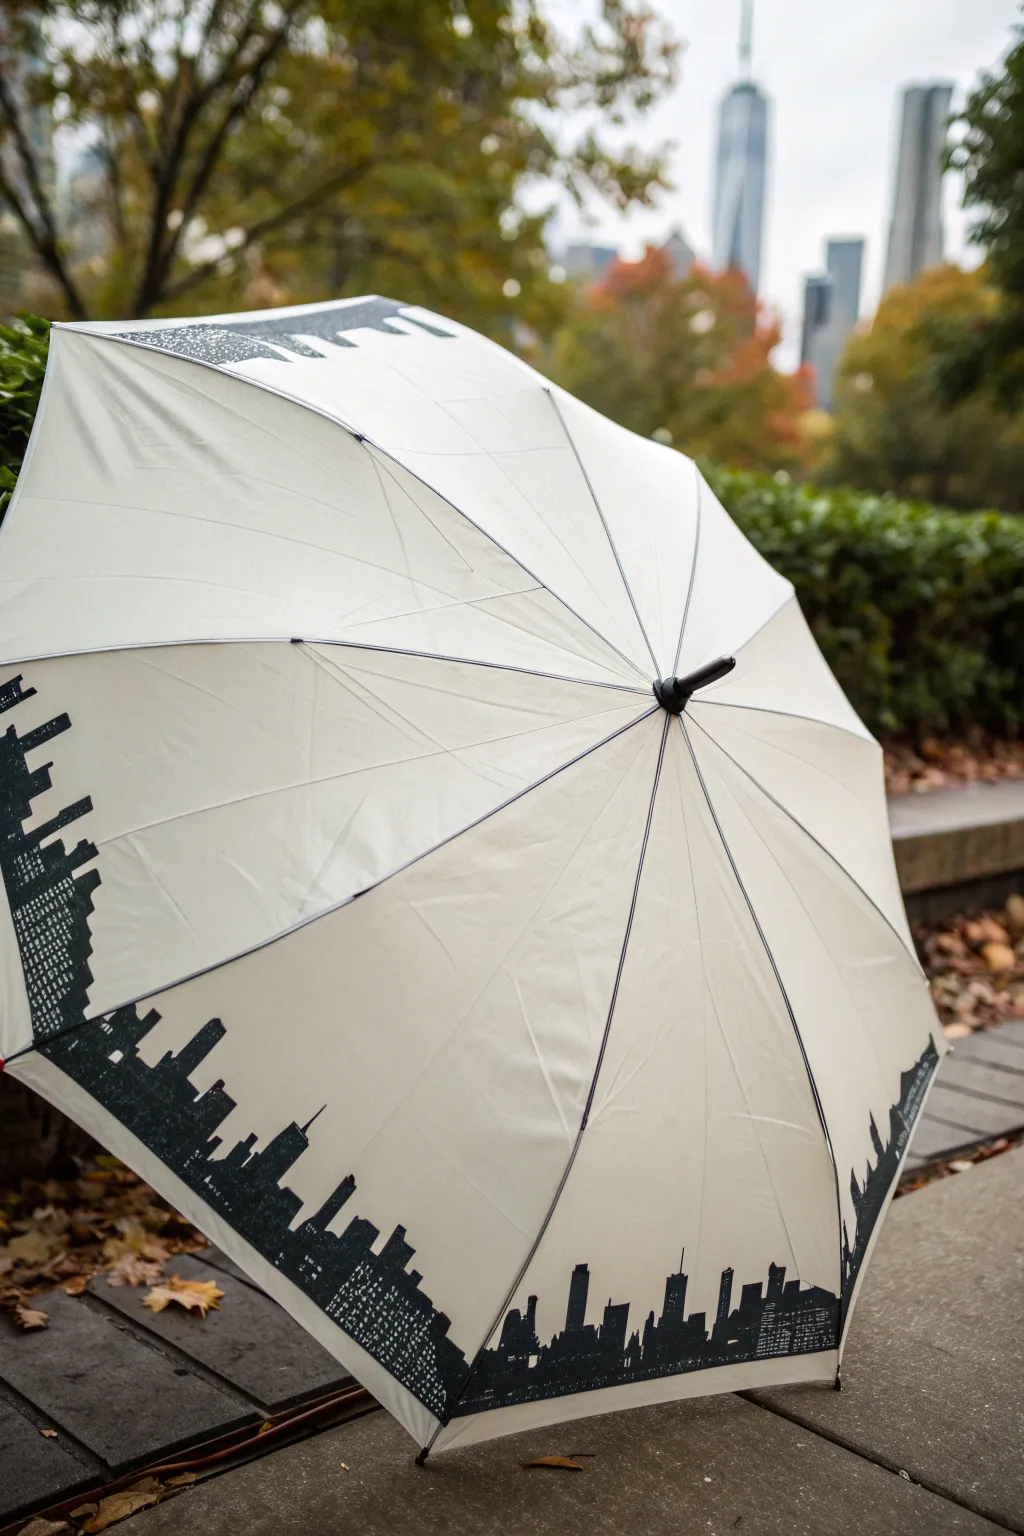
Transform a plain white umbrella into a chic accessory featuring a detailed black cityscape wrapping around the trim. This project uses high-contrast silhouettes to create a sophisticated, modern look perfect for rainy city days.
Step-by-Step
Materials
- White or light-colored solid umbrella
- Fabric medium
- Black acrylic craft paint (or water-resistant fabric paint)
- Wide painters tape (1-2 inches)
- Fine detail brush (liner brush)
- Small flat brush (size 4 or 6)
- City skyline stencil (optional but recommended for precision)
- Pencil or chalk fabric marker
- Hair dryer (for speeding up sticky tape process)
- Palette or paper plate
Step 1: Setting the Horizon
-
Prepare the workspace:
Open the umbrella fully and set it on a protected surface. Because the umbrella is curved, you might find it easier to work with it resting on the floor or a large table where you can rotate it freely. -
Clean surface:
Wipe the bottom edge of the umbrella canopy with a damp cloth to remove any dust or manufacturing oils that might repel the paint. -
Establish the baseline:
Using your painter’s tape, tape off a straight line along the very bottom edge of the umbrella panels. This creates a crisp bottom border for your buildings so the paint doesn’t bleed off the fabric. -
Mix the paint:
Mix your black acrylic paint with fabric medium according to the bottle instructions (usually 1:1 or 2 parts paint to 1 part medium). This ensures the paint remains flexible and doesn’t crack when the umbrella folds.
Step 2: Designing the Skyline
-
Sketch the silhouette:
Using a pencil or chalk fabric marker, lightly sketch your city skyline directly onto the fabric, starting just above your tape line. Vary the heights of your buildings—include tall skyscrapers, shorter blocks, and angled roofs for visual interest. -
Add recognizable landmarks:
If you want to feature a specific city, sketch in iconic shapes like the Empire State Building or the Space Needle now to anchor your design. -
Stencil alternative:
If you aren’t comfortable freehand sketching, position a flexible city skyline stencil along the edge and lightly trace the outline with your pencil. -
Review the flow:
Spin the umbrella to ensure the buildings connect seamlessly from one panel to the next. The skyline should look like a continuous horizon rather than disjointed blocks.
Bleeding Lines?
If paint bleeds under the tape, don’t panic. Once dry, use a permanent white fabric marker to draw over the mistake and straighten the line.
Step 3: Painting the City
-
Outline the buildings:
Dip your fine detail liner brush into the black fabric paint mix. carefully trace the pencil outlines of your buildings, ensuring sharp corners and straight vertical lines. -
Fill in the shapes:
Switch to your small flat brush to fill in the body of the buildings. Apply the paint evenly, but try not to glob it on too thick, as that can make the fabric stiff. -
Mind the seams:
When painting over the metal ribs or seams of the umbrella, go slowly. Use the brush to push paint into the crevices of the seam so no white fabric shows through. -
Create windows:
To mimic the look in the image, you have a choice: either paint the buildings solid black, or leave tiny rectangular grid spaces unpainted to represent lit windows. I find it easier to paint everything black first. -
Adding texture details:
If you painted the buildings solid black, wait for them to dry slightly. Then, use a very fine brush with a slightly lighter grey mix (or white paint) to add tiny dots or grids for windows over the black silhouette. -
Refining edges:
Go back over the top edges of the buildings. Add tiny antennas or spires with the very tip of your liner brush to give the skyline a realistic, intricate finish.
Sharper Antennae
For ultra-thin spires and antennas on top of buildings, use a black permanent marker or fine-tip Sharpie instead of a paint brush.
Step 4: Finishing Touches
-
Remove the tape:
While the paint is still slightly tacky (not fully dry, to prevent peeling), carefully peel off the bottom strip of painter’s tape. Pull it away at a 45-degree angle. -
Touch up the bottom:
Inspect the bottom edge where the tape was. If any paint bled or the line is jagged, use a small brush with a tiny bit of white paint (or the umbrella’s base color) to clean it up. -
Cure the paint:
Let the umbrella sit open to dry completely for at least 24 hours. Check your fabric medium bottle to see if heat setting with a hair dryer is required for water resistance.
Now you have a custom rainy-day accessory that showcases your favorite metropolis
Koi Pond From a Top View
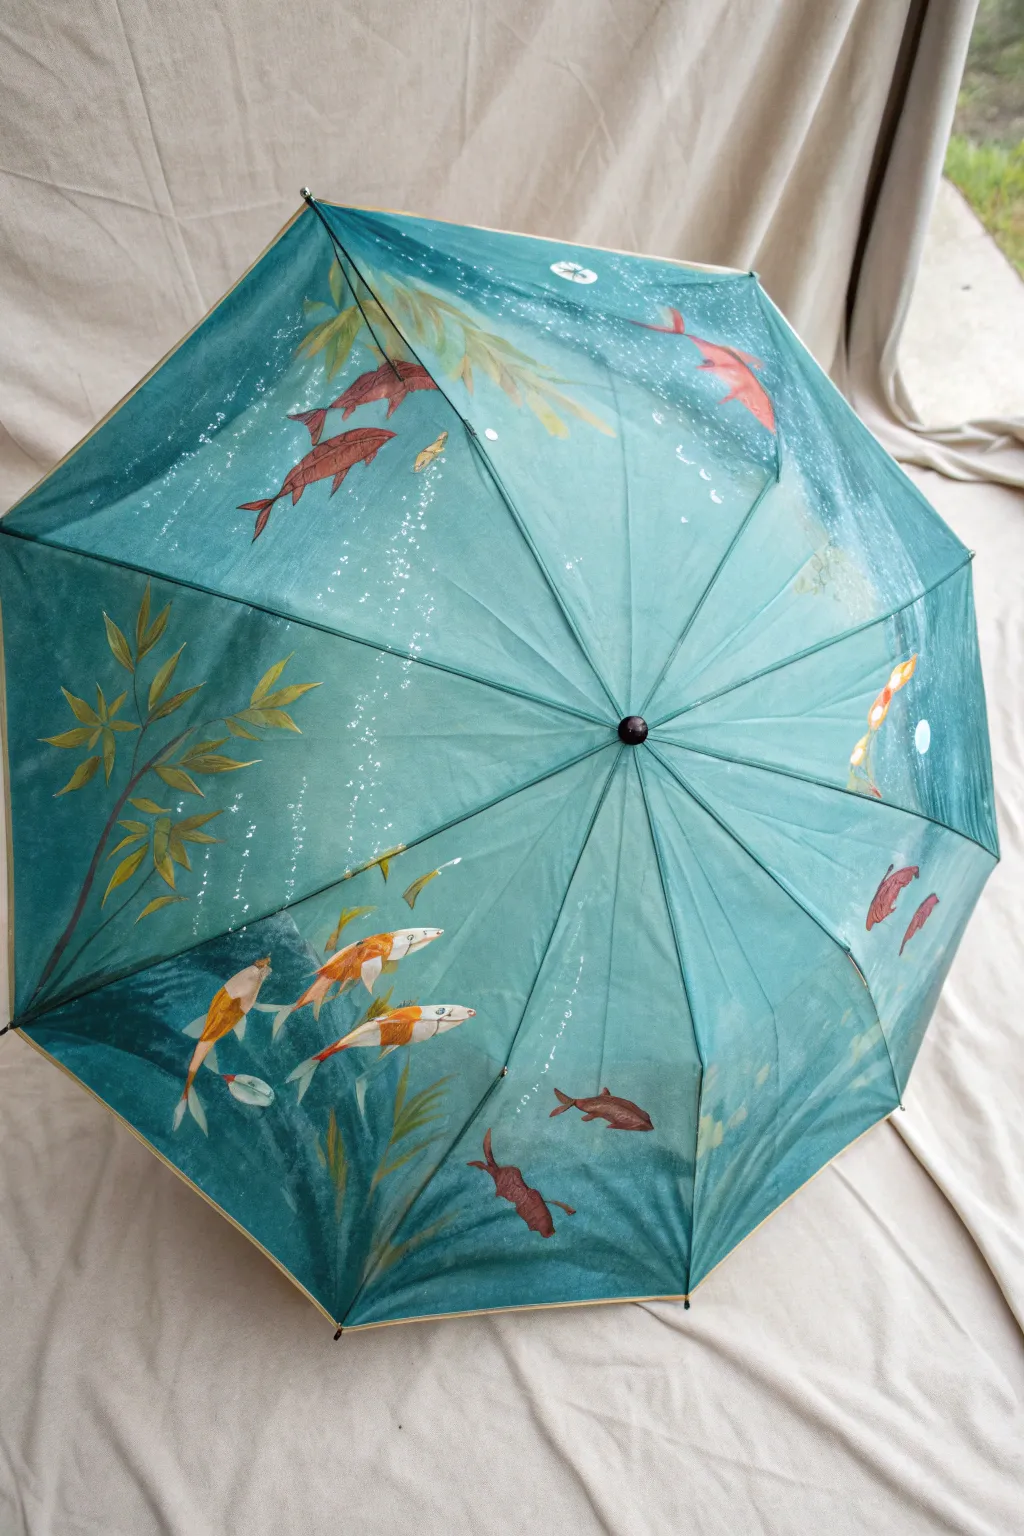
Transform a plain umbrella into a tranquil water garden view from above with this immersive painting project. Using the umbrella’s natural teal hue as your water base, you will layer aquatic plants, shimmering bubbles, and lively koi fish swimming in a circle.
Step-by-Step Tutorial
Materials
- Teal or greenish-blue nylon umbrella
- Fabric medium
- Acrylic paints (White, Orange, Red, Dark Brown, Yellow, Deep Green, Black)
- Set of acrylic brushes (Filbert, round, and fine liner)
- White or light blue chalk pencil
- Palette
- Cup of water
- Paper towels
Step 1: Preparation & Water Texture
-
Prepare the surface:
Fully open the umbrella and set it on a stable surface where you can access all sides easily. If the fabric is wrinkled, you might want to carefully steam it from the underside, but be cautious with heat. -
Draft the layout:
Using a light colored chalk pencil, lightly sketch the directional flow of your pond. Mark where the main groups of koi will swim—aim for a circular motion around the center pole—and where the bamboo leaves will drape from the edges. -
Mix the medium:
Mix your acrylic paints with fabric medium according to the bottle’s instructions (usually 1:1 or 2:1). This ensures the paint flexes with the umbrella fabric and doesn’t crack when folded. -
Create depth:
To enhance the watery feel, mix a very diluted wash of dark green and blue. Apply this loosely in the deeper areas of your ‘pond’ and near the edges to create a vignette effect, leaving the center slightly lighter.
Paint Bleeding?
If paint bleeds into the fabric weave, your mix is too watery. Use less water and more fabric medium, or thicken the paint slightly with white for better opacity.
Step 2: Plant Life & Atmosphere
-
Paint bamboo stems:
Using a liner brush and dark brown paint mixed with a touch of green, paint thin, delicate branches extending from the outer rim inward. Focus on the left side panel for the main cluster shown in the reference. -
Add bamboo leaves:
With a small filbert or round brush, press and lift to create the tapered shape of bamboo leaves. Use a mix of olive green and yellow-ochre for variety. I like to overlap some leaves to make the foliage look dense and natural. -
Paint deep water weeds:
In the lower shadowed areas, use a dark teal-green mix to paint long, wavy grasses that look like they are sitting deeper underwater. Keep edges soft here so they look submerged. -
Create bubbles:
Take Titanium White and dilute it slightly. Using a very fine brush or dotting tool, create streams of tiny bubbles rising to the surface. Cluster them in lines to mimic movement in the water.
Step 3: Painting the Koi
-
Base coat the fish:
Paint the silhouettes of the fish using white paint first. The umbrella fabric is dark, so a white underlayer will make your oranges and reds pop. Let this dry completely. -
Block in color:
Paint the bodies of the koi. Use bright orange for the main body, blending into white towards the tail and fins on the calico varieties. -
Add red details:
For the darker fish, use a deep red or reddish-brown. Paint the fins slightly translucent by mixing the color with a bit of the fabric medium or water. -
Define scales and fins:
Using a fine liner brush and diluted black or dark brown, very lightly outline almost-invisible scales and the spines of the fins. Keep lines extremely thin. -
Add shadows:
To make the fish look like they are floating, paint a faint, blurry shadow on the ‘pond bottom’ underneath each fish using a dark navy or black wash, slightly offset from the body.
Go 3D
Glue on small, flat-backed rhinestones or clear dew drops over the painted bubbles. This catches the light and adds a magical, wet dimension to the rain gear.
Step 4: Final Details
-
Add highlights:
With pure white, add tiny highlights to the fish eyes and the tops of their backs where the ‘sunlight’ hits the water surface. -
Surface ripples:
Paint thin, broken white circles or arcs around where the bamboo stems enter the water or where the fish are turning, suggesting ripples on the surface. -
Weatherproofing:
Once fully dry (give it 24 hours), check your fabric medium instructions. Some require heat setting with a hair dryer or iron (with a protective cloth) to make the paint permanent.
Now you have a stunning, hand-painted canopy that turns a rainy day into a walk through a peaceful water garden
Giant Butterfly Wings Transformation
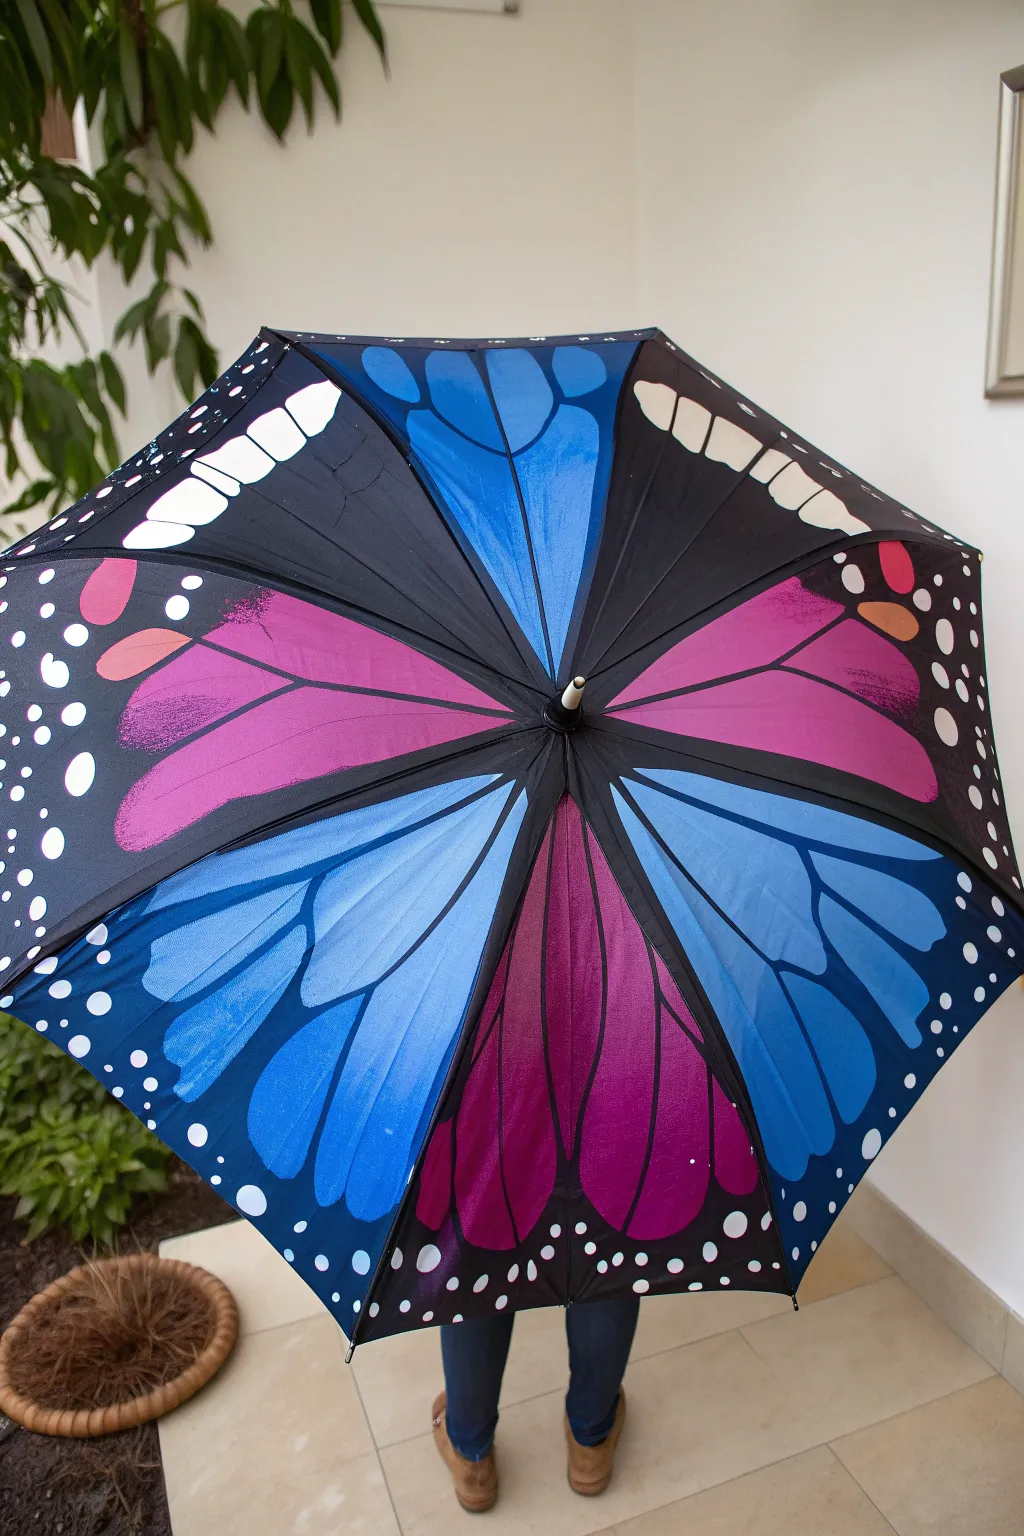
Transform a plain black umbrella into a stunning, wearable piece of art by mimicking the symmetrical beauty of butterfly wings. This project uses the umbrella’s natural panels to guide a vibrant design featuring bold pink and blue sections accented with white dots.
Step-by-Step Guide
Materials
- Solid black umbrella (nylon or polyester)
- White fabric paint or gesso (for priming)
- Soft body fabric paints (Magenta/Pink, Sky Blue, Royal Blue)
- Wide flat synthetic brush (for large areas)
- Medium round brush
- Fine detail brush
- White chalk or fabric pencil
- Reference photo of butterfly wings
- Water cups and paper towels
Step 1: Planning and Priming
-
Clean and Open:
Fully open your black umbrella in a spacious area. Wipe the canopy down with a damp cloth to remove any dust or manufacturing residue, and let it dry completely before starting. -
Map the Symmetry:
Visualize the umbrella as pairs of wings. Since this is an 8-panel umbrella, assign two adjacent panels for each ‘wing’ section. Use white chalk to lightly sketch the large teardrop or petal shapes that radiate from the center ferrule toward the edge. -
Define the Color Zones:
Mark which wing sections will be pink and which will be blue. In the reference image, the colors alternate in large blocks, so plan for two large pink sections and two large blue sections opposing each other to maintain symmetry. -
Create a Base Layer:
Painting bright colors directly on black fabric can result in dull hues. To make them pop, paint a base layer of white fabric paint or gesso inside your chalk outlines. I find leaving a slight gap between the white base and the black outline creates a crisper edge later. -
Let it Dry:
Allow the white base coat to dry thoroughly. This is crucial; if the base is wet, your top colors will mix with the white and become pastels rather than vibrant jewel tones.
Make Colors Pop
Painting bright colors on black fabric is tough. Always paint a layer of white primer or gesso first, let it dry, then paint your bright butterfly colors on top.
Step 2: Applying Color
-
Paint the Pink Wings:
Using a wide flat brush, apply the magenta or hot pink fabric paint over your dried white base on the designated panels. Work in smooth strokes radiating from the center outward. -
Add Gradient Depth:
While the pink paint is still slightly wet, blend a tiny amount of purple/darker pink near the center seams and edges to give the wing segments a curved, 3D appearance. -
Paint the Blue Wings:
Switch to a clean brush and apply the sky blue paint to the alternate wing sections. Ensure you cover the white primer completely. -
Layer the Blues:
To mimic the texture of the reference image, add streaks of royal blue or darker cyan along the ‘veins’ of the wing segments. Feather these darker strokes into the lighter blue for a natural transition. -
Refine the Veins:
The black umbrella fabric itself acts as the black veins of the butterfly. Use a small flat brush with black paint (if needed) to clean up any messy edges where your color meets the original black fabric, sharpening the lines between the colored panels.
Step 3: Detailing and Sealing
-
Add Decorative Spots:
Butterfly wings often have signature white spots near the edges. Dip a round brush into opaque white paint and press firmly to create circles of varying sizes along the outer rim of the black sections. -
Create Upper Wing Details:
Paint larger, elongated white or cream shapes near the top edge of the uppermost panels (the ‘forewings’) to replicate the specific pattern seen in the photo. -
Highlight the Veins:
For extra dimension, you can use a very fine brush with a lighter shade of your main color (light pink or pale blue) to add tiny, thin scratches or texture lines within the colored zones, following the direction of the ribs. -
Check for Opacity:
Hold the umbrella up to a light source. If any painted areas look streaky or transparent, apply a second coat of color once the first is dry. -
Final Dry:
Leave the umbrella open to dry for at least 24 hours. Most fabric paints require heat setting, so check your bottle’s instructions—usually, a blast from a hair dryer is sufficient for items that won’t be machine washed.
Sticky Situation?
Acrylics can stick when folded. After fully drying, lightly dust the painted surfaces with talcum powder or cornstarch before closing the umbrella for the first time.
Now you are ready to flutter through the rain with your colorful wings spread wide


Have a question or want to share your own experience? I'd love to hear from you in the comments below!