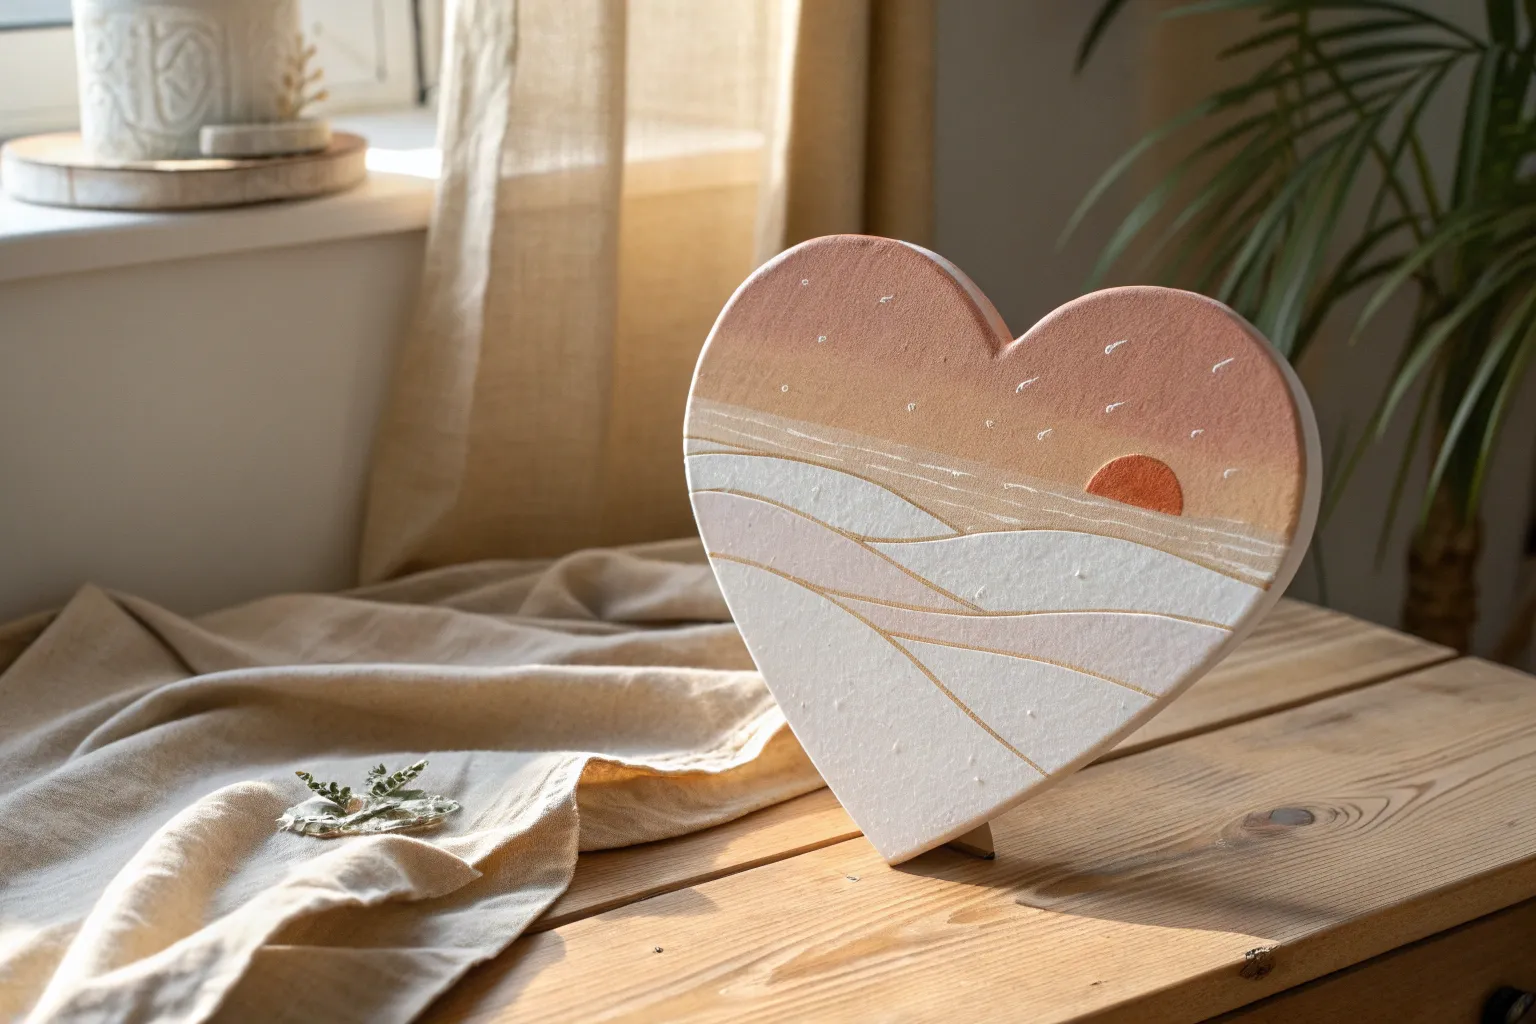
There’s something instantly charming about painting on a heart-shaped canvas—the shape basically does half the composing for you. I pulled together my favorite ideas that really lean into those curves, that little top dip, and the pointed bottom for extra visual drama.
Classic Floral Border
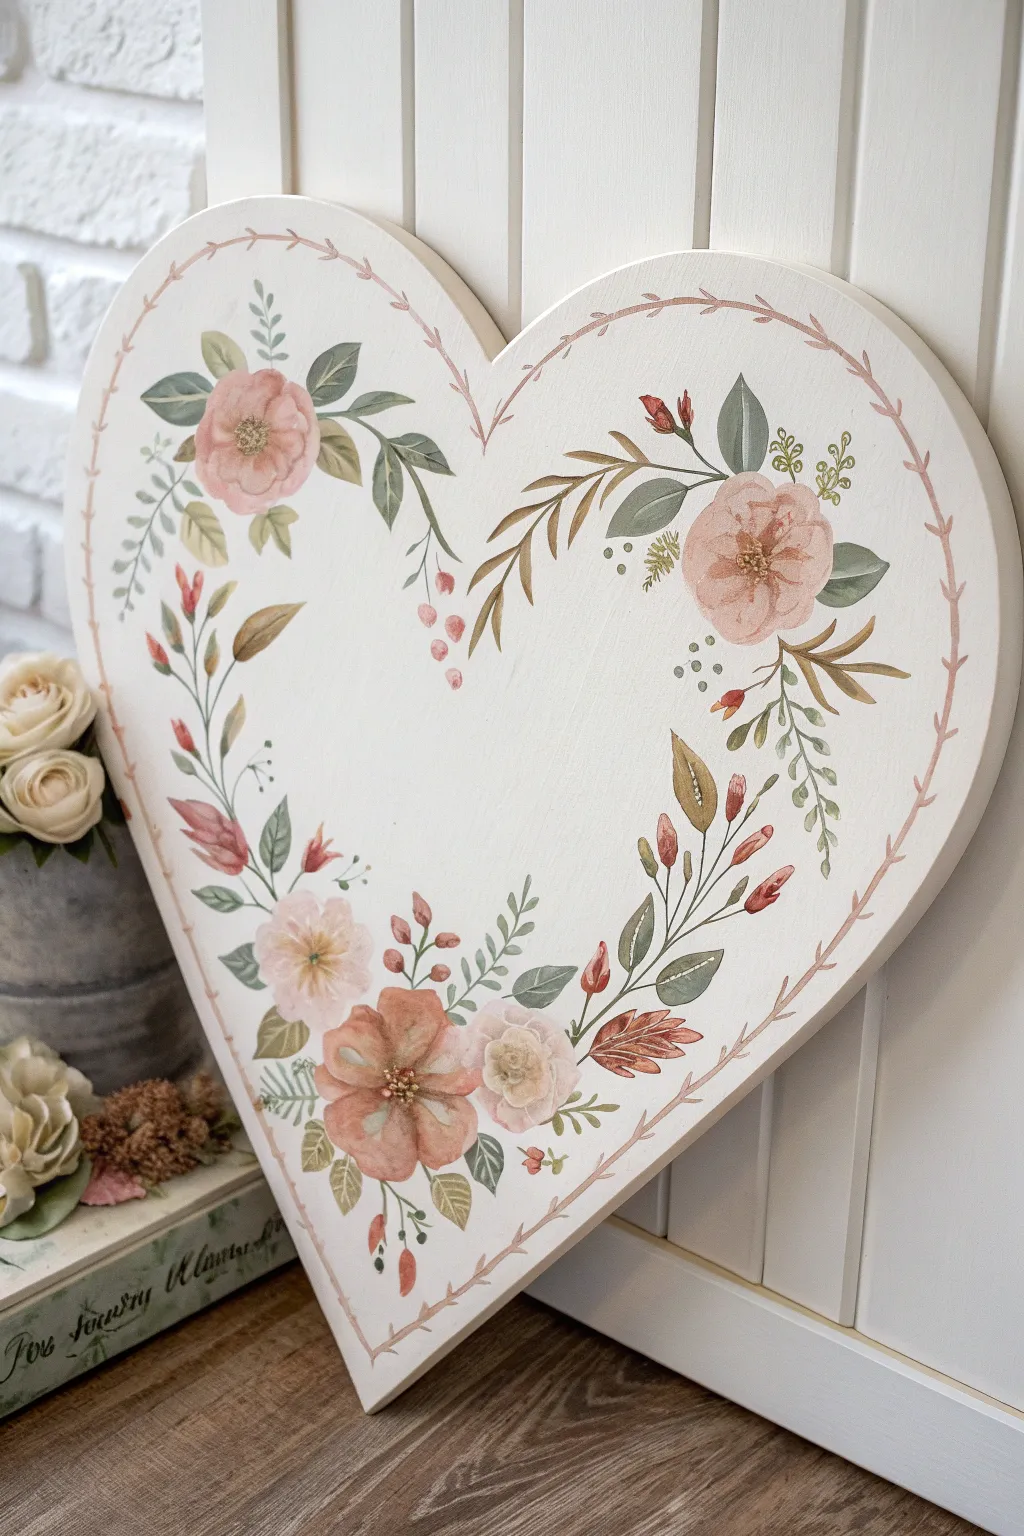
Capture the romance of a vintage garden with this heart-shaped wooden canvas project. Featuring soft blush roses and trailing greenery, this piece uses gentle acrylic blending to mimic the airy look of watercolors.
Detailed Instructions
Materials
- Heart-shaped wooden plaque or canvas (approx. 12-16 inches)
- White gesso or primer
- Fine-grit sandpaper (220 grit)
- Acrylic paints (Titanium White, Burnt Sienna, Olive Green, Sap Green, Alizarin Crimson, Yellow Ochre, Raw Umber)
- Matte acrylic medium (for glazing)
- Round brushes (sizes 2, 4, and 6)
- Liner brush (size 0 or 00)
- Pencil and eraser
- Palette and paper towels
- Clear matte varnish spray
Step 1: Preparation & Sketching
-
Prime the Surface:
Begin by applying two coats of white gesso to your wooden heart. Allow the first coat to dry completely before sanding it lightly for a smooth finish, then apply the second coat. -
Lightly Sand Again:
Once the second coat of gesso is bone dry, give it one final, very light sanding. This creates a velvety surface that takes detail work beautifully. -
Mapping the Design:
Using a pencil, very faintly sketch a border inside the edge of the heart, leaving about a half-inch margin. This will be your vine guide. -
Sketching Florals:
Sketch the placement of three main anchor flowers: one at the top left, one at the top right, and a cluster at the bottom point. Keep the lines incredibly faint so they don’t show through the paint later.
Paint looking too thick?
If your acrylics look chunky, mix in a drop or two of flow improver or water. You want the consistency of heavy cream for smooth, graceful strokes.
Step 2: Painting the Foliage
-
Mixing Green Shades:
Mix three shades of green: a pale sage (Olive Green + White), a deeper forest tone (Sap Green + tiny touch of Umber), and a brownish-green for dried leaves (Olive Green + Burnt Sienna). -
Base Foliage Layer:
Using a size 4 round brush, paint the larger leaves closest to the flower positions. I like to start with the pale sage color here to establish the background shape. -
Adding Contrast Leaves:
While the first leaves are drying, use the deep forest tone to add varied leaf shapes—some rounded eucalyptus styles and some pointed fern-like leaves. -
Painting Stems & Twigs:
Switch to your liner brush and the brownish-green mix. Connect the leaves with thin, delicate stems that follow the curve of the heart shape. -
The Decorative Border:
Using diluted Burnt Sienna and a liner brush, paint the outer vine border. Instead of a solid line, paint short, overlapping twig-like strokes with tiny ‘thorns’ or leaf buds.
Step 3: Creating the Blooms
-
Base Flower Color:
Mix a soft blush color using Titanium White with a tiny dot of Alizarin Crimson and Yellow Ochre. Paint the blooming rose shapes with this base color using a size 6 brush. -
Defining Petals:
While the base is still slightly tacky, mix a slightly darker version of the blush. Use the size 2 brush to paint ‘C’ shaped strokes starting from the center and working outward to define the petals. -
Deepening the Centers:
Mix a warm chestnut color (Alizarin Crimson + Burnt Sienna). Dab this into the very center of the roses to give them depth. -
Adding Stamen Details:
With your liner brush and a mix of Yellow Ochre and White, add tiny dots around the dark center of the flowers to mimic pollen stamens. -
Painting Buds:
Don’t forget the smaller buds scattered along the vines. Use the tip of your brush to press down and lift up, creating teardrop shapes in dark pink or reddish-brown.
Pro Tip: ‘Ghost’ leaves
Mix a very pale grey-green and paint faint leaves behind your main foliage layer. This creates instant depth and makes the arrangement look fuller.
Step 4: Refining & Finishing
-
Layering Transparent Washes:
Mix a tiny amount of Raw Umber with plenty of matte medium or water. Glaze over some of the lower leaves to push them into the background. -
Adding Highlights:
Take pure Titanium White and add tiny highlights to the tips of the leaves and the upper edges of the rose petals to catch the light. -
Final Vine Details:
Inspect the composition. If there are gaps, use your liner brush to add wispy sprigs or tiny groups of dots in sage green acting as filler flowers. -
Sealing the Work:
Let the painting cure for at least 24 hours. Because acrylics can remain tacky, spray with a clear matte varnish to protect the surface from dust and fingerprints. -
Attaching Hardware:
Once dry, flip the heart over and attach a sawtooth hanger or screw small eye hooks into the top lobes to hang with a ribbon.
Hang your charming new artwork on a door or gallery wall to bring a touch of perennial spring into your home


Soft Ombre Sunset Wash
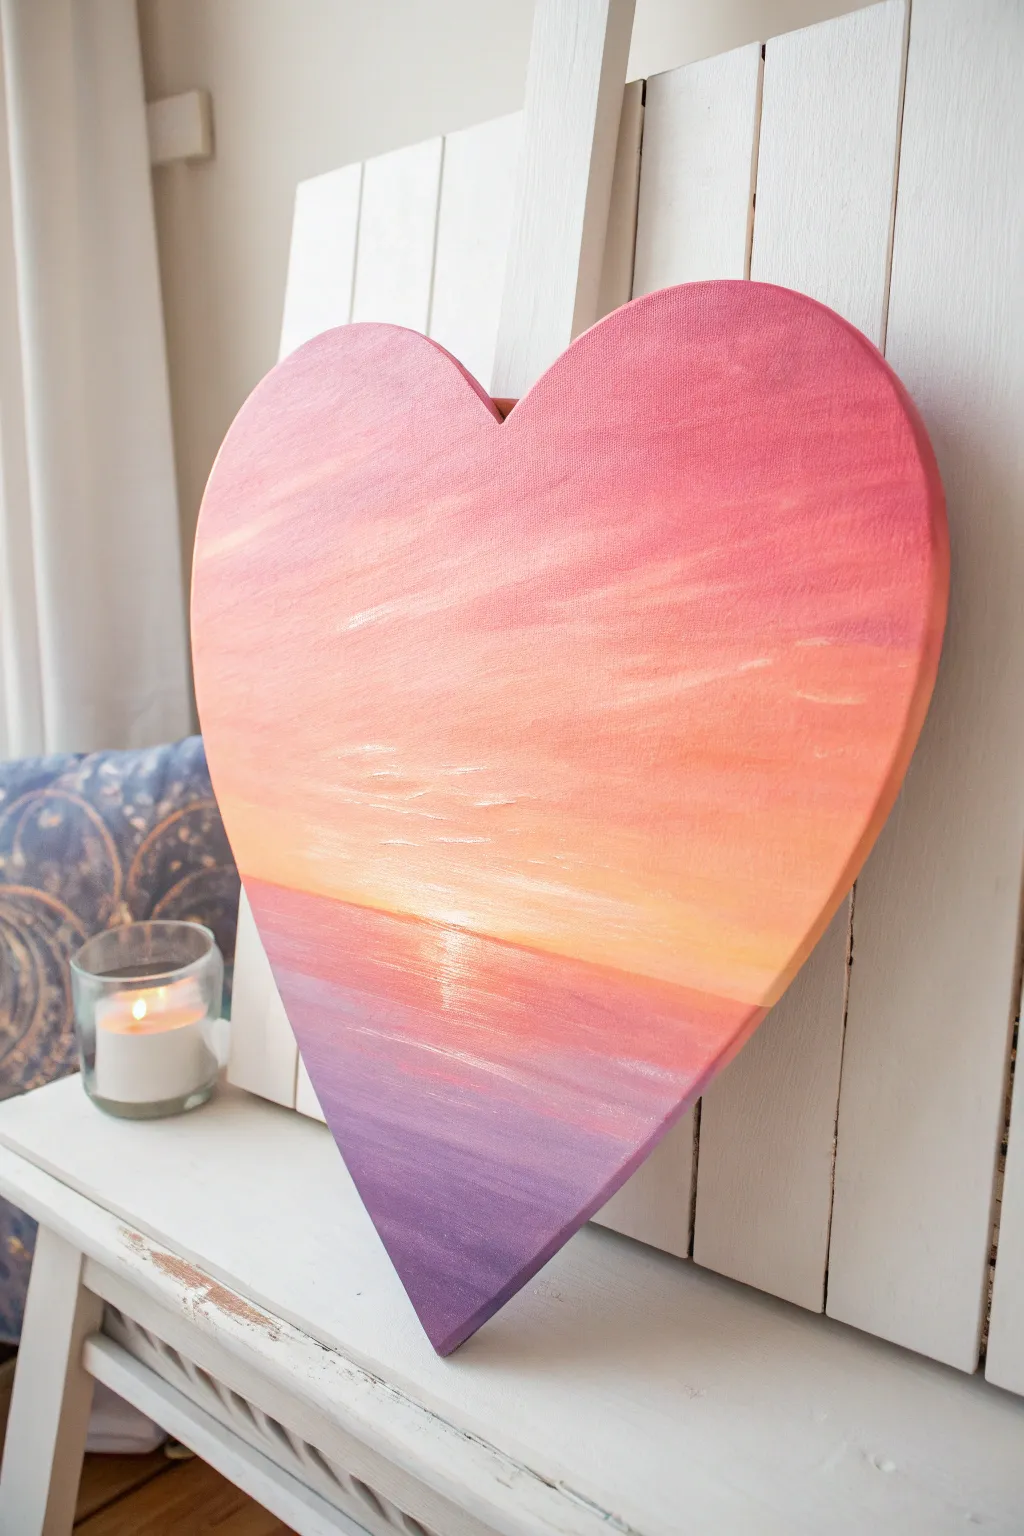
Capture the tranquil beauty of dusk with this gentle gradient painting on a unique heart-shaped canvas. Blending warm pinks, oranges, and calming purples creates a dreamy horizon line that radiates warmth.
Step-by-Step Tutorial
Materials
- Heart-shaped stretched canvas (approx. 12-16 inches)
- Acrylic paints: Titanium White, Cadmium Yellow, Orange, Magenta, Violet/Purple
- Large flat wash brush (1-inch width)
- Medium flat brush
- Small round detail brush
- Palette or paper plate
- Cup of water
- Paper towels
- Easel (optional)
Step 1: Prepping the Gradient
-
Prepare the palette:
Squeeze out generous amounts of your paints onto the palette. You will need plenty of white to mix pastel variations of your main colors, as this style relies on soft transitions rather than harsh contrasts. -
Identify the horizon line:
Visualize a line running horizontally across the lower third of the heart. This will be your horizon where the sun meets the water. It doesn’t need to be drawn with a pencil, just kept in mind as the focal point of light. -
Paint the sun glow:
Mix Titanium White with a tiny touch of Cadmium Yellow. Using the medium flat brush, paint a horizontal band across your imagined horizon line, slightly left of center. This should be the brightest part of the canvas. -
Blend outward with orange:
While the yellow is still wet, introduce a soft orange to your brush. Blend this into the yellow band, moving upwards towards the top of the heart and downwards towards the point. Use long, horizontal strokes to ensure a smooth transition.
Step 2: Painting the Sky
-
Add pink to the upper sky:
Pick up Magenta on your large wash brush. Starting from the very top curves of the heart, paint downwards. As you approach the orange section, lighten your pressure to let the colors mix on the canvas. -
Create the ombre transition:
Use a clean, slightly damp brush to work the area where the magenta meets the orange. Brush back and forth horizontally to blur the line, creating a soft peach tone in the middle. -
Incorporate subtle cloud streaks:
Mix a pale pink using White and a dot of Magenta. With the edge of a flat brush, drag loose, wispy horizontal lines across the upper sky to suggest drifting clouds. -
Highlight the clouds:
Add a little more white to your brush and highlight the top edges of these cloud streaks. This gives them volume and catches the imaginary light from the setting sun. -
Refine the sky gradients:
Step back and look for any harsh lines. If the paint has dried, you may need to apply a thin glazing layer of water or a retarder to re-blend the sections for that seamless airbrushed look.
Wet-on-Wet Blending
Keep a misting spray bottle handy to keep your acrylics slightly damp on the canvas. This allows for smoother gradients.
Step 3: Creating the Water Reflection
-
Establish the water base:
Below the horizon line, mirror the colors used in the sky but in reverse order. Start with a band of orange just under the yellow horizon glow. -
Introduce purple tones:
Mix Violet with a touch of Titanium White. Apply this to the bottom point of the heart, painting upwards. This creates the depth of the water near the viewer. -
Blend the mid-water:
Between the orange reflection and the purple bottom, blend in some Magenta tones. I prefer to use horizontal strokes exclusively here to simulate the flat surface of calm water. -
Paint the sun’s reflection:
Using your small round brush and pure White (or very pale yellow), paint a vertical series of short, dashed horizontal lines directly below the brightest point of the sunset. -
Taper the reflection:
Make the reflection lines wider near the horizon and narrower as they move down into the purple water. The lines should also get slightly darker or more transparent as they descend. -
Add water texture:
Mix a light lavender color. Use the small brush to add thin, scattered horizontal lines across the purple and pink sections of the water to represent gentle ripples catching the light. -
Paint the edges:
Don’t forget the thick sides of the canvas. Extend your colors around the edges of the heart shape so the painting looks finished from every angle. -
Final highlights:
Add a few final distinct sparkles of pure white to the center of the sun reflection and perhaps one or two on the sharpest cloud edges for contrast.
Fixing Muddy Colors
If colors turn grey or muddy mid-blend, let the layer dry completely. Then, paint a fresh, vibrant layer over the top.
Allow your beautiful sunset seascape to dry fully before displaying it on a shelf or wall


Two Swans Forming a Heart
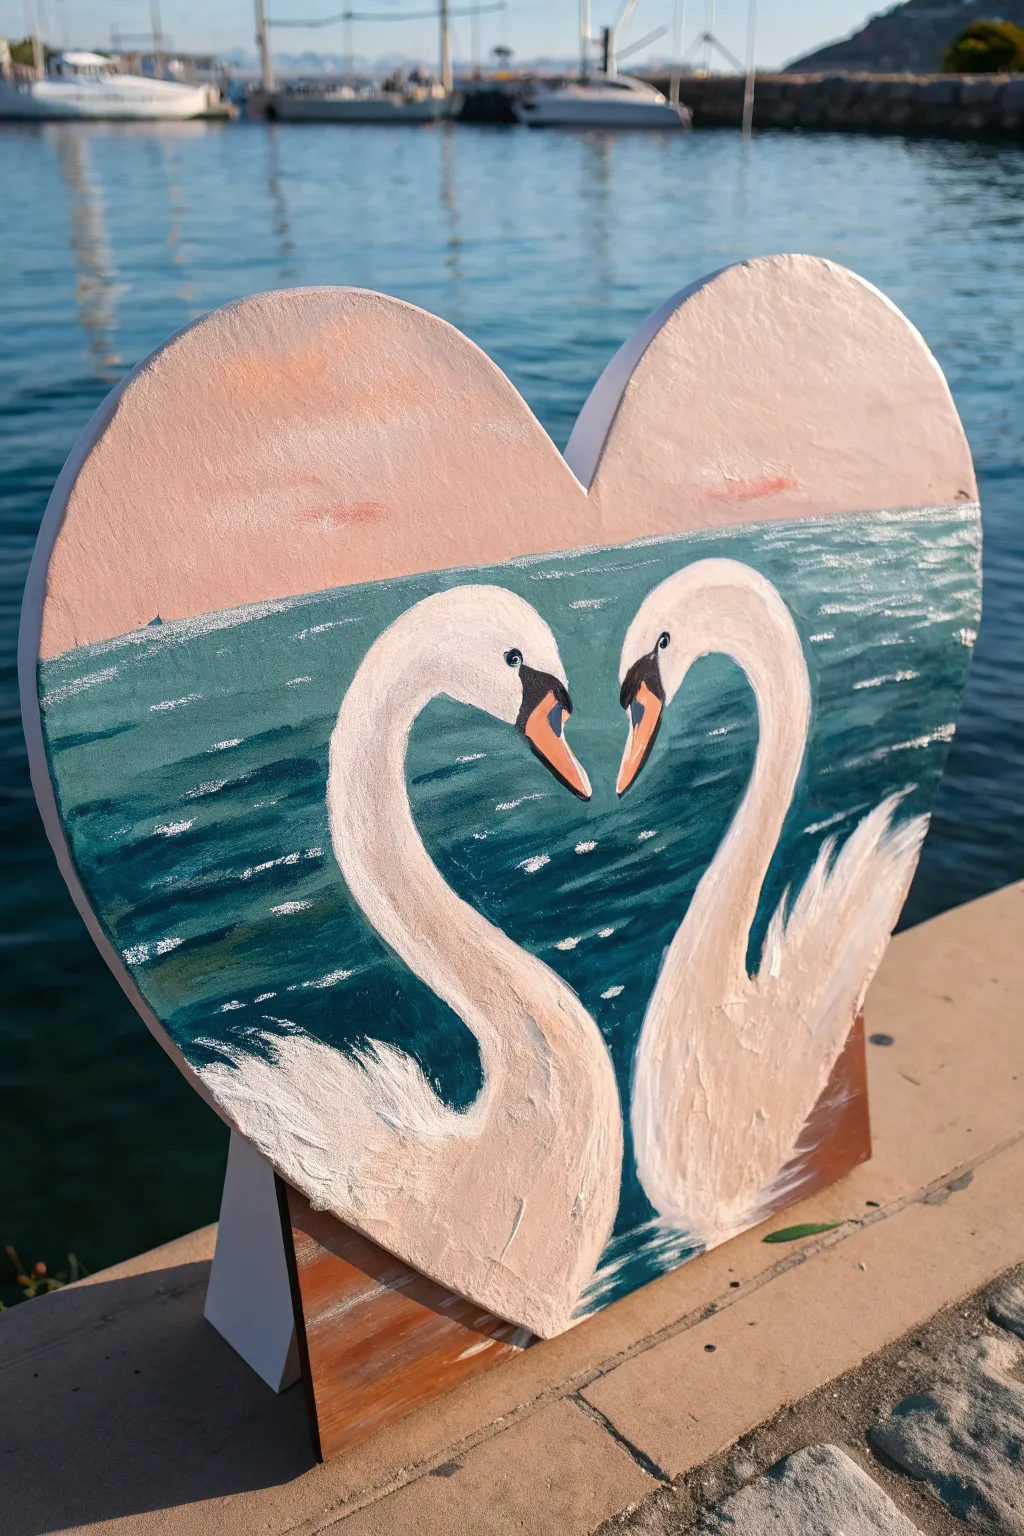
Capture the romance of nature with this serene painting of two graceful swans forming a heart shape with their long necks. Painted on a heart-shaped canvas, this piece features soft sunset hues and textured water details that bring the scene to life.
Step-by-Step
Materials
- Heart-shaped stretched canvas or canvas board (approx. 12-16 inches)
- Acrylic paints: Titanium White, Ultramarine Blue, Phthalo Green, Burnt Sienna, Cadmium Orange, Black
- Assorted brushes: 1″ flat brush, medium filbert brush, small round detail brush, liner brush
- Palette or mixing plate
- Cup of water and paper towels
- Pencil and eraser
- Easel (optional)
Step 1: Setting the Scene
-
Establish the horizon line:
Begin by deciding where your water meets the sky. Draw a light horizontal line across the heart shape, roughly one-third of the way down from the top dip of the heart. -
Mix the sky colors:
Create a soft, pastel peach color by mixing a generous amount of Titanium White with a tiny dot of Cadmium Orange and a touch of Burnt Sienna. -
Paint the sky:
Using your flat brush, fill the entire area above the horizon line with your peach mixture. Use horizontal strokes for a calm look. -
Add subtle clouds:
While the sky paint is still slightly wet, mix a slightly darker version of the peach (add a bit more orange/sienna). Dab in a few soft, horizontal cloud streaks near the horizon line. -
Block in the ocean base:
Mix Ultramarine Blue with Phthalo Green and a little white to create a deep teal ocean color. Paint the entire area below the horizon line with this base color using horizontal strokes.
Pro Tip: Symmetry Hack
To get perfectly symmetrical swan necks, sketch one side first on paper, cut it out, flip it, and trace it onto the canvas for the second swan.
Step 2: Drafting the Subjects
-
Sketch the swans:
Once the background is completely dry, lightly sketch the outline of the two swans. Position their heads close together near the center so their curved necks mirror each other to form a heart shape. -
Refine the shapes:
Ensure the bases of the necks widen significantly into the visible body feathers at the bottom of the canvas. The bodies should anchor the bottom point of the heart.
Step 3: Bringing the Swans to Life
-
Apply base white coat:
Using a filbert brush and pure Titanium White, fill in the sketched shapes of the swans. You may need two coats to fully cover the teal background. -
Paint the beaks:
Mix orange with a little white for the main part of the beak. Use a small round brush to paint the beak shapes, ensuring the tips point downward. -
Add facial details:
Switch to a liner brush with black paint. Carefully paint the triangular area connecting the beak to the eye and outline the eye itself. Add a tiny white dot in the eye for a highlight. -
Shading the necks:
Mix a very light grey or beige (white with a speck of brown/black). Gently shade the underside of the clear neck curve to give the swans roundness and dimension. -
Texture the feathers:
For the lower body feathers, I like to use a dryer brush with thick white paint. Use swift, upward flicking motions to create a fluffy, textured feather effect on the swans’ backs.
Level Up: Gloss Finish
Once fully dry, apply a high-gloss varnish only to the water area. Leave the swans and sky matte to make the water look wet and reflective.
Step 4: Water Details and Final Touches
-
Add distant waves:
Using a small brush and thinned white paint, add fine, short horizontal dashes across the teal water background to suggest distant ripples. -
Enhance water movement:
Paint slightly thicker, wavier white lines closer to the swans’ bodies to show the water displacement where they are swimming. -
Deepen the water shadows:
Glaze a transparent layer of dark blue mixed with black just under the white feathers of the swans to make them pop against the water. -
Final inspection:
Check your edges. Since this is a shaped canvas, paint the sides (the thickness of the canvas) to match the adjacent colors—peach for the top, teal for the sides.
Display your masterpiece on a small easel or mount it on a wall to add a touch of love to any room


Tree of Love Composition
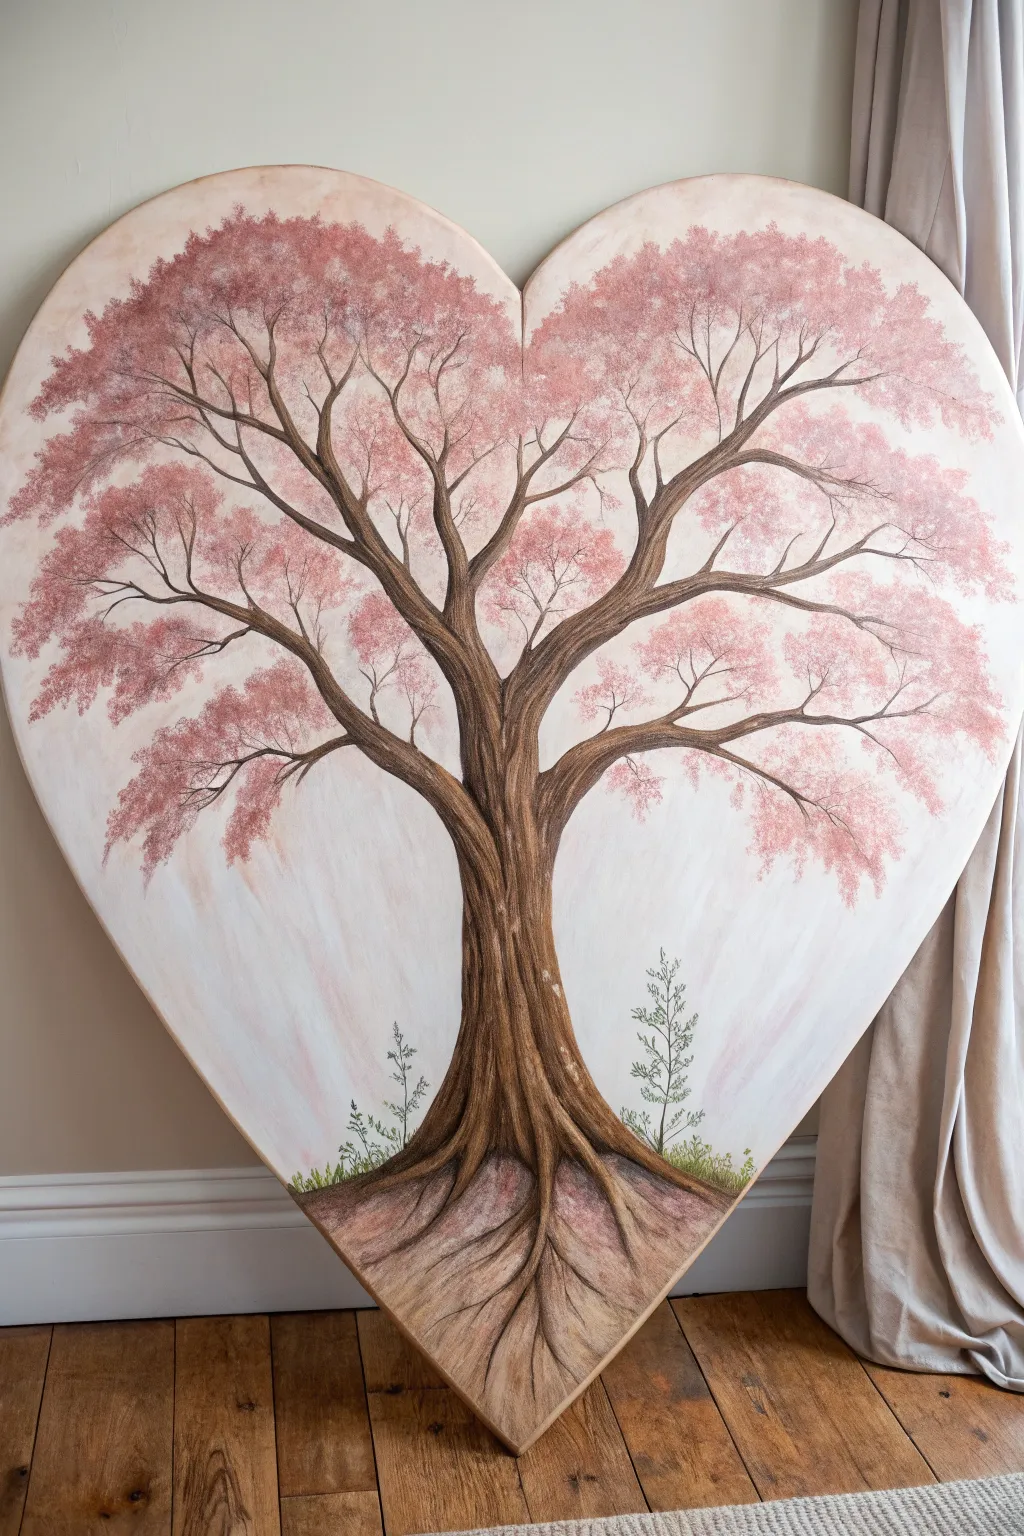
This stunning painting captures the enduring strength of love through a majestic tree that perfectly fills a heart-shaped canvas. With its textured bark, sprawling roots, and a canopy of soft pink foliage, this piece creates a romantic focal point for any room.
How-To Guide
Materials
- Large heart-shaped stretched canvas
- Acrylic paints: Burnt Umber, Raw Sienna, Titanium White, Mars Black, Alizarin Crimson, Sap Green
- Large flat brush (for background)
- Medium filbert brush (for trunk)
- Small round detail brush (for branches)
- Stippling brush or old scruffy brush (for leaves)
- Palette knife (optional, for bark texture)
- Water cup and paper towels
- Easel or flat workspace
Step 1: Setting the Atmosphere
-
Prime with a wash:
Begin by creating a soft, misty background. Mix a large amount of Titanium White with a tiny dot of Alizarin Crimson and a hint of water to create a very pale pink glaze. -
Apply the background:
Using your large flat brush, sweep this pale mixture across the entire canvas. Create subtle vertical streaks using upward strokes to mimic light filtering through. -
Add warmth:
While the background is still slightly damp, bled a tiny bit of Raw Sienna into the lower third of the canvas, fading it upward into the white-pink. Let this layer dry completely.
Step 2: Structuring the Trunk
-
Sketch the silhouette:
Lightly sketch the tree’s outline with a pencil or thinned brown paint. Position the trunk centrally, ensuring the main branches V-shape out towards the two top humps of the heart. -
Base coat the wood:
Mix Burnt Umber with a little water for flow. Fill in the main trunk and the primary thick branches with your filbert brush, establishing the central anchor of the piece. -
Create the root system:
Extend the trunk downward into the point of the heart. Paint twisting roots that flow seamlessly into the bottom tip, grounding the tree within the unique canvas shape. -
Define the texture:
Mix Raw Sienna and a touch of Titanium White. Using a dry-brush technique or a palette knife, drag this lighter color vertically down the trunk to simulate rough bark ridges. -
Deepen the shadows:
Mix Burnt Umber with a tiny bit of Mars Black. apply this to the shadowed sides of the trunk and underneath the roots to create cylindrical volume.
Muddy colors?
If your pink leaves are turning brown against the branches, let the brown branch layer dry 100% before stippling the foliage on top.
Step 3: Branching Out
-
Paint secondary branches:
Switch to a smaller round brush. Extend thinner branches from the main boughs, ensuring they curve gracefully to fill the rounded upper edges of the canvas. -
Add fine twigs:
Use the very tip of your detail brush with thinned dark brown paint to add delicate twigs at the ends of the branches. Make them look organic by trembling your hand slightly as you paint.
Add Hidden Details
Carve your initials into the trunk paint while wet using a toothpick, or paint two tiny birds nesting in the branches for a personalized touch.
Step 4: The Foliage Canopy
-
Mix your leaf colors:
Prepare three shades of pink on your palette: a dark crimson-pink shadow, a mid-tone rose, and a pale highlight pink. -
Stipple the base layer:
Use a scruffy barrier or stippling brush. Dip it into the darkest pink and lightly dab clusters of leaves at the ends of the branches. Don’t cover the branches entirely; let the wood peek through. -
Build volume:
Clean your brush slightly and pick up the mid-tone rose. Stipple this over the dark areas, concentrating on the tops of the leaf clusters where light would hit. -
Add highlights:
Finally, use the lightest pink to dab the very outer edges of the canopy, especially near the top curves of the heart, to make the foliage look airy and sunlit.
Step 5: Grounding Details
-
Paint the earth:
Around the roots, paint a small mound of earth using a mix of Burnt Umber and Raw Sienna, blending it softly into the background wash. -
Add greenery:
With your smallest detail brush and Sap Green, paint tiny, vertical grass blades sprouting up between the roots. -
Plant saplings:
Paint two small, delicate saplings or tall weeds on either side of the trunk near the base to balance the composition. Use fine lines and tiny dots for leaves. -
Final warm glaze:
I like to finish by adding a very transparent wash of Raw Sienna on the roots at the very bottom point to warm up the foreground.
Hang your beautiful heart canvas in a place where it can remind you daily of growth and connection
BRUSH GUIDE
The Right Brush for Every Stroke
From clean lines to bold texture — master brush choice, stroke control, and essential techniques.
Explore the Full Guide
Glitterless Galaxy Heart
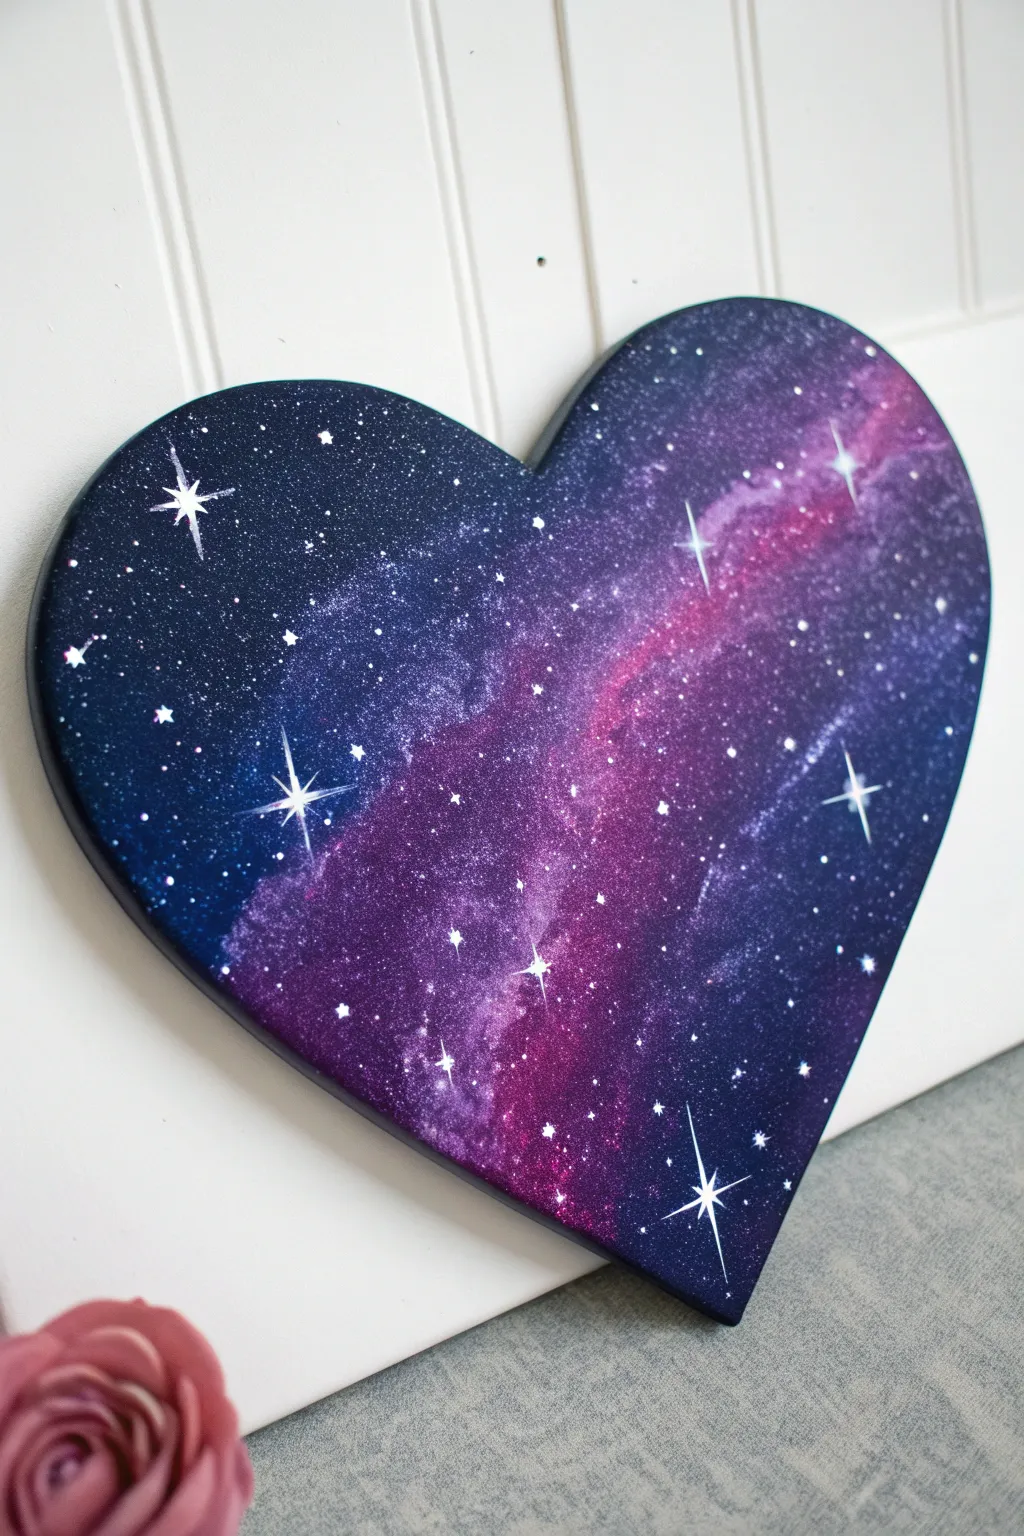
Capture the infinite beauty of space on a uniquely shaped canvas with this mesmerizing galaxy painting. By blending deep blues, vibrant pinks, and stark white stars, you will create a stunning piece of wall art that looks far more complex than it actually is.
Step-by-Step
Materials
- Heart-shaped stretched canvas (approx. 10-12 inches)
- Acrylic paints: Black, Prussian Blue, Dioxazine Purple, Magenta or Quinacridone Rose, Titanium White
- Sponges (makeup wedges or sea sponge)
- Assorted paintbrushes: 1-inch flat brush, small round brush, fine liner brush
- Old toothbrush (for spattering)
- Palette or paper plate
- Cup of water and paper towels
Step 1: Setting the Background
-
Base Coat Application:
Begin by painting the entire heart-shaped canvas with black acrylic paint. Use your flat brush to ensure full coverage, painting the sides of the canvas as well for a finished look. -
Developing the Deep Space:
While the black is still slightly damp, take a sponge dampened with a tiny bit of Prussian Blue. Dab it primarily around the outer edges of the heart, leaving the center mostly black to create depth. -
Blending the Blues:
Continue sponging the blue inward slightly, using a light tapping motion to create a soft, cloudy texture rather than solid lines.
Muddy colors?
If your pinks and blues are turning gray where they meet, let the bottom layer dry completely before sponging the next color over it to keep hues distinct.
Step 2: Creating the Nebula
-
Layering the Purple:
Switch to a clean sponge area. Load it with Dioxazine Purple and dab a diagonal swath across the heart, starting from the top right lobe down towards the bottom left. This forms the backbone of your galaxy. -
Adding Vibrancy:
While the purple is fresh, pick up some Magenta paint on a sponge. Dab this directly on top of the purple stream, focusing on the center of that diagonal line to make it glow. -
Softening the Edges:
Use a clean, slightly damp sponge to blur the boundaries between the black/blue background and your purple/pink nebula stream. The transition should look smoky and soft. -
Highlighting the Cloud:
Mix a tiny drop of Titanium White with your Magenta to create a light pink. Sponge this sparingly into the very center of the brightest pink areas to create intense pockets of light. -
Creating Depth:
If the clouds look too flat, go back in with a little black on a sponge and tap lightly around the edges of the pink band to make the nebula recede into the darkness.
Add dimension
For a dreamy 3D effect, mix a tiny amount of iridescent mixing medium or pearl white paint into your magenta layer for a subtle, shimmering glow.
Step 3: Painting the Stars
-
Preparing Star Paint:
Water down a small amount of Titanium White paint on your palette until it reaches an ink-like consistency. -
Technique: The Spatter:
Dip an old toothbrush into the thinned white paint. Hold it over the canvas and run your thumb across the bristles to flick tiny specks of ‘distant stars’ across the entire surface. -
Checking Density:
I usually do a test spray on a paper towel first to ensure the drops aren’t too big. Aim for a mix of densities—some areas thick with stars, some sparse. -
Adding Medium Stars:
Using your smallest round brush or the back end of a paintbrush handle, dot individual white stars onto the canvas. Place these randomly, but cluster a few near the bright nebula strip.
Step 4: The Lens Flares
-
Painting the Major Stars:
Select 3 or 4 spots for your largest, glowing stars. Use your fine liner brush to paint a small white cross at each location. -
Extending the Rays:
Carefully drag the paint outward from the center of the cross to lengthen the arms. Make the vertical line slightly longer than the horizontal one. -
Adding the Halo:
Dry brush a tiny, faint circle of white haze around the center intersection of your largest stars to make them appear to glow. -
Adding Micro-Flares:
Add smaller, simpler crosses (just two quick intersecting lines) to a few of the medium-sized stars for variety. -
Final White Highlights:
Place a solid, opaque dot of white right in the dead center of your crosses to give them a piercingly bright core. -
Drying and Sealing:
Allow the painting to dry overnight. Once cured, apply a coat of gloss varnish to deepen the black tones and make the stars pop.
Hang this celestial heart in a well-lit spot to watch your personal galaxy shimmer and shine
Masked Negative Space Message
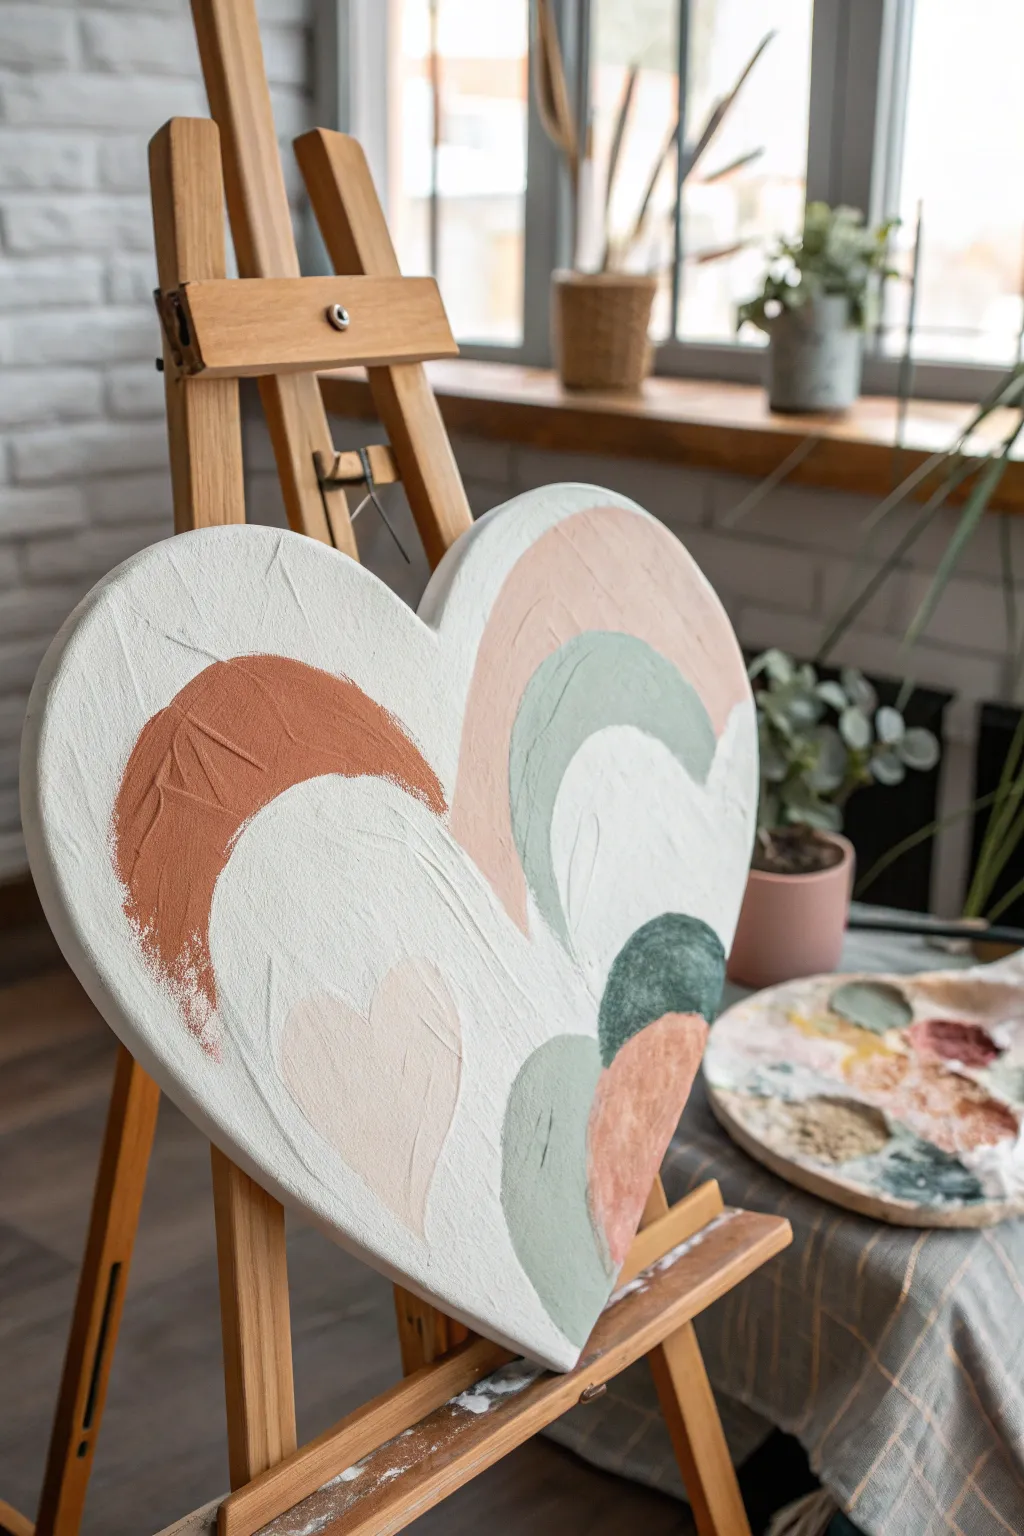
Transform a simple heart-shaped canvas into a chic piece of bohemian decor using textured modeling paste and a soft, earthy color palette. This project combines raised, tactile arches with negative space to create a modern, minimalist design that looks effortlessly high-end.
Step-by-Step Guide
Materials
- Heart-shaped stretched canvas
- Acrylc modeling paste or texture gel
- Palette knife (flat edge)
- Acrylic paints (terracotta, sage green, blush pink, dark teal, white)
- Paintbrushes (small angle brush and detail round brush)
- Pencil
- Paper plate or mixing palette
Step 1: Preparation and Base Layer
-
Prime the Surface:
Begin by ensuring your heart-shaped canvas is clean. Apply a coat of white acrylic paint or gesso over the entire surface to create a crisp, bright starting point. Let this dry completely before moving forward. -
Sketch the Design:
Using a pencil, very lightly sketch your abstract arch shapes. Draw a large arch on the left side curving inward, a double rainbow-style arch on the upper right, and a few semi-circles near the bottom right. Keep the lines faint so they are easy to cover later. -
Apply Modeling Paste Background:
Scoop out a generous amount of plain white modeling paste with your palette knife. Spread it across the canvas, but avoid the areas where you sketched your colored shapes if you want them strictly flat, or cover the whole thing for a unified texture. -
Create Texture:
While the white paste is wet, use the flat edge of your palette knife to create ‘peaks and valleys.’ Press down and lift up randomly to build that stucco-like, rough surface texture seen in the white negative space. Avoid smoothing it out perfect. -
Let it Cure:
This is crucial: allow the modeling paste to dry completely. Depending on the thickness, this can take anywhere from 2 to 24 hours. The paste must be hard to the touch before painting.
Step 2: Adding Color to Shapes
-
Mix the Terracotta:
On your palette, mix burnt sienna with a touch of white and a tiny dot of yellow oxide to get that warm, earthy terracotta hue. You want a creamy consistency. -
Paint the Left Arch:
Using a flat brush, fill in the large arch shape on the left side with your terracotta mix. Apply the paint somewhat thickly to mimic the texture of the background. Let the edges be slightly rough and organic rather than perfectly sharp. -
Mix Sage Green:
Combine sap green, a generous amount of white, and a tiny bit of grey or black to desaturate the color. You represent a soft, muted sage. -
Paint the Upper Right Arch:
Apply the sage green to the inner curve of the rainbow shape on the top right. Follow the curve carefully, allowing the texture of the canvas or underlying paste to show through slightly for a rustic look. -
Create the Blush Tone:
Mix a small amount of red or magenta with plenty of titanium white and a hint of yellow or ochre. This should result in a soft, dusty pink or peach color. -
Fill the Outer Arch:
Paint the outer band of the top-right rainbow shape with this blush tone. I like to blend the edge where it meets the sage green just slightly if they are both wet, or leave a tiny gap for separation. -
Add the Bottom Details:
Mix a darker teal by adding more blue and black to your green mix. Paint the small semi-circle on the bottom right edge. -
Paint the Final Details:
Use the remaining terracotta or a slightly lighter peach mix to fill in any remaining small shapes, like the bottom-most semi-circle. Ensure the paint fills the crevices of the textured surface.
Cracking Paste?
If your modeling paste cracks while drying, it was likely applied too thick in one go. Fill cracks with a thin layer of fresh paste or white paint to hide them.
Step 3: Refining and Finishing
-
Enhance Texture:
Once the colored shapes are tacky or dry, you can use a clean palette knife to gently scrape over the top of the painted areas. This ‘distressing’ technique reveals some white peaks underneath, enhancing the vintage, worn look. -
Clean Up Edges:
Use a small detail brush with white paint to tidy up the negative space between the colored arches. If you accidentally painted outside the lines, simply cover it with opaque white paint or a dab of fresh modeling paste. -
Check the Side Profile:
Don’t forget the edges of the canvas. Paint the sides white to match the background for a gallery-wrapped look, or continue the colored shapes over the edge for a continuous design. -
Scratch in Details:
While the terracotta arch is drying (or fully dry), use the back end of a paintbrush or a toothpick to gently scratch line patterns into the paint. This adds an extra layer of visual interest and tactile variation. -
Seal (Optional):
Because of the heavy texture, varnishing can be tricky. If you choose to seal it, use a spray matte varnish. Hold the can 12 inches away and do light coats to avoid pooling in the crevices.
Add Gold Accents
For a luxe upgrade, paint thin lines of gold leaf adhesive between the color blocks and apply gold foil leafing for a shimmering border.
Hang your textured heart art in a cozy corner or prop it on a shelf to bring a warm, artistic touch to your space


Have a question or want to share your own experience? I'd love to hear from you in the comments below!