If you’ve got a handful of smooth rocks and a little paint, you’re already halfway to the cutest tiny flock of owls. Here are my favorite owl rock painting ideas—starting with the classic looks everyone loves and ending with a few artsy twists that’ll make your rocks feel extra special.
Classic Big-Eyed Owl Face
Transform a simple smooth stone into a charming, innocent-looking owl character with wide eyes and textured feathery wings. This project uses a clean white base to make the earthy brown tones and bold black outlines really pop, creating a delightful desk companion or garden accent.
Step-by-Step Tutorial
Materials
- Smooth, oval-shaped river rock (palm-sized)
- White acrylic paint (high opacity)
- Light brown acrylic paint
- Medium brown acrylic paint
- Golden yellow or ochre acrylic paint
- Black acrylic paint or extra-fine black paint pen
- Flat paintbrush (medium size)
- Fine detail paintbrush or liner brush
- Pencil for sketching
- Matte or satin varnish sealant
Step 1: Base and Sketching
-
Clean the canvas:
Before you begin, scrub your rock with soap and water to remove any dirt or grit. Let it dry completely in the sun or with a quick blast from a hairdryer to ensure the paint adheres properly. -
Apply the base coat:
Using your flat brush, paint the entire surface of the rock with white acrylic paint. You will likely need 2-3 coats to achieve a solid, opaque finish. I like to let each layer dry fully before adding the next to avoid streaks. -
Sketch the outline:
Once the white base is bone dry, lightly sketch the owl’s features with a pencil. Draw two large circles for eyes that touch in the middle, a small triangle beak below them, two curved wing shapes on the sides, and a tuft of feathers at the very top.
Step 2: Adding Features and Color
-
Paint the feathered crown:
Fill in the sketched tuft at the top of the head with medium brown paint. This area should look a bit jagged to resemble ruffled feathers. -
Color the wings:
Paint the two curved wing shapes on the owl’s sides using the light brown paint. Apply an extra coat if the color looks thin. -
Add wing details:
While the wing paint is still slightly wet or after it dries, add a darker brown accent at the top curve of each wing to create depth and shadow. -
Paint the beak:
Use your golden yellow or ochre paint to carefully fill in the small triangular beak located just below where the eyes meet. -
Create the feet:
Near the bottom edge of the rock, paint two small, semi-circular shapes in golden yellow to represent the owl’s talons gripping a branch.
Uneven Lines?
If brush outlining feels shaky, use an extra-fine acrylic paint marker or permanent marker. It offers much better control than a brush for beginners.
Step 3: Outlining and Detailing
-
Outline the eyes:
Switch to your fine liner brush or a black paint pen. Carefully trace the two large eye circles. Make the line thick enough to be bold but consistent. -
Draw the pupils:
Inside each large white eye circle, paint a smaller black circle. Position them slightly towards the center or looking upward to give the owl a curious expression. -
Add a highlight:
Once the black pupils are dry, dip the very tip of a clean brush or a toothpick into white paint and add a tiny white dot to each pupil. This ‘catchlight’ brings the character to life. -
Outline the beak and crown:
Use the black paint pen or fine brush to outline the yellow beak and the brown feather tufts on the head. -
Define the wings:
Outline the brown wing shapes with black. Then, draw curved lines horizontally across the wings to simulate layers of feathers. -
Draw chest feathers:
In the central white space of the body, paint small ‘v’ shapes or check marks scattered in rows. These simple marks effectively mimic the texture of breast feathers. -
Detail the feet:
Add three small vertical black lines on each yellow foot shape to separate the individual talons. -
Add speckling:
For a bit of organic texture, you can add tiny black dots around the outer edges of the face or body area, keeping them sparse. -
Seal the rock:
Once all paint is thoroughly dry, apply a coat of matte or satin varnish. This protects your artwork from chipping and gives it a professional, finished look.
Glow in the Dark
Paint the large white circles of the eyes with glow-in-the-dark acrylic paint for a spooky night-time surprise in your garden.
Place your finished owl on a bookshelf or in a potted plant to enjoy its watchful gaze


Minimalist Owl Eyes and Beak
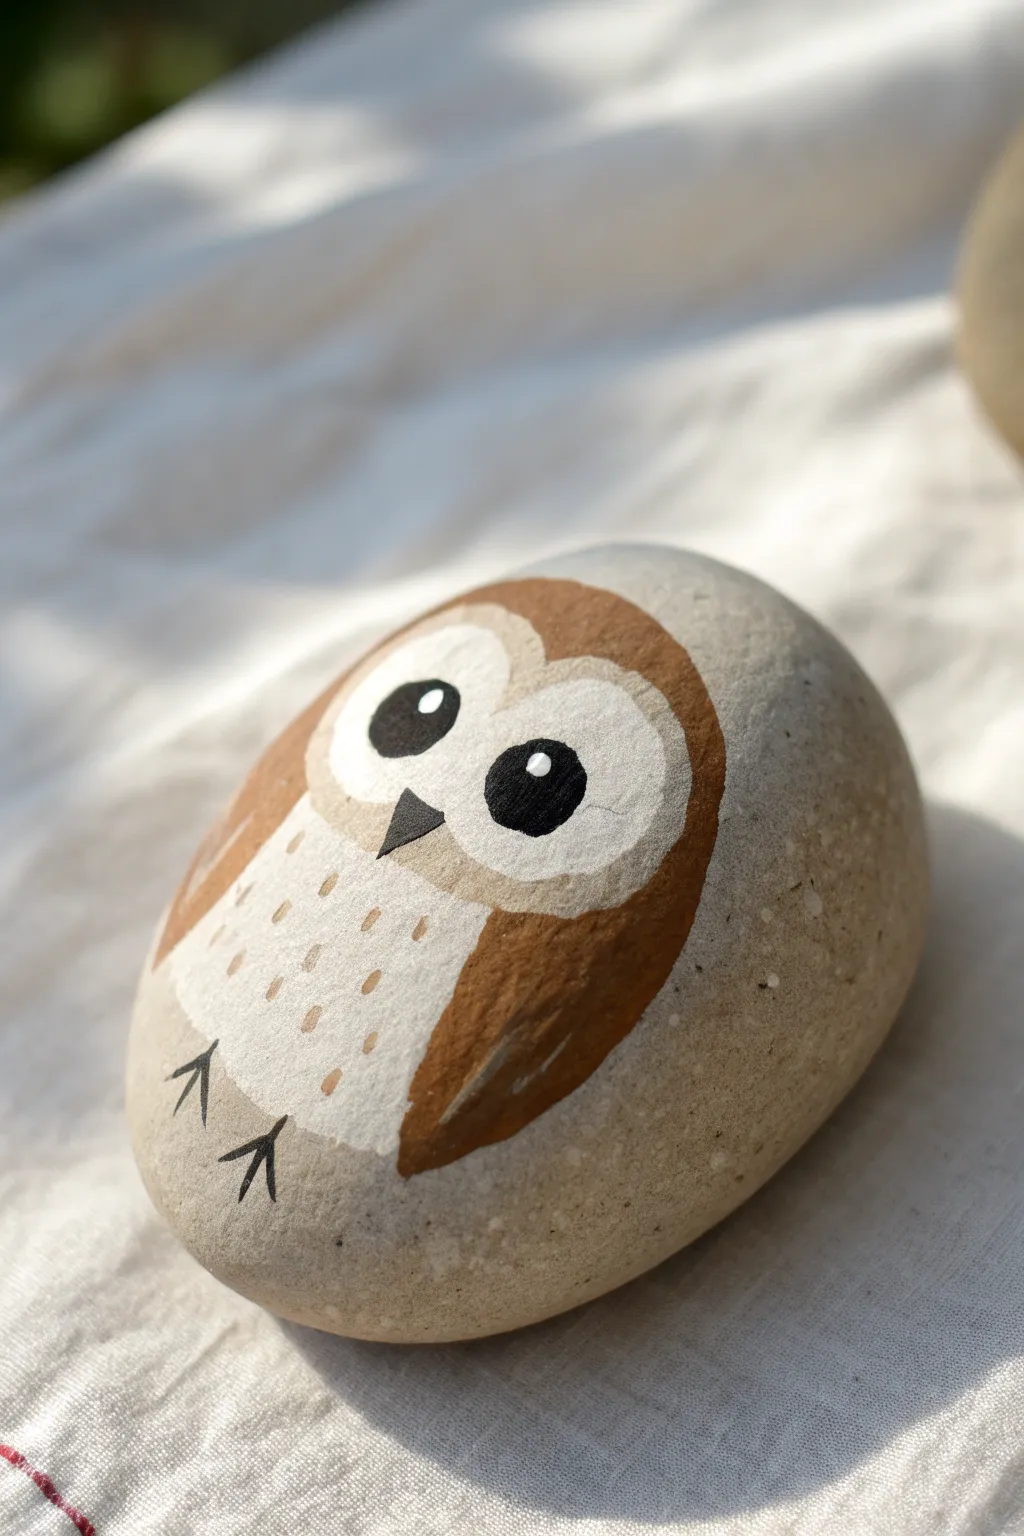
Transform a simple garden stone into a charming woodland companion with this easy-to-follow painting project. The design uses warm, earthy tones and clean lines to create an owl that feels both rustic and modern.
Detailed Instructions
Materials
- Smooth, oval-shaped river rock (approx. 3-4 inches wide)
- Acrylic paints: warm white (or light beige), medium brown, dark brown, black
- Flat paint brushes (small and medium)
- Fine detail liner brush (size 0 or similar)
- Dotting tool or toothpick
- Pencil and eraser
- Matte finish sealer (spray or brush-on)
- Water cup and paper towels
Step 1: Preparation and Base Shape
-
Clean the canvas:
Begin by thoroughly washing your stone with soapy water to remove any dirt or oils. Let it dry completely in the sun or with a hairdryer before you start sketching. -
Outline the body:
Using a pencil, lightly sketch the main outline of the owl on the top face of the stone. Draw a large oval shape that tapers slightly at the bottom, centering it well on the rock’s surface. -
Define the face frame:
At the top of your oval, draw a heart-shaped curve that dips in the center (the forehead) and curves around to form the top of the wings. This ‘widow’s peak’ shape is crucial for the owl’s character. -
Pencil in the mask:
Inside the top area, sketch a figure-eight or infinity symbol shape for the eye mask area. This will be where the large eyes sit later.
Step 2: Painting the Large Blocks
-
Paint the chest:
Mix a warm white or very light beige. Using a medium flat brush, fill in the central chest area (below the face mask) with this color. You might need two coats to get solid coverage over the grey stone. -
Fill the eye mask:
Using the same light beige color, carefully paint the figure-eight shape for the face. Ensure the paint meets the chest area seamlessly, but keep the shapes distinct for now. -
Add the wings and head:
Switch to your medium brown paint. Fill in the area surrounding the light beige sections—this acts as the wings and the top of the head. Carefully trace along the outer edge of your initial pencil sketch. -
Smooth the edges:
While the brown paint is still workable, use a clean, slightly damp brush to tidy up the line where the brown meets the beige, creating a crisp, clean border. -
Let it dry:
This is a good moment to pause. Allow these base layers to dry completely (about 15-20 minutes) so your next details won’t smear or blend unintentionally.
Stone Selection Tip
For this design, the rock’s natural color acts as the background. Pick a stone that is smooth, grey, and free of deep pits so your straight lines stay crisp.
Step 3: Adding the Face and Details
-
Create the eyes:
Using black paint and a small round brush, paint two large, solid black circles inside the beige eye mask area. I find it helps to start small and slowly widen the circles until they look balanced. -
Paint the beak:
Take your black paint (or a very dark charcoal grey) and paint a small, sharp triangle right between the eyes. The top of the triangle should point downward. -
Add eye highlights:
Dip the non-brush end of a paintbrush, or use a dotting tool, into pure white paint. Place a single crisp white dot in the upper-right area of each black pupil to bring the owl to life. -
Contour the eyes:
Mix a slightly darker beige (add a tiny drop of brown to your white). Using a fine liner brush, paint a very thin outline around the beige eye mask ‘circles’ to give them depth against the brown feathers.
Level Up: Texture
Instead of painted brown dashes on the chest, try using a gold or bronze metallic paint pen for the feather details to add a subtle shimmer.
Step 4: Feather Texture and Finish
-
Add chest speckles:
Using the medium brown paint and a fine liner brush (or toothpick), create small, vertical dash marks on the beige chest. Scatter these loosely to mimic ruffled feathers. -
Vary the speckles:
Add a few smaller, fainter dots near the bottom of the chest area. This simple texture prevents the large white space from looking too flat. -
Paint the talons:
At the very bottom of the white chest area, use black paint and your finest liner brush to draw two sets of feet. Use simple ‘V’ shapes or ‘arrow’ lines pointing down. -
Final retouching:
Look over your rock. If the beige chest looks a bit translucent, carefully dab a little more paint on the highlighted areas, avoiding your fresh brown speckles. -
Seal the deal:
Once the paint is bone dry (give it at least an hour), apply a layer of matte varnish sealer. This protects the stone from weather if you plan to keep it outdoors.
Place your little stone owl on a bookshelf or window ledge to verify its wisdom


Barred Owl Stripe Pattern
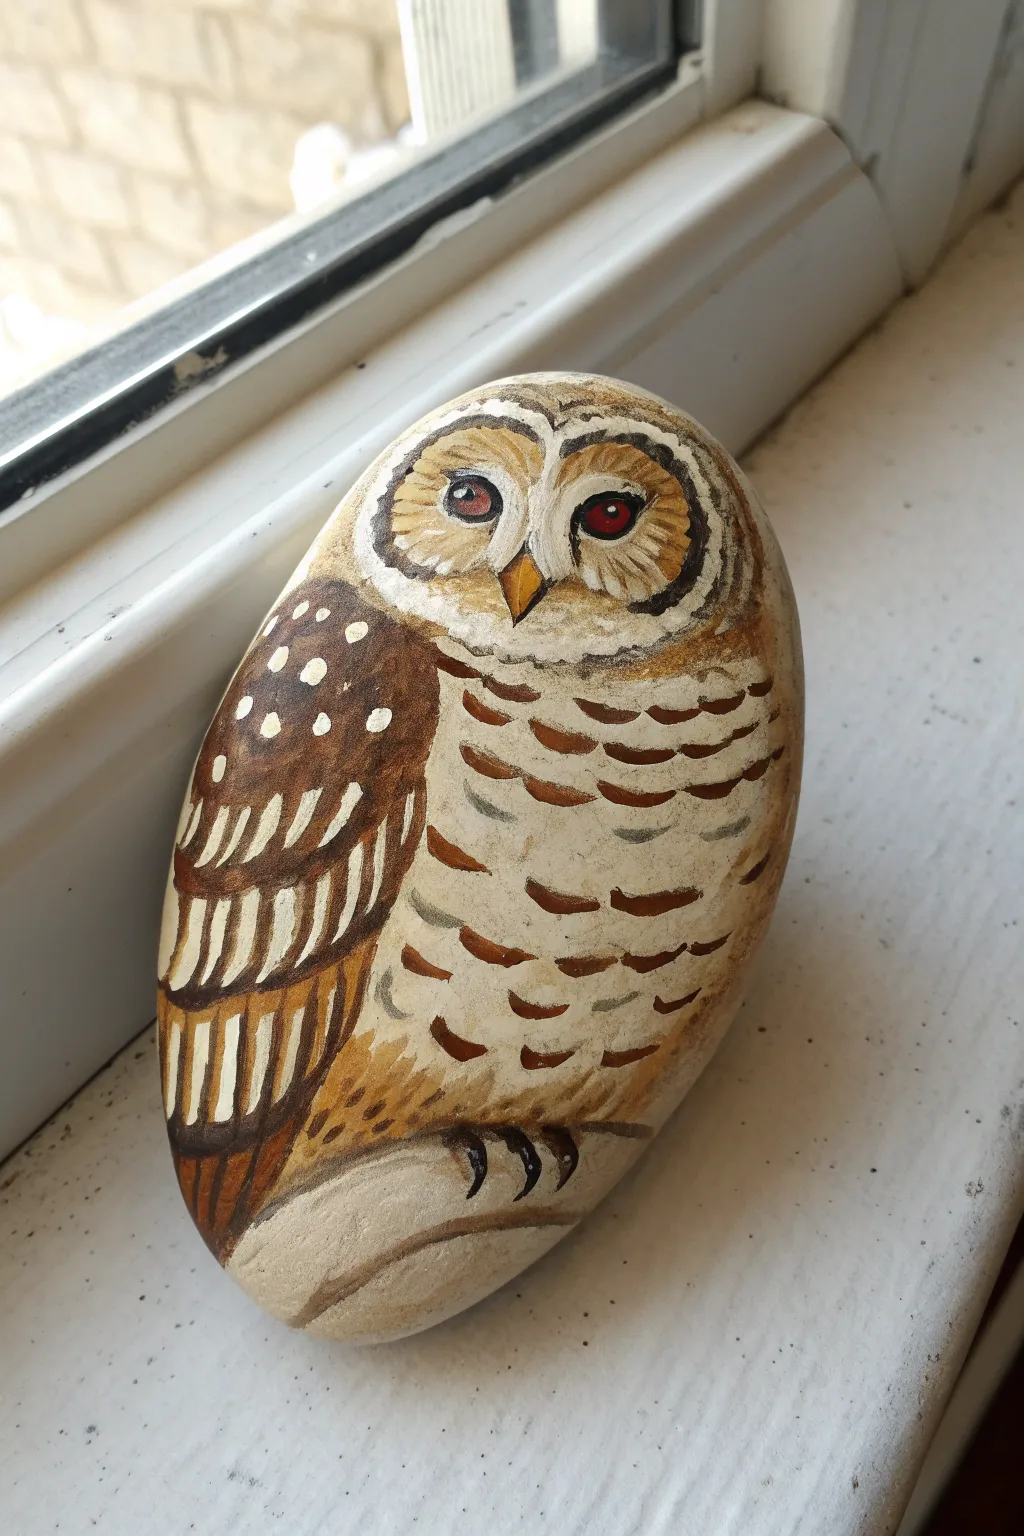
This tutorial guides you through transforming a smooth, oblong stone into a charming barred owl, complete with its signature horizontal barring and soulful eyes. The natural shape of the rock perfectly mimics the perched posture of the bird, making for a delightful garden decoration or paperweight.
How-To Guide
Materials
- Smooth, oblong river rock (about palm-sized)
- Acrylic paints (Titanium White, Burnt Umber, Yellow Ochre, Black, Raw Sienna)
- Assorted brushes (flat brush for base, fine liner for details)
- Pencil (HB or lighter)
- Posca paint pens (optional, for fine lines)
- Matte or satin varnish/sealant
- Water cup and paper towels
Step 1: Base Coat and Sketching
-
Clean the canvas:
Begin by scrubbing your rock with warm, soapy water to remove any dirt or oils. Let it dry completely in the sun or use a hairdryer to speed things up. -
Apply the primer:
Paint the entire surface of the rock with a mix of Titanium White and a tiny drop of Yellow Ochre to create a warm, off-white base. You will likely need two coats for full opacity. -
Map out the owl:
Once the base is dry, use a pencil to lightly sketch the owl’s outline. Draw a large oval for the body and a rounded heart shape near the top for the face disc. Mark the wing curve on the left side.
Step 2: Blocking in Color
-
Paint the face disc:
Inside the heart-shaped face area, use a very light cream color. Around the edge of this shape, paint a jagged border using dark brown and black to create the distinctive facial ruff. -
Define the wing:
Fill in the wing area on the left with a solid coat of Burnt Umber mixed with a little water to help it flow. This creates the dark background for the feathers later. -
Add the beak:
Paint a small, downward-pointing triangle for the beak right between the eyes using Yellow Ochre or a golden yellow shade. -
Create the eyes:
Paint two circles for the eyes. For this barred owl look, I prefer using a dark black pupil surrounded by a very thin ring of reddish-brown, leaving a tiny white dot in each for the reflection.
Uneven Lines?
If your brushstrokes feel shaky on the chest bars, switch to an acrylic paint pen. The firm nib offers more control on the rocky surface than soft bristles.
Step 3: Detailed Patterns
-
Start the chest barring:
This is the signature step. Using a fine liner brush and thinned brown paint, create short, horizontal curved dashes across the chest. These should look like little smiles or scallops. -
Texturize the face:
Using a very dry brush with light tan paint, gently stroke outward from the eyes to the edge of the face disc to simulate fine radiating feathers. -
Layer the wing feathers:
Over the dark brown wing, paint rows of elongated tear-drop shapes in white and cream. Arrange them in vertical tiers to look like layered flight feathers. -
Refine the wing spots:
Add small white dots on the upper shoulder part of the wing (the scapulars) to add variety to the texture. -
Deepen the contrast:
Go back in with your darkest brown or black to add shadows under the white wing feathers and between the chest bars to make the texture pop.
Glow in the Dark
Mix a small amount of phosphorescent medium into the white paint for the eyes. This will make your owl’s gaze glow softly at night in the garden.
Step 4: Finishing Touches
-
Paint the talons:
At the very bottom, paint three curved black lines representing talons gripping a branch. -
Add a perch:
Paint a simple curved line or shape under the talons in a light grey or beige to represent the branch or log the owl is sitting on. -
Final highlights:
Use pure Titanium White to add the sharpest highlights on the beak and the brightest parts of the wing feathers. -
Seal the artwork:
Allow the paint to cure for at least 24 hours. Once fully dry, apply a coat of matte or satin varnish to protect your owl from the elements if you plan to keep it outside.
Now you have a wise little companion ready to perch on your windowsill or hide among your flowerbeds


Snowy Owl in Soft Whites
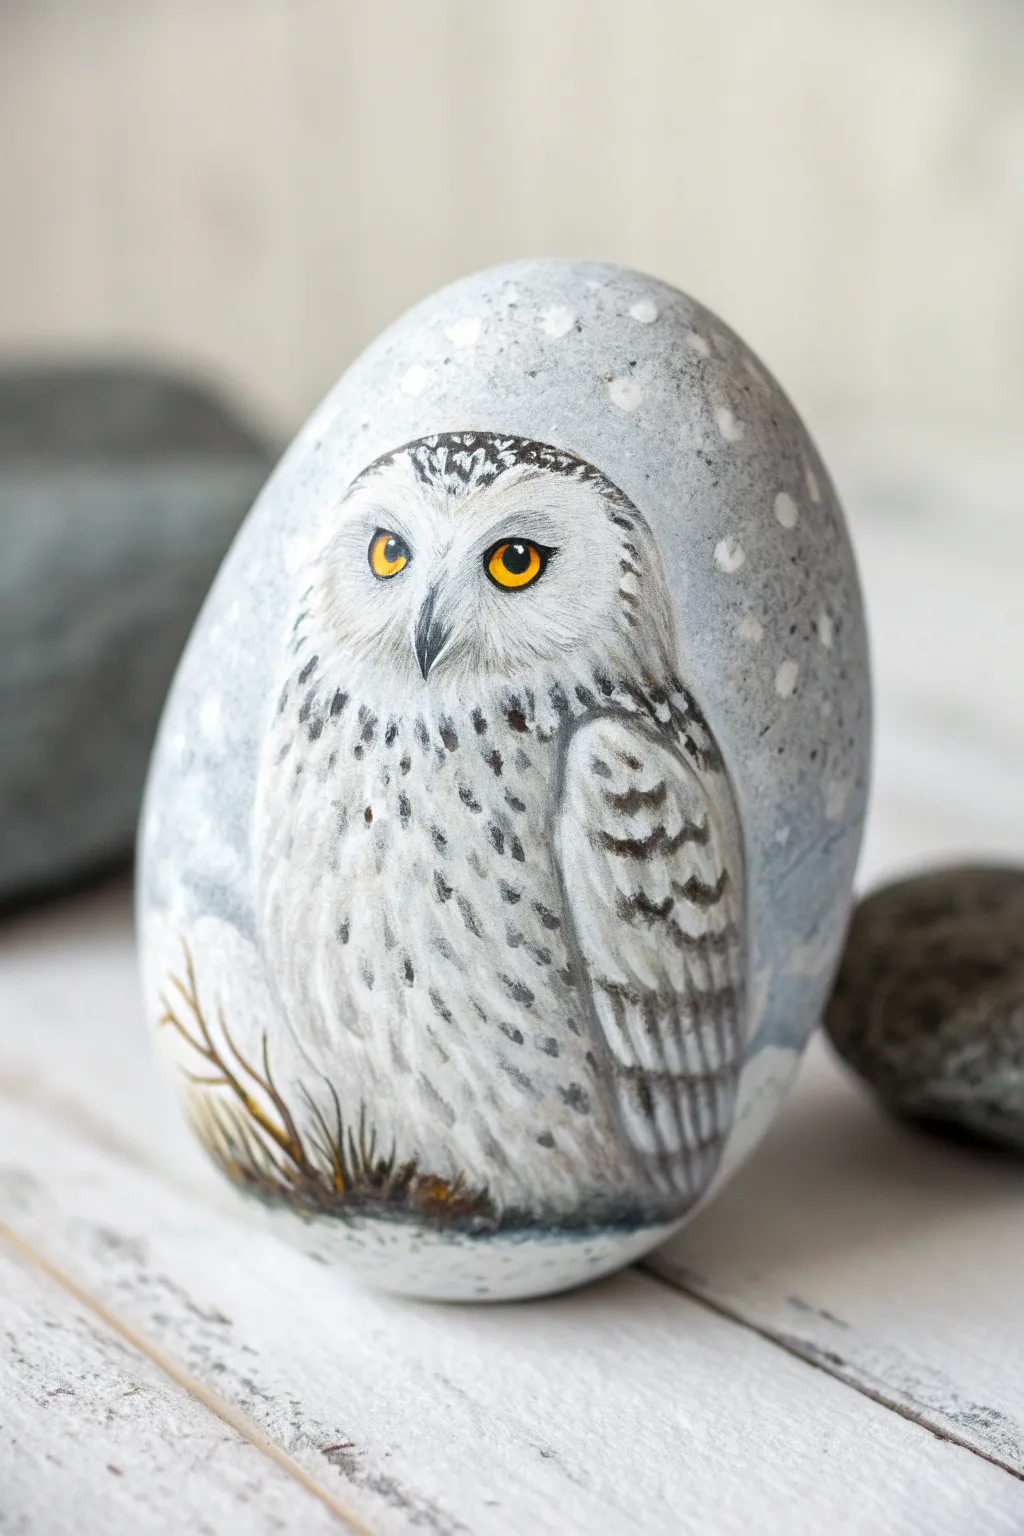
Capture the silent beauty of the arctic tundra with this snowy owl rock painting project. The smooth, egg-shaped stone provides the perfect canvas for realistic feather textures and piercing yellow eyes that seem to follow you.
Step-by-Step Guide
Materials
- Smooth, egg-shaped river rock (cleaned and dried)
- Acrylic paints: Titanium White, Mars Black, Burnt Umber, Yellow Ochre, Cadmium Yellow, Grey (or mix black/white)
- Pencil for sketching
- Gesso primer (white or clear)
- Variety of brushes: Fine liner (00 or 000), small flat brush, medium synthetic filbert
- Matte or satin acrylic sealer spray
- Water cup and palette
Step 1: Preparation & Base Coat
-
Clean and Prime:
Begin by scrubbing your rock thoroughly with soap and water to remove any dirt or oils. Once completely dry, apply a coat of white or clear gesso. This creates a grippy surface for the paint and ensures your colors appear bright. -
Sketch the Outline:
Using a pencil, lightly sketch the oval shape of the owl’s body in the center of the rock. Mark the position of the face (a subtle heart shape), the wings folded at the side, and the eyes. Keep lines faint so they are easy to cover later. -
Background Application:
Mix a very pale, cool grey using white and a tiny dot of black. Paint the entire background area around the owl. While the paint is still wet, you can blend in slight variations of darker grey near the edges to create depth. -
Falling Snow:
Once the grey background is dry, dip the handle end of a paintbrush into pure white paint. Dot random snowflakes around the background, varying the pressure to create different sized flakes. Let this dry completely before starting the bird.
Step 2: Painting the Owl
-
Base White Layer:
Fill in the entire owl shape with Titanium White. You may need two coats to get solid, opaque coverage ensuring no rock shows through. Let this dry fully. -
The Eyes:
Paint two circles with a bright yellow (mix Cadmium Yellow with a touch of Yellow Ochre). Outline them thinly with black using your finest liner brush. -
Pupils and Highlights:
Paint solid black pupils in the center of the yellow eyes. Once dry, add a tiny white dot in the upper corner of each pupil to simulate a reflection, bringing the owl to life. -
Beak Details:
Paint the small, hooked beak using dark grey or black. Keep it partially nestled in the facial feathers. I find it helps to add a tiny streak of light grey on the top curve of the beak for dimension. -
Facial Disc definition:
Using a very dilute grey wash (mostly water, little paint), outline the facial disc and the area around the eyes. Use short, outward strokes to simulate fluff rather than a solid line.
Feathery Texture Trick
Use a fan brush or an old, frayed flat brush with very dry white paint to whisk over the body. This creates instant, realistic fuzzy down texture.
Step 3: Feather Texture & Details
-
Chest Feathers – Speckling:
Mix a dark grey/brown shade. Using your smallest liner brush or a toothpick, add small ‘V’ shapes or dashes down the chest. Keep them sparse near the neck and denser towards the belly. -
Wing Definition:
Outline the folded wing on the right side. Paint vague horizontal bands of dark grey/black dashes to represent the primary feathers. -
Adding Fluff:
Load a small flat brush with white paint but wipe most of it off (dry brushing). Gently whisk over the grey speckles on the chest to soften them, making the feathers look soft and layered rather than just painted dots. -
Deepening Shadows:
Add a slightly darker grey shading under the wing and between the legs/belly area to give the owl volume. This prevents the bird from looking flat.
Moonlight Glow
Mix a tiny drop of iridescent or pearlescent medium into your white paint for the final highlights to give the snowy feathers a magical, icy shimmer.
Step 4: Grounding & Finishing
-
Painting the Grass:
At the very bottom of the rock, paint a few strokes of Burnt Umber mixed with yellow ochre to create dry winter grass or twigs peeking through the snow. -
Ground Shadow:
Add a wash of dark grey right underneath the owl where it meets the ‘ground’ to anchor it to the surface. -
Final Highlights:
Go back with pure white and add sharp, crisp lines to the facial disc and the edges of the wing feathers to make them pop. -
Sealing the Rock:
Allow the rock to cure for 24 hours. Coat with a matte or satin spray sealer to protect your detailed work from chipping.
Now you have a wise winter guardian to decorate your home or garden throughout the cold season
BRUSH GUIDE
The Right Brush for Every Stroke
From clean lines to bold texture — master brush choice, stroke control, and essential techniques.
Explore the Full Guide
Owl on a Painted Branch
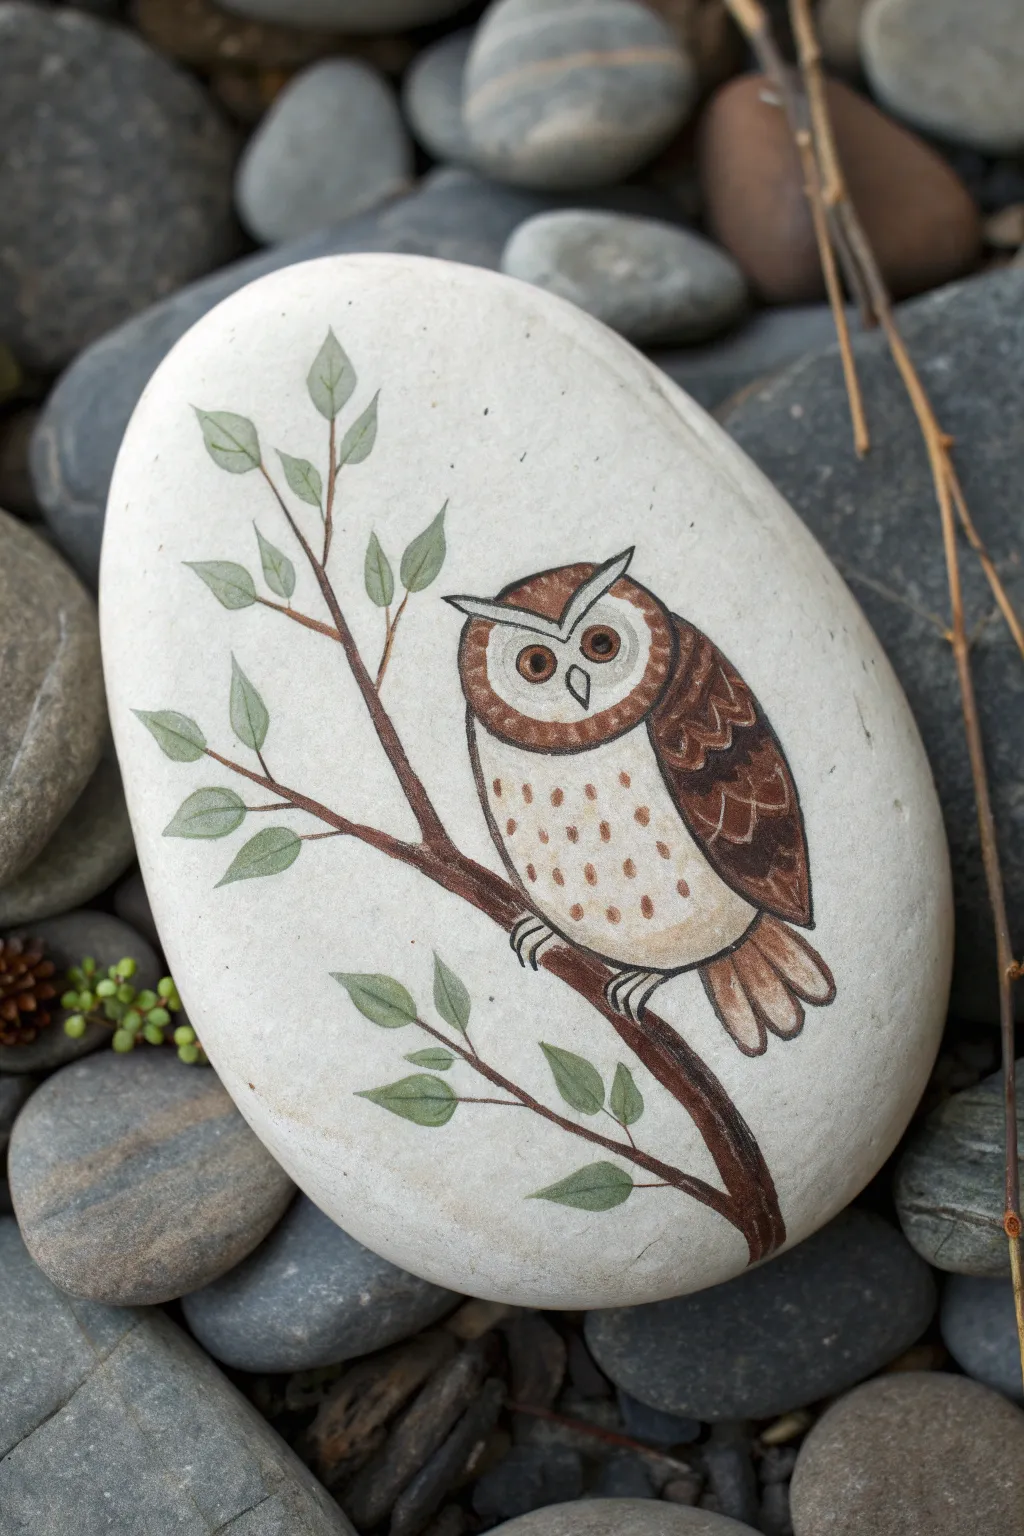
This elegant project features a beautifully detailed owl with a rusty brown coat perched upon a delicate branch. The clean white background of the stone allows the earthy tones of the feathers and the soft green of the leaves to truly stand out.
Step-by-Step Guide
Materials
- Smooth, flat oval river rock (ideally white or very light grey)
- Acrylic paints (dark brown, rust/red-brown, ochre/tan, white, sage green, black)
- Fine-point detail brushes (sizes 00 and 0)
- Flat shader brush (size 2 or 4)
- Pencil and eraser
- Palette for mixing
- Matte spray varnish or sealer
Step 1: Sketching the Layout
-
Clean and prep:
Begin by washing your stone with soap and water to remove any dirt or oils. Let it dry completely. If your rock isn’t naturally white, you can apply a base coat of white acrylic paint and let it dry before starting. -
Outline the branch:
Using a light pencil, lightly sketch a diagonal line curving up from the bottom right to the middle left. Add a few smaller offshoots for twigs where leaves will go later. -
Position the owl:
Sketch an oval shape resting on the main branch for the owl’s body. Add a slightly flattened circle on top for the head, creating faint ear tufts at the corners. -
Detail the face:
Lightly draw the heart-shaped facial disk, two round eyes, and a small triangular beak. Don’t press too hard with the pencil, as graphite can sometimes smudge into lighter paint colors.
Shaky Hands?
If painting fine details like the eyes or feather spots is difficult, switch to extra-fine tip acrylic paint pens. They offer more control than a brush.
Step 2: Painting the Owl
-
Base coat the body:
Mix a creamy off-white or very light tan color. Fill in the owl’s chest and the facial disk area. Apply two thin coats if needed for solid coverage, letting the first dry before adding the second. -
Block in the wings:
Using a rust-brown or reddish-brown paint, fill in the wing shape on the right side of the body and the top of the head (excluding the ear tufts and facial disk). -
Define the eyes:
With a fine brush, paint two circles in a warm ochre or gold color. Once dry, add large black pupils in the center, leaving a tiny dot of white in each for a reflective highlight. -
Add facial details:
Outline the facial disk with a thin line of rust-brown paint. Paint the small beak a dark grey or soft black. -
Create texture on the chest:
Using the tip of your smallest brush and the rust-brown paint, dab small, vertical dashes or teardrop shapes onto the cream-colored chest. These mimic the spotted feather pattern. -
Feather the wings:
Mix a darker brown shade. Paint scalloped lines or small ‘U’ shapes on the wing area to create the illusion of layered feathers. Add a few lighter tan highlights to the edges of these feathers for depth. -
Paint the tail:
Extend the tail feathers below the wing using the rust-brown color. Add vertical dark brown stripes to separate the individual feathers.
Night Mode
Paint the background of the rock a deep navy blue or black before starting. Add white stars and a yellow moon to turn this into a nocturnal scene.
Step 3: Branch and Finishing Touches
-
Fill the branch:
Use a dark brown paint to fill in your sketched branch. Vary the thickness slightly, making it thicker at the base and tapering toward the tips. -
Add the feet:
paint two sets of talons gripping the branch using a light grey or tan color. Outline them thinly in black so they stand out against the wood. -
Paint the leaves:
Using a sage green or muted olive color, paint small almond-shaped leaves attached to the twig offshoots. I find that varying the green by adding a touch of white for some leaves creates a more natural look. -
Vein the leaves:
Once the green is dry, use your thinnest brush or a fine-tip paint pen to draw a delicate center line down each leaf. -
Final outlines:
Go over the main outlines of the owl—the head, wings, and body—with a very fine black line to crisp up the edges. -
Seal the stone:
Allow the paint to cure for at least 24 hours. Finish by spraying a matte varnish over the stone to protect your artwork from weathering or chipping.
Now you have a charming woodland friend that will look perfect in a garden or on a desk
Two Owls Cuddled Together
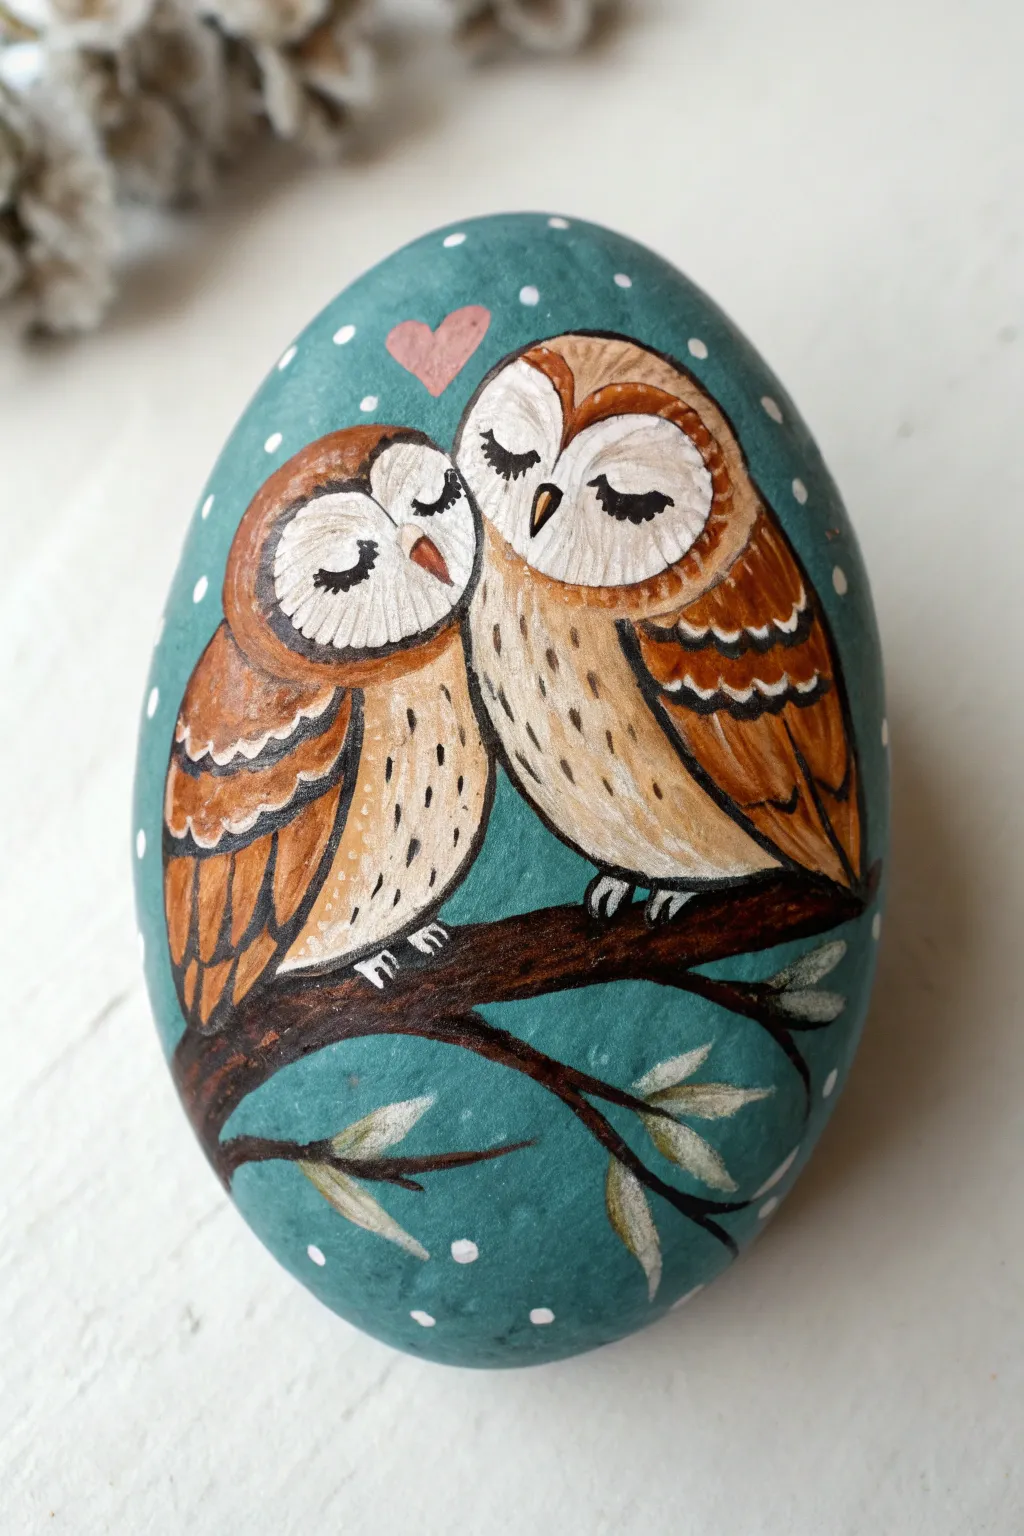
This heartwarming rock painting features a pair of snugly barn owls perched on a branch under a gentle snowfall. The soft brown tones and teal background create a cozy, romantic scene perfect for a gift or decorative piece.
Step-by-Step
Materials
- Smooth, oval-shaped rock
- Acrylic paints (teal/turquoise, white, warm brown, burnt sienna, tan, black, pink)
- Small flat brush
- Fine detail brush (liner brush)
- Pencil for sketching
- Matte or satin varnish/sealant
Step 1: Base and Background
-
Clean the rock:
Begin by thoroughly washing your rock with soap and water to remove any dirt or grease. Let it dry completely before starting. -
Apply the base coat:
Using a flat brush, paint the entire surface of the rock with a teal or turquoise acrylic paint. You will likely need two coats to get a solid, opaque coverage. I like to let the first coat dry for about 15 minutes before applying the second. -
Sketch the outlines:
Once the teal base is fully dry, use a pencil to lightly sketch the oval shapes for the owl bodies, the heart shape above their heads, and the branch beneath them. Don’t press too hard; just create a guide.
Uneven Dots?
If your white snow dots look messy or have peaks, lightly tap the wet paint with a clean finger to flatten them out, or use a specialized dotting tool for perfect circles.
Step 2: Blocking in the Owls
-
Fill in the white faces:
Use a small brush and white paint to create the heart-shaped face masks of the barn owls. These should look like two rounded lobes connected at the beak. -
Paint the bodies:
Mix a warm tan or beige color and fill in the chest and belly areas of both owls. The bodies should be rounded and snuggled close together. -
Add the wings:
Using a darker warm brown or burnt sienna, paint the wing shapes on the outer sides of the owls. Curve the strokes to mimic the shape of folded wings.
Step 3: Adding Details
-
Outline and define:
With a very fine liner brush and dark brown or black paint mixed with a tiny bit of water for flow, outline the facial discs and separate the wings from the bodies. -
Create feather texture:
Using the same fine brush, make small, short vertical dashes on the tan bellies to suggest soft feathers. On the brown wings, add scalloped lines in layers. -
Highlight the wings:
Paint thin white scalloped lines just above your dark wing lines. This layering creates depth and makes the feathers pop. -
Paint the faces:
Carefully paint two sweeping internal curves on each face with light brown to define the nose bridge. Add closed eyes using simple, curved black lines with tiny eyelashes for a sleepy look. -
Add beaks:
Paint small, downward-pointing triangular beaks in a golden-brown or orange shade right between the eyes.
Add a Message
Customise this for an anniversary or Valentine’s Day by writing a date or initials inside the pink heart using a super-fine permanent marker.
Step 4: Finishing Touches
-
Paint the branch:
Using a dark brown, fill in the branch you sketched earlier. Extend it across the width of the rock and add a few smaller twigs branching off. -
Add talons:
With white or light grey paint, add small, curved strokes over the branch at the base of the owls to look like gripping claws. -
Paint the Love Heart:
Fill in the floating heart shape above the owls with a soft pink paint. -
Add leaves:
Paint simple leaf shapes on the extending twigs using a mix of white and pale green or beige. Keep them loose and painterly. -
Create the snow:
Dip the non-brush end of your paintbrush into white paint and dot it randomly around the teal background to create falling snow or stars. Vary the pressure to get different sized dots. -
Seal the artwork:
Allow the paint to cure for at least 24 hours. Finishing with a coat of matte or satin varnish will protect your painting from chipping and make the colors vibrant.
You now have a charming keepsake that perfectly captures a cozy moment in nature

PENCIL GUIDE
Understanding Pencil Grades from H to B
From first sketch to finished drawing — learn pencil grades, line control, and shading techniques.
Explore the Full Guide
Owl Family Rock Set
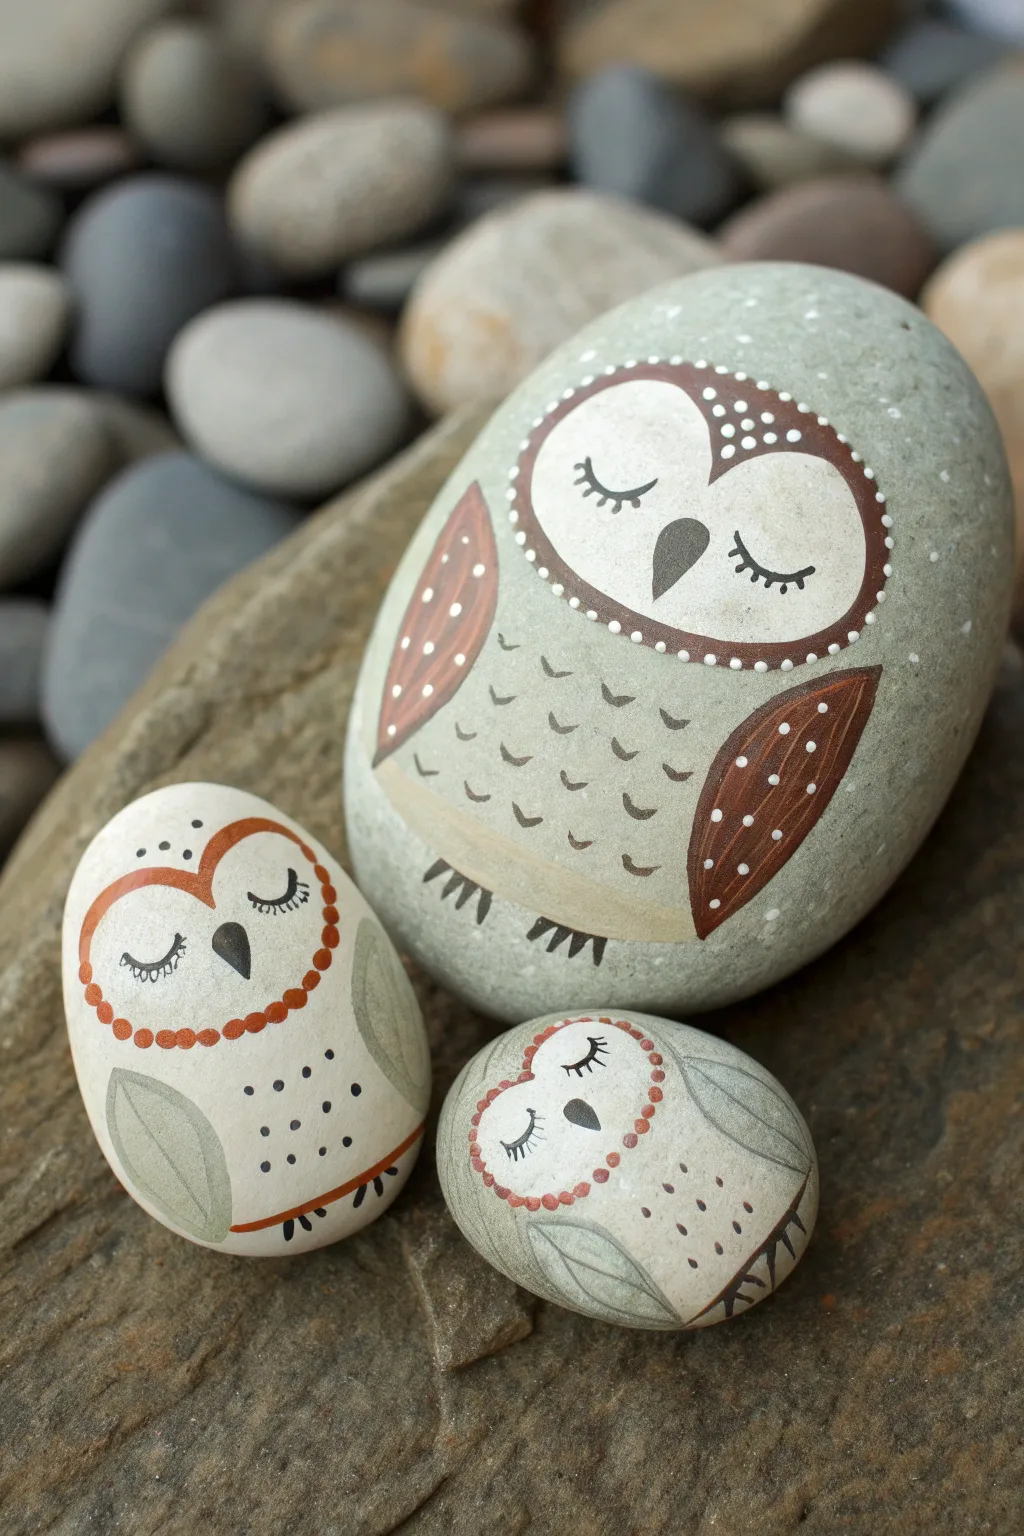
Transform smooth river stones into a charming family of sleeping owls with this peaceful rock painting project. The serene, closed-eye expressions and earthy color palette make this trio a perfect addition to a garden or a cozy corner of your shelf.
How-To Guide
Materials
- Smooth oval river rocks (one large, two small)
- Acrylic paints (white, grey, light brown, dark brown, black)
- Fine-grit sandpaper (optional)
- Pencil for sketching
- Assorted paintbrushes (flat brush, round brush, fine liner)
- Dotting tools or toothpicks
- Matte finish sealant spray
Step 1: Preparation & Base Coat
-
Stone Selection:
Choose your stones carefully; finding a large, flattish oval for the parent and two smaller, rounder pebbles for the babies creates a natural ‘family’ look. -
Cleaning:
Wash the rocks thoroughly with soap and water to remove dirt and oils, then let them dry completely. If the surface is too rough, give it a quick rub with fine-grit sandpaper. -
Base Color Mixing:
Mix a very light grey or off-white color for the parent owl’s body. The baby owls in the image have a slightly creamer, whiter base, so prepare a separate white mix for them. -
Painting the Base:
Apply the base coat to the front surface of each rock. You may need two coats for full opacity, allowing the first to dry completely before applying the second.
Pro Tip: Steady Hands
Make the fine lines (like eyelashes) easier by bracing your painting hand against the table or resting your pinky finger on a dry part of the rock for stability.
Step 2: Sketching & Defining Features
-
Outline Sketch:
Once the paint is bone dry, lightly sketch the heart-shaped face masks and wing placements with a pencil. Keep the lines faint so they don’t show through later. -
Face Mask – Parent:
For the large owl, paint the heart-shaped face area with a clean white or very pale cream. This creates a strong contrast for the eyes later. -
Face Mask – Babies:
For the baby owls, paint their face masks as well. Notice the one on the left has a reddish-brown outline which we will add later, so just block in the lighter color first. -
Wing Blocking:
Paint the wing shapes on the parent owl using a medium brown. For the baby owls, use a muted sage green or grey for their folded wings.
Step 3: Adding Details
-
Parent Owl Outline:
Using a fine liner brush and dark brown paint, carefully outline the white face mask of the large owl. Make this line fairly thick and bold. -
Baby Owl Outlines:
Outline the left baby owl’s face with a reddish-brown paint using a series of small connected dots or a solid line. For the right baby, use a dotted grey line. -
Dotting the Outlines:
Dip a small dotting tool or toothpick into white paint. Add tiny, evenly spaced dots along the dark brown outline of the parent owl’s face for a decorative border. -
Painting the Beaks:
Paint a small, inverted teardrop shape in the center of each face using dark grey or black paint to create the beaks. -
Sleeping Eyes:
With your finest liner brush or a black paint pen, draw two curved downward arches for the closed eyelids. Add tiny lashes flicking outward for a gentle expression. -
Feather Details – Parent:
Add texture to the parent’s chest by painting small, ‘V’ shaped tick marks in grey. Keep these loose and scattered. -
Wing Decoration:
On the parent’s brown wings, use your dotting tool to add rows of white dots for feather patterns. Add simple line details to the baby owls’ wings. -
Belly Streaks – Babies:
Add tiny black dots or very small dashes on the bellies of the baby owls to simulate soft downy feathers.
Level Up: Nest Display
Arrange your finished owl family in a shallow planter filled with moss or create a small ‘nest’ from twigs and dried grass to display them together.
Step 4: Final Touches
-
Feet:
At the very bottom of the parent owl, paint two sets of small claws using dark grey paint. -
Cleanup:
Check for any pencil marks that might still be visible and gently erase them if the paint is fully cured, or touch up with base paint. -
Sealing:
I like to finish with a matte spray sealant rather than glossy, as it keeps the natural stone look and protects your fine detail work.
Your sleepy stone owl family is now ready to bring a touch of woodland calm to your home
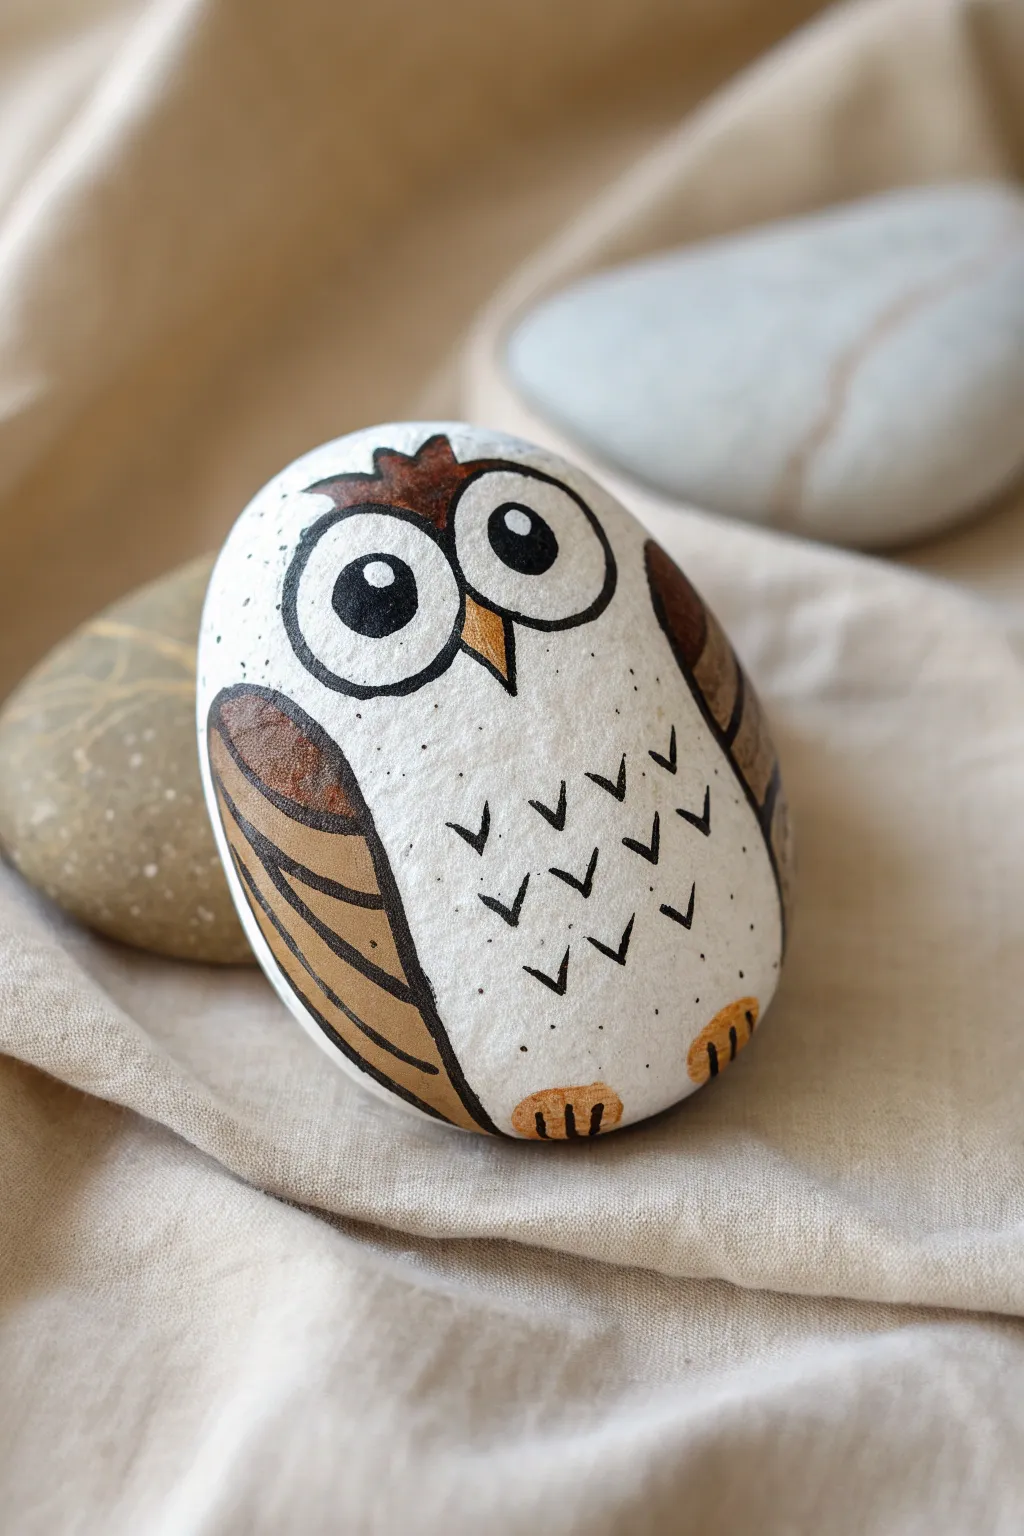
Chubby Baby Owl With Fluffy Belly
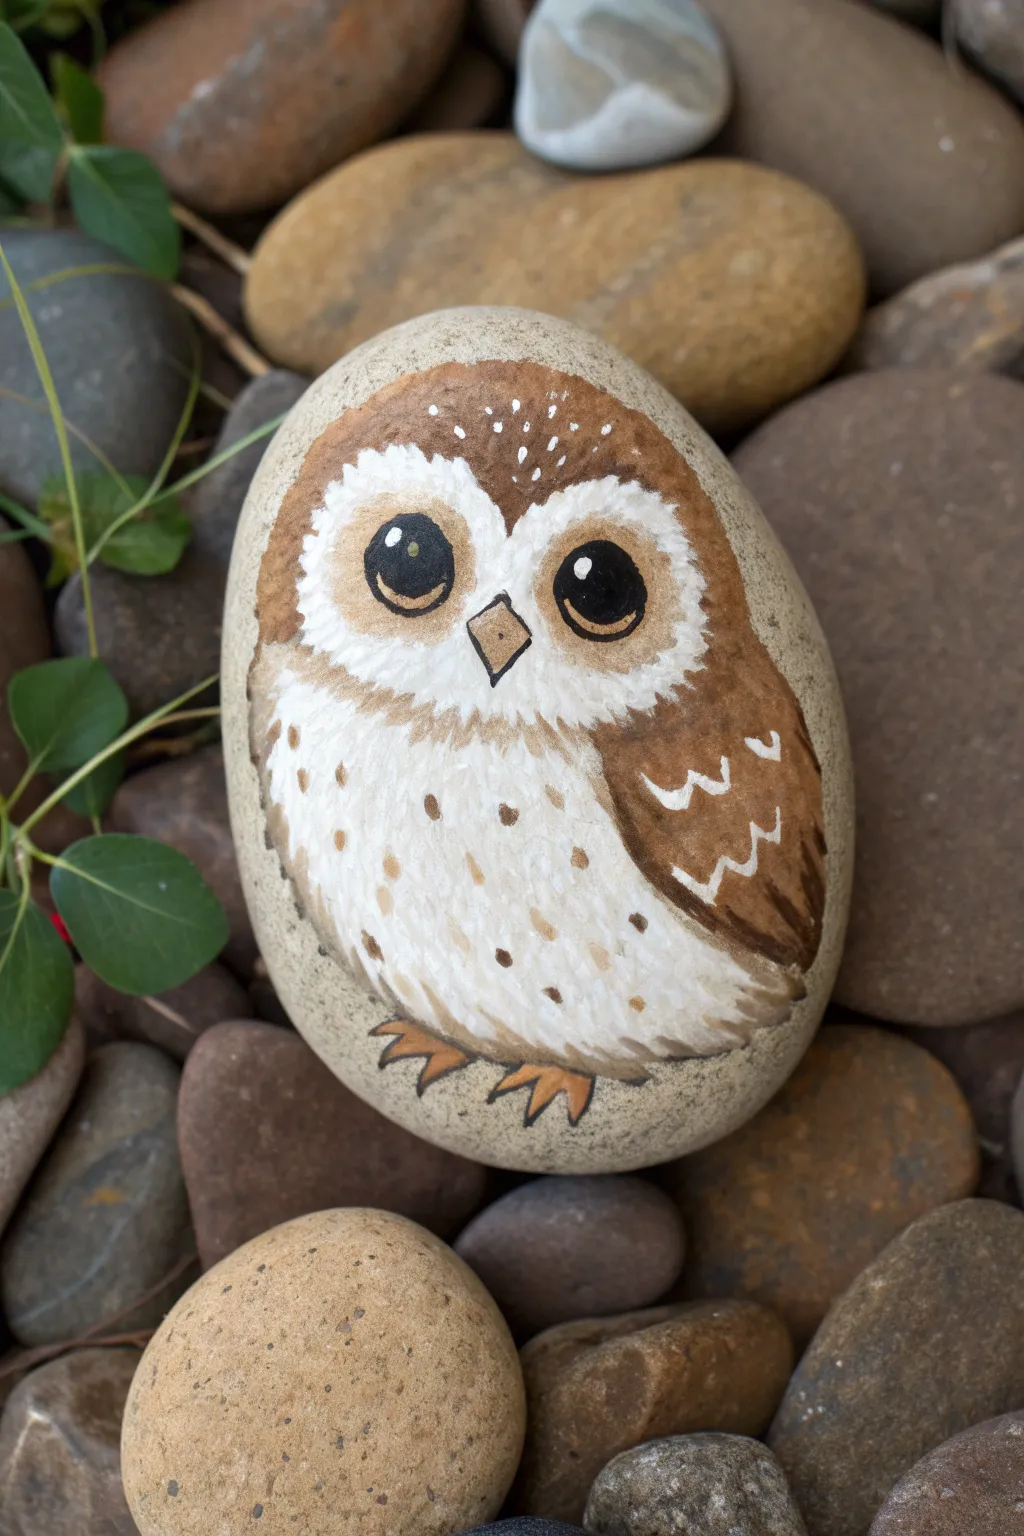
Capture the irresistible charm of a baby owl with wide, curious eyes and a wonderfully soft belly. This design uses gentle brushstrokes to mimic fluffy down feathers, turning a simple stone into a lovable woodland friend.
Step-by-Step
Materials
- Smooth, oval-shaped river rock (cleaned and dried)
- Acrylic paints: Titanium White, Burnt Umber (dark brown), Raw Sienna (light brown/tan), Black, Yellow Ochre
- Paintbrushes: Flat brush (for base), small round brush (size 1-2), liner brush or fine detail brush (size 0 or 00)
- Pencil (optional for sketching)
- Palette or paper plate
- Water cup and paper towels
- Matte or satin clear sealant spray
Step 1: Planning and Foundation
-
Select the right canvas:
Choose a smooth, oval rock that stands upright if possible. Scrub it clean with soapy water and let it dry completely before starting. -
Sketch the outline:
Lightly sketch the owl’s basic shape using a pencil. Draw a large oval for the body and define a heart-shaped face area near the top. Mark two large circles for the eyes and a small diamond shape between them for the beak. -
Base coat the shape:
Mix a small amount of Titanium White with a drop of Raw Sienna to create a creamy off-white. Use your flat brush to paint the entire owl silhouette on the rock. Let this layer dry completely.
Step 2: Painting the Face and Eyes
-
Frame the face:
Using Burnt Umber and a small round brush, paint the outer hood of the head, outlining the heart-shaped face mask. Feather the edges inward slightly with short strokes to suggest fur or feathers. -
Fill the eyes:
Paint the two large eye circles solid black. Ensure they are round and evenly spaced. -
Add warmth around the eyes:
Dilute a tiny bit of Raw Sienna with water to make a glaze. Gently paint a ring around the black pupils on the cream background to give the eyes depth and a shadow effect. -
Paint the beak:
Fill the diamond-shaped beak with a mix of Yellow Ochre and a touch of brown. Outline it thinly with black if needed for definition. -
Life-giving highlights:
Dip the handle end of a paintbrush into white paint. Place a small dot in the upper right side of each black eye pupil. This reflection brings the owl to life instantly.
Fixing Shaky Eyes
If your eye circles aren’t perfectly round, let the black dry fully. Then, use the cream face color to ‘cut in’ and reshape the circle from the outside.
Step 3: Creating the Fluffy Texture
-
Start the belly feathers:
Load your small round brush with white paint. Starting from the bottom of the face mask, paint short, downward strokes in rows to create the chest feathers. -
Add dimension:
Mix a very light tan using White and Raw Sienna. Add sporadic, short dashboard-like strokes amongst the white chest feathers to create shadows and fluffiness. -
Detail the belly spots:
Using a fine detail brush and light brown paint, add small, scattered V-shapes or dashes on the lower belly area. These mimic the speckled pattern of downy feathers. -
Paint the wings:
On the right side of the owl’s body, paint a curved wing shape using Burnt Umber. While the paint is wet, blend in a little lighter brown near the center for a rounded look. -
Decorate the wings:
Once the wing is dry, use your liner brush and white paint to add small, squiggly ‘w’ shapes or scallops along the wing to represent layered feathers.
Fluffier Feathers
Instead of straight lines, use a ‘stippling’ motion with a nearly dry brush for the belly. This creates a soft, textured look rather than rigid stripes.
Step 4: Finishing Touches
-
Head speckles:
Dip a fine brush or a toothpick into white paint. Add tiny dots onto the dark brown forehead area, clustering them slightly at the top like snowflakes. -
Paint the feet:
At the very bottom of the white belly, paint two small sets of talons using a vibrant orange-brown mix. Three small toes for each foot works perfectly. -
Refine the outlines:
If any edges look too sharp, soften them with a slightly damp, clean brush to maintain the ‘fluffy’ aesthetic. I like to lightly feather the brown edges into the white stone background. -
Seal the artwork:
Allow the rock to dry for at least 24 hours. Finish by spraying a matte or satin sealant over the rock to protect your painting from chipping and UV light.
Place your finished little owl in a garden pot or on a shelf where it can watch over the room


Bright Cartoon Color Owl
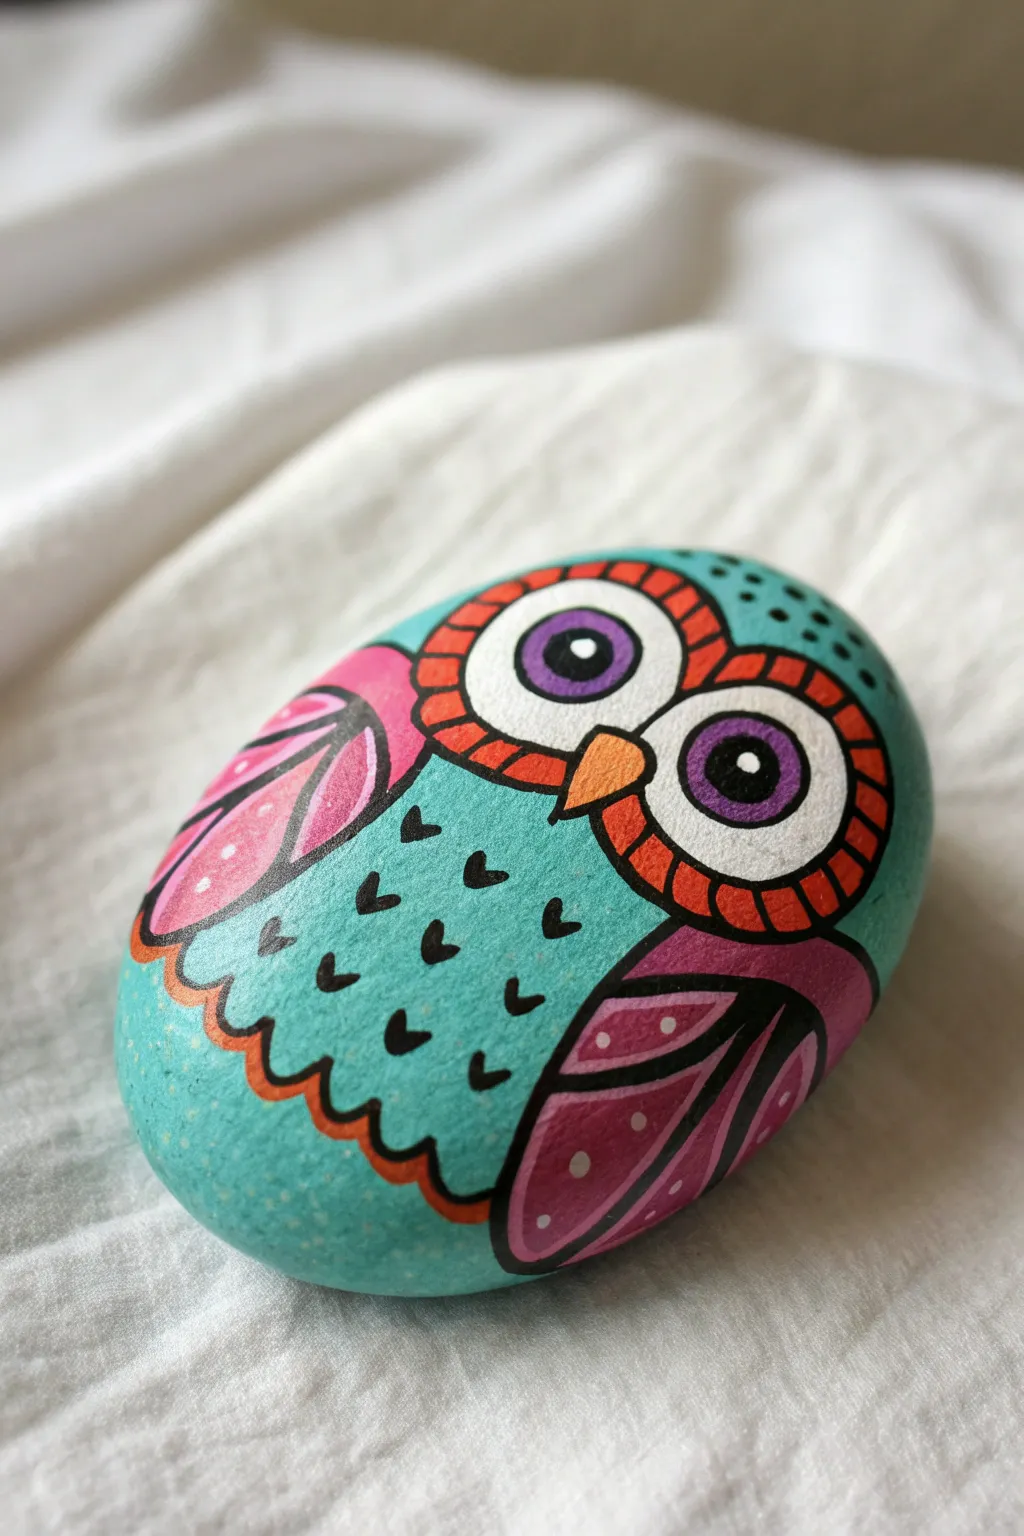
Transform a simple river stone into a vibrant, wide-eyed character with this delightful cartoon owl design. The combination of bright teal, bold orange, and playful pinks creates a cheerful piece perfect for garden decor or a friendly desk companion.
Step-by-Step Tutorial
Materials
- Smooth, oval-shaped river rock (cleaned and dried)
- Acrylic paint (Teal/Turquoise, White, Orange, Bright Pink, Purple, Black)
- Pencil for sketching
- Assorted paintbrushes (medium flat brush, small detail brush)
- Black fine-point paint pen (optional but recommended for outlines)
- Dotting tool or toothpick
- Clear weather-resistant sealer (gloss or matte)
Step 1: Base Coat and Sketching
-
Prepare the Rock:
Start with a clean, dry rock. Apply a solid base coat of teal or turquoise acrylic paint over the entire top surface. Let it dry completely, then add a second coat if needed to ensure the stone’s natural color doesn’t show through. -
Pencil Outlines:
Once the teal base is fully dry, lightly sketch the main shapes of the owl with a pencil. Draw two large, touching circles for eyes near the top, a small triangular beak between them, and two curved wing shapes on the sides.
Step 2: Painting the Features
-
Fill the Eyes:
Using a small brush and white paint, fill in the two large eye circles. This will likely need two coats to be bright and opaque against the teal background. -
Paint the Wings:
Block in the wing shapes. Paint the upper portion of the left wing with a bright pink. For the right wing, use a deeper purple or magenta tone for interest, or stick to pink for symmetry. -
Add the Beak:
Paint the small triangular beak in the center using bright orange paint. A small pointed brush works best here to keep the corners sharp. -
Create the Eye Rims:
Mix a little white with your orange if it needs to be more opaque, or use straight orange to paint a thick ring around the outside of each white eye circle. This frame gives the owl its signature cartoon look. -
Detail the Wings:
Once the wing base colors are dry, add contrasting feathers. Paint simple leaf-like shapes inside the wings using a lighter pink or white to suggest individual feathers.
Paint Pen Consistency
If your black paint pen acts dry over the acrylics, scribble on a scrap paper to get the ink flowing, or press the nib down gently to re-saturate it.
Step 3: Fine Details and Outlining
-
Pupils:
Paint large purple circles inside the white part of the eyes. Position them slightly cross-eyed or looking up for a cute expression. -
Pupil Highlights:
Dip the handle end of a brush or a large dotting tool into black paint and add a smaller circle inside the purple. Finally, add a tiny white dot in the black area for a ‘sparkle’ effect. -
Eye Rim Details:
Using a very fine brush or black paint pen, draw small radial lines all around the orange eye rims, creating a textured, sun-burst effect. -
Chest Feathers:
On the teal body area between the wings, paint small, black ‘V’ shapes or little hearts. Scatter them randomly to mimic fluffy chest feathers. -
Wing Dots:
Use a dotting tool or toothpick to add tiny white accents to the tips of the wing feathers for extra texture. -
Upper Head Details:
Add a few small black dots on the forehead area above the eyes to fill any empty teal space. -
Main Outlines:
Outline the major shapes—the eyes, beak, and wings—with a steady black line. I find a paint pen offers much better control here than a brush. -
Scalloped Belly Line:
Draw a wavy, scalloped line near the bottom of the teal area to define the owl’s belly feathers. Add a second line of orange underneath it for a decorative border.
Glow in the Dark
For a spooky night-time twist, use glow-in-the-dark paint for the white parts of the eyes and the chest feather specks
Step 4: Finishing Touches
-
Cleanup:
look over your rock for any smudges or uneven lines. You can touch up the teal background carefully if any paint went outside the lines. -
Seal the Rock:
Allow the paint to cure for at least 24 hours. Apply a layer of clear sealer to protect your artwork from chipping and weather damage, especially if it will live outside.
Now you have a charming little gathered friend ready to perch on your shelf or hide in the garden
Night Owl With Moon and Stars
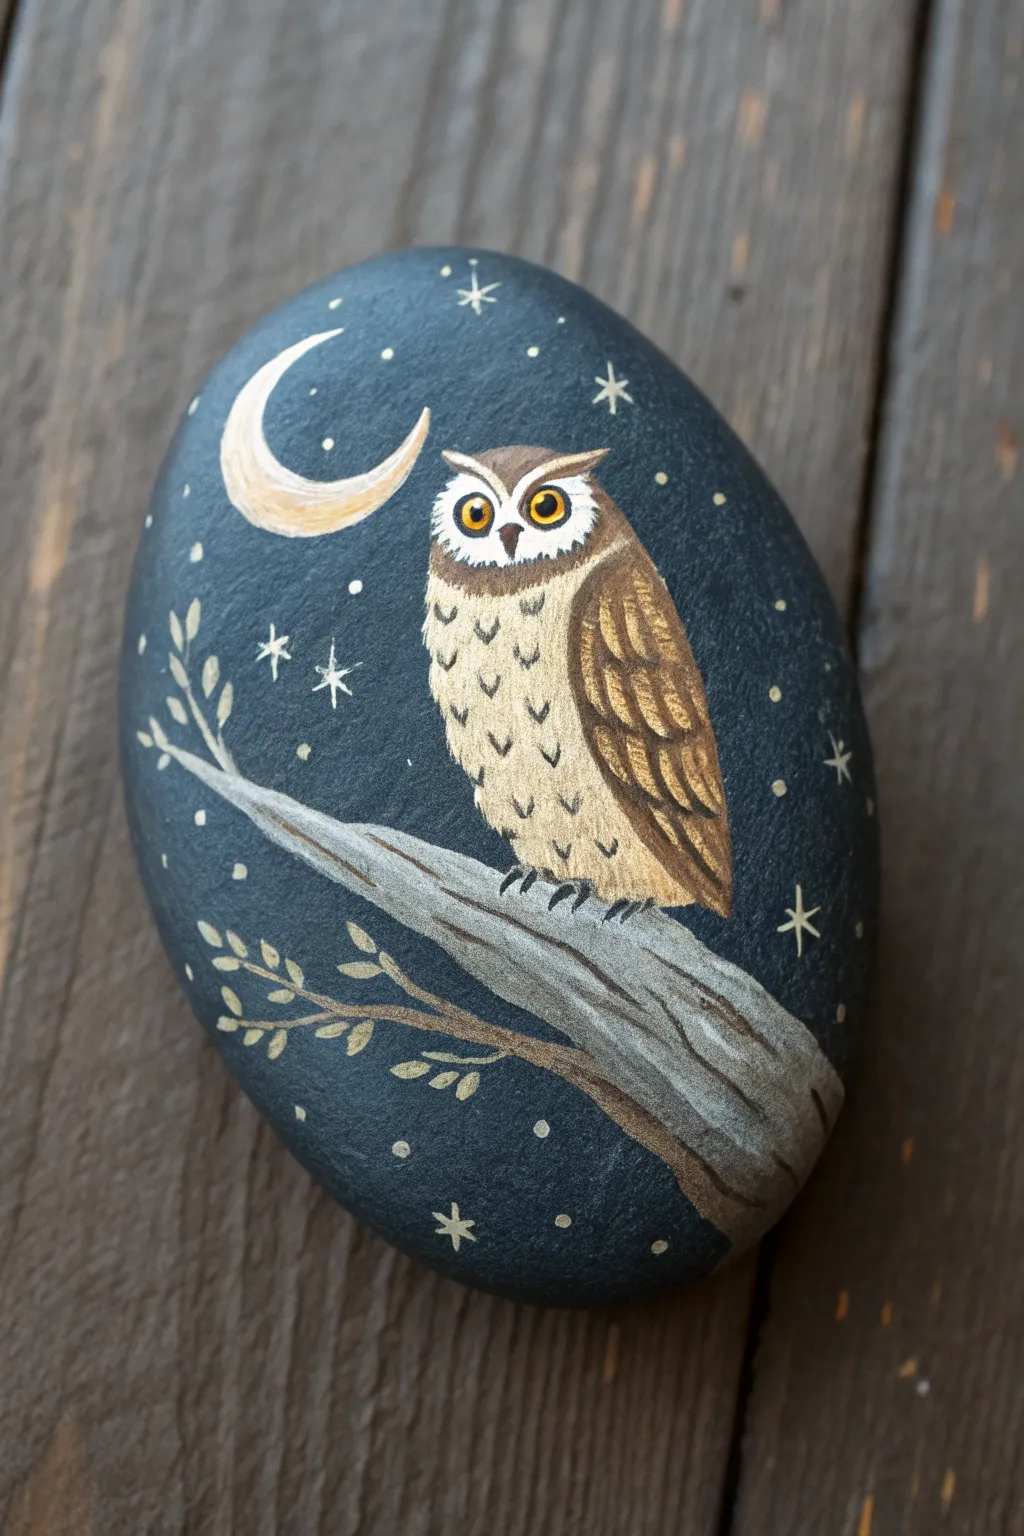
This whimsical project transforms a simple smooth stone into a serene night scene featuring a wide-eyed owl perched beneath a golden crescent moon. The dark background makes the metallic paints and starry details truly pop, creating a magical little piece of art.
Step-by-Step Guide
Materials
- Smooth, oval-shaped river rock (cleaned and dried)
- Acrylic paints (black/dark navy, white, brown, tan, gold, yellow, grey)
- Fine detail paintbrushes (size 00 or 0)
- Small flat paintbrush
- Pencil or white chalk pencil
- Spray sealant or clear varnish (matte or satin finish)
- Palette for mixing
- Water cup and paper towels
Step 1: Base and Sketch
-
Prepare the canvas:
Begin by painting the entire front surface of your rock with a mixture of black and a tiny drop of dark navy blue. This creates a deep, midnight sky effect rather than a harsh flat black. Let this base coat dry completely before proceeding. -
Outline the composition:
Using a white chalk pencil or a very light regular pencil, sketch the main elements. Draw a long, curved branch extending from the bottom right, the oval shape of the owl’s body sitting on it, and a crescent moon in the upper left corner.
Starry Sky Trick
For tiny stars, dip an old toothbrush in watered-down white paint and flick the bristles with your thumb. Test on paper first to control the splatter size.
Step 2: Painting the Owl
-
Base coat the owl:
Fill in the owl’s body shape with a light tan or beige color. Don’t worry about texture yet; just get a solid opaque layer down so the dark background doesn’t show through. -
Define the wings:
Mix a medium brown shade and paint the folded wing shape on the right side of the owl’s body. The wing should curve slightly to follow the roundness of the bird. -
Add face details:
Using white paint, create the heart-shaped facial disc at the top of the owl’s head. Paint two small circles for eyes inside this white area, coloring them yellow or bright gold. -
Create feather texture:
Take your finest brush and a darker brown paint. Apply tiny, V-shaped strokes (scallops) down the owl’s chest to simulate fluffy feathers. On the brown wing, use lighter tan strokes to define the long wing feathers. -
Finalize the face:
Add small black dots for the pupils in the yellow eyes. Use a tiny bit of dark brown to paint a small triangular beak and outline the top of the facial disc to give the owl its distinct ‘ears’ or tufts.
Step 3: Branch and Scenery
-
Paint the branch:
Fill in your branch sketch with a medium grey paint. I like to add a few streaks of white and black while the grey is still wet to create a wood grain effect that looks like bark. -
Add foliage:
Using a muted green or brownish-grey, paint thin, delicate sprigs coming off the main branch. Add small leaf shapes to these sprigs, keeping them simple and stylized. -
Anchor the owl:
With black or dark grey paint, add tiny claws gripping the branch at the base of the owl’s body so it doesn’t look like it’s floating.
Glow in the Dark
Mix glow-in-the-dark medium with your white paint for the moon and stars. Your owl will look cute by day but truly magical when the lights go out.
Step 4: Celestial Details
-
Paint the moon:
Fill in the crescent moon shape with pale yellow or cream paint. You can add a subtle wash of gold metallic paint over it once dry for extra shimmer. -
Add brighter stars:
Using a fine brush and white paint, create several four-pointed or six-pointed stars scattered around the sky. Focus on the empty spaces to balance the composition. -
Create distant stars:
Dip the tip of a toothpick or the handle end of a paintbrush into white or gold paint. Dot these into the background to create tiny, distant stars. -
Seal the artwork:
Allow the entire painting to dry for at least 24 hours. Once cured, spray with a clear sealant to protect the paint from chipping and to give the rock a unified finish.
Place your finished nocturnal friend in a garden or on a bookshelf to watch over your home
Galaxy Owl With Splatter Sky

Transform a simple river stone into a mystical evening scene featuring a stylized owl perched against a vast, starry sky. This project combines smooth blending techniques with crisp details for a stunning galaxy effect.
Step-by-Step
Materials
- Smooth oval river rock (approx. 3-4 inches)
- Acrylic paints: Black, White, Navy Blue, Purple, Magenta, Light Pink, Grey
- Paint brushes: Wide flat brush, small angular shader, fine liner brush (00 or 000)
- Sponges or makeup wedges
- Water cup and paper towels
- Gloss varnish or clear sealer (optional)
- Pencil (optional)
Step 1: Creating the Galaxy Background
-
Prime the Surface:
Start with a clean, dry rock. If your stone is very dark or rough, apply a coat of white acrylic paint or gesso to the entire surface to help the colors pop later. -
Lay the Foundation Colors:
Visualize a diagonal line splitting the rock. On the upper right section, apply your deepest navy blue. On the lower left section, near where the horizon will be, paint a patch of light pink or white. -
Blend the Transition:
While the paint is still wet, bridge the gap between the navy and the light pink using purple and magenta. Use a sponge or wedge to dab the colors together where they meet, creating a soft, seamless gradient from dark night sky to a glowing twilight. -
Smooth the Gradient:
Continue dabbing gently with a slightly damp sponge to blur any harsh lines. The goal is an ethereal, misty transition. Let this background layer dry completely before moving on.
Paint too thick?
If your fine lines for the owl or tree look chunky, thin your paint with a drop of water until it has an inky consistency. It will flow much smoother from the liner brush.
Step 2: Painting the Foreground Elements
-
Rough in the Boulder:
At the bottom of the rock, paint a rounded, uneven shape in medium grey to serve as the boulder the owl stands on. It should take up about the bottom quarter of the stone. -
Add Rock Texture:
Mix a little black into your grey to create a shadow shade. Use this to paint the underside of the boulder ledges. Then, add pure white highlights to the top ridges to make the rock look three-dimensional. -
Detail the Stone:
With a fine brush or a toothpick, add tiny black specks and texture lines to the grey boulder to give it a realistic, weathered stone appearance. -
Sketch the Silhouette Tree:
Using thin black paint and your liner brush, draw a tree trunk emerging from the left side of the boulder. Extend the branches upward and diagonally across the pink/purple section of the sky. -
Refine the Branches:
Make sure your branch tips taper off into very fine points. The stark black silhouette contrasts beautifully against the lighter sunset colors.
Glow in the Dark
Mix phosphorescent medium into your white paint for the moon and stars. Your galaxy scene will charge up during the day and magically glow at night.
Step 3: The Owl and The Stars
-
Outline the Owl:
Using a very fine liner brush and white paint, carefully draw the outline of the owl perched on the grey boulder. Start with the ‘horns’ (tufts), then the body curve, and the folded wing. -
Fill the Black Body:
Fill in the owl’s body shape with solid black paint, being careful to stay inside your white outline. If you paint over the white line slightly, you can re-touch it later. -
Paint the Eyes:
Once the black body is dry, paint two large white circles for eyes. Add a tiny black dot in the center of each, and outline the circles in black to define them. -
Add Feathery Details:
Using your finest brush and white paint, add small dashes on the owl’s chest and vertical stripes on the wing to suggest feathers. Draw a small, downward-pointing triangle for the beak. -
Paint the Moon:
In the upper center of the dark blue sky, paint a crisp white crescent moon. I find it helpful to paint a ‘C’ shape first and then thicken the middle. -
Create the Starfield:
Dip a toothbrush or stiff brush in watered-down white paint and flick it over the dark blue section for tiny distant stars. Be careful not to splatter the owl. -
Highlight Major Stars:
Hand-paint a few larger, four-pointed stars using a cross shape (+) to make specific constellations stand out against the galaxy background. -
Seal the Artwork:
Allow the entire stone to dry for at least 24 hours. Finish with a layer of spray gloss varnish or clear sealant to protect your painting from scratches and fading.
Place your finished galaxy owl rock in a garden corner or on a desk to add a touch of nighttime magic to your day
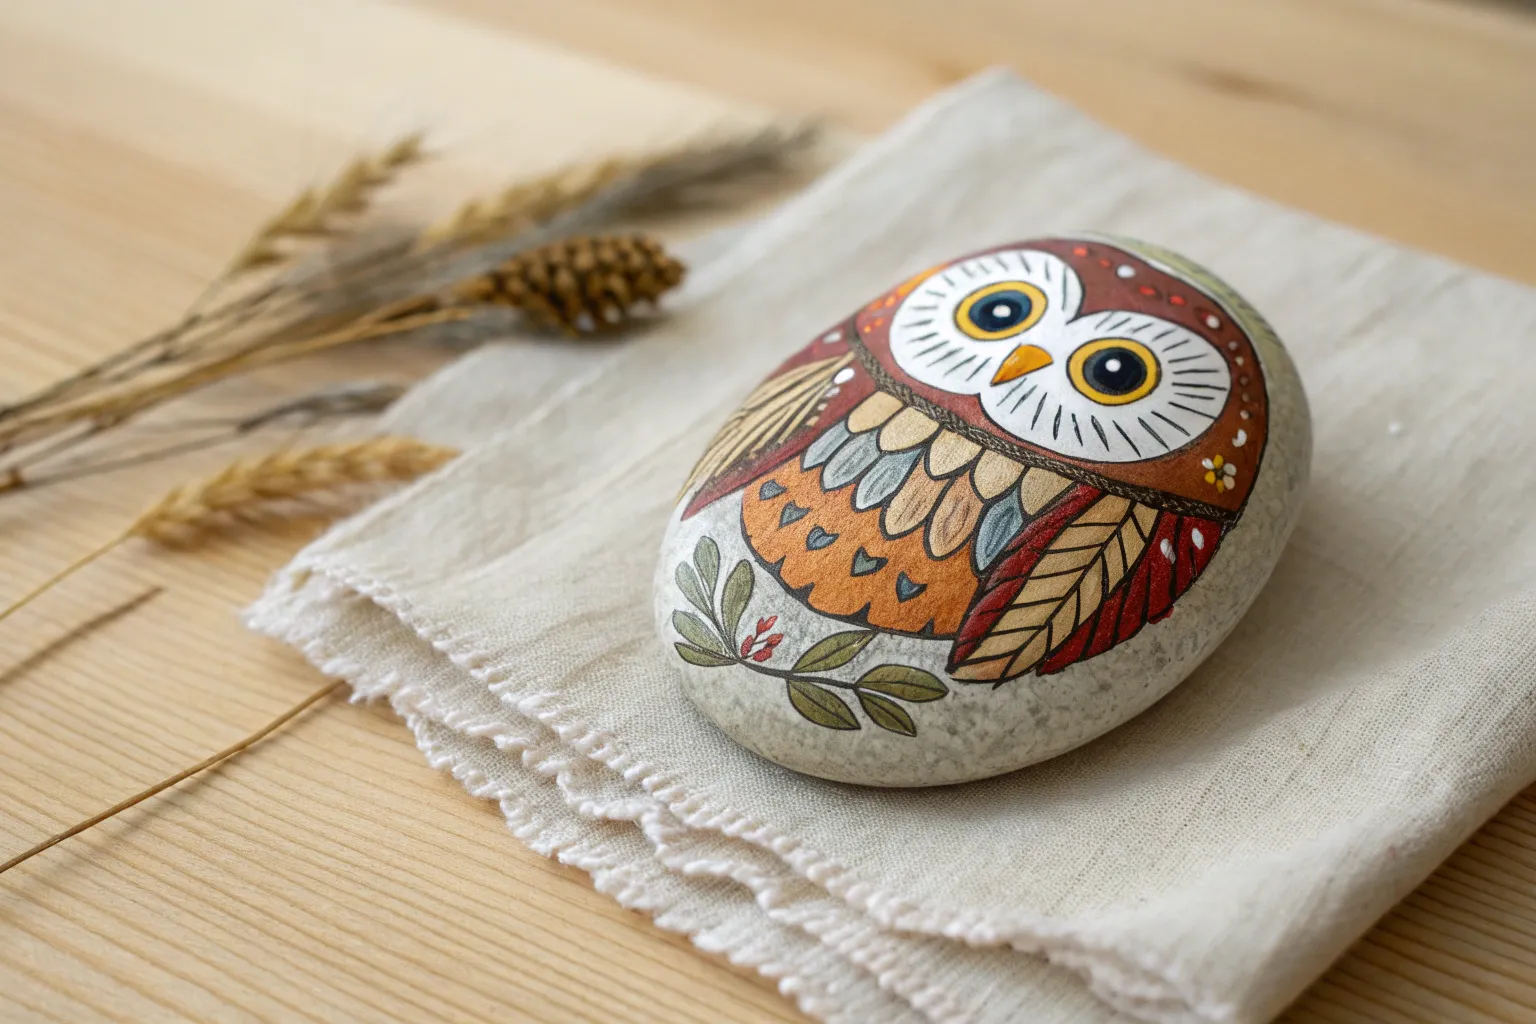
Mandala Chest Pattern Owl
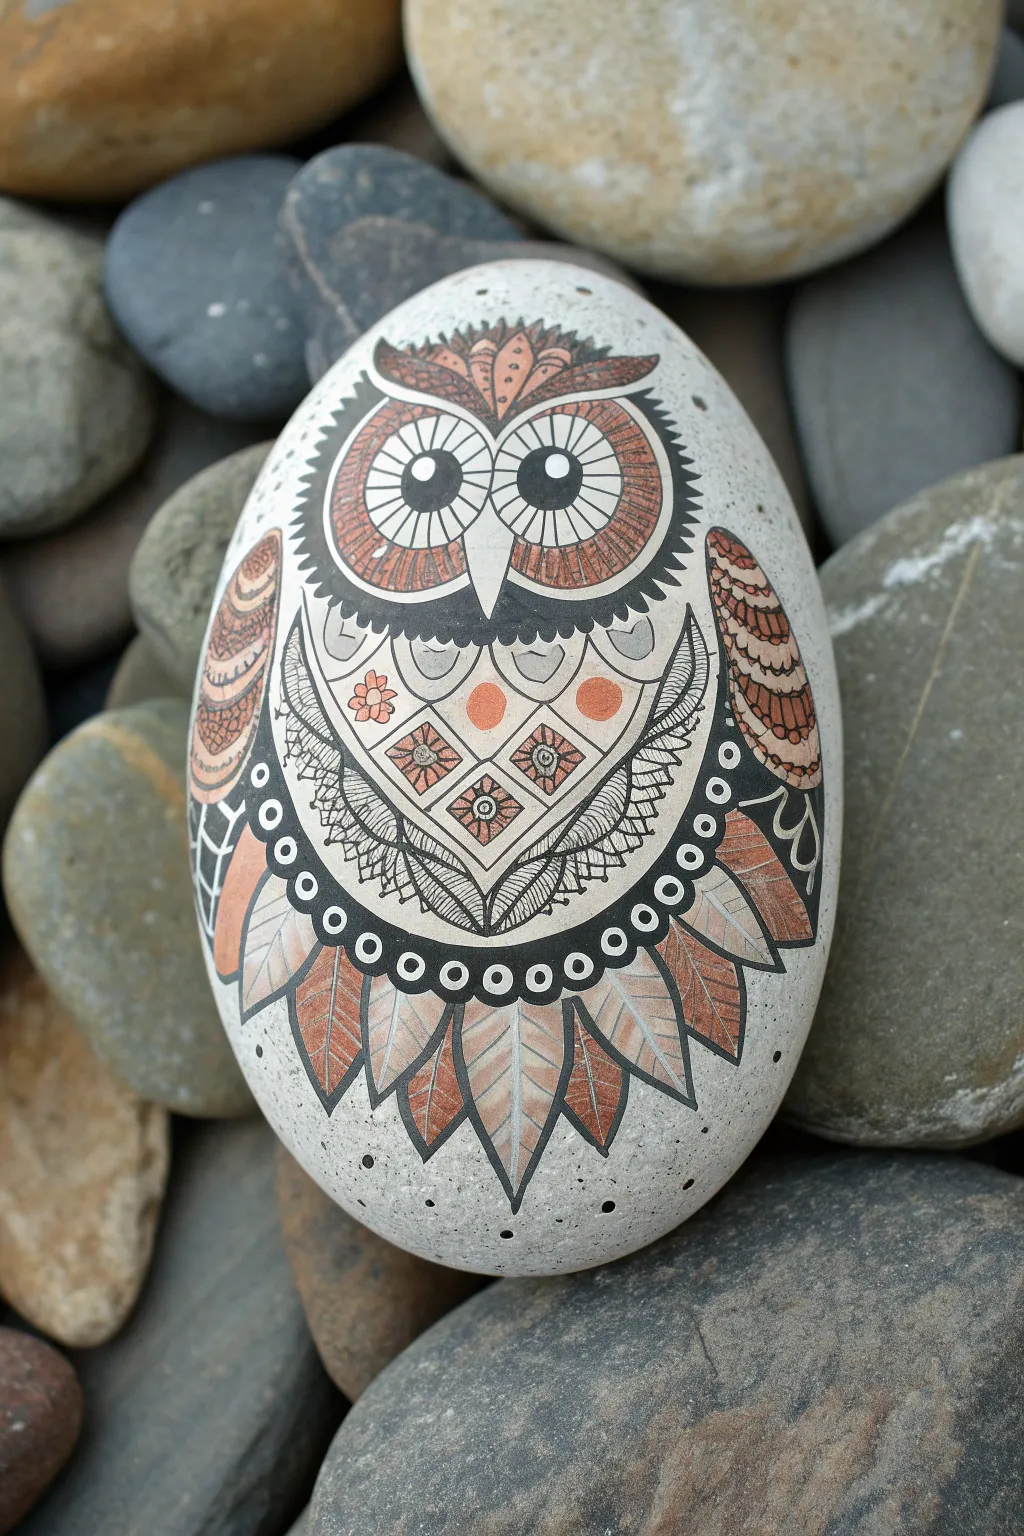
This intricate project transforms a simple river stone into a stunning piece of folk art, featuring a highly detailed owl design with mandala-inspired chest patterns. The unique combination of crisp black ink lines and warm terracotta tones against a creamy white background creates a striking contrast perfect for display.
Step-by-Step Guide
Materials
- Smooth, oval river rock (approx. palm-sized)
- White acrylic paint or gesso
- Gesso primer (optional but recommended for smoothness)
- Black archival ink pen (fine tip/micron 005 or 01)
- Black acrylic paint or paint pen (medium tip)
- Terracotta or rust-orange acrylic paint
- Small round paintbrushes (sizes 0/0 and 1)
- Pencil and white eraser
- Compass or circle stencils
- Spray matte varnish or clear sealer
Step 1: Preparation & Base Coat
-
Prepare the canvas:
Begin by scrubbing your rock with soapy water to remove any dirt or oils. Let it dry completely in the sun or with a hairdryer. -
Apply the base:
Paint the entire surface of the rock with white acrylic paint. You will likely need 2-3 coats to achieve a solid, opaque coverage where the dark stone underneath doesn’t show through. Allow each coat to dry fully.
Step 2: Outline & Facial Features
-
Sketch the symmetry:
Using a pencil very lightly, draw a vertical centerline down the middle of the rock. This guide is crucial for keeping your mandala patterns symmetrical. -
Draw the eyes:
Near the top third of the rock, draw two large circles touching each other for the main eye discs. Inside these, draw smaller circles for the pupils. Add the triangular beak between them. -
Ink the eyes:
Use your fine-tip black pen to trace the eye circles. Draw radiating lines from the pupil to the outer edge of the eye discs, creating a sunburst effect. -
Paint the pupils:
Fill the pupils with black paint, leaving a tiny white dot in each for a reflection highlight. -
Add color to eyes:
Dilute your terracotta paint slightly and glaze over the radiating lines in the eyes, or carefully paint alternating segments to give them warmth.
Smudge Stopper
Ink smearing on rocks is common. Ensure your white base coat is 100% dry before inking, and let the ink cure overnight before applying any varnish.
Step 3: Mandala Chest Design
-
Establish the chest triangle:
Draw a large inverted triangle shape starting from below the beak area, curving down towards the bottom center. This frames the main mandala chest piece. -
Create the grid:
Inside this chest area, lightly pencil a grid of diamond shapes. Inside each diamond, draw a tiny flower or starburst pattern. -
Ink the fine details:
Switch back to your fine micrometer pen. Carefully ink the diamond grid and the floral centers. Use stippling (tiny dots) to add texture to the background of uncolored diamonds. -
Add decorative curves:
Below the diamond grid, draw two sweeping curves that meet at a point, resembling a folded wing or collar. Fill this area with dense, intricate line work like cross-hatching or lace patterns. -
Color accents:
Using the terracotta paint and a size 0 brush, fill in select diamonds and add small dots of color to the chest pattern to bring the design to life.
Metallic Magic
Replace the terracotta paint with a metallic copper or bronze acrylic. The subtle shimmer will make the mandala patterns glow when light hits the stone.
Step 4: Wings & Feathers
-
Outline the wings:
On the left and right sides of the main body, sketch long, vertical oval shapes for the folded wings. -
Detail the wing feathers:
Divide the wings into layered sections. Use scalloped lines to create rows of feathers. I like to alternate between plain white feathers and feathers filled with the terracotta paint. -
Ink the wing texture:
Add fine ink lines to the terracotta sections to suggest feather barbs. -
Create the bottom skirt:
Draw a row of large, pointed leaf-shapes along the very bottom curve of the owl. These act as the tail feathers. -
Pattern the tail:
Paint the tail feathers terracotta, then use white paint or your white gel pen (if opaque enough) to draw crisp leaf veins on top of the dried color.
Step 5: Final Definition
-
Connect the design:
Draw a thick black band that swoops under the chest mandala and connects the wings, creating a cohesive border. Add small white circles (dots) along this black band for a pearl-necklace effect. -
Deepen contrasts:
Go over your main outlines with a slightly thicker black marker or paint to make the main shapes pop against the intricate interior details. -
Final dots:
Add a few stray black dots around the bottom edge of the stone for texture and balance. -
Seal the work:
Once the ink and paint are fully cured (wait at least an hour), seek the artwork with a matte spray varnish to protect the fine pen lines from smearing.
Place your finished owl on a desk or bookshelf where its intricate patterns can be appreciated up close
Dot-Painted Boho Owl
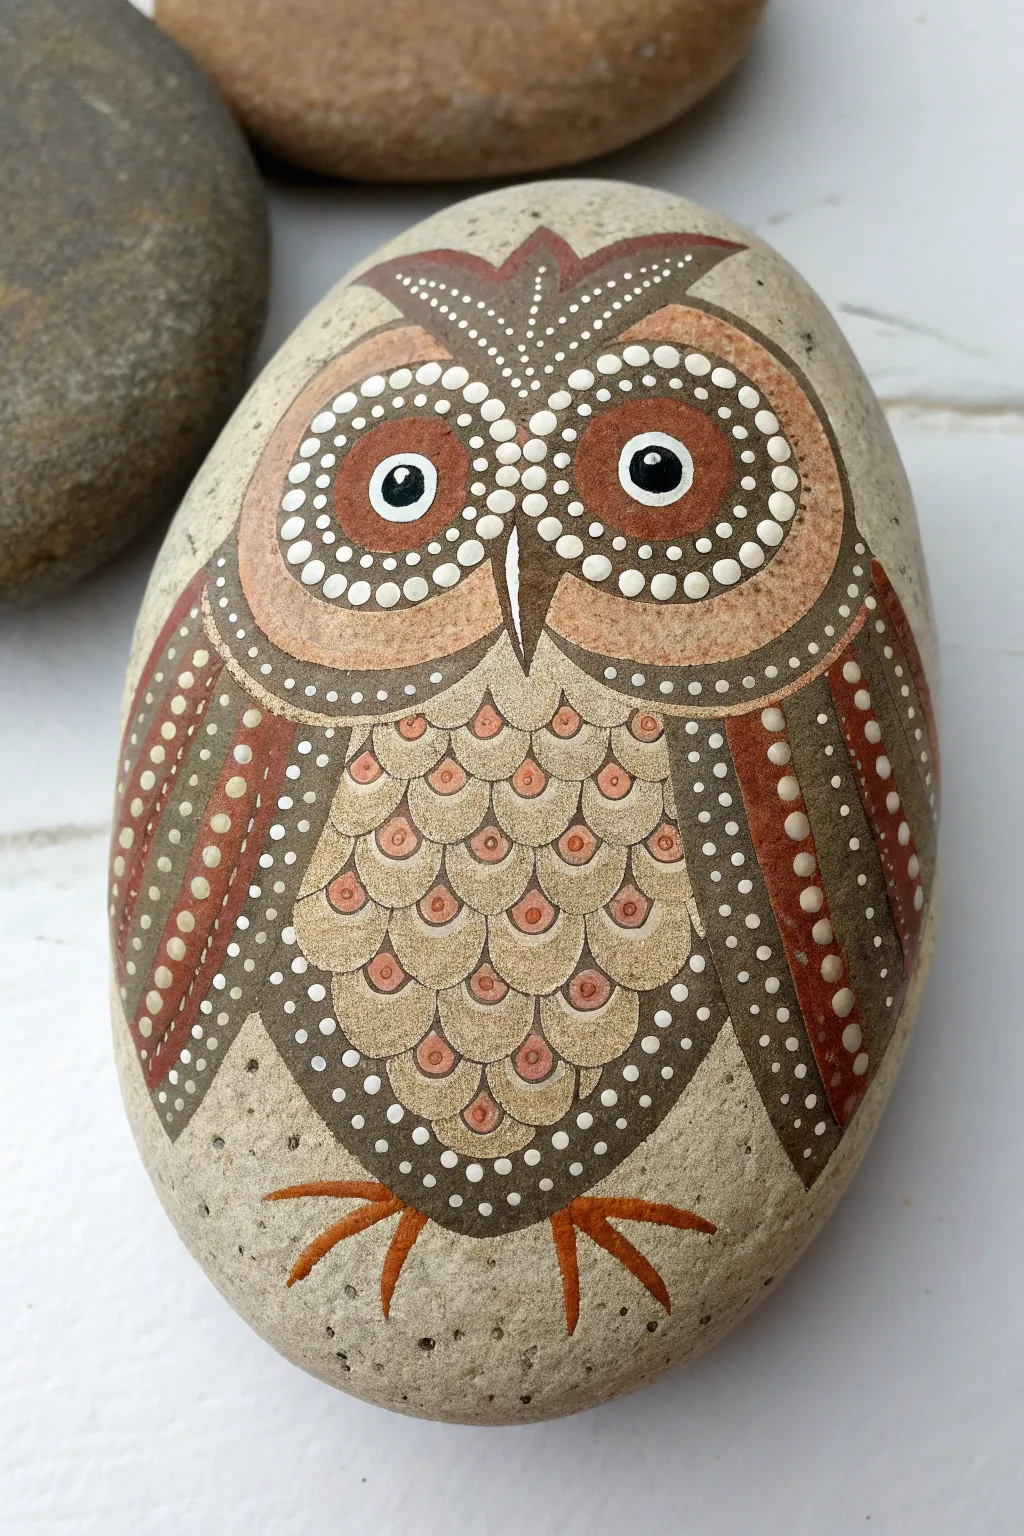
Bring a touch of woodland whimsy to your garden or desk with this intricately detailed owl painted on a smooth river stone. By combining flat color blocking with delicate dotting techniques, you’ll create a textured, folk-art masterpiece that feels both ancient and modern.
Detailed Instructions
Materials
- Smooth, oval river rock (palm-sized or larger)
- Acrylic paints (dark brown, tan/beige, burnt orange, white, black)
- Pencil and eraser
- Fine detail brushes (sizes 0 and 00)
- Dotting tools (various sizes) or toothpicks/brush ends
- Matte or satin spray varnish
- Palette for mixing colors
Step 1: Sketching and Base Blocking
-
Clean your canvas:
Begin by scrubbing your rock with soap and warm water to remove any dirt or oils. Let it dry completely before starting to ensure the paint adheres properly. -
Sketch the outline:
Using a pencil, lightly sketch the main shapes of the owl. Draw a large oval for the body, two large circles for the eyes, a triangular beak, and the slightly pointed ‘ear’ tufts at the top. -
Paint the eye circles:
Mix a soft, warm beige color. Paint the two large outer circles that define the face mask area, ensuring the paint is opaque. You may need two coats here. -
Fill the body and wings:
Paint the wings on either side using a medium brown tone. For the chest area, use a lighter beige or cream color to create a backdrop for the feathers we will add later. -
Define the face details:
Inside the beige eye circles, paint two smaller circles with a burnt orange or rust color for the irises. Add a triangular beak in dark brown right between the eyes.
Paint Consistency Check
If your dots have peaks (look like Hershey’s Kisses), your paint is too thick. Thin it slightly with a drop of water or pouring medium so the dots settle flat and smooth.
Step 2: Adding the Feathers and Features
-
Create the pupils:
Paint a solid black circle inside each orange iris. Once dry, add a tiny white dot (highlight) in the upper right corner of each pupil to bring the owl to life. -
Scales on the chest:
Using a fine liner brush and dark brown paint, carefully draw rows of ‘U’ shapes or scallops down the cream-colored chest area. These will act as the chest feathers. -
Coloring the scallops:
Inside each ‘U’ scale, paint a smaller ‘U’ shape using a slightly darker beige or tan, leaving the original cream background visible at the edges. -
The central dot:
Place a single, small dot of burnt orange paint in the very center of each chest scale. This creates a consistent, patterned look similar to chainmail or fish scales. -
Wing stripes:
On the brown wings, paint vertical stripes using your burnt orange and dark brown paints. These stripes will guide your dot placement in the next phase.
Step 3: Detailed Dot Work
-
Dotting the eyes:
Take a small dotting tool and white paint. Create a ring of small, evenly spaced dots around the orange iris. Then, add a second ring of slightly larger white dots around the outer edge of the beige face circles. -
Forehead decoration:
On the brown forehead triangle above the eyes, use a very fine tool to add rows of tiny white dots leading up to the ear points, following the curve of the shape. -
Wing detailing:
Follow the vertical stripes on the wings with rows of dots. Alternate between white dots on the brown sections and cream dots on the orange sections to create contrast. -
Outline the body:
Using dark brown paint and your finest dotting tool, place a border of tiny dots along the bottom curve of the owl’s body to give it a finished edge. -
Paint the talons:
At the bottom of the body, paint two simple, three-pronged feet using the burnt orange paint. Make the lines sharp and slightly curved. -
Final touches:
Look over your design. Fill any empty negative spaces on the wings or face with tiny micro-dots in white or cream to add texture. -
Seal the artwork:
Allow the rock to dry for at least 24 hours. Once fully cured, apply a matte or satin spray varnish to protect the paint from chipping and fading.
Add Metallic Flair
Replace the burnt orange paint with a metallic copper or bronze acrylic. This will make the eyes and wing accents shimmer beautifully when the sun hits the rock.
Now you have a wise little companion to keep watch over your garden or bookshelf
Watercolor-Style Wash Owl
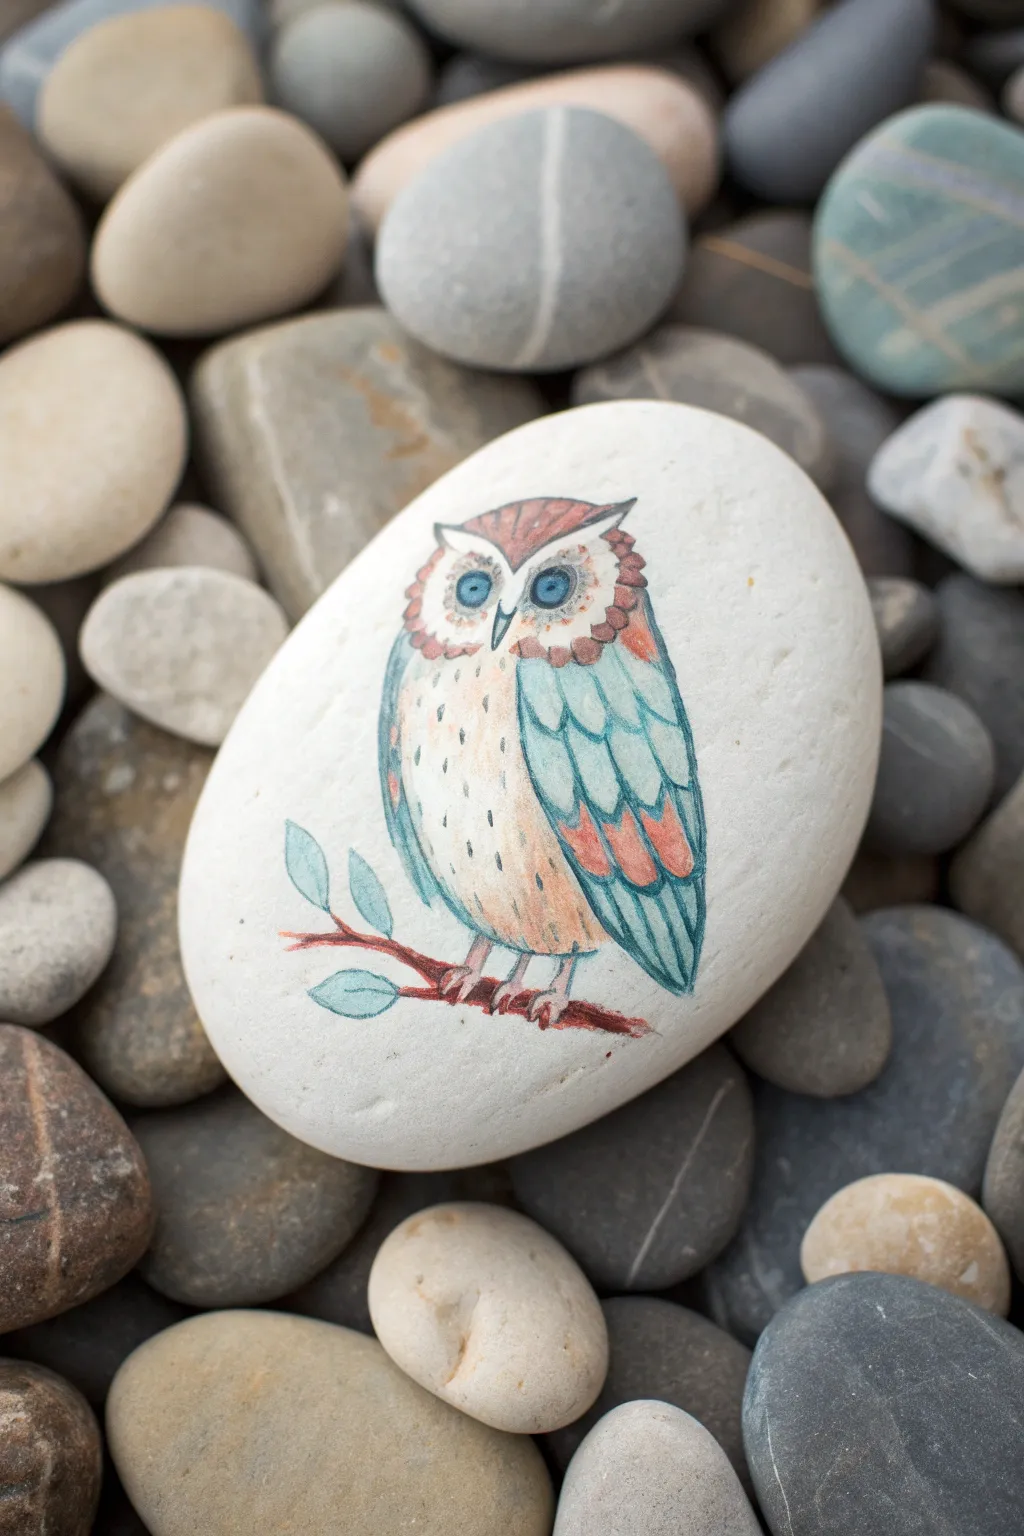
Capture the delicate beauty of a storybook illustration on stone with this watercolor-style owl design. Using thinned acrylics and fine linework, you’ll create a soft, feathery look that feels both vintage and charming.
Step-by-Step Tutorial
Materials
- Smooth, white oval river rock
- Gesso or white acrylic primer
- Pencil (HB or lighter)
- Acrylic paints (Titanium White, Burnt Sienna, Teal/Turquoise, Yellow Ochre, Burnt Umber)
- Glazing medium or water for thinning
- Fine liner brushes (size 0 and 00)
- Micro-pen or ultra-fine black paint marker (waterproof)
- Matte spray varnish
Step 1: Drawing the Base Design
-
Prime the surface:
Even if your rock is naturally white, applying a thin coat of white gesso creates a toothy surface that holds diluted paint better than raw stone. Let this dry completely before sketching. -
Sketch the outline:
Lightly draw the owl’s shape with a pencil. Start with a large oval for the body, then add the slightly flatter head shape on top. Position the owl slightly off-center to leave room for the branch. -
Define the face:
Draw the heart-shaped facial disk typical of owls. Inside this area, sketch two large circular eyes and a small, downward-pointing triangular beak. -
Add wing and tail details:
Sketch the folded wing along the right side of the body. Divide it into tiers to represent layered feathers—scalloped shapes work best here. Add the tail feathers extending below the wing. -
Draw the perch:
Sketch a simple, gnarled branch beneath the owl’s feet, extending out to the left with a few small leaves attached.
Step 2: Applying color washes
-
Prepare your washes:
Mix your acrylics with water or glazing medium until they have the consistency of watercolor or ink. You want the colors to be translucent, not opaque. -
Paint the body base:
Mix a very pale wash of Yellow Ochre and Titanium White. Apply this to the owl’s chest and belly area, keeping the edges soft. -
Color the wings:
Use a diluted Teal or Turquoise for the main wing feathers. Apply the wash gently, letting the white background show through slightly to keep that airy, watercolor feel. -
Add warmth to the plumage:
While the blue is drying, specific sections of the wing and the top of the head need warmth. Use a wash of Burnt Sienna to paint the tips of the wing feathers and the ‘ears’ or top of the head. -
Paint the eyes:
Fill the eyes with a very diluted blue wash, keeping the center slightly lighter if possible. Once dry, paint the pupils solid black, leaving a tiny white catchlight for life. -
Color the branch:
Use a wash of Burnt Umber for the branch. For the leaves, use a mix of Teal and White creates a soft, sage-like green that complements the wing color.
Ink Bleeding?
If your black outline bleeds into the paint, your paint wasn’t fully dry. Use a hairdryer on a cool setting for 2-3 minutes before any inking.
Step 3: Detailing and Inking
-
Create texture on the chest:
Mix a slightly thicker consistency of Burnt Sienna. Using the very tip of your smallest brush, dab tiny vertical dashes across the chest to mimic downy feathers. -
Outline the main shapes:
Once all paint is 100% dry, use a waterproof micro-pen or a liner brush with black ink to outline the entire owl. Keep the line weight thin and delicate. -
Detail the feathers:
Draw the individual feather shapes on the wings over your color washes. The ink lines should define the separation between the teal and sienna sections. -
Enhance the face:
Outline the eyes and the facial disk. Add small, scalloped lines around the edge of the face to suggest fluffiness. -
Define the feet:
Draw three toes grasping the branch. A simple line drawing is sufficient here; you don’t need heavy shading. -
Add final branch details:
Outline the branch and leaves. Add a vein line down the center of each leaf for a finished botanical look. -
Seal the artwork:
Because the washes are delicate, spray varnish is safer than brush-on varnish, which might smear the ink. Apply two light coats of matte spray varnish to protect your work.
Soften The Look
For an even softer, dreamier look, dilute your black outlines with a tiny drop of water to make them dark grey instead of harsh black.
Now you have a charming little stone companion that captures the quiet wisdom of nature


Have a question or want to share your own experience? I'd love to hear from you in the comments below!