Blank wooden pegs are the tiniest little canvases, and they’re honestly addictive once you start. Here are my favorite peg doll painting ideas—from sweet and simple to the kind that make you want to build a whole miniature world around them.
Simple Peg Doll Faces
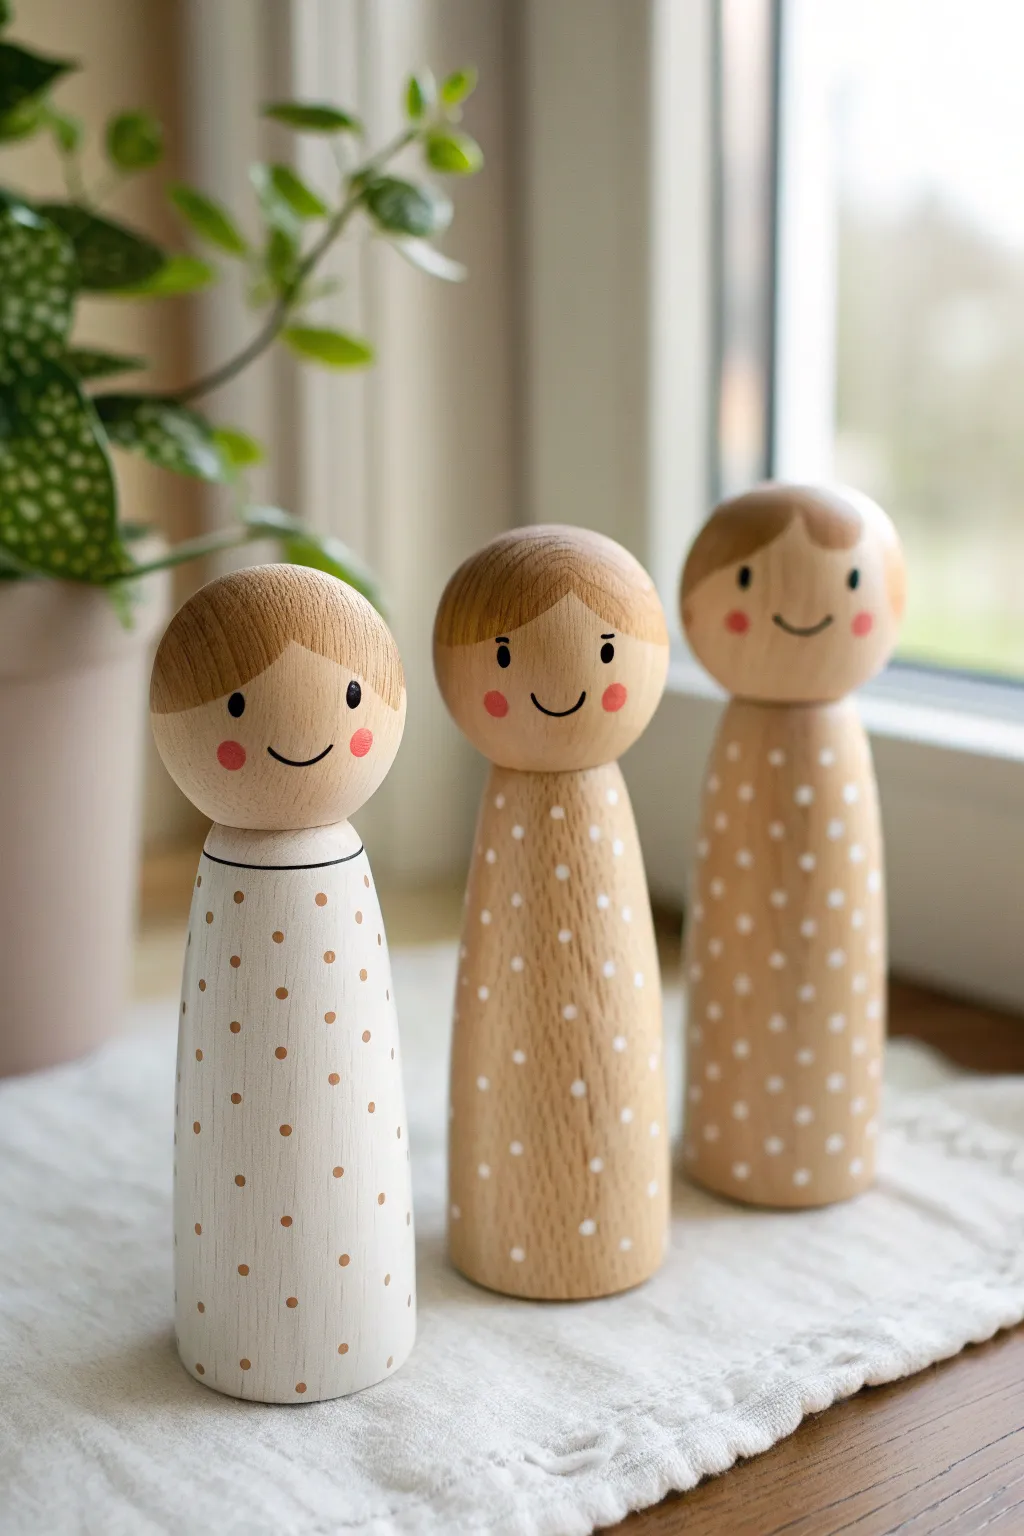
These charming wooden figures rely on the natural beauty of the wood grain paired with delicate, minimalist painting. With their friendly expressions and polka-dotted outfits, they make perfect gentle playthings or decorative accents for a nursery shelf.
Step-by-Step Tutorial
Materials
- Unfinished wooden peg dolls (cylindrical shape with round heads)
- Fine-grit sandpaper (220 grit)
- Acrylic paint (white, soft brown, pink, black)
- Fine detail paintbrush (size 0 or 00)
- Dotting tool or toothpick
- Painter’s tape or washi tape
- Matte finish varnish or sealant (water-based)
- Pencil for sketching
Step 1: Preparation & Planning
-
Sand the Wood:
Begin by giving your wooden peg dolls a quick sanding with fine-grit sandpaper to remove any rough spots or splinters, ensuring a smooth canvas for your paint. -
Dust Off:
Wipe the dolls down with a dry, lint-free cloth or a tack cloth to remove all sanding dust before you start adding color. -
Sketch the Hairline:
Using a pencil very lightly, sketch the hairline on the top sphere. For this trio, aim for simple bangs—either straight across or slightly curved—that frame the face area.
Pro Tip: Eye Placement
Place eyes lower on the face sphere, closer to the imaginary ‘nose’ line rather than the center. This ‘low face’ technique instantly makes dolls look cuter and younger.
Step 2: Painting the Base Features
-
Paint the Hair:
For the hair, mix a warm, soft brown shade. Carefully paint the top hemisphere of the doll, following your pencil line. Use smooth downward strokes to mimic hair texture. -
Body Color Selection:
Decide on your body colors. For the white-bodied doll, paint the entire bottom cylinder section with creamy white acrylic paint. It may need two thin coats for full coverage. -
Natural Wood Bodies:
For the other two dolls, leave the wood natural. This creates a beautiful contrast and highlights the grain, which is a key part of this rustic look. -
Let it Dry:
Allow the base coats and hair to dry completely. Acrylics dry fast, but patience here prevents smudging later.
Troubleshooting: Bleeding
If paint bleeds into the wood grain, use a clear acrylic medium or sealer on the bare wood first. This fills the wood’s pores, creating a barrier so your colored paint lines stay crisp.
Step 3: Adding the Details
-
Create the Neckline:
On the white-painted doll, use your finest brush and black paint (or a fine-tip paint pen) to draw a very thin line separating the head from the body, defining a collar. -
Draft the Face:
Before painting, lightly mark the position of the eyes and mouth with a pencil. aim for wider-set eyes for that innocent ‘kawaii’ inspired look. -
Paint the Eyes:
Dip the handle end of a paintbrush or a large dotting tool into black paint. Press gently onto your pencil marks to create perfectly round, small eyes. -
Add the Smile:
Using your size 00 brush and slightly watered-down black paint (ink consistency helps flow), paint a simple, small ‘U’ shape between the eyes for a smile. -
Add Rosy Cheeks:
Mix a soft pink color or dilute a red with plenty of white. Use a Q-tip or a small dry brush to dab round, soft circles on the cheeks just below the eyes.
Step 4: Pattern & Finish
-
Prepare the Dotting Tool:
For the polka dots, dip a toothpick or a small dotting tool into your paint. Use white paint for the natural wood bodies and brown paint for the white body. -
Apply the Pattern:
Start applying dots in a staggered pattern, working from the top of the ‘dress’ down to the bottom. Keep the spacing consistent but random enough to look organic. -
Clean Up Edges:
Check the hairline and neckline for any stray marks. You can scrape away tiny mistakes on unpainted wood with a craft knife or sandpaper. -
Seal the Dolls:
Once all paint is bone dry (wait at least an hour), apply a coat of matte water-based varnish. This protects the wood and keeps the paint from chipping during handling.
Display your new wooden friends near a window or give them as a heartfelt handmade gift


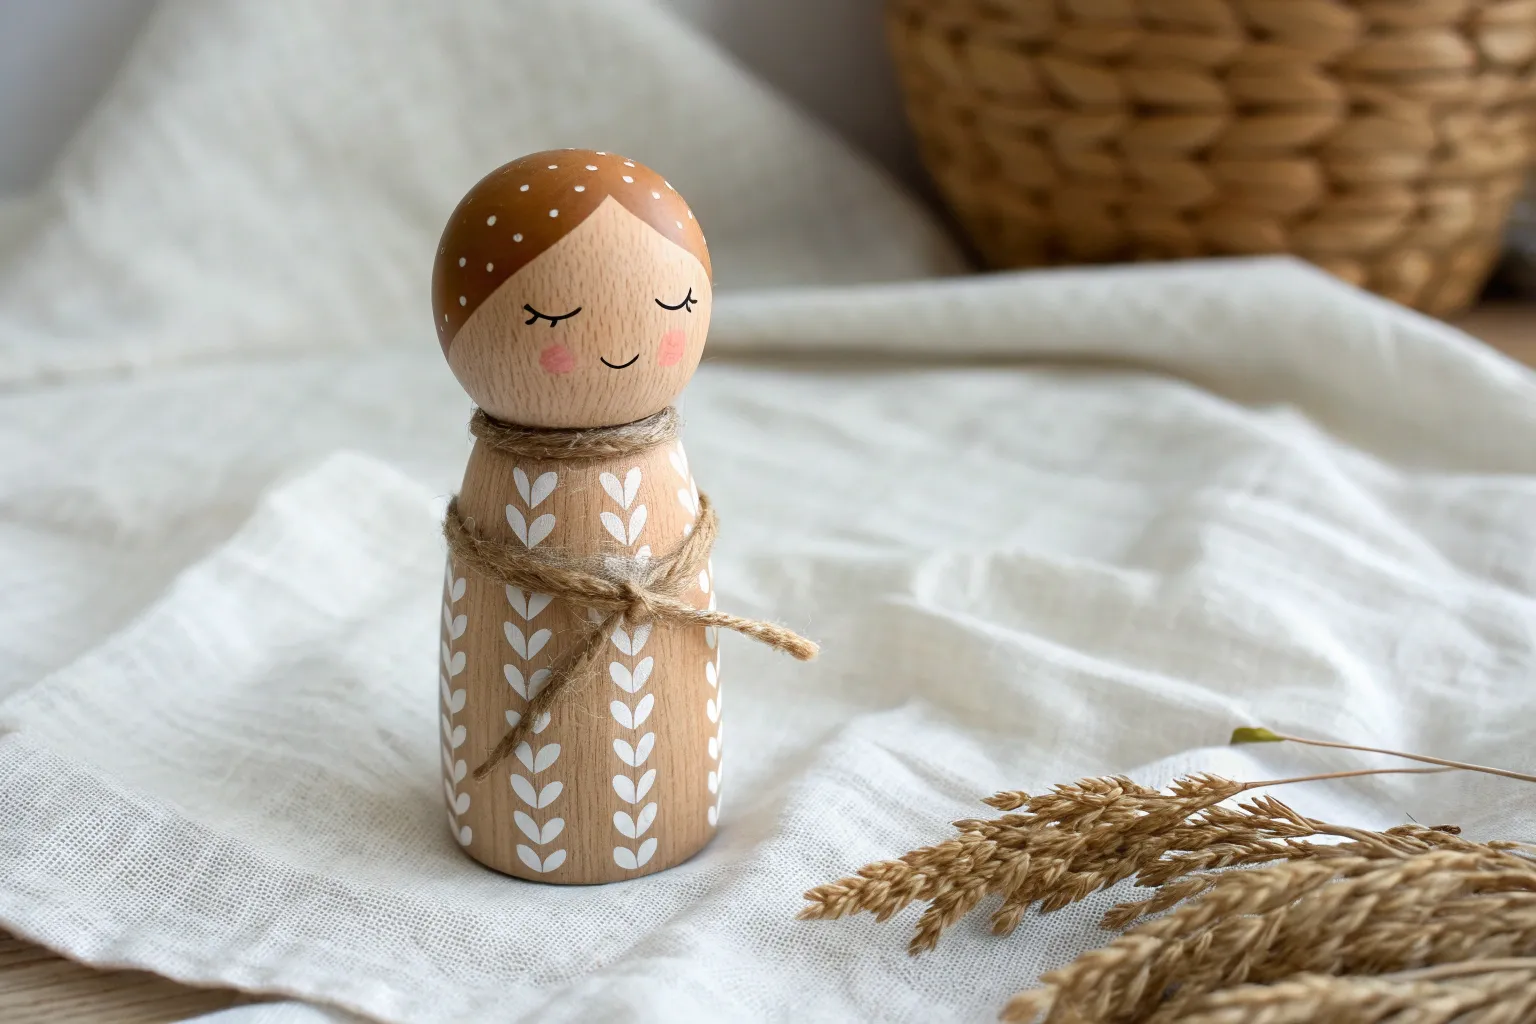
Painted Hairlines and Bangs
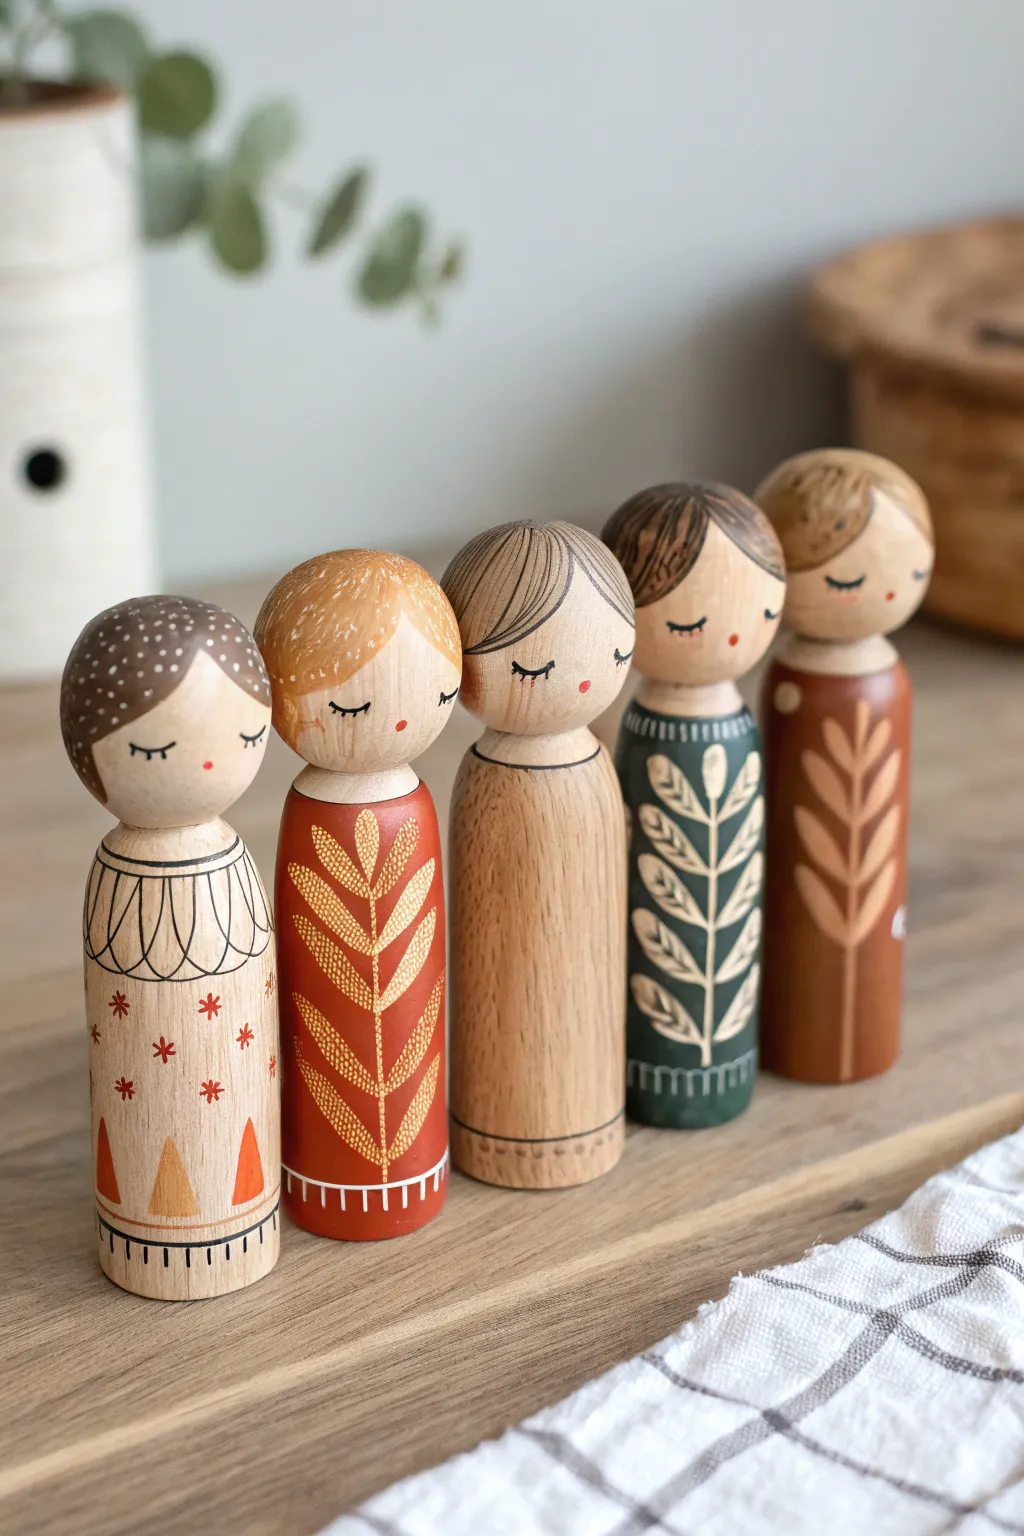
These charming wooden figures celebrate the beauty of nature with earthy tones and delicate botanical patterns. The project highlights how distinct hairstyles—from side-swept bangs to textured buns—can give each little character a unique personality.
Detailed Instructions
Materials
- Unfinished wooden peg dolls (standard size, roughly 3.5 inches)
- Fine-grit sandpaper (220 grit)
- Acrylic craft paints (cream/off-white, terracotta/rust, sage green, tan, dark brown, pale pink)
- Detail paintbrushes (sizes 0, 00, and 000)
- Pencil and eraser
- Matte varnish or sealant
- Jar of water and paper towels
- Palette or shiny paper plate
Step 1: Preparation & Base Tones
-
Smooth the surface:
Begin by giving your wooden peg dolls a quick sanding with fine-grit sandpaper. This removes any rough grain and ensures your fine painted lines won’t bleed or skip. -
Map out the design:
Using a pencil very lightly, sketch the hairline and the ‘neckline’ on each doll. For the hairlines, vary the shapes: try a straight blunt bang for one, a side-swept fringe for another, and a center part for a third. This variation is key to their charm. -
Sketch the faces:
Still using your pencil, mark the position of the eyes about midway down the head circle. These dolls feature closed, sleeping eyes, which are just simple curved ‘U’ shapes.
Step 2
-
Base coat the hair:
Select different shades of brown and tan for each doll to create variety. Paint the entire back of the head and the top section down to your pencil hairline. You may need two thin coats for solid coverage. Let this dry completely. -
Add hair texture:
Using your thinnest liner brush (00 or 000) and a darker or lighter shade of the hair color, paint fine, sweeping lines over the dry base coat. Follow the curve of the head to simulate strands of hair. -
Detail the bangs:
Pay special attention to the front hairline. For side-swept bangs, curve your brush strokes diagonally across the forehead. For the textured bun look (like the first doll), use small stippling dots in contrasting shades.
Brush Control Trick
For the finest eyelashes and hair strands, thin your acrylic paint slightly with a drop of water until it has an ink-like consistency creating smoother flow.
Step 3
-
Paint the eyes:
With a fine brush and black or dark brown paint, carefully trace over your pencil lines for the closed eyes. Add tiny lashes at the outer corners if you wish. -
Add rosy cheeks:
Dip the handle end of a paintbrush into pale pink paint or dilute it to make a wash. Dot this onto the cheeks for a perfect circle, or softly blend it for a blushing look. -
The tiny mouth:
Place a single, tiny dot of red or pink paint plain in the center below the eyes to create a sweet, pursed mouth.
Wood Grain Texture
Instead of painting a solid dress color, use a colored wood stain or a watercolor wash. This adds color while letting the beautiful natural grain show through.
Step 4
-
Body base colors:
Paint the body of each doll in solid earthy tones: cream, rust red, natural wood (clear coat only), and forest green. I prefer to leave one doll with the natural wood showing for texture contrast. -
Stem structure:
Once the body paint is fully dry, use a contrasting color (cream on green, or rust on red) to paint the central vertical stem of your plant design. It should run from the neck down to the bottom. -
Leaf variations:
Paint leaves branching off the main stem. Experiment with shapes: try long, thin willow leaves on the red doll and rounded, symmetrical leaves on the green one. Use quick, confident strokes that are wider at the base and taper to a point. -
Adding texture details:
For the cream-colored doll, paint a scalloped collar around the neck using black ink or paint. Add small asterisks or stars scattered across the dress for a whimsical pattern. -
Geometric accents:
On the bottom of the dresses, add simple geometric borders. Small triangles or vertical tick marks create a finished ‘hem’ look that grounds the design.
Step 5
-
Clean up lines:
Check your work for any smudges. If you made a mistake on the natural wood doll, you can usually sand it off gently. For painted areas, touch up with the base color. -
Seal for protection:
Apply two thin coats of matte varnish to the entire doll. This protects the paint from handling and gives the wood a lovely, professional sheen without being too glossy.
Now you have a serene little family of figures ready to add a touch of woodland magic to a shelf or play set


Matching Peg Doll Family Sets

Create a charming, nature-inspired family of peg dolls using unexpected color combinations like teal, rust, and soft pinks. This set relies on clean lines and simple botanicals to achieve a modern heirloom look that feels warm and inviting.
Step-by-Step
Materials
- Unfinished wooden peg dolls (various sizes: mom, dad, children)
- Acrylic paints (teal, rust orange, deep red, blush pink, cream/white, dark grey or black)
- Small flat paintbrushes (sizes 2-4)
- Fine detail liner brush (size 0 or 00)
- Pencil and eraser
- Matte finish sealant (spray or brush-on)
- Painters tape or washi tape (optional for straight lines)
- Sandpaper (fine grit)
Step 1: Preparation & Base Layers
-
Prep the surface:
Begin by lightly sanding your wooden peg dolls to remove any roughness or splinters. Wipe them down with a slightly damp cloth to ensure a dust-free surface for painting. -
Sketch the designs:
Using a pencil, very lightly sketch where the head stops and the clothing begins. Mark out the hair shapes—notice how the ‘mom’ figure has a side-swept look while the others have simple fringes or center parts. -
Sketch clothing details:
Lightly draw the main design elements on the bodies: the large leaf on the teal doll, the oval leaf shape on the rust doll, and the geometric blocking on others. -
Paint the skin tone:
Leave the face area as natural wood. If you prefer a painted skin tone, mix a custom shade and apply it now to the head area, keeping the hairline edges neat. -
Base coat: The Tallest Doll:
Paint the body of the largest doll with a deep teal or forest green. Leave the collar area natural wood or paint it a contrasting rust orange if you prefer the layered look shown. -
Base coat: The Medium Dolls:
For the second largest doll, paint the main body deep red, leaving a large oval in the center unpainted (or paint it a lighter terracotta later). For the third doll, paint the body a soft rust-orange. -
Base coat: The Smallest Dolls:
Paint the toddler doll in a solid deep red. For the baby doll, paint the bottom half blush pink and the top section cream or light beige to create stripes later.
Clean Lines Hack
For the perfectly straight stripes on the baby doll, limit bleeding by painting a thin layer of your base color (or matte medium) over the tape edge first before applying the stripe color.
Step 2: Hair & Facial Details
-
Paint the hair base:
Using a medium brown or tan paint, fill in the hair shapes you sketched earlier. Ensure the curves around the face are smooth and symmetrical. -
Add hair texture:
Once the brown is dry, use your finest liner brush and a slightly darker brown shade to paint thin, curved lines following the shape of the head to simulate hair strands. -
Paint the faces:
I find it best to keep faces minimal. Use the back of your paintbrush handle dipped in black paint to stamp two small dots for eyes. Use a tiny brush stroke for a simple smile. -
Add rosy cheeks:
Dilute a tiny drop of pink paint with water until it’s very sheer. Dab it onto the cheeks with a fingertip or Q-tip for a soft blush effect.
Swap the Season
Change the color palette to pastels for spring or icy blues and whites for winter, but verify that your light colors are opaque enough to cover the wood grain.
Step 3: Decorative Patterns
-
Teal Doll: The Fern:
On the teal body, paint a long vertical stem in light grey or sage green. Add angled oval leaves branching out from bottom to top to create a fern pattern. -
Teal Doll: The Collar:
Add the rust-colored shoulder detail if you haven’t already. Use a dotting tool or toothpick to add tiny white dots along the curved edge of this collar. -
Rust Doll: The Leaf:
On the medium doll with the rust body, fill the center oval with a lighter terracotta or salmon color. Once dry, paint a central vein and branching veins in a creamy white. -
Terracotta Doll: Geometric Lines:
On the third doll, use a fine liner brush and white paint to create thin, crisp triangular lines stemming from the neck down the sides. Add a few scattered polka dots near the bottom. -
Toddler Doll: Polka Dots:
Take the small red doll and use a toothpick dipped in white paint to add a ring of small polka dots around the base. -
Baby Doll: Floral Pattern:
On the cream upper section of the smallest doll, use the tip of your smallest brush to dab tiny red and brown clusters to look like scatter flowers. -
Baby Doll: Stripes:
Paint thin horizontal bands in rust or dark red to separate the floral section from the pink bottom section. Add white dots to the bottom pink stripe. -
Sealing:
Allow all paint to cure fully for 24 hours. Apply 1-2 coats of matte varnish to protect the paint and give the wood a finished, professional look.
Group your finished family together on a shelf or use them for gentle play


Storybook Princess and Knight Looks
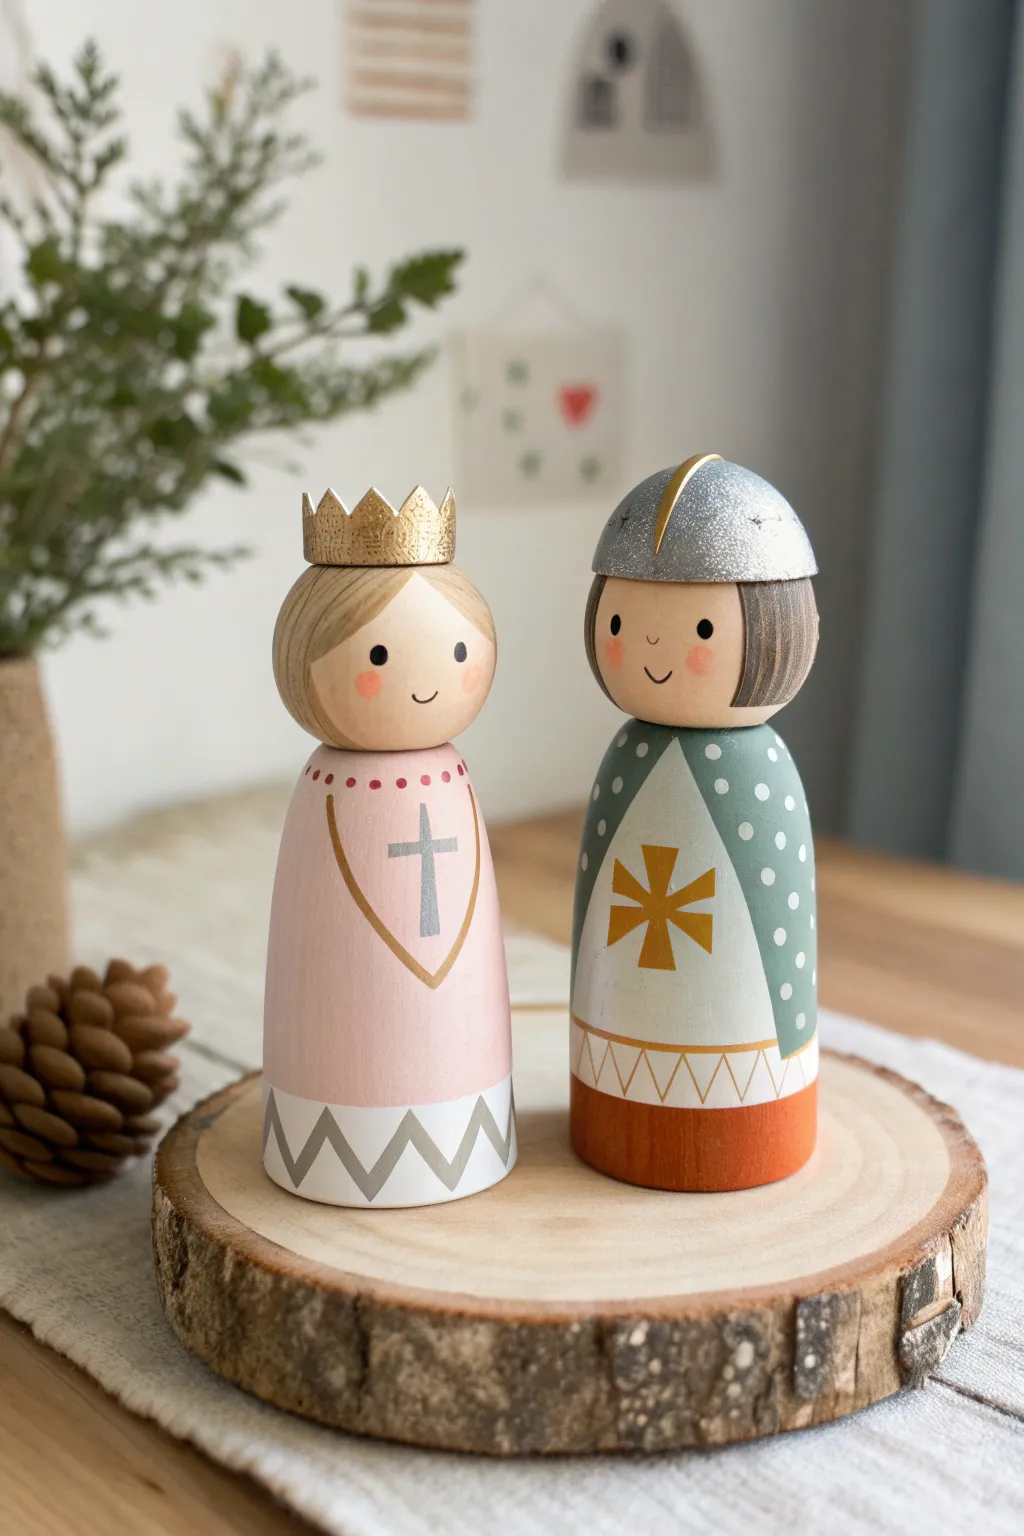
Bring a classic fairy tale to life with this charming wooden pair featuring a serene princess in soft pink and a brave knight in shimmering armor. The gentle pastel palette combined with metallic accents gives these figures a modern storybook aesthetic that looks beautiful on a shelf or in a play set.
Step-by-Step Guide
Materials
- Large wooden peg dolls
- Acrylic craft paints: light pink, cream/white, peach (skin tone), slate blue-grey, metallic gold, metallic silver, rust orange/terracotta
- Detail brushes (fine and medium round)
- Pencil and eraser
- Dotting tool or toothpick
- Glitter paint or fine loose glitter (silver)
- Matte spray sealant or brush-on varnish
Step 1: Painting the Base Layers
-
Prep and sketch:
Begin by lightly sanding your wooden pegs if they feel rough. Using a pencil, lightly sketch where the heads meet the bodies if there isn’t a defined groove, and outline the general shape of the princess’s dress neckline and the knight’s tunic. -
Skin tones:
Mix a soft peach or beige skin tone suitable for your dolls. Paint the circular head area of both figures, ensuring smooth coverage. You may need two coats for an opaque finish. -
The princess’s dress:
Paint the entire body of the princess doll with a soft, pastel pink. Leave the bottom half-inch unpainted for now if you plan to add the geometric trim later, or paint it solid white as a base. -
The knight’s tunic:
For the knight, block out the main body area in a muted slate blue-grey or sage green color. Paint the bottom section (his trousers/boots area) in a warm rust or terracotta orange.
Clean Lines Hack
For the straight lines on the hems or the knight’s tabard, use thin strips of washi tape or painter’s tape to mask off areas. This ensures crisp edges without needing a perfectly steady hand.
Step 2: Adding Character Details
-
Hair styling:
For the princess, paint the top of the head a light blonde or tan color, sweeping it slightly across the forehead. For the knight, paint sleek brown hair that peeks out from under where his helmet will be. -
The silver helmet:
Paint a silver dome shape on top of the knight’s head, slightly overlapping the hair. Add a thin vertical strip coming down the center of the forehead to represent the helmet’s nose guard. -
Glitter accent:
While the silver paint is tacky (or using a second layer of glitter medium), add silver glitter to the helmet for a textured, chainmail effect. -
The golden crown:
Paint a simple crown shape on the princess’s head using metallic gold. I find it easiest to paint a simple band first, then add the triangular points on top.
Level Up: 3D Elements
For a tactile crown, instead of painting it flat, cut a strip of gold washi tape or glitter cardstock with zigzag spikes and glue it around the princess’s head for a real dimensional accessory.
Step 3: Decorative Accents
-
Princess dress details:
Using your finest brush, paint a V-shaped necklace or trim on the pink dress in gold. In the center of the chest, carefully paint a silver cross or star shape. -
Dress hem work:
At the very bottom of the pink dress, paint a white band. Over the white, use grey or silver to paint a zigzag mountain pattern all the way around. -
Knight’s shield emblem:
Paint a large white triangle on the knight’s chest to represent a tabard or shield area. Once dry, paint a bold gold cross in the center. -
Polka dot texture:
Dip a dotting tool or a toothpick into white paint. Add tiny, evenly spaced dots over the blue-grey sections of the knight’s outfit to simulate studded armor or fabric texture. -
Knight’s decorative hem:
Where the blue tunic meets the orange bottom, paint a thin white horizontal stripe. Add a terracotta zigzag line inside this white band for a unified look with the princess.
Step 4: Faces and Finishing
-
Rosy cheeks:
Before adding eyes, create cheeks by dipping a dry brush or q-tip into very watered-down pink paint and gently dabbing it onto the face area. -
The eyes:
Using black paint and a dotting tool, place two wide-set eyes on the face line. Keep them low on the face for a cute, childlike proportion. -
Smiles:
Use your finest liner brush or a fine-tip black ink pen to draw a tiny, simple ‘U’ shape for the smile between the blush spots. -
Varnish:
Once absolutely everything is dry, apply a coat of matte varnish to protect the paint from chipping during play.
Once sealed and dried, this royal duo is ready to preside over their kingdom or join other wooden friends for imaginative adventures
BRUSH GUIDE
The Right Brush for Every Stroke
From clean lines to bold texture — master brush choice, stroke control, and essential techniques.
Explore the Full Guide
Woodland Gnome Peg Dolls

Embrace the charm of the forest with these adorable woodland gnome peg dolls, featuring natural wood textures and muted earth tones. Their distinctive tall hats and textured beards make them perfect for a cozy seasonal display.
How-To Guide
Materials
- Cone-shaped wooden peg dolls (approx. 4-5 inches tall)
- Acrylic paints (olive green, terracotta orange, cream, metallic white, dark brown)
- Fine detail paintbrush (size 0 or 00)
- Small flat paintbrush (size 4)
- Wood stain (light oak or natural) – for the unpainted body look
- Matte sealant or varnish
- Pencil
- Palette for mixing
Step 1: Base Coats & Color Blocking
-
Prepare the wood:
Ensure your wooden peg dolls are clean and smooth. If they feel rough, give them a quick sanding with fine-grit sandpaper and wipe away the dust. -
Sketch the guidelines:
Using a pencil, lightly mark where the hat meets the face. This line should be about 1/3 of the way down from the top point. Draw a small oval for the nose right below the hat line. -
Paint the green hat:
For the first gnome, use your flat brush to paint the cone hat olive green. Apply smooth, even strokes from the tip down to the pencil line. You may need two coats for opaque coverage. -
Paint the orange hat:
On the second gnome, paint the hat area a warm terracotta orange. Keep the edge clean against the face area. -
Create the raw wood look:
For the central gnome with the ‘raw wood’ body, you can either leave the wood natural or apply a very light wash of watered-down white paint or a light oak stain to the hat area (rust/brown tone) and leave the body natural. -
Paint the bodies:
Paint the body of the green-hatted gnome in the same olive green. Paint the body of the orange-hatted gnome a soft, muted sage green. Leave the ‘raw wood’ gnome’s body unpainted to show the grain.
Clean Lines Troubleshooting
If your paint bleeds into the wood grain, apply clear matte medium or sealer over your pencil lines first. This fills the grain and creates a barrier for crisp edges.
Step 2: Faces & Beards
-
Skin tone base:
Mix a small amount of cream with a tiny dot of brown to create a natural wood/skin tone. Paint the face area (the strip between the hat and where the beard will start) and the oval nose. -
Outline the beard:
Lightly sketch the beard shape with your pencil. It should start under the nose and flow outwards, ending in a point near the bottom of the doll. -
Base coat the beards:
Fill in the beard shape with a solid coat of cream or off-white paint. This acts as a background for the texture you’ll add later. -
Add beard texture:
Using your finest detail brush and white paint (slightly thickened if possible), paint small, overlapping ‘V’ shapes or teardrops to mimic hair tufts. Start from the bottom tip and layer them upwards toward the nose. -
Define the mustache:
Paint two larger, swooping teardrop shapes starting from the center of the nose going outwards to create a mustache that sits on top of the beard. -
Eyes:
Dip the non-brush end of your paintbrush into black or dark brown paint. Dot two small eyes onto the face area on either side of the nose.
Level Up: Accessories
Create tiny clay mushrooms or acorns to glue to the base of your gnomes, or glue a tiny scrap of actual wool felt onto the hat for mixed-media texture.
Step 3: Finishing Details
-
Hat texture (optional):
To give the hats a felt-like look, you can stipple a slightly lighter shade of the base color over the dry paint using a dry brush technique. -
Separation lines:
For the raw wood gnome, use a very fine brush and diluted brown paint to outline the beard and mustache, making it pop against the natural wood background. -
Beard highlighting:
Once the beard texture is dry, I like to add tiny strokes of pure bright white to the tips of the ‘V’ shapes to make the texture stand out more. -
Final seal:
Allow all paint to dry completely (at least 2 hours). Apply a coat of matte varnish to protect your work without adding unnatural shine.
Now you have a trio of forest friends ready to guard your shelves with quiet charm
Flower Fairy Peg Dolls
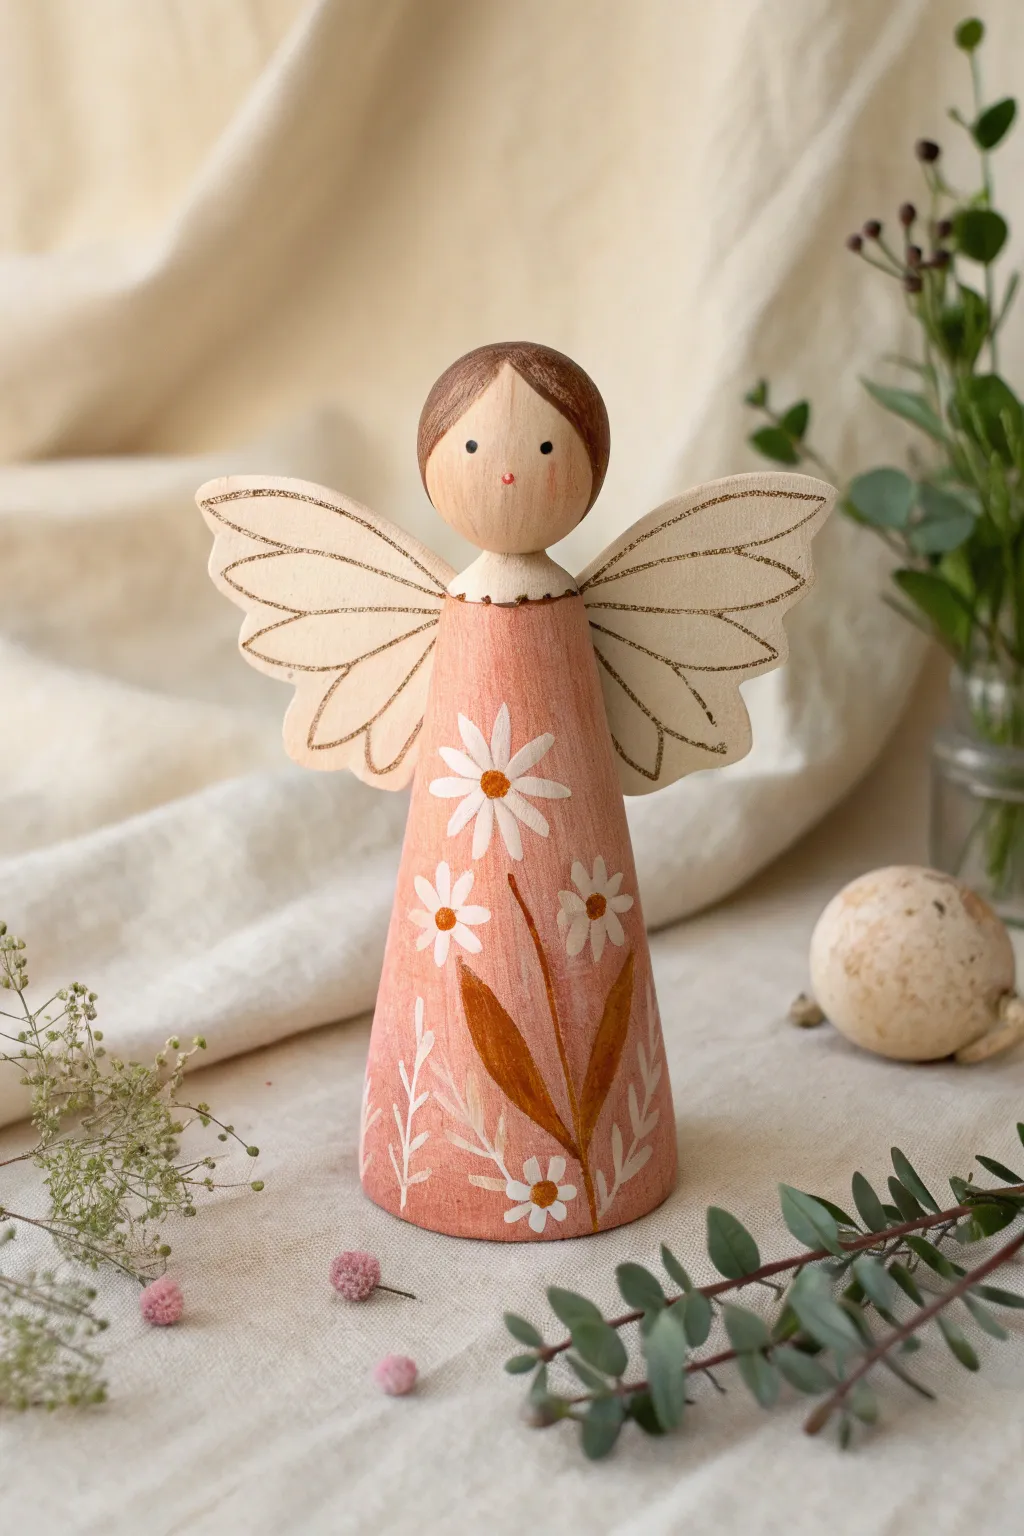
This whimsical wooden peg doll captures the gentle spirit of a garden fairy with its soft peach dress adorned with delicate white daisies. The added wooden wings give it an angelic silhouette, making it a perfect keepsake or seasonal decoration.
Step-by-Step Tutorial
Materials
- Large wooden peg doll body (roughly 3.5 inches tall)
- Wooden angel wings cutout (laser cut or craft store find)
- Acrylic paints: Peach/Dusty pink, White, Brown, Yellow, Gold, Black
- Fine detail paintbrushes (size 0 and 00)
- Flat shader brush
- Pencil
- Wood glue or strong craft glue
- Matte spray varnish
Step 1: Painting the Base
-
Base coat the dress:
Start by mixing a lovely dusty pink or peach tone for the dress. Using your flat shader brush, paint the entire conical body of the peg doll, stopping just at the neck groove. Apply two thin coats for opaque coverage, letting the first dry completely before adding the second. -
Paint the skin tone:
Mix a gentle skin tone that matches the natural wood or slightly lighter, and paint the face area if you aren’t leaving the natural wood show through. In the example, the face has a natural wood look, but you can seal it with a clear matte medium to prevent paint bleeding later. -
Outline the hairline:
With a pencil, very lightly sketch a curved hairline. The hair in this design features a center part and swoops down low on the sides of the face to frame it sweetly. -
Paint the hair:
Using brown acrylic paint and a small round brush, fill in the hair area. Follow the curve of the head with your brushstrokes to simulate hair strands. I like to add a tiny bit of white to the brown for a second layer of subtle highlights near the top.
Uneven Petals?
If your flower petals look messy, wait for the white paint to fully dry, then reshape them by painting over the edges with your background pink color.
Step 2: Floral Details
-
Draft the flowers:
Lightly sketch the placement of your daisies on the pink dress using a pencil. Place one large daisy near the chest area as a focal point, and scatter smaller ones below. -
Paint daisy petals:
With white paint and your finest detail brush, paint the petals. Press down at the center and lift up as you pull outward to create a teardrop shape for each petal. Don’t worry about perfection; organic shapes look more natural. -
Add flower centers:
Once the white petals are dry, dip the tip of a brush handle or a dotting tool into yellow-ochre paint and dot the center of each daisy. -
Paint the stems and leaves:
Mix a warm brown or use a dark ochre for the leaves. Paint two large, sweeping lance-shaped leaves rising from the bottom of the dress. Fill them in solid. -
Add delicate foliage:
Using thinned white or pale cream paint, add fine, fern-like sprigs fill in the background space around the bottom of the dress. These should be very airy and light.
Sparkle finish
Mix a tiny amount of iridescent medium into the white paint for the wings or flower petals to give the fairy a magical, shimmering quality in the light.
Step 3: Finishing the Face & Accessories
-
Paint the eyes:
Use the wrong end of a small paintbrush or a dotting tool dipped in black paint to create two wide-set eyes. Keep them small for a sweet expression. -
Add rosy cheeks:
Mix a very watery pink glaze. remove most of the paint from your brush on a paper towel, then gently dab small circles under the eyes for a blushing effect. -
Paint the mouth:
Using a tiny dot of red or coral paint, place a small mouth right between the cheeks. It should be just a speck or a tiny heart shape. -
Prepare the wings:
If your wooden wings are plain, give them a wash of white paint that is watered down so the wood grain still shows through slightly. -
Detail the wings:
With a fine liner brush and gold or dark brown paint, draw the feather details. Create scallops along the edges and lines radiating from the center to mimic vein structures. -
Attach the wings:
Apply a strong wood glue to the center back of the wings and press them firmly against the back of the doll’s body. hold in place for a minute or two until the glue grabs. -
Collar detail:
Paint a tiny scalloped collar around the neck using white paint to create a seamless transition between the dress and head. -
Final varnish:
Once absolutely everything is dry (give it a few hours), spray the entire doll with a matte varnish to protect your artwork.
Now you have a charming little garden guardian ready to watch over your shelves

PENCIL GUIDE
Understanding Pencil Grades from H to B
From first sketch to finished drawing — learn pencil grades, line control, and shading techniques.
Explore the Full Guide
Mermaid Peg Doll Scale Patterns
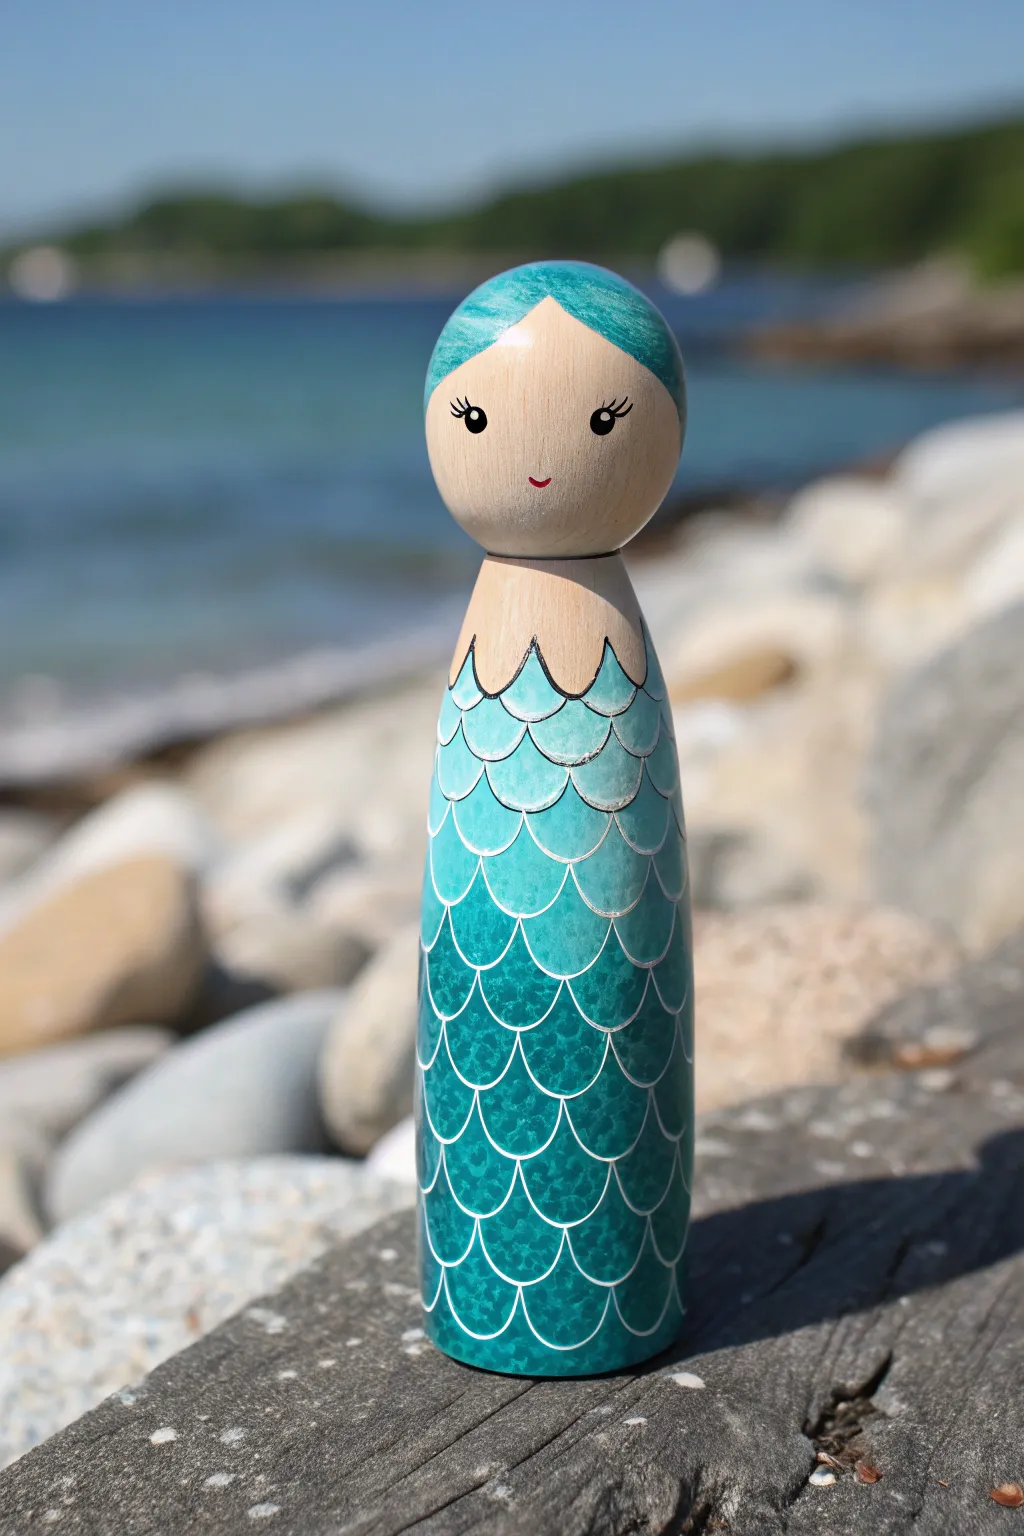
Capture the magic of the ocean with this charming wooden mermaid peg doll, featuring a mesmerizing gradient of teal scales and a sweet, simple face. The design relies on layering and fine linework to create depth, making it a perfect project for practicing your brush control.
Step-by-Step Guide
Materials
- Unfinished wooden peg doll (woman or angel shape)
- Fine grit sandpaper
- Acrylic paints (Teal, Dark Teal, White, Peach/Skin tone, Black, Red)
- Small flat brush
- Detail liner brush (size 00 or 000)
- Gloss varnish or sealant
- Pencil and eraser
- Mixing palette
- Water cup and paper towels
Step 1: Base Prep and Blocking
-
Smooth the Surface:
Before painting, lightly sand the wooden peg doll to remove any rough patches or splinters. Wipe it down with a damp cloth or tack cloth to ensure it is dust-free. -
Define the Face:
Using a pencil, lightly sketch a horizontal line around the neck groove where the head meets the body. Sketch a second curved line on the forehead to mark where the hair will begin. -
Paint the Skin Tone:
Mix a skin tone suitable for your mermaid using peach, white, and a tiny dot of brown if needed. Paint the entire face area and the upper chest area, just below the neck groove. Let this dry completely. -
Hair Base Coat:
Using a teal paint, carefully fill in the hair area on the top of the head. Keep the hairline neat and curved. I like to do two thin coats here for solid coverage rather than one thick gloopy one.
Scales Running Together?
If your white outlines are bleeding into the teal, your base paint isn’t dry enough. Let the teal cure for longer, and ensure your white paint isn’t too watery.
Step 2: Creating the Scale Gradient
-
Sketch the Scale Boundary:
With a pencil, draw a scalloped line across the chest where the skin meets the scales. This line should dip down like a sweetheart neckline or sea-shell bra shape. -
Blocking the Body Color:
Paint the entire body below the scalloped chest line with a medium teal color. This acts as the background for your scales. Allow this to dry fully. -
Mixing the Gradient:
Prepare three shades of teal on your palette: a very light teal (mixed with white), the medium base teal, and a dark, ocean-depths teal. -
Painting Top Scales:
Start at the top near the chest line. Using the lightest teal mix and a small brush, paint a row of ‘U’ shapes or scallops. Fill these shapes in so they look like solid light scales. -
Transitioning Downward:
Move to the next row of scales below the first. Switch to your medium teal color. Paint these scales slightly offset from the row above, like bricks in a wall. -
Darkening the Depths:
As you move past the midpoint of the doll body, switch to your darkest teal mix. Paint the remaining rows of scales all the way to the bottom base. -
Adding Texture (Sponging):
To mimic the watery texture seen in the photo, take a small piece of sponge or a dry scruffy brush. Lightly dab a bit of lighter teal over the dark bottom scales to create a mottled, underwater effect.
Step 3: Fine Details and Finishing
-
Outlining the Scales:
This is the most crucial step. Using your thinnest liner brush and white paint (thinned slightly with water for flow), carefully outline the bottom curve of every single scale. -
Refining the Hair:
Use the same dry-brush or sponging technique on the hair cap with a lighter teal or white to give it texture similar to the scales. -
Painting the Eyes:
Using the tip of a toothpick or a dotting tool, place two black dots for eyes. Once dry, add tiny eyelashes with your liner brush. -
Adding the Mouth:
Paint a very small, simple red smile using the very tip of your detail brush. -
Protective Seal:
Once all paint is absolutely dry (give it a few hours), apply a coat of gloss varnish. The gloss finish makes the ‘wet’ look of the mermaid scales really pop.
Pro Tip: Liquid Flow
Add a drop of flow improver or water to your liner paint. It helps the brush glide smoothly over the curves for crisp, continuous scale outlines without skipping.
Display your finished mermaid near a window where the light can catch those glossy scales
Cozy Winter Peg Dolls
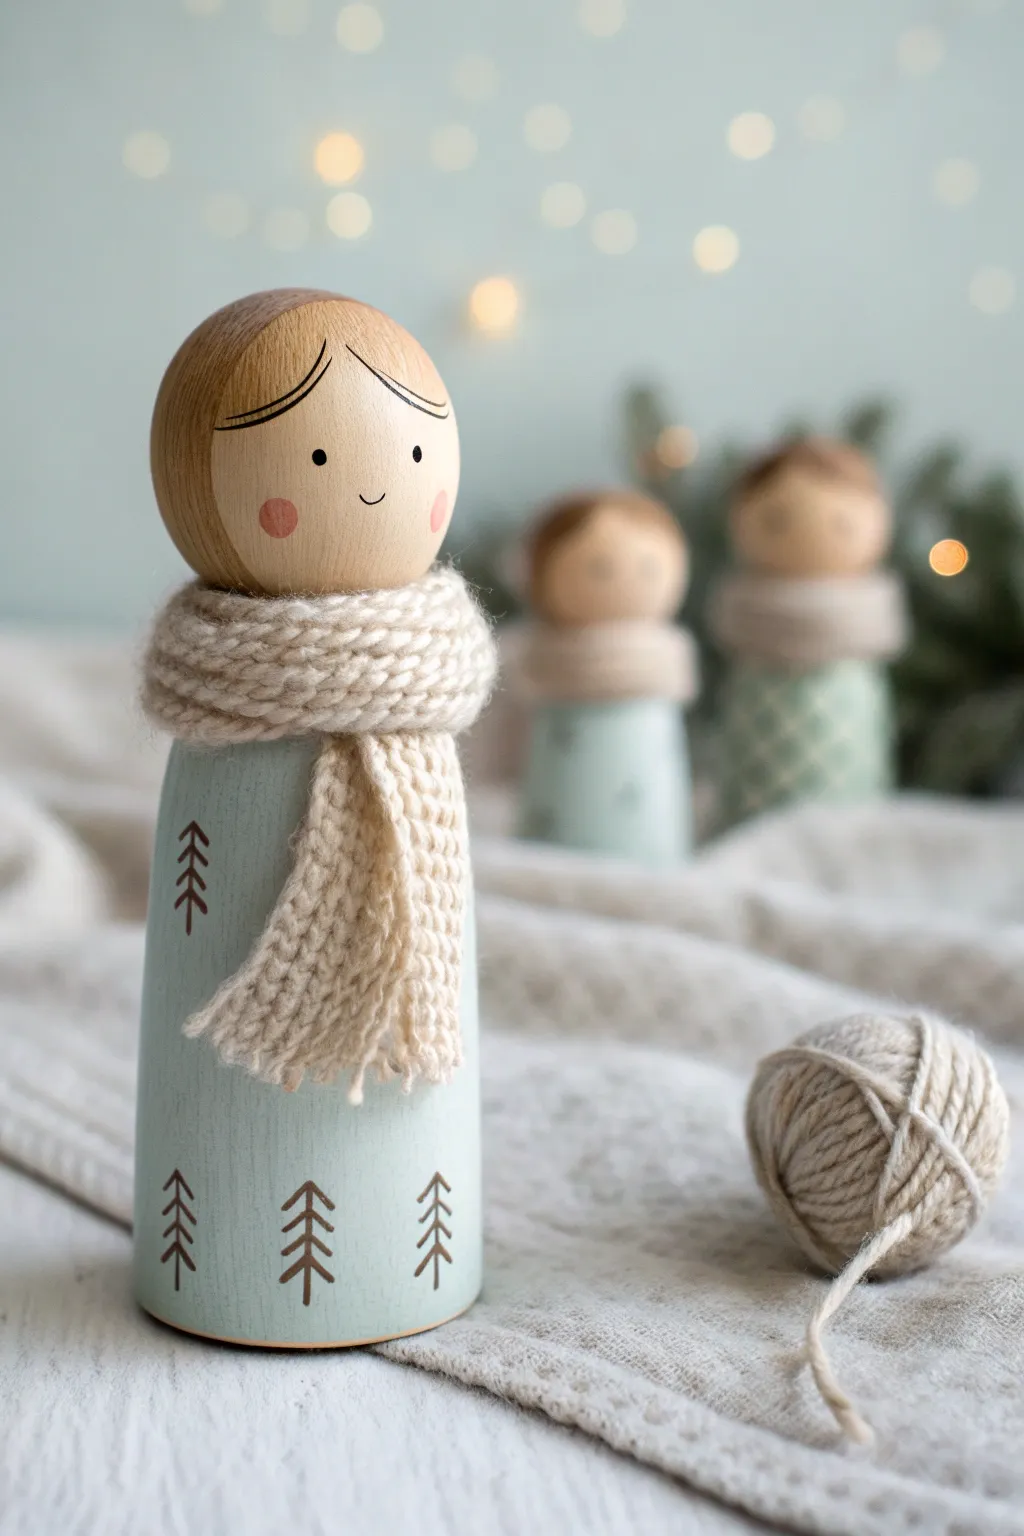
Capture the serene beauty of winter with this charming peg doll design featuring a soft blue coat and delicate pine tree motifs. The addition of a tiny, hand-knit scarf adds an irresistible layer of texture and coziness to your wooden friend.
Step-by-Step
Materials
- Large wooden peg doll (approx. 3.5 inches)
- Acrylic paints: warm beige/flesh tone, soft ice blue, dark brown, rosy pink
- Fine detail paintbrush (size 0 or 00)
- Medium flat paintbrush
- Matte sealant or varnish
- Beige or cream worsted weight yarn
- Small knitting needles (size US 2-4) or a crochet hook (optional)
- Pencil
- Craft glue or hot glue gun
Step 1: Painting the Base
-
Sketch the hairline:
Begin by lightly sketching a simple, curved hairline on the round head of the peg doll with a pencil. Aim for a side-swept bang look. -
Paint the face:
Mix a warm beige or flesh tone suitable for your doll. Carefully paint the face area below the hairline you just drew. -
Coat the body:
While the face dries, move to the body. Using your medium flat brush, paint the entire cylindrical body in a soft, ice-blue shade. This represents the winter coat. -
Second coat:
Depending on the opacity of your blue paint, apply a second layer to ensure the wood grain doesn’t show through too strongly. Let this dry completely. -
Paint the hair:
For the hair, you can actually leave the raw wood exposed if you like that natural look shown in the image, or paint it a light brown. If painting, carefully fill in the area above the hairline.
Step 2: Adding Details
-
Draw hair strands:
Using your finest brush and diluted dark brown paint, add two or three sweeping curved lines across the forehead to define the bangs and add movement to the hair. -
Create the eyes:
Dip the non-brush end (the handle) of your paintbrush into black or dark brown paint. Dot two wide-set eyes onto the face. -
Add a smile:
With your 00 detail brush, paint a tiny, gentle ‘U’ shape between the eyes for a sweet smile. -
Rosy cheeks:
Mix a watery rosy pink paint. lightly dab two soft circles on the cheeks. I find using a finger tip or a Q-tip helps blend edges for a natural flush. -
Tree motifs:
Switch back to your dark brown paint. Around the base of the blue coat, paint small, simple pine tree shapes. Start with a vertical line for the trunk. -
Pine branches:
Add downward-slanting lines coming off the trunk to create the branches. Stagger them around the bottom hem of the coat. -
Upper details:
Add a single pine tree detail higher up within the coat area if desired, or keep the pattern strictly at the hem. -
Seal the doll:
Once all paint is perfectly dry, apply a coat of matte varnish to protect your work and give it a professional finish.
Natural Wood Tip
For the hair, try using a wood stain marker instead of paint. It highlights the natural grain while adding color, matching the organic Scandinavian aesthetic perfectly.
Step 3: The Tiny Scarf
-
Knit a strip:
Cast on about 4-6 stitches using your small knitting needles and beige yarn. Knit a simple garter stitch rectangle that is long enough to wrap around the doll’s neck plus overlap. -
Alternative: Braided scarf:
If you don’t knit, cut 9 strands of yarn about 8 inches long. Group them into three sections of three and braid them together to make a chunky scarf. -
Wrap the scarf:
Wrap your knitted or braided piece around the doll’s neck. -
Secure the crossover:
Arrange the scarf so one end hangs down the front, resembling a classic winter wrap. Use a dab of glue where the pieces overlap to secure it permanently. -
Trim the ends:
Trim the hanging yarn ends to your desired length. You can fray the very tips slightly to look like fringe.
Level Up: Texture
Instead of painting the pine trees, try using a fine-point wood burning tool to etch the tree designs into the wood before painting the blue coat for a tactile finish.
Now you have a cozy winter friend ready to sit on your mantel or join a holiday centerpiece


Autumn Peg Doll Sweaters and Leaves
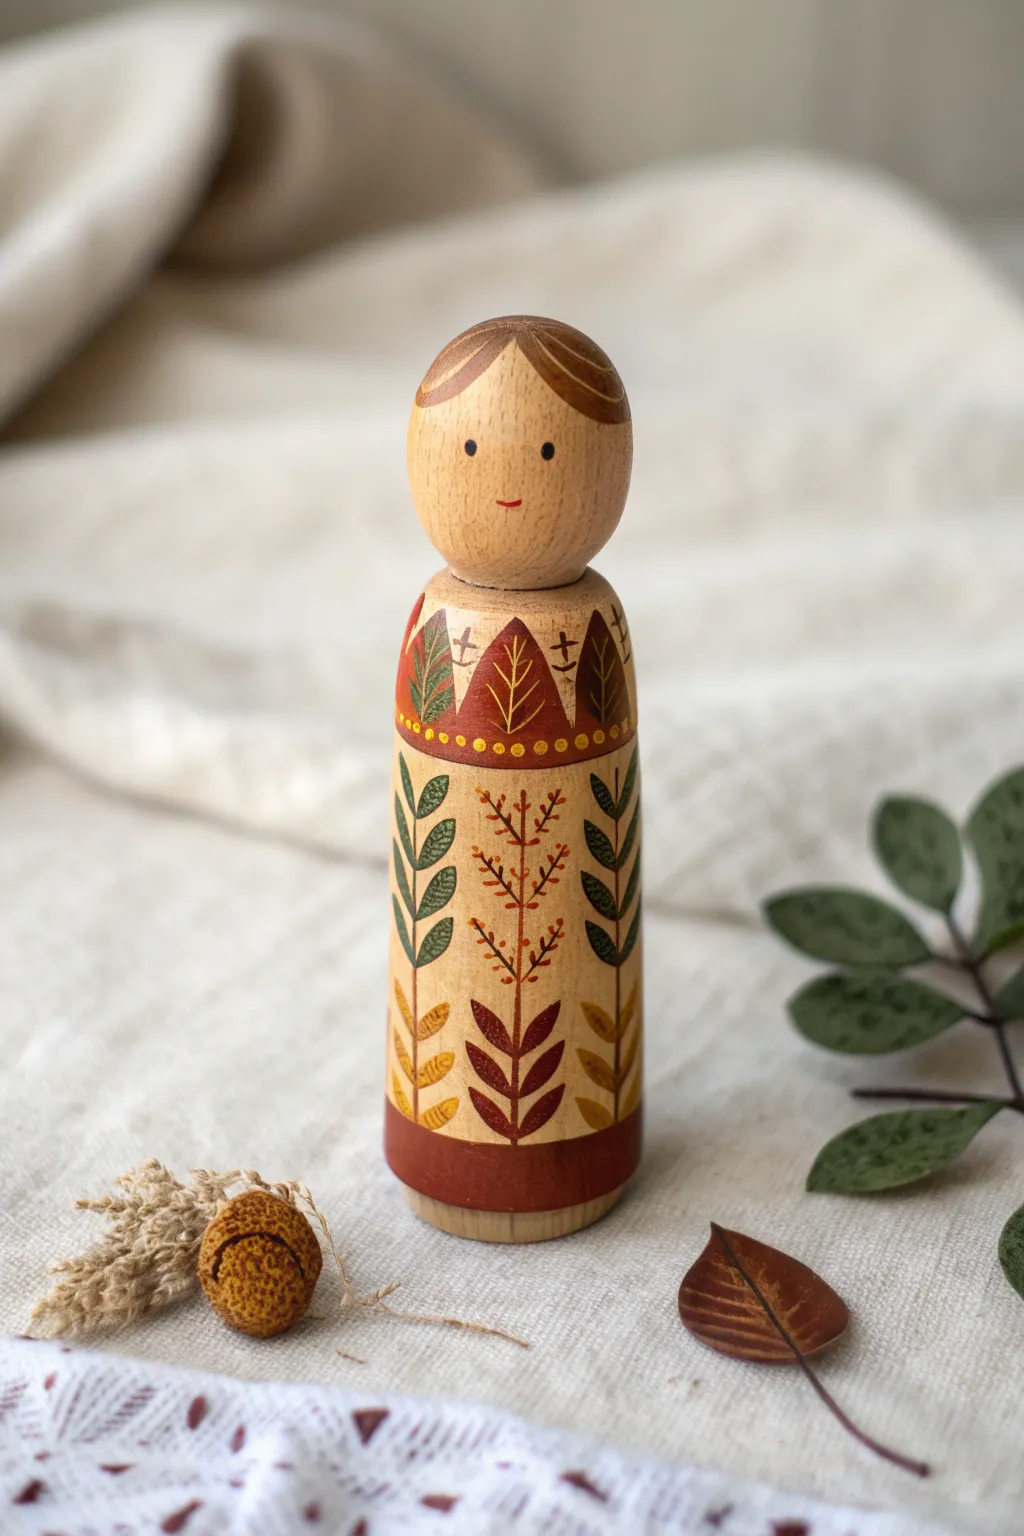
Celebrate the changing seasons with this warm, nature-inspired peg doll featuring vertical botanical vines and earthy tones. The design uses the natural wood grain as a backdrop, creating a rustic, cozy feel that is perfect for autumn decor.
Step-by-Step Guide
Materials
- Unfinished wooden peg doll (approx. 3.5 inches)
- Acrylic paints (colors: burnt sienna, deep olive green, golden yellow, cream, dark brown, black)
- Detail brushes (sizes 0 and 00)
- Flat brush (size 2)
- Pencil and eraser
- Gloss or matte varnish sealer
- Palette or mixing plate
- Water cup and paper towels
Step 1: Planning and Base Coats
-
Surface pre:
Begin by inspecting your wooden peg doll. If there are any rough spots, give them a quick sand with fine-grit sandpaper to ensure your paint glides on smoothly. -
Sketching the face:
Lightly sketch a horizontal oval at the top of the head for the hairline. Just below the center of the face area, mark two small dots for eyes and a tiny curved line for the mouth. -
Mapping the body design:
On the cylindrical body, lightly draw a horizontal line about 1/4 inch down from the neck to define the yoke or collar area. Below this line, pencil in vertical guidelines where your vine patterns will go. -
Painting the hair:
Mix a light brown shade and paint the hair cap area you marked. While the paint is wet, use a slightly darker brown to paint curved strokes following the shape of the head to mimic hair strands. -
Adding the bangs:
Carefully paint two sweeping curves meeting in the center of the forehead to create the parted bangs. Let this dry completely.
Steady Hand Trick
Rest your painting hand’s pinky finger on the doll itself (on a dry area) or the table surface. This anchors your hand for painting those tiny leaf veins.
Step 2: The Autumn Yoke
-
Base collar color:
For the collar area (the top section of the body), paint distinct triangles pointing upwards using deep burnt sienna or rust red. Leave the spaces between them as natural wood. -
Adding definition between triangles:
In the negative space between your red triangles, use a very fine brush and dark brown paint to add small cross symbols (+) and vertical lines to fill the gaps decoratively. -
Painting the leaf motif:
Inside each red triangle, use a lighter yellow-orange paint to paint a simple leaf vein structure—a vertical line with V-shapes branching off it. -
Dotted border:
Use the non-brush end of a paintbrush or a dotting tool dipped in golden yellow paint to create a row of small dots along the bottom edge of the collar line.
Step 3: The Botanical Body
-
Central vine stem:
I like to start the main body patterns by painting the central stems first. Use a thin brown paint to draw vertical lines from the dotted border down to the bottom of the doll. -
Painting green leaves:
On the outer stems, paint pairs of almond-shaped leaves using deep olive green. Make sure the leaves angle upwards slightly. -
Leaf detailing:
Once the green leaves are dry, mix a lighter green or cream color. Paint tiny veins inside each green leaf for added texture. -
Central botanical sprig:
For the central pattern, paint a delicate, twig-like structure. Instead of full leaves, use small dabs of burnt orange and brown to create what looks like dried berries or seeds branching out. -
Bottom leaf clusters:
At the very base of these stems, paint larger, more solid leaf shapes in dark reddish-brown to anchor the design visually. -
Base trim:
Finish the bottom edge of the doll with a thick band of the rust-red paint to frame the design, similar to the collar color.
Uneven Dots?
If your collar dots look messy, let them dry fully, then use a toothpick to gently scrape away the excess paint or paint over the mistake with a skin-tone mix.
Step 4: Final Details
-
Facial features:
using your smallest brush (size 00) or a fine-tip black paint pen, carefully dot the eyes. Use a tiny touch of red mixed with cream for a subtle, smiling mouth. -
Cheek blush:
To give her a rosy glow, mix a very watery, transparent pink. Dab it gently onto the cheeks with a fingertip or a dry brush. -
Sealing the work:
Allow the doll to dry overnight. Apply a coat of matte or satin varnish to protect the paint and bring out the richness of the colors.
Place your finished peg doll on a mantel or among pinecones to enjoy a touch of handmade autumn charm
Animal Costume Peg Dolls
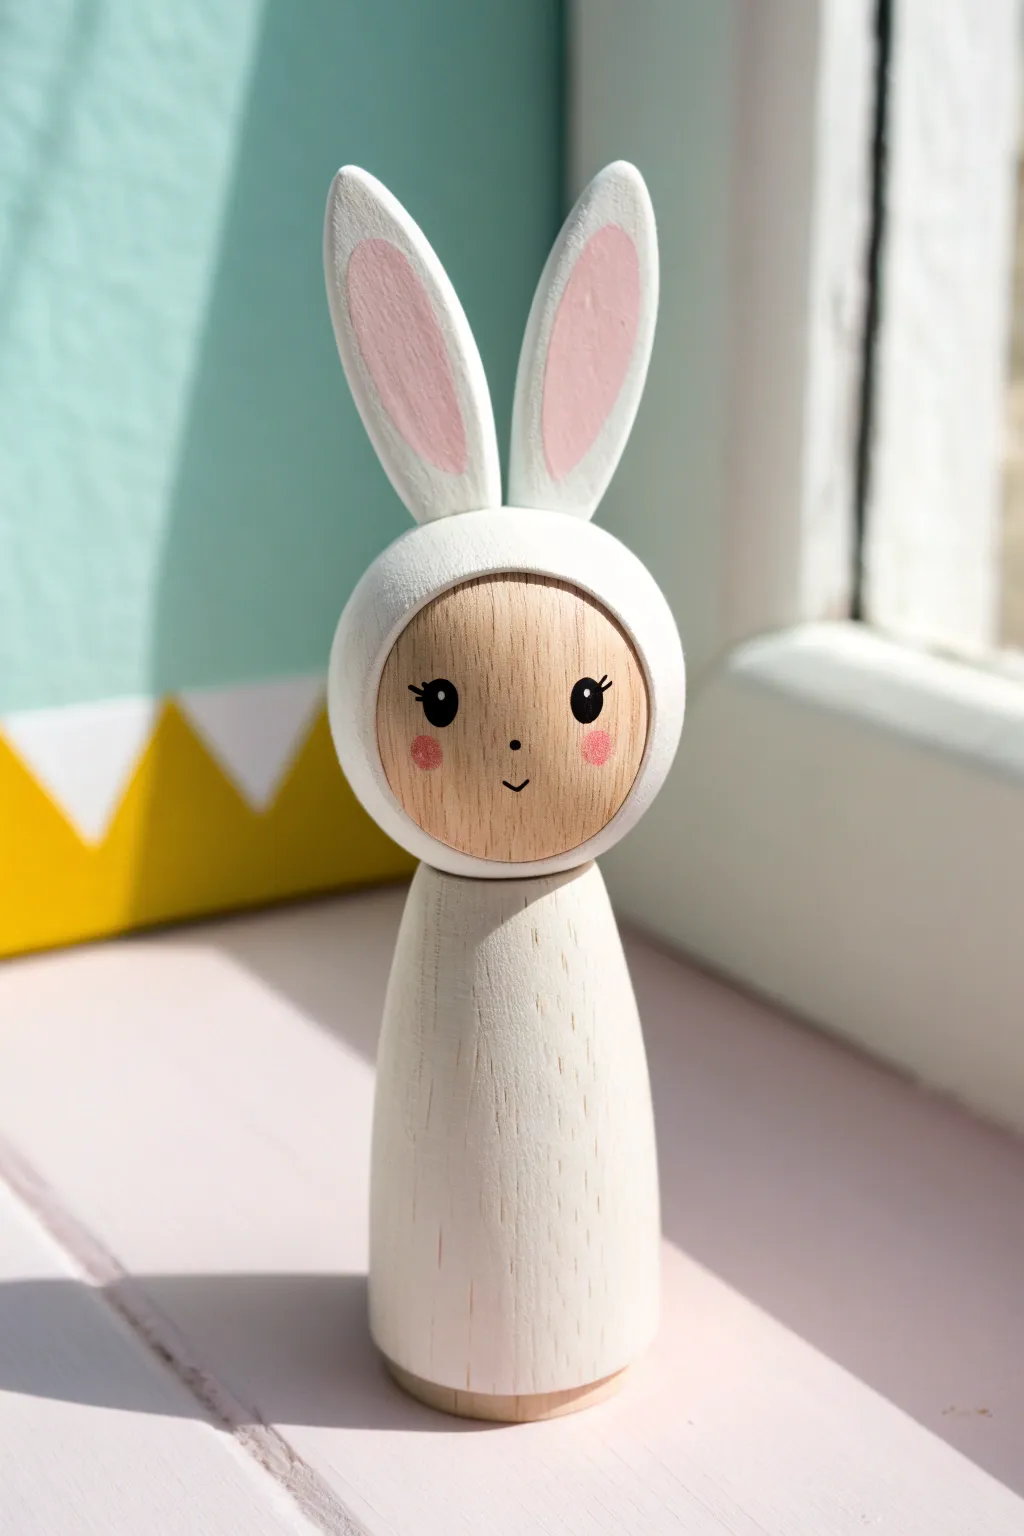
Transform a simple wooden peg doll into an adorable character dressed in a cozy bunny suit. This minimalist design emphasizes natural wood textures while adding sweet, simple details for a charming finish.
Step-by-Step
Materials
- Wooden peg doll (classic shape with round head)
- Wooden bunny ear shapes (flat)
- White acrylic paint (matte finish)
- Pink acrylic paint (soft pastel shade)
- Black acrylic paint or fine tip paint pen
- Small flat brush
- Fine detail brush
- Wood glue or strong craft glue
- Clear matte varnish (optional)
- Sandpaper (fine grit)
- Pencil
Step 1: Preparation & Base Coat
-
Smooth the surface:
Before opening your paints, give the wooden peg doll and the wooden ears a light sanding. This ensures a professional finish and helps the paint adhere better to the wood grain. -
Clean the wood:
Wipe away all the sanding dust with a dry cloth or tack cloth. Any leftover dust can create a gritty texture in your white paint. -
Mark the face area:
Using a pencil, lightly sketch a circle on the front of the doll’s head. This will be the opening for the face, which remains unpainted to show the natural wood tone. -
Paint the hood:
Using your small flat brush and white acrylic paint, carefully paint around the circle you just drew on the head. Cover the rest of the head entirely in white. -
Paint the body:
Continue painting the body of the doll white to match the hood. You might find it easier to hold the doll by the top of the head while painting the bottom half. -
Apply a second coat:
White paint can often be translucent on wood. Once the first layer is dry to the touch, apply a second coat to get that opaque, solid look seen in the photo.
Uneven White Paint?
If your white paint looks streaky, don’t keep brushing wet paint. Let it dry completely, then sand it very lightly before applying a fresh, thin coat.
Step 2: Preparing the Ears
-
Paint the ears white:
Take your wooden ear shapes and paint both sides white. Don’t forget the thin edges of the wood shapes. -
Sketch the inner ear:
Once the white base is completely dry on the ears, lightly draw a smaller, elongated oval shape inside each ear for the pink section. -
Paint the pink details:
Mix a soft pastel pink or use a pre-mixed bottle. Carefully fill in the inner ear shapes using a detail brush. I prefer to do two thin layers here to keep it smooth.
Step 3: Face & Assembly
-
Sketch face features:
Returning to the doll’s face, use your pencil to very lightly mark the position of the eyes, nose, and mouth. The eyes should be wide-set for a cute appearance. -
Paint the eyes:
Using the back end of a paintbrush dipped in black paint (or a dotting tool), stamp two solid black circles for the eyes. Add a tiny eyelash flick with your finest brush if desired. -
Add eye sparkle:
Wait for the black eye paint to dry fully. Then, add a tiny white dot in the upper corner of each eye to bring the character to life. -
Draw the nose and mouth:
With a fine black paint pen or a very steady hand and a liner brush, paint a tiny dot for the nose and a small ‘v’ shape for the smile. -
Blush the cheeks:
Dilute a tiny amount of pink paint with water to make a glaze, or use a fairly dry brush. Dab round pink circles onto the cheeks for a rosy effect. -
Attach the ears:
Apply a small bead of strong wood glue to the bottom edge of each painted ear. Press them firmly onto the top of the head, holding them in place for a minute until the glue grabs. -
Final touches:
Check for any paint gaps where the ears join the head. You can touch up with a little white paint to blend the seam seamlessly. -
Seal the work:
To protect your creation, apply a coat of clear matte varnish over the painted areas, avoiding the raw wood face if you want to keep that natural texture.
Add a Fluffy Tail
Glue a small white pom-pom to the lower back of the doll to give your bunny character a cute, tactile cotton tail detail.
Now you have a sweet woodland friend ready to hop onto your display shelf
Minimalist Monochrome Peg Dolls

These charming peg dolls capture the serenity of a secret garden with their muted pastel tones and delicate white leaf motifs. The design combines visible natural wood grain with soft, matte colors for a beautiful organic finish that makes a perfect nursery decoration.
Detailed Instructions
Materials
- Unfinished wooden peg dolls (approx. 3-4 inches tall)
- Acrylic paints (dusty pink, teal blue, olive green, white, reddish-brown)
- Fine grit sandpaper (400 grit)
- Small flat paintbrush
- Ultra-fine detail brush (size 000 or 00)
- White gel pen (optional, but easier for dots)
- Matte spray varnish or Mod Podge
- Painter’s tape or masking tape
- Pencil and eraser
Step 1: Preparation and Base Colors
-
Prepare the wood:
Begin by lightly sanding your wooden peg dolls with fine-grit sandpaper. This removes any rough spots or factory finish, ensuring the paint adheres smoothly to the wood. -
Mark the hairline:
Using a pencil, very lightly sketch a simple curved hairline on the head of each doll. It should sweep down from the center like parted hair. Keep the line faint so it’s easy to cover later. -
Paint the hair:
Mix a watery wash of reddish-brown acrylic paint. Apply this to the hair area you just marked. Using a wash rather than opaque paint allows the beautiful wood grain to show through, mimicking the texture of hair. -
Outline the hair:
Once the hair wash is dry, take your fine detail brush and a slightly darker, opaque brown paint. Carefully trace the hairline to define the shape cleanly. -
Paint the body base:
Choosing your first color (like the dusty pink), paint the entire body of the peg doll. Use horizontal strokes for a smooth finish. You will likely need two coats for solid coverage; let the first coat dry completely before adding the second.
Steady Hands
If your hand shakes while doing the fine white lines, try holding your breath for just the moment the brush touches the wood, and brace your wrist against the table edge.
Step 2: Adding the Gradient and Texture
-
Mix a darker shade:
Take your base body color and mix in a tiny drop of black or dark grey to create a slightly deeper, shadowed version of the same hue. -
Apply the color block:
Paint the bottom third of the doll’s body with this darker shade. You don’t need to blend it perfectly; a distinct line creating a ‘dipped’ look works well here, as the leaf design will bridge the gap. -
Create the polka dots:
Using the very tip of a small brush or a white gel pen, add tiny, scattered white dots to the upper (lighter) portion of the body. -
Vary the dot pattern:
Keep the dots random and sparse near the top, getting slightly denser as you move down toward the color transition line.
Step 3: Painting the Leaf Motif
-
Sketch the leaf stem:
With a pencil, lightly draw a vertical line starting from the very bottom edge and reaching up almost to the neck. This will be the central stem of your leaf. -
Draw the leaf outlines:
Sketch pairs of leaves branching off the stem. Make the bottom leaves larger and the top leaves smaller and more pointed. Aim for symmetry, but don’t worry about perfection. -
Paint the stem:
Load your fine detail brush with white acrylic paint. Paint over your pencil line for the stem with a steady hand. I find resting my pinky finger on the table helps stabilize the brush strokes. -
Outline the leaves:
Carefully outline each leaf shape in white. Keep the lines thin and delicate. -
Fill with texture:
Instead of filling the leaves solidly, use a stippling technique. Dip your detail brush in white paint and dab tiny dots inside the leaves to create a textured, fabric-like look. -
Add vein details:
Paint a thin white line down the center of each leaf to represent the vein, overlapping your stippled texture slightly.
Metallic Magic
Instead of plain white for the leaves, try using a metallic gold or silver paint pen. It adds a sophisticated shimmer that looks lovely against the matte body colors.
Step 4: Facial Features and Finishing
-
Sketch the face:
Using a pencil, mark the position of the eyes and mouth. The eyes should be two small semi-circles curving downward (sleeping eyes) placed wide apart. -
Paint the eyes:
Using black paint and your finest brush (or a fine-tip black ink pen), trace the sleeping eye curves. Add three tiny lashes to the outer corner of each eye. -
Add the smile:
Paint a tiny, subtle ‘U’ shape between the eyes for a sweet, simple nose-mouth indication. -
Add rosy cheeks:
Dip the back end of a paintbrush handle or a Q-tip into pink paint. Dab off the excess on a paper towel, then stamp gentle round circles on the cheeks. -
Seal the project:
Once all paint is thoroughly dry (give it a few hours), spray the dolls with a matte varnish to protect the artwork without adding excessive shine.
Group your trio together on a shelf or windowsill to enjoy their calming presence
Folk Art Floral Peg Dolls

Capture the charm of traditional designs with this simple yet elegant folk art peg doll. Using the natural wood grain as a backdrop, you’ll paint delicate floral motifs and a sweet, serene face.
Step-by-Step
Materials
- Unfinished wooden peg doll (approx. 3.5 inches)
- Acrylic paints (Red, Green, Dark Brown, White)
- Fine detail paintbrush (sizes 0 or 00)
- Very fine dotting tool or toothpick
- Pencil for sketching
- Clear matte varnish or sealant
- Palette or small plate
- Cup of water and paper towels
Step 1: Preparation & Sketching
-
Sand the surface:
Before you begin, inspect your wooden peg doll for any rough spots. Lightly sand the surface with fine-grit sandpaper if necessary to ensure a smooth painting base. -
Sketch the hair:
Using a pencil, very lightly sketch the hairline. Draw a gentle curve across the forehead for bangs and designate the back area for the rest of the hair. -
Outline the collar:
Sketch a scalloped collar area on the upper chest. It should look like two rounded ‘U’ shapes meeting in the center, drapped over the shoulders. -
Plan the floral pattern:
Lightly mark vertical lines where your flower stems will go. This helps ensure your pattern stays straight and evenly spaced around the doll’s skirt.
Fixing Wobbly Lines
If your stem lines aren’t straight, don’t worry. Use a slightly damp cotton swab to wipe away wet paint, or wait for it to dry and gently sand it off to try again.
Step 2: Painting the Head & Collar
-
Paint the hair base:
Load your brush with dark brown paint. Carefully fill in the hair area you sketched, keeping the edges neat. Since the wood is porous, you might need a second coat after the first dries for solid coverage. -
Add hair details:
Once the brown is dry, you can mix a tiny bit of white with brown to create a lighter shade. Use your finest brush to add a few subtle curved lines to suggest hair texture. -
Create the face:
Dip a dotting tool or the non-brush end of your paintbrush into black or dark brown paint. Dot two wide-set eyes onto the face. Use your finest brush to paint a tiny, gentle smile just below them. -
Base coat the collar:
Paint the area inside your scalloped collar sketch with white paint. This might need two thin coats to be opaque against the wood. -
Detail the collar:
With red paint and a steady hand, outline the bottom edge of the white collar. Then, using a toothpick or small dotting tool, add tiny red dots in a uniform pattern across the white area.
Add Dimension
Mix a tiny drop of white into your red paint to create a highlight color. Add a small comma-stroke to the side of each tulip for a rounded, 3D effect.
Step 3: Painting the Floral Skirt
-
Paint the main stems:
Mix a muted green shade. Using your fine liner brush, paint thin vertical lines starting from the base of the doll up towards the collar. Leave some space between them. -
Add the tulips:
On the central stem, paint a red tulip shape at the top. It basically looks like a ‘U’ with a jagged top edge. Fill it in solid red. -
Paint side flowers:
For alternating stems, paint smaller red floral elements. Try adding small, red ‘V’ shapes lower down the stems and clusters of tiny red dots at the tips to mimic buds. -
Paint the leaves:
Using your green paint, add leaves to the stems. I find it easiest to press the brush down and lift up quickly to create a teardrop leaf shape. -
Add leaf veins:
Once the green leaves are completely dry, use a white paint and your thinnest brush to draw delicate lines or veins inside the larger leaves for a folk-art look. -
Detail the hem:
Finish the painting process by adding a row of red dots around the very bottom edge of the doll to mirror the collar design.
Step 4: Finishing
-
Dry thoroughly:
Let the doll sit for at least an hour or two to ensure all layers of paint are completely dry. -
Erase pencil marks:
Check for any visible pencil lines from your initial sketch and gently erase them if the paint is cured. -
Seal the doll:
Apply a coat of clear matte varnish. This protects the wood and keeps the paint from chipping, ensuring your folk art doll lasts for years.
Place your finished doll on a shelf or windowsill to enjoy a touch of handmade floral beauty every day
Tiny Patterns: Dots, Stripes, Checks
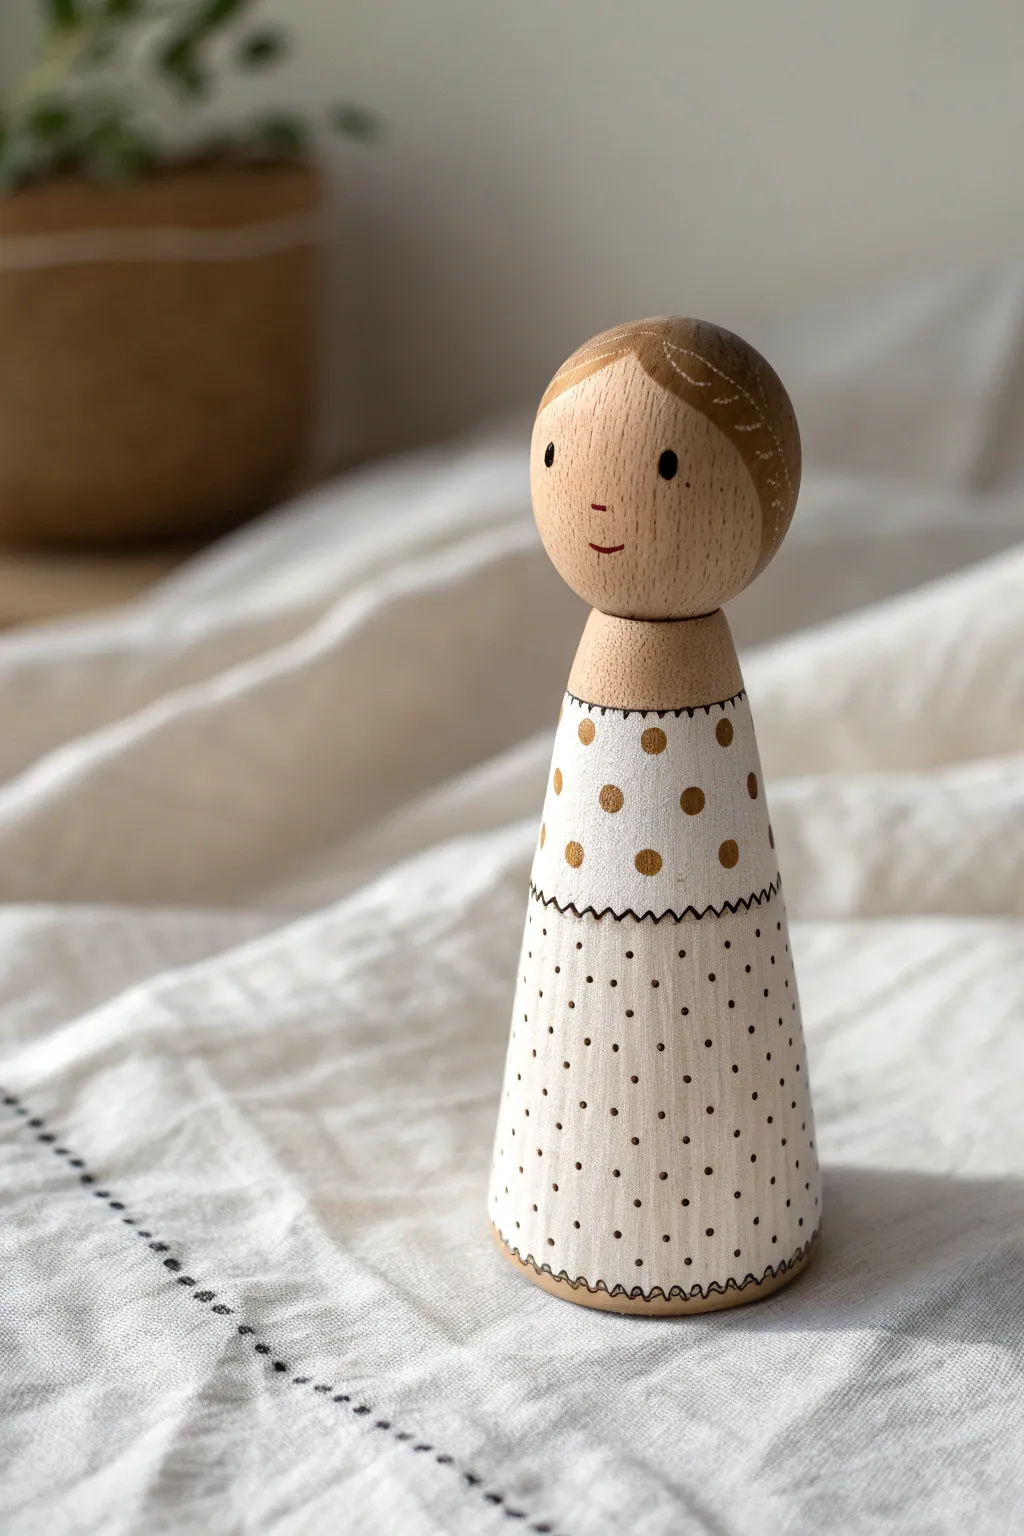
Embrace the natural beauty of wood with this minimalist design that combines raw timber with delicate painted patterns. This project features a sweet tiered dress design using gold and black dots to create elegant contrast without overwhelming the piece.
How-To Guide
Materials
- Unfinished wooden peg doll (approx. 3-4 inches)
- Fine grit sandpaper (320 or 400 grit)
- Acrylic paint: White, Gold/Metallic Bronze, Black
- Fine point detail brush (0 or 00 size)
- Very fine black posca pen or micron liner (005 size)
- Stylus tool or toothpick (for dots)
- Matte finish sealant spray or varnish
- Pencil and eraser
Step 1: Preparation & Sketching
-
Sand the surface:
Begin by lightly sanding your wooden peg doll. You want the surface to be incredibly smooth so the ink and paint don’t bleed into the wood grain. Wipe away any dust with a clean, dry cloth. -
Plan the hairlines:
Using a pencil very lightly, sketch the hairline. Draw a gentle curve across the forehead for the bangs and define where the hair ends at the back of the head. -
Define the dress tiers:
Mark the neckline just below the head. Then, draw a horizontal line around the waist area to separate the bodice from the skirt. This will help you switch pattern styles later. -
Sketch the face:
Lightly mark the position of the eyes and a small, curved mouth. Keep the features low on the face for a cute, childlike proportion.
Clean Lines
If your wood grain is deep and causes ink to bleed, apply a layer of clear matte medium or sealer to the raw wood *before* drawing your fine lines.
Step 2: Painting the Base Details
-
Paint the hair base:
Mix a diluted brown acrylic paint or use a watercolor wash to paint the hair area. You want it to be semi-transparent so the wood grain still shows through slightly, rather than a solid opaque block. -
Add white hair details:
Once the brown wash is completely dry, use your finest brush and white acrylic paint to add delicate lines through the hair. Create a scalloped or zig-zag pattern along the bangs implying texture or a braid. -
Paint the bodice background:
Paint the upper section of the dress (the bodice) with white acrylic paint. It may need two thin coats for full opacity against the wood. Let this dry thoroughly. -
Paint the skirt background:
Paint the lower skirt section with a very pale cream or off-white color, or keep it raw wood if you prefer the natural look shown in some variations. The reference image uses a subtle off-white wash.
Add Texture
Try wood burning (pyrography) for the scalloped waist and hem lines instead of ink. It adds a beautiful tactile texture that complements the raw wood head.
Step 3: Patterning & Face
-
Create the waist separation:
Using your fine black pen, draw a scalloped or wavy line exactly where the white bodice meets the skirt. This adds a charming stitched look to the garment. -
Add the hemline detail:
Repeat this scalloped line pattern at the very bottom edge of the doll to create a finished hem. -
Apply large gold dots:
Dip the flat end of a paintbrush handle or a large stylus into gold or bronze metallic paint. Stamp relatively large, evenly spaced polka dots onto the upper white bodice section. -
Stipple the skirt pattern:
For the skirt, switch to your finest black pen or a very sharp toothpick dipped in black paint. Create rows of tiny, delicate specks or micro-dots. I like to stagger these rows to keep the pattern balanced. -
Paint the eyes:
Using the back of a small paintbrush or stylus, dot two solid black eyes onto the face. They should be slightly oval or round. -
Add a smile:
With your finest liner brush and a reddish-brown paint (or a fine red pen), carefully draw a tiny, curved smile between the eyes. -
Seal the work:
Allow the paint to cure for at least 24 hours. Finish by applying a matte spray varnish in light coats to protect the wood and paint without making it incredibly shiny.
Display your charming new figure on a shelf or group several together for a sweet decorative vignette
Ombre Peg Doll Dresses
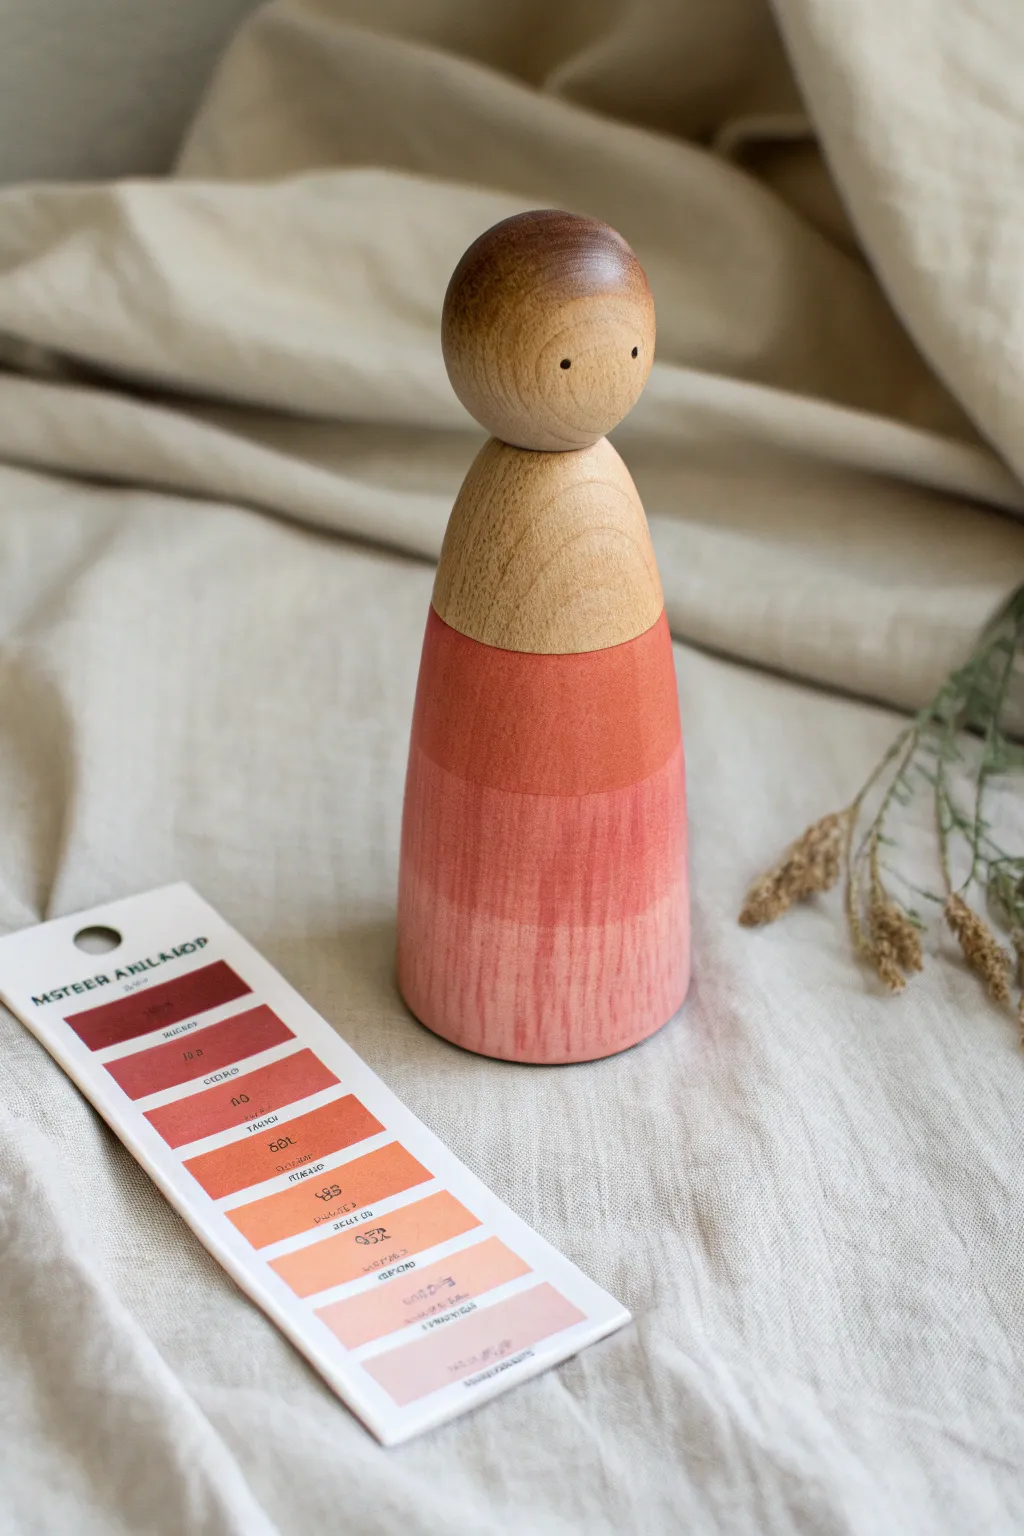
Master the art of subtle color shifts with this elegant ombre design. By blending warm coral and terracotta tones across the dress, you create a sophisticated look that highlights the natural beauty of the wood grain.
Step-by-Step Tutorial
Materials
- Unfinished wooden peg doll (large/curvy shape)
- Acrylic paints (Terracotta, Coral, Salmon Pink, White)
- Wide flat brush (for body)
- Fine detail brush or dotting tool (for eyes)
- Painter’s tape or Washi tape
- Mixing palette
- Fine-grit sandpaper (optional)
- Matte spray varnish or sealant
Step 1: Preparation & Color Planning
-
Prep the wood:
Begin by inspecting your wooden peg doll. If there are any rough spots, give it a quick rub with fine-grit sandpaper to ensure a smooth painting surface. Wipe away any dust with a clean, dry cloth. -
Map the head:
Decide where the dress neckline will start. Generally, leaving the head and the very upper curve of the shoulders unpainted creates a beautiful contrast. You can lightly mark this line with a pencil if you prefer a guide. -
Prepare your palette:
Squeeze out your darkest shade (Deep Terracotta) and your lightest shade (Pale Salmon or Peach) onto your palette. You will also need a mid-tone Coral.
Step 2: Painting the Ombre Effect
-
Define the neckline:
Using a flat brush, carefully paint the top edge of the dress. Use your lightest color (or the natural wood tone if you are doing a negative space design, but for this specific look, standard wood is best). Actually, looking closely at the design, the top section is the darkest. Let’s adjust: Load your brush with the darkest Terracotta shade. -
Paint the top tier:
Paint a band around the upper third of the body (just below the neck/head) using the Deep Terracotta/Rust color. Create a clean, horizontal line where the paint meets the raw wood of the head. -
Mix the middle shade:
You want the transition to be distinct but harmonious. If you don’t have a premixed mid-tone, mix a little of your dark Terracotta with some Coral paint to create a bridge color. -
Apply the middle band:
Paint the middle third of the doll’s body with your mid-tone Coral color. Don’t worry about blending the wet edges perfectly just yet; this design features defined blocks of color rather than a seamless airbrushed gradient. -
Refine the line:
Use a steady hand to make sure the line between the top dark band and the middle coral band is straight. I find rotating the doll while holding the brush still helps get a straighter line. -
Mix the lightest shade:
For the bottom section, mix your Coral with a healthy amount of White or pick a Pale Salmon color. -
Paint the bottom tier:
Cover the bottom third of the dress with this lightest shade. This anchors the ombre effect, moving from dark at the top to light at the bottom. -
Add texture (optional):
To mimic the slight vertical texture seen in the reference, you can use a very dry brush with a tiny amount of the adjacent color and lightly drag it vertically across the transition lines. This softens the blocky look slightly. -
Check opacity:
Let the first coat dry completely. The wood grain showing through slightly is lovely, but if you want solid coverage, apply a second thin coat to each color band.
Wobbly Lines?
If you struggle with free-handing straight horizontal lines, use thin strips of Washi tape or painter’s tape to mask off each section before painting.
Step 3: Finishing and Details
-
Paint the hair:
Moving to the head, paint a simple cap of hair using a dark brown or walnut color. Use the natural curve of the bead to guide where the hairline sits. -
Add the face:
This style relies on extreme minimalism. Dip a dotting tool or the non-brush end of a paintbrush into black paint. Dot two wide-set eyes on the face. Note there is no mouth—this is key to the aesthetic. -
Dry time:
Allow the doll to sit undisturbed for at least an hour to ensure all layers are fully cured. -
Seal the work:
To protect the paint and give it a finished feel, apply a coat of matte spray varnish. Avoid glossy finishes as they detract from the natural, earthen feel of this project.
Pro Tip: Custom Shades
Make your own matching paint swatch card like the one in the photo! It helps you finalize your color palette before touching the brush to the wood.
Enjoy your beautiful, minimalist creation on a shelf or as part of a playset
Metallic Accents on Peg Dolls

This charming peg doll celebrates the beauty of natural wood grain enhanced by delicate painted details and striking metallic accents. By keeping the face and dress partially unpainted, the warm timber tones serve as a perfect backdrop for the deep blue sashes and glittering gold star.
Step-by-Step
Materials
- Large wooden peg doll (approx. 3.5 inches)
- Acrylic paint: dark brown, navy blue, white, metallic gold
- Fine detail paintbrush (size 0 or 00)
- Small flat paintbrush
- Dotting tool or toothpick
- Pencil and eraser
- Sealant (matte or satin varnish)
Step 1: Planning and Sketching
-
Define the head:
Start by lightly sketching the hairline on the round head of the peg doll. Create a sweeping curve that dips slightly in the center for a part, covering the top third of the sphere. -
Map the dress design:
On the body cylinder, sketch a V-neck shape that starts at the ‘shoulders’ and meets near the center of the chest. Draw a horizontal band around the waist area just below the V. -
Sketch the geometric base:
Near the bottom of the doll, draw a second horizontal band. Between this band and the bottom edge, lightly pencil in a row of triangles for the geometric motif.
Wobbly Lines?
If your hand shakes while painting lines, try using ‘painters tape’ or masking tape cut into thin strips to block off the wood areas. Press it down firmly to prevent bleeding.
Step 2: Painting the Hair & Face
-
Base coat the hair:
Using the dark brown paint, carefully fill in the hair area you sketched. You might need two thin coats to get solid coverage over the wood grain. -
Add hair details:
Once the brown is dry, use a slightly lighter brown (or mix a drop of white into your dark brown) to paint very faint, thin strokes to suggest hair texture, though a solid block of color works beautifully too for a minimal look. -
Draw facial features:
Using your finest brush or a fine-tip black paint pen, draw two small arched curves for closed, sleepy eyes. Add tiny eyelashes at the outer corners. -
Add the mouth and nose:
Place a tiny ‘U’ shape for the nose and a small red or pink curved line for a smiling mouth. Keep these features centered and relatively low on the face for a cute expression.
Step 3: Dress & Metallic Details
-
Paint the blue sash:
With your navy blue paint and a steady hand, paint the V-shape neckline and the horizontal waist band. I find it helpful to anchor my pinky finger on the table to keep the lines straight. -
Detail the hem:
Paint the bottom horizontal band in the same navy blue. Let this dry completely before moving to the next color. -
Add white dots:
Dip your dotting tool or a toothpick into white paint. Carefully place evenly spaced dots along the center of the navy V-neck and the bottom navy band. -
Create the zig-zag pattern:
Using a thin brush and a darker brown or rust color (transparent enough to let some wood grain show is nice), paint a zig-zag line just below the waist band. -
Paint the geometric triangles:
Fill in the triangles near the base with that same rust/brown shade. Create a row of triangles pointing up, and interlock them with lighter or unpainted triangles if desired. -
The metallic star:
Using metallic gold paint, paint a five-pointed star right in the center of the forehead, overlapping the hair and skin. It acts as a crown or headpiece. -
Gold accents:
Add a few tiny dots of metallic gold along the hairline or around the star to make it sparkle. -
Seal the doll:
Once absolutely everything is dry (give it a few hours), apply a clear matte or satin varnish to protect the paint and bring out the richness of the unpainted wood areas.
Make It 3D
Instead of painting the gold star on the head, glue a small wooden star veneer shape or a sequin onto the forehead for actual texture and dimension.
Display your finished figure alongside some natural greenery or pinecones to complement the rustic wood aesthetic
Painted Props for Peg Dolls
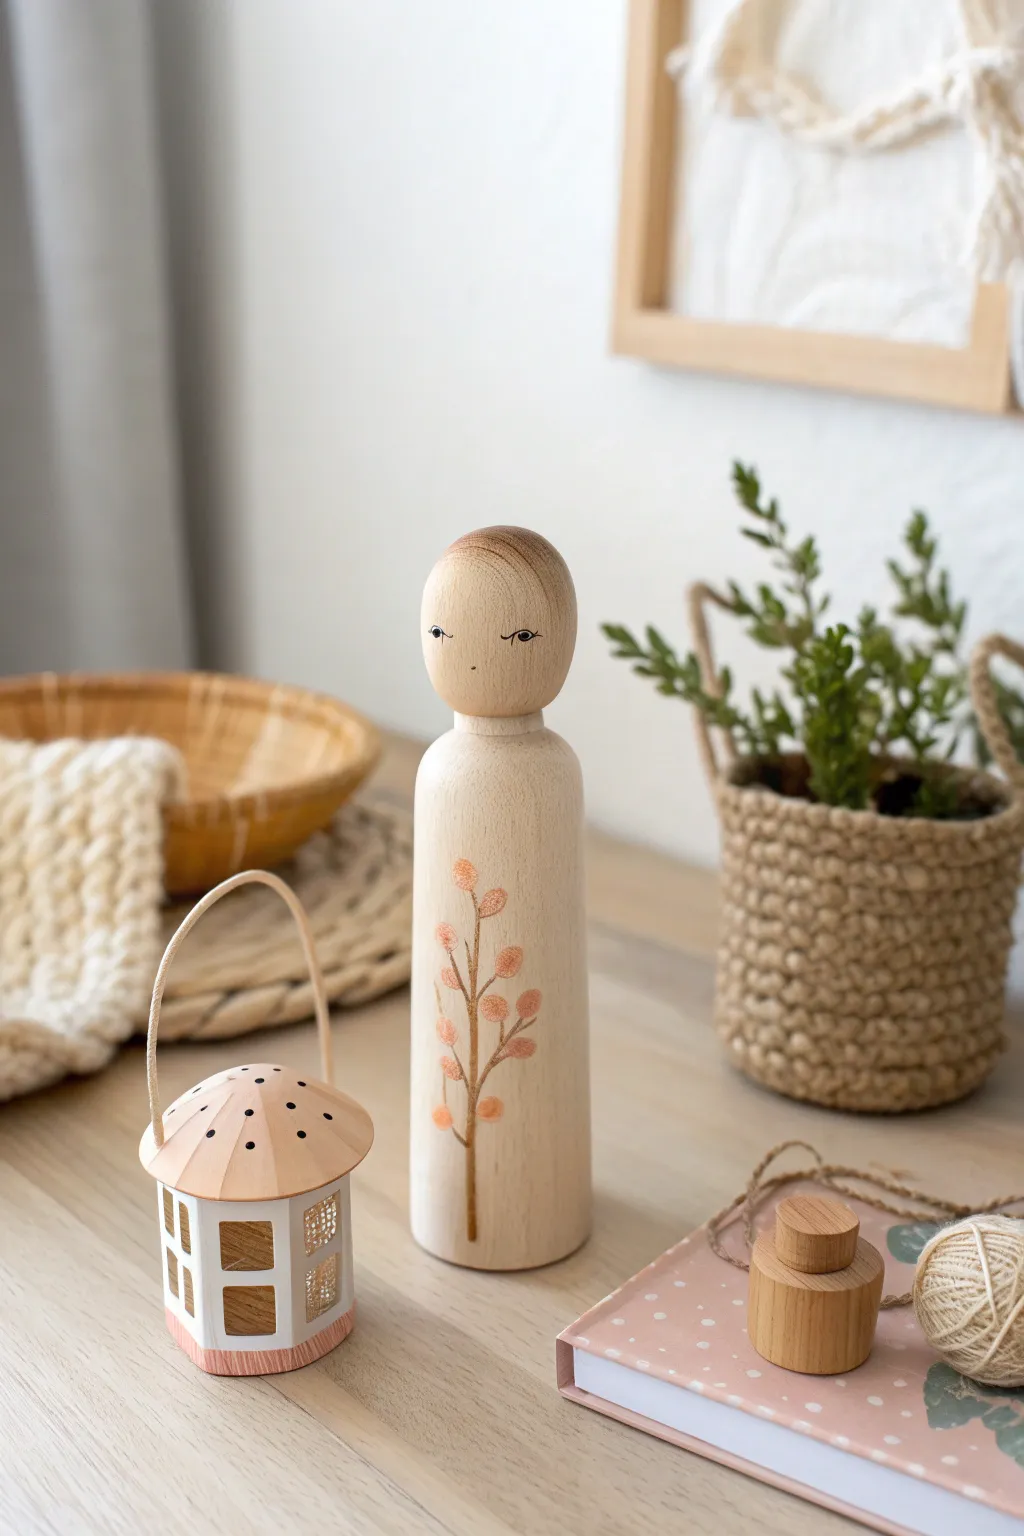
Embrace the natural grain of wood with this elegant, minimalist peg doll design. Featuring a delicate coral-hued branch and a simple, serene face, this project proves that sometimes less truly is more when it comes to peg doll artistry.
Detailed Instructions
Materials
- Tall, unpainted wooden peg doll (approx. 3.5 inches)
- Fine grit sandpaper (320 or 400 grit)
- Acrylic paint (Coral pink, Burnt Umber or deep brown, Black)
- Very fine detail paintbrush (size 000 or 00/0)
- Small round paintbrush (size 0 or 1)
- Matte water-based varnish or sealant
- Palette or small dish for mixing
- Pencil with a very sharp point
- Paper towel and water cup
Step 1: Preparation & Planning
-
Sand the surface:
Before painting, give your wooden peg doll a quick, gentle sanding with fine-grit sandpaper. This removes any rough fibers that might snag your delicate brushstrokes later. -
Dust it off:
Wipe the doll down with a dry cloth or tack cloth to ensure absolutely no dust remains on the surface. -
Sketch the face:
Using a very light hand, sketch the facial features with a pencil. Place the eyes wide apart, about halfway down the head sphere. The nose is just a tiny dot between them. -
Sketch the botanical:
Lightly draw a curved, vertical line starting near the bottom hem and reaching up to the chest area. Add small, alternating branches coming off the main stem.
Bleeding Lines?
If paint bleeds into the wood grain, apply a clear matte sealer to the raw wood *before* painting. This seals the pores and creates a smooth canvas for crisp lines.
Step 2: Painting the Features
-
Mix the brown shade:
Thicken your Burnt Umber paint slightly on the palette so it isn’t too watery; you want crisp lines that won’t bleed into the wood grain. -
Paint the stem:
Using your finest liner brush (000), carefully trace over your pencil line for the main stem. Keep the pressure light to maintain a thin, elegant line. -
Add the branches:
Continue using the brown paint to add the small offshoot branches. I find it easier to pull the brush from the main stem outward to get a tapered end. -
Prepare the pink tones:
Squeeze out your coral pink paint. If you want variety, mix a tiny bit of white into one portion to create a two-tone effect for the leaves or buds. -
Paint the buds:
Dip a small round brush into the coral paint. Press gently at the end of each branch tip to create small, oval-shaped buds or leaves. You don’t need to be perfectly uniform; organic shapes look best. -
Add texture details:
Once the coral buds are dry, you can use your liner brush with a tiny amount of diluted brown paint to add little dots or veins inside the pink shapes for depth, though leaving them solid is lovely too.
Step 3: Bringing the Face to Life
-
Outline the eyes:
Switch to black acrylic. With the 000 brush, paint the upper lash line first. It should be a gentle downward curve, almost like a sleepy eye. -
Add lashes:
Flick the brush precisely at the outer corner of each eye to create a single, prominent eyelash. -
Paint the pupil:
Add a tiny semi-circle or dot attached to the bottom of the lash line, looking towards the side or down, to give the doll a demure expression. -
Dot the nose:
Using the very tip of your brush or a toothpick dipped in brown paint, place a tiny dot for the nose. It should be subtle.
Seasonal Switch
Change the vibe by swapping the botanical! Paint holly berries for winter, bright yellow mimosa flowers for spring, or tiny orange pumpkins for an autumn decoration.
Step 4: Finishing Touches
-
Let it cure:
Allow the paint to dry completely. Since we are painting on raw wood, the paint might dry faster, but give it at least 20 minutes to be safe. -
Erase pencil marks:
Gently erase any visible pencil lines that weren’t covered by paint. Be extremely careful near the face not to smudge your work. -
Apply sealant:
Protect your work with a matte varnish. Apply thin coats to avoid drips running down the unpainted wood.
Now you have a serene, nature-inspired piece that brings a sense of calm to any shelf or play set
Expressive Peg Doll Faces
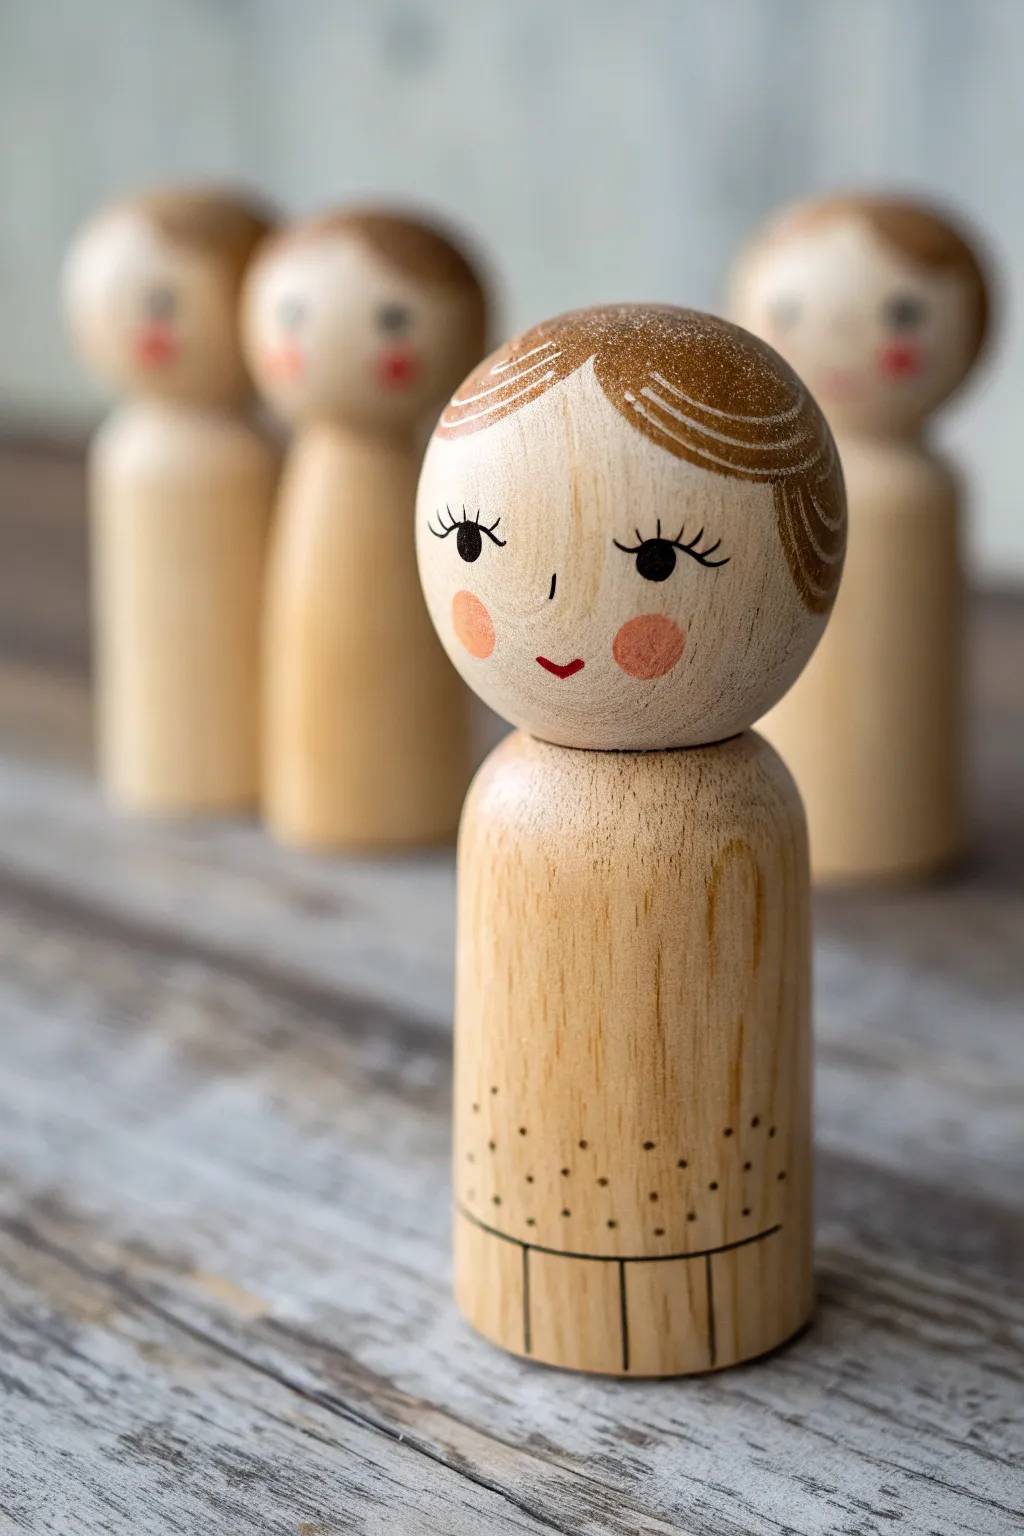
Embrace the beauty of raw wood with this minimalist peg doll design that focuses on delicate facial expressions rather than heavy coverage. This approach uses the natural grain as a warm skin tone, accented by carefully placed details for a gentle, timeless look.
Step-by-Step
Materials
- Unfinished wooden peg doll bodies (standard shape)
- Fine grit sandpaper (320 or 400 grit)
- Acrylic paint (warm brown for hair, blush pink, red, black)
- White paint pen or very fine detail brush
- Pointed detail brush (size 0 or 00)
- Black micron pen or fine liner brush
- Matte or satin clear sealant spray
- Small dotting tool or toothpick
Step 1: Preparation & Hair Painting
-
Sand for smoothness:
Begin by giving your wooden peg doll a light sanding with fine grit sandpaper. Focus on the face area to ensure the wood grain is smooth enough to accept fine details without the ink bleeding. -
Outline the hairline:
Using a light pencil sketch, map out the hairline. For this doll, create a sweetheart curve or gentle bangs that swoop down on the forehead, covering the top third of the head sphere. -
Paint the base hair color:
Load your brush with a warm medium-brown acrylic paint. Carefully fill in the hair area you just outlined, extending all the way down the back of the head. -
Smooth the edges:
While the brown paint is wet, ensure the hairline edge is crisp and curved nicely. Let this base coat dry completely before adding texture. -
Add hair highlights:
Using a white paint pen or an extremely fine brush with white paint, draw wispy, curved lines over the brown hair. Follow the curve of the head to simulate strands and add dimension. -
Create dry brush texture:
I like to add a subtle shimmering effect by lightly dry-brushing a tiny amount of white or lighter brown at the very top of the head for a sun-kissed look.
Pro Tip: Cheek Technique
To get that soft, airbrushed look on the cheeks, mix your acrylic paint with a tiny drop of glazing medium or water to increase transparency before applying.
Step 2: Painting the Expressive Face
-
Position the eyes:
Mental spacing is key here. Visualize the center line of the face; the eyes should be wide-set, sitting just below the horizontal midline of the head sphere. -
Draw the eyelashes:
Using your finest black liner brush or a micron pen, draw three distinct, curved eyelashes on each side. The lashes should fan outward to create a sleepy or gentle gaze. -
Add the pupils:
Paint a solid black oval or circle at the base of the eyelashes to ground the eye. Keep these small so the doll doesn’t look startled. -
Blush the cheeks:
Mix a soft, peachy-pink paint. Dip a round brush (or your finger) into the paint, dab most of it off onto a paper towel, and gently stamp two rosy circles below and outside the eyes. -
Paint the nose and mouth:
With the finest point, add a tiny black vertical dash for the nose. Directly below, paint a small, red ‘V’ shape for a smiling mouth.
Step 3: Dress Details & Finishing
-
Sketch the skirt hem:
Moving down to the cylindrical body, use a black fine liner to draw a horizontal line about 1/4 inch from the bottom edge. -
Draw vertical pleats:
From that horizontal line down to the bottom of the peg, draw simple vertical lines spaced evenly apart to suggest pleats or a ruffle. -
Add the polka dot pattern:
Dip a small dotting tool or the tip of a toothpick into black paint. Create a field of tiny dots on the lower half of the dress, letting them fade out as you move upward toward the neck. -
Clean up stray marks:
Check the raw wood areas for any accidental smudges. If you find any, gently sand them away with your high-grit sandpaper. -
Seal the doll:
Protect your work with a spray sealant. A matte finish looks best to maintain the natural wood aesthetic, but satin works if you prefer a slight sheen.
Troubleshooting: Bleeding Ink
If your black pen ink bleeds into the wood grain, prep the face area first with a clear matte sealer. Once dry, your pen lines will stay perfectly crisp.
Now you have a charming little figure ready for play or display
Painted Peg Doll Playset Worlds
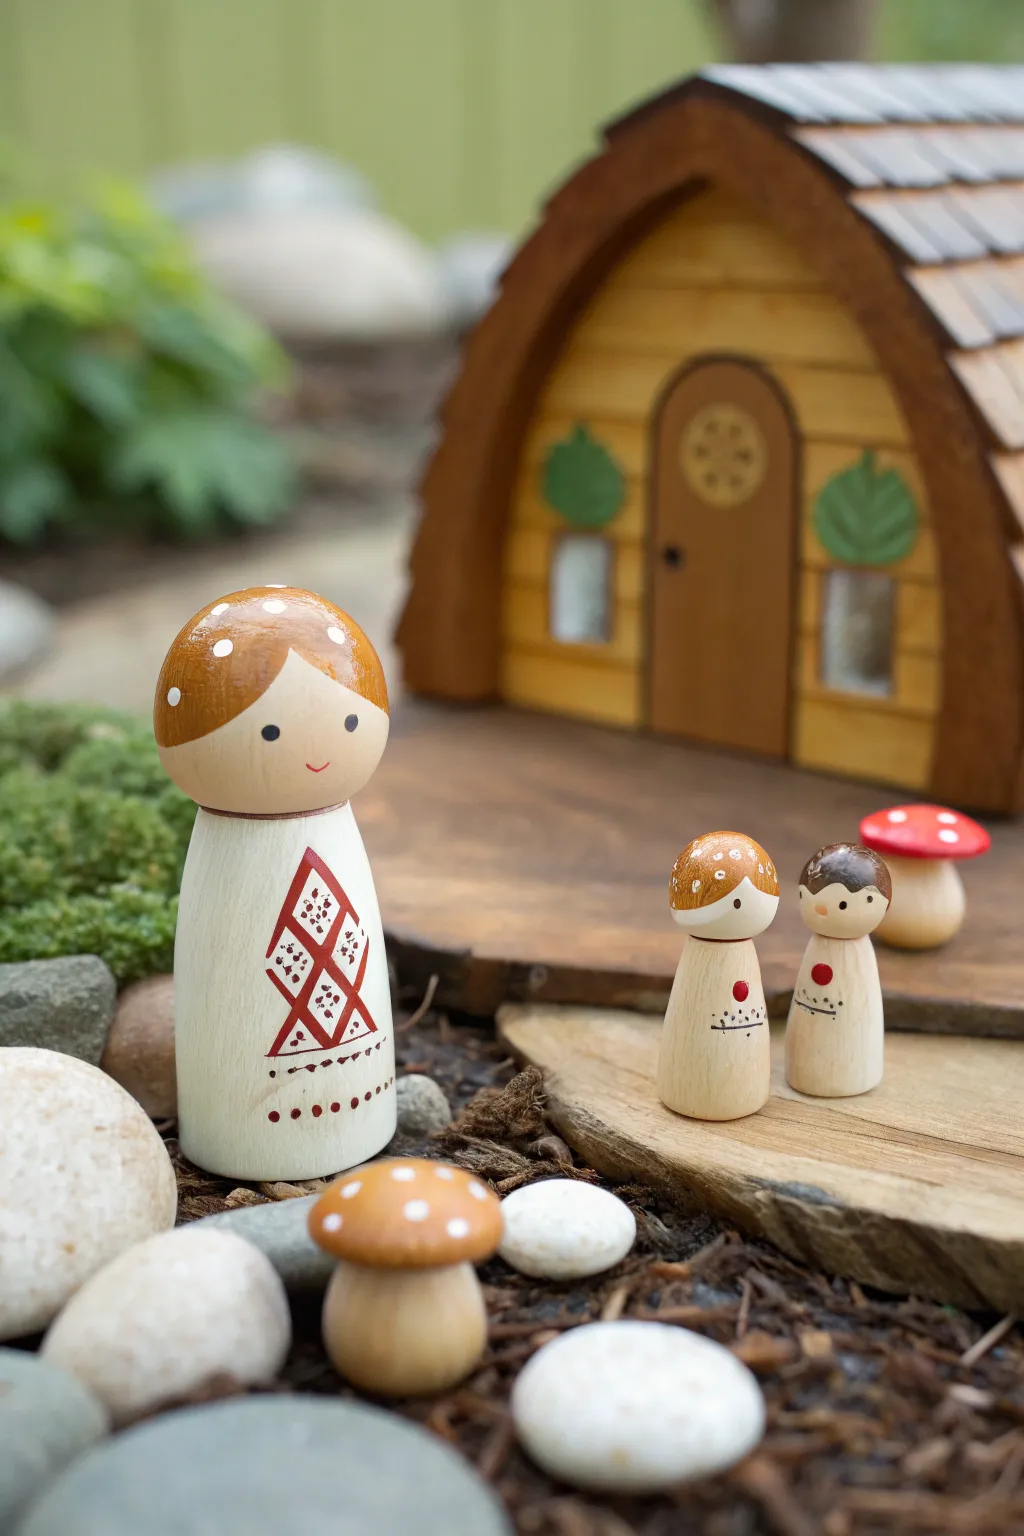
Bring a touch of woodland whimsy to your playscapes with this charming family of wooden peg dolls. These figures feature simple but striking folk-art details and natural wood tones that look right at home in a garden setting.
Step-by-Step Tutorial
Materials
- Unfinished wooden peg dolls: 1 large (mom), 2 small (children), 1 mushroom shape
- Acrylic craft paint: White, Burnt Sienna (brown), Red (crimson), and Black
- Detail brushes: Fine liner and round size 0 or 1
- Pencil and eraser
- Clear matte or satin varnish (water-based)
- Small cup of water and paper towels
Step 1: Planning and Base Coats
-
Sketch the designs:
Begin by lightly sketching your design directly onto the raw wood with a pencil. For the mother figure, draw a swoop for the hair, two dots for eyes, a small smile, and the diamond pattern on the front. For the children, mark the hair outlines and simple collar details. -
Paint the mother’s dress:
Using a soft round brush, paint the body of the large peg doll with white acrylic paint. Stop at the neck line to leave the face natural wood. You will likely need two thin coats for opaque coverage; let the first coat dry completely before adding the second. -
Paint the mother’s hair:
Mix a warm brown shade using Burnt Sienna. Carefully paint the hair cap on the large doll, following the curved line you sketched. I find it helpful to turn the doll upside down to get a clean edge along the forehead. -
Base coat the mushroom:
While the dolls dry, paint the cap of your wooden mushroom shape with the same brown used for the hair. Leave the stem natural wood or paint it a soft cream if you prefer.
Step 2: Painting the Foliage Children
-
Hair details for the kids:
Paint the hair on the two smaller dolls. Give one doll the same brown hair as the mother. For the second child, mix a little white into your brown to create a lighter, honey-brown shade, or use a mustard yellow for variety. -
Adding whimsical dots:
Once the hair paint is tacky or dry, use a very fine brush or a toothpick to add tiny white dots to the hair caps. This gives them a mushroom-like or fawn-like appearance. -
Leaf collars:
Instead of full clothes, these smaller figures have simple drawn details. Use a fine black pen or very thin black paint to draw a scalloped or straight line across the chest, adding tiny vertical dashes to suggest embroidery or a collar. -
Heart details:
Paint a single, bold red dot or heart shape in the center of each child’s chest detail using your smallest brush.
Dotting Tool Hack
Don’t have a dotting tool? Use the head of a sewing pin or a toothpick dipped in paint for precision dots on the hair and eyes.
Step 3: Adding the Folk Art Details
-
The diamond pattern:
Return to the mother figure. Using red paint and a fine liner brush, paint the outline of a large diamond on the front of her dress. Divide this diamond into four smaller diamonds. -
Filling the pattern:
Inside the diamond grid, add small decorative touches. Paint tiny ‘X’ shapes or clusters of dots within the segments to mimic embroidery stitches. -
Hemline details:
Near the bottom of the white dress, paint a horizontal row of red dots. Above that, paint a thin, wavy or straight red line to frame the pattern. -
Hair decoration:
Just like the children, add small white dots to the mother’s brown hair. Cluster them slightly towards the top of the head for a natural, speckled look. -
Mushroom finishing:
Add white dots to the brown mushroom cap you painted earlier to tie the whole set together visually.
Fixing Wobbly Lines
If your folk art lines get messy, wait for the paint to dry completely, then gently scrape the excess off with a craft knife or toothpick.
Step 4: Faces and Finishing
-
Painting the eyes:
Use the handle end of a paintbrush dipped in black paint to stamp perfect circles for the eyes. Place them wide apart for a sweet, innocent expression. -
Rosey cheeks:
Mix a tiny drop of red with plenty of water to make a glaze, or use a pink colored pencil. Gently apply small circles to the cheeks. -
The smile:
With a fine liner brush or a black chaotic pen, add a tiny, subtle smile between the cheeks. -
Sealing the wood:
Once all paint is thoroughly dry (give it at least an hour), coat the entire doll in a matte or satin varnish. This protects the paint from chipping during play and seals the raw wood areas.
Group your little family together in a garden pot or on a shelf for an instant storybook scene


Have a question or want to share your own experience? I'd love to hear from you in the comments below!