
A boat hull is basically the coolest moving canvas you’ll ever paint, and the color choices hit totally different out on open water. Here are my favorite boat paint ideas—from clean, classic looks to bolder designs that make your hull feel totally yours.
Clean White Hull With a Thin Accent Stripe
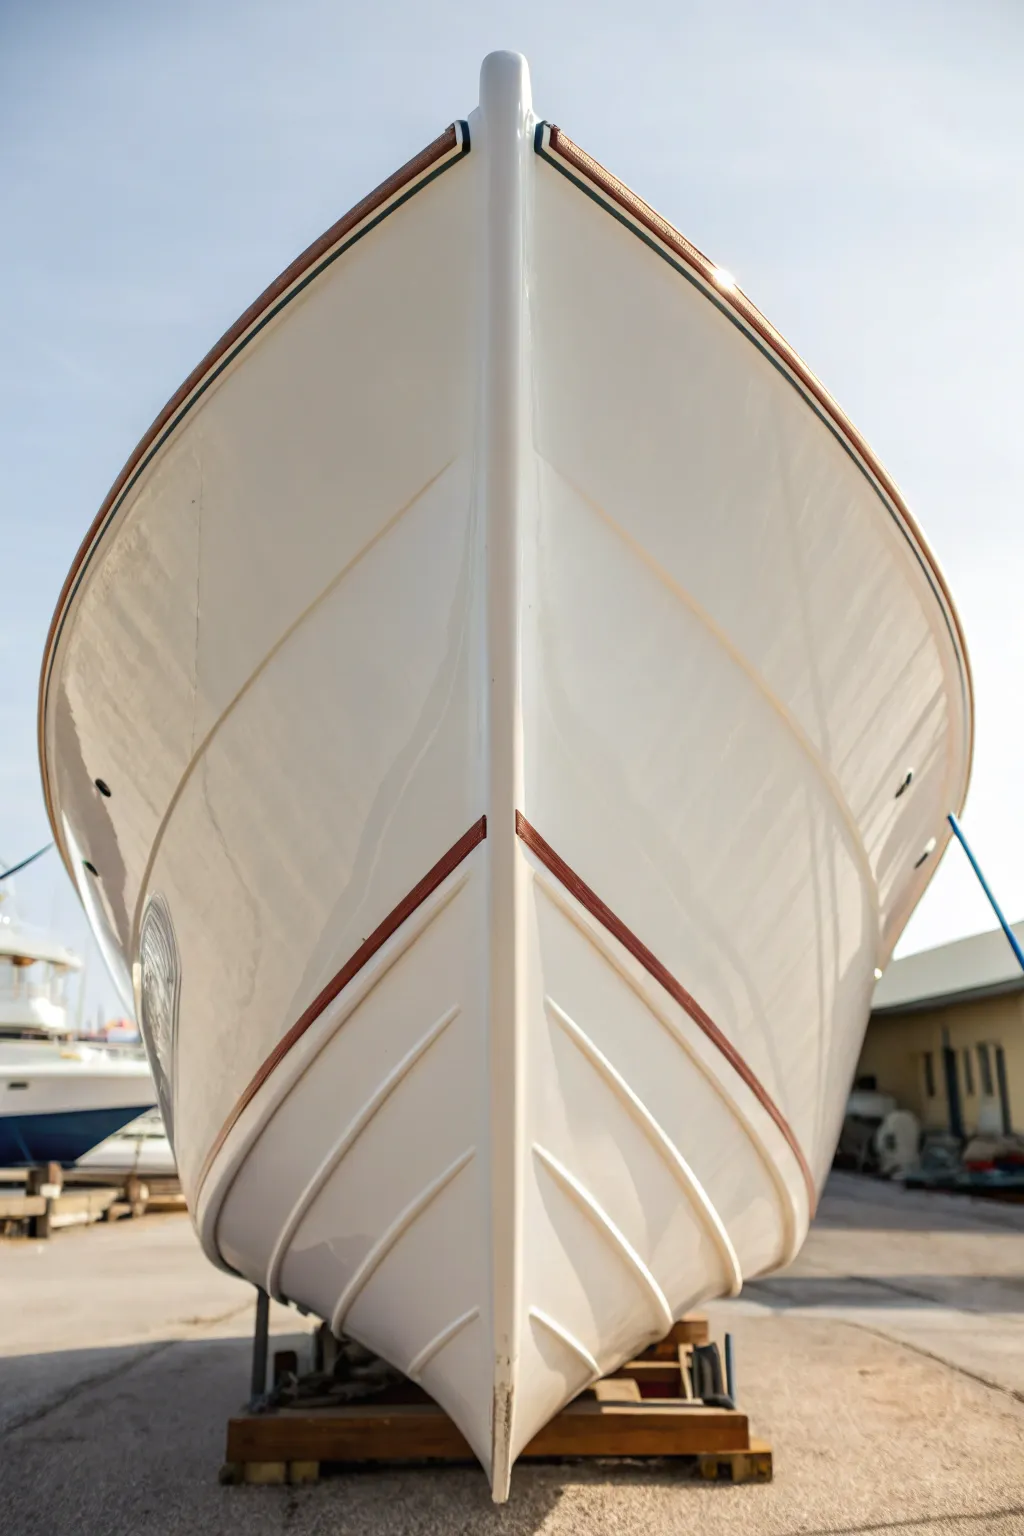
Transform your vessel’s appearance with a flawless, high-gloss white finish that highlights its elegant lines, paired with subtle wood-toned striping for a timeless nautical look. This project focuses on achieving that showroom-quality shine and perfectly crisp accent lines.
How-To Guide
Materials
- Marine-grade high-gloss white topside paint (polyurethane)
- Epoxy primer
- Mahogany or teak colored striping paint (or vinyl tape)
- Varnish (if using real wood trim)
- High-grit sandpaper (220, 320, 400 wet/dry)
- Tack cloths
- Fine-line masking tape (blue or green)
- Foam rollers and tipping brushes
- Solvent/Thinner suited for your paint
- Polishing compound and buffer
Step 1: Surface Preparation
-
Clean the hull:
Begin by thoroughly washing the entire hull with a specialized hull cleaner and degreaser to remove all salt, wax, and grime. -
Sand for adhesion:
Sand the existing surface with 220-grit sandpaper until it is completely dull and smooth. This mechanical bond is crucial for the new paint to stick. -
Fill imperfections:
Inspect the hull closely for any gouges or scratches. Fill these with marine fairing compound, let cure, and sand flush. -
Remove dust:
Wipe the entire surface down with solvent and tack cloths. I like to do this twice to ensure absolutely no dust particles remain.
Step 2: Priming and Base Coat
-
Apply primer:
Roll on a coat of high-build epoxy primer. Follow the ‘roll and tip’ method: one person rolls the paint on, and a second person immediately drags a dry brush lightly over it to pop bubbles. -
Sand the primer:
Once cured, sand the primer with 320-grit paper to create a glass-smooth base. Check for any remaining low spots. -
Mix the topcoat:
Mix your high-gloss white polyurethane paint with the appropriate thinner and hardener. Let it induct (sit) for the time specified by the manufacturer. -
First coat application:
Apply the first coat of white topside paint using the roll and tip method. Work in small sections to keep a wet edge. -
Sand between coats:
Lightly sand with 400-grit wet sandpaper after the first coat cures to knock down any dust nibs. -
Final white coats:
Apply 2-3 additional thin coats of white for depth and durability, allowing proper cure time between each.
Orange Peel Problems?
If you see a bumpy texture, your paint might be too thick or the day too hot. Add a splash more thinner to help the paint flow out flat before it dries.
Step 3: Adding the Accent Clean Lines
-
Map the stripe:
Determine the placement of your accent stripe. It should follow the natural sheer line or chine of the boat. -
Tape carefully:
Apply fine-line masking tape to define the upper and lower edges of your stripe. Press the edges down firmly to prevent bleed-under. -
Scuff the stripe area:
Very lightly scuff the white paint inside the taped area with a scouring pad to help the accent paint adhere. -
Paint the stripe:
Using a small foam brush or high-quality bristle brush, apply your mahogany or teak-colored accent paint within the taped lines. -
Apply second coat:
If the coverage isn’t opaque, wait for the first coat to tack up and apply a second thin layer. -
Remove tape:
Pull the tape off while the paint is still slightly wet. Pull away from the painted edge at a 45-degree angle for the sharpest line.
Go for Gold
For an even more classic touch, add a very thin gold vinyl pinstripe immediately above or below your mahogany accent stripe to make the colors pop.
Step 4: Finishing Touches
-
Detail the rub rail:
If your boat has a wooden rub rail like the one shown, sand it down to bare wood. -
Sealing the wood:
Apply 6-8 coats of high-gloss marine varnish to the wooden rub rail, sanding lightly between coats for a deep shine. -
Final polish:
Once the hull paint has fully cured (usually several days), use a fine polishing compound and a buffer to bring out a mirror-like reflection.
Step back and admire how the crisp white hull contrasts beautifully with the warm accent stripe, giving your boat a fresh new life on the water


Classic Two-Tone With a Crisp Waterline
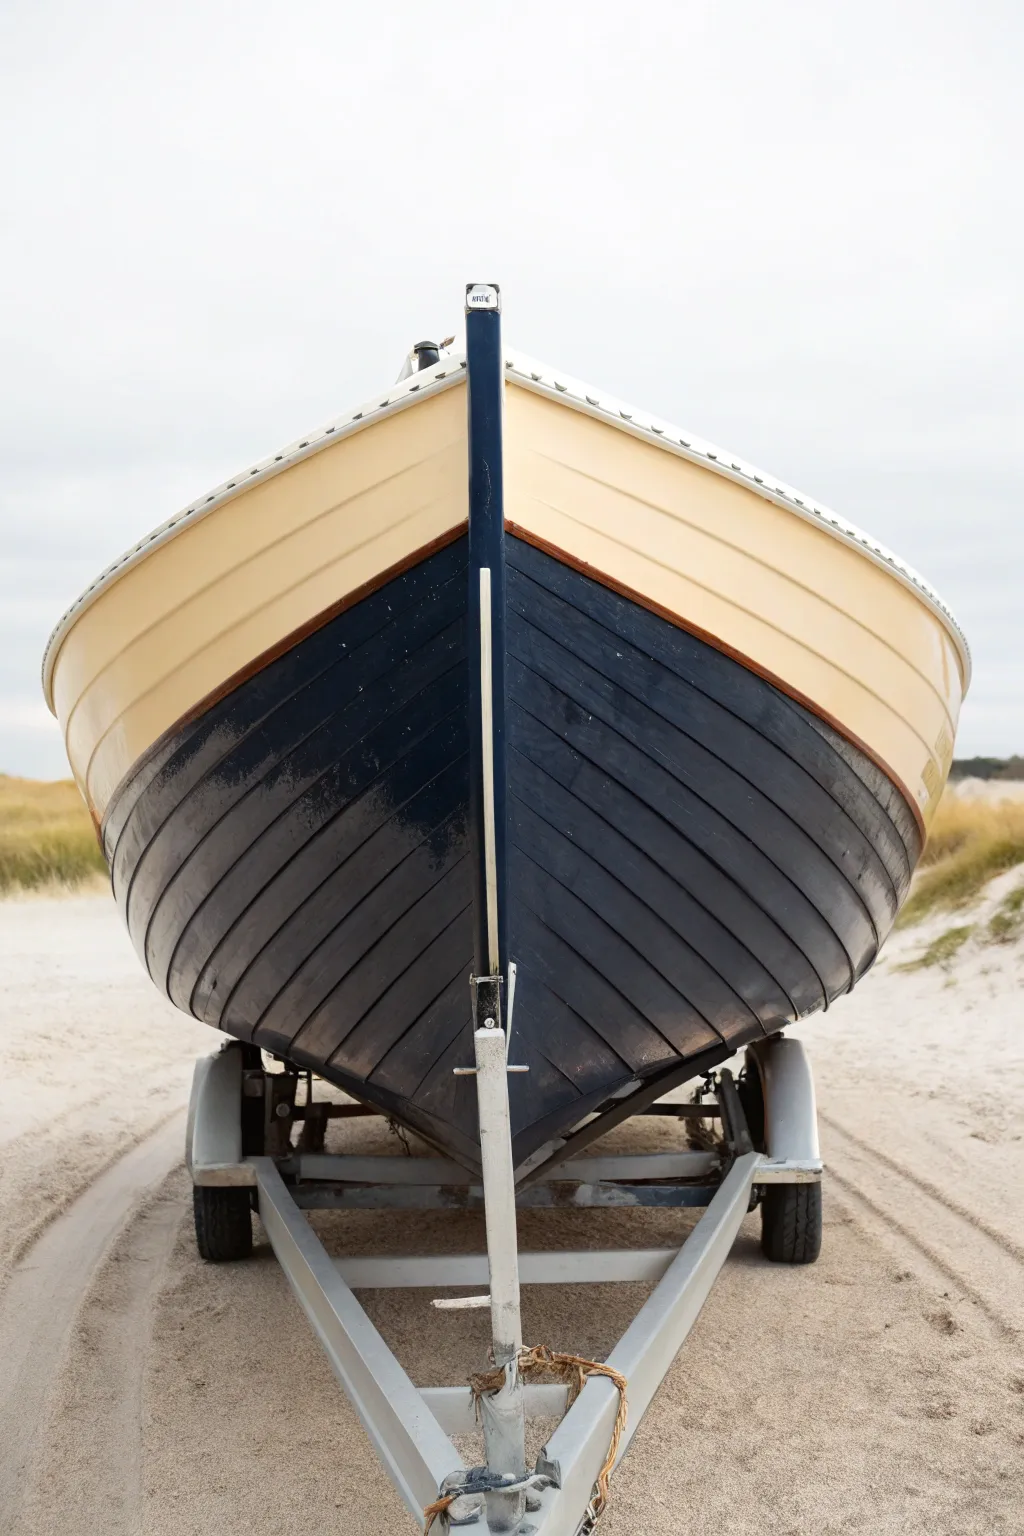
This project captures the essence of traditional maritime style with a stunning two-tone finish on a lapstrake hull. The interaction between the soft cream upper and the deep, glossy navy bottom accentuates the beautiful lines of the clinker build.
Step-by-Step Tutorial
Materials
- Marine-grade primer (for wood or fiberglass)
- Marine topside paint (Cream/Light Beige)
- Marine topside paint (Deep Navy or Midnight Blue)
- High-quality masking tape (automotive grade preferred)
- Sandpaper assortment (80, 120, 220 grit)
- Tack cloths
- Foam rollers and rolling tray
- Tipping brushes (natural bristle for oil-based, synthetic for water-based)
- Paint thinner or mineral spirits (for cleanup)
- Canvas drop cloths
- Personal protective equipment (respirator, gloves)
Step 1: Preparation & Priming
-
Clean and Degrease:
Begin by thoroughly washing the entire hull to remove salt, dirt, and any previous waxes. Use a dewaxing solvent and plenty of clean rags to ensure a contaminant-free surface. -
Sand the Hull:
Sand the entire exterior surface. If the old paint is sound, scuff it with 120-grit paper to provide a good mechanical bond. If you have peeling areas, sand them down to bare wood or fiberglass and feather the edges. -
Remove Dust:
Vacuum up the sanding dust extensively. Follow up by wiping down the entire boat with a tack cloth to pick up the finest particles; any leftover dust will show in your final gloss finish. -
Apply Primer:
Roll on a coat of high-quality marine primer. Use the ‘roll and tip’ method: one person rolls the paint on, and a second person immediately drags a brush lightly over the wet surface to smooth out bubbles and texture. -
Sand the Primer:
Once the primer is fully cured, sand it smooth with 220-grit sandpaper. This is the most crucial step for a glass-like final appearance, so take your time here.
Step 2: Applying the Upper Color
-
First Coat of Cream:
Start with the lighter color on the upper strakes. Pour your cream marine paint into a tray and apply using the roll and tip technique. Work in small sections to keep a wet edge. -
Dry and Sand:
Check the manufacturer’s drying times. Once dry, lightly sand with fine-grit paper to knock down any nibs. Wipe clean with a tack cloth before proceeding. -
Second Coat:
Apply the second coat of cream paint. I usually find that two coats are sufficient for good coverage, but a third thin coat can add depth and durability if needed. -
Establish the Waterline:
Allow the paint to cure for at least 24-48 hours. Carefully measure and mark your waterline. Apply high-quality masking tape firmly along this line to separate the upper and lower sections.
Master the “Roll & Tip”
Work in pairs! One person rolls the paint to get it on the surface, while the second person follows immediately with a dry brush to smooth it out.
Step 3: The Deep Navy Bottom
-
Seal the Tape Edge:
To ensure a razor-sharp line, you can lightly paint over the tape edge with the *cream* paint first. This fills any tiny gaps under the tape with the base color, preventing the dark blue from bleeding under. -
Apply First Navy Coat:
Begin painting the lower section with your deep navy paint. On a lapstrake hull, pay special attention to the underside of each plank overlap to ensure full coverage. -
Check for Runs:
Dark, glossy paints show runs easily. Inspect your work frequently as you go, tipping out any drips before they start to tack up. -
Sand Between Coats:
Just like the top section, allow the first coat to dry, then scuff sand lightly with 220-grit paper and wipe clean with a fresh tack cloth. -
Final Dark Coat:
Apply the final coat of navy paint. Maintain a consistent pace to avoid lap marks, working from bow to stern or vice versa depending on your reach. -
Remove Tape:
Here is the satisfying part: peel the masking tape while the final coat is still slightly tacky (not wet, but not fully hard). Pull the tape away from the painted edge at a 45-degree angle for the cleanest line. -
Final Cure:
Let the boat sit undisturbed for several days to allow the paint to harden completely before relaunching or putting it back on the trailer rollers.
Add a Boot Stripe
For extra flair, add a thin, contrasting stripe (like red or white) right at the waterline between the cream and navy sections.
Now you have a freshly painted beauty ready to turn heads at the marina or the beach


Navy-and-White Nautical Banding
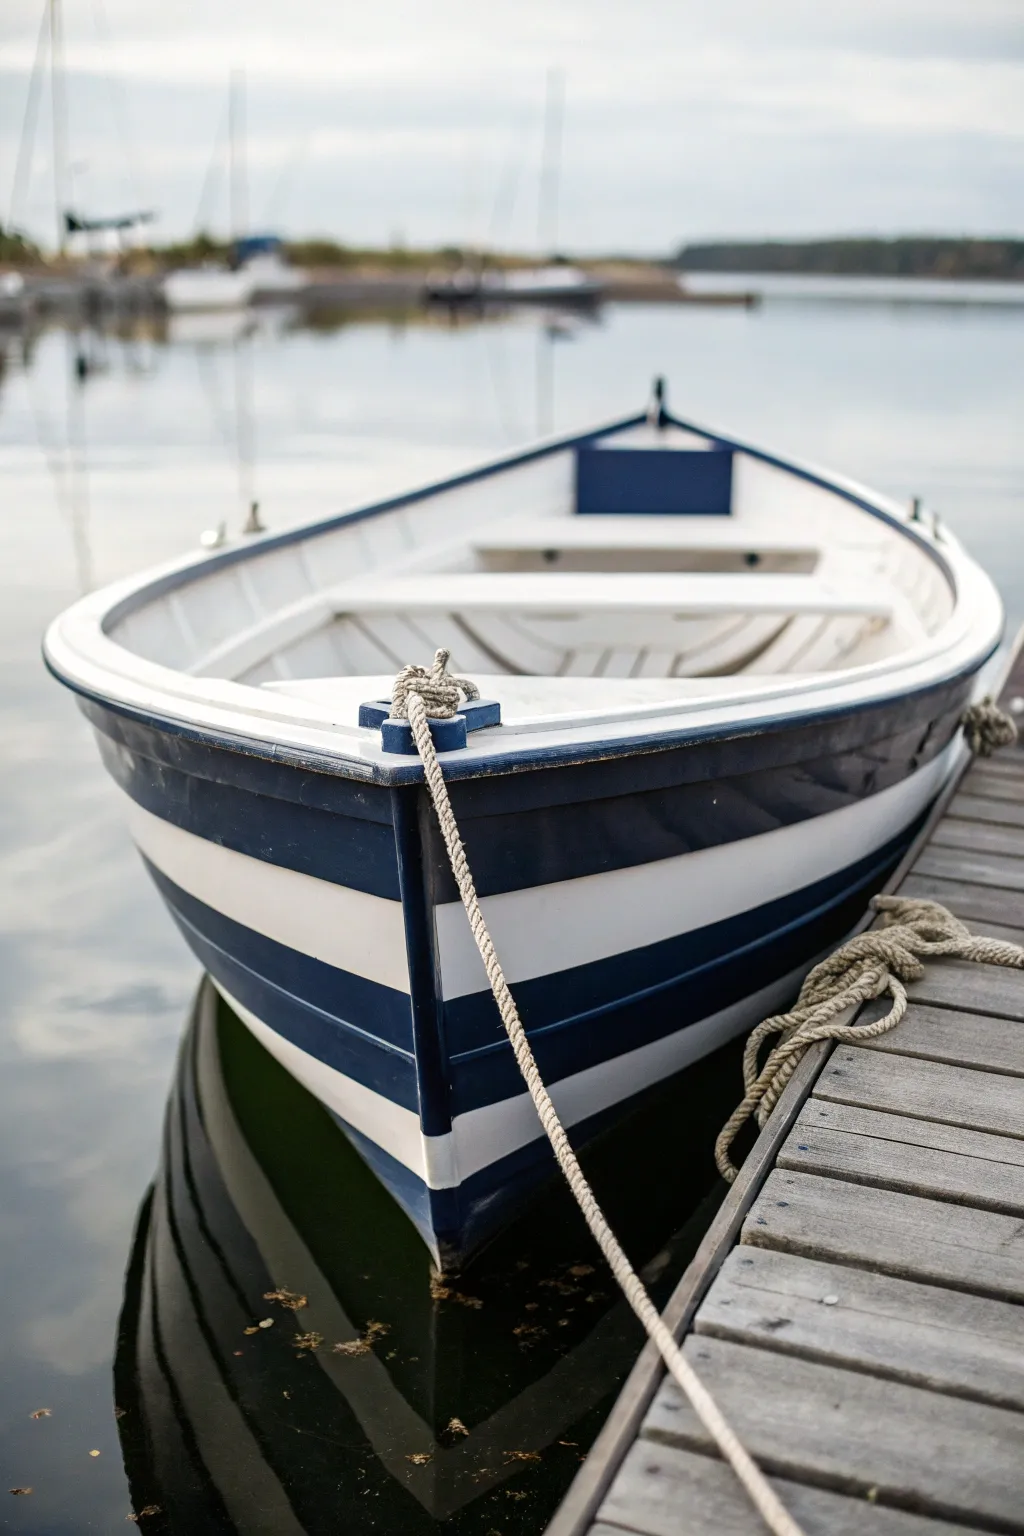
Transform a plain wooden rowboat into a timeless maritime beauty with this crisp, high-contrast banding technique. The deep navy blue paired with bright white creates a sleek, professional finish that looks right at home on any harbor or lake.
Step-by-Step Guide
Materials
- Marine-grade topside paint (Navy Blue)
- Marine-grade topside paint (Bright White)
- High-quality painter’s tape (automotive or marine grade specifically for clean lines)
- Sandpaper (80, 120, and 220 grit)
- Orbital sander (optional but recommended)
- Primer compatible with your marine paint
- Tac cloth and acetone
- Foam rollers (4-inch cabinet grade)
- High-quality angled sash brush
- Measuring tape and pencil
- Paint tray and liners
Step 1: Preparation & Priming
-
Surface Cleaning:
Begin by thoroughly cleaning the exterior hull. Remove any algae, old wax, or loose paint chips using a scraper and a strong detergent wash. Rinse and let dry completely. -
Initial Sanding:
Sand the entire hull with 80-grit sandpaper to remove old finishes and create a ‘key’ for the new paint. Follow this with a pass of 120-grit to smooth out the scratches. -
Dust Removal:
Wipe down the entire boat with a tack cloth, followed by a rag dampened with acetone to ensure zero dust or oils remain on the surface. -
Priming the Hull:
Apply a full coat of marine-grade primer using a foam roller. Work in sections, keeping a ‘wet edge’ to avoid lap marks. I like to tip off the wet primer with a dry brush to smooth out any roller stipple. -
Final Sanding:
Once the primer is fully cured (check your can’s instructions), lightly hand sand with 220-grit paper until the surface feels glass-smooth. Wipe away dust again.
Bleeding Lines?
If paint bleeds under tape, wait until fully dry. Gently scrape excess with a razor blade, then use a fine artist brush to touch up the line with the base color.
Step 2: Painting the Base & Stripes
-
Apply the White Base:
Paint the entire hull with your Bright White marine paint. Apply 2-3 thin coats rather than one thick one, allowing proper drying time between each. -
Cure Time:
Allow the white base coats to cure for at least 24-48 hours. The paint needs to be hard enough to withstand tape removal without peeling. -
Measuring the Waterline:
Determine where your bottom stripe will sit. Measure up from the keel at intervals and mark light pencil dashes to guide your tape line. -
Taping the Stripes:
Apply your painter’s tape along your pencil marks. Press the tape edge down firmly with a putty knife or fingernail to prevent bleed-through. This project uses wide alternating bands, so measure carefully to keep them parallel to the gunwale. -
Sealing the Tape:
Paint a very thin layer of the *white* base paint over the edge of your tape. This seals the tape line so any seepage is white-on-white, creating a razor-sharp edge later. -
Applying Navy Paint:
Roll the Navy Blue paint onto the exposed sections between your tape lines. Use a small roller for speed and follow immediately with a brush to smooth it out (tipping). -
Second Navy Coat:
Once the first coat is tacky but dry to touch, apply a second coat of Navy Blue for full opacity and depth of color. -
Tape Removal:
Remove the tape while the final coat of blue paint is still slightly wet. Pull the tape slowly at a 45-degree angle away from the painted edge to ensure a clean break.
Make it Metallic
For a luxury yacht look, add a very thin pinstripe of metallic gold or silver vinyl tape between the navy and white bands after the paint cures.
Step 3: Gunwale & Interior Detail
-
Refining the Gunwale:
Use your angled sash brush to carefully paint the top rail (gunwale) in Navy Blue. This frames the boat beautifully and connects the exterior design to the interior. -
Interior Touch-ups:
If painting the interior benches white as seen in the photo, prep and paint the seats now, being careful not to drip onto your freshly painted exterior. -
Curing:
Let the boat sit in a covered, dry area for several days to allow the marine paint to fully harden before launching into water.
Now you are ready to take your striking new vessel out on the water and enjoy the admiring glances


Coastal Teal With Soft Wave Swirls
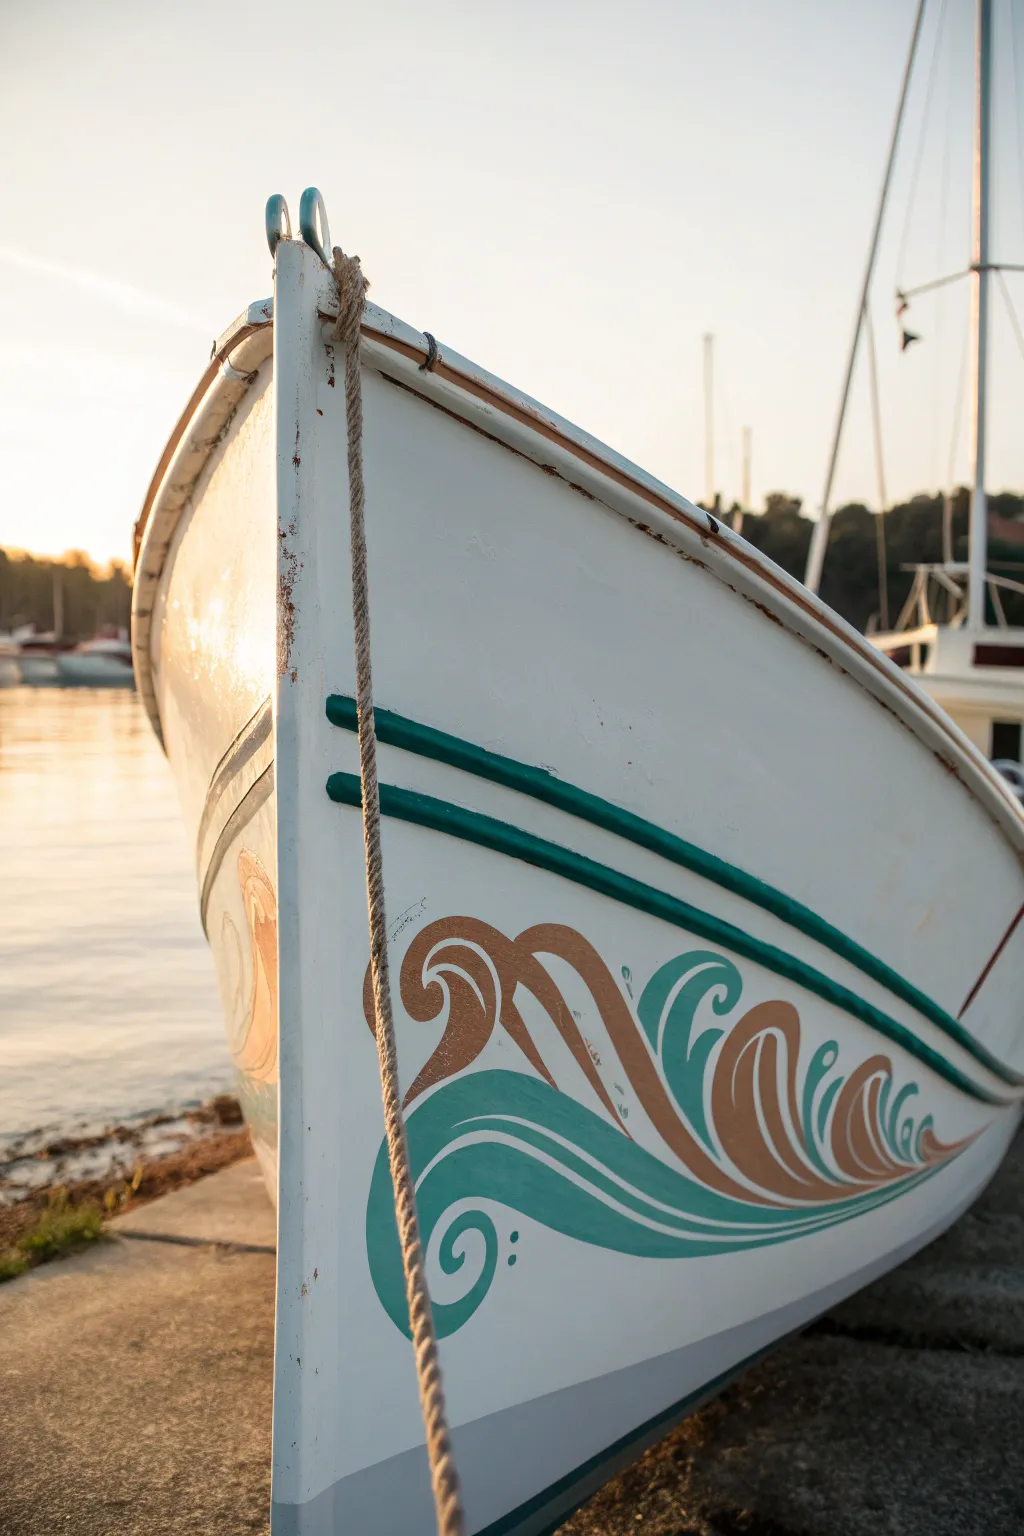
Transform a plain white hull into a nautical masterpiece with these elegant, flowing wave motifs. The combination of deep teal and warm terra-cotta creates a sophisticated, Mediterranean-inspired look that mimics the movement of the sea itself.
How-To Guide
Materials
- High-gloss marine enamel paint (White)
- Marine enamel paint (Teal/Turquoise)
- Marine enamel paint (Terra-Cotta/Burnt Orange)
- Painter’s tape (various widths)
- Fine-grit sandpaper (220-grit)
- Pencil or chalk
- Tracing paper (optional)
- Fine-tip artist brushes (for detailing)
- Medium flat brush (for stripes)
- Sailing rope or flexible curve ruler
- Clean rags and mineral spirits
Step 1: Preparation & Base Coat
-
Clean the surface:
Begin by thoroughly cleaning the bow area of your boat. Use a marine-grade cleaner to remove any salt, grease, or existing wax. This step is crucial for paint adhesion. -
Sand gently:
Lightly scuff the area where you plan to paint the design using 220-grit sandpaper. You don’t need to strip it to the bare hull, just create enough ‘tooth’ for the new paint to grab onto. -
Wipe down:
Remove all sanding dust with a rag dampened in mineral spirits or a tack cloth. The surface must be perfectly dust-free. -
Apply base white:
If your hull isn’t already a crisp white, or if the surface is uneven, apply a fresh coat of high-gloss white marine enamel. Let this cure fully according to the manufacturer’s instructions before starting the design work.
Paint Dries Too Fast?
If working outdoors in the sun, marine enamel can get sticky quickly. Add a small amount of painting conditioner (like Penetrol) to improve flow and extend working time.
Step 2: Drafting the Design
-
Establish the stripe lines:
The design features two horizontal stripes above the swirls. Measure down from the gunwale (the top edge) to ensure consistency. I find marking faint tick marks every few inches helps keep the line straight. -
Tape the stripes:
Run long strips of painter’s tape to delineate the upper and lower teal stripes. Press the edges of the tape down firmly to prevent bleed-through. -
Sketch the wave motif:
For the swirly design at the bottom, sketch your pattern lightly with a pencil directly on the hull. If you aren’t confident freehanding, draw it on tracing paper first and transfer it using graphite paper. -
Refine the curves:
Use a flexible curve ruler or even a piece of thin rope taped to the hull to help you visualize and trace smooth, sweeping curves for the main wave shapes.
Pro Tip: Symmetric Design
To get identical designs on both sides of the bow, create a paper pattern first. Poke holes along the lines, tape it to the hull, and ‘pounce’ chalk dust through the holes.
Step 3: Painting the Details
-
Paint the horizontal stripes:
Using your medium flat brush, fill in the taped-off horizontal stripes with the teal marine enamel. Apply thin, even coats to avoid drips. -
Outline the large swirls:
Switch to a fine-tip artist brush. Carefully outline the large teal wave shape at the bottom, following your pencil guides. Steady your hand by resting your pinky finger on a dry part of the hull. -
Fill the teal sections:
Once outlined, fill in the body of the large teal wave. Keep the paint wet edge moving to blend brushstrokes seamlessly. -
Add the terra-cotta scrolls:
Load a clean fine brush with the terra-cotta paint. Paint the intricate, vine-like scrolls that nestle above and inside the teal wave. Focus on creating tapered ends where the brush strokes lift off. -
Paint the secondary teal details:
Go back to your teal paint and add the smaller, hook-like flourishes that interlock with the terra-cotta shapes. These often look like stylized splashing wavetops. -
Add the dots:
Using the very tip of a small round brush or a dotting tool, carefully place the decorative dots near the curl of the bottom wave.
Step 4: Finishing Touches
-
Remove tape:
Peel off the painter’s tape while the paint is still slightly tacky, not fully dry. This helps ensure a crisp line without chipping the paint edge. -
Clean up edges:
If any paint seeped under the tape or your hand slipped, use a small brush dipped in mineral spirits to gently wipe away mistakes immediately. -
Review and touch up:
Step back and look at the design from a distance. Up close, you might miss symmetry issues. Fix any thin spots with a second light coat if necessary. -
Allow to cure:
Let the artwork act as a ‘no touch’ zone for several days. Marine paints often take longer to fully harden to a durable finish than standard house paints.
Now you have a custom, hand-painted detail that gives your boat distinct character even when docked at the marina
BRUSH GUIDE
The Right Brush for Every Stroke
From clean lines to bold texture — master brush choice, stroke control, and essential techniques.
Explore the Full Guide
Sunset Ombre From Bow to Stern
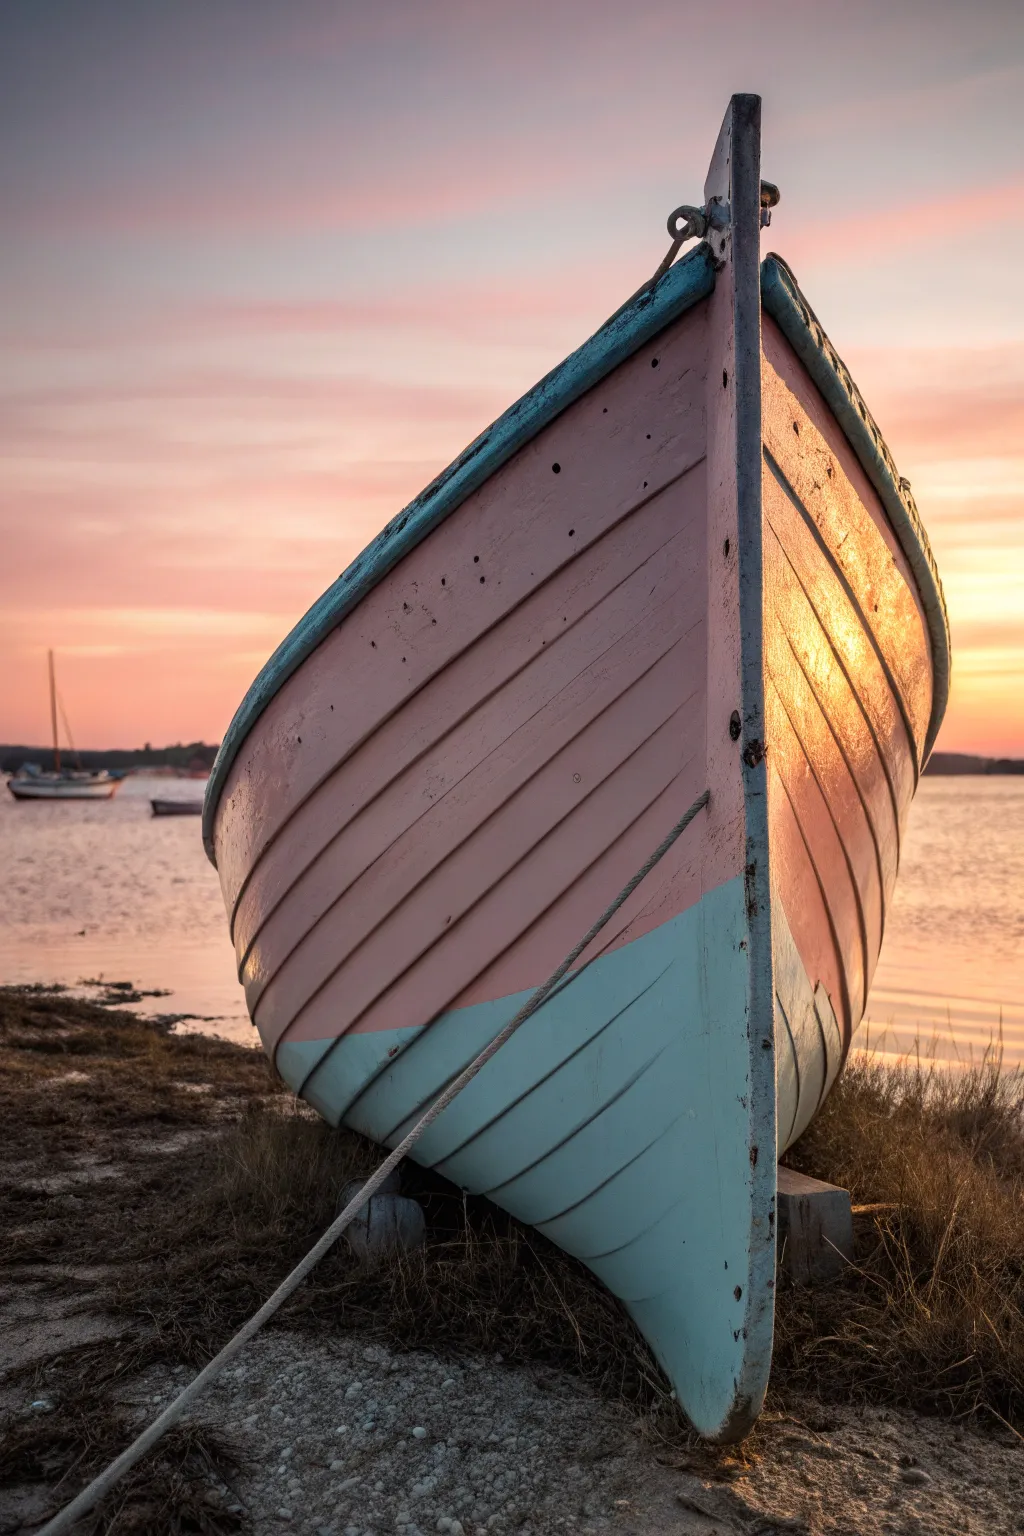
Capture the serene beauty of a sunset shore with this elegant two-tone paint scheme designed for wooden clinker-built boats. By pairing a dusty, warm rose pink with a cool seafoam green, you create a harmonious balance that reflects the colors of twilight on the water.
Step-by-Step Tutorial
Materials
- High-quality marine primer (for wood)
- Marine-grade topside paint (Dusty Rose/Pale Pink)
- Marine-grade topside paint (Seafoam Green/Pale Cyan)
- Marine-grade topside paint (Dark Grey) for the gunwales
- Painter’s tape (high adhesion)
- Sanding block and sandpaper (80, 120, and 220 grit)
- Tack cloth
- Paint rollers (foam or short nap)
- Angled sash brushes (2-inch)
- Stir sticks
- Drop cloths
- Measuring tape and pencil
Step 1: Preparation & Priming
-
Surface Preparation:
Begin by thoroughly cleaning the boat’s exterior hull to remove any salt, dirt, or grease. Once dry, sand the entire hull with 80-grit sandpaper to remove loose old paint, followed by 120-grit for a smoother finish. -
Dust Removal:
Wipe down the entire sanded surface with a tack cloth. It is crucial to remove every speck of dust to ensure the marine paint bonds correctly and leaves a smooth finish. -
Apply Primer:
Roll on a coat of high-quality marine primer over the entire hull. Use a brush to work the primer into the laps (the overlapping edges of the planks) where a roller might miss. -
Sand the Primer:
Allow the primer to dry completely according to the manufacturer’s instructions. Once dry, lightly sand with 220-grit paper to create a mechanical bond for your topcoat, then wipe clean again.
Smooth Lapstrakes
When painting clinker (lapstrake) boats, always brush horizontally along the plank length, never vertically. This prevents drips from collecting under the overlapping edges.
Step 2: Painting the Upper Hull
-
Mark the Waterline:
Determine where the color split will occur. In this design, the split doesn’t follow the straight waterline exactly but follows the plank lines. Choose a specific strake (plank) overlap about one-third of the way up from the keel to serve as your masking line. -
Apply the First Pink Coat:
Stir your Dusty Rose marine paint thoroughly. Using a roller for the flat areas and a brush for the lapstrake edges, apply the first coat to the upper two-thirds of the hull. Don’t worry about perfect coverage yet; thin, even coats are best. -
Cut in the Edges:
Carefully paint the stem (the front vertical timber) and the transom edges. I find using a smaller angled brush here gives me better control around the curves of the bow. -
Second Coat Application:
After the first coat has cured and been lightly sanded, apply a second coat of the pink paint. This layer should provide full opacity and a rich, solid color.
Sun-Kissed Effect
Mix a tiny drop of gold pearl medium into your final clear coat on the pink section only. It catches the sunset light beautifully without looking glittery.
Step 3: Painting the Lower Hull & Details
-
Masking the Separation:
Ensure the pink paint is fully cured (give it an extra day if possible). Apply painter’s tape precisely along the bottom edge of the lowest pink plank to create a crisp line for the green section. -
Apply Seafoam Green:
Apply the Seafoam Green paint to the lower hull section and the keel. Use the same roller-and-brush technique, paying special attention to the underside of the planks where shadows can hide missed spots. -
Layering the Green:
Sand lightly between coats and apply a second layer of green for durability and depth. Remove the painter’s tape while the final coat is still slightly tacky to prevent peeling the paint edge. -
The Gunwale Accent:
Mask off the top edge of your pink hull. paint the gunwales (the upper rails) with a dark grey or charcoal marine paint. This dark accent frames the boat and adds a sharp, finished look. -
Weathering (Optional):
To achieve the rustic look seen in the inspiration photo, you can very lightly scuff the high points of the dry paint with fine steel wool, or simply let the sea and sun do the work naturally over time.
allow the boat to cure for several days before launching to ensure the finish is hard enough to withstand the waves
Racing Stripes That Follow the Sheer Line
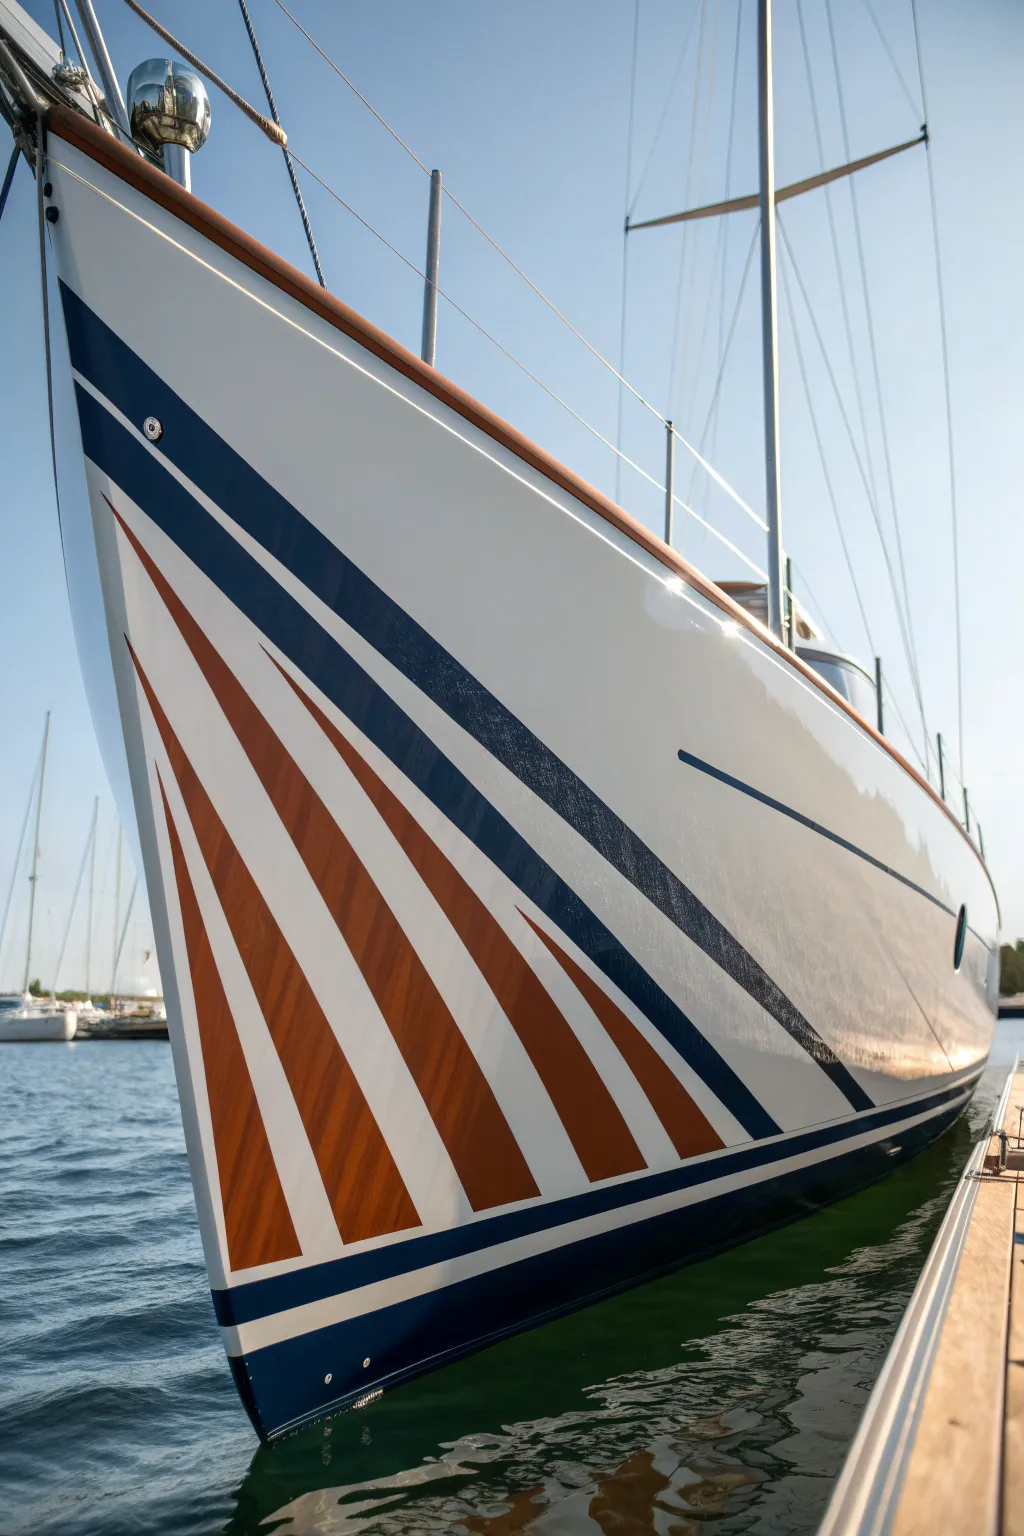
Transform your sailboat’s bow into a statement piece with this dynamic, retro-inspired stripe design. Combining classic navy sheer stripes with a bold, amber-toned sunburst pattern creates a sense of speed and elegance even when you’re docked.
Step-by-Step
Materials
- High-quality marine topside paint (White base)
- Marine topside paint (Navy Blue)
- Marine topside paint (Burnt Orange/Amber)
- High-grade vinyl masking tape (fine line tape like 3M 218)
- Standard blue painter’s tape for larger areas
- Dewaxing solvent or acetone
- Sandpaper (320-grit and 400-grit wet/dry)
- Tack cloths
- High-density foam rollers (4-inch size)
- Quality synthetic angled sash brush (1.5 or 2 inch)
- Measuring tape
- Pencil and long flexible batten or straight edge
- Protective gear (respirator, gloves, eye protection)
Step 1: Preparation & Layout
-
Clean the surface:
Begin by thoroughly cleaning the entire bow area with soapy water, rinsing well, and finishing with a dewaxing solvent to remove any wax or grease that could inhibit adhesion. -
Establish the sheer line:
Using your flexible batten as a guide, lightly mark the path for the upper navy sheer stripe. It should run parallel to the gunwale, starting narrow at the bow stem and widening slightly as it moves aft. -
Mark the waterline stripe:
Measure up from the waterline to position the lower navy stripe. This acts as a visual anchor for the design. -
Layout the sunburst pattern:
Determine the focal point for your sunburst fan, which is usually just below the forestay attachment on the stem. Mark a series of radiating lines downward and aftward. I find using a chalk line or laser level helpful here to get the angles symmetrical on both sides. -
Tape the design edges:
Apply fine line vinyl tape along all your pencil marks. This tape is crucial for sharp curves and preventing paint bleed. Press firmly along the edges with your thumbnail or a plastic squeegee. -
Double check symmetry:
Stand directly in front of the boat to ensure the port and starboard stripes mirror each other perfectly. Adjust tape as needed before any paint touches the hull.
Pro Tip: The Batten Trick
For long, sweeping curves, use a long strip of flexible PVC or wood trim as a ruler. Tape it at the ends and let it naturally find the fairest curve along the hull.
Step 2: Painting the Sheer Stripes
-
Scuff sand the area:
Lightly sand only the areas inside the taped lines with 320-grit sandpaper to give the paint a ‘tooth’ to grab onto. Wipe away dust with a tack cloth. -
Mask surrounding areas:
Use standard blue painter’s tape and paper or plastic sheeting to cover the white hull areas immediately adjacent to your distinctive stripes to protect against roller splatter. -
Apply the first navy coat:
Using a foam roller, apply a thin, even coat of navy blue paint to the upper sheer stripe and the lower waterline stripe. Use a ‘roll and tip’ method: roll the paint on, then lightly drag the tip of a dry brush over it to smooth out bubbles. -
Sand and recoat:
Allow the first coat to dry according to the manufacturer’s instructions. Lightly sand with 400-grit, tack off dust, and apply a second coat for depth and opacity.
Troubleshooting: Bleeding Paint
If paint bleeds under the tape, let it dry completely. Then, lightly sand the bleed area and touch up with the base white paint using a fine artist brush.
Step 3: Creating the Sunburst Fan
-
Mask the sunburst rays:
Once the navy stripes are dry to the touch (or if you are working carefully in sections), ensure all areas surrounding the amber sunburst rays are masked off. Remember, you are painting the colored stripes, so mask over the white gaps. -
Apply the amber paint:
Roll the Burnt Orange/Amber paint into the tapered ray sections. Because these shapes narrow significantly, you might need to use a small artist’s brush near the tip of the bow for precision. -
Second coat of amber:
Just like the navy stripes, apply a second coat of amber paint after the appropriate drying and light sanding. This vibrant color often needs two or three coats to look solid. -
Remove the tape:
This is the most satisfying part. carefully peel back the fine line tape while the final coat is still slightly tacky (wet edge). Pull the tape back against itself at a 45-degree angle away from the painted edge to ensure a razor-sharp line.
Step 4: Finishing Touches
-
Inspect and cleanup:
Check closely for any small bleeds or uneven edges. Use a rag with a tiny amount of solvent to wipe away fresh mistakes, or wait for them to dry and carefully scrape them with a razor blade. -
Curing time:
Allow the paint to cure fully—often 24 to 48 hours—before exposing it to aggressive scrubbing or waxing. -
Final polish:
Once fully cured, apply a coat of marine wax over the entire area to seal the edges of your new stripes and protect the gloss finish from UV rays.
Your sleek custom striping is ready to turn heads at the marina and on the open water

PENCIL GUIDE
Understanding Pencil Grades from H to B
From first sketch to finished drawing — learn pencil grades, line control, and shading techniques.
Explore the Full Guide
Matte Lower Hull With Gloss Topside Contrast
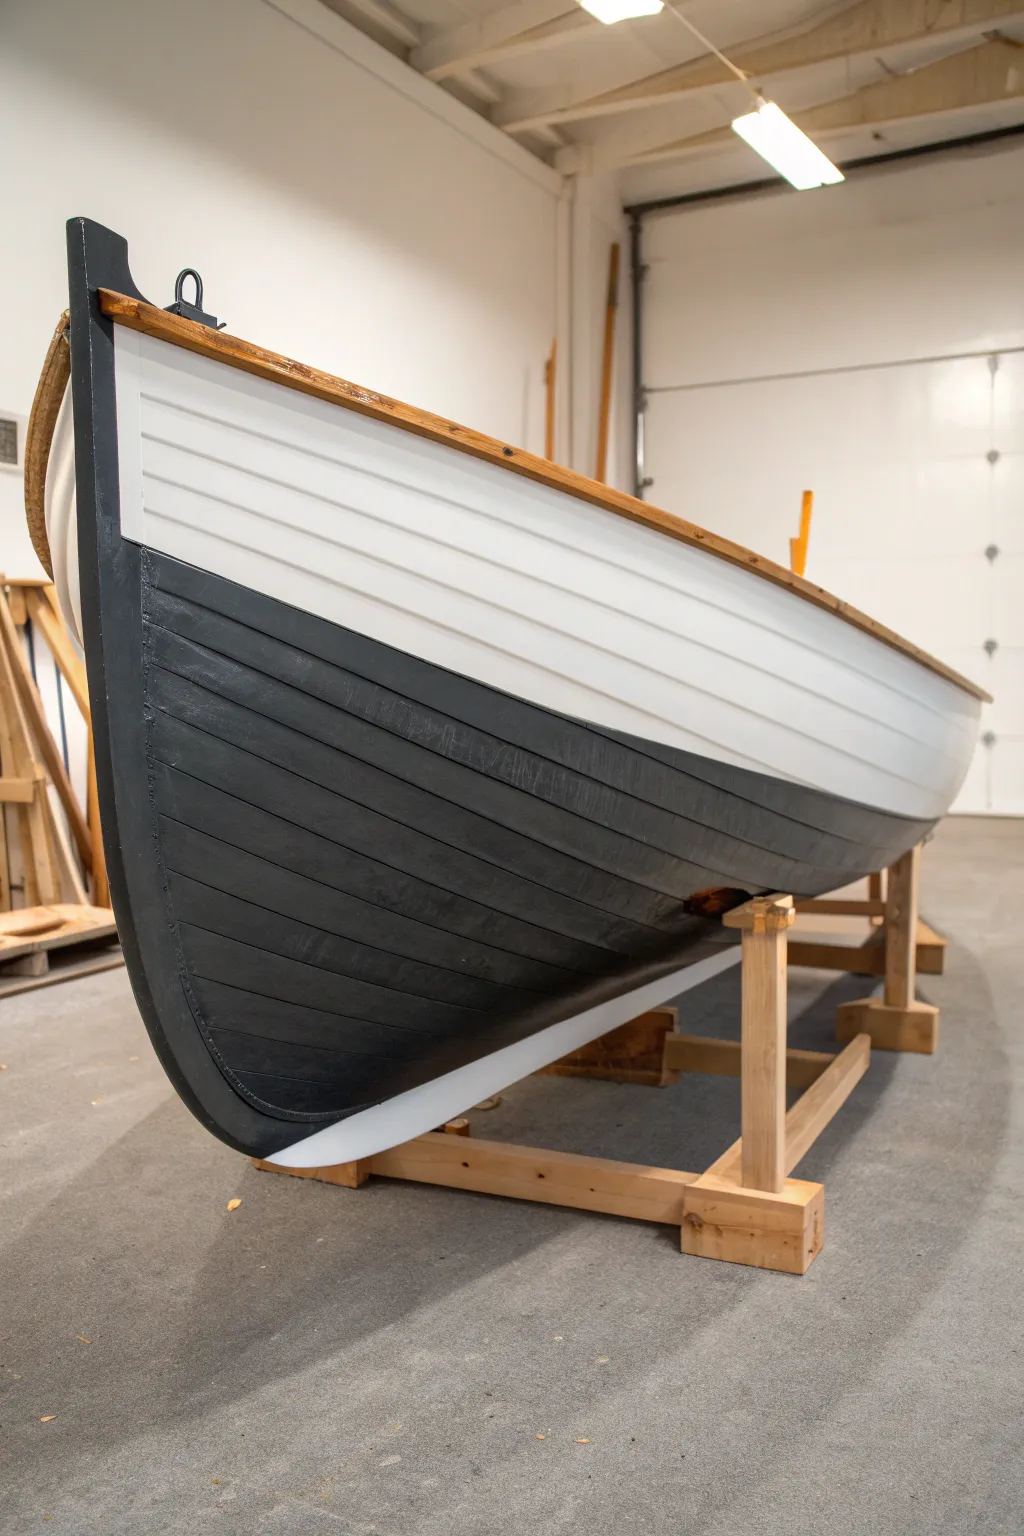
This project transforms a classic lapstrake hull into a striking modern statement by juxtaposing a deep, matte black bottom against a crisp white topside. The finish emphasizes the beautiful lines of the planking while providing a durable, stealthy aesthetic underneath the waterline.
Step-by-Step Tutorial
Materials
- Marine-grade matte black enamel paint
- Marine-grade semi-gloss white enamel paint
- High-gloss spar varnish
- Blue painter’s tape (2-inch width)
- Fine-line tape (optional, for crisp edges)
- Sandpaper assortment (120, 220, 320 grit)
- Tack cloths
- Foam rollers (4-inch)
- High-quality bristle brushes (2-inch and 1-inch)
- Wood sealer or primer suitable for marine use
- Paint thinner or mineral spirits
Step 1: Preparation and Priming
-
Inspect the hull:
Begin by thoroughly inspecting the bare wood hull for any rough spots, old finish, or residue. The surface needs to be immaculately clean. -
Sand the entire exterior:
Using 120-grit sandpaper, carefully sand the entire exterior of the hull. Sand with the grain of the planks, paying special attention to the ‘steps’ where the lapstrake planks overlap. -
Clean the dust:
Vacuum the hull thoroughly to remove sanding dust, then wipe it down with a tack cloth to capture remaining fine particles. -
Apply sealer:
Apply a penetrating wood sealer or marine primer to the entire exterior. This ensures the paint adheres properly and protects the wood from moisture. -
Sand the primer:
Once the primer is fully cured, lightly scuff it with 220-grit sandpaper to create a mechanical bond for your topcoats.
Tape Line Perfection
To stop black paint bleeding under the tape, paint a thin layer of the WHITE paint over the tape edge first. This seals the gap with the base color.
Step 2: Painting the Topside
-
Mask the gunwale:
Carefully run painter’s tape along the bottom edge of the top oak gunwale (the wooden rail) to protect it from white paint. Press the edges down firmly. -
Apply the first white coat:
Using a 4-inch foam roller primarily, apply the first coat of semi-gloss white marine enamel to the upper section of the hull. Use a brush to work paint into the lapstrake crevices where the roller can’t reach. -
Tip off the paint:
Immediately after rolling a section, lightly drag a dry brush horizontally across the wet paint to smooth out bubbles and roller texture. -
Sand and recoat:
Allow the first coat to dry overnight. Lightly sand with 320-grit paper, wipe clean, and apply a second coat of white for full opacity.
Dealing With Dust
If you find dust nibs in your final matte coat, do NOT sand them. Sanding changes the sheen. Carefully pick them out with a tweezer or leave them be.
Step 3: Creating the Contrast Line
-
Establish the waterline:
Determine where the black paint will meet the white. This isn’t just a straight line; it curves to follow the boat’s shape. Mark this line lightly with a pencil. -
Apply the masking line:
Run a strip of high-quality painter’s tape or fine-line tape exactly along your pencil mark. This is the most crucial step for a professional look. Ensure the tape is adhered tightly to prevent bleed-under. -
Burnish the tape edge:
I always rub the tape edge firmly with a fingernail or a plastic putty knife to seal it completely against the hull irregularities.
Step 4: Applying the Matte Black
-
Prep the black paint:
Stir the matte black marine enamel thoroughly. Matte paints have flattening agents that settle at the bottom, so failing to mix well can result in a patchy sheen. -
Apply first black coat:
Roll on the black paint from the keel up to the tape line. Use a brush for the stem (front curve) and the underside of the plank laps. -
Watch for drips:
Matte paint can show drips clearly. Keep a close eye on the overlapping planks and catch any runs immediately with your brush. -
Second coat application:
After appropriate drying and a light scuff sand, apply the second coat of matte black. Ensure even coverage so the deep charcoal tone is uniform. -
Remove tape:
While the final coat of black is still slightly tacky (not fully dry), slowly peel away the masking tape at a 45-degree angle. This prevents the paint from chipping at the line.
Step 5: Finishing Touches
-
Clean the gunwale:
Remove the tape from the top gunwale. If any white paint seeped through, carefully scrape it away or sand it off. -
Varnish the wood trim:
Apply three to four coats of high-gloss spar varnish to the gunwale rails. This glossy natural wood serves as a warm crown to the cool painted hull. -
Final cure:
Let the entire project cure for several days in a dust-free environment before moving the boat or exposing it to water.
Now you have a stunning, classic vessel ready to cut through the water with style
Bold Color-Block Panels Along the Hull
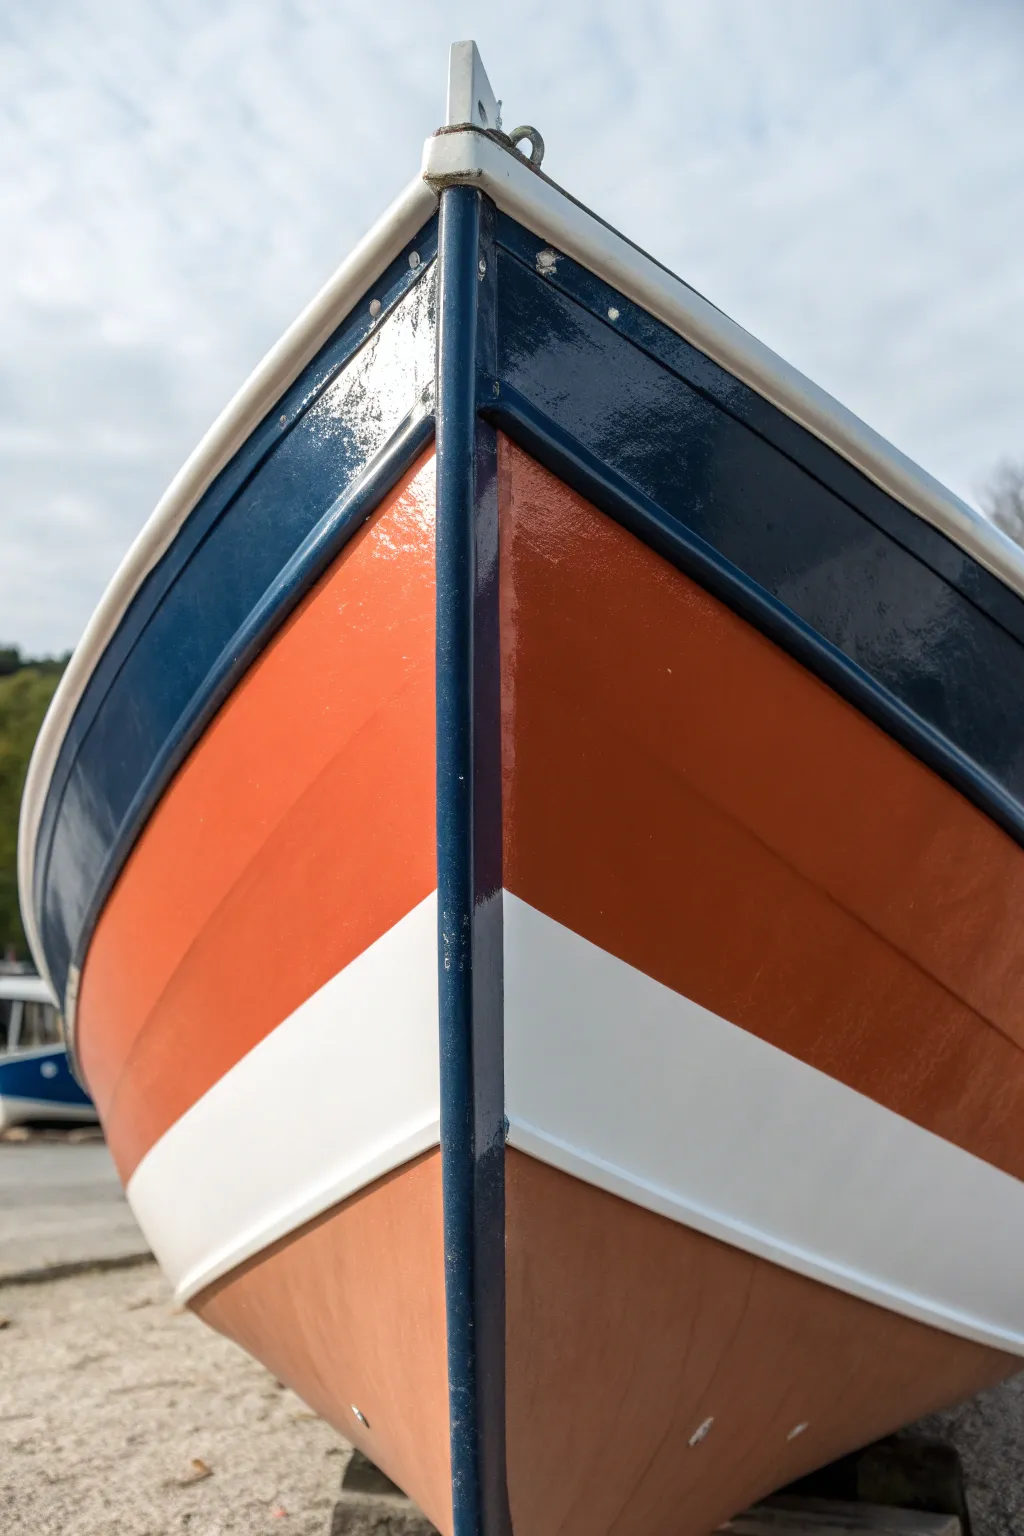
Recreate this classic maritime aesthetic by applying bold, horizontal color blocks that emphasize the sleek lines of a boat’s hull. The finished look combines deep navy, vibrant orange, and crisp white for a striking, high-contrast finish that looks professional and clean.
Step-by-Step Tutorial
Materials
- Marine-grade topside paint (Navy Blue)
- Marine-grade topside paint (Bright Orange)
- Marine-grade topside paint (White)
- Copper-based antifouling bottom paint
- Epoxy primer (if working on bare fiberglass/wood)
- High-quality masking tape (blue or green painters tape)
- Fine-line tape (for crisp edges)
- Foam rollers and roller tray
- High-grit sandpaper (220-320 grit)
- Tack cloth
- Acetone or paint thinner (for cleaning)
- Personal protective equipment (respirator, gloves)
Step 1: Preparation & Layout
-
Clean and Sand:
Begin by thoroughly washing the hull to remove any salt, grease, or dirt. Once dry, sand the entire surface with 220-grit sandpaper to create a mechanical key for the new paint to adhere to. -
Dust Removal:
Wipe down the entire sanded area with a tack cloth or a rag dampened with acetone. It is critical that no dust remains, as it will ruin the smooth finish of your color blocks. -
Mark the Waterline:
Determine where your bottom paint will meet the topside paint. Use a laser level or a batten to mark this line accurately, ensuring it follows the natural curve of the hull. -
Tape the Upper Boundary:
Apply fine-line tape to define the upper edge of where the white stripe will go. This stripe acts as a separator between the bottom paint and the main orange section.
Use Fine-Line Tape
Never use standard masking tape for the actual color separation lines. Use specialized vinyl fine-line tape; it stretches around curves and prevents paint bleed.
Step 2: Applying the Colors
-
Paint the White Stripe:
Roll on the white marine paint in the designated stripe area. I like to extend the paint slightly over the tape lines to ensure full coverage, as the next layers will cover the overlap. -
Let it Cure:
Allow the white paint to dry completely according to the manufacturer’s instructions. Do not rush this, or the tape you apply next will peel it up. -
Mask the White Stripe:
Once fully cured, carefully apply fine-line tape over the white paint to protect it. Position the tape exactly where you want the sharp transitions to be. -
Apply the Orange Section:
Roll the bright orange paint onto the large middle section of the hull. Use the ‘roll and tip’ method—rolling on the paint and then lightly dragging a dry brush across it—to smooth out bubbles and roller marks. -
Second Orange Coat:
After the first coat tacks up, apply a second coat of orange to ensure deep, opaque color saturation. -
Mask for the Navy Top:
After the orange layer is dry, tape off the lower boundary of the top section. Ensure this line runs parallel to the gunwale for a symmetrical look. -
Paint the Navy Blue:
Apply the navy blue paint to the top reinforced section of the hull (the sheer strake). This dark color frames the boat beautifully and hides scuffs from docking.
Step 3: Finishing Touches
-
Paint the Stem:
Carefully mask vertical lines on either side of the center stem (the front edge of the bow). Paint this vertical strip in the same navy blue to connect the design and add structural definition. -
Remove Tape:
Pull the masking tape while the final coat of paint is still slightly tacky but not wet. Pull away from the painted edge at a 45-degree angle to get the sharpest line. -
Apply Bottom Paint:
Finally, paint the area below the white stripe with the copper-based antifouling paint. This textured reddish-brown paint contrasts well with the glossy topside finish. -
Final Inspection:
Check for any small bleeds or imperfections. If necessary, use a fine artist’s brush to touch up the edges where the colors meet.
Uneven Waterlines
If your stripes look wavy, step back 10 feet. Use a long, flexible batten or PVC pipe taped to the hull to guide your masking tape in one smooth, continuous curve.
Once the paint has fully hardened, your boat will turn heads with its refreshed, custom vibrancy


Marsh-Tone Camouflage for a Stealthy Look
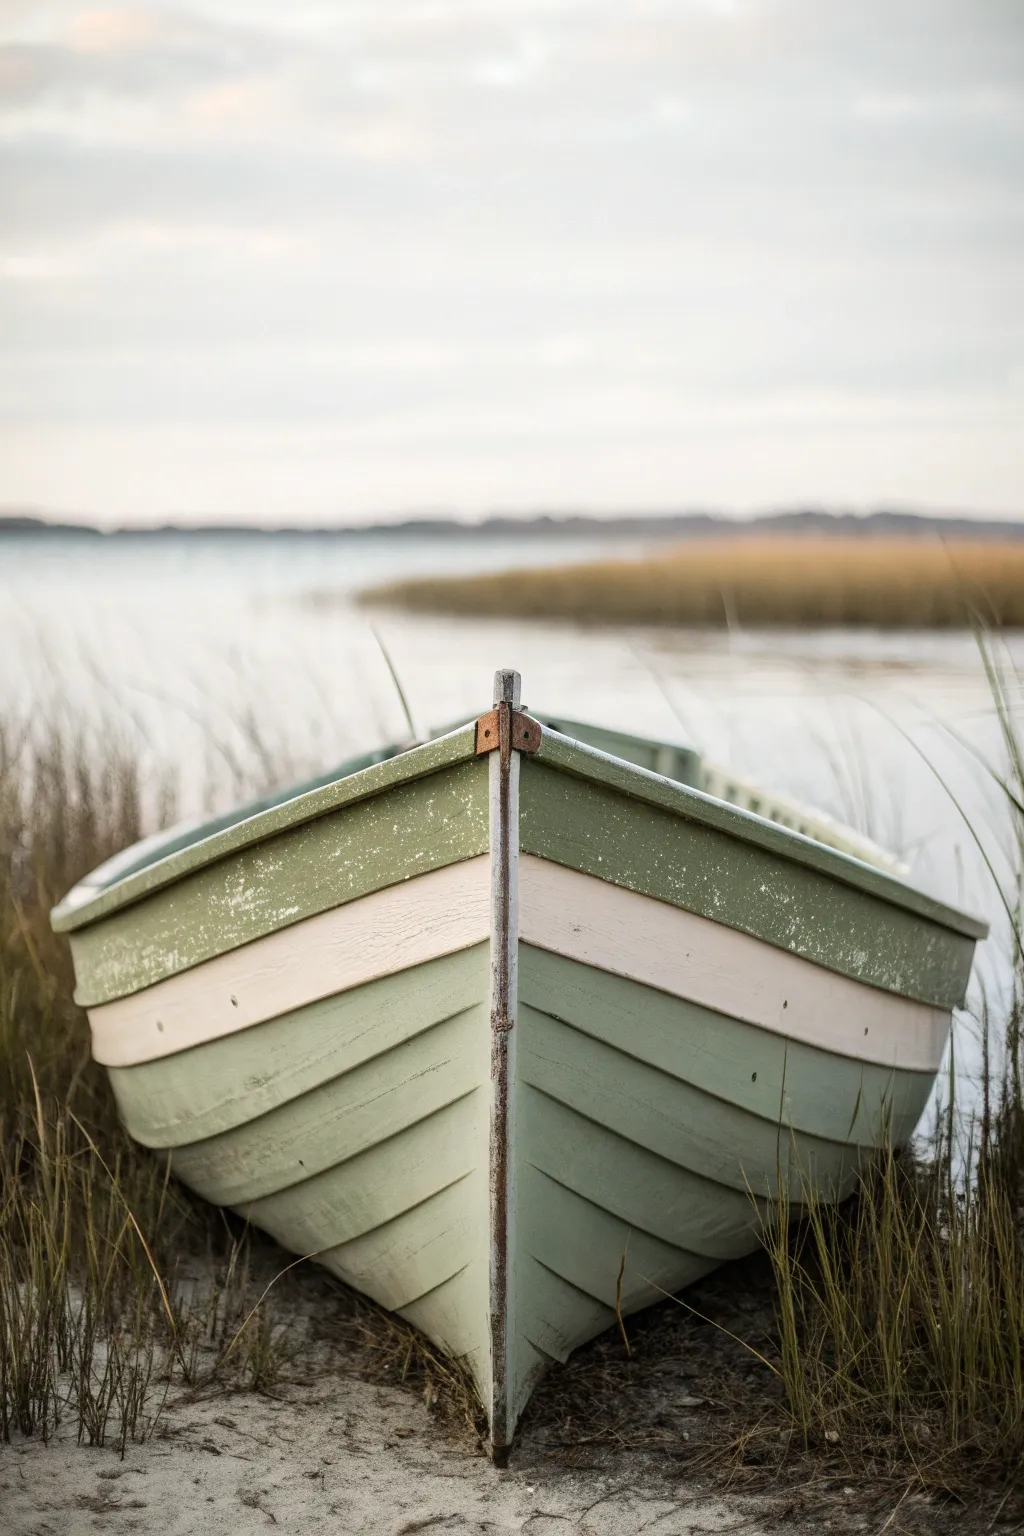
Blend seamlessly into the estuary reeds with this serene, nature-inspired paint scheme. By utilizing muted sage greens and a crisp cream accent stripe, you’ll give your vessel a classic, understated camouflage that looks as peaceful as the water itself.
Detailed Instructions
Materials
- High-gloss marine paint (Sage Green)
- High-gloss marine paint (Cream/Off-White)
- High-gloss marine paint (Pale Green/Khaki)
- Marine primer
- Sandpaper (80, 120, and 220 grit)
- Painter’s tape (high quality)
- Foam rollers and tray
- Angled sash brush (2-inch)
- Acetone or mineral spirits
- Tack cloths
- Canvas drop cloth
Step 1: Preparation & Priming
-
Assess and clean:
Begin by thoroughly cleaning the boat’s hull to remove dirt, algae, or grease. Let it dry completely before inspecting for any loose paint or damage that needs repair. -
Sand the hull:
Using 80-grit sandpaper, sand the entire exterior surface. If the previous finish is intact, you just need to scuff it for adhesion; if it’s flaking, sand down to the bare wood or fiberglass. -
Smooth the surface:
Follow up with 120-grit sandpaper to smooth out the rough scratches, then wipe the hull down with acetone or mineral spirits to remove all dust. -
Apply the primer:
Roll on a coat of marine primer covering the entire exterior. Use a brush to work the primer into the laps (the overlapping edges of the planks) to ensure full coverage. -
Final smooth sanding:
Once the primer is cured according to the can’s instructions, lightly hand-sand with 220-grit paper for a glass-smooth base.
Step 2: Painting the Hull colors
-
Paint the top stake:
Starting at the gunwale, paint the topmost plank (strake) with your Sage Green marine paint. I prefer using an angled brush here for better control along the top edge. -
Define the stripe area:
Identify the second strake down as your accent stripe. Carefully apply painter’s tape along the bottom edge of the top strake and the top edge of the third strake to mask off the area. -
Apply the cream stripe:
Paint the exposed second plank with the Cream/Off-White paint. Use smooth, long horizontal strokes to mimic the wood grain direction. -
Paint the lower hull:
Move to the Pale Green/Khaki paint for the remainder of the hull. Start from the third plank down and work your way to the keel, using a foam roller for the broad areas and a brush for the lap grooves. -
Remove tape promptly:
Peel off the painter’s tape while the paint is still slightly tacky, pulling it away at a 45-degree angle to ensure a crisp, clean line.
Wet Edge Wonder
Always keep a “wet edge” by painting small sections and overlapping slightly before the paint dries to avoid lap marks.
Step 3: Finishing Details
-
Sand between coats:
Allow the first coat of colors to dry fully (usually 24 hours). Lightly sand everything with 220-grit sandpaper and wipe away dust with a tack cloth. -
Apply second coats:
Repeat the painting process for the Sage Green, Cream, and Pale Green sections. Masking again isn’t strictly necessary if you have a steady hand, but I recommend it for the crispest results. -
Detail the stem:
The vertical stem post at the bow often takes a beating. Paint this matching the adjacent hull colors, or sand it back and seal with clear marine varnish for a rustic wood accent. -
Inspect the laps:
Check the underside of the overlapping planks. It’s easy to miss spots here, so use a small brush to touch up any holidays (missed spots) in the Pale Green section. -
Final cure:
Allow the boat to cure for several days in a dry, covered area before launching. Marine paints harden over time, so patience here prevents immediate scratches.
Weathered Effect
For a vintage look, lightly dry-brush a darker green sparsely over the dry cream stripe to mimic algae or wear.
With these soft earthy tones applied, your boat will look perfectly at home nestled among the cattails and sand
Tiger or Zebra Stripes as a Full Hull Wrap
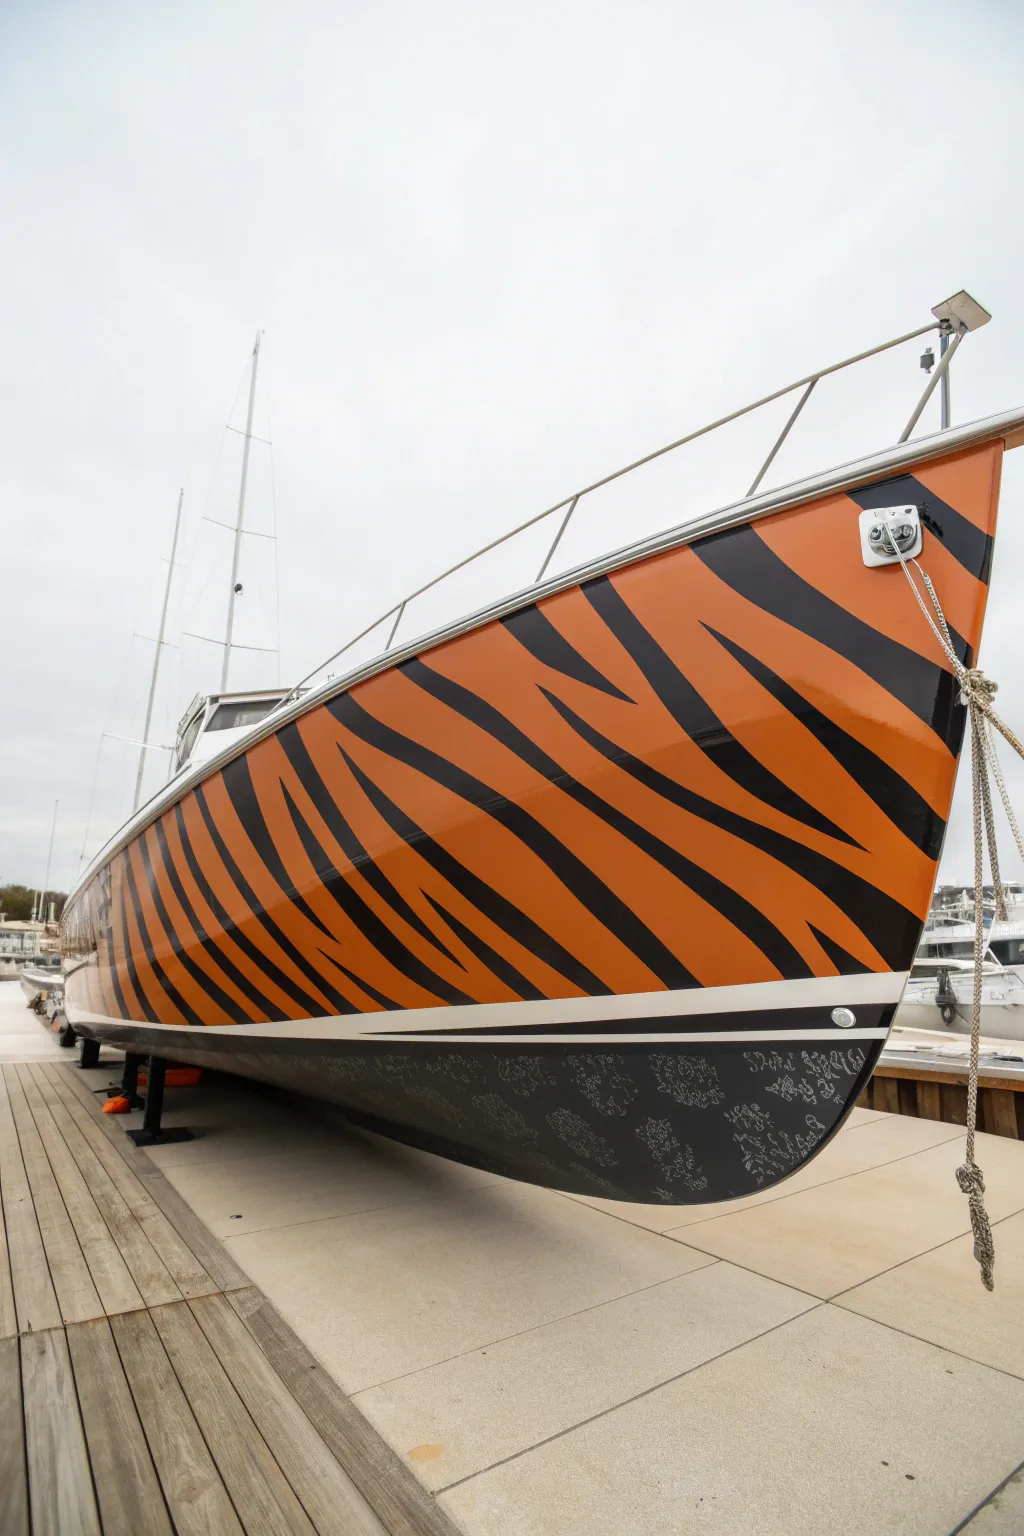
Transform your vessel into a fierce predator of the seas with this striking tiger stripe design. This project combines bold, high-contrast vinyl wrapping on the topsides with a subtle, textured antifouling finish below the waterline for a look that screams speed and power.
Step-by-Step Guide
Materials
- High-quality marine vinyl wrap (Orange gloss)
- High-quality marine vinyl wrap (Black gloss)
- Knifeless tape or precision cutting blade
- Squeegee with felt edge
- Heat gun
- Surface cleaner and degreaser
- Lint-free microfiber cloths
- Masking tape (various widths)
- White pinstriping tape
- Black antifouling paint
- Patterned roller or stencil (for lower hull texture)
- Sanding block and sandpaper (120-220 grit)
- Epoxy filler (if hull repairs are needed)
Step 1: Preparation and Planning
-
Assess the hull:
Begin by thoroughly inspecting the hull for any deep scratches, gouges, or imperfections. Since vinyl hugs every curve, bumps will show through, so fill divots with epoxy filler and sand them flush. -
Deep clean the surface:
Scrub the entire exterior with a marine-grade degreaser to remove salt, wax, oil, and grime. Rinse thoroughly and dry completely with lint-free cloths to ensure perfect adhesion. -
Establish the waterline:
Use a laser level or existing marks to tape off the waterline. This distinct line separates your glossy vinyl work from the protective bottom paint.
Wrinkle Rescue
Vinyl wrinkling on the bow curve? Heat it gently (don’t burn it!) and pull firmly outward to distribute tension before squeegeeing down.
Step 2: Applying the Orange Base
-
Cut the base vinyl:
Measure the length of your hull and cut panels of the orange gloss vinyl, leaving generous overlap at the edges for trimming. -
Initial application:
Peel back a small section of the backing paper and anchor the vinyl at the bow. Work horizontally towards the stern, using your squeegee to press the film down firmly. -
Smooth out bubbles:
Work in overlapping strokes with the felt-edged squeegee. If you encounter air pockets, gently lift the vinyl and re-apply, or use a needle to prick and flatten stubborn bubbles. -
Heat and stretch:
As you reach the complex curves near the bow or chine, use the heat gun on a low setting to warm the vinyl, making it pliable enough to stretch around corners without wrinkling.
Level Up: Reflective Eyes
Hide small reflective vinyl details within the black stripes. At night, hit by a dock light, the hull will shimmer like a lurking predator.
Step 3: Creating the Stripes
-
Design the pattern:
Lightly sketch your tiger stripe pattern onto the orange vinyl using a grease pencil, or plan it out using knifeless tape for the safest cuts. -
Lay the black vinyl:
Apply the black vinyl sheets over the areas where the stripes will be. I prefer to do this in manageable sections rather than one giant sheet. -
Cut the shapes:
Carefully cut along your pattern lines. If using knifeless tape, pull the filament now to cleanly slice through the black vinyl. Remove the excess material to reveal the orange orange beneath. -
Seal the edges:
Go over every single stripe edge with the heat gun and squeegee to ensure a tight seal that won’t lift at high speeds.
Step 4: Lower Hull and Detailing
-
Apply the pinstripe:
Run a thick white vinyl stripe or pinstripe tape immediately above the waterline. This creates a crisp visual break between the intense tiger pattern and the dark underbelly. -
Prep the bottom:
Ideally, lightly sand the area below the waterline to key the surface for the antifouling paint. -
Apply texture base:
Roll on your first coat of black antifouling paint. Let it tack up slightly but not dry completely. -
Create the subtle pattern:
Using a textured roller or a faint stencil with a slightly lighter charcoal shade, apply the organic, bubbly texture shown in the image to the bottom paint. This adds unique depth. -
Final inspection:
Walk around the boat once everything is dry. Check for any lifted vinyl edges or holidays in the paint and touch them up immediately.
Step back and admire your fierce new hull design, ready to turn heads at every marina you visit
Shark Mouth Graphic on the Bow
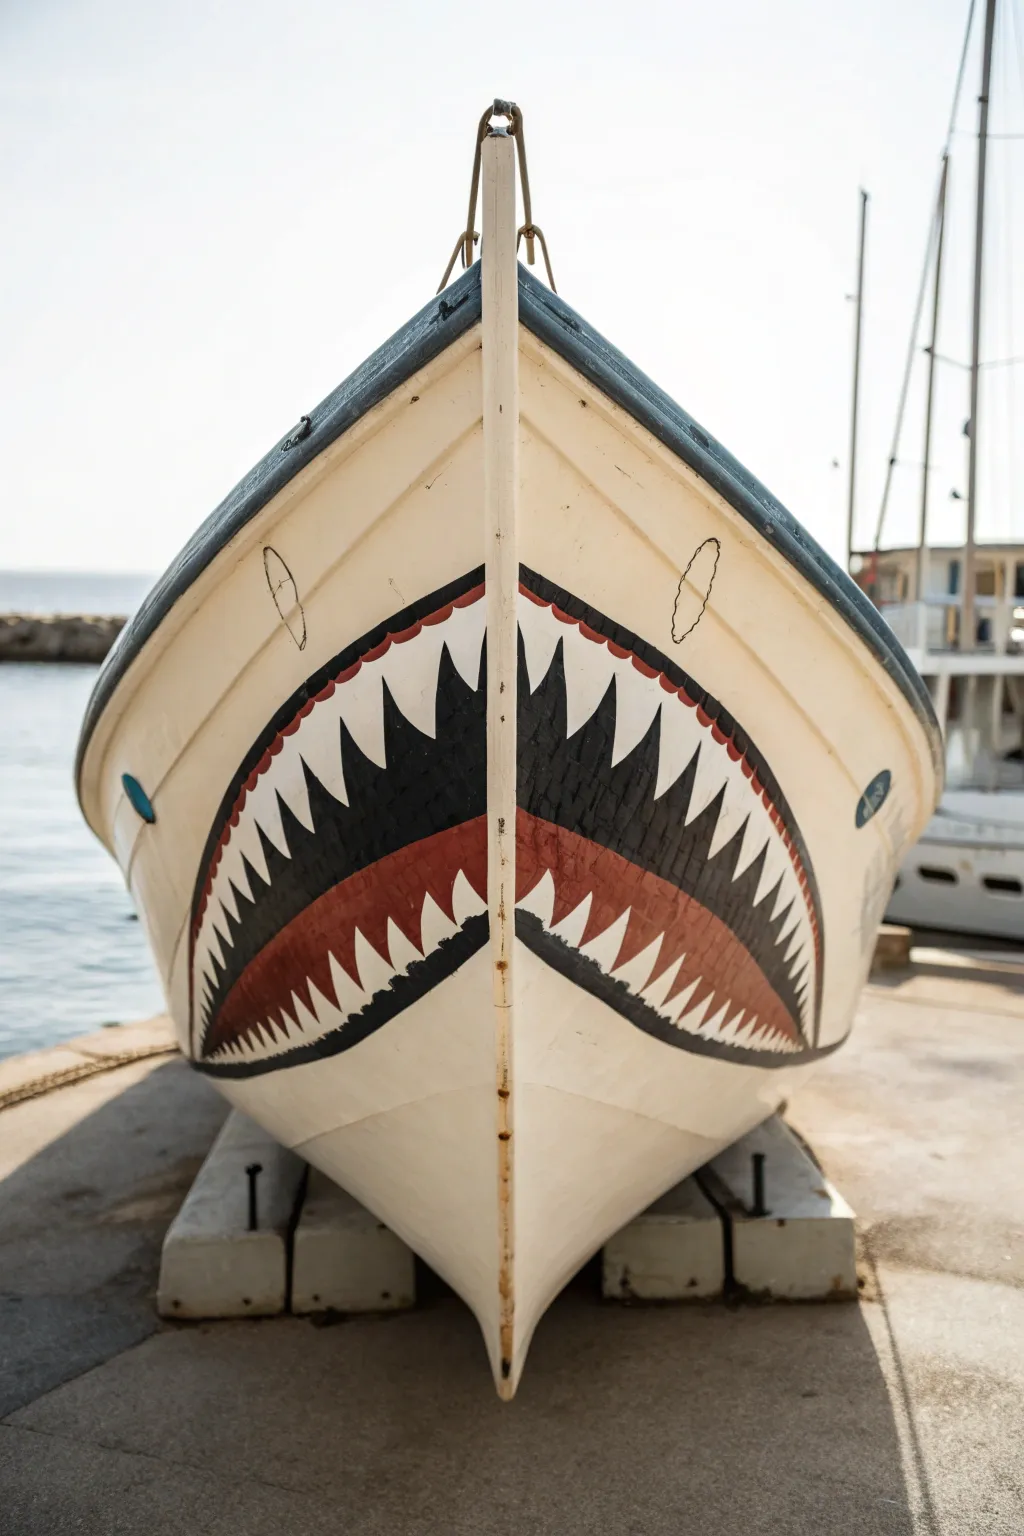
Transform your vessel’s bow into a menacing predator with this classic shark mouth graphic influenced by vintage fighter jet nose art. This bold, high-contrast design uses black, red, and white marine paints to create a striking 3D jaw effect separated by the prow’s sharp edge.
How-To Guide
Materials
- High-gloss marine enamel boat paint (White)
- High-gloss marine enamel boat paint (Black)
- High-gloss marine enamel boat paint (Red/Oxide Red)
- Painter’s tape (1-inch/25mm width)
- Fine-line tape (1/4-inch/6mm width for curves)
- Pencil or chalk stick
- Various paintbrushes (1-inch flat, #4 round detail brush)
- Flexible ruler or tape measure
- Cleaning solvents/degreaser appropriate for your hull
- Sandpaper (220-grit)
Step 1: Preparation and Layout
-
Clean the Surface:
Begin by thoroughly cleaning the bow area. Remove all salt, grime, and wax using a quality hull cleaner or degreaser to ensure the paint adheres properly. -
Light Sanding:
Scuff the area where the design will go with 220-grit sandpaper. You don’t need to strip the gelcoat, just create a ‘key’ for the new paint to grip. -
Wipe Down:
Remove all sanding dust with a tack cloth or a rag dampened with solvent. A clean surface is crucial for crisp lines. -
Mark Key Points:
Use a pencil or chalk to mark the outer limits of the mouth. Measure down from the gunwale on both the port and starboard sides to ensure symmetry.
Curve Control
For the long, swooping curve of the mouth, use 1/4-inch vinyl fine-line tape. It bends much easier than standard masking tape and won’t buckle on the curved hull.
Step 2: Outlining the Design
-
Draw the Upper Arc:
Sketch the large upper curve of the mouth first. It should sweep upwards from near the waterline towards the stem, curving back down slightly like a grimace. -
Sketch the Teeth:
Lightly draw the sawtooth pattern. Notice how the teeth angle slightly backward; recreate this angle to give the design movement and aggression. -
Define the Gum Line:
Sketch a second, inner curve parallel to your main upper outline. This space will become the black ‘gum’ or lip area. -
Draft the Lower Jaw:
Sketch the lower jaw shape, which typically mirrors the bottom curve of the hull but sweeps upward to meet the top jaw corners. -
Tape the Main Outlines:
Use fine-line tape to mask the major outer boundaries of the entire design. While I prefer freehanding tight corners, tape ensures the long swooping lines remain smooth.
Step 3: Painting the Layers
-
Paint the Base White:
Fill in the entire tooth area with your white marine enamel. Even if the hull is white, a fresh coat ensures the teeth look bright and intentional. Let this dry completely. -
Tape the Teeth:
Once the white is fully cured, carefully apply tape over the white triangles you want to keep as teeth. Press the edges down firmly to prevent bleed. -
Apply the Black Background:
Paint the upper ‘gum’ area and the spaces between the top teeth with black enamel. Use a smaller round brush to get sharp points between the teeth. -
Fill the Red Mouth:
Paint the large central area and the lower jaw section with red enamel. This typically covers the negative space between the lower set of white teeth. -
Add Black Outline:
Using a steady hand and a detail brush, paint the thick black outline that borders the bottom of the red jaw. This frames the design and adds visual weight. -
Detail the Corners:
Refine the corners of the mouth where the upper and lower jaws meet, ensuring the black outline creates a clean, continuous loop.
Paint Bleeding?
If you see bleed after removing potential tape, wait for it to dry fully. Then, lightly scrape the excess with an X-Acto blade rather than smearing wet paint.
Step 4: Finishing Touches
-
Remove Tape:
Pull the tape while the paint is still slightly tacky (not wet, but not rock hard) to get the cleanest edge. Pull at a 45-degree angle away from the paint. -
Touch Up:
Inspect the teeth points. If any paint bled under the tape, use a small brush with a tiny amount of solvent or the background hull color to tidy it up. -
Cure Time:
Allow the design to cure for at least 24 hours before exposing it to heavy water spray or scrubbing.
With the tape removed and the paint cured, your boat now sports a grin that commands respect on the open water
Skeletal Fish Mural for an Edgy Angler Theme
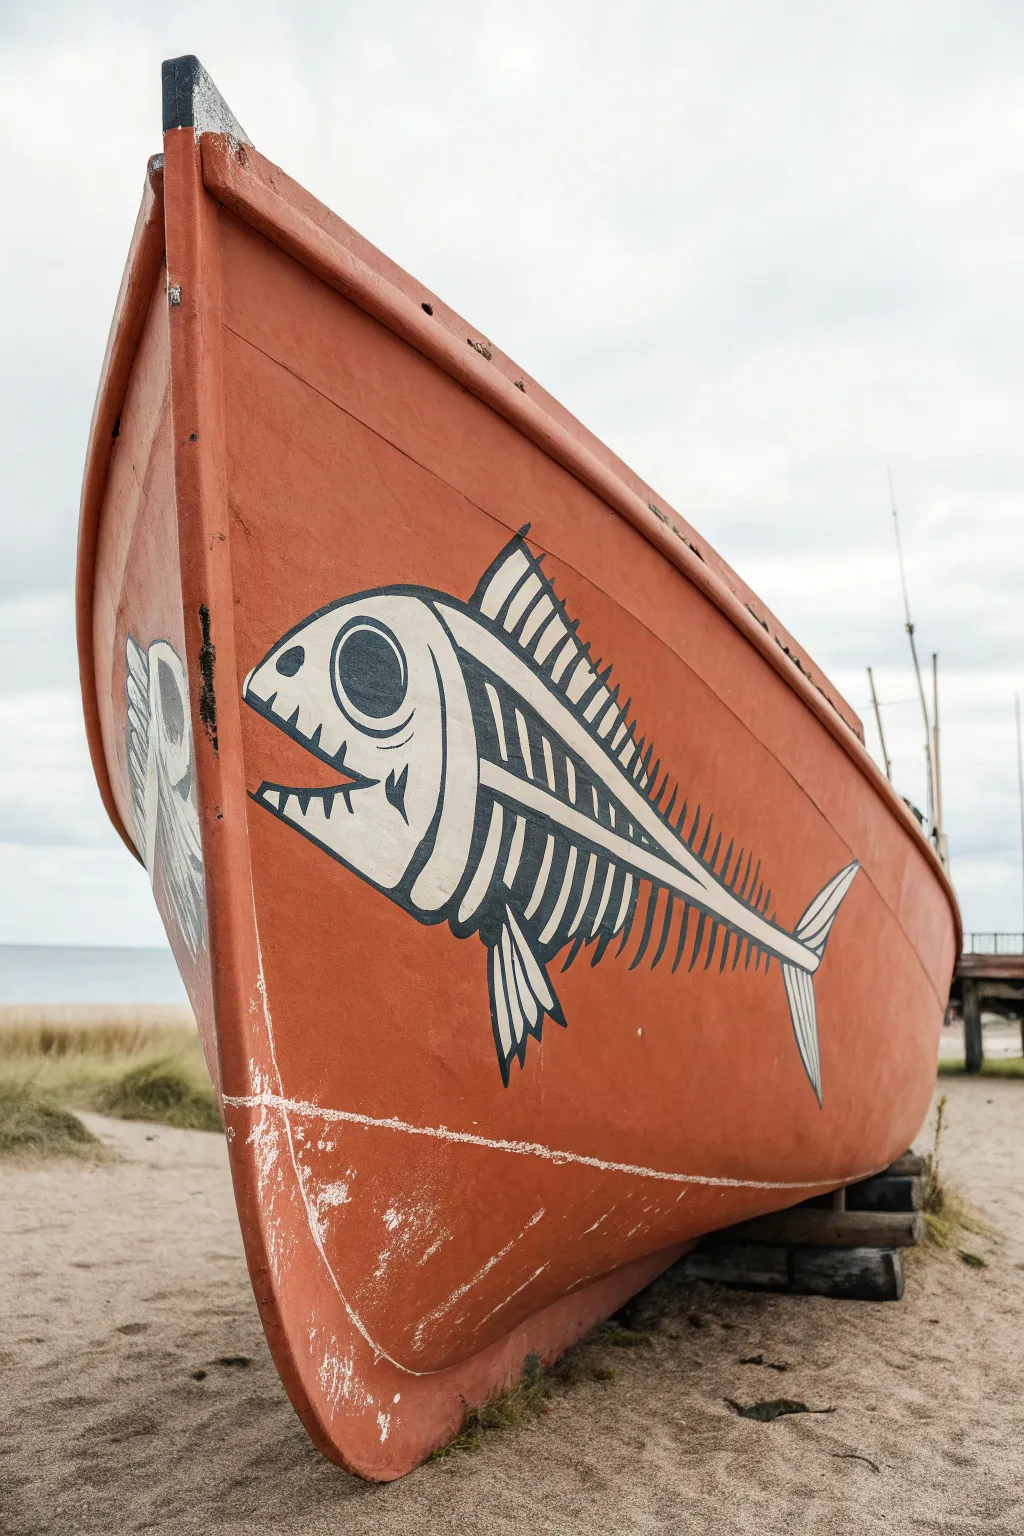
Transform a standard hull into a striking statement piece with this bold, graphic fish skeleton design. The stark contrast of black and white against a weathered terracotta orange creates a rugged, pirate-worthy aesthetic perfect for any edgy angler.
Detailed Instructions
Materials
- Marine-grade paint (Terracotta/Red-Orange for base)
- Marine-grade enamel or epoxy paint (Black)
- Marine-grade enamel or epoxy paint (White)
- Sandpaper (80, 120, and 220 grit)
- Painter’s tape (various widths)
- Chalk or a light-colored grease pencil
- Synthetic bristle brushes (2-inch flat, 1-inch angled, and fine liner)
- Small foam roller
- Protective clear coat (marine spar varnish)
- Cleaning rags and acetone
Step 1: Hull Preparation & Base Coat
-
Clean the surface:
Begin by thoroughly cleaning the boat hull to remove any marine growth, salt, or old flaking paint. A pressure washer is ideal here, followed by a scrub with soapy water. -
Sand for adhesion:
Once dry, sand the area where the mural will go. Start with 80-grit if the surface is rough, then move to 120-grit. You need a key for the new paint to bite into. -
Wipe with acetone:
Remove all sanding dust using a rag soaked in acetone. This ensures no oils or particles interfere with the paint bond. -
Apply the base color:
Roll on your terracotta or red-orange marine paint. Depending on coverage, I find two thin coats are always better than one thick coat to prevent drips. Let this cure fully according to the manufacturer’s instructions.
Uneven Lines?
If your hand is shaky, use fine-line automotive masking tape to create the long curves of the spine and ribs. Remove while paint is still tacky.
Step 2: Drafting the Design
-
Establish the spine:
Using a piece of chalk or a grease pencil, draw a long, slightly curved line horizontally across the hull to act as the central spine of the fish. This guides the flow of the artwork. -
Sketch the head shape:
Draw the large, rounded shape of the fish head at the front. It should look somewhat like a rounded triangle with an open mouth. -
Outline the ribs and fins:
Sketch the dorsal fin on top and the pectoral fin below using angular, jagged shapes. Then, mark out the vertical rib bones extending from the spine, getting progressively shorter toward the tail. -
Detail the tail:
Draw the bifurcated tail fin at the rear end of your spine line. Keep the lines somewhat loose and organic; this style relies on a hand-drawn feel.
Step 3: Painting the Artwork
-
Outline with black:
Dip a fine liner brush or small angled brush into the black marine enamel. Carefully trace over your chalk outlines to define the skeleton’s structure. -
Fill the black sections:
Switch to a slightly larger brush to fill in the dark areas, particularly the large black pupil, the spaces between the ribs, and the distinct triangular shadows at the base of the spine. -
Create the eye:
Paint a large black circle for the eye socket, then add a smaller white highlight later. The stark circle is crucial for that startled, skeletal look. -
Paint the white bones:
Using the white marine paint, fill in the actual bone structures—the skull, the ribs, and the fin spines. You may need two coats of white to ensure it covers the terracotta base completely. -
Add the teeth:
With a steady hand and a small detail brush, paint small, sharp white triangles inside the open mouth area for the teeth. -
Refine the edges:
Once the main blocks of color are dry, go back with your black liner brush to tidy up any edges where the white paint might have bled or looks uneven.
Glow in the Dark
Mix a phosphorescent powder into your white marine paint or clear coat. The skeleton will charge in the sun and glow eerily at night in the marina.
Step 4: Finishing Touches
-
Add subtle weathering (optional):
If you want the mural to look aged like the reference, you can dry-brush a tiny amount of the hull color lightly over parts of the white bone to simulate wear. -
Paint the waterline:
Use painter’s tape to mark a crisp line below the mural (or keep it rough like the image) and add the white waterline stripe if your boat needs one. -
Seal the work:
Once the artwork is completely cured (this can take 24-48 hours), apply a clear marine spar varnish over the painted area to protect it from UV rays and saltwater.
Step back and admire your fierce new hull design as it prepares to cut through the waves
Marlin-In-Action Side Mural Across the Hull
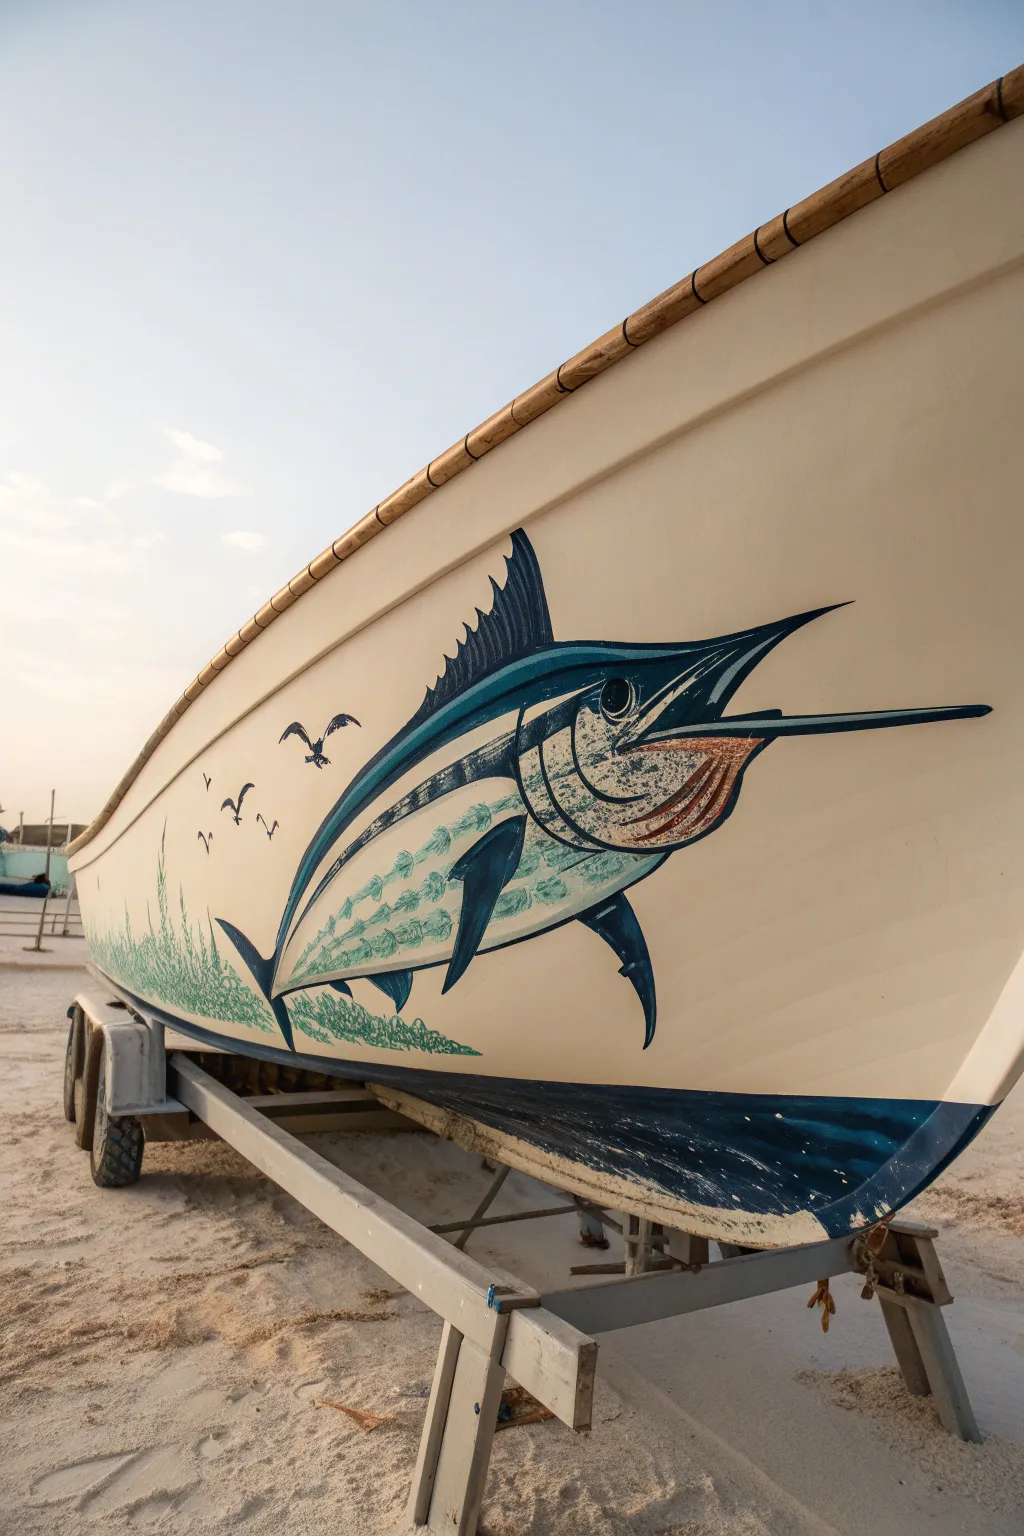
Transform a plain white hull into a seascape masterpiece with this striking marlin mural. The design features a stylized blue marlin leaping across the side, accented by silhouetted seabirds and abstract green sea foam, perfect for adding character to any fishing vessel.
Step-by-Step Tutorial
Materials
- Marine-grade topside paint (Off-white/Beige base)
- Marine-grade topside paint (Deep Navy Blue)
- Marine-grade topside paint (Teal/Light Blue)
- Marine-grade topside paint (White)
- Marine-grade topside paint (Burnt Orange/Brown)
- Marine-grade topside paint (Sea Green for foam)
- Pencil or chalk for sketching
- Painter’s tape (various widths)
- Assorted angular and round paintbrushes
- Small roller for base coat
- Sandpaper (220 grit)
- Tack cloth
- Clear coat (optional marine sealant)
Step 1: Prepping the Canvas
-
Clean surface:
Begin by thoroughly cleaning the hull area where the mural will go. Use a degreaser to remove any wax, oil, or salt residue, then rinse and let it dry completely. -
Sand lightly:
Scuff the area with 220-grit sandpaper. This creates a rougher ‘tooth’ for the new paint to adhere to, ensuring your artwork doesn’t peel in the harsh marine environment. -
Wipe down:
Use a tack cloth to remove every speck of dust. Any debris left behind will create bumps in your final finish. -
Base coat application:
If your hull isn’t already the desired creamy off-white shown in the reference, roll on a fresh layer of marine topside paint to create a uniform background. Allow this to cure for at least 24 hours.
Step 2: Sketching the Giant
-
Outline the body:
Using a pencil or light chalk, lightly sketch the large, crescent-shaped body of the marlin. Position it diagonally so the nose points toward the bow, giving the impression of forward movement. -
Refine the details:
Add the dorsal fin (the large sail on top), the pectoral fins, and the distinctive long bill. Don’t worry about perfection yet; just get the proportions right relative to the boat’s length. -
Sketch the birds and foam:
Draw three small seabird silhouettes behind the marlin’s tail. Below the fish, sketch a rough, jagged line indicating where the abstract sea foam pattern will sit along the chine.
Pro Tip: Steady Lines
Rest your painting hand’s pinky finger on a dry part of the hull to stabilize your brush strokes when painting the long, straight bill of the marlin.
Step 3: Blocking in Color
-
Paint the dark outline:
Using a steady hand and a medium angular brush, paint the thick Deep Navy Blue outline of the marlin’s upper body, dorsal fin, and bill. This defines the shape immediately. -
Fill the lower jaw:
While the blue is wet or just after, mix a touch of Burnt Orange with brown and fill in the lower jaw area. Add thin lines of this color into the gill plate for texture. -
Create the belly gradient:
The belly isn’t pure white; it uses a light teal or aqua. Paint the lower section of the fish’s body with this lighter shade, leaving a gap between it and the dark blue back. -
Blend the midsection:
Mix a transition color between the navy back and teal belly. Apply this in the middle stripe of the fish to create a rounded, 3D effect. -
Paint the fins:
Fill in the side fins (pectoral and pelvic) with the Deep Navy Blue. Note how the pectoral fin overlaps the body colors—paint this carefully to maintain sharp edges.
Troubleshooting: Drips
If vertical drips occur on the curved hull, don’t wipe them immediately. Wait until they are tacky, then slice them off carefully with a razor blade before touching up.
Step 4: Details and Atmosphere
-
Add the eye:
Paint a solid black circle for the eye, then add a tiny white reflection dot once it’s dry to bring the fish to life. Outline the eye socket in white or light grey for contrast. -
Stipple the texture:
To recreate the textured look on the fish’s side, use a dry brush technique with white paint. Dab lightly over the teal belly area to suggest scales or light reflection. -
Paint the birds:
With a fine round brush and Deep Navy Blue or Black, fill in the simple ‘V’ shapes of the three trailing birds. -
Create the sea foam:
Using your Sea Green paint, create the abstract water effect along the bottom. I like to use a dabbing motion or a sponge here to simulate splashing water and frothy foam. -
Paint the bottom stripe:
Tape off the bottom edge of the hull (the chine) and paint a thick stripe of Deep Navy Blue that runs the length of the boat, anchoring the artwork. -
Weathering effect:
If you want the slightly worn look from the photo, lightly dry-brush some white streaks over the dried navy blue bottom stripe to simulate saltwater wear.
Step back and admire your nautical mural as it adds a classic, adventurous spirit to your boat’s profile
Pop-Art Polka Dots With a Cutout Illusion
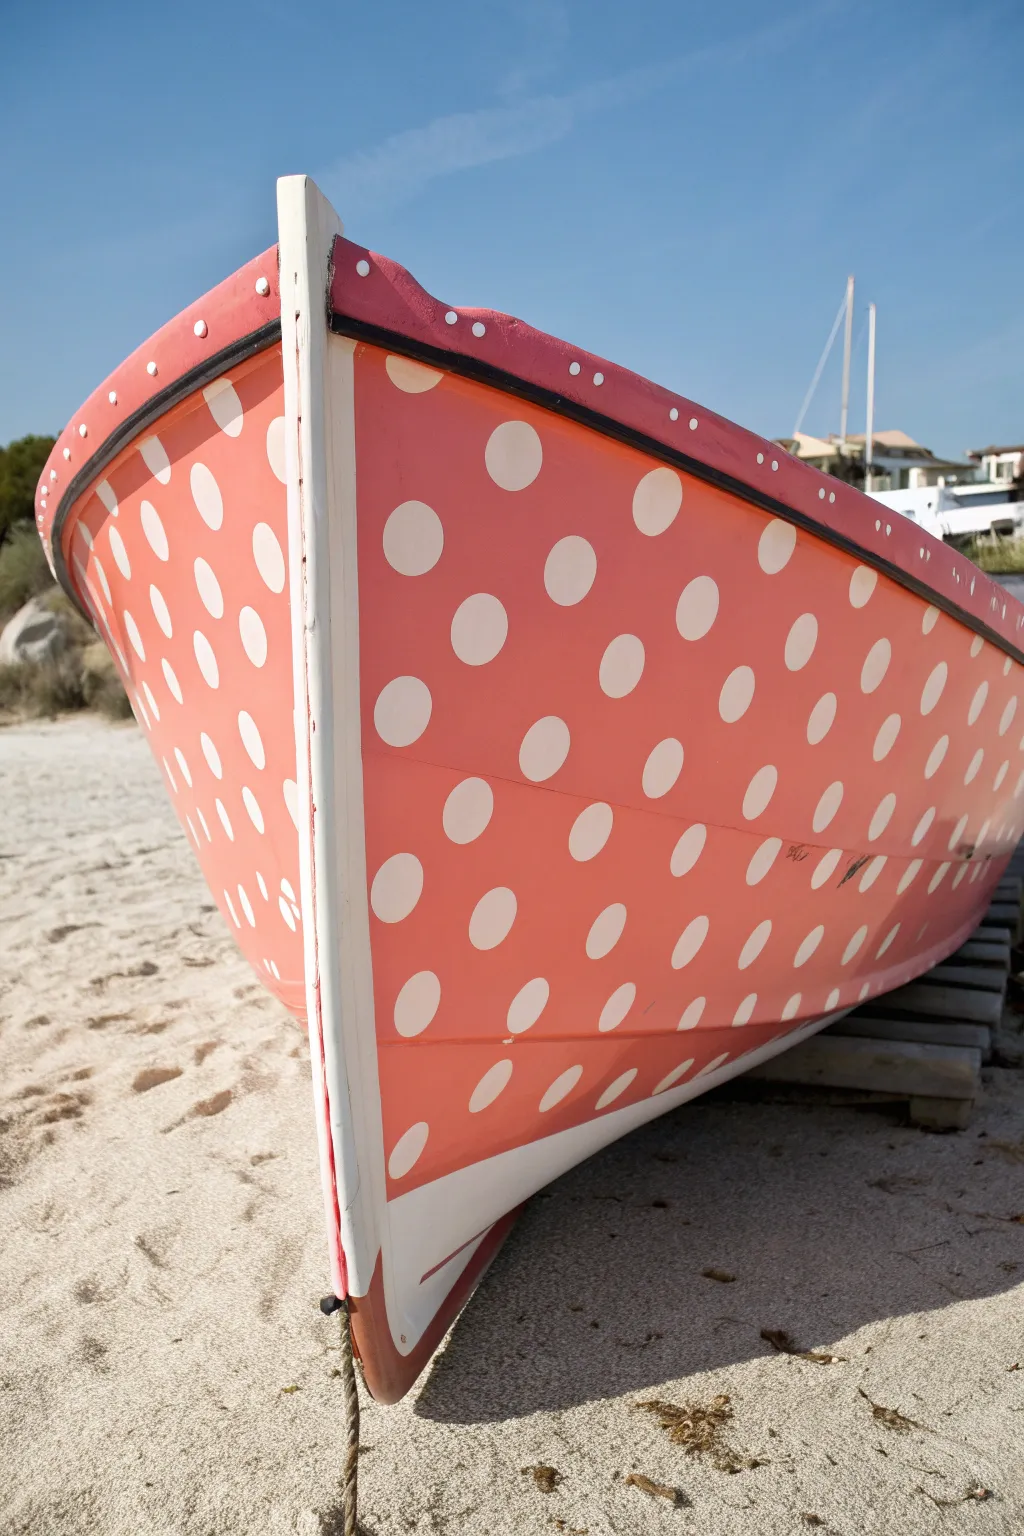
Turn a standard wooden dinghy into a floating piece of retro art with this playful salmon and white polka dot design. The cheerful pattern adds instant character while the crisp white keel creates a sharp, tailored finish.
Step-by-Step
Materials
- Marine-grade primer
- Marine-grade gloss enamel paint (Salmon Pink)
- Marine-grade gloss enamel paint (White)
- Painter’s tape (multi-width pack)
- Circle stencils (assorted sizes or custom cut)
- Stencil adhesive spray
- High-density foam rollers
- Angled sash brush (2-inch)
- Sandpaper (120 and 220 grit)
- Tack cloth
- Drop cloths
- Measuring tape
- Pencil
Step 1: Prep and Prime
-
Clean the Hull:
Begin by thoroughly cleaning the exterior of the boat hull with soap and water to remove any salt, grease, or marine growth. Let it dry completely. -
Sand the Surface:
Sand the entire exterior hull with 120-grit sandpaper to rough up the previous finish. This key step ensures your new marine paint adheres properly without peeling later. -
Wipe Down:
Use a tack cloth to meticulously wipe away all sanding dust. Even tiny particles can ruin the smooth gloss finish we are aiming for. -
Apply Primer:
Roll on a coat of marine-grade primer over the entire hull. Use a brush to get into any crevices along the keel or gunwale. -
Smooth the Base:
Once the primer is fully cured, lightly sand it with 220-grit sandpaper for a glass-smooth base, then wipe clean again.
Step 2: Base Colors
-
Paint the Keel and Trim:
Using your white marine enamel, paint the central keel strip and the top gunwale railing first. I find it easier to paint these details first and tape them off later. -
Protect the White:
Allow the white paint to cure for at least 24 hours. Then, carefully apply painter’s tape over the white keel and the top railing to protect them from the pink paint. -
Roll the Pink Base:
Apply the salmon pink marine enamel to the main body of the hull using a high-density foam roller for a smooth, spray-like finish. -
Second Coat:
Let the first pink coat dry according to the manufacturer’s instructions, then apply a second coat for full opacity and depth of color.
Bleed-Proof Dots
Before painting white, seal the stencil edges with a tiny bit of the base pink color first. This fills gaps so the white layer on top has a crisp, perfect edge.
Step 3: The Polka Dots
-
Prepare Stencils:
While the base coat cures hard (wait at least 48 hours so tape doesn’t pull it up), prepare your circle stencils. You’ll need primarily large circles, about 4-5 inches in diameter. -
Plan the Layout:
Lightly mark grid points on the hull with a pencil to ensure your dots are evenly spaced in alternating rows, rather than a rigid grid. -
Adhere Stencils:
Apply a light mist of stencil adhesive to the back of your stencil. Press it firmly onto the hull at your first mark, smoothing edges to prevent bleed. -
Stipple the White:
Using a stencil brush or a small foam pouncer, dab white marine paint into the stencil circle. Use a dry-brush technique—too much paint causes drips. -
Repeat the Pattern:
Move across the hull, placing stencils and painting dots. Periodically wipe the back of your stencil to keep the pink surface clean. -
Detail the Railing:
For the upper gunwale (the red/pink trim at the very top), use a much smaller dot stencil or the end of a paintbrush handle to create the tiny decorative white dots shown in the image. -
Remove Tape:
Once all dots are dry to the touch, carefully peel away the painter’s tape from the keel and gunwales at a 45-degree angle. -
Final Cure:
Allow the boat to cure on land for several days before launching to ensure the paint hardens completely against water friction.
Make It Reflective
Mix a small amount of reflective glass beads into the white paint for the dots. At night, your boat will glimmer when hit by harbor lights or flashlights.
Now you are ready to launch your stylish vessel for a sunny day on the water


Have a question or want to share your own experience? I'd love to hear from you in the comments below!