If you’ve ever wanted to try dot painting on rocks, this is your sign—it’s one of those techniques that looks fancy but feels super doable once you start. I’m sharing my favorite easy dot rock painting ideas that give you big “wow” results with simple, repeatable dots.
Classic Mandala Rock Rings
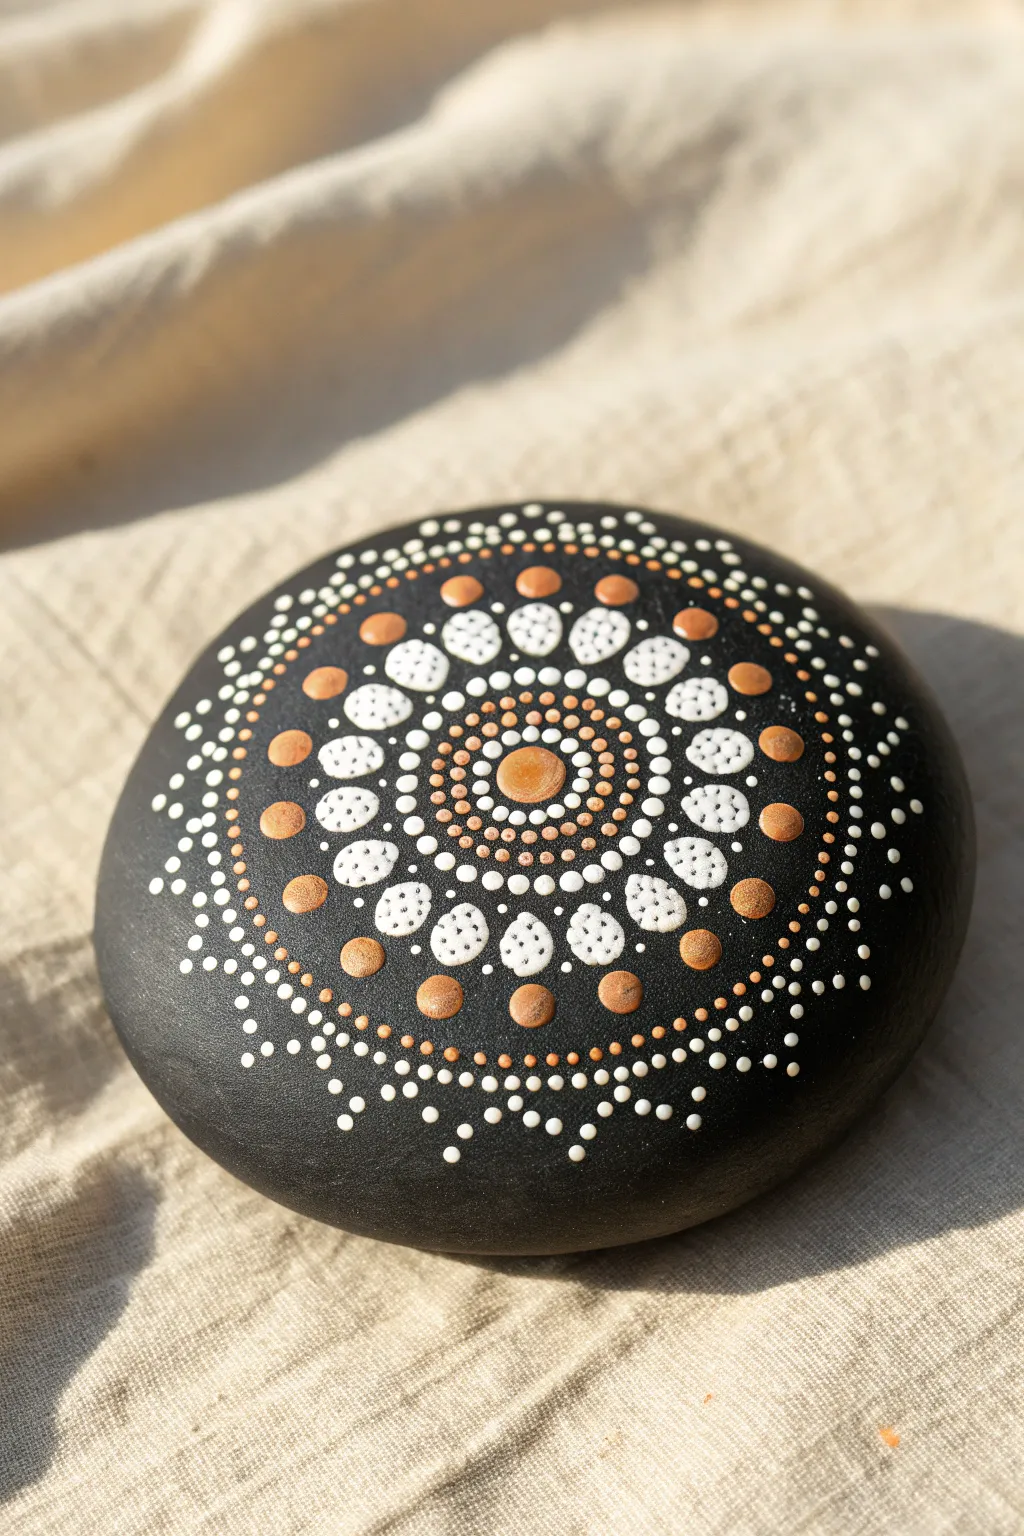
This classic mandala design uses a striking contrast of metallic gold and crisp white against a matte black background to create an elegant, radiating sunburst effect. The satisfying symmetry is achieved through simple dotting techniques, building outward from a central point.
Detailed Instructions
Materials
- Smooth, round river rock (approx. 4-5 inches)
- Black acrylic paint (matte finish preferred)
- White acrylic paint
- Metallic gold or bronze acrylic paint
- Set of dotting tools (various sizes)
- Small pointed paintbrush (for touch-ups)
- Spray varnish or clear acrylic sealer (matte or satin)
Step 1: Base Preparation
-
Clean the surface:
Begin by washing your stone thoroughly with soap and water to remove any dirt or oils. Let it dry completely before starting to ensure the paint adheres properly. -
Apply the base coat:
Paint the entire top surface of the stone with matte black acrylic paint. I usually apply two thin coats rather than one thick one to get the smoothest, most opaque finish. Allow this to dry fully.
Fixing Smudges
If a dot smudges or merges, don’t panic. Wait for it to dry completely, paint over the mistake with black base paint, let that dry, and re-dot the spot.
Step 2: Creating the Center
-
finding the center:
Using your largest dotting tool, place a single, large gold dot directly in the visual center of the stone. This will anchor your entire design. -
First ring:
Switch to a very small dotting tool. Dip it in white paint and create a tight ring of tiny white dots immediately surrounding the central gold circle. -
Second ring:
Using a slightly larger tool, create a second ring of gold dots around the white ring. Try to space them evenly. -
Third ring:
With a medium-small tool and white paint, create a third ring. Place these white dots directly in the spaces between the gold dots of the previous ring (interstitial spacing) to begin the expanding pattern.
Level Up: Swooshes
Replace the outer dot ring with ‘swooshes’ using a comma-stroke. Drag the dotting tool while the paint is wet to pull the dot into a tail for a motion effect.
Step 3: Building the Petals
-
Main petal anchors:
Using a medium-large tool, place a ring of larger white dots further out from your center rings. Leave a good amount of space between this ring and the previous one. -
Creating the petal shape:
Use a small tool with white paint to ‘walk the dots’ around these larger anchors. Place tiny dots starting from the top of the anchor dot and following the curve down to the base to create a teardrop or petal outline. -
Filling the petals:
Inside each teardrop shape you just created, add a few tiny random white dots to give them texture and fullness. -
Gold accents:
In the gap between your center rings and these new white petals, place medium-sized gold dots. These should sit in the ‘V’ spaces between the petal bases.
Step 4: Outer Detail Rings
-
Large gold border:
Select a large dotting tool again. Place bold gold dots around the outside of your white petal layer, creating a wide, defining ring. -
Inner details:
Create a delicate ring of tiny white dots just inside this new gold ring, framing the inner pattern. -
Outer framing:
Using a medium-small tool, create a ring of white dots immediately outside the large gold dots. -
The final fringe:
Finish the design with one last ring of very small, widely spaced white dots that fade toward the edge of the stone. This softens the border.
Step 5: Finishing Touches
-
Top dots:
Once the base layers are dry, go back to the large gold dots in the outer ring. Add a tiny white dot on top of each dried gold dot to create a highlight effect. -
Drying:
Let the stone sit undisturbed for at least 24 hours to ensure the thick dots are cured all the way through. -
Sealing:
Protect your work with a spray varnish. A satin finish works beautifully here, preserving the gold shine without making the black background too glossy.
Place this golden mandala in your garden or on a desk for a daily reminder of balance and calm


Simple Center-Out Dot Flower
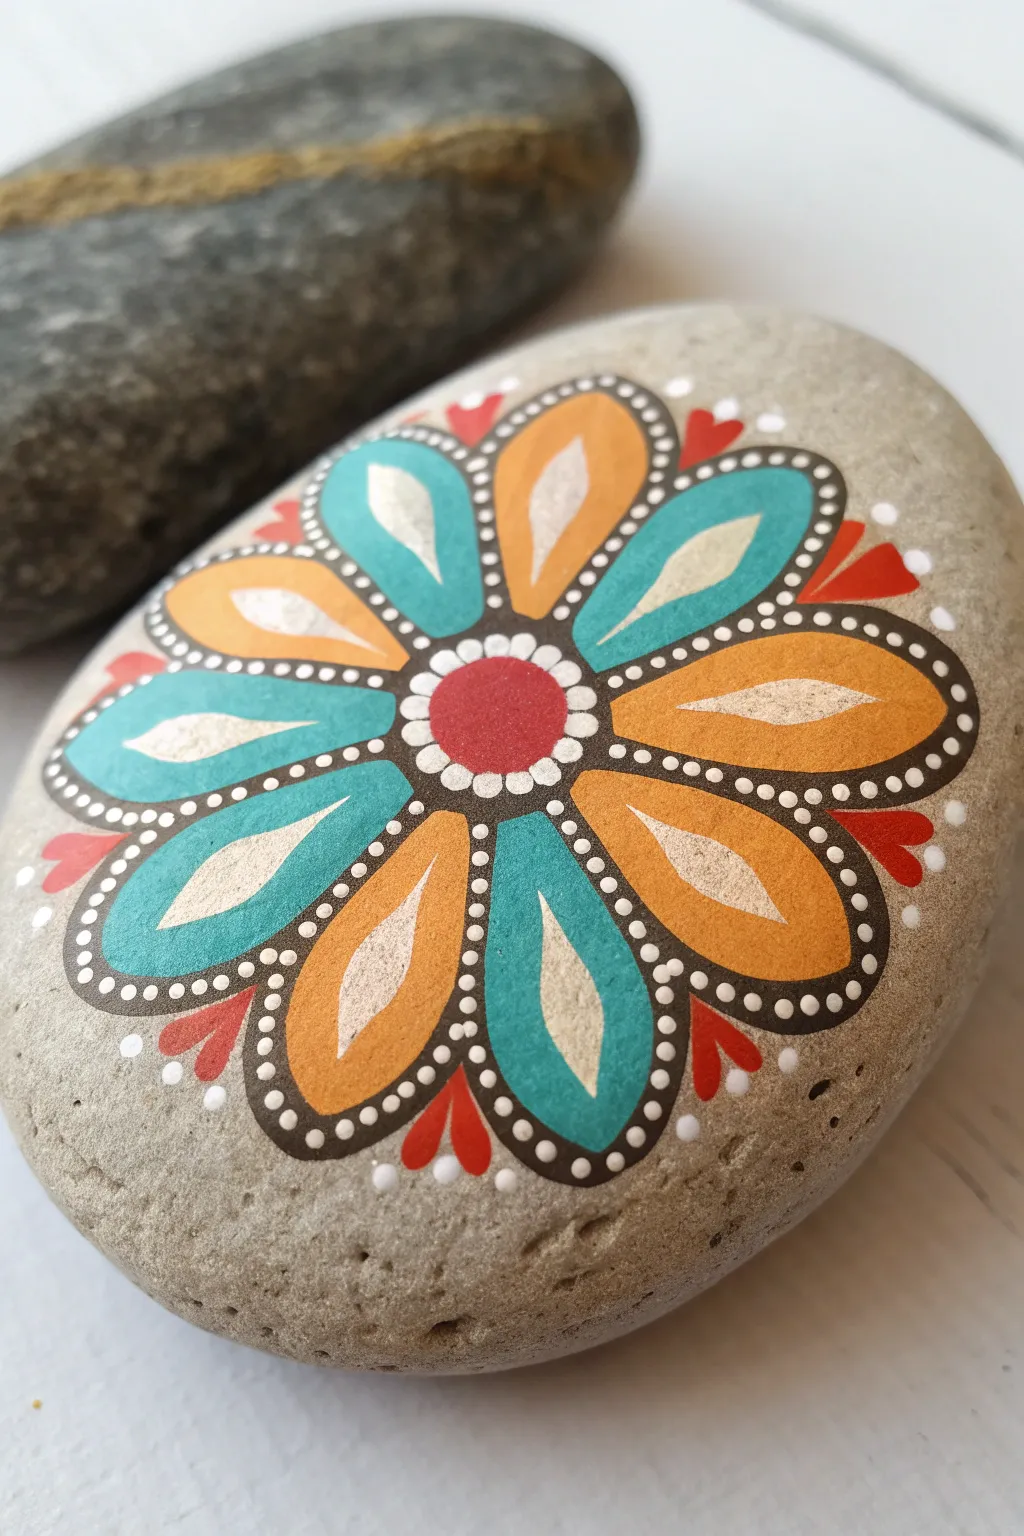
This cheerful design moves away from traditional dotting by using solid blocks of color contrasted with delicate dotted outlines. It features alternating petals of sunny yellow and teal radiating from a bold red center, perfect for smooth, oval stones.
How-To Guide
Materials
- Smooth, oval river stone (light grey)
- Acrylic paints: Teal/Turquoise, Golden Yellow/Orange, Cherry Red, White, Black
- Fine detail paintbrush (00 or 000 size)
- Dotting tools (various sizes, especially small)
- Pencil for sketching
- Spray varnish or sealant
Step 1: Preparation & Sketching
-
Clean surface:
Begin by washing your stone with soapy water and drying it completely to ensure the paint adheres properly. -
Mark the center:
Find the approximate center of your stone and lightly mark a small circle with your pencil. -
Draft the petals:
Sketch eight petals radiating from the center circle. Try to keep them evenly spaced, resembling a daisy shape. Don’t worry if your pencil lines are a bit messy; the paint will cover them.
Paint Consistency Trick
If your black outline paint feels too thick or drags, add a singular drop of water. Ink-like consistency makes lining smooth curves much easier.
Step 2: Base Colors
-
The center dot:
Using a large dotting tool or the back of a brush, paint the center circle with bright cherry red paint. -
Teal petals:
With your fine detail brush, fill in every other petal with the glossy teal paint. Apply two thin coats rather than one thick one for the smoothest finish, letting the first coat dry to the touch before adding the second. -
Yellow petals:
Fill the remaining four petals with your golden yellow paint. I find that yellow often needs an extra coat to be truly opaque, so be patient here. -
Inner highlights:
Once the colored petals are completely dry, paint a smaller, white teardrop shape inside the center of each petal. This creates a bright highlight effect.
Add Some Sparkle
Replace the inner white teardrops with metallic gold or silver paint. It catches the sunlight beautifully if you place the rock in a garden.
Step 3: Detailed Dot Work
-
Center outline:
Dip a medium-small dotting tool into white paint. Place a ring of distinct white dots around the red center circle, right on the border where the red meets the petals. -
Black petal outlines:
Using your finest brush and slightly thinned black paint, carefully outline each petal. This line should be relatively thick—enough to hold the white dots you’ll add later. -
Dotted border:
Switch to a very small dotting tool (or a toothpick). Dip it in white paint and carefully place tiny white dots directly on top of the black outline you just painted. Work slowly to keep the spacing even.
Step 4: Final Flourishes
-
Outer red hearts:
In the ‘V’ space between the tips of each petal, paint a small red heart shape pointing outward. You can do this by placing two dots close together and dragging them down to a point. -
Outer white dots:
Place a single white dot at the very tip of each red heart. -
Gap fillers:
Add a small white dot in the crevice between each petal, just below the red hearts, to tie the design together. -
Let it cure:
Allow the stone to dry for at least 24 hours to ensure all layers, especially the thick dots, are hard. -
Seal:
Finish with a gloss spray varnish to protect your rock from weather and make the colors pop.
Enjoy displaying your vibrant mandala stone in a garden or on a desk for a spot of daily color


Easy Ladybug Dot Rock
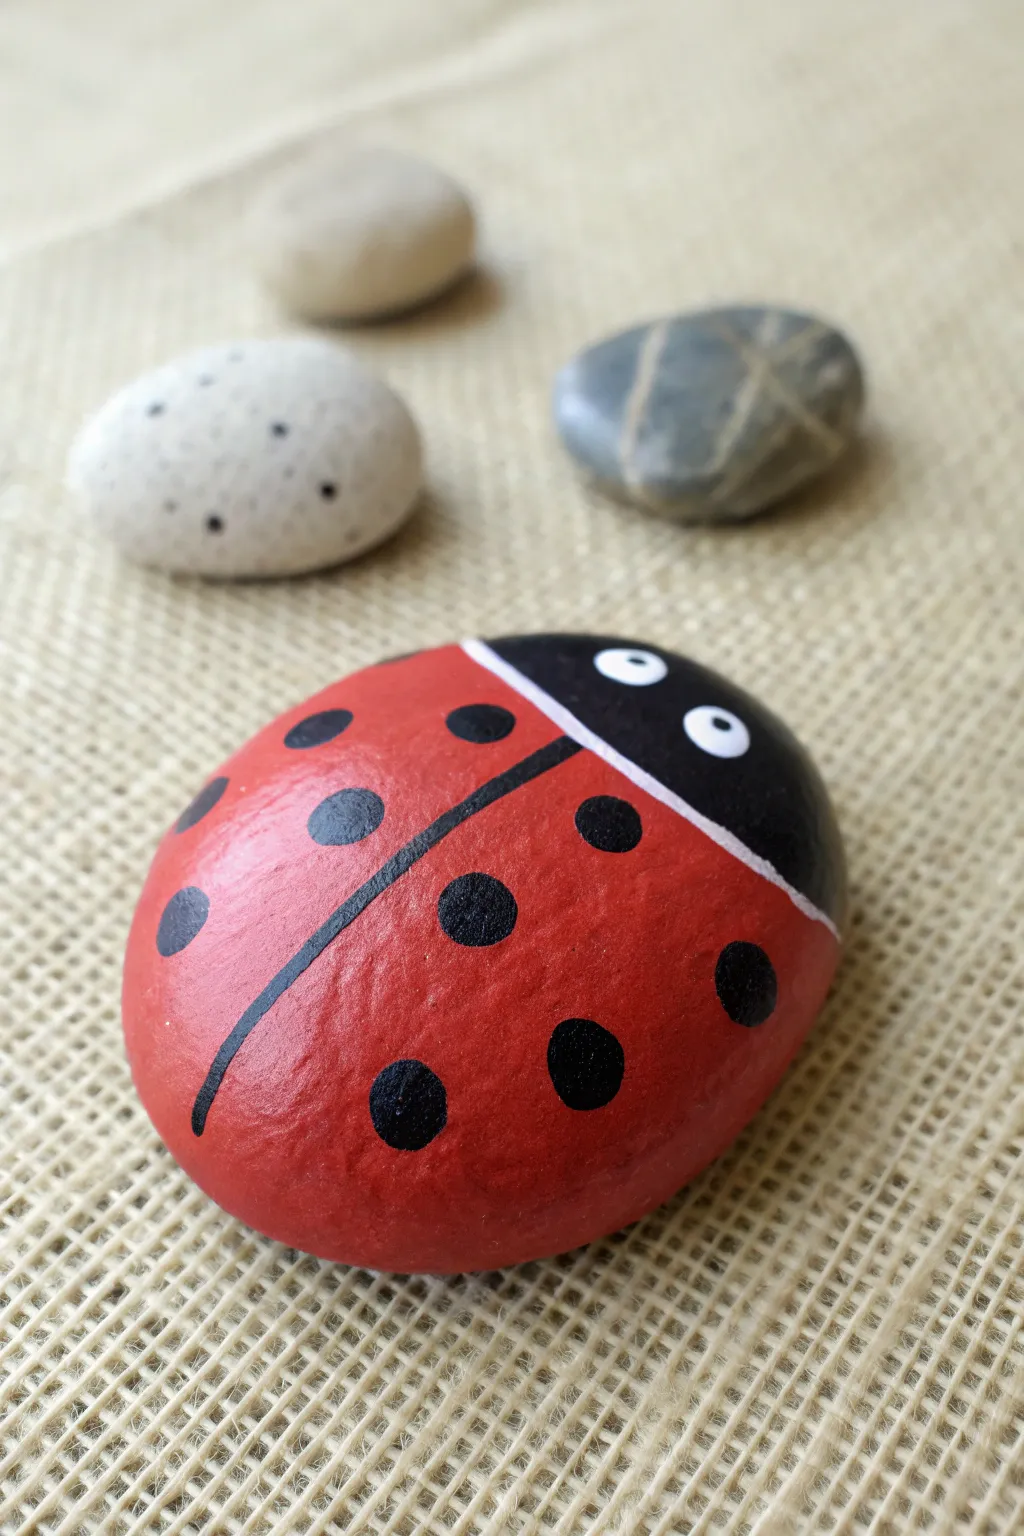
Transform a simple garden stone into a charming little beetle with this bright and cheerful project. The smooth, rounded shape of a river rock is the perfect canvas for creating a classic red ladybug with crisp black spots.
Step-by-Step
Materials
- Smooth oval river rock (palm-sized)
- Red acrylic paint (bright scarlet or primary red)
- Black acrylic paint
- White acrylic paint
- Flat paintbrush (medium size)
- Detail liner brush (size 0 or 00)
- Dotting tools or toothpicks
- Pencil
- Sealer (Mod Podge or spray varnish)
Step 1: Preparation & Base Coat
-
Clean the stone:
Begin by scrubbing your rock with warm soapy water to remove any dirt or oils. Let it dry completely before starting, as moisture can trap bubbles under the paint. -
Sketch the outline:
Once dry, use a pencil to lightly sketch a curved line about one-third of the way down the rock. This will separate the ladybug’s head from its body. -
Start the body:
Load your flat brush with bright red acrylic paint. Apply paint to the larger section of the rock, covering everything below your pencil line. -
Add a second coat:
Acrylics can be slightly translucent, so let the first red layer dry for about 10-15 minutes. Apply a second coat to ensure a solid, vibrant color without streaks. -
Paint the head:
Using the black paint, carefully fill in the smaller top section of the rock. Use the edge of your flat brush to create a clean line where the black meets the red.
Fixing Smudged Dots
If a black dot smears while wet, don’t wipe it! Let it dry completely, then paint a layer of red over the mistake before re-dotting.
Step 2: Adding Details
-
Define the wings:
Switch to your fine liner brush with black paint. Draw a thin, straight line starting from the center of the distinct neck line down to the bottom of the rock to separate the wings. -
Create the white band:
Clean your brush thoroughly. With white paint, draw a thin, curved stripe right over the border where the red body meets the black head. This creates a sharp separation. -
Plan the spots:
Visualize where you want the spots to go. Aim for a symmetrical look, generally placing three or four large spots on each side of the central line. -
Paint the spots:
Using a medium-sized dotting tool or the back end of a paintbrush dipped in black, press firmly onto the red sections to create perfectly round dots. Some dots can ‘fall off’ the edge for a realistic look. -
Add the eye base:
Dip a smaller dotting tool into white paint. Place two white dots on the black head area, spacing them somewhat wide apart for a cute expression. -
Finish the eyes:
Wait for the white eye dots to dry completely. Then, using a tiny dotting tool or a toothpick, add a small black pupil inside each white circle.
Painting Tip
For the crispest dots, reload your tool with fresh paint after every single dot. This prevents the paint from looking transparent in the middle.
Step 3: Finishing Touches
-
Inspect and touch up:
Look closely at your lines. If the black central line looks shaky, you can tidy it up carefully with the liner brush once everything is dry to the touch. -
Allow to cure:
Set the rock aside in a safe place. Acrylic paint dries quickly, but for the thick dots to harden all the way through, I like to let this dry briefly for at least an hour. -
Seal the artwork:
To protect your ladybug from weather or scratches, apply a coat of clear sealer. A spray varnish works best to avoid smearing the paint, but brush-on Mod Podge works if applied gently.
Place your finished ladybug in a planter or on a desk for a spot of garden cheer


Heart Outline Made of Dots
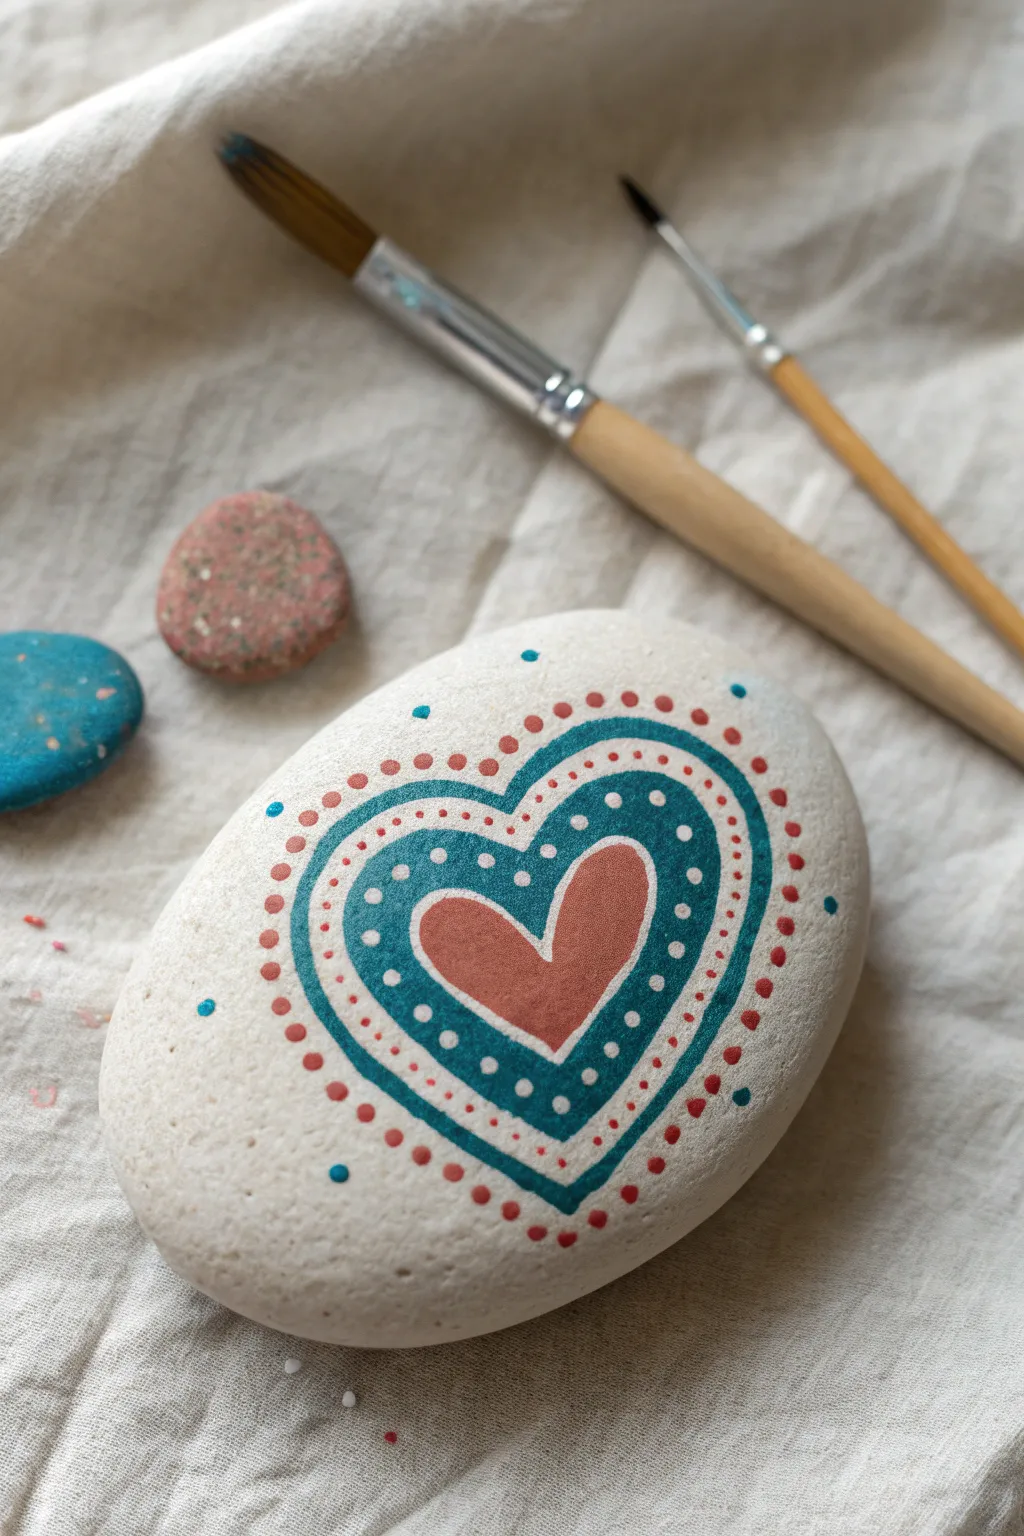
This charming painted rock features a rustic, folk-art inspired heart design centered on a smooth white stone. By layering simple shapes and carefully placed dots in teal and rust-red, you can create a beautiful keepsake that feels both modern and handmade.
Step-by-Step Guide
Materials
- Smooth oval river rock (white or light beige)
- Acrylic paint (Rust Red/Terracotta)
- Acrylic paint (Deep Teal/Turquoise)
- Acrylic paint (White)
- Fine detail paintbrush (size 0 or 00)
- Dotting tools (various sizes) or toothpicks/brush ends
- Pencil (optional for sketching)
- Acrylic matte varnish or sealant
Step 1: Base and Center Heart
-
Clean the surface:
Begin by washing your stone with soap and water to remove any dirt or oils. Let it dry completely. If your stone isn’t naturally white, you can paint a base coat of white or cream acrylic paint over the entire surface. -
Sketch the outline:
Lightly sketch a medium-sized heart in the center of the rock using a pencil. Make sure to leave enough room around the edges for the decorative borders we will add later. -
Paint the central heart:
Load your fine brush with the rust red paint. Carefully fill in the pencil sketch to create a solid heart shape. I find two thin coats work better than one thick coat for a smooth, opaque finish. -
Let it dry:
Allow the central heart to dry completely before moving to the next color. This prevents the teal from bleeding into the red.
Clean Dot Hack
If you don’t have professional dotting tools, dip the flat end of a drill bit, a chopstick, or a bobby pin into paint for perfect circles.
Step 2: Teal Border Layer
-
Outline in teal:
Using the deep teal paint and a detail brush, paint a border around the red heart. Leave a very tiny gap of white space between the red heart and this new teal line to make the colors pop. -
Thicken the band:
Widen this teal outline until you have a band that is approximately 1/4 inch thick (roughly 4-6mm). It should follow the curves of the inner heart perfectly. -
Smooth the edges:
Go back over the edges of the teal band to ensure they are crisp and the band is uniform in width all the way around. -
Dry properly:
Let this teal layer dry fully. Acrylics dry darker, so don’t worry if it looks bright while wet.
Wonky Dots?
If a dot smears or isn’t round, wait for it to dry completely, then scrape it off gently or paint over it with the base stone color.
Step 3: Dotting Details
-
Add inner white dots:
Dip a small dotting tool (or the tip of a toothpick) into white paint. Carefully place a series of small, evenly spaced dots right down the center of the teal band you just painted. -
Create the outer dotted border:
Switch back to your rust red paint. Using a medium-sized dotting tool or the blunt end of a paintbrush, place dots around the outside perimeter of the teal heart. Keep them close to the teal edge but not touching it. -
Refine the border:
Try to keep the spacing between these red dots consistent as you work your way around the curves. If you run out of paint on the tool, reload it to keep the dot sizes uniform. -
Add floating accents:
Using a very small tool, add tiny teal dots sporadically around the outer red dotted border. I like to place these randomly to give the piece a whimsical, scattered confetti look. -
Final tiny details:
Place a few extra-tiny teal dots further out towards the edges of the stone, and perhaps one or two near the bottom point of the heart for balance.
Step 4: Finishing Touches
-
Check for imperfections:
Once dry, look for any smudges. You can often clean up edges by carefully painting over mistakes with the background color (white or cream). -
Final drying time:
Let the entire rock sit for at least 24 hours to ensure all layers of dots are hardened all the way through. -
Seal the artwork:
Apply a coat of matte spray varnish or brush-on sealant to protect your design from chipping and fading over time.
Place your finished heart stone on a desk or in the garden as a small reminder of creativity and love
BRUSH GUIDE
The Right Brush for Every Stroke
From clean lines to bold texture — master brush choice, stroke control, and essential techniques.
Explore the Full Guide
Spiral Dot Swirl Rock
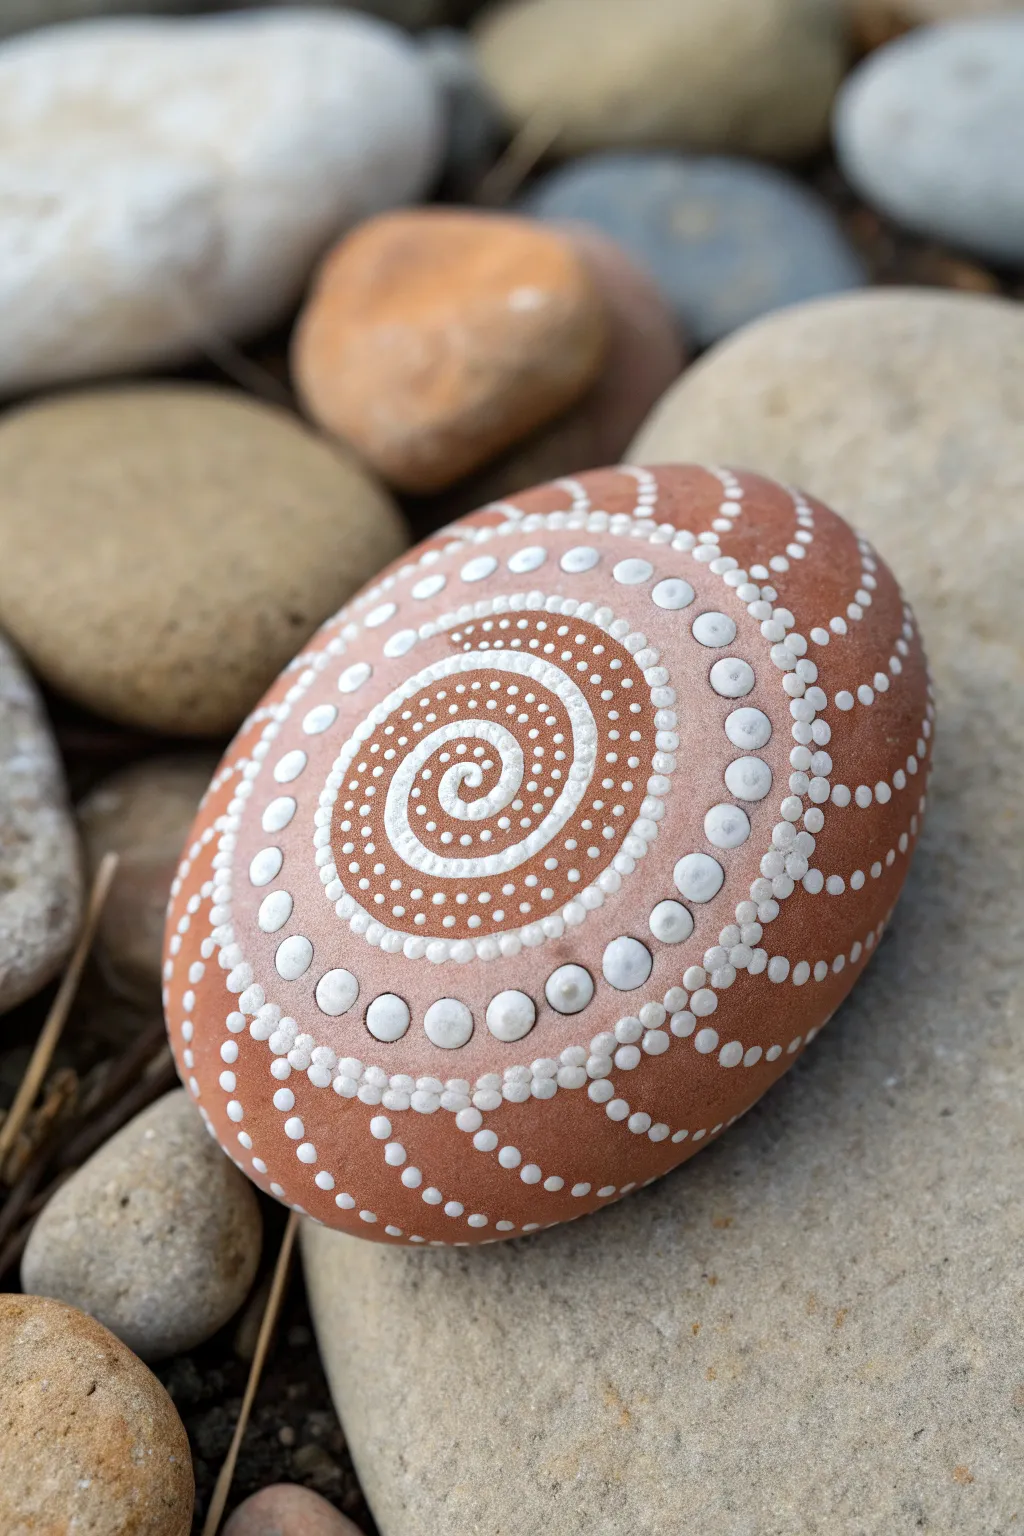
This elegant rock painting design relies on the striking contrast between a warm, earthy terracotta base and crisp white dots. The hypnotic spiral motion draws the eye inward, creating a soothing and mesmerizing piece of art that looks far more complex than it actually is.
Step-by-Step Tutorial
Materials
- Smooth, oval river rock (medium size)
- Terracotta or reddish-brown acrylic paint (matte finish)
- White acrylic paint (heavy body or multi-surface works best)
- Dotting tools (various sizes, from fine stylus to rod)
- Small flat paintbrush
- Paint palette or foil
- Cotton swabs and water (for clean up)
- Clear spray sealant (optional)
Step 1: Base Preparation
-
Clean the Stone:
Begin by washing your rock with warm, soapy water to remove any dirt or oils. Scrub it gently with a brush if needed, then let it dry completely in the sun or with a towel. -
Apply the Base Coat:
Using your flat paintbrush, apply a smooth, even coat of the terracotta acrylic paint over the entire top surface of the rock. You don’t need to paint the bottom unless you want to. -
Second Coat:
Once the first layer is dry to the touch, apply a second coat to ensure opaque coverage. Let this base dry thoroughly—rushing this step can cause the dots to crack later.
Step 2: Creating the Central Spiral
-
Start the Center:
Load your smallest dotting tool or a fine stylus with white paint. Place a single small dot slightly off-center on the rock to begin your spiral anchor. -
Form the First Curl:
Using the same small tool, place a series of tiny dots curving tightly around your initial anchor point. Keep the spacing minimal so it looks like a continuous, organic line. -
Expand the Spiral arm:
Continue adding small dots, widening the curve as you spiral outward. Imagine you are drawing a snail shell. We want about three or four rotations before stopping the continuous line. -
Thicken the Spiral:
To make the spiral pop, go back alongside your dot trail and add a second row of even smaller dots on the ‘inside’ track of the spiral for the outer loops. This creates visual density.
Oops! Smudged Dot?
Don’t panic! Wait for the smudge to dry completely, then paint over it with your terracotta base color. It acts like an eraser. Once dry, re-dot the area.
Step 3: Radiating Patterns
-
Plot Larger Dots:
Switch to a medium-sized dotting tool. Following the outer curve of your spiral, place a series of significantly larger dots spaced evenly apart. Think of these as the ‘planets’ orbiting your spiral sun. -
Connect with Veins:
Using your smallest tool again, create curved lines of tiny dots that ‘flow’ from the spiral center out toward those larger dots. These should look like curved spokes on a wheel. -
Double the Rows:
Add a parallel line of tiny dots next to your curved spokes. I find that doubling these lines adds a lace-like texture to the overall look.
Try Top Dots
Once the big white dots are fully dry, add a smaller terracotta-colored dot on top of them, then a tiny white one on top of that for a 3D stacked effect.
Step 4: Outer Details
-
Add the Largest Dots:
Move to your largest dotting tool. Place the biggest white dots near the outer edge of the design, nesting them in the V-shapes created by your radiating lines. -
Walking the Dots:
Technique time: ‘Walk the dots’ around these large outer circles. Place a medium dot above a large one, then without reloading your tool, tap dots down one side until the paint runs out. Repeat on the other side. -
Fill the Gaps:
Look for any empty triangular spaces between your major elements. Fill these with a single medium dot or a tiny cluster of three small dots to balance the composition. -
Review Symmetry:
Hold the rock at arm’s length. If the design feels heavier on one side, add a few extra trailing dots to the lighter side to balance the visual weight.
Step 5: Finishing Touches
-
Dry Time:
Let the rock sit undisturbed for at least 24 hours. The thick mounds of paint on the larger dots take much longer to dry than the thin base coat. -
Seal (Optional):
If you plan to keep this rock outdoors, spray it with a clear, non-yellowing acrylic sealer to protect your beautiful dot work from the elements.
Enjoy the calming process of creating this mandala and finding the perfect spot in your garden to display it
Rainbow Arc Dot Bands
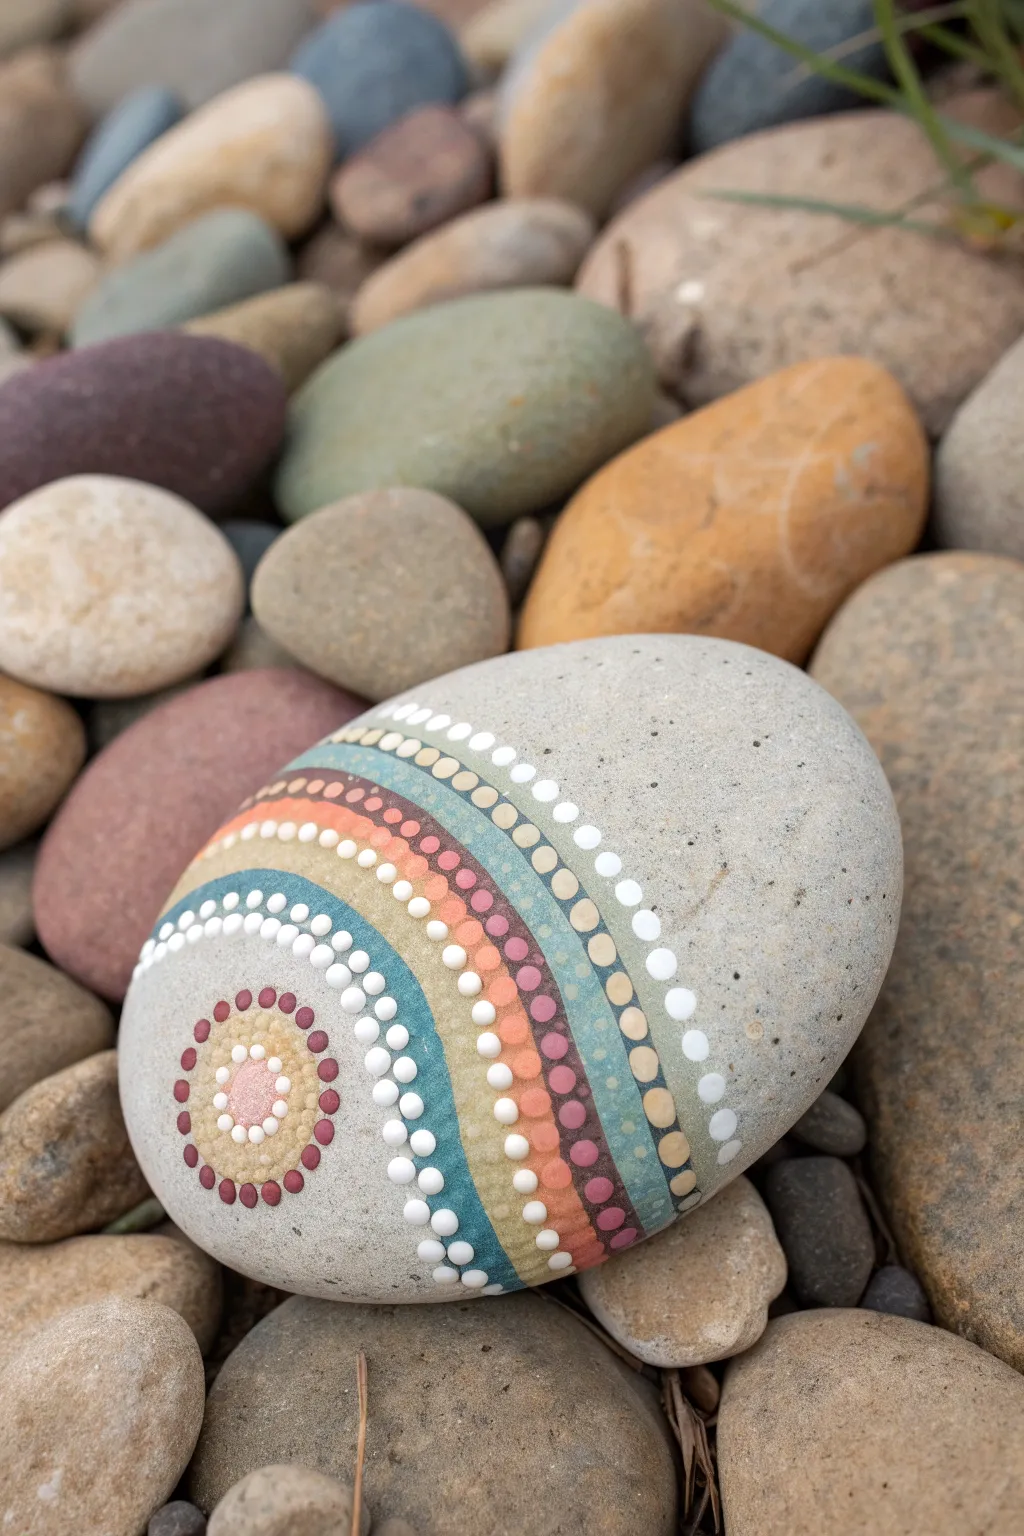
Transform a simple smooth stone into a visual delight featuring sweeping curved bands of color and delicate white dotting accents. This project combines mandala-style precision with a soft, flowing rainbow palette that mimics a sunrise over water.
How-To Guide
Materials
- Smooth, oval-shaped river rock (approximately palm-sized)
- Acrylic paints (light grey/beige for base, teal, peach/coral, mustard yellow, dusty rose, white)
- Set of dotting tools (various sizes)
- Fine detail paintbrush
- Pencil for sketching
- Palette or small plate
- Clear acrylic sealer (spray or brush-on)
- Damp cloth or paper towel
Step 1: Preparation and Base
-
Clean the surface:
Begin by washing your stone with warm soapy water to remove any dirt or oils. Scrub gently with a brush if needed, then let it dry completely in the sun or with a cloth. -
Apply the base coat:
Using a wide flat brush, paint the entire surface of the stone with a light grey or beige acrylic paint. This creates a uniform canvas that makes the colors pop. Apply a second coat if the stone’s natural color shows through, allowing full drying time between layers. -
Sketch the guidelines:
Lightly draw your main design lines with a pencil. Start with a small circle near the bottom left area for the ‘sun’ focal point. Then, draw sweeping, curved lines radiating outward from that circle towards the right side of the rock to separate your color bands.
Uneven Dots?
If your dots look pointy like chocolate kisses, your paint is too thick. Mix in a drop of water or flow medium to smooth it out before dotting.
Step 2: The Focal Point
-
Paint the center circle:
Fill the small central circle in the bottom left with a soft peach or pink paint. Use a small brush to keep the edges crisp. -
Add the first ring:
Paint a ring of mustard yellow immediately surrounding the center circle. This creates a halo effect. -
Dot the center:
Using a medium-sized dotting tool, place a ring of white dots inside the peach center circle. Add a final single white dot directly in the middle. -
Decorate the yellow ring:
Dip a smaller dotting tool into burgundy or dark rose paint and place evenly spaced dots around the yellow ring.
Layering Like a Pro
Wait for the bottom dot to be 100% dry before adding a smaller top dot. If wet, they will bleed together into a puddle.
Step 3: Creating the Color Bands
-
Paint the first blue band:
Moving outward from your focal point, paint the first curved band using a teal or medium blue shade. Follow the pencil guide carefully to maintain a smooth arc. -
Apply the yellow band:
Paint the next band using mustard yellow. I find it helps to rotate the rock as you paint to get a more natural curve with your wrist. -
Add the peach/rose band:
Fill the next section with a gradient or solid band of dusty rose or peach color. Ensure the paint is opaque enough to cover the base coat. -
Paint the outer teal band:
Apply another band of teal blue. This repetition helps balance the design. Make this band slightly wider than the previous ones. -
Finish with the outer grey band:
The final section creates a lighter grey or beige band that blends softly into the rest of the stone’s natural shape.
Step 4: Detailing with Dots
-
Dot the blue band:
Dip a medium-large tool into white paint. Walk a line of dots along the center of the first blue band. Start with a larger dot and slowly decrease the size if you wish, or keep them uniform. -
Detail the yellow band:
Switch to a smaller tool. Place tiny white dots along the lower edge of the yellow band, following the curve perfectly. -
Embellish the rose band:
Using a large tool, place bold dots of a contrasting color (like dark grey or purple) along the rose band. Once dry, add a top dot of white to each one for a layered look. -
Layer dots on the outer teal band:
Create a pattern of alternating large beige dots and smaller white dots along the wide teal band. This adds rhythm to the outer edge. -
Final white accents:
Go back over your design and add tiny ‘micro-dots’ of white in any empty spaces between the larger dots to act as filler and add sparkle. -
Seal the artwork:
Allow the stone to dry for at least 24 hours. Once cured, apply a clear acrylic sealer (spray is best to avoid smearing the dots) to protect the paint from chipping and UV damage.
Place your finished stone in a garden or on a desk to enjoy a permanent splash of serene color

PENCIL GUIDE
Understanding Pencil Grades from H to B
From first sketch to finished drawing — learn pencil grades, line control, and shading techniques.
Explore the Full Guide
Ombre Dot Gradient Stripes
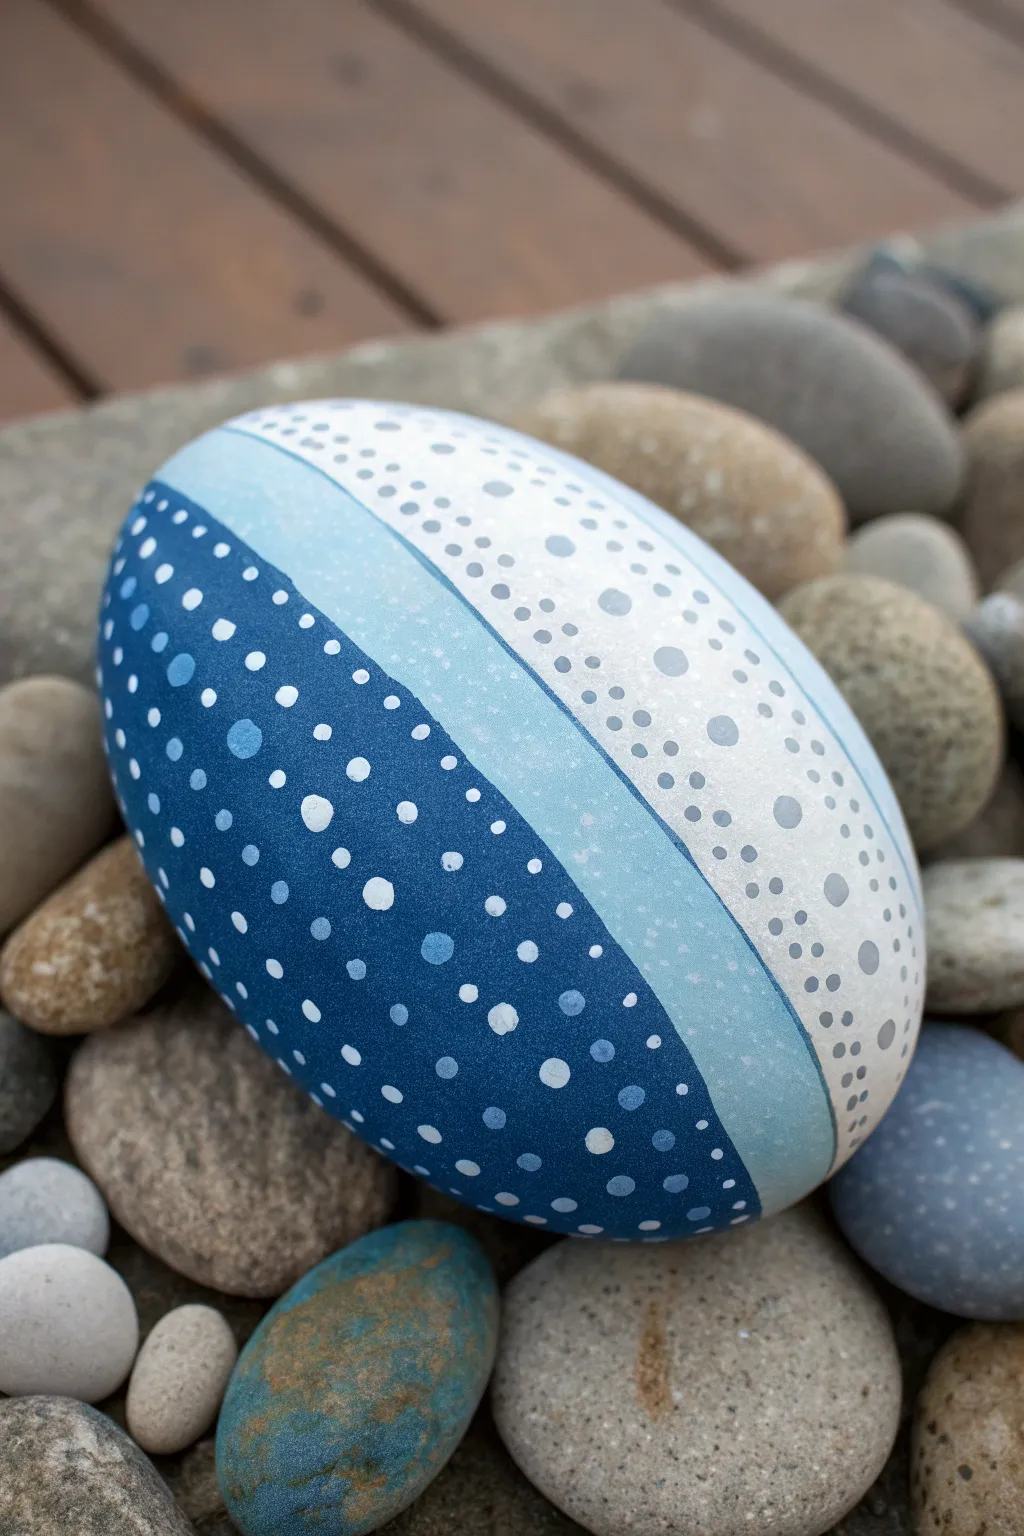
Create a soothing, geometric piece of art using simple masking and dotting techniques on a smooth stone. This project features diagonal bands of deep indigo, soft azure, and crisp white, all brought to life with a cascading shower of delicate dots.
Detailed Instructions
Materials
- Large, smooth oval rock (approx. 4-5 inches)
- Acrylic paints: Navy Blue, Light Blue, White
- Painter’s tape or masking tape (1/4 inch or similar width)
- Dotting tools (various sizes, or use paintbrush handles/toothpicks)
- Flat paintbrush
- Sealant (spray or brush-on)
- Palette or small tray for mixing
- Paper towels and water cup
Step 1: Preparation & Base Geometry
-
Clean surface:
Begin by washing your rock with soap and water to remove any dirt or oils. Let it dry completely to ensure the paint adheres properly. -
Mask the first band:
Decide on the angle of your stripes. Place a strip of painter’s tape diagonally across the rock to separate where the dark blue and light blue sections will meet. Press the edges down firmly to prevent paint bleeding. -
Paint the dark section:
Paint the bottom section of fresh rock below the tape with your Navy Blue acrylic. Apply smooth brushstrokes following the curve of the stone. -
Add a second coat:
Depending on the opacity of your paint, you may need a second coat of Navy Blue. Let the first layer dry to the touch before adding the next to avoid lifting the paint. -
Dry and reveal:
Once the dark blue paint is mostly dry, carefully peel back the painter’s tape. You should have a crisp, diagonal line.
Tape Trick
Before painting, seal the edge of your painter’s tape with a tiny bit of the base color (or clear medium) to ensure absolutely zero seepage under the tape.
Step 2: Creating the Gradient Bands
-
Mask the second band:
Place a new strip of tape higher up on the rock, leaving a gap of about an inch or so above your dark blue section. This exposed gap will become your light blue stripe. -
Paint the middle stripe:
Fill in this new section with your Light Blue paint. I find that painting slightly over the edge where it meets the dark blue (using a steady hand or re-masking if you prefer absolute precision) creates a seamless transition, but for this design, distinct blocks of color are key. -
Paint the top section:
Paint the remaining top portion of the rock with White acrylic. This creates the highest contrast area. You might need 2-3 coats of white to cover the natural rock color completely. -
Tape removal:
Remove any remaining tape while the paint is still slightly tacky to keep the edges sharp. Allow the entire base coat to dry completely before starting the dots.
Step 3: The Dotting Process
-
Select your tools:
Gather dotting tools of at least three different sizes: one relatively large for the main accents, a medium one, and a fine point for tiny details. -
Dotting the dark zone:
Start in the Navy Blue section. Dip a medium tool into White paint (or a very pale blue mix) and place random dots. Mix sizes by using different tools—larger dots act as anchors, while smaller ones fill the gaps. -
Adding tonal variety:
In that same dark blue section, add a few dots using the Light Blue paint. This creates depth and ties the color scheme together. -
Dotting the middle band:
Move to the Light Blue stripe. Here, use White paint for the primary dots to keep it bright. Keep the density slightly airier than the bottom section. -
Subtle accents:
Add a few tiny darker blue dots into the Light Blue band. These should be sparse, just enough to mimic the texture of the section below. -
Dotting the white zone:
Finally, decorate the top White section. Use Light Blue or a diluted Grey/Blue for these dots so they show up softly against the white background. -
Create the fade:
As you move towards the very top edge of the rock, make the dots smaller and more spaced out, creating a fading effect that disappears into the white. -
Final dry and seal:
Let the dots dry overnight—thick dots take longer than flat paint! Once fully cured, apply a clear sealant to protect your work from scratches and weather.
Metallic Magic
In the dark blue section, replace a few white dots with silver metallic paint. It gives the rock a shimmering, starry night effect.
Place your finished stone in a garden nook or on a desk for a peaceful splash of color
Confetti Polka-Dot Rock
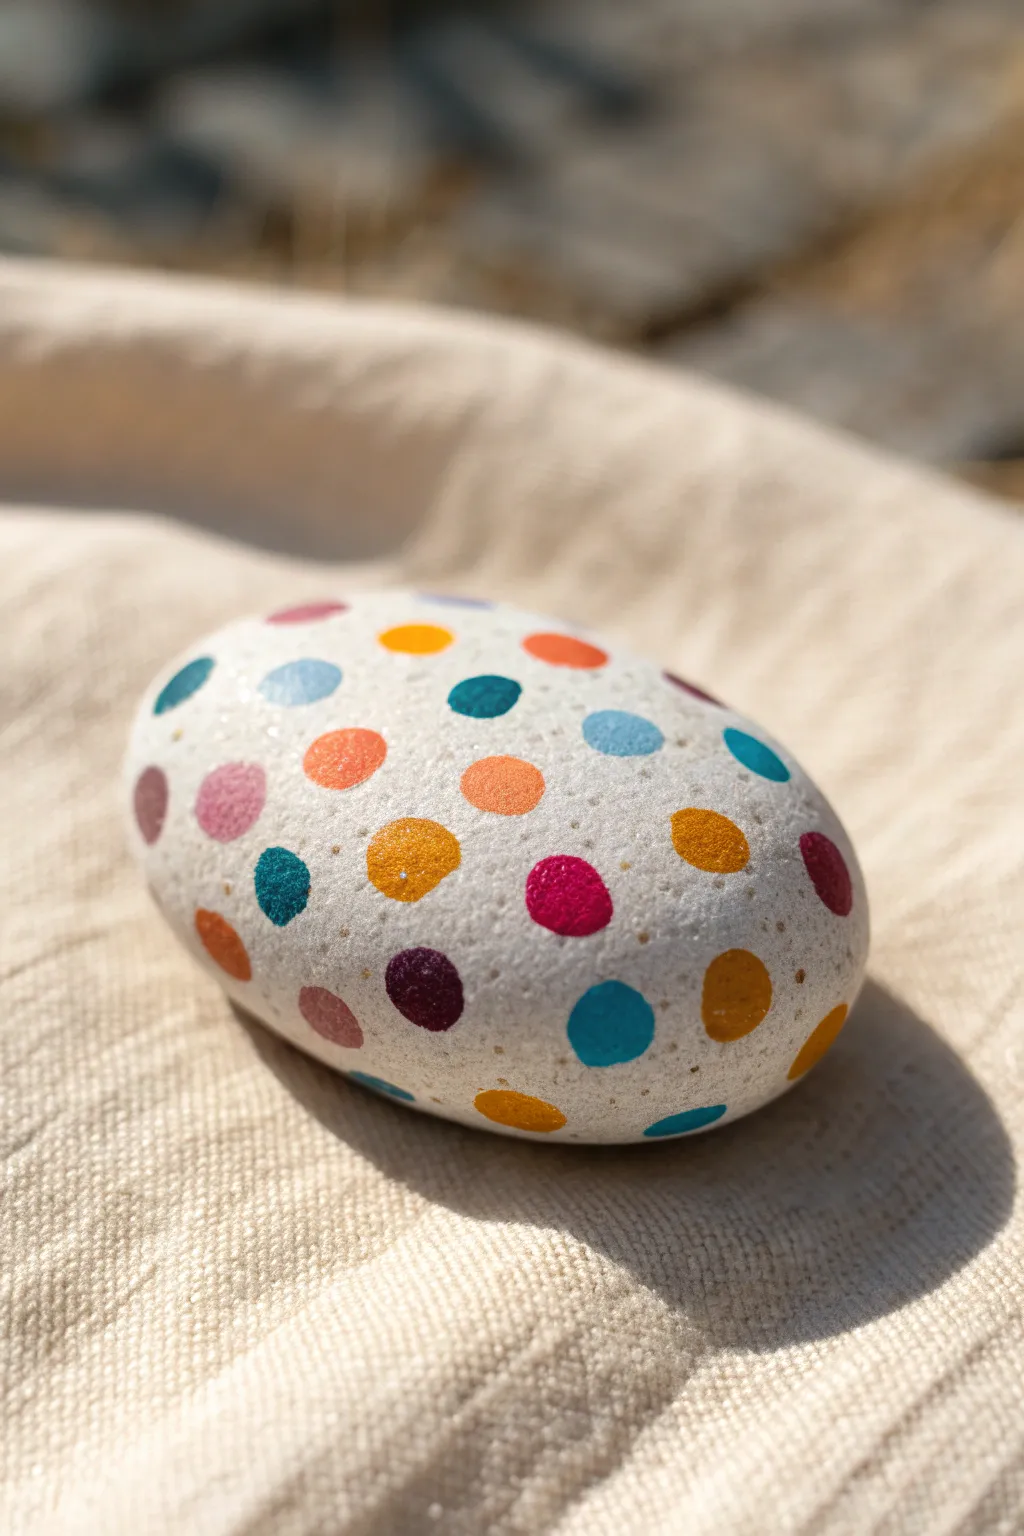
Brighten up your garden or desk with this cheerful rock painting project that mimics the fun of a confetti toss. With a crisp white background and vibrant, randomly placed dots, this simple design is perfect for beginners looking to practice their brush control.
Step-by-Step Guide
Materials
- Smooth, oval river rock
- White acrylic paint (high opacity)
- Acrylic paints in various colors (teal, hot pink, orange, yellow-ochre, plum, light blue, lavender)
- Flat paintbrush (size 6 or 8)
- Small round paintbrush (size 2) or dotting tools
- Clear acrylic sealer (spray or brush-on)
- Palette or paper plate
- Water cup and paper towels
Step 1: Preparation & Base Coat
-
Clean the stone:
Before starting, scrub your rock with warm soapy water to remove any dirt or oils. Let it dry completely in the sun or with a hair dryer. -
Prime the surface:
Apply a thin layer of white acrylic paint to the top surface of the rock. Use a wide flat brush for smooth coverage. -
Let it dry:
Allow the first coat to dry fully. It might look streaky, but don’t worry—that’s normal. -
Apply a second coat:
Paint a second layer of white to ensure a solid, opaque background. This bright white canvas will make your colored dots really pop. -
Check for coverage:
I like to hold the rock up to the light to check for thin spots. If needed, dab a little extra white on any dark areas showing through.
Step 2: Painting the Confetti Dots
-
Prepare your palette:
Squeeze out dime-sized amounts of your colorful acrylic paints onto your palette. You’ll need about 6-8 distinct shades for that true confetti look. -
Start with the first color:
Load your small round brush or a medium-sized dotting tool with your first color (e.g., teal). Press gently to create random circles across the surface. -
Create good spacing:
Space the dots out generously; aim to leave plenty of white space between them for the other colors you’ll add later. -
Switch colors:
Rinse your brush thoroughly. Move on to a contrasting color, like orange, and fill in some of the gaps. -
Vary paint placement:
Try not to put two dots of the same color right next to each other. Keeping them scattered creates a more dynamic visual effect. -
Add warmer tones:
Dip into your pinks and deep reds. Place these dots near the cooler colors to create vibration and energy in the pattern. -
Address the edges:
Paint half-circles wrapping around the curve of the rock. This makes the pattern feel continuous, as if the rock was wrapped in confetti paper. -
Fill in small gaps:
Look for any large white empty spaces. Use your smaller brush tip to add tinier dots of yellow or lavender in these areas. -
Refine the circles:
If any dots look uneven or wonky, go back with a slightly damp brush to round out the edges while the paint is still workable.
Fixing Uneven Dots
If a dot loses its round shape, wait for it to dry completely. Then, use a small brush with white base paint to carefully ‘erase’ the messy edge.
Step 3: Finishing Touches
-
Allow thorough drying:
Let the painted dots dry completely. This is crucial because wet paint can smear when you apply the sealer. -
Seal the rock:
Apply a coat of clear acrylic sealer. A spray sealer works best to avoid dragging colors, but a brush-on varnish works if you are very gentle. -
Final cure:
Let the sealer cure according to the bottle instructions (usually 24 hours) before placing your rock outside.
Add Some Sparkle
For a magical twist, mix a tiny amount of iridescent medium into your colored paints, or add a single dot of gold paint between the colored confetti.
Enjoy displaying your vibrant confetti rock and watching the colors brighten up your space


Stacked Dot “Beads” Pattern
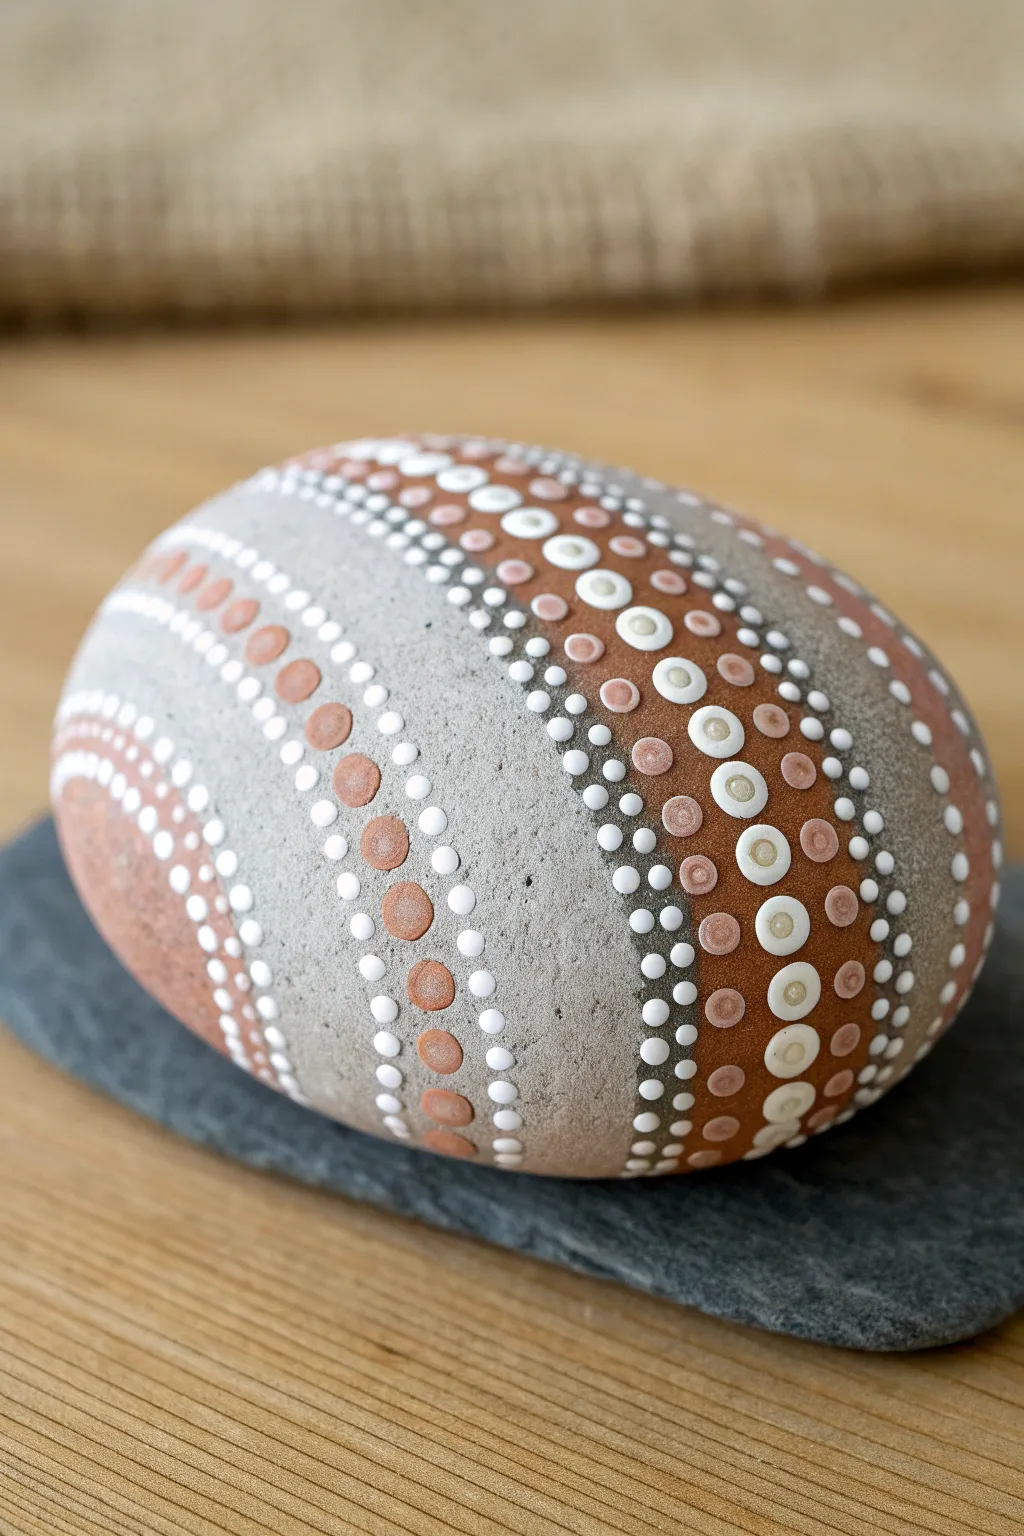
This elegant design uses swaying lines of dots to mimic strands of beads draped over the stone’s natural surface. By combining earthy terracotta tones with crisp white highlights against raw grey stone, you achieve a sophisticated, modern look.
Detailed Instructions
Materials
- Smooth, oval river rock (grey)
- Acrylic paint: Terracotta/Rust Orange
- Acrylic paint: Titanium White
- Dotting tools (various sizes)
- Damp cloth or paper towel
- Palette or small plate
- Matte or satin varnish (optional)
Step 1: Preparation and Planning
-
Clean the surface:
Wash your rock thoroughly with warm soapy water and let it dry completely to ensure the paint adheres properly. -
Study the shape:
Hold your rock and identify its natural curves. This design works best when the lines of dots follow the rounded contours of the stone rather than straight lines.
Step 2: Painting the Primary Curves
-
Mix your base color:
Prepare a small amount of terracotta or rust-colored acrylic paint on your palette. -
Create the central anchor line:
Using a medium-sized dotting tool, dab a curved line of terracotta dots across the widest part of the rock. Space them evenly, leaving about half a dot’s width between each. -
Add secondary curves:
Create similar sweeping lines on either side of your central curve using the same terracotta color. Vary the spacing slightly to create wide and narrow bands of negative space. -
Vary dot sizes:
For visual interest, try making the dots on the outer curves slightly smaller than the central ones by using a smaller tool. -
Let the base layer dry:
Allow these primary rust-colored dots to dry completely before moving on. This usually takes about 10-15 minutes.
Oops! Runny Dots?
If your dots are merging or losing their round shape, your paint is too thin. Let it sit on the palette for a few minutes to thicken slightly before applying.
Step 3: Adding the White Accents
-
Frame the central band:
Dip a small dotting tool into white paint. Place a row of small white dots on both sides of your central terracotta line, hugging the curves closely. -
Create outer white borders:
Add corresponding rows of small white dots along the edges of your other terracotta curves. This high contrast makes the warm tones pop against the grey stone. -
Top-dot the largest circles:
Return to your central band of large terracotta dots. Using a smaller tool, place a single white dot in the center of each dry rust circle. -
Add a third layer (optional):
If you have a very fine tool or toothpick, add a tiny dot of light beige or pale orange inside the white top-dots for a 3D bead effect. -
Fill the gaps:
Look for larger areas of grey stone between your main bands. Fill these spaces with rows of tiny white walking dots—start with one dip of paint and dot repeatedly until the paint runs out to create a fading tail.
Try This Twist
Mix a tiny drop of white into your terracotta paint for a lighter shade. Use this intermediate color for ‘top dots’ to create a soft gradient effect.
Step 4: Final Touches
-
Check for symmetry:
Rotate the rock to view it from different angles. If a line feels incomplete, extend the dot pattern down the sides of the rock. -
Clean up errors:
If I make a smudge or a misshapen dot, I quickly wipe it away with a damp Q-tip before it dries. -
Allow full cure time:
Let the rock sit undisturbed for at least 24 hours to ensure all layers of paint are fully hardened. -
Seal the artwork:
Apply a coat of matte or satin varnish to protect the dots from chipping and give the stone a finished, professional sheen.
Place your warm, earthy creation on a desk or shelf where its repetitive patterns can offer a moment of calm
Easy Snowflake Dot Symmetry
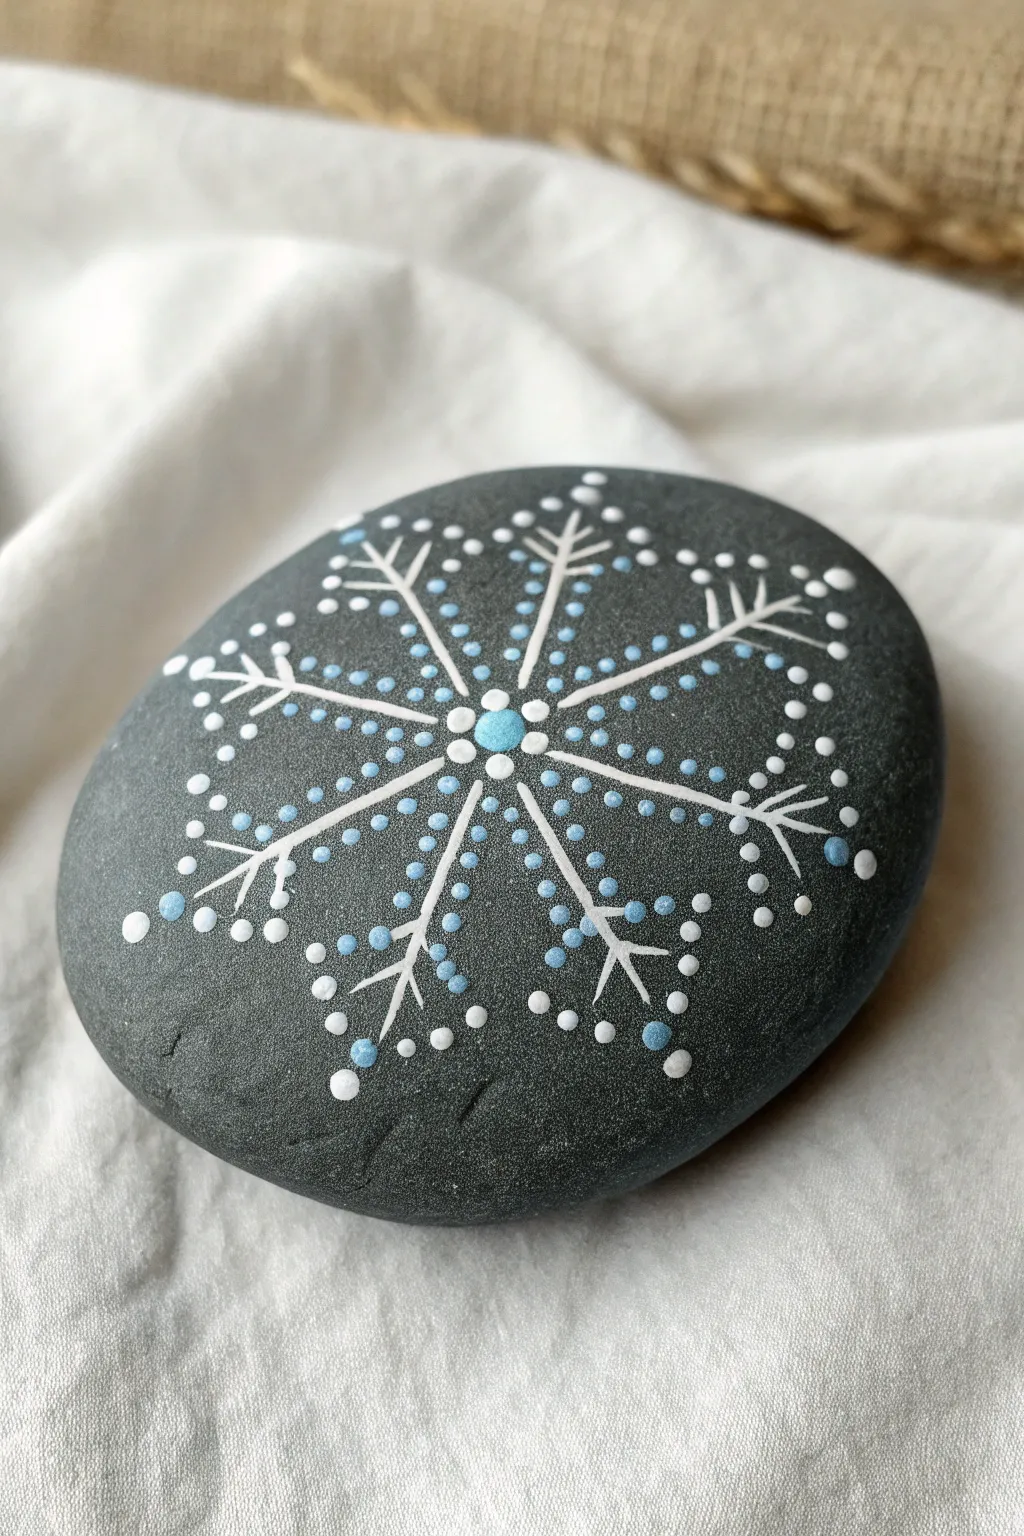
Transform a simple grey river rock into a stunning winter keepsake with this delicate snowflake mandala design. Using just white and light blue acrylic paints, you’ll create a symmetrical, six-point starburst that pops beautifully against the dark stone background.
How-To Guide
Materials
- Smooth, dark grey river stone (approx. palm-sized)
- White acrylic paint
- Light blue acrylic paint (cyan or baby blue)
- Set of dotting tools (various sizes)
- Fine liner brush (size 00 or 000)
- Pencil or white chalk pencil (optional for guidelines)
- Clear acrylic sealer or varnish
Step 1: Creating the Skeleton
-
Clean and prep:
Begin by washing your stone with soap and water to remove any dirt or oils. Let it dry completely before starting. -
Find the center:
Locate the approximate center of your stone. Using a medium-sized dotting tool, place a single light blue dot right in the middle. -
First ring:
Switch to a slightly smaller tool and dip it in white paint. Place six evenly spaced white dots in a circle directly around the central blue dot. -
Draw the main spokes:
Using your fine liner brush and thinned white paint, draw a straight line extending outwards from each of the six white dots. These should reach almost to the edge of the stone. -
Add clear tips:
At the very end of each of these six long lines, place a small-to-medium white dot to cap off the spoke.
Step 2: Building the Branches
-
First chevron:
On each of the six spokes, about halfway down the line, paint a ‘V’ shape pointing outwards. The arms of the V should angle back towards the center. -
Second chevron:
Paint a second, smaller ‘V’ shape further down the spoke, closer to the outer tip. Repeat this on all six spokes. -
Cap the chevrons:
Use a small dotting tool to place a tiny white dot at the tips of every ‘V’ arm you just painted to soften the sharp lines.
Paint Consistency
For the painted lines, thin your white acrylic slightly with a drop of water. It should flow like smooth ink, preventing clumps.
Step 3: Filling with Dots
-
Inner blue detail:
Look at the space between the main white spokes. Near the center, place a column of three small blue dots in the gaps between the lines. -
Extending the pattern:
Continue that line of blue dots outward. As you move further from the center, mix in slightly larger blue dots to fill the widening gap between the spokes. -
White accents:
Switch back to white paint. Add a row of tiny white dots running parallel to the main spokes, acting as a border for the blue dots. -
Outer framing:
Near the outer edge of the stone, between the tips of the main spokes, add a cluster of larger white dots to create a rounded border effect. -
The final sparkle:
Fill any remaining large gaps near the outer rim with alternating medium blue and white dots to give the snowflake a full, intricate look. -
Dry and seal:
Allow the paint to dry for at least 24 hours. Once cured, I prefer to apply a coat of clear varnish to protect the design and make the colors pop.
Wobbly Lines?
If your hand shakes, anchor your pinky finger on the table or a dry part of the rock. You can also sketch guidelines with chalk first.
Now you have a frosty piece of art that won’t melt, perfect for a paperweight or winter decoration
Dotted Dragonfly Silhouette
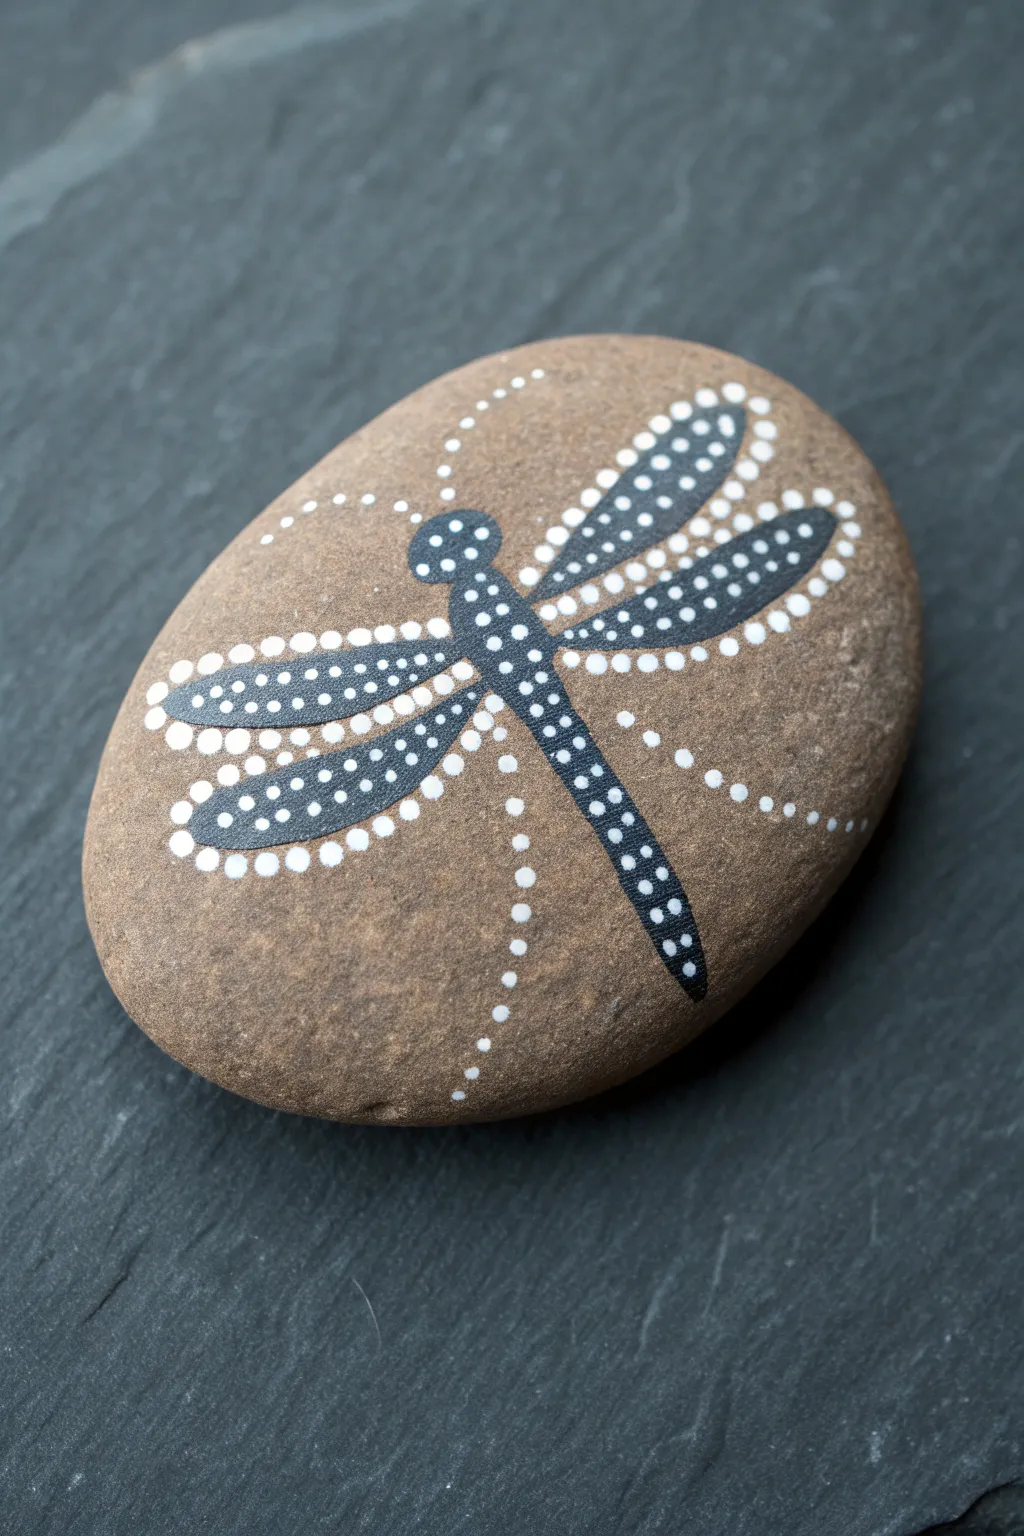
Capture the delicate beauty of a dragonfly using simple dotting techniques on a natural stone canvas. This design combines bold silhouette shapes with intricate stippling to create a stunning contrast against the bare rock.
Step-by-Step Tutorial
Materials
- Smooth, flat river rock (palm-sized or larger)
- Black acrylic paint
- White acrylic paint
- Very fine detail paintbrush (00 or 000 size)
- Dotting tools (various sizes) or household alternatives (toothpicks, pencil erasers, cotton swab ends)
- Pencil for sketching
- Sealant (spray varnish or Mod Podge)
Step 1: Preparation and Sketching
-
Clean the surface:
Begin by thoroughly washing your rock with soap and water to remove any dirt or oils. Let it dry completely before starting. -
Sketch the silhouette:
Lightly draw the outline of the dragonfly in the center of the stone using a pencil. Draw a long, thin body with a rounded head, and four long, petal-shaped wings extending outward. -
Adjust the proportions:
Review your sketch. The upper wings should be slightly larger and angled forward, while the lower wings are slimmer and angled slightly back.
Step 2: Painting the Base Silhouette
-
Fill the body:
Using your fine detail brush and black acrylic paint, carefully fill in the body of the dragonfly. Keep the edges smooth and sharp. -
Outline the wings:
Paint the outline of the four wings with black paint. I like to make the outline slightly thicker than a standard line, creating a bold frame for the interior dots we will add later. -
Fill the wing interiors:
Completely fill in the wings with the black paint so you have a solid black silhouette of the entire dragonfly. Allow this black layer to dry fully before moving on to dotting.
Paint Consistency Pro-Tip
For perfect round dots, ensure your paint is fluid but creamy like yogurt. If it’s too thick, add a drop of water or pouring medium to help it flow off the tool smoothly.
Step 3: Adding the Dotted Details
-
Dot the spine:
Take a small dotting tool or the tip of a toothpick dipped in white paint. Create a vertical line of tiny dots running down the center of the dragonfly’s black body. -
Outline the wings with dots:
Using a medium-sized dotting tool dipped in white, place evenly spaced dots around the *outside* perimeter of all four wings, creating a bright halo effect. -
Add inner wing texture:
Switch to a smaller dotting tool. Inside the black wing shapes, add rows of small white dots that follow the curve of the wing. This mimics the translucent veins of a real dragonfly. -
Detail the head:
Add two or three tiny white dots to the rounded head area to simulate eyes and add definition. -
Check for consistency:
Look over your dots. If any are too faint, you can carefully re-dot them once the first layer is dry to make the white pop.
Level Up: Metallic Magic
Swap the white wing dots for metallic gold or iridescent pearl paint. This will make the wings shimmer and catch the light just like a real dragonfly’s wings do.
Step 4: Decorative Flourishes
-
Create the flight trail:
Starting from the tail of the dragonfly, create a curved line of white dots trailing off to the bottom edge of the rock. This gives the illusion of movement. -
Add upper atmosphere dots:
Add a few curved lines of tiny dots above the dragonfly’s head or near the wing tips to suggest wind or energy swirling around the insect. -
Clean up:
If you have any messy graphite lines still visible, gently erase them once you are certain all paint is bone dry. -
Seal the artwork:
Protect your dotted masterpiece with a layer of clear spray varnish or a coat of Mod Podge to ensure it lasts outdoors or on display.
Place your finished stone in a garden pot or on a sunny windowsill to enjoy the intricate details
Sunset Horizon in Dot Layers
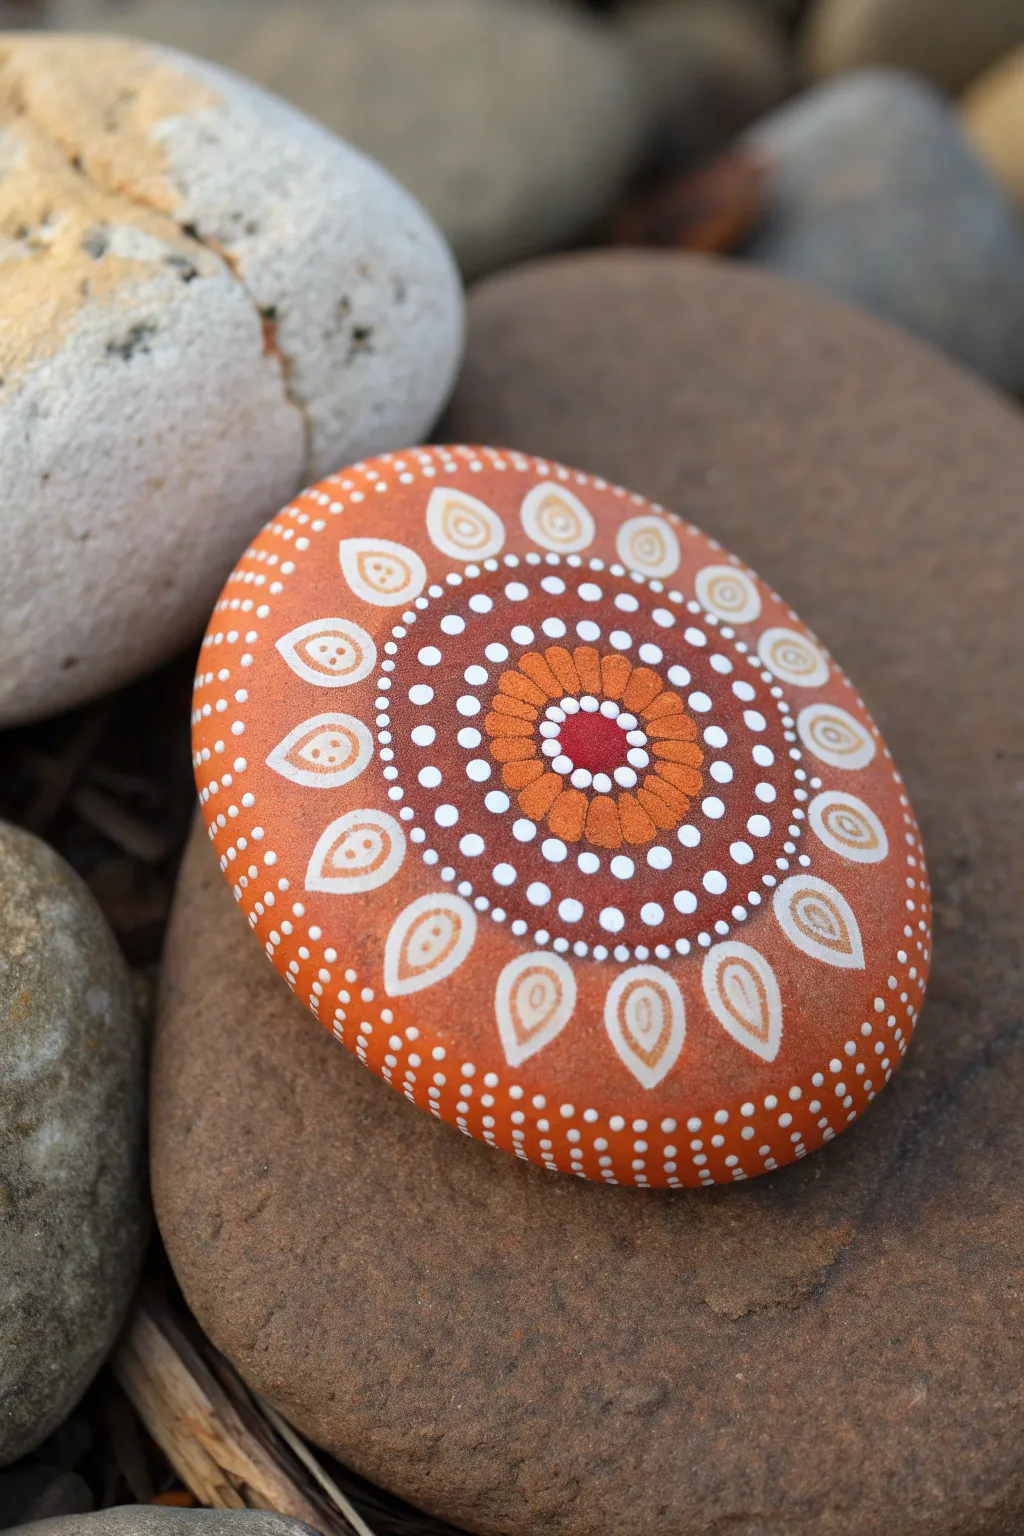
This radiant rock painting captures the warmth of a sunset with its vibrant orange hues and precise white detailing. The design features a glowing central flower motif surrounded by delicate teardrops and concentric rings, creating a mesmerizing sunburst effect.
How-To Guide
Materials
- Smooth, round river rock (approx. 3-4 inches wide)
- Acrylic paint: Bright Orange, Deep Red, White, Burnt Orange/Terracotta
- Paintbrushes: Wide flat brush (for base coat), fine liner brush
- Dotting tools: Set of various sizes (or improvised tools like dowels and toothpicks)
- Acrylic varnish (gloss or satin)
- Palette or small plate
- Water cup and paper towels
Step 1: Base Preparation
-
Clean the surface:
Begin by washing your stone with warm soapy water to remove any dirt or oils. Let it dry completely in the sun or with a hair dryer. -
Apply the base coat:
Using a wide flat brush, paint the entire top surface of the rock with a bright orange acrylic paint. Ensure the coverage is opaque; you might need a second coat once the first is dry. -
Smooth the finish:
Check for any brush strokes. If the paint looks streaky, apply a final thin layer of orange mixed with a tiny drop of water to help it self-level.
Step 2: Creating the Central Flower
-
The center point:
Load a medium-sized dotting tool with deep red paint. Place a single, perfect dot directly in the center of your rock. -
First ring:
Switch to a small dotting tool and white paint. Carefully place a ring of small white dots touching the edge of the central red dot. -
Flower petals:
Mix your bright orange with a little burnt orange to get a slightly darker shade. Using a larger dotting tool, place 8-10 large dots around the white ring. While the paint is wet, drag the paint inward slightly with a needle tool to create a subtle petal shape, though keeping them round is fine too.
Pro Tip: Consistency
If your paint forms peaks on the dots like meringue, mix in a tiny drop of flow medium or water. You want the paint to settle into a smooth, flat dome.
Step 3: Building the Mandala Pattern
-
Outer petal dots:
Using a small tool and white paint, place a tiny dot in the ‘valley’ between each of the orange petals you just created. -
Concentric white rings:
Now, create three distinct rings of white dots radiating outward. Start with very small dots for the first ring, slightly larger for the second, and larger again for the third. Spacing is key here for symmetry. -
The teardrop ring:
This is the feature element. Paint a ring of large white tear-drop shapes. I find it easiest to paint a large dot first, then use a fine liner brush to drag the top point outward and contour the bottom roundness. -
Teardrop details:
Once the white teardrops are dry, dip a small tool in your bright orange base color. Place a dot inside the bottom (fat part) of each white teardrop. Then, place a tiny white dot in the center of that orange dot.
Level Up: Gradient Petals
For the outer white teardrops, try double-loading your brush with white and pale yellow to create a beautiful two-tone gradient effect as you paint the shape.
Step 4: Outer Details and Finishing
-
Outer border dots:
Surround the outer edge of the main design with two rows of tiny white dots. These should follow the curve of the teardrops initially, then fill the gaps. -
Side layering:
Continue these tiny white dots down the sloped sides of the rock. Create rows that wrap around the circumference, giving the design a finished, waterfall-like edge. -
Dry time:
Allow the stone to dry undisturbed for at least 24 hours. The thick dots take longer to cure than the base coat. -
Sealing the art:
Apply a coat of gloss or satin varnish to protect your work from scratches and make the colors pop. Brush it on gently to avoid smearing any uncured paint.
Place your finished sunburst stone in a garden or on a windowsill to catch the light
Ocean Waves With Dot Foam
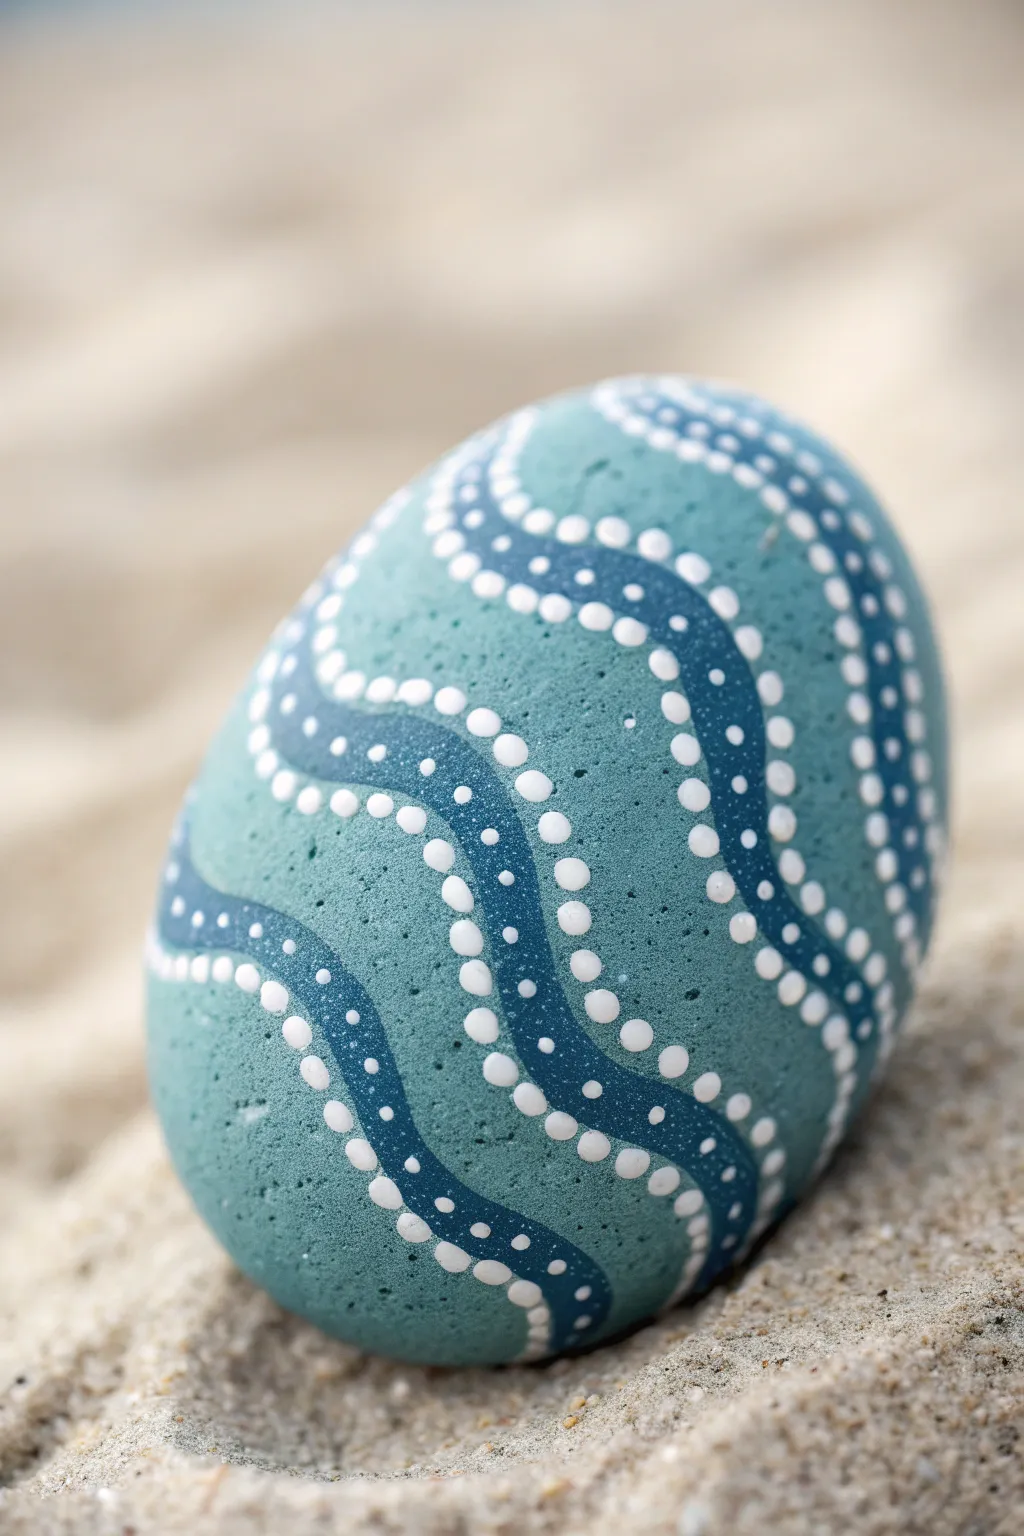
Capture the rhythm of the ocean with this serene, wave-inspired rock painting. Using simple dotting tools, you’ll create flowing bands of deep blue and teal, accented by crisp white dot foams that look beautiful on a beachy stone.
How-To Guide
Materials
- Smooth, rounded river rock (egg-shaped works well)
- Acrylic paints: Teal/Turquoise base, Dark Navy Blue, Titanium White
- Dotting tools (various sizes, or improvised tools like toothpicks and brush ends)
- Fine detail paintbrush (optional)
- Acrylic sealant (matte or glossy)
- Palette or small plate
- Water cup and paper towels
Step 1: Base Preparation
-
Clean the Surface:
Begin by scrubbing your rock with warm, soapy water to remove any dirt or oils. Let it dry completely in the sun or with a hairdryer before starting. -
Apply the Base Coat:
Paint the entire surface of the rock with a smooth layer of teal or turquoise acrylic paint. This mid-tone blue-green serves as the water’s main color. -
Add a Second Layer:
Once dry, apply a second coat of the teal paint to ensure opacity and a rich, even color. Allow this base to cure fully before moving to the pattern work.
Consistency is Key
If your dots have peaks (Hershey’s Kiss shape), your paint is too thick. Thin it slightly with a drop of water or pouring medium for smooth, round domes.
Step 2: Creating the Wave Structure
-
Draft the Waves:
Using a very light pencil or white chalk, sketch two or three wavy, undulating bands wrapping around the rock. These will be your dark blue zones. -
Paint the Wave Bands:
Use a brush to fill inside your sketched lines with dark navy blue paint. These bands should be roughly half an inch wide, curving diagonally across the stone. -
Smooth the Edges:
Check the edges of your navy bands; they don’t need to be perfect since we will cover the transition with dots, but try to keep the curves flowing naturally.
Step 3: Adding the Dot Foam
-
Start the Large Dots:
Dip a medium-sized dotting tool into white paint. Place a row of evenly spaced dots mostly on the teal background, right along the upper edge of the navy blue wave. -
Mirror the Dots:
Repeat this process on the lower edge of the navy wave. The white dots should hug the contour of the dark blue shape, creating a border effect. -
Inner Wave Dots:
Switch to a slightly smaller dotting tool. Inside the navy blue band, create a central line of smaller white dots that follows the same curve as the band itself. -
Refine the Flow:
If the dark band is wide enough, you might add two rows of these internal dots. The goal is to make them look like bubbles caught in the current. -
Add Tiny Accents:
Using your smallest tool or a toothpick, add tiny ‘micro dots’ near the larger border dots. Placing these sporadically gives the impression of sea foam spray.
Gradient Waves
Instead of solid navy bands, mix a little white into your blue to create an ombré effect inside the wave before adding the top layer of white dots.
Step 4: Finishing Touches
-
Correct Mistakes:
If any dots merged or smeared, wait for them to dry, touch up with the background color, and re-dot. -
Let it Cure:
Allow the paint to dry completely. Dense dots can take longer than flat paint, so I usually leave mine overnight to be safe. -
Seal the Rock:
Apply a coat of clear acrylic sealer. A matte spray keeps the natural look shown in the photo, while gloss will make it look wet like a real river stone.
Place your finished wave rock in a garden or on your desk for a daily reminder of the calming sea
Cactus Rock With Dot Texture
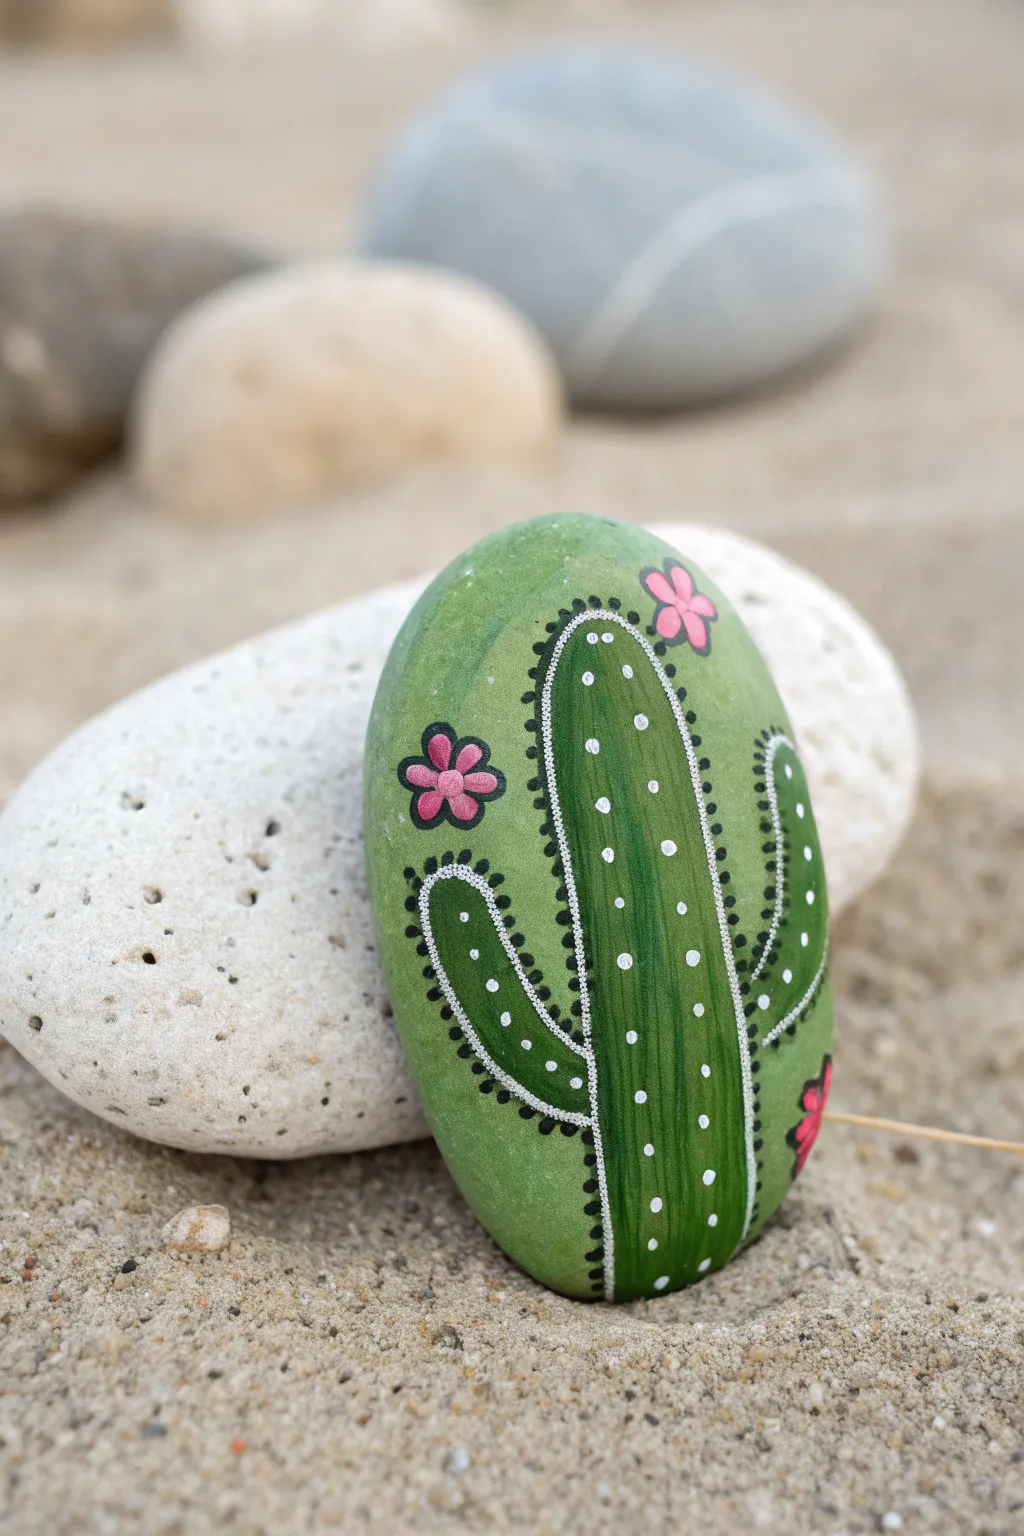
Transform a smooth, oval river stone into a vibrant desert scene with this charming cactus design. The project uses simple dotting techniques to create pleasing texture and contrast against a soft green background.
Step-by-Step
Materials
- Smooth, oval-shaped rock
- Acrylic paints: Light sage green, forest green, white, black, pink
- Flat paintbrush (medium)
- Fine detail liner brush (size 0 or 00)
- Dotting tools (or toothpicks/ends of paintbrushes)
- Sealer (Mod Podge or clear acrylic spray)
Step 1: Base and Shape
-
Clean the canvas:
Start by washing your rock with soap and water to remove any dirt or grit, then let it dry completely. -
Apply the base coat:
Using your flat brush, paint the entire surface of the rock with a light sage green color. You might need two coats for full opacity. -
Outline the cactus:
Visualize a central column with one arm curving up on the left and a smaller arm on the right. Lightly sketch this shape with a pencil if you need a guide. -
Fill the cactus shape:
Paint the interior of your cactus shape with a darker forest green, leaving the surrounding light green background visible. -
Highlight the center:
While the dark green is still slightly wet or freshly dry, blend a streak of lighter green down the center of the main stem and arms to create a 3D rounded effect.
Steady Hands
Rest your wrist heavily on the table while painting fine lines. If your hand shakes, try exhaling slowly as you pull the brush for smoother strokes.
Step 2: Detailing and Texture
-
Outline in white:
Using a very fine liner brush and white paint, carefully trace a thin line around the entire perimeter of the cactus shape. -
Add spine details:
Along the outside of that white line, use a small dotting tool or toothpick to place tiny black dots. Put them close together to mimic the thorny texture of the edge. -
Create the inner white border:
Now, paint a second thin white line just inside the cactus body, running parallel to your outer border. This separates the ‘edge’ from the ‘body’. -
Add inner spines:
Place tiny black dots along this inner white line as well. These double rows of dots give the cactus that classic prickly look. -
Vertical texture lines:
Paint thin vertical white lines running up the center of the main stem and the arms. -
Add main dots:
Using a slightly larger dotting tool, place white dots in a vertical row between your painted lines on the cactus body. -
Randomize the texture:
In the remaining dark green spaces, scatter a few smaller white dots to fill the gaps without making it look too cluttered.
Step 3: Floral Accents
-
Paint flower petals:
Choose a spot near the top of the rock and one on the side arm. Use pink paint to create five small teardrop shapes meeting in a center point. -
Detail the center:
Once the pink is dry, place a small yellow or white dot in the very center of each flower. -
Outline the flowers:
Use your finest brush or a superfine black marker to outline each petal, adding definition to the blooms. -
Final drying:
Allow the entire rock to sit undisturbed for several hours until the thickest dots of paint are fully hardened. -
Seal the artwork:
Protect your design with a coat of clear sealer or varnish to prevent the dots from chipping over time.
Sunset Vibes
Instead of a solid green background, paint a gradient sunset with orange, pink, and purple before painting the cactus on top for a warm desert evening look.
Place your finished succulent stone in a planter or on your desk for a touch of greenery that never needs watering
Galaxy Rock Starfield Dots
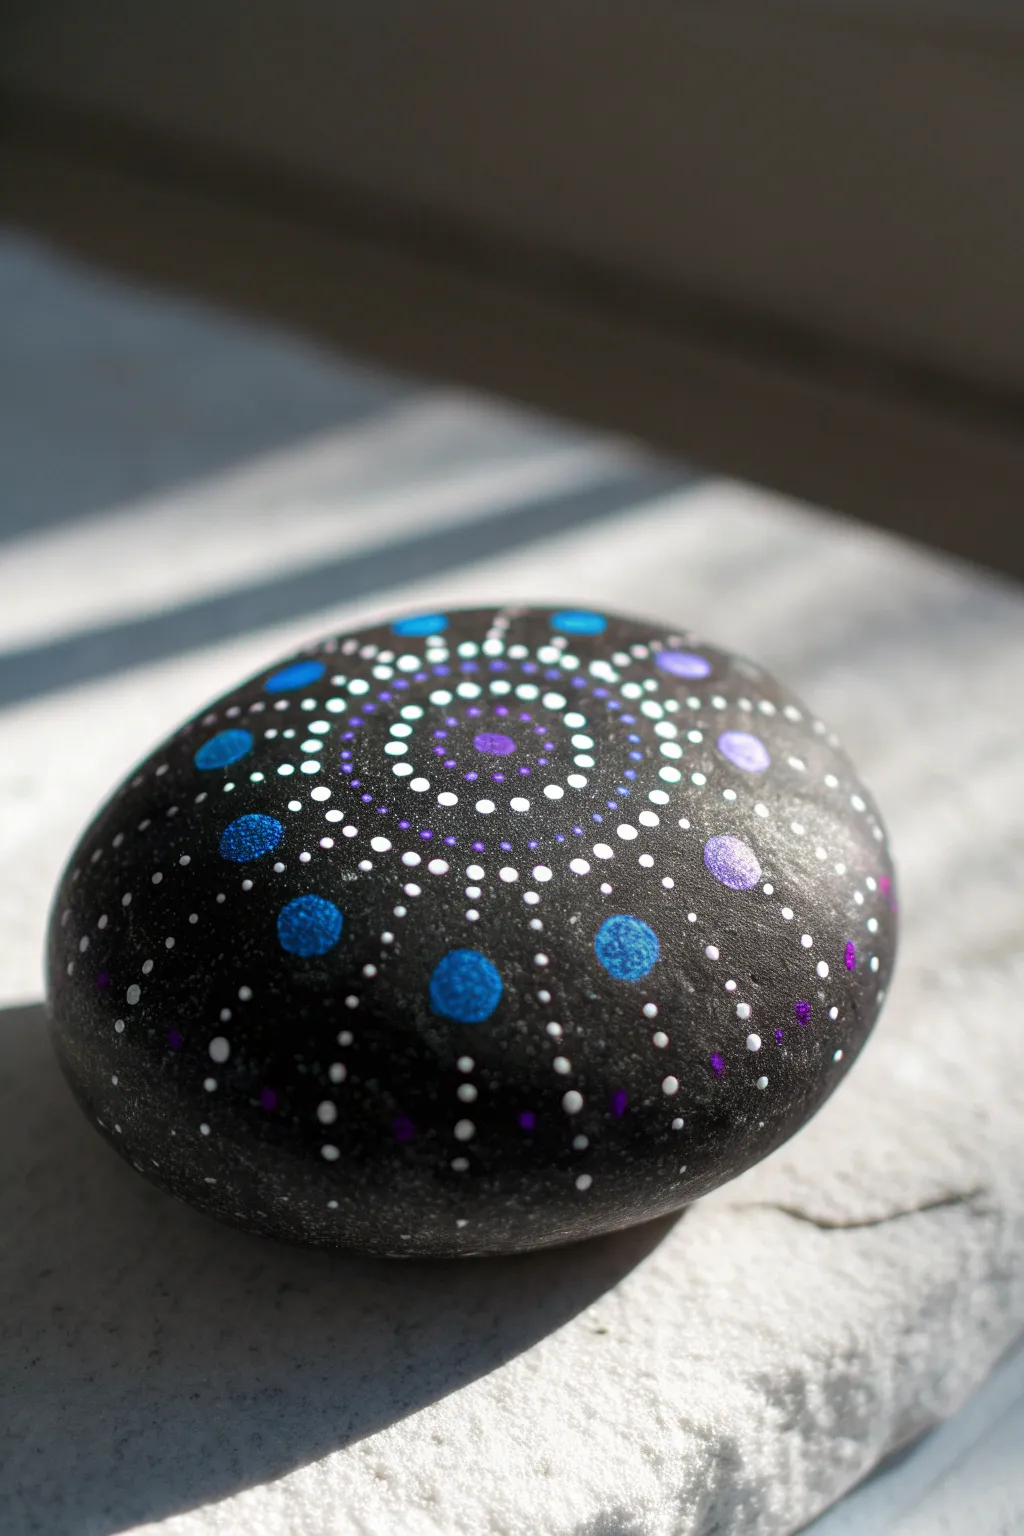
Transform a simple river rock into a mesmerizing piece of the galaxy with this dot-painting project. Using a base of deep black, you’ll layer intricate rings of white, blue, and purple dots to create a radiating starfield effect that looks beautiful on any desk or windowsill.
Step-by-Step Guide
Materials
- Smooth, round river rock (approx. 3-4 inches wide)
- Black acrylic paint (matte or satin)
- White acrylic paint
- Metallic or pearl blue acrylic paint
- Metallic or pearl purple acrylic paint
- Light lavender/lilac acrylic paint
- Acrylic paint sealer (matte or gloss)
- Set of dotting tools (various sizes)
- Fine detail paintbrush (optional)
- Palette or paper plate
- Damp paper towel
Step 1: Preparation & Base Coat
-
Clean the Stone:
Begin by washing your rock with warm, soapy water to remove any dirt or oils. Scrub it gently and let it dry completely, as any moisture trapped underneath will affect the paint adhesion. -
Apply the Base Layer:
Using a flat brush, paint the entire top surface of the rock with black acrylic paint. You want a solid, opaque background, so applying two thin coats is better than one thick coat. -
Let it Cure:
Allow the black base to dry fully. It should be dry to the touch and not tacky before you start dotting.
Paint Peaks?
If your dots have pointy peaks, your paint is too thick. Mix in a tiny drop of pouring medium or water to thin it, then tap the rock gently on the table to flatten wet peaks.
Step 2: The Center Galaxy
-
The Central Dot:
Load a medium-sized dotting tool with metallic purple paint. Place a single, crisp dot in the absolute center of your rock to anchor the design. -
First Ring – Purple:
Using a much smaller tool, create a tight ring of tiny metallic purple dots immediately surrounding the central dot. Keep them close together but not touching. -
Second Ring – White:
Switch to white paint. Using a small tool, dot a ring around the purple one. Try to align these white dots in the gaps between the purple dots of the previous ring for a nesting effect. -
Third Ring – Separation:
Create another ring of small white dots, spacing this ring slightly further out from the previous one to create a dark band of separation, which adds depth to the galaxy look.
Step 3: Expanding the Pattern
-
Larger White Dots:
With a slightly larger tool, place a ring of more prominent white dots. These should be spaced out a bit more than the inner rings. -
Accenting the Gaps:
Return to your smallest tool. Place tiny white ‘filler’ dots in the spaces between the larger white dots you just painted, pushing them slightly inward toward the center. -
The Blue Horizon:
Using a medium-large tool, load up your metallic blue paint. Place a ring of bold blue dots around the perimeter of your current design. Spacing is key here; leave room for details between them. -
Connecting Dots:
Using the smallest tool and white paint, create delicate chains of dots connecting the inner white ring pattern to the new outer blue dots, purely following the visual flow of the mandala.
Cosmic Sparkle
Before sealing, brush a very thin layer of transparent holographic glitter glue over just the black negative spaces for a true twinkling starfield effect.
Step 4: Outer Rings & Details
-
Dual-Tone Outer Ring:
Move further out towards the edge of the rock. Creating a wider circle, alternate between medium-sized metallic blue dots and slightly smaller metallic purple/lilac dots. -
Adding Stardust:
Take your finest dotting tool or a toothpick. Dip it in white paint and fill the empty black spaces between the main rings with tiny, random specks to simulate distant stars. -
Walking the Dots:
For the largest outer dots, try ‘walking the dots’ – place a large main dot, then without reloading ink, use a smaller tool to tap smaller dots curving around it like a halo. -
Edge Fading:
Allow the pattern to fade out naturally as it curves down the side of the rock. Add a few sparse purple and blue dots near the bottom edge that disappear into the black base.
Step 5: Finishing Touches
-
Top Dots:
Once the base layers of your dots are dry, add ‘top dots.’ Place a smaller, lighter colored dot on top of the largest blue and purple dots (e.g., light blue on dark blue) to create a sphere-like 3D effect. -
Final Inspection:
Look for any uneven spacing. I sometimes add extremely tiny white micro-dots to balance out areas that look too empty. -
Sealing:
Allow the stone to cure for at least 24 hours. Apply a coat of clear acrylic sealer to protect the paint from chipping and to make the metallic colors pop.
Place your finished cosmic stone in a sunny spot to watch the metallic paints shimmer
Name Rock Filled With Dots
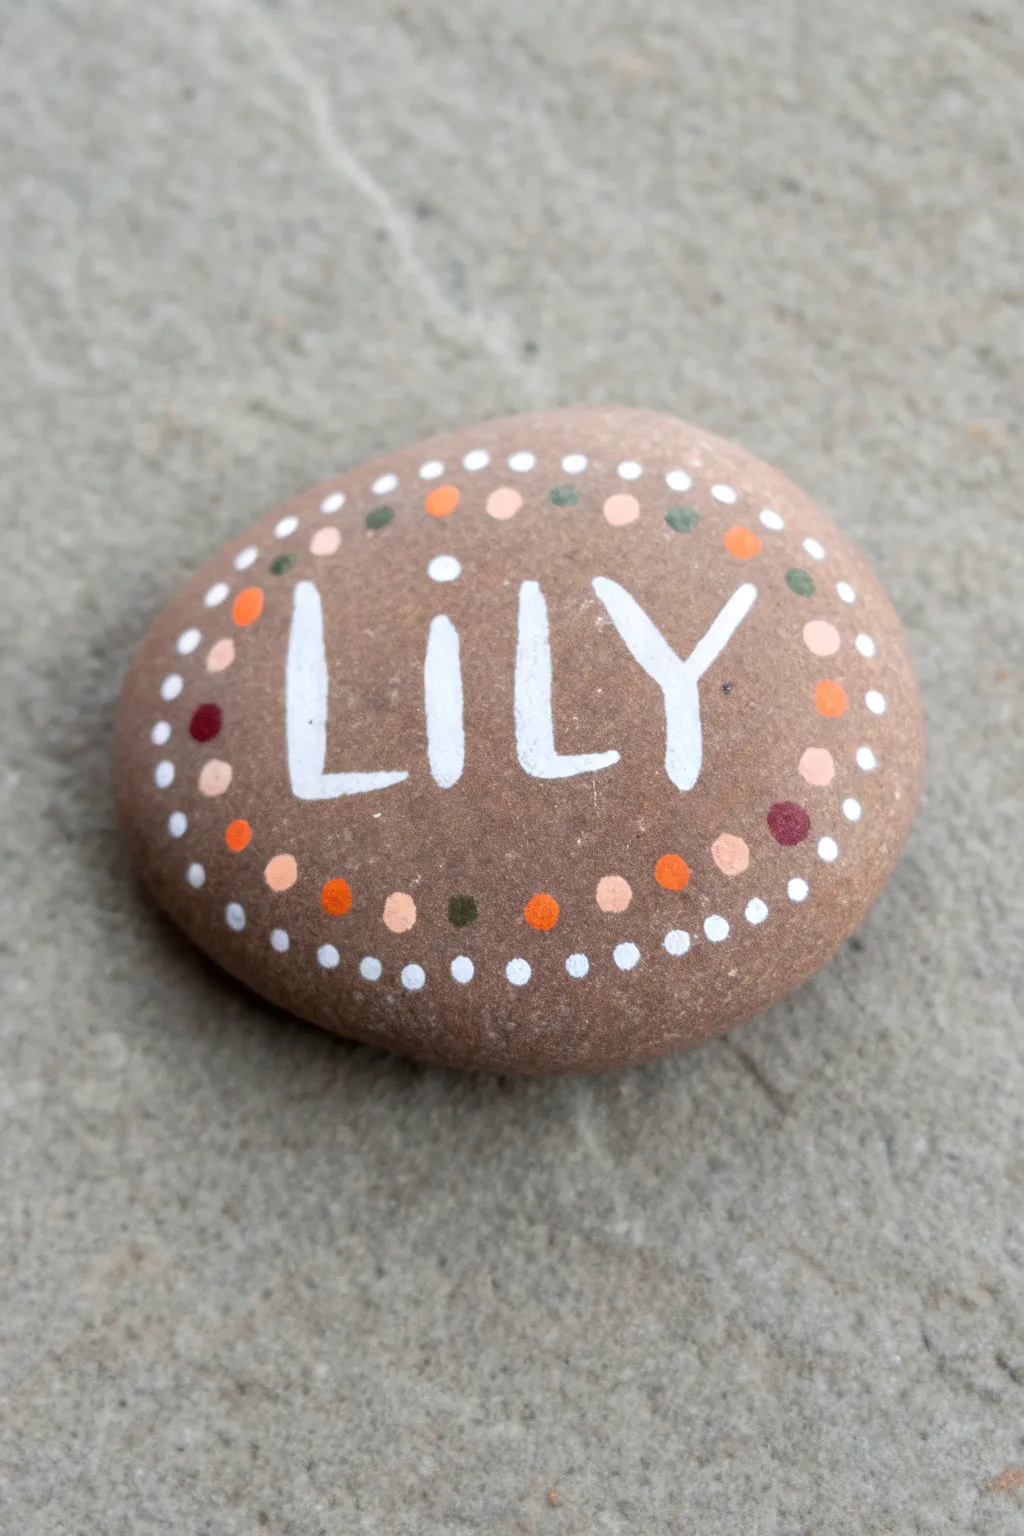
Personalize a river rock with a charming, hand-painted name surrounded by a whimsical border of colorful dots. This simple design combines bold white lettering with soft earth tones for a lovely handmade keepsake.
Step-by-Step Tutorial
Materials
- Smooth, flat river stone (brown or grey)
- White acrylic paint or paint pen (medium tip)
- Dotting tools or toothpicks
- Acrylic paints: orange, peach/flesh tone, dusty rose, maroon, olive green
- Clear acrylic sealer (spray or brush-on)
- Damp paper towel
- Paper plate or palette
Step 1: Preparation and Lettering
-
Clean the stone:
Begin by washing your stone with warm soapy water to remove any dirt or oils. Let it dry completely before applying any paint, as moisture can prevent the paint from adhering properly. -
Draft the name:
If you are nervous about freehanding, lightly sketch the name ‘LILY’ (or your chosen name) in the center of the rock with a pencil. Aim for the center to leave room for the border. -
Paint the letters:
Using a white paint pen or a fine brush with white acrylic paint, trace over your pencil lines. Make the letters blocky and capitalized. -
Clean up edges:
Go over the letters a second time if the first coat looks translucent. Ensure the edges of the letters like ‘L’ and ‘Y’ are crisp and solid. -
Dry the lettering:
Allow the white lettering to dry fully. This is crucial so you don’t accidentally smudge the name while adding the dot border.
Paint Consistency
If your paint leaves peaks on the dots, it’s too thick. Mix in a tiny drop of water or pouring medium so the dots settle flat and smooth.
Step 2: Creating the Dot Border
-
Prepare your palette:
Squeeze small amounts of your colored acrylic paints—orange, peach, maroon, and olive green—onto your paper plate. Also put a dollop of white paint for the outer ring. -
Start the inner ring:
Imagine an oval shape surrounding the name. Dip a medium-sized dotting tool or the flat end of a brush handle into the orange paint. -
Place anchor dots:
Place a few orange dots at key points around the name—top, bottom, left, and right—to guide your oval shape. -
Fill in the pattern:
Between the orange dots, add dots of the peach paint. I find alternating colors randomly gives it a more organic, playful look rather than a strict pattern. -
Add darker accents:
Intersperse smaller dots of maroon and olive green into this inner ring. These darker tones provide contrast against the lighter stone color. -
Vary dot sizes:
Use different sized tools for the inner ring. The orange and peach dots should be slightly larger, while the maroon and green accents can be smaller. -
Begin the outer ring:
Switch to your white paint. Using a smaller dotting tool, start placing white dots around the outside of your colored ring. -
Spacing the white dots:
Place the white dots fairly close together, creating a delicate halo effect that frames the colored dots inside. -
Check for gaps:
Step back and look at your oval. If there are large gaps in the border, fill them with tiny white ‘filler’ dots to complete the circle. -
Clean tools:
Wipe off your dotting tools onto the damp paper towel frequently to prevent paint buildup, which can alter dot shape.
Gradient Style
Try an ombré effect for the name by blending two colors on the brush (like dark blue to light blue) as you paint the letters.
Step 3: Finishing Touches
-
Final drying:
Let the entire rock sit undisturbed until the dots are dry to the touch. Thicker dots will take longer to cure than the flat lettering. -
Erase pencil marks:
If any pencil lines are still visible from your initial sketch, gently erase them now, being careful not to rub the paint. -
Seal the artwork:
Apply a coat of clear acrylic sealer. A spray sealer works best to avoid smearing the dots, but a brush-on varnish works if you are gentle.
Your personalized name rock is now ready to brighten up a garden path or sit on a desk as a cheerful paperweight


Have a question or want to share your own experience? I'd love to hear from you in the comments below!