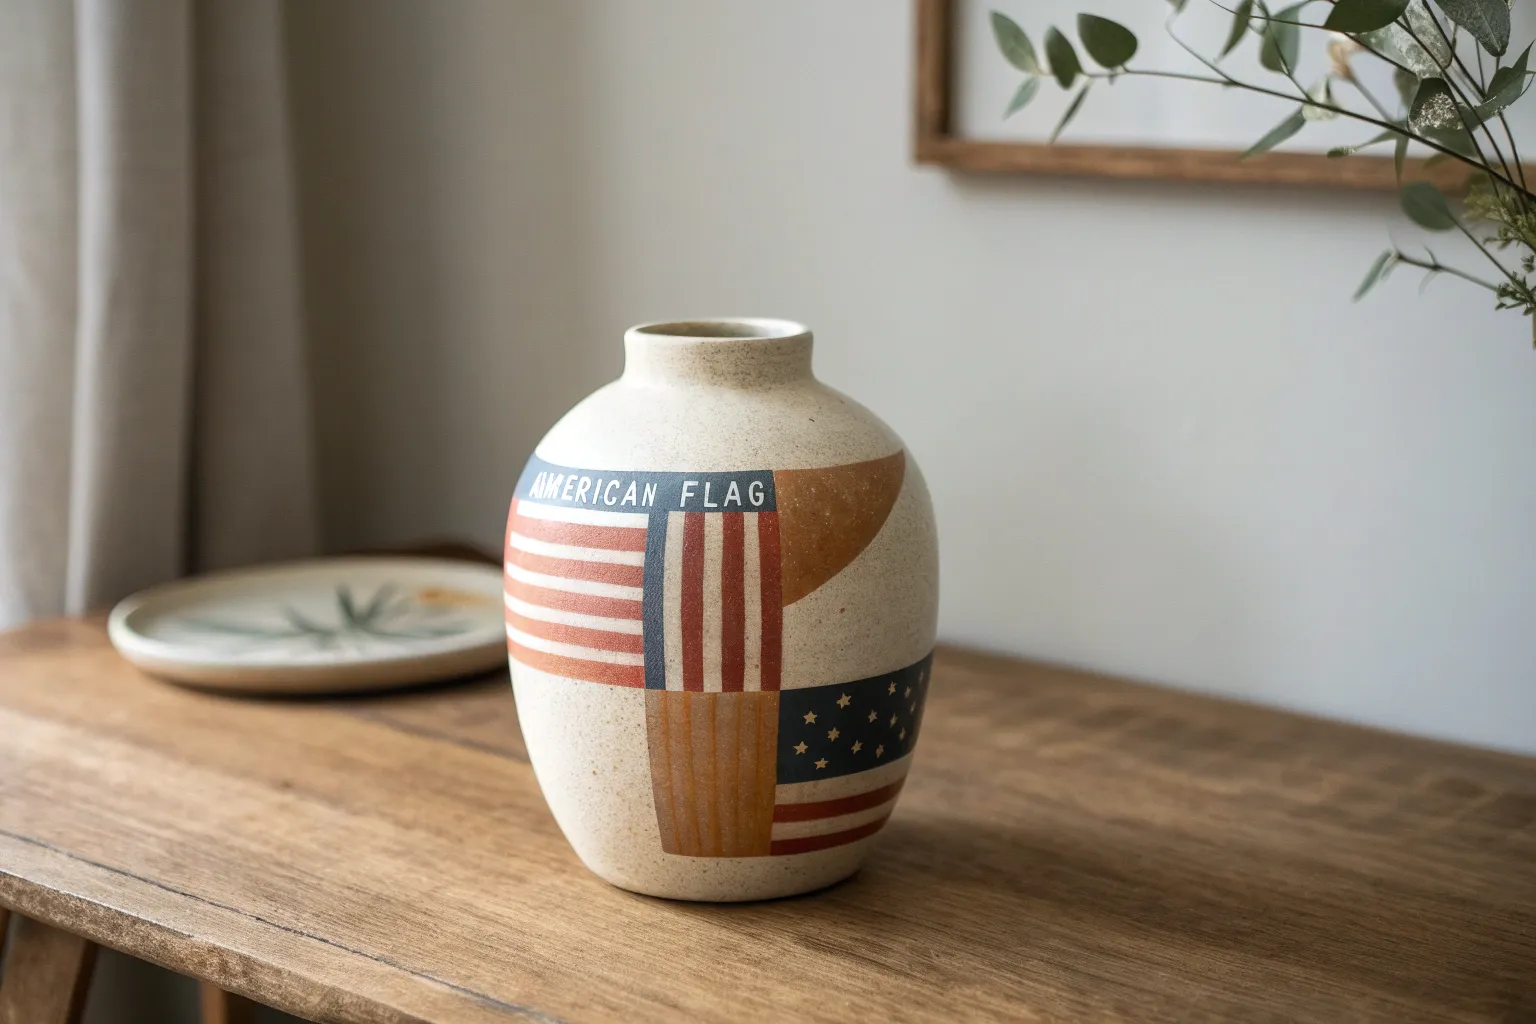
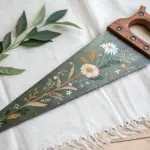
Whenever I need a feel-good project, I reach for red, white, and blue and start playing with familiar symbols in a fresh way. Here are my favorite patriotic painting ideas—easy to start, super satisfying to finish, and totally adaptable to your style.
Stars-and-Stripes Heart
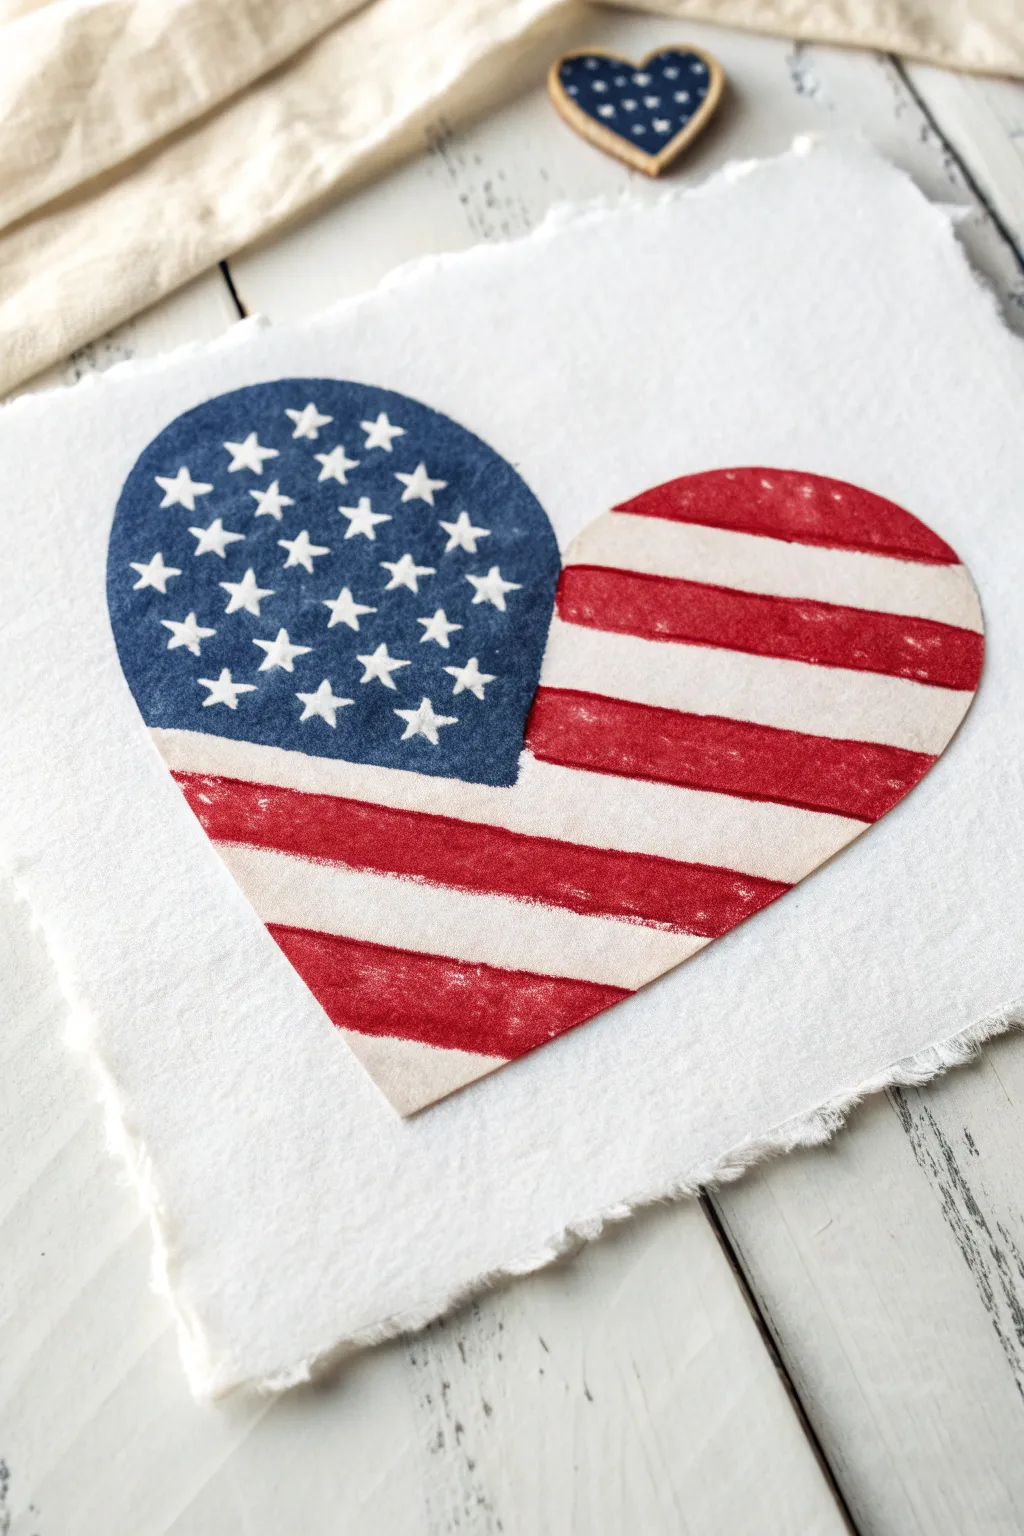
Capture the spirit of Americana with this charming block-printed heart design. The textured, slightly imperfect finish on handmade paper gives it a timeless, vintage appeal perfect for framing or gifting.
Step-by-Step
Materials
- Thick handmade cotton rag paper (with deckled edges)
- Linoleum carving block (rubber or soft-cut)
- Linoleum cutter tool with V-gouge and U-gouge blades
- Water-soluble block printing ink (Deep Blue, Red, White)
- Brayer (rubber roller)
- Pencil and eraser
- Tracing paper
- Craft knife
- Glass palette or acrylic sheet (for rolling ink)
- Wooden spoon or baren
- Ruler
Step 1: Design & Carve
-
Draft the shape:
Begin by sketching a symmetrical heart shape on a piece of paper that fits comfortably within your linoleum block’s dimensions. -
Divide the sections:
Using a ruler, lightly draw horizontal lines across the heart to represent the stripes. Reserve the upper left lobe of the heart for the star field, marking a curved boundary line. -
Transfer to block:
Transfer your design onto the soft-cut linoleum block. You can use tracing paper or draw directly on the block with a soft pencil. -
Carve the stars:
Load your cutter with a small V-gouge blade. Carefully carve out the small star shapes in the upper left section. remember, whatever you carve away will remain white (the paper color). -
Outline the field:
Switch to a U-gouge to clear away the area surrounding the star field, leaving the blue field raised, but be careful—this project works best as a multi-block or reduction print, but for simplicity, we will carve separate puzzle pieces. -
Separate the pieces:
Actually, the cleanest way to get distinct colors is to cut the linoleum block itself. Use a craft knife to physically cut the heart shape out of the block first. -
Isolate the blue field:
Now, cut the ‘blue’ star field section away from the rest of the heart. You now have two separate stamps: one for the stars and one for the stripes. -
Carve the white stripes:
Take the ‘stripes’ portion of the block. Use a U-gouge to carve away the bands that should be white. These receding areas won’t touch the paper, letting the white paper show through. -
Clean up edges:
Trim any excess rubber around the outer edges of your heart pieces to ensure a clean impression without stray ink marks.
Step 2: Inking & Printing
-
Prepare the workspace:
Lay your handmade paper on a flat, clean surface. I sometimes tape the corners down lightly with painter’s tape to keep it from shifting. -
Roll the red ink:
Squeeze a small amount of red block printing ink onto your glass palette. Roll the brayer back and forth until the ink sounds like ‘velcro’—a tacky, consistent texture. -
Ink the stripes:
Roll the red ink evenly over the ‘stripes’ portion of your linoleum block. Ensure the raised stripes are fully coated. -
Print the red section:
Carefully place the inked red block onto the paper. Press down firmly. Use a baren or the back of a wooden spoon to rub the back of the stamp in a circular motion to transfer the ink. -
Lift and clean:
Lift the block straight up to reveal the stripes. Wipe your hands to ensure no red ink transfers to the next step. -
Roll the blue ink:
Clean your brayer or use a second one. Prepare the deep blue ink heavily on the palette. -
Ink the star field:
Roll the blue ink onto the small ‘star field’ block piece. Make sure the surface is rich with color but not pooling in the carved star recesses. -
Align and print:
Align the blue block carefully with the upper left curve of the red impression. It should fit like a puzzle piece. -
Final transfer:
Press and rub with the spoon again. The handmade paper has texture, so you need firm pressure to get the ink into the valleys of the paper fibers. -
Dry thoroughly:
Peel the block away and let the print dry for at least 24 hours, as oil-based relief inks can take time to cure on thick cotton rag.
Patchy Ink?
Handmade paper is very textured. If your print looks too faint, mist the paper very lightly with water before printing to soften the fibers and grab the ink better.
Add Vintage Age
Once fully dry, dip a teabag in warm water and lightly dab it over the white stripes and edges of the paper for an antique, tea-stained parchment look.
Now you have a piece of handcrafted patriotic art ready to display for the holiday


Patriotic Gnome With a Flag
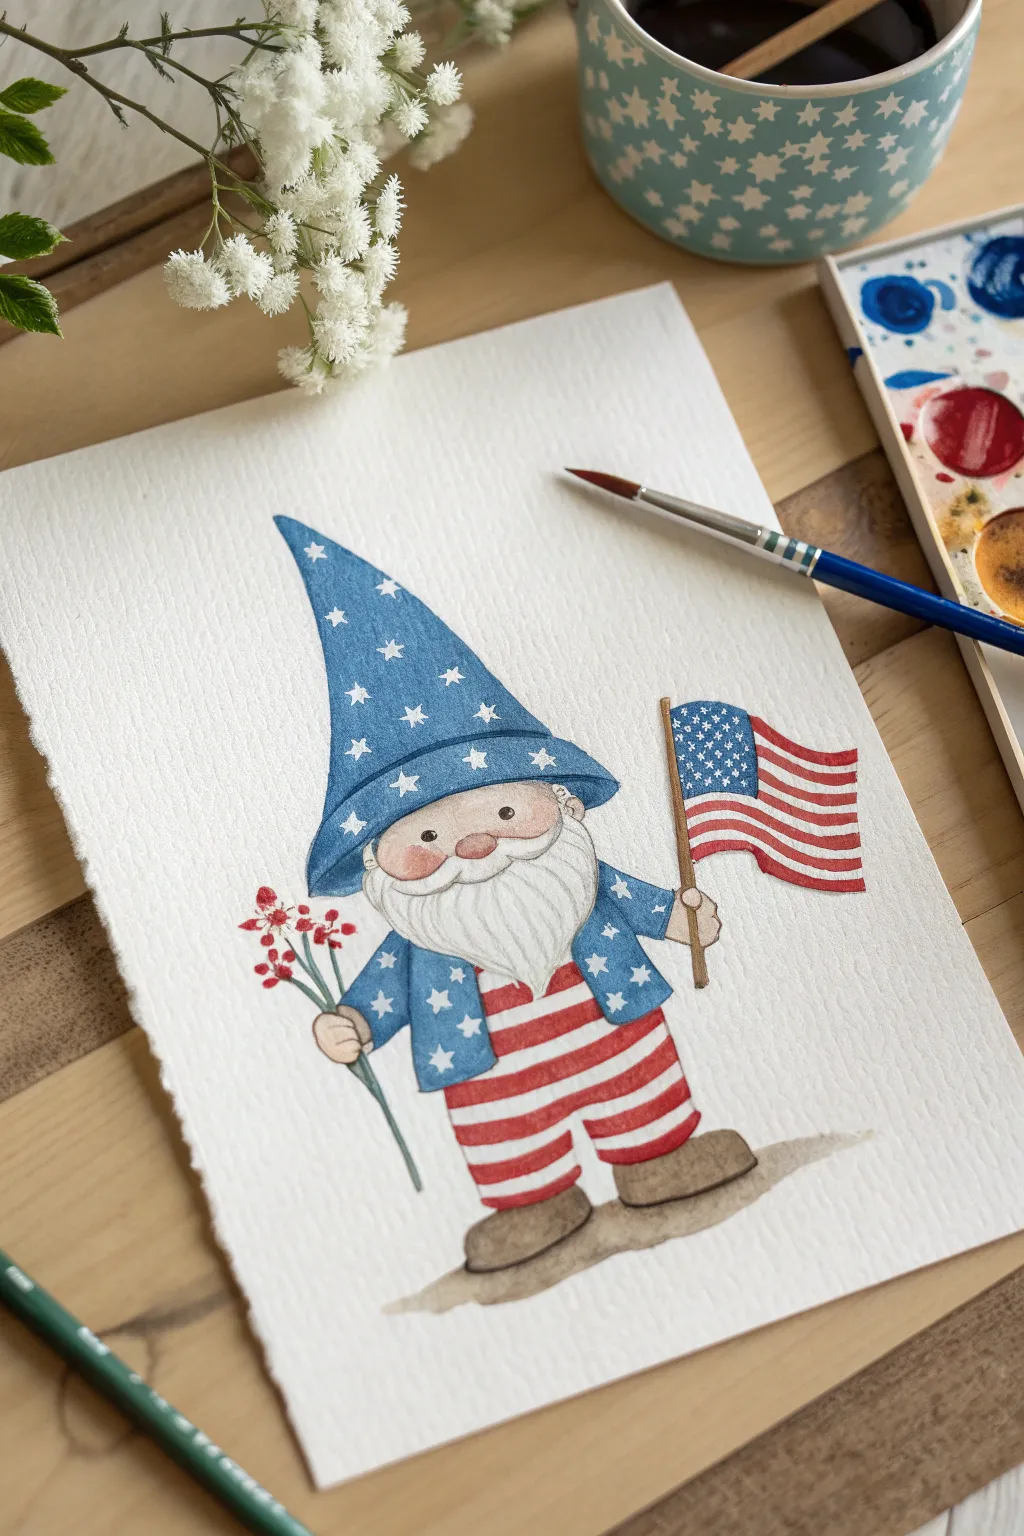
Capture the spirit of the 4th of July with this adorable watercolor gnome, dressed head-to-toe in patriotic patterns. This project features clean lines, bright primary colors, and a whimsical character style perfect for cards or seasonal decor.
Step-by-Step Tutorial
Materials
- Cold-press watercolor paper (300 gsm)
- Pencil and eraser
- Watercolors (Cobalt Blue, Cadmium Red, Yellow Ochre, Burnt Umber, Flesh Tint/Peach)
- Round brushes (sizes 2 and 6)
- White gouache or white gel pen
- Fine liner pen (brown or sepia)
- Palette and water cups
Step 1: Sketching the Character
-
Basic Shapes:
Begin with a light pencil sketch. Draw a large, slightly curved triangle for the hat, tilting towards the left. Below it, sketch an oval for the head and body area. -
Facial Features:
Define the nose as a soft oval right in the center of where the hat brim meets the face. Add two small dots for eyes and a curved line for the smile peeking out from the beard. -
Beard and Clothing:
Draw the fluffy beard flowing down from the nose, covering the chest area. Sketch the jacket sleeves and the striped pants extending below the beard. -
Accessories:
Add the hands—simple rounded shapes. In the right hand, draw the flagpole and waving flag. In the left hand, sketch the stems and small clusters of flowers.
Rosy Cheeks
Apply the red blush while the skin tone is wet (wet-on-wet technique). This creates a soft, natural gradient rather than harsh red circles on the face.
Step 2: Painting the Gnome
-
Skin Tones:
Mix a diluted peach or flesh tint. Apply a light wash to the nose and the small area of the face visible under the hat brim. While the paint is still damp, dab a tiny bit of diluted red onto the cheeks and nose tip for a rosy glow. -
Hat Base Layer:
Load your size 6 brush with Cobalt Blue. Carefully paint the entire hat, working around the brim. I find it helpful to keep the edges crisp here. Let this layer dry completely. -
Jacket Blue:
Using the same Cobalt Blue, paint the jacket sleeves and the body portion visible on the sides of the beard. Ensure you leave the beard area white. -
Striped Pants:
Switch to a size 2 brush and Cadmium Red. Paint the horizontal stripes on the pants. Leave the white stripes as the bare paper. -
Flag Details:
Paint the red stripes on the flag with the same red mix. Paint the canton (the top left rectangle) with the blue mix. -
Boots and Shadow:
Mix Burnt Umber with a touch of blue for a cool brown. Paint the boots. Using a very diluted version of this mix, add a soft shadow on the ground beneath the gnome to ground him.
Texture Twist
Sprinkle a pinch of table salt on the wet blue hat paint. As it dries, the salt absorbs pigment, creating a cool blossoming texture that looks like worn denim.
Step 3: Refining and Detailing
-
Beard Shading:
Mix a very watery grey (using blue and brown). Add subtle strokes to the beard to suggest hair texture, following the curve of the beard shape. -
Flagpole Color:
Paint the wooden stick of the flag using Yellow Ochre or a light brown. -
Flower Accents:
Paint the small flowers in the left hand with bright red dots. Use a mix of green (blue + yellow) for the thin stems. -
Star Patterns:
Once the blue paint is bone dry, use white gouache or a white gel pen to draw the stars on the hat and jacket. Keep them small and evenly spaced. -
Final Outlines:
To make the illustration pop, use a very fine brown or sepia liner pen to outline the major shapes—the hat, beard, clothes, and flag. Keep the line weight light and broken in places for a whimsical look. -
Highlights:
Add tiny white highlights to the eyes and the top of the nose to bring the character to life.
Once the final details are dry, your festive gnome artwork is ready to frame or turn into a holiday greeting card


Patriotic Lettering Quote Art
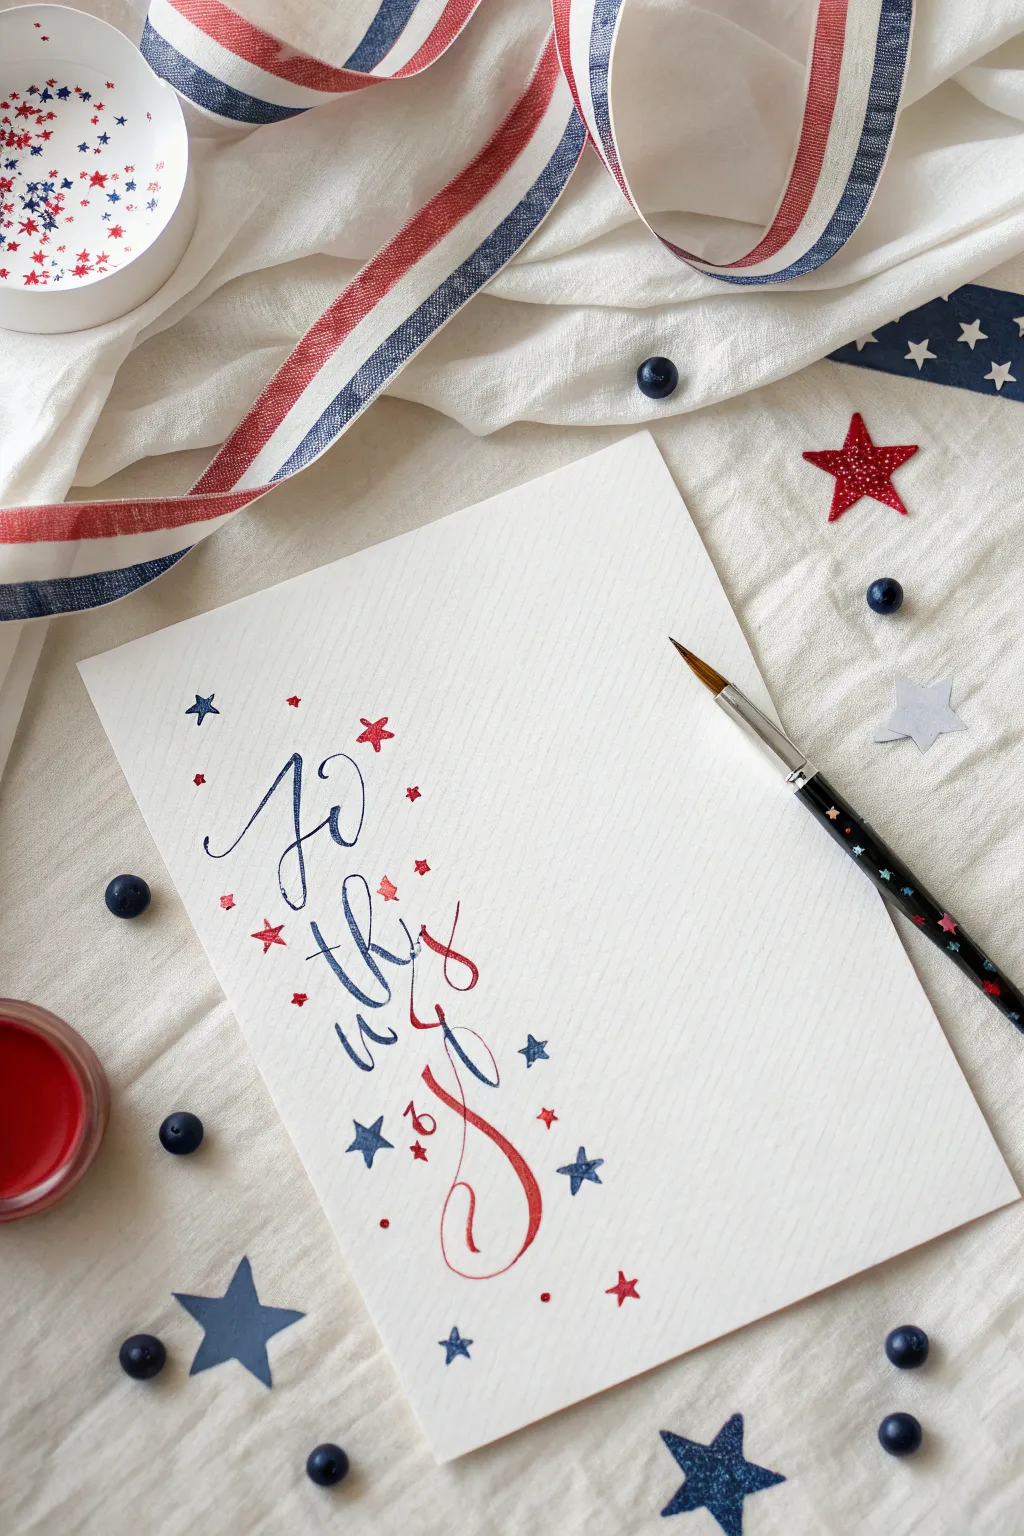
Celebrate Independence Day with this elegant hand-lettered art piece that combines graceful calligraphy with festive patriotic motifs. The flowing script of “July 4th” is surrounded by a playful scattering of stars and berries, creating a balanced vertical composition perfect for greeting cards or framed holiday decor.
Step-by-Step Tutorial
Materials
- Heavyweight watercolor paper or mixed media cardstock
- Fine round paintbrush (size 0 or 1)
- Navy blue watercolor or gouache paint
- Crimson red watercolor or gouache paint
- Pencil and eraser
- Paper towel
- Water cup
- Optional: Star confetti or stencils for reference
Step 1: Preparation & Layout
-
Prepare your workspace:
Clear a flat surface and tape down your watercolor paper if it tends to buckle. Ensure your paints are activated with a little water until they reach a creamy, ink-like consistency. -
Draft the lettering:
Using a pencil, very lightly sketch the phrase “July 4th” in a vertical arrangement. Allow the tail of the ‘y’ and the ‘4’ to interact gracefully. Keep the lines faint so they can be easily erased later. -
Plan the flourishes:
Sketch the large, swooping descender for the number ‘4’ or the ‘th’ to anchor the bottom of the design. This curve gives the piece its elegant movement.
Brush Control
For the sharpest stars, don’t paint the outline first. Instead, place your brush in the center and flick outward five times to create natural points.
Step 2: Lettering Phase
-
Start with the ‘J’:
Load your brush with navy blue paint. Paint the ‘J’ with a thin upstroke and a slightly thicker downstroke, maintaining a loose, modern calligraphy style. -
Complete the word ‘July’:
Continue painting ‘u’, ‘l’, and ‘y’ in blue. Let the letters connect naturally, lifting your brush completely between strokes to keep edges crisp. -
Switch to red:
Rinse your brush thoroughly. Load it with the crimson red paint for the number ‘4’. Ensure the red is vibrant and opaque. -
Paint the number ‘4’:
Execute the ‘4’ with confidence, letting the vertical line cross deeply through the composition. Add a decorative flourish to the bottom of the number or the word associated with it. -
Add the ‘th’:
Switch back to blue or use a mix to paint the small ‘th’ superscript next to the number. Keep these letters smaller and simpler than the main text. -
Refine the strokes:
Look over your lettering. If any downstrokes look too thin, carefully go back over them to add weight, mimicking the look of a nib pen.
Prop Styling
Photograph your finished art with blueberries, ribbon, and star confetti to share it on social media for a fully festive Independence Day vibe
Step 3: Embellishments
-
Paint large decorative stars:
Mix a small amount of diluted blue paint. Paint a few five-pointed stars around the text. Using the tip of your brush, pull paint from the center outward to create sharp points. -
Add small red stars:
Using the red paint, add tiny, simple star shapes—almost like asterisks—scattered near the letters to fill negative space. -
Create micro-stars:
With the very tip of your fine brush, add the smallest stars in blue, interspersed between the larger elements. -
Add dot details:
Dip just the tip of your brush in red paint. Gently touch the paper to create small red dots or “berries” floating around the script for texture. -
Balance the composition:
Step back and look at the piece as a whole. Add a few more tiny blue dots or stars if one side feels too empty compared to the other. -
Erase guidelines:
Once the paint is Bone Dry—I usually wait at least 30 minutes to be safe—gently erase any visible pencil marks.
Display your beautiful patriotic script on the mantel or scan it to print custom July 4th party invitations


Stars-and-Stripes Rock Mini Paintings
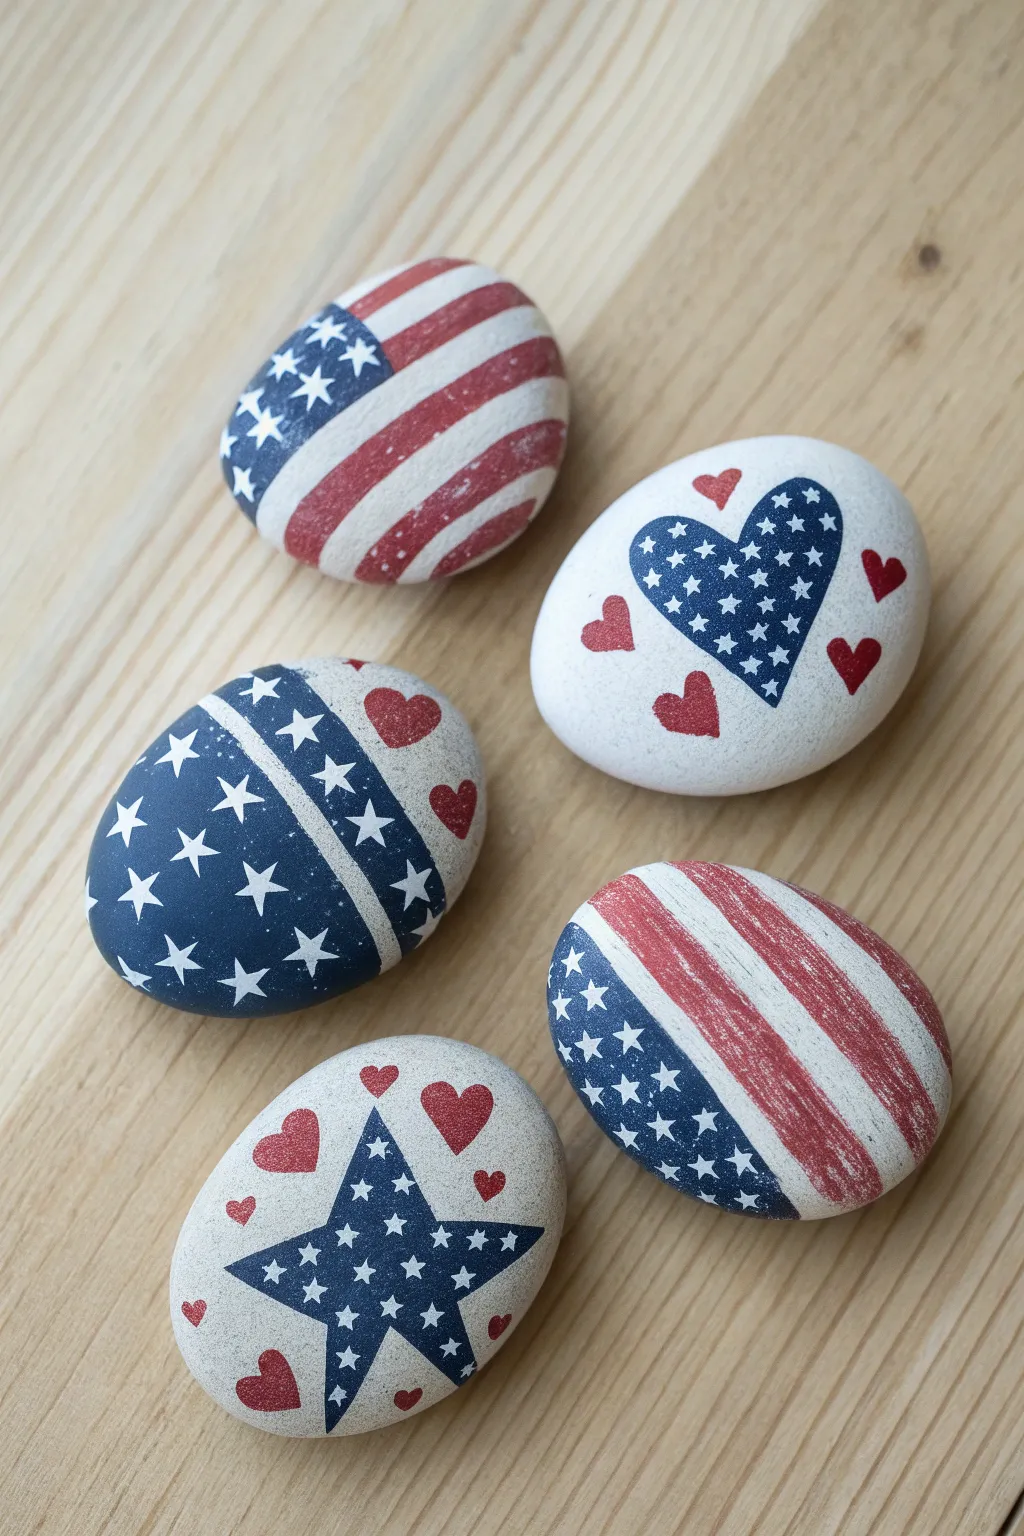
Transform smooth river stones into handheld pieces of patriotic art with these charming, rustic designs. Featuring a playful mix of stars, stripes, and hearts in classic red, white, and blue, these rocks are perfect for Fourth of July décor or a summer garden accent.
Step-by-Step
Materials
- 5 Smooth, round river rocks (palm-sized)
- Acrylic craft paint (red, dark navy blue, white)
- Small flat paintbrush (size 2 or 4)
- Fine detail liner brush (size 00 or 0)
- Pencil for sketching
- Matte or satin spray sealant
- Paper palette or plate
- Water cup and paper towels
Step 1: Preparation and Base
-
Clean the canvas:
Begin by washing your rocks thoroughly with warm, soapy water to remove any dirt or oils. Let them dry completely, preferably in the sun, to ensure the paint adheres properly. -
Prime the surface:
Paint a base coat of white acrylic paint onto all the rocks. Depending on the opacity of your paint, you may need two coats. Allow fully to dry between layers until the surface is solid white. -
Sketch the designs:
Lightly sketch your patterns onto the dried white rocks with a pencil. Plan for two ‘flag’ rocks with stripes and a blue corner, one ‘solid star’ rock, one ‘star-spangled heart’ rock, and one ‘blue star’ rock.
Step 2: Painting the Flag Rocks
-
Block the blue:
On two of the oval-shaped rocks, use your flat brush to paint a curved section of navy blue. On one rock, place this on the upper-left; on the other, cover the bottom-left third. -
Add red stripes:
Using the flat brush, paint thick, curved red stripes across the white space remaining on these rocks. Leave gaps of white between the red strokes to create the striping effect. -
Distress the stripes:
For that rustic look shown in the image, don’t make the red lines perfect. Keep the brush somewhat dry to let the rock texture show through slightly at the edges. -
Add stars:
Switch to your fine detail brush. Dip it in white paint and carefully dab small five-pointed stars onto the dry navy blue sections.
Dry Brush for Texture
To get that vintage, weathered look on the red stripes, wipe most of the paint off your brush onto a paper towel before painting. This creates a scratchy, textured stroke.
Step 3: Creating the Solid Blue Rock
-
Create the blue field:
Take a rounder rock and paint nearly the entire surface navy blue, leaving a thick band of white curving through the middle. -
Fill with stars:
Once the blue is dry, use the detail brush and white paint to fill the blue sections with varied sizes of stars. I like to rotate the rock as I work so the stars don’t all point the same direction. -
Stripe the band:
In the white band you left reserved, paint small red hearts or thin red stripes to add interest, or leave it plain white with blue stars crossing over the border slightly.
Glittery Fireworks
Mix a tiny pinch of silver or iridescent glitter into your white paint before adding the stars for a subtle sparkle that catches the light like fireworks.
Step 4: Painting the Symbol Rocks
-
Paint the patterned heart:
On a white rock, paint a large heart shape in the center using navy blue. While that dries, paint small floating red hearts around the central blue heart. -
Detail the blue heart:
Using your tiniest brush and white paint, fill the interior of the navy blue heart with miniature stars. -
Paint the big star:
On the final white rock, paint a large, five-pointed star in the center using navy blue paint. -
Embellish the star rock:
Once the blue star is dry, add white polka dots or tiny stars inside it. Then, paint small red hearts floating in the white negative space around the main star.
Step 5: Finishing Touches
-
Clean up lines:
Check all your rocks for smudges. You can use a bit of white paint to touch up edges where the red or blue might have bled. -
Seal the art:
In a well-ventilated area, spray the rocks with a matte or satin sealant. This protects the paint from chipping and gives them a unified finish.
Arranged together in a bowl or scattered on a table, these patriotic stones add a wonderful homespun touch to your celebration
BRUSH GUIDE
The Right Brush for Every Stroke
From clean lines to bold texture — master brush choice, stroke control, and essential techniques.
Explore the Full Guide
Wood Slice Flag Ornament
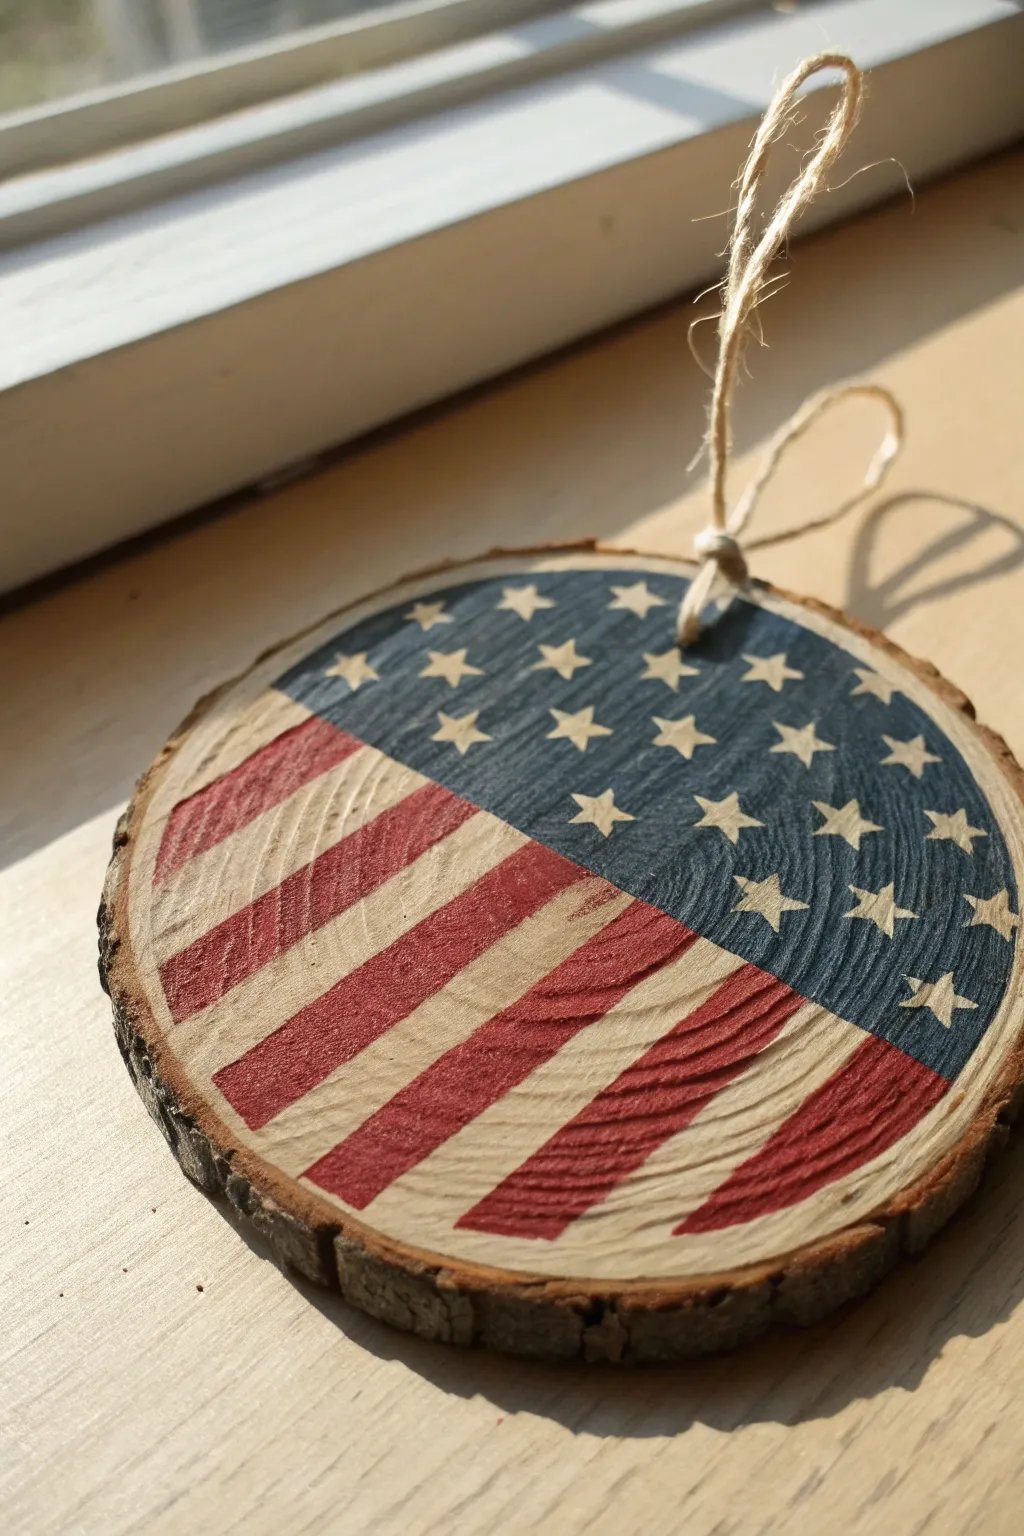
Bring a touch of classic Americana to your decor with this charming wood slice ornament. The natural grain of the wood adds beautiful texture to the bold red, white, and blue design, making it a perfect rustic accent.
Detailed Instructions
Materials
- Small round wood slice (approximately 3-4 inches diameter) with bark edge
- Acrylic craft paint: Navy Blue, Deep Red, Titanium White
- Masking tape or painter’s tape
- Flat shader brush (size 6 or 8)
- Small round detail brush (size 0 or 1)
- Jute twine
- Small eye hook or drill with small bit
- Clear matte sealer (spray or brush-on)
- Pencil
- Ruler
Step 1: Preparing the Base
-
Prepare the surface:
Ensure your wood slice is clean and dry. If the surface is rough, lightly sand the face with fine-grit sandpaper, but be careful not to damage the bark rim. -
Attach the hanging mechanism:
Before painting, screw a small eye hook into the top edge of the bark. Alternatively, carefully drill a small hole through the top near the rim for the twine later. -
Mark the union:
Using a ruler and pencil, lightly draw a diagonal line across the wood slice. The top section will become the blue union field, covering roughly 40-50 percent of the circle.
Clean Lines Secret
Before painting red, brush a thin layer of matte medium over the tape edges. This seals the tape so no red paint creeps under.
Step 2: Painting the Union
-
Tape the line:
Place a strip of masking tape directly below your pencil line to protect the stripe area. Make sure to press the edge down firmly to prevent paint bleed. -
Paint the blue field:
Using your flat shader brush, fill the top section with Navy Blue acrylic paint. You may need two coats for opaque coverage, allowing the first to specific dry completely. -
Remove tape:
Peel the tape away carefully while the paint is still slightly tacky to ensure a crisp edge. -
Allow to dry:
Let the blue paint dry fully before moving on to the next step. I usually wait about 15-20 minutes here to avoid smudging.
Uneven Stars?
If painting stars by hand is frustrating, use a white paint pen or the tip of a toothpick for easier control.
Step 3: Creating the Stripes
-
Sketch the stripes:
Lightly sketch diagonal lines in the lower unpainted section to guide your stripes. Typically, aiming for 3 red stripes and 2-3 natural wood stripes works best for this scale. -
Tape for red stripes:
Apply strips of tape to mask off the areas that will remain natural wood. -
Paint red stripes:
Paint the exposed stripe sections with Deep Red. Paint inwards from the tape edge to prevent seepage underneath. -
Reveal the pattern:
Once the red paint is mostly dry, gently remove the tape to reveal the crisp alternation between red paint and natural wood grain. -
Touch ups:
If any paint bled, use a small craft knife to gently scrape it away or touch it up with a tiny bit of water and a clean brush.
Step 4: Adding Details & Finish
-
Paint the stars:
Using your smallest detail brush and Titanium White, paint small 5-pointed stars on the blue field. Don’t worry about perfect symmetry; a scattered pattern looks great. -
Let stars set:
Allow the white stars to dry completely. A second coat on just the stars will make them pop against the dark blue. -
Seal the artwork:
Apply a thin coat of clear matte sealer over the entire face of the wood slice to protect the paint and enhance the wood grain. -
Add the hanger:
Cut a 6-inch length of jute twine. -
Secure the loop:
Thread the twine through your eye hook or drilled hole and tie a secure knot to create a hanging loop.
Hang your finished ornament in a sunny spot to let the natural wood grain shine through
Star Constellations in Flag Colors
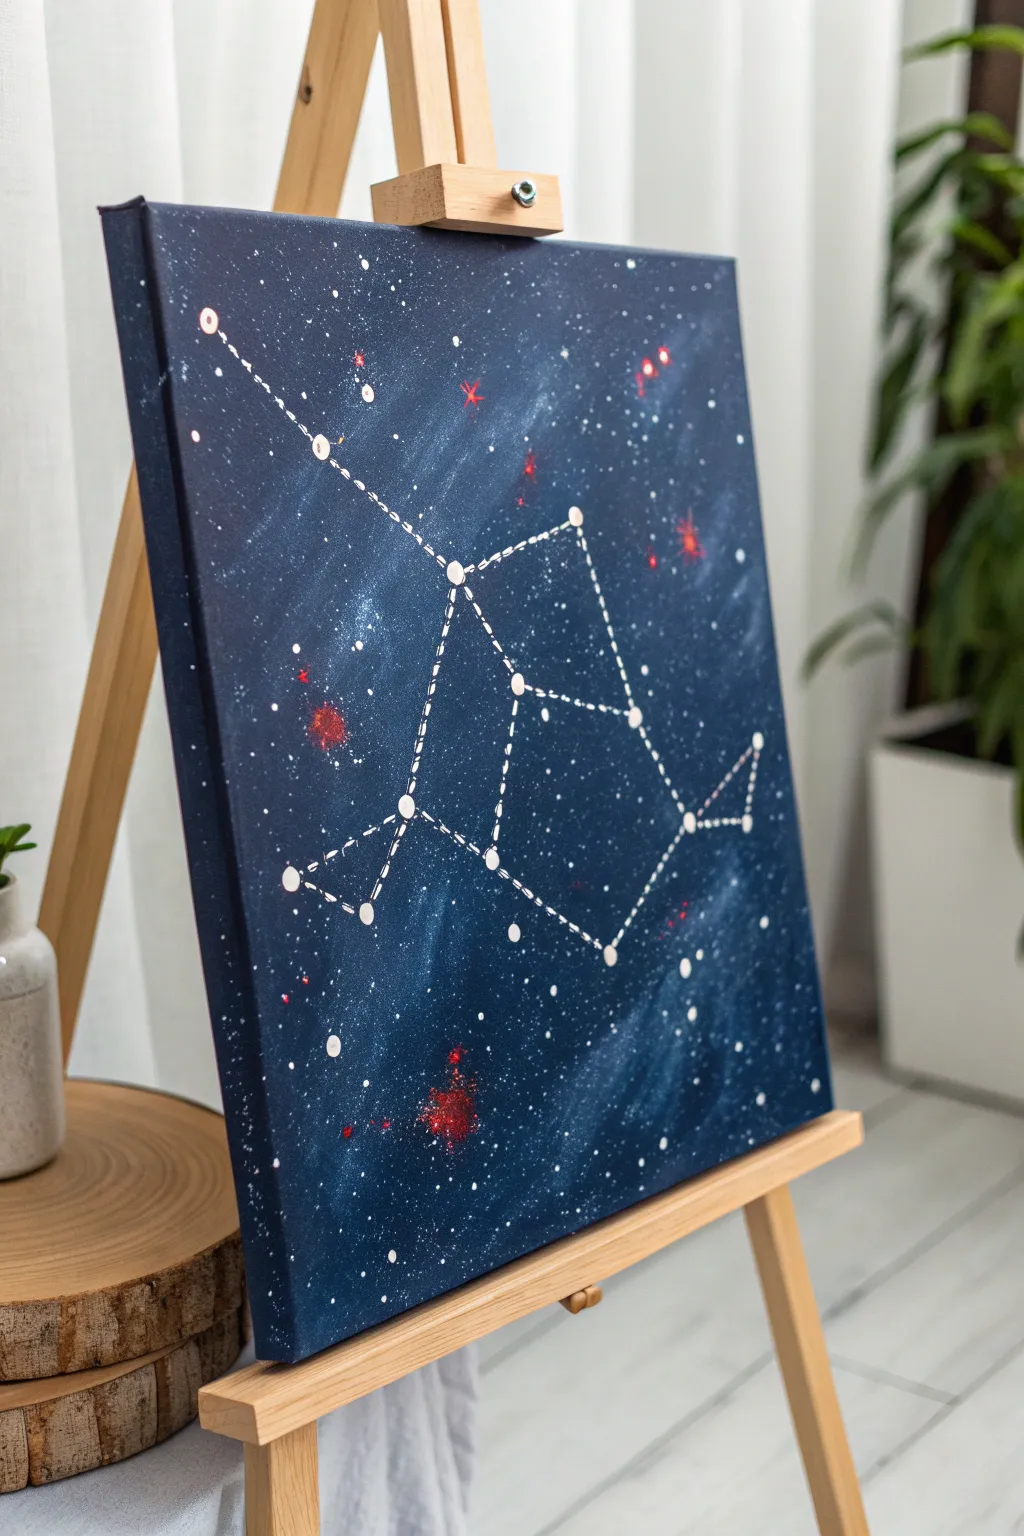
Bring the beauty of the cosmos into your home with a patriotic twist that feels both modern and timeless. This project transforms a deep blue galaxy background into a subtle nod to the flag by incorporating red starbursts and white constellations.
Step-by-Step Tutorial
Materials
- Square stretched canvas (12×12 or similar)
- Acrylic paints: Navy blue, black, titanium white, bright red
- Sponge or sea sponge
- Flat brush (1 inch)
- Small round detail brush (size 0 or 1)
- Old toothbrush
- Pencil or white charcoal pencil
- Ruler
- Palette or paper plate
- Cup of water and paper towels
Step 1: Creating the Galaxy Background
-
Base coat application:
Start by painting the entire canvas with a solid coat of navy blue using your large flat brush. Don’t forget to paint the sides of the canvas for a finished look. -
Adding depth:
While the blue is still slightly wet, mix a tiny drop of black into your navy blue on the palette. Apply this darker shade irregularly around the corners and edges to create a vignette effect. -
Sponging texture:
Dampen your sponge slightly and dip it into a mix of navy blue and a touch of white to make a lighter blue. Gently dab this onto the center and diagonal areas to create cloudy nebula effects. -
Blending layers:
Use a clean, dry brush to softly sweep over the sponged areas if the texture looks too rough. This helps blur the clouds into the background. -
Adding red nebulas:
Using a clean corner of your sponge, dab very small, subtle amounts of bright red paint into a few random clusters. These will serve as the background for your brighter red stars later. -
Drying time:
Allow the background to dry completely before moving on to the stars. This usually takes about 20-30 minutes.
Nebula Pro Tip
Don’t overmix your sponge colors. Let the red and blue sit side-by-side on the canvas rather than blending them into purple. This keeps the colors distinct and patriotic.
Step 2: Adding Starts and Splatters
-
Creating the star field:
Water down a small amount of titanium white paint until it acts like ink. Dip an old toothbrush into this mixture. -
Splatter technique:
Hold the toothbrush over the canvas and run your thumb across the bristles to spray fine white specks across the surface. I like to test this on a scrap paper first to control the spray. -
Painting larger stars:
Use the tip of your small detail brush to add specific, larger white dots randomly throughout the sky to create variation in star magnitude. -
Highlighting red stars:
Return to the areas where you sponged red earlier. Paint a small red cross or ‘x’ shape in the center of these patches to simulate twinkling red stars.
Step 3: Mapping the Constellation
-
Planning the layout:
Choose a constellation shape you love. Using a white charcoal pencil or very light regular pencil, mark the position of the main ‘connective’ stars. -
Painting primary stars:
Paint bold, solid white circles over your pencil marks. These anchor stars should be larger than the background stars. -
Connecting the dots:
Load your detail brush with thinned white paint. Carefully paint dashed lines connecting the main stars together. -
Refining the lines:
Try to keep your dashes consistent in length. If the paint starts to drag, add a tiny bit more water to your brush. -
Adding final trails:
Extend a single dashed line leading off from the top of the constellation towards the edge of the canvas to suggest a connection to the wider universe. -
Clean up:
Once fully dry, you can gently erase any visible charcoal pencil marks, though the paint usually covers them well.
Glow Up
Mix a tiny amount of silver glitter into your white paint for the primary constellation stars. It adds a subtle shimmer that catches the light beautifully when hung.
Hang your cosmic creation on a well-lit wall to let those subtle details shine

PENCIL GUIDE
Understanding Pencil Grades from H to B
From first sketch to finished drawing — learn pencil grades, line control, and shading techniques.
Explore the Full Guide
Silhouette Tribute With Flag Gradient
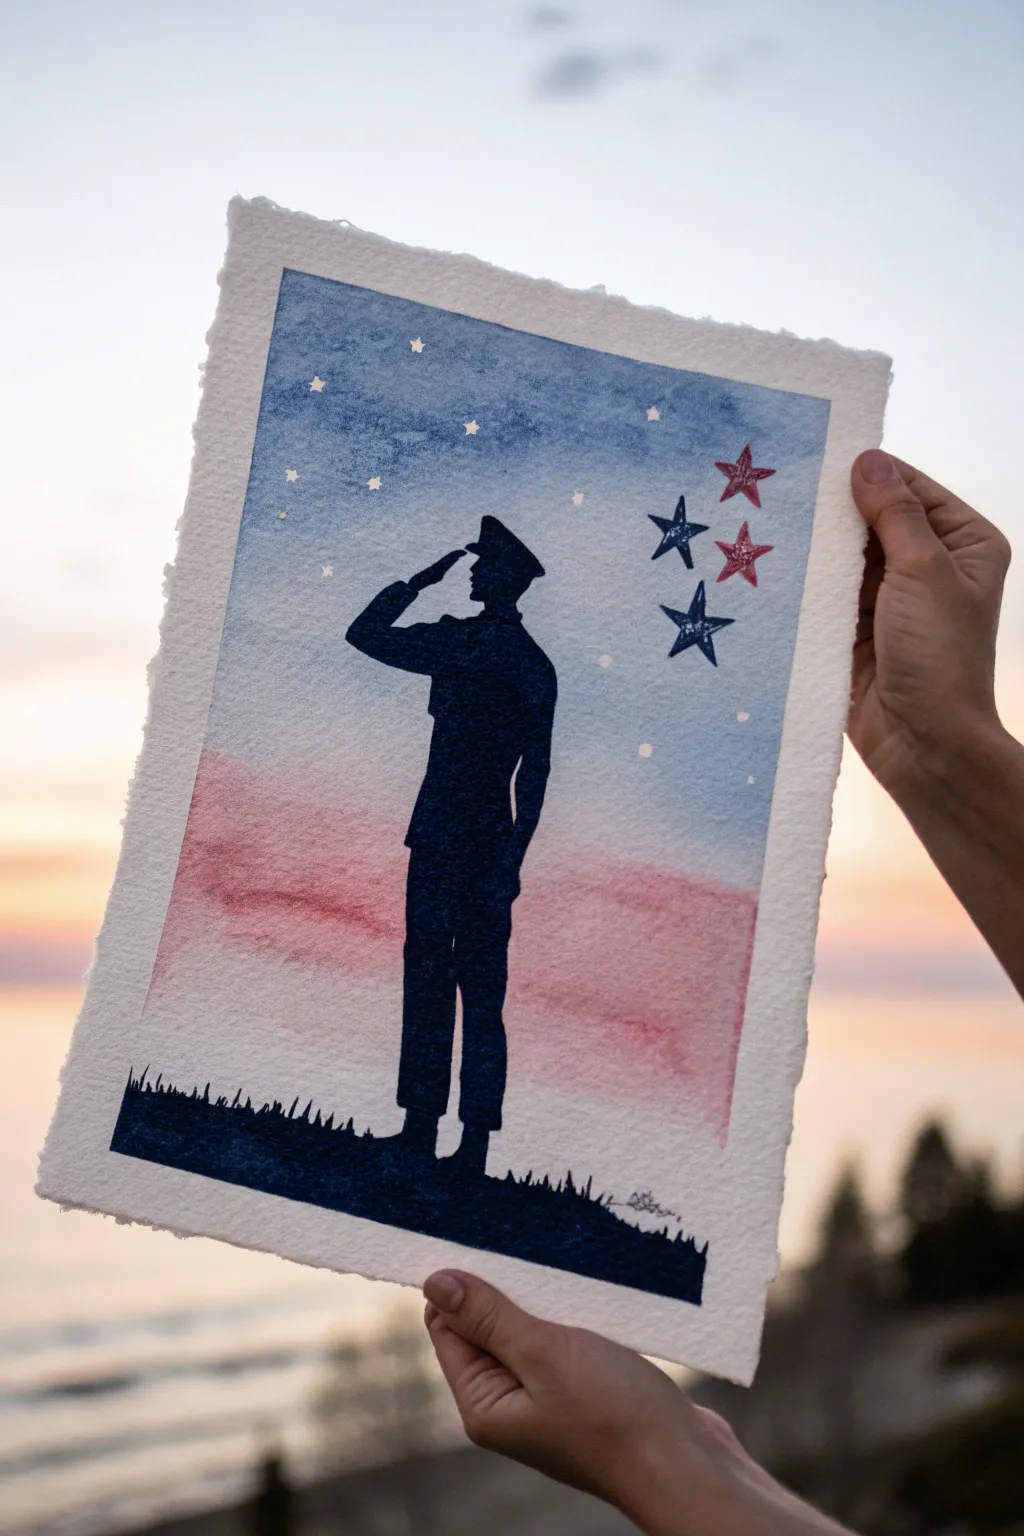
This moving tribute combines the softness of watercolor washes with the stark impact of a silhouette. By blending a patriotic sky gradient behind a saluting figure, you create a piece that feels both respectful and artistically expressive.
Step-by-Step
Materials
- Cold press watercolor paper (deckled edge preferred)
- Watercolor paints (Indigo/Navy Blue, Alizarin Crimson, Ultramarine)
- Masking fluid or white gouache
- Pencil and eraser
- Round brushes (sizes 4 and 8)
- Detail brush (size 0 or 1)
- Painter’s tape or drawing board
- Jar of clean water
- Paper towels
- Soldier silhouette reference photo
Step 1: Preparation and Sketching
-
Prepare the paper:
If you are using a loose sheet with deckled edges, tape it down gently to your board. If you want the rough edge to show, tape only the very backs or use a gummed block. -
Sketch the outline:
Lightly sketch the outline of the saluting soldier in the center of the paper. Keep your pencil lines very faint so they don’t show through the final wash. -
Mask the small stars:
Using a fine brush or a dipping pen, apply dots of masking fluid in the upper blue section to represent the distant stars. Let this dry completely before painting.
Step 2: Painting the Sky Gradient
-
Mix your colors:
Prepare a watery mix of Ultramarine Blue for the top sky and a diluted Alizarin Crimson for the bottom horizon glow. -
Wet the paper:
With a large clean brush, wet the entire background area around your soldier sketch with clean water. Avoid wetting inside the soldier outline if possible, though a little overlap is okay since the silhouette will be dark. -
Apply the blue wash:
Start at the very top edge with your blue mix. Paint horizontally, letting the color flow down. As you move lower, add more water to your brush to fade the blue into transparency before you reach the middle. -
Add the red horizon:
While the paper is still damp but not soaking, introduce the pale red wash at the bottom horizon line, just above where the grass will be. Blend it upwards gently so it fades into the white/pale middle section. -
Soften the transition:
Use a clean, slightly damp brush to smooth out the area where the blue and red fade towards each other. We want a soft, cloudy transition, not a hard purple line. -
Let it dry:
Allow the background wash to dry completely. The paper must be bone dry before you start the silhouette to prevent bleeding.
Uneven Wash?
If your sky gradient has hard lines or “cauliflowers,” wet the area lightly again and lift pigment with a thirsty brush, or dab gently with a paper towel.
Step 3: The Silhouette and Details
-
Mix the silhouette color:
Create a very concentrated, dark mixture using Indigo or a mix of Navy and Black. You want this opaque. -
Outline the figure:
Using your smaller round brush, carefully paint the edges of the soldier’s shape. Pay close attention to the angle of the arm and the cap. -
Fill the form:
Once the outline is crisp, fill in the rest of the body with the dark paint. Ensure coverage is solid and even. -
Paint the ground:
Extend the dark color to the bottom of the paper to create the grassy hill. Use the tip of your brush to flick small, uneven strokes upward to mimic grass blades along the horizon. -
Add the large stars:
Using a stencil or freehand, paint a few larger five-pointed stars on the right side. Use reduced-water red and blue paint so they stand out against the background wash. -
Reveal the white stars:
Once the sky paint is totally dry, gently rub off the masking fluid dots with your finger or a rubber cement pickup to reveal the white paper underneath. -
Add final sparkles:
If you didn’t use masking fluid, or want more brightness, use a tiny dot of opaque white gouache to add the small stars now. -
Clean up edges:
I like to check the edges of the silhouette one last time. If any lines look shaky, smooth them out with the detail brush and thick dark paint.
Add Texture
Sprinkle a pinch of salt onto the wet blue sky wash while it’s drying. Brush it off later to create a starry, textured galaxy effect.
Display this piece in a simple floating frame to show off those beautiful paper edges
Modern Minimal Flag in Negative Space
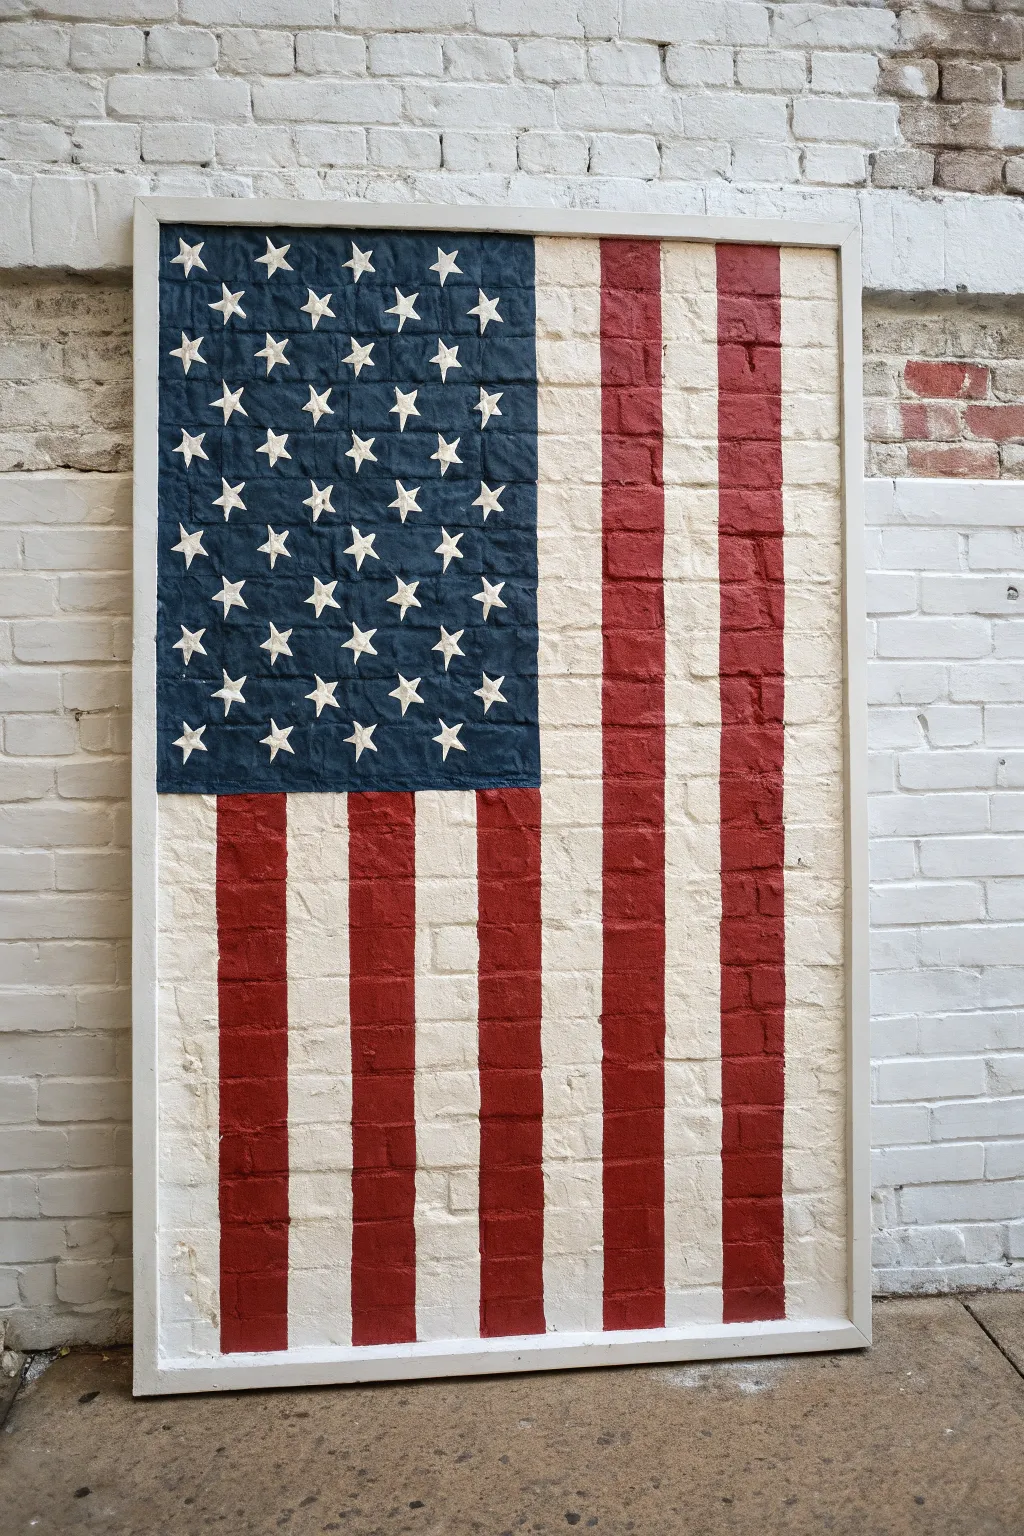
Transform a textured faux brick panel into a stunning piece of patriotic wall art that blends rustic charm with modern clean lines. This project uses the natural texture of the ‘bricks’ to create depth, letting white negative space define the stripes while bold blues and reds bring the flag to life.
Detailed Instructions
Materials
- Faux brick paneling (4′ x 8′ sheet cut to size)
- Wooden trim (1×2 lumber)
- White primer/paint (satin or matte)
- Navy blue acrylic paint (outdoor quality if hanging outside)
- Deep red acrylic paint
- Painter’s tape (1-inch width)
- Star stencil
- Stencil brush or sponge dauber
- Small flat artist brush
- Medium sash brush or roller
- Sandpaper (medium grit)
- Wood glue and finish nails
Step 1: Preparation & Base Coat
-
Cut the Panel:
Measure and cut your faux brick panel to your desired size. A vertical orientation works beautifully for this design, similar to the reference photo. -
Light Sanding:
Give the surface a quick, light sanding to remove any factory sheen and help the primer adhere better to the textured surface. -
Clean the Surface:
Wipe down the entire panel with a tack cloth or damp rag to remove dust. Paint will peel if there’s debris left in the faux mortar lines. -
Prime the Panel:
Apply a coat of white primer over the entire board. Ensure you get into all the nooks and crannies of the brick texture. -
Apply Base White:
Once primed, paint the entire board with your base white color. This will serve as your white stripes and stars later, so ensure solid coverage. -
Let it Cure:
Allow the white base coat to dry completely, preferably overnight, so your tape won’t peel it up in the next phase.
Bleeding Lines?
If paint bleeds under the tape due to the brick texture, wait for it to dry, then use a small stiff brush and your base white paint to carefully clean up the edges.
Step 2: Mapping the Stripes
-
Measure the Union:
Mark off the top left quadrant for the blue field (the Union). Use a pencil to lightly sketch where this rectangular block will end. -
Tape the Stripes:
Apply horizontal strips of painter’s tape to mask off what will become the white stripes. Press the tape firmly into the brick indentations to prevent bleed. -
Seal the Tape:
I always paint a thin layer of the base white paint *over* the tape edges now. This seals the tape line and ensures crisp edges later. -
Paint the Red Stripes:
Using a brush or small roller, fill in the exposed stripe areas with deep red paint. You may need two coats for a rich, consistent color.
Step 3: Creating the Union
-
Block Out the Blue:
Once the red stripes are dry, remove the tape. Now, carefully paint the top left rectangular area with navy blue, covering both red and white sections as needed to create the solid block. -
Position the Stencil:
Once the blue paint is fully dry, place your star stencil over the blue field. Secure it with small pieces of tape. -
Stenciling Technique:
Load a stencil brush with white paint and offload most of it onto a paper towel until the brush is almost dry. -
Dab the Stars:
Lightly dab (don’t drag) the white paint through the stencil. Build up opacity slowly to keep lines sharp against the textured surface. -
Hand-Touch Ups:
Because the surface is bumpy, the stencil might miss spot. Go back with a tiny artist brush to sharpen the points of the stars manually.
Clean Stencils
For the crispest stars on textured surfaces, use spray adhesive on the back of your stencil rather than just tape. It holds the stencil flat against the uneven bricks.
Step 4: Framing & Finish
-
Cut the Frame:
Measure the outer dimensions of your painted panel. Cut your 1×2 wooden trim to create a simple frame. -
Assemble Frame:
Paint the frame pieces white to match the stripes, then attach them to the edges of the panel using wood glue and finish nails. -
Distress (Optional):
If you want a more weathered look, lightly sand high points on the brick texture to reveal a bit of the base material or underlayers. -
Seal the Work:
Apply a clear matte sealer over the entire piece to protect the paint, especially if you plan to display this on a patio or porch.
Hang your textured masterpiece proudly and enjoy the shadow play across the bricks throughout the day


Have a question or want to share your own experience? I'd love to hear from you in the comments below!