
A plain water bottle is basically a tiny curved canvas you get to carry everywhere, and I love how a good design can make it feel totally yours. Here are my favorite water bottle painting ideas—starting with the classics everyone reaches for, then sliding into more playful, artsy twists.
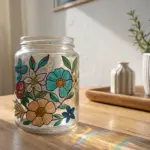
Bold Sunflower Cluster
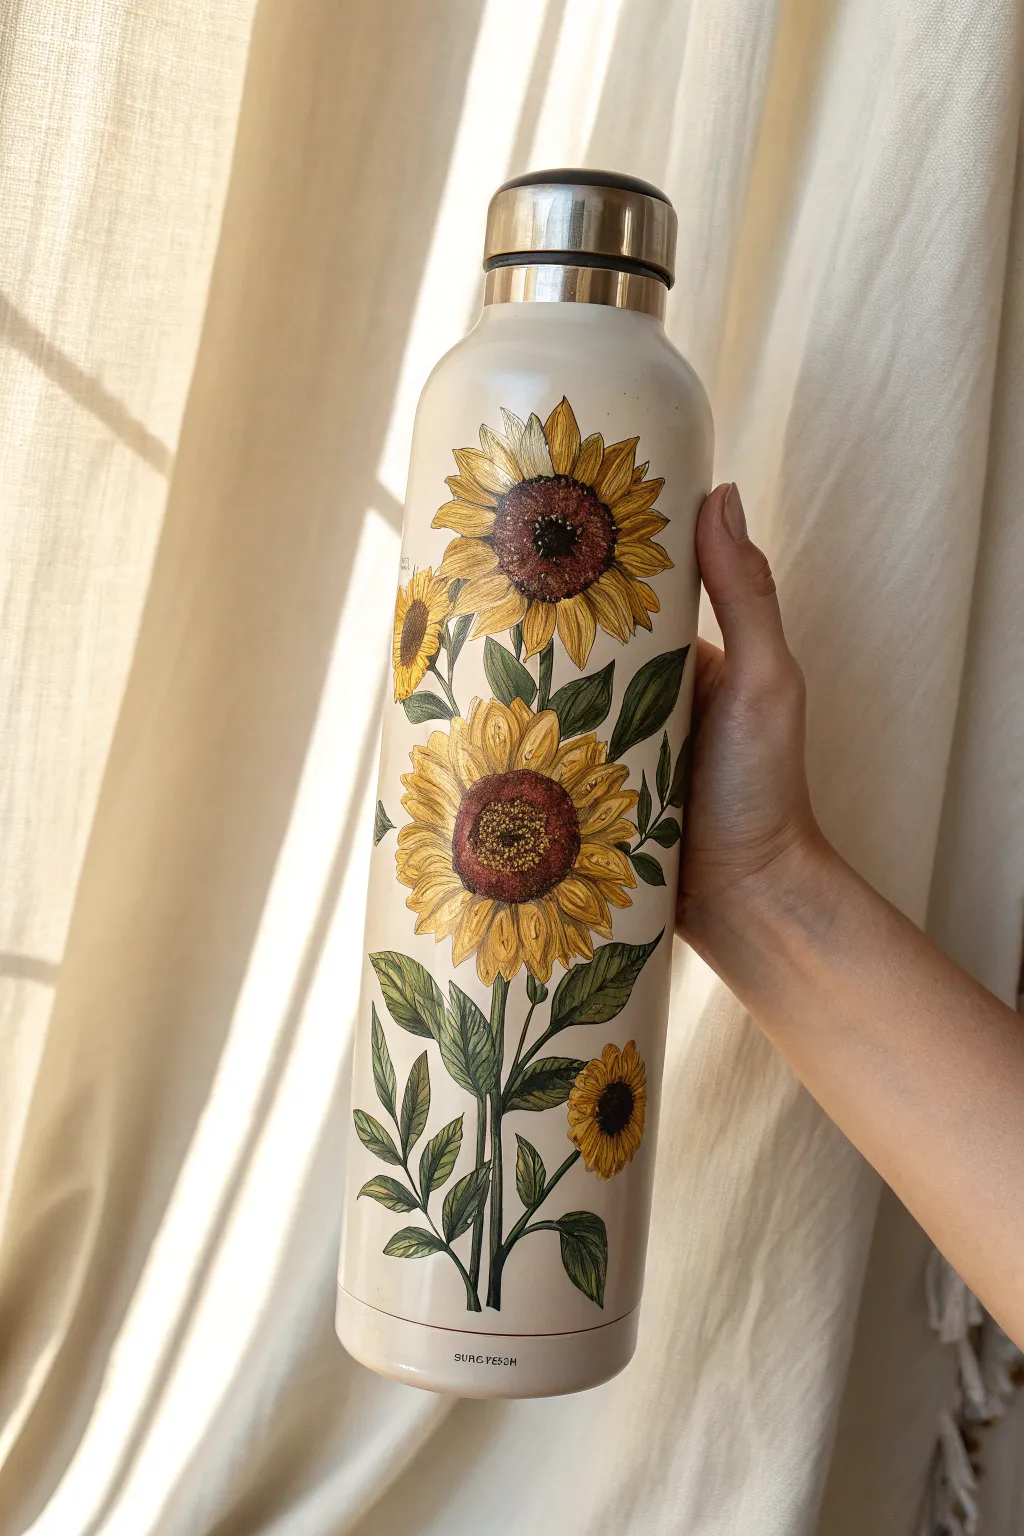
Transform a plain water bottle into a portable piece of art with this detailed sunflower study. The creamy beige background gives it a warm, vintage botanical illustration feel that perfectly complements the golden petals and deep greens.
Detailed Instructions
Materials
- Stainless steel water bottle (pre-primed cream or beige)
- Acrylic paints (Titanium White, Cadmium Yellow, Yellow Ochre, Burnt Sienna, Burnt Umber, Sap Green, Hooker’s Green)
- Small round brushes (sizes 0, 2, and 4)
- Fine liner brush (size 00 or 000)
- Matte spray varnish or sealant
- Pencil for sketching
- Palette for mixing
Step 1: Preparation and Base Sketch
-
Prepare the surface:
Ensure your bottle is clean and coated with a matte cream or beige base paint. If you are starting with a metal bottle, use a metal primer first followed by two coats of cream acrylic paint. Let this dry completely—at least 24 hours is best for durability. -
Plan the composition:
Visualize the vertical layout. The design features a large central sunflower, a slightly smaller one above it, and two smaller buds tucked in. The arrangement is fairly vertical to suit the bottle’s shape. -
Sketch the outlines:
Using a light pencil, gently sketch the circles for the flower heads first to establish spacing. Then, draw the guiding lines for the stems connecting them. Keep your pencil pressure very light so it doesn’t scratch the base coat. -
Draw the petals:
Flesh out the petal shapes around your center circles. Remember that sunflower petals are slightly jagged and overlap. Sketch the leaves branching out from the lower stems.
Step 2: Blocking In Color
-
Base coat the petals:
Mix Cadmium Yellow with a touch of Titanium White to create a bright, opaque base mix. Fill in all the petals with this color. Don’t worry about shading yet; just get solid coverage within your lines. -
Base coat the leaves:
Use Sap Green to fill in the leaf shapes and stems. Apply the paint in thin, even layers. If the beige background shows through, let the first coat dry and apply a second. -
Paint the centers:
Fill the circular centers of the sunflowers with a solid coat of Burnt Sienna. This warm brown provides the perfect undertone for the seeds later.
Brush Maintenance
Acrylic dries incredibly fast on brushes. Keep a cup of water nearby and rinse your fine liner brushes immediately after detailing to prevent stiffening.
Step 3: Detaling and Shading
-
Add petal depth:
Mix Yellow Ochre with a tiny amount of Burnt Sienna. Using a size 2 brush, paint streaks starting from the base of each petal (near the center) and pulling outward about halfway. This creates the shadow where the petals meet the disk. -
Highlight the tips:
Clean your brush and pick up pure Titanium White mixed with a little yellow. Add highlights to the very tips and edges of the petals to distinguish them from one another. -
Texture the centers:
I like to stipple here for texture. Take a small, stiff brush or an old round brush, dip it in Burnt Umber, and dab small dots around the outer ring of the brown center. Leave the very middle lighter. -
Add center highlights:
Switch to your smallest liner brush. detailed dots of Yellow Ochre and a few specks of White in the very center of the flower heads to mimic the texture of seeds catching the light. -
Shadow the leaves:
Mix Hooker’s Green with a dot of Burnt Umber to make a deep shadow green. Paint the veins of the leaves and add shadows where leaves overlap or tuck behind the flowers. -
Highlight the greenery:
Mix Sap Green with yellow to create a lime green shade. Use this to highlight the edges of the leaves and the parts of the stems where the light hits. -
Refine the stems:
Use your liner brush and the dark green mix to tidy up the edges of the stems, ensuring they look connected and sturdy enough to hold the heavy flower heads.
Gloss it Up
For a ceramic look, use a high-gloss spray varnish as your final step instead of matte. It makes the painted flowers look like glazed pottery.
Step 4: Finishing Touches
-
Check consistency:
Step back and look at the bottle as a whole. If any yellow petals look too flat, add a thin glaze of watered-down orange to warm them up. -
Clean up edges:
If you painted outside the lines, use a small angled brush dipped in your original cream background color to carefully ‘erase’ any mistakes. -
Seal the artwork:
This is crucial for a water bottle. Once the paint is bone dry (wait at least 48 hours for acrylics to fully cure), apply 2-3 coats of a durable, clear spray sealant suitable for metal surfaces.
Enjoy carrying your portable garden with you wherever you go.

Vertical Lavender Sprigs
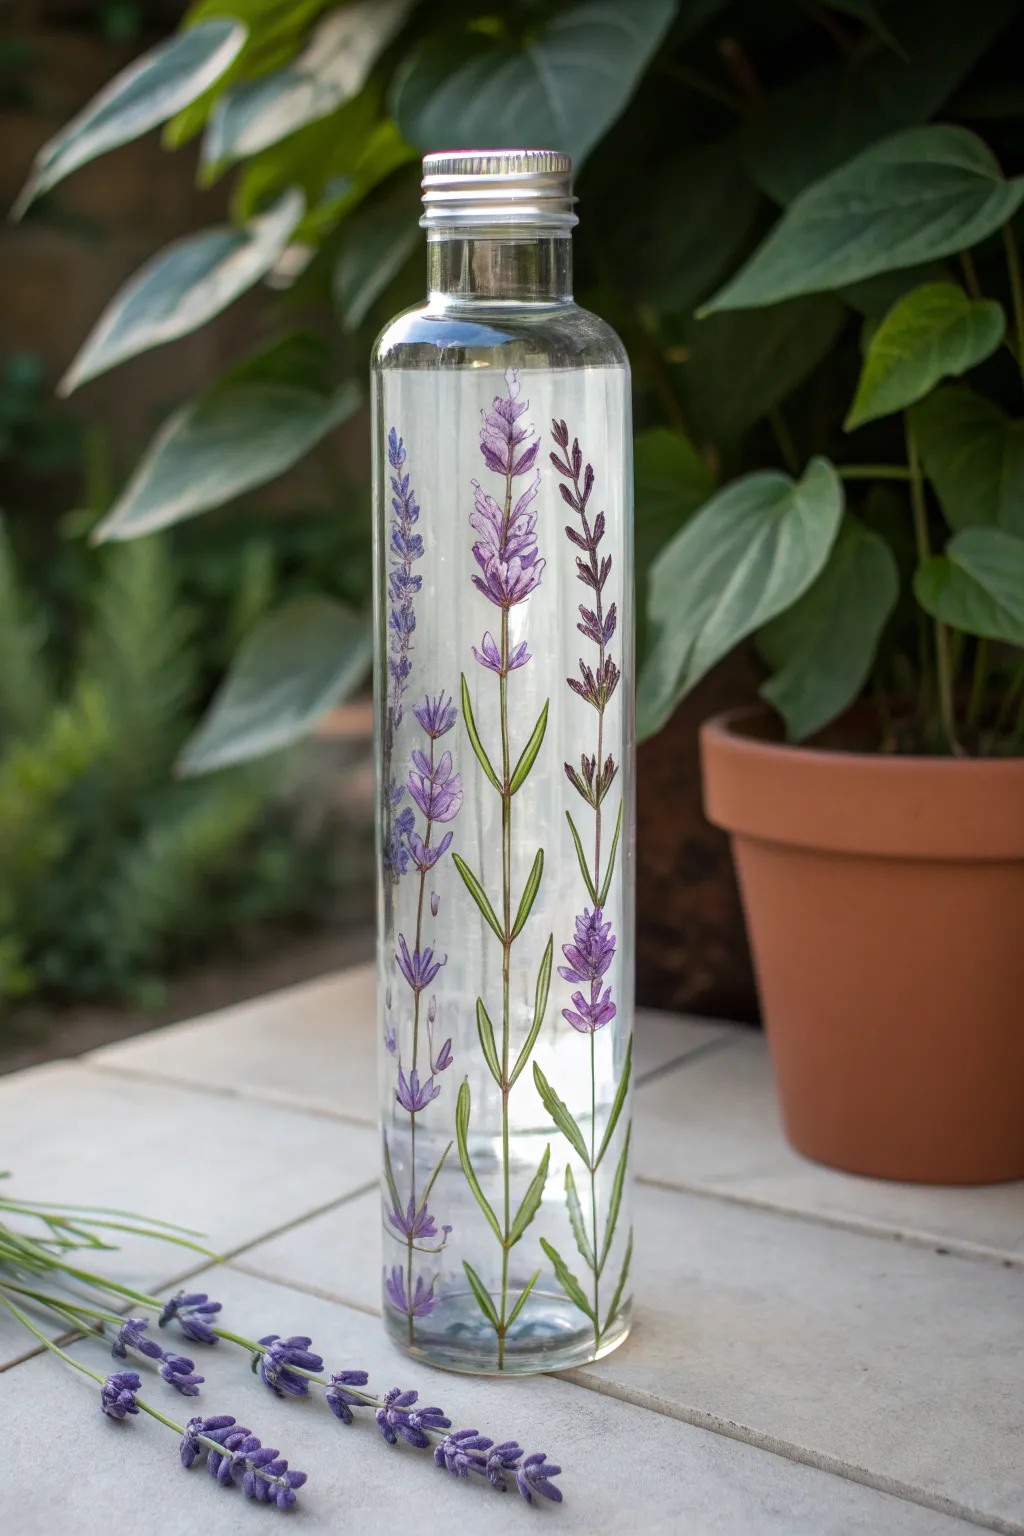
Transform a plain glass water bottle into an elegant hydration accessory with these delicate, vertical lavender sprigs. The translucent paint application mimics the airy feel of real wildflowers, creating a calming visual every time you take a sip.
Step-by-Step Guide
Materials
- Clear glass water bottle (straight-sided works best)
- Rubbing alcohol and cotton pads
- Enamel glass paints (Deep Green, Sage Green, Violet, Lavender, White)
- Fine liner brush (size 00 or 0)
- Small round brush (size 1 or 2)
- Palette or small dish
- Oven (for curing, optional)
Step 1: Preparation & Planning
-
Clean surface:
Before even touching a brush, wipe the entire exterior of the bottle with rubbing alcohol. This removes unseen oils and fingerprints that could prevent the paint from adhering properly. -
Plan positions:
Visualize three tall, vertical lines equally spaced around the bottle. You want the stems to start near the bottom and reach up to the neck, leaving a little breathing room at the very top.
Keep it Steady
Rest your pinky finger against the glass while painting the long stems. This creates a pivot point and stabilizes your hand for smoother, straighter lines.
Step 2: Greens & Stems
-
Mix stem color:
Mix a small amount of Deep Green with a touch of Sage Green on your palette to create a natural, shadowed olive tone. -
Paint main stems:
Using your fine liner brush, paint long, thin strokes upward. Don’t make the lines perfectly straight; a slight natural wobble adds realism to the botanical look. -
Add side branches:
From the main stem, pull out very short, thin diagonal lines where the flower clusters will eventually sit. Keep these sparse mostly near the top third of the stem. -
Base leaves:
Switch to the small round brush. Using the Sage Green, press and lift the brush along the lower sections of the stems to create long, slender leaves. The motion is: touch lightly, press down to widen, then lift to a point. -
Leaf detailing:
Once the green leaves are tacky but not fully dry, take your liner brush with a tiny bit of darker green and add a central vein to a few leaves for depth.
Step 3: The Blooms
-
Mix base purple:
Create a medium purple tone by mixing Violet with a tiny drop of White. This will be the shadow color for the flowers. -
Paint flower buds:
Using the tip of your small round brush, dab small, teardrop shapes along the top third of the stems. Cluster them tightly near the tip and space them out slightly as you move down. -
Vary the clusters:
Try to make the overall shape of the flower head conical—wider at the bottom of the cluster and tapering to a single bud at the tip. -
Highlight mixing:
Mix a much lighter shade using Lavender and more White. This should be opaque enough to stand out against the darker purple. -
Layering highlights:
I find it helps to let the base purple dry for about 10 minutes before this step. Dab tiny dots of the light mixture onto the upper left side of each little flower bud to mimic light hitting them. -
Darker accents:
For the sprig on the right (or to add variety), create a deeper purple mix. Add a few very dark, almost indigo specs at the base of the flower clusters to anchor them visually.
Scented Experience
Once fully cured, tie a real dried lavender sprig around the neck of the bottle with twine. It adds a lovely tactile element and a relaxing scent.
Step 4: Finishing Touches
-
Connect gaps:
Check where your purple buds meet the green stems. If there are floating flowers, use your liner brush and the green mix to paint tiny connecting stems. -
Cleanup:
If you made any stray marks, use a cotton swab dipped in rubbing alcohol to wipe them away while the paint is still wet. -
Curing:
Follow your specific paint brand’s instructions. Most glass enamels require either 21 days of air drying or baking in a cool oven that heats up to 350°F for 30 minutes to become dishwasher safe.
Now you have a functional piece of art that brings a garden vibe to your daily routine


Whimsical Rose Vines
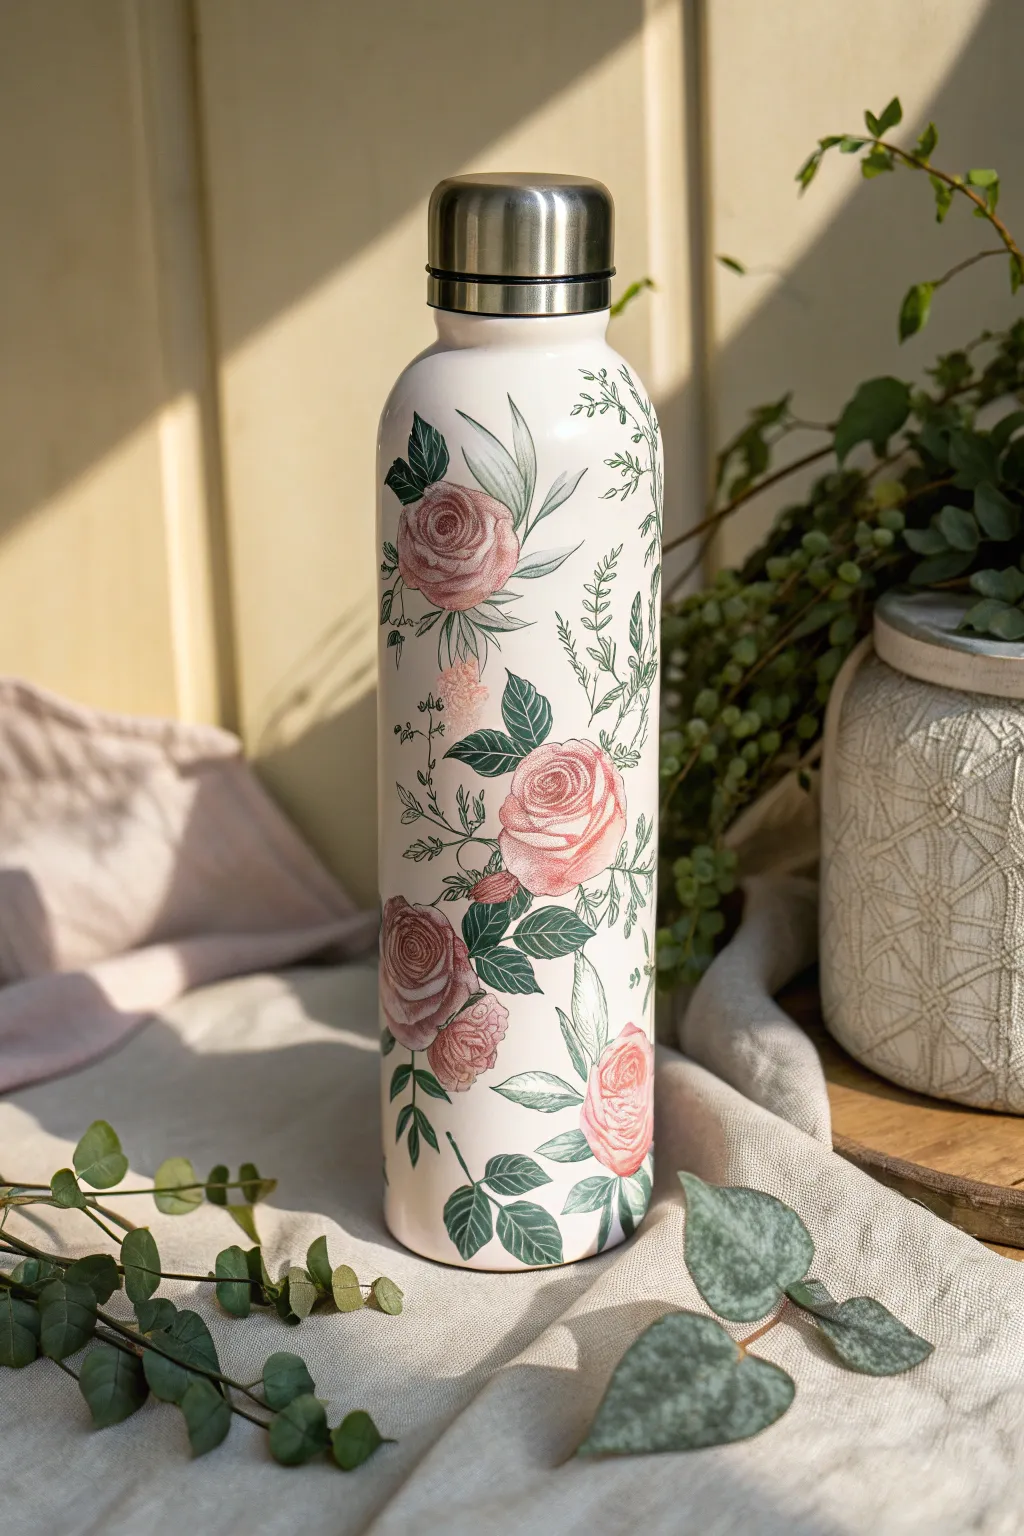
Transform a plain water bottle into a romantic, garden-inspired accessory with this delicate rose vine design. The soft pink blooms and intricate greenery create a timeless, vintage botanical illustration look that’s perfect for everyday elegance.
Detailed Instructions
Materials
- Stainless steel water bottle (pre-primed white or pale cream base)
- Acrylic craft paints (creamy white, pale pink, dusty rose, deep maroon, sage green, forest green, olive green)
- Very fine detail brushes (sizes 0, 00, and 000)
- Round fan brush or soft shader brush
- Pencil for sketching
- Fine-grit sandpaper
- Clear spray sealant (matte or satin finish)
- Palette or small plate for mixing
- Water cup and paper towels
Step 1: Preparation & Base Coat
-
Prepare the surface:
Before painting, lightly scuff the entire exterior of your bottle with fine-grit sandpaper. This creates ‘tooth’ for the paint to grip onto, preventing future peeling. -
Apply the base color:
Paint the entire bottle with a creamy white or very pale blush acrylic paint. You will likely need 2-3 thin, even coats to get full opacity. Let each layer dry completely before adding the next. -
Plan the composition:
Using a very light pencil touch, sketch out the rough placement of your three main rose clusters. Place one large bloom near the middle, one near the bottom, and a bud near the top to guide the eye.
Stealing the Detail
For the ultra-fine ‘engraved’ look on the petals, try using a fine-tip permanent ink pen instead of paint for the final outlines. It gives crisp definition easier than a brush.
Step 2: Painting the Roses
-
Block in the rose shapes:
Mix a soft, pale pink and paint rough, rounded circles where your main flowers will be. Keep the edges slightly uneven to mimic natural petals. -
Define the centers:
While the base pink is still tacky, mix a slightly darker dusty rose color. Dab this into the center of your circles, swirling outward in a loose spiral motion to suggest the tight inner petals. -
Add petal definition:
Switch to your size 0 brush. Using the deep maroon paint thinned slightly with water, paint very fine, curved lines to delineate individual petals. Start tight in the center and make larger, C-shaped strokes as you move outward. -
Highlight the edges:
Mix a tiny bit of white into your palest pink. Carefully add highlights to the top edges of the outer petals to make them look like they are catching the light. -
Create softness:
To achieve that vintage illustration look, uses a clean, slightly damp brush to gently feather out the harsh lines of your maroon shading, blending them softly into the pink petals. -
Paint the buds:
For the smaller buds, paint teardrop shapes in pale pink. Add a few vertical maroon streaks to show the tightly wrapped petals, then cup the bottom of the bud with sage green sepals.
Step 3: Adding Greenery & Vines
-
Layout the main stems:
Using a mix of sage and forest green, paint thin, winding stems connecting your flowers. Let them meander naturally, leaving space for leaves. -
Paint large leaves:
Near the large blooms, paint broad, ovate leaves using forest green. I like to leave a tiny gap down the center of each leaf to represent the main vein, letting the background peek through slightly. -
Add texture to leaves:
Once the dark green leaves dry, use your finest brush (000) and olive green paint to add tiny hatching lines or cross-hatching to simulate leaf veins and texture. -
Create filler greenery:
Fill in the empty spaces with delicate, fern-like sprigs. Use quick, light flicks of your brush with sage green to create airy, feather-like branches. -
Add contrast leaves:
Paint a few smaller, darker leaves in deep olive near the base of the stems to add depth and variety to the foliage.
Vintage Patina
Mix a tiny drop of brown paint into glaze medium and lightly wash over the finished dried vines. This ‘antiquing’ gives the bottle an aged, old-world porcelain appearance.
Step 4: Finishing Touches
-
Refine the details:
Step back and look for any gaps. Add tiny dots or very thin tendrils in palest green to balance the composition without overcrowding it. -
Stipple for texture:
If desired, take a nearly dry brush with dark green paint and gently stipple (pot) around the base of the roses to create shadow and depth where the flower meets the stem. -
Seal the artwork:
Allow the paint to cure for at least 24 hours. Once fully dry, apply 2-3 light coats of clear matte spray sealant to protect your handiwork from scratches and water.
Enjoy carrying your beautiful, hand-painted piece of art wherever you go


Wildflower Bouquet Panel
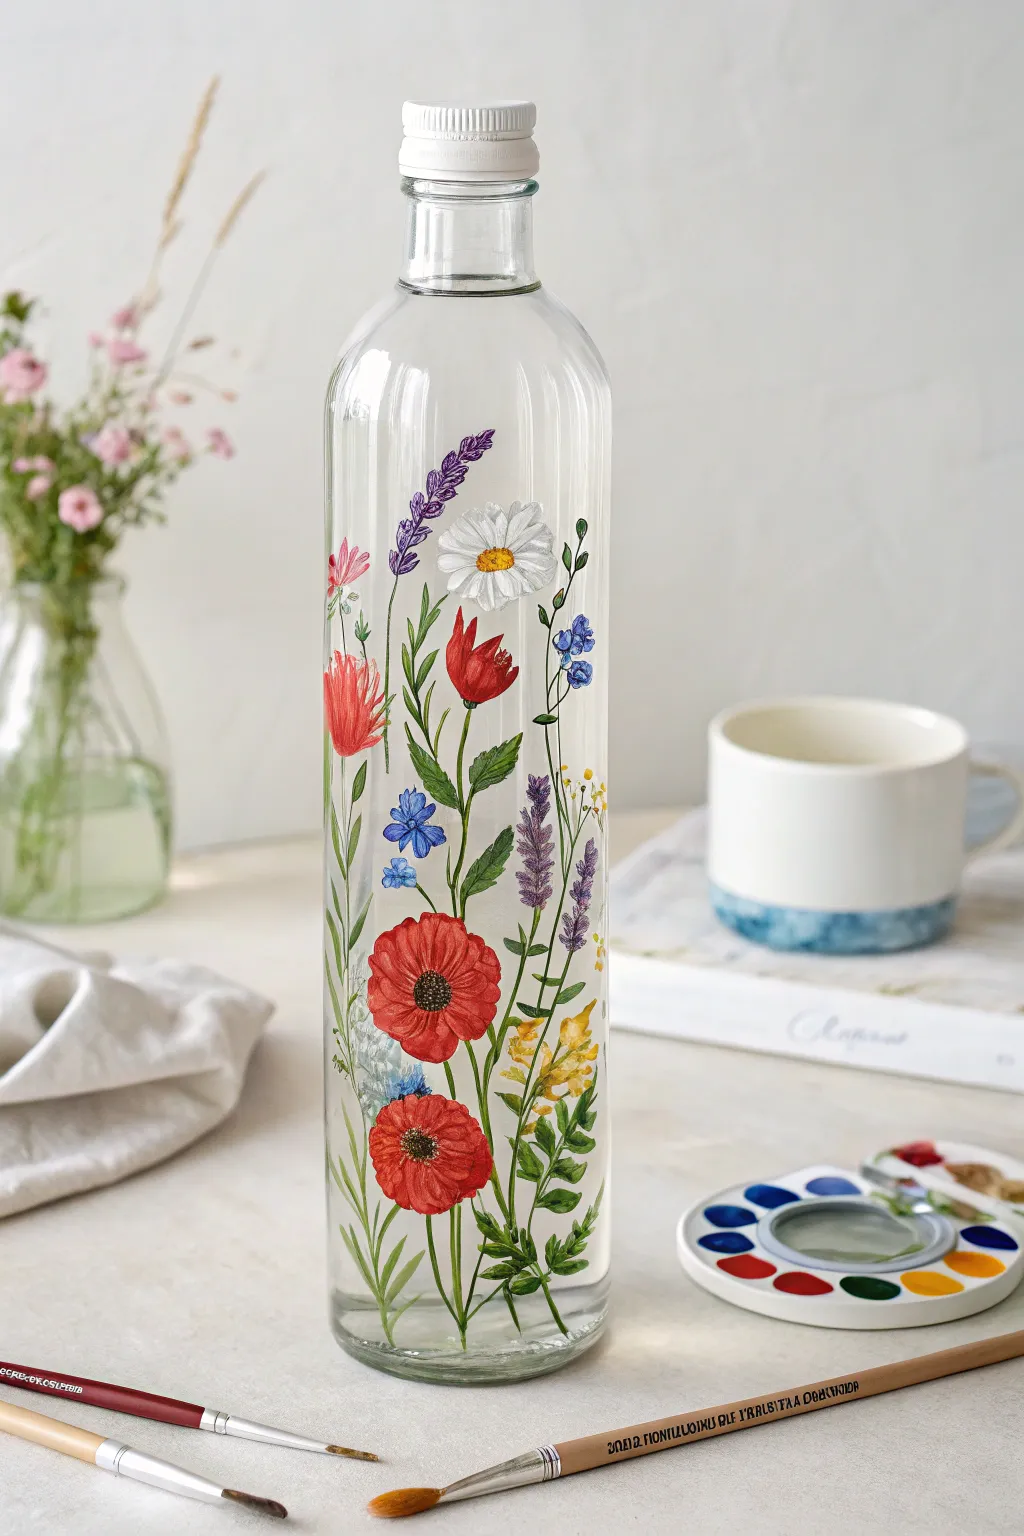
Transform a plain glass water bottle into a portable garden with this delicate wildflower bouquet design. Using glass paints, you’ll create a vertical arrangement of poppies, lavender, and daisies that looks fresh-picked and vibrant against the transparent background.
Step-by-Step
Materials
- Clear glass water bottle with cap
- Rubbing alcohol and cotton pads
- Glass-specific acrylic paints (or acrylic enamels)
- Fine detail brushes (sizes 0, 00, and 1)
- Small flat shader brush (size 2)
- Palette or small plate
- Water cup and paper towels
- Oven (optional, for curing)
Step 1: Preparation & Layout
-
Clean surface:
Before painting, wipe the entire surface of the glass bottle with rubbing alcohol and a cotton pad. This removes oils and fingerprints that could prevent the paint from adhering properly. -
Plan position:
Visualize a vertical column on one side of the bottle where your bouquet will grow. You can lightly mark the top and bottom boundaries with a washable marker if you need guidelines.
Paint Sliding?
If paint slips on the glass, your brush is too wet. Don’t use water to thin the paint; use a specific glass medium or use the paint straight from the tube for better grip.
Step 2: Painting the Greenery
-
Mix greens:
On your palette, mix a few shades of green. Create a sap green for lighter stems and a deeper forest green for shadows. Having variation makes the foliage look realistic. -
Main stems:
Using your size 1 liner brush and the lighter sap green, paint long, thin vertical lines originating from the bottom of your designated area. Curve them slightly; nature rarely moves in straight lines. -
Add leaves:
Switch to a size 0 brush to add small, lance-shaped leaves along the stems. For the fern-like foliage at the bottom, use tiny flicking motions to create feathery textures. -
Layer depth:
Go back over the lower sections of the stems with your darker green mix to add dimension and ground the bouquet visually.
Step 3: Adding the blooms
-
Poppy base:
For the two large red poppies near the bottom, paint circular shapes using bright red paint and the flat shader brush. Don’t make them perfect circles; rough, wavy edges mimic ruffled petals. -
Lavender spikes:
Mix a soft purple. Using the tip of a size 00 brush, dab tiny dots in a cone shape at the top of a few tall stems to create the look of lavender or salvias. I like to let the dots overlap slightly. -
White daisy:
Paint a white daisy near the top center. Use the small flat brush to pull strokes from the outside in towards a center point, leaving a small gap in the middle. -
Filler flowers:
Add small clusters of blue five-petal flowers and tiny yellow buds throughout the arrangement to fill gaps. Keep these simple and small to avoid overcrowding.
Make it Shine
Once fully cured, paint a layer of clear gloss medium over just the flower petals. This creates a raised, enamel-like finish that catches the light beautifully.
Step 4: Detailing & Finishing
-
Poppy centers:
Once the red paint is dry, use black or dark brown to stipple a center into the poppies. Add a few tiny white dots on top of the black for highlights. -
Daisy center:
Paint the center of the white daisy with a golden yellow. Add a tiny crescent of orange on the bottom edge of the yellow circle for a 3D effect. -
Highlighting petals:
Mix a lighter version of your red (add a touch of white or orange) and paint thin lines on the poppy petals to suggest creases and light hitting the flower. -
Stem connections:
Check where your flowers meet the stems. Use your smallest green brush to ensure every bloom is connected to a stalk, painting tiny calyxes (green cups) at the base of the flower heads. -
Clean up:
If you made any stray marks, use a damp cotton swab or a toothpick to gently scrape away the wet paint before it sets. -
Curing:
Allow the paint to dry for at least 24 hours. Refer to your specific paint brand’s instructions for baking the glass in a home oven to make the design dishwasher safe.
Now you have a refreshing piece of functional art to keep you hydrated
BRUSH GUIDE
The Right Brush for Every Stroke
From clean lines to bold texture — master brush choice, stroke control, and essential techniques.
Explore the Full Guide
Butterflies With Tiny Highlights
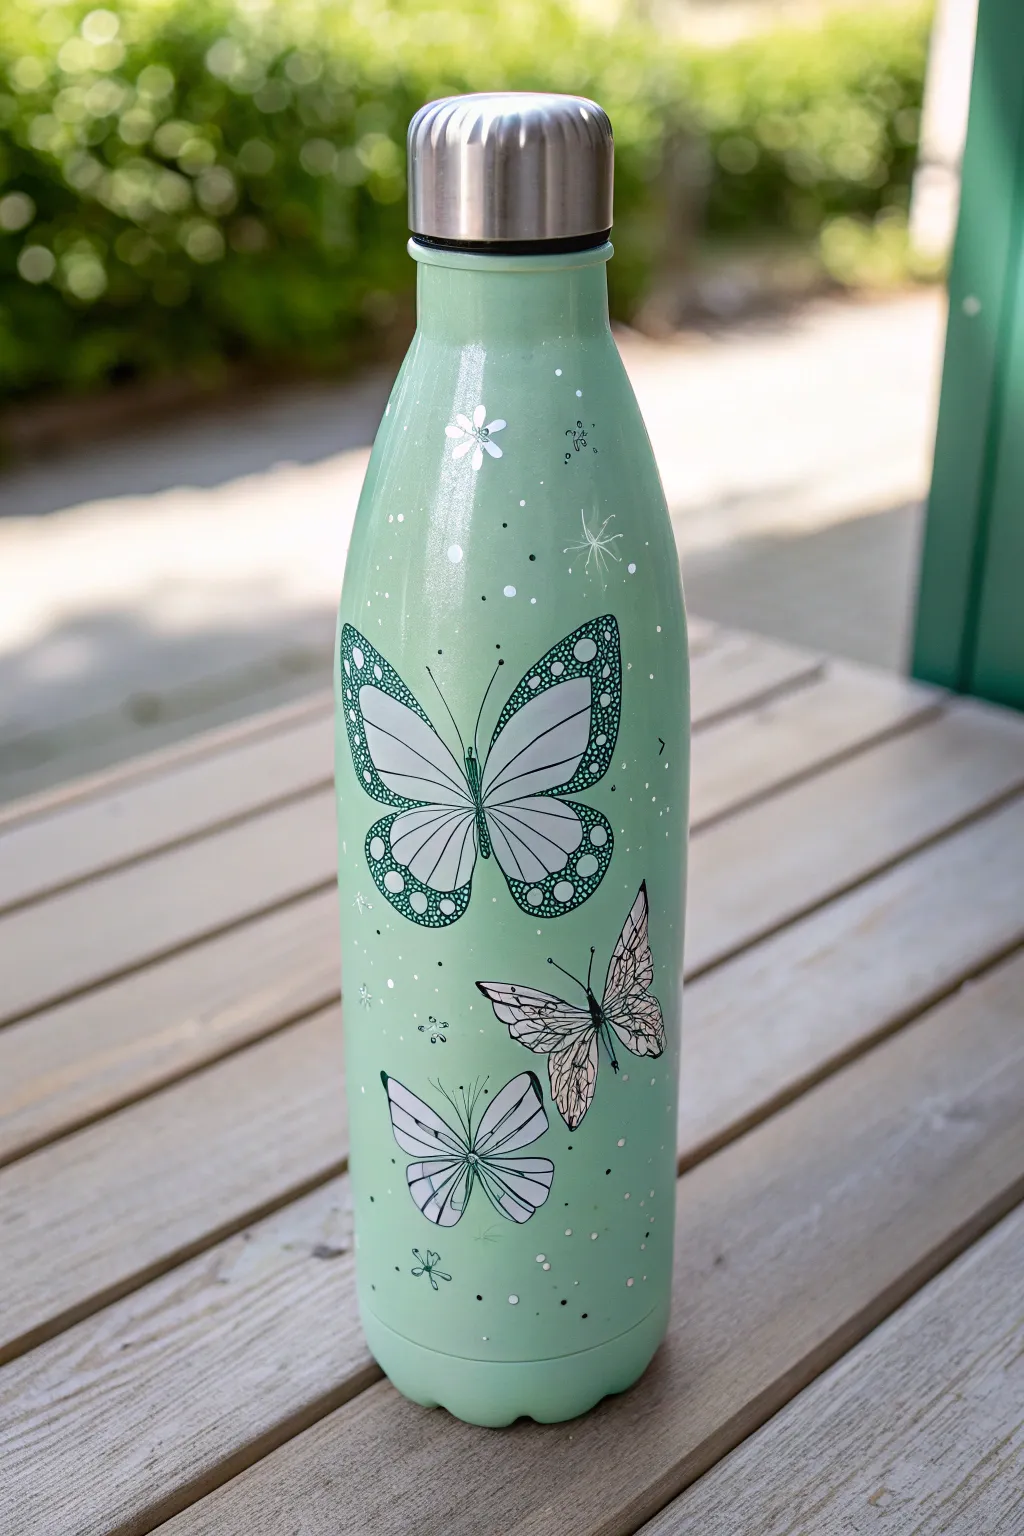
Transform a plain water bottle into a whimsical garden scene featuring delicate butterflies and airy floral accents. This project uses a soothing mint green base with black fine-line details and white highlights to create a fresh, illustrative look.
Detailed Instructions
Materials
- Stainless steel water bottle (primed or pre-painted mint green)
- Acrylic paints: Teal, White, Black (or paint pens)
- Fine liner paint markers (Black and White, 0.5mm tip)
- Small round detail brush (size 0 or 1)
- Spray sealant (matte or gloss)
- Pencil for sketching
- Cotton swabs and rubbing alcohol (for cleanup)
Step 1: Preparation & Base Art
-
Prep the Surface:
Clean your bottle thoroughly with rubbing alcohol to remove any oils. If your bottle isn’t already mint green, apply two even coats of mint acrylic paint, allowing complete drying time between layers. -
Plan the Layout:
Lightly sketch the positions of your three butterflies using a pencil. Place the largest butterfly centrally, a side-profile butterfly slightly below it to the right, and a smaller open-winged butterfly near the bottom. -
Base Color: Large Butterfly:
For the main butterfly, paint the upper wing sections with a soft white. Use a teal shade for the edges and lower wing tips, blending slightly where the colors meet if you want a gradient, though distinct blocks of color work well here too. -
Base Color: Lower Butterflies:
Fill in the shapes of the lower two butterflies primarily with white acrylic. Keep the paint application thin and smooth; thick lumps will make the fine details harder to add later. -
Dry Completely:
Let the base shapes dry for at least 30 minutes. If the white looks translucent, add a second thin coat for opacity.
Clean Lines Hack
If you make a mistake with the paint pen, don’t panic. Dampen a cotton swab with a tiny bit of rubbing alcohol and gently erase the line while the ink is still wet.
Step 2: Detailed Line Work
-
Outline the Wings:
Using a black fine liner paint pen, carefully trace the outer edges of your dried butterfly shapes. Keep your hand steady and rest your pinky on the bottle for balance. -
Add Veins:
Draw delicate lines radiating from the butterfly bodies to the wing edges to create the veins. For the large butterfly, keep the veins simple and spaced out. -
Detailing the Main Butterfly:
On the large top butterfly, thicken the black borders on the lower wings. Inside these thickened black areas, leave or paint tiny empty circles to create the spotted pattern effect characteristic of monarchs. -
Detailing the Side Butterfly:
For the middle butterfly in profile, use very fine scribbly lines or stippling with your black pen on the wings to create texture and shadow, giving it a more realistic, sketched appearance. -
Detailing the Bottom Butterfly:
Keep the bottom butterfly simple. Draw a straight, thin body and add clean, symmetrical vein lines on the white wings.
Add Some Shimmer
For a magical touch, use a metallic silver or iridescent pearl paint for the white dots and wing highlights. They will catch the light beautifully when you turn the bottle.
Step 3: Highlights & Accents
-
Tiny Flowers:
Using a white paint pen or small brush, paint small, simple five-petal flowers scattered around the upper portion of the bottle. -
Dandelions & Sparkles:
Draw a few ‘dandelion puff’ shapes using fine white lines radiating from a center point. Add tiny starbursts or four-pointed stars in empty spaces to make the design feel magical. -
Polka Dot Magic:
Dip the non-brush end of a paintbrush into white paint (or use a dotting tool) to create scattered dots of varying sizes around the butterflies. I like to cluster them slightly to look like pollen or fairy dust. -
Black Accents:
Switch back to your black fine liner to add tiny distinct dots intermingled with the white ones, and draw small doodle-style flowers near the bottom for contrast. -
Final Highlights:
Add tiny dashes of white inside the black bodies of the butterflies to give them dimension and shine. -
Seal the Work:
Once the artwork is cured (wait 24 hours for best results), apply a clear spray sealant. Use light, sweeping motions to avoid making the ink run.
Enjoy using your custom-painted bottle for your daily hydration goals
Bees and Daisy Scatter
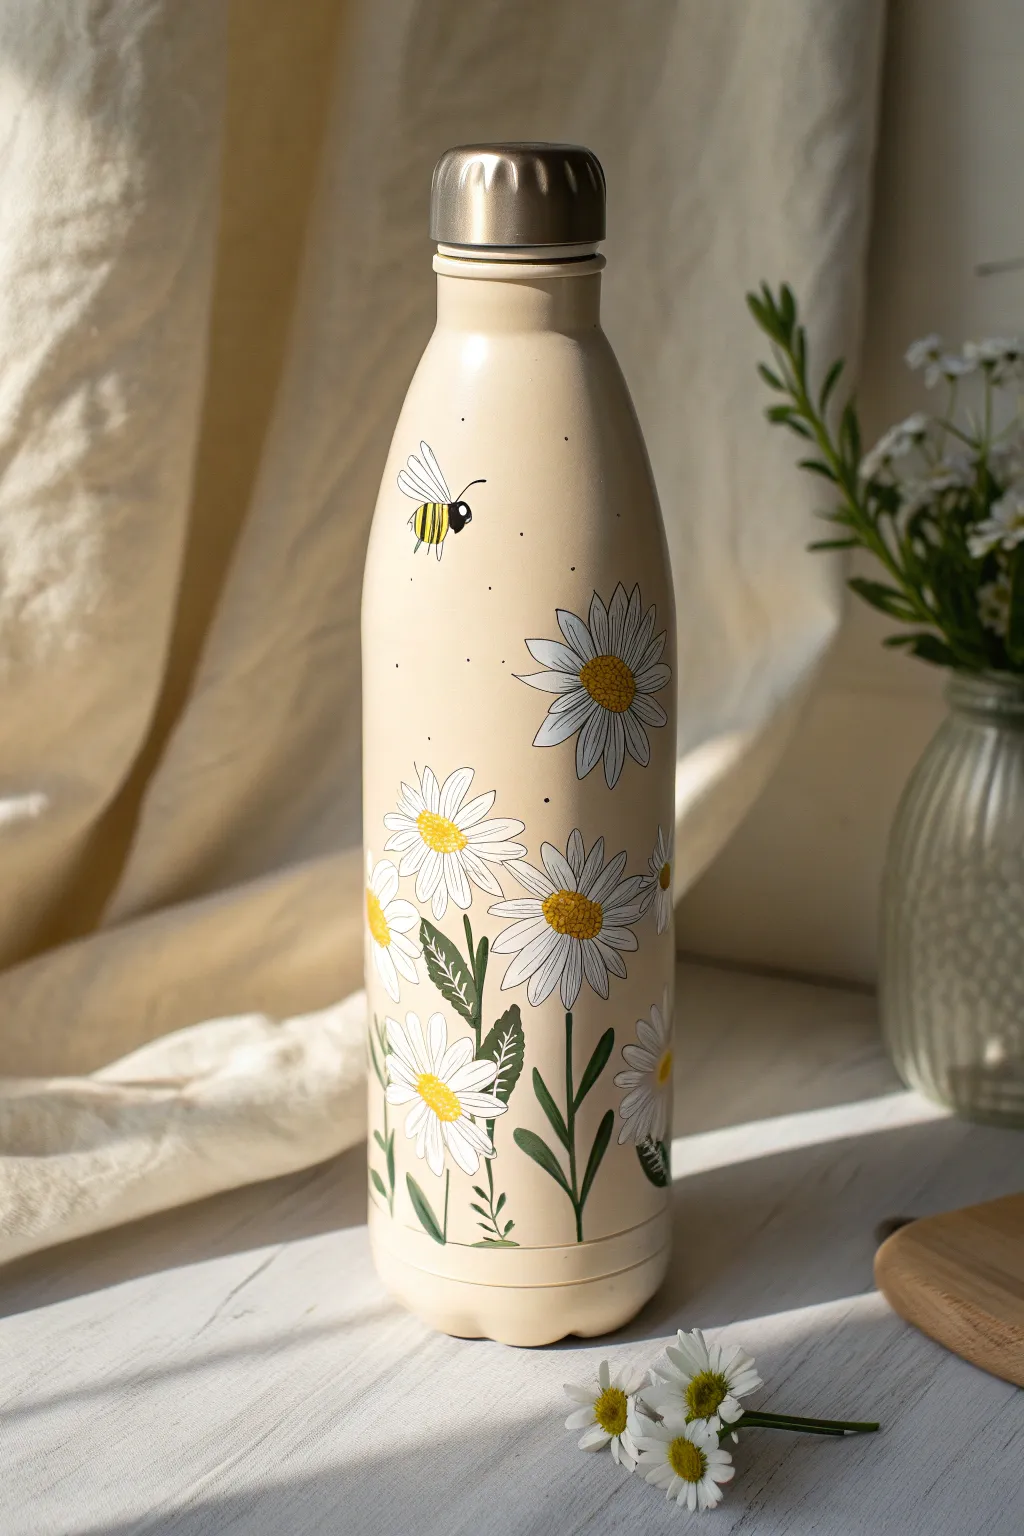
Transform a plain water bottle into a sunny garden scene with this cheerful bee and daisy design. The warm cream background pairs beautifully with crisp white petals and a buzzing little friend for a refreshing, nature-inspired accessory.
Step-by-Step Tutorial
Materials
- Stainless steel water bottle (preferably beige/cream, or use primer)
- Multi-surface acrylic paints (white, yellow, black, green)
- Small round paintbrushes (sizes 0 and 2)
- Fine liner brush or black acrylic paint pen
- Pencil for sketching
- Clear sealant spray (dishwasher safe/waterproof)
- Paper palette
- Water cup and paper towels
Step 1: Preparation & Base
-
Clean and prep:
Begin by thoroughly washing and drying your water bottle to remove any oils or residue. If your bottle feels very slick, scuff it lightly with fine-grit sandpaper to help the paint adhere. -
Base coat application:
If your bottle isn’t already a creamy beige color like the one shown, mix white with a tiny drop of yellow ochre to create a warm cream shade. Apply two even coats over the entire bottle, letting the first layer dry completely before adding the second. -
Let it cure:
Wait until the base coat is fully dry to the touch. I usually give this step at least an hour just to be safe, so the detailed painting doesn’t lift the background.
Step 2: Painting the Daisies
-
Map out the flowers:
Lightly sketch the positions of your main daisy heads using a pencil. Place a larger cluster near the bottom third and a single large bloom floating higher up on the side for balance. -
Paint flower centers:
Using your size 2 brush and a bright yellow paint, dab round circles where each flower center will be. Don’t worry about perfect edges yet; the petals will refine the shape. -
Create the first petals:
Switch to white paint. Starting from the yellow center, pull your brush outward to create long, slender petal shapes. Paint the background petals first—the ones that look like they are behind the others. -
Layer the main petals:
Once the background petals are dry, paint the foreground petals over them. Make these whiter and more opaque to create depth. -
Add petal details:
Mix a tiny amount of grey or light blue into your white paint. Use the fine liner brush to add very faint shadow lines on a few petals to separate them visually. -
Texture the centers:
Go back to the yellow centers. Stipple (dab repeatedly) a darker golden yellow or light orange on the bottom half of each yellow circle to give it a fuzzy, 3D pollen look.
Clean Lines Tip
If you struggle with fine brush work, swap the liner brush for an ultra-fine tip Posca marker or acrylic paint pen for the black outlines and bee legs.
Step 3: Adding Greenery & Life
-
Paint the stems:
Using a deep forest green, paint straight but slightly angled lines extending down from the flower heads. Vary the heights so the flowers don’t look like soldiers in a row. -
Add leaves:
Paint elongated, lance-shaped leaves attached to the stems. Add a few small jagged edges to the leaves for a realistic daisy foliage look. -
Outline the flowers:
Use a very fine liner brush with black paint (or an acrylic paint pen) to outline the petals and centers. keep the lines thin and delicate, not bold. -
Detail the leaves:
With the same black liner, add a central vein to each green leaf and outline the edges to match the illustrative style of the flowers.
Level Up: Glossy finish
After sealing, add a drop of dimensional glaze or clear UV resin just to the yellow flower centers and the bee’s body to make them shine and pop.
Step 4: The Bee & Finishing Touches
-
Paint the bee body:
Find an empty spot near the top of the bottle. Paint a small yellow oval for the bee’s main body and a smaller black circle for the head. -
Stripes and stinger:
Once the yellow is dry, paint two black stripes across the body and add a tiny point at the back for the stinger. -
Bee wings:
Use watered-down white paint or a very light grey to paint two teardrop-shaped wings. Outline them with your fine black liner and add subtle vein details. -
Flight path:
Add tiny black dots scattered around the background, focusing on the space between the bee and the flowers, to create a sense of movement or pollen dust. -
Seal the deal:
Allow the painted design to cure for 24 hours. Finish by applying two light coats of waterproof sealant spray to protect your artwork from scratches and washing.
Now you have a hydration companion that brings a little bit of spring with you everywhere you go

PENCIL GUIDE
Understanding Pencil Grades from H to B
From first sketch to finished drawing — learn pencil grades, line control, and shading techniques.
Explore the Full Guide
Simple Monogram and Florals
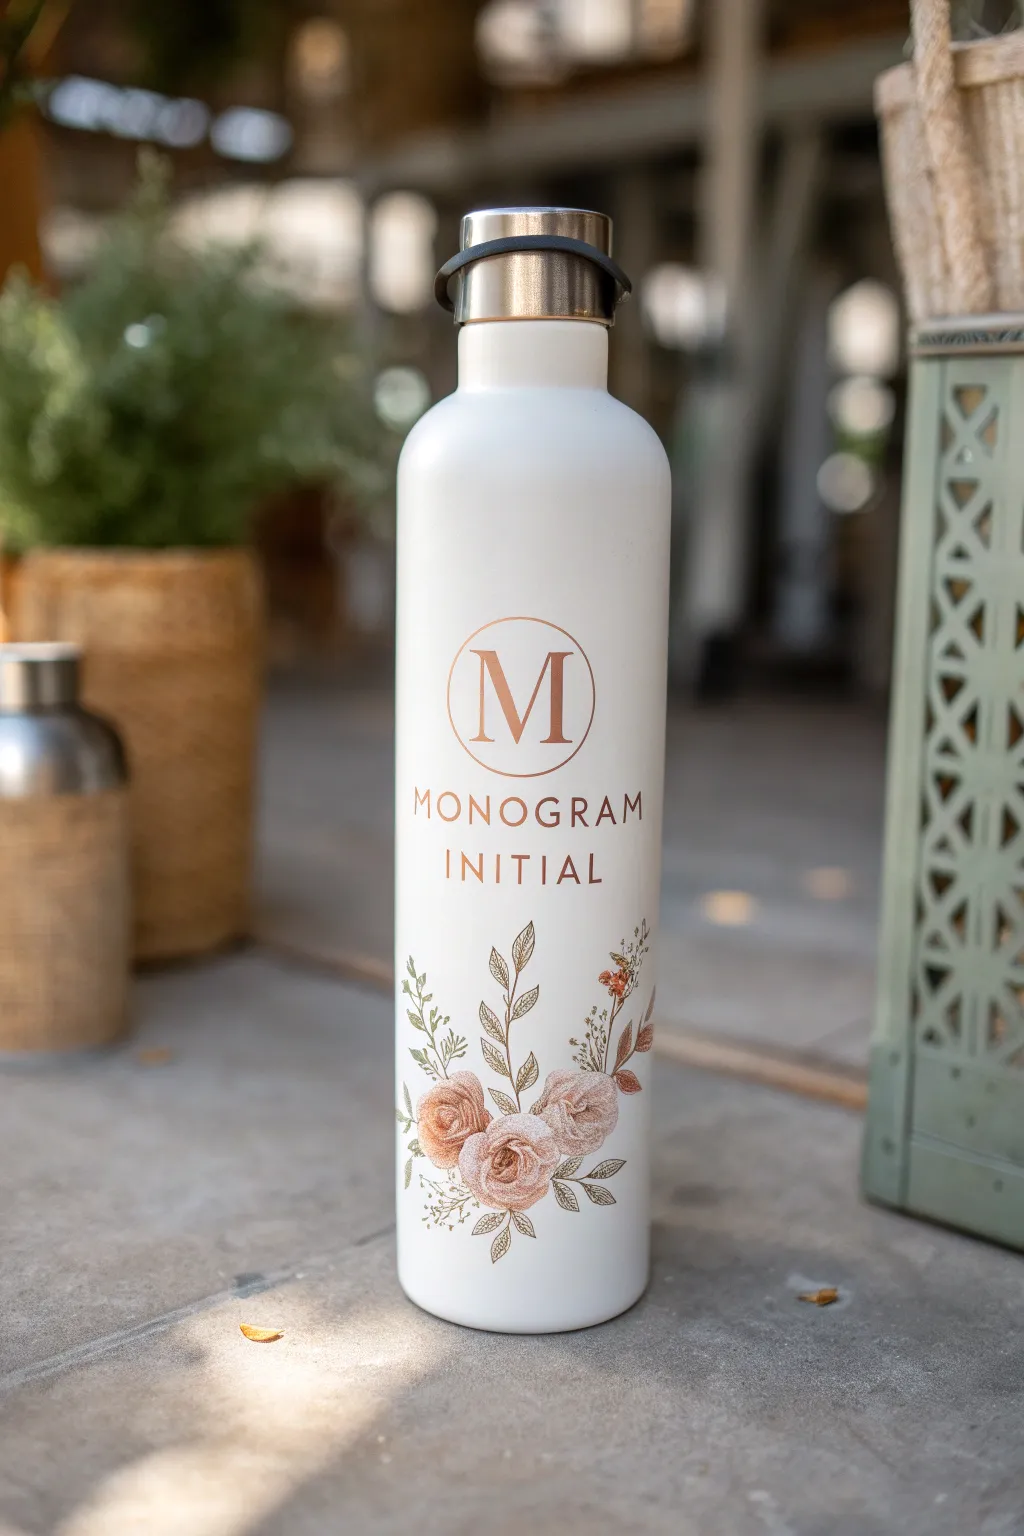
Transform a plain white water bottle into a boutique-style accessory with this sophisticated rose gold design. Combining clean typography with delicate sketched florals creates a personalized piece that looks professionally printed rather than hand-painted.
Detailed Instructions
Materials
- Stainless steel water bottle (matte white finish)
- Adhesive vinyl (rose gold or copper metallic)
- Transfer tape
- Cricut or Silhouette cutting machine
- Fine-point weeding tool
- Scraper tool
- Rubbing alcohol and cotton pads
- Measuring tape
- Digital SVG file for floral bouquet (line art style)
- Digital font (serif style used here)
- Standard grip cutting mat
Step 1: Preparation & Design
-
Clean the Surface:
Before doing anything, wipe the entire surface of the bottle with rubbing alcohol and a cotton pad. This removes invisible oils from your hands that prevent vinyl from sticking properly. -
Measure the Printable Area:
Use a flexible measuring tape to determine the height and width of the flat area of your bottle. You want to avoid the curve at the top neck and the very bottom rounded edge. -
Set Up the Monogram:
In your design software, create a circle outline. Place a large serif ‘M’ (or your chosen initial) inside it. Below the circle, type your desired text like ‘MONOGRAM INITIAL’ in a clean, sans-serif font, ensuring it is centered. -
Add the Florals:
Import a line-art style floral bouquet SVG. Position it underneath the text in your software workspace to visualize the final composition. I usually size the flowers to wrap slightly around the curve for a natural look. -
Cut the Vinyl:
Load your metallic rose gold vinyl onto the cutting mat, shiny side up. Send the design to your machine, ensuring you select the correct material setting for ‘Metallic Vinyl’ to get a clean cut through the foil layer.
Pro Tip: Curved Surface Hack
Make small snips in the transfer tape (not cutting the vinyl) around the design edges. This flexibility helps the flat tape mold to the round bottle without creasing.
Step 2: Weeding & Transfer
-
Weed the Excess:
Use your fine-point weeding tool to carefully remove the background vinyl. Be extremely slow with the floral section; the thin stems and leaves are delicate and can lift easily. -
Remove Inner Pieces:
Pick out the tiny negative spaces inside the letters (like the holes in ‘O’, ‘A’, and ‘R’) and inside the floral details. -
Apply Transfer Tape:
Cut a piece of transfer tape slightly larger than your design. Peel the backing and smooth it sticky-side down over your weeded vinyl design. -
Burnish the Tape:
Use your scraper tool to rub firmly over the transfer tape, adhering the vinyl to it. Do this from the center outward to avoid bubbles. -
Lift the Design:
Slowly peel the paper backing away from the transfer tape. The vinyl design should lift with the tape. If a piece stays on the paper, lay the tape back down and burnish again.
Step 3: Application
-
Align the Bottle:
Lay the bottle on its side. To keep it from rolling, I like to nestle it between two heavy books or rolled-up towels. -
Center the Design:
Hover the transfer tape over the bottle to find the center line. Don’t press down yet! Look at the top rim to help gauge vertical alignment. -
Anchor the Center:
Once aligned, press down only on the center vertical strip of the design. This acts as a hinge. -
Smooth the Sides:
Work your way out from that center strip to the left and right, pressing the vinyl down with your thumb. This technique prevents wrinkles on the curved surface. -
Burnish on the Curve:
Go over the entire design firmly with your scraper tool or fingernail, paying special attention to the thin lines of the flowers and text edges. -
Peel the Tape:
Start at one corner and peel the transfer tape back at a sharp 180-degree angle, keeping it close to the surface of the bottle. -
Final Cure:
Let the bottle sit for 24-48 hours before using or washing. This allows the adhesive to fully bond with the powder-coated surface.
Troubleshooting: Vinyl Won’t Stick
If vinyl lifts with the tape, the bottle is likely powdery or oily. Reclean with alcohol. Try warming the vinyl slightly with a hair dryer to activate the adhesive.
Now you have a stunning, personalized hydration companion that brings a touch of luxury to your daily routine
Soft Ombre Sunset Blend
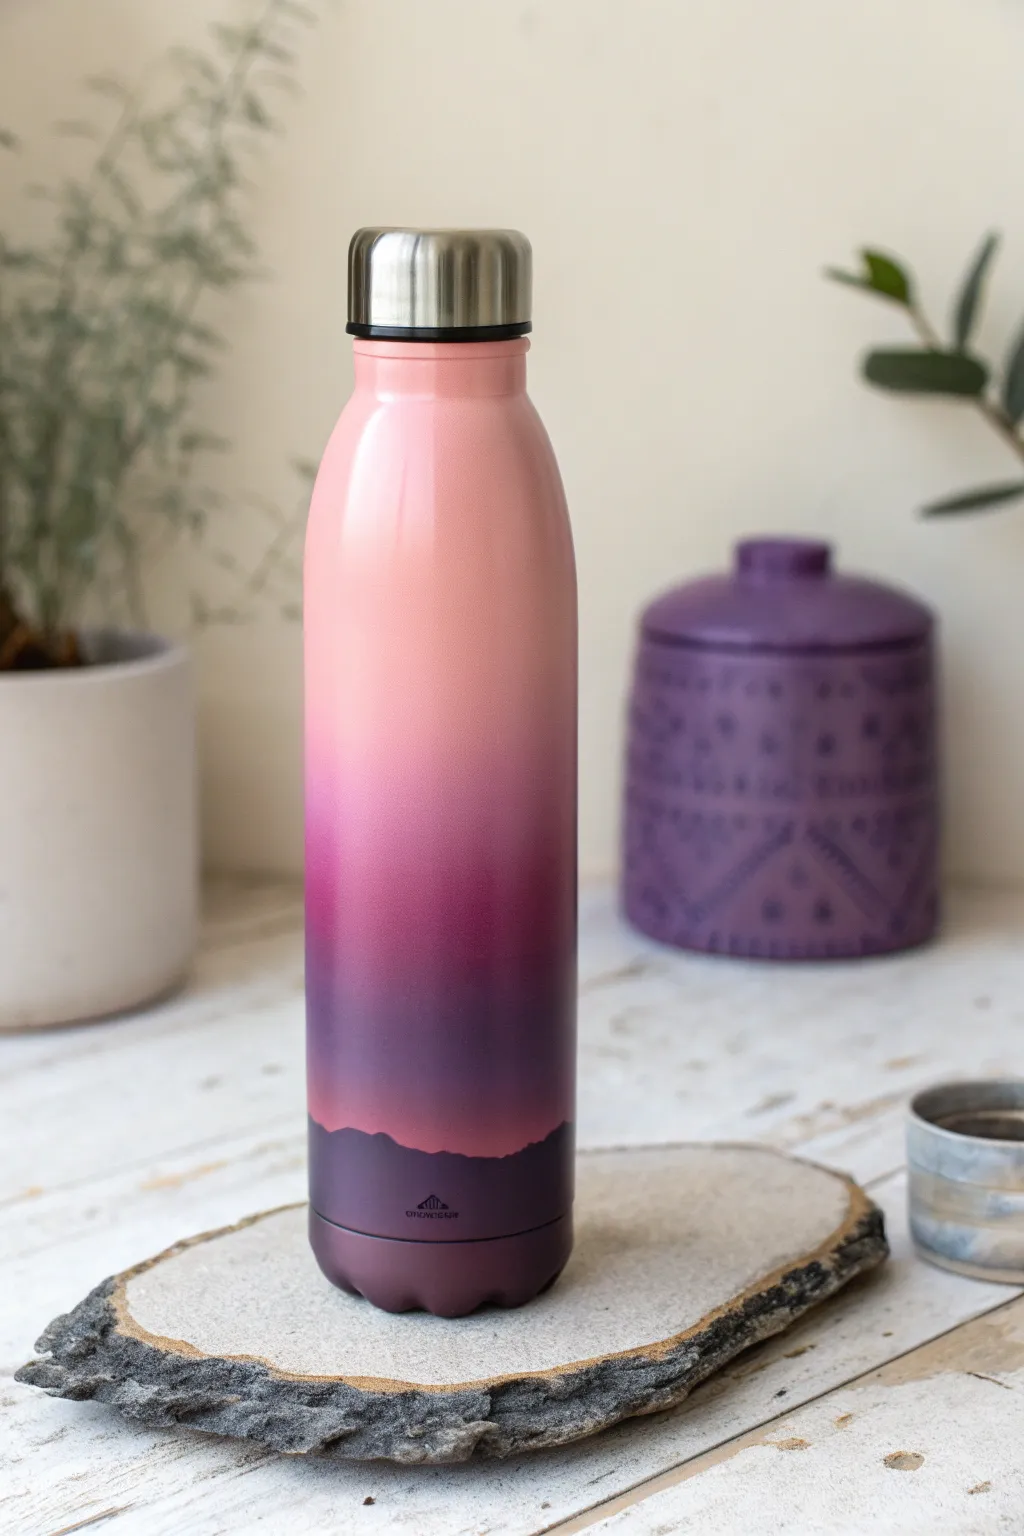
Capture the serene beauty of a twilight sky with this elegant ombre water bottle design. The smooth transition from soft peach to deep plum creates a calming gradient, anchored by a subtle silhouette of rolling hills at the base.
Step-by-Step Guide
Materials
- Stainless steel water bottle
- Sanding sponge (fine grit)
- Painter’s tape
- Spray primer (white or light grey)
- Acrylic craft paints (Light Peach, Dusty Rose, Deep Magenta, Dark Plum, Black)
- Makeup sponges or soft foam douncers
- Small flat detail brush
- Palette or paper plate
- Clear sealant spray (gloss or matte finish)
- Rubbing alcohol
- Lint-free cloth
Step 1: Preparation & Base Coat
-
Prepare surface:
Begin by removing the lid from your water bottle. Use the fine-grit sanding sponge to lightly scuff the entire exterior surface. This creates ‘tooth’ for the paint to grip without damaging the bottle. -
Clean thoroughly:
Wipe the bottle down with rubbing alcohol and a lint-free cloth to remove any sanding dust, oils, or fingerprints. -
Protect the rim:
Apply painter’s tape carefully around the threaded rim where the lid screws on. This ensures your drinking area stays paint-free and clean. -
Prime the bottle:
In a well-ventilated area, apply a thin, even coat of spray primer. I like to rotate the bottle on a dowel or stick to get 360-degree coverage. Let this dry completely according to the can’s instructions.
Pro Tip: Seamless Blending
Keep your makeup sponges slightly damp (not wet!) before dipping into acrylics. This extends the drying time just enough to help the colors merge smoothly.
Step 2: Creating the Ombre Gradient
-
Set up palette:
Squeeze out your acrylic paints: Light Peach, Dusty Rose, Deep Magenta, and Dark Plum. Keep them somewhat separate but ready for mixing. -
Apply top color:
Dip a makeup sponge into the Light Peach. Sponge it onto the top third of the bottle using a dabbing motion for even coverage. -
Start the transition:
While the peach is still slightly wet, pick up some Dusty Rose on a fresh sponge. Apply this below the peach section, overlapping the two colors slightly. -
Blend the upper horizon:
Use a clean sponge to dab gently over the line where Peach meets Rose. Work quickly to soften the edge so the colors melt into each other without a harsh line. -
Add the mid-tone:
Continue down the bottle with Deep Magenta. Sponge this color into the middle section, blending it upwards into the Dusty Rose just as you did before. -
Deepen the base:
Apply the Dark Plum to the lower third of the bottle. This deep purple anchors the sunset look. -
Final blend:
Blend the Dark Plum upward into the Magenta. Step back to check your transitions; if any area looks stripey, lightly dab over it with the lighter of the two adjacent colors. -
Dry time:
Let the ombre layer dry completely. If the colors look transparent, repeat the sponging process for a second coat.
Troubleshooting: Paint Lifting
If sponge dabbing lifts the previous layer of paint instead of adding to it, stop immediately. Let that section dry completely before trying again with a lighter touch.
Step 3: Adding the Silhouette & Sealing
-
Mix shadow color:
Mix a small amount of Black into your Dark Plum paint to create a very deep, almost-black purple for the landscape silhouette. -
Outline the hills:
Using your small flat brush, paint a wavy, uneven line near the bottom of the bottle to mimic the silhouette of distant mountains or hills. -
Fill the bottom:
Fill in the space below your wavy line down to the bottom curve of the bottle with this dark mixture. Ensure solid, opaque coverage here. -
Refine the edge:
Go back over the top edge of your hills to ensure they look organic but crisp against the sunset gradient. -
Remove tape:
Carefully peel off the painter’s tape from the rim while the paint is dry to the touch but hasn’t fully cured for days. -
Seal the artwork:
Once the paint is fully cured (usually 24 hours), spray the entire bottle with a clear sealant. Apply 2-3 thin coats to protect against scratches and hand-washing.
Now you have a stunning, twilight-inspired accessory to keep you hydrated in style


Geometric Color Block Stripes

Transform a plain metal water bottle into a stylish accessory with this geometric color-blocking technique. The combination of mint, terracotta, and dark green creates a soft yet striking retro aesthetic that looks professionally printed.
Step-by-Step Tutorial
Materials
- Stainless steel water bottle (white or primed)
- Painter’s tape or skinny washi tape (crucial for straight lines)
- Acrylic multi-surface paints (Mint Green, Terracotta/Salmon, Sage Green, Dark Forest Green, White)
- Flat synthetic paintbrushes (medium and small)
- Clear acrylic sealer (spray or brush-on, dishwasher safe if possible)
- Rubbing alcohol and cotton pads
- Fine grit sandpaper (optional)
Step 1: Preparation
-
Clean the surface:
Wipe down the entire exterior of your metal flask with rubbing alcohol to remove any oils or fingerprints. This ensures the paint adheres perfectly. -
Light sanding (optional):
If your bottle has a very glossy finish, give it a quick, light scuff with fine-grit sandpaper to give the paint some tooth. -
Base coat:
Starting with a clean slate is best. I like to apply a solid coat of white paint or primer over the whole bottle if it isn’t white already, letting it dry completely for 24 hours.
Clean Lines Secret
Burnish the edges of your painter’s tape firmly with a credit card or spoon handle before painting. This pressure ensures a tight seal against the metal surface.
Step 2: Creating the Pattern
-
Planning the spiral:
Visualize the diagonal spiral going around the bottle. The stripes should wrap at a steep angle, almost like a candy cane but much wider. -
Masking the first lines:
Apply your first strip of painter’s tape diagonally. Start from the bottom and wrap it upwards around the bottle to create a continuous spiral guideline. -
Defining the Mint zones:
This design features a mint green ‘shoulder’ at the top and a matching mint rim at the bottom. Tape off a horizontal ring near the neck and another near the base. -
Paint the background:
Paint the top section (above the tape line near the neck) and the very bottom rim with your Mint Green paint. Apply two thin coats for opacity. -
Tape placement for stripes:
Now, add parallel strips of tape to define the widths of your colored bands. Vary the widths slightly—make the terracotta section wide and the white stripe slightly thinner for visual interest. -
Seal the tape edges:
To get those brutally crisp lines, brush a tiny amount of your base white paint over the edges of the tape. This seals the gap so color doesn’t bleed underneath.
Level Up: Metallic Pop
Add a thin stripe of metallic gold or copper paint between two of the colored blocks. It will catch the light and match the bottle’s metal cap perfectly.
Step 3: applying Color
-
The Dark Forest stripe:
Locate the section intended for the darkest green. Using a flat brush, carefully fill in this area. You may need 2-3 coats since dark greens can be translucent. -
The Terracotta band:
Paint the widest diagonal stripe with your terracotta or salmon color. Ensure your brush strokes follow the diagonal direction of the tape. -
The Sage Green stripe:
Apply the sage green to its designated section. This color acts as a nice bridge between the mint top and the darker elements. -
The White stripe:
Even though your base is white, paint the white stripe area with fresh white paint to ensure the texture and finish match the other colored sections. -
Let it tack up:
Allow the paint to dry until it feels tacky but not fully cured—usually about 15-20 minutes depending on your paint brand. -
The reveal:
This is the satisfying part. Carefully peel the tape away slowly at a 45-degree angle. Pulling while the paint is slightly soft helps prevent chipping at the edges.
Step 4: Finishing Touches
-
Touch-ups:
Inspect your lines. If any paint bled through, use a tiny detail brush with the background color (or a toothpick) to gently scrape or paint over the error. -
Full cure time:
Let the bottle sit undisturbed for at least 24 hours. Acrylic paint needs to off-gas and harden before sealing, or the sealer might turn cloudy. -
Protective coat:
Apply a clear acrylic sealer over the entire painted area. A spray sealer works best to avoid brush marks. Do 2-3 light coats rather than one heavy dripping one.
Once fully cured, your custom geometric bottle is ready to keep you hydrated in style
Mandala Wrap Detail
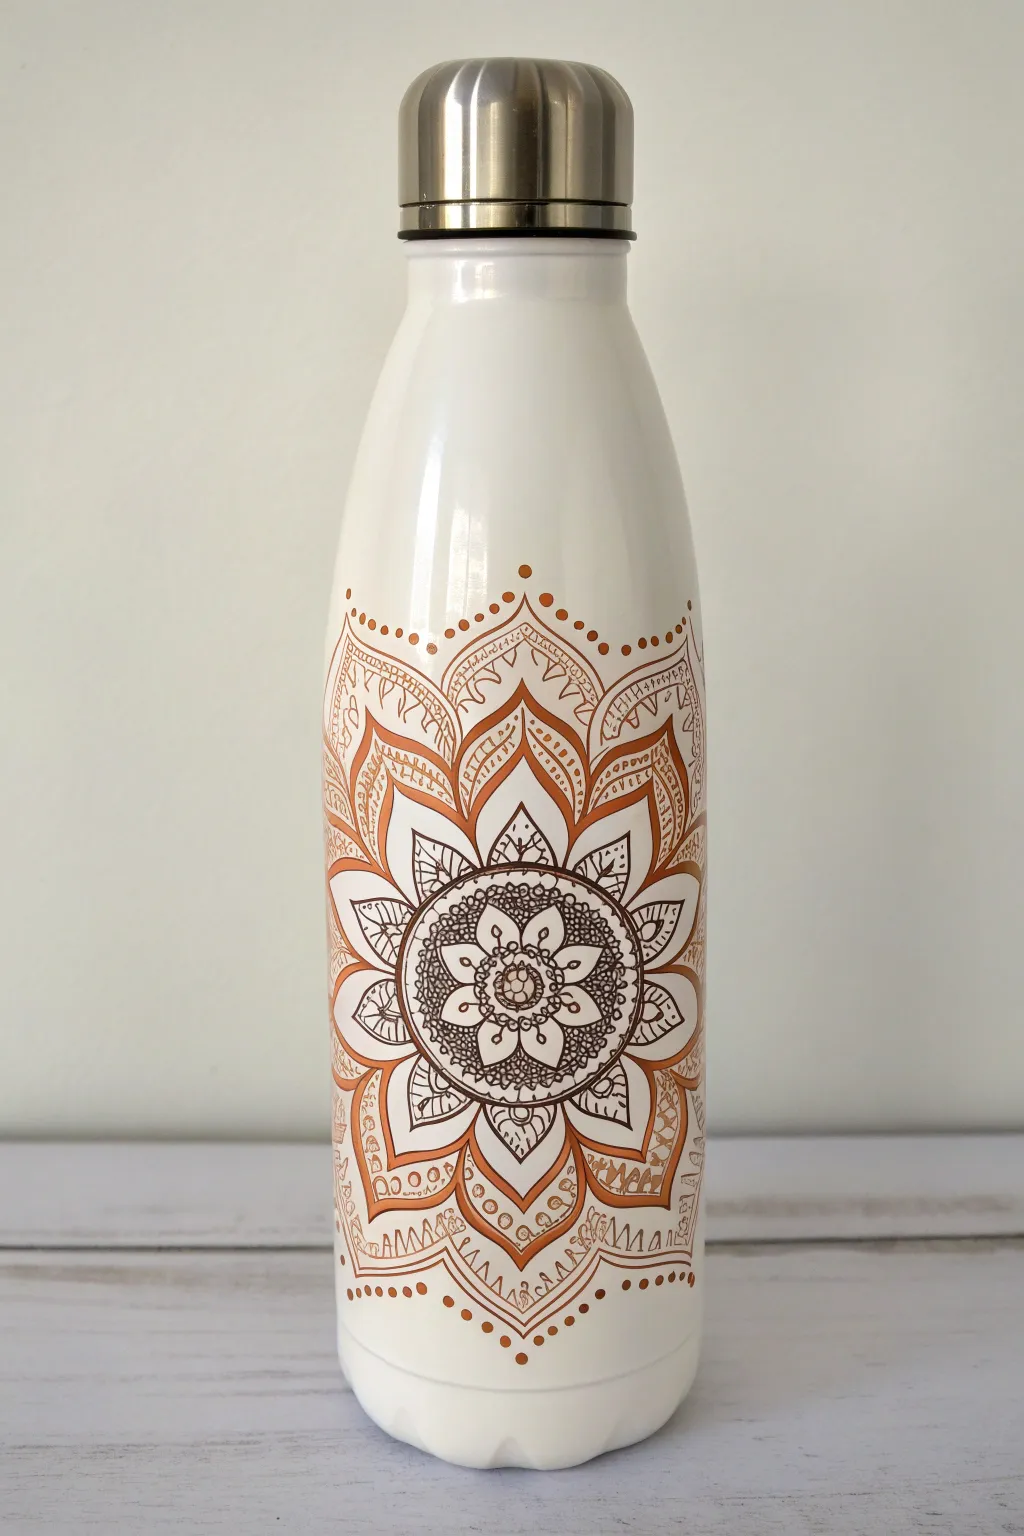
Transform a plain white water bottle into a bohemian masterpiece with this intricate, earth-toned mandala design. The wraparound pattern mimics the delicate beauty of henna art, creating a soothing and functional piece of customized drinkware.
Step-by-Step Guide
Materials
- White stainless steel water bottle (well-cleaned)
- Oil-based paint pens (Fine and Medium tips)
- Colors: Burnt Orange/Terra Cotta and Dark Brown/Espresso
- Rubbing alcohol
- Cotton pads
- Pencil (optional for sketching)
- Paper tape or masking tape (optional for guides)
- Q-tips (for cleanup)
- Clear spray sealant (optional)
Step 1: Preparation and Planning
-
Clean surface:
Begin by wiping the entire surface of the bottle with rubbing alcohol and a cotton pad. This removes any manufacturing oils or fingerprints that might prevent the paint from sticking properly. -
Establish the center:
Visualize where you want the main flower to sit. Since this is a wrap design, pick a central spot on one side to act as the primary focal point. -
Sketch the core (optional):
If you are nervous about freehanding, lightly sketch a small circle in pencil about an inch and a half up from the bottom curve of the bottle to mark your center.
Stealing Support
Rest your painting hand on a rolled-up towel or a thick book while working. This stabilizes your wrist and helps achieve steady, smooth lines on the curved surface.
Step 2: Creating the Central Flower
-
Draw the central eye:
Using the dark brown fine-point pen, draw a small central circle. Fill the very center with tiny dots or a grid pattern to give it texture. -
First petal layer:
Draw eight small, rounded petals around the center circle using the brown pen. Inside each petal, place a single small dot. -
Second petal ring:
Create a second, slightly larger layer of rounded petals behind the first set. Use the burnt orange pen for this layer to start introducing color contrast. -
Define the boundary:
Switch back to the dark brown pen and draw a distinct circle enclosing the entire flower you’ve created so far. This creates a bold border for the next intricate section. -
Add the detailed band:
Draw another circle about 1/4 inch outside the previous one. Fill this new band with tiny, tight circles (like a honeycomb) using the dark brown pen. This adds that dense, henna-like richness.
Step 3: Expanding the Design
-
Large pointed petals:
Using the burnt orange pen, draw large, sweeping pointed petals radiating outward from your dark band. These should be substantial in size, reaching up the bottle. -
Outline the petals:
Take the dark brown pen and carefully outline these large orange petals. I find that going over the lighter color with the darker outline makes the shape pop crisply. -
Internal details:
Inside each large pointed petal, draw a smaller, tear-drop shape in brown. Add a tiny leaf or vine motif within that space to fill the void without creating solid color. -
Connect the peaks:
Draw a scalloped line connecting the tips of the large petals. This creates a web-like effect that helps the design start to wrap around the curvature. -
Geometric filler:
In the V-shapes between the large petals, draw sets of small triangles or chevron lines. Alternating between orange and brown here keeps the eye moving.
Metallic Magic
Swap the burnt orange for a metallic copper or gold paint pen. The shimmer against the matte white bottle adds an incredibly luxurious, high-end finish.
Step 4: Outer Lace and Finishing
-
Upper arches:
Extend the design upward by drawing large, open arches above the main flower. Think of these as a crown resting on the mandala. -
Pattern fill:
Fill these upper arches with repeating patterns—small vertical lines, X-shapes, or tiny zig-zags. Variation is key to the aesthetic. -
The dot halo:
To finish the top edge of the design, use the orange pen to place a series of dots that decrease in size as they move away from the main drawing. This creates a fading, stardust effect. -
Bottom symmetry:
Repeat the arch and dot pattern at the bottom of the mandala so the design feels balanced and grounded near the base of the bottle. -
Cleanup:
Check for any smudges. If the paint is fresh, wipe it quickly with a Q-tip. If dried, you can gently scratch off mistakes with a toothpick. -
Sealing:
Once the paint is completely cured (wait at least 24 hours), apply a clear spray sealant if you plan to wash the bottle frequently, though hand-washing is always safest.
Enjoy using your custom hydration art piece during your next yoga session or hike
Minimal Line Art Botanical

Transform a plain water bottle into a boutique-style accessory with this simple yet sophisticated line art design. The cream matte background provides the perfect canvas for delicate black botanical illustrations, creating a look that is both modern and timeless.
Step-by-Step Tutorial
Materials
- Stainless steel water bottle (preferably cream or white)
- Fine-grit sandpaper (400-600 grit)
- Rubbing alcohol and cotton pads
- Oil-based paint marker (black, fine tip)
- Oil-based paint marker (black, extra-fine tip)
- Masking tape or painter’s tape
- Pencil and eraser (optional)
- Spray sealant (clear matte finish)
Step 1: Preparation
-
Clean surface:
Begin by thoroughly washing and drying your water bottle to remove any store oils or dust from the surface. -
Light scuffing:
If your bottle has a very glossy finish, gently scuff the area you plan to paint with fine-grit sandpaper. This gives the paint marker something to grip onto. -
Final wipe:
Wipe the bottle down one last time with rubbing alcohol to remove any oils from your hands or dust from sanding. -
Drafting guide:
If you are nervous about freehanding, use a pencil to very lightly sketch a vertical line to act as the central stem for your botanical branch.
Steady Hands
Rest your drawing hand on a heavy book or box while turning the bottle with your other hand. This stabilizes your wrist for smoother lines.
Step 2: Drawing the Stem
-
Central line:
Using the fine tip black marker, draw a long, slightly wavy vertical line from near the bottom of the bottle reaching upwards. Don’t make it perfectly straight; a slight organic curve looks more natural. -
Branch points:
Along this main stem, add small, short offshoot lines where you want your leaves to attach. Space them out generously, starting lower on the stem. -
Top branches:
Near the top of the stem, split the line into two or three thinner branches to create a crown for the plant.
Fixing Mistakes
Made a slip? While oil paint is wet, a Q-tip dipped in rubbing alcohol acts like a magic eraser. Just wipe, dry, and redraw.
Step 3: Adding Foliage
-
Leaf outlines:
Switch to your extra-fine tip marker for better control. Draw long, lance-shaped leaves extending from the lower branch points. Keep the tips pointed and the bases tapered. -
Leaf details:
Draw a central vein down the middle of each large leaf. -
Vein texture:
Add angled lines coming off the central vein to create ribbing texture on the leaves, keeping your hand light so the lines don’t bleed. -
Upper buds:
At the top of the stem where it branches out, draw small clusters of buds or tiny flowers. I like to use simple ovals or small circles for a minimalist effect. -
Connecting elements:
Ensure all leaves and bud clusters connect seamlessly back to the main stem.
Step 4: Finishing Touches
-
Cleanup:
Check for any pencil marks that might still be visible. Wait until the ink is completely dry—at least 30 minutes—before gently erasing them. -
Curing time:
Let the bottle sit undisturbed for at least 24 hours to allow the oil-based paint to fully cure and harden. -
Sealant application:
In a well-ventilated area, apply a light coat of clear matte spray sealant. Hold the can about 12 inches away and use sweeping motions to avoid drips. -
Second coat:
Once the first coat is dry to the touch, apply a second light coat of sealant for maximum durability. -
Final cure:
Allow the sealant to cure according to the manufacturer’s instructions before using or washing the bottle.
Now you have a custom piece of functional art that makes staying hydrated feel a little more beautiful every day
Ocean Waves and Seafoam

Capture the raw power of the sea with this dynamic water bottle design featuring crashing waves and frothy whitecaps. The blend of deep iridescent blues and crisp seafoam creates a stunning sense of movement right in the palm of your hand.
How-To Guide
Materials
- Stainless steel water bottle (clean and dry)
- Sandpaper (fine grit)
- Painter’s tape
- Acrylic paints: phthalocyanine blue, turquoise, teal, white, navy blue
- Paintbrushes: medium flat brush, small filbert brush, fine liner brush
- Old toothbrush or stiff bristle brush
- Crystal clear epoxy resin or dishwasher-safe sealant (like Mod Podge Dishwasher Safe)
- Sponge or sea sponge (optional)
- Palette for mixing
Step 1: Preparation and Base Coat
-
Prep the Surface:
Begin by lightly sanding the entire exterior surface of the bottle. This roughs up the metal slightly to help the paint adhere better. Wipe away any dust with a damp cloth. -
Masking Areas:
Apply painter’s tape around the very top rim where the cap screws on. You want to keep this area clean so the lid seals properly later. -
Base Color Application:
Mix a mid-tone teal with a touch of white. Use the medium flat brush to cover the main body of the bottle. Don’t worry about perfect smoothness; slight brushstrokes add to the water texture. -
The Granite Base:
Tape off a line about 1.5 inches from the bottom. Paint this bottom section solid navy blue. Let it dry completely. -
Texturing the Bottom:
Dip a toothbrush or stiff brush into white paint and flick it over the navy bottom section to create a speckled, granite-like stone effect. Remove the tape once dry.
Fixing Muddy Colors
If your blues are blending into a gray mess, stop and let the layer dry completely. Acrylics are opaque, so you can paint fresh, crisp colors right over the dry mistake.
Step 2: Painting the Ocean Swell
-
Mapping the Waves:
Using a light wash of turquoise, sketch out large, sweeping curves diagonally across the bottle. These will be the spines of your crashing waves. -
Deepening the Depths:
Take your darkest navy blue and paint the areas ‘below’ the wave crests. Blend this wet-on-wet into the base teal layer to create a gradient from deep ocean to surface water. -
Adding Highlights:
Mix pure turquoise with a little white. Paint the upper curves of the waves, using long, flowing strokes that follow the shape of the bottle. -
Blending the Gradient:
While the paint is still tacky, use a soft, damp brush to smooth the transition between the navy shadows and the turquoise highlights, creating a rounded, 3D water effect. -
Defining the Crests:
Use a smaller filbert brush and lighter teal to sharpen the top edge of the wave. Allow the paint to be slightly thicker here to simulate the volume of the water.
Add Some Shimmer
Mix a tiny amount of iridescent mixing medium or pearl white paint into your turquoise layers. It makes the water look like it’s catching actual sunlight.
Step 3: Detailing the Seafoam
-
Creating the Spray:
Dip a sponge or scrunched-up paper towel into titanium white paint. Dab it lightly along the crests of your waves to create the initial frothy texture. -
Painting Fine Foam:
Switch to your fine liner brush. Paint delicate, veiny lines trailing down from the white foam into the dark blue water, mimicking the way foam dissipates after a crash. -
Adding Splatters:
Load your toothbrush with watered-down white paint again. Carefully target the ‘crash’ zones of your waves and flick fine mist to represent sea spray. -
Refining Highlights:
Add tiny dots and pure white lines on the highest points of the water for extra sparkle and wetness. -
Final Sealing:
Once the artwork is completely dry (give it at least 24 hours), apply a coat of resin or dishwasher-safe sealant. This protects your waves from chipping during daily use.
Now you have a refreshing piece of art to keep you hydrated on your next adventure
Mountain Skyline Silhouette
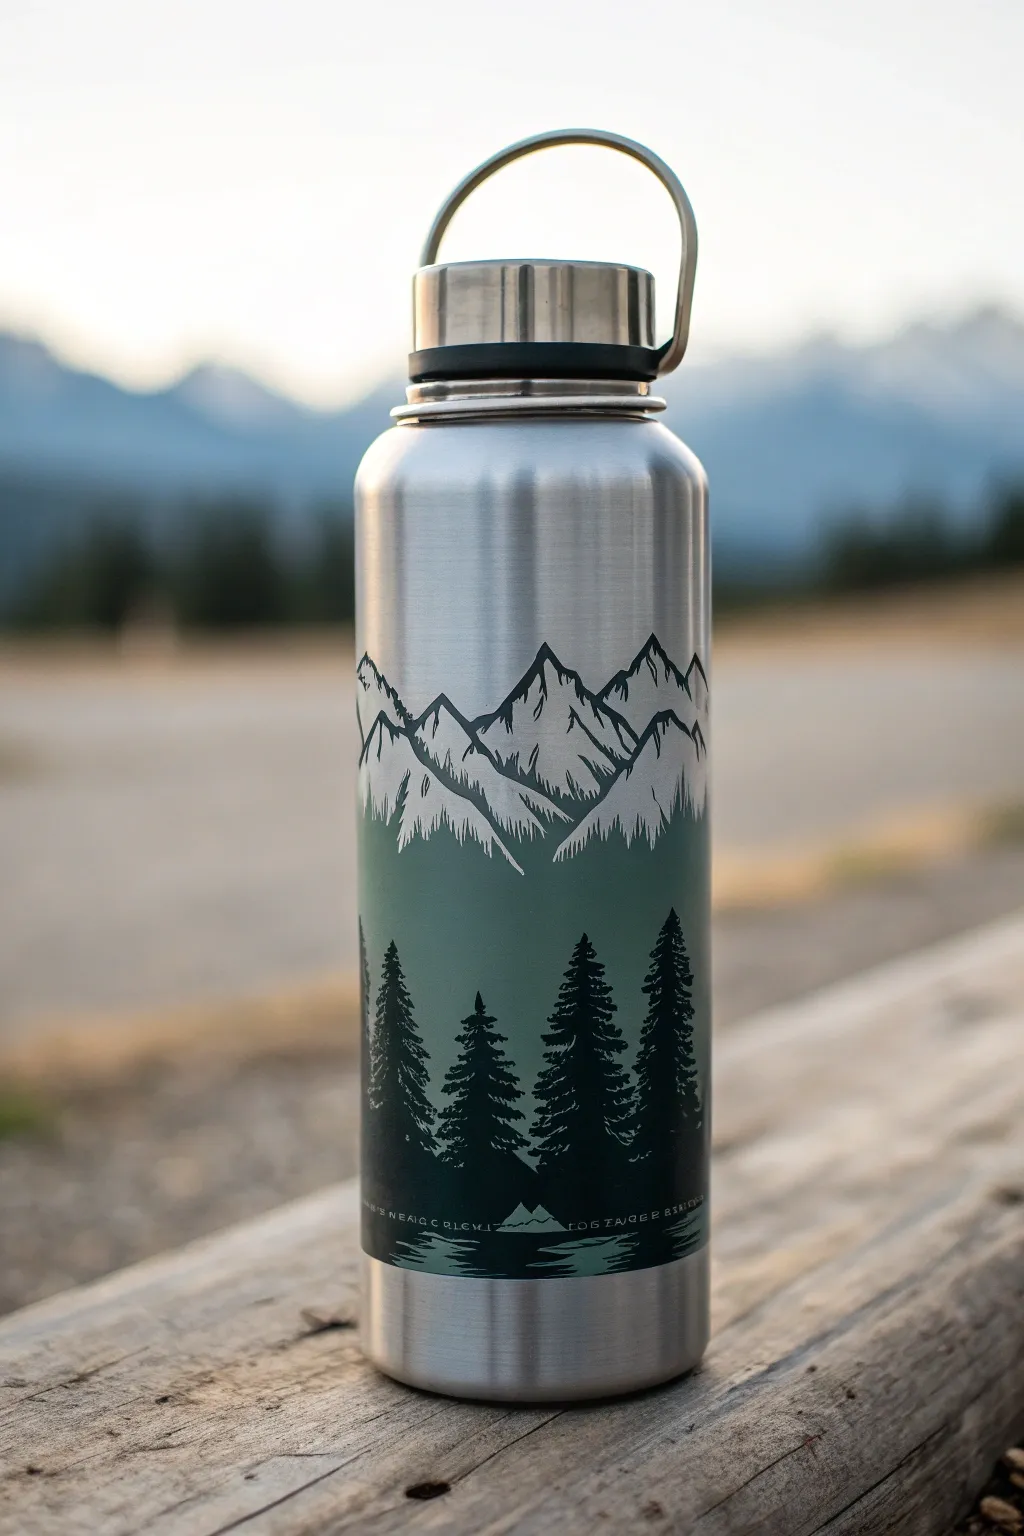
Transform a plain stainless steel bottle into a rugged piece of art with this striking mountain and forest design. Using a clever negative space technique, you’ll layer silhouettes of peaks and pines over a stunning gradient background.
Step-by-Step
Materials
- Stainless steel water bottle (clean and dry)
- Rubbing alcohol and cotton pads
- Painter’s tape or masking tape
- Acrylic craft paints (Dark forest green, lighter sage green, white, black, grey)
- Posca paint pens (Fine tip: Black, White)
- Small flat brush
- Detail liner brush
- Makeup styling sponge or foam pouncer
- Spray sealant (gloss or matte finish)
- Pencil and eraser
Step 1: Prep and Prime
-
Clean the surface:
Before thinking about paint, wipe the entire exterior of your bottle with rubbing alcohol. This removes oils and residue that could cause the paint to peel later. -
Define the canvas:
Decide how high you want your design to go. Taping off the top rim and bottom base is optional, but it creates a clean, professional border if you want a defined edge to your artwork. -
Sketch the horizon:
Using a pencil, lightly sketch a jagged line around the middle of the bottle. This will serve as the transition point between the upper snowy mountains and the lower forest area.
Step 2: Painting the Base Gradient
-
Mix your forest greens:
On your palette, prepare a deep forest green and a slightly lighter sage green. You want the bottom to be darkest. -
Apply the dark base:
Use a sponge or flat brush to paint the bottom third of the design area with your darkest green. Don’t worry about texture; a slightly uneven look adds to the natural feel. -
Blend upward:
While the dark green is still slightly wet, blend the lighter sage green into the middle section, fading it out as you reach your pencil line. Let this base layer dry completely. -
Add the metallic sky:
For the upper mountain section, we actually want the stainless steel to show through as the ‘sky’ or snow in some areas, but you can paint a light grey undercoat if your bottle isn’t silver.
Paint Slipping?
Painting on metal can be slick. If your first layer streaks, don’t overwork it. Let it dry fully, then lightly sand it with fine-grit sandpaper before adding a second coat for better grip.
Step 3: Creating the Peaks
-
Outline the mountains:
Using a fine white Posca pen or detail brush with white paint, draw the sharp, jagged outline of the mountain peaks above your green section. -
Fill the snow caps:
Fill in the peaks with white paint, but leave some streaks of the underlying silver or grey showing through to create dimension and shadow. -
Add mountain texture:
Mix a tiny bit of black into your white to make a pale grey. Use a dry brush technique to whisk small lines down one side of each peak, suggesting shadows on the rock face. -
Clean up the edges:
Use a detail brush to sharpen the tips of your mountains. The sharper the peak, the more realistic it looks.
Pro Tip: Sharp Peaks
For the crispest mountain lines, use liquid masking fluid or bits of cut tape to block out the sky area before painting the snow caps. Peel it away for razor-sharp summits.
Step 4: Adding the Forest Detail
-
Block in the trees:
Switch to your darkest green or black paint. Starting at the bottom of the bottle, paint vertical lines of varying heights to represent tree trunks. -
Foliage technique:
I like to use a tiny fan brush or the very tip of a round brush for this. Stipple creates the best pine needle texture. Start at the top of a trunk and dab downward in a triangular shape, getting wider as you go down. -
Layer the forest:
Paint the tallest foreground trees in pure black or the deepest green imaginable. Ensure their tops overlap the lighter green background area for contrast. -
Add depth:
Once the dark trees are dry, mix a slightly lighter green and add smaller, faint tree shapes in the gaps between the dark ones to create the illusion of distance.
Step 5: Final Details and Seal
-
Refine the transition:
Check the area where the white mountains meet the green forest. If it looks messy, add a few more tiny trees or a horizontal line of ‘mist’ using watered-down white paint to blend them. -
Let it cure:
Allow the bottle to sit undisturbed for at least 24 hours. Acrylic paint feels dry quickly, but it needs time to harden on metal. -
Apply sealant:
Take the bottle outside and spray it with a clear acrylic sealant. Do 2-3 light coats rather than one heavy one to prevent drips. -
Remove tape:
If you used tape at the rim or base, carefully peel it away now to reveal your crisp, straight edges.
Once sealed and cured, your custom bottle is ready for your next hiking adventure
Night Sky Galaxy Splash
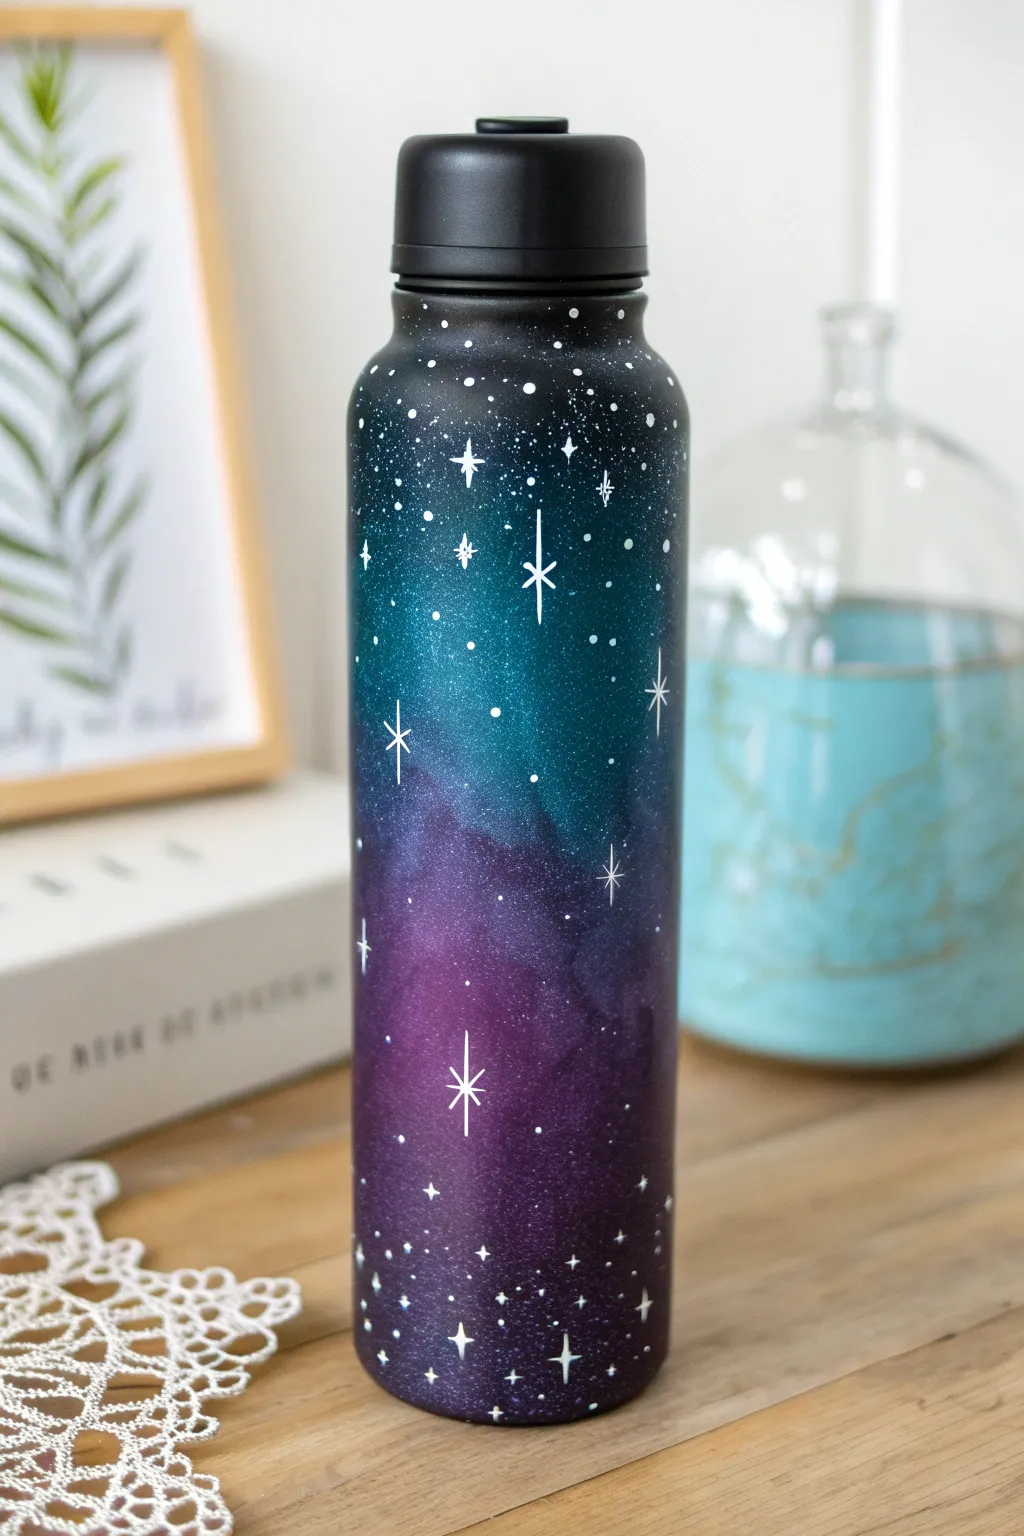
Transform a plain black water bottle into a window to the cosmos with this stunning galaxy splash design. Using a sponge blending technique, you’ll create a seamless drift from deep teal to cosmic purple, illuminated by hand-painted starlight.
Detailed Instructions
Materials
- Black metal water bottle (matte finish preferred)
- Acrylic paints: Titanium White, Teal/Turquoise, Deep Violet, Black
- Makeup sponge wedges or small sponge daubers
- Fine detail brush (size 0 or 00)
- Old toothbrush (optional for splatter)
- Painter’s tape
- Sealant (spray varnish or dishwasher-safe Mod Podge)
- Palette or paper plate
- Water cup and paper towels
Step 1: Preparing the Base
-
Clean surface:
Thoroughly wash and dry your water bottle. Wipe the surface down with rubbing alcohol to remove any oils or fingerprints, which helps the paint adhere better. -
Protect the rim:
Apply a strip of painter’s tape around the very top rim where the lid screws on. You want to keep this area paint-free to ensure a tight seal later. -
Base coat check:
If your bottle isn’t already black, apply two coats of matte black acrylic paint using a sponge to minimize brush strokes. Let it dry completely between coats.
Galaxy Glow Pro-Tip
Mix a tiny drop of white into your teal or purple for the very center of the colored patches. This highlights the ‘core’ of the nebula and makes it look like it’s glowing from within.
Step 2: Creating the Nebula
-
Load the sponge:
Dampen a makeup sponge wedge slightly and squeeze out excess water. Dip the wide end into your teal paint, dabbing it off on your palette first so it isn’t glooped on. -
Apply teal gradient:
Start dabbing the teal paint onto the upper-middle section of the bottle. Concentrate the color in the center of the patch and dab lighter as you move outward to create a faded edge. -
Introduce purple:
Using a fresh sponge or the other side of the wedge, pick up the deep violet paint. Dab this below the teal section, allowing the two colors to slightly overlap in the middle. -
Blend the transition:
While the paint is still tacky, gently dab over the meeting point of the teal and purple to create a seamless transition. You don’t want a hard line, just a soft blur. -
Fade to black:
Take a clean part of the sponge with a tiny amount of black paint. Lightly tap around the outer edges of your colored nebula to soften the transition back into the black bottle background. -
Second layer:
Once the first layer is dry to the touch, repeat the sponging process. I find this second pass makes the colors pop against the dark background.
Oops! Blobs happen
If you accidentally make a star too big or a splash too messy, don’t wipe it! Let it dry completely, then dab a little black paint over it with a sponge to erase it.
Step 3: Adding Starlight
-
Mix star paint:
Mix a small amount of white paint with a drop of water. You want an inky consistency—flowy enough to leave a crisp dot but opaque enough to show up bright white. -
Paint major stars:
Using your finest detail brush, paint several four-pointed stars. Start with a thin vertical line, then cross it with a horizontal line. Make the center point slightly thicker. -
Add variance:
Vary the size of your larger stars. Place one prominent star in the teal section and another in the purple to balance the composition. -
Dot the constellations:
Dip the very tip of your brush handle or a toothpick into the white paint. Gently touch it to the bottle to create perfect round dots of varying sizes. -
Cluster the stars:
Cluster more tiny dots within the colored nebula sections to look like distant star clusters, and space them out more as you move into the black areas. -
Optional splatter:
For a dense milky way look, dip an old toothbrush in watered-down white paint. Run your thumb over the bristles to flick a fine mist of specks over the nebula. Practice on paper first.
Step 4: Finishing Touches
-
Remove tape:
Carefully peel off the painter’s tape from the rim while the paint is dry but before sealing. -
Cure time:
Let the bottle sit undisturbed for at least 24 hours. The acrylic needs to fully cure before you apply a top coat. -
Seal the deal:
Apply two coats of a clear, water-resistant sealant. A spray varnish works best for an even finish without smearing your delicate stars.
Now your water bottle is ready to accompany you on any adventure, showing off the beauty of deep space right in your hand
Fruit Pattern Pop Art
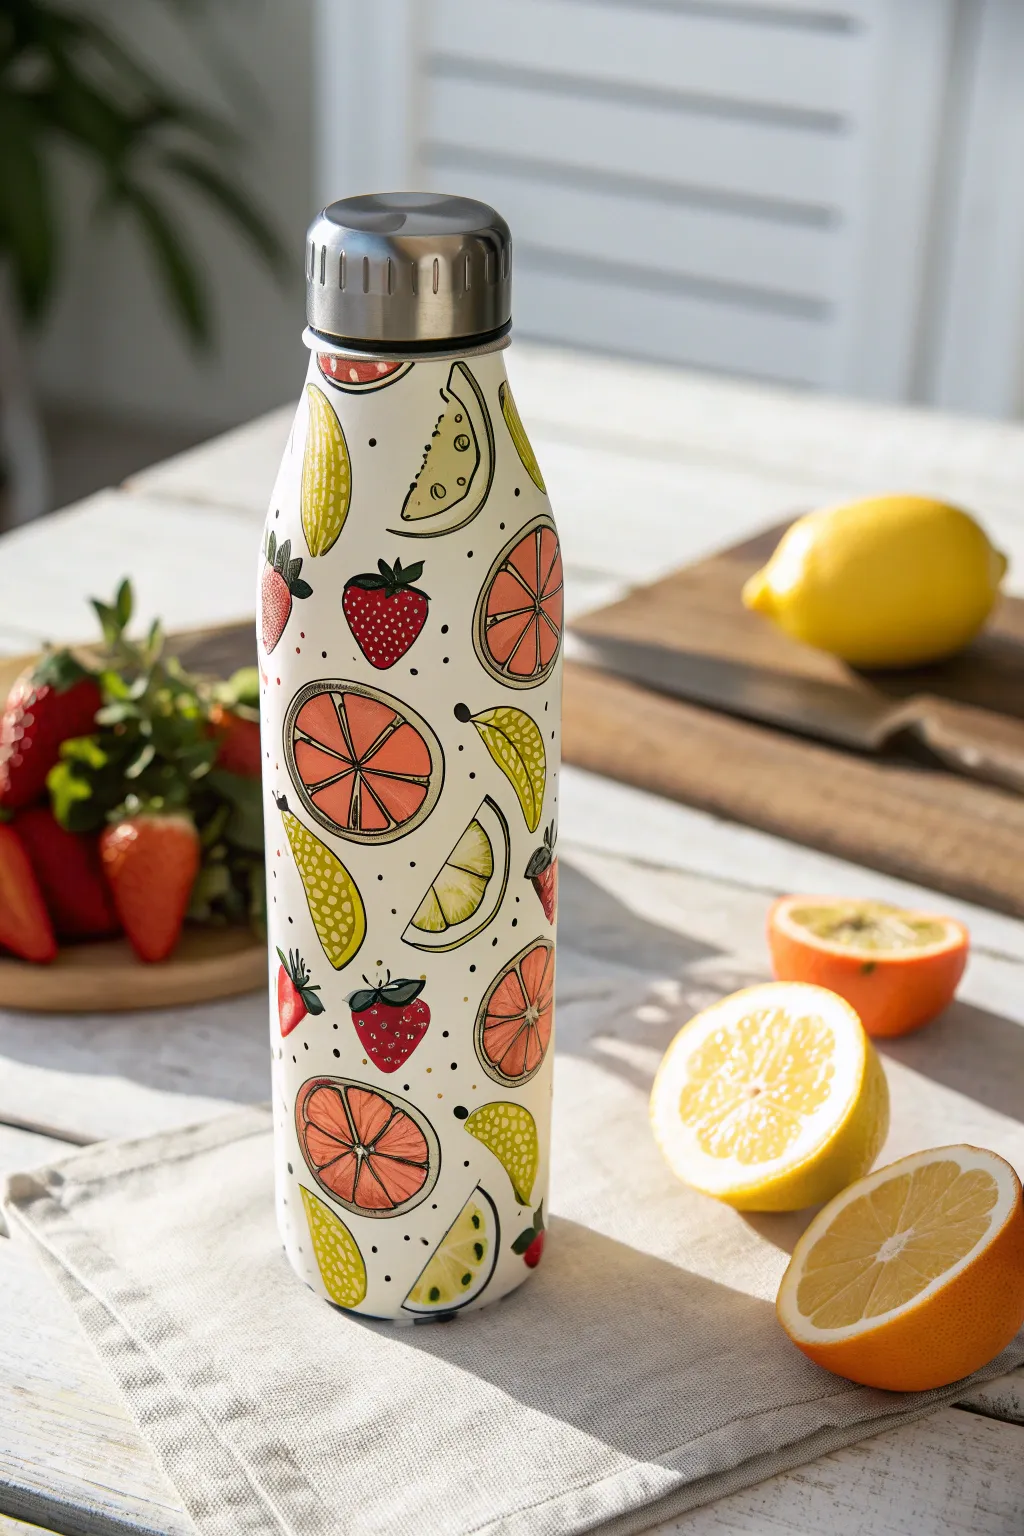
Transform a plain metal water bottle into a refreshing summer accessory with this vibrant fruit pattern. Featuring slices of citrus and sweet strawberries in an illustrative pop-art style, this design uses bold outlines and simple shapes for a clean, professional finish.
Step-by-Step Tutorial
Materials
- White stainless steel water bottle (matte finish preferred)
- Acrylic paints (Red, Orange, Yellow, Light Green, White, Black)
- Fine grit sandpaper
- Rubbing alcohol and cotton pads
- High-quality fine liner brushes (sizes 0 and 00)
- Small flat brush (size 4)
- Black acrylic paint marker (ultra-fine tip)
- Spray varnish (gloss or satin finish)
- Pencil for sketching
- Palette for mixing
Step 1: Preparation & Base
-
Prepare the surface:
Before painting, lightly scuff the entire surface of your bottle with fine-grit sandpaper. This creates a ‘tooth’ for the paint to grab onto. -
Clean thoroughly:
Wipe the bottle down with rubbing alcohol to remove any oils, dust, or sanding residue. Let it dry completely. -
Establish the background:
If your bottle isn’t already white, apply two thin coats of white acrylic paint using a flat brush or sponge applicator to minimize brushstrokes. Allow full drying between coats.
Step 2: Planning & Base Colors
-
Sketch the layout:
Using a pencil, lightly sketch your main fruit shapes scattered randomly around the bottle. Aim for a mix of whole strawberries, half-circle fruit slices, and triangular wedges. -
Paint the grapefruit slices:
Mix a soft coral-orange color. Fill in the semi-circles for the grapefruit slices, leaving a small white border around the edge for the rind. -
Add lemon elements:
Use a bright yellow to paint the lemon wedges. These shape are slightly curved triangles or crescent moon shapes. -
Paint the lime accents:
Mix yellow with a tiny dot of light green for a zesty lemon-lime shade. Paint additional wedges or use this for the interior segments of the yellow lemons. -
Block in strawberries:
Paint the classic strawberry heart shapes using a deep red. Don’t worry about the seeds or leaves yet; just get a solid, opaque base color down.
Clean Lines Hack
For steadier lines when drawing the segments on rounded bottles, rest your wrist on a dense energetic foam block or a stack of books to keep your hand level.
Step 3: Detailed Line Work
-
Outline the fruits:
Once the base colors are bone dry, use your black acrylic paint marker or a size 00 brush with thinned black paint to outline every fruit shape. -
Detail the citrus segments:
Inside the orange and yellow semi-circles, draw thin lines radiating from the center to create the fruit segments. I usually draw a small semi-circle in the center first as a guide. -
Add strawberry leaves:
Paint jagged little green tops on the red strawberries. Once dry, outline these leaves with your black liner. -
Create strawberry seeds:
Using a very fine point, add tiny V-shapes or dots in white or pale yellow over the red strawberry bodies to mimic seeds. -
Texture the lemons:
Add small stippling dots or tiny circles inside the lemon and lime wedges to give them a juicy texture.
Runny Paint?
If your paint feels too thin on the metal surface, don’t keep brushing it wet. Let the patchy layer dry fully, then apply a second coat for opacity.
Step 4: Final Touches & Sealing
-
Add filler dots:
Step back and look at the negative space. Use the tip of a brush handle dipped in black paint to place small, random dots in the empty white areas between fruits to balance the composition. -
Clean up errors:
If any lines went astray, use a small brush with white paint to touch up the background and sharpen the edges of your fruit. -
Wait for cure time:
Allow the paint to cure for at least 24 hours. This ensures all layers are hardened before sealing. -
Apply varnish:
Spray the bottle with two light coats of clear sealer. Hold the can about 10 inches away and rotate the bottle while spraying to avoid drips.
Your personalized hydration companion is now ready to keep you cool and stylish
Cute Face Upcycle Characters
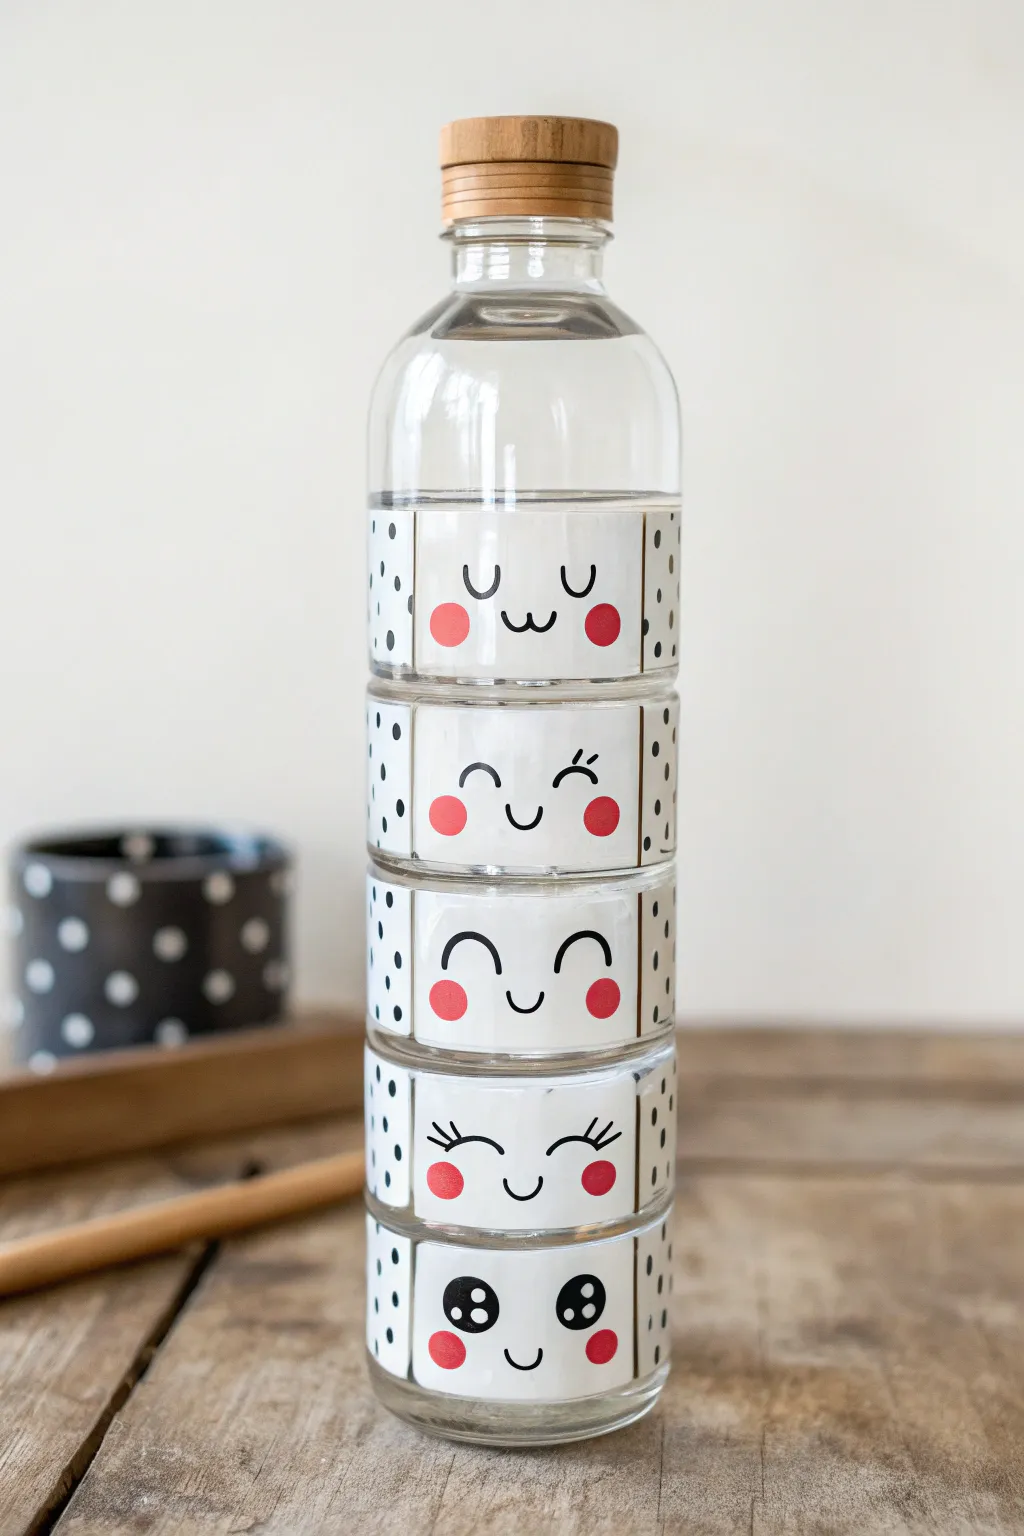
Transform a plain glass water bottle into an adorable totem of expressions with this stacked character design. Featuring five distinct kawaii faces separated by playful polka-dot bands, this project uses simple shapes to create maximum cuteness.
Step-by-Step Guide
Materials
- Clear glass water bottle (smooth sides preferred)
- White sticker paper or white vinyl sheets
- Measuring tape
- Pencil
- Scissors or craft knife
- Black permanent marker or paint pen (fine tip)
- Red paint pen or round stickers (for cheeks)
- Clear sealant spray (optional)
- Ruler
Step 1: Planning and Surface Prep
-
Clean the glass:
Begin by washing your glass bottle thoroughly with warm soapy water to remove any grease or fingerprints. Dry it completely with a lint-free cloth. -
Measure the bottle height:
Use your measuring tape to determine the usable vertical space on your bottle. You will need to fit five distinct sections, so divide your total height by five to find the height for each face band. -
Cut the base strips:
Cut five long strips of white sticker paper or vinyl. The height of each strip should match your calculation from the previous step, and the length should wrap fully around the bottle with a slight overlap. -
Mark the face area:
Lay your strips flat. Lightly mark a central rectangular area in the middle of each strip with a pencil. This designated ‘face zone’ will remain white, while the sides will get a pattern.
Step 2: Drawing the Expressions
-
Draft the faces:
On the central white zone of your strips, lightly sketch five different kawaii expressions with a pencil. Try a winking face, a happy closed-eye face, and a wide-eyed innocent look to add variety. -
Ink the eyes:
Using your black permanent marker or paint pen, carefully trace over your pencil lines for the eyes. For the bottom face, draw large circles with small white highlights left uncolored for that classic anime look. -
Add the mouths:
Draw small, simple ‘u’ shapes or tiny ‘w’ shapes for the mouths. Keep them centered between the eyes and positioned slightly lower to maintain the cute proportion. -
Create the cheeks:
Use a red paint pen to draw round rosy cheeks on either side of the smile. Alternatively, perfectly round red stickers work great here for instant uniformity. -
Add delicate details:
For the winking or sleeping faces, I like to add tiny eyelashes flicking outwards from the closed lids using the very tip of the marker.
Wrinkle Rescue
If the sticker paper wrinkles while wrapping the bottle, lift the edge gently and snip a tiny slit in the hidden back section to help it lay flat against the curve.
Step 3: Patterning and Assembly
-
Create the side borders:
To frame the faces, draw a vertical golden or brown thin line on the left and right edge of the ‘face zone’ you marked earlier. -
Add the polka dots:
On the remaining length of the white strips (the parts that will wrap around the back), draw a random pattern of small black dots. This creates a textural contrast with the clean white faces. -
Apply the bottom strip:
Peel the backing off the strip with the wide-eyed face first. Align it carefully at the very bottom of the bottle’s cylindrical section and wrap it around, smoothing out air bubbles as you go. -
Stack the remaining strips:
Apply the next four strips moving upward, ensuring the bottom edge of each new strip sits perfectly flush against the top edge of the one below it. This creates the illusion of stacked blocks. -
Seal the design:
If you plan to wash the bottle frequently, lightly mist the outside with a clear waterproof sealant spray to protect your artwork from peeling or running.
Pro Tip: Translucency
For a cooler effect when the bottle is full, use clear vinyl instead of white for the side panels, so the water shows through behind the black polka dots.
Now you have a hydration companion with a whole range of emotions to brighten your desk
Faux Stained Glass Florals
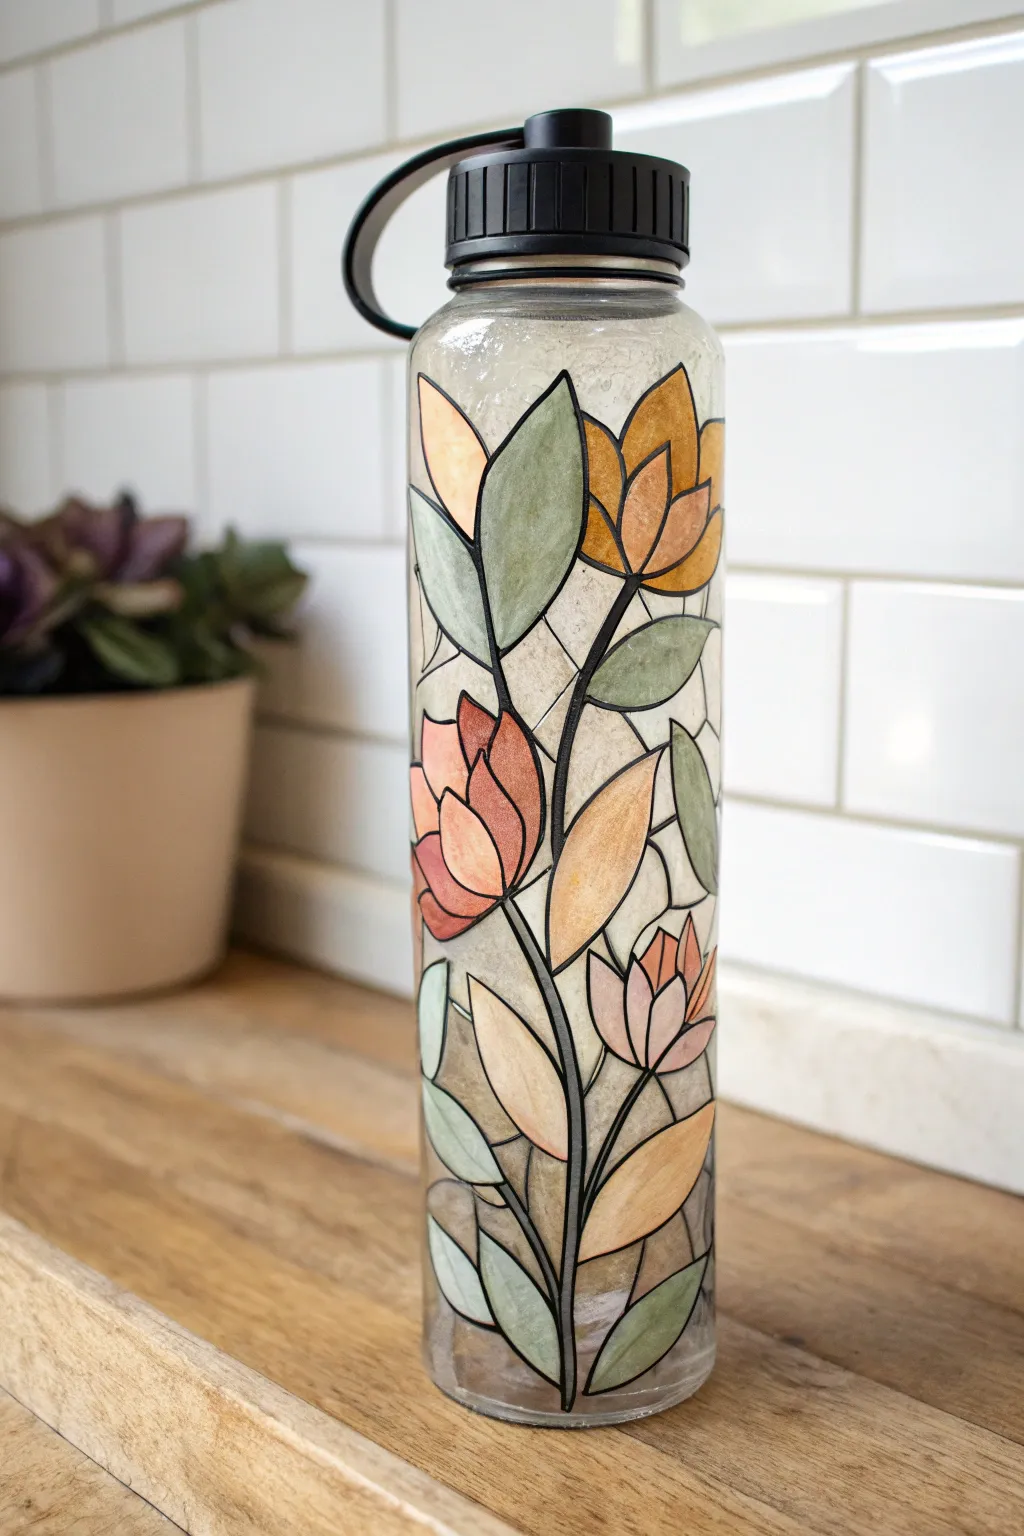
Transform a plain water bottle into a functional piece of art that mimics the elegance of traditional stained glass. With bold lead lines and washes of translucent color, this project captures light beautifully and turns hydration into a stylish statement.
Step-by-Step
Materials
- Clear glass or hard plastic water bottle
- Rubbing alcohol and cotton pads
- Liquid leading (black) or black 3D puffy paint
- Gallery Glass paint or translucent glass paints (amber, olive green, sage, rose pink)
- Small round paintbrush
- Toothpicks
- Printed floral pattern (optional, for tracing)
- Painter’s tape (optional)
Step 1: Preparation & Outlining
-
Clean surface:
Begin by thoroughly cleaning the exterior of your bottle with rubbing alcohol and a cotton pad. This removes oils and fingerprints, ensuring the paint adheres perfectly to the slick surface. -
Plan the design:
You can either freehand your floral design or sketch it lightly with a dry-erase marker first. If you have a clear bottle, a great trick is to roll up a printed pattern and insert it inside the bottle to trace directly. -
Begin the main stem:
Using the liquid leading or black 3D puffy paint, start at the bottom of the bottle. Draw a long, slightly curving main stem stretching upward. Keep steady pressure on the bottle to ensure a consistent line width. -
Add leaf outlines:
Branching off the main stem, draw large, pointed oval shapes for the leaves. Create a mix of sizes, placing larger ones near the base and smaller ones toward the top for balance. -
Create flower shapes:
Draw the outlines of your tulip-like flowers. Start with a central petal shape and add curved side petals hugging it. Distribute these flowers at different heights along the stem. -
Segment the background:
To achieve a true stained-glass mosaic look, draw random intersecting lines in the background space between the flowers and leaves. Creating these ‘shards’ of background space is crucial for the final effect. -
Check line connections:
Inspect your work closely. Every single line needs to connect to another line to create closed shapes. Gaps will cause the colored paint to bleed later. -
Let the lead cure:
Allow the black outlines to dry completely. This usually takes at least 6 to 8 hours, but I prefer leaving it overnight to ensure the lines are hard and won’t smudge when filled.
Clean Lines
Keep a Q-tip dipped in alcohol nearby while doing the black outlines. If you make a mistake, you can quickly wipe the wet line away and redraw it without ruining the base.
Step 2: Adding Color & Texture
-
Prepare paint consistency:
If you aren’t using designated glass stain, mix a small amount of acrylic paint with clear gloss medium or school glue to make it translucent. You want the light to pass through the color. -
Paint the leaves:
Using a small round brush, flood the leaf sections with olive and sage green paints. Instead of brushing back and forth, drip the paint into the center and nudge it to the edges for a smooth, pooled look. -
Fill the petals:
Fill the flower sections with your amber and rose pink shades. For a dimensional look, you can add a tiny drop of a darker shade at the base of the petal and swirl it slightly with a toothpick. -
Pop air bubbles:
Keep a toothpick handy as you work. If you see tiny bubbles forming in the wet paint, pop them immediately before the paint starts to skin over. -
Frost the background:
For the background ‘shards’ created by your intersecting lines, use a clear textured medium or a very diluted wash of white or light grey. Apply this with a tapping motion to create a frosted, textured appearance. -
Dry horizontally:
Because the paint is applied thickly to simulate glass, gravity can cause it to run. Lay the bottle on its side, propped up so it doesn’t roll, to let a section dry before rotating to paint the next side. -
Assess opacity:
Once the first layer is dry, hold the bottle up to a light source. If any colors look too streaky or pale, carefully dab on a second coat to deepen the saturation. -
Seal the work:
Although glass paints are durable, applying a coat of clear, waterproof spray sealant (gloss finish) over the entire bottle will protect your artwork from scratches and hand-washing.
Level Up: Gradient Glass
Mix two colors directly inside a petal shape (like yellow fading to orange) using a toothpick. Swirl them gently while wet for a stunning, realistic art-glass gradient effect.
Enjoy using your beautiful new bottle as a daily reminder to stay hydrated and creative
Negative Space Drip Illusion
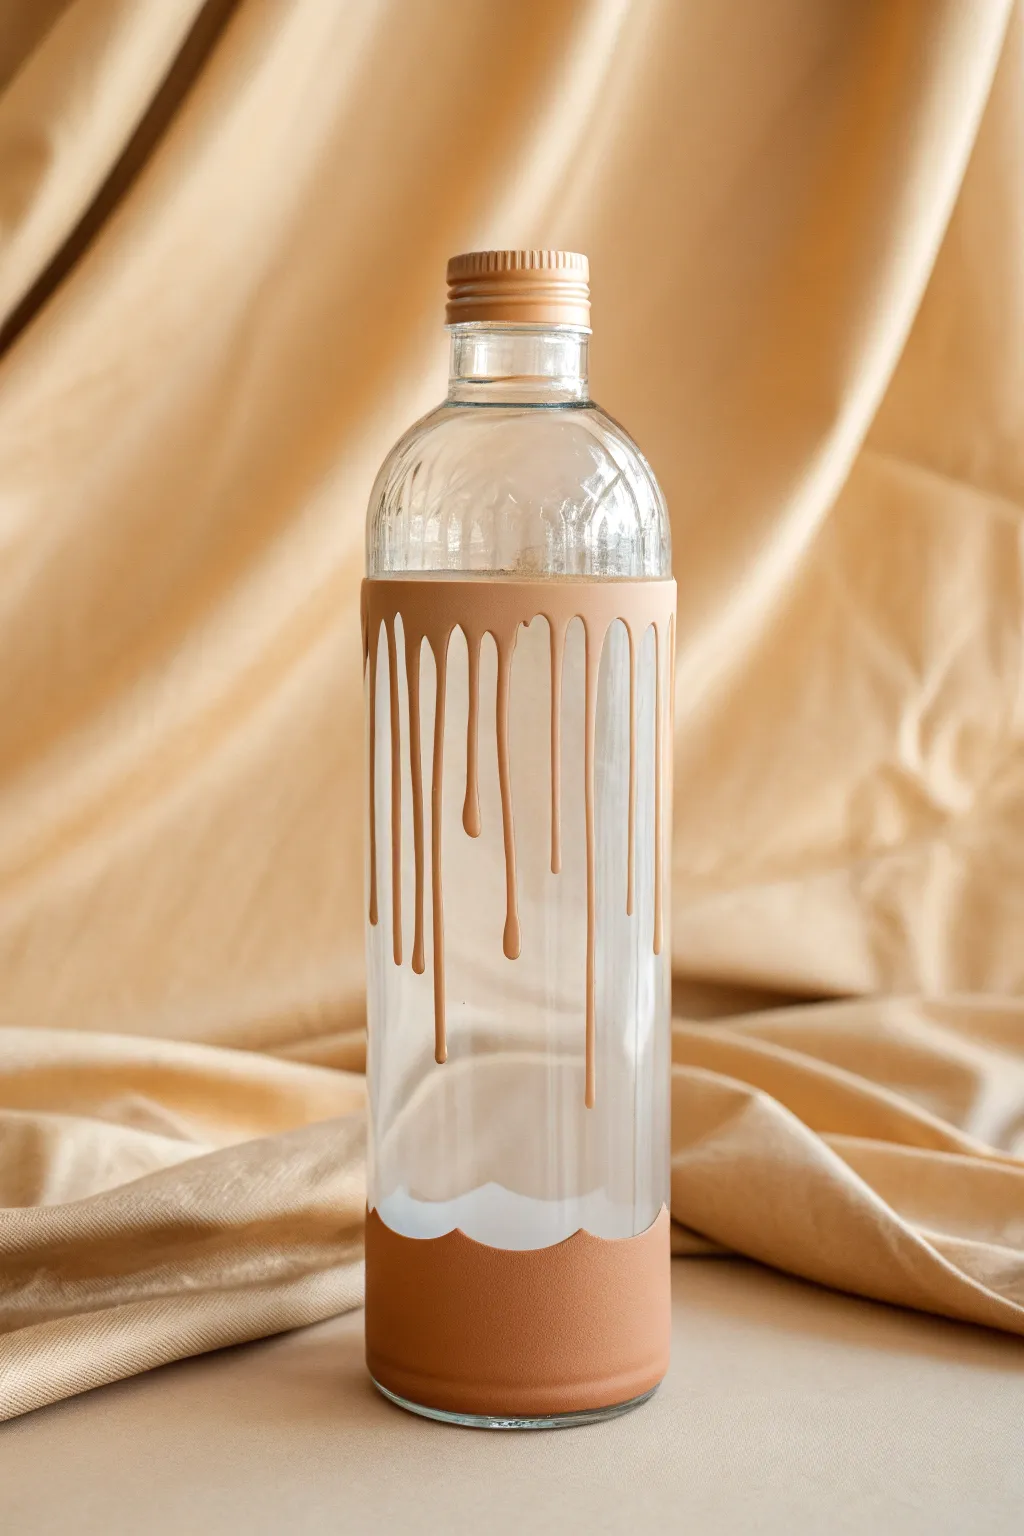
Transform a plain glass water bottle into an elegant statement piece with this clever illusion. By using negative space, you create the appearance of the bottle being dipped in luxurious caramel or melted chocolate, all while leaving a window to see your water level.
Step-by-Step Guide
Materials
- Clear glass water bottle with screw cap
- Multi-surface acrylic paint (beige/tan/caramel shade)
- Rubbing alcohol and cotton pads
- Painter’s tape or masking tape
- Fine detail paintbrush
- Medium flat paintbrush
- Palette or small dish
- Pencil or dry-erase marker (optional)
- Clear spray sealant (optional but recommended)
Step 1: Preparation
-
Clean the Surface:
Begin by thoroughly cleaning the exterior of your glass bottle. Wipe it down with rubbing alcohol and a cotton pad to remove any oils or fingerprints, which ensures the paint adheres properly. -
Remove and Prep the Cap:
Unscrew the cap and set it aside. If the cap has a glossy finish, lightly sand it with fine-grit sandpaper to give it some ‘tooth’ for the paint to grip. -
Plan Your Spacing:
Visualize where you want your drips to fall. The key is to leave a significant clear section in the middle of the bottle.
Natural Flow Tip
Don’t space drips perfectly evenly. Group two close together, then leave a gap. Nature is random, so perfect spacing looks artificial.
Step 2: Painting the Base
-
Tape the Bottom:
Apply a strip of painter’s tape around the bottom of the bottle to create a straight edge for the base section. -
Mark the Wave:
About 2-3 inches up from the bottom, use a dry-erase marker (or faint pencil line) to sketch a gentle, uneven wavy line. This will be the top of your bottom paint section. -
Fill the Bottom Section:
Using your medium flat brush, paint the area between the tape and your wavy line with the caramel colred paint. Create a solid, opaque block of color. -
Refine the Wave:
Use the detail brush to carefully smooth out the top edge of your wave pattern, ensuring the curves look organic and intentional. -
Dry and Repeat:
Let the first coat dry completely. Depending on your paint’s opacity, you might need 2-3 coats to get a solid, rich color without streaks.
Step 3: Creating the Drips
-
Establish the Shoulder Line:
Moving to the top of the bottle (just below the neck), paint a solid horizon line around the circumference where the shoulder of the bottle begins to curve. -
Sketch the Drips:
I find it helpful to lightly sketch the vertical drip paths with a dry-erase marker first. Vary the lengths—some short, some very long—to make it look natural. -
Start the Flow:
Load your detail brush generously with paint. Start from your shoulder line and pull the paint downward along your sketched paths. -
Create the Bead:
To make the drip look realistic, add a small rounded ‘bead’ of paint at the very bottom tip of each drip line. This mimics how liquid naturally pools due to gravity. -
Thicken the Connections:
Go back to where the drip meets the shoulder line and slightly widen the connection point. Looking at real spilled liquids helps visualize how it tapers. -
Layering the Drips:
Because drips are thin, they often show brushstrokes. Apply multiple thin layers, letting each dry fully, rather than one thick gloppy layer.
Fixing Shaky Lines
If a drip edge looks jagged, wait for it to dry completely. Use a toothpick to gently scrape away excess paint and smooth the line.
Step 4: Finishing Touches
-
Paint the cap:
While the bottle dries, paint the cap in the matching color. Paint the top and sides carefully, avoiding the threads underneath so it still closes properly. -
Clean Up:
Once the paint is fully dry to the touch, gently wipe away any visible dry-erase marker lines with a damp Q-tip. -
Remove Tape:
Peel off the tape from the bottom of the bottle slowly at a 45-degree angle to reveal a crisp straight edge. -
Seal (Optional):
To make your bottle hand-wash safe, apply a clear sealant over the painted areas. A matte spray works best to maintain the smooth, clay-like finish. -
Final Cure:
Let the bottle cure for at least 24 hours (or according to your paint/sealer instructions) before using it.
Now you have a stunning, modern piece of functional art that makes hydration look incredibly stylish


Have a question or want to share your own experience? I'd love to hear from you in the comments below!