Belly painting is one of my favorite ways to turn that growing bump into a sweet little celebration, and boy-themed designs give you so many fun directions to play in. Here are my go-to belly painting ideas for a baby boy, starting with the classic crowd-pleasers and drifting into more unexpected studio-style concepts.
It’s a Boy Banner
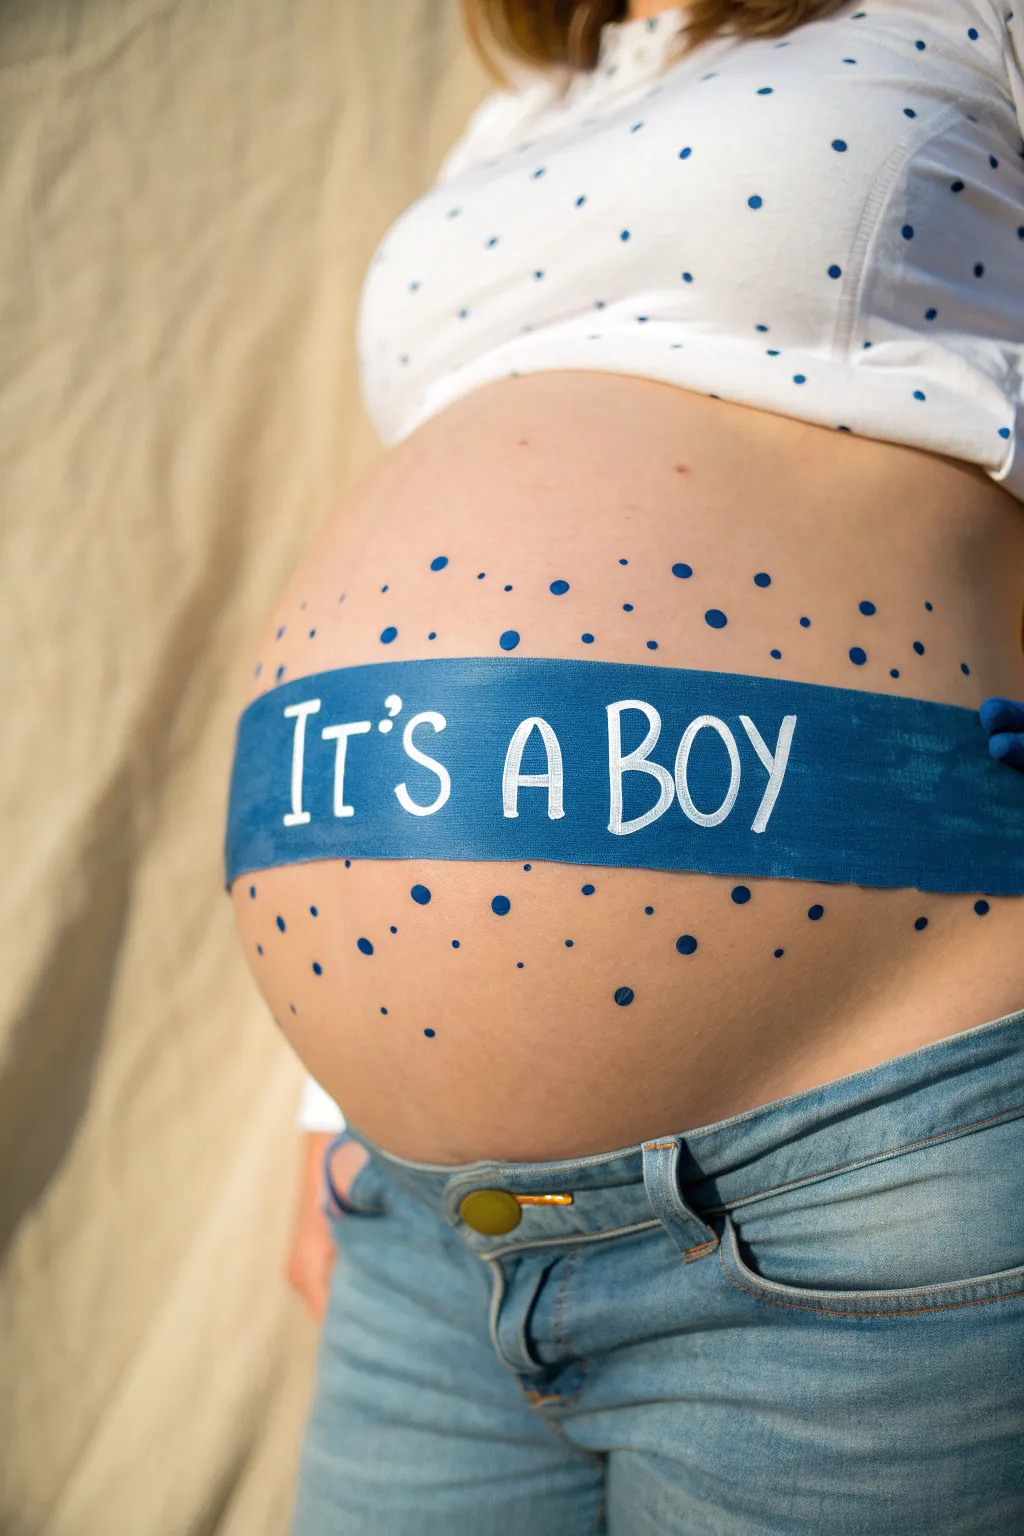
This charming belly painting design features a classic hand-lettered banner across the midsection, surrounded by festive confetti dots. It creates a bold, clear announcement that pairs perfectly with casual denim for photos.
Step-by-Step
Materials
- Face and body paint (dark blue, medium blue, white)
- Small flat brush (1/2 inch)
- Fine liner brush (size 0 or 1)
- Medium round brush (size 4 or 6)
- Skin-safe pencil liner (nude or white) for sketching
- Cup of water
- Paper towels
- Baby wipes (for cleanup)
Step 1: Sketching the Banner
-
Clean the canvas:
Start with clean, dry skin on the belly. Ensure there are no lotions or oils, as these can cause the paint to bead up or slide off. -
Mark the center:
Using your skin-safe pencil liner, lightly mark the center of the belly button. This will be your visual anchor point to keep the design symmetrical. -
Draft the banner outline:
Lightly sketch two parallel horizontal lines across the widest part of the belly. Use natural curves that follow the shape of the bump rather than trying to force a straight ruler line. -
Close the shape:
On the left and right sides, draw vertical lines to connect the top and bottom parallels, creating a long rectangular band. -
Map out the lettering:
Still using the sketch pencil, lightly write ‘IT’S A BOY’ inside the banner. Start with the ‘A’ in the center to ensure even spacing, then work outwards to the left and right.
Step 2: Painting the Blue Background
-
Load the flat brush:
Load your 1/2 inch flat brush with dark blue body paint. You want the consistency to be creamy, not too watery, to get opaque coverage. -
Outline the edges:
Carefully trace over your sketched outline of the banner first. Use the sharp edge of the flat brush to get a crisp, clean border. -
Fill in the banner:
Fill in the rest of the banner shape with the dark blue paint. Use smooth, horizontal strokes to minimize streakiness. -
Paint around the letters:
I find it helpful to paint carefully around the sketched letters if your white paint isn’t very opaque. If you have high-quality, dense white paint, you can just paint the whole banner blue and layer white on top later. -
Let it dry completely:
Allow the blue base layer to dry fully. This is crucial so the white letters don’t turn light blue when you apply them. Fan the area if needed to speed this up.
Fixing Smudges
If the white paint picks up blue from underneath, stop immediately. Let the area dry completely, clean your brush, and re-apply a thick dab of white on top without dragging.
Step 3: Adding Text and Details
-
Prepare the white paint:
Clean your brush thoroughly or switch to a fine liner brush. Load it with creamy white body paint. -
Paint the letters:
Carefully paint the ‘IT’S A BOY’ text. Use confident, deliberate strokes. If the blue shows through, let the first coat dry and apply a second white coat for brightness. -
Refine the typeface:
Go back and thicken the vertical strokes of the letters slightly to give them a bolder, hand-lettered font look. -
Create large dots:
Switch to the medium round brush. Load it with the same dark blue used for the banner. Press the brush tip gently onto the skin above and below the banner to create varying sizes of confetti dots. -
Add variation:
Mix a little white into your blue to make a lighter shade, or just use varying pressure to create different sized dots. Scatter them randomly but keep them denser near the banner and sparser further away. -
Final check:
Step back and look at the design. Use a baby wipe wrapped around your finger to clean up any smudged edges on the banner or stray paint marks.
Make it Pop
Add a thin shadow to the right side of the white letters using black or dark grey paint. This creates a 3D effect that makes the text jump off the blue ribbon.
Once the paint sets, capture the moment with a contrasting white shirt for a classic look


Baby Boy Footprints Trail
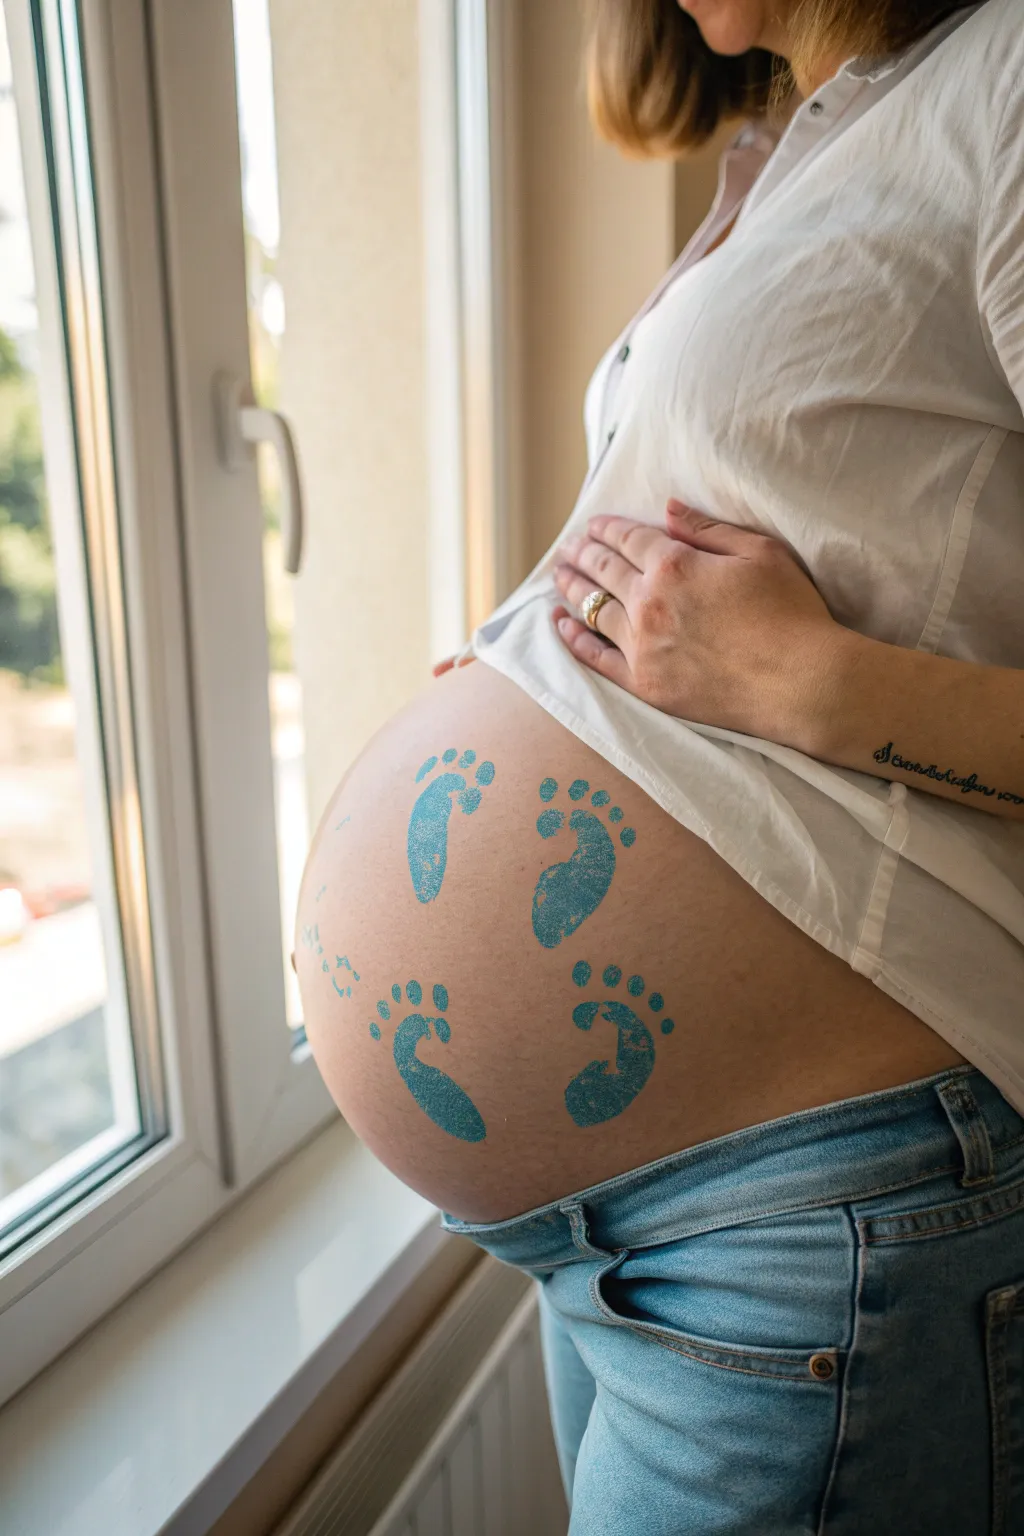
Celebrate the journey of your baby boy with this simple yet deeply symbolic footstep trail design. Using a gentle blue hue, these footprints create a playful path across your bump, symbolizing the baby’s very first steps into the world.
Step-by-Step Guide
Materials
- Water-based face/body paint (snazaroo or similar) in medium blue
- High-density makeup sponge (wedge shape)
- Small spray bottle with water
- Baby wipes (for cleanup)
- Optional: Footprint stencil (or flexible plastic sheet/mylar to make one)
- Exacto knife (if making your own stencil)
- Soft towel
- Setting spray (optional)
Step 1: Preparation
-
Clean the canvas:
Start with clean, dry skin on the belly. Wipe the area gently with a baby wipe to remove any oils or lotions, then pat dry with a soft towel to ensure the paint adheres properly. -
Prepare the stencil:
If you aren’t free-handing this, you’ll need a stencil. You can purchase a baby footprint stencil or create one by drawing a simple foot shape (toes and sole) onto flexible plastic or mylar and cutting it out carefully with an exacto knife. -
Activate the paint:
Lightly mist your blue body paint cake with water. You want a creamy consistency, not too runny, so the sponge picks up enough pigment without dripping.
Natural Texture
Don’t aim for solid, opaque color. A slightly patchy application looks more realistic, like a real foot dipped in paint would leave on paper.
Step 2: Painting the Trail
-
Load the sponge:
Rub your high-density sponge into the activated blue paint. Ensure the sponge is evenly coated but not sodden. -
Position the first print:
Start at the lower left side of the belly for the first footprint. Position the stencil (or visualize your spot) so the foot is angled slightly outward, simulating a natural walking gait. -
Apply the first layer:
Gently dab the loaded sponge over the stencil opening or directly onto the skin. Use a stippling motion (up and down) rather than dragging, which keeps the edges crisp. -
Lift and check:
Carefully lift the stencil straight up to avoid smudging the edges. If free-handing, refine the shape with a smaller brush if needed. -
Position the second print:
Move to the right side, slightly higher up. Place the stencil so this foot corresponds to the right foot, mirroring the angle of the first one but tilting the opposite way. -
Paint the second step:
Repeat the stippling process. I always like to double-check my paint consistency here; if the sponge is getting dry, reload it lightly. -
Planning the arc:
Before painting the next two, visualize an arc going up and over. The prints should look like they are climbing the curve of the bump. -
Paint the third step:
Place the next left footprint higher on the belly, above the first one but slightly more centered. Apply the paint firmly. -
Paint the final top step:
Add the final right footprint near the top right of the curve. This creates the illusion of movement walking away or up.
Smeared Stencil?
If paint bleeds under the stencil, your sponge was too wet. Wait for it to dry, wipe the error away with a damp Q-tip, and try again with a drier sponge.
Step 3: Texture and Finishing
-
Create the stamped look:
To mimic the texture seen in the photo, take a clean, dry corner of your sponge and lightly dab over the still-damp paint. This lifts tiny bits of pigment, making it look like a real ink stamp. -
Clean up edges:
Wrap a wet wipe tightly around your finger or use a cotton swab to clean up any blurry edges around the toes or heels. -
Dry completely:
Allow the design to air dry for about 5-10 minutes. Avoid covering it with clothing immediately. -
Optional setting:
If you plan to wear the design for a photoshoot, a light mist of barrier spray or setting spray will help it resist rubbing off on fabrics.
Now you have a sweet, sentimental design perfect for a gender reveal or maternity shoot


Sleepy Baby Boy Wrap
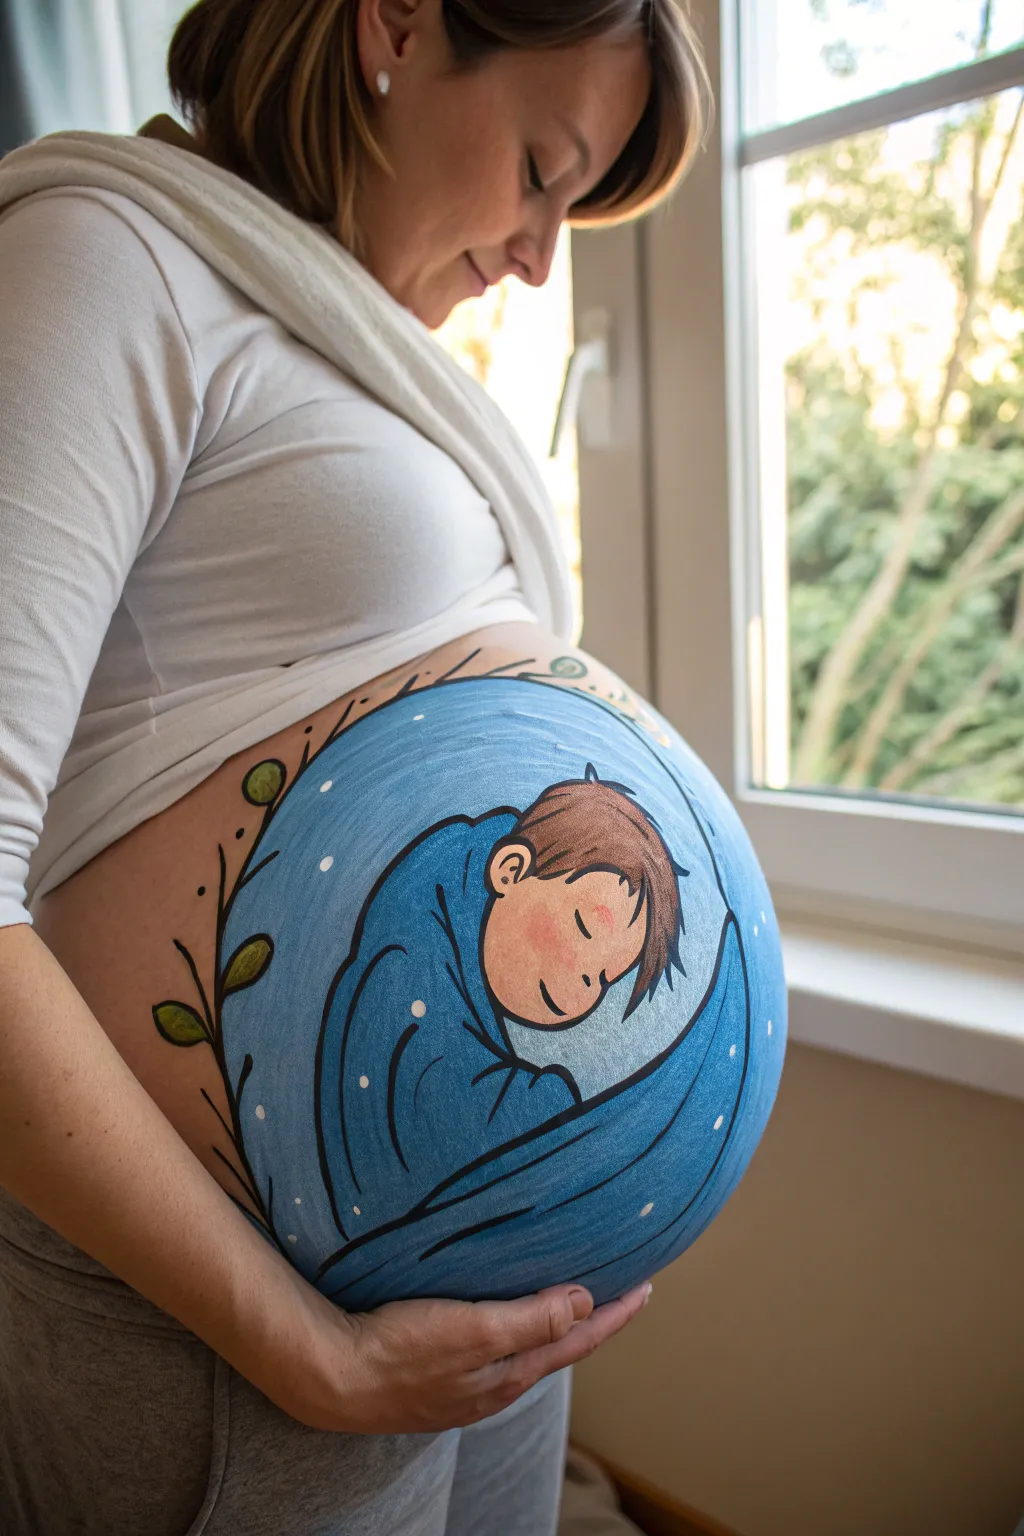
Capture the anticipation of your little one’s arrival with this serene belly painting design. Featuring a sweetly sleeping baby boy wrapped in soft blue fabric against a starry night background, this artwork creates a peaceful moment of connection.
Detailed Instructions
Materials
- Water-based face and body paints (brand like Snazaroo or Mehron)
- Colors: Light blue, medium blue, dark blue, white, peach/skin tone, brown, light green, dark green, black
- Large flat brush (1 inch)
- Medium round brush (size 4 or 6)
- Fine liner brush (size 0 or 1)
- Sponge triangles
- Spray bottle with water
- Baby wipes or damp cloth for corrections
- Comfortable chair for the mom-to-be
Step 1: Setting the Background
-
Outline the circle:
Start by lightly sketching a large circle on the belly using a thin brush and very watery light blue paint. This guides your entire composition and ensures the artwork is centered. -
Fill the base color:
Using a slightly damp sponge, load up a mix of light and medium blue paint. Dab this gently inside your circle outline to create a solid, opaque background. Leave the center area slightly lighter to suggest a soft glow. -
Add texture:
While the paint is still slightly tacky, dab a clean, dry sponge over the blue areas to smooth out streaks and create a soft, fabric-like texture for the background wrap.
Uneven Edges?
If the main circle looks wobbly, don’t restart. Use a wet wipe wrapped around your finger to ‘erase’ and reshape the edge, or cover mistakes with the outer vine design.
Step 2: Creating the Sleeping Boy
-
Sketch the wrap shape:
With a round brush and dark blue paint, outline the shape of the swaddle cloth. Visualize a crescent moon shape that cradles the baby, curving from the bottom right up towards the left shoulder. -
Paint the face silhouette:
Using a skin-tone or peach paint and a medium brush, fill in the baby’s face shape. It should look like a soft oval tucked into the upper opening of your blue wrap outline. -
Add the ear:
Paint a small, C-shaped ear on the side of the head using the same peach tone. Position it relatively low on the head to leave room for hair. -
Define the hair:
Load a round brush with brown paint. Use short, sweeping strokes to create the hair, starting from the crown and flicking outward to mimic messy, soft baby hair. -
Paint facial features:
Switch to your finest liner brush and black paint. Carefully draw a simple curved line for the closed eyelid and a small curve for the nose. Add a tiny smile line and details inside the ear. -
Add warmth:
Mix a tiny amount of red into your peach paint or use a very diluted pink. Gently tap this onto the cheek area with a finger or damp sponge to give the sleeping baby a rosy, healthy glow.
Make it Sparkle
Before the white star dots dry completely, gently press cosmetic-grade glitter onto them. It adds a beautiful, magical shimmer that catches the light.
Step 3: Details & Atmosphere
-
Outline the figure:
Use your fine liner brush and black paint to outline the entire baby and the wrap. Keep the lines relatively thin but confident to make the illustration pop against the blue background. -
Add fabric folds:
Draw curved black lines within the blue wrap area to represent folds and creases in the fabric, emphasizing the roundness of the baby’s form beneath the cloth. -
Create the starry sky:
Using the handle end of a paintbrush dipped in white paint, dot ‘stars’ all over the remaining blue background area. Vary the pressure to create different sized dots for a magical effect. -
Highlight the wrap:
Add thin white lines along the top edges of the blue fabric folds. This highlight gives dimension and suggests the moonlight is hitting the fabric.
Step 4: Floral Frame
-
Draw the main stem:
On the bare skin outside the large blue circle, specifically on the left side, paint a long, curving black line that hugs the contour of your design. -
Add leaves:
Paint simple leaf shapes attached to the stem using green paint. I like to alternate light and dark green leaves for visual interest. -
Outline the leaves:
Once the green is dry, use your black liner brush to loosely outline the leaves and add a central vein to each one. -
Final touches:
Add a few tiny stray details like small berries or extra dots near the vine if you have empty space to fill, then step back and admire the composition.
Take a moment to enjoy this beautiful, temporary art piece honoring the new life growing inside.


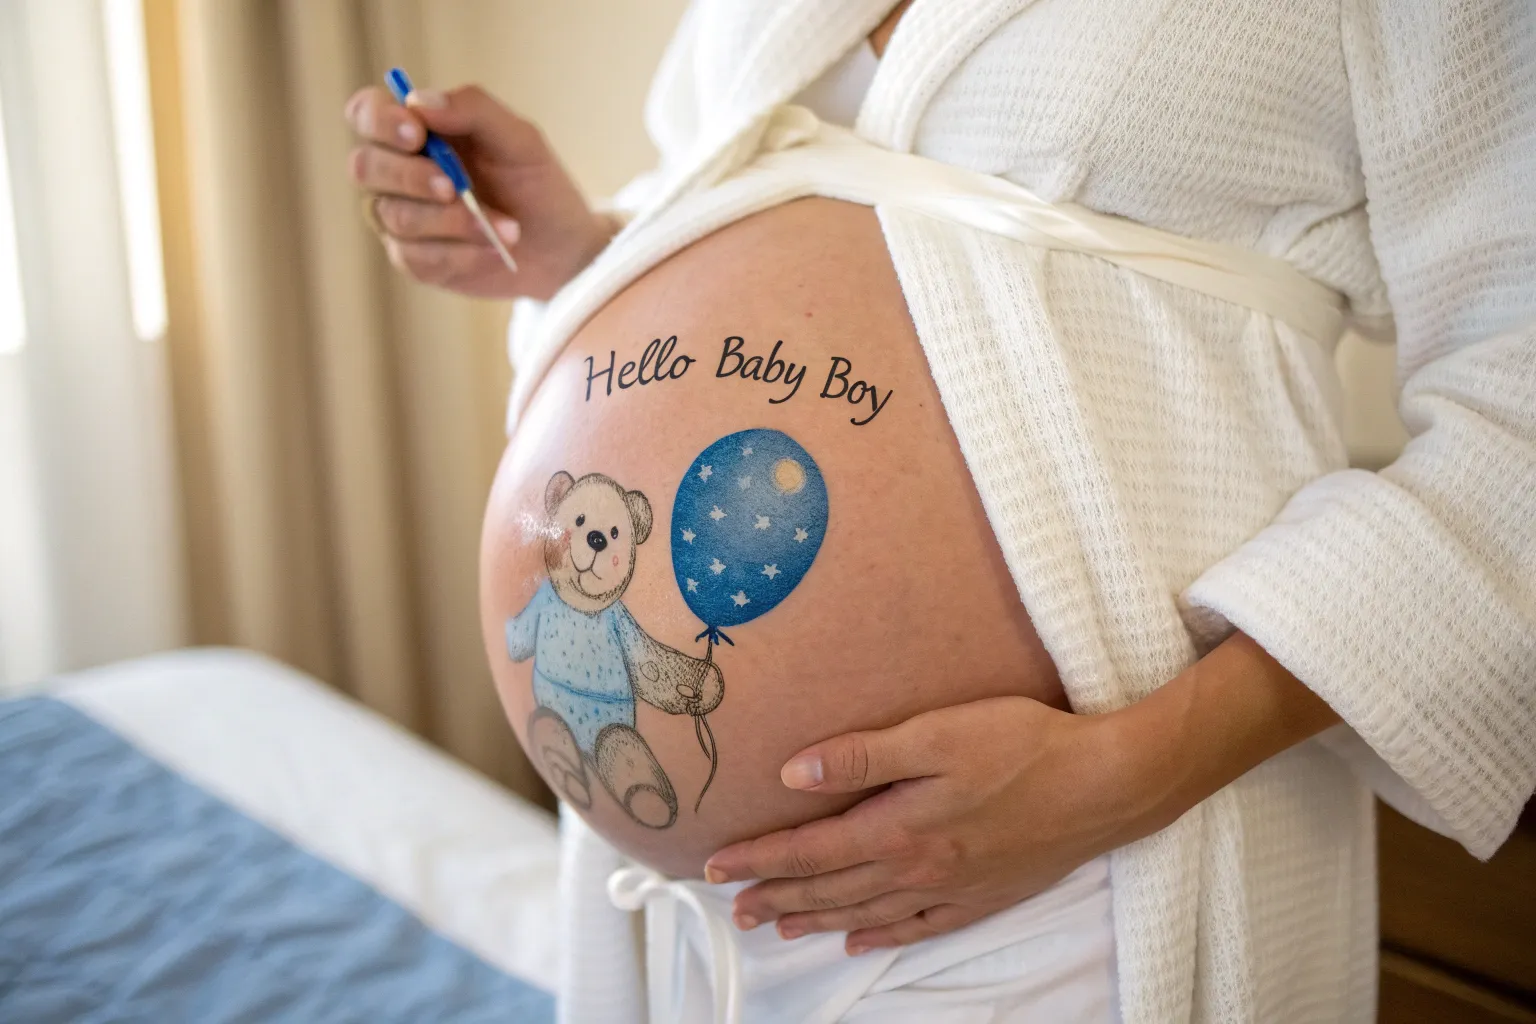
Teddy Bear With Blue Heart
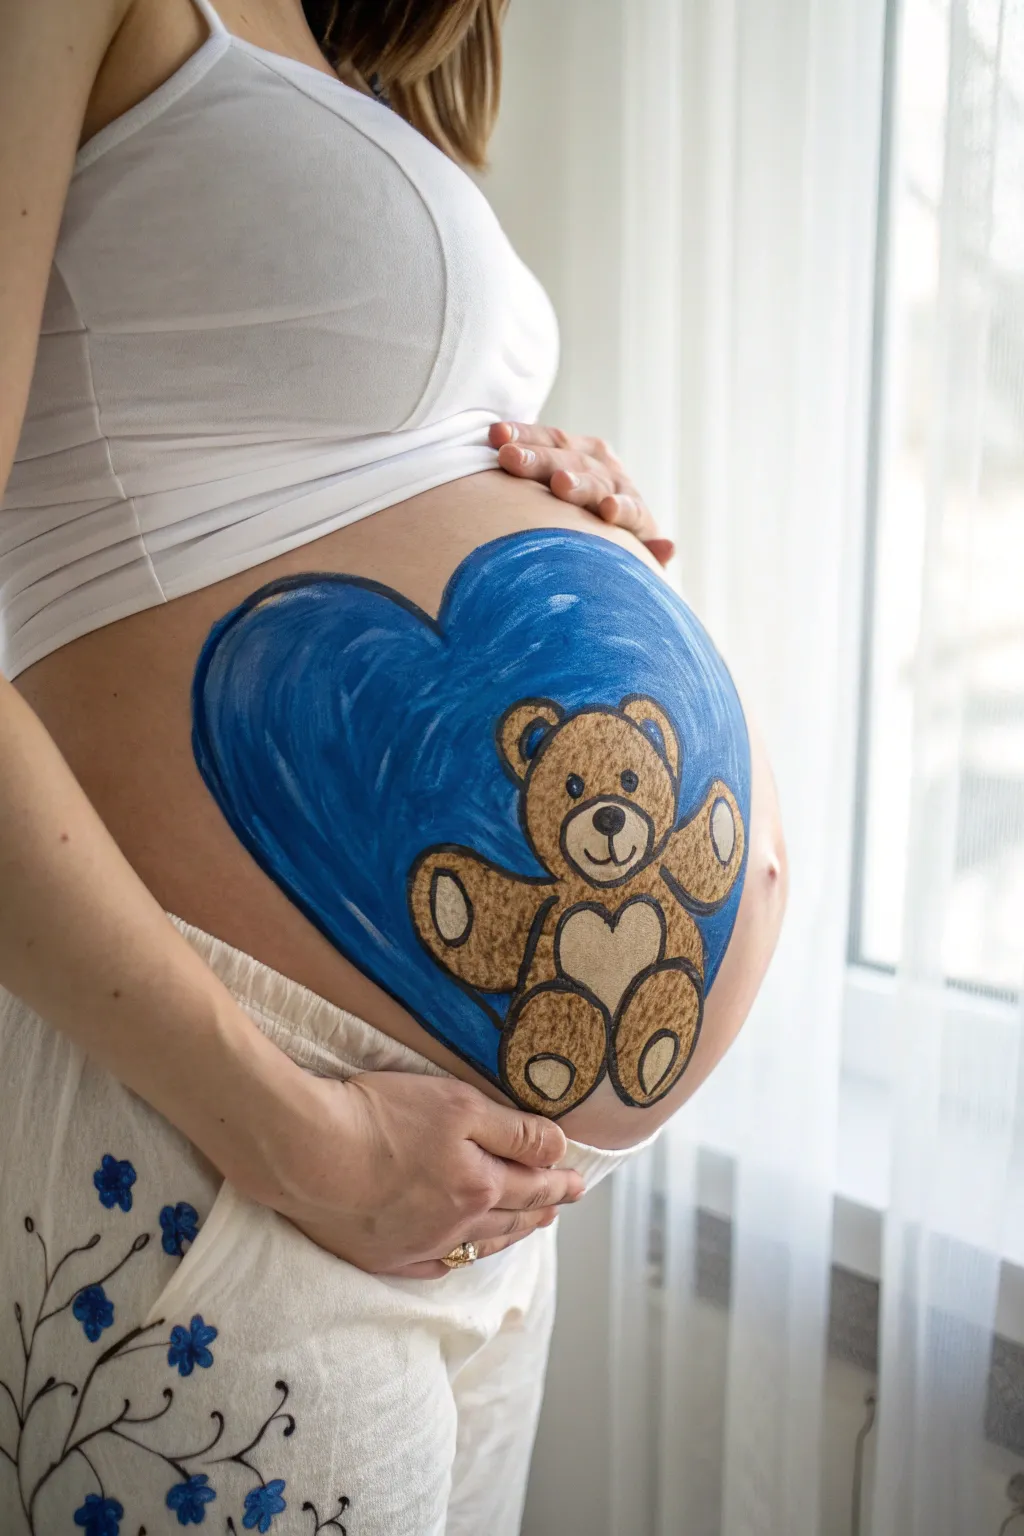
This adorable belly painting features a classic teddy bear nestled comfortably inside a sweeping blue heart, perfect for welcoming a baby boy. The design uses simple shapes and bold outlines, making it a charming and relatively easy look to achieve for your maternity photoshoot.
How-To Guide
Materials
- Face paint (Blue, brown, light beige/tan, black, white)
- Wide flat brush
- Medium round brush
- Fine liner brush
- Cup of water
- Spray bottle (optional, for activating paints)
- Makeup sponge
- Baby wipes (for cleanup)
Step 1: Painting the Heart Background
-
Outline the heart:
Start by using a medium round brush loaded with dark blue face paint. Draw the outline of a large heart centered on the belly. The top curves should sit high on the belly, and the point should extend downwards towards the navel area, giving you plenty of canvas space inside. -
Fill the base color:
Switch to a wider flat brush or a damp makeup sponge. Fill in the entire heart shape with a solid blue color. Use broad strokes to cover the skin evenly. -
Add dimension:
While the blue is still slightly tacky, I like to take a slightly lighter blue or a watered-down white on a sponge and dab it near the top curves to create a subtle highlight, giving the heart a rounded, 3D appearance. -
Let it dry:
Allow the blue background paint to dry completely. This is crucial so the brown bear paint doesn’t mix with the blue and turn muddy. It should feel dry to the touch before proceeding.
Smooth Base Tip
Keep your blue background paint consistency creamy, not watery. If it’s too thin, it will drip down the belly. A slightly thicker paint ensures full coverage without mess.
Step 2: Creating the Teddy Bear Shape
-
Outline the head and body:
Using a medium round brush and brown face paint, paint a circle for the head in the upper center of the heart. Directly below it, paint a slightly larger oval for the bear’s body. -
Add the ears:
Paint two small semi-circles on top of the head for the ears. Make sure they are spaced evenly apart. -
Paint the arms:
Extend two arm shapes outwards from the upper body. They should look like rounded, slightly curved tubes reaching out towards the sides of the heart. -
Paint the legs:
Add two oval shapes at the bottom of the body for the legs. Position them so the bear looks like it is sitting down comfortably. -
Fill in the bear:
Use your brown paint to fill in the entire silhouette of the bear you just outlined. Apply a second coat if the blue background is showing through too much.
Personalize It
Instead of a heart on the bear’s tummy, paint the baby’s name or due date in the beige patch. You can also change the background heart color to pink or yellow.
Step 3: Adding Details and Contours
-
Paint the lighter accents:
Clean your brush thoroughly and load it with a light beige or tan color. Paint a small oval in the center of the face for the snout. -
Detail the ears and tummy:
Using the same light beige, fill in the inner parts of the ears. Paint a heart shape on the bear’s chest and oval pads on the bottom of the feet and the palms of the hands. -
Outline the bear:
Switch to a fine liner brush with black paint. Carefully outline the entire teddy bear to make it pop against the blue background. Keep your hand steady for crisp lines. -
Draw the face:
With the liner brush and black paint, draw two small dots for eyes, a rounded triangle for the nose on the snout, and a small curved line for the mouth. -
Add texture strokes:
To give the bear a fuzzy look, add tiny, short, dashed lines in black along the inside of the brown areas, particularly on the limbs and forehead. -
Final highlights:
Dip the very tip of your fine brush into white paint. Add a tiny dot to the nose and eyes for a sparkle of life, and a few small strokes on the blue heart’s edge to define the shape further.
Now you have a sweet keepsake photo opportunity to cherish before the baby arrives
BRUSH GUIDE
The Right Brush for Every Stroke
From clean lines to bold texture — master brush choice, stroke control, and essential techniques.
Explore the Full Guide
Little Gentleman Bow Tie
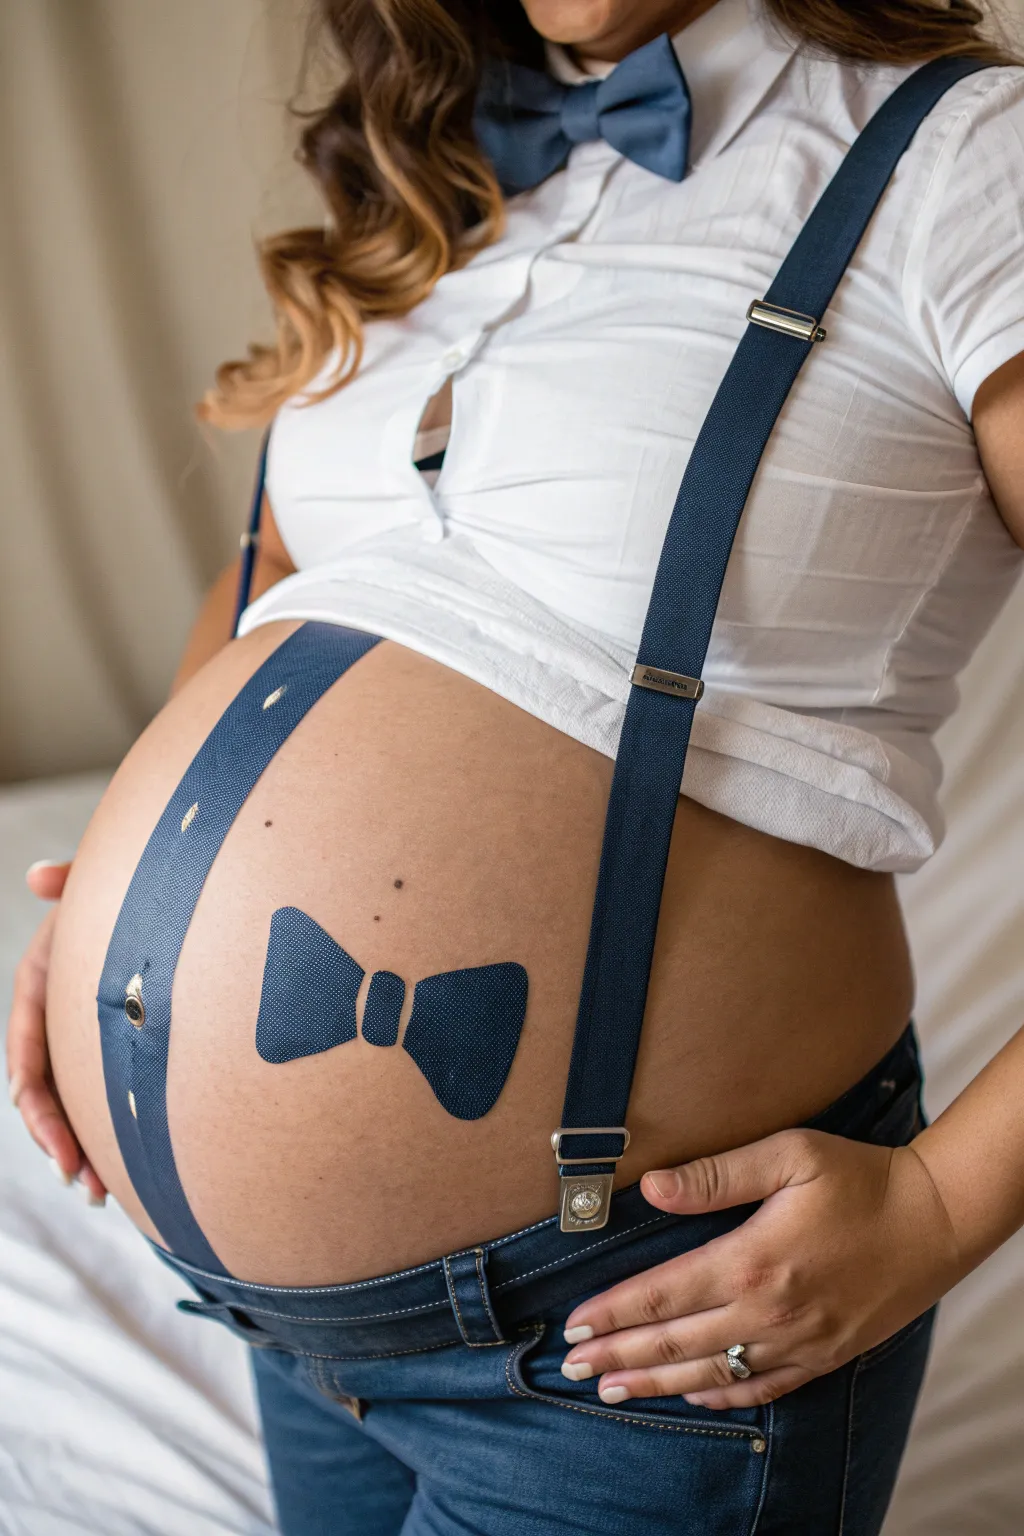
Transform your baby bump into a charming little gentleman with this clever trompe-l’œil design. By combining real accessories with painted elements, you create a seamless and dapper look that is perfect for maternity photos.
Detailed Instructions
Materials
- Face/body paint (royal blue, navy blue, white, gold/yellow)
- Flat brush (medium size)
- Fine detail brush or liner brush
- Small shading brush
- Water container
- Paper towels
- Pregnant belly (as canvas)
- Real suspenders (navy blue)
- Real bow tie (optional, for reference)
- White button-up shirt
- Jeans
Step 1: Planning the Layout
-
Dress the part:
Start by having the model wear the white button-up shirt unbuttoned at the bottom to expose the belly, along with the jeans. Attach one real suspender on the model’s left side (viewer’s right) so you have a live reference for color and width. -
Mark the suspender path:
Visualize where the missing suspender would naturally fall across the curve of the belly. Using a very light wash of blue paint or a makeup pencil, lightly sketch two parallel lines on the bare skin to mark the width and path of the painted suspender. -
Position the bow tie:
Find the center point of the belly, slightly below the belly button area. Sketch a simple outline for the bow tie: a small rectangle in the center with two flared shapes coming out from either side. Keep the shape symmetrical.
Step 2: Painting the Suspender
-
Base coat application:
Load your flat brush with a solid royal blue or navy face paint. Fill in the long strip you sketched for the suspender. I like to use long, smooth strokes to avoid patchiness. -
Adding texture:
Once the base blue is dry, mix a lighter blue shade. Using a fine brush or a stippling sponge edge, gently create a cross-hatch or fine woven pattern over the blue strip to mimic the fabric texture of the real suspender. -
Creating the buttonhole illusion:
Towards the bottom of the painted suspender (where it meets the jeans), paint a small vertical oval shape in a darker navy tone to represent a buttonhole area. -
Painting the button:
Inside or just above that oval, paint a small circle using gold or yellow paint. Add highlights with white and shadows with dark brown to make it look like a metallic button fastening the suspender to the pants. -
Stitching details:
With your finest brush and white or light grey paint, add tiny dashed lines along the edges of the blue strip to replicate stitching. This small detail really sells the illusion.
Uneven Lines?
If your suspender lines look wobbly, use the straight edge of a piece of paper or cardstock as a guide while painting the long borders.
Step 3: Painting the Bow Tie
-
Filling the bow tie:
Using the same blue base color, fill in the bow tie outline. Ensure the edges are crisp and clean. The center ‘knot’ should be distinct from the two side ‘wings’. -
Shadows and depth:
Mix a darker shade of navy blue. Paint along the bottom edges of the bow tie and right next to the center knot to create depth, making it look like 3D fabric rather than a flat drawing. -
Highlighting folds:
Use a lighter blue or white on the upper curves of the bow tie wings and the center knot. This simulates light hitting the top of the fabric folds. -
Fabric texture:
Just like the suspender, add tiny cross-hatching or stippling on the bow tie surface using a fine brush to give it that woven appearance.
Texture Pro Tip
Instead of painting every thread, use an old toothbrush dipped in white paint to gently spatter or drag texture onto the blue areas for a denim look.
Step 4: Final Touches
-
Clean up edges:
Inspect the edges of your painting. Use a damp cotton swab or a brush with a tiny bit of concealer to clean up any smudges or uneven lines on the skin. -
Coordinate with clothing:
Adjust the shirt so it frames the painting perfectly, ensuring the painted suspender lines up logically with the waistband of the jeans. -
Add final sparkle:
For a little extra ‘pop’ for photography, add a tiny dot of pure white on the gold button and the highest point of the bow tie to simulate a strong light reflection.
Step back and admire your dapper little gentleman, ready for his close-up
Nautical Anchor for Baby Boy
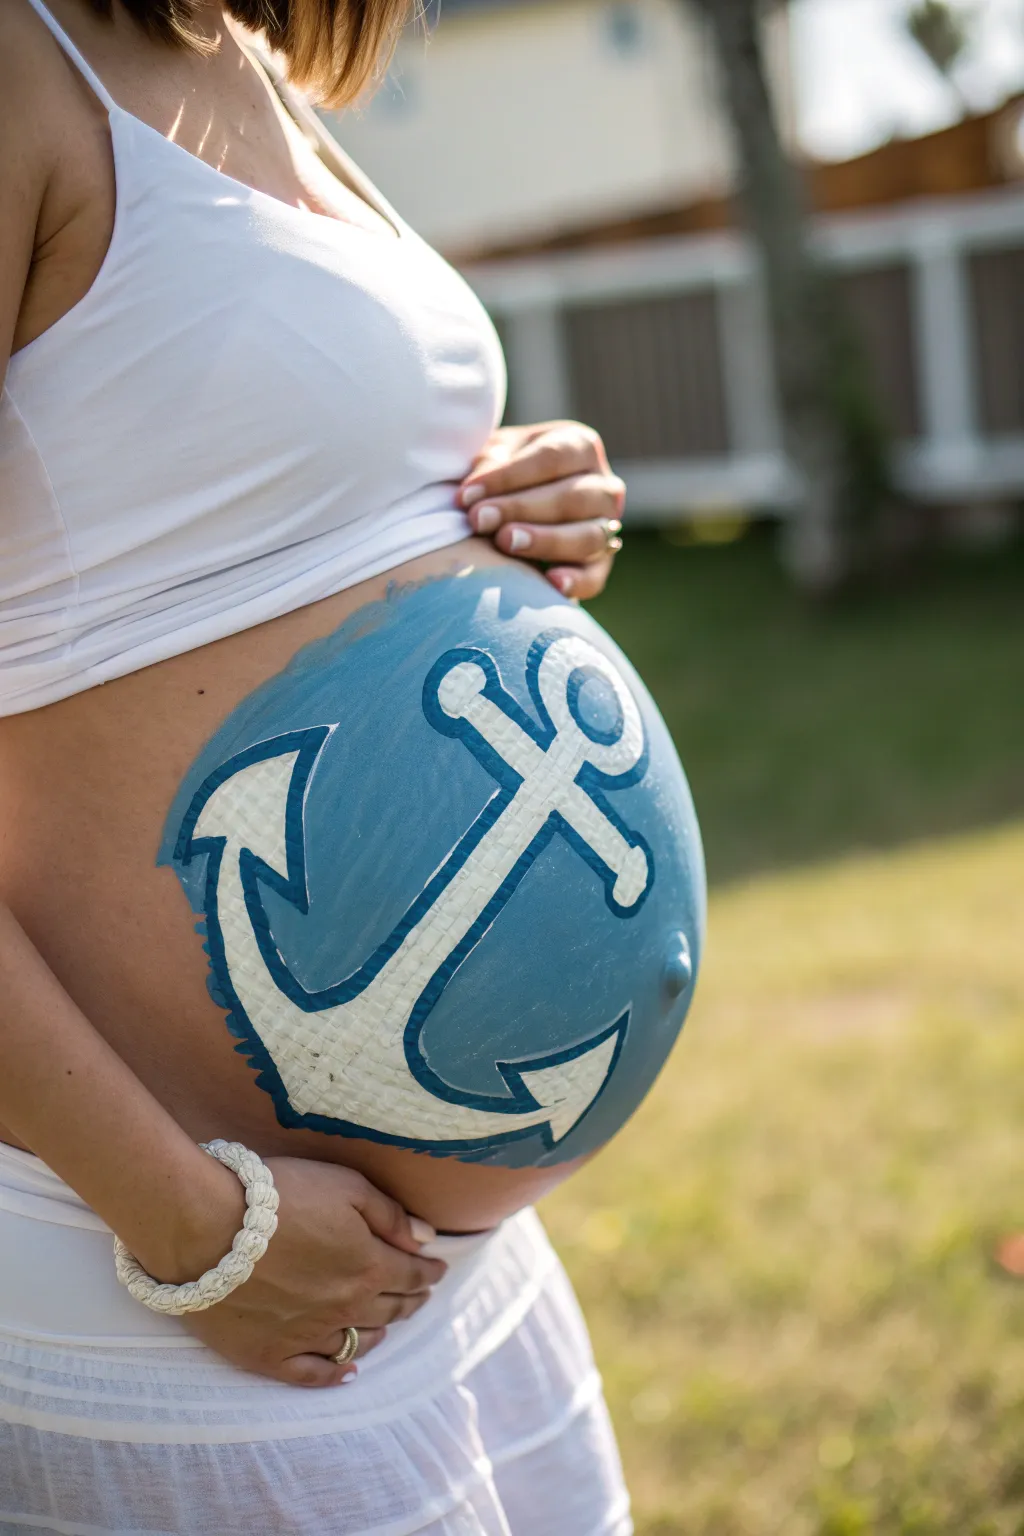
Celebrate the upcoming arrival of your little sailor with this crisp, classic nautical design. Featuring a bold white anchor set against a calm blue sea, this belly painting is perfect for a baby boy shower or a beachside maternity shoot.
Step-by-Step Tutorial
Materials
- Light blue water-based face/body paint
- Medium blue water-based face/body paint (for shading)
- White water-based face/body paint
- Dark blue or navy body paint (for outlining)
- Wide flat brush (for background)
- Medium round brush (for shapes)
- Fine detail brush (for outlining)
- Small cup of water
- Sponges (optional, for blending)
- Baby wipes (for cleanup)
- Spray bottle with water (to activate paints)
Step 1: Setting the Scene
-
Prepare the canvas:
Ensure the skin is clean, dry, and free of oils or lotions. Have the mom-to-be sit comfortably in a chair where she can relax for about 30-45 minutes. -
Outline the circle:
Using a medium round brush and a very light wash of blue paint, sketch a large circle on the center of the belly. This doesn’t need to be geometrically perfect, but it guides the overall shape. -
Map the anchor:
Inside your circle, lightly sketch the basic cross shape of the anchor using that same faint blue wash. Draw a vertical line down the center and a curved ‘U’ shape at the bottom for the arms. -
Add anchor details:
Still sketching lightly, add the crossbar near the top of the vertical line and a small circle (the eye) at the very top. Add the triangular flukes at the ends of the curved arms.
Step 2: Painting the Background
-
Fill the blue sea:
Load your wide flat brush or a sponge with light blue paint. Fill in the entire circular background area, carefully painting around your sketched anchor shape. Leaving the anchor space unpainted now will make the white pop more later. -
Build opacity:
If the first layer of blue looks streaky, let it dry for a minute and apply a second coat. You want a solid, opaque blue field. -
Add depth:
While the blue is still slightly damp, take a little bit of medium blue on a sponge or brush and dab it around the outer edges of the circle to create a subtle vignette effect.
Keep It Creamy
For the white anchor, ensure your paint has a creamy, melted-chocolate consistency. If it’s too watery, the blue background will show through.
Step 3: Creating the Anchor
-
Fill in the white:
Rinse your brushes thoroughly. Load a clean medium round brush with white face paint. Fill in the entire anchor shape you mapped out earlier. -
Refine the shape:
As you paint the white, clean up the edges of the crossbar, the central shank, and the curved arms. Ensure the white paint is thick and creamy for solid coverage. -
Let it set:
Allow the white paint to dry completely. If you rush to the next step while it’s wet, the colors might muddy.
Rope & Knots
Paint a twisting rope wrapping around the anchor shank in a beige or gold color to add extra nautical flair and complexity to the design.
Step 4: Defining Details
-
Start the outline:
Load a fine detail brush with dark blue or navy paint. Carefully trace the outer edge of the white anchor. A consistent line thickness helps this look graphic and bold. -
Outline the background:
Using the same dark blue, outline the large outer circle of the blue background. I find that breaking the line slightly or varying the pressure gives it a more organic, painted feel rather than a rigid sticker look. -
Create shadows:
Mix a tiny drop of black into your blue to create a shadow color. Paint a thin shadow line along one side of the anchor (e.g., the right side of the shank and under the crossbar) to give it a 3D effect. -
Texture the anchor:
With a mostly dry brush and a tiny bit of grey or light blue, lightly cross-hatch or stipple onto the white anchor to give it a weathered, texture appearance. -
Final highlights:
Add a few pure white dots or small starbursts on the blue background to simulate sparkling water or light hitting the surface. -
Clean up:
Use a baby wipe wrapped around your finger to clean up any smudges outside the main blue circle for a crisp finish.
Step back and admire your beautiful nautical belly art, ready for photos

PENCIL GUIDE
Understanding Pencil Grades from H to B
From first sketch to finished drawing — learn pencil grades, line control, and shading techniques.
Explore the Full Guide
Whale and Blue Waves
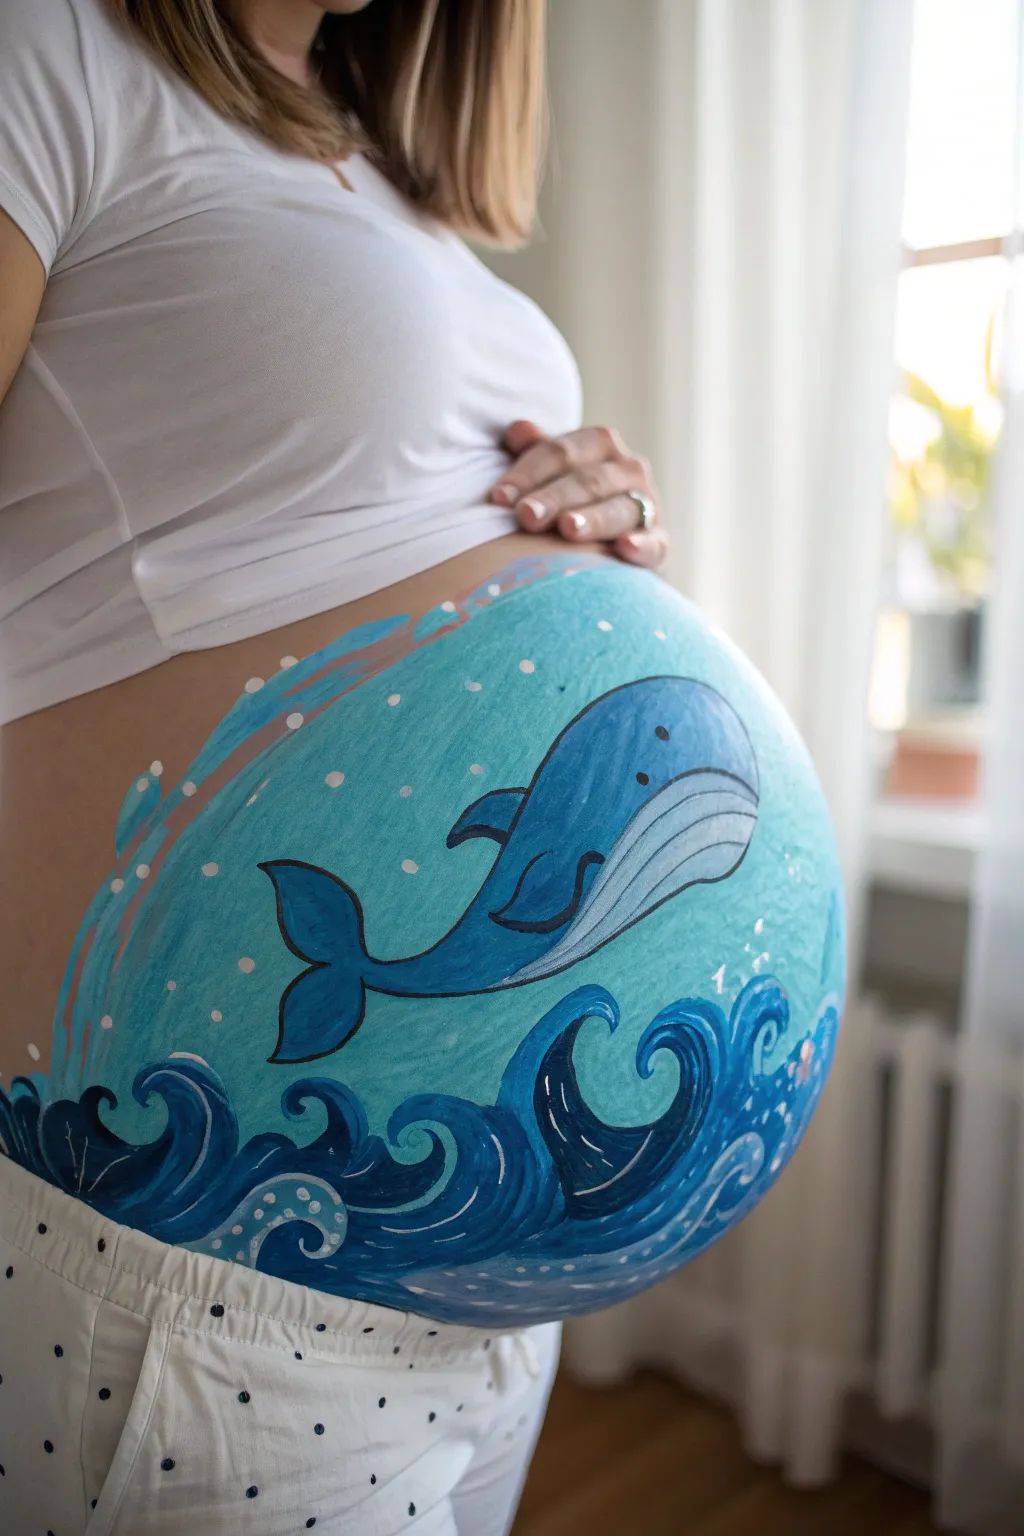
Capture the essence of the deep blue sea with this soothing belly painting featuring a gentle whale gliding through stylized waves. The design uses cool aqua tones and crisp lines to create a serene, oceanic scene perfect for welcoming a baby boy.
How-To Guide
Materials
- Water-activated face/body paints (light blue, medium royal blue, dark navy blue, white, black, aqua)
- Wide flat brush (for background)
- Medium round brush (for shapes)
- Fine liner brush (for outlining)
- Cup of clean water
- Paper towels
- Spray bottle with water (optional)
- Cosmetic sponge
Step 1: Setting the Scene
-
Prepare the canvas:
Start by gently wiping the belly with a baby wipe or damp cloth to ensure the skin is clean and dry; apply a thin layer of moisturizer if the skin feels dry, but let it absorb fully before painting. -
Mix the background color:
Load a cosmetic sponge or a wide flat brush with a light aqua or turquoise body paint, ensuring the consistency is creamy but not dripping. -
Apply the base coat:
Cover the entire round area of the belly with the aqua paint using wide, sweeping circular motions to create the underwater background; fade the edges slightly for a softer look. -
Dry the base:
Allow this base layer to dry completely for a minute or two to prevent colors from muddying in the next steps.
Paint drying too fast?
Body paints dry quickly on warm skin. Keep a spray bottle handy to lightly mist your paints (not the belly!) to keep the consistency creamy and workable.
Step 2: Painting the Waves
-
Outline the wave peaks:
Using a medium round brush loaded with dark navy blue paint, sketch the swirling crests of the waves along the bottom third of the belly. -
Fill the dark water:
Fill in the wave shapes with the navy blue, leaving the tips of the crests slightly transparent or lighter to suggest movement. -
Add wave layers:
Mix a medium royal blue and paint a second layer of smaller waves slightly behind and in between the larger navy ones to create depth. -
Highlight the crests:
With a fine brush and white paint, carefully trace along the top edges of the dark waves; add small hooks and swirls inside the blue areas to mimic rolling water. -
Create sea foam:
Dot small white circles of varying sizes near the base of the waves and inside the swirls to look like bubbling sea foam.
Pro Tip: Smoother Backgrounds
For a streak-free background, pat the aqua paint on with a high-density sponge rather than stroking it on with a brush. This creates an even, airbrushed finish.
Step 3: The Gentle Giant
-
Outline the whale body:
Switch back to your dark navy or black paint on a fine round brush and outline the curved shape of the whale floating diagonally in the center of the belly. -
Block in the color:
Fill the top half of the whale’s body with a medium blue paint, blending it downwards. -
Paint the belly:
Use a very light grey or diluted blue-white mixture to fill in the whale’s underbelly, blending slightly where it meets the darker blue top. -
Detail the grooves:
Using a fine liner brush and thinned black or dark grey paint, draw long, curved lines along the whale’s light underbelly to create its signature pleats. -
Add fins and tail:
Paint the pectoral fin on the side and the flukes (tail) at the back using the medium blue, outlining them sharply in black for definition.
Step 4: Final Flourishes
-
Give it a face:
Place a small black dot for the eye near the front of the whale’s head and add a tiny curved smile line just below it. -
Add background bubbles:
I like to dampen a cotton swab or the back of a brush handle, dip it in white paint, and stamp scattered dots throughout the aqua background for bubbles. -
Splash accents:
Paint a few curved, white splash lines or stylized drops near the top left to balance the composition, suggesting the whale just broke the surface. -
Clean up edges:
Walk around the design with a clean, slightly damp brush to sharpen any blurry lines or errant smudges.
Enjoy this beautiful moment of connection as you admire your underwater masterpiece
Dolphin Splash for Baby Boy
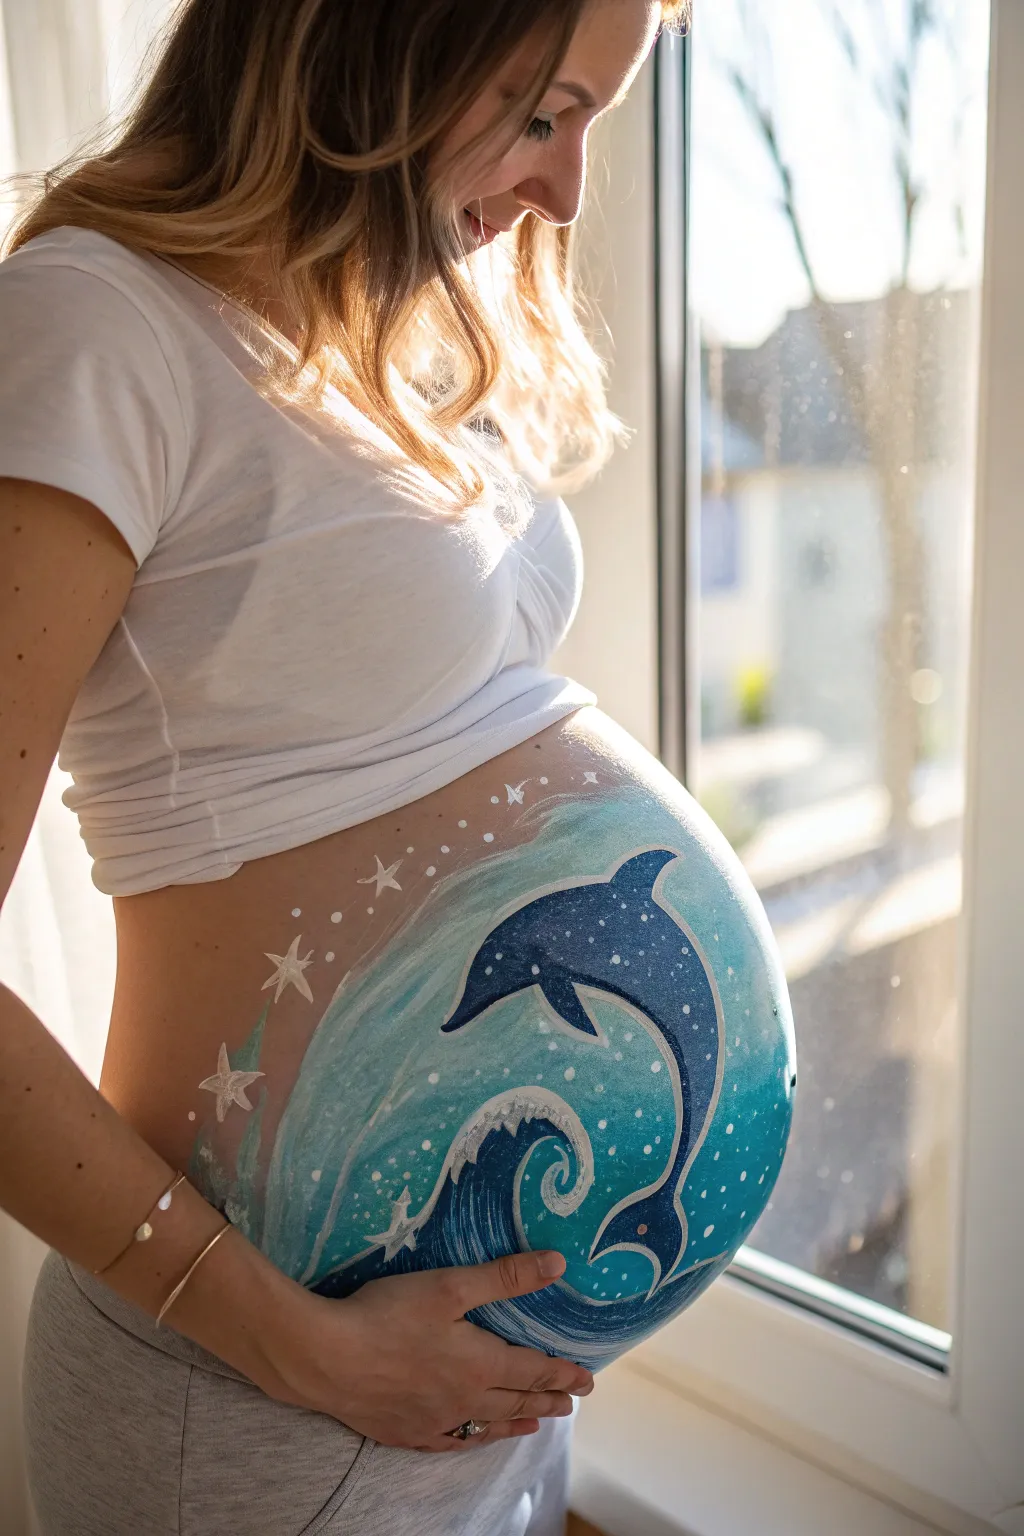
Celebrate the upcoming arrival of your little boy with this enchanting dolphin belly painting design. Featuring swirling ocean waves, whimsical stars, and a graceful dolphin silhouette, this artwork turns the baby bump into a beautiful aquatic scene.
Step-by-Step
Materials
- Water-activated face/body paints (dark blue, medium blue, teal/turquoise, white)
- High-density sponge (cut into halves or quarters)
- Flat brush (medium size)
- Round brush (fine tip for details)
- Round brush (medium size)
- Cup of water
- Spray bottle with water
- Baby wipes (for cleanup)
Step 1: Creating the Ocean Backdrop
-
Prepare the Sponge:
Begin by dampening your high-density sponge with a spray bottle or by dipping it lightly in water and squeezing out the excess. It needs to be moist but not dripping. -
Load the Base Colors:
Load the sponge with a mix of teal and turquoise body paint. You want a soft, oceanic background color that covers most of the belly area. -
Apply the Background:
Gently sponge the paint onto the belly in a large, circular shape. Use a stippling motion (dabbing up and down) rather than dragging to get an even, opaque coverage. -
Fade the Edges:
As you reach the outer edges of the circle, use a cleaner part of the sponge or less pressure to fade the teal paint out into the skin, creating a soft, dreamy border.
Smudge Control
If the design smears, wait for the paint to fully dry before correcting. Once dry, use a slightly damp cotton swab to lift the mistake like an eraser.
Step 2: Painting the Wave and Dolphin
-
Outline the Wave:
Using a medium round brush and dark blue paint, sketch the bottom wave. Start low on the belly and create a large, curling spiral shape that mimics a crashing wave. -
Fill the Wave Body:
Fill in the body of the wave with medium blue paint, blending it slightly into the dark blue outline. Leave the very center of the swirl slightly lighter to add depth. -
Outline the Dolphin:
With the dark blue paint and a round brush, carefully outline the shape of the dolphin jumping over the wave. Position it so the curve of the dolphin’s back complements the curve of the bump. -
Fill the Dolphin:
Fill the inside of the dolphin shape with the dark blue paint. Ensure the coverage is solid and consistent. -
Add Highlights:
While the blue is still slightly tacky, I like to take a clean brush with a tiny amount of lighter blue or white and blend a highlight along the top of the dolphin’s back and the dorsal fin to give it dimension.
Step 3: Details and Embellishments
-
Create White Water:
Switch to your white face paint and a medium brush. Paint swift, curved strokes along the top of the dark blue wave to represent sea foam and splashing water. -
Add Swirling Accents:
Using a fine liner brush and white paint, add delicate swirls inside the wave and around the dolphin’s tail to emphasize movement. -
Paint the Stars:
Paint several five-pointed stars around the upper left curve of the belly design using white paint. Vary their sizes, making the ones closer to the main design slightly larger. -
Dotting the sky:
Use the very tip of your fine brush or the handle end to create small white dots scattered between the stars and around the dolphin, simulating magical sea spray or distant stars. -
Define Contours:
Go back with a fine brush and white paint to add a crisp outline to the upper edge of the dolphin and the inner curl of the wave for extra pop. -
Soft Background Stars:
Mix a very watery white paint and add a few faint, ghost-like stars in the background for a translucent effect. -
Final Touches:
Check the edges of your design. If any lines look shaky, use a clean damp brush to smooth them out or sharpen the points of your stars.
Add Sparkle
While the paint is still slightly wet, gently puff cosmetic-grade iridescent glitter over the dolphin and waves. It catches the light beautifully in photos.
Step back and admire your beautiful, bump-hugging masterpiece before taking plenty of photos


Blue Starry Night “Little Boy”

Transform your baby bump into a serene midnight landscape with this celestial design perfect for a little boy. The deep blues dissolve into soft horizon lights, creating a peaceful scene featuring a crescent moon and twinkling stars.
Detailed Instructions
Materials
- Face/Body paints: Dark blue (ultramarine or navy), light blue (cyan or sky blue), white, black, yellow
- Soft synthetic sponges (triangle or petal shape)
- Wide flat brush (for blending)
- Fine liner brush (size 0 or 1)
- Medium round brush (size 4 or 5)
- Cup of water
- Spray bottle with water
- Baby wipes (for cleanup)
Step 1: Setting the Background
-
Prepare the canvas:
Start with clean, dry skin free of oils or lotions to ensure the paint adheres smoothly. Position yourself or the model comfortably, perhaps sitting with back support. -
Load the sponge:
Spritz your dark blue face paint with a little water until it’s creamy. Rub your sponge firmly into the paint to get a rich, opaque load. -
Create the midnight sky:
Begin dabbing the dark blue paint across the upper two-thirds of the belly. Use a stippling motion rather than dragging to get even, full coverage without streaks. -
Add the horizon light:
Load a fresh sponge with light blue mixed with a tiny drop of yellow or teal. Dab this lighter color just below your dark blue section, creating a horizontal band across the middle of the belly. -
Blend the transition:
While both paints are still slightly damp, gently dab over the line where the dark blue meets the light blue. If needed, use a slightly damp, clean sponge to soften the gradient so it looks like a natural sky fade.
Patchy Blue Paint?
If the dark blue looks streaky, your sponge might be too wet. Squeeze it out thoroughly, reload with stickier paint, and stipple over the patch again.
Step 2: Painting the Sea & Landscape
-
Define the ocean:
Mix dark blue with a small amount of black to create a deep navy shade. Apply this to the bottom third of the belly using a sponge, curving underneath to follow the natural round shape. -
Form the horizon line:
Using a flat brush or the edge of your sponge with the dark navy mix, create an uneven, wavy line where the sea meets the lighter sky. This suggests distant mountains or waves. -
Add mountain details:
With a medium round brush and dark grey or black paint, define the silhouette of the distant mountains more clearly against the lighter horizon glow. -
Paint water ripples:
Load a fine liner brush with thin white paint. Paint thin, horizontal dashes across the dark water area. Vary the length of the strokes to mimic light reflecting on gentle waves.
Step 3: Celestial Details
-
Outline the crescent moon:
Using a round brush loaded with creamy white paint, carefully draw a ‘C’ shape on the upper left side of the belly. Determine the thickness you want before filling it in. -
Fill the moon:
Fill inside your outline with solid white paint. I like to let this dry briefly and add a second coat if the blue background shows through too much. -
Add crater texture:
Mix a tiny bit of grey paint. Lightly stipple or streak faint textures onto the white moon to give it a realistic, cratered appearance rather than a flat sticker look. -
Paint large hero stars:
choose 3-5 spots for your largest stars. Use the fine liner brush and white paint to draw five-pointed stars. Start with an ‘A’ shape without the crossbar, then connect the points. -
Add distant stars:
Dip the back end of your paintbrush (the wooden handle) into white paint. Dot it gently onto the dark blue sky to create perfectly round, medium-sized stars. -
Create stardust:
For the tiniest stars, use the very tip of your smallest brush to make tiny pinprick dots. Group some together to look like constellations. -
Final highlights:
Add a few tiny white sparkles or dots to the water area to connect the sky reflection to the sea below.
Starry Splatter Trick
For a magical galaxy effect, load a toothbrush with watered-down white paint and flick the bristles with your thumb to spray tiny stars effortlessly.
Enjoy this peaceful moment bonding with baby while creating a beautiful piece of art
Train “Delivering” Baby Boy

All aboard for this charming, vintage-inspired belly painting that features a cheerful steam engine chugging across a soft, pastel landscape. The gentle blue-green background and illustrative details create a storybook feel perfect for welcoming a baby boy.
Step-by-Step Tutorial
Materials
- Body paints (Pale sage/blue, white, grey, brown, rustic red, orange, dark blue)
- Large sponge for background coverage
- Fine liner brushes (Size 0 or 1)
- Medium round brush (Size 4 or 6)
- Small flat brush
- Cup of water
- Paper towels
- Baby wipes (for cleanup)
- Soft cosmetic glimmer or shimmer powder (optional)
Step 1: Setting the Scene
-
Prepare the canvas:
Ensure the skin is clean, dry, and free of oils or heavy lotions to help the paint adhere properly. -
Base coat application:
Dampen your large sponge and load it with a pale sage or soft blue-green body paint. Gently pat this color over the entire belly. -
Smooth coverage:
Continue sponging until you have an even, opaque circle that covers the main surface of the bump, fading slightly at the edges. -
Initial sketch:
Using a very fine brush and a diluted light brown or grey paint, very faintly sketch the outline of your train track curve and the boxy shapes of the carriages. This acts as your roadmap.
Smudge Control
If you smudge a line, don’t wipe it! Wait for it to dry completely, then paint over it with the background color before trying the line again.
Step 2: Constructing the Train
-
Painting the caboose:
Start from the left with the caboose. Fill the rectangular shape with a soft teal or blue paint using a small flat brush. -
Painting the engine:
Move to the center-right to block in the engine shape with the same blue tone, adding the tall smokestack. -
Adding carriage details:
Fill the passenger carriage behind the engine with a warm, rustic terracotta or orange paint. Leave small circles or squares empty for windows. -
Window work:
Once the base colors are dry to the touch, fill the window spaces with white or pale yellow. -
Wheels and motion:
Use a dark grey or charcoal paint to add the round wheels along the bottom of all train cars. I like to keep them slightly imperfect to maintain that hand-drawn look. -
Connecting the cars:
Draw the connecting hitches and the base platform of the train with a thin line of brown paint.
Step 3: Fine Lines & Atmosphere
-
Outlining everything:
Load your finest liner brush with black or very dark grey paint. Carefully outline the entire train, wheels, and windows to give it that crisp illustration style. -
Puffing smoke:
Above the smokestack, dab white paint in a billowing, vertical cloud shape. Once dry, outline it with wiggly black lines and add small ‘c’ shapes inside for texture. -
Distant clouds:
Add a smaller, singular white cloud near the top right of the belly and outline it in the same illustrative style. -
Growing foliage:
Using a medium round brush and a darker shade of teal or sage, paint long, fluid vines climbing up the left side of the belly. -
Leaf details:
Add smaller leaves to your vines and a few tufts of grass near the train wheels using quick, flicking stokes. -
Starry accents:
Paint a few simple five-point stars in muted orange or gold scattered around the sky area. -
Final flourish:
Add tiny clusters of orange dots and small flower shapes near the grass to tie the color palette together.
Add a Passenger
Personalize the train by painting a tiny silhouette of a teddy bear or a baby in the engine window as the conductor.
Now you have a moving masterpiece that celebrates the journey of pregnancy
Loading Bar: Boy Arriving Soon
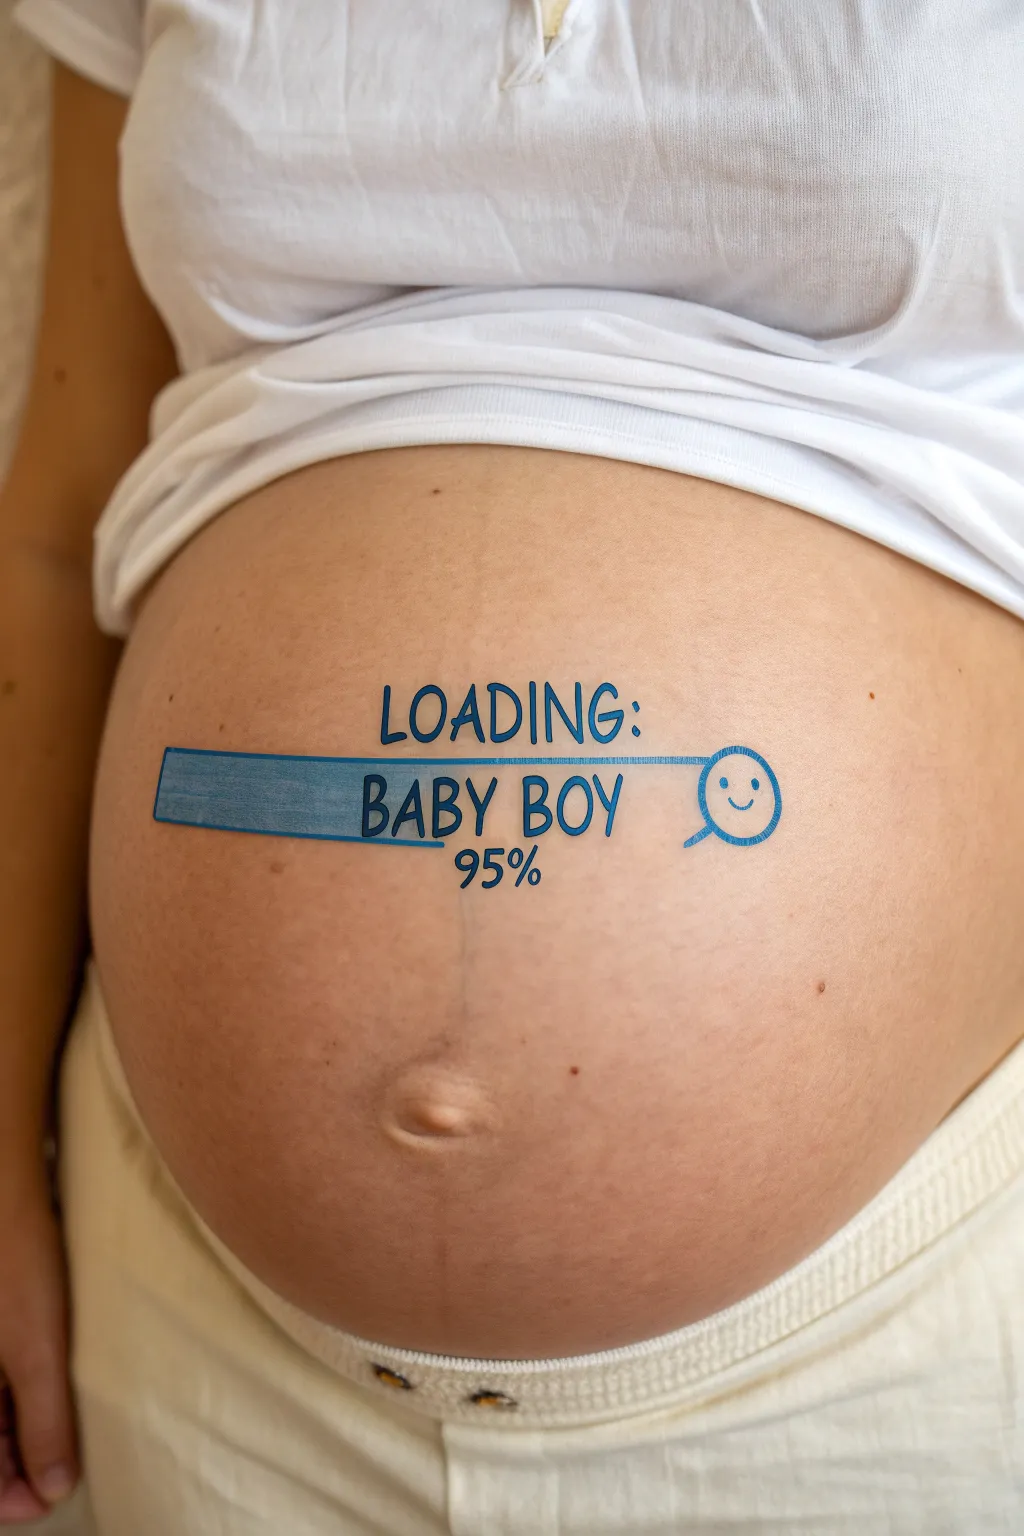
Celebrate the final countdown with this playful and humorous belly painting design that mimics a computer loading screen. Using skin-safe body paints, you’ll create a crisp blue progress bar announcing the imminent arrival of a baby boy.
Step-by-Step
Materials
- Water-based body paint (blue, white, black)
- Flat brush (medium size, approx. 1/2 inch)
- Fine liner brush (size 0 or 00)
- Small round brush (size 2 or 3)
- Cup of water
- Paper towels or soft cloth
- Baby wipes (for quick corrections)
- Optional: White eyeliner pencil (for sketching)
Step 1: Preparation and Sketching
-
Clean the canvas:
Begin by gently wiping the belly area with a baby wipe or a damp cloth to remove any oils or lotions. This ensures the paint adheres smoothly and lasts longer. -
Find the center:
Visualize the center of the bump, usually around the navel area. This is where your main progress bar will sit horizontally. -
Sketch the outline:
Using a white eyeliner pencil or a very pale wash of paint on a liner brush, lightly sketch a long, narrow rectangle across the belly button. Don’t worry about perfection; this is just a guide. -
Draft the text placement:
Above the bar, lightly mark where the word “LOADING:” will go. Below or inside the bar area, mark out “BABY BOY” and the percentage “95%” underneath.
Step 2: Painting the Progress Bar
-
Outline the bar:
Load your fine liner brush with blue body paint. Carefully trace over your sketched rectangle lines to create a crisp border for the progress bar. -
Create the rounded icon:
At the right end of the rectangle, draw a circle connected to the bar. This will become the smiley face download icon shown in the design. -
Fill the progress:
Switch to your flat brush and load it with blue paint. Fill in the rectangle, starting from the left and moving right. Leave a small gap of unpainted skin before the circle to show that the ‘loading’ isn’t quite 100% yet. -
Texture the bar:
For a slightly digital or textured look, you can dab the wet paint lightly with a sponge or dry brush, rather than painting perfectly smooth strokes. This gives it that ‘filling up’ appearance. -
Paint the icon outline:
Using the liner brush with blue paint, go over the circle outline again to thicken it slightly so it matches the visual weight of the bar. -
Add the smiley face:
With the fine liner brush and blue paint, draw two small dots for eyes and a simple curved line for a smile inside the circle icon.
Smudged Lines?
If a line goes rogue, wait for the paint to dry completely. Then, use a slightly damp Q-tip to gently erase the mistake like an eraser before repainting.
Step 3: Adding Typography
-
Lettering “LOADING:”:
Using the fine liner brush and blue paint, carefully write “LOADING:” in capital letters above the center of the bar. Try to keep the font simple and sans-serif for a tech look. -
Lettering “BABY BOY”:
Beneath the bar (or overlapping the filled section if you prefer), paint “BABY BOY” in the same blue tone. Keep your hand steady and use your pinky finger as a pivot point on the skin for stability. -
Adding the percentage:
Below “BABY BOY,” paint the number “95%” aligned with the text above. You can adjust this number based on how far along the pregnancy actually is.
Make It Pop
Add a thin white shadow line to the right and bottom of text and the bar. This simple trick makes the blue design look like it’s floating slightly off the skin.
Step 4: Final Touches
-
Clean up edges:
Dip a clean, damp brush or a cotton swab in water to sharpen any fuzzy edges on your lettering or the rectangular bar. -
Enhance text contrast:
I like to go back over the letters with a second coat of blue if the first layer looks a bit transparent, ensuring the text is bold and readable in photos. -
Highlighting (Optional):
If you want a 3D effect, mix a tiny bit of white into your blue paint. Add a very thin highlight line along the top edge of the progress bar. -
Dry and set:
Allow the paint to dry completely for about 5 to 10 minutes. Advise the model to avoid touching the design or pulling clothes over it immediately.
Snap a few photos of this adorable status update before washing it off with warm soapy water
Under Construction: Baby Boy
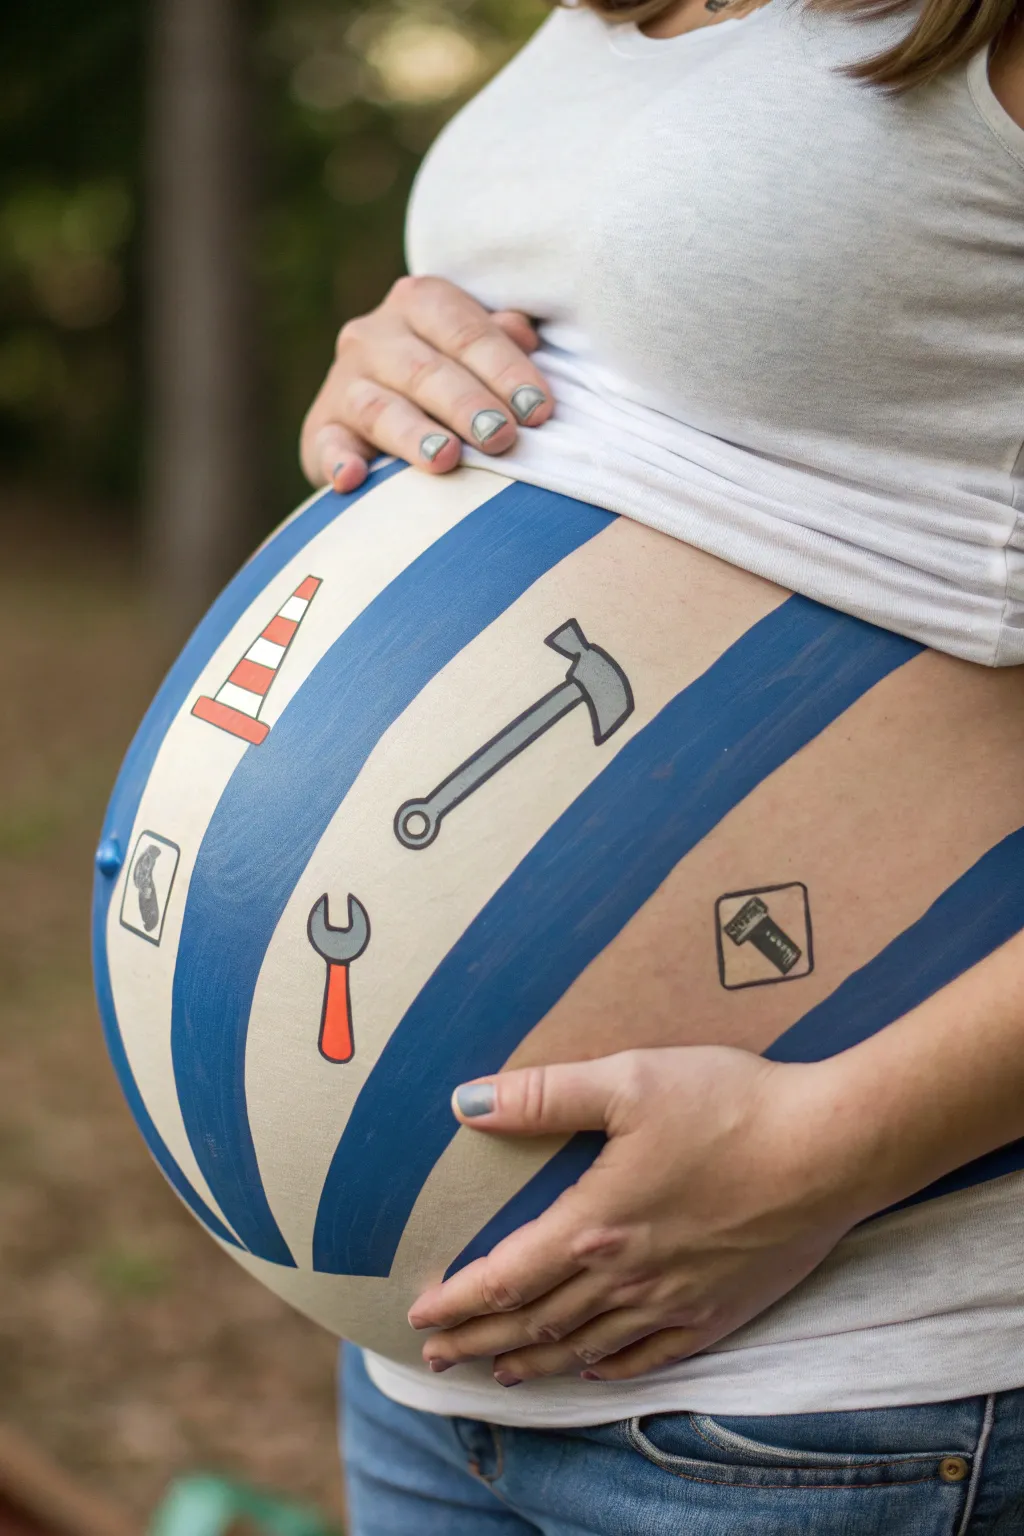
Transform your baby bump into a cute construction zone with this playful ‘work in progress’ design. Featuring classic blue stripes and adorable tool icons, this belly painting is perfect for a boy-themed baby shower or maternity photo shoot.
How-To Guide
Materials
- White face paint (water-based)
- Medium blue face paint (water-based)
- Orange face paint
- Grey face paint
- Black face paint (for outlining)
- Wide flat brush (for base and stripes)
- Medium round brush
- Small liner brush (size 0 or 1)
- Spray bottle with water
- Pencil eyeliner (optional, for sketching)
- Baby wipes (for cleanup)
Step 1: Preparing the Canvas
-
Clean and comfy:
Ensure the skin is clean and free of heavy lotions, as oils can make the paint streak. Have the mom-to-be sit in a comfortable, reclined position since this process might take about 30-40 minutes. -
Mixing the base tone:
The background isn’t pure white; it’s a soft cream. On your palette, mix a large amount of white face paint with just a tiny drop of orange or yellow to warm it up. Test the color on your hand first to ensure it’s a nice off-white. -
Applying the base layer:
Using a wide flat brush or a gentle sponge, cover the entire front of the belly with your cream mixture. Use smooth, circular motions to blend it out toward the sides of the waist so there are no harsh edges. -
Let it dry:
Allow this base layer to dry completely. It should feel dry to the touch, not tacky, before you proceed to the next step to prevent colors from muddying together.
Step 2: Laying the Foundation
-
Sketching the layout:
Before committing to paint, lightly sketch your diagonal lines using a light blue or white eyeliner pencil. Plan for thick blue stripes alternating with the cream background. -
Painting the blue stripes:
Load your wide flat brush with medium blue face paint. Carefully follow your sketched lines to create the thick diagonal stripes. I find it helpful to paint the edges of the stripe first and then fill in the center for a cleaner look. -
Smoothing texture:
If the blue paint looks uneven, wait for the first coat to dry slightly and apply a second thin coat. Aim for opacity so the cream color underneath doesn’t show through the blue.
Uneven Lines?
If your stripes end up wobbling, don’t wipe them off. Thicken the line slightly to correct the curve, or use the cream base paint to ‘cut in’ and straighten the edge once dry.
Step 3: Adding the Tools
-
Planning the icons:
Space out where your four main icons will go: a traffic cone, a hammer, a wrench, and two small diamond signs. They should sit in the cream-colored spaces between the blue stripes. -
Traffic cone base:
For the cone, use a medium round brush and orange paint. Paint a rounded triangle shape, and add a small white stripe near the top and bottom of the triangle. -
The hammer time:
Mix a light grey using white and a touch of black. Paint the hammer head (a rectangle with a curved claw) and a long handle. Keep the shapes simple and cartoon-like. -
Wrench details:
Paint the handle of the wrench in orange (or red). At the top, switch to grey to paint the ‘C’ shaped open-ended head. Add a small circle at the bottom of the handle for the hanging hole. -
Signage shapes:
For the road signs, paint simple grey or black outline squares rotated to look like diamonds. Inside the diamonds, paint tiny silhouettes—one looks like a boot comfortably resting, and the other a digging shovel.
Pro Tip: Sticker Hack
Not confident drawing tools? You can actually use high-quality temporary tattoos or skin-safe stickers for the icons instead of painting them by hand.
Step 4: Finishing Touches
-
Outlining the construction:
This step makes the design pop. Using your finest liner brush and black paint with a creamy, ink-like consistency, carefully outline all your tools and signs. -
Cone definition:
Add a thin black outline around the traffic cone and define the base platform underneath it. -
Hammer handle:
Outline the hammer. You can add a darker grey stripe down the center of the handle to give it a rubber grip appearance like in the reference image. -
Final clean up:
Look over the design for any smudges. Use a damp Q-tip or a brush with a tiny bit of fresh base color to erase any small mistakes.
Enjoy capturing some memorable photos of this creative construction zone before baby arrives
Crown and “Our Little Prince”
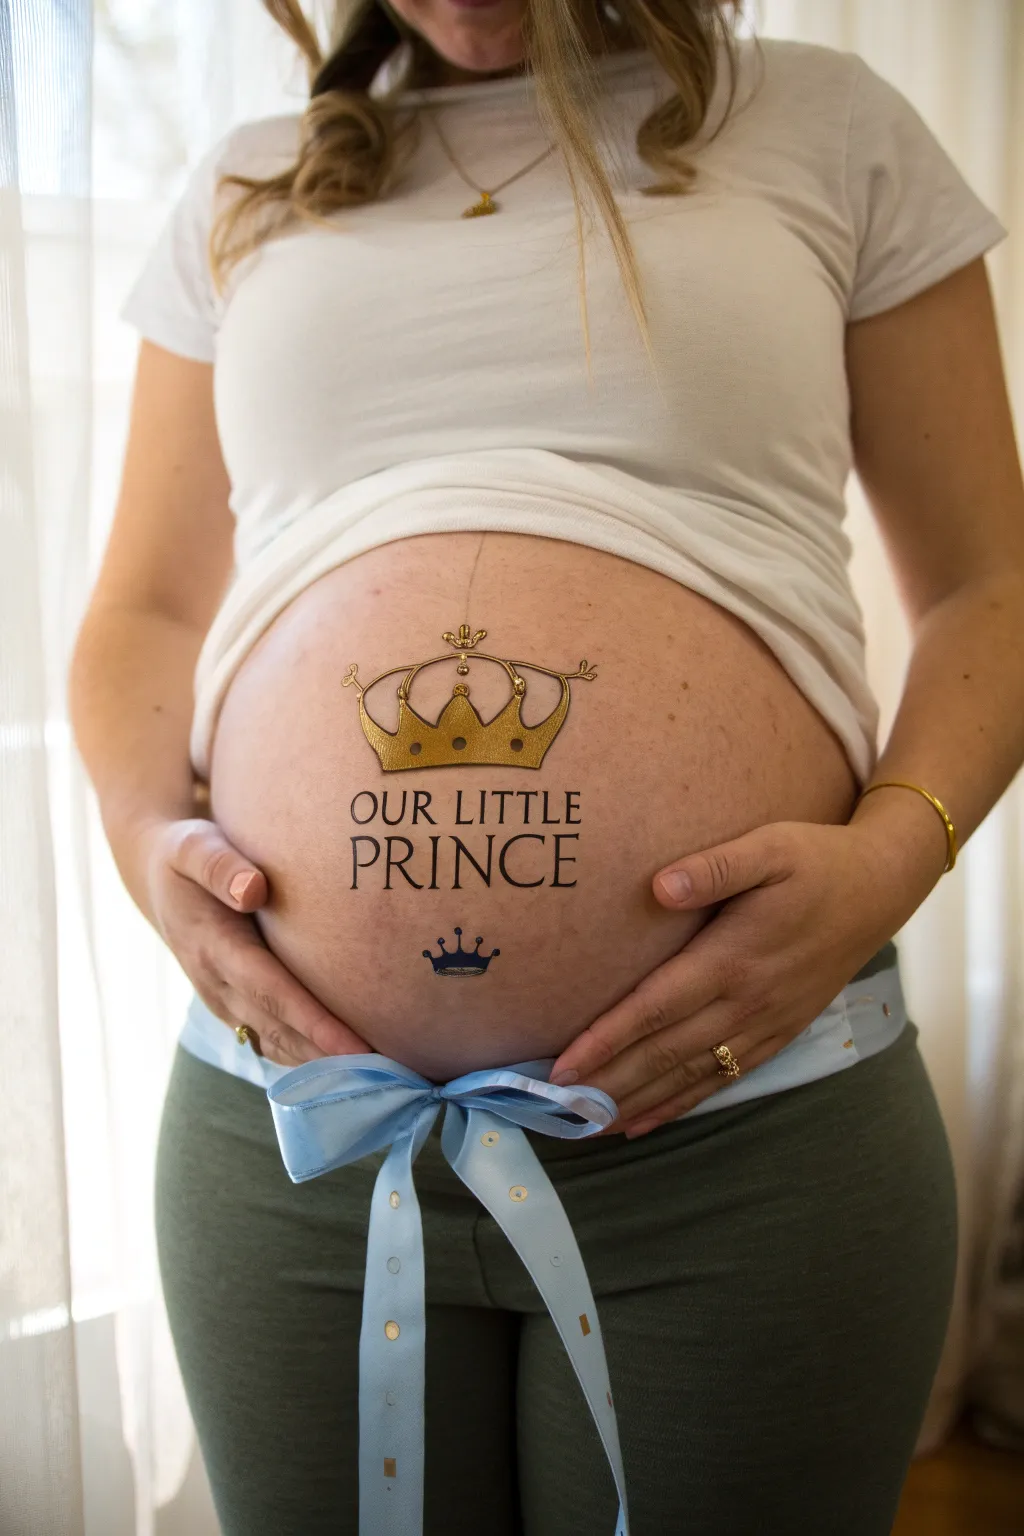
Celebrate your little one’s impending arrival with this elegant and classic design featuring regal gold crowns and bold typography. While it looks like a temporary tattoo, you can recreate this stunning look with body paint for a personalized maternity photoshoot.
Step-by-Step Tutorial
Materials
- Water-activated body paints (metallic gold, black, navy blue)
- Small round detail brush (size 1 or 2)
- Medium round brush (size 4)
- Flat brush (optional, for filling gold)
- Light blue satin ribbon (approx. 2 inches wide)
- Baby wipes or cotton swabs (for cleanup)
- Skin-safe pencil eyeliner (brown or nude)
- Small spray bottle with water
Step 1: Planning and Sketching
-
Prepare the canvas:
Ensure the belly skin is clean, dry, and free of lotions or oils, as these can cause the body paint to separate or slide. -
Mark the center:
Using your belly button as a central guide, lightly sketch a vertical centerline with your skin-safe eyeliner pencil to help align the text and crowns. -
Draft the text placement:
Lightly sketch the words “OUR LITTLE” in an arc or straight line just above the belly button area, and “PRINCE” in larger block letters directly below it. -
Outline the main crown:
Above the text, sketch the large crown shape. Start with the base curve, then add the outer swoops and the central arch to create that classic royal silhouette. -
Sketch the mini crown:
Draw a much smaller, simple crown shape below the word “PRINCE” to balance the design.
Troubleshooting Shaky Lines
If your hands are shaky, anchor your pinky finger gently on a dry part of the belly to stabilize your hand while painting fine details.
Step 2: Painting the Crowns
-
Mix the gold paint:
Activate your metallic gold body paint with a spritz of water until it reaches a creamy, opaque consistency. -
Fill the large crown:
Using your medium round brush or flat brush, fill in the entire shape of the large top crown with the gold paint. -
Let it dry:
Allow the gold paint to dry completely for a minute or two; painting black details over wet gold will result in muddy gray smears. -
Add basic definition:
Using a size 1 detail brush and black paint, carefully outline the exterior of the gold crown. -
Detail the jewels:
Paint small circular shapes and teardrops inside the gold crown with your thin black brush to mimic the look of jewels and structural bands. -
Top embellishment:
Add a tiny cross or fleur-de-lis shape at the very top point of the main crown using the black detail brush. -
Paint the bottom crown:
For the tiny crown at the bottom, use navy blue paint instead of gold to fill the shape, then outline it thinly with black once dry.
Level Up: Gemstones
Use skin-safe eyelash glue to adhere small, flat-backed rhinestones onto the gold crown points for a 3D sparkling effect.
Step 3: Lettering and Finishing Touches
-
Lettering the top row:
Load your detail brush with black paint. Carefully go over your sketch for “OUR LITTLE,” using a serif font style (adding little feet to the letters) for a sophisticated look. -
Lettering the main word:
Paint the word “PRINCE” in larger letters. I find it helpful to paint the middle letter first and work outward to keep the spacing even. -
Sharpen edges:
If any lines look fuzzy, use a damp cotton swab to gently clean up the edges of the letters or the crowns. -
Prepare the ribbon:
Cut a long length of light blue satin ribbon, ensuring it is long enough to wrap around the lower back and tie comfortably. -
Tie the bow:
Position the ribbon under the painted belly area and tie a neat bow slightly off-center or directly in the middle, letting the tails hang down naturally.
Step back and admire your regal masterpiece before capturing the moment
Blue Mandala With Boy Initial
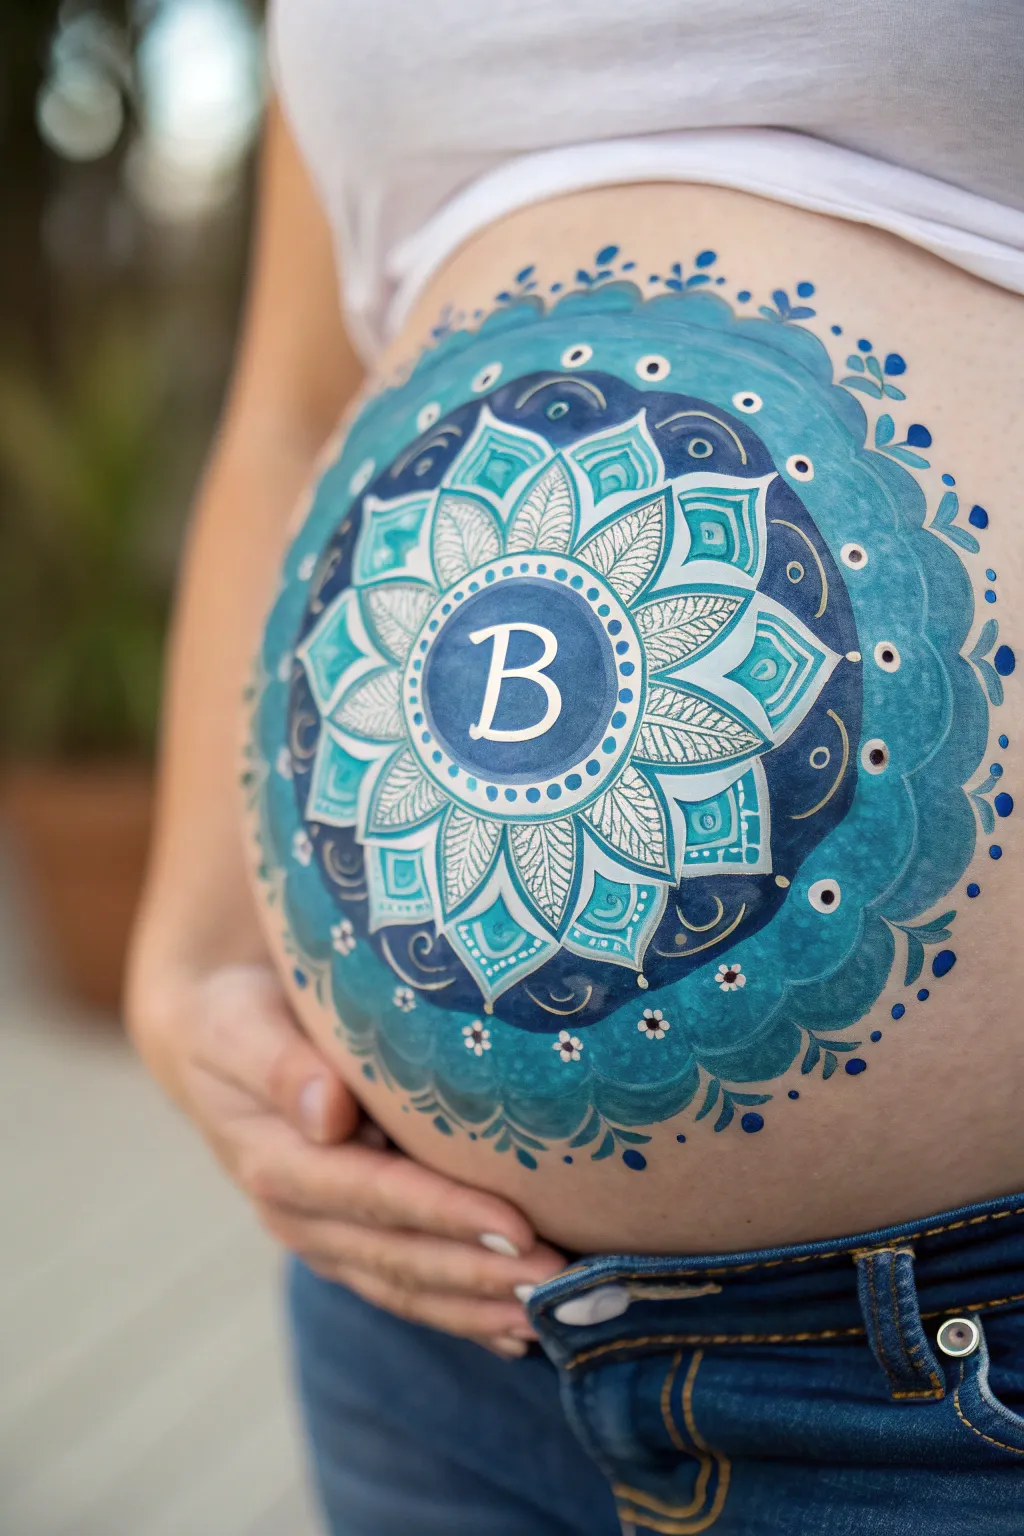
Celebrate your baby boy with this stunning, intricate mandala design featuring calming shades of ocean blue and teal. At its heart sits a personalized initial, surrounded by petal details and dotted accents that make the belly look like a blooming work of art.
Detailed Instructions
Materials
- FDA-approved water-based face/body paints (Dark Navy Blue, Teal/Turquoise, Sky Blue, White)
- Small spray bottle with water
- High-density sponge (cut in half)
- Round brushes (sizes #2, #4, and #6)
- Flat brush (3/4 inch)
- Baby wipes (for cleanup)
- Stencil for initial (optional)
Step 1: Setting the Background
-
Prepare the canvas:
Ensure the skin is clean and dry; do not apply lotion beforehand as it prevents the paint from adhering properly. -
Map the center:
Using a #2 round brush and very pale blue paint, mark a small dot exactly on the belly button or just slightly above it to serve as your central anchor point. -
Create the central circle:
Load a #6 round brush with solid dark navy blue. Paint a smooth, perfect circle about 3 inches in diameter around your center point, ensuring full coverage. -
Add the inner ring:
Switch to white paint on a #4 brush. Immediately inside the navy circle’s border, paint a thin, consistent white ring to define the space where the letter will go. -
Paint the initial:
With a #4 brush and creamy white paint, carefully paint your chosen initial in the center of the navy circle. I like to use a serif font style (like Times New Roman) for a classic look.
Wobbly Lines?
Rest your pinky finger gently on a dry part of the belly to stabilize your hand while painting fine details. It works like a kickstand for steadier lines.
Step 2: Layering the Mandala Petals
-
First petal layer:
Mix a vibrant teal color. Using a #6 brush, paint a ring of pointed, leaf-shaped petals radiating outward from the central navy circle. -
Outline the first petals:
Using white paint and a #2 brush, carefully outline each teal petal to make them pop against the skin. -
Add internal vein details:
Still using the fine #2 brush and white paint, add delicate cross-hatching or vein lines inside every other petal for intricate texture. -
Second petal layer:
Load a #6 brush with a lighter sky blue. Paint a second, larger layer of petals in the gaps between the teal petals (the negative space), creating a nested flower effect. -
Add geometric frames:
Surrround the petal tips with a thick band of teal paint that follows the scalloped shape of the flower, creating a continuous wavy border around the design. -
Detail the border:
Inside this teal band, use your fine brush to add small white squares or geometric lines to mimic lace or jewelry patterns.
Step 3: Outer Rings and Flourishes
-
Create the dark background ring:
Using a sponge or large flat brush, apply a broad, soft ring of dark navy blue around the entire existing flower. Fade the outer edge slightly for a softer look. -
Paint large outer scallops:
With a medium blue or teal, paint large, rounded scallops over the navy background ring. These should be the largest petals yet, framing the whole piece. -
Outline and define:
Outline these large outer scallops with a thin line of lighter blue or white to separate them from the navy background. -
Add the dot work:
This is crucial for the mandala look. Using the back end of your paintbrush dipped in white paint, stamp dots of varying sizes along the borders of the central circle and outer rings. -
Draw hanging charms:
At the very bottom and sides of the design, paint small tear-drop shapes or tiny three-dot clusters that look like jewelry hanging from the main mandala. -
Final highlights:
Add tiny starbursts or sparkles (a cross with a dot in the middle) in white on the darkest parts of the blue to add dimension and shine. -
Clean edges:
Use a baby wipe wrapped around your finger to clean up any smudges around the outer perimeter for a sharp, professional finish.
Add Glitter
While the white paint on text or dots is still slightly damp, puff a tiny bit of cosmetic-grade iridescent glitter onto it for a magical shimmer.
Take a moment to admire the beautiful symmetry you have created on the baby bump


Have a question or want to share your own experience? I'd love to hear from you in the comments below!