If you’ve got an empty paint bucket hanging around, you’re sitting on one of my favorite blank canvases for upcycling. Let’s turn that practical, kind-of-ugly container into something you’ll actually want to display (and use) every day.
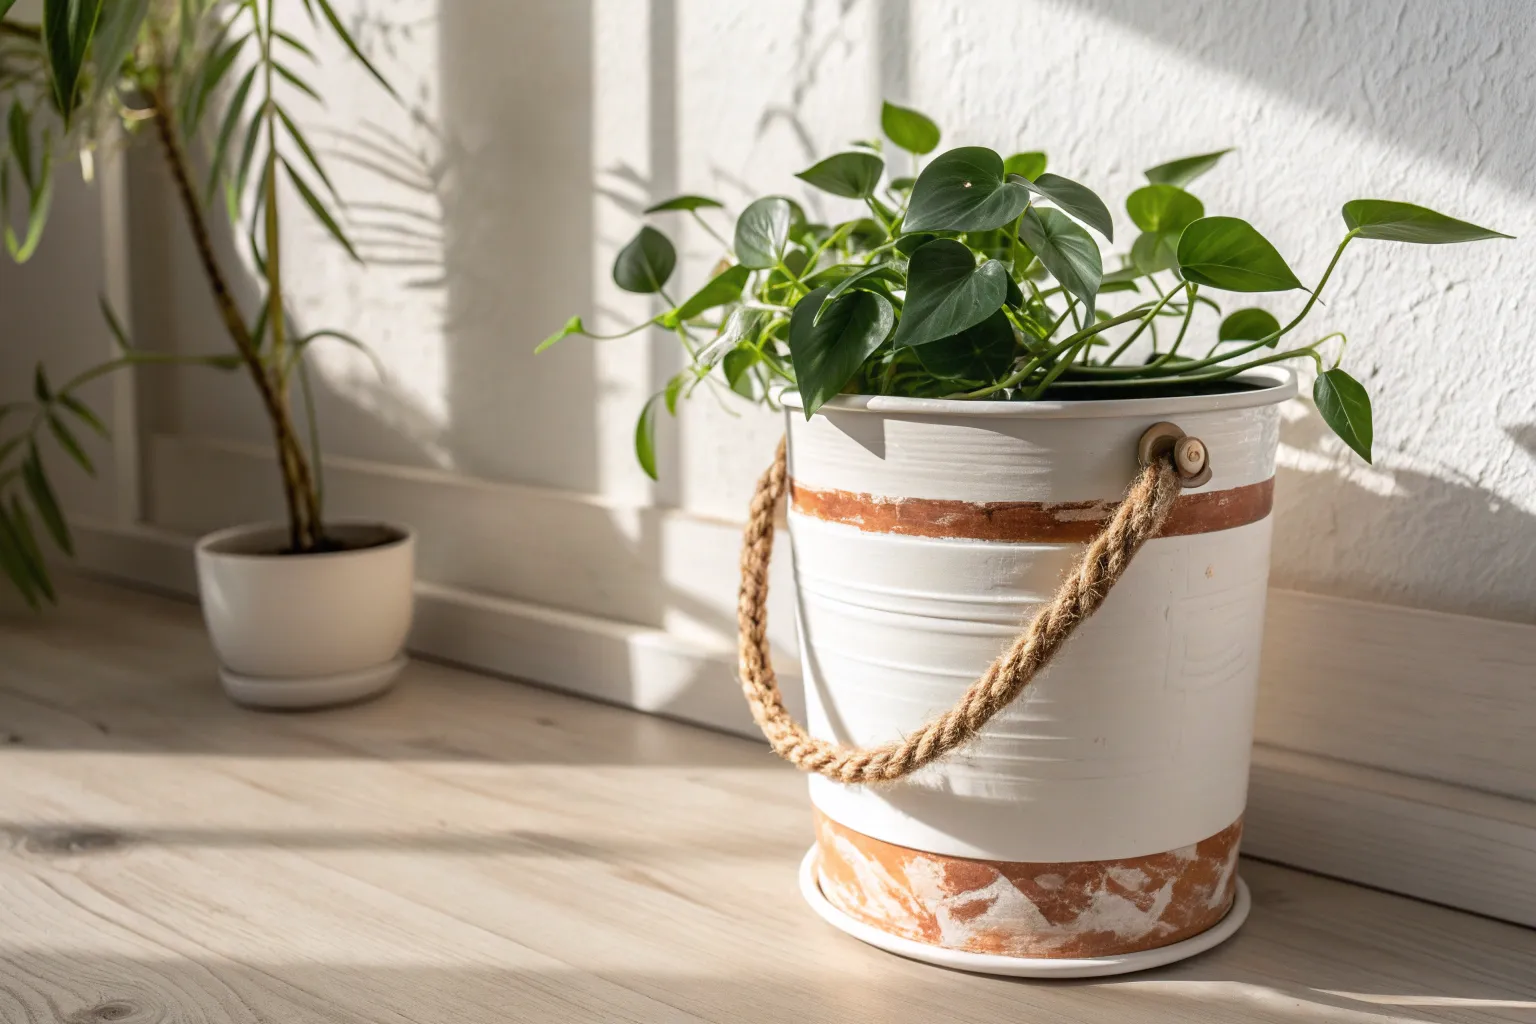
Rope-Wrapped Paint Bucket Planter
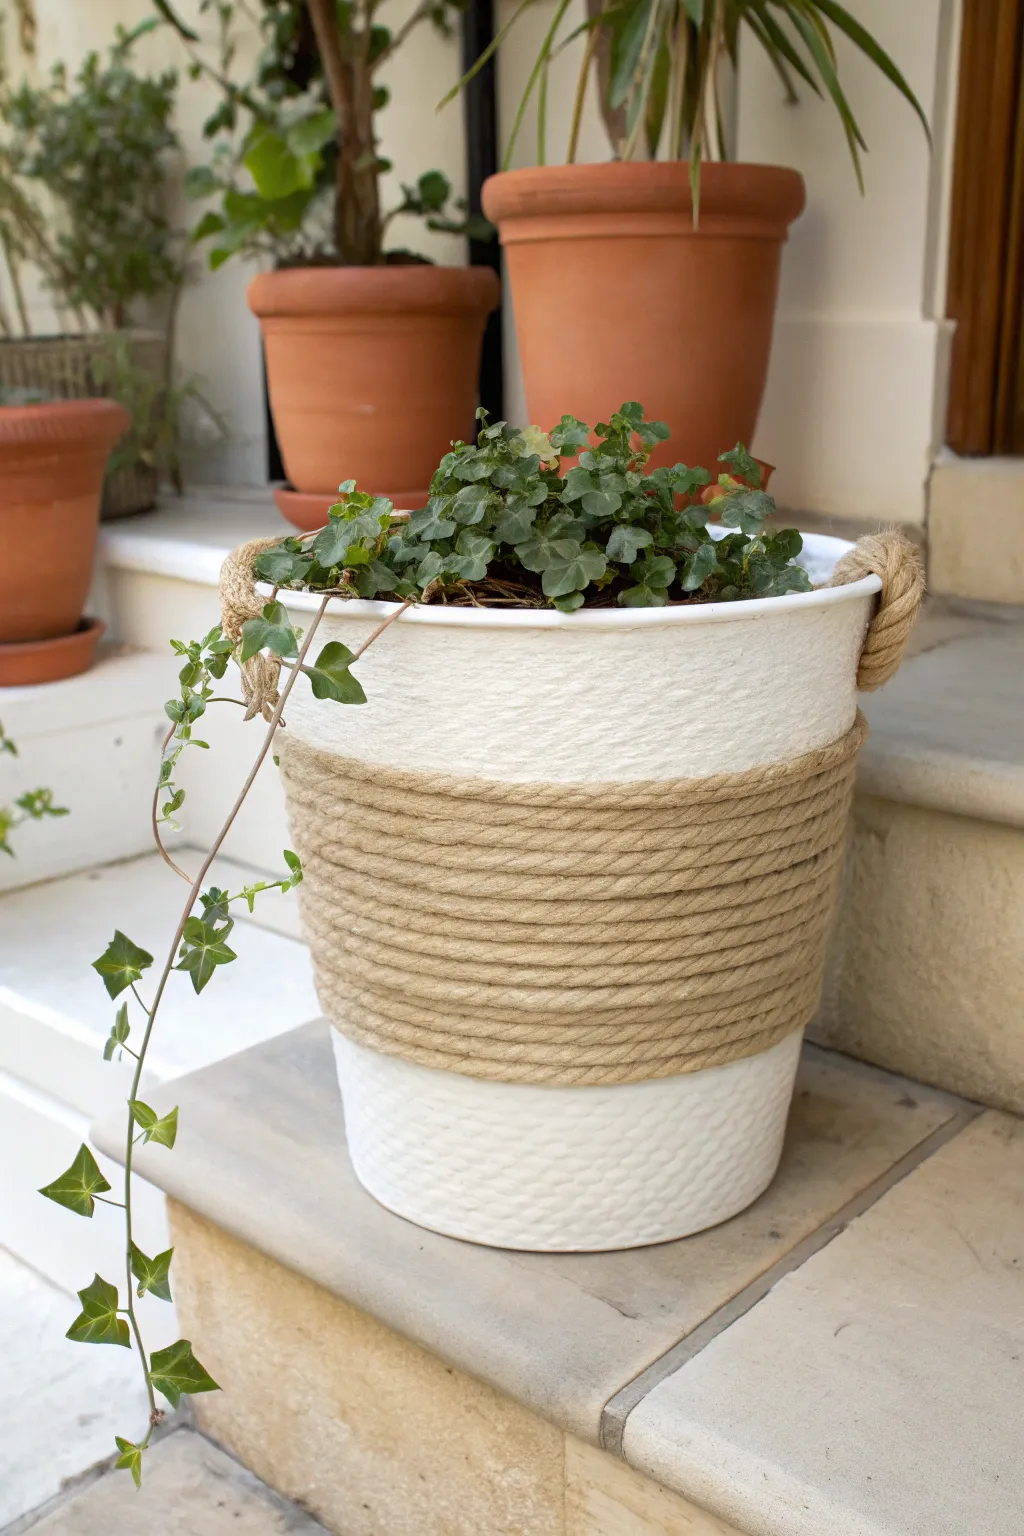
Transform an ordinary plastic paint bucket into a chic, nautical-inspired planter perfect for porch steps or corners. This project combines a clean, textured white finish with earthy jute accents for a timeless look that flatters trailing greenery.
How-To Guide
Materials
- Clean plastic paint bucket (empty)
- White spray paint (textured or stone-effect preferred)
- Thick jute rope (approx. 1/2 inch diameter)
- Hot glue gun and heavy-duty glue sticks
- Scissors or utility knife
- Sandpaper (medium grit)
- Drill with large bit (for drainage holes)
- Painter’s tape (optional)
- Potting soil and trailing plant (like ivy)
Step 1: Preparing the Base
-
Clean the bucket:
Start with a thoroughly cleaned paint bucket. If there is dried paint inside, that’s fine, but the outside must be free of grease, sticker residue, or loose dirt. -
Remove the handle:
Pop off the original wire or plastic handle. You won’t need it for this design, and it often gets in the way of painting. -
Sand the surface:
Scuff up the smooth plastic exterior with medium-grit sandpaper. This creates a rougher surface -
Create drainage (optional):
If you plan to plant directly into the bucket rather than using it as a cachepot, flip it over and drill 4-5 drainage holes in the bottom.
Tidy Rope Ends
Before gluing cut rope ends, wrap a tiny piece of masking tape around the spot you plan to cut. Cut through the tape to prevent fraying.
Step 2: Painting the Texture
-
First coat:
In a well-ventilated area, apply the first coat of white spray paint. A textured or stone-effect spray paint works best here to mimic the look of ceramic or stone. -
Observe and dry:
Let this coat dry completely according to the can’s instructions. Don’t worry about full coverage yet; thin layers prevent drips. -
Second coat:
Apply a second, heavier layer to ensure the original bucket color is completely hidden. -
Full cure:
Allow the paint to cure fully—I usually give it at least 24 hours so the paint doesn’t scratch off when we start wrapping the rope.
Step 3: Adding the Rope Wrap
-
Mark your centerline:
Decide where you want the rope band to sit. Measuring about one-third of the way up from the bottom usually creates a nice visual balance. -
Secure the start:
Apply a generous dab of hot glue at your starting point and press the raw end of the jute rope firmly against the bucket. Hold it for a few seconds until the glue sets. -
Begin winding:
Start wrapping the rope horizontally around the bucket. Apply a line of hot glue every few inches to keep the rope secure against the plastic. -
Keep it tight:
Push each new row of rope strictly against the previous one. Gaps will show the bucket underneath, so snug fits are essential. -
Create the band:
Continue wrapping until you have a band about 4-5 inches wide (or roughly 8-10 rows of rope). The width is up to you, but a substantial band looks sturdier. -
Finish the wrap:
Cut the rope at an angle so the end tapers slightly. Glue it down firmly, ideally positioning the cut end on the ‘back’ side of the planter near where you started.
Nautical Upgrade
For a coastal vibe, tie simple overhand knots in the middle of your handle ropes before gluing them down for added texture.
Step 4: Creating the Rope Handles
-
Cut handle pieces:
Cut two pieces of rope, roughly 8 inches long each, to serve as the decorative side handles. -
Glue the first side:
Determine the placement on the rim. Glue one end of a rope piece just under the top lip of the bucket. Use plenty of glue here. -
Form the loop:
Loop the rope upward and over slightly to create a U-shape, then glue the other end about 3 inches away from the first attachment point. -
Repeat opposite:
Repeat this process on the exact opposite side of the bucket for symmetry. Note that these are decorative handles only; don’t lift the full planter by them. -
Planting:
Fill your new planter with soil and add a trailing plant like ivy or pothos for a beautiful contrast against the white texture.
Now you have a custom planter that looks high-end for a fraction of the cost


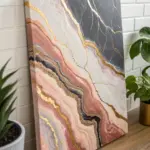
Paint-Drip Rim Flower Pot

Transform a plain white utility pail into a rustic-chic centerpiece with this deceptively simple paint-drip technique. By letting gravity do the work, you create an organic, artistic rim that beautifully contrasts the clean industrial metal with warm, earthy tones.
Detailed Instructions
Materials
- Clean white metal bucket or pail with handle
- Terracotta or copper-colored acrylic craft paint (satin finish recommended)
- Squeeze bottle or disposable cup with spout
- Cardboard or drop cloth (for catching mess)
- Damp cloth or paper towels
- Clear matte sealant spray (optional)
- Floral foam or chicken wire (for arrangement)
- Fresh ranunculus and eucalyptus stems
Step 1: Preparing the Canvas
-
Clean surface:
Begin by thoroughly wiping down the exterior of your white metal bucket. Remove any manufacturing grease, stickers, or dust using a damp cloth and a mild soap solution if necessary. -
Dry completely:
Ensure the bucket is absolutely dry before proceeding. Any moisture will prevent the paint from adhering properly to the smooth metal surface. -
Setup workspace:
Place a large piece of cardboard or a heavy drop cloth on your table. This project is intentionally messy, as paint will be dripping off the bucket, so protect your work surface well.
Drips won’t stop?
If paint is too runny and hitting the table, wait 5 minutes for it to tack up, then gently wipe away the excess bottom tails with a Q-tip to shorten them neat.
Step 2: Creating the Drip Effect
-
Mix paint consistency:
Check your terracotta acrylic paint. It needs to be fluid enough to flow but thick enough to hold a drip shape. If it’s too thick, add a few drops of water or pouring medium; I find a consistency similar to warm honey works best here. -
Load the paint:
Pour your prepared paint into a squeeze bottle for precise control, or use a disposable cup with a pinched rim to create a makeshift spout. -
Start the rim:
Position the nozzle or cup at the very top edge of the bucket. Slowly begin pouring a thick bead of paint all the way around the rim. -
Initiate drips:
As you move around the circumference, pause periodically and squeeze slightly harder (or pour a bit more) in specific spots to encourage the paint to overflow and run down the sides. -
Vary the lengths:
Create visual interest by varying the amount of paint you release. Use more paint for long, dramatic drips that reach halfway down the bucket, and less paint for short, subtle drips. -
Smooth the connection:
Look at the top horizontal band of paint. Use a brush or your finger (gloved) to gently smooth out the paint connection around the rim so there is a solid band of color connecting all your drips. -
Let gravity work:
Back away and let the bucket sit undisturbed. The paint will continue to travel down slowly for several minutes. Do not touch the drips while they are moving.
Paint Mixing Hack
Mix baking soda into your acrylic paint before pouring. It creates a textured, ceramic-like finish that makes the ‘terracotta’ look even more realistic.
Step 3: Finishing Touches
-
Clean adjustments:
If a drip runs too far or looks messy at the bottom, promptly wipe it up with a damp paper towel before it sets, but try to leave the natural path intact for authenticity. -
Dry thoroughly:
Allow the bucket to dry completely. Because the paint is applied thickly in the drips, this may take 24 hours or more. Don’t rush this step or you risk smudging the texture. -
Seal:
Once fully cured, lightly mist the exterior with a clear matte sealant spray to protect the paint from chipping, especially if you plan to move the bucket often.
Step 4: Styling the Arrangement
-
Insert mechanics:
Place a soaked block of floral foam or a ball of chicken wire inside the bucket to support your stems. -
Add greenery:
Start by inserting stems of eucalyptus around the perimeter, letting some drape over the painted edge to soften the look. -
Place focal flowers:
Cut white and pale pink ranunculus stems at varying heights. Cluster the larger blooms near the center and allow smaller buds to stick out further. -
Fill gaps:
Fill in any empty spaces with smaller foliage or sprigs of seeds to create a lush, overflowing appearance. -
The final touch:
For a casual, styled look, lay a single cut flower stem on the table next to the base of your new planter.
Enjoy the effortless beauty of your new art-inspired floral container.


Matte Painted Storage Bucket for Blankets
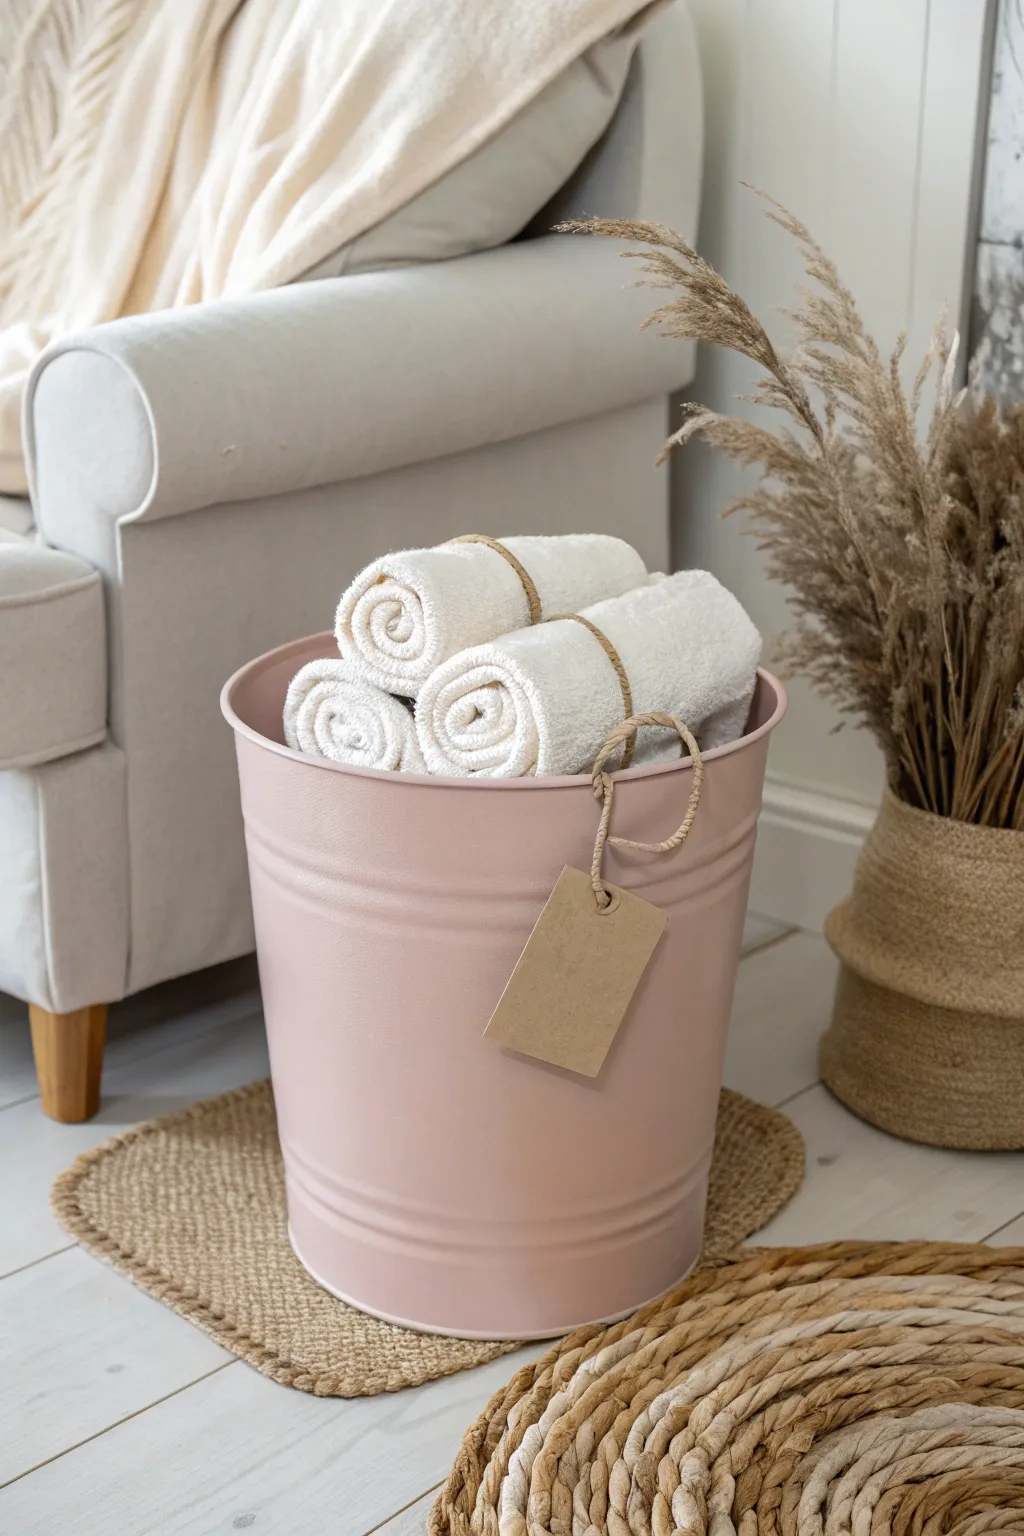
Transform an ordinary metal pail into a sophisticated storage solution with a soft matte finish that perfectly complements modern farmhouse or bohemian decor. This subtle blush-pink bucket is ideal for organizing rolled towels or cozy throw blankets in a stylish, understated way.
Step-by-Step
Materials
- Clean metal bucket (galvanized or smooth steel)
- Fine-grit sandpaper (220-grit)
- Rubbing alcohol and cloth
- Metal primer (spray or brush-on)
- Matte spray paint (Blush Pink or Soft Rose)
- Matte clear sealant spray
- Jute twine
- Kraft paper gift tag
- Scissors
- Drop cloth or cardboard
- Painter’s tape (optional, for masking handles)
Step 1: Preparation
-
Clean the Surface:
Begin by thoroughly cleaning the metal bucket with warm soapy water to remove any grease, dust, or sticker residue. Dry it completely with a lint-free cloth. -
Sand for Adhesion:
Lightly scuff the entire exterior surface of the bucket using 220-grit sandpaper. This creates a microscopic texture that helps the primer bond securely to the smooth metal. -
Final Wipe Down:
Wipe the sanded surface with a cloth dampened with rubbing alcohol. This removes sanding dust and oils, ensuring a pristine base for your paint. -
Protect the Interior:
If you want to keep the inside silver or original, stuff the bucket with newspaper or tape off the inner rim with painter’s tape to prevent overspray.
Step 2: Painting
-
Prime the Metal:
In a well-ventilated area, place your bucket upside down on a drop cloth. Apply a thin, even coat of metal primer. I find that using a primer specifically designed for metal prevents rust and chipping later on. -
Let Primer Cure:
Allow the primer to dry according to the manufacturer’s instructions, usually about 30 minutes to an hour. -
First Colour Coat:
Shake your matte blush pink spray paint vigorously. Hold the can 8-10 inches away and apply the first coat in light, sweeping motions. Don’t try to cover everything at once; transparency is okay for the first pass. -
Dry Time:
Wait about 15-20 minutes for the first coat to become tacky-dry before proceeding. -
Second Colour Coat:
Apply a second light coat, focusing on areas that look thin. Rotate the bucket as you work to ensure even coverage around the ribs and handle connection points. -
Inspect and Touch Up:
Check for any uneven spots. If a third light coat is needed to get that solid, opaque look, apply it now. A true matte finish relies on consistent coverage without drips. -
Seal the Finish:
Once the color is fully dry (usually 24 hours), apply a coat of matte clear sealant. This protects the paint from scratching when metal handles move or when loading items in and out.
Smooth Operator
For the smoothest matte finish, warm your spray paint can in a bowl of warm water for 5 minutes before spraying. This helps the paint atomize finer for a velvety texture.
Step 3: Styling Details
-
Prepare the Towels:
Take your white towels or small blankets and fold them lengthways. Roll them tightly into neat cylinders. -
Tie the Rolls:
Cut lengths of jute twine long enough to wrap around each rolled towel twice. Wrap the twine around the center of the roll and tie it securely. -
Prepare the Tag:
Take a blank kraft paper tag. You can leave it plain for a minimalist look or hand-letter a label like ‘Guest’ or ‘Towels’ using a white paint marker. -
Attach the Tag:
Thread a shorter piece of jute twine through the tag’s hole. Loop this through the bucket’s handle attachment point or around the handle itself, tying a loose, casual knot. -
Arrange contents:
Place your rolled textiles vertically into the bucket. Arrange them so the spiral of the roll is visible at the top, creating a spa-like presentation.
Ombre Upgrade
To add dimension, spray the bottom third of the bucket with a slightly darker shade of pink or terracotta while the base coat is wet for a subtle, trendy gradient effect.
Enjoy the organized calm your new custom storage piece brings to your space


Lidded Toy Bucket With Stenciled Label
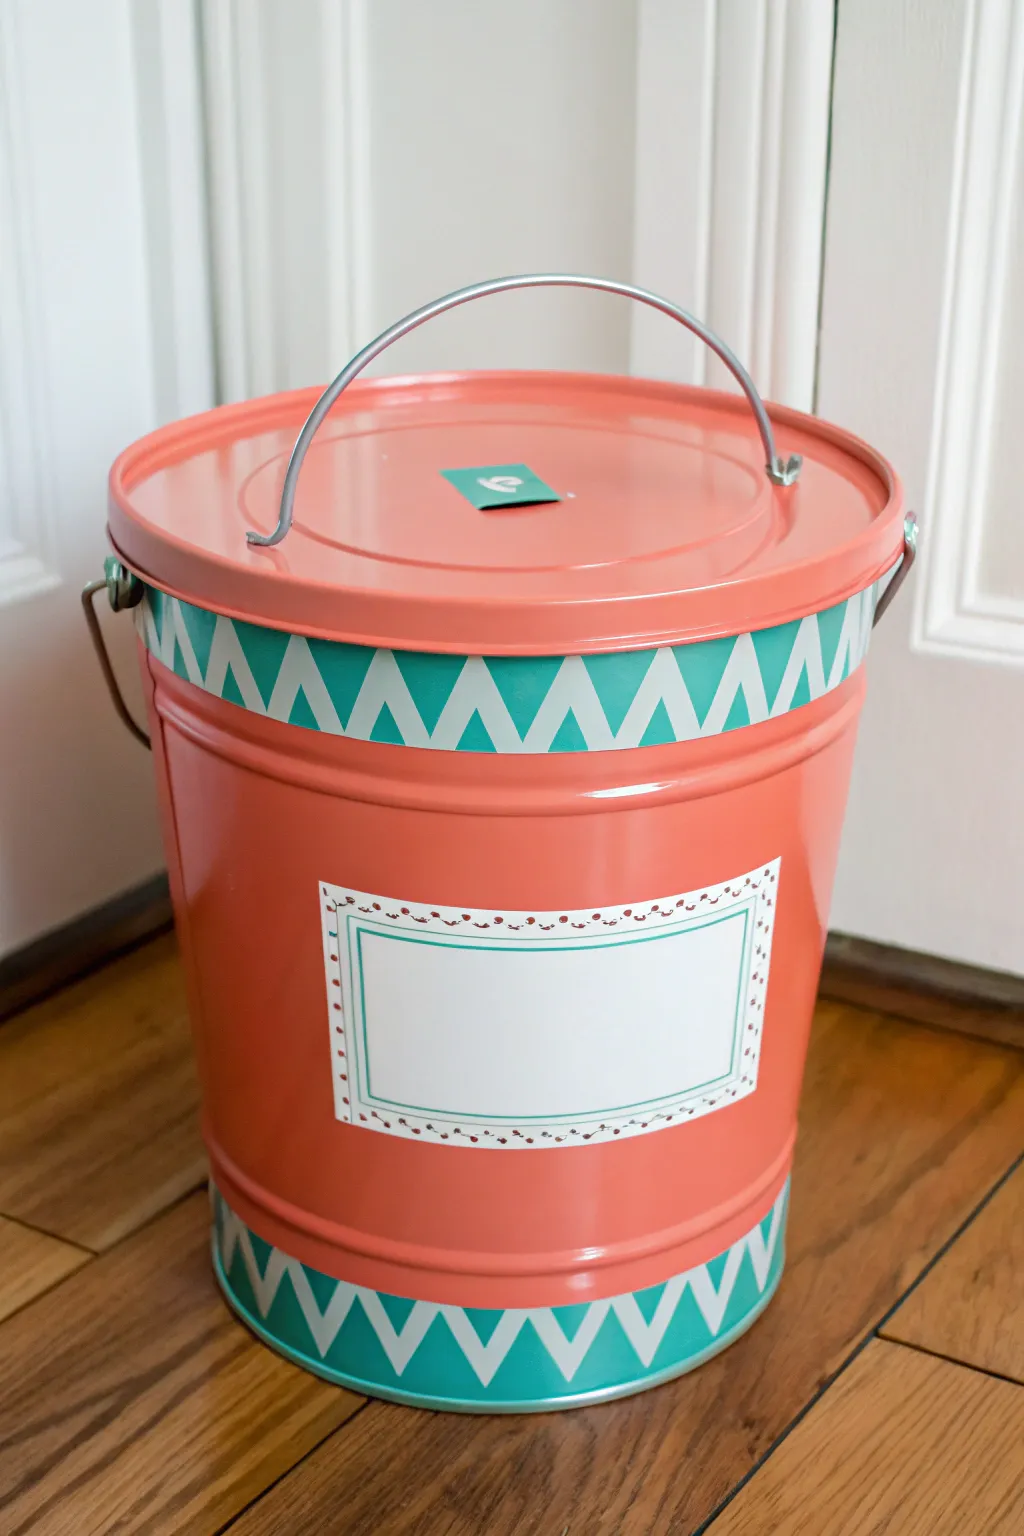
Transform a plain metal paint bucket into a vibrant storage solution with this coral and teal makeover. Featuring crisp chevron bands and a customizable label area, this sturdy container is perfect for organizing small toys or craft supplies in style.
Step-by-Step Guide
Materials
- Clean metal paint bucket with lid and handle
- Coral spray paint (gloss or satin finish)
- Teal acrylic paint or craft paint
- White acrylic paint
- Painter’s tape or masking tape
- Chevron stencil (or painter’s tape to create the pattern manually)
- Fine-grit sandpaper
- Rectangular label stencil or decal
- Red fine-tip paint pen or marker
- Small foam pouncer or stencil brush
- Medium flat paintbrush
- Clear sealant spray (optional)
Step 1: Preparation and Base Coat
-
Clean the surface:
Begin by thoroughly cleaning your metal bucket to remove any grease, dust, or sticker residue. Wipe it down with a damp cloth and let it dry completely. -
Rough up the texture:
Lightly sand the exterior of the bucket and the lid with fine-grit sandpaper. This helps the spray paint adhere better to the smooth metal surface. -
Remove hardware:
If possible, carefully remove the wire handle to make painting easier. If it’s fixed, wrap it securely with painter’s tape to protect it from overspray. -
Apply base color:
In a well-ventilated area, spray the entire outside of the bucket and lid with the coral spray paint. Hold the can about 8-10 inches away and use sweeping motions. -
Second coat:
Allow the first coat to dry according to the can’s instructions, then apply a second coat for full, opaque coverage. Let the bucket cure completely, ideally overnight, so the paint hardens.
Step 2: Creating the Chevron Bands
-
Mark the bands:
Use painter’s tape to mark off two horizontal bands around the bucket—one near the top rim and one near the bottom edge. These areas will become your teal chevron stripes. -
Paint the background band:
Inside the taped-off areas, paint a solid coat of teal acrylic paint using a flat brush. You may need two coats to cover the coral completely. Let this dry fully. -
Position the stencil:
Once the teal band is dry, place your chevron stencil over the teal area. Secure it tightly with small pieces of tape to prevent shifting. -
Apply the white zigzag:
Load a foam pouncer with a small amount of white paint. Dab off excess paint on a paper towel—this ‘dry brush’ technique prevents bleeding under the stencil. -
Stipple the pattern:
Gently dab the white paint over the stencil openings to create the white zigzags against the teal background. Repeat this process around both the top and bottom bands. -
Reveal the design:
Carefully peel away the stencil and the horizontal painter’s tape while the paint is still slightly tacky to ensure crisp lines.
Paint Bleeding?
If paint bleeds under your stencil, use a small angled brush dipped in the base color (teal or coral) to carefully touch up the edges once dry.
Step 3: Adding the Label Detail
-
Create the label background:
On the center front of the bucket, use a rectangular stencil or measure a rectangle with tape. Fill this area with white paint to create a solid background for your label. -
Outline the frame:
Once the white rectangle is dry, use a fine brush and teal paint to carefully paint a thin inner border line, creating a frame effect inside the white box. -
Add decorative dots:
Using a red fine-tip paint pen, draw small dots or tiny flourishes around the outer edge of the white rectangle to give it a decorative, finished look. -
Paint the lid detail:
Don’t forget the lid! I like to paint a small teal square or rectangle in the center of the lid to match the label style. -
Reattach handle:
Once all paint is completely dry, remove the tape from the handle or reattach the wire handle to the bucket. -
Seal the project:
To protect your hard work from chips and scratches, spray a light coat of clear sealant over the entire exterior of the bucket.
Chalk It Up
Paint the inner label rectangle with chalkboard paint instead of plain white acrylic. This lets you re-label the contents as your storage needs change.
Now you have a cheerful, customized container ready to organize your space
BRUSH GUIDE
The Right Brush for Every Stroke
From clean lines to bold texture — master brush choice, stroke control, and essential techniques.
Explore the Full Guide
Rolling Paint Bucket Art Supply Caddy
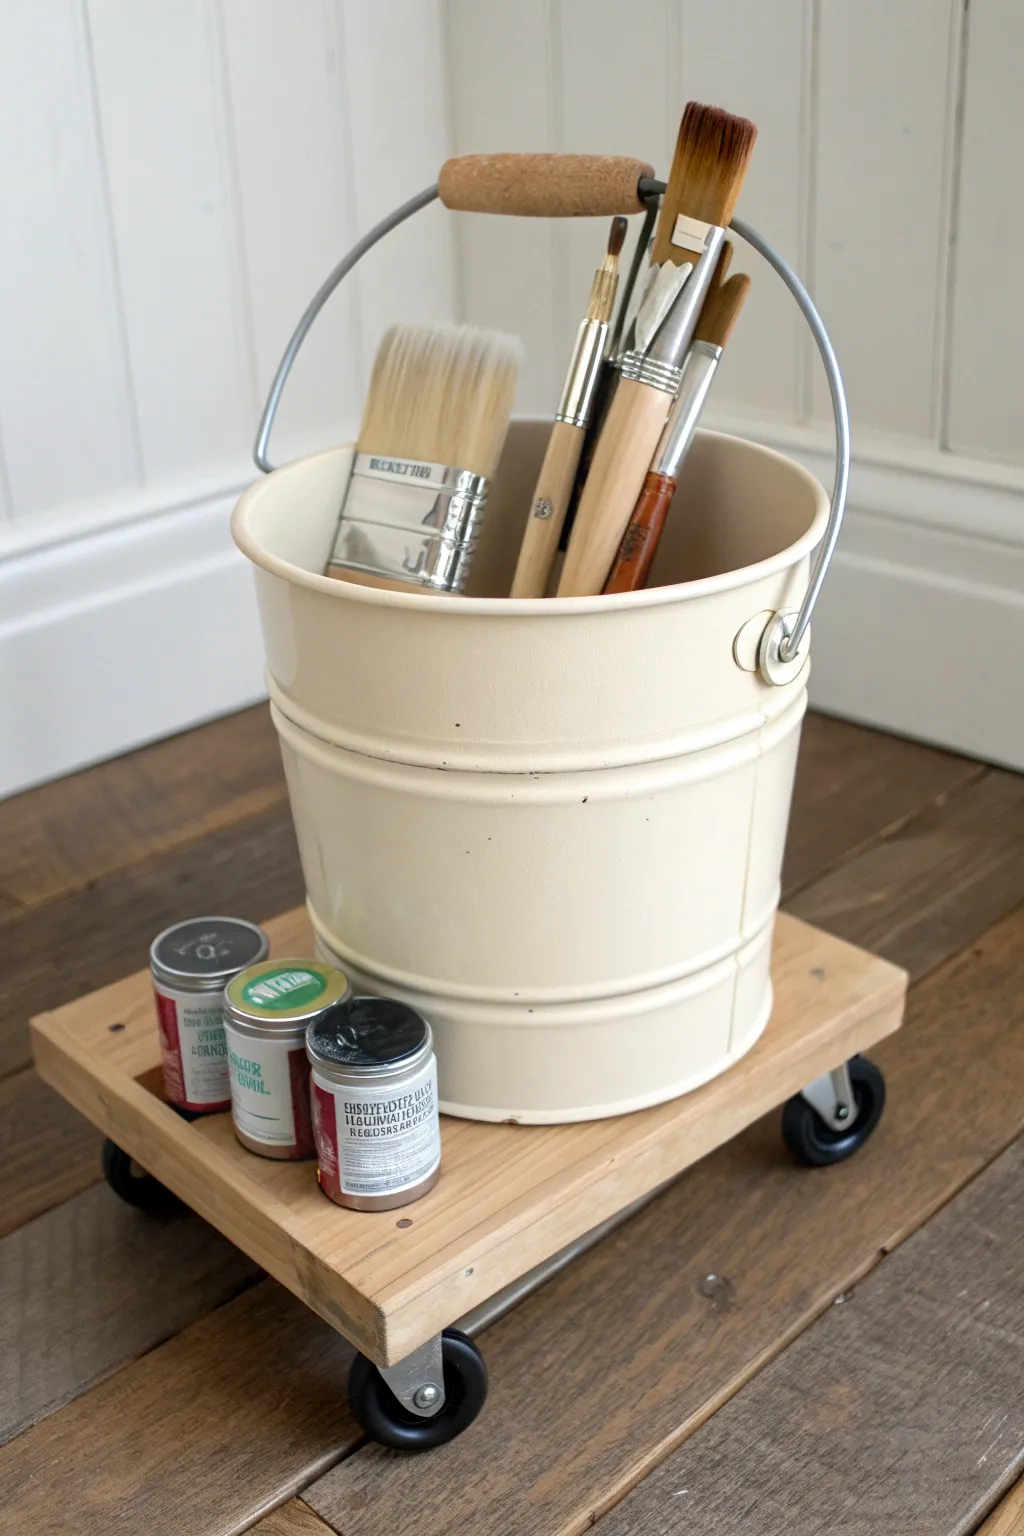
Transform a simple metal bucket into a mobile art station that’s perfect for studio organization. This charming project combines a custom-built wooden dolly with a classic pail to keep your brushes and mediums rolling right alongside your creativity.
Step-by-Step Tutorial
Materials
- Metal paint bucket (approx. 1 gallon)
- Small piece of plywood or solid wood (approx. 10×12 inches)
- 4 small swivel caster wheels
- 16 wood screws (short enough not to pierce through the wood)
- Power drill or screwdriver
- Sandpaper (medium grit)
- Wood stain or clear varnish
- Clean rag or foam brush
- Pencil
- Ruler or tape measure
Step 1: Prepare the Base
-
Measure and cut:
Begin by measuring the diameter of your bucket’s base. You will want your wooden platform to be rectangular and slightly larger than the bucket to accommodate the jars. A size around 10 inches by 12 inches usually works well, but adjust based on your specific bucket. -
Sand the edges:
Once your wood is cut to size, take your medium grit sandpaper and smooth down all the rough edges and corners. You don’t want splinters while reaching for a paintbrush later. -
Finish the wood:
Apply a coat of wood stain or clear varnish using a clean rag or foam brush. I find that a light clear coat really brings out the natural grain without making it too dark. Let this dry completely according to the manufacturer’s instructions.
Smooth Rolling
Choose rubber casters over hard plastic ones if you have hardwood floors. They are quieter, roll smoother, and won’t leave scratch marks as you move your station.
Step 2: Install the Wheels
-
Position the casters:
Flip your wooden board over so the bottom side is facing up. Place a caster wheel in each of the four corners. -
Mark the holes:
Inset the wheels about 1 inch from the edges to ensure stability. Use a pencil to mark the screw holes for each caster. -
Pre-drill holes:
Using a drill bit slightly smaller than your screws, carefully drill shallow pilot holes at your pencil marks. This prevents the wood from splitting when you drive the screws in. -
Attach the casters:
Line up the caster plates with the pilot holes and screw them securely into place using the wood screws. Make sure they are tight so the caddy rolls smoothly.
Step 3: Assemble and Organize
-
Test the roll:
Flip the dolly right-side up and give it a test roll on the floor to ensure it moves freely and sits level. -
Position the bucket:
Place your clean metal bucket onto the wooden platform. Offset it slightly to one side to leave room for your small paint jars. -
Secure the bucket (optional):
For extra stability, you can use a strong adhesive like E6000 or a small screw through the bottom center of the bucket into the wood, though gravity usually holds it quite well. -
Arrange supplies:
Place your jars of medium or paint on the open space of the platform next to the bucket. -
Fill the bucket:
Place your larger brushes, sponges, and long-handled tools inside the bucket. Arranging them bristles-up helps protect the brush tips and makes them easy to grab.
Magnetic Magic
Glue small magnets to the side of the metal bucket. You can use them to hold metal palette knives or clips for holding reference photos right where you work.
Your mobile art caddy is now ready to follow your inspiration wherever it takes you in the studio
Paint Bucket Stool With Padded Seat
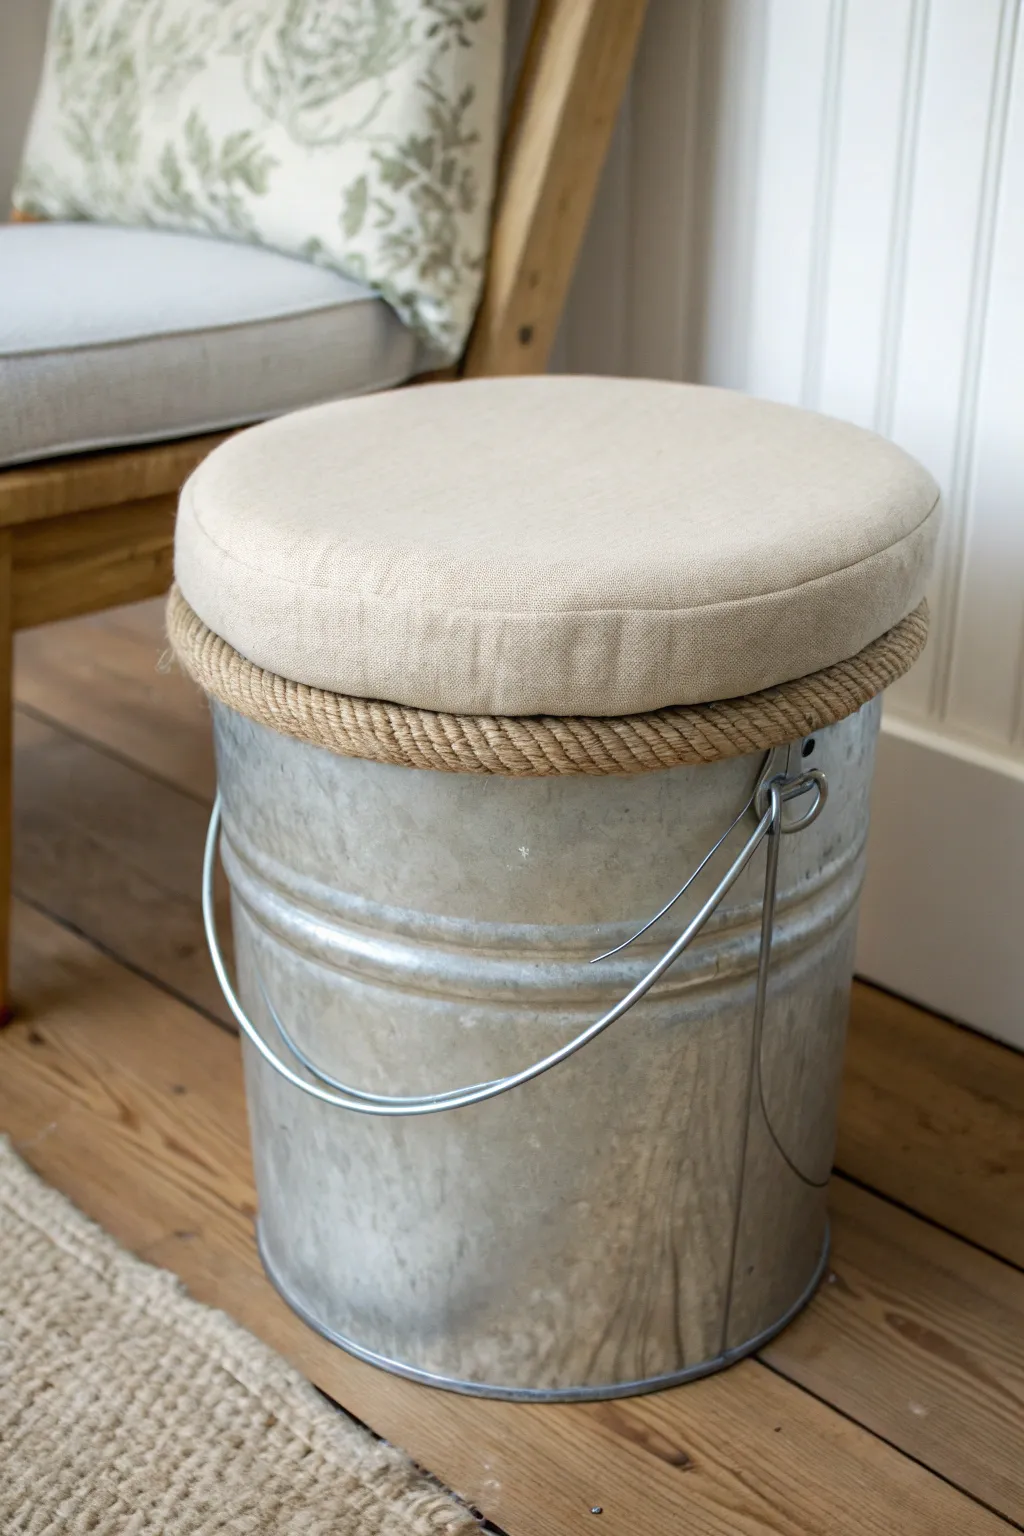
Transform a plain galvanized metal bucket into a charming piece of functional decor perfect for a farmhouse or cottage aesthetic. This clever upcycle combines rugged industrial metal with soft linen textures and rope detailing for a cozy, hidden-storage stool.
Step-by-Step Guide
Materials
- Clean galvanized metal bucket (5-gallon size)
- Round wooden board (plywood or MDF), cut to match bucket diameter
- High-density foam (2 inches thick)
- Batting
- Medium-weight linen or canvas fabric (beige/natural)
- Thick jute rope (approx. 1/2 inch to 3/4 inch thick)
- Heavy-duty spray adhesive
- Staple gun and staples
- Hot glue gun and glue sticks
- Serrated knife or electric carving knife
- Scissors
Step 1: Preparing the Seat Base
-
Measure and cut the board:
Begin by measuring the top diameter of your bucket precisely. Cut a circle from your wooden board that matches this measurement; it should sit flush on the rim without falling inside. -
Trace foam circle:
Place your wooden circle directly onto your high-density foam sheet. Using a marker, trace snugly around the wood to create your cushion template. -
Cut the foam:
Carefully cut out the foam circle using a serrated knife or an electric carving knife for the cleanest edge. Keep the knife perpendicular to the foam to avoid angled sides. -
Adhere foam to wood:
Spray one side of your wooden disc and the bottom of your foam circle with heavy-duty spray adhesive. Let it get tacky for a few seconds, then press them firmly together, aligning the edges perfectly.
Sticky Situation?
If the rope keeps sliding down the smooth metal while the glue dries, use strips of painter’s tape to hold the rows in place vertically until the adhesive fully sets.
Step 2: Upholstering the Cushion
-
Add batting layer:
Lay out a piece of batting larger than your seat. Place the seat foam-side down onto it. Wrap the batting up and over the wood edge, stapling it underneath. Trim away any excess bulk. -
Cut the fabric:
Spread out your linen fabric face down. Place the batting-covered seat (foam side down) in the center. Cut a circle of fabric about 3-4 inches larger than the seat all the way around. -
Anchor the fabric:
Pull the fabric taut on one side and place a staple into the wood bottom. Pull the fabric tight on the directly opposite side and staple. Repeat this for the remaining two coordinates (North, South, then East, West) to create even tension. -
Pleat and staple:
Work your way around the circle, pulling the fabric firmly and creating small, neat pleats as you staple. I find that spacing staples about an inch apart keeps the edge looking smooth. -
Trim excess material:
Once the fabric is fully secured, use scissors to trim away the excess fabric close to the staples so the bottom remains relatively flat.
Pro Seating Tip
Add a layer of nonslip shelf liner or rubber feet to the bottom of the bucket. This prevents the metal from scratching your floors and stops the stool from sliding when you sit.
Step 3: Assembly and Detailing
-
Secure seat to bucket:
Run a bead of strong construction adhesive or heavy-duty hot glue along the top rim of the metal bucket. Center your upholstered seat on top and press down firmly to bond it. -
Start the rope trim:
To hide the seam where the fabric meets the metal, apply hot glue to the bucket rim just under the cushion. Press the end of your thick jute rope into the glue. -
Wrap the rope:
Continue gluing and wrapping the rope around the circumference of the bucket. Keep the rope tight against the underside of the cushion for a professional finish. -
Complete the wrapping:
Wrap the rope around 2-3 times, or until you are satisfied with the thickness of the band. The goal is to cover the gap and add a decorative texture. -
Finish the rope end:
Cut the rope at an angle. Apply a generous amount of hot glue to the end and tuck it neatly against the previous row or slightly underneath to conceal the cut. -
Clean up:
Inspect the project for any stray hot glue strings or loose threads and snip them away. Ensure the handle moves freely without catching on the new rope trim.
Now you have a stylish, customized seat that doubles as storage for your craft supplies or magazines

PENCIL GUIDE
Understanding Pencil Grades from H to B
From first sketch to finished drawing — learn pencil grades, line control, and shading techniques.
Explore the Full Guide
Tufted Paint Bucket Ottoman With Legs
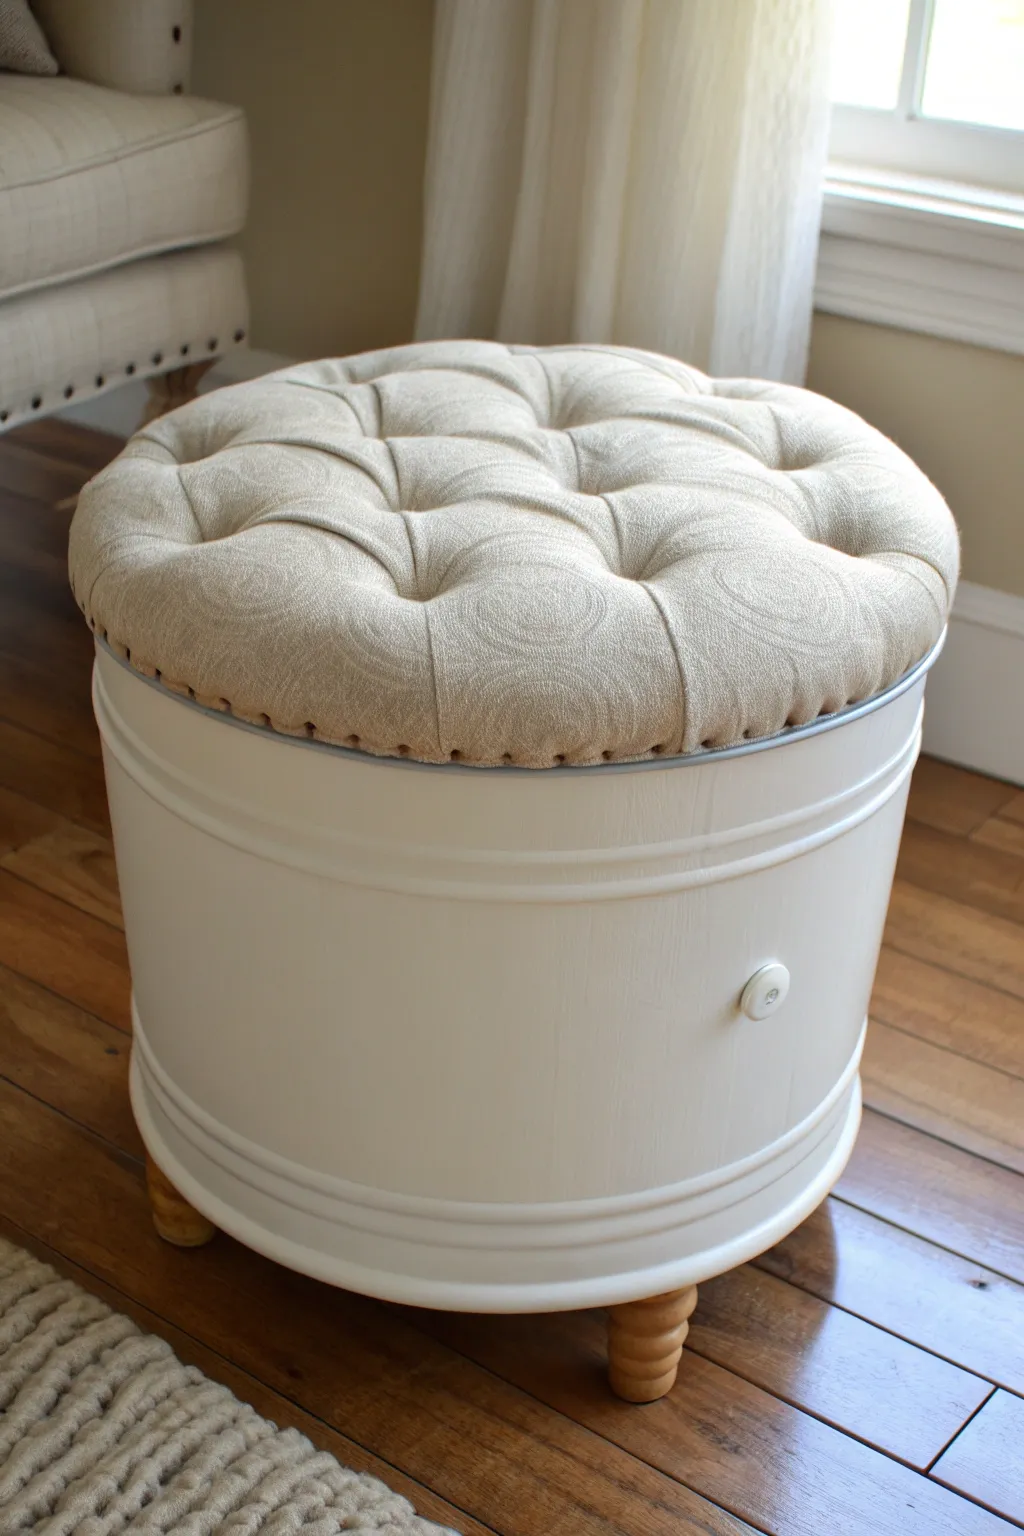
Transform an ordinary plastic paint bucket into a chic, high-end piece of furniture with this tufted ottoman project. Featuring a creamy painted finish, wooden legs, and a plush upholstered top, this storage seat is indistinguishable from store-bought decor.
Step-by-Step
Materials
- Clean 5-gallon plastic bucket with lid
- Primer suitable for plastic (spray or brush-on)
- Cream or off-white chalk paint or satin finish paint
- 4 turned wooden furniture feet/legs
- 4 wooden mounting plates for legs
- Plywood sheet (thick enough to support weight)
- Jigsaw
- High-density upholstery foam (2-3 inches thick)
- Quilt batting
- Heavy-duty upholstery fabric (linen or canvas look)
- Upholstery staple gun and staples
- Button cover kit
- Long upholstery needle and strong waxed thread
- Drill with bits
- Decorative ceramic knob
- Spray adhesive
- Hot glue gun
Step 1: Preparing the Base
-
Clean surface:
Thoroughly scrub your 5-gallon bucket to remove any dirt, oil, or labels. Lightly sand the exterior plastic surface with medium-grit sandpaper to give the paint something to grip. -
Prime the plastic:
Apply a coat of high-quality primer specifically designed for plastic adhesion. Let this base coat dry completely according to the manufacturer’s instructions. -
Apply finish color:
Paint the bucket with your chosen cream or off-white color. Chalk paint works beautifully here for a matte, vintage look, or use a satin finish for durability. Apply 2-3 coats as needed for full coverage. -
Secure the legs:
Flip the bucket upside down. Position your four wooden mounting plates evenly around the bottom perimeter. Mark holes, drill pilot holes through the plastic, and secure the plates with nuts and bolts rather than just screws for extra stability. -
Attach feet:
Screw the turned wooden feet into the mounting plates. If you want the wood tone to match your décor, stain or paint the legs before attaching them. -
Add the handle:
Drill a single hole on the side of the bucket, roughly halfway up or slightly lower. Attach the decorative ceramic knob here; while it doesn’t open a drawer, it adds a charming furniture-like detail.
Clean Pleats Tip
When stapling circular fabric, pull opposite sides first (12 o’clock, then 6, then 3, then 9). This prevents uneven bunching and makes pleating the remaining sections much easier.
Step 2: Creating the Tufted Seat
-
Cut the wood base:
Trace the shape of the bucket lid onto your plywood. Cut out this circle using a jigsaw. It should be slightly larger than the bucket opening if you aren’t using the original plastic lid as a base, or exactly the size of the lid if you plan to reinforce it. -
Cut the foam:
Place your plywood circle onto the upholstery foam and trace it. Cut the foam out using a serrated bread knife or an electric carving knife for a clean edge. -
Drill tufting holes:
Mark a diamond pattern or your desired button placement on the plywood circle. Drill small holes through the wood at each mark where a button will go. -
Transfer holes to foam:
Lay the foam onto the wood, aligning the edges. Push a marker or long needle up through the drilled holes to mark the corresponding spots on the bottom of the foam. Cut small plug holes out of the foam at these spots to help the buttons sink in deep. -
Adhere layers:
Use spray adhesive to secure the foam to the plywood base. Cover the entire foam top with a layer of quilt batting, wrapping it over the edges and stapling it to the underside of the wood.
Paint Peeling?
If paint scrapes off the plastic easily, you likely skipped sanding or used the wrong primer. Sand the spot down and re-apply a ‘plastic-bonding’ spray paint for a quick fix.
Step 3: Upholstery & Assembly
-
Prepare fabric:
Cut your upholstery fabric into a circle about 4-5 inches wider than your seat diameter. Lay it centered over the batting. -
Make buttons:
Using your button cover kit and scraps of the same fabric, create enough covered buttons for your pattern. -
Begin tufting:
Thread your long upholstery needle with strong waxed thread. Start from the center button: push the needle up through the plywood hole, through the foam, and out the fabric. Thread on a button, then go back down through the fabric and foam. -
Secure tufts:
Pull the thread tight from the bottom so the button sinks deeply into the foam, creating that plush look. Staple the thread securely to the underside of the wood in a zigzag pattern to lock it in place. -
Finish remaining buttons:
Repeat the tufting process for all remaining holes, working from the center outward to smooth the fabric as you go. -
Secure fabric edges:
Pull the fabric edges taut around to the underside of the plywood. Create neat pleats as you staple the fabric down, ensuring consistent tension all around. -
Final assembly:
If you kept the original plastic lid, glue your upholstered seat onto it using strong construction adhesive. Alternatively, add small wood blocks to the underside of your plywood seat that fit snugly inside the bucket rim to keep the lid from sliding off.
Now you have a stylish hidden storage solution that looks perfectly at home in your living room
Hanging Herb Garden From Small Paint Cans
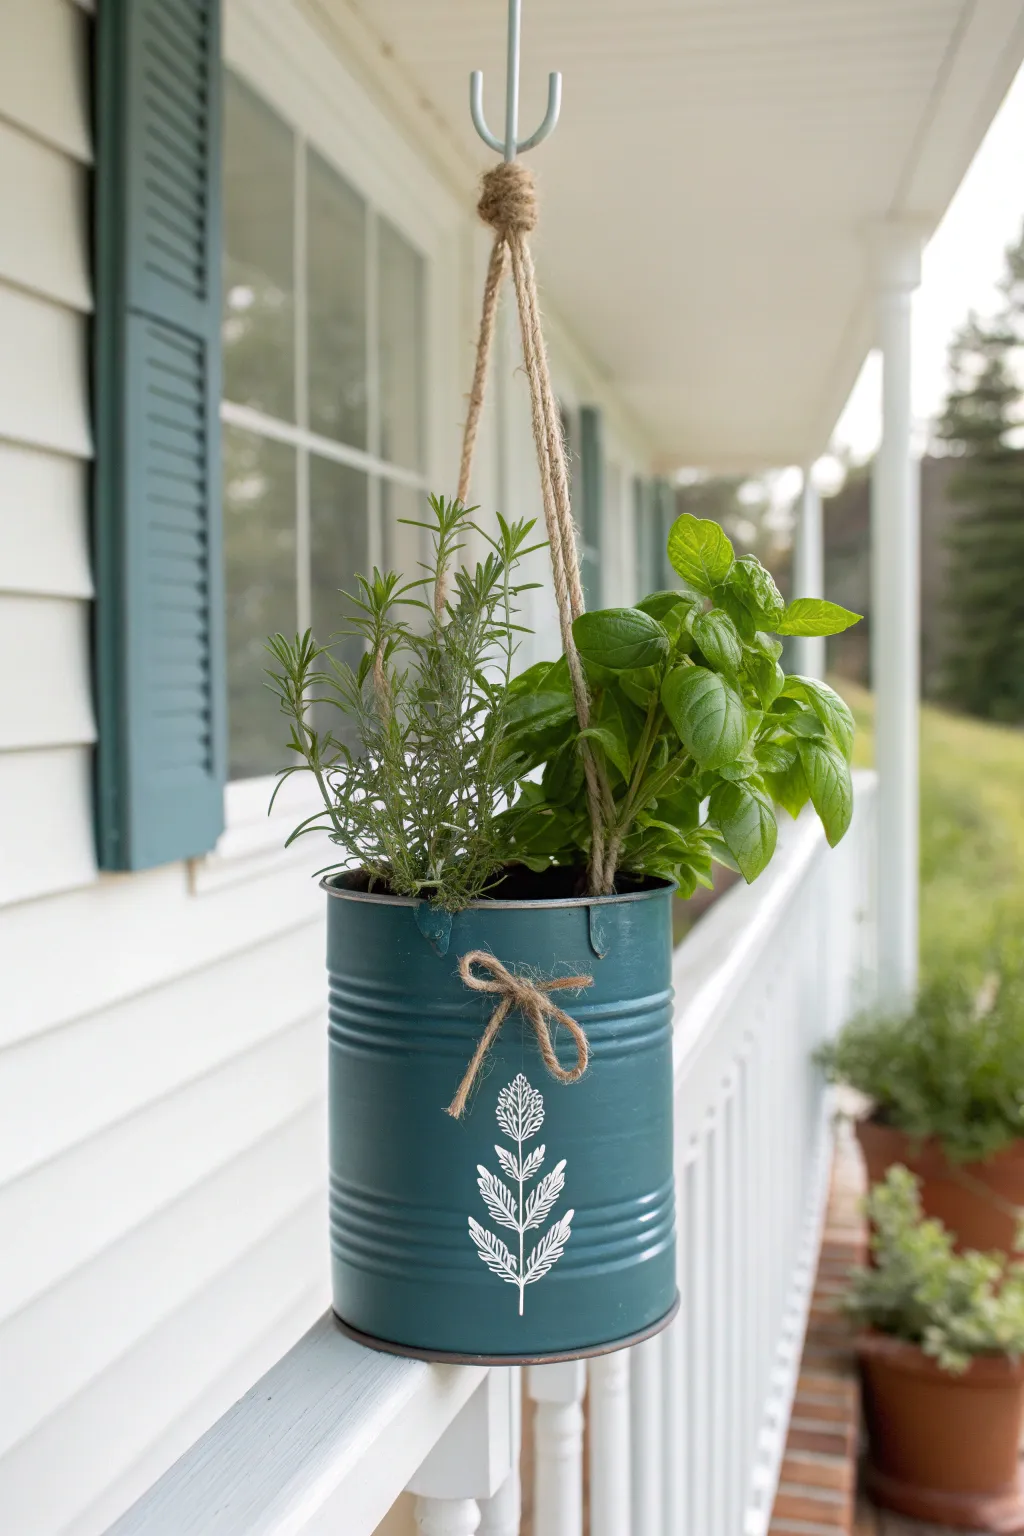
Transform an ordinary metal paint pail into a charming hanging planter with a pop of teal color and a rustic touch. This project combines a simple stenciled design with natural jute accents to create a delightful home for your favorite kitchen herbs.
Detailed Instructions
Materials
- Clean, empty metal paint can (quart sized) or large tin food can
- Spray paint (satin finish, teal or blue-green)
- White acrylic craft paint
- Small detail paintbrush or stencil brush
- Leaf stencil (roughly 3-4 inches tall)
- Painter’s tape or stencil adhesive
- Jute twine (medium thickness)
- Thick jute rope (for hanging)
- Electric drill with a metal drill bit (1/4 inch or slightly larger)
- Hammer and nail (for pilot holes)
- Hot glue gun and glue sticks
- Potting soil
- Small gravel or rocks (for drainage)
- Herb starts (rosemary and basil)
Step 1: Preparing the Can
-
Clean and dry:
Thoroughly wash your metal can with warm soapy water to remove any labels, glue residue, or dust. Dry it completely inside and out to ensure the paint adheres properly. -
Mark hole locations:
Using a marker, place two dots directly opposite each other just below the top rim of the can. These will be for the hanging rope. -
Create pilot divots:
Place the can on a sturdy surface. Use a hammer and a large nail to tap a small dent or divot over each mark. This prevents your drill bit from slipping on the smooth metal surface. -
Drill drainage holes:
Turn the can upside down. Drill 4-5 holes in the bottom center of the can to allow excess water to escape, which is crucial for herb health. -
Drill hanging holes:
Switch back to the side marks and carefully drill through the metal at your pilot divots. Use steady pressure and wear safety glasses during this step.
Step 2: Painting and Stenciling
-
Apply base coat:
In a well-ventilated area, spray the entire exterior of the can with your teal spray paint. Hold the can about 8-10 inches away and use light, sweeping coats to avoid drips. -
Allow to dry:
Let the paint dry completely according to the manufacturer’s instructions. I usually give it at least an hour to be safe before touching it. -
Position the stencil:
Place your leaf stencil on the front center of the can. Secure it firmly with painter’s tape or use a light spray of stencil adhesive to keep it tight against the curve. -
Paint the design:
Dip your brush into a small amount of white acrylic paint. Dab off excess paint onto a paper towel until the brush is almost dry—this ‘dry brush’ technique prevents paint from bleeding under the stencil. -
Fill the stencil:
Apply the paint over the stencil using an up-and-down dabbing motion rather than a brushing stroke. Repeat until the white is opaque. -
Reveal the design:
Carefully peel away the tape and lift the stencil straight up to reveal your crisp white leaf design. allow this to dry for 20 minutes.
Bleeding Lines?
If paint seeps under the stencil, wait for it to dry fully. Then, use a toothpick to gently scrape away the excess while keeping the base coat intact.
Step 3: Assembly and Planting
-
Add drainage layer:
Place a one-inch layer of small gravel or rocks at the bottom of the can to prevent the soil from clogging the drainage holes. -
Fill with soil:
Add potting soil until the can is about two-thirds full. -
Plant the herbs:
Gently remove your rosemary and basil plants from their nursery pots. Loosen the roots slightly and nestle them into the can, adding more soil around the sides until secure. -
Secure the hanger:
Cut a length of thick jute rope (about 24-30 inches). Thread each end through the side holes from the outside in. Tie sturdy double knots on the inside of the can to secure them. -
Create the bow:
Cut a smaller piece of medium twine. Tie a simple shoelace bow. -
Attach the bow:
Place a small dab of hot glue on the back of the bow’s knot and press it onto the front of the can, centered just above the painted leaf design. -
Hang it up:
Using the loop of rope created at the top, hang your new planter from a sturdy ceiling hook on your porch or patio.
Pro Tip: Rust Proofing
Since metal cans rust over time with watering, spray the inside with a clear coat sealant or line the bottom with a plastic bag poke with holes before planting.
Now you have a stylish, upcycled planter ready to provide fresh herbs all season long


Patio Drink Cooler Paint Bucket
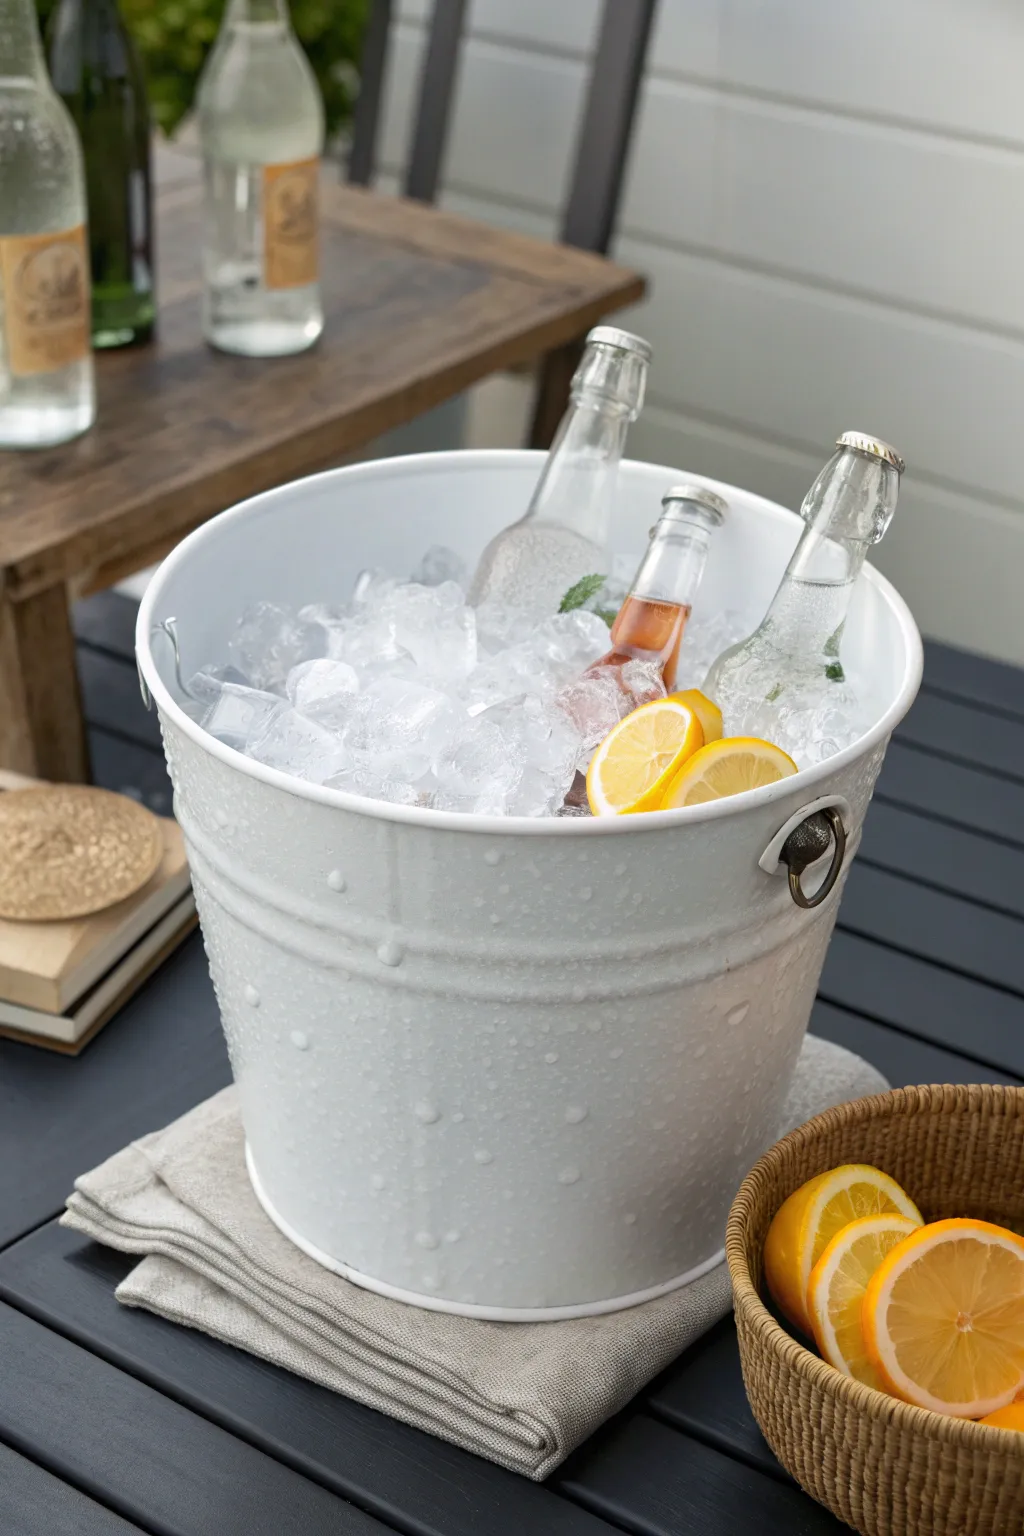
Transform a plain metal utility pail into a chic, farmhouse-style beverage cooler perfect for summer gatherings. This project uses a clean white finish to create a sophisticated vessel that makes your bottled drinks and citrus garnishes pop.
How-To Guide
Materials
- Metal paint bucket or utility pail (approx. 2-5 gallon)
- Sandpaper (medium and fine grit)
- Tack cloth or lint-free rag
- Metal primer spray
- High-gloss or satin white spray paint (enamel preferred)
- Clear sealant spray (optional, for waterproofing)
- Clean drop cloth or cardboard
- Painter’s tape
Step 1: Preparation
-
Clean the bucket:
Start by thoroughly washing your metal bucket with warm, soapy water to remove any grease, sticker residue, or industrial oils. Dry it completely with a clean towel. -
Remove hardware:
If possible, carefully remove the wire handle. If the handle isn’t removable, wrap the metal wire and the wooden or plastic grip entirely in painter’s tape to protect them from spray. -
Sand the surface:
Scuff the entire exterior surface of the bucket using medium-grit sandpaper. This creates a texture (‘tooth’) that helps the primer adhere better than it would to smooth metal. -
Wipe down:
Clean off all the sanding dust using a tack cloth or a damp lint-free rag. Any dust left behind will create bumps in your final paint job. -
Tape the interior:
Apply painter’s tape along the inner rim of the bucket if you want to keep the inside its original metal finish. Alternatively, you can cover the opening with cardstock or newspaper.
Paint Peeling Off?
If paint peels easily after drying, the metal wasn’t sanded enough. Sand the peeling spot down to bare metal, clean thoroughly, re-prime, and repaint that specific section.
Step 2: Painting
-
Set up your workspace:
Place the bucket upside down on a drop cloth or large piece of cardboard in a well-ventilated area, preferably outdoors. -
Apply primer:
Shake your metal primer can vigorously. Apply a thin, even coat of primer to the entire exterior, holding the can about 8-10 inches away. -
Check for drips:
Inspect the primer layer quickly. If you see any drips beginning to form, lightly brush them out or wait for them to dry and sand them flat before proceeding. -
Let primer cure:
Allow the primer to dry completely according to the manufacturer’s instructions, usually about an hour. -
First coat of white:
Apply your first coat of white spray paint. Use long, sweeping motions side-to-side, starting and stopping the spray off the bucket to avoid heavy buildup. -
Dry and repeat:
Let the first coat dry until tacky or touch-dry. I like to wait about 20 minutes between light coats to ensure the finish is durable. -
Second coat:
Apply a second coat of white paint to ensure full opacity. Pay special attention to the embossed rings or ridges on the bucket, making sure paint gets into the crevices. -
Third coat (if needed):
If the original metal color is still showing through, apply a third light coat. Multiple thin layers are always better than one thick, drippy layer.
Step 3: Finishing Touches
-
Seal the finish:
Once the white paint is fully dry (wait at least 24 hours), apply a clear sealant spray. This extra step helps protect the paint from condensation and scratches from ice. -
Remove tape:
Carefully peel away any painter’s tape from the handle or rim. Do this slowly to avoid chipping the fresh paint edge. -
Reattach handle:
If you removed the handle earlier, reattach it now. Ensure the connection points are secure enough to hold the weight of heavy ice and bottles. -
Style the rim:
Check the rim for any rough paint edges. If necessary, very lightly sand the rim with fine-grit sandpaper for a smooth touch. -
Ready to use:
Fill your new cooler with plenty of ice, arrange your favorite bottled beverages, and tuck in a few fresh lemon wedges for a perfect summer look.
Add a Vintage Label
Before the clear coat, apply a waterproof vinyl decal or use a stencil to add a vintage soda logo or the word ‘ICE’ in black or charcoal gray for extra farmhouse charm.
Enjoy your stylish new cooler at your next backyard barbecue or relaxing evening on the patio
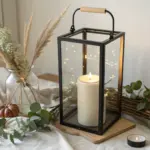
Rustic Lantern From a Metal Paint Can
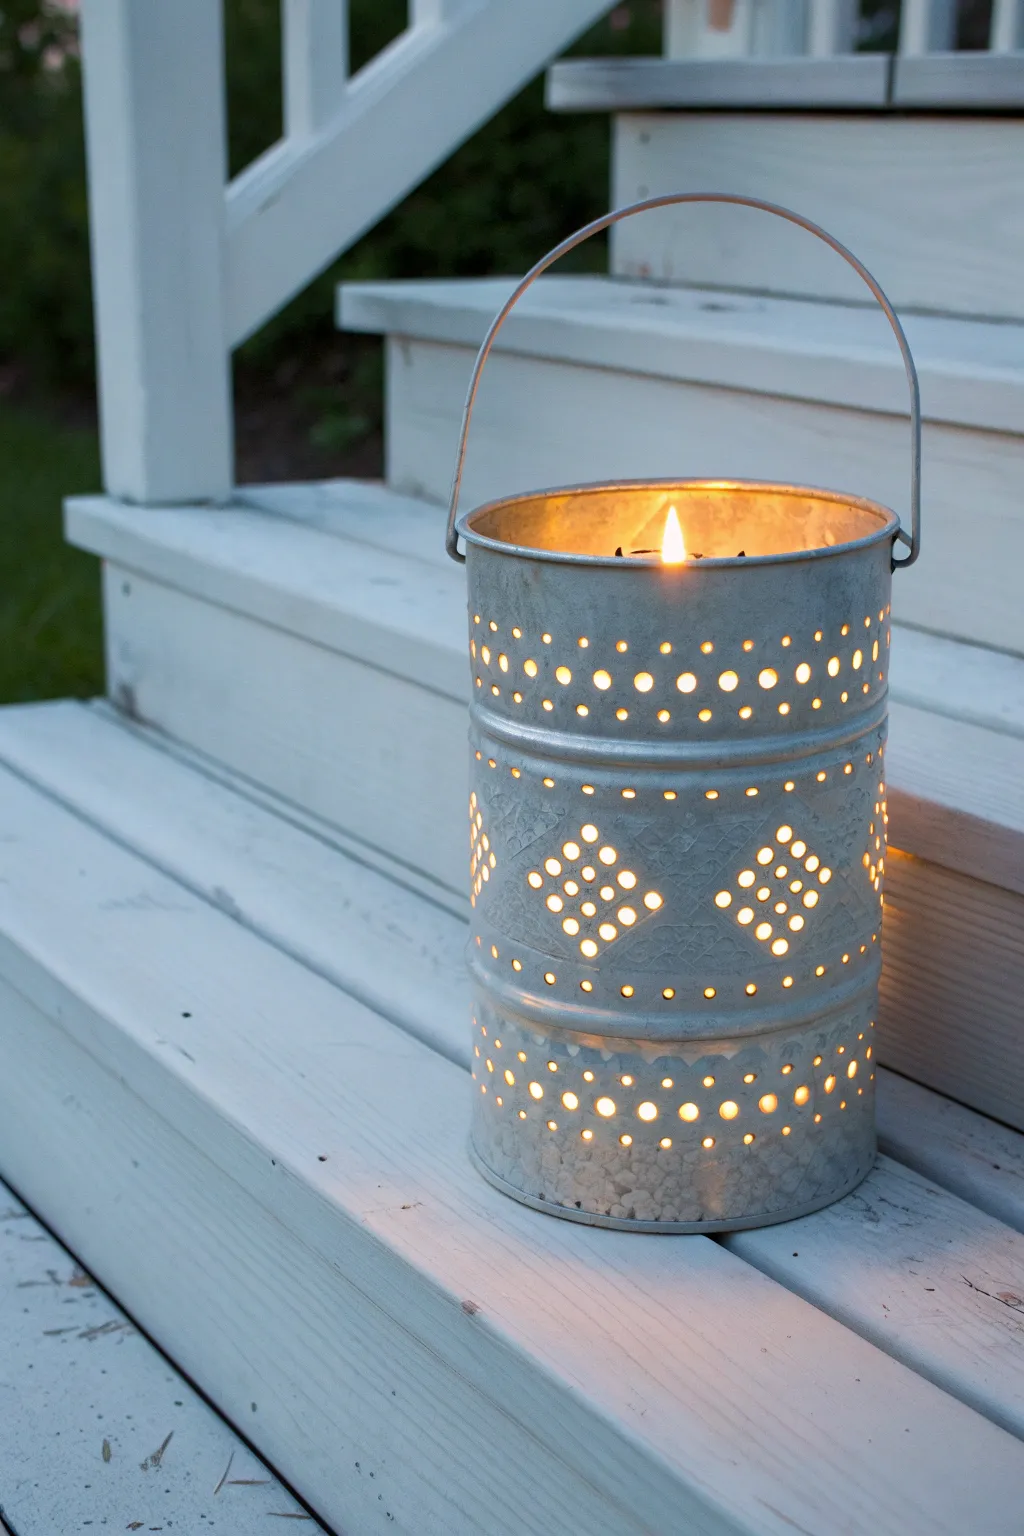
Transform a humble galvanized paint bucket into a charming source of ambient light with this simple punched tin technique. This rustic lantern casts beautiful diamond patterns when lit, adding a cozy farmhouse feel to any porch or patio.
Step-by-Step Tutorial
Materials
- Clean 1-gallon metal paint can (empty)
- Freezing water
- Towel or sandbag
- Paper template or graph paper
- Masking tape
- Hammer
- Large nail or awl
- Thick galvanized wire (12-gauge or similar)
- Pliers with wire cutter
- Drill with metal bit (optional, for handle holes)
- Pea gravel or small stones
- Large pillar candle
Step 1: Preparation & Freezing
-
Clean the can:
Begin by thoroughly cleaning your metal paint can. Remove any labels using warm soapy water and a scrub brush to get rid of sticky residue. If it’s a used paint can, ensure all dried paint is scraped out. -
Fill with water:
Fill the clean can with water until it is about 1 to 2 inches from the rim. Do not fill it all the way to the top, as the ice needs room to expand. -
Freeze solid:
Place the water-filled can in your freezer. I like to let this sit for at least 24 hours to ensure the center is completely frozen solid. This ice core is crucial because it prevents the metal can from distinctively denting or collapsing when you hammer the nails.
Save Your Thumbs
Hold the nail with a pair of pliers or a clothespin while hammering. This keeps your fingers safely away from the hammer strike zone while punching dozens of holes.
Step 2: Creating the Design
-
Plan your pattern:
While the can freezes, create your pattern on a piece of paper cut to the circumference of the can. For the look in the photo, draw horizontal lines near the top and bottom, and arrange dots into diamond shapes for the center band. -
Secure the template:
Once the can is frozen, remove it from the freezer. Immediately wrap your paper template around the can and secure it firmly with masking tape so it doesn’t slip. -
Prepare the workspace:
Nestle the frozen can sideways into a folded towel or on a sandbag. This keeps the round object stable while you work on it. -
Punch the border holes:
Using a hammer and a large nail (or an awl), begin punching holes along your top horizontal lines. Give the nail a firm tap to pierce the metal but stop once you hit the ice. -
Create the diamonds:
Move to the central section and punch holes to form the diamond shapes. Space your holes evenly to keep the geometric pattern distinct. -
Finish the bottom pattern:
Complete the punching process by creating the decorative lines and borders near the bottom of the can. -
Thaw and dry:
Remove the paper template. Place the can in a sink or outdoors and let the ice melt completely. Dump the water and dry the can thoroughly with a towel to prevent immediate rusting.
Ice Melting Too Fast?
If the ice starts melting and shifting inside the can before you finish your design, pop it back in the freezer for an hour. Don’t hammer against hollow metal or it will dent.
Step 3: Handle & Finishing
-
Make handle holes:
If your can doesn’t have holes for a handle, punch or drill two holes on opposite sides of the rim, about half an inch from the top edge. -
Shape the wire:
Cut a length of thick galvanized wire, roughly 18 inches long. Bend it over your knee or a round object to create a smooth arch shape. -
Attach the wire:
Insert one end of the wire into a handle hole. Using pliers, bend the end upward and twist it around the main wire strand to secure it. Repeat on the other side. -
Hammer down sharp edges:
Run your hand carefully inside the can (watch out for sharp metal burs!). If the punched holes are very jagged inside, use the handle of the hammer to gently flatten them against the can wall. -
Add drainage (optional):
If you plan to leave this outdoors uncovered, punch 3-4 holes in the very bottom of the can to allow rainwater to drain out. -
Add gravel base:
Pour about an inch or two of pea gravel or small decorative stones into the bottom of the lantern. This weighs it down and provides a level surface for the candle. -
Insert candle:
Twist a large pillar candle into the gravel until it is stable and standing straight.
Light your candle and enjoy the warm, patterned glow on your steps
Quart Paint Can Centerpiece Vases
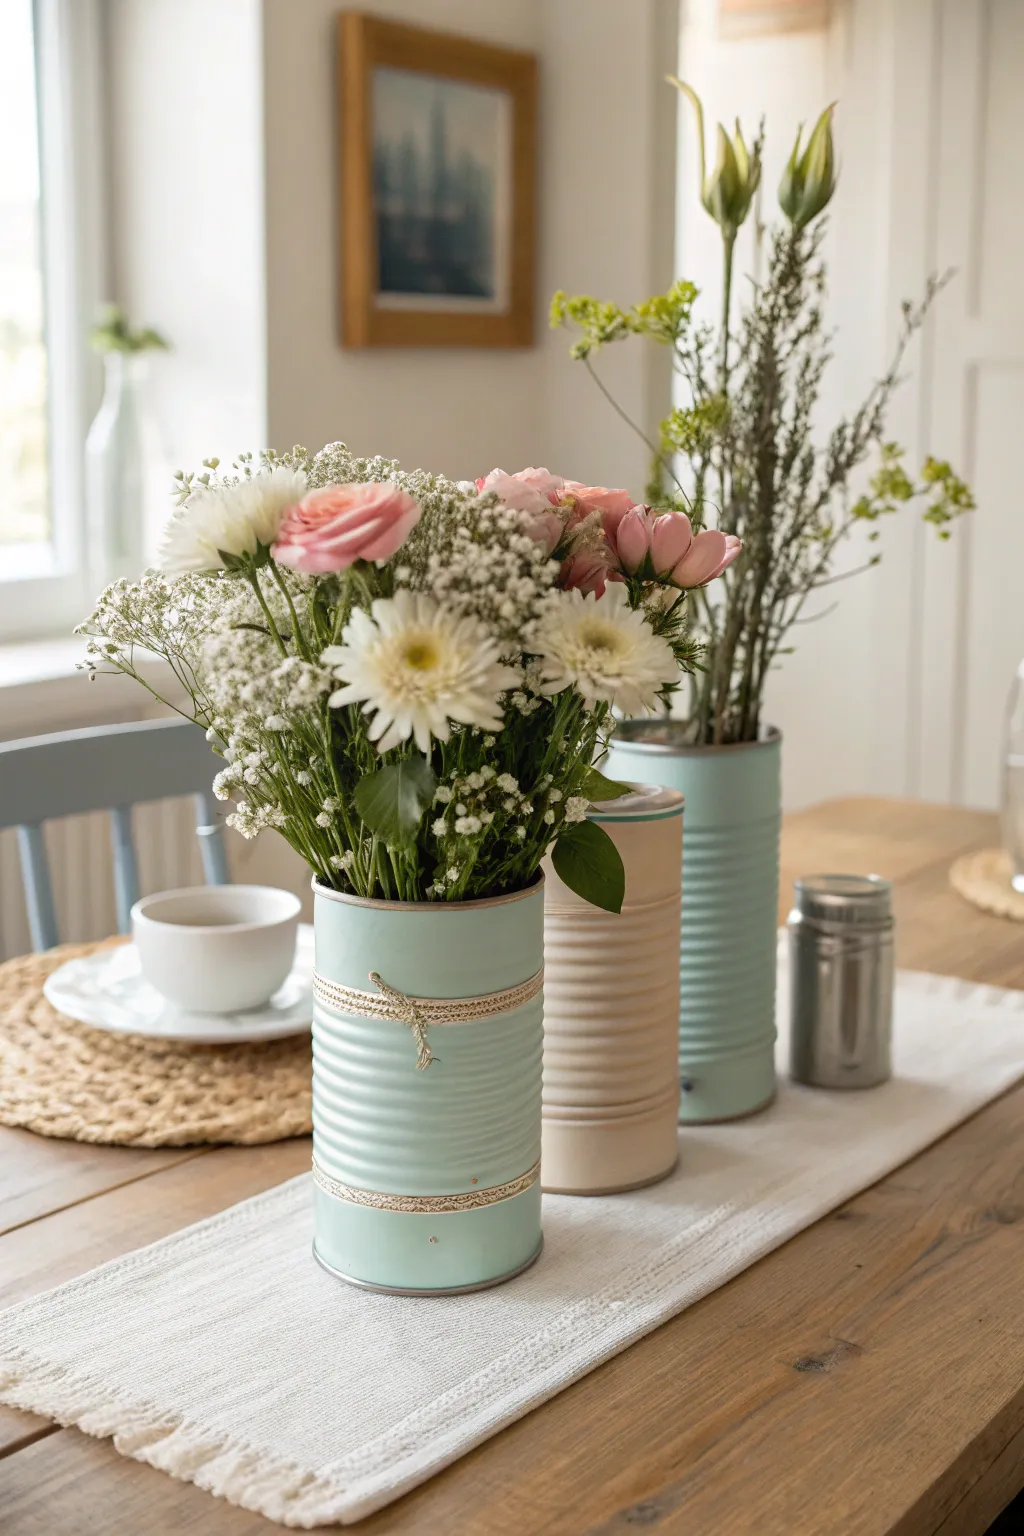
Transform ordinary metal quart cans into a charming centerpiece trio that perfectly balances farmhouse rustic with soft pastel elegance. These upcycled vases feature a creamy matte finish and delicate lace accents, making them an ideal home for fresh spring bouquets.
Step-by-Step Guide
Materials
- 3 clean quart-sized metal paint cans or large ridged food cans (empty)
- Matte spray paint (Pastel Mint/Seafoam Green)
- Matte spray paint (Cream/Beige)
- Rubbing alcohol
- Cotton pads or clean cloth
- Thin vintage cotton lace trim (cream or white)
- Jute twine
- Hot glue gun and clear glue sticks
- Scissors
- Drop cloth or cardboard (for spraying)
- Fresh flowers (Pink roses, white chrysanthemums, baby’s breath, greenery)
Step 1: Preparation & Painting
-
Clean surface:
Before painting, wipe down the exterior of all three cans with rubbing alcohol and a cotton pad. This removes any oils or residue that might prevent the paint from bonding properly. -
Dry completely:
Allow the cans to air dry for a few minutes until all alcohol has evaporated. -
Setup spraying area:
Lay down your drop cloth or cardboard in a well-ventilated area, preferably outdoors. -
First coat:
Apply the first coat of mint green spray paint to two of the cans and the cream paint to the third can. Hold the can 8-10 inches away and use light, sweeping motions to avoid drips. -
Wait time:
Let the first coat dry for about 15-20 minutes, or until it’s tacky but not wet. -
Second coat:
Apply a second coat to ensure full coverage, paying special attention to the ridges where paint might be thinner. -
Inspect the rim:
I like to spray the top rim thoroughly, as this part will be visible even when filled with flowers. -
Full cure:
Allow the cans to dry completely according to the manufacturer’s instructions, usually 24 hours for a durable finish.
Smooth Spraying Trick
Place the can on a lazy susan covered with paper. Spin it slowly while spraying to get an even coat without having to walk around the table constantly.
Step 2: Embellishment
-
Measure lace:
Take your lace trim and wrap it around the front mint green can to determine the length needed. You’ll want two strips: one for the upper section and one for the lower section. -
Cut lace:
Cut the lace strips, leaving about half an inch of overlap. -
Apply top lace:
Apply a small dot of hot glue to the back of the can. Press one end of the lace into it. Wrap the lace around snugly and secure the other end with another dot of glue. -
Apply bottom lace:
Repeat this process for the second strip of lace near the bottom of the can. -
Add twine detail:
Cut a piece of jute twine long enough to wrap around the can with enough excess to tie a bow. -
Secure twine:
Wrap the twine directly over the center of the top lace strip. Use a tiny dot of hot glue at the back to stop it from slipping. -
Make the bow:
Tie a small, tight bow at the front center of the top lace strip. Trim the twine ends so they don’t dangle too long.
Distressed Finish
Once the paint is fully dry, lightly sand the raised ridges of the can with fine-grit sandpaper. This reveals the metal underneath for a vintage, weathered look.
Step 3: Arrangement
-
Prepare stems:
Trim your flower stems at an angle so they sit at the right height for the 1-quart size. The blooms should rest just above the rim. -
Fill the primary vase:
Fill the front decorated can with a dense mix of white mums, pink roses, and baby’s breath. The fullness is key to the look. -
Fill background vases:
For the taller visual effect shown in the background cans, use taller greenery or branches with longer stems to create height variation.
Place your new centerpiece on a table runner to instantly brighten up your dining area
Jack-o’-Lantern Painted Bucket Decor

Transform an ordinary galvanized pail into a festive autumn decoration that perfectly balances rustic charm with classic Halloween fun. This durable metal pumpkin features a painted face and a clever twig-and-twine handle accent that mimics a real pumpkin stem.
Detailed Instructions
Materials
- Galvanized metal bucket (approx. 1-2 gallon size)
- Glossy orange spray paint (enamel or multi-surface)
- Black acrylic craft paint (outdoor rated if possible)
- Sandpaper (medium grit, around 150-180)
- Painter’s tape or masking tape
- Small flat paintbrush
- Pencil
- Clear matte or gloss sealer spray (optional)
- Small bundle of dry twigs or thin sticks
- Jute twine or burlap ribbon
- Hot glue gun and glue sticks
- Scissors
Step 1: Prepping and Painting the Base
-
Clean the surface:
Start by thoroughly washing the galvanized bucket with warm soapy water to remove any manufacturing oils or dust. Dry it completely with a clean cloth. -
Sand for adhesion:
Lightly scuff the exterior of the bucket with medium-grit sandpaper. You don’t need to remove the metal finish, just create enough texture for the paint to grip securely. -
Protect the interior:
Use painter’s tape to carefully mask off the top rim and the inside of the bucket if you want to keep the original silver metal look on the interior. -
Tape the handle hardware:
Don’t forget to wrap small pieces of tape around the metal loops where the handle connects to the bucket to keep them free of orange paint. -
First coat of orange:
In a well-ventilated area, apply a light, even coat of glossy orange spray paint. Hold the can about 8-10 inches away and use sweeping motions to avoid drips. -
Apply subsequent coats:
Allow the first coat to dry for about 15-20 minutes, then apply a second and possibly third coat until you have solid, opaque orange coverage. Let this dry fully for at least 24 hours to cure.
Paint Adhesion Tip
Galvanized metal can be slick. For the absolute best durability, spray a coat of metal-specific primer before applying your orange color.
Step 2: Creating the Face
-
Sketch the face:
Once the orange paint is fully hardened, lightly use a pencil to draw your Jack-o’-Lantern face directly onto the bucket. A classic design uses triangles for eyes and nose, and a wide, toothy grin. -
Outline with paint:
Load a small flat brush with black acrylic paint. Outline the pencil marks first to define the sharp edges of the triangles and the smile. -
Fill in the features:
Fill in the outlines with the black paint. You may need two coats of black to ensure no orange shows through, especially over the ridges of the bucket. -
Clean up edges:
If I make a small mistake or the line isn’t crisp, I like to use a damp cotton swab or a tiny bit of orange touch-up paint to correct the edge once the black is dry. -
Seal the design:
For longevity, especially if this will sit on a porch, spray a light coat of clear sealer over the entire bucket to protect the paint from chipping.
Step 3: Adding the Rustic Topper
-
Gather the twigs:
Collect a small handful of twigs, about 4-5 inches long. Break them so they are roughly uneven lengths for a natural look. -
Bundle the stem:
Bunch the twigs together tightly to form a cylinder shape that resembles a pumpkin stem. -
Wrap with twine:
Take your jute twine or a strip of burlap and wrap it tightly around the middle of the twig bundle several times. -
Secure the bundle:
Tie the twine in a knot and use a dab of hot glue to secure the wrapping so the bundle doesn’t fall apart. -
Attach to handle:
Position the twig bundle at the very top center of the wire handle. Use a liberal amount of hot glue or tie it with extra twine to fix it securely in place, mimicking a floating stem. -
Final leaf accents:
Tuck one or two loose strands of twine or a curly dried vine into the bundle to look like tendrils.
Fixing Drips
If the spray paint drips, don’t wipe it wet! Let it dry completely, sand the drip smooth gently, and then apply a light top coat to blend it.
Now your charming metal pumpkin is ready to hold candy or greet guests on your front steps
Snowman Paint Bucket Luminary
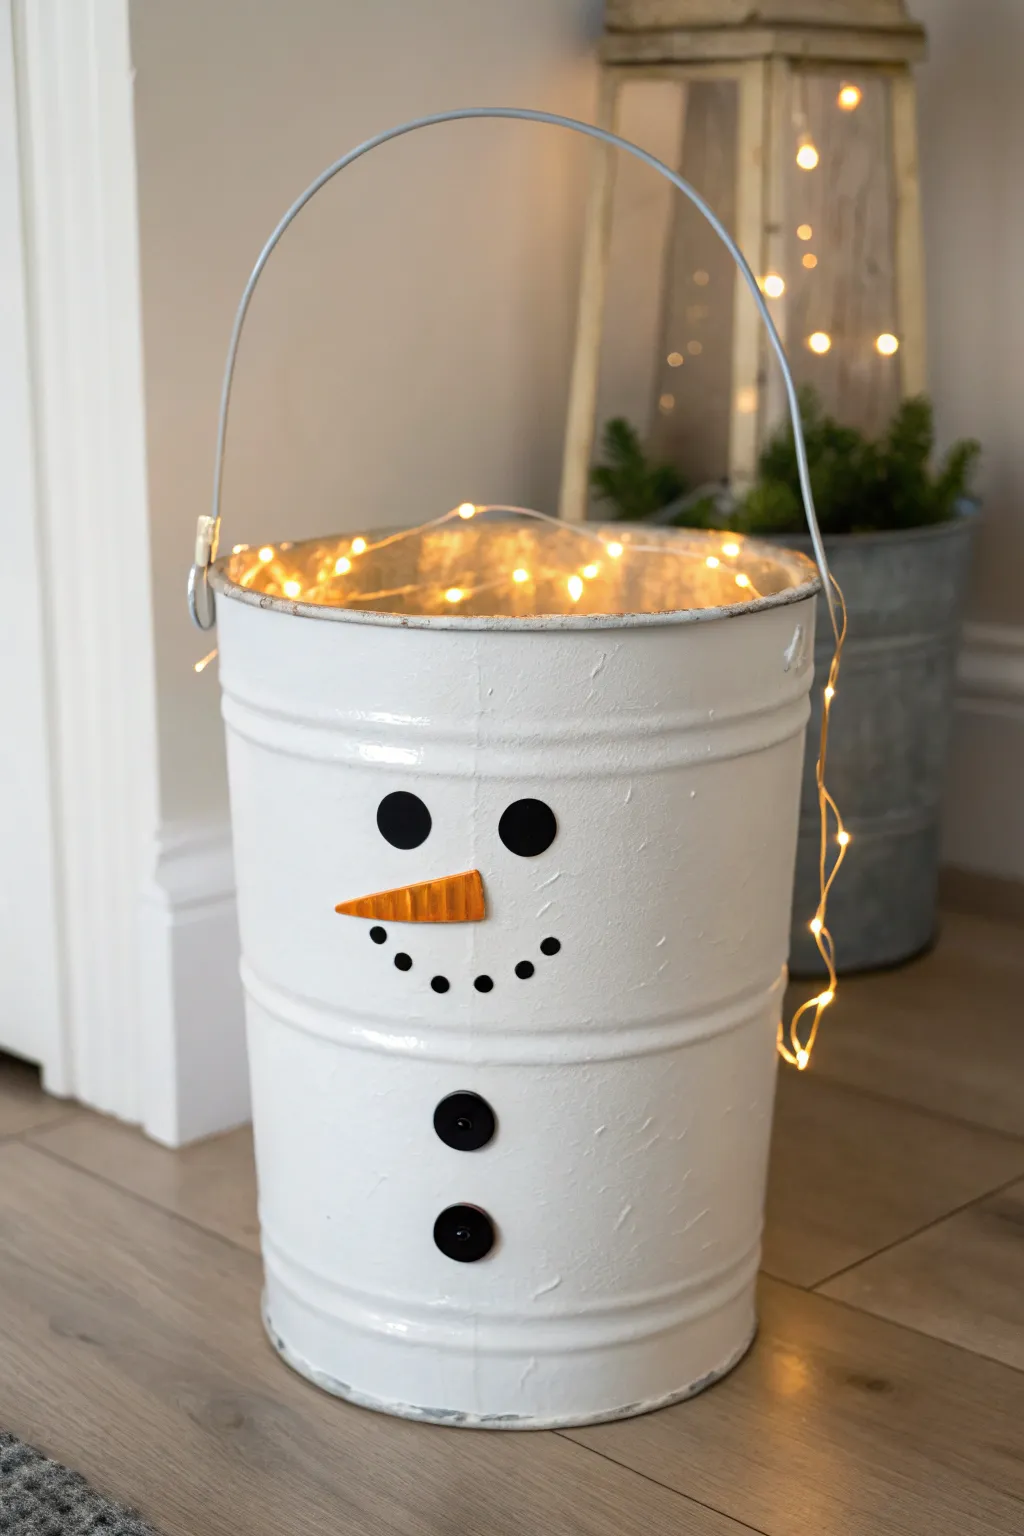
Transform an old metal paint bucket into a charming winter friend that lights up those dark evenings. With a coat of textured white paint and simple facial features, this sturdy luminary brings a warm, cozy glow to any porch or entryway.
Step-by-Step Tutorial
Materials
- Clean metal paint bucket (gallon size)
- White chalk paint or acrylic paint (matte finish)
- Paintbrush (medium size)
- Sea sponge (optional, for texture)
- Orange craft foam or felt
- Large black buttons (2 for body)
- Small black buttons (5-7 for mouth)
- Black cardstock or felt (for eyes)
- Hot glue gun and glue sticks
- Scissors
- String of warm white LED fairy lights (battery operated)
- Sandpaper (medium grit, optional)
Step 1: Prepping the Base
-
Clean the Container:
Thoroughly wash and dry your metal bucket. Remove any old labels or sticky residue with warm soapy water or a solvent to ensure the paint adheres properly. -
Sand the Surface:
If your bucket is very slick or glossy, scuff the exterior lightly with medium-grit sandpaper. Just a quick pass is enough to give the paint something to grab onto. -
Apply the Base Coat:
Paint the entire exterior of the bucket with white chalk paint. Don’t worry about perfect strokes; a little texture actually helps mimic the look of packed snow. -
Build Texture:
While the first coat is tacky, I like to dab a second layer on using a sea sponge or a stippling brush. This creates a fluffy, uneven finish rather than a factory-smooth one. -
Dry completely:
Allow the white paint to dry fully for at least 2-3 hours. If the metal still shows through, add a third coat for solid coverage.
Paint Peeling?
If paint peels off the metal, the surface was likely too slick. Sand the bare spots, apply a spray primer first, and then repaint for a durable bond.
Step 2: Creating the Face
-
Cut Out Eyes:
Cut two circles out of black cardstock or felt, approximately 1.5 inches in diameter. These will be the snowman’s bright, attentive eyes. -
Proper Eye Placement:
Position the eyes on the upper third of the bucket, spacing them about 2 inches apart. Use a small dab of hot glue to secure them in place. -
Craft the Nose:
Cut a triangle shape from orange craft foam or thick felt. Make it about 2-3 inches long, slightly elongated to resemble a carrot. -
Add Nose Detail:
To give the nose dimension, you can lightly score horizontal lines across the foam or use a marker to draw ridges before gluing it down just below the eyes. -
Design the Smile:
Lay out your 5-7 small black buttons in a curved smile shape below the nose to test the spacing before committing to glue. -
Secure the Mouth:
Hot glue each small button individually, following the curve you planned. Press firmly for a few seconds to ensure they bond with the textured paint.
Step 3: Adding the Body & Glow
-
Place Body Buttons:
Take your two large black buttons and arrange them vertically on the lower half of the bucket. They represent the snowman’s coat buttons. -
Glue the Buttons:
Using a generous amount of hot glue, attach the large buttons securely. Ensure they are centered directly beneath the nose for alignment. -
Prepare the Lights:
Unravel your string of LED fairy lights. Ensure the batteries are fresh so your snowman shines brightly. -
Fill with Light:
Bundle the main cluster of lights inside the bucket. You don’t need to arrange them perfectly; a loose pile at the top creates the best ambient glow. -
Accenting the Exterior:
Leave a tail of the light string hanging outside the bucket. Gently drape it around the handle or down the side for a whimsical, spilling-over effect. -
Hide the Battery Pack:
Tuck the battery pack deep inside the bucket at the bottom, or tape it just inside the rim if you need easier access to the switch.
Cozy Topper
Make earmuffs for your bucket! Glue two large pom-poms on the sides near the handle joints and connect them with a thick pipe cleaner over the top.
Place your glowing snowman by the fireplace or front door to welcome guests with a cheerful smile
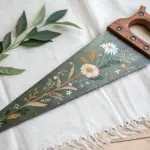
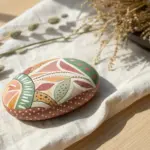
Hand-Painted Floral Gift Pail
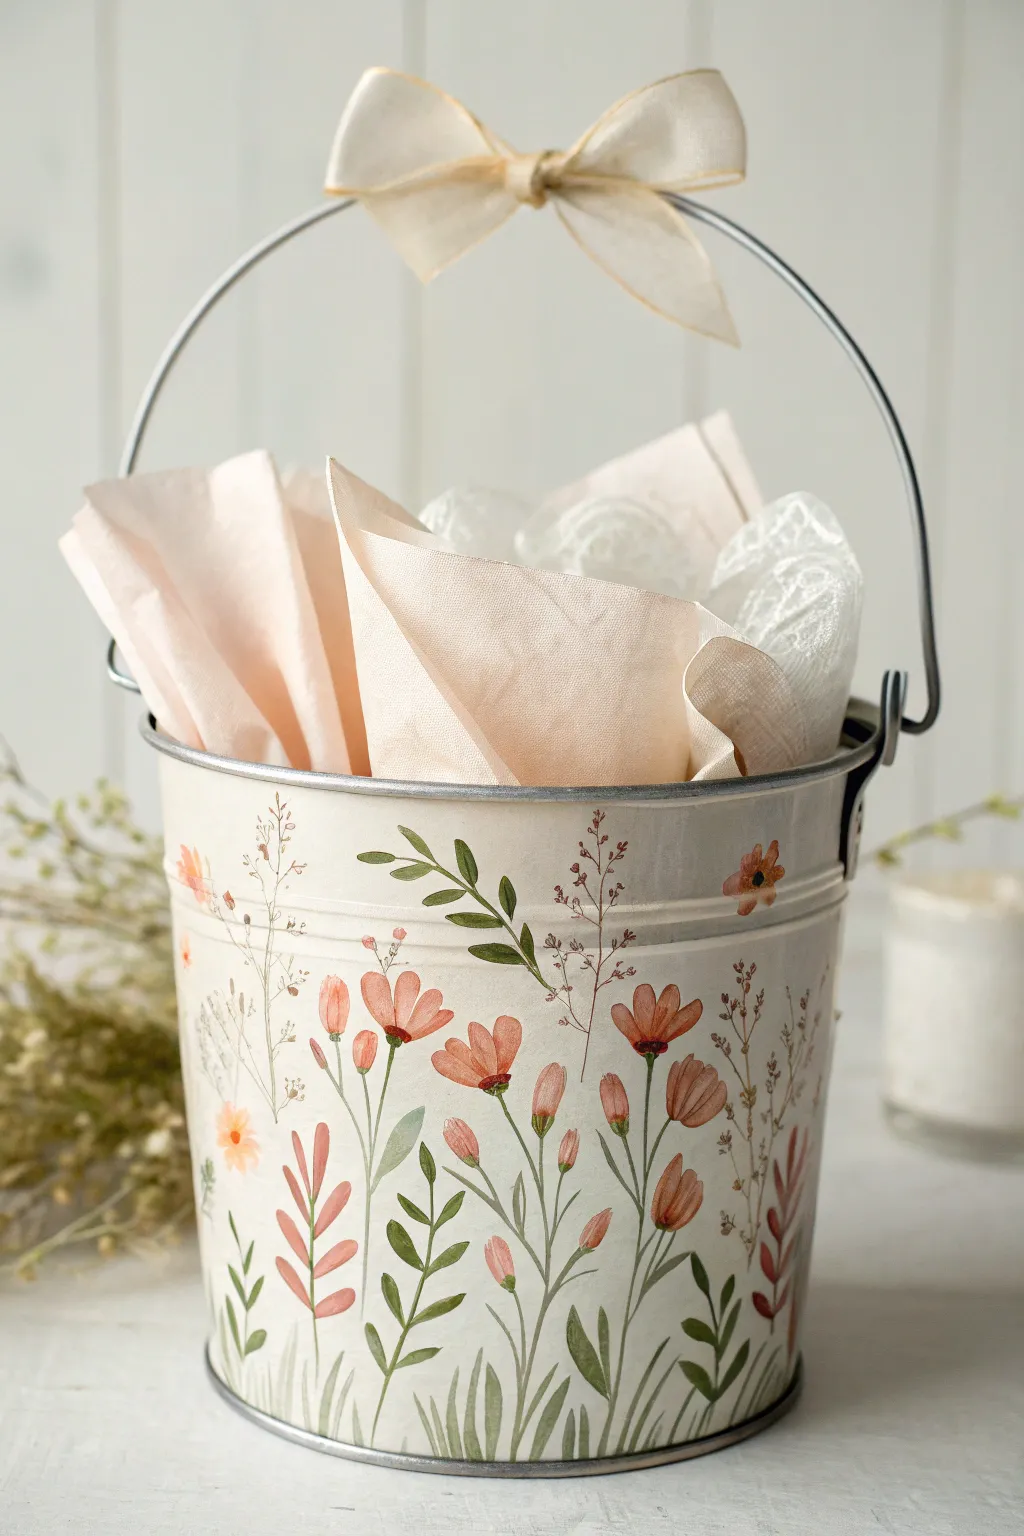
Transform a plain metal bucket into a charming keepsake vessel featuring delicate hand-painted wildflowers. This project combines soft watercolors and acrylics to create a vintage-inspired look perfect for gifting or home storage.
Step-by-Step
Materials
- Small galvanized metal bucket (approx. 6-8 inches tall)
- White matte spray paint (primer)
- Cream or off-white acrylic craft paint
- Acrylic paints: sage green, olive green, peach, terracotta, dusty pink, burnt sienna
- Fine detail brushes (sizes 0, 1, and 2 round)
- Small flat brush (size 4 or 6)
- Clear matte acrylic sealer spray
- Cream chiffon or organza ribbon (1 inch wide)
- Sandpaper (fine grit)
- Pale pink tissue paper and lace scraps (for filling)
Step 1: Preparing the Canvas
-
Surface prep:
Begin by lightly sanding the entire exterior of your metal bucket. This roughs up the smooth galvanized coating and gives the primer something to grip onto. -
Base priming:
In a well-ventilated area, spray the bucket with the white matte primer. Apply light, even coats to avoid drips, rotating the bucket as you go. Let it dry completely according to the can’s instructions. -
Cream topcoat:
Once the primer is cured, use a flat brush to apply the cream acrylic paint. I usually do two thin layers here to get a smooth, opaque finish that looks like matte ceramic. Let this dry fully for at least an hour.
Step 2: Painting the Meadow
-
Planning the layout:
Visualize a “meadow” growing from the bottom rim. You don’t need to sketch everything, but you can lightly mark stem positions with a pencil if you’re nervous about freehanding. -
Main stems:
Mix a watery sage green. Using your thinnest liner brush (size 0), paint long, slender stems rising from the bottom edge. Vary the heights—some short, some reaching nearly to the rim—and curve them slightly for a natural feel. -
Adding grass texture:
At the very base of the bucket, paint short, quick upward strokes in varied shades of green to simulate blades of grass anchoring your taller flowers. -
Leaf details:
Switch to a size 1 round brush. Along some of the thicker stems, press and lift your brush to create tear-drop shaped leaves. Use the olive green here for depth. -
Fern accents:
Paint a few fern-like leaves using the tip of your brush to make tiny, opposing dashes along a central vein. These add lovely texture to the bouquet.
Paint Slipping?
If acrylic paint beads up on the metal, the surface is too slick. Lightly sand that specific spot again and dab a tiny bit of primer before re-painting the flower.
Step 3: Blooming Details
-
Base poppy shapes:
For the main focal flowers (the poppies), mix terracotta and dusty pink. Paint loose, open cup shapes at the tops of your tallest stems. Keep the paint somewhat translucent to mimic watercolor. -
Tulip buds:
Use the dusty pink to paint small, closed oval buds on the medium-height stems. A single stroke for the left side and one for the right usually creates a perfect bud shape. -
Wildflower fillers:
Using burnt sienna or a dark brown, dab tiny dots in clusters on the thinnest, wispiest stems. These represent dried seed heads or intricate baby’s breath. -
Defining the petals:
Once your base flower shapes are dry, take a slightly darker shade of your flower color and add thin lines at the base of the petals to show separation and shadow. -
Flower centers:
Dip a toothpick or the very tip of your smallest brush into dark brown paint. Add tiny specks to the centers of the open poppies and the wildflowers. -
Floating petals:
Paint a few stray petals or leaves “floating” in the negative space near the top rim to make the composition feel breezy and loose. -
Bottom foliage:
Return to the base of the bucket with a pinkish-brown mix. Paint simpler, fern-like fronds growing upwards to fill in any gaps near the bottom, blending the flora into the ‘ground’.
Level Up: Vintage Patina
Mix a tiny drop of brown paint with water (glaze consistency). Brush it over the dry bucket and immediately wipe it off with a rag to leave ‘aged’ shadows in the crevices.
Step 4: Finishing Touches
-
Sealing the work:
Allow the paint to cure overnight. Once dry, spray the entire bucket with a clear matte acrylic sealer to protect your artwork from scratches and moisture. -
Handle bow:
Take your cream chiffon ribbon and tie a simple bow around the top center of the wire handle. Trim the tails so they drape nicely but don’t obscure the painting. -
Lining the interior:
To style it like the example, fluff two sheets of pale pink tissue paper and tuck them inside. Add a snippet of white lace peeking out from the top for extra vintage charm.
Now your custom-painted pail is ready to serve as a beautiful gift basket or a stylish organizer for your craft room
Pet Food Station Using Paint Buckets
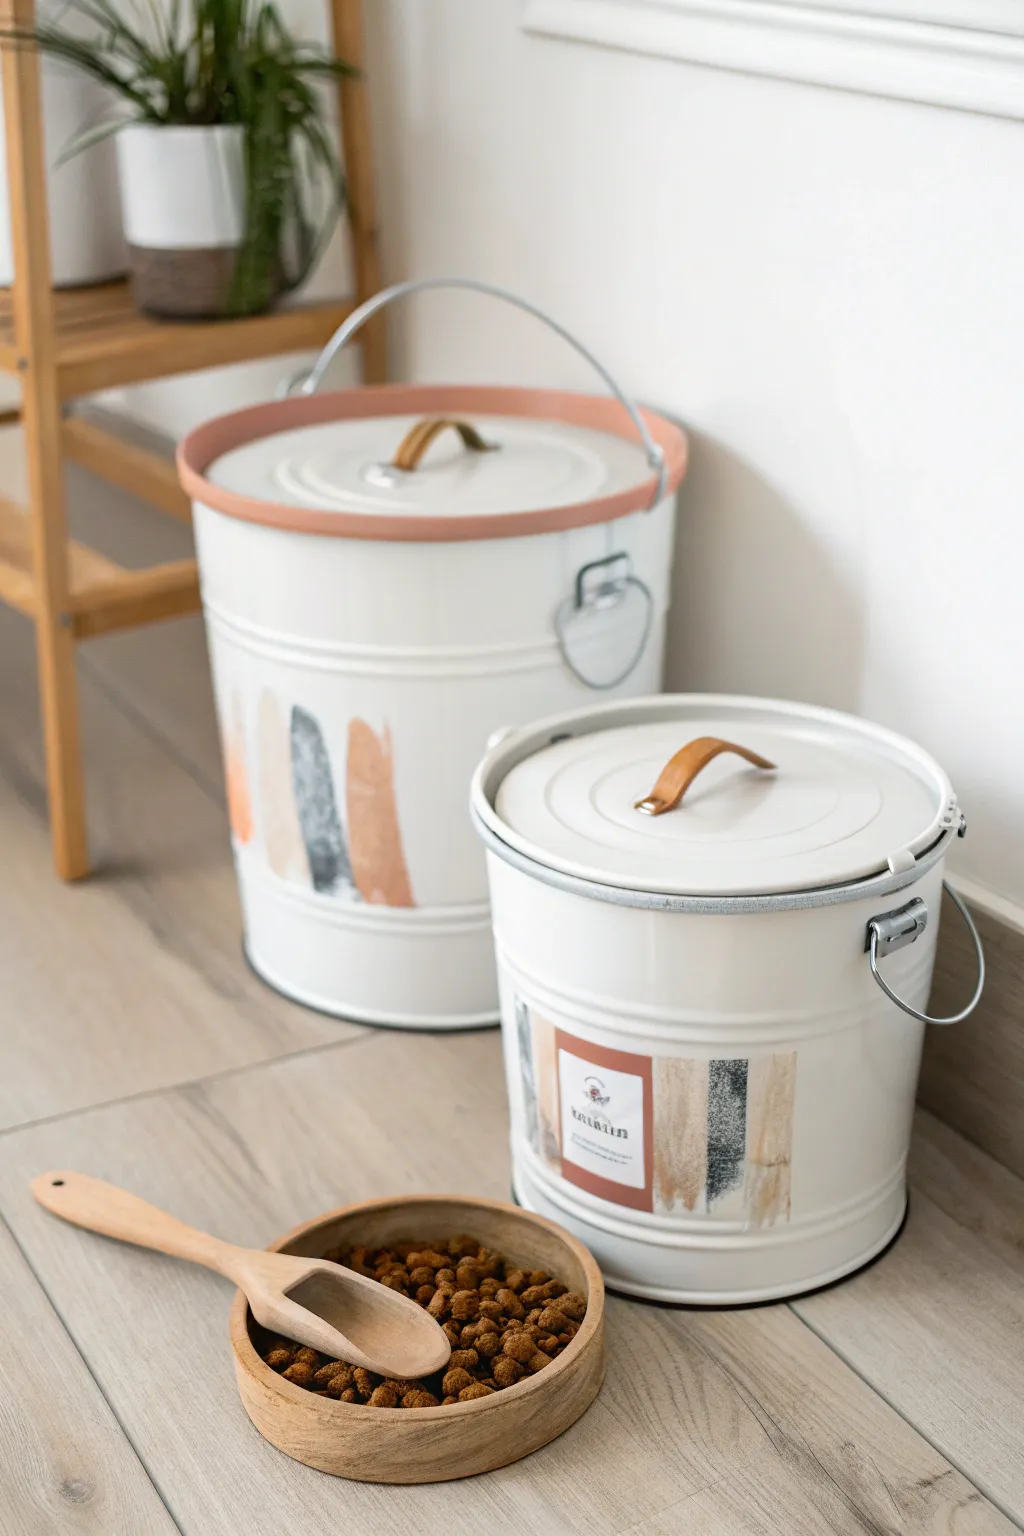
Transform ordinary metal paint buckets into stylish pet food storage that you won’t want to hide away in the pantry. With a fresh coat of white paint and some artistic, earthy brushstrokes, these bins offer a modern, Scandinavian-inspired look perfect for keeping kibble fresh.
How-To Guide
Materials
- Two minimal metal paint buckets with lids (5-gallon and 1-gallon sizes)
- White gloss spray paint or multi-surface enamel
- Acrylic paints (terracotta, slate grey, muted beige/cream)
- Wide flat paintbrush (approx. 2 inches)
- Medium flat paintbrush (approx. 1 inch)
- Leather scraps or leather cord strips
- Strong craft glue (E6000) or drill with small bolts
- Sandpaper (fine grit)
- Clear matte sealant spray
- Optional: Printed label or sticker paper
Step 1: Prepping and Base Coating
-
Clean the surfaces:
Before doing anything, ensure your buckets are completely clean. If they are reused paint cans, remove any dried residue. Wash them with warm soapy water and let them dry thoroughly to prevent rust. -
Sand for adhesion:
Lightly scuff the exterior surface of the metal buckets and lids with fine-grit sandpaper. This creates a ‘tooth’ for the paint to grab onto, ensuring your finish doesn’t chip later. -
Apply the base coat:
In a well-ventilated area, spray the buckets and lids with white gloss paint. Hold the can about 8-10 inches away and use sweeping motions. -
Layer the white:
Apply 2-3 thin coats rather than one heavy one to avoid drips. Allow complete drying time between coats according to the can’s instructions. I like to let the final coat cure overnight for maximum durability. -
Detail the rim:
For the larger bucket, inspect the image carefully—the top rim is painted a soft terracotta color. Use a small brush to carefully paint just the lip of the lid in this accent hue.
Pro Tip: Clean Lines
If you struggle with freehand painting, use painter’s tape to mark the vertical boundaries of your brushstrokes, then peel it off while the paint is still wet for crisp edges.
Step 2: Adding the Artistic Flair
-
Select your palette:
Pour small amounts of your terracotta, slate grey, and beige paints onto a palette or paper plate. You want these colors to feel earthy and organic. -
Paint the first stroke:
Using your wide flat brush, load up the terracotta paint. Starting near the bottom third of the bucket, pull the brush upward in a loose, vertical stroke. Don’t worry about perfect edges; the dry-brush texture looks better. -
Add dimension:
Clean your brush and switch to the slate grey. Paint a similar vertical stroke next to the first one, slightly overlapping if you wish. Vary the heights slightly for a natural look. -
Finish the abstraction:
Complete the pattern with the beige or cream color. Repeat this tri-color grouping around the bucket, leaving plenty of white space between the groups. -
Label the small bin:
For the smaller bin, create a rectangular background using the beige paint behind where your label will go. Paint vertical strokes of grey and terracotta on either side of this central block. -
Apply the label:
Once the paint is bone dry, attach your printed label to the center of the painted rectangle on the smaller bucket. A simple serif font works best for this aesthetic.
Level Up: Wooden Base
Add a cheap round wooden cutting board or cork coaster to the bottom of the bucket using strong glue. It protects your floors and adds a high-end mixed-material look.
Step 3: Finishing Touches
-
Seal the artwork:
Protect your handiwork with a coat of clear matte sealant spray. This is crucial since these bins will be handled daily and might need occasional wiping. -
Prepare leather handles:
Cut two strips of leather, approximately 4 inches long and 1 inch wide. These will replace or enhance the standard metal handles on the lids. -
Shape the loops:
Fold the leather strips into a simple loop shape, pinching the ends together. -
Attach the handles:
For a strong hold, I prefer to drill a small hole through the center of the lid and bolt the leather loop in place. Alternatively, use a strong industrial adhesive like E6000 to glue the leather loop to the center of each lid. -
Let it cure:
Allow the adhesive or paint to cure fully for at least 24 hours before filling the bins with heavy kibble.
Now you have a functional piece of art that keeps your pet’s food fresh and your home looking beautiful
Kids’ Drum Made From a Paint Bucket
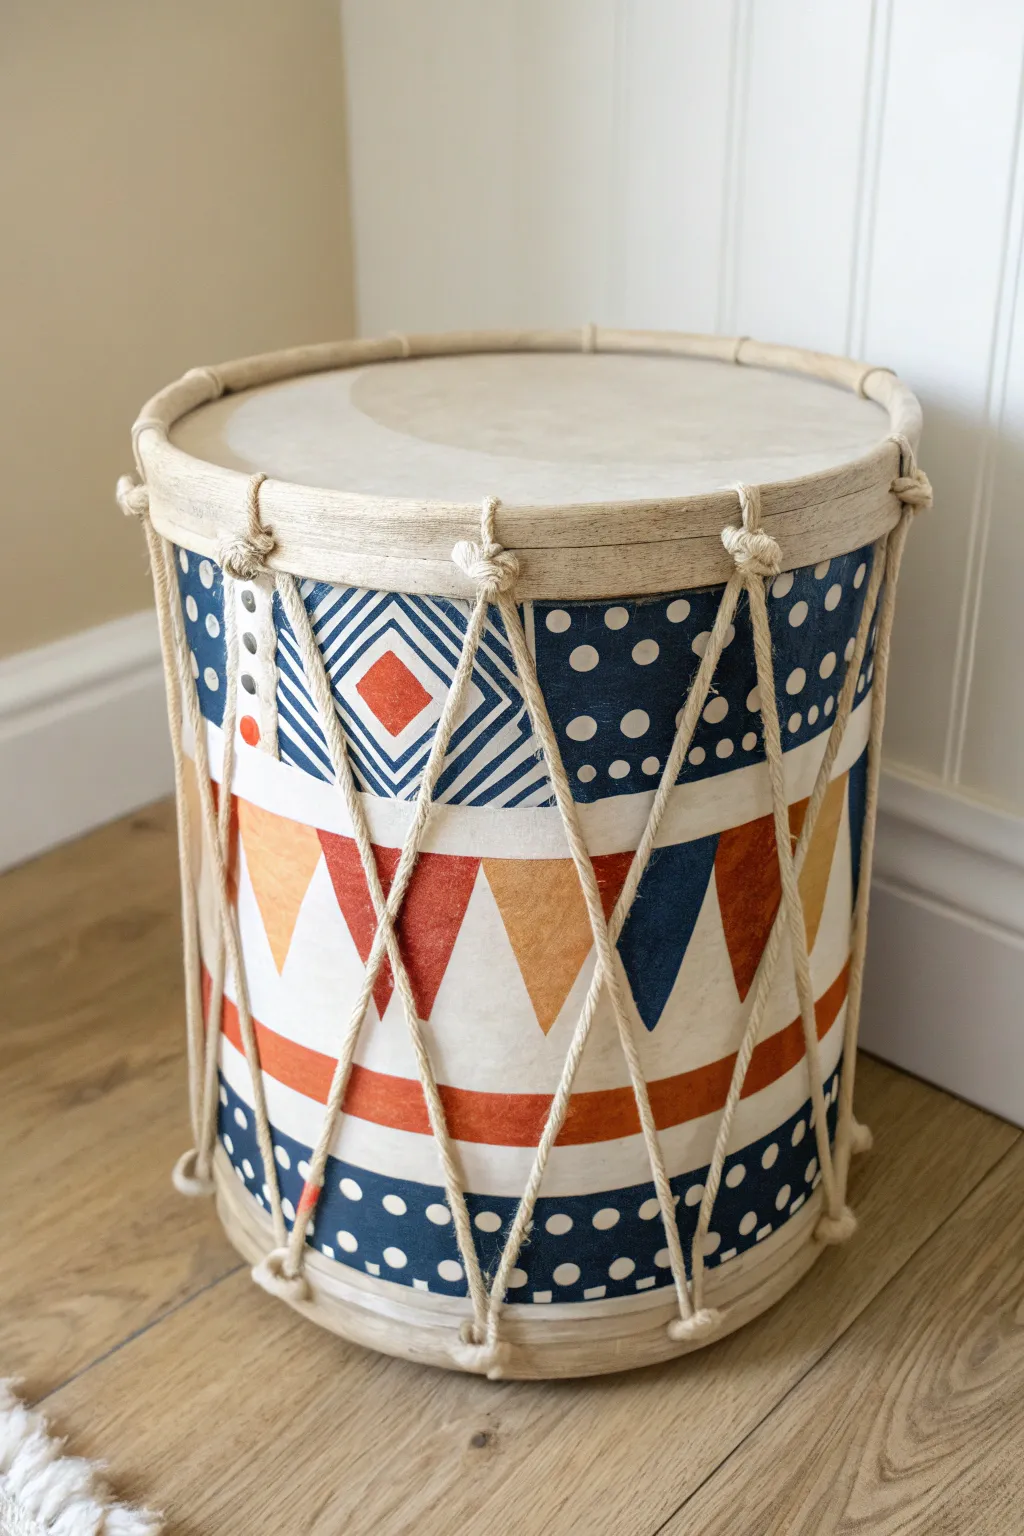
Transform an ordinary plastic paint bucket into a rhythm-making masterpiece with this detailed drum craft. Featuring bold geometric patterns and authentic rope tensioning, this project looks as good as it sounds in any playroom.
Step-by-Step Guide
Materials
- Clean 5-gallon plastic paint bucket with lid
- Heavyweight canvas fabric or faux leather (for the drum head)
- Patterned wrapping paper or cardstock (geometric/tribal print)
- Mod Podge or white craft glue
- Jute rope or thick cotton cord (approx. 5-7mm thickness)
- Hot glue gun and glue sticks
- Spray adhesive (optional)
- Scissors
- Measuring tape
- Clear acrylic sealer spray
Step 1: Preparing the Base
-
Clean and prep:
Thoroughly wash and dry your 5-gallon bucket, removing any metal handles. If the handle attachments are bulky, carefully trim them flush with a utility knife so the sides are smooth. -
Measure the wrap:
Measure the height of the bucket from just under the top rim to the bottom edge. Then, measure the circumference. Cut your patterned paper to these dimensions, adding an inch of overlap for the seam. -
Apply the pattern:
Apply spray adhesive or a thin, even layer of Mod Podge to the back of your paper. Carefully wrap it around the bucket, smoothing out air bubbles as you go. Ensure the seam is neat and located at the back. -
Seal the design:
Once the paper is secure, brush a coat of Mod Podge over the entire exterior to protect the design from tears and scratches. I like to let this dry briefly before adding a second coat for extra durability.
Loose Ropes?
If your zig-zag ropes feel loose, tighten them by pinching two adjacent vertical ropes together in the middle and wrapping them with a small piece of twine.
Step 2: Creating the Drum Head
-
Cut the canvas:
Place the bucket lid on your canvas or faux leather. Trace a circle that is about 3-4 inches wider than the lid on all sides and cut it out. -
Attach to lid:
Center the lid on the fabric circle. Fold the excess fabric edge up and over the rim of the lid, securing it to the underside (the inside of the lid) with hot glue. Pull tightly as you work to ensure a taut drum surface. -
Secure the lid:
Snap the fabric-covered lid firmly onto the bucket. If the fabric makes it too tight, you may need to use a rubber mallet to gently tap it into place.
Custom Sound
Before sealing the lid, experiment with sound by adding a handful of dry beans or rice inside the bucket to create a shaker-drum hybrid effect.
Step 3: Binding the Rims
-
Top rim measurement:
Measure the circumference of the lid’s edge. Cut a length of jute rope slightly longer than this measurement. -
Top rim wrapping:
Using hot glue, attach the rope around the very top edge of the drum lid. This hides the plastic rim and provides an anchor point for the tension ropes later. -
Create the bottom ring:
Repeat the process at the very bottom of the bucket. Glue a single ring of rope around the base to act as the bottom anchor. -
Add loops:
Cut 16 small pieces of rope, about 3 inches each. Form them into U-shaped loops. Glue 8 loops evenly spaced around the top rope ring, and 8 loops directly below them on the bottom rope ring.
Step 4: Stringing the Drum
-
Anchor the cord:
Take a long length of jute rope (several yards). Tie one end securely to one of the bottom loops. A simple knot with a dab of hot glue will keep it permanent. -
Start the zigzag:
Pull the rope up to the corresponding top loop. Thread it through, then pull it diagonally down to the next available bottom loop. -
Tension and weave:
Continue this zigzag pattern all way around the drum. Keep the tension tight but consistent so the ropes look straight and taut like a real Djembe drum. -
Knot intersections:
For a more authentic look, where the diagonal ropes cross over horizontal bands in the pattern, you can add a small dab of clear glue to keep them perfectly positioned against the bucket. -
Tie off:
When you return to the start, tie the rope off securely at the bottom hoop. Tuck the loose end behind the wrapping and secure with glue. -
Final binding:
Wrap a final layer of rope horizontally around the top rim, covering the knots of your vertical ropes. This creates that thick, finished rim seen in the photo.
Now grab some wooden spoons or chopsticks and enjoy the deep, resonant beats of your new creation
Mixed-Media Sculpture Built on a Paint Bucket Base
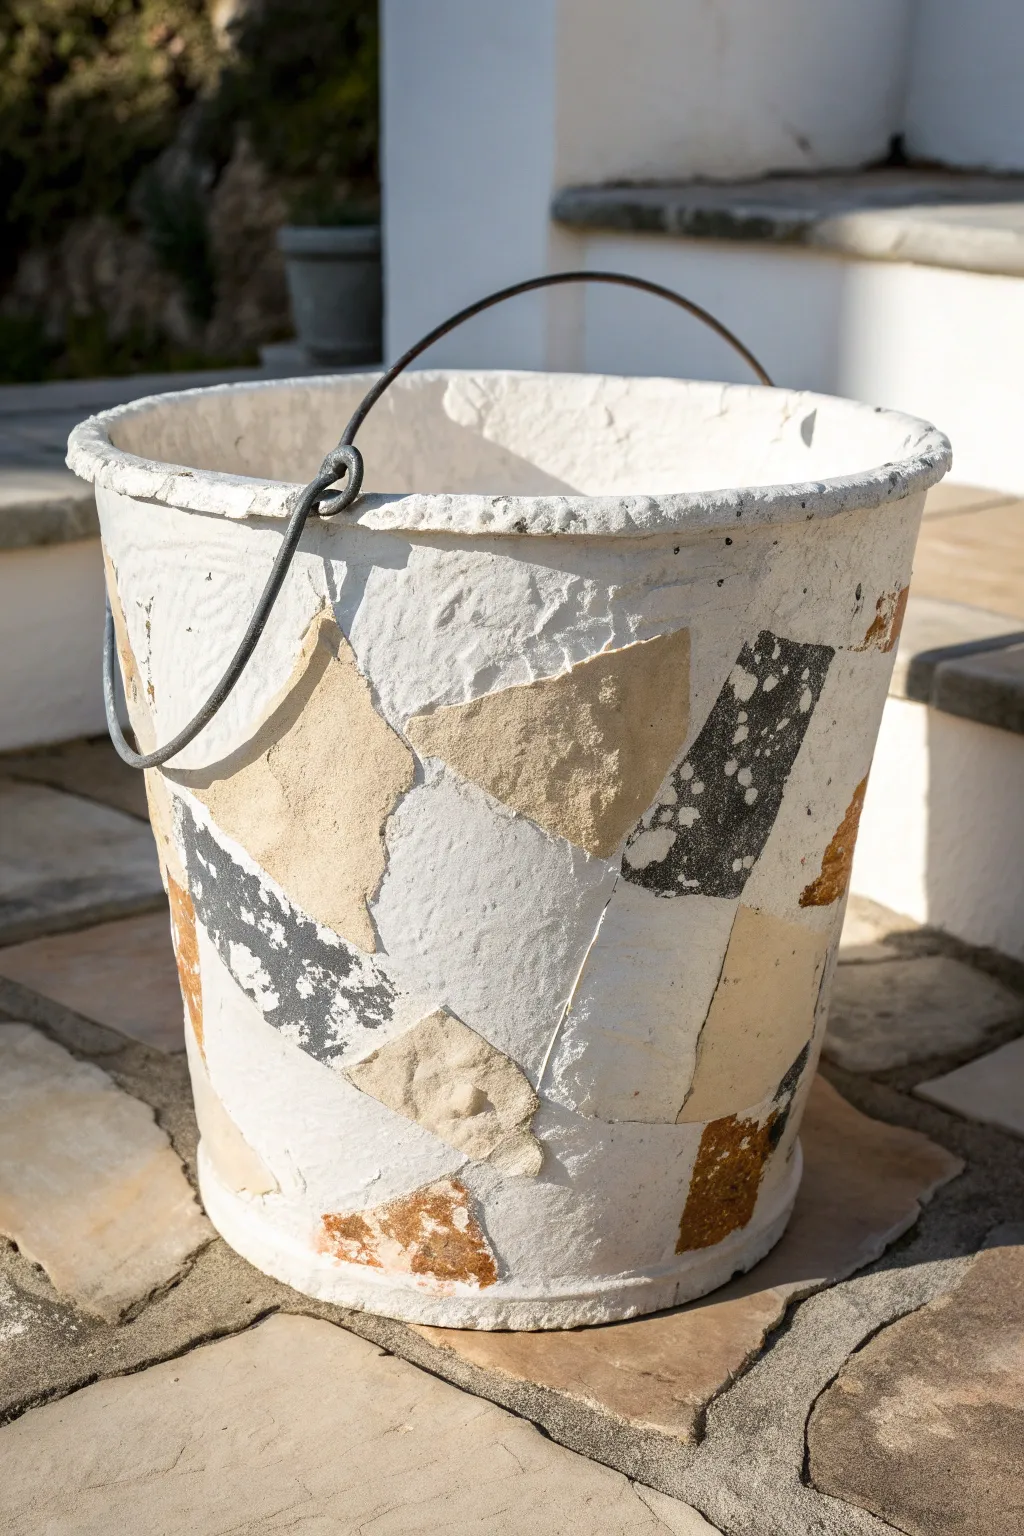
Transform a humble plastic utility bucket into a high-end, gallery-worthy vessel that mimics the look of ancient stone and terrazzo. This project uses a clever paper clay or joint compound technique to build texture, embedding torn paper or fabric shapes to create a sophisticated, rugged mosaic effect.
Detailed Instructions
Materials
- Clean plastic paint bucket (1-gallon or 5-gallon)
- Joint compound or premixed textural medium (like stucco patch)
- White acrylic paint or gesso
- Heavyweight textured paper (water color paper or cardstock) or fabric scraps
- Acrylic paints (black, beige, terracotta/burnt sienna, grey)
- Matte finish decoupage medium or white glue
- Sandpaper (medium grit)
- Palette knife or spatulas
- Wire (heavy gauge) for the handle
- Drill with small bit
- Clear matte sealant spray
Step 1: Preparation & Base Texture
-
Prepare the Bucket:
Begin by removing the original plastic handle from your paint bucket. Clean the exterior surface thoroughly with soap and water to remove any dust or grease residue. If the surface is very smooth, give it a quick sanding to help your materials adhere. -
Drill Handle Holes:
Using a drill, create two small holes on opposite sides of the bucket rim where your new wire handle will eventually attach. It is much easier to do this now than after the texture is applied. -
Apply the Base Coat:
Apply a generous layer of white gesso or acrylic primer to the entire exterior. This blocks out any logos or bright bucket colors and provides a toothy surface for the texture medium. -
Create Texture Mix:
Mix your joint compound or texture medium with a small amount of white acrylic paint. This ensures the base color is bright white and adds flexibility to the compound so it’s less likely to crack as it dries. -
Slather and Spread:
Using a palette knife, slather the mixture onto the bucket. Don’t try to be smooth—you want ridges, dips, and an organic, handmade feel. Leave it slightly thicker in some areas to mimic hand-thrown pottery.
Step 2: Creating the Terrazzo Shards
-
Paint the Papers:
While the bucket dries, take your heavy textured paper or cardstock. Paint sections of the paper in your earth tones: a warm sand beige, a dark charcoal grey speckled with white, and a rusty terracotta. -
Add Speckling:
For the dark grey sections, I like to flick a little white paint off an old toothbrush onto the wet paint to create a natural stone look. Let these papers dry completely. -
Tear the Shapes:
Once dry, manually tear the paper into irregular, geometric shards. Avoid using scissors; the torn edges blend better into the bucket’s texture and look more like broken stone chips.
Cracking Up?
If the joint compound cracks while drying, don’t panic. Mix a little more compound with white glue and fill the cracks. It adds to the aged character.
Step 3: Assembly & Finishing
-
Plan Your Layout:
Dry fit your paper shards against the bucket to visualize the spacing. You want a random distribution with plenty of white space between the colored ‘stones’. -
Adhere the Shards:
Apply a layer of decoupage medium to the back of a shard and press it firmly onto the textured bucket. If the texture is very rough, add a little extra joint compound behind the paper to fill gaps. -
Build Up Around Shards:
Take a little more of your white texture paste and carefully dab it around the edges of the glued paper shards. Feather it outward so the paper looks embedded in the surface, rather than just stuck on top. -
Light Sanding:
Once everything is bone dry (this may take overnight), use medium-grit sandpaper to gently knock down any overly sharp peaks in the texture. You can scuff the paper shards slightly too, to give them a weathered appearance. -
Install the Handle:
Cut a length of heavy-gauge wire. Feed the ends through the pre-drilled holes and curl them upwards with pliers to secure them. Shape the wire into a simple arc. -
Seal the Work:
Spray the entire exterior with a matte clear sealant. This is crucial to protect the joint compound from moisture and to keep the paper elements from peeling over time.
Make It Ancient
Mix a very watery wash of brown paint and brush it over the dried bucket, then immediately wipe it off. The pigment will settle in crevices for an antique look.
Now you have a stunning, heavyweight-looking vessel ready for dry floral arrangements or as a standalone sculpture


Have a question or want to share your own experience? I'd love to hear from you in the comments below!