If you’re craving that groovy, colorful hippy painting vibe, you’re in the right headspace—think psychedelic color, nature symbols, and a little spiritual sparkle. I pulled together ideas that feel classic and instantly recognizable first, then get progressively more playful and unexpected.
Groovy Bubble-Letter Quote
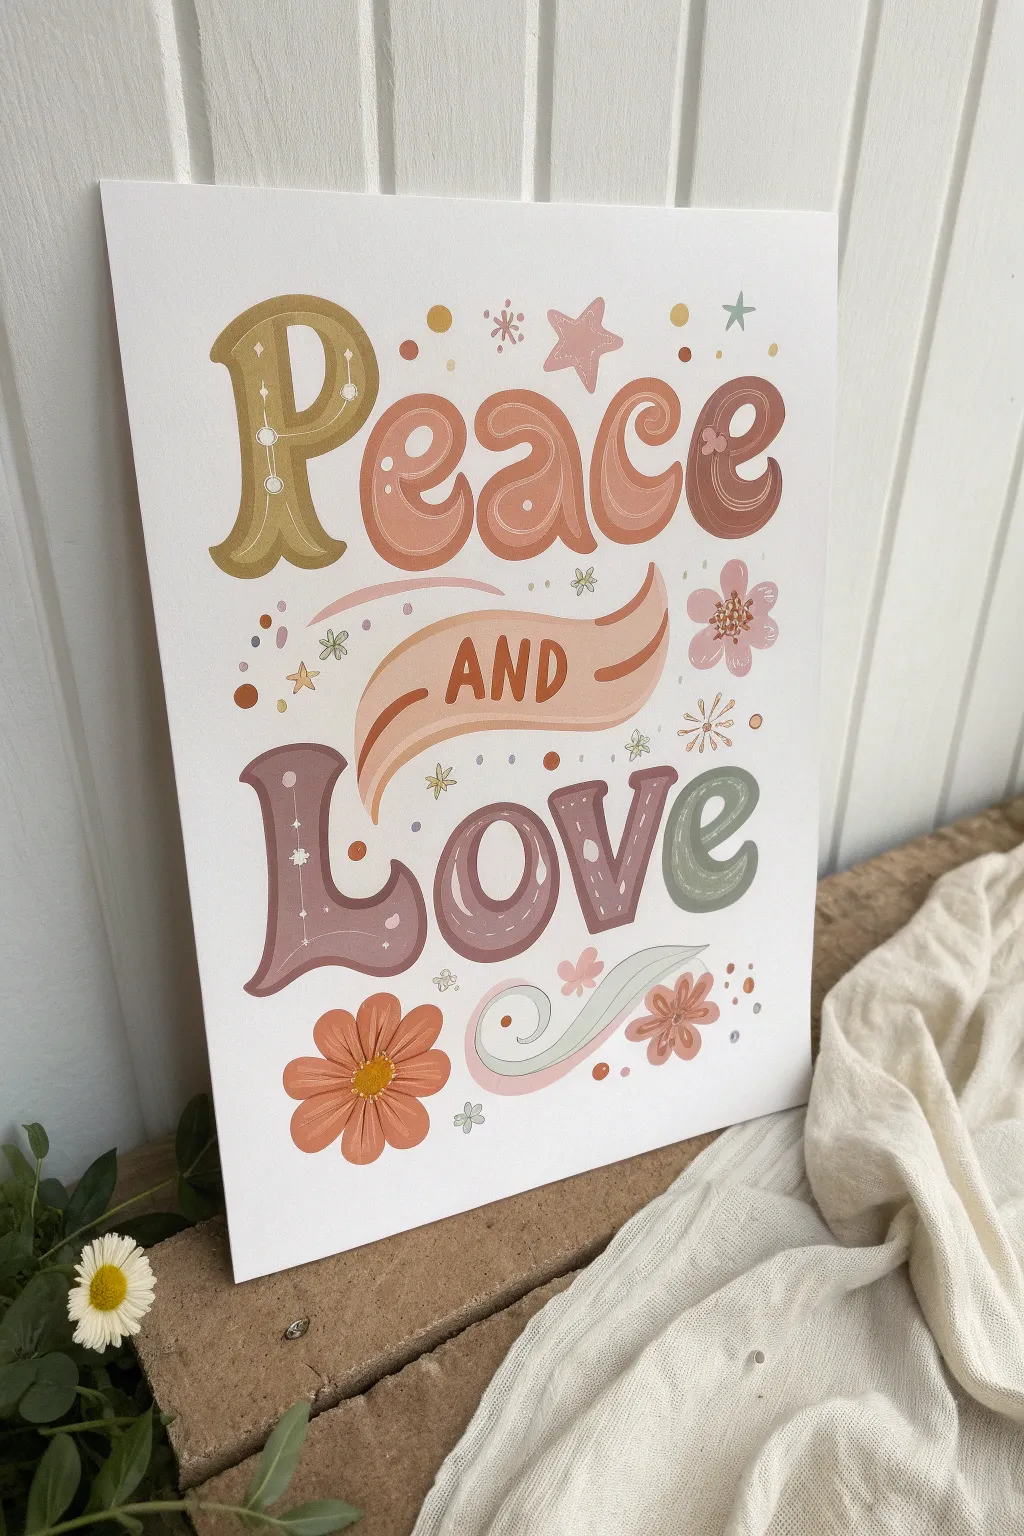
Channel the mellow vibes of the 1970s with this hand-lettered poster art featuring iconic groovy typography. The dusty pastel palette and playful bubble letters create a nostalgic aesthetic perfect for brightening up a cozy corner.
Step-by-Step
Materials
- Heavyweight drawing paper or smooth mixed media paper (9×12 or similar)
- Pencil (HB or lighter) and eraser
- Ruler
- Acrylic gouache or matte acrylic paints (mustard yellow, terracotta, blush pink, sage green, mauve)
- Fine round paintbrushes (sizes 0, 2, and 4)
- Small flat brush (size 4 or 6)
- Palette for mixing
- Water cup and paper towels
Step 1: Planning the Layout
-
Establish guidelines:
Using a ruler and a very light touch with your pencil, mark the horizontal center of your paper. Draw two distinct horizontal baselines: one for ‘Peace’ near the top third and one for ‘Love’ near the bottom third, leaving ample space in the middle for the ribbon banner. -
Sketch the letters:
Lightly sketch the word ‘Peace’ in a rounded serif style and ‘Love’ in a chunky bubble serif font. Don’t worry about perfection yet; focus on getting the letter spacing even. Notice how the ‘P’ and ‘e’ slightly overlap, and the ‘L’ curves generously. -
Add the banner:
In the center space, draw a wavy ribbon shape. Think of it as a gently flowing ‘S’ curve lying on its side. Inside the ribbon, sketch simple block letters for ‘AND’. -
Draw supporting motifs:
Fill the negative spaces with retro elements. Sketch a large flower at the bottom left and a smaller cluster at the bottom right. Add whimsical stars, dots, and a few small daisies floating around the text to balance the composition.
Smooth Operator
To get those buttery smooth lines on the curves, slightly dilute your acrylic gouache with a drop of water. It should flow like heavy cream, not paste.
Step 2: Painting the Base Colors
-
Paint the first letter:
Mix a muted mustard yellow tone. Using a size 4 round brush, carefully fill in the capital ‘P’ in ‘Peace’. Keep your edges crisp. -
Complete the top word:
Switch to a terracotta or deep peach color for the remaining letters ‘eace’. Use the size 2 brush for tighter corners inside the loops of the ‘e’ and ‘a’. -
Fill the ribbon:
Mix a soft blush pink or beige-pink. Using the flat brush for smoother strokes, fill in the main body of the ribbon banner. Let this shape dry completely before attempting to add the text on top later. -
Paint the bottom word:
Moving to ‘Love’, use a dusty mauve color for the ‘L’, ‘o’, and ‘v’. I like to switch to a sage green for the final ‘e’ to add visual interest and link it to the foliage colors.
Texture Twist
Once dry, use colored pencils to add shading on top of the paint. It creates a fuzzy, vintage texture that mimics old printed posters perfectly.
Step 3: Adding Details and Accents
-
Lettering the banner:
Once the ribbon paint is bone dry, use a size 0 brush with the terracotta paint to carefully lettering ‘AND’ inside the banner shape. Add small curved lines at the ribbon folds to give it dimension. -
Inner details on ‘Peace’:
With a very fine brush and a lighter shade of your base colors (mix in a little white), paint thin contour lines inside the letters of ‘Peace’. Add delicate vertical lines and dots inside the ‘P’ for a decorative touch. -
Stylize ‘Love’:
For the bottom word, use white or a very pale grey to add highlights. Paint small stars or ‘sparkles’ on the ‘L’ and thin inline strokes on the ‘o’ and ‘v’ to make them look inflated. -
Paint the flora:
Fill in the large daisy at the bottom left with terracotta petals and a mustard center. Use the sage green to paint simplistic leaves and stems flowing from the bottom center.
Step 4: Final Touches
-
Scattered elements:
Take your time painting the small floating stars and dots. Use mustard yellow, sage green, and blush pink to distribute the color palette evenly across the white space. -
Refine edges:
Look closely at your letter edges. If any look shaky, use a small flat brush with the background color (if painted) or the letter color to sharpen the lines. -
Erase guidelines:
Ensure the painting is absolutely dry—acrylic gouache can smear if slightly damp. Gently erase any visible pencil sketch lines that weren’t covered by paint.
Step back and admire your groovy creation, ready to bring a touch of peace into your space


Sunflowers and Daisies Forever
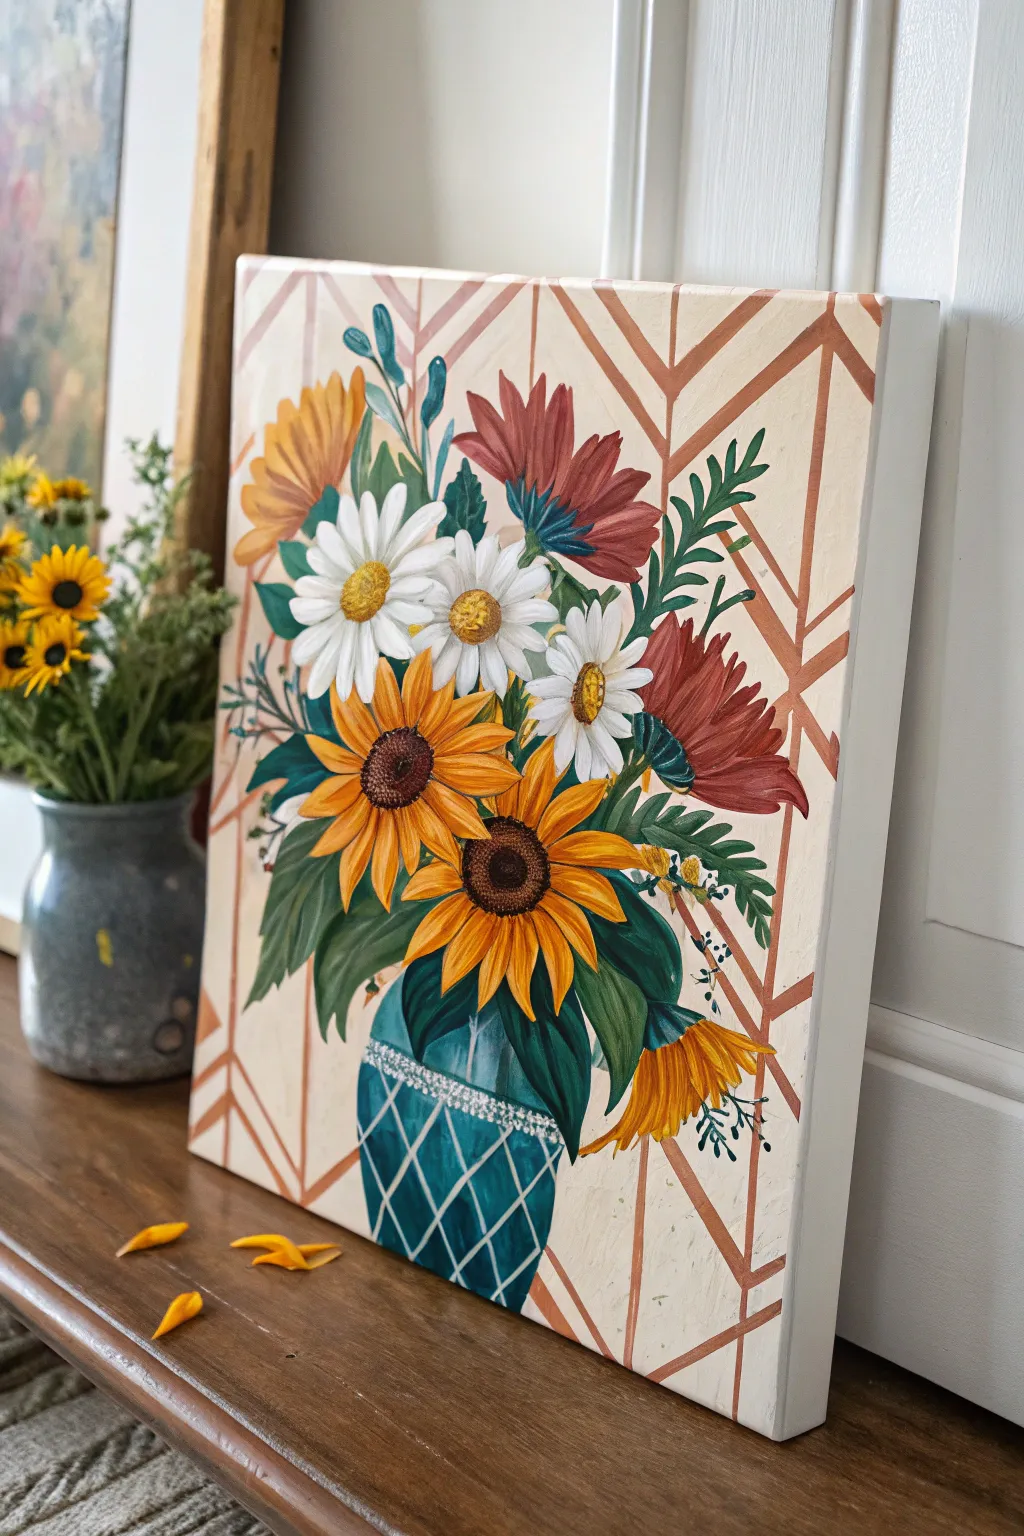
Marrying crisp geometric lines with soft, organic floral shapes creates a striking contrast that feels both modern and retro. This painting features a joyous arrangement of sunflowers, daisies, and coneflowers bursting from a patterned teal vase against a warm, linear background.
Step-by-Step Tutorial
Materials
- Stretched canvas (square or rectangular)
- Acrylic paints (Titanium White, Yellow Ochre, Cadmium Yellow, Burnt Sienna, Burnt Umber, Teal/Turquoise, Sap Green, Deep Red)
- Painter’s tape (1/4 inch width)
- Flat brushes (various sizes)
- Round detail brushes (sizes 0-4)
- Ruler or straight edge
- Pencil
- Palette and water cup
Step 1: Setting the Background Stage
-
Prepare the geometry:
Begin with a blank canvas. To achieve the sharp chevron pattern, lay down strips of 1/4 inch painter’s tape deeply firmly in a series of inverted ‘V’ shapes or zig-zags across the entire canvas surface. Don’t worry about perfect spacing; a little irregularity adds charm. -
Initial wash:
Mix a very pale wash of Burnt Sienna or a warm peach tone with plenty of water or a matte medium. Paint over the entire taped canvas to create the base layer between the geometric lines. -
Layering the lines:
Once dry, carefully peel off the tape to reveal the white canvas underneath. Now, re-tape or simply use a steady hand with a flat brush to paint those white lines with a diluted, warm copper or terracotta color, creating the linear geometric structure shown in the reference.
Step 2: Vase and Base
-
Sketching the composition:
Lightly sketch the outline of the vase near the bottom center and rough circles where your main flower heads will go. This helps ensure your composition stays balanced before you commit to paint. -
Painting the vase:
Fill in the vase shape with a rich teal or turquoise color. Apply two coats if necessary for full opacity. -
Vase details:
Once the teal is dry, use a fine liner brush with white paint to create the diamond cross-hatching pattern on the vase body. Add a decorative rim of small dots near the neck for texture.
Bleeding Lines?
If paint seeps under your tape, don’t panic. Wait for it to dry completely, then use a small flat brush and your background color to touch up the edges for a crisp look.
Step 3: Foliage Foundation
-
Darkest greens first:
Mix Sap Green with a touch of Burnt Umber to create a deep shadow green. Paint the base leaves, focusing on the areas that sit behind the flowers to create depth. -
Leaf details:
Using a lighter green mix, add the fern-like fronds and spear-shaped leaves that extend outward. Let these overlap your geometric background slightly to integrate the foreground with the back.
Pro Tip: Depth of Field
Add a few ‘leaves’ using a diluted, translucent green glaze over parts of the background pattern. This pushes the pattern back and makes the bouquet pop forward.
Step 4: Blooming Flowers
-
Sunflower petals:
Mix Cadmium Yellow with a touch of Yellow Ochre. Using a filbert or small flat brush, paint the petals of the sunflowers, pulling strokes from the outside edge toward the center. -
Daisy whites:
For the daisies, use Titanium White. Paint the petals in a similar fashion, but keep them slightly more slender than the sunflower petals. Add a tiny dot of grey or blue to the white for shadows where petals overlap. -
Coneflower colors:
Mix Deep Red with Burnt Sienna for the reddish flowers. These petals often droop slightly downwards, so curve your brushstrokes toward the ground. -
Sunflower centers:
Mix Burnt Umber and Black. Stipple (dab repeatedly) the centers of the sunflowers to create a textured, seedy look. Ring the outer edge of the center with a slightly lighter brown highlighter. -
Daisy centers:
Use a mix of yellow and ochre to paint the mounded centers of the white daisies and coneflowers. Add a small crescent of darker brown on one side to indicate form and shadow.
Step 5: Final Flourishes
-
Refining edges:
Look at where your petals overlap leaves. Use a small round brush to sharpen any edges or add tiny highlights to the tips of the petals with a mix of yellow and white. -
Whimsical sprigs:
Add the final delicate touches: thin stems with tiny buds poking out from the bouquet, using a dark green or blue-green mix. -
Protecting the work:
Allow the painting to dry completely, ideally overnight. If you want a glossy finish like the inspiration photo, apply a coat of gloss varnish to seal it.
Step back and admire how the rigid background makes your organic flowers feel even more alive and vibrant


Psychedelic Sunset Landscape

Capture the flowing energy of a dreamscape with this groovy sunset painting, featuring stylized waves of color that ripple across the sky and land. The result is a harmonious blend of warm and cool tones, distinct outlines, and soft gradients that create a mesmerizing, movement-filled composition.
Detailed Instructions
Materials
- Square canvas (16×16 or similar)
- Acrylic paints (Magenta, Violet, Orange, Yellow, Teal, Phthalo Green, White)
- Fine liner brushes (sizes 0 and 1)
- Flat shader brushes (sizes 4 and 8)
- Pencil and eraser
- Mixing palette
- Slow-drying blending medium (optional)
Step 1: Drafting the Flow
-
Sketch the horizon:
Begin by lightly sketching a wavy horizon line just above the center of the canvas. Instead of jagged peaks, draw smooth, rolling curves to represent the distant mountain range. -
Outline the sun:
Draw a perfect circle slightly to the right of the center, nestled just above your mountain line. A small cup or roll of tape makes a great gentle template for this. -
Create the sky ribbons:
Starting from the sun and radiating outward, sketch long, undulating ribbons that stretch to the edges of the canvas. Let lines overlap and interact, creating sections that look like flowing wind. -
Map the foreground hills:
Below the mountains, sketch layers of rolling hills. Imagine them as fabric folding over itself rather than realistic terrain. Divide the bottom third into sweeping, curved segments that flow horizontally across the canvas.
Clean Lines
If your hand gets shaky on the long outlines, try holding your breath while pulling the brush, or rest your pinky finger on a dry part of the canvas for stability.
Step 2: Painting the Sky
-
Base layer for the sun:
Mix a pale, creamy yellow using white and a touch of yellow. Paint the sun circle smoothly. While it’s still slightly wet, I like to blend a tiny drop of orange near the edges for a subtle glow. -
Warm gradients:
For the sky ribbons nearest the sun and mountains, mix orange and bright pink. Paint these sections with a gradient that moves from orange near the center to pink further out. -
Cooler upper sky:
As you move to the top of the canvas, transition your colors to deep magentas and violets. Paint the upper ribbons in these darker hues, keeping the paint application smooth and flat. -
Defining the edges:
Between each ribbon of color in the sky, leave a hair-thin gap or paint a very pale contour line using a mix of white and pink. This separation gives it that distinct ‘stained glass’ look.
Step 3: Mountains and Mid-ground
-
Distant mountains:
Mix purple with a little white to create a hazy lavender. Paint the furthest mountain range. As you move to the closer ranges, reduce the white and add a bit of teal or violet to darken the value. -
Transition zone:
For the hills directly below the mountains, introduce your deep teal and phthalo green. Mix these with a touch of purple to bridge the color gap between the warm sky and the cool earth.
Add Sparkle
Mix a tiny amount of iridescent medium or metallic gold paint into the sun and the lightest hill crests for a psychedelic shimmer that catches the light.
Step 4: Flowing Foreground
-
Teal waves:
Paint the large, sweeping hills in the mid-foreground with varying shades of teal. Use white to lighten some sections, creating the illusion of light hitting the crest of a rolling wave. -
Earth tones:
In the bottom right corner, reintroduce the warm colors from the sky. Paint sweeping sections in muted pinks and terracottas to balance the composition. -
Seafoam highlights:
For the very bottom sections, mix a seafoam green using teal, yellow, and lots of white. Apply this lighter color to the ‘front’ of the hills. -
Adding texture:
Once the base blocks of color are dry, use a slightly lighter shade of each color to paint thin, internal contour lines within the shapes. These should follow the curve of the hill, reinforcing the 3D effect.
Step 5: Final Details
-
Refining outlines:
Using your smallest liner brush and a very unsteady hand (wiggles are okay here!), outline the major shapes. You can use a pale, almost white pink for the sky outlines and a light mint green for the earth outlines. -
Smoothing gradients:
Check your gradients within each ribbon. If any transition looks too harsh, use a slightly damp brush to glaze over the area and soften the blend. -
Varnish:
Allow the painting to dry for at least 24 hours before applying a satin or matte varnish to protect the colors and unify the sheen.
Step back and admire the rhythmic flow of your vibrant new landscape.


Smiling Sun and Moon Duo
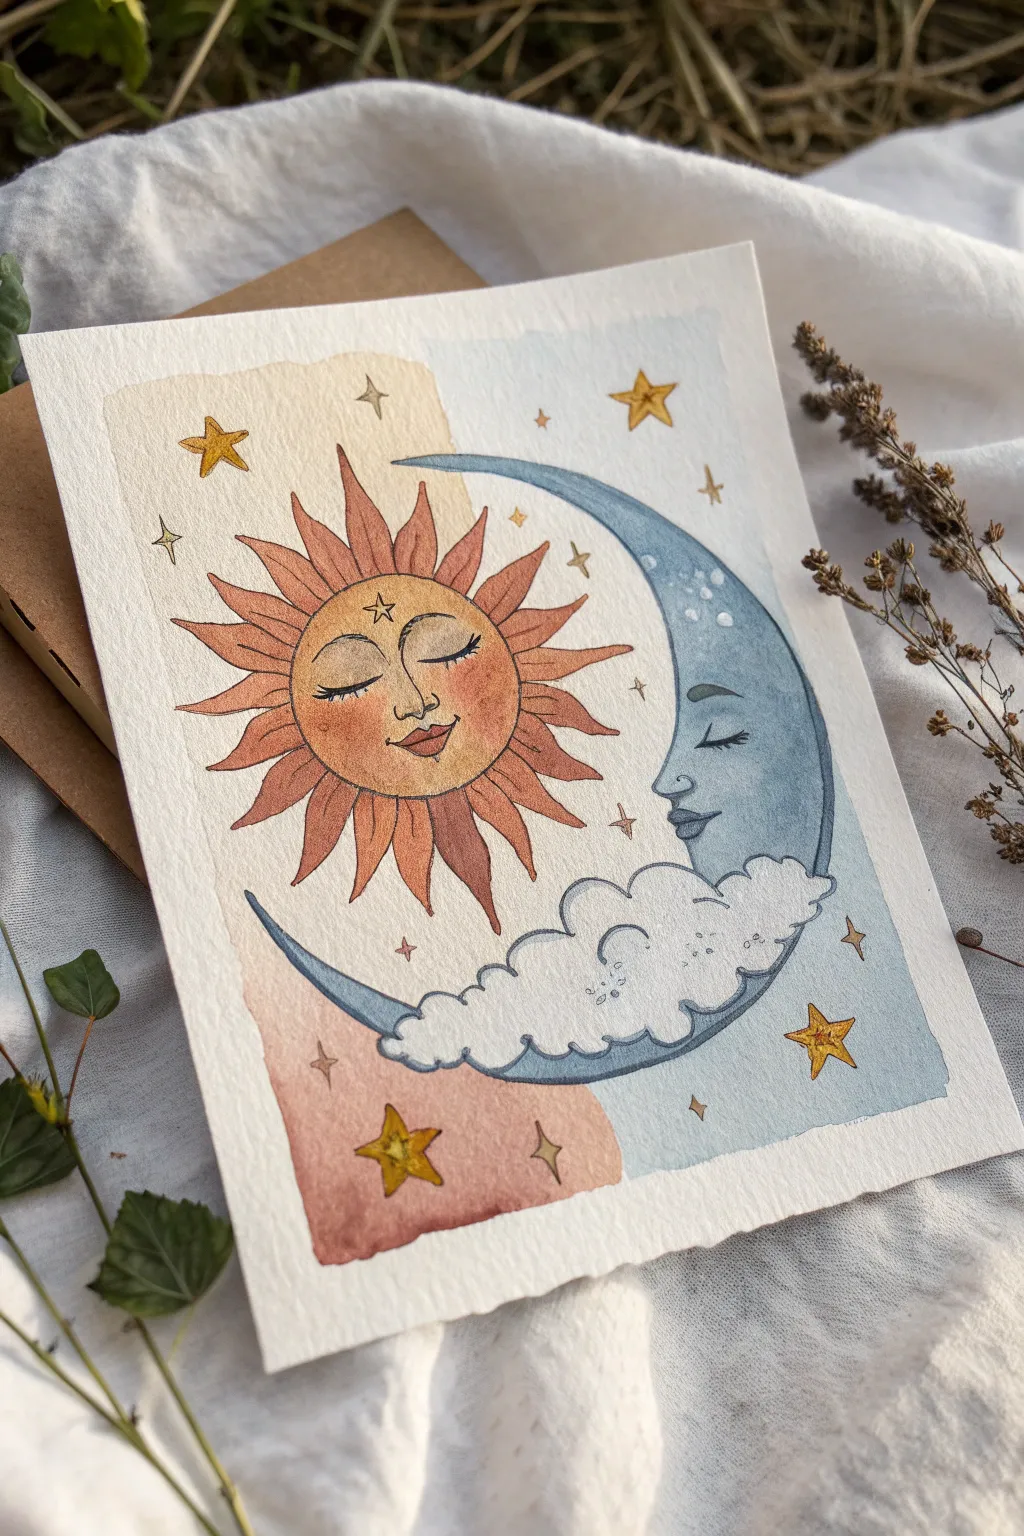
Capture the peaceful balance of day and night with this dreamy watercolor illustration featuring a slumbering sun and moon. The soft washes of color and delicate ink details create a warm, vintage-inspired piece perfect for any celestial lover’s wall.
Step-by-Step Guide
Materials
- Cold press watercolor paper (approx. 5×7 inches)
- Watercolor paint set (pans or tubes)
- Round watercolor brushes (size 4 and size 0 or 00 for details)
- Waterproof fine liner pen (black or dark sepia, 0.3mm)
- Pencil (HB or H)
- Kneaded eraser
- Jar of water
- Paper towels
- Masking tape (optional)
Step 1: Sketching the Celestial Layout
-
Map out the background:
Begin by lightly sketching a loose rectangle in the center of your paper to define the painting area. It doesn’t need to be perfectly straight; a slightly organic edge adds character. -
Draw the sun:
In the left half of your rectangle, draw a perfect circle for the sun’s face. Sketch wavy, flame-like rays radiating outward. Make them varied in length but generally consistent in shape. -
Outline the moon:
On the right side, draw a large crescent moon shape. The inner curve should cradle the sun’s rays without touching them, while the outer curve defines the right edge of your composition. -
Add the cloud:
Sketch a fluffy, scalloped cloud at the bottom right, overlapping the lower tip of the moon crescent. This helps ground the composition and adds softness. -
Detail the faces:
Draw the facial features lightly. Give the sun closed, peaceful eyes with lashes, a small nose, and smiling lips. Give the moon a profile face with a closed eye, nose, and lips facing the sun. -
Scatter the stars:
Fill the empty spaces with simple four-pointed or five-pointed stars. Vary their sizes, placing larger stars in open areas and tiny diamonds in tighter spots.
Step 2: Applying the Watercolor Wash
-
Paint the background split:
Mix a very watery, pale peach or terracotta wash. Paint a loose vertical rectangle behind the sun side. While that dries, mix a watery pale blue for the moon side and paint the background behind the moon. -
Base coat for the sun:
Once the background is dry to the touch, mix a warm golden yellow. Fill in the sun’s face circle. Add a touch more water to your brush to make the center slightly lighter than the edges. -
Color the rays:
Using an orange-red or terracotta mix, carefully paint the sun’s rays. I like to drop in a tiny bit of darker red at the base of each ray while it’s still wet to create a gradient. -
Paint the moon:
Mix a cool, slate blue. Paint the crescent moon shape, avoiding the cloud area. While the paint is wet, you can lift out some pigment with a dry brush or paper towel to create lighter highlights on the forehead or nose. -
Shade the cloud:
Use a very diluted grey-blue mix for the cloud. Keep the top edges mostly white paper, adding shadow only to the bottom curves of the fluff to give it volume. -
Star accents:
Paint the stars with a bright yellow ochre or gold. If the stars are tiny, switch to your smallest brush to stay inside the lines.
Clean Edges
For that crisp, rectangular border look, tape down the edges of your painting area with washi tape before starting. Peel it off slowly at a 45-degree angle only after the paint is fully dry.
Step 3: Inking and Final Details
-
Add sun cheeks:
Mix a rosy pink and add circular blush spots to the sun’s cheeks. Soften the edges with a clean, damp brush so they blend into the yellow face. -
Outline the main shapes:
Wait until the painting is completely bone dry. Take your waterproof fine liner and trace over your pencil outlines for the sun, moon, and cloud. -
Pattern the rays and cloud:
Use the pen to add small texture lines. Add veins or center lines inside the sun rays. For the cloud, add little ‘c’ shaped scallops or dots inside the puffy shapes to suggest texture. -
Define the faces:
Carefully ink the eyes, noses, and mouths. Add distinct eyelashes to the closed eyes. You can thicken the line on the upper eyelid slightly for emphasis. -
Final celestial touches:
Ink the stars. Finally, use a white gel pen or opaque white paint to add tiny dots or sparkles on the moon’s surface and perhaps a highlight on the sun’s nose.
Make It Sparkle
Mix a little metallic gold watercolor or gouache into your yellow paint for the sun and stars. It will catch the light beautifully when viewed from different angles.
Let your artwork dry completely before framing it to preserve the delicate ink lines and soft gradients
BRUSH GUIDE
The Right Brush for Every Stroke
From clean lines to bold texture — master brush choice, stroke control, and essential techniques.
Explore the Full Guide
Mandala With Cosmic Galaxy Center
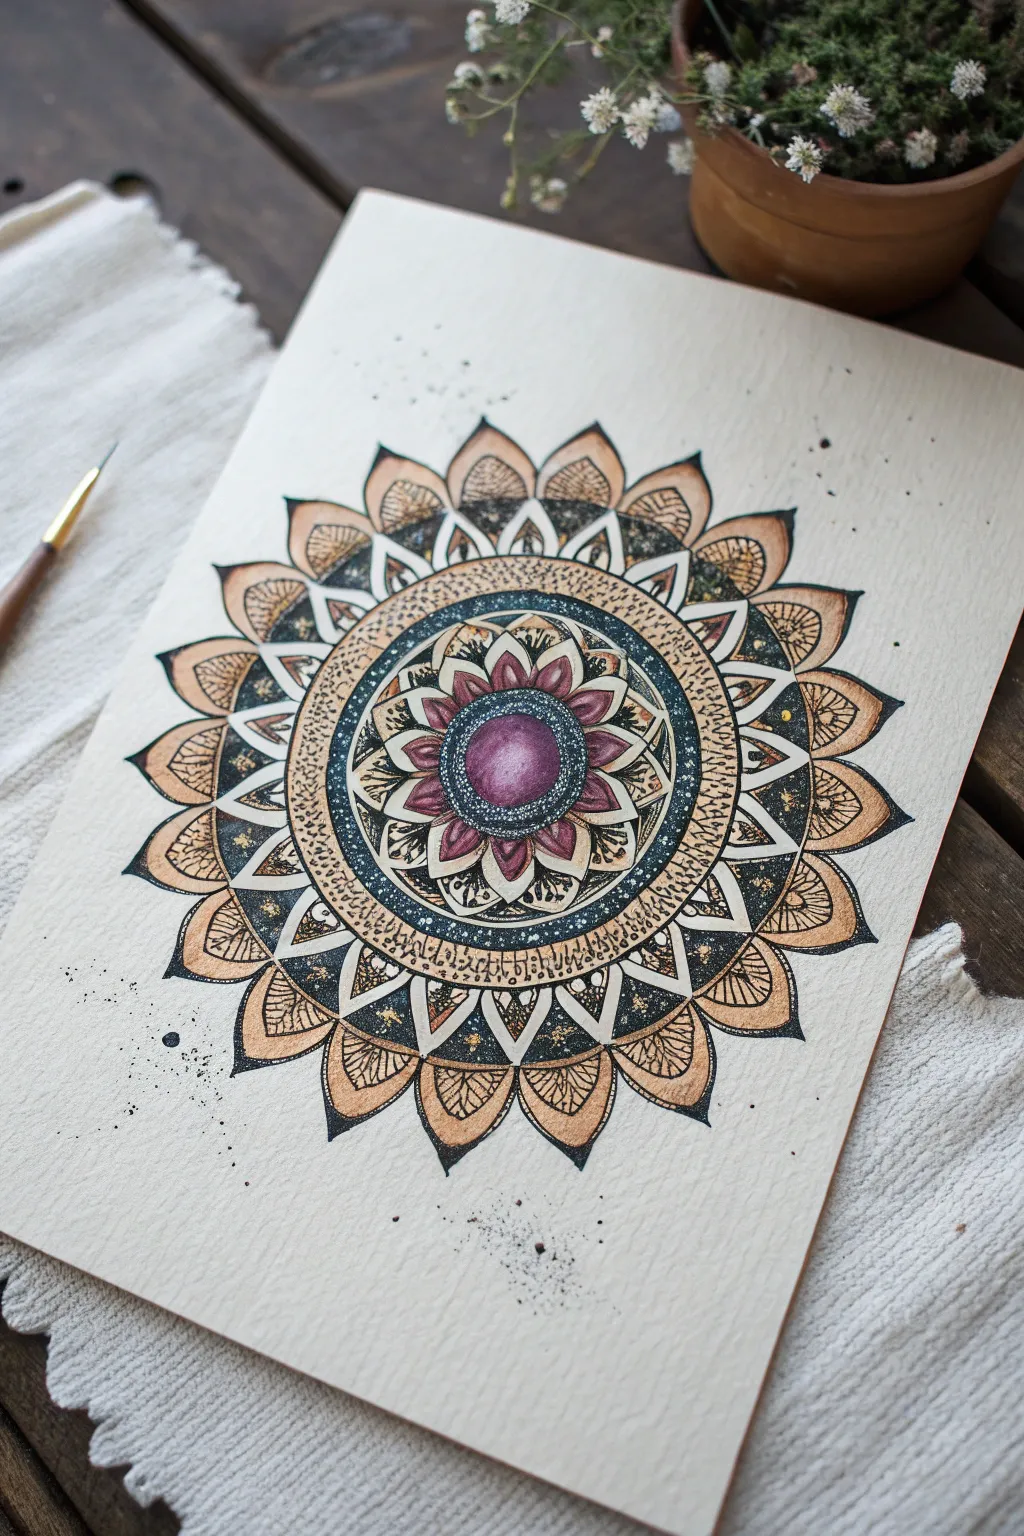
This intricate mandala combines structured geometric patterns with the organic, nebulous beauty of a galaxy washing through its center. The warmth of the coffee-toned petals contrasts beautifully with the deep, starry purples and blues of the cosmic core.
Step-by-Step
Materials
- Heavyweight watercolor paper (hot press for smoothness)
- Compass and ruler
- Lead pencil (HB or 2H)
- Watercolors (pans or tubes: deep purple, magenta, dark blue, black, ochre, burnt sienna)
- White gel pen or white gouache
- Black fine liner pens (sizes 005, 01, and 05)
- Gold metallic watercolor or ink
- Small round brushes (sizes 0, 1, and 3)
- Eraser
Step 1: Drafting the Geometry
-
Establish the center:
Find the exact center of your paper and mark it lightly. Using your compass, draw a small central circle about 1 inch in diameter. -
Map the rings:
Continue creating concentric circles outward from the center. You will need about five distinct bands of varying widths to house differences in petal sizes and border patterns. -
Divide the circle:
Use a protractor to divide your circle into equal segments. For this design, dividing the circle into 16 or 24 equal pie slices works best as a guide for petal symmetry. -
Sketch the inner flower:
In the ring immediately surrounding the center circle, sketch a row of pointed, lotus-like petals. Ensure the tips touch the boundary of the next ring. -
Outline the outer petals:
Sketch the large, dominant outer petals in the widest outer band. These should have a slightly curved, leaf-like shape. Inside each large petal, lightly draw a smaller, parallel inner shape. -
Add detailing framework:
Between the inner flower and outer petals, sketch a band explicitly for the dark, starry background. Also, lightly pencil in the triangular ‘filler’ spikes between the outer petals.
Uneven Petals?
If your freehand petals look wonky, cut a single petal template from cardstock. Trace this template around your circle guide to ensure every petal is identical.
Step 2: Painting the Galaxy Core
-
Base wash:
Wet the very center circle and the surrounding ring purely with clean water. Drop in deep magenta and purple, letting them bleed together naturally to create a soft, nebulous look. -
Deepen the cosmos:
While the paper is still slightly damp, introduce concentrated dark blue and black paint to the edges of the center circle and the background ring, creating depth. -
Paint the inner petals:
Mix a diluted berry or wine color. Paint the petals of the central flower, keeping the tips lighter and the bases darker to simulate shadow. -
Add the stars:
Once the dark galaxy sections are completely bone dry, use your white gel pen or a toothbrush with white gouache to speckle tiny stars over the purple and black areas. I find flicking the bristles gives the most natural spray.
Level Up: Gemstone Center
Instead of painting a flat center, use shading to paint a spherical 3D gemstone effect, or literally glue a flat-backed crystal or mirror into the middle.
Step 3: Inking and Gold Accents
-
Color the outer petals:
Mix an ochre or light tan wash. Fill in the large outer petals. While wet, drop a tiny bit of burnt sienna at the base of each petal for a gradient effect. -
Apply the major outlines:
Using a size 05 pen, trace over your main pencil lines. Go slowly to ensure smooth curves, especially on the large outer petals. -
Detail the filler spikes:
Use a size 005 or 01 pen to fill the triangular spikes between the petals with stippling (tiny dots) or solid black, leaving small white borders for contrast. -
Intricate petal patterns:
Draw delicate veins or leaf-like webbing inside the tan outer petals using your finest pen. Keep the lines incredibly thin and feathery. -
Create the heavy border:
Thicken the circular border line separating the galaxy ring from the outer petals. You can fill this ring with tiny circles or cross-hatching to add texture. -
Add gold embellishments:
Using gold metallic paint or ink, paint small accents inside the dark galaxy ring and highlight the tips of the inner reddish petals. -
Final splatter:
Dip a brush in watered-down black ink or paint. Tap the brush handle against your finger to splatter light droplets across the entire piece for an organic, worn texture. -
Cleanup:
Wait at least an hour to ensure all ink and paint is cured. Gently erase any visible pencil guidelines to reveal the sharp contrast.
Enjoy the meditative process of watching your cosmic garden bloom on the paper.
Third Eye in Bloom
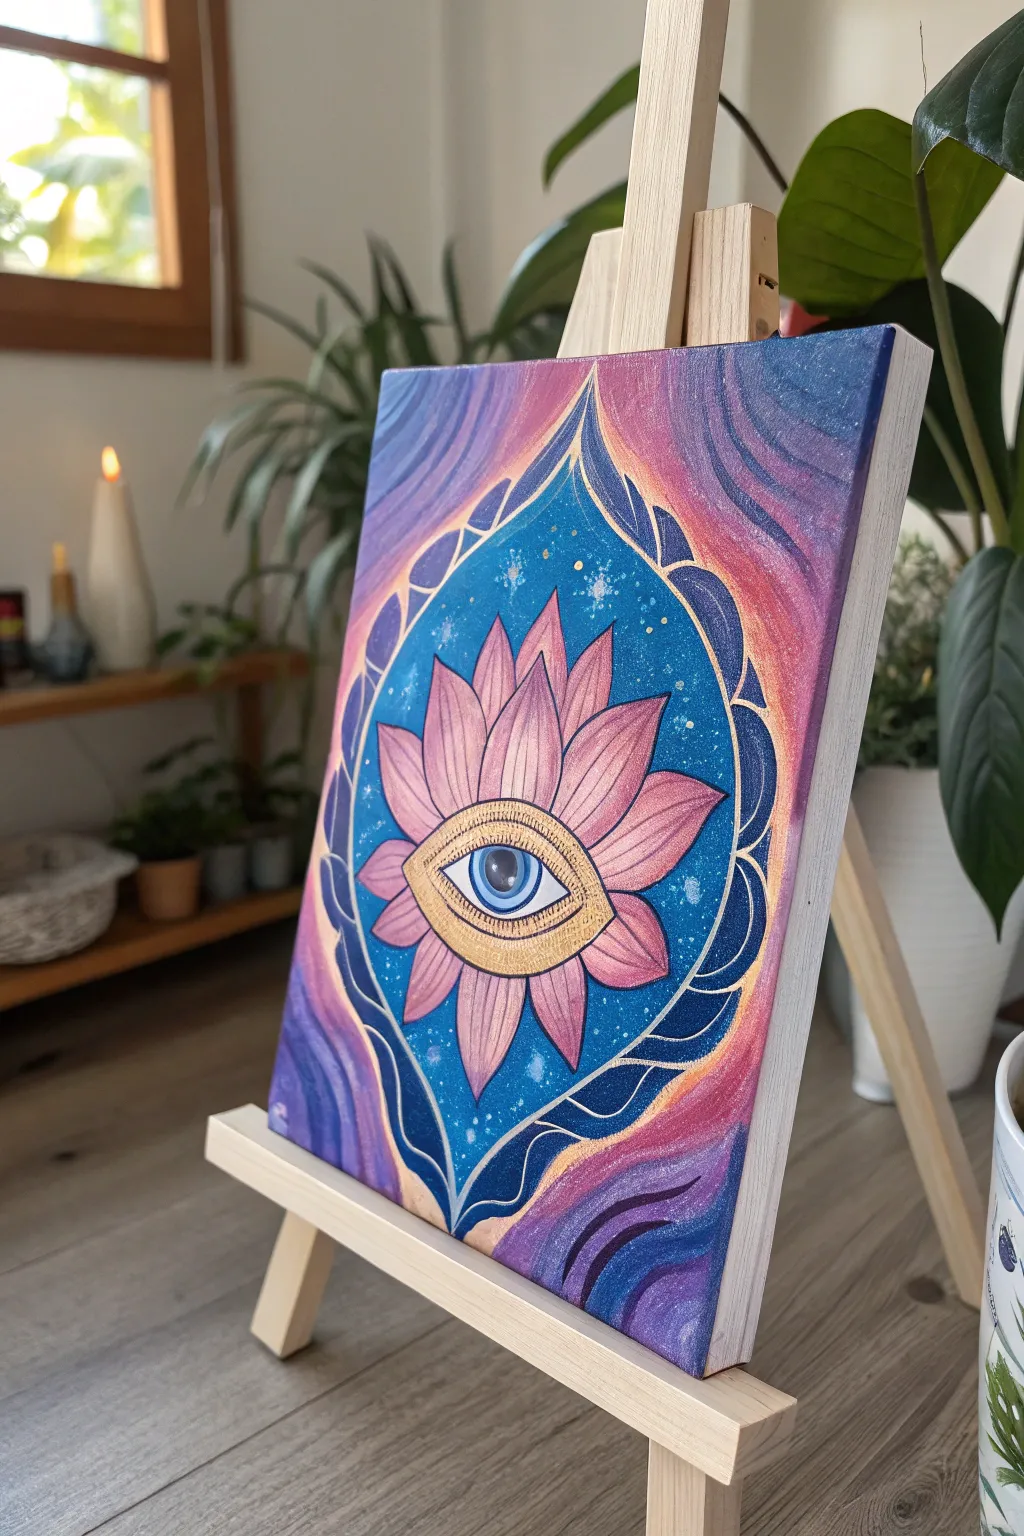
Blend cosmic energy with botanical beauty in this vibrant acrylic painting featuring a stylized eye resting at the heart of a blooming lotus. Gold accents and a swirling galaxy background give this piece a mystical, dimensional quality that pops right off the canvas.
Step-by-Step Tutorial
Materials
- Small rectangular canvas (approx. 8×10 or 9×12 inch)
- Acrylic paints: Titanium White, Phthalo Blue, Dioxazine Purple, Magenta/Pink, Gold Metallic, Black
- Assorted brushes: 1-inch flat wash, small round brushes (sizes 2 and 4), fine liner brush (size 0 or 00)
- Pencil and eraser for sketching
- Palette for mixing
- Water cup and paper towels
- Ruler (optional for finding center)
Step 1: Cosmic Background
-
Establish the background flow:
Begin by envisioning the flow of the galaxy background. It should curve around where your central design will be. On your palette, mix Phthalo Blue with a touch of purple and white to create a medium violet-blue. -
Paint the outer swirls:
Using a flat brush, paint sweeping, curved sections in the corners and sides of the canvas. Leave a large, oval-like shape empty in the center for now. Blend purple and magenta into the wet blue paint to create a soft, nebular transition. -
Deepen the cosmos:
While the paint is still workable, add darker blues and purples to the outer edges to create depth. Add streaks of lighter pinks and whites following the curve of your brushstrokes to simulate movement in the energy field. -
Define the central window:
Paint the central empty space with a solid coat of deep blue (Phthalo Blue mixed with a tiny drop of black). This will be the night sky behind the lotus. Bring this dark color out to meet your swirling outer background, creating a distinct almond or pointed-oval shape.
Step 2: The Central Motif
-
Sketch the structure:
Once the background is completely dry, lightly sketch the central design with a pencil. Draw a large almond shape for the main border, then place a circle in the exact center for the iris. Surround the iris with the outline of the eyelids. -
Draft the petals:
Sketch the lotus petals radiating outward from the eye. Start with the top and bottom central petals to establish symmetry, then fill in the side petals. They should look like they are blooming from behind the eye itself. -
Base coat the lotus:
Mix a soft, dusty pink using Magenta, White, and a tiny touch of Gold. Fill in all the petals with this color. You may need two coats to ensure opacity over the dark background. -
Paint the eye foundation:
Paint the sclera (white of the eye) with Titanium White. Paint the skin surrounding the eye with a solid Gold Metallic paint. This creates the golden ‘mask’ effect seen in the reference. -
Detail the iris and pupil:
Paint the iris with a bright blue. Let it dry, then add a black pupil in the center. Add darker blue shading at the top of the iris and lighter blue near the bottom for dimension.
Steady Hands
For the crisp gold linework, rest your pinky finger on a dry part of the canvas to stabilize your hand. If the paint is too thick, thin it with a drop of water for smoother lines.
Step 3: Golden Details & Magic
-
Petal shading:
Mix a slightly darker version of your pink (add a little purple). Using a small round brush, add thin lines or strokes from the base of each petal upward to create texture and shadow. -
Outline the border:
Using your fine liner brush and Gold Metallic paint, carefully outline the large almond shape that separates the central night sky from the outer galaxy background. Add the decorative scallops or ‘petals’ along this border line. -
Ornate flourishes:
I find that using slightly watered-down gold paint helps with flow here. Outline the eye, the iris, and draw delicate lashes. Outline every single pink petal with a steady hand to make them crisp. -
Add the stars:
Load a brush with watered-down white paint. Tap the handle against another brush over the dark blue center to create a splatter of stars. Use a liner brush to manually add larger, specific stars or sparkles. -
Final highlights:
Add a single, crisp white dot to the pupil for the reflection (catchlight). This brings the eye to life instantly. If desired, add tiny dots of gold floating in the central blue space for extra magic.
Crystal Embellishment
Make the artwork 3D by gluing tiny flat-back Swarovski crystals or rhinestones where the stars are painted. A large clear gem placed over the pupil adds an intense gaze.
Step back and admire how the gold catches the light, bringing a sense of ancient wisdom to your space

PENCIL GUIDE
Understanding Pencil Grades from H to B
From first sketch to finished drawing — learn pencil grades, line control, and shading techniques.
Explore the Full Guide
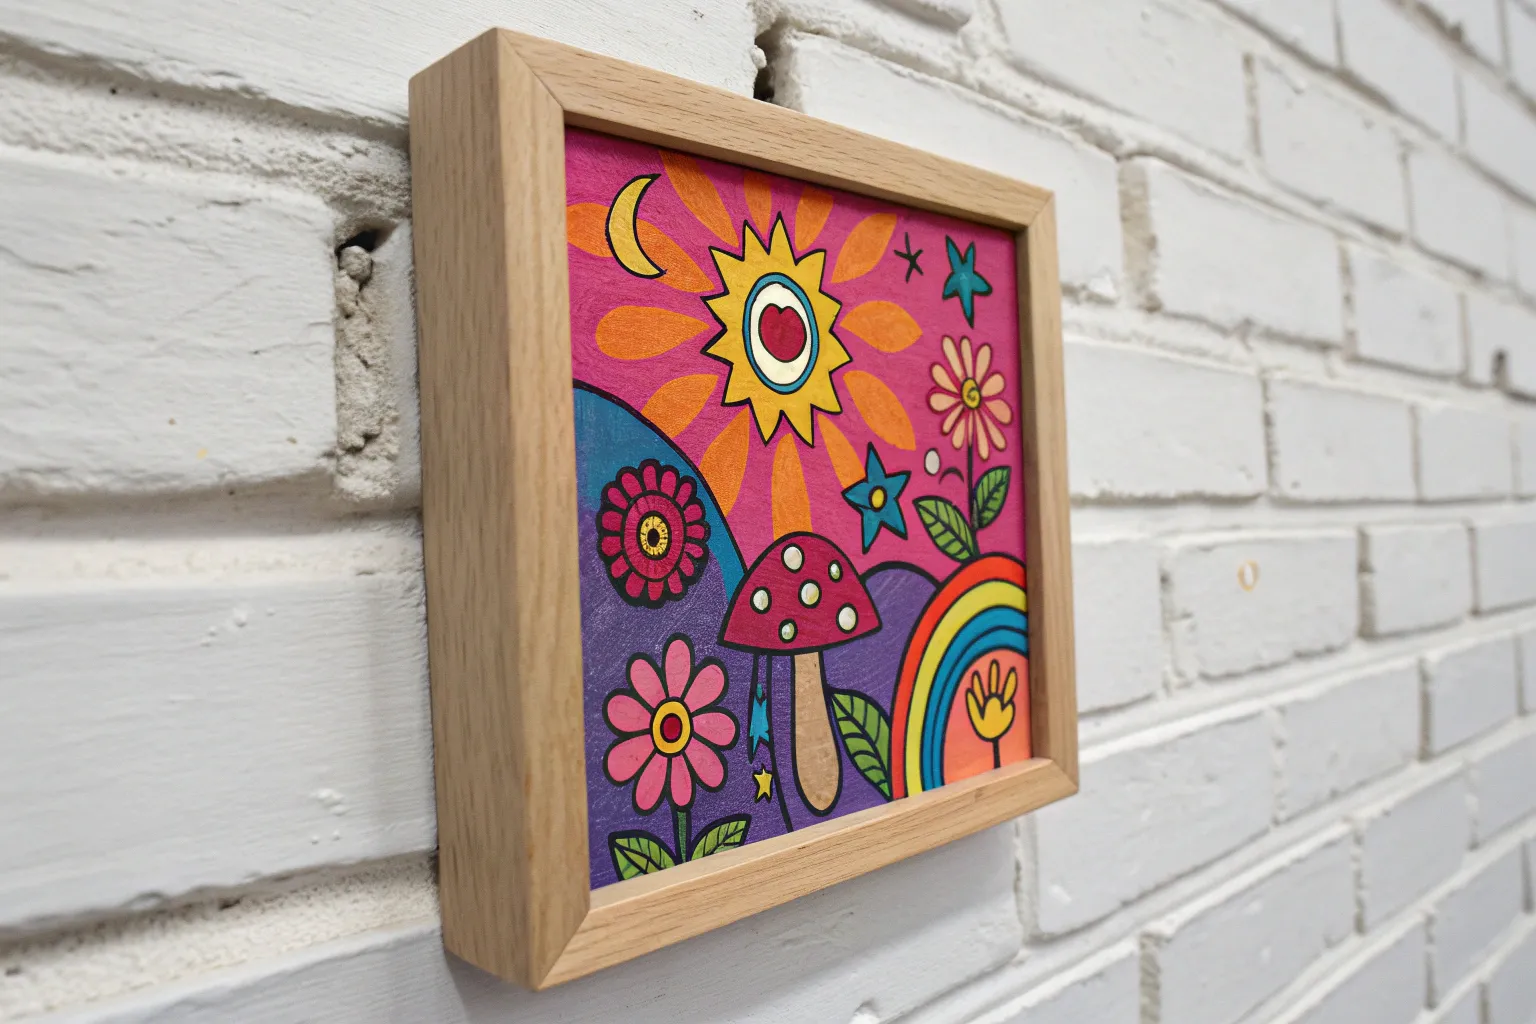
Good Vibes Radiating Smiley
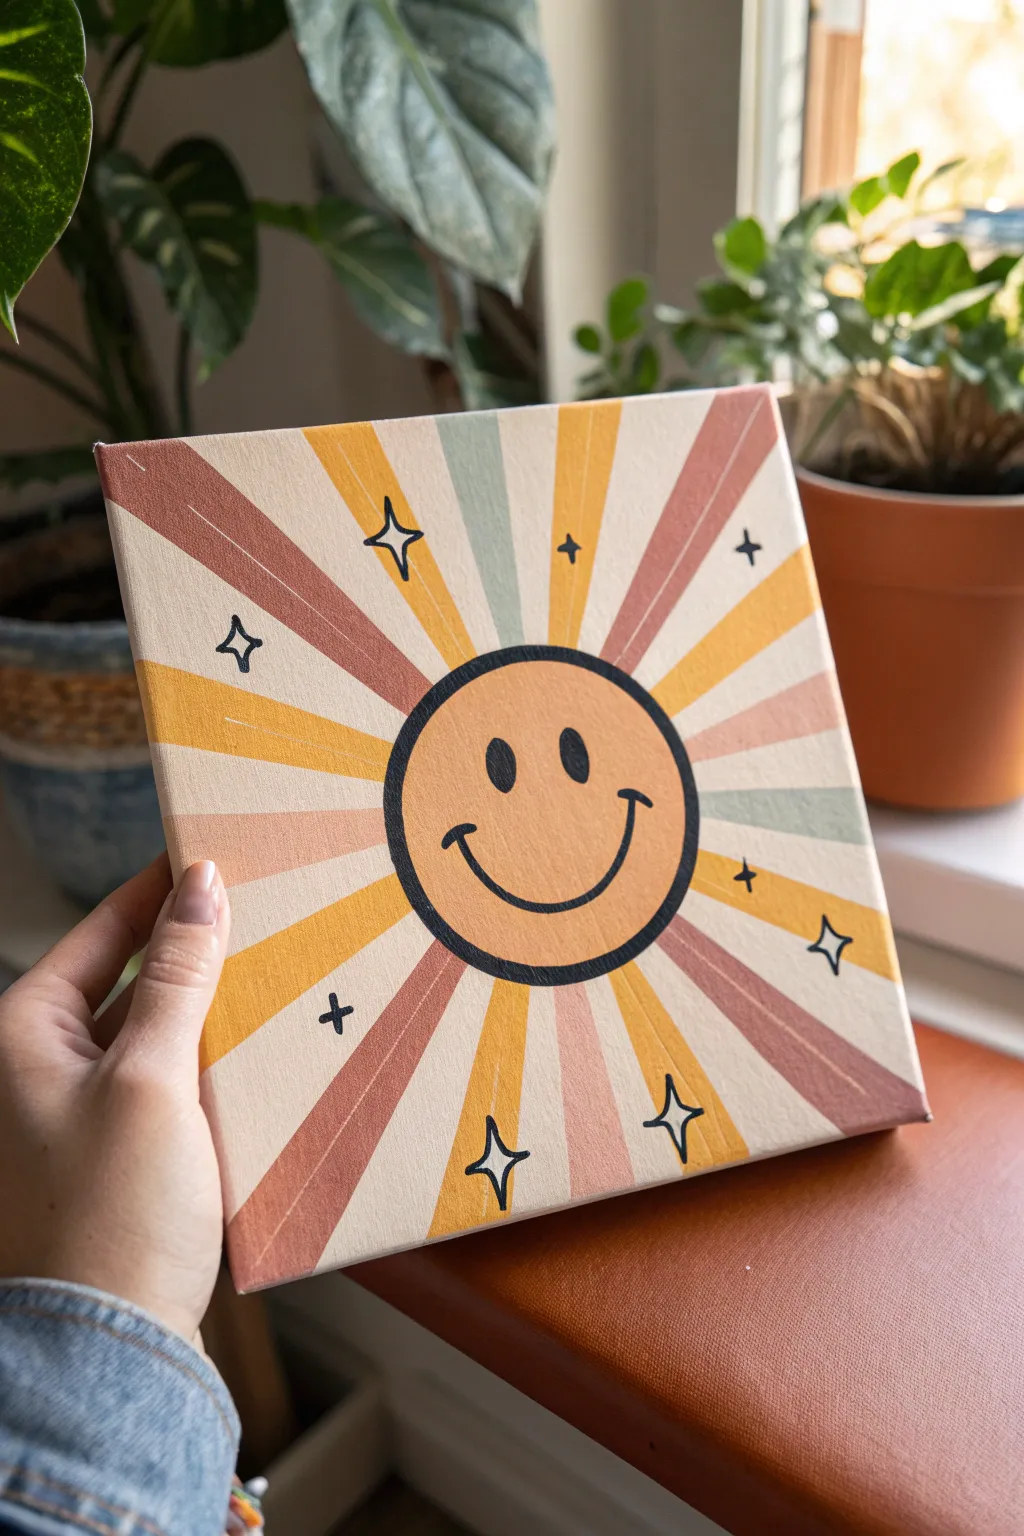
Bring a burst of 70s sunshine into your space with this cheerful, retro-inspired canvas art. Featuring a classic smiley face surrounded by muted, earthy sunbeams, this project uses a warm color palette to radiate pure positivity.
Step-by-Step
Materials
- Square stretched canvas (8×8 or 10×10 inches)
- Acrylic paints (terracotta, mustard yellow, sage green, off-white/cream, black)
- Round object for tracing (bowl or lid)
- Ruler
- Pencil and eraser
- Painter’s tape or masking tape (optional but helpful)
- Flat paintbrushes (medium and small)
- Fine liner brush or black paint marker
Step 1: Planning and Sketching
-
Center the smiley:
Place your canvas on a flat surface. Position your round bowl or lid directly in the center of the canvas and trace around it lightly with a pencil to create the sun’s face. -
Mark the center point:
Find the approximate center point inside your circle. Make a tiny dot; this will act as the vanishing point for all your sun rays. -
Draw the main rays:
Using your ruler, draw straight lines radiating outward from that center dot all the way to the edges of the canvas. Don’t worry about drawing inside the face circle; just start the lines from the circle’s edge if that’s easier. -
Vary the width:
Space your lines out irregularly to create rays of different widths. Some should be narrow slivers, while others can be wide wedges for visual interest.
Crisp Line Hack
For perfectly straight rays, apply painter’s tape along your pencil lines. Seal the tape edge with a thin layer of white paint/gesso first to prevent color bleeding.
Step 2: Painting the Sunburst
-
Mix your palette:
Prepare your acrylics. If your colors are too bright, tone them down to get that vintage look: add a touch of brown to the yellow for mustard, or a drop of gray to the green for sage. -
Paint the first color:
Start with your mustard yellow. Select several non-adjacent rays and paint them in carefully using a flat brush. Painting every third or fourth ray helps prevent wet colors from touching. -
Add the terracotta:
Move on to the terracotta or rusty orange shade. Fill in dispersed sections, ensuring you maintain clean edges against the white canvas. -
Fill with sage and cream:
Paint the remaining rays with sage green and off-white. For the off-white sections, you might need two coats to ensure opacity over the canvas texture. -
Extend to the edges:
Make sure to carry your paint colors over the sides of the canvas for a professional, finished gallery wrap look. -
Let it dry completely:
Allow the background rays to dry fully before moving on. This usually takes about 20-30 minutes depending on paint thickness.
Step 3: The Smiley Face
-
Base coat the face:
Fill in the central circle with a warm, peach or light orange tone. I find that mixing a little white into the terracotta makes a perfect skin-tone shade for this. -
Outline the circle:
Once the face base is dry, use a fine liner brush loaded with black paint (or a black paint marker) to verify the circle’s edge with a bold, consistent outline. -
Sketch the features:
Lightly sketch two oval eyes and a wide, U-shaped smile. Keep the features simple and classic. -
Paint the eyes:
Fill in the oval eyes with solid black. Try to keep them vertical and slightly elongated for that distinctive retro style. -
Paint the smile:
Trace over your smile line with a steady hand. Add small tick marks at the ends of the smile to give it distinct cheeks.
Add Texture
Mix a small amount of baking soda into your acrylic paint for the colored rays. This creates a chalky, matte texture that feels authentically vintage.
Step 4: Finishing Touches
-
Add sparkles:
Using your fine brush or marker, draw small four-pointed stars or diamond shapes scattered randomly across the rays. -
Add crosses:
Fill in any empty-feeling gaps with simple small ‘plus sign’ stars to balance the composition. -
Clean up lines:
Inspect your ray edges. If any paint bled, you can touch it up with the neighboring color or re-outline specific areas if you want a more illustrative look. -
Seal the work:
Once fully cured (wait at least 24 hours), apply a coat of matte or satin varnish to protect the colors and unify the sheen.
Hang this happy little piece near a window or on a gallery wall to keep the good vibes radiating all day long
Neon Mushroom Patch Dream
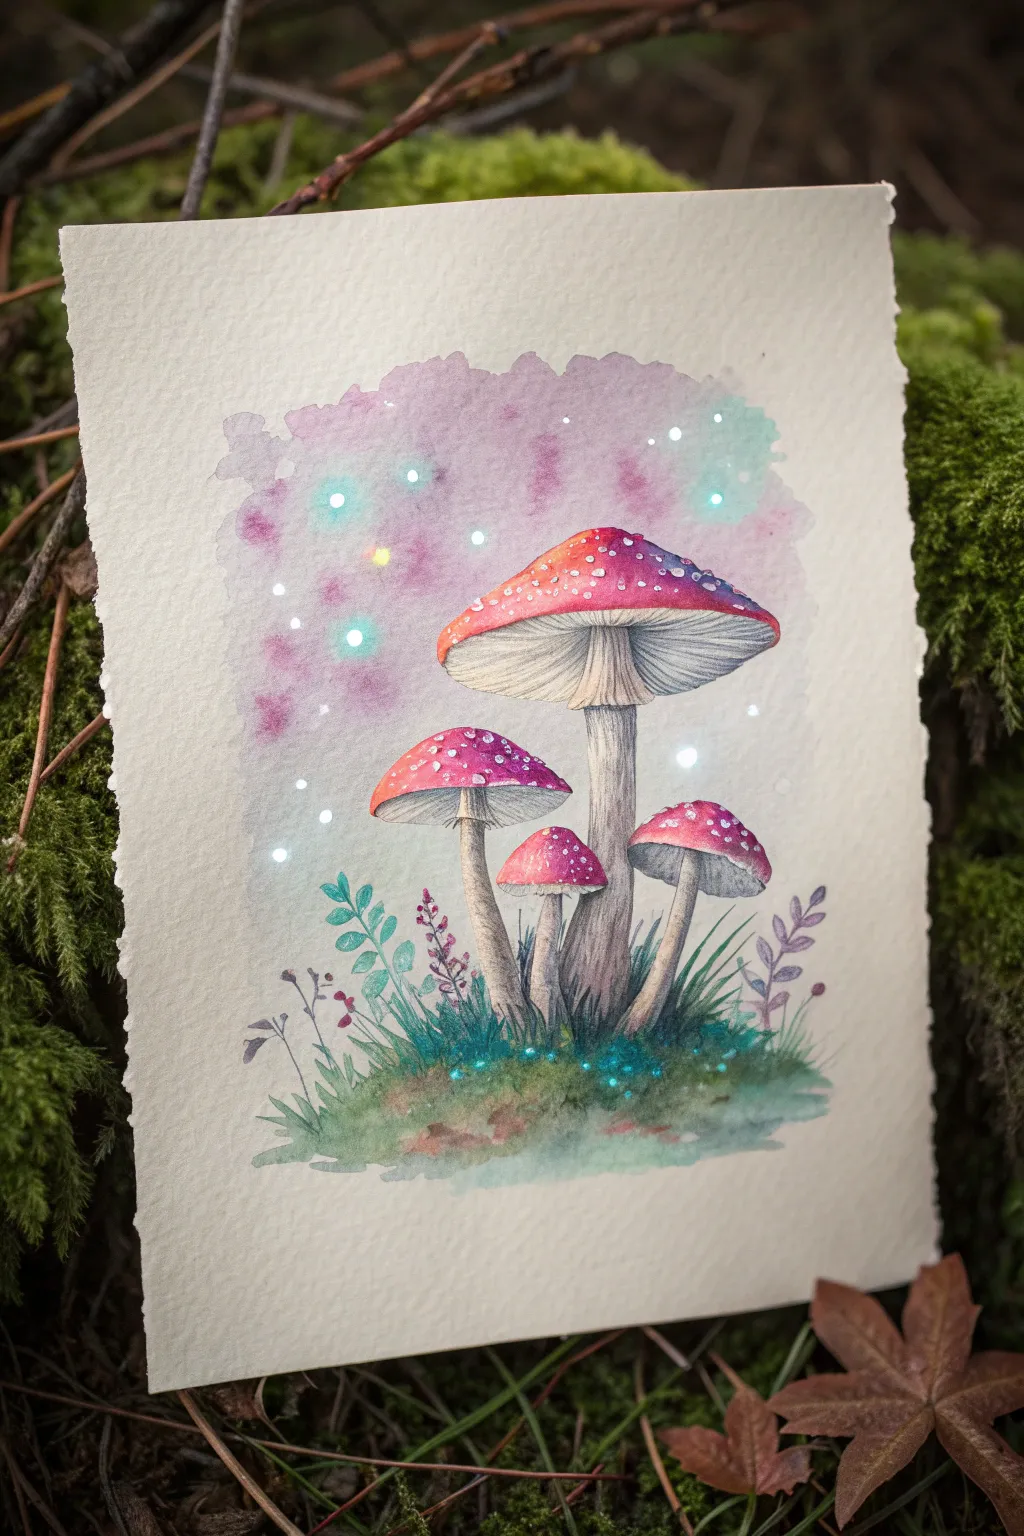
Capture the magic of an enchanted forest with this radiant watercolor tutorial featuring fly agaric mushrooms bathed in ethereal light. This piece relies on soft washes and clever masking techniques to create those dazzling glowing orbs.
How-To Guide
Materials
- Cold press watercolor paper (300 gsm)
- Watercolor paints (Alizarin Crimson, Cadmium Red, Sap Green, Burnt Umber, Payne’s Gray, Purple/Violet)
- White opacity marker (like Posca) or white gouache
- Masking fluid
- Small round brushes (size 0, 2, and 4)
- Pencil (HB or H)
- Kneadable eraser
- Salt (optional for texture)
Step 1: Planning and Underpainting
-
Sketch the composition:
Begin by lightly sketching the outline of four mushrooms. Place the largest one centrally, flanked by two medium ones and a tiny button mushroom nestled in the front. Keep lines faint so they don’t show through the paint. -
Add foliage details:
Sketch a small mound of earth at the base, along with a few delicate sprigs of leaves and ferns rising up on the left and right sides. -
Mask the highlights:
Before painting, use masking fluid to dot small circles where your magical glowing orbs will be in the background. Also, mask the white dots on the mushroom caps to keep them crisp. -
Wait for drying:
Let the masking fluid dry completely. It should feel rubbery and not tacky to the touch.
Muddy colors?
If your background purple looks brown next to the green grass, let the purple dry completely before painting any green nearby. Complementary colors mixed wet-in-wet will turn brown.
Step 2: Painting the Background
-
Wet the background area:
Using a clean brush and water, wet the area around the mushrooms in an irregular rough shape, leaving raw paper edges for a vintage look. -
Drop in color:
While the paper is wet, drop in swirls of diluted purple and violet paint. Let them bleed naturally into the wet paper. -
Add depth:
While still damp, touch in slightly darker purple tones near the mushrooms to make them pop forward. I like to sprinkle a pinch of salt here if I want extra starry texture. -
Remove background masking:
Once the background is bone dry, gently rub off the masking fluid dots to reveal the stark white paper underneath.
Pro Tip: Soft Glows
To make the ‘lights’ look real, soften the hard edge of the paper dot with a slightly damp, clean brush. This blurs the perimeter just enough to create a glowing effect.
Step 3: Painting the Mushrooms
-
Base layer for caps:
Paint the mushroom caps with a gradient. Start with Cadmium Red at the top center and blend it into a cooler Alizarin Crimson toward the edges. -
Add shadows to caps:
Mix a tiny bit of purple into your crimson and paint the very bottom edges of the caps to create curvature. -
Paint the stems:
For the stems, use a very watery wash of Burnt Umber. While damp, streak in vertical lines of darker brown/gray mixture (Burnt Umber + Payne’s Gray) to mimic the fibrous texture. -
Detail the gills:
Underneath the caps, use a size 0 brush to paint fine, radiating lines for the gills using a diluted gray-brown mix. -
Lift the cap masking:
Remove the masking fluid from the mushroom caps. If the white dots look too stark, glaze over them very lightly with watered-down yellow or cream.
Step 4: Grounding and Glow
-
Paint the mossy base:
Paint the ground mound with Sap Green and touches of brown. Use dabbing motions to simulate a mossy texture. -
Define the foliage:
Using your smallest brush, paint the fern leaves and sprigs. Use a mix of blue-green for distant leaves and warmer green for closer ones to add dimension. -
Enhance the glow:
Select a few of your background white dots. Using a very diluted teal or cyan, paint a soft halo around them to make them look like they are emitting light. -
Final highlights:
Take your white gouache or Posca pen and add tiny sparkles to the moss at the base and a few extra sharp bright spots in the center of your glowing orbs. -
Crisp up edges:
If any background paint bled into the stems, use white gouache to tidy up the silhouette of the mushrooms for a clean finish.
Now you have a magical little patch of forest life ready to frame or send as a card


Mother Nature With Wildflower Hair
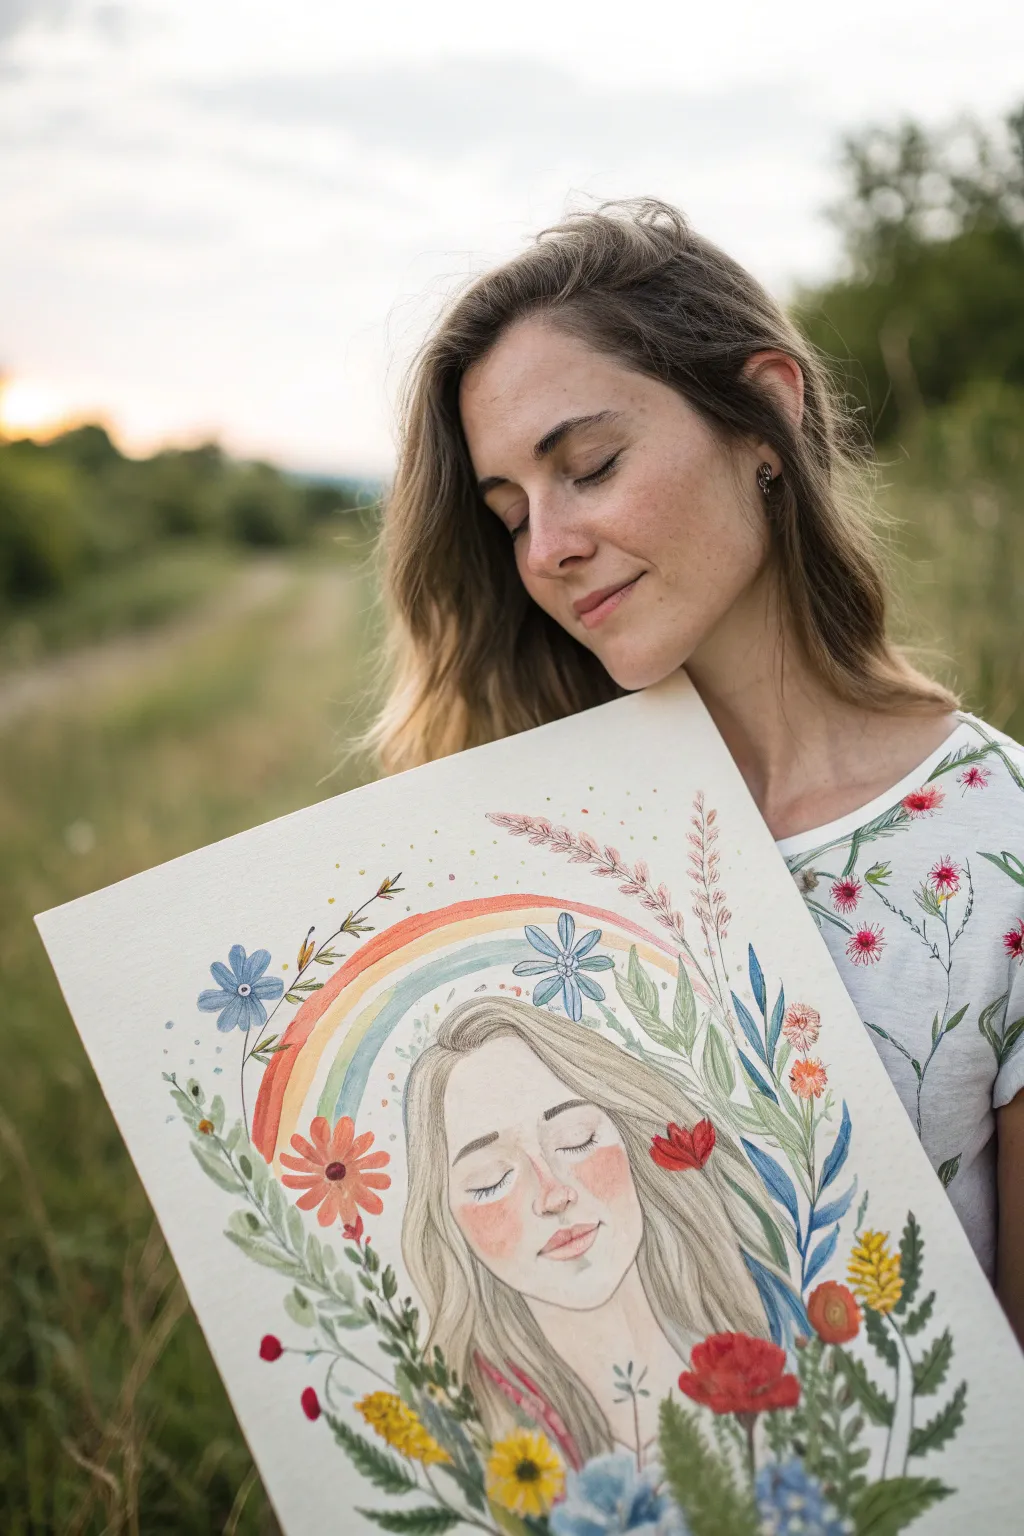
Capture the peaceful essence of nature with this dreamy watercolor and mixed media portrait. By blending a serene face with vibrant wildflowers and a soft rainbow arch, you’ll create a piece that radiates calm and connection to the earth.
Step-by-Step Tutorial
Materials
- Hot press watercolor paper (smooth texture)
- Watercolor paints (pan or tube set)
- Colored pencils (wax or oil-based)
- HB or 2B graphite pencil for sketching
- Kneaded eraser
- Fine round watercolor brush (size 2 or 4)
- Medium round watercolor brush (size 6 or 8)
- Water cups and paper towels
- White gouache or white gel pen (optional for highlights)
Step 1: Sketching the Composition
-
Placement:
Begin by lightly marking the center of your paper. Draw a large oval in the bottom center third for the face, leaving plenty of room above and around for the floral border and rainbow. -
Facial Features:
Sketch the facial features gently. The eyes should be closed curved lines with lashes pointing down to convey sleep or meditation. Add a small, soft nose and relaxed lips. Keep the lines faint so they don’t show through the paint later. -
Hair Outline:
Draw the hair flowing loosely around the face. The hair serves as a container for the face but should feel organic, blending out into where the flowers will be. -
floral Elements:
Sketch stems rising up from the bottom corners and sides. Draw a variety of flower shapes—daisies, poppies, and lavender sprigs—framing the head. Don’t worry about perfect detail yet; just map out the shapes. -
The Rainbow Arch:
Draw three or four concentric arches above the head, ensuring they curve nicely over the hair without touching the forehead.
Step 2: Painting the Base Layers
-
Skin Tone Base:
Mix a very watery, pale skin tone using ochre and a touch of red or pink. Apply a wash over the face area, leaving the paper white for the brightest highlights on the nose and forehead. -
Blush and Warmth:
While the face is still slightly damp, drop a stronger concentration of pink or coral onto the cheeks and the tip of the nose to create that soft, flushed joyful look. -
Hair Wash:
Paint the hair with a light wash of brown or dirty blonde. Use long strokes that follow the direction of the hair strands. -
Rainbow Layers:
Paint the rainbow stripes using somewhat muted, earthy tones rather than neon brights. I prefer using watered-down terracotta, mustard yellow, and sage green for a vintage 70s vibe.
Muddy Colors?
If your watercolors are bleeding into muddy gray, ensure each section serves a drying time before painting a neighbor. Use a hair dryer on low heat to speed this up.
Step 3: Refining Details
-
Deepening the Hair:
Once the first hair layer is dry, use a smaller brush to add darker strands using a deeper brown. Focus on the shadow areas near the neck and under the hair parting to create volume. -
Painting the Flowers:
Fill in your floral sketches. Use bright reds for poppies and deep blues for cornflowers. Vary the opacity—let some leaves be transparent and others opaque for depth. -
Leafy Greens:
Paint the stems and leaves using different shades of green. Mix some greens with blue and others with yellow to differentiate the plant types. Allow the leaves to overlap the rainbow slightly. -
Facial Definition:
Using a very fine brush and a mix of brown and red perform faint outlining. define the nostrils, the line of the mouth, and the eyelashes carefully.
Make it Personal
Swap the generic wildflowers for blooms that are native to your specific region or birth month flowers to give the piece a deeply personal connection.
Step 4: Mixed Media Finishing Touches
-
Pencil Shading:
Take your colored pencils once the painting is completely bone dry. lightly shade over the hair to add texture that paint sometimes misses. Use a dark brown pencil to crispen the individual strands. -
Cheek Texture:
Use a pink or orange colored pencil to add light hatching marks on the rosy cheeks, enhancing the illustration style. -
Floral Details:
Outline the flower petals and leaves with matching colored pencils. This sharpens the blurry watercolor edges and makes the botanical elements pop. -
Decorative Dots:
Add small whimsical dots or ‘pollen’ floating around the flowers and rainbow using a marker or concentrated paint to fill empty negative space. -
Final Highlights:
If needed, use white gouache to add a tiny dot to the tip of the nose or the lips to bring the face forward.
Now you have a heartwarming piece of art that celebrates the tranquility of nature
Retro Camper Van in a Trippy Scene
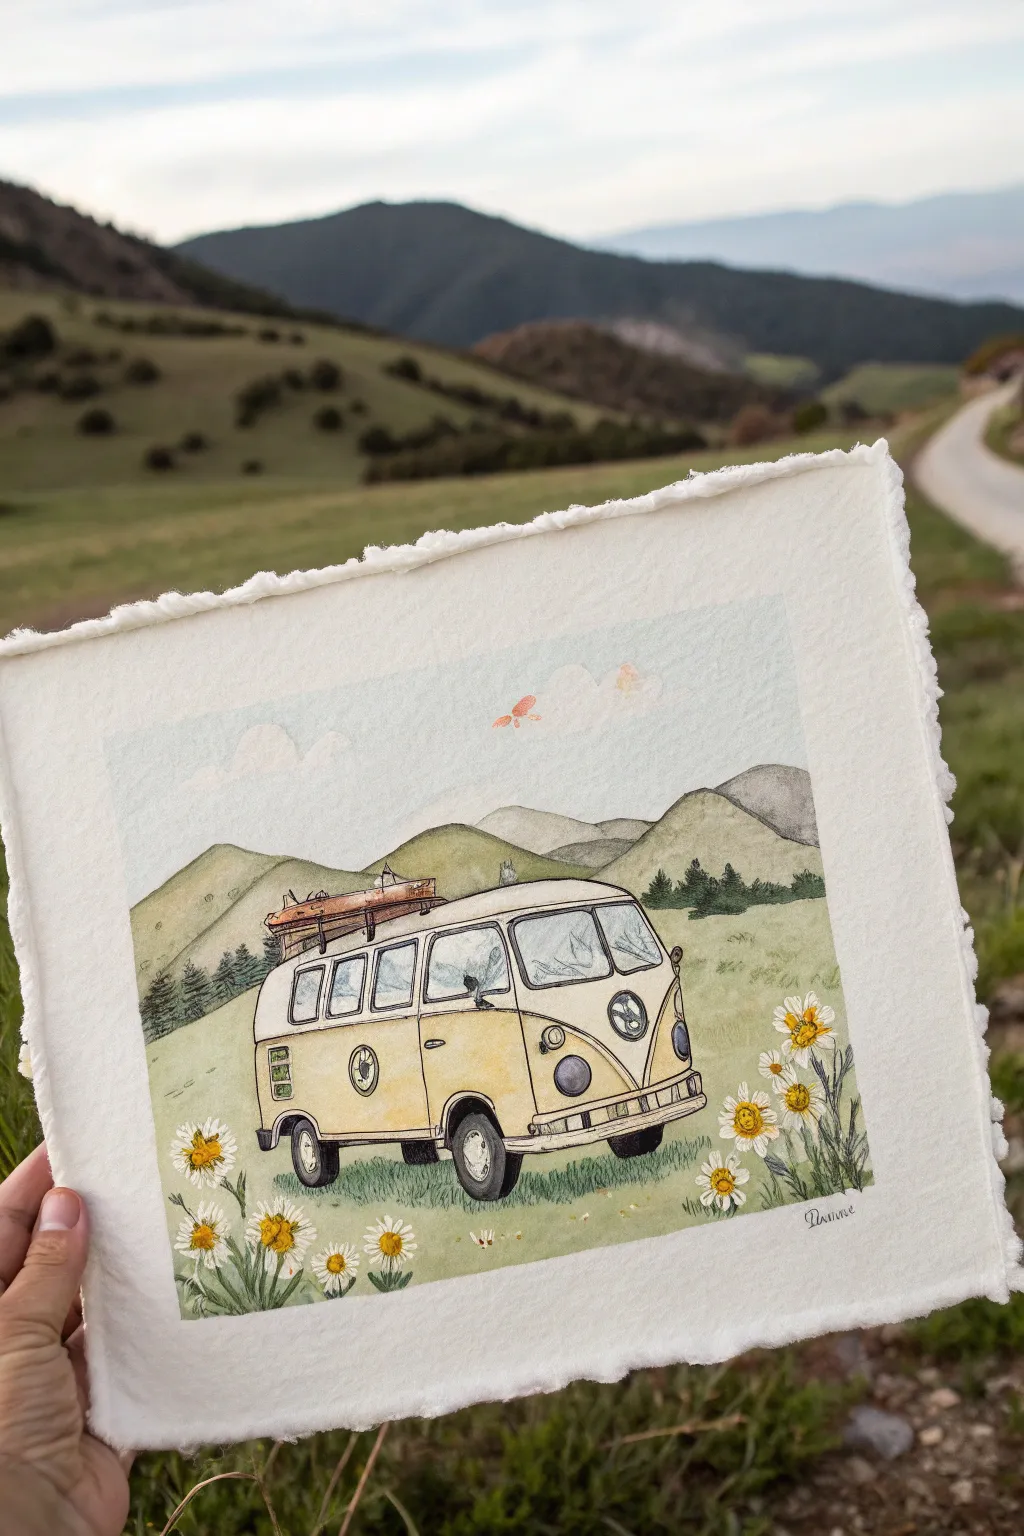
Capture the spirit of adventure with this whimsical illustration of a classic yellow camper van nestled among rolling hills. Using delicate ink lines and soft watercolor washes on deckled-edge paper creates a nostalgic, vintage vibe perfect for any bohemian art collection.
Detailed Instructions
Materials
- Heavyweight watercolor paper (300gsm, cold press/rough texture)
- Fine liner waterproof pens (0.1mm, 0.3mm, 0.5mm)
- Watercolor paint set (pans or tubes)
- Round brushes (sizes 2, 6, and 8)
- Pencil (HB) and kneaded eraser
- Ruler
- Jar of clean water
- Paper towels
- Deckle edge ripper or ruler (optional)
Step 1: Planning and Sketching
-
Draft the framework:
Start by lightly sketching the camper van using your HB pencil. Begin with a rectangular box shape angled slightly towards the right to establish perspective, then refine the rounded nose and roofline characteristic of classic split-window buses. -
Add van details:
Sketch the prominent V-shape on the front, the large circular headlights, the split windshield, and the peace sign emblem. Don’t forget the bumper, side windows, and wheels. At this stage, keep your lines faint so they can be easily adjusted. -
Develop the roof rack:
Draw the roof rack loaded with adventure gear. Start with the horizontal bars, then stack loose shapes representing luggage, surfboards, or camping equipment on top. -
Establish the landscape:
Below the van, draw jagged grass lines and large daisy shapes in the foreground corners. Behind the van, sketch rolling hills using overlapping curved lines to create depth, ending with distant mountains near the top third of the paper.
Step 2: Inking the illustration
-
Outline the van:
Switch to your waterproof fine liner pens. Use a 0.5mm pen for the main outline of the van to make it pop, ensuring lines are confident but slightly loose for a hand-drawn feel. -
Detail work:
Use a finer 0.1mm or 0.3mm pen for intricate details like the grill vents, hubcaps, and the luggage on the roof rack. Add small dashed lines or tiny circles on the bumper for texture. -
Inking the background:
Outline the mountains and hills with thin, broken lines to suggest distance. For the foreground grass and daisies, use quick, upward strokes to simulate organic growth. Once the ink is completely dry, gently erase all pencil marks.
Muddy Greens?
If your grass looks dull, avoid mixing black into green. Instead, mix your green with red to deepen it, resulting in rich, natural olive shadows that look organic.
Step 3: Watercolor Washes
-
Paint the classic yellow:
Mix a warm, muted yellow (like Yellow Ochre with a touch of Cadmium). Apply a light wash to the lower body of the van. While wet, drop in slightly darker pigment near the bottom edges and wheel wells to create rounded volume. -
Shade the white areas:
Using a very dilute mix of Payne’s Grey or blue-violet, paint shadows on the white upper half of the van, particularly under the roof rack and around the window frames. -
Color the accessories:
Paint the tires dark grey (not pure black) and the bumpers a cool grey. Use burnt sienna and warm browns for the luggage and roof rack, varying the tones to distinguish different items. -
Fill the windows:
Mix a pale, watery blue-grey for the glass. Leave small white gaps or lift some paint with a thirsty brush to create the reflection of clouds or light on the windshield.
Vintage Paper Hack
For an instantly aged look, tint your paper with a weak tea wash before you start painting. Let it dry completely flat before sketching to give the van a retro parchment feel.
Step 4: Landscape and Finish
-
Create the grassy field:
Mix sap green with a little yellow ochre for a natural grass tone. Wash this over the foreground, carefully painting around the daisies. Darken the green directly under the van to ground it in the scene. -
Paint the hills:
For the middle ground hills, use a slightly cooler, lighter green. For the distant mountains, switch to a pale greyish-purple or blue to mimic atmospheric perspective. -
Brighten the flowers:
Dab bright yellow centers into the daisies. Use a very light grey to add minimal shading to the white petals, giving them dimension without making them look dirty. -
Sky and butterflies:
Paint a very faint blue wash for the sky, leaving fluffy white shapes unpainted for clouds. Add tiny touches of orange or pink for the butterflies fluttering above the van. -
Create the deckled edge:
To match the reference photo’s rustic look, place a heavy ruler firmly on the paper’s edge. Tear the excess paper upwards against the ruler to create a rough, fibrous ‘deckled’ border.
Ideally, frame your piece floating in a shadow box to show off those beautiful rough edges you created
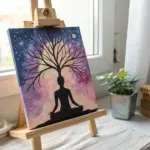
Chakra Aura Silhouette
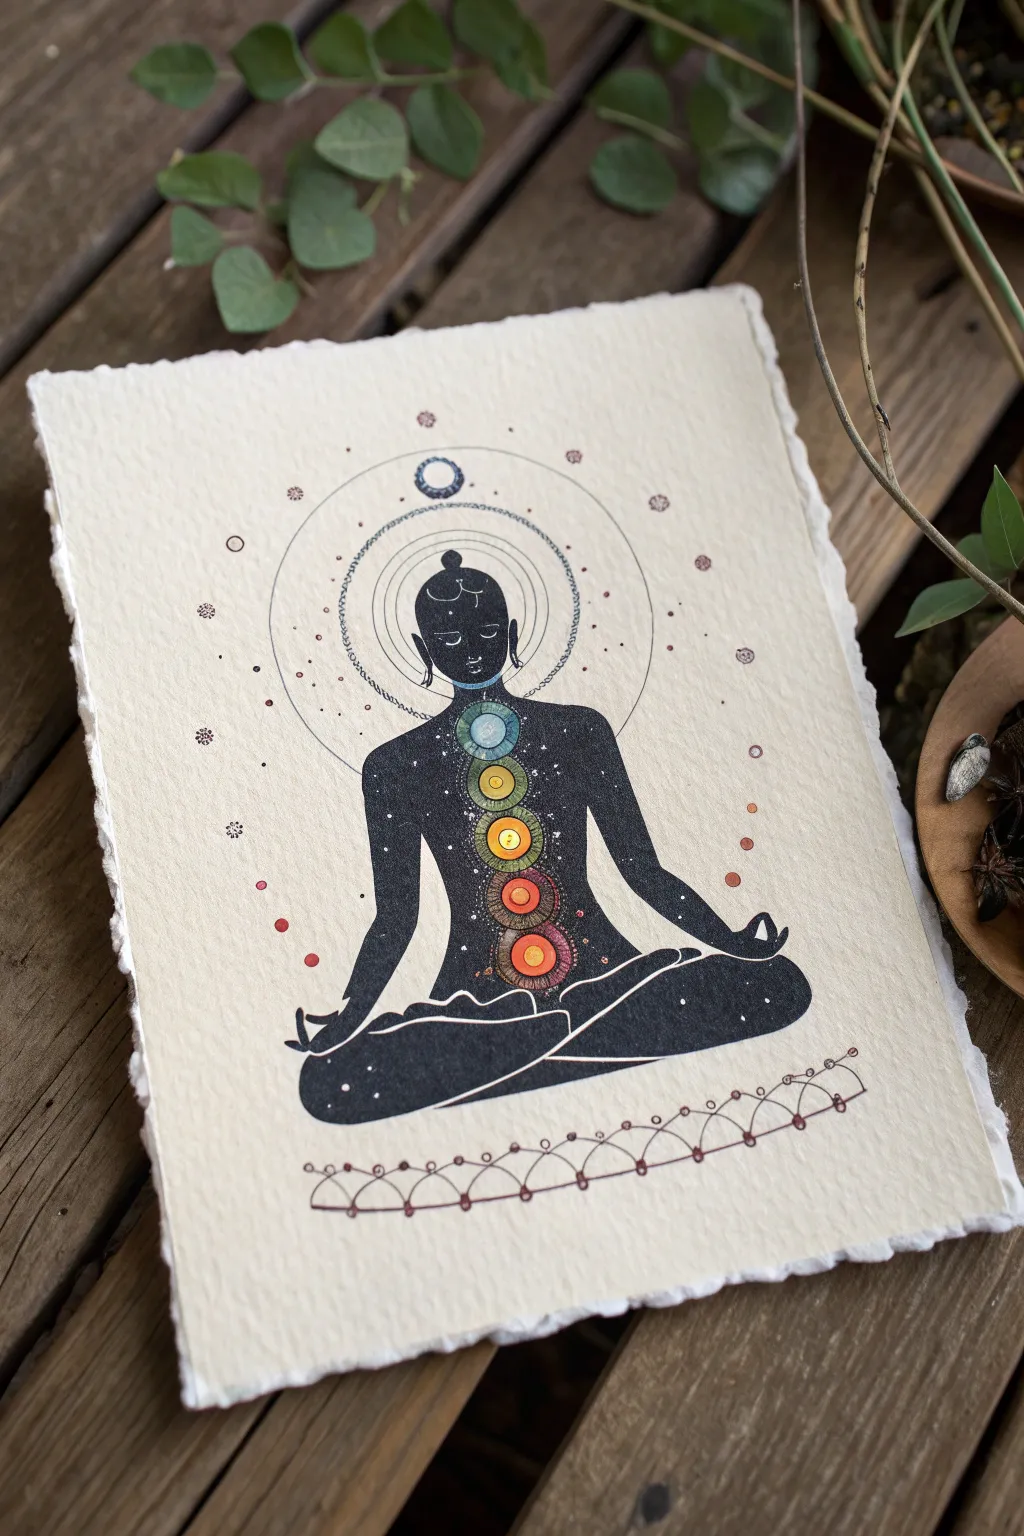
Center yourself with this serene mixed-media illustration featuring a meditative silhouette adorned with vibrant chakra points. The piece combines stark black ink work with delicate watercolor details on beautiful, heavy-texture handmade paper for an earthy, spiritual finish.
Detailed Instructions
Materials
- Heavyweight cold-press watercolor paper or handmade cotton rag paper (rough texture)
- Black waterproof Indian ink or high-quality acrylic ink
- Fine liner pens (sizes 01, 005, and 05) – black and colored (optional)
- Watercolor paints (rainbow spectrum: red, orange, yellow, green, blue, indigo, violet)
- Small round brushes (size 0 and 2)
- Gold or metallic gel pen (or metallic watercolor)
- Compass and ruler
- Pencil and eraser
- Masking fluid (optional)
Step 1: Planning and Sketching
-
Paper Preparation:
Begin with a sheet of heavy, textured paper. If you have handmade cotton rag paper with deckled edges, this works perfectly to create that rustic, ancient feel seen in the example. -
Drafting the Center Line:
Lightly draw a vertical centerline down the middle of your page with a pencil. This is crucial for keeping the meditating figure symmetrical and the chakras aligned. -
Sketching the Figure:
Sketch the outline of a person in a lotus position. Focus on the smooth curves of the shoulders and the crossed legs. Keep the pencil lines very faint so they don’t show through later. -
Mapping the Chakras:
Along your centerline, draw seven small, evenly spaced circles starting from the base of the spine up to the crown of the head. These will be your focal points. -
Drafting the Halos:
Use a compass to draw the concentric circles around the head. Create varying gaps between the rings to mimic the radiating energy effect.
Step 2: Inking the Silhouette
-
Outlining in Ink:
Using a size 05 pen or a small brush with Indian ink, carefully outline the entire body, skipping over the seven chakra circles you drew earlier. -
Filling the Void:
Fill in the body shape with solid black ink. I find using a slightly larger round brush helps get a smooth, opaque finish without streak marks. -
Refining Edges:
Once the main fill is dry, use a fine liner (01 size) to sharpen the edges of the silhouette, specifically around the fingers in the mudra position and the curves of the legs. -
Adding Negative Space Details:
If you wish to have white lines defining the arms or legs (like the folds of the pants in the reference), leave extremely thin gaps of white paper unpainted, or go back later with a white gel pen. -
Starry Texture:
Dip an old toothbrush or stiff brush into white acrylic paint or ink. Use your thumb to flick a very fine mist of ‘stars’ onto the black silhouette while it is dry, giving it a cosmic look.
Bleeding Lines?
If ink bleeds into the textured paper too much, switch to a pigment liner pen instead of liquid ink, or prep the specific drawing area with a tiny bit of clear gesso first.
Step 3: The Chakra Orbs
-
Base Colors:
Using your size 0 brush, paint the chakra circles. Start with red at the bottom, moving up through orange, yellow, green, blue, indigo, to violet at the crown. -
Watercolor Bleed:
Keep the paint watery so it has a translucent, glowing quality. Don’t worry if the texture appears uneven; that adds to the organic look. -
Detailing the Orbs:
Once dry, use fine pens or a darker mix of watercolor to add concentric rings or tiny dots inside each colored circle to distinguish them.
Metallic Pop
Use gold leaf adhesive and a tiny dab of gold foil on the center of the ‘heart’ chakra or the halo rings to make the artwork catch the light dramatically.
Step 4: Geometric Details and Finish
-
Tracing the Halo:
Go back to your compass pencil lines around the head. Trace these with a very fine 005 pen. Use stippling (tiny dots) for some rings to create a lighter, ethereal texture. -
Bottom Pattern:
At the bottom of the page, draw the intersecting arc pattern. Use a compass to ensure the semi-circles are uniform. -
Connecting Dots:
Add small colored dots or metallic accents at the intersections of your bottom pattern, similar to a mala bead string. -
Floating Elements:
Scatter small decorative elements around the aura—circles, dots, and tiny flower shapes using muted earth tones or metallic ink. -
Cleaning Up:
Wait for everything to be completely bone-dry. Gently erase any visible pencil sketch lines, being careful not to rub the watercolor areas.
Frame this piece in natural wood to compliment the organic paper texture and hang it in your meditation space
Yin-Yang With Flowers and Stars

Balance nature and the cosmos with this stunning canvas painting that reinterprets the classic Yin-Yang symbol. By combining detailed floral work with a dreamy galaxy background, you’ll create a piece that feels both grounding and expansive.
How-To Guide
Materials
- Square stretched canvas (approx. 12×12 inches or similar)
- Acrylic paints: Titanium White, Mars Black, Phthalo Blue, Teal/Turquoise, Coral/Orange, Purple, Magenta, Gold or Copper metallic paint, Yellow Ochre, Sap Green
- Assorted paintbrushes: Large flat brush, medium filbert, fine liner brush (size 0 or 00)
- Pencil and eraser
- Compass or large circular object (like a dinner plate) for tracing
- Palette for mixing
- Water cup and paper towels
- Old toothbrush (optional for star splatter)
Step 1: Drafting the Design
-
Draw the base circle:
Start by finding the center of your canvas. Use a compass or trace a large plate to draw a perfect circle that fills most of the space, leaving just the corners free. -
Create the S-curve:
Lightly sketch the signature S-curve down the middle of the circle to divide it into the two teardrop shapes of the Yin-Yang. -
Map out the quadrants:
Use a ruler to lightly divide the background corners behind the circle into distinct zones: vertical line down the left edge and horizontal line on top, isolating the top-left corner for the metallic section.
Struggling with Curves?
If painting the S-curve freehand is intimidating, cut two circles of paper the same size as your main circle. Cut them into the Yin-Yang shapes and trace them directly onto the canvas.
Step 2: Painting the Backgrounds
-
Block in the dark cosmos:
Mix Mars Black with a tiny touch of Phthalo Blue. Paint the entire right side of the canvas background (outside the circle) and the top portion of the Yin-Yang curve with this deep, rich dark tone. -
Create the galaxy nebula:
While the dark paint is still slightly tacky, blend in teal and turquoise at the bottom right corner, creating a cloudy, nebular effect. -
Apply the metallic corner:
Paint the top-left corner background with your copper or rose gold metallic paint. You might need two coats for opaque coverage. -
Fill the lower floral corner:
Paint the bottom-left corner with a solid matte black base coat and let strictly dry. -
Establish the white section:
Fill the left-side teardrop shape of the Yin-Yang with Titanium White. Apply multiple thin layers to ensure a smooth, crisp finish without brushstrokes showing.
Step 3: The Cosmic Yin (Dark Side)
-
Paint the moon:
Instead of a simple dot, paint a textured full moon in the upper part of the dark swirl using white mixed with a tiny drop of black or grey for craters. -
Paint the purple flower:
Using your filbert brush, paint a large purple aster or daisy-like flower on the right side. Start with darker purple petals and layer lighter magenta strokes on top for dimension. -
Add lush greenery:
Using a liner brush and Sap Green mixed with a little Yellow Ochre or Teal for variety, paint vines curving around the purple flower. -
Add the stars:
Dip an old toothbrush in watered-down white paint and flick it over the dark sections to create a field of stars. Use a fine brush to add a few larger, distinct stars.
Paint opacity issues
Yellows and oranges are often transparent. To make the small flowers in the bottom corner pop against the black background, paint them white first, let dry, then paint the color over the white.
Step 4: The Earthly Yang (Light Side)
-
Create the dark void:
Paint a small black circle in the lower part of the white swirl. I like to add a tiny blue swirl inside it to echo the galaxy theme. -
Paint the coral flower:
Draw a large, round flower near the bottom left edge of the white section. Paint the petals with a coral/orange mix, using thin, radial strokes from the center outward to create texture. -
Detail the center:
Add a dark purple or maroon center to the coral flower with small stippled dots for pollen. -
Add delicate stems:
Paint thin, flowing green stems rising up from the coral flower, adding small red buds and almond-shaped leaves.
Step 5: Refining Borders and Details
-
Pattern the copper corner:
On the dry metallic top-left corner, use your fine liner brush and black paint (or a paint pen) to draw delicate floral outlines and vines. -
Pattern the dark corner:
In the bottom-left black corner, paint small yellow and orange flowers. Cluster them densely near the circle’s edge and let them scatter out. -
Clean up the edges:
Using a steady hand and a small flat brush, touch up the main border of the large circle with black or white to ensure distinct separation between the Yin-Yang and the background. -
Final varnish:
Once absolutely uniform dry (wait at least 24 hours), apply a satin or gloss varnish to make the galaxy colors pop and protect the metallic sheen.
Hang your finished masterpiece and enjoy the peaceful vibe it brings to your space
Peace Dove in Psychedelic Clouds
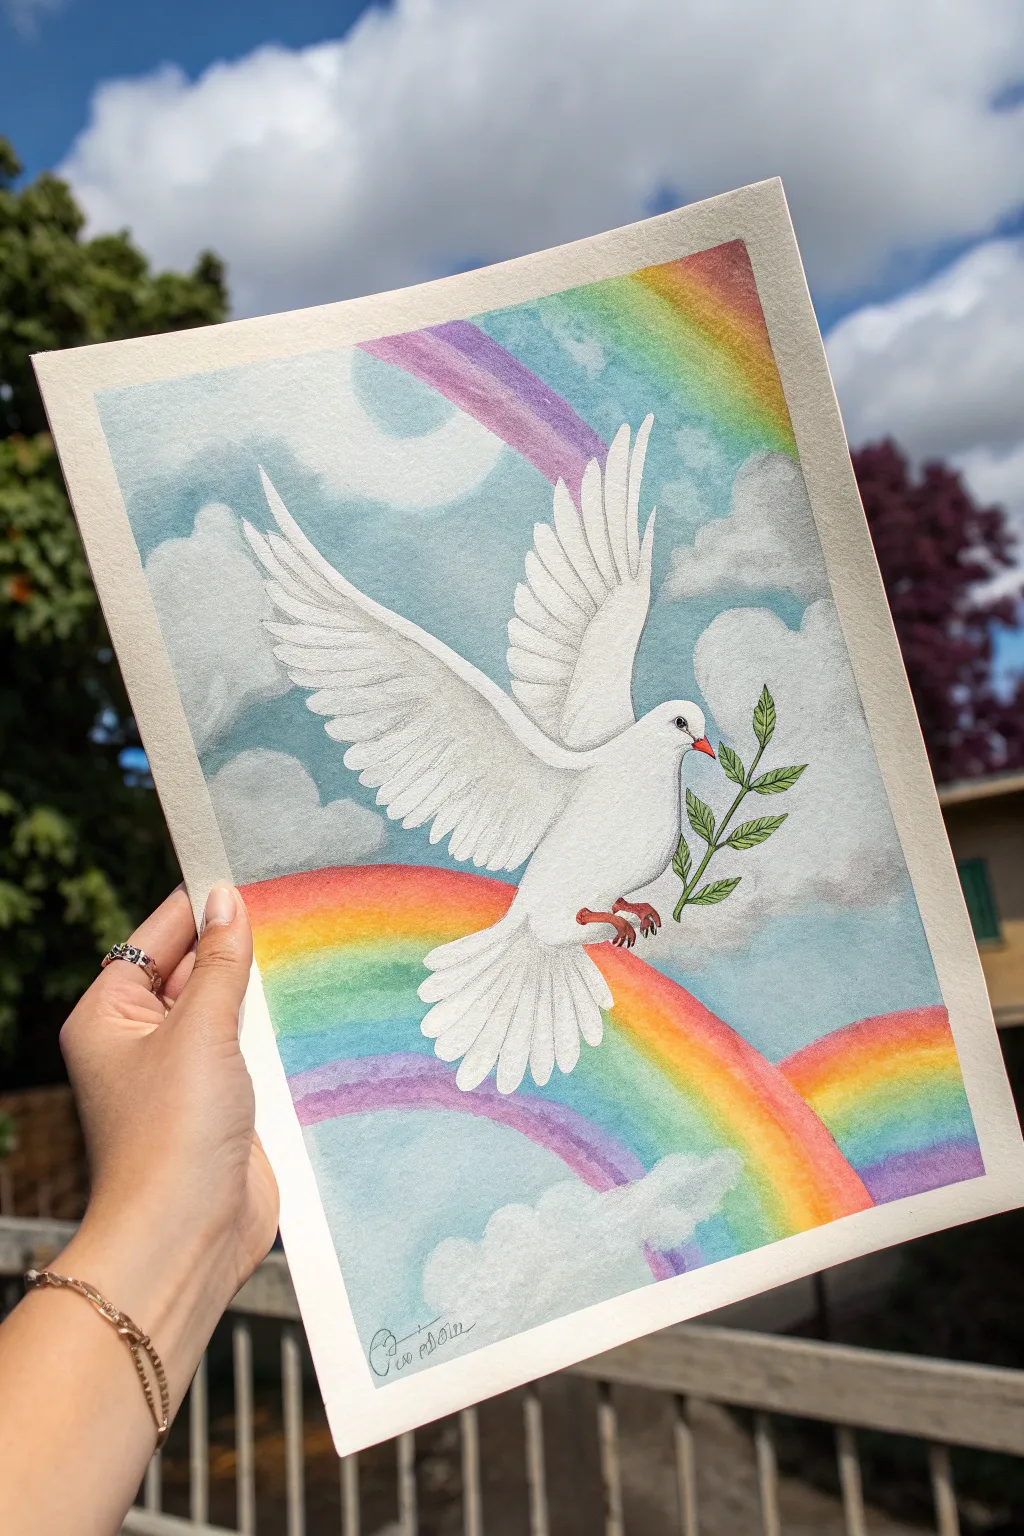
Capture a symbol of serenity with this watercolor painting featuring a graceful white dove soaring through a vibrant, cloud-filled sky. The contrast between the soft, white feathers and the bold, colorful rainbow arcs creates a stunning and uplifting composition.
Detailed Instructions
Materials
- Cold press watercolor paper (300 gsm)
- Watercolor paint set (pans or tubes)
- Masking fluid (drawing gum)
- Round watercolor brushes (Size 2, 6, and 10)
- HB pencil and soft eraser
- Two water jars (clean and rinse)
- Paper towels
- Palette for mixing
- White gouache (optional, for highlights)
Step 1: Sketching and Masking
-
Draft the composition:
Begin by lightly sketching the outline of the dove in the center of your paper. Focus on the graceful curve of the wings and the fan shape of the tail feathers. Add the olive branch in its beak with simple leaf shapes. -
Map the background:
Lightly draw the swooping arcs of the rainbows. Notice there are two distinct sections: one arcing high above the left wing and another curving below the dove. sketch outlines for the large, fluffy cloud formations behind the bird. -
Protect the white:
The dove needs to remain pristine white, so apply masking fluid carefully over the entire bird shape and the clouds. Don’t forget to mask the olive branch leaves as well. Allow the fluid to dry completely until it’s tacky and hard to the touch.
Mastering the Blend
To get smooth rainbow transitions, paint the next color strip while the previous one is barely damp, not soaking wet. This allows soft bleeding without creating muddy brown mixes.
Step 2: Painting the Sky and Rainbows
-
Wet-on-wet sky base:
Using your largest brush, wet the sky area around the rainbows with clean water. Drop in a diluted mix of cerulean blue or cobalt blue, letting it bloom softly to create an airy atmosphere. Avoid the rainbow strips for now. -
Define cloud shadows:
While the blue is still damp, mix a pinch of gray or violet into your blue. Paint soft, irregular shadows at the bottom of the cloud shapes to give them volume and fluffiness. -
First rainbow band:
Once the blue sky is dry, wet the first strip of the top rainbow arc. Load your size 6 brush with varying colors—red, orange, yellow—and paint them in sequence, letting the edges blur slightly into each other for a soft transition. -
Completing the rainbows:
Continue painting the other color bands of the rainbows (green, blue, purple). Keep the colors vibrant but slightly transparent so the texture of the paper shows through. Be careful to respect the boundaries of the masked dove. -
Remove masking:
Wait until the entire painting is perfectly dry—this is crucial to avoid tearing paper. Gently rub away the masking fluid with your finger or a rubber cement pickup to reveal the crisp white paper underneath.
Step 3: Detailing the Dove
-
Feather foundations:
Mix a very watery, pale gray (dilute some Payne’s gray or mix ultramarine with burnt sienna). Paint curved strokes along the underside of the wings and belly to suggest heavy shadows and roundness. -
Wing texture:
Switch to your size 2 brush. Using a slightly darker gray mix, paint fine lines to separate the individual flight feathers. Keep the top edges of the wings pure white to look like sunlight hitting them. -
Tail feathers:
Define the fan of the tail with similar gray strokes, radiating outward from the body. Leave thin white gaps between strokes to represent the shafts of the feathers. -
Beak and feet:
Paint the beak with a small touch of bright orange-red. For the feet, use a mix of pink and brown, adding tiny darker details for the claws. -
The eye:
Carefully paint the eye using a dark brown or black. Leave a tiny speck of white paper bare for the catchlight, or add a dot of white gouache later if you miss it.
Fixing Hard Edges
If masking fluid left jagged edges on your clouds, use a damp stiff brush to ‘lift’ and soften the harsh lines, blending them gently into the surrounding blue sky.
Step 4: Final Touches
-
Detailed olive branch:
Paint the leaves with sap green or olive green. Use two tones—a lighter wash for the base and a darker green for the veins and stems—to add dimension. -
Softening edges:
Review the clouds. If the edges where the masking fluid was look too sharp, dampen a clean brush and gently scrub the edges to soften them, blending the white cloud into the blue sky. -
Highlight check:
I like to take a step back and assess the contrast. If the dove looks too flat, deepen the darkest shadows under the wing with another layer of cool gray glaze.
Sign your name in the corner and frame this symbol of peace to brighten any room
Neon-on-Dark Blacklight-Inspired Poster Art
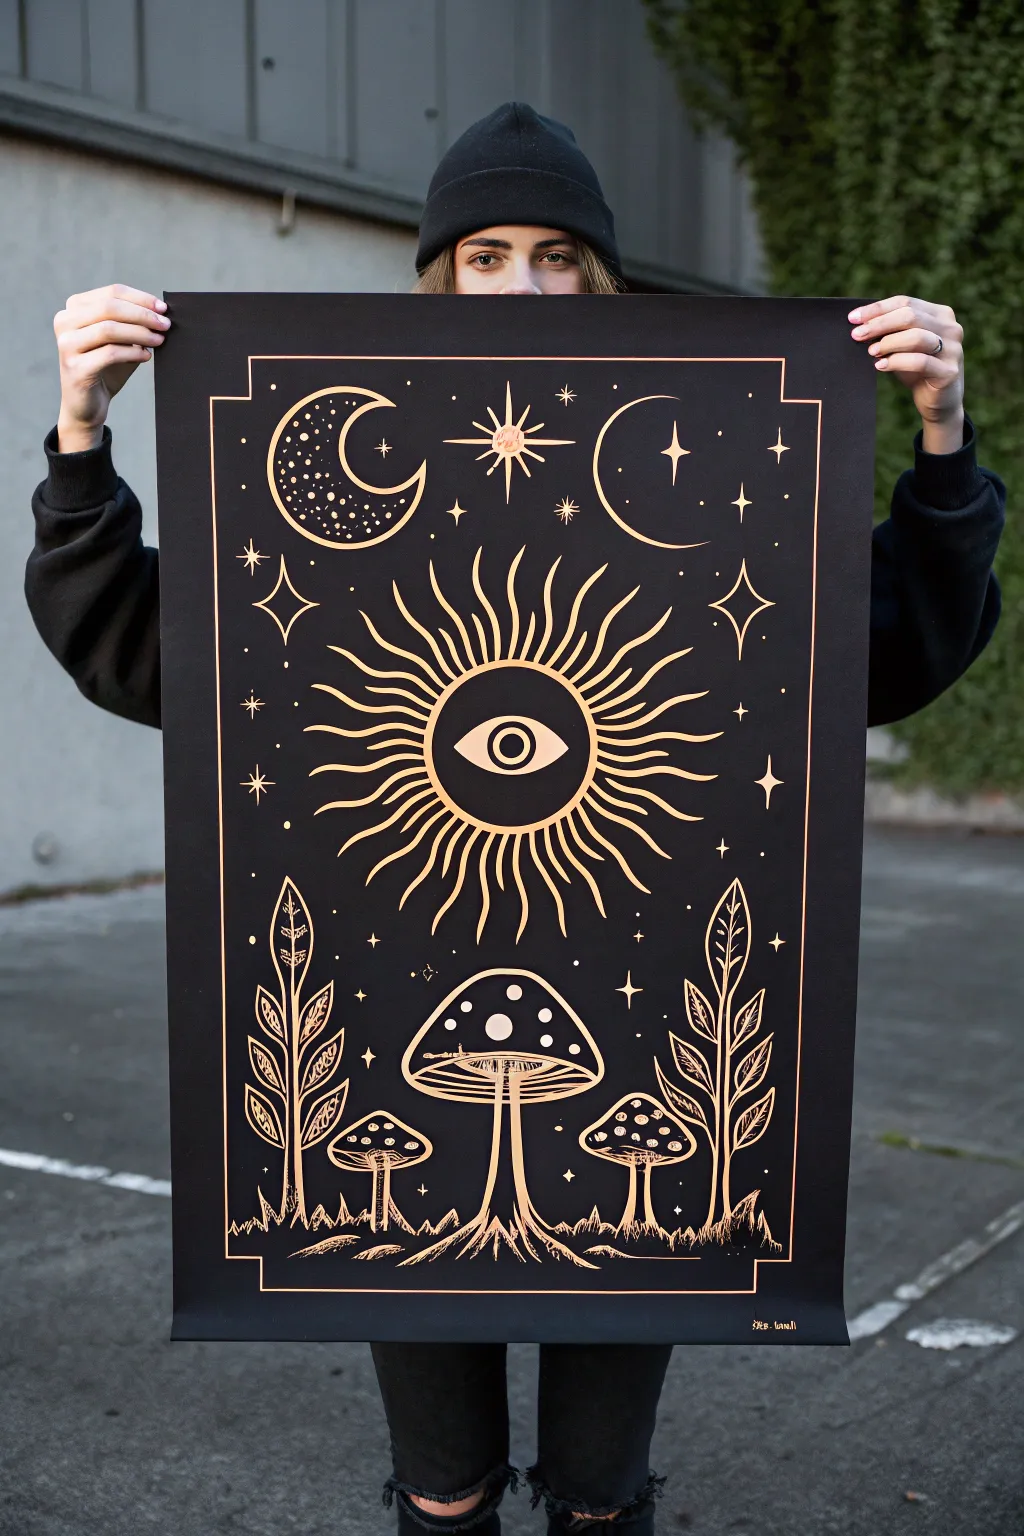
Channel cosmic vibrations with this striking poster art that mimics the look of gold foil printing on rich black paper. The high-contrast design features esoteric symbols like all-seeing eyes, mushrooms, and moon phases, creating a piece that glows with mystical energy.
How-To Guide
Materials
- Large sheet of heavyweight black mixed-media paper or black poster board (A2 or 16×20 inches)
- Metallic gold or copper paint marker (fine and medium tips)
- White charcoal pencil or chalk pencil
- Ruler (preferably 18-inch or longer)
- Circle template or compass
- Eraser (kneaded eraser works best on black paper)
- Reference sketch or printed template
- Painters tape
Step 1: Planning and Layout
-
Secure the paper:
Tape your black paper down to a flat work surface using painter’s tape on the corners. This prevents shifting while you draw and keeps the paper flat. -
Establish the border:
Using a ruler and your white charcoal pencil, measure about 1.5 to 2 inches from the edge on all sides. Lightly draw a rectangular frame. Add small indented corners (notched corners) to give it that classic tarot card aesthetic. -
Find the center:
Measure to find the exact horizontal and vertical center of your poster area. Mark this central point lightly; this is where your main eye motif will live.
Smudge Alert
Work from the top left to bottom right (if right-handed) to avoid dragging your hand through wet metallic ink. Place a clean sheet of paper under your hand as a guard.
Step 2: Drafting the Design
-
Sketch the central eye:
At your center mark, use your compass or circle template to draw a perfect circle. Sketch the almond shape of the eye inside it, followed by the iris and pupil. Keep your charcoal lines very faint so they are easy to clean up later. -
Draft the sunburst:
Draw wavy, flamelike rays radiating outward from the central eye circle. It helps to draw the four main directional rays (North, South, East, West) first to keep the spacing symmetrical, then fill in the gaps with alternating lengths. -
Add celestial elements:
In the top left corner, sketch a crescent moon facing right. In the top right, sketch a crescent moon facing left. In the top center, draft a small star or sun symbol. Fill the empty upper space with small four-point stars. -
Sketch the earthly elements:
move to the bottom section. Draw a large central mushroom cap below the sunburst. Flank it with two smaller mushrooms. On the far left and right sides, sketch tall, leafy plants growing upwards towards the sun. -
Ground the scene:
Draw a jagged, grassy horizon line at the very bottom, connecting the stems of the mushrooms and plants.
Level Up: UV Glow
Trace over select white highlights with invisible UV-reactive ink. Under blacklight, your mystic poster will reveal hidden glowing secrets.
Step 3: Inking the Gold
-
Test your markers:
Before touching the final paper, shake your metallic paint markers well and press the nib on a scrap piece of black paper to ensure the ink flows smoothly and isn’t blobbing. -
Outline the frame:
Start with the border. Use the medium-tip gold marker and your ruler to ink the straight lines of the frame. I find it easier to pull the pen toward me rather than pushing it away to keep the line consistent. -
Ink the central motif:
Switch to your fine-tip marker for detailed work. Carefully trace the eye and the central circle. Fill in the pupil, leaving a tiny black dot for the highlight if you wish. -
Define the sun rays:
Trace the wavy sun rays. Vary your pressure slightly; pressing harder at the base of the ray and lifting off at the tip creates a nice tapered effect. -
Fill the moons and stars:
Ink the crescent moons. For the left moon, use stippling (small dots) to fill in the dark side of the crescent, giving it texture. Draw the four-point stars with sharp, distinct points. -
Detail the flora:
Trace the mushrooms and plants. Add small circles or gills inside the mushroom caps for texture. Use smooth, sweeping strokes for the plant leaves to mimic organic growth. -
Add decorative sparkles:
Look at the empty negative spaces in the composition. Add tiny dots, small crosses, or diamond shapes with the fine tip marker to make the sky look full and magical.
Step 4: Finishing Touches
-
Let it cure:
Allow the metallic paint to dry completely. This usually takes about 15-20 minutes depending on the brand of marker. It must be bone dry before the next step. -
Erase guidelines:
Gently erase all the white charcoal sketch lines. Use a light hand to avoid scuffing the black surface of the paper or smearing the gold ink. -
Final inspection:
Check for any faint lines or uneven strokes. You can go over significant lines a second time to make the gold pop even more against the black background.
Hang your finished piece in a dimly lit room to let the metallic lines catch the light and create a truly magical atmosphere


Have a question or want to share your own experience? I'd love to hear from you in the comments below!