A plain lampshade is basically a blank canvas that gets to glow from the inside out. If you’ve been itching to refresh a lamp without redoing the whole room, these lampshade painting ideas will get your hands moving fast.
Classic Two-Color Stripes
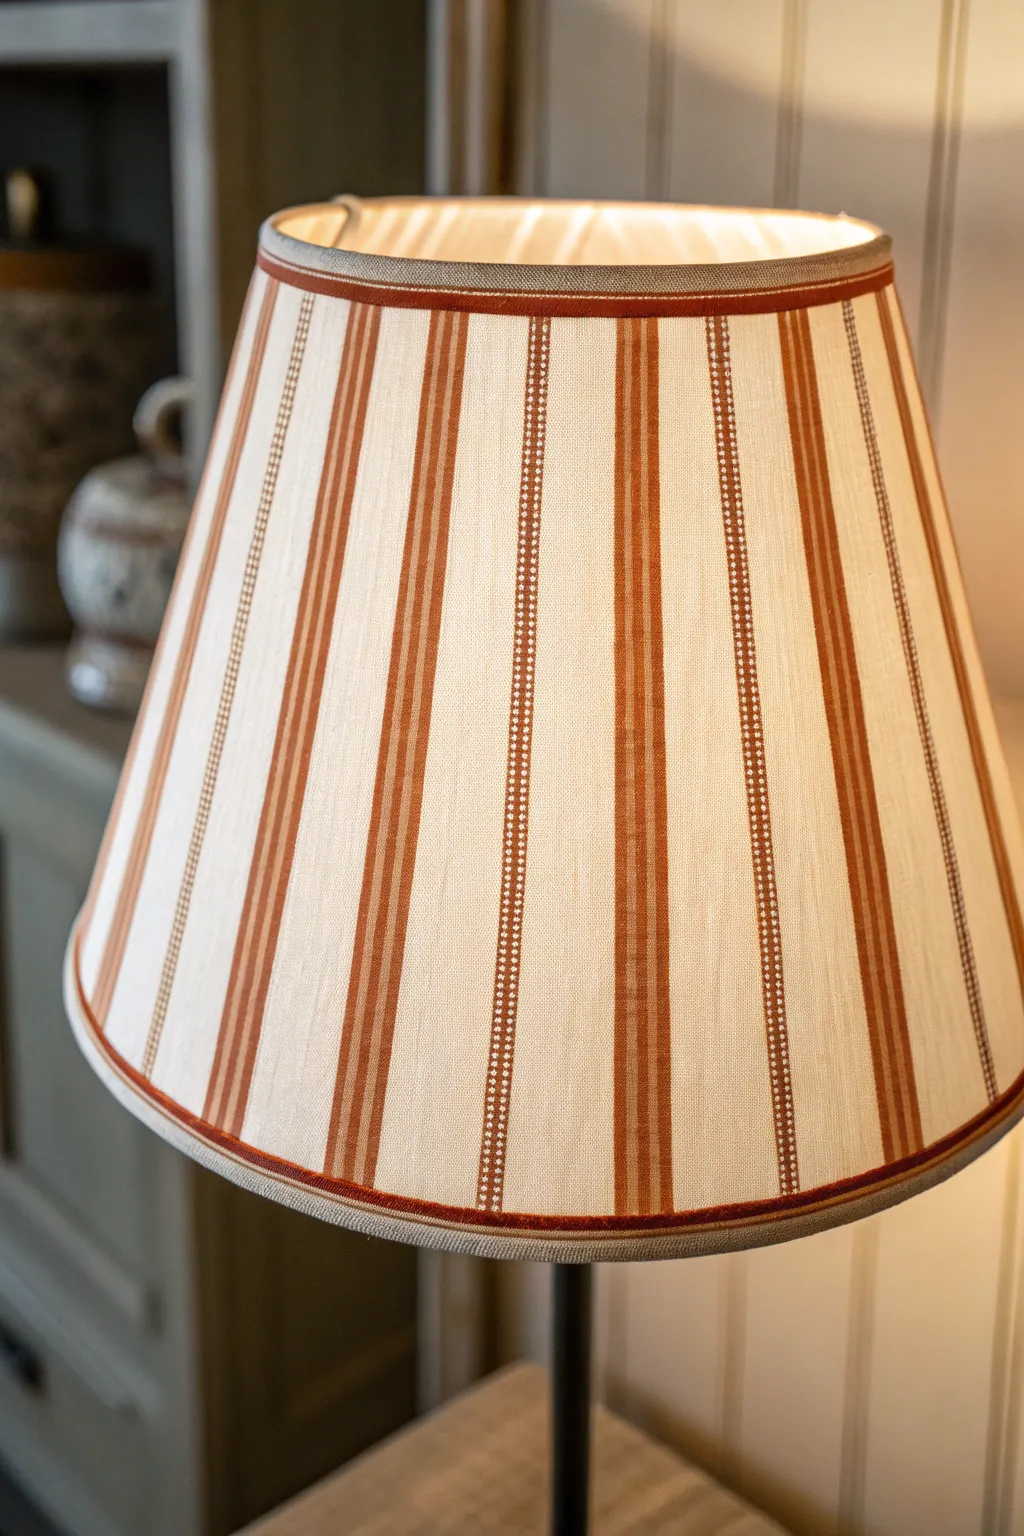
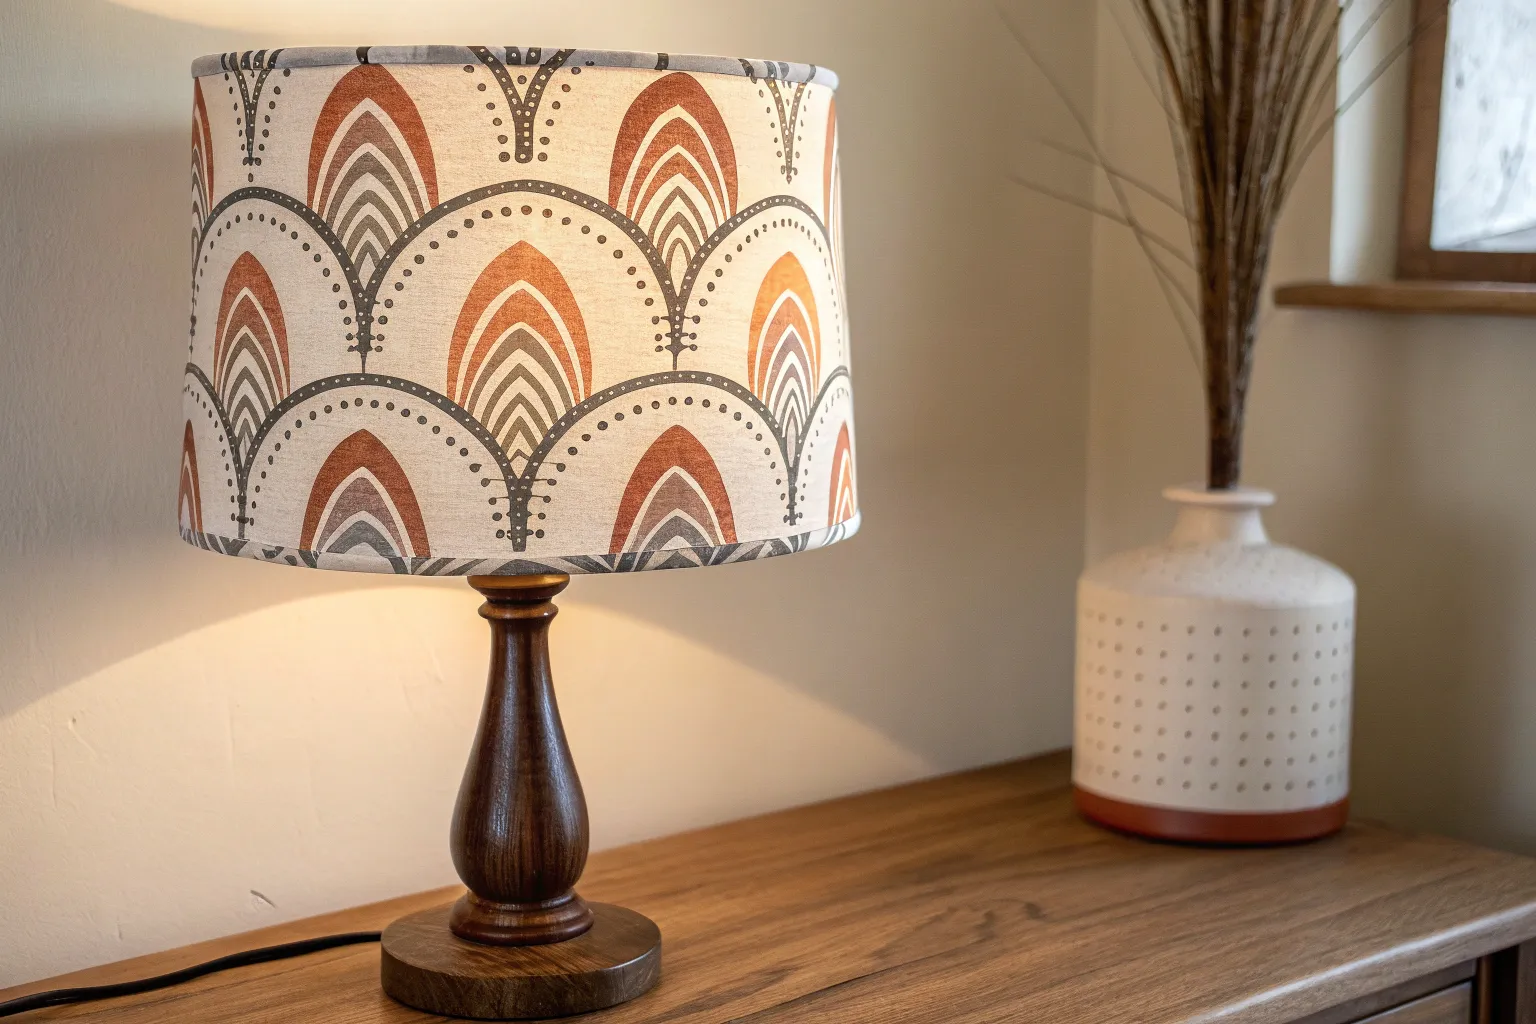
Transform a plain drum or empire lampshade into a piece of country-chic decor with this precise striping project. The pattern combines a classic rust-colored solid stripe with a textured, dotted cream stripe for a sophisticated, layered finish that looks professionally upholstered.
How-To Guide
Materials
- Plain fabric lampshade (cream or white base)
- Rust-orange acrylic paint or fabric paint
- Off-white or cream acrylic paint (slightly lighter than shade fabric)
- Medium flat shader brush (approx. 1/2 inch) for main stripes
- Small fine-point detail brush (size 1 or 0)
- Painter’s tape (choose a low-tack delicate surface variety)
- Flexible measuring tape
- Pencil
- Ruler
- Fabric medium (optional, for softer finish)
- Clear matte sealer spray (optional)
Step 1: Preparation & Mapping
-
Clean the surface:
Begin by ensuring your lampshade is free of dust or lint. A quick roll with a lint roller works wonders to ensure the tape sticks properly and lines remain crisp. -
Calculate stripe width:
Measure the circumference of the bottom of your shade. Divide this number by the number of desired stripe repeats to determine the width of each section. Mark these intervals lightly with a pencil around the bottom rim. -
Repeat for the top:
Repeat the measuring process for the top rim. If you are using a tapered shade (like the one pictured), the top intervals will be slightly smaller than the bottom ones to account for the angle. -
Connect the marks:
Use your ruler or a straight edge to lightly connect the top and bottom marks with a pencil, creating vertical guidelines for where your stripes will live. -
Tape the solid rust stripes:
Apply painter’s tape to masking off the area for the solid rust stripes. Ensure you press the tape edges down firmly with your thumbnail to prevent paint bleed on the textured fabric.
Step 2: Painting the Base Stripes
-
Mix the rust color:
Mix your rust-orange acrylic paint with a small amount of fabric medium if desired. This helps the paint flexibility, though straight acrylic works fine for a stiffer finish. -
Paint the solid stripes:
Using the flat shader brush, fill in the masked areas with the rust paint. Apply in thin, even coats, painting vertically from top to bottom. -
Let it dry:
Allow the first coat to dry completely. If the fabric absorbs too much pigment and looks patchy, apply a second coat for full opacity. -
Remove tape carefully:
Peel off the tape while the final coat is still slightly tacky to ensure clean lines. Pull the tape away from the wet paint at a 45-degree angle. -
Tape the thin dotted stripes:
Once the rust paint is fully cured (give it a few hours), mask off extremely thin vertical sections—about 1/8th inch wide—spaced evenly between the rust stripes. These will be the foundation for the dotted pattern. -
Paint thin vertical base:
Paint these narrow strips with the same rust color to create a continuous dark background for the dots we will add later.
Bleed-Proof Lines
Before applying your rust paint, brush a thin layer of clear matte medium over the tape edge. This seals the tape and prevents color from creeping under.
Step 3: Detailing & Bordes
-
Start the dotting process:
Load your fine-point detail brush with the cream or off-white paint. The goal is to place small, distinct dots directly on top of the thin rust stripe you just painted. -
Establish rhythm:
Start at the top of a stripe and work your way down, tapping the brush tip gently to leave a small dot. Try to keep the spacing consistent, roughly every few millimeters. -
Create the illusion of stitching:
I usually step back every few inches to check the effect; these dots simulate a running stitch or woven texture, adding immense visual interest. -
Paint the top trim:
Using the flat brush, carefully paint the very top fabric bias binding (the rim) of the shade in the solid rust color to frame the artwork. -
Paint the bottom trim:
Repeat the process for the bottom rim, ensuring a solid, opaque coat of rust paint that covers the original fabric binding entirely. -
Add secondary trim lines (optional):
For extra definition, you can use a steady hand to paint a very thin line of rust just inside the top and bottom rims, mirroring the photo’s double-border look.
Uneven Dot Spacing?
If your dots get wonky, don’t wipe them! Let them dry, paint over that small section with the rust base color, and try the dots again.
Step 4: Final Touches
-
Clean up edges:
Inspect your work for any paint bleeds. You can often gently scrape away small acrylic mistakes on fabric with a craft knife once dry, or touch up with the original shade color. -
Seal the work:
If this lamp is in a high-traffic area, give the entire shade a light misting of clear matte sealer spray to protect the paint from dust and handling. -
Install and light up:
Place the shade back on your lamp base. Turn it on to ensure the paint coverage looks even when illuminated from behind.
This refined, custom-painted shade will add instant warmth and character to your room the moment you switch on the light


Soft Ombre Fade
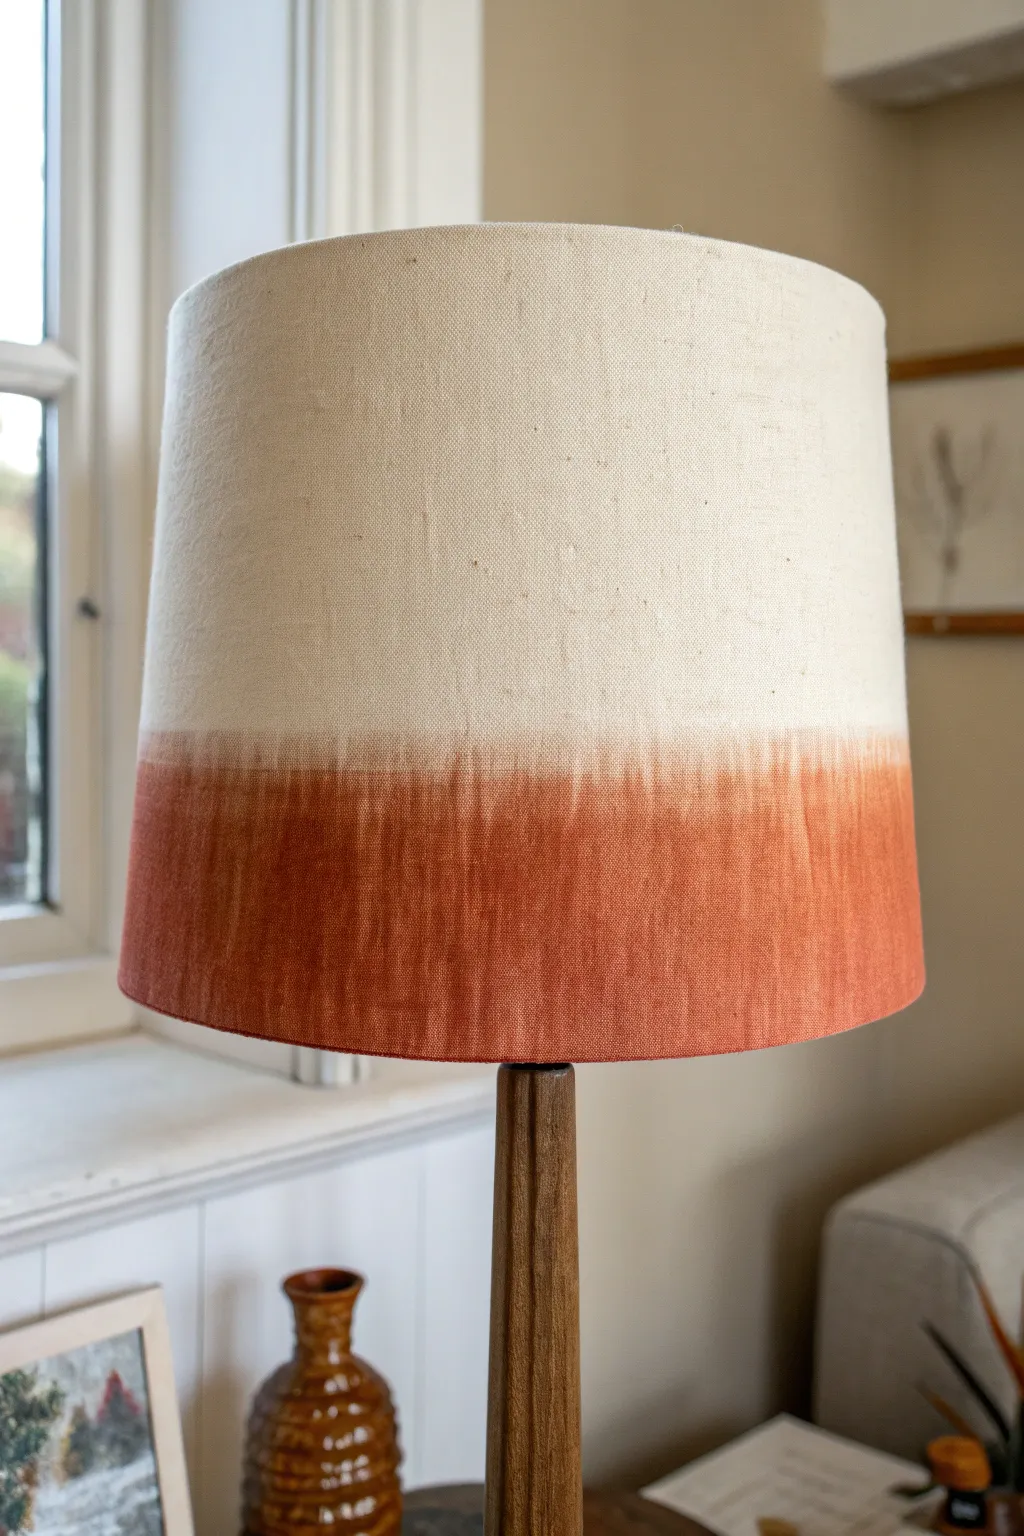
Achieve a trendy, boutique-hotel look with this surprisingly simple dip-dye technique that transforms a plain drum shade into a statement piece. The rusty terracotta hue bleeds softly into the natural linen, creating a warm, organic gradient perfect for cozy spaces.
How-To Guide
Materials
- Fabric drum lampshade (natural linen or cotton)
- Fabric paint or watercolor paint (rust/terracotta color)
- Wide foam brush or soft bristle brush
- Spray bottle with clean water
- Fabric medium (if using acrylic paint)
- Painter’s tape or masking tape (optional)
- Drop cloth or plastic sheet
- Clean rag or paper towels
- Mixing bowl or container
Step 1: Preparation & Setup
-
Clean the shade:
Begin by ensuring your lampshade is completely free of dust or lint. Use a lint roller gently over the entire surface, as stray fibers can get caught in the paint and ruin the smooth finish. -
Protect your workspace:
Lay down a drop cloth or plastic sheet on a flat surface. This process involves water and can get drippy, so protecting your table is essential. -
Mix your paint:
In a mixing bowl, combine your terracotta paint with water. You want a consistency similar to ink or heavy cream—a wash, not a thick coat. If you are using standard acrylic paint, mix in a fabric medium first according to the bottle instructions to keep the fabric soft, then dilute with water. -
Test the color:
Before touching the shade, test your diluted paint mixture on a scrap piece of similar fabric or paper towel to ensure the color saturation is to your liking.
Wicking Wisdom
Work quickly while the fabric is damp. If the shade dries out mid-process, the paint won’t bleed smoothly, leaving hard watermarks. Keep that spray bottle handy.
Step 2: Creating the Ombre Guide
-
Determine the height:
Decide how high you want the color to go. For the look in the photo, aim for the bottom third of the shade. -
Mark the water line:
Instead of a hard tape line, we need a water boundary. Using your spray bottle, lightly mist the bottom third of the lampshade. You want the fabric damp, but not dripping wet. -
Establish the fade zone:
Pay special attention to the upper edge of the wet area. This damp edge is crucial because it encourages the paint to wick upward slightly and bloom, creating that soft transition rather than a harsh line.
Step 3: Applying the Color
-
Paint the bottom edge:
Dip your foam brush into the paint wash. Start applying the color at the very bottom rim of the shade first. This should be your most saturated point. -
Work upwards:
Move your brush upward from the bottom rim, painting in horizontal strokes around the shade. As you move up, reload your brush less frequently. -
Approach the transition:
When you get close to your damp ‘water line’ (about an inch below where you want the color to stop), stop adding new paint to the brush. -
Feather the edge:
Use the residual paint left on the brush to gently push the color upward into the damp, clear fabric. The water in the fabric will grab the pigment and pull it up naturally. -
Soften with water:
If the line looks too stark, take a clean, wet brush (just water) and run it along the top edge of the paint line to encourage further bleeding and softening.
Dual-Tone Detail
Once the first layer is dry, mix a slightly darker version of your color and paint just the bottom 1 inch for a deeper, double-gradient effect.
Step 4: Refining & Drying
-
Check for consistency:
Rotate the lamp slowly to ensure the height of the color is relatively even all the way around, keeping the organic, wavy feel intact. -
Blot excess drips:
Keep an eye on the bottom rim. If gravity pulls too much liquid down, lightly dab the bottom edge with a rag to prevent drips from falling off. -
Let it cure:
Allow the lampshade to dry completely in an upright position. I find it takes at least 24 hours for the fabric to fully dry and the color to set. -
Heat set (optional):
If you used fabric medium, you may need to heat set the design once dry. A hair dryer on a high heat setting blown over the surface for a few minutes works well for this cylinder shape.
Place your newly refreshed shade on a wooden base to highlight those warm, earthy tones


Simple Polka Dots That Glow
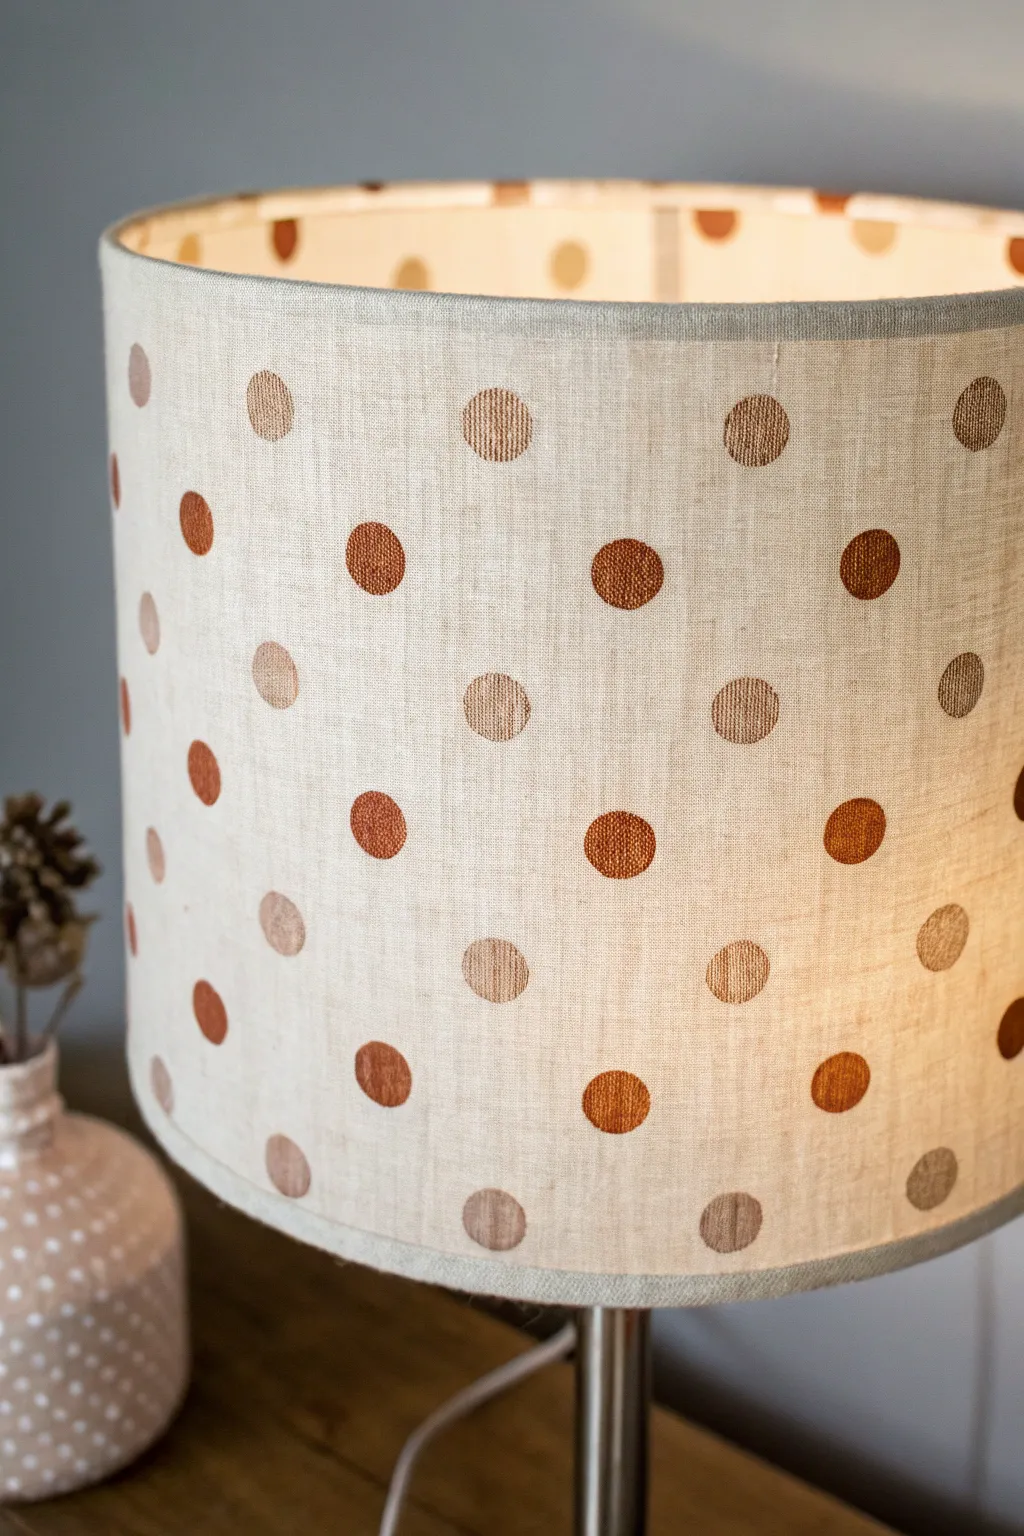
Transform a plain drum shade into a sophisticated feature piece with this simple yet striking update. By using a mix of metallic and matte fabric paints on natural linen, you’ll create a polka dot pattern that glows warmly when the lamp is lit.
Step-by-Step Guide
Materials
- Plain drum lampshade (light-colored linen or cotton works best)
- Fabric paint (metallic copper/bronze)
- Fabric paint (matte beige or light gold)
- Round foam pouncers (approx. 1-inch diameter)
- Painter’s tape or masking tape
- Measuring tape
- Pencil or disappearing ink fabric marker
- Paper plate or palette
- Scrap paper or cardboard for practice
Step 1: Preparation & Planning
-
Clean the Surface:
Begin by using a lint roller or a piece of tape to remove any dust, lint, or stray pet hair from your lampshade surface to ensure the paint adheres smoothly. -
Plan Your Spacing:
Decide on the layout of your polka dots and I recommend aiming for a classic staggered grid pattern rather than straight columns. -
Mark Vertical Guidelines:
Using a measuring tape, lightly mark vertical intervals around the circumference of the shade where your columns of dots will sit, spacing them about 2 inches apart. -
Mark Horizontal Guidelines:
Along those vertical lines, make small tick marks for each dot placement, ensuring alternating rows are offset so the dots sit in the windows of the row below. -
Protect the Trim:
Apply a strip of painter’s tape along the very top and bottom rim of the fabric shade to protect the binding from accidental smudges.
Stamp Smartly
For crisper circles on fabric, slide a heavy book or a block of wood inside the shade to provide a hard backing surface to press against while stamping.
Step 2: Stamping the Pattern
-
Prepare the Palette:
Squeeze a generous amount of your metallic copper paint and your matte beige paint onto separate areas of a paper plate. -
Load the Pouncer:
Dip your foam pouncer into the first color, ensuring the entire circular face is covered, then blot it once on scrap paper to remove excess globsthat might bleed. -
Practice Makes Perfect:
Before touching the lampshade, practice your stamping technique on scrap paper to determine how much pressure is needed for a solid circle. -
Start with the Darker Tone:
Begin stamping the metallic copper dots first, skipping every other marked spot in your grid pattern to leave room for the lighter tone. -
Apply Even Pressure:
Press the pouncer straight down onto the fabric with firm, even pressure, giving it a very slight twist before lifting straight up to create crisp edges. -
Check for Opacity:
If the metallic paint looks too sheer, let the first dot dry for a moment and carefully re-stamp over it, though a little texture adds character to the light. -
Clean or Swap Tools:
Once all the dark metallic dots are placed, either wash and thoroughly dry your pouncer or switch to a fresh one for the second color. -
Apply Lighter Dots:
Load the pouncer with the matte beige or light gold paint and fill in the remaining marked spots in your pattern. -
Handle with Care:
Rotate the lamp carefully as you work to avoid smudging wet paint with your hands or sleeves. -
Inspect the Edges:
Use a small, fine-tip paintbrush to touch up any circles that didn’t stamp perfectly round or have uneven edges.
Go Geometric
Instead of round foam pouncers, use triangular or square makeup sponges to create a modern geometric pattern with the same metallic finish.
Step 3: Finishing Touches
-
Let it Cure:
Allow the lampshade to dry completely, ideally overnight, to ensure the paint is fully set before heat from a bulb is introduced. -
Remove Tape:
Gently peel away the painter’s tape from the top and bottom rims. -
Heat Set (Optional):
If your fabric paint instructions suggest it, use a hairdryer on a low warm setting to help set the paint for durability. -
Install and Light Up:
Place the shade back on your lamp base and turn it on to see how the different paint textures filter the light differently.
Enjoy the gentle, patterned glow your new custom shade casts across the room

Wildflower Garland Band

Transform a plain drum shade into a blooming meadow using paints to mimic the delicate texture of needlework. This project pairs loose, organic wildflower shapes with fine detailed lines to create a stunning botanical wraparound design that looks like hand-stitched linen.
Detailed Instructions
Materials
- Plain linen or cotton drum lampshade (light beige or cream)
- Fabric medium
- Acrylic craft paints (various greens, sunny yellow, orange, deep red, cornflower blue, navy)
- Fine liner brushes (sizes 00 and 0)
- Round watercolor brushes (sizes 2 and 4)
- Water-erasable fabric marking pen
- Paper plate or palette
- Cup of water
- Paper towels
Step 1: Planning the Garden
-
Prepare the fabric canvas:
Begin by gently wiping down your lampshade with a lint roller to ensure the surface is free of dust. If your shade has a plastic lining, you can work comfortably knowing paint won’t bleed through, but be mindful of pressing too hard. -
Mix your paint medium:
Mix your acrylic paints with fabric medium according to the bottle instructions (usually a 1:1 or 2:1 ratio). This is crucial—it prevents the dried paint from cracking when the lamp heats up and helps it glide over the fabric weave like ink. -
Sketch the stems:
Using your air-erasable pen, lightly draw vertical, wavy lines around the circumference of the shade. Vary their heights, with some reaching almost to the top rim and others staying low for a wild, natural variance.
Pro Tip: Stitch texture
To truly fake the embroidery look, don’t smooth out your paint strokes. Let the paint be slightly thicker so it leaves raised ridges that catch the light like thread strands.
Step 2: Painting the Blooms
-
Establish the blue cornflowers:
Load a size 4 round brush with cornflower blue. Create the cone-shaped base of the flower first, then use quick, outward flicking motions to create the jagged petals. Don’t worry about perfect coverage; a little transparency mimics thread. -
Add the sunny zinnias:
Dip into your orange and red mixture. For the round flowers, dab small, concentric circles of petals, leaving a tiny gap in the center for the yellow eye later. Make some full-facing circles and some ovals to suggest flowers facing sideways. -
Create vertical sprigs:
Switch to a smaller brush and use red paint to create tall, vertical grain-like flowers. These are simple repeated dashed lines stacked on top of each other, tapering to a point. -
Paint the yellow accents:
Using a bright yellow, paint small five-petal wildflowers scattered in the gaps. These should be smaller than your main blooms to create depth and scale variety.
Level Up: 3D Elements
Once the paint is dry, use a real needle and embroidery floss to add actual French knots to the flower centers, piercing right through the fabric shade for a mixed-media masterpiece.
Step 3: Adding Greenery & Detail
-
Paint the main stems:
Using a thin liner brush and a mix of olive and vine green, trace over your initial vertical stem guidelines. Keep your hand loose; a slightly shaky line actually looks more like an organic stem than a ruler-straight one. -
Leaf variety:
Paint different leaf shapes for different flowers. For the red zinnias, use broad, darker green leaves with serrated edges. For the blue cornflowers, paint long, thin, grass-like wisps. -
Fern-like filler:
Fill empty vertical spaces with fern fronds. Draw a central stem, then use short, quick strokes to add diagonal leaves climbing up both sides. -
The faux-embroidery trick:
This is my favorite part to make it pop: Take your smallest liner brush (00) and a darker shade of each flower color. Paint tiny, short lines inside the petals to mimic the direction of embroidery stitches. -
Detailing the centers:
Add the final centers to your flowers. Use contrasting colors—a navy dot in a yellow flower, or a yellow textured center in the orange blooms—to replicate French knots.
Step 4: Matching the Base (Optional)
-
Clean the ceramic:
If painting a matching ceramic base, wipe the area with rubbing alcohol to remove oils. -
Paint the garland band:
Load a small flat brush and gently press alternating flower shapes (blue rosettes, red dots) around the curved base of the lamp to create a matching garland. -
Seal the work:
Once the base paint is fully dry (give it 24 hours), apply a clear gloss sealant over the ceramic painted areas only to protect it from dusting.
Switch on your new lamp and enjoy the warm glow illuminating your hand-painted garden
BRUSH GUIDE
The Right Brush for Every Stroke
From clean lines to bold texture — master brush choice, stroke control, and essential techniques.
Explore the Full Guide
Botanical Vines Climbing Up
Transform a plain lampshade into a botanical masterpiece featuring delicate, hand-painted greenery. This project uses fabric paints to create a sophisticated, nature-inspired climbing vine pattern that looks like high-end printed fabric.
Step-by-Step Guide
Materials
- Plain fabric lampshade (cream or white)
- Fabric medium
- Acrylic craft paints (Deep Forest Green, Sage Green, Olive, Warm Brown)
- Small round brushes (Size 0, 2, and 4)
- Pencil (HB or lighter)
- Eraser
- Paper plate or palette
- Cup of water
- Botanical reference images
Step 1: Planning and Preparation
-
Clean surface:
Ensure your lampshade is free of dust by running a lint roller over the surface. If it’s an older shade, wipe it down gently with a barely damp cloth and let it dry completely. -
Mix your medium:
On your palette, mix your acrylic paints with the fabric medium according to the bottle’s instructions (usually a 1:1 or 2:1 ratio). This prevents the paint from cracking when the lamp heats up and ensures smooth application on fabric. -
Sketch the flow:
Lightly sketch your main vine stems directly onto the shade using a pencil. Aim for a vertical orientation, as if the plants are growing upward toward the light, spacing them out unevenly for a natural look. -
Plan variety:
Mark out different types of foliage. You’ll want three distinct styles: large darker leaves, delicate feathery sprigs, and small rounded eucalyptus-style leaves to create visual interest.
Natural Variation
Don’t use just one green! Mix a tiny bit of red or brown into your green to de-saturate it for a more realistic, organic botanical look.
Step 2: Painting the Foliage
-
Paint main stems:
Using your size 2 brush and a mix of brown and deep green, trace over your pencil lines for the main stems. Keep your hand loose to avoid stiff, unnatural lines. -
Add large leaves:
Switch to the size 4 brush. For the largest leaves, press the belly of the brush down and lift as you pull away to create a tapered point. Use your darkest forest green shade here. -
Create depth with shading:
While the large leaves are still slightly wet, add a touch of lighter sage green to one side or the tips. This creates a subtle gradient that adds dimension. -
Paint feathery sprigs:
Using your smallest size 0 brush, paint the delicate, fern-like sprigs. Use short, quick strokes extending from a central stem, keeping the paint consistency fluid. -
Add rounded leaves:
For the medium-sized varietals, use olive green. Paint small, teardrop or oval shapes in clusters of three or five. I find it helpful to rotate the lamp as I work to maintain a comfortable painting angle. -
Incorporate fine details:
For the very light, airy filler plants (resembling dried baby’s breath), use a watered-down sage green or a grey-green mix. Creating tiny dots or ‘Y’ shapes gives a nice textural contrast.
Paint Bleeding?
If paint bleeds into the fabric weave, your mix is too watery. Let it dry, then paint over the mistake with opaque white paint before trying again.
Step 3: Refining and Sealing
-
Check for gaps:
Step back and look at the lampshade from a distance. If there are large empty spaces, add small floating leaves or extend a vine to fill the void. -
Add veins:
Once the main leaves are dry to the touch, use your size 0 brush with a slightly darker green (or brown) to paint very fine central veins on the largest leaves. -
Deepen shadows:
Add a tiny bit of dark brown to the base where the leaf meets the stem on your larger botanicals. This anchors the leaves visually. -
Erase guidelines:
Inspect the shade for any visible pencil marks. Gently erase them, being careful not to rub over the painted areas. -
Final cure:
Allow the lampshade to dry for at least 24 hours before turning the light on. The heat from the bulb will help set the fabric paint permanently.
Now you have a custom piece of decor that brings the calming influence of nature right into your home
Big Statement Florals

Transform a plain drum shade into a work of art with this bold, romantic floral design. Using textile mediums to achieve a soft, watercolor effect, this project creates a sophisticated focal point that looks hand-painted by a master.
Detailed Instructions
Materials
- Plain white or cream fabric drum lampshade
- Fabric paint or acrylic paint mixed with textile medium
- Soft synthetic watercolor brushes (Round #4, #8, and a fine liner)
- Water container and paper towels
- Pencil (H or HB)
- Palette
- Color palette: Deep maroon, dusty pink, titanium white, sap green, burnt umber, yellow ochre, black
Step 1: Planning and Sketching
-
Prepare your workspace:
Set up in a well-lit area. If your lampshade is dusty, use a lint roller to clean it first so the paint adheres smoothly. -
Sketch the main bloom:
Lightly sketch the large central flower slightly off-center. Focus on the general oval shape first, then break it down into ruffled petals radiating from the center. -
Add secondary elements:
Draw stems extending downwards and outwards in organic curves. Add smaller teardrop shapes for the buds on the right side and leaf clusters near the main bloom. -
Refine the composition:
Check your spacing. The design should feel airy, so leave plenty of negative space. Keep your pencil lines very faint as they can be hard to erase from fabric.
Water Control is Key
Fabric absorbs water quickly. Keep your brush damp but not dripping to prevent the paint from bleeding outside your sketched lines.
Step 2: Painting the Blooms
-
Mix the base colors:
Mix your acrylics with a generous amount of textile medium to improve flow. Prepare a dusty pink by mixing maroon, white, and a touch of yellow ochre. -
Lay down the first wash:
Using the #8 round brush, paint the outer edges of the petals with a watered-down wash of the dusty pink. Keep the edges soft and slightly uneven. -
Deepen the shadows:
While the first layer is still slightly damp, drop in concentrated maroon paint at the base of the petals and in the crevices between them to create depth. -
Feather the strokes:
Use a clean, slightly damp brush to blend the dark maroon into the lighter pink, pulling the color outward towards the petal tips to mimic texture. -
Paint the side buds:
For the buds on the right, use the maroon paint more heavily at the base and tip, leaving the middle slightly lighter to show roundness. -
Create the flower center:
Mix yellow ochre with a speck of brown. Dab this into the center of the main flower using the tip of your brush to create the stamen cluster. -
Add pollen details:
Once the center is dry, use your fine liner brush with white and black paint to add tiny dots (anthers) on top of the yellow center for realistic detail.
Match the Base
For a cohesive look, paint a matching floral motif on the ceramic base of the lamp if it allows, tying the whole piece together.
Step 3: Leaves and Stems
-
Mix olive greens:
Create an olive tone by mixing sap green with burnt umber and a touch of yellow. You want a muted, vintage green rather than a bright vibrant one. -
Paint the main stems:
Using a liner brush or the tip of the #4 round, paint thin, elegant lines for the stems. Vary the pressure to make the lines thick and thin naturally. -
Add the leaves:
Paint the leaves using a ‘press and lift’ motion. Start with light pressure, press down to widen the leaf body, and lift up to create a sharp point. -
Add darker accents:
Mix a dark brownish-black. Apply this sparingly to the base of the stems and the calyx (the green cup holding the flower) to ground the image. -
Final dry brushing:
I like to take a nearly dry brush with a tiny bit of white paint and lightly graze the tops of the petals to add a final highlight. -
Seal edges:
If you notice any paint bleeding slightly, use a fine brush with a tiny bit of white paint (or shade color) to tidy up the perimeter.
Now step back and illuminate your room with this soft, custom-painted glow


Have a question or want to share your own experience? I'd love to hear from you in the comments below!