Ceramic coasters are my favorite tiny canvases because you can finish one in a single sitting and actually use it every day. Here are ceramic coaster painting ideas I reach for all the time—starting simple and classic, then getting delightfully bold once you’re warmed up.
Classic Black-and-White Stripes
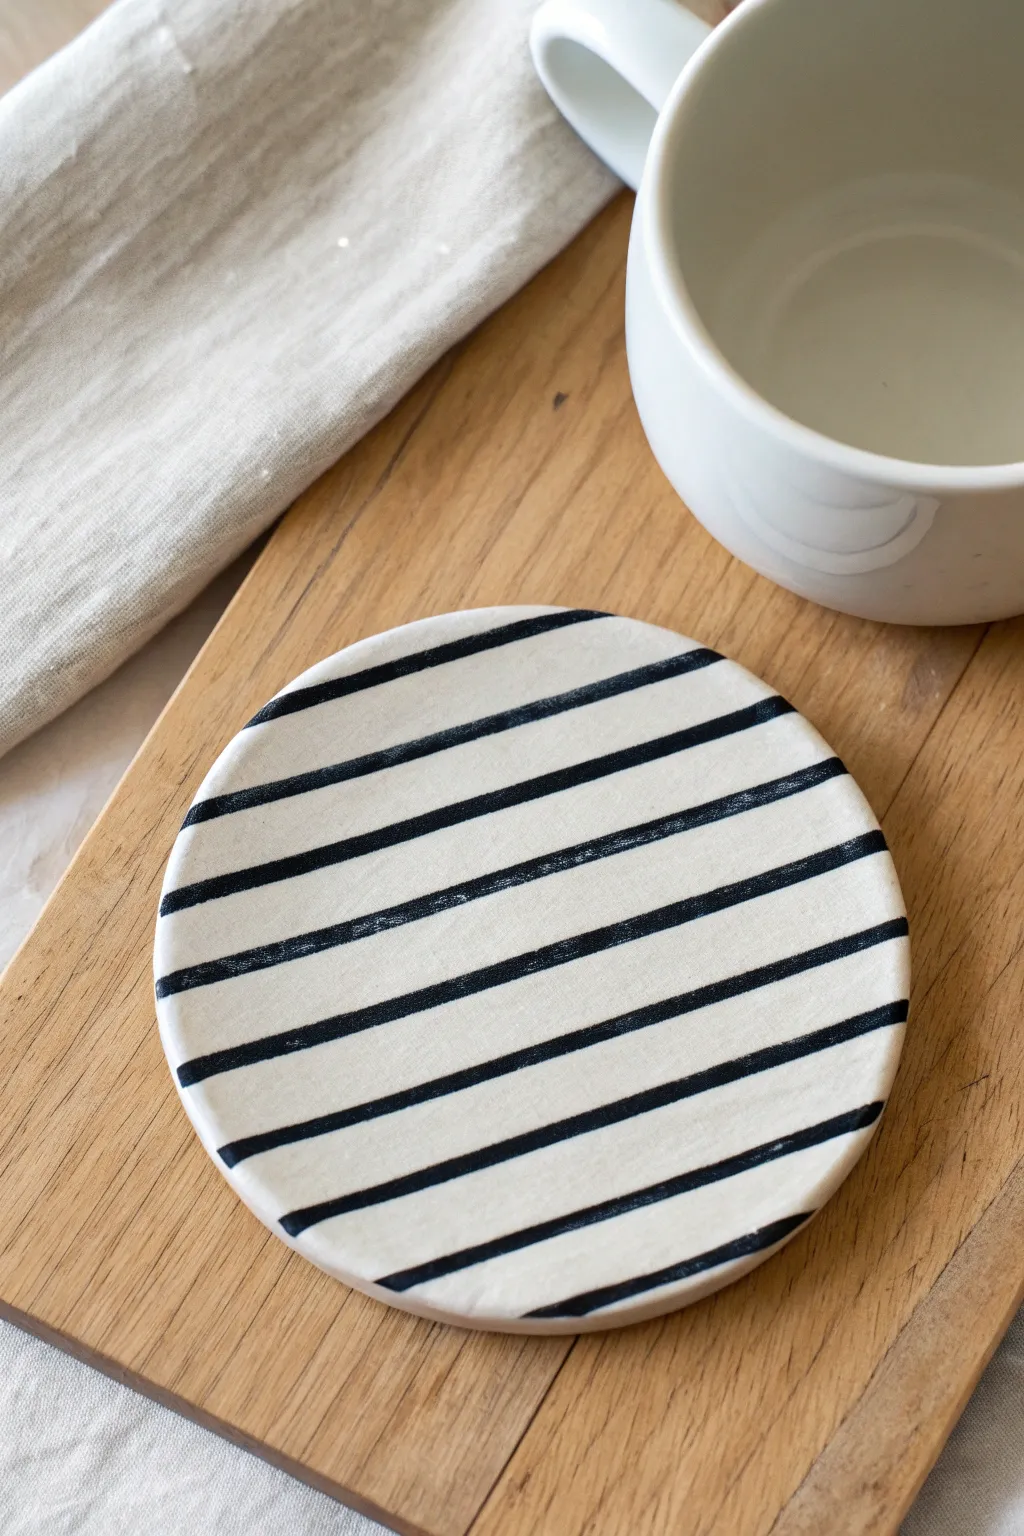
Embrace the beauty of simplicity with this timeless black-and-white striped coaster design. The imperfect, hand-painted lines add an organic warmth that makes this modern pattern feel cozy and approachable.
How-To Guide
Materials
- Round bisque ceramic coaster
- Black underglaze or ceramic paint
- Small round paintbrush (size 2 or 4)
- Clear matte or glossy glaze (optional)
- Pencil
- Ruler
- Damp sponge
- Water cup
- Paper towel
Step 1: Preparation
-
Clean the surface:
Begin by gently wiping your bisque coaster with a slightly damp sponge. This removes any ceramic dust or oils from your hands that might repel the paint. -
Dry completely:
Allow the moisture to evaporate fully before marking on the surface, which usually takes just a few minutes.
Step 2: Mapping the Design
-
Mark the center:
Using your ruler, lightly find the visual center of your circle and make a tiny dot with your pencil. -
Measure stripe intervals:
Mark faint tick marks along the vertical axis of the coaster, spacing them about 1/2 inch to 3/4 inch apart, depending on how thick you want your white spaces to be. -
Sketch guideline segments:
Instead of drawing a hard line all the way across, sketch very faint dashes horizontally across these tick marks to serve as a guide. Keep the pencil pressure extremely light so it burns off in the kiln or wipes away.
Uneven Lines?
Don’t panic if your hand shakes. If a line gets too wobble, thicken it slightly to correct the curve. The handmade aesthetic is forgiving.
Step 3: Painting the Stripes
-
Load the brush:
Dip your round brush into the black underglaze. You want the brush fully loaded but not dripping. -
Check consistency:
If the underglaze feels too thick or draggy, mix in a drop or two of water on your palette. It should flow like heavy cream. -
paint the first stripe:
Start near the center. Place your brush tip down and drag it horizontally across the coaster, following your faint pencil guide. -
Embrace imperfections:
Don’t worry if the line wavers slightly or varies in thickness; this is the charm of the hand-painted look seen in the photo. -
Complete the pattern:
Continue painting stripes above and below your center line. I find it easiest to work from the center out to the edges to keep the spacing balanced. -
Refine the edges:
As you paint stripes near the rounded edges of the coaster, carefully pull the brush off the edge so the stripe wraps slightly or ends cleanly. -
Layering density:
The black in the image is solid. If your first pass looks streaky or translucent, let it dry until it’s chalky and matte, then apply a second coat directly over the existing lines.
Use a Banding Wheel
If you have a banding wheel, place the coaster on it. Hold your brush steady in one spot and slowly spin the wheel for straighter lines.
Step 4: Finishing Touches
-
Clean up smudges:
If you accidentally got a spot of black where it doesn’t belong, wait for it to dry completely, then gently scratch it off with a craft knife or a stiff clean brush. -
Final drying:
Let the coaster dry completely for at least an hour. -
Glazing (Optional):
If you want a sealed, food-safe finish, dip the entire coaster into a clear glaze. For the exact look in the photo, a matte clear glaze works best. -
Firing:
Fire the piece in a kiln according to the instructions on your specific underglaze and clay body (typically Cone 06 or Cone 6).
Now you have a stylish, graphic piece ready to protect your tabletops with modern flair


Playful Polka Dot Pop
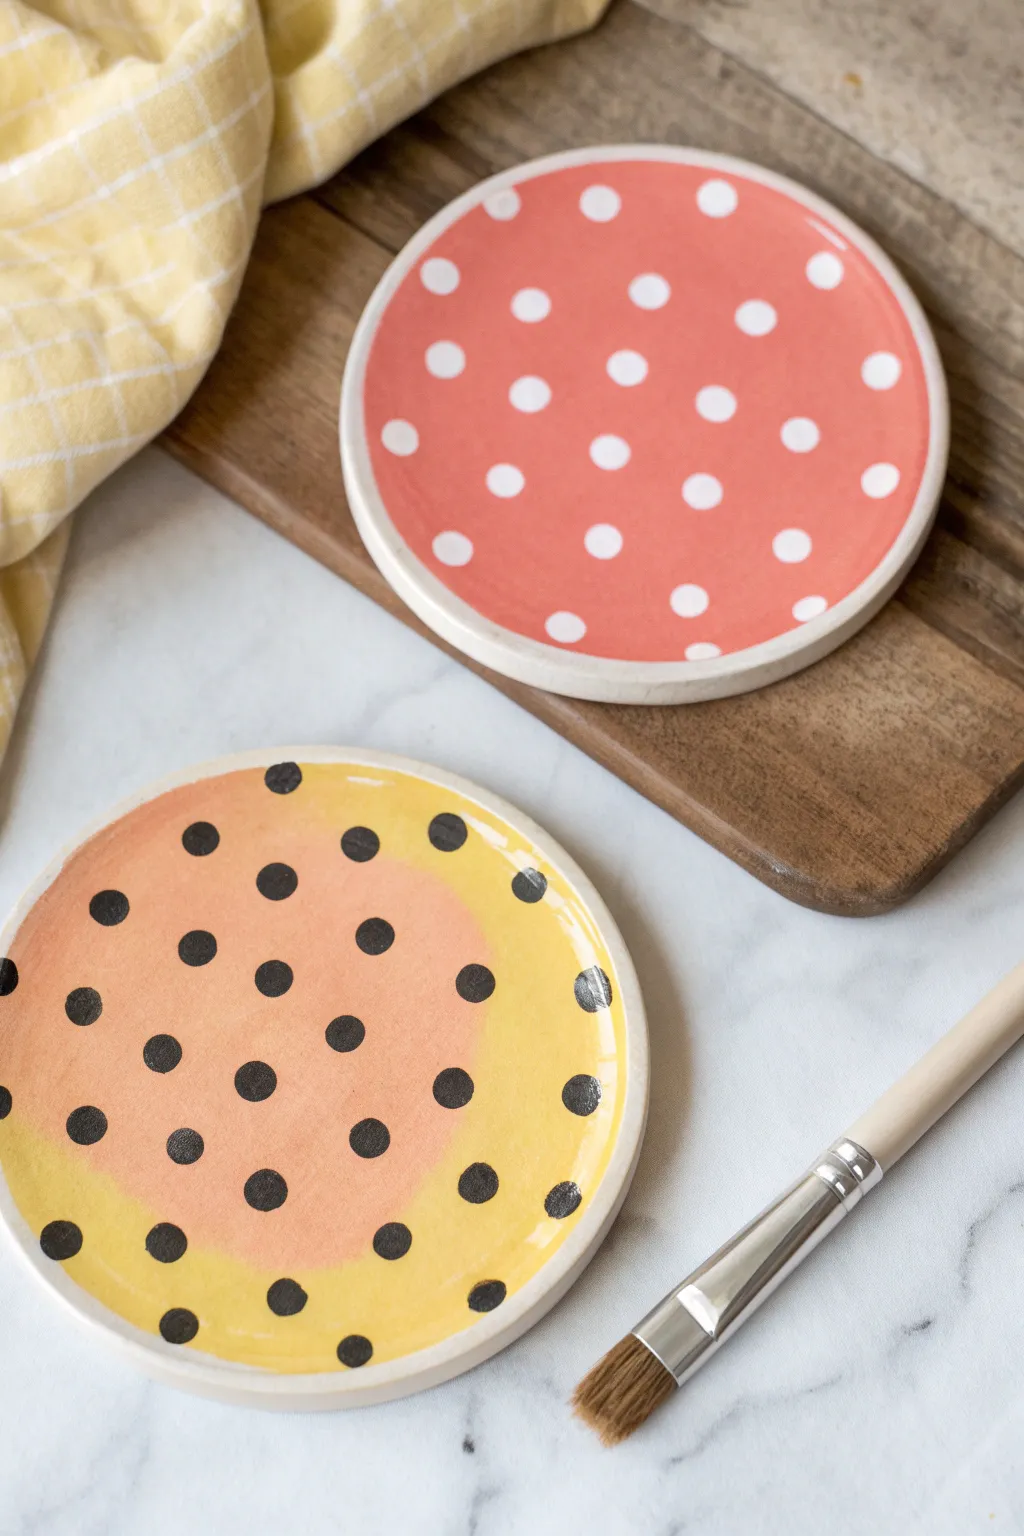
Bring a burst of cheerful energy to your coffee table with these easy-to-paint ceramic coasters. Featuring uneven, hand-painted polka dots and soft, blended backdrops, this project embraces a charmingly imperfect aesthetic perfect for brightening up any space.
Detailed Instructions
Materials
- 2 plain bisque or unglazed ceramic coasters (round)
- Acrylic paints (Coral Pink, Sunshine Yellow, White, Black)
- Wide flat paintbrush
- Small round paintbrush (size 2 or 4)
- Glaze or clear acrylic sealer (satin or glossy finish)
- Palette or paper plate
- Cup of water
- Paper towels
Step 1: Base Coat Prep
-
Clean surface:
Before you begin, wipe down your ceramic coasters with a slightly damp cloth to remove any dust or debris from the surface. Let them dry completely. -
Mix your colors:
Prepare your palette. You’ll need a good amount of coral pink for the first coaster. For the second coaster, have both yellow and a touch of that same coral ready to go.
Oops! Smudged Dot?
If you smear a wet dot, don’t wipe it! Let it dry completely, then paint over the mistake with your background color. Try again once the fix is dry.
Step 2: The Coral Coaster
-
Apply the background:
Using your wide flat brush, paint the entire top surface of the first coaster with the coral pink paint. -
Refine the edges:
Carefully run the brush along the rim, but leave the very outer edge raw if you prefer the natural ceramic look shown in the photo, or paint it solid for a cleaner finish. -
Let it dry:
Allow this base coat to dry fully. Acrylics dry fast, but give it about 15-20 minutes to ensure it’s not tacky. -
Paint the dots:
Switch to your small round brush and dip it into white paint. Instead of trying to make perfect circles, dab the brush down to create organic, slightly irregular dots. -
Create a pattern:
Start from the center and work your way out in concentric circles or rows to keep the spacing somewhat even, though random placement adds character.
Make It 3D
Instead of a brush, use the eraser end of a pencil or a cotton swab dipped in paint to stamp your dots. This creates a slightly raised, textured feel.
Step 3: The Sunshine Swirl Coaster
-
Paint the yellow base:
On the second coaster, use the flat brush to paint a large, loose circle of yellow paint, leaving some space near the center or edges for blending. -
Add the coral blotch:
While the yellow is still slightly wet, rinse your brush and pick up some coral pink. Paint a large, irregular shape in the center or slightly off-center. -
Blend the transition:
Use a clean, slightly damp brush to gently feather the edges where the pink and yellow meet. You want a soft, washed transition rather than a hard line. -
Dry completely:
This step is crucial; let the blended background dry entirely before adding the next layer to avoid muddying your black dots. -
Add black dots:
Using the small round brush and black paint, add your polka dots over the top. I find that pressing slightly firmer creates that bold, varied dot shape seen in the image. -
Vary the placement:
Scatter the black dots across both color zones, ensuring some cross over the blended boundary to tie the design together.
Step 4: Finishing Touches
-
Check for gaps:
Inspect your dots. If the paint looks thin or streaky, carefully dab a second coat of color onto the dots once the first layer is dry. -
Clean the rim:
If you got any stray paint on the unglazed rim, you can gently scrape it off with a craft knife or sand it lightly once dry. -
Seal the deal:
Once all paint is cured (usually 24 hours is best), apply a coat of clear acrylic sealer or glaze. This protects your artwork from condensation and scratches. -
Add backing:
Optional: Cut varying small circles of felt or cork and glue them to the bottom of the coasters to prevent scratching your furniture.
Set your new coasters out on the coffee table and enjoy a pop of handmade color with your next drink


Minimal One-Line Face Drawing
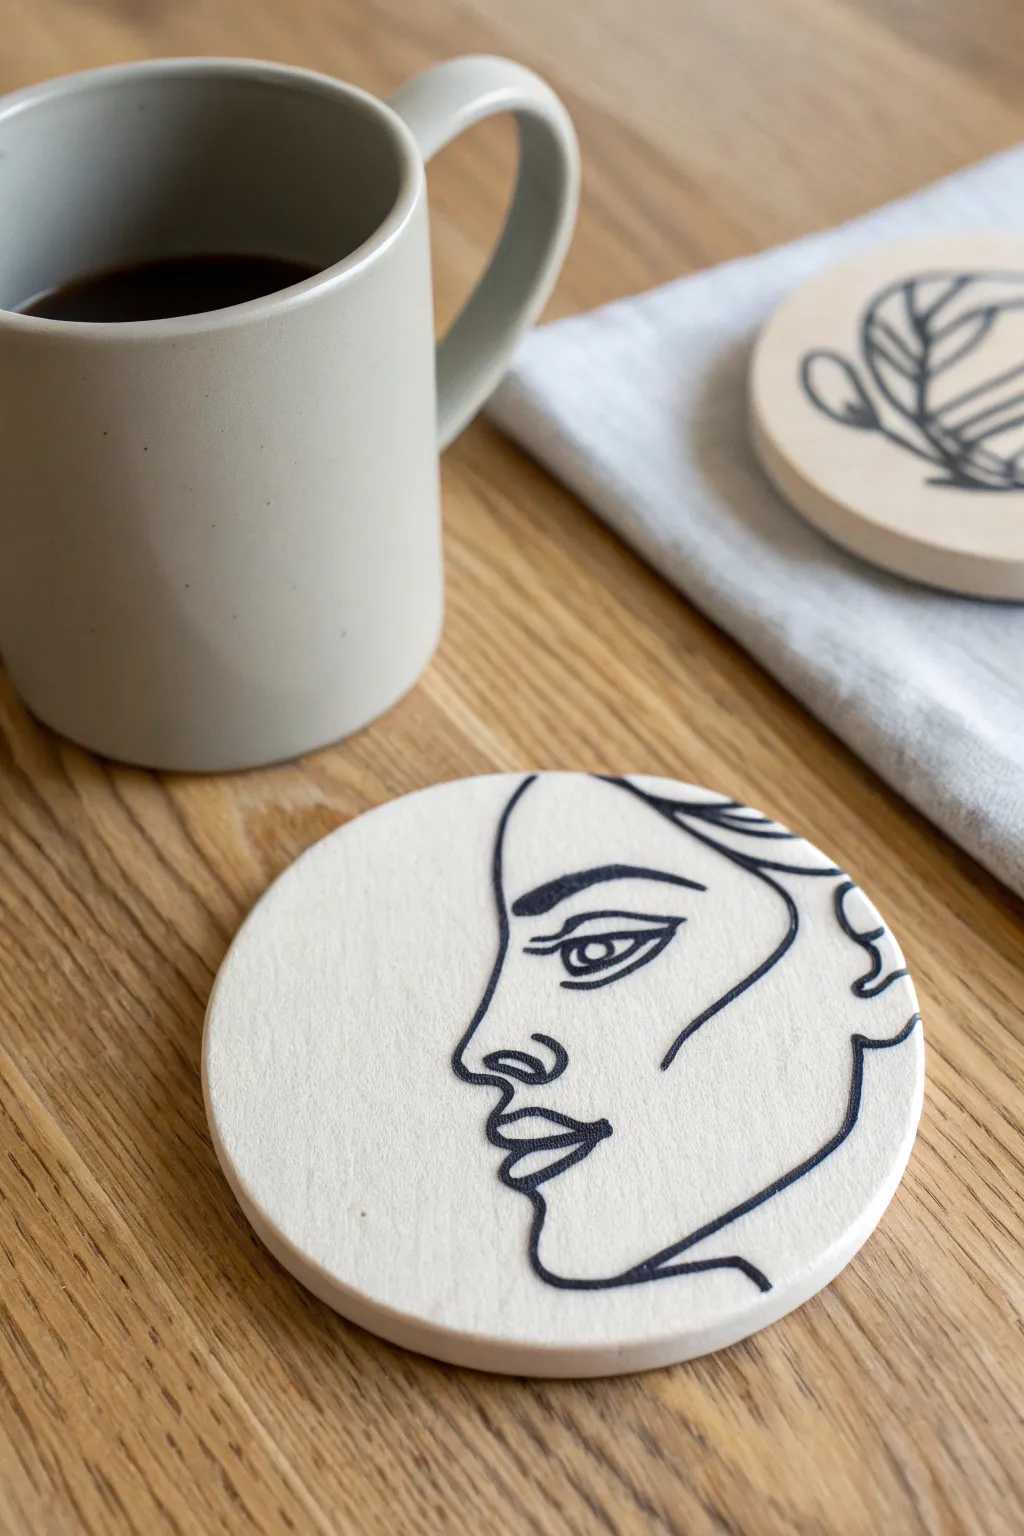
Capture the elegance of modern line art with this sophisticated coaster project. Using a simple ceramic base and steady strokes, you’ll create a striking facial profile that looks like it belongs in a gallery gift shop.
Step-by-Step Tutorial
Materials
- Round unglazed bisque ceramic coaster
- Fine-point black oil-based paint marker (or fine liner for ceramics)
- Pencil (HB or lighter)
- Eraser
- Tracing paper (optional)
- Clear matte sealant spray
- Carbon paper (optional)
- Scrap paper for practice
Step 1: Preparation & Sketching
-
Clean the surface:
Begin by wiping down your ceramic coaster with a dry, lint-free cloth to remove any ceramic dust or oils from your hands, which can repel the marker. -
Map out the design:
On a piece of scrap paper cut to the size of your coaster, practice drawing a continuous line face profile until you are happy with the flow. -
Transfer or sketch:
Lightly sketch the design onto the ceramic using a pencil. Keep your pressure extremely light so you don’t groove the clay. -
Refine the placement:
Check the composition. The nose and lips should sit comfortably in the center, while the hair and jawline can bleed off the edges for a dynamic look. -
Clean up sketch lines:
If your pencil lines are too thick or dark, gently dab them with an eraser to fade them out so they act only as a faint guide.
Pro Tip: Steady Hands
Rest your wrist on a book or block of wood that is the same height as the coaster while drawing. This prevents your hand from floating and gives you much cleaner lines.
Step 2: Drawing the Line Art
-
Prime the marker:
Shake your black oil-based paint marker well and press the tip onto scrap paper to get the ink flowing smoothly before touching the coaster. -
Start at the top:
Begin drawing at the forehead or hair line. I find it easiest to work from top to bottom to avoid smudging the ink with my hand. -
commit to the line:
Draw the forehead leading into the nose bridge with a confident, steady speed. Hesitating often causes shaky lines. -
Detail the eye:
Carefully draw the eye and eyebrow. These specific lines are slightly thicker in the example, so you may need to go over them twice for emphasis. -
Create the profile:
Trace down the nose tip and loop back for the nostril. Keep the curves smooth and fluid. -
Form the lips:
Draw the upper and lower lips. The reference uses slightly bolder, filled-in shapes for the lips to add weight to the face. -
Finish the jawline:
Sweep the pen down to create the chin and jawline, curving upward toward the ear area. -
Add hair details:
Add the sweeping curves on the right side to suggest hair flowing back from the face. -
Check line weight:
Look at the overall balance. If the main profile line looks too thin compared to the eye or lips, carefully thicken it with a second pass.
Level Up: Color Pop
After the black line art dries, add a single abstract shape of color—like a terracotta circle or a sage green sway—behind the face for a modern, mixed-media effect.
Step 3: Finishing Touches
-
Let it dry completely:
Allow the paint marker to dry for at least 24 hours. Oil-based markers on porous ceramic need time to truly cure. -
Erase pencil marks:
Once the ink is bone-dry, very gently erase any visible pencil guidelines that weren’t covered by the black ink. -
Seal the artwork:
Take the coaster to a well-ventilated area and apply a light coat of clear matte sealant spray. -
Apply second coat:
After the first coat is dry to the touch, apply a second light coat to ensure the coaster is water-resistant for hot mugs. -
Final cure:
Let the sealant cure according to the can’s instructions (usually 24 hours) before placing a hot coffee cup on it.
Enjoy your chic new coaster set that brings a touch of art to your morning coffee routine


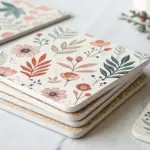
Botanical Wreath Border
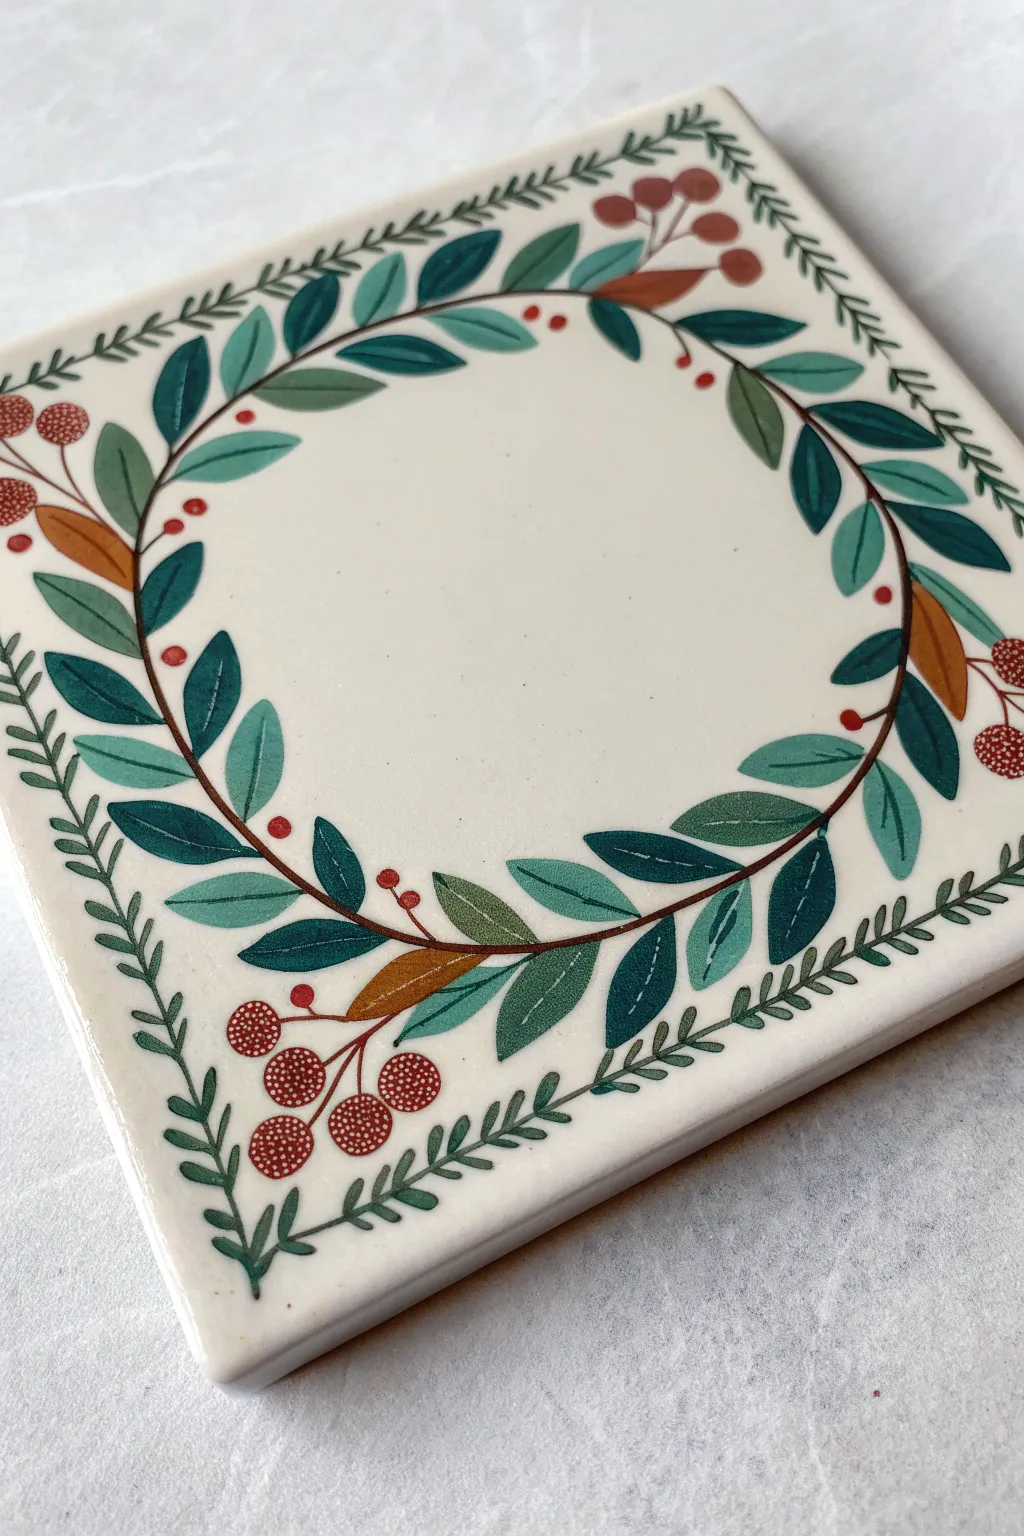
This charming ceramic coaster features a delicate wreath design that balances rustic warmth with clean, modern lines. Using a mix of deep teals, forest greens, and pop of berry red, you’ll create a functional piece of art perfect for holiday gifting or everyday use.
How-To Guide
Materials
- Square ceramic bisqueware coaster (4×4 inch)
- Ceramic underglazes (Deep Teal, Sage Green, Forest Green, Rust Orange, Berry Red)
- Detail liner brush (size 00 or 000)
- Small round brush (size 2)
- Pencil for sketching
- Clear dipping glaze
- Jar of water
- Paper towels
Step 1: Sketching the Framework
-
Find the center:
Begin by lightly marking the center of your ceramic tile with a pencil to help orient your design. -
Draw the main circle:
Sketch a large circle in the middle of the tile, leaving about a half-inch margin from the edges. This line will serve as the main vine. -
Add the outer border:
Lightly sketch a straight border line about 1/4 inch from the edge on all four sides to guide the fern details later. -
Map the leaf clusters:
Sketch the basic direction of your leaves flowing clockwise around the circle. Don’t draw every single leaf, just the stems and general spacing.
Fixing Shaky Lines
If your vine lines look wobbly, accept it! Organic matter isn’t perfect. Alternatively, steady your painting hand by resting your pinky finger on a dry part of the tile.
Step 2: Painting the Foliage
-
Paint the main vine:
Using your detail liner brush and a dark brown or rust color mixed with a tiny bit of black, carefully trace your circular vine line. -
Start the teal leaves:
With the round brush, paint the largest leaves in Deep Teal. Use a ‘press and lift’ stroke—start with light pressure at the stem, press down to widen the leaf, and lift up to create a point. -
Add secondary greens:
Switch to your Forest Green glaze. Fill in the gaps between the teal leaves with slightly smaller leaves, following the same flow. -
Layer in lighter tones:
Using Sage Green, add the smallest leaves near the tips of the clusters. This variation in greens creates visual depth. -
Add contrasting rust leaves:
Paint a few sporadic leaves in Rust Orange for contrast. I find placing these asymmetrically—perhaps one cluster at the bottom left and one top right—adds the most interest.
Add Gold Luster
For an upscale finish, apply real gold luster to the berries or the leaf veins after the main glaze firing, then fire again at a lower temperature (Cone 018).
Step 3: Details & Berries
-
Paint the berry clusters:
Using the tip of your round brush or a dotting tool, dab clusters of Berry Red circles. Place large clusters in the corners and small single berries along the vine. -
Detail the berries:
Once the red circles are dry, take your finest liner brush and add tiny stippling dots inside the larger berries using a darker red or brown to give them texture. -
Connect the berries:
Use the liner brush and your vine color to draw thin, delicate stems connecting the berry clusters to the main wreath. -
Create the fern border:
Along the straight edge guide you drew earlier, paint a simple fern pattern. Paint a central stem line, then add tiny, quick dashes branching off it in a V-shape. -
Add leaf midribs:
For a refined look, use a very pale green or white slip on your liner brush to paint extremely thin center lines down the middle of the larger teal leaves.
Step 4: Finishing Touches
-
Clean up:
Check for any smudges. On bisque, you can gently scrape away mistakes with a craft knife or a stiff, damp brush. -
Burn off pencil marks:
Don’t worry about erasing your sketch lines; the graphite will burn away completely in the kiln firing. -
Glaze application:
Once the underglaze is bone dry, apply a clear dipping glaze or brush on three smooth coats of clear gloss glaze. -
Fire:
Fire the coaster according to your clay and glaze specifications (typically Cone 06 or Cone 6 depending on materials used).
Now you have a beautifully hand-painted coaster ready to hold your favorite mug
BRUSH GUIDE
The Right Brush for Every Stroke
From clean lines to bold texture — master brush choice, stroke control, and essential techniques.
Explore the Full Guide
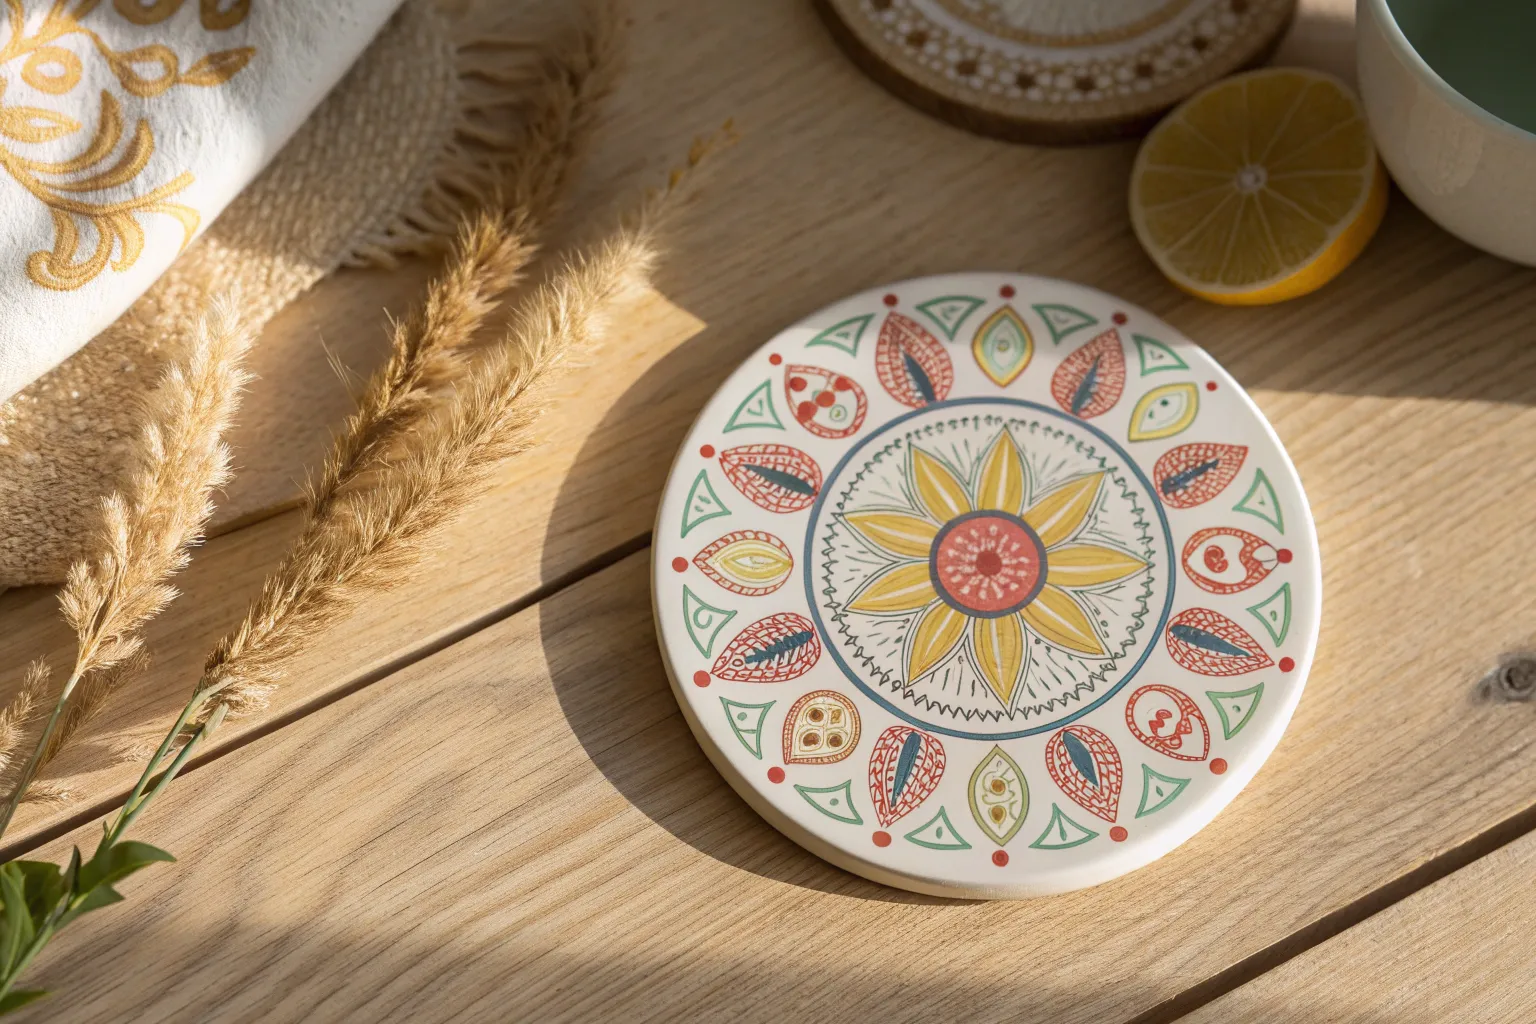
Citrus Slice Medallions
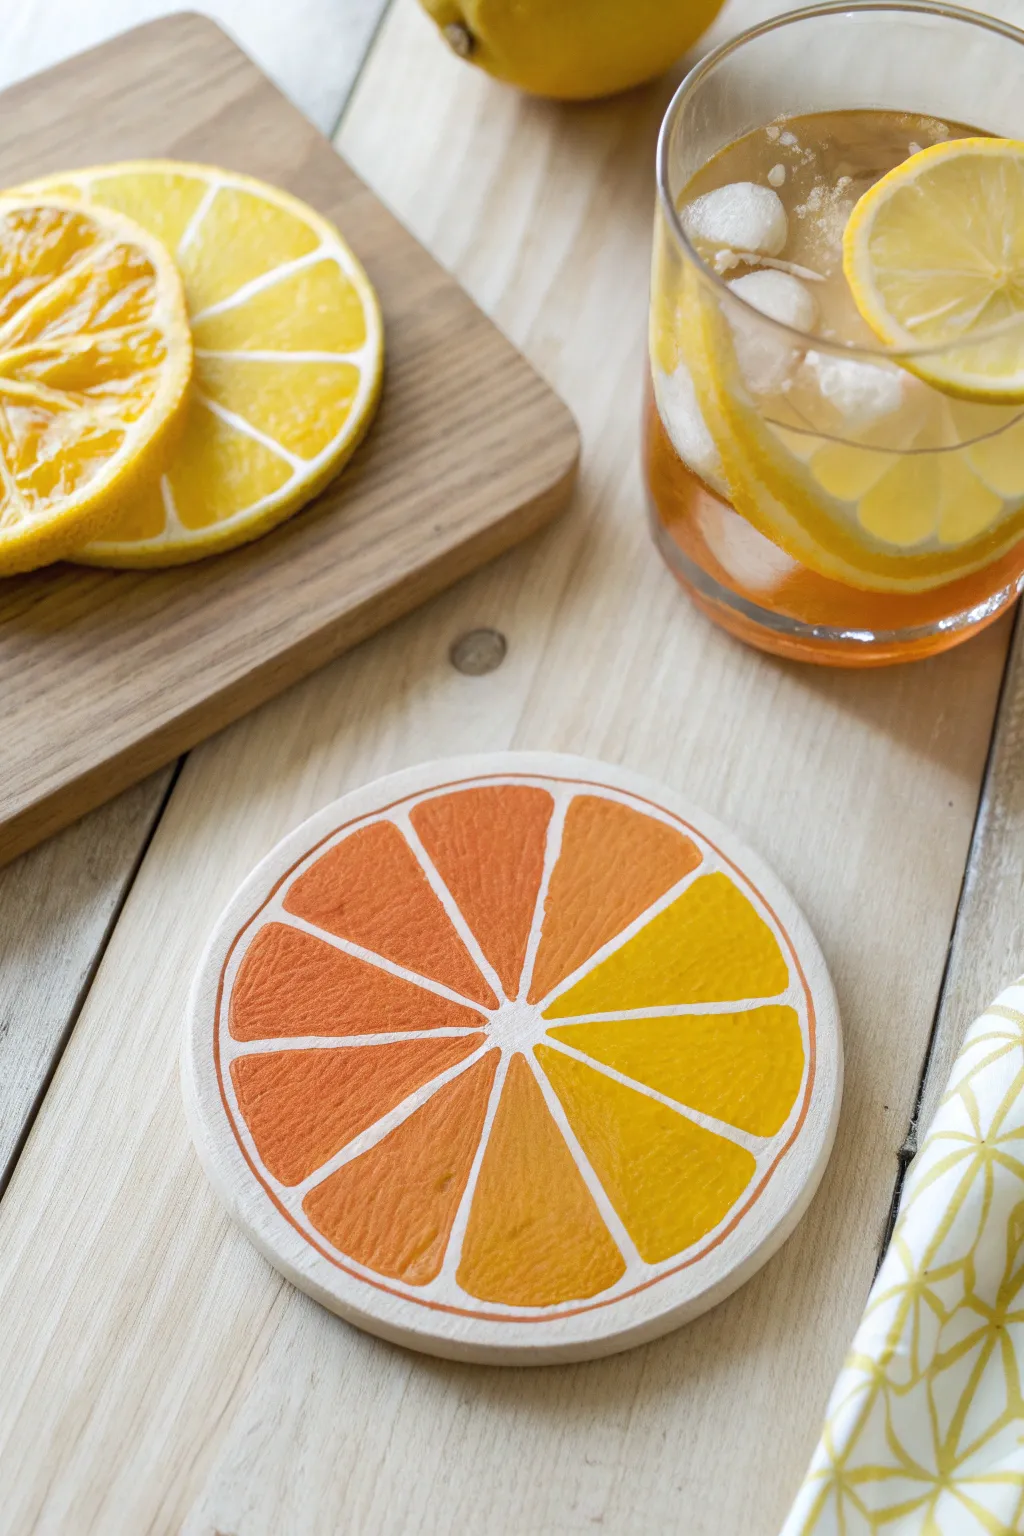
Brighten up your table setting with this cheerful, juicy coaster design that captures the warmth of summer. Using a gradient of warm yellows and oranges, you’ll transform a plain ceramic round into a realistic-looking citrus slice that looks good enough to squeeze.
Step-by-Step Tutorial
Materials
- Round unglazed ceramic coaster (bisque)
- Acrylic paints (bright yellow, golden yellow, orange, burnt orange, white)
- Small flat brush (size 4 or 6)
- Fine liner brush (size 0 or 00)
- Pencil and eraser
- Ruler
- Palette or paper plate
- Cup of water and paper towels
- Clear acrylic sealer spray (matte or gloss)
Step 1: Sketching the Segments
-
Find the center:
Begin by finding the approximate center of your coaster. Mark it lightly with a dot using your pencil. -
Draw the main axes:
Using a ruler, lightly draw a cross through the center point to divide the circle into four equal quadrants. -
Divide the quadrants:
Draw two diagonal lines through the center, splitting each quadrant in half. You should now have eight equal pie slices. -
Round the corners:
Inside each triangular slice, sketch the fruit segment shape. Draw curved lines slightly inside your guide lines, rounding off the corners near the center and the outer edge to create that classic teardrop citrus shape. Leave about 1/8 inch of space between segments for the white pith. -
Clean up lines:
Gently erase the original straight guide lines, leaving only your rounded segment shapes visible.
Smooth Operator
Work quickly when painting the large segments to avoid brush strokes. If the ceramic is absorbing water too fast, lightly mist the coaster surface before painting.
Step 2: Painting the Fruit
-
Prepare your palette:
Squeeze out your yellow, golden yellow, orange, and burnt orange paints onto your palette. Arranging them in gradient order helps visualize the transition. -
Paint the yellow segments:
Starting on the right side of the coaster, use your small flat brush to fill in two or three segments with the brightest yellow paint. Apply two thin coats for opaque coverage. -
Create a transition color:
Mix a little golden yellow into your bright yellow. Paint the next segment clockwise with this slightly warmer hue. -
Move to orange:
Fill the bottom segments with pure orange paint. Ensure you stay inside your pencil lines, keeping the edges crisp. -
Finish with deep orange:
For the final segments on the left side, use the burnt orange or mix a tiny dot of red into your orange to create a deep, ripe citrus shade. This creates a beautiful ombre effect across the whole slice. -
Add texture detail:
Once the base colors are dry to the touch, use a very dry brush with a slightly lighter shade of paint to dab tiny texture marks onto each segment. This mimics the juicy pulp of the fruit.
Make a Full Set
Don’t stop at one! Create a full 4-piece set by painting one coaster entirely lime green, one pink grapefruit, one lemon yellow, and one blood orange red.
Step 3: Adding the Pith & Finish
-
Outline the segments:
Switch to your fine liner brush and white paint. Carefully paint the spaces between the colorful segments. I find it easiest to pull the brush from the center outward for steady lines. -
Paint the rim:
Paint the outer rim of the coaster white, creating a consistent border around all the fruit segments. -
Add the rind:
Using your liner brush again, paint a thin, colored line on the very outer edge of the white rim. Match the color to the adjacent fruit segment (yellow near yellow segments, orange near orange) to represent the peel. -
Clean up edges:
If any color strayed into the white areas, use a clean brush with white paint to touch up the separation lines once everything is dry. -
Seal the coaster:
Take the coaster to a well-ventilated area and apply a clear acrylic sealer spray. This protects the paint from moisture and condensation when you use it.
Enjoy your fresh slice of summer decor every time you set down your drink
Strawberry Pattern Repeat
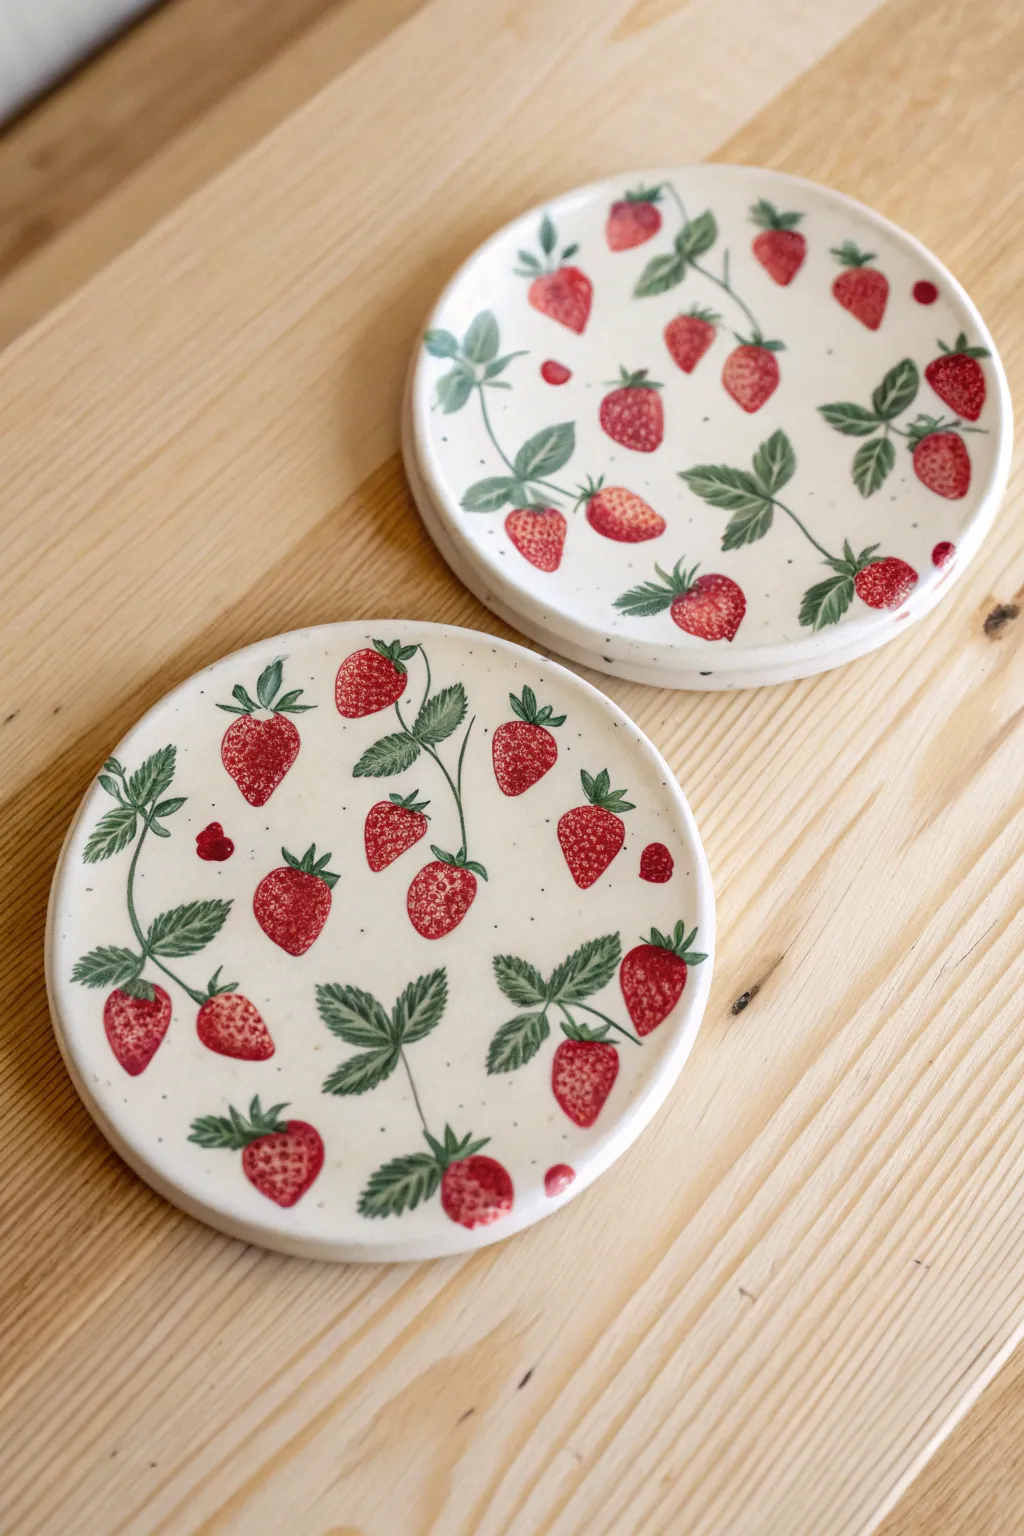
Bring the refreshing charm of a summer garden to your table with these hand-painted strawberry coasters. The scattered pattern of ripe berries and vibrant lattice-green leaves creates a whimsical, organic look that pops beautifully against a milky white ceramic base.
Step-by-Step Guide
Materials
- Bisque ceramic coasters (blank)
- Underglaze paints (Bright Red, Deep Green, Light Green, Dark Brown/Black)
- Clear dipping glaze or brushing glaze
- Small round paintbrushes (sizes 0 and 2)
- Fine liner brush (size 00)
- Pencil
- Palette or mixing tray
- Water cup and paper towels
- Kiln (or oven if using oven-bake porcelain paints)
Step 1: Planning the Layout
-
Clean surface:
Begin by wiping down your bisque coasters with a slightly damp sponge to remove any ceramic dust. This ensures the underglaze adheres properly without crawling. -
Sketch loosely:
Using a light pencil, sketch small, scattered oval shapes for the strawberries across the surface. Don’t worry about perfection; the pencil lead will burn off in the kiln. Aim for a random distribution, rotating the angles so some berries point up, down, or sideways. -
Add stems:
Sketch thin, winding lines connecting some of the berries, and add small groupings of leaves. Leave plenty of negative white space to keep the design feeling airy and light.
Step 2: Painting the Fruit
-
Base red layer:
Load a size 2 round brush with Bright Red underglaze. Fill in your sketched berry shapes. Apply the paint slightly thicker in the center and lighter at the edges for a natural look. -
Create texture:
While the first red layer is damp, you can dab a tiny bit of darker red or orange near the bottom of a few berries to create subtle dimension, though a flat red works beautifully for this illustrative style too. -
Paint berry seeds:
Once the red base is touch-dry, switch to your finest liner brush or a needle tool. You can either paint tiny dots of yellow/white on top, or gently scratch through the red paint to reveal the white bisque underneath, creating tiny seed specks.
Natural Variation
Don’t paint every berry identical. Make some fat, some thin, and leave one or two ‘unripe’ by painting them pale pink or green.
Step 3: Adding the Foliage
-
Leaf clusters:
Mix your Deep Green and Light Green underglazes slightly to get a varied, natural tone. Using the size 0 brush, paint the leafy caps (sepals) directly on top of the strawberries. -
Stem work:
With a steady hand and the liner brush, draw thin, trailing stems connecting the leaves. I find that breaking the line occasionally makes the vine look more organic rather than stiff. -
Leaf detailing:
Paint the larger, serrated leaves attached to the vines. Focus on creating jagged edges to mimic real strawberry leaves. You can layer a darker green stroke down the center of each leaf for a vein effect.
Matching Set
Paint a matching milk jug or small sugar bowl with the same pattern to create a charming breakfast serving set.
Step 4: Defining Details
-
Fine outlining:
This step makes the pattern pop. Using a very fine brush and diluted Dark Brown or Black underglaze, add extremely thin outlines to parts of the leaves and stems. -
Broken lines:
Avoid outlining the entire shape completely. Just accent one side of a stem or the tip of a leaf to give the illustration definition without making it look like a coloring book. -
Speckled background:
To achieve that earthy, speckled pottery look, dip an old toothbrush or stiff brush into diluted brown underglaze. Run your thumb over the bristles to flick tiny specks onto the background white space.
Step 5: Glazing and Firing
-
Final drying:
Allow the coasters to dry completely for at least 24 hours if using traditional ceramic glazes. -
Apply clear glaze:
Dip the coaster into a clear transparent glaze, or brush on three even coats of brushing clear glaze. Ensure the application is smooth to avoid cloudy spots. -
Clean the foot:
Wipe the bottom of the coaster clean with a sponge so it doesn’t stick to the kiln shelf. -
Fire:
Fire the coasters in a kiln according to the clay and glaze specifications (usually Cone 06 or Cone 6). If using oven-bake paints, follow the manufacturer’s baking instructions.
Once fired and cooled, your coasters are ready to protect your surfaces with a touch of sweetness

PENCIL GUIDE
Understanding Pencil Grades from H to B
From first sketch to finished drawing — learn pencil grades, line control, and shading techniques.
Explore the Full Guide
Bold Leaf Silhouettes
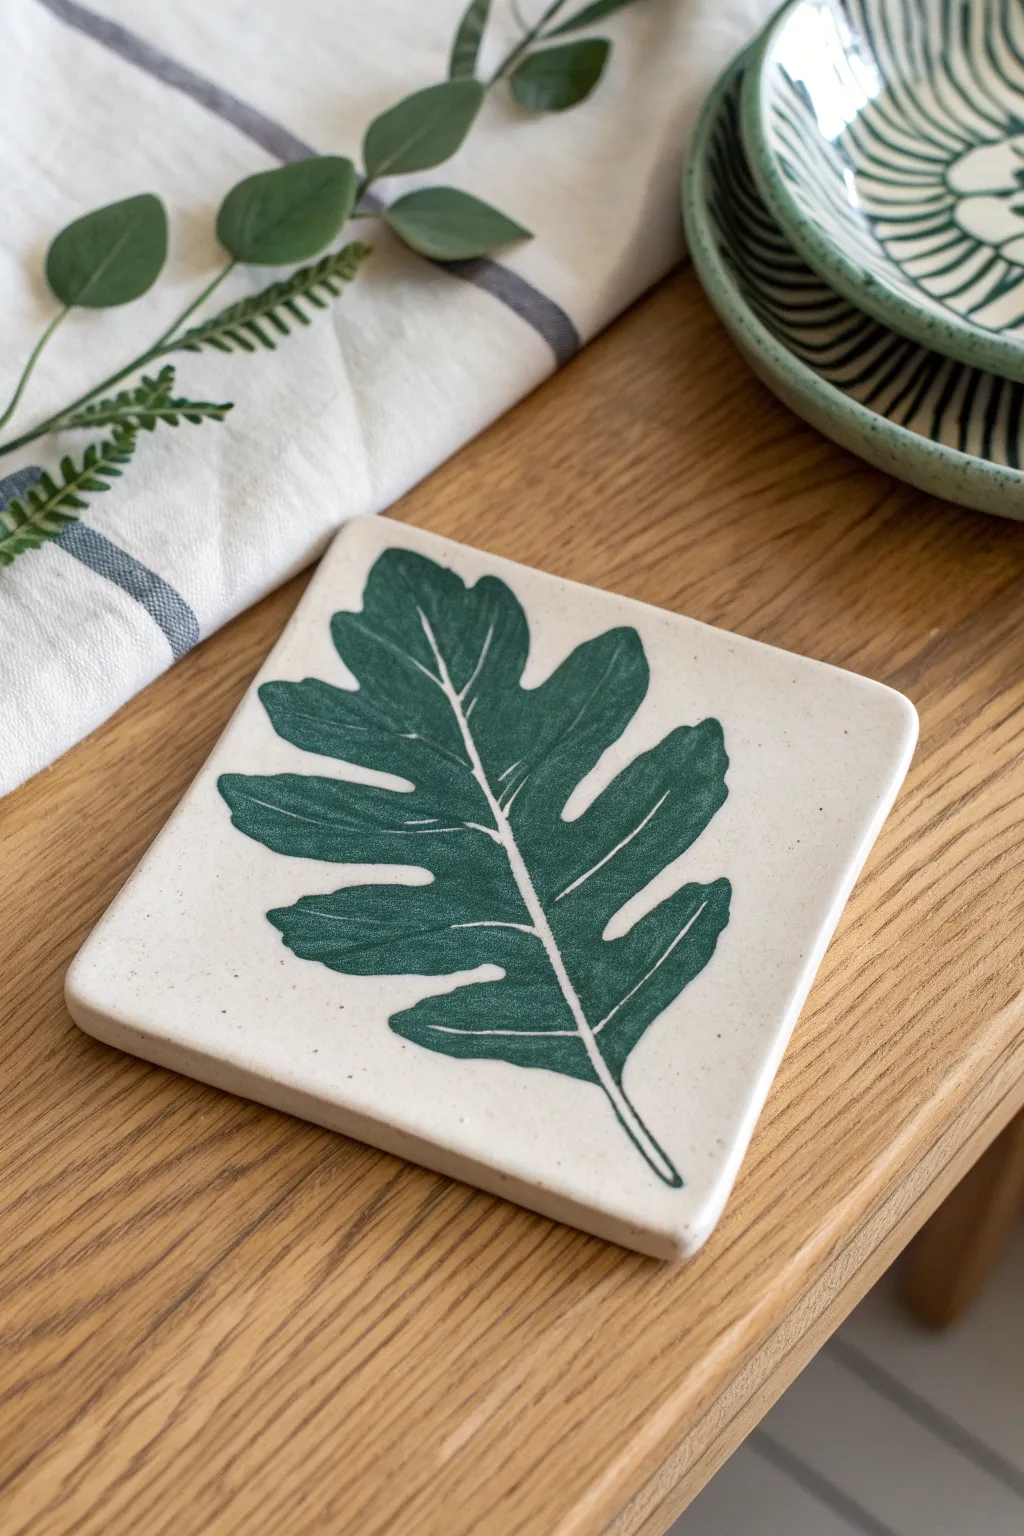
Capture the elegance of nature with this minimalist ceramic coaster design featuring a bold, deep green jagged leaf. The striking contrast between the organic shape and the speckled cream background creates a modern, botanical feel perfect for any coffee table.
Step-by-Step
Materials
- Square ceramic bisque coaster (approx. 4×4 inches)
- Deep forest green underglaze or acrylic paint (depending on finish desired)
- Fine liner brush (size 00 or 0)
- Small round brush (size 2 or 3)
- Pencil (HB or 2B)
- Tracing paper (optional)
- Small printed leaf template (optional)
- Masking tape
- Clear matte glaze or sealant spray
- Palette or small dish
- Paper towels
- Water cup
Step 1: Preparation & Sketching
-
Clean the surface:
Wipe down your ceramic coaster with a slightly damp paper towel to remove any dust or oils. This ensures your paint adheres smoothly. -
Plan placement:
Visualize a diagonal line running from the bottom right corner to the top left. This will serve as the spine of your leaf. -
Sketch the spine:
Lightly draw the central vein (spine) of the leaf using your pencil. Extend it almost to both corners, curving it slightly for a natural look. -
Outline the lobes:
Starting from the bottom of the spine, sketch the jagged, lobed edges of an oak-style leaf. Aim for asymmetry—nature isn’t perfect, and variations make it look more realistic. -
Refine the shape:
Ensure the lobes get wider towards the middle of the leaf and taper off at the top. Keep the pencil lines light so they don’t show through later. -
Add vein details:
Sketch thin, branching veins extending from the central spine into each major lobe section. These lines will remain unpainted to create the white vein effect.
Clean Lines Hack
Make a mistake on the veins? Wait for the paint to dry fully, then use a sharp X-Acto knife or needle tool to gently scratch off the excess paint to reveal the white line underneath.
Step 2: Painting the Silhouette
-
Load your brush:
Dispense a small amount of deep forest green paint onto your palette. If the paint feels too thick, dip your brush in water to thin it slightly for better flow. -
Outline the perimeter:
Using your fine liner brush, carefully trace the outer edge of your pencil sketch. This establishes a crisp boundary for the silhouette. -
Define the veins:
This acts as a ‘reverse’ outline. Using the very tip of the liner brush, paint closely along both sides of your pencil vein lines, leaving a thin strip of the bare ceramic showing through. -
Fill the larger areas:
Switch to your size 2 or 3 round brush. Pick up more paint and fill in the body of the leaf lobes. Work quickly to blend the wet edges so you don’t get streak marks. -
Refine the negative space:
Return to the fine liner brush to tidy up the white veins. If you accidentally painted over a vein, you can carefully scratch the paint away with a toothpick while it is still semi-wet. -
Add texture strokes:
I like to add faint directional strokes within the green areas that follow the growth of the leaf. It gives the flat color a bit more visual interest. -
Paint the stem:
Using the liner brush, paint a thin, solid line for the stem at the bottom right, connecting it to the base of the leaf. -
Let it dry completely:
Allow the paint to fully cure. If using acrylics, this takes about 30 minutes; underglazes dry faster but are powdery to the touch.
Get That Speckled Look
If your tile isn’t naturally speckled, dilute a tiny bit of black or brown paint on an old toothbrush and flick the bristles to spray fine speckles over the background before painting.
Step 3: Finishing Touches
-
Check opacity:
Hold the coaster up to the light. If the green looks patchy or translucent, apply a careful second coat to deepen the color, avoiding the white vein lines. -
Erase guidelines:
Once absolutely dry, gently erase any visible pencil marks in the white vein areas using a soft eraser. -
Seal or simple glaze:
If using acrylics, spray with a matte clear sealant. If using underglaze, apply a clear transparent glaze and fire according to your clay’s specifications.
Now you have a stunning botanical coaster that brings a touch of the forest into your home
Dot Mandala Centerpiece
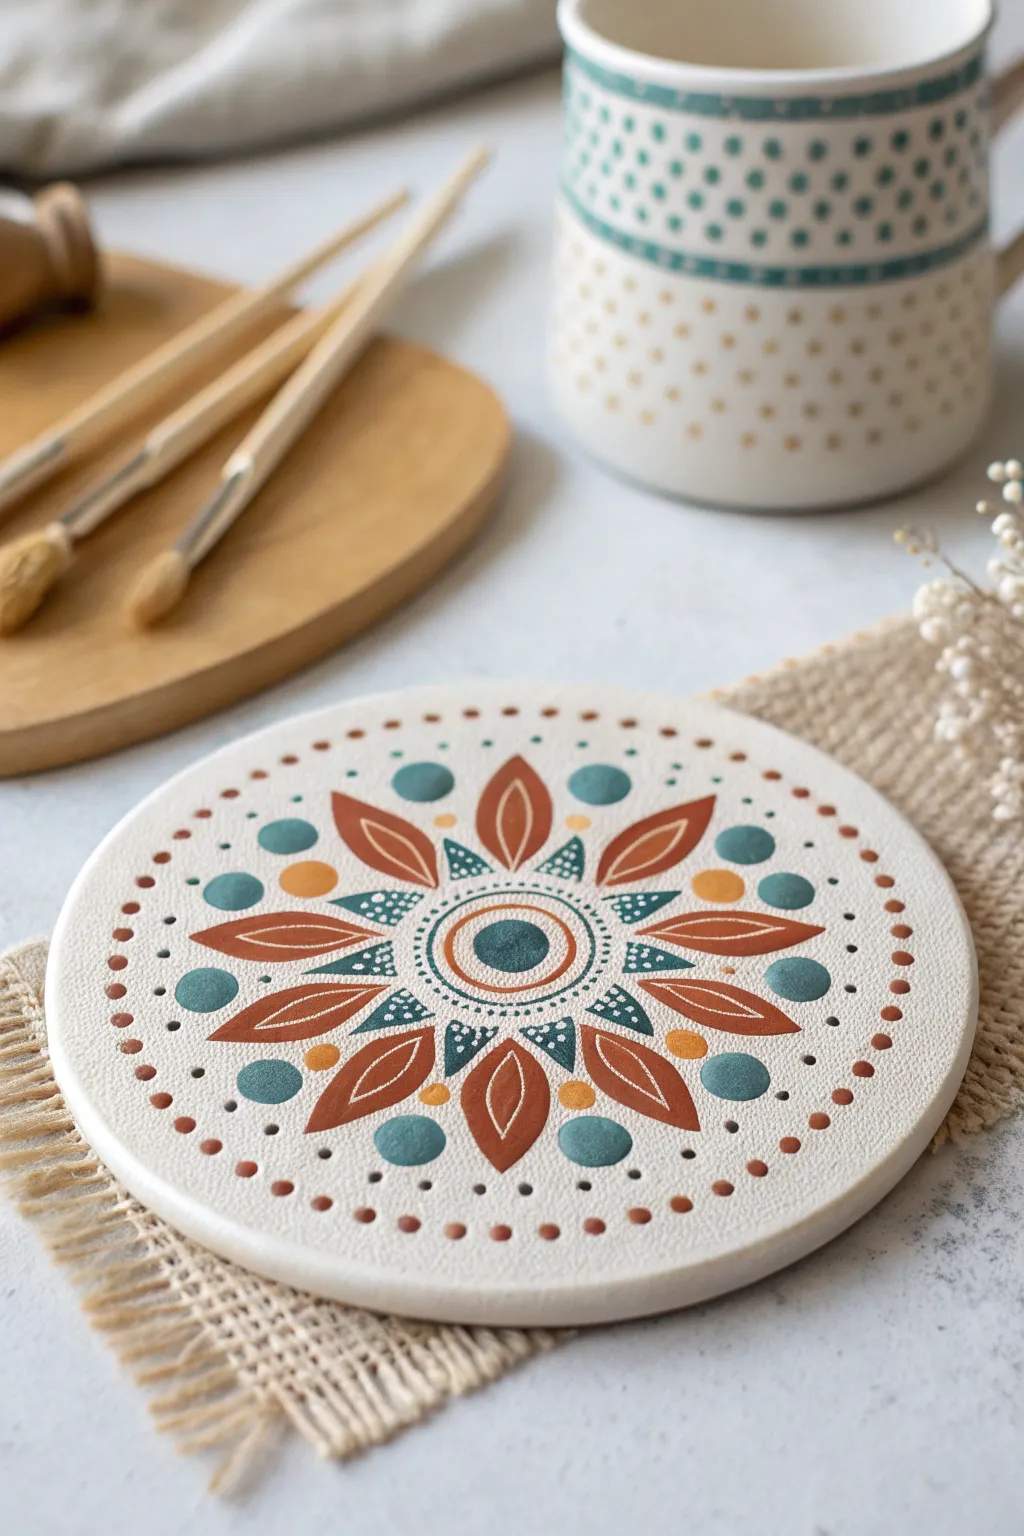
Bring warmth to your coffee table with this soothing mandala design, featuring earthy terracotta petals and calming teal accents. This project combines simple dotting techniques with petal brushstrokes to create a piece that feels both grounded and intricate.
How-To Guide
Materials
- Round ceramic coaster blank (unglazed bisque or matte white)
- Acrylic paints: Terracotta/Rust, Deep Teal, Mustard Yellow, Cream/Off-White
- Synthetic round brushes (size 0 and 2)
- Dotting tools (various sizes)
- Pencil and compass (or circle stencil)
- Matte spray varnish
Step 1: Setting the Foundation
-
Clean surface:
Begin by wiping down your ceramic coaster with a slightly damp cloth to remove any ceramic dust or oils. Let it dry completely. -
Mark the center:
Find the absolute center of your coaster. Use a ruler to measure across the diameter in two directions; where they intersect is your center point. -
Draft guidelines:
Using a compass, lightly sketch a series of concentric circles radiating from the center. These don’t need to be perfect, just faint guides to help you keep your mandala symmetrical. -
Divide the circle:
Lightly mark eight equal sections around the coaster, like slicing a pizza. These lines will guide the placement of your main petals.
Paint Consistency
For smooth dots that don’t finish with a Hershey’s Kiss point, mix a tiny drop of flow medium or water into your paint. It should be the consistency of heavy cream.
Step 2: Painting the Core
-
Center dot:
Start with a large dot of Deep Teal right in the center. Use a large dotting tool or the back of a paintbrush handle to get a perfect circle. -
Inner ring:
Once the center dot is dry, paint a thin ring of Rust/Terracotta around it. Leave a tiny gap of white space between the teal dot and this ring for contrast. -
Detailed second ring:
Paint a second, slightly wider ring further out using the same Terracotta shade. This creates the ‘track’ for the detailed dot work later. -
Internal detail:
Inside that second Terracotta ring, use your smallest dotting tool (or a toothpick) to add tiny white or cream dots in a circle pattern.
Step 3: Creating the Petals
-
Main petals:
Using a size 2 round brush loaded with Terracotta paint, create eight large petal shapes radiating from the central core. Use your pencil guidelines to ensure they are evenly spaced. -
Refining the shape:
I like to thicken the middle of each petal slightly and taper them to a sharp point at the outer edge. Make sure the paint coverage is opaque and smooth. -
Inner vein detail:
Once the terracotta petals are dry, use a fine liner brush (size 0) to paint a thin, long oval or teardrop shape inside each petal using white or light cream paint. -
Teal triangles:
In the ‘V’ shape between the base of each petal, paint a small triangle or wedge shape using Deep Teal. -
Triangle details:
Add three tiny white dots sitting on top of each teal triangle to brighten the center area.
Add Texture
Use ‘puff paint’ or dimensional fabric paint for the dots instead of standard acrylics. This will give the finished coaster a wonderful tactile, raised texture.
Step 4: Accents and Outer Borders
-
Mustard dots:
Place a medium-sized Mustard Yellow dot between the tips of the petals, slightly further out than the petal points. -
Teal accents:
Directly next to each Mustard dot (forming a wider circle), add slightly larger dots of Deep Teal. These anchor the outer design. -
Outer borders:
Using a medium dotting tool, create a ring of Terracotta dots around the entire perimeter of the design. Space them evenly. -
Final border ring:
Add a final ring of smaller Terracotta dots on the very edge of the design, staggering them between the previous row for a nested look. -
Space fillers:
Look for empty white spaces between the petals and the outer ring. Fill these selectively with tiny Deep Teal or Mustard micro-dots to balance the composition.
Step 5: Finishing Touches
-
Erase guides:
wait at least 24 hours for the paint to fully cure. Gently erase any visible pencil marks with a soft eraser. -
Seal the work:
Take the coaster outside or to a well-ventilated area. Spray it with two light coats of matte varnish to protect the paint from moisture and heat without making it glossy.
Now you have a beautifully hand-painted coaster ready to cradle your morning tea


Terrazzo Speckle Party
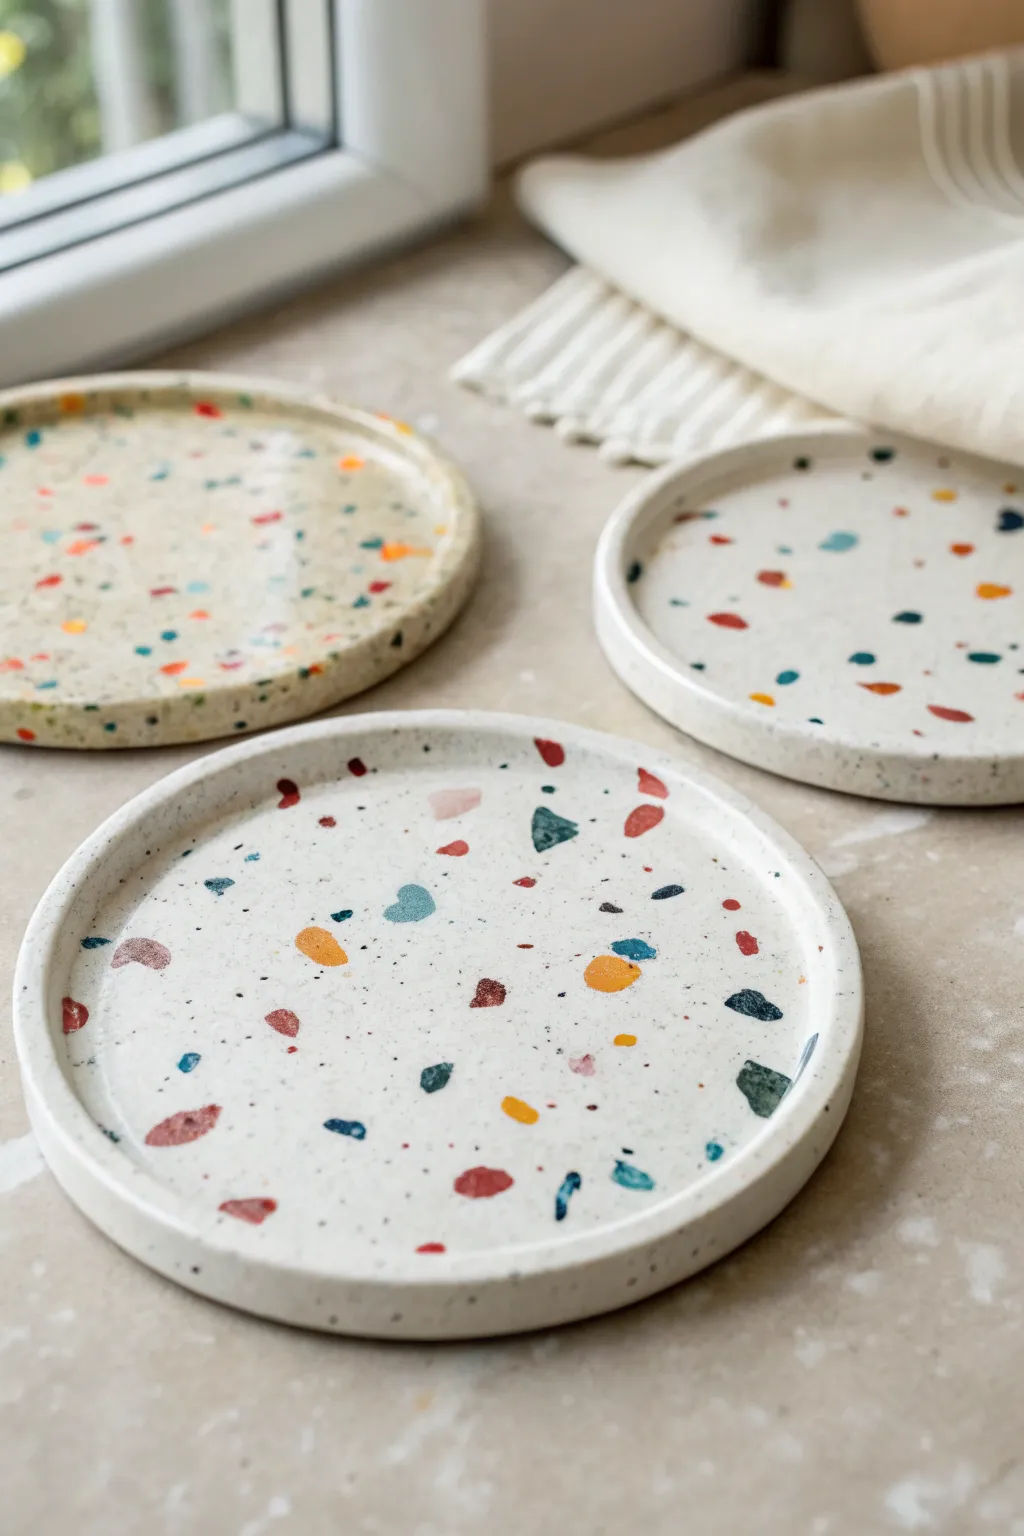
Bring the classic Italian flooring style to your coffee table with these playful, speckled coasters. This technique mimics the random, confetti-like beauty of real terrazzo using nothing but simple ceramic paints and a keen eye for balance.
Step-by-Step Guide
Materials
- Round ceramic coasters (bisque or glazed)
- Ceramic or acrylic multi-surface paints (Cream/Off-white for base)
- Small assortment of accent paints (Red, Navy Blue, Teal, Mustard Yellow, burnt Orange)
- Flat shader brush (medium size)
- Small round detail brush (size 0 or 1)
- Old toothbrush (optional for micro-speckles)
- Palette or paper plate
- Paper towels
- Clear sealant (varnish or resin, optional)
Step 1: Setting the Stage
-
Clean surface:
Begin by wiping down your ceramic coasters with a damp cloth or a little rubbing alcohol to remove any dust or oils. Let them dry completely. -
Base coat application:
Using your flat shader brush, apply a smooth, even coat of the cream or off-white paint to the entire top surface and rim of the coaster. -
Smoothing the base:
While the paint is still wet, lightly run your brush over the surface in long strokes to minimize texture. Let this coat dry fully. -
Reinforce the background:
Apply a second coat of your base color to ensure full opacity. The background needs to be solid so the colorful chips really pop.
Step 2: Creating the Chips
-
Prepare your palette:
Squeeze small, dime-sized amounts of your accent colors onto your palette. I generally like to keep my colors distinct rather than mixing them for this look. -
Start with large shapes:
Dip your small round brush into your first color (e.g., teal) and paint random, irregular geometric shapes. Think trapezoids, uneven triangles, or jagged rocks rather than perfect circles. -
Rotate and repeat:
Rotate the coaster as you work to avoid painting patterns that all face the same direction. Add a few more large shapes in a second color, like mustard yellow. -
Spacing is key:
Leave plenty of negative space between these larger ‘chips.’ Authentic terrazzo feels random, so avoid creating a grid-like pattern. -
Medium accents:
Switch to your third and fourth colors (red and navy). Paint slightly smaller chips in the gaps between the large ones, varying the pressure on your brush to get different edges. -
Check for balance:
Step back and look at your composition. If one area looks too empty, add a medium-sized chip there. Ensure no two identical colors are touching.
Unwanted Blobs?
If a paint ‘chip’ looks too round or perfect, wait for it to dry slightly, then use a damp toothpick to gently scrape and reshape the edges into a jagged, stone-like form.
Step 3: The Speckle Effect
-
Tiny details:
Using the very tip of your smallest brush, dot tiny specks of color into the remaining white spaces. These represent the smallest aggregate in terrazzo concrete. -
Micro-misting (Optional):
For a very authentic grainy look, dilute a small amount of grey or black paint with water. Dip an old toothbrush in it and flick the bristles to spray fine mist over the coaster. Practice on paper first! -
Dry time:
Allow the painted pattern to dry completely, preferably overnight, to ensure the distinct layers don’t smudge during sealing.
Level Up: Gold Leaf
Add a touch of luxury by placing small bits of gold leaf adhesive size in the gaps after painting. Apply gold foil flakes for a shimmering, high-end terrazzo finish.
Step 4: Sealing and Finishing
-
Choose your finish:
Decide if you want a matte look (like raw stone) or glossy (like polished stone). Select your sealant accordingly. -
First seal coat:
Apply a thin layer of clear varnish or sealant over the top. Brush in one direction gently to avoid dragging the paint if it isn’t fully cured. -
Let it cure:
Wait for the manufacturer’s recommended drying time before applying a second coat if needed for extra durability against hot mugs.
Now you have a chic set of faux-stone coasters ready to protect your furniture with style
Sun-and-Moon Companion Set
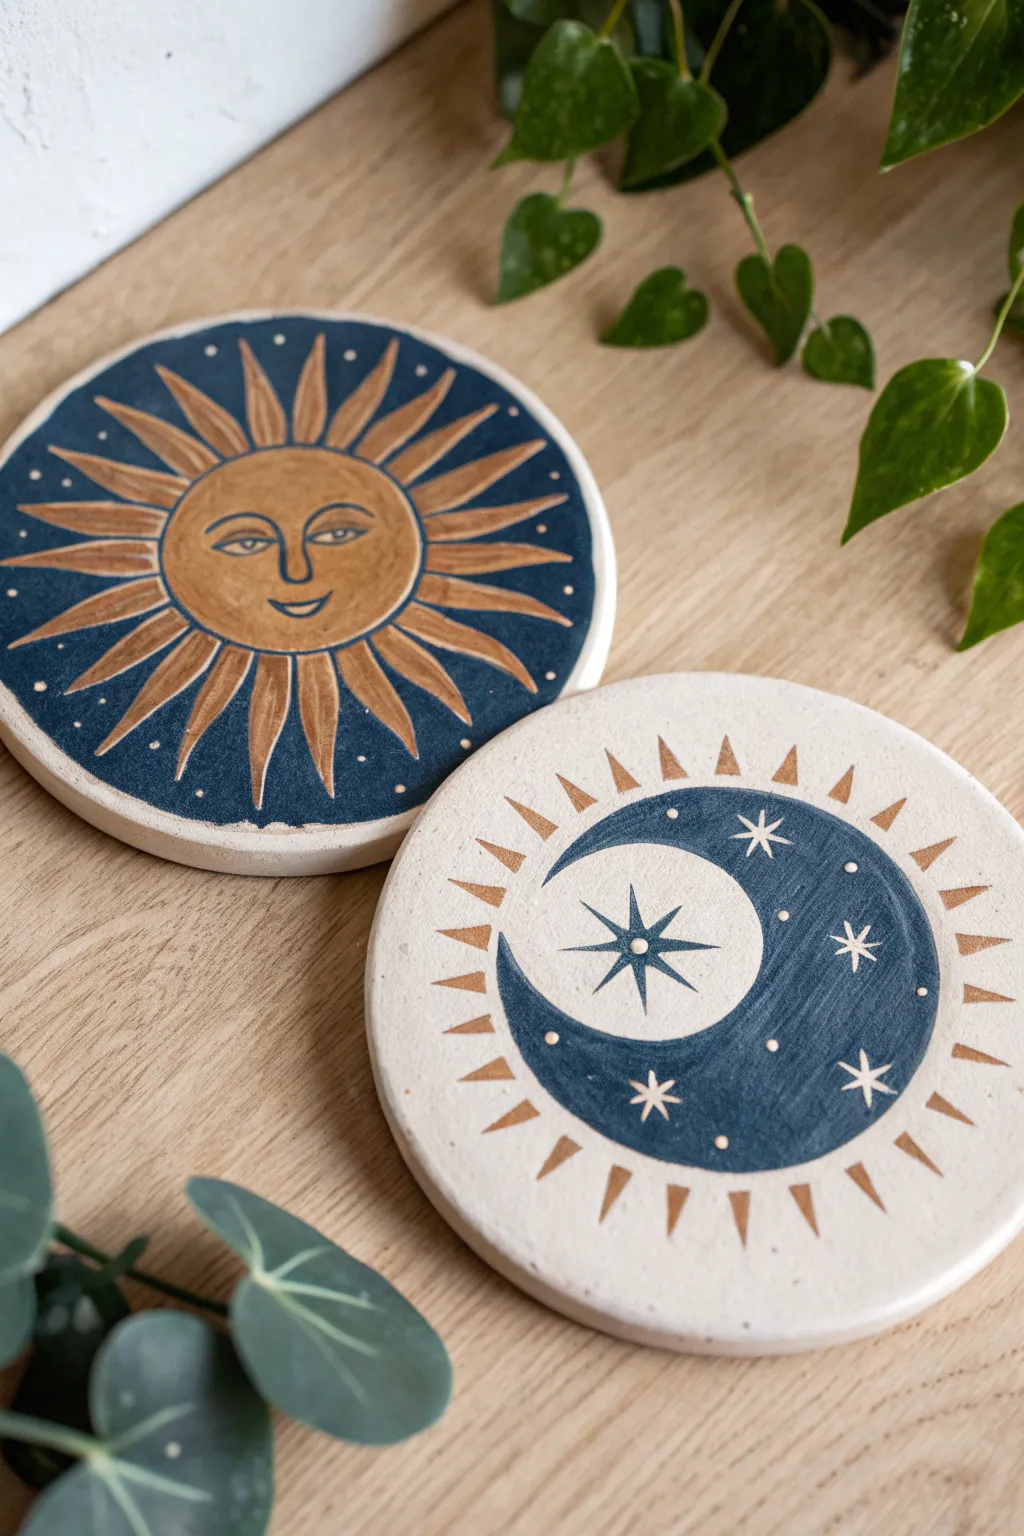
Bring the timeless dance of day and night to your coffee table with this hand-painted ceramic coaster set. The warm bronze sun and cool midnight blue moon create a striking contrast that is both mystical and modern.
How-To Guide
Materials
- 2 Round unglazed ceramic coasters (bisque ware)
- Acrylic paints: Midnight Blue, deep Bronze/Gold, White
- Paintbrushes: Medium flat brush, fine liner brush (0 or 00 size)
- Pencil and eraser
- Compass or round objects for tracing
- Palette or mixing dish
- Clear acrylic sealant (spray or brush-on)
Step 1: Preparation & Sketching
-
Clean surface:
Before starting, wipe your ceramic coasters with a slightly damp cloth to remove any dust or ceramic powder, ensuring a smooth painting surface. -
Sketch the Sun:
On the first coaster, draw a large circle in the center for the sun’s face. Sketch long, triangular rays extending outward to the edge of the coaster. -
Detail the Sun’s face:
Lightly pencil in the facial features: almond-shaped eyes with lids, a defined nose bridge, and a gentle, serene smile. -
Sketch the Moon design:
On the second coaster, use a compass or circular object to draw a perfect circle in the center. Inside this circle, sketch a crescent moon shape on the left side. -
Add Moon rays:
Draw small, sharp triangular rays radiating outward from the central circle, floating in the negative space around the rim.
Uneven Lines?
If your blue background bleeds into the raw ceramic area, wait for it to dry completely, then gently scrape the excess paint away with an X-Acto knife.
Step 2: Painting the Sun Coaster
-
Fill the background:
Using your medium brush and Midnight Blue paint, carefully fill in the negative space between the sun rays. I like to do this first to define the edges of the rays clearly. -
Paint the Sun base:
Switch to clean water and your Bronze/Gold paint. Fill in the entire central face circle and all the triangular rays. -
Second coat:
Metallic paints can be semi-transparent, so apply a second coat of bronze once the first is dry for a rich, solid finish. -
Outline the features:
With your finest liner brush and Midnight Blue, carefully paint the outlines of the eyes, nose, mouth, and eyebrows directly over the dry bronze paint. -
Add starry details:
Dip the non-brush end of a paintbrush into white paint and dot small ‘stars’ into the blue background sections between the rays.
Pro Choice
Leave the ‘white’ areas unpainted as raw ceramic. The texture difference between the smooth paint and the matte bisque adds a high-end, tactile finish.
Step 3: Painting the Moon Coaster
-
Paint the night sky:
On the second coaster, fill the large central circle with Midnight Blue, carefully painting around the crescent moon shape you sketched so it remains the color of the raw ceramic. -
Paint the outer rays:
Use the Bronze/Gold paint to fill in the small floating triangles around the coaster’s rim. -
Create the central star:
In the white crescent space, use Midnight Blue to paint an eight-pointed star. Start with a cross, then add smaller diagonal lines in between. -
Add constallations:
Using white paint and your liner brush, paint delicate four-pointed stars and tiny dots inside the blue night sky area. -
Erase guidelines:
Once all paint is completely bone dry, gently erase any visible pencil marks, particularly around the raw ceramic areas. -
Seal the artwork:
Apply a coat of clear acrylic sealant to protect your work from moisture and cup rings.
Place your finished celestial set on your table and enjoy the customized charm they bring to your space
Ocean Waves in Concentric Rings
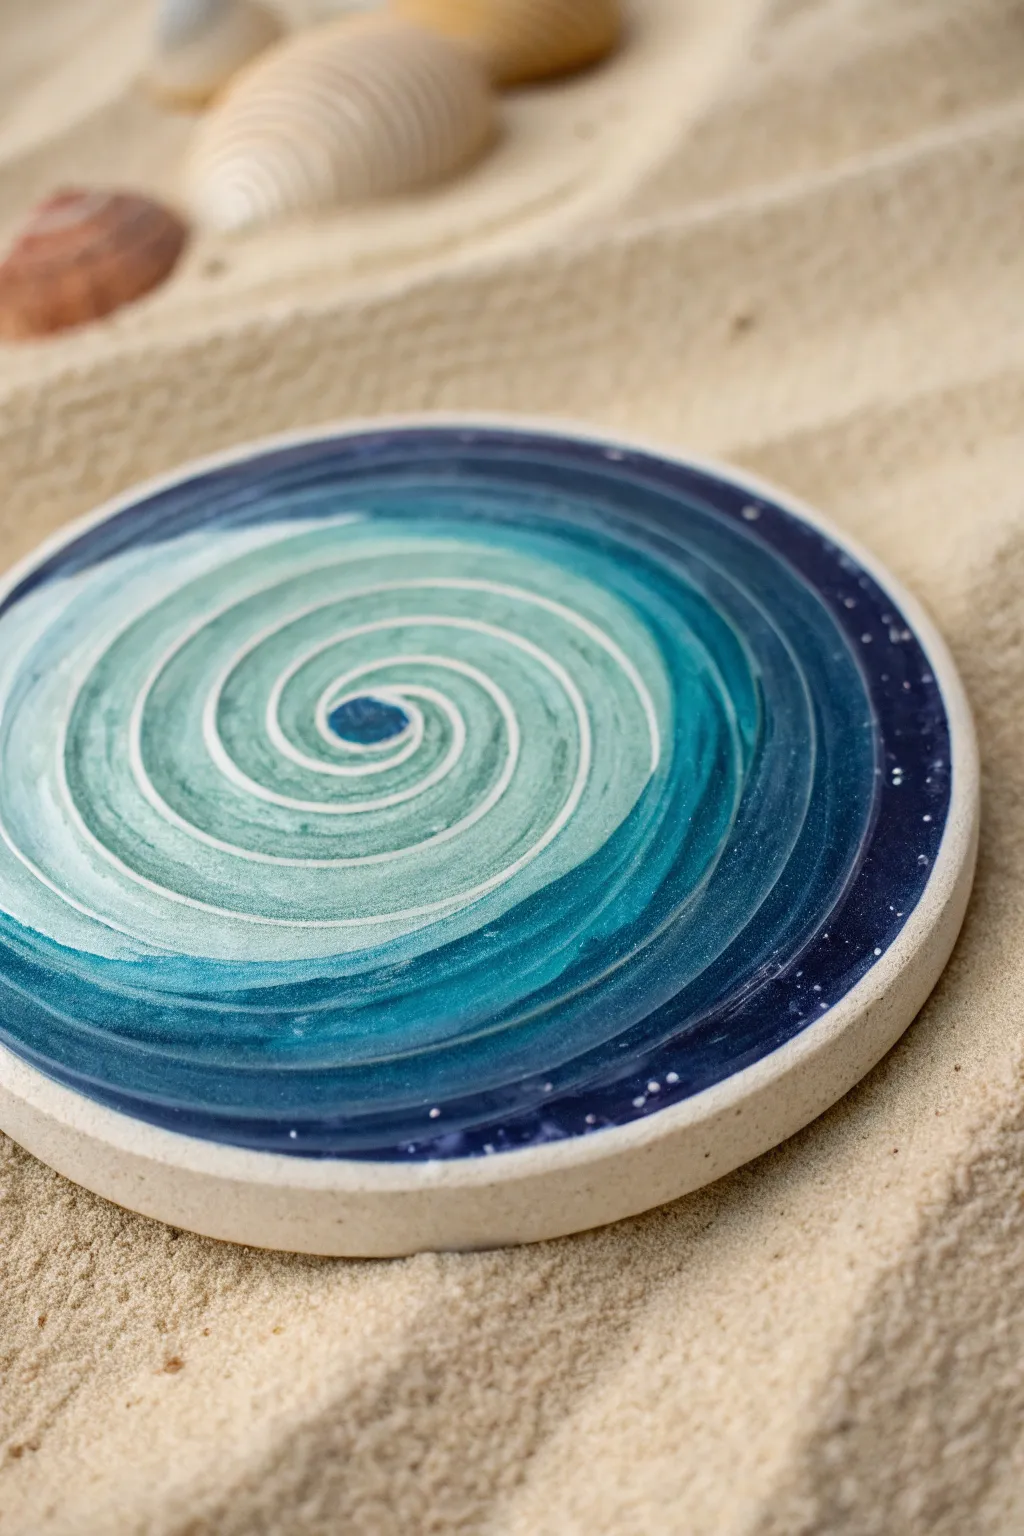
Capture the hypnotic motion of the sea with this stunning concentric ring design. By blending deep indigos into soft seafoam greens in a tight spiral, you’ll create a captivating depth that draws the eye right to the center of your ceramic coaster.
Step-by-Step Tutorial
Materials
- Round bisqueware ceramic coaster (unglazed)
- Acrylic paints (Phthalo Blue, Turquoise, White, Teal)
- Clear gloss varnish or epoxy resin
- Small round paintbrush (size 2 or 4)
- Fine liner brush
- Mixing palette
- Potter’s wheel or lazy Susan (optional but helpful)
- Pencil
- Water cup and paper towels
Step 1: Preparation and Mapping
-
Clean surface:
Begin by wiping the ceramic coaster down with a slightly damp cloth to remove any dust or ceramic crumbs. This ensures a smooth painting surface. -
Mark the center:
Find the exact center of your coaster and make a tiny dot with your pencil. This will serve as the anchor point for your entire spiral. -
Sketch the spiral:
Using a very light touch, draw a continuous spiral starting from that center dot and winding outwards to the rim. Doesn’t have to be perfect, just a guide for your brush.
Step 2: Painting the Ocean Depths
-
Mix the darkest blue:
On your palette, prepare your darkest shade—a deep Phthalo Blue mixed with a tiny touch of black or purple for extra depth. This will be your outer ring. -
Paint the outer edge:
Apply this dark blue to the outermost rim of the coaster’s surface. Paint a solid band just inside the raised lip. -
Create the first transition:
Mix a medium blue-green by adding turquoise to your dark blue. Paint the next ring inward, slightly overlapping the wet edge of the dark blue to encourage blending. -
Blend the teal tones:
Move to a pure turquoise or teal shade for the middle section. As you paint this ring, use gentle, curved brushstrokes that follow your spiral guide. -
Lighten the mixture:
Gradually add white to your teal paint. This lighter seafoam green should be used as you approach the inner third of the coaster. -
Center highlights:
For the very center spiral, use a mix of mostly white with just a hint of the seafoam green. Paint tight, small strokes right into the center dot.
Spin It
Use a lazy Susan or banding wheel while painting the main rings. Holding the brush steady while spinning the wheel creates smoother, more consistent circles than moving your hand alone.
Step 3: Refining the Spiral
-
Define the swirl:
Switch to your fine liner brush. I like to load it with a thinned-down white paint to create the crisp highlight line that separates the colors. -
Trace the spiral:
Starting from the center, carefully drag the fine brush along the ‘ridge’ of your spiral. This thin white line creates the visual illusion of the water swirling. -
Add deep accents:
Create some contrast by adding very thin streaks of darker blue alongside the white lines in the outer sections. -
Starry spray:
Dip a stiff brush or toothbrush into white paint and flick it gently near the dark outer rim. This creates tiny speckles that resemble sea spray or stars.
Glittering Depths
Mix a tiny pinch of iridescent mica powder or fine silver glitter into your dark blue paint or the final resin coat to mimic sunlight hitting the ocean surface.
Step 4: Sealing and Finishing
-
Dry completely:
Let the acrylic paint cure fully for at least 24 hours. If the paint is still tacky, the sealer might cloud it. -
Apply varnish:
Brush on a coat of high-gloss varnish or pour a thin layer of resin. The gloss is crucial here—it makes the colors look wet and vibrant like real water. -
Final cure:
Allow the varnish or resin to cure according to the manufacturer’s instructions in a dust-free area.
Place your favorite mug on this little piece of the ocean and enjoy the serene view
Mini Mountain Landscape Scene
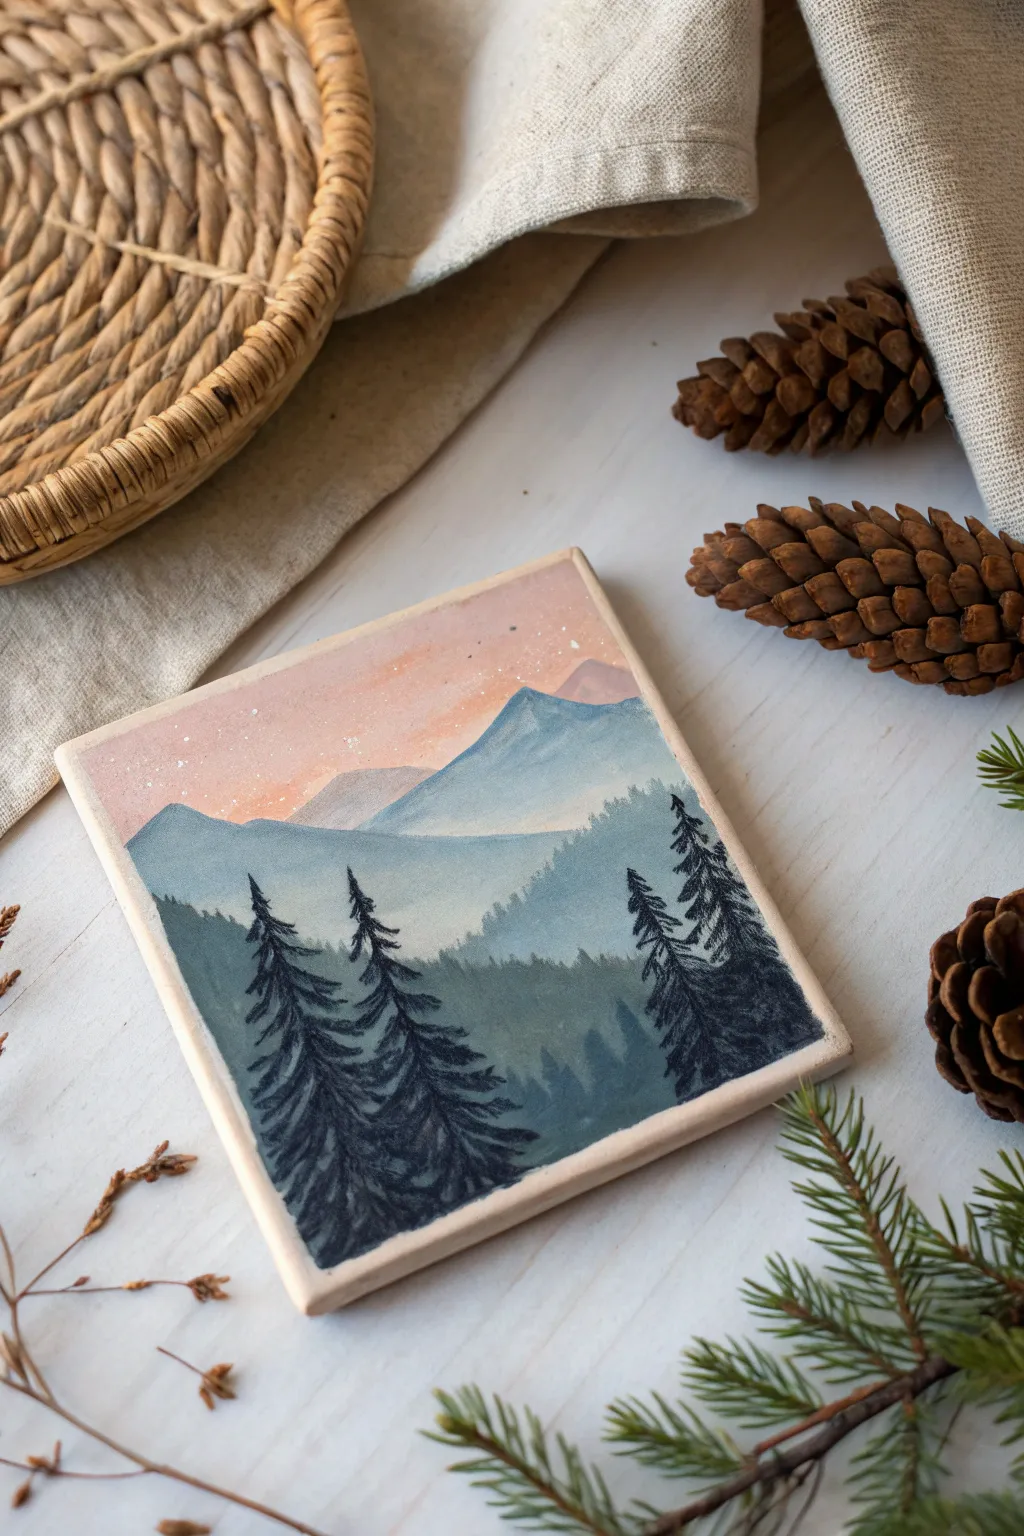
Capture the serenity of a mountain range at dusk on a simple ceramic tile. This project uses soft blending techniques to create atmospheric perspective, with crisp pine silhouettes in the foreground to frame the dreamy, pastel sky.
Step-by-Step Guide
Materials
- Square ceramic bisqueware coaster (unglazed top)
- Acrylic paints: Titanium White, Slate Blue, Indigo, Peach/Salmon Pink, Deep Green, Black
- Flat shader brush (size 6 or 8)
- Small round detail brush (size 0 or 1)
- Old toothbrush or stiff bristle brush
- Palette for mixing
- Cup of water and paper towels
- Matte spray sealant or clear acrylic varnish
Step 1: Setting the Sky
-
Base layer:
Begin by painting the top third of the coaster with a mix of Titanium White and a very small touch of Peach. You want a creamy, near-white base that will help the sunset colors glow. -
Adding the glow:
While the base is still slightly tacky, mix a stronger Peach/Salmon Pink color. Lightly brush this across the middle section of your sky area, blending it upwards into the pale white to create a soft gradient. -
Distant peaks:
Mix a very pale violet using a dot of Slate Blue and a touch of Peach into White. Paint two small, triangular mountain shapes in the distance, overlapping the bottom edge of your pink sky. Keep the edges soft. -
Adding stars:
Before moving to the mountains, create the stars. Dilute a tiny amount of white paint with water. Dip a stiff brush (like an old toothbrush) into it and flick the bristles with your thumb to create a fine spray of specks over the sky area. Let this dry completely.
Wet-on-Wet Magic
For the misty effect at the bottom of the mountains, work quickly while the paint is wet. A clean, damp brush drags the color down beautifully.
Step 2: Layering the Mountains
-
First mountain range:
Mix Slate Blue with a healthy amount of White to create a light, icy blue. Using your flat brush, paint a large, sweeping mountain shape below the pink sky. Angle the peak towards the right side. -
Creating mist:
While the blue paint is wet on the coaster, brush a little plain water along the bottom edge of this mountain shape. This thins the paint and makes it look like fading mist. -
Second range:
Mix a slightly darker shade using Slate Blue and a touch of Indigo. Paint a rolling hill shape below the first mountain, extending from the left side. I find overlapping these shapes helps build realistic depth. -
Atmospheric fade:
Just like the previous step, water down the bottom edge of this darker hill so it fades out into the white ceramic surface below.
Step 3: The Forest Foreground
-
Mixing deep greens:
Create a dark, moody forest color by mixing Deep Green with Indigo and a small amount of Black. The goal is a color that looks almost black but has cold blue-green undertones. -
Distant tree line:
Using the tip of your round brush, stipple a jagged, uneven line of tiny trees just below your misty blue hills. Keep these very small to suggest they are far away. -
Foreground base:
Fill the bottom third of the coaster with your dark green mixture. This will be the solid ground for your main trees. -
Main tree trunks:
Switch to your finest detail brush. Paint three vertical lines for the main tree trunks—two on the left side and a cluster on the right. Make the lines slightly thicker at the bottom. -
Painting branches:
Start at the top of a trunk. Use a tapping motion to paint downward-sloping branches. Keep the top branches very short and widen them as you move down the tree. -
Building volume:
Go back over the branches with a second layer of tapping. Adding slightly more Indigo to your mix here creates shadows within the pine needles, making the trees look dense and full. -
Connecting the ground:
Using the dark green mix, blend the bottom of your trees into the foreground base you painted earlier, ensuring there are no gaps.
Trees Looking Blobby?
Switch to a smaller brush and use less paint. Dabbing off excess paint on a paper towel before hitting the tile keeps pine needles sharp, not muddy.
Step 4: Finishing Touches
-
Edge cleanup:
Check the sides of the coaster. If paint spilled over, wipe it off with a damp cloth or paint the edges a solid color (like white or gold) for a framed look. -
Sealing:
Allow the painting to dry overnight. Once cured, spray with a matte sealant to protect the artwork from condensation and scratches.
Now you have a serene piece of functional art ready for your morning coffee or evening tea
Faux Stained-Glass Butterfly
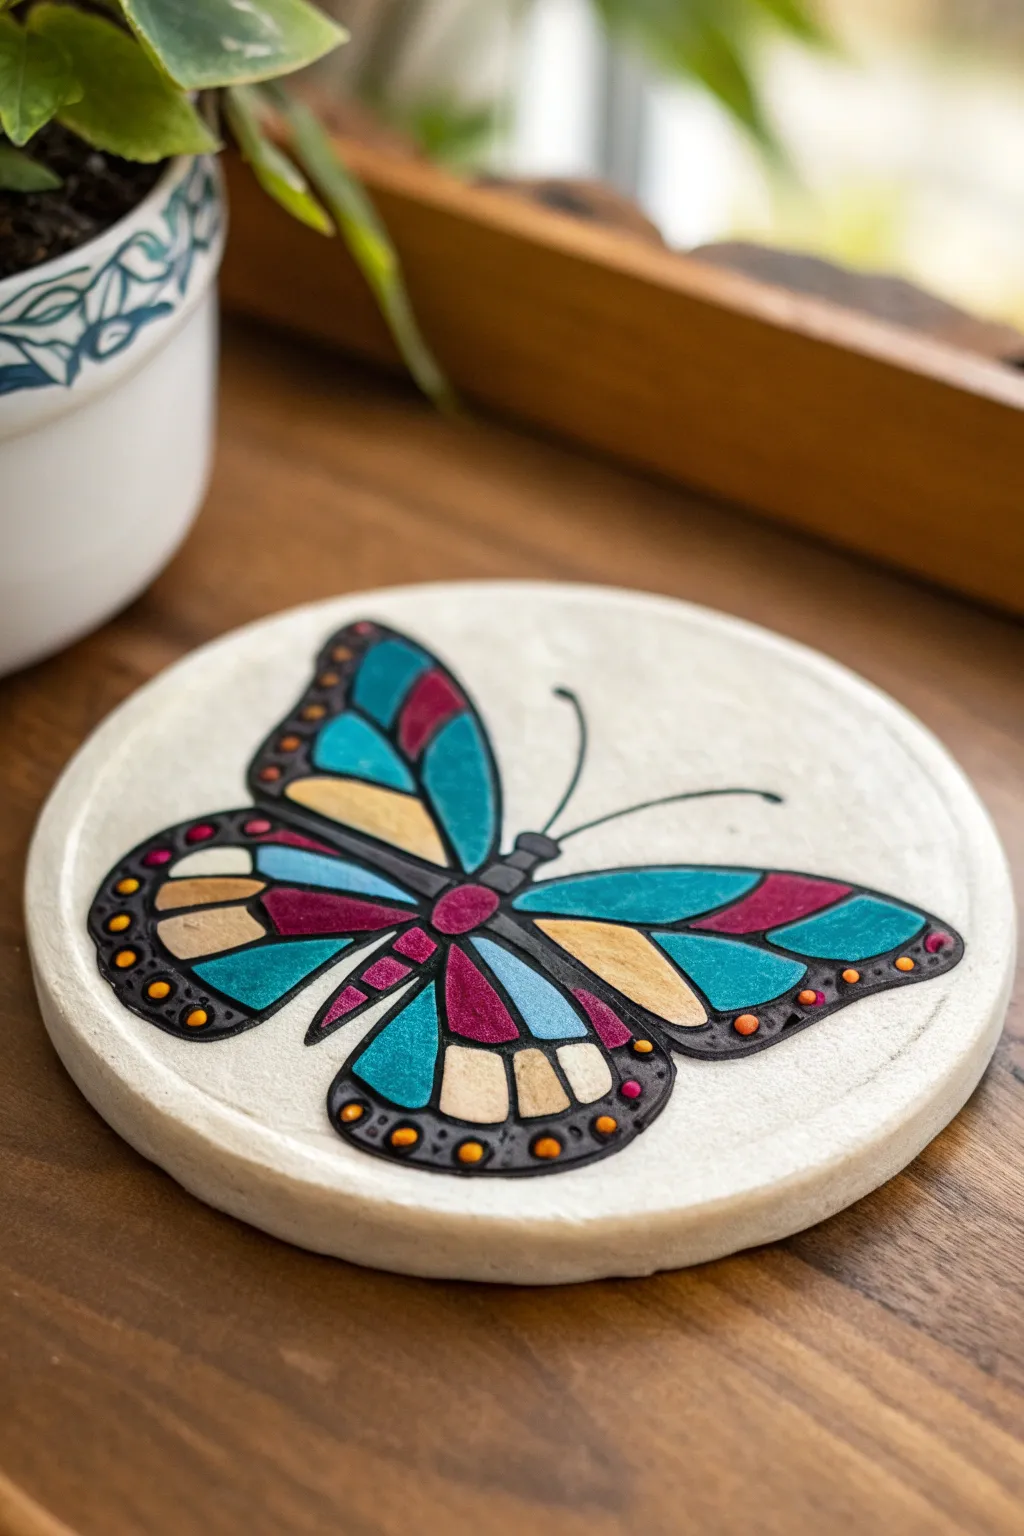
Capture the elegant look of colorful glasswork on a durable ceramic surface with this vibrant butterfly design. The bold black outlines contrast beautifully with jewel-toned teals, purples, and ambers to create a mesmerizing faux stained-glass effect.
Step-by-Step Tutorial
Materials
- Round unglazed ceramic coaster (bisque)
- Black liquid leading paint or dimensional fabric paint (fine tip)
- Acrylic paints (Teal, Magenta, Golden Yellow, Cream, Black)
- Gloss acrylic medium or glazing liquid
- Fine detail paintbrush (size 0 or 00)
- Pencil and eraser
- Clear spray sealant (gloss finish)
Step 1: Drafting the Design
-
Base preparation:
Wipe the ceramic coaster with a slightly damp cloth to remove any dust and let it dry completely. -
Light sketch:
Using a soft pencil, lightly sketch the butterfly’s centerline and torso slightly off-center to create dynamic movement. -
Outline the wings:
Draw the main wing shapes, ensuring the upper wings are larger and curve gently, while the lower wings are smaller and rounded. -
Sectioning:
Map out the internal patterns of the wings with geometric shapes that mimic glass panes, keeping lines relatively simple for easier painting.
Step 2: Creating the ‘Lead’ Lines
-
Tracing main lines:
Using black dimensional paint or liquid leading directly from the bottle, carefully trace over your pencil lines for the torso and wing outlines. -
Adding segments:
Fill in the internal dividing lines of the wings, keeping consistent pressure on the bottle to ensure an even, raised line thickness. -
The antennae:
Draw two thin, sweeping lines for the antennae, curling slightly at the ends, making sure they don’t smear into the wet wing lines. -
Drying time:
Allow the black outline to dry completely, which usually takes 2-4 hours depending on the brand used, until it is hard to the touch.
Keep it Flowing
Work from the center of the coaster outward when applying the black lines. This prevents your hand from accidentally smudging wet outlines you’ve already laid down.
Step 3: Adding Jewel Tones
-
Mixing translucent colors:
Mix a small amount of gloss medium with your teal acrylic paint to create a semi-transparent, glass-like consistency. -
Painting the teal sections:
Fill in the largest upper wing sections and select lower segments with the teal mixture, dabbling the paint right up to the raised black edges. -
Adding magenta accents:
Clean your brush and mix magenta paint with the gloss medium. Apply this to the central wing sections near the body for a pop of contrast. -
Highlighting with gold:
Use the golden yellow mixed with a touch of cream for the remaining inner wing panels to add brightness to the design. -
Lower wing details:
Paint the small bottom edge panels of the lower wings with alternating cream or pale yellow tones.
Uneven Lines?
If a line comes out too thick or shaky, let it dry for just a moment and then use a toothpick to gently nudge the paint back into a smooth shape before it sets.
Step 4: Final Details
-
Dot details:
Using the very tip of a paintbrush handle or a dotting tool, dip into orange and yellow paint to add small decorative dots along the solid black wing borders. -
Torso definition:
If the body section looks too flat, add tiny horizontal stripes of dark grey or purple to give the butterfly’s abdomen some texture. -
Cleanup:
Erase any visible pencil marks that might be showing through lighter paint areas gently. -
Sealing the work:
Once fully cured (wait at least 24 hours), spray the entire coaster with a clear gloss sealant to protect the artwork and enhance the shiny glass effect.
Now you have a stunning piece of functional art ready to brighten up your coffee table
Kid-Friendly Thumbprint Holiday Icons
This charming ceramic coaster project captures holiday magic with simple line drawings and adorable finger-stamped motifs. It combines minimalist pine trees with personalized touches, creating a keepsake that feels both modern and sentimental.
Step-by-Step
Materials
- Round unglazed or matte-finish ceramic coaster blank
- Fine-tip permanent markers or ceramic paint pens (Forest Green, Red)
- Red ink pad or red acrylic craft paint
- Sponge dauber (if using paint)
- Pencil and eraser
- Spray sealant (clear acrylic or polycrylic)
Step 1: Planning and Layout
-
Clean the Surface:
Begin by wiping down your ceramic coaster with a damp cloth to remove any dust or oils. Let it dry completely to ensure your ink adheres properly. -
Visualize the Design:
Observe the layout in the reference image. The design features five main elements: two large stylized trees at the bottom and left, two smaller floating trees, a large red ornament, and two red handprint/fingerprint motifs. -
Lightly Sketch Positions:
Using a pencil with a very light touch, mark the general placement for your trees and the ornament. Don’t draw the details yet, just faint guidelines for where the main shapes will sit.
Step 2: Drawing the Greenery
-
Draw the Large Tree Spine:
Start with the green marker. Draw a straight vertical line for the trunk of the large tree at the bottom center. -
Add Large Tree Branches:
Add horizontal branches to the trunk. Start wide at the bottom and make them progressively shorter as you move up, creating a classic triangular pine shape. Keep the lines simple and straight. -
Create the Second Large Tree:
Repeat this process for the tree on the left side of the coaster. Use the same technique: a central line crossed by graduation horizontal lines. -
Add Floating Top Trees:
Draw the two smaller trees near the top and right side. For these, instead of rigid horizontal lines, angle the branches slightly downward like arrows to give them a looser, more organic feel. -
Draw the Tiny Tree:
Add the smallest tree near the bottom right. Keep it simple with just three or four sets of angled branches.
Ink Control Pro-Tip
Ceramic allows ink to sit on the surface longer than paper. Be careful not to rest your hand on wet ink while drawing. Work from left to right (if right-handed) to avoid smearing.
Step 3: Adding Red Details
-
Outline the Ornament:
Switch to your red fine-tip marker. Draw a circle in the bottom-left quadrant. Top it with a small square and a tiny loop for the hanger. -
Fill the Ornament:
Inside the circle, draw a concentric swirl or spiral starting from the center and working outward. The lines don’t need to be perfect; a hand-drawn look adds character. -
Prepare the Fingerprints:
Decide on your ‘handprint’ strategy. For a true kid-friendly craft, paint a child’s thumb or finger with red acrylic paint (or use an ink pad) and press it onto the coaster. If drawing by hand like the example, proceed to the next step. -
Draw the Handprint Icons:
Using the red marker, stipple (dot) a small oval shape to represent the palm. Then, stipple four or five tiny fingers extending from it. Create two of these: one near the center and one inside a circle on the right. -
Add the Dot Border:
For the handprint on the right, draw a circle of red dots surrounding it to frame the design like a decorative bauble.
Level Up: Metallic Pop
Use a gold paint pen to add tiny stars or dots in the empty white spaces, or trace over the ornament hook for a festive shimmer.
Step 4: Finishing Touches
-
Check for Smudges:
Carefully inspect the coaster. If you see any stray pencil marks, wait until the ink is 100% dry before gently erasing them. -
Emphasize Textures:
I like to go back and add a second pass of color to the tree trunks just to darken them slightly, anchoring the design. -
Seal the Coaster:
In a well-ventilated area, spray a thin coat of clear acrylic sealant over the coaster. This prevents the marker from bleeding if a hot mug is placed on it later. -
Let it Cure:
Allow the sealant to cure for at least 24 hours before using the coaster to ensure the finish is durable.
Now you have a festive, custom piece of decor ready for your holiday coffee table


Have a question or want to share your own experience? I'd love to hear from you in the comments below!