When I’m craving that soft, storybook feeling, cottagecore painting is my favorite way to slow down and breathe. Let’s fill your page with woodland whimsy, cozy little homes, and the kind of nature details that feel like a sweet daydream.
Orchard Picking Scene at Golden Hour
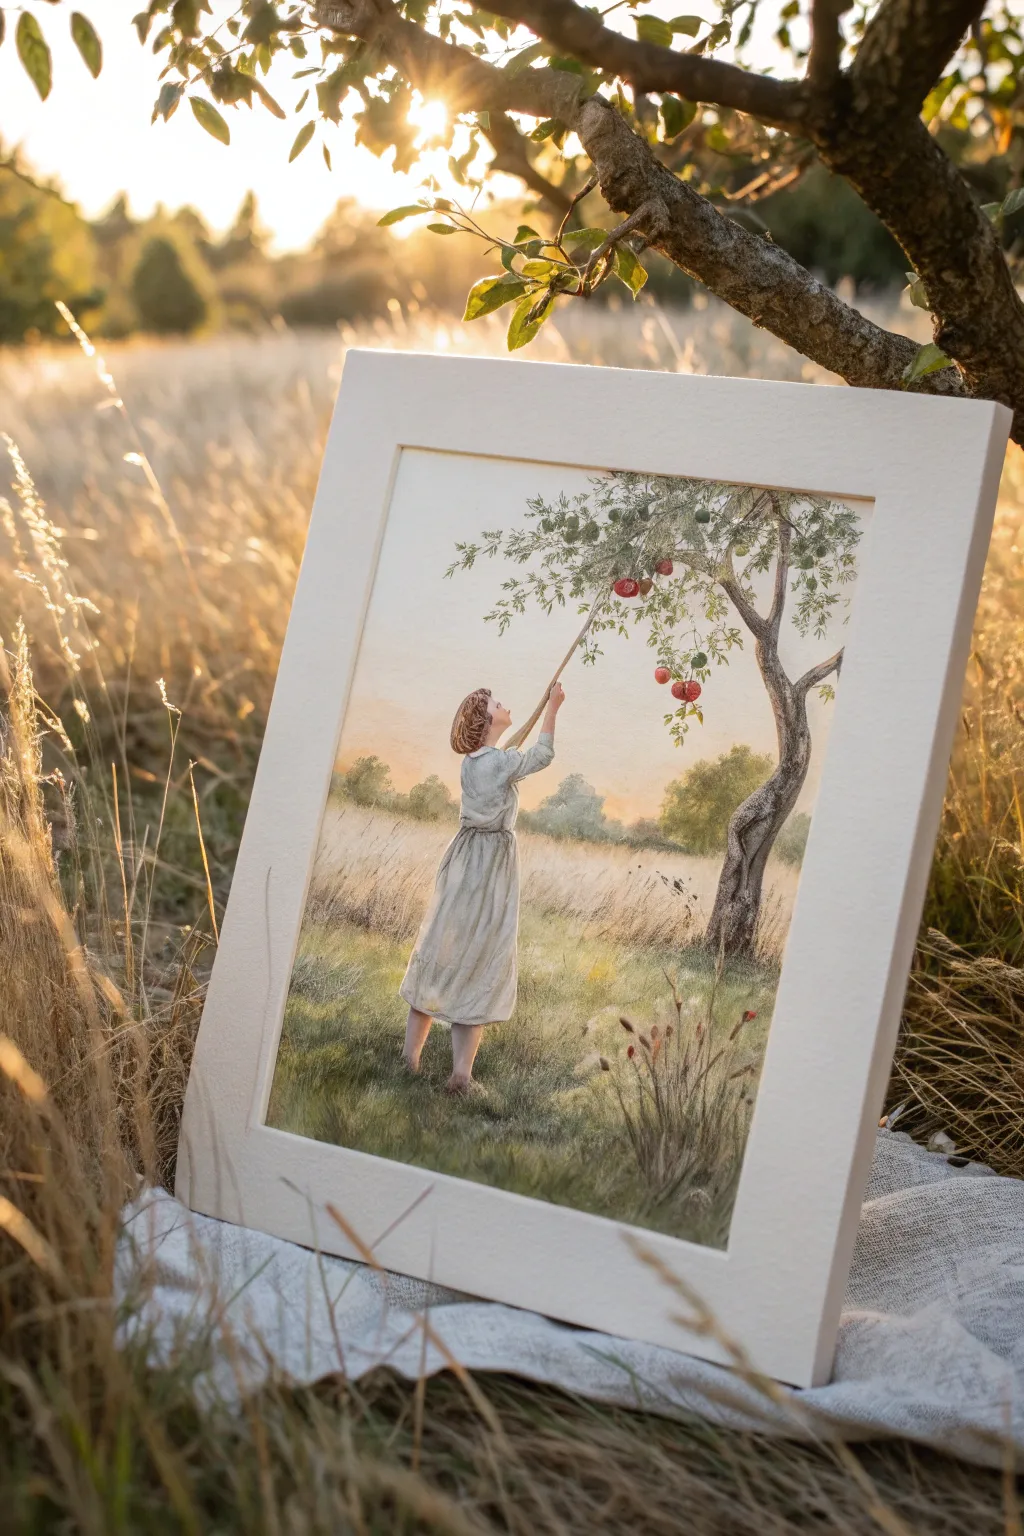
Capture the nostalgic warmth of summer fading into autumn with this gentle watercolor scene. You will learn to paint a delicate figure reaching among orchard branches, bathed in the soft, diffused light of the golden hour.
How-To Guide
Materials
- Cold press watercolor paper (300 gsm)
- Watercolor paints (Yellow Ochre, Burnt Sienna, Sap Green, Alizarin Crimson, Ultramarine Blue, Payne’s Grey)
- White gouache for highlights
- Round brushes (sizes 2, 6, and 10)
- Rigger brush for fine branches
- Masking tape
- Pencil (HB) and kneadable eraser
- Two jars of water
- Paper towels
- Mixing palette
Step 1: Planning and Sketching
-
Prepare your surface:
Tape your watercolor paper down to a board on all four sides. This prevents buckling when we add washes later and creates that crisp, clean border visible in the reference. -
Establish the horizon:
Draw a faint horizon line about one-third of the way up the paper. This low horizon emphasizes the height of the tree and the sky. -
Sketch the tree structure:
Lightly sketch the main trunk on the right side, curving slightly inward. Extend branches outward, focusing on the specific branch the figure will be reaching for. -
Outline the figure:
Sketch the figure standing centrally. Her body should be slightly turned, arm extended upward grasping a branch. Keep the dress shapes simple and flowing, indicating folds where the fabric drapes.
Step 2: The Golden Background
-
Wet-on-wet sky wash:
Wet the entire sky area with clean water using your largest brush. Avoid the figure and the main tree trunk. -
Apply the glow:
While the paper is wet, drop in a very dilute wash of Yellow Ochre near the horizon to simulate the setting sun. As you move up the paper, blend in a touch of very pale Ultramarine for a soft atmospheric transition. -
distant foliage:
While the sky is still damp but not soaking, dab in soft shapes for distant trees along the horizon using a mix of Sap Green and a tiny bit of Burnt Sienna. Let them bleed slightly for a soft-focus effect. -
Wait for drying:
Allow this layer to dry completely before moving on. The paper must be flat and cool to the touch.
Sunlight Tip
To make the light look truly ‘golden’, add a tiny glazing layer of pure Yellow Ochre over the sunlit side of the figure’s dress after the grey underpainting typically dries.
Step 3: Painting the Foreground
-
Field base layer:
Mix a muted green using Sap Green and Yellow Ochre. Paint the grassy area with vertical strokes, leaving some white paper showing for texture. -
Building depth:
While the grass is damp, drop in darker greens (Sap Green + Payne’s Grey) at the bottom corners and around the figure’s feet to ground her. -
Dry grass details:
Once dry, use a size 2 brush with a mix of Burnt Sienna and Yellow Ochre to flicks stiff, thin lines representing tall, dried wheat or grass stalks in the foreground.
Muddy Greens?
Avoid mixing green and red directly on the paper while wet, as they are complementary colors and turn brown. Let the green leaves dry fully before painting adjacent red apples.
Step 4: The Figure and Tree Details
-
Tree trunk texture:
Paint the tree trunk with a mix of Burnt Sienna and Payne’s Grey. Use the side of your brush to create a rough bark texture, leaving lighter patches on the left side where the sun hits it. -
Branches and leaves:
Switch to your rigger brush to paint fine branches extending from the main boughs. Use a stippling motion with a size 6 brush and varying shades of green to create clusters of leaves. -
Painting the dress:
Paint the dress with a very watery wash of grey-blue. I like to keep this extremely light. While wet, drop slightly darker pigment into the shadowed folds and under the waistline. -
Skin tones:
Mix a tiny amount of Burnt Sienna and Yellow Ochre with plenty of water for skin tones. Carefully paint the arm, face, and legs. -
The apples:
Using Alizarin Crimson, paint the round apple shapes hanging from the branches. Add a second layer of red on the shadowed side of each fruit for dimension.
Step 5: Final Touches
-
Highlights with gouache:
Use white gouache to add tiny highlights to the tops of the apples and the sunlit edge of the tree trunk. -
Foreground flowers:
Add small touches of red or russet among the tall grasses to suggest wildflowers or seed heads. -
Remove tape:
Once the painting is 100% dry, peel the masking tape away slowly at a 45-degree angle to reveal your crisp white border.
Now you have a serene piece of art that perfectly captures the quiet beauty of a country harvest


Wildflower Field Under a Pink-Blue Sky
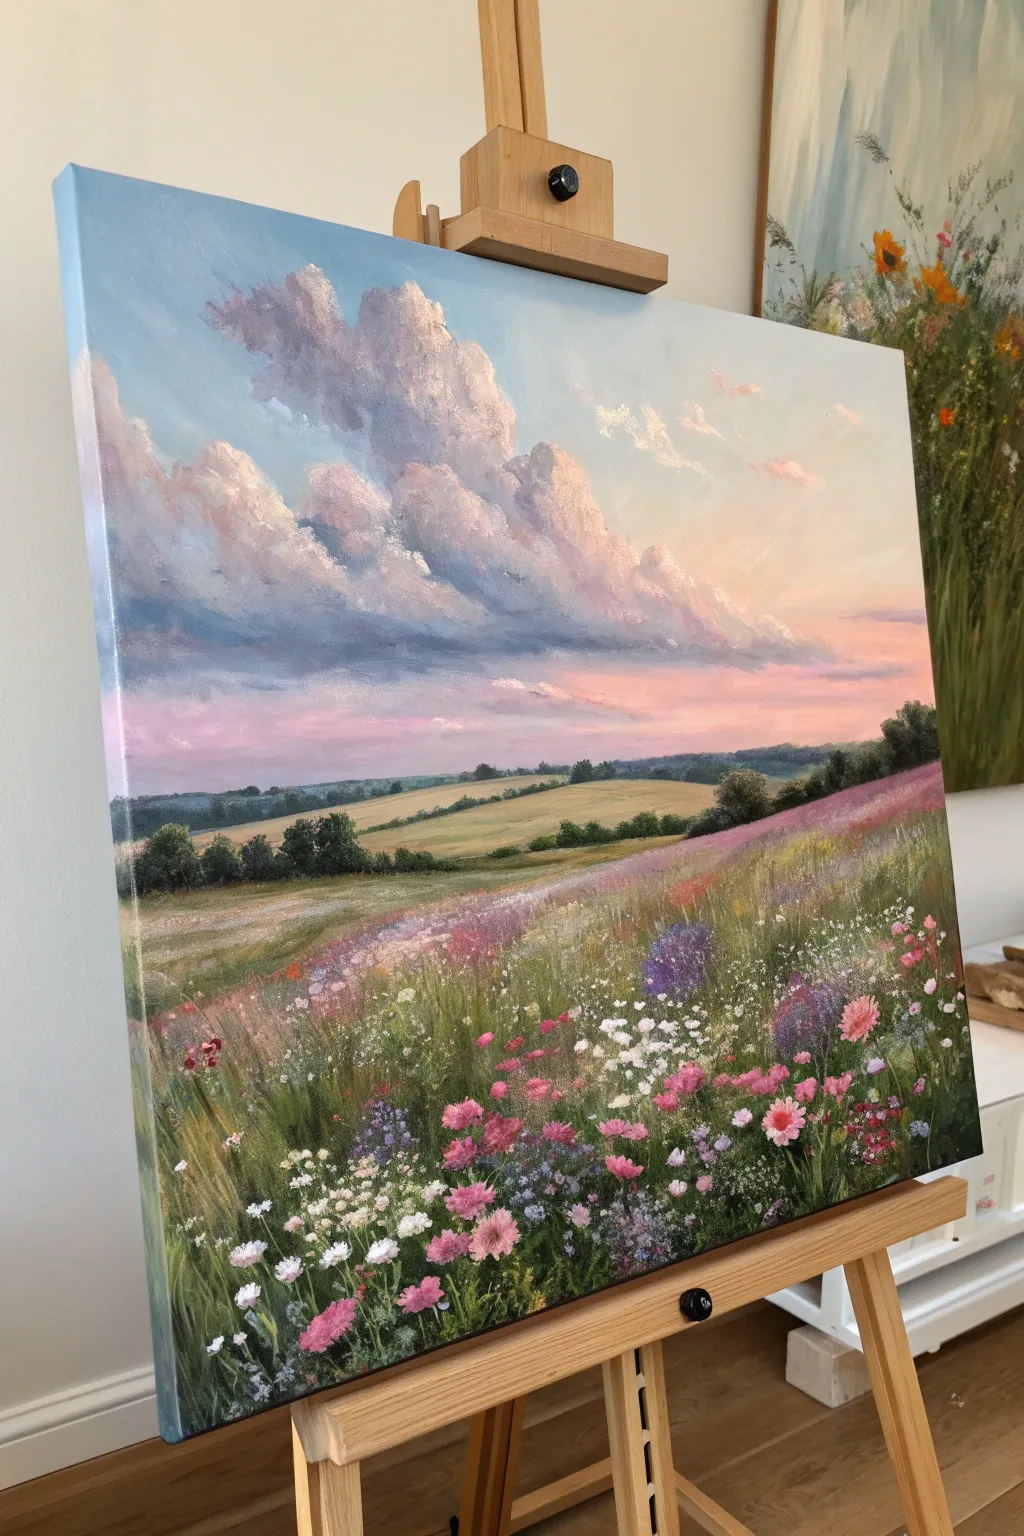
Capture the dreamlike essence of cottagecore with this vibrant landscape painting, featuring rolling hills under a dramatic, cloud-filled sky. The soft pink and blue hues create a serene atmosphere, while the textured wildflowers in the foreground bring the scene to life.
Detailed Instructions
Materials
- Canvas (stretched, 16×20 or similar)
- Acrylic or oil paints (Titanium White, Ultramarine Blue, Cerulean Blue, Alizarin Crimson, Cadmium Yellow, Sap Green, Burnt Sienna, Violet)
- Large flat brush (1-2 inch) for sky blending
- Medium filbert brush for clouds and hills
- Small round brushes (sizes 2 and 4) for flowers
- Fan brush (optional, for grass texture)
- Palette knife
- Palette
- Water jar or solvent
- Paper towels
Step 1: Setting the Scene: Sky & Background
-
Sky gradient base:
Begin by blocking in the sky. Mix a pale blue using Titanium White and Cerulean Blue for the upper left corner. As you move down and to the right, gradually blend in a touch of Alizarin Crimson and more White to create a soft pinkish-mauve transition. -
Horizon glow:
Near the horizon line (about one-third up from the bottom), apply a mixture of White, a tiny dot of Yellow, and soft pink. This imitates the warm light of a setting or rising sun. -
Drafting the cloud shapes:
Using a medium filbert brush and a mix of Ultramarine Blue, Alizarin Crimson, and a touch of Burnt Sienna to gray it down, rough in the large diagonal cloud formation stretching across the sky. Keep edges soft. -
Highlighting the clouds:
Load your brush with thick Titanium White and a hint of pink. Dab this onto the top left edges of your dark cloud shapes to create fluffy, illuminated volumes. Use a dry brush to gently blend the bottom edges into the sky. -
Distant hills:
Paint the furthest hill lines using a cool, muted blue-green (Sap Green + Ultramarine Blue + White). Atmospheric perspective makes distant objects lighter and bluer. -
Mid-ground rolling fields:
Move closer in the mid-ground with warmer greens. Mix Sap Green with Yellow Ochre or Cadmium Yellow and White. Paint sloping shapes that define the rolling landscape.
Cloud Volume Secret
Don’t over-blend the clouds! Leave distinct brushstrokes of thick white paint on the highlights. This impasto texture catches the room’s light.
Step 2: Creating the Grassy Foundation
-
Underpainting the field:
For the large foreground field, lay down a dark base coat. Use Sap Green mixed with a little Violet or Burnt Sienna to create a deep shadow color. This depth is crucial for making the bright flowers pop later. -
Building vertical strokes:
Once the base is tacky or dry, take a fan brush or a medium flat brush turned sideways. Use lighter olive greens and grassy tones to flick upward strokes, simulating tall grasses swaying in the breeze. -
Shadow play:
I like to vary the greens here, adding some blue-green patches in the lower corners to create a vignette effect, drawing the eye toward the center. -
Mid-ground texture:
As the grass recedes toward the hills, make your brushstrokes much smaller and less distinct. Simply stippling or dabbing color suggests texture without needing detailed blades.
Metallic Magic
Mix a tiny amount of iridescent medium or pearl white into your cloud highlights for a subtle, shimmering glow.
Step 3: The Wildflower Explosion
-
Scatter the foliage:
Before painting blooms, add variety to the greenery. Mix a sage green color and use a small round brush to paint specific stems and leaf clusters in the immediate foreground. -
Cluster shapes:
Start indicating flower positions with general blobs of color. Use pinks, whites, and violets. Don’t worry about petals yet; just place the color masses where you want your main blooms. -
Detailed pink blooms:
Using your smallest round brush, define the pink cosmos or poppy-like flowers. Paint the petals with a mix of Alizarin Crimson and White, leaving the centers dark. -
White delicate fillers:
Dot in clusters of small white flowers (like Queen Anne’s Lace or baby’s breath) using pure Titanium White. Keep these clusters loose and airy. -
Purple accents:
Add touches of deep violet or lavender flowers among the grass. These cool tones balance the warmth of the pinks and the sunset sky. -
Splatter technique:
For a magical, random effect, dilute some white or light pink paint slightly with water. Load a stiff brush and flick the bristles to spray tiny specks over the field, mimicking distant blooms and pollen. -
Final highlights:
Add final bright highlights to the tips of the grass and the flower petals catching the most light. Step back and ensure the composition feels balanced.
Step back and enjoy the peaceful countryside view you have brought into your home


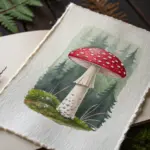

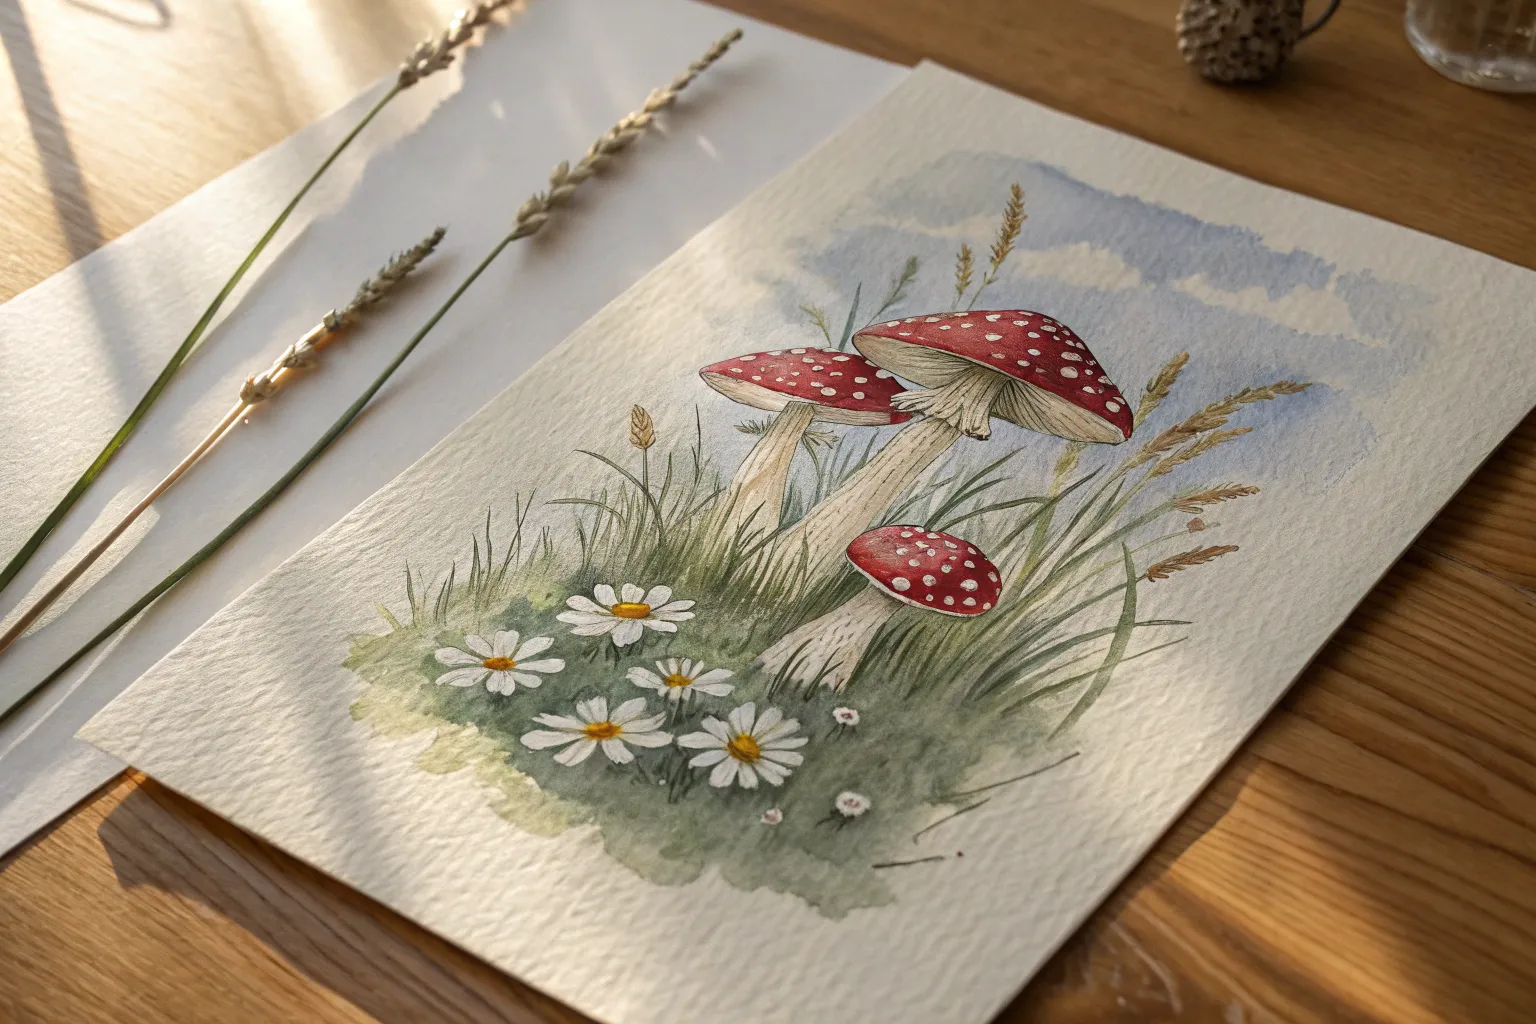
Moonlit Mushrooms With Firefly Glow
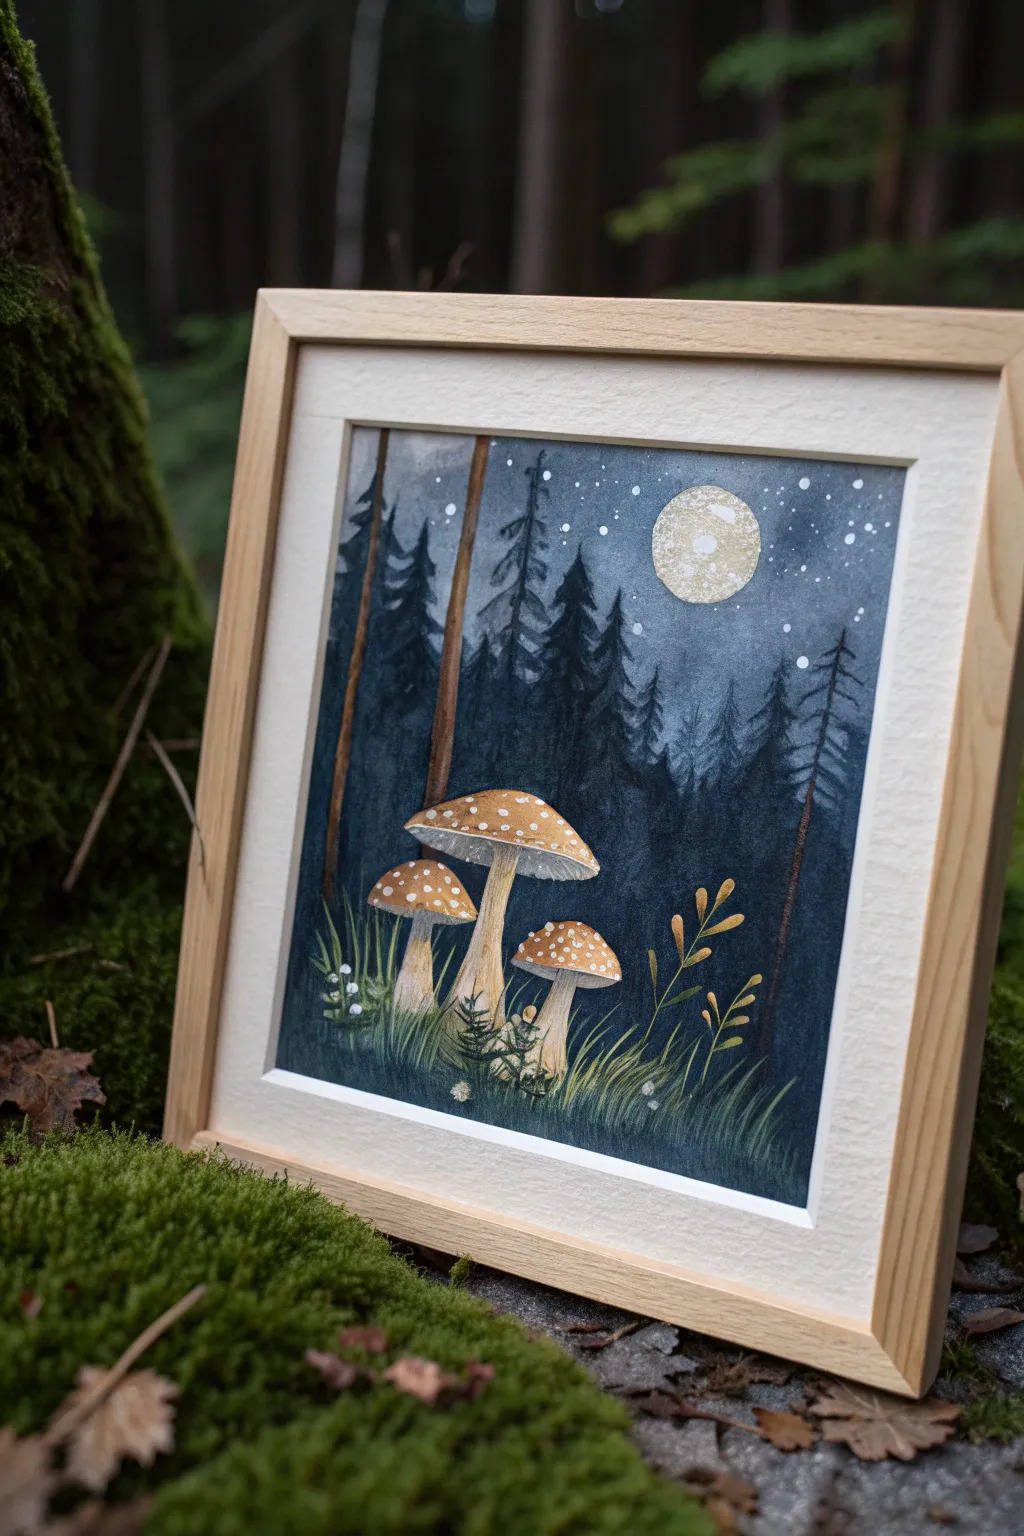
Capture the quiet magic of a woodland at midnight with this atmospheric night scene. Using deep indigo hues and contrasting warm earth tones, you’ll create a glowing focus on three charming toadstools beneath a full moon.
Step-by-Step Tutorial
Materials
- Cold-pressed watercolor block (140lb/300gsm)
- Watercolor paints (Indigo, Payne’s Gray, Burnt Sienna, Yellow Ochre, Sap Green)
- Gouache paints (White, Metallic Gold – optional)
- Round brushes (sizes 2, 6, and 10)
- Fine liner brush (size 0 or 00)
- Masking fluid
- Old toothbrush
- Pencil and eraser
- Two jars of water
- Paper towel
Step 1: Sketching and Masking
-
Lightly sketch the composition:
Begin by drawing the three main mushroom caps in the lower center. Add thick stalks and sketch the horizon line of grass around them. Draw a perfect circle for the moon in the upper right quadrant. -
Define the tree trunks:
Sketch two or three vertical lines extending off the top edge to represent the large foreground pine trunks. Keep these lines slightly uneven to mimic bark texture. -
Protect the highlights:
Apply masking fluid carefully over the three mushroom shapes (caps and stalks), the moon circle, and a few tiny dots in the grass for upcoming flowers. Let this dry completely before touching any paint.
Step 2: The Midnight Background
-
Prepare the night sky wash:
Mix a large puddle of Indigo with a touch of Payne’s Gray. Wet the entire paper around the masked areas with clean water first to encourage a smooth gradient. -
Paint the gradient sky:
Starting at the top, lay down your dark blue mix, diluting it slightly as you move downward toward the horizon line to create a sense of atmospheric depth. -
Add distant tree silhouettes:
While the paper is still damp but not soaking, mix a thicker, darker blue-black. Using the size 6 brush, dab in triangular pine shapes along the horizon line, allowing the soft edges to blur into the background mist. -
Paint the foreground trees:
Once the background dry, mix a strong black-brown using Burnt Sienna and Indigo. Paint the tall vertical trunks you sketched earlier, dry-brushing slightly to create bark texture. -
Create the starry sky:
Load a toothbrush with white gouache (consistency of heavy cream). Flick the bristles to spray fine stars across the upper sky. Add larger stars manually with your smallest brush.
Pro Tip: Glowing Edges
When painting the sky around the moon, re-wet the area with clean water first. Drop the dark paint further away and let it bleed toward the moon without touching it for a soft halo effect.
Step 3: Painting the Mushrooms
-
Remove the masking fluid:
Gently rub away the rubbery masking fluid with your finger or an adhesive eraser to reveal the pristine white paper underneath. -
Base coat the caps:
Mix Yellow Ochre with a dot of Burnt Sienna. Paint the mushroom caps, keeping the color more concentrated at the top center and washing it out to near-white at the edges for a glowing 3D effect. -
Detail the stalks:
Using a very pale wash of yellow-brown, shade the sides of the mushroom stalks, leaving the centers white to imply roundness. -
Add the gills:
With your fine liner brush and a diluted brown mix, paint incredibly thin, delicate lines on the underside of the caps to represents the gills. -
Paint the cap spots:
Dip your fine brush into opaque white gouache. Dot distinct white spots onto the dried caps, varying their sizes for natural irregularity.
Troubleshooting: Blotchy Flat Wash
If your night sky dries with hard water marks (blooms), don’t panic. Gently scrub the dry area with a damp stiff brush to soften the edge, or paint a second glaze over the entire sky.
Step 4: Foreground and Details
-
Paint the moon:
Fill the moon circle with a very watery pale yellow. While still wet, drop in hints of gray or gold gouache to create craters and surface texture. -
Create the grassy floor:
Using Sap Green mixed with a little Indigo for darkness, paint upward flicking strokes at the base of the mushrooms to create deep forest grass. -
Highlight the grass:
Mix a lighter olive green or yellow-green. Add fresh grassy strokes over the dark base layer to simulate moonlight catching individual blades. -
Add botanical accents:
Paint delicate leafy sprigs or ferns in the foreground using a gold or light ochre color to contrast against the dark blue shadowy grass. -
Final bright touches:
Use your white gouache to add the tiny white flowers in the lower left corner and perhaps a few more ‘firefly’ dots hovering near the grass.
Once framed, this piece brings a peaceful, fairylike window into nature right onto your wall


Folk Art Animal With Floral Surround
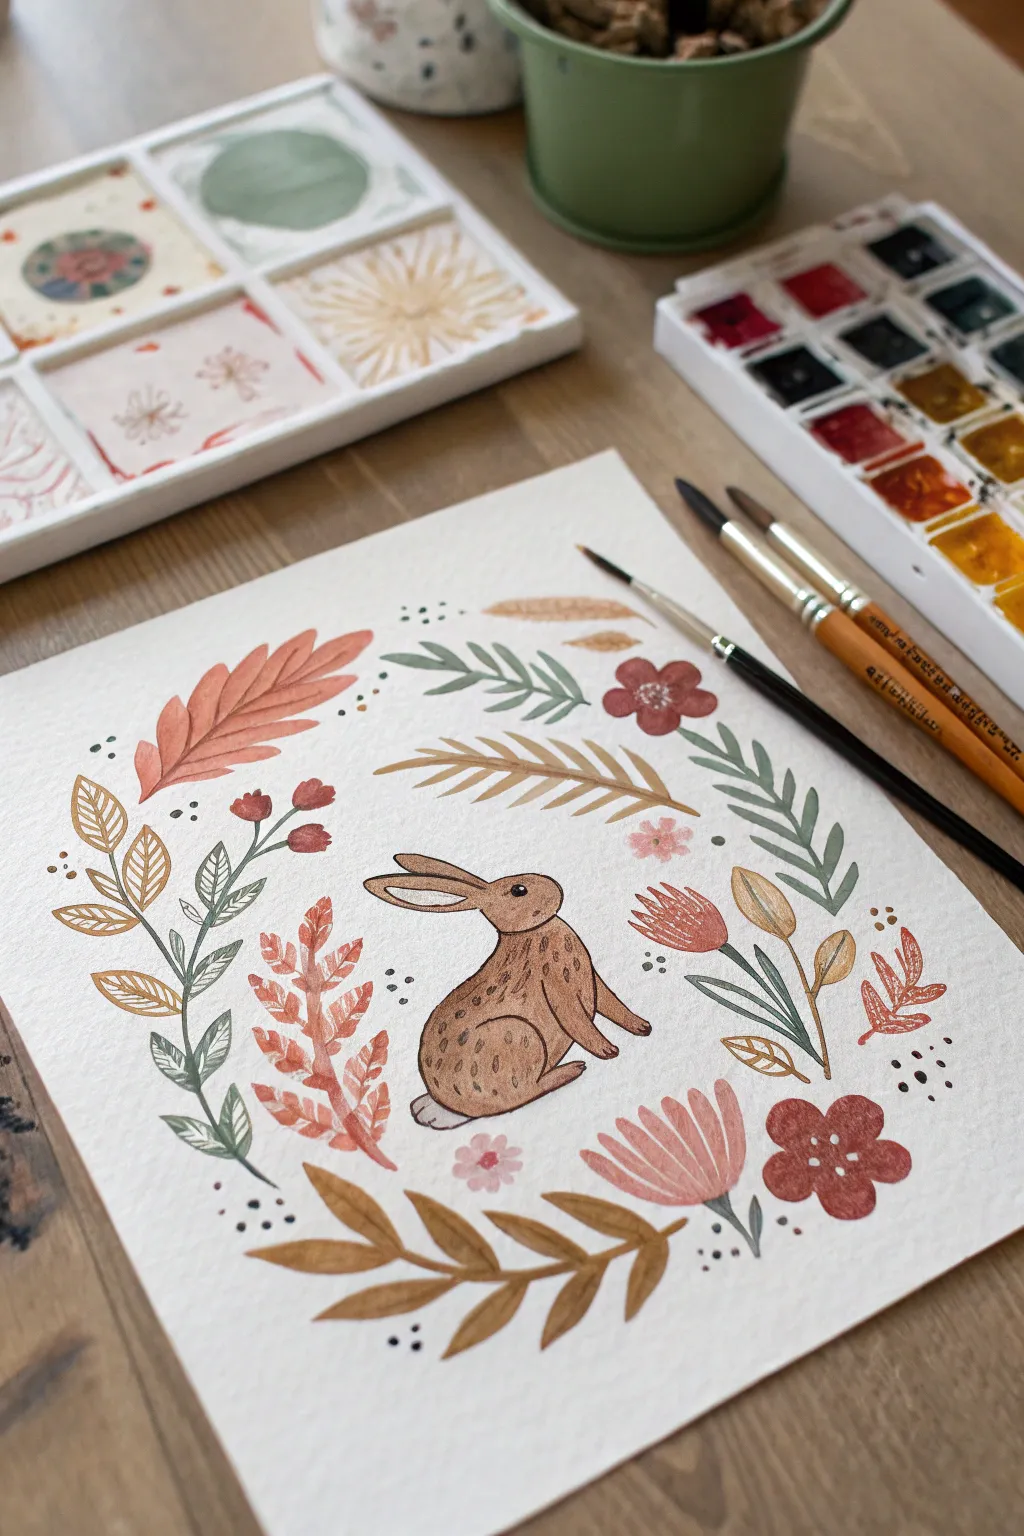
Capture the essence of cottagecore charm with this delightful folk art illustration featuring a gentle rabbit nestled among autumnal flora. Using warm, earthy watercolors and simple brushstrokes, you’ll create a comforting piece that feels both vintage and fresh.
Step-by-Step Tutorial
Materials
- Cold press watercolor paper (300 gsm)
- Watercolor paint set (focus on earth tones: Burnt Sienna, Yellow Ochre, Sap Green, Alizarin Crimson)
- Round watercolor brushes (Size 2, 4, and 6)
- Pencil (HB or 2H)
- Kneaded eraser
- Jar of clean water
- Paper towel
Step 1: Sketching the Composition
-
Draft the center subject:
Begin by lightly sketching the outline of the rabbit in the direct center of your paper. Focus on the simple shapes first: an oval for the body and a smaller circle for the head, connecting them with a gentle curve for the neck. -
Refine the rabbit features:
Add the long ears pointing backward, the small front paws, and the rounded haunch of the back leg. Keep your pencil lines extremely light so they won’t show through the transparent watercolor later. -
Map out the wreath:
Lightly draw a large circle around the rabbit to serve as a guide for your floral elements. You don’t need to draw every leaf perfectly right now; just mark the placement of the main stems and larger flowers to ensure the composition feels balanced.
Clean Lines
To keep the folk art style crisp, let each element dry completely before painting a neighboring shape. This prevents colors from bleeding into each other.
Step 2: Painting the Rabbit
-
Base wash:
Mix a watery wash of Burnt Sienna or a light brown. Using a size 4 brush, fill in the rabbit’s body, leaving the small tail unpainted (white) for contrast. Let the color pool naturally for texture. -
Adding dimension:
While the base layer is still slightly damp but not soaking wet, drop a slightly darker brown into the bottom of the rabbit’s haunch, under the neck, and along the ears to create soft shadows. -
Defining details:
Once the base is completely dry, mix a concentrated dark brown. Use your size 2 brush to paint the eye, add a tiny nose, and outline the ears and limbs with thin, delicate lines. -
Texture work:
Using the very tip of your small brush and the dark brown mix, add small dashes and dots across the rabbit’s back and thigh to mimic the texture of fur.
Step 3: Building the Floral Surround
-
Painting the large leaves:
Starting at the top left, paint the large, rust-colored feather-shaped leaf. Use a flat wash of Terra Cotta or mixed orange-brown, pressing the belly of the brush down to widen the stroke and lifting for the tip. -
Adding greenery:
Switch to a muted Sap Green. Paint the fern-like sprigs on the left and right sides. I find it easiest to paint the central stem first, then flick the brush outward to create the individual leaflets. -
Painting the golden elements:
Using Yellow Ochre, paint the wheat-like stalk above the rabbit and the curved leaves at the bottom. These warm tones help tie the wreath together. -
Floral accents:
Mix a dusty rose or muted red for the simple five-petal flowers and the tulip-shaped blooms. Keep the shapes simple and folk-art inspired rather than realistic. -
Filling the gaps:
Look for empty spaces in your wreath circular guide. Add smaller sprigs of leaves in alternating colors—some brown, some green—to create a lush, woven look. -
Adding berries and buds:
Use the tip of a size 2 brush to dot small red berries on thin stems. These tiny details add a lovely whimsy to the piece.
Make It Seasonal
Change the color palette to match the seasons: use pastels for a spring bunny, bright greens for summer, or cool blues and silvers for a winter scene.
Step 4: Finishing Touches
-
Detailing the leaves:
Once the large rust leaf and other broad leaves are fully dry, mix a slightly darker version of their base color. Paint thin central veins to give them structure. -
Decorative dots:
Dip your smallest brush into dark grey or black paint. Add clusters of three tiny dots around the rabbit and between floral elements to fill negative space and add a magical quality. -
Flower centers:
Add a tiny dot of white gouache or pale yellow to the centers of your red flowers to make them pop. -
Final assessment:
Step back and look at the overall balance. If one side feels too light, add a small floating leaf or a few more decorative dots to even out the visual weight.
Now you have a charming piece of folk art perfect for hanging in a cozy kitchen or gifting to a nature-loving friend


Have a question or want to share your own experience? I'd love to hear from you in the comments below!