If you’re craving fresh furry drawing ideas, you’re in the perfect headspace to play, experiment, and build characters that feel alive. I pulled together a mix of classic go-to sketches and weirder concept prompts so you can go from quick doodles to a polished fursona design.
Classic Fursona Headshot
This project focuses on capturing personality and expression through energetic line work and subtle shading. You’ll create a charming canine or fox-style headshot with large, lively eyes and a classic smiling muzzle, perfect for practicing furry anatomy.
Step-by-Step
Materials
- Sketchbook or drawing paper (medium tooth)
- H pencil (for initial layout)
- 2B or 4B pencil (for detailing and shading)
- Kneaded eraser
- Pencil sharpener
- Blending stump (optional)
Step 1: Laying the Foundation
-
Basic Circle:
Start by drawing a loose circle in the center of your page using your H pencil with very light pressure. This will serve as the main volume of the skull. -
Guidlines:
Draw a vertical centerline slightly curved to the right to indicate a 3/4 view. Add a horizontal eyeline crossing the middle of the circle, also curved to match the spherical form. -
Muzzle Block-out:
Sketch a rounded box or snout shape protruding from the lower half of the circle’s intersection. Keep this geometric for now; focusing on the 3D volume rather than the final fur lines. -
Ear Placement:
Indicate the position of the ears with two large triangles on top of the head. The ear on the left should be turned slightly outward, while the right ear faces more forward.
Keep it Loose
Don’t press too hard when drawing fur tufts. Quick, flicking wrist motions create much sharper and more natural-looking hair tips than slow, heavy strokes.
Step 2: Defining Features
-
Eye Shapes:
Draw two large, expressive oval shapes resting on the horizontal guidline. The eye on the right (closest to the viewer) should be slightly larger and taller than the one on the left. -
Nose and Mouth:
Refine the muzzle shape. Draw a soft, rounded triangular nose at the tip of the snout. From the bottom of the nose, draw the mouth line, curving it upwards into a cheerful smile. -
Cheek Fluff:
Begin to break the geometric circle shape by sketching jagged, tufted lines on the cheeks. Use quick, outward flicks of your pencil to suggest thick fur. -
Ear Details:
Inside the ear triangles, specificy the inner ear. Use sweeping curves to show the depth and add small jagged lines at the base for inner ear fluff.
Add Personality
Try changing the ear orientation or the eyebrow angle. One ear flopped down or a raised eyebrow can completely change the character’s mood instantly.
Step 3: Refining and Inking with Pencil
-
Switch Pencils:
Switch to your 2B or 4B pencil now for darker, more confident lines. Outline the eyes, thickening the upper lash line significantly for a cartoon style. -
Pupils and Iris:
Draw large pupils and irises looking upward to the right. Leave a small white circle in the corner of each pupil for a lively highlight. -
Fur Texture:
Go over your cheek and neck guidelines with deliberate, jagged strokes. I like to vary the size of the fur tufts—some large, some small—to make the coat look natural. -
Muzzle Definition:
Darken the nose and the smile line. Add a few small dots on the muzzle for whisker spots and define the lower jaw slightly open. -
Neck Ruff:
Extend the drawing downwards by adding a fluffy chest area. Use downward-pointing spikes of varying lengths to show gravity pulling on the fur.
Step 4: Shading and Finishing Touches
-
Hatching the Ears:
Add light hatching lines inside the ears to create depth, darkening the deepest recesses. -
Eye Depth:
Shade the iris, making it darker at the top under the eyelid and lighter towards the bottom. This gradient makes the eyes spark. -
Muzzle Shading:
Add very light cross-hatching to the side of the snout and under the chin. This separates the head from the neck and adds volume to the muzzle. -
Clean Up:
Use your kneaded eraser to lift away the initial H pencil guidelines that are still visible. Don’t worry if some faint lines remain; they add to the sketchbook charm. -
Final Contrast:
Do one final pass with your darkest pencil, reinforcing the corners of the mouth, the pupils, and the deepest fur crevices to make the drawing pop off the page.
Now you have a lively character sketch ready to be scanned or filled with color


Expression Sheet With Muzzle Variations
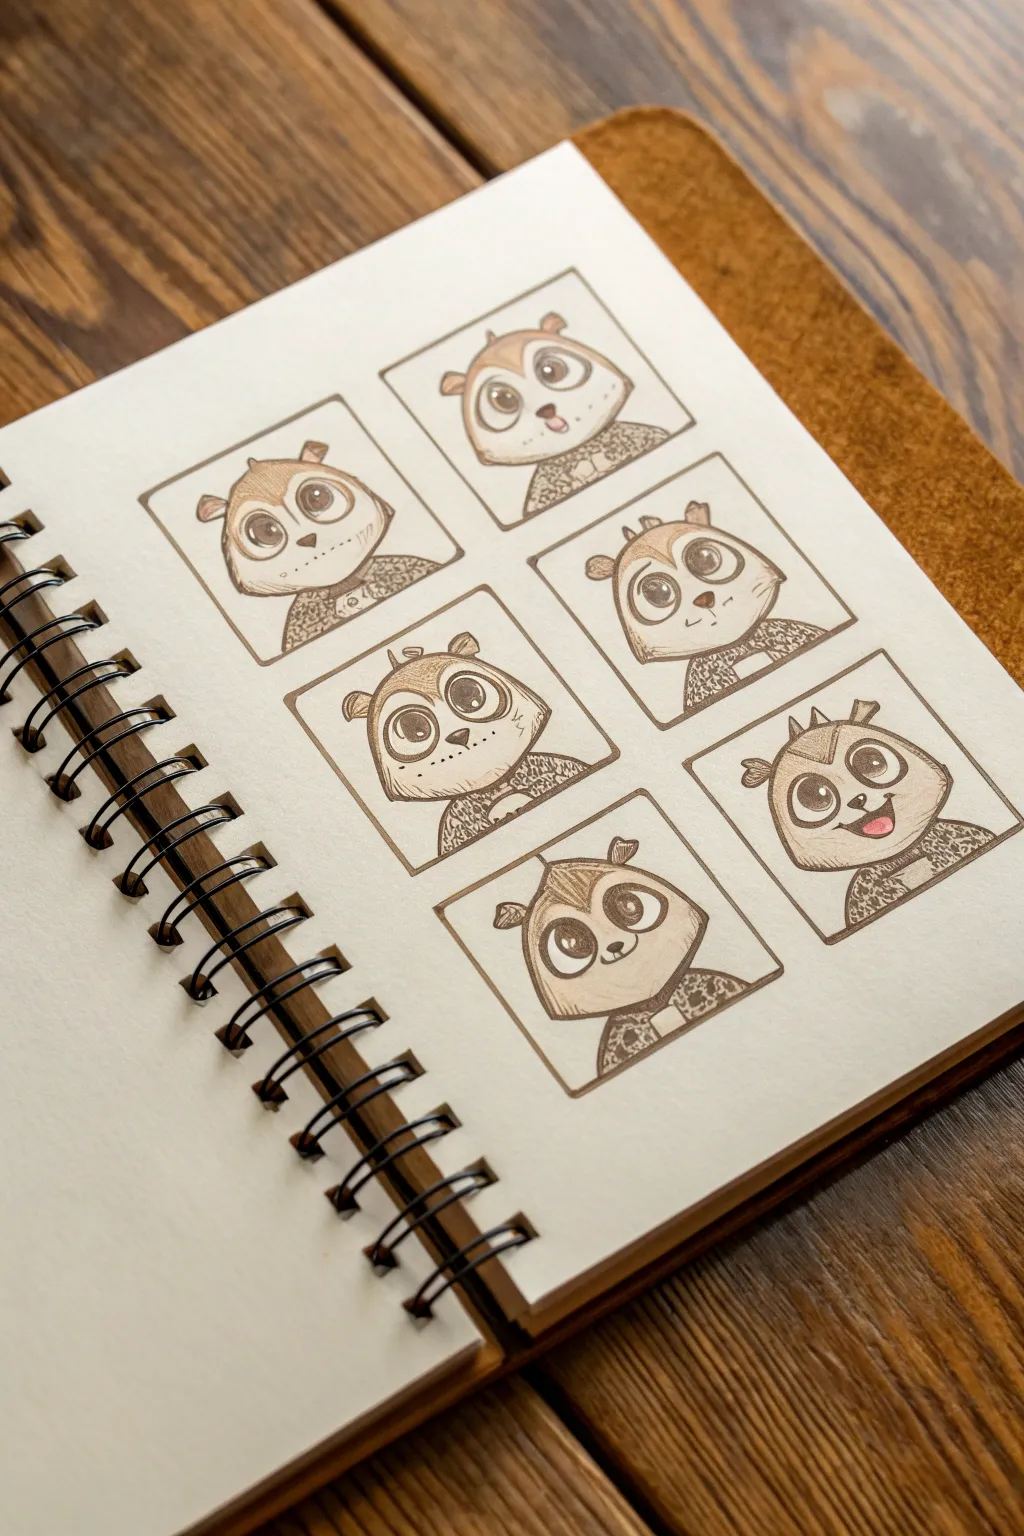
Master the art of facial nuances with this charming character study sheet, focusing on subtle changes in muzzle shapes and expressions. This project uses a warm, monochromatic palette to keep the focus strictly on form and emotion.
Detailed Instructions
Materials
- Spiral-bound sketchbook (heavyweight cream or mixed media paper)
- Mechanical pencil (HB or 2B)
- Fine liner pens (sepia or dark brown, 0.1mm and 0.5mm)
- Alcohol markers (warm grey, light brown, or sepia set)
- Ruler
- Kneaded eraser
- White gel pen (optional for highlights)
Step 1: Setting the Grid
-
Layout calculation:
Begin by observing your sketchbook page size. You need to fit six squares in a 2×3 grid. Measure the width of your page and leave uniform margins on the sides. -
Drafting the frames:
Using your ruler and mechanical pencil, lightly map out the six boxes. Aim for squares that are roughly 2.5 to 3 inches on each side. -
Inking the borders:
Once satisfied with the spacing, trace over your pencil lines with a 0.5mm sepia fine liner. I like to freehand this final line just slightly to give it a looser, organic sketchbook feel rather than a rigid geometric look.
Pro Tip: Eye Cohesion
Even when changing the muzzle shape, keep the eye size and spacing identical across all six drawings. This anchors the character’s identity.
Step 2: The Base Sketches
-
Rough circles:
Inside each box, lightly sketch a large circle for the head. Position it centrally but allow room at the bottom for the character’s collar and shoulders. -
Guidance lines:
Draw a vertical center line and a horizontal eye line on each face. Vary the angle slightly in a few boxes to show subtle head tilts. -
Eye placement:
Sketch two large oval shapes for the eyes on the horizontal guide. Keep them large and expressive, hallmark to the ‘furry’ art style. -
Muzzle definition:
This is the core of the exercise. For the first row, draw rounded, soft muzzles. In the second row, try a slightly squarer shape. In the bottom row, experiment with a more triangular, pointed muzzle.
Step 3: Details & Line Art
-
Defining the features:
Pencil in the ears, tufts of hair, and neck ruffs. Give each version slightly different ear positions—some perked up, some relaxed. -
Inking the outline:
Switch to your 0.5mm sepia pen. Outline the main head shape and ears. Use quick, short strokes for the cheek fur to imply texture. -
Facial details:
Use the finer 0.1mm pen for delicate areas like the eyes, nose, and mouth. Vary the expressions: make one stick its tongue out, make another look surprised, and have one smiling gently. -
Adding the ‘mask’:
These characters have raccoon or panda-like eye patches. Outline these shapes lightly around the eyes with your pen. -
Shoulder patterns:
Draw the shoulders and clothing collar. Add a scribbly, textured pattern to the clothing area to separate it visually from the fur. -
Erase guidelines:
Wait a moment for the ink to set, then gently remove all pencil marks with your kneaded eraser.
Troubleshooting: Ink Smears
If your sepia fineliner smears under the marker, switch to a pigment-based liner and let it cure for at least 15 minutes before coloring.
Step 4: Shading & Tone
-
Base tone application:
Using a light warm grey or pale brown marker, fill in the ‘mask’ area around the eyes. Keep the stroke direction consistent. -
Deepening the eyes:
Color the pupils dark brown or black, leaving a small white circle for the catchlight. If you forget, you can add it back later with a white gel pen. -
The hair cap:
Apply the same light brown tone to the ‘hair’ or darker fur patch on top of the head. -
Shadowing the muzzle:
Add a very subtle shadow under the chin and along the bottom edge of the muzzle to give it 3D volume. -
Clothing texture:
Go over the scribbled clothing pattern with a darker brown marker to create contrast against the lighter face. -
Final touches:
Strengthen the outer contour lines of the boxes one last time if they faded during coloring to make the grid pop.
Now you have a comprehensive reference sheet that demonstrates how small shifts in line work can create unique personality traits


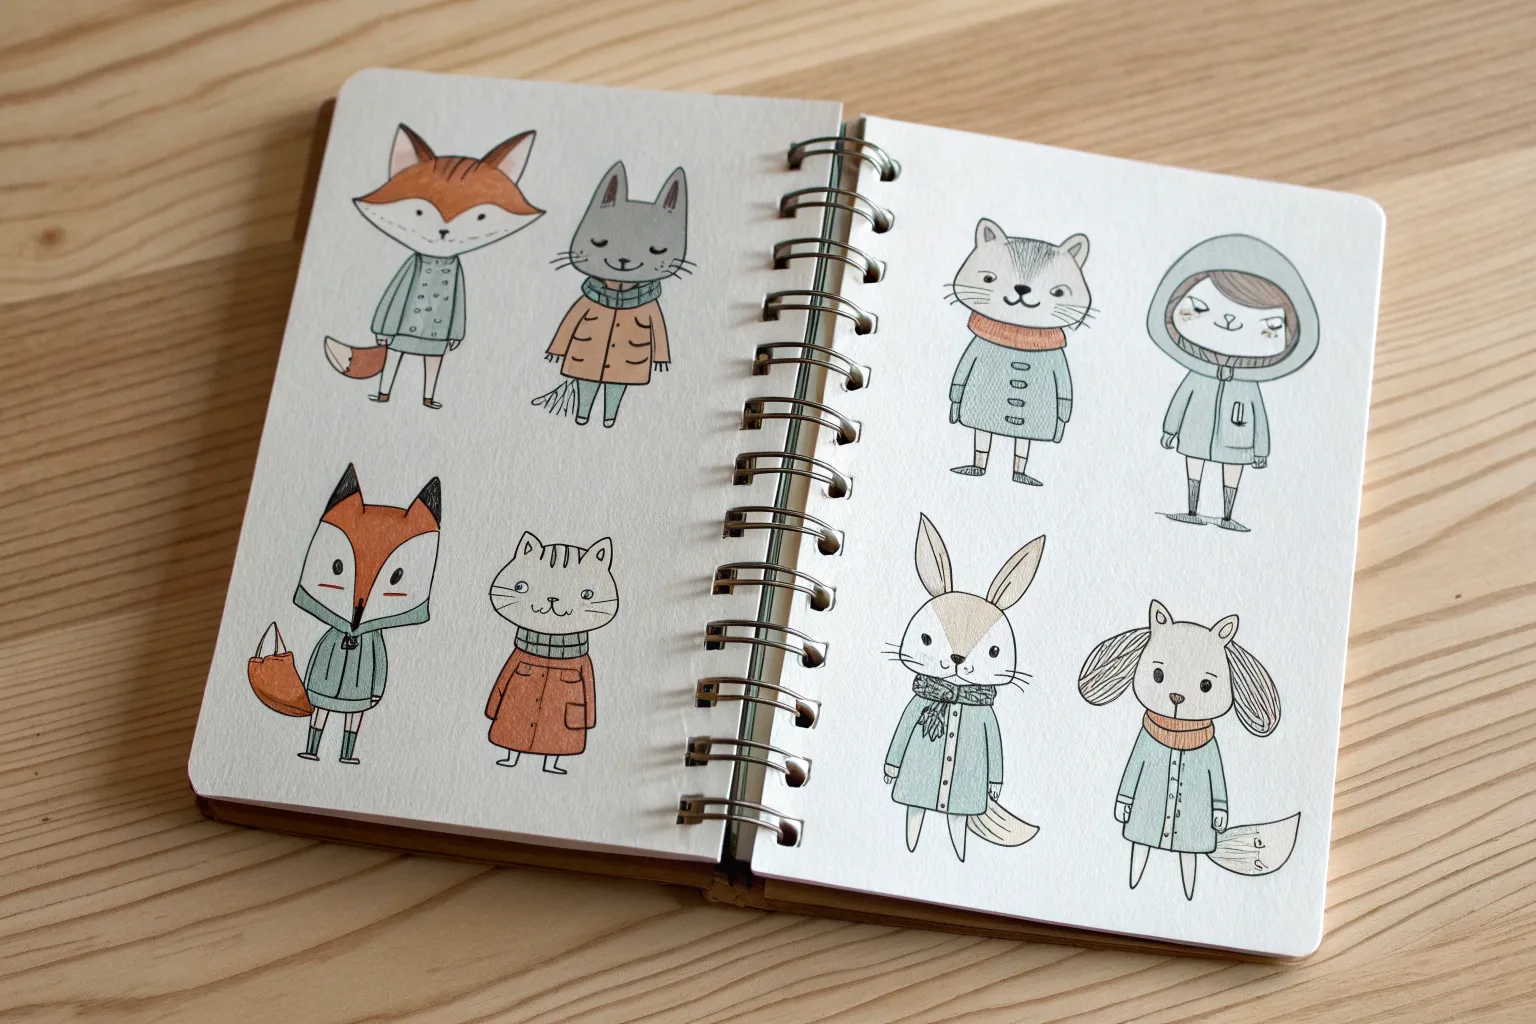
Species Lineup Grid

Capture the delicate charm of woodland flora and fauna with this structured yet whimsical sketching exercise. By arranging small, detailed drawings into neat boxes, you create a cohesive collection that serves as both practice and a beautiful finished piece.
Step-by-Step
Materials
- Spiral-bound dot grid or graph paper notebook
- Fine liner pens (0.1mm and 0.3mm brown or sepia)
- Mechanical pencil (0.5mm HB)
- Ruler or straight edge
- Eraser
- Reference photos of woodland creatures and plants
Step 1: Setting up the Structure
-
Define the grid:
Using your ruler and mechanical pencil, lightly map out a 3×4 grid on the right-hand page of your notebook using the dot grid as a guide for straight lines. -
Determine proportions:
Aim for rectangular boxes, roughly 1.5 inches wide by 2 inches tall, leaving a small buffer of empty space between each box to let the artwork breathe. -
Ink the borders:
Once you are happy with the layout, trace over your pencil grid lines with a light brown or sepia fine liner. Use a ruler here for crisp, clean edges that frame your future sketches perfectly. -
Erase guidelines:
Wait a moment for the ink to dry completely, then gently erase the underlying pencil graphite to leave just the clean, inked frames.
Use Sepia Ink
Using brown or sepia fineliners instead of standard black immediately gives the drawing a vintage, naturalistic field-study vibe reminiscent of old biology textbooks.
Step 2: Planning the Content
-
Theme selection:
Decide on a mixture of subjects. For this forest theme, aim for a balance: four botanical elements (leaves/branches), four trees, and four animals. -
Rough placement:
Lightly sketch the basic shapes of your subjects into the boxes with pencil. Don’t worry about detail yet; just position the main forms to ensure they fit comfortably within the borders. -
Central focus:
Place your most character-rich subjects, like the owl or squirrel, in the central columns to draw the eye inward.
Break the Frame
Make the drawing dynamic by letting a branch tip, a tail, or an antler extend just slightly outside the grid box line. It adds depth and liveliness to the layout.
Step 3: Sketching the Flora
-
Branch structure:
Start with the trees and branches. Use shaky, organic lines for the trunks and stems to mimic natural wood texture rather than perfectly straight lines. -
Foliage details:
Add leaves using small, repetitive marks. For pine trees, use short, directional hatch marks; for deciduous trees, use small scumbled loops or cloud-like outlines. -
Inking the plants:
Go over your plant sketches with your finest pen (0.05mm or 0.1mm). Keep the lines very delicate, broken occasionally to suggest light hitting the leaves.
Step 4: Drawing the Fauna
-
Outline the animals:
Refine the pencil sketches of your animals—the owl, squirrel, and deer. Focus on simple silhouettes first. -
Suggesting fur texture:
Instead of outlining the entire animal with a solid line, create the edge using short, directional strokes that mimic fur. I find this works best when flicking the pen outward slightly. -
Building density:
Use hatching and cross-hatching to build shadows under the owl’s wings or the squirrel’s tail. Keep the face areas lighter to maintain expression. -
Final inking:
Commit to the animal shapes with your pen. Use a slightly thicker line (0.3mm) for the darkest shadow areas to give the creatures weight and dimension.
Step 5: Final Touches
-
Atmospheric elements:
Add tiny stippling dots loosely around the subjects within the boxes. This ‘dust’ effect adds texture and keeps the background from looking too stark. -
Clean up:
Do a final pass with your eraser to remove all remaining pencil marks, ensuring the page looks crisp and professional. -
Review contrast:
Step back and look at the grid as a whole. If any box looks too light compared to its neighbors, add a few more textural ink lines to balance the visual weight.
Now you have a charming collection of nature studies preserved in your sketchbook.


Markings, Spots, and Stripe Experiments
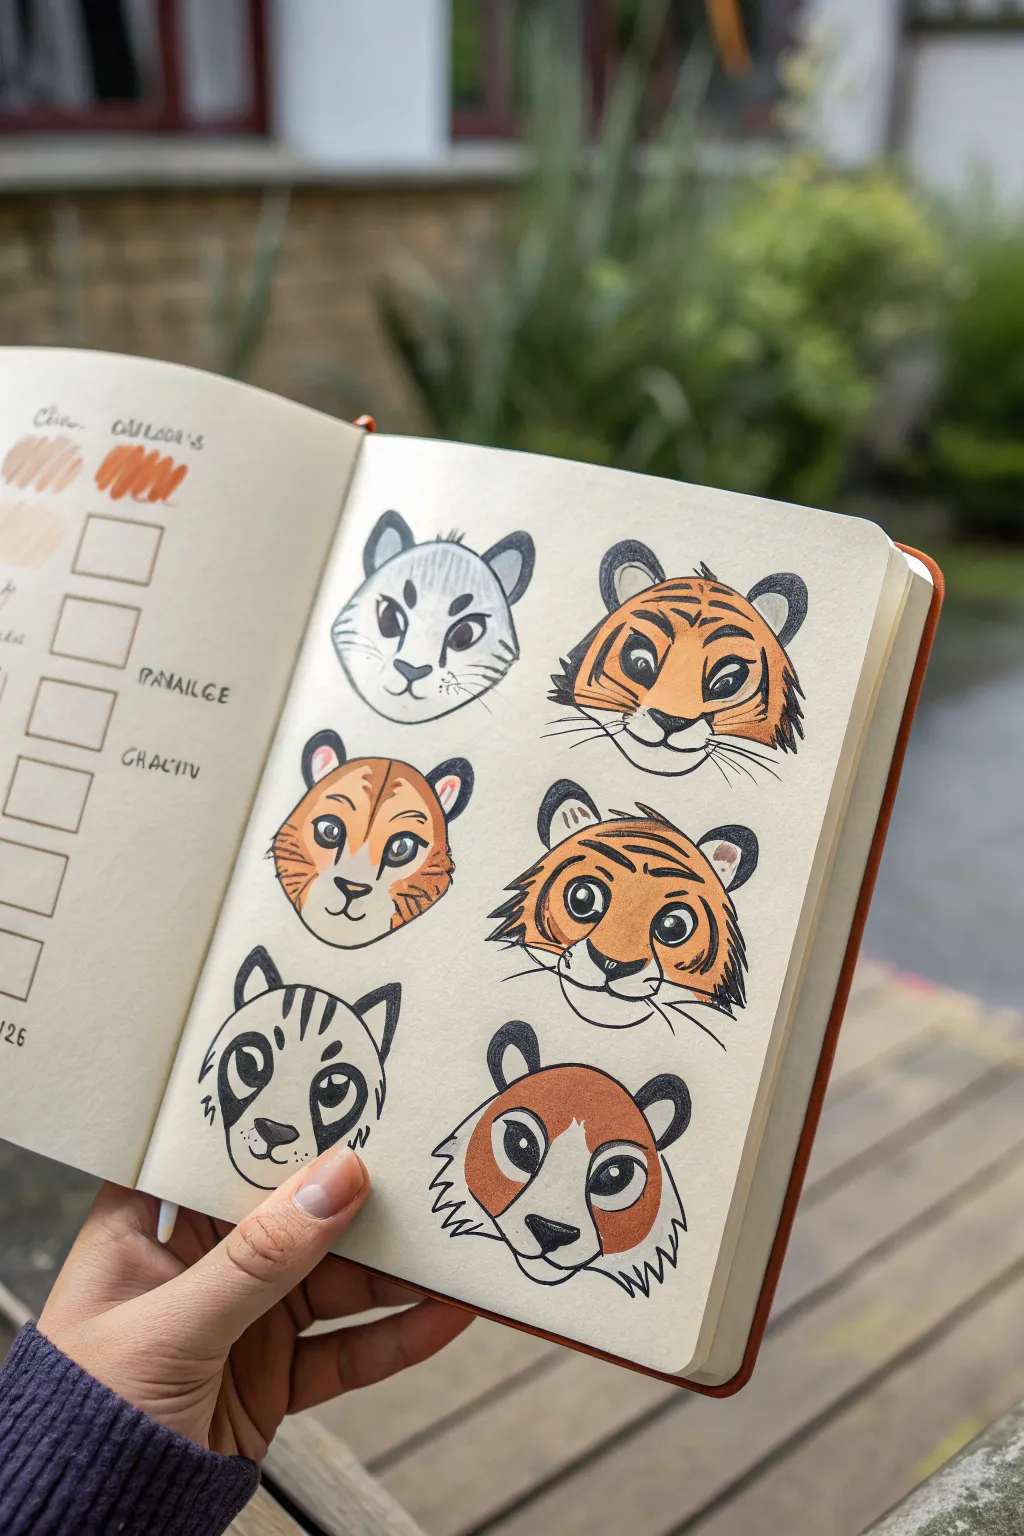
Explore the diversity of feline markings by creating a grid of tiger-inspired headshots in your sketchbook. This exercise focuses on varying stripe patterns, ear shapes, and color applications to develop unique character designs.
Step-by-Step Guide
Materials
- Sketchbook (heavyweight paper recommended)
- HB Pencil and eraser
- Fine liner pens (0.3mm and 0.5mm, black)
- Alcohol-based markers (muted orange, deep orange, pale beige)
- White gel pen
Step 1: Planning the Layout
-
Grid setup:
Visualize a 2×3 grid on the right-hand page of your sketchbook to house six distinct character heads. -
Basic shapes:
Lightly sketch six circles using your HB pencil as the base for each head. Don’t worry about making them perfect circles; organic shapes work well for faces. -
Adding structure:
Draw faint vertical center lines and horizontal eye lines on each circle to help with symmetry and facial placement later.
Design Tip: Shape Language
Use shapes to imply personality! Rounder cheeks and eyes suggest friendliness, while angular stripes and narrower eyes can make a character look mischievous or fierce.
Step 2: Drafting Designs
-
Defining outlines:
Sketch the jawlines and cheek fluff. Vary the shapes slightly for each head—some rounder, some more angular—to give them individual personalities. -
Ears and eyes:
Add rounded triangular ears on top. Sketch large, expressive eyes along your horizontal guide lines, keeping the pupils wide for a cute, cartoony look. -
Marking variations:
This is the experimental part. Lightly draft different marking patterns for each head. Try classic tiger stripes on one, spot-like markings on another, and perhaps a masked bandit look on a third.
Troubleshooting: Bleeding Ink
If your black liner smudges when you color over it with markers, it isn’t waterproof. Let it dry much longer (1hr+) or color first and add line art last.
Step 3: Inking the Lines
-
Main outlines:
Using a 0.5mm fine liner, carefully trace the outer contours of the faces and ears. Keep your lines confident and smooth. -
Detail work:
Switch to a 0.3mm pen for finer details like the eyes, nose, and whiskers. This line weight hierarchy adds professional depth to the drawing. -
Filling blacks:
Use your thicker pen to fill in the pupils, noses, and any solid black markings you planned, leaving small white highlights in the eyes. -
Clean up:
Once the ink is completely dry, thoroughly erase all pencil guidelines to reveal a clean line art base.
Step 4: Adding Color
-
Testing colors:
I always use the opposite page to swatch my markers first. Create small squares to test your orange, beige, and brown tones to ensure they complement each other. -
Base coat:
Select a few heads to color fully. Apply your main orange tone, leaving the muzzle and eye areas the white of the paper for contrast. -
Color blocking:
For variety, leave some heads grayscale or monochromatic. On the colored heads, try using a pale beige for the inner ears or chest fur if visible. -
Layering tone:
Go back over areas where shadows would fall—like under the chin or inside the ears—with a second layer of the same marker to deepen the color.
Step 5: Final Touches
-
Highlighting:
Use a white gel pen to add small shines to the eyes and nose if your original paper highlights got covered. -
Check balance:
Review the spread. If any ink lines look faded next to the bold marker colors, re-trace them carefully to make them pop. -
Annotations:
Label your color swatches on the left page with the specific marker names or codes for future reference.
Now you have a reference sheet of unique feline faces to inspire your next big character illustration
BRUSH GUIDE
The Right Brush for Every Stroke
From clean lines to bold texture — master brush choice, stroke control, and essential techniques.
Explore the Full Guide
Fur Texture Swatch Library
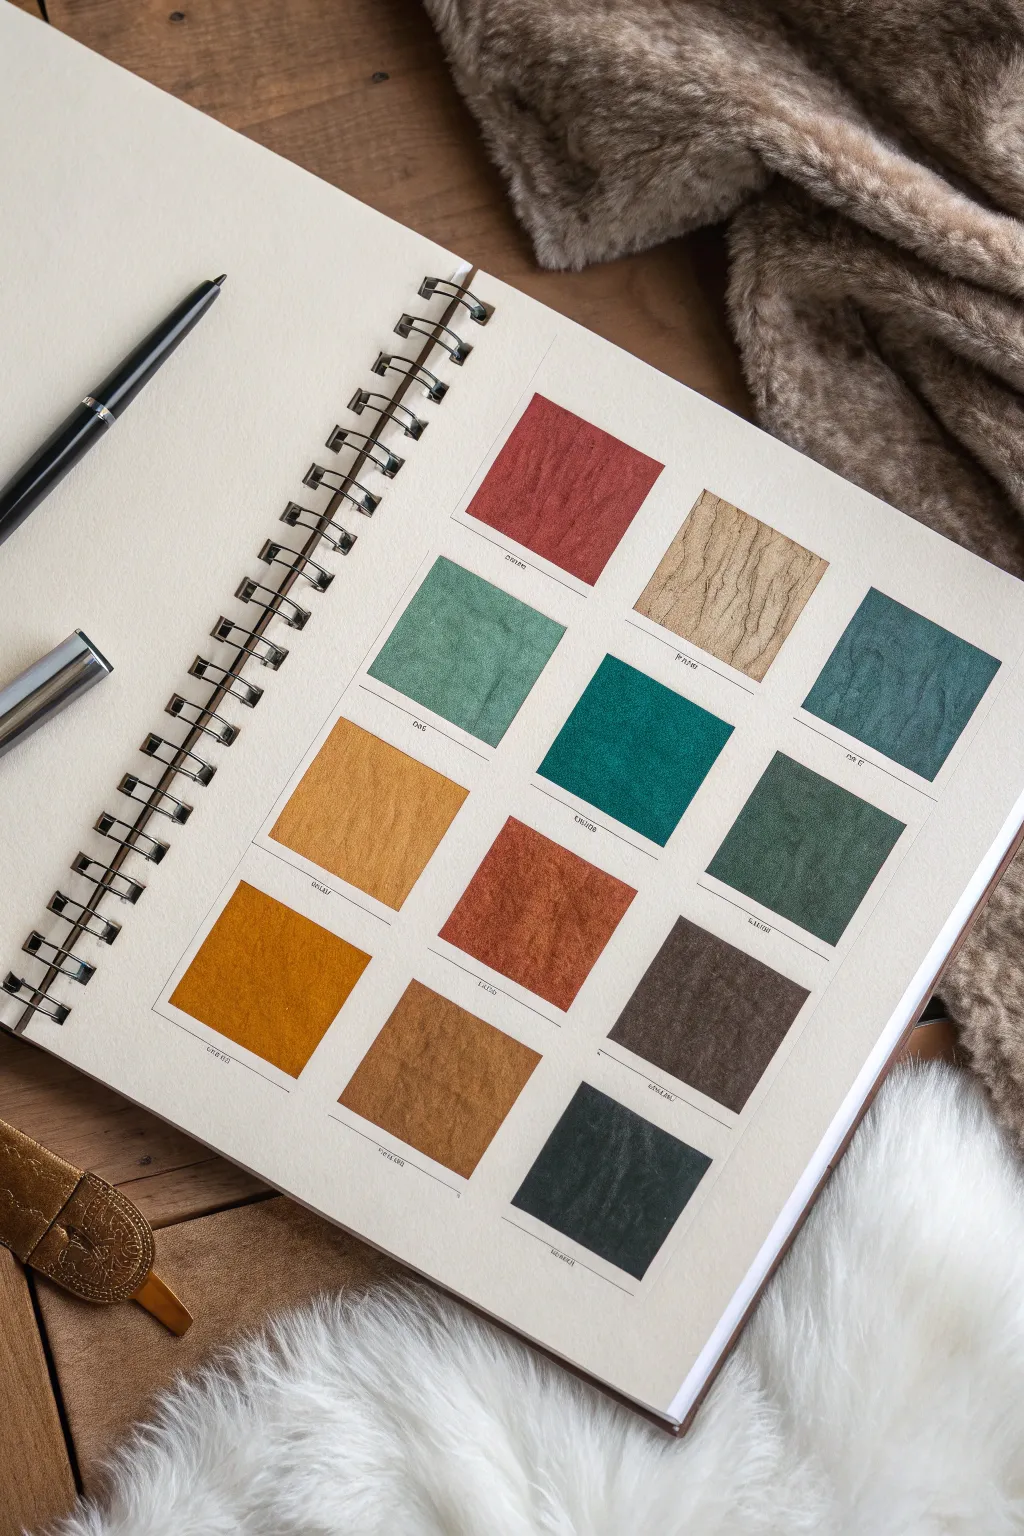
Build a personal reference guide for your artwork by creating a grid of varied fur and texture swatches. This hands-on exercise helps you master rendering different surface qualities, from soft velvets to coarse hairs, all neatly organized in your sketchbook.
Step-by-Step
Materials
- Spiral-bound sketchbook with heavyweight paper (mixed media or watercolor)
- Ruler
- Pencil (HB or 2H for guidelines)
- Fine liner pen (black, 0.1mm or 0.3mm)
- Colored pencils (wax-based or oil-based)
- Markers (alcohol-based preferred for base layers)
- White gel pen (for highlights)
- Kneaded eraser
Step 1: Setting up the Grid
-
Measure the layout:
Open your sketchbook to a fresh page. Using your ruler, measure out a grid that will accommodate twelve evenly spaced squares. A 3×4 layout works beautifully for a standard A4 or letter-sized page. -
Draw the frames:
Lightly pencil in your twelve squares. Aim for each square to be about 2 inches (5 cm) wide. Leave ample gutter space between them to write notes later. -
Ink the borders:
Once you are satisfied with the spacing, trace over your pencil lines with a fine liner pen. Keep your hand steady or use the ruler again for crisp, clean edges. -
Add text lines:
Draw a thin, horizontal line just below each square. This is where you will label the texture type or color code later.
Grain Direction Trick
Rotate your book while drawing hair strokes. Pulling the pencil toward your body helps maintain consistent pressure and creates smoother, more natural-looking taper on fur strands.
Step 2: Base Layers and Underpainting
-
Select your palette:
Choose twelve distinctive colors. Include earthy tones like ochre, sienna, and umber, as well as some cool tones like teal, slate blue, and forest green to create a diverse library. -
Apply marker base:
Fill each square with a flat layer of alcohol marker in your chosen colors. This provides a rich, solid undertone that speeds up the drawing process and prevents white paper specks from showing through the fur texture. -
Let it dry:
Allow the marker ink to dry completely. Alcohol markers dry quickly, usually within a minute, ensuring your subsequent pencil layers won’t smudge or bleed.
Step 3: Rendering Textures
-
Start the short fur:
For smooth textures (like on the teal or rust swatches), use a sharp colored pencil in a slightly darker shade than your base. Make very small, tight circular motions or tiny ticks to simulate a velvet-like surface. -
Create directional flow:
On other squares, establish a direction for the ‘hair’. Use quick, short strokes all going roughly the same way to mimic the natural pile of fur. -
Add deep shadows:
Select a variety of darker pencils. Gently shade one corner or side of each square to give the swatch a sense of dimension, making it look like a physical sample glued to the page. -
Simulate coarse texture:
For rougher textures (like the beige swatch), use firmer pressure and more irregular lines. I find creating broken, jagged strokes helps replicate a coarser material. -
Layering colors:
Don’t stick to just one pencil per square. Overlay analogous colors—like adding orange to the yellow swatch or indigo to the green—to create depth and visual interest.
Uneven Texture Fix
If a swatch looks too scratchy, lightly blend it with a colorless blender pencil or a cotton swab dipped in a tiny bit of rubbing alcohol to soften and unify the pencil strokes.
Step 4: Details and Finishing
-
Enhance with highlights:
Use a white colored pencil or a very sparing touch of white gel pen to add sheen to the top of the texture. This suggests light hitting the crests of the fur or fabric grain. -
Refine the edges:
Go back over the black borders if any color went outside the lines. If you want a messy ‘swatch’ look, you can skip this, but crisp borders give it that professional catalog feel. -
Label your library:
On the small lines you drew earlier, write the name of the texture (e.g., ‘Short Pile’, ‘Wool’, ‘Velvet’) or the specific color numbers used. This turns your art into a useful tool for future projects. -
Clean up:
Gently erase any remaining pencil guidelines with your kneaded eraser, being careful not to rub over the colored pencil work.
You now have a beautiful, permanent reference sheet to consult whenever you need inspiration for rendering surfaces.
Chibi Furry Character Minis
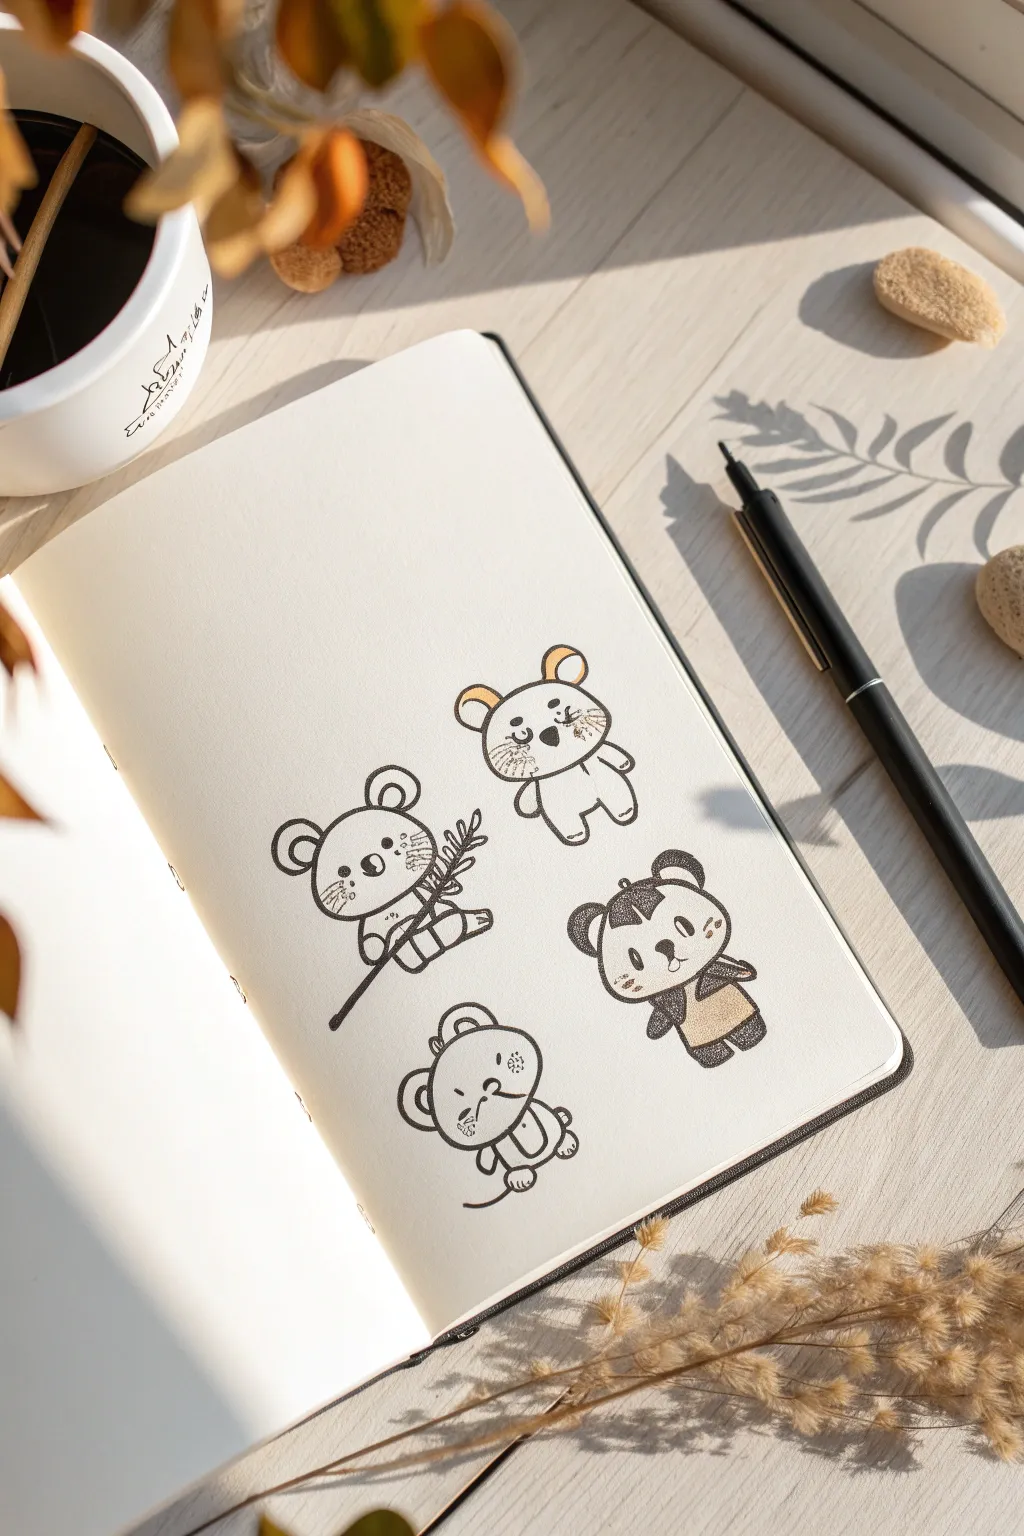
Capture the charm of four distinct chibi personalities in this sketchbook study, featuring clean ink lines and minimal shading. These miniature animal portraits are perfect for filling empty page corners or creating custom stickers.
Step-by-Step Tutorial
Materials
- Cream or off-white sketchbook paper (smooth texture)
- Fine liner pen (0.3mm or 0.5mm, black ink)
- Light brown or beige marker/colored pencil
- Pencil for sketching
- Kneaded eraser
Step 1: Planning the Layout
-
Rough placement:
Begin by visualizing four zones on your page. Lightly mark four circles with your pencil to establish where each head will go—one top center, two in the middle row, and one offset at the bottom. -
Basic shapes:
Flesh out the bodies using soft, rounded shapes like beans or teardrops attached to the head circles found in the previous step. Keep the proportions ‘chibi’ style, meaning the heads should be almost as large as the bodies.
Ink Smearing?
If your fine liner smears when erasing, switch to a waterproof pigment liner or wait at least 30 minutes before erasing pencil marks.
Step 2: Drawing the Gentle Mouse (Top)
-
Head and ears:
Outline a wide oval head. Add two large, C-shaped ears on top. Inside the ears, draw the inner ear shape using a light brown marker or pencil first, then outline around it. -
Facial features:
Place two small dots for eyes wide apart. Draw a tiny triangular nose and add three whiskers on each cheek using quick, flicking motions. -
Body outline:
Draw a simple, rounded body beneath the head. Add two small U-shapes for feet and minimal nubs for arms resting at the sides.
Step 3: Sketching the Koala (Middle Left)
-
Koala ears:
Draw a round head with two large, fluffy semi-circles on the sides for ears. Use a double line on the inner ear to suggest thickness. -
Holding the branch:
Sketch a diagonal line across the body for the branch. Draw the koala’s paws gripping this line—simple oval shapes work best. -
Leaf details:
Add small, pointed oval leaves emerging from the top of the branch near the koala’s face. Keep the linework loose here. -
Final details:
Inking the nose is crucial—draw a large, dark oval nose between the eyes. Add subtle shading lines on the cheeks.
Add Personality
Give each character a unique accessory like a tiny scarf, a bow tie, or holding a different object like a flower or acorn.
Step 4: Creating the Panda (Middle Right)
-
Panda markings:
Start with a round head similar to the others. Draw two small, dark circles for ears. For the eyes, outline patches first, then fill them in distinctively black. -
Outfit sketch:
Draw the body slightly wider. Sketch a horizontal line across the tummy to define the top of the overalls or apron. -
Color blocking:
Use your light brown marker or pencil to color in the apron area on the belly. Ink the arms and legs solidly black to contrast with the light apron.
Step 5: Drafting the Bottom Mouse
-
Head angle:
Draw the final head circle slightly tilted. Add round mouse ears, keeping the lines smooth and unbroken. -
Curled pose:
Sketch the body rounded and compact, as if sitting. Draw the feet pointing slightly upward. -
Tail flourish:
Add a long, thin tail curving out from behind the body. End the line with a gentle taper.
Step 6: Inking and Refining
-
Clean lines:
Go over your pencil sketches with the fine liner. Use a steady hand, but don’t worry if lines overlap slightly—it adds to the sketchy charm. -
Texture details:
Add tiny hatching lines or stippling on the cheeks of all characters to suggest fur texture without drawing individual hairs. -
Weight variation:
Thicken the outlines on the bottom of the characters slightly. I find this grounds them and gives a sense of weight. -
Erase:
Wait for the ink to be completely dry, then gently remove all underlying pencil marks with the kneaded eraser.
You have now filled a page with adorable, distinct animal friends ready to brighten your sketchbook

PENCIL GUIDE
Understanding Pencil Grades from H to B
From first sketch to finished drawing — learn pencil grades, line control, and shading techniques.
Explore the Full Guide
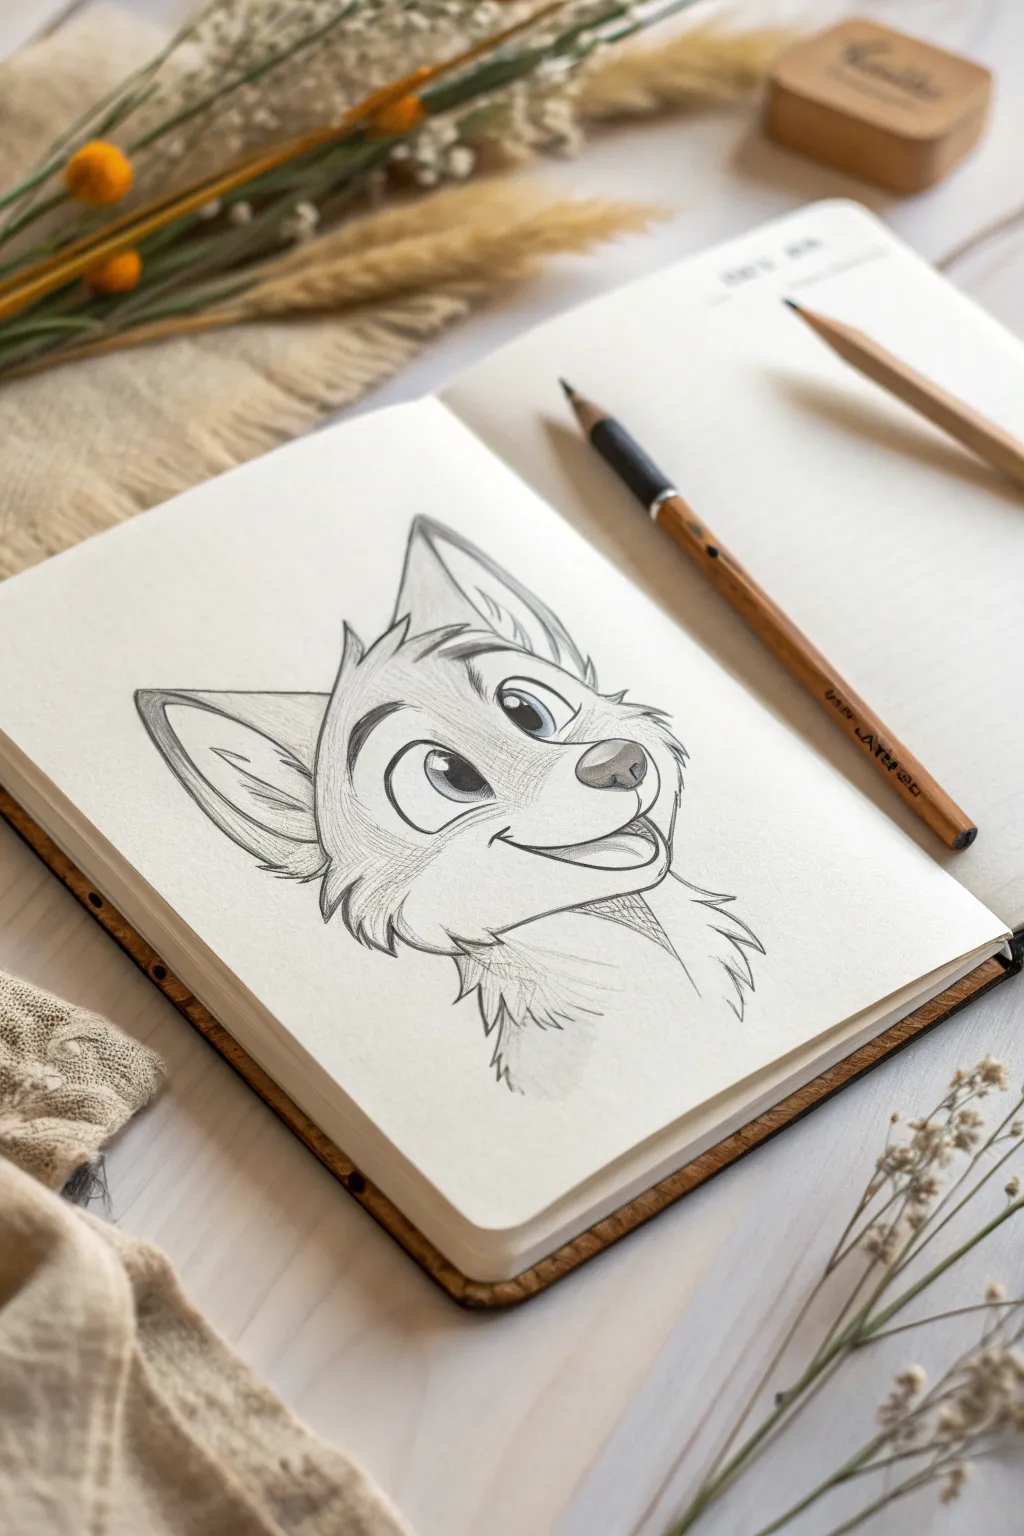
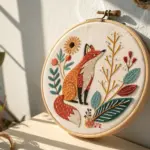
Accessories That Tell a Story
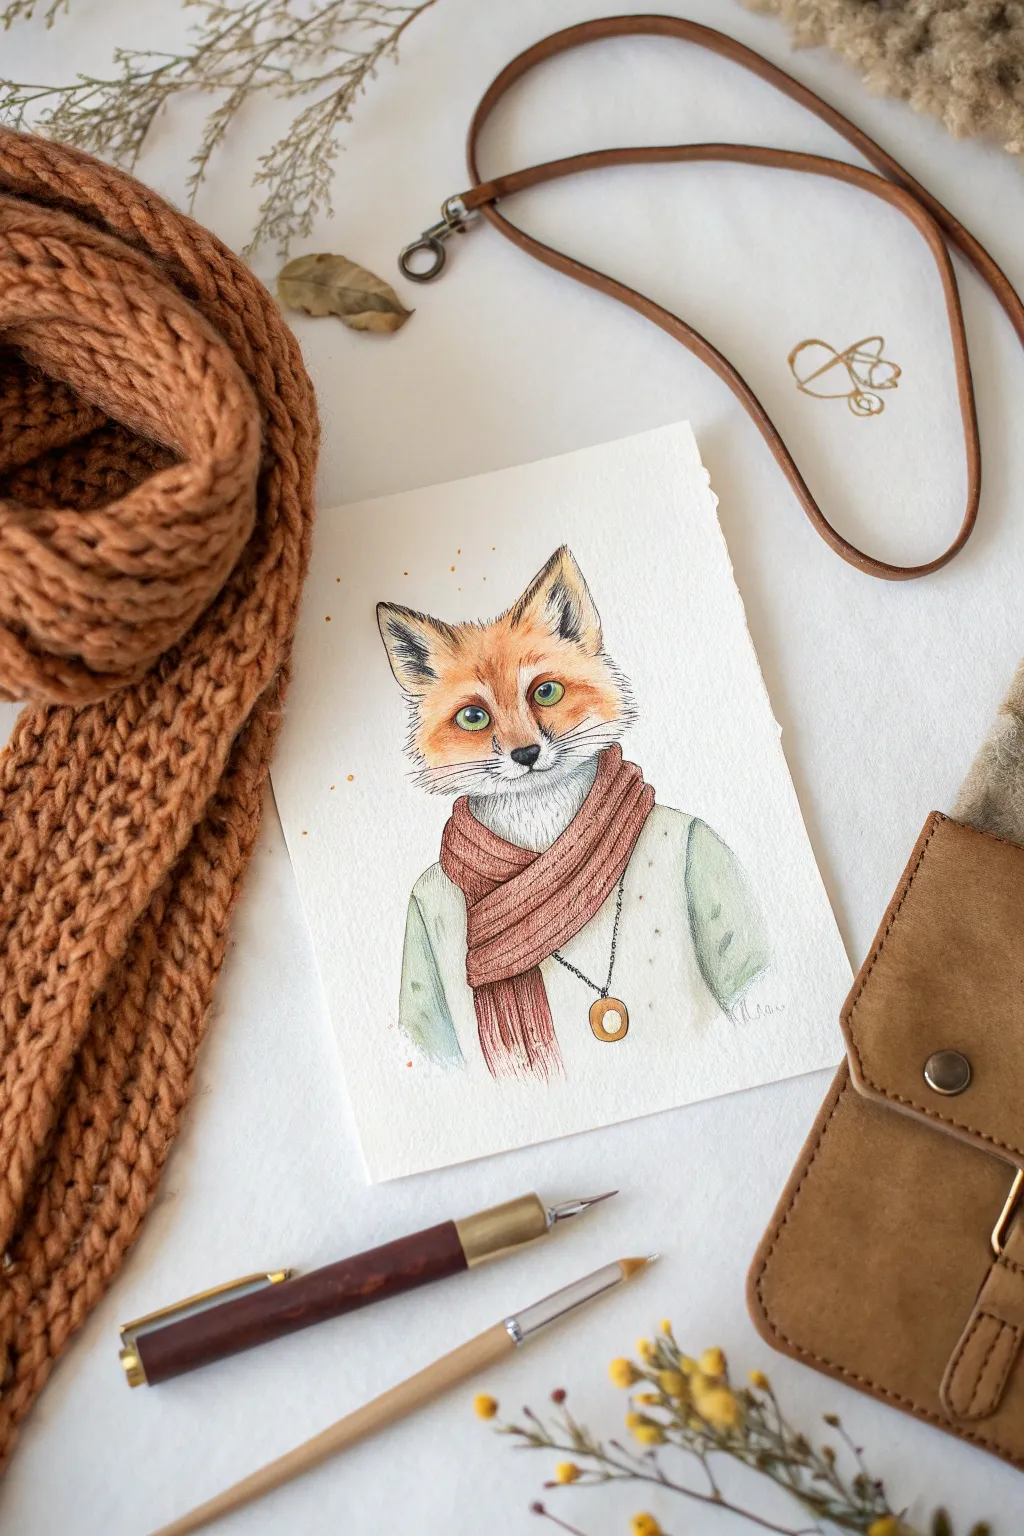
Capture the charm of woodland wildlife with this cozy fox portrait, featuring detailed fur texture and warm, autumnal accessories. This mixed-media piece combines the precision of ink liners with the soft, layered washes of watercolor for a look that is both illustrative and inviting.
Detailed Instructions
Materials
- Heavyweight watercolor paper (300gsm cold press recommended)
- HB graphite pencil and kneaded eraser
- Waterproof fine liner pens (sizes 0.05, 0.1, and 0.3, brown or sepia preferred)
- Watercolor paints: Burnt Sienna, Yellow Ochre, Paynes Grey, Sap Green, Alizarin Crimson
- Round watercolor brushes (Size 2 and Size 4)
- White gouache or white gel pen for highlights
- Paper towel and water jar
- Masking tape
Step 1: Sketching the Framework
-
Basic Shapes:
Start with a light pencil sketch. Draw a circle for the head and add a tapering snout. Position two large, triangular shapes for the ears. Keep the neck thick enough to support the scarf later. -
Refining Features:
Place the eyes about halfway down the face, spacing them evenly. Sketch the nose at the tip of the snout and refine the cheek fluff shapes. Lightly outline the scarf wrapping around the neck and the simple shape of the sweater beneath. -
Adding Accessories:
Detail the scarf folds. Draw the necklace chain hanging over the sweater and the circular pendant at the bottom. Keep your pencil lines faint so they won’t show through the watercolor later.
Ink Smearing?
Check your pen is waterproof before painting! If it smears, let the ink dry for 24 hours, or switch the order: paint the watercolor first, let it dry completely, and then add your ink lines on top.
Step 2: Inking the Details
-
Texturing the Fur:
Using a 0.05 or 0.1 fine liner, begin inking the fur. Use short, quick strokes that follow the direction of hair growth—outward from the nose and up the forehead. -
Defining the Eyes:
Outline the eyes carefully with a slightly thicker pen (0.3). Draw a distinct pupil and leave a small circle empty for the highlight. Add tiny dashes around the eyes to integrate them into the fur. -
Structuring the Scarf:
Outline the scarf with confident, continuous lines. Inside the scarf shape, use hatching lines to suggest the knit texture and fabric folds, concentrating the lines where shadows would fall. -
Finalizing Outlines:
Ink the necklace and the sweater’s shoulders. Once the ink is completely dry—wait at least 15 minutes to be safe—gently erase all pencil marks with your kneaded eraser.
Level Up: Seasonal Styling
Change the vibe by swapping the scarf for a flower crown in spring, or adding holly berries to the sweater for winter. Match the background splatter color to the season for a cohesive look.
Step 3: Applying Watercolor Washes
-
Base Fur Coat:
Mix a watery wash of Yellow Ochre and Burnt Sienna. Apply this to the fox’s face, avoiding the white muzzle area, the insides of the ears, and the eyes. Let the color fade out naturally towards the cheeks. -
Deepening Values:
While the first layer is still slightly damp, drop in pure Burnt Sienna around the nose bridge, forehead, and outer ears to create volume. This wet-on-wet technique keeps the fur looking soft. -
Painting the Eyes:
Use a small Size 2 brush to fill the irises with a diluted Sap Green or olive tone. Once dry, deepen the top of the iris with a second layer of green mixed with a tiny touch of brown for depth. -
Coloring the Scarf:
Mix Alizarin Crimson with a touch of Burnt Sienna to get that muted, cozy red. Paint the scarf, leaving small gaps of white paper or using less pigment on the raised folds to create highlights. -
Sweater and Accessories:
Paint the sweater with a very pale wash of Paynes Grey and Green. For the pendant, use a concentrated Yellow Ochre or Gold paint. Don’t worry about perfect coverage; a sketchy look adds character.
Step 4: Final Touches
-
Reinforcing Shadows:
Once everything is bone dry, use your fine liner to re-emphasize any lost shadows, particularly under the chin where the scarf meets the fur. -
Adding Whiskers:
With a quick, confident hand, draw long, thin whiskers using the 0.05 pen. They should radiate from the muzzle area. -
Highlights and Splatter:
Use white gouache or a gel pen to pop a bright white highlight in each eye. Finally, load a brush with watered-down Burnt Sienna and tap it against your finger to splatter tiny droplets around the fox for a playful finish.
Step back and admire the unique personality you have captured in your woodland friend
Anthro vs. Feral Version Pair
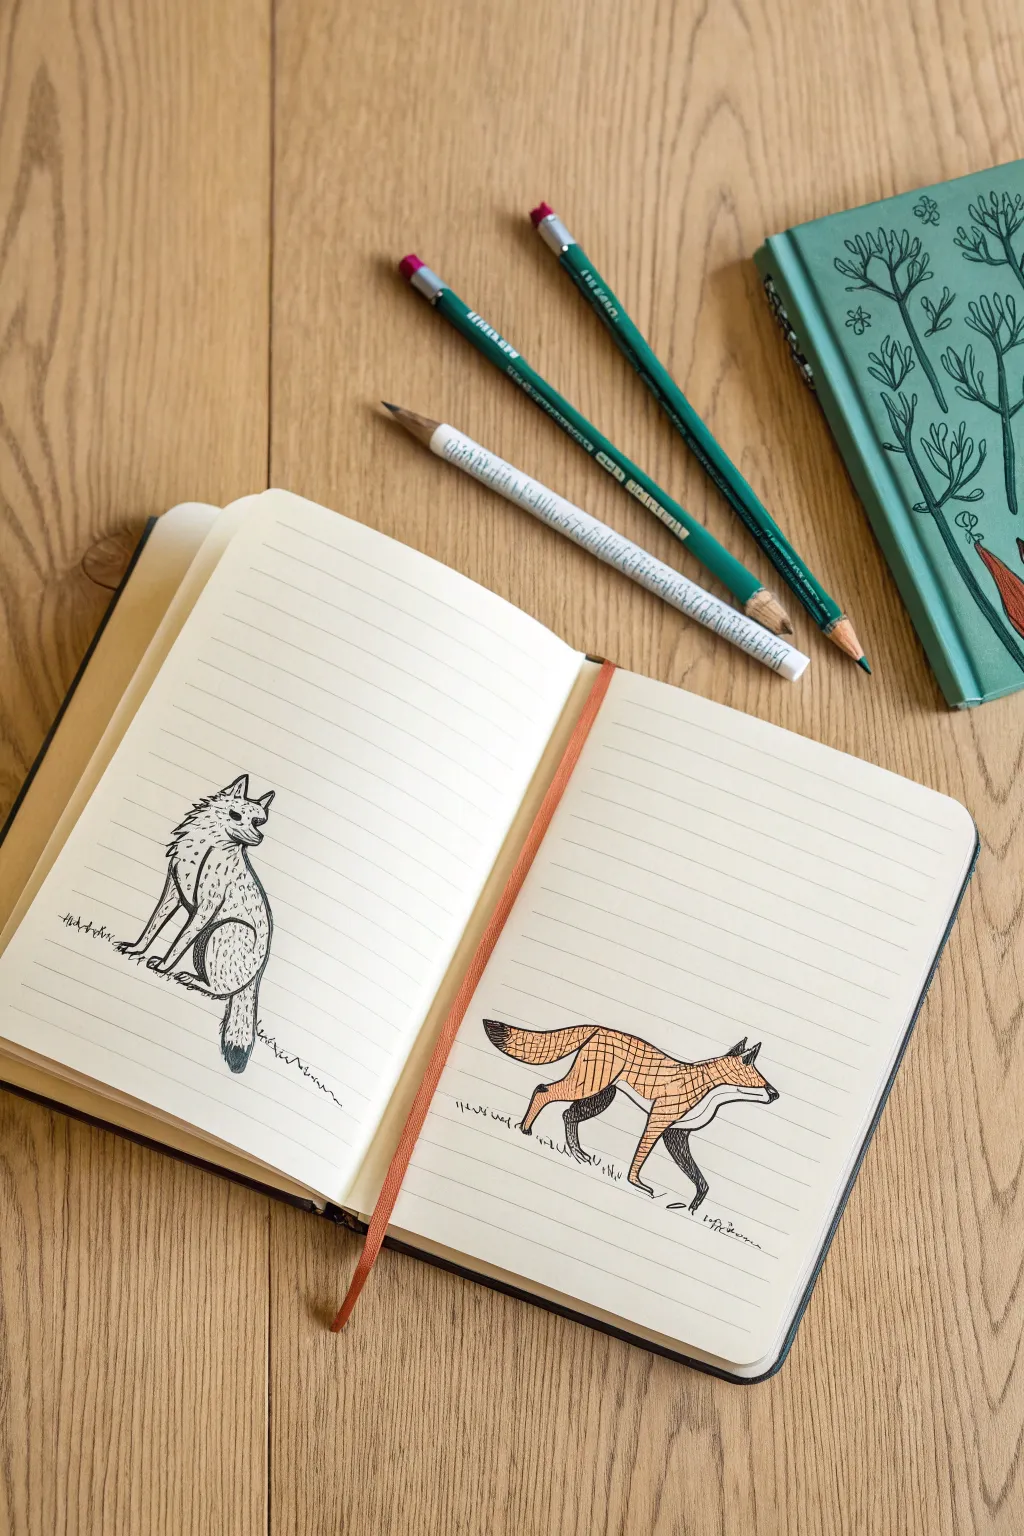
This charming sketchbook spread features two distinct canine poses, offering a perfect opportunity to practice both stationary anatomy and movement. With simple linework and a touch of colored pencil hatching, you’ll create a lively pair of illustrations that feel classic and hand-drawn.
Step-by-Step Tutorial
Materials
- A5 lined notebook (cream or off-white paper recommended)
- Fine liner pen (0.3mm or 0.5mm, black)
- Graphite pencil (HB for sketching)
- Eraser
- Orange or terracotta colored pencil
- White or light gray colored pencil (for blending/highlights)
Step 1: Planning the Layout
-
Split the composition:
Open your notebook to a fresh two-page spread. Visualize the left page for your seated figure and the right page for the walking figure to create a balanced composition. -
Sketch the seated framework:
On the left page, start lightly with your graphite pencil. Draw a vertical oval for the body and a smaller circle on top for the head. Add a vertical centerline to help with symmetry. -
Sketch the walking framework:
On the right page, draw a horizontal bean shape for the torso. Add a circle for the head on the right side and stick-figure lines to indicate the legs in mid-stride.
Step 2: Drawing the Seated Wolf (Left Page)
-
Define the head shape:
Refine the circle into a wolfish shape. Draw triangular ears perked up and a slightly elongated snout pointing to the right. -
Add facial features:
Sketch small, angular eyes and a nose tip. Keep the expression neutral but alert. Use jagged lines at the jawline to suggest fur. -
Structure the body:
Draw the front legs straight down, resting firmly on the ground. Curve the back leg to show the haunch sitting tucked against the body. -
Outline with ink:
Switch to your fine liner. Trace over your pencil sketch with confident strokes. Use short, jagged creates for the ruff around the neck and the chest to mimic fur texture. -
Add textural details:
Inside the body outline, use small stippling dots or tiny dashes to suggest shadows/spots on the coat, particularly on the chest and thigh. -
Ground the figure:
Draw a messy, scribbled line underneath the paws to represent grass or uneven ground, extending slightly to the left.
Pro Tip: Fur Selection
Don’t color everything solid! Leaving the belly, chest, and tip of the tail white creates instant contrast and makes the animal look more recognizable as a fox.
Step 3: Drawing the Walking Fox (Right Page)
-
Refine the silhouette:
Working over your guide on the right page, smooth out the spine line from the neck to the tip of the tail. The tail should be held straight out, thick and bushy. -
Detail the legs:
Flesh out the legs. The front right leg should be lifted, bent at the joint, while the back legs provide the push forward. Keep the paws dark. -
Ink the outline:
Go over the fox with your fine liner. Keep the belly line smooth and the tail outline slightly jagged for fluffiness. Define the distinctive cheek ruff. -
Start the hatching:
Take your fine liner again. Instead of solid coloring, use cross-hatching (diagonal intersecting lines) on the lower legs and the shadowed underbelly to create depth. -
Add color:
Using the orange colored pencil, lightly fill in the upper body and head. Apply more pressure near the spine and tail base for a vibrant coat. -
Create texture with pattern:
Draw a grid-like cross-hatch pattern directly over the orange pencil using your ink pen. This gives the drawing that classic biological illustration look. -
Final touches:
Darken the nose and the “socks” on the legs with the pen. Add a faint ground line underneath the walking fox to match the left page. -
Clean up:
Once the ink is completely dry, gently erase any visible pencil guidelines from both pages.
Troubleshooting: Inking
If your ink smudges when adding colored pencil, wait at least 5-10 minutes for the pen lines to cure completely, or color first and add ink texture on top.
You now have a lively study of movement and stillness in your sketchbook.


Dynamic Action Pose With Flying Fur
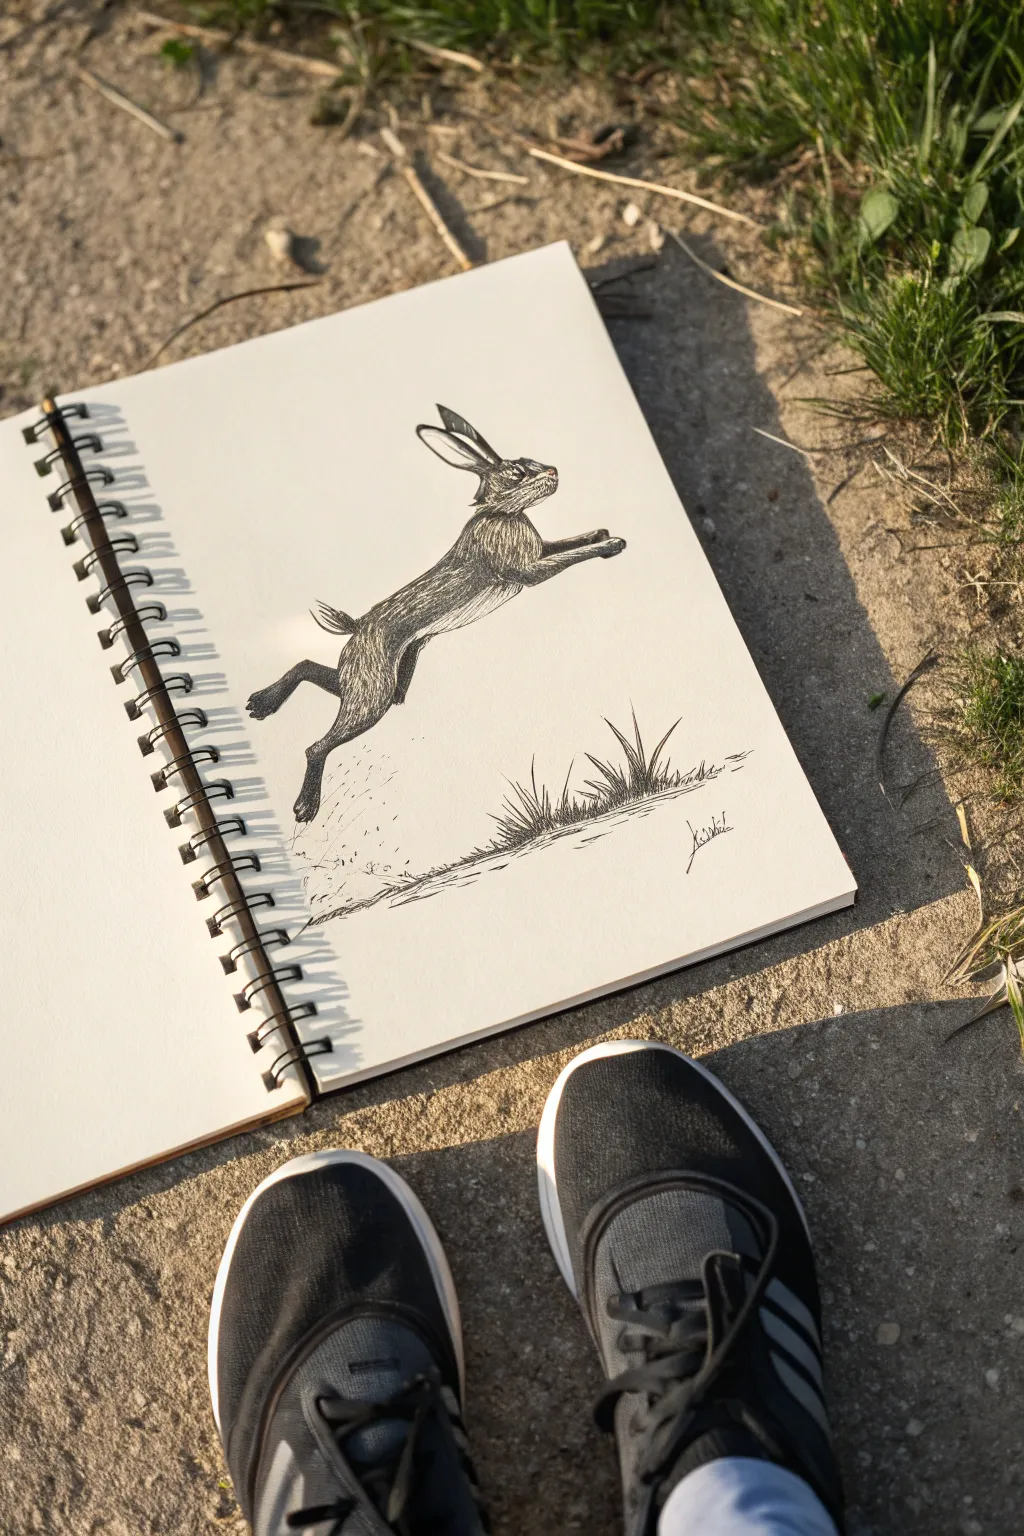
Capture the raw energy of nature with this ink sketch of a hare in mid-spring. Using delicate cross-hatching and decisive line work, you’ll learn to render texture and motion in a single, dynamic pose.
How-To Guide
Materials
- Heavyweight sketchbook paper (bright white)
- Fine liner pens (0.1mm, 0.3mm, 0.5mm)
- HB or 2H graphite pencil for sketching
- Kneadable eraser
- Reference photo of a leaping hare
Step 1: Drafting the Dynamic Pose
-
Establish the curve:
Begin with a faint pencil line that traces the ‘line of action.’ For this leaping hare, draw a shallow, upward-arcing curve that starts low on the left and reaches up toward the right, mimicking the animal’s trajectory. -
Blocking in shapes:
Lightly sketch an oval for the ribcage along the center of your arc and a smaller circle for the head at the top right. Connect them with a curved line for the neck. -
Adding the hindquarters:
Draw a large, rounded shape at the lower left of your arc to form the powerful hind leg and hip area. This should be the heaviest part of the body, indicating the source of the jump’s power. -
Mapping the limbs:
Sketch the legs extending from body. The front legs should reach forward, parallel to each other. The back legs kick out behind, with the feet flexed to show propulsion. -
Refining the silhouette:
Connect your shapes with smooth contour lines. Add the distinctive long ears pointing back slightly, which increases the sense of aerodynamic speed.
Step 2: Inking the Outlines
-
Initial contours:
Switch to your 0.3mm fine liner. Instead of a solid continuous line, use broken, short strokes to outline the body. This mimics the texture of fur right from the start. -
Facial details:
Use a 0.1mm pen for the delicate eye and nose. Keep the eye large and dark, leaving a tiny speck of white paper for a highlight to bring it to life. -
Defining the ears:
Outline the ears with confident strokes. Add a darker inner line to show the fold of the ear, shading the inside deeply while leaving the outer rim light.
Ink Confidence
Don’t worry if your lines overlap or look messy. In animal sketching, ‘mistakes’ often look like natural fur variations. Keep your hand loose and moving.
Step 3: Building Fur Texture
-
Directional hatching:
Using the 0.1mm pen, begin hatching along the neck and back. Vital tip: ensure your pen strokes follow the direction the fur actually grows (generally flowing from head to tail). -
Mid-tone shading:
Build up density on the underside of the belly and the haunches. I like to overlay diagonal hatching here to create shadow without losing the fur texture. -
Deepening shadows:
Switch to the 0.5mm pen for the darkest areas, specifically under the chin, the armpit area, and the shadow beneath the hind leg. This high contrast makes the drawing pop. -
Refining the legs:
Use short, staccato marks on the legs. The fur here is shorter, so your pen strokes should be minimal and precise. -
Tail texture:
Sketch the fluffy tail with quick, outward-flicking strokes. Keep this loose and slightly messy to differentiate the soft tail fur from the sleek body coat.
Make it Pop
Use a white gel pen to add whiskers over the black ink or to re-establish highlights in the eye if they got too dark during the inking phase.
Step 4: Grounding and Finishing
-
Ground elements:
To show the hare hasn’t just floated into space, draw a patch of ground below the impending landing spot. Sketch a few blades of grass and uneven dirt lines. -
Motion debris:
Add tiny dots and specks of ‘dirt’ kicked up near the back feet. This subtle detail emphasizes the force of the push-off. -
Erase pencil lines:
Wait at least five minutes for the ink to fully cure, then gently lift away all underlying graphite sketches with your kneadable eraser. -
Final assessment:
Step back and check your contrast. If the hare looks too flat, go back with your 0.1mm pen and add a second layer of hatching to the darkest shadow areas.
Now you have a lively piece of wildlife art that captures a fleeting moment in time
Cozy Slice-of-Life Furry Scene
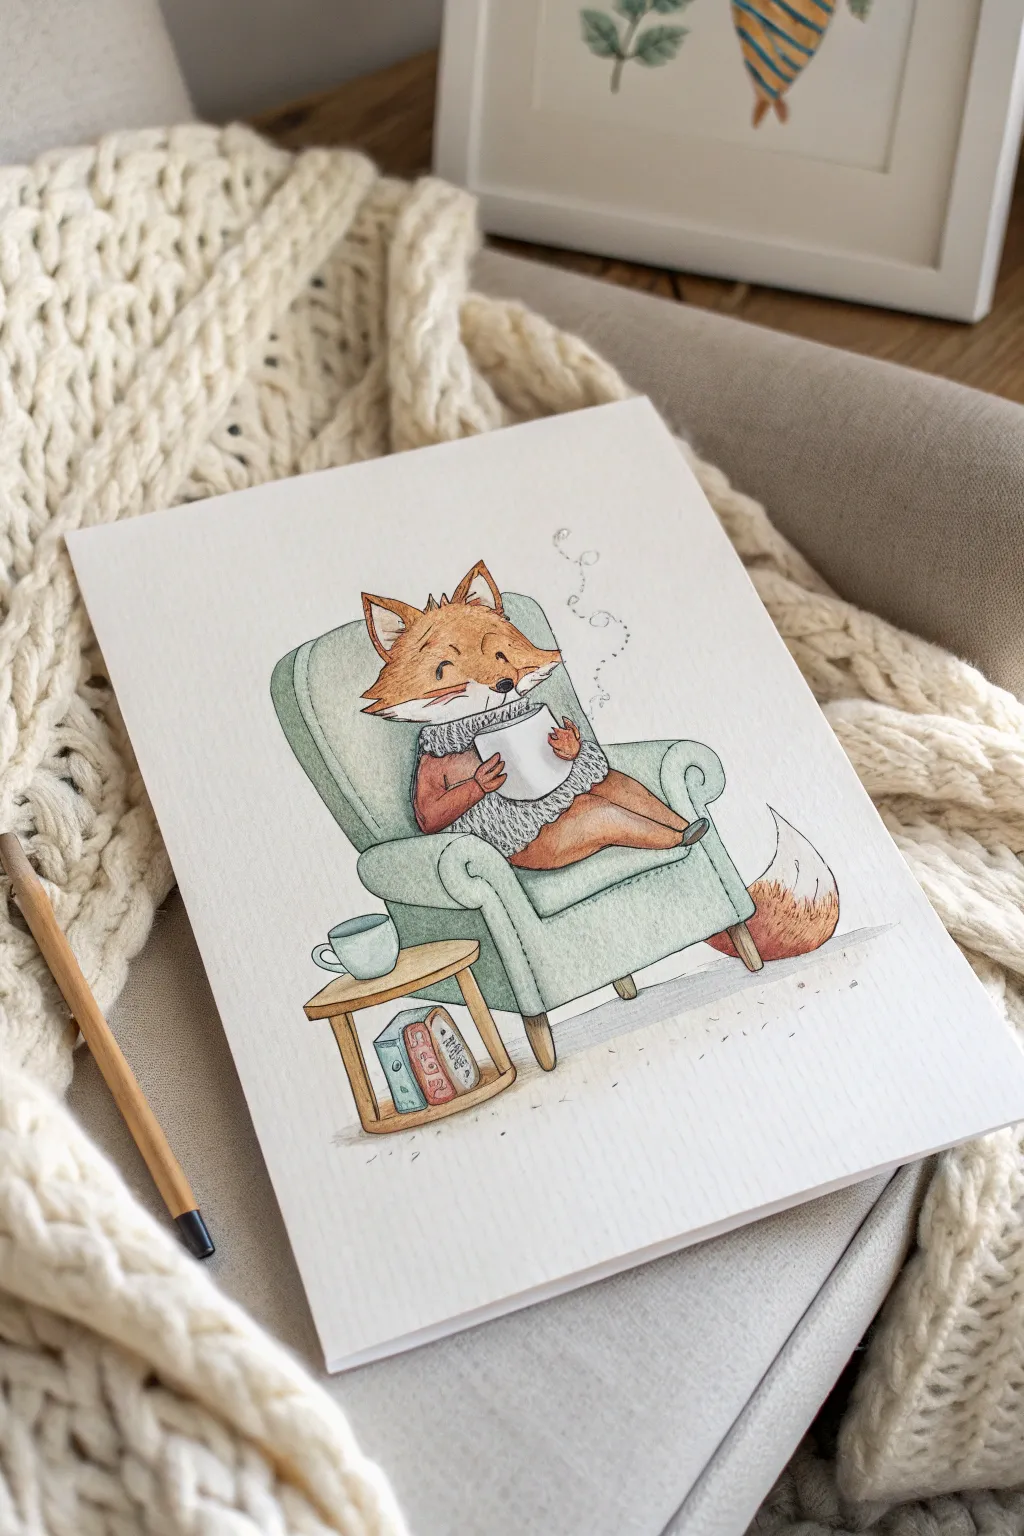
Capture the essence of hygge with this charming illustration of a fox enjoying a peaceful moment in a cozy armchair. This project combines delicate line work with soft watercolor washes to create a heartwarming scene perfect for greeting cards or wall art.
Detailed Instructions
Materials
- Hot press watercolor paper (A5 size)
- HB graphite pencil for sketching
- Waterproof fine liner pen (0.1mm and 0.3mm, black or sepia)
- Watercolor paints (burnt sienna, sage green, warm grey, yellow ochre)
- Small round watercolor brush (size 2 or 4)
- Kneaded eraser
- White gel pen (optional for highlights)
Step 1: Planning the Composition
-
Sketch the Chair Structure:
Begin by lightly sketching the armchair using soft, rounded shapes. Draw a large ‘U’ shape for the back and arms, and add a rectangular cushion seat. Keep your pencil pressure very light so lines can be erased later. -
Position the Character:
Nestle the fox into the chair. Start with a rounded triangle for the head and an oval body that sinks slightly into the cushion. Ensure the posture looks relaxed, with legs extended comfortably forward. -
Add Facial Features:
Sketch the fox’s snout, closed happy eyes, and large triangular ears. Position the paws holding a large mug close to the chest to emphasize the cozy feeling. -
Include Accessories:
Draw the side table next to the chair using simple cylinder and oval forms. Add the small stack of books underneath and a spare tea cup on top.
Knit Effect
To make the sweater look extra cozy, keep the grey paint very watery and light, focusing darker pigment only in the crevices of the knit pattern.
Step 2: Inking and Definition
-
Refine the Fox:
Using your 0.1mm fine liner, carefully trace the fox’s outline. Use broken, jagged lines for the fur on the cheeks and tail to suggest texture rather than a solid smooth line. -
Detail the Sweater:
Draw the chunky knit sweater around the fox’s neck and shoulders. I suggest using small ‘v’ shapes or loops to mimic the knitted pattern of the wool. -
Outline the Furniture:
Switch to a slightly thicker pen (0.3mm) for the armchair and table to give them weight. Keep the lines smooth but slightly imperfect to maintain a hand-drawn, whimsical look. -
Erase Guidelines:
Wait for the ink to dry completely—give it at least five minutes to avoid smudges—then gently lift all graphite pencil marks with a kneaded eraser.
Smudged Ink?
If your ink bleeds when painting, your pen isn’t waterproof. Stop! Let the outlines dry for 24 hours, or switch to coloring with colored pencils instead.
Step 3: Applying Color
-
Paint the Fur Base:
Mix a watery wash of Burnt Sienna. Apply this to the fox’s face, body, and tail, carefully leaving the tip of the tail and the muzzle white. -
Deepen Fur Shadows:
While the first layer is still slightly damp, drop in a slightly more concentrated orange-brown near the ears and where the paws meet the mug to create depth. -
Color the Armchair:
Mix a soft Sage Green with plenty of water. Paint the armchair in sections, letting the brush strokes follow the curve of the cushions to suggest volume. -
Paint the Sweater:
Use a warm grey wash for the sweater. Once dry, you can add tiny darker grey dots or lines to emphasize the knitting texture you drew earlier. -
Wood and Accessories:
Paint the table legs and chair legs with a light brown or yellow ochre. Add touches of color to the book spines, perhaps choosing red or blue to contrast with the green chair.
Step 4: Finishing Touches
-
Ground the Scene:
Add a very faint wash of grey or brown underneath the chair and table to create a simple shadow, so the furniture doesn’t look like it’s floating in space. -
Add Steam and Atmosphere:
Using your finest pen, draw delicate swirls of steam rising from the mug. You can also add small stippling dots around the floor to suggest a carpet or rug feel. -
Highlight Details:
If desired, use a white gel pen to add a tiny shine to the nose or to clean up any edges on the white muzzle area.
Once dry, frame your artwork or gift it to a friend who loves quiet, cozy afternoons
Sci-Fi Furry With Mechanical Details
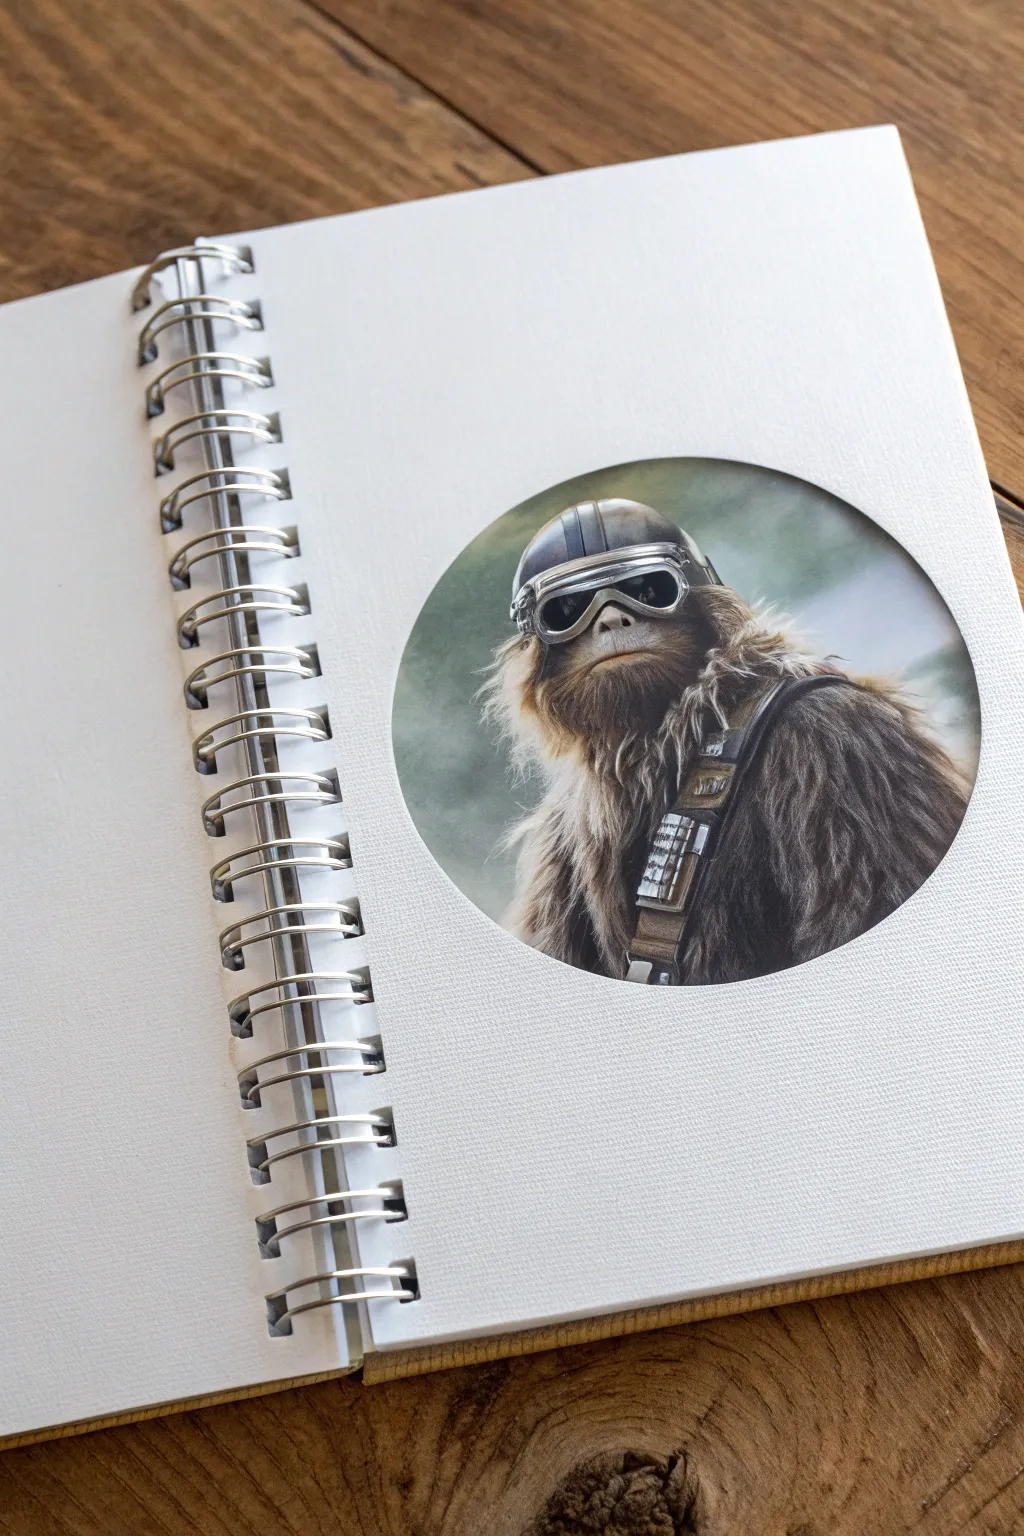
Transform a standard spiral notebook into a galactic portfolio piece with this clever cutout technique. This project combines character illustration with layered paper crafting to create a striking “porthole” effect that reveals a sci-fi furry warrior beneath the cover.
Detailed Instructions
Materials
- Hardcover spiral-bound sketchbook (A5 or A4 size)
- Heavyweight cardstock or illustration board
- Circle cutter or compass and craft knife
- Digital painting software (or traditional media like colored pencils/gouache)
- High-quality matte photo paper (if printing)
- Pencil and eraser
- Self-healing cutting mat
- Double-sided tape or spray adhesive
- Reference photo of a primate or Wookiee
Step 1: Planning the Layout
-
Measure the notebook:
Begin by measuring the exact dimensions of your sketchbook’s cover. You need to know the workable area between the spiral binding and the outer edge. -
Determine circle placement:
Lightly mark the center point for your circular window on the first page of the sketchbook. Aim for the visual center, which is often slightly higher than the mathematical center. -
Trace the window:
Using a compass, draw a perfect circle about 4-5 inches in diameter on the first page of thick paper.
Step 2: Creating the Character Art
-
Draft the composition:
Whether drawing digitally or traditionally, sketch your Chewbacca-inspired character so the head and shoulders fit nicely within a circular frame of the same size you just measured. -
Block in base colors:
Lay down base tones for the fur—browns, tans, and greys work best for a realistic look. Don’t forget the skin tones for the face area around the muzzle. -
Detail the headgear:
Draw the steampunk aviation goggles on the character’s forehead. Focus on metallic reflections—use sharp white highlights to make the chrome rims look shiny. -
Render the fur texture:
Build up the fur using directional strokes. I find it helpful to start with darker under-layers and layer lighter individual strands on top to create volume. -
Add mechanical elements:
Illustrate the bandolier strap across the chest. Paint small metallic cartridges with distinct highlights to contrast against the soft organic texture of the fur. -
Refine the background:
Paint a soft, out-of-focus background in muted greens or greys to simulate a blurred forest environment, ensuring the sharp character pops out. -
Print or finalize artwork:
If working digitally, print your artwork on high-quality matte photo paper. If working traditionally, ensure your final layer of fixative is dry.
Ragged Circles?
If your circle cut isn’t perfect, use a thick silver or gold paint marker to draw a detailed ‘rim’ around the hole. It hides uneven cuts and looks like a spaceship porthole.
Step 3: Assembly
-
Cut the window:
Place a cutting mat inside the sketchbook, under the first page. Use a circle cutter or a very sharp craft knife to carefully cut out the circle you marked earlier. -
Clean the edges:
If the cut edge is slightly rough, use a fine-grit sandpaper or an emery board to gently smooth the paper fibers. -
Position the artwork:
Slide your character artwork behind the page with the hole. Adjust its position until the composition looks perfect through the window. -
Apply adhesive:
Flip the window page over and apply double-sided tape or a thin even coat of spray adhesive to the back, avoiding the very edge of the circle to prevent oozing. -
Mount the artwork:
Carefully press the artwork against the adhesive, smoothing from the center outwards to eliminate air bubbles.
Add Depth
Mount the artwork on foam tape instead of flat adhesive. This creates a shadow inside the hole, giving the window a genuine recessed 3D effect.
Step 4: Finishing Touches
-
Trim excess paper:
If the artwork paper extends beyond the notebook page edges, trim it flush using a metal ruler and craft knife. -
Define the rim:
Run a bone folder around the edge of the circular cutout to press the layers together tightly, creating a professional, seamless look. -
Press flat:
Close the sketchbook and place a heavy book on top for a few hours. This ensures the glue cures flat and prevents the page from warping.
Now you have a custom sketchbook that inspires you every time you open it to a fresh page


Have a question or want to share your own experience? I'd love to hear from you in the comments below!