If you’re in the mood to paint something powerful and a little mysterious, a shark is such a fun subject to build an entire ocean scene around. I pulled together my favorite shark painting ideas—from classic underwater realism to stylized, artsy twists you can totally make your own.
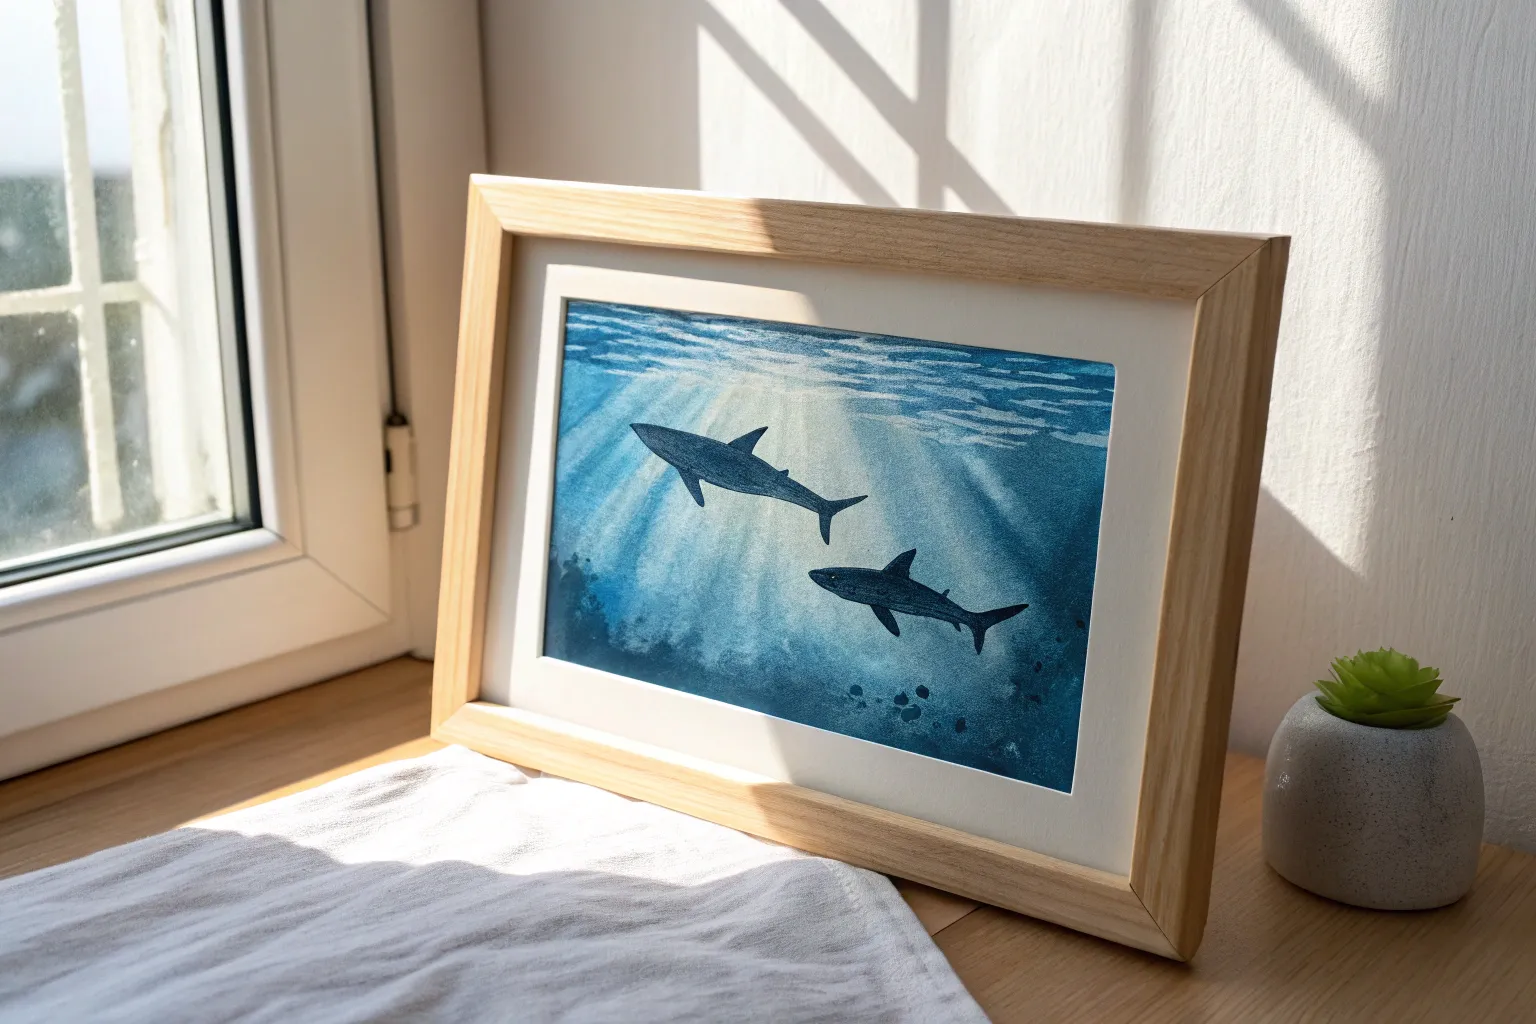
Sun-Dappled Underwater Shark Scene
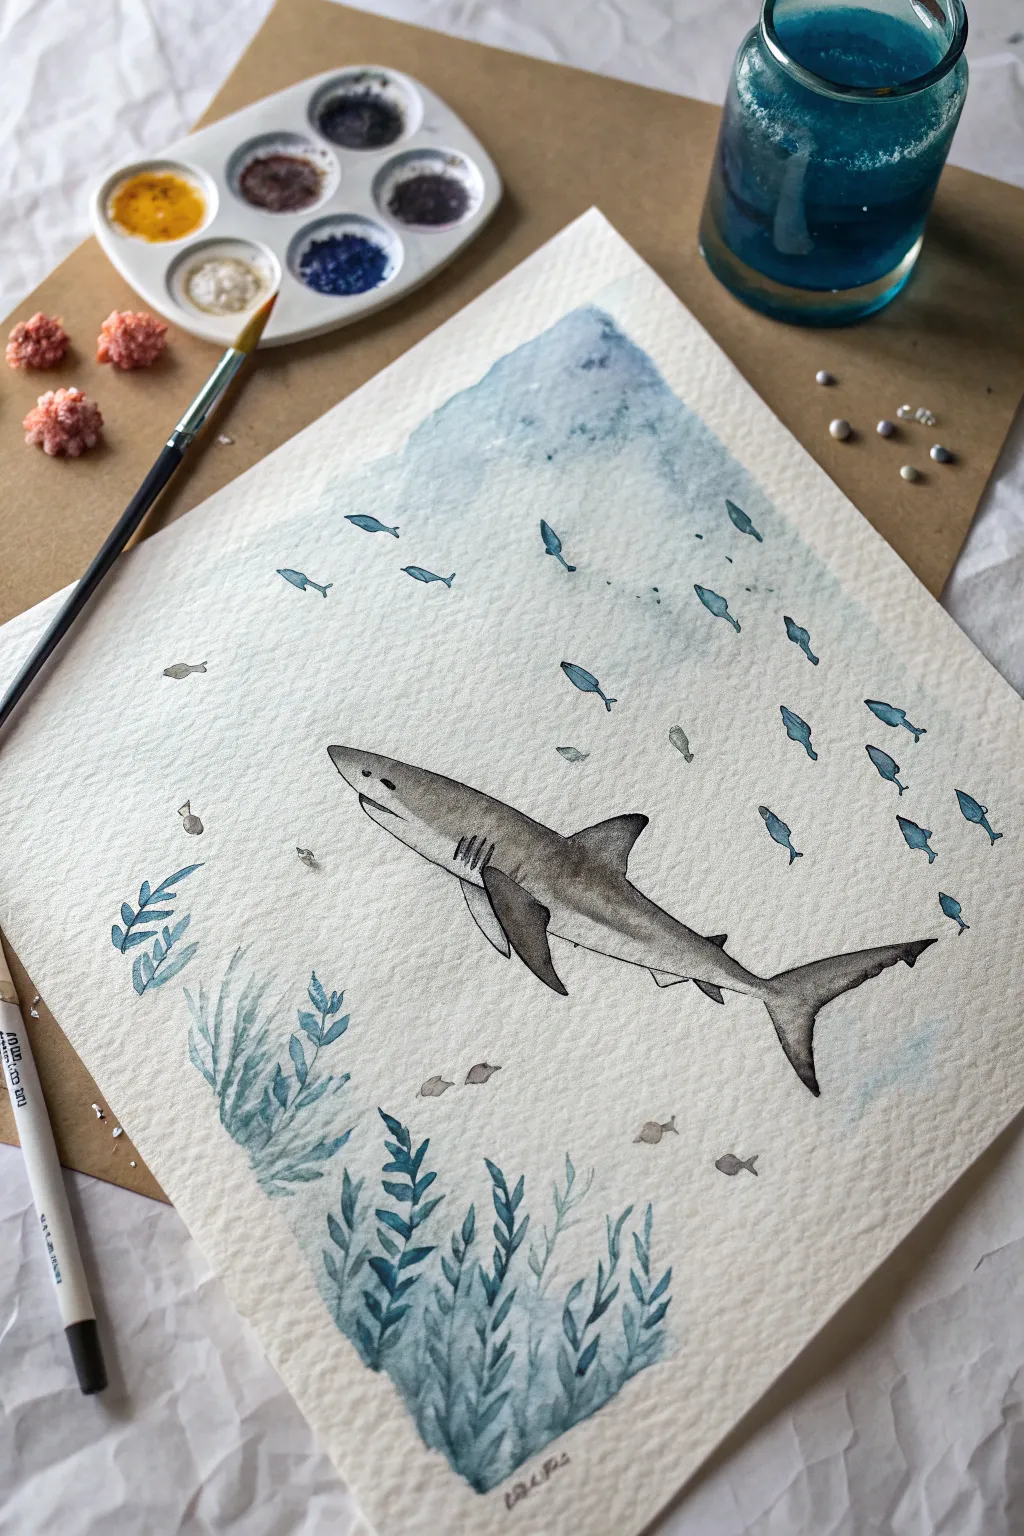
Capture the serene majesty of marine life with this watercolor painting that focuses on light filtration and creating depth. The piece features a solitary shark navigating through piercing sunbeams, using a limited aquatic palette to mesmerizing effect.
Step-by-Step Guide
Materials
- Heavyweight watercolor paper (300gsm/140lb, cold press recommended)
- Masking fluid
- Watercolor paints (Phthalo Blue, Turquoise, Prussian Blue, Payne’s Gray, Burnt Sienna, White Gouache)
- Flat wash brush (1 inch)
- Round brushes (sizes 4, 8, and 0/00 for details)
- Board and artist tape
- Pencil and eraser
- Salt (optional for texture)
- Ruler or straight edge
Step 1: Preparation and The Shark
-
Secure the paper:
Tape your watercolor paper down firmly to a board on all four sides. This ensures a crisp white border and prevents the paper from buckling during heavy washes. -
Draft the subject:
Lightly sketch the outline of the shark near the center-right of the paper. Keep lines faint so they won’t show through later; focus on the sleek curve of the body and the distinct dorsal and pectoral fins. -
Protect the highlights:
Apply masking fluid carefully over the entire shark shape. I like to add a few small speckles of masking fluid in the water area too, representing floating particles catching the light. Let this dry completely.
Uneven Gradients?
If your ocean background dries with hard edges (blooms), re-wet the entire area gently with a spray bottle and tilt the board to help pigments settle evenly.
Step 2: Creating the Ocean Gradient
-
Wet-on-wet base:
Generously wet the entire paper surface with clean water using your large flat brush until it glistens evenly but isn’t pooling. -
Upper light zone:
Start at the top with a very diluted mix of Turquoise and Phthalo Blue. Keep it transparent to represent the water surface where light enters. -
Deepening the blue:
As you move down the paper, gradually introduce more saturated Phthalo Blue and a touch of Prussian Blue. Use horizontal strokes to mimic water movement. -
The abyss:
For the bottom third, mix Prussian Blue with a tiny bit of Payne’s Gray or Burnt Sienna to create a deep, dark teal. Blend this upward into the mid-tones for a seamless gradient. -
Surface texture:
While the top area is still damp, dab in slightly more concentrated blue in wavy horizontal lines to suggest surface ripples. Let the entire background dry completely.
Step 3: Sunbeams and Atmosphere
-
Lifting the light:
Using a ruler and a damp, clean flat brush (blotted so it’s thirsty), lift out pigment in diagonal lines radiating from top-left to bottom-right. This creates the ‘god rays’ or sunbeams. -
Reinforcing shadows:
Once the lifted areas are dry, glaze a very watery dark blue mix between the sunbeams to increase the contrast, making the light rays appear brighter. -
Surface sparkles:
Use a toothbrush or small brush to flick tiny droplets of white gouache or masking fluid near the surface area to create the look of bubbles and light refractions.
Sunbeam Secret
Use a straight-edge piece of paper as a shield when lifting out sunbeams. Place it diagonally and scrub alongside the edge for sharp, defined rays of light.
Step 4: Painting the Shark
-
Reveal the subject:
Gently rub off the masking fluid from the shark shape once you are certain the background is bone dry. -
Base shadow layer:
Mix a soft grey using diluted Payne’s Gray and Blue. Apply this to the underside of the shark and the lower fins to establish form. -
Skin tone:
Wash a light, warm brownish-grey (mix Burnt Sienna with a touch of blue) over the top half of the shark’s body. -
Counter-shading:
Blend the darker top color into the lighter belly color while wet to achieve that smooth, natural counter-shading sharks are famous for. -
Defining features:
Using your smallest round brush (0 or 00), paint the dark eye, the gill slits, and the trailing edges of the fins with a concentrated dark grey mix. -
Dappled light effect:
Paint faint, irregular lighter strips across the shark’s back using white gouache or by lifting pigment. This mimics the sunbeams hitting the animal’s skin. -
Final highlights:
Add tiny touches of white gouache to the tips of the fins and the eye to bring the creature to life.
Peel off your tape to reveal crisp white borders framing your serene underwater encounter


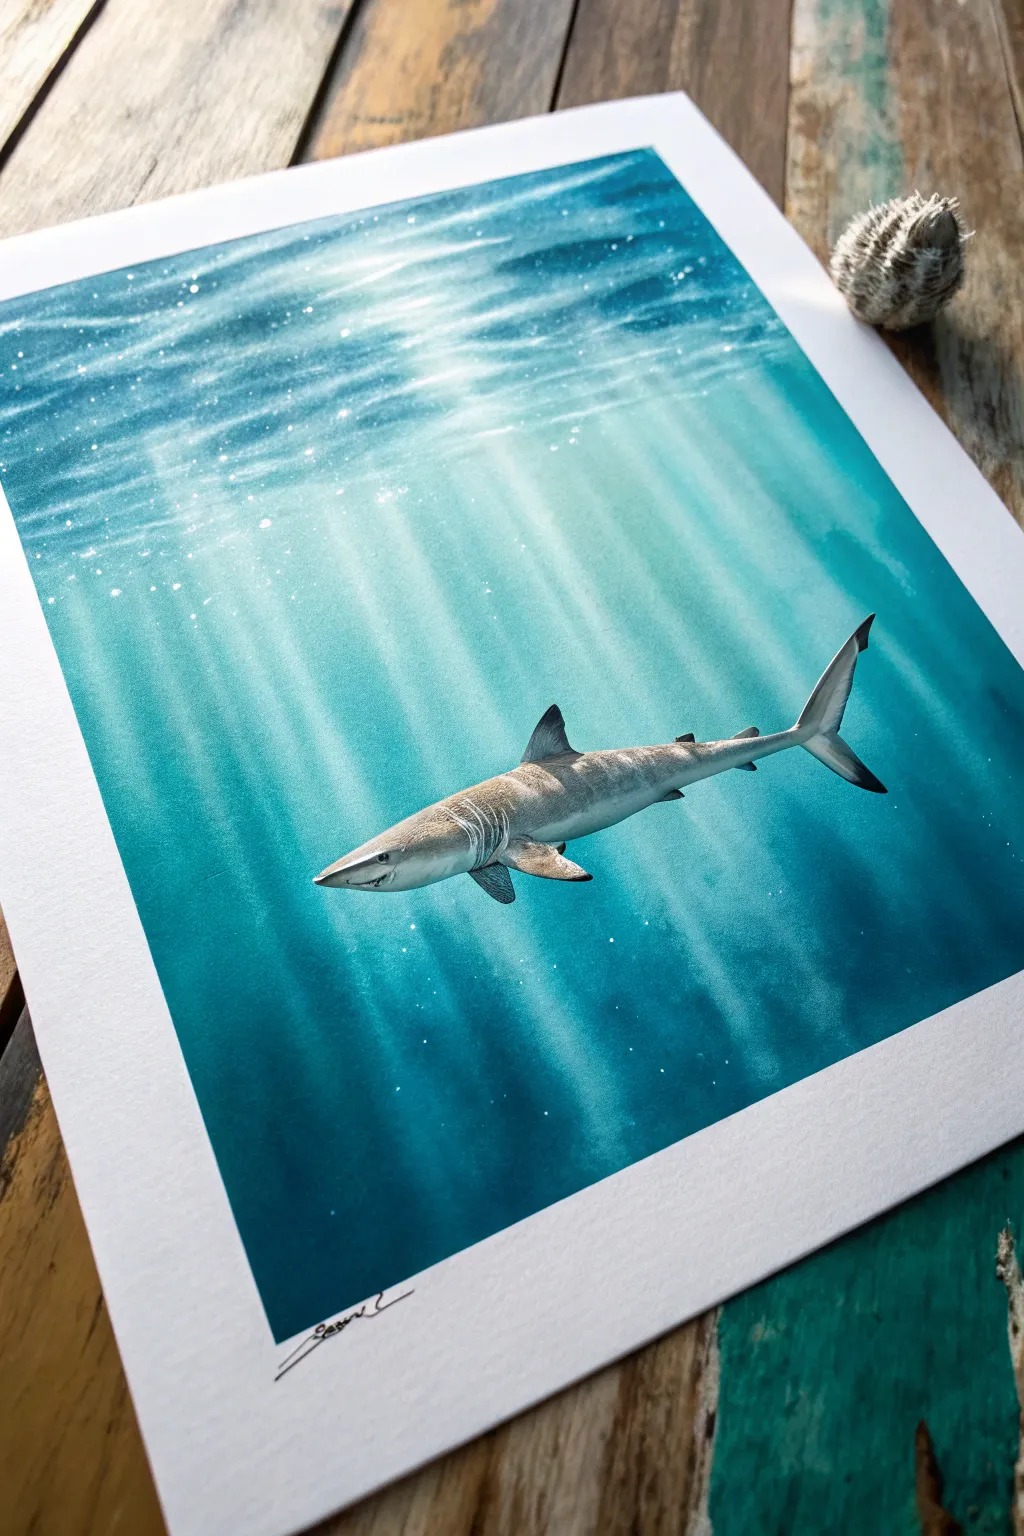
Realistic Shark Side Profile Study
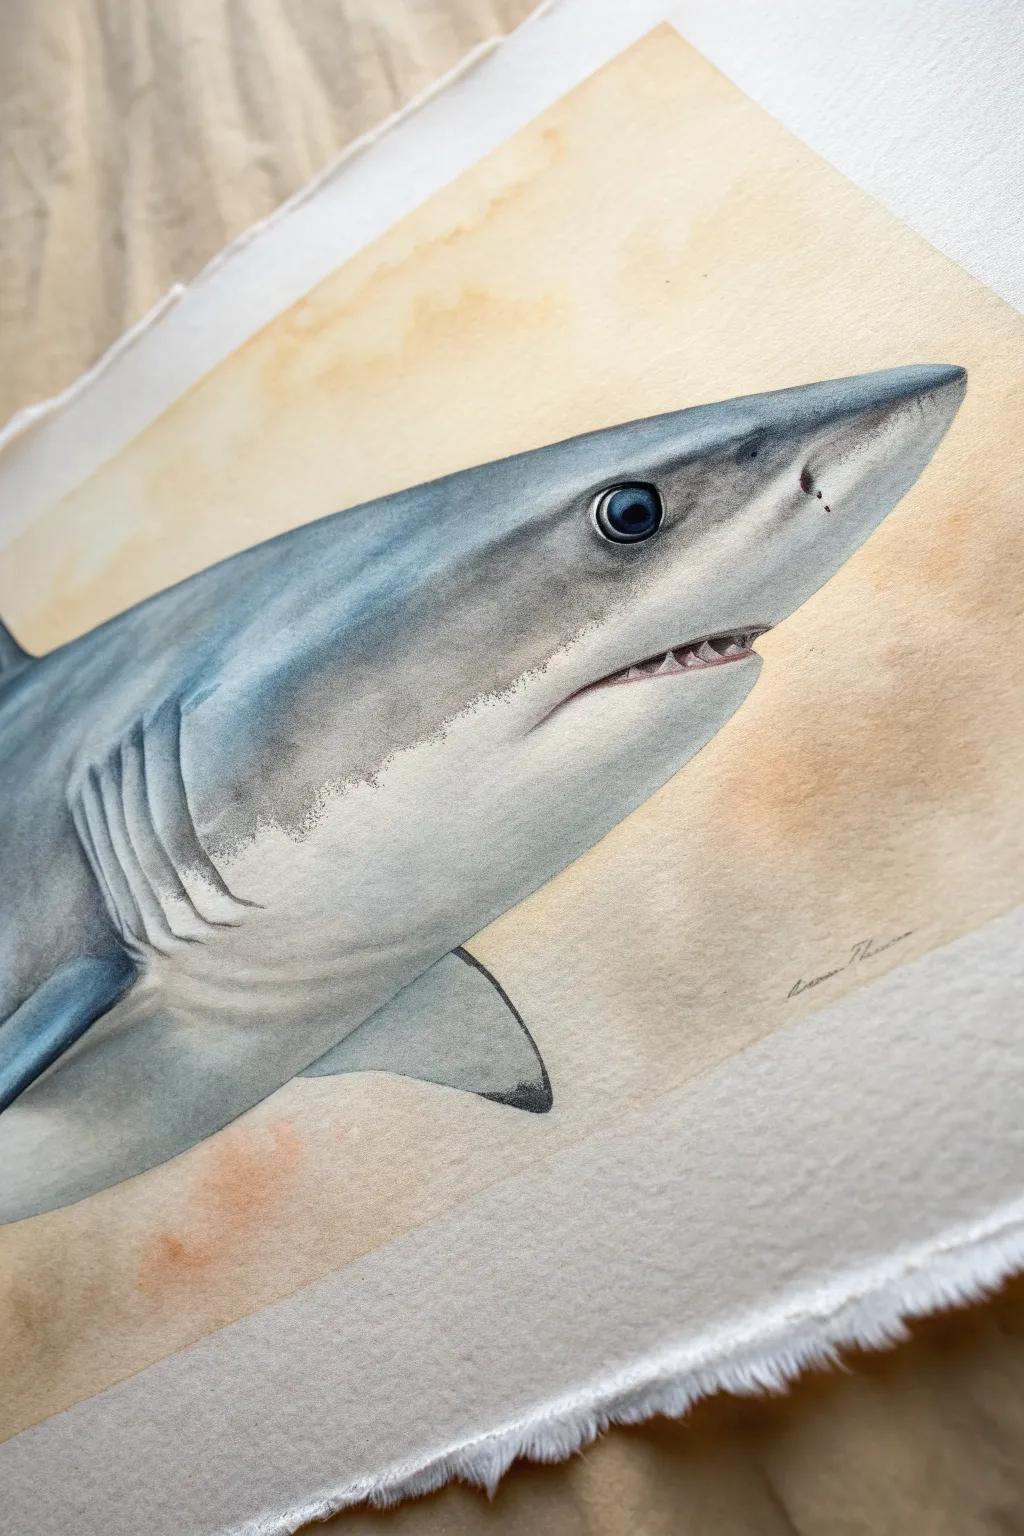
Capture the sleek, predatory elegance of a shark with this realistic watercolor profile study. Focusing on subtle gradients and precise detailing, this project transforms a simple gray palette into a lifelike marine portrait on textured paper.
Step-by-Step Tutorial
Materials
- Cold press watercolor paper (300gsm/140lb)
- Pencil (HB or H for light sketching)
- Kneaded eraser
- Watercolor paints: Payne’s Grey, Cerulean Blue, Indigo, Burnt Umber, Lamp Black
- Round brushes: Sizes 6 or 8 (for washes) and 0 or 1 (for details)
- Clean water jar
- Paper towels
- Masking tape
Step 1: Sketching the Outline
-
Establish the curve:
Begin by lightly sketching the long, sloping dorsal curve of the shark using an HB pencil. Keep the line smooth and unbroken to capture the hydrodynamic shape. -
Define features:
Place the eye socket relatively low on the head, followed by the distinctive gill slits. Add the mouth line, ensuring it curves subtly downward at the corner, and outline the pectoral fin below the body. -
Refine the lines:
Use a kneaded eraser to lift almost all the graphite, leaving only the faintest ghost lines to guide your painting without showing through the translucent watercolor.
Step 2: Base Layers & Gradients
-
Prepare the background:
Mix a very dilute wash of Burnt Umber and a touch of Yellow Ochre. Apply this loosely around the outside of the shark shape to create a warm, sandy water effect, fading it out toward the paper edges. -
Initial body wash:
Wet the upper body of the shark with clean water (wet-on-wet technique). Drop in a mix of Cerulean Blue and a tiny bit of Payne’s Grey, letting the color bleed naturally but stopping abruptly at the lateral line where the shark’s belly turns white. -
Softening the transition:
Before the gray-blue wash dries, use a clean, damp brush to soften the bottom edge so the color fades gently into the white of the belly rather than leaving a hard line. -
Building depth:
Once the first layer is dry, mix a darker Payne’s Grey. Glaze this over the top of the head and dorsal area to create the rounded form, keeping the highlight area near the eye lighter.
Edge Control Tip
To get the shark’s skin to look wet, keep your edges sharp on the outline but soft on the inside shadows. Hard outlines against soft interior blending create immediate volume.
Step 3: Texturing the Skin
-
Creating the speckled effect:
The transition zone on a shark’s flank often has a stippled look. Using a semi-dry brush with your gray mix, gently stipple the area where the gray meets the white belly to create a textured, organic gradient. -
Painting the gills:
Use a liner brush with a darker Indigo mix to paint the gill slits. Paint the dark recessed line first, then use a damp brush to pull the color slightly backward, creating a shadowed ridge effect. -
Defining the fins:
Paint the pectoral fin with a gradient that is dark at the leading edge and lighter towards the rear. Add a very dark, sharp tip to the fin for definition.
Deckle Those Edges
For the authentic look shown in the photo, tear your watercolor paper against a ruler instead of cutting it with scissors. This creates a rough ‘deckled’ edge.
Step 4: Fine Details
-
The eye:
Paint the entire eye with a dark blue-black, leaving a tiny circle of white paper for the highlight. Once dry, outline the eye with a thin rim of lighter blue to suggest the orbital ring. -
Mouth and teeth:
Use a very fine brush to paint the mouth line. Add the small, triangular teeth using a diluted gray—don’t make them stark white, as they are in shadow. -
Nostrils and sensors:
Add the small nostril mark near the snout tip. I like to add a few tiny dots around the snout area to represent the ampullae of Lorenzini (sensory pores). -
Shadows and highlights:
Enhance the three-dimensionality by adding a faint cool gray shadow along the bottom of the white belly. Use white gouache if you need to reclaim any lost highlights on the gills or eye.
This study captures the quiet power of the ocean’s apex predator with elegant simplicity


Head-On Shark With Dramatic Teeth
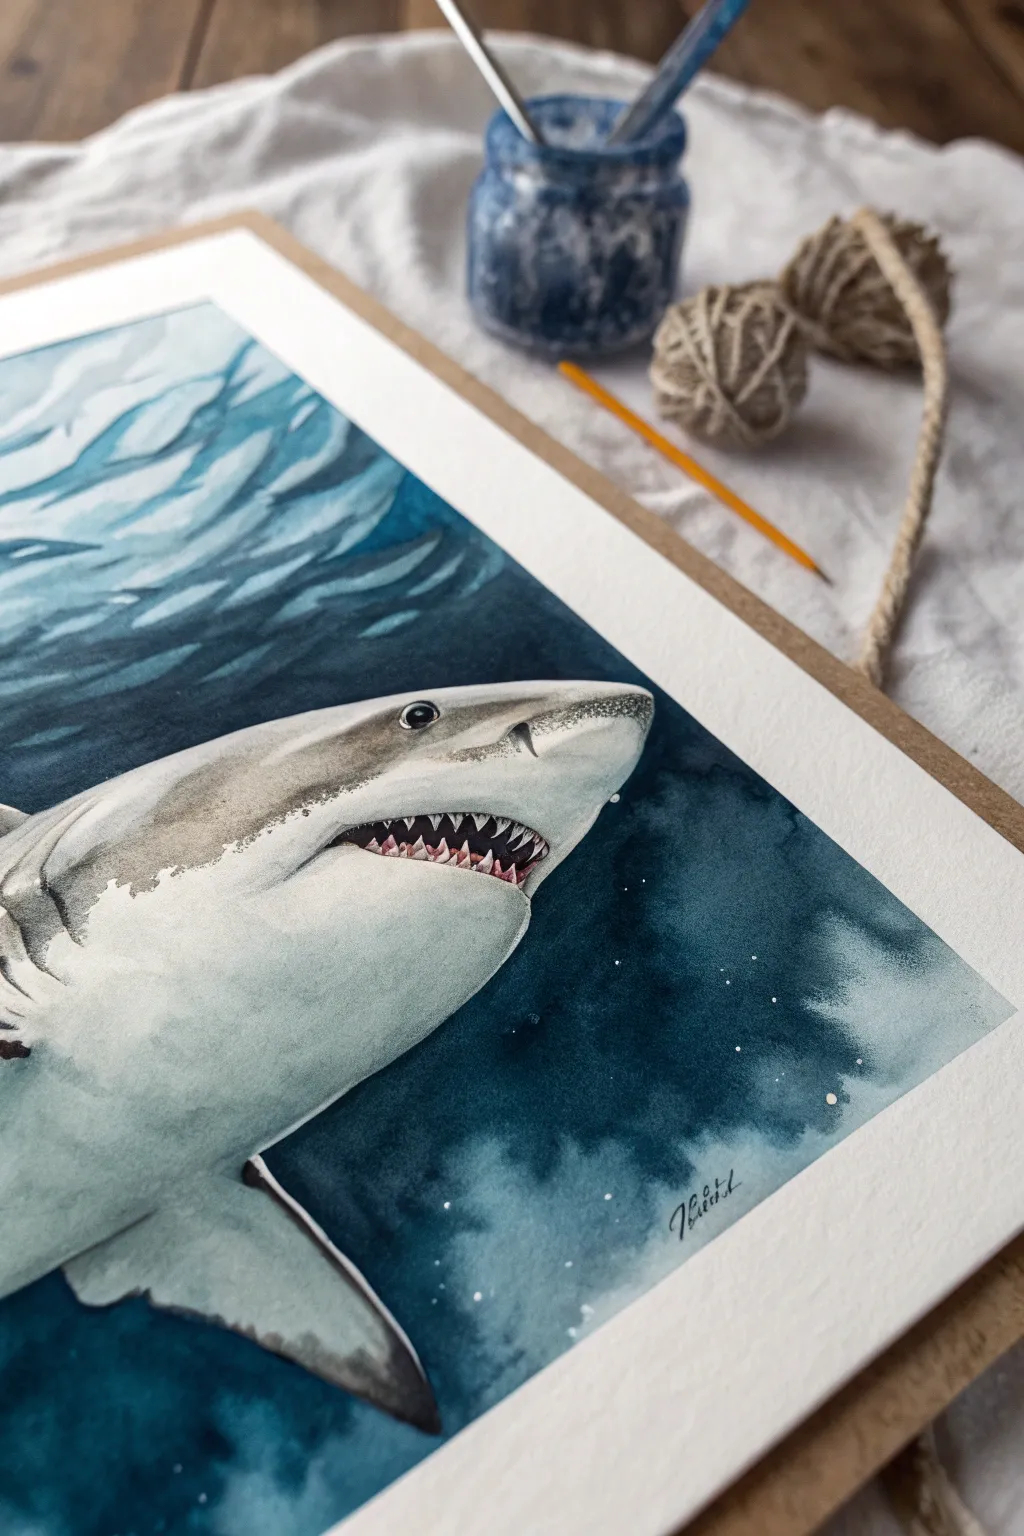
Dive into the depths by capturing the raw power and elegance of a Great White Shark using watercolors to create a striking underwater scene. This tutorial focuses on essential techniques like wet-on-wet blending for the ocean background and precise layering to render the shark’s iconic teeth and skin texture.
Step-by-Step Guide
Materials
- Cold press watercolor paper (300 gsm/140 lb)
- Watercolor paints (Indigo, Phthalo Blue, Burnt Umber, Payne’s Grey, Titanium White gouache)
- Round watercolor brushes (Size 8 for washes, Size 2 for details)
- Masking tape
- Pencil (HB or H)
- Kneaded eraser
- Two jars of water
- Paper towels
- Drawing board
Step 1: Sketching and Preparation
-
Secure the edges:
Begin by taping down all four edges of your watercolor paper to a board. This prevents the paper from buckling when you apply wet washes and creates that clean, professional white border seen in the example. -
Outline the shark:
Lightly sketch the profile of the shark using an HB pencil. Focus on the triangular shape of the nose, the sleek curve along the back, and the protruding pectoral fin at the bottom. -
Refine the details:
Sketch the mouth carefully, indicating the gum line and the jagged rows of triangular teeth. Mark the location of the eye and the distinctive gill slits on the side. Keep lines faint so they don’t show through the paint later.
Keep the Teeth Sharp
Don’t try to paint the white teeth. Instead, use ‘negative painting’ by carefully painting the dark mouth/gums *around* the white paper shapes to keep them crisp.
Step 2: Painting the Ocean Depths
-
Wet the background:
Using your larger brush and clean water, wet the entire background area around the shark, being careful not to get water inside the shark’s outline. -
Apply deep blues:
While the paper is glistening, drop in a mix of Indigo and Phthalo Blue. Concentrate the darkest Indigo pigment near the shark’s body and the bottom corners to create depth and contrast. -
Create water texture:
As the background begins to dry but is still damp, lift out some pigment using a thirsty, clean brush to suggest light filtering through the water above. Alternatively, paint gentle, wavy strokes of lighter turquoise near the top corner to imply surface ripples. -
Let it cure:
Allow the background to dry completely. If the paper feels cool to the touch, it is still damp; wait until it is room temperature before proceeding.
Muddy Water Fix
If your blue background bleeds into the shark, wait for it to dry completely. Then, use white gouache to paint over the mistake and reshape the shark’s outline.
Step 3: Rendering the Shark
-
Base shadow layer:
Mix a very watery grey using Payne’s Grey and a touch of Phthalo Blue. Apply this pale wash to the shark’s upper body (the dorsal side), leaving the belly paper-white. -
Build contrasting skin tones:
Once the base is dry, mix a darker, thicker grey-brown (Payne’s Grey + Burnt Umber). Paint the upper back and nose, using a jagged, irregular motion where the dark skin meets the white belly to mimic the shark’s natural counter-shading. -
Deepen the shadows:
Add shadows specifically under the snout, around the gill slits, and at the base of the pectoral fin. Soften the edges of these shadows with a damp brush to make the form look rounded. -
Paint the eye:
Using nearly pure black or concentrated Payne’s Grey, fill in the shark’s eye. Leave a tiny speck of white paper (or add white gouache later) for a highlight to bring it to life.
Step 4: The Mouth and Final Details
-
Color the gums:
Mix a diluted muddy pink using Burnt Umber and a tiny touch of Red. Carefully paint the gum line inside the mouth, painting around the triangular teeth shapes. -
Darken the mouth interior:
Paint the deep recess of the mouth with absolute black or dark Indigo to create depth, making the teeth pop forward. -
Define the teeth:
Use a very watery grey to add slight shadows on one side of each tooth for dimension. They shouldn’t be stark white flat triangles; give them a little volume. -
Texturize the skin:
Using a relatively dry brush and dark grey paint, stipple (tap) tiny dots along the nose and upper back to suggest the rough, sandpaper-like texture of shark skin. -
Add floating debris:
Load a small brush with Titanium White gouache or opaque white watercolor. Splatter very fine droplets over the dark blue water background to simulate suspended particles and marine snow. -
Sign and reveal:
Sign your name in the corner with a fine liner or small brush. Slowly peel away the masking tape at a 45-degree angle to reveal your crisp, clean borders.
Step back and admire the fierce yet beautiful creature you’ve brought to surface on your paper


Shark Silhouette Against a Bright Sun
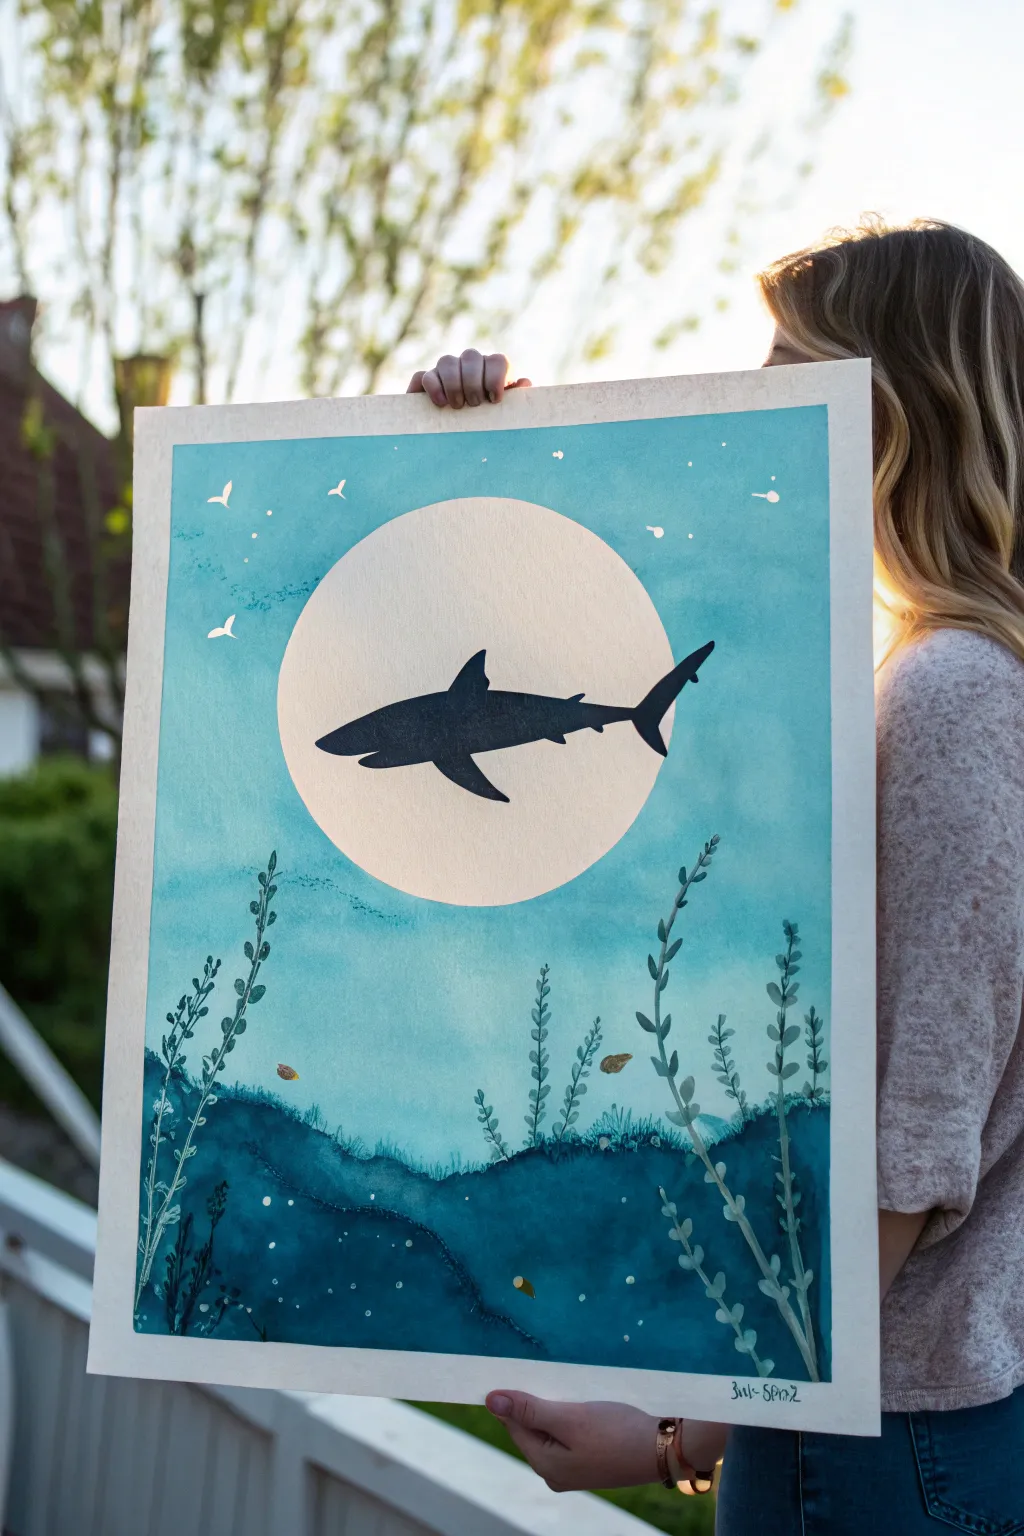
Capture the mysterious beauty of the deep ocean with this striking silhouette painting. By using simple watercolor washes and a bold black silhouette, you can create a serene yet powerful scene where a lone shark glides past a luminous moon.
Step-by-Step Guide
Materials
- Large sheet of cold-press watercolor paper (A3 or similar size)
- Painter’s tape or masking tape
- Watercolor paints (Turquoise, Cerulean Blue, Prussian Blue, Dark Indigo or Payne’s Gray)
- Black acrylic paint or black India ink
- Large flat wash brush
- Medium round brush
- Small liner or detail brush
- Circular masking object (like a plate or adhesive masking film)
- Pencil and eraser
- White gel pen or white gouache
- Two jars of water
- Paper towels
Step 1: Preparation and Sketching
-
Secure the paper:
Begin by taping down all four edges of your watercolor paper to a rigid board or your work surface. This prevents the paper from buckling when wet and creates a clean, professional border once removed. -
Mask the moon:
Decide on the size of your moon. You can lightly trace a dinner plate or bowl in the upper center of the page. To keep this area perfectly white, apply a circular piece of masking film, or carefully paint liquid frisket over the circle. Alternatively, you can just paint very carefully around your pencil line, though masking is safer. -
Sketch the seabed:
Lightly sketch a rolling, uneven line near the bottom third of the paper to represent the ocean floor. Don’t worry about details yet; just establish the horizon line.
Step 2: Painting the Ocean
-
Prepare the background wash:
Mix a large amount of a light turquoise or aquatic blue. You want enough wash to cover the top two-thirds of the paper without running out. -
Apply the first wash:
Using your large flat brush, wet the paper above the seabed line with clean water first (wet-on-wet technique). Then, apply your turquoise mix, starting from the top and working down toward the seabed. Paint right over the masked moon if you used masking film. -
Add subtle depth:
While the paper is still damp, drop in small touches of slightly darker blue near the edges and randomly in the open water to create texture so the water doesn’t look flat. -
Paint the deep seabed:
Switch to a darker mix using Prussian Blue and a touch of Indigo. Paint the area below your seabed line. You want this area significantly darker than the sky/water above to ground the composition. -
Create texture in the deep:
While the bottom section is wet, dab in concentrated dark blue or Payne’s Gray to create the look of uneven terrain and deep shadows along the ocean floor. Let the entire painting dry completely.
Bleeding Edges?
If paint bleeds under your tape, use a slightly damp, clean brush or a ‘magic eraser’ sponge to gently lift the unwanted paint while it’s still slightly wet, or cover with white gouache later.
Step 3: The Silhouette
-
Sketch the shark:
Once the paper is bone dry, lightly sketch the outline of the shark inside the moon circle (or overlapping it). Focus on the distinct dorsal fin, the curved tail, and the pointed nose. -
Remove the mask:
If you used masking film or fluid for the moon, gently peel or rub it away now to reveal the pristine white paper underneath. -
Paint the shark:
Using black acrylic paint or India ink and a medium round brush, carefully fill in your shark sketch. Acrylic is preferred here because it’s opaque and matte, providing a stark contrast against the pale moon.
Pro Tip: Masking Fluid
Don’t shake your masking fluid bottle before use! This creates air bubbles that will pop and ruin the perfect circle of your moon. Gently roll the bottle instead.
Step 4: Aquatic Details
-
Paint the kelp foundations:
Using a dark blue-green (mix your seabed color with a little green), paint wavy vertical lines rising from the seabed. Vary the heights; some should reach clearly into the lighter water section. -
Add leaves to the kelp:
With a smaller brush, add small, oval-shaped leaves along your wavy lines. Keep the leaves looser and more transparent near the top, and darker near the bottom. -
Add foreground seaweed:
Mix an even darker, almost black-blue color. Paint a few strands of seaweed in the very front, overlapping your previous layers to create depth and dimension. -
Paint the distant birds:
Using white gouache or a white gel pen, add tiny V-shapes in the upper left corner to represent seabirds or fish silhouettes in the distance. -
Add bubbles:
Using the white pen or small dots of white paint, add scattered bubbles rising from the seabed and around the shark. Keep them sparse and random. -
Final touches:
Add a few tiny speckles of white in the water to look like catching light or plankton. Sign your work in the bottom corner. -
Reveal the border:
Once everything is absolutely dry, slowly peel away the painter’s tape at a 45-degree angle to reveal your crisp white borders.
Hang your artwork in a well-lit spot to see the contrast pop
BRUSH GUIDE
The Right Brush for Every Stroke
From clean lines to bold texture — master brush choice, stroke control, and essential techniques.
Explore the Full Guide
Negative Space Shark in Painted Water
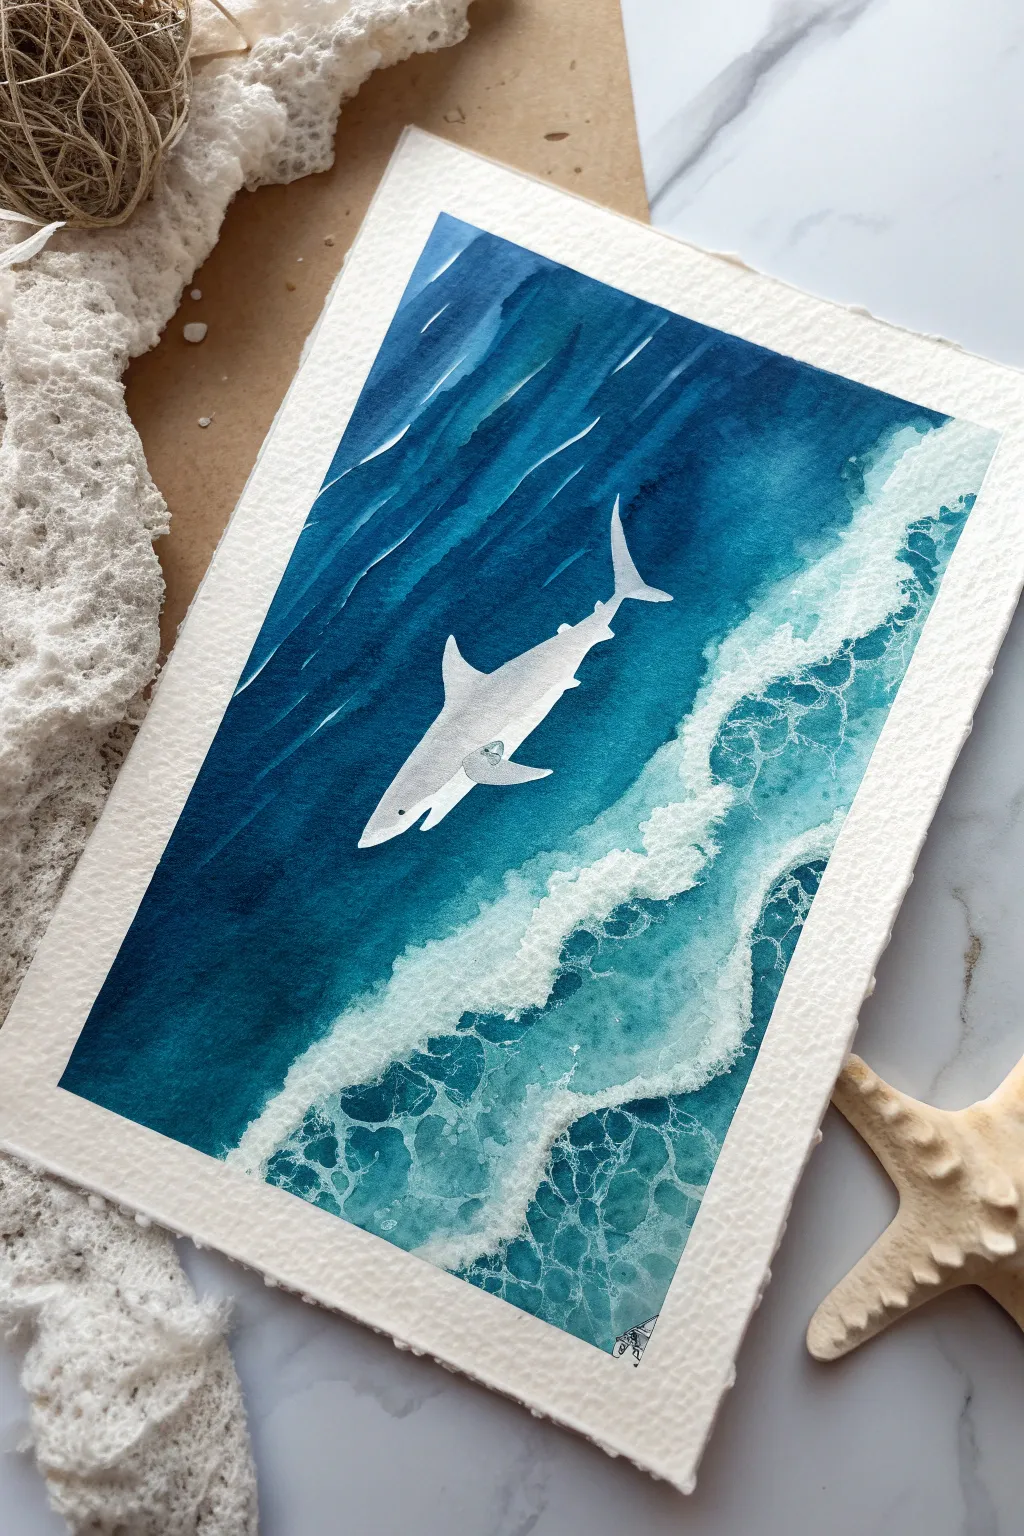
Capture the serene power of the ocean with this watercolor project that uses masking fluid to keep your shark crisp and bright against deep azure waters. The contrast between the stark white paper and the rich, layered blues creates a striking overhead perspective.
Detailed Instructions
Materials
- Cold press watercolor paper (300gsm, 100% cotton recommended)
- Masking fluid (drawing gum)
- Old brush or masking fluid applicator
- Watercolor paints: Prussian Blue, Phthalo Blue, Indigo, Turquoise, Payne’s Gray
- Large wash brush (flat or mop)
- Medium round brush (size 6 or 8)
- Small detail brush (size 0 or 1)
- Small jar of white gouache or white ink
- Pencil and eraser
- Paper towels
- Salt (optional for texture)
Step 1: Planning and Masking
-
Sketch the silhouette:
Lightly sketch the outline of a shark swimming diagonally across your paper. Focus only on the outer shape—the fins and the curved body—keeping your pencil lines very faint so they don’t show later. -
Mask the shark:
Using an old brush or a silicone applicator, carefully fill in the entire shark shape with masking fluid. This preserves the white of the paper which will become the shark’s body later. -
Protect the foam lines:
Apply thin, jagged lines of masking fluid along the right side of the paper where the wave foam will be. create sporadic dots and broken lines to mimic splashing water. -
Allow to cure:
Let the masking fluid dry completely. It should feel gummy and tack-free to the touch before you add any water.
Save Your Brushes
Never use your good watercolor brushes for masking fluid! It ruins the bristles instantly. Use a silicone sculpting tool, a matchstick, or an incredible cheap craft brush you don’t mind discarding.
Step 2: Painting the Ocean Depths
-
Prepare the wet-on-wet base:
Wet the entire paper surface with clean water, going right over your dried masking fluid. The paper should be glisten, but not hold puddles. -
Drop in the deep blues:
Load your large brush with a mix of Prussian Blue and Indigo. Start painting the upper left corner—the deepest part of the water—using long, sweeping diagonal strokes that follow the water’s current. -
Create the gradient:
As you move toward the bottom right (the shoreline side), switch to lighter blues like Phthalo Blue and Turquoise. Let the colors bleed and blend naturally on the wet paper. -
Add current lines:
While the paint is still damp, lift out pigment using a damp, clean brush or paper towel to create subtle streaks of light reflecting on the swells parallel to the shark. -
Intensify the depths:
Once the first layer is semi-dry, go back into the upper left area with a concentrated mix of Indigo and Payne’s Gray to create that abyssal, deep-sea look around the shark’s tail. -
Dry completely:
Wait for the paper to be bone dry. This is crucial before removing the mask to prevent tearing.
Add a Little Sparkle
Mix a tiny pinch of mica powder or iridescent medium into your white gouache for the sea foam. When it dries, the crashing waves will shimmer slightly as if catching the sunlight.
Step 3: Refining the Waves
-
Remove the mask:
Gently rub away the masking fluid with your finger or a rubber cement pickup tool to reveal the stark white shark and foam lines. -
Add soft shadows:
Mix a very watery, pale gray (using a tiny dot of black or Payne’s Gray). Paint a soft shadow along the right side of the shark’s body and under the fins to give it dimension so it doesn’t look flat. -
Define the eye and gills:
Using your smallest detail brush and dark gray paint, add the tiny details of the eye, the gill slits, and the defined line of the mouth. -
Paint around the foam:
With a medium turquoise mix, carefully paint negative shapes around the white foam areas on the right side. Paint into the gaps of the white splashes to make the water look like it is churning underneath the foam.
Step 4: Foam and Finish
-
Enhance the sea foam:
Load a small brush with thick white gouache. Stipple (dot) fresh white paint over the masked foam areas to make them brighter and more textured. -
Create sea spray:
Load an old toothbrush or stiff brush with watered-down white gouache and flick it over the wave area to create tiny droplets of spray. -
Add final highlights:
Paint thin, broken white lines along the edges of the water currents in the deep blue section to suggest surface movement. -
Flatten and display:
Once fully dry, place the painting under a heavy book overnight to flatten any buckling from the water washes.
Frame this piece without glass initially to admire the beautiful texture of the watercolor paper and the crisp edges of your shark
Hammerhead Shark With Bold Shape
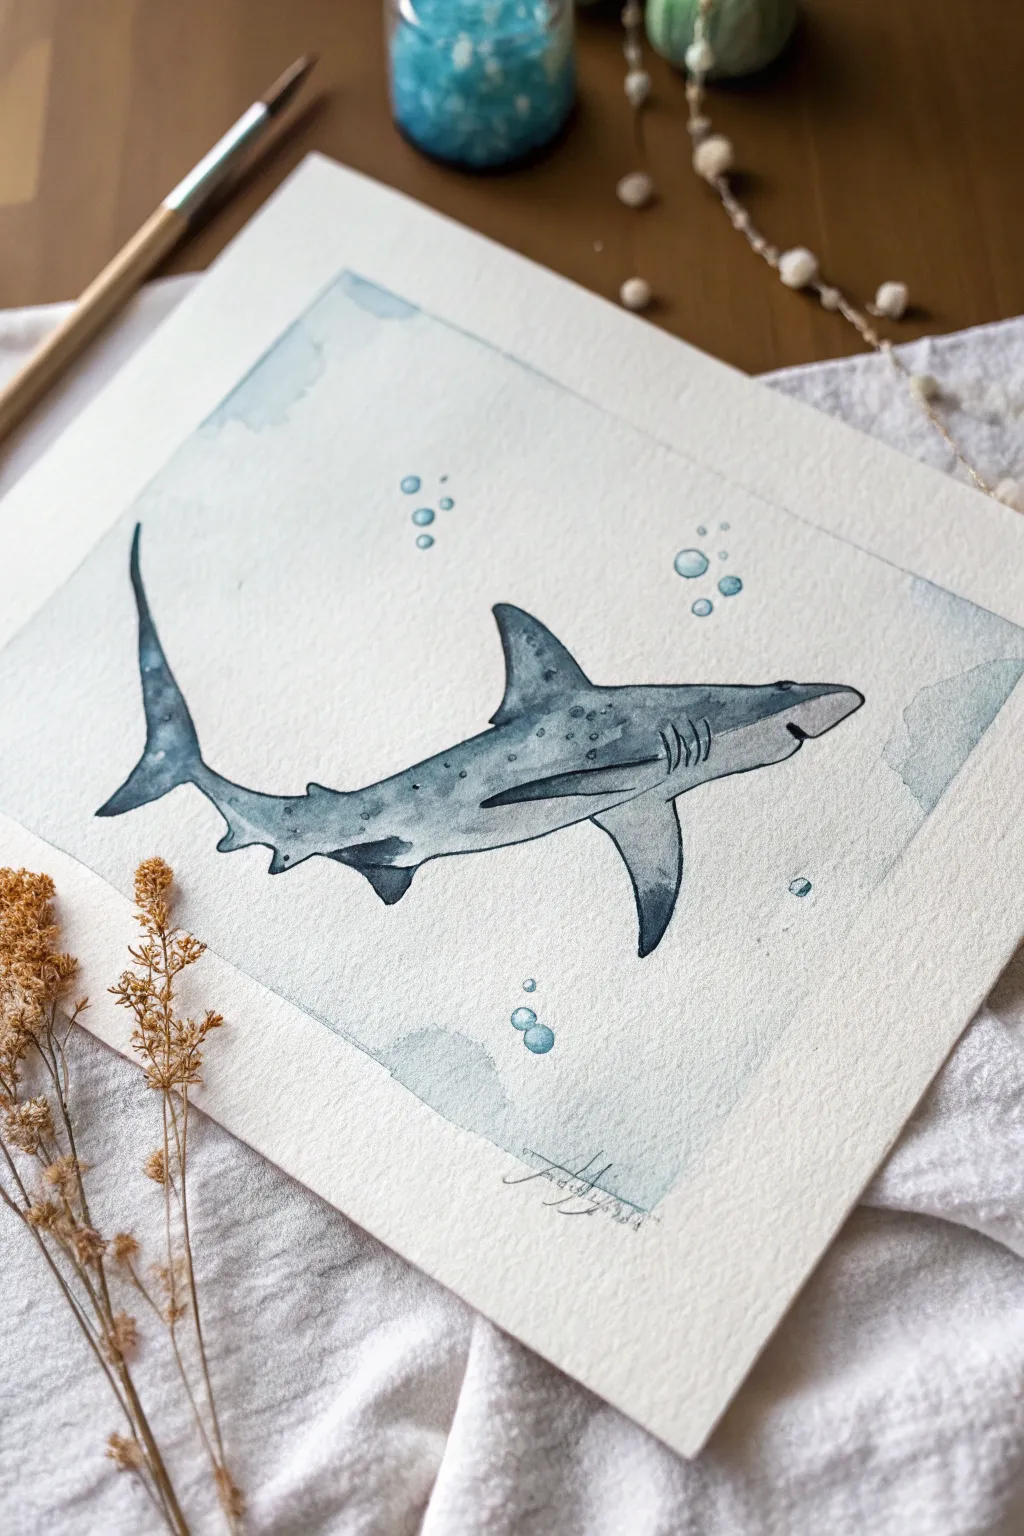
Capture the quiet elegance of marine life with this delicate watercolor shark painting. Using soft washes and precise ink outlines, you’ll create a piece that feels both fluid and structured, perfect for an ocean-themed art collection.
How-To Guide
Materials
- Cold press watercolor paper (300 gsm)
- Watercolor paints (Payne’s Grey, Indigo, Cerulean Blue)
- Fine liner pen (waterproof, black, 0.1mm or 0.3mm)
- Round watercolor brushes (size 4 and 8)
- Pencil (HB) and soft eraser
- Masking tape
- Jar of clean water
- Paper towels
Step 1: Sketching the Form
-
Prepare your paper:
Begin by taping down the edges of your watercolor paper to a flat board or your table. This creates a clean white border and prevents the paper from buckling when wet. -
Outline the body shape:
Lightly sketch the main curve of the shark’s body using your HB pencil. Start with a long, torpedo-like shape that tapers towards the tail, keeping your lines faint so they don’t show through the paint later. -
Add the fins:
Draw the dorsal fin on top, making it slightly curved backward. Sketch the pectoral fins (the side fins) and the distinctive tail fin with its long upper lobe and shorter lower lobe. -
Refine the details:
Add the smaller details like the gill slits, eye, and mouth line. Erase any unnecessary construction lines gently to leave a clean outline.
Keep It Fluid
Don’t overwork the gray paint inside the shark. Let the water move the pigment naturally. If it blooms or creates ‘cauliflowers,’ leave them—they look like water refractions.
Step 2: Painting the Background
-
Define the water area:
Lightly pencil a loose, rectangular border inside your paper area to define where the ‘water’ wash will go. It doesn’t need to be perfectly straight; a jagged edge adds character. -
Apply a wet-on-wet wash:
With a large clean brush, wet the area around the shark with clear water. Be careful not to paint inside the shark’s outline. -
Drop in color:
Dilute some Cerulean Blue with plenty of water. Gently touch your loaded brush to the wet paper, letting the blue bloom outward. Keep the color very pale and uneven to mimic varying water depths. -
Add seabed accents:
While the paper is still damp near the bottom, dab in a slightly grayish-blue mix to suggest a sandy bottom or rock formation without painting specific details. -
Let it dry completely:
Allow this background layer to dry fully before moving on. The paper must be bone dry to prevent the shark’s colors from bleeding into the water.
Level Up: Salt Texture
While the shark’s grey body paint is still wet, sprinkle a few grains of table salt on the back. Once dry, brush it off to create a unique, starry skin texture.
Step 3: Painting the Shark
-
Base layer for the body:
Mix a watery wash of Payne’s Grey with a touch of Indigo. Paint the entire upper body of the shark, leaving the belly area white or extremely pale. -
Darkening the fins:
While the base layer is still slightly damp, drop more concentrated Indigo pigment into the tips of the fins and the tail. I find this creates a nice natural gradient as the colors merge. -
Add texture and spots:
Once the first layer is semi-dry, use a smaller brush to dab small dots of darker grey along the back and dorsal fin to create a mottled skin texture. -
Define the shadows:
Paint a darker line along the bottom edge of the shark’s body and under the fins to give the shark three-dimensional volume. -
Paint the bubbles:
Using diluted blue paint, create small circles of varying sizes floating above the shark. Leave a tiny white spot in the center of each circle for a highlight.
Step 4: Inking and Finishing
-
Outline the form:
Once the paint is absolutely dry, use your fine liner pen to trace the shark’s outline. Use broken lines in some areas to suggestive light hitting the skin rather than a heavy continuous line. -
Ink the details:
Draw the gill slits with short, curved distinct lines. Outline the eye, filling it in but leaving a tiny spec of white for life. -
Enhance the texture:
Add tiny stippled dots with your pen near the top of the back and on the fins to reinforce the painted texture. -
Outline bubbles:
Gently outline your painted bubbles, keeping the line thin and delicate. -
Sign and reveal:
Sign your work at the bottom, strictly pencil or fine pen. Finally, carefully peel off the masking tape at a 45-degree angle to reveal your crisp white borders.
Now you have a tranquil underwater scene that beautifully balances precise lines with free-flowing watercolor.

PENCIL GUIDE
Understanding Pencil Grades from H to B
From first sketch to finished drawing — learn pencil grades, line control, and shading techniques.
Explore the Full Guide
Shark Over a Coral Reef Corner Frame
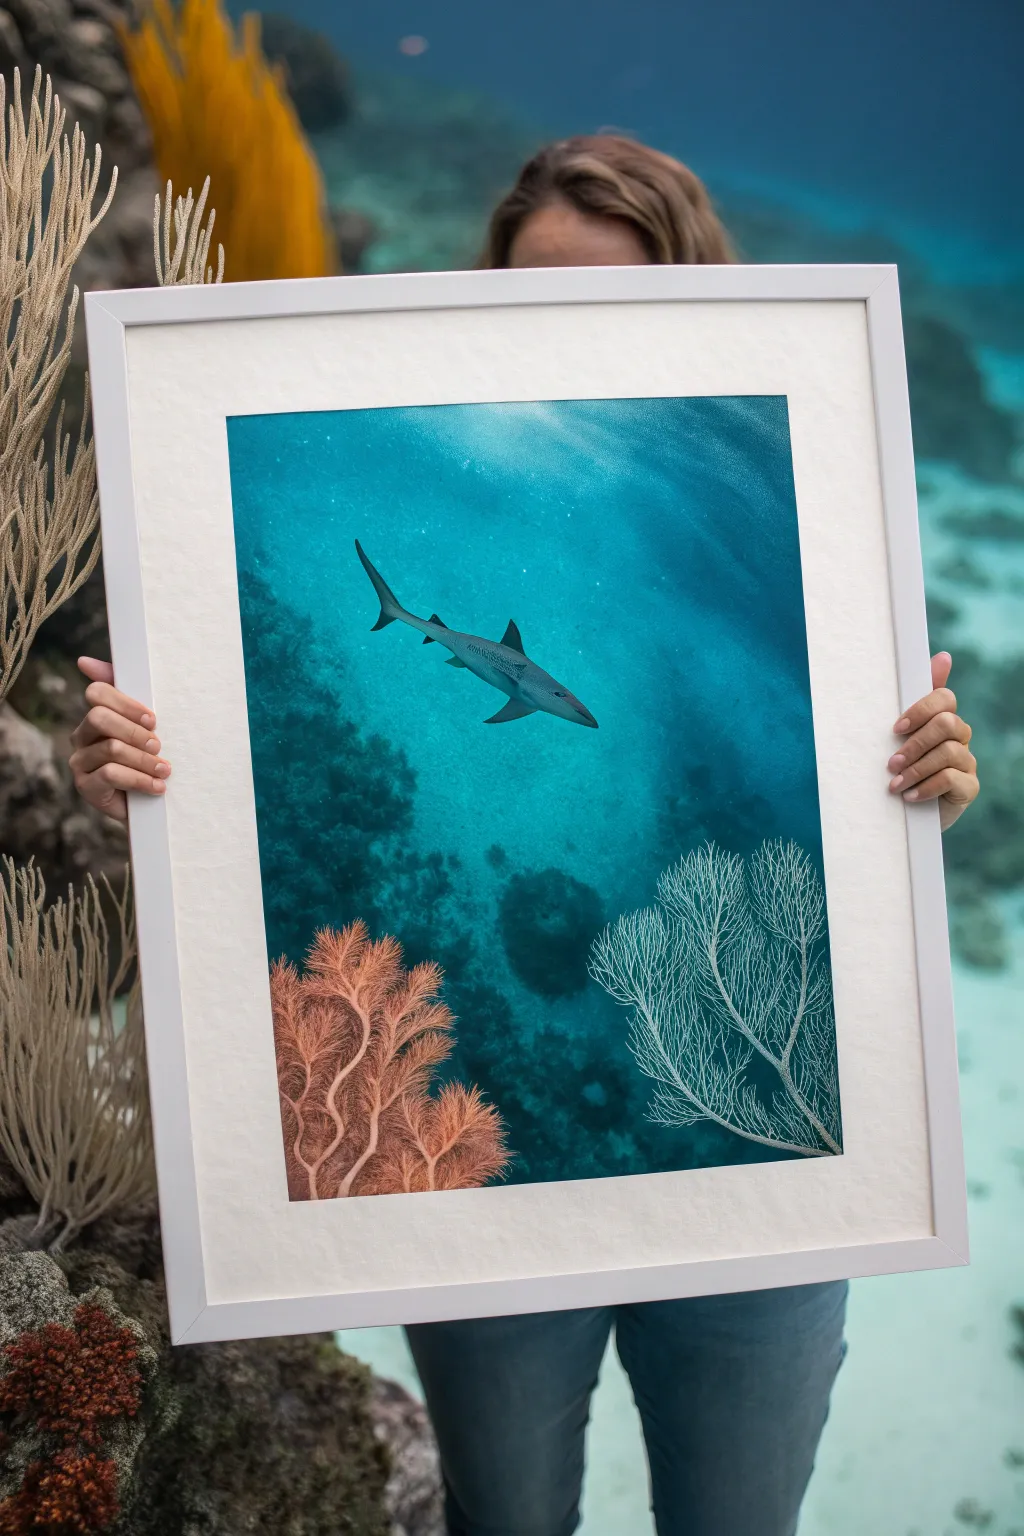
Capture the serenity of the underwater world with this striking composition featuring a sleek reef shark gliding over vibrant coral formations. This project combines smooth gradients for the ocean depths with detailed texture work for the foreground coral, creating a professional-looking piece perfect for coastal decor.
Step-by-Step Guide
Materials
- Large format watercolor paper or cold press illustration board (18×24 or similar)
- Watercolor paints (Phthalo Blue, Prussian Blue, Turquoise, Hookers Green, Burnt Sienna, Orange)
- White gouache or acrylic ink (for highlights)
- Masking fluid
- Large flat wash brush
- Medium round brush (size 6 or 8)
- Fine liner brush (size 0 or 10/0)
- Salt (table salt and coarse sea salt)
- Pencil and eraser
- White mat board
- White wooden frame
Step 1: Drafting and Masking
-
Sketch the composition:
Begin by lightly sketching the outline of the shark in the center-left area, angling it diagonally downward. Sketch the rough shapes of the fan coral in the bottom right and the branching coral in the bottom left. -
Mask the coral:
Using a dedicated brush or masking tool, carefully apply masking fluid over the intricate white fan coral structure on the right. This preserves the white paper for later. -
Mask the shark:
Apply masking fluid to the shark’s silhouette as well. This allows you to paint the ocean background freely without worrying about painting around the main subject. -
Wait for drying:
Ensure all masking fluid is completely dry to the touch before proceeding to any painting steps to avoid tearing the paper surface.
Step 2: Creating the Ocean Depth
-
Wet the paper:
Using your large flat brush, apply clean water across the entire paper surface except for the masked areas. You want an even sheen, not puddles. -
Apply the gradient base:
Load your brush with Turquoise and Phthalo Blue. Start near the top with lighter, watered-down washes to represent the sunlit surface water. -
Deepen the colors:
As you move down the paper, mix in Prussian Blue and a touch of Hookers Green to create the darker, deeper water tones. Work quickly to ensure a seamless blend. -
Add texture with salt:
While the background wash is still damp, sprinkle a pinch of salt near the top and middle sections. This creates subtle ‘bokeh’ effects that look like floating particles or light refraction. -
Suggest distinct rocks:
While the paper is damp but not soaking, drop in concentrated dark blue-green pigment in the lower left and center background to suggest vague, out-of-focus rock formations or reef walls.
Uneven Water?
If your ocean gradient dries with hard lines (blooms), gently scrub the area with a damp stiff brush to soften the edge, then glaze over with a thin wash of color.
Step 3: Detailing the Subject
-
Remove the mask:
Once the background is bone dry, gently rub off the masking fluid with your finger or a rubber cement pickup tool to reveal the stark white paper underneath. -
Paint the shark’s body:
Mix a watery grey-blue wash. Apply this to the shark, keeping the belly lighter (almost white) and the top darker. Use wet-on-wet technique to blend the transition on the side of the shark. -
Shark details:
Using your fine liner brush and a darker grey mix, add the gill slits, the eye, and the definitive black tips on the fins. Adding a tiny line of white gouache on the top edge creates a sun-catching highlight. -
Paint the left coral:
For the bottom-left coral structure, use a mix of Burnt Sienna and Orange. Paint the branches with a medium brush. -
Add coral texture:
While the orange coral is drying, stipple darker brown dots and lines to give it a rough, organic surface texture. -
Refine the fan coral:
The bottom-right fan coral was preserved white by the mask. Now, use a very watery, pale blue-grey to add slight shadows to the back branches, giving the white structure dimension without losing its brightness.
Add Some Life
Use your finest brush to paint tiny silhouettes of smaller fish in the distant background. Keep them faint and blue-tinted to make them look far away.
Step 4: Final Assembly
-
Check highlights:
Review the painting. If the water looks too flat, use a dry brush with a tiny amount of white gouache to add faint sun rays angled from the top surface. -
Mount artwork:
Place your dried painting behind a clean white mat board. Use acid-free tape to secure it to the back of the mat. -
Framing:
Clean the glass of your white wooden frame meticulously. Place the matted artwork inside and secure the backing.
Hang your masterpiece in a prominent spot to bring a calming aquatic atmosphere to your space
Shark Chasing a Tiny School of Fish
Immortalize the ocean’s apex predator with this serene watercolor composition featuring a sleek shark navigating a vertical seascape. The textured paper and soft blue washes create a convincing underwater atmosphere, while the precise pen work brings the shark to life.
Detailed Instructions
Materials
- Cold press watercolor paper (300 gsm)
- Watercolor paints (Indigo, Paynes Gray, Prussian Blue, Burnt Umber)
- Small round brush (size 2 or 4)
- Fine liner brush (size 00)
- Black waterproof fineliner pen (0.1mm or 0.3mm)
- HB pencil and eraser
- Clean water jar
- Mixing palette
- Masking tape (optional)
Step 1: Sketching the Composition
-
Outline the shark:
Begin lightly with your HB pencil in the center of the paper. Draw the shark’s streamlined body, angling it slightly upward. Pay attention to the dorsal fin shape and the characteristic asymmetrical tail fin. -
Add the ecosystem:
Sketch floating seaweed fronds rising from the bottom corners, swaying gently to the right. Add a school of tiny fish outlines scattering in the upper right quadrant to create a sense of movement. -
Refine the details:
Add small details like the gill slits, the eye, and the separation line where the shark’s color changes from gray to white. Keep your pencil lines very faint so they won’t show through the paint later.
Shark Skin Texture
When painting the shark’s gray body, try blotting the wet paint gently with a crumpled tissue. This lifts pigment to mimic rough sandpaper-like shark skin.
Step 2: Painting the Ocean Background
-
Mix your water wash:
Dilute a Prussian Blue or Indigo heavily with water to create a very pale, transparent blue. You want this to be subtle. -
Apply the background wash:
Paint the upper section of the paper, fading out as you go down. I like to let the brush skip slightly over the paper’s texture to create natural ‘bubbles’ and light variances. -
Soften the edges:
While the paint is still wet, use a clean, damp brush to soften the edges of your blue wash, making it look like sunlight filtering through water.
Level Up: Salt Technique
While the blue ocean background wash is still wet, sprinkle a few grains of coarse salt on it. Once dry, brush it off to reveal stunning star-like texture.
Step 3: Painting the Shark
-
Base gray layer:
Mix Paynes Gray with a touch of Burnt Umber to warm it up. Paint the top half of the shark’s body, carefully leaving the belly white. This wet-on-dry technique gives you a crisp edge. -
Developing shadow:
While the gray is still slightly damp, drop in a more concentrated Paynes Gray near the bottom edge of the gray area and along the fins to create volume and roundness. -
Fin details:
Paint the pectoral and dorsal fins. The pectoral fin (the side one) should be darker, almost black at the tips, to show it is in shadow beneath the body.
Step 4: Adding Life and Flora
-
Paint the seaweed:
Mix Indigo with a tiny bit of teal or green. Using the tip of your round brush, paint the seaweed leaves with quick, leafy strokes, layering them to build density at the bottom. -
School of fish:
Use a medium blue mix to fill in the tiny fish silhouettes. Vary the blue intensity slightly between fish to create depth—some should look closer, some further away. -
Tiny bottom dwellers:
Add a few very small, brownish-gray fish near the shark’s belly using a neutral tint.
Step 5: Final Definition
-
Wait for complete dryness:
Ensure the paper is bone dry before picking up your pen. If it’s damp, the ink will bleed and ruin the crisp lines. -
Ink the shark:
Use the waterproof fineliner to outline the shark. Don’t trace smoothly; use broken, sketchy lines to suggest texture. Add the gill slits and the eye with the pen. -
Enhance the school:
Add tiny outlines or tails to just a few of the small blue fish, leaving others soft and painted only. This implies focus and motion. -
Sign and date:
Add your signature discreetly near the bottom seaweed cluster to finish the piece.
Step back and admire your peaceful underwater scene as the layers dry completely.


Stormy Water Shark With Swirling Motion
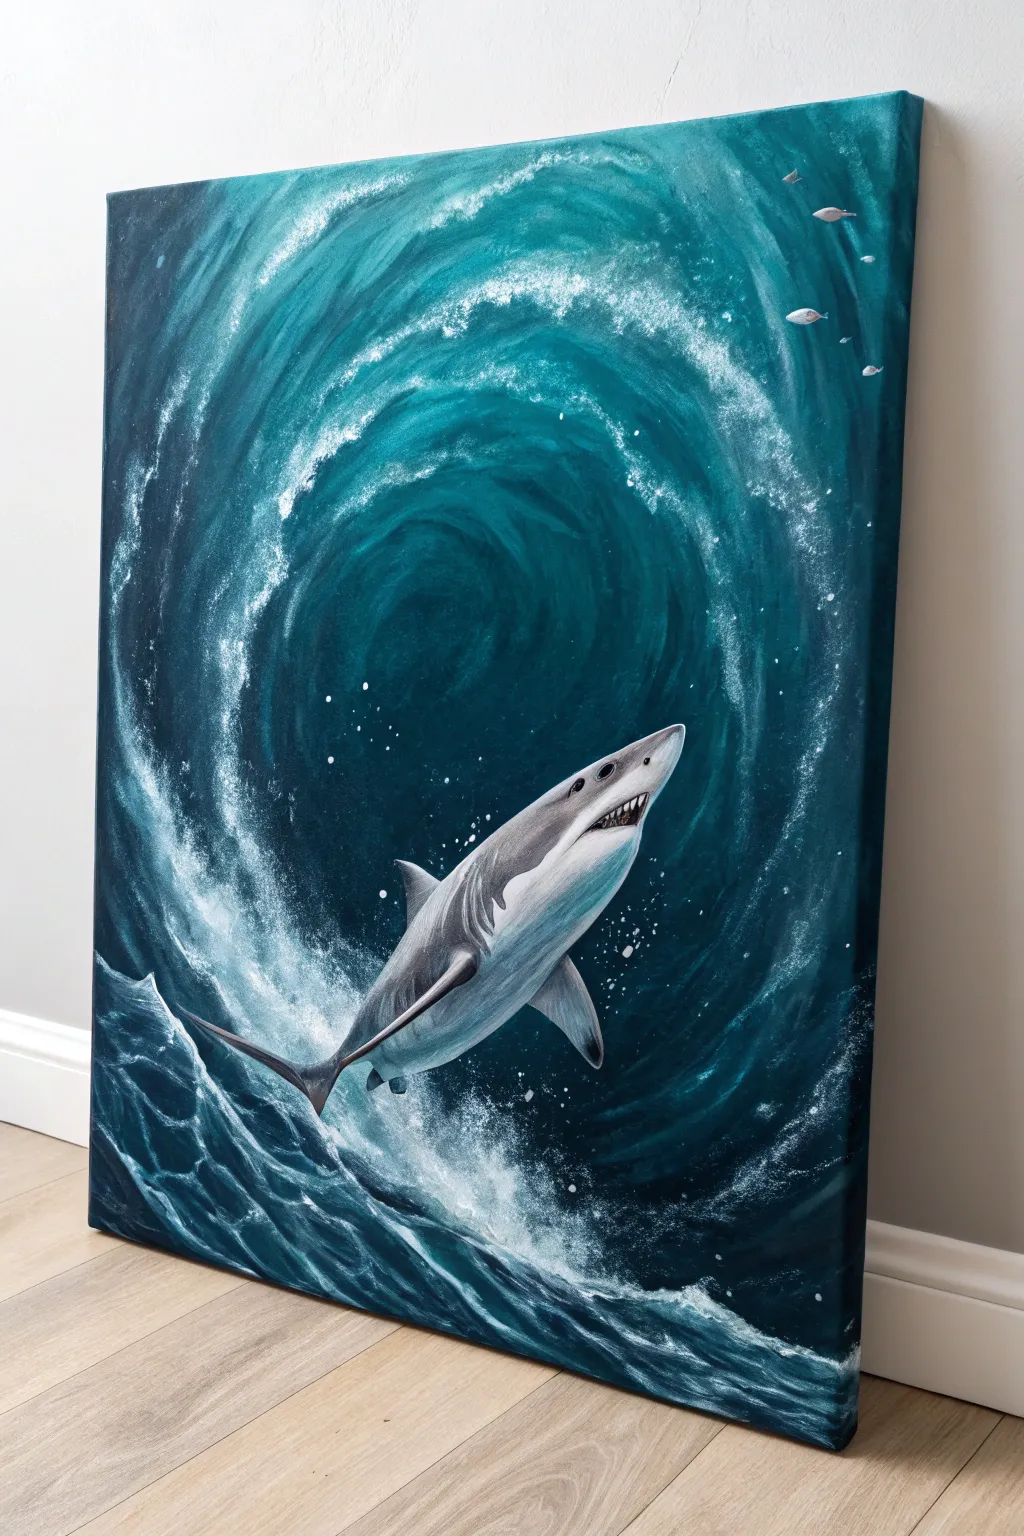
Capture the raw power of the ocean with this dynamic acrylic painting, featuring a great white shark breaching through a dramatic, swirling vortex of deep blue water. This tutorial guides you through creating depth with a spiral composition and capturing movement with expressive sea foam.
Step-by-Step Tutorial
Materials
- Rectangular canvas (e.g., 18×24 inches or similar vertical format)
- Acrylic paints: Phthalo Blue, Prussian Blue, Turquoise, Titanium White, Carbon Black, Cool Grey
- Large flat brush (for background)
- Medium filbert brush (for blending)
- Small round brush (for details)
- Old toothbrush or stiff bristle brush (for splatter spray)
- Reference photo of a great white shark
- Palette and water cup
- Chalk or pastel pencil (for sketching)
Step 1: Setting the Scene
-
Base sketch:
Begin by lightly sketching the large spiral shape that dominates the composition. Start wide at the edges and spiral inward toward a center point slightly above the middle. Then, outline the shark leaping upwards, ensuring its body follows the flow of the water. -
Darkest depths:
Mix Prussian Blue with a touch of Carbon Black to create a deep navy. Paint the outer corners of the canvas and the very center of the vortex with this dark hue to establish immediate depth. -
Mid-tone spiral:
Using Phthalo Blue and Turquoise, paint the swirling bands of water between the dark center and the edges. Follow the curve of your sketch with long, sweeping brushstrokes to mimic the water’s movement. -
Wet-on-wet blending:
While the paint is still tacky, use a damp, large brush to soften the transition between the deep navy abyss and the lighter teal swirls. You want a gradient effect rather than hard lines.
Depth Trick
Make the foam in the center of the vortex blurry and the foam near the shark sharp. This focus shift creates a huge sense of 3D depth.
Step 2: Painting the Shark
-
Underpainting the body:
Fill in the shark’s silhouette with a solid coat of Cool Grey for the upper body and Titanium White for the belly. Don’t worry about shading yet; just get the shapes solid. -
Adding volume:
Mix a slightly darker grey and apply it to the shark’s back and the shadow side of the fins. Blend this into the lighter grey while wet to create roundness. -
Shark details:
Switch to your small round brush to paint the gill slits, the dark eye, and jagged mouth. Use pure white for the teeth and a tiny dot of white in the eye for a lifelike glint. -
Water reflection:
Glaze a very thin, watery layer of blue over the lower tail area of the shark to make it look like it is still partially submerged or wet.
Muddy colors?
If your blues look dull, you likely mixed in orange or yellow by accident. Keep your brush clean and stick to cool colors (blues/greens/purples) only.
Step 3: The Turbulent Water
-
Creating the spiral foam:
Load a medium brush with Titanium White. Using a dry-brush technique (wipe most paint off first), follow your spiral path. Scrub the paint on lightly to create the frothy, misty texture of the swirling current. -
Intensifying the breach:
Paint thicker, more opaque white strokes around the shark’s tail and body where it breaks the surface. Add jagged, choppy strokes at the bottom left to represent crashing waves. -
Splatter effects:
Dilute some white paint with water until it’s ink-like. Dip an old toothbrush into it and flick the bristles with your thumb to spray fine mist over the spiral and the shark’s entry point. I find this creates the most realistic sea spray. -
Little fish:
Near the top right corner, paint a few tiny, simple silhouettes of fish using silver or light grey. These provide a sense of scale to your massive shark. -
Final highlights:
Add touches of pure white to the tips of the waves and the wettest parts of the shark’s nose and fins to make them shine.
Step back and admire the powerful movement you have captured in your deep sea scene
Moody Monochrome Shark in Ink Wash

Capture the contrast between fierce and fragile with this moody ink wash painting. Combining a realistic shark study with delicate botanical elements on textured handmade paper creates a stunning, timeless piece of art.
How-To Guide
Materials
- Heavyweight handmade cotton paper (deckled edge)
- Black waterproof fine liner pens (0.1 and 0.3)
- Black india ink or watercolor paint
- Diluted sepia or tea wash (optional for aging)
- Round watercolor brushes (Size 2 and 6)
- Pencil (HB) and kneaded eraser
- Mixing palette
- Water cups
- Paper towels
Step 1: Preparation & Sketching
-
Prepare the paper:
Start with a sheet of creamy, handmade paper with deckled edges. If your paper is too white, brush a very light wash of diluted tea or sepia watercolor over the entire surface and let it dry completely to achieve that vintage, aged look. -
Map out the composition:
Using an HB pencil, lightly sketch the shark in the upper left quadrant. Position it diagonally, swimming downwards slightly towards the right. Keep the lines faint so they won’t show through the washes later. -
Sketch the florals:
In the lower right corner, draw a cluster of three to four lush, open blooms—resembling wild roses or peonies—with accompanying leaves. Ensure the leaves arc gently upwards, creating a visual flow towards the shark. -
Refine the shark outline:
Tighten up the shark’s silhouette. Focus on the dorsal fin’s sharp triangle and the characteristic curve of the tail. Mark the placement of the gills and the pectoral fin.
Natural Edge Tip
To enhance the deckled edge look, gently tear your watercolor paper against a ruler before painting instead of cutting it with scissors.
Step 2: Painting the Shark
-
Base gray wash:
Mix a very watery, pale gray using your black ink or watercolor. Apply this base wash to the entire upper body of the shark, leaving the underbelly the color of the paper. -
Building form shadows:
While the first layer is barely damp, drop in a slightly darker gray along the spine and the upper edges of the tail and fins. This wet-on-wet technique creates a soft, rounded appearance. -
Defining the features:
Switch to a size 2 brush and a darker ink mix. Carefully paint the eye, nostril, and the five gill slits. Use short, controlled strokes to darken the tips of the dorsal and pectoral fins. -
Adding texture:
Once the shark is dry, dry-brush a little texture over the darker gray areas to simulate skin. Keep the transition to the white underbelly smooth but distinct. -
Final shark details:
Take your 0.1 fine liner pen and add very sparing ink lines to define the mouth corner and the sharpest edge of the tail where it meets the water.
Fixing Hard Edges
If your ink wash dries with a harsh line you didn’t intend, scrub it gently with a clean, damp stiff brush to soften the gradient.
Step 3: Painting the Florals
-
Floral base tint:
Mix an extremely pale, warm sepia or dirty pink tone. Wash this loosely over the flower petals. The goal is barely-there color, keeping the vintage monochrome feel. -
Painting the leaves:
Use a desaturated gray-green mix for the leaves. Create variety by making some leaves darker (in shadow) and others quite pale. I find lifting a bit of pigment with a paper towel helps create natural botanical highlights. -
Defining petals:
With a fine brush and a medium-strength sepia or gray, outline the individual petals. Keep the lines broken and organic rather than solid outlines. -
Leaf veins and stems:
Using the 0.1 fine liner or a very fine brush with concentrated ink, draw delicate veins in the leaves and crisp lines for the stems. -
Flower centers:
For the pollen centers, stipple small dots of darker brown or black ink. Allow these dots to be denser in the middle and sparse as they radiate outward.
Step 4: Finishing Touches
-
Enhancing contrast:
Step back and assess the values. If the shark looks too pale against the flowers, glaze another layer of translucent gray over the darkest parts of the shark’s body. -
Connecting the elements:
Extend a few leaf tips slightly closer to the shark if the gap feels too wide, ensuring the negative space feels intentional. -
Final ink pass:
Use the fine liner to add tiny scratches or texture marks to the shark’s skin and sharpen the very tips of the floral stamens.
Allow your painting to dry fully before framing it to showcase that beautiful paper texture
Watercolor Shark With Ocean Gradient Background
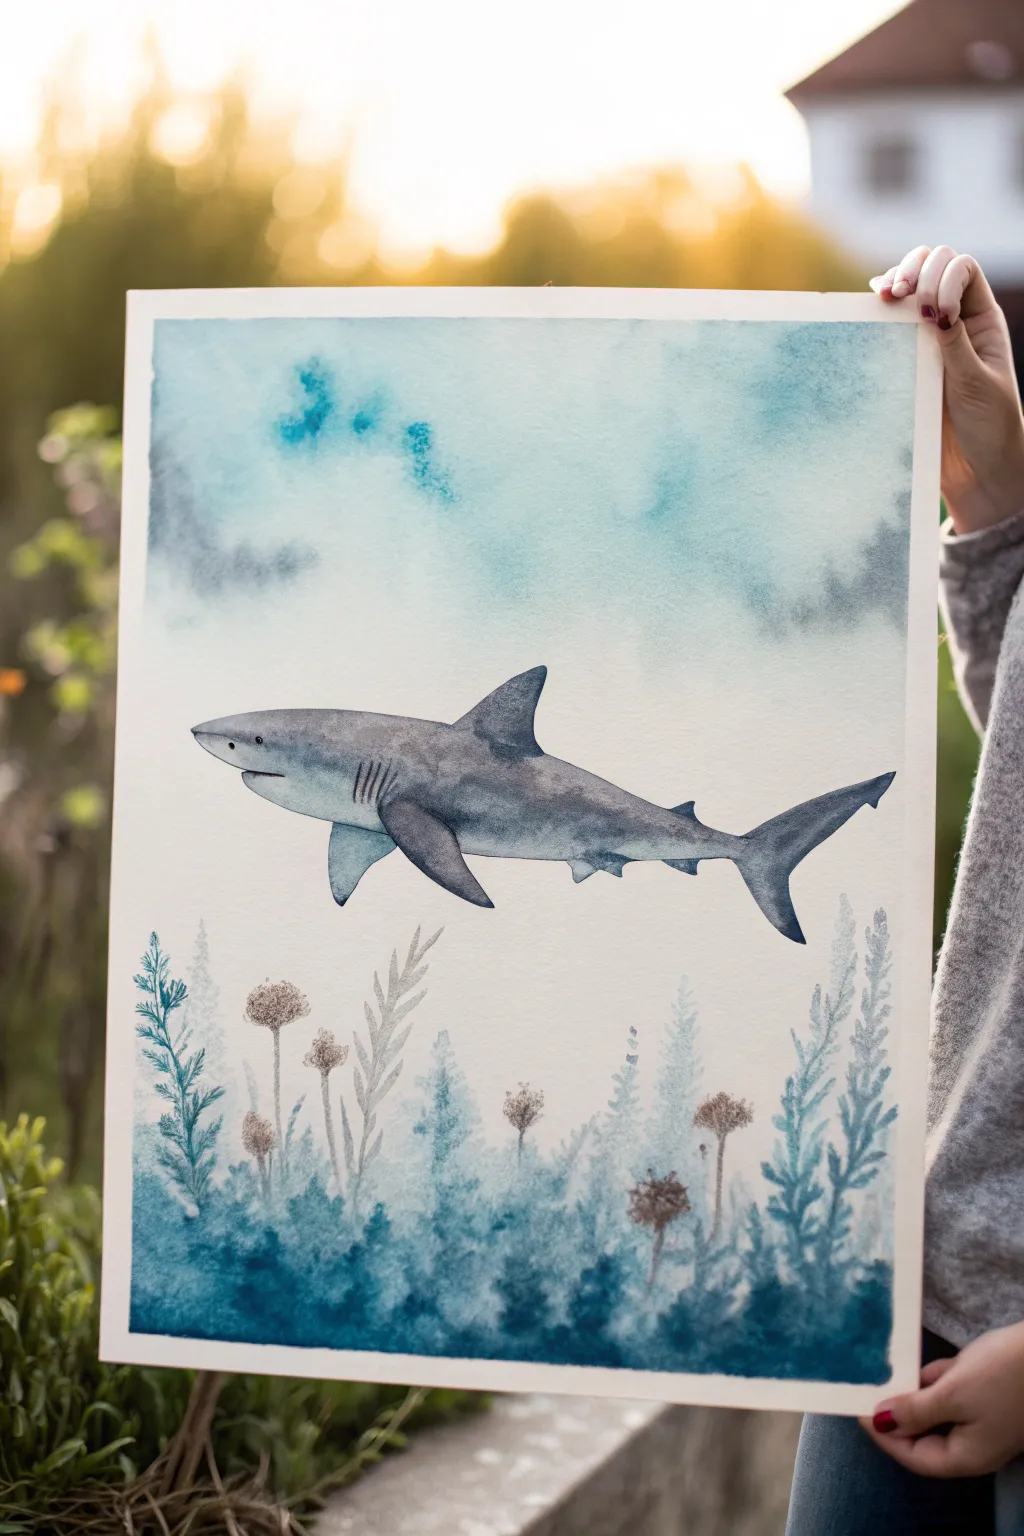
Capture the serene power of the ocean with this vertical watercolor composition featuring a solitary shark gliding above a lush seabed. The piece balances loose, atmospheric wet-on-wet washes with precise detailing for the shark’s anatomy.
Step-by-Step Tutorial
Materials
- Cold press watercolor paper (block or taped down)
- Watercolor paints (Payne’s Grey, Indigo, Phthalo Blue, Turquoise, Hookers Green, Burnt Umber)
- Round brushes (sizes 2, 6, and 10)
- Pencil (HB or H) and kneaded eraser
- Two jars of water
- Paper towels
- Masking fluid (optional)
Step 1: Sketching and Preparation
-
Outline the shark:
Begin by lightly sketching the shark’s silhouette in the center of your paper. Focus on the streamlined torpedo shape, the dorsal fin’s distinct triangle, and the long, asymmetrical tail fin. Keep your pencil pressure very light so graphite doesn’t smudge later. -
Add anatomical details:
Refine the sketch by adding the pectoral fins, the gill slits, the eye placement, and the defining line where the dark grey top meets the white underbelly. -
Plan the environment:
Very faintly suggest the horizon line of the seabed plants at the bottom, just to give yourself a visual boundary. Don’t draw individual plants yet; we want those to be organic paint strokes.
Wet-on-Wet Magic
For the softest shark skin texture, pre-wet the shark’s grey area with clear water before adding pigment. The color automatically flows into the shape smoothly.
Step 2: Painting the Shark
-
Base wash:
Mix a watery grey using diluted Payne’s Grey. Apply a light wash over the entire upper body of the shark, carefully avoiding the white underbelly. Let this initial layer dry completely. -
Deepening shades:
Create a darker mix of Payne’s Grey with a touch of Indigo. Using a size 6 brush, apply this to the shark’s back and fins to create volume. -
Softening edges:
While the paint is still damp, use a clean, moist brush to feather the bottom edge of the grey paint where it meets the white belly, creating a smooth, rounded transition rather than a hard line. -
Defining features:
Switch to your size 2 brush. Use concentrated Payne’s Grey to paint the eye, the nostrils, and the five gill slits. Add a thin, dark line along the mouth. -
Final shark details:
Darken the tips of the fins and tail for contrast. Add subtle shadow lines on the white belly near the pectoral fins using a very diluted, watery grey.
Step 3: Creating the Atmosphere
-
Upper sky wash:
Wet the paper area above the shark with clean water. Drop in loose clouds of Turquoise and Phthalo Blue. Tilt the paper slightly to let the colors drift naturally across the top third of the page. -
Adding texture:
While the sky wash is still wet, dab in a bit of Indigo in the corners to create depth. Allow the paint to bloom and spread on its own, mimicking underwater currents or a cloudy sky. -
Let it cure:
Allow the background sky layer to dry completely before moving to the seabed. This prevents the colors from running down and ruining the whitespace around the shark.
Make It Sparkle
Once fully dry, use a white gel pen or white gouache to add tiny highlight dots to the shark’s eye and the tips of the underwater plants for a magical effect.
Step 4: The Ocean Floor
-
First plant layer:
Mix a light, watery bluish-green. Using the size 10 brush, paint vague, upright shapes at the bottom of the paper to form the distant background vegetation. Let these be soft and undefined. -
Defining the mid-ground plants:
Once dry, mix a stronger teal color. Paint defined seaweed shapes—some leafy, some needle-like—layering them over the lighter wash. Vary the heights to keep the composition interesting. -
Adding the seed heads:
Mix a brownish-grey color. Paint thin vertical stems rising from the plant bed and add round, textured seed pods or coral blooms at the tips using a stippling motion. -
Foreground depth:
Mix your darkest Indigo and Green. Paint the bottom-most edge of the paper with dense foliage shapes to ground the image and push the other plants into the distance. -
Texture spatter:
Load a brush with clear water or diluted dark blue paint and tap it against your finger over the dried bottom section to create subtle water texture spots.
Step back and admire your tranquil underwater scene before removing the tape
Textured Shark With Thick Paint Highlights
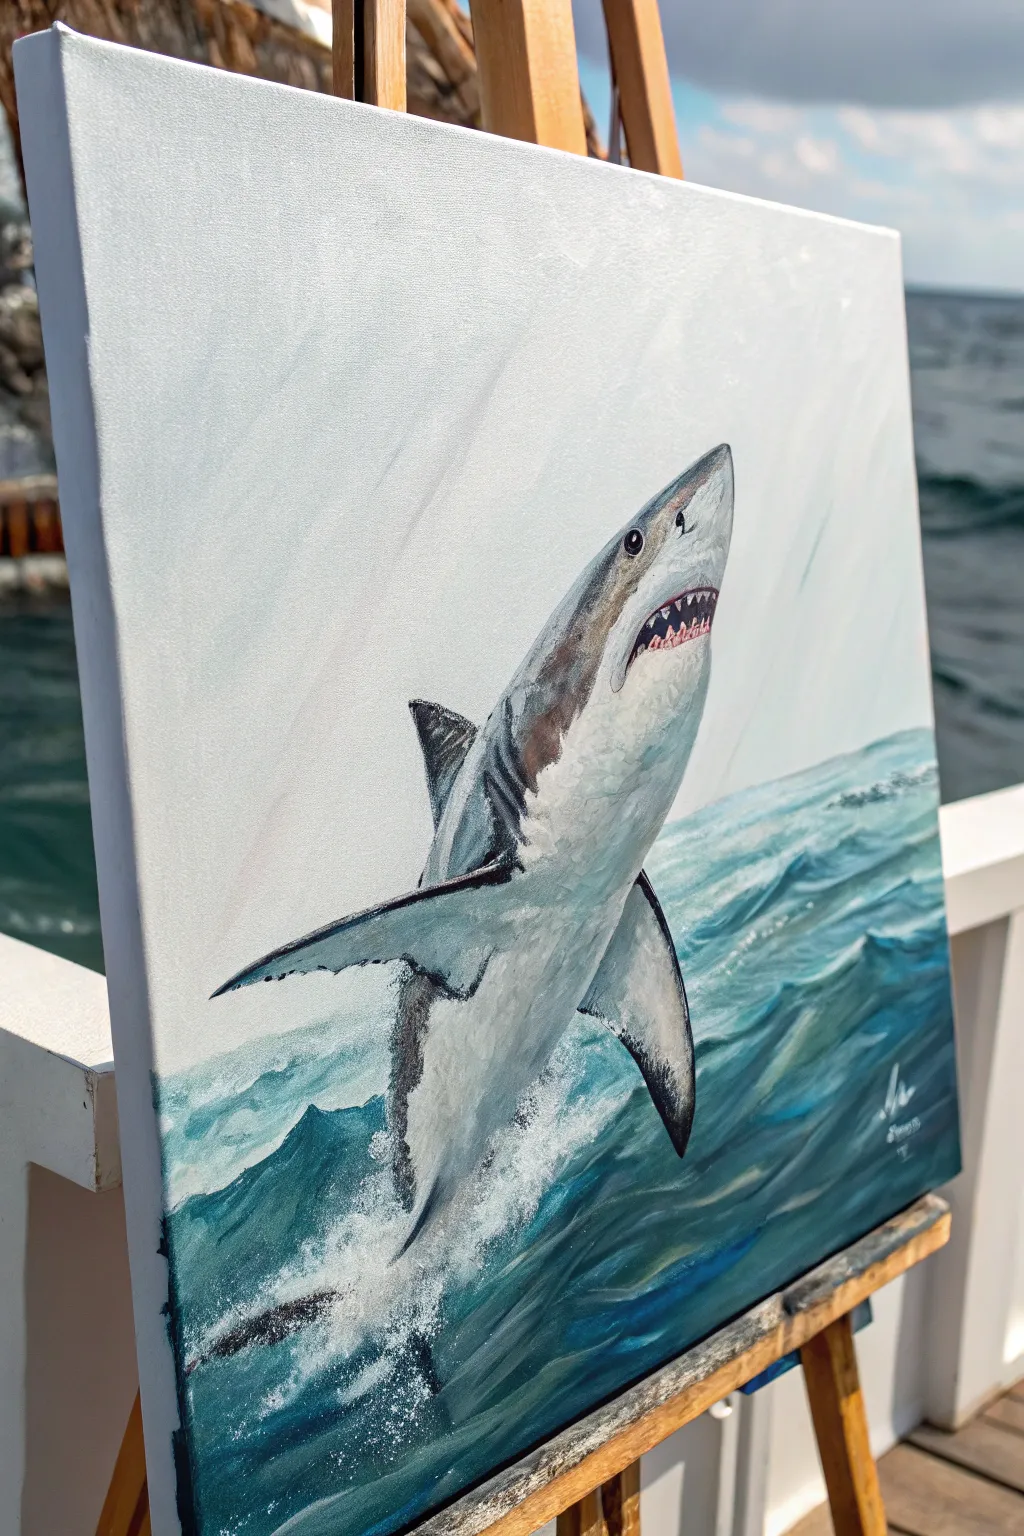
Capture the raw power of the ocean with this dynamic painting of a great white shark leaping from the waves. Using thick body acrylics allows you to build physical texture in the splashing foam and the shark’s rugged skin.
Step-by-Step Guide
Materials
- Stretched canvas (e.g., 16×20 inch)
- Heavy body acrylic paints (Titanium White, Phthalo Blue, Prussian Blue, Burnt Umber, Mars Black, Cadmium Red)
- Flat brushes (various sizes: large for background, medium for shark)
- Round detail brushes (size 0 and 2)
- Palette knife
- Water cup and paper towels
- Easel or flat painting surface
Step 1: Setting the Scene
-
Establish the background gradient:
Start by mixing Titanium White with a tiny touch of Phthalo Blue. Using a large flat brush, paint the upper two-thirds of the canvas with diagonal strokes, moving from the top left corner down towards the right. Keep this sky area very pale and airy. -
Block in the ocean base:
For the water, mix Prussian Blue, Phthalo Blue, and a touch of Mars Black. Paint the bottom third of the canvas, angling the horizon line slightly to add drama. Don’t worry about waves yet; just get a solid dark blue base down. -
Sketch the shark’s silhouette:
Once the background is dry to the touch, use a small round brush with watered-down grey paint to outline the shark. Position it diagonally, leaping upwards from the dark water into the light sky. Focus on the torpedo shape of the body and the triangular fins.
Step 2: Painting the Shark
-
Base coat the shark’s underbelly:
Mix a warm white using Titanium White and a barely-there speck of Burnt Umber. Fill in the entire belly area, extending up the sides. Applying this thickly helps create a smooth texture for the skin later. -
Apply the grey dorsal colors:
Mix Mars Black with White to create a medium grey. Paint the top half of the shark, blending it wet-into-wet where it meets the white underbelly to create a soft, rounded transition. Darken the grey as you move towards the shark’s back and dorsal fin. -
Define the gills and fins:
Using a smaller flat brush and a dark charcoal grey (Black + Blue), paint the sharp pectoral fin and the dorsal fin. Use the edge of the brush to create the vertical, crescent-shaped shadow lines for the gills just behind the head. -
Paint the eyes and nostrils:
Switch to your smallest round brush. Use pure Mars Black for the eye, adding a tiny white highlight dot near the top to make it look wet and alive. Add the small dark nostril dot near the snout. -
Create the mouth and teeth:
Paint the interior of the mouth with a mix of Cadmium Red and a touch of brown for a deep, fleshy tone. For the teeth, I prefer to use a size 0 liner brush with pure thick white, dabbing small triangles along the jawline.
Fixing Flat Water
If the ocean looks too flat, don’t just add white. Glaze a thin layer of dark blue/green over the shadow areas to deepen the visual transparency.
Step 3: Creating Movement and Splash
-
Form the waves:
Return to your ocean blues. Add Titanium White to your blue mix to create a mid-tone teal. Using choppy, diagonal strokes, paint the rising swells of water around the shark’s base, following the direction of the splash. -
Add deep shadows to the water:
Use Prussian Blue mixed with Black to paint deep crevices and shadows between the waves. This high contrast is what makes the water look deep and turbulent. -
Start the sea spray:
Load a worn-out bristle brush or a fan brush with slightly watered-down white paint. Stipple (tap repeatedly) around the base of the shark where it breaks the surface to create the misty, foamy spray. -
Layer the thick foam:
Take straight Titanium White on a palette knife or a coarse brush. Apply it thickly over the misty spray areas, letting the paint stand up off the canvas physically. This impasto technique mimics heavy, churning foam. -
Splash details:
Flick the bristles of a toothbrush or stiff brush loaded with white paint to send tiny droplets flying across the lower canvas, simulating water drops in the air.
Level Up: Gloss Varnish
Once fully dry, apply a high-gloss varnish only to the wet parts (shark skin and water). Leave the sky matte for realistic contrast.
Step 4: Final Highlights
-
Highlight the shark’s skin:
Mix a glazed white (white with a lot of medium or water) and gently brush it over the top of the grey dorsal area and the pectoral fin to show wetness reflecting the sun. -
Enhance water reflections:
Add sharp, pure white lines along the crests of the blue waves using a liner brush. These crisp lines define the movement of the water. -
Final assessment:
Step back and look for contrast. If the shark doesn’t pop enough, darken the blue water directly behind it to push the figure forward.
Now you have a dynamic seascape that captures the thrill of nature right on your canvas
Geometric Shark With Faceted Planes

This project transforms the sleek, fluid lines of a shark into a modern, crystalline form using a geometric design. The result is a striking piece of wall art that blends cool tones with sharp, faceted planes for a sophisticated low-poly look.
Detailed Instructions
Materials
- High-quality watercolor paper or heavy cardstock (white)
- Pencil (HB or 2H for light lines)
- Ruler
- Eraser
- Watercolor paints or gouache (shades of navy, teal, turquoise, grey, and black)
- Fine-point black or grey felt-tip pen (optional for details)
- Small flat brush and fine round brush
- Painter’s tape or masking tape
- Wooden frame with mount (for finishing)
Step 1: Drafting the Construct
-
Outline the silhouette:
Begin by lightly sketching the general outline of a Great White shark on your paper. Don’t worry about the geometric pattern yet; focus on getting the sleek, torpedo-like shape, the dorsal fin, pectoral fins, and tail correct. -
Map the grid using a ruler:
Using a ruler, start drawing the internal lines that will create the facets. The goal is to break the body (minus the head and belly) into a network of interlocking triangles. Vary the sizes of the triangles to create a sense of curvature and dimension. -
Define the non-geometric zones:
Leave the shark’s snout, lower jaw, belly, and gills free of the triangle grid. These areas will be painted as solid, smooth shapes to contrast with the faceted body. I find this mix of styles makes the rest of the geometry pop. -
Clean up the lines:
Go over your pencil lines one last time to ensure they are crisp. Erase any stray marks outside the silhouette so your painting surface is clean.
Uneven Edges?
If your hand shakes while painting triangle borders, use small strips of washi tape to mask off individual shapes. Paint, let dry, peel, and repeat for crisp lines.
Step 2: Applying Color
-
Prepare your palette:
Mix several distinct shades of blue and grey. You’ll need a range: deep navy, dusty blue, teal, light turquoise, and slate grey. Having 5-7 pre-mixed shades ensures variety in your facets. -
Paint the first set of facets:
Select a specific color, like your darkest navy, and paint scattered triangles throughout the body grid. Do not paint adjacent triangles the same color. -
Fill in mid-tones:
Switch to your teal and medium-blue shades. Fill in more empty triangles, working carefully up to the pencil lines. A small flat brush helps keep those edges sharp. -
add the lightest facets:
Use your lightest turquoise or pale grey to fill the remaining triangles. This variation in value mimics light hitting a faceted surface. -
Paint the smooth sections:
Paint the snout, jaw area, and underbelly in a solid, pale grey wash. This area should look smooth, lacking the harsh lines of the body. -
Detail the gills and eye:
Using a very fine brush or a thin liner pen, add the vertical gill slits in black or dark grey. Paint a small, dark circle for the eye, perhaps with a tiny ring of copper or gold paint for a little warmth. -
Add the mouth and teeth:
Draw the mouth line carefully. Start with a thin dark line for the separation of jaws, then add tiny, jagged triangles for the teeth using a very fine tip pen or a zero-size brush.
Go Digital style
Make the triangles smaller and denser near the spine and larger near the belly. This creates a 3D rounded ‘wireframe’ illusion that looks very tech-savvy.
Step 3: Finishing Touches
-
Erase guidelines:
Once the paint is completely bone-dry, gently erase the visible pencil lines between the colored triangles. If you prefer a stained-glass look, you can leave thin white gaps between shapes instead. -
Add texture (optional):
If parts of the grey belly look too flat, dry-brush a tiny bit of darker grey near the bottom edge for subtle shading. -
Frame your work:
Place your finished painting inside a mount (mat board) and secure it within a simple wooden frame to complete the modern, gallery-ready aesthetic.
Hang your new geometric shark in a bright spot to let those sharp angles really stand out
Mixed Media Shark Collage in Ocean Layers
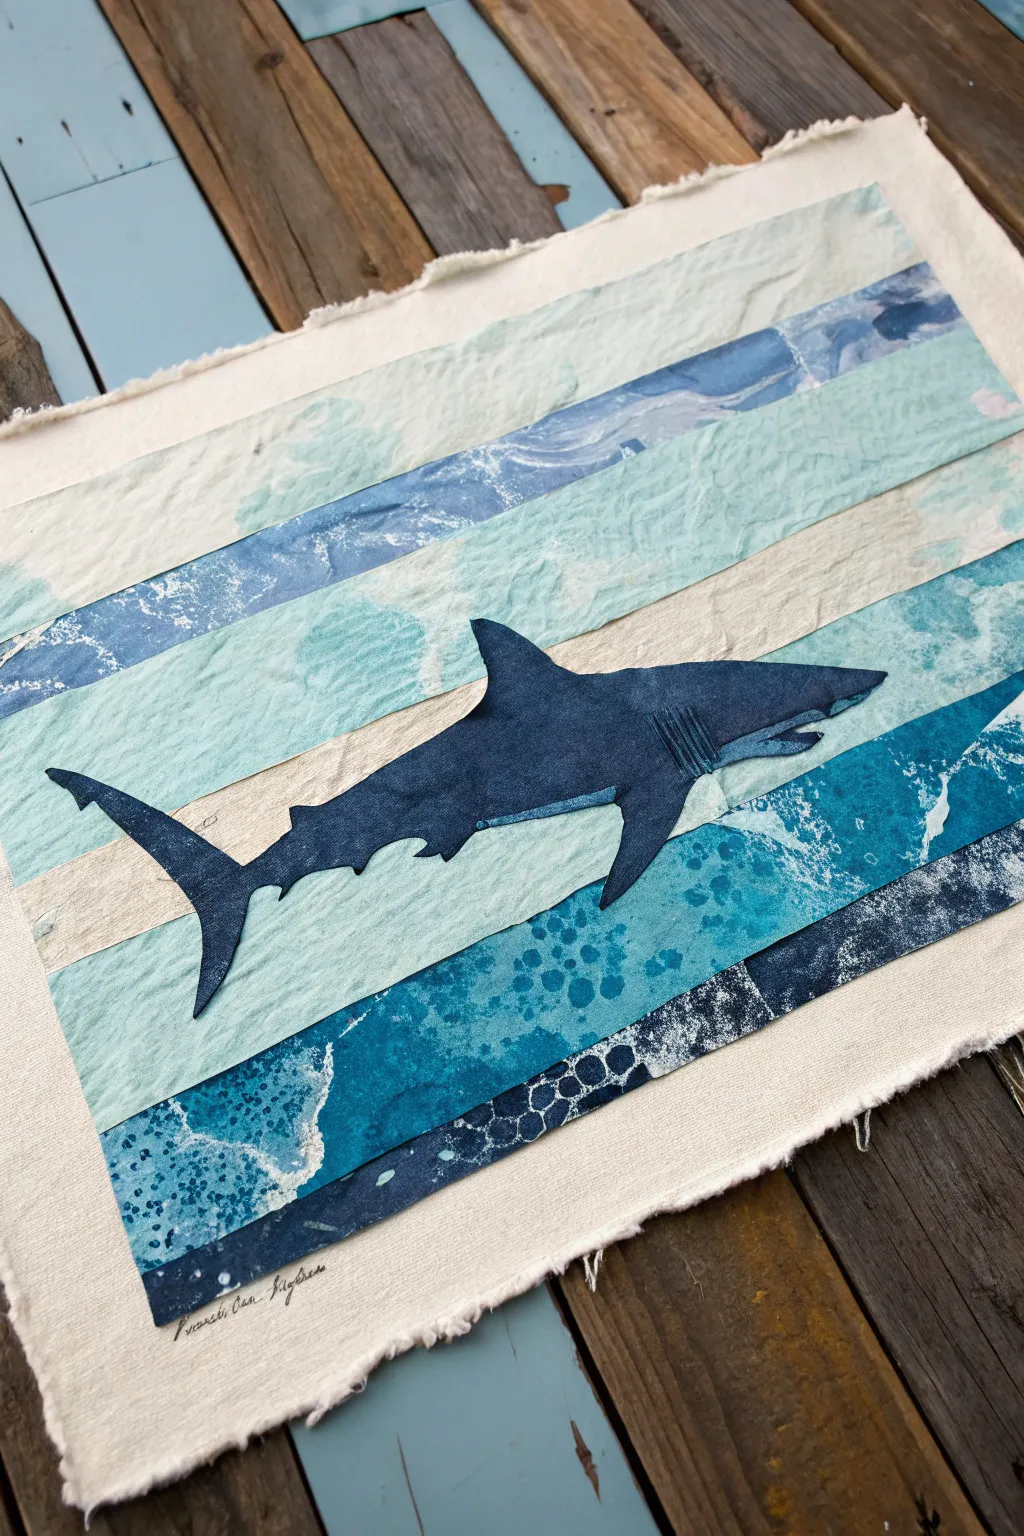
Capture the depth of the sea and the sleek power of a shark with this layered mixed media project. Using strips of textured, hand-painted paper creates a beautiful, rippled water effect that serves as the perfect backdrop for your silhouette.
Step-by-Step Guide
Materials
- Heavyweight canvas or cotton rag paper (approx. 9×12 inches)
- Assorted textured papers (tissue paper, mulberry paper, watercolor paper)
- Acrylic paints (Phthalo Blue, Ultramarine, White, Black, Teal)
- Matte gel medium or decoupage glue
- Wide flat brush (1 inch)
- Fine detail brush or X-Acto knife
- Tracing paper
- Pencil
- Scissors
- Ruler
Step 1: Creating the Ocean Texture
-
Prepare paper strips:
Begin by gathering various white or light-colored textured papers. Tear or cut them into long strips varying in width from 1 to 2 inches. You want enough strips to cover your entire canvas background horizontally. -
Mix ocean gradients:
Set up your palette with White, Teal, Phthalo Blue, and Ultramarine. Creating a gradient is key here; mix five or six distinct shades ranging from very pale, foamy teal to deep, midnight blue. -
Paint the papers:
Apply your mixed colours to the paper strips. Use a dry-brush technique on some strips to let the paper’s natural texture show through, creating a ‘frothy’ look. -
Add water effects:
While the paint is still wet on the darker strips, splatter a tiny bit of water or rubbing alcohol on them. This pushes the pigment away and creates organic bubbles and spots that resemble sea foam. -
Let them dry:
Lay all your painted strips flat to dry completely. If they curl up excessively, you can press them under a heavy book once they are touch-dry.
Wrinkles are Good
Don’t try to smooth the paper strips perfectly flat. Letting them wrinkle creates natural shadows that mimic ocean waves.
Step 2: Assembling the Background
-
Plan the layout:
Arrange your dry strips on the canvas without gluing them yet. Place the lightest, palest strips at the top to mimic surface light, transitioning gradually to the darkest, texture-rich strips at the bottom. -
Apply base adhesive:
Apply a thin layer of matte gel medium to the top section of your canvas where the first strip will go. -
Layer the strips:
Adhere the strips one by one, working from top to bottom. Allow them to overlap slightly to build physical texture. Don’t worry about the side edges being perfectly straight; the rough look adds charm. -
Seal the background:
Once all strips are glued down, coat the entire surface gently with a layer of matte medium. This seals the paper and ensures a unified satin finish.
Step 3: Creating the Shark
-
Prepare the shark paper:
Take a separate piece of watercolor paper and paint it a solid, deep slate blue. I like to mix a touch of black into Ultramarine to get that classic shark skin tone. -
Sketch the silhouette:
On a piece of tracing paper, draw the outline of a shark swimming horizontally. Focus on the distinct dorsal fin and the curve of the tail. -
Transfer and cut:
Transfer your sketch onto the dry, slate-blue painted paper. Carefully cut out the shark shape using sharp scissors or an X-Acto knife for the tighter curves. -
Add subtle details:
Using a very fine brush and a slightly lighter grey-blue paint, add minimal details to your cutout: five gill slits, the separation of the pectoral fin, and a faint line for the mouth. -
Position the subject:
Place your shark cutout onto the background. Position it in the middle third of the composition, where the water colors are medium-toned, to ensure it pops against the stripes. -
Adhere the shark:
Apply heavy gel medium to the back of the cutout and press it firmly onto the background. Use a brayer or your palm to ensure it adheres over the ridges of the layered background paper.
Add Salt Texture
Sprinkle coarse salt on the wet paint of your bottom strips. Brush it off when dry for an incredible coral-reef texture.
Step 4: Finishing Touches
-
Add final highlights:
With a tiny amount of white paint, add a small highlight to the shark’s eye and the tip of the nose to give it dimension. -
Rough the edges:
If you used a canvas sheet, gently fray the edges of the canvas with your fingers to create a raw, organic border. -
Sign your work:
Using a fine-tip archival pen or a small brush, sign your name in the bottom corner of the canvas fabric.
Hang your artwork in a spot with good natural light to let the textured layers really shine
Surreal Galaxy Shark in Cosmic Water
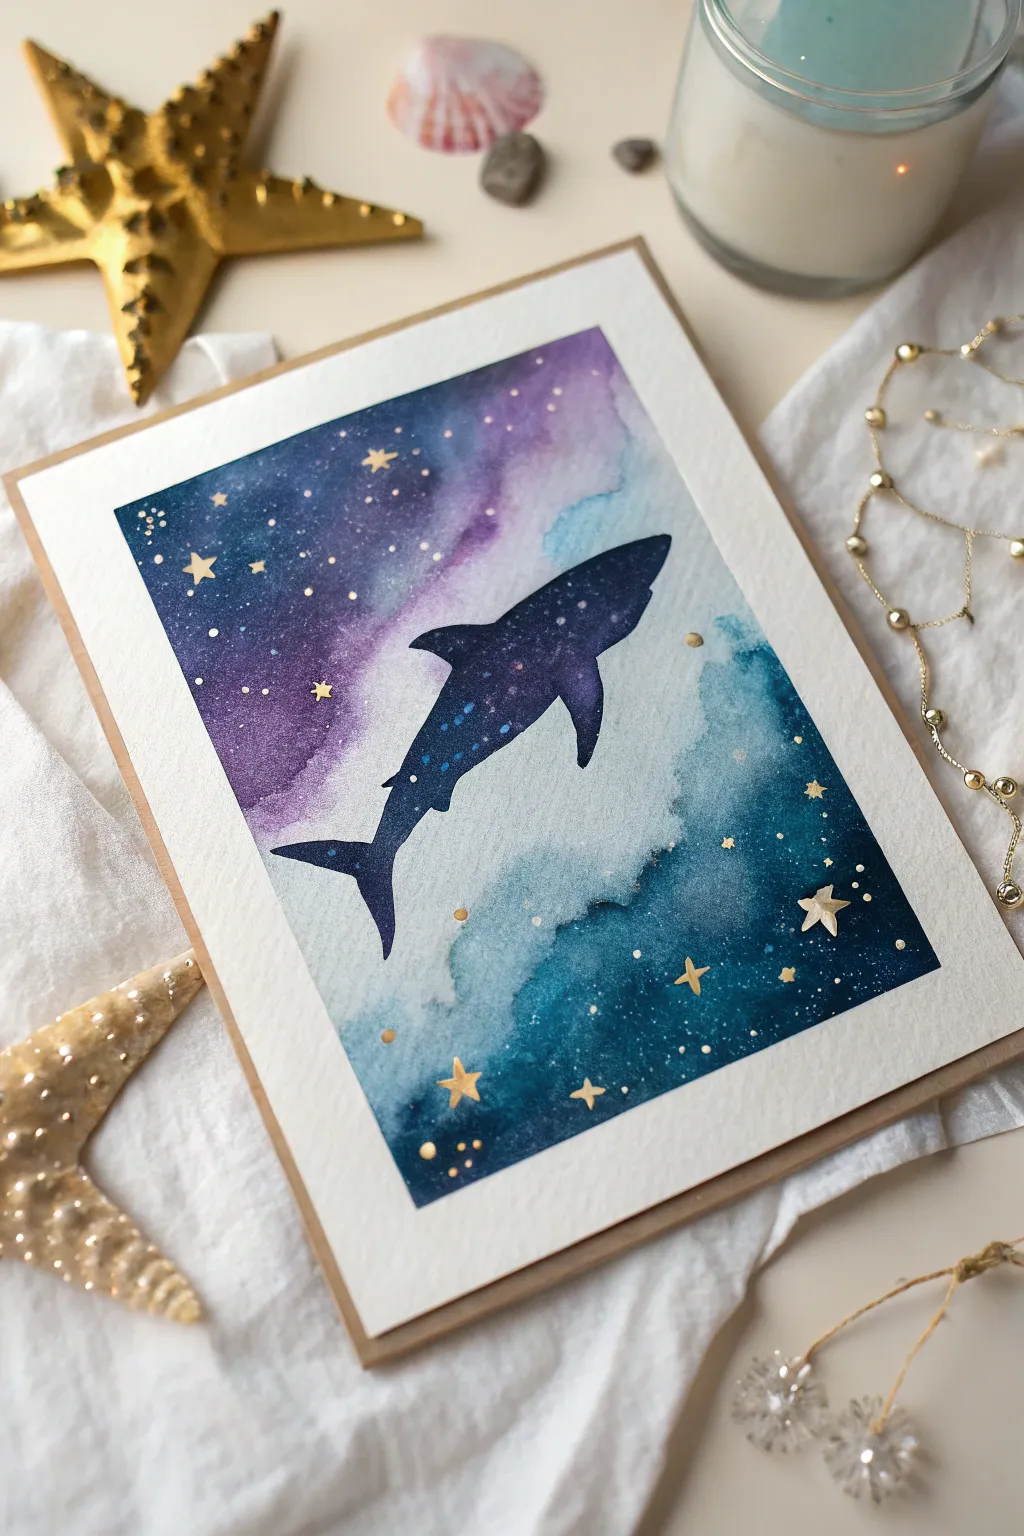
Merge the mysteries of the deep ocean with the vastness of space in this ethereal watercolor painting. This project creates a stunning shark silhouette floating through a nebula of deep blues, purples, and shimmering gold stars.
Detailed Instructions
Materials
- Cold press watercolor paper (300 gsm)
- Watercolor paints (Indigo, Prussian Blue, Purple/Violet, Teal, Turquoise)
- Black gouache or concentrated black watercolor
- Gold metallic paint or gold ink
- Masking fluid (drawing gum) and old brush
- Round brushes (sizes 2, 6, and 10)
- Painter’s tape or washi tape
- Jar of clean water
- Paper towels
- Kraft paper cardstock (for mounting)
Step 1: Preparation & Masking
-
Secure the paper:
Begin by taping down all four edges of your watercolor paper to a board or hard surface using painter’s tape. This prevents buckling when the paper gets wet and creates that crisp white border seen in the final piece. -
Sketch the silhouette:
Lightly sketch the outline of a shark in the center of the paper using a hard pencil (like 2H) so the lines remain faint. Focus on capturing the curve of the body and the distinct dorsal fin. -
Apply masking fluid:
Using an old brush (one you don’t mind ruining) or a silicone applicator, fill in the entire shark shape with masking fluid. This preserves the white paper underneath while we paint the galaxy background. -
Let it cure:
Allow the masking fluid to dry completely. It should feel rubbery and not tacky to the touch before you introduce any water.
Uneven Watercolors?
If you get ‘cauliflower’ blooms where you don’t want them, it means you added water to paint that was already drying. Try to work faster or re-wet the whole section gently.
Step 2: Painting the Galaxy
-
Wet-on-wet technique:
Use your largest brush to apply a layer of clean water over the entire paper, painting right over the masked shark. The paper should be glisten, but not hold puddles. -
Drop in the cosmos:
While the paper is wet, load your brush with purple and teal. Drop these lighter colors primarily in the upper center and diagonal areas to create the ‘nebula’ cloud effect. -
Deepen the space:
Now, pick up your darker blues and Indigo. Paint the corners and edges heavily, letting the dark paint bleed inward towards the lighter colors. Keep the area immediately around the shark somewhat lighter to create contrast. -
Blend and soften:
Gently tilt the board or use a damp brush to help the colors merge organically. If you lose too much light color, lift some pigment out with a thirsty, clean brush or a dabbing paper towel. -
Add texture:
While the paint is still damp but losing its sheen, splatter a tiny bit of clean water onto the darker areas. This creates ‘blooms’ that look like distant star clusters. -
Dry completely:
This step is crucial—let the background dry 100%. If the paper is cool to the touch, it’s still damp. Using a hairdryer on a low setting can speed this up.
Make it Shine
For a true celestial look, mix a tiny pinch of iridescent medium into your purple and blue paints. The whole galaxy will shimmer subtly when caught in the light.
Step 3: The Shark & Stars
-
Reveal the shark:
Gently rub your finger or a rubber cement pick over the masking fluid to peel it away, revealing the pristine white shark silhouette underneath. -
paint the Void:
Fill in the shark shape using black gouache or very concentrated watercolor. Instead of solid flat black, I like to dab in a little dark blue or purple while it’s wet to give the creature’s form some cosmic dimension. -
Create the constellation:
Once the black shark is dry, dip a small detail brush or a toothpick into white gouache or gel pen. Add tiny dots inside the shark body to mimic a constellation or bioluminescence. -
Gold stars:
Load a small round brush with metallic gold paint. Paint small five-pointed stars and varying sizes of dots scattered across the galaxy background. -
Splatter gold:
Tap the handle of your gold-loaded brush against your finger to flick tiny golden specs across the entire piece for extra magic. -
Remove tape:
Carefully peel off the painter’s tape at a 45-degree angle away from the painting to ensure a clean edge without tearing the paper. -
Mount and finish:
Use double-sided tape or glue to mount your finished galaxy artwork onto a piece of kraft cardstock, leaving a small brown border visible.
Now you have a serene piece of galaxy art that captures the silent beauty of the ocean depths


Have a question or want to share your own experience? I'd love to hear from you in the comments below!