Tile drawings are my favorite way to get that “finished design” feeling fast—because the square format gives you an instant frame. Whether you’re sketching tiles in a notebook grid or drawing directly on a tile, these ideas will help you fill a little square with big personality.
Classic Azulejo-Inspired Symmetry

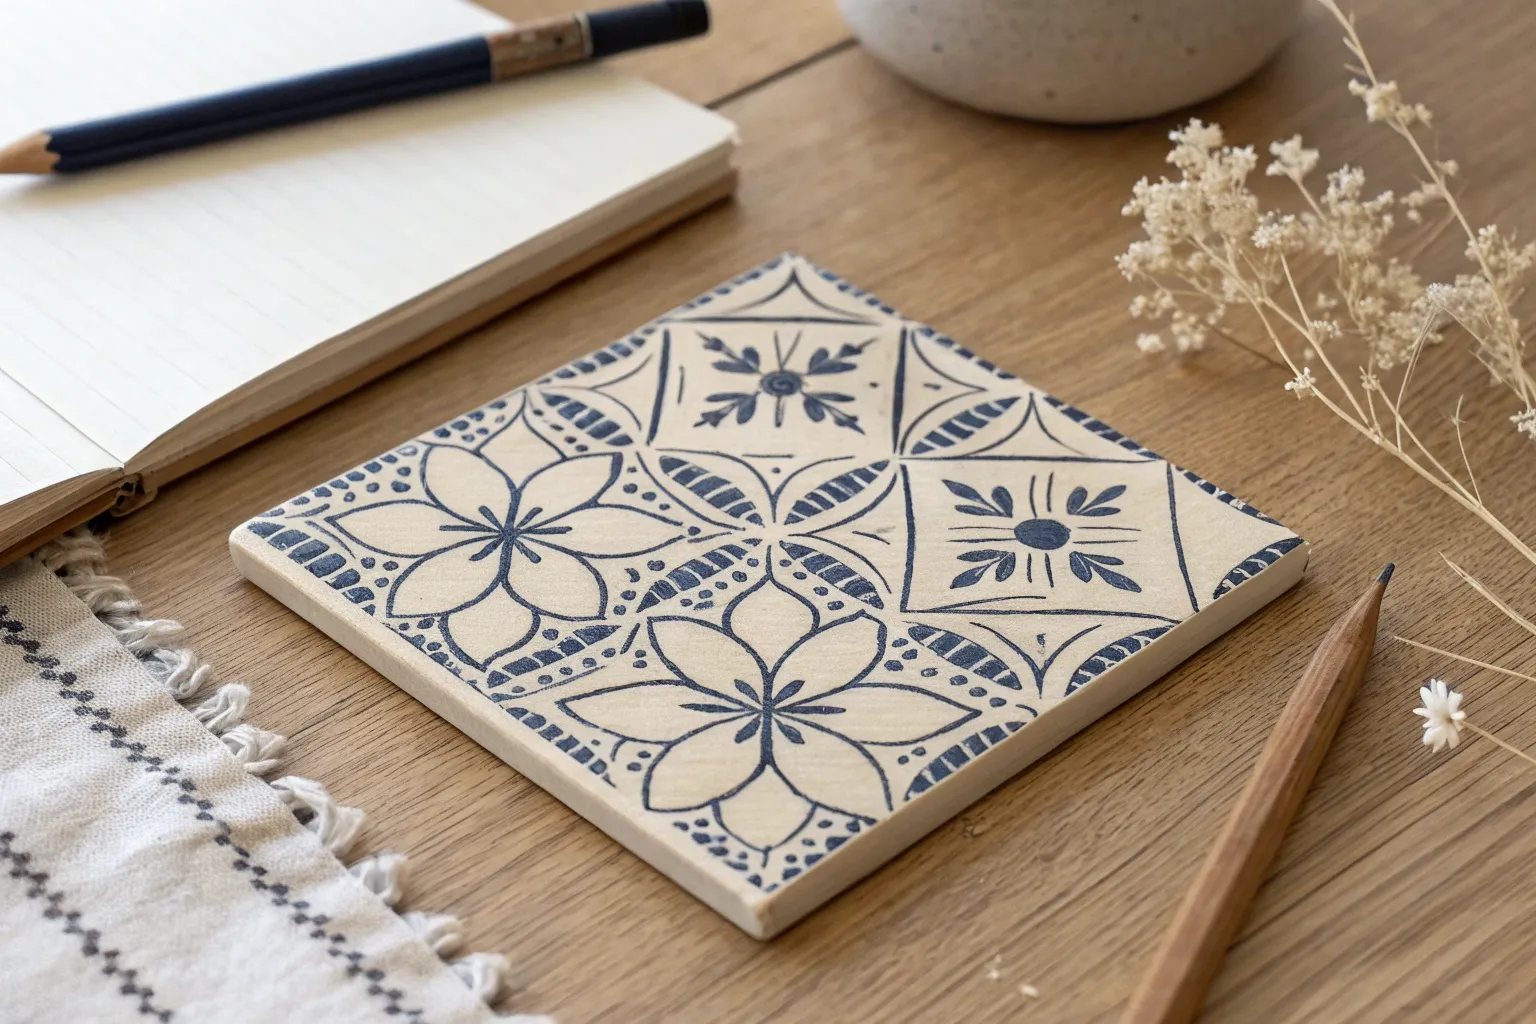
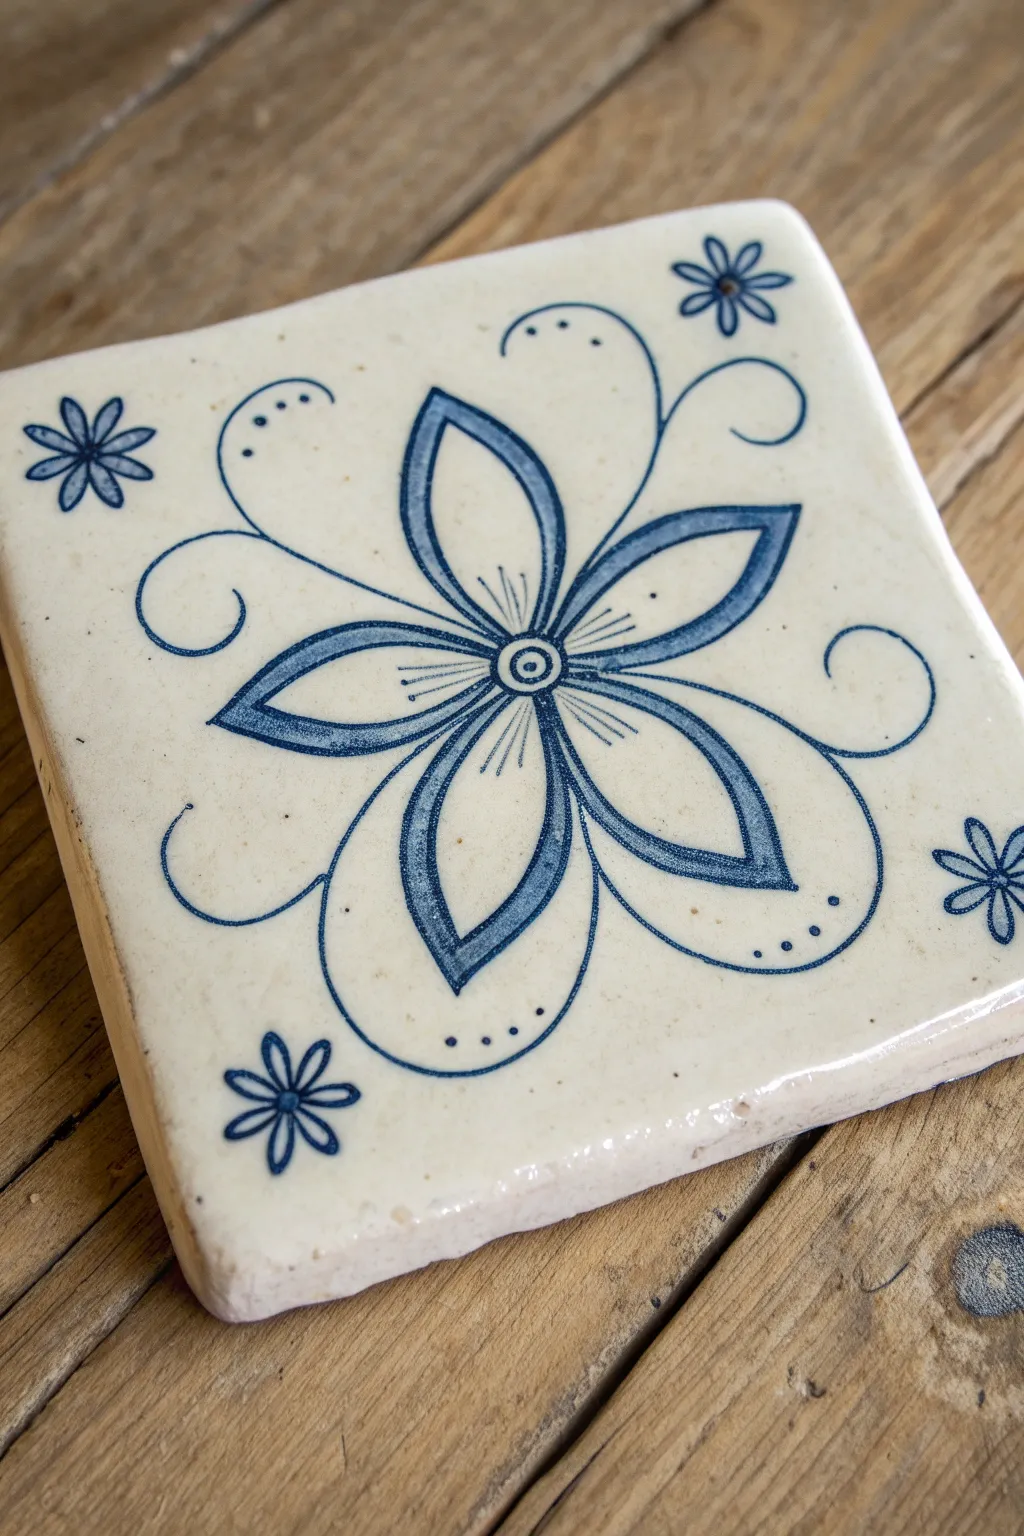
This project captures the essence of classic Portuguese tilework with a symmetrical, hand-drawn floral design. Using simple ceramic markers or paints, you can transform a plain white tile into a stunning piece of geometric art featuring calming teal and indigo hues.
How-To Guide
Materials
- White ceramic tile (4×4 inches or 6×6 inches)
- Graphite pencil (HB or 2H)
- Ruler
- Eraser
- Blue ceramic paint pen or permanent marker (medium tip)
- Teal/Aqua ceramic paint pen or permanent marker (medium tip)
- Fine-liner pen (black, waterproof, suitable for ceramics)
- Sketchbook for practice (optional)
Step 1: Planning and Grid
-
Clean surface:
Begin by wiping down your ceramic tile with rubbing alcohol or a damp cloth to remove any dust or oils. Let it dry completely. -
Find the center:
Using your ruler and pencil, lightly draw diagonal lines from corner to corner to locate the exact center point of the tile. -
Draw the main axes:
Draw a vertical line and a horizontal line crossing through the center point, dividing the tile into four equal quadrants. -
Sketch the central circle:
Lightly sketch a small circle (about the size of a pea) right at the intersection of your lines to serve as the flower’s center.
Smudge Alert
Work from the center outwards if you’re right-handed (or right to left) to avoid dragging your hand through wet ink. A scrap paper under your palm helps too.
Step 2: Drawing the Main Flower
-
Outline the primary petals:
Sketch four large, pointed petals extending from the center along the diagonal axes. They should look like stretched teardrops pointing toward the corners. -
Add secondary petals:
Draw four slightly narrower petals in between the main ones, aligning them with your vertical and horizontal axis lines. -
Create the inner detail:
Inside each of the eight petals, draw a smaller, inner petal shape. This creates a border which we will color in later. -
Add leaf veining:
Inside the innermost petal shapes, draw a simple central line with small V-shaped veins branching off, giving them a leaf-like appearance. -
Draw background diamonds:
In the negative space between the petals, sketch triangular shapes that peek out from behind the flower, forming a subtle square or diamond backdrop.
Step 3: Adding Corner Accents
-
Position corner flowers:
In each of the four stark corners of the tile, sketch a small circle for the center of a mini-flower. -
Draw mini petals:
Add four petals to these corner flowers. Orient them so two point toward the tile corner and two point inward toward the main design.
Coaster Conversion
Turn this art piece into a functional coaster by gluing a square of cork or felt to the underside. This protects surfaces and prevents sliding.
Step 4: Inking and Coloring
-
Outline with black:
Carefully trace over your final pencil lines with the fine black marker. I find it helpful to rotate the tile constantly to keep my hand at a comfortable angle. -
Erase pencil guides:
Wait at least 10 minutes for the black ink to set, then gently erase all graphite lines. Be careful not to smudge. -
Color the outer borders:
Using the dark blue marker, fill in the outer border of the main eight petals. Leave the inner ‘leaf’ section white for now. -
Fill the background shapes:
Color the triangular shapes peeking out from behind the main flower using the teal marker. This adds depth and contrast. -
Color the corner flowers:
Alternate colors for the small corner flowers: paint the top and bottom petals dark blue, and the side petals teal. -
Add tiny accents:
Place a tiny black dot at the tip of each main petal and small uncolored circles between the petals near the outer edge for extra detail. -
Bake to set (optional):
If using heat-set ceramic pens, follow the manufacturer’s instructions to bake the tile in an oven. This usually involves 30 minutes at 300°F.
Place your finished tile on a display stand or use it as a coaster to enjoy a touch of Mediterranean charm in your home


Simple Four-Petal Floral Tile
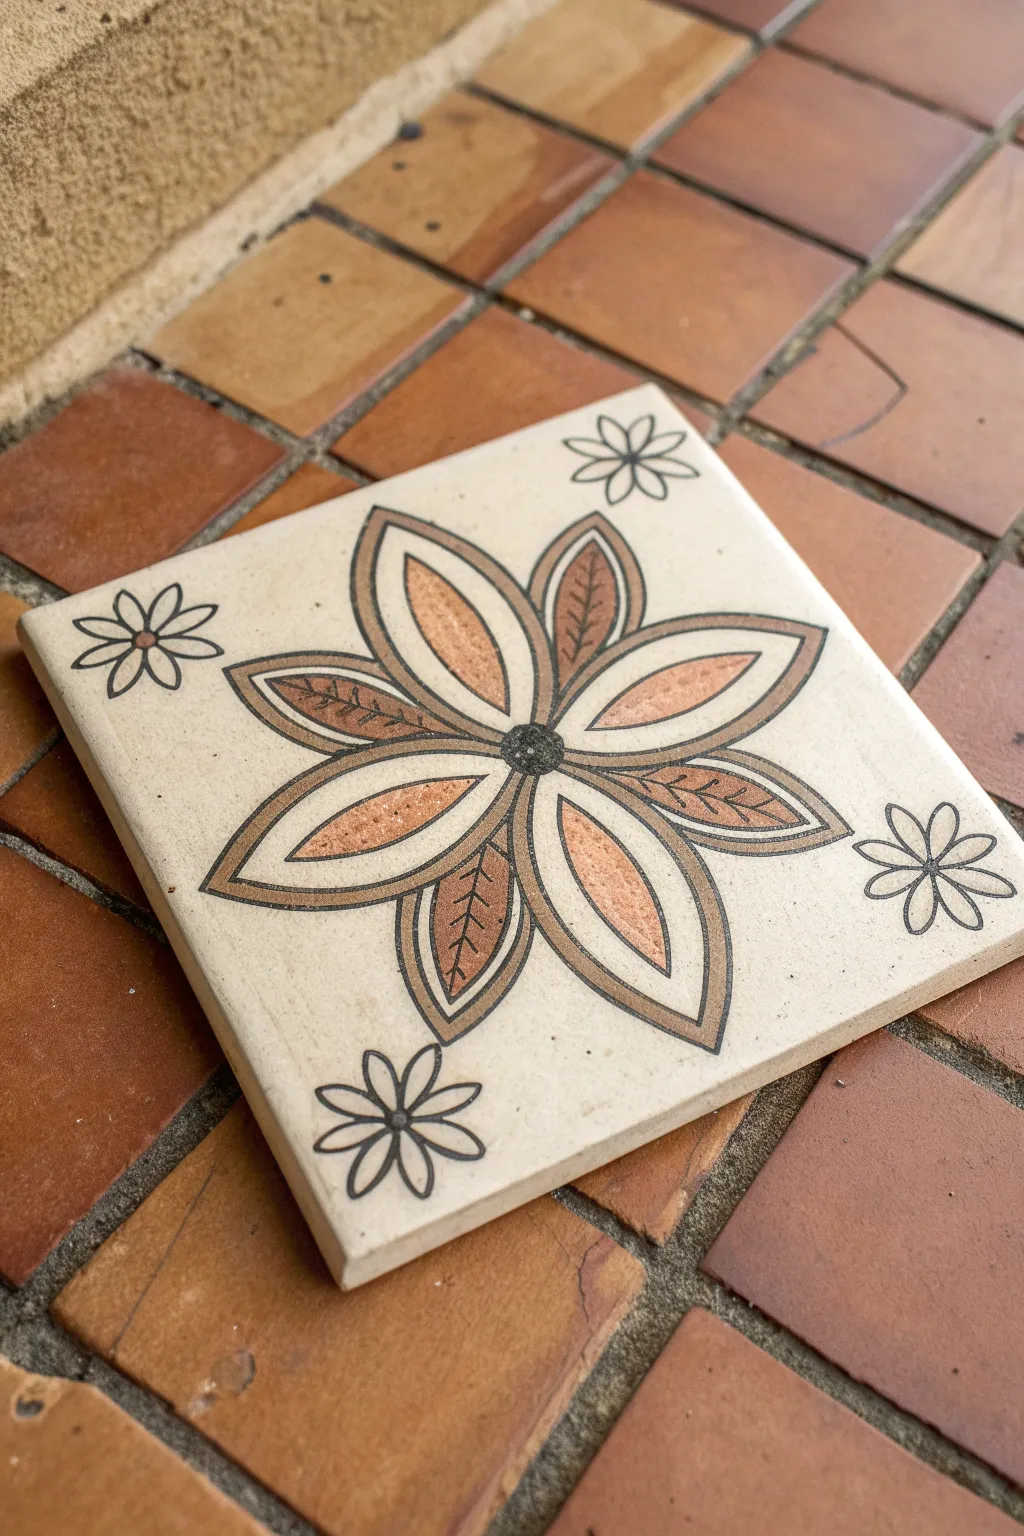
Transform a plain ceramic coaster or tile into a warm, earth-toned decor piece with this symmetric floral design. The pattern alternates between textured leaf-like petals and smooth terracotta ones for a delightful hand-painted folk art aesthetic.
Detailed Instructions
Materials
- 4×4 inch cream or off-white ceramic tile (bisque or glazed)
- Black fine-point permanent marker or fine liner brush
- Oil-based paint markers or ceramic paints (Terracotta, Dark Brown, Black)
- Pencil and eraser
- Ruler
- Circular template or compass
- Clear sealant spray (optional)
Step 1: Drafting the Layout
-
Find the center:
Use your ruler to lightly draw diagonal lines from corner to corner with a pencil. Where they intersect is your exact center. -
Mark the petal guides:
Draw a light circle about 3 inches in diameter centered on the tile to guide the length of your petals. Then, draw light lines dividing the circle into eight equal ‘pie slices’ to help space the petals evenly. -
Sketch the center pistil:
Draw a small circle, roughly the size of a pea, right at the center intersection point. -
Outline the main petals:
Sketch eight petal shapes radiating from the center. They should be pointed ovals (almond-shaped) that touch at the center and extend almost to your guide circle. -
Add the inner detail shapes:
Inside each large petal, lightly sketch a smaller, matching almond shape. Leave a consistent border between this inner shape and the outer petal line.
Steady Hands
If you’re nervous about painting the inner shapes, start in the center of the shape and push the paint outward toward the black lines rather than dragging along the edge.
Step 2: Inking the Outline
-
Trace with black:
Using a fine-point black marker or a very thin brush with black ceramic paint, carefully trace over your pencil lines for the main eight-petal flower. I find steadier hands come from resting your pinky on the table while drawing. -
Create the center texture:
Fill the small central circle with tiny stippled dots rather than solid black to give it a textured, pollen-like appearance. -
Draw corner accents:
In each of the four empty corners, freehand a simple six-petal daisy. These should be much smaller and simpler, just line drawings without inner shapes. -
Clean up:
Once the ink is completely dry—give it a few minutes—gently erase any visible pencil guidelines.
Step 3: Adding Color and Texture
-
Select your palette:
You will need two main earth tones: a warm terracotta orange and a darker chocolate brown. -
Color the ‘smooth’ petals:
Choose four petals in a ‘plus sign’ formation (top, bottom, left, right). Paint the inner almond shape of these petals with your terracotta color. -
Stipple the shading:
While the terracotta is fresh (or using a second marker layer), add tiny dots of the darker brown near the base of these petals to create a slight gradient effect. -
Color the ‘leaf’ petals:
For the four diagonal petals in between, paint the inner shape with the dark brown color. -
Add vein details:
Once the dark brown is dry, use your fine black pen to draw a central line and small angled veins over the brown paint, giving these petals a leaf-like look. -
Seal the work:
If you plan to use this as a coaster, apply a clear sealant spray in light, even coats to protect your artwork from moisture and scratches.
Mix It Up
Try alternating cool tones like sage green and navy blue instead of brown and orange for a completely different Mediterranean seaside vibe.
Now you have a beautifully symmetrical piece of art that brings a rustic touch to any tabletop


Border and Center Medallion
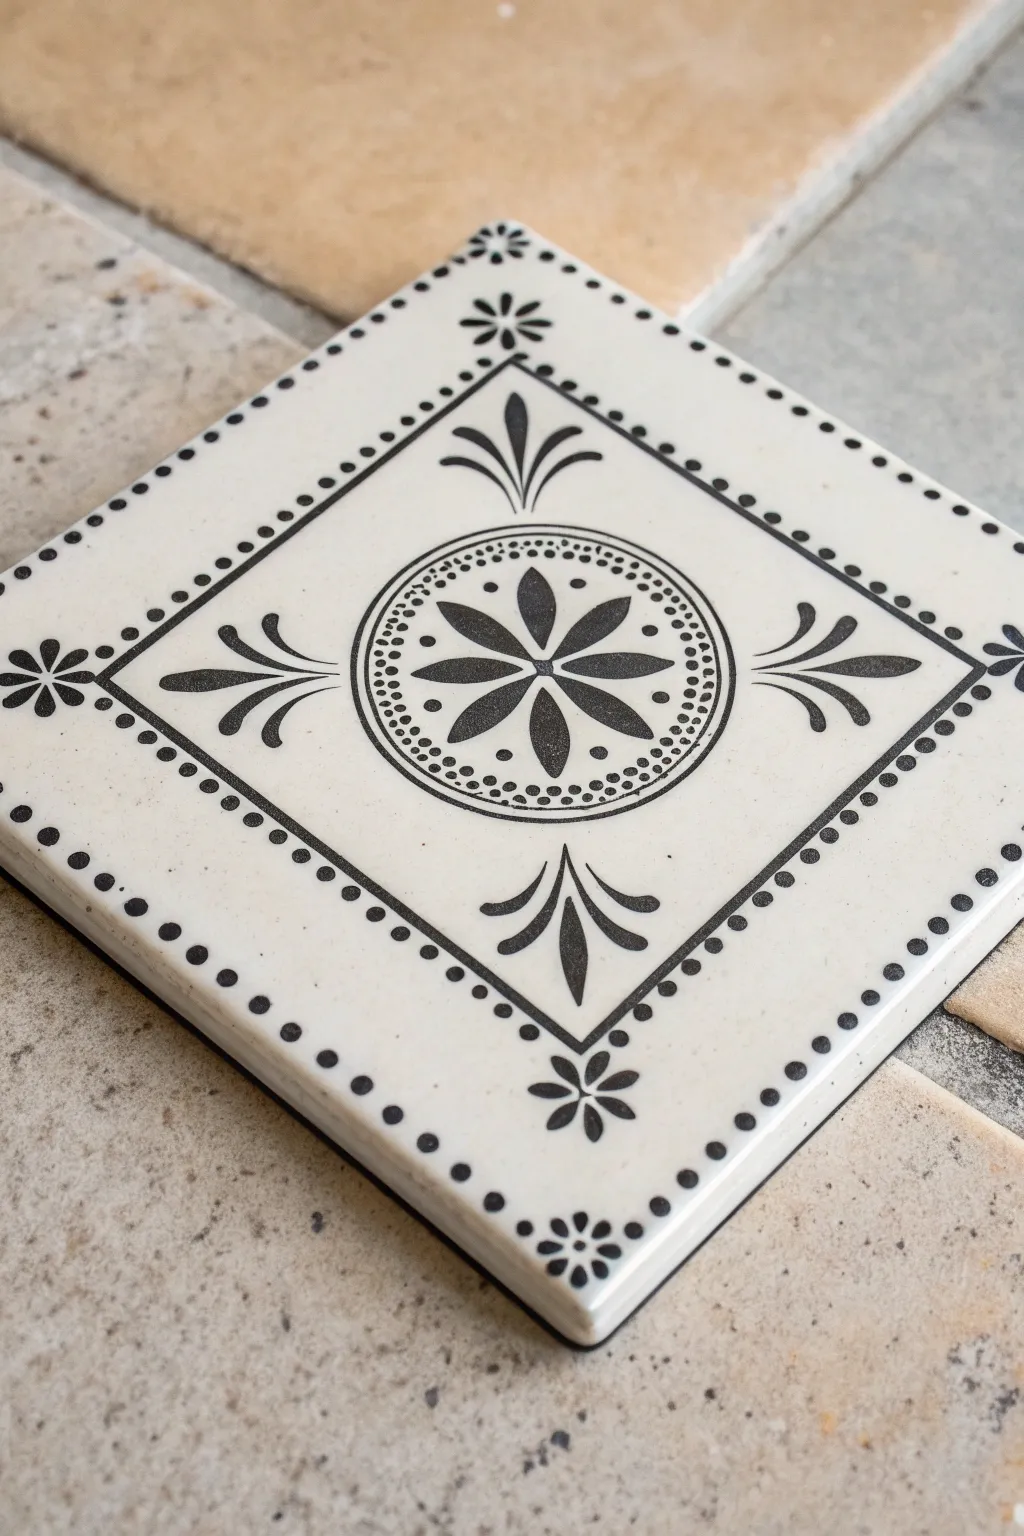
This elegant black-and-white tile design combines clean geometric lines with soft, stylized floral motifs for a classic European look. The pattern features a beautiful central medallion surrounded by diamond framing and delicate corner flourishes, making it perfect for coasters or decorative accents.
Detailed Instructions
Materials
- White glazed ceramic tile (4×4 inches)
- Black oil-based paint marker (fine point)
- Black oil-based paint marker (extra-fine point)
- Ruler
- Pencil (HB or lighter)
- Circular stencil or compass
- Q-tips and rubbing alcohol (for cleanup)
- Clear spray sealant (gloss or matte)
Step 1: Planning the Structure
-
Find the center:
Begin by lightly marking the exact center of your tile with a pencil. Use your ruler to measure diagonally from corner to corner; where the lines cross is your midpoint. -
Draw the main diamond:
Measure about 0.5 inches inward from each of the four edges of the tile and mark a dot. Connect these four dots using your ruler to create a large diamond shape that sits squarely on the tile. -
Draft the central circles:
Using a compass or a circular stencil placed on your center mark, draw two concentric circles in the middle of the diamond. The inner circle should be roughly 1 inch in diameter, and the outer circle about 1.25 inches. -
Mark guide lines:
Lightly sketch a vertical line and a horizontal line crossing through the center to help align your floral petals later. Add diagonal lines crossing through the center as well to create an 8-point guide.
Steady Hand Trick
Rest your pinky finger on a dry section of the tile while drawing. It acts as an anchor to stabilize your hand for cleaner curves and straight lines.
Step 2: Inking the Center Medallion
-
Outline the rings:
With the extra-fine black paint marker, trace the two circular penciled rings. Keep your hand steady and turn the tile as you draw to maintain a smooth curve. -
Add the center flower:
Draw an eight-petaled flower inside the inner circle. Start with the vertical and horizontal petals, making them pointed ovals. Then, fill in the diagonal spaces with four more identical petals. -
Fill the petals:
Color in each petal solidly black. I find it helps to outline the shape first and then fill the inside to keep the edges crisp. -
Decorate the ring:
In the open space between the two circle outlines, carefully add small dots all the way around. Space them evenly to create a beaded effect. -
Inner details:
Place a single small dot in the white space between the tips of the petals and the inner circle ring.
Go Colorful
While black and white is classic, try navy blue for a Delftware look or terracotta red for a warm Mediterranean vibe.
Step 3: Creating the Outer Motifs
-
Ink the diamond border:
Switch to your fine point marker for a slightly bolder line and trace the large diamond shape you penciled earlier. -
Draw corner flourishes:
Inside each corner of the diamond, draw a stylized lily shape. Start with a central teardrop shape pointing toward the corner, then add two curved lines flanking it that curl outward. -
Add floating dots:
Just outside the diamond border, add a row of evenly spaced dots running parallel to the line. These should follow the diamond shape all the way around.
Step 4: Finishing the Corners
-
Corner flowers:
In the four extreme corners of the tile (outside the diamond), draw a small six-petaled flower. These should be simple asterisk shapes with rounded petal tips. -
Connect the pattern:
Extend the row of dots you drew earlier so it wraps around the diamond corners and seems to originate from the corner flowers. -
Clean up:
Allow the ink to dry completely for at least 30 minutes. Once dry, gently erase any visible pencil marks. If you made smudges, use a Q-tip dipped in rubbing alcohol to tidy them up. -
Seal:
To protect your design, spray a thin, even coat of clear sealant over the tile in a well-ventilated area.
Your sophisticated custom tile is now ready to serve as a coaster or wall accent


Corner-to-Corner Vine Design
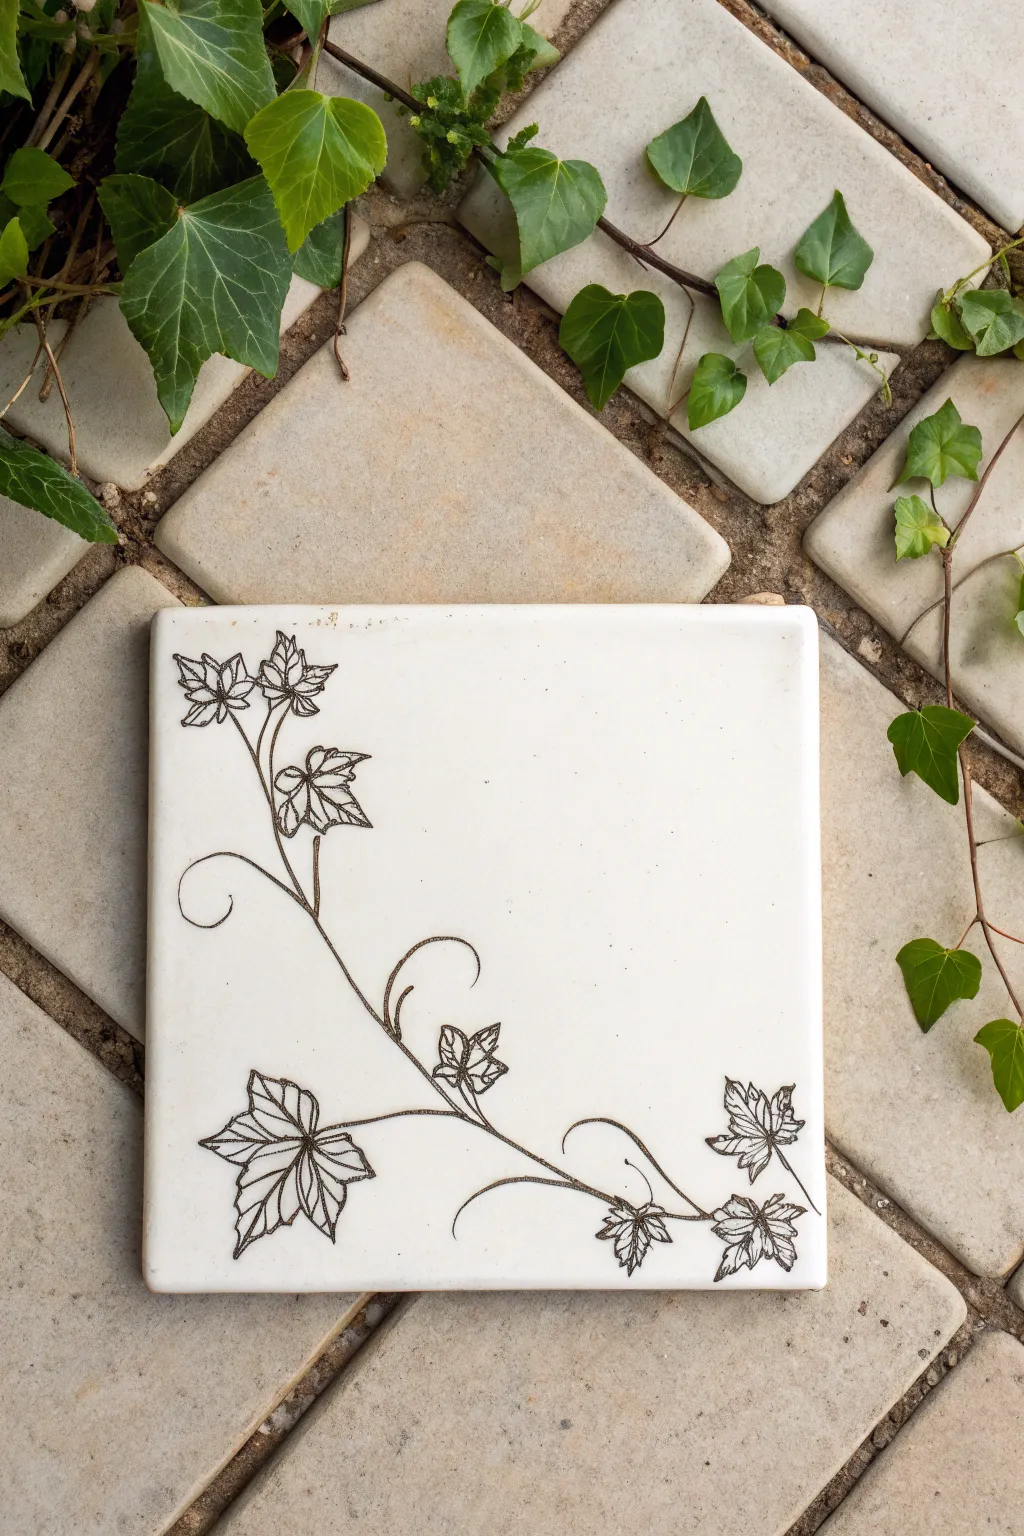
Transform a plain ceramic tile into a piece of botanical art with this delicate corner-to-corner vine design. Using fine liners or permanent markers, you will create a high-contrast, etched-style illustration that mimics the organic flow of real ivy.
How-To Guide
Materials
- White glazed ceramic tile (4×4 or 6×6 inches)
- Black oil-based paint marker (fine point)
- Black oil-based paint marker (extra-fine point)
- Pencil (HB or lighter)
- Soft eraser
- Rubbing alcohol
- Cotton pads or paper towel
- Clear acrylic sealer spray (gloss or matte)
Step 1: Preparation and Sketching
-
Clean surface:
Before starting, wipe the entire surface of your ceramic tile with rubbing alcohol and a cotton pad. This removes invisible oils or fingerprints that could prevent the marker from adhering properly. -
Map the main stem:
Using a light pencil grip, draw a flowing, slightly curved line starting near the bottom-left area, stretching diagonally towards the top-left, and curling back down towards the bottom-right. This ‘S’ curve forms the backbone of your vine. -
Position the leaves:
Lightly sketch rudimentary shapes—roughly diamond or kite-shaped—where you want the leaves to sit. Place a large focal leaf near the bottom left, a cluster at the top left, and trailing leaves towards the bottom right. -
Add tendrils:
Draw loose, curly lines branching off the main stem. These will become the delicate tendrils that give the ivy its whimsical look. Keep them sweeping and organic rather than stiff.
Smudged Ink?
If you accidentally smear wet ink, dampen a Q-tip with a tiny drop of rubbing alcohol and carefully clean up the edges. Wait for the alcohol to evaporate fully before redrawing.
Step 2: Inking the Outline
-
Trace stem structure:
Take your fine point black marker and carefully trace over your main stem pencil line. Instead of one solid thick line, try using shaky, broken strokes or double lines in places to simulate the texture of a woody vine. -
Outline leaf shapes:
Outline the perimeter of your leaves using the extra-fine marker. Ivy leaves have distinct points, usually three to five per leaf. Make the edges slightly jagged rather than perfectly smooth to look more natural. -
Connect to stem:
Draw the petioles (leaf stems) connecting each leaf back to the main vine. Ensure the connection points look sturdy but elegant. -
Inking tendrils:
Go over your pencil tendrils with long, confident swoops of the extra-fine marker. If your hand shakes slightly, don’t worry—it adds to the organic character of the plant.
Pro Tip: Line Quality
Don’t press hard with paint markers on ceramic. Instead, let the nib glide over the surface. Hard pressure can cause the liquid to pool and create blobs rather than fine lines.
Step 3: Detailing and Texture
-
Draw primary veins:
Inside each leaf, draw a central vein line from the stem to the tip. Then, add lateral veins extending to the other leaf points. -
Add etching texture:
This is crucial for the style shown. Use the extra-fine marker to add tiny, rapid hatching lines inside the leaves. Focus these lines near the veins and the base of the leaf to create shadow and depth. -
Vary line weight:
Go back to the main vine stem. Thicken the underside of curves to suggest weight and shadow. I find this subtle variation instantly makes the drawing look less flat. -
Create leaf dimension:
On the larger bottom-left leaf, add more dense hatching on one side of the central vein. This makes the leaf appear slightly folded or turned towards the light. -
Refine the points:
Sharpen the tips of your leaves with the extra-fine marker, ensuring they look crisp against the white background.
Step 4: Finishing Touches
-
Drying time:
Let the ink sit for at least 15 to 20 minutes to ensure it is completely dry. Oil-based markers can smear easily on glazed surfaces if touched too soon. -
Erase guidelines:
Gently erase your initial pencil sketches. Be extremely light-handed to avoid scratching off the dried ink. -
Final inspection:
Check for any gaps in your lines or areas that need a bit more contrast. Add a few tiny dots or stray marks near the vine for an artistic, imperfect finish. -
Sealing:
In a well-ventilated area, spray a thin, even coat of clear acrylic sealer over the tile. This protects your drawing from scratches and allows the tile to be wiped clean later.
Place your finished tile on a shelf or use it as a coaster to enjoy a touch of nature indoors
BRUSH GUIDE
The Right Brush for Every Stroke
From clean lines to bold texture — master brush choice, stroke control, and essential techniques.
Explore the Full Guide
Blue-and-White Linework Tile
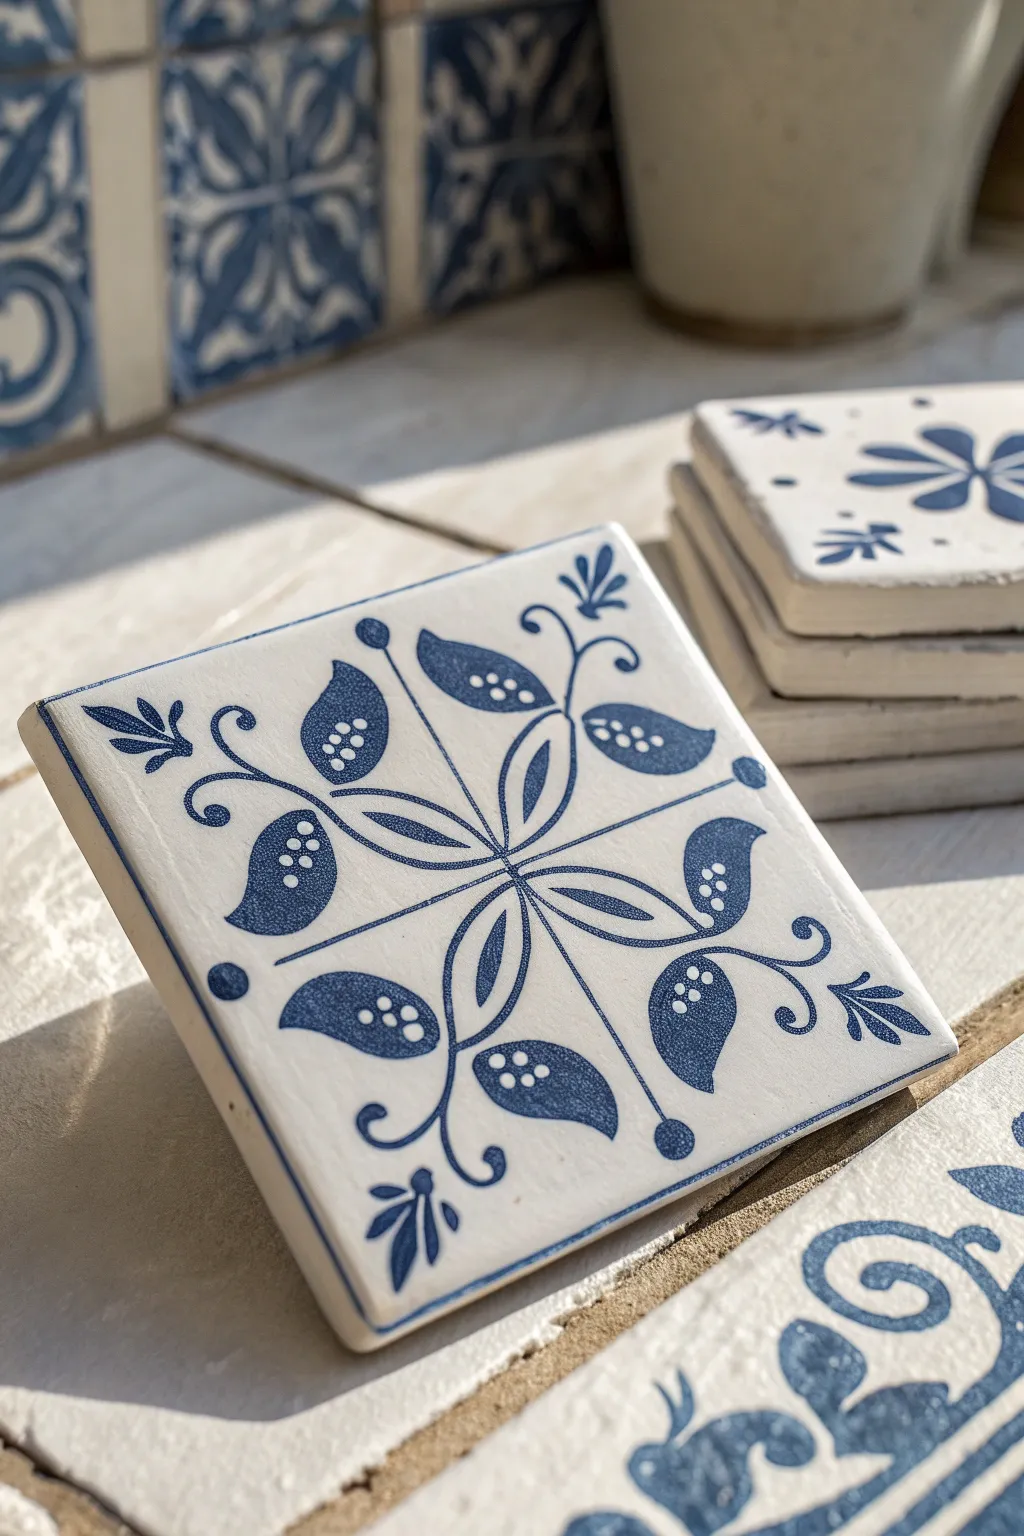
Capture the timeless elegance of classic Azulejo or Delft styles with this intricate blue-and-white tile design. Using simple line work and dotting techniques, you will create a symmetrical botanical pattern that looks stunningly professional whether displayed as a coaster or wall art.
Step-by-Step Tutorial
Materials
- Square white ceramic tile (4×4 inch)
- Pebeo Porcelaine 150 paint (Navy Blue or similar deep blue)
- Fine liner brush (size 0 or 00)
- Round brush (size 2)
- Graphite transfer paper
- Pencil and eraser
- Ruler
- Rubbing alcohol
- Cotton rounds
- Palette or small dish
- Oven (for curing)
Step 1: Preparation & Mapping
-
Clean surface:
Before anything else, thoroughly wipe down your ceramic tile with rubbing alcohol and a cotton round. This removes invisible oils that repel paint. -
Find the center:
Using a ruler and a light pencil touch, draw a faint ‘X’ from corner to corner to locate the exact center of the tile. -
Draft the grid:
Draw horizontal and vertical lines crossing through that center point, dividing your tile into four equal quadrants. This grid is essential for keeping the radial symmetry accurate. -
Sketch the primary axes:
Lightly sketch two long, slender leaf shapes extending diagonally from the center point into each of the four corners. These form the main ‘X’ shape of the floral design. -
Add secondary elements:
In the spaces between the main diagonal leaves, sketch the curved stems and leaf pairs that will fill the vertical and horizontal axes.
Clean Lines Only
If you make a mistake with the porcelain paint, don’t panic. Use a damp Q-tip to wipe away the error immediately before it starts to tack up.
Step 2: Painting the Linework
-
Load the liner brush:
Dip your fine liner brush into the deep blue porcelain paint. You want a creamy consistency—if it feels too thick to drag smoothly, add a single drop of water or thinning medium. -
Vertical and Horizontal lines:
Paint the thin, straight cross lines that divide the quadrants first. Stop these lines just short of the tile edge to create a frame effect. -
Outline the main leaves:
Carefully outline the four main diagonal leaf shapes you sketched earlier. Keep your wrist steady and try to make the points sharp. -
Paint the stems:
Switching back to the fine liner, paint the curling stems that emerge from the center lines. Add the small spiral flourishes at the ends of the scrolls. -
Add the border line:
Paint a thin, solid border line around the very perimeter of the tile face. I find turning the tile as I go helps me maintain a consistent hand angle.
Step 3: Filling & Detailing
-
Fill the large leaves:
Using the size 2 round brush, fill in the main diagonal leaves with solid blue. Ensure the coat is opaque but not gloppy. -
Fill secondary leaves:
Paint the smaller, secondary leaves attached to the scrolling stems solid blue. -
Add the corner motifs:
In the empty corners, paint the small fan-like floral sprigs. These usually consist of three small strokes meeting at a base point. -
Create the negative space dots:
This is the signature detail: While the blue paint on the large leaves is wet, use a clean, dry tool edge or a rubber nib to lift off small circles of paint, revealing white dots. Alternatively, let the blue dry completely and paint white dots on top for an easier method. -
Add floating dots:
Using the tip of a brush handle or a dotting tool dipped in blue, place small solid dots at the ends of the straight divider lines and near the scrolling vines. -
Bake to set:
Allow the tile to dry for at least 24 hours. Once fully dry, cure it in a domestic oven according to the paint manufacturer’s instructions (usually 300°F for 35 minutes) to make it scratch-resistant.
Make a Set
Create a matching set of four by rotating the design 45 degrees on the next tile, or by inverting the colors to have white leaves on a blue background.
Once baked and cooled, your custom tile is ready to serve as a beautiful coaster or decorative trivet in your home
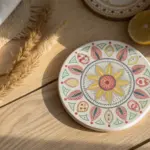
Sunburst Rays From the Center
Capture the warmth of a Mediterranean summer with this striking sunburst tile design featuring an array of extended rays and geometric accents. The earthy palette of terracotta and mustard yellow over a creamy base creates a timeless, hand-painted aesthetic perfect for coasters or decorative accents.
Detailed Instructions
Materials
- Unfinished ceramic bisque tile (4×4 or 6×6 inch)
- Ceramic underglazes or acrylic paints (Terracotta Red, Mustard Yellow/Ochre)
- Fine round paintbrush (size 0 or 1)
- Medium flat paintbrush
- Pencil and eraser
- Ruler
- Protractor or circle template
- Clear sealant or glaze (glossy finish)
Step 1: Preparation & Base Layout
-
Prepare the surface:
Wipe down your ceramic tile with a slightly damp cloth to remove any bisque dust or oils from your fingers. Let it dry completely. -
Find the center point:
Using a ruler, lightly draw diagonal lines from corner to corner to pinpoint the exact center of the tile. Keep your pencil pressure very light so it’s easy to erase later. -
Draft the central circles:
Use a compass or circle template to draw three concentric circles starting from the center point. The smallest will hold the yellow core, the middle creates the red ring, and the outer one defines the border for the dots. -
Mark the ray guidelines:
Draw a faint horizontal and vertical line through the center to create a cross. Then, divide these quadrants with diagonal lines to create an 8-point star framework. These will guide your main long rays.
Step 2: Designing the Rays
-
Sketch the primary rays:
On your 8 main guide lines, sketch long, thin triangles radiating outward. The points should almost touch the edge of the tile. Note that these triangles taper to a sharp point. -
Add secondary rays:
In the spaces between your long rays, draw shorter, diamond-shaped rays. These should float in the middle space, not touching the center circle or the outer edge. -
Sketch the corner motifs:
In the four corners of the tile, lightly sketch small circles. Surround these with tiny guide marks for the petal dots. -
Refine the lines:
Go over your sketch to ensure symmetry, but don’t worry about perfection; small wobbles add to the hand-painted charm.
Clean Lines Trick
Work from the center outward when painting. Resting your hand on a dry paper towel placed over the tile prevents smudging wet paint with your palm.
Step 3: Painting the Design
-
Paint the central eye:
Load a small round brush with Mustard Yellow. Fill in the innermost circle and the four small corner circles. Apply two coats for solid opacity. -
Outline the sunburst:
Switch to your Terracotta Red. Using just the tip of a fine liner brush, carefully outline the central ring, the long rays, and the floating diamond shapes. -
Fill the rays:
Use a slightly larger brush to fill in the red outlines. I find that pulling the brush from the wide base of the triangle toward the tip helps keep the points sharp. -
Add the central ring detail:
Paint a thick red ring around the yellow center. Once dry, outline the yellow center with a thin red line to define it. -
Create the dot details:
Dip the non-brush end of your paintbrush into the red paint to ‘stamp’ dots. Place a ring of dots inside the central white band, and surround the yellow corner circles with petal-like dots. -
Stipple texture:
For a rustic look, use an almost dry brush or a needle tool to add tiny, random speckles of red paint in the white negative space around the rays. -
Paint the edge border:
Run a line of red paint along the very outer edge of the tile surface to frame the artwork.
Coaster Conversion
Turn this art piece into functional decor by gluing a square of cork or felt to the back. This prevents the rough ceramic from scratching your table surface.
Step 4: Finishing
-
Let it cure:
Allow the paint to dry fully. If you used underglazes, the tile is now ready for firing. If using acrylics, wait at least 24 hours. -
Erase guidelines:
Gently erase any visible pencil marks, being careful not to rub off any acrylic paint. -
Seal the tile:
Apply a coat of glossy varnish or clear sealant to protect the design and give it that fired ceramic shine.
Enjoy the warm glow of your new sunburst tile as a standout piece in your home decor collection

PENCIL GUIDE
Understanding Pencil Grades from H to B
From first sketch to finished drawing — learn pencil grades, line control, and shading techniques.
Explore the Full Guide
Zentangle-Style Doodle Fill Tile
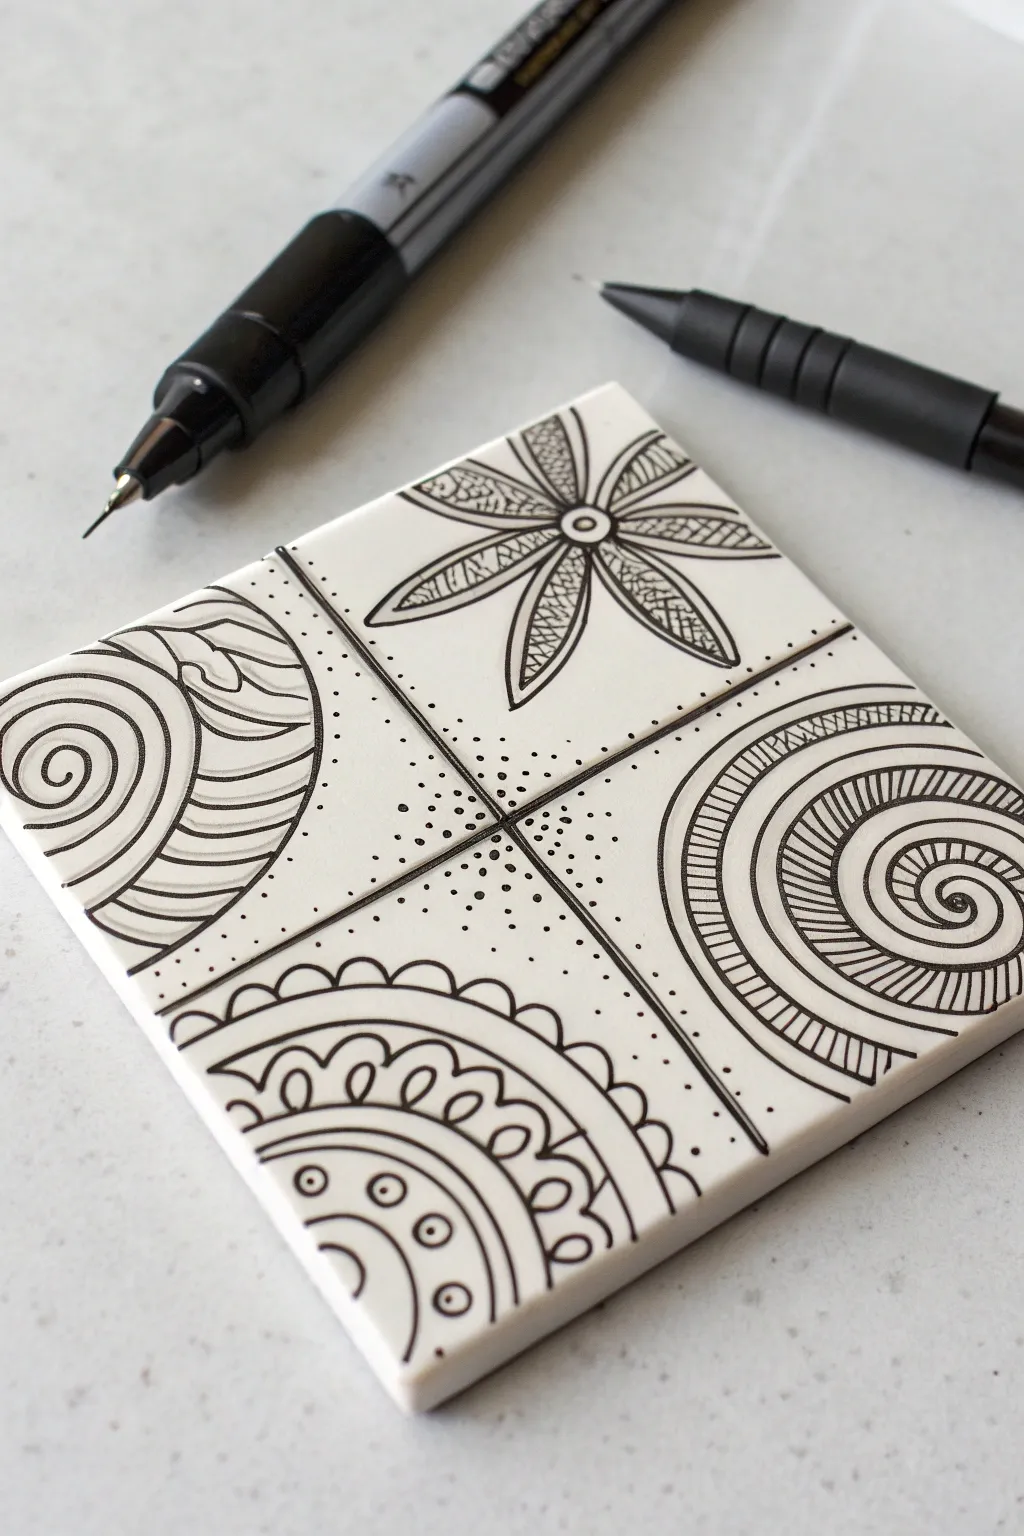
Transform a plain ceramic tile into an intricate piece of art using meditative, Zentangle-inspired patterns. This design breaks the square into four distinct quadrants, each featuring a unique doodle style, ranging from organic flower petals to geometric swirls.
Step-by-Step
Materials
- 4-inch white ceramic tile (bisque or glazed)
- Black fine liner pen (0.5mm tip works well)
- Black ultra-fine liner pen (0.1mm tip for details)
- Pencil and eraser
- Ruler
Step 1: Planning the Layout
-
Divide the space:
Begin by cleaning your tile surface to ensure it is free of dust or oils. Using your ruler and a pencil, lightly draw a cross directly in the center to divide the tile into four equal square quadrants. -
Define the boundaries:
With your 0.5mm black pen, trace over your pencil lines to create a permanent black cross. Don’t worry about using a ruler here; a slightly hand-drawn line adds character. -
Add separation lines:
Draw a second line parallel to each arm of the cross, leaving a small gap of about 2-3mm. This creates a double-line border that separates the four pattern zones.
Smudge Alert
Ceramic surfaces are non-porous, meaning ink sits on top longer than on paper. Keep your hand lifted off the tile or rest it on a clean scrap of paper to avoid smearing wet ink.
Step 2: Drawing the Floral Quadrant
-
Anchor the flower:
Focus on the top-right quadrant. Draw a small circle in the very center of the tile (where lines intersect) and a larger circle around it to form the flower’s center. -
Sketch the petals:
Draw six large, pointed petals radiating outward from the center circle. Make them large enough to almost touch the edges of this quadrant. -
Fill the petals:
Inside each petal, draw a slightly smaller petal shape. Fill the space between the inner and outer petal lines with tiny, tight scribbles or stippling for texture. -
Detail the center:
Draw a straight line down the center of each petal to give it dimension.
Baking Your Design
To make your coaster usable, bake the tile at 350°F (175°C) for 30 minutes if you used oil-based permanent markers. Let it cool completely in the oven before removing.
Step 3: Creating the Spiral Quadrant
-
Start the spiral:
Move to the bottom-right quadrant. Start from the center of this square area and draw a continuous, expanding spiral line that moves outward until it hits the borders. -
Thicken the spiral:
Go back over your spiral line to thicken it slightly, or draw a second line parallel to the first to create a ribbon effect. -
Add hatching:
Inside the created ribbon path of the spiral, draw small, perpendicular hatch marks. Keep them closely spaced to create a dense, shaded look.
Step 4: Drawing the Organic Waves
-
Outline the orb:
In the top-left quadrant, draw a large semi-circle or partial orb shape that fills most of the corner. -
Fill with waves:
Inside this orb, draw flowing, wavy lines that stack on top of each other. Vary the thickness of these lines—color some in completely black to add visual weight. -
Add outer spirals:
In the negative space outside the orb (towards the tile corner), draw a simple, bold spiral to balance the composition.
Step 5: Finishing Touches
-
Scalloped arches:
In the bottom-left quadrant, draw a series of concentric arches starting from the bottom-left corner. Decorate one band with scallops (semi-circles) and another with small circles to create a lace-like pattern. -
Stippling texture:
Using your finest 0.1mm pen, add stippling (tiny dots) inside the central cross borders you created in the very first step. Concentrate the dots near the center intersection and let them fade out as you move toward the edges. -
Erase and cure:
Wait at least 15 minutes for the ink to fully dry. Gently erase any visible pencil guidelines. If using special geometric markers, you can bake the tile according to the manufacturer’s instructions to set the ink.
Now you have a stunning, hand-drawn coaster that looks complex but was built one simple line at a time
Mix-and-Match Patchwork Tile Set
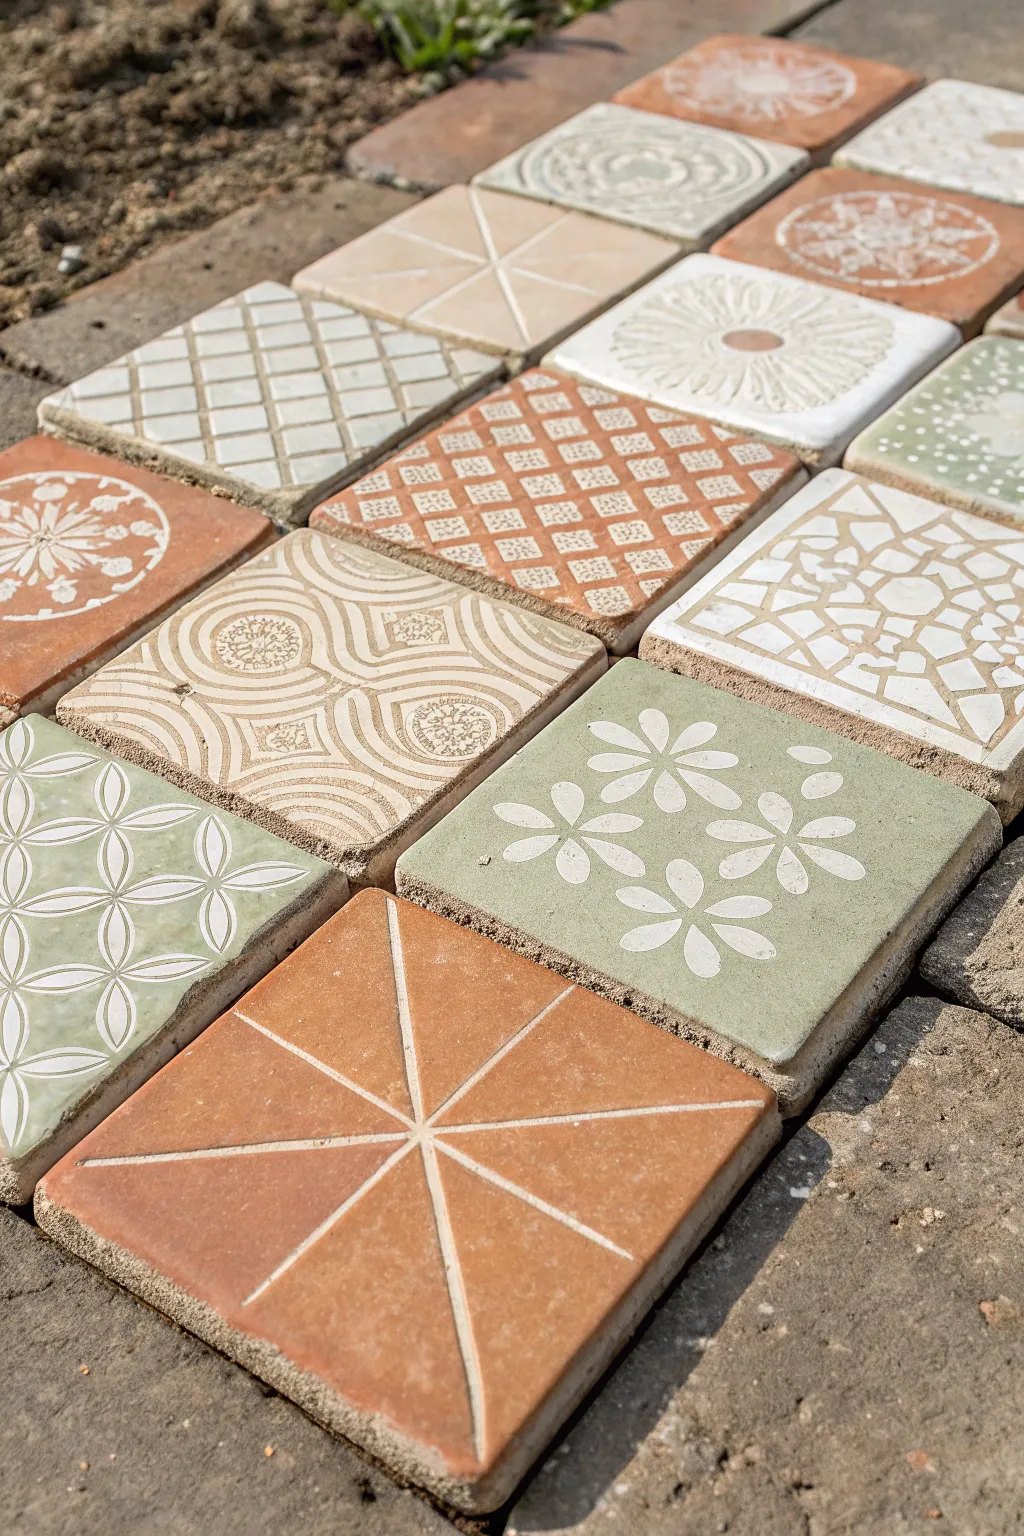
Transform plain ceramic tiles into a stunning, eclectic mosaic that mimics the charm of vintage cement tiles. By using simple geometric and floral motifs with a muted, earthy color palette, you’ll create a cohesive set perfect for coasters or garden accents.
Step-by-Step Tutorial
Materials
- Unfinished bisque or plain ceramic tiles (4×4 inch)
- Pencil and eraser
- Ruler or straight edge
- Acrylic paints (terracotta, sage green, cream, white)
- Small flat paintbrushes
- Fine-point detail brushes (size 0 or 1)
- Matte spray sealant
- Painter’s tape (optional)
- Compass (for circular designs)
Step 1: Preparation & Base Coats
-
Clean surface:
Begin by wiping down your ceramic tiles with a damp cloth to remove any dust or oils that might prevent the paint from adhering properly. -
Mix your palette:
Prepare your color palette. Aim for earthy, muted tones. Mix a burnt orange with a touch of brown for the terracotta, and soften a bright green with a little grey or white for the sage. -
Apply base colors:
Select which tiles will be solid colors and which will be background colors. Paint the entire surface of each tile with a flat brush. You’ll likely need two coats for opaque, even coverage. -
Dry completely:
Allow the base coats to dry fully. This is crucial; if the base is wet, your pencil sketches will gouge the paint instead of resting on top.
Use Posca Pens
Struggling with brush control? Use white or cream acrylic paint markers for the fine lines and geometric details. They offer much better stability for straight lines.
Step 2: Drafting the Designs
-
Mark centers:
For the symmetrical designs, use a ruler to lightly mark the center point of the tile with a pencil to guide your pattern. -
Sketch the starburst:
On a terracotta tile, draw intersecting lines from corner to corner and side to side to create an eight-point star framework. -
Draft the grid:
For the checkerboard-style floral pattern, use your ruler to draw a light grid. This helps ensure your repeating flower motifs stay aligned later. -
Draw organic shapes:
Freehand the more circular, swirling designs. Don’t worry about perfect symmetry here; the hand-drawn look adds to the rustic charm. -
Create the mosaic look:
For the faux-mosaic tile, sketch irregular geometric shapes similar to shattered glass, leaving small gaps between them to represent grout lines.
Fixing Smudges
If you smudge a line while it’s wet, don’t wipe it! Let it dry completely, then paint over the mistake with the background base color before trying again.
Step 3: Painting the Motifs
-
Paint fine lines:
Using your smallest detail brush and creamy white paint, carefully trace over your pencil lines for the geometric starbursts. Keep the paint consistency thin enough to flow but thick enough to cover. -
Fill the sage florals:
On a sage green tile, paint simple five-petal daisy shapes using white. Start from the center and press the brush down and pull outward to create the petal shape naturally. -
Detail the swirls:
For the intricate swirl patterns on the beige tiles, use a very light hand. I find it helps to rotate the tile itself while painting curves rather than twisting my wrist awkwardly. -
Add pattern texture:
Use a dry-brush technique or a stippling motion on some of the larger shapes to give them a weathered, stone-like texture rather than a flat, plastic look. -
Refine edges:
Go back with your base color to touch up any mistakes where the design lines became too thick or wobbly.
Step 4: Finishing Touches
-
Erase guidelines:
Once the design paint is bone dry—give it a few hours—gently erase any visible pencil marks. Be very gentle to avoid rubbing off the acrylic. -
Seal the work:
Take the tiles outside or to a well-ventilated area. Apply a light, even coat of matte spray sealant. This protects the design from scratches and moisture. -
Apply second coat:
After the first coat dries (check the can for times), apply a second coat of sealant for durability, especially if these will be heavily handled.
Arranging your finished tiles together creates a beautiful, custom surface that feels distinctively handcrafted


Stripe-and-Dot Minimal Tile
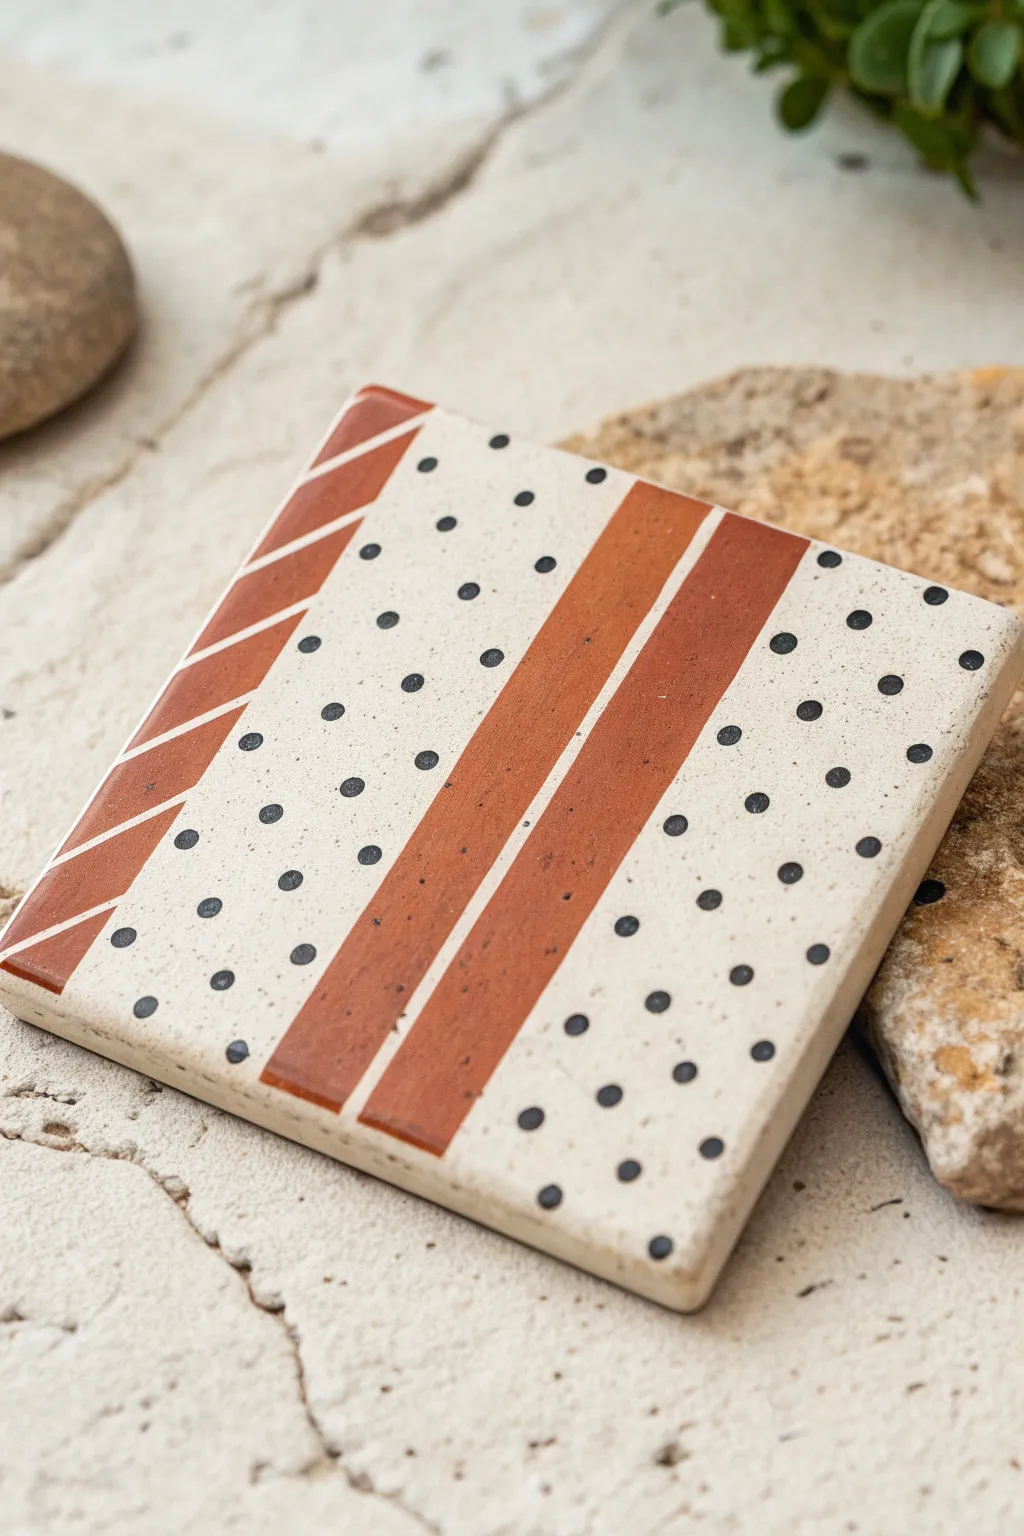
Bring a touch of earthy, geometric charm to your space with this simple terracotta and cream tile design. The combination of clean stripes and playful dots creates a balanced, minimalist look that is surprisingly easy to achieve.
Step-by-Step Guide
Materials
- Square ceramic tile (unglazed bisque or primed)
- Terra cotta or burnt sienna acrylic paint
- Carbon black acrylic paint
- Cream or off-white acrylic paint (optional, for base)
- Painter’s tape (various widths)
- Flat shader brush (medium size)
- Small round detail brush or dotting tool
- Ruler or straight edge
- Pencil
- Clear matte sealant spray
Step 1: Preparation and Base
-
Clean surface:
Begin by wiping down your ceramic tile to ensure it is free of dust and oils. If you are using a raw bisque tile, give it a quick wipe with a damp sponge. -
Apply base coat:
If your tile isn’t naturally the creamy off-white color shown, apply two even coats of cream acrylic paint to the entire surface. Allow the first coat to dry completely before applying the second to ensure solid coverage. -
Dry time:
Let the base coat cure fully for at least an hour. This is crucial because applying tape to wet paint will peel it right off later.
Step 2: Creating the Solid Stripes
-
Plan vertical lines:
Using a ruler and a light pencil touch, mark where your two central vertical stripes will go. Notice that one stripe is slightly thicker than the other, separated by a thin gap. -
Tape the first stripe:
Apply strips of painter’s tape to mask off the area for the thicker vertical stripe. The tape defines the sharp edges, so press it down firmly to prevent bleeding. -
Tape the second stripe:
Place tape to define the second, slightly thinner vertical stripe next to the first one. Leave a small gap of the base color exposed between them. -
Paint vertical stripes:
Load your flat brush with terracotta paint. Fill in the exposed rectangular areas defined by your tape. Use smooth, vertical strokes to minimize brush marks. -
Remove tape:
While the paint is still slightly tacky (but not wet), carefully peel away the tape at a 45-degree angle. This helps keep the edges crisp.
Bleeding Edges?
If paint seeps under your tape, wait for it to dry completely. Then, use a small angled brush with your cream base color to carefully ‘erase’ and straighten the line.
Step 3: Creating the Slanted Pattern
-
Tape the slanted section:
Once the previous paint is dry, use tape to section off a wide vertical band on the left side of the tile. This defines the outer vertical boundary of the slanted design. -
Create diagonals:
Cut smaller pieces of painter’s tape or use thin detailing tape. Place these diagonally inside the vertical band you just masked off, creating uniform gaps that will become the slanted stripes. -
Paint diagonals:
Paint over the gaps between your diagonal tape strips using the same terracotta color. I find dabbing the paint on rather than brushing helps stop paint from sneaking under these small pieces of tape. -
Reveal the pattern:
Gently remove all tape from the left section to reveal the ‘candy cane’ style diagonal column.
Level Up: Texture
Mix a small amount of baking soda into your terracotta paint before applying. This creates a grainy, faux-ceramic texture that looks incredibly high-end.
Step 4: Detailing and Finishing
-
Plan the dots:
Visualize where your dots will go in the creamy negative spaces. You want rows that run parallel to your vertical stripes. -
Load the tool:
Dip the end of a small brush handle or a specific dotting tool into your black paint. You don’t need a lot of paint; just a small bead on the tip. -
Add first row:
Start with the space between the slanted pattern and the center stripes. Press gently to create a vertical column of evenly spaced black dots. -
Add remaining dots:
Repeat the dotting process on the right side of the tile. Try to keep the spacing consistent, but don’t worry if they aren’t mechanically perfect; the hand-painted look adds character. -
Clean up:
If any dots smudge or lose their round shape, wait for them to dry, dab a tiny bit of cream base paint over the mistake, and try again. -
Seal the work:
Once the entire design is bone dry, take the tile to a well-ventilated area. Spray a light, even coat of matte clear sealant over the top to protect the paint from scratches and moisture.
Now you have a stylish geometric coaster or decor piece ready to display
Soft Ombre Wash With Line Drawing
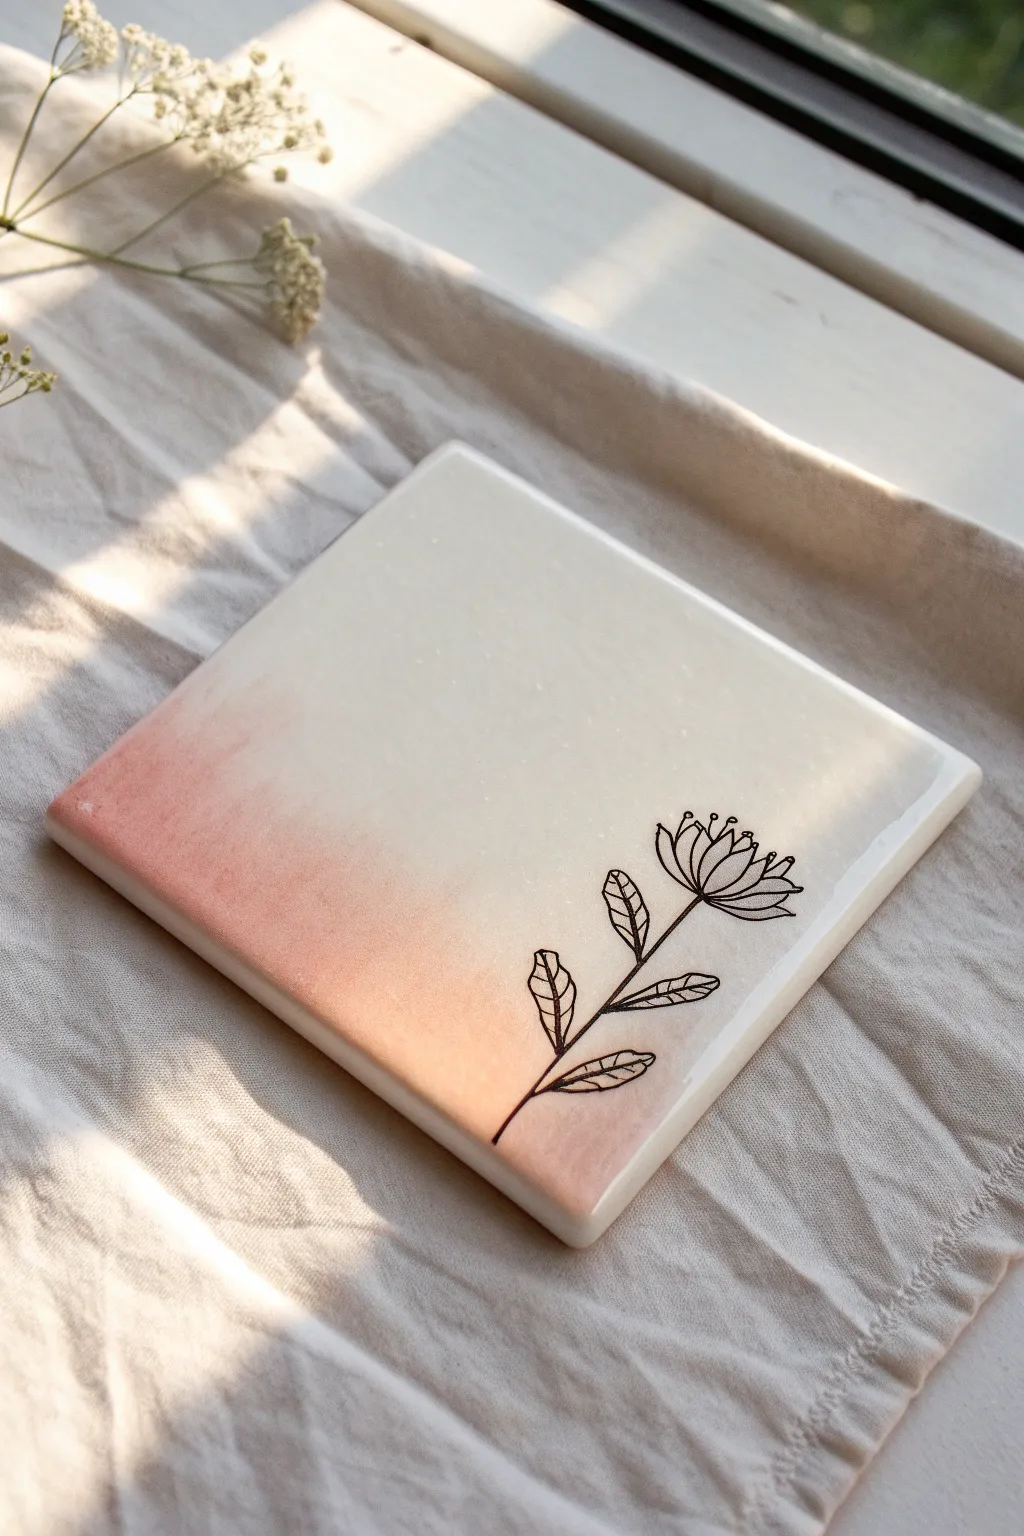
This project combines the delicate, dreamy look of watercolor washes with the crisp precision of fineliner drawing. The result is a ceramic coaster that feels warm and organic, featuring a gradient from soft peach to creamy white beneath a minimalist floral stem.
How-To Guide
Materials
- 4×4 inch white ceramic tile (matte or bisque works best)
- Alcohol ink or high-pigment watercolor (peach/coral shades)
- Rubbing alcohol (if using alcohol ink) or water (if watercolor)
- Soft synthetic brush (round or filbert)
- Black permanent pigment liner or oil-based paint pen (fine tip)
- Sealant spray (clear gloss or matte)
- Paper towel
- Pencil (optional)
Step 1: Preparation and Base Wash
-
Clean the surface:
Before starting, wipe down your ceramic tile with rubbing alcohol or soapy water to remove any oils or dust. Let it dry completely to ensure the pigments adhere evenly. -
Prepare your palette:
If using watercolors, create a watery puddle of peach or coral paint. If using alcohol inks, dispense a few drops of ink onto a palette and have your blending solution or rubbing alcohol ready nearby. -
Dampen the tile:
Using your clean brush, lightly dampen the bottom left corner of the tile with plain water (or alcohol blending solution). This helps the color spread naturally without harsh edges. -
Apply the first color wash:
Dip your brush into the peach pigment and touch it to the dampened bottom-left corner. Allow the color to bloom outward. -
Create the gradient:
While the paint is still wet, rinse your brush and use just the clean damp brush to pull the color diagonally across the tile towards the upper right. -
Feather the edges:
Keep pulling the pigment until it fades completely into the white of the tile. I like to use a very light hand here so the transition looks misty rather than streaky. -
Add depth:
Drop a tiny bit more concentrated pigment into the very bottom corner to intensify the ombre effect, letting it naturally diffuse into the damp wash. -
Dry thoroughly:
Let the tile sit undisturbed until fully dry. If you used watercolor, this might take an hour; alcohol inks dry much faster. Do not touch the surface while drying.
Step 2: Line Drawing and Sealing
-
Plan your placement:
Once the wash is bone dry, visualize where your flower will go. It should sit near the bottom right to balance the color wash. -
Draw the stem:
Using your black pigment liner, draw a single, slightly curved line starting from the bottom edge and reaching about halfway up the right side of the tile. -
Add the main bloom:
At the top of the stem, draw a U-shape for the flower base. Add petal shapes inside, keeping them simple and slightly open. -
Detail the center:
Add small stamens or lines radiating from the center of the flower for a touch of botanical realism. -
Sketch the leaves:
Draw three or four leaves attached to the stem. Use a simple teardrop shape with a central vein line. -
Refine the lines:
Go over any lines that look too faint. The contrast between the bold black ink and the soft peach wash is key. -
Allow ink to cure:
Let the drawing sit for at least 15 minutes to ensure the ink is smudge-proof. -
Apply the sealant:
In a well-ventilated area, hold the sealant spray about 12 inches away from the tile. Apply a light, even mist coat. -
Add finish coats:
Once the first coat is tacky, apply 1-2 heavier coats of gloss sealant to protect the artwork and give it that finished ceramic shine.
Soften the Blow
Work quickly with alcohol inks. If harsh lines form, re-wet the area slightly with plain alcohol to reactive and smooth the gradient.
Ink Bleeding Issues?
If your pen ink bleeds into the color wash, the base layer wasn’t 100% dry. Use a hair dryer on low heat to ensure zero moisture remains before drawing.
Place your finished tile on a side table to enjoy its peaceful vibe or add felt pads underneath to use it as a coaster
One-Line Continuous Motif Tile
Capture the charm of classic Delftware with this simple yet elegant floral tile project. Using basic ceramic markers, you’ll create a stylized six-petal blossom surrounded by delicate swirls and corner accents on a rustic stone or ceramic base.
How-To Guide
Materials
- 4×4 inch cream or off-white ceramic tile (tumbled stone or bisque work best)
- Blue ceramic paint marker (fine tip)
- Blue ceramic paint marker (medium tip)
- Pencil (HB or lighter)
- Eraser
- Paper towel or rag
- Oven (for baking the tile)
- Ruler (optional)
Step 1: Planning the Layout
-
Clean the surface:
Begin by wiping down your tile with a damp paper towel to remove any dust or oils. Let it dry completely before starting your sketch. -
Mark the center:
Using your pencil very lightly, find the approximate center of the tile. You don’t need a ruler if you prefer a looser, hand-drawn look, but a tiny dot helps anchor the design. -
Sketch the center flower:
Lightly sketch a small circle around your center point. Radiating from this circle, draw six teardrop-shaped petals. Try to keep them evenly spaced, but minor variations add character. -
Add the swirls:
Sketch four large C-shaped swirls extending outwards between the petals, curving toward the corners. These will become the decorative tendrils. -
Place corner accents:
In the open space at each of the four corners, lightly sketch a simple six-petaled daisy shape.
Fixing Smudges
If you smudge the ink while it’s wet, dampen a Q-tip with a little rubbing alcohol or water and gently lift the mistake off the tile surface immediately.
Step 2: Drawing the Main Flower
-
Outline the center:
Switch to your fine-tip blue ceramic marker. Draw the small center circle, then add a second, slightly smaller circle inside it. Place a single dot in the very middle. -
Draw the main petals:
Trace over your pencil lines for the six main petals using the fine tip. Ensure the lines connect cleanly back to the center circle. -
Add the inner detail:
Inside each petal, draw a slightly smaller teardrop shape that mimics the outer contour. This creates that distinctive double-line effect. -
Thicken the inner motif:
Using the medium-tip marker (or by making multiple passes with the fine tip), color in the gap between the two petal outlines. This bold blue border defines the flower’s shape. -
Detail the petal centers:
Switch back to the fine tip. At the base of each petal (nearest the center), draw three or four very short, thin lines flicking outward to add texture.
Custom Colors
Swap the classic blue for a terra cotta red or sage green marker to match different decor styles while keeping the same folk pattern.
Step 3: Adding Decorative Flourishes
-
Draw the swirls:
Trace the large C-shaped swirls you sketched earlier with the fine-tip marker. I like to keep your wrist loose here to ensure the curve looks smooth and organic. -
Add secondary curls:
From the top of each large swirl, draw a smaller, tighter curl branching off in the opposite direction, creating a whimsical vine effect. -
Create the dot accents:
Following the curve of the main swirls, add a graduated series of three or four small dots along the outer edge. This is a classic folk art technique. -
Execute the corner flowers:
Using the fine tip, draw the four corner daisies. Keep these simple—just single-line petals meeting at a center point. -
Finishing touches:
Examine the design for any gaps. You might want to add a tiny dot inside the loops of the swirls or near the corner flowers to balance the negative space.
Step 4: Curing
-
Dry and erase:
Allow the ink to dry for at least 30 minutes. Once completely smudge-proof, gently erase any visible pencil sketch lines. -
Bake the tile:
Place the tile in a cold oven and set it to 350°F (176°C). Once it reaches temperature, bake for 30 minutes, then turn the oven off and let the tile cool down inside to prevent cracking.
Display your finished tile as a coaster or mount it in a frame for a lovely piece of handmade wall art
Tiny Window Scene Inside a Tile

Capture the charm of a rolling countryside view through an arched window with this delicate ceramic painting project. Using a bisque tile with a raised border creates a natural frame for your miniature scene, blending rustic texture with soft, illustrative details.
Step-by-Step Guide
Materials
- Square terracotta bisque tile (approx. 4×4 or 6×6 inches) with raised border
- White underglaze or ceramic paint (matte finish)
- Black fine-line ceramic pen or detail brush with black underglaze
- Underglaze colors: Sage green, terracotta/orange-brown, beige, dusty blue
- Clear dipping glaze or brush-on clear glaze
- Small synthetic brushes (flat shader and size 0 round)
- Pencil for sketching
- Damp sponge
Step 1: Preparation and Base Coat
-
Clean the Surface:
Wipe your terracotta bisque tile with a damp sponge to remove any dust. This ensures your glaze adheres properly and prevents pinholing later on. -
Apply the White Base:
Using a flat shader brush, apply 2-3 coats of white underglaze to the entire front surface of the tile, including the raised border. Let each coat dry until it’s chalky to the touch before adding the next. -
Refine the Edges:
If you want that rustic look shown in the image, carefully wipe away any white glaze that spilled onto the outer side edges, revealing the raw terracotta clay underneath.
Clean Lines Trick
If your hand shakes while outlining, rest your pinky finger on a dry part of the tile for stability. A fine-tip applicator bottle can be easier than a brush for lines.
Step 2: Sketching the Scene
-
Draft the Design:
Once the white base is bone dry, lightly sketch your design using a pencil. Start by drawing the arched window slightly off-center to the right for visual interest. -
Add Rolling Hills:
Draw three distinct layers of hills behind the window. The foreground should slope gently, the middle ground connects the window base to the left edge, and the background hill rises softly against the horizon. -
Detail the Foreground:
Sketch a few blade-like agave or aloe plants in the immediate bottom right foreground. Add two small, bushy shrubs on the middle hill to create depth.
Step 3: Painting the Landscape
-
Paint the Sky:
Keep the sky area unpainted (white) for a bright, airy feel, or use a very watered-down wash of pale blue if you prefer a hint of color. -
Color the Hills:
Using your sage green, paint the furthest back hill. I like to dilute the underglaze slightly with water here to get that watercolor-wash effect. -
Middle Ground Warmth:
Paint the middle band of earth with a diluted terracotta or orange-brown shade. This contrasts beautifully with the greens. -
Foreground Vegetation:
Fill the closest hill area with a very pale beige or sandy wash. Then, go in with a deeper green to paint the spiky foreground plants and the small shrubs.
Add Dimension
Before firing, carve gently into the damp underglaze with a needle tool to add physical texture to the plants or window frame.
Step 4: The Window and Details
-
Outline the Window:
Using a terracotta underglaze and a small round brush, paint the frame of the arched window. Keep the lines relatively thick to mimic a wooden frame. -
Fill Window Panes:
Instead of painting ‘glass’, use the same landscape colors inside the window frame sections, matching up the horizon lines so the view continues logically through the window. -
Fine Line Work:
Take your black fine-line ceramic pen or a size 0 brush with black underglaze. Carefully outline the window frame, the hill horizons, and the plants. Keep the lines thin and sketch-like. -
Window Pane Details:
Draw the internal cross-bars of the window with the black liner. Don’t forget the arched details at the top. -
Border Accent:
Use the terracotta color to gently dab or dry-brush the very inner edge of the raised border, creating a frame-within-a-frame effect. Add small dashed lines with a fine brush for extra texture.
Step 5: Finishing
-
Clear Glaze Application:
Ensure all underglaze design work is completely dry. Apply a coat of clear glaze over the entire front surface. If brushing, use long, soft strokes to avoid smudging your drawing. -
Firing:
Fire the tile in a kiln according to the manufacturer’s instructions for your specific glaze and clay body (usually cone 06 or 04).
Once fired, prop your new pastoral artwork on a shelf or windowsill to bring a permanent view of the outdoors inside
Four Tiles That Form One Big Image
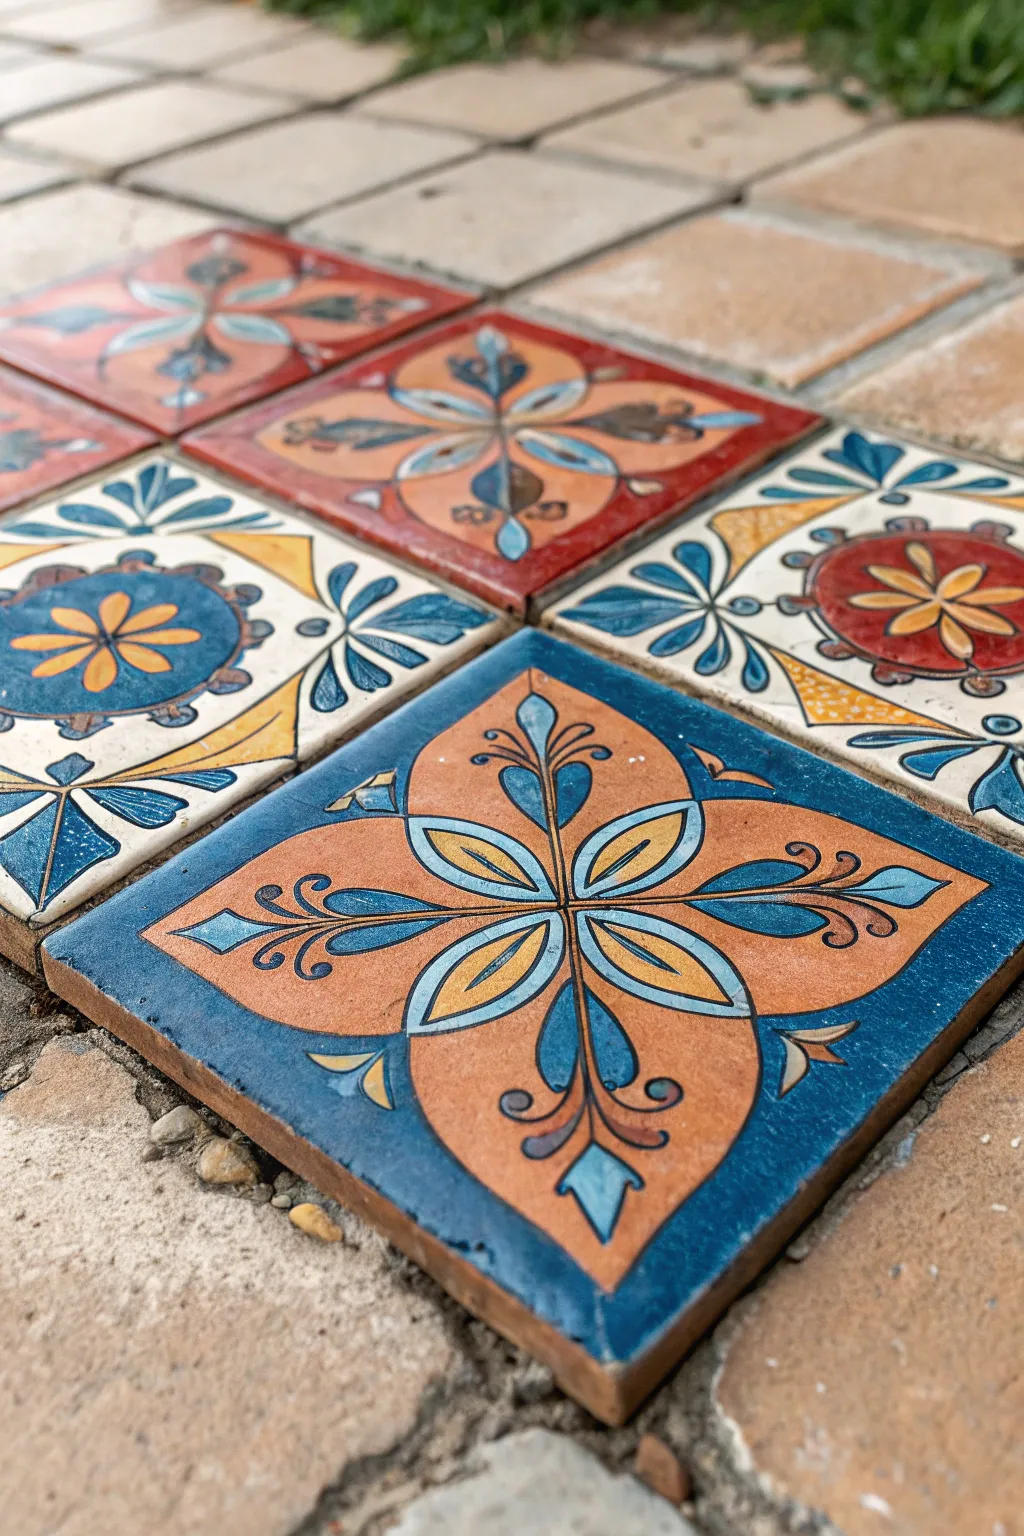
Bring the warmth of Spanish or Portuguese artistry into your home with these hand-painted ceramic tiles featuring intricate geometric florals. The design balances bold outlining with vibrant, earthy glazes to create a stunning, timeless look.
Detailed Instructions
Materials
- 4 unglazed bisque tiles (4×4 or 6×6 inches)
- Pencil and ruler
- Tracing paper (optional)
- Underglaze pencil (black or dark blue)
- Ceramic glazes (Terra cotta/rust, deep teal, mustard yellow, cream/off-white)
- Detail brushes (sizes 0, 1, and 2)
- Clear dipping glaze
- Kiln access (or use air-dry clay and acrylics for a non-functional version)
Step 1: Planning the Layout
-
Clean surface:
Begin by wiping down your bisque tiles with a barely damp sponge to remove any dust that might resist the glaze. -
Find the center:
Using a ruler and a standard pencil, lightly mark the exact center of the tile by drawing faint diagonal lines from corner to corner. The graphite will burn off in the kiln. -
Draft the quadrants:
Draw vertical and horizontal lines through the center point to divide the tile into four equal quadrants. This grid is essential for the symmetrical geometric design.
Fixing Smudges
Glaze dust can settle where you don’t want it. Use a dry, stiff brush to flick away stray powder before firing, rather than wetting it which smears color.
Step 2: Creating the Linear Design
-
Sketch the petal shapes:
Starting from the center point, sketch four large, petal-like almond shapes extending into each corner. Ensure they are evenly sized. -
Add inner details:
Inside each large petal, draw a smaller, narrower tear-drop shape. This creates the layered floral look seen in the reference. -
Corner elements:
In the spaces between the main petals (the flat sides of the tile), sketch sweeping flourishes or half-petal shapes that point inward toward the center. -
Commit to the lines:
Once satisfied with your pencil sketch, trace over the main structural lines with a black underglaze pencil or a very fine brush dipped in dark blue underglaze. Keep your hand steady for clean lines.
Step 3: Applying Color
-
Painting the background:
Using your size 2 brush, fill the outer negative space (the corners or edges depending on your specific pattern variant) with the deep teal glaze. This creates a strong contrast for the floral elements. -
Focal points:
Paint the four main large petals with a terra cotta of rust-colored glaze. I find that applying two to three thin coats gives a smoother, more opaque finish than one thick gloop. -
Highlight details:
Fill the inner tear-drop shapes with a mustard yellow glaze. If your pattern includes small dots or accents near the center, add those now with the same yellow. -
Secondary accents:
Use a light cream or off-white glaze for any remaining small flourishes or the very center point to brighten the overall composition. -
Clean up:
If any glaze crossed over your black outlines, gently scrape it back with a craft knife or clean it up with a damp brush tip.
Make It a Set
Vary the background color on subsequent tiles (try mustard or cream backgrounds) while keeping the same pattern to create a cohesive but dynamic backsplash.
Step 4: Finishing
-
Let it dry:
Allow the underglazes and glazes to dry completely. The tile should feel dry to the touch and not cool. -
Clear coat:
Dip the entire tile into a clear transparent glaze. Shake it gently to remove excess drips; a thin, even coat is all you need. -
Wait for firing:
Once the clear coat is dry, the tile is ready for the kiln. Fire according to the specific cone requirements of your clay and glaze.
Once fired, these tiles will make beautiful coasters or a striking accent for a garden wall


Have a question or want to share your own experience? I'd love to hear from you in the comments below!