
If you’ve been craving that satisfyingly bumpy, touchable look, textured acrylic painting is where the magic happens. I’m sharing my favorite tactile, dimensional ideas that turn simple paint into little sculptural moments on canvas.
Cloud Banks Built From Soft Palette Knife Smears

Capture the dramatic weight and ethereal light of a summer sky with this textured acrylic cloud study. Using a combination of heavy body paints and palette knife techniques allows you to build physical depth that mimics the towering structure of cumulonimbus formations.
How-To Guide
Materials
- Stretched canvas (16×20 or similar)
- Heavy body acrylic paints (Titanium White, Paynes Grey, Ultramarine Blue, Burnt Umber, Yellow Ochre, Alizarin Crimson)
- Modeling paste or thick impasto medium
- Palette knives (assorted shapes, specifically trowel and tear-drop)
- Large flat brush (for background)
- Medium filbert brush (for softening)
- Palette for mixing
- Water container and distinct rag
Step 1: The Atmospheric Foundation
-
Prime the sky:
Begin by covering the entire canvas with a smooth gradient for the sky behind the clouds. Mix Ultramarine Blue with a significant amount of Titanium White and a tiny touch of Paynes Grey. -
Create the gradient:
Using your large flat brush, apply the darker blue mix at the very top of the canvas and gradually add more white as you work downward. The sky should be palest just above where your cloud line will start. -
Establish the cloud horizon:
While the background is still slightly tacky, sketch the rough outline of your main cloud mass using a thinned wash of Paynes Grey and Burnt Umber. Keep the shapes organic and bubbly. -
Mix the texture base:
On your palette, mix your modeling paste 50/50 with Titanium White heavy body paint. This creates a stiff, peaks-holding mixture that forms the core of your cloud highlights.
Knife Pressure Pro-Tip
Vary your pressure. Heavy pressure scrapes paint thin for transparency (shadows), while light pressure lets the paint sit on top of the canvas for thick, opaque texture (cloud highlights).
Step 2: Building the Shadow Mass
-
Mix deep shadow tones:
Combine Paynes Grey, ultramarine blue, and a touch of Alizarin Crimson to create a deep, stormy slate color. Do not add white yet; we want these lower shadows to feel heavy. -
Apply the dark underbelly:
Using a palette knife, scrape this dark mixture horizontally across the bottom third of your cloud shape. Press the knife flat against the canvas to create smooth, sweeping areas that suggest distant rain or shadow. -
Transition to mid-tones:
Mix a medium grey-blue by adding some white and a dot of burnt umber to your shadow color. Apply this just above the darkest areas, using the edge of the knife to create upward-moving ridges. -
Soften the transitions:
Before the paint dries completely, use a dry, clean filbert brush to lightly whisk the boundary between the deep shadow and the mid-tones. This creates that ‘fuzzy’ look typical of lower cloud decks.
Step 3: Sculpting the Crown
-
Prepare warm highlights:
Take your white/paste mixture and divide it into two piles. Tint one very faintly with Yellow Ochre (for sunlit warmth) and keep the other pure white. -
Lay the first light layer:
Load a trowel-shaped palette knife with the ochre-tinted white. Apply it to the upper rounded edges of the clouds using a ‘buttering’ motion—thick and textured. -
Build the billows:
Work in circular motions with the knife tip to create the cauliflower-like heads of the clouds. Let the thick paint overlap slightly onto the blue sky background. -
Bridge light and dark:
Where the white tops meet the grey bottoms, mix a transitional color on the canvas. I like to use a dirty knife to drag a little grey up into the white, simulating vertical convection currents. -
Refine the brightest peaks:
Clean your knife thoroughly. Pick up pure, thick Titanium White (mixed with paste) and apply it only to the very top edges of the cloud formations where the sun hits most directly. -
Add reflected light:
Mix a tiny amount of Alizarin Crimson and white to make a pale pink. Carefully dab this into the transition zone between the shadows and the highlights to suggest scattered light.
Level Up: Sunbeams
Glaze thin lines of Titanium White and Zinc White diagonally from the top corner across the clouds after drying. This creates soft ‘god rays’ breaking through the storm.
Step 4: Atmospheric Adjustments
-
Enhance the glow:
If the clouds look too stark against the blue, glaze a very thin wash of transparent Yellow Ochre around the edges of the white clouds once the main layer is dry to touch. -
Texture check:
Step back and look at the canvas from the side. Use the tip of a clean knife to physically lift and peak any white areas that have flattened out too much. -
Final shadow depth:
Return to your darkest Paynes Grey mix. Add a few sharp, horizontal streaks at the very bottom base of the cloud to anchor the composition. -
Soften distinct edges:
As a final touch, use a dry brush to very gently blur the outer edges of some (but not all) cloud tops into the blue sky, suggesting wind movement. -
Seal the texture:
Allow the painting to dry for at least 24-48 hours due to the thick impasto layers before considering any varnish.
Hang your new masterpiece in a spot with good lighting to really show off the physical texture of those cloud banks


Simple Abstract Color Blocks With Thick Edges
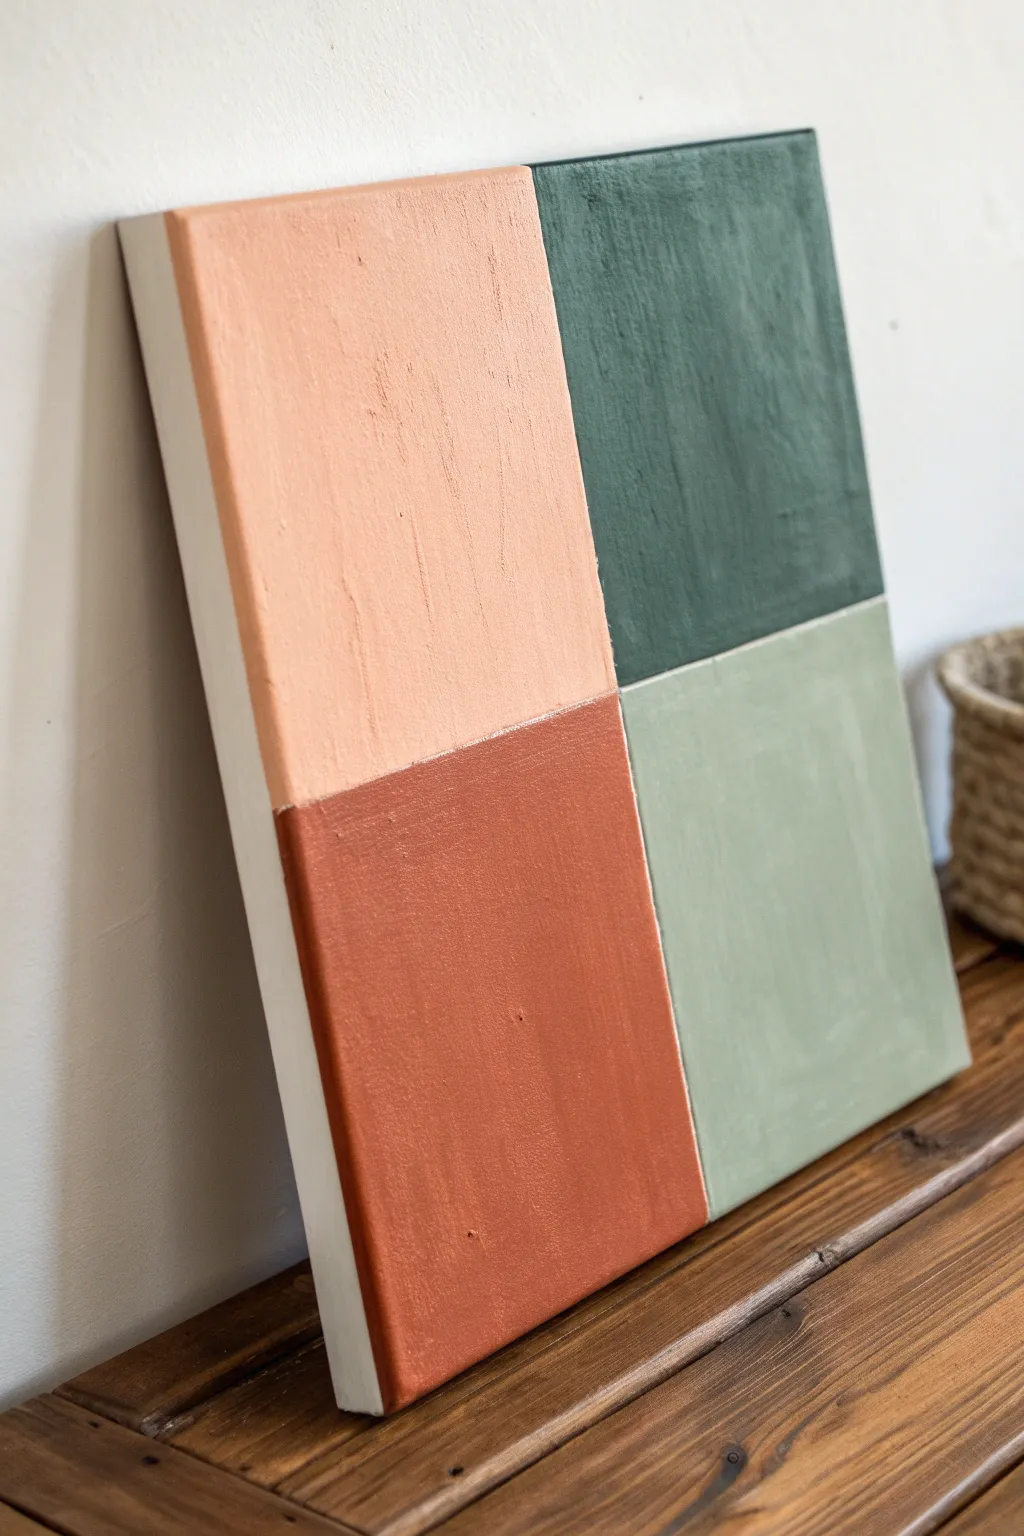
Master the art of understated elegance with this four-quadrant abstract painting that prioritizes texture over complexity. The thick, structured edges give the canvas a sculptural quality, while the muted earth tones create a calming modernist vibe.
Step-by-Step Tutorial
Materials
- Square stretched canvas (gallery wrapped)
- Acrylic paints (peach, dark forest green, terracotta rust, sage green)
- White gesso
- Modeling paste (or thick body acrylic medium)
- Wide flat synthetic brush (1-2 inch)
- Low-tack painter’s tape or masking tape
- Palette knife
- Ruler or straight edge
- Pencil
- Clean rags or paper towels
Step 1: Preparation and Layout
-
Prepare the surface:
Even if your canvas is pre-primed, apply a fresh coat of white gesso to ensure a perfectly smooth starting point. Let this dry completely before moving on. -
Measure the center:
Using your ruler, find the exact vertical and horizontal center points of the canvas. Mark these lightly with a pencil. -
Draw the grid:
Connect your center marks to draw a simple cross, dividing the canvas into four equal quadrants. Keep the lines light enough to cover easily with paint later. -
Apply texture base:
For that distinctive raised look, mix modeling paste with a small amount of white gesso. Apply this across the entire surface using a wide brush, intentionally leaving directional brushstrokes visible. Let this texture layer dry overnight or until fully hard to the touch.
Crisp Line Secret
To get razor-sharp lines on textured canvas, apply a thin layer of clear matte medium over the tape edge before painting. This seals the gap so color won’t bleed.
Step 2: Creating the Quadrants
-
Tape the first section:
Apply painter’s tape along the vertical center line and horizontal center line to isolate the top-left quadrant. Ensure the tape edges are firmly pressed down to prevent bleeding. -
Mix the peach tone:
Combine white with a touch of orange and a tiny dot of red to create a soft, muted peach color. I like to keep the mixture slightly thick to maintain the texture. -
Paint the top-left block:
Apply the peach paint to the top-left section. Brush vertically to emphasize the underlying texture stripes. Extend the paint around the outer side edge of the canvas for a finished gallery look. -
Remove tape immediately:
While the paint is still wet, carefully peel back the tape at a 45-degree angle. This ensures a crisp, sharp line. -
Tape the opposite quadrant:
Once the peach section is dry to the touch, tape off the borders for the bottom-right quadrant. -
Apply sage green:
Mix a light sage green using white, green, and a tiny drop of yellow oxide or brown to dull it down. Paint the bottom-right block, remembering to paint the corresponding outer edge as well.
Step 3: Completing the Composition
-
Protect finished areas:
Ensure the first two sections are completely dry. Now, tape carefully over the edges of the peach and sage squares to protect them while you paint the remaining areas. -
Mix deep forest green:
For the top-right quadrant, mix a dark green with a touch of black or dark blue to create a moody forest shade. This provides a strong value contrast. -
Paint top-right section:
Fill in the top-right block with your dark green. Use confident, vertical strokes and ensure full coverage over the textured ridges. -
create terracotta rust:
Mix orange, brown (burnt sienna works well), and a little red to achieve a warm terracotta rust color for the final section. -
Paint bottom-left section:
Fill the last quadrant with the rust color. Check that the paint gets deep into the texture grooves so no white specks show through. -
Paint the final edges:
Don’t forget to wrap the dark green and rust colors around their respective outer edges of the canvas stretcher bars.
Metallic Accent
For a luxe modern twist, use gold leaf or metallic gold paint for the diving cross lines instead of leaving them as simple color boundaries.
Step 4: Refining Edges
-
Final tape removal:
Peel off the final pieces of tape while the paint is still slightly damp to reveal your clean crosshair intersection. -
Touch up lines:
If any paint bled under the tape, use a small flat brush and the appropriate paint color to carefully straighten the lines freehand. -
Assess the sides:
Check the sides of the canvas one last time to ensure the color transitions at the corners are neat and fully covered.
Hang your new geometric masterpiece in a spot with good lighting to really highlight those rich textures you created


Minimal Monochrome Texture Study in White
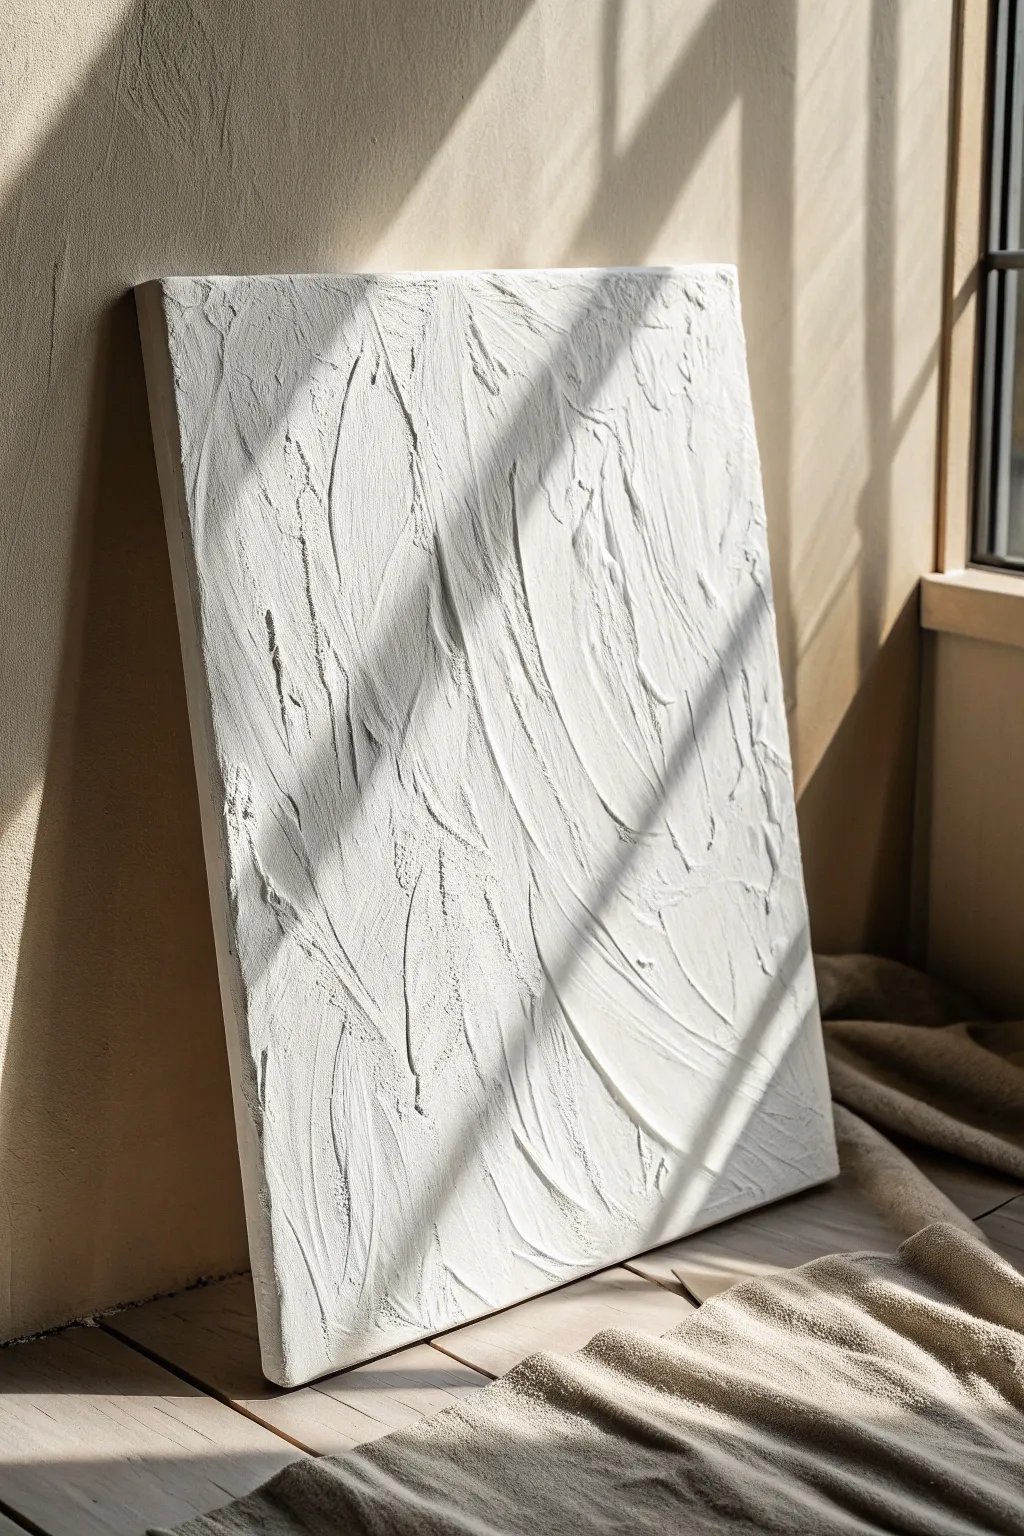
Embrace the beauty of pure form with this minimalist white-on-white texture study. By utilizing heavy-body mediums and simple tools, you’ll sculpt light and shadow directly onto the canvas, creating a piece that changes character as the day’s light shifts across your room.
Step-by-Step Guide
Materials
- Large stretched canvas (24×36 inches recommended)
- Modeling paste or thick texture medium
- Gesso (white)
- White heavy-body acrylic paint
- Large palette knife (trowel style)
- Wide putty knife or drywall scraper
- Spray bottle with water
- Drop cloth or newspapers
- Disposable mixing bowl or palette
- Sandpaper (fine grit, optional)
- Matte varnish (spray or brush-on)
Step 1: Preparation and Base Layer
-
Surface Prep:
Begin by laying down your drop cloth. Even though we are working with white materials, texture paste can be messy. Ensure your canvas is clean and taut. -
Prime the Canvas:
Apply a generous coat of white gesso to the entire canvas surface. This ensures a consistent white ground if any gaps in the texture appear later. -
Mix the Medium:
In your mixing bowl, combine the modeling paste with a small amount of white acrylic paint. This tints the paste to a true bright white rather than the slightly off-white translucent color some pastes have when dry. -
Consistency Check:
Stir the mixture until it resembles thick frosting or peanut butter. If it feels too stiff to spread, mist it lightly with water, but be careful not to make it runny.
Finding the Light
Work with a lamp positioned to the side of your canvas, raking light across it. This reveals the texture depth instantly as you work, helping you see where you need more height.
Step 2: Sculpting the Texture
-
Initial Application:
Using the large palette knife or putty knife, scoop a significant amount of the paste mixture onto the center of the canvas. -
Spread the Base:
Spread this initial blob outward, aiming for uneven coverage. You want some areas to be thick (about 1/4 inch) and others scraped almost down to the canvas weave. -
Create Vertical Motion:
Use the wide putty knife to drag the paste in long, sweeping vertical motions. Don’t worry about perfect straight lines; allow your arm to curve naturally. -
Building Ridges:
Tilt your knife at a 45-degree angle and scrape against the wet paste to create raised ridges. These ‘peaks’ will catch the light most effectively. -
Textural Variety:
I like to switch to the smaller palette knife here to add contrasting textures. Use the edge of the knife to cut thin lines or smaller scrapes into the larger sweeping fields. -
Rough Patches:
Dab the flat side of the knife into wet areas and pull straight up to create rough, stippled textures that resemble stucco. -
Smoothing Moments:
Identify a few areas to smooth out slightly. Having areas of calm flatness next to high texture creates visual breathing room. -
Edge Work:
Don’t forget the sides of the canvas. Carry the texture over the edges for a professional, gallery-wrapped look. -
Reviewing the Flow:
Step back and look at the composition. The lines should generally flow upward, but crisscrossing strokes add dynamic energy. Add more paste to areas that feel too flat.
Add Organic Grits
Mix a handful of clean sand or coffee grounds into your white paste before applying. Once painted over in white, this adds a porous, stone-like micro-texture.
Step 3: Finishing Touches
-
The Drying Phase:
Let the artwork dry completely. Because the paste is thick, this can take 24 to 48 hours. Keep it flat while drying to prevent gravity from slumping your textures. -
Optional Sanding:
Once hard, run your hand gently over the surface. If there are any dangerously sharp spikes of dried paste, gently knock them down with fine-grit sandpaper. -
Final Coat:
Paint the entire textured surface with a final layer of titanium white heavy-body acrylic. This unifies the sheen of the paste and the gesso. -
Seal the Work:
After the final paint layer is dry, apply a matte varnish. A matte finish is crucial creates the soft, plaster-like effect seen in the inspiration image without distracting glare. -
Display:
Place your painting near a window or light source where shadows can play across the surface.
Now you have a serene, tactile piece of art that brings a modern calmness to your space


Comb-Raked Waves for Uniform Texture
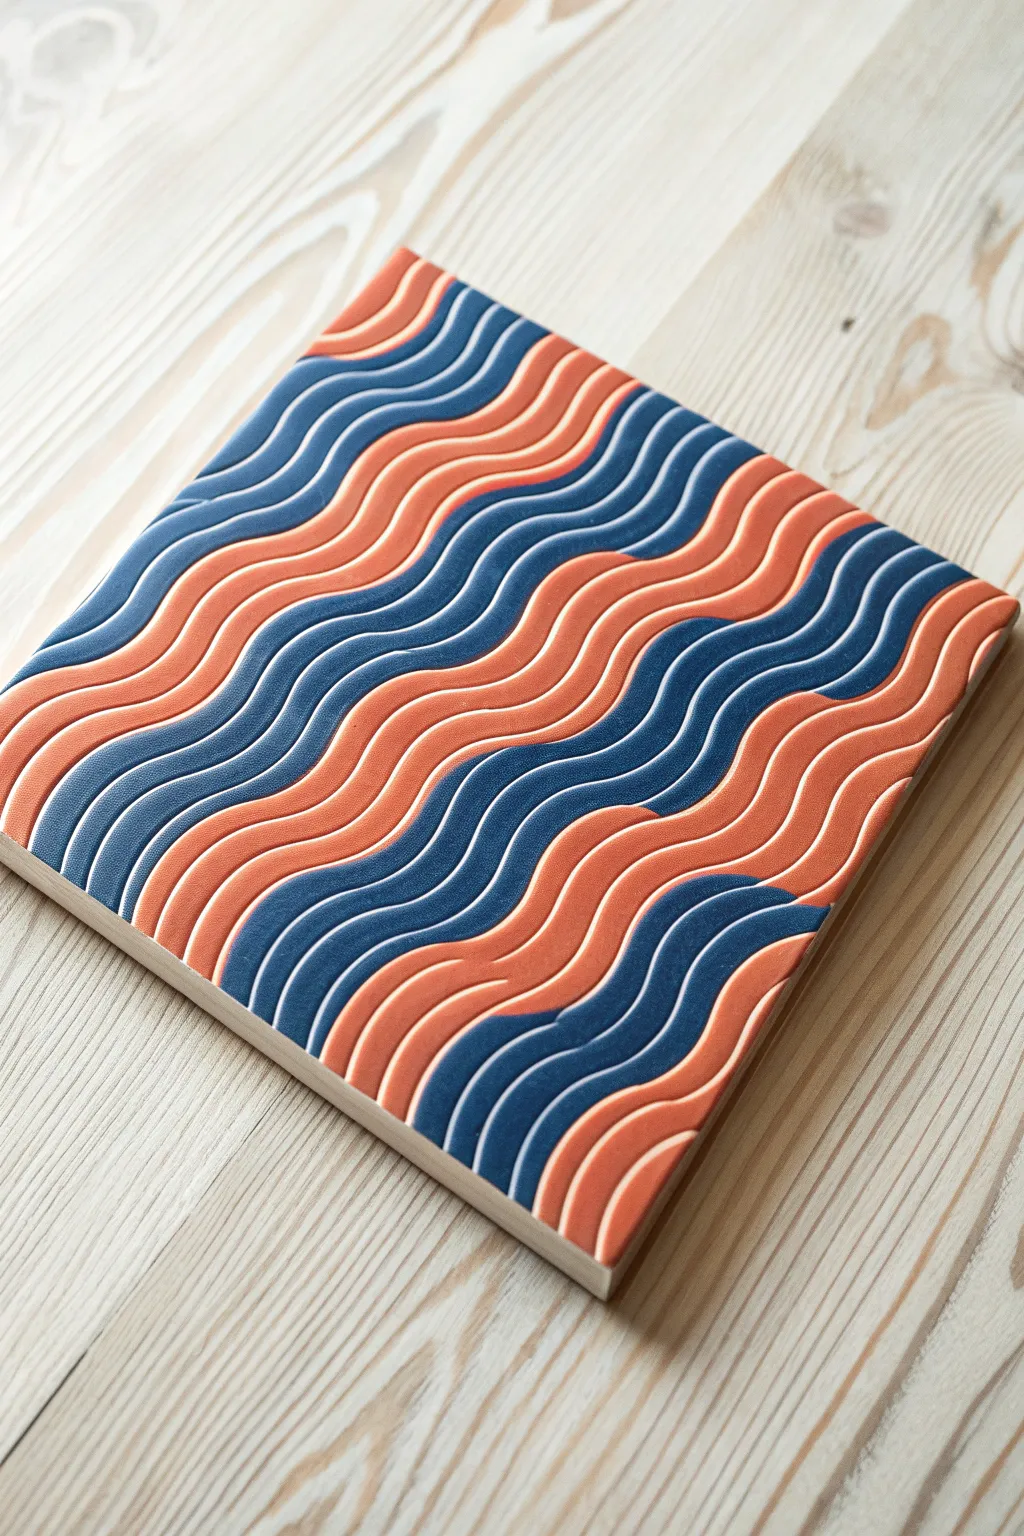
This mesmerizing project transforms a simple wooden panel into a tactile ocean of deep blues and earthy terracotta tones. By manipulating thick molding paste with a notched trowel, you creates distinct, raised waves that catch the light beautifully.
Step-by-Step Tutorial
Materials
- Square plywood panel or wooden cradled board (approx. 10×10 or 12×12 inches)
- Acrylic heavy body paints (Navy Blue/Prussian Blue, Terracotta/Burnt Sienna)
- Acrylic molding paste or heavy gel medium (matte finish)
- Notched trowel or wide decorating comb (fine to medium teeth)
- Wide flat brush (2-inch)
- Palette knife
- Painter’s tape
- Sandpaper (fine grit)
- Mixing cups or disposable palette
Step 1: Preparation and Base
-
Prepare the surface:
Begin by sanding your plywood panel lightly to ensure a smooth, splinter-free surface. Wipe away any dust with a tack cloth or slightly damp rag. -
Apply a primer coat:
Using your wide flat brush, apply a thin, even coat of white gesso or a neutral base color to seal the wood. Let this dry completely before moving on. -
Mask the edges:
If you want to keep the raw plywood look on the sides as shown in the photo, careful mask off the edges of the panel with painter’s tape. Press down firmly to prevent bleed-under.
Sticky Situation?
If the paste drags or tears rather than forming smooth ridges, lightly mist the surface with water before combing. This lubricates the tool for a cleaner glide.
Step 2: Creating the Texture
-
Mix the texture medium:
In a mixing cup, combine a generous amount of molding paste with your Navy Blue acrylic paint. You want a ratio of about 70% paste to 30% paint to maintain the thick structure. Mix until the color is uniform. -
Mix the second color:
Repeat the mixing process in a separate cup for the Terracotta color. Ensure the consistency matches the blue mixture perfectly so they dry at the same rate. -
Apply the paste:
Using a palette knife, scoop the blue mixture onto the panel. Spread it roughly across the surface, but don’t worry about smoothness yet. -
Blend the zones:
Scoop the Terracotta mixture onto the panel in alternating areas or simply next to the blue. I like to lay them down in thick horizontal bands initially, knowing they will be manipulated. -
Level the surface:
Use the flat edge of your trowel or a large palette knife to spread the two pastes across the entire board. You want a thick layer (about 1/8 to 1/4 inch deep) covering every inch of the top face.
Step 3: Combing the Pattern
-
Position the comb:
Ideally, you want a notched tool that is wider than your canvas so you can do this in one pass. Position the notched edge at the very top of the panel. -
Practice the motion:
Before committing to the wet paste, practice the wrist motion found in the wave pattern in the air. It’s a consistent, gentle S-curve movement. -
Create the waves:
Starting at the top edge, drag the comb down through the wet paste. As you pull downward, gently oscillate your hand left and right to create the wavy ridges. -
Maintain pressure:
Keep consistent downward pressure as you drag. If you press too hard, you’ll scrape to the wood; too light, and the ridges won’t be defined. Aim for the middle ground. -
Review the pattern:
Check your work immediately. If the waves aren’t crisp or the colors didn’t interact how you hoped, simply smooth the paste flat with your knife and re-comb. The open time of molding paste is generous. -
Clean the edges:
Once satisfied with the wave pattern, use a clean palette knife to swipe away any thick globs of paste hanging over the taped edges.
Clean Comb Hack
Wipe your combing tool clean after every single pass if you are doing multiple rows. Buildup on the teeth ruins the definition of subsequent waves.
Step 4: Finishing
-
Initial drying:
Let the panel sit undisturbed in a dust-free area. Because the paste is thick, the surface may dry while the center remains soft. -
Remove the tape:
Carefully peel away the painter’s tape while the paste is still slightly pliable (after about 30-60 minutes). This prevents the dried acrylic skin from ripping later. -
Full cure:
Allow the piece to cure fully for at least 24 to 48 hours. The thicker ridges need time to harden completely before handling. -
Seal the surface:
Once bone dry, apply a spray varnish (matte or satin) to protect the intricate ridges from dust accumulation without filling them in.
This tactile art piece brings a sophisticated, modern energy to any wall it graces
BRUSH GUIDE
The Right Brush for Every Stroke
From clean lines to bold texture — master brush choice, stroke control, and essential techniques.
Explore the Full Guide
Sgraffito Reveal With Bold Underpainting
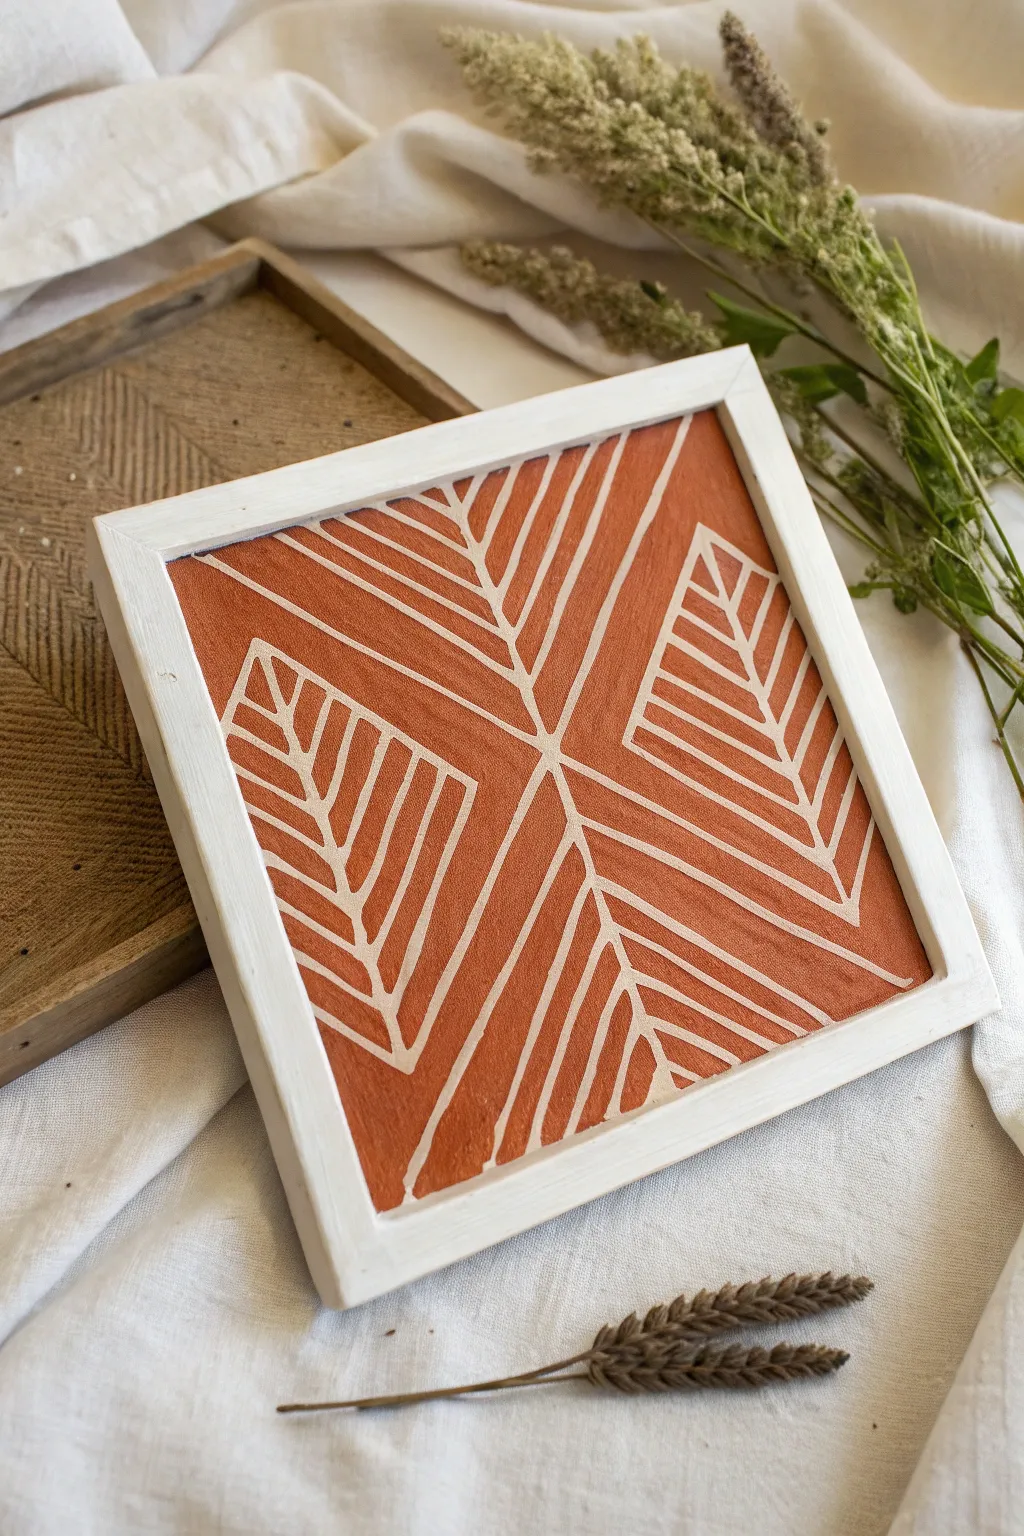
Embrace the earthy warmth of terracotta tones with this satisfying sgraffito project. By scratching intricate geometric lines through a layer of wet paint, you’ll reveal the bright white canvas beneath to create a striking, modern botanical-inspired design.
Step-by-Step Guide
Materials
- Small square canvas or wood panel (approx. 8×8 inches)
- White acrylic paint or white gesso
- Terracotta or burnt orange acrylic paint
- Flat paintbrush (1-inch width)
- Stylus tool, empty ballpoint pen, or a pointed palette knife
- Ruler (optional)
- Wooden floating frame (square)
- Glue or small nails (for framing)
Step 1: Base Preparation
-
Prime the surface:
Begin by applying a solid coat of white acrylic paint or white gesso to your square canvas or panel. This acts as your ‘reveal’ layer, so ensure it is bright and opaque. -
Let it dry completely:
Allow this white base layer to dry thoroughly. It must be rock hard before you proceed to the next step, or you risk dragging the white paint up with your top coat later. -
Mix your top color:
While the base dries, prepare your terracotta hue. If you don’t have a premixed tube, combine burnt sienna with a touch of red oxide and a dab of white to get that creamy, clay-pot color.
Clean Line Tip
Keep a damp cloth nearby to wipe your scratching tool every 3-4 strokes. Accumulated paint on the tip causes jagged, messy lines instead of crisp reveals.
Step 2: Painting and Sgraffito
-
Apply the top coat:
Using your flat brush, paint a generous, even layer of the terracotta paint over the dried white base. You want the coverage to be thick enough to hide the white, but not so thick that it drips. -
Wait for the ‘sweet spot’:
This is crucial: don’t start scratching immediately. Let the paint sit for just a minute or two until it starts to feel slightly tacky but is still wet underneath. I generally test a tiny corner first. -
Mark the center:
Using your scratching tool (like a dull pencil or stylus), gently mark a vertical line down the center and a horizontal line across the middle to divide the canvas into four equal quadrants. -
Draw the main diagonals:
Starting from the center intersection, scratch diagonal lines extending outward toward the four corners. This creates the ‘X’ shape that anchors the design. -
Create the diamond outline:
In the left and right quadrants, scratch lines to form the outer edges of the large diamond shapes. Keep your pressure firm enough to scrape paint away but gentle enough to avoid gouging the canvas. -
Fill the top chevron:
Moving to the top quadrant, scratch a series of inverted ‘V’ shapes or chevrons that nest inside each other, following the angle of your initial diagonal lines. -
Mirror the bottom chevron:
Repeat this pattern in the bottom quadrant, scratching upright ‘V’ shapes that mirror the top section exactly. Aim for consistent spacing between your lines. -
Detail the side diamonds:
For the left and right diamond shapes, fill the interiors with lines that run perpendicular to the main X diagonals. This creates a leaf-vein effect. -
Refine the lines:
Wipe the tip of your tool frequently on a paper towel to prevent paint buildup, which can make your lines messy. Go back over any lines that look too thin to ensure the white pops through clearly. -
Clean up the edges:
If paint has pooled at the very edges of the canvas, gently scrape it away or smooth it out carefully so the geometric pattern extends fully to the border.
Step 3: Finishing and Framing
-
Final drying time:
Allow the carved painting to dry completely. Since the paint layer might be slightly thicker than usual, give it at least 24 hours to cure. -
Prepare the frame:
Take your wooden floating frame and ensure it is clean. You can leave it raw for a natural look or paint it white to match the revealed lines. -
Mount artwork:
Place your dry panel into the frame. Secure it from the back using strong craft glue or small nails, depending on the depth of your frame. -
Dust off debris:
Once mounted, use a soft, dry brush to gently whisk away any dried paint crumbs or ‘burrs’ created during the scratching process.
Try Metallic Underlayers
Swap the white base coat for gold or copper leaf. When you scratch through the matte terracotta paint, you’ll reveal shimmering metallic lines for a luxe look.
Now you have a piece of textured geometric art that brings a warm, organic touch to any wall


Have a question or want to share your own experience? I'd love to hear from you in the comments below!