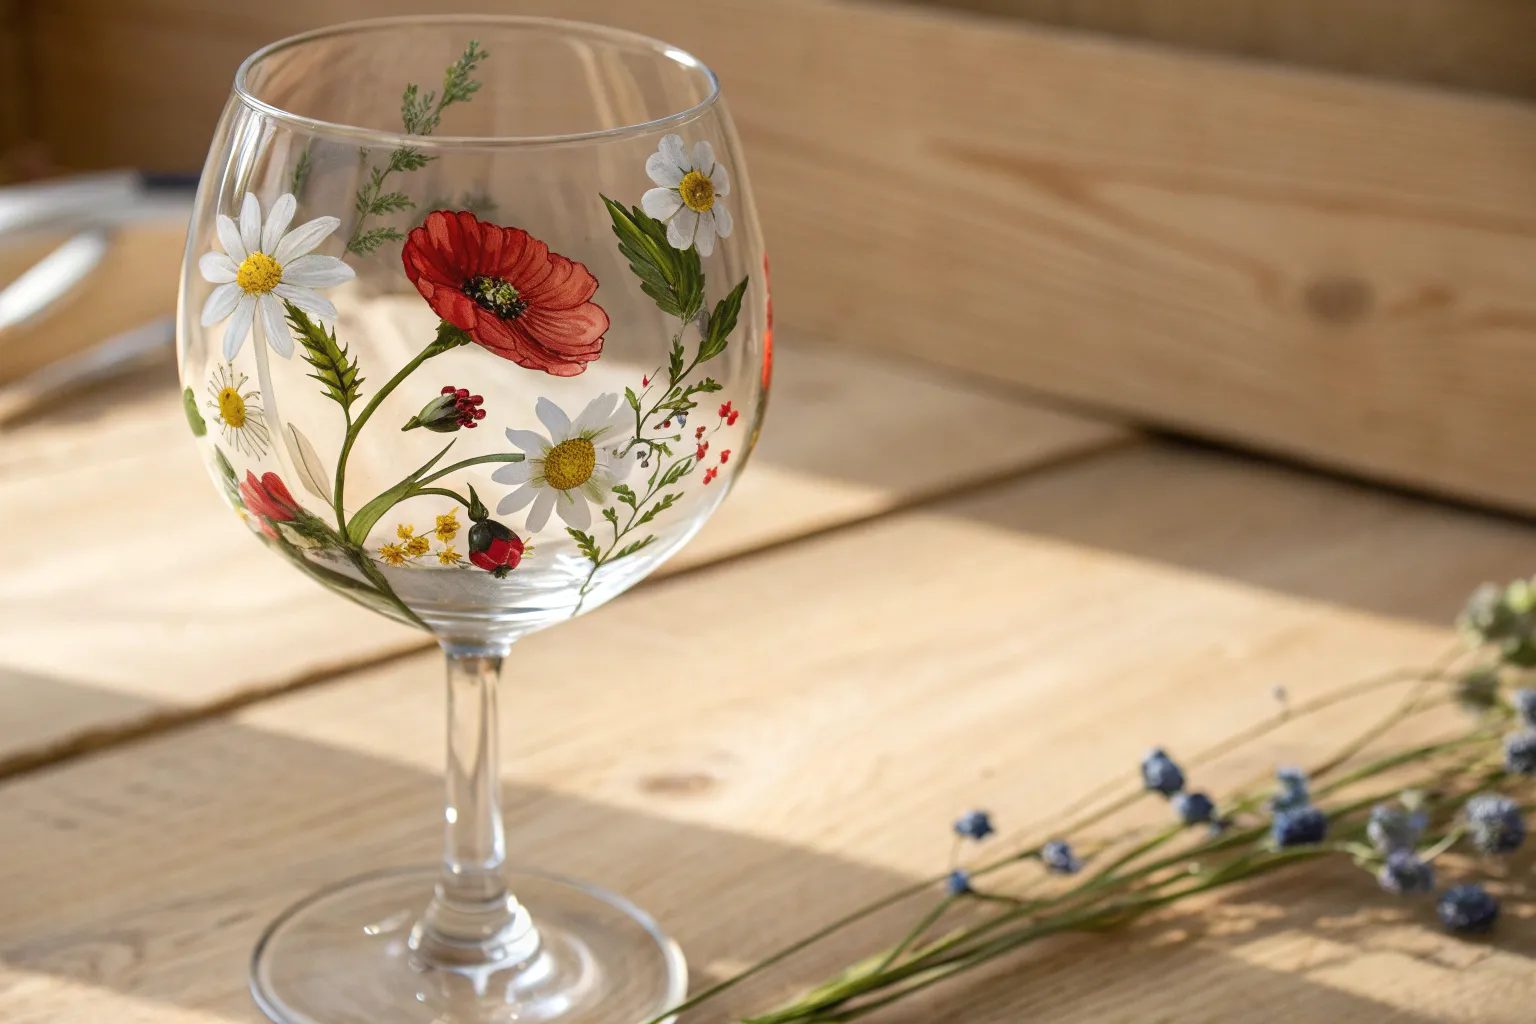
There’s something extra satisfying about painting flowers on wine glasses—the curves make every petal feel a little more alive. I’m sharing my favorite wine glass painting ideas that start super classic and slowly drift into the fun, unexpected floral stuff.
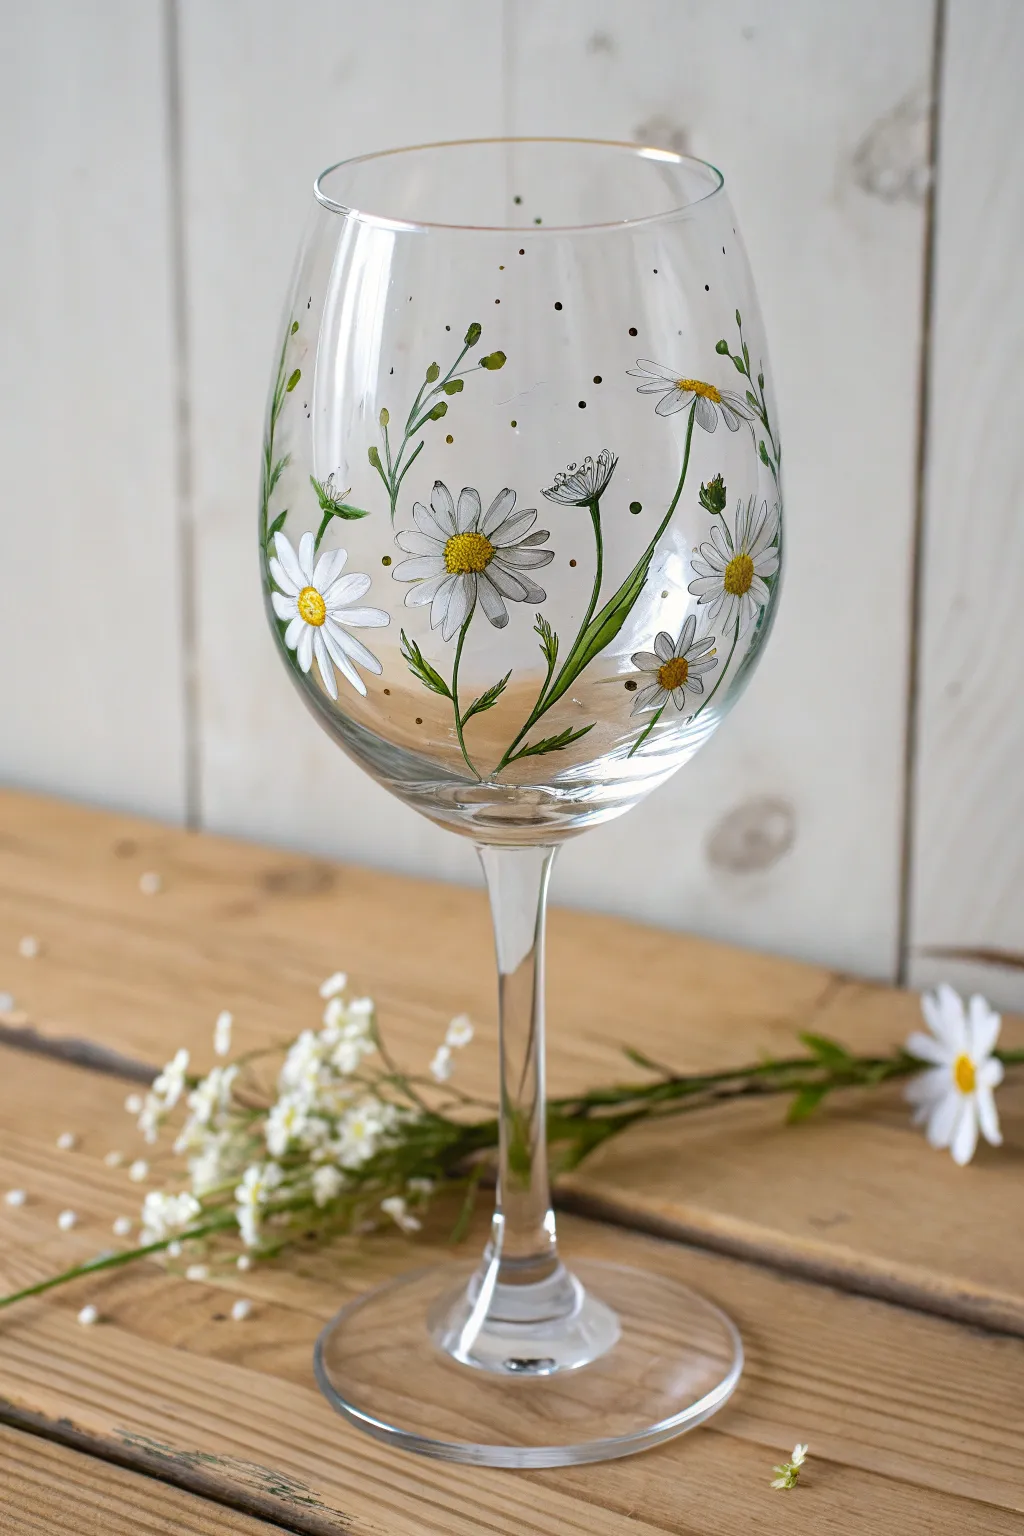
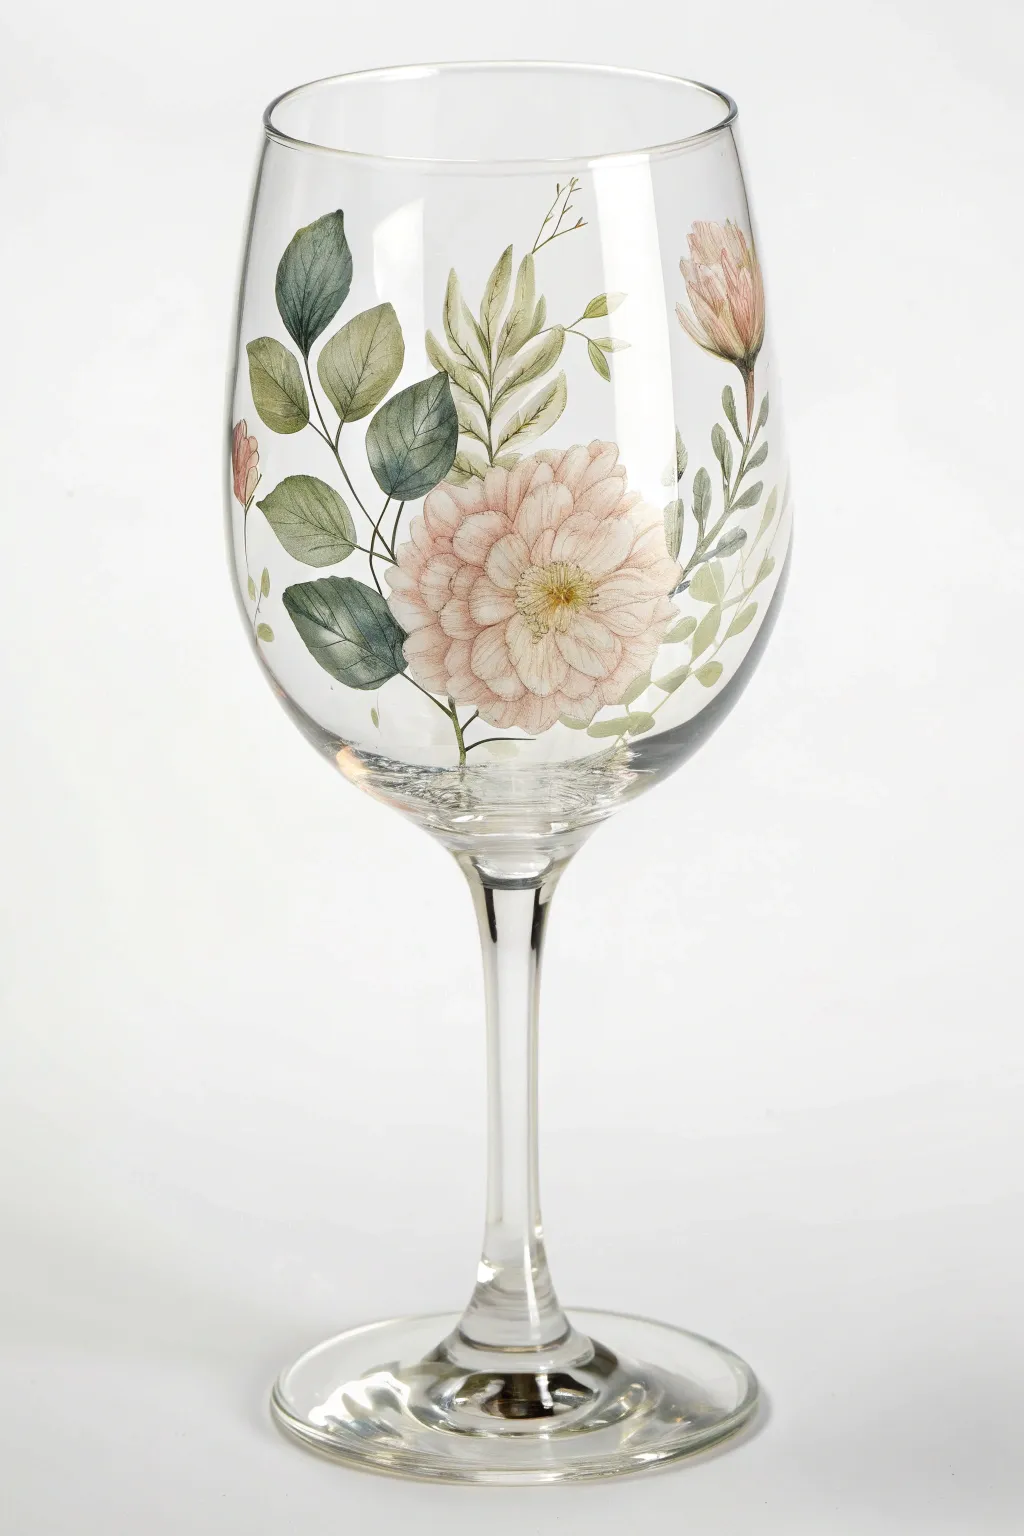
Classic White Daisies Around the Bowl
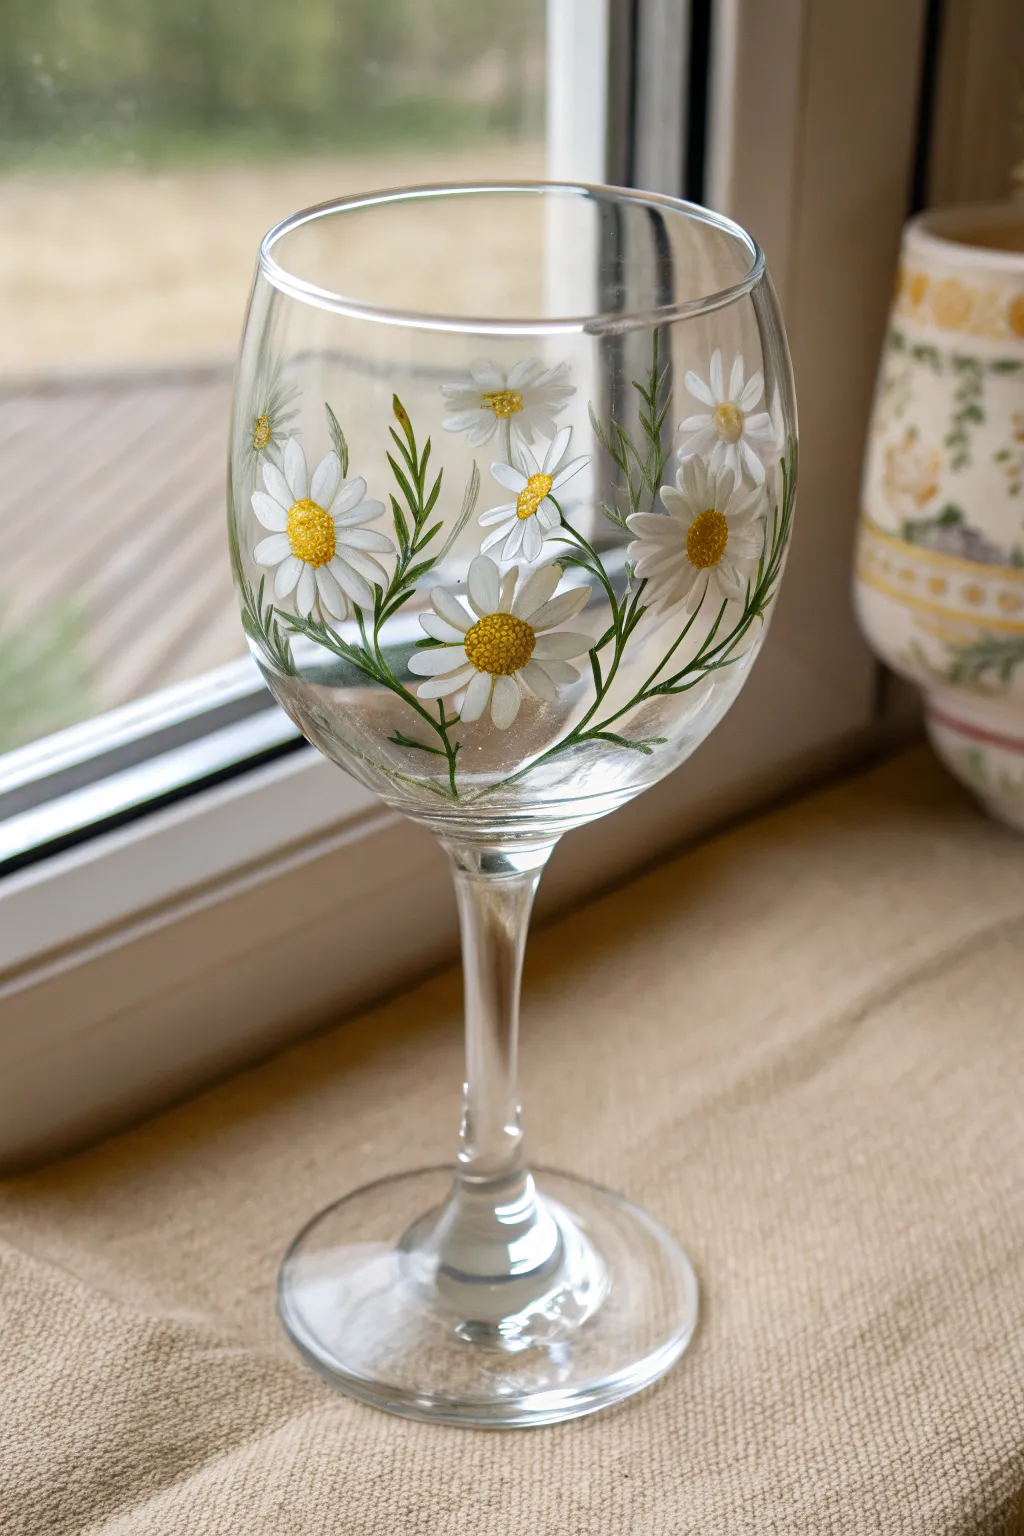
Transform a plain wine glass into a charming garden scene with these incredibly lifelike painted daisies. The design features a delicate interplay of opaque white petals, textured yellow centers, and sweeping greenery that wraps naturally around the bowl.
Step-by-Step Tutorial
Materials
- Clear stemmed wine glass
- Rubbing alcohol and cotton pads
- Enamel glass paint (opaque white, yellow, dark green, sap green)
- Round synthetic brushes (sizes 0 and 2)
- Small detail brush or liner brush (size 00)
- Stippling sponge or small dotting tool
- Palette or paper plate
- Oven (for curing, if required by paint manufacturing)
Step 1: Preparation & Layout
-
Clean the Surface:
Before dipping your brush, thoroughly wipe down the outside of the wine glass with rubbing alcohol and a cotton pad. This removes invisible oils and fingerprints that prevent paint adhesion. -
Plan Composition:
Visualize where your main flower clusters will sit. Aim for three to five main daisies spaced unevenly around the bowl’s equator, with stems flowing downward toward the stem of the glass.
Keeping It Crisp
Keep a paper towel handy to wipe your brush frequently. Glass is slippery, and paint buildup on the bristles leads to messy, thick blobs rather than crisp petal edges.
Step 2: Painting the Foliage
-
Mix Green Shades:
On your palette, place a drop of dark green and a drop of sap green. Lightly blend them but don’t mix fully; picking up both colors at once adds natural variation to leaves. -
Paint Stems:
Using your size 00 liner brush, paint thin, curving stems starting from the base of the bowl and reaching upwards. Let them cross over each other slightly for a wild, organic look. -
Add Base Leaves:
Switch to the size 0 round brush. Press down near the stem and lift as you pull away to create tapered, needle-like leaves similar to rosemary or cosmos foliage. -
Layering Greenery:
Add smaller sprigs branching off the main stems. Keep the strokes fluid and quick to maintain a natural appearance. -
Initial Dry Time:
Let this greenery layer dry to the touch (usually 15-20 minutes) so you don’t smudge the green paint when adding the flowers.
Step 3: Creating the Daisies
-
Base Petals:
Load your size 2 round brush with opaque white enamel. Press the brush belly down onto the glass for the center of the petal and drag it inward toward an imaginary center point, lifting at the end. -
Petal Arrangement:
Paint 12-15 petals for each main flower. Vary the length slightly and allow some petals to overlap the green stems you painted earlier. -
Add Side Blooms:
For flowers that are facing sideways or away, paint shorter, more clustered petals in a fan shape rather than a full circle. -
Refining Opacity:
Glass paint can be translucent. If the white looks streaky, let the first layer dry completely, then carefully paint a second layer of white over the exact same petals to brighten them. -
Petal Details:
Using a very tiny amount of grey or diluted blue mixed with white, add extremely faint shadow lines near the base of the petals where they meet the center, giving the flower depth.
Morning Dew Effect
Use a toothpick to place tiny dots of clear gloss medium or transparent glass paint on a few petals or leaves. It creates a permanent raised ‘dew drop’ effect.
Step 4: Centers & Finishing Touches
-
Yellow Base:
Dip a small round brush into yellow paint and create a solid oval or circle in the center of your dry white petals. -
Texturing the Centers:
I like to use a small dotting, a toothpick, or a stippling sponge here. While the yellow is wet, dab small dots of a darker yellow-orange or light brown along the bottom edge of the center to create a 3D, pollen-like texture. -
Highlighting Centers:
Add a tiny speck of white or pale yellow to the top left of the flower center to simulate a light reflection. -
Cleanup:
If you made any mistakes or stray marks, use a cotton swab dipped in rubbing alcohol to wipe them away before the paint cures. -
Curing:
Follow the instructions on your specific bottle of enamel paint. Most require air drying for 21 days or baking in a cool oven that heats up to 350°F (176°C) for 30 minutes to make the design dishwasher safe.
Now you have a beautiful piece of functional art ready for your next spring gathering


Wildflower Meadow at the Base
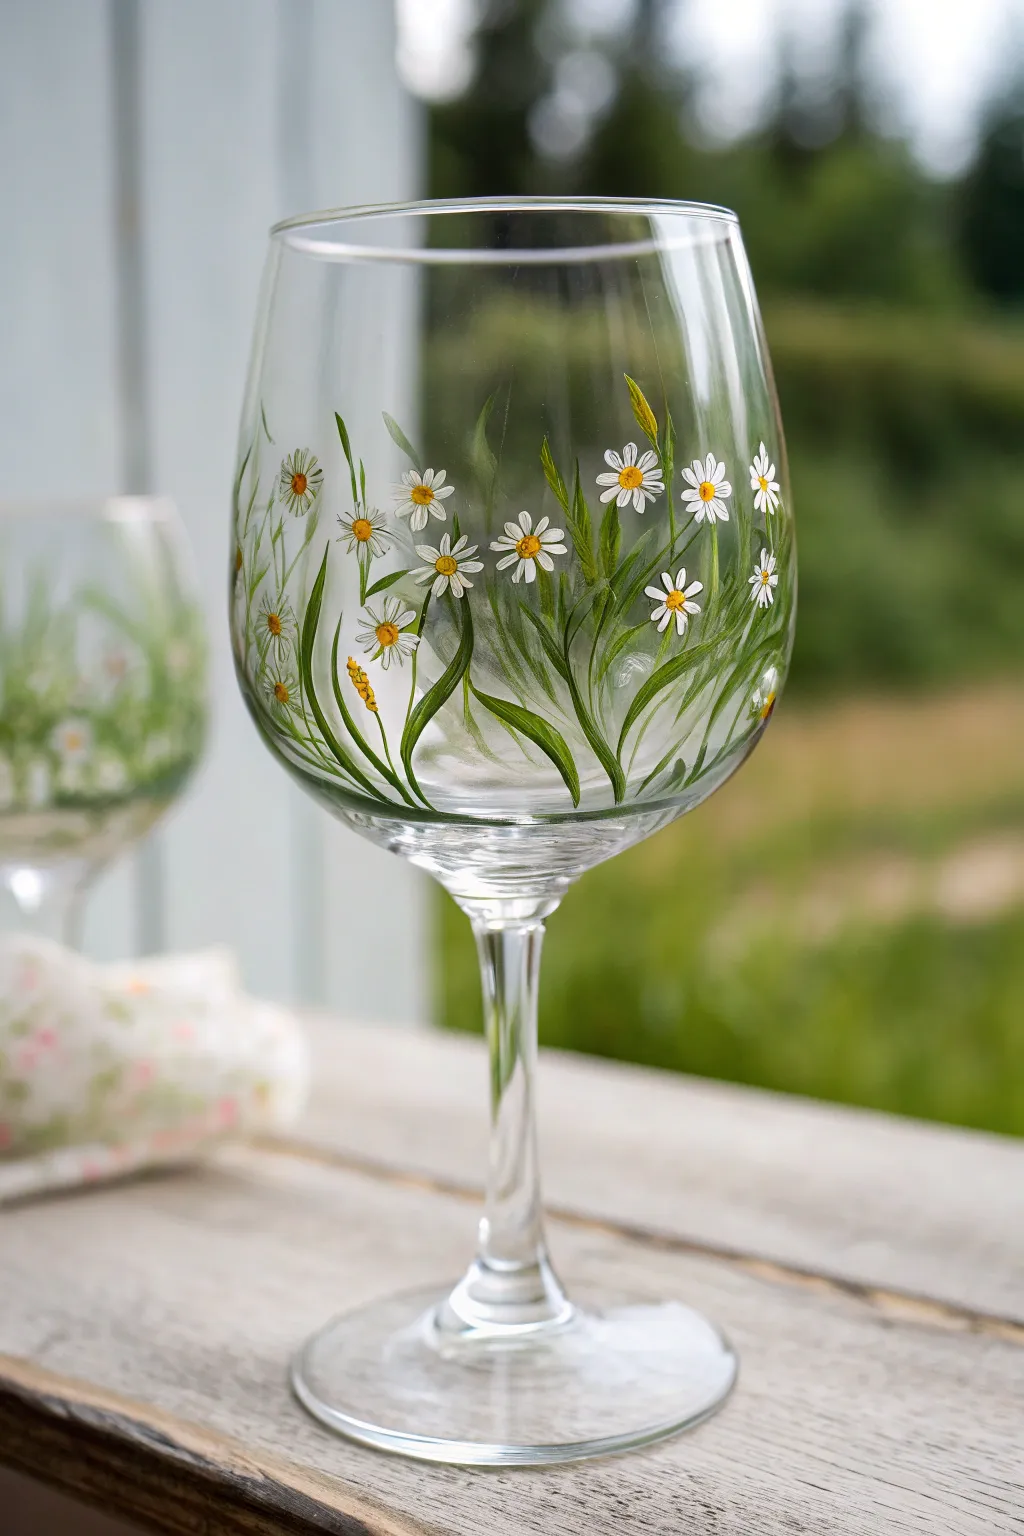
Transform a plain wine glass into a delicate garden keepsake with this wildflower meadow design. The artwork features charming daisies and sweeping blades of grass that appear to grow organically from the stem, perfect for summer sipping or gifting.
Step-by-Step
Materials
- Large clear wine glass
- Rubbing alcohol
- Cotton pads
- Enamel glass paints (Opaque White, bright Yellow, Sap Green, Olive Green)
- Fine liner brush (size 00 or 000)
- Small round brush (size 1)
- Dotting tool or toothpick
- Palette or small plate
- Oven (for curing, optional depending on paint brand)
Step 1: Preparation and Base Grassy Layer
-
Clean the Surface:
Before putting brush to glass, thoroughly wipe down the exterior of the wine glass bowl with rubbing alcohol and a cotton pad. This removes oils and fingerprints that could prevent the paint from adhering properly. -
Load Your Palette:
Squeeze out small amounts of both green shades (Sap and Olive) onto your palette. I like to keep them separate but close enough to mix a mid-tone green if needed for variety. -
Start the Long Grasses:
Using your fine liner brush loaded with Olive Green, paint long, sweeping strokes starting from the very bottom curve of the bowl, pulling upwards. Vary the lengths, making some quite tall (reaching mid-glass) and others shorter. -
Add Depth with Lighter Green:
Clean your brush and switch to the lighter Sap Green. Paint additional blades of grass in between the darker ones. Let these strokes cross over the previous layer slightly to create a natural, tangled meadow look. -
Create Leafy Textures:
For variety, paint a few broader leaves near the base using the size 1 round brush. Press down slightly at the start of the stroke and lift up as you drag the brush to create a tapered point. -
Dry the Base Layer:
Allow this initial layer of greenery to dry for about 15-20 minutes. The green needs to be tacky or dry so the white flowers we add next won’t turn muddy.
Brushing Up
Add a drop of water or thinner to your green paint for the grass. A thinner consistency helps the liner brush glide smoothly for longer, uninterrupted blade strokes.
Step 2: Painting the Daisies
-
Plan Flower Placement:
Visualize where you want your blooms. Aim for odd numbers—maybe three large clusters and a few stragglers—placed at different heights among the tall grass blades. -
Paint the Petals:
Dip the fine liner brush into the Opaque White enamel. For each daisy, paint thin tear-drop shapes radiating outward from a central imaginary point. Keep the petals thin and slightly separate. -
Paint Half-Opened Blooms:
To make the meadow realistic, paint some buds or half-opened flowers. Do this by painting just 3 or 4 petals fanning upwards in a ‘V’ shape rather than a full circle. -
Layer the White:
Glass paint can be translucent. If your white looks streaky, let the first coat dry for a few minutes and gently dab a second layer of white over the petals to make them pop. -
Add Yellow Centers:
Once the white petals are dry to the touch, use a dotting tool or the back of a paintbrush dipped in bright Yellow. Place a firm dot in the center of the full daisies. -
Detail the Centers:
For the side-facing or half-open flowers, place a small semi-circle of yellow at the base of the petals where they join the stem.
Buzzing With Life
Bring the scene to life by adding a tiny painted ladybug or bumblebee crawling on one of the leaves or landing on a petal.
Step 3: Final Details and Curing
-
Connect the Blooms:
Use your liner brush with a mix of the greens to paint thin, delicate stems connecting each floating flower head down into the main grassy patch. -
Add Tiny Buds:
Using the tip of a toothpick, add tiny white dots at the tips of the tallest grass blades to represent seeds or distant buds. -
Create Highlights:
Mix a tiny bit of yellow into your green and add very fine, light highlight strokes on the sunny side of the larger leaves to give them dimension. -
Check for Gaps:
Hold the glass up to the light. If the base looks too sparse, add a few more short grass strokes at the very bottom to ground the composition. -
Cure the Paint:
Follow the instructions on your specific paint bottle. Most enamels require air drying for 21 days or baking in a cool oven (usually 350°F for 30 mins) to become dishwasher safe.
Enjoy using your new garden-themed glassware for your next outdoor brunch or quiet evening in


Stem-as-Stem Sunflower Design
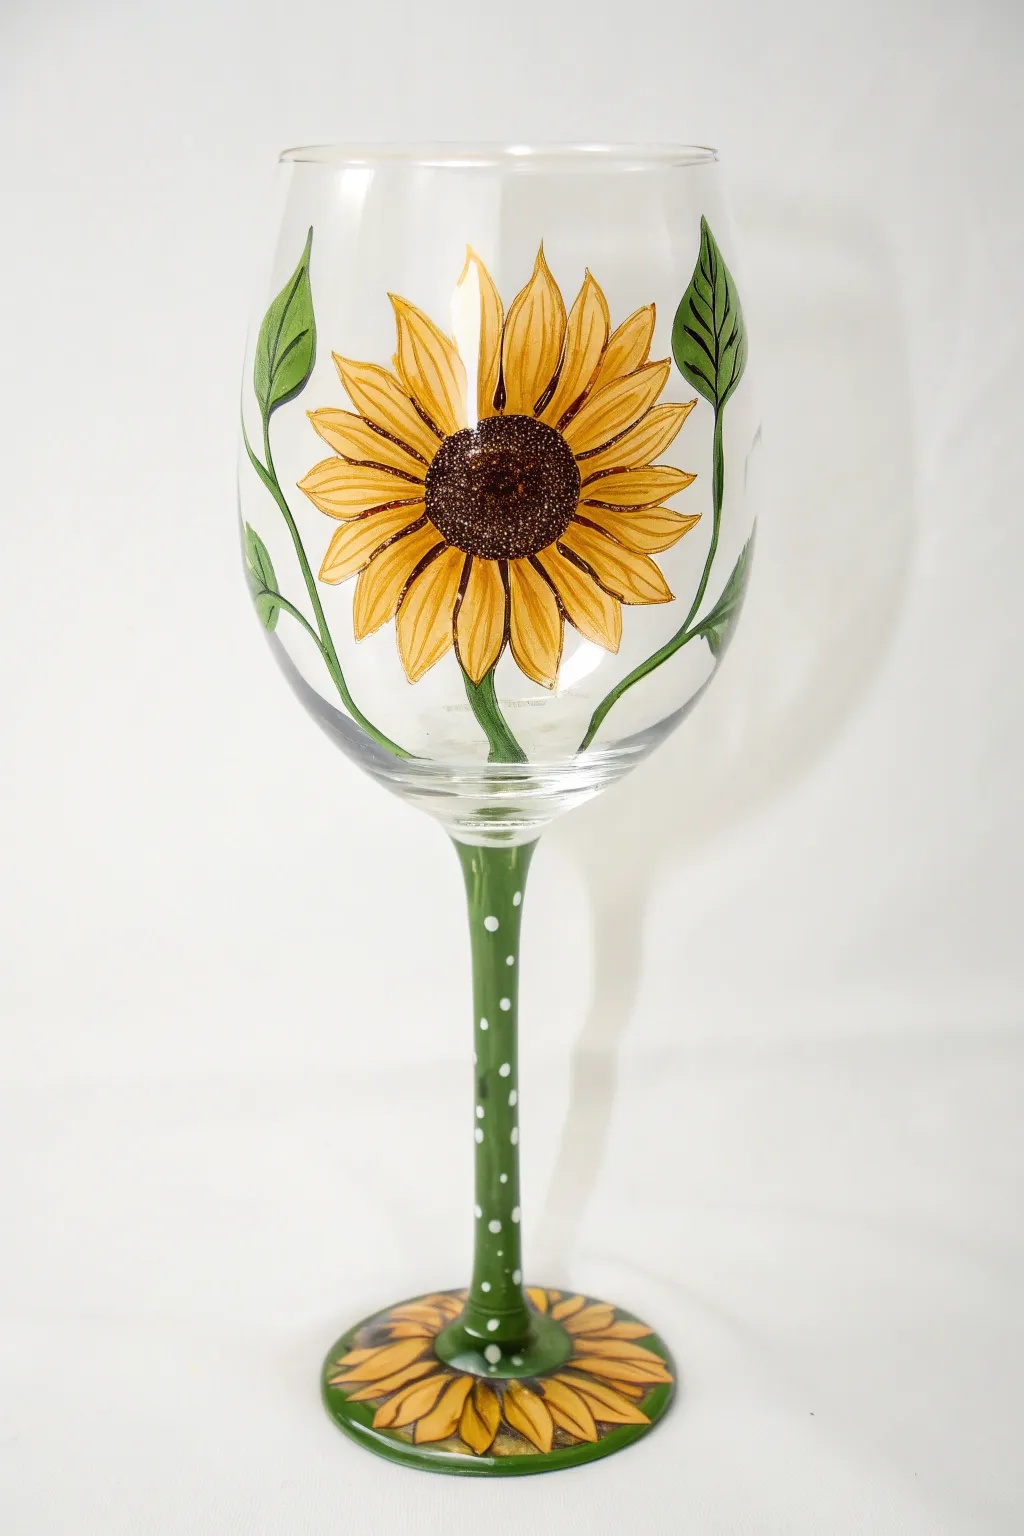
Transform a simple wine glass into a blooming garden with this clever design that uses the glass’s actual stem as the flower’s stem. The result is a bold, sunny sunflower that stretches elegantly from the base to the bowl, perfect for summer sipping.
Step-by-Step Guide
Materials
- White or pinot grigio wine glass (thoroughly cleaned with rubbing alcohol)
- Enamel glass paints: Golden yellow, sunflower yellow, dark brown, leaf green, white
- Fine liner brush (size 00 or 0)
- Small round brush (size 2 or 3)
- Flat shader brush (small)
- Rubbing alcohol and cotton pads
- Paper plate or painting palette
- Small painting sponge (optional)
- Oven (for curing)
Step 1: Painting the Stem and Base
-
Prep the Surface:
Before dipping your brush, wipe down the entire glass surface with rubbing alcohol on a cotton pad to remove any oils or fingerprints. This is crucial for paint adhesion. -
Coat the Stem:
Using your flat brush and leaf green paint, cover the entire stem of the glass. Apply the paint smoothly from the top of the stem down to where it meets the base. You may need two coats for full opacity, allowing the first to dry for about 15 minutes. -
Extend to the Base:
Paint the top surface of the glass base with a mix of green and a touch of brown for contrast, or stick to the solid green. This creates the ‘ground’ for your flower. -
Add Polka Dot Details:
Once the green stem is touch-dry, dip the handle end of a paintbrush into white paint. Gently dot a line of white specks running vertically up the green stem for a whimsical touch. -
Create Base Petals:
On the flat base of the glass, paint large yellow petals radiating outward from the stem connection. Use your round brush to create teardrop shapes, filling the entire base circle to look like a sunflower lying flat.
Fixing Streaky Paint
If your yellow petals look transparent or streaky, don’t keep brushing wet paint. Let the first coat dry completely, then apply a second layer for solid, bright coverage.
Step 2: Blooming the Bowl
-
outline the Center:
On the side of the glass bowl, visualize where the stem connects. slightly above this point, paint a dark brown circle roughly the size of a large coin. This will be the sunflower’s seed center. -
Texture the Center:
While the brown paint is wet, dab it gently with a dry sponge or stipple it with your brush tip to create a rough, seedy texture. Sprinkle a tiny pinch of brown glitter here if you want extra sparkle. -
Paint the First Layer of Petals:
Load your round brush with golden yellow. Start at the edge of the brown circle and pull outward to create the first layer of petals. Press down at the start and lift up as you drag out to create pointy tips. -
Add Dimension with Highlights:
Mix a little white into your yellow paint. While the first petals are still tacky, paint smaller strokes down the center of each petal to give them a sun-kissed look. -
Fill in the Gaps:
Using a slightly darker or orange-yellow shade, paint a second layer of petal tips in the V-shaped gaps between the main petals. This adds depth and makes the flower look full. -
Define the Petals:
Take your fine liner brush and thinned brown paint. Carefully outline the edges of each yellow petal. Keep your hand loose; these lines don’t need to be perfect, just enough to separate the petals visually. -
Add Inner Detail Lines:
With the same liner brush, draw very faint lines from the center of the flower extending midway up the petals. This mimics the natural veins of a sunflower.
Step 3: Connecting the Elements
-
Draw the Connecting Stem:
Using the green paint and a liner brush, paint a stem line extending from the actual glass stem up the side of the bowl until it meets your sunflower head. I find this connects the two parts seamlessly. -
Add Leaves:
Paint two large, almond-shaped leaves branching off the stem on the bowl. Make them swoop upwards to frame the flower. -
Detail the Leaves:
Use a darker green or black paint on your liner brush to draw a central vein down each leaf. Add tiny V-shapes branching off the central vein. -
Final Cleanup:
Look over your design. Use a toothpick or a cotton swab dampened with alcohol to clean up any smudges or sharpen any blurry edges. -
Cure the Glass:
Allow the glass to air dry for at least one hour (or up to 24 hours depending on paint brand). Place the glass in a cool oven, set to 350°F (175°C), and bake for 30 minutes. Turn off the oven and let it cool completely inside.
Level Up: Glitter Center
For a textured, realistic center, tap dark brown glitter into the wet brown paint of the sunflower’s middle before it dries for a 3D seed effect.
Once baked and cooled, your radiant sunflower glass is ready for your next garden party or quiet evening on the porch


Lavender Sprigs With Loose Brushstrokes
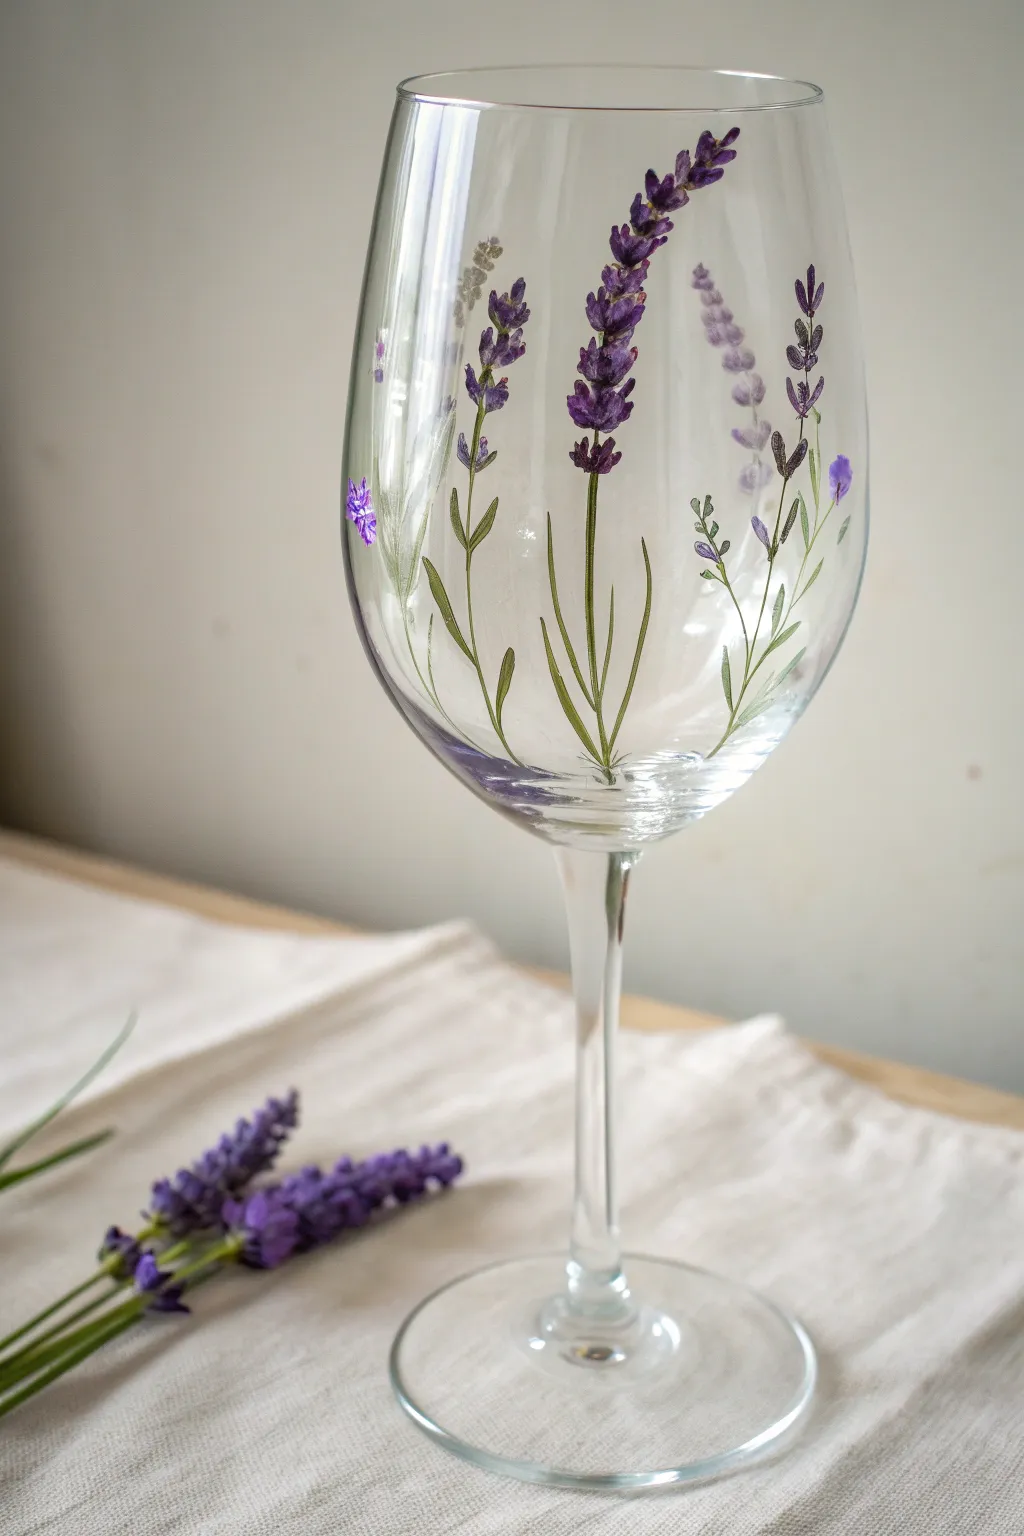
Transform a simple clear wine glass into a pastoral piece of art with these delicate, hand-painted lavender sprigs. The result is an elegant, botanical design that looks beautiful whether filled with white wine or displayed on a shelf.
How-To Guide
Materials
- Clear wine glass (washed and dried)
- Rubbing alcohol
- Cotton pads or paper towel
- Enamel glass paint (opaque purple)
- Enamel glass paint (dark violet or deep blue-purple)
- Enamel glass paint (olive green)
- Enamel glass paint (white – for mixing)
- Fine liner brush (size 0 or 00)
- Small round brush (size 1 or 2)
- Palette or small dish
- Oven (for curing, if required by paint manufacturing)
Step 1: Preparation & Stems
-
Clean the surface:
Before you start painting, it is crucial to remove any oils or fingerprints from the glass. Wipe the entire exterior surface down thoroughly with rubbing alcohol and a cotton pad, then let it air dry completely. -
Mix your greens:
Squeeze out a small amount of olive green enamel paint. To create depth later, mix a tiny bit of white into a separate puddle of green to make a lighter sage shade. -
Paint the first central stem:
Load your fine liner brush with the olive green. Starting from the base of the glass bowl, pull a long, slender line upwards about two-thirds of the way up the glass. Let the line taper off naturally at the top to create a thin tip. -
Add gentle curves:
Paint two or three additional stems around the glass. Instead of making them perfectly straight, give them a slight bow or curve to mimic the natural sway of wildflowers. -
Create branching leaves:
Near the bottom third of your main stems, paint long, thin leaves. Press the liner brush down slightly near the stem to widen the stroke, then lift as you pull outward to create a sharp point. These should angle upwards like real lavender foliage.
Paint sliding down?
Work with very thin layers. If the paint is too thick, gravity will pull it down the slippery glass. Let the first thin coat set for 10 mins before adding more layers.
Step 2: Painting the Blooms
-
Prepare the purples:
On your palette, place your primary opaque purple and the darker violet. I like to keep them separate initially but will mix them slightly on the brush as I work. -
Start the flower spikes:
Switch to your small round brush or continue with the liner if you prefer total control. Dip into the lighter purple first. Starting near the top tip of a green stem, paint small, teardrop-shaped dabs clustered together. -
Build the shape:
Work your way down the stem for about an inch or two. Lavender flowers grow in little whorls, so paint small gaps between clusters of purple dabs rather than a solid block of color. -
Layer in darks:
While the first layer is still slightly wet or tacky, dip the very tip of your brush into the darker violet. Add tiny dots or strokes near the base of the individual flower clusters to add shadow and dimension. -
Add background sprigs:
To create depth, paint a few shorter, fainter stems between your main ones using the lighter sage green mix. These should be thinner and less detailed. -
Paint distant blooms:
For these background stems, use a lighter wash of purple (mix a speck of white if needed) and apply fewer dabs. This makes them look further away compared to the bold foreground stalks. -
Refine the details:
Go back to your main flowers. Using your finest brush, add tiny flicks of white or very pale lavender to the tops of a few floral buds to simulate sunlight catching the petals. -
Check opacity:
Hold the glass up to the light. If the purple looks too translucent, let the first coat dry for about 15-20 minutes, then carefully dab a second layer of paint over the existing blooms.
Step 3: Curing
-
Dry partially:
Allow the glass to sit undisturbed for at least 1 hour until the paint is dry to the touch. Be careful not to smudge the wet paint during this time. -
Clean edges:
If you made any mistakes or have stray paint marks, dampen a Q-tip with rubbing alcohol or water (check your paint type) and carefully wipe them away before the paint fully hardens. -
Full cure time:
Consult your specific enamel paint bottle for curing instructions. Most require air-drying for 21 days or baking in a cool oven. If baking, place the glass in a cold oven, heat to 350°F (176°C) for 30 minutes, then let it cool completely inside the oven.
Pro Tip: Texture
Don’t over-smooth your flower petals. Leaving the paint dabs slightly raised creates a lovely tactile texture that feels real when you hold the glass.
Once cured, your beautiful botanical glassware is ready to be hand-washed and admired at your next dinner party
BRUSH GUIDE
The Right Brush for Every Stroke
From clean lines to bold texture — master brush choice, stroke control, and essential techniques.
Explore the Full Guide
Roses With Layered Petal Swirls
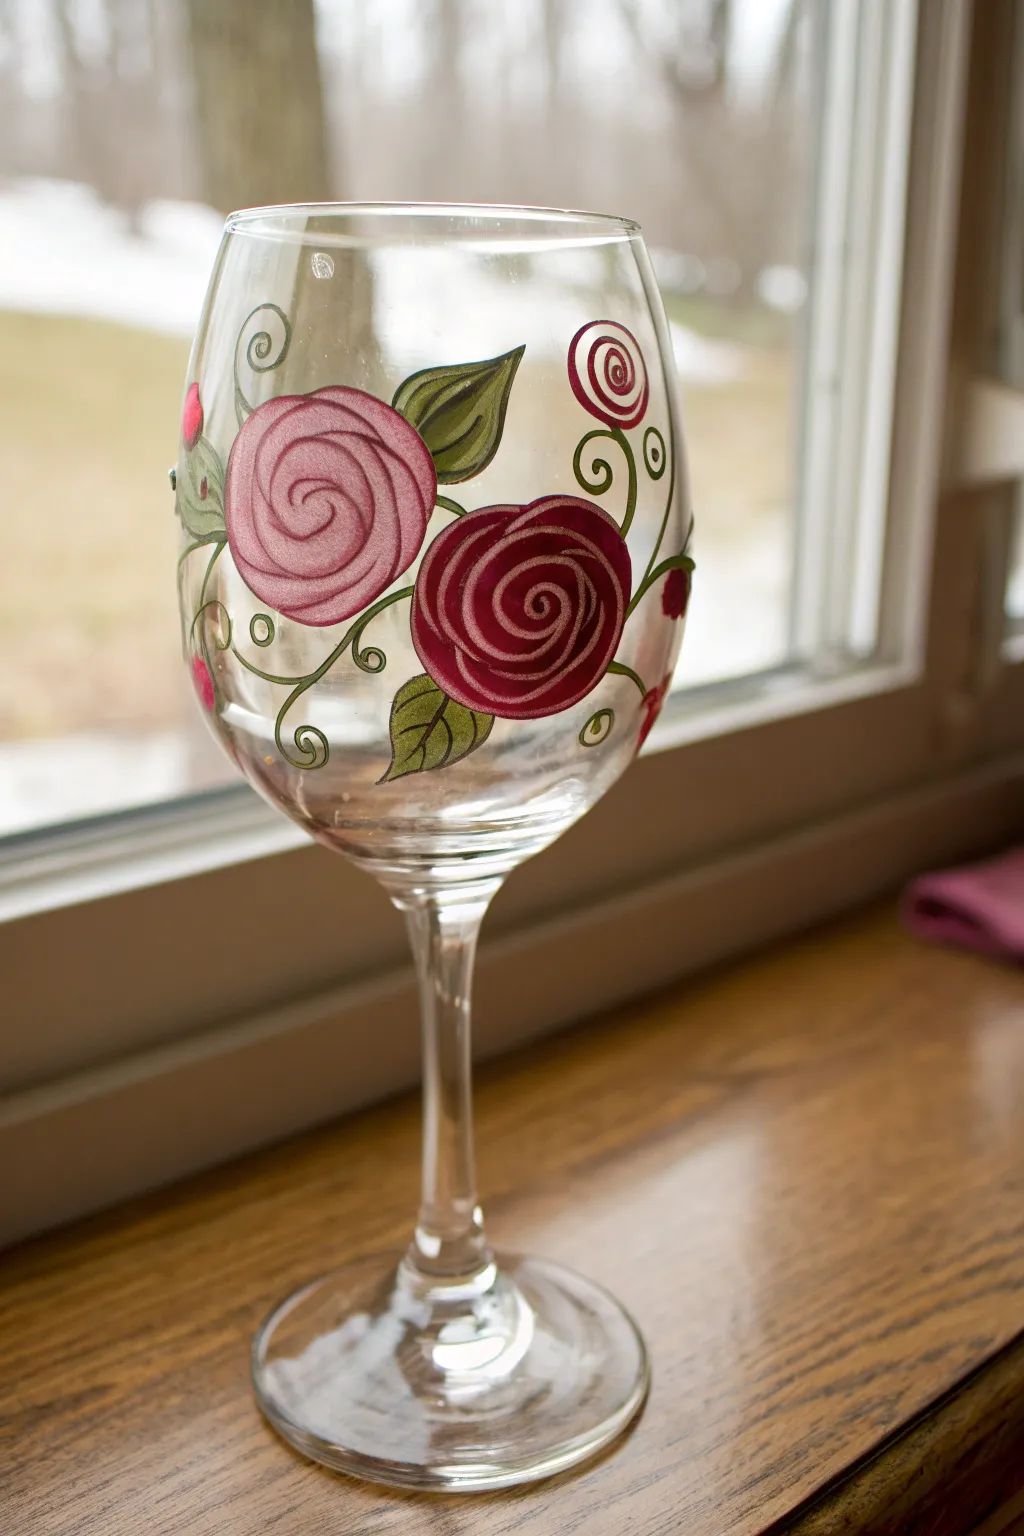
Transform a plain wine glass into a blooming garden with these delightful swirled roses and playful vines. The design features a charming mix of deep red and soft rose-pink flowers accented by olive green leaves, perfect for a personalized gift or elegant home decor.
Step-by-Step
Materials
- Clear wine glass
- Rubbing alcohol
- Cotton pads or paper towel
- Enamel glass paints (Deep Red, Rose Pink, Olive Green, White)
- Fine liner brush (size 0 or 00)
- Round brush (size 2 or 4)
- Palette or small plate
- Oven (for curing, if paint requires)
Step 1: Preparation and Base Shapes
-
Clean the surface:
Begin by thoroughly wiping down the outside of your wine glass with rubbing alcohol and a cotton pad. This removes any oils or fingerprints that could prevent the paint from adhering properly. -
Plan your placement:
Visualize where you want your main flowers to sit. In this design, we place a large pink rose slightly higher and a deep red rose slightly lower for a balanced, asymmetrical look. -
Paint the pink base circle:
Using your round brush, mix a touch of white into your Rose Pink to soften it slightly if needed. Paint a solid, filled circle about an inch in diameter for the upper flower. -
Paint the red base circle:
Clean your brush and switch to the Deep Red paint. Create a similar solid circle slightly below and to the right of your pink one. -
Add bud accents:
Dab a few small, simple circles or teardrop shapes around the perimeter of the glass using both red and pink shades to represent smaller buds. -
Dry the base layer:
Let these base circles dry completely before moving on to the details. This is crucial so your next layer of lines remains crisp and doesn’t blend into the background.
Steady Hand Trick
For smooth vine lines, fill the wine glass with water or rice. The added weight stabilizes the glass, stopping it from rolling or vibrating while you paint delicate details.
Step 2: Adding the Swirl Details
-
Mix the highlight color:
For the pink rose, mix a darker shade of pink or use the Deep Red on your fine liner brush. I find thinning the paint just slightly with a tiny drop of water helps the lines flow better. -
Paint the pink spiral:
Starting from the very center of the dry pink circle, paint a messy, loose spiral moving outward. The lines don’t need to be perfect; slight wobbles make them look more like petals. -
Detail the red rose:
Clean your liner brush and load it with white or a very pale pink. Replicate the same spiral motion on the Deep Red circle, starting from the center and swirling out to the edge to define the petals. -
Add spirals to the buds:
Add tiny little swirl accents to the smaller bud shapes you painted earlier using contrasting colors (red on pink, white on red).
Glitter Glam
Before the paint dries, lightly sprinkle ultra-fine glitter onto the wet centers of the roses. This adds a subtle sparkle that catches the light beautifully when filled with wine.
Step 3: Leaves and Vines
-
Outline the leaves:
Using the liner brush and Olive Green paint, draw simple leaf outlines extending from the sides of your main roses. -
Fill the leaves:
Switch to your round brush to fill in the leaf shapes with the green paint. You don’t need full opacity; a little translucency adds to the stained-glass effect. -
Draw the leaf veins:
Once the green is tacky or dry, use your liner brush with a very dark green (or black mixed with green) to draw a central vein down each leaf and small veins branching off. -
Create the curling vines:
Load your liner brush with the Olive Green again. Anchor your hand on the table for stability and draw long, thin, curling vines that connect the flowers and buds. -
Add the playful accents:
Draw tiny spirals at the ends of some vine tendrils and add small dots along the vines for a whimsical touch. -
Final cure:
Follow the manufacturer’s instructions on your specific brand of enamel paint to cure the glass. This often involves baking it in a cool oven that heats up gradually to set the design permanently.
Now you have a stunning, custom piece of glassware ready for your next dinner party or relaxing evening
Cherry Blossom Branch Crawling Upward
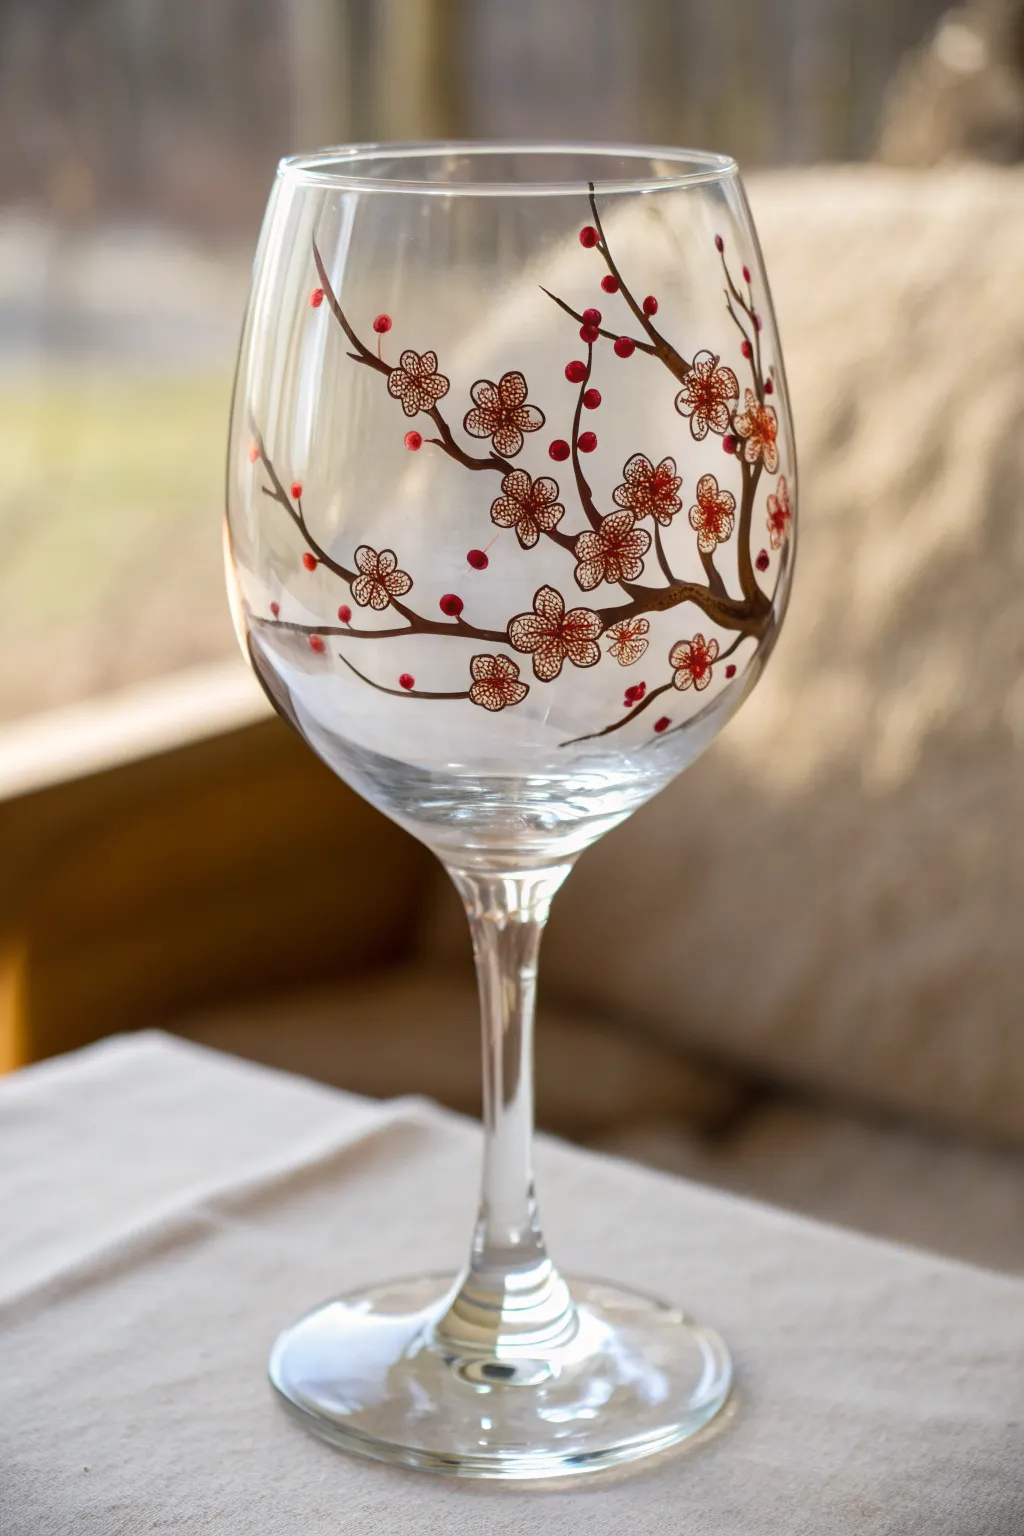
Transform a plain wine glass into an elegant piece of art with this upward-crawling cherry blossom branch design. The intricate metallic outlines and bold red accents create a stunning contrast against the clear glass, perfect for sophisticated sipping.
How-To Guide
Materials
- Clear white wine glass (thoroughly cleaned)
- Rubbing alcohol and cotton pads
- Glass paint outliner/relief paste (Bronze or Metallic Brown)
- Glass paint (Dark Brown for branches)
- Glass paint (Crimson Red for buds/centers)
- Fine detail paintbrush (size 0 or 00)
- Small round paintbrush (size 2)
- Q-tips (for clean up)
- Oven (for curing, check paint instructions)
Step 1: Preparation & Branch Structure
-
Clean surface:
Begin by wiping the entire exterior surface of the wine glass with rubbing alcohol on a cotton pad. This removes oils and fingerprints that prevent paint from adhering properly. -
Plan the main branch:
Visualize a thick branch starting low on the bowl, perhaps curving up from the right side. Using your fine brush and Dark Brown glass paint, draft the main thick anchor line. -
Extend secondary branches:
Paint thinner branches splitting off from the main stem. Let them reach upward and across the glass bowl, tapering them to fine points at the ends. -
Add twig details:
Use the very tip of your detail brush to add tiny, delicate twigs branching off the secondary stems. These will serve as anchor points for your flowers and buds later. -
Initial drying:
Let the brown branch layer dry to the touch (usually 15-20 minutes) before proceeding. I find it helpful to rest the glass upside down to prevent drips while drying.
Steady Hand Trick
Is your hand shaking? Fill the wine glass with a crumpled cloth or socks. This gives you something solid to grip inside the glass while you paint the outside.
Step 2: Painting the Blossoms
-
Outline the first flower:
Select a spot near a branch intersection. Using the Bronze relief paste or outliner tube directly, squeeze gently to draw a five-petal flower shape. -
Detail the petal interiors:
Inside each petal outline, draw a fine mesh or web-like pattern with the outliner. This intricate detail gives the blossoms a lace-like appearance. -
Repeat flower placement:
Continue adding these outlined flowers along the branches. Vary their sizes slightly, placing some in clusters and some solitary near branch tips. -
Add flower centers:
Once the outlines have set slightly, dip your detail brush or a stylus tool into the Crimson Red paint. Place a small, precise dot in the absolute center of each flower. -
Create floating petals:
For a whimsical touch, draw a stray petal or two floating away from the branch on the other side of the glass.
Add Subtle Shimmer
Mix a tiny drop of gold mica powder or shimmer medium into your red paint before dotting the buds. It adds a lovely, subtle sparkle when the light hits.
Step 3: Buds & Finishing Touches
-
Paint berry buds:
Identifiy the tips of the smallest twigs. Using the round end of a paintbrush handle or a dotting tool, dip into Crimson Red and stamp small, solid red dots. -
Cluster the buds:
Add clusters of 2-3 small red dots along the thicker parts of the branch to represent unopened buds waiting to bloom. -
Connect the buds:
Use your finest brush and a tiny amount of Dark Brown to connect any floating red dots back to the main branch with a hairline stem. -
Clean edges:
Inspect your work. If any lines are wobbly, dampen a Q-tip with a tiny bit of rubbing alcohol and gently wipe away the mistake before it cures fully. -
Full cure time:
Allow the glass to air dry for at least 24 hours. Most glass paints require a long initial set time to harden properly. -
Bake to set:
Follow your specific paint manufacturer’s instructions for baking. Typically, place the glass in a cold oven, heat to 325°F (160°C), bake for 30-40 minutes, and let it cool completely inside the oven.
Enjoy your beautiful new custom stemware at your next dinner party or gift it to a friend who loves floral art

PENCIL GUIDE
Understanding Pencil Grades from H to B
From first sketch to finished drawing — learn pencil grades, line control, and shading techniques.
Explore the Full Guide
Tulip Row in a Clean Modern Band
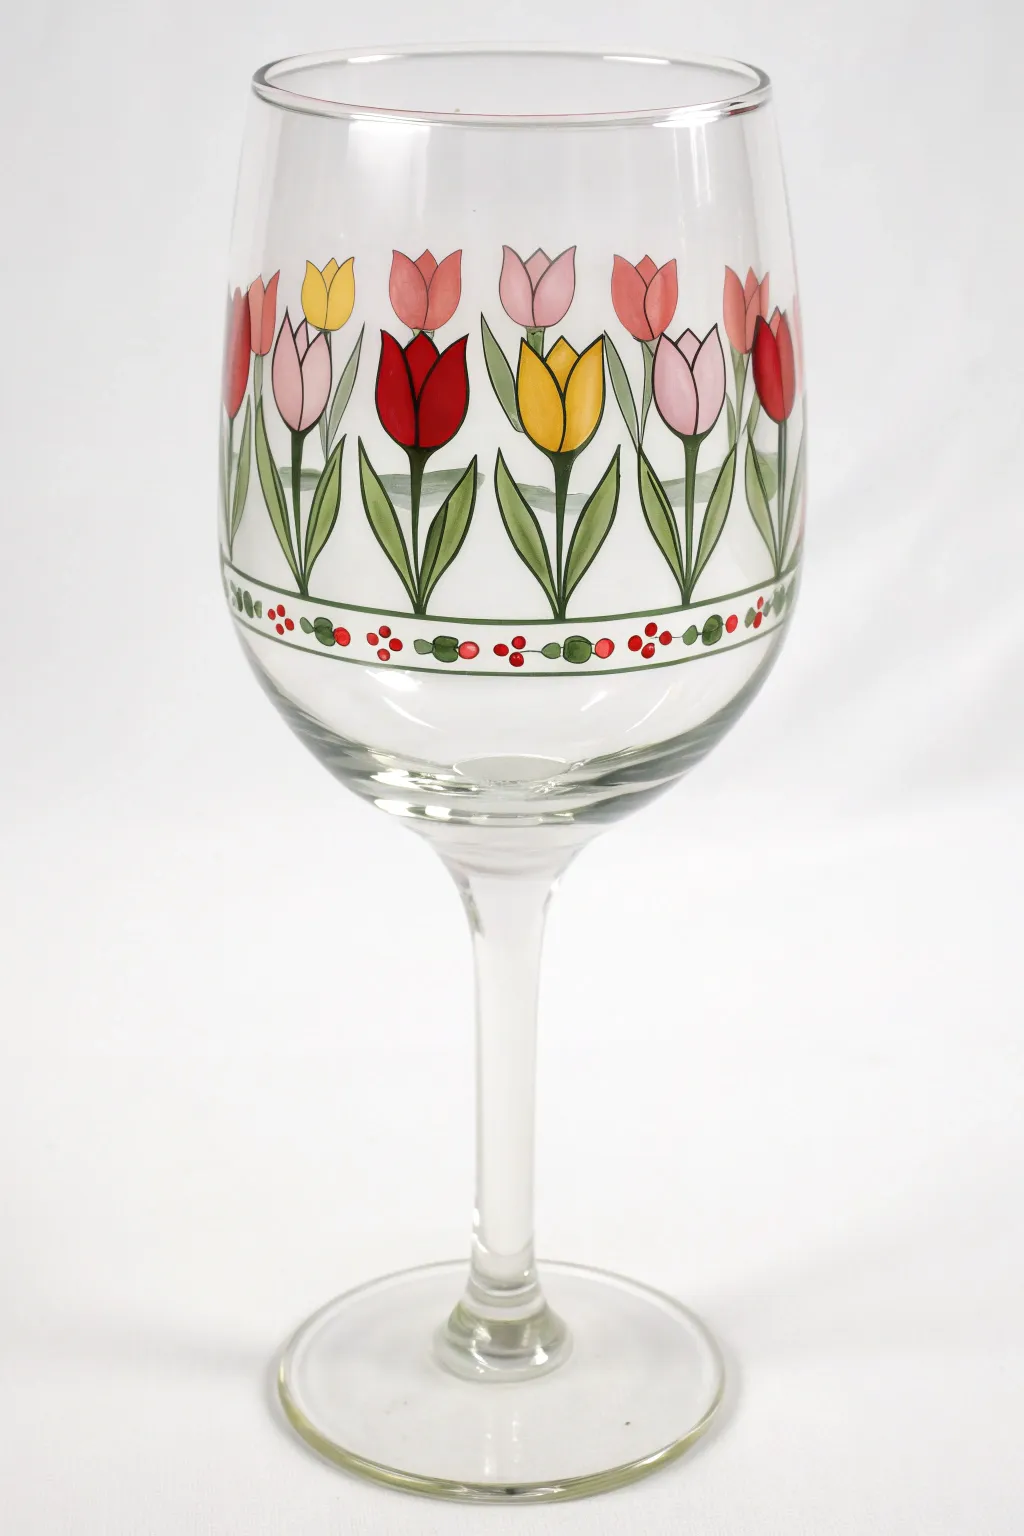
Enhance your stemware collection with this elegant and precise floral design. Featuring a repeating band of stylized tulips in vibrant reds, yellows, and pinks above a delicate garland border, this project brings a touch of spring to your table setting.
Step-by-Step Tutorial
Materials
- Glass wine glass (thoroughly cleaned)
- Rubbing alcohol
- Gloss enamel glass paints (opaque red, yellow, soft pink, dark pink, leaf green)
- Black glass liner paint or fine-tip black oil-based paint marker
- Fine detail paintbrush (size 0 or 00)
- Small round paintbrush (size 2)
- Paper towels
- Palette or small plate
- Painter’s tape or masking tape
- Cotton swabs (for mistakes)
Step 1: Preparation and Guidelines
-
Clean and degrease:
Before starting, wipe the entire surface of the glass with rubbing alcohol on a paper towel. This removes oils and fingerprints that could prevent the paint from adhering properly. -
Mark the bottom guide:
To ensure your design is perfectly straight, apply a strip of painter’s tape horizontally around the bowl of the glass. Position it where you want the bottom decorative border to begin. -
Mark the top guide:
Place a second strip of tape approximately 2.5 inches above the first strip. This defines the height of your main tulip band and keeps all flowers consistent.
Opacity Pro-Tip
Glass paint can often be translucent. To get the solid, bold look shown here, apply a thin coat of white paint first as a primer, let it dry, and then paint your colors on top.
Step 2: Painting the Foliage
-
Outline the main stems:
Using the black liner paint or a paint marker, draw straight vertical lines spaced evenly apart. Since I want a dense pattern, I space these about 1 inch from each other. These will be the center lines for your tulip stems. -
Draw the leaf outlines:
From the base of each vertical stem, draw two long, curving leaves that extend upward and slightly outward, reaching about two-thirds of the way up the stem. Use the black liner for this to create a defined, illustrative look. -
Color blocking the leaves:
Once the black outlines are dry to the touch, load your size 2 brush with leaf green enamel paint. Carefully fill in the leaf shapes, staying within your black lines. -
Adding stem detail:
Trace over the central stem line again with a very thin amount of green paint if you prefer a solid green stem, or leave it as a simple black line for a more graphic style.
Smudged Lines?
If you smudge a black line or paint outside the border, wait for it to dry completely. Once dry, you can easily scratch the mistake off with a craft knife or toothpick without ruining the rest.
Step 3: Creating the Tulips
-
Drafting the flower heads:
At the top of each stem, outline the tulip shape using your black liner. Start with a central U-shape for the main petal, then add two curved lines on either side that meet at the top point to create the classic closed tulip form. -
Fill the primary blooms:
Select your opaque red and yellow paints. Alternating colors as you move around the glass, fill in the main tulip outlines on the prominent foreground stems. -
Painting the background blooms:
Between the main stems, paint smaller flower heads that appear to be ‘behind’ the main row. Use softer shades like pink and light coral for these to create a sense of depth. -
Painting background stems:
Draw very thin, subtle stems connecting these background flowers down toward the main foliage line. You don’t need full leaves for these; simple lines suggest they are tucked behind. -
Refining the edges:
If your color painting obscured any black outlines, go back over them gently with the fine liner to crisp up the edges.
Step 4: The Decorative Border
-
Remove the tape:
Carefully peel away your masking tape guides. Ensure the paint near the tape is dry so you don’t smudge your work. -
Paint the horizontal band:
Draw two thin, parallel horizontal lines in green right below where the stems end. This creates a ‘ground’ or ribbon effect for the flowers to rest on. -
Add the vine details:
Between the two horizontal lines, paint small green oval shapes to represent tiny leaves. Space them out slightly to leave room for the berries. -
Dotting the berries:
Dip the handle end of a paintbrush into red paint. Direct stamp small red dots between the green leaves on the border band. This technique creates perfectly round berries. -
Final drying and curing:
Allow the glass to dry for at least 24 hours. Follow the manufacturer’s instructions on your paint bottle to cure the glass, which usually involves baking it in a cool oven.
Once baked and cooled, your custom glassware is ready to hold your favorite vintage or serve as a stunning handmade gift
Floating Florals With No Stems
Capture the airy feeling of a summer meadow with this delicate wine glass design featuring crisp white daisies and scattered greenery, even though the title suggests floating florals, this piece beautifully incorporates slender stems for a grounded yet ethereal look. The translucent effect of the white petals against the clear glass creates a sophisticated finish perfect for garden parties or quiet evenings.
Step-by-Step
Materials
- Clear wine glass (washed with rubbing alcohol)
- Enamel glass paints (opaque white, sunny yellow, sap green, olive green, black)
- Fine liner brush (size 0 or 00)
- Small round brush (size 1 or 2)
- Dotting tool or toothpick
- Palette or small plate
- Paper towels
- Rubbing alcohol
- Cotton swabs (for clean-up)
Step 1: Preparation and Planning
-
Clean the Surface:
Before dipping your brush, thoroughly wipe down the outside of your wine glass with rubbing alcohol and a paper towel. This removes oils and fingerprints that could prevent the paint from adhering properly. -
Visualize the Layout:
Hold the glass and mentally map out where your main daisy blooms will sit. Aim for an organic grouping around the bowl—some slightly higher, some lower—rather than a perfect straight line.
Keep it Flowing
If your liner brush drags, thin the paint with a microscopic drop of water. The consistency should be like ink so you can get those long, uninterrupted stem lines.
Step 2: Painting the Foliage Base
-
Mix Your Greens:
On your palette, blend a touch of sap green with olive green to create a natural foliage color. You want a shade that looks organic, not neon. -
Draft the Main Stems:
Using your fine liner brush and the green mix, paint long, slender stems curving up from the bottom of the bowl. Vary the pressure: press slightly harder at the base and lift off to a whisper-thin point at the top. -
Add Leaf Details:
Along these main stems, stroke on small, narrow leaves. Flick your wrist quickly to get sharp, tapered ends that mimic the grassy texture of daisy foliage. -
Create Bud Stems:
Paint a few shorter, wandering stems that branch off or stand alone. At the tips of these, add tiny green teardrop shapes which will serve as the base for unopened buds or filler flowers.
Oops! Smudged Petal?
Don’t panic! Use a clean, dry brush to lift away the wet smudge immediately, then clean the area with a Q-tip dipped in alcohol before repainting.
Step 3: Adding the Blooms
-
Start the Daisy Centers:
Switch to your yellow enamel paint. Using the small round brush or even the back of a brush handle, place dots where you want the centers of your open daisies to be. -
Paint Petal Layers:
Load your round brush with opaque white. Press the brush down near the yellow center and pull outward, lifting as you go to create a petal shape. Repeat this around the center. -
Refine the Petals:
For a more realistic look, I like to go back over the petals to make them slightly translucent at the edges and more opaque near the center. Don’t worry if they overlap slightly; it adds depth. -
Paint Side-View Daisies:
For variety, paint one or two flowers as if seen from the side. Paint a semi-circle of white petals fanning upward, leaving the bottom open for the green base (calyx). -
Add the Calyx:
Once the white petals on the side-view flowers are dry to the touch, use your liner brush and green paint to add the small green cup shape at the base of the petals, connecting it to the stem. -
Detail the Centers:
Return to the yellow centers. Use a toothpick dipped in a tiny bit of orange or darker yellow to stipple texture onto the bottom edge of the yellow dots, giving them a 3D effect.
Step 4: Final Flourishes
-
Create Filler Flowers:
Using the tip of your liner brush and white paint, add tiny clusters of dots or very small petals to the tops of the thinner stems you painted earlier. This mimics baby’s breath or wildflower fill. -
Outline for Definition:
This is a crucial step for the illustrated look shown in the image. Take your finest liner brush with black paint (thinned slightly if needed). Very delicately outline some of the petals and stems. You don’t need to outline everything completely—broken lines look more artistic. -
Add Whimsical Dots:
Dip a dotting tool or toothpick into the black paint. In the empty spaces of the glass above the flowers, add tiny, scattered dots of varying sizes to create a magical, floating pollen effect. -
Clean Up Edges:
If you made any stray marks, dampen a cotton swab with rubbing alcohol or water (depending on paint type) and gently wipe them away before the paint sets. -
Curing the Glass:
Allow the glass to air dry for at least 1 hour. Follow the manufacturer’s instructions on your specific enamel paint bottle for curing—this usually involves baking the glass in a non-preheated oven to make it dishwasher safe.
Once baked and cooled, your custom glassware is ready to hold your favorite vintage or serve as a stunning handmade gift


Negative Space Flowers With Outlined Petals
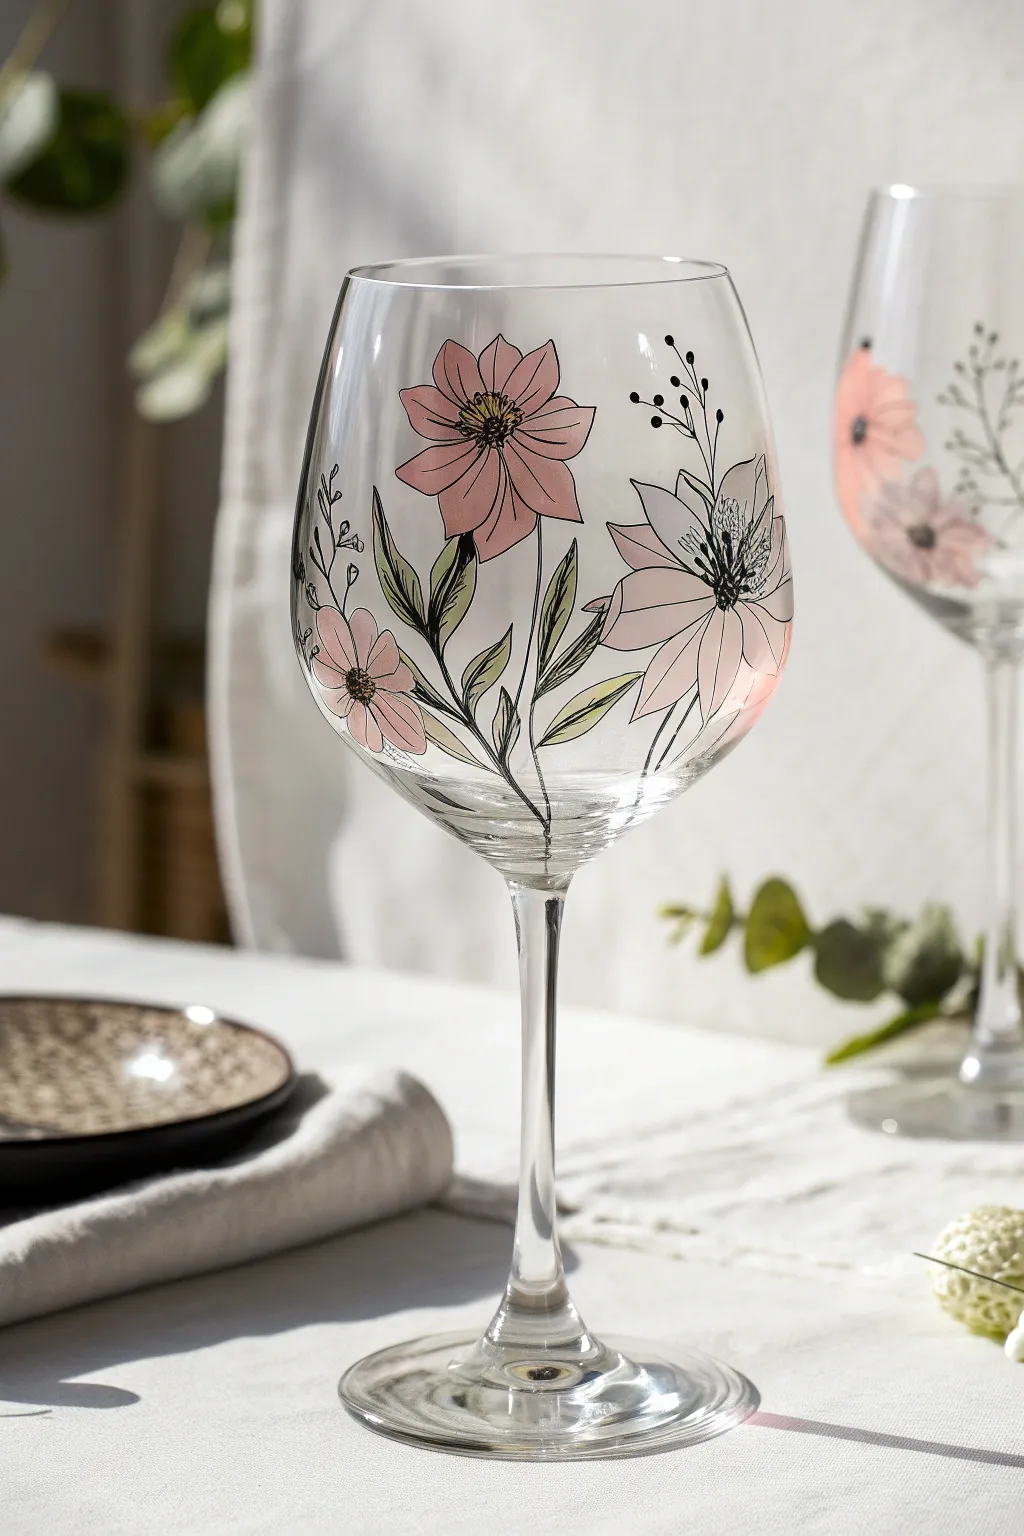
Capture the ethereal beauty of a summer garden with this elegant glass painting project featuring translucent pink petals and crisp black linework. The combination of black outlines with soft washes of color creates a sophisticated, illustrated look that feels both modern and timeless.
Detailed Instructions
Materials
- Red or white wine glasses (thoroughly cleaned)
- Rubbing alcohol and cotton pads
- Gloss enamel craft paint (pale pink, medium rose, white, sage green, olive green, yellow)
- Black glass liner or oil-based paint marker (fine tip)
- Small round synthetic brushes (size 0 and 2)
- Palette or small dish
- Paper towels
- Q-tips (for cleanup)
- Oven (if baking is required for your specific paint)
Step 1: Preparation & Base Composition
-
Clean the surface:
Before putting any paint down, wipe the exterior of the glass bowl thoroughly with rubbing alcohol on a cotton pad. This removes invisible oils and fingerprints that could prevent the paint from adhering properly. -
Plan your placement:
Visualize three main floral clusters around the bowl of the glass. You want them to sit at slightly different heights to look natural, rather than forming a straight line around the middle. -
Mix your petal shades:
On your palette, mix a small amount of white into your pale pink to create a very soft blush tone. Keep the medium rose color separate for variety.
Uneven outlines?
Don’t panic! Sketchy, broken lines are part of this style. If a line is too thick, simply wipe it away quickly with a wet Q-tip before it sets and try again.
Step 2: Painting the Blooms
-
Paint the first large bloom:
Using your size 2 brush and the blush pink mixture, paint a large flower shape with roughly 7-8 petals. Don’t worry about perfect edges; the outline will define them later. -
Add a second bloom:
Paint a second flower nearby using the medium rose tone to add depth to your bouquet. Let the petals be slightly irregular, just like real cosmos flowers. -
Incorporate a side view:
For variety, paint a third flower shape that looks like a bloom seen from the side—sort of a fan shape or half-circle of petals. -
Add foliage fullness:
Using the sage green, paint small, elongated almond shapes near the base of the flowers to represent leaves. Keep these layers thin and flat so they don’t drip. -
Let the first layer cure:
This is crucial: allow the colored paint to dry until it is tacky or completely dry to the touch (usually 1 hour). If you outline too soon, the black marker will gouge through the wet paint.
Add some sparkle
Mix a tiny pinch of fine iridescent glitter into your final clear coat or the colored paint for a shimmer that catches the light during candlelit dinners.
Step 3: Detailed Outlining
-
Start the centers:
Once the paint is dry, take your black fine-tip glass marker. Draw a small, tight cluster of tiny circles or stippled dots in the center of each flower. -
Outline the petals:
Trace the outer edge of your pink painted shapes. I prefer to keep my hand loose here—if the line doesn’t perfectly match the paint edge, it actually adds to the artistic, sketched charm. -
Add petal definition:
Draw faint lines radiating from the flower center outward into each petal to suggest texture and veins. -
Draw the stems:
Draw long, slender black lines extending from the flower bases down toward the stem of the glass. Let these lines flow naturally and join together near the bottom of the bowl. -
Detail the leaves:
Outline your green painted leaf shapes, adding a single central vein line down the middle of each one. -
Add wild sprigs:
Draw delicate, branching lines extending freely into the empty glass space. Add tiny black loops or ‘buds’ at the ends of these lines to create filler foliage that doesn’t need colored paint.
Step 4: Final Accents & Curing
-
Highlight the centers:
Using your smallest size 0 brush, dab tiny dots of yellow paint directly over the black stippled centers to make the flowers pop. -
Add white highlights:
Add extremely subtle streaks of white paint on top of a few pink petals to suggest light reflection. Use a very dry brush for this. -
Clean up edges:
If any paint went where it shouldn’t, use a Q-tip dampened with water (or alcohol if the paint is dry) to tidy up the glass. -
Cure the project:
Follow the instructions on your specific paint bottle. Most enamels require air drying for 21 days or baking in a cool oven (place glass in cold oven, heat to 350°F/175°C, bake for 30 mins, cool in oven) to become dishwasher safe.
Now you have a stunning piece of functional art ready for your next dinner party
Pressed-Flower Look With Soft Translucent Layers
Achieve the delicate beauty of pressed botanical specimens directly on your glassware using specialized paints and layering techniques. This project captures the airy, ethereal quality of watercolor on a clear surface, perfect for elegant sipping.
Step-by-Step Guide
Materials
- Large clear wine glass (thoroughly cleaned)
- Glass paints or multi-surface acrylics (translucent or thinning medium required)
- Colors: Pale dusty pink, cream/ivory, sage green, olive green, deep forest green, and yellow ochre
- Glass painting medium or clear extender
- Fine liner brush (size 0 or 00)
- Small round brush (size 2 or 3)
- Rubbing alcohol
- Paper towels
- Palette or small glass plate
- Cotton swabs for cleanup
Step 1: Preparation & Outline
-
Prep the Surface:
Before painting, wipe the entire surface of the glass with rubbing alcohol to remove any oils or fingerprints. This ensures the paint adheres properly. -
Drafting the Design:
If you aren’t confident painting freehand, lightly sketch the main flower placement using a washable marker, or tape a sketch inside the glass to use as a guide. -
Mixing Sheet Colors:
Mix a tiny amount of glass medium with your olive and sage greens to increase transparency. You want the paint to feel like a glaze rather than opaque acrylic.
Step 2: Layering Leaves
-
Base Leaf Shapes:
Using the round brush, paint broad, flat oval shapes for the larger leaves. Keep the paint thin so light passes through, mimicking real pressed leaves. -
Adding Leaf Veins:
While the green shapes are still slightly tacky or just dry, switch to your fine liner brush. Dip it into a slightly darker, more opaque forest green. -
Detailing the Greenery:
Gently draw a central vein down each leaf, allowing the line to be faint in some areas. Add branching veins with a flick of the wrist. -
Ferns and Fronds:
Paint the wispy, fern-like stems behind the main leaves using a very dilute olive green. These should look like background shadows.
Clear Medium Magic
Don’t just use water to thin your paint, as it weakens the bond to glass. Use a proper glass painting medium or clear extender to get that watercolor look.
Step 3: The Main Bloom
-
Petal Base Layer:
Mix dusty pink with plenty of clear medium to create a soft blush wash. Start painting the large flower petals, working from the outside edge inward. -
Layering Petals:
Paint individual, overlapping petals. Let the first layer dry for a few minutes before painting petals on top of them; this builds that crucial translucent depth. -
Inner Petal definition:
Mix a slightly creamier version of the pink. Use the liner brush to add very faint outlines or creases to the inner petals to distinguish them from the background wash. -
Creating the Center:
Dab a small cluster of yellow ochre mixed with cream in the very center of the flower. -
Stamen Details:
Once the center yellow spot is dry, use your finest brush to add tiny, hair-like lines radiating outward from the center in a darker yellow or light brown.
Add Metallic Shimmer
For a luxe touch, outline just the edges of the main petals with a very fine line of translucent gold glass paint to catch the light.
Step 4: Finishing Touches
-
Adding Buds:
Paint the small, closed rosebud near the top rim using the same technique: a translucent wash of pink first, followed by darker definition lines. -
Connecting Stems:
Draw very thin, delicate stems connecting the flower head and the bud to the main cluster of greenery. Keep these lines shaky and organic. -
Final Inspection:
Hold the glass up to the light to check for opacity issues. If a leaf looks too solid, you can gently lift some paint with a damp brush. -
Curing:
Follow the manufacturer instructions for your specific paint. Most glass paints require either 21 days of air curing or baking in a conventional oven to become dishwasher safe.
Now you have a stunning, hand-painted glass that looks like a preserved garden frozen in time
Boho Folk Flowers With Bold Petal Shapes
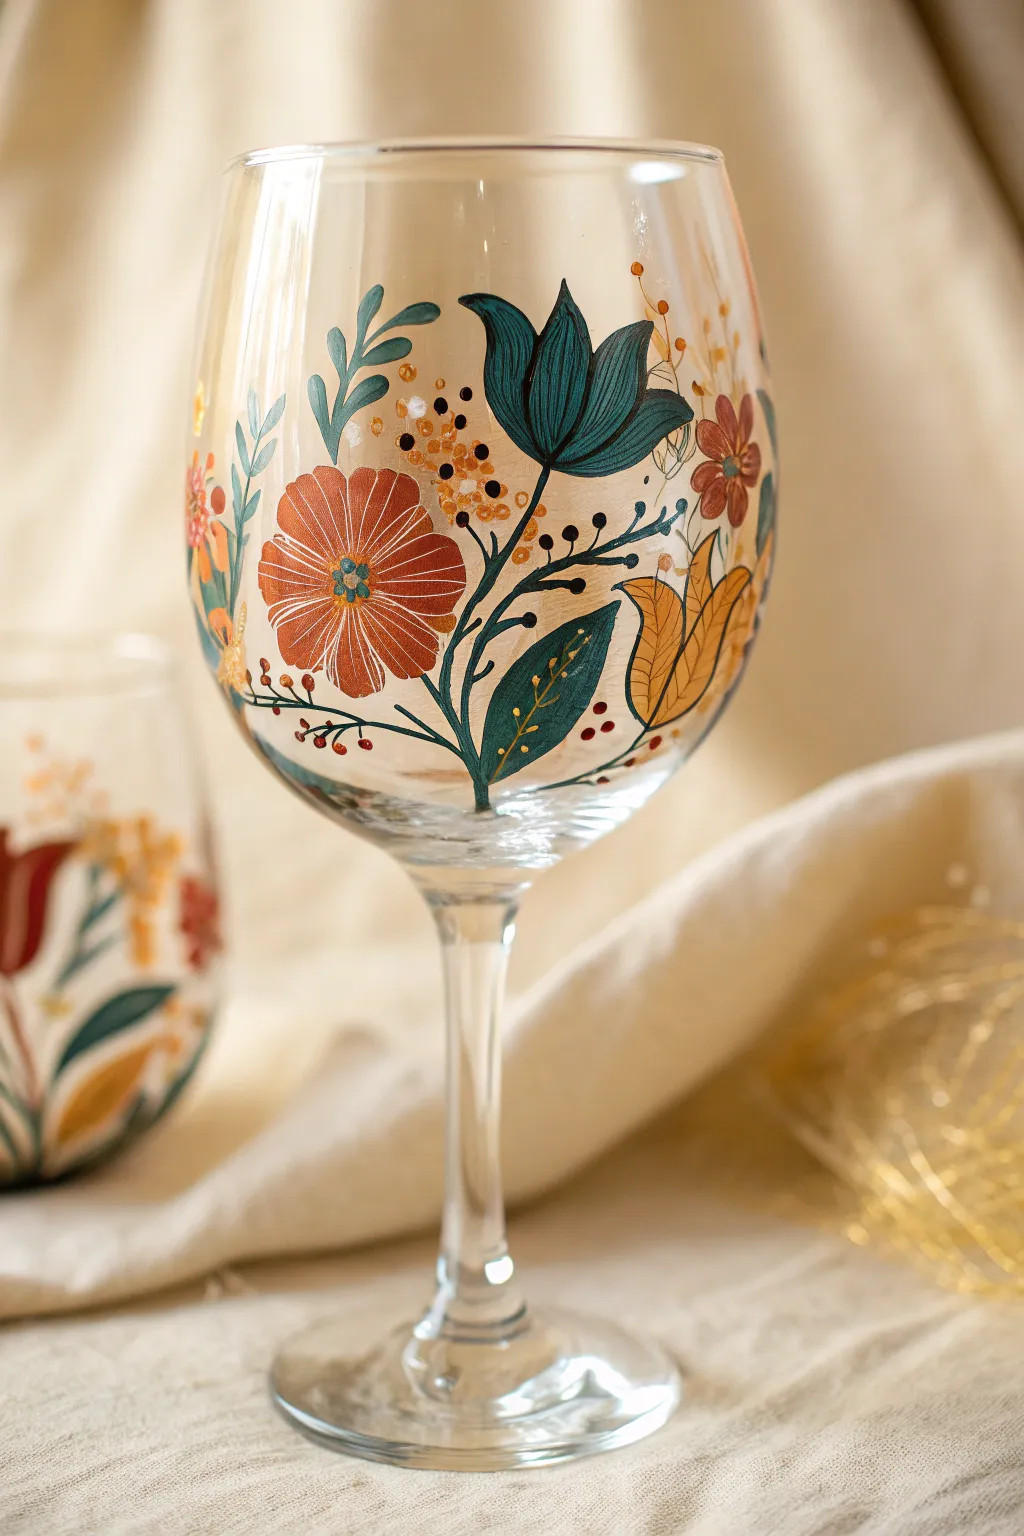
Transform a simple glass into a bohemian statement piece with this folk art-inspired floral design. Featuring bold petal shapes in teal, rust, and mustard, this project relies on smooth, confident brushstrokes to create an intricate yet warm aesthetic.
Step-by-Step Guide
Materials
- Large, clear wine glass (red or white style)
- Rubbing alcohol and paper towel
- Enamel glass paints (Deep Teal, Rust/Terracotta, Mustard Yellow, Cream/Off-White)
- Small round synthetic brushes (size 0 and 2)
- Fine liner brush (size 00 or 000)
- Small dotting tool or toothpick
- Palette or small plate
- Cotton swabs (for touch-ups)
Step 1: Preparation & Base Stems
-
Clean surface:
Before you begin painting, meticulously clean the outside of the wine glass with rubbing alcohol and a paper towel. This removes oils and fingerprints that could prevent the paint from adhering properly. -
Plan the layout:
Visualize three main floral clusters around the bowl of the glass. You want them spaced somewhat evenly but at slightly different heights to maintain an organic, flowing look. -
Paint main stems:
Load your fine liner brush with Deep Teal paint diluted slightly if necessary for flow. Starting near the base of the bowl, paint curving, sweeping stems that reach upward. Branch them out naturally, leaving ample space at the ends for the flower heads.
Paint Slipping?
If paint slips or pools, the glass is too slick. Clean again with alcohol. Apply thinner coats, letting each dry individually, rather than one thick gloppy layer.
Step 2: Painting the Bold Blooms
-
Add the large teal tulip:
Select a spot for the primary focal flower. Using a size 2 round brush loaded with Deep Teal, paint a tulip shape composed of three distinct petal strokes: one central petal and two curving outward on the sides. Keep the edges crisp and the paint opaque. -
Create the rust daisy:
Nearby, position the large rust-colored flower. Using the Rust/Terracotta paint, create a circular shape made of distinct, slightly separated petals. Press the brush down and pull toward the center to create a slightly tapered petal shape. -
Paint secondary blooms:
Add a smaller tulip shape using the Mustard Yellow paint. Place this slightly lower or to the side of the teal flower to balance the composition. Ensure the coverage is solid; you may need a second coat after the first dries. -
Leaf details:
Switch back to the Deep Teal. Along the main stems, paint medium-sized, pointed leaves. Vary the sizes, making some leaves broader like the petals and others thin and wispy. -
Dry time check:
Allow these base layers to dry for at least 15-20 minutes. If the paint looks streaky, apply a second coat now before moving to details.
Step 3: Fine Lines & Folk Details
-
Outline the tulip:
Load your finest liner brush with black or a darkened teal paint. Carefully outline the petals of the large teal tulip to give it that illustrative folk-art definition. Add a central line down the middle petal. -
Detail the rust flower:
On the Rust/Terracotta flower, use a lighter color (like Cream or Mustard) or a very fine white line to draw the veins on the petals. Add a small center in a contrasting color like teal or blue. -
Mustard flower accents:
Add definition to the yellow tulip using the fine liner brush and the Rust paint. Draw a central vein line and outline the outer edges to make the yellow pop against the glass. -
Add decorative berries:
Dip your dotting tool or the non-brush end of a paintbrush into the Rust paint. Dot small berries along the thinner, wispier branches of your teal stems. Vary the pressure to create slightly different sized dots. -
Inner leaf details:
Using a very light hand and the Cream or Mustard paint, draw tiny dots or thin veins inside the larger dark teal leaves. This creates texture and adds to the intricate folk style. -
Floating accents:
Fill empty negative spaces with clusters of tiny golden-yellow dots or simplistic small sprigs. These ‘filler’ elements help the design feel cohesive and abundant without overcrowding the main blooms. -
Final cure:
Check the manufacturer instructions for your specific glass paint. Most require curing by baking the glass in a non-preheated oven or air-drying for 21 days to become dishwasher safe.
Pro Tip: Baking Safely
Always place glass in a COLD oven. Turn heat to 350°F (175°C) for 30 mins. Turn oven off and let glass cool completely inside before opening the door.
Once baked and cooled, your custom glassware is ready to add a cozy, artistic touch to your next dinner gathering
Night Garden Florals on a Tinted Background
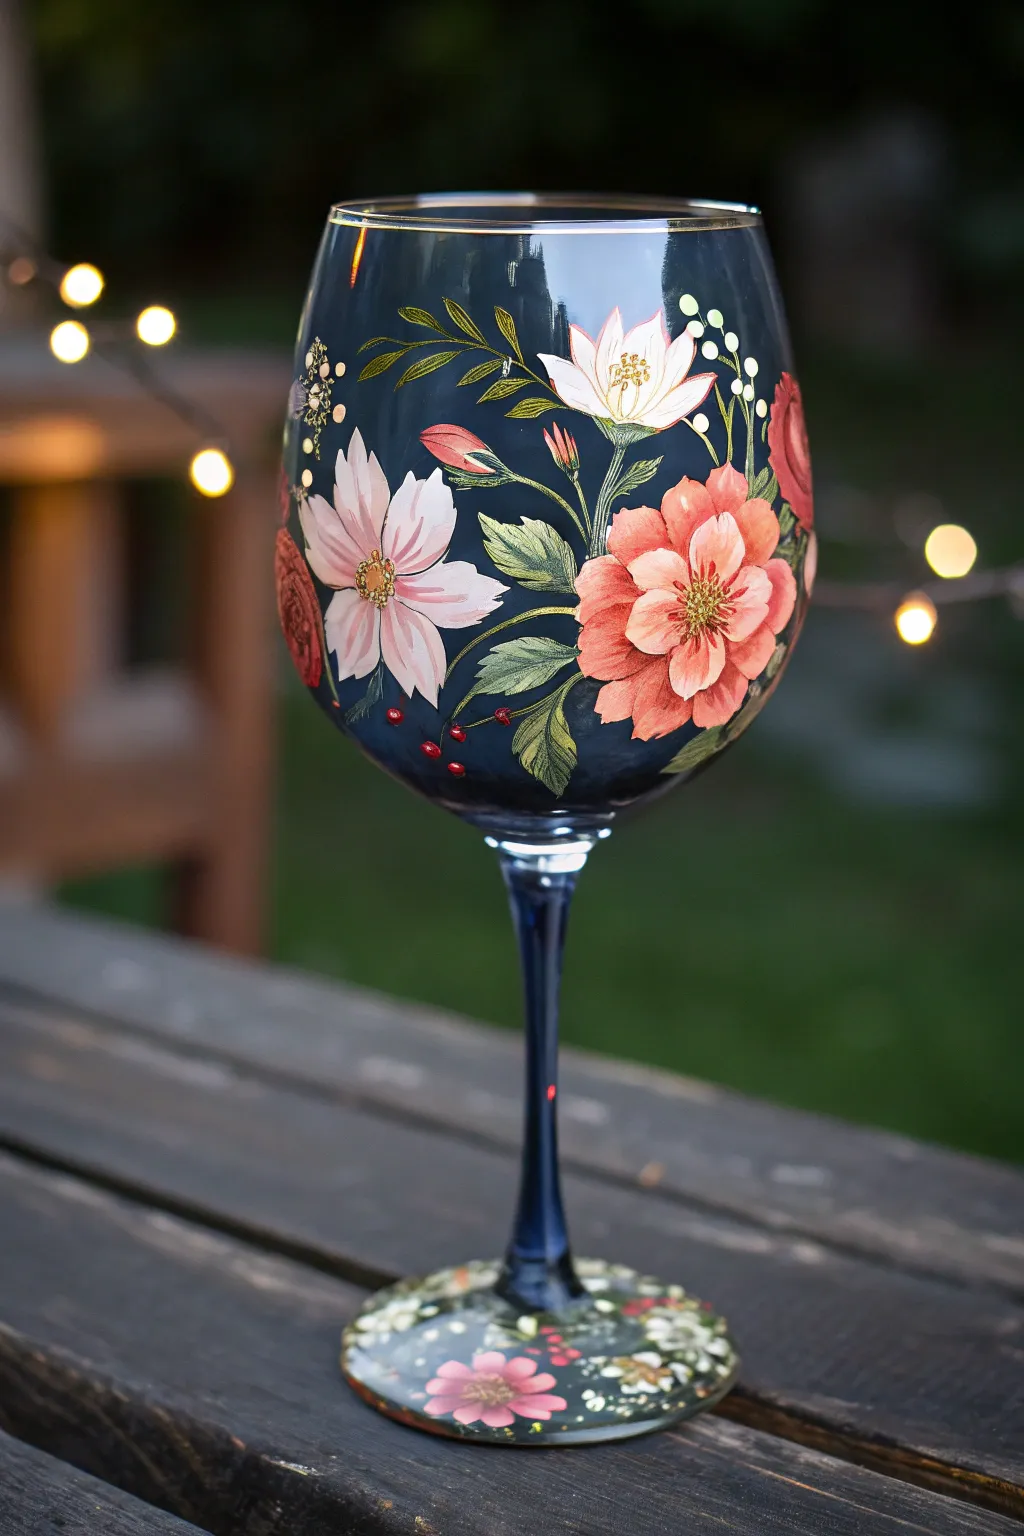
Transform a plain wine glass into a mesmerizing garden scene set against a deep evening sky. The rich, dark background makes the soft peaches, whites, and greens of the floral design pop with sophisticated elegance.
Detailed Instructions
Materials
- Large clear wine glass
- Rubbing alcohol and cotton pads
- High-gloss multi-surface enamel paints (Deep Midnight Blue, Creamy White, Peach/Salmon, Deep Rose, Sage Green, Forest Green)
- Metallic Gold enamel paint
- Sponge daubers
- Fine liner brush (size 0 or 00)
- Small flat brush (size 2-4)
- Filbert brush
- Oven for curing (optional, depending on paint brand)
Step 1: Preparing the Night Sky
-
Clean surface:
Before painting, wipe the entire glass surface with rubbing alcohol to remove oils and fingerprints, ensuring the paint adheres properly. -
Establish the background:
Load a sponge dauber with Deep Midnight Blue enamel paint. Gently dab the paint over the bowl of the glass, starting from the rim and working down towards the stem. -
Blend the coverage:
Continue dabbing until you have a smooth, relatively opaque layer. Don’t worry if it’s slightly translucent; this adds depth. Stop the blue at the top of the stem. -
Tint the stem:
Using a smaller brush or sponge, carefully paint the stem in the same midnight blue, allowing it to fade slightly as you reach the foot of the glass. -
Initial drying:
Let this base coat dry completely according to the manufacturer’s instructions, usually at least one hour, before attempting to paint flowers over it.
Fixing Sheer Paint
If your background blue looks too streaky or see-through, let the first coat dry completely, then sponge on a second thin layer for solid coverage.
Step 2: Painting the Blooms
-
Base shapes for flowers:
Using Creamy White mixed with a tiny drop of Peach, use a filbert brush to block in the silhouette of the large open flower shapes. Don’t worry about petals yet; just get the oval and circle placements right. -
Defining the peony petals:
For the large peach-colored bloom, mix Peach/Salmon with a touch of Deep Rose. Use the small flat brush to paint layered, scalloped strokes, working from the outer edges toward the center to create a fluffy peony look. -
Painting the white cosmos:
For the white, star-shaped flowers, use the Creamy White paint. Stroke from the tip of the petal inward toward the center, leaving a small gap in the middle for the stamens later. -
Adding foliage:
Load your fine liner brush with Forest Green. Paint thin, winding stems connecting your blooms. Add leaves using a ‘press and lift’ motion: press down to widen the leaf, then lift while dragging to create a sharp point. -
Highlighting leaves:
While the green is tacky or after it dries, add veins or lighter areas to the leaves using the Sage Green to give them dimension. -
Adding delicate buds:
Use the tip of your round brush to add small, unseen rosebuds or berries in Deep Rose and Peach, tucked between the larger flowers and leaves.
Step 3: Details & Base
-
Flower centers:
Dip the back end of your paintbrush (or a dotting tool) into Metallic Gold paint. Dot the centers of the white flowers and the large peach peony to create rich, textured stamens. -
Gold rim:
Carefully run a line of Metallic Gold along the very rim of the glass. I find steadying my hand against the table helps keep this line crisp. -
Decorating the foot:
Don’t forget the base! Dab a mottled background of Sage Green and Midnight Blue on the foot of the glass. -
Base florals:
Using the fine liner, paint miniature versions of the main pink cosmos flowers on the foot, scattering them like fallen petals. -
Cleanup:
If you made any mistakes or smeared paint, use a damp cotton swab or a toothpick to gently scrape away unwanted paint before it fully cures. -
Curing:
Follow your paint brand’s instructions for curing. This usually involves air drying for 21 days or baking the glass in a cool oven that heats up to 350°F for 30 minutes to make it dishwasher safe.
Gilded Edges
For a luxury look, lightly outline the edges of your texturized peach petals with a very fine line of metallic gold to catch the light.
Now you have a stunning, moody floral glass ready for your next evening gathering
Matching Floral Set With One Flower per Glass
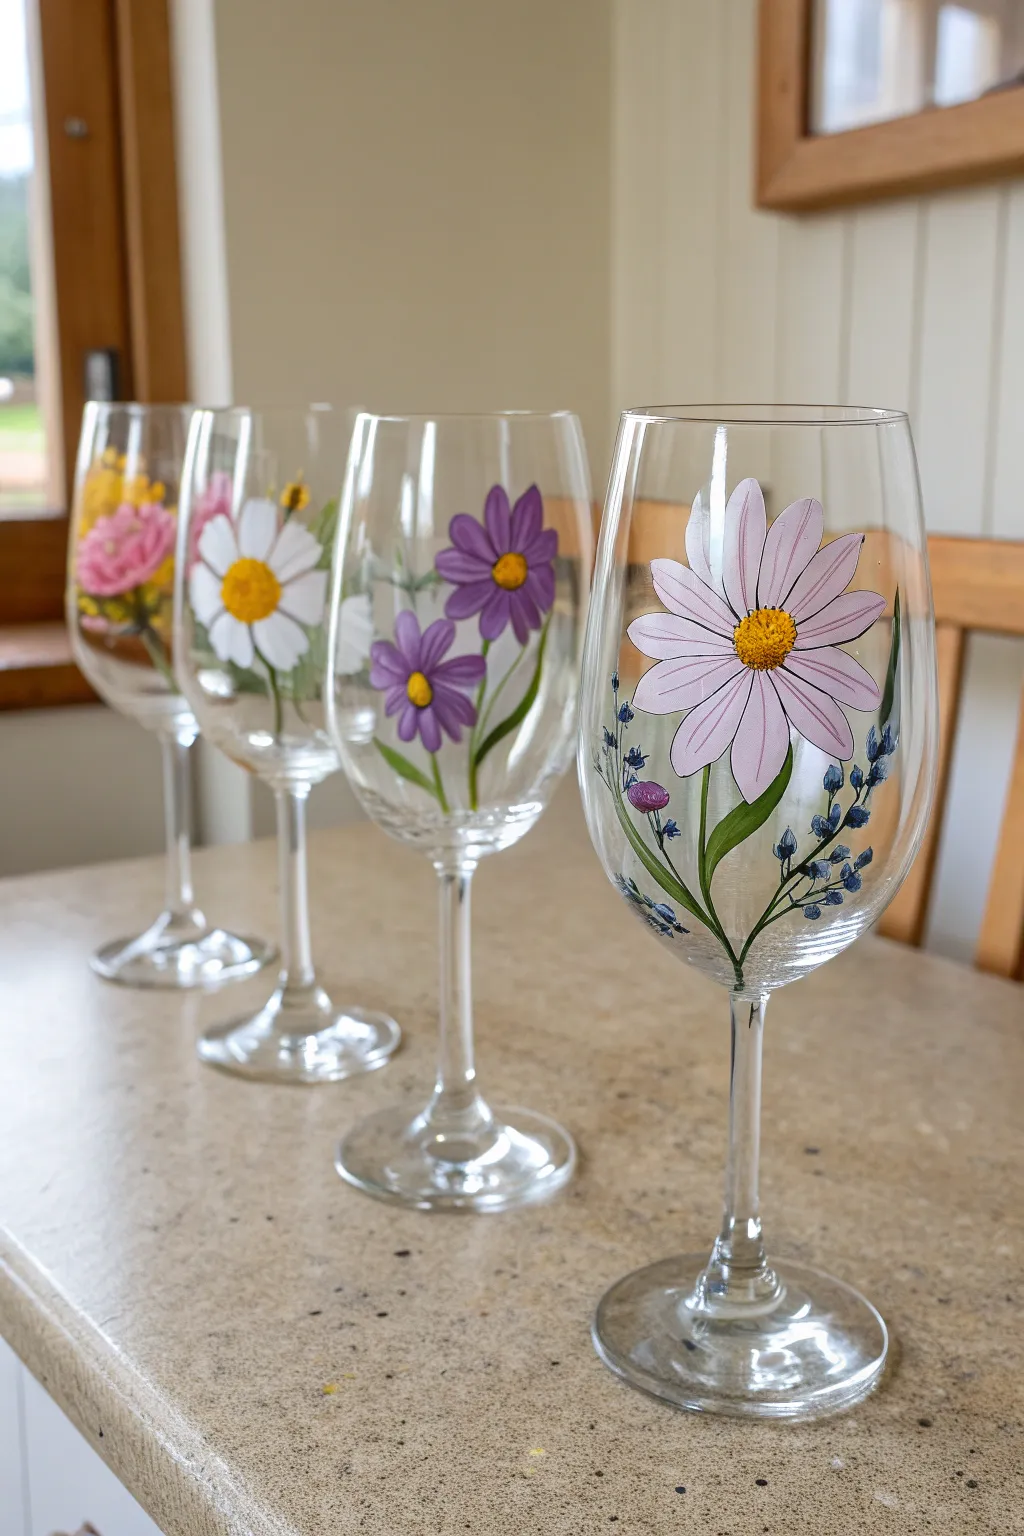
Capture the delicate beauty of a summer garden with this elegant four-glass set, where each goblet features a distinct floral personality. The translucent petals and fine linework create a stained-glass effect that elevates simple glassware into artful decor.
Step-by-Step
Materials
- 4 Clear white wine glasses (clean and dry)
- Rubbing alcohol and cotton pads
- Gloss enamel paints (opaque white, lavender, purple, bright yellow, green, pink)
- Black liquid outlining medium or fine-tip black oil-based paint pen
- Fine detail brushes (size 0 and 00)
- Small flat shader brush (size 2)
- Palette or small disposable plate
- Paper towels
- Water cup
- Oven (for curing)
Step 1: Preparation & Planning
-
Clean the surface:
Before you paint a single stroke, wipe down the exterior of all four glasses with rubbing alcohol. This removes unseen oils or fingerprints that prevent the enamel from bonding properly. -
Define the compositions:
Plan a different flower for each glass. Based on the image, you will be creating: a large pink-tinged daisy, a purple cosmos duo, a classic white daisy, and a cluster of pink wildflowers. -
Rough sketching (optional):
If you don’t feel confident freehanding, you can lightly sketch the main flower placement on the glass using a dry-erase marker. This wipes away easily later.
Uneven Coverage?
If your petal paint looks streaky, resist adding more wet paint immediately. Wait for the first layer to dry to the touch, then apply a second thin coat for opacity.
Step 2: Painting the Flowers
-
Base petals – Pink Daisy:
For the first glass, mix a tiny drop of pink into your white enamel to create a very pale blush. Paint long, slender oval petals radiating from a central point, keeping the paint slightly translucent. -
Base petals – Purple Cosmos:
For the second glass, use a flat brush to paint two flowers at different heights. Use a medium purple for the petals, making them slightly wider at the tips than the daisy. -
Base petals – White Daisy:
On the third glass, paint pure white petals in a classic daisy shape. Apply two thin coats rather than one thick one to avoid drips, letting the first coat dry for about 15 minutes. -
Base petals – Pink Cluster:
For the final glass, dab small, textured clusters of bright pink and yellow to mimic a dense wildflower head. -
Painting stems and leaves:
Using your size 0 liner brush and green enamel, draw long, sweeping stems that curve naturally from the bottom of the bowl up to the flower heads. -
Adding foliage details:
Add different leaf styles for variety. Use long, grass-like blades for the large daisy and smaller, teardrop-shaped leaves for the cosmos. -
Painting the accents:
On the large pink daisy glass, add small blue buds on the sides using a stippling motion with a tiny brush. This adds height and framing to the main bloom. -
Painting the centers:
Once the petals are tacky-dry, dip the tip of your brush in bright yellow. Stipple (dot) the center of the daisies and cosmos to create a textured, pollen-like appearance.
Stabilize Your Hand
Place a rolled-up towel inside the glass while painting. This gives you a solid background to see your strokes and stops the glass from rolling on the table.
Step 3: Outlining & Definition
-
Begin the outlining:
This is where the design pops. Use a fine-tip black oil-based paint marker or outlining liquid. I find it helps to anchor my pinky finger on the glass stem for stability. -
Outline the petals:
Trace the edge of every petal. Don’t worry if the line isn’t perfectly consistent; a slight variation in thickness mimics a hand-drawn illustration style. -
Center details:
Draw small circles or dots within the yellow centers of the flowers to define the seed heads. -
Leaf veins:
Draw a central vein down the middle of the larger green leaves to give them dimension. -
Floral lines:
For the large pink daisy, add delicate lines running from the center of the flower outward into the petals to suggest texture and contour. -
Final foliage touches:
Add tiny outlines to the blue accent buds on the first glass, connecting them to the main stems with very fine black lines.
Step 4: Curing & Finish
-
Drying time:
Allow the glasses to air dry for at least 24 hours. The paint needs to fully cure on the surface before being subjected to heat. -
Baking process:
Place the glasses in a cold oven. Set the temperature to 350°F (175°C) and bake for 30 minutes. Turn the oven off and let the glasses cool completely inside the oven to prevent cracking.
These beautiful glasses are now ready to be the centerpiece of your next garden party or quiet evening in


Have a question or want to share your own experience? I'd love to hear from you in the comments below!