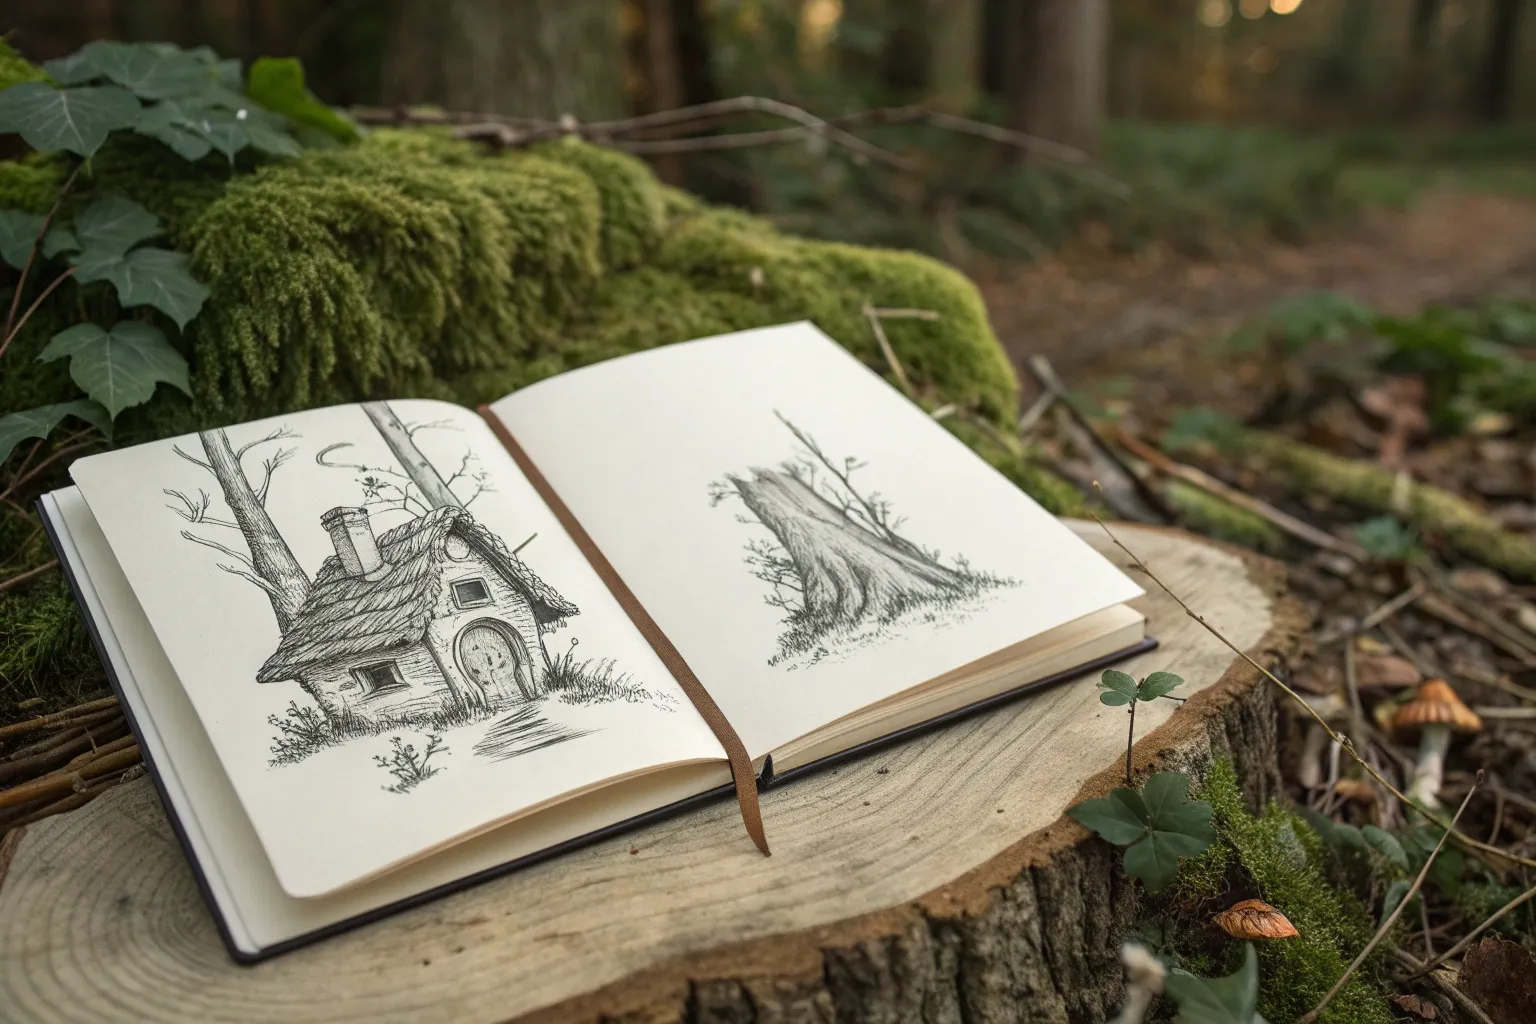
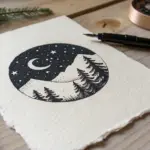
If you’re craving that fairytale feeling on paper, enchanted drawings are where it’s at—nature, but with secrets. I love how one tiny magical detail can turn a simple sketch into a whole hidden world.
Oversized Toadstool Mushroom Houses
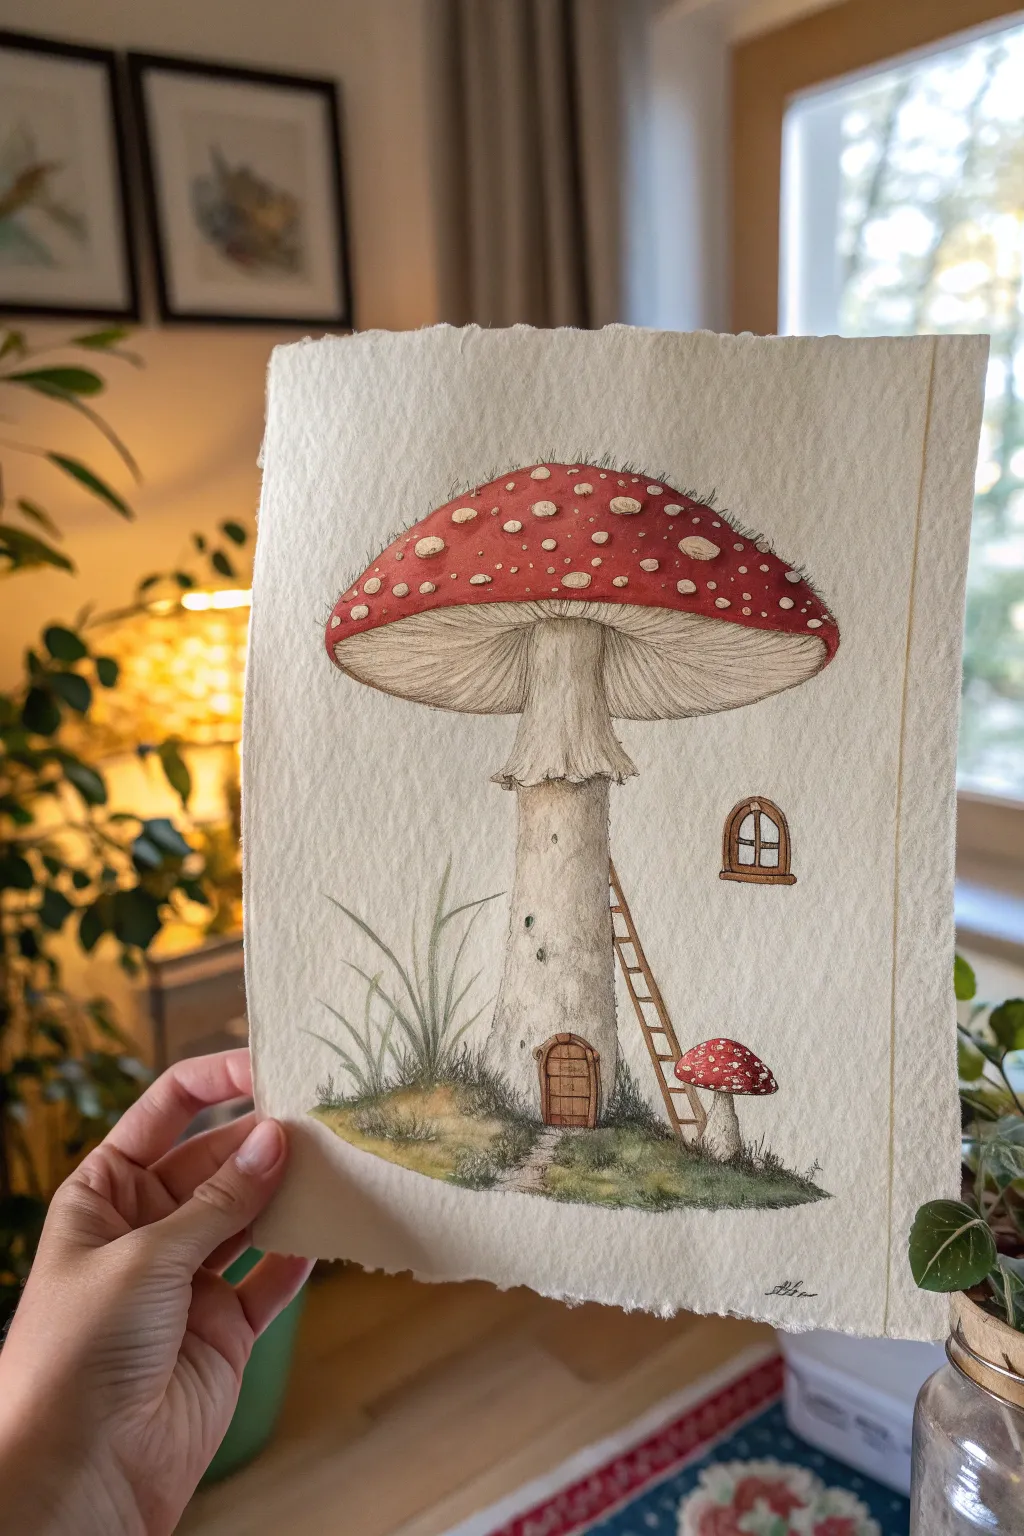
Step into a fairytale with this delicate illustration of a cozy mushroom house, complete with a tiny door and ladder. The project captures the texture of a classic red toadstool using fine liner pens and soft coloring techniques on high-quality textured paper.
Step-by-Step Tutorial
Materials
- Hot press or textured watercolor paper (heavyweight)
- Pencil (HB or 2H)
- Kneadable eraser
- Fine liner pens (0.05mm, 0.1mm, and 0.3mm black)
- Watercolor paints or watercolor pencils (Red, Cream, Earthy Browns, Mossy Greens)
- Small round brushes (Size 0 and 2)
- White gel pen or gouache for highlights
Step 1: Sketching the Structure
-
Outline the Cap:
Begin by lightly sketching a large, broad oval shape for the mushroom cap. Ensure the top is rounded and the bottom curve is slightly flattened where the gills will be. -
Draw the Stem:
Extend a thick, sturdy stalk downwards from the center of the cap. Let the base flare out slightly where it meets the ground to create a solid foundation for your house. -
Add the Skirt:
Sketch the ‘skirt’ or annulus of the mushroom just below the cap. Make the edges ragged and uneven to mimic natural organic textures. -
Draft the Details:
Lightly draw a small arched door at the base of the stalk. Add a small arched window higher up on the right side of the stem and sketch a simple ladder leaning against the side. -
Create the Environment:
Drawing a small mound of earth around the base helps ground the structure. Add a few blades of grass to the left and a tiny companion mushroom on the right side.
Natural Imperfections
Don’t make your dots perfect circles. Real Amanita mushrooms have raised, scabby warts that are irregular shapes, which adds realism.
Step 2: Inking and Texture
-
Refine the Outline:
Using a 0.1mm fine liner, go over your pencil lines. Use broken, shaky lines for the mushroom cap’s edge to give it an organic feel rather than a perfect geometric curve. -
Detail the Gills:
With your finest 0.05mm pen, draw very fine, closely spaced lines radiating from the stem to the edge of the cap to create the delicate gill structure. -
Texture the Stem:
Use stippling (lots of tiny dots) and short vertical dashes on the stem to suggest a rough, fibrous texture. Concentrate these marks under the skirt and near the base for shading. -
Wood Grain Details:
Ink the door and window frames with slightly thicker lines (0.3mm). Draw vertical planks on the door and add tiny circles for nail heads. -
Grass and Ground:
Use quick, upward flicks of the pen to ink the grass blades. Use a scribbly texture for the mossy ground to differentiate it from the smooth mushroom skin.
Step 3: Adding Color
-
Base Tone for the Cap:
Paint the mushroom cap with a vibrant red watercolor. Leave small, irregular circular patches unpainted for the white spots, or carefully paint around them. -
Shadowing the Cap:
While the red is still damp, drop in a slightly darker crimson along the bottom edge and sides of the cap to create volume and roundness. -
Stem and Gills:
Apply a very diluted wash of cream or pale warm gray to the stem and gills. Keep this layer subtle so the ink work remains visible. -
Painting the Wood:
Use a warm brown tone such as burnt sienna for the door, window frame, and ladder. I like to vary the intensity here to make the wood look aged and weathered. -
Ground Cove:
Mix sap green with a touch of brown for the grassy mound. Dab the color on loosely to create a mossy texture, darkening the area directly under the mushroom base. -
Final Touches:
Once dry, use a white gel pen or opaque white gouache to brighten the spots on the cap if they got muddy. You can also add tiny white highlights to the top of the mushroom for a shiny effect.
Ink Smudging?
Ensure your ink is 100% waterproof before painting. If unsure, do the watercolor wash first, let it dry fully, then add ink details on top.
Now you have a charming little hideaway ready for forest sprites to move in


Wildflowers With Little Faces and Personalities
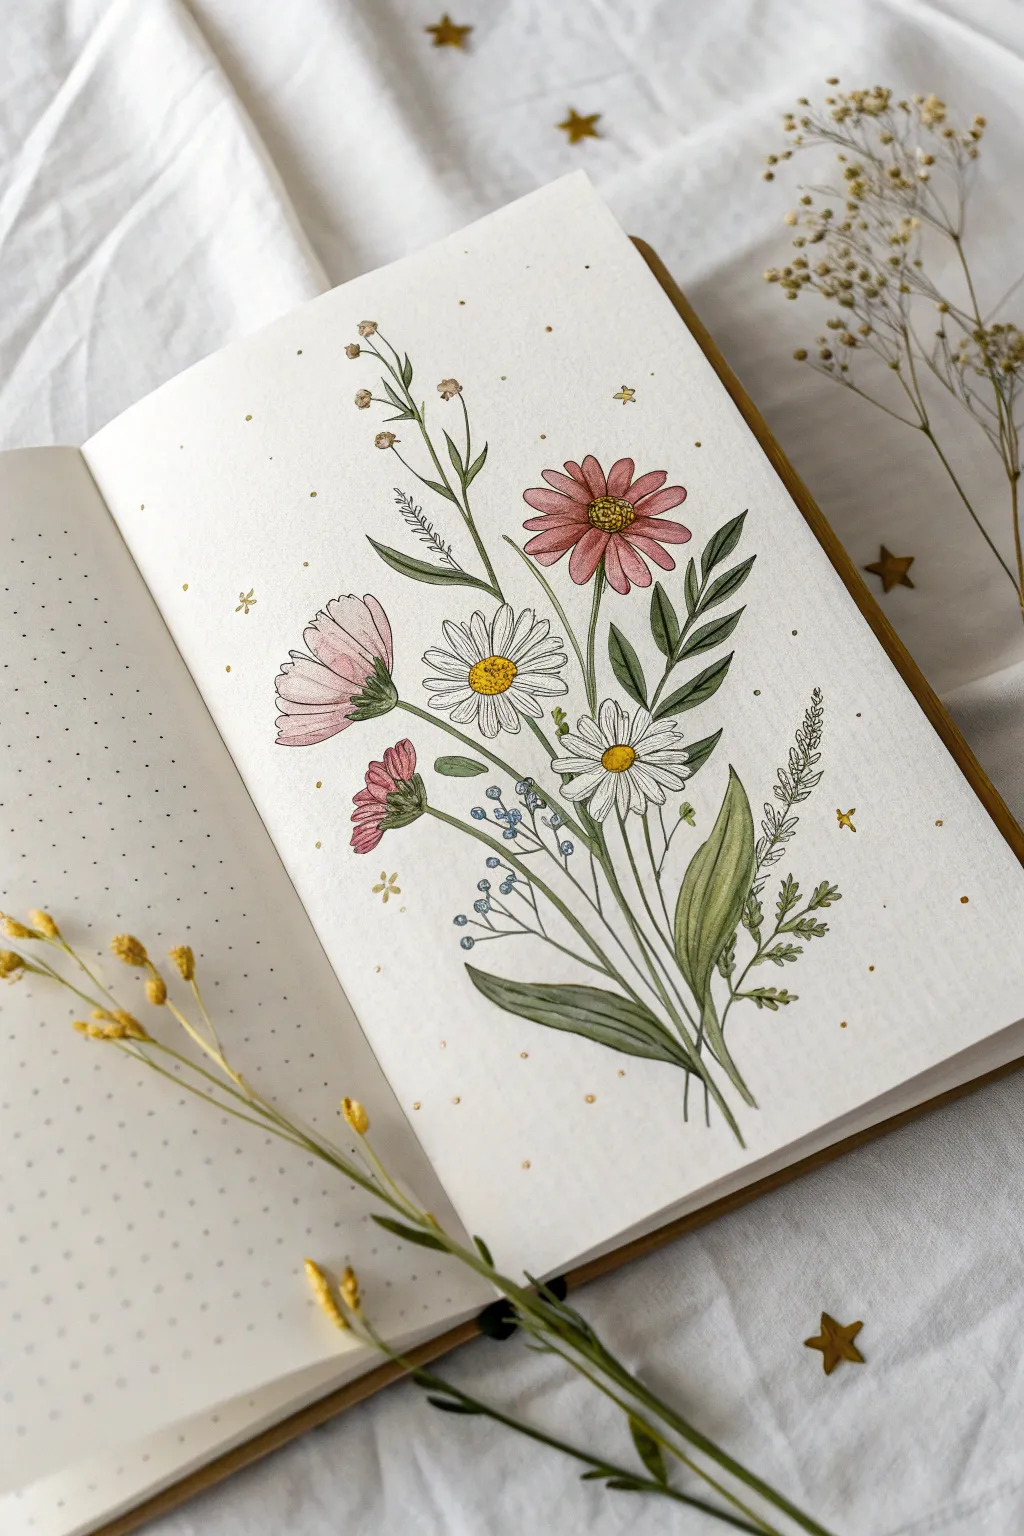
Capture the whimsy of a sun-drenched field with this delicate wildflower illustration on dot grid paper. Using fine liners and soft washes of color, you’ll build a charming bouquet that feels both organic and meticulously detailed.
Step-by-Step
Materials
- A5 Dot grid journal or mixed media paper
- Pencil (HB) and kneaded eraser
- Waterproof fine liner pens (sizes 0.1, 0.3, and 0.05)
- Watercolor paints or water-based markers
- Small round watercolor brush (size 2 or 4)
- White gel pen (optional for highlights)
Step 1: Planning and Sketching
-
Establish the curve:
Begin by lightly penciling a gentle, curved line that serves as the central stem or ‘spine’ of your bouquet. This helps create a natural flow rather than a stiff, upright arrangement. -
Map flower positions:
Sketch circles and ovals to represent where the flower heads will go. Place the largest blooms—the pink daisy and white daisies—first to anchor the composition. -
Draft the stems:
Connect your flower head shapes to the base of the bouquet with long, sweeping lines. Let the stems cross over each other near the bottom to mimic how gathered wildflowers naturally bundle. -
Add foliage shapes:
Lightly sketch in the larger leaves, particularly the broad, ribbed leaves at the bottom right. Fill empty gaps with suggestions of smaller filler flowers and thin, grassy sprigs.
Step 2: Inking the Details
-
Outline the main blooms:
Using a 0.1 fine liner, carefully ink the petals of the pink and white daisies. Keep your lines slightly broken or jagged at the petal tips to suggest texture. -
Detail the centers:
Switch to a 0.05 pen for the flower centers. Use tiny stippling dots to create the textured, pollen-filled look of the daisy cores. -
Ink the stems and leaves:
Trace over your pencil stem lines with confident, smooth strokes. When inking the leaves, add a center vein line but keep the shading minimal for now. -
Add delicate filler:
Draw the tiny blue flower buds and the feathery foliage on the right side. Use very light pressure here so these elements don’t overpower the main flowers. -
Golden sparkles:
Scatter small star shapes and tiny dots around the bouquet in the background space to give the piece a magical, illustrated fee. Allow the ink to dry completely before erasing pencil marks.
Loose Lines
Don’t try to close every single shape perfectly. Leaving small gaps in your ink lines makes the drawing feel breezier and more organic, especially for delicate wildflowers.
Step 3: Adding Color
-
Base pink wash:
Mix a diluted dusty pink watercolor. Paint the petals of the top-right daisy and the left-side cosmos-like flower. Keep the wash light initially; you can darken it later. -
Daisy shadows:
For the white daisies, don’t paint the petals fully white. Instead, use a very watery grey-blue to add shadows just where one petal overlaps another. This creates depth immediately. -
Bright centers:
Drop a saturated yellow ochre or gold into the centers of the daisies. While it’s still damp, touch the bottom edge with a tiny bit of brown for a shadow effect. -
Leafy greens:
Paint the stems and leaves with a sap green or olive tone. I find varying the green intensity helps separating the leaves—make the background leaves slightly darker than those in front. -
Blue accents:
Use a soft cornflower blue for the tiny sprigs of filler flowers on the left side. These small pops of cool color balance all the warm pinks and yellows. -
Second layers:
Once the first layer is bone dry, add a second, darker coat of pink to the base of the petals and along the center veins to make the flowers look cupped and dimensional. -
Final decorative touches:
Take a gold gel pen or yellow ochre paint and color in the small background stars and dots you drew earlier.
Bleeding Lines?
If your black ink smudges when painting, your pen isn’t fully waterproof or dry. Wait at least 15 minutes before painting, or test your pen on scrap paper first.
Close your journal and enjoy the permanent touch of spring you have captured on the page


Deer With Mossy Antlers and Blooming Vines
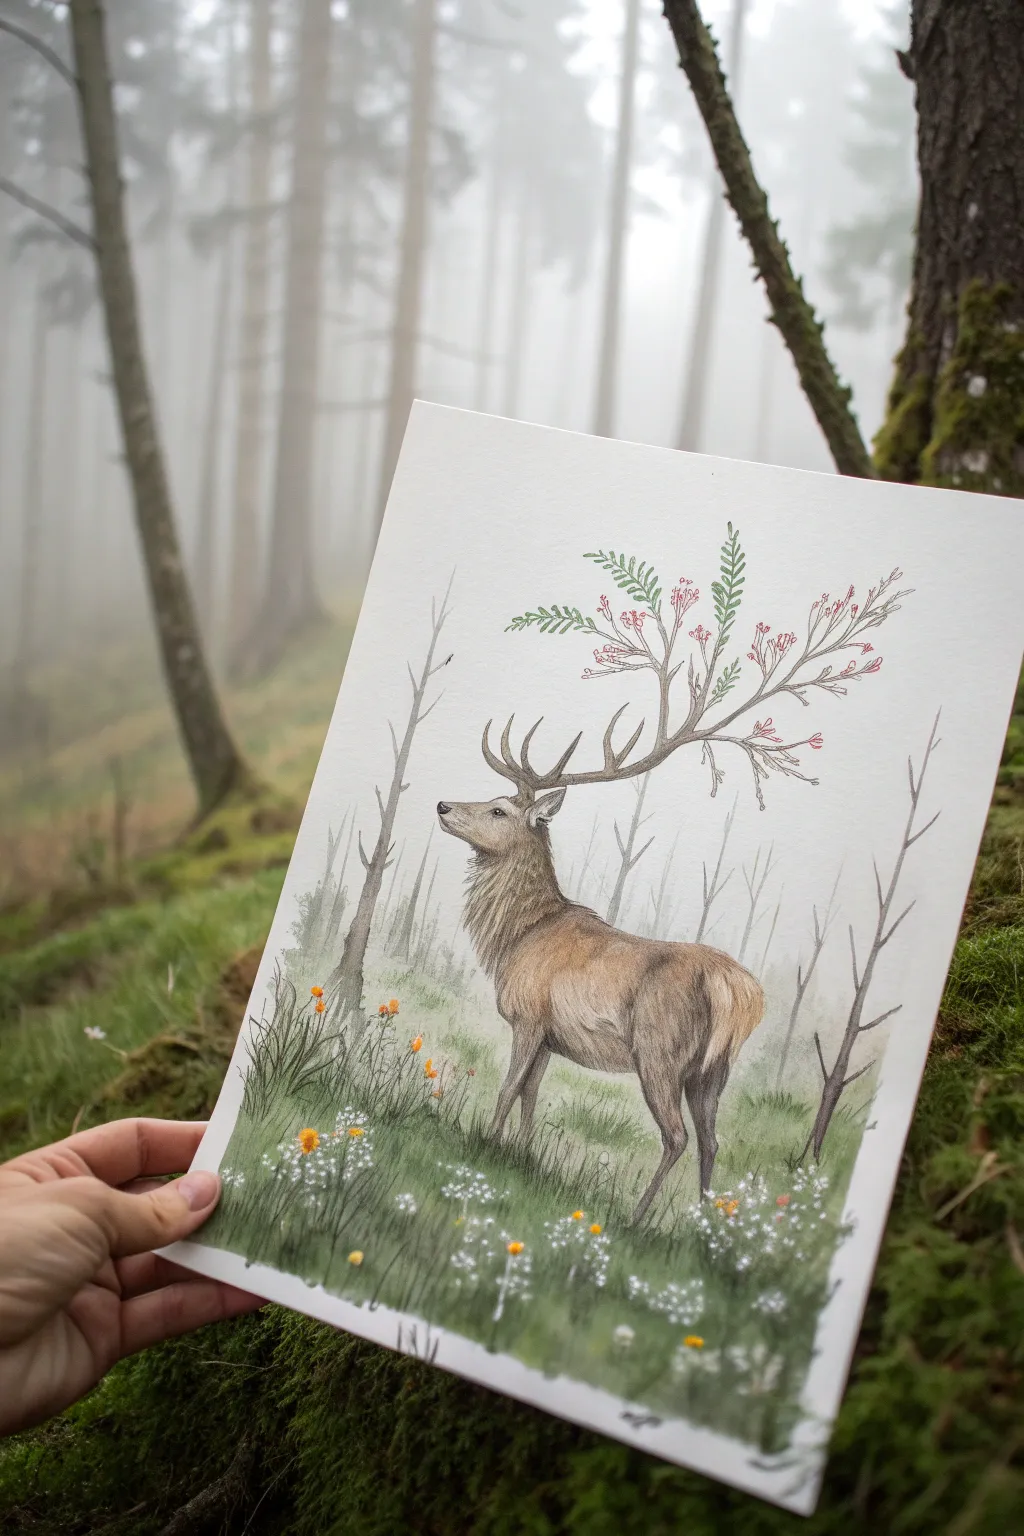
Capture the magic of nature with this enchanting watercolor and ink illustration featuring a noble deer whose antlers bloom with life. You’ll layer soft washes to create a misty forest atmosphere before adding precise ink details that bring the creature and its floral crown to life.
Detailed Instructions
Materials
- Cold press watercolor paper (300 gsm)
- Watercolor paints (Earth tones: Burnt Sienna, Raw Umber, Yellow Ochre; Greens: Sap Green, Olive Green; Red: Alizarin Crimson)
- Waterproof fine liner pens (sizes 0.1, 0.3, and 0.5)
- White gouache or white gel pen
- Round watercolor brushes (sizes 2, 6, and 10)
- Pencil (HB) and kneaded eraser
- Masking tape
- Two jars of water and paper towels
Step 1: Sketching the Composition
-
Map out the scene:
Begin by taping down your paper to prevent buckling. Lightly sketch the horizon line about a third of the way up the page to establish ground level. -
Draw the deer’s form:
Sketch the deer’s body in the center, starting with simple ovals for the chest and hindquarters. Connect them with smooth lines for the neck and back, keeping the pose alert and majestic. -
Draft the magical antlers:
Draw the main structure of the antlers extending upward. Instead of terminating in points, extend the tips into flowing branch shapes that curve organically. -
Add forest elements:
Lightly pencil in vertical tree trunks in both the foreground and background. Sketch clumps of grass and small wildflowers around the deer’s hooves.
Don’t Overwork the Fog
For the misty background, apply the paint once and let it settle. Going back into drying wash will create ‘cauliflowers’ or hard edges that ruin the soft, foggy illusion.
Step 2: Creating the Atmosphere
-
Paint the misty background:
Mix a very dilute wash of gray-green. Using your size 10 brush, apply this wash to the background trees and sky area. Keep it wet and loose to suggest fog, softening any hard edges with clean water. -
Establish the forest floor:
While the top is drying, mix Sap Green with a touch of Burnt Sienna. Paint the grassy area at the bottom, using upward flicking motions with a size 6 brush to suggest blades of grass. -
Define the mid-ground trees:
Once the first layer is dry, paint the thinner, closer trees using a slightly darker grey-brown mix. These should look more defined than the misty background trees but still soft.
Seasonal Variations
Change the antler foliage to match different seasons: bright green oak leaves for summer, vibrant orange maples for autumn, or bare icy branches for winter.
Step 3: Painting the Guardian
-
Base coat for the deer:
Mix a light wash of Yellow Ochre and Burnt Sienna. Apply this to the deer’s body, carefully avoiding the white chest patch and the inner ears. -
Build fur texture:
With a finer brush (size 2) and a darker brown mix (Burnt Sienna + Raw Umber), add shadows under the neck, belly, and legs. Use small, dashed strokes to mimic the direction of fur growth. -
Detail the head:
Deepen the color around the eyes and nose. I find that leaving a tiny speck of white paper in the eye creates a vital spark of life. -
Color the antlers:
Paint the base of the antlers with a pale bone color, transitioning into brown branches as you move up. Use Sap Green for the fern-like leaves and diluted Alizarin Crimson for the delicate pink berries.
Step 4: Ink and Refinement
-
Outline the deer:
Wait until the paint is bone dry. Use a 0.3 pen to outline the deer’s silhouette, broken up by short strokes to keep the furry texture soft rather than cartoonish. -
Detail the floral crown:
Switch to a 0.1 pen to draw the veins in the leaves and the delicate stems of the pink berries attached to the antlers. -
Enhance the foreground:
Use the 0.3 pen to draw specific blades of grass and the outlines of the wildflowers in the foreground. Darken the tree trunks on the left and right edges to frame the subject. -
Add final highlights:
Using white gouache or a gel pen, add tiny dots for the white wildflowers in the grass and highlights on the deer’s nose and eyes. Splatter a tiny amount of white gouache for a magical, pollen-like effect if desired.
Step back and admire how your gentle brushwork has brought this mystical creature out of the mist and onto your page


Crystal Cave Entrance Covered in Roots

Create a mesmerizing portal to another world with this illustration of a luminous crystal monolith nestled within an ancient root cave. Using colored pencils or digital media, you’ll capture the contrast between the dark, textured wood and the ethereal glow of the central gem.
Step-by-Step
Materials
- Heavyweight textured paper (Bristol vellum or watercolor paper)
- High-quality colored pencils (wax or oil-based)
- White gel pen or gouache for highlights
- Kneaded eraser
- Graphite pencil (HB or 2H)
- Blending stump or solvent (optional)
- Ruler
Step 1: Sketching the Foundation
-
Establish the Composition:
Begin by lightly sketching a central vertical rectangle for your crystal. Position it slightly below the center of the page. -
Form the Cave Entrance:
Draw an archway around the crystal. This doesn’t need to be perfect; irregular shapes serve the organic look better. -
Add the Roots:
Sketch winding, intertwined lines radiating reaching over the archway. Think of them as thick veins or muscular ropes wrapping around the entrance. -
Place the Details:
Lightly outline small clusters of mushrooms near the base of the entrance on the left and right, and indicate the pathway leading up to the crystal.
Glow Like a Pro
To make the crystal finish truly luminous, keep the paper white underneath your brightest colors. Colored pencil creates the best glow when layered over bare paper rather than white pencil.
Step 2: Coloring the Roots and Cave
-
Base Layers for Wood:
Using a cool teal or blue-grey pencil, lay down a light base color over all the root structures. Keep your strokes directional, following the flow of the roots. -
Deepening Shadows:
Take a darker slate blue or charcoal color and shade the recessed areas between the roots. This negative space is crucial for defining the 3D shapes. -
Adding Texture:
Use a sharp black or dark indigo pencil to draw thin, wavy cracks and bark texture on top of the teal roots. -
Painting the Void:
Fill the space directly behind the crystal (the inside of the cave) with your darkest black or deep indigo. Press firmly to create a solid, dark void that will make the crystal pop.
Level Up: Texture
Add ‘noise’ to the stone floor by stippling small dots of various colors. This gritty texture contrasts beautifully with the smooth, glass-like gradient of the crystal.
Step 3: Illuminating the Crystal
-
Crystal Gradient:
Start coloring the crystal from the top down. Use a bright teal or aqua at the peak, blending smoothly into yellow, and finally a warm orange at the base. -
Adding Inner Light:
Leave a thin vertical strip in the center of the crystal much lighter, or even white, to represent the core energy source. -
Refining Edges:
Use a white pencil to burnish (blend heavily) the transitions between the teal, yellow, and orange, creating a smooth, glowing glass effect. -
Surface Reflections:
Add stark white geometric highlights along the edges of the crystal facets using a white gel pen or gouache.
Step 4: Atmosphere and Details
-
Glowing Mushrooms:
Color the mushroom caps with purple and pink. Add a touch of yellow to the stems to suggest they are reflecting the crystal’s light. -
The Pathway:
Color the ground leading to the crystal with horizontal strokes. Use dark purples at the edges and blend into bright yellow in the center where the crystal casts its light. -
Light Spill:
I like to take a yellow pencil and lightly glaze over the inner edges of the root cave, creating the illusion that the crystal is casting light onto the wood. -
Final Touches:
Review your contrast. Deepen the blacks inside the cave and brighten the white highlights on the crystal one last time.
Frame your creation in a simple mount to let the magical colors speak for themselves

PENCIL GUIDE
Understanding Pencil Grades from H to B
From first sketch to finished drawing — learn pencil grades, line control, and shading techniques.
Explore the Full Guide
Living Treehouse Built From Branches and Vines
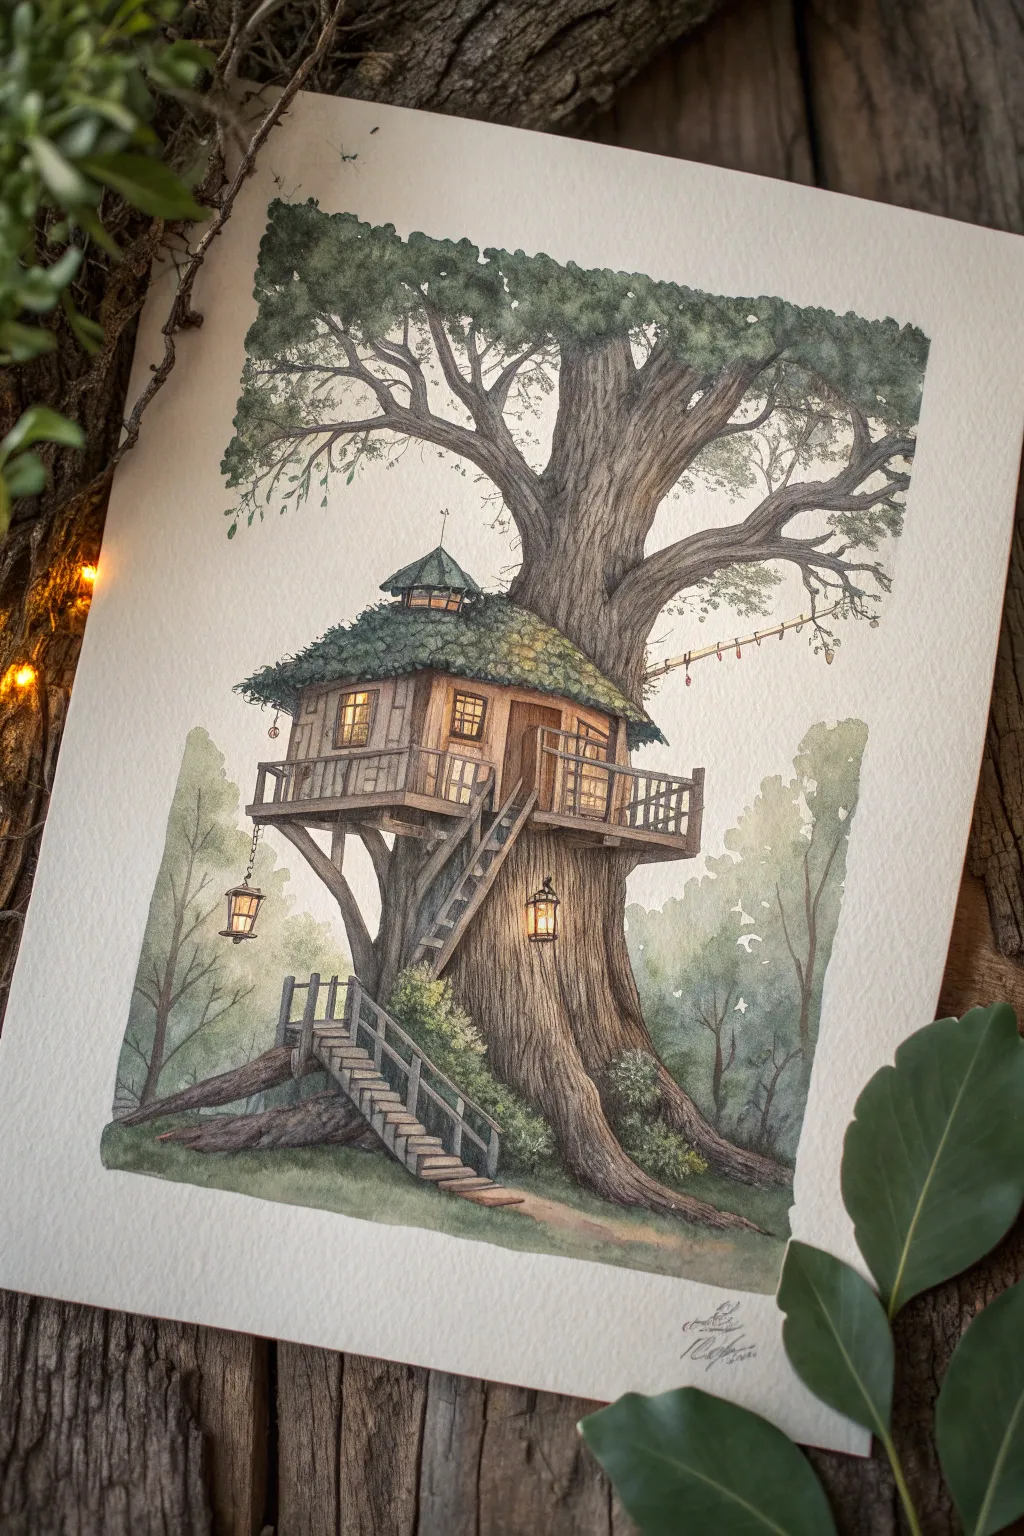
Capture the magic of childhood dreams with this detailed illustration of a cozy treehouse nestled in an ancient oak. Using a blend of fine ink lines and soft watercolor layers, you’ll create a piece that feels both rustic and enchanted.
Step-by-Step Guide
Materials
- Hot press watercolor paper (smooth texture)
- Waterproof fine liner pens (0.1, 0.3, and 0.5 sizes)
- Watercolor paint set (pans or tubes)
- Round watercolor brushes (sizes 2, 4, and 8)
- HB pencil and kneaded eraser
- Masking fluid (optional)
- Jar of clean water and paper towels
Step 1: Sketching the Skeleton
-
Establish the Trunk:
Begin with a light HB pencil sketch. Draw the massive central trunk first, making it wide at the base and slightly narrowing as it goes up. I like to add a few large, gnarly roots spreading out at the bottom to ground the tree. -
Place the Structure:
Sketch the main cabin shape comfortably nestled in the first major fork of the branches. Draw a simple house shape with a slanted roof, adding a wrap-around deck. -
Add Connecting Elements:
Draw the spiral staircase leading up from the roots to the deck. Sketch a rope ladder or bridge extending to the right branch to suggest more adventure off-page. -
Foliage Framework:
Lightly outline the canopy shapes. Don’t draw individual leaves yet; just block in the cloud-like masses where the leaves will sit.
Step 2: Inking the Details
-
Refining the Bark:
Using your 0.1 fine liner, start texturing the bark. Use long, vertical flowing lines that contour around the shape of the trunk. Break these lines occasionally to create knots and rough patches. -
Architectural details:
Switch to a 0.3 pen for the treehouse structure. Draw vertical planks for the siding and carefully outline the railing posts. Ensure the perspective of the railing matches the curve of the deck. -
Roof Texture:
For the roof, create a shingled or thatched look using small, repetitive ‘U’ or ‘V’ shapes. Keep them tight and layered. -
Stairs and Accessories:
Ink the wooden stairs, adding wood grain texture to the treads. Don’t forget the hanging lanterns—draw them dangling from the deck, with simple cage outlines. -
Leafy Borders:
Outline the clumps of foliage using jagged, slightly erratic lines to mimic leaf edges. You don’t need to close every shape; open lines let the watercolor breathe.
Ink Tip
Wait at least 15 minutes after inking before erasing pencil lines or painting. Smudged ink can ruin the crisp illustrative look instantly.
Step 3: Adding Color and Light
-
Base Washes:
Once the ink is totally dry, erase pencil marks. Mix a watery wash of Burnt Sienna and Raw Umber. Apply this loosely to the tree trunk, letting it be lighter in the center for a rounded 3D effect. -
Painting the Treehouse:
Use a warm Yellow Ochre for the house siding to make it look like lit wood. For the roof, mix a dusty moss green using Sap Green and a touch of neutral grey. -
Canopy Greens:
Paint the foliage masses with varied greens. Start with a pale yellow-green wash, then drop in darker Hooker’s Green or Olive while the paper is still damp to create natural shadows within the leaves. -
Illuminating Windows:
For the windows and lanterns, use a bright punch of Cadmium Yellow or Lemon Yellow. Leave a tiny speck of white paper in the center of the lanterns for the brightest highlight. -
Deepening Shadows:
Mix a dark Sepia or Paynes Grey. I carefully apply this under the deck, beneath the roof eaves, and in the deep crevices of the bark to make the structure pop. -
Background Atmosphere:
Create a very watery, pale wash of bluish-green for the background trees. Paint these silhouettes without detail to push them into the distance and create depth. -
Final Textures:
Once everything is dry, use a nearly dry brush with dark brown paint to drag lightly over the bark and stairs, enhancing the rough wooden texture.
Make It Glow
Paint a faint halo of yellow wash around the lanterns on the surrounding bark. This subtle ‘bloom’ effect makes the light look real and warm.
Now you have a charming woodland hideaway ready to be framed or gifted to a fellow dreamer
Upturned Forest: Roots in the Sky
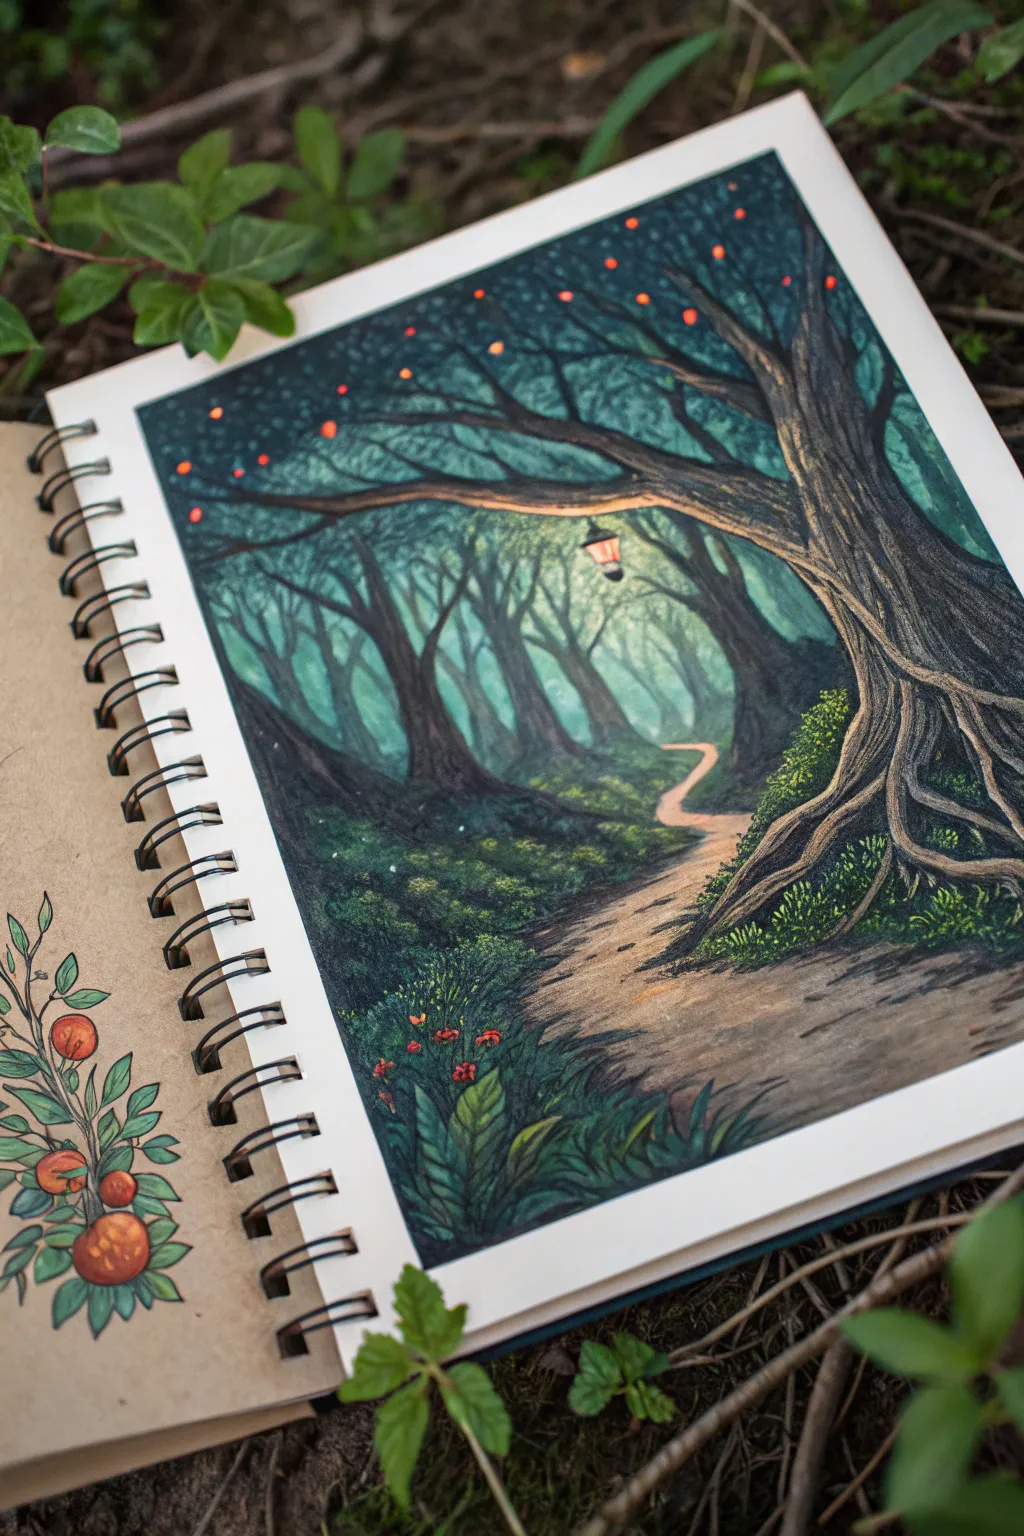
Capture the magic of an enchanted evening with this atmospheric forest scene, rendered in rich colored pencils and ink. This project features a glowing lantern guiding the way down a winding path, framed by ancient, gnarled trees and sparkling fireflies.
Step-by-Step
Materials
- Spiral-bound sketchbook (heavyweight paper)
- Set of artist-grade colored pencils (greens, browns, earthy tones, orange, yellow)
- Black fineliner pens (0.1mm and 0.5mm)
- White gel pen or white gouache
- Pencil (HB for sketching)
- Kneaded eraser
- Blending stump (optional)
Step 1: Sketching the Composition
-
Map out the horizon:
Begin lightly with your HB pencil. Draw a winding S-shaped curve starting wide at the bottom right and narrowing as it disappears into the center distance. This will be your forest path. -
Anchor the foreground:
Sketch a large, dominant tree on the right side. Focus on the texture of the roots gripping the earth and the trunk curving slightly inward towards the path. -
Create depth with trees:
Draw several vertical lines for trees in the background. Make them thinner and closer together as they recede into the distance to create atmospheric perspective. -
Add key details:
Sketch a thick branch extending from the main tree over the path. Hang a small lantern from this branch, positioning it centrally to serve as a focal point. -
Refine the sketch:
Add rough outlines for shrubbery and undergrowth along the path edges and around the base of the main tree.
Step 2: Layering Colors
-
Base layer for the path:
Use a light creamy beige or sandy brown pencil to color the path. Keep your strokes horizontal to suggest the flatness of the ground. -
Background atmosphere:
Color the sky area and distant background with a cool teal or blue-green. Apply this lightly; we want a misty, ethereal look for the furthest trees. -
Deepening the forest tones:
Use darker greens and prussian blues for the middle-ground trees. I find that layering blue over green really helps push these trees back visually without making them muddy. -
Bark texture base:
Fill in the main tree trunk with a medium brown. Don’t press too hard yet; you need tooth on the paper for subsequent layers. -
Defining the bark:
Using a dark walnut or dark grey pencil, draw flowing, organic lines up the trunk to mimic deep grooves and bark texture. Follow the curve of the wood.
Muddy colors?
If your greens look muddy, stop layering wax pencils. Spray a light workable fixative, let it dry completely, and then add fresh, crisp layers on top to restore vibrancy.
Step 3: Building Depth and Lighting
-
Shadows and contrast:
Use black or very dark indigo to shade the deepest parts of the forest on the left and the shadowed side of the main tree. This high contrast makes the glowing elements pop. -
The lantern glow:
Color the lantern panes with bright yellow and orange. softly blend a halo of light yellow around the lantern into the surrounding blue-green foliage to create a glow effect. -
Texturing the undergrowth:
Stipple or use small circular motions with various shades of green to create leafy bushes along the path. Add touches of yellow-green where the lantern light would hit the leaves. -
Root details:
Sharpen your dark brown or black pencil and define the gnarled roots of the foreground tree. Add highlights on top of the roots with a tan or ochre pencil to show dimension. -
Path shadows:
Add subtle shadows across the path using a cool grey or light purple, mimicking the shadows cast by the trees.
Add a hidden friend
Hide a small silhouetted forest creature, like a rabbit, deer, or owl, peeking out from behind one of the distant trees for a storytelling element.
Step 4: Final Magical Touches
-
Sparkling fireflies:
Using an orange or bright red pencil, press firmly to create small dots scattered in the upper canopy. These are your fireflies or magical lights. -
Intense highlights:
Take your white gel pen or a fine brush with white gouache. Add a tiny white dot in the center of the lantern and the center of the brightest fireflies. -
Small floral details:
Add tiny specks of red and orange in the bottom left corner to represent small wildflowers in the foreground grass. -
Final outline check:
Go over the very darkest lines of the foreground tree with your black fineliner to crispen edges, but keep the background softer.
Close your sketchbook knowing you’ve captured a quiet, magical world on paper.


Have a question or want to share your own experience? I'd love to hear from you in the comments below!