Whenever I’m stuck in a creative rut, I make a bowl—because you get a tiny “canvas” inside, plus a whole second world on the outside. Here are my favorite pottery bowl ideas for shape, surface decoration, and glaze effects you can totally make your own.
Floral Garland Interior
Bring the softness of a wildflower meadow into your kitchen with this delicate, hand-painted ceramic bowl. The interior features a loose, breezy garland of ferns, tiny blossoms, and greenery that perfectly frames whatever you choose to serve.
Detailed Instructions
Materials
- Wheel-thrown or hand-built stoneware bowl (leather hard or bisque)
- White slip or creamy white underglaze (for base)
- Assorted underglazes (sage green, forest green, olive green, coral pink, mustard yellow, rust red)
- Clear transparent glaze
- Fine liner brushes (size 00 or 000)
- Small round brush (size 2)
- Sponge
- Pencil (optional)
Step 1: Preparation & Base Coat
-
Prepare the surface:
Begin with a thrown or hand-built bowl. If you are working on leather-hard clay, ensure it is stiff enough to handle. If working on bisque, wipe it down with a damp sponge to remove dust. -
Apply the background:
If your clay body is dark, you may want to apply a layer of white slip or creamy underglaze to the interior to make the colors pop. If using white stoneware, you can paint directly on the clay surface. -
Create a guide:
Lightly sketch a circle about 1.5 inches down from the rim using a dull pencil. This faint line will act as the spine for your floral garland and will burn off in the kiln.
Smudged Lines?
If underglaze smears while painting, wait for it to dry completely, then gently scratch the mistake off with an X-Acto knife or needle tool instead of wiping.
Step 2: Painting the Foliage
-
Mix your greens:
On your palette, prepare three shades of green: a sage, a deeper forest green, and an olive tone. Slight variations in color create depth and realism. -
Paint the main stems:
Using your fine liner brush loaded with sage green, paint thin, curving lines that weave along your pencil guide. Don’t make them a perfect circle; let the lines break and overlap naturally. -
Add fern fronds:
Switch to the forest green. Along one section of the vine, paint tiny, repetitive hash marks extending from a central stem to create a fern-like texture. -
Paint leafy sprigs:
Using the olive green and the small round brush, add simple teardrop-shaped leaves. Press the belly of the brush down and lift up quickly to create the tapered point of the leaf. -
Integrate rosemary textures:
With the finest liner brush and a dark green, add clusters of needle-like strokes in sparse areas to mimic rosemary or pine foliage.
Level Up: Texture
Before painting, use a slip trailer to create the stems. This adds a raised, tactile quality to the vines that will be felt even under the smooth clear glaze.
Step 3: Adding Floral Details
-
Dot the yellow flowers:
Load a liner brush with mustard yellow. Create small clusters of 3-5 dots near the fern sections to represent mimosa or goldenrod. -
Create coral blooms:
Using coral pink, paint small, five-petaled flowers. Keep them loose and impressionistic rather than perfectly botanical. -
Add rust accents:
For contrast, paint tiny buds or berries using rust red. I like to place these near the ends of the wispy stems to weigh them down visually. -
Connect the elements:
Go back with your finest green liner brush to ensure all flowers have a tiny stem connecting them to the main garland. Floating flowers can look disjointed. -
Check balance:
Step back and look at the interior. If there are large empty gaps in the garland, fill them with a simple curved line or a few extra leaves.
Step 4: Finishing & Glazing
-
Let it dry completely:
Allow the underglaze decoration to dry fully. If you painted on greenware, bisque fire the bowl now. -
Prep for glazing:
Once the bowl is bisqued, wipe it down gently with a damp sponge to remove any kiln dust and ensure the pencil lines are gone. -
Apply clear glaze:
Pour a clear, food-safe transparent glaze into the bowl. Roll it around to coat the entire interior evenly, then pour out the excess. -
Clean the rim and foot:
If you want a raw clay rim like the photo, sponge the glaze off the very top edge. Definitely wipe the foot of the bowl clean. -
Final firing:
Fire the bowl to the temperature required by your specific clay and glaze combination.
Once fired, you’ll have a durable piece of functional art that makes every meal feel like a picnic


Modern Geometric Color Blocking
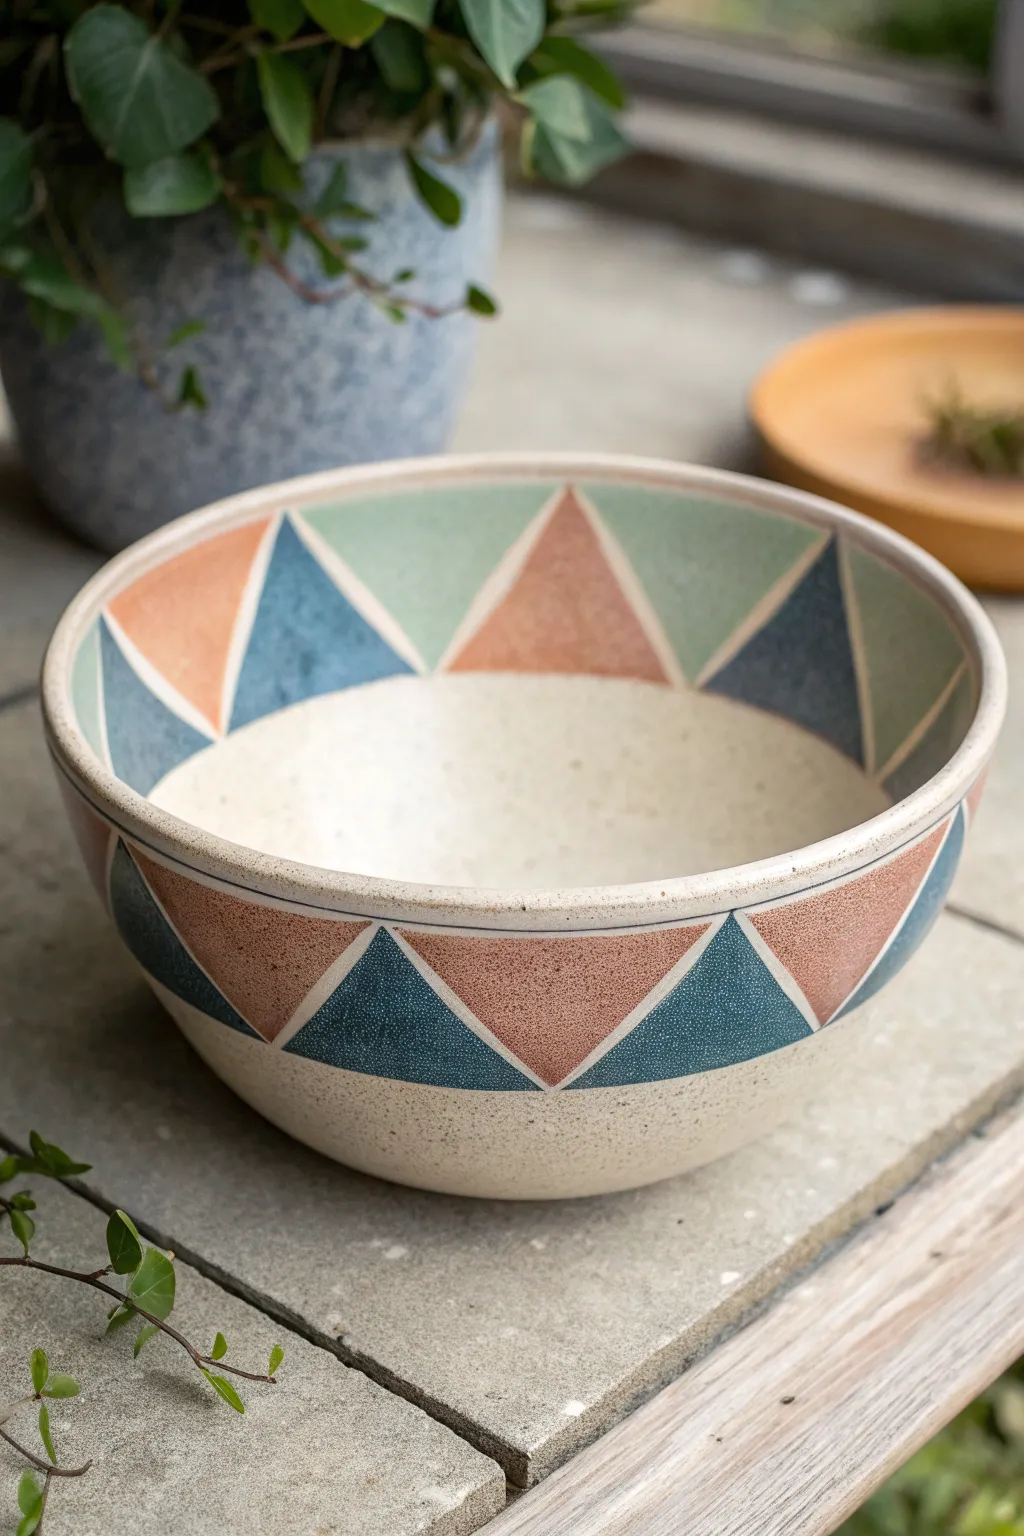
This project captures the essence of modern desert aesthetics with its warm terracotta, muted teal, and soft sage triangles. The speckled clay body adds a wonderful organic texture that peeks through the crisp geometric lines, creating a perfect balance between structured design and earthy warmth.
How-To Guide
Materials
- Speckled stoneware clay (white or buff)
- Pottery wheel (or slab rolling equipment for hand-building)
- Rib tool (metal and rubber)
- Trimming tools
- Sponge
- Underglazes: Muted teal, terracotta/rust, light sage green
- Fine-line tape (1/8 inch or 1/4 inch width)
- Small flat brush
- Small detail brush
- Clear matte or satin glaze
- Pencil
- Ruler or measuring tape
Step 1: Forming the Vessel
-
Throw the base form:
Begin by centering your speckled stoneware clay on the wheel. Throw a simple, wide bowl shape with high, slightly flared walls. Aim for a rim that is substantial but not clunky, smoothing it with a chamois for a professional finish. -
Refine the curve:
Use a metal rib to compress the inside curve and remove any throwing lines on the exterior. The surface needs to be as smooth as possible for the geometric design to sit correctly. -
Dry to leather hard:
Allow the bowl to dry slowly until it reaches a sturdy leather-hard stage. It should be firm enough to handle without warping but still hold moisture. -
Trim the foot:
Flip the bowl and trim a distinct foot ring. A clean, defined foot elevates the modern look. Once trimmed, smooth the exterior one last time with a slightly damp sponge to remove any grog drag marks.
Crisp Lines Hack
If painting freehand, scratch the outline of your triangles lightly with a needle tool. The groove acts as a physical barrier, stopping the underglaze from flowing past the line.
Step 2: Drafting the Design
-
Mark the bands:
Decide on the width of your pattern band. Using a pencil and supporting your hand on a steady surface (or a banding wheel), lightly draw a horizontal line around the exterior circumference about halfway up the bowl, and another near the rim to define the painting area. -
Measure equal segments:
Measure the circumference of your bowl and divide it by the number of peaks you want (around 6-8 usually works well). Lightly mark these vertical division points on the rim and the lower pencil line. -
Connect the triangles:
Use a ruler or straight edge to lightly sketch the zig-zag pattern connecting your marks. You want a continuous line of triangles pointing up and down. -
Repeat for interior:
Recreate a similar, perhaps slightly larger, zig-zag pattern on the upper interior wall of the bowl. This creates a delightful surprise when looking inside.
Step 3: Applying Color
-
Tape boundaries (optional):
For razor-sharp lines, apply fine-line tape along your penciled triangle borders. Press down firmly to prevent underglaze from bleeding underneath. I like to tape just one set of triangles first to avoid tape overlap confusion. -
Paint the exterior teal:
Using a small flat brush, apply the muted teal underglaze to the downward-pointing exterior triangles. Apply 2-3 coats for opaque coverage, letting each coat dry until matte before adding the next. -
Paint the exterior terracotta:
Paint the upward-pointing triangles on the exterior with the terracotta/rust underglaze. Be careful near the edges if you aren’t using tape; a steady hand and a detail brush work wonders here. -
Paint the interior accents:
Moving to the inside, paint the triangles. Alternate between the teal, the terracotta, and the light sage green. The sage green offers a soft contrast to the speckled clay body inside. -
Clean up lines:
If you used tape, remove it gently once the underglaze is dry to the touch but not bone dry. If you painted freehand, use a sharp cleanup tool or a stiff, slightly damp brush to tidy up any ragged edges. -
Bisque fire:
Let the bowl dry completely to the bone-dry stage. Load it into the kiln and bisque fire it to Cone 04 (or your clay’s specific bisque temperature).
Make it Pop
Leave a thin 1-2mm gap of unpainted raw clay between the color blocks. This negative space highlights the speckled clay and makes the colors appear more vibrant.
Step 4: Glazing and Finishing
-
Prepare for glazing:
Wipe the bisque-fired bowl with a damp sponge to remove any kiln dust. This ensures the clear glaze will adhere properly without crawling. -
Apply clear glaze:
Dip the entire bowl into a clear matte or satin glaze. A matte finish complements the modern style better than a high gloss. Shake off excess glaze gently. -
Clean the foot:
Immediately wipe the foot ring clean with a sponge to prevent the pot from fusing to the kiln shelf. -
Final firing:
Fire the bowl to the maturity temperature of your clay and glaze (typically Cone 5 or 6 for stoneware). Allow the kiln to cool naturally before opening.
Once cooled, fill your new bowl with fruit or simply display it to admire how the geometric lines play against the natural speckles of the clay


Classic Stripe Bands Around the Rim
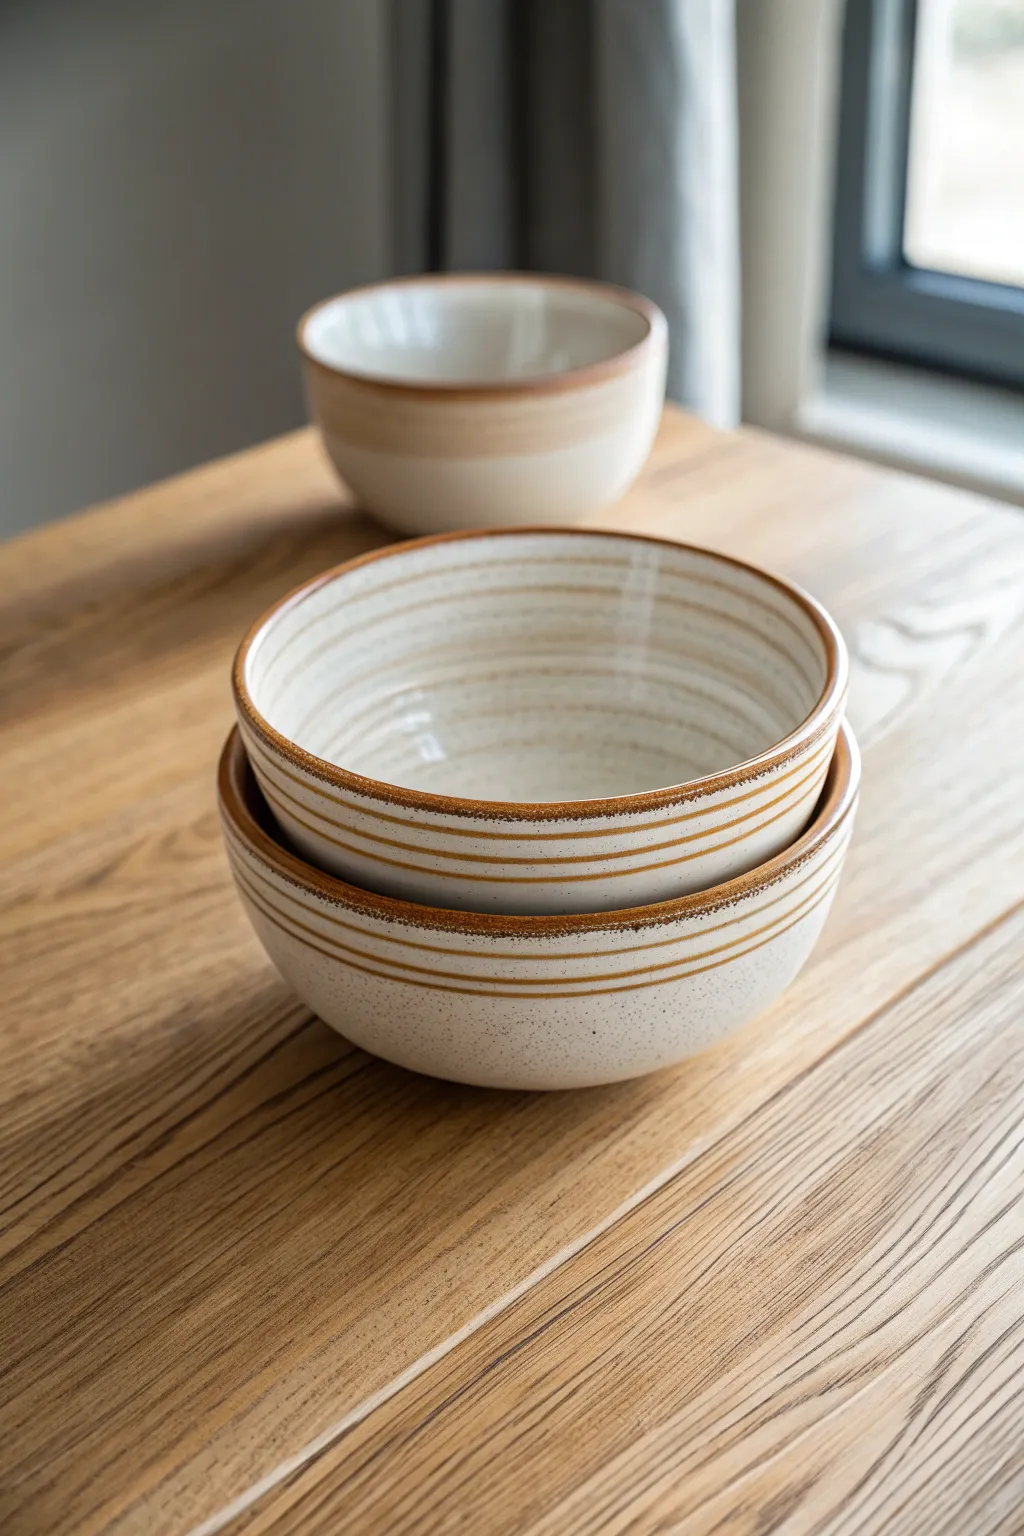
Embrace the timeless appeal of rustic minimalism with these hand-thrown stoneware bowls featuring simple, classic stripe bands. The warm, speckled clay body peeking through a creamy white glaze, accented by earthy oxide lines, creates a cozy yet elegant addition to any dining table.
Step-by-Step
Materials
- Speckled stoneware clay (mid-fire or high-fire)
- Pottery wheel
- Throwing tools (rib, sponge, wire cutter)
- Trimming tools
- Creamy satin-matte white glaze (dipping or brushing)
- Iron oxide wash or dark brown underglaze
- Banding wheel
- Fine liner brush or sumi brush
- Wax resist
- Kiln
Step 1: Throwing and Shaping
-
Center the Clay:
Begin with about 1.5 to 2 lbs of speckled stoneware clay. Wedge it thoroughly to remove air pockets, then slap it onto the wheel head. Center the clay using consistent pressure and water. -
Open the Form:
Open the centered mound, establishing a curve for the interior bottom rather than a flat floor, which gives the bowl a continuous, flowing shape. -
Pull the Walls:
Pull the walls up and slightly outward to create a medium-sized mixing bowl shape. Aim for an even thickness, tapering slightly thinner at the rim. -
Refine the Profile:
Use a metal or wooden rib on the interior to compress the clay and remove throwing lins, creating a smooth canvas for the future glaze. Do the same on the exterior for a uniform curve. -
Define the Rim:
Compress the rim with a chamois or your sponge to ensure it is rounded and durable. This area will be highlighted with oxide later, so a clean edge is essential. -
Remove from Wheel:
Wire the bowl off the wheel head and set it aside on a ware board until it reaches a leather-hard state.
Wobbly Stripes?
Rest your painting arm on a steady stack of books or a jar while spinning the banding wheel. Keeping your hand stationary while the pot moves ensures crisp, even lines.
Step 2: Trimming and Decorating
-
Trim the Foot:
Once leather-hard, center the bowl upside down on the wheel. Trim away excess clay from the bottom to create a defined foot ring that complements the bowl’s curve. -
Smooth the Surface:
Burnish the trimmed areas slightly with a smooth rib or the back of a spoon if you want the raw clay sections to feel extra smooth after firing. -
Bisque Fire:
Allow the bowls to dry completely (bone dry). Load them into the kiln for a bisque firing according to your clay body’s specifications (usually Cone 04 or 06).
Variation: Raw Clay
For a textural contrast, use wax resist over the stripes on bare clay before dipping in white glaze. This leaves recessed, unglazed bands of raw earth tone.
Step 3: Glazing and Striping
-
Clean the Bisque:
Wipe the bisque-fired bowl with a damp sponge to remove any dust that might prevent the glaze from adhering properly. -
Wax the Foot:
Apply wax resist to the foot ring and bottom of the bowl to prevent glaze from sticking to the kiln shelf. -
Apply Base Glaze:
Dip the entire bowl into a creamy white satin-matte glaze. If the glaze is too thick, thin it slightly with water to ensure the clay’s speckles show through. I typically hold it under for just 3 seconds. -
Clean the Rim:
While the glaze is still powdery but dry to the touch, you can choose to wipe the very edge of the rim with a damp sponge if you want bare clay there, or leave the glaze as a base for the oxide. -
Set Up Banding Wheel:
Place the glazed bowl on a banding wheel. Center it as perfectly as possible to ensure your stripes are straight. -
Mix Oxide Wash:
Mix iron oxide with water (and a little glazing medium if available) to create a wash with the consistency of watercolor paint. -
Paint the Rim:
Spin the banding wheel slowly but consistently. Hold a brush loaded with oxide wash steady against the rim to create a solid dark band at the very top. -
Add Variable Stripes:
Move your hand slightly lower to paint the secondary stripes. Apply different pressures or use brushes of varying widths to create one or two thin parallel lines just below the main rim band. -
Final Fire:
Load the bowls into the kiln for the glaze firing (typically Cone 5 or 6 for stoneware). Ensure the bowls do not touch each other.
Once cooled, your bowls are ready to bring a touch of warm, artisan charm to your next meal


Playful Polka Dot Scatter
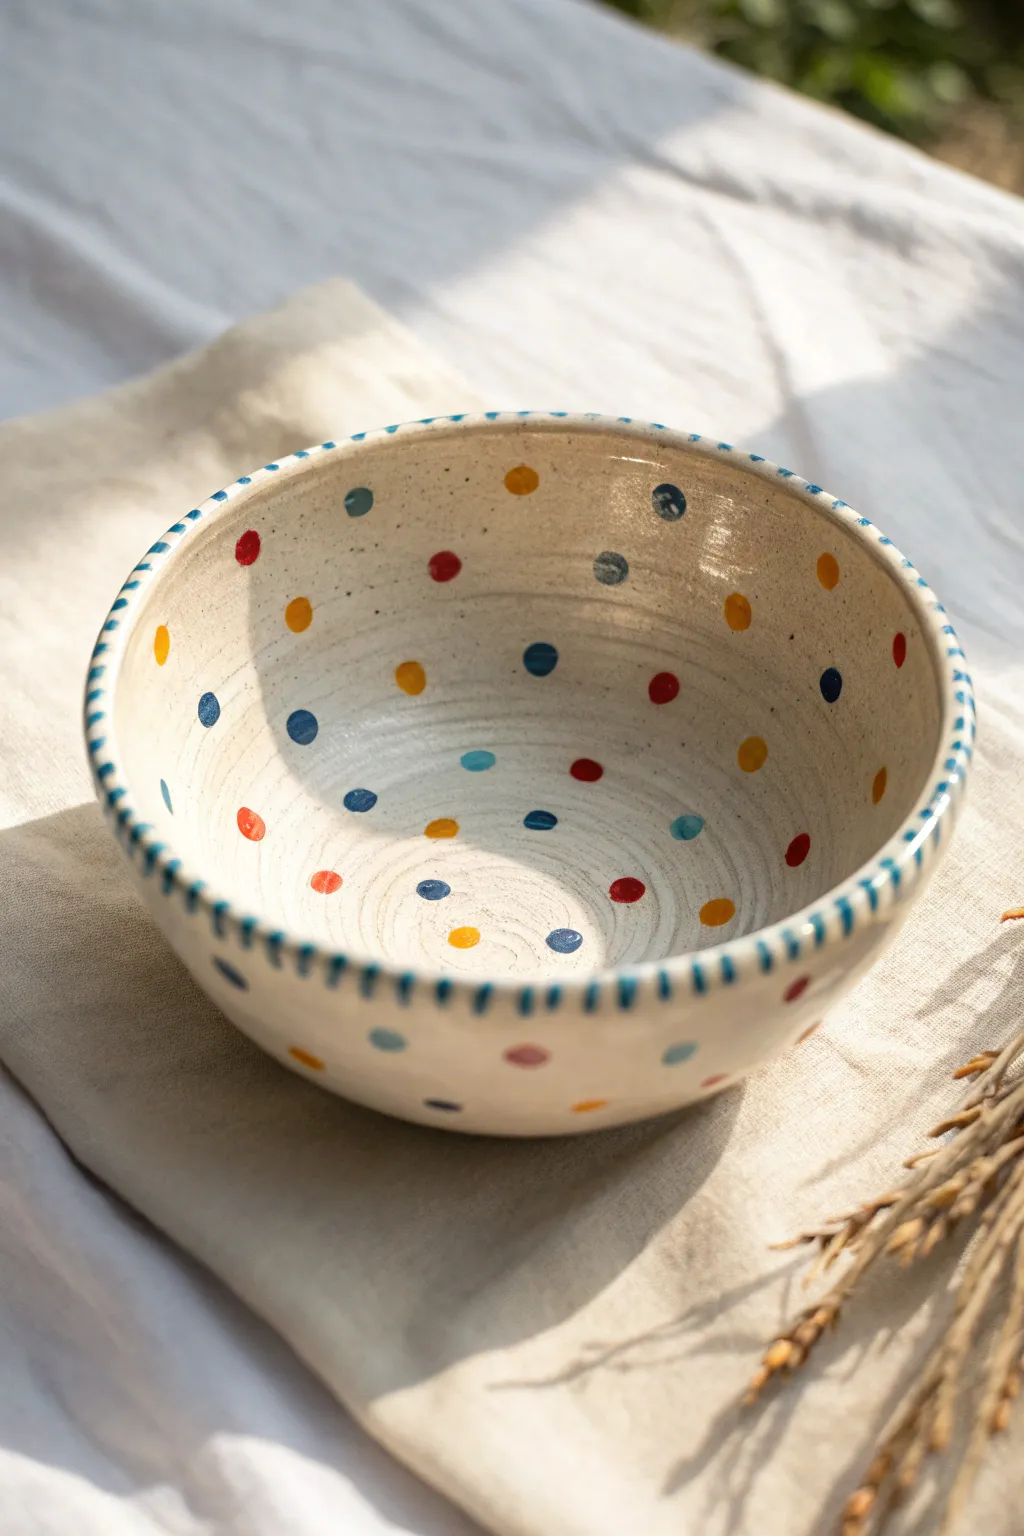
Bring a splash of joy to your morning routine with this charming hand-painted ceramic bowl. The design features a playful scatter of colorful dots against a creamy speckled base, finished with a classic dashed rim that frames your food perfectly.
Detailed Instructions
Materials
- Bisque-fired ceramic bowl (medium size)
- Underglazes in Red, Cobalt Blue, Teal, and Sungold Yellow
- Clear dipping or brushing glaze (food safe)
- Cream/Off-White speckled matte glaze (optional base, if not using clear over plain clay)
- Small round detail brush (size 2 or 4)
- Fine liner brush
- Sponge
- Water container
- Lazy Susan or banding wheel
Step 1: Preparation and Base Coat
-
Clean the Bisqueware:
Start by wiping down your bisque-fired bowl with a damp sponge. This removes any kiln dust or oils from handling that might resist the glaze application. -
Apply the Base Color:
If your clay body isn’t naturally the creamy color you desire, apply 2-3 coats of a cream or off-white underglaze to the entire interior and exterior. Allow each coat to dry until it loses its sheen before applying the next layer. -
Smooth the Surface:
Once the final base coat is dry, gently run a clean, dry finger over the surface to knock down any high spots or brush strokes.
Fixing Smudged Dots
If you accidentally smudge a wet dot, let it dry completely first. Then, gently scrape the mistake away with an X-Acto knife or a stiff clean brush before repainting.
Step 2: Painting the Polka Dots
-
Load the Brush:
Shake your underglaze bottles well. Squeeze small amounts of red, blue, teal, and yellow onto a palette. Load your size 4 round brush with the first color, ensuring the bristles are fully saturated but not dripping. -
Start the Scatter:
Begin placing random dots on the inside of the bowl. Press the brush tip gently against the surface and lift straight up to create a round mark. Don’t worry about making imperfect circles; the handmade look is part of the charm. -
Rotate and Repeat:
Place the bowl on a banding wheel if you have one. Spin it slowly while adding dots to ensure random placement without clustering them too tightly in one area. -
Switch Colors:
Rinse your brush thoroughly and switch to the second color. Fill in the empty spaces between the first set of dots. I find it helpful to vary the spacing slightly to keep the pattern dynamic. -
Complete the Interior:
Continue cycling through your red, teal, blue, and yellow underglazes until the interior feels balanced but airy. Leave plenty of negative space. -
Decorate the Exterior:
Repeat the polka dot process on the outside of the bowl. Given the curvature, you may want to space these slightly further apart than the interior dots. -
Layering for Opacity:
Most underglazes require a second or third coat for solid color. Go back over each dot carefully once the first layer is dry to ensure the colors pop after firing.
Gradient Effect
Mix a tiny amount of white underglaze into your colors for some dots to create pastel variations. This adds depth without introducing new hues.
Step 3: Defining the Rim
-
Prep the Liner Brush:
Switch to your fine liner brush and load it with the Cobalt Blue underglaze. You want the paint consistency to be fluid but not watery. -
Mark the Dashes:
Starting at any point on the rim, paint short, vertical dash marks that wrap slightly over the edge—from the very top of the inside rim to just over the outside lip. -
Create Rhythm:
Space the dashes about a quarter-inch apart. Try to keep a steady rhythm as you work your way around the circumference. -
Check Consistency:
Step back and look at the rim. If any dashes look too faint, carefully re-apply a second coat of blue over the existing marks.
Step 4: Glazing and Firing
-
Dry Thoroughly:
Allow the underglaze decoration to dry completely, preferably overnight. The dots should be powdery to the touch. -
Apply Clear Glaze:
Dip the entire bowl into a clear, food-safe glaze. If you don’t have a dipping setup, brush on 2-3 coats of clear brushing glaze, using a fan brush to minimize streaks. -
Wipe the Foot:
Use a damp sponge to meticulously wipe all glaze off the bottom foot ring of the bowl. This prevents it from fusing to the kiln shelf. -
Final Fire:
Fire the bowl in the kiln according to the specific temperature guidelines of your clay and glaze combination (typically Cone 5 or 6 for stoneware).
Once cooled, your bowl is ready to brighten up your kitchen table with its custom confetti pattern
BRUSH GUIDE
The Right Brush for Every Stroke
From clean lines to bold texture — master brush choice, stroke control, and essential techniques.
Explore the Full Guide
Citrus or Watermelon Slice Illusion
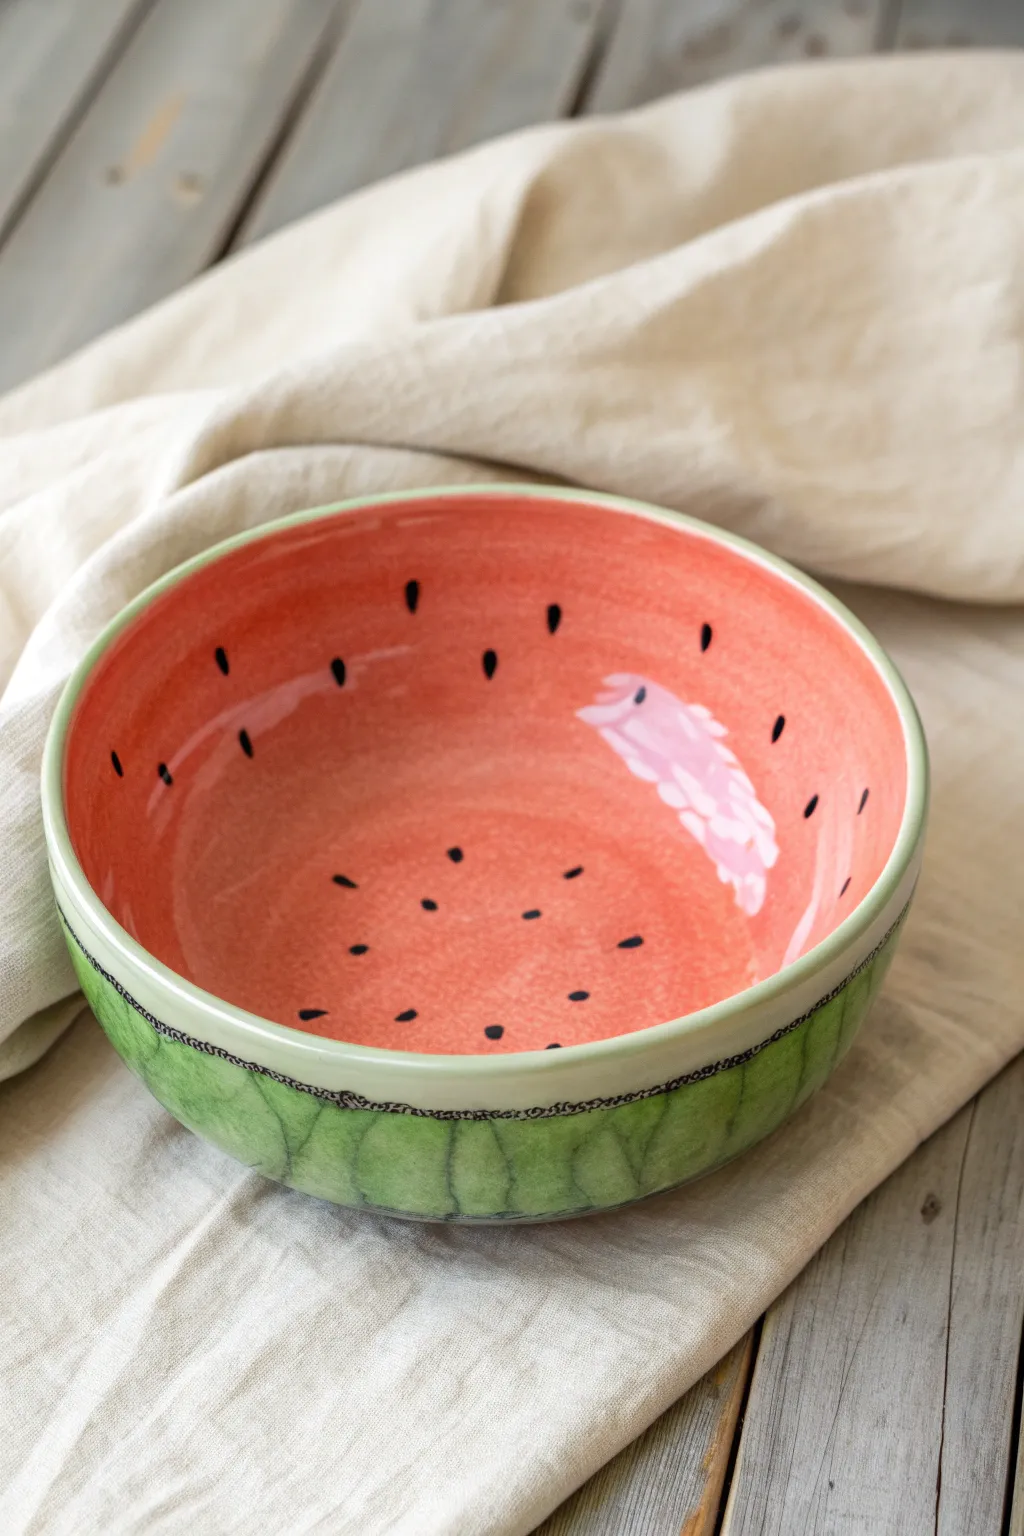
Transform a simple bisque bowl into a refreshing splash of summer using this clever glazing technique. This project captures the juicy vibrancy of a ripe watermelon, complete with dappled rind patterns and scattered seeds, making it a playful addition to any table setting.
Step-by-Step
Materials
- Bisque-fired ceramic bowl (medium size)
- Underglazes: Bright Red or Coral, Light Pink, Lime Green, Forest Green, Black
- Clear transparent glaze (food safe)
- Fan brush
- Detail liner brush (size 0 or 1)
- Small round brush
- Sponge
- Pencil
- Kiln access
Step 1: Painting the Juicy Interior
-
Clean the bisque:
Before you begin, wipe down your bisque bowl with a damp sponge to remove any kiln dust or oils from your hands, ensuring a clean surface for glaze adhesion. -
Map the rim:
Using a pencil, lightly mark a line about half an inch down from the rim on the outside. This will be the separation point between the rind and the fruit flesh. -
Base coat the interior:
Apply three even coats of Bright Red or Coral underglaze to the entire inside of the bowl, extending just over the rim to meet your pencil line on the exterior. Allow each coat to dry until it’s chalky to the touch before adding the next. -
Create the juicy highlight:
While the red is dry, mix a tiny amount of Light Pink with water to create a thin wash. Using a round brush, swipe a loose, crescent-shaped patch on one side of the interior wall to mimic the glistening, fibrous texture of the fruit. -
Add the seeds:
Load your detail liner brush with Black underglaze. Paint small, teardrop-shaped seeds scattered randomly around the interior walls and base. -
Orient the seeds:
Make sure the pointed ends of the teardrop seeds generally aim toward the center bottom of the bowl for a natural look.
Seed Depth Trick
Add a tiny dot of white on top of each black seed after it dries. This creates a playful shine and makes the seeds look wet and three-dimensional.
Step 2: Creating the Rind Texture
-
Base coat the exterior:
Apply three coats of Lime Green underglaze to the exterior of the bowl, stopping right at your pencil line. Let this dry completely. -
Sketch the rind stripes:
Lightly sketch vertical, wavy lines around the outside of the bowl with a pencil. These don’t need to be perfect; irregular spacing looks more organic. -
Paint the dark stripes:
Using the Forest Green underglaze and a round brush, paint over your sketched lines. I find that wobbling the brush slightly as you pull it down creates that authentic, jagged watermelon rind texture. -
Feather the edges:
While the dark green is still slightly damp, use a clean, slightly moist brush to feather the edges of the dark stripes into the lime background so they aren’t too harsh. -
Add the dividing line:
With a steady hand and your detail brush, paint a thin, wavy Black line directly over the transition point where the red interior meets the green exterior. This adds a cartoon-like definition to the piece. -
Detail the divider:
To enhance the texture shown in the example, add tiny cross-hatching or small scribbles along that black dividing line so it looks like a textured separation rather than a solid stripe.
Step 3: Finishing and Firing
-
Dry thoroughly:
Allow the entire piece to dry overnight to ensure all moisture has evaporated from the underglaze layers. -
Apply clear glaze:
Dip the bowl into a clear, food-safe dipping glaze, or brush on three coats of brushing clear glaze. Ensure you don’t smudge your seed details. -
Clean the foot:
Wipe the bottom foot of the bowl completely clean with a wet sponge to prevent it from sticking to the kiln shelf. -
Fire the piece:
Fire the bowl in the kiln according to the clay and glaze manufacturer’s instructions (typically cone 06 or cone 6 depending on your materials).
Bitten Effect
Before bisque firing, use a fettling knife to cut a jagged, bite-mark shape out of the rim. Glaze the cut edge red to look like a freshly eaten slice.
Now you have a permanently ripe piece of summer fruit ready for your next picnic or snack time
Mandala Center Medallion
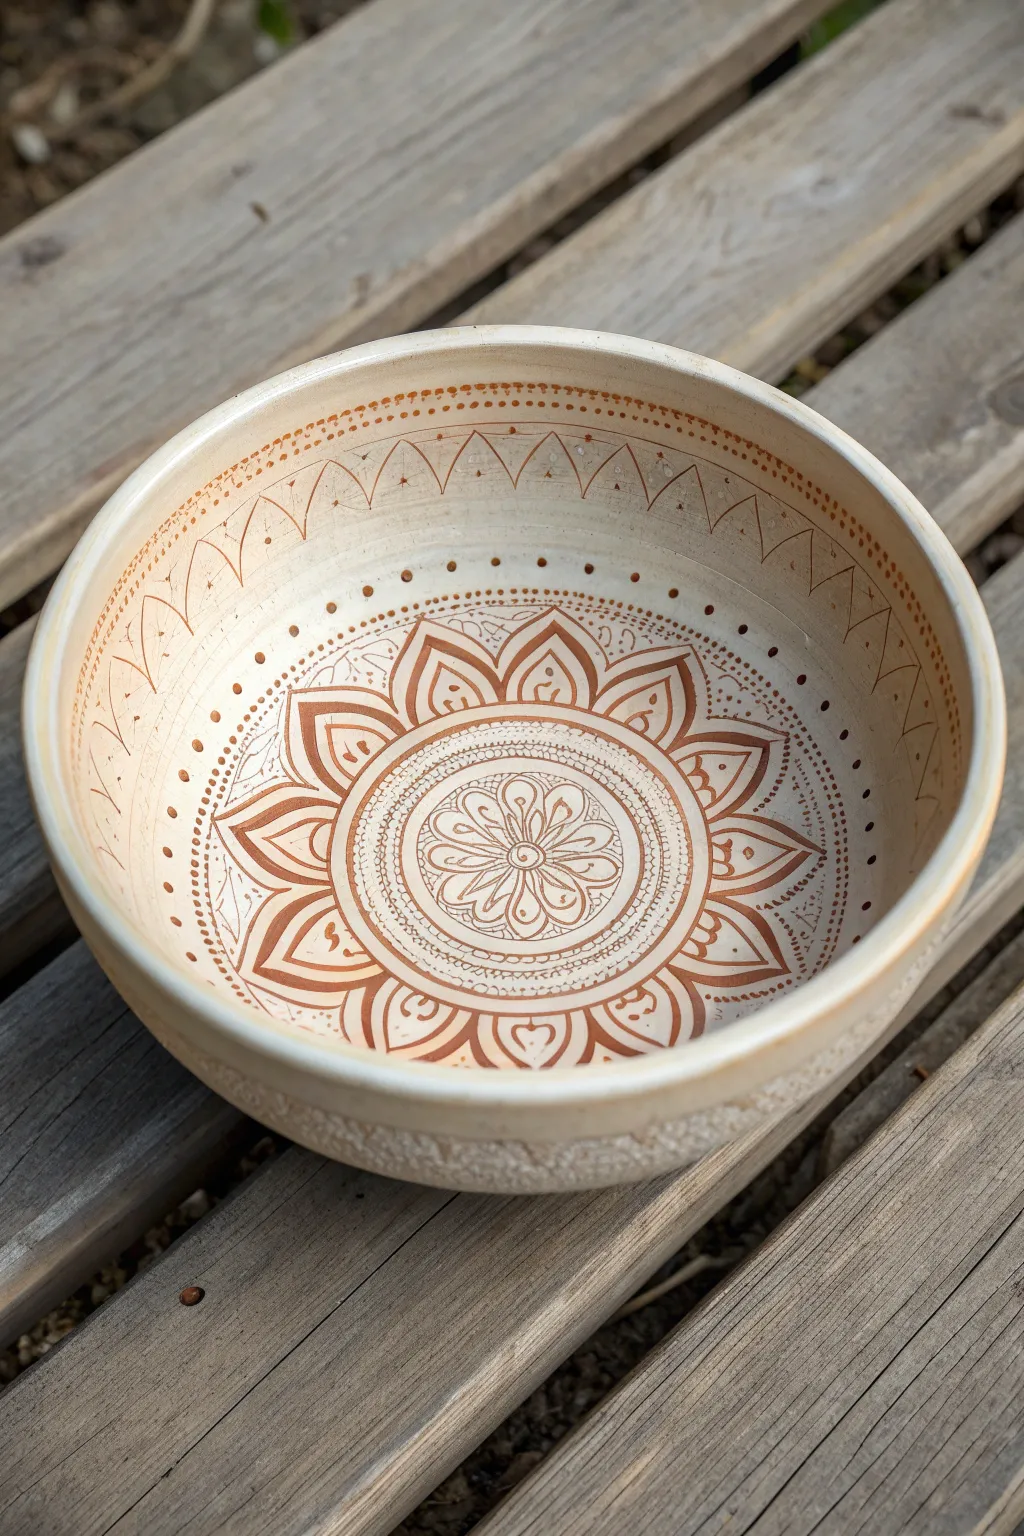
This project transforms a simple wheel-thrown or hand-built bowl into a mesmerizing centerpiece using precise line work and geometric symmetry. The design mimics the delicate beauty of henna tattoos, featuring a central floral medallion that radiates outward into intricate petal layers.
Step-by-Step Guide
Materials
- Light colored stoneware or porcelain clay
- Pottery wheel (or slab roller/molds for hand-building)
- Reddish-brown underglaze or slip (terracotta color)
- Fine-tip underglaze applicator bottle or slip trailer
- Needle tool
- Trimming tools
- Damp sponge
- Clear matte or satin glaze
- Banding wheel
- Soft fan brush
Step 1: Creating the Form
-
Throw the bowl form:
Begin by centering your clay on the wheel and opening it up to create a wide, open bowl shape. Aim for smooth, even walls that curve gently upward, providing a broad canvas for your interior decoration. -
Refine the rim:
Compress the rim with a chamois or your finger to ensure it’s strong and rounded. A slight inward curve at the very top helps frame the future design nicely. -
Trim the foot:
Once the bowl is leather-hard, trim a clean foot ring. I like to keep the exterior relatively simple to let the interior design shine, perhaps adding just a subtle texture near the base if desired.
Step 2: Drafting the Design
-
Center on banding wheel:
Place your leather-hard bowl upside down or right-side up on a banding wheel. Ensure it is perfectly centered so your concentric circles will be accurate. -
Mark guide circles:
Using a needle tool and a steady hand while spinning the banding wheel, very lightly score concentric circles into the interior. You’ll need a small central circle, a middle band for the main petals, and outer rings near the rim for the border details. -
Divide the space:
Lightly mark radial lines to divide your bowl into equal sections—start with quarters, then eighths, then sixteenths. These faint marks are crucial for keeping your mandala symmetrical.
Clogged Applicator?
If your slip trailer keeps clogging, your underglaze might be too thick. Add a few drops of water or a deflocculant like Darvan to improve flow without losing opacity.
Step 3: Applying the Decoration
-
Draw the central flower:
Fill your underglaze applicator with the reddish-brown slip. In the very center circle, draw a small eight-petaled flower with a circular core. Keep the lines fluid and confident. -
Add the first petal layer:
Around the central flower, draw a series of larger, enclosed petals. Inside each petal, create a double outline to add depth. -
Create the main medallion:
Moving outward, draw large, pointed spade-shaped petals that extend towards your middle guide circle. Fill the negative space inside these petals with smaller teardrop shapes or dots. -
Detail the texture band:
Between the main medallion and the rim, create a band of dense texture. Use tiny dots or small hatching lines to create a shaded effect that contrasts with the open spaces of the petals. -
Execute the rim border:
Near the rim, draw a zigzag or chevron pattern between two guide rings. Add a distinct dot in the peak of each triangle and at the dip of each valley. -
Add finishing dots:
Go back through the design and add tiny dots of slip along the outer edges of the main petals and around the central medallion. These small details mimic the granulation found in jewelry.
Sgraffito Twist
Instead of trailing slip on top, paint the whole interior with underglaze and carve the design away for a stunning negative-colored mandala.
Step 4: Firing and Glazing
-
Bisque fire:
Allow the bowl to dry completely. Because we’ve added wet slip to leather-hard clay, dry it slowly to prevent cracking. Fire to cone 04 (or your clay’s bisque temperature). -
Clean the surface:
Wipe the bisqued bowl with a damp sponge to remove any dust and debris, which could cause pinholing in your final glaze. -
Apply clear glaze:
Pour a clear matte or satin glaze into the bowl, roll it around to coat the entire interior, and pour out the excess. A matte finish is preferable here as it reduces glare and makes the intricate line work easier to read. -
Final firing:
Fire the bowl to the maturity temperature of your clay and glaze (typically cone 5 or 6 for stoneware). Ensure the kiln is well-vented to keep the clear glaze bright.
Once fired, the warm terracotta lines will pop beautifully against the cream background, giving you a functional piece of art

PENCIL GUIDE
Understanding Pencil Grades from H to B
From first sketch to finished drawing — learn pencil grades, line control, and shading techniques.
Explore the Full Guide
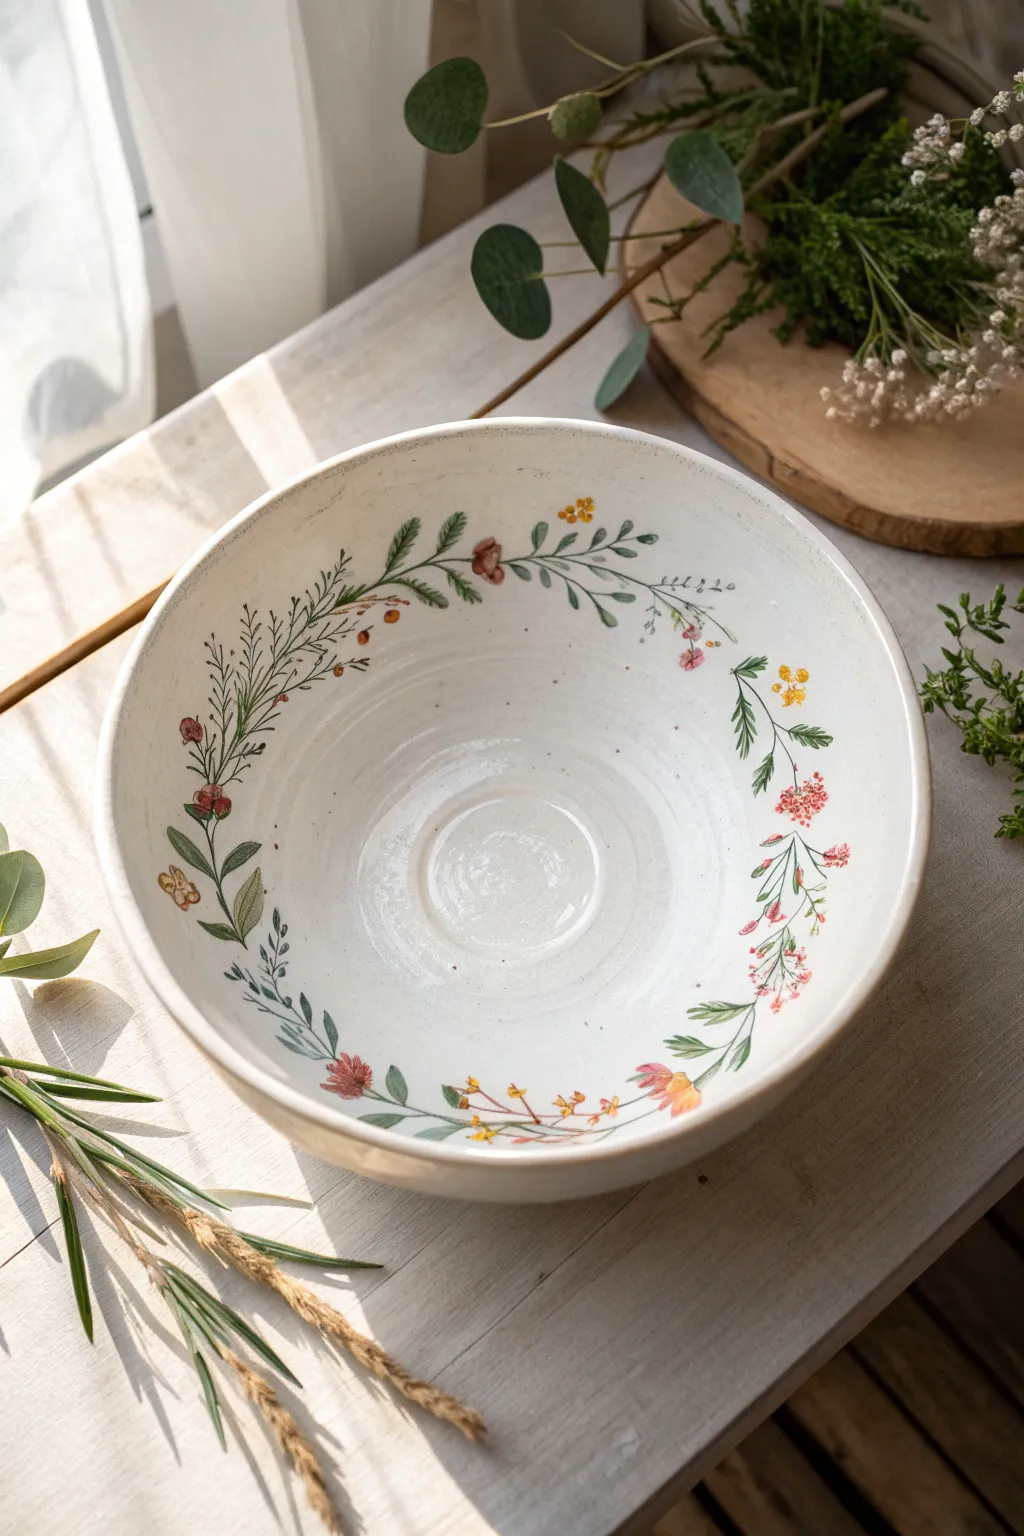
Pressed Leaf and Wildflower Imprints
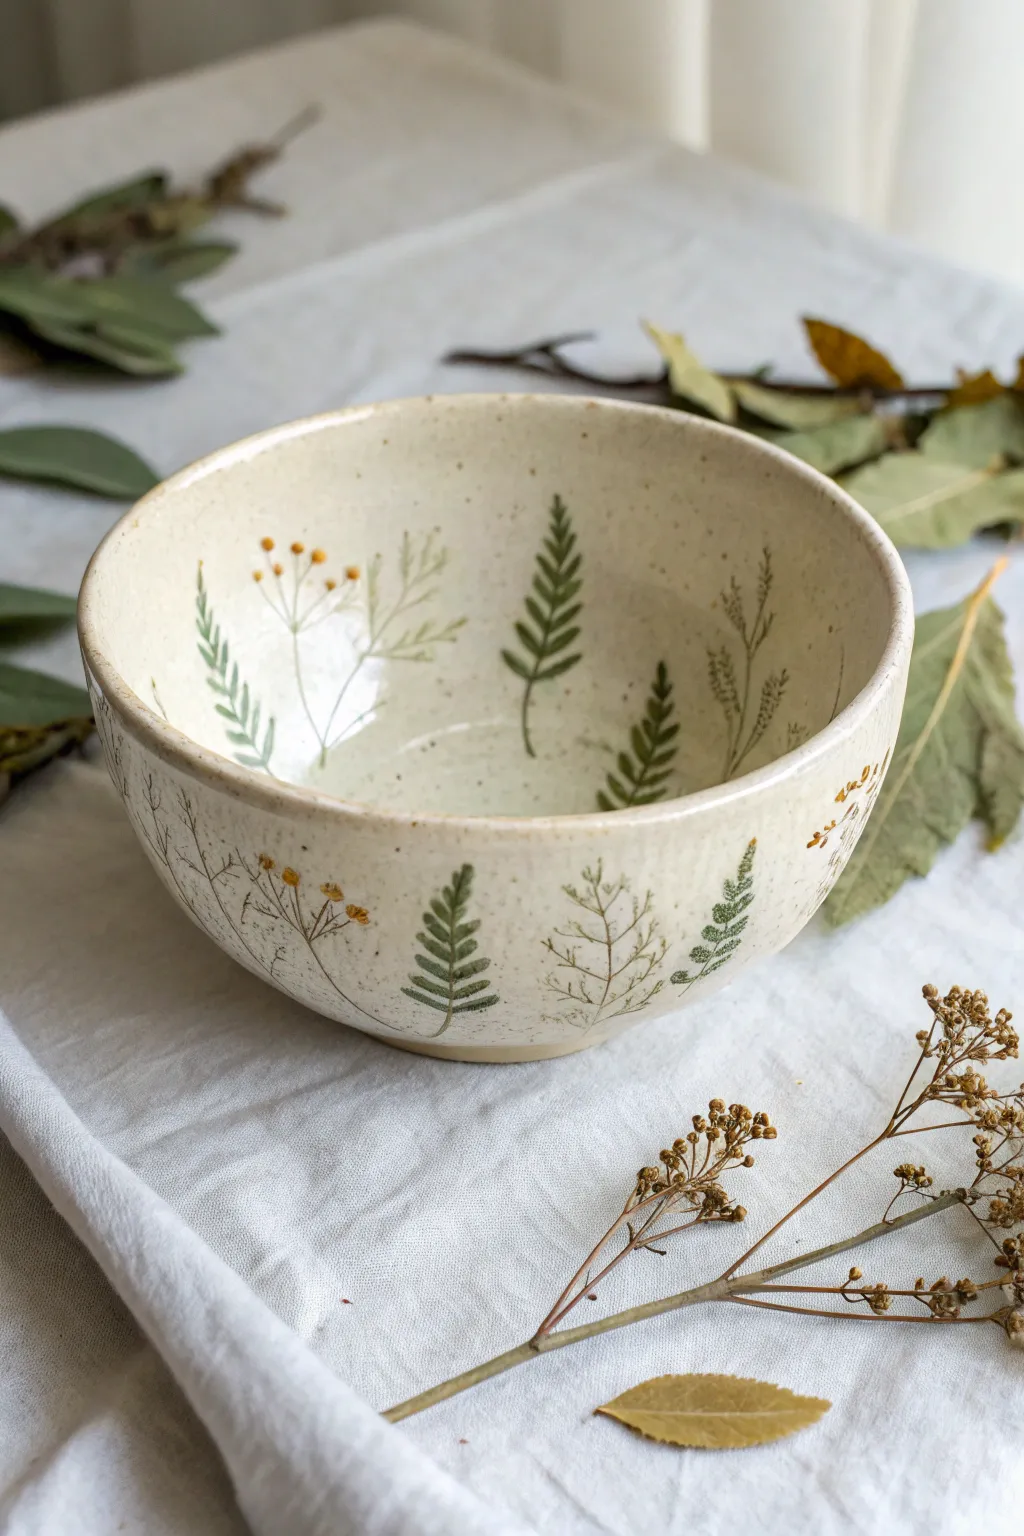
Capture the delicate beauty of a summer meadow with this hand-built or wheel-thrown bowl featuring intricate botanical motifs. By pressing real ferns and wildflowers into the clay and highlighting them with underglaze, you create a timeless piece that feels freshly gathered from the garden.
Step-by-Step Tutorial
Materials
- Stoneware clay (smooth or lightly speckled)
- Collection of small, fresh leaves and wildflowers (ferns, yarrow, grasses)
- Rolling pin (if hand-building)
- Pottery wheel (optional)
- Rib tool (wooden or silicone)
- Sponge
- Underglazes (forest green, olive green, mustard yellow, brown)
- Fine detail brushes
- Clear glossy glaze
- Kiln
Step 1: Forming the Vessel
-
Prepare the clay:
Begin by wedging your stoneware clay thoroughly to remove air bubbles. If you want that natural speckled look shown in the photo, choose a clay body with fine grog or iron speckles. -
Shape the bowl:
Throw a medium-sized bowl on the wheel, aiming for a smooth curve and a slightly thicker rim. Alternatively, you can hand-build this using a slump mold and a rolled slab of clay. -
Clean surface:
Use a rib tool to smooth the interior and exterior walls. You want a very clean canvas for your botanicals, so remove any throwing lines or finger marks now. -
Wait for leather hard:
Allow the bowl to dry until it reaches a soft leather-hard stage. The clay needs to be firm enough to hold its shape but soft enough to accept an impression without cracking.
Step 2: Creating the Impressions
-
Select your botanicals:
Choose small, resilient leaves like ferns and sturdy flower stems. Avoid very fleshy plants as they can get mushy; flatter, vein-heavy leaves work best for crisp details. -
Arrange the exterior:
Gently press a fern or flower stem against the outside of the bowl. Support the wall from the inside with one hand while using a pony roller or your thumb to press the plant into the clay. -
Arrange the interior:
Repeat the process on the inside of the bowl. Be strategic with placement—allow stems to ‘grow’ up from the bottom center towards the rim. -
Embed the texture:
Roll over the plants firmly enough that they sit flush with the clay surface. You want the veins to imprint deeply. -
Peel and reveal:
Carefully use a needle tool or tweezers to lift the edge of the plant material and peel it away. Blow away any small debris left behind. -
Bisque fire:
Once you are happy with the arrangement, let the bowl dry completely (bone dry) and bisque fire it according to your clay body’s schedule.
Freshness Matters
Use plants immediately after picking. If they dry out and become brittle, they will crumble into the clay rather than leaving a clean, peelable impression.
Step 3: Glazing and Finishing
-
Clean the bisque:
Wipe the bisque-fired bowl with a damp sponge to remove any dust, which ensures the glaze adheres properly. -
Paint the foliage:
Using your fine detail brushes, fill in the impressed leaf shapes with green underglazes. I like to use a darker forest green for the ferns and a lighter olive for grasses to create depth. -
Add floral details:
Dab small dots of mustard yellow or brown underglaze onto the flower heads or seed pods. You don’t need to stay perfectly in the lines; a watercolor effect looks lovely here. -
Wax the foot:
Apply wax resist to the bottom foot ring of the bowl to prevent glaze from sticking to the kiln shelf. -
Apply clear glaze:
Dip the entire bowl into a clear, glossy glaze. Make sure the glaze isn’t too thick, or it might cloud the delicate underglaze work. -
Final firing:
Load the kiln and glaze fire the piece to the recommended temperature for your clay and glaze combination.
Stained Glass Look
For a different vibe, fill the leaf impressions with a transparent celadon glaze instead of underglaze. The glaze will pool in the veins, creating a darker, highlighted effect.
Your finished bowl will forever hold the memory of a summer garden in its surface
Simple Line-Drawn Doodles
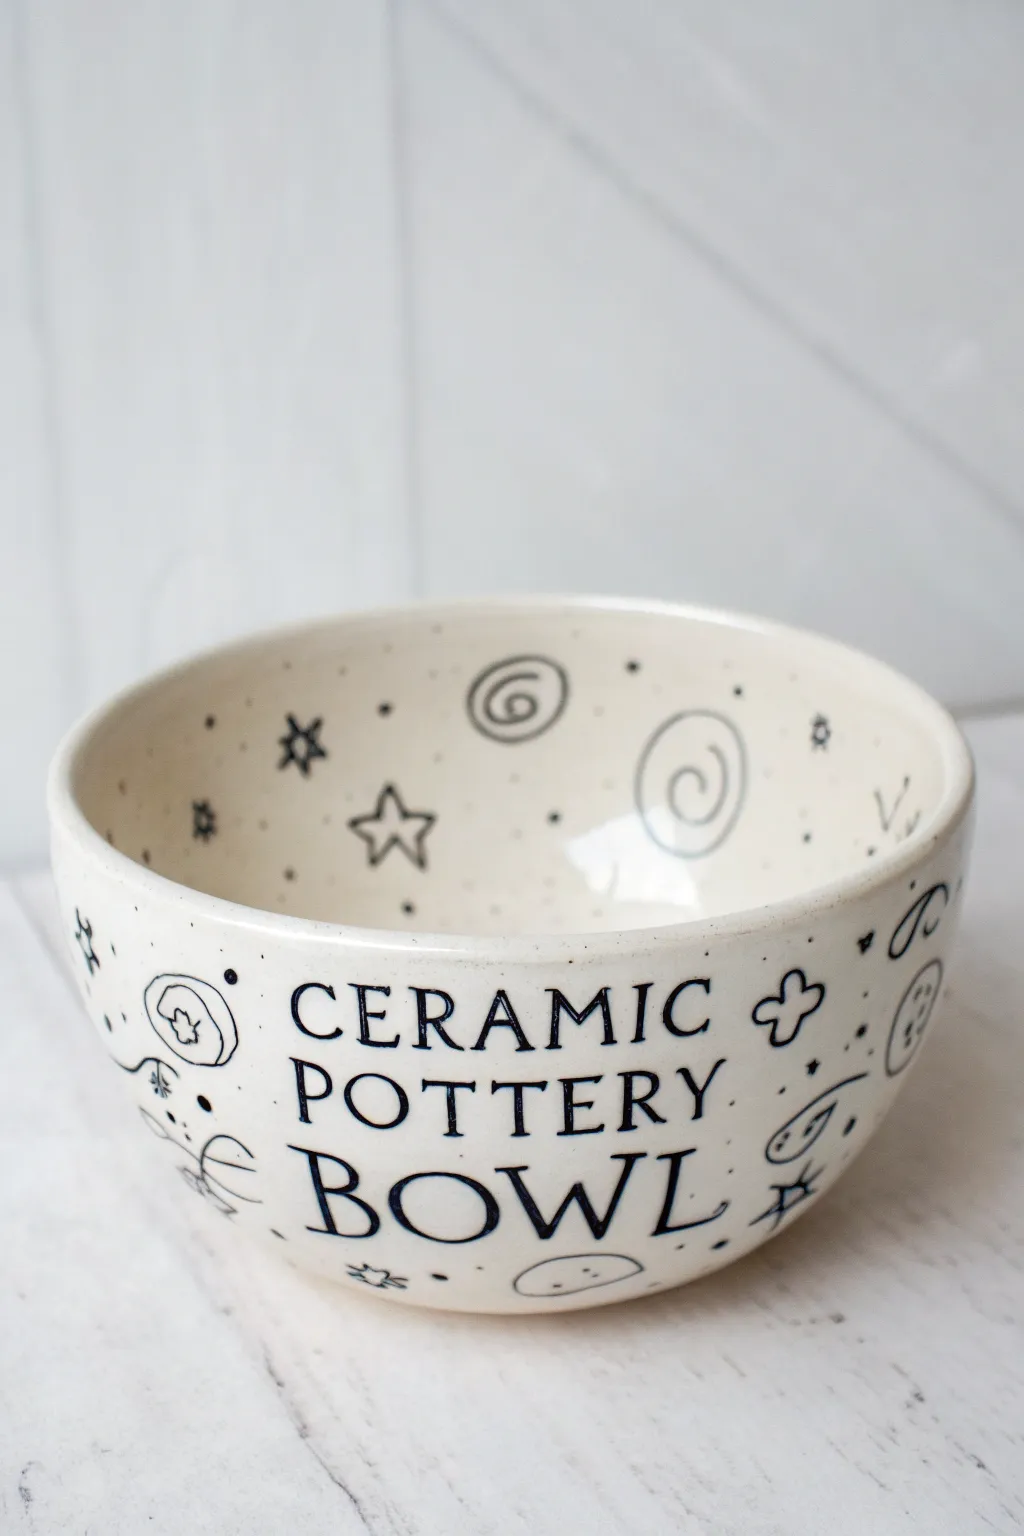
Sometimes the most charming designs are the simplest, like this delightful bowl that literally labels itself. With its playful black line art featuring swirls, stars, and bold lettering against a classic creamy glaze, this project proves you don’t need to be a master painter to create stunning pottery.
Detailed Instructions
Materials
- Bisque-fired ceramic bowl (medium size)
- Black underglaze pencil or fine-tip underglaze applicator bottle
- Clear dipping glaze (food safe)
- Damp sponge
- Pencil (standard graphite)
- Stable banding wheel (optional)
- Soft fan brush (if brushing glaze instead of dipping)
- Kiln access
Step 1: Preparation & Planning
-
Clean the bisque:
Start with a piece of bisque ware that has already been fired once. Wipe the entire surface down with a damp sponge to remove any dust or oils from handling, which can prevent the underglaze from adhering properly. -
Sketch the layout:
Using a standard graphite pencil, lightly sketch your main text and larger design elements directly onto the bisque. Don’t worry about being perfect; graphite burns off completely in the kiln, so these lines won’t be visible later. -
Position the text:
Mark out three horizontal lines to guide your lettering on the exterior. Center the words ‘CERAMIC’ on the top line, ‘POTTERY’ in the middle, and ‘BOWL’ on the bottom line, ensuring the spacing feels balanced.
Clogged Applicator?
If the underglaze stops flowing, don’t squeeze harder or it will explode. Use a thin needle tool or unbent paperclip to clear the metal tip, then test flow on paper.
Step 2: Line Work Application
-
Prepare the applicator:
Shake your black underglaze applicator bottle vigorously to ensure the pigment is smooth. Test the flow on a piece of scrap paper; you want a consistent, thin line without air bubbles. -
Lettering the top row:
Carefully trace over your penciled ‘CERAMIC’ text. Keep your wrist steady and apply even pressure to the bottle. I find that pulling the applicator toward me rather than pushing it away gives me smoother control over the curves. -
Completing the text:
Continue with ‘POTTERY’ and ‘BOWL’ below. Notice how the ‘BOWL’ lettering is slightly larger and looser; allow the letters to have a bit of handcrafted charm rather than looking like a typed font. -
Adding interior swirls:
Move to the inside of the bowl. Draw loose, spiral swirls randomly spaced around the interior walls. These should look like little cinnamon rolls or galaxy spirals. -
Drawing interior stars:
Fill the gaps between swirls with simple five-point stars. Draw them quickly and fluidly so they retain that playful, sketchy aesthetic. -
Exterior doodles:
Rotate the bowl and add similar motifs to the outside, surrounding your text. Include simple flower shapes—a circle with four or five looped petals—and small vine-like squiggles. -
Adding details:
Dot the empty spaces with tiny specks or ‘stardust’ points using just the tip of the applicator. This connects the larger elements and makes the pattern feel cohesive. -
Drying time:
Let the black underglaze dry completely. It will look matte and chalky when it’s ready for the next step. This usually takes about 20-30 minutes.
Add Pop of Color
Before the clear coat, water down some pastel underglazes (pink or blue) and daub them loosely inside the shape outlines for a ‘coloring book’ style effect.
Step 3: Glazing & Firing
-
Check for smudges:
Before glazing, inspect your bowl. If you smeared any black underglaze, you can try to gently scrape it off with a craft knife, but be careful not to create deep scratches in the clay. -
Prepare the clear glaze:
Stir your clear dipping glaze thoroughly. It should have the consistency of heavy cream. -
Dip the bowl:
Using glazing tongs or a steady hand, dip the entire bowl into the clear glaze. Hold it there for about 3 seconds, then lift it out and shake it gently to remove excess drips. -
Touch-ups:
If you missed any spots or have tong marks, dab a little extra glaze on those areas with your finger or a small brush to smooth them over. -
Clean the foot:
Use a sponge to wipe the bottom foot of the bowl completely clean of glaze. This is crucial so it doesn’t fuse to the kiln shelf during firing. -
Final Fire:
Load the bowl into the kiln and fire it to the temperature recommended for your specific clay and glaze combination (usually Cone 5 or 6 for stoneware).
Once cooled, your bowl is ready to be a conversation starter at your next meal or simply admired on a shelf


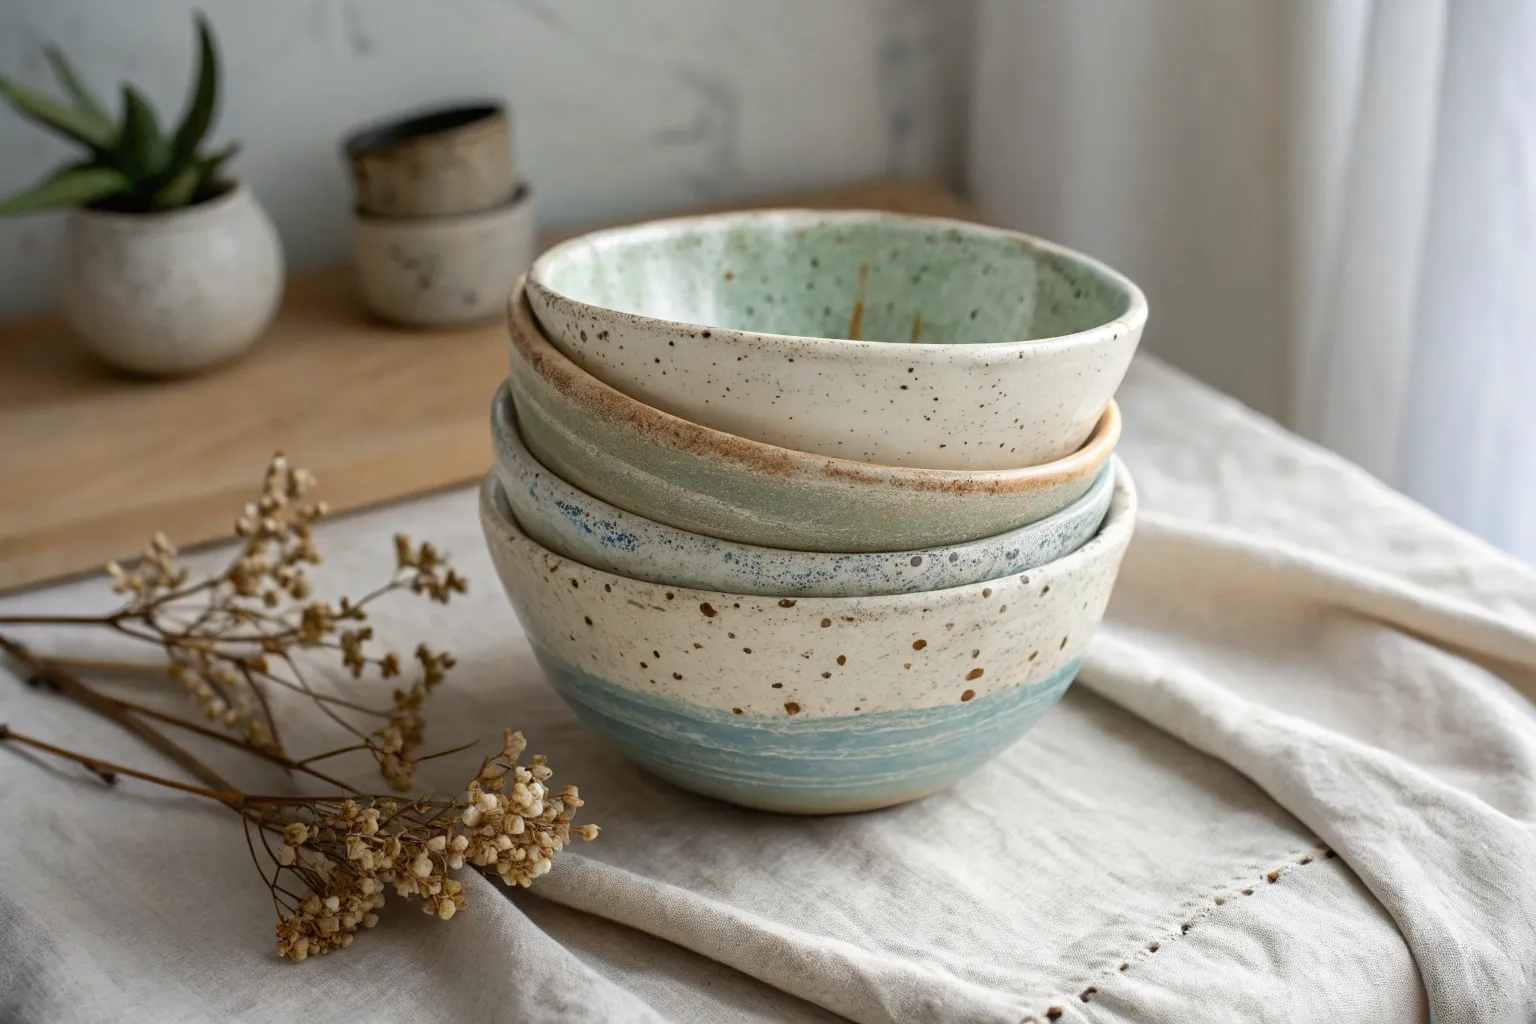
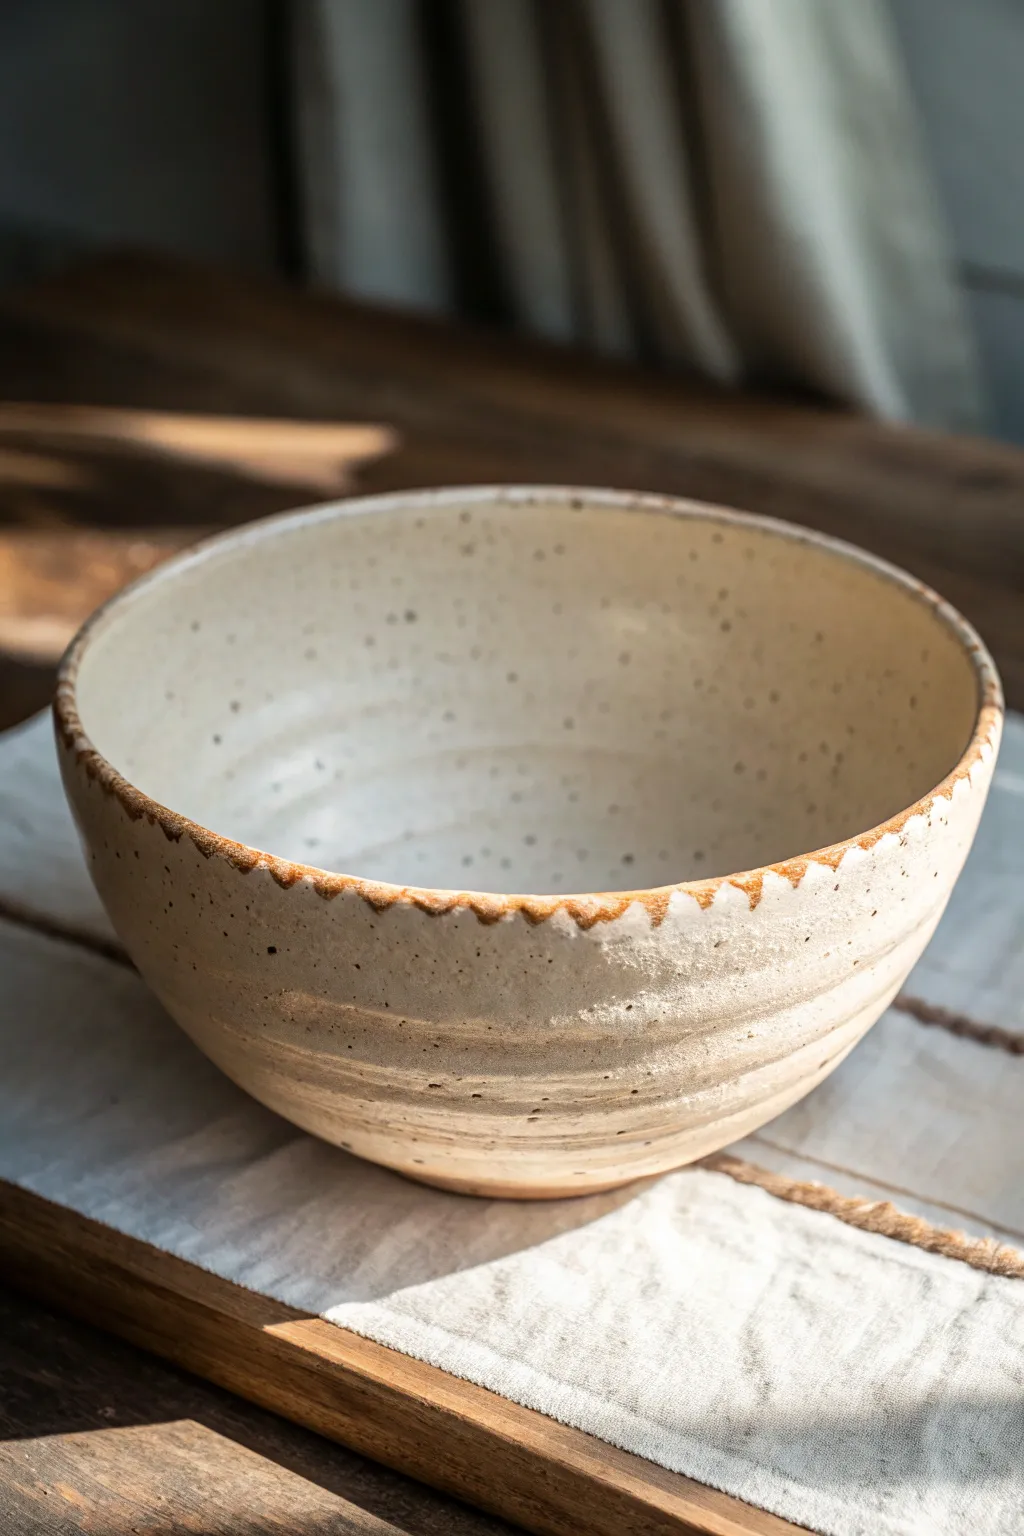
Cozy Speckled “Stoneware” Look
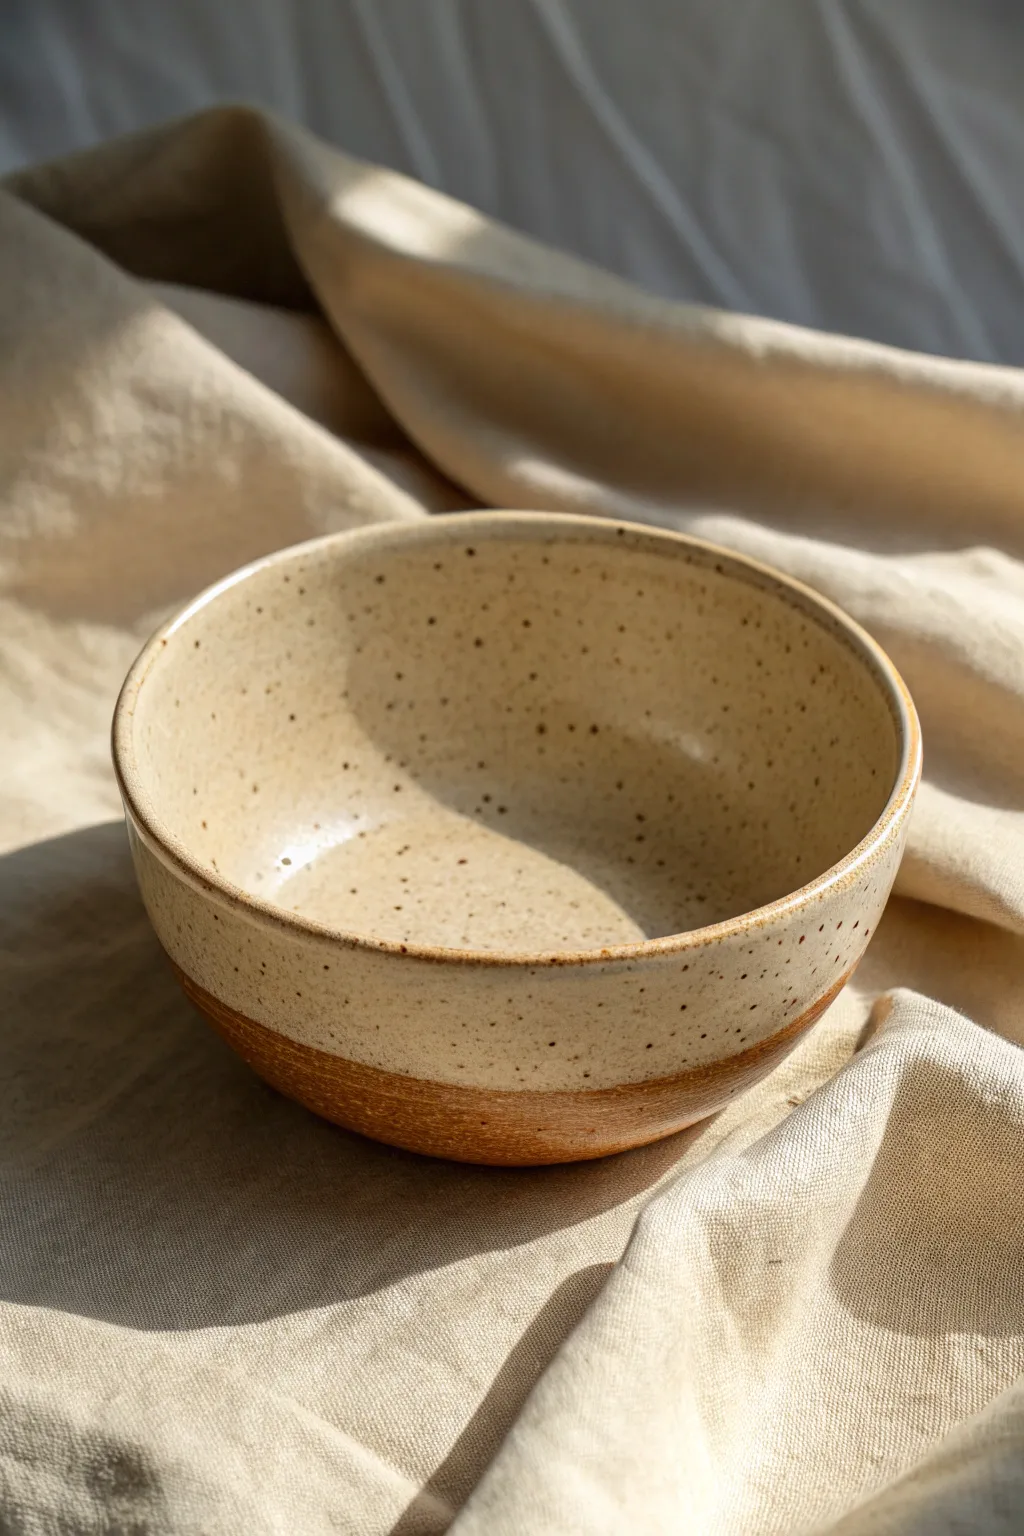
Embrace the warmth of natural clay with this wheel-thrown bowl that highlights the beauty of raw materials. By leaving the base unglazed, you create a stunning textural contrast against the creamy, speckled interior.
Step-by-Step Guide
Materials
- Speckled stoneware clay (e.g., Laguna Speckled Buff or similar)
- Potter’s wheel
- Throwing tools (sponge, wooden rib, wire tool)
- Trimming tools (large loop tool)
- White or cream matte glaze (food safe)
- Wax resist
- Paintbrush for wax
- Kiln
Step 1: Throwing the Form
-
Center the clay:
Start with a well-wedged ball of speckled stoneware clay roughly the size of a large grapefruit. Slam it onto the wheel head and center it using firm, steady pressure with wet hands. -
Open the vessel:
Press your thumbs into the center of the spinning clay to open it up, stopping about a half-inch from the bat to leave enough thickness for the foot later. -
Pull the walls:
Begin pulling the walls upward. For this specific bowl shape, you want a gentle, continuous curve rather than straight vertical walls. Keep your pulls steady to maintain even thickness. -
Shape the profile:
Use a wooden rib inside the bowl to press outward while supporting the outside with your hand or a flexible metal rib. Aim for a generous, open curve that invites two-handed holding. -
Refine the rim:
Compress the rim gently with a sponge or a strip of chamois leather. A rounded, slightly thickened rim adds durability and visual softness to the finished piece. -
Wire off:
Run your wire tool under the base of the bowl to separate it from the wheel head, then carefully lift it off to a ware board. Let it dry until it reaches a leather-hard state.
Boost the Speckles
If your clay is plain, wedge in a teaspoon of granular manganese or ilmenite before throwing. This creates those lovely dark spots that bleed through the light glaze.
Step 2: Trimming and Refining
-
Center for trimming:
Place the leather-hard bowl upside down on the wheel. Tap it into the center and secure it with three or four small lugs of soft clay. -
Define the foot:
Using a sharp loop tool, carve away excess clay from the base. This is crucial for the final look; you want a clearly defined, rounded bottom area that will remain unglazed. -
Smooth the texture:
Once the foot ring is carved, I like to run a slightly damp sponge over the raw clay exterior to bring some of the grog or speckles to the surface and smooth out tool marks. -
Bisque fire:
Allow the bowl to dry completely (bone dry). Load it into the kiln for a bisque firing, typically to Cone 04 or 06, depending on your clay body.
Glaze Crawling?
If the glaze pulls away from the clay during firing, your bisque might have been too dusty or oily (from lotion). Always wipe your bisque thoroughly with water before glazing.
Step 3: Glazing technique
-
Clean the bisque:
Wipe the fired bowl down with a clean, damp sponge to remove any dust that might interfere with glaze adhesion. -
Apply wax resist:
This is the most important stylistic step. Paint a generous layer of wax resist over the bottom third of the exterior bowl and the entire foot ring. Create a clean, straight line where the glaze will stop. -
Prepare the glaze:
Mix your cream-colored matte glaze thoroughly. If your clay doesn’t have enough natural iron speckles, mix a small amount of granular ilmenite into the glaze itself. -
Dip the bowl:
Holding the foot (which is waxed), submerge the bowl into the glaze bucket. Dip it just past the wax line to ensure full coverage, then lift and shake off the excess. -
Clean the resist:
While the wax repels most glaze, small beads might remain. Use a damp sponge to wipe the waxed bottom completely clean, revealing the raw bisque ware. -
Glaze fire:
Load the bowl into the kiln for the final glaze firing (usually Cone 5 or 6 for stoneware). Ensure the unglazed foot is clean so it doesn’t fuse to the kiln shelf.
Now you have a timeless bowl perfect for morning oatmeal or late-night soup.
Ombre Dip-Dye Fade
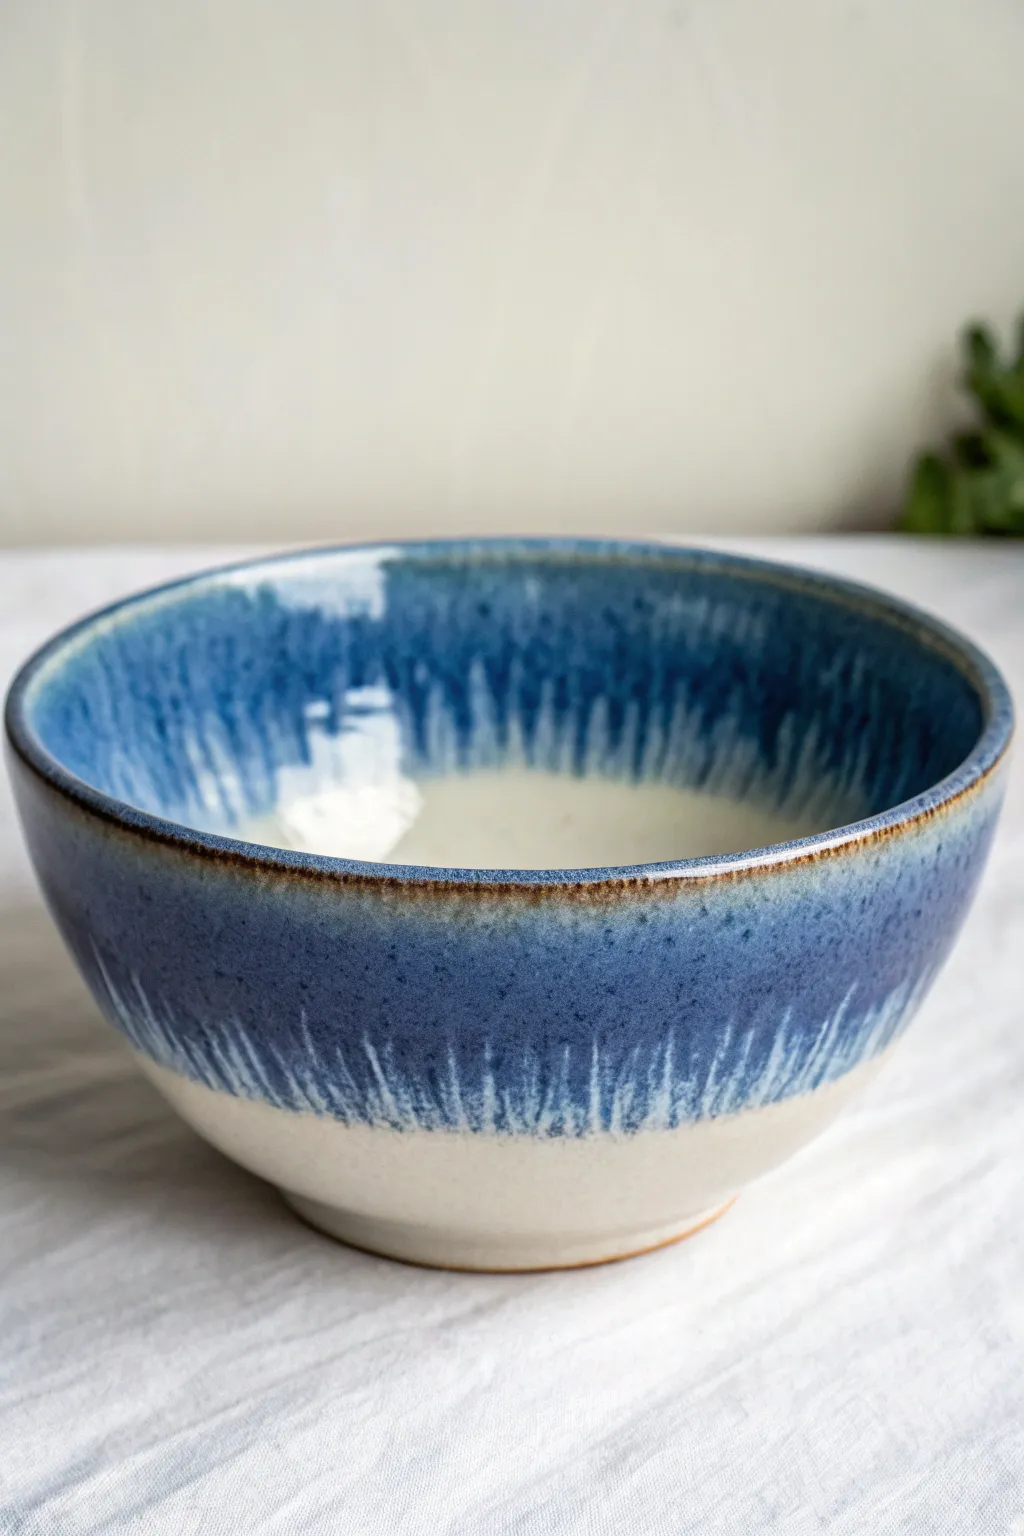
This pottery project captures the movement of crashing waves with a stunning dip-dye effect where deep indigo meets creamy stoneware. The glaze technique creates a natural, streaky transition that makes each bowl entirely unique.
Detailed Instructions
Materials
- Bisque-fired stoneware bowl
- Deep cobalt blue dipping glaze
- Cream or white matte glaze
- Iron oxide wash (optional)
- Glaze tongs
- Wax resist emulsion
- Sponge and bucket of water
- Small paintbrush
- Kiln access
Step 1: Preparation and Base Coat
-
Clean the bisque:
Start by wiping down your bisque-fired bowl with a barely damp sponge. This removes any kiln dust or oils from handling that might prevent the glaze from adhering properly. -
Wax the foot:
Apply a coat of wax resist to the very bottom foot ring of the bowl and about 1/4 inch up the side. This prevents glaze from fusing your bowl to the kiln shelf later. -
Mix the base glaze:
Stir your cream or white matte glaze thoroughly. It should have the consistency of heavy cream; if it’s too thin, the coverage won’t be opaque enough to create contrast. -
Coat the interior:
Pour the white glaze inside the bowl, swirl it quickly to coat the entire interior surface, and pour the excess back out. Give the bowl a quick shake to level the coating. -
Dip the exterior base:
Hold the bowl by the rim and dip the bottom half into the white glaze bucket. You want to cover roughly the bottom third to half of the exterior. Hold for 3 seconds and lift. -
Clean the rim:
Once the white glaze is dry to the touch, use a damp sponge to wipe any white glaze off the top rim and the upper interior section where you want the blue to go.
Running Too Much?
If your test tiles show the blue glaze running off the pot, slightly increase the viscosity by adding a localized thickener, or simply reduce the dip time by 1-2 seconds on the next attempt.
Step 2: Creating the Ombre Effect
-
Prepare the blue glaze:
Mix your cobalt blue dipping glaze. For this specific runny look, I prefer the glaze to be slightly thinner than usual to encourage movement during firing. -
The main dip:
Using glaze tongs or a secure grip, dip the top half of the bowl (rim down) into the blue glaze. Submerge it past the point where the white glaze ended, overlapping by about an inch. -
Hold and release:
Hold the bowl in the blue glaze for 4-5 seconds. The longer dip creates a thicker application, which is crucial for that dripping, streaky effect. -
Create the fade:
As you lift the bowl out, do so slowly. Give it a gentle shake or two while inverted to encourage the excess blue glaze to run down toward the rim, but leave enough bulk to drift downward during firing. -
Check the interior:
If you missed spots inside during the dip, you can pour blue glaze inside and roll it around, pouring out the excess to match the exterior line. -
Add the rim detail:
For that earthy brown rim seen in the image, dip a small brush into iron oxide wash. Gently painting a thin line along the very edge of the rim adds definition and breaks the glaze nicely. -
Clean up drips:
Inspect the foot ring again. If any blue glaze has run all the way down to the wax, wipe it back slightly. The blue is mobile, so give it room to move without hitting the shelf. -
Dry thoroughly:
Let the bowl dry completely for at least 24 hours. The thick, overlapping glaze layers need to be fully dry to prevent crawling or steam explosions in the kiln. -
Load the kiln:
Place the bowl in the kiln, ensuring no other pots are too close to the rim, just in case the blue glaze is particularly active. -
Fire to temperature:
Fire the kiln to the maturity temperature of your clay and glazes (likely Cone 6 or Cone 10 depending on your stoneware).
Layered Texture
Try dipping the bowl at an angle for an asymmetrical wave look. You can also lightly sponge the overlap line before firing to create a softer, cloud-like transition instead of streaks.
Unload your kiln to reveal a beautiful, customized bowl perfect for serving soups or salads
Wax-Resist Pattern Reveals
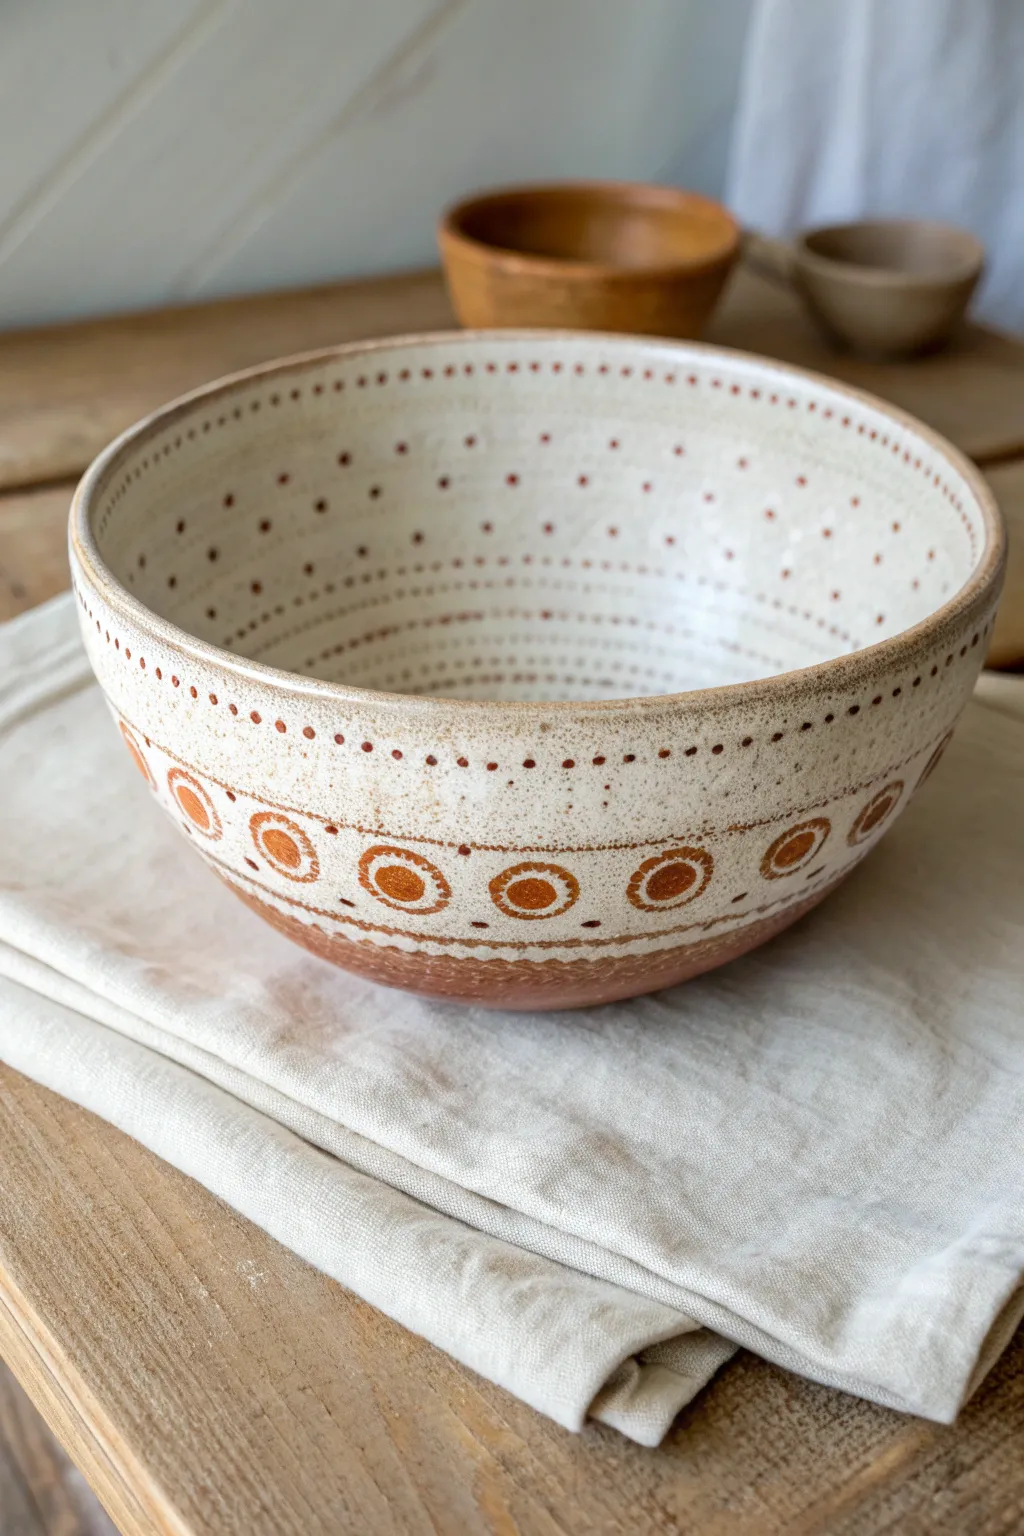
This charming bowl celebrates the raw beauty of clay by using a wax-resist technique to reveal patterns of warm terracotta against a creamy speckled glaze. The design features a rhythmic band of sun-like circles and delicate dotted rows, creating a piece that feels both rustic and refined.
How-To Guide
Materials
- Bisque-fired bowl (red or brown stoneware clay)
- Liquid wax resist (or melted beeswax)
- Fine-point paintbrush or slip-trailing bulb
- Sponge
- Creamy matte white glaze (speckled variety recommended)
- Wide glazing brush or tongs for dipping
- Clean water
Step 1: Preparation & Inside Pattern
-
Surface Cleaning:
Begin by wiping your bisque-fired bowl with a damp sponge. This removes any dust that might prevent the wax or glaze from adhering properly. -
Planning the Interior:
Visualize the pattern for the inside of the bowl. The design relies on concentric rings of small dots starting from the center and working outward. -
Applying Interior Wax:
Dip a fine-point brush into your liquid wax resist. Carefully dab small dots onto the interior surface of the bare bisque. -
Creating Rows:
Continue creating rings of dots, spacing them evenly. You don’t need to be perfectly symmetrical; slight variations add handmade character. Let the wax dry completely until it’s hard to the touch.
Step 2: Exterior Design
-
Mapping the Band:
On the outside of the bowl, visualize a wide band running horizontally around the mid-section where your main circle motifs will go. -
Waxing the Circles:
Using the wax resist, paint solid circles (about the size of a large coin) spaced evenly around the bowl’s circumference. -
Adding Outer Rings:
Paint a thin ring of wax around each solid circle, leaving a small gap of bare clay between them. This creates a bullseye effect. -
Top Border Dots:
Above your circle band, near the rim, add a horizontal row of small wax dots. -
Bottom Border Lines:
Below the circle band, paint two parallel horizontal lines of wax to frame the design. -
Define the Base:
Apply a coat of wax to the very bottom foot of the bowl and slightly up the side (about half an inch) to leave the raw clay exposed at the base. -
Drying Time:
Allow all the exterior waxwork to dry thoroughly. The wax protects these areas from absorbing glaze in the next step.
Use Colored Wax
Tint your liquid wax with a drop of food coloring. The color burns off in the kiln, but it makes it much easier to see your design on the bisque while you’re painting.
Step 3: Glazing & Finishing
-
Glaze Preparation:
Stir your creamy white speckled glaze thoroughly to ensure all particles are suspended evenly. -
Dipping the Bowl:
Using glazing tongs or a firm grip on the foot, dip the entire bowl into the bucket of glaze. Hold it submerged for about 3 seconds to get an even coat. -
The Reveal:
Lift the bowl out and let the excess drip off. You will immediately see the glaze bead up and roll off the waxed areas, revealing the red clay pattern beneath. -
Cleanup:
If any stubborn droplets of glaze remain on the waxed spots, gently wipe them away with a damp sponge or your finger once the glaze is dry to the touch. -
Rim Detail:
If the rim glaze looks too thick, lightly sponge it back to reveal a hint of the clay body, matching the rustic aesthetic. -
Final Firing:
Load the kiln and fire to the temperature appropriate for your specific clay and glaze combination (likely Cone 5 or 6 for stoneware).
Iron Oxide Wash
Before waxing, brush a diluted iron oxide wash over the clay and wipe it back. This will darken the exposed clay areas for higher contrast after firing.
Once fired, the warmth of the raw clay circles will create a beautiful contrast against the cool, speckled glaze
Mishima Inlaid Linework

This elegant ceramic project features a delicate, repeating leaf pattern created using the Mishima inlay technique. The earthy contrast between the cream-colored clay body and the warm brown inlay creates a timeless, organic design that wraps seamlessly inside and out.
How-To Guide
Materials
- Stoneware clay (smooth, light-colored body)
- Pottery wheel
- Throwing tools (sponge, rib, wire cutter)
- Trimming tools
- Needle tool or X-Acto knife
- Carving tool (fine-point loop tool or stylus)
- Brown underglaze or slip
- Soft paintbrush
- Metal rib or green scouring pad
- Clear matte glaze
Step 1: Forming the Bowl
-
Prepare the Clay:
Begin by wedging about 2-3 pounds of a smooth, light-colored stoneware clay to remove air bubbles. -
Center and Throw:
Center your clay on the wheel and open it up, pulling the walls into a classic, deep bowl shape with a gently curving interior. -
Refine the Rim:
Compress the rim with a chamois or sponge to ensure it is smooth and slightly rounded, matching the organic feel of the final design. -
Smooth the Surface:
Use a smooth kidney rib on both the interior and exterior to remove throwing lines, creating a blank canvas for your carving. -
Leather Hard Stage:
Allow the bowl to dry slowly until it reaches a firm leather-hard state. It should be stiff enough to handle without warping but soft enough to carve easily. -
Trim the Foot:
Flip the bowl over, centering it on the wheel, and trim a clean, defined foot ring to give the piece visual lift.
Pro Tip: Wax Resist
Before applying your slip, coat the uncarved areas with wax resist. This makes wiping back the excess underglaze much faster and keeps the clay body cleaner.
Step 2: Carving the Mishima Design
-
Plan the Leaf Structure:
Using a very light touch with a needle tool, sketch vertical guidelines to mark the central stems of your leaves. Space them evenly around the bowl so they meet at the base. -
Carve the Stems:
With a fine carving tool or stylus, incise the main vertical stems deeply into the clay surface, extending from the rim down into the center of the bowl. -
Add the Veins:
Carve diagonal lines branching off each stem to create the leaf veins. Mirror the angle on both sides of the stem, creating a chevron-like ‘V’ pattern. -
Connect the Pattern:
Ensure the veins of adjacent leaves almost touch, creating a continuous, rhythmic texture across the entire surface. -
Continue Inside:
Repeat the exact same carving process on the interior of the bowl, aligning the inner leaves with the outer ones if possible for symmetry. -
Clean Up Burrs:
Gently brush away larger clay crumbs, but don’t worry about smoothing perfect edges yet; the scraping step will fix this.
Step 3: Inlay and Finishing
-
Apply the Inlay:
Generously paint a warm brown underglaze or slip over all the carved lines. I generally make sure the slip is pushed deep into the grooves. -
Let it Set:
Allow the underglaze to dry until it is no longer shiny and feels chalky to the touch. -
Scrape the Surface:
Using a sharp metal rib or a slightly damp green scouring pad, carefully scrape away the excess underglaze from the high points of the clay. -
Reveal the Clean Lines:
Continue scraping until the clay body is clean and cream-colored again, leaving the brown color only inside the carved lines. -
Bisque Fire:
Slowly dry the bowl completely, then valid fire it to cone 04 (or your clay’s specific bisque temperature). -
Glaze Application:
Dip or spray the bowl with a clear matte glaze to seal the surface without obscuring the intricate linework. -
Final Firing:
Glaze fire the piece to the maturity temperature of your clay body (likely cone 5 or 6).
Level Up: Colored Slips
Instead of a single brown tone, try using a gradient of different colored slips for the inlay to create an ombre leaf effect from rim to center.
Now you have a stunning, nature-inspired vessel ready for your table or display shelf
Reactive Glaze Layering and Pooling
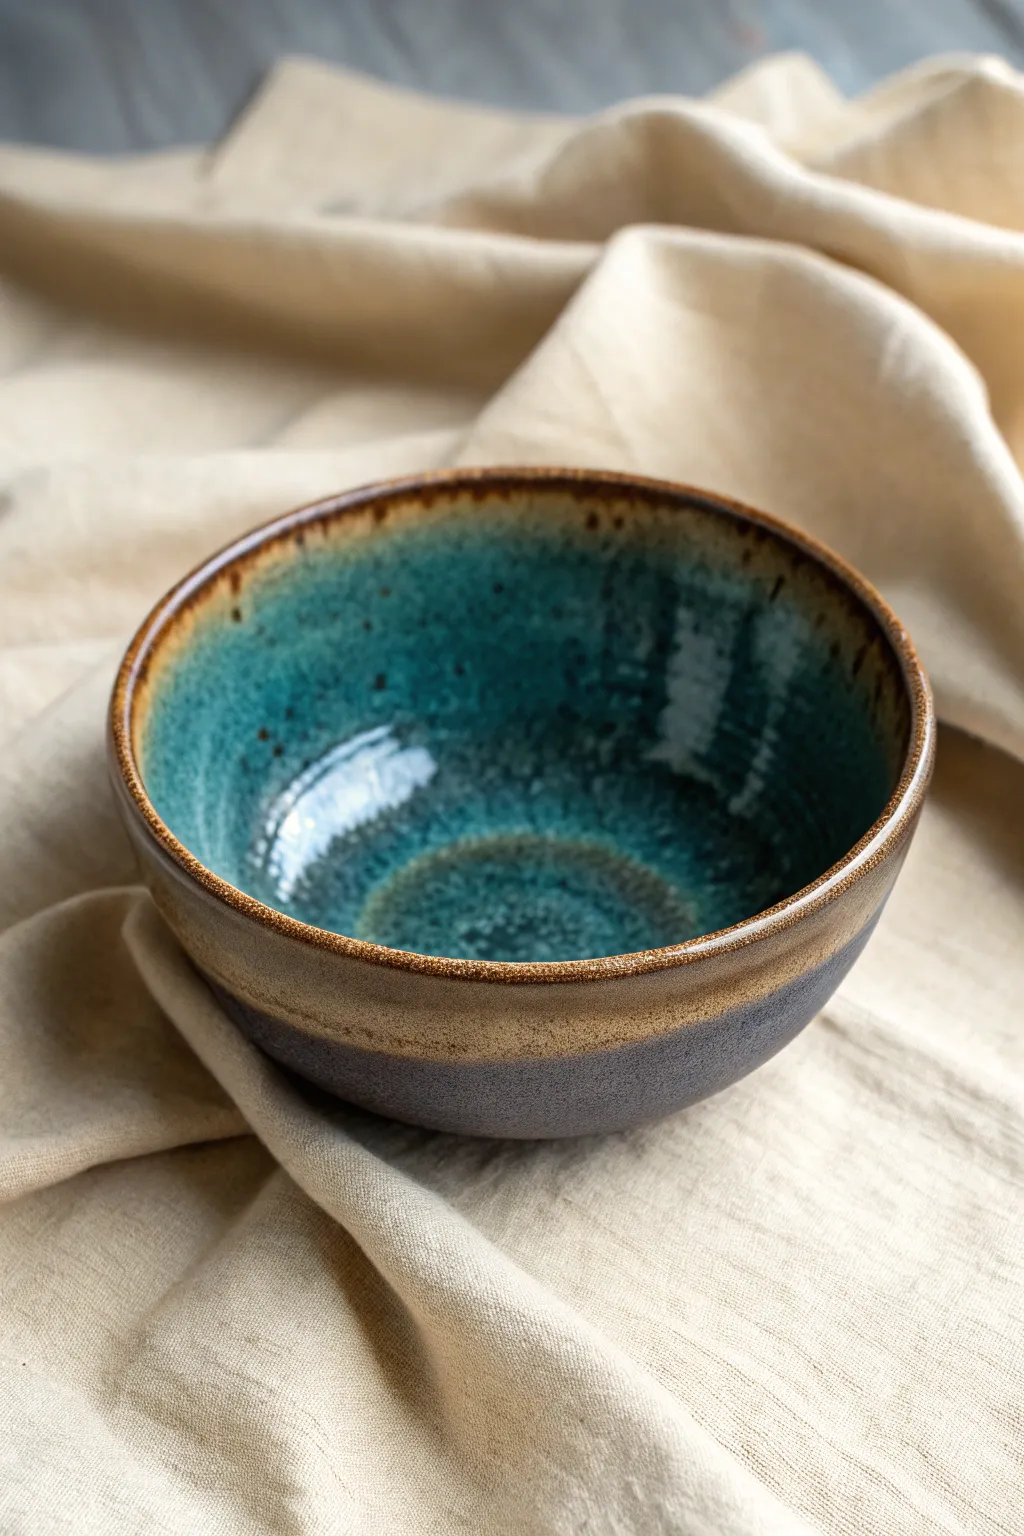
This project captures the mesmerizing depth of a lagoon with its pool of high-gloss teal glaze nestled inside a warm, earthy vessel. The magic lies in the intersection of a matte exterior and a reactive glassy interior, creating a stunning contrast of textures.
Step-by-Step Guide
Materials
- Stoneware clay body (buff or speckled)
- Pottery wheel and tools (sponge, needle tool, rib, cutting wire)
- Trimming tools (loop tool)
- Bisque firing kiln
- Wax resist
- Glaze 1: Matte Charcoal or Slate Grey
- Glaze 2: Glossy Turquoise or Teal (reactive type)
- Glaze 3: Rutile-based Honey or Toasted Brown (for the rim)
- Soft fan brush
- Glaze sponge
Step 1: Throwing and Trimming
-
Center the clay:
Begin with about 1.5 to 2 lbs of wedged stoneware clay. Slam it onto the wheel head and center it using water and steady pressure to ensure a wobble-free base. -
Open the form:
Drill your thumb into the center, stopping about a half-inch from the bottom. Open the clay wide, establishing a gentle curve for the interior floor. -
Pull the walls:
Slowly pull the walls upward and slightly outward. Aim for a classic hemispherical shape that is wider at the top than the bottom, giving the glaze plenty of surface area to react. -
Refine the rim:
Compress the rim with a chamois or sponge. Keep it slightly thickened; this thickness will pair beautifully with the toasted brown glaze later. -
Shape the interior:
Use a smooth wooden or metal rib to compress the inside curve. Remove any throwing lines if you want a glassy smooth finish, or leave subtle rings if you prefer the glaze to break over texture. -
Wire off and dry:
Cut the bowl from the wheel using a wire tool. Allow it to dry to a leather-hard state, usually overnight depending on humidity. -
Trim the foot:
Center the leather-hard bowl upside down on the wheel. Trim excess clay from the bottom to create a defined foot ring, ensuring the wall thickness is even throughout. -
Bisque fire:
Once bone dry, fire the piece to cone 04 (or your clay’s specific bisque temperature) to prepare it for glazing.
Pinholing Issues?
If you see tiny craters in the matte exterior, try a ‘drop and hold’ firing schedule. Hold the peak temp for 15 minutes to let gases escape and the glaze smooth out.
Step 2: Glazing the Exterior
-
Clean the bisque:
Wipe the bisque-fired bowl with a damp sponge to remove any dust, which can cause pinholing in the glaze. -
Apply wax resist:
Paint a layer of wax resist on the bottom of the foot ring and about 1/4 inch up the side of the foot to prevent glaze from fusing the pot to the kiln shelf. -
Glaze the lower exterior:
Dip the bottom two-thirds of the bowl’s exterior into the Matte Charcoal glaze. Alternatively, brush on 3 coats if using a commercial brushing glaze. -
Wipe the rim:
If any charcoal glaze touched the rim or the top third of the exterior, wipe it back cleanly with a sponge. You want the top section bare for the next glaze.
Step 3: Creating the Interior Depth
-
Pour the interior:
Pour a generous amount of the Glossy Turquoise glaze inside the bowl. Roll it around to coat the entire interior surface evenly, then pour out the excess. -
Watch the drip:
Ensure the interior coat is thick enough to pool slightly at the bottom but not so thick it will crawl. This depth creates the ‘lagoon’ effect. -
Glaze the upper exterior:
Using a brush or dip method, apply the Rutile Honey/Toasted Brown glaze to the top rim and overlap it slightly onto the Charcoal exterior glaze below. -
Blend the transition:
I like to gently dab the overlap line where the brown meets the grey with a sponge; this softness encourages a natural gradient during the melt. -
Rim reaction:
Apply a second, slightly heavier coat of the Toasted Brown glaze specifically to the rim lip. This extra flux will help pull the colors down slightly into the interior turquoise. -
Clean the foot:
Double-check the foot ring and wipe away any stray glaze droplets that might have dripped onto the wax resist. -
Glaze fire:
Load into the kiln and fire to Cone 6 (approx 2232°F / 1222°C) or the specific maturity temperature of your glazes. A slow cooling cycle can help develop micro-crystals in the reactive glazes.
Level Up: Iron Oxide
Wipe a sponge with Red Iron Oxide lightly over the rim before the final glaze. It intensifies the rustic brown break and adds dramatic dark speckling.
Opening the kiln to reveal how the glazes have mingled and flowed is the best part of the process, so enjoy your new masterpiece
Drippy Rim Glaze Moment
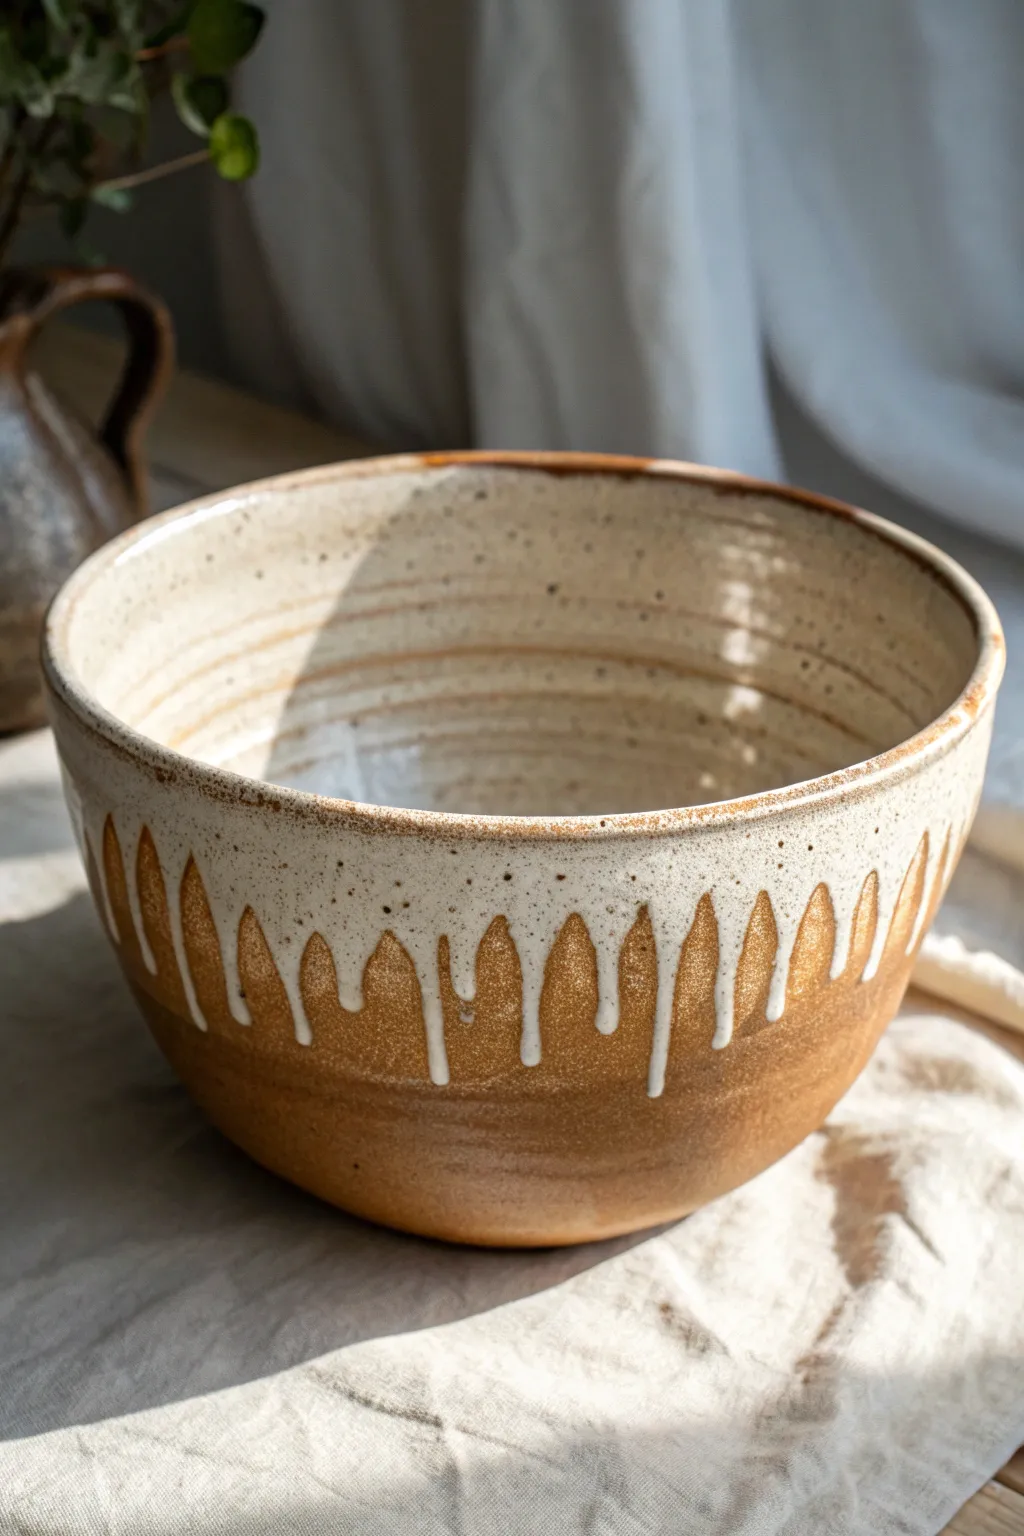
Embrace the natural beauty of flowing glaze with this stunning stoneware bowl, featuring a rich amber base kissed by a creamy, intentionally drippy rim. The speckled clay body adds rustic texture while the cascading white glaze creates a mesmerizing pattern that makes every firing unique.
Step-by-Step
Materials
- Speckled stoneware clay body (e.g., Lagunitas or similar)
- Pottery wheel
- Throwing tools (sponge, wire tool, ribs, trimming tools)
- Amber/Honey celadon glaze
- Opaque white glaze (thick application)
- Wax resist
- Glaze brushes or dipping tongs
- Kiln
Step 1: Throwing and Shaping
-
Prepare the Clay:
Begin by thoroughly wedging about 2-3 pounds of speckled stoneware clay to remove air bubbles and ensure consistency. -
Center and Open:
Center the clay firmly on the wheel head. Open the mound, focusing on creating a wide, gentle curve for the interior bottom. -
Pull the Walls:
Pull the walls up, aiming for a height of about 5-6 inches. Keep the rim slightly thick to support the upcoming glaze layers. -
Shape the Curve:
Use a kidney rib to gently belly out the sides, creating a continuous, smooth curve from foot to rim. Leave visible throwing lines near the top if you like the texture shown in the reference. -
Refine the Rim:
Compress the rim with a chamois or sponge. A slightly rounded rim helps the final glaze drip naturally over the edge. -
Wire Off:
Run your wire tool under the base and set the bowl aside to dry until leather-hard.
Control Your Gravity
To encourage specific drips without total chaos, lightly touch the wet white glaze with a loaded brush at intervals where you want the flow to start downward.
Step 2: Trimming and Bisque
-
Trim the Foot:
Once leather-hard, center the bowl upside down on the wheel. Trim a clean foot ring, removing excess weight from the bottom while mirroring the interior curve. -
Smooth the Surface:
Use a smooth rib or sponge to tidy up any rough trimming marks, but preserve the speckles in the clay texture. -
Dry Slowly:
Allow the bowl to dry slowly and evenly to the bone-dry stage to prevent warping. -
Bisque Fire:
Load the bowl into the kiln for a bisque firing (typically Cone 04 or 06) to prepare it for glazing.
Step 3: Glazing the Drip Effect
-
Wax the Foot:
Apply wax resist carefully to the bottom foot ring and about 1/4 inch up the side to protect your kiln shelves from running glaze. -
Glaze the Interior:
Pour the amber/honey glaze inside the bowl, swirl it to coat the entire interior surface, and pour out the excess. Wipe any drips off the rim immediately. -
Dip the Exterior Base:
Holding the foot, dip the exterior of the bowl into the amber glaze, bringing the glaze line nearly to the rim but leaving the very top edge bare for a moment. -
Apply the Base Rim:
Now, ensure the amber glaze covers the rim completely. I usually let this base layer dry until it’s powdery to the touch before adding the second color. -
Create the Drip Layer:
Dip just the top 1-2 inches of the rim into the thick white glaze. Hold it there for 3-5 seconds—a longer hold creates a thicker application which encourages longer drips. -
Clean Up:
Check the foot ring one last time to ensure no stray glaze droplets are adhering to the wax. -
Glaze Fire:
Fire the bowl to maturity (typically Cone 5, 6, or 10 depending on your clay and glaze). The heat will cause the heavy white rim to melt and cascade down into the amber base.
Play with Texture
Leave distinct throwing rings near the top when shaping. The melting white glaze will pool and break over these ridges, adding depth to the drip pattern.
Unloading the kiln reveals how gravity and heat collaborated to paint your unique masterpiece
Bubble Glaze Circles in the Bowl’s Center
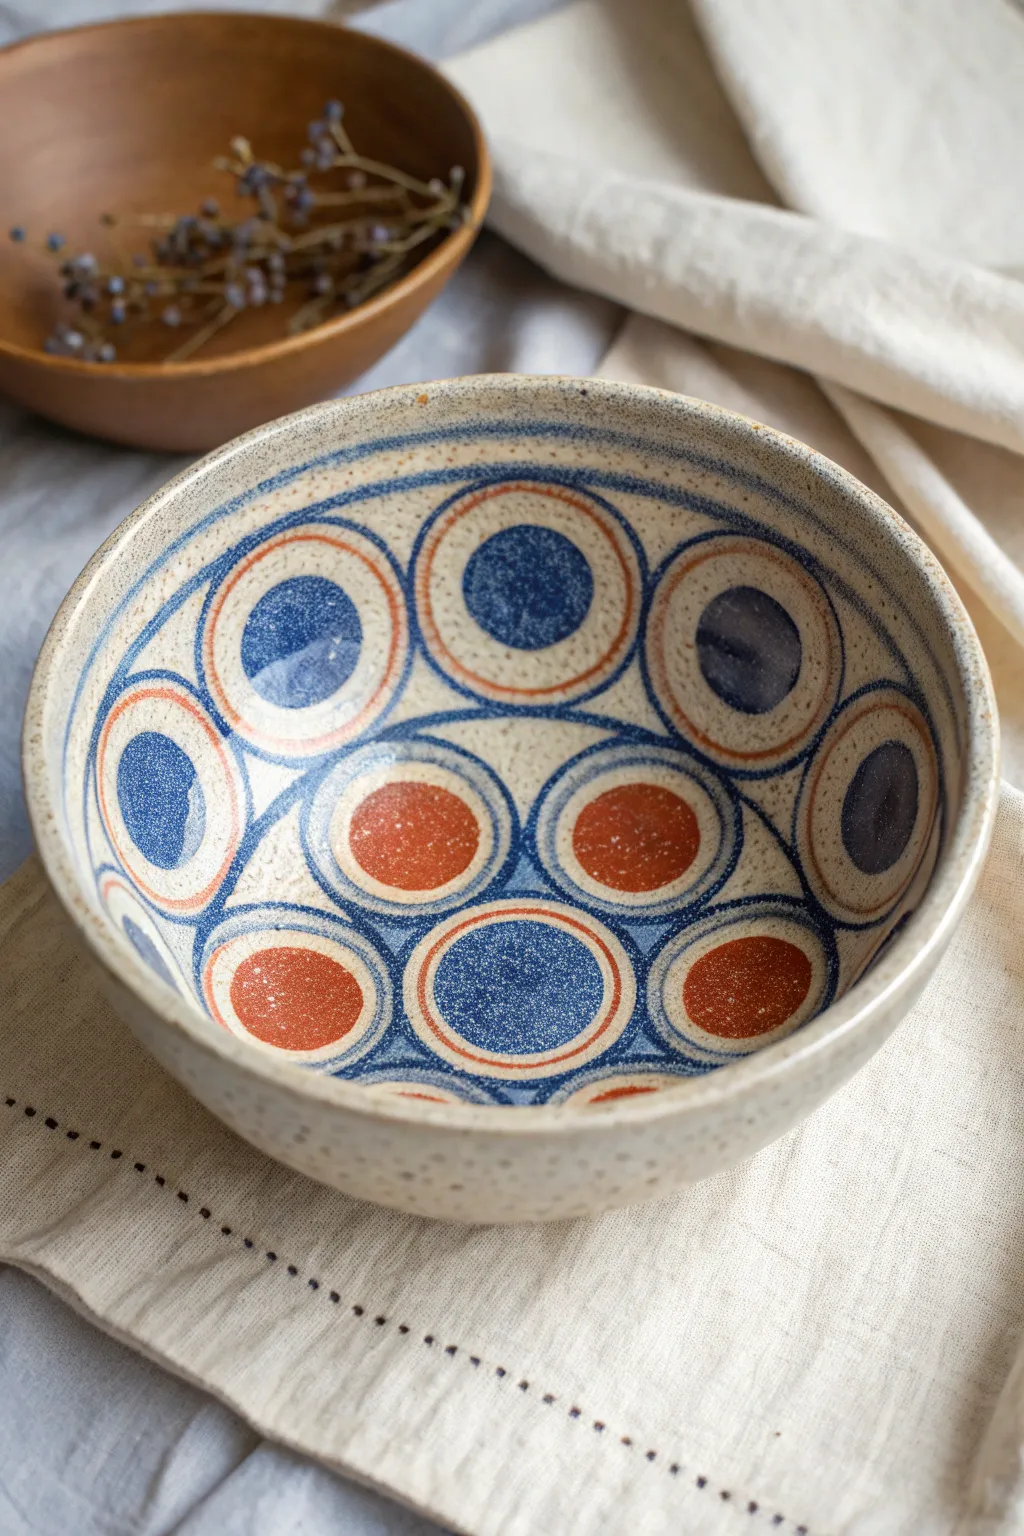
This project combines the rustic charm of speckled clay with a structured, geometric design that feels both modern and retro. By layering circular motifs in alternating bands of cobalt blue and terracotta orange, you’ll create a mesmerizing centerpiece that draws the eye straight to the bottom of the bowl.
Detailed Instructions
Materials
- Speckled stoneware clay body
- Pottery wheel and throwing tools
- Trimming tools
- Underglaze (Cobalt Blue)
- Underglaze (Terracotta/Burnt Orange)
- Clear transparent glaze (food safe)
- Round watercolor brushes (Size 4 and 8)
- Banding wheel
- Pencil (HB or 2B)
- Compass or circular templates (various sizes)
- Damp sponge
Step 1: Forming the Base
-
Throw the bowl:
Center roughly 2-3 lbs of speckled stoneware clay on your wheel. Open the center and pull up the walls to create a deep, hemispherical bowl shape with a smooth, continuous interior curve. -
Refine the rim:
Using a chamois or a damp sponge, compress the rim to ensure it is rounded and durable. A slight inward curve at the rim helps frame the interior design later. -
Trim the foot:
Once leather hard, flip the bowl and trim a clean foot ring. Smooth the exterior surface with a metal rib to remove any grog drag marks, ensuring a nice canvas for the speckled clay to show through. -
Bisque fire:
Allow the bowl to bone dry completely before loading it into the kiln. Bisque fire to your clay body’s specifications (usually Cone 04 or 06).
Uneven Coverage?
If your underglaze looks streaky after firing, you likely didn’t apply enough layers. Always apply 3 coats, letting each dry until matte before adding the next.
Step 2: Mapping the Geometry
-
Clean surface:
Wipe the bisqued bowl with a damp sponge to remove any kiln dust. This ensures the underglaze adheres properly without crawling. -
Mark concentric bands:
Place the bowl on a banding wheel. lightly hold a pencil against the interior wall while spinning the wheel to mark the horizontal bands where your rows of circles will sit. -
Draft the circles:
Using circular templates or a steady hand, lightly sketch the rows of circles in pencil directly onto the bisque. Create a top row near the rim, a middle row, and a central cluster at the bottom. Pencil marks will burn off in the kiln, so don’t worry about being messy.
Try Wax Resist
For ultra-crisp circles, paint the colored centers first. Once dry, apply wax resist over the dots, then paint the contrasting ring freely over the wax.
Step 3: Painting the Design
-
Outline the top row:
Mix your Burnt Orange underglaze to a creamy consistency. Using a size 4 brush, paint the outer ring of the circles in the top row. Keep the line weight consistent. -
Fill the top centers:
Switch to Cobalt Blue underglaze. Use the larger size 8 brush to fill in the centers of the orange-ringed circles. Apply 2-3 coats for solid opacity. -
Outline the middle row:
For the row below, reverse the pattern. Paint the outer rings in Cobalt Blue using the finer brush. I find resting my pinky on the bowl edge helps stabilize my hand for these curves. -
Fill the middle centers:
Fill the centers of these blue rings with the Burnt Orange underglaze. Again, ensure you apply enough coats so the speckles don’t show through the color too heavily. -
Paint the bottom cluster:
For the very bottom of the bowl, revert to the first scheme: Orange rings with Blue centers. Ensure the central-most circle is perfectly centered to anchor the design. -
Add connecting lines:
Using a thinned blue underglaze and a fine liner brush, paint the horizontal connecting lines between the rows of circles, effectively creating a grid that separates the tiers. -
Create the rim band:
Spin the banding wheel and apply a steady band of blue underglaze just below the rim on the inside. Add a thinner orange band just below that to frame the entire composition.
Step 4: Glazing and Finishing
-
Clean up details:
Use a damp stiff brush or a scratching tool to clean up any smudged edges or droplets of underglaze. The lines between the circles should be clean loops. -
Dip in clear glaze:
Once the underglaze is fully dry, dip the entire bowl into a clear, gloss glaze. Shake off excess gently to prevent pooling in the bottom. -
Check the thickness:
Rub your finger over the rim immediately after dipping to ensure the glaze isn’t too thick, which can cause cloudiness over your detailed painting. -
Glaze fire:
Load into the kiln for the final glaze firing (e.g., Cone 5/6). Ensure the bowl is not touching other pots.
Now you have a stunning, food-safe bowl ready for display or daily use
Glossy Interior With Raw Clay Exterior
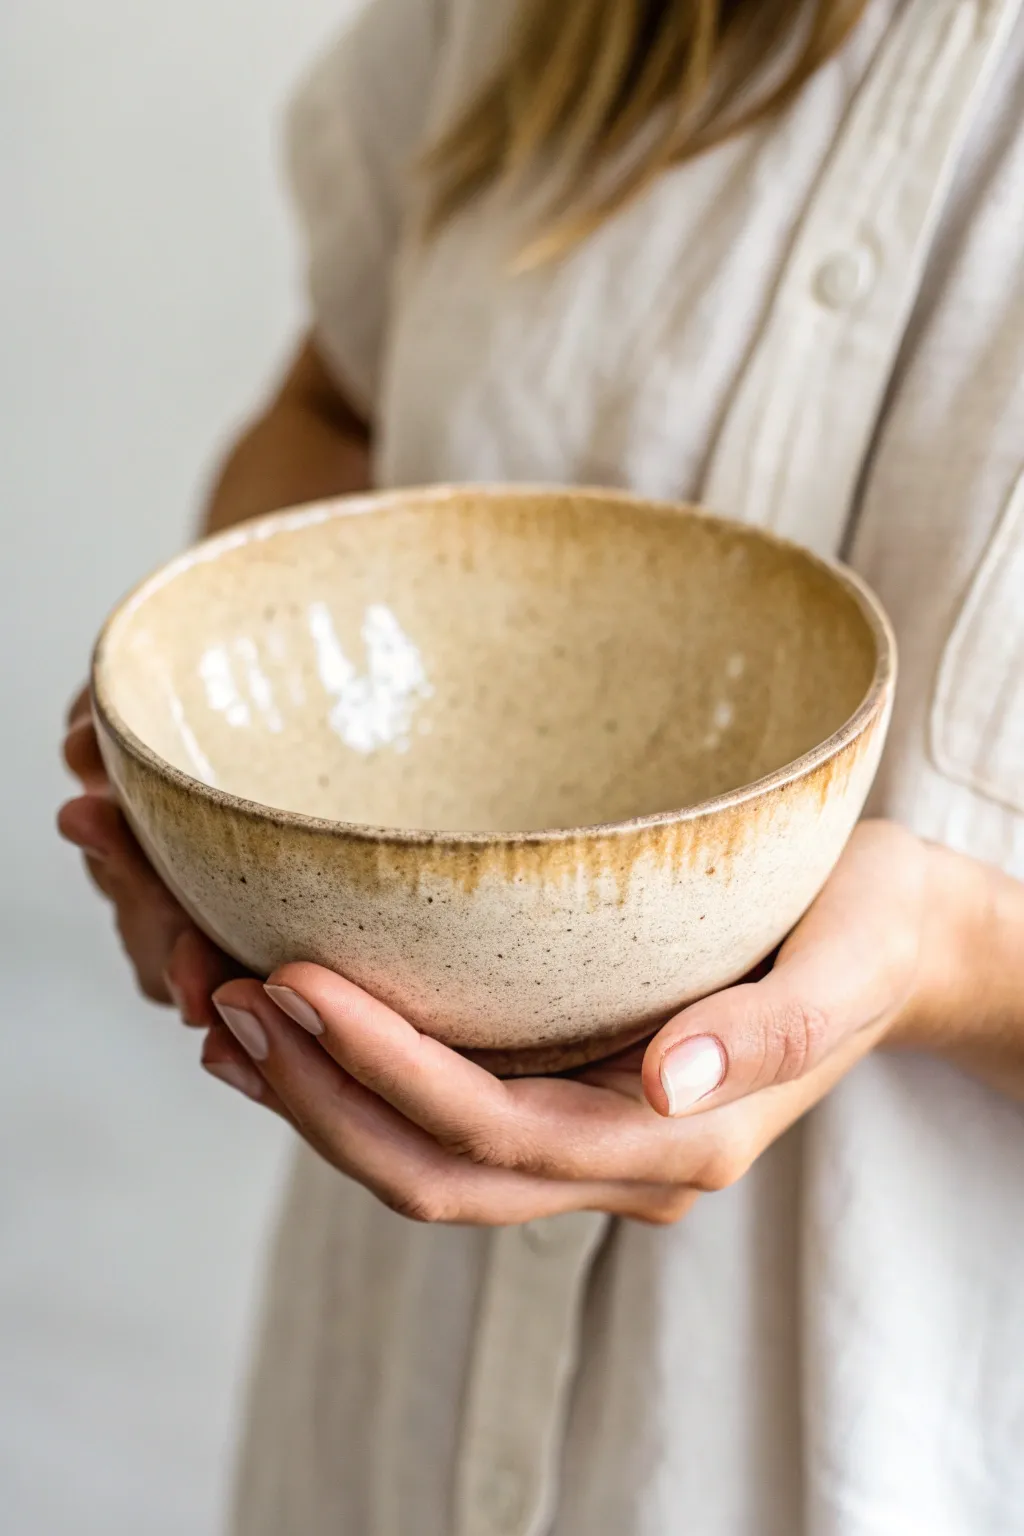
This project explores the beautiful contrast between a smooth, glassy interior and the slightly rougher, tactile nature of raw stoneware clay. The result is a comforting, minimalist bowl that feels as lovely in your hands as it looks on your table, perfect for serving soups or morning porridge.
Step-by-Step
Materials
- Speckled stoneware clay (buff or light brown)
- Pottery wheel
- Throwing tools (sponge, needle tool, rib)
- Wire cutter
- Trimming tools
- Glossy cream or transparent glaze (food safe)
- Wax resist
- Glaze brush or dipping tongs
- Kiln
Step 1: Throwing the Form
-
Wedging:
Begin by thoroughly wedging about 1.5 to 2 pounds of speckled stoneware clay to remove air bubbles and ensure consistency. Form it into a tight ball before heading to the wheel. -
Centering:
Throw the ball onto the center of the bat. Use water and steady pressure to center the clay, pushing it up into a cone and pressing it back down a few times to align the particles. -
Opening:
Create a well in the center of your mound, opening it up until you leave about a quarter-inch of clay at the bottom for the foot. Widen the base to your desired width, keeping the floor flat and smooth. -
Pulling walls:
Slowly pull the walls up. Aim for a gentle, rounded curve rather than straight sides. I like to keep the rim slightly thicker than the walls to prevent warping and give it a nice mouth-feel. -
Shaping:
Use a rib tool on the inside to broaden the curve, pushing gently outward while supporting the outside with your other hand. Smooth the rim with a chamois or sponge for a professional finish. -
Cutting off:
Run a wire tool under the base to separate the bowl from the bat. Leave it to dry until it reaches a leather-hard state.
Uneven Rim?
If your rim feels sharp after firing, use a diamond sanding pad or wet sandpaper (400 grit) to gently smooth it down. Always sand wet to avoid dust.
Step 2: Trimming & Refining
-
Centering for trim:
Place the leather-hard bowl upside down on the wheel head. Secure it with small lugs of fresh clay. Tap it gently to ensure it is perfectly centered. -
Defining the foot:
Use a trimming tool to carve away excess clay from the base, creating a distinct foot ring. This elevates the bowl and gives the raw exterior a finished look. -
Smoothing texture:
Once trimmed, use a slightly damp sponge to smooth any harsh tool marks on the exterior, but don’t over-smooth—you want to keep the natural clay texture visible. -
Bisque firing:
Load the bone-dry bowl into the kiln and fire it to cone 04 (or your clay’s bisque temperature). This hardens the clay and prepares it for glazing.
Step 3: Glazing
-
Cleaning:
Wipe the bisque-fired bowl with a damp sponge to remove any kiln dust, which can cause glaze defects. -
Waxing the exterior:
Apply wax resist generously to the entire exterior of the bowl, stopping right at the rim. This ensures the glaze only adheres to the inside, creating that sharp contrast line. -
Interior glazing:
Pour your glossy cream glaze into the bowl, swirl it quickly to coat the entire interior surface, and pour the excess back out. Alternatively, you can dip the bowl rim-down, but be careful not to let glaze run too far down the outside. -
Rim detail:
If glaze has dripped excessively on the outside, wipe it back. However, allowing just a tiny bit of glaze to break over the rim creates a lovely transition line that highlights the clay body. -
Final drying:
Let the glaze dry completely before loading the kiln. Check the foot ring one last time to ensure no glaze is on the bottom. -
Glaze firing:
Fire the bowl to cone 5 or 6 (depending on your clay and glaze specifications). This final firing will melt the glaze into a smooth, glossy surface and mature the stoneware.
Speckle Pop
To enhance the speckles often found in buff clay, try a transparent or semi-transparent glaze. Opaque glazes will hide the natural iron spots in the clay.
Enjoy the simple pleasure of holding your handmade, textured bowl
Wavy Pinched Rim for a Handmade Feel
Embrace the beauty of imperfection with this lovely wheel-thrown bowl, featuring visible throwing lines and a distinctively textured rim. The warm, creamy glaze over speckled clay creates a cozy, farmhouse aesthetic that highlights the hand-touched details.
Detailed Instructions
Materials
- Speckled stoneware clay (approx. 2-3 lbs)
- Potter’s wheel
- Water bucket and sponge
- Wire cutting tool
- Wooden throwing rib
- Loop trimming tools
- Needle tool
- Cream or oatmeal colored dipping glaze
- Kiln
Step 1: Throwing the Form
-
Prepare the Clay:
Begin by thoroughly wedging your speckled stoneware clay to remove any air bubbles. Form it into a smooth ball and slam it onto the center of the wheel head. -
Center and Open:
With the wheel spinning at a moderate speed, cone the clay up and down to center it. Once stable, open the center of the mound, pressing down until you leave about a half-inch for the floor. -
Establish the Floor:
Compress the clay floor by running your fingers from the center outward several times. This compression helps prevent S-cracks during the drying process. -
Pull the Walls:
Slow the wheel down slightly. Using a pincer grip or your knuckles, begin pulling the walls upward. Unlike standard cylinders, allow the walls to flare outward gradually to create a wide, open bowl shape. -
Leave the Throwing Rings:
As you pull, don’t worry about smoothing the outside with a rib too much. Let your fingertips leave subtle spiral grooves (throwing rings) on the exterior wall; these add great texture that the glaze will break over later. -
Shape the Curve:
Use a wooden rib on the inside of the bowl to define a continuous, smooth curve from the floor to the rim, ensuring there are no sharp corners inside.
Uneven Pinches?
If your spacing gets erratic, don’t restart. Use a rib to smooth the rim back to a circle while the wheel spins, then try the pinching process again.
Step 2: Creating the Rim
-
Level the Top:
While the wheel is spinning slowly, use your needle tool to trim the very top edge if it’s uneven, creating a fresh, level surface to work on. -
Pinch the Pattern:
Stop the wheel completely. Using your thumb and forefinger, gently pinch the rim edge. Move your hand slightly to the right and pinch again, repeating this process around the entire circumference to create a rhythmic, wavy pattern. -
Refine the Edge:
Smooth the pinched areas slightly with a damp sponge or a piece of chamois leather to ensure the rim isn’t sharp, but be careful not to wash away the texture you just created. -
Wire Off:
Pull your wire tool taut and slice underneath the bowl to separate it from the wheel head. Carefully lift the bowl using bat pins or pot lifters and set it aside.
Highlighting Texture
Choose a ‘breaking’ glaze (one that thins on edges). This naturally darkens the rim and throwing lines, emphasizing the handmade details seen here.
Step 3: Trimming and Glazing
-
Leather Hard Stage:
Allow the bowl to dry until it reaches a leather-hard state. It should be firm enough to handle without warping but still hold an imprint from your fingernail. -
Trim the Foot:
Center the bowl upside down on the wheel. Secure it with clay lugs. Use a loop tool to trim away excess weight from the base and carve out a neat foot ring. -
Bisque Fire:
Once bone dry, load the bowl into the kiln for a bisque firing (usually to Cone 04 or 06, depending on your clay body). -
Wax the Foot:
After the kiln cools, apply wax resist to the bottom foot ring to prevent glaze from adhering to the shelf. -
Apply Glaze:
Stir your cream or oatmeal glaze thoroughly. Hold the bowl by the foot and dip it rim-first into the bucket for about 3 seconds. Pull it out and give it a quick shake to remove drips. -
Check the Rim:
The glaze on the pinched rim will naturally be thinner because of gravity. I usually check to make sure it’s not too thick in the crevices, which can obscure the texture. -
Final Firing:
Fire the glazed piece to maturity (Cone 5, 6, or 10, per your clay and glaze instructions). The heat will cause the iron specks in the clay to bleed through the pale glaze.
Once cooled, your bowl is ready to bring a touch of earthy charm to your dining table
Nesting Bowl Set With Scaled Motifs
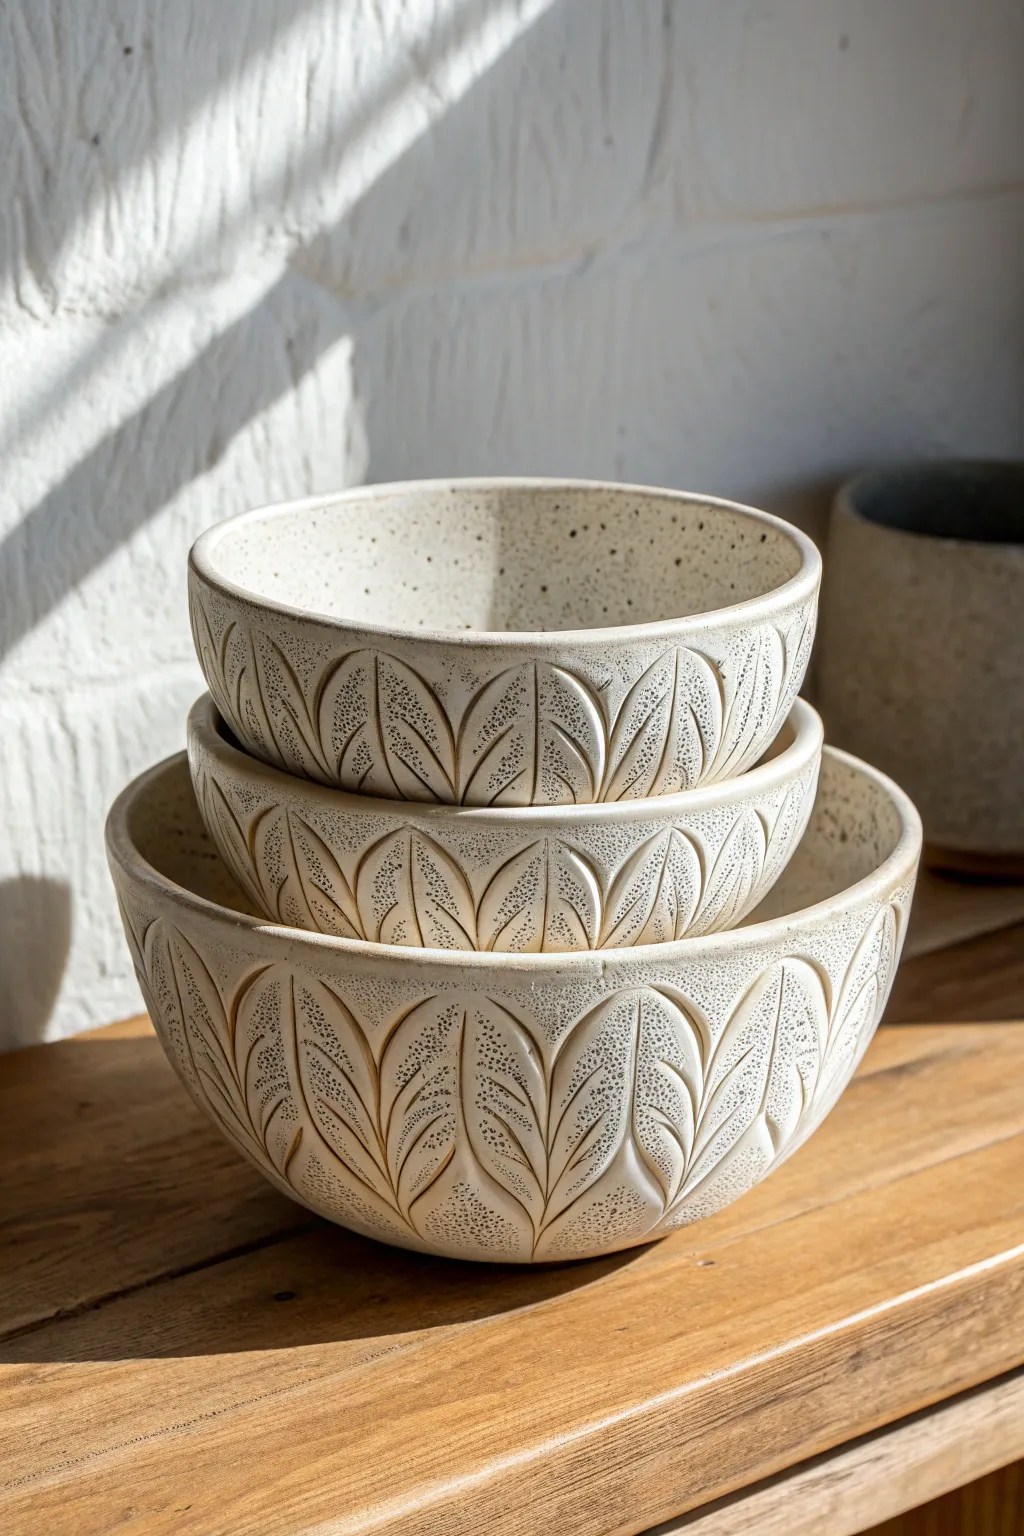
Create a unified yet distinct trio of bowls that nest perfectly together, featuring a repeating organic leaf pattern carved into the exterior. The raw, speckled clay body contrasts beautifully with the carved textures, giving these pieces a timeless, handcrafted feel ideal for serving or display.
Step-by-Step Guide
Materials
- Speckled stoneware clay (mid-fire)
- Pottery wheel
- Throwing bat
- Ribs (wooden and rubber)
- Wire cutter
- Needle tool
- Carving tool set (specifically a V-tip loop tool or sgraffito tool)
- Sponge
- Clear matte or satin glaze
- Kiln
Step 1: Throwing the Nesting Set
-
Weigh your clay:
Preparation is key for nesting bowls. Divide your clay into three graduating weights to ensure progressive sizes. A good starting ratio is 1 lb, 2 lbs, and 3.5 lbs for a small, medium, and large bowl. -
Throw the large bowl:
Start with the largest ball of clay. Center it on the wheel and open it wide. Pull the walls to a medium height with a gentle, open curve. Focus on creating a rim that is slightly thickened to withstand the carving process later. -
Measure the interior:
Before removing the large bowl, use calipers or a ruler to measure the interior width at the bottom and the halfway point. You need these measurements to ensure the next bowl fits inside. -
Shape the rim:
Compress the rim firmly with a chamois or sponge. For this design, a slightly flattened or rounded rim works best to frame the exterior pattern. -
Throw the medium bowl:
Using your measurements as a guide, throw the second bowl so its exterior width is slightly smaller than the large bowl’s interior. Mimic the same open curve shape to ensure they stack cleanly. -
Throw the small bowl:
Repeat the process for the smallest vessel. It should nest comfortably inside the medium bowl. Don’t worry if the height varies slightly; the nesting mechanism relies mostly on the curve and foot width. -
Trimming the feet:
Once leather hard, trim a defined foot ring on each bowl. The foot gives the bowl lift and creates a distinct stopping point for your carving pattern.
Uneven Spacing?
If your pattern doesn’t meet up perfectly at the end, don’t panic. Gently smudge the last few outlines and re-space them slightly wider or narrower. Organic patterns are forgiving!
Step 2: Carving the Motif
-
Plan the spacing:
While the clay is still leather hard—sturdy but easily carved—lightly scratch vertical guide lines around the exterior with a needle tool. Spacing them evenly is crucial for the pattern to meet up correctly. -
Draw the leaf outlines:
Sketch the outline of upward-pointing leaves or scales within your vertical guides. Each shape should have a pointed tip near the rim and a rounded bottom, resembling a stylized tulip or artichoke leaf. -
Carve the relief outlines:
Using a V-tipped carving tool, carve deep grooves along your sketched outlines. I prefer to vary the depth slightly, cutting deeper at the intersections to create dramatic shadows. -
Create the central vein:
Carve a single, confident line straight down the center of each leaf shape. This divides the leaf and mimics the spine of the foliage. -
Add texture to the leaves:
Inside each leaf half, use a smaller loop tool or needle to stipple or scratch tiny dots and dashes. This texture contrasts against the smooth clay ‘veins’ and outlines. -
Clean up burrs:
Once the carving is complete, let the bowls dry slightly more. Then, use a stiff brush or a lightly damp sponge to smooth away any sharp clay crumbs or burrs created during carving.
Add Color Depth
Apply a dark oxide wash (like iron oxide) over the carving and wipe it back before glazing. The dark color will remain in the deep crevices, making the texture pop.
Step 3: Glazing and Finishing
-
Bisque fire:
Load the thoroughly dried bowls into your kiln and bisque fire them according to your clay body’s specifications (usually Cone 04 or 06). -
Wax the feet:
Apply wax resist to the bottom of the foot rings to prevent glaze from sticking to the kiln shelf. -
Apply clear glaze:
Dip each bowl into a clear matte or satin glaze. A glossy glaze can sometimes cause glare that hides the texture, whereas a matte finish emphasizes the shadows in your carving. -
Wipe back (optional):
If your clear glaze is thick, gently wipe the raised areas with a damp sponge. This thins the glaze on the high points, allowing the speckled clay body to show through more clearly. -
Glaze fire:
Fire the bowls to maturity (likely Cone 5 or 6). Once cool, sand the bottoms if necessary to ensure they don’t scratch your table.
Stack your finished set on a shelf to show off the interlocking natural design.


Have a question or want to share your own experience? I'd love to hear from you in the comments below!