There’s something so satisfying about painting a dandelion seed head—it’s delicate, graphic, and instantly recognizable. Here are my favorite dandelion painting ideas that make the fluffy texture feel doable, even if you’re keeping things simple and playful.
Sunset Silhouette Dandelion Scene
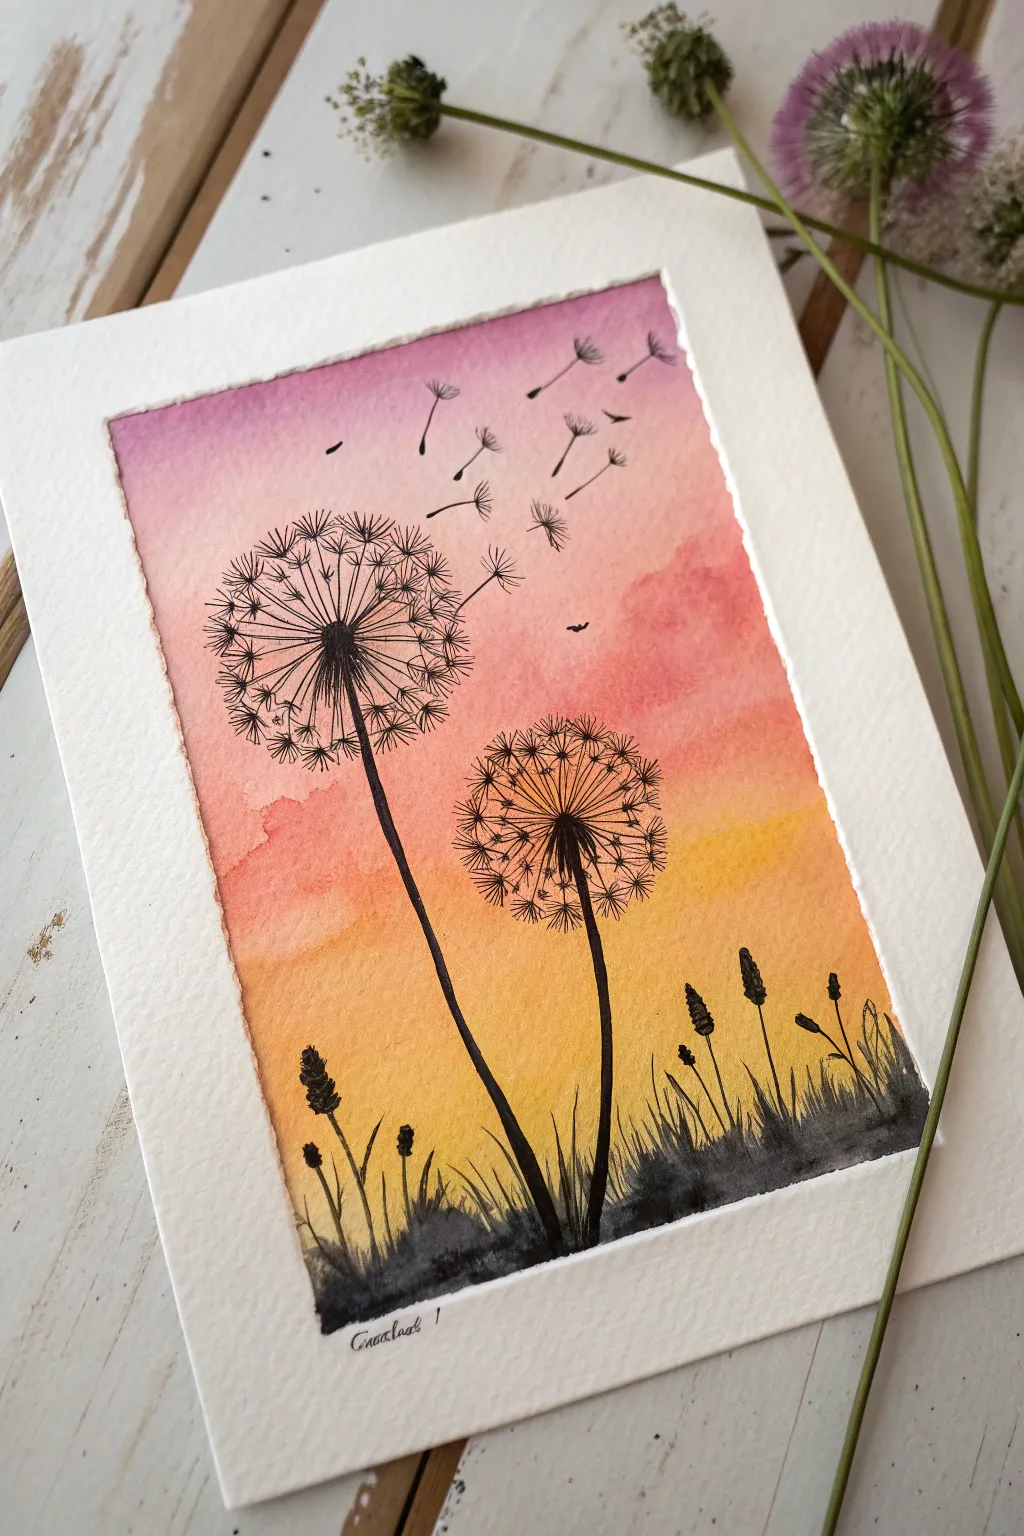
Capture the fleeting beauty of dusk with this vibrant watercolor and ink project. By combining a classic wet-on-wet sunset gradient with crisp black silhouettes, you’ll create a striking contrast that feels both peaceful and dynamic.
Step-by-Step Guide
Materials
- Cold press watercolor paper (300gsm/140lb suggested)
- Watercolor paints (Purple, Pink/Rose, Orange, Yellow)
- Black ink fine liner pens (0.1 and 0.5 sizes)
- Black watercolor paint or gouache
- Flat wash brush (1/2 inch or 3/4 inch)
- Small round brush (size 2 or 4)
- Masking tape
- Mixing palette
- Clean water
- Paper towels
Step 1: Setting the Sky Stage
-
Prepare your paper:
Begin by taping down your watercolor paper to a board or table surface using masking tape. This prevents the paper from buckling when wet and creates that crisp white collection border later. -
Wet the surface:
Use your large flat wash brush to apply a layer of clean water across the entire area of the paper inside the tape. You want the paper to be glistening and evenly damp, but not so soaked that puddles form. -
Apply the yellow base:
Load your brush with a bright, warm yellow. Start painting horizontally across the bottom third of the paper, letting the color bleed naturally upwards slightly. -
Transition to sunset orange:
Clean your brush and pick up a vibrant orange. Paint the middle section of the paper, slightly overlapping with the top of the yellow area to create a soft, blended transition. -
Add the rosy pink:
Next, introduce a pink or rose hue above the orange. Again, apply this in horizontal strokes, allowing the wet paper to do the work of mixing the edges where the pink meets the orange. -
Finish with purple:
For the very top of the sky, use a deep violet or purple. Blend this into the top edge of the pink section, creating a seamless gradient from night sky to sunset glow. -
Dry completely:
Let the background painting dry fully. This is crucial—if the paper is even slightly damp, your ink lines will bleed and lose their sharpness. I often use a hair dryer on a low setting to speed this up.
Keep it Airy
Don’t draw a perfect circle for the dandelion outline. Leave gaps between the seed tufts to make the flower look fluffy and translucent rather than solid.
Step 2: Sketching the Silhouettes
-
Paint the ground layer:
Using a small round brush and opaque black watercolor (or gouache for darker coverage), paint an uneven, organic line across the very bottom for the ground. -
Add texture to the grass:
While the black ground is still wet, flick your brush upward rapidly to create thin, grassy blades rising from the earth. Vary the heights to make it look natural. -
Draw the main stems:
Switch to your thicker fine liner pen or a very steady hand with the black paint. Draw two long, curving stems rising from the grass—one tall one on the left, leaning slightly right, and a shorter one on the right. -
Create the seed centers:
At the top of each stem, draw a small, solid black oval. From this center point, draw fine, straight lines radiating outward in a perfect sphere shape to form the skeleton of the dandelion seed head. -
Detail the tall dandelion:
On the taller flower, use your 0.1 fine liner to draw tiny ‘parachutes’ (little V shapes or tufts) at the end of each radiating line. Keep the lines delicate to maintain an airy feel. -
Detail the shorter dandelion:
Repeat the process for the lower dandelion. You can make this one slightly denser to show variety in perspective.
Step 3: Final Flourishes
-
Add drifting seeds:
To suggest a gentle breeze, draw several loose dandelion seeds floating away from the top flower towards the upper right corner. Draw them progressively smaller as they get further away. -
Incorporate low foliage:
Use your pen to draw some distinct plant silhouettes among the grass at the bottom. Adding shapes that look like plantain weeds, wheat, or small buds adds wonderful depth to the foreground. -
Darken the bottom edge:
If your watercolor grass dried too light, go back over the absolute bottom edge with another layer of black paint to anchor the image visually. -
Remove tape:
Once the black ink and paint are 100% dry, slowly peel off the masking tape at a 45-degree angle to reveal your clean white border. -
Sign your work:
Sign your name small at the bottom in the white border or within the bottom black painted area for a professional finish.
Fixing Bleeds
If ink bleeds into the sky, the paper wasn’t dry. Let it dry fully, then turn the bleed into a flying bird or a drifting seed to hide the mistake.
Now you have a serene piece of art that perfectly captures the quiet magic of a summer evening


Toilet Paper Roll Stamp Dandelion Heads

Transform simple cardboard tubes into delicate botanical stamps to create custom wrapping paper or greeting cards. This project combines rustic charm with eco-friendly crafting for a sophisticated, nature-inspired look.
Detailed Instructions
Materials
- Toilet paper rolls (at least 2)
- Acrylic paint (sage green or olive green)
- White fabric ribbon or heavy textured paper
- Kraft paper envelope or cardstock
- Small scissors or craft knife
- Paper plate or palette
- Small detail paintbrush
- Ruler
Step 1: Crafting the Stamps
-
Prepare the roll:
Take a clean toilet paper roll and flatten one end slightly so you can cut into it more easily. -
Create the fringe:
Using small scissors, cut thin strips into the end of the roll, going about 1 to 1.5 inches deep. Try to keep the strips relatively uniform in width for a neat look. -
Fray the edges:
Gently fan out the cut strips so they radiate outward like a sunburst. This will form the fluffy head of your dandelion. -
Make a variation:
For variety, create a second stamp with slightly shorter or thicker fringe to mimic dandelions at different stages of bloom. -
Prepare the paint:
Squeeze a generous dollop of sage green acrylic paint onto your paper plate. Spread it out slightly so it’s a thin, even layer rather than a glou.
Clean Lines Tip
If the cardboard strips get soggy after a few stamps, let the roll dry out or switch to a fresh tube for crisp lines.
Step 2: Printing the Design
-
Load the stamp:
Press your fanned-out cardboard roll into the paint. rotate it slightly to ensure all the ‘petals’ are coated effectively. -
Test print:
I always recommend doing a test stamp on scrap paper first to check how much pressure you need to apply. -
Stamp the surface:
Press the stamp firmly onto your ribbon or paper. Rock it extremely gently in a circular motion to ensure the outer edges make contact. -
Lift carefully:
Lift the roll straight up to avoid smudging the delicate lines of the flower head. -
Repeat the pattern:
Continue stamping along your material. Vary the height and spacing to create a natural, organic wildflower field look.
Go 3D
Once the green paint dries, add tiny dots of white or yellow paint to the tips of the ‘fluff’ for extra dimension.
Step 3: Adding Details
-
Paint the stems:
Dip a small detail brush into the same green paint. Draw a thin, straight line extending downward from the center of each flower head. -
Add the center:
Dab a small concentration of dots or a solid circle in the very center of the burst to ground the flower petals. -
Create texture:
If your stamp missed a few spots, use the tip of your brush to manually add a few extra radiating lines for fullness. -
Make a frayed edge:
If working on fabric or paper scraps like the sample, gently pull the horizontal threads at the top and bottom to create a soft, frayed fringe. -
Final drying:
Allow the paint to dry completely before rolling up the ribbon or handling the card to prevent smearing.
Enjoy using your custom-printed botanical designs to add a personal touch to your next gift


Minimal Grass Line and Tall Stems
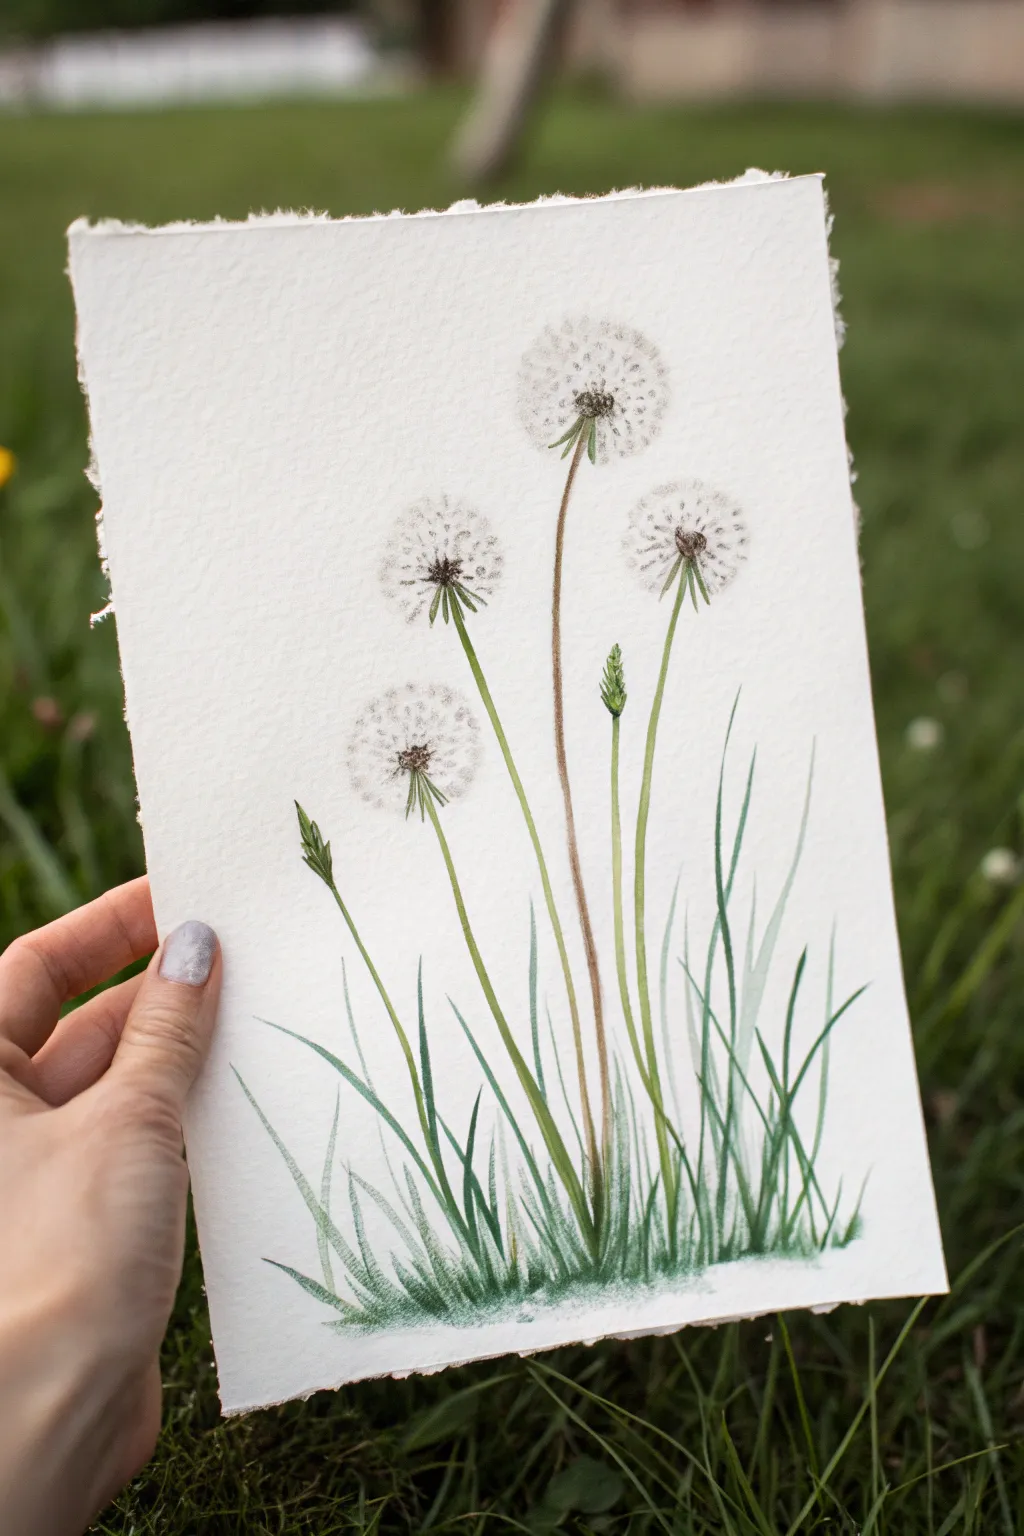
Capture the delicate, fleeting nature of dandelion seed heads with this soft watercolor study. This project focuses on fine lines and light textures to create a serene botanical illustration that feels like a breath of fresh air.
Step-by-Step Guide
Materials
- Heavyweight cold press watercolor paper with deckled edges
- Watercolor paints (Sap Green, darker earthy green, Burnt Sienna or Sepia, trace of Payne’s Grey)
- White gouache paint
- Small round detail brush (size 0 or 1)
- Fine liner brush (size 000)
- Pencil (light H grade)
- Mixing palette
- Paper towels
- Jar of clean water
Step 1: Planning the Composition
-
Sketch the placement:
Begin by lightly marking the positions of your four main flower heads using an H pencil. Draw faint circles where the seed puffs will go, varying their heights to keep the composition dynamic. -
Draw the stem lines:
Trace very faint, slightly curved lines extending downward from each circle center. Let these lines converge towards the bottom center of the paper, but keep them distinct.
Pro Tip: Deckle Edges
To mimic the handmade paper look in the photo, dip a ruler in water, press it firmly on the drawing paper edge, and tear the paper against the ruler. It creates a soft, fibrous edge.
Step 2: Creating the Seed Heads
-
Paint the centers:
Mix a small amount of Sepia or dark brown. Using the very tip of your detail brush, stipple tiny dots in the center of your penciled circles to create the seed attachment point. -
Add the bracts:
Below the stippled centers, paint small, downward-facing green jagged shapes (the involucre/bracts) using Sap Green. These should look like tiny collars holding the seed head. -
Create the fuzz texture:
Dilute a tiny amount of Payne’s Grey until it is barely visible—almost like dirty water. Gently dab soft, cloudy patches around the brown centers to suggest the density of the seeds without drawing every individual filament. -
Detail with white gouache:
Once the pale wash is dry, load your fine liner brush with white gouache. Paint exceedingly thin, radial lines exploding outward from the center brown dots to the edge of your circle. -
Add the seed parachutes:
At the end of some of your white lines, dab tiny ‘V’ or star shapes with the white gouache to represent the fluffy pappus (the parachute part of the seed).
Troubleshooting: Shaky Stems
If your long stem lines look wobbly, don’t worry. Just thicken them slightly or add a second sprouting leaf to cover the error. Nature isn’t perfectly straight anyway.
Step 3: Stems and Details
-
Paint the main stems:
Mix Sap Green with a touch of brown for a natural stem color. Using a steady hand and your liner brush, pull paint from the flower base down to the grass line. I find it helps to exhale slowly while pulling these long lines to keep them steady. -
Vary the stem colors:
Notice that some stems in the reference are browner than others. Glaze a little Burnt Sienna over one or two stems while they are still slightly damp to add realistic variation. -
Add budding stalks:
Paint two shorter, un-flowered stalks. Use pure Sap Green to create the tight, pointed bud shapes, looking a bit like small spears rising among the taller stems.
Step 4: The Grassy Base
-
Start the grass layer:
At the bottom of the page, use your round brush to flick upward strokes of green. Start with a lighter, watered-down green to build the background density. -
Deepen the shadows:
Mix a darker, cooler green (add a touch of blue or grey to your green). Paint shorter, sharper blades of grass near the very bottom to anchor the plants. -
Create texture and movement:
Add a few taller, singular blades of grass that reach higher up the page, crossing over the flower stems slightly. Use quick, confident flicks of the wrist to make the tips taper naturally to a point. -
Ground the painting:
Dab a denser concentration of the dark green horizontally along the very bottom edge of the grass clump to simulate the earth and shadow where the stems emerge.
Step 5: Finishing Touches
-
Erase guidelines:
Ensure the paper is bone dry, then verify that no pencil marks are visible through the translucent seed heads. Gently lift away any remaining graphite guides. -
Final highlights:
Take a final look at the white seed heads. If they faded too much while drying, add a few more crisp dots of white gouache to bring them forward.
Now you have a serene little meadow scene ready to be framed or gifted to a nature lover

One-Color Monochrome Dandelion Painting
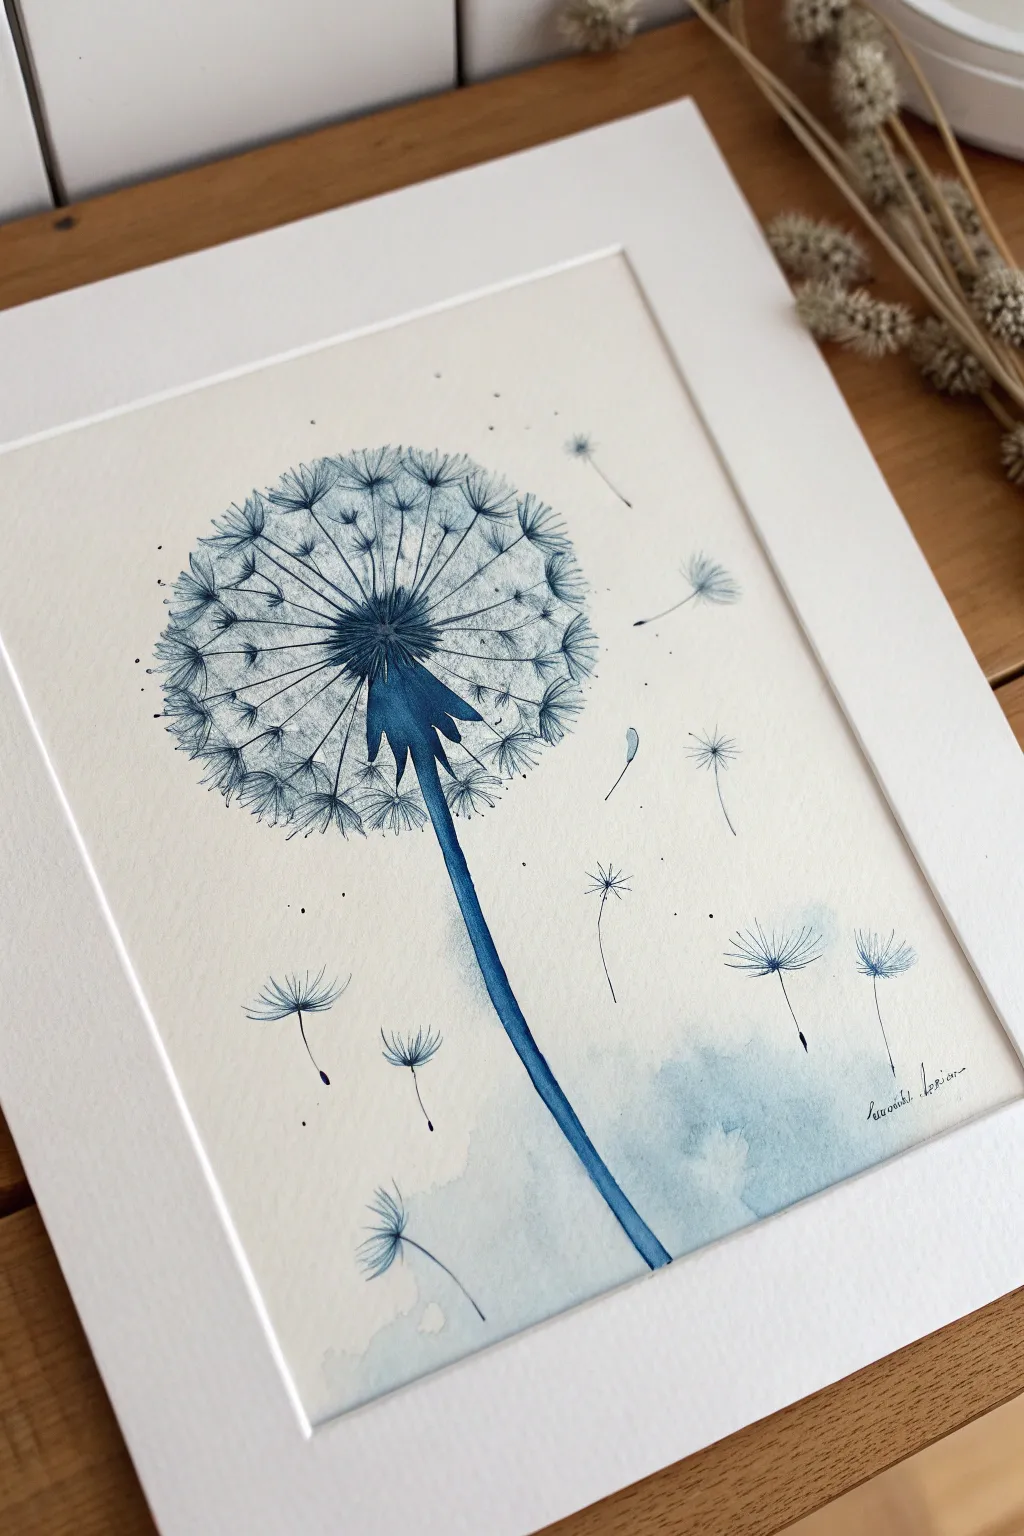
Capture the delicate beauty of a fading dandelion using a single captivating shade of blue. This monochrome watercolor project combines soft washes with precise ink-like details to create a serene and elegant piece of art.
How-To Guide
Materials
- Cold press watercolor paper (300 gsm)
- Watercolor paint (Indigo or Prussian Blue)
- Fine round brush (size 2 or 4)
- Detail brush (size 0 or 00) or fine blue pigmented liner pen
- Clean water jar
- Paper towels
- Pencil (HB) and eraser
- White mat frame (optional for display)
Step 1: Planning the Composition
-
Outline the center:
Begin by lightly sketching a small oval near the upper center of your paper. This will be the dense heart of the flower head where the stem connects. -
Define the perimeter:
Lightly draw a large, faint circle around your center point to define how big the fluffy seed head will be. Don’t make the line continuous; use dotted marks so it disappears easily later. -
Sketch the stem:
Draw a long, slender stem curving gently downwards from the center oval. It should get slightly wider as it reaches the bottom of the page. -
Position the flight:
Mark the positions of several drifting seeds floating away to the right and lower sections of the paper. Keep them random to mimic a natural breeze.
Step 2: Painting the Base Structure
-
Stem base wash:
Mix a medium-strength wash of your blue watercolor. Carefully paint the stem, letting the color pool slightly at the edges for a natural 3D effect. -
The bracts:
Paint the small, leaf-like structures (bracts) at the very top of the stem where it meets the flower head. Use a slightly more concentrated paint here to make it look darker and denser. -
Watercolor blooming:
While the bottom right area of the paper is clean, wet a patch of paper with just water and drop in very diluted blue paint. Let it bloom softly to create a dreamy background atmosphere near the bottom right
Use Salt for Texture
While the background wash at the bottom is still wet, sprinkle a few grains of table salt on it. Brush it off when dry for a frost-like effect.
Step 3: Creating the Seed Head
-
Center details:
Load your fine brush with dark, concentrated blue. Paint short, radiating strokes outward from the very center oval, creating the dense cluster of seeds before they spread out. -
Drawing the spokes:
Using a very fine brush size 0 or a blue liner pen, draw thin, straight lines radiating from the center out to the perimeter of your circle. These are the ‘beaks’ of the seeds. -
Varying the pressure:
Keep your hand light. Some lines can be faint or broken; you don’t need to draw every single spoke, just enough to give the impression of fullness. -
Adding the fluff (pappus):
At the end of each radiating line, paint tiny, star-shaped sprays. Think of them as miniature umbrellas. Use just the tip of your brush to make these delicate textures. -
Building density:
I like to go back over the outer edge and add a second layer of these tiny star shapes in a lighter wash. This creates the illusion that some seeds are behind others, adding depth to the sphere.
Add Metallic Accent
Trace over just a few of the seed ‘spokes’ or the flying seeds with a silver gel pen or metallic watercolor to simulate sunlight catching the fluff.
Step 4: The Drifting Seeds
-
Flying seeds structure:
For the seeds floating away, start by painting the tiny seed kernel using a dark, concentrated dot or small dash. -
Connecting the fluff:
Draw a fine line extending from the seed kernel, and top it with a wide, fan-shaped parachute of fine hairs. -
Motion and direction:
Orient these floating seeds in different directions—some tumbling, some drifting straight—to suggest movement in the air. -
Background speckles:
Load a brush with watery paint and tap it against another brush handle to splatter tiny droplets around the main flower. This adds energy and texture to the white space. -
Final darkening:
Once everything is dry, mix your darkest possible blue (almost black-blue). Add tiny touched-up shadows at the base of the stem and deep in the center of the flower head to maximize contrast.
Frame your piece with a wide white mat to emphasize the minimalist, monochromatic elegance of your work
BRUSH GUIDE
The Right Brush for Every Stroke
From clean lines to bold texture — master brush choice, stroke control, and essential techniques.
Explore the Full Guide
Negative Space Dandelion on a Washy Background
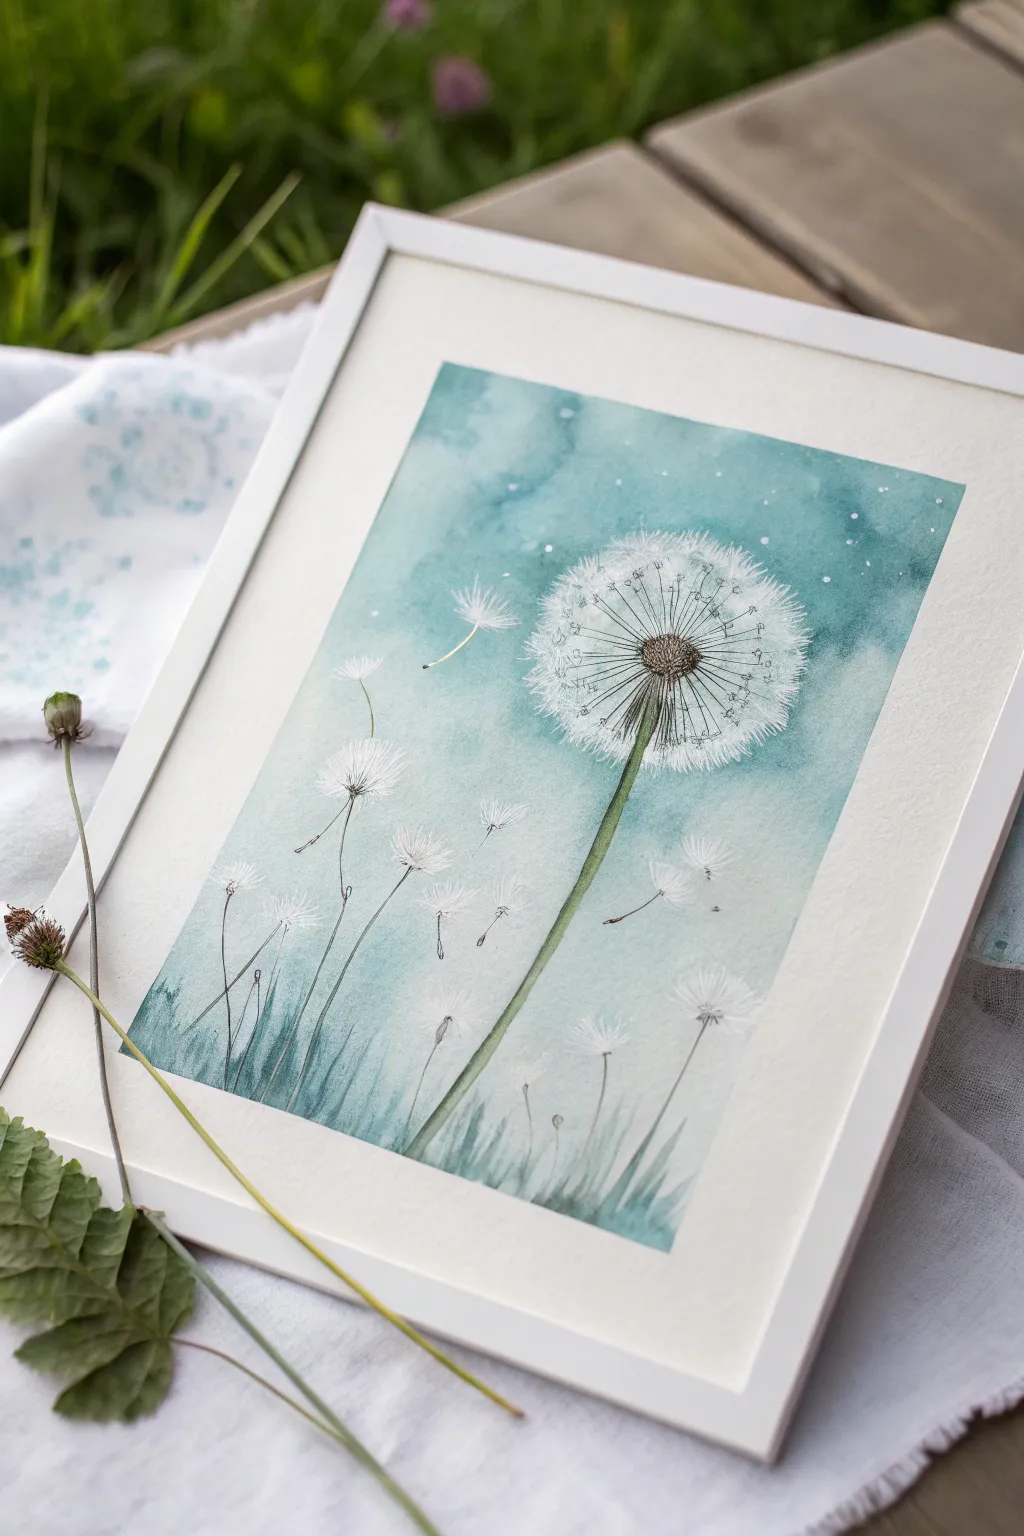
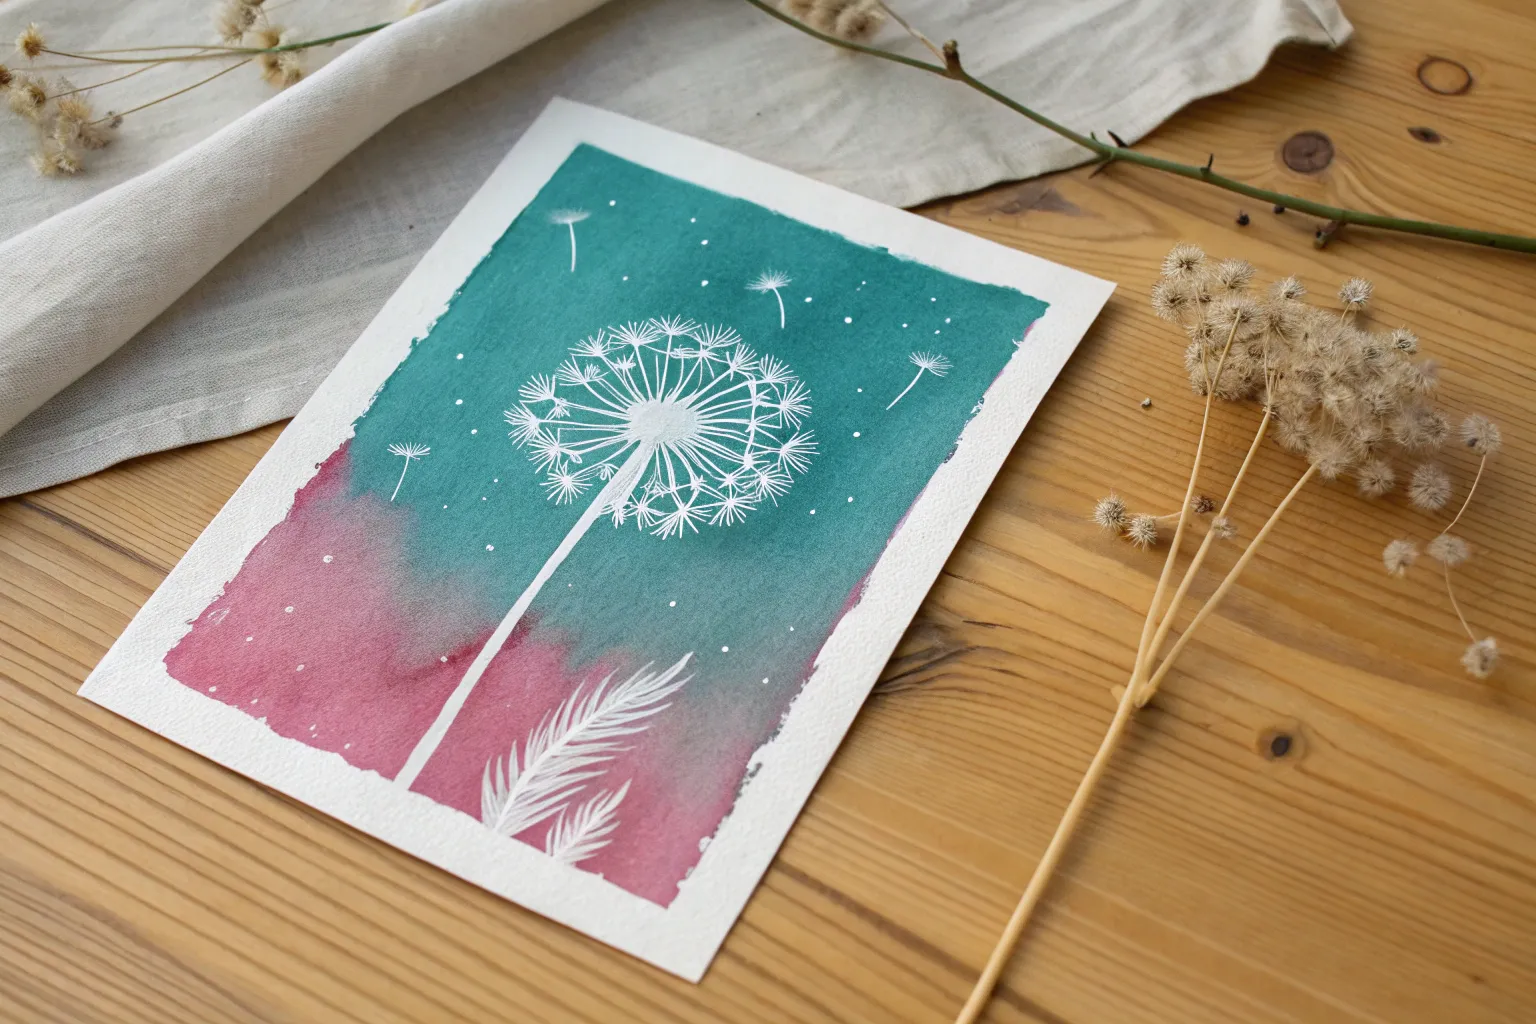
This project captures the delicate, fleeting nature of a dandelion seed head against a dreamy turquoise backdrop as shown in the article’s featured image. It uses a combination of wet-on-wet watercolor techniques and fine masking or white gouache detailing to create an ethereal, airy effect.
Detailed Instructions
Materials
- Cold press watercolor paper (300 gsm)
- Watercolor paints (Turquoise, Phthalo Blue, Sap Green, Burnt Umber)
- Masking fluid (drawing gum) with applicator or old brush
- Opague white gouache or white gel pen
- Round watercolor brush (size 6 or 8)
- Fine liner brush (size 0 or 00) or rigger brush
- Painter’s tape
- Jar of clean water
- Salt (optional, table or sea salt)
Step 1: Preparation and Masking
-
Secure the paper:
Tape your watercolor paper down to a flat board on all four sides. This prevents buckling when we add the wet wash later and creates that crisp white border seen in the framed example. -
Sketch lightly:
Using a hard pencil (like an H or HB), draw a very faint vertical line for the stem and a circle for where the main seed head will be. Simplicity is key here; these are just guide marks. -
Apply masking fluid:
This is the most crucial step for the ‘negative space’ look. Using a fine applicator or an old brush dipped in soapy water, apply masking fluid to protect the white seed head. Draw a tight cluster of dots in the center, and radiating lines moving outward. -
Detail the floating seeds:
Don’t forget the loose seeds floating away. Use the masking fluid to draw tiny ‘parachutes’ drifting to the left of the main flower. -
Add background stars:
Flick tiny specks of masking fluid across the rest of the paper to create the subtle ‘stardust’ or pollen effect visible in the sky area. -
Let it dry completely:
Wait until the masking fluid is perfectly dry to the touch. It should feel rubbery and not tacky. Impatience here can ruin your brush or tear the paper.
Sticky Situation?
If masking fluid tears your paper upon removal, you may be removing it too fast or the paper wasn’t fully dry. Always pull slowly at a low angle, away from the painted area.
Step 2: Creating the Washy Background
-
Wet the paper:
Use a large clean brush to wet the entire surface of the paper with clean water. You want an even sheen, not puddles. -
Drop in color:
Load your brush with a watery mix of Turquoise and Phthalo Blue. Start at the top and let the color flow down, keeping it darker near the top and right side, and fading slightly as you go down. -
Create texture:
While the wash is still wet, drop in tiny hints of clean water or a slightly darker blue concentration to create blooms and cloud-like variations in the sky. -
Paint the grass area:
Near the bottom, blend in a mix of Turquoise and a touch of Sap Green. Use upward strokes to suggest abstract grass blades blending into the blue sky. -
Dry the background:
Allow the paint to dry completely. The paper must be bone dry before removing the mask.
Step 3: Revealing and Refining
-
Remove masking fluid:
Gently rub away the rubbery masking fluid with a clean finger or a rubber cement pickup tool. You should now have crisp white shapes against your blue background. -
Paint the center:
Mix a concentrated Burnt Umber and a tiny bit of blue for a dark, brownish-black. Using your smallest detail brush, paint the dense center of the dandelion seed head, stippling dots to create texture. -
Draw the stem:
Paint the stem using a mix of Sap Green and Burnt Umber. Keep the line thin and organic, slightly thickening it where it meets the flower head. -
Detail the seeds:
Switch to your fine liner brush or a fine-tip black pen. Draw very delicate, thin lines radiating from the brown center out toward the white masked fluff areas. -
Enhance smaller dandelions:
For the shadowy, smaller dandelions in the background (lower left), use a very diluted grey-blue mix to sketch their stems and faint heads, making them look further away. -
Add white highlights:
I like to use white gouache or a gel pen to add extra fine hairs on the outer edge of the seed head and to crisply define the flying seeds if the masking fluid shapes look too blocky. -
Final touches:
Add a few tiny darker grass blades at the very bottom to ground the composition, then remove your tape carefully pulling away from the painting.
Pro Tip: Airy Texture
To make the dandelion look fluffier, dampen a stiff brush and gently scrub the edges of the white masked areas after painting to soften the hard lines into a fuzzy halo.
Frame your delicate masterpiece in a simple white frame to let the turquoise hues really shine
Palette Knife Scrapes for Sparkly Seed Highlights
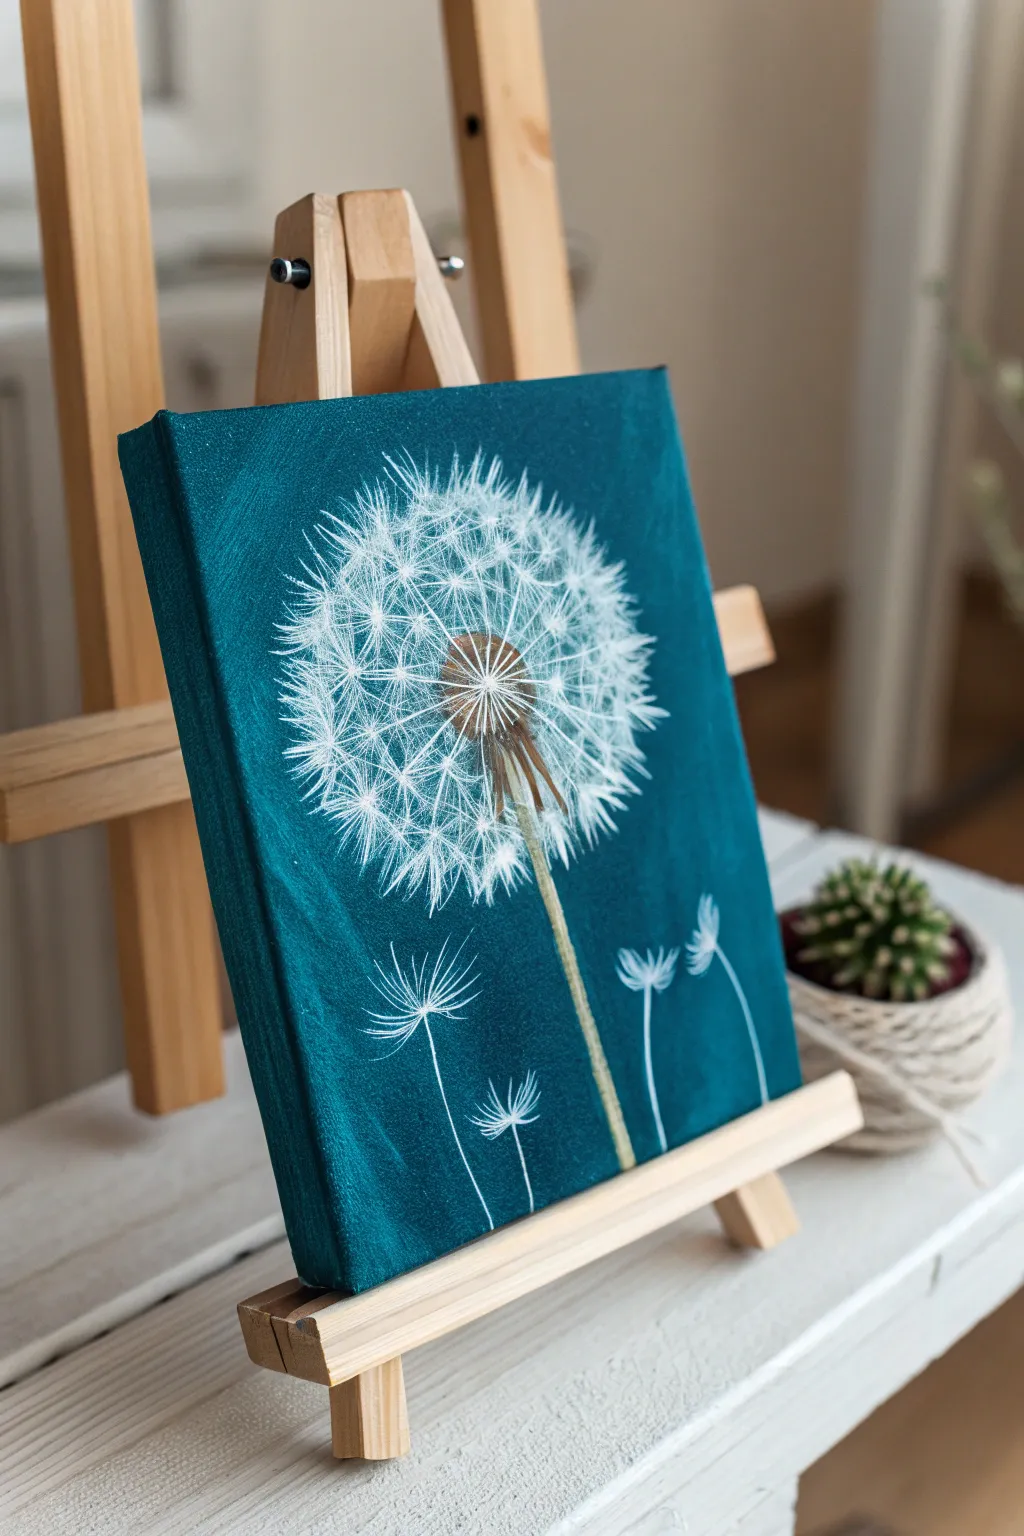
Capture the ethereal beauty of a dandelion seed head against a rich teal backdrop with this striking acrylic painting. The high-contrast white details create a luminous effect that makes the delicate seeds seem to pop right off the canvas.
Step-by-Step Guide
Materials
- Small to medium stretched canvas (e.g., 8×10 or 9×12)
- Acrylic paints: Dark Teal (or Phthalo Green mixed with a touch of Blue and Black), Titanium White, Raw Umber, Yellow Ochre
- Large flat brush (for background)
- Small round brush (size 1 or 2)
- Very fine liner brush (size 000 or 00)
- Palette knife (optional, for texture)
- Chalk or pastel pencil (white)
- Cup of water
- Paper towels
Step 1: Setting the Mood
-
Prepare the Background:
Begin by covering your entire canvas with the dark teal paint. If you don’t have a pre-mixed teal, combine Phthalo Green with a little Phthalo Blue and a tiny dot of Black to get that deep, moody ocean color. -
Add Subtle Texture:
While the background paint is still wet, use your large flat brush to create subtle vertical streaks or cross-hatching motions. This gives the background a bit of visual interest rather than being a flat wall of color. -
Dry Completely:
Allow the background to dry fully. If the canvas shows through, apply a second coat for opacity. A bone-dry surface is crucial before starting the delicate white lines.
Lines too thick?
If your fine lines are looking clunky, your paint is likely too thick. Add a drop of water to the white paint until it has the consistency of fluid ink.
Step 2: Constructing the Core
-
Sketch the Placement:
Lightly mark the center point of your dandelion head with a white chalk pencil. Draw a faint circle around it to guide the outer limit of the seeds, but keep the lines very soft so they don’t show later. -
Paint the Center:
Mix Raw Umber with a tiny touch of Yellow Ochre. Using a small round brush, paint a small, rough circle in the center. It shouldn’t be a perfect dot; dab the edges to make it look organic and fuzzy. -
Add the Stem:
Using the same brown mixture, but perhaps lightened slightly with white or more ochre on one side for a highlight, paint the main stem extending downwards from the center. Keep the stem thin and slightly uneven.
Step 3: The Fluff Technique
-
Mix Your White:
Prepare your Titanium White. I find adding a tiny drop of water or flow improver helps the paint glide more smoothly for the fine lines we are about to create. -
Fundamental Spokes:
Switch to your fine liner brush. Start painting straight, very thin lines radiating from the brown center outward to your chalk circle guide. These are the main ‘spokes’ of the seed parachute. -
Create the Seeds:
At the end of each spoke, paint a tiny ‘V’ shape or a small cluster of 3-4 tiny ticks. These represent the individual tufts of the dandelion fluff. -
Layering the Middle:
Move inwards on the spokes. Paint smaller, shorter lines crossing the main spokes. Concentrate more white lines near the center to create volume and density, making the middle look like a thick sphere. -
Varying Opacity:
For a 3D effect, mix a tiny bit of the background teal into your white on a separate part of the palette. Use this ‘tinted white’ for some of the background seeds to make them look further away, saving the pure bright white for the foreground seeds. -
Refining the Center:
Go back to the brown center. Use your liner brush with pure white to add tiny dots or short lines right in the middle of the brown area, suggesting where the seeds attach to the head.
Make it Sparkle
Mix a tiny amount of iridescent medium or silver glitter paint into your final white highlights to make the dandelion seeds glisten when the light hits the canvas.
Step 4: Drifting Seeds & Details
-
Floating Seeds:
Below the main flower head, choose two or three spots for drifting seeds. Paint a small central point for each floaty. -
Mini Parachutes:
Using the liner brush, paint upward-facing curves or ‘u’ shapes for the parachute part of the floating seeds. Connect them to the central point with a single thin stem line. -
Final Highlights:
Dip your finest brush into un-thinned Titanium White. Add sharp, crisp highlights to the very tips of the main dandelion fluff and the top edges of the stem for contrast. -
Dry Brushing (Optional):
If parts of the main puff look too sparse, wipe most of the paint off a small brush and gently ‘dry brush’ a faint white haze in the dense areas to simulate soft fuzz. -
Clean Up:
Once the paint is fully dry, gently wipe away any visible chalk guidelines with a damp cloth or cotton swab.
Step back and admire the stark, elegant contrast of your botanical creation

PENCIL GUIDE
Understanding Pencil Grades from H to B
From first sketch to finished drawing — learn pencil grades, line control, and shading techniques.
Explore the Full Guide
Splatter Seed Drift for Energetic Motion
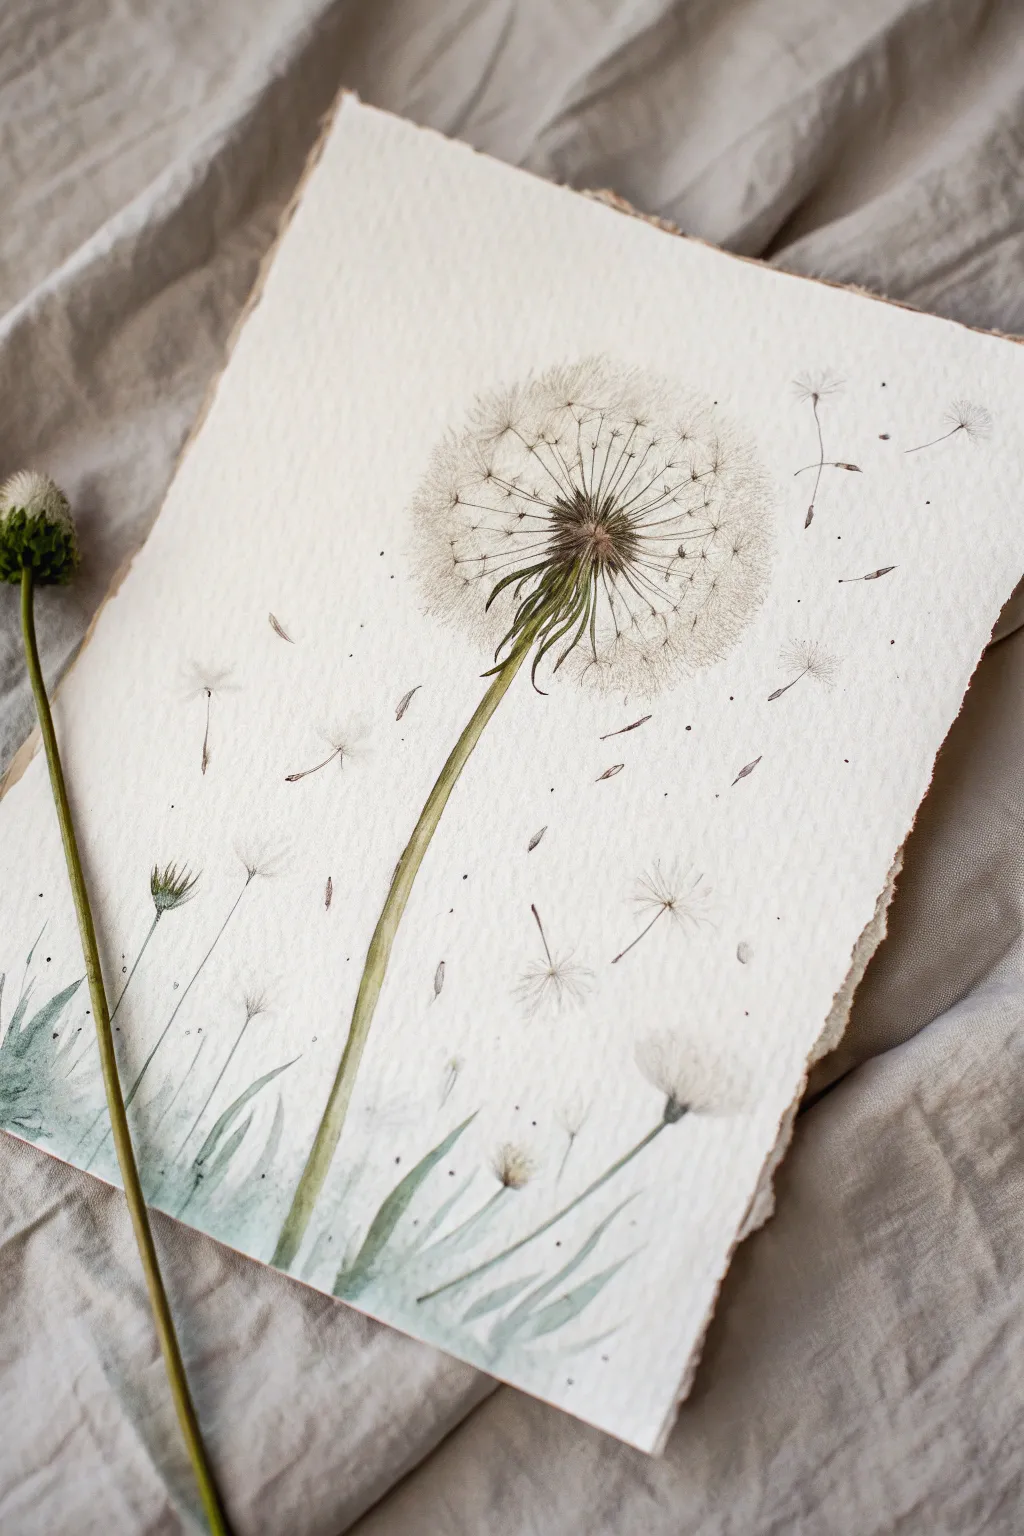
Capture the delicate transience of a dandelion seed head dispersing in the breeze with this detailed watercolor tutorial. The project emphasizes fine line work and soft washes on textured paper to create a vintage botanical illustration feel.
Step-by-Step
Materials
- Cold press watercolor paper (300 gsm or heavier), preferably with deckled edges
- Watercolor paints (Olive Green, Sepia, Payne’s Grey, Raw Umber)
- Fine liner brush (size 0 or 00)
- Small round brush (size 2 or 4)
- Pencil (H or HB for light lines)
- Kneaed eraser
- White gouache or white gel pen (optional for highlights)
- Masking fluid (optional)
- Jar of water & paper towels
Step 1: Planning and Sketching
-
Position the stem:
Begin by lightly penciling a long, gently curved line for the main stem. Start from the bottom third of the paper and curve it slightly to the right, ending just above the center of the page. -
Outline the seed head:
Draw a faint circle at the top of your stem to mark the outer boundary of the dandelion clock. Inside this, draw a much smaller, solid oval where the stem meets the seeds—this is the receptacle. -
Map the dispersing seeds:
Lightly sketch the pathways of the flying seeds. Draw faint directional lines drifting away from the main head towards the top right corner to suggest wind movement. -
Add lower foliage:
At the very bottom, sketch a few loose, grass-like blades and perhaps a smaller, unopened bud or a second smaller flower to ground the composition.
Pro Tip: Masking Fluid Magic
Apply thin lines of masking fluid for the white pappus hairs before painting. Once you wash color over the background, rub it off to reveal crisp white lines.
Step 2: Painting the Structure
-
Base wash for the stem:
Mix a watery Olive Green with a touch of Sepia. Using your round brush, paint the stem with a single confident stroke. While it’s still wet, drop in a tiny bit of darker green on the shadowed side (usually the right) to create volume. -
Detailing the receptacle:
Switch to a smaller brush. Paint the receptacle (the center point) using a mix of Sepia and Green. Paint the small, leafy bracts that curl downwards from the center using quick, curved strokes. -
Creating the grassy base:
Wash in the grass blades at the bottom using a very diluted mix of Payne’s Grey and Green. Keep these loose and watery so they don’t distract from the main subject. -
Dry brush texture:
Once the stem is dry, take a slightly damp brush with thicker Sepia pigment and drag it lightly along the length to create a fibrous texture.
Troubleshooting: Too heavy-handed?
If your seed fluff lines look too thick or dark, lift some pigment immediately with a clean, damp tissue. You can also paint over them with semi-opaque white gouache.
Step 3: The Seed Head and Drift
-
Painting the central fluff:
This is the most delicate part. Using your finest liner brush and a very pale, watery Sepia or Grey, start painting fine lines radiating outward from the center receptacle. -
Adding seed anchors:
At the end of some of these radiating lines, paint a tiny dark speck (the seed itself). Concentrate these darker specks closer to the center to show density. -
Creating the pappus (fluff):
For the fluffy ends of the seeds, use extremely faint strokes. You might want to switch to a ‘dry brush’ technique here, whisking the brush barely over the paper to create a feathery texture that mimics the white fluff. -
Building density:
Layer these fine strokes. I like to let the first layer dry completely before adding a second layer of slightly darker fine lines to create depth within the sphere. -
The drifting seeds:
Paint the individual flying seeds you sketched earlier. Draw a tiny brown seed, a thin stalk, and then a starburst of faint grey lines for the parachute. Vary their angles to make them look like they are tumbling in the wind.
Step 4: Finishing Touches
-
Splatter details:
To enhance the feeling of movement and debris, load a small brush with watery Sepia. Tap it against your finger to create tiny, controlled splatters around the drifting seeds. Keep these subtle. -
Enhancing contrast:
Go back to the center of the dandelion head. Use your darkest Sepia mix to darken the crevices between the bracts and the base of the seeds, making the center pop. -
Optional white highlights:
If you feel the fluff got lost, use a white gel pen or a tiny bit of white gouache to add crisp, fine lines back into the seed head primarily on the sunlit side. -
Soften edges:
If the grass at the bottom looks too sharp, use a clean, damp brush to gently soften the edges into the paper, grounding the plant in a misty atmosphere.
Frame your botanical illustration in a simple wood frame to complement its natural, earthy tones
Galaxy Night Dandelion Wish Painting
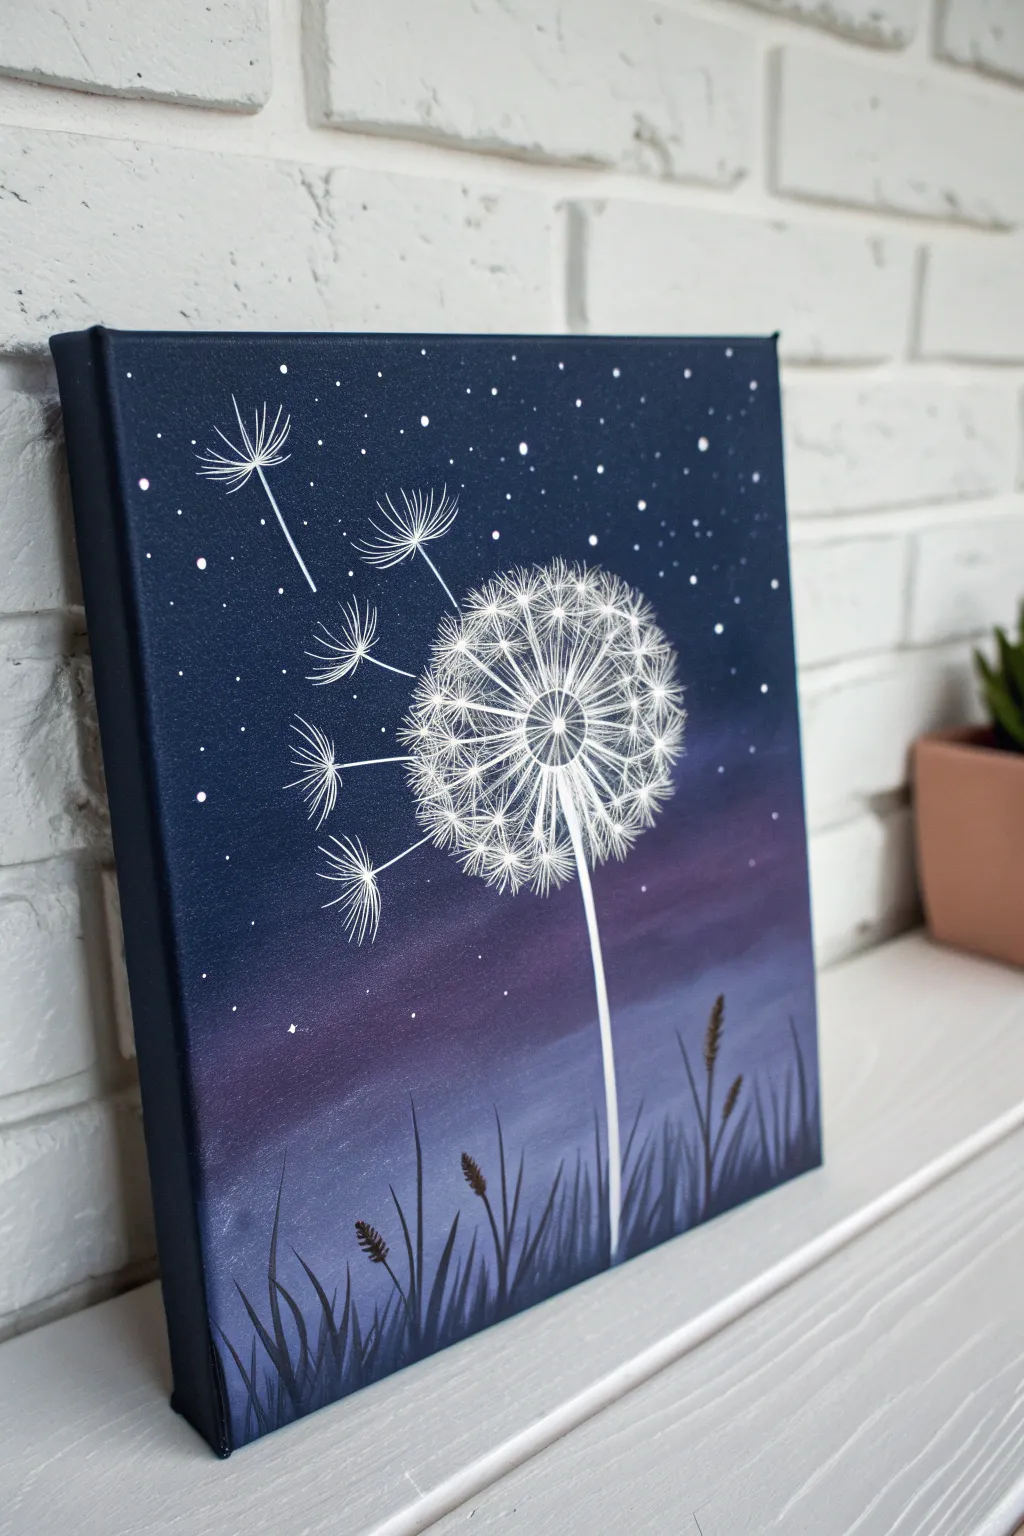
Capture the magic of a midnight wish with this striking acrylic painting that blends a deep galaxy gradient with delicate botanical details. The stark contrast between the bright white dandelion seeds and the moody night sky creates a captivating piece for any wall.
Step-by-Step
Materials
- Stretched canvas (square format, e.g., 10×10 or 12×12 inches)
- Acrylic paints: Navy Blue, Deep Purple, Violet, Titanium White, Black
- Flat shader brush (large)
- Round detail brush (size 0 or 00)
- Small round brush (size 2)
- Palette or paper plate
- Cup of water and paper towels
- Old toothbrush (optional for stars)
Step 1: Creating the Galaxy Background
-
Prime with dark blue:
Start by loading your large flat brush with Navy Blue. Paint the top third of the canvas using long, horizontal strokes, ensuring you cover the top edge of the canvas as well for a finished look. -
Blend the purple transition:
Without cleaning your brush thoroughly, dip into Deep Purple. Paint the middle section of the canvas, slightly overlapping the wet blue paint above to create a soft, seamless ombre transition. -
Add the horizon glow:
Mix a little White with Violet to create a misty lavender shade. Apply this to the bottom third of the canvas, blending upward into the darker purple. This creates a glowing horizon effect. -
Deepen the night sky:
To make the sky feel vast, mix a tiny dot of Black into your Navy Blue and re-apply it to the very top corners. Blend it downward gently; this vignette effect draws the eye to the center. -
Dry completely:
Let the background dry fully before moving on. I like to use a hairdryer on a cool setting to speed this up, as the next steps require a crisp surface.
Sharpen Your Lines
For the thinnest possible lines on the dandelion fluff, mix a tiny drop of water or flow improver into your white paint. Ink-consistency paint flows much smoother than heavy body paint.
Step 2: Painting the Dandelion Structure
-
Sketch the stem placement:
Using a size 2 round brush and thinned White paint, draw a single, slightly curved vertical line starting from the bottom right-center, stopping about two-thirds up the canvas. -
Create the seed center:
At the top of your stem, paint a small white dot. From this center, paint several short, thin spokes radiating outward like a wheel. -
Draft the outer shape:
Switch to your smallest detail brush (size 0). Visualize a large circle around your center point. Paint very faint, thin lines radiating from the center out to the edge of this imaginary circle. -
Add the seed filaments:
Near the outer ends of these radiating lines, paint small V-shapes or tiny branching lines. This mimics the fluffy texture of the dandelion head. -
Layer for density:
Go back over the seed head, adding more radiating lines in between the first set. Vary the lengths slightly so it looks natural and not too perfectly geometric. -
Detail the center density:
Add concentration to the middle of the flower by painting shorter, brighter white lines near the center hub. This gives the flower depth and volume.
Add Sparkle
Once the painting is fully dry, paint over a few of the white stars and the center of the dandelion with a clear glitter glaze or metallic silver paint for a magical shimmer.
Step 3: Flying Seeds and Grass
-
Paint drifting seeds:
To the left of the main flower, paint three or four individual seeds floating away. Paint a small stem line for each, topped with the tiny V-shaped filaments. -
Add movement:
Angle the floating seeds as if a breeze is catching them, carrying them upward toward the top left corner. -
Ground the scene:
Mix a dark shade using Navy Blue and a touch of Black. Use your medium round brush to paint grass blades at the very bottom, sweeping upward with quick, flicking motions. -
Add seed pods:
Among the grass, paint a few taller stalks with small, oval-shaped tips to represent wild grass seed heads or unopened buds. -
Highlight the grass:
Mix a slightly lighter blue-grey and add a few highlights to the tips of the grass blades for dimension.
Step 4: Final Magical Touches
-
Prepare the stars:
Thicken some Titanium White paint with a tiny drop of water until it has an ink-like consistency. -
Dot the stars:
Using your smallest brush, gently dot stars into the upper blue section of the sky. Vary the pressure to create different sizes. -
Create distant stardust:
For the tiniest stars, you can flick the bristles of an old toothbrush dipped in white paint, or just use the very tip of your detail brush for micro-dots. -
Final inspection:
Check for any areas where the white needs brightening, especially on the main dandelion stem, and add a second coat of white if the background is showing through.
Now you have a serene piece of night-sky art that feels calm and inspirational.


Gold Leaf Accents on Floating Dandelion Seeds
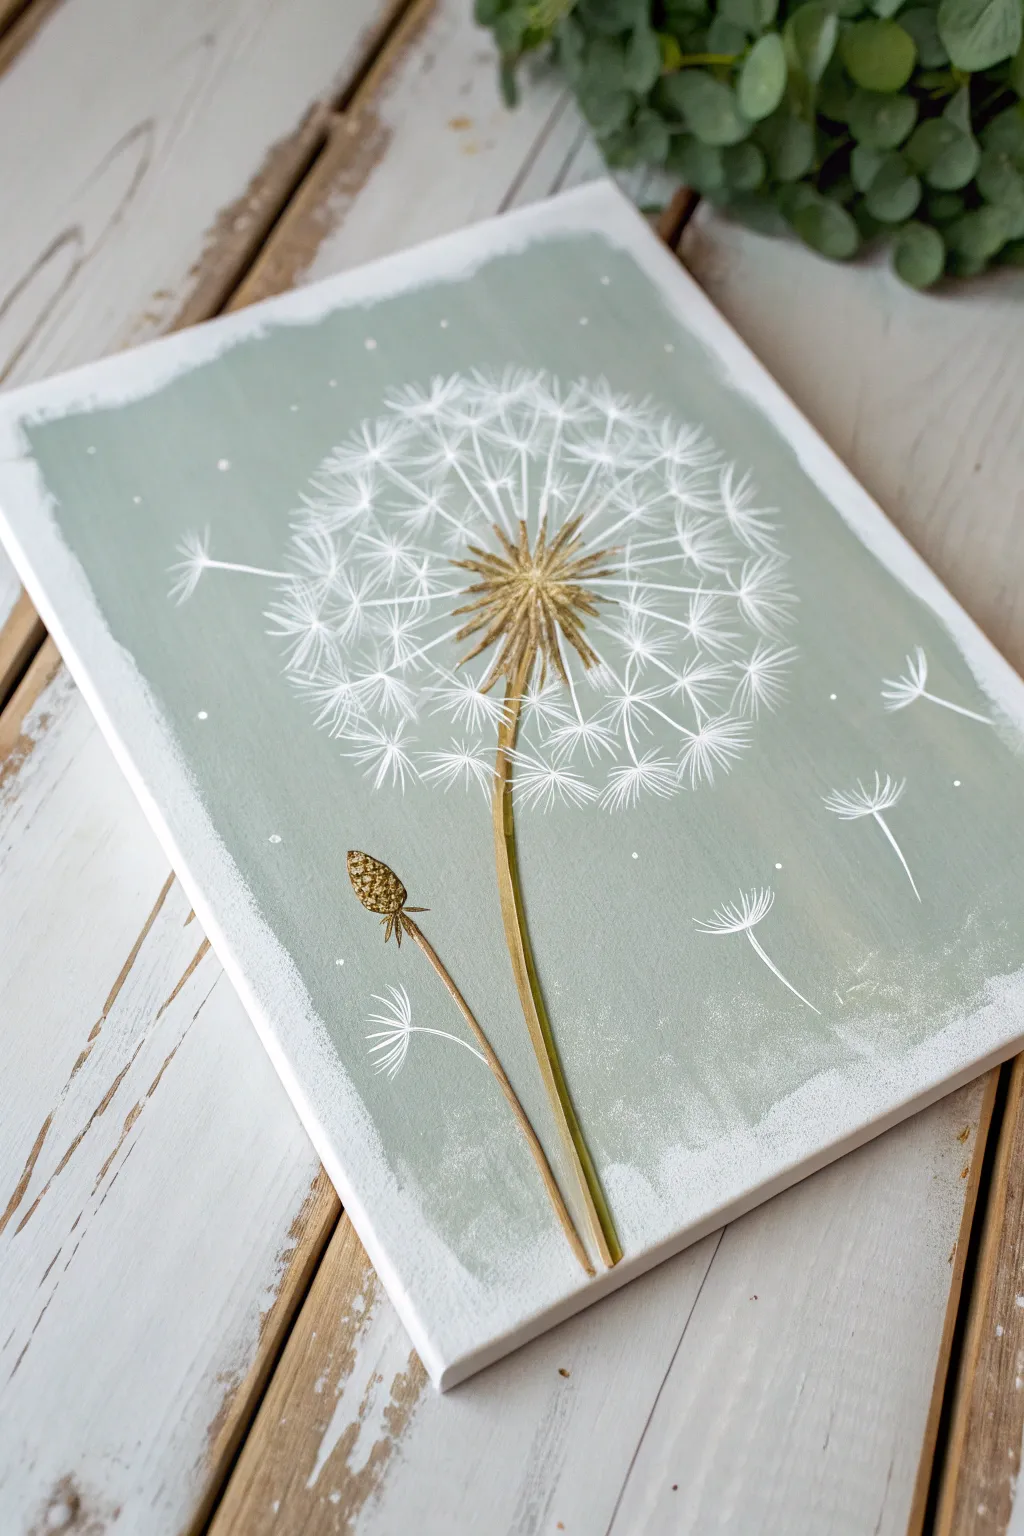
This elegant mixed-media piece combines soft acrylics with metallic accents to create a dreamy, floating dandelion. The muted sage green background and touch of gold leaf give it a sophisticated, modern farmhouse feel.
How-To Guide
Materials
- Rectangular canvas (approx. 9×12 or similar)
- Acrylic paint: Sage Green, Titanium White, Raw Umber
- Fine liner brush (size 00 or 0)
- Small flat shader brush
- Medium flat brush (for background)
- Gold foil flakes or gold leaf adhesive pen
- Soft charcoal pencil or white chalk pencil
- Gold glitter paint or metallic gold acrylic
- Palette and water cup
Step 1: Setting the Background
-
Prepare the canvas:
Start with a clean white canvas. If your canvas isn’t primed, apply a coat of gesso first and let it dry completely. -
Mix the sage tone:
Create a muted sage green by mixing your green acrylic with a generous amount of white and a tiny dot of raw umber to desaturate it. The goal is a soft, pastel-like hue. -
Paint the central block:
Using the medium flat brush, paint a large rectangle of sage green in the center of the canvas. Don’t paint all the way to the edge; leave about an inch of white space around the perimeter. -
Create the distressed edges:
While the green is still slightly tacky, take a dry brush with a small amount of Titanium White. Roughly drag it from the white border into the green area and vice versa to create a shabby-chic, distressed vignetting effect. -
Add subtle speckles:
Dilute a bit of white paint with water. Flick the bristles of an old brush to create very tiny, faint white speckles across the green background for texture.
Step 2: Constructing the Stem & Center
-
Sketch the placement:
Lightly mark the center of the dandelion head and the curve of the stem using a white chalk pencil. Position the main flower head slightly off-center near the top. -
Paint the main stem:
Mix Raw Umber with a touch of sage green. Using your fine liner brush, paint a long, slender stem curving upwards from the bottom edge. -
Paint the bud stem:
Add a second, shorter stem for the closed bud to the left of the main flower. -
Add stem highlights:
While the brown paint is drying, streak a very thin line of lighter green or yellow-ochre down one side of the stems to give them dimension. -
Form the seed center:
At the top of the main stem, paint a small, slightly domed center using a mix of brown and gold metallic paint. This is anchor point for all the seeds. -
Paint the bud head:
For the unopened bud, paint a small teardrop shape at the top of the shorter stem. Use stippling (small dots) with brown and gold to give it a textured, seedy look.
Pro Brush Tip
For the thinnest, sharpest lines on the dandelion fluff, thin your white acrylic paint with a drop of water until it has an ink-like consistency.
Step 3: Detailed Line Work & Gold
-
Start the spokes:
Using your finest liner brush and metallic gold paint, draw fine lines radiating outward from the center point. These shouldn’t be perfectly straight; give them a slight organic curve. -
Layer the fluff:
Switch to pure Titanium White. Paint the delicate ‘fluff’ at the end of each spoke. Make small ‘V’ or starburst shapes at the end of imaginary spokes to create the round puffball shape. -
Build density:
Add more white fluffs in the spaces between the gold spokes. Some should look closer (brighter white) and some further back (slightly diluted white) to create a 3D sphere effect. -
Float the seeds:
Paint a few detached seeds floating away to the right side of the canvas. Draw a tiny white stem and a small starburst of fluff for each one. -
Apply gold accents:
Once the paint is dry, carefully apply small dabs of gold leaf adhesive or thick gold metallic paint to the center of the main flower and the texture of the bud. -
Final sparkle:
Add tiny dot highlights of white scattered near the center of the dandelion head to mimic light hitting the base of the seeds.
Level Up: 3D Texture
Mix a little modeling paste into your brown paint for the center button and the bud. This will physically raise those areas off the canvas for tactile texture.
Hang your painting in a spot with natural light to catch the metallic shimmer throughout the day
Abstract Dandelion Made From Layered Circles
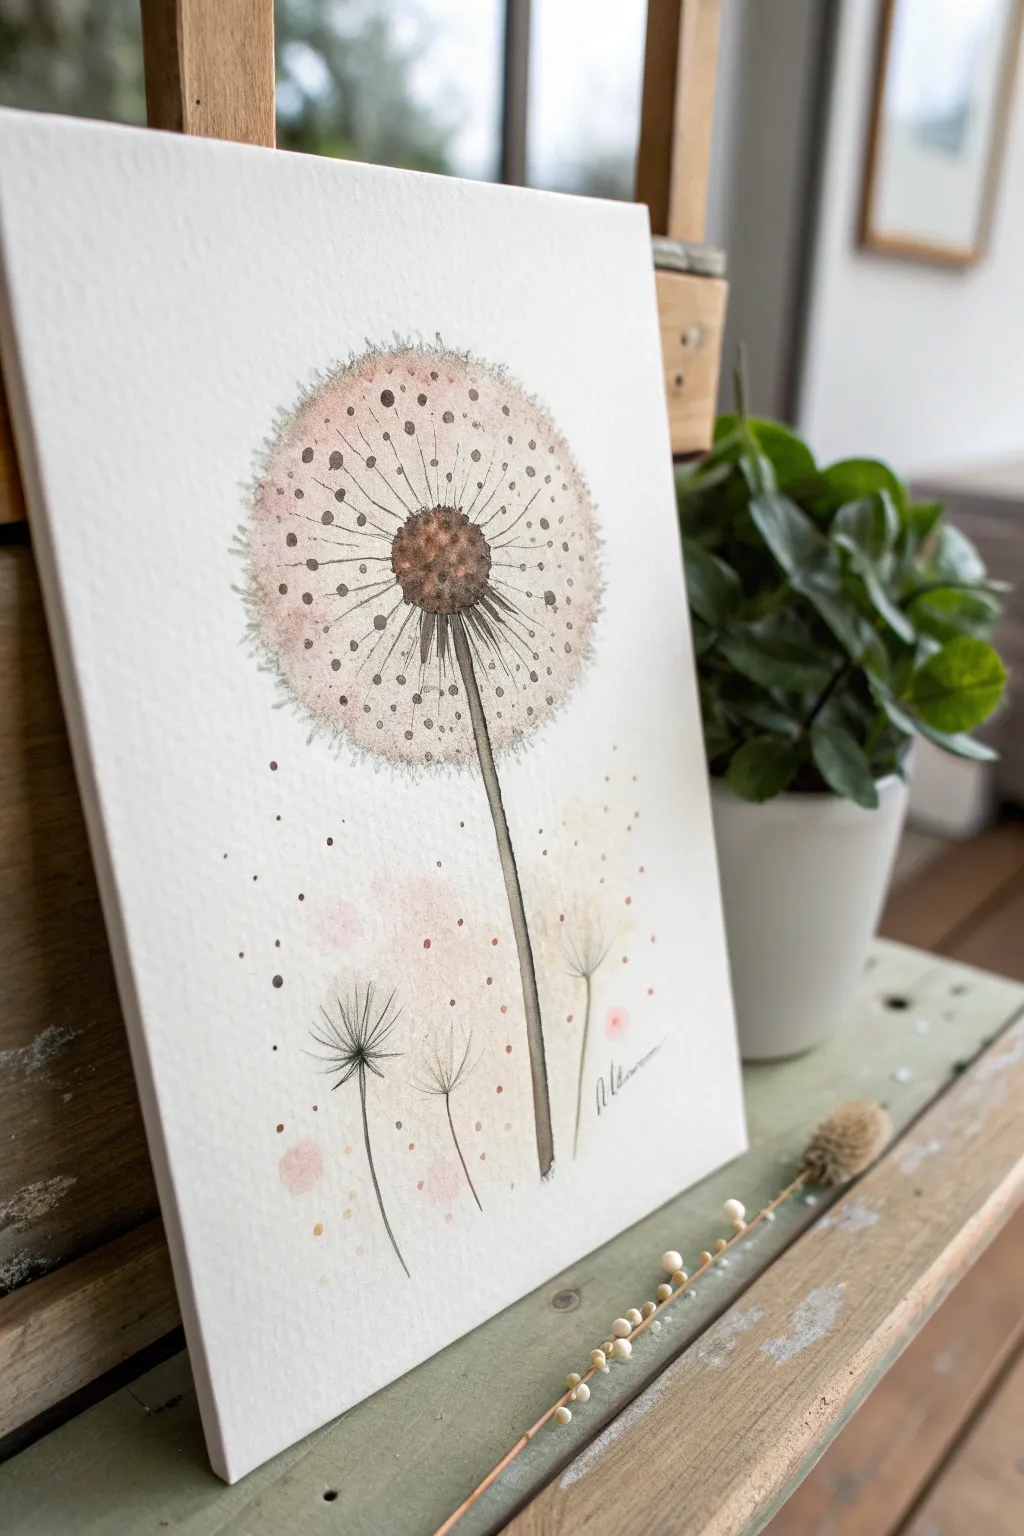
Capture the airy delicacy of a dandelion gone to seed with this soft, stylized watercolor project. By combining loose washes with precise pen detailing, you’ll create a piece that feels both abstract and beautifully organic.
Step-by-Step Guide
Materials
- Cold press watercolor paper (300 gsm)
- Watercolor paints (Sepia, Burnt Umber, a touch of Rose Madder or Pink)
- Round watercolor brush (size 6 or 8)
- Fine liner pen (0.1 or 0.3mm, waterproof, black or dark brown)
- White gouache or white gel pen (optional for highlights)
- Pencil and eraser
- Jar of water and paper towels
Step 1: Sketching and Base Washes
-
Lightly outline the composition:
Begin by sketching a large circle for the main dandelion head near the top center of your paper. Add a thin line going straight down for the stem. Sketch two smaller, incomplete circles near the bottom left and right for background flowers. -
Prepare your color palette:
Mix a very watery, pale wash of Sepia with a hint of Rose Madder to get that dusty, warm brownish-pink tone seen in the main bloom. -
Paint the main circle:
Using your round brush, apply the pale wash to fill the large circle. Keep the edges soft and slightly uneven rather than perfectly round to mimic the fluffiness of seeds. -
Create the center shadow:
While the large circle is still damp (but not soaking), drop a slightly more concentrated mix of Burnt Umber into the very center. Let it bleed outward naturally to create a soft gradient. -
Add background splashes:
Paint loose, very watery patches of color near the bottom where the smaller dandelions will go. These should look like faint pinkish clouds rather than defined shapes. -
Splatter for texture:
Load your brush with watery pigment and gently tap it over the wet washes to create accidental speckles and texture inside the main circle. -
Let it dry completely:
This is crucial. The paper must be bone dry before you add any pen lines, or the ink will bleed and ruin the crisp effect.
Step 2: Adding Definition and Details
-
Draw the center seed head:
Using your fine liner pen, start stippling (making small dots) tightly in the dark center of the main dandelion. As you move outward from the center, space the dots further apart. -
Add the seed radial lines:
Draw fine, straight lines radiating from the center core outward toward the edge of the circle. These don’t need to touch the edge; they just suggest direction. -
Create the outer seeds:
At the ends of the radiating lines, or floating near the edge of your painted circle, draw small ‘V’ shapes or tiny dots to represent individual seeds about to fly away. -
Emphasize the perimeter:
Go around the very edge of the painted circle with small, scratchy marks or dots to give the dandelion a fuzzy silhouette. -
Paint the stem:
Switch back to your paint brush. Use a concentrated mix of Sepia or Burnt Umber to paint the long stem. I like starting from the top and pulling a single stroke downward for a natural taper. -
Outline the stem:
Once the painted stem is dry, use your pen to add a sketchy outline on one side of it to give it dimension. -
Detail the background flowers:
For the smaller bottom flowers, keep it simple. Draw just a few radiating lines and a thin stem with your pen. Don’t add heavy detail; let them fade into the painted background washes.
Wet-on-Wet Magic
For the softest look, dampen the paper incorrectly with clear water first, then drop the pigment in. This creates fuzzy, natural edges perfect for dandelion fluff.
Step 3: Final Touches
-
Add floating seeds:
Draw a few stray dots or tiny seed shapes floating in the white space around the main flower to suggest movement. -
Enhance with extra dots:
Look at the composition as a whole. Add larger painted dots using the tip of your brush in the negative space to balance the artwork. -
Sign your work:
Add your signature near the bottom right in a fine script using your pen.
Ink Smearing?
If your pen drags or bleeds, the paper is still damp deep down. Use a hairdryer on a low setting for 30 seconds to ensure the core of the paper is totally dry.
Now display your delicate floral painting where it can remind you of warm summer breezes


Have a question or want to share your own experience? I'd love to hear from you in the comments below!