
A good pool mural turns that plain stretch of wall and concrete into a little escape you get to swim inside. I love designs that echo the water itself—so your painted ocean and real pool start to feel like one big scene.
Tropical Beach Horizon Backdrop
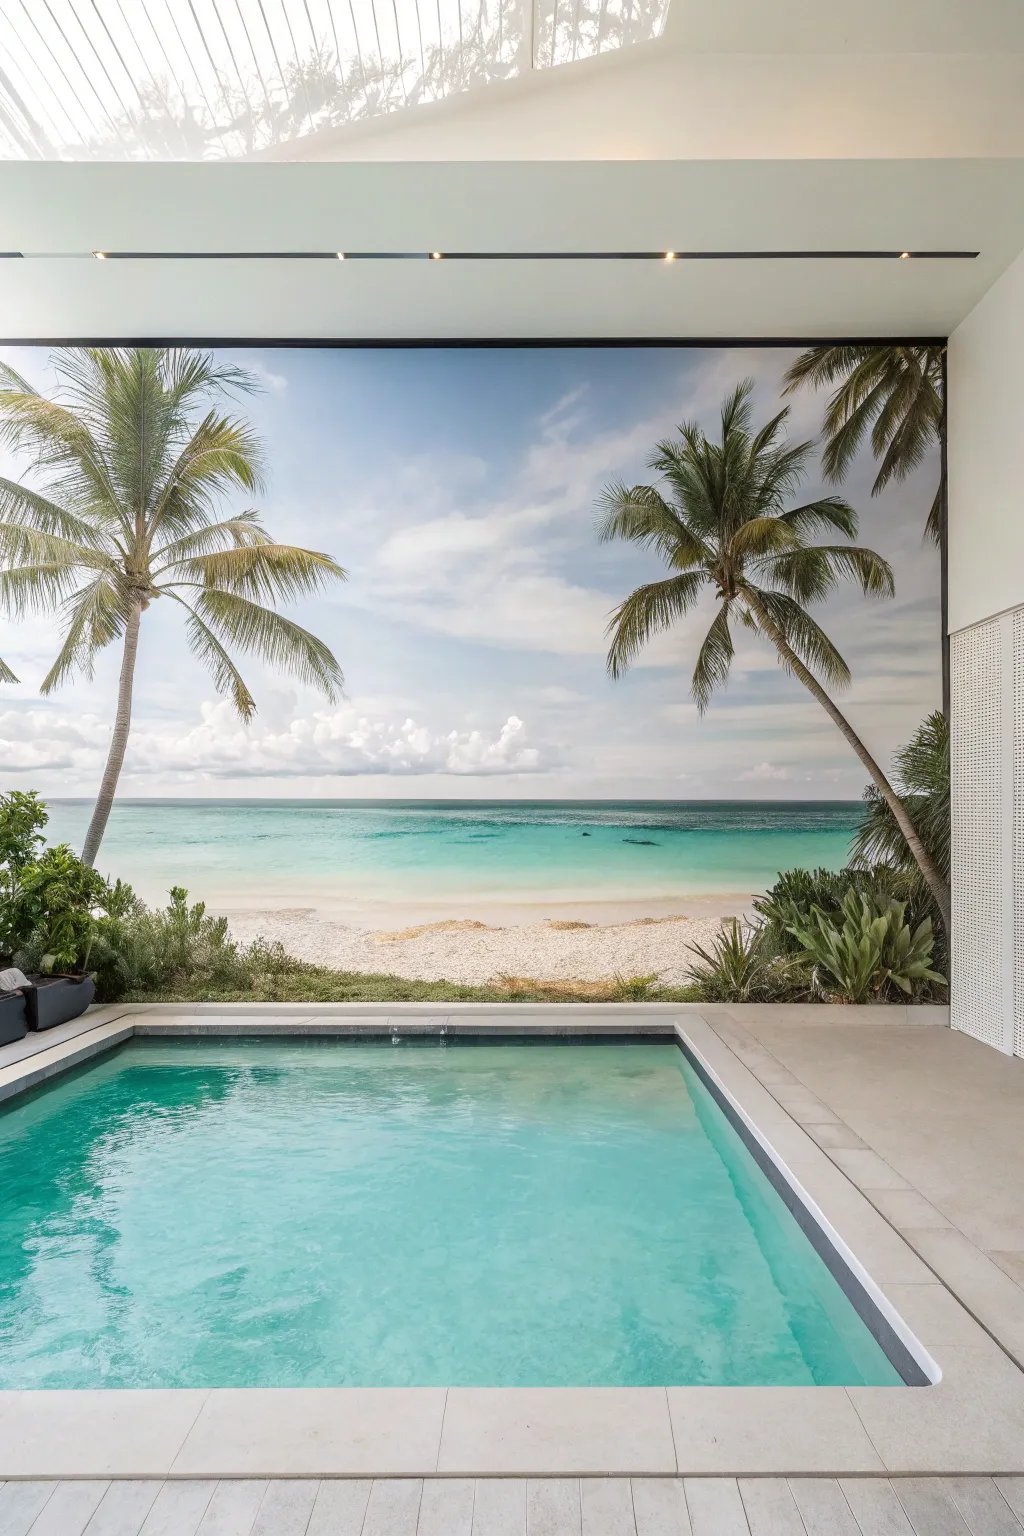
Transform your pool area into a permanent vacation spot with this large-scale landscape mural. By capturing the translucent turquoise waters and swaying palms of a distant shoreline, you’ll create an immersive backdrop that blends perfectly with the real water in your pool.
How-To Guide
Materials
- Exterior-grade acrylic latex paint (white primer, turquoise, cerulean blue, sand beige, deep brown, palm green, lime green, white)
- UV-resistant clear topcoat (matte or satin)
- Chalk snap line
- Large paint rollers and extension pole
- Assorted synthetic bristle brushes (4-inch flat to fine liner)
- Sea sponges
- Painter’s tape
- Drop cloths
- Graph paper and pencil
- Pellon or transparency film (optional for projection)
Step 1: Preparation and Sky Gradient
-
Surface Prep:
Begin by thoroughly cleaning the wall surface to remove any humidity residue or pool chemical buildup. Once dry, apply a high-quality masonry primer if working on concrete, or a standard exterior primer for drywall, ensuring a solid white base for your colors to pop. -
Establish the Horizon:
Measure about one-third of the way up from the pool deck floor. Use a level and a chalk snap line to mark a perfectly straight horizon line across the entire width of the wall. This is the most crucial line in the entire painting. -
Sky Base Coat:
Mix a pale, airy blue using cerulean and plenty of white. Roll this color onto the upper two-thirds of the wall, starting from the top and working down toward your horizon line. -
Blending the Horizon:
While the sky paint is still wet, blend in almost pure white right at the horizon line, fading it upward into the blue. This atmospheric perspective gives the illusion of infinite distance. -
Cloud Structure:
Using a large, dry brush or a sea sponge, scumble irregular patches of white paint into the sky area. Keep the edges soft and indistinct to mimic distant cumulus clouds.
Uneven Blending?
If acrylics dry too fast to blend your sky or water gradient, mix a glazing medium or a paint retarder into your colors. This keeps the paint wet longer for smoother transitions.
Step 2: The Ocean and Beach
-
Deep Water:
Paint a strip of deep turquoise right below the horizon line using a steady hand or a guide tape. This represents the deeper ocean water far offshore. -
Shallow Gradient:
As you move down the wall toward the ‘sand,’ progressively mix more white and a touch of lime green into your turquoise. Create a seamless gradient that mimics the crystalline look of shallow tropical water. -
Sand Foundation:
Paint the bottom section of the wall in a warm beige tone. Use a stabbing motion with an old, splayed brush to texture the transition where the water meets the sand, creating the look of a wet shoreline. -
Shoreline Detail:
Add a thin, broken line of white foam where the water meets the sand. I like to drag a dry brush horizontally here to simulate gentle waves lapping at the beach.
Step 3: Palm Trees and Foreground
-
Trunk Placement:
Sketch your palm trees lightly with chalk. Position two large ones on the sides to frame the view, leaning them slightly inward to lead the eye toward the center. -
Painting Trunks:
Use a mix of deep brown and grey for the trunks. Paint them slightly narrower at the top, adding horizontal ridges with a liner brush to create the segmented texture of palm bark. -
Frond Structure:
With a long-bristled brush, paint the central spine of each palm frond arching outward from the top of the trunk. Use a dark green for these spines. -
Leaf Detail:
Using a dagger striper brush or a fan brush, pull individual leaves downward from each spine. Start with a deep green near the center and switch to a lighter lime green at the tips where the sun hits them. -
Foliage Depth:
Add some yellow-green highlights to the top of the fronds and deep indigo shadows underneath where the leaves overlap. This volume prevents the trees from looking flat. -
Foreground Vegetation:
At the very bottom corners, dab in some dark green shrubbery using a stippling technique. This grounds the mural and blends the painted world with your actual pool deck.
Add Real Texture
Mix fine sand texture additive into your beige paint for the beach section. It adds a literal gritty feel that catches light differently than the smooth water paint.
Step 4: Highlights and Sealing
-
Sunlight Effects:
Add tiny glints of pure white on the water’s surface to suggest sunlight reflection. Keep these sparse and concentrated in the center. -
Final Cleanup:
Step back to the far side of the pool to check the perspective. Touch up any areas where the gradient isn’t smooth or the horizon looks crooked. -
Protective Sealant:
Once the mural has cured for at least 48 hours, apply two coats of a UV-resistant clear sealer. This is vital to protect the art from humidity, splashing pool water, and fading.
Now you have a breathtaking view that guarantees perfect swimming weather all year round


Classic Rolling Wave Band
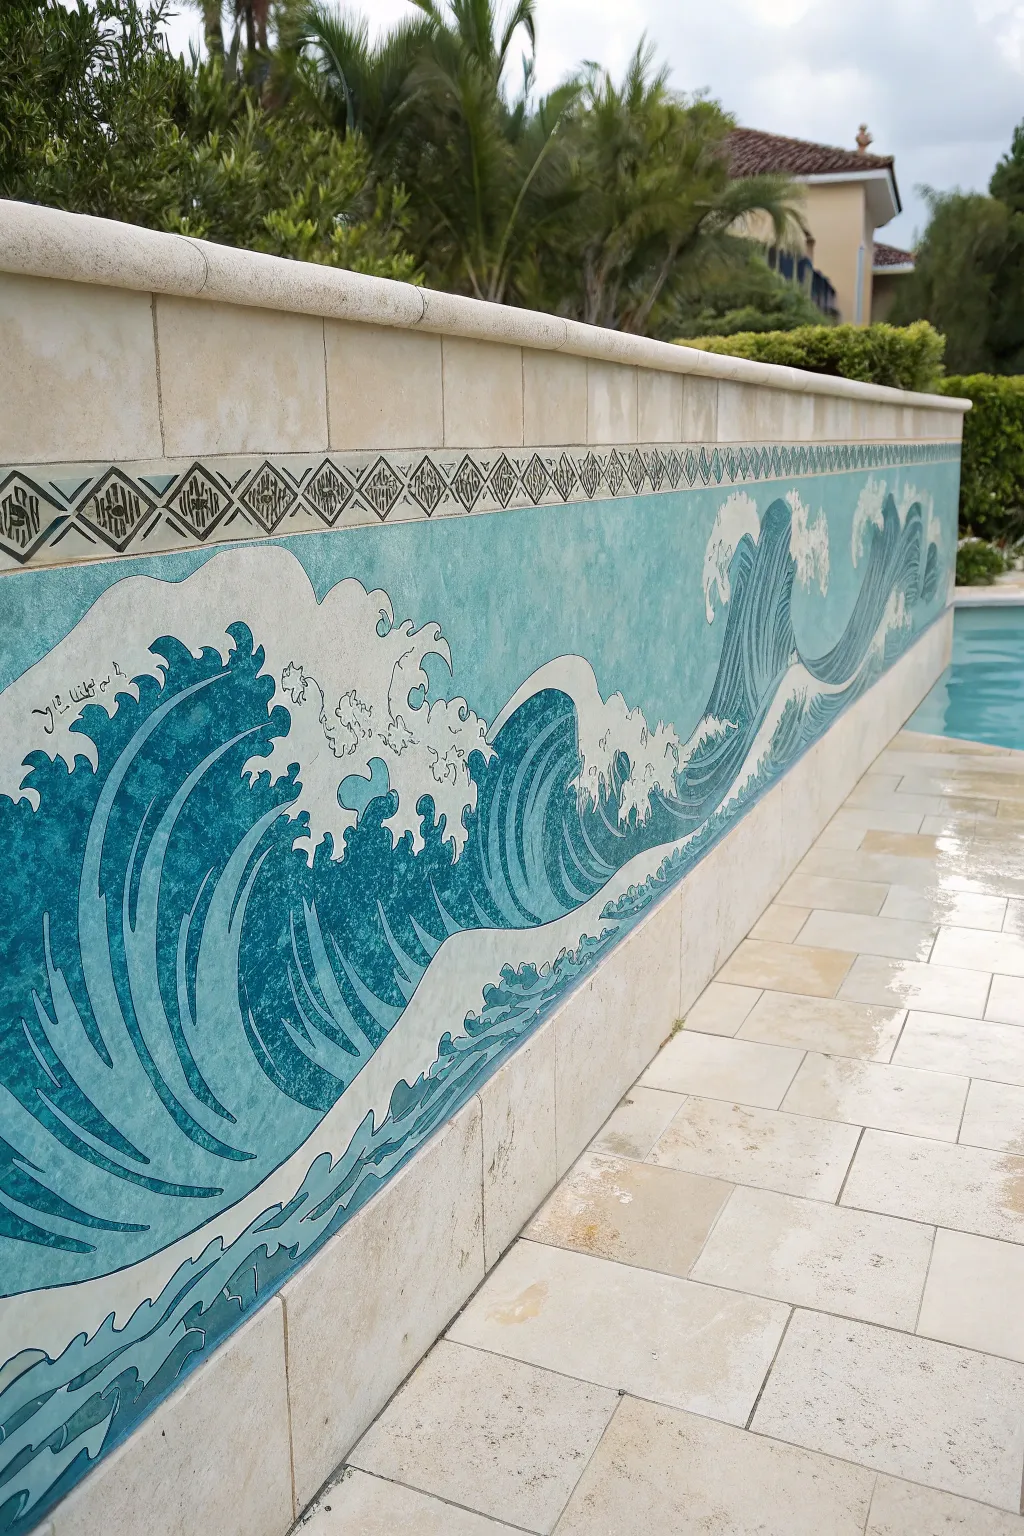
Bring the timeless elegance of Japanese woodblock prints to your backyard with this stunning wave mural. Featuring stylized crests and deep teal currents, this continuous band creates a dynamic yet soothing border just below your pool’s coping.
Detailed Instructions
Materials
- Exterior-grade acrylic latex paint (white, teal, deep navy, light blue)
- Clear concrete/masonry sealer (UV-resistant and pool-safe)
- Cleaner/degreaser and scrub brush
- Painter’s tape (2-inch width)
- Chalk snap line
- Pencils and large erasers
- Assorted synthetic brushes (fitch brushes, 1-inch angled sash, fine liner)
- Plastic drop cloths
- Stencils for the top geometric border (optional)
- Marine-grade varnish (optional for waterlines)
Step 1: Surface Preparation
-
Clean the substrate:
Begin by thoroughly cleaning the wall area where the mural will go. Use a stiff scrub brush and a degreaser to remove any pool chemicals, algae, or dirt. This step is critical for paint adhesion. -
Rinse and dry:
Power wash or hose down the area completely to remove all cleaning residue. Allow the masonry to dry fully for at least 24-48 hours before applying any paint. -
Define the boundaries:
Use a chalk snap line to mark the top and bottom straight edges of your mural band. Apply painter’s tape along the coping edge and the waterline to protect surrounding stone and tiles. -
Prime the surface:
Roll on a coat of high-quality exterior masonry primer tinted to a light cream or off-white. This neutralizes the background and provides a smooth base for your colors.
Uneven Stone Surface?
If painting directly on rough stone or uneven tile, dab paint into crevices with an old stippling brush rather than wiping, which can miss deep textures.
Step 2: Layout and Sketching
-
Sketch the wave forms:
Using a pencil, lightly draw the large, sweeping curves of the waves. Focus on the rhythm—create a pattern of highs and lows where large crests flow into smaller troughs. -
Detail the foam:
Add the intricate, claw-like shapes of the sea foam at the crest of each wave. I find it helpful to look at reference images of ‘The Great Wave off Kanagawa’ to get the jagged finger-like shapes right. -
Mark the decorative border:
Measure a 3-4 inch strip at the very top of your mural area for the geometric diamond pattern. Use a straightedge to mark these lines lightly.
Use a Template
Make a cardboard cutout of your main wave shape. Flip and trace it repeatedly along the wall to ensure a consistent rhythm without drawing freehand.
Step 3: Painting the Base Layers
-
Apply the sky background:
Mix a very light teal wash. Paint the negative space above the waves but below the decorative border. Keep this layer semi-transparent/textured to mimic an aged fresco look. -
Block in the water:
Fill in the main body of the waves with a mid-tone cyan or turquoise. Don’t worry about shading yet; just get solid coverage on the water sections. -
Paint the foam caps:
Use pure white exterior paint to fill in the foam crests and the splashing droplets. Apply two coats if necessary to ensure it stands out bright against the blue. -
Create the wave texture:
Using a dry-brush technique with a darker teal, streak curved lines following the shape of the wave. This mimics the movement of water and adds volume.
Step 4: Detailing and Refining
-
Add deep shadows:
Take your deep navy blue and a smaller angled brush. Paint stripes inside the curve of the waves to indicate depth and the heavy underside of the water. -
Outline the forms:
With a fine liner brush and black or very dark grey paint, carefully outline the foam caps and the major swoops of the waves. This linework is essential for that graphic, woodblock print style. -
Paint the top border:
Move to the top strip. Paint the background a light neutral tone. Once dry, use a swaying diamond stencil or hand-paint the geometric pattern using black or dark grey for contrast. -
Refine the edges:
Go back with your background color to touch up any places where the blue wave paint might have bled outside the lines.
Step 5: Sealing and Protection
-
Apply first sealer coat:
Once the paint has cured for roughly 48 hours, apply a clear, water-based masonry sealer. Use a roller for large areas and a brush for the corners. -
Finish with UV protection:
Apply a second coat of sealer, specifically ensuring it is a UV-resistant formula. This prevents the vibrant blues from fading in the harsh sun. -
Remove tape:
Carefully peel away the painter’s tape while the sealer is still slightly tacky to avoid pulling up any dried film. Clean up any edges with a razor blade if needed.
Now you have a serene, artful border that transforms your pool area into a classical retreat


Underwater Coral Reef Panorama
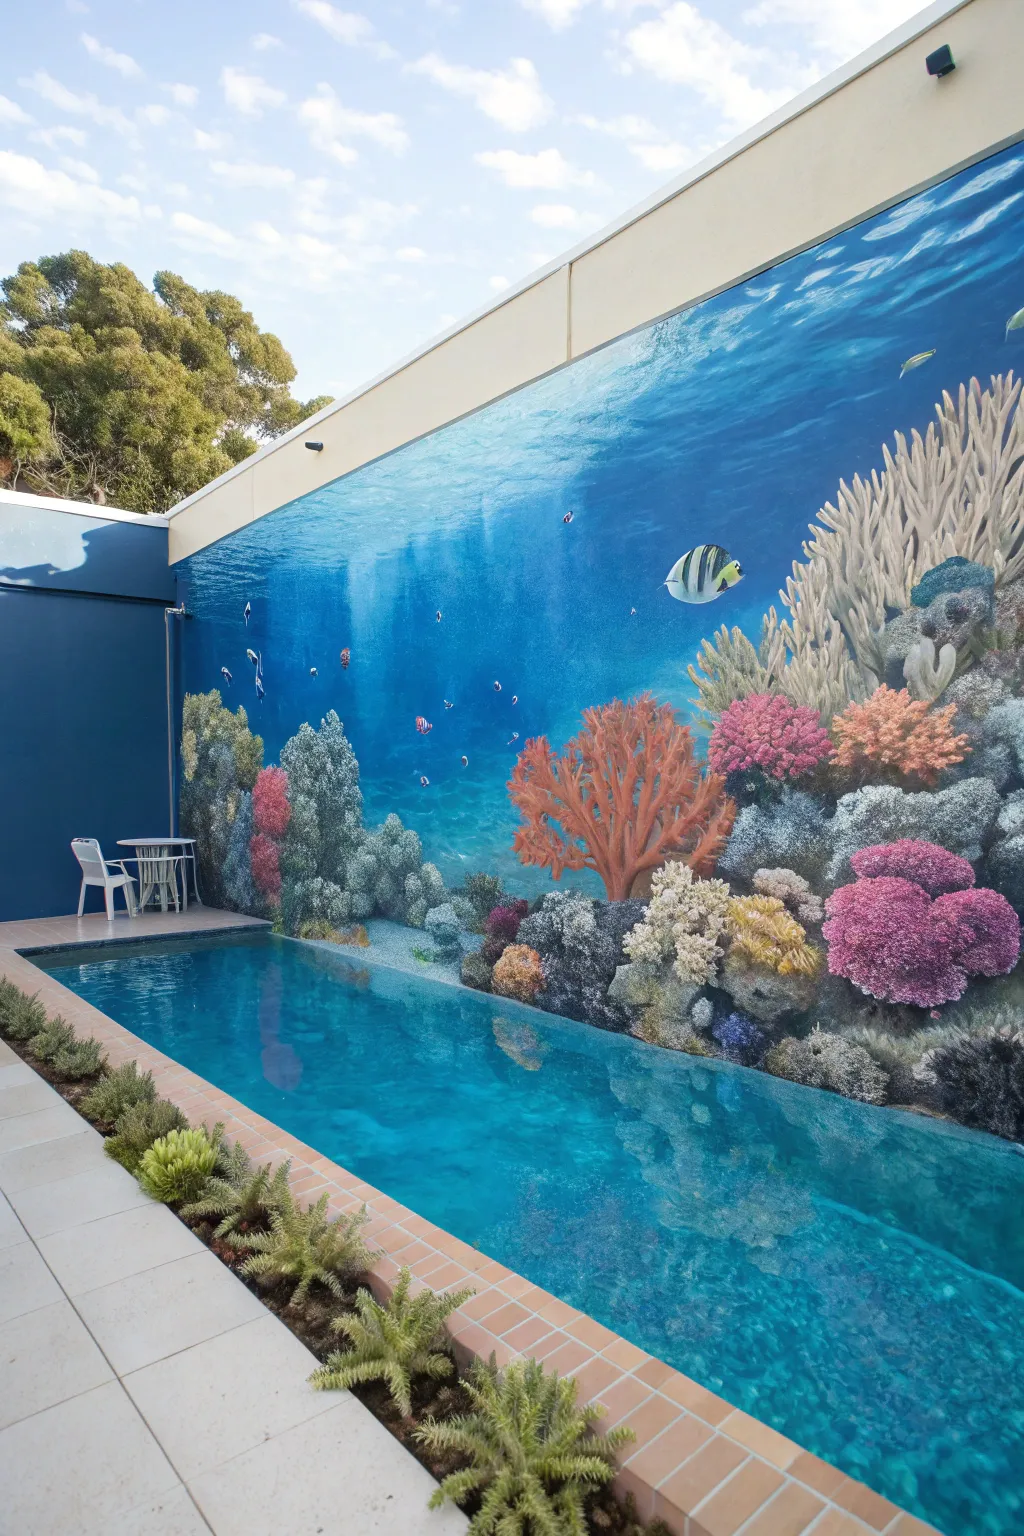
Transform your backyard into a permanent vacation spot with this immersive underwater coral reef panorama. By blending the pool’s waterline with a painted ocean depth, you create a stunning optical illusion that expands your space infinitely.
Step-by-Step Tutorial
Materials
- Exterior masonry primer
- High-quality exterior acrylic latex paints (various shades of blue, teal, cyan, white)
- Acrylic paints (coral pink, orange, purple, yellow, silver/grey)
- UV-resistant clear topcoat (matte or satin)
- Paint rollers (large nap for rough walls) and extension pole
- Large and medium paint brushes
- Detail brushes (various sizes)
- Painter’s tape
- Chalk or pastel stick for sketching
- Scaffolding or sturdy ladder
- Plastic drop cloths
- Sea sponges (optional for texture)
Step 1: Preparing the Canvas
-
Clean the Surface:
Power wash the exterior wall thoroughly to remove any dirt, mildew, or loose paint. Let the wall dry completely for at least 24-48 hours before starting. -
Protect the Area:
Lay down plastic drop cloths over the pool deck and cover the pool water surface nearest the wall to prevent paint splatter from falling in. -
Prime the Wall:
Apply a generous coat of high-quality masonry primer using a heavy nap roller. This ensures your ocean blues will adhere properly and look vibrant.
Uneven Blending?
If your gradient lines look too harsh, mist the wall lightly with water while blending the wet paint. This keeps acrylics workable longer.
Step 2: Creating the Ocean Depth
-
Establish the Ombré:
Mix three to four gradients of blue, ranging from a deep navy to a light cyan. Start painting the top of the wall with the lightest blue, representing the surface water. -
Blend Downward:
Work your way down the wall, transitioning into the darker blues as you go deeper. I like to use a wet-on-wet technique here, blending the edges where the colors meet with a large brush while the paint is still tacky to create a seamless gradient. -
Add Surface Light:
Using a watered-down white paint or a glaze, add ‘caustics’—the refracted light patterns found underwater. Paint wiggly, horizontal, interconnected lines near the top, fading them out as you go lower. -
Paint Light Rays:
With a very dry brush and translucent white paint, sweep long, diagonal beams coming from the top surface downward to simulate sunlight piercing the deep water.
Step 3: Constructing the Reef
-
Sketch the Composition:
Use white chalk to loosely outline the shapes of your coral structures. Plan large groupings on the sides and bottom to frame the open water in the center. -
Block in Base Colors:
Fill in the sketched coral shapes with solid base coats. Use dark greys and greens for background rocks, and bright pinks, oranges, and purples for the foreground coral. -
Create Depth with Shadows:
Mix a darker version of your base colors (or add a touch of blue/black) and paint the crevices and undersides of the coral to give them three-dimensional form. -
Add Texture:
For brain coral or spongy textures, use a sea sponge dipped in a lighter highlight color and dab it gently over the base shape.
Depth Trick
To make the water look endless, paint objects smaller and bluer/hazier as they move toward the top-center of the wall, simulating distance.
Step 4: Adding Life and Detail
-
Paint Fan Coral:
Use a liner brush to paint delicate, branching fan corals in darker reds or oranges. These should look like intricate nets or trees catching the current. -
Detail the Reef:
Go back in with your smallest brushes to add dots, stripes, and ridges to the large coral mounds. This detail work is what makes the reef look realistic from a distance. -
Populate with Fish:
Paint fish of various sizes. Start with a white silhouette to ensure opacity, then layer on their colors—yellow tangs, striped angel fish, or schools of small silver fish. -
Highlight the Fish:
Add a tiny dot of white to the top of the fish and their eyes to simulate light reflecting off their scales. -
Final Glazing:
Mix a very dilute blue glaze (mostly water or glazing medium with a drop of blue paint) and lightly wash over the most distant coral reefs to push them into the background.
Step 5: Protection
-
Seal the Mural:
Once the paint has cured (check the manufacturer’s recommendation, usually a few days), apply two coats of UV-resistant clear topcoat to protect against sun fading and pool chemical splashes.
Enjoy your private aquatic paradise every time you step outside for a swim


Playful Dolphin Pod Pass-By
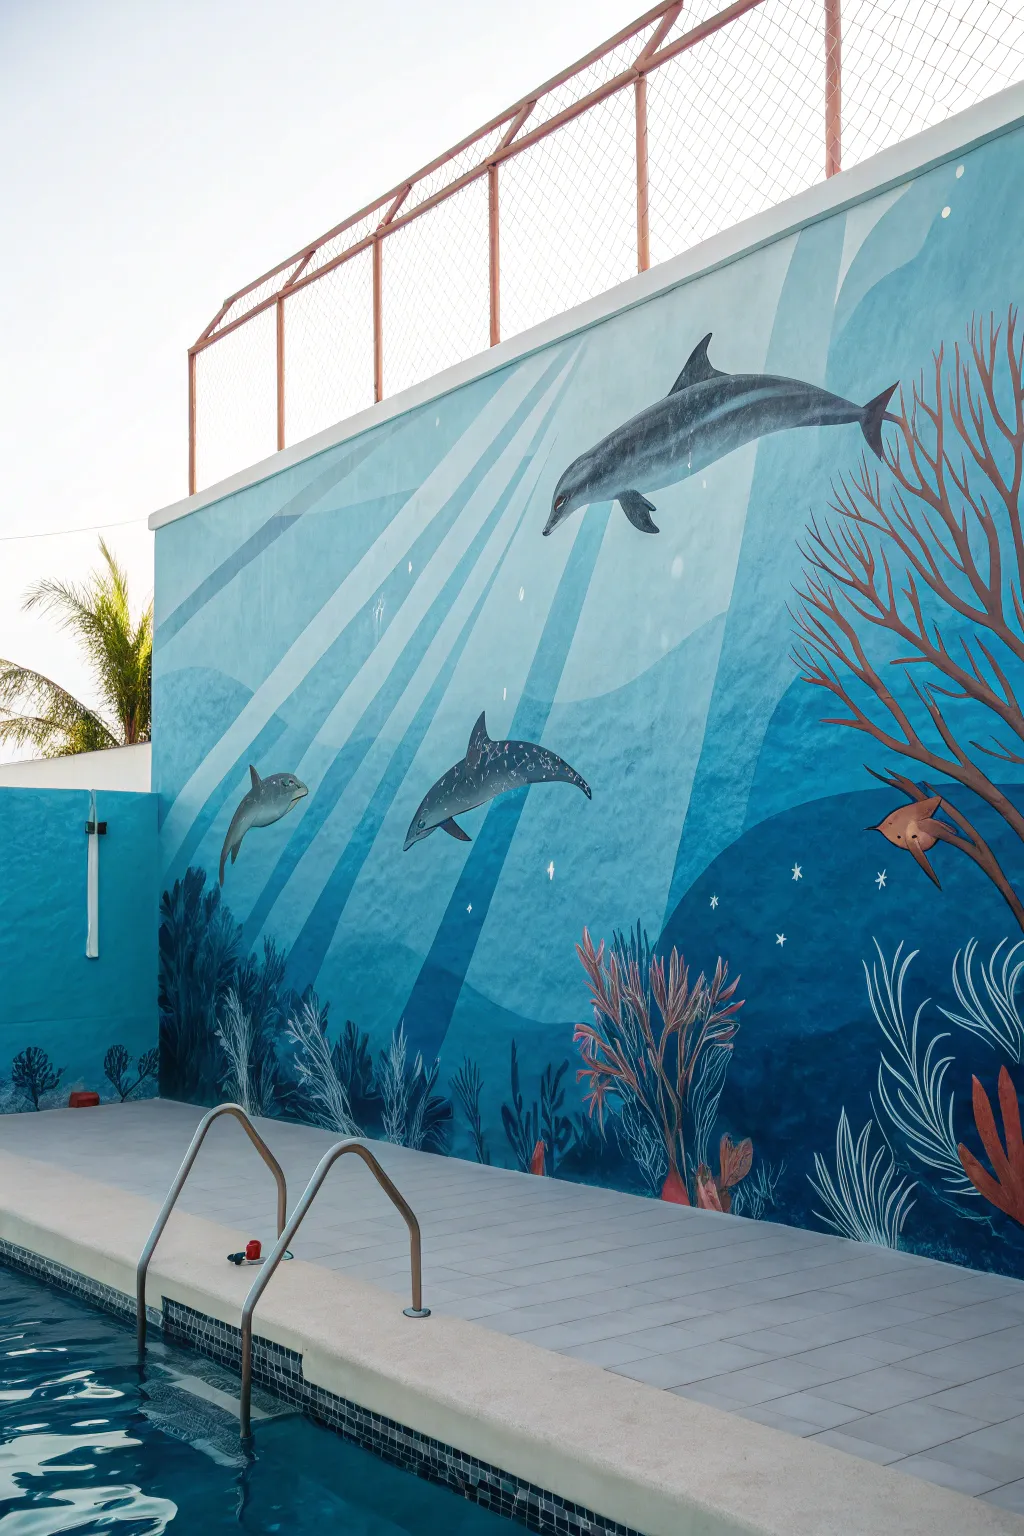
Transform a plain retaining wall into an underwater sanctuary featuring a playful pod of dolphins gliding through sun-pierced waters. This mural uses a technique of layered geometric light rays and organic sea life to create depth and movement right beside your pool.
Step-by-Step
Materials
- Exterior masonry primer (white)
- Exterior acrylic latex paint (deep navy blue, medium ocean blue, turquoise, light cyan, white)
- Assorted sizes of synthetic bristle brushes (2-inch sash, 1-inch flat, fine liner)
- Painter’s tape (2-inch width)
- Chalk line or long straight edge
- Chalk for sketching
- Paint rollers and tray
- UV-resistant clear topcoat (matte or satin finish)
Step 1: Prepping and Base Layer
-
Clean the surface:
Thoroughly pressure wash the wall to remove any dirt, moss, or loose paint. Let the masonry dry completely for at least 24 hours before beginning. -
Prime the canvas:
Roll on a generous coat of high-quality white masonry primer. This ensures your blue tones will pop and provides a unified surface for the artwork. -
Establish the background gradient:
Mix your medium ocean blue and turquoise paints. While the paint is wet, blend them on the wall to create a soft gradient, keeping the lighter turquoise near the top and transitioning to the medium blue towards the bottom third.
Bleed-Through Blues
If paint bleeds under your ray tape, wait for it to dry completely. Then, use a small angled brush and the original background color to carefully touch up the line for a sharp edge.
Step 2: Creating the Sunbeams
-
Map the light source:
Decide on a focal point at the very top center of the wall where the ‘sun’ would be. Snap a chalk line radiating outward from this point to the bottom corners and edges to create diagonal ray guides. -
Mask the rays:
Apply painter’s tape along your chalk lines. You want to create wide, expanding beams of light. Press the tape edges down firmly to prevent bleed-through. -
Paint the light shafts:
In the taped-off sections, paint using a very light cyan or a white usually mixed with a tiny drop of blue. Apply this thinly; I find a slightly translucent application looks more like actual light filtering through water. -
Reveal the beams:
Carefully peel away the painter’s tape while the paint is still slightly tacky to ensure crisp, sharp edges.
Step 3: Bringing in the Wildlife
-
Sketch the dolphin positions:
Using white chalk, sketch the outlines of three dolphins. Place the largest one high on the right, swimming upward, and two smaller ones lower on the left to balance the composition. -
Base coat the dolphins:
Fill in the dolphin silhouettes with a slate grey paint. Don’t worry about shading yet; just get a solid opaque coverage. -
Add dolphin dimension:
Mix a darker charcoal grey to paint the upper backs and dorsal fins for shadow. Use white to highlight the bellies and the tops of their snouts where the ‘sunlight’ hits them. -
Detail the faces:
Switch to a fine liner brush to paint the eyes and the distinctive smile line of the beak using black or deep navy paint. -
Sketch the seabed:
At the bottom of the wall, chalk out flowing, organic shapes for the reef mounds. Vary the heights to make the terrain interesting. -
Paint the deep reef:
Fill these bottom mounds with your darkest navy blue. This anchors the mural and simulates the depths of the ocean floor.
Level Up: Shimmer Effect
Mix a small amount of pearlizing medium or iridescent glaze into the white paint used for the dolphin bellies and the sunbeams. It will catch the actual sunlight beautifully.
Step 4: Foreground Coral and Finishing
-
Paint the shadowy flora:
Using a slightly lighter navy blue, paint leafy, seaweed-like shapes rising from the dark mounds on the left side. These should look like silhouettes. -
Draft the red coral:
On the right side, paint a large, branching structure in a rusty red or coral color. Use a 1-inch flat brush to keep the branches thick and sturdy-looking. -
Add white sea grass:
With a thin round brush and pure white paint, create fluid, grass-like strokes overlapping the dark blue mounds. Group them in tufts to look like swaying vegetation. -
Incorporate playful fish:
Add a hidden orange fish peeking out from the red coral branches to add a pop of contrasting color. -
Sprinkle magic sparkles:
Using a small brush, add tiny white four-pointed stars or dots randomly in the darker blue areas to represent catching light or distant bioluminescence. -
Seal for longevity:
Once the mural has cured for at least 48 hours, apply two coats of UV-resistant clear topcoat to protect your masterpiece from sun fading and pool splashes.
Now your pool area has a custom view that invites everyone to dive into a world of imagination
BRUSH GUIDE
The Right Brush for Every Stroke
From clean lines to bold texture — master brush choice, stroke control, and essential techniques.
Explore the Full Guide
Sea Turtle Glide Along the Waterline
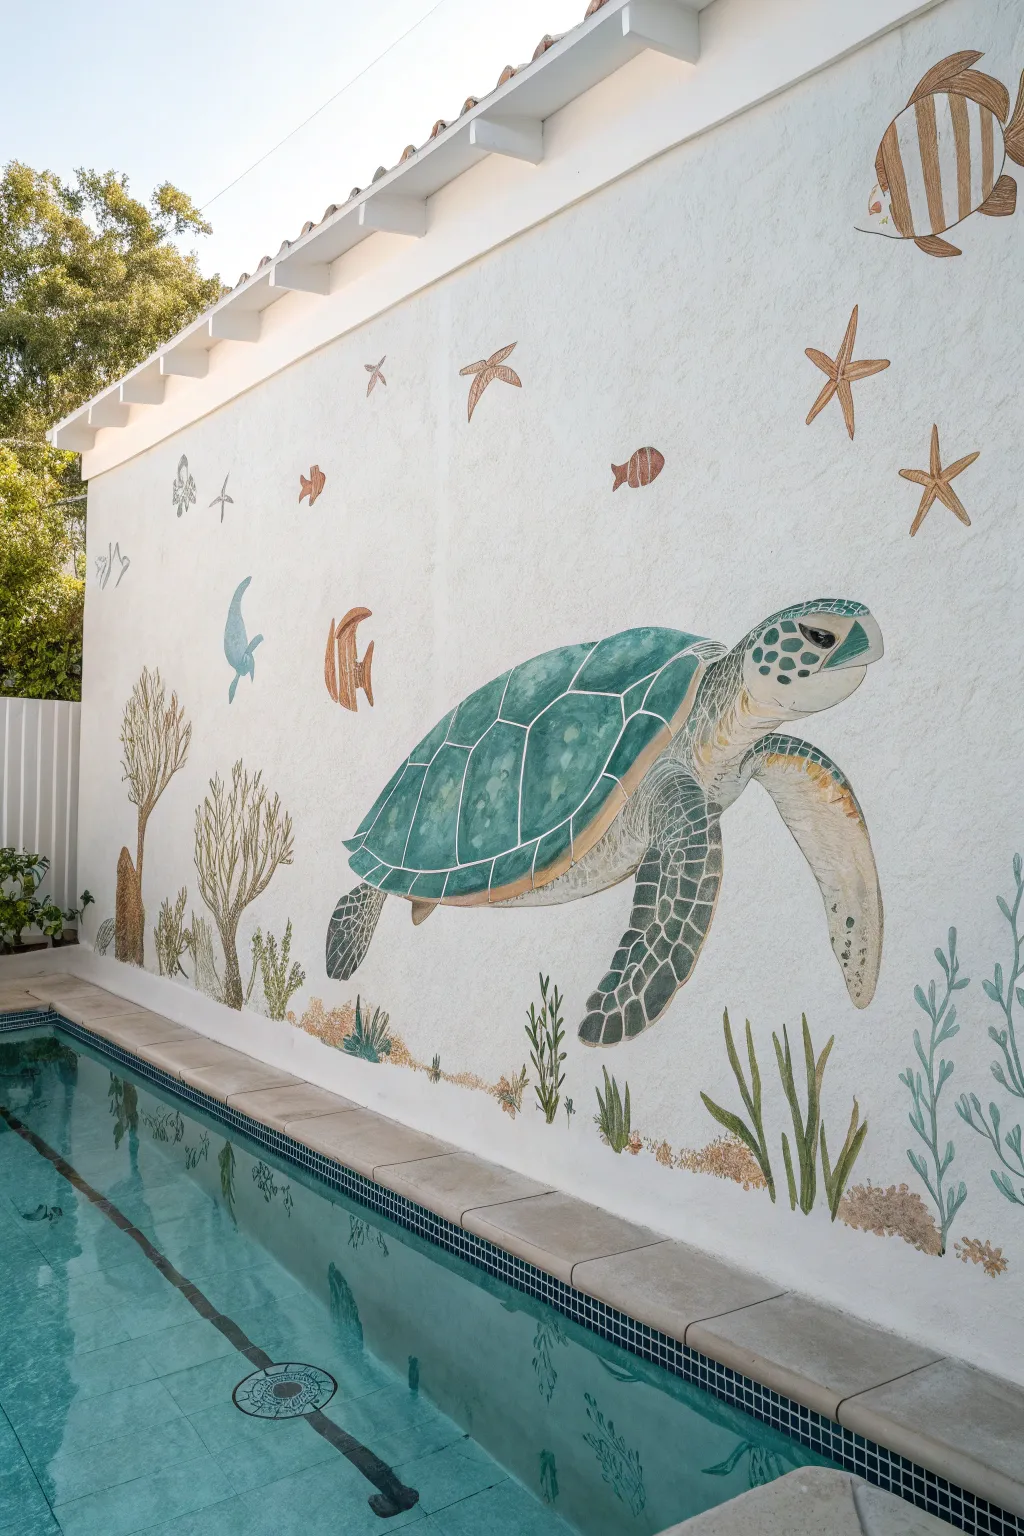
Transform a blank pool wall into a vibrant underwater seascape with this large-scale mural featuring a majestic sea turtle as the centerpiece. The soft, textured strokes and playful scattered sea life create a relaxing atmosphere that perfectly complements the rippling water below.
Step-by-Step Tutorial
Materials
- Exterior masonry primer (white)
- Exterior acrylic latex paints (greens, blues, browns, creams, orange)
- Wide rollers and extension pole
- Assorted paintbrushes (2-inch flat, 1-inch angled, detail liners)
- Chalk or pastel pencil for sketching
- Painter’s tape
- Drop cloths
- Clear outdoor sealant (UV resistant)
- Ladder or scaffolding
- Mixing trays and cups
Step 1: Preparation & Background
-
Clean and Protect:
Begin by thoroughly cleaning the wall surface to remove any dirt, moss, or loose paint. Once dry, tape off the waterline tiles and the eaves above to protect them from splatters. Lay down drop cloths over the pool edge and deck. -
Prime the Surface:
Roll on a solid coat of high-quality exterior masonry primer. This ensures your mural adheres well to the stucco texture and creates a neutral white base for your colors to pop. -
Establish the Base Color:
Apply a base coat of off-white or very pale cream exterior paint across the entire wall. This mimics the sandy feel of the ocean floor and keeps the mural feeling light and airy.
Use the Stucco
Don’t fight the bumpy stucco texture. Let your brush skip over low spots when painting the coral or sea floor to create instant, natural-looking grit and dimension.
Step 2: Sketching the Composition
-
Outline the Turtle:
Using a light-colored chalk or pastel pencil, sketch the large sea turtle in the center right of the wall. Keeping the turtle relatively horizontal gives the impression it is swimming parallel to the water. -
Add Surrounding Elements:
Sketch in the supporting cast of sea creatures. Add starfish near the top, a few small fish swimming in a school, and larger striped fish in the corners. Don’t forget the coral shapes and seagrass along the bottom edge. -
Review Distance:
Step back from the wall frequently to check your proportions. The turtle should be the dominant focal point, significantly larger than the other elements.
Step 3: Painting the Sea Turtle
-
Base Coat the Shell:
Paint the main shell area with a deep teal or seafoam green. Don’t worry about the pattern yet; just get a solid block of color down. -
Detail the Scutes:
Once the base is dry, use a thinner liner brush and a creamy white paint to outline the hexagonal plates (scutes) on the shell. If you want more depth, mix a darker green to shade the edges of each plate before outlining. -
Paint the Flippers and Head:
Fill in the skin areas with a pale sage or grey-green. While wet, blend in darker charcoal or deep green spots to create the reptile skin texture, particularly on the front flippers and top of the head. -
Define the Eye:
Paint the eye carefully with black, adding a tiny white dot for a reflection highlight. This brings the character to life immediately. -
Underbelly Shading:
Use a warm beige or cream to paint the turtle’s underside and the bottom edge of the shell, blending it gently into the upper green sections for a rounded, 3D effect.
Make It Interactive
Hide small, painted ‘treasures’ in the seagrass along the bottom—like a tiny crab, a gold coin, or a message in a bottle—for swimmers to discover while underwater.
Step 4: Adding Life & Environment
-
Starfish and Shells:
Paint the starfish using warm ochre and terracotta tones. Simple five-point star shapes work best here; keep the edges slightly soft to mimic the organic texture of the wall. -
Swimming Fish:
Fill in the striped fish (like the one in the top right) with alternating bands of white and rust-orange. Add tiny fins and tails with a fine brush. -
Bottom Vegetation:
Along the very bottom of the wall, paint vertical, wavy strokes of green to represent seagrass. Vary the greens from deep olive to bright lime to create depth. -
Coral Accents:
Intersperse brown or tan branching coral shapes among the seagrass. Using a dry-brush technique here can help the wall’s natural texture do the work for you, making the coral look rugged. -
Jellyfish Details:
If you sketched a jellyfish, use a very watered-down blue or grey glaze to paint it. You want it to look translucent, so let some of the background wall color show through.
Step 5: Finishing Touches
-
Refine Edges:
Go back with your background off-white color and touch up any areas where the paint might have gone outside the lines, sharpening the silhouette of the turtle and fish. -
Seal the Artwork:
Once the paint has cured completely (usually 24-48 hours), apply two coats of a clear, non-yellowing UV-resistant sealer. This is crucial for protecting the colors from baking in the sun and fading over time.
Enjoy your customized aquatic view during your next swim
Shark Silhouette Depth Trick

Transform a plain pool wall into a dramatic deep-sea scene with this striking shark silhouette mural. Using simple blocking techniques and underwater-inspired hues, this project adds a playful sense of danger and depth to your swimming area.
How-To Guide
Materials
- Exterior masonry primer (white or light blue)
- Exterior acrylic latex paint (Cyan Blue, Navy Blue, Black, Dark Grey)
- Painter’s tape
- Chalk or pastel pencil for sketching
- Large foam roller and tray
- Various paintbrushes (2-inch flat, 1-inch angled, fine detail brush)
- Cardboard or stencil acetate (optional for shark template)
- Drop cloths
- Extension pole for roller
Step 1: Preparation & Base Coat
-
Clean the Surface:
Begin by thoroughly cleaning the pool wall. Use a pressure washer or a stiff scrub brush with a mild detergent to remove any algae, dirt, or loose paint chips, then let the concrete dry completely for at least 24 hours. -
Protect the Area:
Lay down drop cloths along the pool deck and cover the tile line at the water’s edge with painter’s tape to prevent accidental splatters on the coping or existing tiles. -
Mix the Base Color:
Create a vibrant cyan blue by mixing your exterior latex paint. Depending on your existing wall color, you might need two coats to ensure a solid, opaque background that resembles clear ocean water. -
Apply the Background:
Using a large foam roller on an extension pole, roll the cyan blue paint across the entire section of the wall you intend to paint. Work in ‘W’ patterns for even coverage. -
Let it Cure:
Allow the base coat to dry fully according to the manufacturer’s instructions, usually about 4 to 6 hours, before attempting to sketch on top of it.
Step 2: Creating the Shark
-
Draft the Silhouette:
Using a piece of chalk or a pastel pencil, lightly sketch the outline of the shark. Focus on the distinct dorsal fin, the powerful tail curves, and the sleek, torpedo-shaped body. -
Refine the Outline:
Step back to view the sketch from a distance. I find it helpful to look at the wall from the opposite side of the pool deck to ensure the proportions feel menacing and realistic. -
Select the Shark Color:
Pour a small amount of black exterior paint into a container. Because this is a silhouette meant to look like a shadow, you want a flat, solid dark color without highlights. -
Paint the Edges:
Use a 1-inch angled sash brush to carefully cut in the outline of the shark. Keep your hand steady to create sharp, crisp edges on the fins and tail. -
Fill the Body:
Switch to a smaller roller or a 2-inch flat brush to fill in the main body of the shark. Apply the paint thickly enough to hide the blue background completely. -
Check for Pinholes:
Concrete can be porous, so inspect the black silhouette closely for any tiny unpainted spots and dab them with your brush to ensure a solid blackout effect.
Shark Shape Success
Struggling with the shark shape? Project a shark image onto the wall using a cheap projector at night and trace the outline for perfect proportions.
Step 3: Adding the Seabed
-
Sketch the Terrain:
Below the shark, sketch a rolling, uneven line to represent the seabed or distant coral reefs. Make the shapes organic and bumpy rather than a straight line. -
Mix Deep Sea Colors:
Mix a dark navy blue with a touch of dark grey. This color needs to be significantly darker than the cyan water but slightly lighter or different in tone than the black shark to create atmospheric perspective. -
Paint the Foreground:
Fill in the seabed shapes using the dark navy mix. Don’t worry about being too precise with the bottom edge as it often fades or meets the pool floor. -
Layering the Shapes:
For added depth, add a second layer of ‘hills’ behind the first one using a slightly lighter shade of blue. This creates a receding effect, making the ocean look vast. -
Add Vertical Weeds:
On the right side, paint tall, vertical shapes resembling kelp or underwater towers using a dark teal or green-blue mix to frame the composition. -
Final Inspection:
Walk around the pool perimeter one last time to spot any uneven edges or light patches in the dark paint. Touch up as needed with a small detail brush. -
Seal (Optional):
If your pool gets heavy chemical use, consider applying a clear concrete sealer over the dried mural to prolong the life of the artwork. -
Clean Up:
Remove the painter’s tape carefully while the final touch-ups are still slightly tacky to prevent peeling, then clean your brushes immediately with soapy water.
Make It Pop
Add a few tiny, lighter blue fish silhouettes swimming away from the shark to create a narrative and emphasize the predator’s size.
Once the pool is filled, the water’s refraction will make your shark look like it’s genuinely prowling the deep end

PENCIL GUIDE
Understanding Pencil Grades from H to B
From first sketch to finished drawing — learn pencil grades, line control, and shading techniques.
Explore the Full Guide
Sunrise-to-Sunset Gradient Sky
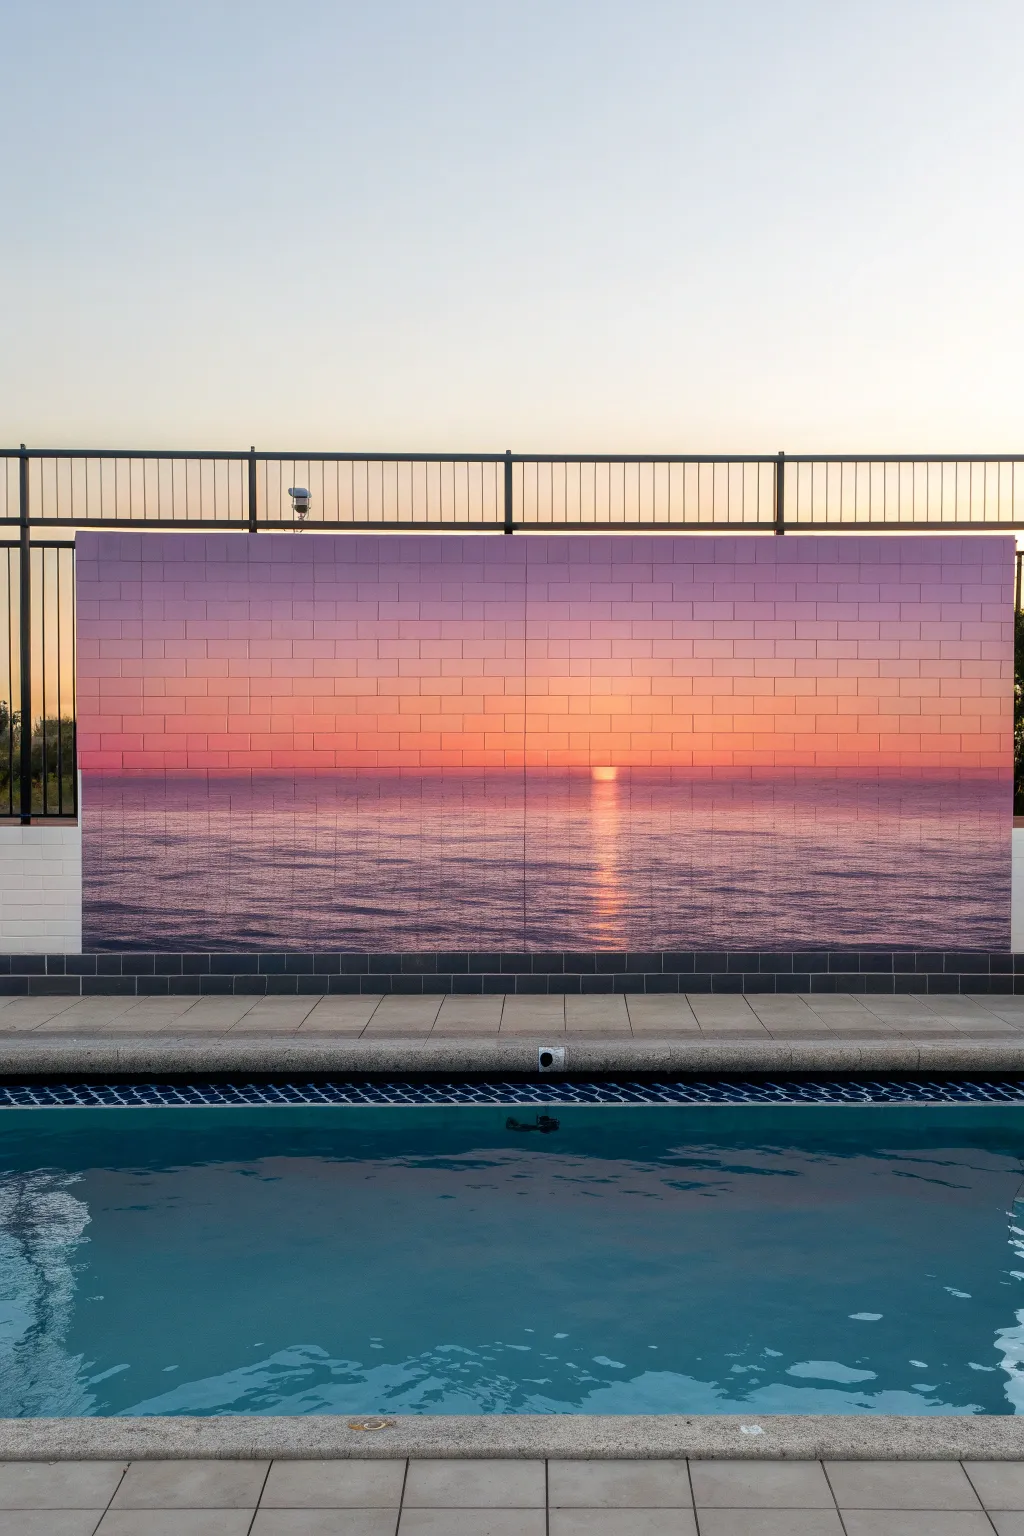
Transform a plain poolside wall into a breathtaking ocean view with this large-scale tiled mural. By using water-resistant printing on individual tiles, you can recreate the serene gradient of a sun dipping below the horizon, extending the feeling of your pool into an infinite seascape.
Step-by-Step Guide
Materials
- High-resolution sunset landscape image
- Ceramic or porcelain wall tiles (rectangular subway style)
- Sublimation printer and heat press (or professional tile printing service)
- Tile adhesive (exterior grade)
- Notched trowel
- Tile spacers (1/8 inch or smaller)
- Sanded grout (charcoal or dark gray for contrast)
- Grout float
- Sponge and bucket
- Tile cutter or wet saw
- Level and measuring tape
- Painter’s tape
- UV-resistant sealant (specifically for outdoor photo tiles)
Step 1: Planning and Preparation
-
Measure the space:
Carefully measure the height and width of the wall section you intend to cover. This mural relies on exact dimensions to ensure the horizon line remains straight. -
Source the image:
Select a high-resolution photograph of a sunset over the ocean. The image needs to be large enough to be blown up to wall size without pixelating; look for vector art or photos taken with professional DSLR cameras. -
Calculate tile grid:
Divide your totale wall dimensions by the size of your chosen tiles. Map out exactly how many rows and columns you will need. -
Prepare the digital file:
Using photo editing software, slice your main image into smaller segments that match your tile grid. Each segment represents one physical tile.
Step 2: Creating the Photo Tiles
-
Print or order tiles:
If you have sublimation equipment, print your image segments onto sublimation transfer paper. Otherwise, upload your sliced files to a custom ceramic tile printing service that specializes in outdoor murals. -
Transfer the image:
For DIY sublimation, secure the transfer paper face-down on the tile blank with heat-resistant tape. Press at 400°F (204°C) for widely recommended times, usually around 4-6 minutes depending on tile thickness. -
Number the backs:
As you finish each tile, immediately write its row and column number on the back (e.g., R1-C1). This is crucial, as mixing up the subtle sky gradients is very easy to do later. -
Dry run layout:
Lay the tiles out on a clean, flat floor to verify the color transitions look smooth and no pieces are missing or misprinted.
Uneven Gradients?
If adjacent tiles look drastically different in color due to printer variations, try arranging them slightly out of order on the floor first to see if blending them creates a better visual flow.
Step 3: Installation
-
Prep the surface:
Ensure the existing wall is clean, dry, and free of loose debris. If the surface is uneven, you may need to apply a scratch coat first. -
Set the baseline:
Use your level to mark a perfectly straight horizontal line near the bottom of the wall. I always double-check this, because if the bottom row is crooked, the horizon ocean line will be tilted. -
Apply adhesive:
Spread exterior-grade tile adhesive onto a small section of the wall using a notched trowel. Create consistent ridges to ensure a strong bond. -
Place the first tiles:
Starting from the bottom center or corner (depending on your layout plan), press the tiles firmly into the adhesive. Insert spacers between them to ensure uniform gaps. -
Continue row by row:
Work your way up the wall, constantly checking your numbered backs to ensure the gradient flows correctly from the dark water to the bright sunset. -
Cut edge pieces:
If your wall dimensions don’t perfectly match full tile widths, use a wet saw to trim the edge tiles to fit the remaining space. -
Let adhesive cure:
Allow the adhesive to dry completely according to the manufacturer’s instructions, typically 24 to 48 hours.
Pro Tip
Use ‘rectified’ tiles if possible. These have perfectly straight cut edges (unlike molded edges), allowing for extremely thin grout lines that make the image look more continuous.
Step 4: Finishing Touches
-
Mix the grout:
Prepare your sanded grout. A dark gray or charcoal color works best here to mimic the shadows in the water and frame the bright colors without being distracting. -
Apply grout:
Using a rubber float, press the grout into the gaps at a 45-degree angle. Ensure every joint is filled solid. -
Clean the surface:
Once the grout hazes over (usually 15-20 minutes), wipe down the tiles with a damp sponge. Rinse your sponge frequently to avoid spreading haze. -
Apply sealant:
Since this mural will face the sun and pool water, apply a high-quality UV-resistant clear sealant over the entire surface to protect the colors from fading.
Now you have a permanent sunset view to enjoy every time you go for a swim
Palm Fronds and Coconut Shadows
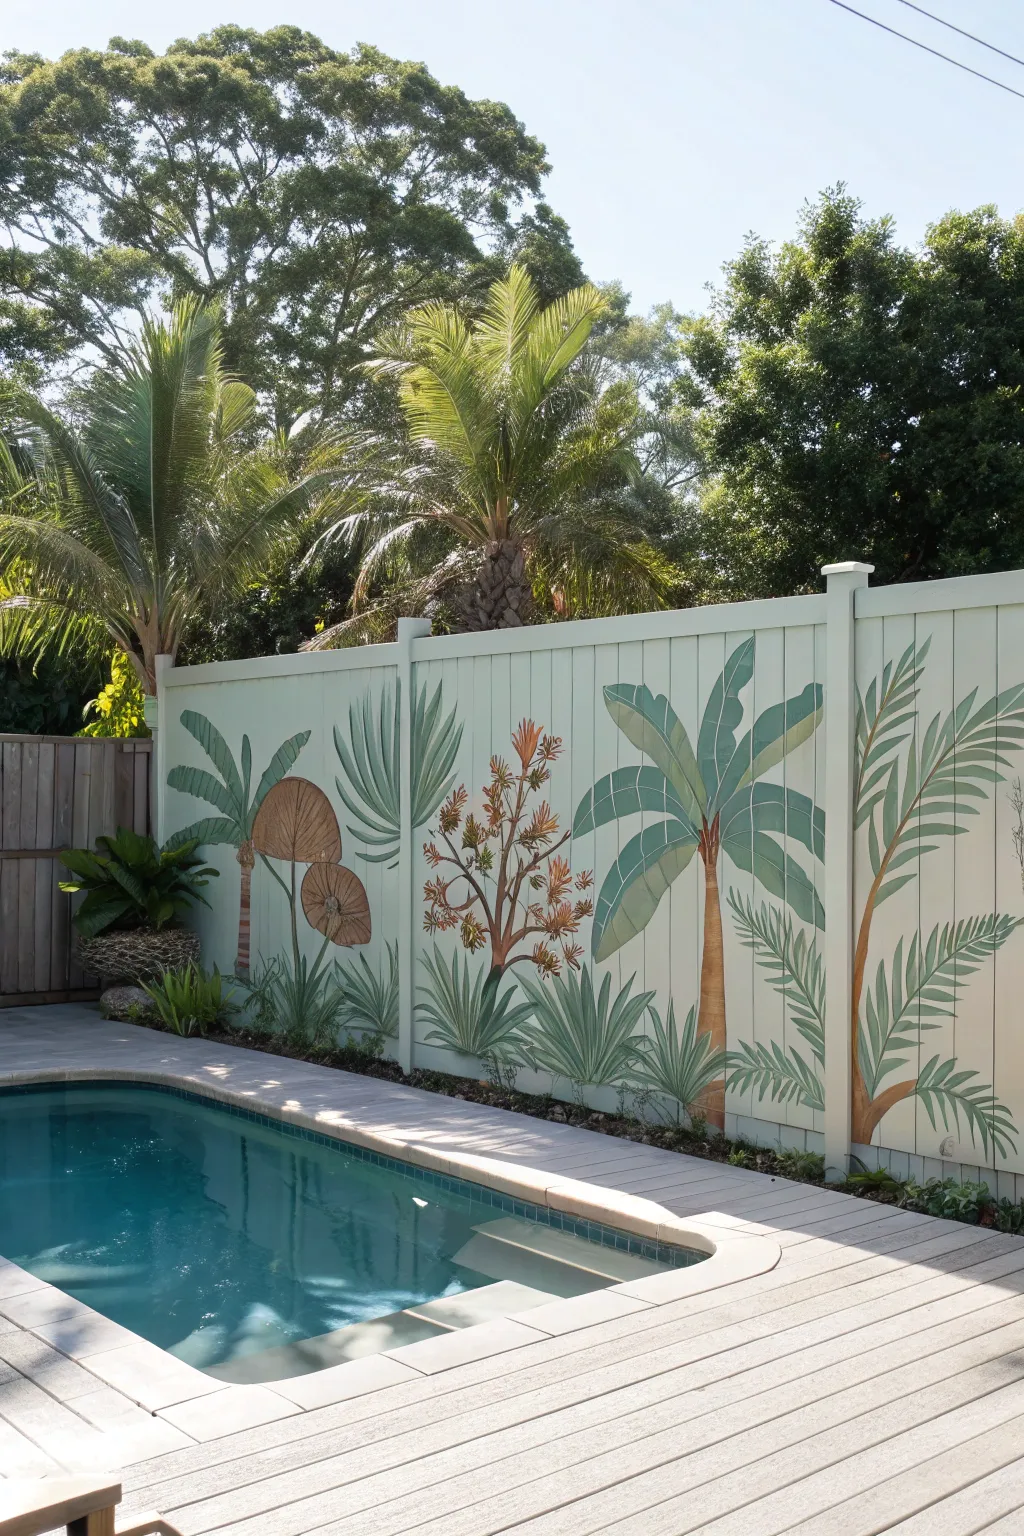
Transform a plain backyard fence into a lush, botanical escape with this simplified realistic style. The soft sage background creates a calming atmosphere while the detailed palm fronds add depth and character to your poolside view.
Step-by-Step
Materials
- Exterior primer
- Exterior latex paint (Soft Sage Green for background)
- Exterior acrylic mural paints (Deep Forest Green, Olive Green, Teal, Brown, Terracotta, Tan, Cream)
- Set of angled sash brushes (1.5 inch and 2 inch)
- Set of round detail brushes (#4, #8, #12)
- Painters tape
- Chalk or watercolor pencils (for sketching)
- Step ladder
- Drop cloth
- Clear UV-resistant topcoat
Step 1: Preparation & Background
-
Clean the surface:
Begin by thoroughly power washing the fence to remove dirt, mildew, and loose paint. Let the wood dry completely for at least 24 hours before moving to the next step. -
Mask the area:
Apply painters tape to any hardware, posts you want to keep plain, or adjacent structures. Lay down a drop cloth over the pool deck or grass to catch drips. -
Prime the wood:
Roll on a high-quality exterior primer to ensure your mural adheres well and lasts through the seasons. Allow this to dry according to the can’s instructions. -
Apply the base color:
Paint the entire fence with two coats of Soft Sage Green exterior latex paint. This muted, minty backdrop mimics the humidity of the tropics and makes the darker greens pop.
Step 2: Sketching the Layout
-
Plan the composition:
Look at the fence panels as individual framing elements. Plan for one major plant grouping per panel section to keep the design balanced but organic. -
Chalk the outlines:
Using white chalk or a light watercolor pencil, loosely sketch the main trunks and sweeping curves of the palm fronds. Don’t worry about details yet; just focus on height and placement. -
Establish variety:
Vary your leaf shapes. Sketch some as fan palms (rounded shapes), others as feather palms (long, arching lines), and include low-lying agave or textural grasses at the base.
Pro Tip: Perspective
Make plants in the foreground slightly larger and more vibrant green, while keeping background foliage smaller and more muted to create depth.
Step 3: Painting the Foliage
-
Paint the trunks:
Mix brown with a touch of tan and paint the slender tree trunks. I like to add horizontal stripes or texture marks with a darker brown while the paint is still wet to mimic bark segments. -
Block in base greens:
Using your 1.5-inch sash brush, fill in the main leaf shapes with a mid-tone Olive Green. Keep your brushstrokes directionally flowing from the stem outward to the leaf tip. -
Add deep shadows:
Switch to Deep Forest Green. Paint the underside of the fronds and the areas where leaves overlap or connect to the trunk. This creates the illusion of 3D volume. -
Highlight the tips:
Mix a little Teal and Cream into your Olive Green. Use this lighter shade on the tops of the curved leaves where the sun would naturally hit. -
Define the fan palms:
For the rounded fan palms, use a smaller round brush to paint distinct ‘fingers’ or segments, leaving tiny gaps of the sage background showing through to separate them. -
Paint the specialty flora:
For the flowering bush shown in the center, use Terracotta and Brown to paint the branch structure first. Then, stipple small clusters of flowers using Cream and Tan. -
Ground the mural:
Add clusters of spiky agave or aloe plants at the very bottom of the fence using Teal and Cream mixtures. This visual weight connects the mural to the ground.
Troubleshooting: Drips
If paint runs on the vertical fence boards, don’t wipe it while wet. Let it dry completely, sand the drip smooth, and touch up with the background color.
Step 4: Detaling & Sealing
-
Refine the edges:
Take a small round brush (#4) and clean up any leaf edges with the original sage background color if you went outside the lines, or sharpen the tips of the fronds. -
Add texture lines:
Paint thin center veins on the larger leaves using a mix of Cream and Green. This small detail adds immense realism. -
Protect your work:
Once the mural has cured for at least 48 hours, apply a clear, UV-resistant exterior topcoat to prevent fading from the sun and protect against pool water splashes.
Enjoy your new permanent vacation view right in your own backyard


Tile Pattern Illusion Border
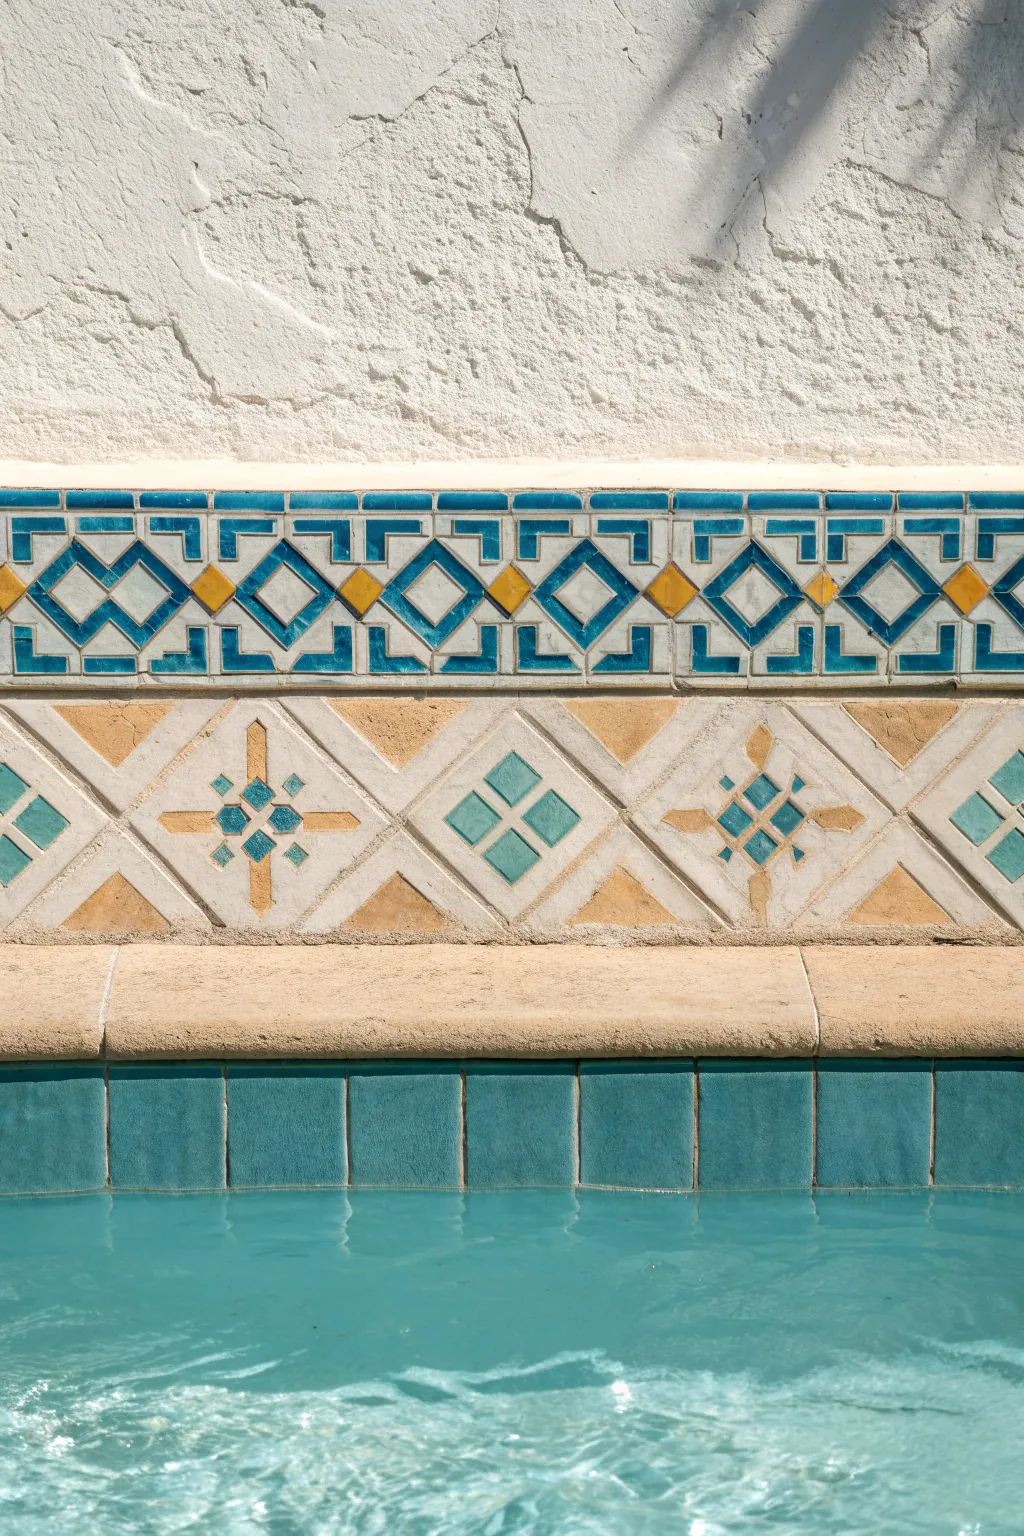
Transform a plain poolside wall into a Mediterranean escape with this comprehensive mural tutorial. By mimicking the look of glazed ceramic tiles and weathered stone through careful taping and painting, you’ll create a sophisticated border that looks surprisingly real.
Detailed Instructions
Materials
- Exterior masonry primer
- Exterior latex paint (white, light beige, terracotta gold, dark teal blue, light teal blue)
- Glazing medium
- Painter’s tape (various widths: 1/4 inch, 1/2 inch, 1 inch)
- Chalk line or laser level
- Long ruler or straightedge
- Pencil
- Small angled sash brush
- Detail brushes (flat and round)
- Sea sponge
- Rags
- Clear exterior acrylic sealer (UV resistant)
Step 1: Preparation and Layout
-
Clean surface:
Begin by thoroughly cleaning the wall surface to remove any dirt, mildew, or loose stucco. A pressure washer on a low setting works well, but allow the wall to dry completely for at least 24 hours before proceeding. -
Prime the area:
Apply a coat of high-quality exterior masonry primer to the entire area where the mural will go. This ensures your ‘grout’ lines and colors adhere properly to the textured surface. -
Establish horizontal guides:
Using a laser level or chalk line, mark the horizontal boundaries for your two main bands: the narrow top ‘ceramic’ border and the wider bottom ‘stone’ border. -
Base coat application:
Paint the top band area with a creamy white (representing the grout and base ceramic color) and the bottom band with a sandy beige (representing the stone base). Let this cure fully.
Bleeding Lines?
If paint bleeds under your tape, don’t panic. Wait for it to dry completely, then use a small flat brush and your original base color (white or beige) to touch up the ‘grout’ lines.
Step 2: Creating the Top Geometric Border
-
Grid the design:
Lightly pencil a grid into the top white band. You need squares that stand on their points (diamonds) separated by vertical spacers. Accuracy here is key for a convincing tile effect. -
Tape the structure:
Use 1/4 inch tape to mask off the ‘grout’ lines. You are essentially preserving the white base coat. Create the diamond shapes and the rectangular spacers as seen in the reference. -
Paint the blue elements:
Fill in the geometric outlines with your dark teal blue. Use a small angled brush to get crisp edges against the tape. -
Add yellow accents:
Paint the small diamond shapes between the blue patterns with the terracotta gold paint. This pop of color mimics traditional Spanish tile work. -
Highlight and shadow:
Before removing the tape, mix a little white into your blue and add slight highlights to the top edges of the blue shapes. Add a darker blue to the bottom edges to simulate dimension. -
Reveal the grout:
Carefully peel back the tape while the paint is still slightly tacky to avoid pulling up dry chips. You should now see crisp white lines separating your colors.
Step 3: The Stone Relief Border
-
Mark the stone pattern:
On the lower beige band, use a long ruler to draw the large diamond lattice pattern. Inside alternating diamonds, draw the ‘cross’ shapes and the ‘four-square’ motifs. -
Create stone texture:
Mix your beige paint with glazing medium and a touch of darker brown. Use a sea sponge to dab this mixture unevenly over the band, creating a weathered stone look. -
Paint the relief shadows:
To make the design look carved, paint thin shadows along the bottom and right edges of your pencil lines using a watery dark taupe. I find a thin liner brush works best for this delicate work. -
Paint the relief highlights:
Paint thin highlights along the top and left edges of the lines using a lighter cream color. This ‘trompe l’oeil’ technique tricks the eye into seeing depth. -
Add colored inlays:
Fill in the specific geometric shapes—the four squares and the cross details—with watered-down teal and gold paint. You want this to look like stained stone or faded inlay, not opaque paint.
Antique Glaze
After sealing, wash a very diluted raw umber acrylic over the entire mural and immediately wipe it off with a rag. This leaves ‘dirt’ in the crevices for an aged look.
Step 4: Finishing Touches
-
Soften edges:
If any lines look too sharp or manufactured, lightly sand them with fine-grit sandpaper to distress the finish and enhance the ‘ruined’ aesthetic. -
Seal the mural:
Apply two coats of clear, matte exterior acrylic sealer. This is crucial for protecting the pigments from pool chemicals and harsh sunlight.
Step back and enjoy the illusion of hand-laid tile work that brings timeless elegance to your swimming area
Lily Pads on the Pool Floor
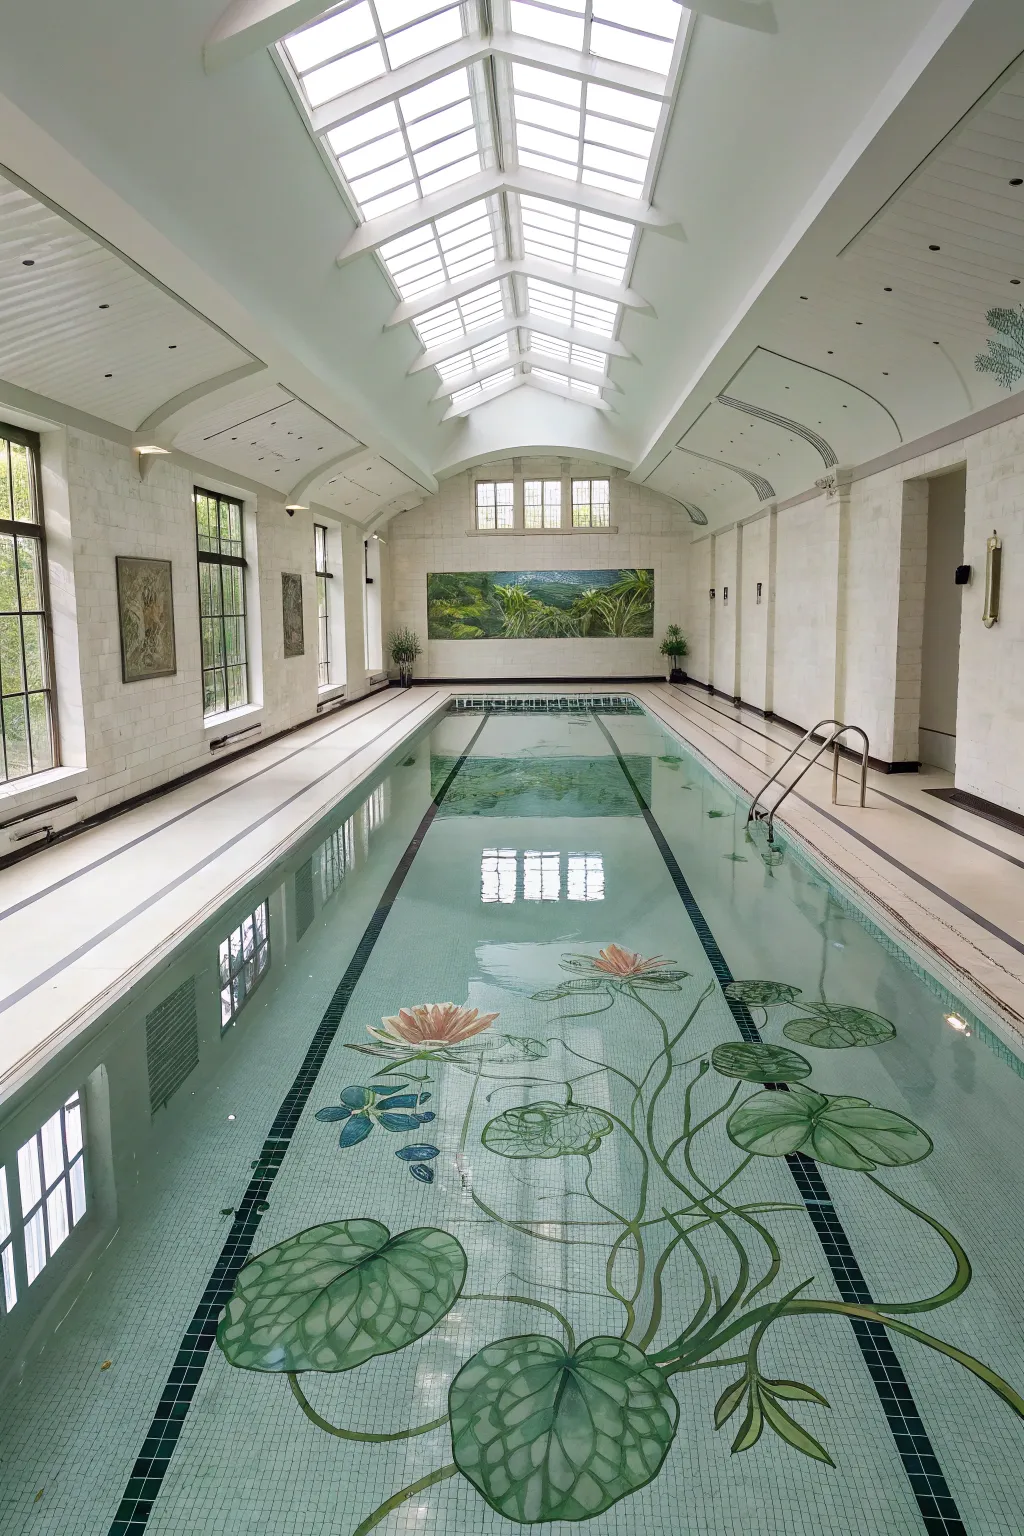
Transform your pool floor into an ethereal pond with this stunning lily pad mural, designed to look as if it’s floating just beneath the surface. This large-scale project creates a permanent, serene garden that ripples beautifully under the water, turning every swim into a dip in a secluded lagoon.
Step-by-Step Tutorial
Materials
- Epoxy pool paint (White, Deep Green, light Green, Pink, Yellow, Black)
- High-grit sandpaper or sanding disc
- Acid wash solution (muriatic acid)
- Pressure washer
- Chalk snap line
- Grease pencil or waterproof marker
- Long-handled paint rollers
- Assorted angled brushes (2-inch and 3-inch)
- Fine detail brushes (synthetic)
- Clear epoxy topcoat (pool-grade)
- Painter’s tape
- Mixing buckets and stir sticks
- Protective gear (respirator, gloves, goggles)
Step 1: Preparation & Base Coat
-
Drain and Clean:
Begin by completely draining the pool. Remove any debris and scrub the floor thoroughly. This is crucial because any algae or dirt will prevent the paint from bonding. -
Sand the Surface:
Use a high-grit sanding disc to rough up the existing plaster or concrete floor. You want to create a mechanical tooth for the epoxy paint to grip onto. -
Acid Wash:
Apply an acid wash solution (following manufacturer safety instructions strictly) to etch the surface further. Rinse thoroughly with a pressure washer and let the pool dry completely—usually for 3-5 days. -
Layout the Swim Lanes:
Before painting the art, establish the boundaries. Use a chalk snap line to mark two long parallel lines running the length of the pool. Tape these off with high-quality painter’s tape. -
Paint the Lane Lines:
Fill in the taped lane lines with black or deep nave epoxy paint. Apply two coats for solidity, removing the tape while the second coat is still slightly tacky to ensure a crisp edge.
Scale Illusion
Make pads near the shallow end slightly smaller and those in the deep end larger. The water depth magnifies images, enhancing the 3D effect.
Step 2: Sketching the Design
-
Create a Grid:
To manage this massive scale, I recommend lightly snapping a large grid over the center floor area using your chalk line. This will help you transpose your reference drawing accurately. -
Outline the Stems:
Using a grease pencil, sketch the long, winding stems first. Start from the deep end or corners and let them meander towards the center, mimicking the organic flow of underwater plants. -
Place the Pads:
Draw large ovals and notched circles for the lily pads attached to your stems. Vary the sizes significantly—some should be massive (3-4 feet wide) to create foreground perspective.
Uneven Surface?
If the pool floor is heavily pitted, use a high-build epoxy primer first. It fills small voids, preventing your detailed painting from looking distorted.
Step 3: Painting the Mural
-
Block in Base Greens:
Mix a mid-tone green epoxy paint. Using a roller for speed, fill in the main shapes of the lily pads and thick stems. Don’t worry about shading yet; just get the solid color down. -
Add Pad Veining:
Switch to a smaller brush and a lighter green shade. Paint the radial veins spreading from the center of each lily pad to the edges. This web-like structure gives the leaves their characteristic look. -
Deepening Shadows:
Mix a dark green (almost black) shade. Paint along the bottom edges of the stems and the undersides of the pads where they would cast shadows on themselves. This adds immediate volume. -
Highlighting Edges:
Use a pale, minty green or white mixture to dry-brush the top edges of the pads and the upper curves of the stems. This simulates sunlight hitting the plants. -
Paint the Blooms:
For the lotus flowers, start with a soft pink base. Paint the petals radiating outward from a central point, keeping the tips pointed and the bodies slightly curved. -
Detail the Flowers:
Add depth to the flowers by painting a darker magenta at the base of each petal and pure white highlights at the tips. Dot the center of the blooms with bright yellow for the stamen.
Step 4: Sealing & Curing
-
Final Inspection:
Walk the length of the pool to check for any missed spots or uneven edges. Touch up small details with a fine brush while the paint is still workable. -
Cure the Mural:
Allow the painted mural to cure for at least 3-4 days (check your epoxy brand’s specific window). It must be hard to the touch before sealing. -
Apply Topcoat:
Roll on a clear, UV-resistant epoxy topcoat over the entire mural area. This protects the pigments from pool chemicals and sun fading ensuring longevity. -
Final Cure and Fill:
Wait the full recommended curing time (often up to 7 days) before reintroducing water. Filling too early can cause the paint to cloud or blister.
Once the pool is filled, watch as the water’s movement brings your submerged garden to life
Bubbles and Light-Refraction Rays
Transform a plain exterior wall into a mesmerizing underwater window that perfectly mirrors your pool’s tranquility. This large-scale mural uses gradients and strategic highlighting to create a realistic illusion of depth, sunlight filters, and effervescent bubbles.
Step-by-Step
Materials
- Exterior masonry primer
- High-quality exterior acrylic latex paints (Phthalo Blue, Ultramarine Blue, Turquoise, White, Black)
- Wide rollers and extension pole
- Assorted paintbrushes (large flat brushes, medium filbert, fine liner)
- Sea sponge or stippling brush
- Bubble wrap or circular stencils (optional)
- Painter’s tape
- Chalk line or laser level
- Clear UV-resistant topcoat (exterior grade)
- Mixing buckets and trays
Step 1: Preparation & Base Gradient
-
Clean and prime:
Begin by thoroughly cleaning the wall surface to remove dust or mildew. Once dry, apply a generous coat of exterior masonry primer to ensure your mural adheres properly and lasts through the seasons. -
Map the horizon:
Since this is an underwater scene, there is no traditional horizon line, but decide where the water surface ‘break’ will be at the very top. Use tape to mask off the edges of your rectangular canvas area for crisp borders. -
Mix the deep blues:
In a bucket, mix a dark midnight blue using Phthalo Blue with a touch of Black. This will be for the deepest parts of the ocean. -
Mix the mid-tones:
Prepare a vibrant medium blue (pure Ultramarine works well) and a lighter turquoise shade for the upper sections where the light hits. -
Roll the gradient:
Start rolling the dark midnight blue at the bottom and sides of the mural. While the paint is still wet, switch to the medium blue for the center, blending the edges into the dark sections. -
Blend the surface water:
Apply the turquoise and white mixture at the very top left, blending it downward into the medium blue. I like to use a dry brush to feather these wet edges for a seamless transition.
Pro Tip: Glazing Medium
Mix your white paint with 50% glazing liquid for the sun rays. This keeps the beams transparent without looking chalky or hiding the blue water beneath.
Step 2: Creating Texture & Coral
-
Sketch the coral shapes:
Using a light wash of diluted white paint or chalk, roughly outline the coral reef formation in the bottom left corner. -
Block in coral shadows:
Paint the base of the coral with a dark teal-black mixture. Keep the shapes organic and bumpy rather than smooth. -
Stipple the texture:
Dip a sea sponge into a lighter teal-green shade. Dab it repeatedly over the coral base to create a porous, rocky texture. -
Highlight the reef:
With a smaller brush and a mix of light green and white, add specific highlights to the tips of the coral structure to make it look three-dimensional.
Step 3: Light Rays & Bubbles
-
Establish the light source:
Identify the spot near the top center where the sun is ‘breaking’ the surface. Paint a concentrated burst of pure white here. -
Paint the first ray:
Mix a very translucent glaze using water or glazing medium and white paint. Paint a wide, straight beam extending diagonally down from the light source. -
Layer the beams:
Continue adding translucent beams in a fan shape. Vary the opacity—some should be faint, others brighter. The key is to let the blue background show through. -
Create large bubbles:
For the main bubble clusters on the right, use a filbert brush to paint irregular circles. Don’t fill them in solid white; paint thin rings with a small highlight dot on the upper left and a reflected curve on the bottom right. -
Add micro-bubbles:
Load a toothbrush or stiff bristle brush with watery white paint. Use your thumb to flick or spatter tiny dots upwards through the water column to simulate effervescence. -
Refine the surface:
Paint subtle, wavy horizontal lines in white near the top of the mural to represent distinct ripples on the water’s surface. -
Seal the work:
Once the mural has cured for at least 48 hours, apply two coats of clear UV-resistant sealer to protect the colors from sun fading and water splashes.
Level Up: 3D Bubbles
For the largest bubbles, add a tiny touch of iridescent or pearl medium to your white highlights. They will shimmer realistically when the actual sun hits the wall.
Step back and enjoy the permanent sunshine and cool waters of your new backyard oasis
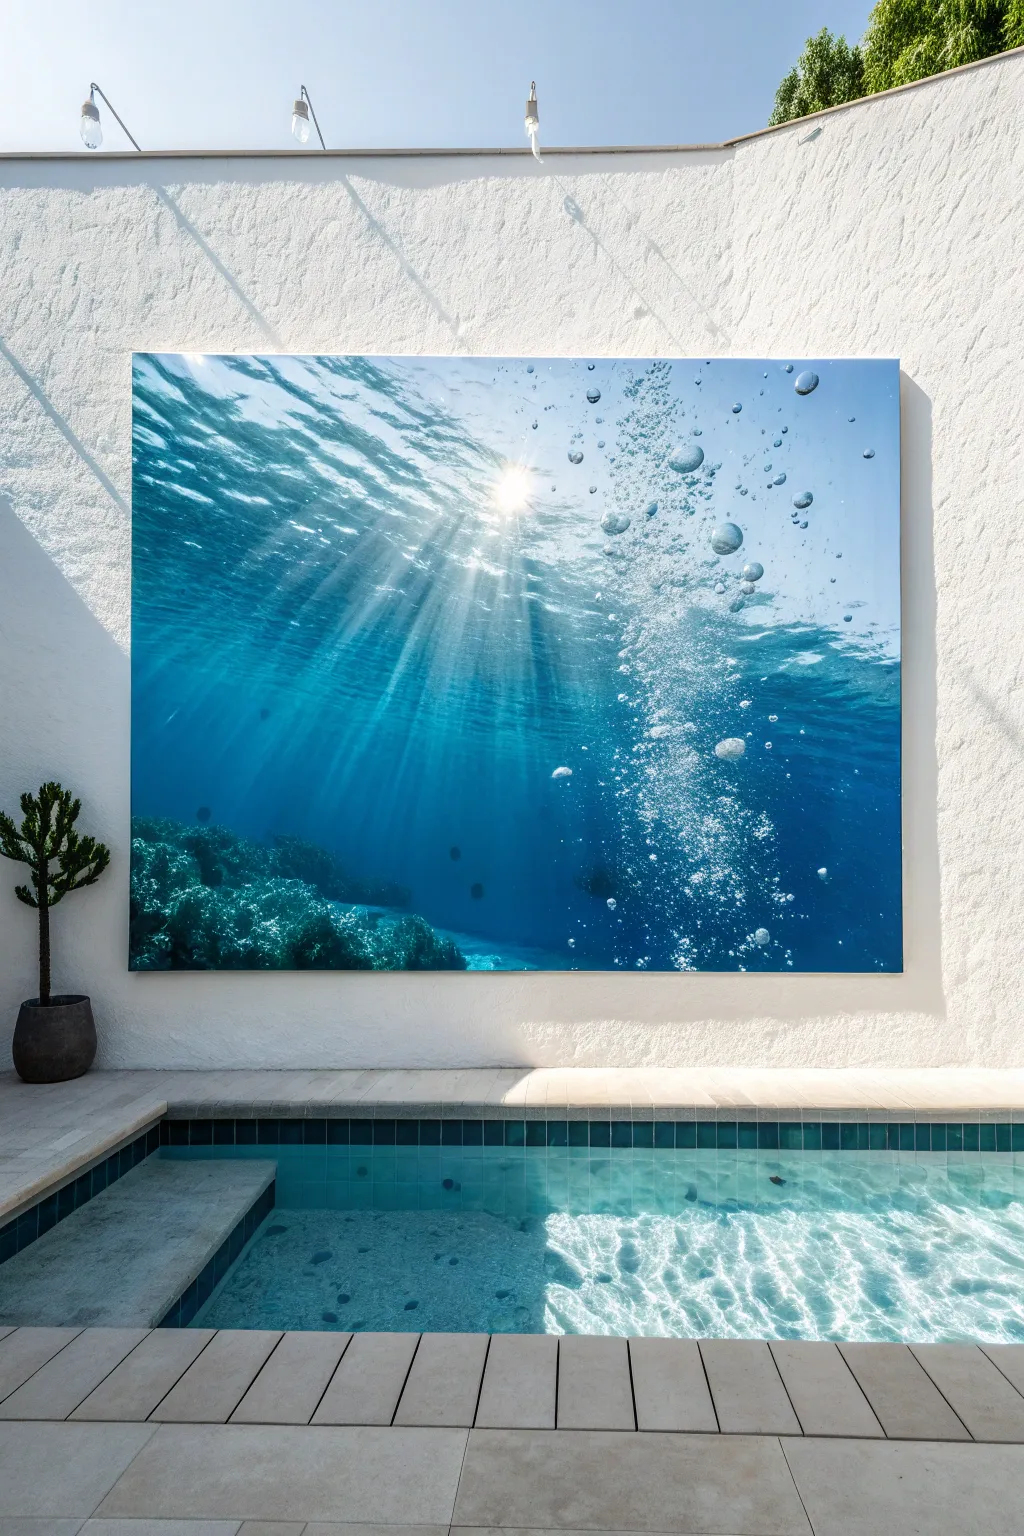
Infinity Edge Mirage on a Flat Wall
Transform a blank outdoor wall into a breathtaking extension of your view with this trompe-l’œil mural. By framing a realistic seascape within a crisp rectangle, you create the illusion of a window that adds depth and artistic intrigue to your pool area.
How-To Guide
Materials
- Exterior masonry primer
- Highest quality exterior acrylic latex paints (UV resistant)
- Colors: Phthalo Blue, Ultramarine, Titanium White, Raw Umber, Burnt Sienna, Payne’s Grey
- Painter’s tape (exterior grade, 2-inch width)
- Bubble level or laser level
- Measuring tape and chalk line
- Assorted brushes: 2-inch flat brush, 1-inch angle sash brush, assorted round detail brushes
- Mini foam roller and tray
- Clear matte exterior varnish (polyurethane or acrylic based)
Step 1: Preparation and Framing
-
Prepare the surface:
Begin by thoroughly cleaning the plastered wall to remove any salt, dust, or mold. If the textured plaster is very rough, you might sand the specific mural area slightly to create a smoother painting surface, though keeping some texture adds to the fresco look. -
Measure and mark:
Decide on the placement of your ‘window.’ Use a measuring tape to find the center, then use a bubble level or laser level to mark a perfect rectangle with a pencil. The sharp geometry is crucial for the effect. -
Tape the border:
Apply wide exterior painter’s tape along the outside edges of your pencil lines. Press the tape edges down firmly with a putty knife or your fingernail to prevent paint bleed on the textured surface. -
Prime the area:
Roll a coat of high-quality masonry primer within the taped rectangle. This ensures your colors will be vibrant and adhere properly to the stucco. Let this dry completely according to the manufacturer’s instructions.
Step 2: Painting the Seascape
-
Establish the horizon:
Use a straightedge and a light pencil line to mark the horizon. For a harmonious look, try to align this painted horizon with the actual horizon visible from the pool deck. -
Block in the sky:
Mix a gradient of Phthalo Blue and Titanium White. Start with the deeper blue at the top of the mural and wet-blend into a very pale, almost white blue as you reach the horizon line to mimic atmospheric perspective. -
Create the distant sea:
Below the horizon line, paint the distant water using a mix of Ultramarine and a touch of Grey. Keep this color flat and hazy to push it into the distance. -
Paint the foreground water:
As you move down the mural toward the bottom, warm up the water color with a tiny bit of green or yellow and add more white for foam. Use horizontal brushstrokes to suggest gentle movement. -
Sketch the rocky shoreline:
Using a thinned mixture of Raw Umber, loosely outline the shapes of rocks in the lower left or right corner, creating a cove effect similar to the actual view. -
Base coat the rocks:
Fill in the rock shapes with a mid-tone grey-brown. Don’t worry about detail yet; just establish the silhouette against the water. -
Add rock texture:
Use a rough, dry brush or even a sponge with lighter greys and whites to dab texture onto the rocks. Highlight the top surfaces where the sun would hit. -
Deepen the shadows:
Mix Payne’s Grey and Burnt Sienna to create deep crevices and shadows at the base of the rocks where they meet the water. This high contrast makes the rocks pop. -
Blend the reflections:
Where the water meets the sky, soften the line slightly with a clean, dry brush to create a realistic atmospheric haze.
Bleed Blocker
Before painting colors, brush a layer of the clear varnish or base wall color over the tape edge. This seals the tape so any seepage is invisible, ensuring a razor-sharp line.
Step 3: Finishing Touches
-
Add whitecaps:
With a fine round brush and pure white paint, add tiny, random dashes in the mid-ground water to suggest small waves catching the light. -
Refine the border:
I like to leave the painting to cure for 24 hours before removing the tape. Carefully peel the tape away at a 45-degree angle to reveal the crisp edge. -
Touch up edges:
If any paint bled under the tape onto the white wall, use a small brush and the original wall color to meticulously clean up the rectangle’s lines. -
Seal the work:
Apply two coats of clear, UV-resistant matte exterior varnish. Extend the varnish slightly past the painted edge onto the white wall to seal the seam against moisture.
Visual Echo
Take a photo of the actual view at sunset and use those specific colors for your palette. Matching the ‘Golden Hour’ tones creates a magical link between art and reality.
Now step back and admire how your new window perfectly frames a permanent slice of paradise.
Minimal Geometric Poolline Mural

Transform a plain retaining wall into a Mediterranean-inspired focal point with this bold geometric mural. By using a repeating arch motif and a striking limited color palette, you will create architectural depth and elegance right by the poolside.
Step-by-Step Tutorial
Materials
- Exterior masonry paint (White/Off-white base)
- Exterior masonry paint (Deep Navy Blue)
- Exterior masonry paint (Terracotta/Burnt Orange)
- Exterior masonry paint (Light Turquoise/Aqua)
- Paint rollers (medium nap for textured walls)
- Extension pole
- Assorted paintbrushes (1-inch, 2-inch angled sash)
- Painter’s tape (exterior grade)
- Chalk line or laser level
- Pencil or chalk
- Cardboard or poster board (for templates)
- Measuring tape
- Drop cloths
- Ladder
Step 1: Base Preparation
-
Clean the surface:
Begin by thoroughly cleaning the retaining wall. If the wall is old, power wash it to remove mildew, dirt, and peeling paint. Let it dry completely for at least 24 hours. -
Prime the wall:
Apply a high-quality masonry primer if the wall is bare concrete or block. This ensures your mural colors will be vibrant and long-lasting. -
Apply the base coat:
Roll on the base color, likely a crisp white or soft cream. Apply two coats to ensure full coverage, allowing sufficient drying time between layers according to the paint can instructions.
Seal Tape Edges
On textured block walls, paint bleed is common. After taping, brush a little of your *base* wall color over the tape edge first. This seals the gap so the colored paint won’t seep underneath.
Step 2: Mapping the Grid
-
Measure the wall length:
Measure the total length of your wall to determine how many arches will fit. Aim for equal spacing, leaving room for the vertical columns between each arch. -
Snap horizontal guide lines:
Using a chalk line or laser level, mark the horizontal line where the terracotta stripe will go. This creates a solid baseline for your design alignment. -
Mark vertical guides:
Mark the vertical centers for each arch and column. Ensure these are perfectly plumb using a level, as crooked lines will be very noticeable in a geometric pattern. -
Create an arch template:
Cut a template from cardboard or poster board for the curved upper section of the navy blue arches. This ensures every arch is identical in shape and size. -
Trace the design:
Using your template and measurements, trace the full outline of the arches, the vertical light blue columns, and the horizontal stripe onto the wall with a pencil.
Add Dimension
Mix a slightly darker shade of your navy blue and paint a thin 1/2-inch shadow line along one side of the arches. It creates a subtle 3D effect, making the mural look like real tile work.
Step 3: Painting the Structure
-
Tape the light blue columns:
Apply painter’s tape along the vertical lines of the column sections. Press the edges down firmly to prevent bleed, especially on textured block walls. -
Paint the columns:
Fill in the vertical rectangular columns with your light turquoise or aqua paint. I prefer to do two thin coats rather than one thick one for a smoother finish. -
Remove tape and dry:
Remove the tape while the paint is still slightly tacky to avoid peeling, then let these sections dry completely before taping over them for the next step. -
Tape the horizontal stripe:
Tape off the long horizontal band that runs through the design. This line will intersect your other shapes, so ensure your masking is precise. -
Paint the terracotta band:
Paint the horizontal stripe with the terracotta orange color. Use a smaller brush to carefully cut in near the edges of the columns you just painted.
Step 4: Detailing the Arches
-
Outline the navy arches:
For the curved sections, tape is difficult to use. Use a high-quality angled sash brush to carefully hand-paint the outline of the navy blue arches. -
Fill the navy sections:
Once outlined, fill in the rest of the navy blue shapes. These act as the ‘legs’ and ‘shoulders’ of the design, giving it structural weight. -
Add the triangular accents:
Locate the center top of each navy arch. Paint the inverted triangular keystones using the terracotta color. A small artist’s brush helps keep the points sharp. -
Touch up lines:
Inspect your work for any paint bleed or uneven edges. Use a small brush and your base white paint to ‘erase’ any mistakes and sharpen the graphic lines. -
Seal the mural (optional):
If your wall is exposed to harsh elements or pool chemicals, apply a clear UV-resistant masonry sealer over the finished mural to protect the colors.
Step back and admire your new Mediterranean oasis that brings structure and color to your outdoor space
Greenery-Integrated Pool Fence Mural
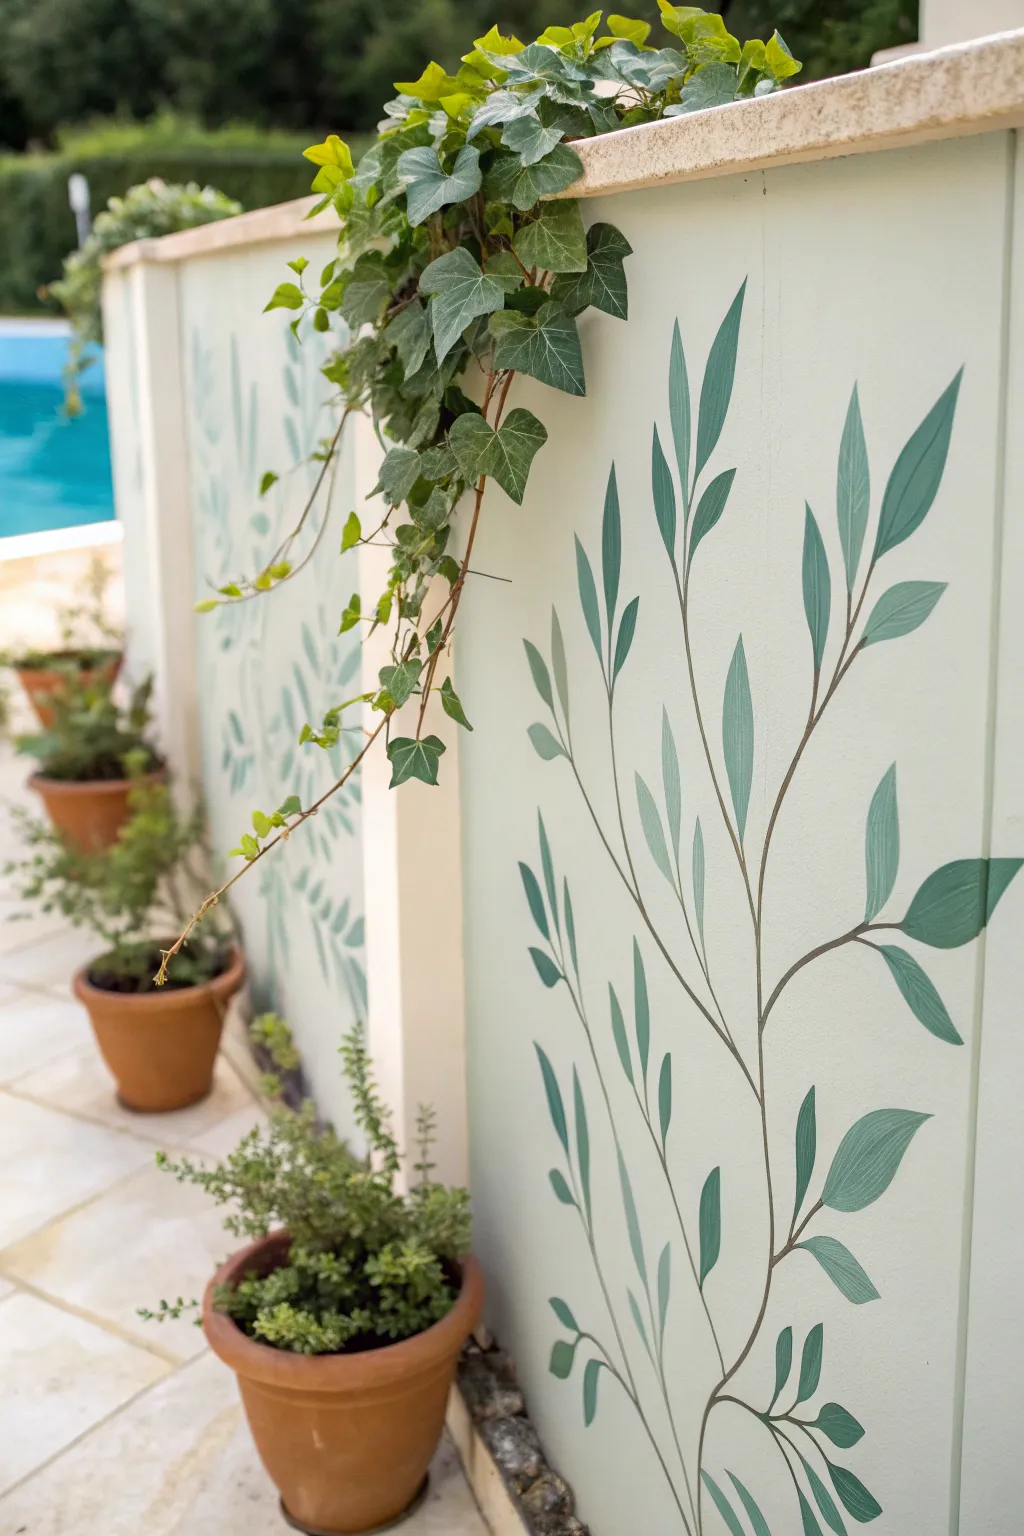
Blur the line between nature and art with this clever trompe-l’œil mural that extends your garden right onto your pool fence. By pairing real trailing ivy with soft, hand-painted botanical silhouettes, you create a lush, dimensional backdrop that never needs watering.
Step-by-Step
Materials
- Exterior masonry primer (white or off-white)
- Exterior acrylic latex paint (soft sage green)
- Exterior acrylic latex paint (hunter green)
- Exterior acrylic latex paint (brown)
- Assorted angled sash brushes (1-inch to 2-inch)
- Fine liner brush for detail work
- Pencil and large eraser
- Cardstock or stencil acetate (optional)
- Outdoor matte varnish
- Real ivy plants for the planter box
Step 1: Preparation & Base Coat
-
Clean the surface:
Begin by thoroughly cleaning your fence or wall surface. Use a stiff bristle brush and a mild detergent solution to remove any moss, dirt, or pool chemical residue, then let it dry completely in the sun. -
Prime the wall:
Apply a high-quality exterior masonry primer to the entire area. This ensures your mural adheres properly and withstands humidity. If your wall is already painted a suitable light cream or off-white, you can skip this step, but a fresh coat always helps the colors pop. -
Map out the vines:
Using a pencil, lightly sketch the main ‘skeleton’ of your vines. Start from the bottom ground level and draw sweeping, upward curves that branch out naturally. Don’t worry about leaves yet; just focus on the flow and direction of the stems.
Paint Drips on Rough Walls
If painting on stucco or rough concrete, dab paint rather than dragging the brush. Keep a wet rag handy to immediately blot any drips that get caught in the texture crevices.
Step 2: Painting the Structure
-
Paint the stems:
Mix a small amount of hunter green with a touch of brown to create a deep, natural vine color. Using your fine liner brush, trace over your pencil sketches. -
Vary line thickness:
As you paint the stems, press harder at the base and lift pressure as you move toward the tips to create a natural taper. I like to add a few tiny ‘thorn’ or bud bumps along the stem for realism. -
Create a leaf template (optional):
If you aren’t confident freehanding leaves, cut a simple almond or lanceolate leaf shape out of cardstock or acetate. This ensures your foliage size stays consistent throughout the mural.
Add Hidden Life
Hide tiny painted details among the leaves for guests to find, like a small ladybug, a butterfly, or a little lizard resting on a branch. It adds whimsy and charm.
Step 3: Adding the Foliage
-
Paint the base leaves:
Dip a small angled brush into your soft sage green paint. Starting near the bottom, paint leaves emerging from the stems. If using a stencil, dab the paint gently; if freehanding, use a ‘press and lift’ stroke to create the leaf point. -
Layer in darker tones:
While the sage green is still slightly tacky or just after it dries, mix a little hunter green into your sage supply. Paint a second set of leaves, some overlapping the lighter ones, to create depth and shadow. -
Add vein details:
Once the leaf shapes are dry, take your fine liner brush with the thinned brown/green stem mixture and paint a subtle central vein down the middle of the larger leaves. Keep this delicate—it doesn’t need to be on every single leaf. -
Check the composition:
Step back about ten feet to view the wall. Look for any bald spots or areas that feel too heavy. Add small floating leaves or extra sprigs to balance the negative space.
Step 4: Finishing Touches
-
Seal the artwork:
Apply two coats of clear, outdoor matte varnish over the painted areas. This is crucial for pool areas where splashes and sun exposure are constant. -
Plant real greenery:
Install your planter boxes or pots at the top and bottom of the wall. Fill the top planters with trailing English Ivy or Vinca Vine. -
Train the real vines:
Gently guide the real trailing vines to hang down over the painted section. You can use small, clear outdoor command hooks to position a few tendrils so they mingle with the painted artwork, completing the illusion.
Now you have a serene, low-maintenance garden wall that looks lush all year round
Starry Night Scene for Indoor Pool Walls

Transform your indoor pool area into a midnight sanctuary with this expansive night sky mural. Featuring a deep indigo backdrop, stylized clouds, and shimmering gold stars that reflect beautifully in the water, this project creates a serene and magical atmosphere for your evening swims.
Detailed Instructions
Materials
- High-quality interior/exterior acrylic latex paint (Deep Navy/Indigo)
- Acrylic latex paint (White, Light Grey, Medium Blue, Gold Metallic)
- Painter’s tape (various widths)
- Drop cloths and plastic sheeting
- Paint rollers (large nap for texture, small foam for details)
- Extension pole for rollers
- Assorted paintbrushes (angled sash, small detail, stippling)
- Star stencils (various sizes) or cardstock to make your own
- Chalk line or laser level
- Sea sponge (natural)
- Matte or satin clear sealant (water-resistant)
Step 1: Preparation & Base Coat
-
Protect the area:
Since you are working near a pool, meticulously cover the pool edge, decking, and water surface with plastic sheeting and secure it firmly with painter’s tape to prevent any drips from contaminating the water. -
Clean and prime:
Scrub the wall down to remove humidity residue or pool chemical buildup. Once dry, apply a high-adhesion primer suitable for humid environments to ensure your mural adheres properly. -
Roll the midnight sky:
Apply your deep navy or indigo base color using a roller on an extension pole. This large surface area will likely need two coats to achieve the solid, velvety depth of a night sky. -
Let it cure:
Allow the base coat to dry completely for at least 24 hours. Given the humidity of a pool room, rushing this step can cause peeling later on.
Star Bleeding?
If paint bleeds under your star stencil, don’t wipe it wet! Let it dry completely, then use the navy base color to carefully paint over the mistake and reshape the star point.
Step 2: Painting the Cloudscape
-
Sketch the horizon:
Using white chalk, lightly sketch a rolling, mountainous cloud line along the bottom third of the wall. Keep the shapes organic and undulating rather than sharp triangles. -
Base layer of clouds:
Mix a medium blue shade slightly lighter than your sky. Paint the entire area below your chalk line with this color to establish the silhouette of the cloud bank. -
Add dimension:
While the blue is still slightly tacky, use a sea sponge dipped in light grey to dab texture along the upper ridges of the clouds. This softens the edge between the clouds and the sky. -
Highlight the peaks:
Using a dry-brush technique with white paint, lightly sweep over the very tops of the cloud forms. This creates a frost-tipped look that separates the foreground from the background.
Pro Tip: Glow Effect
Mix a tiny amount of clear glaze with your gold paint for the outer edges of the large stars. This creates a subtle halo effect that makes the stars look like they are truly glowing.
Step 3: Creating the Stars & Moon
-
Position the moon:
Decide on the placement of your crescent moon—offsetting it to one side usually looks best. Trace a circular template, then mask off the dark side or hand-paint the crescent shape in white first. -
Shade the moon:
Once the white base is dry, add subtle grey shading to the inner curve of the crescent to give it a cratered, dimensional appearance. -
Plot the major stars:
mark the spots for your largest, brightest stars first. I find it helpful to step back frequently to ensure the distribution feels random yet balanced. -
Stencil the large stars:
Use your stencils and metallic gold paint to create the prominent four- and five-pointed stars. Use a stippling brush with very little paint to prevent bleeding under the stencil edges. -
Paint medium stars:
Freehand smaller four-pointed stars using a thin liner brush. A simple cross shape with tapered ends works perfectly here. -
Create the Milky Way effect:
Dip a toothbrush or stiff bristle brush into thinned white or pale gold paint. Run your thumb over the bristles to flick a fine mist of tiny dots across the sky, concentrating them in diagonal bands for a galaxy effect. -
Add specific constellations:
If you wish to include real constellations, use a reference image and mark your points now, connecting the main stars with very faint, thin lines if desired.
Step 4: Sealing & Protection
-
Inspect and touch up:
Remove all stencils and tape carefully. Use a small brush with the navy base color to crisp up any edges on the stars or moon that look messy. -
Apply clear coat:
This is crucial for a pool environment. Apply a water-resistant, non-yellowing clear topcoat over the entire mural to protect it from humidity and splashes. -
Final dry:
Let the clear coat cure according to the manufacturer’s instructions before removing the final protective sheeting from the pool area.
Now you have a breathtaking celestial backdrop that turns every swim into a dip in the galaxy
Surreal Portrait Beneath the Surface
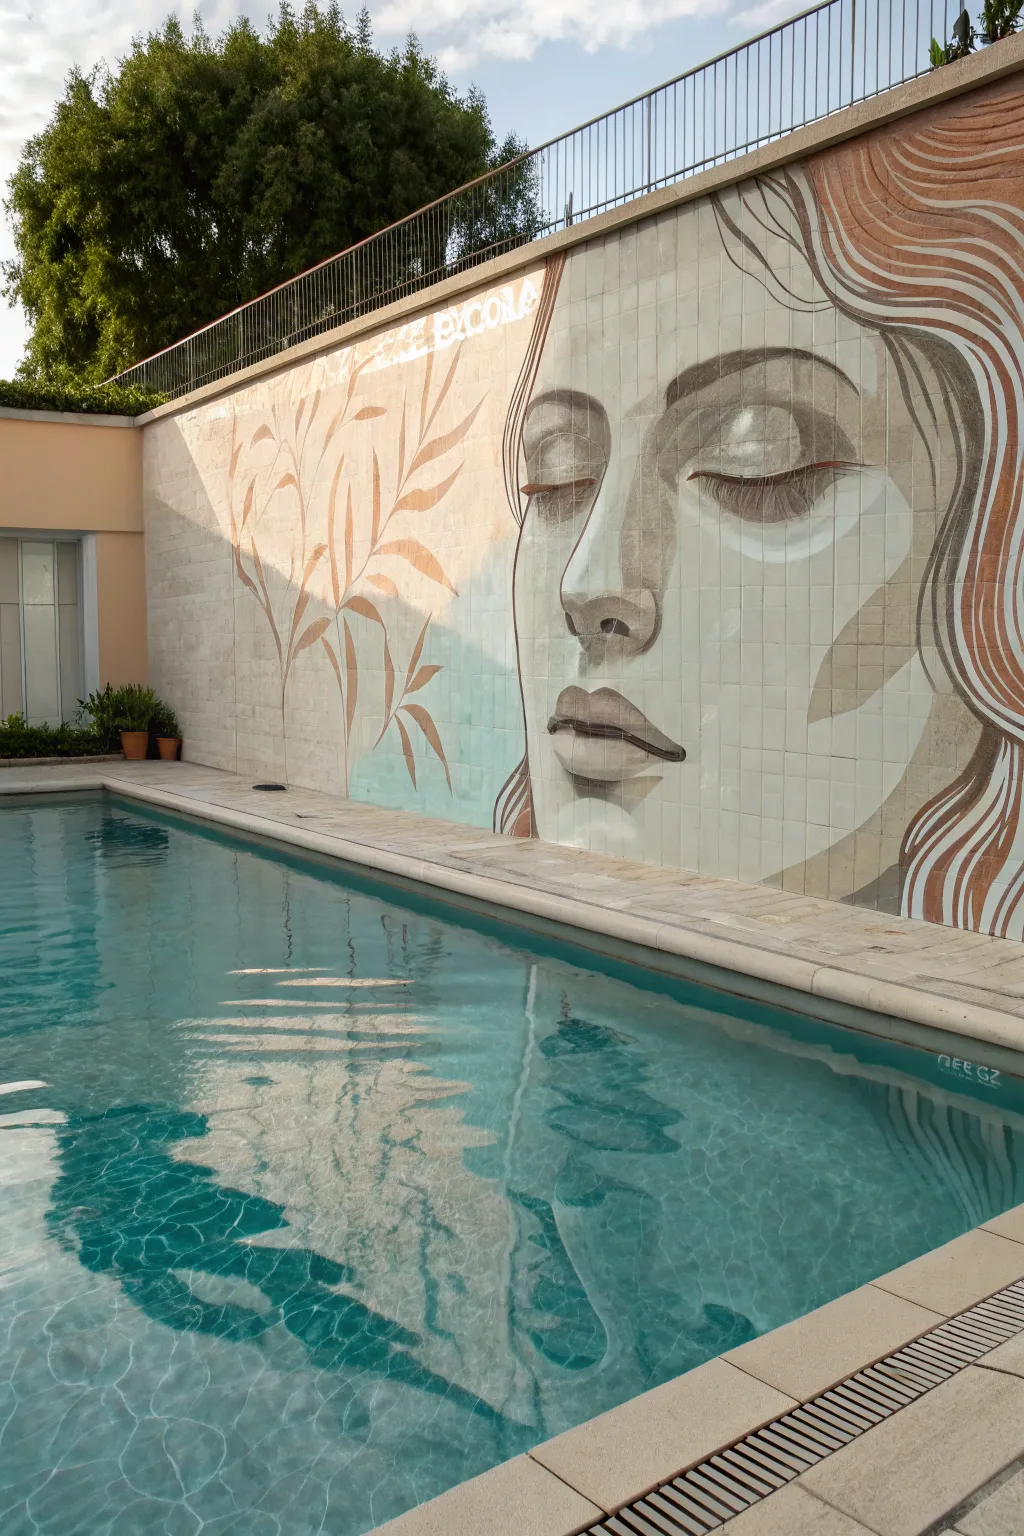
Transform a plain tiled pool wall into a captivating, large-scale sanctuary with this stylized mural project. The design features a meditative face with flowing, organic lines that seem to ripple alongside the water, creating a tranquil atmosphere for your swim.
Step-by-Step Guide
Materials
- High-quality exterior primer (bonding primer for glazed surfaces)
- Exterior acrylic latex paint (soft beige, cream, terracotta, slate grey, white)
- Set of angled synthetic brushes (2-inch to 4-inch)
- Fine detail brushes (round sizes 4 and 8)
- Low-tack painter’s tape
- Chalk or watercolor pencils (light grey)
- Grid transparency or projector (optional but recommended)
- Clear UV-resistant concrete/masonry sealer (satin or matte)
- Drop cloths
- Mixing buckets for custom washes
Step 1: Preparation & Priming
-
Clean the surface:
Start by thoroughly scrubbing the tiled wall with a heavy-duty cleaner or degreaser to remove any pool residue, algae, or dirt. Rinse well and let it dry completely. -
Sand for adhesion:
Lightly scuff the glaze of the existing tiles with fine-grit sandpaper (around 220-grit). This micro-abrasion helps the primer stick without damaging the wall structure. -
Mask the area:
Use painter’s tape to protect the pool coping, adjacent walls, and any water fixtures. Lay down drop cloths to prevent paint from dripping into the pool water. -
Apply bonding primer:
Roll or brush on a high-adhesion bonding primer specifically designed for glossy surfaces like tile. This is the most crucial step for longevity. -
Dry thoroughly:
Allow the primer to cure according to the manufacturer’s maximum recommendation—often 24 to 48 hours—before adding color. -
Base coat wash:
Mix a small amount of water with your cream or off-white paint to create a semi-opaque wash. Apply this over the primer so some of the tile texture still reads through, mimicking the natural stone look of the original.
Step 2: Sketching the Subject
-
Establish the grid:
Since the scale is massive, project the image onto the wall at night for the most accurate outcome. Alternatively, use the ‘doodle grid’ method or a standard measuring grid with chalk. -
Outline the face:
Using a light grey watercolor pencil, lightly sketch the contours of the face, focusing on the placement of the closed eyes, the nose bridge, and the lips. The eyes should be the focal point. -
Draft the organic elements:
Sketch the flowing hair lines to the right and the stylized branch/leaf motifs to the left. Keep these lines fluid and loose rather than rigid.
Tile Texture Trick
Don’t try to fill the grout lines with paint. Let your brush skip over them slightly; the grid pattern adds to the mosaic aesthetic of the mural.
Step 3: Painting the Face & Foliage
-
Block in facial shadows:
Using a slate grey paint thinned with a glazing medium or water, gently brush in the shadows around the eye sockets, the side of the nose, and the jawline. Build coverage slowly to keep it soft. -
Define the features:
Switch to a smaller angle brush and mix a darker grey-brown. Sharpen the line of the eyelashes, the nostril curve, and the separation of the lips. -
Paint the lips:
Fill in the lips with a muted mauve or terracotta tone. I usually blend the edges slightly with a dry brush to prevent them from looking like a sticker. -
Create the highlights:
Use pure white or a very pale cream to add highlights on the eyelids, the tip of the nose, and the cupid’s bow. This gives the face immediate dimension. -
Paint the flowing hair:
Load a 2-inch brush with terracotta paint. create long, confident strokes for the hair strands. Vary the pressure to make the lines taper naturally. -
Add the botanical details:
On the left side, paint the leaf shapes using a light tan or beige. These should be flatter and more graphic than the face to create visual contrast.
Metallic Glaze
Mix a pearlescent glaze into the hair paint color. When the sun hits the wall, the wavy strands will shimmer like the surface of the pool water.
Step 4: Sealing & Protection
-
Cure the paint:
Let the artwork dry completely for at least 3-4 days to ensure all moisture has evaporated from the latex paint layers. -
Apply the sealer:
Roll on a clear, non-yellowing masonry sealer. This protects the mural from UV fading and splashes of chlorinated pool water. -
Final inspection:
Remove the tape and check for any touch-ups needed along the edges. Enjoy your new poolside masterpiece.
Now your pool area has a stunning focal point that invites relaxation and serenity every time you swim


Have a question or want to share your own experience? I'd love to hear from you in the comments below!