
Penguins are basically the perfect drawing subject: simple shapes, instant personality, and tons of room for styling. Here are my favorite penguin drawing ideas that start super classic and slowly get more playful, weird, and wonderfully creative.
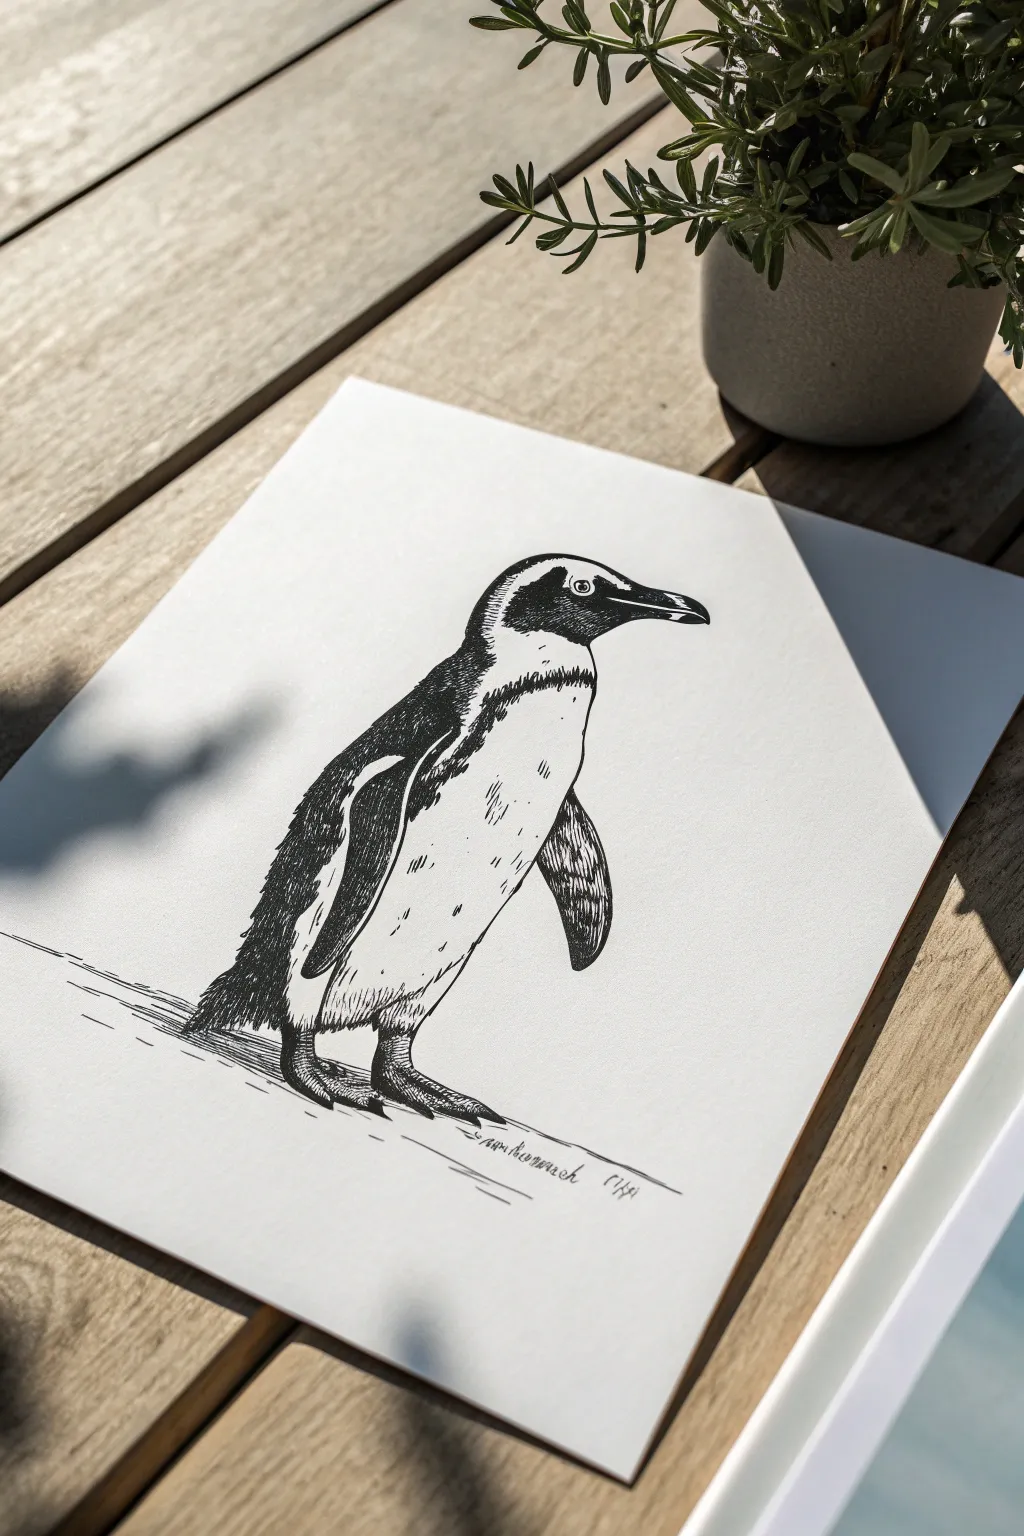
Classic Front-Facing Cute Penguin
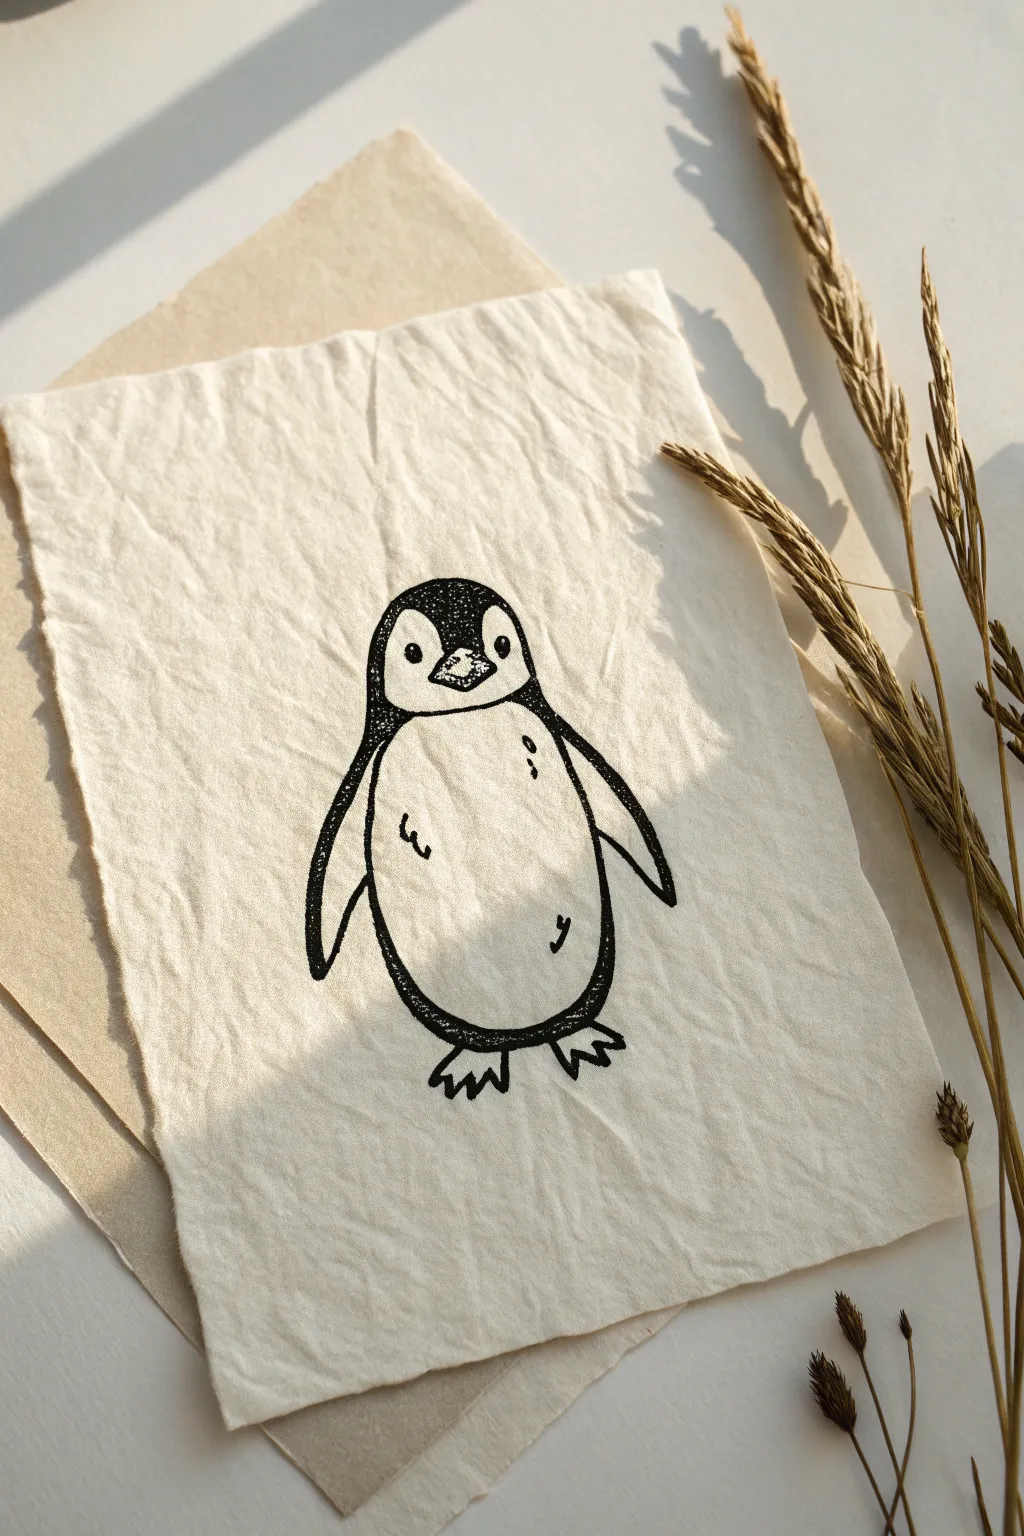
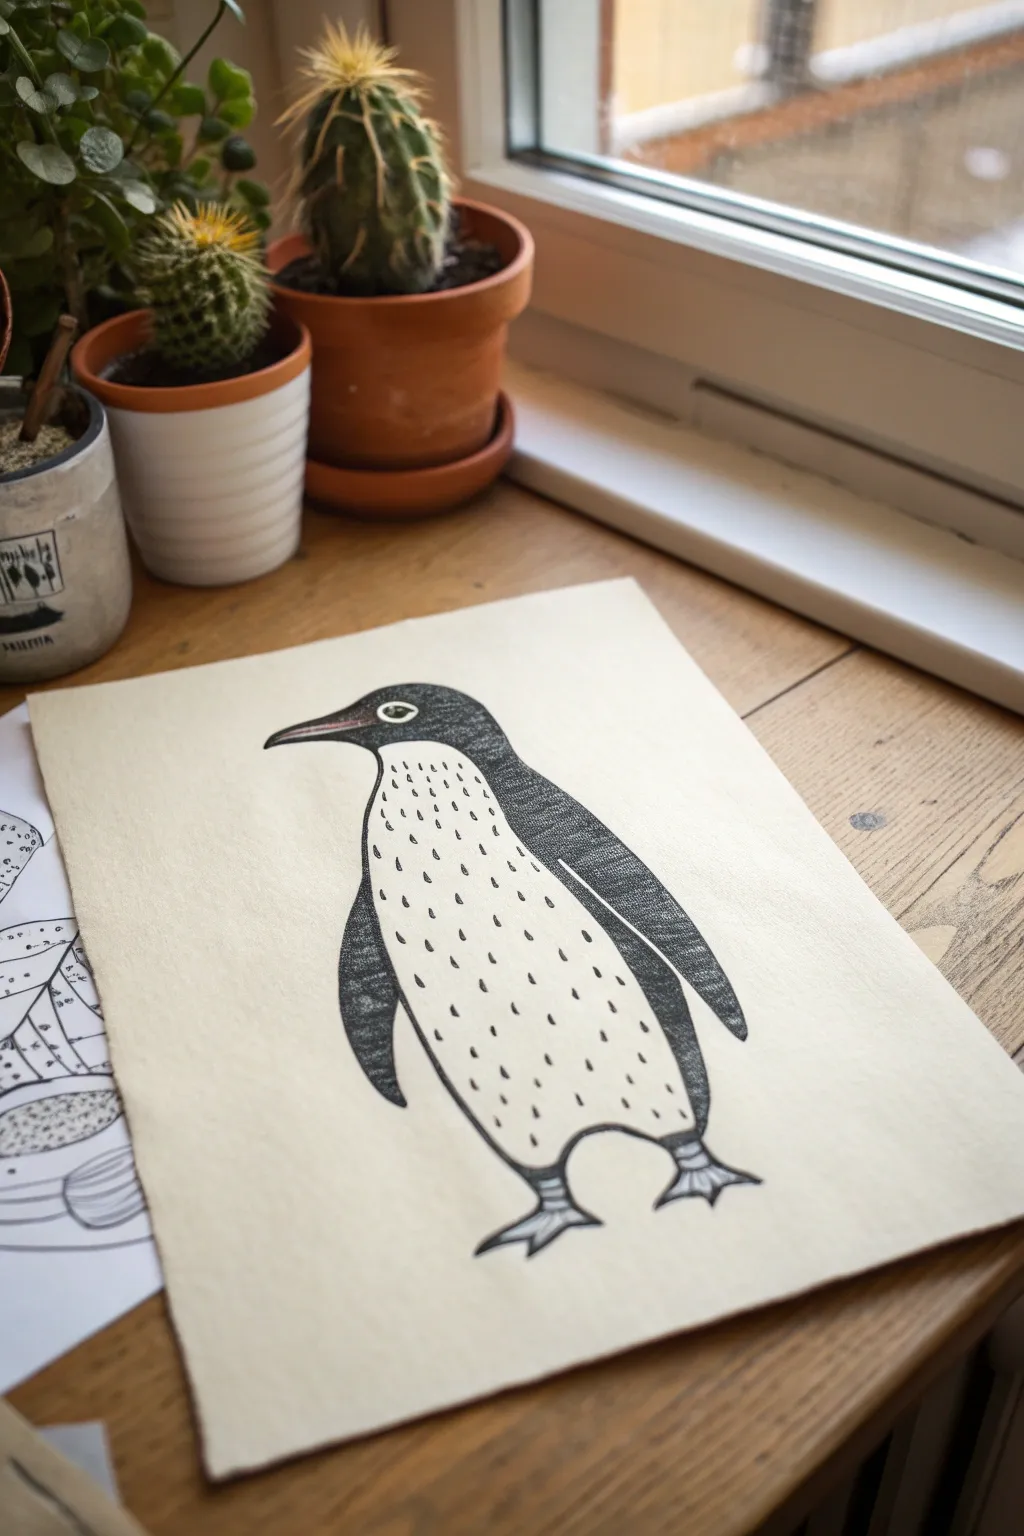
This charming front-facing penguin sketch captures a minimalist aesthetic on textured paper. With clean black lines and simple shapes, this project is perfect for creating a classic, illustrative look.
Step-by-Step
Materials
- Textured oatmeal or cream colored paper (handmade or rough grain)
- Black fine liner pen (0.5mm or 0.8mm)
- Pencil (HB for light sketching)
- Soft eraser
- Ruler (optional for centering)
Step 1: Drafting the Basic Shape
-
Outline the body:
Start by lightly sketching a large, rounded oval shape in the center of your paper using your pencil. This will form the main body of the penguin. Keep the top slightly narrower than the bottom, almost like an egg. -
Define the head:
Create a curved line across the upper third of the oval to separate the head area from the belly. This line should dip slightly in the middle where the beak will go, looking like a wide, shallow ‘M’. -
Sketch the flippers:
Draw two long, curved shapes extending from the shoulders downwards. The flipper on the left should hug the body closely, while the right flipper can flare out slightly for a dynamic pose. -
Add the feet:
At the bottom of the body, sketch two small, webbed feet pointing outwards. Each foot should have three little triangular points for toes.
Ink Texture Tip
Don’t color the black areas solidly. Leave tiny specks of white paper showing through your scribbles to create a natural, feathery texture.
Step 2: Adding Facial Details
-
Position the beak:
Right in the center of the face area, draw a small diamond shape for the beak. Add a horizontal line through the middle of it to separate the upper and lower beak. -
Place the eyes:
Draw two small circles on either side of the beak. Leave a tiny white dot inside each pupil to acting as a highlight, which gives the penguin life. -
Detail the face mask:
Refine the boundary line between the white belly and the black head feathers. Curve it around the eyes to create that classic penguin ‘mask’ look.
Make It Wintery
Add a tiny red scarf with simple stripes around the penguin’s neck for a pop of color and a cozy winter vibe.
Step 3: Inking and Filling
-
Outline the main form:
Switch to your black fine liner pen. Carefully trace over your pencil lines for the outer body shape. Use a confident, steady hand, but don’t worry if the line has a little natural wobble—it adds character. -
Fill the head:
Using small, dense stippling or tiny circular scribbles, fill in the top head area around the eyes and beak. I prefer a scribbly texture here rather than solid black ink to mimic the look of feathers. -
Line the flippers:
Trace the flippers. Use a slightly thicker line on the outer edge of the flippers to give them weight. -
Define the belly:
Go over the inner curve that separates the black back from the white belly. Ensure this line connects smoothly from the flipper area. -
Ink the feet:
Trace the feet at the bottom. You can make the outline of the feet slightly bolder to ground the character.
Step 4: Final Textures & Cleanup
-
Add belly markings:
Draw a few small, scattered marks on the white belly area. A tiny squiggle or two shaped like a ‘3’ or a comma suggests movement or ruffled feathers. -
Darken the outer edges:
Go back over the darkest parts of the penguin—specifically the outer edges of the flippers and the very bottom of the body—to increase the contrast. -
Texture the beak:
Add a few tiny dots or lines to the beak to give it a bit of roughness, distinguishing it from the smooth belly. -
Erase pencil lines:
Once the ink is completely dry (give it a few minutes to be safe), gently erase all the underlying pencil sketches. -
Add final details:
Take a look at your composition. If the penguin feels too floating, you can add a barely-there shadow line beneath the feet. -
Rough the paper edges:
To match the reference aesthetic, you can manually tear the edges of your paper creates a lovely deckled edge effect that complements the rustic drawing style.
Now you have a sweet little penguin friend ready to frame or gift


Kawaii Penguin With Big Sparkly Eyes
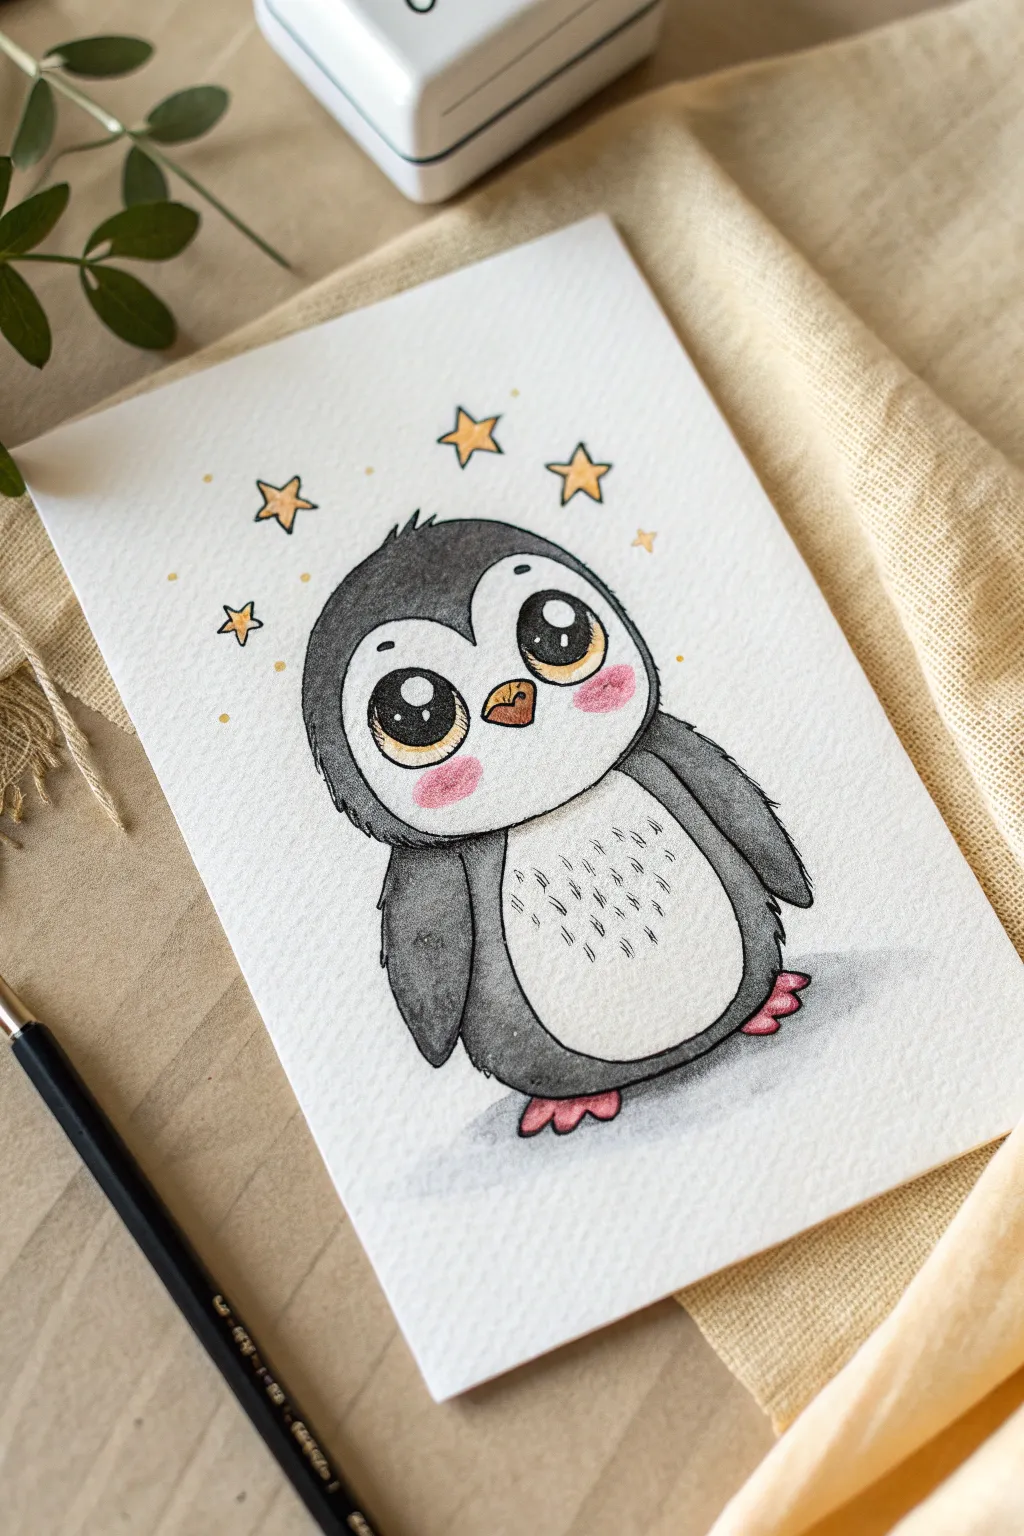
This adorable penguin drawing is impossible to resist, featuring oversized anime-style eyes and blushing cheeks. Using watercolor or markers on textured paper brings a soft, inviting quality to the character, perfect for greeting cards or a sketchbook page.
Step-by-Step Tutorial
Materials
- Textured watercolor paper (cold press, approx. 300gsm)
- Pencil (HB or lighter) for sketching
- Eraser
- Fine liner pen (black, waterproof, size 01 or 03)
- Watercolor paints or watercolor markers (black/grey, pink, yellow/gold)
- White gel pen or gouache for highlights
- Small round brushes (size 2 and 4)
- Cup of water and paper towel
Step 1: Sketching the Base
-
Head and Body Shape:
Start by drawing a large, rounded oval for the head. Directly underneath, attach a slightly wider, bean-shaped body that rounds out at the bottom. Keep your pencil pressure very light so you can erase lines later. -
Define the Face:
Inside the head oval, draw a heart-shaped hairline (the widow’s peak) at the top center. Curve lines down from there to create the white face mask area, leaving a border for the black feathers around the sides. -
Flippers and Feet:
Add two curved flippers on either side of the body. They should rest naturally against the sides. Draw two small, three-toed feet at the very bottom, pointing slightly outward. -
The Face Details:
Draw two very large circles for eyes within the white face mask. In the center between them, add a small, rounded triangular beak. -
Celestial Additions:
Sketch three simple five-pointed stars floating above the penguin’s head in an arch shape. Add tiny circles or dots around them for extra sparkle.
Step 2: Inking the Outline
-
Main Outline:
Using a waterproof fine liner, carefully trace over your pencil lines. For the penguin’s fuzzy texture, don’t use a solid, straight line; instead, use short, broken strokes or slightly jagged lines, especially around the top of the head and cheeks. -
Eye Details:
Ink the outer circles of the eyes. Draw two smaller circles inside each eye for the light reflections (one large, one small). These white highlights are crucial for the cute look. -
Belly Texture:
Add tiny little tick marks or dashes on the white belly area to suggest soft downy feathers. Erase all your pencil marks once the ink is completely dry.
Keep it clean!
Wait for the ink outline to be 100% dry before erasing pencil marks. Smudged ink is the enemy of a crisp drawing, so give it an extra minute.
Step 3: Adding Color
-
Grey Body Base:
Dilute your black watercolor to create a medium grey. Fill in the head (outside the face mask), the flippers, and the outer edges of the body. I like to keep the center of the grey areas slightly lighter for a 3D effect. -
Darkening the Contrast:
While the grey is still slightly damp, drop in a more concentrated black/dark grey pigment along the edges and under the chin to create shadows and depth. -
Rosy Cheeks:
Using a soft pink, paint oval blushes right under the eyes. Blend the edges out with a clean, damp brush so the blush looks soft and natural. -
The Eyes:
Fill in the main part of the eye with black ink or paint, being extremely careful not to paint over the white highlight circles you drew earlier. Leave a tiny crescent of lighter brown or gold at the bottom of the iris for warmth. -
Beak and Feet:
Color the beak with a warm golden brown or orange. Paint the feet a soft pinkish-red. -
Starry Background:
Paint the stars with a bright yellow or gold. Add tiny dots of yellow around them for magical dust.
Uneven watercolor?
If your grey wash looks patchy, wet the paper with clean water first (wet-on-wet technique), then drop the pigment in. It will spread much smoother.
Step 4: Final Touches
-
Grounding Shadow:
Mix a very watery, cool grey. Paint a puddle-like shadow underneath the penguin’s feet so it doesn’t look like it’s floating in mid-air. -
Highlight Pop:
Once everything is fully dry, use a white gel pen to add extra shine. Put a tiny dot on the beak and clarify the eye reflections if they got muddy.
Now you have a charming little penguin pal ready to brighten up your desk or be gifted to a friend


Penguin Side Profile With Curved Back
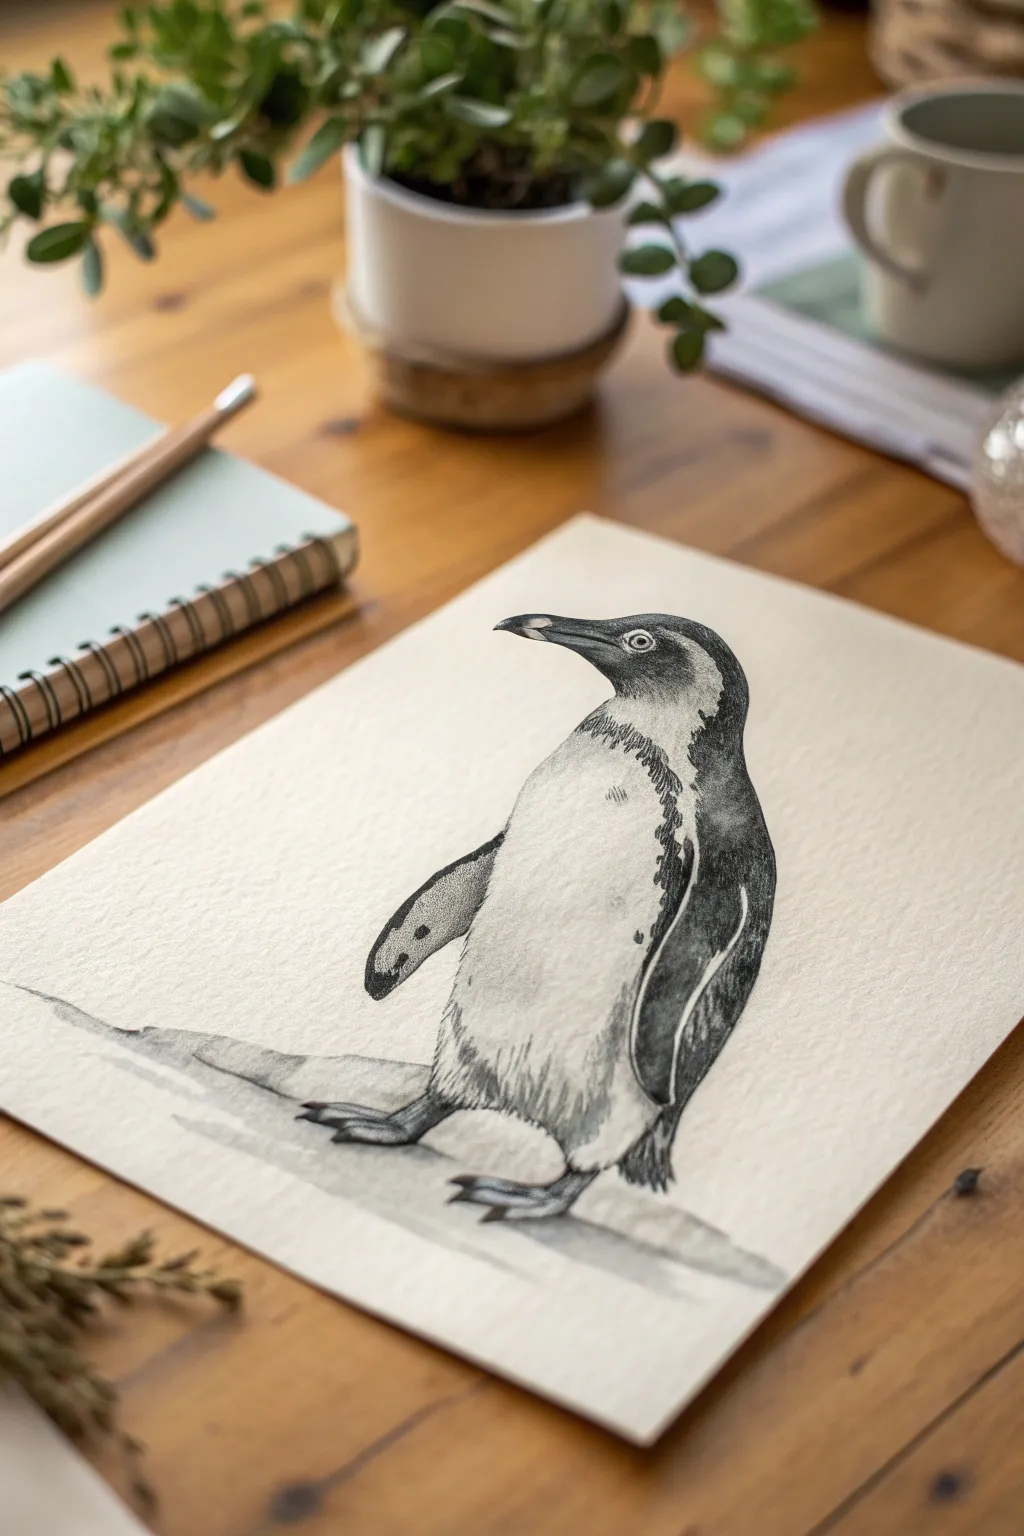
Capture the dignified charm of this Antarctic bird with a detailed graphite pencil sketch that focuses on soft textures and striking contrast. This project explores shading techniques to render the sleek feathers and unique markings of a penguin in profile.
Step-by-Step Guide
Materials
- High-quality drawing paper (smooth or vellum finish)
- Set of graphite pencils (HB, 2B, 4B, 6B)
- Kneaded eraser
- Precision mechanical pencil (optional for details)
- Blending stump or tortillon
- Pencil sharpener
Step 1: Shaping the Foundation
-
Outline the head and beak:
Begin with a light HB pencil to sketch the basic shape of the head. Draw a smooth curve for the crown that slopes down into the beak. Ensure the beak is slightly open, defining the upper and lower mandibles with gentle lines. -
Form the curved back:
From the back of the neck, draw a long, elegant curve sweeping downwards to create the penguin’s hunched back profile. This line defines the bird’s posture. -
Define the belly and chest:
Sketch the front curve starting from under the throat, protruding slightly for the chest and rounding out for the belly. Connect this to the tail area, keeping the shape plump and grounded. -
Sketch the flipper:
Position the flipper on the side of the body. It should act like an arm resting against the torso, wider at the shoulder joint and tapering to a rounded point. Angle it slightly backward. -
Place the feet:
Draw the feet at the base. They should look flat and webbed, with distinct claws. Position one foot slightly behind the other to give a sense of dimension and stability on the ground.
Smudge Strategically
Use a twisting motion with your blending stump to soften the graphite on the belly, making the white feathers look fluffy and soft.
Step 2: Adding Details and Markings
-
Draw the eye:
Place a small circle for the eye near the top of the head. Add a tiny highlight inside the pupil before darkening the rest to make it look alert and glassy. -
Map the patterns:
Lightly sketch the boundary lines where the black feathers meet the white belly. This penguin has a distinctive band of spots and a dark stripe running down the side, so map these shapes out carefully before shading. -
Refine the beak:
Use a 2B pencil to darken the beak, leaving a thin strip of light on the upper edge to show its glossy texture. Define the fleshy corner of the mouth clearly.
Background Atmosphere
Add faint, blurry outlines of distant icebergs or rocks in the background using a hard H pencil to give the scene icy depth.
Step 3: Shading and Texture
-
Shade the dark feathers:
Switch to a 4B or 6B pencil to fill in the head and back. Use short, dense strokes to replicate the look of tight, waterproof feathers. Press firmly to achieve a deep, rich black. -
Add texture to the belly:
The white belly shouldn’t be perfectly blank. Use an HB pencil to add very faint, wispy shadows under the flipper and along the lower abdomen to suggest volume and roundness. -
Detail the transition zone:
Where the dark feathers meet the white chest, use irregular, jagged strokes. This creates the realistic textural transition of fur-like small feathers rather than a smooth, unnatural line. -
Render the flipper:
Shade the flipper with a gradient, making the top edge darker and the underside lighter. Add a few small, dark spots near the tip as shown in the reference. -
Enhance the feet:
Darken the feet and claws, adding texture to the skin. Use the 4B pencil to add cast shadows underneath the feet to ground the penguin firmly on the surface. -
Create the ground:
Sketch a simple, uneven horizon line for the ice or rock. Use horizontal shading strokes to create the ground texture, smudging it slightly for a soft, snowy appearance. -
Final contrast check:
Look over the entire drawing. Deepen the darkest blacks (like the eye and the back stripe) with your softest pencil to maximize contrast against the white paper.
Take a moment to admire the personality in your bird’s posture before signing your work


Baby Penguin With Fluffy Texture
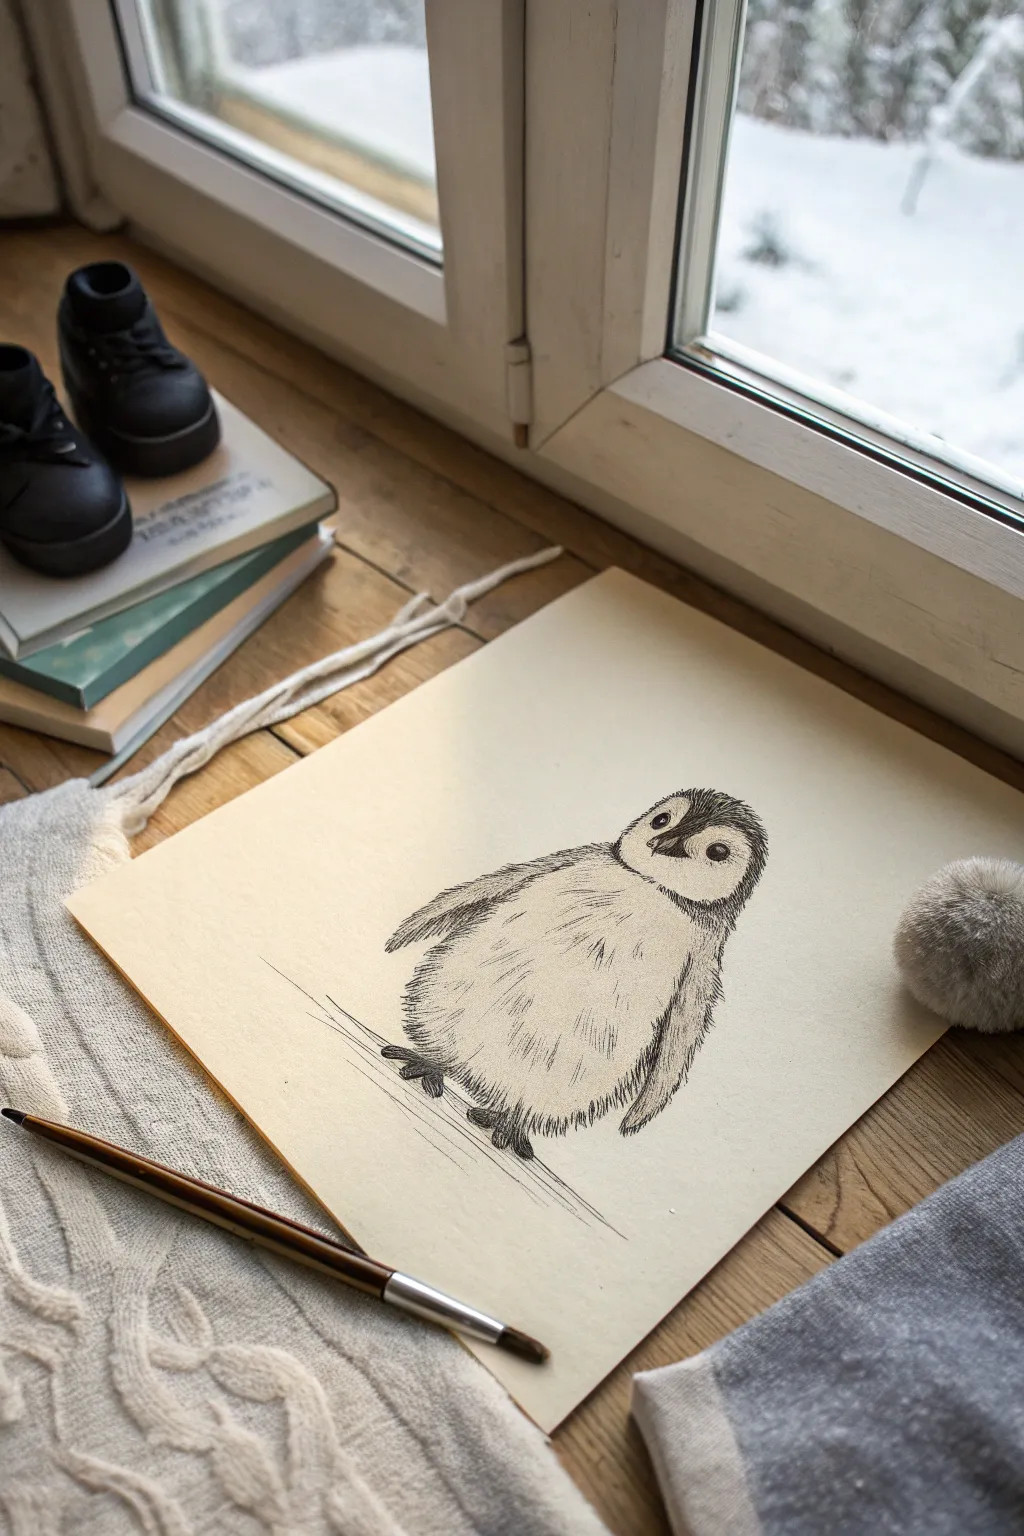
Capture the adorable essence of an emperor penguin chick with this deceptively simple ink sketch. By focusing on short, directional strokes, you will learn how to build up a convincingly soft, downy texture without needing complex shading.
Step-by-Step Tutorial
Materials
- Smooth ivory or cream drawing paper (sketchbook weight)
- Fine liner pen (black, 0.3mm or 0.5mm)
- Graphite pencil (HB or 2B for sketching)
- Soft block eraser
Step 1: Basic Structure
-
Outline the head:
Start near the top center of your page by lightly sketching a small, rounded oval for the head using your pencil. Keep the lines very faint so they can be erased later. -
Define the body:
Attach a larger, pear-shaped oval directly beneath the head. The bottom needs to be significantly wider than the top to give the chick that classic, bottom-heavy rounded look. -
Add wing guides:
Sketch two simple flap shapes on the sides. The left wing should angle slightly backward, while the right wing hangs down along the body’s curve. -
Place the facial features:
Mark the center of the face with a light cross. Draw a small triangular beak pointing slightly left and place two round eyes on either side of the beak line.
Pen Pressure Tip
Vary your pressure. Press harder for the feet and beak, but lift the pen quickly at the end of each body stroke to create tapered, hair-like lines.
Step 2: Inking the Details
-
Draw the eye and beak:
Switch to your fine liner pen. Start with the beak, outlining the triangle and adding a small line for the mouth. Fill in the pupil of the eye, leaving a tiny white highlight circle to bring it to life. -
Outline the head cap:
Emperor penguin chicks have a distinct black cap. Use short, flicking pen strokes to outline the top of the head, mimicking feathers rather than drawing a solid line. -
Texture the neck boundary:
Draw the separation between the black head and white neck. Instead of a solid line, use jagged, dense strokes to suggest where the black feathers overlap the lighter down. -
Create the wing shape:
Move to the left wing. Outline the top edge with relatively smooth lines, but break up the bottom edge with serrated, fluffy marks to show texture.
Winter Greeting Card
Scan your finished drawing and print it on cardstock. Use a white gel pen to add falling snow dots over the black areas for a festive greeting card.
Step 3: Building Fluff Texture
-
Establish the belly contour:
This is the most crucial part for the texture. Do not draw a solid outline for the body. Instead, use hundreds of tiny, quick dashes that follow the curve of the pear shape. -
Directional shading:
Inside the body outline, add sparse clusters of these short dashes. I like to curve these slightly inward to emphasize the roundness of the belly. -
Darken the shadows:
Increase the density of your hatch marks under the chin and beneath the wings. More lines equals darker shadow, which adds three-dimensional volume to your fluff ball. -
Right wing texture:
Ink the right wing using longer, sweeping strokes that point downward, blending the wing visually into the body feathers. -
Draw the feet:
At the very bottom, draw two sets of claws peeking out from the fluff. Shade them darkly with cross-hatching to make them look solid compared to the soft feathers.
Step 4: Finishing Touches
-
Ground the subject:
Draw a few long, quick horizontal lines underneath the feet to suggest the ground or ice. This prevents the penguin from looking like it is floating. -
Refine the contrast:
Go back to the head cap and the tip of the wings. Add more ink strokes to darken these areas, increasing the contrast against the white paper. -
Erase guidelines:
Wait at least five minutes for the ink to fully dry. Gently run your soft eraser over the entire drawing to remove the initial pencil sketch marks. -
Add stray fluffs:
Finally, add a few stray, flyaway lines outside the main body shape. This ‘messiness’ actually makes the texture look softer and more realistic.
Now you have a charming little winter companion sketched out on your page
BRUSH GUIDE
The Right Brush for Every Stroke
From clean lines to bold texture — master brush choice, stroke control, and essential techniques.
Explore the Full Guide
Penguin With a Cozy Winter Scarf
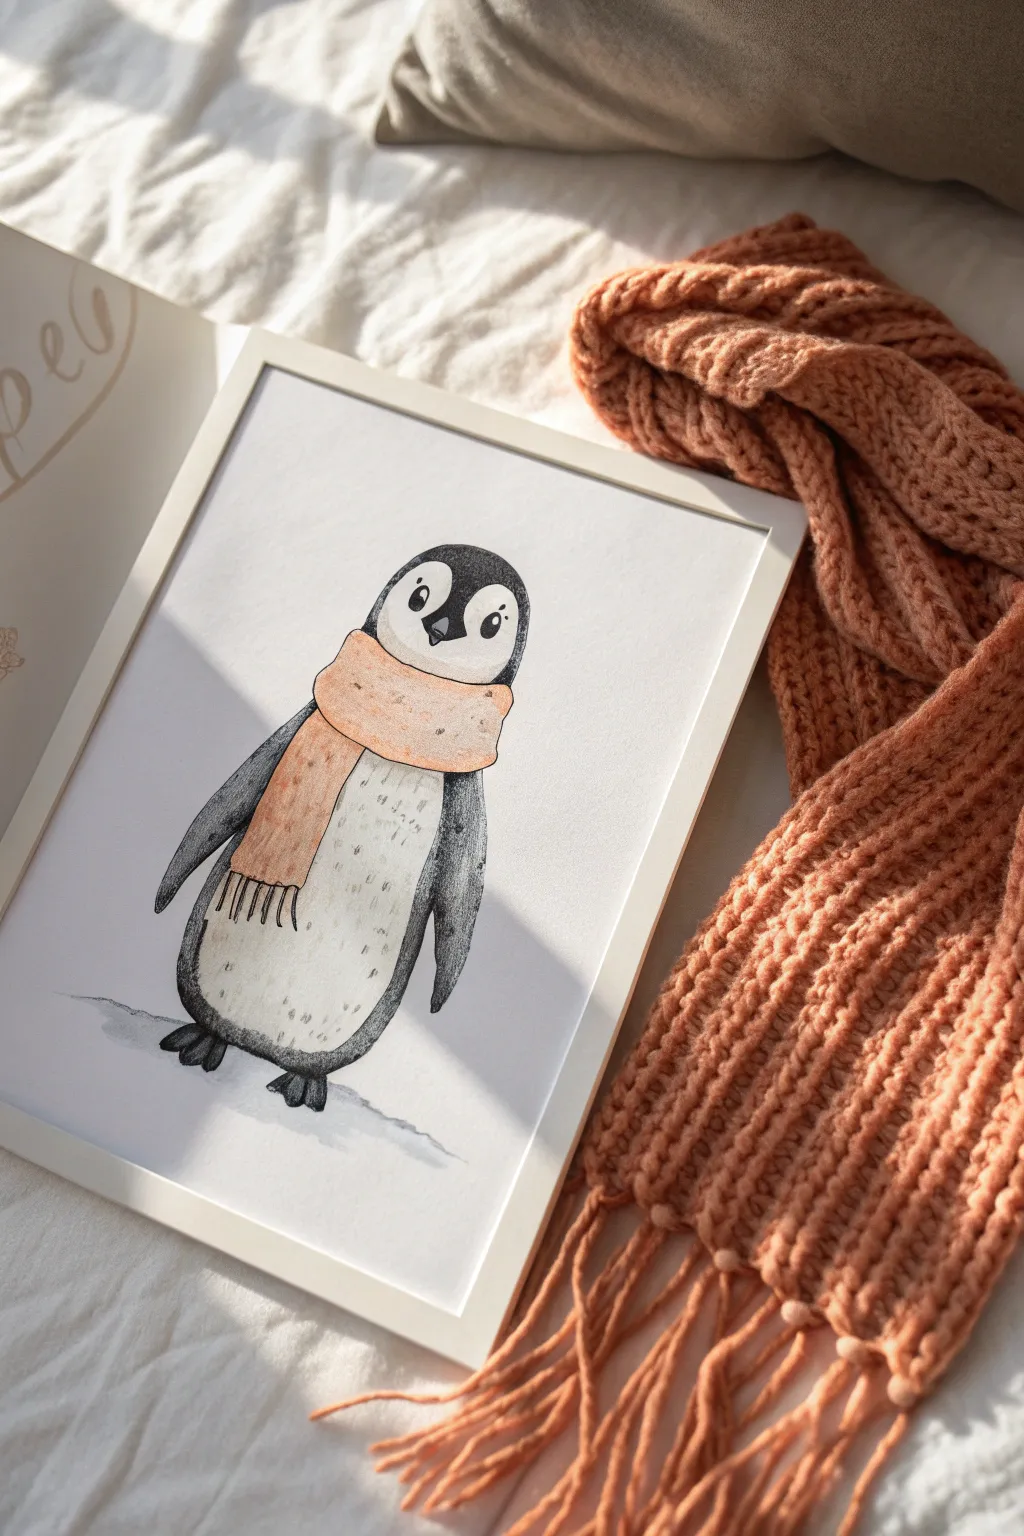
This adorable penguin brings winter warmth to life with its chunky knit scarf and friendly expression. The illustration combines soft watercolor washes with crisp pencil details for a charming, textured finish that looks great in a simple frame.
How-To Guide
Materials
- Hot press watercolor paper (smooth texture)
- H or HB pencil for initial sketching
- Watercolors (black/grey mixing set, burnt orange/terracotta)
- Round watercolor brushes (size 2 and size 6)
- Black fine liner or dark charcoal pencil for outlining
- Charcoal pencil or soft graphite (4B+) for texturing
- Paper towel
- Cup of water
- White gel pen (optional for highlights)
Step 1: Sketching the Base
-
Body Outline:
Begin by drawing a large, elongated oval shape for the penguin’s body. The bottom should be slightly wider and flatter than the top to give him a grounded, heavy look. -
Head and Mask:
Define the head area by drawing a curved line across the top of the oval. Sketch the heart-shaped ‘mask’ area for the face; the top two curves should dip down in the center of the forehead. -
Adding the Scarf:
Draw the scarf wrapping around the neck area. Create a thick, sausage-like shape for the main wrap, and let one long end drape down the let side of the body. -
Wings and Feet:
Sketch two flippers coming from the shoulders. The left flipper should tuck slightly behind the scarf end, while the right flipper hangs freely. Add two small, webbed feet at the very bottom. -
Facial Features:
Place two small oval eyes within the white face mask. Add a small, triangular beak just below the eyes. Don’t press too hard with your pencil here, as we want the watercolor to shine through.
Step 2: Painting and Coloring
-
Painting the Body:
Mix a diluted watery grey using black watercolor. Fill in the main body and head area, leaving the face mask and the belly completely white. Let the paint be slightly uneven to suggest texture. -
Darkening the Features:
While the grey is still slightly damp, drop a more concentrated black pigment into the flippers and the top of the head to create a soft gradient. Paint the feet solid black. -
Coloring the Scarf:
Mix a warm terracotta or burnt orange color. Paint the scarf carefully. I usually paint the main neck wrap first, let it dry for a minute, and then paint the hanging tail to keep the sections distinct. -
Belly Shading:
Using extremely watered-down grey paint, add a very subtle shadow along the bottom curve of the white belly to give the penguin some roundness. -
Ground Shadow:
Add a wash of cool grey under the feet, extending outwards slightly, to ground the character so he isn’t floating in space. Let everything dry completely.
Textural Depth
Use cold-pressed paper instead of hot-pressed if you want the natural grain of the paper to do some of the texturing work for you.
Step 3: Adding Texture and Details
-
Outline Definition:
Once the paint is bone dry, take your dark charcoal pencil or soft graphite. Gently outline the entire body, varying your pressure to create a sketched, organic look rather than a rigid line. -
Scarf Texture:
Outline the scarf with the charcoal pencil. Add small speckles or dots inside the orange scarf area to mimic the texture of wool. Draw vertical lines at the bottom of the scarf end for the fringe. -
Feather Texture:
Using the charcoal pencil, add short, vertical dash marks on the white belly area. Keep them sparse in the center and more clustered near the sides to simulate fur or feathers. -
The Face:
Darken the eyes with solid black, leaving a tiny speck of white paper (or use a white gel pen later) for the catchlight. Outline the beak clearly. -
Deepening Shadows:
Add a final layer of charcoal shading right under the scarf where it meets the feathers, and under the flippers, to create depth. -
Final Smudge:
Lightly smudge the charcoal outline on the dark parts of the head with your finger or a blending stump to soften the edge against the white paper.
Festive Twist
Swap the solid orange scarf for red and green stripes, or add a matching beanie hat to turn this into a holiday card design.
Framing this piece in a simple white frame really makes the charcoal textures pop
Penguin Holding a Little Gift
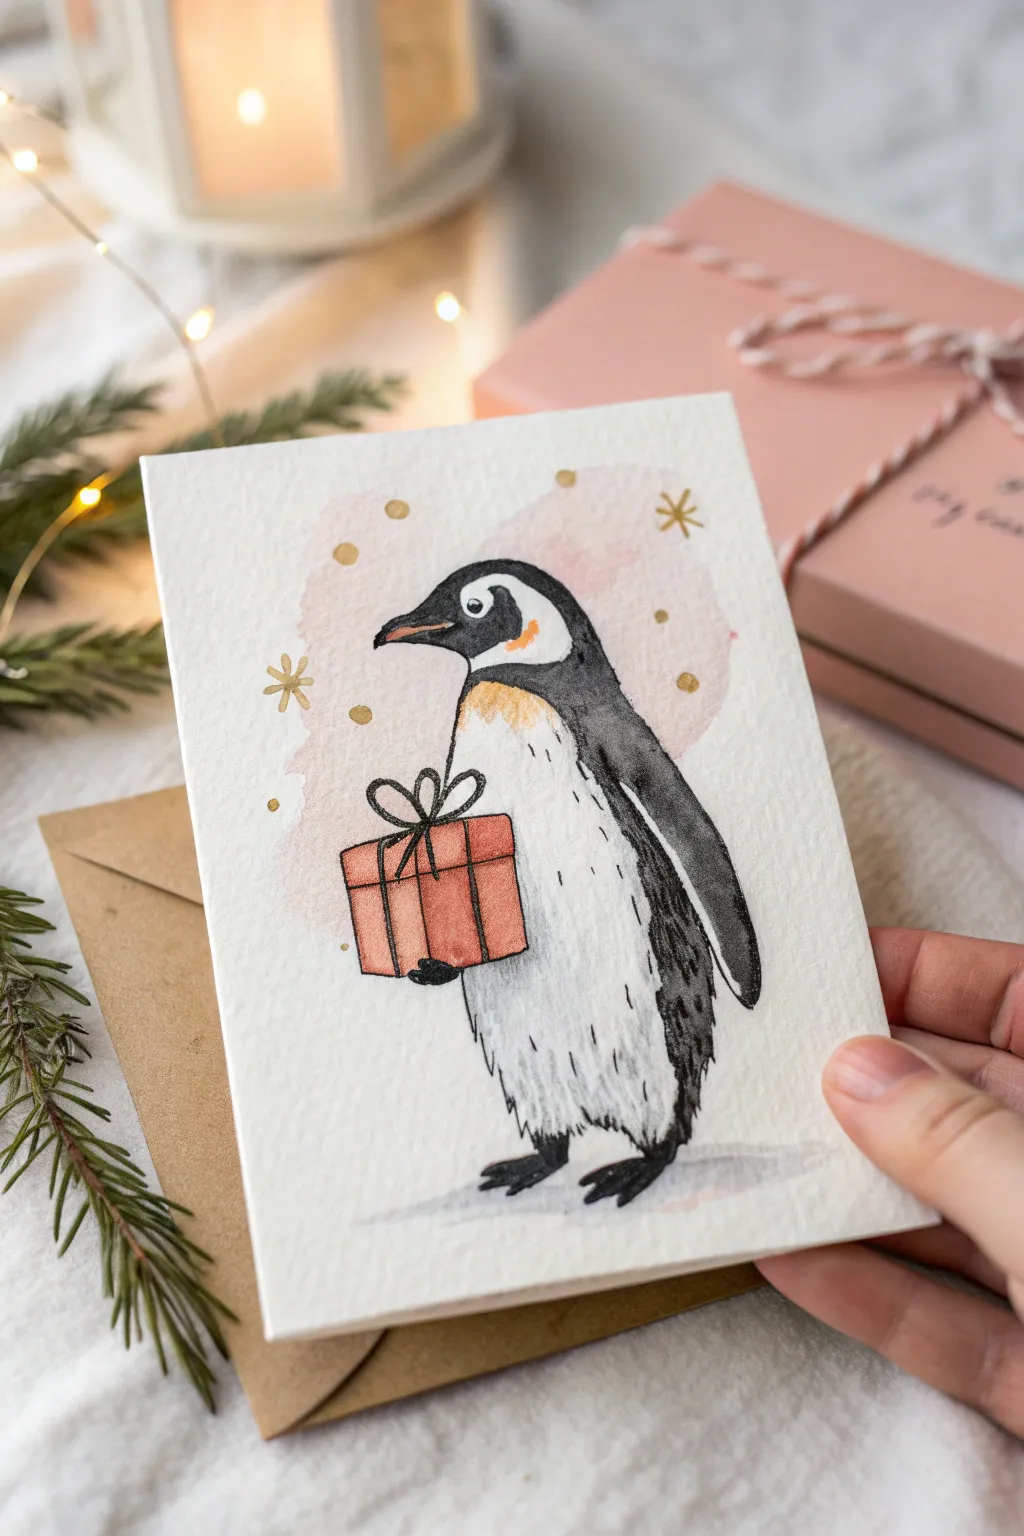
This charming holiday card features a sweet emperor penguin presenting a small, wrapped gift, rendered in soft watercolors and crisp ink lines. The textured paper and delicate golden snowflakes add a warm, handmade feel perfect for seasonal greetings.
Step-by-Step Tutorial
Materials
- Cold press watercolor paper (A5 size or folded card stock)
- Watercolor paints (Black, Payne’s Grey, Yellow Ochre, Burnt Orange, Coral/Salmon Pink)
- Fine liner pen (Black, waterproof, size 0.3 or 0.5)
- Gold metallic watercolor paint or gold gel pen
- Round watercolor brushes (Size 4 and Size 2)
- Pencil (HB) and eraser
- Jar of clean water
- Paper towel
Step 1: Sketching the Outline
-
Basic Shapes:
Start lightly with your pencil. Draw a tall, elongated oval shape for the penguin’s body, leaning slightly to the left. Add a smaller, rounded shape at the top for the head that seamlessly connects to the body. -
Refining the Form:
Define the beak pointing left, making it slightly curved. Sketch the flipper on the right side of the body, letting it hang down naturally. Add the feet at the bottom, keeping them simple and webbed. -
Adding the Gift:
Draw a square box shape tucked against the penguin’s belly, positioned as if held by an unseen left flipper. Sketch a simple ribbon cross on the box and a looped bow on top. -
Marking Patterns:
Lightly mark the boundary lines for the black markings on the head and back, and the characteristic yellow patch on the neck. Keep these lines very faint as they are just guides for painting.
Feathery Texture Tip
When inking the belly, use a rapid, flicking motion with your wrist. Lifting the pen at the end of each stroke creates a tapered line that looks much more like soft down than a uniform stick.
Step 2: Watercolor Layers
-
Background Wash:
Mix a very watery, pale pink or coral wash. Paint a loose, uneven patch behind the penguin’s upper body. Don’t worry about perfect edges; the organic shape adds character. -
Painting the Body:
Using a mix of Black and Payne’s Grey, paint the head, back, and flipper. Leave a small white circle for the eye area. I like to keep the edges slightly textured to suggest feathers. -
Neck Gradient:
While the black is drying, dampen the chest area slightly. Drop in a small amount of Yellow Ochre near the neck, blending it into a touch of Burnt Orange for that signature emperor penguin glow. -
Shadows and Fluff:
Dilute your grey paint heavily with water. Use this pale grey to add shadows under the belly and between the legs to give the body volume, using short strokes to mimic fur texture. -
The Gift Box:
Paint the gift box with a solid coat of Coral or Salmon Pink. Be careful to paint around the ribbon area if you want to keep it distinct, or just paint the whole square and ink over it later. -
Grounding Shadows:
Add a wash of pale grey horizontal strokes under the penguin’s feet to ground the figure so it isn’t floating in space.
Make it 3D
Use a foam adhesive square to attach a separately painted and cut-out gift box to the card. This adds a fun pop-up element that makes the gift literally stand out.
Step 3: Inking and Details
-
Outline the Penguin:
Once the paint is completely dry, take your waterproof fine liner. Outline the penguin’s body using broken, sketchy lines to create a furry, feathered texture rather than a solid smooth line. -
Face Details:
Ink the eye, leaving a tiny white highlight un-inked. distinctively outline the beak and the separation between the black head and white cheek. -
Gift Ribbon:
Draw the ribbon and bow on the gift box with the black pen. Make the loops of the bow slightly uneven for a hand-tied look. -
Texture Details:
Add small, vertical dash marks on the white belly of the penguin to suggest density and fur texture. Focus these mostly on the bottom half and under the flipper. -
Gold Accents:
Using your gold paint or gel pen, draw small asterisks and dots scattered around the background wash to represent sparkling snowflakes. -
Final Touches:
Add a few gold dots on the penguin’s chest or near the gift for extra festive magic. Erase any visible pencil lines gently.
Now you have an adorable, handcrafted card ready to warm someone’s heart this winter season

PENCIL GUIDE
Understanding Pencil Grades from H to B
From first sketch to finished drawing — learn pencil grades, line control, and shading techniques.
Explore the Full Guide
Penguin Holding a Flower Like a Tiny Character

This charming illustration captures a sweet penguin offering a pink flower, rendered in a classic ink-and-wash style. The texture of the linework combined with the gentle pop of color creates a heartwarming piece perfect for framing.
Step-by-Step Guide
Materials
- Warm white or cream drawing paper (smooth or light texture)
- Black technical pens (fine sizes like 0.1, 0.3, and 0.5mm)
- Pink colored pencil or watercolor paint
- Yellow colored pencil or watercolor paint
- Pencil (HB or 2B) for sketching
- Soft eraser
- Ruler
Step 1: Sketching the Framework
-
Basic Shapes:
Start lightly with your pencil. Draw a tall, rounded oval shape for the penguin’s body, leaning slightly backward as if looking up. -
Head Definition:
Define the head area by drawing a smaller circle at the top of your oval. Sketch a small, pointed triangle protruding to the right for the beak. -
Adding Wings:
Draw the flippers. The one facing us should be a long, curved teardrop shape resting against the body. The other arm needs to be positioned slightly outward to hold the flower stem. -
Flower Placement:
Sketch a long, slightly curved stem being held by the far flipper. Add a circle at the top for the flower center and sketch eight to ten simple, rounded petals. -
Face Details:
Mark out the curved line separating the black feathers from the white belly. Draw a small circle for the eye with a tiny highlight dot inside.
Hatching Tip
When hatching the black feathers, follow the curve of the body with your pen strokes. This makes the penguin look round and 3D rather than flat.
Step 2: Inking the Outlines
-
Initial Inking:
Switch to your medium-thickness pen (0.3mm). Outline the penguin’s body, beak, and flippers. I like to intentionally keep the lines slightly loose rather than perfectly geometric. -
Flower Definition:
Ink the flower stem and petals carefully. For the center of the flower, use small stippling dots to create texture rather than a solid circle. -
Refining the Face:
Fill in the pupil of the eye, leaving the tiny highlight white. Draw the definitive line for the facial mask that swoops down from the beak. -
Feet and Ground:
Ink the small feet at the bottom. Add a few horizontal, scratchy lines underneath the penguin to suggest the ground so he isn’t floating in space.
Step 3: Adding Texture and Detail
-
Dark Feathers:
Using a 0.5mm pen, begin filling the black areas of the penguin (head, back, and wings). Don’t color it solid black; use dense, vertical hatching lines to mimic the texture of feathers. -
Building Contrast:
Go over the hatching a second time in darker areas, especially under the flipper and around the neck, to create shadow and depth. -
White Feathers:
Switch to your finest pen (0.1mm). On the white belly, draw sparse, short dashes and tiny ticks to suggest fluffiness without darkening the area. -
Background Accents:
Add tiny clusters of dots or small circles floating in the background air to give the piece a whimsical, magical atmosphere.
Level Up
Try using a ‘deckled edge’ paper or manually tearing the edges of your finished drawing before mounting it for a more organic, vintage sketchbook feel.
Step 4: Final Touches
-
Cleanup:
Wait until the ink is completely dry to prevent smearing, then gently erase all your underlying pencil sketches. -
Flower Color:
Use a pink colored pencil or a light wash of watercolor to fill in the petals. Keep the pressure light for a soft, pastel look. -
Flower Center:
Add a touch of yellow to the stippled center of the flower. -
Framing:
Once finished, mount your drawing in a simple white frame to let the classic line work stand out.
Now you have a sweet illustrative piece ready to brighten up any corner of your home
Penguin With Clean Ink Outline and Bold Contrast
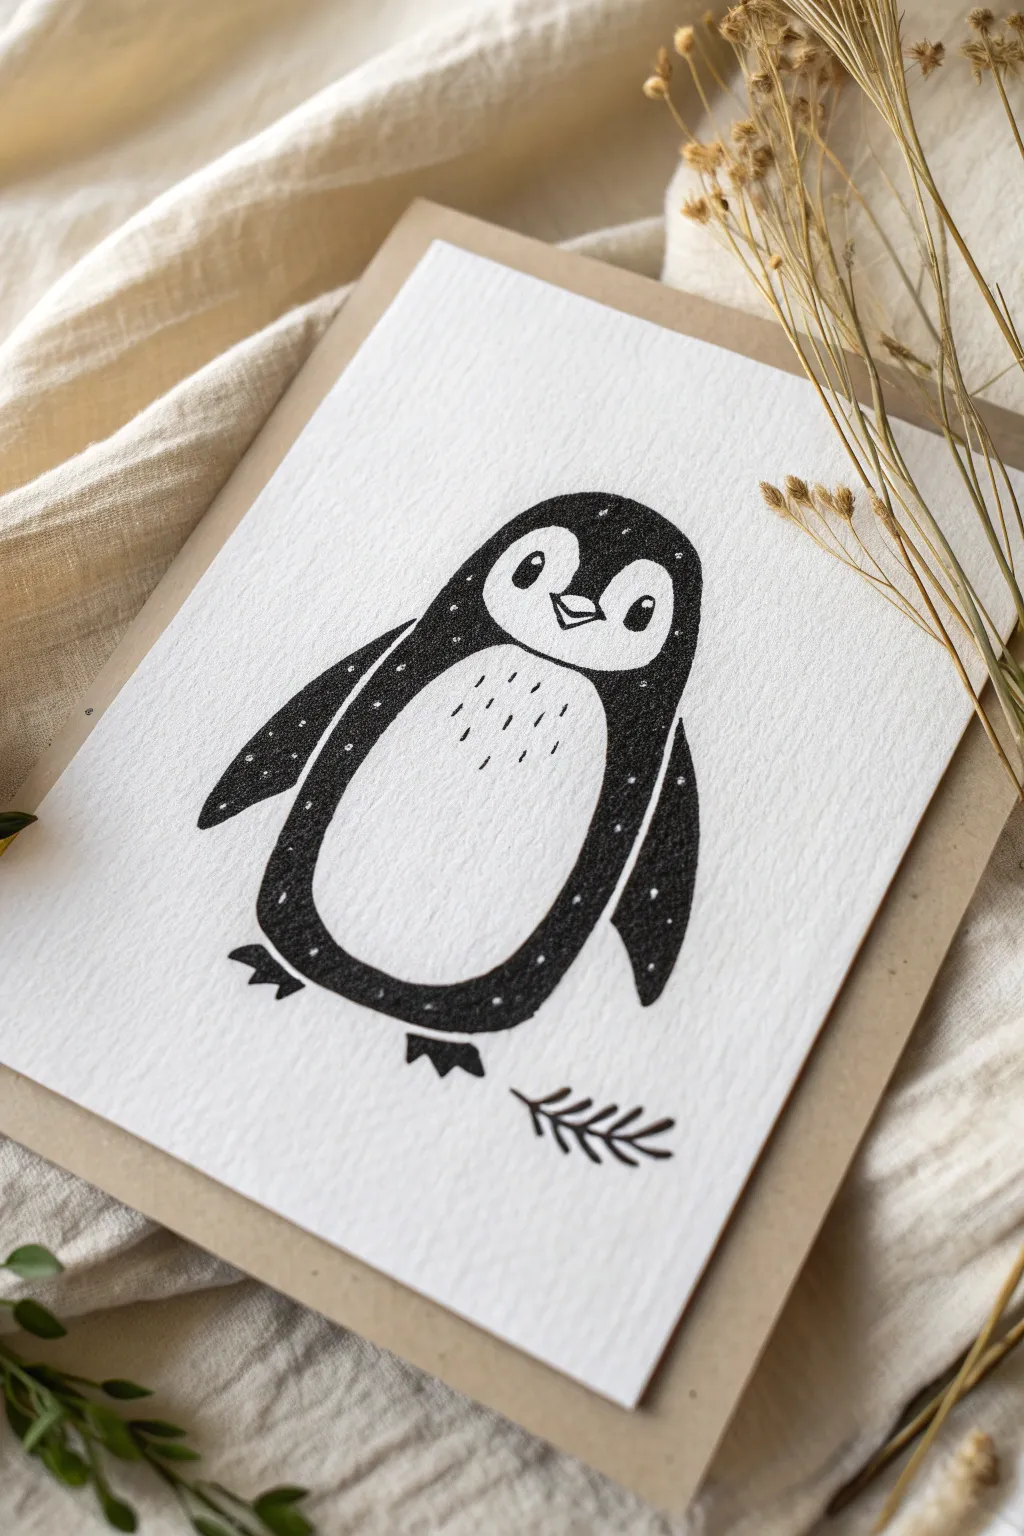
This charming penguin illustration relies on high-contrast black ink and subtle texture to create a cozy, whimsical feel. By combining solid blocking with delicate negative space details, you’ll create a character that pops right off the textured paper.
How-To Guide
Materials
- High-quality cold press watercolor paper or textured cardstock
- Fine liner pens (sizes 005, 01, and 05)
- Black brush pen or India ink with a small brush
- Pencil (HB or 2H)
- Kneaded eraser
- White gel pen (optional, for corrections or extra stars)
Step 1: Drafting the Shapes
-
Establish the curve:
Begin by lightly sketching a large, rounded egg shape for the penguin’s body. Let the bottom be slightly flatter to give the penguin a grounded weight. -
Define the face mask:
Inside the top third of your egg shape, sketch a curved ‘heart-like’ dip. This line separates the black head feathers from the white face markings. -
Add the belly patch:
Draw a smaller oval inside the main body. Leave a consistent border between this oval and the outer edge to define the black wings and body surrounding the white belly. -
Sketch the wings:
Coming off the shoulders of your egg shape, draft two simple, curved wings that hug the sides of the body. They should taper to gentle points near the hips. -
Place features:
Sketch two small oval eyes within the face mask area. Just below and between them, draw a small diamond shape for the beak. Add small triangular points at the bottom for feet.
Step 2: Inking the Outline
-
Outline the body:
Using an 05 fine liner, carefully trace the outer silhouette of the penguin. Keep your hand steady to create a smooth, confident line. -
Define the separation:
Switch to an 01 pen to trace the inner lines—specifically the curves separating the white belly and face from the dark body. A slightly thinner line here keeps the focus on the contrast. -
Ink facial features:
Carefully ink the small beak using the 01 pen. Draw the eye outlines, leaving a tiny white circle inside each pupil for a highlight, which gives the character life. -
Add the sprig:
Near the penguin’s feet, draw a simple botanical sprig. Use a single line for the stem and small V-shapes for the leaves.
Ink Smearing?
Work from top-left to bottom-right (if right-handed) to avoid dragging your hand through wet ink. Use a scrap paper under your hand as a guard.
Step 3: Filling and Texturing
-
Block in solid blacks:
Using a brush pen or brush with India ink, begin filling in the dark areas of the penguin: the head, back, and wings. Be careful around the eyes and belly outline. -
Create the texture:
Instead of filling the black areas 100% solid, lift your brush occasionally or use a ‘dry brush’ technique near the edges to let the paper’s grain show through. This mimics the speckled look in the reference. -
Stipple the transition:
Where the black body meets the white belly, don’t make a hard, straight line. Use tiny dots with your 05 pen to blend the black edge inward slightly, softening the transition. -
Add starry details:
While the black ink is wet, you can lift tiny specks with a dry tissue, or wait until it’s dry and use a white gel pen to add tiny ‘stars’ or speckles scattered across the dark feathers. -
Fill the eyes:
Color in the pupils with pitch black, ensuring you preserve that crucial white highlight you sketched earlier. -
Belly details:
On the white belly patch, use your finest 005 pen to draw tiny vertical dashes. Keep them loose and sparse to suggest soft downy feathers without cluttering the space. -
Final clean up:
Once the ink is completely dry—give it a few extra minutes just to be safe—gently erase your pencil guidelines with the kneaded eraser so only the crisp ink remains. -
Mounting:
If you drew this on a separate sheet, adhere it now to a beige or kraft-colored card backing to match the warm, earthy aesthetic of the original image.
Winter Vibes
Dab a tiny bit of watered-down red watercolor on the cheeks for a ‘cold nose’ effect or add a tiny red scarf for holiday flair.
Your finished penguin now has a wonderful graphic quality that is perfect for a greeting card or winter decoration


Realistic Penguin Sketch With Soft Shading

Capture the elegant simplicity of a standing penguin with this realistic graphite sketch. By focusing on delicate shading and directional pencil strokes, you’ll create a lifelike texture that brings the bird’s soft plumage to life on paper.
Detailed Instructions
Materials
- High-quality drawing paper (smooth or light texture, A4 size)
- Graphite pencils (HB for outlines, 2B and 4B for shading)
- Mechanical pencil (0.5mm HB) for fine details
- Kneaded eraser
- Fine-point black fineliner (optional for deepest accents)
- Blending stump or cotton swab
- Pencil sharpener
Step 1: Drafting the Basic Form
-
Establish the pose:
Begin with a light HB pencil. Draw a tall, slanted oval for the body and a smaller, rounded shape on top for the head, connecting them with a gentle curve to form the neck. -
Define the beak and eye:
I like to place the eye early to give the drawing character. Sketch a small circle near the center of the head, and extend a pointed beak shape towards the left. -
Sketch the flipper and feet:
Add the wing (flipper) on the right side of the body, curving it slightly backward. At the base, lightly sketch the triangular shapes of the feet, ensuring they look grounded. -
Refine the silhouette:
Go over your initial oval shapes to create a cleaner outline. Smooth out the connection between the neck and chest, and ensure the back has a slight, natural hunch.
Smudgy Paper?
Place a scrap piece of paper under your drawing hand while you work. This prevents oils from your skin transferring to the paper and stops you from accidentally smearing your finished graphite work.
Step 2: Developing Texture and Tone
-
Map the patterns:
Lightly draw the separation line between the dark back plumage and the white belly. This line should be jagged and irregular to suggest feathers rather than a hard edge. -
Start the dark shading:
Switch to a 2B pencil. Begin filling in the back, flipper, and the top of the head. Use short, directional strokes that follow the curve of the bird’s body to mimic feathers. -
Deepen the blacks:
Layer a 4B pencil over the darkest areas, specifically the back of the neck and the center of the flipper. Leave some tiny gaps to suggest light catching the glossy feathers. -
Detail the head:
Using the mechanical pencil or a sharp HB, carefully draw the eye, leaving a tiny white highlight. Shade the beak, making the tip darker and the area near the feathers slightly lighter.
Feather Direction
Always stroke your pencil in the direction the feathers grow. On the head, strokes go back; on the belly, they go down. This directional shading is key to realistic anatomy.
Step 3: Texturing the White Plumage
-
Suggest belly feathers:
Even the white areas aren’t purely white. Use a very light hand with an H or HB pencil to add sparse, tiny flecks on the belly, concentrating them near the edges of the wing. -
Create shadow and volume:
Add subtle shading along the bottom curve of the belly and under the wing. This makes the penguin look round rather than flat. -
Soften the transitions:
Use a blending stump to gently smudge the graphite on the belly, creating a soft, downy appearance. Be careful not to over-blend the dark back feathers, as you want to keep that texture crisp. -
Address the feet:
Sketch the feet with darker strokes for the claws and webbing. Add texture by using small, cross-hatching marks to simulate the rough skin. -
Ground the subject:
Add a cast shadow beneath the feet using horizontal strokes. Keep the shadow darkest directly under the claws and fade it out quickly as it moves away.
Step 4: Final Refinements
-
Enhance the contrast:
Review your drawing. If the darks look washed out, go back in with your 4B pencil or a fine black pen to re-state the deepest shadows on the wing tip and eye. -
Clean up edges:
Use the kneaded eraser to pick up any stray graphite smudges on the white paper background. -
Highlight the breast:
Tap your clean kneaded eraser on the center of the chest to lift off graphite, ensuring the highlight is the brightest part of the bird. -
Final texture check:
Add a few loose, stray feather marks at the tail area to break up the outline and make the bird look fluffier and more realistic.
Take a moment to admire how those simple pencil strokes have come together to form a characterful little bird.
Penguin With Simple Shadow Grounding
This elegant drawing captures the charm of an African penguin using classic ink techniques to build texture and form. By focusing on high-contrast shading and simple linework, you’ll create a striking monochrome piece that feels both lively and grounded.
Step-by-Step
Materials
- Smooth white drawing paper or cardstock
- Pencil (HB or 2H for sketching)
- Fine liner pens (sizes 0.1, 0.3, and 0.5)
- Black brush pen or marker (for filling large dark areas)
- Kneaded eraser
- Ruler (optional for ground lines)
Step 1: Sketching the Form
-
Establish the posture:
Begin lightly with your pencil. Draw a tall, slanted oval for the body, leaning slightly to the left. This creates that characteristic upright penguin stance. -
Add the head and beak:
Attach a smaller, rounded shape at the top for the head. Extend a medium-length beak pointing horizontally to the right. The beak should have a slight downward curve at the very tip. -
Define the wings:
Sketch the left wing (closest to viewer) tucked tightly against the side of the body, curving slightly outward. Draw the tip of the right wing peeking out behind the body. -
Place the feet:
Draw two flat, webbed feet at the base. Keep them relatively short and planted firmly to support the leaning posture. -
Mark the patterns:
Lightly outline the distinct black-and-white patterns on the face, specifically the C-shape curve that wraps around the eye and cheek, separating the black face mask from the white chest.
Ink Control Pro-Tip
When creating the feather textures on the chest, always pull your pen stroke from the dark area *into* the white area. This creates a natural tapered line that mimics hair.
Step 2: Inking the Outlines
-
Outline the head:
Using a 0.3 fine liner, carefully trace the outline of the head and beak. Pay close attention to the eye; draw a small circle with a tiny white highlight preserved in the center. -
Refine the body contour:
Ink the outer shape of the penguin. Instead of a single solid line, use slightly broken or jagged strokes on the back to suggest feathers overlapping. -
Inking the feet:
Outline the feet and claws. Use firmer lines here to show weight and solidity.
Level Up: Watercolor Wash
Once the waterproof ink is dry, add a very pale wash of diluted blue-grey watercolor to the shadowed side of the belly and the ground for extra dimension.
Step 3: Building Texture and Shadows
-
Fill the dark areas:
Switch to your brush pen or 0.5 marker. Fill in the solid black areas on the face, the back of the neck, and the main body of the wing. Leave the white strap across the chest untouched. -
Feather the edges:
Where the black markings meet the white feathers (like on the chest band), use a 0.1 pen to flick tiny, quick strokes outward. This makes the transition look like fur or small feathers rather than a hard plastic edge. -
Stipple the belly:
Add texture to the white belly using very sparse stippling (dots) and short dashes. Concentrate these marks slightly more on the shadowed side (the left) to give the body volume. -
Detail the wing:
On the visible wing, use hatching lines to show the texture of the stiff feathers. Leave a thin sliver of white along the wing’s edge to separate it visually from the body. -
Ground the figure:
Using the 0.1 pen, draw uneven horizontal scratches and lines underneath the feet. These shouldn’t be perfect; let them fade out to the left and right to suggest a rough, snowy or rocky surface.
Step 4: Final Touches
-
Deepen the shadows:
Go back over the darkest areas with your thickest pen to ensure the black is solid and rich. I find checking this contrast really makes the white paper pop. -
Erase pencil marks:
Wait for the ink to become completely dry. Gently rub your kneaded eraser over the entire drawing to lift the initial graphite sketch. -
Sign your work:
Add a small, messy signature or date near the ground lines to balance the composition, just like in the variety of field sketches artists create.
You now have a clean, graphically bold penguin illustration that looks professional and ready to frame
Penguin in a Tiny Snow Scene Background
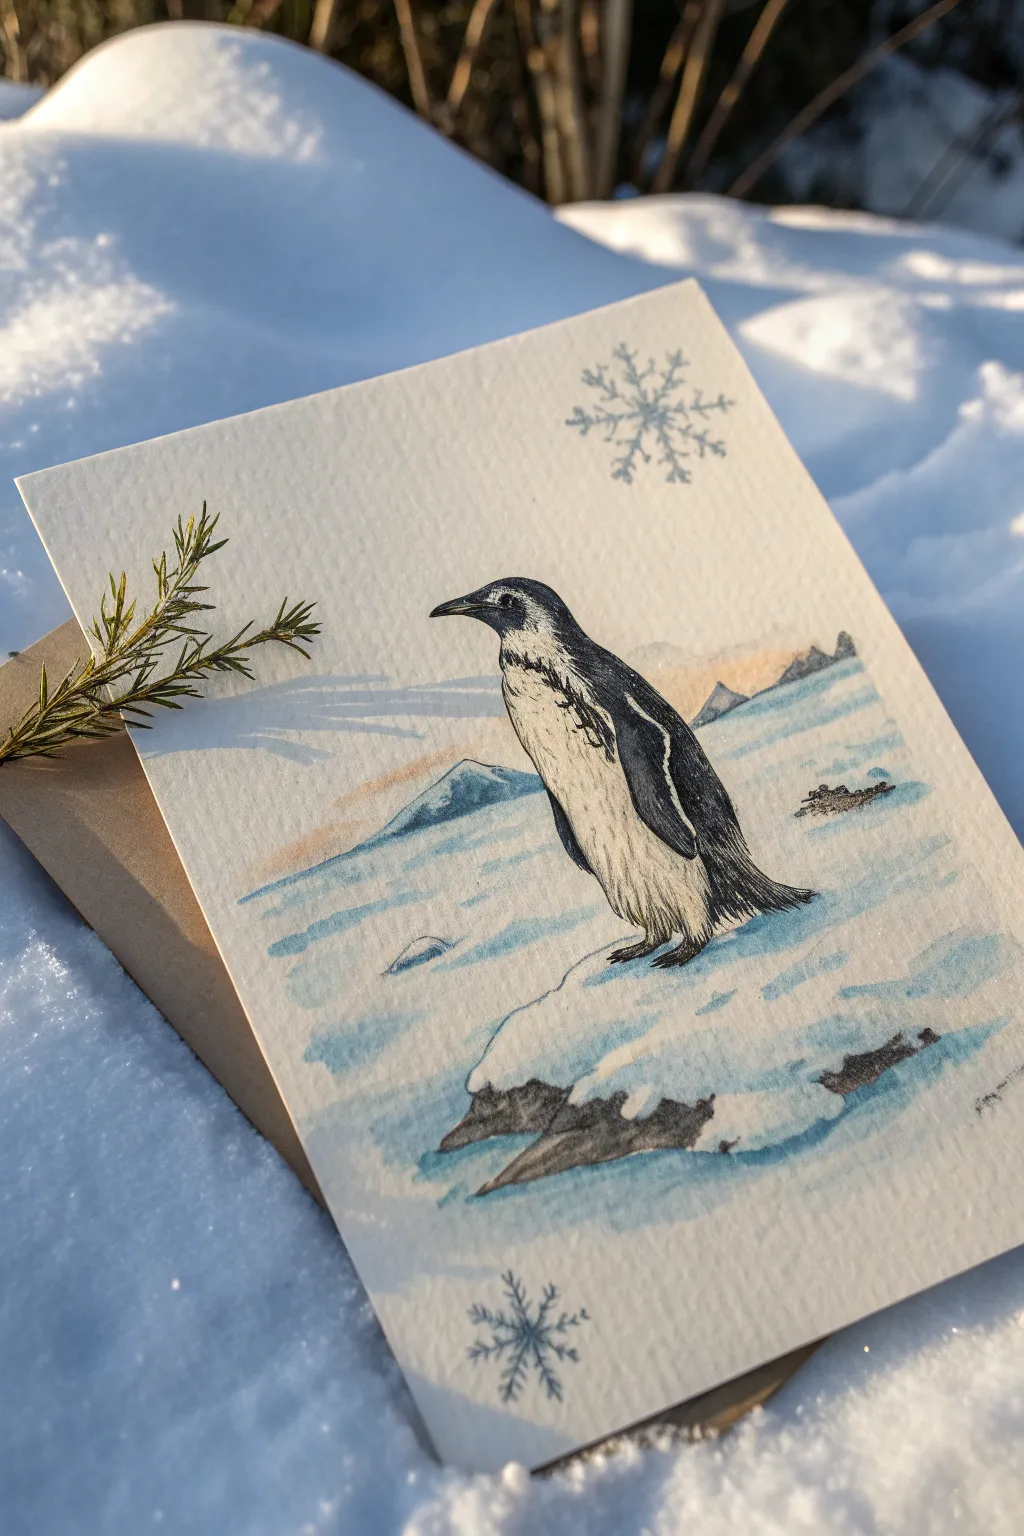
Process the beauty of the Antarctic with this delicate mixed-media card, featuring a solitary Chinstrap penguin surveying an icy landscape. Combining fine ink details for the bird with soft, washed-out watercolors for the background creates a stunning depth and wintry atmosphere.
How-To Guide
Materials
- Cold press watercolor paper (approx. 5×7 inches)
- Black waterproof fineliner pens (0.1mm and 0.3mm)
- Watercolor paints (Indigo, Cerulean Blue, Payne’s Gray, Burnt Umber, tiny touch of Orange/Ochre)
- Round watercolor brushes (sizes 2 and 6)
- Pencil (HB) and kneaded eraser
- Silver or light blue metallic gel pen (optional)
- Snowflake rubber stamp and silver ink pad (or draw by hand)
- Paper towel and water jar
Step 1: Sketching the Scene
-
Outline the penguin:
Begin by lightly sketching the penguin’s shape in the center-right of your paper. Focus on the oval body, the distinct tilt of the head, and the small triangular tail dragging behind. -
Add scene details:
Sketch a rough, jagged rock formation beneath the penguin’s feet for it to stand on. Keep the lines irregular to mimic natural stone. -
Map the horizon:
Draw a faint horizon line about a third of the way up the page. Sketch simple triangular shapes for distant mountains on the left and right sides. -
Refine the bird:
Add the defining ‘chinstrap’ line of this penguin species—a thin line running under the chin from ear to ear. Mark out the flipper positioning and the beak shape.
Step 2: Inking the Penguin
-
Commit to the outline:
Using your 0.1mm waterproof fineliner, go over your penguin sketch. Use broken, feathery strokes for the belly and chest to suggest soft feathers, but smoother, firmer lines for the beak and flipper. -
Fill the darks:
Switch to a 0.3mm pen to fill in the penguin’s back, head, and flipper. Don’t make it a solid block of black; leave tiny slivers of white paper showing through to suggest the glossy texture of wet feathers. -
Detail the rock:
Ink the bottom edge of the rock formation with jagged lines. Avoid outlining the top of the snow-covered rock excessively; let the white paper do the work there. -
Erase guidelines:
Once the ink is completely dry—give it a good few minutes to be safe—gently erase all pencil marks with your kneaded eraser.
Smudgy Ink?
Waterproof pens are essential! If you don’t have one, do the ink drawing LAST, after the paint is fully dry, to prevent bleeding.
Step 3: Watercolor Washes
-
Paint the sky:
Dissolve a tiny amount of dilute Indigo or Payne’s Gray into a lot of water. Wash this very lightly over the sky area, fading it out to white as you reach the horizon line. -
Add sunset warmth:
While the sky is still slightly damp near the horizon, touch in a barely-there hint of Orange or Ochre to suggest a cold, distant sunset glow behind the mountains. -
Create the icy ocean:
Mix a watery Cerulean Blue. Using horizontal strokes, paint the water and ice field behind the penguin. Leave intentional white gaps to represent ice floes. -
Define the mountains:
With a slightly stronger mix of Cerulean and Indigo, paint the distant mountains. Keep the edges soft to make them feel far away in the mist. -
Shadow the snow:
I like to use a very dilute mix of Cerulean Blue and a touch of Purple for snow shadows. Apply this to the shadowed side of the rock the penguin is standing on. -
Ground the rock:
Using Burnt Umber mixed with Payne’s Gray, paint the exposed rock beneath the snow. Keep this dark and contrasty against the white snow.
Pro Tip: Ice Texture
Sprinkle a few distinct grains of table salt onto the wet blue watercolor wash. When dry, brush it off for a perfect crystalline ice effect.
Step 4: Final Touches
-
Penguin shadows:
Add a very faint grey wash to the underside of the penguin’s white belly to give it volume and weight. -
Texture the water:
Once the background wash is dry, add a few thin, horizontal lines of darker blue to suggest ripples in the icy water. -
Snowflake accents:
Using a stamp and silver ink, or a metallic pen, add two or three large, delicate snowflakes in the corners of the card to frame the scene.
Now you have a serene Antarctic snapshot ready to send as a thoughtful winter greeting
Penguin Family: Adult and Chick Pair
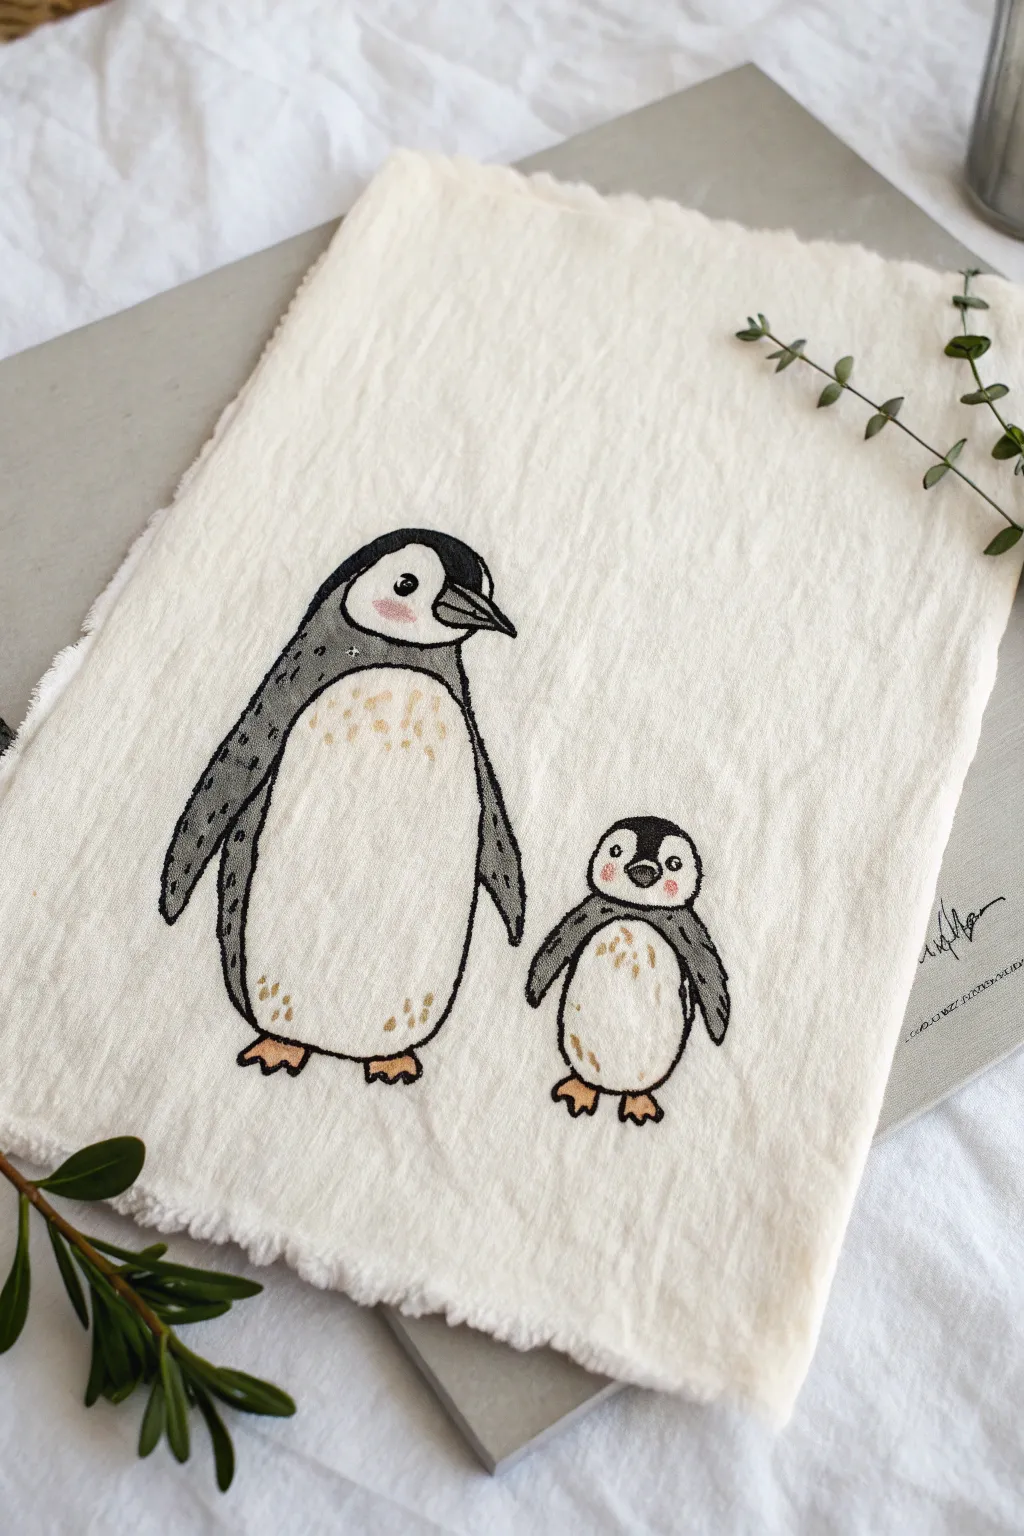
Capture the heartwarming bond of a parent and chick with this charming embroidery project. Using simple stitches and soft textures on raw-edged fabric, you’ll create a piece that feels organic, handmade, and full of character.
Detailed Instructions
Materials
- Off-white linen or heavy cotton fabric (fat quarter)
- Embroidery hoop (6-8 inch)
- Pencil or water-soluble fabric pen
- Embroidery floss in black, charcoal grey, white, pale orange, and soft pink
- Embroidery needle (size 5-7)
- Small sharp scissors
- Fabric glue or fray check (optional)
Step 1: Preparation & Sketching
-
Prepare the fabric canvas:
Cut a rectangle of your linen or cotton fabric, leaving roughly an inch or more of space around where you want your design to sit. Gently pull loose threads at the edges or rub them with your thumb to create that soft, raw-edged fringe look shown in the photo. -
Secure the fabric:
Place your fabric into the embroidery hoop, ensuring it is taut like a drum skin. This prevents puckering later on. -
Outline the adult penguin:
Using your pencil or fabric pen, lightly sketch the large penguin on the left. Draw a tall oval body, add the flippers extending slightly out, and sketch the head shape with a distinct beak pointing downward. -
Outline the chick:
Sketch the smaller penguin to the right, looking up towards the adult. Its body should be rounder and stouter, with smaller flippers and a cute, rounded head. -
Define facial features:
Draw the details for the faces: the white patches around the eyes, the beaks, and the boundary lines separating the white bellies from the dark backs.
Pro Tip: Thread Mixing
For the grey areas, try mixing one strand of black and one strand of grey in your needle. This creates a speckled, tweedy depth that looks great for feathers.
Step 2: Stitching the Outlines
-
Backstitch the contours:
Thread your needle with two strands of black floss. Use a neat backstitch to outline the entire body of both penguins. Keep your stitches small and even, especially around the curves of the heads and flippers. -
Create the grey texture:
Switch to a charcoal grey thread. Instead of filling the area solidly, use small, scattered running stitches describing the texture on the adult’s back and flippers. This mimics the dappled look of feathers. -
Detail the adult’s head:
Use a satin stitch or very close backstitches with black thread to fill in the dark cap on the adult’s head, leaving the eye area clear. -
Beak details:
For the beaks, outline them sharply in black. Fill the interior slightly with grey or keep it minimal to distinguish the segments.
Step 3: Adding Color & Texture
-
Add warmth to the bellies:
Thread a single strand of pale orange or tan floss. Stitch tiny, isolated seeds or specks on the white bellies of both penguins. Concentrate these near the bottom and sides to suggest shadowing and fluffiness. -
Stitch the feet:
Using the same pale orange floss (perhaps 2 strands now for thickness), stitch the feet using a satin stitch to make them look solid and flat against the ground. -
Blush the cheeks:
Thread a soft pink floss. Stitch a very small, soft cluster of stitches or a small French knot on the cheeks of both penguins to give them a rosy, affectionate expression. -
The baby’s grey coat:
On the baby penguin, use the charcoal grey thread to outline the ‘hood’ and wings. Use slightly longer stitches here to make the chick look downier and fuzzier than the sleek adult. -
Final eye details:
With black thread, stitch the small round eyes. Add a tiny white highlight stitch inside the black pupil if possible, or just keep them simple and round.
Troubleshooting: Puckering
If the fabric buckles inside the outlines, your thread tension is too tight. Snip those stitches and redo them with a looser hand, or use a stabilizer behind the fabric.
Step 4: Finishing Up
-
Clean up stray marks:
If you used a water-soluble pen, dab the lines gently with a damp cloth or Q-tip to remove the blue ink. If using pencil, ensure your stitching covered the lines well. -
Enhance the fringe:
Remove the hoop. I like to revisit the edges here—pull a few more threads if the fringe looks too neat. You want that rustic, torn-paper aesthetic. -
Press and display:
Press the fabric face down on a fluffy towel with a warm iron (avoiding direct heat on the textured stitches) to smooth the linen background.
Once pressed, this sweet embroidery is ready to be framed or gifted to someone special.
Penguin With a Fish Snack

This charming project features a bold, graphic penguin enjoying a fresh catch against a warm, rusty-orange sun. Using block printing techniques (or a faux-block print painting style), you can create this textured, folk-art inspired design on a tea towel or tote bag.
Step-by-Step Tutorial
Materials
- Fabric blank (tea towel or canvas tote)
- Soft linoleum block (e.g., Soft-Cut or Speedy-Carve)
- Linoleum carving tools (V-gouge and U-gouge)
- Fabric block printing ink (Black, Rust Orange, Light Blue-Grey)
- Brayer (rubber roller)
- Glass or acrylic palette for rolling ink
- Tracing paper and pencil
- Baren or a smooth wooden spoon for pressing
- Optional: Fine detail paintbrush
Step 1: Designing and Carving
-
Draft the design:
Begin by sketching the penguin directly onto paper that matches the size of your linoleum block. Draw the main penguin body, the fish in its mouth, and the large circle behind its head. -
Separate the layers:
Since this is a multi-color print, you need to decide if you want to use the ‘reduction’ method (carving away from one block) or separate blocks. For beginners, I recommend transferring the orange circle to one block and the black penguin details to a second block. -
Transfer to the block:
Place your tracing paper drawing face down onto the linoleum and burnish the back to transfer the graphite image. -
Carve the negative space (Orange Layer):
On your first block (the sun), use a large U-gouge to carve away everything *except* the circle. Inside the circle, use a small V-gouge to carve out the thin radiating lines and short dashes. -
Carve the Penguin (Black Layer):
On the second block, carefully carve away the background. Leave the penguin’s outline, wings, and eye mask raised. Carve out the belly, the white part of the fish, and the eye highlights. -
Add texture details:
Use your finest V-tool to add the small dash marks on the penguin’s belly to simulate feathers. Don’t worry about perfect uniformity; the hand-carved look adds character.
Registration Helper
Make a simple paper ‘L’ shaped guide and tape it to your fabric. Align the corner of your linoleum block into this ‘L’ for every layer to ensure your penguin lands perfectly in front of the sun.
Step 2: Printing the Colors
-
Prepare the fabric:
Lay your fabric flat on a slightly padded surface (a piece of felt or a towel underneath helps get a better impression). Tape the corners down to prevent shifting. -
Ink the sun layer:
Squeeze a small amount of Rust Orange ink onto your palette. Roll the brayer back and forth until it makes a ‘velc-ro’ sound and is evenly coated. Roll the ink onto your circle block. -
Print the sun:
Position the circle block on the upper half of your fabric. Press down firmly. Use a baren or the back of a spoon to rub the back of the block in circular motions to transfer the ink. -
Lift and dry:
Carefully peel back the block to reveal the orange sun. Let this layer dry completely before moving on—fabric ink can smear easily. -
Ink the penguin layer:
Clean your brayer and load it with black fabric ink. Roll a generous, even layer onto your penguin block. Make sure the fish details aren’t clogged with too much ink. -
Register the print:
Align the penguin block so the head overlaps the orange sun slightly centered. Getting this alignment right is crucial, so take your time peering under the block edges. -
Print the penguin:
Press the block down and burnish thoroughly with your spoon or baren, paying extra attention to solid areas like the wings to ensure a deep black coverage. -
Add the cheeks:
Once the black ink is dry, use a small paintbrush or a q-tip dipped in the orange ink to dab two small circles onto the penguin’s face for rosy cheeks.
Level Up: Mix Media
Instead of carving the ground foliage, try embroidering the leaves with blue-grey floss after the ink dries. The mix of print and thread adds amazing tactile texture.
Step 3: Finishing Touches
-
Carve the foliage stamps:
Using scrap pieces of linoleum, carve a simple stem with leaves and some small mound shapes for the ground. -
Print the ground cover:
Mix a muted Blue-Grey ink. Apply this to your scrap stamps and press them along the bottom of the penguin’s feet to ground the figure. -
Heat set the ink:
Once your artwork is fully dry (this can take 24 hours or more for oil-based inks), heat set it with an iron according to the ink manufacturer’s instructions to make it washable.
Now you have a whimsical, handcrafted piece of art that brings a bit of arctic charm to your kitchen or tote bag
Penguin Dancing With Rhythm Lines
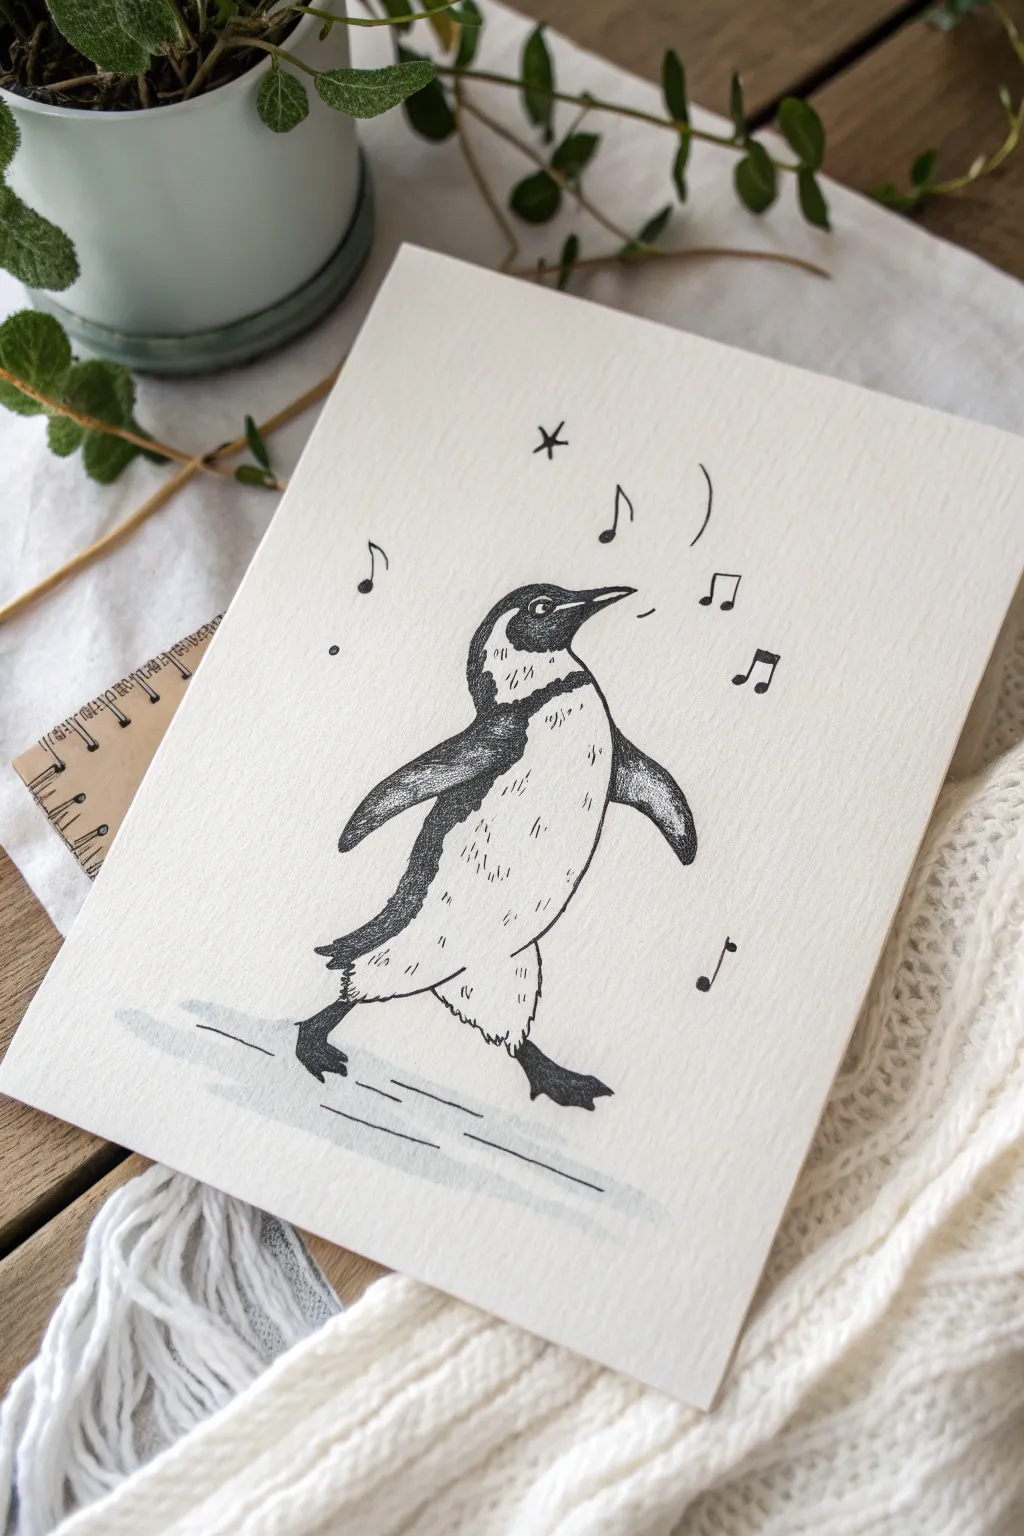
Capture the joy of a happy-footed penguin with this charming fine liner illustration. Using simple hatching techniques and playful musical elements, you’ll create a lively character that seems to waddle right off the textured paper.
Step-by-Step Tutorial
Materials
- Textured mixed media or watercolor paper (heavyweight)
- Black fine liner pens (sizes 0.1, 0.3, and 0.5)
- HB Pencil
- Soft eraser
- Light grey alcohol marker or watercolor wash
Step 1: Sketching the Posture
-
Outline the head and body:
Start with a light pencil sketch. Draw a rounded, slightly oblong shape for the body, leaning forward just a bit. Place a smaller circle on top for the head, seamlessly connecting it to create a smooth neck curve. -
Add the playful wings:
Sketch the left wing extending backwards, giving a sense of motion. The right wing should point slightly forward and down, balancing the penguin’s walking pose. -
Position the feet:
Draw the back foot firmly on the ground. For the front foot, lift the toes slightly upward to suggest a rhythmic step or a waddle mid-motion. -
Refine the facial features:
Sketch a pointed beak, keeping the top beak curved slightly downward. Place the eye relatively high on the head, leaving space for the distinctive markings around the neck.
Ink Smearing?
If your hand smudges ink while drawing, place a scrap piece of paper under your drawing hand. This acts as a shield, protecting your fresh lines.
Step 2: Inking and Details
-
Outline the main form:
Switch to your 0.3 fine liner. Carefully trace over your pencil lines for the beak, back, and wings. Use a broken, sketchy line for the belly to suggest fluffy feathers rather than a smooth seal-like skin. -
Fill in the dark markings:
Using the 0.5 pen, fill in the solid black areas of the head and the back of the wings. Leave a small white highlight in the eye to bring your penguin to life. -
Create texture on the back:
Instead of coloring the back completely solid black, use dense hatching or stippling near the edges of the dark patches. This transition softens the look and mimics feathers. -
Add feathery details:
With the 0.1 fine liner, add short, vertical dashes along the white belly and chest. These shouldn’t be uniform; cluster them slightly under the wing and near the legs to suggest shadow and volume. -
Define the legs and feet:
Ink the feet with solid black, but leave tiny gaps or lighter areas on the top ridges of the toes to show dimension.
Add a Pop of Color
For a festive twist, add a tiny red scarf or earmuffs using colored pencils. A bright splash of color against the black and white looks striking.
Step 3: Adding Rhythm and Atmosphere
-
Draw musical notes:
Scatter a few musical notes around the head. I like to vary the sizes—some eighth notes, some single quarter notes—and curve their stems to match the bouncy vibe. -
Include decorative elements:
Add a small star or two and a simple curved ‘movement line’ near the head to emphasize the dancing motion. -
Erase pencil guides:
Once the ink is totally dry (give it a few minutes to avoid smudging), gently erase all underlying pencil sketches. -
Ground the figure:
Using a very light grey marker or a diluted watercolor wash, paint a horizontal shadow beneath the feet. Keep strokes loose and horizontal to suggest an icy surface. -
Final touches:
Review your contrast. If the dark areas look patchy, go over them again with the 0.5 pen for a rich, deep black.
You have just created a charming little character full of rhythm and personality
Penguin With Patterned Belly Designs
This charming penguin illustration combines bold black ink work with delicate belly patterns for a stylized, folk-art feel. It is a deceptively simple project that focuses on clean lines and texture, perfect for practicing your ink control.
Detailed Instructions
Materials
- Cream or off-white textured drawing paper (heavyweight)
- Black fine liner pen (0.5mm)
- Black brush pen or broad marker
- Pencil (HB or 2B)
- Eraser
- Ruler (optional for alignment)
Step 1: Sketching the Outline
-
Start with the head:
Lightly sketch a rounded dome shape for the top of the head using your pencil. Keep the lines faint so they are easy to erase later. -
Form the beak:
Extend a slightly curved, pointed shape out from the left side of the head. The top line should curve down gently, meeting a straighter bottom line. -
Draw the back curve:
From the back of the head, draw a long, smooth sloping line downwards to create the penguin’s back. Let it curve slightly outward towards the bottom to suggest a full body. -
Define the belly:
Draw the front line starting from under the beak, curving outwards significantly to make a plump chest and belly, then curving back in at the feet. -
Add the wing:
Sketch a long, teardrop-shaped wing on the side of the body. It should start just below the neck area and extend down past the midpoint of the body, curving slightly backward. -
Place the feet:
At the bottom of the body, draw two small arched openings for legs, then sketch simple triangular shapes for the webbed feet pointing outwards.
Ink Flow Tip
If your markers bleed, lay down the black areas first, let them dry fully, then draw the delicate belly patterns. This prevents smudging.
Step 2: Inking the Forms
-
Outline the main shape:
Using your fine liner, go over your pencil lines for the entire outer contour of the penguin. Keep your hand steady for a smooth, confident line. -
Define the face separation:
Draw a curved line starting from the base of the beak, arching up over where the eye will be, and flowing down the side of the body to separate the black back from the white belly. This line should connect to the front edge of the wing. -
Detail the eye:
Inside the head area, draw a small circle. Within that circle, draw a smaller dot for the pupil, leaving the rest of the circle white. -
Fill the dark areas:
Switch to your black brush pen or broad marker. Carefully fill in the head (avoiding the white eye circle), the entire back area, and the wing. I prefer doing this slowly near the edges to keep the outline crisp. -
Add texture to the darks:
Allow the ink to dry, then use the fine liner to add very subtle cross-hatching or texture lines over the filled black areas if your marker looks too flat, though a solid black works well too.
Make It Wintery
Add a bright red scarf around the penguin’s neck or a simple yellow hat using colored pencils for a festive pop of color.
Step 3: Adding the Pattern
-
Start the belly pattern:
With the 0.5mm fine liner, begin adding small marks on the white belly area. These should be short, vertical dashes or tiny teardrop shapes. -
Create density:
Place the marks closer together near the top of the chest and the sides of the belly, spreading them out as you move toward the center. This creates a sense of roundness. -
Vary the marks:
Keep the dashes slightly irregular. Some can be mere dots, while others are short lines. This organic variety mimics feathers better than a rigid grid. -
Detail the feet:
Draw horizontal stripes across the leg/ankle area to simulate texture or skin folds. Outline the toes clearly. -
Clean up:
Once all ink is completely dry, gently erase any visible pencil sketch lines to leave a clean, professional finish.
Now you have a delightful, stylized penguin character ready to frame or gift.
Penguin Made of Geometric Shapes
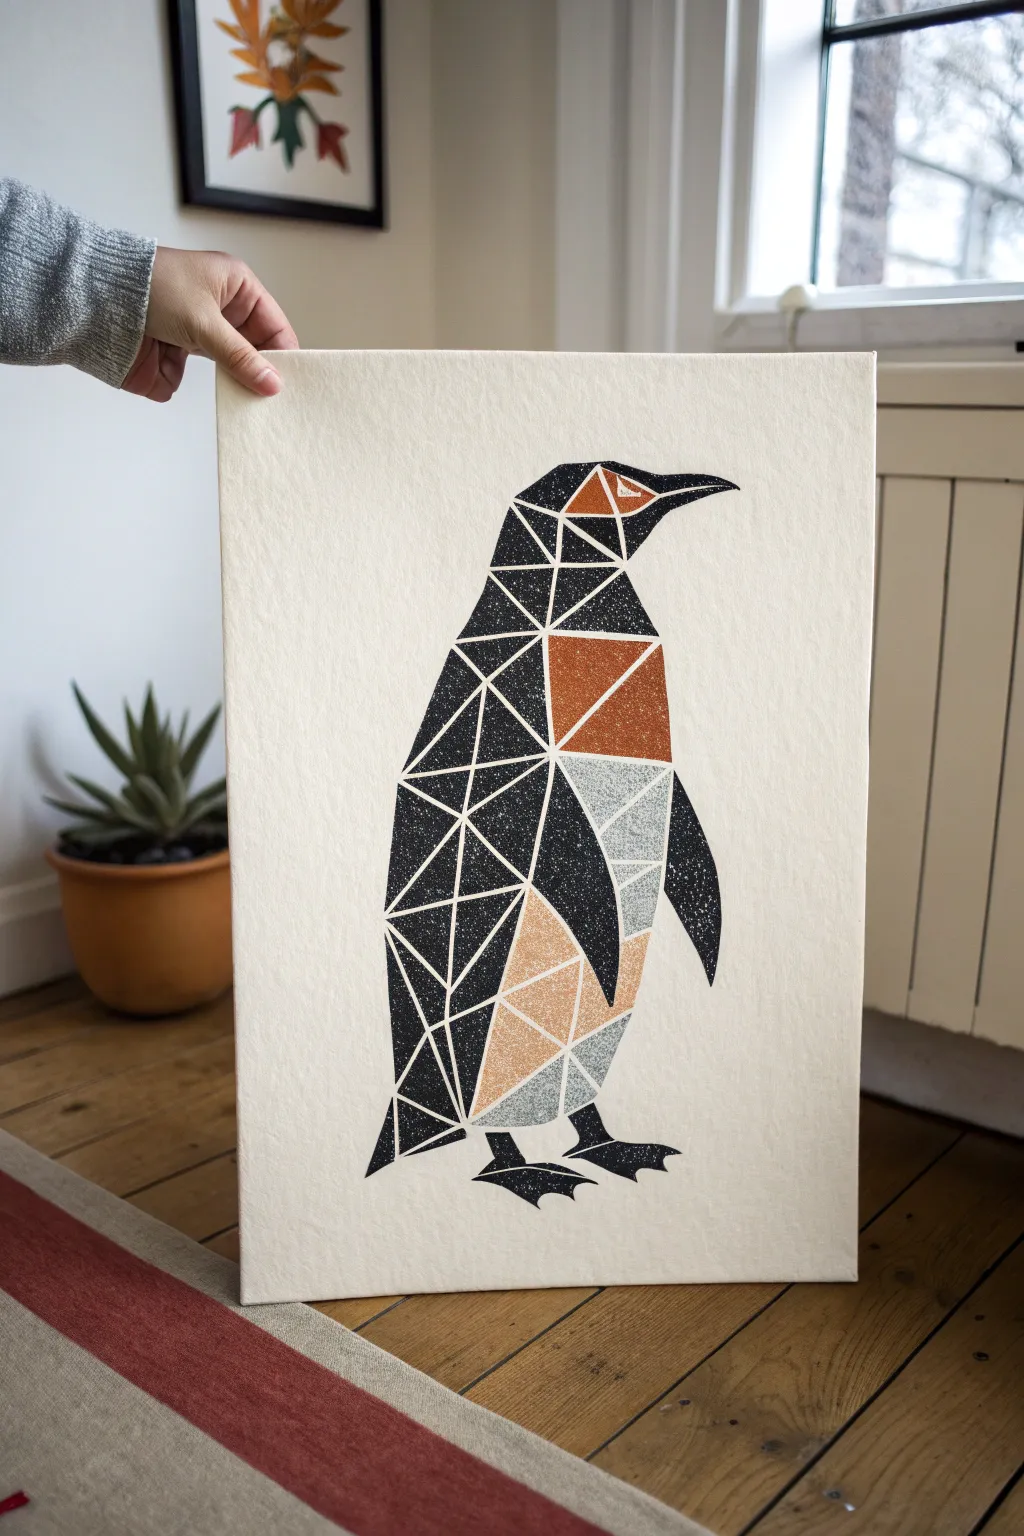
This striking wall art deconstructs a classic penguin silhouette into sharp, bold geometric facets. Using stencils and texture techniques, you’ll create a modern, minimalist piece with a handmade, slightly distressed finish.
How-To Guide
Materials
- Rectangular canvas or thick watercolor paper (approx. 18×24 inches)
- Acrylic paints (black, burnt orange/rust, beige, light grey, white)
- Adhesive stencil film or masking tape (low-tack)
- Craft knife (X-Acto)
- Cutting mat
- Pencil and eraser
- Dense foam sponge or stippling brush
- Ruler
- Printed template of geometric penguin (optional)
Step 1: Designing the Geometry
-
Sketch the Silhouette:
Start by lightly drawing the outer outline of a standing penguin on your canvas. If you aren’t confident in freehand drawing, print a silhouette, cut it out, and trace lightly around it. -
Create the Facets:
Using a ruler, break the interior of the penguin shape into triangles and quadrilaterals. Reference the image to place the ‘chest’ area and the ‘beak’ correctly. The lines should connect to form a mesh-like pattern. -
Map the Colors:
Lightly mark which sections will be which color. Note that the back and flipper are primarily black, the chest has a rust-orange patch, and the belly uses beige and grey tones. Leave thin gaps between shapes to act as the white ‘grout’ lines.
Clean Lines Tip
Before applying your colored paint, seal the stencil edges by painting a thin layer of the background color (white) or clear matte medium. This prevents color bleeding.
Step 2: Creating the Stencils
-
Apply Stencil Film:
Cover your drawing with a sheet of adhesive stencil film. It’s transparent enough to see your pencil lines through. Alternatively, you can use strips of masking tape to outline individual shapes, but film is more precise. -
Cut the Shapes:
With a sharp craft knife, carefully cut out the geometric shapes, removing the film only from the areas you plan to paint black first. Leave the thin strips between shapes (the ‘grout’ lines) covered with film or tape to keep the canvas white. -
Secure Edges:
Run your fingernail or a bone folder firmly along the cut edges of the remaining film to prevent paint from bleeding underneath.
Level Up: Gold Leaf
Replace the rust-orange or beige sections with gold leaf for a metallic pop. Apply sizing glue to those geometric shapes and press the leaf on for a chic finish.
Step 3: Painting and Texturing
-
Prepare the Sponge:
Squeeze black acrylic paint onto a palette. Dab your sponge into the paint, then offload most of it onto a paper towel until the sponge is almost dry. -
Apply Black Base:
Using an up-and-down dabbing motion, apply the black paint to the exposed stencil areas. The motion creates a speckled, stone-like texture rather than a solid, flat color. -
Add Speckles:
For added texture, lightly flick a stiff toothbrush dipped in slightly watered-down white paint over the wet black areas to create the starry, speckled effect seen in the reference. -
Reveal and Repeat:
Once the black paint is touch-dry, carefully peel off the film for the next color sections (the rust orange). Mask off the surrounding areas if needed. -
Paint Accent Colors:
Repeat the sponge dabbing process with your rust-orange paint for the upper chest area. Remember to offload the paint first to maintain that gritty texture. -
Paint Belly Tones:
Move on to the beige and light grey sections on the lower belly. I like to let these dry briefly before adding a second, very light dabbing layer to build depth without losing the texture. -
Detail the Eye:
Use a small detail brush or a tiny piece of masking tape to preserve the sharp white triangle for the eye within the colored head section.
Step 4: Finishing Touches
-
Remove Masking:
When all paint is completely dry, slowly peel away all remaining stencil film or tape. Pull at a sharp angle to ensure clean, crisp lines. -
Check the Lines:
Inspect the white lines between your geometric shapes. If any paint has bled, touch it up carefully with white paint and a fine liner brush. -
Seal the Artwork:
To protect the textured surface, apply a clear matte varnish spray over the entire piece. This also unifies the sheen of the different paint colors.
Once hung, the sharp geometry combined with the organic texture makes for a sophisticated focal point in any room


Have a question or want to share your own experience? I'd love to hear from you in the comments below!