Green is my go-to color when I want furniture to feel fresh, grounded, and instantly more “designed” without trying too hard. Here are my favorite green painted furniture directions—from classic, cozy shades to bolder, artsy finishes you can totally make your own.
Classic Sage Dresser Refresh
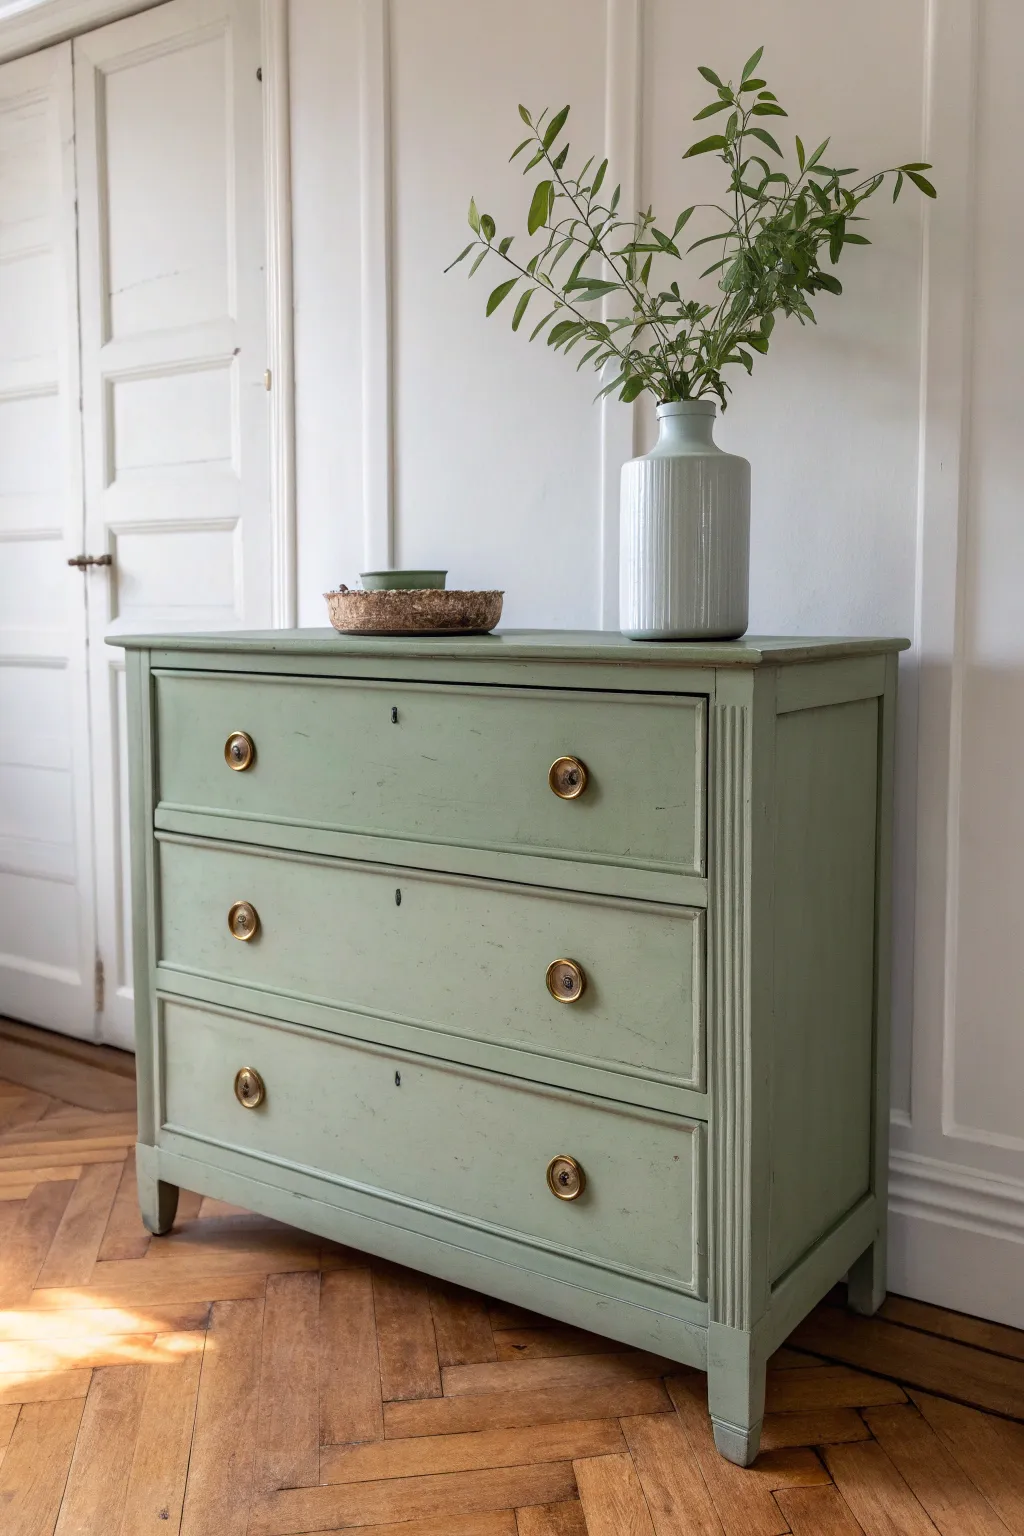
Give a weary antique dresser a fresh, sophisticated life with this calming sage green makeover. The result is a soft, matte finish that highlights beautiful details like fluted columns while preserving the piece’s vintage charm.
Step-by-Step Guide
Materials
- Vintage wooden dresser (Louis XVI style works best)
- Mild degreaser or TSP substitute
- Sanding sponges (120 and 220 grit)
- Tack cloth
- Painter’s tape
- Stain-blocking primer (shellac-based recommended)
- Chalk or mineral paint in a muted sage green
- High-quality synthetic oval paintbrush
- Small artist brush for details
- Matte furniture wax or polycrylic topcoat
- Wax brush or lint-free rags
- Screwdriver for hardware removal
- Brass polish (optional)
Step 1: Preparation & Cleaning
-
Remove Hardware:
Begin by carefully unscrewing all knobs, handles, and keyhole escutcheons. Store them in a marked bag so no screws get lost during the process. -
Deep Clean:
Scrub the entire piece with a mild degreaser or TSP substitute to remove decades of furniture wax, oils, and dirt. A clean surface is crucial for paint adhesion. -
Rinse and Dry:
Wipe down the furniture with a damp cloth to remove any cleaning residue, then let it dry completely before moving to the next step. -
Scuff Sanding:
Using a 120-grit sanding sponge, lightly scuff the entire surface. You aren’t trying to strip it to bare wood, just breaking the existing glossy finish to give the primer something to grip. -
Dust Removal:
Vacuum up the sanding dust, then wipe everything down with a tack cloth to ensure a perfectly smooth starting surface.
Pro Tip: Flawless Fluting
When painting fluted columns, brush vertically along the grooves, then immediately do a very light horizontal pass with a dry brush to feather out excess paint pooling at the bottom.
Step 2: Priming & Painting
-
Apply Primer:
Since vintage furniture can bleed tannins, apply a coat of stain-blocking primer. A shellac-based primer is my go-to for preventing pink or yellow stains from soaking through the green paint. -
Light Sanding:
Once the primer is dry, quickly run a 220-grit sponge over the surface to knock down any brush strokes or raised grain. Wipe away the dust. -
First Coat of Green:
Dip your oval brush into the sage green paint. Apply a thin, even coat, working with the grain of the wood. Don’t worry if coverage isn’t perfect yet; thin costs are better than thick ones. -
Detail Work:
Use a smaller artist brush to get paint into the fluted columns or intricate carvings without letting it pool or drip in the crevices. -
Dry Time:
Allow the first coat to dry according to the manufacturer’s instructions, usually 2-4 hours depending on humidity. -
Second Coat:
Apply the second coat of sage green. This should provide full, opaque coverage. Watch for drips along the bottom edges of drawers and smooth them out immediately. -
Final Smooth Sanding (Optional):
For a buttery smooth finish, very gently pass a high-grit sanding pad (like 400 grit) or a crumpled brown paper bag over the dried paint.
Troubleshooting: Bleed Through
If you see pink or yellow spots appearing through your dry green paint, don’t panic. Apply a spot coat of shellac-based primer over just the stain, let dry, and repaint that area.
Step 3: Finishing Touches
-
Applying Protection:
To achieve that soft, matte sheen seen in the photo, apply a clear furniture wax. Brush it on in sections using a wax brush. -
Buffing:
Let the wax sit for about 15-20 minutes, then buff it off with a clean, lint-free cloth. The more you buff, the slightly shinier it will become. -
Hardware Refresh:
While the wax cures, clean your original gold hardware. If they are too tarnished, a little brass polish will bring back the shine that contrasts so beautifully with the sage green. -
Reassembly:
Reattach your knobs and escutcheons carefully. Don’t over-tighten the screws, as fresh paint can sometimes be soft for a few days. -
Cure Time:
Avoid placing heavy objects on the dresser for at least a week to allow the paint and wax to fully cure and harden.
Enjoy the calm and classic atmosphere your newly refinished piece brings to the room


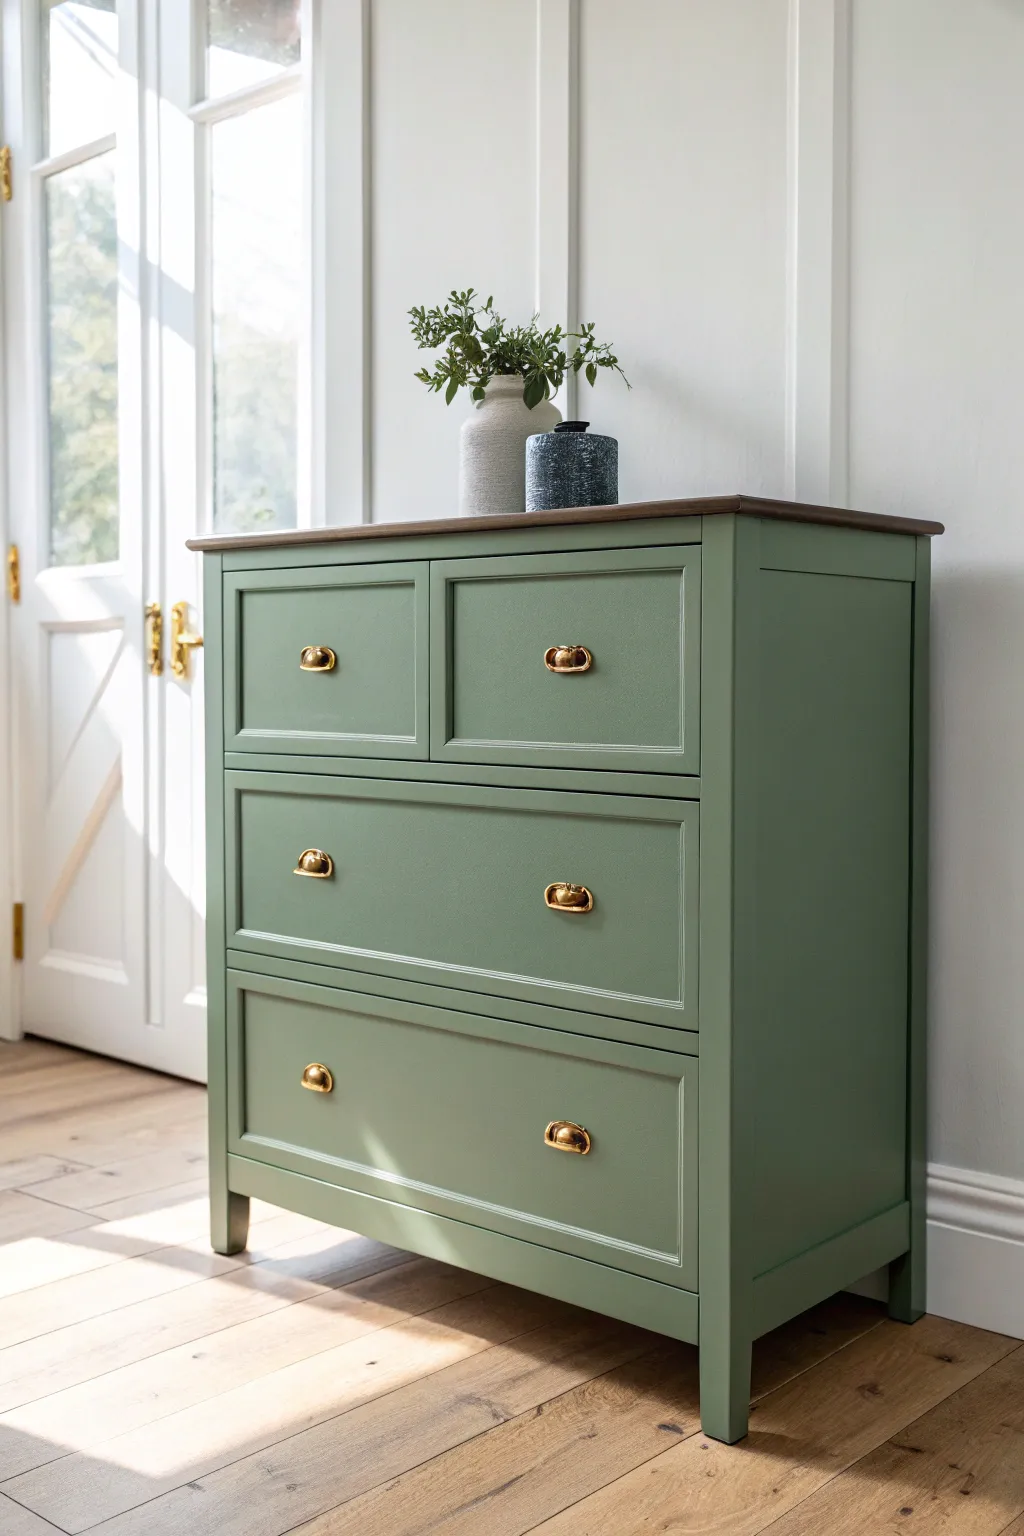
Moody Forest Green Sideboard
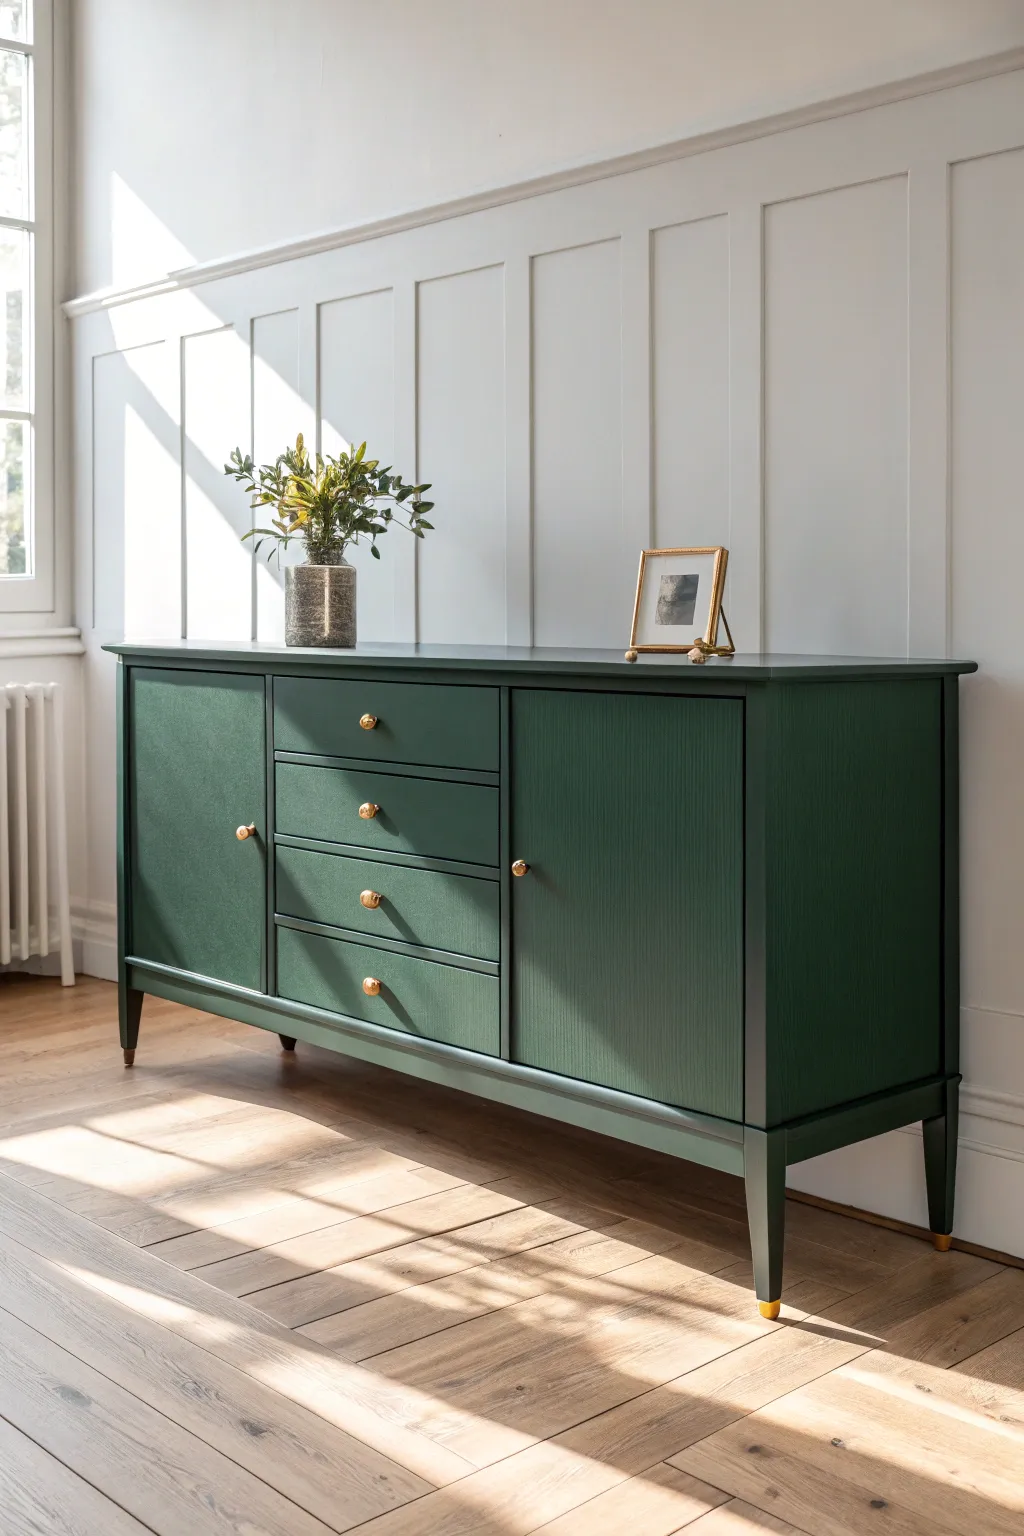
Transform a dated sideboard into a sophisticated focal point using a rich, moody forest green shade. This project perfectly balances modern elegance with classic design, highlighting the furniture’s lines with brass hardware accents.
How-To Guide
Materials
- Wooden sideboard or dresser
- Sanding block (120 and 220 grit)
- Clean rags or tack cloth
- TSP cleaner or degreaser
- Painter’s tape
- High-quality stain-blocking primer
- Forest green mineral or chalk paint
- Synthetic oval brush
- Small foam roller
- Polycrylic topcoat or furniture wax
- Gold or brass knobs
- Gold paint pen (optional for feet)
Step 1: Preparation
-
Hardware Removal:
Begin by removing all drawers and doors from the sideboard body. Unscrew all existing knobs, hinges, and handles, placing them in a labeled bag so nothing gets lost. -
Cleaning:
Thoroughly clean the entire piece using a TSP cleaner or a strong degreaser. Scrub well to remove years of built-up oil, wax, or grime, as this ensures your paint cures correctly. -
Scuff Sanding:
Using a 120-grit sanding block, scuff sand every surface you intend to paint. You aren’t trying to remove the old finish entirely, just roughening it up to give the primer something to grip. -
Dust Removal:
Vacuum up the sanding dust, then wipe the piece down with a damp tack cloth. Ensure the surface is completely dry and dust-free before moving on. -
Tape Off:
Apply painter’s tape to the inside edges of the drawers or any internal compartments you wish to keep unpainted for a clean transition line.
Smooth Finishing Trick
Between paint coats, gently sand with a crumbled brown paper bag. It acts like ultra-fine sandpaper to polish the paint surface incredible smooth.
Step 2: Painting Process
-
Priming:
Roll or brush on a coat of high-quality stain-blocking primer. If your piece is made of mahogany or cherry, I recommend two coats to prevent tannins from bleeding through the green later. -
Smooth the Base:
Once the primer is fully dry, lightly run a 220-grit sanding block over the surface to knock down any texture. Wipe away the dust. -
First Coat of Green:
Stir your forest green paint thoroughly. Use a synthetic oval brush to cut in corners and detailed edges, then immediately use a foam roller for the larger flat surfaces to create a smooth, brush-free finish. -
Drying Time:
Allow the first coat to dry according to the manufacturer’s instructions, usually 2-4 hours. -
Second Coat:
Apply the second coat of green using the same method. Pay special attention to coverage on drawer fronts and side panels to ensure the color is deep and opaque. -
Check Coverage:
Inspect the piece in good lighting. If you see any patchiness, apply a thin third coat where necessary.
Sticky Drawers?
If painted drawers stick, rub a clear candle or beeswax along the runners and sides. This lubricates the wood and prevents paint friction.
Step 3: Finishing Touches
-
Sealing:
Once the paint has cured for at least 24 hours, apply your topcoat. A matte polycrylic provides durability without too much shine, or use clear furniture wax for a softer, hand-rubbed look. -
Painting the Feet:
To mimic the brass-capped look in the photo, use a gold paint pen or metallic liquid leaf to carefully paint the bottom inch of the legs. Use tape to get a crisp, straight line. -
Reassembly:
Reattach the doors and slide the drawers back into place once everything is dry. -
New Hardware:
Install the new brass knobs. The contrast against the dark green is what really makes this look pop.
Enjoy styling your elegant new storage piece with framed art and fresh greenery


Olive Nightstands as Calm Neutrals

Transform a plain wooden nightstand into a calming bedroom anchor with this dusty olive green finish. This project creates a smooth, matte look that pairs perfectly with natural textures like woven lampshades and linen bedding.
Step-by-Step Guide
Materials
- Wooden nightstand (unfinished or previously finished)
- Sandpaper (120 and 220 grit)
- Tack cloth or microfiber rags
- High-quality bonding primer
- Olive green chalk or mineral paint (e.g., a shade like ‘Bayberry’ or ‘Olive’)
- Synthetic bristle paint brush (2-inch angled)
- Small foam roller (optional for flat surfaces)
- Clear matte protective topcoat (wax or polycrylic)
- Wax brush or lint-free cloth (if using wax)
- Screwdriver
- Painter’s tape
- Drop cloth
- New hardware (dark bronze knob)
Step 1: Preparation
-
Remove Hardware:
Begin by removing the drawer from the nightstand. Use your screwdriver to take off the old knob or handle. Store the screws in a safe place if you plan to reuse them, though we will likely be swapping hardware for this look. -
Clean Thoroughly:
Wipe down the entire piece with a degreasing cleaner or a mixture of dish soap and warm water. It is crucial to remove any oils, dust, or old furniture polish to ensure the new paint sticks properly. -
Scuff Sanding:
Using 120-grit sandpaper, improved the surface adhesion by giving the entire nightstand a light scuff sand. You don’t need to strip it to bare wood; just roughen up the glossy finish. -
Dust Removal:
Vacuum up the sanding dust, then wipe the piece down meticulously with a tack cloth. Any remaining dust will create a gritty finish, so take your time here. -
Tape Off Areas:
If there are areas you don’t want painted, such as the inside of the drawer or drawer glides, apply painter’s tape now to protect them.
Step 2: Priming and Painting
-
Apply Primer:
Since this is a solid color finish, apply a coat of high-quality bonding primer. This prevents bleed-through and ensures an even base color. Use a brush for corners and a small roller for the top and sides. -
Sand the Primer:
Once the primer is completely dry, lightly sand it with 220-grit sandpaper to knock down any brush strokes or raised grain. Wipe away the dust again. -
First Coat of Green:
Stir your olive green mineral or chalk paint thoroughly. Apply the first coat using a damp synthetic brush. Long, smooth strokes work best to minimize texture. Don’t worry if coverage isn’t perfect yet. -
Dry Time:
Allow the first coat to dry according to the manufacturer’s instructions. Chalk-style paints dry quickly, but give it at least an hour or two to be safe. -
Second Coat Application:
Apply a second coat of the olive green paint. This coat should provide full, opaque coverage. Watch for drips along the edges of the top and legs. -
Check for Imperfections:
Once the second coat is dry, inspect the finish in good light. If you see any uneven patches, apply a third thin coat just to those areas or over the whole surface for uniformity. -
Smooth the Finish:
For a factory-smooth feel, take a very fine sanding sponge or a crumpled brown paper bag and buff the dry paint surface gently. This polishes the paint without removing it.
Sticky Drawer?
If the drawer sticks after painting, rub a plain candle or a bar of beeswax along the wooden runners and the bottom edges of the drawer to help it glide perfectly again.
Step 3: Protecting and assembling
-
Apply Topcoat:
To seal the paint, apply a clear matte protective topcoat. If using wax, brush it on and buff off the excess with a lint-free cloth. If using polycrylic, apply thin layers with a brush, sanding lightly between coats. -
Cure Time:
Let the topcoat dry thoroughly. While it might feel dry to the touch quickly, handle the piece gently for the first few days while the finish hardens. -
Install New Knob:
Take your new dark bronze knob—a round, simple shape complements the clean lines best—and attach it to the drawer front. -
Reassemble:
Slide the drawer back into the nightstand. Ensure it glides smoothly; if paint got on the runners, sand it off or apply a little wax to lubricate the track.
Add Drawer Details
Line the inside of the drawer with a floral or botanical wallpaper scrap. It adds a secret pop of pattern that coordinates beautifully with the olive exterior.
Place your newly refreshed nightstand beside your bed and enjoy the calm atmosphere it brings to your room


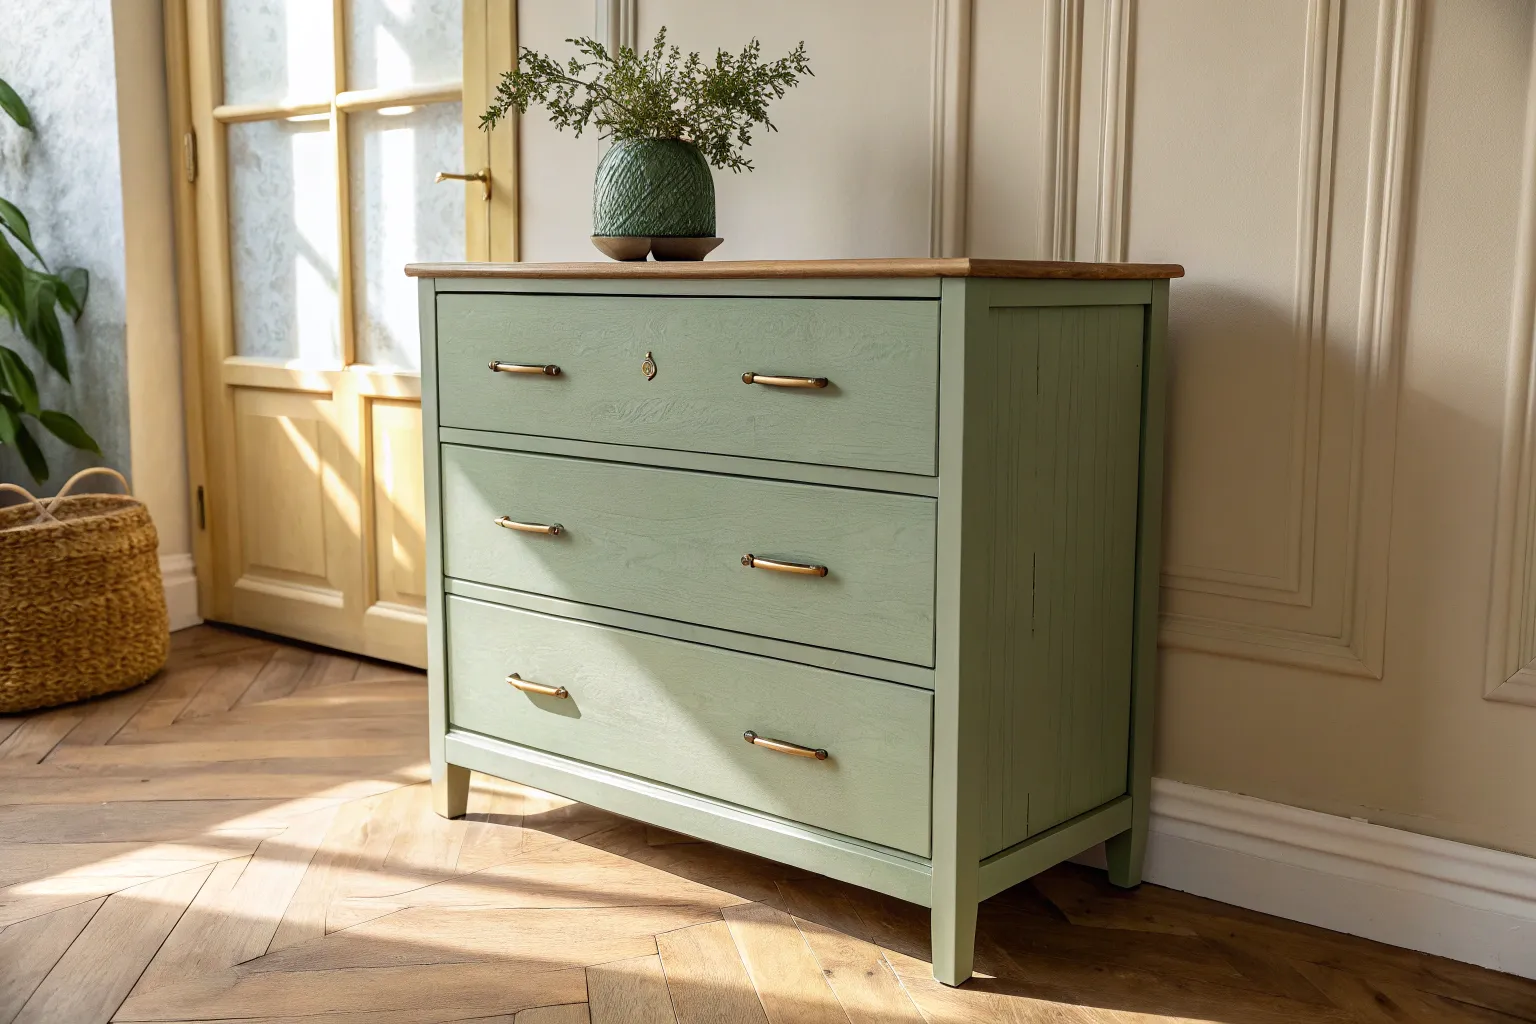
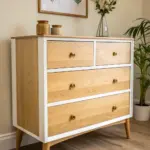
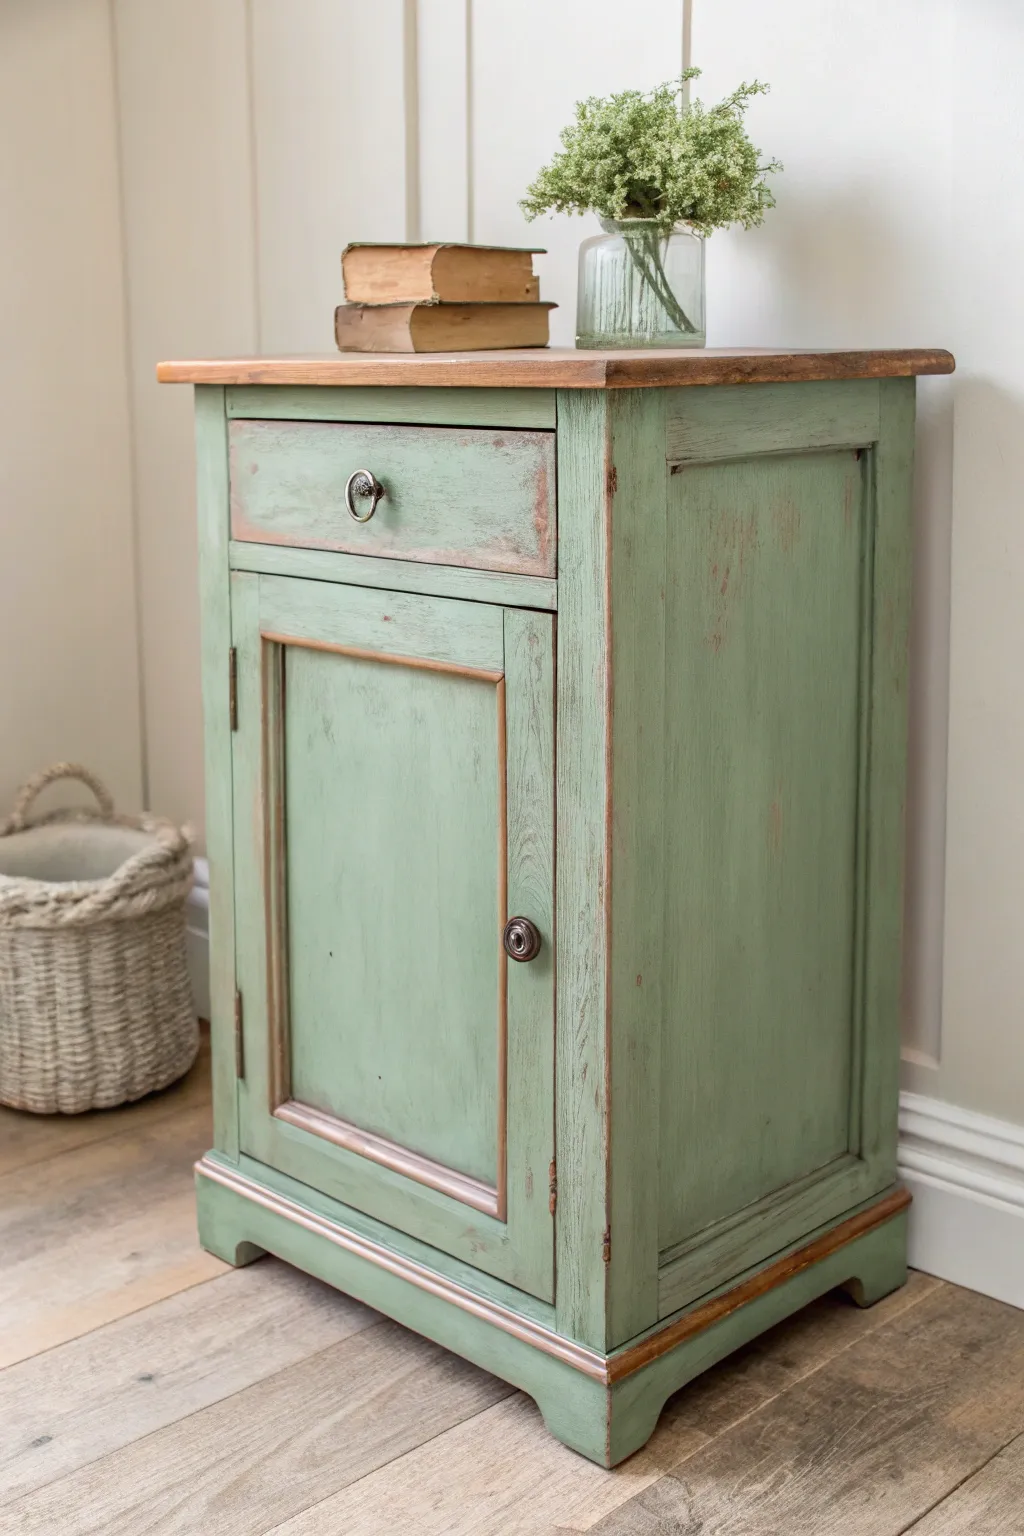
Two-Tone Green Body With Wood Top
Transform an ordinary chest of drawers into a sophisticated statement piece with this classic two-tone finish. By pairing a muted, earthy green body with a warm, natural wood top, you create a timeless look that feels both rustic and refined.
Step-by-Step
Materials
- Wooden dresser (solid wood top preferred)
- Orbital sander with 80, 120, and 220 grit discs
- Liquid sandpaper or deglosser
- Wood stain (Golden Oak or Provencal tone)
- Sage green furniture paint (chalk or mineral paint)
- High-quality synthetic paint brush (2-inch)
- Polyurethane topcoat (matte or satin)
- Tack cloths
- Painter’s tape
- New wooden knobs (stained to match top)
- Wood filler
- Screwdriver
Step 1: Preparation & Sanding
-
Disassemble the hardware:
Begin by removing all drawers from the dresser carcass. Use a screwdriver to take off the old knobs or handles and set them aside if you plan to reuse them, though new wooden knobs really suit this look. -
Sand the top surface:
Because we want to reveal the natural grain, use an orbital sander on the top surface. Start with 80-grit sandpaper to strip the old finish, wipe away dust, and progress to 120-grit. -
Final smooth sanding:
Finish the top surface with 220-grit sandpaper. This ensures the wood is silky smooth and ready to accept the stain evenly. Run your hand over the surface to check for any rough patches. -
Prep the body:
For the painted sections (the body and drawer fronts), you don’t need to sand back to bare wood. A ‘scuff sand’ with 120-grit paper is sufficient to give the paint something to grip. -
Clean thoroughly:
Vacuum up all the sanding dust from the corners and crevices. Finish by wiping the entire piece down with a deglosser or a mixture of water and vinegar to remove any residual oils or grime.
Smooth Finish Secret
Between paint coats, dip your sanding sponge in water for a ‘wet fry’ sand. It creates an ultra-smooth, factory-like surface without the dust.
Step 2: Staining the Accents
-
Mask the edges:
Apply painter’s tape carefully along the top edge of the base where it meets the newly sanded top. This prevents your stain from bleeding onto the area you plan to paint green. -
Apply the stain:
Using a lint-free cloth or staining pad, apply your chosen wood stain to the top surface. Work with the grain, ensuring even coverage. I usually wipe off excess stain after about 5-10 minutes for a lighter, more natural tone. -
Stain the knobs:
While the top dries, stain your wooden knobs to match. Inserting a screw into the back of the knob gives you a handle to hold while staining so you don’t get messy fingers. -
Apply first clear coat:
Once the stain is completely dry (check the can for times), apply a thin layer of matte protective topcoat over the stained wood to seal it.
Step 3: Painting & Finishing
-
Tape the top:
Apply fresh painter’s tape along the underside of the newly stained top to protect it from stray brush strokes while you paint the body. -
First coat of green:
Stir your sage green mineral or chalk paint thoroughly. Using a quality synthetic brush, apply the first coat to the dresser body and drawer fronts. Don’t worry if it looks patchy; thin, even coats are key. -
Sand between coats:
After the first coat dries, lightly run a fine-grit sanding sponge over the surface. This knocks back any raised wood grain or brush marks for a professional finish. -
Second coat coverage:
Apply your second coat of green paint. This should provide full, opaque coverage. Pay special attention to the drawer edges and recessed panels. -
Seal the paint:
Once the paint has cured (usually 24 hours is best), apply a clear matte wax or polycrylic topcoat over the green sections to protect against scuffs and daily wear. -
Reassemble:
Remove all painter’s tape carefully. Reinstall the drawers and screw on your newly stained wooden knobs to complete the two-tone aesthetic.
Drawer Lining Logic
Line the interior drawers with a botanical or vintage floral wallpaper. It adds a hidden pop of pattern that complements the sage green exterior perfectly.
Enjoy the calm, natural vibe your beautifully revamped dresser brings to the room
BRUSH GUIDE
The Right Brush for Every Stroke
From clean lines to bold texture — master brush choice, stroke control, and essential techniques.
Explore the Full Guide
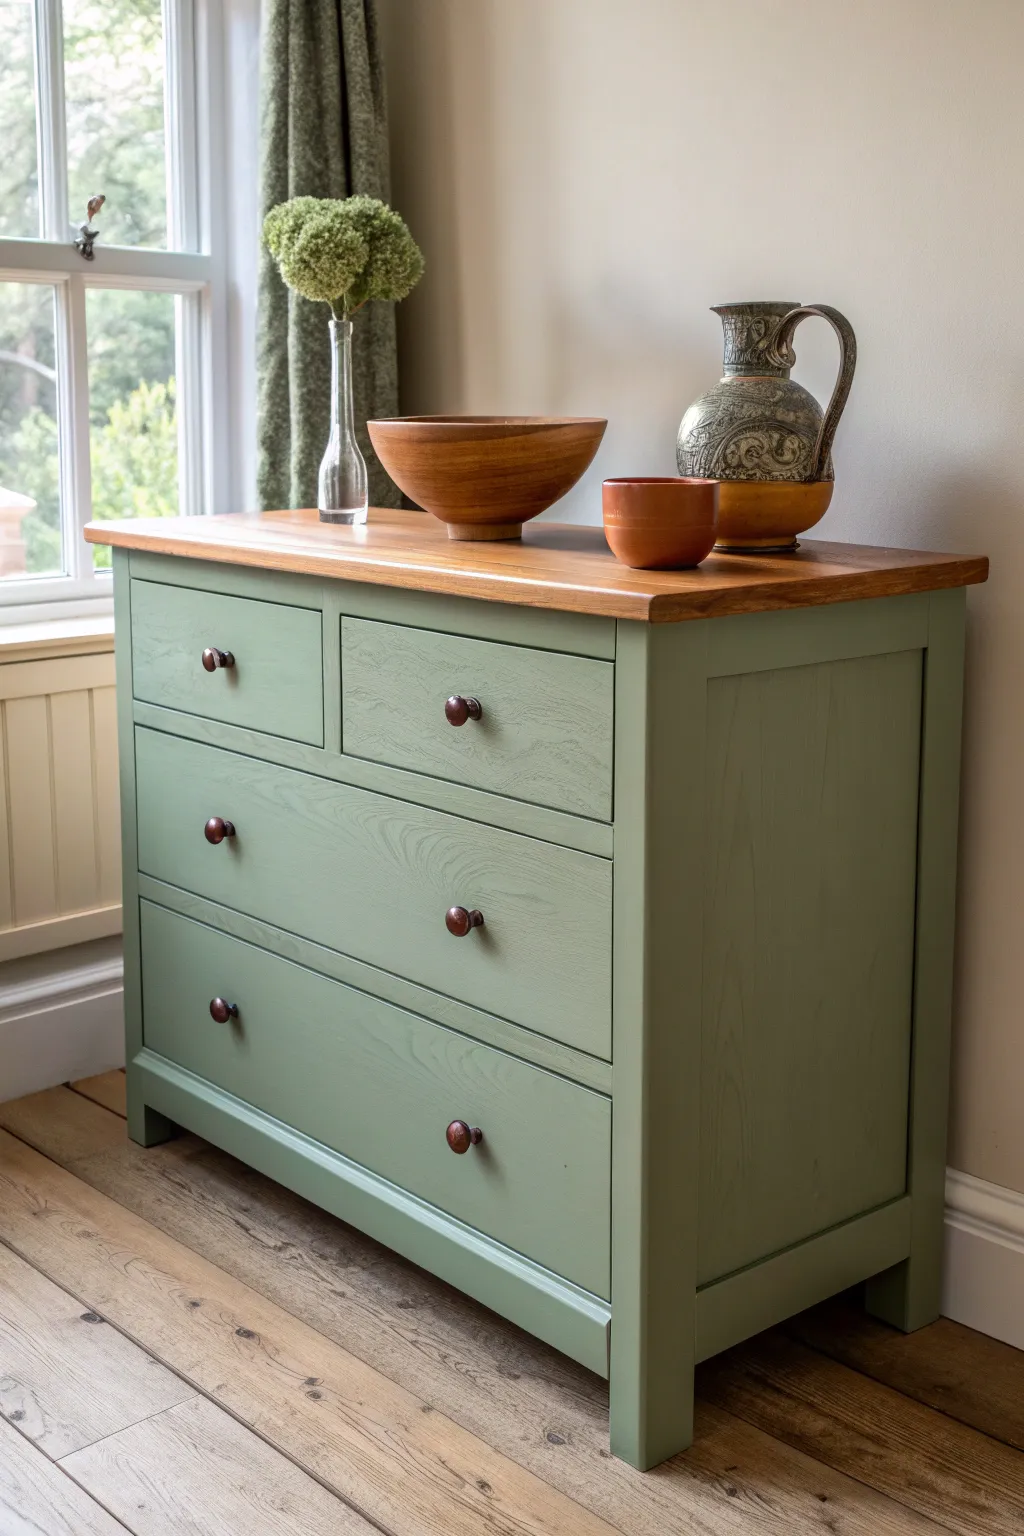
Green Paint Paired With Warm Metal Pulls
Transform a tired wooden dresser into a statement piece using a soothing sage green palette and warm metallic accents. The contrast between the matte painted body, the rich stained top, and the gleaming brass hardware creates a look that is both modern and timeless.
Detailed Instructions
Materials
- Wooden dresser (with separate top if possible, or masking tape)
- Sage Green furniture paint (e.g., mineral or chalk paint)
- Dark walnut wood stain
- Water-based polyurethane topcoat (matte for body, satin for top)
- Gold or brass cup pulls (6 total)
- Gold or brass knobs (2 for top drawers)
- Medium and fine grit sandpaper (120 and 220)
- Orbital sander (optional but helpful)
- Tack cloth
- High-quality synthetic bristle brush
- Small foam roller
- Wood filler (if filling old hardware holes)
- Drill and bits (for new hardware)
- Painter’s tape
- Drop cloth
Step 1: Preparation
-
Remove Hardware:
Begin by removing all the drawers from the dresser. Unscrew the old handles and knobs and set them aside. If you plan to reuse the holes, make sure your new hardware matches the measurements; otherwise, proceed to the next step. -
Clean Thoroughly:
Scrub the entire piece with a degreasing cleaner like TSP or a water-based alternative. Old furniture often has built-up wax or polish that can prevent paint adhesion, so do a thorough job here. -
Fill Holes:
If your new cup pulls require different hole spacing, fill the old holes with wood filler. Let it dry completely, usually soaking in for an hour or so depending on depth, then sand flush. -
Sand the Top:
Since we are staining the top, you need to sand it down to bare wood. Start with 120-grit paper on your orbital sander to remove the old finish, then switch to 220-grit to smooth it out perfectly. Wipe away all dust. -
Scuff Sand the Body:
For the painted sections, you don’t need to go to bare wood. Just give all surfaces a good scuff sanding with 120-grit paper to create a ‘tooth’ for the paint to grab onto. Don’t forget the drawer fronts.
Bleed-Through Blues?
If you see pink or yellow stains appearing through your primer, that’s tannin bleed. Stop painting and seal the area with a shellac-based primer before continuing.
Step 2: Staining the Top
-
Apply Stain:
Stir your dark walnut stain well. Apply it to the raw wood top using a lint-free rag or a staining sponge, going with the grain. I like to work in long, continuous strokes to avoid lap marks. -
Wipe Back:
After letting the stain penetrate for a few minutes (check your can for specifics), wipe away the excess with a clean rag. The longer you leave it, the darker it gets. -
Seal the Wood:
Once the stain is fully dry (usually 24 hours), apply 2-3 coats of a satin polyurethane. Lightly sand with very fine paper between coats for a professional factory finish feel.
Pro Tip: Drawer Edges
Don’t paint the sides of the drawers where they slide on the tracks. Paint buildup here makes drawers stick. Use wax on the wooden runners instead for smooth gliding.
Step 3: Painting
-
Masking:
Use painter’s tape to carefully mask off the underside of the newly stained top to protect it from stray brush strokes. -
Prime (Optional):
If your dresser is dark mahogany or bleeds tannins (like cherry), apply a coat of stain-blocking primer first. If using a high-quality chalk or mineral paint on lighter wood, you might be able to skip this. -
First Coat:
Apply your sage green paint. Use a brush for corners and detailed moldings, and a small foam roller for the large flat sides and drawer fronts to minimize texture. Let this coat dry completely. -
Sand Between Coats:
Lightly run a fine sanding sponge over the painted surfaces to knock down any bumps or dust nibs. Wipe clean with a tack cloth. -
Second Coat:
Apply the second coat of green paint. This should provide full, opaque coverage. Watch for drips along the edges of the drawers. -
Seal the Paint:
Protect your paint job with a matte clear coat or wax. Apply thin layers, allowing adequate dry time. This matte finish gives that soft, modern look seen in the photo.
Step 4: Assembly
-
Drill New Holes:
Measure and mark the center points for your new cup pulls and knobs. Drill fresh holes carefully, keeping the drill level to avoid splintering the wood inside. -
Install Hardware:
Attach the brass cup pulls to the lower drawers and the knobs to the top drawers. Hand-tighten with a screwdriver rather than a drill to prevent stripping the screws. -
Final Polish:
Remove the painter’s tape, slide the drawers back in, and give the top a quick buff with a soft cloth to make that walnut stain shine.
Enjoy the satisfaction of giving an old piece a sophisticated new life with this classic color combination
Cottage Distressed Green Finish
Bring rustic charm to your bedroom with this beautifully weathered sage green nightstand. The technique uses strategic distressing to reveal warm wood tones underneath, creating a piece that feels both vintage and timeless.
Step-by-Step
Materials
- Wooden nightstand or small cabinet
- Sage green chalk finish paint
- Dark walnut or espresso wood stain
- Clear matte polyurethane topcoat
- Vaseline (petroleum jelly)
- Medium-grit sandpaper (120-150 grit)
- Fine-grit sandpaper (220 grit)
- Paintbrushes (synthetic bristle)
- Lint-free rags
- Drop cloth
- Screwdriver
Step 1: Preparation & Staining
-
Remove Hardware:
Use a screwdriver to carefully remove the drawer pull and door knob. Store these screws in a small bag so they don’t get lost during the painting process. -
Clean the Surface:
Wipe down the entire piece with a damp rag to remove dust and grime. If the existing finish is glossy, give it a light scuff sand with 150-grit sandpaper to help the new finish adhere. -
Sand the Top:
If you want the top to remain natural wood like the photo, sand the existing finish off the top completely using 120-grit sandpaper until you reach raw wood. -
Stain the Top:
Apply a coat of dark walnut stain to the raw wood top using a lint-free rag. Wipe away excess stain immediately and let it dry according to the manufacturer’s instructions. -
Stain Edges (Optional):
If your piece is currently a light color or raw wood, apply stain to the edges, corners, and spots where you plan to distress later. This ensures a dark, rich contrast when you sand back the green paint.
Step 2: The Resist Technique & Painting
-
Apply Resist Medium:
Dip a finger or small cloth into Vaseline and apply it to areas where you want natural wear. Focus on corners, raised moldings, edges of the drawer, and random patches on flat surfaces. -
First Coat of Green:
Stir your sage green chalk finish paint thoroughly. Apply the first coat over the entire base of the cabinet, painting right over the Vaseline spots. Don’t worry if the paint slips a bit in those areas. -
Dry Time:
Allow the first coat to dry completely. Chalk finish paint usually dries quickly, often within 30 to 60 minutes. -
Second Coat:
Apply a second coat of green paint for solid coverage. I find two coats usually provide the perfect depth of color. Let this dry fully, preferably overnight to ensure the paint hardens.
Vaseline Resist Trick
The more Vaseline you use, the larger the paint chips will be. Use it sparingly for subtle wear or heavily for a chippy, farmhouse look.
Step 3: Distressing & Finishing
-
Reveal the Wood:
Take a lint-free rag and firmly wipe the areas where you applied the Vaseline. The paint should flake or wipe off easily, revealing the stained wood underneath. -
Detailed Sanding:
Use 150-grit sandpaper to distress additional areas. Focus on high-traffic spots like near the handle, door edges, and feet to mimic natural aging. -
Smooth the Coat:
Once you are happy with the distressing, lightly sand the entire painted surface with 220-grit sandpaper. This doesn’t remove paint but makes the surface feel buttery smooth. -
Remove Dust:
Vacuum or wipe away all sanding dust. A tack cloth works wonders here to get every last particle before sealing. -
Protect the Top:
Apply a coat of clear matte polyurethane to the stained wood top. This surface gets the most wear, so durability is key. -
Seal the Paint:
Apply the same matte topcoat or a clear furniture wax over the painted sections to seal the chalk paint and protect your finish. -
Reattach Hardware:
Once the topcoat is fully dry and cured (usually 24 hours), screw the hardware back into place to complete the transformation.
Add Antique Glaze
For extra age, brush a dark wax or brown glaze into the crevices and wipe back. It settles in corners to create instant shadow and depth.
Step back and enjoy the authentic, timeworn character you’ve just added to your home

PENCIL GUIDE
Understanding Pencil Grades from H to B
From first sketch to finished drawing — learn pencil grades, line control, and shading techniques.
Explore the Full Guide
High-Gloss Emerald Statement Piece
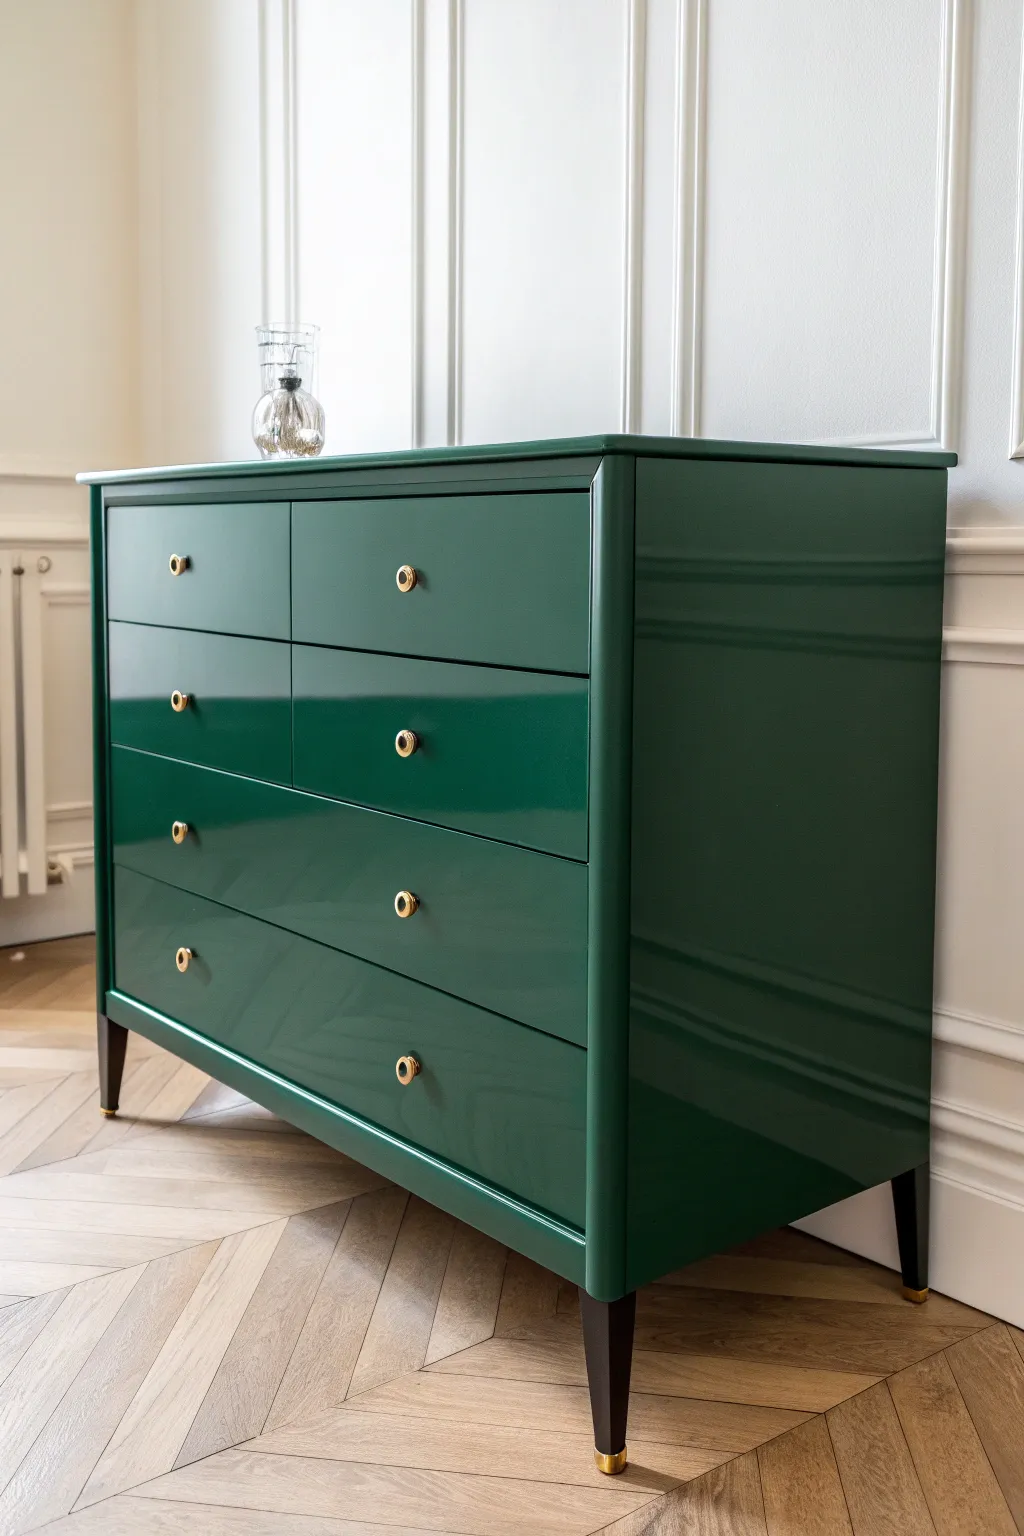
Transform a standard dresser into a luxurious focal point with a deep emerald shade and an ultra-high-gloss finish that rivals professional lacquer. The rich green tone paired with gold hardware creates a sophisticated, boutique-hotel vibe right in your own home.
Step-by-Step Guide
Materials
- Wooden dresser (clean lines preferred)
- High-quality wood filler
- Medium (120) and fine (220-320) grit sandpaper
- Tack cloth
- De-glosser or TSP substitute
- High-adhesion primer (oil-based recommended for gloss)
- High-gloss emerald green enamel paint (e.g., Hollandlac or similar)
- Small foam roller
- High-quality synthetic bristle brush
- Gold drawer knobs
- Gold-capped furniture legs (optional replacement)
- Painter’s tape
- Drop cloth
Step 1: Preparation Perfection
-
Remove hardware:
Begin by removing all drawers from the dresser. Unscrew the old knobs and remove any existing leg hardware if you plan to replace them. Store everything safely in a labelled bag. -
Clean thoroughly:
Wipe down the entire piece with a TSP substitute or a strong de-glosser. Possessing a clean surface is non-negotiable for a finish this shiny, as oils will repel the paint. -
Fill imperfections:
Inspect the wood for deep scratches or old hardware holes you want to move. Apply wood filler, leaving it slightly over-filled to account for shrinkage. -
Sand smooth:
Once the filler is dry, sand the filled areas and scuff-sand the entire dresser with 120-grit paper. The goal isn’t to strip it to bare wood, but to create ‘tooth’ for the primer. -
Remove dust:
Vacuum up the bulk of the sanding dust, then wipe every inch with a tack cloth to capture even the finest particles.
Fixing “Orange Peel”
If the finish looks bumpy like an orange skin, your paint is drying too fast. Add a paint conditioner (like Floetrol or Penetrol) to improve leveling.
Step 2: Priming for Gloss
-
Apply primer:
Using a foam roller for flat surfaces and a brush for corners, apply a coat of high-adhesion primer. I prefer an oil-based primer here because it levels out beautifully, creating a glass-smooth base. -
Sand the primer:
This step is crucial for high gloss: once the primer is fully dry, verify flatness by lightly sanding with 220-grit paper. You want the surface to feel like smooth plastic. -
Clean again:
Another round of tack cloth wiping is necessary now. Any speck of dust left behind will look like a mountain under high-gloss paint.
Upgrade the Interior
Line the drawers with a black velvet liner or a geometric black-and-white wallpaper for a hidden pop of pattern when you open them.
Step 3: The Emerald Finish
-
First coat application:
Stir your emerald enamel gently to avoid bubbles. Apply the first coat using a ‘roll and tip’ method: roll the paint on a small section, then immediately drag a dry, high-quality brush lightly across it to smooth out texture. -
Dry time patience:
High-gloss enamels often have longer open times. Let this first coat cure for at least 24 hours (or as recommended by your specific paint brand) before even looking at it. -
Light sanding:
Very lightly wet-sand or dry-sand with fine 320-grit paper between coats to knock down any nibs. Wipe clean with a damp cloth and then a tack cloth. -
Second coat:
Apply the second coat using the same meticulous roll-and-tip method. Watch for drips on vertical edges, as glossy paint tends to slide more than matte paint. -
Assess depth:
Check your coverage. Deep greens often require a third coat to achieve that swimming-pool depth. If needed, repeat the sanding and painting process one final time.
Step 4: Reassembly
-
Hardware installation:
Allow the paint to cure for several days before stressing the finish. Once hardened, install your new gold knobs carefully to avoid scratching the surface. -
Leg updates:
Screw in the new tapered legs with gold caps. If you kept the original legs, painting the bottom inch with liquid gold leaf is a great alternative. -
Final polish:
Slide the drawers back onto their tracks. Give the piece a final gentle buff with a soft, dry microfiber cloth to remove fingerprints.
Enjoy the incredible depth and shine of your new statement piece
Velvety Matte Green for a Soft Look
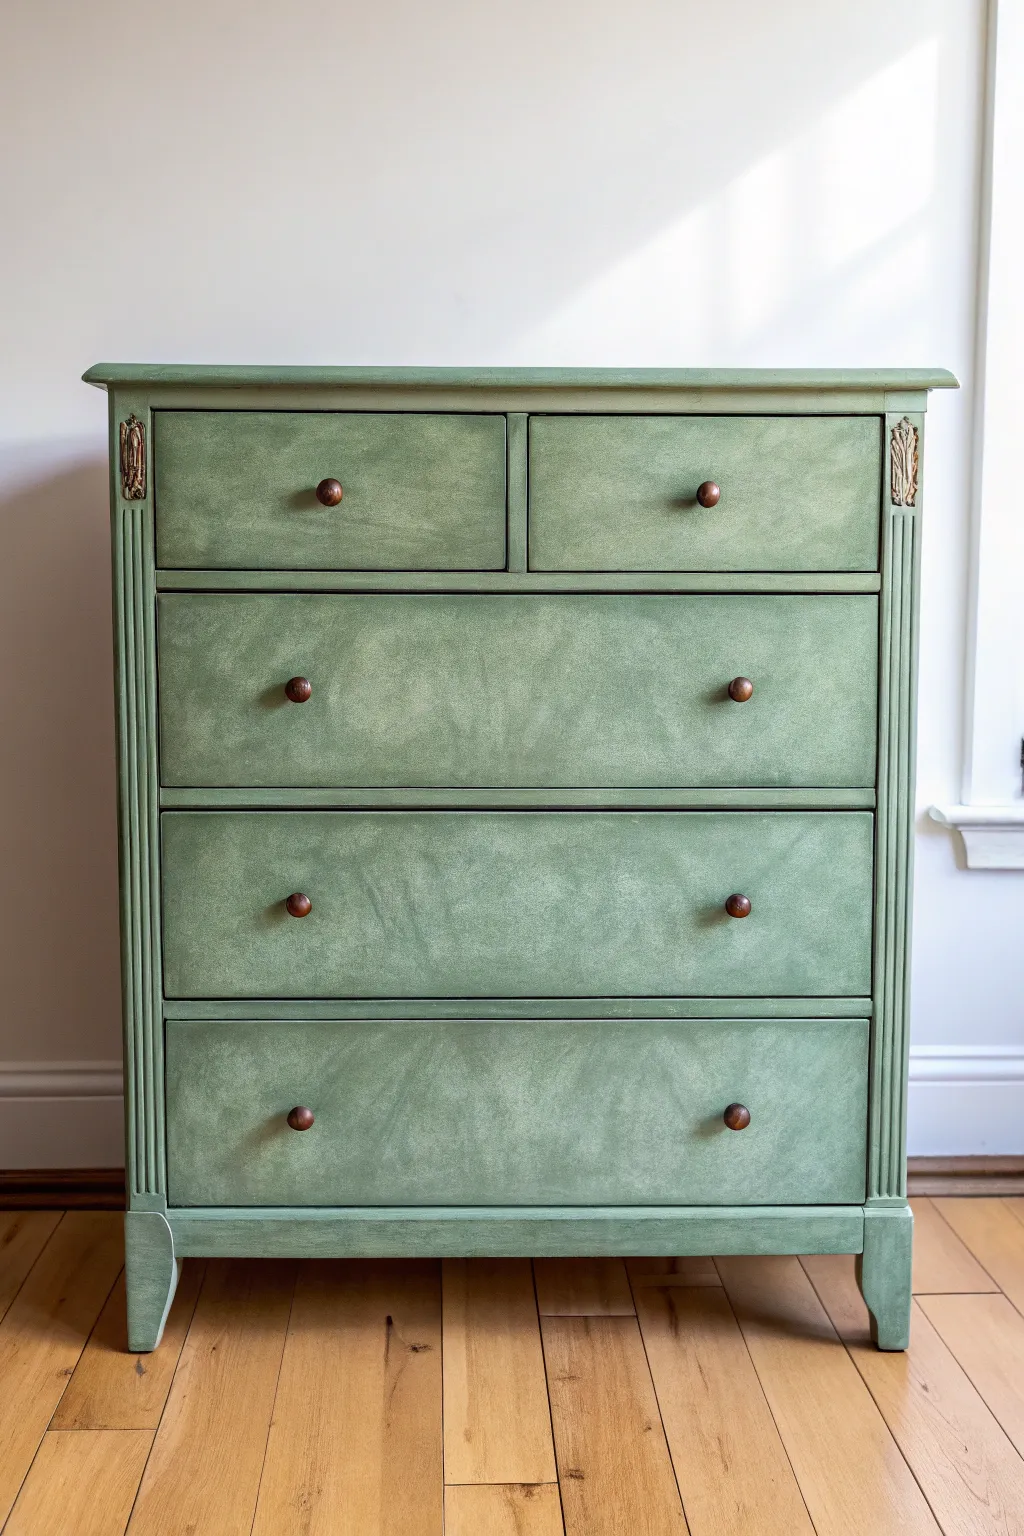
Transform a standard wooden dresser into a statement piece with a finish that feels as soft as it looks. This project uses a specific layering technique with chalk-style paint to achieve a clouded, textured depth that mimics the look of worn velvet or suede.
How-To Guide
Materials
- Wooden dresser (cleaned and prepped)
- Chalk-style paint in ‘Sage Green’ or similar muted earth tone
- Chalk-style paint in a slightly lighter shade (e.g., ‘Dried Thyme’)
- Clear furniture wax
- Dark antique wax
- Round wax brush
- Synthesis bristle paintbrush (oval shape recommended)
- Lint-free rags
- Gold gilding wax
- Sandpaper (220-grit)
- TSP cleaner or degreaser
- Painter’s tape
Step 1: Preparation & Base Coat
-
Remove hardware:
Unscrew all the wooden knobs and set them aside in a labeled bag so you don’t lose the screws. If the drawers are removable, take them out to make painting the frame easier. -
Clean thoroughly:
Scrub the entire piece with a TSP cleaner or degreaser to remove years of oils and furniture polish. This step is non-negotiable for good adhesion. -
Light scuff sand:
Run 220-grit sandpaper over the surface just to rough it up slightly. You don’t need to strip the original finish, just give the paint something to grip. -
Apply the first coat:
Using your oval brush, apply the darker of your two sage green shades. Paint in different directions rather than straight lines to begin building that textured, non-uniform base. -
Let it dry:
Allow this first coat to dry completely, which usually takes about 1-2 hours depending on humidity.
Step 2: Creating the Velvet Texture
-
Prepare the second coat:
For the next layer, use the same darker sage green, but keep a damp rag nearby. You want the paint to be moveable. -
Stipple and cross-hatch:
Apply the paint using a stippling (poking) motion or cross-hatch X-strokes. This chaotic brushwork creates the visual ‘nap’ of velvet. -
Introduce the lighter shade:
While the dark coat is still wet, dip the very tip of your brush into the lighter green shade. Offload most of it onto a paper towel. -
Blend wet-in-wet:
Feather this lighter color randomly into the centers of the drawers and flat surfaces. Blend it outwards into the darker wet paint so there represent no harsh lines, just soft clouds of color. -
Dry brush highlights:
Once the paint is tacky but not fully dry, use a nearly dry brush to whisk over the surface lightly. This catches the high points of the brushstrokes you created earlier. -
Full cure time:
Let this textured paint layer dry overnight. It needs to be perfectly hard before waxing.
Pro Tip: The Water Mist
Keep a spray bottle of water handy. If your paint drags too much while blending the two green shades, a light mist helps the colors slide together seamlessly.
Step 3: Waxing & Detailing
-
Apply clear wax:
Use a round wax brush to push clear furniture wax into the paint. Work in small sections, wiping off excess with a lint-free rag as you go. -
Add dark wax for depth:
I like to mix a tiny pea-sized amount of dark antique wax with clear wax. Apply this concentrated mixture into the corners of the drawer fronts and along the fluted columns to simulate aged shadows. -
Buff to a sheen:
Wait 15-20 minutes for the wax to haze over, then buff firmly with a clean cloth. The more you buff, the more satin-like the finish becomes. -
Refinish the knobs:
While the dresser settles, clean the original wooden knobs. If they look tired, rub a little dark wax or hemp oil on them to rejuvenate the wood tone without painting them. -
Highlight the details:
Take a small amount of gold gilding wax on your fingertip or a small artist brush. Gently rub it over the raised decorative carvings at the top corners of the columns. -
Reassemble:
Once the wax is fully cured (non-tacky), screw the knobs back onto the drawers and slide the drawers back into the frame.
Troubleshooting: Too Streaky?
If you see distinct brush lines instead of a cloudy texture, your brush was too dry. Simply apply a thin layer of clear wax and blend it out again to soften.
Enjoy the calm, organic presence this newly finished piece brings to your room


Antiqued Green With Dark Glaze Depth
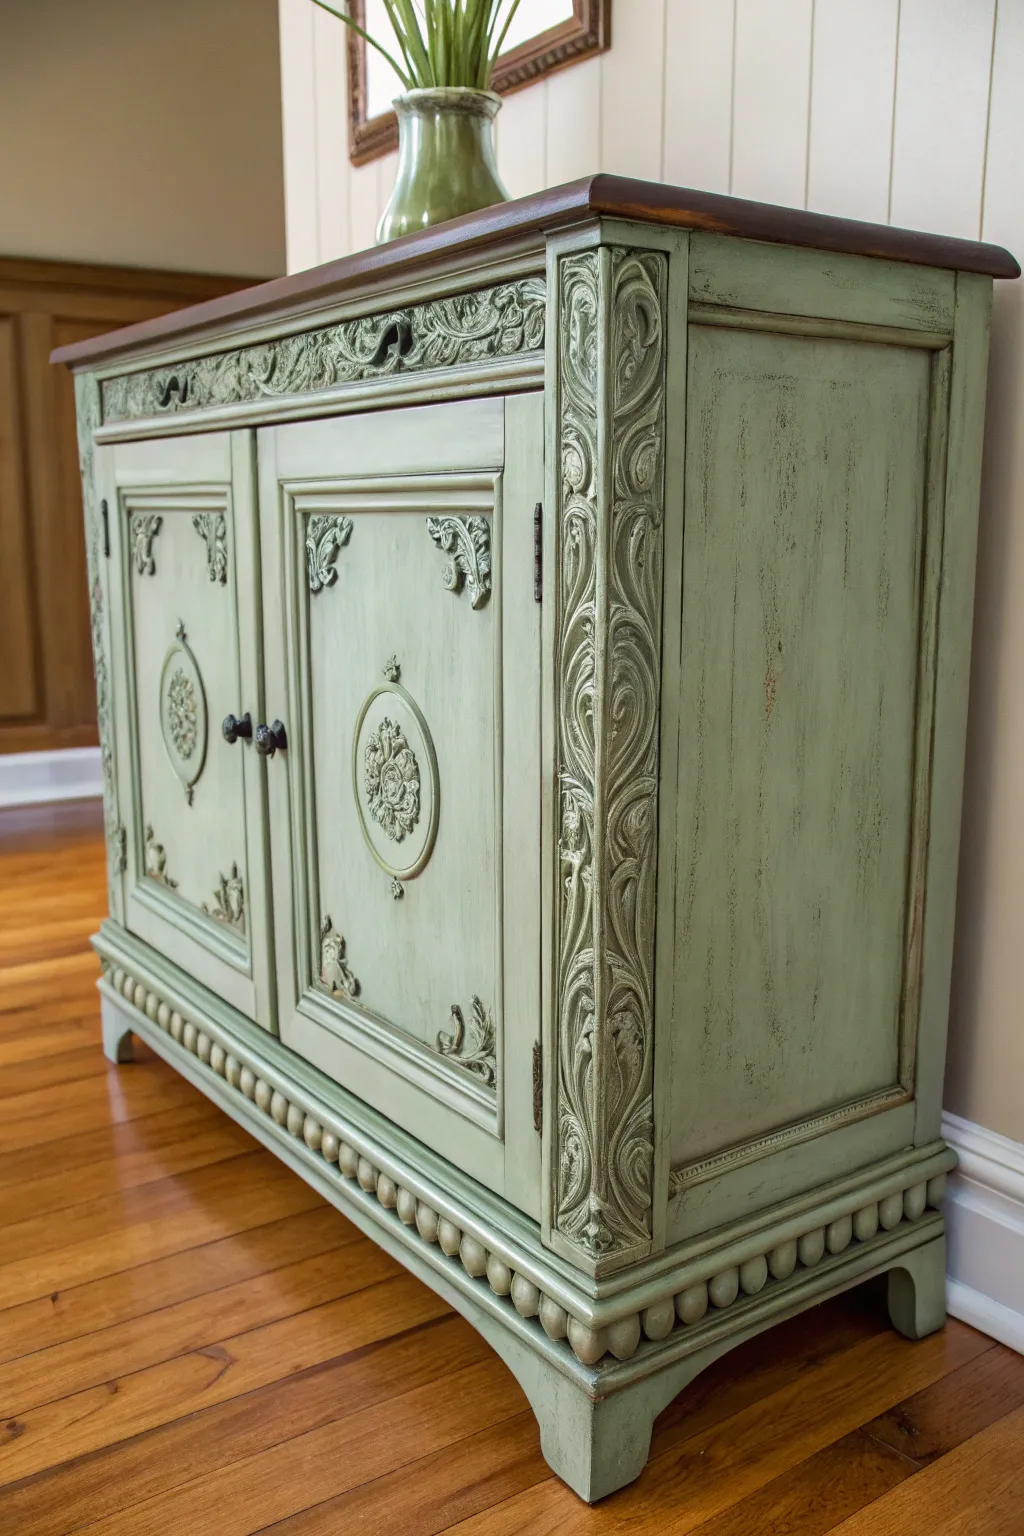
Transform a plain wooden cabinet into a stately heirloom piece using a soft sage green base and a deep espresso glaze. This technique highlights carved details beautifully, settling into crevices to create authentic-looking depth and aged character.
Step-by-Step Tutorial
Materials
- Wooden cabinet with carved details
- Sandpaper (120 and 220 grit)
- Tack cloth
- High-quality bonding primer
- Sage green chalk or mineral paint
- Dark walnut or espresso oil-based gel stain (for the top)
- Dark antique glaze (brown or black)
- Polycrylic top coat (satin finish)
- Paintbrushes (synthetic bristle)
- Foam brushes
- Clean lint-free rags
- Small artist brush
- Painter’s tape
Step 1: Preparation of the Piece
-
Clean and Hardware Removal:
Begin by removing all drawers, doors, and hardware. Store the screws in a labeled bag so they don’t get lost. Give the entire piece a thorough cleaning with a degreaser or TSP alternative to remove years of furniture polish and grime. -
Sanding the Body:
Scuff sand the entire body of the cabinet using 120-grit sandpaper. You don’t need to remove the old finish completely, but you need to dull the surface to ensure the primer adheres well. -
Stripping the Top:
Since we are keeping the top wood-toned, sand the top surface down to bare wood. Start with 80-grit if the old finish is thick, then move to 120-grit, and finish with 220-grit for a smooth surface. -
Dust Removal:
Wipe down the entire piece with a tack cloth to pick up every speck of dust. Any debris left behind will show up in your final paint job. -
Tape and Protect:
Use painter’s tape to meticulously mask off the newly sanded wood top specifically where it meets the body, protecting it from your green paint.
Control Your Glaze
If the glaze is drying too fast or looks too dark, keep a rag dampened with water (for water-based glaze) or mineral spirits (for oil-based) nearby to ‘erase’ mistakes.
Step 2: Painting and Staining
-
Prime the Surface:
Apply a coat of high-quality bonding primer to the cabinet body, doors, and drawers. If you are painting over a dark wood, a second coat of primer may be necessary to prevent bleed-through. -
First Coat of Green:
Once the primer is fully dry, apply your sage green chalk or mineral paint. Use long, smooth strokes with a synthetic brush. Don’t worry if coverage isn’t perfect on the first pass. -
Second Coat of Green:
Apply a second coat of sage green paint. Pay special attention to the carved areas, dabbing paint into the deep recesses with your brush tips to ensure full coverage. -
Staining the Top:
While the paint dries, carefully remove the tape from the top. Apply a dark walnut or espresso gel stain using a foam brush or lint-free rag, wiping with the grain. Wipe off excess stain and let it dry according to the manufacturer’s instructions. -
Sealing Before Glazing:
Apply a single clear coat of satin polycrylic over the green paint. This is crucial; it creates a slip layer so the dark glaze doesn’t soak into the porous paint instantly, giving you more control.
Step 3: The Antiquing Process
-
Applying the Glaze:
Working in small sections (like one door at a time), brush the dark antique glaze freely over the painted surface. Ensure it gets into all the carvings, corners, and recessed panels. -
Wiping Back:
Immediately use a slightly damp lint-free rag to wipe the glaze off the high points and flat surfaces. Use a light hand; you want the glaze to remain heavy in the crevices and corners to create that shadowed effect. -
Detailing the Carvings:
For the intricate floral carvings on the sides and doors, use a clean dry brush to manipulate the glaze, feathering it out so it looks like natural aging rather than a hard line. -
Adding Texture (Optional):
To mimic the distressed look in the image, lightly sand the edges and raised floral details with 220-grit paper after the glaze is mostly dry, revealing a bit of the base wood or lighter paint underneath. -
Final Protection:
Once the glaze has cured completely (refer to the can, as oil-based glazes take longer), seal the entire painted body with two coats of satin polycrylic. Seal the stained wood top with three coats for extra durability. -
Hardware Reassembly:
Reattach your doors and drawers. While the original hardware is dark, dragging a dry brush with a tiny bit of metallic bronze paint over the knobs can coordinate beautifully with the new antique look.
Add Jeweled Accents
For a regal touch, apply a tiny amount of gilding wax in gold or copper only to the highest points of the floral carvings after the topcoat dries.
Step back and admire how the dark glaze has completely transformed the simple green paint into a piece full of historic charm and depth
Green Wash That Lets Grain Whisper Through
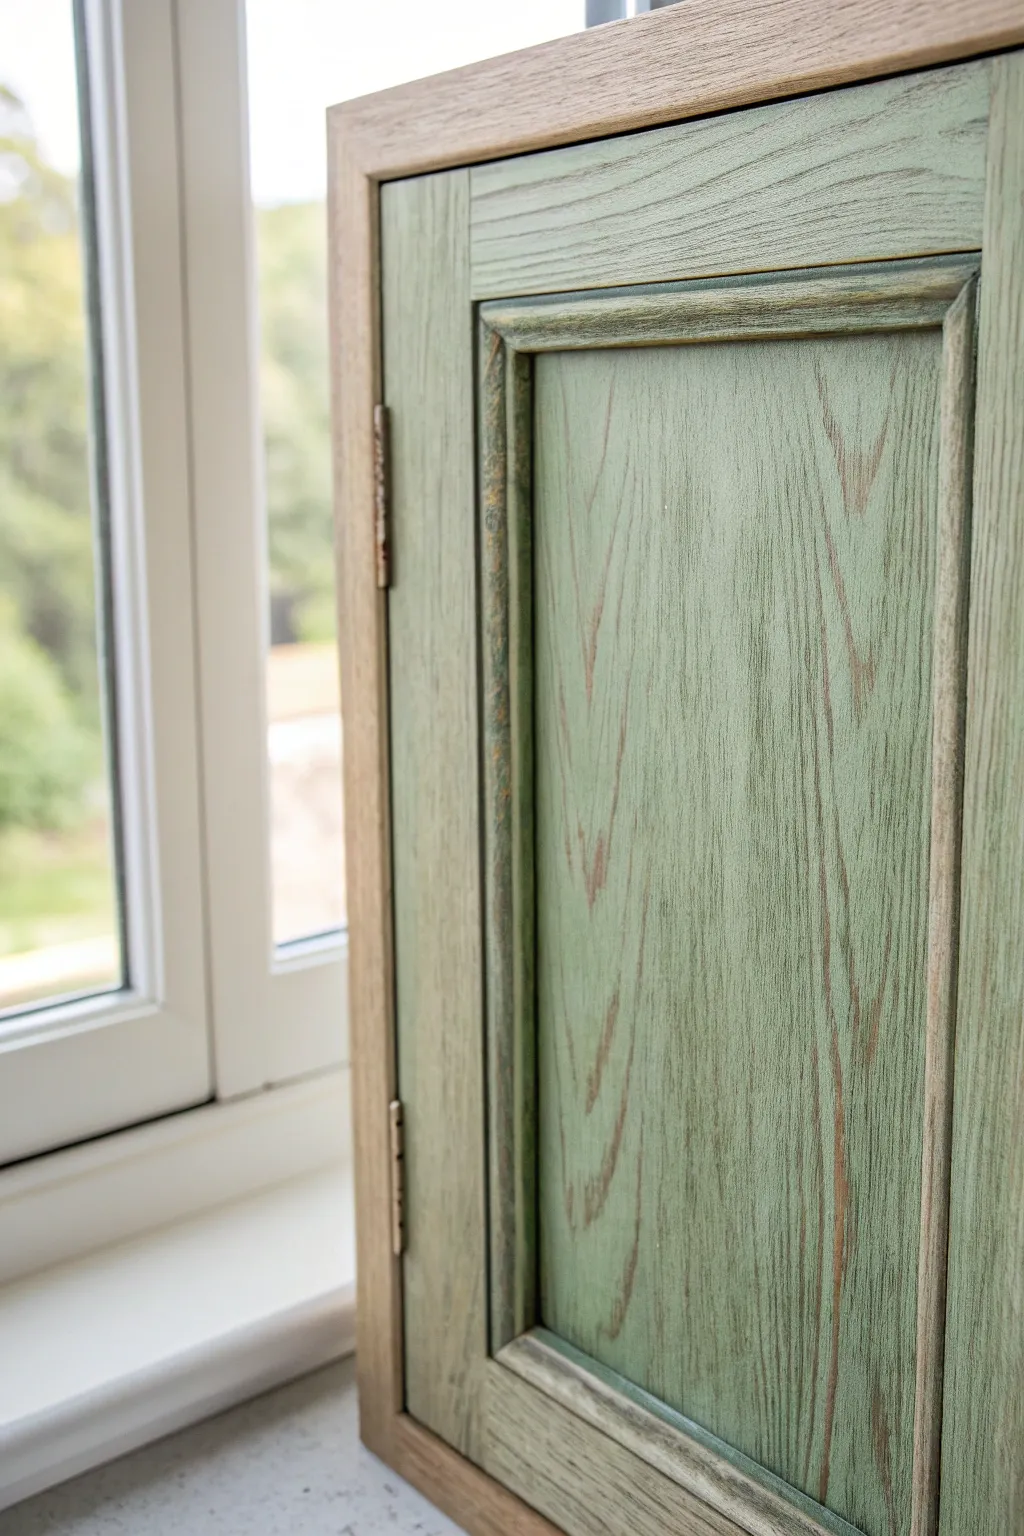
This technique transforms standard wood cabinetry into a textural masterpiece by using a semi-transparent green wash that highlights, rather than hides, the natural wood grain. The result is a sophisticated, rustic-modern finish where the timber’s original warmth peeks through a sage-colored veil.
Step-by-Step
Materials
- Unfinished oak or ash cabinet door (deep grain wood is essential)
- Sandpaper (120, 180, and 220 grit)
- Clean tack cloths
- Sage green chalk paint or milk paint
- Water (for diluting)
- Dark antique wax (brown or espresso)
- Clear furniture wax
- Lint-free cotton rags
- Synthetic bristle paint brush
- Wax brush or stiff chip brush
- Small cup for mixing
- Painter’s tape (if protecting adjacent areas)
Step 1: Preparation & Sanding
-
Assess the wood:
Begin by ensuring you are working with an open-grain wood like oak or ash. This technique relies on the pigment settling into deep pores, so smooth woods like maple or poplar won’t achieve the same effect. -
Initial rough sand:
Sand the entire surface with 120-grit sandpaper to remove any existing finish or oils. You want to open up the pores of the wood as much as possible. -
Smoothing the surface:
Progress to 180-grit sandpaper to smooth out scratches from the rough sanding, but avoid going too fine just yet, as we want the wood to remain somewhat ‘thirsty’ for the wash. -
Clean deeply:
Vacuum the wood thoroughly to pull dust out of the grain, then wipe with a tack cloth. Any dust left in the pores will prevent the paint from settling correctly. -
Tape off edges:
If your cabinet door has a natural wood frame you wish to keep unpainted, carefully apply painter’s tape to shield those areas now.
Grain Enhancement Pro-Tip
For deeper definition, use a wire brush lightly along the grain before painting. This ‘opens’ the soft grain further, creating deeper channels for the green wash and dark wax to settle into.
Step 2: Applying the Green Wash
-
Mix the wash:
In a small cup, mix your sage green chalk paint with water. I usually aim for a 50/50 ratio, creating a consistency similar to heavy cream or whole milk. -
Test the opacity:
Brush a small amount of wash onto a scrap piece of wood or the back of the door. If it’s too opaque, add more water; if it’s too faint, add a touch more paint. -
Brush firmly:
Dip your synthetic brush into the wash and apply it to the door. Work the brush in various directions initially to force the pigment deep into the wood grain. -
Smooth the stroke:
Finish the painting process with long, even strokes following the direction of the wood grain to ensure a uniform look. -
Wipe back:
Before the paint dries completely (wait about 1-2 minutes), take a damp, lint-free rag and gently wipe the surface. This removes paint from the high points while leaving it in the low grain. -
Dry time:
Allow the green wash to dry completely. Since it is diluted, this should take about 30 to 60 minutes depending on humidity. -
Light distress:
Once dry, very lightly scuff the surface with 220-grit sandpaper. This sharpens the contrast between the painted pores and the wood surface.
Level Up: Hardware Contrast
Install antiqued brass or unlacquered bronze hardware. The warm golden tones contrast beautifully against the cool sage wash, highlighting the reddish-brown notes in the exposed wood grain.
Step 3: Waxing & Finishing
-
Clear wax base:
Apply a thin layer of clear furniture wax over the entire painted surface using a wax brush or clean rag. This seals the paint and acts as an ‘eraser’ barrier for the dark wax. -
Apply dark wax:
Dip a stiff brush sparingly into the dark antique wax. Work it aggressively into the corners, crevices, and the deep grain lines of the wood. -
Wipe away excess:
Immediately wipe off the dark wax with a clean cloth. The clear wax you applied earlier allows you to slide the dark wax off the high points, leaving that rich brown color only in the texture. -
Check the corners:
Pay special attention to the molding profiles. Leaving a little extra dark wax in the recesses adds depth and an aged, dimensional look. -
Buff to sheen:
Wait 15-20 minutes for the wax to harden slightly, then buff the door vigorously with a soft cotton cloth to achieve a satin sheen. -
Final cure:
Let the piece cure in a dry area for at least 24 hours before reattaching hardware or mounting the door.
Now step back and admire how the subtle green tint breathes new life into the wood without hiding its natural story
Green Painted Chair as a Small Pop
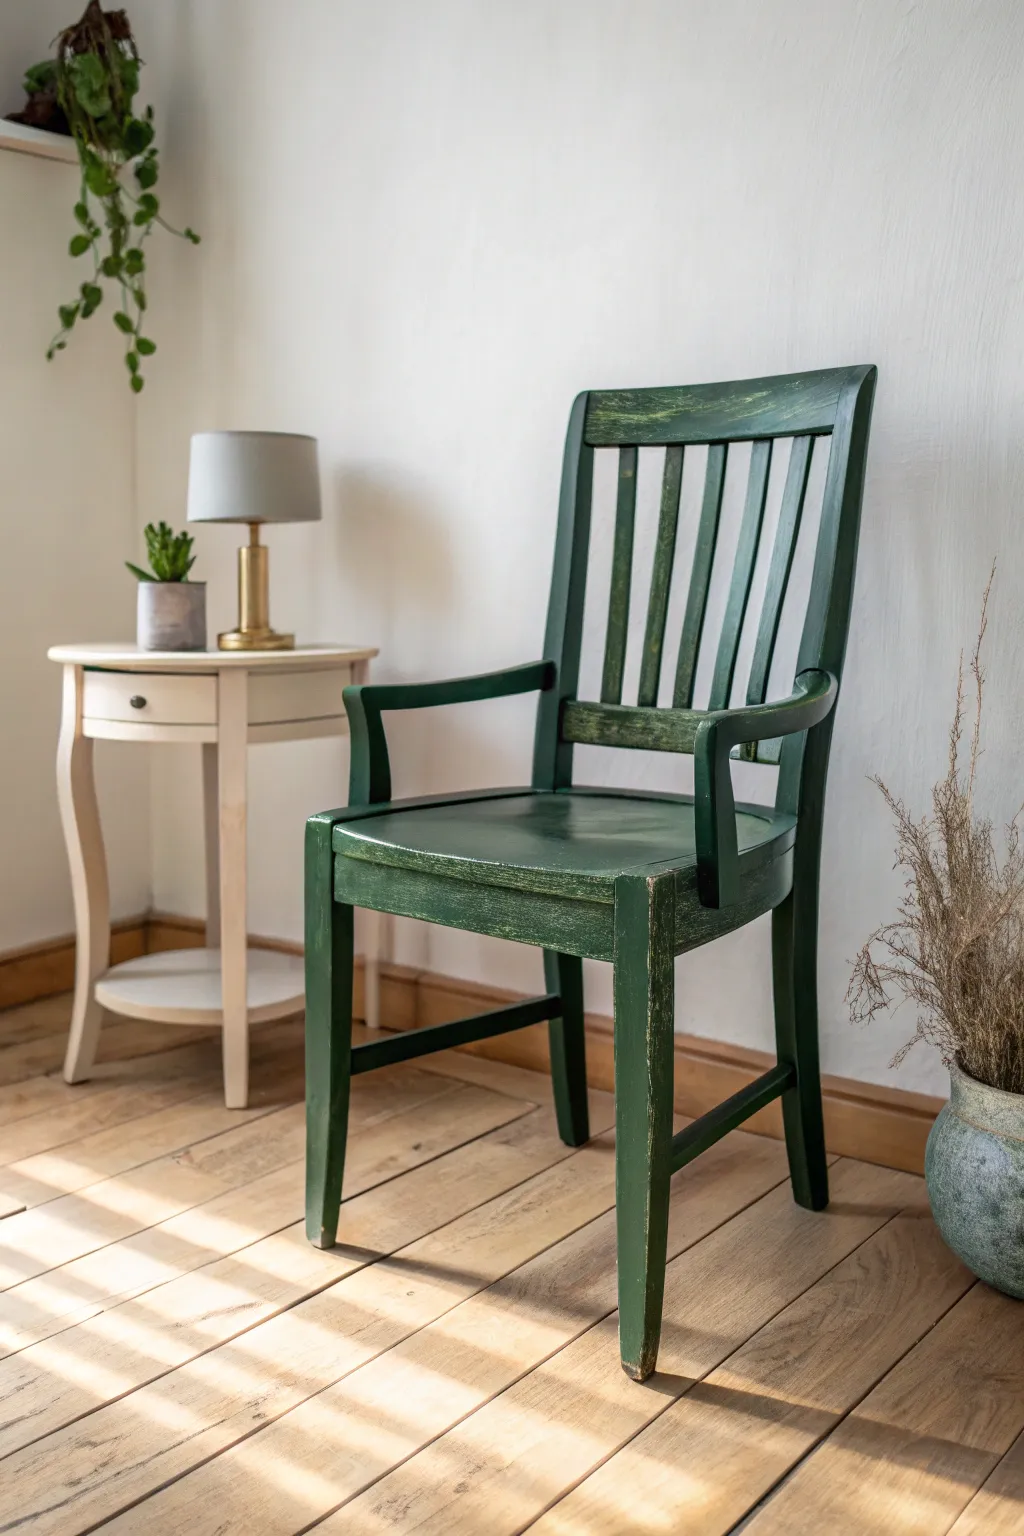
Transform a plain wooden chair into a statement piece with a rich, deep green finish that feels both modern and timeless. This project uses a subtle distressing technique to give the chair a lived-in, vintage character right from the start.
How-To Guide
Materials
- Wooden dining chair (unfinished or sanded)
- Medium and fine grit sandpaper (120 and 220 grit)
- Tack cloth or microfiber rag
- Deep forest green chalk-style or milk paint
- High-quality synthetic bristle brush (2-inch)
- Small artist brush for tight corners
- Clear furniture wax or matte polyurethane
- Wax brush or lint-free cloth (if using wax)
- Drop cloth
Step 1: Preparation
-
Prepare your workspace:
Lay down your drop cloth in a well-ventilated area to protect your floors from dust and paint drips. -
Clean the surface:
Wipe down the entire chair with a damp cloth to remove any dirt, grease, or grime. If the chair is old, use a mild degreaser like TSP substitute. -
Scuff sand the wood:
Using 120-grit sandpaper, lightly sand the entire surface of the chair. You don’t need to strip it to bare wood, just create enough ‘tooth’ for the paint to adhere properly. -
Focus on glossy areas:
Pay special attention to any areas with a glossy finish, ensuring they are dulled down completely. -
Remove dust:
Wipe the chair thoroughly with a tack cloth to catch every particle of sawdust before painting.
Natural Wear Trick
Close your eyes and run your hands over the chair. Sand wherever your hands naturally grab or rest to create the most authentic distressing pattern.
Step 2: Painting
-
Mix your paint:
Stir your deep green paint thoroughly. If you are using milk paint, mix the powder with water according to package instructions and let it sit for a few minutes to thicken. -
Flip the chair:
Turn the chair upside down and place it on a table or workbench. This makes it much easier to paint the legs and undersides without missing spots. -
Paint the first coat (underside):
Apply the green paint to the legs and rungs. Use long, smooth strokes with the grain of the wood. Don’t worry about perfect coverage yet; a thin coat is better. -
Flip and finish the first coat:
Turn the chair right side up. Continue painting the seat, arms, and back slats. Use the small artist brush to get deep into the crevices where the slats meet the frame. -
Dry completely:
Allow this first coat to dry fully. Chalk and milk paints dry quickly, usually within 30-60 minutes, but check your specific product label. -
Apply the second coat:
Apply a second coat of green paint to ensure rich, opaque color depth. Cover any streaks or light patches visible from the first round. -
Let it cure:
Let the paint dry completely, preferably overnight, to ensure it hardens enough for the distressing phase.
Add Depth
After clear wax, apply a tiny amount of dark antique wax into corners and crevices to emphasize the texture and age the piece further.
Step 3: Distressing and Sealing
-
Identify wear points:
Look at where the chair would naturally wear over time—the edges of the seat, the hand-rests on the arms, and raised details on the legs. -
Distress with sandpaper:
Take your 220-grit sandpaper and gently sand these edges. Apply light pressure to slowly reveal the wood underneath the green paint. I usually start very light here; you can always take off more paint, but you can’t put it back easily. -
Vary the pressure:
Create an organic look by varying your sanding pressure. Let some areas remain solid green while others show more exposed wood. -
Clean up dust:
Once you are happy with the distressed look, wipe the chair down again with a clean tack cloth to remove all sanding dust. -
Apply wax or sealer:
Using a wax brush or lint-free cloth, massage clear furniture wax into the paint. This deepens the green color and seals the surface. -
Buff the finish:
After the wax has hazed over (usually about 15-20 minutes), buff it vigorously with a clean cotton cloth to achieve a soft, satin sheen.
Now you have a beautifully custom piece that brings a touch of nature indoors with its rich color and rustic charm
Color-Blocked Drawers in Two Greens
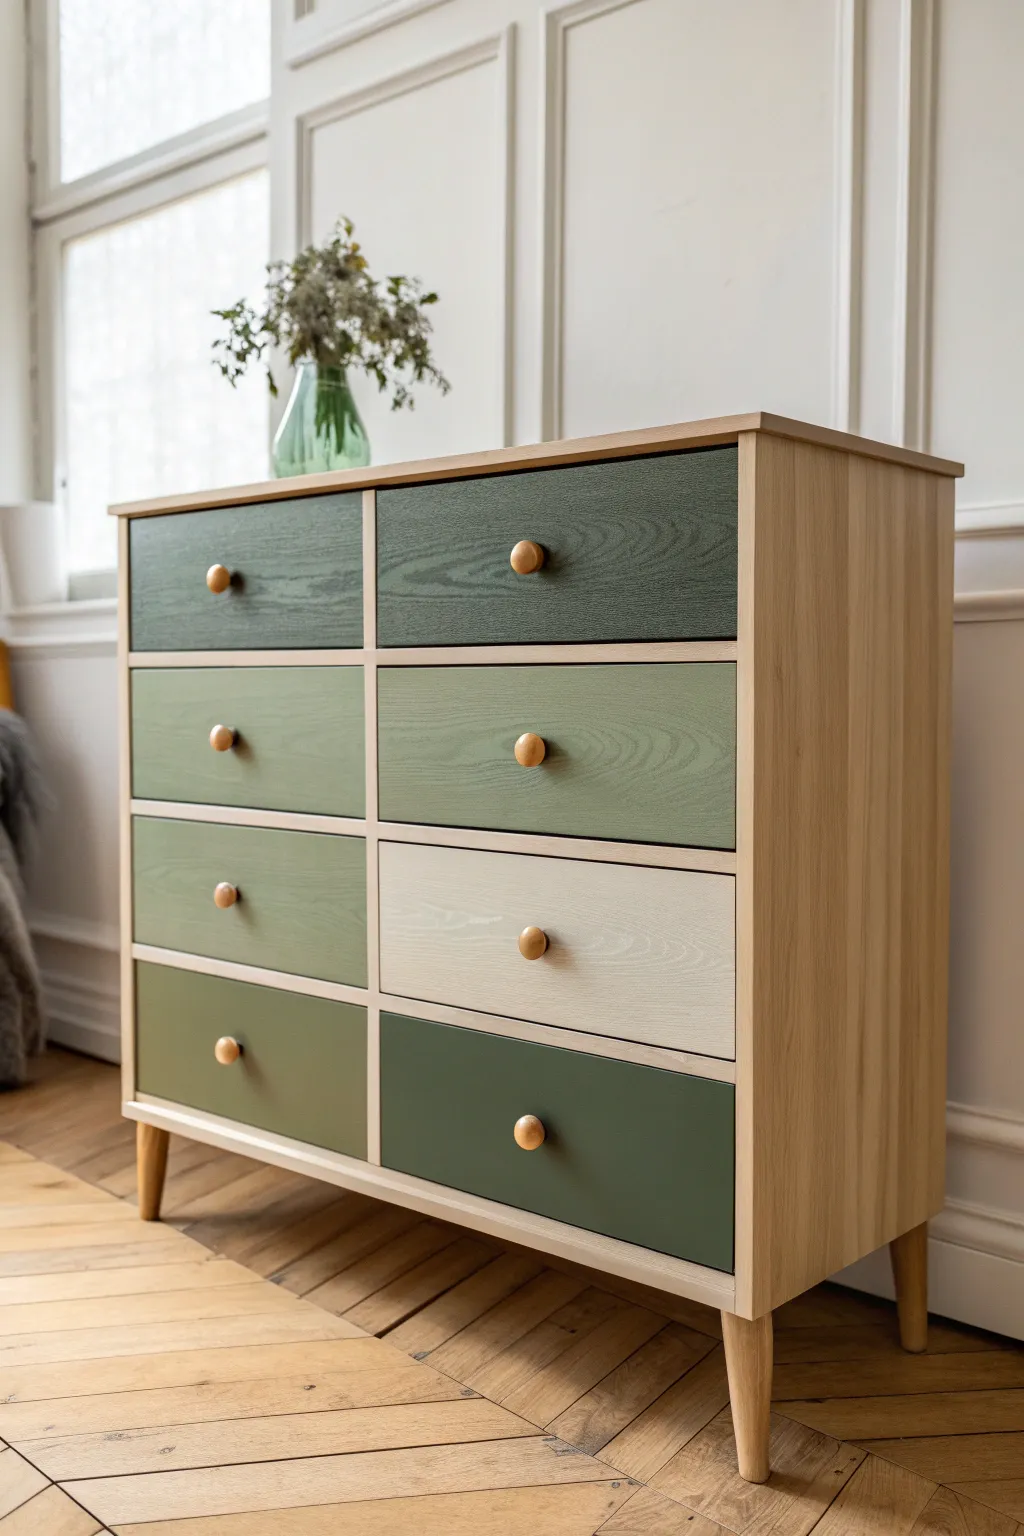
Transform a plain wooden dresser into a statement piece with this sophisticated color-blocked design. By mixing deep forest hues with sage and beige, you create a modern gradient effect that adds depth and character to any bedroom.
Step-by-Step Tutorial
Materials
- Unfinished wooden dresser (8-drawer)
- Sandpaper (120 and 220 grit)
- Tack cloth
- Painter’s tape
- Wood primer (water-based)
- Satin paint: Deep Forest Green
- Satin paint: Sage Green
- Satin paint: Beige/Cream
- Polycrylic topcoat (matte or satin)
- Foam roller and tray
- Small angled paintbrush
- Round wooden knobs (unfinished)
- Wood stain or clear oil (for knobs)
- Screwdriver
Step 1: Preparation
-
Disassemble the dresser:
Start by removing all drawers from the dresser frame. If there are existing knobs or handles, unscrew and remove them, setting the hardware aside in a labeled baggie so nothing gets lost. -
Sand the surfaces:
Using 120-grit sandpaper, lightly sand the drawer fronts and the main frame of the dresser to open up the wood grain. If the dresser was previously finished, you may need to sand a bit more aggressively to remove the old clear coat. -
Smooth the finish:
Switch to 220-grit sandpaper for a final pass. This ensures a buttery smooth surface for your paint to adhere to. Wipe everything down thoroughly with a tack cloth to remove every speck of dust. -
Protect the frame:
Since we are keeping the outer frame natural wood, apply painter’s tape carefully along the inside edges where the drawer fronts will sit. This prevents stray paint strokes from landing on the beautiful raw wood casing.
Pro Tip: Grain Direction
When painting wood that has a strong grain texture like pine, always drag your final brush stroke in the direction of the wood grain. This helps the paint settle naturally rather than fighting the texture.
Step 2: Painting the Drawers
-
Plan your palette:
Lay the drawers out on a drop cloth in the same 4×2 arrangement they sit in the dresser. This visualization is crucial simply because you don’t want to accidentally paint two adjacent drawers the exact same shade. -
Prime the wood:
Apply a thin, even coat of water-based primer to all drawer fronts. Using a high-quality primer prevents the wood tannins from bleeding through your lighter green and beige paint later. -
Sand the primer:
Once the primer is bone dry—usually after about an hour—give it a very light scuff sand with 220-grit paper. This knocks down any raised grain and guarantees a professional finish. -
Apply the darkest green:
Start with your Deep Forest Green. Use a foam roller to apply the color to the top-right, bottom-left, and bottom-right drawers to anchor the design visually. -
Apply the medium sage:
Next, dip into the Sage Green. Paint the top-left, second-row-left, second-row-right, and third-row-left drawers. This distribution creates that scattered, asymmetrical look. -
Paint the accent drawer:
Finally, paint the remaining drawer (third row, right side) with the Beige/Cream paint. This light ‘pop’ breaks up the greens and adds a modern twist. -
Apply second coats:
Let the first coat dry completely according to the can’s instructions. Apply a second coat to all drawers to ensure rich, opaque coverage, using the angled brush to catch the edges perfectly.
Step 3: Finishing and Assembly
-
Seal the drawers:
Once the paint has cured for at least 24 hours, apply two coats of Polycrylic topcoat using a clean foam roller. I advise light, long strokes to avoid bubbling. -
Prep the knobs:
While the drawers dry, take your round wooden knobs and lightly sand them. You want them to match the dresser frame, so either seal them with clear oil or leave them raw if the frame is unfinished. -
Seal the frame:
Apply a clear protective coat (oil or polycrylic) to the main body of the dresser and the legs. This keeps the wood looking fresh and prevents yellowing over time. -
Reattach hardware:
Screw the wooden knobs back onto the center of each drawer front. Ensure they are tightened securely so they don’t wiggle during daily use. -
Reassemble the piece:
Slide the drawers back into their tracks, following your original color pattern. Take a step back and check that the gaps between drawers look even.
Troubleshooting: Sticky Drawers
If drawers stick after painting, run a plain candle (wax) along the wooden runners and the sides of the drawer box. The wax acts as a lubricant and helps the wood glide smoothly.
Now you have a custom piece suitable for any modern home
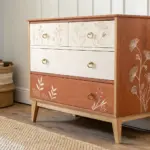
Green Frame With Natural Drawer Fronts
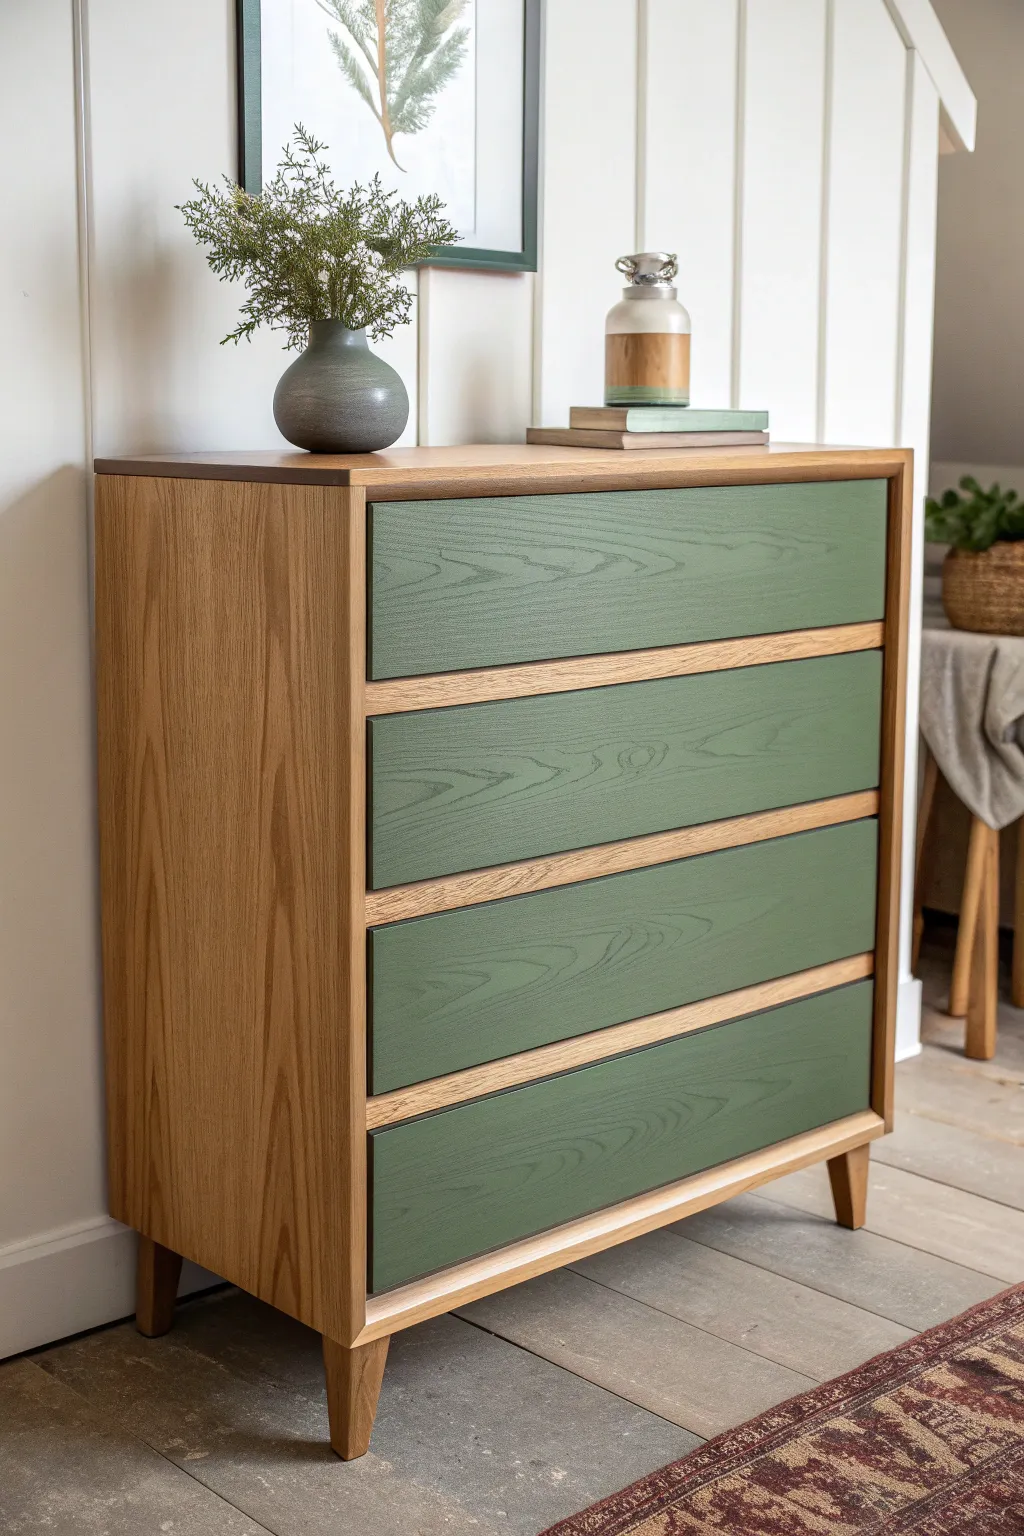
This project flips the script on typical painted furniture by highlighting the beautiful natural grain of the frame while adding a calming pop of color to the drawers. The result is a sophisticated two-tone dresser that feels both modern and timeless, perfect for bringing an organic touch to any room.
Step-by-Step Guide
Materials
- Wooden dresser (raw or to be stripped)
- Orbital sander
- Sandpaper (80, 120, 220 grit)
- Wood stain (optional, if color matching is needed)
- Water-based matte polyurethane
- Sage or olive green chalk-style paint or mineral paint
- High-quality synthetic angled brush
- Small foam roller
- Painter’s tape
- Tack cloth
- Mild degreaser or TSP
Step 1: Prep and Strip
-
Assess your piece:
Start by removing all drawers from the dresser. Remove any existing hardware if your dresser has pulls, though the inspiration piece features sleek, finger-pull drawers without external knobs. -
Clean thoroughly:
Scrub the entire piece down with a mild degreaser or TSP alternative to remove years of furniture polish, oil, and grime. This ensures your sanding won’t just grind dirt deeper into the wood. -
Heavy sanding:
Using an orbital sander with 80-grit paper, sand down the top, sides, legs, and drawer fronts. You want to remove all the old finish and get down to the bare, raw wood. Be careful on the edges to keep them crisp. -
Refine the surface:
Switch to 120-grit sandpaper to smooth out the scratches from the heavier grit. Follow this immediately with 220-grit for a truly buttery smooth finish on the raw wood. -
Remove dust:
Vacuum up the bulk of the sawdust, then wipe everything down with a tack cloth to capture remaining fine particles.
Step 2: Protecting the Frame
-
Tape details:
If there are areas where the drawer fronts might touch the frame, mask them off carefully. However, since we are painting the drawers separately, your main job is just keeping the workspace organized. -
Seal the body:
Stir your water-based matte polyurethane gently. Using a high-quality synthetic brush, apply a thin, even coat to the top, sides, frame, and legs of the dresser. Don’t touch the drawer fronts yet. -
Sand between coats:
Once the first coat is dry (usually 1-2 hours), lightly hand-sand with a fine sanding sponge or 320-grit paper to knock down any raised grain. -
Second seal coat:
Wipe away the sanding dust and apply a second coat of polyurethane. I find three thin coats usually provide the best durability for tabletops, but two is often sufficient for the sides.
Grain Game Strong
To keep the wood grain texture visible through the paint like the photo, slightly water down your first coat of paint (about 10%). It acts closer to a solid stain than a thick coat.
Step 3: Painting the Drawers
-
Mask drawer edges:
To get that professional look seen in the photo, masking is key. Place painter’s tape along the sides and top edges of the drawer fronts if you want to keep the bevels or sides natural wood. -
Prime (if needed):
If your chosen green paint doesn’t have a built-in primer and your wood has tannins (like oak), apply a stain-blocking primer to the drawer fronts to prevent bleed-through. -
First coat of green:
Using a small foam roller for the flat surfaces and a brush for corners, apply your sage green paint. Work in long, smooth strokes to minimize texture. -
Check for grain:
The inspiration photo shows the wood grain texture still visible through the paint. To achieve this, don’t apply the paint too thickly; let the texture of the wood dictate the finish. -
Light sanding:
After the first coat is fully dry, very lightly sand with fine paper to ensure a smooth finish, wiping away dust afterwards. -
Final coat:
Apply the second coat of green paint. This should provide full opaque coverage while maintaining that lovely matte look.
Level Up: Hidden Detail
Line the inside of the drawers with a patterned wallpaper or fabric that features botanical prints to complement the sage green exterior.
Step 4: Finishing Touches
-
Seal the paint:
Once the green paint has cured for at least 24 hours, apply the same matte water-based polyurethane over the painted drawer fronts. This protects the color from scratches and fingerprints. -
Reassembly:
Remove any remaining painter’s tape carefully. If you taped edges, pull the tape away at a 45-degree angle while the topcoat is still slightly tacky to avoid peeling. -
Final wipe:
Slide the drawers back into their slots. Give the entire piece a final wipe with a clean microfiber cloth to remove fingerprints from handling.
Now you have a stunning, custom furniture piece that beautifully balances natural warmth with modern color
Stenciled Pattern Over Green Furniture
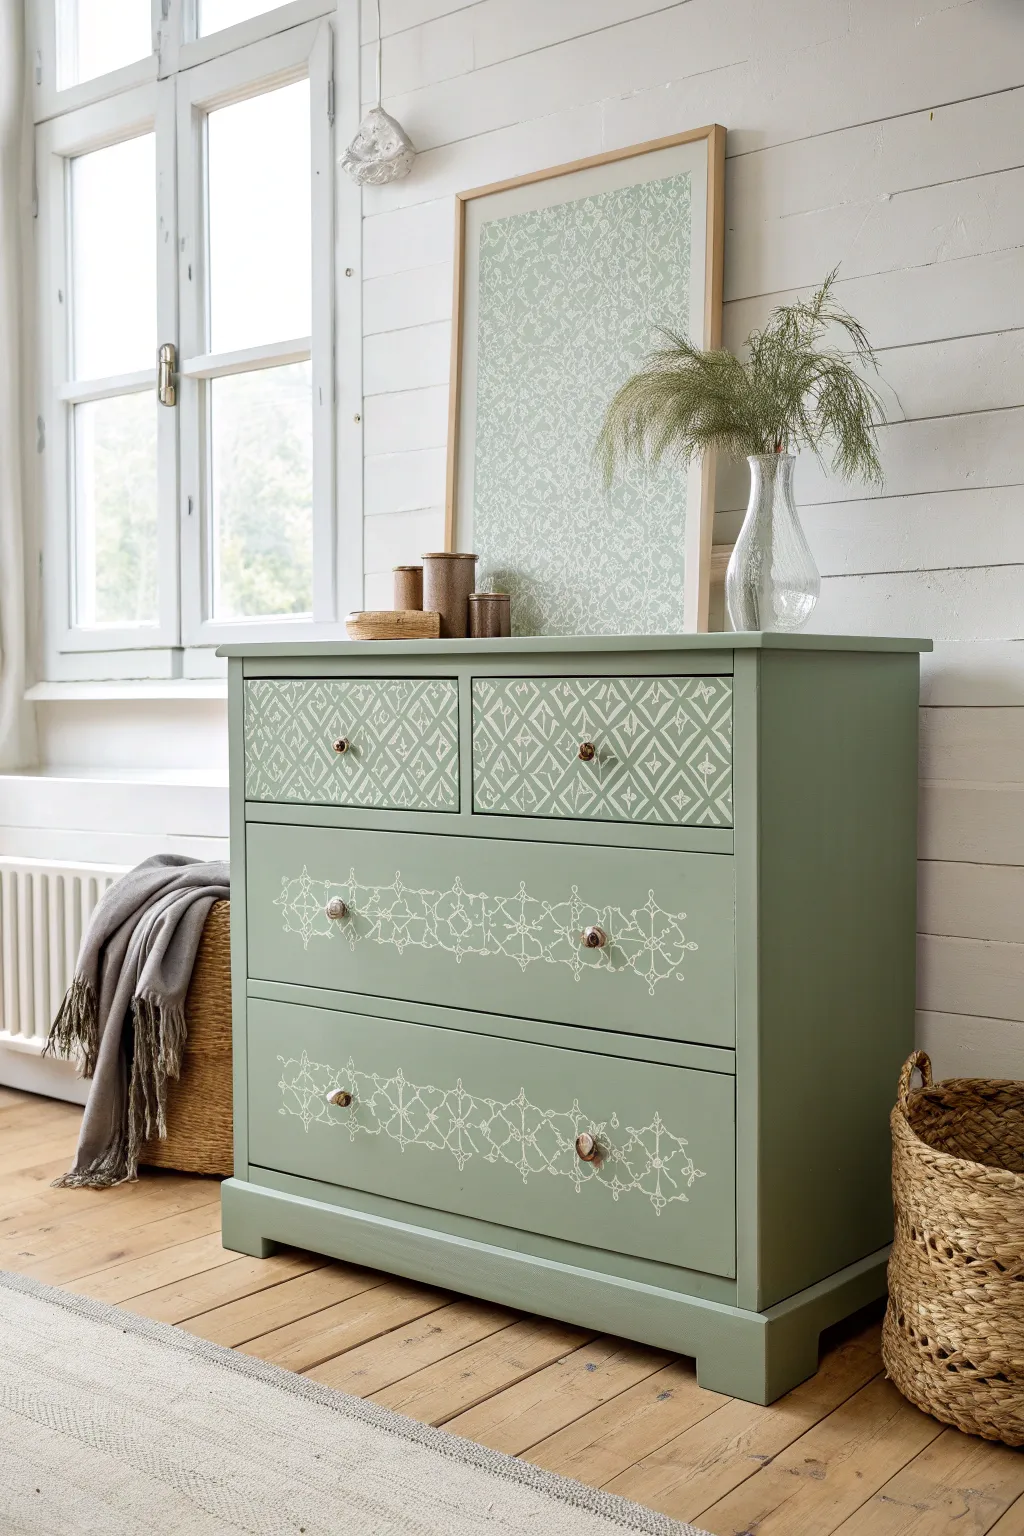
Transform a plain wooden dresser into a calming focal point with this sage green makeover featuring dual stencil designs. By combining a dense geometric pattern on the top with delicate horizontal flourishes below, you achieve a custom, hand-painted look that feels both modern and timeless.
Step-by-Step Tutorial
Materials
- Wooden dresser (prepped/sanded)
- Sage green chalk or mineral paint
- Cream or off-white detail paint (chalk or acrylic)
- Geometric lattice stencil (sized for small drawers)
- Ornate horizontal border stencil
- High-density foam roller
- Stencil brushes (various sizes)
- Painter’s tape (low tack)
- Paper towels
- Matte clear coat or wax
- Drawer pulls/knobs (antique brass or wood)
- Screwdriver
- Reference photo or ruler
Step 1: Base Preparation
-
Remove hardware:
Begin by removing all existing knobs and drawer pulls with a screwdriver. Store the screws in a baggie inside a drawer so they don’t get lost. -
Clean and sand:
Wipe the entire piece down with a degreaser to remove oils. Lightly scuff-sand the surface with 220-grit sandpaper to give the paint superb adhesion, then wipe away the dust. -
Apply base coat:
Paint the entire dresser frame and drawer fronts with your sage green chalk paint. Use a high-quality synthetic brush for corners and a foam roller for flat areas to minimize brush strokes. -
Second coat:
Allow the first coat to dry completely (usually 1-2 hours). Apply a second coat to ensure opaque, even coverage. Let this cure overnight before stenciling.
Clean Lines Pro-Tip
Spray the back of your stencil with a repositionable spray adhesive. It creates a temporary tacky surface that seals the stencil tightly to the wood, virtually eliminating paint bleed.
Step 2: Stenciling the Top Drawers
-
Position the geometric stencil:
Remove the top drawers and lay them flat on a table. Center your diamond lattice stencil on the first drawer front and secure it firmly with painter’s tape. -
Load the brush:
Dip your stencil brush or small foam roller into the cream paint. Offload almost all the paint onto a paper towel; the brush should feel nearly dry to prevent bleed-under. -
Apply the pattern:
Using a vertical dabbing motion (stippling) or very light rolling, apply the cream paint over the stencil. Do not drag the brush. -
Check and repeat:
Carefully lift one corner to check coverage. If it looks good, remove the stencil straight up. Reposition it to cover the rest of the drawer front, matching the pattern edges perfectly, and repeat. -
Process the second drawer:
Repeat this entire process on the second small top drawer, ensuring the pattern density matches the first.
Step 3: Detailing the Large Drawers
-
Mark the center:
Lay the large bottom drawers flat. Use a ruler to lightly mark the horizontal center line where your hardware will eventually go; this helps align the border design. -
Align the border stencil:
Place your ornate horizontal border stencil so the pattern is centered directly over the hardware holes. Tape it down securely. -
Stipple the design:
Using a smaller stencil brush and the ‘dry brush’ technique from earlier, dab the cream paint onto the intricate design. Go lighter here than on the top drawers for a delicate effect. -
Connect the pattern:
Lift the stencil and move it left or right to continue the band across the entire width of the drawer, being careful to align the registration marks. -
Reinstall hardware:
Once the paint is fully dry (wait at least 4 hours), reattach your knobs. For this look, antique brass or natural wood knobs complement the sage tone beautifully. -
Seal the work:
Protect your handiwork by applying a clear matte wax or polyacrylic topcoat over the entire piece. I like to use a lint-free cloth to buff the wax to a soft sheen.
Level Up: Distressed Look
After the stencil paint dries, lightly sand over the designs with 300-grit sandpaper. This gently wears away parts of the cream paint, making the pattern look aged and integrated.
Step back and admire how a simple coat of paint and some strategic patterns have given your dresser a completely new life
Botanical Lined Drawers Inside a Green Dresser
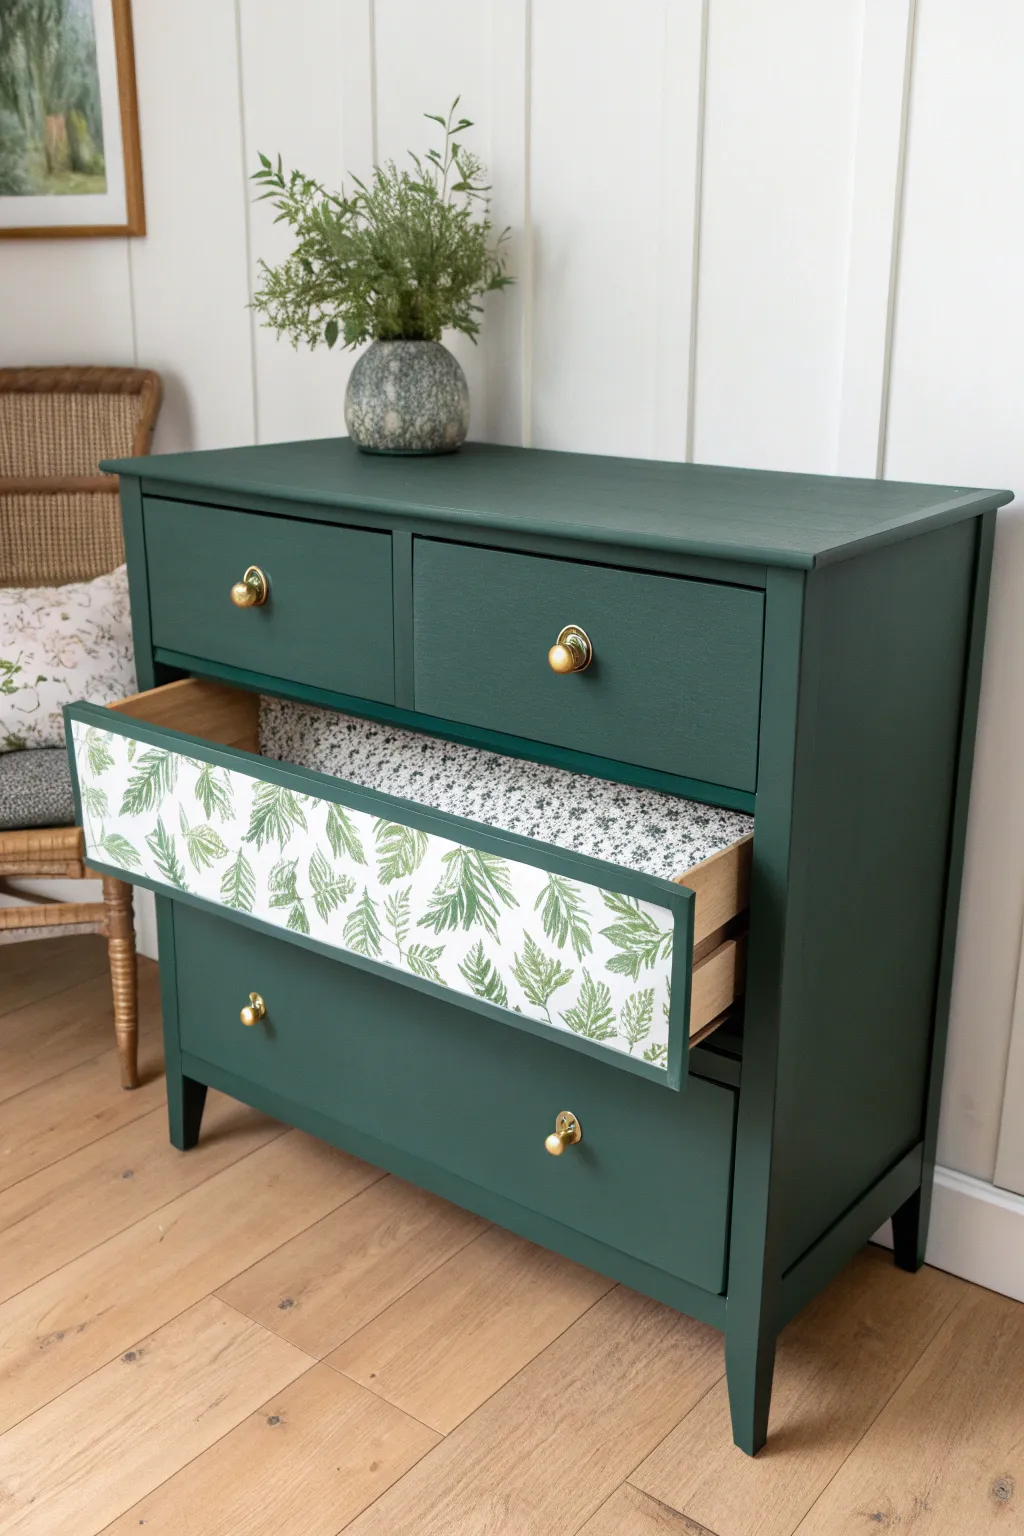
Transform a plain dresser into a forest-inspired statement piece with a deep green finish and a surprise inside. This project elevates standard furniture painting by adding a playful pop of botanical pattern to the drawer sides, revealing a secret garden every time you reach for something.
Detailed Instructions
Materials
- Wooden dresser
- Deep forest green chalk or mineral paint
- Clear matte polyurethane or wax topcoat
- Botanical fern-patterned wallpaper or heavy gift wrap
- Speckled or complementary patterned drawer liner paper
- Mod Podge (Hard Coat recommended) or wallpaper paste
- Gold or brass drawer knobs
- Sandpaper (120 and 220 grit)
- Small foam roller and tray
- High-grit synthetic paint brush
- X-Acto knife with fresh blades
- Smoothing tool or credit card
- Screwdriver
- Wood filler (optional)
Step 1: Preparation & Painting
-
Remove hardware:
Begin by removing all drawers from the dresser shell. Use your screwdriver to take off all existing knobs or pulls and set them aside in a labeled baggie so screws don’t get lost. -
Prep surfaces:
Lightly sand the entire exterior of the dresser and the drawer fronts with 120-grit sandpaper to scuff the existing finish. This helps the new paint adhere firmly. Wipe away all dust with a tack cloth or damp rag. -
Tape edges:
If you want clean lines where the drawer fronts meet the drawer sides (which will be papered later), apply painter’s tape along the side edges of the drawer fronts. -
First coat:
Pour your deep green mineral paint into a tray. Use a high-quality synthetic brush to cut in corners and edges, then switch to a small foam roller for the large flat surfaces to ensure a smooth, brush-stroke-free finish. -
Dry and repeat:
Allow the first coat to dry according to the can’s instructions, usually about 2-4 hours. Lightly sand with 220-grit sandpaper for an ultra-smooth feel, wipe clean, and apply a second coat for full opacity. -
Seal the finish:
Once the paint is fully cured (I like to wait 24 hours just to be safe), apply a clear matte protective topcoat using a clean roller. This protects that rich green color from scuffs.
Step 2: Adding the Hidden Details
-
Measure drawer sides:
While the dresser shell dries, focus on the drawers. Measure the height and length of the exterior drawer sides precisely. It is better to overestimate slightly than underestimate. -
Cut the paper:
Roll out your fern-patterned paper. Cut rectangular strips using your measurements, adding about half an inch of excess on all sides to allow for trimming later. -
Apply adhesive:
Brush a thin, even layer of Mod Podge or wallpaper paste directly onto the wooden side of the drawer. Ensure you get coverage all the way to the edges to prevent peeling. -
Position the paper:
Carefully align the paper with the front edge of the drawer side (closest to the painted face). Smooth it down gently with your hands to tack it in place. -
Smooth bubbles:
Use a plastic smoothing tool or an old credit card to press the paper firmly against the wood, working from the center outward to push out any trapped air bubbles or excess glue. -
Trim excess:
Once the paper is secure but before the glue fully hardens, use a sharp X-Acto knife to trim the excess paper flush with the top, bottom, and back edges of the drawer side. -
Seal the paper:
For durability, especially since drawers slide in and out, apply a coat of Hard Coat Mod Podge or a clear sealer over the paper. This makes the surface wipeable and prevents snagging. -
Line the interior:
Measure the inside bottom of the drawers. Cut your speckled liner paper to size and install it using double-sided tape or spray adhesive for a polished look inside and out.
Sticky Drawers?
If paper makes the drawer fit too tight, sand the drawer runner (the bottom edge) slightly or rub a bar of soap along the tracks for lubrication.
Step 3: Assembly
-
Reattach hardware:
Locate the holes for your knobs. If they were covered by paint, poke through gently with a screw. Attach your gold or brass knobs, tightening firmly. -
Reinsert drawers:
Slide the drawers back into the dresser case. If the paper adds too much thickness, rub a little candle wax on the drawer runners to help them glide smoothly.
Level Up
Paint the legs or base in gold metallic paint to match the hardware, adding a touch of mid-century modern glamour to the rustic green.
This delightful surprise of pattern will bring a smile to your face every time you organize your clothes
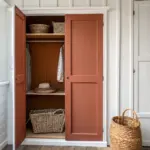
Painted Interior Shelves in a Green Cabinet
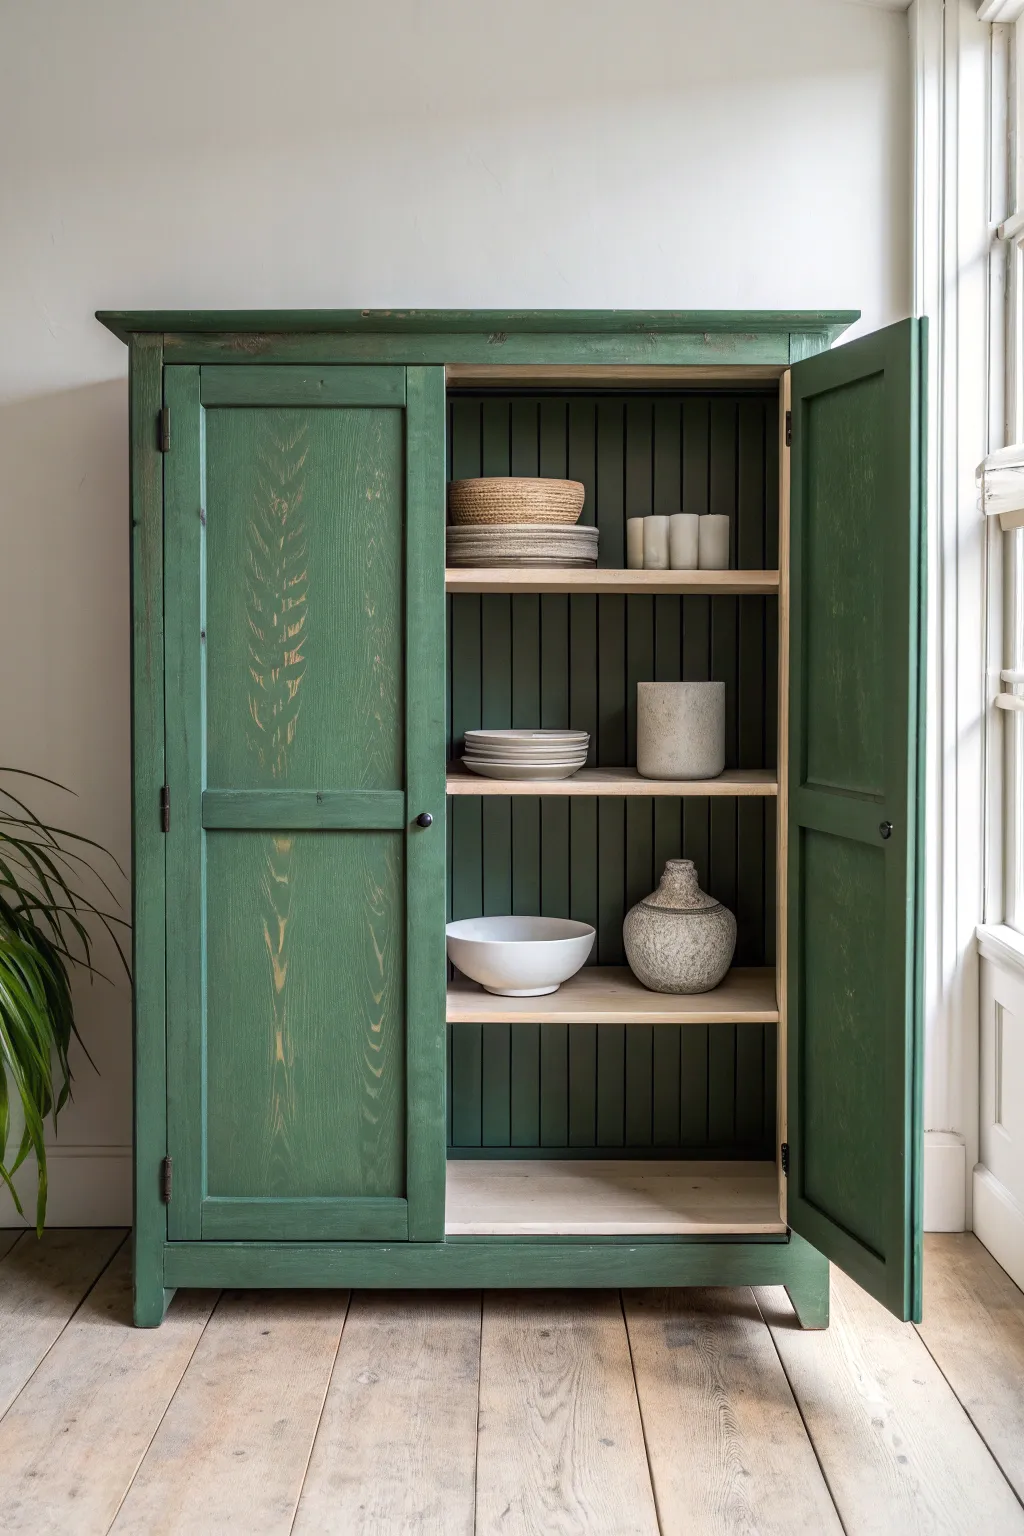
Transform a plain wooden cupboard into a statement piece by pairing a rustic green exterior with contrasting natural wood shelves. This project highlights the beauty of beadboard backing by painting it a moody, deep shade while leaving the shelving bright and airy.
Step-by-Step Tutorial
Materials
- Unfinished wooden cabinet with beadboard backing (or existing cabinet to refinish)
- Medium-grit sandpaper (120-grit)
- Fine-grit sandpaper (220-grit)
- Tack cloth
- Painter’s tape
- Wood primer (if painting over existing finish)
- Sage or forest green chalk-style paint (for exterior)
- Dark hunter green or black-green paint (for interior back panel)
- Matte clear topcoat or furniture wax
- 2-inch angled sash brush
- Small foam roller
- Medium flat brush
- Screwdriver (for hardware removal)
- Drop cloth
Step 1: Preparation & Disassembly
-
Remove hardware:
Begin by removing all knobs, hinges, and latches using your screwdriver. Place all screws and hardware in a labeled bag so nothing gets lost during the process. -
Detach the doors:
Carefully take the doors off the cabinet frame. This makes painting the nooks and crannies much easier and prevents drips. -
Remove shelves:
If the shelves are removable, slide them out now. If they are fixed, you will simply tape them off later, but removing them is preferred for a cleaner finish. -
Sand the surfaces:
Using 120-grit sandpaper, lightly scuff all surfaces you intend to paint. If you actally want to keep the shelves natural like the photo, sand them down to raw wood now to remove any old varnish. -
Clean the dust:
Wipe down the entire piece with a tack cloth to remove every speck of sawdust. Dust is the enemy of a smooth finish.
Clean Lines Pro-Tip
For crisp lines on the beadboard, run a credit card over the painter’s tape edge to seal it tight. Paint a thin layer of the *base* color first to block bleed-through before applying the green.
Step 2: Painting the Exterior
-
Protect the interior:
Use painter’s tape to mask off the front edge of the interior shelves and the inside frame if you want a sharp line between the exterior color and the interior. -
Apply the first exterior coat:
Dip your angled brush into the sage green chalk paint. Start painting the face frame, sides, and the front and back of the doors. Brush with the grain of the wood for the best look. -
Let it dry:
Allow the first coat to dry completely according to the can’s instructions, usually about 2-4 hours. -
Apply second coat:
Apply a second coat of the sage green to ensure full coverage. I like to keep this coat slightly thinner to avoid brush marks slightly masking the wood texture. -
Distress (Optional):
Once dry, use fine-grit sandpaper to gently rub the edges and raised areas where natural wear would occur, revealing a bit of wood underneath for that rustic look shown in the photo.
Sticky Door Fix
If doors stick after painting, sand the contact edges down to raw wood. Rub a bar of soap or paraffin wax along the touching edges to help them glide smoothly without scraping the new paint.
Step 3: Interior & Finishing
-
Tape the shelves:
If your shelves are fixed and you want them to remain natural wood, carefully tape off the shelf surfaces where they meet the back panel. -
Paint the back panel:
Using a smaller brush or a mini roller, paint the beadboard backing with the darker hunter green paint. The vertical grooves of beadboard can be tricky, so ensure you get paint into the crevices first before rolling the flat surfaces. -
Seal the natural wood:
Apply a clear matte topcoat or wax to the unpainted natural wood shelves to protect them from scratches while keeping the raw look. -
Seal the painted surfaces:
Apply a clear wax or matte polyurethane over all painted green surfaces. This seals the chalk paint and adds durability. -
Reassemble:
Once everything has cured for at least 24 hours, screw the hinges and knobs back onto the doors and reattach the doors to the cabinet frame. -
Style the shelves:
Insert your shelves back in (if removed) and style with neutral ceramics to make the green background pop.
Now you have a stunning, dual-toned display cabinet ready to showcase your favorite pottery.
Green Bar Cabinet With a Surprise Back Panel
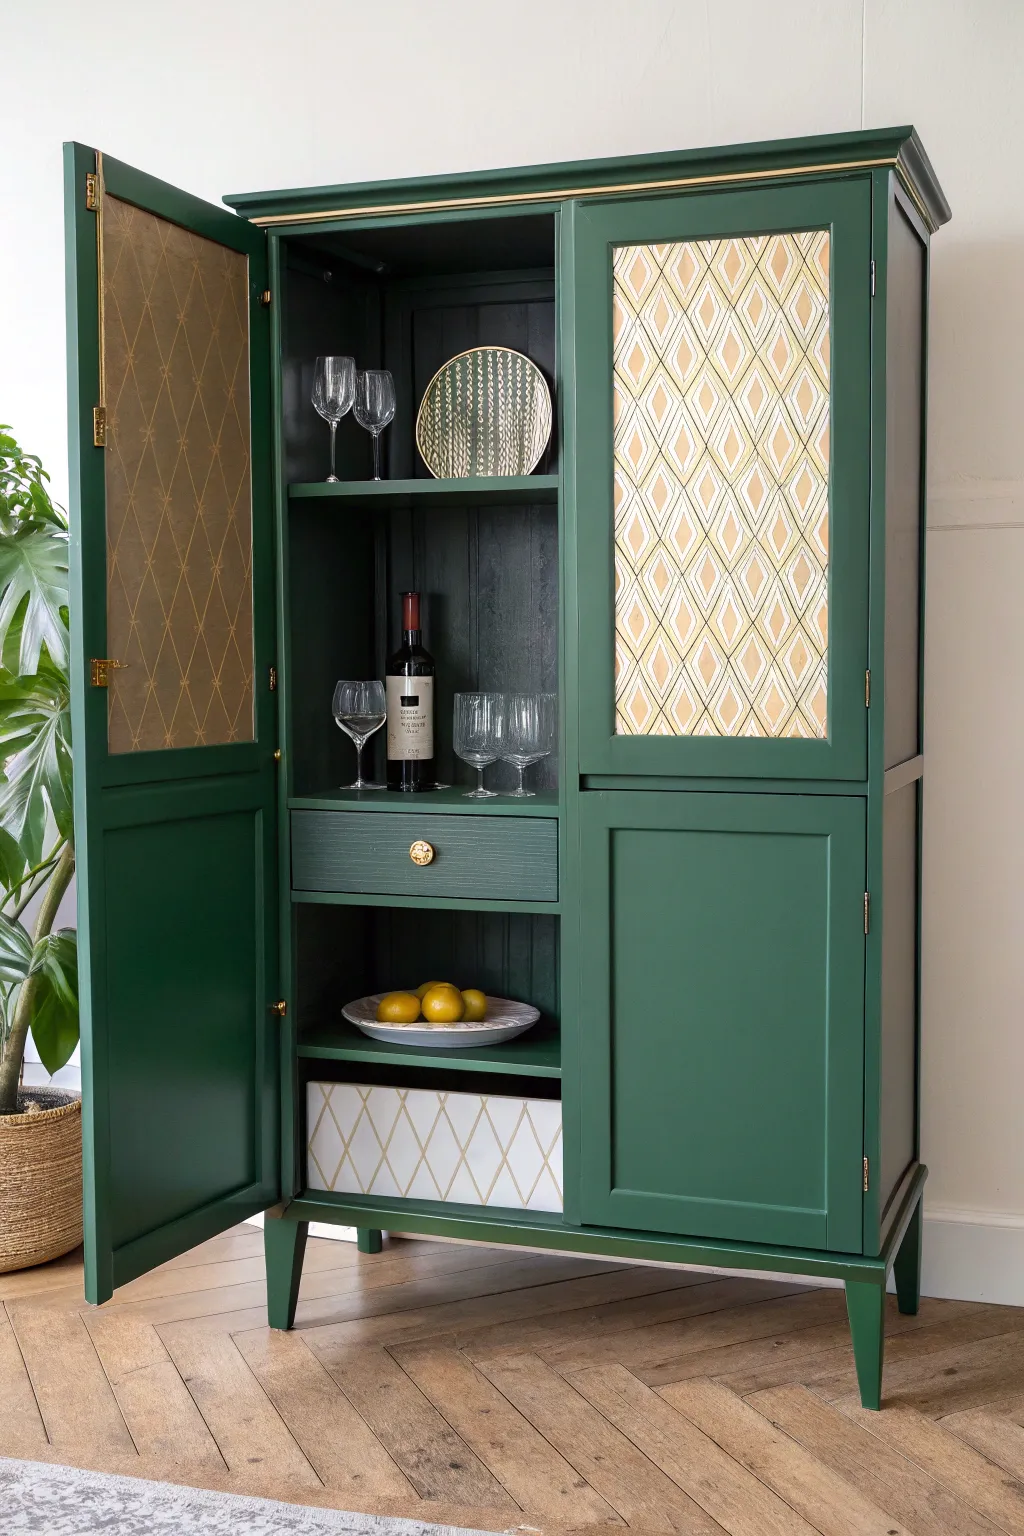
Transform a plain wooden cabinet into a sophisticated home bar featuring a rich forest green finish and stunning metallic geometric accents. The secret to this piece’s high-end look lies in the combination of matte paint and eye-catching patterned paper on the interior panels.
Step-by-Step Guide
Materials
- Cabinet or armoire
- Forest green mineral or chalk paint
- Sanding block (medium and fine grit)
- Geometric wallpaper or contact paper (gold and white)
- Gold spray paint or Rub ‘n Buff
- Painter’s tape
- Wallpaper paste (if not using peel-and-stick)
- Gold geometric knob
- Clear matte polyurethane topcoat
- Screwdriver
- Paintbrush (synthetic bristle)
- Foam roller
- Craft knife or box cutter
- Cleaning solution (TSP or degreaser)
Step 1: Preparation and Cleaning
-
Remove hardware:
Begin by removing all doors, drawers, and existing hardware. Keep the screws and hinges in a labeled bag so you don’t lose them. -
Clean surfaces:
Wipe down the entire piece with a TSP solution or a strong degreaser to remove years of dust, oil, and furniture polish. This step is crucial for paint adhesion. -
Sand for grip:
Lightly sand all exterior and interior surfaces you plan to paint using a medium-grit sanding block. You aren’t trying to strip the wood, just scuffing it up to give the paint something to grab. -
Address panels:
If your cabinet has glass panels, tape them off carefully. If it has wood panels you plan to cover, ensure they are smooth and clean.
Bubbling Paper?
If stubborn air bubbles appear in your contact paper, prick the bubble with a fine needle to release the trapped air, then smooth it flat with your finger.
Step 2: Painting the Structure
-
First coat application:
Apply your forest green mineral paint. I like to use a synthetic brush for corners and detailed moldings, then switch to a foam roller for the flat sides to minimize brush strokes. -
Interior painting:
Don’t forget the inside! Paint the interior shelving area and the back of the doors that will frame your wallpaper accent. Leave the specific areas where paper will go unpainted if possible, or paint them if you want a base color. -
Drying and sanding:
Let the first coat dry completely according to the manufacturer’s instructions. Once dry, lightly run a fine-grit sanding block over the surface to smooth out any raised wood grain. -
Apply second coat:
Apply a second coat of green paint for full, opaque coverage. Watch for drips around corners and recessed panels. -
Seal the paint:
Once fully cured, apply a clear matte polyurethane topcoat to protect the finish, especially on the shelves where bottles and glasses will slide.
Clean Edges
When painting along the edges of the wallpaper sections, use a ‘cutting in’ technique or painter’s tape to ensure you don’t get green paint on your new pattern.
Step 3: Adding the Accents
-
Measure panels:
Measure the recessed panels on your doors and the back panel of the cabinet interior precisely. -
Cut the paper:
Cut your geometric wallpaper or contact paper to size. It helps to cut slightly larger than the space to allow for adjustments. -
Apply the pattern:
Carefully adhere the paper to the door panels and interior back wall. Use a smoothing tool or credit card to push out air bubbles as you go, working from the center outward. -
Trim excess:
Use a sharp craft knife to trim the excess paper right up against the molding for a perfect, seamless fit. -
Drawer liner:
For an extra surprise, line the bottom or front of the drawer with the same paper to tie the look together.
Step 4: Finishing Touches
-
Update hardware:
Spray paint your original hinges gold, or clean them up if they are already brass. Install a new gold geometric knob on the drawer. -
Add gold trim:
Using a small artist’s brush and liquid gold leaf or Rub ‘n Buff, highlight the very top edge of the cabinet molding to create a subtle metallic crown. -
Reassembly:
Reattach the doors and slide the drawers back in. Ensure the doors swing freely without scraping the new paint. -
Styling:
Stock your new bar with glassware, plates, and your favorite spirits to see how the dark green pops against the gold accents.
Enjoy the rich, custom look of your new bar cabinet every time you pour a drink
Retro Lime Green for a Playful Twist
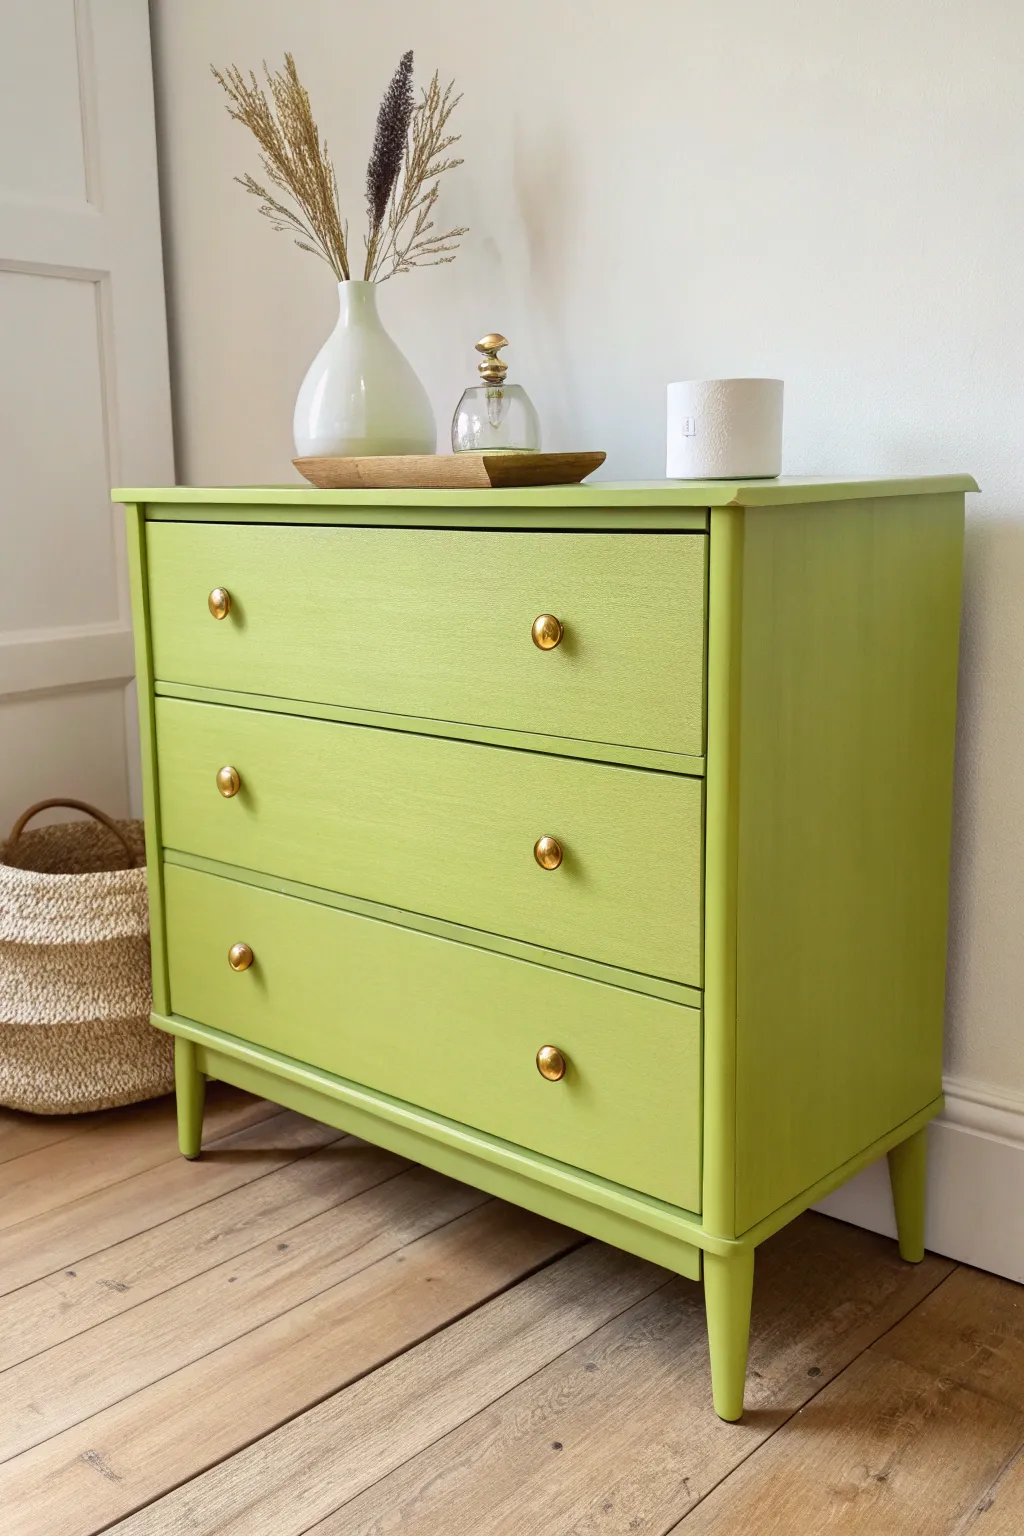
Transform a tired wooden dresser into a vibrant focal point with this retro-inspired lime green makeover. This project uses a bold, playful chartreuse hue paired with classic gold hardware to create a piece that feels both vintage and refreshingly modern.
How-To Guide
Materials
- Mid-century modern style wooden dresser
- Sander (orbital or detailing)
- Sandpaper (120 and 220 grit)
- Tack cloth
- Wood filler
- High-quality bonding primer
- Satin or eggshell enamel paint (color matched to chartreuse/lime green)
- 2-inch angled synthetic paintbrush
- 4-inch foam roller or mohair roller
- Roller tray
- Gold or brass round knobs (6)
- Screwdriver
- Painter’s tape
- Mild degreasing cleaner
Step 1: Preparation
-
Remove hardware:
Begin by removing all the drawers from the dresser shell. Use a screwdriver to take off the old knobs or handles and set them aside in a baggie if you plan to keep them, though we will likely be replacing them with gold knobs. -
Clean thoroughly:
Wipe down the entire piece, including the drawer fronts and legs, with a mild degreasing cleaner to remove years of furniture polish, oil, and dust. -
Fill imperfections:
Inspect the wood for deep scratches or dents. Apply wood filler to these areas with a putty knife, smoothing it out as much as possible. -
Initial sand:
Once the filler is dry, sand the entire dresser with 120-grit sandpaper. You aren’t trying to strip it to bare wood, just scuffing the shiny finish to give the paint something to grip. -
Smooth sanding:
Follow up with a pass of 220-grit sandpaper to ensure a buttery smooth surface. I always make sure to hand-sand the tapered legs carefully so the curves stay nice and round. -
Dust removal:
Vacuum up the sanding dust and finish by wiping everything down with a tacky cloth to remove every last speck of debris.
Pro Tip: Elevate the Legs
To prevent paint form pooling at the bottom of the tapered legs, hammer a large nail or furniture tack into the very bottom of each foot before painting to lift it slightly off your drop cloth.
Step 2: Painting
-
Prime the surface:
Apply a coat of high-quality bonding primer. Use a brush for corners and legs, and a small roller for the flat surfaces. This is crucial for preventing bleed-through and ensuring the green pop. -
Sand primer:
Let the primer dry completely according to the can’s instructions. Lightly sand it with fine-grit paper to smooth out any brush strokes, then wipe away the dust. -
First coat of green:
Cut in the edges, corners, and legs using your angled paintbrush with your chosen lime green paint. -
Roll the flats:
Immediately follow up with a foam or mohair roller on the flat sides and drawer fronts while the brushed paint is still wet to blend the textures. -
Dry and assess:
Allow the first coat to dry fully. Don’t be discouraged if it looks streaky; bold greens often need multiple coats for true opacity. -
Second coat:
Apply a second coat using the same method: brush the details first, then roll the larger areas. Watch for drips around the edges of the drawers. -
Final touch-ups:
Inspect the finish once dry. If the color still looks a bit transparent in spots, apply a light third coat for that perfect, saturated look.
Step 3: Assembly
-
Cure time:
Let the dresser sit for at least 24 to 48 hours before reassembly. This prevents the drawers from sticking to the frame. -
Install hardware:
Screw the gold button knobs onto the drawer fronts. If the new knobs have different screw lengths, ensure they fit snugly without wobbling. -
Reinsert drawers:
Carefully slide the drawers back into their tracks. If the paint adds thickness that makes them stick, you can rub a little candle wax on the wooden runners to help them glide.
Level Up: Drawer Liners
Line the inside of the drawers with a peel-and-stick wallpaper featuring a botanical or geometric print that complements the lime green for a hidden surprise.
Enjoy styling your freshly revived dresser with simple organic decor pieces to let that bold color shine.
Textured Green Finish for Old-World Character
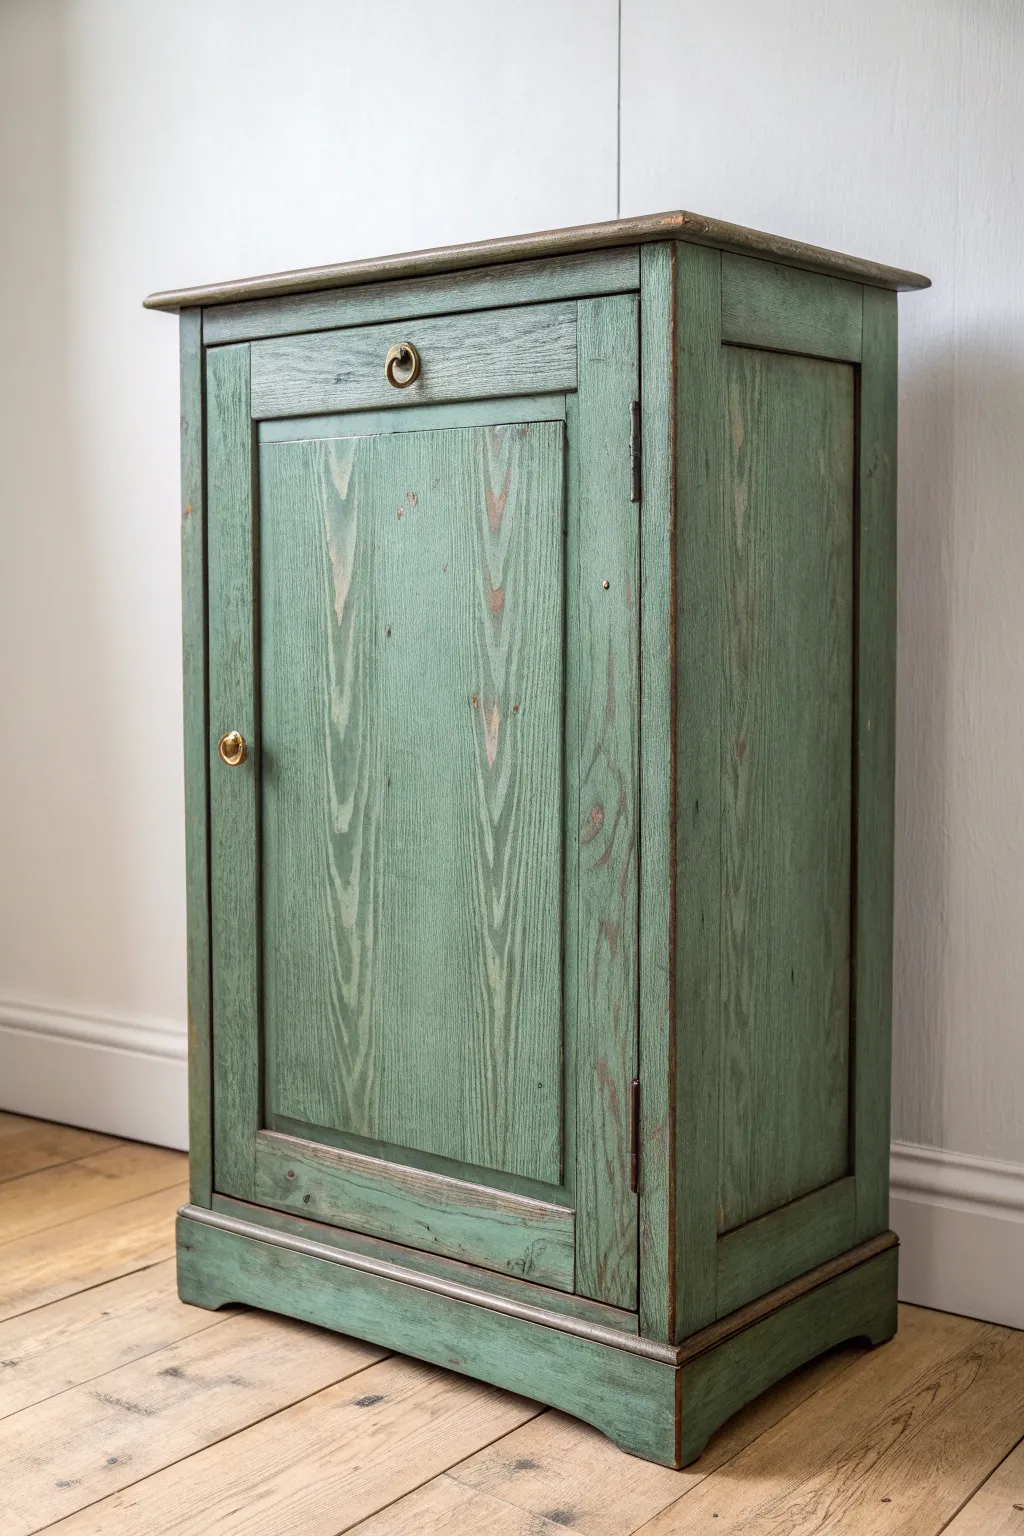
Transform a plain wooden cabinet into a piece brimming with age and character using this layered wash technique. The finish features a muted sage green that allows the natural wood grain to peek through, accented by subtly distressed edges for that authentic Old-World charm.
Step-by-Step Tutorial
Materials
- Raw wooden cabinet (pine or oak works best)
- Medium-grit sandpaper (120-150 grit)
- Fine-grit sandpaper (220 grit)
- Sage or moss green chalk mineral paint
- Dark antique wax
- Clear furniture wax
- Lint-free rags or cheesecloth
- Paintbrush (synthetic bristle)
- Round wax brush
- Water spray bottle or mixing cup
- Tack cloth
- Small brass knob (optional replacement)
Step 1: Preparation & Surface Prep
-
Remove Hardware:
Before you begin, unscrew any existing knobs, latches, or hinges. This ensures you can paint uninterrupted and prevents paint buildup on your metal fixtures. -
Initial Sanding:
Sand the entire piece with medium-grit sandpaper to remove any existing varnish or shiny factory finishes. You want to expose the raw wood fibers so they can absorb the pigmented wash. -
Dust Removal:
Thoroughly wipe down the cabinet with a tack cloth or a damp rag. Any lingering sawdust will get trapped in your paint finish and create a gritty texture. -
Enhance Grain (Optional):
If your wood is very smooth, use a wire brush to gently drag along the direction of the grain. This opens up the pores and creates deeper valleys for the paint and wax to settle into later.
Too dark?
If the dark wax looks too heavy or stains a spot too deeply, simply apply a dab of clear wax over it. The fresh clear wax acts like an eraser, lifting the excess pigment.
Step 2: Creating the Green Wash
-
Mix the Wash:
In a mixing cup, combine your sage green chalk paint with water. I usually aim for a 1:1 ratio—you want a consistency more like melted ice cream or heavy cream than thick paint. -
Apply First Coat:
Dip your brush into the wash and apply it to the cabinet, working in sections. Brush with the direction of the wood grain. -
Wipe Back:
Immediately after painting a section, use a lint-free rag to wipe off the excess paint. The goal is to stain the wood green rather than coat it solidly. -
Check Coverage:
Step back and assess the transparency. If the wood looks too bare, apply a second thin wash layer, but keep it translucent enough to see the beautiful grain patterns underneath. -
Dry Time:
Allow the green wash to dry completely. Since the paint is diluted, this might happen quickly, but give it at least 2 hours to be safe.
Step 3: Distressing & Aging
-
Edge Distressing:
Take your fine-grit sandpaper and gently rub the high points where wear would naturally occur—corners, molding edges, and around the handle area. -
Reveal Raw Wood:
Sand until you see the raw wood peek through the green. This creates the ‘halo’ effect seen on the edges of the cabinet door and top rim. -
Apply Clear Wax:
Using a wax brush, apply a thin layer of clear furniture wax over the entire piece. This seals the paint and provides a workable surface for the dark wax. -
Buff the Clear Wax:
Buff the clear wax gently with a clean cloth. It doesn’t need to be high-gloss, just smooth to the touch.
Grain Direction
Always wipe your paint wash off in the direction of the wood grain. Wiping across the grain can leave unsightly streaks that ruin the natural, stained effect.
Step 4: Final Patina
-
Apply Dark Wax:
Load a small amount of dark antique wax onto your brush. Focus this application on the corners, crevices, and the deep grain lines you opened up earlier. -
Work it In:
Push the dark wax into the texture of the wood. This step adds that shadowy, aged dimension that makes the piece look like an antique find. -
Blend and Remove:
Use a heavy hand with a clean cloth to wipe back the dark wax from the flat surfaces, leaving it only in the recessed areas and grain lines. -
Final Buff:
Once the waxes have cured (usually overnight), give the whole piece a final buff to achieve a subtle, satin sheen. -
Reattach Hardware:
Screw the brass knob back into place. The gold tone generally contrasts beautifully against the muted sage background.
Enjoy the muted elegance of your new old-world cabinet in your home
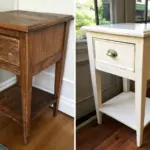


Have a question or want to share your own experience? I'd love to hear from you in the comments below!