
Smooth, flat rocks are basically tiny canvases, and I love how easy it is to get crisp lines and clean details on them. If you’re craving fresh flat rock painting ideas, I pulled together a mix of classics and a few surprising twists you can totally make your own.
Dot Mandala Medallions
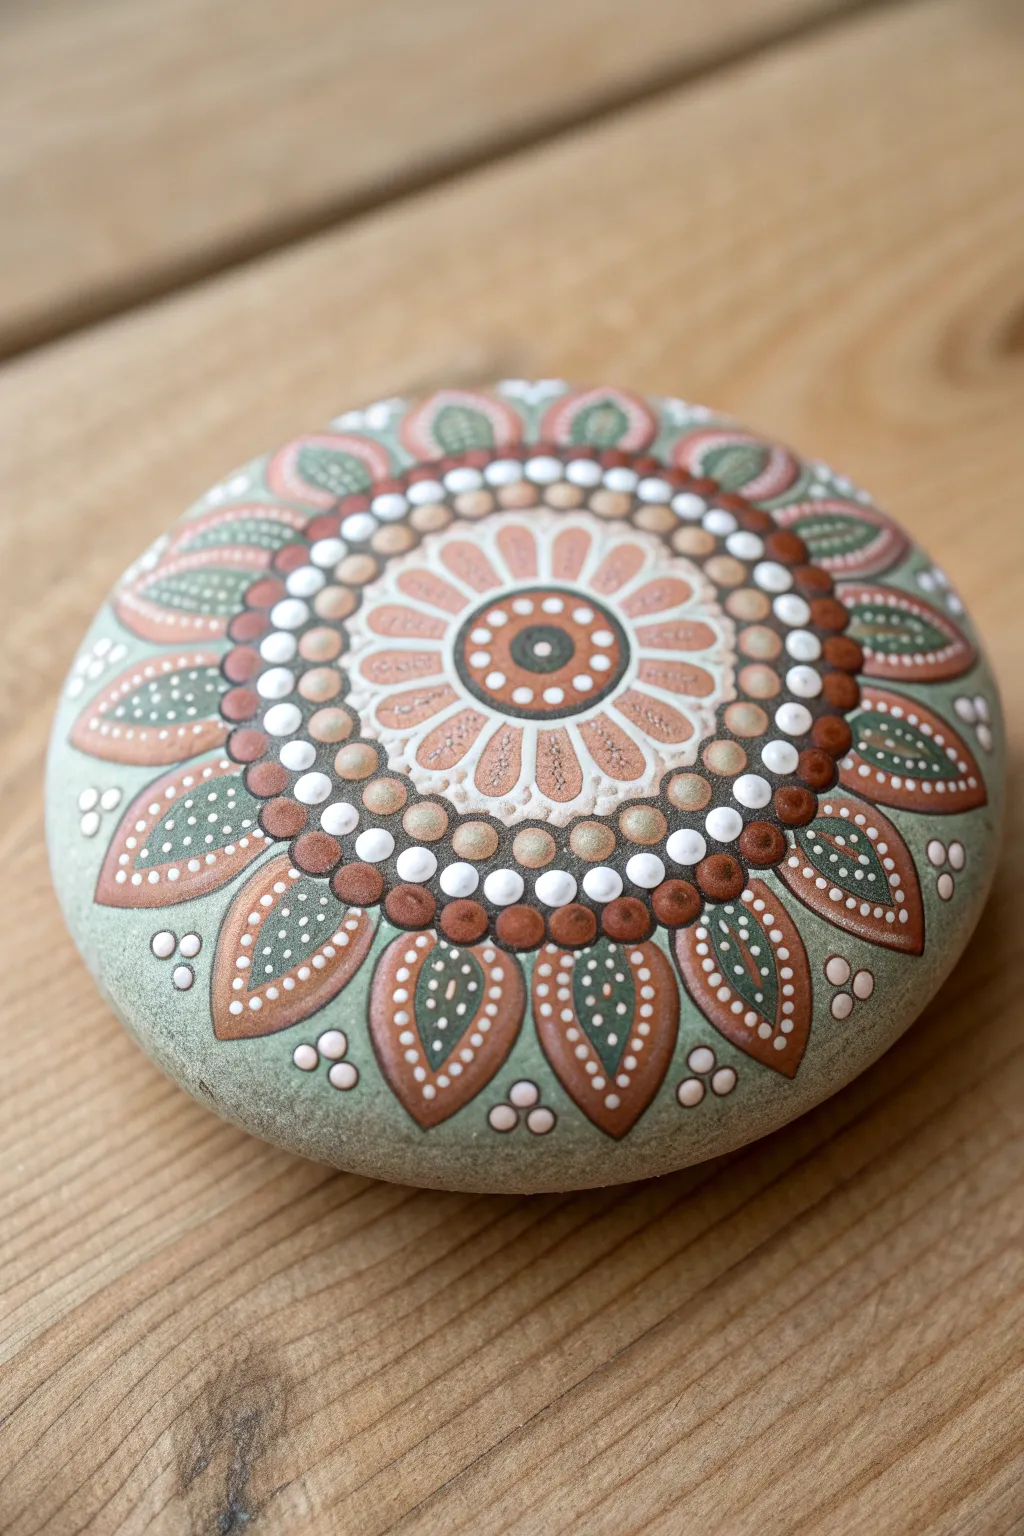
This soothing mandala design combines earthy terracotta tones with soft sage greens for a grounded, meditative piece. The precise dot work creates a mesmerizing medallion effect that looks beautiful on any smooth, round river rock.
Detailed Instructions
Materials
- Smooth, round river rock (approx. 4-5 inches wide)
- Acrylic paints (Sage Green, Terracotta/Rust, Cream/Off-White, Dark Forest Green, Mocha Brown)
- Set of dotting tools (various sizes from stylus to large rod)
- Fine liner brush (size 00 or 000)
- Compass or white chalk pencil (for guidelines)
- Matte or satin varnish
- Palette for mixing
Step 1: Preparation and Center
-
Base Prep:
Clean your rock thoroughly with soapy water and let it dry completely. Paint the entire surface with a base coat of Sage Green mixed with a tiny drop of white to soften it. You may need two coats for full opacity. -
Map Guidelines:
Find the center of your stone. Using a chalk pencil or a compass, lightly draw a series of concentric circles radiating from the center. These don’t need to be perfect, but they will guide your symmetry. -
The Bullseye:
Start with a medium-large dot of Dark Forest Green in the absolute center. Let it dry slightly, then place a smaller Terracotta dot on top, followed by a tiny Cream dot in the very middle. -
First Ring:
Using a small dotting tool, place a ring of small Cream dots around the central bullseye. Keep them tightly spaced but not touching. -
Second Ring:
Switch to Terracotta paint. Place slightly larger dots around the Cream ring. Try to place these in the gaps between the previous row’s dots for a honeycomb effect.
Oops, Smudged It?
If a dot smudges or runs, don’t wipe it! Let it dry completely, then paint over it with the base color (Sage Green). Reapply the dot once the fix is dry.
Step 2: Building the Flower
-
Petal Outlines:
Using your fine liner brush and Cream paint, paint small, elongated petal shapes radiating outward from the Terracotta ring. Aim for about 12-14 petals total. -
Petal Filling:
Fill the bottom half of these petals with a diluted Terracotta wash or stippling, fading into the Cream at the top to create a gentle gradient. -
Outer Definition:
outline the very tip of each cream petal with a thin line of Mocha Brown to separate them from the next layer. -
Walking the Dots:
Around the outer curve of these petals, use the ‘walking the dots’ technique with Mocha Brown. Place one larger dot at the petal peak, then walk smaller and smaller dots down the sides until they meet the base.
Step 3: The Outer Medallion
-
Creating the Fence:
Between each petal peak, place a large Mocha Brown dot. These serve as the anchors for the next section. -
Swoops and Swirls:
Using a medium tool and Cream paint, make dots directly on top of the large Mocha anchors (once dry). Then, use a smaller tool to place a row of Cream dots connecting these anchors, creating a scalloped border. -
Large Petal Base:
Paint large, leaf-shaped outlines extending from the scalloped border towards the rock’s edge using Terracotta paint. These should be perfectly aligned with the inner flower petals. -
Green Leaf Centers:
Fill the inside of these large Terracotta leaves with Dark Forest Green. Leave a thin border of the Terracotta showing. -
Spine Details:
Dip a fine stylus in Cream paint. Draw a dotted line down the center of each green leaf, starting with larger dots at the base and getting tiny at the tip. -
Top Dots:
Add smaller Cream dots along the sides of the central spine inside the green leaf area to add texture. -
Final Outer Accents:
In the negative space between the large outer leaves (the Sage Green background areas), place groups of three Cream dots in visual triangles to fill the void.
Variation Idea
Swap the terracotta for a deep navy blue and the sage background for a light slate grey to transform this earth-toned mandala into a cool, wintery design.
Step 4: Finishing Touches
-
Top Lighting:
Go back to the very center rings. Add tiny white ‘highlight’ dots on top of the largest dots to make them look spherical and shiny. -
Cleanup:
Use a damp Q-tip to gently erase any visible chalk guidelines that haven’t been covered by paint. -
Sealing:
Allow the stone to cure for at least 24 hours. Apply a layer of matte varnish to protect the artwork without adding distracting glare.
Place your finished stone in a garden nook or on a desk where its symmetry can bring a moment of calm


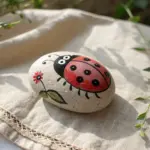
Ladybug and Garden Beetle Rocks
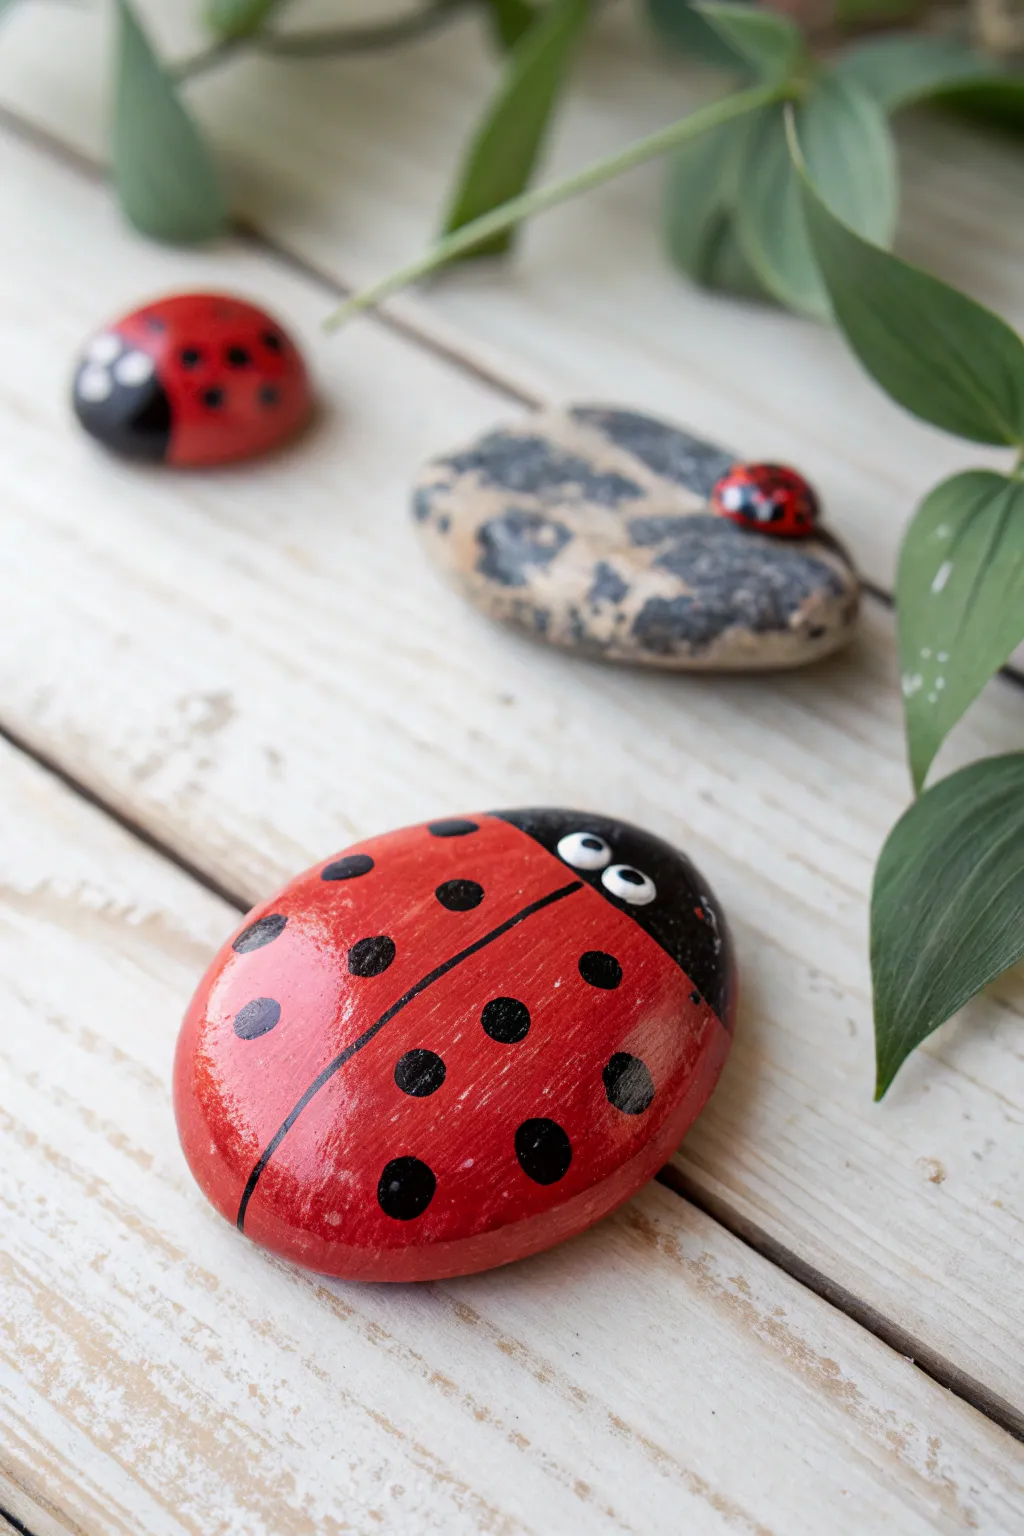
Bring your garden walkway to life with these charming, classic ladybug rocks that never fly away. Using smooth, oval stones as your canvas, you can create a family of bright red beetles complete with shiny shells and expressive little eyes.
Step-by-Step Guide
Materials
- Smooth, oval-shaped river rocks (various sizes)
- Acrylic paint (bright red, black, white)
- Flat paintbrush (medium size)
- Fine detail paintbrush or liner brush
- Dotting tools (various sizes) or the end of a paintbrush
- Pencil
- Outdoor sealant or varnish (satin or gloss finish)
- Cup of water
- Paper towels
Step 1: Base Coating
-
Clean the canvas:
Before opening any paint, scrub your rocks thoroughly with soap and water to remove any dirt or moss. Let them dry completely, preferably in the sun. -
Sketch the outline:
Using a pencil, lightly draw a curved line across the front third of the rock to separate the head from the body. Draw a straight line down the center of the body to mark the wings. -
Paint the wings red:
Use your flat brush to apply bright red acrylic paint to the body section of the rock. You will likely need two to three coats to get that opaque, vibrant shell color, letting each layer dry in between. -
Paint the head black:
Once the red paint is dry, use a smaller brush to fill in the head section with black acrylic paint. Be careful to keep the edge where the red and black meet as crisp as possible.
Uneven Coverage?
If your red paint looks streaky or translucent even after drying, apply a coat of white gesso or paint first as a primer. This makes the red pop instantly.
Step 2: Adding Details
-
Create the dividing line:
Use a fine liner brush and black paint to trace over your pencil line down the center of the red back. This creates the separation between the ladybug’s elytra (wing covers). -
Start dotting spots:
Dip a dotting tool or the handle end of a paintbrush into black paint. Press gently onto the red surface to create the iconic ladybug spots. -
Vary spot pattern:
Make the spots somewhat symmetrical on either side of the center line, but don’t worry about perfection; natural ladybugs have varied patterns. I sometimes like to add half-circles on the edges to make the pattern wrap around. -
Paint the eyes:
Dip a clean, medium-sized dotting tool into white paint. Place two white dots on the black head area for the eyes. -
Add pupils:
Once the white dots are completely dry, use a much smaller dotting tool or a toothpick to add a tiny black dot inside each white circle. Positioning these slightly off-center can give the beetle a cute, gazing expression.
Level Up: 3D Effect
Add a tiny dot of white paint to the top corner of each black spot and the main black head. This ‘highlight’ makes the shell look wet and shiny.
Step 3: Finishing Touches
-
Create variations:
For a varied garden scene, try painting a tiny ladybug on top of a larger, unpainted grey rock. Use the same technique but on a miniature scale with your smallest brush. -
Dry thoroughly:
Allow the finished painting to cure for at least 24 hours. The thick dots of paint may take longer to dry than the flat layers. -
Seal for protection:
Apply a coat of clear outdoor varnish or sealant. A glossy finish works beautifully here, mimicking the natural sheen of a beetle’s hard shell. -
Weatherproofing:
If these will live outside, apply a second coat of sealer to the underside of the rock to prevent moisture from seeping up and peeling the paint.
Set your new beetle family among some green leaves or on a fence post to surprise your garden guests


Clean Geometric Patterns on Flat Stones
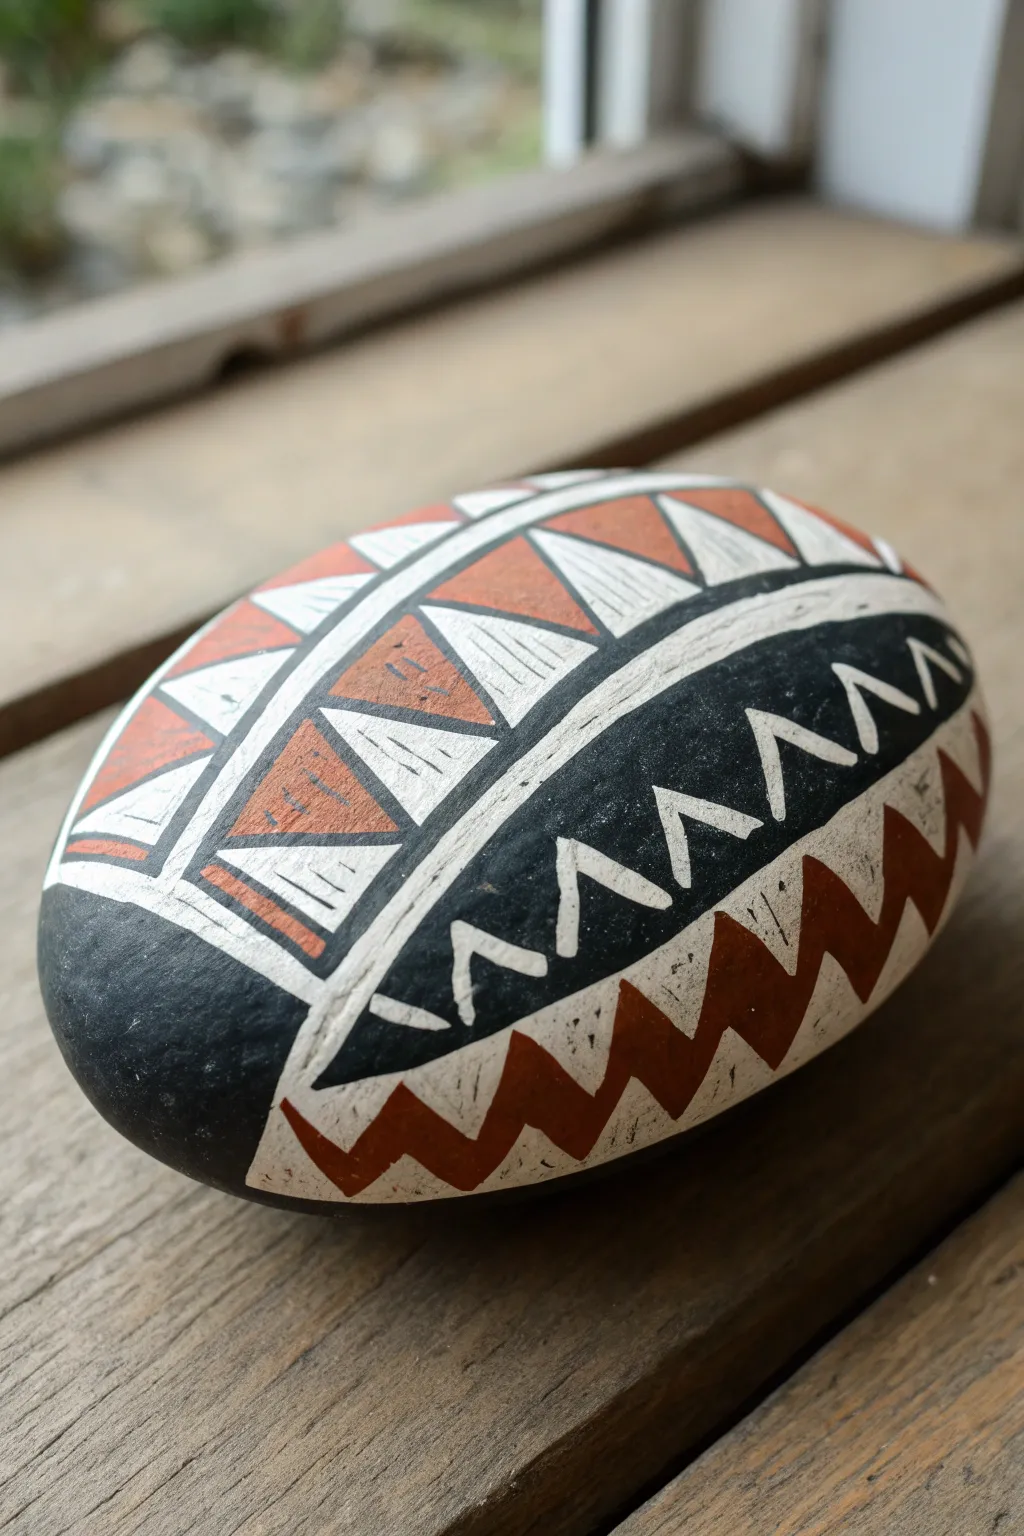
Transform a simple smooth river rock into a striking piece of decor reminiscent of ancient pottery shards. This design combines bold black bands and sawtooth angles with warm terracotta tones for an earthy, sophisticated look.
Step-by-Step
Materials
- Smooth, oval river rock (palm-sized)
- Acrylic paints: Black, White, Burnt Sienna/Terracotta
- Pencil for sketching
- White eraser
- Fine liner brush (size 0 or 00)
- Small flat brush (size 2 or 4)
- Matte spray sealant or varnish
- Water cup and paper towels
Step 1: Base and Sketching
-
Clean the surface:
Begin by scrubbing your rock with warm soapy water and a stiff brush to remove any dirt or oils. Let it dry completely in the sun or with a hairdryer. -
Map out the zones:
Using a pencil, lightly draw three curved, horizontal dividing lines across the main face of the rock. These will separate your different pattern bands. -
Sketch the top motif:
In the top section, draw a series of large, downward-pointing triangles. They should touch the dividing line below them. -
Outline the central wave:
In the middle band (reserved for black), sketch a zigzag or sawtooth line running horizontally through the center. -
Detail the bottom trim:
For the lowest section, sketch another zigzag line, creating a series of sharp peaks that point upwards.
Step 2: Color Blocking
-
Paint the top triangles:
Load your small flat brush with Burnt Sienna or terracotta paint. Carefully fill in the negative space *around* the triangles in the top section, turning the triangles into white (unpainted rock) shapes initially. -
Refine the terracotta:
Actually, looking closer at the design, paint the *background* of the top section terracotta, leaving space for white triangles to be painted on top later. This usually gives better coverage. -
Fill the central band:
Switch to black acrylic. Paint the entire middle band solid black, covering your pencil sketch for now. It helps to do two thin coats rather than one thick one for opacity. -
Paint the bottom section base:
Paint the lowest section white. This will serve as the background for the bottom red zigzag. Let everything dry for at least 15 minutes.
Uneven Lines?
If your geometric lines are shaky, try resting your pinky finger on a dry part of the rock to stabilize your hand while painting the fine details.
Step 3: Geometric Detailing
-
Add white structural lines:
Using your fine liner brush and white paint, draw thick, confident lines creating a border between the top terracotta section and the middle black section. -
Define the top triangles:
Still using white, paint the triangles inside the terracotta band. Outline them heavily in white, then create smaller, scratchy white triangles inside the larger ones for a textured look. -
Start the central white zigzags:
On the dry black middle band, use your fine liner to paint a white zigzag line. The peaks should look like small ‘V’ shapes floating in the black field. -
Thicken the white details:
Go back over your white zigzag lines in the center. I find that dabbing the brush slightly creates a rougher, more authentic pottery feel compared to a perfect sleek line. -
Create the bottom sawtooth:
Mix a little Burnt Sienna. Paint a sharp zigzag pattern over the white base of the bottom section. The points should face upward towards the black band. -
Connect the sections:
Paint a curved white dividing line between the black middle section and the bottom red sawtooth pattern to clearly separate them.
Make it Ancient
For an aged pottery look, lightly sand the dried paint with fine-grit sandpaper (300+) before sealing. This distresses the design beautifully.
Step 4: Finishing Touches
-
Add texture marks:
To mimic the weathered look of the original, use a dry brush with a tiny amount of white paint to add faint scratches or hatch marks inside the terracotta triangles. -
Clean up borders:
Use a little black paint to crisp up the edges of the central band if the white lines bled over. -
Check side views:
Wrap the pattern slightly around the curve of the rock so it doesn’t look like it just ‘stops’ abruptly at the sides. -
Seal the stone:
Once fully dry (give it an hour), take the rock outside and spray it with a clear matte sealant to protect the paint from chipping.
Now you have a stunning, geometric accent stone that looks like a museum artifact


Gradient Sunsets With Silhouette Shapes
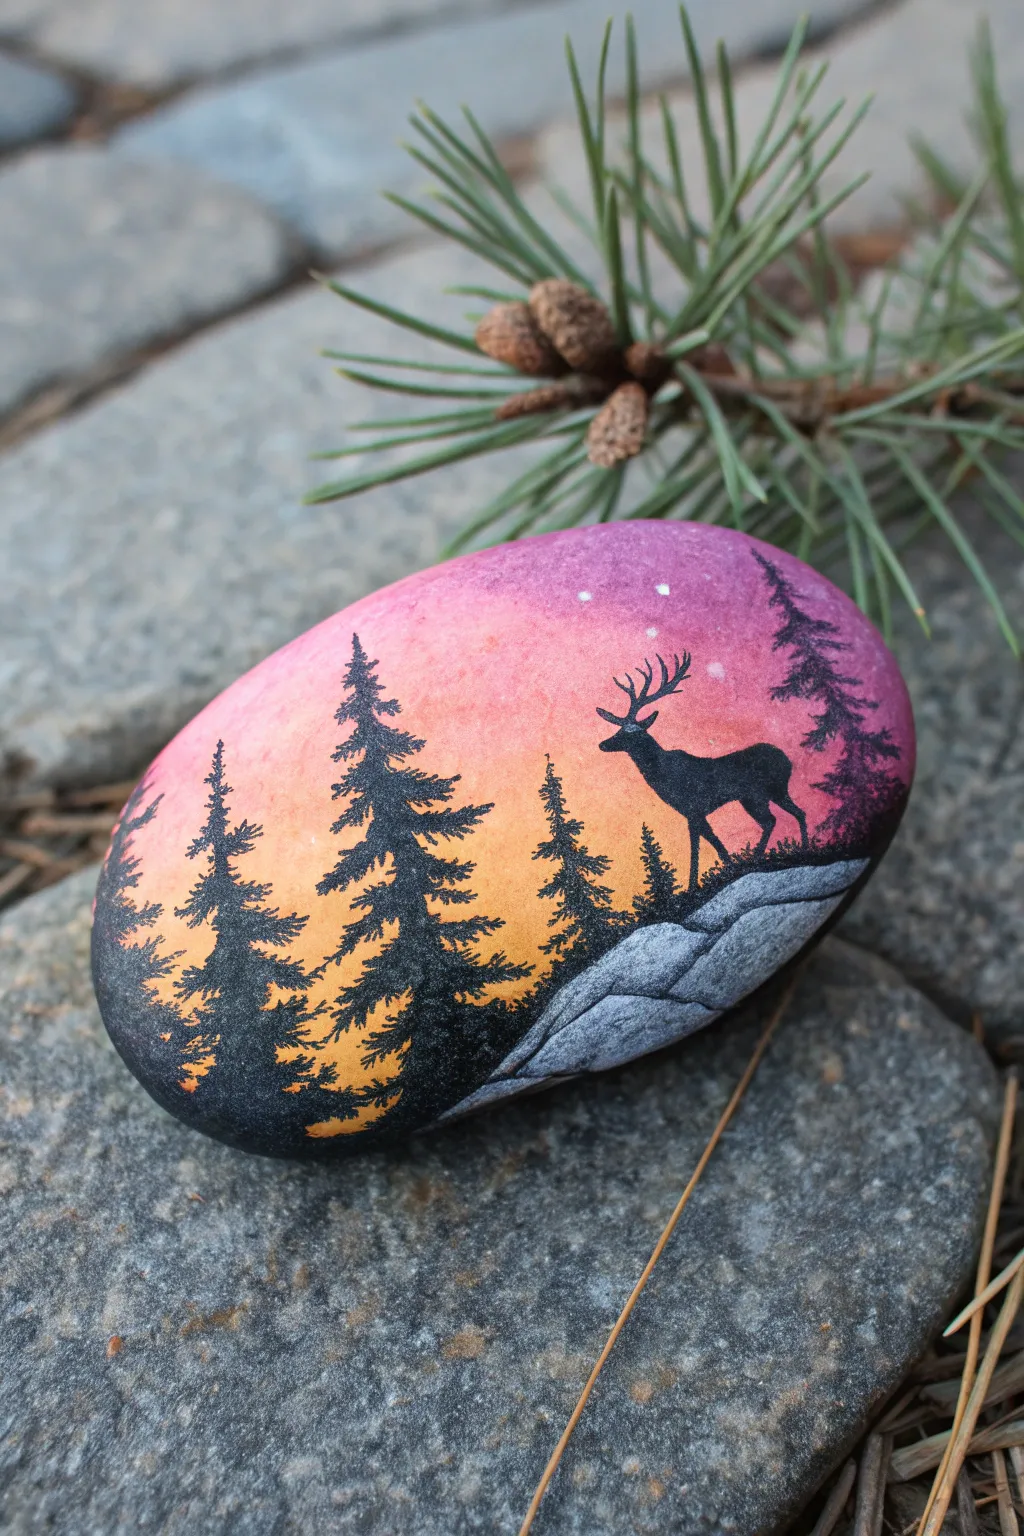
Capture the serene beauty of a mountain dusk with this striking gradient sunset rock. You’ll layer warm acrylics to create a glowing sky before adding sharp, dramatic silhouettes of pine trees and a majestic elk.
Step-by-Step Tutorial
Materials
- Smooth, oval river rock (cleaned and dried)
- Acrylic paints: Titanium White, Magenta/Pink, Orange, Cadmium Yellow, Black, Light Grey
- Flat brush (medium size) for blending
- Fine liner brush (size 00 or 000)
- Sponge dabber (optional)
- Water cup and paper towels
- Clear spray sealer (matte or gloss)
- Pencil (optional)
Step 1: Creating the Glowing Sky
-
Base coat:
Start by priming your clean rock with a layer of titanium white acrylic paint. This ensures your sunset colors will pop and look vibrant rather than muddy against the dark stone. -
Top gradient:
Using your flat brush, apply a generous band of magenta or deep pink paint across the top third of the rock. Don’t worry about perfect edges yet; we are building blocks of color. -
Middle tones:
While the pink is still slightly wet, paint a band of bright orange across the middle section. Where the orange meets the pink, gently stroke the brush back and forth to blur the line, creating a transition color. -
Bottom glow:
Apply yellow paint to the bottom third of the rock. Blend it upward into the orange section just like before. Create a smooth fade from pink to orange to yellow. -
Dry completely:
Let this background layer dry fully. If the colors look translucent, apply a second coat for opacity, repeating the blending process.
Step 2: Painting the Rocky Foreground
-
Outline the outcrop:
Using light grey paint and a smaller brush, map out the shape of the large boulders in the bottom right corner. These should curve upward, providing a stage for the elk. -
Fill the rocks:
Fill in the boulder shapes with solid light grey paint. It needs to be opaque enough to cover the sunset gradient underneath. -
Add dimension:
Mix a tiny drop of black into your grey to create a shadow shade. Paint thin, craggy cracks and shadows along the bottom edges of the boulders to give them volume and weight. -
Highlights:
Add a few strokes of pure white on the top edges of the grey rocks to simulate moonlight hitting the stone.
Blending Woes?
If acrylics dry too fast to blend smooth gradients, mix in a drop of ‘slow drying medium’ or keep your brush slightly damp to extend working time.
Step 3: Detailing the Silhouettes
-
Tree placement:
Load your fine liner brush with black paint. I find slightly thinned paint makes fine lines easier here. Paint a vertical line for the trunk of the largest tree on the left side. -
Tree branches:
Stipple or dab horizontal branches coming off the trunk, making them wider at the bottom and tapering to a point at the top. Repeat this for the smaller trees in the background. -
Elk sketch:
If you are nervous about freehanding, lightly sketch the elk outline with a pencil on top of the dry background. Focus on the triangular chest and the majestic antler curve. -
Elk body:
Fill in the elk’s body with solid black paint using your fine liner brush. Ensure the legs look firmly planted on the grey rocks you painted earlier. -
Antler details:
Carefully paint the antlers. Use the very tip of your smallest brush and barely touch the surface to keep the lines crisp and delicate. -
Grounding:
Add small tufts of grass or uneven terrain in black along the top of the grey rocks and at the base of the trees to ensure nothing looks like it’s floating.
Level Up: Snow Effect
Splatter faint white paint specks over the finished black trees using an old toothbrush to create the look of a light, first winter snowfall.
Step 4: Finishing Touches
-
Starry night:
Dip the tip of a toothpick or a clean detail brush into white paint. Dot a few tiny stars into the upper pink section of the sky. -
Final dry:
Allow the black silhouette layer to dry for at least an hour to prevent smearing during the sealing process. -
Seal the art:
Spray the rock with a clear acrylic sealer. Several light coats are better than one heavy coat to prevent drips.
Place your finished miniature landscape on a bookshelf or give it as a peaceful, hand-painted gift
BRUSH GUIDE
The Right Brush for Every Stroke
From clean lines to bold texture — master brush choice, stroke control, and essential techniques.
Explore the Full Guide
Night Sky Galaxies With Tiny Stars
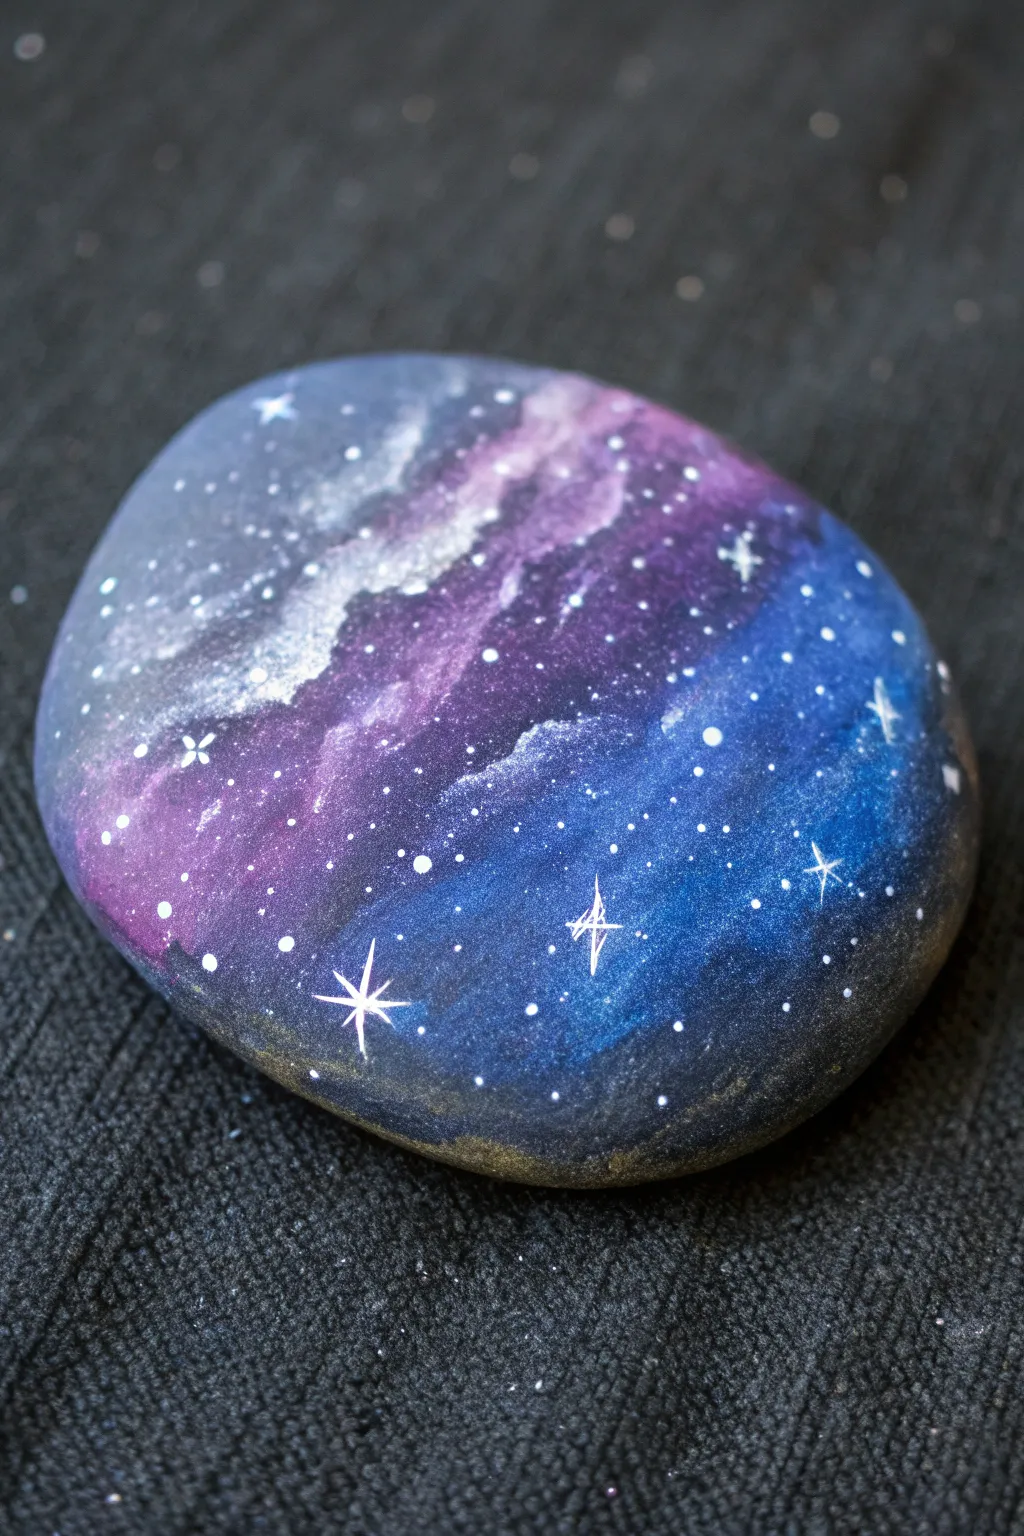
Transform an ordinary smooth stone into a pocket-sized universe with this mesmerizing galaxy painting project. By blending deep blues, vibrant purples, and shimmering whites, you’ll create a nebula effect that looks stunningly complex but is surprisingly simple to achieve.
How-To Guide
Materials
- Smooth, flat river rock (oval shape preferred)
- Acrylic paints (black, navy blue, violet, magenta, titanium white)
- Small sponges or makeup cosmetic wedges
- Fine detail paintbrush (size 0 or 00)
- Medium flat paintbrush
- Toothbrush (optional, for spattering)
- Water cup and paper towels
- Clear sealant (spray or brush-on gloss)
Step 1: Base Coat & Background
-
Clean surface:
Begin by washing your rock thoroughly with soap and water to remove any dirt or oils. Let it dry completely before starting. -
Prime the canvas:
Using your medium flat brush, paint the entire surface of the rock black. This dark base creates the perfect depth for a night sky. -
Apply a second coat:
Once the first layer is dry, add a second coat of black paint to ensure full, opaque coverage so no stone color shows through. -
Create the nebula base:
Dip a small piece of sponge into navy blue paint. Dab off the excess on a paper towel until the texture is almost dry. -
Sponging the blue:
Lightly sponge the navy blue diagonally across the rock, leaving the corners and edges primarily black. This creates the main “path” of your galaxy.
Sponge Technique
Don’t press hard with the sponge! Use a light tapping motion. If you push too hard, you’ll get solid blobs of paint instead of the airy, cloudy texture needed for a galaxy.
Step 2: Layering Colors
-
Add violet tones:
Using a fresh sponge area, pick up some violet paint. Sponge this lightly over parts of the navy blue, concentrating on the center of the diagonal path. -
Introduce magenta highlights:
Take a very small amount of magenta on a sponge. Dab this sparingly into the center of the violet areas to create glowing hotspots. -
Blend the transition:
If the transition between colors looks too harsh, go back with a slightly damp sponge with a tiny bit of black or navy to soften the edges. -
Add misty white clouds:
Mix a tiny drop of white with a drop of water to thin it slightly. Lightly sponge this along the very center of your brightest galaxy colors to create a milky way effect. -
Dry time:
Allow these sponge layers to dry completely. Since the paint layers are thin, this should only take about 10-15 minutes.
Step 3: Stars & Details
-
Paint main stars:
Load your fine detail brush with pure white paint. Place small dots of varying sizes throughout the painted area, clustering more of them within the colorful nebula. -
Create distant stars:
For tiny, distant stars, I prefer to dip a toothbrush in watery white paint and flick the bristles with my thumb over the rock for a fine mist effect. -
Draw large twinkling stars:
Select 3 or 4 spots to feature large, twinkling stars. Draw a simple cross shape with long, thin tapered lines using your finest brush. -
Detail the twinkle:
Add a diagonal ‘X’ shape over the cross center, but make these lines much shorter to create the classic eight-point starburst look. -
Add final sparkle:
Place a tiny, solid white dot in the very center of your starbursts to make them pop against the dark background. -
Seal the artwork:
Once absolutely dry (give it at least an hour), apply a coat of clear gloss sealant to protect the paint and give the galaxy a wet, shiny finish.
Glow in the Dark
Mix glow-in-the-dark medium into your white paint for the stars, or use glow paint for the clouds. When the lights go out, your rock will actually look like space.
Place your finished galaxy rock on a desk or shelf to add a touch of cosmic wonder to your room
Mini Mountains and Pine Tree Landscapes
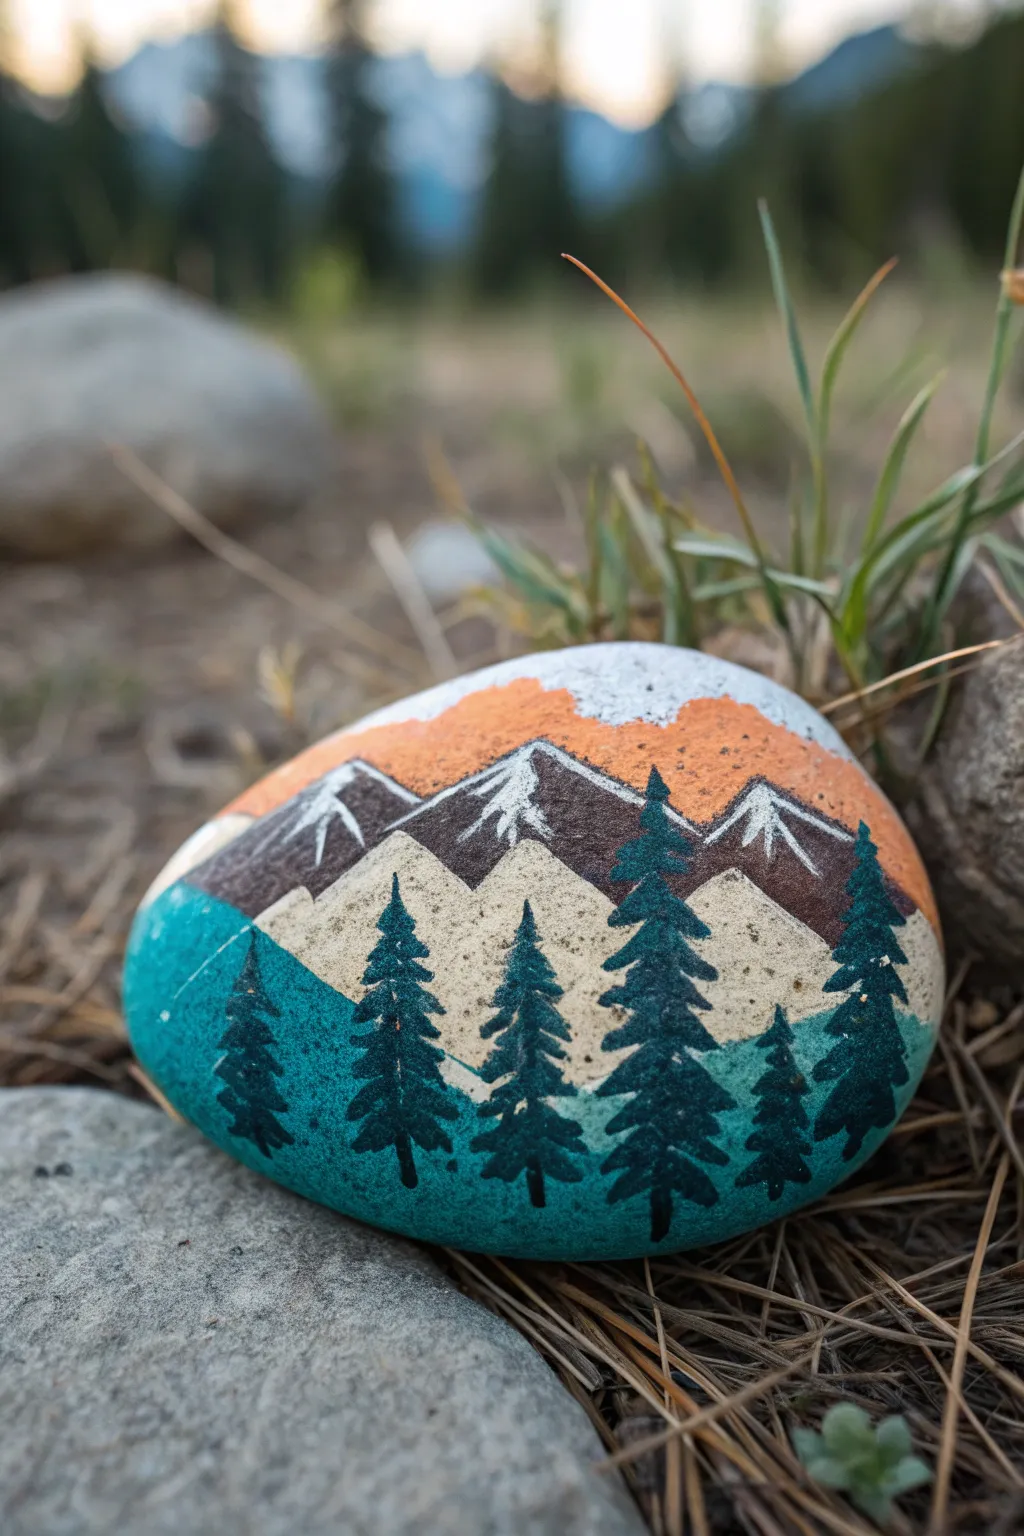
Capture the fresh air of the mountains on a smooth river stone with this layered landscape design. Featuring snowy peaks, rustic foothills, and a silhouette of evergreens against a sunset sky, this project brings nature right into the palm of your hand.
Step-by-Step Tutorial
Materials
- Smooth, flat river rock (palm-sized)
- Acrylic paints: Turquoise/Teal, Beige/Sand, Dark Brown, Burnt Orange, White, Black, Dark Green
- Paintbrushes: Medium flat brush, small round brush, fine liner brush
- Pencil (optional)
- Spray sealant (matte or gloss)
Step 1: Planning and Sky
-
Clean your canvas:
Begin by washing your rock with soap and warm water to remove any dirt or oils. Let it dry completely before you start painting so the acrylics adhere properly. -
Base sketch:
Lightly sketch the horizon lines with a pencil if you want a guide. You’ll need three sections: a curvy bottom line for the turquoise ground, a jagged line for the foothills, and sharper peaks for the mountains near the top. -
Paint the sky:
Using a medium brush, paint the very top curved section of the rock white. Without washing the brush, pick up some burnt orange paint. -
Blend the sunset:
Apply the orange paint just below the white area. While the paint is still wet, gently blend the orange upward into the white to create a soft, hazy sunset gradient.
Step 2: Layering the Mountains
-
Paint the high peaks:
Mix dark brown with a tiny touch of black. Paint the tall mountain shapes below your orange sky, ensuring the tops are pointed and sharp. -
Add the foothills:
Below the dark brown mountains, fill in the middle section with a beige or sand color. I like to overlap the base of the brown mountains slightly to create depth. -
Paint the foreground:
Fill the bottom third of the rock with a vibrant turquoise or teal paint. The top edge of this section can be slightly uneven to mimic rolling hills. -
Dry thoroughly:
Let these base layers dry completely. If the colors look transparent, apply a second coat to ensure solid coverage.
Trees look like blobs?
Switch to your tiniest brush. Instead of painting solid triangles, use quick, erratic dabbing motions. Leave tiny gaps of background showing through the branches for realism.
Step 3: Detailing the Peaks
-
Add snow caps:
Switch to a small round brush and white paint. Carefully paint irregular triangular shapes on the tips of the dark brown mountains. -
Create texture:
Drag dry brush strokes of white down the sides of the brown peaks to look like snow trails or crevices. -
Outline the foothills:
Using a bit of diluted dark brown paint or a very fine brush, lightly define the edge where the beige foothills meet the dark mountains if the contrast isn’t sharp enough.
Pro Tip: Depth trick
Make the trees in the ‘front’ (lower on the rock) darker and larger. Mix a little white into your green for trees that are ‘further back’ (higher up) to create atmospheric distance.
Step 4: The Pine Forest
-
Mix the tree color:
Create a deep forest green by mixing dark green with a small amount of black. The color should look almost black but with a green tint. -
Draw center lines:
Using a fine liner brush, paint thin vertical lines where you want each tree to stand. Vary their heights, making some taller and some shorter. -
Start the branches:
Starting at the top of a vertical line, tap the tip of your brush gently to create the pointed tree top. -
Widen the tree:
Work your way down the trunk using short, downward strokes that get progressively wider as you reach the bottom. Think of a triangle shape as you paint. -
Fill the forest:
Repeat this process for all the trees. Place some trees slightly higher up on the turquoise section and some lower down to create a sense of distance.
Step 5: Final Touches
-
Add ground shadows:
Use the dark green mix to lightly stipple or dab the very bottom of the trees where they meet the turquoise ground, anchoring them to the soil. -
Seal the artwork:
Once the rock is fully dry—give it a few hours just to be safe—take it outside and apply a clear spray sealant to protect your miniature landscape from the elements.
Now you have a durable piece of mountain scenery perfect for use as a paperweight or a garden decoration

PENCIL GUIDE
Understanding Pencil Grades from H to B
From first sketch to finished drawing — learn pencil grades, line control, and shading techniques.
Explore the Full Guide
Cute Animal Face “Rock Pets”
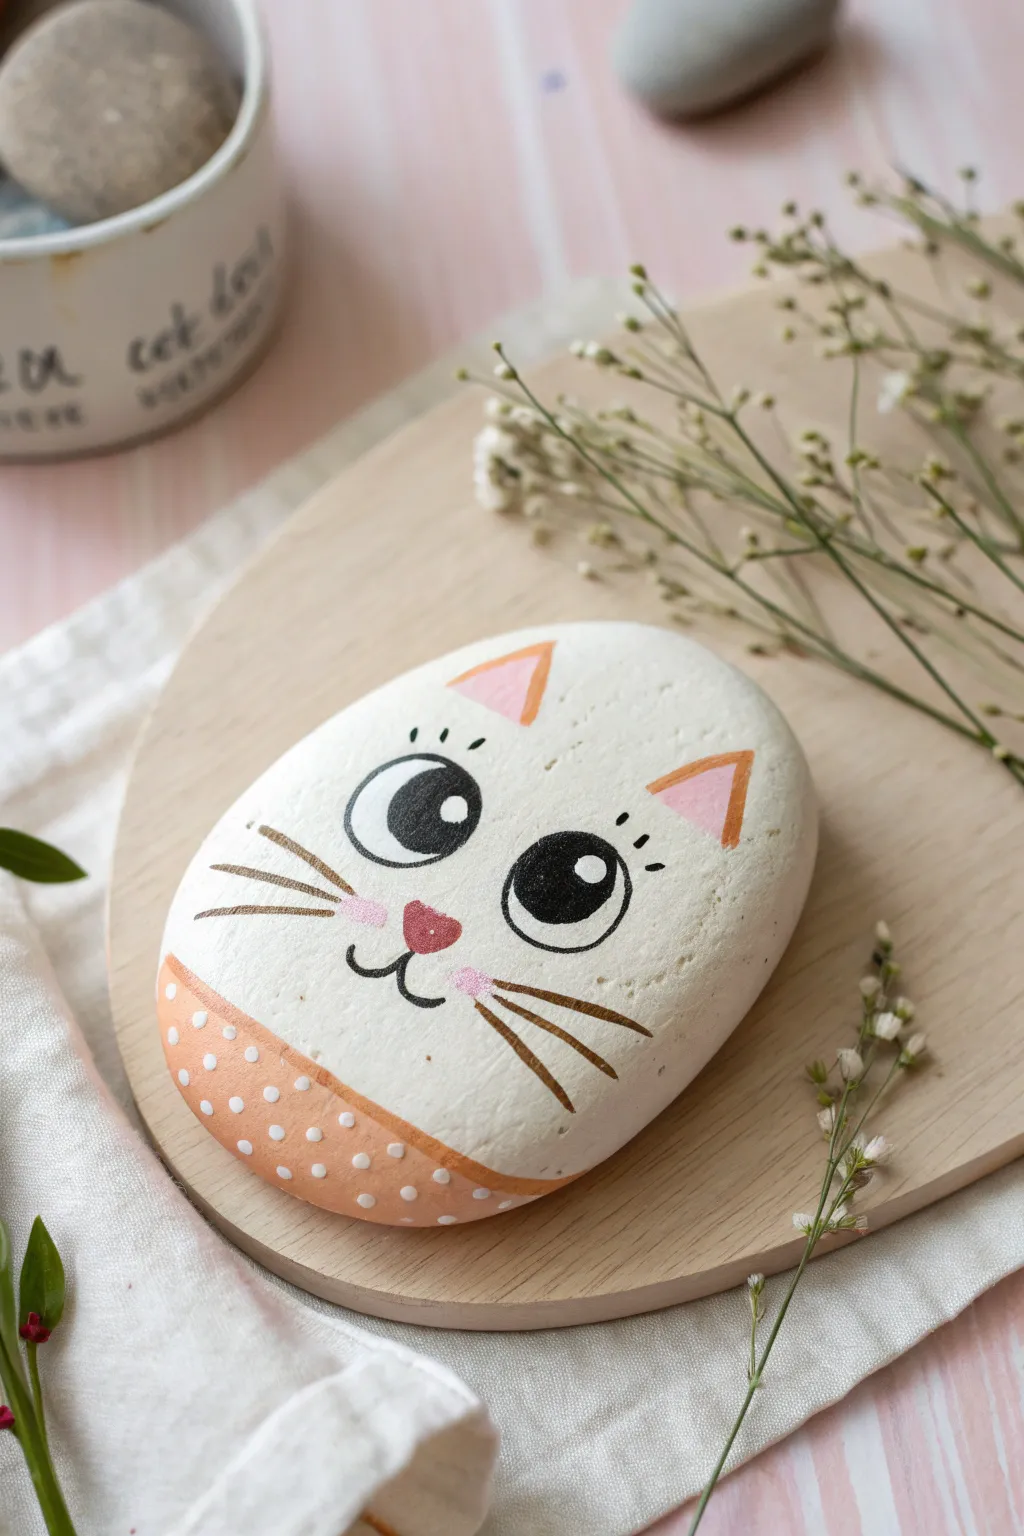
Transform a simple garden stone into an adorable, wide-eyed feline friend with this charming rock painting project. This design features a crisp white kitty face with sweet pink accents and a festive polka-dot collar, making it a perfect pocket-sized companion.
Detailed Instructions
Materials
- Smooth, oval-shaped river rock (flat is best)
- White acrylic paint (high coverage)
- Black acrylic paint or fine-point paint pen
- Pink acrylic paint (soft pastel shade)
- Peachy-orange acrylic paint
- Paintbrushes (flat shader brush, small round detail brush, liner brush)
- Dotting tool or toothpick
- Clear matte sealer/varnish
- Pencil and eraser
Step 1: Preparation & Base Coat
-
Clean the Stone:
Begin by scrubbing your rock with warm, soapy water to remove any dirt or oils. Rinse it thoroughly and let it dry completely, ideally in the sun, to ensure the paint adheres properly. -
Establish the White Base:
Using a flat shader brush, apply a generous coat of white acrylic paint over the entire top surface of the rock. This will be the cat’s fur. -
Build Opacity:
Let the first layer dry fully. Apply a second or third coat of white until the color of the rock underneath is completely hidden and the surface looks smooth and opaque. -
Sketch the Face:
Once the white paint is bone-dry, use a pencil to very lightly sketch the placement of the eyes, triangle ears, nose, and the curved line for the collar/sweater at the bottom.
Smoother Stone Tip
If your rock has tiny pits or uneven texture, apply a layer of gesso or a mixture of white glue and white paint first to fill the holes before painting.
Step 2: Painting the Features
-
Color the Ears:
Mix a soft pink shade if you don’t have one ready. Use a small detail brush to fill in the inner triangles of the ears, keeping the edges neat. -
Outline the Ears:
Using a liner brush and the peachy-orange paint, carefully outline the pink triangle ears to give them definition. I find that pulling the brush towards you helps steady the hand. -
Paint the Nose:
Using the same soft pink shade, paint a small, rounded heart or triangle shape in the center of the face for the nose. -
Create the Eyes:
With black paint and a small round brush (or a black paint marker for more control), draw two large, slightly oval circles for the eyes. Fill them in solid black. -
Add Eye Highlights:
Wait until the black paint is completely dry. Dip the handle end of a paintbrush or a dotting tool into white paint and add a large white dot in the upper right of each pupil, followed by a tiny dot below it for a sparkling effect. -
Detail the Mouth:
Using a very fine liner brush or a fine-tip black paint pen, draw two small curves coming down from the nose to form the mouth anchor.
Step 3: Adding Character & Accessories
-
Draw Whiskers:
With a thin liner brush and dark brown or black paint, flick three whiskers out from each cheek area. Try to taper the lines so they are thicker at the base and thinner at the ends. -
Add Eyelashes:
Use your finest brush or pen to add three small vertical dashes above each eye to suggest eyelashes. -
Paint the Collar Base:
For the bottom section of the rock, paint the curved area in a warm peachy-orange color. This acts as the cat’s cute patterned sweater or collar. -
Add Polka Dots:
Dip a dotting tool or the tip of a toothpick into white paint. Gently press dots onto the orange collar section, spacing them out in an organized pattern. -
Rosy Cheeks:
If desired, mix a very watery, translucent pink and dab extremely lightly on the cheeks near the whiskers for a subtle blush effect. -
Final Seal:
Once absolutely all paint is dry (give it a few hours just to be safe), apply a coat of matte clear sealer to protect your artwork from chipping and moisture.
Try a Tuxedo Cat
Swap the all-white base for black paint, leaving a white patch on the chest and face to create a stylish tuxedo cat version of this rock pet.
Place your new painted pet on a desk or shelf to add a touch of whimsy to your day
Cactus and Succulent Garden Markers

Transform a smooth, flat stone into a charming, maintenance-free cactus that blends perfectly into your succulent garden. This painted rock features realistic vertical shading and crisp white details to mimic the prickly texture of a desert plant without the spikes.
Detailed Instructions
Materials
- Smooth, flat, oblong rock (river rock works best)
- Acrylic paints: dark green, olive green, light sage green, and white
- Flat paintbrush (medium size)
- Fine tip liner brush or detail brush
- Pencil (optional for sketching)
- Acrylic sealer (matte spray suggested)
- Water cup and paper towels
Step 1: Base Coat and Sections
-
Clean and Dry:
Begin by scrubbing your rock thoroughly with soapy water to remove any dirt or oils. Let it dry completely in the sun, as moisture trapped inside can ruin the paint later. -
Mix Your Base Green:
Create a mid-tone green by mixing your dark green with a touch of olive. This will be the foundational color for the cactus body. -
Apply the Base Coat:
Paint the entire face of the rock with your mixed green. You might need two layers to get solid opacity; just let the first layer dry to the touch before adding the second. -
Plan the Segments:
Imagine the rock divided into three or four vertical ‘ribs’ or sections, curving slightly with the shape of the stone. You can lightly sketch these lines with a pencil if you want a guide.
Step 2: Shading and Definition
-
Paint the Center Stripe:
Take a slightly darker shade of green paint and fill in the central vertical section. This creates visual depth, making the cactus look rounder. -
Add Lighter Sections:
Mix a bit of white or light sage into your original green. Paint the outer vertical sections with this lighter hue to simulate light hitting the sides of the cactus. -
Define the Ridges:
Using your fine detail brush and your darkest green (or even a drop of black mixed in), paint thin vertical lines between your color sections. These lines act as the deep grooves found on saguaro cacti. -
Blend Edges (Optional):
If the transition between the dark grooves and lighter sections looks too harsh, use a damp, clean brush to gently soften the edges while the paint is still slightly tacky. -
Let It Dry:
Allow the green layers to dry completely. This is crucial because we are about to add crisp white lines on top, and we don’t want the colors to muddy.
Natural Texture
Don’t aim for perfect straight lines. Slight wobbles in your vertical stripes make the cactus look organic and more realistic.
Step 3: Adding the Spines
-
Create the Areoles:
Dip a fine liner brush or a toothpick into pure white paint. Along the darkest vertical grooves, place a series of evenly spaced dots. These represent the areoles where spines grow. -
Paint Side Needles:
On the lighter, outer sections of the rock, paint small diagonal dashes. Group them in loose clusters or evenly spaced rows slanting away from the center to look like needles catching the light. -
Add Center Details:
On the central dark stripe, you can add tiny ‘x’ shapes or simple vertical dashes in white. Keep your hand steady and light; thick lines will ruin the illusion of sharp spines. -
Highlight the Top:
Add a few extra small dashes or dots near the very top curve of the rock to show structure where the cactus rounds off. -
Clean Up Edges:
If any white paint smudged, just touch it up with the corresponding green background color once dry. -
Seal the Rock:
Since this will likely live near soil or water, spray the finished piece with a matte acrylic sealer. This protects the paint from fading in the sun or chipping when watered.
Paint Peeling off?
If paint lifts off while you work, the rock might still be dirty or the previous layer wasn’t fully dry. Let it cure longer between coats.
Nestle your new stone creation into a pot of real soil for a fun trompe l’oeil effect that lasts all year


Watermelon and Citrus Slice Illusions
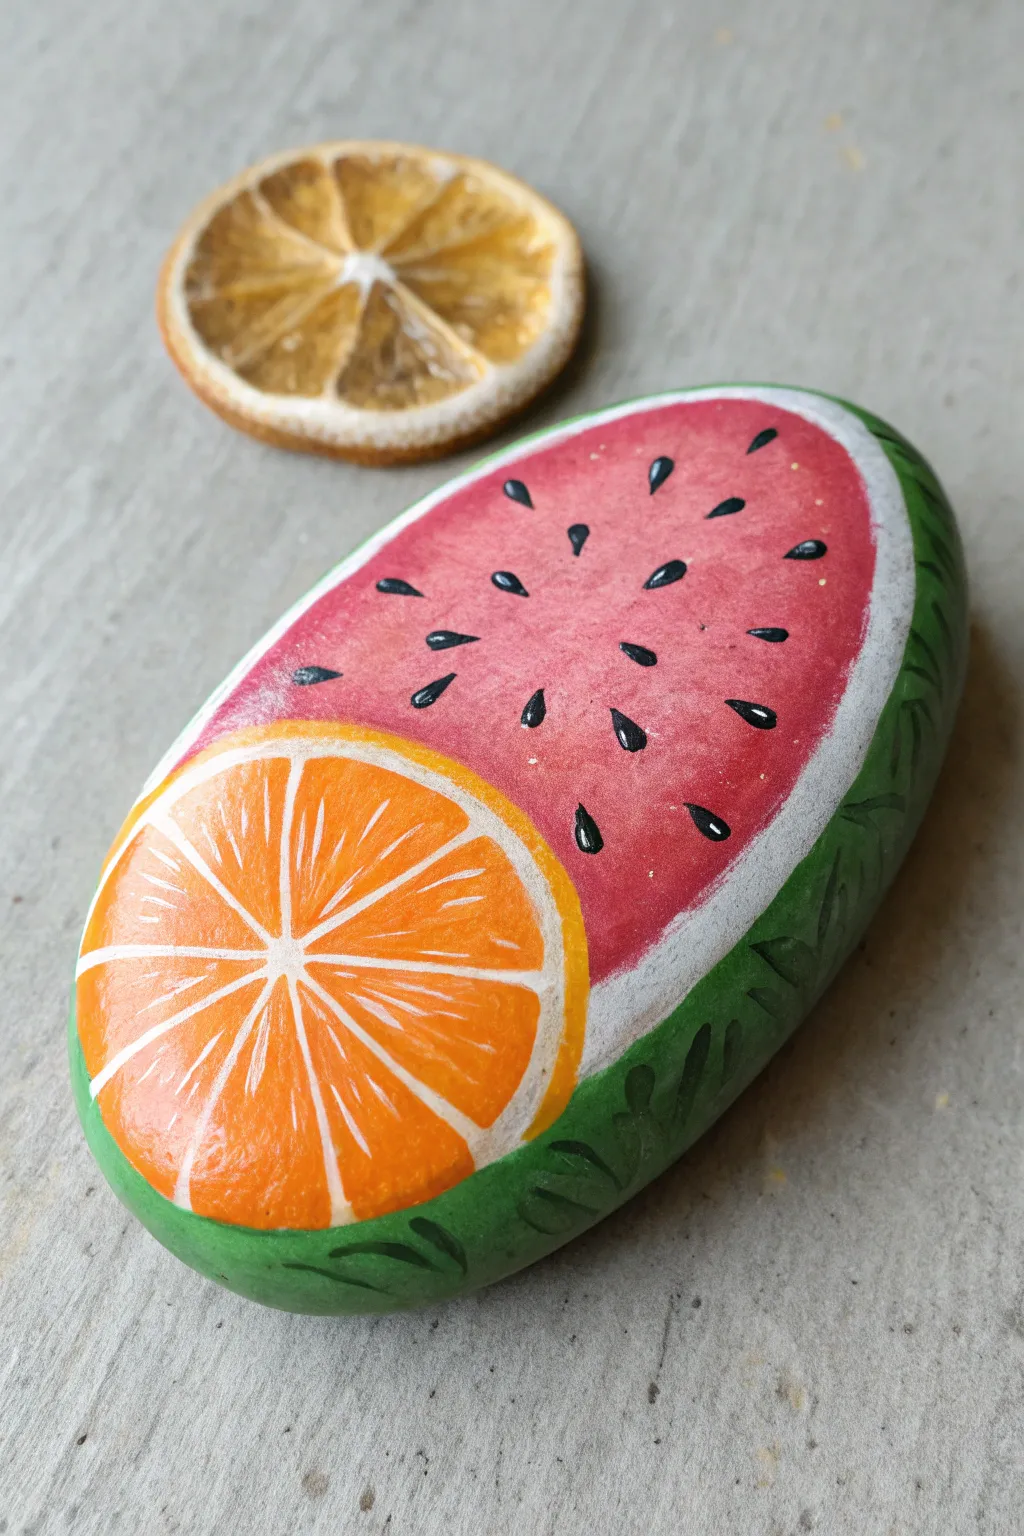
Transform a simple garden stone into a refreshing piece of summer art featuring juicy watermelon and zesty citrus slices. This dual-fruit design uses vibrant acrylics to create a delightful optical illusion that looks good enough to eat.
How-To Guide
Materials
- Smooth, oval river rock (palm-sized)
- White acrylic paint (priming and details)
- Red or deep pink acrylic paint (watermelon flesh)
- Bright orange acrylic paint (citrus slice)
- Green acrylic paint (watermelon rind)
- Darker green paint or marker (rind stripes)
- Black acrylic paint or fine liner (seeds)
- Assorted brushes: flat brush, round brush, and very fine detail brush
- Gloss varnish or sealer
Step 1: Base Coat and Outlining
-
Prime the surface:
Begin by scrubbing your rock clean and letting it dry completely. Apply a base coat of white acrylic paint over the top surface where you plan to paint the fruit. This is crucial for making the red and orange colors pop against the dark stone. -
Map the shapes:
Once the white base is dry, lightly sketch two shapes with a pencil: a large oval filling most of the rock for the watermelon, and a smaller circle overlapping the bottom left corner for the orange slice. -
Block in the watermelon:
Paint the large oval area with a vibrant red or deep pink shade. Leave a small rim of white showing around the curved edge to act as the inner rind. -
Create the citrus base:
Fill the circular shape on the bottom left with a solid coat of bright orange paint. You might need two coats here to get a solid, opaque color that covers the red if they overlap.
Uneven Coverage?
If your red or orange looks streaky, don’t keep brushing wet paint. Let the first thin layer dry completely, then apply a second coat for solid opacity.
Step 2: Adding the Rinds and Details
-
Paint the outer rind:
Using a medium green, paint the outer edge of the entire rock, framing the white rim of the watermelon. Ensure the green meets the white cleanly without smudging. -
Add rind texture:
Dip a fine brush into a darker green shade. Paint deliberate, wiggly lines or small ‘V’ shapes along the green outer edge to mimic the classic striped skin of a watermelon. -
Define the orange segments:
Switch to your fine detail brush and white paint. Carefully draw a ‘cartwheel’ or pie chart pattern inside the orange circle to divide it into triangular segments. -
Thicken the pith:
Go back over your white divider lines on the orange, thickening them slightly near the outer edge and tapering them toward the center. -
Texture the pulp:
Mix a tiny amount of white into your orange paint to create a lighter tint. Use this to add tiny, rapid strokes inside the orange segments to simulate the texture of juicy pulp.
Flavor Variations
Swap the orange slice for yellow (lemon) or green (lime). You can even paint a bite mark using the white base coat color for a fun, eaten effect.
Step 3: Seeds and Finishing Touches
-
Place the seeds:
Using black paint and a very fine brush (or a paint marker), dab small teardrop shapes onto the red watermelon area. Scatter them somewhat randomly but keep them radiating from purely vertical to angled near the edges. -
Highlight the seeds:
I like to wait for the black seeds to fully dry, then add a tiny speck of white to the top of each seed. This simple trick adds wetness and dimension. -
Add fruit highlights:
For extra realism, create a very watery wash of white paint. Subtly glaze the upper part of the red area to make the watermelon look glistening and moist. -
Refine the edges:
Check the border where the orange slice meets the watermelon. If the line is messy, carefully touch it up with a thin line of white to separate the two fruits clearly. -
Seal the artwork:
Once all paint layers are completely bone dry, apply a coat of gloss varnish. This protects the stone outdoors and gives the fruit that permanently fresh, wet look.
Place your juicy creation in a garden bed or window sill to enjoy eternal summer vibes
Ocean Wave Swirls and Sea Life
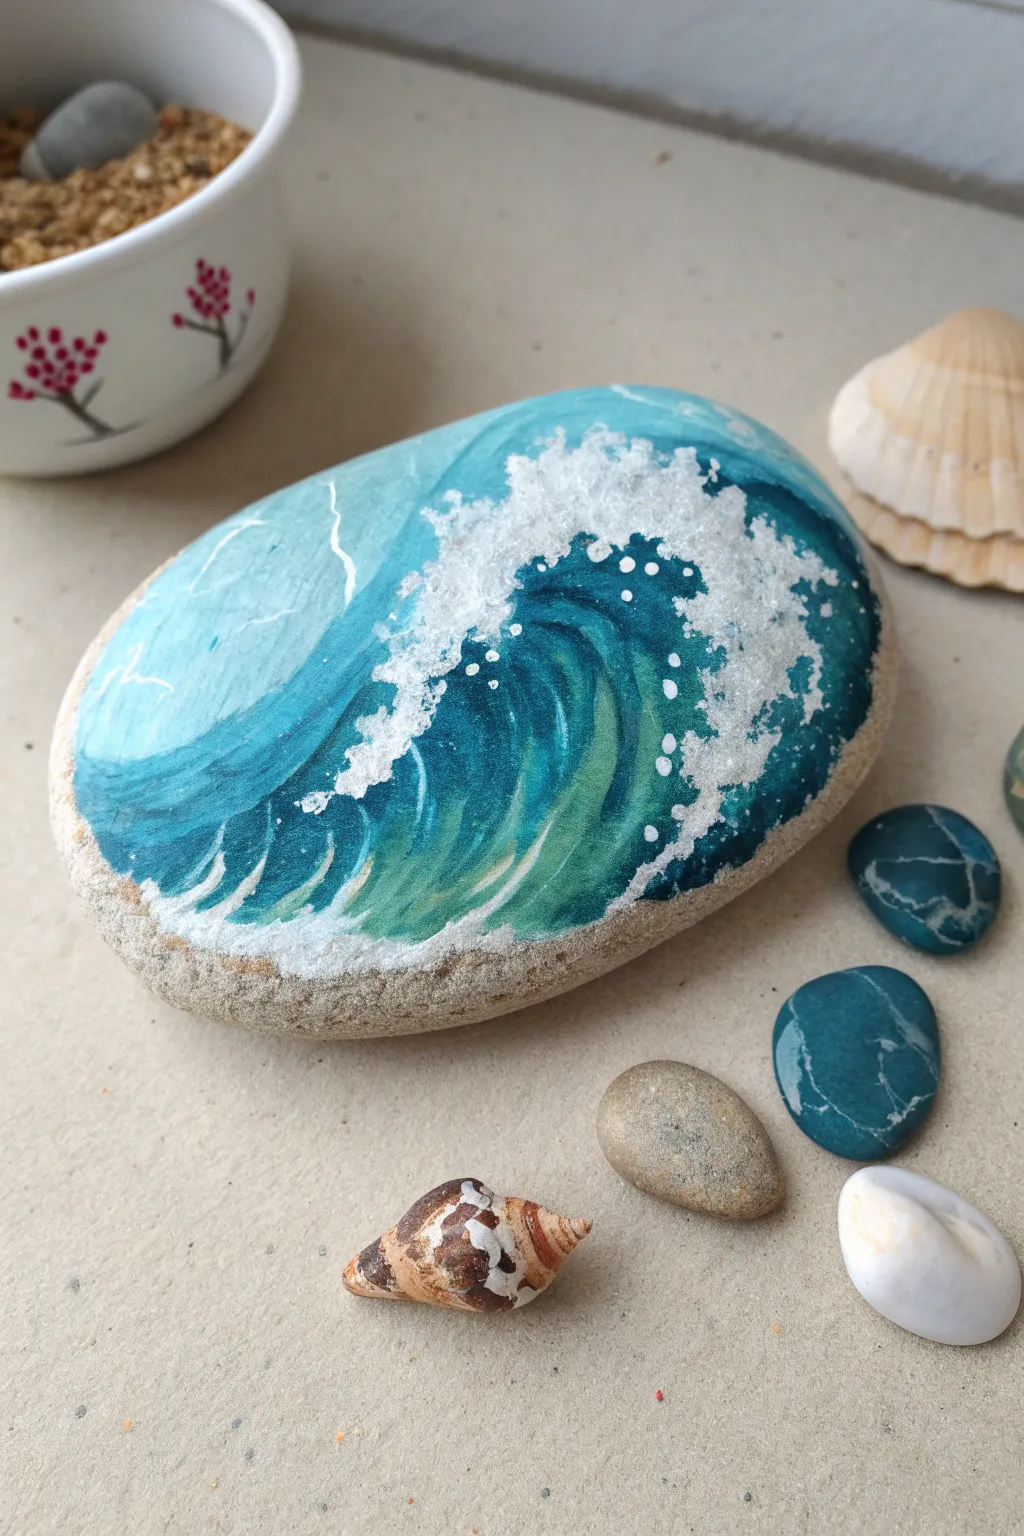
Capture the raw power and beauty of the ocean on a simple stone with this dynamic wave painting. You’ll layer shades of turquoise and deep blue to create depth before adding brilliant white foam for a realistic splash effect.
Step-by-Step
Materials
- Smooth, flat oval rock (river stone works best)
- Acrylic paints (Titanium White, Phthalo Blue, Turquoise, Emerald Green, Light Blue)
- Assorted paintbrushes (flat shader, small angled brush, fine liner)
- Sea sponge or stiff stipple brush
- Palette or paper plate
- Cup of water and paper towels
- Clear acrylic sealer (spray or brush-on)
- Pencil (optional)
Step 1: Preparation and Base Layer
-
Clean your canvas:
Begin by thoroughly washing your rock with soap and water to remove any dirt or oils. Let it dry completely in the sun or with a hairdryer before starting. -
Plan the composition:
Lightly sketch the main curve of the wave using a pencil. Draw a large, swooping arc that starts from the bottom left and curls over towards the right, defining where the water will crash. -
Block in the sky area:
Mix a very pale blue using Titanium White and a tiny drop of Light Blue. Paint the upper left section above the wave curve, keeping the strokes fairly loose to mimic a soft sky or distant water.
Foam too solid?
If your sea foam looks like a blob, wait for it to dry, then repaint some dark blue holes/gaps back over the white to break it up and restore depth.
Step 2: Building the Wave Body
-
Apply the darkest depths:
Using your flat brush, load up Phthalo Blue mixed with a touch of Emerald Green. Paint the deep shadow area directly under the crest of the wave, where the water curls over itself. -
Create the mid-tones:
Blend Turquoise into your dark blue mix and paint the middle section of the wave face. Use curved brushstrokes that follow the shape of the water to imply movement. -
Add translucent greens:
As you move toward the bottom of the wave where the water is thinner, mix Emerald Green with a little White. Paint this into the lower center of the wave, blending it wet-on-wet with the blues above for a seamless gradient. -
Paint the background water:
Fill in the remaining area to the right of the wave with a deep teal color. This pushes the crashing wave into the foreground. -
Refine the gradients:
While the paint is still tacky, use a soft, slightly damp brush to smooth out the transitions between the deep blues, teals, and lighter greens. The goal is a glassy, rolling look. -
Define the lip:
Use a liner brush with a lighter turquoise mix to define the sharp upper edge of the water just before it breaks into foam.
Pro Tip: Depth trick
Paint the area underneath the white foam the darkest blue on your palette. High contrast makes the white appear much brighter and the foam more 3D.
Step 3: Creating the Sea Foam
-
Start the main crash:
Load a stiff stipple brush or a small piece of sea sponge with pure Titanium White. Dab it texturedly along the top crest of the wave where it is breaking. -
Texture the foam:
Continue dabbing white paint down the right side of the wave, creating a chaotic, bubbly pattern. Don’t make it a solid block of white; let some of the dark blue background peek through. -
Add sea spray dots:
Using your finest liner brush or a dotting tool, place tiny individual dots of white flying off the main foam mass to represent spray droplets suspended in the air. -
Create surface foam:
Dilute your white paint slightly with water so it flows easily. Paint thin, web-like veins of foam on the surface of the wave face, following the curve of the water. -
Highlight the base:
Add a thick, textured line of white foam along the very bottom of the rock where the wave would be hitting the sand or churning up.
Step 4: Final Details
-
Enhance contrast:
If the white foam looks too flat, I sometimes mix a tiny bit of grey-blue into white to add subtle shadows to the bottom of the foam clouds, giving them volume. -
Brighten the highlights:
Go back with pure, unthinned white to hit the very brightest points of the splash and the top of the wave curve for maximum pop. -
Let it cure:
Allow the rock to dry overnight to ensure all thick layers of paint are solid. -
Seal the artwork:
Apply a coat of clear acrylic sealer to protect your painting from chipping and to give the water a permanent wet look.
Place your finished stone among some seashells or give it as a calming gift to a beach lover
Tic-Tac-Toe Sets Painted on Flat Rocks
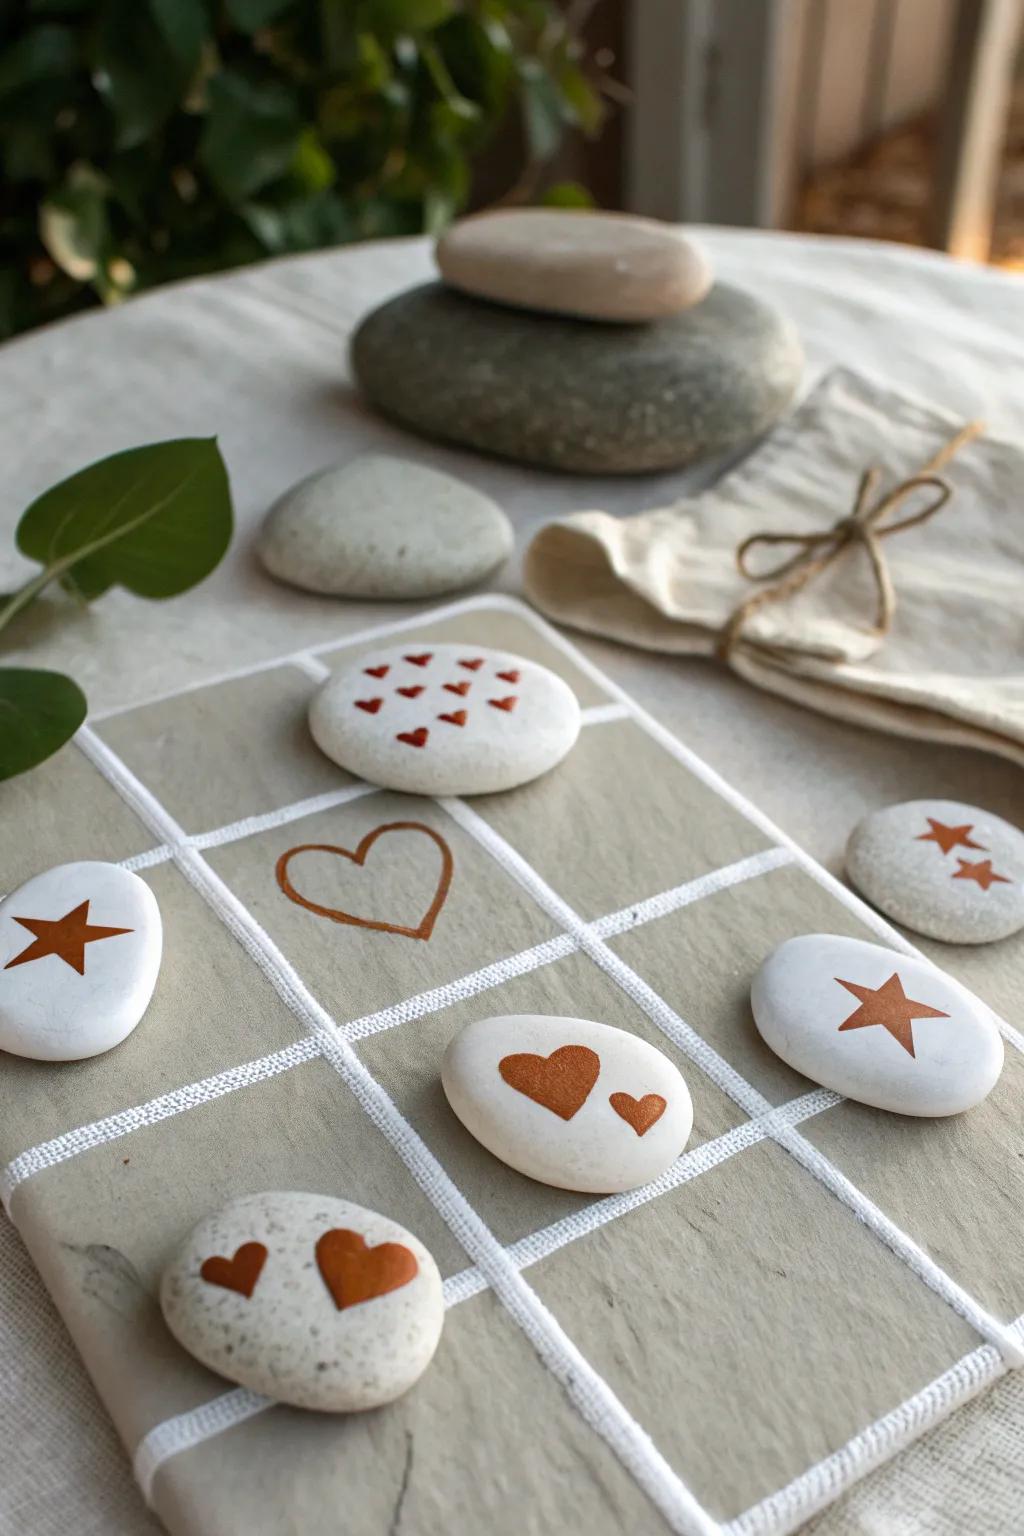
Elevate the classic game of strategy with earthy textures and metallic accents. This travel-friendly set replaces traditional paper grids with a sturdy stone slab and smooth river rocks painted with charming copper motifs.
Detailed Instructions
Materials
- One large, flat rectangular stone or slate tile (approx. 8×8 inches)
- 10 smooth, flat river rocks (approx. 1.5-2 inches diameter)
- White acrylic paint (matte finish)
- Metallic copper or bronze acrylic paint
- Fine-point detail brush (size 0 or 1)
- Flat shader brush (size 4 or 6)
- Ruler
- Pencil
- Matte spray varnish or sealant
- Small cloth pouch (optional for storage)
Step 1: Preparing the Game Pieces
-
Clean the stones:
Begin by thoroughly washing your river rocks and the large base stone with warm soapy water to remove any dirt or oils. Let them dry completely, preferably in the sun. -
Base coat application:
Using the flat shader brush, paint the top surface of the 10 small playing rocks with white matte acrylic paint. -
Layering the white:
Allow the first coat to dry for about 15 minutes. Apply a second coat to ensure the gray rock doesn’t show through, creating a clean, bright canvas. -
Smooth finish:
If you notice brush strokes, lightly dampen your brush to smooth out the final layer of white paint while it is still wet.
Step 2: Designing the Grid Board
-
Measure the grid:
Take your large rectangular stone and use a ruler to find the center. Lightly sketch a classic 3×3 tic-tac-toe grid using a pencil. -
Paint the lines:
Using a small flat brush and white paint, carefully trace over your pencil lines. Aim for a line width of about 1/8th of an inch. -
Create a sewn effect:
To mimic the fabric-like texture seen in the inspiration photo, paint small, perpendicular ticks along the grid lines. These should look like stitches. -
Add a center accent:
In the very center square of the grid, paint a simple heart outline using your metallic copper paint. This serves as a sweet decorative element when the board is empty.
Paint Peeling?
If the white paint peels off the smooth stone, lightly sand the rock surface with fine-grit sandpaper before painting to create a better grip.
Step 3: Painting the Symbols
-
Sort your pieces:
Divide your 10 white painted stones into two groups of five. One group will be the ‘Stars’ and the other will be the ‘Hearts’. -
Paint the stars:
On the first group of five stones, use your detail brush and metallic copper paint to draw a single, bold five-pointed star in the center. -
Paint the hearts:
On the second group, paint various heart designs in copper. I like to mix it up: paint two small hearts on some stones, one large solid heart on others, or a cluster of tiny hearts. -
Refine the edges:
Once the copper paint is tacky but not fully wet, go back in and sharpen the points of your stars or the curves of your hearts if needed. -
Let it cure:
Allow all the painted stones and the board to dry undisturbed for at least one hour.
Gift-Ready Bag
Decorate a simple canvas drawstring bag with the same copper star and heart stamps to store the loose pieces, making the set perfectly giftable.
Step 4: Finishing Touches
-
Seal the artwork:
To protect your game from chipping during play, spray a light coat of matte varnish over the board and the painted side of the rocks. -
Second seal coat:
After 20 minutes, apply a second light coat of sealer for extra durability. -
Final cure:
Let the set cure overnight before playing your first game to ensure the sealant has fully hardened.
Gather your family and enjoy a timeless game on your new handcrafted stone set


Have a question or want to share your own experience? I'd love to hear from you in the comments below!