If you’ve got a blank wall staring back at you, I promise it’s basically a giant sketchbook waiting for you to play. These easy wall drawing ideas lean on simple shapes, bold outlines, and a little negative space so you can get a big-impact look without stressing the details.
One-Line Face Outline
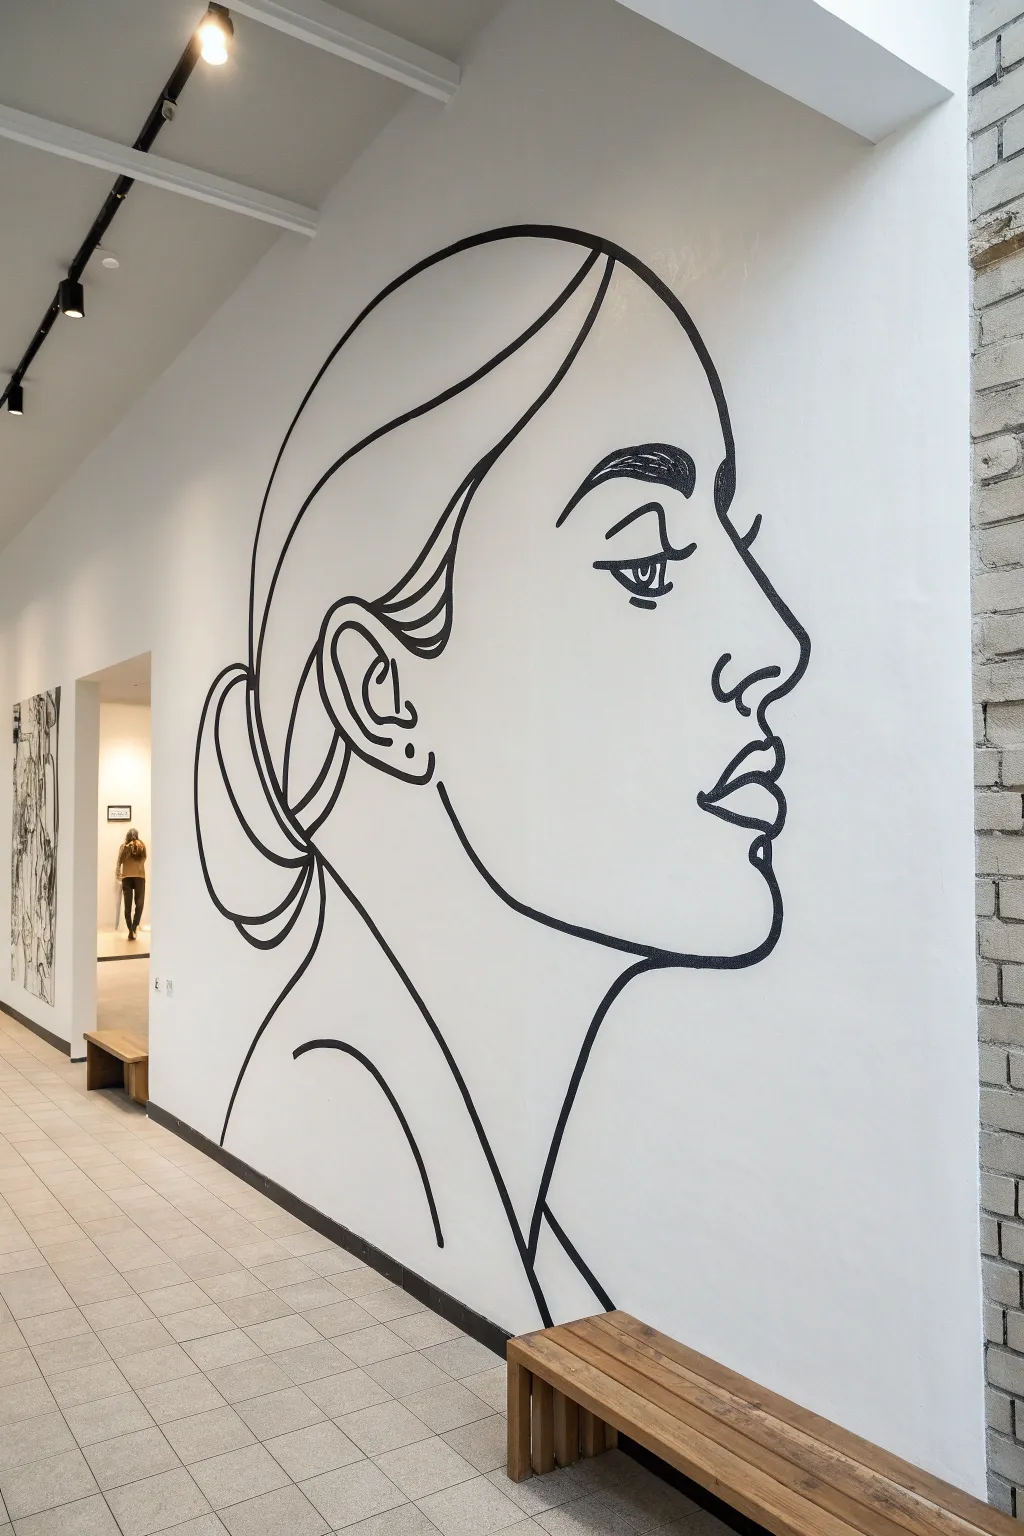
Transform a plain white wall into a modern art gallery with this striking, large-scale line drawing. This project uses bold, varying line weights to create a sophisticated profile that looks effortlessly chic but is surprisingly simple to execute.
Step-by-Step
Materials
- Projector (digital or overhead)
- Pencil (HB or 2B)
- Eraser (kneaded)
- Black acrylic paint (high pigment)
- Round artist brushes (small, medium, large)
- Filbert brush (for smooth curves)
- Painter’s tape
- Drop cloth
- Ladder or sturdy step stool
- Digital image of the face profile
Step 1: Preparation & Projection
-
Prepare the workspace:
Clear the area in front of your chosen wall and lay down a drop cloth to protect the flooring from any accidental paint drips. -
Clean the surface:
Wipe down the wall with a damp cloth to remove dust or grease. If the wall has scuffs, touch them up with base paint first so you have a pristine canvas. -
Set up the projector:
Position your projector on a table or steady surface. Cast the digital image of the face profile onto the wall, adjusting the distance to get the scale exactly right. -
Trace lightly:
With the room lights dimmed, use a pencil to lightly trace the projected lines onto the wall. Keep your hand steady and just focus on getting the main path down. -
Refine the sketch:
Turn the lights back on and the projector off. Step back to check proportions. If any lines feel shaky, lightly erase and correct them with your pencil now.
Clean Up Edges
For ultra-crisp lines, keep a damp Q-tip handy while painting. If you wobble, quickly wipe the wet paint away before it sets on the wall texture.
Step 2: Painting the Outline
-
Mix your paint:
Pour a generous amount of black acrylic paint onto a palette or paper plate. Add a tiny drop of water if the paint feels too thick, improving its flow for long strokes. -
Test your brush:
I recommend testing a few strokes on a piece of scrap cardboard first to get comfortable with the pressure needed for different line thicknesses. -
Start with the hairline:
Begin at the top of the head using a medium round brush. Paint the sweeping curve of the hair with a confident, continuous motion. -
Define the profile:
Switch to a slightly smaller brush for the forehead and nose bridge. Use a lighter touch here to keep the line elegant and thin. -
Detail the eye:
Carefully paint the eye and eyebrow. The eyebrow should be thicker and bolder, perhaps using a filbert brush, while the eye lashes require a fine detail brush. -
Sculpt the lips:
Paint the lips with varied pressure. Press down harder on the brush for the shadow under the lower lip to create visual weight. -
Draw the jawline:
Connect the chin to the neck with a smooth, downward stroke. This line usually tapers off, so lift your brush gradually as you finish the stroke.
Add Color accents
Once the black ink is dry, paint a solid shape (like a circle or organic blob) in a muted pastel tone behind the drawing to act as a background accent.
Step 3: Building Depth
-
Thicken specific areas:
Go back over the initial lines in key areas—like the back of the bun, the nape of the neck, and under the ear—to add thickness and variety. This ‘line weight’ variation creates the illusion of shadow. -
Refine the ear:
Use a small brush to paint the intricate curves inside the ear. Keep these lines fairly thin so they don’t look like a dark blob. -
Add the neck lines:
Paint the sweeping lines that suggest the shoulder and collarbone. These should be loose and fluid, trailing off at the bottom. -
Check for consistency:
Step back frequently to ensure the black is opaque. If you see streaks or thin spots, apply a second coat of black paint carefully over those specific sections. -
Clean up edges:
If any paint went outside your lines, wait for it to dry completely. Then, use a small angled brush with your wall’s original white paint to ‘erase’ the mistakes. -
Let it cure:
Allow the entire mural to dry for at least 24 hours before moving furniture back into place or touching the wall.
Step back and admire how a few simple curves have completely redefined your space


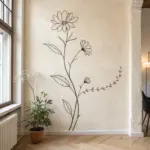
Corner Vine Crawl
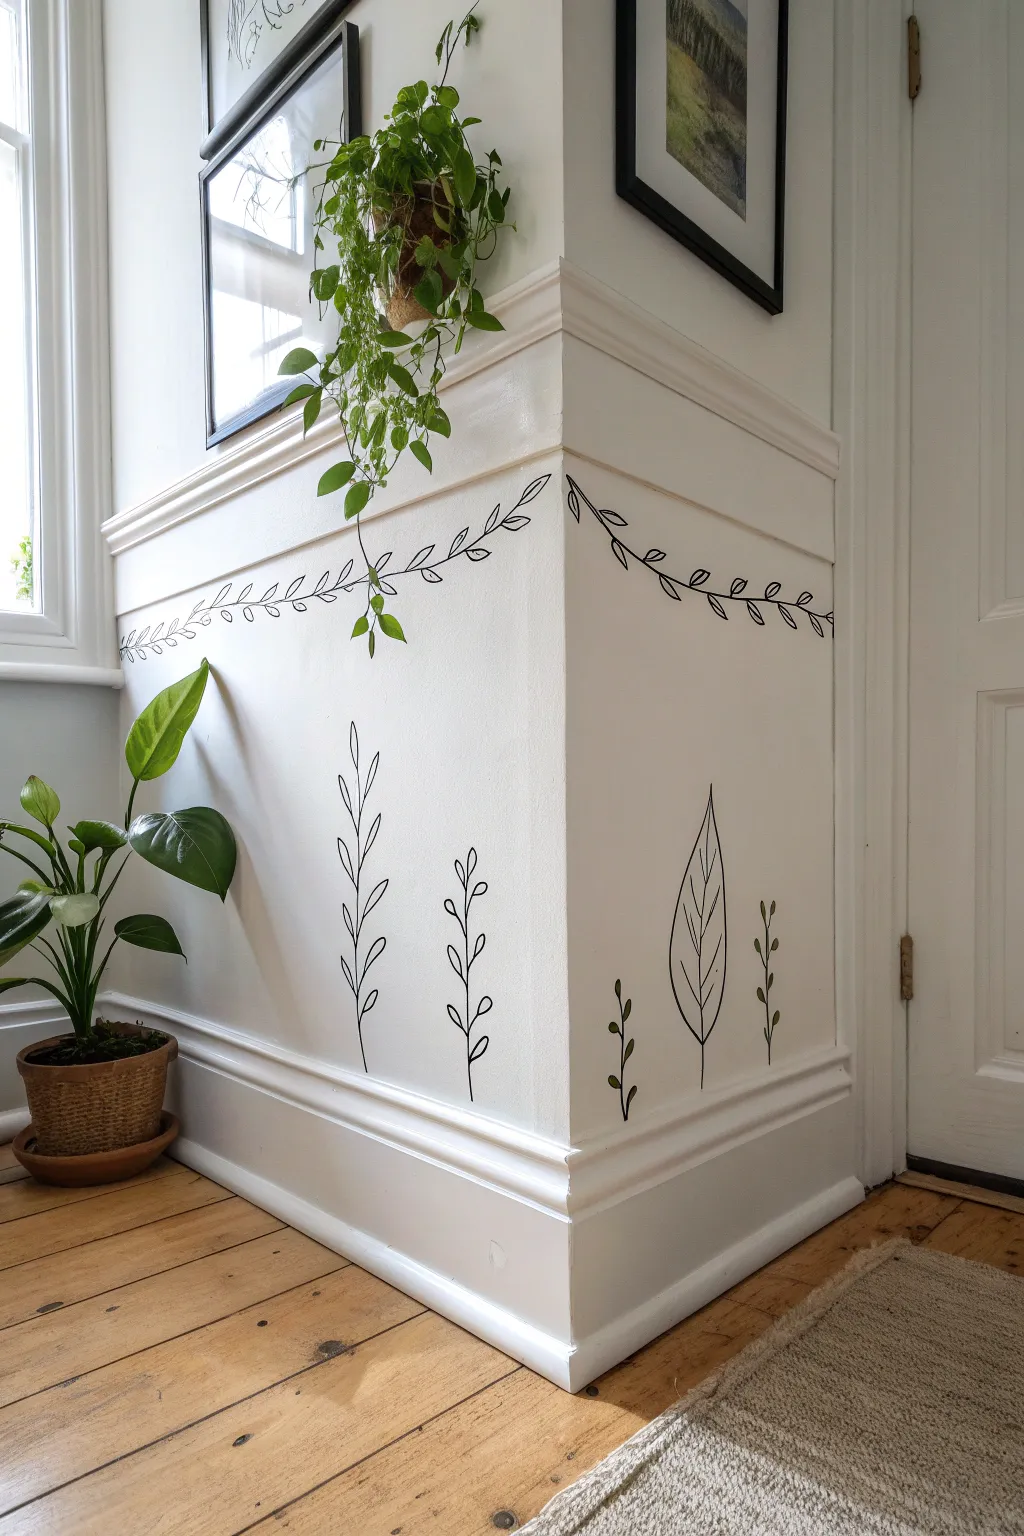
Transform a plain corner or wainscoting into a playful botanical scene with this simple line art project. Using basic black markers, you can create a charming, continuous vine that wraps around corners, complemented by standing leaf motifs that mimic a garden bed.
Step-by-Step Guide
Materials
- Black oil-based paint marker (medium tip)
- Black oil-based paint marker (fine tip)
- Pencil (HB or lighter)
- White eraser (high quality)
- Ruler or level (optional)
- Damp cloth
- Step stool (if working near ceiling)
Step 1: Preparation & Planning
-
Clean the surface:
Before starting, wipe down the wall area with a damp cloth to remove any dust or oils that might interfere with the ink adhesion. Let it dry completely. -
Define your boundaries:
Identify the top border for your vine. In the reference image, the vine runs parallel to the chair rail molding. If you don’t have molding, use a ruler or level to lightly mark a straight horizontal guide line where you want the main vine to flow.
Smudge Fix
If you accidentally smear wet ink, don’t wipe it! Let it dry completely, then paint over the mistake with a small brush and leftover wall paint. Redraw the line once the patch is dry.
Step 2: Drawing the Upper Vine
-
Sketch the main stem:
Using your pencil, lightly draw a long, wavy line horizontally across the wall. Make the waves gentle and shallow rather than deep peaks and valleys. -
Wrap the corner:
When you reach the wall corner, ensure the line continues seamlessly to the adjacent wall. I find it helpful to stand back a few feet to check that the flow looks natural across the 90-degree angle. -
Add leaf skeletons:
Along your wavy pencil line, sketch small, simple tear-drop leaf shapes. Alternate them on the top and bottom of the stem for a balanced look. -
Outline with marker:
Take your medium-tip black paint marker. Before applying it to the wall, depress the tip on a scrap piece of paper to get the ink flowing smoothy. -
Trace the stem:
Carefully trace over your pencil line for the main stem. Use a confident, steady speed; moving too slowly can make the line shaky. -
Detail the leaves:
Trace the outline of each leaf. For the inner vein detail, switch to the fine-tip marker to sketch a single line down the center of each leaf, stopping just short of the tip.
Step 3: Planting the Garden Bed
-
Sketch vertical stems:
Focus on the lower section of the wall now. Lightly pencil in vertical lines of varying heights rising from the baseboard. Space them out irregularly to feel organic. -
Vary the foliage types:
On the left side, sketch a tall stem with paired, pointed leaves reaching upward. In the center, try a shorter stem with small, rounded leaves. -
Create a focal leaf:
On the adjacent wall, sketch a large, single leaf shape (like a Hosta leaf) standing on a thin stem. Add interior veins to this larger shape for texture. -
Add filler plants:
Fill in any awkwardly large gaps with very small sprouts or tiny stems, keeping the composition open and airy. -
Inking the lower plants:
Using the medium-tip marker again, trace your vertical stems. Start from the bottom and flick your wrist slightly as you move up to tapers the lines. -
Inking the leaves:
Trace the leaf outlines. For the large focal leaf, ensure the outer line is bold and continuous. -
Adding fine details:
Switch back to the fine-tip marker. Add the veins inside the leaves and any tiny details on the smaller filler plants.
Add Color
Once the black outline is fully cured (give it 24 hours), use watercolor pencils to lightly shade inside the leaves for a soft, transparent pop of greenery.
Step 4: Finishing Touches
-
Let the ink cure:
Allow the paint marker to dry for at least 30 minutes. Oil-based markers can smear easily if touched too soon. -
Erase guidelines:
Gently erase any visible pencil marks with your white eraser. Be careful near the inked lines to avoid smudging. -
Inspect and refine:
Step back and look for any breaks in your lines or spots where the black ink looks thin. Touch up these areas carefully for a crisp, professional finish.
Now you have a custom, hand-drawn accent wall that brings life to your corner without taking up any floor space


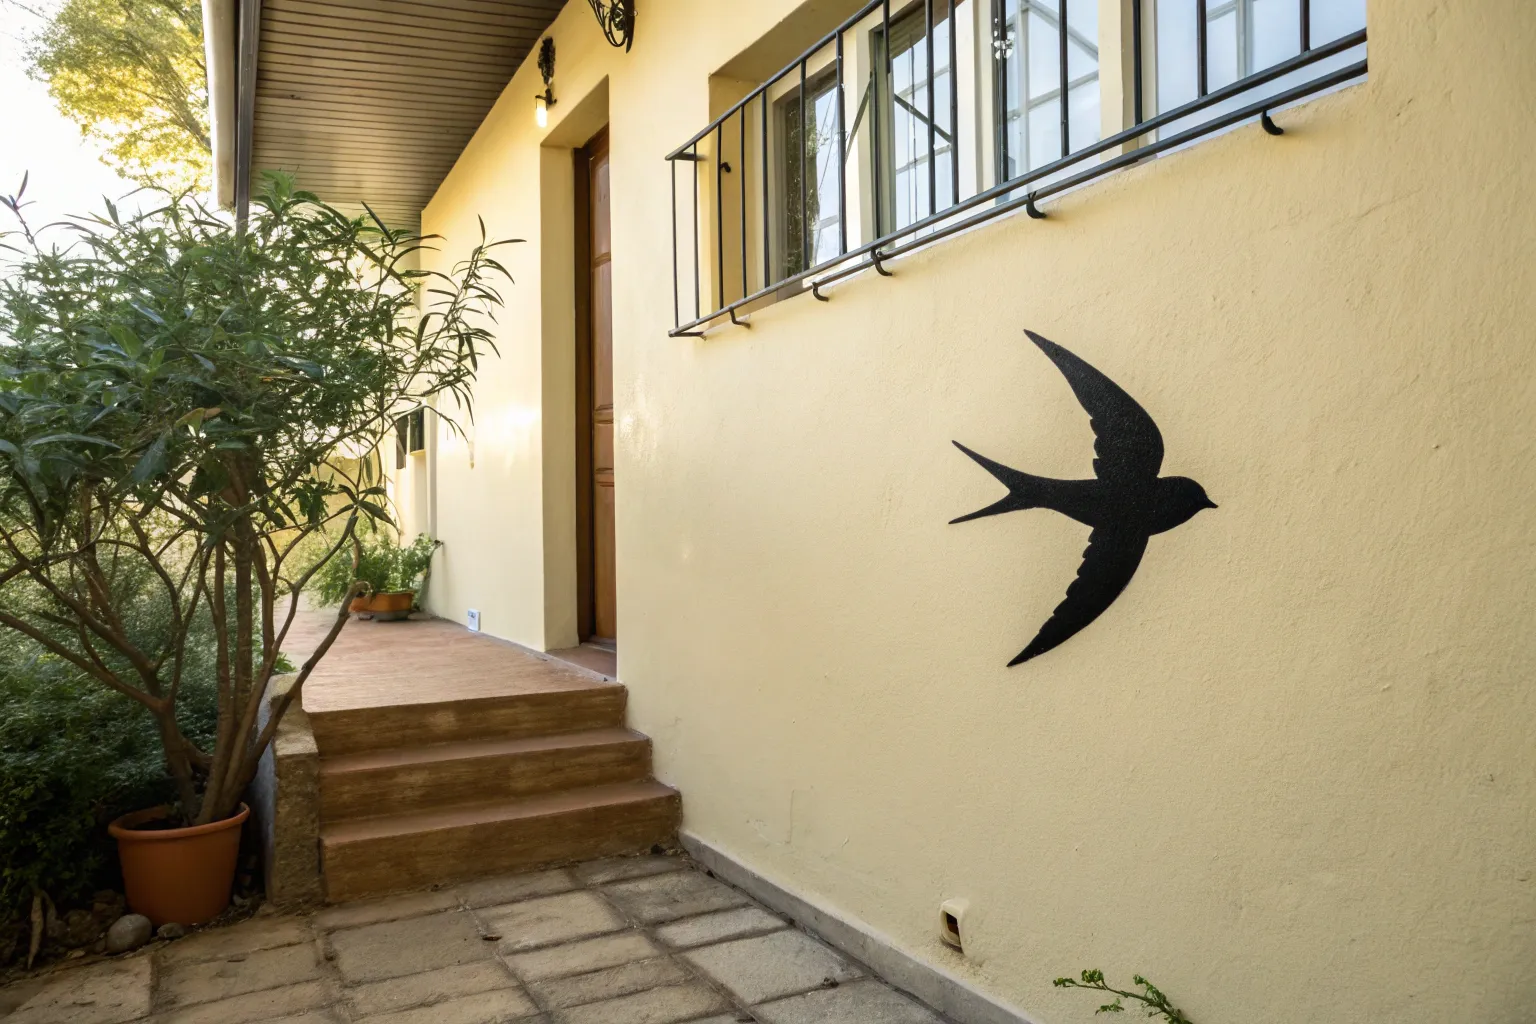
Branch With Flying Birds
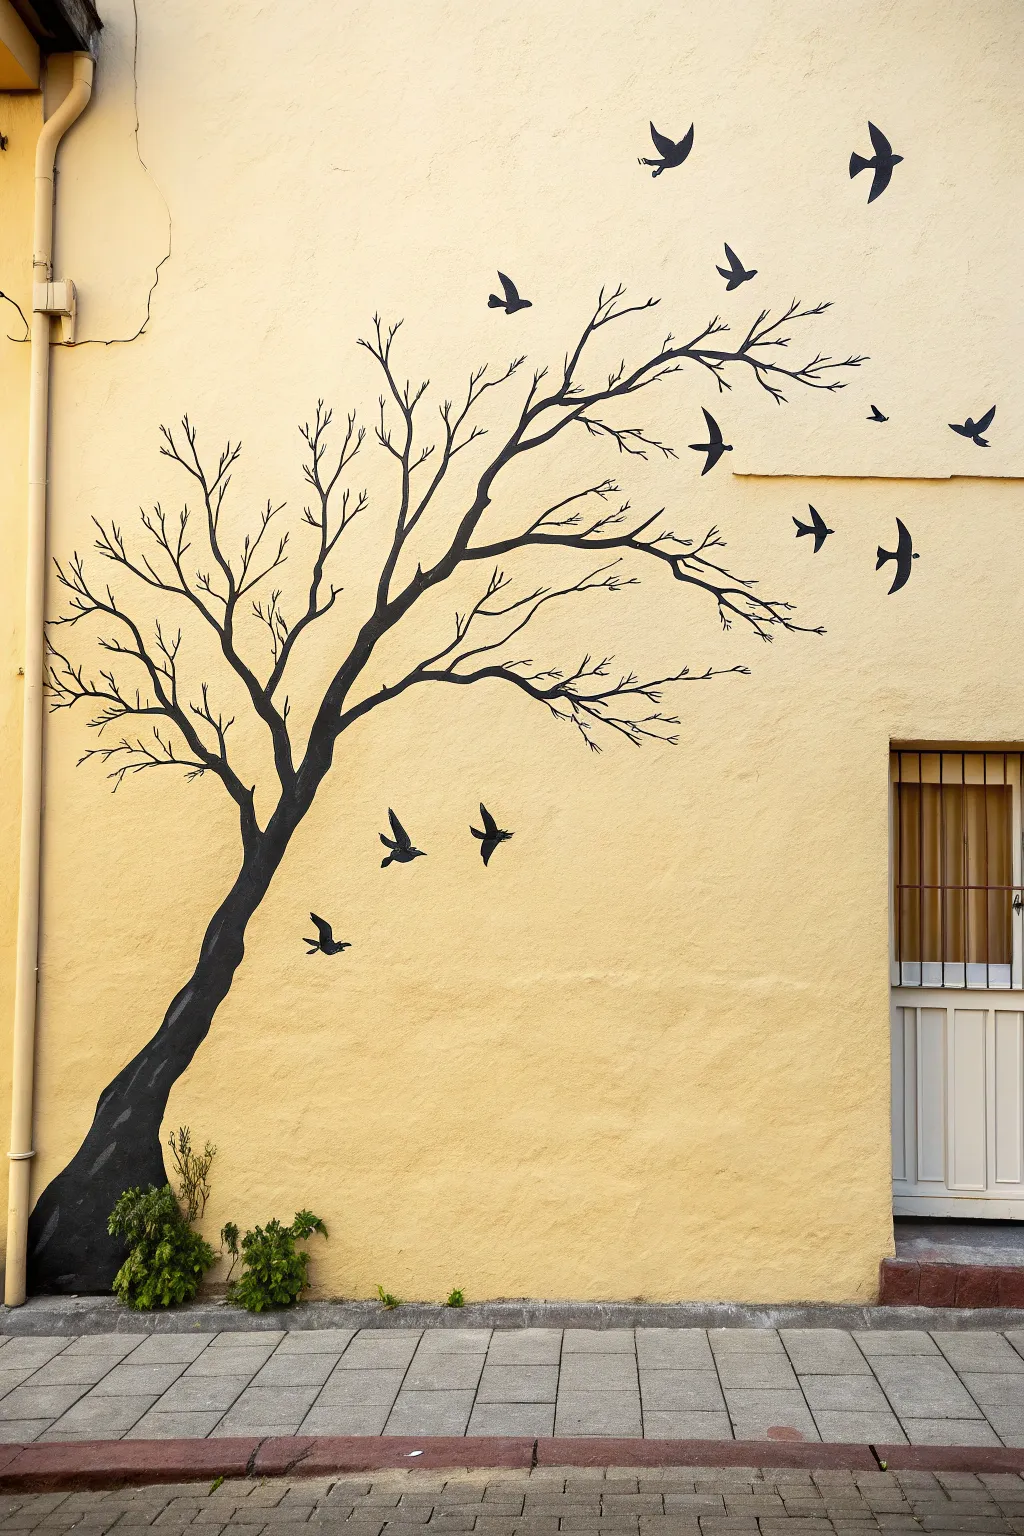
Transform a plain exterior or interior wall into a striking visual story with this high-contrast silhouette mural. The stark black tree reaches elegantly across the surface, releasing a flock of birds that creates a wonderful sense of movement and freedom against the textured background.
How-To Guide
Materials
- External or internal acrylic paint (black)
- Small and medium angled paintbrushes
- Fine detail liner brush
- Chalk or pencil for sketching
- Painter’s tape (optional)
- Sturdy step ladder
- Drop cloth
- Projector (optional, for tracing)
- Damp rag
Step 1: Planning and Sketching
-
Prepare the surface:
Begin by ensuring your wall surface is clean and dry. If working on exterior stucco like the example, use a stiff brush to remove any loose debris or dust that might interfere with paint adhesion. -
Establish the curve:
Using a piece of chalk, lightly sketch the main trunk line. Start from the bottom left corner, creating a gentle curve that leans towards the right. This ‘S’ curve is essential for giving the tree a natural, wind-swept appearance. -
Draft the main branches:
Extend 3-4 primary branches from the top of your trunk. Let them fan out towards the upper right corner, maintaining that sweeping motion. Keep the lines loose at this stage; you can refine them later. -
Add secondary twigs:
Sketch smaller offshoots from your main branches. I find it helpful to vary the lengths and directions slightly to avoid it looking too uniform or patterned. These should get thinner as they move away from the trunk. -
Position the flock:
Mark the positions for your birds. Place a cluster of three near the middle trunk area, flying upward. Then, scatter the rest near the upper branches, mixing their orientations so they look like a chaotic, natural flock taking flight. -
Review composition:
Step back about ten feet to view the whole wall. Check that the visual flow carries the eye from the bottom left to the top right. Adjust any chalk lines now before committing to paint.
Stucco Texture Tip
On rough stucco, don’t drag the brush. Use a ‘stippling’ or poking motion to force paint into deep pits, then smooth the surface for a solid black look.
Step 2: Painting the Tree
-
Outline the trunk:
Using a medium angled brush and black paint, carefully outline the trunk’s edges over your chalk guide. The base should be significantly wider, gradually tapering as you move up. -
Fill the trunk:
Fill in the trunk silhouette. On textured walls like stucco, you may need to use a dabbing motion causing the bristles to push paint into the crevices for solid coverage. -
Paint thick branches:
Continue painting the thicker primary branches. Ensure the transition where the branch meets the trunk is curved and smooth, mimicking organic growth rather than sharp angles. -
Detail the tips:
Switch to a smaller brush or a liner brush for the branch tips. These lines need to be delicate and sharp. A little water mixed into your acrylics here helps the paint flow smoother for long, thin lines. -
Refine the edges:
Go back over the main structure. If the stucco texture has created jagged edges, smooth them out with your liner brush to ensure the silhouette looks crisp against the yellow background.
Step 3: Adding the Birds
-
Paint flying bodies:
For the birds, start by painting a simple crescent or V-shape for the wingspan. Vary the openness of the ‘V’ to show different stages of flapping flight. -
Add torsos and heads:
thicken the center of the wing shape to create a small body and a tiny dot for the head. Refer to the reference image—some birds are gliding (flatter wings) and others are climbing (angled wings). -
Detail the tails:
Add small triangular tails to the larger birds. This detail helps orient them and gives the silhouette direction. -
Clean up chalk:
Once the paint is fully dry to the touch, use a damp cloth to gently wipe away any visible chalk guidelines. -
Optional landscaping:
If your mural is at ground level, consider planting small green shrubs at the base of the painted trunk. It anchors the art to the real world and hides the transition where the wall meets the ground.
Make It Metallic
Instead of matte black, try using a dark metallic bronze or copper paint. It will catch the sunlight on an exterior wall and add an elegant shimmer.
Enjoy the peaceful atmosphere your new nature-inspired silhouette brings to the space


Balloon Cluster Silhouette
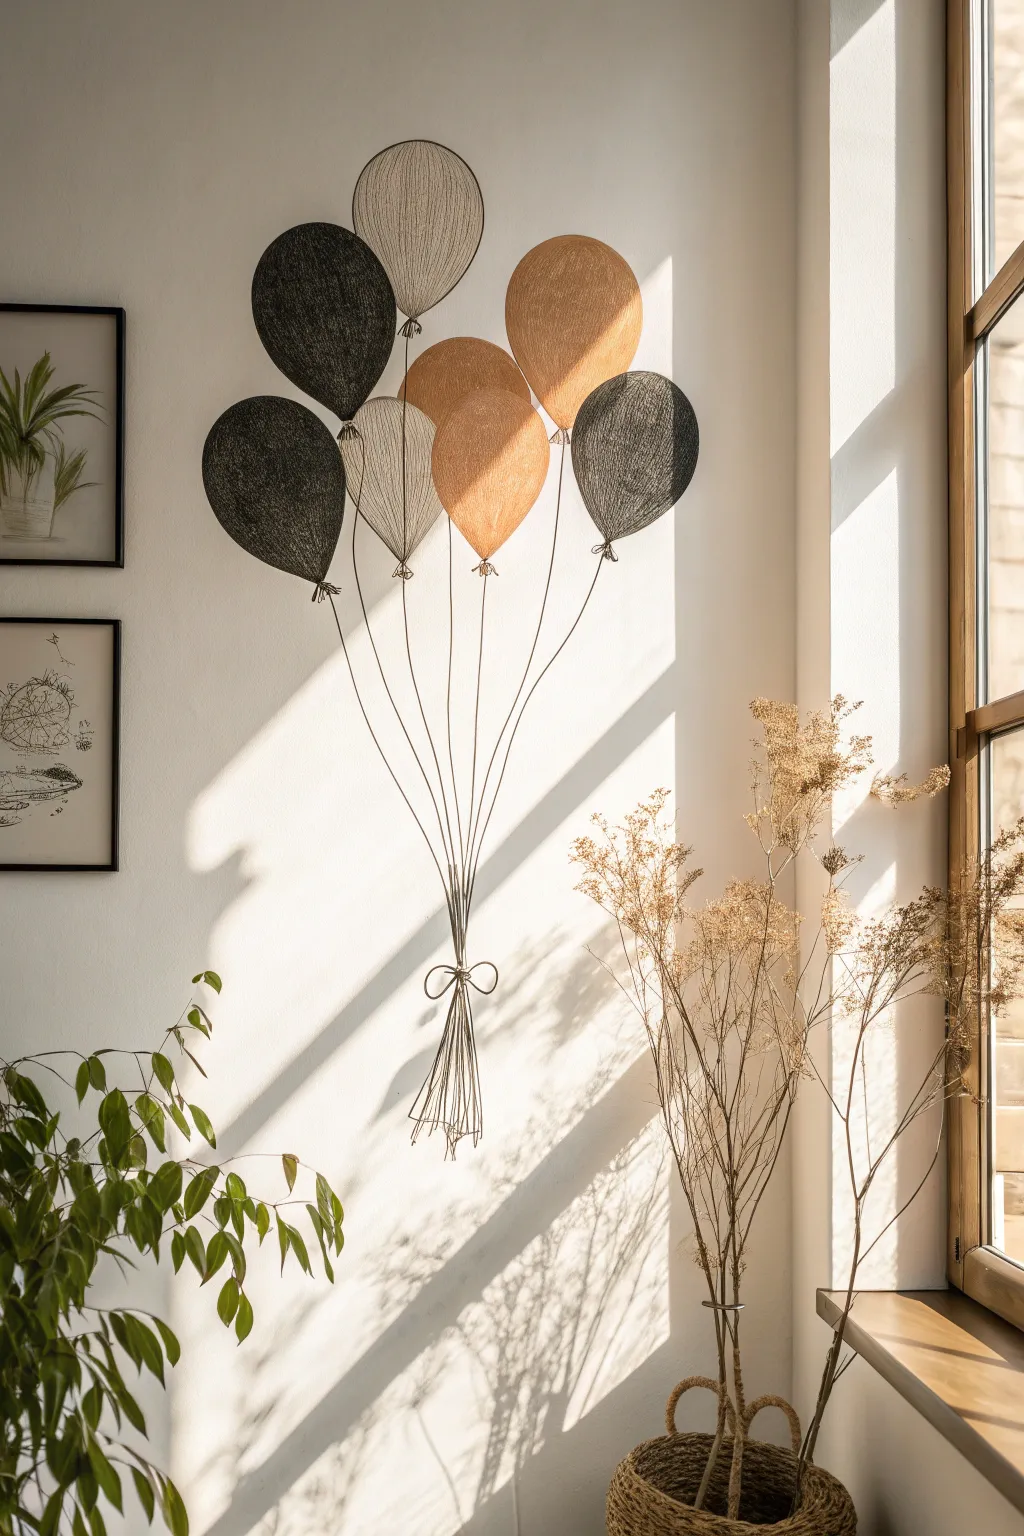
Capture the airy lightness of floating balloons with this trompe-l’œil wall art project that mimics the look of delicate wire or string sculptures. Using fine liner pens and careful shading, you will create a permanent cluster of joy that appears to cast real shadows on your wall.
Step-by-Step Guide
Materials
- Large sheet of white drawing paper or cardstock (A2 or similar)
- Fine liner pens (Black, 0.1mm, 0.3mm, and 0.5mm)
- Brown/Tan fine liner or colored pencil
- HB and 2B graphite pencils
- Eraser
- Ruler or straight edge
- Circle template or compass (optional)
- Blending stump or cotton swab
Step 1: Planning the Cluster
-
Lightly sketch the shapes:
Begin by deciding where your balloon cluster will sit on the paper. Use your HB pencil to lightly sketch seven overlapping ovals or egg shapes. Vary the angles slightly so they look like they are jostling for space. -
Add the balloon knots:
At the bottom center of each oval, draw a tiny, gathered triangle shape for the balloon knot. This small detail is crucial for realism. -
Draft the strings:
From each knot, draw a faint line converging toward a single point near the bottom of the page. These lines don’t need to be perfectly straight; a slight wave adds movement.
Step 2: Creating the Wire Texture
-
Outline in ink:
Take your 0.3mm black pen and carefully trace the outer edge of your first balloon. Instead of a solid line, try using short, connecting scratches to mimic a wrapped wire texture. -
Start the cross-hatching:
For the darker ‘black’ balloons, use the 0.1mm pen to fill the shape with dense diagonal hatching. Keep your strokes consistent in direction. -
Layering the cross-hatch:
Add a second layer of hatching in the opposite direction. I find that building this up slowly creates a rich, mesh-like appearance rather than a flat block of color. -
Inking the lighter balloons:
For the beige or tan balloons, switch to a brown fine liner or a very sharp colored pencil. Use the same cross-hatching technique but keep the lines spaced slightly further apart to let the white paper show through. -
Adding volume:
To make the balloons look round, increase the density of your hatching near the edges and leave the center slightly lighter. This creates a subtle highlight effect.
Fixing Smudges
Graphite shadows can get messy. Use a kneaded eraser to lift away accidental smudges or to lighten shadows that became too dark and heavy.
Step 3: Strings and Anchor
-
Inking the strings:
Go over your pencil string lines with the 0.5mm black pen. Press firmly to create a bold, wire-like appearance. Ensure almost all strings meet at the convergence point. -
Draw the bow:
Where the strings meet, sketch a simple loop-style bow. Use double lines to give the ‘wire’ of the bow some thickness. -
The trailing ends:
Extend the lines below the bow to create the loose ends of the wire bunch. Let these flare out slightly at the very bottom.
Up the Realism
For a mixed-media twist, glue actual thin crafting wire over the string lines and let the loose ends hang off the bottom of the paper.
Step 4: The 3D Shadow Effect
-
Determine the light source:
Imagine a light coming from the top right (similar to the window in the reference photo). This means your shadows will fall to the bottom left. -
Sketch the shadow shapes:
Using the 2B pencil, lightly outline a duplicate of the balloon cluster shifted slightly down and to the left of your drawing. -
Fill the shadows:
Gently fill this shadow area with soft graphite shading. Do not press hard; you want a grey mist, not a dark shape. -
Blur and soften:
Take your blending stump or cotton swab and smudge the graphite shadows. The goal is to make the edges fuzzy and indistinct, just like a real shadow cast on a wall. -
Shadow the strings:
Don’t forget to add a faint, blurred grey line parallel to your strings and the bow. This final touch lifts the artwork off the page visually.
Step back and admire how your simple lines have transformed into a dimensional piece of art ready to frame
BRUSH GUIDE
The Right Brush for Every Stroke
From clean lines to bold texture — master brush choice, stroke control, and essential techniques.
Explore the Full Guide
Mountain Range Along The Bottom
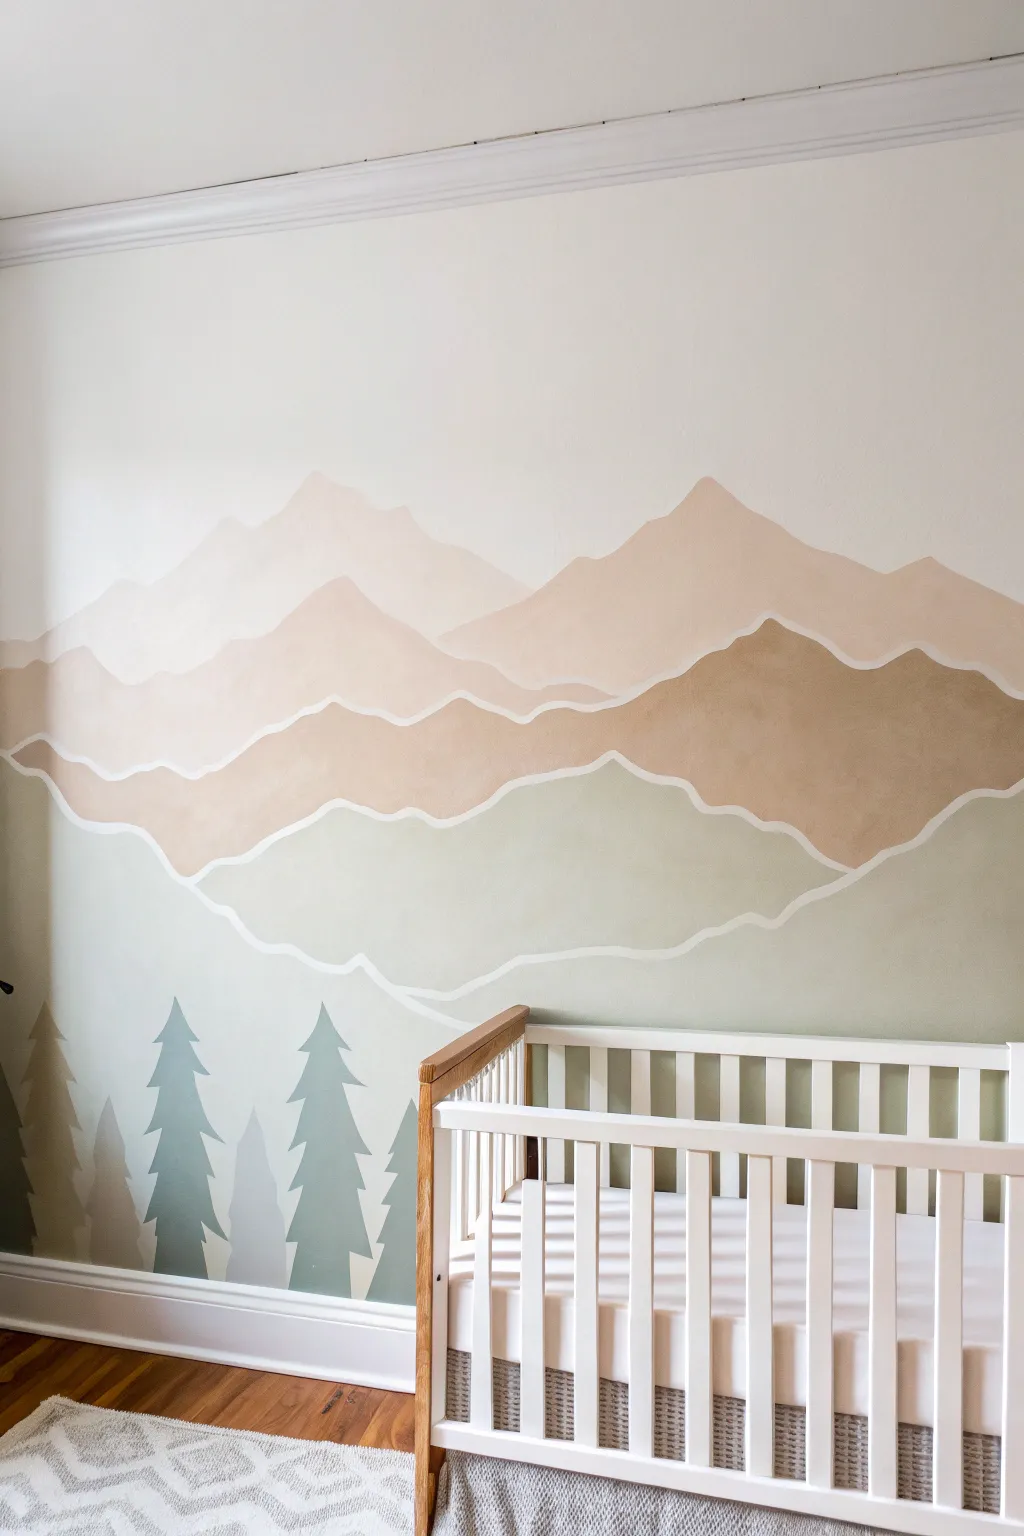
Transform a nursery wall into a serene landscape with this layered mountain mural featuring gentle earth tones and crisp white outlines. This project creates instant depth and calm, perfect for a cozy corner or behind a crib.
How-To Guide
Materials
- Interior latex paint (white base + 3-4 sample pots in gradient shades: cream, beige, tan, sage green)
- Painter’s tape (blue or green)
- Pencil and eraser
- Small angled sash brush (1.5 – 2 inch)
- Small foam roller and tray
- Artist’s liner brush (fine tip) or white paint pen (thick nib)
- Drop cloth
- Ladder or step stool
Step 1: Preparation & Sketching
-
Prepare the workspace:
Clear the area of furniture, including the crib, and lay down a drop cloth to protect your flooring. Wipe the walls down with a damp cloth to remove any dust, which ensures crisp lines later. -
Establish the background:
If your wall isn’t already white or your desired sky color, roll on two coats of your base background color and let it dry completely overnight. -
Sketch the ranges:
Lightly sketch three distinct mountain ranges using a pencil. Start with the highest peaks (the furthest range) near the top third of the wall. Keep the lines irregular and organic—mountains aren’t perfect triangles. -
Add the middle and foreground:
Sketch a second, lower range below the first one, varying the peaks so they don’t align perfectly with the top layer. Finally, sketch a third, lowest range that is wider and more rolling.
Clean Lines Hack
If your hand is unsteady for the white lines, use flexible striping tape. Apply it along the mountain edge, paint white over it, and peel while wet.
Step 2: Painting the Layers
-
Start from the top:
Begin with the highest mountain range using your lightest shade (pale cream or barely-there blush). Use an angled sash brush to carefully cut in along your pencil line, creating the sharp peak edges. -
Fill the top layer:
Once the edge is defined, use a small roller to fill in the body of this top mountain section down to where the next pencil line begins. Don’t worry about being neat at the bottom edge, as it will be covered up. -
Paint the middle range:
Move to the second layer using a slightly darker shade (warm beige or tan). Cut in the top edge of this range carefully, overlapping the bottom of the first layer slightly to ensure full coverage. -
Complete the bottom range:
Apply the third color (a sage green or muted olive) for the lowest mountain section. Again, cut in the top edge meticulously before rolling the rest of the section down to the baseboards. -
Assess coverage:
Let the paint dry for at least 2-4 hours. Check for patchiness and apply a second coat to any mountain section that looks uneven. I find that darker colors often need that second pass for richness.
Step 3: Detailing & Trees
-
Add the white contour lines:
This is the signature detail. Use a fine artist brush and white paint (or a wide white paint pen) to trace the top edge of every mountain range. Keep the line thickness consistent, about 1/4 inch wide. -
Steady your hand:
When painting these white lines, rest your pinky finger on a dry part of the wall to stabilize your hand. Move slowly to maintain smooth curves. -
Sketch the trees:
Using a pencil, lightly draw simple evergreen tree shapes along the very bottom of the wall. Vary their heights—tall ones mixed with short saplings creates a natural forest look. -
Paint the tree silhouettes:
Fill in your tree sketches with a darker blue-grey or slate green paint using a small craft brush. Keep the edges relatively sharp but slightly jagged to mimic pine branches. -
Paint the ghost trees:
To add depth, paint a few trees in a lighter grey shade between the darker ones. This makes them look further away in the mist. -
Final touches:
Check your white contour lines one last lime. If any background color smeared onto the white, do a tiny touch-up with a small brush.
Level Up: Texture
Mix a small amount of texture additive or sand into the paint for the lowest mountain range to give the foreground tactile, earthy grit.
Step back and admire your peaceful mountain view that invites adventure and calm in equal measure
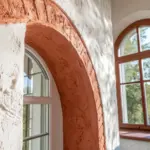
Rainbow Arch With Clean Bands
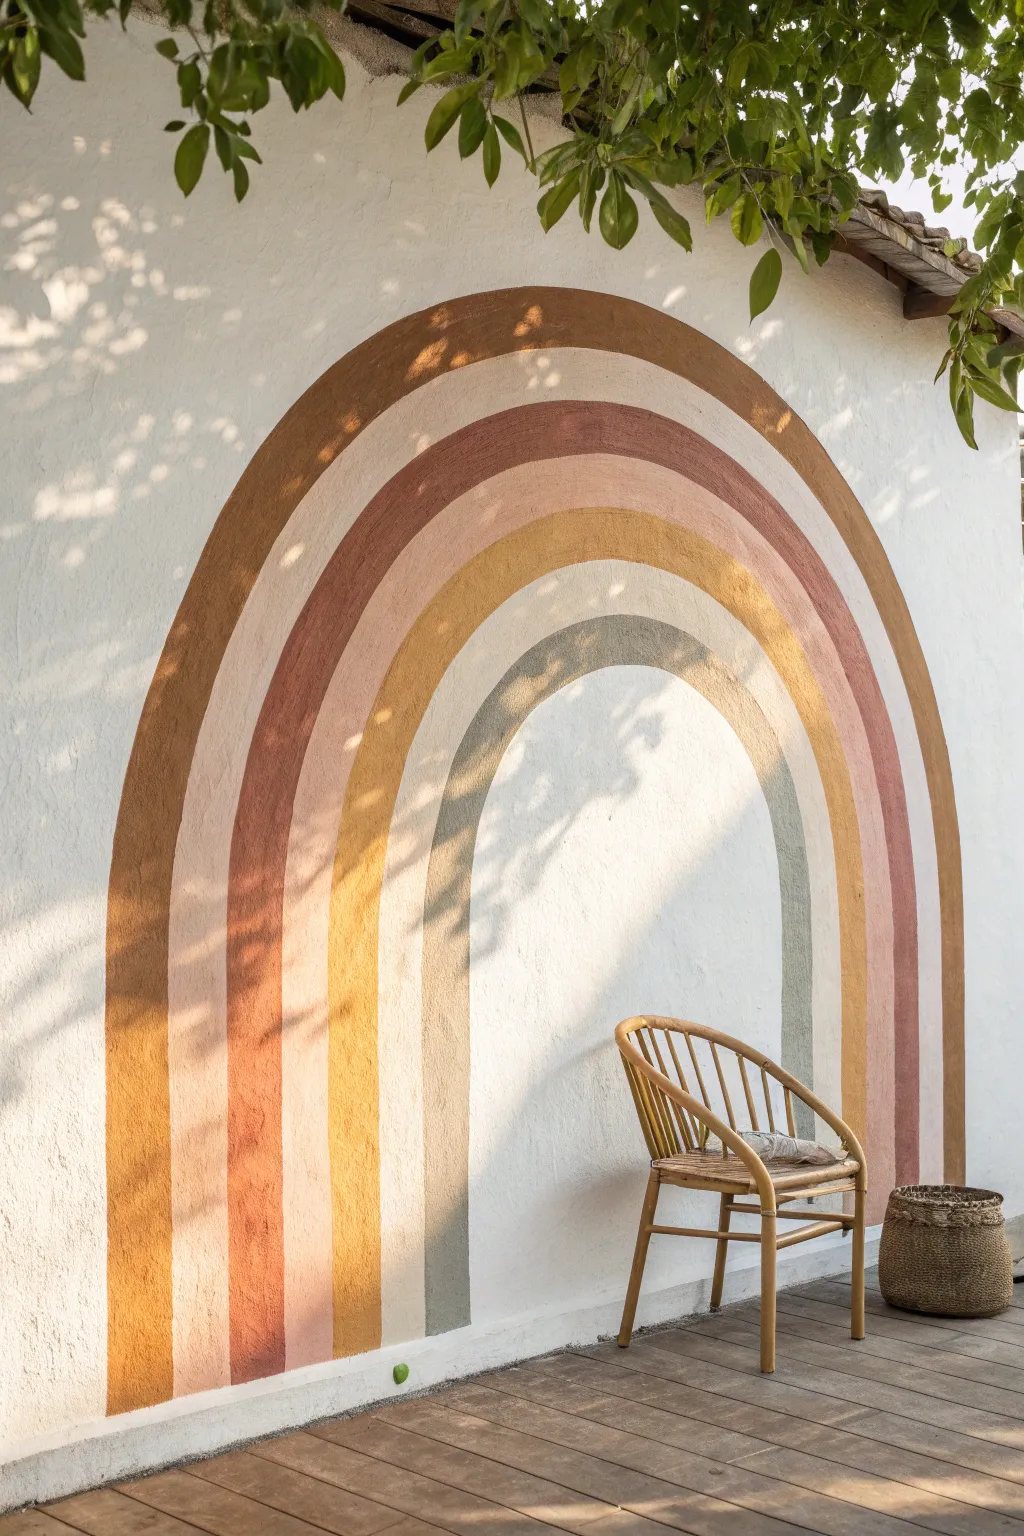
Transform a plain exterior or interior wall into a warm focal point with this large-scale rainbow arch. Using a palette of terracotta, muted pinks, ochre, sandy beige, and sage green, this design brings a grounded, organic feel to any space.
Step-by-Step Tutorial
Materials
- Exterior or interior latex paint (5 colors: dark terracotta, dusty rose, ochre yellow, pale sand, sage green)
- White base paint (for touch-ups)
- Pencil
- String or non-stretchy twine
- Push pin or tape
- Painter’s tape (optional for straight vertical lines)
- 2-inch angled sash brush
- 1-inch flat artist brush (for edges)
- Drop cloth
- Measuring tape
- Level
- Ladder or sturdy step stool
Step 1: Preparation & Measuring
-
Clean the surface:
Begin by thoroughly cleaning the wall surface. If working outdoors on stucco like the example, use a stiff brush to remove dust and cobwebs so the paint adheres properly. -
Determine the center point:
Measure the width of your desired arch area and mark the center point on the floor or bottom trim. This is where your guideline string will originate. -
Set the anchor:
Secure a piece of string to the bottom center point. You can tape it firmly to the floor or ask a friend to hold it down tight. -
Mark the outer arch:
Tie a pencil to the other end of the string at your desired maximum height. Pull the string taut and draw a large semi-circle to define the top of the outermost band. -
Draw the remaining bands:
Shorten the string by roughly 4 to 6 inches (depending on how thick you want the stripes) and draw the next arc. Repeat this process until you have 5 distinct arched lanes. -
Extend vertical lines:
Use a level and a long straight edge to extend the ends of each semi-circle straight down to the floor. This creates the ‘legs’ of the rainbow.
Bleeding Lines?
On textured walls, paint bleed is common. Don’t stress perfect lines; the organic look is part of the charm. Use a small artist brush for quick touch-ups.
Step 2: Painting the Bands
-
Start with the outer band:
Dip your 2-inch angled brush into the dark terracotta paint. Carefully cut in the outer edge of the largest arch first. I find it easier to paint the crisp edge first, then fill in the center. -
Fill the first stripe:
Continue filling in the dark terracotta band all the way to the floor. On textured stucco, use a stippling or dabbing motion to get paint into the crevices. -
Paint the second color:
Move to the dusty rose shade for the second band. Be mindful where the colors meet; a steady hand is better than tape here, as tape often bleeds on textured walls. -
Apply the ochre yellow:
Paint the third band with the ochre yellow paint. Step back occasionally to ensure your vertical lines look straight from a distance. -
Add the sandy beige:
Fill the fourth band with the pale sand color. Use the smaller 1-inch artist brush if you need more control near the color transitions. -
Finish with sage green:
Paint the innermost arch with the sage green paint. Since this is the smallest curve, take your time to keep the arch symmetrical. -
Check for gaps:
Inspect the wall for any missed spots, especially if the surface is heavily textured. Dab extra paint into any deep pits in the stucco. -
Clean up edges:
If any lines look wobbly or paint went astray, use a small brush and the original white wall color to ‘erase’ mistakes and sharpen the edges once the colors are dry.
Color Harmony Tip
Mix a tiny spoonful of the wall’s base white paint into each colored paint cup. This unifies the separate hues and makes them feel cohesive with the background.
Once dry, arrange your furniture in front of your new mural to complete the cozy outdoor scene

PENCIL GUIDE
Understanding Pencil Grades from H to B
From first sketch to finished drawing — learn pencil grades, line control, and shading techniques.
Explore the Full Guide
Easy Geometric Triangle Scatter
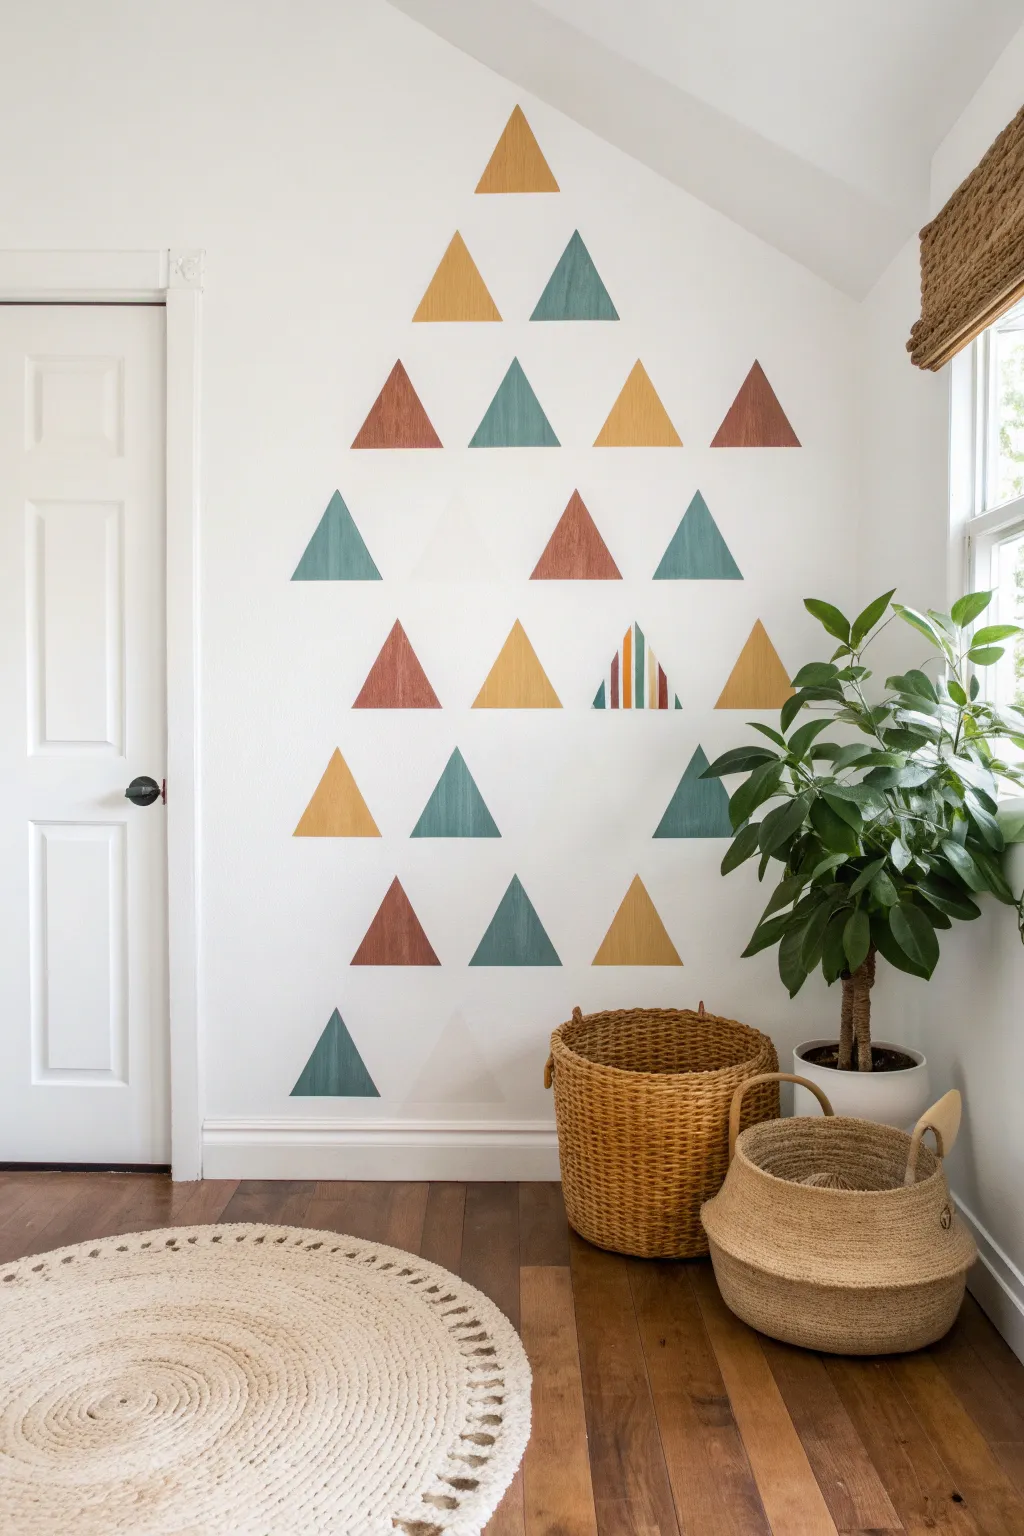
Transform a plain wall into a modern art feature with this scattered triangle mural that mimics the look of high-end wallpaper without the commitment. Using warm, earthy tones like mustard, teal, and terracotta creates a cozy, bohemian vibe perfect for a nursery or creative space.
Detailed Instructions
Materials
- Interior latex wall paint (white for base coat, if needed)
- Small sample pots of paint (Mustard Yellow, Teal Green, Terracotta Rust)
- Painter’s tape (high quality, 1-inch width)
- Cardstock or thick cardboard (for stencil)
- Pencil
- Bubble level or laser level
- Small foam roller or high-quality sash brush
- Ruler or measuring tape
- Craft knife or scissors
- Drop cloth
Step 1: Planning and Preparation
-
Prep the Wall:
Start by ensuring your wall is clean, dry, and free of dust. If you need a fresh base, paint the wall white first and let it cure effectively for at least 24 hours so tape doesn’t peel it up later. -
Create a Template:
Decide on the size of your triangles. For the scale seen here, an equilateral triangle with 6-inch sides works well. Draw this shape on cardstock and cut it out neatly to use as your tracing guide. -
Plan the Layout:
Before putting paint on the wall, map out your design. You can lightly tape your template to the wall in various spots to visualize the scatter pattern. Aim for a denser cluster at the bottom that loosens up as it reaches the ceiling.
Crisp Lines Secret
If you have textured walls, sealing the tape with the base wall color is mandatory. It prevents the colored paint from seeping into the texture grooves.
Step 2: Drafting the Design
-
Establish the First Row:
Starting near the baseboard, place your cardboard template on the wall. Use a bubble level on the bottom edge of the template to ensure it is perfectly straight. -
Trace the Shape:
Lightly trace around the template with a pencil. Don’t press too hard; you want the lines to be just visible enough to guide your tape, but easy to paint over later. -
Build the Pattern:
Move upwards, tracing more triangles. Stagger them so the points of the lower row sit roughly between the bases of the upper row, but keep the spacing strictly organic rather than a rigid grid. -
Check Spacing:
Step back frequently to look at the overall balance. I find that leaving larger gaps near the top helps create that floating, ‘scattered’ effect evident in the finished project.
Step 3: Taping and Painting
-
Tape the Outlines:
Apply painter’s tape along the *outside* of your pencil lines. Press the edges of the tape down firmly with your fingernail or a credit card to prevent paint bleed. -
Seal the Tape:
For razor-sharp lines, lightly brush a tiny amount of your white base wall paint over the tape edge first. This fills any microscopic gaps with white paint so your colors won’t bleed underneath. -
Color Selection:
Assign colors to your triangles randomly to balance the mustard, teal, and rust tones. Ensure no two adjacent triangles share the same color. -
Apply Color:
Using a small foam roller or brush, fill in the triangles. Two thin coats are always better than one thick coat to avoid drips and uneven texture. -
Create the Feature Triangle:
Select one triangle to be the ‘striped’ feature. Once its base color is dry, apply thin strips of tape vertically and paint the alternating stripes in your other accent colors. -
Reveal the Design:
Remove the tape while the final coat of paint is still slightly tacky to pull a clean edge. Pull the tape slowly at a 45-degree angle away from the paint. -
Touch Up:
Once everything is fully dry, use a small artist’s brush and your white wall paint to touch up any small bleeds or pencil marks that are still visible.
Uneven Spacing?
Don’t measure the gaps perfectly! If the scatter looks too uniform, trace a few ‘ghost’ triangles in between the real ones to disrupt the grid.
Enjoy the lively energy this geometric accent adds to your room
Bold Vertical Color Block
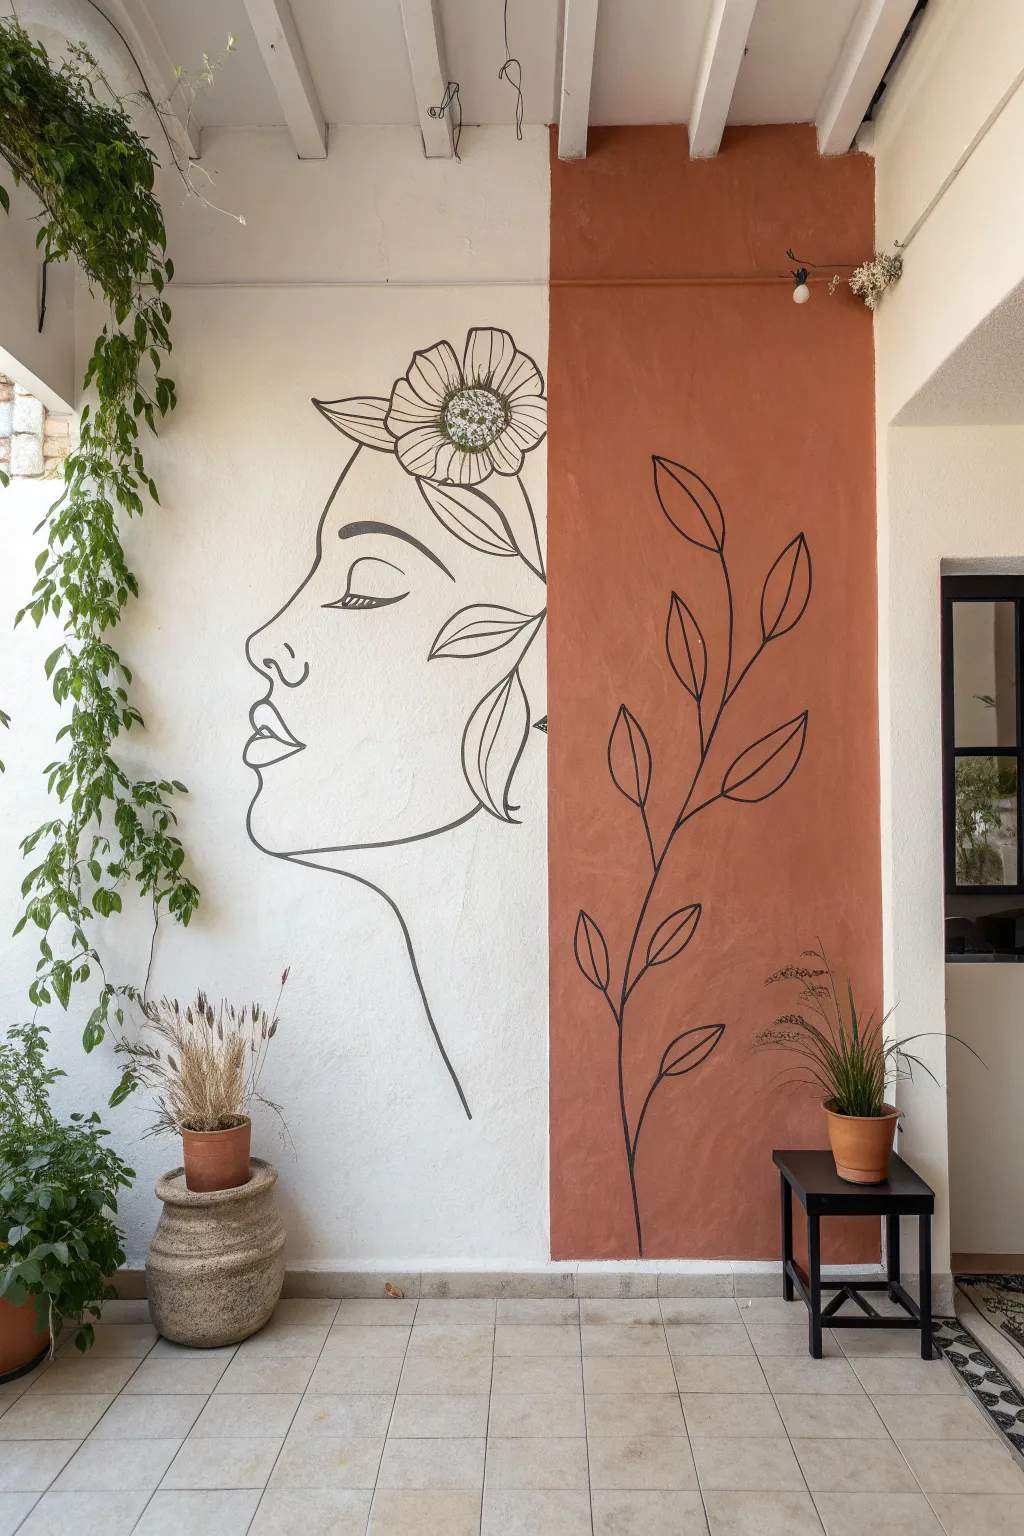
Transform a plain wall into a modern artistic statement by combining a bold vertical color block with delicate line art. This project merges the warmth of terracotta tones with the minimalist elegance of a floral face profile.
Step-by-Step Tutorial
Materials
- White or off-white latex wall paint (base)
- Terracotta or rust-colored latex wall paint
- Painter’s tape (frog tape recommended)
- Pencil and eraser
- Bubble level or laser level
- Measuring tape
- Black acrylic paint or paint marker (broad tip)
- Small round paintbrush (size 2-4)
- Paint rollers and tray
- Drop cloth
- Projector (optional, but helpful for the face design)
Step 1: Preparation & Color Blocking
-
Prepare the workspace:
Clear the area against the wall you plan to paint. Lay down a drop cloth to protect the floor from paint splatters. Ensure the wall is clean, dry, and free of dust. -
Measure the division:
Decide where you want the color split to occur. Looking at our inspiration, the split is slightly off-center to the right. Measure from the corner and mark this vertical line at several points up the wall. -
Tape the line:
Use a long level or a laser level to guide you as you apply painter’s tape vertically down your marked line. Press the edge of the tape firmly to prevent paint bleed. -
Paint the base:
If your wall isn’t already the desired white or cream shade, paint the entire left section now. Let it dry completely before moving to the color block. -
Apply the terracotta block:
Paint the right section with your terracotta or rust color. Use a roller for the main area and a cutting-in brush near the ceiling and floor. Apply two coats for solid, rich coverage. -
Remove tape:
While the second coat of terracotta paint is still slightly tacky, carefully peel back the painter’s tape at a 45-degree angle to reveal a crisp, clean line.
Step 2: Sketching the Design
-
Allow cure time:
Wait for the color block to dry fully—I usually give it at least 24 hours—so your pencil marks don’t dig into soft paint. -
Plan the face:
Lightly sketch the woman’s profile on the white side. Start with the nose and lips to anchor the spacing. The face should be looking away from the color block. -
Sketch the floral crown:
Add the flower detail at the top of the head, ensuring the petals and leaves flow naturally into the hair line. Keep the lines simple and fluid. -
Outline the branch:
On the terracotta side, sketch a tall, vertical botanical branch. Start the stem near the bottom and let it curve gently upwards. -
Add leaves:
Draw large, simple leaf shapes extending from the branch. Space them out generously so the design feels airy rather than cluttered.
Uneven Lines?
If your hand shakes while painting lines, rest your pinky finger against the wall for stability, or use a mahl stick to brace your hand without touching wet paint.
Step 3: Painting the Lines
-
Select your tool:
You can use a high-quality black paint marker for control, or a thin round paintbrush with black acrylic paint for a more organic, hand-painted look. -
Paint the face outline:
Start at the top of the forehead and work your way down the profile. Keep your hand steady and maintain a consistent line thickness. -
Detail the flower:
In the flower crown area, outline the petals carefully. A slightly thinner line weight here can add nice dimension compared to the bold face profile. -
Extend the neck line:
Draw the long, sweeping curve of the neck downwards, letting it fade out near the bottom third of the wall. -
Paint the botanical branch:
Move to the terracotta side. Trace your pencil lines with the black paint. Since the background is dark, you may need a second pass to ensure the black pops. -
Check balance:
Step back to view the whole mural. Ensure the visual weight of the black lines feels balanced between the two colored sections. -
Clean up sketch marks:
Once the black paint is bone dry, gently erase any visible pencil marks with a clean, white eraser.
Make it Pop
Add depth to the floral crown by dabbing tiny dots of white or gold paint into the center of the flowers for a subtle, textured highlight.
Enjoy the calm, artistic atmosphere your new mural brings to the room


Tiny Stars And Simple Constellations
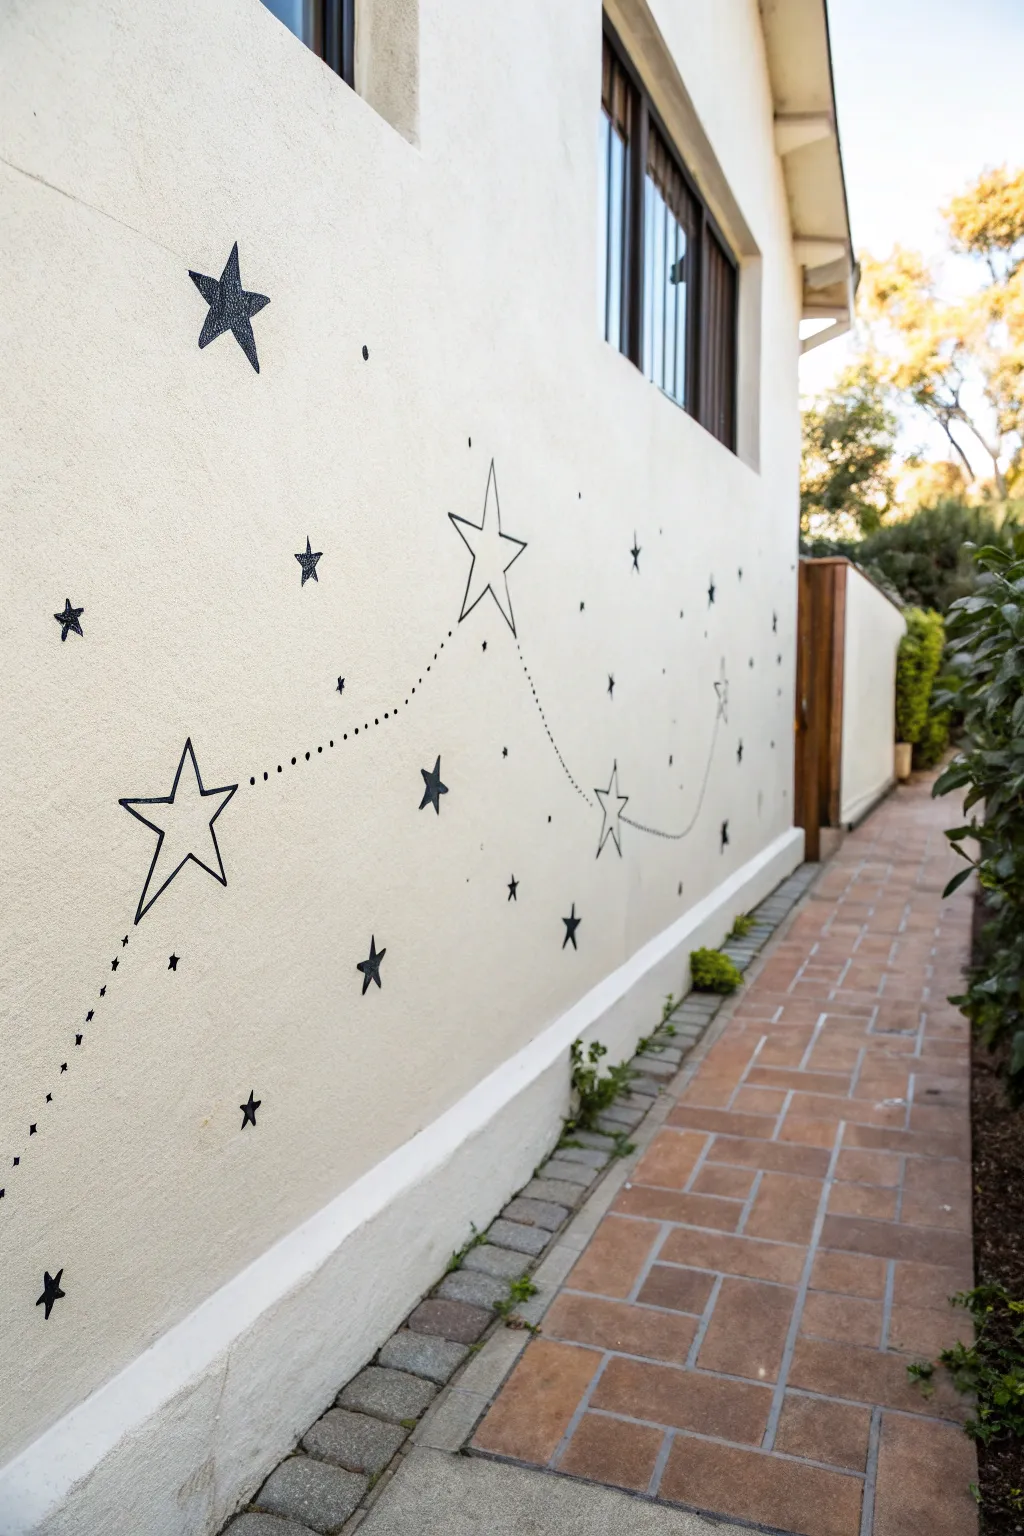
Transform a plain exterior wall into a whimsical night sky with these simple, hand-drawn constellations. The contrast of bold black stars against light stucco creates a charming focal point along a walkway or garden path.
Detailed Instructions
Materials
- Exterior latex paint (black)
- Round synthetic art brush (size 4 or 6)
- Chalk or pencil for sketching
- Ruler or straight edge
- Small paint bucket or cup
- Ladder or step stool (if needed)
- Damp rag (for cleanup)
Step 1: Planning and Sketching
-
Clean surface:
Ensure your wall surface is clean and dry. A quick sweep with a broom is usually enough to remove dust and cobwebs from stucco. -
Sketch anchor stars:
Using a piece of chalk or a pencil, lightly draw the outlines of your largest ‘anchor’ stars first. Space them out widely to create the main flow of the design. -
Connect the dots:
Lightly sketch the swooping lines that will connect your main stars. Let the lines dip and curve naturally, mimicking bunting or a loose string. -
Add filler stars:
Scatter smaller star shapes around the empty spaces. Vary the sizes from tiny specks to medium-sized five-point stars for a natural, unforced look.
Rough Texture Fix
Stucco can be tricky. If paint isn’t getting into the deep pits, use a stiff stencil brush and a ‘pouncing’ (up and down dabbing) motion to fill voids.
Step 2: Painting the Outline Stars
-
Prepare paint:
Pour a small amount of black exterior latex paint into your cup. Exterior paint is crucial here so your artwork withstands the rain and sun. -
Paint main outlines:
Dip your round brush into the paint and carefully trace over your chalk lines for the large, open stars. Use the tip of the brush for sharp points. -
Check brush load:
Stucco is textured, so you might need to reload your brush frequently to get into the crevices without skipping. -
Refine the points:
Go back over the tips of each star point to make sure they are crisp and sharp, not rounded.
Glow in the Dark
For a magical nighttime surprise, go over your black stars with clear, exterior-grade glow-in-the-dark paint once the black layer is fully dry.
Step 3: Creating Constellation Lines
-
Start the dots:
Follow your sketched swooping lines to paint the connectors. Instead of a solid line, create a dotted trail. -
Spacing technique:
Press the tip of the brush gently against the wall to make small, uniform dots. Keep the spacing consistent, about half an inch apart. -
Connect the stars:
Ensure the dotted lines clearly start at one star tip and end at another, physically linking the design elements.
Step 4: Adding Solid Stars and Details
-
Fill small stars:
For the medium and small stars scattered around, paint the outline first and then fill in the center completely for a solid black look. -
Create variation:
I like to leave the largest stars open and fill the medium ones solid to create visual weight and balance. -
Add tiny specks:
Using just the very tip of your brush, dab tiny single dots randomly in the open areas to represent distant stars. -
Review and touch up:
Step back to look at the whole wall. If any lines look shaky or faint against the rough texture, apply a second coat of black paint.
Step 5: Finishing Up
-
Remove sketch marks:
Once the paint is fully dry (usually 1-2 hours), gently wipe away any visible chalk or pencil lines with a damp rag. -
Clean tools:
Wash your brush with warm soapy water immediately so the latex paint doesn’t harden in the bristles.
Now you have a celestial path to guide you home every evening


Have a question or want to share your own experience? I'd love to hear from you in the comments below!