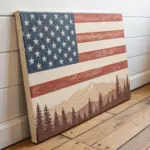
Memorial Day painting can be both soothing and meaningful—like you’re letting your brush do the remembering when words feel too small. I pulled together my favorite Memorial Day art ideas that stay respectful, feel doable, and still give you plenty of room to make the tribute your own.
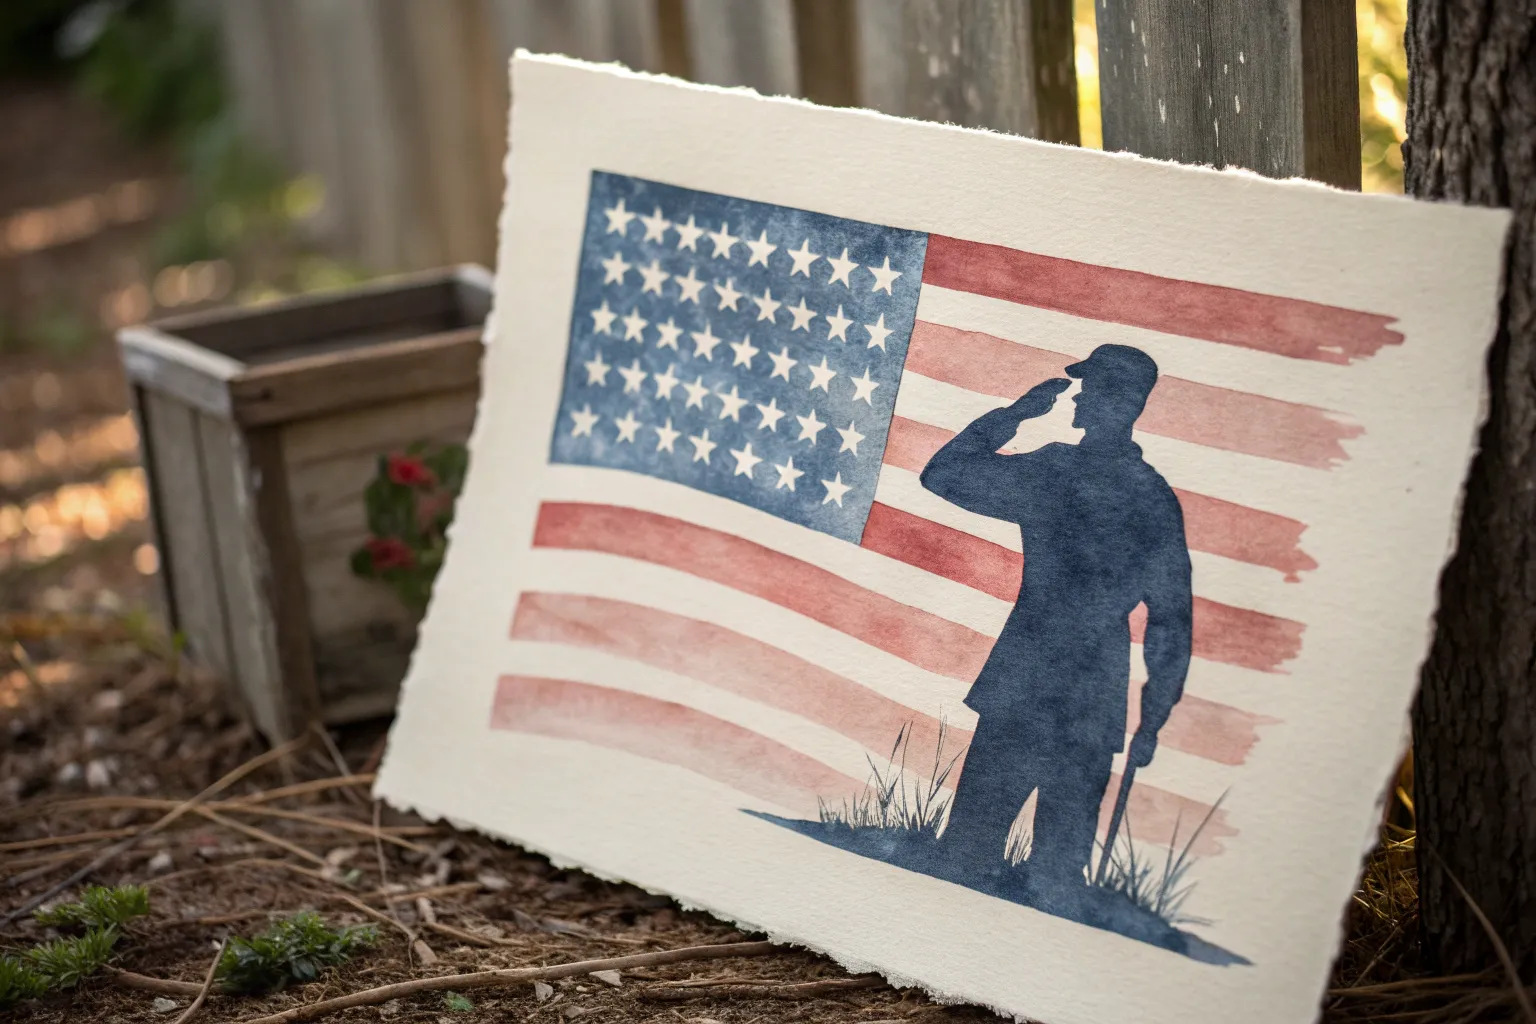
Memorial Day American Flag Wash

Capture the spirit of the holiday with this loose, expressive watercolor rendering of the Stars and Stripes. The beauty of this piece lies in its relaxed, watery edges and the deliberate drips that give it an artistic, hand-painted charm.
Detailed Instructions
Materials
- Cold press watercolor paper (140lb/300gsm)
- Watercolor paints (Alizarin Crimson or Cadmium Red, Ultramarine Blue, Indigo)
- Flat wash brush (3/4 inch)
- Round brush (size 6 or 8)
- White masking fluid or white gouache
- Pencil and ruler
- Painter’s tape
- Paper towels
- Jar of clean water
Step 1: Preparation & Sketching
-
Prepare your surface:
Tape down your watercolor paper to a board or table on all four sides. This prevents the paper from buckling when it gets wet and creates a clean border later. -
Lightly sketch the layout:
Using a pencil and ruler, lightly draw the rectangular boundary of the flag. Mark out the square canton (the blue field) in the top left corner. -
Mark the stripes:
Lightly rule horizontal lines for the stripes. Don’t worry about being perfectly mathematically precise; visual estimation works fine for this loose style. -
Preserve the stars:
Sketch small stars in the canton area. Apply masking fluid carefully over each star using an old brush or a masking fluid pen. Let this dry completely before painting.
Star Power Tip
Can’t draw stars? Use a small star-shaped stamp dipped in masking fluid, or cut a star from painter’s tape and stick it down before painting.
Step 2: Painting the Canton
-
Mix the blue hue:
Create a deep, rich navy by mixing Ultramarine Blue with a touch of Indigo. You want a color that is dark enough to contrast with the white stars. -
Apply the wash:
Load your round brush with the blue mix and paint the canton area. I prefer to work quickly here to avoid hard drying lines within the blue field. -
Soften the edges:
While the blue is still slightly damp, you can gently touch the edges if you want a softer look, but try to keep the rectangular shape generally intact. -
Let it dry:
Allow the blue section to dry completely. If you paint the red stripes while the blue is wet, they might bleed into each other and turn purple.
Step 3: Painting the Stripes
-
Mix the red tones:
Prepare a puddle of red watercolor. Since this is an artistic interpretation, vary the intensity—keep some paint concentrated and dilute some with more water for a varied look. -
Paint the top stripes:
Using the flat wash brush, paint the top red stripes. Use a confident, horizontal stroke. It’s okay if the coverage isn’t perfectly solid; the texture of the paper should show through. -
Continue downward:
Work your way down the flag, skipping the white stripes. Remember to leave the white paper completely untouched for the white stripes. -
Create the bleed effect:
For the bottom-most red stripe, load your brush with extra water and pigment. Paint the stripe, but let the pool of water sit heavily at the bottom edge. -
Encourage drips:
Tilt your board upright slightly. If the paint doesn’t run on its own, gently touch a wet brush to the bottom edge of the wet stripe to guide a few drips down the page. -
Add splatters:
Load a small brush with watery red or blue paint and tap it against your finger over the bottom area to create dynamic splatters.
Vintage Vibes
Mix a tiny drop of brown or tea into your red paint to give the flag an aged, vintage Americana look instead of a bright modern red.
Step 4: Finishing Touches
-
Wait for drying:
Let the entire painting dry completely. The paper must be bone dry before removing the masking fluid. -
Reveal the stars:
Gently rub off the masking fluid with your finger or a rubber cement pickup tool to reveal the crisp white stars underneath. -
Refine if needed:
If any stars look jagged, you can carefully touch them up with a bit of white gouache or a white gel pen. -
Remove the tape:
Peel the painter’s tape away slowly at a severe angle, pulling away from the painting to ensure you don’t rip the paper.
Frame your masterpiece in a simple white frame to let those beautiful watercolor textures take center stage


Memorial Day Salute Silhouette at Dawn
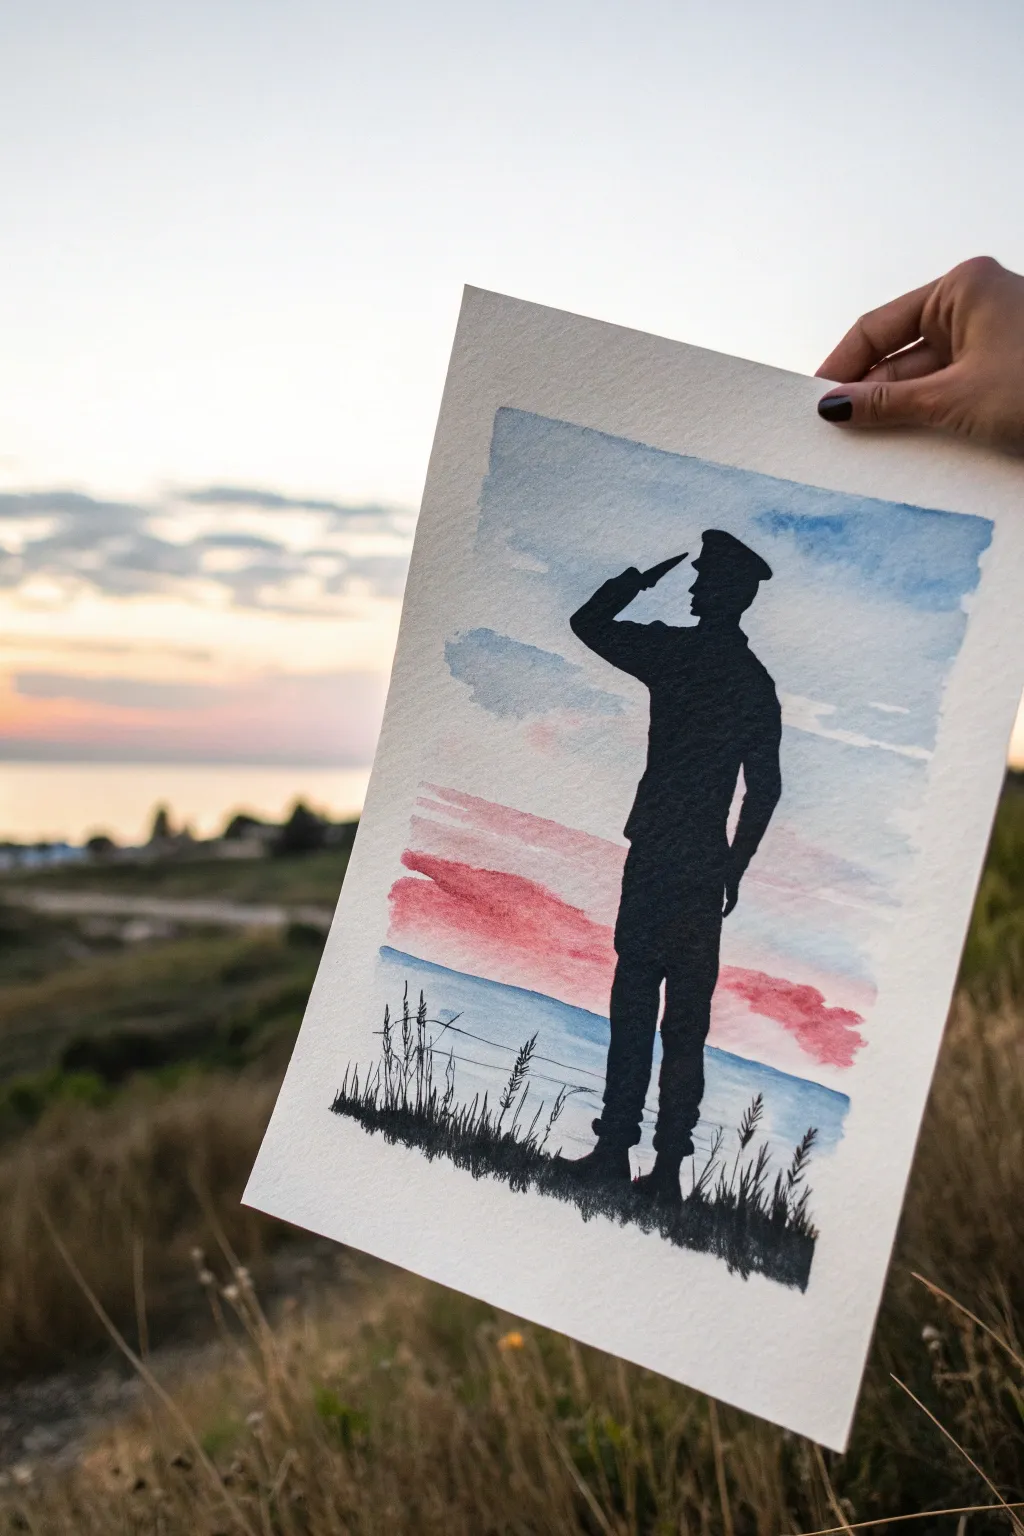
Capture the solemn beauty of a morning tribute with this poignant watercolor and ink silhouette. The project contrasts a soft, blended sunrise sky against the sharp, dark form of a saluting soldier, creating a powerful image of remembrance.
Detailed Instructions
Materials
- Cold press watercolor paper (140lb/300gsm)
- Watercolor paints (phthalo blue, alizarin crimson, cobalt blue)
- Black waterproof Indian ink or black acrylic paint
- Painter’s tape or masking tape
- Drawing pencil (HB or H)
- Flat wash brush (3/4 or 1 inch)
- Small round brush (size 2 or 4)
- Fine liner brush or black micron pen
- Paper towels
- Jar of clean water
Step 1: Preparing the Sky
-
Tape the borders:
Begin by securing your watercolor paper to a board or table using painter’s tape. Create a crisp rectangle in the center; pressing the edges of the tape firmly prevents paint from bleeding underneath. -
Sketch the horizon:
Lightly draw a straight horizontal line about one-third of the way up from the bottom to mark where the sea meets the sky. Keep this line very faint. -
Wet the paper:
Using your large flat brush and clean water, apply a wash over the entire sky area (above your horizon line). The paper should be glisten with sheen but not hold puddles. -
Paint the upper sky:
While the paper is wet, load your brush with a diluted cobalt blue. Sweep it across the top third of the sky, letting the color fade naturally as you move downward. -
Add dawn colors:
Rinse your brush and pick up a watery mix of alizarin crimson. Apply this in horizontal strokes just above the horizon line to simulate the pink glow of sunrise, leaving a small gap of white paper between the blue and pink for clouds. -
Create the sea:
Once the sky is damp but not soaking, paint the area below the horizon line with a slightly darker mix of phthalo blue to represent the water. Ensure the horizon line remains straight. -
Dry completely:
Allow the background wash to dry completely. If the paper feels cool to the touch, it’s still damp. I usually wait at least 30 minutes here to avoid ruining the silhouette later.
Clean Lines
If your black paint bled slightly into the sky, wait for it to dry, then use a white gel pen or opaque white gouache to carefully touch up the edges.
Step 2: Creating the Silhouette
-
Outline the soldier:
Lightly sketch the outline of the soldier in the foreground using your pencil. Focus on the posture: straight back, arm raised in a sharp salute, and legs slightly apart. -
Refine the shape:
Pay close attention to the details of the cap and the angle of the saluting arm to ensure the silhouette looks anatomically correct. -
Fill the silhouette:
Using Indian ink or black acrylic paint and a small round brush, carefully fill in the soldier’s shape. Start from the head and work your way down to avoid smudging your work. -
Sharpen edges:
Use the very tip of your brush to neaten the edges of the uniform. The contrast between the solid black and the soft watercolor sky is what makes this piece effective. -
Ground the figure:
Paint a solid black uneven strip at the very bottom of the paper for the ground the soldier is standing on. Texture the top edge of this strip slightly to look like earth or grass.
Step 3: Details & Final Touches
-
Add grass blades:
Switch to a fine liner brush or a black pen. Flick quick, upward strokes from the black ground strip to create tall grasses and reeds surrounding the soldier’s feet. -
Vary drawing height:
Make some grass blades taller and others shorter to create a natural, organic look. A few can overlap the soldier’s boots to place him firmly within the scene. -
Add seed heads:
On the tips of the tallest grass stalks, dab tiny textured spots to represent wheat or wild grass seed heads, adding delicate detail to the foreground. -
Peel the tape:
Once the black ink is fully dry, slowly peel away the painter’s tape at a 45-degree angle away from the painting to reveal your crisp white borders.
Add Texture
Before the sky dries, sprinkle a tiny pinch of salt into the wet blue paint. Brush it off when dry to create subtle, star-like textures in the atmosphere.
Display your finished painting in a window or simple frame to let the light enhance those morning colors


Memorial Day Eagle and Flag Emblem

Celebrate Memorial Day with this striking, hand-painted banner that combines the classic Stars and Stripes with a majestic bald eagle profile. The design uses negative space and distressed textures to create a vintage, rustic feel that looks deceptively professional.
Step-by-Step
Materials
- White cotton duck canvas or heavy watercolor paper
- Acrylic paints: Navy Blue, Burnt Sienna (or Rust Red), White
- Masking tape or painter’s tape (various widths)
- Pencil and eraser
- Flat shader brushes (medium and large)
- Small round detail brush (size 1 or 2)
- Stencil (optional for stars) or star stamp
- Water cup and palette
Step 1: Planning the Layout
-
Prepare the surface:
Begin with a rectangular piece of white canvas or heavy paper. If using raw canvas, you may want to iron it flat first to ensure your lines stay crisp. -
Block out the canton:
Using a ruler, lightly mark out a rectangular area in the top left corner for the blue field (the canton). It should take up roughly one-quarter of your total surface area. -
Map the stripes:
Measure and lightly draw horizontal guidelines for the stripes across the rest of the canvas. Aim for equal width, ensuring they align with the bottom edge of your canton box. -
Sketch the eagle silhouette:
In the center of the flag area—overlapping both the blue field and the stripes—lightly sketch the profile of the eagle’s head. Focus on the large curve of the neck and the sharp hook of the beak. -
Refine the eagle details:
Add the internal details for the eagle, such as the eye shape, the line defining the beak, and the jagged, feather-like edges at the bottom of the neck. These lines will serve as boundaries for your paint.
Use Negative Space
Don’t buy white paint for the eagle! Let the raw canvas be the white. It adds better texture and saves paint.
Step 2: Painting the Canton
-
Mix the blue:
Create a deep navy blue on your palette. I like to add a tiny touch of black or grey to standard blue to give it a more weathered, historical look. -
Paint around the eagle:
Carefully paint the blue section, stopping precisely at the pencil line of the eagle’s head. The white of the canvas will serve as the eagle’s white feathers, so keep this area clean. -
Create a mottled texture:
While the blue paint is still damp, dab it unevenly with a dry brush or a crumpled paper towel. This lifts slightly different amounts of pigment to create that hazy, vintage denim texture shown in the photo. -
Add the stars:
Once the blue is fully dry, use white paint to add the stars. You can freehand these with a small brush for a rustic look, use a stencil, or cut a small potato stamp. -
Detail the stars:
Don’t worry about perfect opacity; slightly translucent stars blend better with the rustic theme. Ensure no stars are painted inside the eagle silhouette.
Step 3: Adding the Stripes
-
Mix the red tone:
Instead of a bright fire engine red, mix a Burnt Sienna or Rust color. You can thin this slightly with water to create a watercolor-like transparency on the canvas. -
Paint the top stripes:
Using a flat brush, paint the red stripes to the right of the blue canton. Remember to lift your brush as you approach the eagle sketch to preserve the white space. -
Paint the lower stripes:
Continue with the long red stripes extending across the bottom half of the flag. Keep your brushstrokes loose and visible; streaks in the paint add to the hand-crafted charm. -
Add scratch details:
While the red paint is drying, take a clean, damp stiff-bristled brush and drag it through parts of the red stripes to create ‘scratch’ marks, simulating fabric texture or wear.
Coffee Staining
Before painting, lightly brush the entire canvas with strong brewed coffee and let dry for an instant antique, parchment look.
Step 4: Defining the Eagle
-
Outline the features:
Switch to your smallest detail brush and the Rust/Brown paint mixture. Carefully paint the outline of the eagle’s beak and the eye. -
Paint the dark feathers:
Fill in the shadowy areas beneath the beak and down the neck with the dark brown/rust color. Use jagged, triangular strokes to mimic the layering of feathers. -
Accentuate the beak:
Leave the main part of the beak the natural canvas color, but define the mouth line heavily with dark brown to give the face expression and contrast. -
Clean up edges:
Check the boundary where the background stripes and blue field meet the eagle head. If needed, use a tiny bit of white paint to sharpen up any messy edges. -
Final assessment:
Step back and look at the overall balance. If the red stripes look too solid, you can lightly sand them with fine-grit sandpaper for extra distress.
Hang your finished canvas with pride or gift it to a veteran to honor their service this holiday


Memorial Day Marble-Paint Fireworks Burst
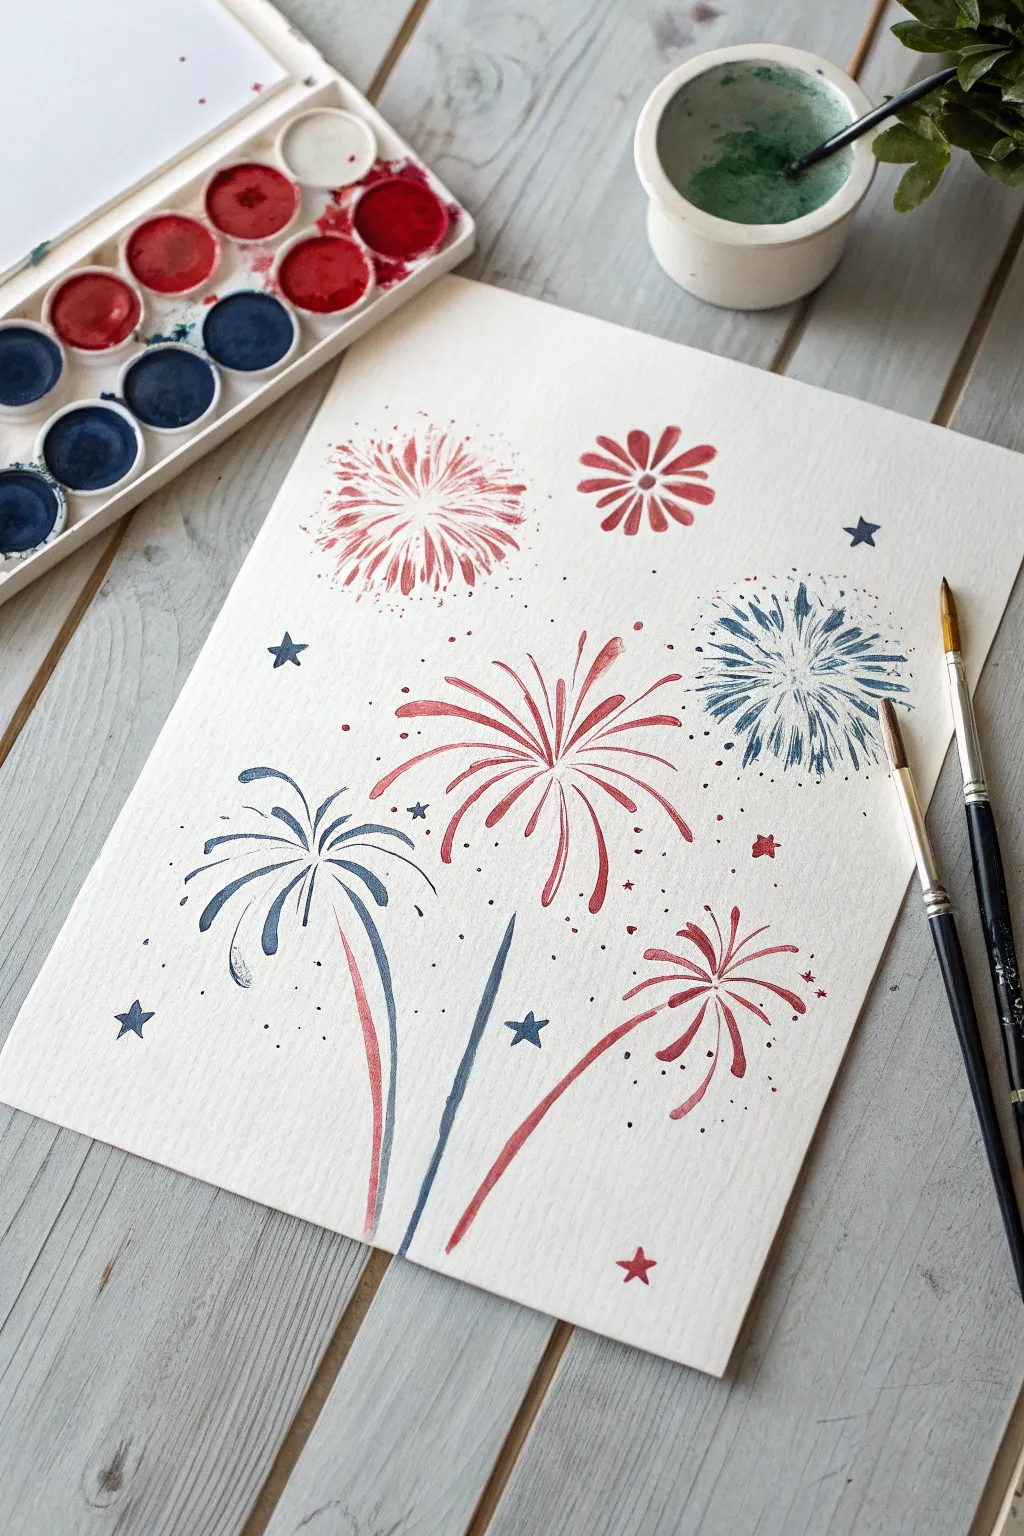
Celebrate with a splash of color by creating these lively, exploding fireworks using simple brushstrokes and watercolor paints. This charming composition balances bold red and deep blue bursts against a textured paper background, perfect for a festive Memorial Day display.
Detailed Instructions
Materials
- Cold press watercolor paper (textured)
- Watercolor palette (specifically red and navy blue)
- Round watercolor brush (size 4 or 6)
- Fine liner brush (size 0 or 1)
- Cup of water
- Paper towel
Step 1: Setting the Stage
-
Prepare your palette:
Begin by wetting your red and navy blue watercolor pans. You want a creamy, saturated consistency—not too watery—so the colors stand out boldly against the white paper. -
Plan the composition:
Visualize where your fireworks will go. In our example, we have a large central burst, two smaller ones floating near the top, and two grounded ones with trails at the bottom. Leave plenty of negative space.
Brush Technique Tip
For the crispest firework lines, press down firmly at the start of the stroke (the center) and lift up quickly as you flick outward to create a tapered point.
Step 2: Painting the Top Bursts
-
Create the red starburst:
For the top-left firework, dip your round brush in red paint. Start from an invisible center point and flick the brush outwards in short, quick strokes to create a dense, radiating circle. -
Add the wheel:
To the right of the starburst, paint a smaller, simpler flower-like shape using thicker red strokes that meet in the middle, resembling a pinwheel. -
Paint the blue sparkler:
Moving to the top right, switch to blue paint. Create a burst similar to the first red one, but alternate between thick and thin lines radiating from the center to give it a shimmering effect. -
Add detail dots:
While the paint is wet, splatter tiny dots around these top shapes by tapping your brush handle, or manually paint small speckles to suggest fizzing sparks.
Add Some Sparkle
Once the watercolor is fully dry, trace over just a few of the burst lines with a silver or gold gel pen to make the fireworks actually shimmer in the light.
Step 3: The Main Attraction
-
Center layout:
Focus on the middle of the page now. Load your brush with a slightly watered-down red for a softer look. -
Execute the swoops:
Paint long, curved strokes radiating outward from a central point. Unlike the tight bursts at the top, these lines should be loose and arched, like a palm tree or a spider mum appearing to explode. -
Vary the length:
Ensure some strokes are longer than others to keep the explosion looking organic and dynamic rather than perfectly symmetrical.
Step 4: Grounded Fireworks
-
Bottom left blue burst:
Clean your brush and switch back to navy blue. Paint a drooping firework shape on the bottom left, where the strokes curve downward like a weeping willow. -
Bottom right red burst:
Repeat this drooping shape on the bottom right using red paint. These two lower fireworks act as anchors for the composition. -
Draw the trails:
Using the very tip of your brush or a fine liner, paint long, thin tails extending from the center of these two bottom fireworks down toward the edge of the paper. I find a single confident stroke works best here. -
Mix colors for trails:
For added interest, draw a third trail in the middle using blue, but don’t attach a burst to it yet—let it fade out as if the rocket is still rising.
Step 5: Stars and Details
-
Paint blue stars:
Scatter 3-4 small, five-pointed stars using blue paint in empty areas, like near the left edge and the top right corner. -
Paint red stars:
Balance the composition by adding a couple of tiny red stars near the bottom right and amongst the central explosion. -
Final stippling:
Take your fine liner brush and add clusters of tiny dots around the outer edges of the main fireworks to represent separating sparks. -
Dry and flatten:
Let the painting dry completely flat to prevent the wet washes from running.
Display your patriotic artwork proudly or frame it for a seasonal decoration


Have a question or want to share your own experience? I'd love to hear from you in the comments below!