When you’re painting on an arm, the secret is to work with the forearm’s long shape instead of fighting it. Here are my favorite arm painting ideas (easy) that look impressive fast, even if you’re brand-new and working in a simple setup.
Butterfly Trail Down the Forearm
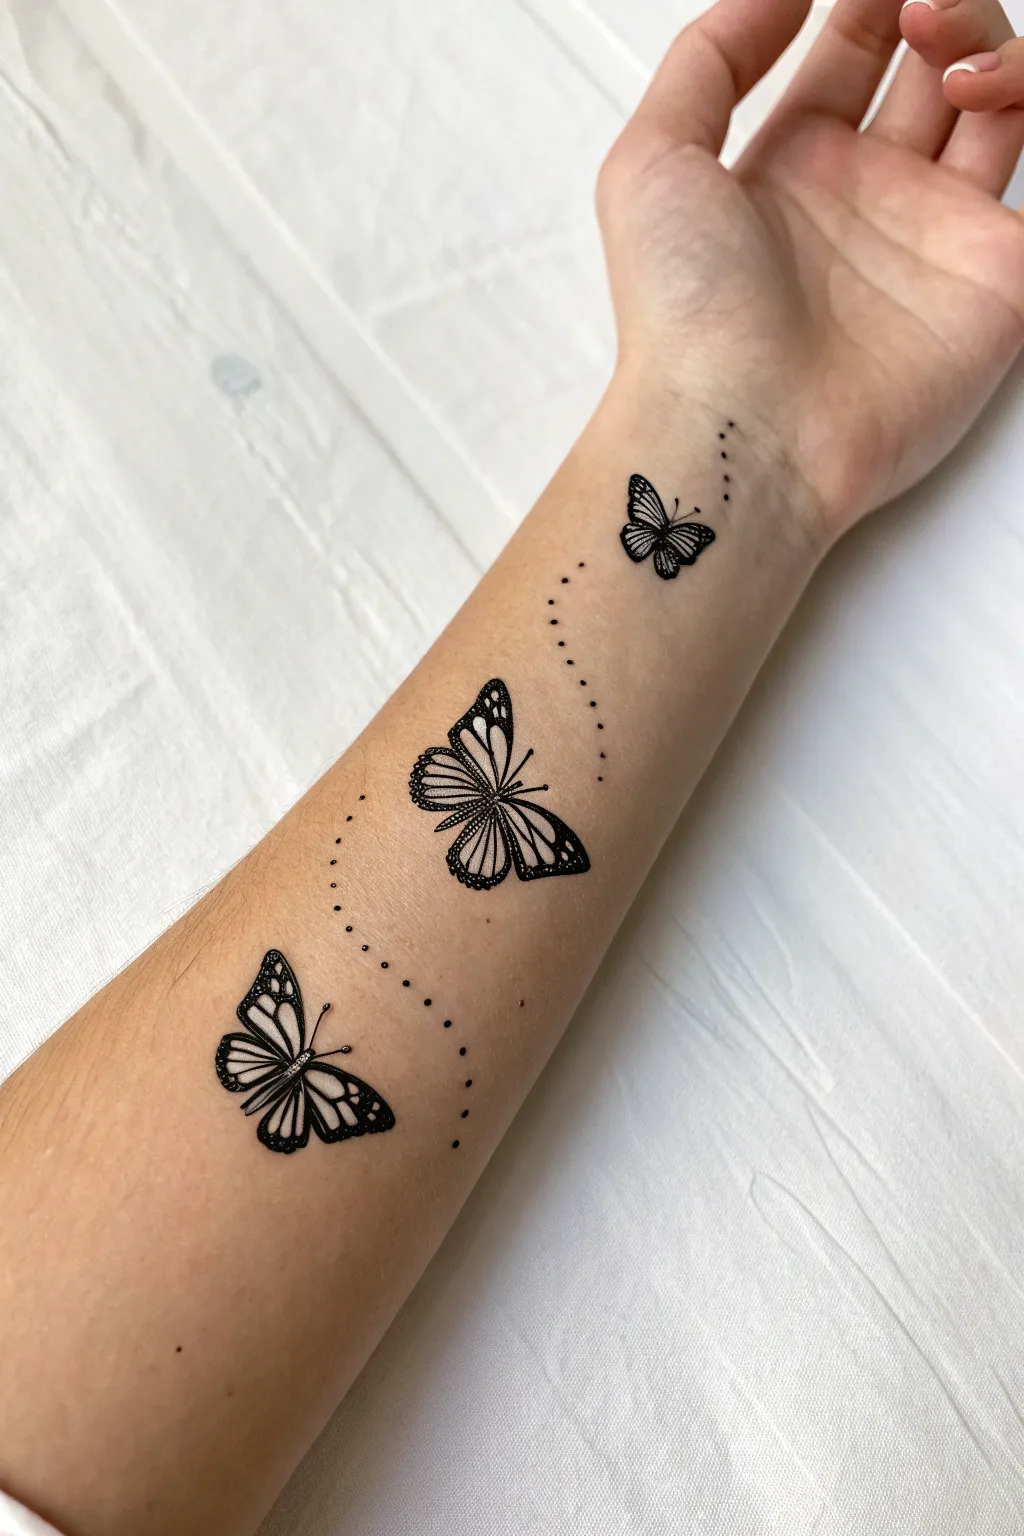
Transform your forearm into a canvas with this delicate black-work design featuring a trio of fluttering butterflies. The high-contrast black ink creates a striking temporary tattoo look, perfect for festivals or simply experimenting with new body art placements.
Detailed Instructions
Materials
- Black body paint (water-activated or alcohol-based) or a cosmetic-grade eyeliner pen
- Fine liner brush (size 0 or 00)
- Small round brush (size 1)
- Reference photo of monarch butterflies
- Setting powder
- Makeup setting spray
- Skin-safe pencil (light gray or nude) for sketching
Step 1: Planning and Sketching
-
Clean the area:
Start by washing your inner forearm with soap and water to remove oils. Dry it thoroughly, as clean skin ensures the paint adheres without sliding. -
Mark the positions:
Using your skin-safe pencil, lightly mark three spots where the centers of your butterflies will go. Place the smallest one near the wrist, the largest in the middle, and the medium one closer to the elbow. -
Sketch the center butterfly:
Begin sketching the outline of the middle butterfly first. Draw a thin, elongated oval for the body, then sketch two large upper wings and two smaller bottom wings in a classic monarch shape. -
Sketch the remaining butterflies:
Outline the top (wrist) butterfly, making it significantly smaller and angled as if flying away. Then, sketch the bottom (elbow) butterfly, slightly angling it in the opposite direction for movement. -
Map the flight path:
Lightly draw a sweeping, S-shaped curve connecting the three insects to represent their flight trail. This guide will help you place the dots accurately later.
Step 2: Inking the Butterflies
-
Outline the wings:
Load your fine liner brush with black body paint. Carefully trace over your pencil sketches, keeping the lines crisp and defined. I find it helpful to rest my pinky finger on my arm for stability here. -
Fill the bodies:
Using the same brush, fill in the narrow bodies of all three butterflies with solid black paint. Add two tiny, curved antennae to the head of each one. -
Thicken wing edges:
Go back to the wing outlines. Carefully thicken the outer edges of the wings, making them bolder than the interior veins. This mimics the classic pattern of a monarch butterfly. -
Draw the veins:
Switch to your finest brush tip. Inside the wings, draw delicate lines radiating from the body toward the outer edges. These lines should represent the intricate vein structure. -
Add detail spots:
On the thickened outer black edges of the wings, leave tiny negative spaces or use a white paint dot (if you have it) to mimic the white spots found on real butterflies. If using just black, simply leave tiny gaps in the black fill. -
Refine the smallest butterfly:
For the tiny butterfly near the wrist, simplify the details. You don’t need every vein; just the main shapes and a solid outline will read clearly from a distance.
Smudged Lines?
If a line smears, don’t wipe it! Let it dry completely, then gently scratch the mistake away with a damp toothpick or clean up with concealer.
Step 3: The Flight Trail and Finish
-
Start the dotted line:
Beginning at the wrist near the smallest butterfly, use the very tip of your brush to press small round dots along your sketched S-curve guide. -
Vary dot spacing:
As you move between the butterflies, vary the spacing slightly. The dots should act as a bridge connecting the tail of one butterfly to the head of the next. -
Connect the final butterfly:
Continue the dotted trail past the largest butterfly down toward the bottom one, ensuring the curve feels fluid and natural. -
Clean up edges:
Dip a cotton swab in a little water or makeup remover to sharpen any lines that became too thick or fuzzy. Clean edges are key to the ‘tattoo’ look. -
Set the design:
Once the paint is completely dry to the touch, lightly dust the area with translucent setting powder to remove shine. Finish with a mist of setting spray to lock it in place for the day.
Pro Tip: Realistic Look
To make the ‘tattoo’ look more realistic, dab a tiny amount of rubbing alcohol over the finished dry paint. It dulls the shine, mimicking real ink on skin.
Enjoy wearing your delicate new artwork and watch how it draws eyes with every movement of your arm


Simple Flower Vine With Leaves
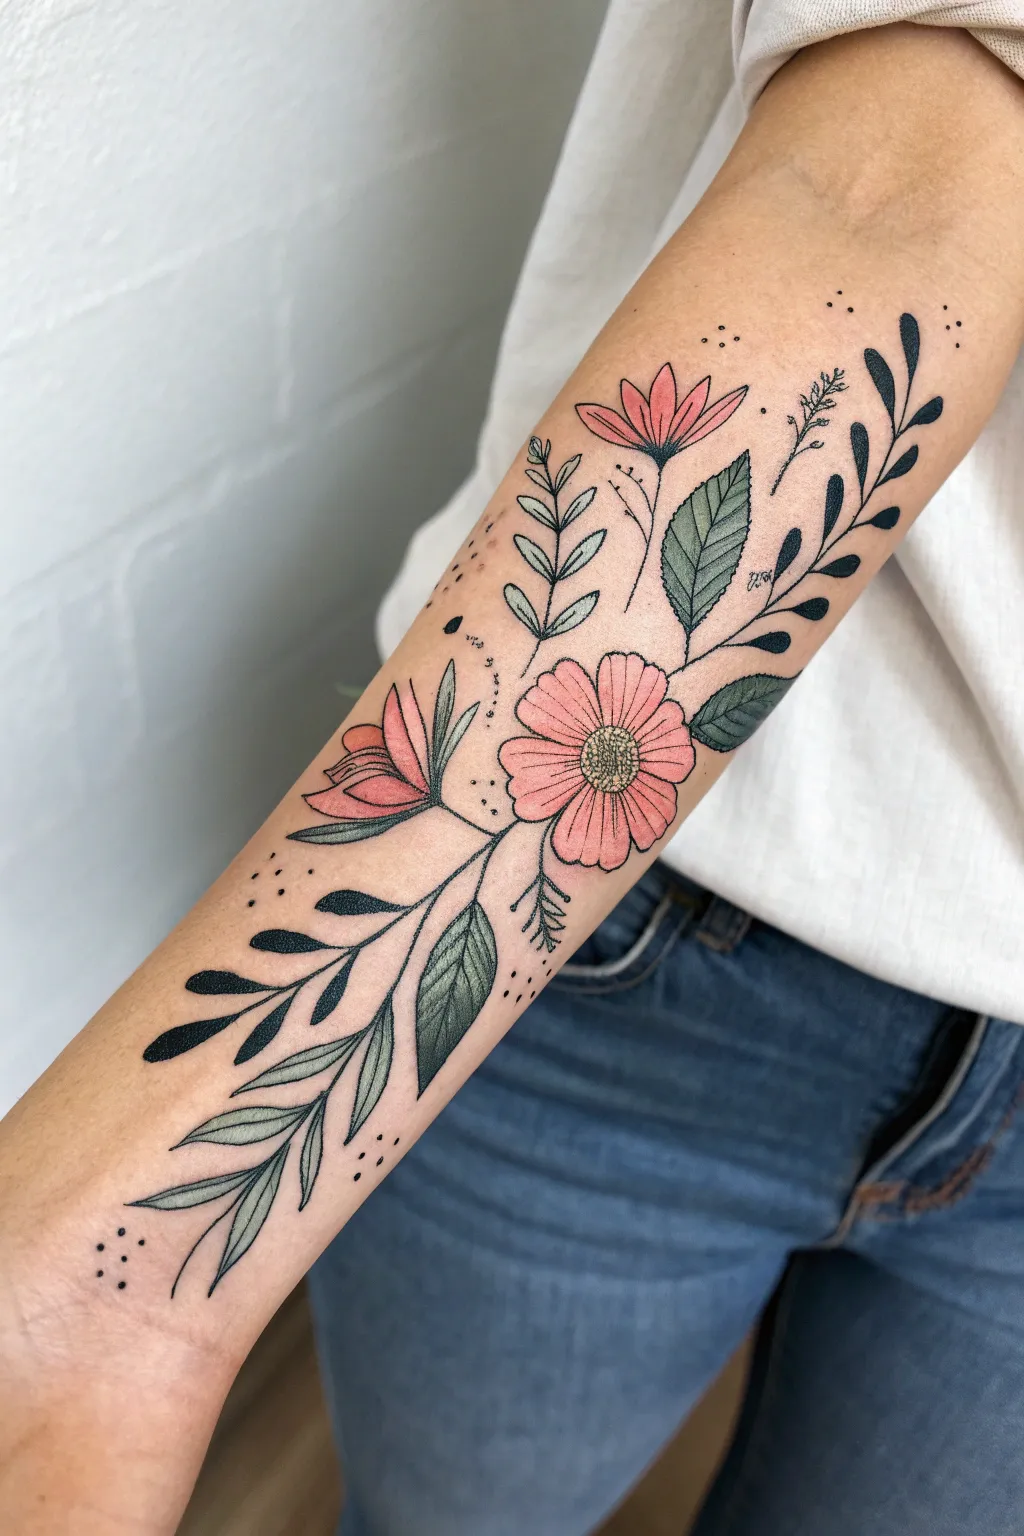
This elegant body art project mimics the aesthetic of a fine-line botanical tattoo, featuring soft pink cosmos flowers intertwined with varied foliage styles. It combines bold black vine work with watercolor-style shading for a sophisticated, nature-inspired look that flows beautifully down the forearm.
Step-by-Step Tutorial
Materials
- Black body paint or liquid eyeliner (waterproof recommended)
- Pink body paint (soft coral or salmon shade)
- Sage green body paint
- Yellow/Ochre body paint
- Fine liner brush (size 0 or 00)
- Small round brush (size 2 or 3)
- Setting spray or translucent powder
- Micellar water and Q-tips (for cleanup)
- Reference image (optional)
Step 1: Planning and Outlining
-
Clean the canvas:
Start by ensuring the forearm is clean, dry, and free of lotions or oils. This helps the paint adhere properly and prevents smudging. -
Map the main vine:
Using a very light wash of gray paint or a pale eyeliner pencil, sketch a faint S-curve starting from the inner elbow down towards the wrist. This acts as the spine for your composition. -
Draft the central flowers:
Lightly sketch the circle center for the main flower near the middle of the arm. Add the petals radiating outward. Sketch a second, side-facing bloom slightly above and to the left of the main flower. -
Add leaf placements:
Mark rough locations for the three main types of leaves: the solid vines near the wrist and elbow, the larger detailed leaves near the flowers, and the delicate fern-like sprigs.
Steady Hand Trick
For crisp lines, anchor your pinky finger on a clean part of the arm while painting. This stabilizes your hand like a bridge, giving you much better control over fine details.
Step 2: Line Work and Black Details
-
Inking the main flower outline:
Load your fine liner brush with black body paint. Carefully trace the petals of the main cosmos flower. Keep the lines thin and consistent, ensuring the petals overlap naturally. -
Outline the secondary bloom:
Trace the side-profile flower above the main bloom. Draw the trumpet-like base and the petals reaching upward. -
Create the solid black vines:
Starting near the wrist, paint a flowing vine with solid black, almond-shaped leaves attached to it. Repeat this same solid-black leaflike pattern at the very top of the design near the elbow. -
Draw the detailed leaves:
Outline the larger, serrated leaves that frame the central flower. Draw a central vein down the middle of each leaf and add tiny diagonal veins branching off it. -
Add the fern sprigs:
Using the very tip of your fine liner, draw delicate, thin stems with tiny, open-outlined leaves. I usually place these in the negative spaces to balance the composition.
Level Up: Metallic Pop
Add a touch of gold liquid liner to the center of the flower or trace just the tips of the leaves. It catches the light beautifully and makes the ‘tattoo’ look like jewelry.
Step 3: Color and Shading
-
Fill the pink petals:
Dilute your pink or coral body paint slightly to get a watercolor effect. Fill in the petals of both flowers, leaving the very edges slightly lighter if possible for dimension. -
Paint the green leaves:
Using sage green paint, fill in the large serrated leaves. Let the black veins show through or re-trace them lightly after the green dries. -
Green accents on fern leaves:
Take a lighter wash of the sage green and carefully fill in just the bottom halves of the delicate fern-like leaves near the wrist, creating a two-tone effect. -
Detailing the flower center:
Dab a bit of yellow-ochre into the center of the main flower. Once dry, use your black liner to make tiny stippling dots over the yellow to create texture. -
Petal shading:
Add very thin, vertical lines inside the pink petals starting from the center and flicking outward. This mimics the texture of real cosmos petals. -
Adding the stippling:
Dip the tip of your liner brush in black paint. Add clusters of tiny dots floating around the outer edges of the design to soften the transition from skin to art.
Step 4: Finishing Touches
-
Clean up edges:
Dip a Q-tip in micellar water to sharpen any lines that became too thick or to clean up accidental smudges. -
Set the design:
Once the paint is completely dry, lightly dust the area with translucent powder or mist with a setting spray to prevent transfer.
Enjoy wearing your beautiful botanical vine art that looks just like the real deal


One-Stroke Snake With Curvy Body
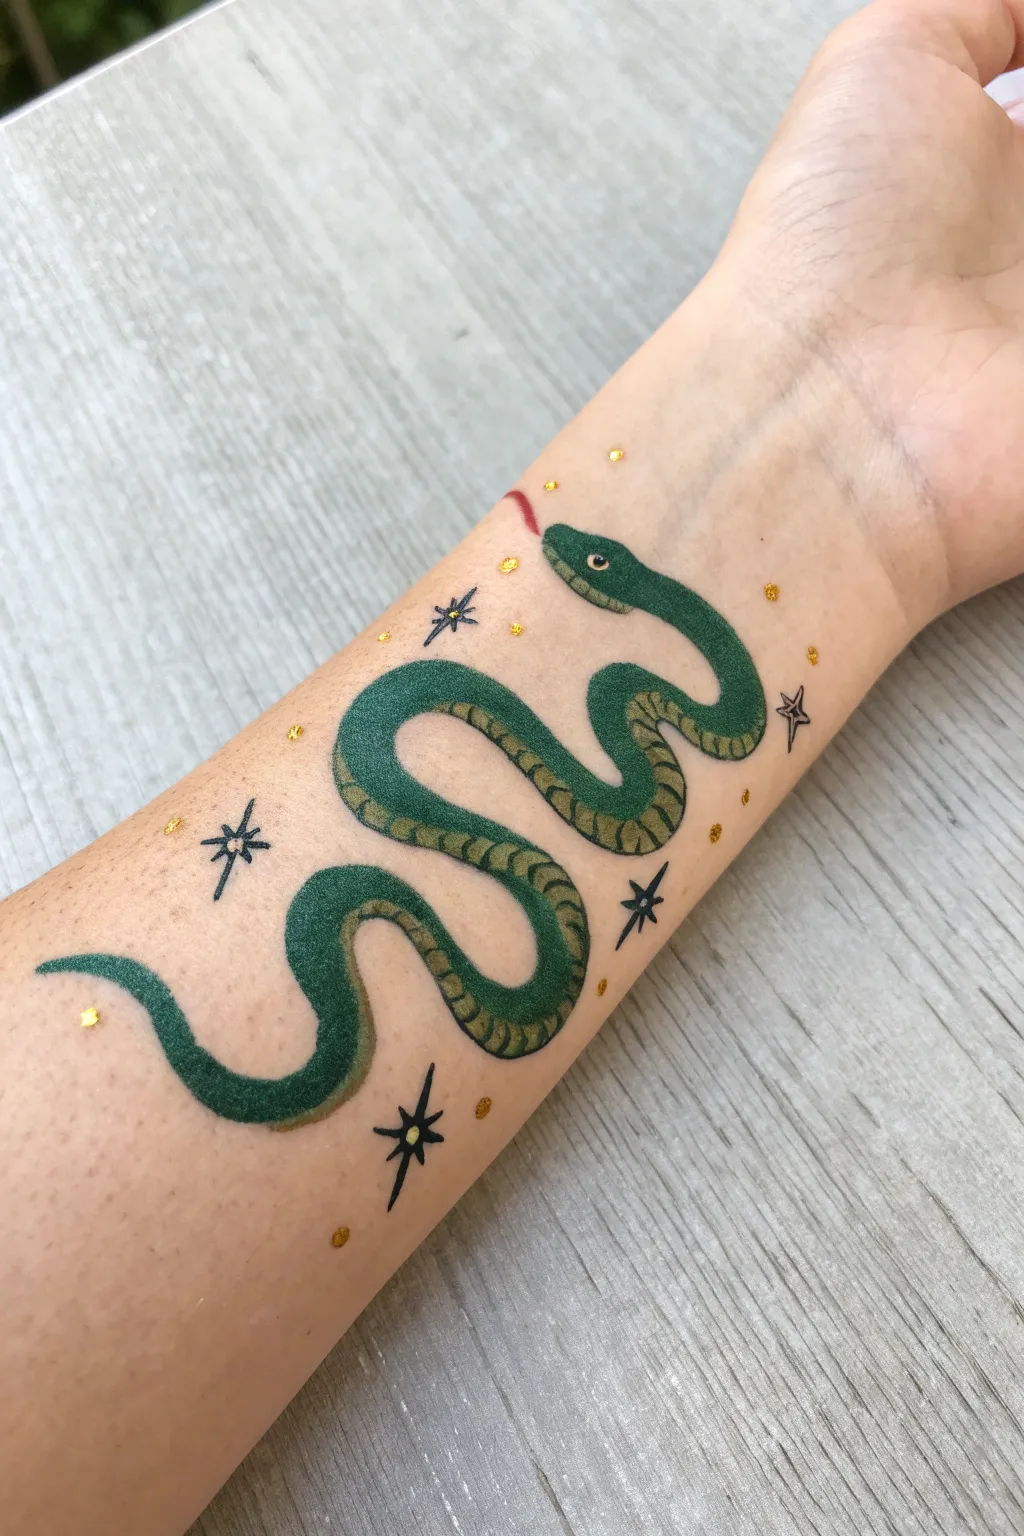
This whimsical design features a winding green serpent slithering amongst stylized stars on your forearm. It combines simple bold strokes with delicate details like golden scales and glitter accents for a magical finish.
How-To Guide
Materials
- Face/body paint (Emerald Green, Light Yellow-Green, Black, White, Red)
- Small round brush (size 2 or 3)
- Fine liner brush (size 0 or 00)
- Gold cosmetic glitter gel or loose glitter with adhesive
- Cup of water
- Paper towels
Step 1: Painting the Body
-
Create the head:
Start near the wrist area. Load your small round brush with emerald green paint and make an oval shape for the snake’s head, slightly tapering the nose. -
Map the curves:
Visualize the S-curve of the body moving down the arm. You want about three or four distinct bends. -
Paint the first curve:
Starting from the back of the head, pull a thick line of green paint curving to the right and then loop back to the left. -
Continue the body:
Paint the next section by curving back to the right again. Keep the width of the stroke consistent, roughly the thickness of your finger. -
Taper the tail:
As you paint the final curve towards the elbow, gradually lift pressure on your brush to create a narrower, pointed tail tip.
Smooth Curves
For the smoothest body shape, try painting the S-curves in one continuous motion rather than lifting the brush. Move your whole arm, not just your wrist.
Step 2: Adding Details
-
Add the belly color:
Clean your brush and pick up the light yellow-green paint. Carefully paint a thin line along the *inner* edge of each curve to represent the snake’s underbelly. -
Outline the belly scales:
Switch to your fine liner brush and black paint. Outline the yellow-green belly section with a thin line. -
Draw the ribs:
Using the same fine liner, paint tiny, curved rungs across the yellow belly section. These horizontal lines create the segmented look of snake scales. -
Paint the eye:
Place a tiny dot of light yellow paint on the head. Once dry, add a minuscule black pupil in the center and a thin white highlight above it. -
Paint the tongue:
Use a detail brush with bright red paint to flick a tiny, forked line coming out of the snake’s mouth area near the wrist.
Step 3: Celestial Accents
-
Draw big stars:
With black paint and your liner brush, create simple starburst shapes. Draw a cross, then add a diagonal cross over it, keeping the lines thin and tapered. -
Add floating stars:
Scatter 3-4 of these eight-pointed stars around the snake’s body at random intervals. -
Paint open stars:
Draw a few five-pointed star outlines without filling them in. These add variety to the background elements. -
Apply gold glitter:
Dip the handle end of a brush or a dedicated dotting tool into gold glitter gel. Dot small clusters of glitter near the stars and curves. -
Highlight the stars:
Add a tiny dot of yellow or gold paint to the very center of your black starbursts to make them pop.
Shaky Lines?
If your black outlines look shaky, thin your paint slightly with water to an ‘ink-like’ consistency so it flows off the liner brush effortlessly.
Now you have a charming reptile companion to show off to your friends


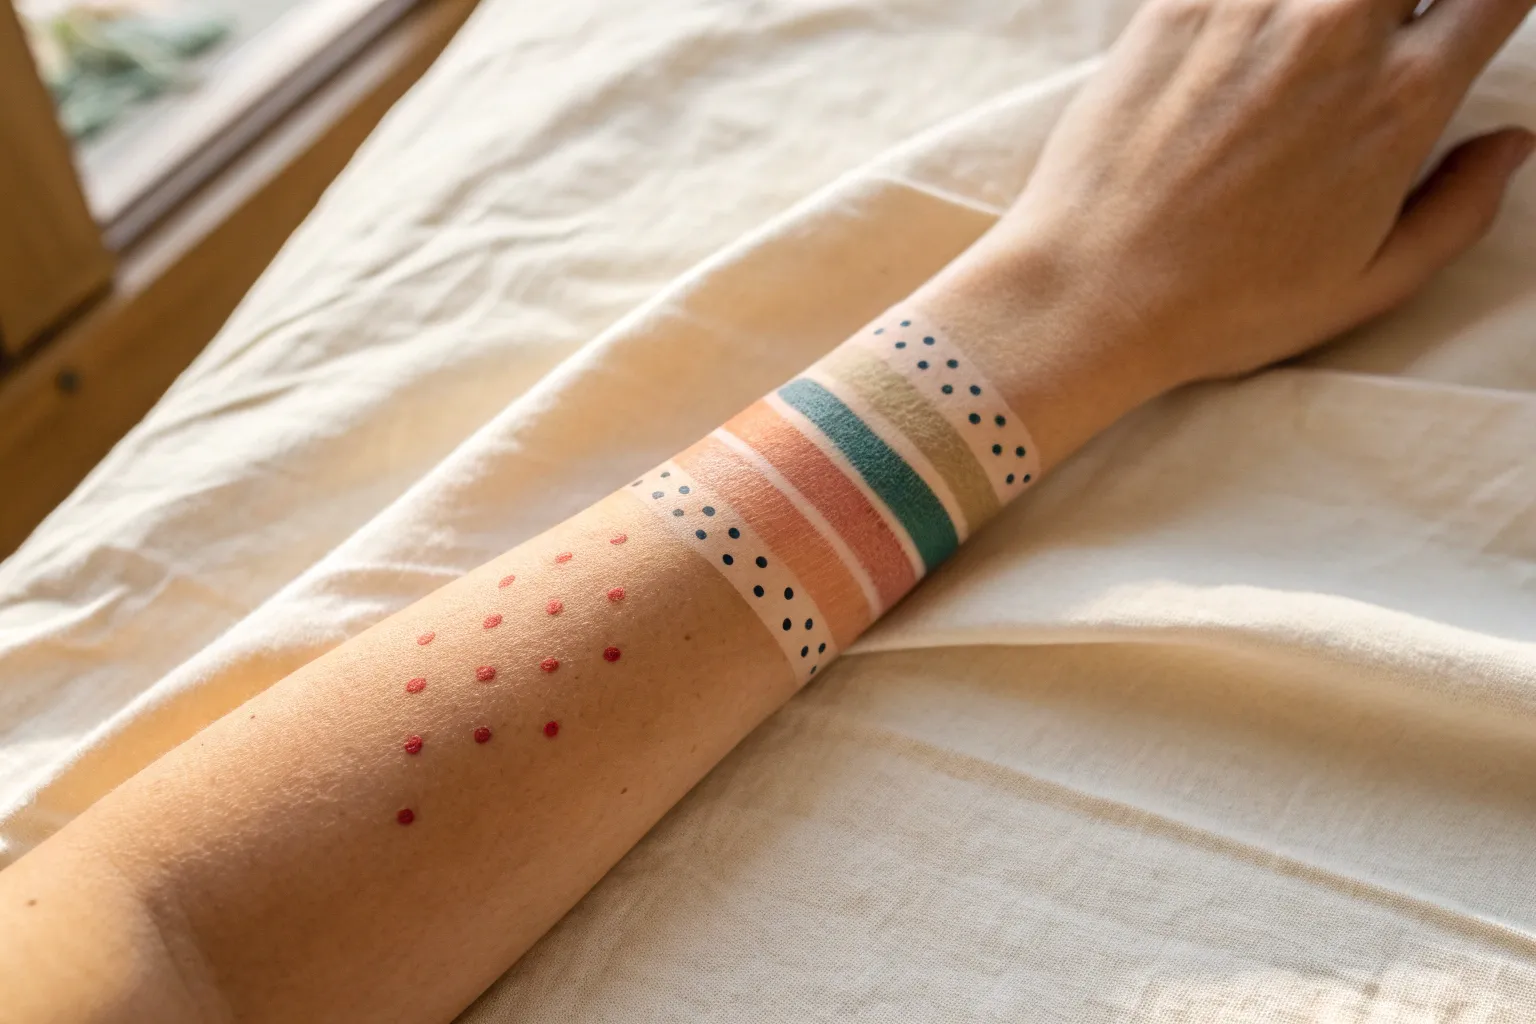
Rainbow Swipe With Star Sprinkles
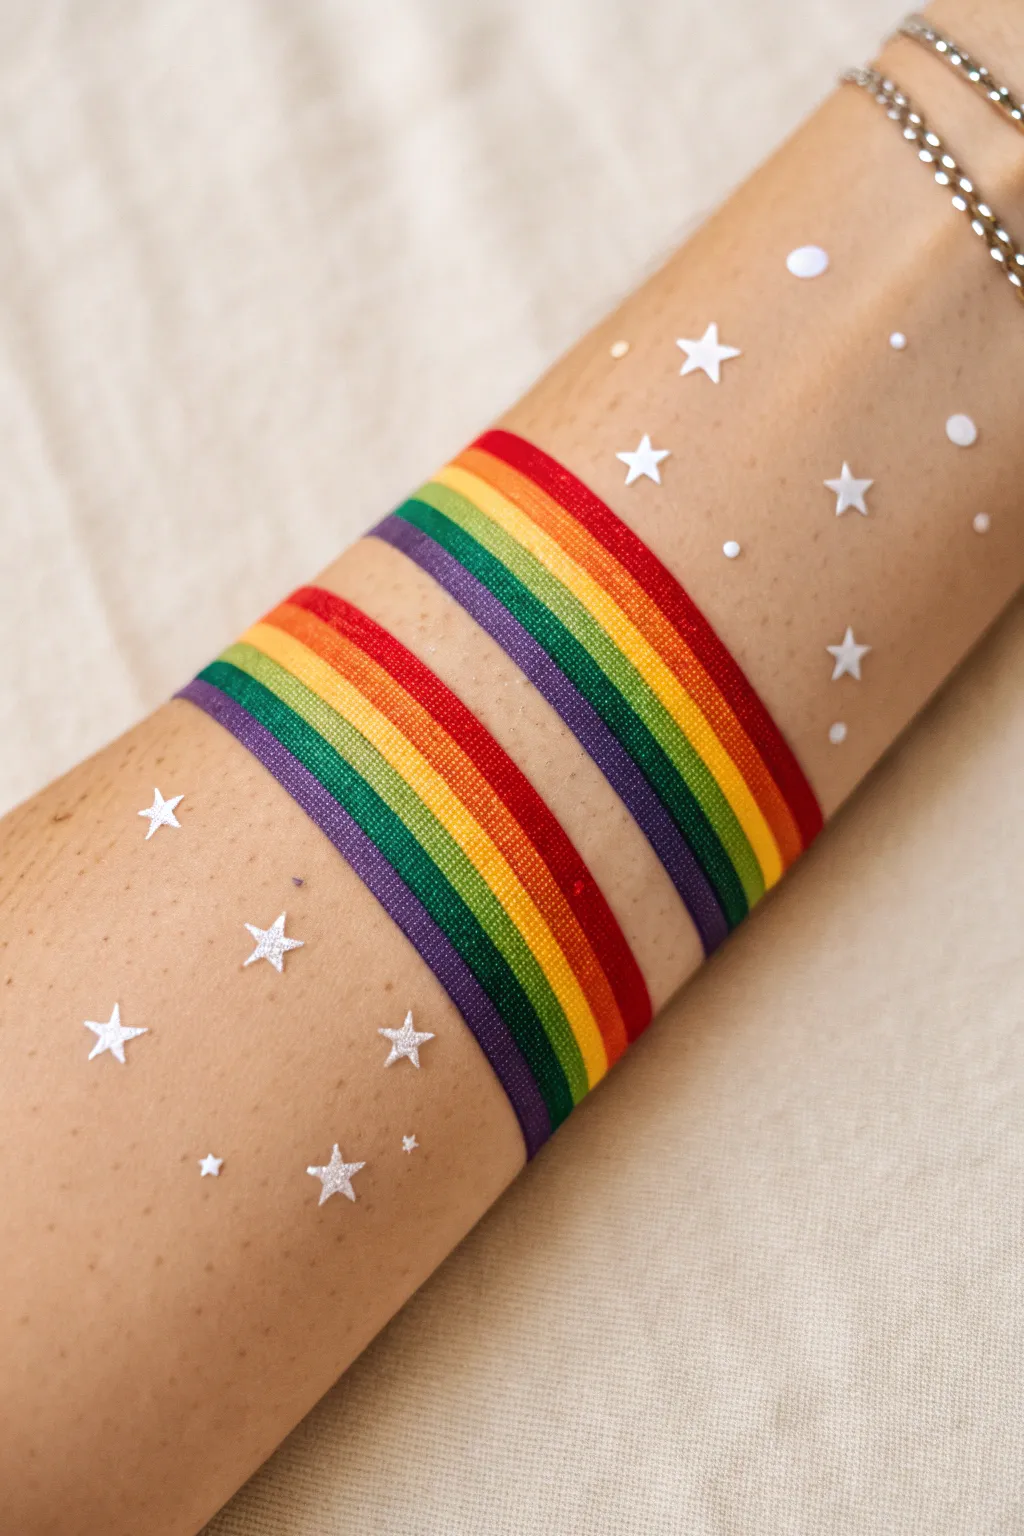
These vibrant rainbow cuffs create a bold, cheerful statement that wraps seamlessly around your arm. Paired with delicate white stars and dots, it offers a festival-ready look that’s surprisingly simple to paint.
Step-by-Step Tutorial
Materials
- High-quality flat 3/4 inch face painting brush (or a wide angular shader)
- Rainbow split cake face paint (featuring red, orange, yellow, green, blue, purple)
- Small spray bottle with water
- Small sheet of white star nail art stickers or face gems
- Small sheet of white dot nail art stickers or face gems (various sizes)
- Tweezers (for precise sticker placement)
- Setting spray (optional but recommended for longevity)
Step 1: Painting the Rainbow Bands
-
Prepare the paint:
Begin by lightly misting the surface of your rainbow split cake with the spray bottle. You want the paint to be creamy and activated, but not so wet that it drips. -
Load the wide brush:
Take your flat 3/4 inch brush and run it back and forth over the rainbow cake. Ensure all the bristles are evenly coated with every color, from the red edge to the purple edge. -
Clean the skin:
Use a gentle wipe to clean the forearm area where you plan to paint. Removing natural oils helps the water-activated paint adhere much better without separating. -
Position the first swipe:
Starting higher up on the forearm, place the brush flat against the skin so the bristles run perpendicular to the arm’s length. Make sure the red strip is closest to the elbow and purple is toward the hand. -
Paint the top band:
In one smooth, confident motion, swipe the brush across the width of the arm. Try not to lift the brush until you have covered the visible top curve of the arm. -
Tidy the edges:
If the starting or ending points look a bit ragged, you can reload the brush slightly and carefully taper the ends underneath the arm so they look like they wrap all the way around. -
Load for the second band:
Clean your brush if the colors have muddied, then reload it generously with the rainbow split cake again, following the same color orientation. -
Align the second band:
Position your brush about an inch below the first rainbow stripe. Leave a clear gap of skin between the two bands to keep the design airy and distinct. -
Paint the lower band:
Execute the second swipe just like the first, moving across the arm in a single fluid stroke. Keep your hand steady to maintain a parallel line with the top band. -
Let it dry:
Hold the arm still for a minute or two. Water-activated face paint dries quickly, but smudges easily while wet. Wait until the shine turns to a matte finish.
Step 2: Adding the Celestial Details
-
Select your large stars:
Using tweezers, peel off 3-4 of the largest white star stickers. I find tweezers prevent the oil from my fingers from ruining the sticker adhesive. -
Place main stars:
Apply these larger stars in a random scattering pattern. Place a couple above the top rainbow band and one or two below the bottom band. -
Add medium stars:
Select slightly smaller five-point stars next. Place these in the empty spaces between the larger stars, creating a gentle constellation effect. -
Incorporate tiny dots:
Peel off the smallest white circular stickers or gems available. These act as distant planets or stardust. -
Scatter the dots:
Place the dots sparingly around the stars. Don’t overthink the placement; randomness makes it look more magical. -
Fill the gaps:
Look for any large areas of bare skin around the rainbow bands that feel too empty. Add a single small star or dot there to balance the composition. -
Press to secure:
Once all stickers are placed, use a clean finger or a dry tissue to firmly press down on each sticker to ensure they adhere fully to the skin. -
Final set:
If you have setting spray, give the entire arm a very light misting from a distance to lock the paint and stickers in place for the day.
Sticky Situation
If stickers won’t stick, the skin might be too oily or the paint too powdery. Clean bare skin with rubbing alcohol first, and use skin-safe glue (like false lash glue) for extra grip on the gems.
Glitter Upgrade
Before the paint fully dries, puff some cosmetic-grade holographic glitter over the rainbow stripes. This makes the colors pop and matches the sparkle of the star stickers perfectly.
Now you have a colorful, cheerful arm design perfect for parades or sunny days
BRUSH GUIDE
The Right Brush for Every Stroke
From clean lines to bold texture — master brush choice, stroke control, and essential techniques.
Explore the Full Guide
Easy Sword With Shine Lines
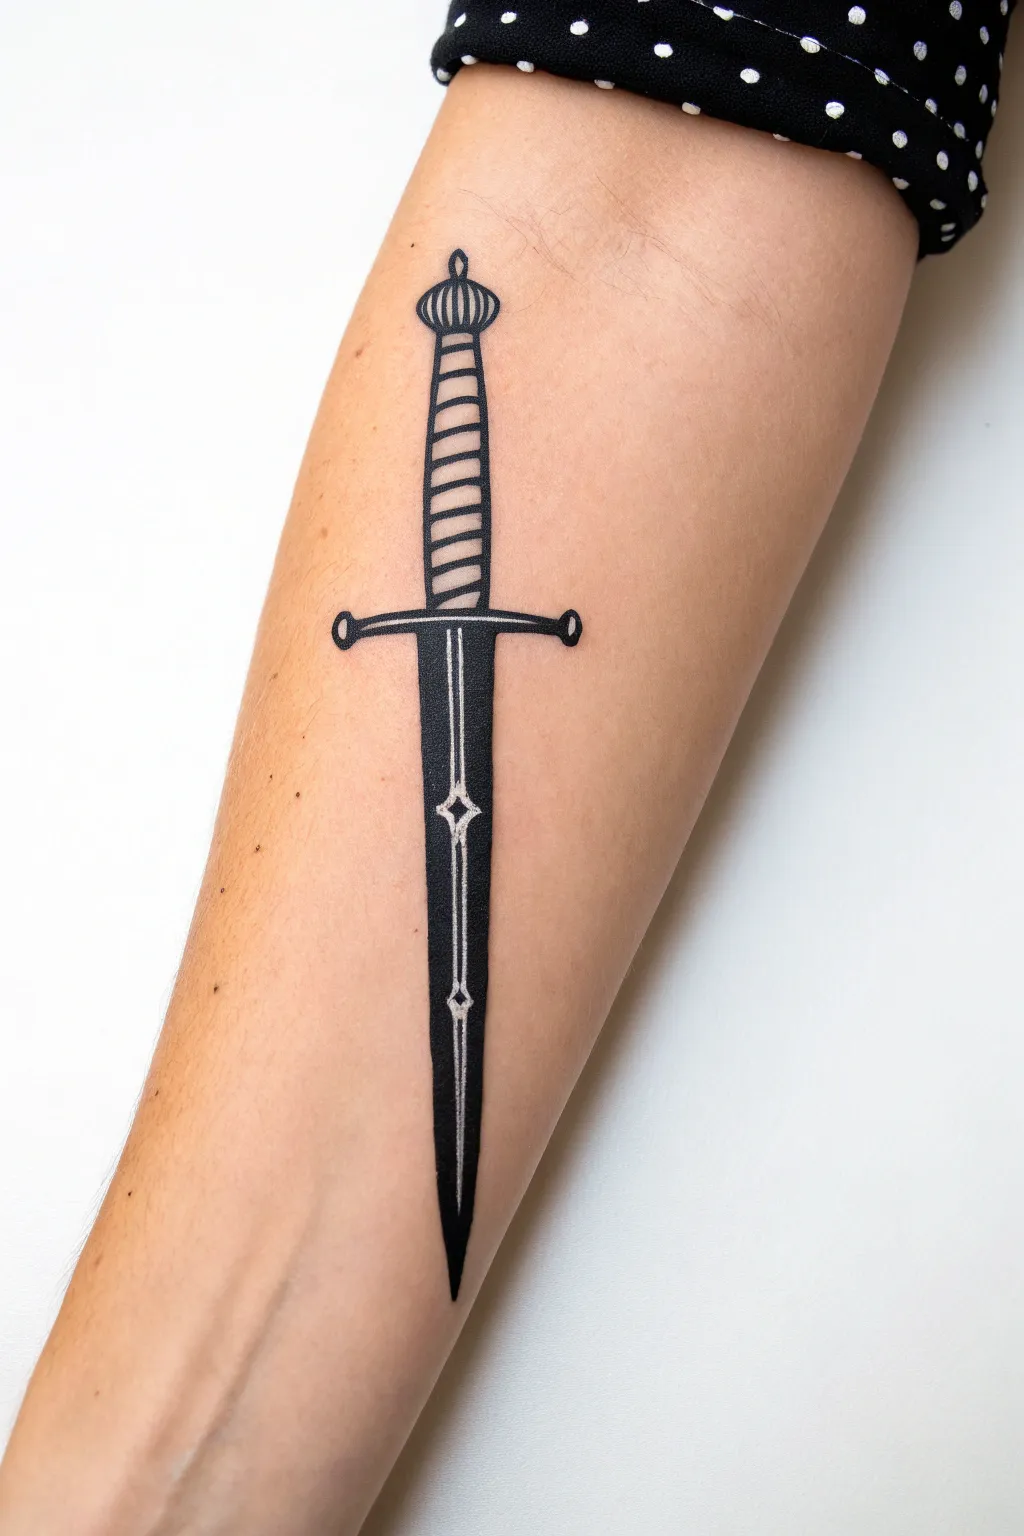
Transform your forearm into a warrior’s canvas with this bold, illustrative dagger design. Using strong black lines and clever negative space, you’ll create a striking sword that looks sharp enough to slice through the boredom of a rainy afternoon.
Detailed Instructions
Materials
- Black body paint or eyeliner liquid pen (waterproof recommended)
- Fine-tip eyeliner brush (if using pot paint)
- White body paint or white liquid eyeliner
- Setting powder
- Makeup setting spray
- Skin-safe pencil (light grey or nude) for sketching
- Cotton swabs
- Micellar water/makeup remover
Step 1: Drafting the Design
-
Clean and prep:
Start with a clean, dry forearm. Wipe away any oils with a bit of alcohol or soap and water to ensure your design stays put. If you have lotion on, the ink might slide right off. -
Find your center:
Using your light sketch pencil, draw a faint vertical line down the center of your forearm. This will be the spine of your sword and ensures the whole weapon stays straight. -
Sketch the pommel:
At the top of your line (near the elbow ditch), sketch a small, round bulb shape. This is the pommel. Add a tiny vertical line extending from the top of it. -
Outline the handle:
Draw the handle grip extending down from the pommel. It should be a straight, thick rectangle, slightly wider than your center guide line. -
Draft the crossguard:
Below the handle, draw a horizontal line that extends past the handle’s width on both sides. Add small circular tips to each end of this crossguard. -
Shape the blade:
From the center of the crossguard, sketch the blade tapering down towards your wrist. It should start as wide as the handle and gradually come to a very sharp point.
Pro Tip: Steady Hands
Rest your painting elbow on a table and anchor your pinky finger on your skin as you draw. This creates a geometric compass effect for smoother lines.
Step 2: Inking the Outline
-
Trace the perimeter:
Switch to your black body paint or liquid liner. Carefully trace the outer edge of the entire dagger you just sketched. Keep your hand steady and lean your pinky on your arm for stability. -
Detail the pommel:
Draw vertical stripes inside the round pommel shape to give it a ribbed texture. -
Wrap the handle:
Create the leather-wrapped look by drawing slightly diagonal, parallel lines across the handle rectangle. I find keeping these lines evenly spaced is key to the clean, illustrative look. -
Define the crossguard:
Thicken the line of the crossguard. It shouldn’t just be a stick; give it a little weight so it looks sturdy.
Troubleshooting: Smudged Ink
If you accidentally smudge a line while it’s wet, wait for it to fully dry first. Then, use a correction pen or concealer to paint over the mistake.
Step 3: Filling and Refining
-
Mark the shine line:
Before filling the blade with black, draw two very thin parallel lines right down the center of the blade. Leave a small diamond shape open near the crossguard and another smaller diamond further down. -
Fill the blade:
carefully fill in the blade area with solid black ink. Do NOT color inside your central parallel lines or the diamonds. That negative space is your ‘shine’. -
Check density:
Go over the black areas again if needed. You want a deep, opaque black, not a watery grey. Let the first layer dry for a moment before adding a second coat if necessary. -
Sharpen the edges:
Use a cotton swab dipped in micellar water to clean up any wobbly edges on the outside of the sword. A crisp outline makes the drawing pop. -
Highlight (Optional):
For extra pop, use a tiny amount of white body paint to trace inside the central ‘shine’ line and the diamonds. This makes the reflection look incredibly bright. -
Set the design:
Once the ink is completely dry, lightly dust the area with translucent setting powder to reduce skin shine and lock the pigment in. -
Final seal:
Mist the entire artwork with a makeup setting spray. This helps prevent smudging if your arm brushes against your clothes.
Wear your new blade with pride and enjoy the tough, adventurous look it adds to your style
Lightning Bolt Power Stripe
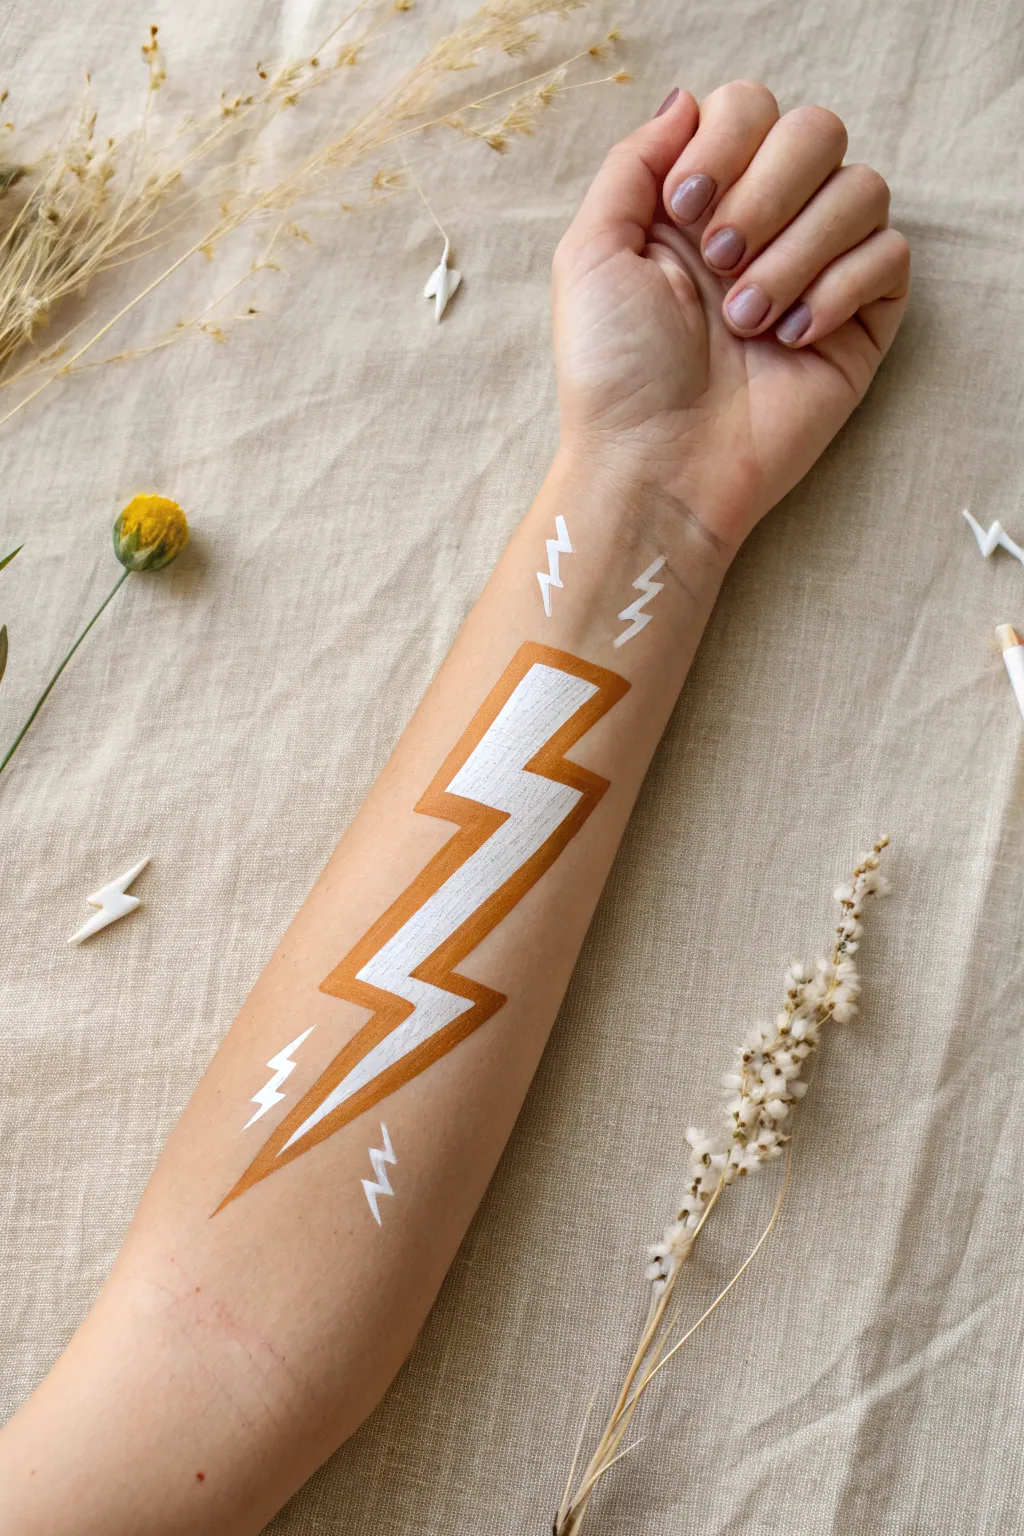
Channel energetic vibes with this bold, graphic lightning bolt design that makes a striking statement on your forearm. The combination of metallic gold and crisp white creates a look that is both modern and electrified.
Step-by-Step Guide
Materials
- Body-safe face/body paint (opaque white)
- Body-safe face/body paint (metallic gold or ochre)
- Flat shader brush (medium width)
- Detail liner brush (fine tip)
- Small cup of water
- Paper towels
- Setting spray or translucent powder (optional)
Step 1: Planning and Base Shape
-
Prep the canvas:
Begin with clean, dry skin on the forearm. Wipe the area with a damp cloth to remove any oils or lotions, which helps the paint adhere better and last longer. -
Identify the placement:
Ideally, position the main bolt down the center of the inner forearm. Imagine a line running from your wrist crease up towards your elbow. -
Draft the outline:
Using a very pale wash of the gold paint and your fine liner brush, lightly sketch the zigzag shape of the lightning bolt to get the proportions right before committing to the thick lines.
Straight Edge Secret
For ultra-crisp lines on the main bolt, you can use strips of surgical tape or medical tape on the skin as a stencil. Peel them off while the paint is still slightly wet.
Step 2: Painting the Gold Border
-
Load the gold paint:
Get your flat shader brush wet and work it into the gold or ochre body paint until you have a creamy consistency, ensuring the brush is fully loaded but not dripping. -
Start the top segment:
Starting near the elbow, paint a straight, diagonal line downwards to create the top left edge of the bolt. Keep your brush flat against the skin for a consistent width. -
Create the first zag:
At the end of your first line, pivot the brush sharply to create the horizontal shelf of the lightning bolt, pulling inward to the right. -
Form the middle section:
Paint the next long diagonal line downwards. I find it helpful to angle my wrist slightly here to maintain a straight stroke relative to the arm. -
Finish the main outline:
Complete the outline by extending the final point down toward the wrist. Repeat this process on the opposite side to create a hollow lightning bolt shape, leaving the center empty. -
Refine the edges:
Go back over your gold lines. You want a consistent, thick border—about a quarter-inch wide—all the way around. Sharpen the external corners with the tip of your brush.
Step 3: Filling the Center
-
Switch brushes:
Rinse your brushes thoroughly or switch to a clean flat brush for the white paint to avoid muddying the colors. -
Apply the white base:
Load your brush with opaque white paint. Carefully fill in the empty space inside your gold outline. -
Control the edges:
Work slowly where the white meets the gold. You want the colors to touch perfectly without overlapping too much, creating a clean, graphic division. -
Second coat:
Let the first white layer dry for a minute or two. If it looks streaky, apply a second thin coat to get that solid, sticker-like opacity.
Level It Up
Add a thin line of silver glitter liquid liner between the white center and the gold border to make the design really pop and sparkle in the light.
Step 4: Adding the Spark Details
-
Load a liner brush:
Switch to your fine detail liner brush and load it with the same white paint. Make sure the consistency is ink-like for smooth flowing lines. -
Paint top accents:
Just above the main bolt near the elbow/wrist crease, paint two small, floating lightning bolts. Keep them simple—just three quick segments each. -
Paint bottom accents:
Move down towards the wrist area. Add two more small white lightning bolts mirroring the placement of the top ones. -
Check symmetry:
Step back and look at the arm. The smaller bolts should look like sparks flying off the main attraction. -
Set the paint:
Once everything is completely dry to the touch, you can lightly mist it with a makeup setting spray to prevent smudging throughout the day.
Now you have an electrifying piece of wearable art ready to show off

PENCIL GUIDE
Understanding Pencil Grades from H to B
From first sketch to finished drawing — learn pencil grades, line control, and shading techniques.
Explore the Full Guide
Space Rocket With Star Dots

Blast off into creativity with this playful, space-themed arm art featuring a classic rocket ship design. Using simple geometric shapes and stars, this monochromatic blue look captures the wonder of space travel right on your skin.
Step-by-Step Tutorial
Materials
- Navy blue body paint (or skin-safe marker)
- Light blue/teal body paint
- Fine detail paintbrush (size 0 or 00)
- Small flat or filbert paintbrush
- Makeup setting spray or translucent powder
- Cosmetic sponge
- Water and paper towels
- Skin-safe pencil or light eyeliner (for sketching)
Step 1: Sketching the Launchpad
-
Prep the canvas:
Start with clean, dry skin on the forearm. Wipe the area with a little rubbing alcohol or soap and water to remove oils, which helps the paint adhere better. -
Outline the fuselage:
Using a skin-safe pencil or a very light eyeliner, sketch a curved, teardrop-like shape for the rocket’s main body. Position it diagonally on the arm so it looks like it’s flying upwards. -
Add the fins:
Draw three fins at the base of your rocket body. Place one on each side, curving slightly outward like shark fins, and one central fin at the very bottom, pointing straight back. -
Sketch the details:
Inside the main body, draw two circular windows—one larger near the top and a slightly smaller one below it. Add a small point or antenna to the very tip of the nose cone.
Step 2: Painting the Fuselage
-
Fill the body:
Load your small flat brush with navy blue body paint. Carefully fill in the main body of the rocket, working around the two circular windows you sketched. -
Sharpen the edges:
Switch to your fine detail brush to neaten the edges of the rocket body. I find that pulling the brush slowly helps create crisp, clean lines that mimic a tattoo style. -
Paint the fins:
Use the navy blue paint to fill in the three fins. For the side fins, leave a tiny sliver of unpainted skin between the fin and the main body to create visual separation. -
Detail the nose:
With the very tip of your fine brush, draw the thin antenna line extending from the nose of the rocket. -
Define the windows:
Clean your fine brush thoroughly. If you want the windows white, you can use white face paint, or simply leave the skin bare for a natural look. Outline them precisely with navy blue to make them pop.
Pro Tip: Steady Hands
Rest your pinky finger against the arm as a stabilizer while drawing the fine star outlines. This anchors your hand and prevents shaky lines.
Step 3: Creating the Exhaust Trail
-
Mix the exhaust color:
If you don’t have a light blue/teal paint, mix a little of your navy blue with white face paint to get a soft, powdery blue shade. -
Apply the thrust:
Using a slightly dry brush or a sponge edge, swipe the light blue paint downwards from the base of the rocket. Use quick, feathery strokes to mimic smoke or flames. -
Fade it out:
As you move further down the arm, let the paint strokes break up and become more sporadic. Add a few small dots of the light blue further down the trail to suggest dissipating smoke.
Level Up: Glow Time
Trace over the light blue exhaust trail or the window interiors with UV-reactive neon paint for a hidden glow that appears under blacklight.
Step 4: Adding the Galaxy
-
Draw primary stars:
Load your fine liner brush with navy blue again. Draw several five-pointed outline stars around the rocket. Vary their sizes—some near the nose, some near the tail. -
Fill smaller stars:
In the gaps between the outline stars, draw a few tiny, solid blue stars. These add depth to your starry background. -
Add cosmic dust:
In the remaining empty spaces, gently dot the tip of your brush to create small stardust specks. Group some closer to the rocket and scatter others further away. -
Set the artwork:
Once the paint is completely dry to the touch, lightly mist with a setting spray or dust with translucent powder to prevent smudging.
Now you are ready to show off your intergalactic masterpiece to the world
Smiling Dolphin Splash Line
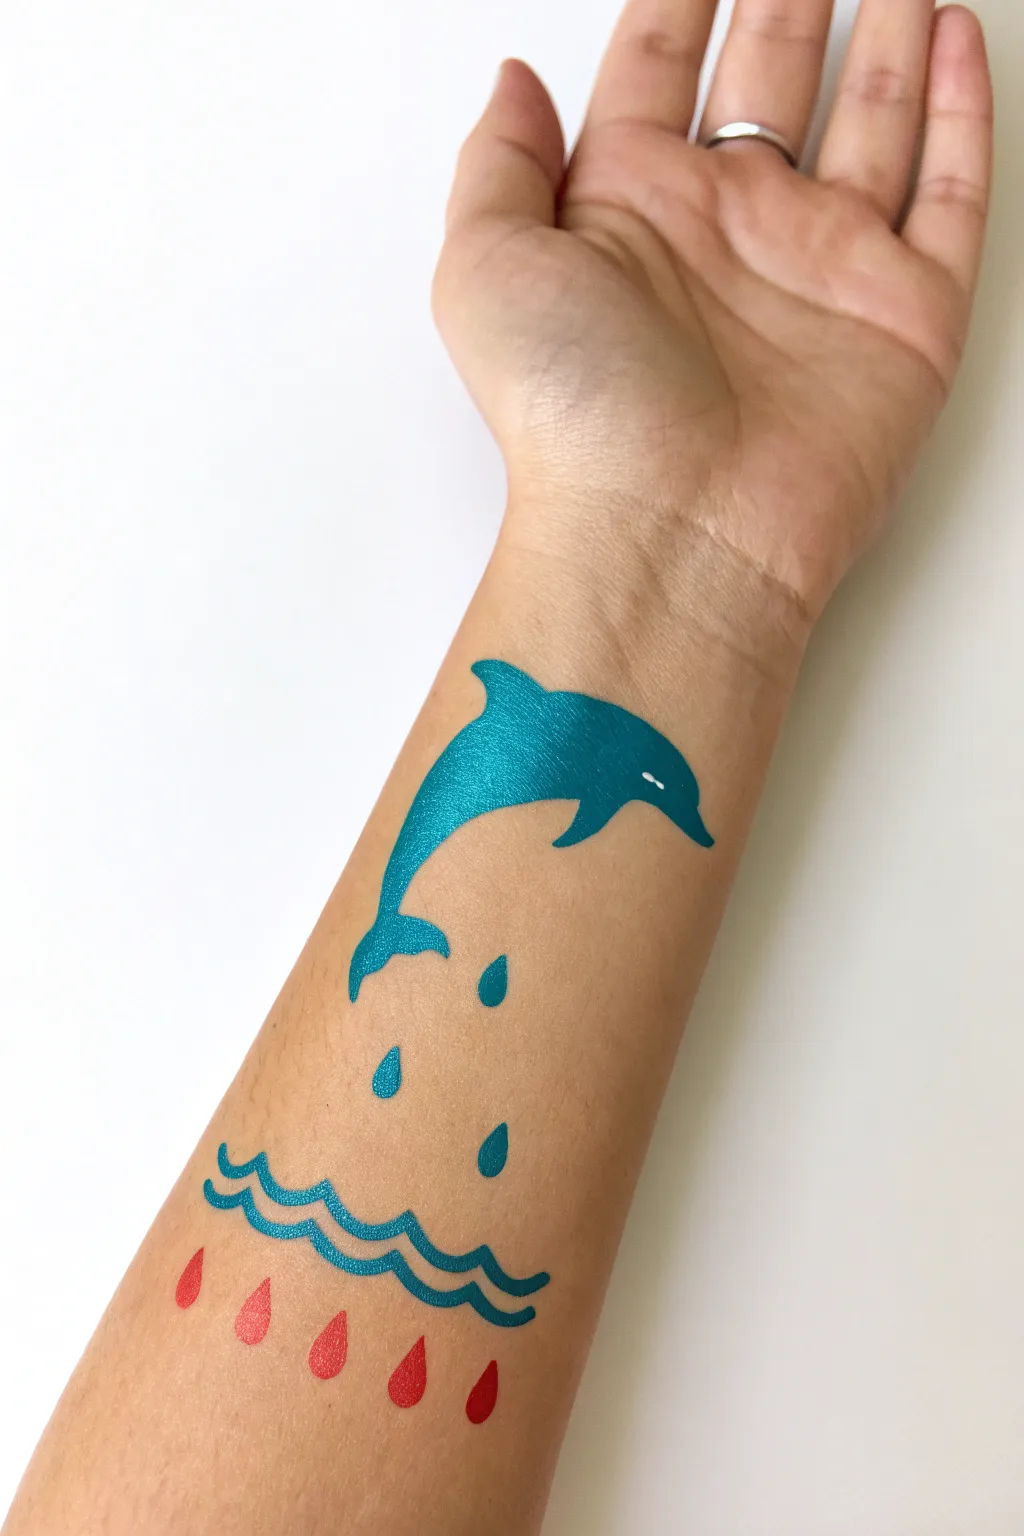
This joyful arm design captures a playful dolphin leaping from stylized waves, rendered in striking metallic teal and red. It’s a perfect beginner-friendly body art project that uses simple silhouettes and bold colors to create a clean, graphic look.
Detailed Instructions
Materials
- Metallic teal or turquoise face/body paint (water-activated or cream)
- Red face/body paint
- Small flat brush (size 4 or 6)
- Fine liner brush (size 1 or 0)
- Cup of water
- Paper towels
- Cotton swabs (for cleanup)
- Skin-safe setting spray or translucent powder (optional)
Step 1: Painting the Dolphin
-
Position the arm:
Begin by having your model rest their arm on a flat surface, palm facing up. Locate the middle of the inner forearm; this is where the dolphin’s body will curve. -
Outline the body curve:
Load your small flat brush with the metallic teal paint. Paint a smooth, thick majestic arch for the dolphin’s back, tapering it slightly at both ends. -
Define the head:
At the upper end of the arch, round off the shape to create the dolphin’s nose, making it slightly blunt rather than perfectly pointed. -
Add the dorsal fin:
Switch to your liner brush for better control. On the center of the dolphin’s back, paint a small triangle that hooks slightly backward to form the dorsal fin. -
Create the tail flukes:
At the bottom of the arch, paint two small, curved triangular shapes branching out to create the tail. The connection point should be thin and delicate. -
Paint the pectoral fin:
Add the side flipper just below the head area. It should angle downwards and backwards, mirroring the direction of the dorsal fin but positioned on the belly side. -
Fill opacity:
If your metallic paint looks a bit sheer, wait a moment for the first layer to tack up, then gently pat on a second coat to get that rich, solid teal color. -
Add the eye detail:
Using a very clean liner brush with a tiny amount of white paint (or by wiping away a speck of wet paint with a damp precision swab), create a small, sliver-like eye just behind the nose.
Fixing Shakey Lines
If your wave lines look uneven, don’t wipe them off. Just thicken the line slightly at the wobble point to smooth out the curve visually.
Step 2: Adding the Waves and Splashes
-
Paint the water droplets:
Using the teal paint and a liner brush, add three teardrop shapes falling from the dolphin. Place one near the tail and two further down, varying their sizes slightly. -
Draft the top wave:
About two inches below the dolphin, paint a wavy horizontal line across the wrist area. Use the liner brush to create consistent, rounded peaks. -
Thicken the first wave:
Go back over your wave line with the flat brush tilted on its edge to thicken it, giving it bold definition. -
Add the second wave:
Paint a second wavy line directly underneath the first one. Follow the same rhythm of peaks and valleys so they look parallel and flowing. -
Load the red paint:
Rinse your brush thoroughly or grab a fresh liner brush. Load it with bright red body paint. -
Create the red drops:
Beneath the bottom wave, paint five evenly spaced red teardrops. The points should face upward toward the waves, creating an abstract, decorative border. -
Refine edges:
Check the edges of your dolphin and waves. If any lines are fuzzy, use a slightly damp cotton swab to clean them up for a crisp silhouette. -
Set the design:
Once the paint is fully dry to the touch, you can lightly dust it with translucent powder or a setting spray to prevent smudging during the day.
Add Some Sparkle
Before the teal paint dries completely, sprinkle a tiny pinch of cosmetic-grade biodegradable glitter on the dolphin’s back for extra shimmer.
Enjoy showing off your playful dolphin design as it catches the light with every move of your arm


Paw Print Path With Tiny Heart
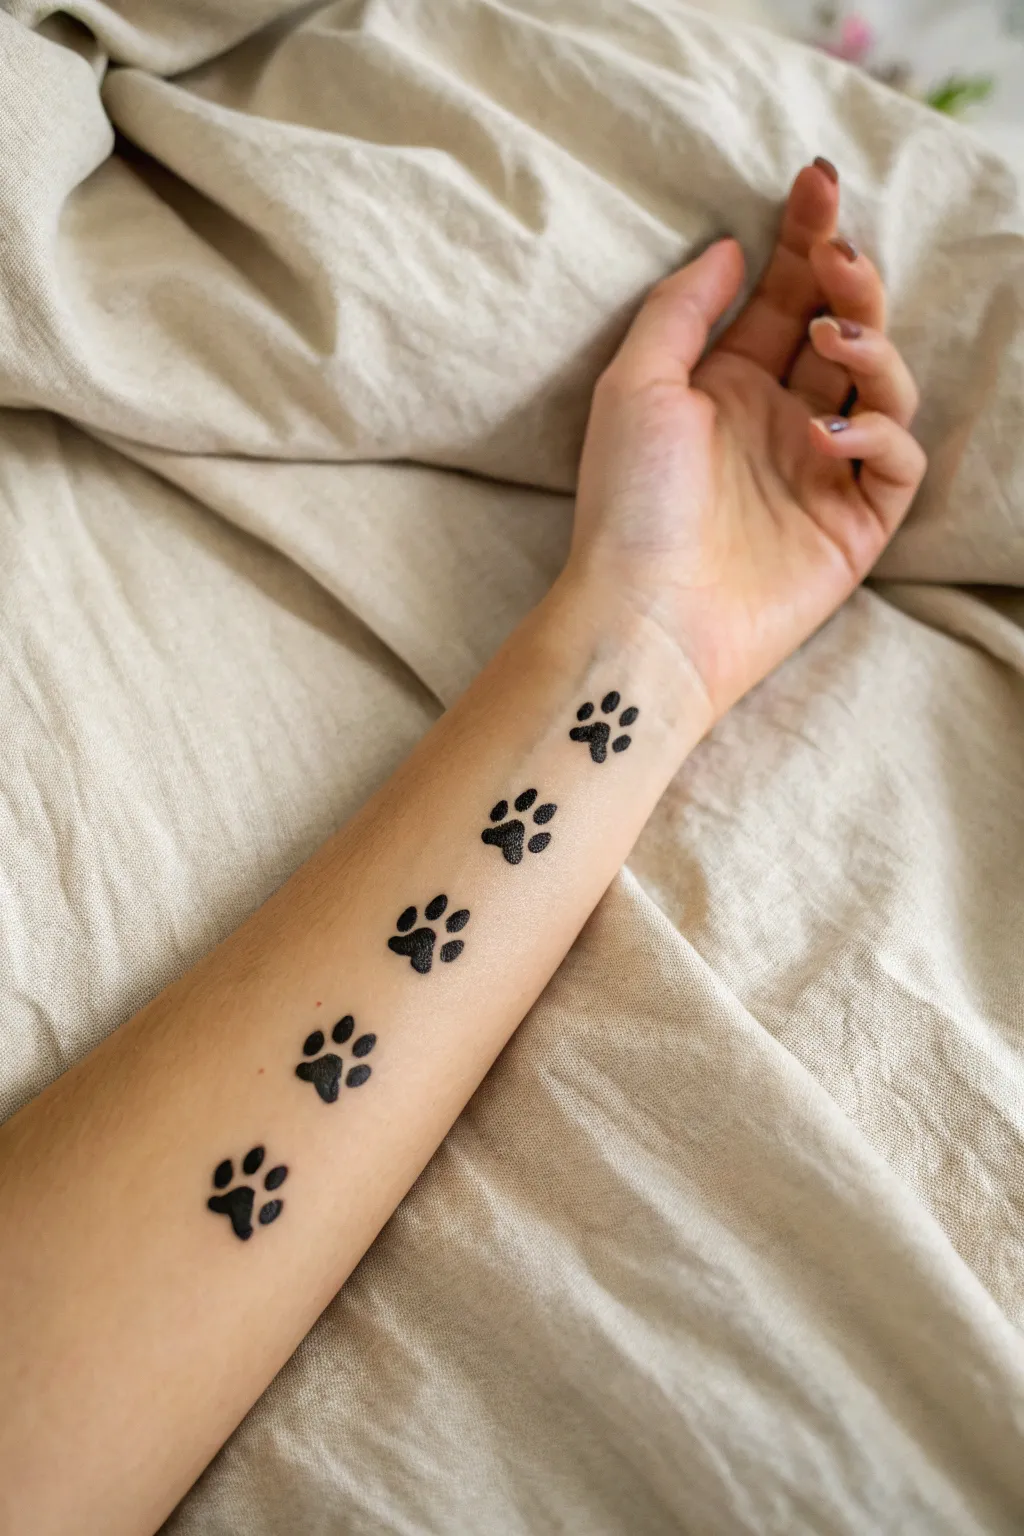
This charming arm painting features a trail of classic paw prints marching up the inner forearm, perfect for animal lovers wanting a simple yet expressive design. The high-contrast black ink creates a tattoo-like appearance that is both bold and playful.
Step-by-Step Guide
Materials
- Black body paint or eyeliner liquid pen
- Fine-tip body art brush (if using pot paint)
- Black cosmetic setting powder
- Makeup remover wipes (for corrections)
- Setting spray (optional)
- Small round sponge applicator (optional)
Step 1: Planning the Path
-
Clean the canvas:
Begin by washing the inner forearm thoroughly with soap and water to remove any oils or lotions, ensuring the skin is completely dry before starting. -
Visualize the spacing:
Hold your arm out straight and mentally map out where the five paw prints will sit. Aim for equal spacing starting near the wrist and ending below the elbow crease. -
Mark the centers:
Using your eyeliner pen or a very light dot of paint, mark the center point for the main pad of each paw print to establish your trail’s flow.
Stamp trick
Make a custom stamp by cutting a paw shape out of a makeup sponge or potato. Dip in body paint and press onto the skin for instantly uniform prints.
Step 2: Painting the Main Pads
-
Outline the first pad:
Starting with the paw print closest to the wrist, draw a rounded, inverted heart shape or a soft triangle with rounded corners. This acts as the main plantar pad. -
Fill it in:
Carefully fill in the outline with solid black. If using liquid eyeliner, use short strokes to get an opaque finish without streaks. -
Repeat up the arm:
Move to the next marked spot and replicate the main pad shape. Try to keep the size consistent with the first one. -
Vary the rotation:
As you paint the subsequent main pads moving up the arm, rotate them slightly left or right to mimic a natural walking gait rather than a straight line. -
Check consistency:
Once all five main pads are painted, pause to ensure they are roughly the same size and the black is fully opaque.
Step 3: Adding the Toe Beans
-
Positioning the toes:
For each paw, you will add four smaller toe pads. Visualize them arching over the top of the main pad. -
Paint the center toes first:
Start with the two middle toe pads. Draw small, slightly oval dots just above the center of the main pad. -
Add the outer toes:
Add the pinky and thumb toes slightly lower on the sides, creating a gentle arc shape around the main pad. -
Refine the shape:
Go back and slightly round out the edges of these smaller dots so they look soft and organic, not perfectly circular. -
Continue the pattern:
Repeat this four-toe process for every paw print up the arm, adjusting the angle of the toes to match the rotation of the main pad.
Opaque fix
If the black looks streaky or grey, don’t keep layering wet paint. Let the first layer dry completely, then dab—don’t drag—a second layer on top.
Step 4: Setting and Refining
-
Clean up edges:
If any edges look fuzzy or smeared, wrap a regular wipe around your fingernail or use a cotton swab to tidy the perimeter. -
Deepen the black:
Apply a second coat of paint or ink if the skin is showing through in any areas, particularly on the larger pads. -
Let it dry:
Allow the design to dry completely for at least 5 to 10 minutes so the finish doesn’t tacky. -
Apply setting powder:
Lightly dust black cosmetic powder or translucent setting powder over the design to mattify the shine and help it last longer. -
Final mist:
Finish with a quick spritz of setting spray held at arm’s length to lock the design in place for the day.
Now you have an adorable trail walking right up your arm to show off your love for animals
Cute Caterpillar With Leaf Stops
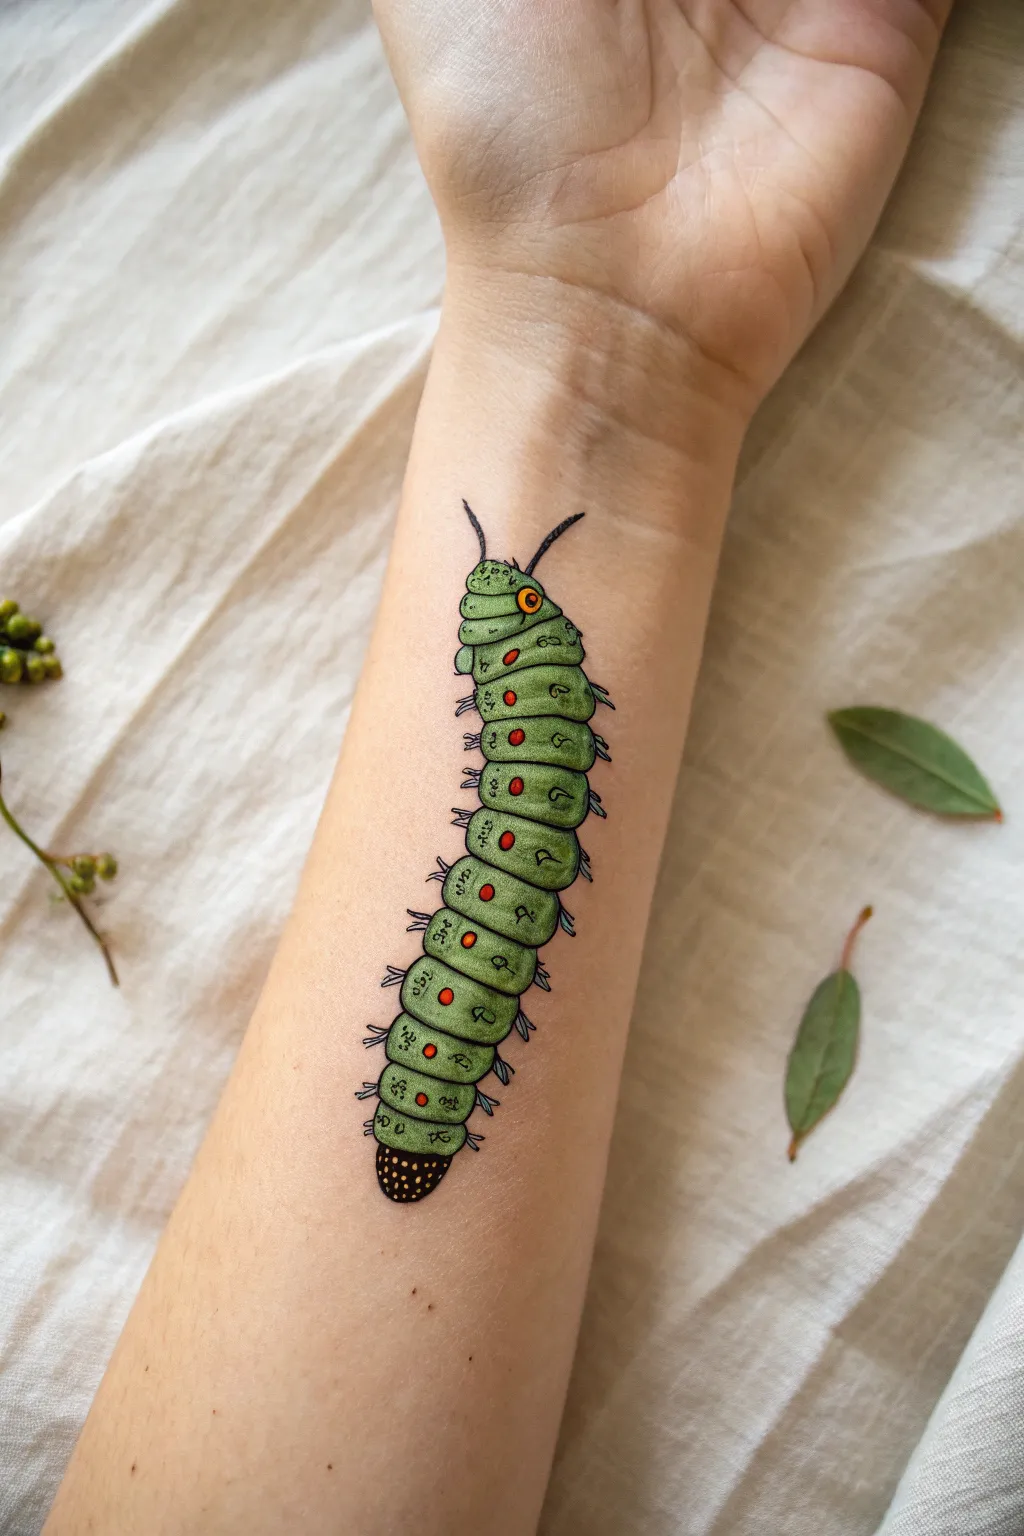
Transform your arm into a vibrant canvas with this charming caterpillar illustration that mimics the style of vintage botanical drawings. With its distinct green segments and playful orange spots, this design wraps naturally along the forearm for a lively, animated effect.
How-To Guide
Materials
- Body-safe face/body paint (light green, dark green, orange, yellow, black)
- Fine liner brush (size 0 or 00)
- Small round brush (size 2)
- Small flat brush or angle brush
- Setting powder or setting spray (optional)
- Water cup and paper towels
- Micellar water and cotton swabs (for cleanup)
Step 1: Planning the Shape
-
Map the curve:
Visualize the caterpillar’s path along your inner forearm. You want a gentle ‘S’ curve or a slight wiggle rather than a straight line to make it look organic. -
Initial sketch:
Using a very diluted light green paint and your fine liner brush, faintly sketch the outline of the segmented body. Start wider at the head (near the wrist) and slightly taper toward the tail.
Smudge Control
If your black outlines start bleeding into the green, the base layer is too wet. Wait 2-3 minutes for the green to be touch-dry before starting any fine linework.
Step 2: Base Color Application
-
Fill the segments:
Load your round brush with a solid, grassy green body paint. Fill in the sketched outline one segment at a time. -
Create dimension:
Leave tiny gaps between the segments unpainted or paint them very lightly; these gaps act as the natural creases of the caterpillar’s body. -
Blend for roundness:
While the green is still slightly damp, mix a tiny bit of yellow or white into the center of each segment to create a highlight. This gives the body a pleasing, rounded volume.
Step 3: Adding Key Details
-
The false eye:
Near the head (the second or third segment from the top), paint a distinct circle. Use a bright yellow base, let it dry for a moment, and add an orange center. -
Warning spots:
Down the length of the body, paint small, circular dots on the side of each segment. The upper ones should be red-orange, transitioning to a lighter orange towards the tail. -
The tail end:
Paint the very last segment at the bottom solid black or very dark brown. This mimics the anal plate often seen on swallowtail larvae. -
Stippling texture:
Take your fine liner with yellow paint and add tiny stippled dots onto the black tail section for texture.
Make It 3D
Add a small white highlight dot (reflection) to the ‘false eye’ and each red body spot. This mimics a wet, shiny surface and makes the creature look surprisingly real.
Step 4: Linework and Definition
-
Outline the body:
Using a fine liner brush and black body paint (ink consistency helps here), carefully outline the entire caterpillar. Keep the line weight thin and delicate. -
Define the segments:
Draw curved lines separating each body segment. I find that curving these lines slightly downward helps reinforce the cylindrical 3D look. -
Add the feet:
Paint the tiny prolegs (the little feet) extending from the lower segments. Use short, stubby strokes in light blue or grey, outlining them thinly in black. -
Antennae work:
At the very top of the head, draw two small, curved feelers or antennae in black. Make them thick at the base and taper to a sharp point. -
Internal markings:
Add tiny decorative squiggles and markings inside the green segments using a very fine black line. These resemble the natural patterning of the insect.
Step 5: Shading and Finishing
-
Deepen the shadows:
Mix a darker green or wash of black. Carefully paint along the bottom edge of the caterpillar where it touches the skin to create a drop shadow, making it pop off the arm. -
Clean up edges:
Dip a cotton swab in micellar water to sharpen any blurry outside edges or remove stray paint marks. -
Set the design:
Once fully dry, lightly dust with translucent setting powder or mist with a setting spray to prevent the design from smudging against clothing.
Now you have a vividly realistic little companion to keep you company throughout the day
Mini Dragon Spine With Spikes
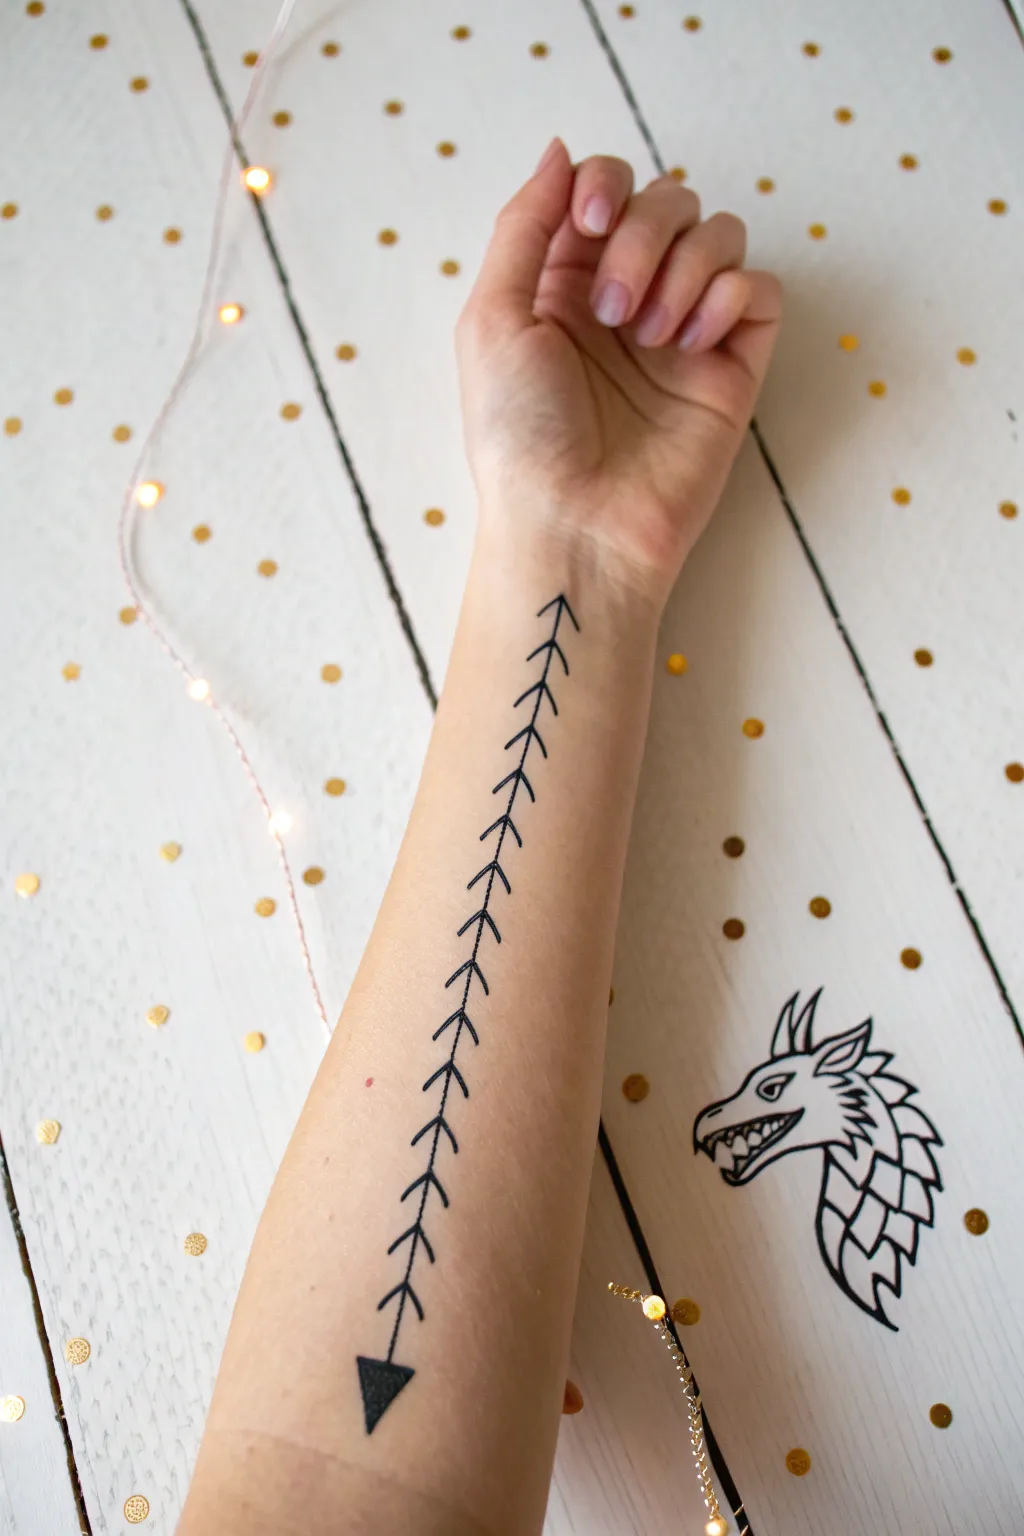
Embrace a touch of fantasy with this sleek, geometric dragon spine design that runs the length of your forearm. This minimalist concept uses clean lines and repeated arrow motifs to create an elongated, spine-like effect that feels both modern and mythical.
Detailed Instructions
Materials
- Black liquid body paint or eyeliner pen (waterproof recommended)
- Fine-tip brush (if using liquid paint)
- Micellar water or makeup remover
- Cotton swabs
- Ruler (optional, clear plastic is best)
- Setting spray or translucent powder
Step 1: Preparation & Mapping
-
Clean the canvas:
Begin by thoroughly washing your forearm with soap and water to remove any oils or lotions. This ensures the body paint or eyeliner adheres crisply and lasts longer without smudging. -
Find your center:
Hold your arm out straight. Visualize a central line running from the inside of your wrist down toward your elbow. This imaginary line will be the spine of your dragon. -
Mark the endpoints:
Using your eyeliner or a very light dot of paint, mark where you want the design to start near the wrist and where you want it to end on the forearm. This helps you keep the length consistent. -
Draw the main axis:
Carefully draw a single, straight black line connecting your two endpoints. If you don’t have a steady hand, I find using the edge of a clean ruler or a piece of cardstock as a guide helps immensely here.
Step 2: Creating the Spine Segments
-
Start the chevrons:
Beginning at the wrist end of your line, draw a small ‘V’ shape pointing upwards (away from the elbow). The point of the ‘V’ should meet the central line perfectly. -
Maintain spacing:
Move about half an inch down the central line and draw your second ‘V’ shape. Try to keep the angle and the length of the arms consistent with the first one. -
Continue the pattern:
Repeat this process down the entire length of the line. The rhythm is key here, so take your time to space them as evenly as possible. -
Check symmetry:
Pause occasionally to look at your arm from a distance. If a chevron looks lopsided, quickly correct it with a cotton swab dipped in micellar water while the ink is still fresh. -
Refine the lines:
Go back over the central spine line to thicken it slightly if needed, ensuring it looks like one cohesive rod connecting all the vertebrae.
Straight Line Hack
Struggling to draw a straight line on curved skin? Place a piece of masking tape along your arm as a guide, trace alongside it, and peel it off for an instant perfect spine.
Step 3: The Tail Detail
-
Draft the triangle:
At the bottom end of the design (closest to the elbow), draw a small triangle shape. The tip of the triangle should point downwards, extending the line of the spine. -
Fill it in:
Fill the triangle completely with black ink. This acts as the heavy ‘tail’ or anchor of the design, giving visual weight to the lighter lines above. -
Sharpen the edges:
Use a clean brush or the fine tip of your pen to make the corners of the triangle razor-sharp. Fuzzy edges will detract from the geometric look. -
Top detail:
At the very top near the wrist, you can finish with a simple inverted ‘V’ like an arrowhead, or leave the line open-ended depending on your preference. The image shows an open arrow shape pointing up.
Level Up: Metallic Scales
Add a dot of gold or silver eyeliner between each chevron ‘vertebrae’ to mimic glistening scales or dragon treasure hidden within the spine.
Step 4: Finishing Touches
-
Clean up stray marks:
Dip a fresh cotton swab in makeup remover and very carefully clean up any smudges or lines that aren’t perfectly straight. Tightening the negative space makes the black pop. -
Let it dry:
Sit still for a few minutes to let the ink or paint dry completely. Avoid bending your wrist too much if the design extends into the crease. -
Set the design:
Lightly mist the area with a makeup setting spray or dust it with translucent powder. This prevents the lines from transferring onto clothes or smudging throughout the day.
Enjoy wearing your fierce new dragon mark knowing you created it entirely by hand
Cactus Column With Tiny Blooms
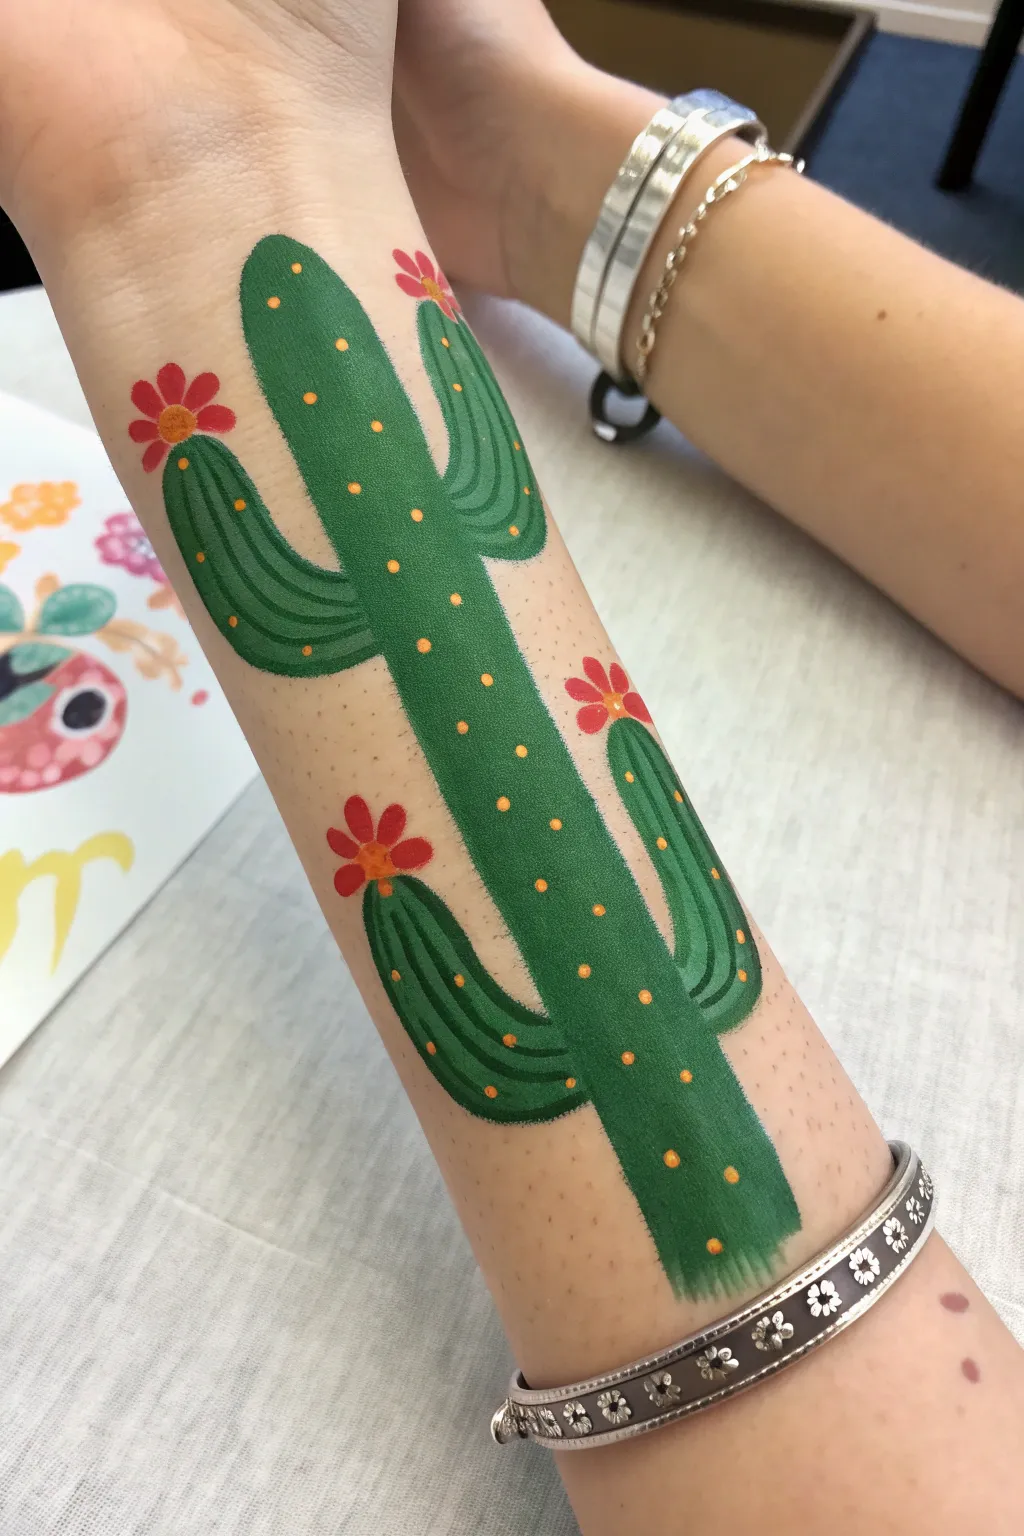
Transform your arm into a cheerful desert scene with this stylized cactus painting. The design features a tall, central column with symmetric curved arms and vibrant red blooms, creating a playful, folk-art inspired look.
Step-by-Step Guide
Materials
- Face/Body Paint (Water-activated or cream-based): Medium green, Dark green, Red, Orange/Yellow
- Flat brush (approx. 1/2 inch or 3/4 inch)
- Round detail brush (size 2 or 3)
- Dotting tool or back of a paintbrush
- Cup of water
- Paper towels
- Translucent setting powder (optional)
Step 1: Painting the Main Stalk
-
Establish the column:
Begin by loading your flat brush with medium green face paint. Ensure the consistency is creamy but not dripping. -
Paint the central line:
Starting near the wrist, pull a straight, wide stroke up toward the elbow ditch to create the main body of the cactus. -
Thicken the base:
If your brush isn’t wide enough, lay down a second parallel stroke right next to the first one to thicken the cactus body to about an inch wide. -
Create the texture base:
While the paint is still slightly damp, streak in a few faint lines of darker green vertically if you want subtle dimension, though a flat solid color works perfectly for this graphic style.
Smudge Control
If your green smears into the red flowers, let the green base layer dry completely first. Apply the red petals only once the green is distinctively dry to the touch.
Step 2: Adding the Cactus Arms
-
Position the lower arms:
Identify a spot about one-third of the way up the column. Using the edge of your flat brush or a large round brush, paint a curved arm extending outward and upward on the left side. -
Mirror the right side:
Paint a matching curved arm on the right side, roughly opposite the first one but slightly offset for a more natural look. -
Add upper arms:
Move higher up the column, closer to the elbow. Paint two smaller arms curving upward, similar to the first set but simpler in shape. -
Define the ribs:
Switch to your fine detail brush loaded with dark green paint. Carefully paint thin, curved lines following the shape of each cactus arm to represent the ribbed texture. -
Refine the edges:
Use the dark green on the detail brush to outline the bottom curves of the arms where they meet the main stem, adding depth and definition.
Step 3: Blooming Details
-
Paint the flower petals:
Clean your brush thoroughly and load a small round brush with bright red paint. On the very top of each cactus arm tip, press down firmly to create small petal shapes. -
Create the flowers:
Arrange 4-5 of these small petal strokes in a fan shape or semi-circle on top of each green arm tip. -
Add flower centers:
Dip the very tip of a clean brush or a dotting tool into orange or yellow paint. Place a small dot right at the base of the red petals where they connect to the green cactus. -
Add prickles:
Using the same orange/yellow color and a fine dotting tool, place small, evenly spaced dots all over the green body of the cactus to represent spines. -
Final touches:
Add a few more spines specifically along the dark green ribbed lines you painted earlier to emphasize the structure. -
Dry and set:
Allow the paint to dry completely for a minute or two. If you plan to wear this for a while, a light dusting of translucent powder will help prevent smudging.
desert vibe
Add a small sun or tiny clouds around the cactus top using white and yellow paint to turn the single element into a full desert scene.
Now you have a piece of wearable desert art that is sure to brighten your day
Cherry Blossom Branch Sweep
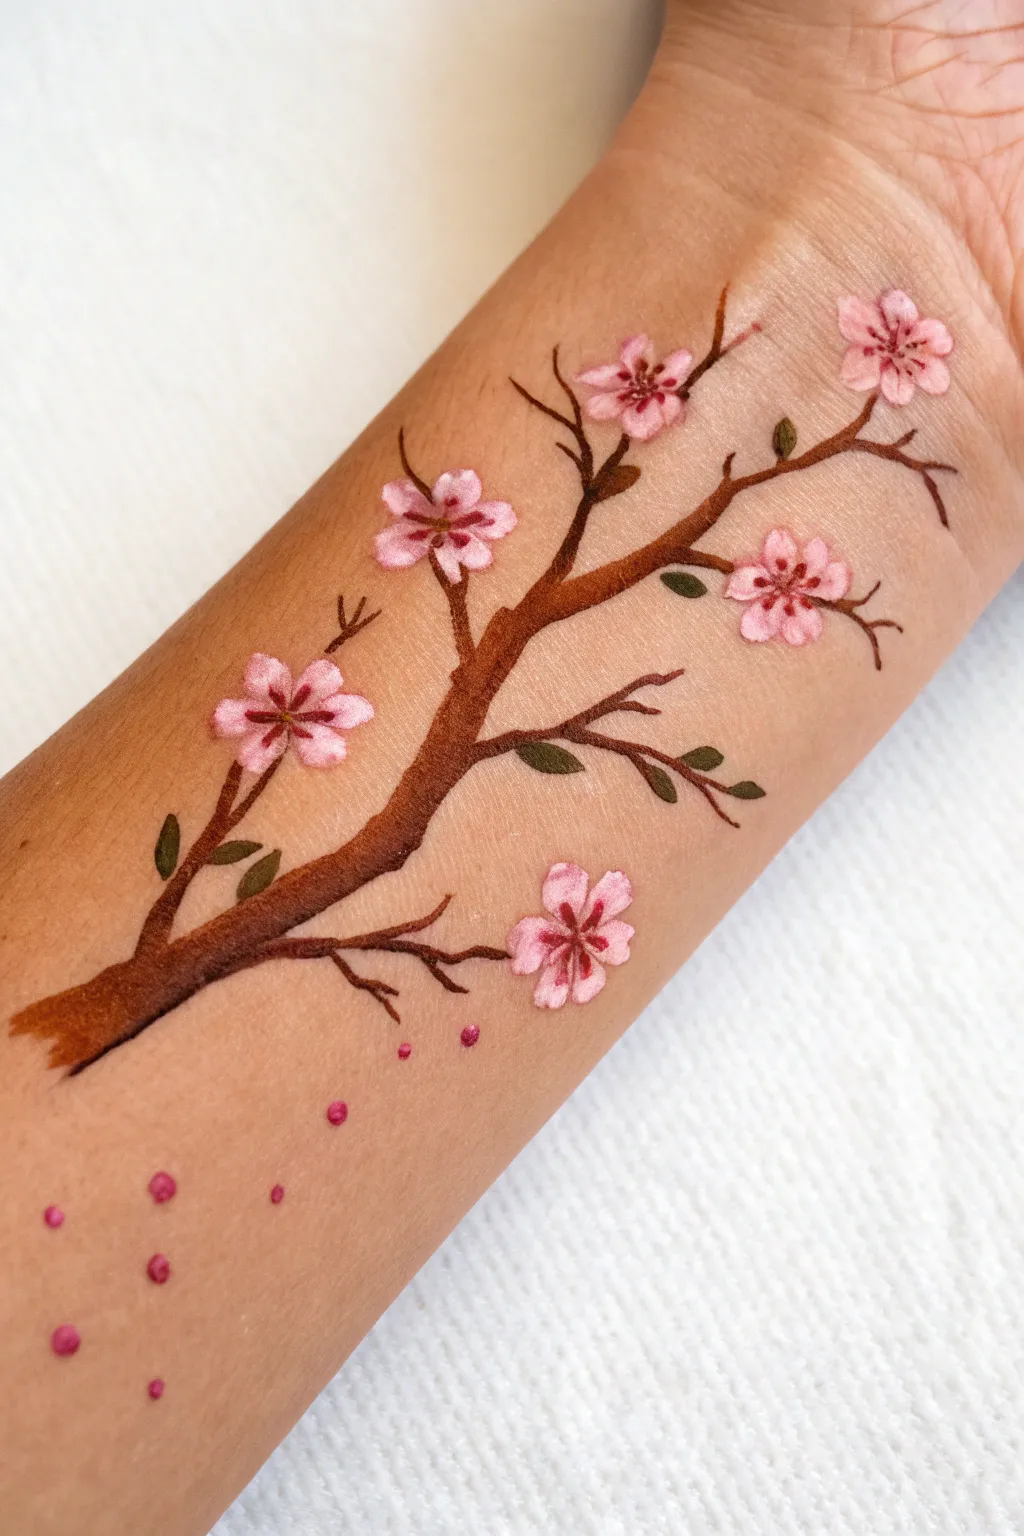
Capture the delicate beauty of spring right on your arm with this cherry blossom branch design. This tutorial guides you through painting soft pink petals and woody textures to create a lovely, floral sweep that looks elegant on the skin.
How-To Guide
Materials
- Brown body paint (water-activated or alcohol-based)
- White body paint
- Pink body paint (light and dark shades)
- Green body paint
- Fine liner brush (size 0 or 00)
- Small round brush (size 2)
- Flat shader brush (optional)
- Cup of water
- Paper towels
- Setting spray or powder (optional)
Step 1: Painting the Branch Structure
-
Establish the main line:
Begin by loading your round brush with brown paint. Starting from the lower left near your wrist (or elbow, depending on orientation), paint a sweeping, diagonal line upwards towards the opposite side of your arm. Let the line taper and get thinner as you reach the end. -
Thicken the base:
Go back over the bottom inch or two of the branch to thicken it substantially. The base of the branch should look sturdy, simulating older wood. -
Add secondary branches:
Using the tip of your round brush or switching to a liner brush, paint smaller offshoot branches. Make a few curve downwards and others reach upwards. Keep your hand loose to create organic, non-straight lines. -
Create fine twigs:
With the finest liner brush and a slightly watered-down brown, add tiny, spindly twigs extending from the secondary branches. These will serve as anchors for your flowers later. -
Texture the bark:
While the brown is still slightly damp, I like to take a very slightly darker brown (or a tiny touch of black mixed in) and add a few thin streaks along the main branch to suggest bark texture.
Step 2: Creating the Blossoms
-
Mix your pinks:
Prepare two shades of pink. You want a very pale, almost white-pink for the petal base, and a deeper magenta for the centers. If you only have one pink, mix it with white for the base. -
Paint the first petals:
Select a spot near a twig tip for your first flower. Using a small round brush loaded with pale pink, press down and lift up to create a teardrop shape. Do this five times in a circle to form a flower. -
Place main flowers:
Repeat the five-petal technique to place about 5-6 fully open flowers along the branch. Space them out irregularly for a natural look—don’t make them too evenly distributed. -
Add dimension:
While the pale pink is drying, take a tiny amount of darker pink on your liner brush. Gently feather this color from the center of the flower outwards about halfway up the petals. -
Define the centers:
With a fine liner brush and a deep reddish-brown or dark magenta, paint tiny star-shaped lines in the very center of each bloom. Add tiny dots at the ends of these lines to represent stamens. -
Create buds:
For areas that look empty but don’t need a full flower, paint small, single ovals or teardrops in pink to represent unopen buds attached directly to the twigs.
Natural Flow Pro-Tip
Follow the natural anatomy of your arm. Let the main branch curve slightly around the radius bone rather than painting a ruler-straight line.
Step 3: Leaves and Final Details
-
Paint the leaves:
Load a small round brush with mossy green paint. Paint small, pointed oval shapes tucked near the flowers and along the twigs. Keep them smaller than the flower petals. -
Vary the leaf placement:
Don’t put leaves everywhere. Just add pairs or single leaves sporadically to give a pop of contrast against the brown and pink. -
Add falling petals:
To create movement, paint a few single pink petals floating in the empty skin space below the main branch, as if they are drifting in the wind. -
Sprinkle polka dots:
Using the back end of your brush handle dipped in pink paint, dot a few tiny specks in the negative space near the bottom of the design for a whimsical magical effect. -
Highlighting:
Using pure white on a clean liner brush, add the tiniest dash of highlight to the top edge of the most prominent leaves and the center of the main branch to make it look 3D. -
Set the design:
Once everything is completely dry, lightly mist with a makeup setting spray or dust with translucent powder to prevent smudging.
Shaky Hands?
If your lines are wobbly, brace your pinky finger against your arm while painting. This creates a stable anchor and gives you much cleaner brushstrokes.
Celebrate the season by showing off your beautiful floral artwork
Simple Mandala Wrist Cuff
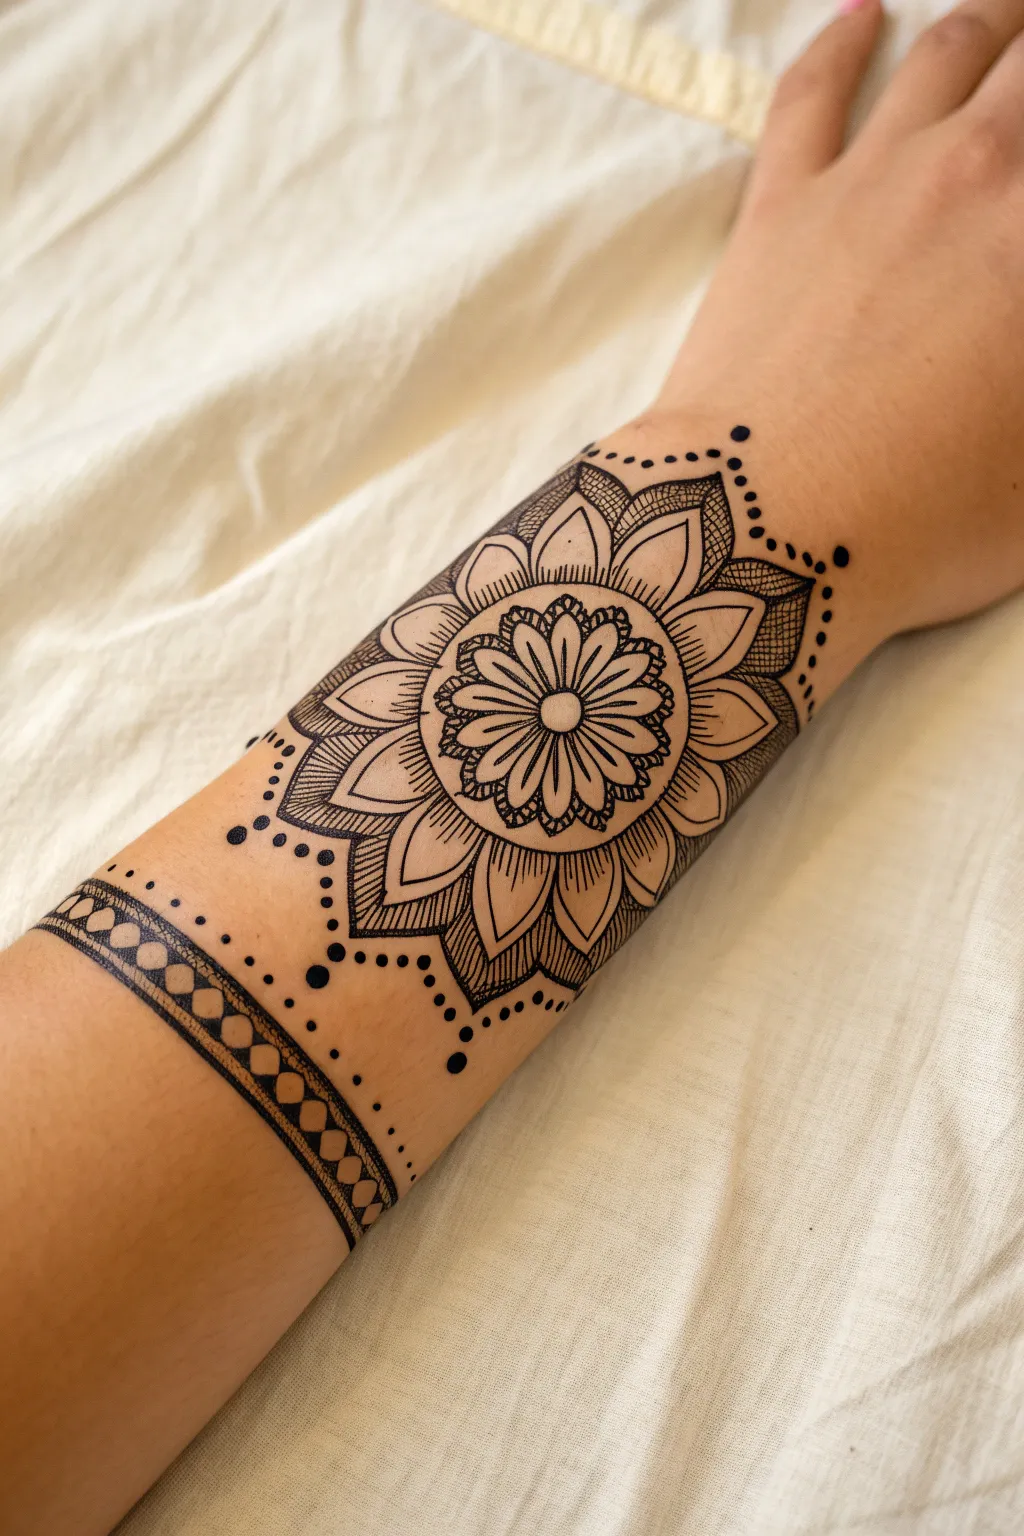
This elegant body art project transforms your forearm into a canvas with a striking mandala flower and a matching geometric armband. It combines bold floral lines with delicate shading and dot work for a sophisticated, jewelry-inspired look.
Detailed Instructions
Materials
- Black body paint or cosmetic-grade ink liner
- Fine-tip body art marker (0.5mm or smaller)
- Medium-tip body art marker (1.0mm)
- Skin-safe setting powder
- Makeup remover wipes or cotton swabs
- Ruler or straight edge (optional)
Step 1: Drafting the Center Flower
-
Find the center:
Locate the middle of your forearm, roughly three inches above your wrist bone. Use your medium-tip marker to draw a small circle, about the size of a pea, as the anchor for your mandala. -
Draw the first petal layer:
Around the center circle, draw eight small, rounded petals. They should touch each other at the base, resembling a simple daisy. -
Add the second layer:
Create a second layer of slightly larger, pointed petals behind the first set. Place the tip of each new petal directly between the rounded tops of the inner layer. -
Detail the inner petals:
Switch to your fine-tip marker. Inside each of the small rounded petals, draw a tiny line down the center for definition. -
Create the main outer petals:
Draw the largest set of petals now. These should be broad and leaf-shaped, extending outward about an inch. Aim for symmetry, but don’t worry if they aren’t perfectly identical. -
Outline for contrast:
Go over the outline of these large outer petals one more time with the medium marker to thicken the lines, making the main flower shape pop.
Uneven Lines?
If a line wobbles, utilize the dot work (stippling) technique to cover it up. Thickening the line slightly or turning the error into a shaded area hides mistakes instantly.
Step 2: Shading and Decoration
-
Stippling the center:
Using the fine tip, add tiny dots inside the very center circle. Focus the dots near the edges and leave the middle slightly open to create a highlighted effect. -
Shade the large petals:
This step adds the depth visible in the photo. With your finest tip, draw very closely spaced, straight lines starting from the base of each large petal and fading out about halfway up. I find creating a flicking motion helps taper the lines beautifully. -
Add the textured halo:
Draw a jagged, saw-tooth line connecting the tips of the large petals. Fill the space between the petals and this new jagged line with a cross-hatch pattern or dense stippling to darken the background. -
Dot framing:
Add a series of dots extending from the top and bottom tips of the mandala, moving toward the wrist and elbow. Start with larger dots and decrease their size as they move further away.
Step 3: The Geometric Armband
-
Mark the band location:
Move down about two or three inches below your main flower. Draw two parallel lines wrapping around your forearm to create a band approximately half an inch wide. -
Create the diamond pattern:
Inside the band, draw a series of connecting diamonds (rhombus shapes). Ensure the points of the diamonds touch the top and bottom lines of your band. -
Fill the negative space:
Color in the small triangular spaces between the diamonds and the parallel lines using your medium marker. This makes the white skin inside the diamonds stand out. -
Add detailed trim:
Draw two thinner parallel lines just above the main band. Fill the space between them with tiny, consistent vertical dashes for a rope-like texture. -
Connect the elements:
To unity the design, add a draped chain of dots connecting the bottom of the mandala section to the top of the armband. The dots should curve gently like a suspended necklace. -
Set the design:
Once the ink is fully dry to the touch, lightly dust the entire area with skin-safe setting powder to prevent smudging and reduce shine.
Make It Last
Apply a thin layer of liquid bandage or hairspray over the dried design. This seals the ink against friction and water, helping your artwork last for the whole day.
Enjoy wearing your intricate, hand-painted jewelry that moves with you
Tribal Flames Up the Forearm
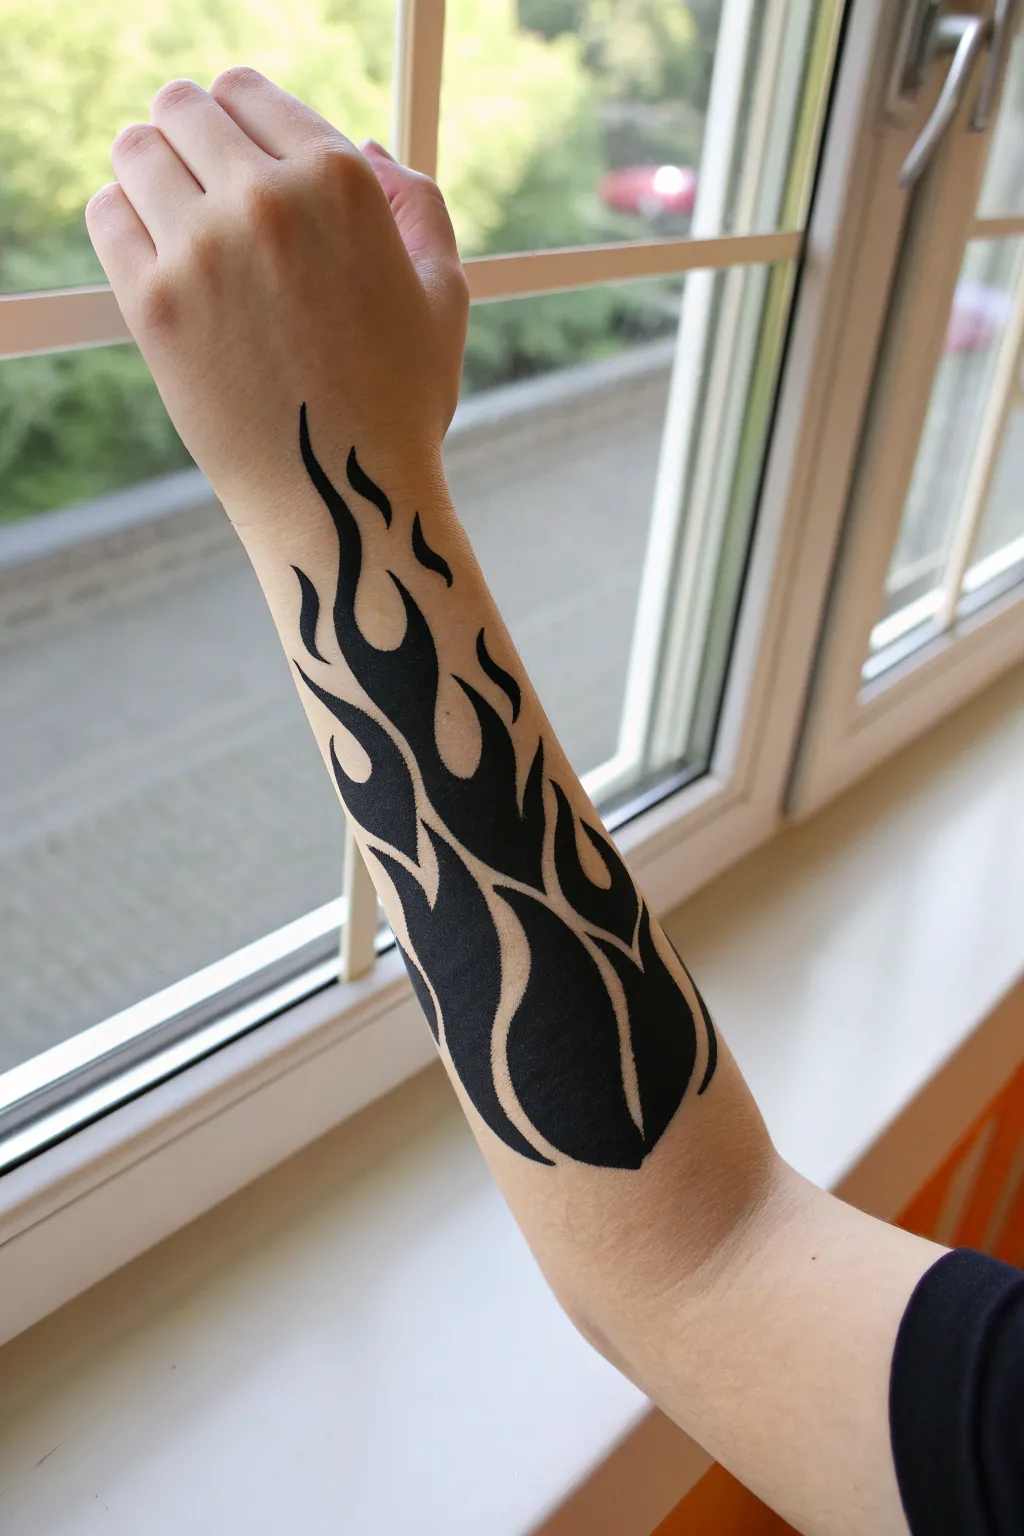
Embrace a bold, classic aesthetic with this striking black tribal flame design that travels up the forearm. This high-contrast body art mimics the look of a permanent tattoo while remaining completely washable, perfect for costumes or testing out placement ideas.
Step-by-Step Tutorial
Materials
- Black body paint (water-activated or alcohol-based)
- Small round detail brush (size 1 or 2)
- Medium flat or filbert brush (size 4 or 6)
- Setting powder or spray (optional)
- Skin-safe makeup remover wipes
- Reference image of tribal flames
Step 1: Planning and Outline
-
Prepare the canvas:
Ensure the forearm is clean, dry, and free of oils or lotions. This helps the paint adhere properly and prevents early smudge. -
Visualize the flow:
Before painting, visualize where the flames will sit. The design should start wider near the elbow and taper off towards the wrist, following the natural curve of the muscle. -
Mark the base points:
Using your small round brush with a very light amount of black paint (watered down slightly for faint lines), mark the bottom-most points of the flames near the elbow. -
Draft the central flamed peak:
Sketch the largest, central flame lick first. Draw a wavy, S-shaped line that extends upward from your base, curving slightly as it rises toward the wrist. -
Add flanking curves:
On either side of that central line, draw corresponding curves that mirror the movement but vary in height. These will form the ‘negative space’ between the solid black shapes. -
Close the shapes:
Connect your upward sweeping lines back down to the base to form sharp, pointed tear-drop or claw-like shapes. The tips should be razor-sharp.
Sharper Tips
To get needle-sharp points, lift your brush gradually off the skin as you reach the end of the stroke, ending with just the very few hairs of the brush tip touching.
Step 2: Filling and Refining
-
Switch brushes:
Move to your medium flat or filbert brush to handle the larger fill areas efficiently. Load it well with opaque black paint. -
Fill the core:
Paint the inside of your outlined shapes solidly black. Ensure there are no patchy or translucent areas; you want a deep, ink-like finish. -
Refine the points:
Switch back to your small detail brush. Carefully drag the paint out at the very tips of the flames to make them needle-sharp. This sharpness is what gives the design its aggressive tribal look. -
Add floating accents:
Look for empty spaces near the top of the design (closer to the wrist). Add one or two small, detached ‘floating’ flame wisps or droplets to balance the composition. -
Check the edges:
Inspect all the edges of your solid black shapes. They should be crisp and smooth, not fuzzy. Clean up any wobbles with a clean, slightly damp brush acting as an eraser. -
Maintain negative space:
Ensure the gaps of bare skin between the flame licks are consistent and distinct. I find that keeping these gaps narrow creates a more cohesive, intense look.
Shaky Lines?
Rest your pinky finger on the person’s arm (or a steady surface) while painting. This anchors your hand and gives you much greater control over fine details.
Step 3: Setting the Look
-
Let it dry completely:
Allow the paint to air dry. Avoid bending your arm or touching surfaces until the sheen turns matte. -
Apply setting powder:
If you are using water-activated paint, lightly dust translucent setting powder over the design with a fluffy brush to prevent transfer. -
Clean up stray marks:
Use a cotton swab dipped in makeup remover to tidy up any final mistakes or to sharpen a tip that looks too blunt.
Now you have a fierce, ink-black design that commands attention and washes off whenever you are ready for a change
Name Banner With Star Filler
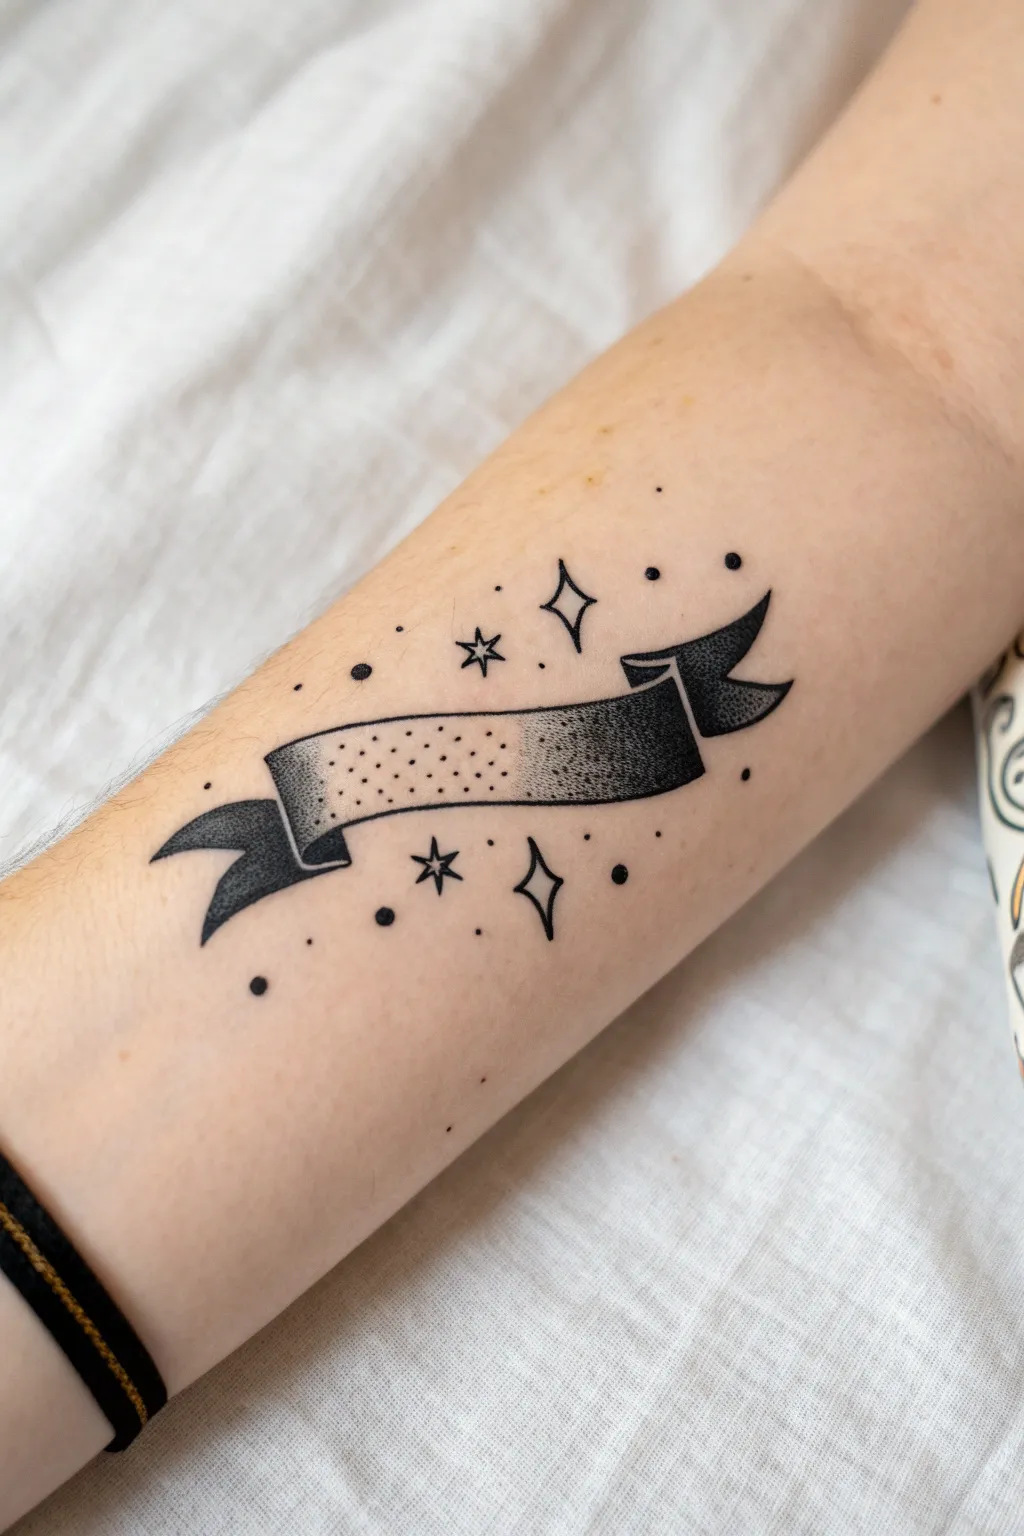
Achieve the classic look of a vintage tattoo without the commitment using this simple body painting tutorial. This design features a flowing ribbon banner with stipple shading and whimsical star accents, perfect for customizing with a name or word.
Step-by-Step
Materials
- Fine-tip black body art marker or cosmetic eyeliner pen (waterproof recommended)
- Medium-tip black body art marker
- Rubbing alcohol and cotton pads (for skin prep)
- Translucent setting powder
- Soft makeup brush
- Setting spray (optional)
Step 1: Preparation and Outline
-
Prep the canvas:
Begin by cleaning the area of the forearm where you want the design. Wipe it down with a cotton pad soaked in rubbing alcohol to remove natural oils, which helps the ink stay crisp and last longer. -
Draft the banner center:
Using your fine-tip marker, draw two parallel, wavy horizontal lines. These lines should curve slightly downward in the middle to create the illusion of a hanging ribbon. -
Close the ends:
Connect the two horizontal lines at both the left and right ends with vertical, slightly curved lines. This forms the main rectangular body of the banner where text would go. -
Add the banner tails:
Draw the folded ribbon tails. Start on the left side by drawing a shape that looks like a ‘V’ pointing inward, emerging from behind the main banner. Repeat this on the right side, ensuring the tails flow naturally. -
Create the folds:
Draw a small, curved triangle connecting the top corner of the banner body to the top edge of the tail on both sides. This simple line creates the illusion that the ribbon is folding backward.
Clean Lines Only
If your hand is shaky, rest your pinky finger against your arm as an anchor while drawing. If you make a mistake, use a Q-tip dipped in rubbing alcohol like an eraser to clean up edges immediately.
Step 2: Shading and Details
-
Thicken the outline:
Switch to your medium-tip marker or carefully go over your initial lines. This is a bold, traditional style, so the perimeter lines should be clean and slightly heavier than the inner details. -
Start the stippling:
Now for the shading technique called stippling. Using the fine tip, start placing tiny dots closely together inside the folded areas (the small triangles) and the very ends of the tails. -
Create a gradient:
Continue dotting inside the main banner body, starting heavily at the right and left edges and gradually spacing the dots out as you maximize distance toward the center. This creates a faded, shadowed effect. -
Darken the deep shadows:
I find it helpful to go back into the deepest corners—like where the ribbon folds—and add more dots until it looks almost solid black, fading out into the lighter grey of the spaced dots. -
Add texture dots:
Sprinkle a very light dusting of dots through the empty white space in the center. Keep these very sparse just to give the ‘paper’ some texture.
Custom Lettering
Before adding the final texture dots in the center, write a name or word in cursive. Thicken the down-strokes of the letters to match the boldness of the banner outline.
Step 3: Stars and Atmosphere
-
Draw primary stars:
Draw two or three larger four-pointed stars (diamond shapes with curved sides) floating above and below the banner. -
Add secondary stars:
Add smaller, standard five-pointed star shapes interspersed around the larger ones. Fill the centers of these small stars with black ink so they stand out. -
Scatter the magic dust:
Surround the banner and stars with varying sizes of solid black dots. Place larger dots closer to the banner and tiny pin-prick dots further away to mimic dispersed stardust. -
Set the design:
Once the ink is completely dry to the touch, lightly dust the area with translucent setting powder using a soft brush. This prevents the ink from smudging against clothes. -
Seal it in:
Finish with a quick spritz of setting spray held at arm’s length to lock in your artwork for the day.
Enjoy your customized, vintage-inspired body art that looks just like the real deal
Quick Galaxy Smudge With Splatter
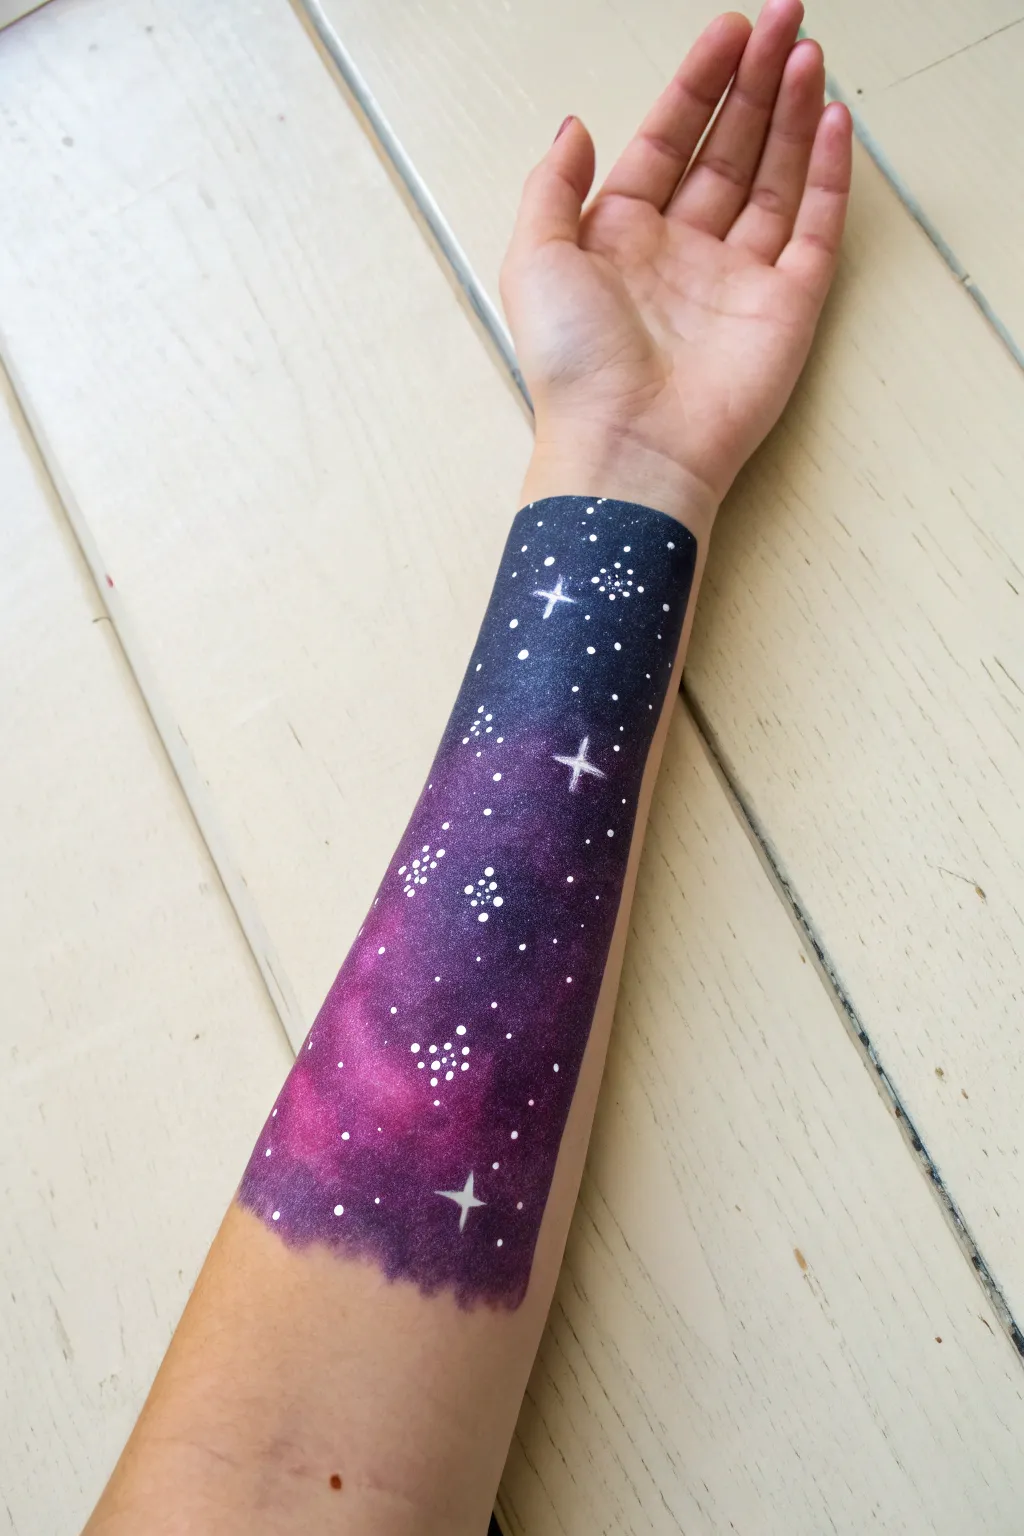
Transform your arm into a window to deep space with this striking geometric galaxy design. Using bold colors and sharp edges creates a stunning contrast that looks like a portal to the universe right on your skin.
Detailed Instructions
Materials
- Black face/body paint (water-activated)
- Dark blue face/body paint
- Purple face/body paint
- Pink face/body paint
- White face/body paint
- Flat brush (approx. 1 inch)
- Makeup sponge
- Fine detail brush (liner brush)
- Painter’s tape or Washi tape
Step 1: Preparation & Base Gradient
-
Prepare the area:
Clean and dry your forearm thoroughly. Position your arm comfortably on a flat surface, palm facing up. -
Define the boundaries:
Apply two long strips of painter’s tape along your forearm to create the side borders of your rectangle. Ensure they are straight and pressed down firmly to stop paint bleeding. -
Mark top and bottom:
Add two shorter pieces of tape horizontally across your wrist and midway up your forearm to close off the rectangular shape. -
Start with the darkest shade:
Dip your damp makeup sponge into the black paint. Dab this concentrated color firmly near the wrist end of the rectangle, establishing the ‘deep space’ zone. -
Introduce deep blue:
Load the sponge with dark blue paint. Blend this into the edge of the black section, moving upward. Dab repeatedly over the transition line to create a seamless smokey fade. -
Transition to purple:
Clean your sponge slightly or use a fresh side. Pick up the purple paint and stipple it into the blue area, continuing to work your way up the arm toward the elbow. -
End with pink nebula:
Finish the gradient by sponging bright pink paint at the very top of the rectangle. Blend it backward into the purple so there are no harsh lines between colors. -
Remove the tape:
Carefully peel away the tape while the paint is still slightly tacky. Pull away from the paint edge to keep the lines crisp and sharp.
Crisp Edge Trick
Before painting, press your tape down firmly and do a quick clear layer of water or transparent powder along the edge to seal it perfectly.
Step 2: Stellar Details
-
Mix the star paint:
Activate your white face paint with a little water until it has a creamy, opaque consistency perfect for detailed dots. -
Create distant stars:
Using your fine detail brush, gently tap random tiny dots all over the galaxy background. Vary the pressure to create different sizes of distant stars. -
Form star clusters:
Choose a few spots in the blue and purple zones to create clusters. Group 5-7 tiny dots close together to mimic distant galaxies or constellations. -
Draft the major stars:
Locate three or four spots for your brightest stars. Use the tip of the fine brush to paint a small vertical line at each spot. -
Complete the cross shape:
Paint a horizontal line crossing through the center of each vertical line. Make the center of the cross slightly thicker and taper the ends to sharp points. -
Refine the edges:
If any paint seeped under the tape, use a slightly damp cotton swab or a flat brush with concealer to crisp up the rectangular border. -
Illuminate the centers:
Add a tiny, concentrated dot of pure white in the dead center of your large cross-shaped stars to make them appear to face-glow. -
Final check:
Look over your galaxy for any empty looking patches and fill them with a few extra micro-dots to balance the composition.
Cosmic Shimmer
While the paint is still slightly damp, gently blow some cosmetic-grade iridescent glitter onto the arm for a sparkling real-life stardust effect.
Enjoy wearing this piece of the cosmos on your arm and watch how the stars pop against the dark gradient background


Have a question or want to share your own experience? I'd love to hear from you in the comments below!