Spray paint art is one of my favorite ways to get a big, bold result fast—especially when you’re craving something dramatic and satisfying. Here are some cool spray paint art ideas I come back to again and again when I want instant wow without overthinking it.
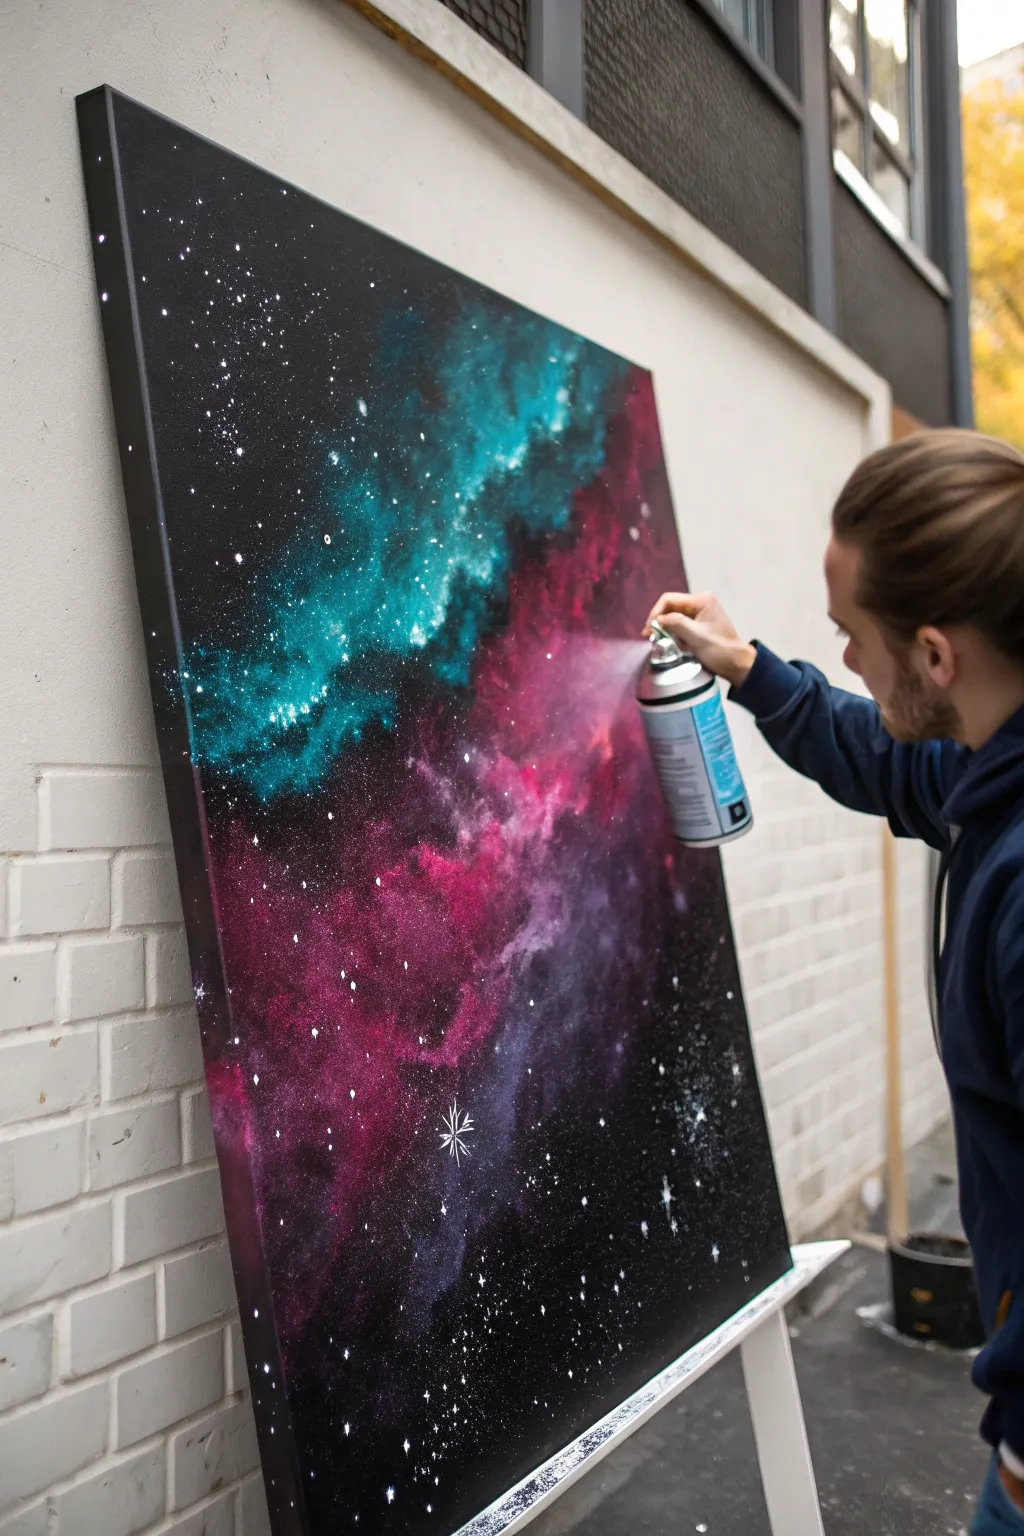
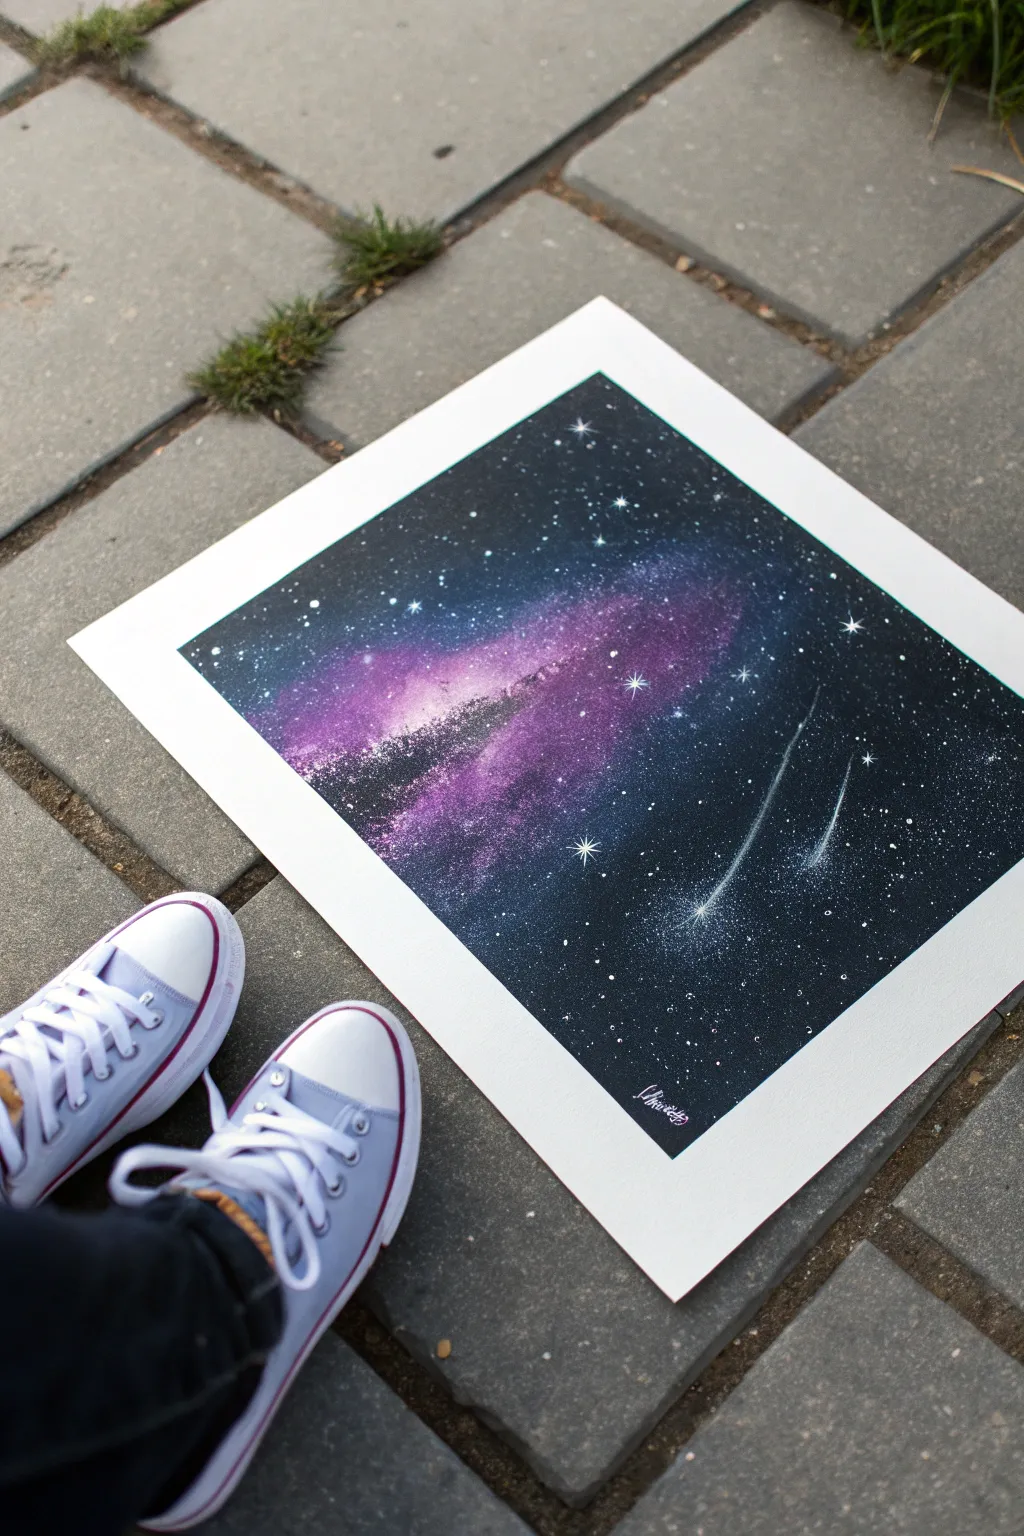
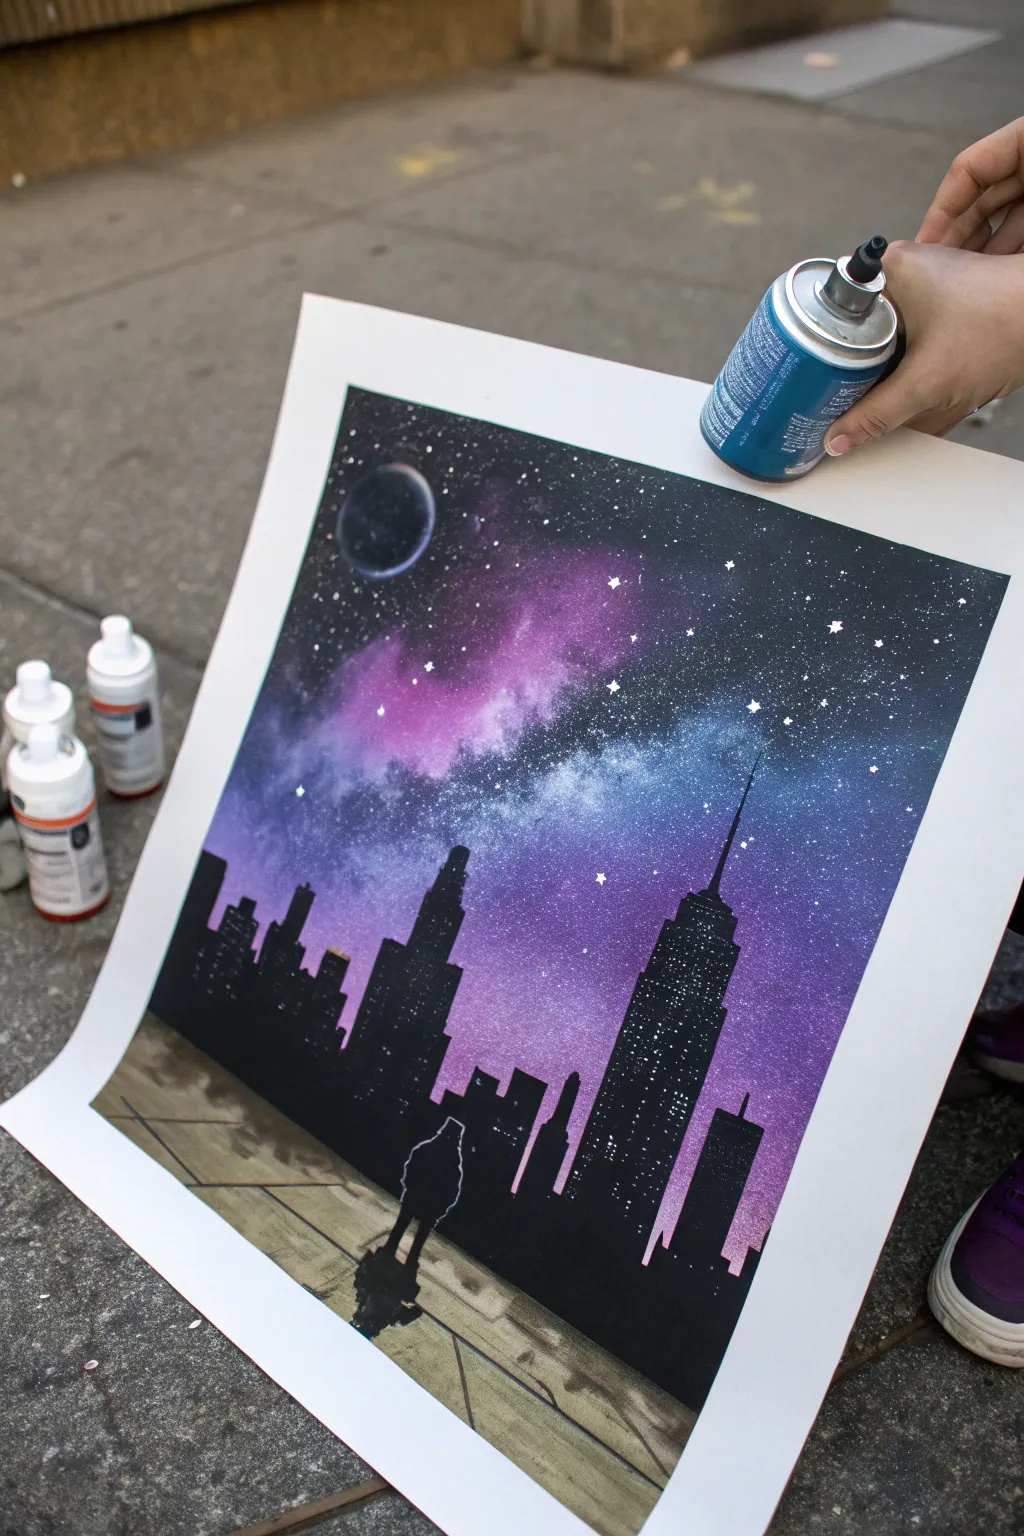
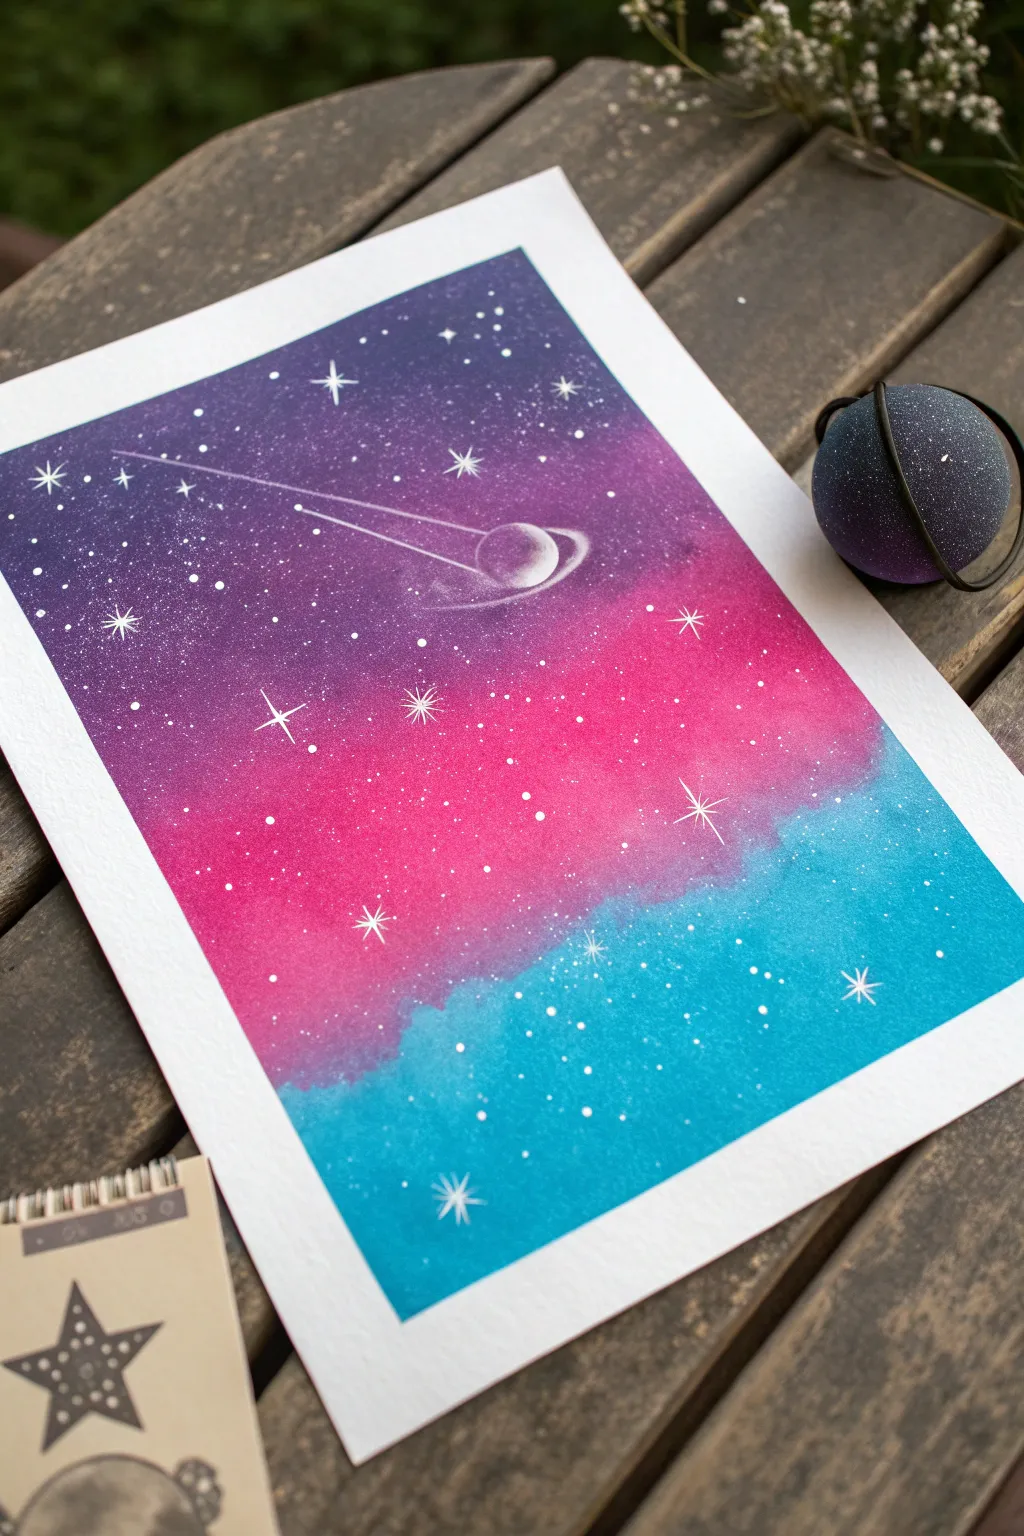
Classic Galaxy Space Scene
Transform a blank canvas into a stunning window to the cosmos with this vibrant galaxy painting. Featuring deep indigo voids, glowing teal nebulas, and sparkling starfields, this piece creates a mesmerizing focal point for any room.
Detailed Instructions
Materials
- Stretched canvas (16 x 20 inches recommended)
- Black acrylic paint or gesso
- Spray paint: Purple, Pink/Magenta, Teal/Cyan, Dark Blue
- White acrylic paint
- Old toothbrush
- Sponge or scrunched-up plastic bag
- Fine detail paintbrush
- Cardstock or paper plate (for masking/shielding)
- Water cup
- Gloss varnish spray (optional)
Step 1: Setting the Void
-
Prepare the workspace:
Since we are using spray paint, head to a well-ventilated area, preferably outdoors. Lay down a drop cloth or newspaper to protect your surroundings. -
Prime the base:
Coat your entire canvas with black acrylic paint or black gesso. This ensures the deepest possible background for your stars to pop against. -
Let it dry completely:
Ensure the black base coat is fully dry to the touch before introducing any spray paint, as moisture can cause cracking later. -
Establish the cloud path:
Visualize a diagonal line running from the top left to the bottom right. This will be the main path of your nebula cloud.
Nebula Texture Trick
Use a torn piece of magazine paper as a shield while spraying. Move it around quickly to create sharp, layered cloud edges.
Step 2: Layering the Nebula
-
Apply the purple layer:
Shake your purple spray can vigorously. Lightly spray the upper section of your diagonal path, keeping the nozzle about 10 inches from the canvas for a soft, diffused edge. -
Add magenta highlights:
While the purple is still tacky, spray bursts of pink or magenta into the center of the purple cloud to create a glowing core and color depth. -
Create the teal section:
Moving down the diagonal path, spray your teal or cyan paint. Allow it to slightly overlap with the purple area to create a beautiful transitional blue hue. -
Deepen with dark blue:
Spray dark blue along the outer edges of the colored clouds to blend them seamlessly back into the black void. -
Texture with a sponge:
Immediately after spraying, take a sponge or scrunched plastic bag and gently dab the wet paint. This lifts some pigment and creates that organic, gaseous texture seen in real nebulas. -
Soften the edges:
If any lines look too harsh, spray a tiny bit of black paint onto your sponge and dab the edges of the colorful clouds to fade them out.
Step 3: Illuminating the Stars
-
Prepare the star paint:
Dilute a small amount of white acrylic paint with water. You want a consistency similar to heavy cream or fluid ink. -
Load the toothbrush:
Dip your old toothbrush into the watered-down white paint, tapping off any huge drips. -
Flick the galaxy:
Hold the brush over the canvas and run your thumb across the bristles to flick tiny specks of paint. Vary your distance to create different star sizes. -
Add distant stars:
Concentrate a finer mist of stars within the colored nebula sections to make them look dense and glowing. -
Paint major stars:
Using your fine detail brush and pure white paint, manually dot a few larger stars scattered around the black space. -
Create the flares:
Select the 3-5 brightest stars to turn into ‘flares.’ Paint a thin vertical line through the center dot, tapering at the ends. -
Cross the flares:
Paint a horizontal line crossing the vertical one, making it slightly shorter. This creates the classic four-point star shine effect. -
Final varnish:
Once the acrylic stars are completely dry (give it at least an hour), seal the piece with a clear gloss spray to unify the sheen and protect the colors.
Add a Planet
Place a pot lid or round bowl on the canvas before spraying your background colors to reveal a perfect black planet silhouette.
Hang your new masterpiece in a well-lit area to let those vibrant cosmic colors truly shine


Planet Reveal With Circular Masks
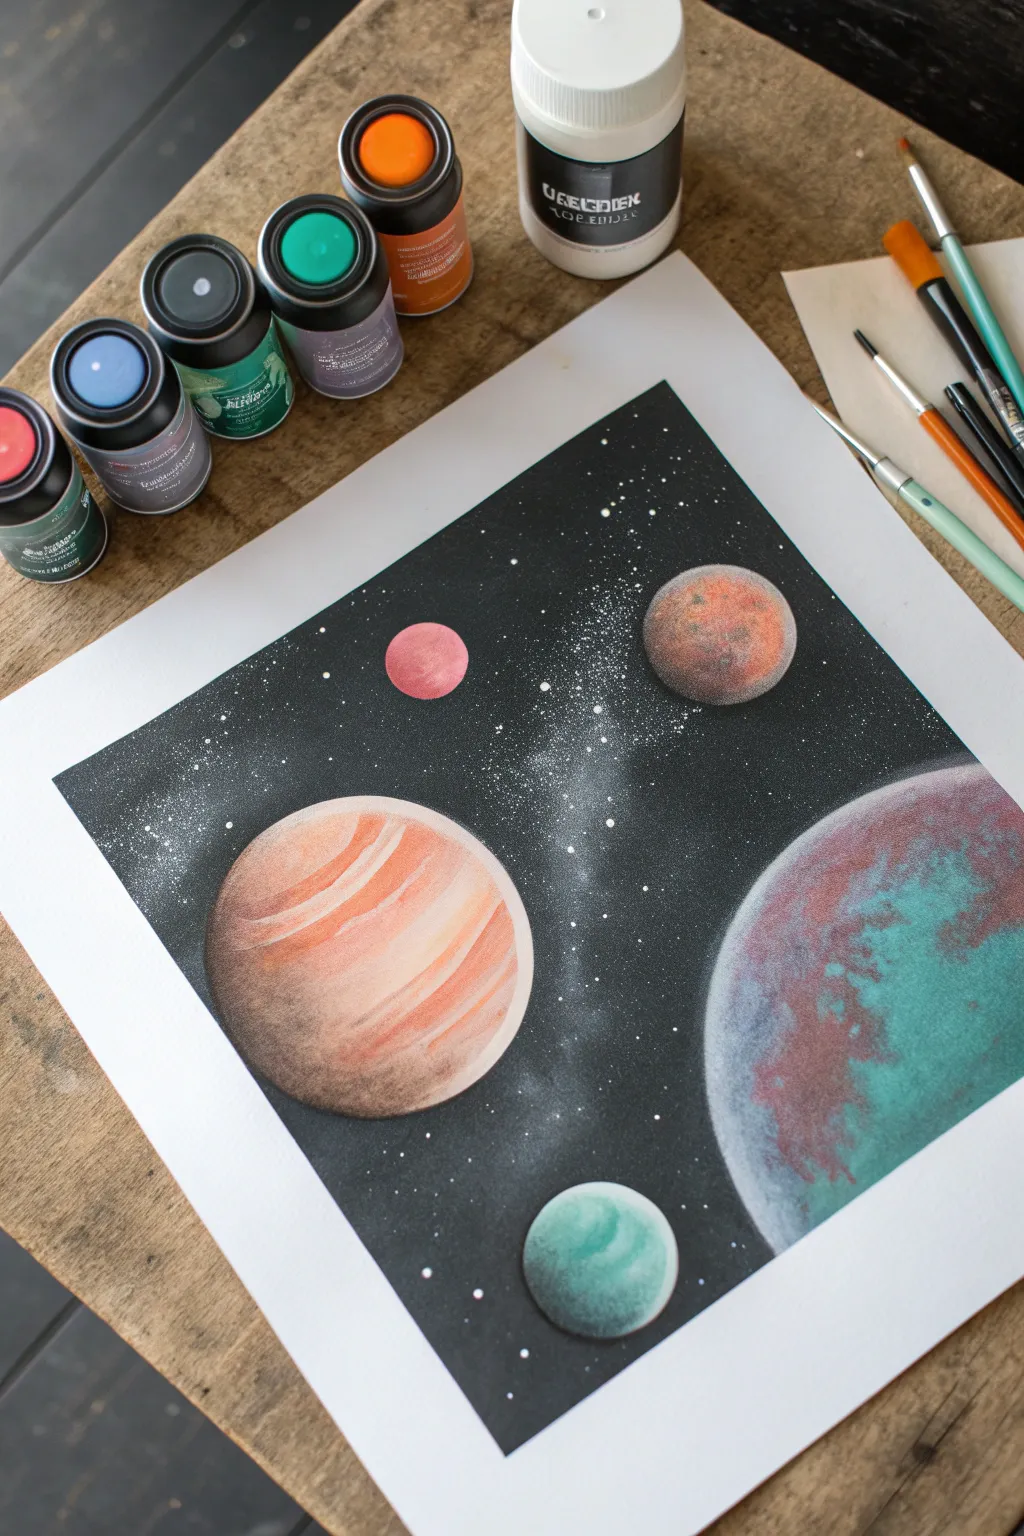
Create a stunning cosmic landscape featuring vibrant, textured planets set against a deep, starry void. This project uses the classic spray paint art technique of layering colors and using circular objects as masks to reveal perfectly round celestial bodies.
Step-by-Step Guide
Materials
- Glossy poster board or heavy cardstock (white)
- Spray paint cans (Black, White, Orange, Teal, Red, Purple/Pink)
- Circular objects for masking (jar lids, caps, bowls of various sizes)
- Magazine pages or scrap glossy paper (for texture)
- Protective gloves and mask
- Drop cloth or newspapers
- Weights (old nuts, bolts, or heavy washers) to hold masks down
Step 1: Painting the Planet Base Layers
-
Plan Layout:
Before spraying, arrange your circular caps and lids on the paper to decide where your planets will live. I like to place the largest planet in a corner to anchor the composition. -
Paint the Large Planet:
Remove the masks for now. In the bottom right area where your largest planet will go, spray a patch of Teal followed by touches of Red and White. Don’t worry about staying in lines; just cover an area slightly larger than your mask. -
Add Texture:
While the paint is still wet, crumple a piece of glossy magazine paper. Gently press it onto the wet paint and lift it off instantly to create vein-like surface textures. -
Shade the Edge:
Spray a quick burst of Black on the bottom-right edge of this colored patch to create a shadow side for your planet. -
Paint the Striped Planet:
Move to the middle-left area for the medium planet. Spray bands of Orange, White, and a tiny bit of Red. Instead of crumpling paper, lay a flat sheet of magazine paper over it and swipe your fingers across to smear the bands together, creating a gas giant effect. -
Paint Smaller Planets:
Repeat the coloring (Teal/White for bottom, Red/Orange for top right) and texturing process for the remaining smaller planet areas. Ensure each spot is slightly larger than the mask you intend to use.
Sticky Caps?
If lifting the caps tears the paper, your paint was too thick or dried too long. Twist the cap slightly before lifting to break the seal without tearing.
Step 2: Masking and Background
-
Apply Masks:
Once your colored textured spots are ready (they don’t need to be dry), carefully place your circular lids and bowls directly over the artwork. Ensure they completely cover the colorful planet areas. -
Secure Masks:
If painting outdoors, place a small weight (like a heavy nut or stone) on top of each cap to prevent the wind or the force of the spray from moving them. -
Spray the Void:
With all masks securely in place, spray the entire remaining white space with Black spray paint. Apply even coverage until the white paper is completely hidden. -
Create the Galaxy:
While the black is wet, take your White spray paint and engage the nozzle very gently—so it ‘spits’ rather than sprays—or spray onto your gloved fingers and flick it across the center to create a milky way band. -
Add Stars:
Spray a small puddle of white paint onto a scrap piece of cardboard. Dip a toothbrush or stiff brush into it and flick the bristles to sprinkle fine white stars across the black background.
Comet Trails
Turn a can of white upside down and quick-spray while moving your hand fast across the sky to create shooting stars or comet tails.
Step 3: The Reveal
-
Dry Briefly:
Let the painting sit for about 5-10 minutes. You want the black paint to be tacky but not dripping wet when you remove the masks. -
Lift the Masks:
Carefully lift each cap straight up. Do not slide them, or you will smear the sharp circular edge of your planets. -
Check for Bleeds:
If any black paint leaked under a mask, wait for it to dry completely, then gently scrape it away with a craft knife or touch it up with a small brush. -
Final Clear Coat:
Once the entire piece is fully dry (usually at least an hour), seal it with a clear gloss spray to make the colors pop and protect the surface.
Hang your new celestial masterpiece on the wall and enjoy the view of your personal galaxy


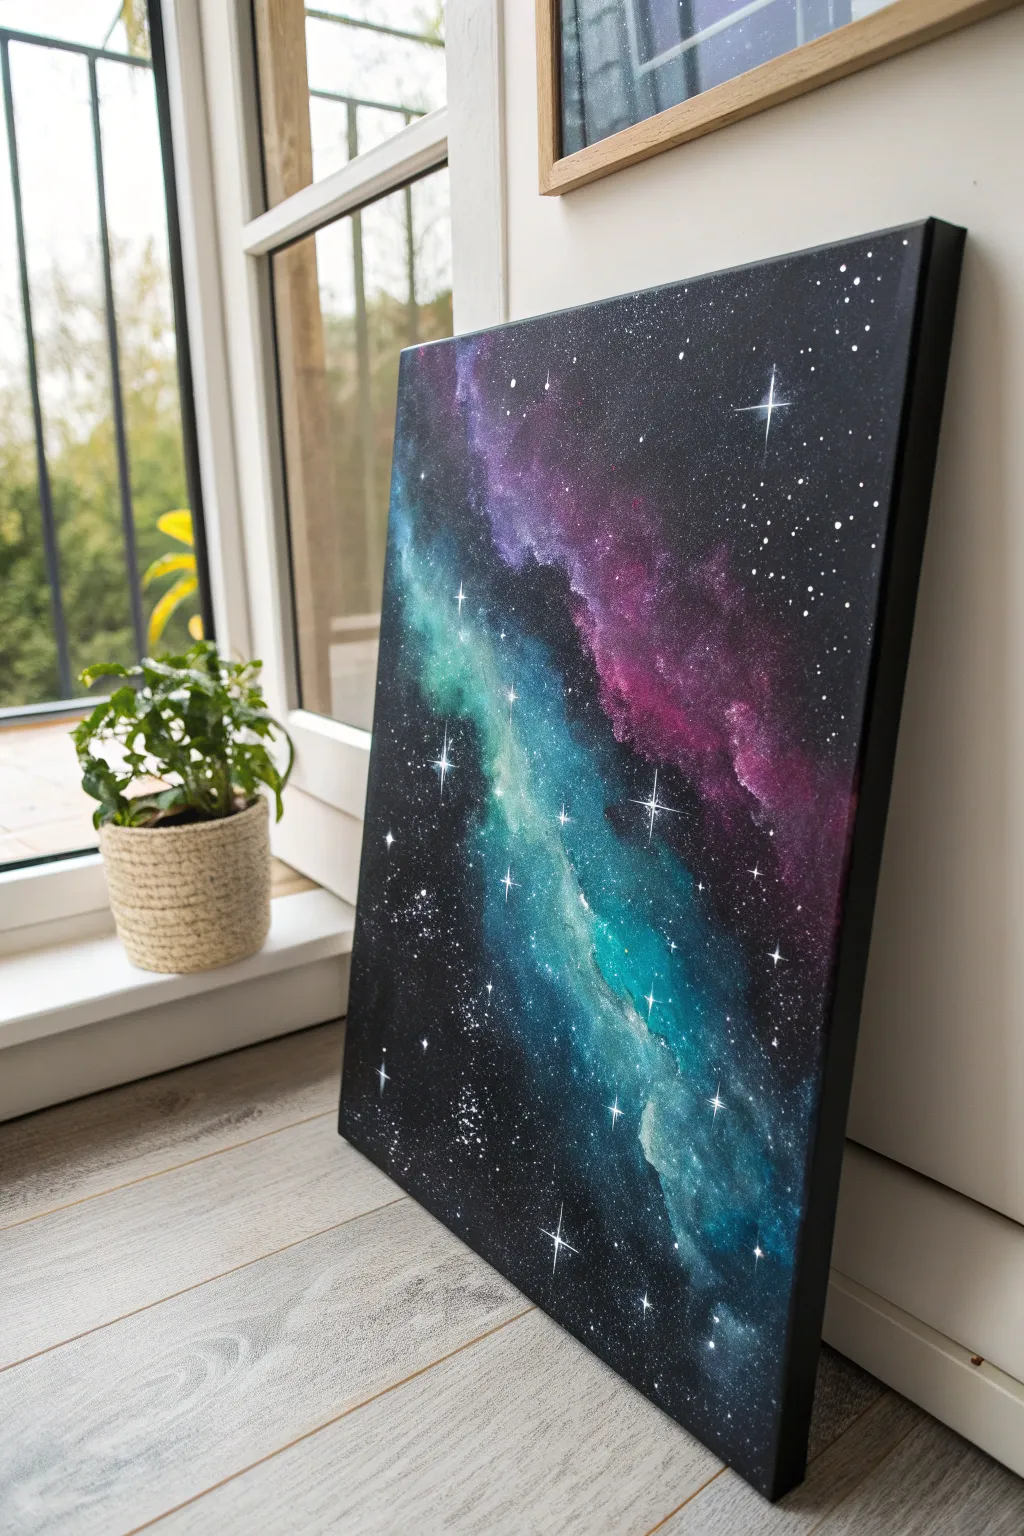
Nebula Clouds With Soft Layering
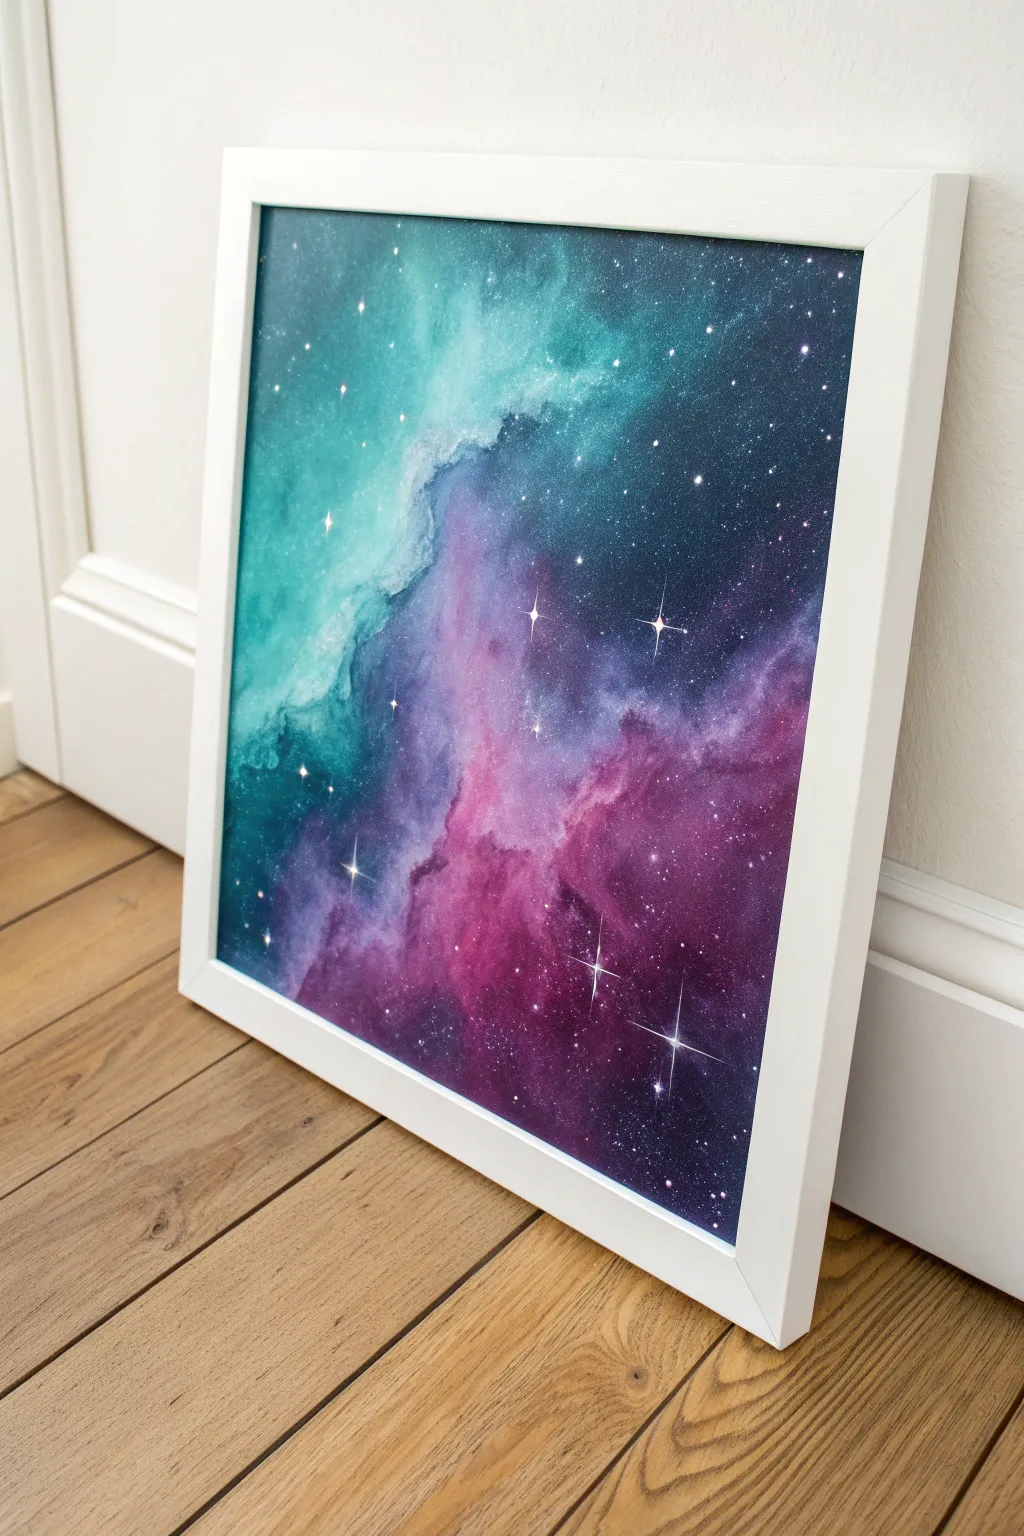
Capture the vast beauty of outer space with this ethereal nebula painting, featuring soft, billowing clouds of teal and magenta against a deep cosmic background. This project teaches you how to achieve smooth, misty transitions and striking starbursts using simple spray paint techniques.
How-To Guide
Materials
- Glossy poster board or heavy cardstock (white)
- Spray paint: Teal/Aqua
- Spray paint: Magenta/Purple
- Spray paint: Deep Blue/Navy
- Spray paint: Black
- Spray paint: White
- Newsprint or crumpled magazine pages
- Plastic gloves
- Respirator mask
- Make-up sponge or small piece of cardstock (for stars)
- Palette knife or old credit card (optional for stars)
Step 1: Laying the Cosmic Foundation
-
Prepare your workspace:
Set up in a well-ventilated area, preferably outdoors. Lay down a large drop cloth or cardboard to catch overspray. Secure your poster board flat on the surface. -
Apply the bright base:
Start by spraying a diagonal band across the paper. Use your teal or aqua spray paint for the upper left corner, letting it fade towards the center. Apply the magenta or purple in the lower center area, slightly overlapping the teal. -
Texture the clouds:
While the paint is still wet—speed is key here—crumple a sheet of newsprint or a magazine page into a loose ball. -
Lift and layer:
Gently dab and roll the crumpled paper over the wet teal and purple areas. This lifting technique removes some paint to reveal the white underneath and creates the organic, cloud-like texture of the nebula. -
Deepen the background:
Spray your deep blue paint around the edges of your colored nebula clouds. Allow the spray to mist lightly over the edges of the teal and purple to create a soft transition, rather than a hard line.
Muddled Colors?
If colors turn brown or gray, you’re over-blending. Let layers dry slightly or use a fresh paper for texture lifting to keep hues distinct.
Step 2: Building Depth and Darkness
-
Add the void:
Take your black spray paint and focus on the outer corners and the far edges of the paper. This creates a vignette effect that draws the eye toward the bright colors in the center. -
Blend the shadows:
Lightly mist some black over parts of the deep blue sections to create pockets of deep space. Be careful not to cover your bright nebula clouds completely. -
Second texture pass:
I generally like to take a fresh piece of crumpled paper and lightly dab the transition zones where the black meets the colors. This softens the gradient and makes the nebula look like it’s fading into the darkness. -
Review the composition:
Step back and look at your work. If the colors look too dim, you can add a quick, targeted burst of purple or teal back into the center and re-dab with paper for vibrancy.
Pro Tip: Soft Glow
Before adding stars, spray a tiny, quick burst of misted white over the brightest center spots to make the nebula look like it’s glowing from within.
Step 3: Creating the Starfield
-
Prepare the stars:
Spray a small puddle of white paint onto a piece of scrap cardboard or plastic. -
Flick the stars:
Dip your gloved fingers or a stiff brush into the white paint puddle. Flick the paint swiftly towards the canvas to create a spray of tiny white dots. Vary your distance to change the cluster density. -
Identify major stars:
Choose 3 to 5 spots where you want prominent, shining stars. These usually look best in the darker transition areas or right on the edge of a cloud. -
Create the flare tool:
To make the cross-shaped flares, spray white paint onto the edge of a palette knife, a piece of stiff cardstock, or even a folded piece of paper. -
Stamp the vertical line:
Gently press the painted edge vertically onto your chosen star location to create a thin white line. -
Stamp the horizontal line:
Re-apply paint to your tool and stamp a horizontal line directly across the vertical one, forming a cross. -
Add the center point:
using a can nozzle or just a fingertip with a tiny dot of white paint, press gently right at the intersection of the cross to make the star’s glowing core.
Step 4: Finishing Touches
-
Dry thoroughly:
Let the painting sit undisturbed for at least 30 minutes to an hour. Glossy poster board can take a little longer to cure than canvas. -
Clear coat (optional):
For extra shine and protection, apply a clear gloss topcoat over the entire piece once it is fully dry. -
Frame your art:
Once cured, place your artwork in a white frame to make the deep colors pop, just like in the reference photo.
Now hang your masterpiece and enjoy your personal window into the cosmos


Comets And Shooting Stars
Capture the ethereal beauty of deep space with this stunning spray paint project featuring a vibrant purple nebula and trailing comets. Using simple household items and a few cans of spray paint, you can create a professional-looking galaxial scene right on your driveway.
How-To Guide
Materials
- Glossy poster board or photo paper (white)
- Spray paint (Black, White, Purple, Dark Blue, Magenta)
- Painter’s tape or masking tape
- A straight edge or scrap piece of poster board
- Old magazine pages or newspaper (for texture)
- Cardboard box or drop cloth (for surface protection)
- Respirator mask and gloves
Step 1: Setting the Stage
-
Prepare your workspace:
Set up outside or in a very well-ventilated area. Lay down your drop cloth or flatten a cardboard box to protect the ground from overspray. -
Create the border:
Place your glossy poster board in the center of your workspace. Use painter’s tape to tape down all four edges of the paper, creating a clean white frame around your future artwork. Press the tape down firmly to prevent paint bleeding.
Step 2: Creating the Nebula
-
Lay down the nebula base:
Start by spraying a diagonal swath of color across the center of your paper where you want the galaxy to be. Use your Magenta and Purple spray paints, blending them slightly as you spray. -
Add highlights:
While the purple paint is still wet, spray small bursts of White and light Blue into the center of the colored area to create the glowing core of the nebula. -
Texture with magazine technique:
Crumple a piece of magazine page or newspaper into a loose ball, then flatten it out slightly. Lay it over the wet paint and gently press down with your fingers. -
Lift for texture:
Peel the paper back up carefully. This lifts some pigment and creates disjointed, organic patterns that mimic gas clouds and space dust. Repeat in a few spots if needed, but don’t overdo it—you want to keep some solid color.
Nebula Nuance
Don’t cover your entire nebula with black shadow. Leaving bright, white ‘hot spots’ in the center makes the galaxy look illuminated from within.
Step 3: Darkening the Void
-
Fill the background:
Spray Black paint around the edges of your colorful nebula, covering the remaining white space on the paper. I suggest spraying from the corners inward. -
Blend the edges:
Lightly mist some Black over the very edges of your purple nebula to soften the transition, making the galaxy look like it is fading into the darkness of space. -
Deepen with blue:
Spray a very light, quick mist of Dark Blue over parts of the black and the edges of the nebula to add depth and dimension to the void. This prevents the background from looking flat.
Cosmic Colors
Try a teal and lime green combination instead of purple for a ‘radioactive’ nebula look, or use reds and oranges for a fiery supernova effect.
Step 4: Stars and Comets
-
Simple star field:
Spray a small puddle of White paint onto a scrap piece of cardboard. Dip your fingers (gloved!) into the paint and flick them toward the canvas to create a splatter of tiny stars. Change the distance of your flick to vary star sizes. -
Create the comet heads:
To make the comets, turn your can of White spray paint upside down. Position the nozzle very close to the paper where you want the comet head to be and give it a quick, sharp burst. This creates a concentrated dot with a soft halo. -
Form the comet tails:
Take a scrap piece of straight-edged poster board. Place the edge touching the bottom of your white comet dot. Angle the board in the direction you want the tail to trail. -
Spray the tail:
Spray a quick burst of white paint onto the scrap board itself, letting the overspray drift off the edge and onto your painting. This creates a soft, fading tail effect behind the comet head. -
Add large detailed stars:
For the brighter ‘hero’ stars with points, hold a piece of cardstock just above the paper to mask an area. Spray white against the edge to create a straight flare. Rotate the cardstock 90 degrees and spray again to create a cross shape. Do this sparingly for 2-3 major stars.
Step 5: The Final Reveal
-
Let it dry:
Allow the painting to sit for at least 10-15 minutes until the surface is tacky or dry to the touch. -
Remove the tape:
Slowly peel away the painter’s tape from the borders. Pull the tape away from the center of the painting at a sharp angle to ensure a crisp, clean white line.
Peel back that tape and admire the miniature universe you’ve just brought into existence
BRUSH GUIDE
The Right Brush for Every Stroke
From clean lines to bold texture — master brush choice, stroke control, and essential techniques.
Explore the Full Guide
Sunrise Glow On A Planet Edge
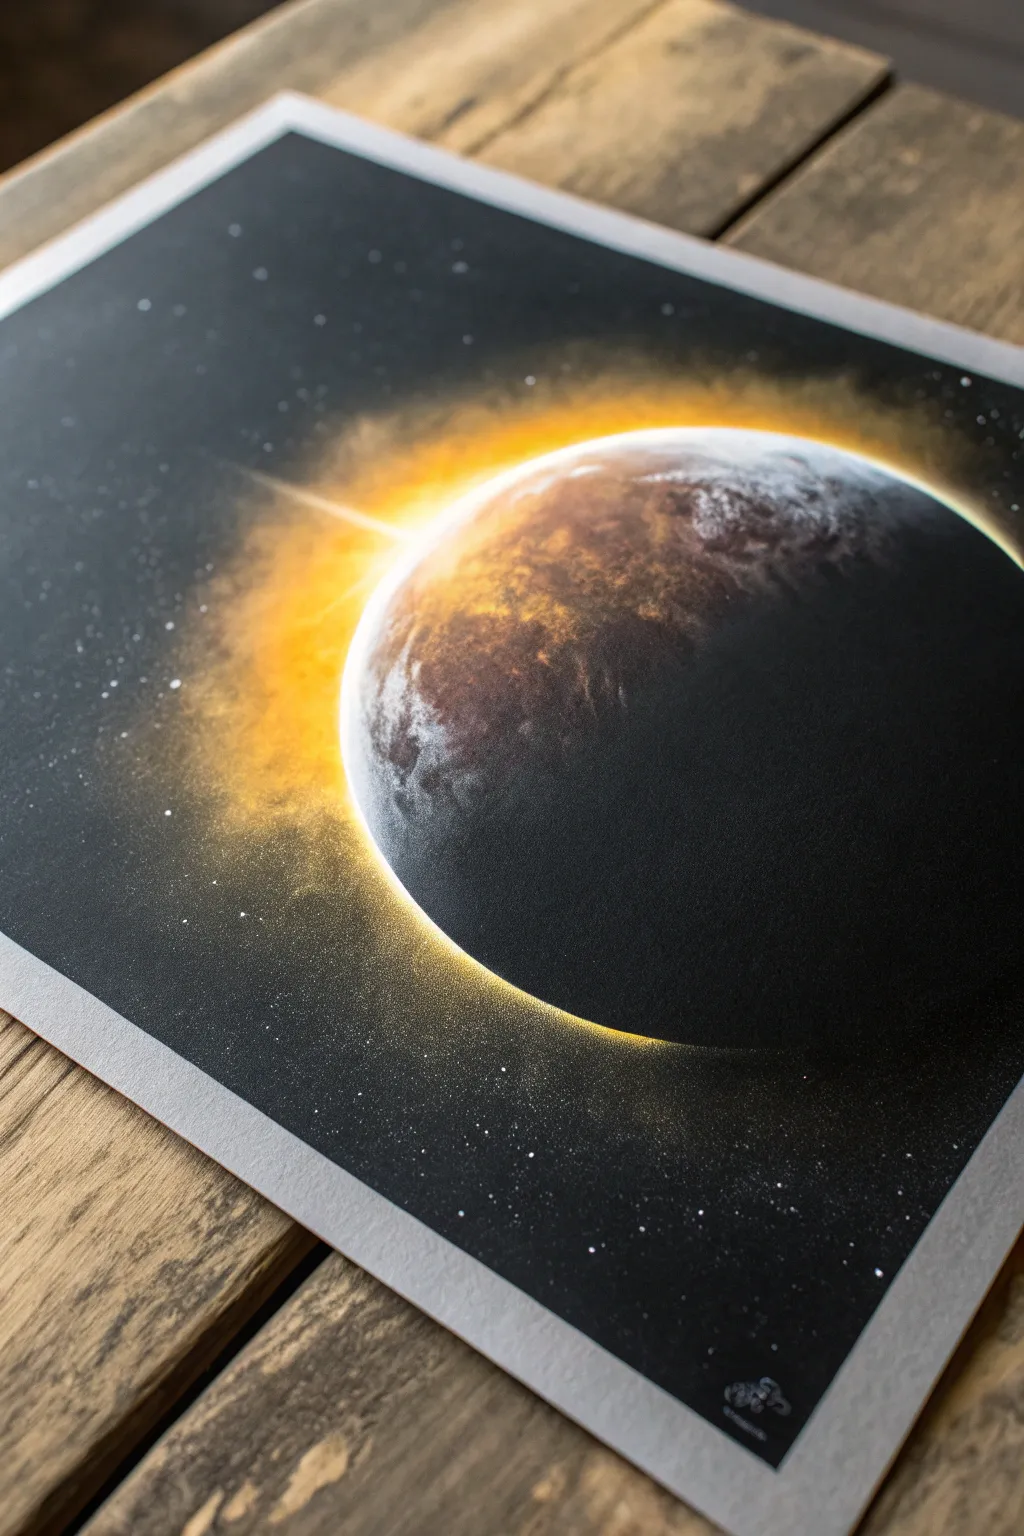
Capture the breathtaking moment a star peeks around a celestial body in this dramatic spray paint project. The contrast between deep velvet space and the blazing orange corona creates an eye-catching glow that looks far more complex to achieve than it actually is.
Step-by-Step Guide
Materials
- Glossy poster board or photo paper (white)
- Black spray paint
- Yellow spray paint
- Orange spray paint
- White spray paint
- Circular stencil (lid, bowl, or cutout)
- Newsprint or magazine pages (for texture)
- Straight edge or piece of stiff cardstock
- Painter’s tape or a small weight
Step 1: Creating the Planet Base
-
Lay the Foundation:
Start by placing your planet stencil (like a round lid) on the paper to visualize where your planet will live. Remove it for now, then spray that specific area with layers of yellow and orange paint. Don’t worry about neatness; you just need color in that general circular zone. -
Add Texture Layers:
While the yellow and orange paint is still wet, lightly mist a small amount of white spray paint over the top, focused on the upper-left quadrant where the light source will be strongest. -
Apply Black Shadow:
Spray a heavy coat of black paint over the bottom-right section of your colored circle. This dark area will become the shadowed side of the planet facing away from the sun. -
Texturizing Technique:
Immediately crumple a piece of magazine paper or newsprint. Open it slightly, lay it flat over your wet paint circle, and gently run your hand over it. Lift the paper straight up to reveal a chaotic, crater-like texture created by the paint lifting off.
Paint Leaking Under Lid?
If your planet’s edge looks fuzzy, your stencil wasn’t heavy enough. Place a rock or heavy nut on top of the lid next time to ensure a tight seal against the paper.
Step 2: Masking and Background
-
Mask the Planet:
Place your circular object (lid or bowl) directly over the textured paint area. Ensure the edges align perfectly with the shape you want to preserve. You can place a small weight on top to keep it from shifting. -
Deep Space Black:
Spray the entire remaining white surface of the poster board with black paint. Apply even, sweeping coats to ensure a totally opaque, deep background. I like to do two lighter coats rather than one heavy one to avoid drips. -
Starry Specks:
Spray a tiny amount of white paint onto a piece of scrap card or your gloved fingertips. Flick the paint toward the wet black background to create distant stars. Vary the size of your flicks for depth.
Step 3: The Sunrise Glow
-
Adding the Corona:
With the circular cover still firmly in place, take your yellow spray paint. Aim mostly at the cover itself, but let the overspray catch the upper-left edge of the planet’s rim. This creates the soft, glowing halo effect. -
Deepening the Burn:
Repeat the previous step with a quick burst of orange paint, but keep it tighter to the edge than the yellow. This adds heat and intensity to the sunrise. -
Creating the Flare:
Take a piece of stiff cardstock or a putty knife. Hold it perpendicular to the paper, angled toward the light source. Spray a quick burst of white paint against the cardstock so it deflects onto the paper in a sharp line, creating a lens flare shooting out from the glow.
Cosmic Cloud Addition
Before removing the lid, quickly spray patches of transparent blue or purple nearby. Use a crumpled bag to dab it, creating nebulae clouds around your planet.
Step 4: Reveal and Finish
-
The Reveal:
Wait about 30 seconds for the tackiness to set slightly, then carefully lift the circular object straight up. Do not slide it, or you will smear the sharp edge of your planet. -
Review Edges:
Inspect the crisp line where the black space meets the planet. The glow should naturally bleed outward, while the shadow side remains sharp against the background. -
Final Star Touch-ups:
If your stars got covered by the glow overspray, you can add a few fresh white specks near the light source for extra sparkle. -
Clear Coat (Optional):
Once the piece is fully dry (give it at least 20 minutes), you can seal it with a clear gloss spray to make the colors pop and protect the surface.
Hang your new celestial artwork in a spot that needs a burst of dramatic light and color
Moon Phases In Space
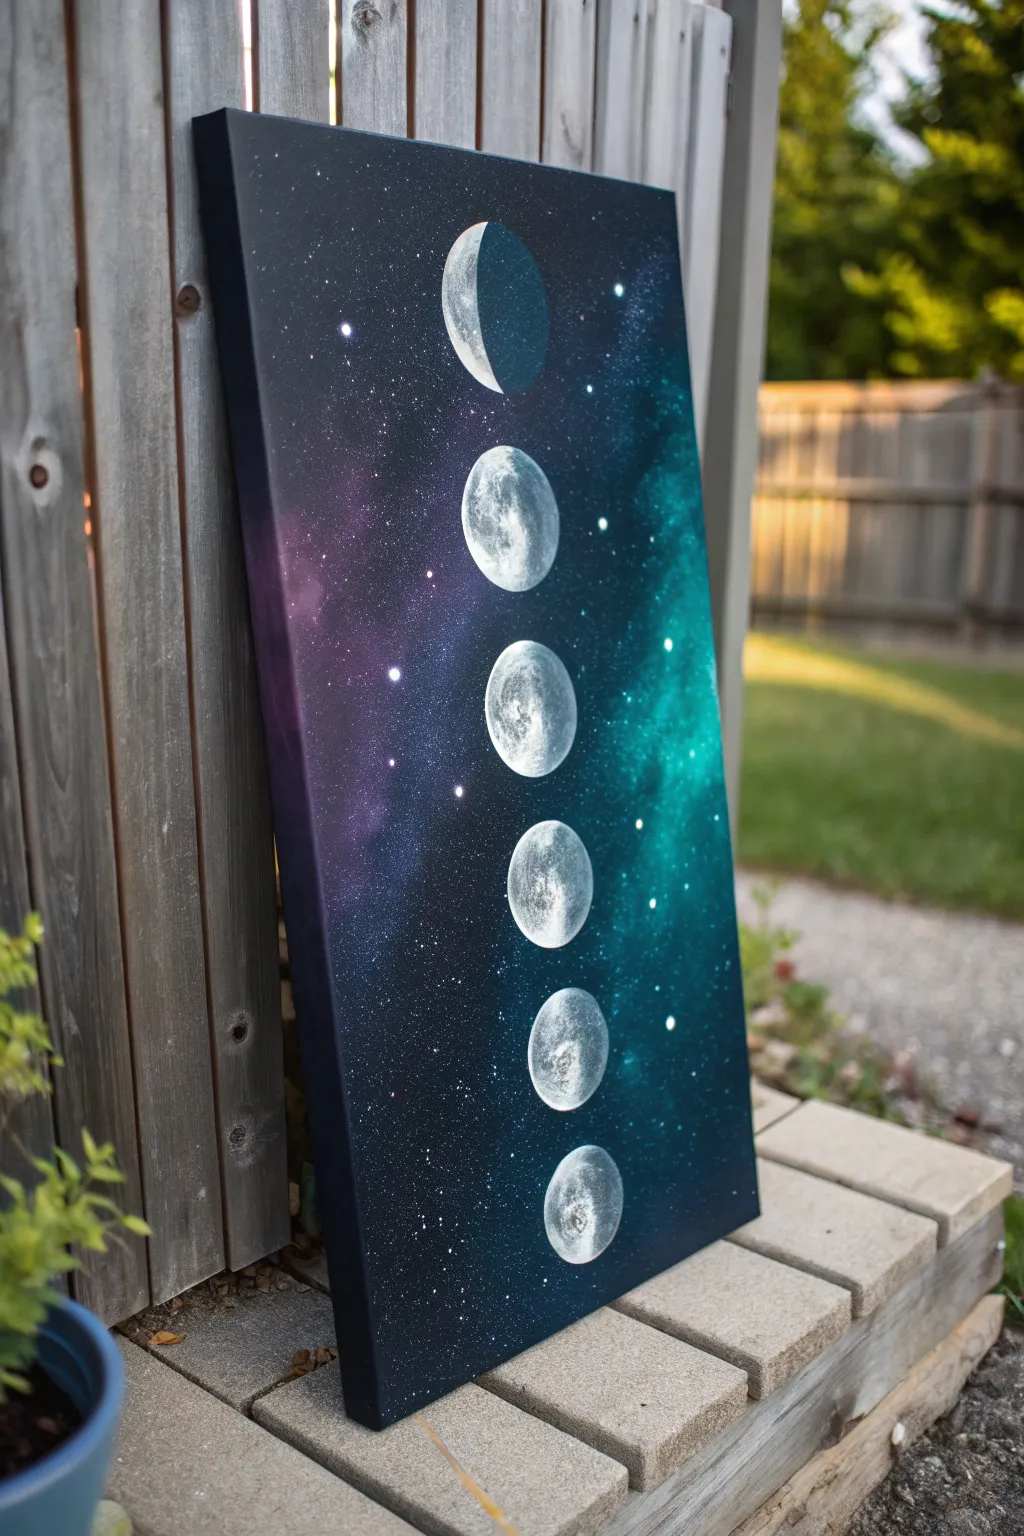
Capture the mystic progression of the lunar cycle with this striking vertical spray paint art piece. By combining deep galaxy hues with crisp, textured moon stencils, you’ll create a stunning cosmic window perfect for any space-themed room.
Step-by-Step Tutorial
Materials
- Tall rectangular canvas (12×24 inch or similar)
- Spray paint: Black, White, Purple, Teal/Turquoise, Navy Blue
- 6 circular objects of identical size (roughly 2.5-3 inches diameter) – jar lids, cut cardboard, or foam shapes
- Glossy magazine paper or poster board (for texture)
- Newspaper or drop cloth
- Painter’s tape (optional)
- Gloves and respirator mask
Step 1: Planning and Texturing
-
Prepare the canvas:
Set up your workspace in a well-ventilated area, laying down drop cloths. If using a standard stretched canvas, ensure it is clean and dust-free. -
Map out the moon positions:
Place your six circular objects (lids work best) in a vertical line down the center of the canvas to visualize spacing. They should be evenly distributed from top to bottom. -
Lay the base texture color:
Remove the lids. Spray the areas where the moons will go with a generous layer of white spray paint. You can add tiny spots of light grey for extra crater depth if desired. -
Add moon texture:
While the white paint is still wet, crumple a piece of glossy magazine paper. Gently press it onto the wet white circles and lift it off immediately. This creates the organic, crater-like texture characteristic of spray paint planets. -
Create the phases:
Now, decide on your phases. The image shows a progression. For the crescent moon at the top, place a circular object slightly offset over the white paint to mask off the ‘dark’ part of the moon, leaving a crescent shape exposed. For full moons, leave the white circle fully exposed. For gibbous moons, cover a small sliver. -
Apply the shadow layer:
Lightly mist black spray paint over the parts of the moon you want to be in shadow (the areas *not* covered by your offset stencils). This is a crucial step to define the phase shape before masking everything.
Shadow trick
To get the crescent shape right, spray black over a portion of your white circle BEFORE placing the cover lid. The black paint acts as the shadow side of the moon.
Step 2: Creating the Galaxy
-
Mask the moons:
Once the texture layer is tacky or dry, place your circular objects (lids) exactly over the moon shapes you created. Ensure the edges are sealed well so no background color leaks onto your white moons. Weigh them down with small rocks if painting flat on the ground. -
Apply the darkest background:
Spray the entire remaining canvas with black paint to establish a deep space base. Cover the sides of the canvas as well for a professional finish. -
Introduce the nebula colors:
Spray a diagonal streak of teal or turquoise down the right side of the canvas, keeping the bursts random and cloudy. -
Add secondary nebula tones:
On the left side, spray patches of purple, allowing it to fade into the black center. Overlap slightly with the black but keep the colors distinct from the teal side to create contrast. -
Blend the atmosphere:
I find that misting a little more black around the edges of the color bursts helps soften them, making the clouds look distant and gaseous rather than like hard stripes.
Step 3: Stars and Reveal
-
Create the stars:
Spray a small puddle of white paint onto a piece of scrap cardboard. Dip your fingers (gloved!) into the paint and flick it towards the canvas to create random star speckles. -
Add major stars:
For larger, brighter stars, hold the spray can upside down very close to the canvas and give a tiny, quick depressed burst in specific spots. Be careful not to create drips. -
Let it set slightly:
Wait about 5-10 minutes for the paint to become tacky but not fully cured. This prevents the paint from tearing when you remove the masks. -
The reveal:
Carefully lift off the circular lids one by one. This is the most satisfying part, revealing the crisp white textured moons against the vibrant galaxy background. -
Touch ups:
If any background color bled under a lid, you can carefully dab it with a brush and white paint, but usually, the texture hides small imperfections well. -
Sealing:
Allow the painting to dry for at least 24 hours. Once fully cured, apply a clear gloss coat to make the colors pop and protect the surface.
Paint bleeding under lids?
Ensure your masking objects are heavy enough. If using plastic lids, place a small rock or nut/bolt on top of each one to press the rim firmly against the canvas.
Hang your new cosmic creation vertically and enjoy the phases of the moon in your own home

PENCIL GUIDE
Understanding Pencil Grades from H to B
From first sketch to finished drawing — learn pencil grades, line control, and shading techniques.
Explore the Full Guide
Silhouette Trees Over A Galaxy Sky
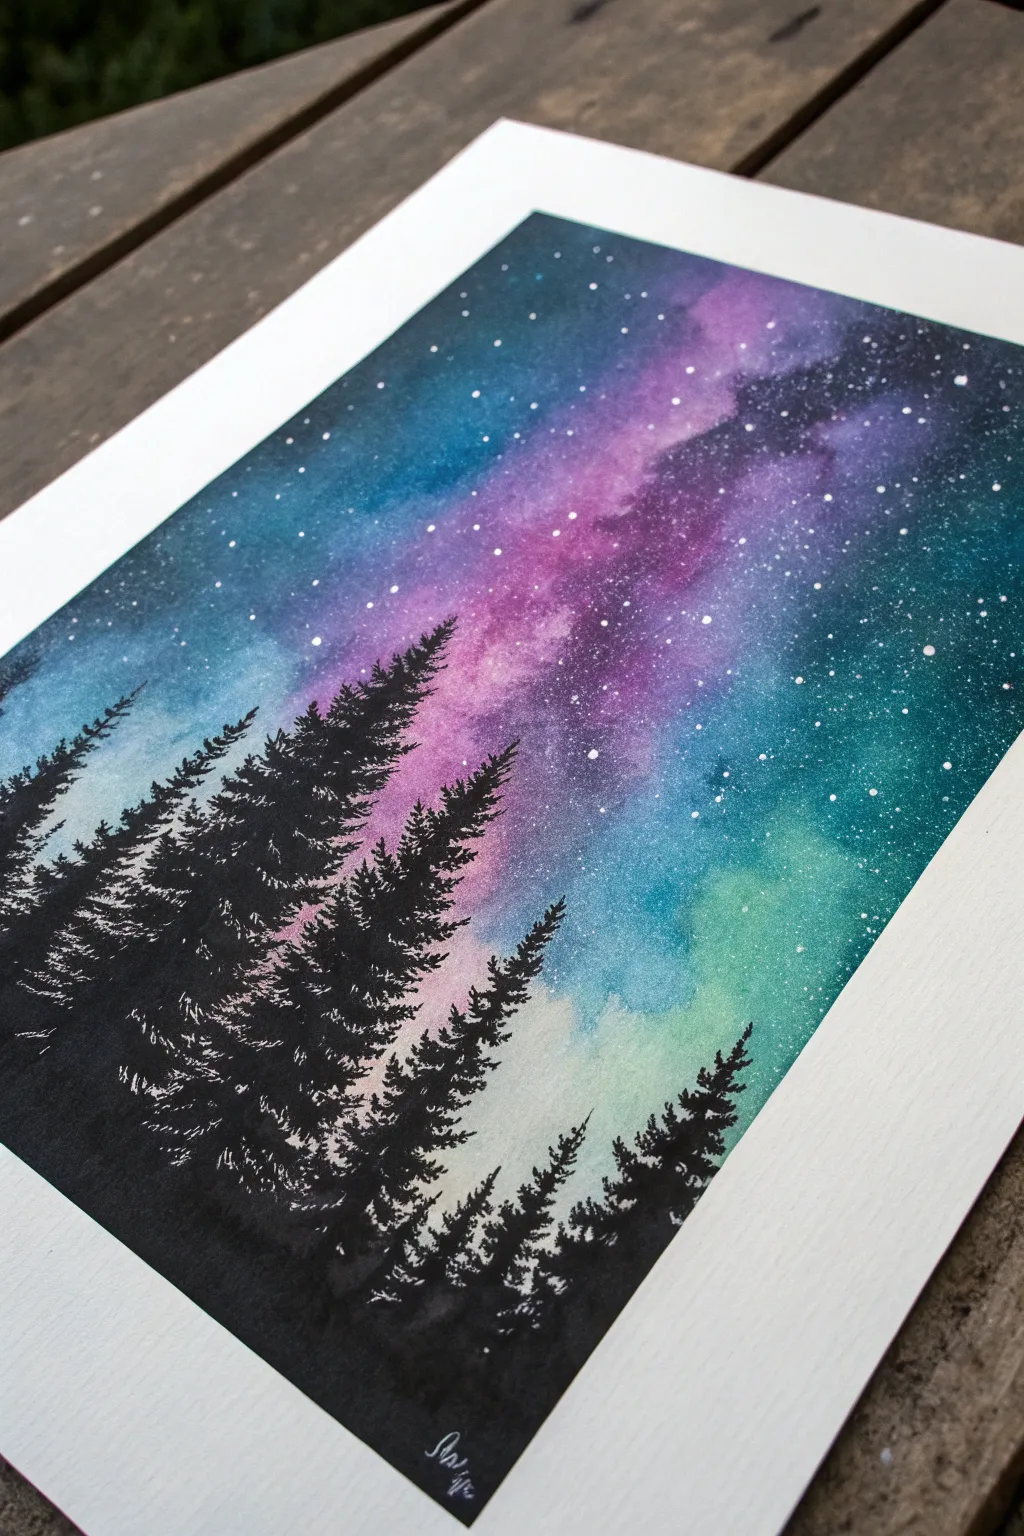
This stunning piece captures the magic of a starry night sky with a vibrant nebula of purples, blues, and teals rising behind stark black pine trees. The contrast between the soft, blended galaxy background and the crisp, dark foreground creates instant depth and drama.
Step-by-Step
Materials
- Heavyweight watercolor paper or mixed media paper (at least 140lb)
- Spray bottles with water
- Spray paints (Teal, Dark Blue, Purple, Magenta, White)
- Black acrylic paint or black spray paint for the foreground
- Flat paint brushes (various sizes)
- Detailed liner brush or fan brush
- Old toothbrush (for the stars)
- Painter’s tape
- Cardboard or scrap paper for masking
Step 1: Setting the Sky Stage
-
Secure your canvas:
Begin by taping down all four edges of your paper to a flat, sturdy surface using painter’s tape. This creates a clean white border and prevents the paper from buckling under moisture. -
Create a diagonal base:
Visualize a diagonal band stretching from the bottom right to the top left—this will be your main galaxy belt. Start by spraying a light mist of teal or light blue in the lower right corner and blending it upward. -
Add the purple heart:
Spray your magenta and purple paints into the center of the paper, creating an irregular, cloud-like shape. Don’t worry about perfect edges; galaxy skies are naturally organic and flowing. -
Deepen the edges:
Fill the upper left and far right corners with your darkest blue spray paint. This dark vignette frame helps focus the viewer’s eye on the bright nebula center. -
Blend while wet:
While the paints are still tacky, use a piece of crumpled plastic wrap or a slightly damp sponge to gently dab the areas where colors meet. This softens the transitions between the teal, purple, and dark blue.
Star Splatter Control
To avoid huge blobs of white paint ruining your sky, always test your toothbrush flick on a scrap piece of paper first. The best stars come from a slightly drier brush.
Step 2: Starlight and Nebulas
-
Mist the nebula:
To create that cloudy, ethereal look in the center, spray a tiny amount of water over the purple section, allowing the pigments to separate and bloom slightly on the paper grain. -
Create main stars:
Shake your white spray paint well (or use white acrylic). Dip a toothbrush into a small puddle of the paint and flick the bristles with your thumb to spray fine mist over the entire sky. -
Add larger stars:
Using a small detail brush or the end of a toothpick dipped in white paint, dot a few larger, distinct stars throughout the darker blue sections. Vary the spacing so it looks natural. -
Let it cure completely:
This is crucial: allow the background layer to dry fully before moving on. I find waiting at least 30 minutes prevents the black trees from bleeding into the colorful sky.
Step 3: The Silhouette Forest
-
Establish the ground:
Using black acrylic paint or spraying black paint into a cup to use with a brush, paint a solid, uneven strip along the very bottom of the paper to serve as the forest floor. -
Paint the trunk lines:
With a thin liner brush, draw vertical lines of varying heights rising from the bottom. These will act as the center spines for your pine trees. -
Start the tree tops:
Switch to a small flat brush or fan brush. Starting at the very tip of a trunk line, gently tap small horizontal dashes, getting slightly wider as you move down. -
Build the branches:
Continue working down the tree trunk, using a dabbing motion to create jagged, needle-like textures. Let the branches flare out wider near the base to create that classic triangle pine shape. -
Overlap for density:
Paint the trees in layers. Make some trees shorter and darker to fill the gaps between the taller ones, creating a dense, impenetrable forest feel at the bottom. -
Add texture highlights:
If you want extra detail, mix a tiny drop of white into your black paint to make a dark grey. Lightly dry-brush just a few tips of the branches on the trees that are ‘closest’ to the viewer. -
The final reveal:
Once the trees are bone dry, carefully peel away the painter’s tape at a 45-degree angle to reveal those crisp, professional white borders.
Fan Brush Secret
Turn a fan brush vertically to tap the top of the tree, then rotate it horizontally as you move down. This mimics pine branches perfectly with minimal effort.
Now you have a breathtaking piece of celestial art ready to frame or gift to a friend
City Skyline Silhouette In Space
Blend the urban and the ethereal with this stunning spray paint project. You’ll create a vibrant purple and blue galaxy sky that transitions seamlessly into a stark city skyline silhouette, all grounded by a reflective foreground.
Detailed Instructions
Materials
- Glossy poster board or heavy cardstock (white)
- Spray paint (Dark Blue, Light Blue, Purple, Black, White)
- Circular stencils (plastic lids or caps)
- Straight edge or ruler
- Piece of scrap paper or magazine page
- Putty knife, palette knife, or old credit card
- Respirator mask
- Gloves
Step 1: Setting the Scene
-
Prepare your workspace:
Find a well-ventilated area, preferably outdoors. Lay down a drop cloth or newspaper to protect the ground from overspray. -
Define the moon:
Decide where you want your moon to be. Place a circular object (like a plastic lid or a custom paper cutout) onto the blank white poster board in the upper left quadrant. Don’t spray yet; just position it to visualize the layout. -
Create the moon texture:
Lift the lid temporarily. Spray a small burst of blue paint where the moon will go. While wet, crumple a small piece of magazine paper, press it onto the paint, and lift it off to create a crater-like texture. Place the lid back down securely to mask this area.
Paint Not Blending?
If colors aren’t mixing well, applying a thin layer of clear coat first keeps the surface wet longer, allowing pigments to swirl together more easily.
Step 2: Creating the Galaxy
-
Apply the galaxy colors:
Spray diagonal bands of Light Blue and Purple across the upper two-thirds of the paper. Overlap them slightly to encourage blending. -
Deepen the cosmos:
Fill in the remaining white space around your colored bands with Dark Blue and Black spray paint, focusing especially on the top corners to create depth. -
Blend the layers:
While the paint is still wet, take a crumpled piece of magazine glossy paper. Gently swipe or dab it across the transition lines between colors to soften the edges and create a gas cloud effect. -
Add the stars:
Spray a small puddle of White paint onto a scrap piece of cardboard. Dip your fingers into the paint and flick them towards the artwork to create a splatter of stars. Vary the distance for different star sizes. -
Create key stars:
For a few brighter, larger stars, hold the can upside down and press the nozzle very slightly to let a few droplets fall, or use a white paint marker later once dry. -
Reveal the moon:
Carefully lift the circular lid to reveal your textured moon. If the edge looks too sharp, you can lightly mist the surrounding area with a tiny bit of white to create a glow.
Step 3: The City Silhouette
-
Establish the horizon:
Place a straight edge or a heavy piece of paper across the bottom third of the painting to mask off the foreground area. Ensure this line is crisp. -
Paint the skyline base:
Spray a solid layer of Black paint immediately above your straight edge mask. This will be the foundation of your buildings. -
Sculpt the buildings:
While the black paint is wet, use a palette knife or the edge of a credit card to scrape away paint in vertical/rectangular shapes, revealing the colors underneath to simulate lit windows. Alternatively, cut a skyline stencil from paper, place it above the horizon, and dust it with Black spray paint for a sharp silhouette. -
Add building details:
Use a small brush or a white paint marker to add specific window details or radio towers (like the tall spire on the right) once the black silhouette is tacky or dry.
Level Up: Glowing Windows
Before spraying black for the buildings, put small pieces of tape where windows will be. Spray black, then peel the tape to reveal the vibrant galaxy colors underneath.
Step 4: The Reflective Foreground
-
Unmask the ground:
Remove the straight edge covering the bottom of the paper. -
Create the ground texture:
Spray a mix of Light Blue, Black, and a touch of White into the bottom area. I like to keep this area slightly lighter than the buildings to show contrast. -
Etch the perspective:
While the foreground paint is still very wet, use your palette knife to scrape straight lines radiating from a central vanishing point. This creates the look of tiled pavement or a futuristic grid. -
Add the lone figure:
Using a stencil or freehanding with a black paint marker/fine brush, draw the silhouette of the person standing on the grid. Add a slight shadow below them to ground the figure. -
Final touches:
Ensure the stars are visible against the dark buildings; if not, add a few tiny white dots on top of the black silhouette to look like distant city lights or stars showing through structures.
Now step back and admire your celestial city view


Constellation Lines Over Spray Stars
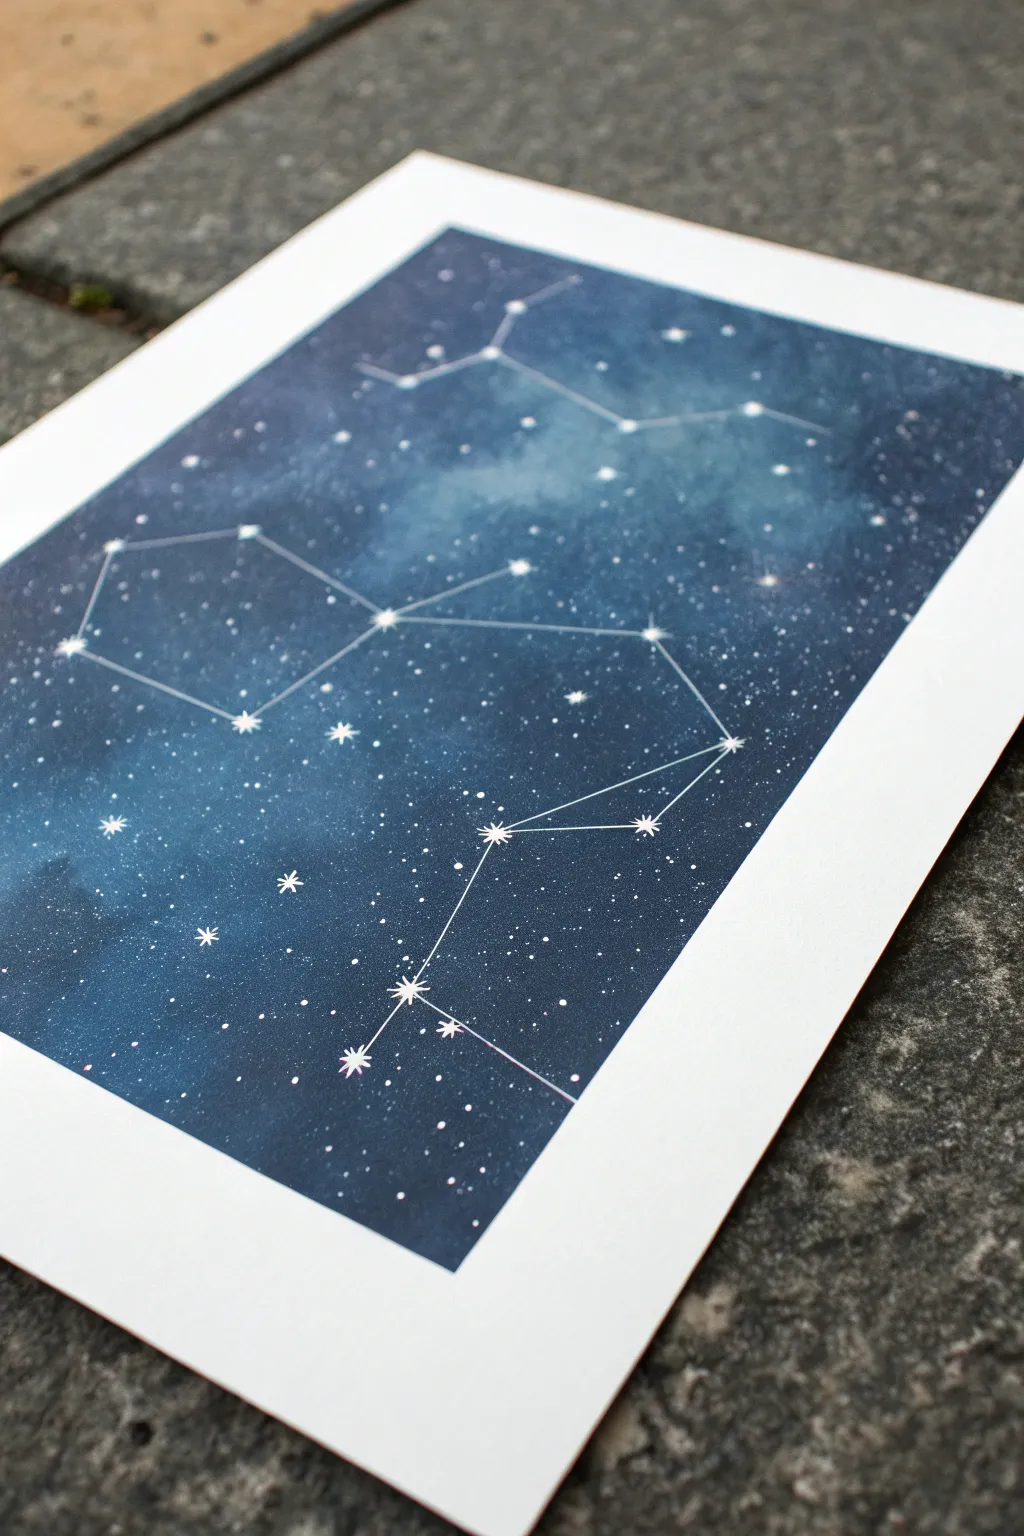
Capture the magic of the night sky with this layered galaxy artwork. You’ll create a deep, nebulous background using spray paint and watercolor techniques, then overlay it with crisp, precise constellation maps.
How-To Guide
Materials
- Heavyweight watercolor paper or mixed-media art board
- Spray paint (Navy Blue, Black, Teal, Purple)
- White acrylic paint or specialized spray paint cap for spattering
- White gel pen (0.8mm or 1.0mm) or extra-fine white paint marker
- Ruler
- Pencil and eraser
- Painter’s tape or masking tape
- Cardboard box or drop cloth (for spraying)
- Water spray bottle (optional)
Step 1: Creating the Galaxy Base
-
Prepare your workspace:
Since we are using spray paint, set up your space outdoors or in a very well-ventilated area. Lay down your drop cloth or set up your cardboard box to catch overspray. -
Secure the paper:
Tape your watercolor paper down onto a flat board or piece of cardboard. Tape all four edges securely; this creates a clean white border later and keeps the paper from curling when wet. -
Apply the darkest base:
Start by spraying a layer of Navy Blue across most of the paper. Don’t worry about perfect coverage; some unevenness creates natural texture. -
Add depth with black:
While the blue is still slightly wet, spray short bursts of Black around the edges and corners to create a vignette effect, drawing the eye toward the center. -
Create light nebulas:
Using the Teal or Purple paint, spray very lightly in the center or in random diagonal patches. Hold the can further back (about 12 inches) to get a misty dusting rather than a heavy coat. -
Blend the layers (optional):
If I want a more watercolor-like texture, I sometimes spritz the wet paint lightly with water. This causes the pigments to separate and bloom slightly, mimicking real gas clouds. -
Dry partially:
Let the paint sit for about 10-15 minutes until it is tacky but not fully cured.
Sticky Pen Tip?
If your gel pen stops writing over the spray paint, scribble on scrap paper to clear the ball. If it persists, the paint isn’t dry enough—stop and wait.
Step 2: Adding Stars and Details
-
Create the starfield:
Spray a small puddle of white spray paint onto a scrap piece of cardboard (or use diluted white acrylic). Dip a stiff paintbrush or toothbrush into it and flick the bristles to splatter tiny dots across your galaxy. -
Vary dot sizes:
Create a mix of fine mist stars and larger distinct planets. Varying the distance of your flicker helps achieve depth. -
Full drying time:
This is crucial: allow the artwork to dry completely. Spray paint needs time to off-gas and harden. Wait at least 1-2 hours so your pens won’t clog on tacky paint.
Step 3: Drawing the Constellations
-
Plan the layout:
Look up a star chart for inspiration. Lightly mark the positions of the main ‘stars’ of your chosen constellation (like Leo or Orion) using a pencil. Keep your pressure extremely light to avoid denting the paper. -
Anchor the stars:
Using your white gel pen or paint marker, draw small, solid white circles over your pencil marks. These anchor points represent the major stars. -
Add radiance:
For the brightest stars in the formation, draw tiny 8-point bursts or crosses over the circles to make them twinkle. -
Connect the dots:
Place your ruler connecting two star points. Draw a purposeful, straight line between them. Lift the pen cleanly at the end of each segment. -
Repeat connections:
Continue connecting your star points according to the constellation pattern until the full shape emerges. -
Enhance surrounding stars:
Scan the background for any spray-paint splatters that naturally landed in interesting spots. Highlight a few of these with your pen to make them pop as background stars. -
Reveal the border:
Once the ink is totally dry, slowly peel away the painter’s tape at a 45-degree angle. This reveals the crisp white border that frames your cosmic scene.
Pro Tip: Nebula Softness
To soften harsh spray edges without water, hold a piece of torn cardboard a few inches above the paper while spraying to act as a soft mask.
Enjoy the deep, celestial depth of your new constellation print
Ringed Planet With Overspray Halo
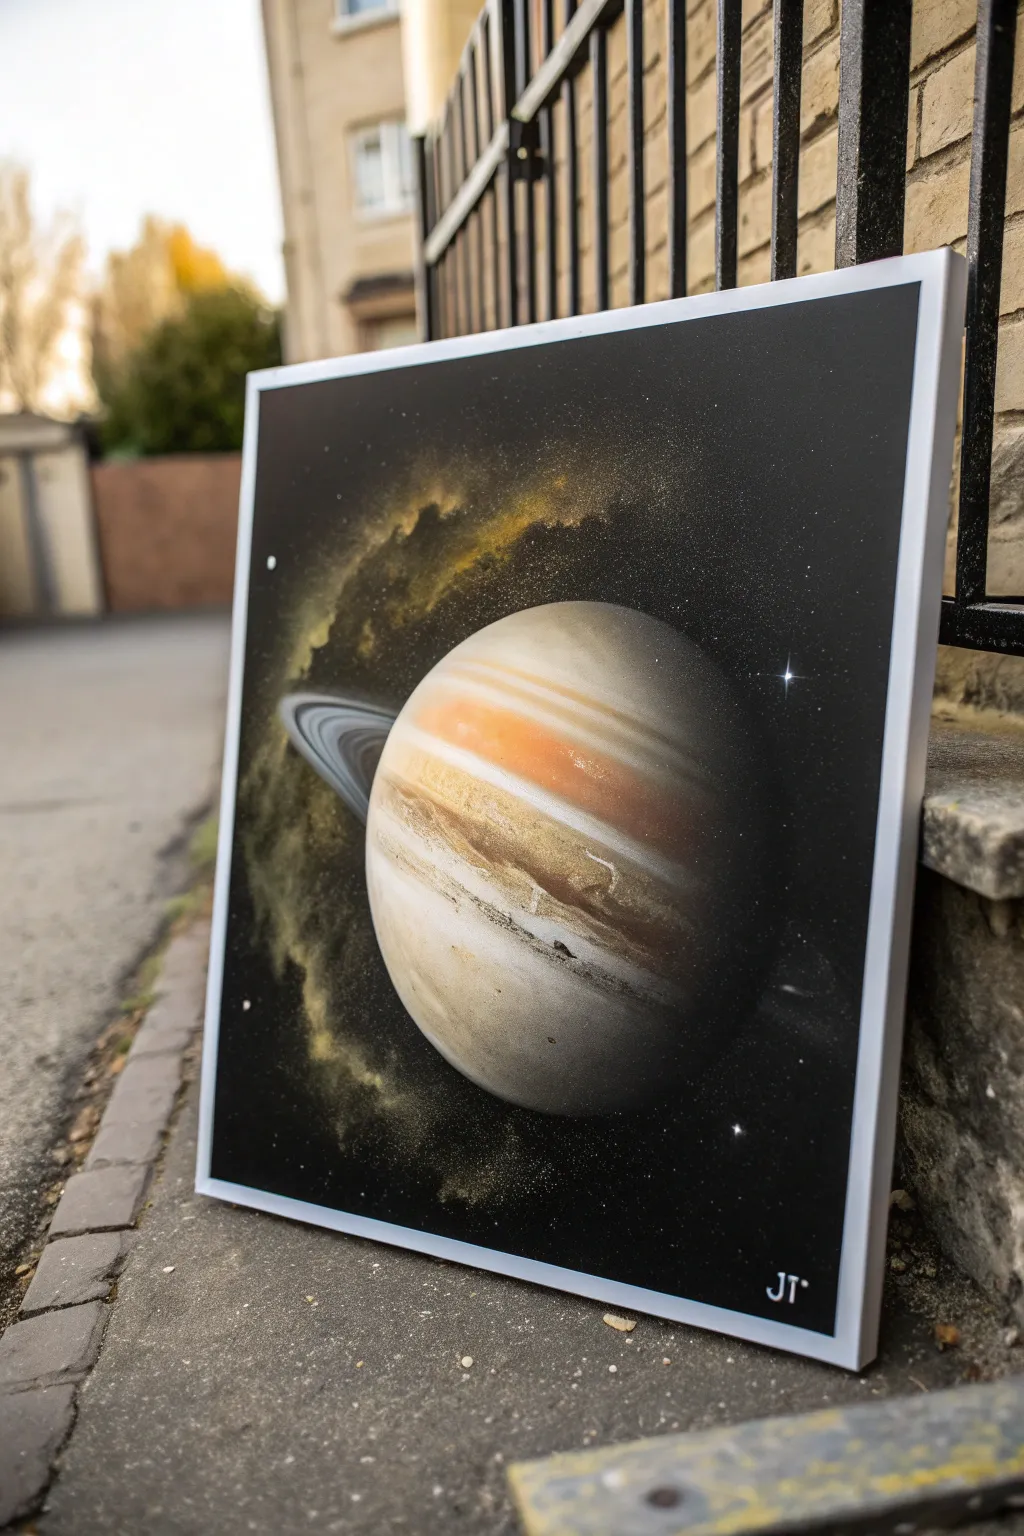
Capture the majesty of a gas giant suspended in deep space with this dynamic spray paint art piece. By combining traditional street art planet techniques with a soft, glowing overspray halo, you’ll create a celestial scene that pops against the void.
Step-by-Step
Materials
- Square canvas or poster board (primed)
- Glossy spray paint: Black, White, Orange, Yellow/Gold, Brown
- Round object for stencil (plate, pot lid, or cut bucket)
- Magazine pages or glossy paper (for textures)
- Putty knife or palette knife
- Toothbrush (optional for stars)
- Clear coat spray (gloss)
Step 1: Setting the Planetary Foundation
-
Lay the base colors:
Start by identifying where your planet will sit. In a circular area slightly larger than your stencil lid, spray erratic patches of yellow, orange, white, and a touch of brown. -
Create texture:
While the paint is still wet, crumple up a sheet of magazine paper. Lay it flat over the wet paint area and gently rub your hand over it. -
Reveal the terrain:
Peel the paper away quickly. This lifts some pigment and creates those intricate, crater-like veins and geological patterns typical of gas giants. -
Add banding:
For a Jupiter-like look, spray a quick, straight line of white or orange across the textured area to simulate atmospheric bands. -
Establish the shadow:
Determine your light source (usually top right or left). Spray a light dust of black paint on the opposite side of your texture circle to create the shadowy dark side of the planet.
Paint Seeping Under Lid?
If your planet edges are fuzzy, your stencil wasn’t flush. Next time, add a heavy weight (like a rock or brick) on top of the lid to keep a tight seal against the canvas.
Step 2: Forming the Planet & Rings
-
Mask the planet:
Place your round object (lid or plate) directly over the textured area. Weigh it down slightly if needed to prevent it from shifting. -
Black out the background:
Spray the entire rest of the canvas with black paint. Ensure total coverage so no white canvas shows through. -
Create the halo effect:
Near the top-left edge of your lid (or wherever your light source is), spray a concentrated burst of yellow and white paint. Let the overspray drift outward into the black void to form a glowing nebula. -
Texture the nebula:
I like to take a clean piece of crumpled paper and dab the wet nebula spray very lightly. This creates a fluffy, cloud-like texture rather than just a flat color mist. -
Add the stars:
Spray a small puddle of white paint onto a scrap piece of cardboard. Dip your fingers (or a toothbrush) in it and flick fine specks across the black areas to create a starfield. -
Spray the ring foundation:
With the lid still in place, envision where the rings will cut across. Spray a white line curving around the lid on the background. -
Shape the rings:
Use a piece of stiff card stock or a palette knife to scrape or block off parts of the white line, refining it into thin, concentric circles that disappear behind the planet. -
Unveil the sphere:
Carefully lift your round stencil object straight up to avoid smudging the edges. Your crisp, spherical planet should now be revealed.
Step 3: Final Details
-
Connect the rings:
If you want the rings to pass in front of the planet, carefully spray a very thin, curved line of white or silver across the face of the planet, connecting the ring edges you created on the background. -
Highlight the star:
Find a large star speck or choose a focal point in the nebula. Use an upside-down can or a stencil cap to create a starburst flare effect (a bright cross shape). -
Seal the work:
Allow the painting to dry for at least 30 minutes. Finish with a layer of clear gloss coat to protect the paint and make the colors distinct.
Soften The Space Dust
For a more realistic nebula, don’t spray directly at the canvas. Spray the air just above the surface and let the pigment mist settle naturally onto the black background.
Hang your finished piece on the wall and enjoy the depth of your own personal galaxy
Space Portal Or Vortex Swirl
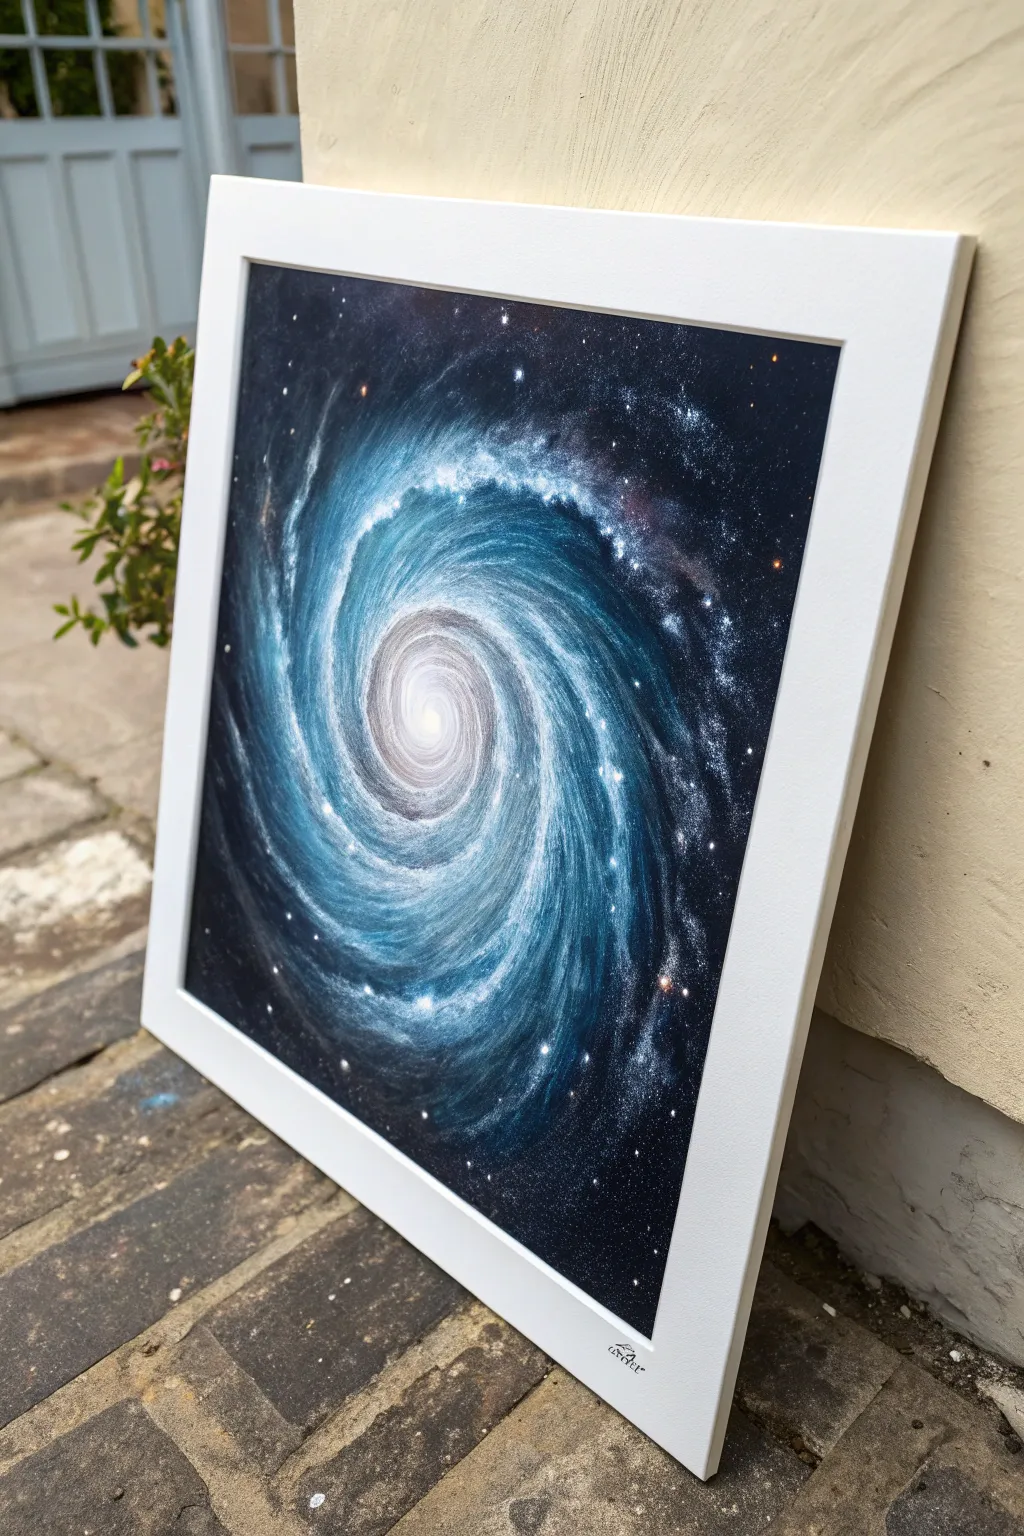
This mesmerizing spray paint piece captures the intense energy of a galactic spiral, pulling the viewer into a deep portal of blue and white light. By mastering layer manipulation and freehand shading, you’ll create a dynamic space scene that feels both expansive and wonderfully detailed.
How-To Guide
Materials
- Gloss spray paint: Black, White, Light Blue, Dark Blue (Navy)
- Poster board or glossy cardstock (approx. 20×20 inches recommended)
- Magazine pages or newspaper (for texture)
- Plastic shopping bag (optional, for texture)
- Circular stencil or a pot lid (approx. 4-5 inches diameter)
- Toothbrush or splatter cap
- Protective gloves and respirator mask
- Drop cloth
Step 1: Setting the Core
-
Prepare the center:
Start by identifying the exact center of your poster board. This will be the eye of your storm, so aim carefully. -
Apply the light base:
Spray a concentrated spot of White paint in the center, about the size of a grapefruit. Before it dries, spray a ring of Light Blue immediately around the white, letting them overlap slightly. -
Texture the core:
Crumple a piece of magazine paper and gently press it onto the wet paint in the center. Lift it straight up quickly to create organic veins and texture within the light. -
Mask the eye:
Once the center is tacky (but not fully dry), place your circular object or pot lid directly over the textured white/blue center to protect it for the next steps.
Use Gravity
For a natural spin look, place your artwork on a lazy susan. Spin the board while spraying your outer spiral arms to get perfect, effortless curved lines.
Step 2: Building the Spiral Arms
-
Lay the dark background:
Spray the entire remaining exposed area with Black paint. Ensure you fully cover the white poster board, especially around the edges. -
Add first galaxy hues:
While the black is still wet, spray arcs of Dark Blue (Navy) swirling outward from the masked center. Think of these as the deep shadows of the galaxy’s arms. -
Layer in the highlights:
Spray lighter bursts of Light Blue and occasional quick spritzes of White on top of the Navy arcs. Don’t cover the black completely; you want depth. -
Create the swirl texture:
Take a flat sheet of glossy magazine paper. Lay it gently over a section of the wet blue paint. -
Manipulate the paint:
Instead of lifting straight up, use your fingers to twist the paper slightly in a circular motion on the surface, mimicking the rotation of a galaxy, then peel it off. I find this twisting motion is crucial for getting that ‘motion blur’ effect. -
Repeat the texture:
Continue this process around the masked center using fresh sheets of paper until you have a full swirling texture surrounding the lid.
Paint Pooling?
If you apply too much paint and it starts to puddle or run, lightly dab it with a crumpled plastic bag. This lifts excess paint while adding cool nebulous texture.
Step 3: Refining the Vortex
-
Reveal the core:
Carefully lift off the pot lid or circular mask. You should have a bright textured circle in the middle of a dark, messy background. -
Blend the transition:
This is the trickiest part: lightly spray White into the very center of your bright circle to make it glow. Then, use very short, controlled bursts of White and Light Blue to bridge the gap between the center circle and the outer swirls so there isn’t a hard line. -
Define the spiral arms:
Using a scrap piece of poster board as a shield, spray curved lines of White paint to sharpen the edges of the spiral arms, defining where the light hits the gas clouds. -
Soften with shadows:
Mist Black spray paint lightly over the areas between the arms to push them into the background and increase contrast.
Step 4: Stars and Details
-
Create distant stars:
Spray a puddle of White paint onto a piece of scrap cardboard. Dip an old toothbrush into it. -
Flick the stars:
Run your thumb over the bristles to flick tiny specks of white paint over the darker outer areas of the painting. Keep the density lower near the center. -
Add major stars:
For the few larger bright stars seen in the reference, hold the can upside down very close to the paper and give the nozzle a split-second depression to create a larger dot. You can use a palette knife to drag a tiny cross shape through these wet dots for a ‘flare’ effect. -
Final clear coat:
Allow the piece to dry completely (at least an hour), then seal it with a clear gloss coat to make the colors pop and protect the finish.
Now step back and admire the deep space illusion you’ve created right on your driveway
Retro Gradient Space Background
Capture the magic of an 80s arcade cabinet with this vibrant space gradient artwork. Using simple masking and layering techniques, you’ll create a seamless blend of deep purple, neon pink, and cyan that feels like a window into a retro galaxy.
Step-by-Step Guide
Materials
- High-quality watercolor paper or heavy cardstock
- Spray paint (Dark Purple, Hot Pink/Magenta, Bright Cyan)
- Painter’s tape or masking tape
- Scrap paper or thick cardstock for stencils
- Scissors and X-Acto knife
- White acrylic paint or a white gel pen
- Old toothbrush (for star splatter)
- Small round detail brush
- Circular object (like a jar lid) or compass
Step 1: Preparation and Masking
-
Secure the paper:
Tape created a clean border for this piece, so start by taping down all four edges of your watercolor paper to a board or heavy cardboard. Press the tape edges firmly to prevent paint bleed. -
Create the planet stencil:
On a separate piece of scrap cardstock, cut out a circle. You can trace a lid or use a compass. You will need the negative space (the hole), not the circle itself. -
Prepare the ring stencil:
Cut a thin, elongated oval shape from cardstock to simulate the planet’s rings. Keep this handy for later steps.
Uneven Gradient?
If your color transitions look blocky, hold the spray can further away (about 12 inches) and do very light, misty passes. Multiple thin layers blend better than one heavy coat.
Step 2: Creating the Gradient
-
Start with the base layer:
In a well-ventilated area, spray the bottom third of your paper with Bright Cyan. Don’t worry about getting it perfect near the middle yet. -
Add the middle tone:
Spray the Hot Pink or Magenta across the middle section. Allow the overspray to lightly dust the top edge of the cyan to start creating a purple blending zone. -
Finish the gradient:
Apply the Dark Purple to the top third of the paper. Let the purple mist drift down into the pink area slightly to soften the transition. -
Allow specifically for drying:
Let this base gradient dry completely. It must be dry to the touch before you attempt to add the detailed planet elements, or the stencil might lift the paint.
Step 3: The Planet and Rings
-
Position the planet:
Place your negative circle stencil (the card with the hole) over the upper middle purple section where you want the planet to live. -
Add planet texture:
Lightly mist a tiny bit of white spray paint or very light gray into the stencil hole. Aim for just a subtle highlight on one side to give it dimension, rather than filling it solid. -
Draw the rings:
Once the planet is dry, remove the stencil. Using a white gel pen or thin brush with white acrylic, draw the elliptical rings around the planet. Make the front lines sharp and bright. -
Add ring trails:
Extend two long, straight lines trailing off from the planet’s rings toward the left edge of the paper, simulating motion or a comet tail effect.
Glow Up
After painting the white stars, use a dry brush with a tiny amount of white pastel dust to gently rub a ‘glow’ around the biggest stars for a hazy, atmospheric effect.
Step 4: Stars and Finishing Touches
-
Mix splatter paint:
Dilute a small dab of white acrylic paint with water until it has the consistency of milk. This is crucial for getting fine stars. -
Flick the stars:
Dip an old toothbrush into the diluted white paint. hold it over the artwork and run your thumb across the bristles to flick tiny specks across the entire galaxy. -
Paint larger stars:
Using your smallest detail brush or a gel pen, hand-paint a few larger, distinct four-point stars. Focus these in the darker purple areas to make them pop. -
Add specific constellations:
connect a few of your smaller dots with very thin lines to create imaginary constellations. -
Peel the tape:
Once everything is fully dry, slowly peel away the painter’s tape at a 45-degree angle to reveal the crisp white border.
Frame this vibrant piece in black or white to let those retro colors really sing on your wall
Mixed Media Space Scene With Scraped Highlights

Transform a blank black canvas into a vibrant window to the cosmos using simple spray techniques and distinct color layering. This striking mixed media space scene features glowing nebulas in teal and magenta, accented by a scattering of bright starlight.
Step-by-Step Guide
Materials
- Large canvas (e.g., 24×36 inches or larger)
- Black gesso or flat black acrylic paint
- Spray paint: Teal/Turquoise
- Spray paint: Magenta/Pink
- Spray paint: White
- Basic spray caps and a skinny cap (optional)
- Old toothbrush or bristle brush
- White acrylic paint or paint pen
- Fine liner brush
- Plastic sheet or drop cloth
- Respirator mask
Step 1: Setting the Abyss
-
Prime the Surface:
Begin by coating your entire canvas with black gesso or flat black acrylic paint. While you can use black spray paint, a brushed-on base often provides a better tooth for the subsequent layers. -
Ensure Full Coverage:
Check the canvas from different angles to make sure no white spots are showing through. Let this base layer dry completely before moving on. -
Plan the Nebula Flow:
Visualize a diagonal flow for your galaxy. In this project, the clouds will move from the top right down towards the bottom left, creating a natural composition.
Nebula Shape Tip
Use a torn piece of cardboard as a shield while spraying to create harder edges on one side of a nebula cloud, mimicking distinct gas formations.
Step 2: Creating the Nebula Clouds
-
Apply the Teal Layer:
Take your teal spray paint and hold the can about 8-10 inches away from the canvas. Spray in short, controlled bursts to form the upper section of the nebula. -
Soften the Edges:
As you spray the teal, try to keep the center of the color cloud opaque while letting the edges fade naturally into the black background. -
Add the Magenta Layer:
Switch to your magenta spray paint. Apply this color below and slightly intertwining with the teal section. I like to let the colors overlap slightly in the middle to create a deep purple transition. -
Build Color Intensity:
Go back over the centers of your nebula clouds with a second light pass of spray paint to make the colors pop against the dark background. -
Create Depth with Mist:
Hold the can further back about 12-15 inches and lightly mist a few areas around the main clouds to create a sense of distant gas and dust.
Level Up: Planet Addition
Place a pot lid or circular object on the black canvas before spraying your nebula. Remove it at the end to reveal a perfect black planet silhouette.
Step 3: Starlight and Details
-
Spray the Star Field:
With white spray paint, press the nozzle very lightly so it sputters, or spray onto your gloved fingertips and flick the wet paint onto the canvas to create random, tiny stars. -
Alternative Star Method:
You can also dip an old toothbrush into white acrylic paint and run your thumb over the bristles to flick a fine mist of stars across the darker areas. -
Highlight the Clouds:
Add very subtle sprays of white directly into the brightest parts of the teal and magenta clouds to make them look like they are glowing from within. -
Add Major Stars:
Using a fine liner brush and white acrylic paint (or a white paint pen), hand-paint a few larger, cross-shaped stars. Place these sparingly for balance. -
Detail the Starbursts:
For the largest starbursts, paint a small central dot and drag four long, thin lines outward, adding shorter diagonal lines in between. -
Let it Cure:
Allow the entire piece to dry in a well-ventilated area for at least 24 hours to ensure the spray paint cures and the fumes dissipate.
Hang your new masterpiece in a well-lit room to let the cosmic colors truly shine


Have a question or want to share your own experience? I'd love to hear from you in the comments below!