I love turning plain cardboard into art that honestly looks way more expensive than it has any right to be. If you’ve got an old box and some paint, you’re already holding a seriously fun surface for experimenting with color, texture, and bold design.
Sunset Gradient With Tree Silhouettes
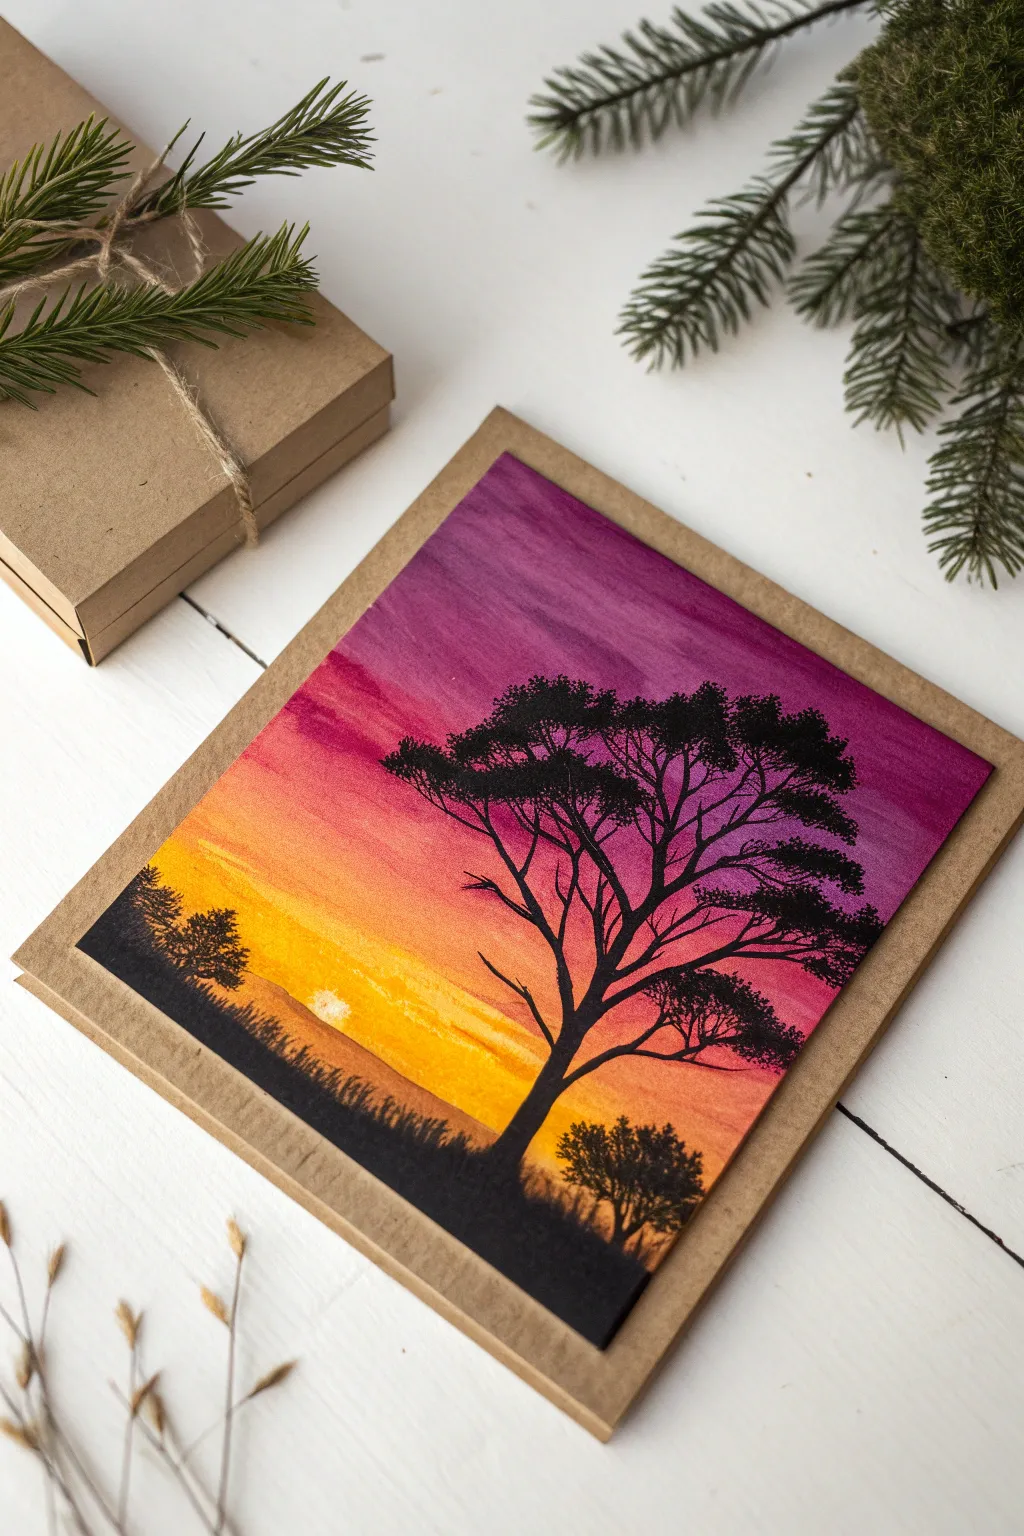
Capture the warmth of a fading day with this striking sunset gradient card. The vibrant transition from deep purple to glowing yellow creates a dramatic backdrop for the delicate tree silhouettes, making it a perfect handmade greeting for any occasion.
Detailed Instructions
Materials
- Cold-pressed watercolor paper (cut to roughly 4×6 inches)
- Kraft cardstock (folded into a card base)
- Watercolor paints (violet, magenta/pink, orange, warm yellow)
- Flat shader brush (3/4 inch or 1 inch)
- Fine liner brush (size 0 or 00)
- Black gouache or black waterproof ink
- Pencil (HB or H)
- Ruler
- Masking tape
- Clean water and paper towels
- Double-sided tape or glue stick
Step 1: Creating the Sunset Gradient
-
Prepare your surface:
Tape down your watercolor paper to a board or table on all four sides. This prevents the paper from buckling when wet and creates a clean, crisp border if you choose to paint right to the edge. -
Pre-wet the paper:
Using your large flat brush, apply a gentle coat of clean water across the entire surface of the paper. You want it shiny and damp, but not forming puddles. -
Apply the top violet layer:
Load your flat brush with a rich violet watercolor. Start at the very top edge and paint a horizontal band, moving back and forth to get solid coverage. -
Transition to magenta:
Clean your brush slightly, pick up a magenta or deep pink shade, and apply it directly below the violet. Let the wet edges touch so they bleed together seamlessly. -
Add the orange tones:
Rinse the brush again and switch to a vibrant orange. Paint the middle section, overlapping slightly with the pink above to create softness. -
Finish with yellow:
Clean the brush thoroughly and use a warm yellow for the bottom section. Paint all the way to the bottom edge. I like to keep this area brightest to represent the setting sun. -
Blend the gradient:
With a clean, slightly damp brush, gently run horizontally across the transition lines between colors if they haven’t blended naturally. Don’t overwork it, or the colors will turn muddy. -
Lift the sun:
While the yellow paint is still damp but not soaking wet, use a clean, thirsty brush or the corner of a paper towel to dab a small, circular spot near the bottom left horizon. This lifts the pigment to create a glowing sun effect. -
Dry completely:
This is crucial. Let the paper dry completely—until it is cool to the touch—before moving to the silhouette phase. You can use a hair dryer on a low setting to speed this up.
Step 2: Painting the Silhouettes and Assembly
-
Draft the horizon:
Lightly sketch a low horizon line with a pencil. It doesn’t need to be perfectly straight; a little unevenness looks more natural for terrain. -
Paint the ground:
Using black gouache and a medium round brush, fill in the ground area below your horizon line. Gouache is opaque and matte, giving a perfect silhouette against the watercolor. -
Start the main tree trunk:
Switch to your fine liner brush. Near the center-right, paint the main trunk of the acacia-style tree. Make it thickest at the base and taper it as it reaches upward, splitting into a ‘V’ shape. -
Branch out:
Extend branches outward from the main trunk. Keep your lines shaky and organic rather than straight ruler lines. Acacia trees tend to have flat, spreading canopies. -
Add foliage clusters:
Use a stippling motion (rapid dots) with the tip of your brush to create clusters of leaves on the ends of the branches. Keep the foliage distinct and somewhat sparse to let the sunset show through. -
Create smaller trees:
Paint a small, shrubbier tree on the right side and a distant tree line or bushes on the left horizon to create depth and balance the composition. -
Add grass details:
Using the very tip of your fine brush, flick tiny vertical strokes upward from the black ground layer to suggest tall savannah grass. -
Assemble the card:
Once the black paint is bone dry, carefully remove the masking tape. Apply double-sided tape or glue to the back of your painting. -
Center and mount:
Press the painting firmly onto the front of your folded Kraft cardstock, ensuring even borders of brown paper are visible around the edges to frame your artwork.
Clean Edges Trick
When peeling masking tape, pull it away from the paper at a sharp 45-degree angle. This prevents the paper fibers from tearing and leaves a perfect edge.
Level Up: Birds
Add 2-3 tiny ‘m’ shapes in the upper pink sky area using your finest pen or brush. These distant silhouette birds add life and scale to the vast sky.
Now write a message inside and you have a stunning, hand-painted gift ready to share


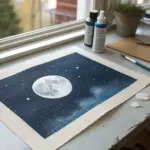
Night Sky on Cardboard With Star Splatter
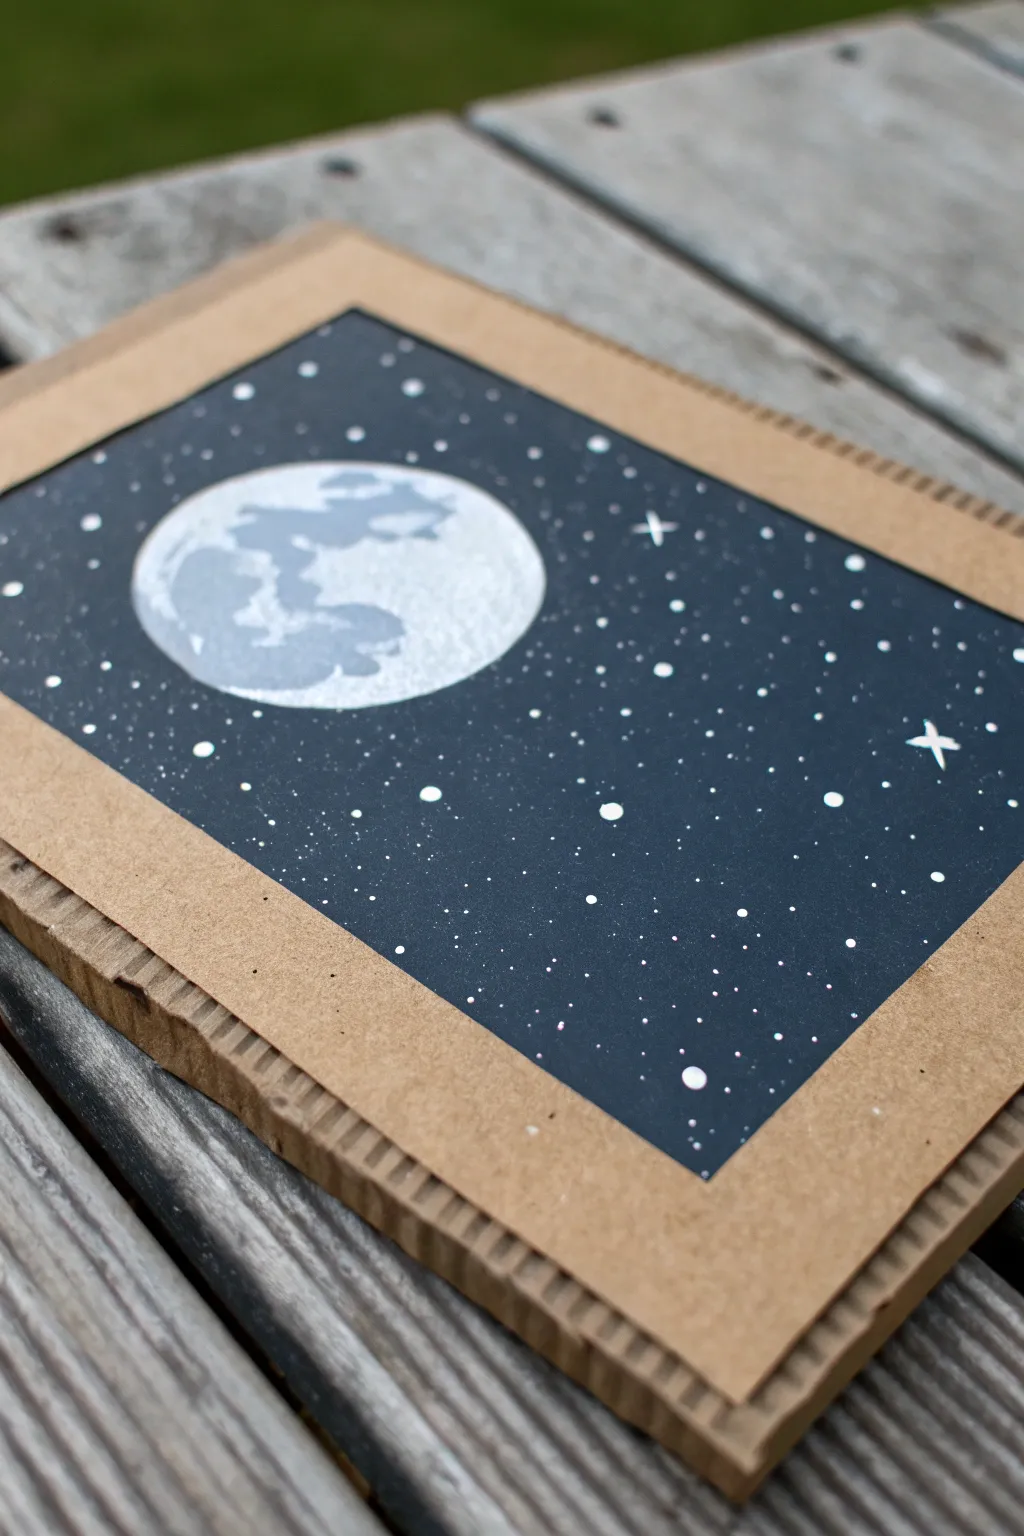
Transform a simple scrap of cardboard into a window gazing out at the cosmos. This project uses the natural texture of the cardboard to frame a deep, starry night sky featuring a textured moon.
Step-by-Step Guide
Materials
- Corrugated cardboard sheet (rectangular)
- Black acrylic paint (matte)
- White acrylic paint
- Grey acrylic paint (or mix black and white)
- Painter’s tape or masking tape
- Medium flat paintbrush
- Small round paintbrush
- Old toothbrush (for splattering)
- Paper plate or palette
- Water cup
- Paper towels
Step 1: Preparing the Canvas
-
Cut the Base:
Begin by cutting a clean rectangle of corrugated cardboard. Ensure the edges are relatively straight, but the exposed corrugation on the sides adds to the rustic charm, so don’t worry about covering them. -
Tape the Border:
Apply strips of painter’s tape or masking tape around the perimeter of the cardboard rectangle. This will create the unpainted ‘frame’ look later. -
Press the Edges:
Run your fingernail or a spoon along the inner edge of the tape to seal it tightly against the cardboard. This prevents the black paint from bleeding underneath and ensures a crisp, clean line.
Tape Removal Tip
Peel the tape away from the wet paint area, not toward it. If the paint is stuck to the tape, score the edge lightly with a craft knife to prevent tearing.
Step 2: Painting the Sky
-
Apply the Base Coat:
Squeeze a generous amount of black acrylic paint onto your palette. Using the medium flat brush, paint the entire exposed inner rectangle black. -
Smooth Coverage:
Work the paint into the texture of the cardboard. You want a solid, opaque black, so if the cardboard color shows through, let the first coat dry and apply a second one. -
Dry Completely:
Allow the black background to dry completely before moving on to the moon and stars. If the base is wet, your white paint will turn grey and muddy.
Step 3: Creating the Moon
-
Outline the Moon:
Using a small round brush and white paint, carefully outline a circle on the left side of your black sky. It doesn’t need to be geometrically perfect; a hand-painted look works well here. -
Fill the Shape:
Fill in the circle with a solid coat of white paint. Depending on your paint’s opacity, you might need two layers to make it bright against the black background. -
Mix a Grey Tone:
While the white circle dries slightly, mix a light grey on your palette. If you don’t have grey, simply mix a tiny dot of black into your white paint. -
Add Craters:
Dip your small brush into the grey paint. Dab irregular, blotchy shapes onto the white moon to represent craters and maria (the dark plains). -
Soften the Edges:
I like to gently dab the wet grey paint with a clean, slightly damp brush to soften the edges so the craters look natural rather than like hard blobs.
Blobs Instead of Stars?
If your stars are huge blobs, your paint is too watery or the brush is too wet. Test the splatter on a scrap piece of cardboard first to get the consistency right.
Step 4: The Starry Splatter
-
Protect the Moon:
Once your moon is dry, cut a circle of scrap paper the same size as your moon and place it gently over the painting to act as a mask. This keeps the moon clean during the splatter phase. -
Prepare Splatter Paint:
Dilute a small amount of white acrylic paint with a few drops of water. The consistency should be fluid, like heavy cream, but not watery. -
Load the Toothbrush:
Dip the bristles of an old toothbrush into the thinned white paint. Tap off any excess so it isn’t dripping. -
Flick the Stars:
Hold the toothbrush over the painting, facing down. Run your thumb across the bristles to flick a fine mist of white specks onto the black background. -
Control the Density:
Focus the spray in certain areas to create ‘clusters’ of stars, leaving other areas sparser for a natural night sky distribution. -
Paint Larger Stars:
Remove the paper mask from the moon. Using the detail brush, hand-paint a few slightly larger dots and perhaps one or two four-pointed glimmer stars for emphasis.
Step 5: The Reveal
-
Let it Set:
Wait for all the paint, especially the thicker dots, to be touch-dry. -
Peel the Tape:
Slowly peel away the painter’s tape at a 45-degree angle. This reveals the crisp, clean cardboard border that frames your night scene.
Now you have a framed piece of the cosmos ready to display on a shelf or gift to a stargazer


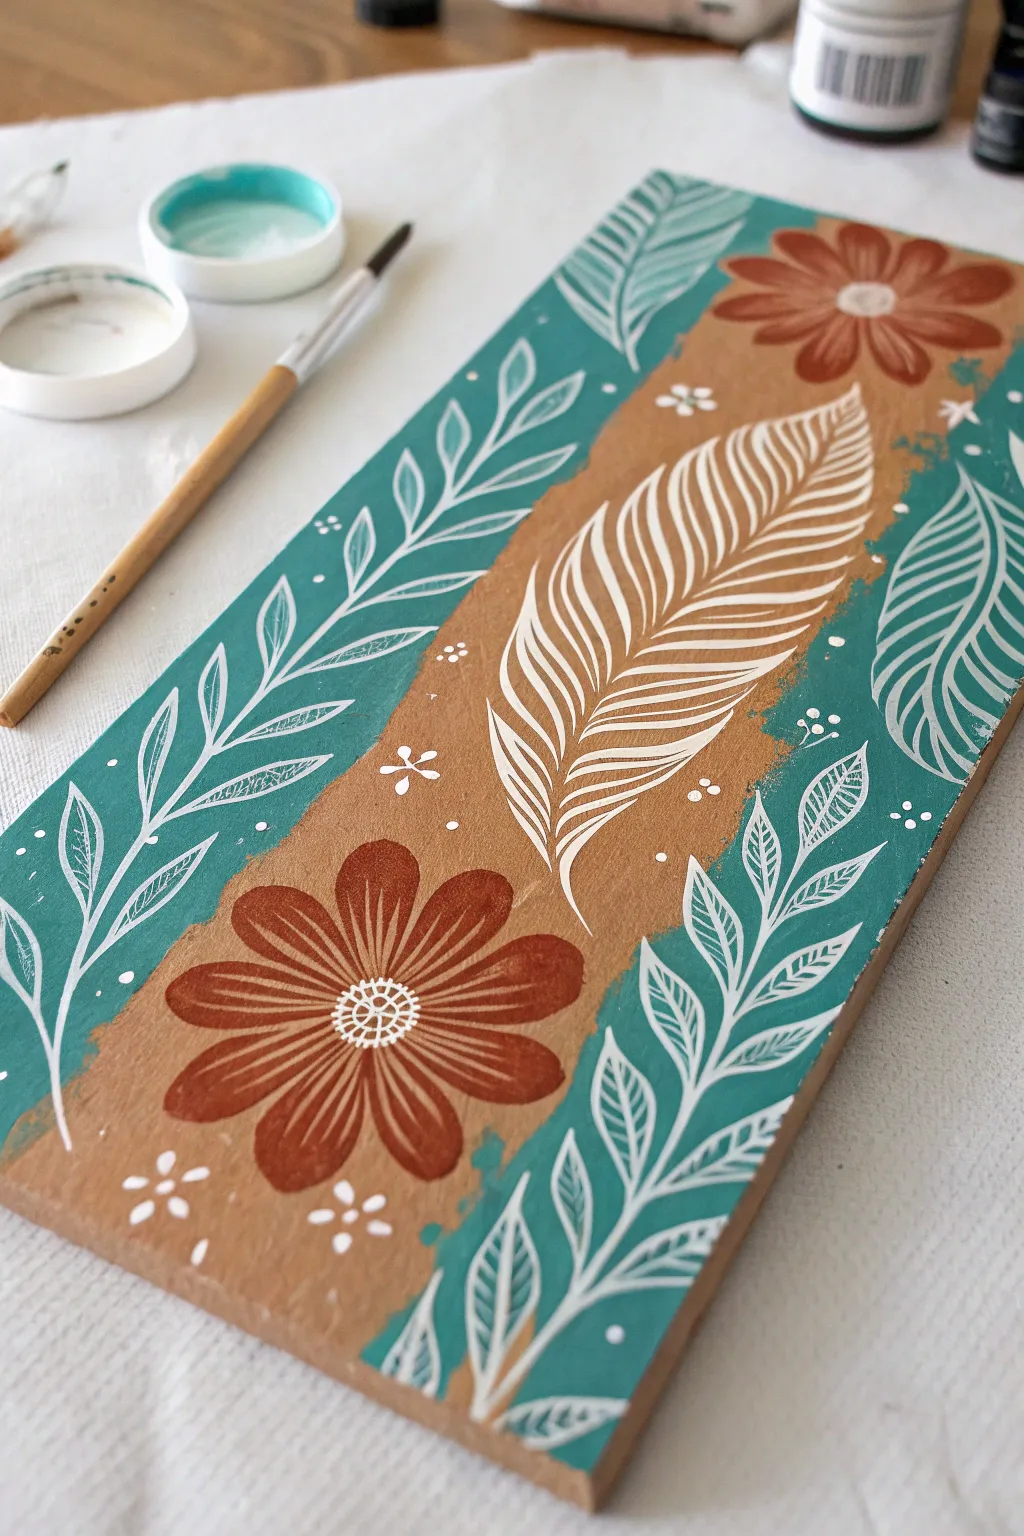
Bold Florals That Pop on Brown Cardboard
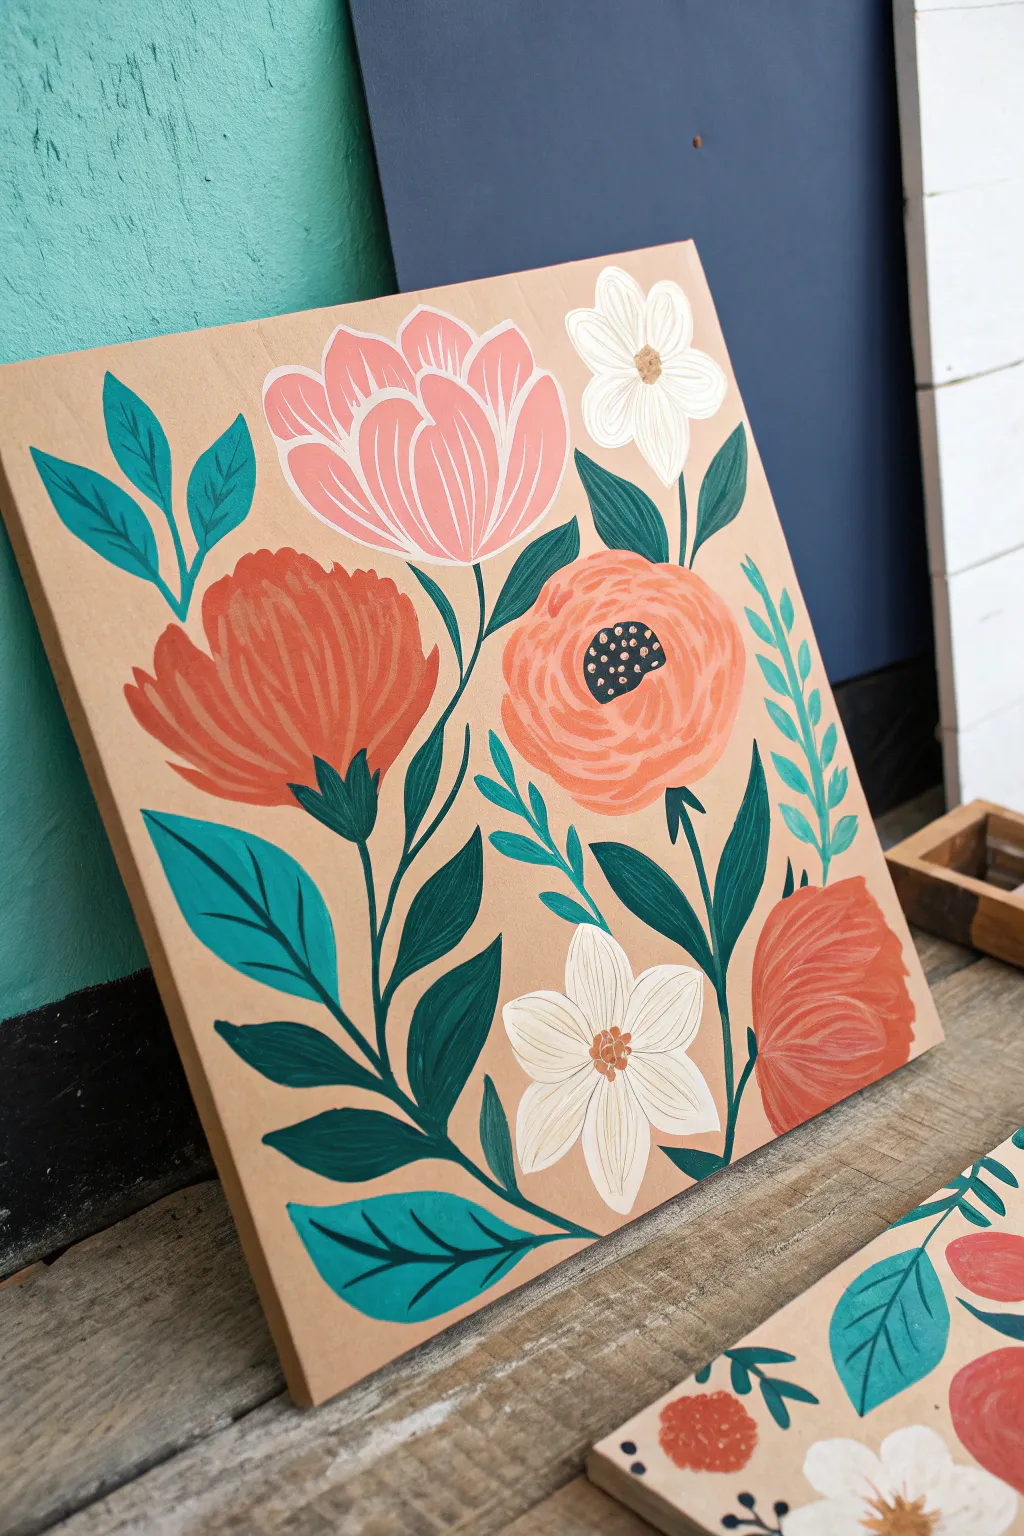
Transform a plain piece of cardboard into a stunning botanical display by playing with opaque colors against a raw, kraft background. This project features stylized blooms in shades of coral, white, and pink, accented by lush teal and olive greenery for a modern folk-art feel.
Detailed Instructions
Materials
- Sturdy cardboard square (approx. 12×12 inches)
- Acrylic paints (opaque matte finish recommended): coral red, soft pink, white, warm yellow, teal blue, hunter green, black
- Assorted brushes: flat shader (medium), round brush (small), and a fine liner brush
- Pencil and eraser
- Palette for mixing
- Water cup and paper towels
Step 1: Sketching the Layout
-
Prepare the canvas:
Begin by selecting a smooth, clean piece of cardboard. If there are any printed logos or tape residue, flip it over to use the unblemished, plain brown side. -
Map out the big blooms:
Lightly sketch three large circular shapes using a pencil to represent the main flowers. Place one large bloom in the center-right, one in the top-left, and one closer to the bottom-right corner to balance the composition. -
Add smaller accents:
Sketch two smaller, star-shaped flowers: one near the top right corner and another tucked into the bottom center area. -
Draw the stems:
Connect your floral shapes with sweeping, curved lines representing stems. Let them flow naturally from the bottom center outwards, creating a bouquet effect. -
Fill in with leaves:
Sketch elongated leaf shapes attached to the stems. Vary the sizes—some large and sweeping near the bottom, others small and delicate near the top.
Opacity Secret
If your cheap craft acrylics feel too transparent on brown cardboard, mix a tiny drop of white paint into every color. It acts as a primer without changing the hue too drastically.
Step 2: Blocking in Color
-
Paint the pink tulip:
Using a flat brush and soft pink paint, fill in the top-left flower shape. Painting in a U-shape helps mimic the cup of a tulip. -
Create the coral blooms:
Mix a warm coral tone (red with a touch of yellow and white) and paint the large main flower on the left and the partial flower in the bottom right corner. -
Paint the central rose:
Use a lighter, peachy-orange shade for the round flower in the center-right. Paint this as a solid circle base first. -
Add the white blossoms:
With a clean brush, fill in the two star-shaped flowers with opaque white paint. You might need a second coat here to ensure the brown cardboard doesn’t show through. -
Base the leaves:
Switch to your greens. Paint the larger lower leaves in a deep hunter green. For the smaller upper leaves and the fern-like sprigs on the right, use a brighter teal or turquoise shade to add contrast.
Level Up: 3D Elements
Cut out leaf or petal shapes from a second piece of cardboard, paint them, and glue them onto your main painting for a cool, low-relief sculptural effect.
Step 3: Adding Details & Definition
-
Detail the pink flower:
Once dry, use a fine liner brush and white paint to draw curved lines inside the pink flower petals, defining their shape and separation. -
Texture the coral flowers:
Add dimension to the coral flowers by painting darker red/orange strokes within the petals to suggest shadows and folds. -
Refine the center rose:
On the peach rose, paint loose, concentric swirls in a slightly darker orange hue to create the look of tightly packed petals. -
Paint the flower centers:
For the white flowers, dab a small circle of warm yellow or gold in the center. For the peach rose, paint a bold black center. -
Add intricate dots:
Using the very tip of your smallest brush or a toothpick, add tiny white dots onto the black center of the rose, and tiny brown dots onto the yellow centers of the white flowers. -
Define the greenery:
Go back over your leaves with the liner brush. Add a central vein line to the larger dark green leaves using a slightly lighter green or black for subtle detail. -
Connect with stems:
Carefully paint over your initial pencil stem lines with dark green or black, ensuring all flowers feel connected to the main bouquet. -
Add decorative veins:
For a stylized look, use a very thin brush to paint black vein lines on the teal leaves, giving them a graphic, illustrative quality. -
Final touches:
Check your edges. If the paint looks transparent anywhere, dab on a little extra connecting color to make the shapes look solid and bold against the cardboard.
Allow your painting to dry completely before propping it on a shelf or framing it for a burst of handmade joy


Leaf Prints Using Cardboard Texture
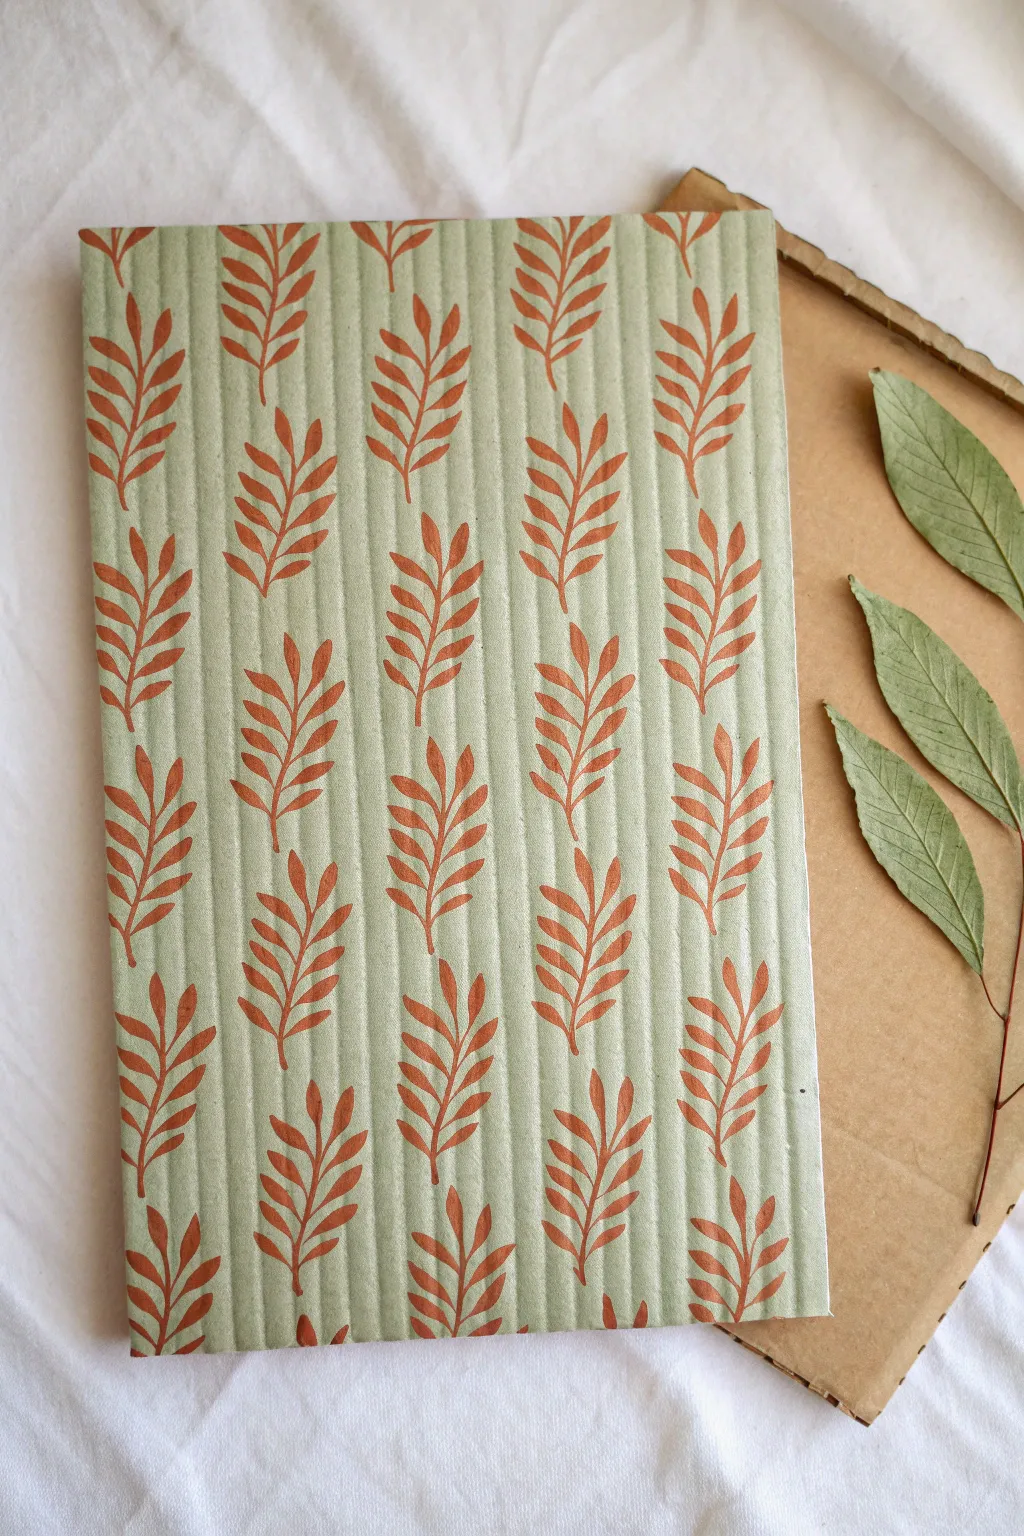
Transform ordinary packaging material into a piece of botanical art by embracing its natural texture. This project uses the distinctive ridges of corrugated cardboard as a canvas for a rhythmic, leafy pattern that feels organic and modern.
How-To Guide
Materials
- Corrugated cardboard sheet (clean, with vertical ridges visible)
- Light sage green acrylic paint
- Burnt sienna or terracotta acrylic paint
- Flat paintbrush (medium width)
- Small round paintbrush (size 2 or 4)
- Pencil
- Ruler
- Paper plate or palette
- Water cup
Step 1: Preparation & Base Coat
-
Select your cardboard:
Cut a rectangular piece of corrugated cardboard to your desired size. Ensure the cuts are clean and straight. -
Check the orientation:
Position the cardboard so the corrugation lines (the ridges) run vertically, from top to bottom. -
Mix the base color:
Pour out a generous amount of sage green acrylic paint onto your palette. If the paint is very thick, add a tiny drop of water to improve flow, but keep it opaque. -
Apply the first coat:
Using the flat paintbrush, paint the entire surface of the cardboard sage green. Brush vertically, following the direction of the ridges. -
Fill the grooves:
Pay special attention to getting paint into the valleys between the ridges. You may need to wiggle the brush slightly to ensure full coverage. -
Let it dry completely:
Allow the base coat to dry fully. Cardboard is absorbent, so this happens relatively quickly, usually within 20-30 minutes. -
Apply a second coat:
For a solid, uniform color that hides the brown cardboard completely, apply a second vertical coat of sage green and let it dry.
Clean Lines
If paint pools in the cardboard grooves, use a dry brush to soak up excess immediately, preventing drips or soggy paper.
Step 2: Painting the Leaf Pattern
-
Plan the spacing:
Imagine invisible vertical columns running down your cardboard. You will be painting leaves in staggered rows within these columns. -
Load the detail brush:
Wet your small round brush and load it with the burnt sienna paint. Roll the tip on the palette to keep it sharp. -
Start the first stem:
Beginning at the top left, paint a thin, slightly curved central stem about 1.5 inches long. -
Adding leaves:
From the bottom of that stem, paint small oval leaf shapes branching outward and upward. Aim for 3-4 pairs of leaves per stem. -
Create the taper:
As you paint the leaves near the top of the stem, make them slightly smaller to create a natural taper. -
Continue the column:
Move down the same imaginary vertical line and paint another leaf sprig, leaving a small gap between the tip of the bottom one and the start of the new one. -
Start the second column:
Move to the right to start the next vertical row. Stagger the placement so these leaves sit in the spaces between the leaves of the first column. -
Mind the texture:
As you paint across the ridges, use a light touch. I find that letting the brush skip slightly over the bumps adds to the rustic charm. -
Fill the surface:
Continue painting columns of leaves until the entire cardboard sheet is covered in a repeating pattern. -
Partial leaves:
Don’t forget the edges—paint partial leaf sprigs going off the sides of the cardboard to make the pattern look continuous. -
Final dry:
Let the reddish-brown paint dry completely before handling or framing your artwork.
Stamp It
Make a simple leaf stamp from an eraser or potato to ensure every leaf shape is identical for a more graphic look.
Now you have a beautifully textured piece of botanical art ready to display
BRUSH GUIDE
The Right Brush for Every Stroke
From clean lines to bold texture — master brush choice, stroke control, and essential techniques.
Explore the Full Guide
Mini Landscapes From Shipping Box Scraps
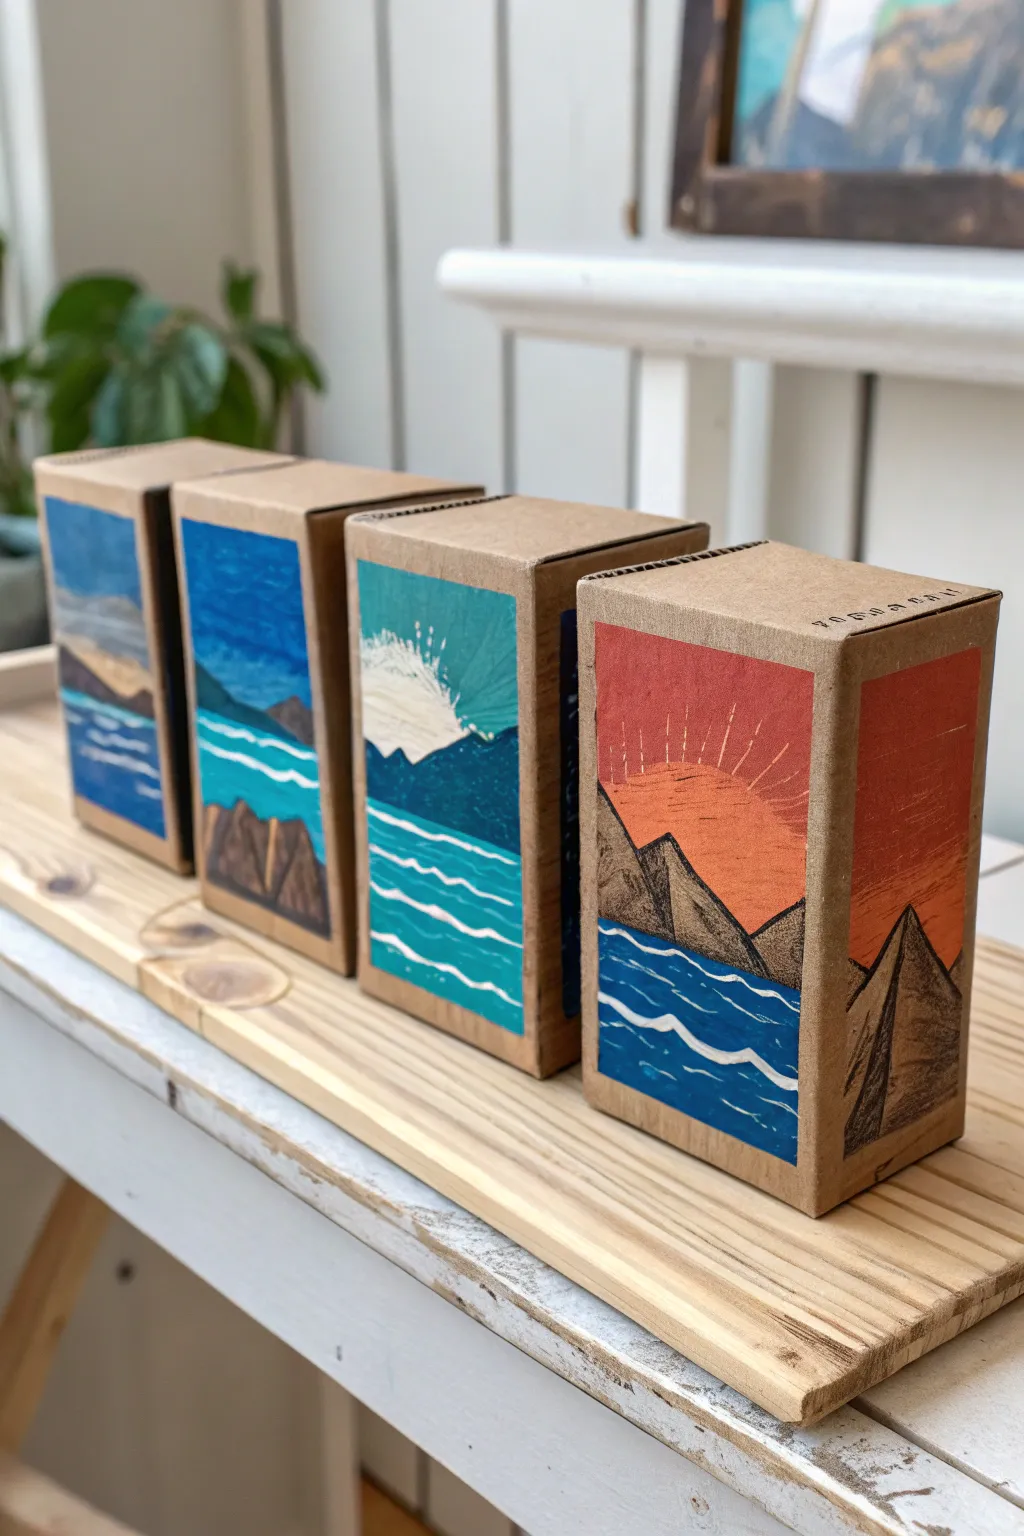
Transform ordinary small cardboard boxes into a charming mountain range display. These self-standing 3D canvases use bold acrylic blocks and stylized line work to create a cohesive series of day-to-night nature scenes.
Step-by-Step
Materials
- Small rectangular cardboard boxes (tea boxes or jewelry boxes work perfectly)
- Acrylic paints (opaque finish)
- Flat shader brushes (size 4-8)
- Fine liner brush (size 0 or 00)
- Pencil for sketching
- Gesso or white primer (optional)
- Palette or paper plate for mixing
- Cup of water and paper towels
Step 1: Preparation & Base Coat
-
Select your canvas:
Gather 3-4 small cardboard boxes of uniform size. Clean off any packing tape or loose paper labels so the surface is relatively smooth. -
Prime the surface (optional):
If your boxes have glossy printing or dark logos, apply a thin layer of white acrylic paint or gesso to the front and side panels. Let this dry completely to ensure your landscape colors pop. -
Sketch the horizon:
Using a pencil, draw a horizon line across the lower third of each box. Carry this straight line around the corner to the side panel. -
Outline the mountains:
Sketch two or three triangular mountain peaks rising from the horizon line. Vary the heights and slopes, ensuring the mountain shapes also wrap around the corner of the box for a 3D effect.
Step 2: Blocking in Color
-
Paint the water:
Mix a deep ocean blue or teal. Using a flat shader brush, fill in the entire area below the horizon line on all boxes. I find painting the sides first and then the front helps keep the edges neat. -
Paint the sky gradients:
Choose a different sky color for each box to represent time of day. Use light blue for morning, bright teal for midday, and a warm coral-orange for sunset. -
Fill the sky area:
Paint the sky section above the mountains, being careful to paint around your pencil outlines. You may need a second coat of the lighter colors to get full opacity on the brown cardboard. -
Base the mountains:
Paint the triangular mountain shapes with a dark grey or charcoal color. Ensure this dark layer is solid, as it will serve as the shadow side of your peaks. -
Dry completely:
Set the boxes aside for at least 20 minutes. It is crucial that the base layers are fully dry before adding the finer details on top.
Warped Cardboard?
Painting on thin cardboard can sometimes cause warping. To fix, paint a large ‘X’ on the INSIDE of the box with water or gesso to counterbalance the tension.
Step 3: Stylized Details
-
Add mountain highlights:
Mix a lighter grey or tan color. Paint just the right-hand slope of each mountain peak to simulate light hitting the rock face, leaving the left side dark. -
Texture the peaks:
Use a dry brush technique or small dashes to add texture to the mountains, making them look rugged rather than perfectly smooth. -
Paint the waves:
Switch to your fine liner brush and white paint. Paint horizontal, wavy lines across the blue water section. -
Vary the line weight:
Make some wave lines thick and others thin. Allow the lines to break and stagger rather than drawing perfectly straight stripes. -
Add sky details:
On the darker ‘night’ or ‘storm’ box, add small white dots for stars or spray foam. On the ‘sunset’ box, use thin white or yellow dashes radiating from the horizon to mimic sun rays. -
Clean the edges:
Check the corner where the front meets the side. If the paint lines don’t meet perfectly, touch them up with the appropriate color so the image flows seamlessly around the bend.
Wrap-Around Art
Don’t stop at the front face! Continue your horizon lines and water patterns onto the sides of the box. This makes the artwork look sculptural and dynamic.
Arranging these little boxes together creates a wonderful panoramic shelf display that celebrates the imperfections of reused materials.
Abstract Mark-Making on Cardboard
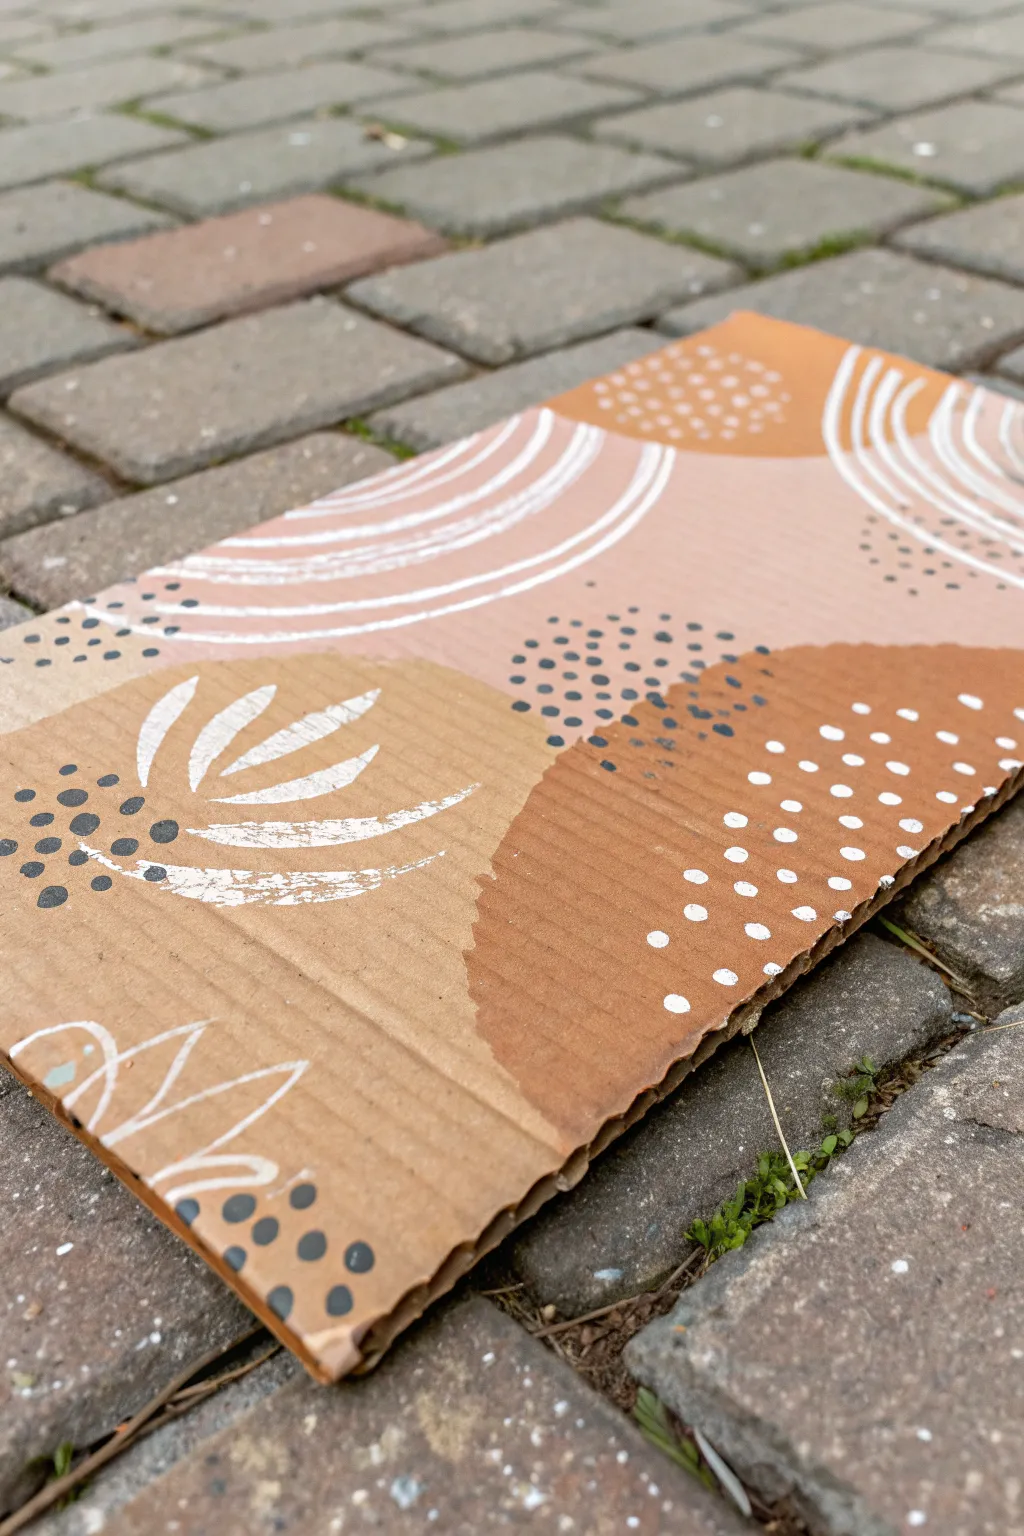
Transform a simple scrap of cardboard into stylish wall decor with this abstract mark-making project. Using a trendy desert-inspired color palette, you will layer organic shapes and expressive lines for a textured, boho-chic look.
How-To Guide
Materials
- Rectangular piece of corrugated cardboard
- Acrylic paints (Terracotta/Burnt Orange, White, Black, Beige/Pale Pink)
- Medium flat brush
- Small round detail brush
- Palette or paper plate
- Water cup and paper towels
Step 1: Base Composition
-
Prepare the canvas:
Start with a clean, rectangular piece of corrugated cardboard. Make sure there are no loose flaps or heavy creases. The natural brown color of the cardboard will serve as a key background element, so there is no need to prime the surface. -
Mix the terracotta shade:
Mix a warm terracotta color using burnt orange and a touch of white to soften it. Alternatively, use a pre-mixed terracotta acrylic paint. -
Paint the first organic shape:
Using a medium flat brush, paint a large, curved semi-circle shape on the right side of the cardboard. Let the edges be smooth but hand-painted for an organic feel. -
Add the lighter tone:
Mix a beige or pale pink shade. Paint a second curved section on the upper left side, overlapping slightly with the center space but leaving gaps where the raw cardboard shows through. -
Create the bottom shape:
Paint a third organic, hill-like shape in the bottom right corner using the terracotta mix. This balances the composition. -
Dry the base layers:
Allow these solid color blocks to dry completely. Cardboard is absorbent, so this step usually happens quickly, but ensure the paint isn’t tacky before adding details.
Embrace the Texture
Don’t fight the ridges! When painting on corrugated cardboard, drag your brush horizontally across the grain to create skipping, distressed artistic textures.
Step 2: White Linework
-
Load the detail brush:
Load a small round brush with pure white acrylic paint. It helps to have the paint slightly fluid for smooth lines, so add a tiny drop of water if it feels too thick. -
Add curved arches:
Over the pale pink/beige section at the top, paint a series of parallel curved lines (arches). Vary the pressure on your brush to give the lines a sketched, painterly texture rather than perfect uniformity. -
Detail the corners:
Repeat this white arch pattern in the top right corner, going off the edge of the cardboard to create a sense of movement. -
Paint the botanical motif:
On the left side, over the raw cardboard section, paint a stylized botanical shape. Create three or four simple, curved leaf shapes radiating from a central point. -
Add dry brush texture:
I like to use a slightly drier brush for the botanical leaves, allowing the cardboard’s texture to show through the white strokes for a distressed look. -
Insert dot details:
Add clusters of white dots over the terracotta section on the bottom right. Keep the dots relatively uniform but randomly spaced within their cluster.
Cardboard Framing
Cut a second, slightly larger piece of cardboard and paint it solid black. Mount your finished art in the center to create a framed, gallery-style matte effect.
Step 3: Black Accents
-
Switch to black paint:
Clean your small round brush thoroughly and switch to black acrylic paint. -
Add stippling effects:
Create clusters of small black dots (stippling) in the negative spaces between your painted shapes. Focus these near the center where the different color zones meet. -
Cluster the dots:
Paint a dense cluster of black dots near the white botanical shape on the left. This provides a strong contrast against the light linework. -
Create background texture:
Add a few more scattered black dots over the pale pink section to tie the black elements together across the composition. -
Final white touches:
If needed, go back with your white brush and add a few final linear outlines or abstract scribbles in the bottom left corner to balance the design. -
Final drying:
Let the entire piece dry completely. The matte finish of the acrylic on cardboard gives it a lovely, earthy quality.
Prop your new eco-friendly art piece on a shelf or hang it using double-sided tape for an instant room refresh

PENCIL GUIDE
Understanding Pencil Grades from H to B
From first sketch to finished drawing — learn pencil grades, line control, and shading techniques.
Explore the Full Guide
White Paint Highlights on Kraft-Brown Cardboard
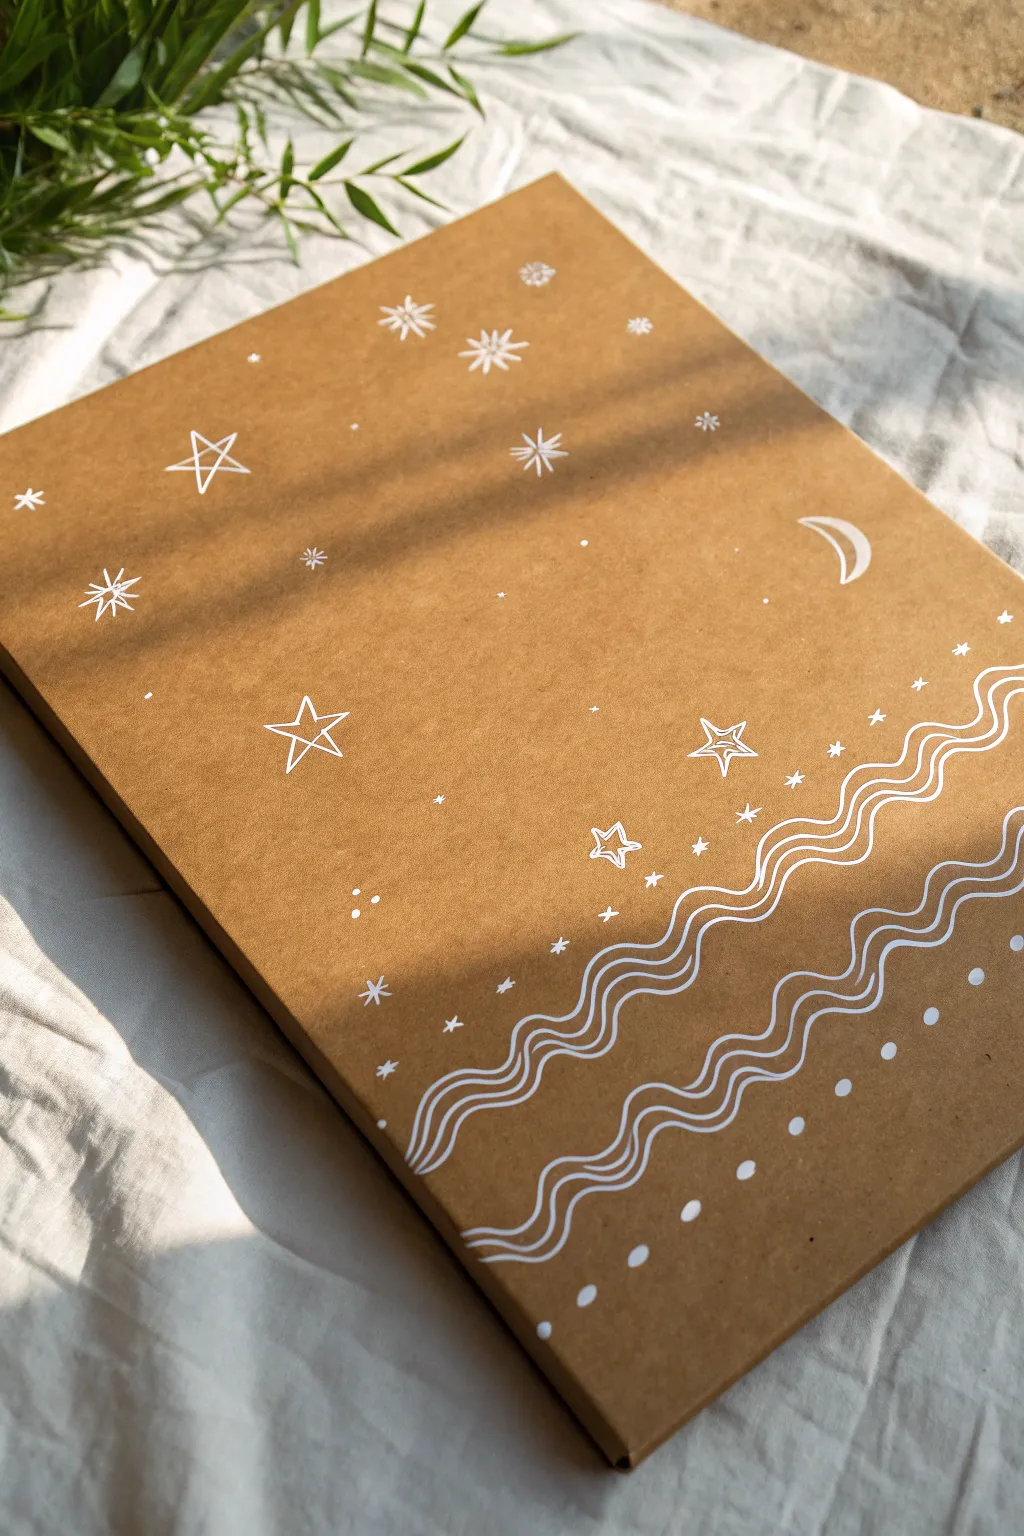
Transform a plain piece of cardboard into a dreamy night sky using simple white line work on a natural kraft background. The contrast between the matte brown cardboard and the crisp white ink creates a celestial scene filled with stars, moons, and gentle waves.
Step-by-Step Guide
Materials
- Clean, flat piece of kraft cardboard or a cardboard box lid
- White paint marker (fine point, e.g., Posca PC-1M or similar)
- White gel pen (optional, for finer details)
- Pencil
- Eraser
- Ruler (optional)
Step 1: Preparation
-
Prepare the surface:
Ensure your cardboard piece is free of dust or oils. If you are using a recycled box, choose a section without creases or existing print. -
Sketch the layout:
Lightly sketch your design with a pencil. Start by marking the horizon line where the waves will begin, roughly one-third up from the bottom.
Ink Absorption Fix
If the cardboard soaks up the ink and makes it look dull, apply a second layer of white marker only after the first is totally dry to boost opacity.
Step 2: Drawing the Celestial Elements
-
Draw the crescent moon:
In the upper right quadrant, draw a C-shaped crescent moon. Keep the lines clean and define the pointed tips carefully. -
Add primary stars:
Scatter large, five-pointed open stars across the upper section. Draw these as outlines rather than filling them in to maintain an airy feel. -
Create starbursts:
Intersperse asterisk-style stars among the open stars. Use eight lines radiating from a central point for these ‘sparkle’ stars. -
Fill the background:
Fill the empty spaces in the sky area with tiny dots and small ‘plus sign’ stars. Varying the size of these elements adds depth to your galaxy. -
Add detail flourishes:
Draw small clusters of three dots near larger stars to create constellations and add visual interest to empty patches.
Step 3: Creating the Wave Pattern
-
Start the first wave:
Begin drawing the wave pattern at the bottom. Start with the uppermost wave line, creating a continuous, flowing squiggly line from left to right. -
Double the line:
Draw a second parallel line immediately below your first wave line to create a ribbon effect. Try to keep the spacing consistent. -
Repeat the pattern:
Create three distinct bands of these double-line waves. Space them out vertically so there is room for decoration between them. -
Maintain flow:
Ensure your waves have a gentle, rhythmic rise and fall. They don’t need to be mathematically perfect, but they should feel organic.
Metallic Accent
add a touch of magic by tracing just the inside of the crescent moon or the center of the stars with a gold or silver metallic paint pen
Step 4: Finishing Touches
-
Decorate between waves:
In the spaces between your wave bands, add rows of small decorative elements. Use alternating dots, tiny stars, or small crosses. -
Add the bottom border:
Near the very bottom edge, create a final row of larger, evenly spaced dots to anchor the design. -
Let it dry:
Allow the white ink or paint to dry completely. Paint markers can smudge easily if touched too soon. -
Erase guidelines:
Once you are absolutely sure the ink is dry, gently erase any visible pencil marks. Be very light-handed to avoid rubbing off the white pigment. -
Review and refine:
Look over your artwork. If any white lines look thin or transparent, go over them a second time to make the white pop against the brown.
Hang your piece on the wall or use it as a unique gift box cover for a handmade touch
Sgraffito Scratching Into Wet Paint on Cardboard

Transform a simple scrap of cardboard into elegant wall art using a clever negative space technique and fine detail work. This project combines earthy terracotta tones with vibrant teal for a striking, nature-inspired decorative panel.
Step-by-Step Tutorial
Materials
- Rectangular piece of sturdy cardboard
- Teal acrylic paint
- Terracotta or rust-orange acrylic paint
- White acrylic paint or a white paint pen
- Flat paintbrush (medium size)
- Fine liner brush (for details)
- Palette or paper plate
- Pencil (optional for sketching)
- Water cup and paper towels
Step 1: Preparing the Base
-
Cut and Clean:
Begin by selecting a clean, flat piece of cardboard. Cut it into a long rectangle shape, roughly 6 inches by 12 inches, though any size works. Ensure the surface is free of dust or tape residue. -
Map the Design:
Visualize the layout: you want a central vertical band of raw cardboard exposed, with painted sections on either side. You can lightly mark these boundaries with a pencil if you need a guide. -
Paint the Teal Borders:
Using your flat brush and teal paint, fill in the left and right sides of the cardboard. Don’t worry about making the inner edges perfectly straight; a slightly jagged, organic edge adds character to the piece. -
Add the Center Color:
If your cardboard isn’t the perfect golden brown, or if you want consistent color, you can paint the center strip with a light brown. However, for the authentic look shown, leave the center raw cardboard. -
Let it Dry:
Allow the teal paint to dry completely. This is crucial because wet paint will smudge when you try to paint the fine white details over it later.
Step 2: Adding the Floral Elements
-
Position the Flowers:
Load a round brush with terracotta or rust-orange paint. Paint two large daisy-like flowers directly onto the raw cardboard center strip—one near the top and one near the bottom. -
Define the Petals:
Make sure the petals are distinct. Start from the center and stroke outward to create a nice, tapered petal shape. Allow the flowers to dry before adding details. -
Paint the Central Feather:
Between the two flowers, use white paint to create a large, stylized feather or leaf shape. Start with the central spine (rachis) distinctively curving down the middle. -
Fill the Feather:
Add the veins or barbs to the feather using careful, curved strokes that extend from the spine to the outer edge. Keeping the lines close together creates a beautiful texture.
Paint Absorption
Cardboard is thirsty! If your first layer of teal looks dull or streaky, let it dry and apply a second coat for that opaque, velvety finish.
Step 3: Detailed Vine Work
-
Start the Vines:
Switch to your finest liner brush or a white paint pen. Begin drawing long, sweeping main stems for the vines over the teal sections. -
Create Flow:
I like to have the vines curve inward toward the center strip, creating a sense of movement that leads the eye to the flowers. -
Add Leaves:
Paint small, pointed oval leaves along the white stems. To replicate the style in the image, outline the leaf shape first, then add a center vein line inside each one. -
Detail the Leaves:
Inside each small leaf, add tiny diagonal hatch marks or veins. This intricacy mimics the look of a lino-cut print or etching. -
Layering Over Edges:
Let some of the white leaves overlap slightly onto the brown center strip. This integrates the two zones so they don’t look separated.
Sharper Lines
Struggling with brush control? Use a white acrylic paint pen (0.7mm) instead of a brush for the vines. It makes precise line work much easier.
Step 4: Final Flourishes
-
Detail the Flowers:
Once the terracotta flowers are dry, use your fine white brush to draw a small circle in the very center. -
Flower Center Pattern:
Add tiny dots inside the center circle and small lines radiating out into the petals to give the flower dimension. -
Filler Accents:
Look for empty spaces in the brown background. Add clusters of three or four small white dots, or tiny simple four-petal flower shapes to fill the gaps. -
Final Inspection:
Check your teal edges. If you want a more distressed look, you can dry brush a tiny bit of teal into the brown area, or leave it crisp depending on your taste.
Hang your botanical masterpiece on the wall or prop it on a shelf for an instant touch of handmade charm

Have a question or want to share your own experience? I'd love to hear from you in the comments below!