Your dining room walls can do so much more than “just sit there”—they can set the whole mood for meals, conversations, and cozy lingering. I’m sharing my favorite dining room wall painting ideas that range from classic color choices to artsy statement moves you can actually pull off.
Classic Warm White Backdrop
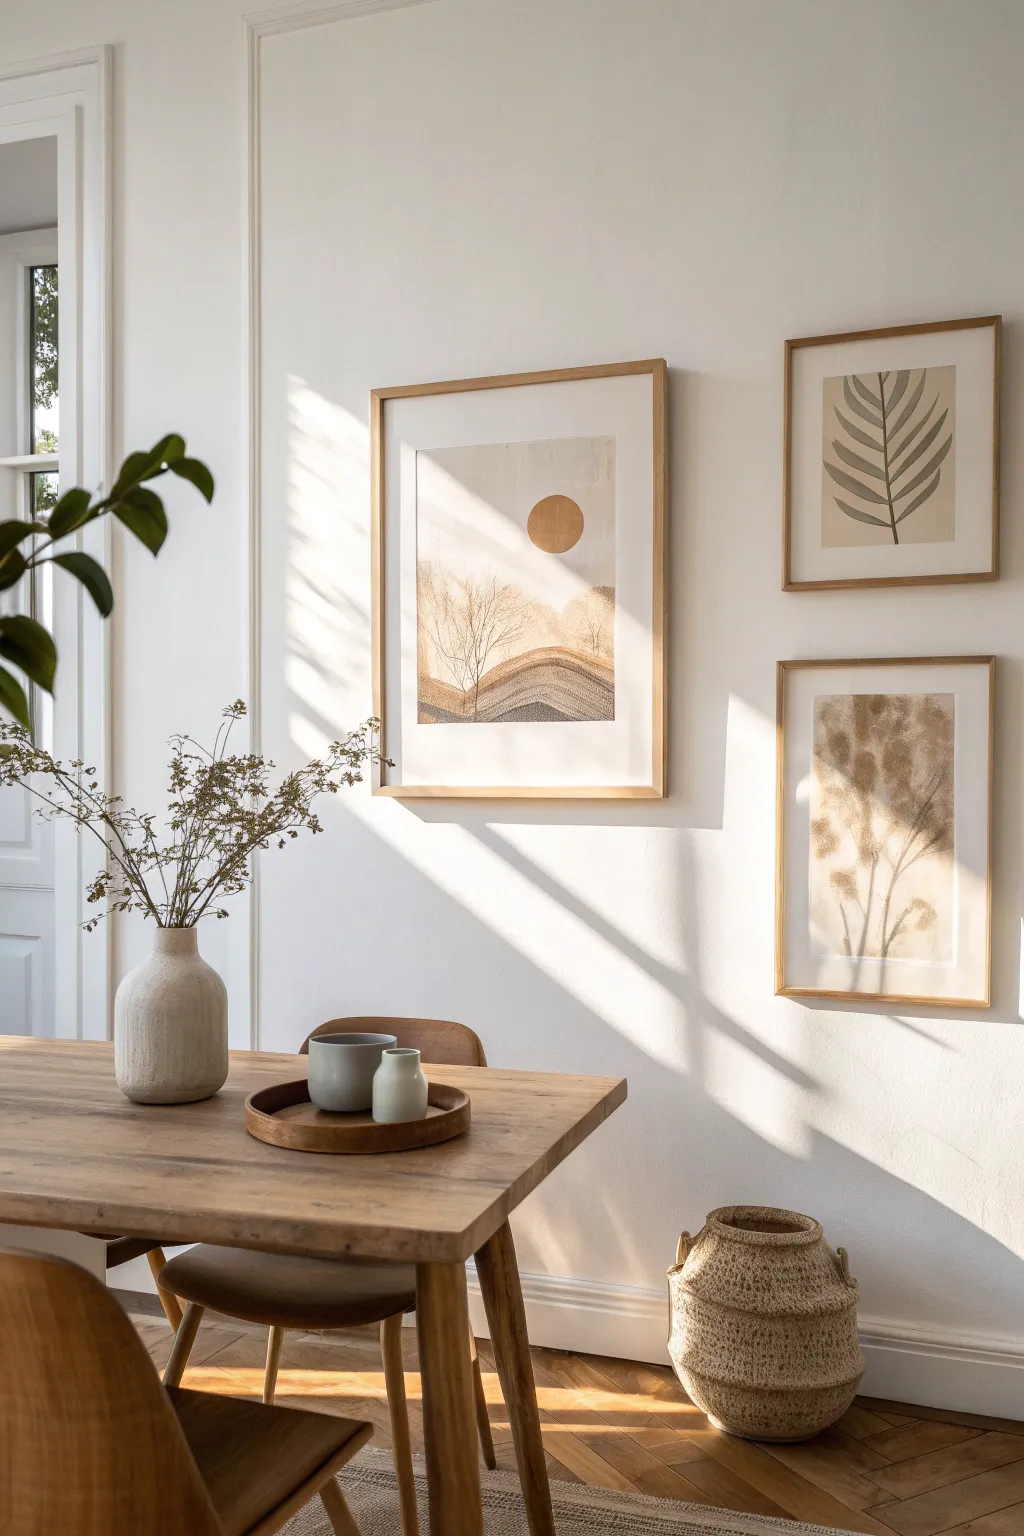
Bring the warmth of nature indoors with this serene, minimalist landscape painting that perfectly complements a warm white interior. This project combines soft geometric shapes with organic textures to create a cohesive and calming focal point for your dining area.
Step-by-Step Guide
Materials
- Large heavy-weight watercolor paper or mixed media board (e.g., 18×24 inches)
- Two smaller sheets of watercolor paper (e.g., 11×14 inches)
- Watercolor paints (Ochre, Burnt Sienna, Payne’s Grey, Raw Umber)
- White gouache paint
- Wide flat wash brush (1-2 inch)
- Medium round brush (size 8 or 10)
- Fine liner brush (size 0 or 1)
- Masking tape or artist tape
- Pencil and large circular object (like a bowl) for tracing
- Palette for mixing
- Two jars of water
- Paper towels
- Ruler
Step 1: Planning and Sketching
-
Prepare your surface:
Secure your large watercolor paper to a flat, hard surface using masking tape around all four edges. This creates a crisp border and prevents the paper from buckling when wet. -
Map the horizon:
Using a pencil and ruler, lightly sketch a low horizon line about one-third of the way up the paper. Draw two or three gentle, overlapping curved hills rising from this line. -
Position the sun:
Place your circular object in the upper center-right portion of the paper. Trace it lightly to create a perfect circle for the sun or moon element.
Clean Lines
For a perfect sun circle, don’t rely on a steady hand. Use masking fluid to block out the circle before painting the sky, then rub it away to paint the sun last.
Step 2: Painting the Landscape
-
Mix the sky wash:
Dilute a very small amount of Raw Umber with plenty of water to create a barely-there beige. Use your wide flat brush to apply this wash over the entire sky area, working around the sun circle. -
Paint the sun:
Mix a rich Burnt Sienna with a touch of Ochre. Carefully fill in the circle using your medium round brush. I like to blot the center lightly with a paper towel while wet to give it a weathered texture. -
Base layer for hills:
Once the sky is dry, mix a wash of Payne’s Grey and Raw Umber. Paint the furthest hill silhouette with this transparent wash. -
Layering the foreground:
For the closer hills, use a slightly more saturated mix of the same colors. Paint these shapes, allowing the layers underneath to show through slightly for depth. -
Adding texture details:
While the foreground hill is dry, use your fine liner brush with a darker grey-brown mix to draw rows of tiny dots or small vertical dashes across the slope, mimicking furrowed fields.
Texture Boost
Make the hills pop by sprinkling a pinch of table salt onto the wet watercolor paint. Brush it off once dry for a stunning, speckled stone effect.
Step 3: Adding Graphical Elements
-
Create the delicate trees:
Switch to your finest liner brush. Mix a dark, inky grey using Payne’s Grey and a little water. Paint incredibly thin, branching tree structures rising from the hills on the left side. -
Refine the branches:
Keep your hand loose and shaky to create natural-looking twigs. Ensure the trees overlap the sun slightly to integrate the elements. -
Final touches:
Add tiny specks of white gouache to the hill texture if you want to create highlights or the suggestion of frost.
Step 4: Companion Pieces (Optional)
-
Leaf study sketch:
On a smaller sheet, sketch a large, simple palm or fern leaf shape. Keep the design symmetrical and bold. -
Paint the leaf:
Fill the leaf shape using a monochrome wash of diluted Payne’s Grey or muted green. Keep the paint application flat and simple. -
Botanical splash:
On the second small sheet, create an abstract botanical piece using the wet-on-wet technique. Drop brown ink or paint onto wet paper and let it bloom into organic, soft shapes. -
Framing:
Once all paintings are completely dry (give them at least few hours), carefully peel off the tape. Mount them in matching light wood frames with generous white mats to complete the gallery look.
Hang your trio of earthy artworks together to instantly warm up your dining room with handmade charm


Soft Greige for Easy Elegance
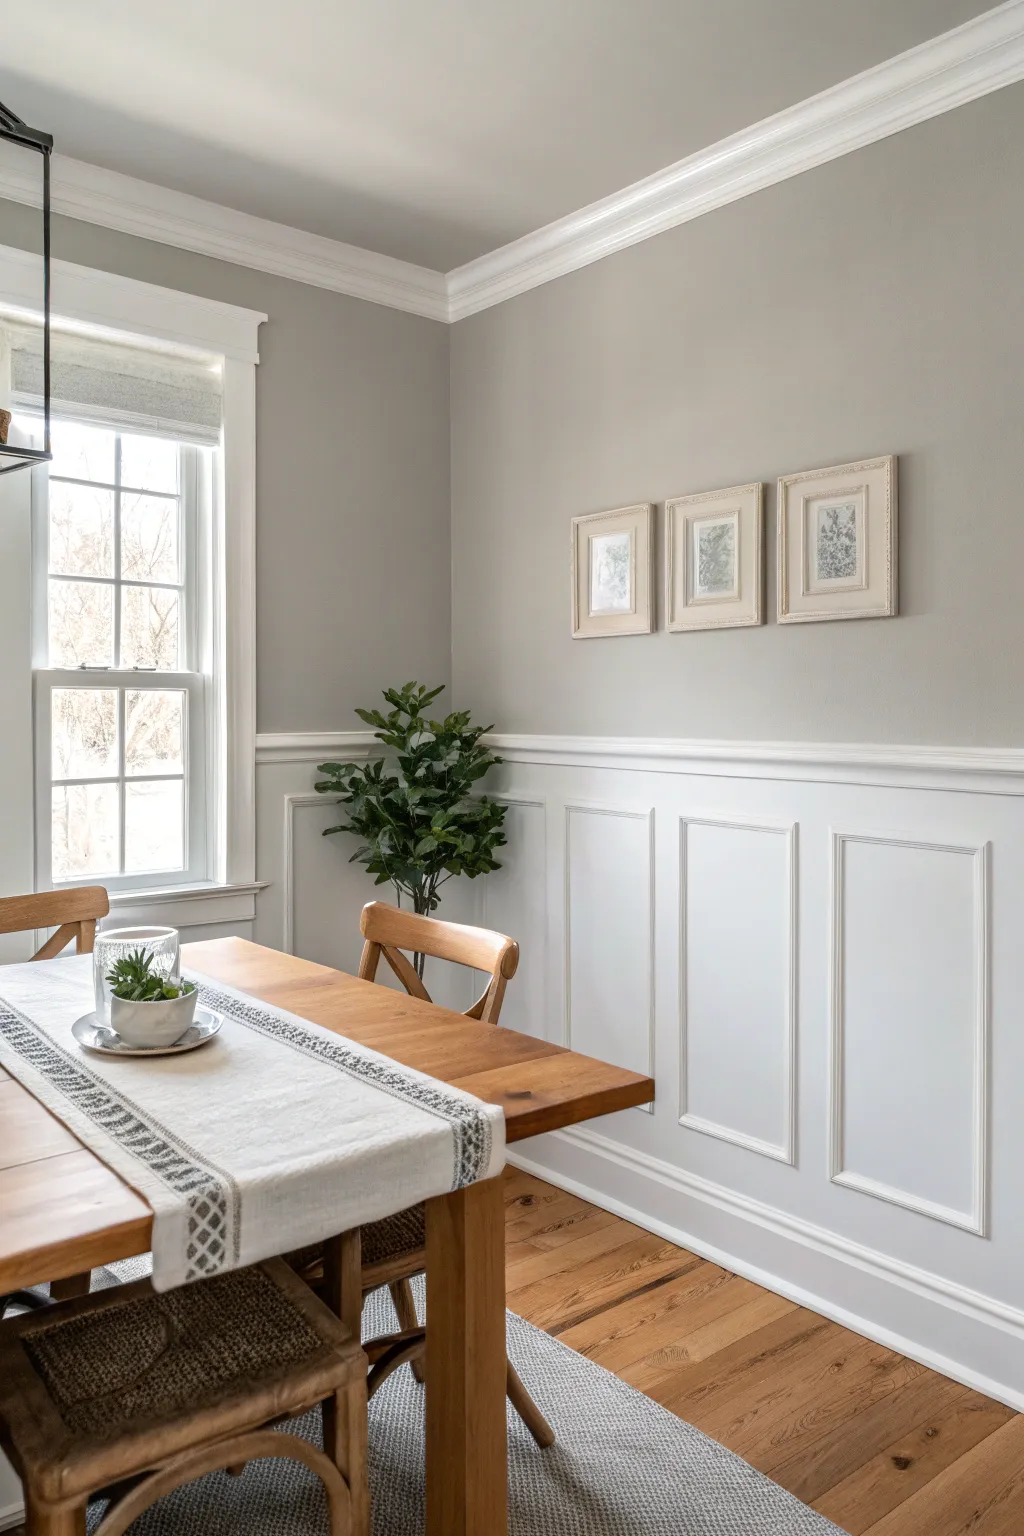
Elevate your dining space with this sophisticated wall treatment that combines classic architectural details with modern color. By pairing crisp white wainscoting with a soothing greige upper wall, you create a balanced, airy atmosphere perfect for gathering.
Step-by-Step
Materials
- High-quality painter’s tape
- Spackle or wood filler
- Sandpaper (120 and 220 grit)
- Caulk and caulk gun
- Primer (stain-blocking)
- Interior semi-gloss paint (White)
- Interior eggshell or satin paint (Greige)
- 2-inch angled sash brush
- Small foam roller and tray
- Drop cloths
- Decorative molding trim (if installing new wainscoting)
- Level and measuring tape
Step 1: Preparation & Planning
-
Clear and clean:
Remove all furniture, outlet covers, and wall art from the room. Wipe down the walls with a damp cloth and mild detergent to remove dust or grease, ensuring a pristine surface for paint adhesion. -
Inspect and repair:
Examine the walls and existing trim for any nail holes, dents, or imperfections. Fill these spots with spackle or wood filler, allowing it to dry completely before sanding smooth with 120-grit sandpaper. -
Establish the line:
If you don’t have a chair rail, determine the height for your wainscoting (typically 32-36 inches). Use a level and a pencil to draw a faint, continuous reference line around the room where the two paint colors will meet.
Step 2: Painting the Upper Wall
-
Cut in edges:
Begin with the greige paint for the upper wall. Use an angled sash brush to carefully cut in along the ceiling line, corners, and just above your chair rail or reference line. -
Roll the main area:
Load a roller with the greige paint and apply it to the upper wall section using a ‘W’ pattern to distribute paint evenly. Work in manageable sections to maintain a wet edge. -
Apply second coat:
Allow the first coat to dry for at least 4 hours. Assess coverage and apply a second coat if necessary to achieve a rich, solid color depth.
Seamless Caulk Lines
Cut the caulk tube tip at a small angle for precision. Keep a damp rag handy to wipe your finger frequently while smoothing, ensuring no excess builds up on the molding profile.
Step 3: Creating the Wainscoting
-
Prep the lower section:
Once the upper wall is fully dry (I usually give it overnight just to be safe), tape off the bottom edge of the greige paint with high-quality painter’s tape to protect your new work. -
Install picture frame molding:
If adding the paneled look shown, measure and cut your decorative molding to create rectangular boxes. Use a level to ensure spacing is uniform between boxes and the floor. -
Secure the molding:
Attach the molding pieces to the wall using construction adhesive and finishing nails. Countersink any nail heads slightly below the surface. -
Fill and caulk:
Fill nail holes with wood filler. Apply a thin bead of paintable caulk along all seams where the molding meets the wall to create a seamless, built-in appearance. Smooth the caulk immediately with a wet finger.
Uneven Walls?
If gaps appear behind your molding due to wavy walls, apply a slightly thicker bead of caulk. For large gaps, use a backer rod before caulking to prevent cracking later.
Step 4: Finishing Touches
-
Prime the trim:
Apply a coat of primer to the new molding and the lower wall section. This step is crucial for unifying the texture of the drywall and the wood trim. -
Paint the woodwork:
Stir your semi-gloss white paint thoroughly. Use the angled brush to paint the recessed areas and edges of the molding first. -
Roll the flat surfaces:
Use a small foam roller to paint the flat wall spaces inside the boxes and the styles between them. The foam roller helps eliminate brush strokes for a sprayed-on look. -
Final coat application:
Apply a second coat of semi-gloss white to the entire lower section once the first coat is dry to the touch. This adds durability and a brilliant sheen. -
Remove tape:
While the final coat is still slightly tacky, carefully peel away the painter’s tape at a 45-degree angle to ensure a razor-sharp transition line.
Step back and admire how this classic architectural update completely transforms the character of your dining room


Deep Navy for a Nighttime Feel
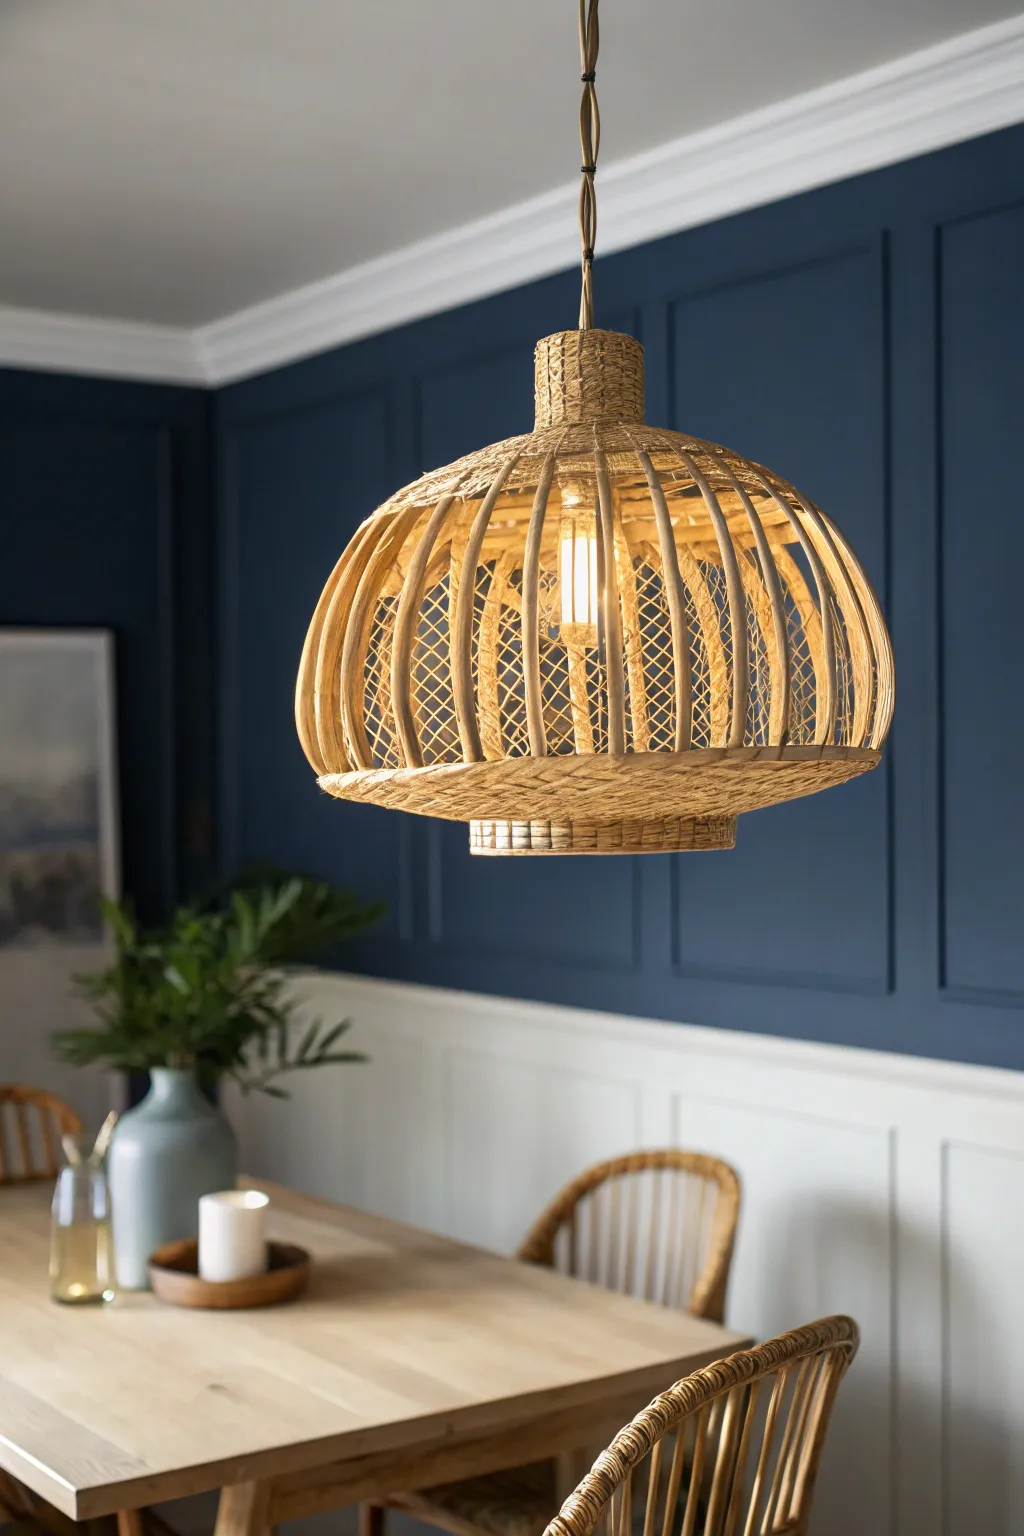
Transform a plain dining room wall into a sophisticated focal point by combining classic board and batten paneling with a rich, deep navy hue. This project balances elegant architectural detail with moody color to create an intimate, nighttime feel perfect for dinner parties.
Step-by-Step Guide
Materials
- 1×2 or 1×3 primed MDF boards (for vertical battens)
- 1×4 primed MDF boards (for top and bottom rails)
- Deep navy blue paint (eggshell or satin finish)
- Crisp white paint for lower wainscoting (semi-gloss)
- Construction adhesive (e.g., Liquid Nails)
- Paintable latex caulk and caulk gun
- Wood filler and putty knife
- Brad nailer with 1.5-inch nails
- Level (2-foot or longer)
- Measuring tape
- Painter’s tape
- Paint rollers (microfiber) and brushes
- Sanding block (fine grit)
- Drop cloths
Step 1: Preparation and Layout
-
Measure and plan:
Begin by measuring the total width of your wall to calculate the spacing for your vertical battens. A spacing of 12 to 16 inches usually looks balanced. Mark these vertical lines lightly on the wall with a pencil to visualize the grid. -
Define the wainscoting height:
Decide on the height of your lower white wainscoting. In the image, the white section sits at chair rail height (around 32-36 inches). Draw a level horizontal line across the entire wall at this height. -
Prep the surface:
Remove any existing baseboards if you plan to replace them or integrate them into the new design. Lightly sand the wall surface to ensure better paint adhesion, then wipe it clean with a damp cloth.
Uneven Walls?
Walls are rarely perfectly flat. If gaps appear behind boards, don’t force them. Fill large gaps with caulk rather than bending the wood, which keeps your grid straight.
Step 2: Installing the Grid
-
Install horizontal rails:
Apply construction adhesive to the back of your horizontal 1×4 boards. Place one along the ceiling line and another along your marked chair-rail line. Secure them into studs using your brad nailer. -
Place vertical battens:
Cut your vertical 1×2 or 1×3 boards to fit snugly between the horizontal rails. Apply adhesive to the back of the first board and place it following your pencil marks. -
Level and secure:
Before nailing, use your level against the side of the vertical board to ensure it is perfectly plumb. Once straight, nail it into the wall. Repeat this process for all vertical battens across the upper navy section. -
Add lower molding (optional):
If you are extending the paneling look to the lower white section, install corresponding vertical battens below the chair rail, aligning them with the ones above for continuity.
Picture Perfect
Install picture hanging hardware onto the battens themselves before painting. This centers art perfectly in your grid squares without damaging the drywall later.
Step 3: Finishing the Woodwork
-
Fill nail holes:
Go over every board and fill the small brad nail holes with wood filler. Leave it slightly mounded as it may shrink when drying. -
Caulk the seams:
Run a thin bead of paintable caulk along every edge where the wood meets the wall or another board. I find smoothing this with a wet finger immediately gives the cleanest transition. -
Sand smooth:
Once the wood filler is completely dry, sand it flush with the surface of the boards. Lightly sand the caulked edges if any roughness remains. -
Prime the patches:
Touch up the sanded filler spots with a dab of primer to prevent flashing paint later.
Step 4: Painting
-
Tape off sections:
Apply painter’s tape to protect the ceiling line and any adjacent walls. Crucially, tape off the top edge of your lower white section if you are painting the navy first. -
Cut in the navy:
Using an angled brush, paint the corners, edges around the battens, and the ceiling line with your deep navy color. Work in small sections to maintain a wet edge. -
Roll the navy wall:
Use a microfiber roller to paint the flat wall sections and the faces of the battens. Apply a second coat after the first has dried for a rich, opaque finish. -
Paint the lower section:
Once the navy paint is fully cured, tape off the bottom of the navy rail carefully. Paint the lower wall and remaining woodwork in a crisp white semi-gloss for durability and contrast. -
Remove tape:
Peel off the painter’s tape slowly while the paint is still slightly tacky to prevent peeling. Step back and admire the dramatic transformation.
The deep navy tone contrasting with bright white paneling creates an instantly classic atmosphere that elevates every meal


Sage Green That Feels Calm and Fresh
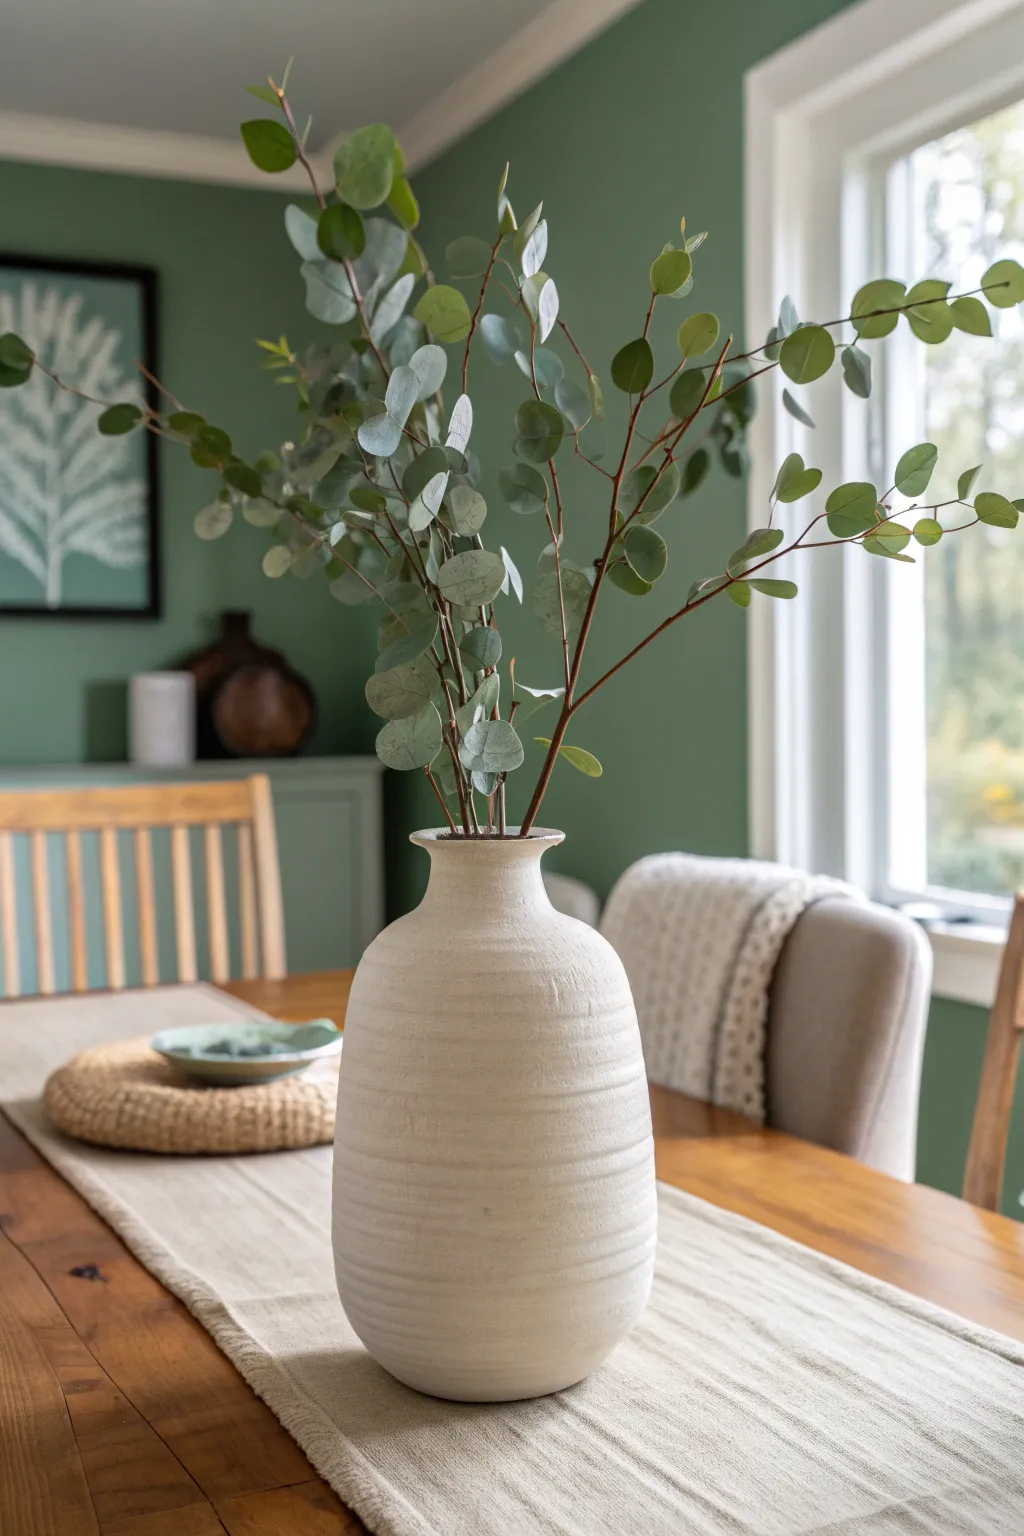
Transform your dining space with this serene sage green wall treatment that instantly breathes fresh air into the room. This project creates a soft, matte finish that pairs beautifully with natural textures like wood and linen, crafting the perfect backdrop for cozy gatherings.
Step-by-Step
Materials
- High-quality interior latex paint (Sage Green)
- White ceiling paint (for trim/edges if needed)
- Painter’s tape (blue or green)
- Drop cloths or plastic sheeting
- Spackle and putty knife
- Sandpaper (120 and 220 grit)
- Microfiber tack cloth
- Angled sash brush (2.5 inch)
- Paint roller frame and extension pole
- Microfiber roller covers (3/8 inch nap for smooth walls)
- Paint tray and liners
- Mild detergent and sponge
Step 1: Preparation & Surface Care
-
Clear and Clean:
Begin by removing all furniture, wall decor, and switch plates from the area. Wash the walls thoroughly with a sponge and mild detergent to remove dust and grease, which ensures better paint adhesion. -
Repair Imperfections:
Inspect the wall for nail holes or dings. Fill these spots with a small amount of spackle using your putty knife, smoothing it out so it’s flush with the wall surface. -
Sand Smooth:
Once the spackle is completely dry, sand the patched areas with 120-grit sandpaper until smooth. I like to lightly sand the rest of the wall as well to roughen the old finish slightly for better grip. -
Remove Dust:
Wipe down the entire wall surface with a microfiber tack cloth or a damp rag to remove all sanding dust. -
Tape Off Edges:
carefully apply painter’s tape along the baseboards, ceiling line, window frames, and door trim. Press the edges of the tape down firmly with a putty knife to prevent paint bleed. -
Protect the Floor:
Lay down drop cloths or plastic sheeting to cover the flooring completely, taping it to the baseboards to ensure it doesn’t shift.
Clean Lines Secret
Before painting the green, seal the tape edge by painting a thin line of your existing wall color (or white trim color) over the tape edge first
Step 2: Cutting In & Rolling
-
Stir the Paint:
Open your sage green paint can and stir it thoroughly with a wooden stick, ensuring the pigments at the bottom are fully incorporated. -
Cut In the Edges:
Dip your angled sash brush about one-third of the way into the paint. carefully paint a 2-3 inch border along top, bottom, and corners where the roller won’t reach. -
Feather the Edges:
While cutting in, feather the outer edge of your brush strokes so they aren’t too thick, preventing ridges when you roll over them later. -
Load the Roller:
Pour paint into the tray and load your roller, ensuring it is saturated but not dripping. Roll it on the ridged part of the tray to remove excess. -
First Coat Application:
Start rolling the wall in a ‘W’ pattern, working in roughly 3×3 foot sections. This distributes the paint evenly before you smooth it out with vertical strokes. -
Maintain a Wet Edge:
Work quickly enough to keep a ‘wet edge,’ overlapping each new stroke slightly with the previous wet paint to avoid stripe marks. -
Dry Time:
Allow the first coat to dry completely according to the manufacturer’s instructions, typically 2-4 hours depending on humidity. -
Inspect and Light Sanding:
Check for any uneven spots or drips. If needed, lightly sand using fine 220-grit sandpaper and wipe clean. -
Apply Second Coat:
Repeat the cutting in and rolling process for a second coat. This deepens the sage color and ensures a true, opaque finish without streakiness.
Textured Dimension
For an earthy look, mix a small amount of texture additive or joint compound into the paint for a subtle limewash or plaster effect
Step 3: Finishing Touches
-
Remove Tape:
I prefer to remove the painter’s tape while the second coat is still slightly tacky—usually about 30-45 minutes after painting. Pull the tape slowly at a 45-degree angle away from the painted area. -
Touch Up:
Use a small artist’s brush to carefully touch up any spots where paint might have peeled or bled. -
Final Cure:
Let the wall cure for at least 24 hours before moving furniture back or rehanging artwork to ensure the surface is durable.
Enjoy the peaceful ambiance of your freshly painted dining room.
BRUSH GUIDE
The Right Brush for Every Stroke
From clean lines to bold texture — master brush choice, stroke control, and essential techniques.
Explore the Full Guide
Olive Green for Cozy, Earthy Depth
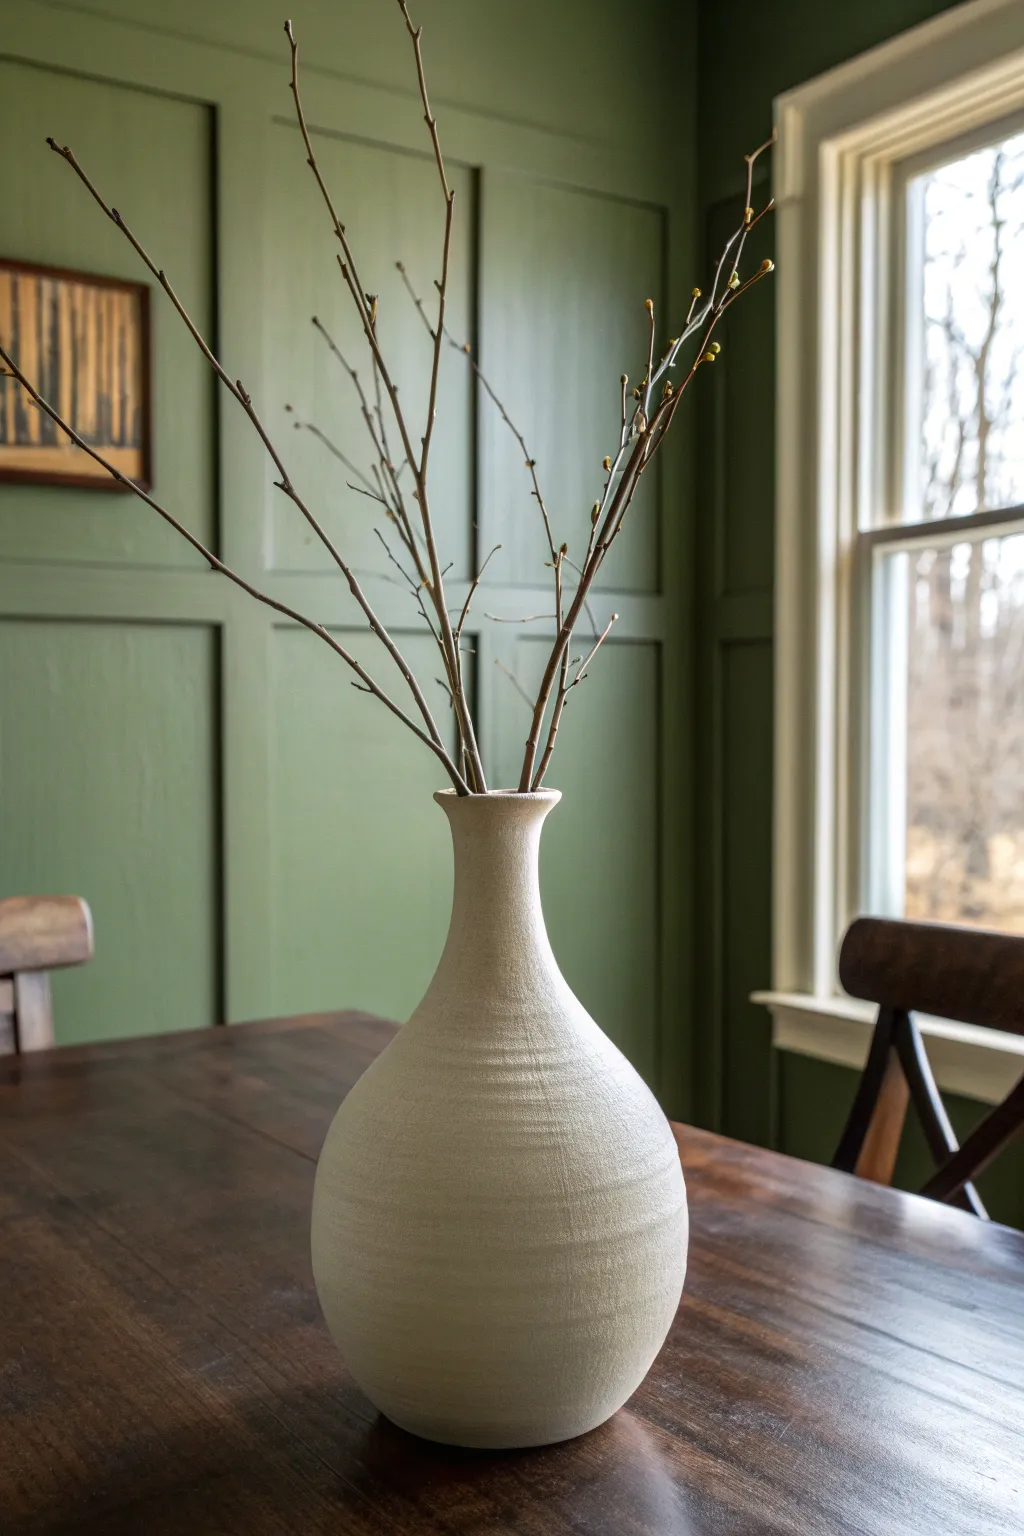
Transform a plain dining room into a cozy retreat with this full-height board and batten project painted in a rich, earthy olive green. This architectural detail adds sophisticated depth and traditional charm that pairs perfectly with warm wood tones.
Step-by-Step Guide
Materials
- 1×3 MDF or primed pine boards (for battens)
- 1×4 MDF or primed pine boards (for top and bottom rails)
- Olive green interior paint (Satin or Eggshell finish)
- Construction adhesive
- Brad nailer and 2-inch brad nails
- Paintable latex caulk and caulk gun
- Wood filler
- Sandpaper (120 and 220 grit)
- Laser level (or standard 4 ft level)
- Measuring tape
- Angle finder (optional)
- Miter saw
- Stud finder
- Paint roller (3/8 inch nap) and angled sash brush
- Drop cloths and painter’s tape
Step 1: Planning and Layout
-
Measure and calculate:
Begin by measuring the total width of your wall. Decide on your desired spacing between vertical battens; for this look, a gap of roughly 16 to 24 inches works well to create large, elegant rectangles. -
Mark the stud locations:
Use a stud finder to locate and mark all studs along the wall. While you’ll rely on adhesive, hitting studs with your nails provides the best hold. -
Sketch the grid:
Sketch your design on paper first. If your wall width doesn’t divide evenly by your spacing, adjust the outer boxes slightly or center the middle box to ensure symmetry.
Keep it Clean
Keep a damp rag handy while caulking. Wipe your finger on the rag after every swipe to prevent caulk buildup from smearing onto the smooth parts of the wood.
Step 2: Installing the Horizontal Rails
-
Prep the surface:
Remove existing baseboards if you plan to replace them with a 1×4 bottom rail for a seamless look, or simply plan to rest your battens on top of the current baseboard. -
Install the top rail:
Cut your 1×4 board to the wall’s length. Apply construction adhesive to the back, place it near the ceiling, ensure it is perfectly level using your laser level, and nail it into the studs. -
Install the middle horizontal rail:
For the grid look shown, you need horizontal dividers. Determine the height (usually about 2/3 up the wall or at chair rail height). Level carefully, apply adhesive, and nail the horizontal boards into the studs.
Step 3: Adding Vertical Battens
-
Cut vertical pieces:
Measure the distance between your baseboard and middle rail, and the middle rail and top rail. Cut your 1×3 boards to these lengths. Measure individually for each spot as floors are rarely perfectly level. -
Install the first batten:
Start at the center of the wall or one edge, depending on your layout plan. Apply adhesive to the back of the 1×3, check it for plumb with your level, and nail it into place. -
Use a spacer block:
To speed up the process, cut a piece of scrap wood to the exact width of your spacing. Use this spacer block to position the next batten quickly without measuring every single time. -
Secure all verticals:
Continue installing vertical battens across the wall. If a batten doesn’t land on a stud, angling your brad nails slightly in alternating directions (like an ‘X’) can help grip the drywall better alongside the adhesive.
Monochromatic Magic
Paint the baseboards, window trim, and even the electrical outlet covers in the same olive green. This ‘color drenching’ technique makes the room feel larger and more cohesive.
Step 4: Finishing and Painting
-
Fill the holes:
Fill all nail holes with wood filler. Let it dry completely, often indicated by a color change in the filler. -
Sand smooth:
Sand the wood filler flush with the board surface using 220-grit paper. Also sand any joints where boards meet to ensure they feel like one continuous piece. -
Caulk the seams:
Apply a thin bead of paintable latex caulk along every edge where the wood meets the wall and where boards meet each other. Smooth firmly with a wet finger to remove excess; this step is crucial for that seamless, built-in look. -
Prime the wood:
If you are using raw pine or unprimed MDF, apply a coat of primer to the wood components to ensure the final finish is even. -
Cut in the edges:
Using an angled sash brush, paint the olive green color along all corners, edges, and inner angles of the grid. I find thorough cutting-in makes rolling much faster later. -
Roll the first coat:
Use a 3/8 inch nap roller to paint the flat wall sections and the faces of the boards. Roll in a ‘W’ pattern for even coverage. -
Apply the second coat:
Allow the first coat to dry according to the paint can’s instructions, then apply a second coat for full depth and richness of color.
Enjoy the dramatic transformation your new feature wall brings to your dining space
Terracotta Walls That Warm Up Every Meal
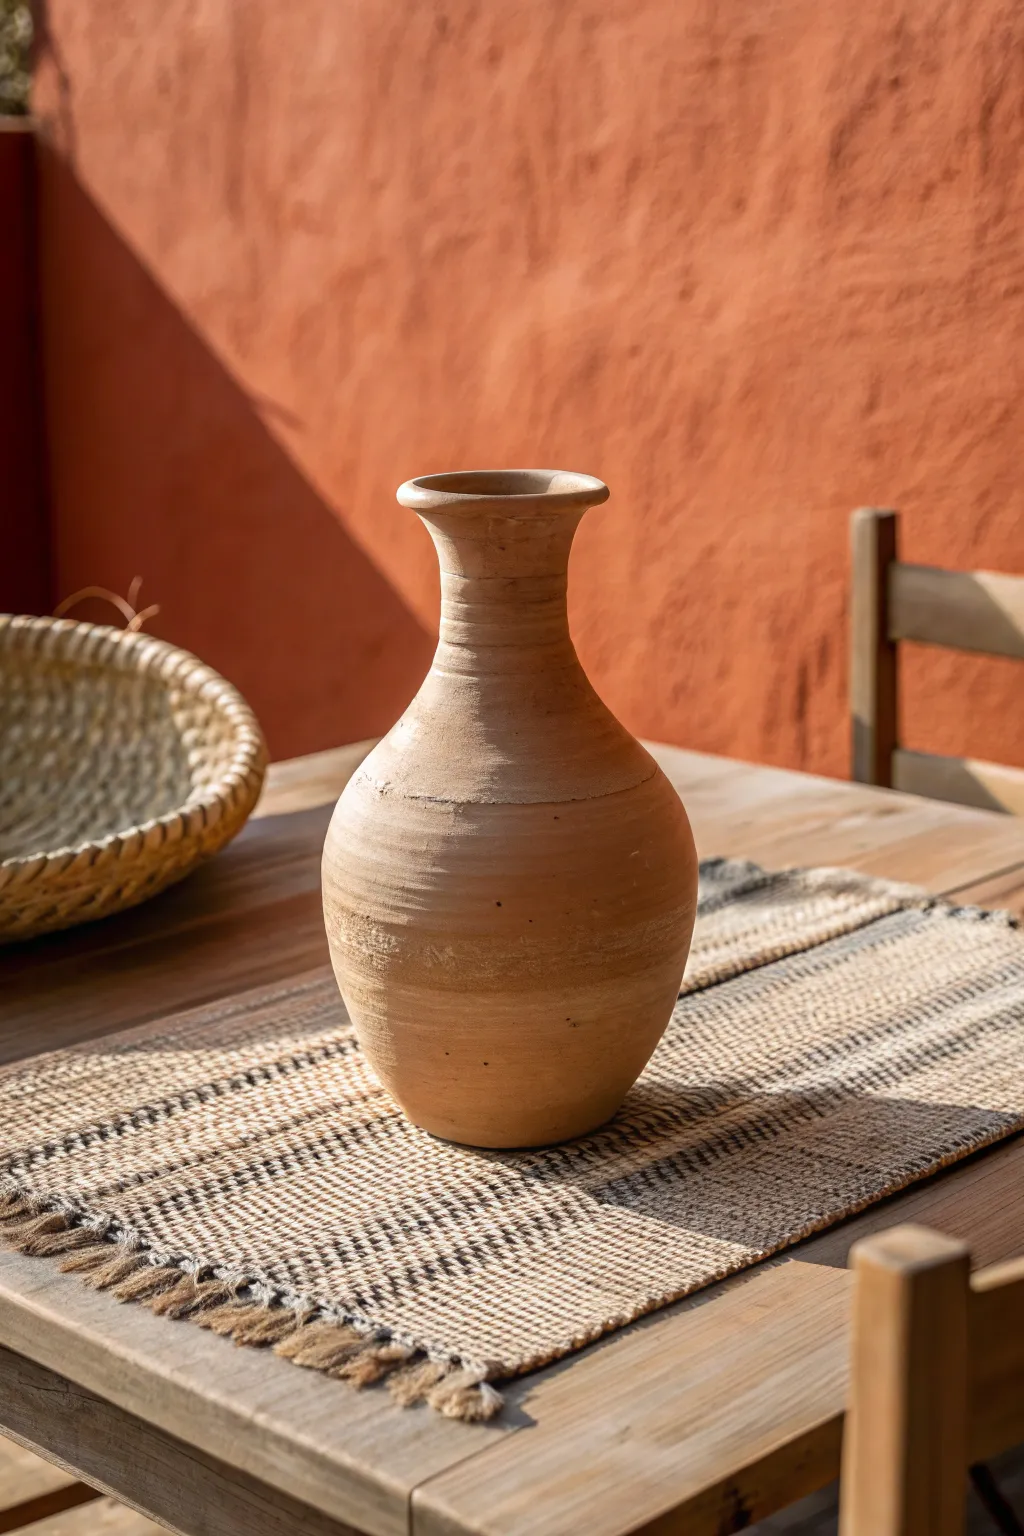
Bring the earthy warmth of a Mediterranean villa into your dining room with this textured terracotta wall finish. By layering warm clay tones and creating a subtle, plastered texture, you creates a cozy backdrop that makes every meal feel like a rustic getaway.
How-To Guide
Materials
- High-quality latex primer
- Terracotta-colored latex paint (base coat)
- Darker burnt-orange latex paint (for depth)
- Lighter peach or sand-colored latex paint (for highlights)
- Texture additive (sand or specialized texture medium)
- Large drywall trowel or Venetian plaster trowel
- 4-inch paint brush (natural bristle)
- Large sponge
- Painter’s tape
- Drop cloths
- Mixing bucket
- Stir sticks
Step 1: Preparation and Priming
-
Protect the area:
Begin by thoroughly taping off all trim, ceilings, and adjacent walls with high-quality painter’s tape to ensure crisp lines. Lay down drop cloths to protect your flooring from drips. -
Apply the primer:
Roll on a coat of high-quality latex primer over the entire wall surface. This ensures your textured paint adheres properly and provides a neutral canvas for the warm tones. -
Let it dry completely:
Check your primer’s instructions for drying times, typically 2-4 hours. Do not rush this step, as a wet base can ruin the texture application.
Visible Seams?
If you see lines between sections, lightly mist the dry edge with water before applying fresh texture to help them blend invisibly.
Step 2: Creating the Texture Base
-
Mix your base texture:
Pour your main terracotta-colored paint into a bucket. Gradually stir in the texture additive until you achieve a consistency similar to thick pancake batter. It should be thick enough to hold peaks but spreadable. -
Apply the first patch:
Using your large brush, slap a generous amount of the textured paint onto a small 3×3 foot section of the wall. Don’t worry about being neat; random placement is better. -
Trowel the texture:
Take your trowel and smooth out the applied paint using multi-directional sweeping motions. The goal is to create peaks and valleys, mimicking old stucco or plaster. Leave some areas thicker than others. -
Work across the wall:
Continue working in small sections, blending the edges of each new patch into the wet edge of the previous one to avoid visible seams.
Aged Patina Effect
Mix a tiny amount of raw umber acrylic into your glaze wash to give the wall a dusty, aged look found in historic buildings.
Step 3: Layering for Depth
-
Dry the base coat:
Allow the textured base coat to dry for at least 6-12 hours, or overnight. It must be rock hard before you add dimension. -
Prepare the glaze mix:
Mix your darker burnt-orange paint with water (about a 1:1 ratio) to create a translucent wash. -
Wash the wall:
Dip a large sponge into the wash and lightly dab it over the textured wall. Focus on getting some pigment into the deeper crevices of the texture. -
Wipe back:
Immediately use a clean, slightly damp rag to gently wipe the surface. This removes paint from the high points while leaving the darker color in the valleys, instantly creating depth. -
Repeat for richness:
If you want a deeper look, I like to let the first wash dry and then apply a second, more targeted application in corners or areas you want to appear shadowed.
Step 4: Highlighting and Finishing
-
Dry brush the highlights:
Dip just the tips of a clean, dry brush into your lightest peach or sand color. Offload almost all the paint onto a cardboard scrap or paper towel until the brush is barely marking. -
Hit the high points:
Lightly drag the dry brush horizontally across the raised texture of the wall. This ‘dry brushing’ technique catches only the highest bumps, mimicking sun-bleached clay. -
Soften harsh lines:
If any highlights look too stark, use a clean, dry blending brush to gently feather them out while the paint is still tacky. -
Final inspection:
Step back and view the wall from a distance. Look for any areas that seem too uniform or empty and make small adjustments with your glaze or highlight paint. -
Clean up:
carefully remove the painter’s tape while the final topcoat is still slightly damp to prevent peeling, and roll up your drop cloths.
Now your dining space radiates a timeless, earthen charm that invites long conversations over dinner

PENCIL GUIDE
Understanding Pencil Grades from H to B
From first sketch to finished drawing — learn pencil grades, line control, and shading techniques.
Explore the Full Guide
Butter Yellow for Cheerful, Sunny Energy
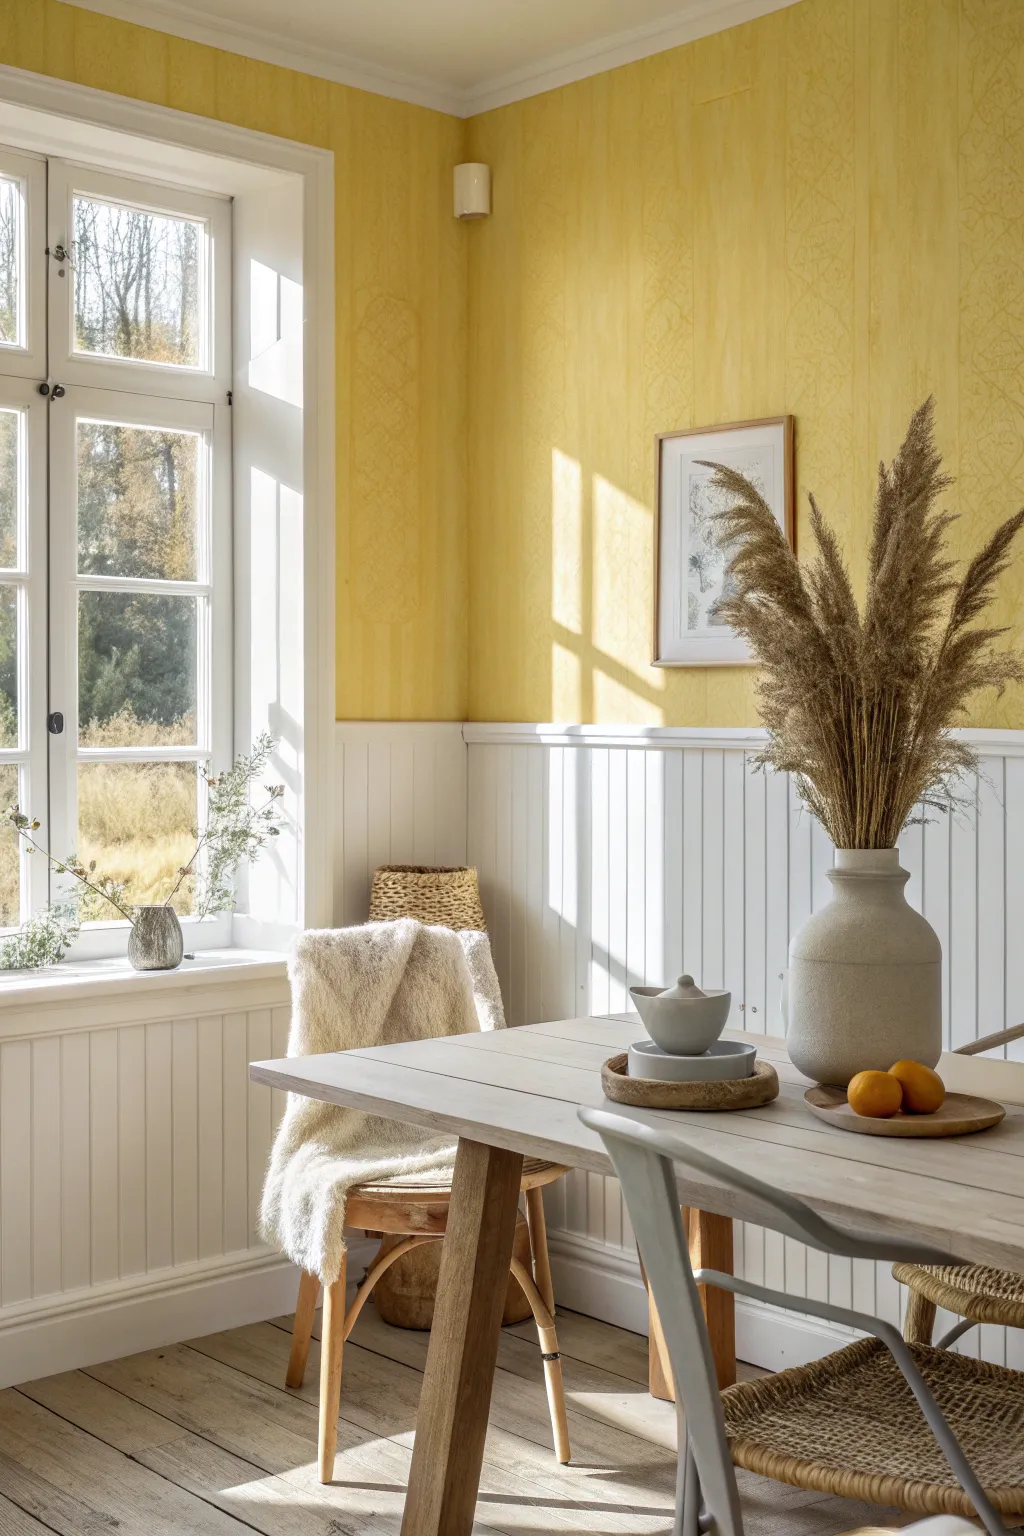
Bring the warmth of a summer afternoon into your dining space with this cheerful, tonal wall treatment. By combining crisp white wainscoting with a textured butter-yellow upper wall, you create a room that feels perpetually bathed in sunlight.
How-To Guide
Materials
- Butter yellow interior latex paint (eggshell or satin finish)
- White semi-gloss interior trim paint
- Beadboard paneling sheets or individual planks
- Baseboard trim and chair rail molding
- High-quality painter’s tape
- Construction adhesive (Liquid Nails)
- Finishing nails and hammer (or nail gun)
- Sanding block (medium and fine grit)
- Wood filler
- Caulk and caulk gun
- Paint rollers (medium nap for wainscoting, smooth for wall)
- Angled sash brush (2-inch)
- Drop cloths
- Level and measuring tape
- Patterned wallpaper (optional, for subtle texture effect shown)
- Wallpaper paste and smoothing tool (if using wallpaper)
Step 1: Preparation & Wall Prep
-
Clear and clean:
Remove all furniture, outlet covers, and existing baseboards from the room to create a clear workspace. Wash the walls with a mild detergent and water solution to remove any grease or dust, ensuring a clean slate for your new finish. -
Patch imperfections:
Inspect the upper and lower portions of your walls for any nail holes or dents. Fill these with spackle using a putty knife, let dry completely, and then sand smooth until flush with the wall surface. -
Establish the height:
Determine the height of your wainscoting—typically about one-third of the wall height, or roughly 32 to 36 inches from the floor. Use a measuring tape to mark this height at several points around the room. -
Draw the line:
Connect your marks using a long level and a pencil, drawing a continuous horizontal line around the entire room. This line will guide the top of your beadboard and ensure your chair rail sits perfectly straight.
Step 2: Installing the Wainscoting
-
Cut panels to size:
Measure the distance from the floor to your marked line carefully. Transfer these measurements to your beadboard sheets and cut them down to size using a circular saw or table saw. -
Apply adhesive:
Apply a zigzag of construction adhesive to the back of your first beadboard panel. I like to keep the adhesive about an inch away from the edges to prevent excessive squeeze-out. -
Secure the panels:
Press the panel firmly against the wall, checking for plumb with your level. Secure it into place using finishing nails along the top and bottom edges, aiming for wall studs where possible. -
Continue installation:
Repeat the process for the remaining beadboard panels, butting them tightly against one another. If you encounter outlets, carefully measure and cut out openings using a jigsaw before installation. -
Add the trim:
Install your new baseboard along the bottom of the beadboard and the chair rail molding along the top edge, covering the seam between the paneling and the drywall. Miter the corners for a professional finish.
Uneven Gaps?
If your walls aren’t perfectly straight, you might see gaps at the chair rail. Don’t force the wood; fill gaps with acrylic caulk before painting for a seamless finish.
Step 3: Painting & Finishing
-
Fill and caulk:
Fill all nail holes with wood filler and sand smooth once dry. Run a bead of paintable caulk along all seams—between panels, along the trim, and in corners—to create a seamless, built-in look. -
Prime the surface:
Even if pre-primed, apply a coat of high-quality primer to the entire wainscoting area and the upper walls to ensure uniform paint absorption and true color representation. -
Paint the woodwork:
Using your semi-gloss white paint, coat the beadboard, baseboards, and chair rail. Use a brush for the grooves and edges first, then follow up with a small roller for the flat surfaces to avoid brush marks. -
Protect the trim:
Once the white paint is fully cured (give it at least 24 hours), apply painter’s tape carefully along the top edge of the chair rail to protect your fresh work from the yellow wall paint. -
Cut in the color:
Open your butter yellow paint and stir well. Using an angled sash brush, ‘cut in’ a 2-inch border around the ceiling line, corners, and just above the taped chair rail. -
Roll the walls:
Pour the yellow paint into a tray and load your roller. Apply the paint to the upper walls using a ‘W’ motion to distribute it evenly, working in manageable 3-foot sections to keep a wet edge. -
Second coat:
Allow the first coat of yellow to dry completely according to the can’s instructions. Apply a second coat to ensure rich, opaque coverage and true depth of color. -
Reveal:
Remove the painter’s tape while the final coat is still slightly tacky to ensure a crisp clean line between the yellow wall and the white chair rail.
Pro Tip: Depth of Color
Yellow can be tricky. Always test a large swatch and view it at different times of day; morning light makes it cooler, while evening light intensifies the warmth.
Step 4: Styling (Optional)
-
Add warmth:
To mimic the image precisely, consider finding a subtle, tone-on-tone yellow wallpaper instead of flat paint, or use a rag-rolling technique with a slightly lighter glaze over your yellow base for depth. -
Final touches:
Replace your outlet covers. Bring in natural wood elements like a raw oak table or woven chairs to complement the sunny hue without competing with it.
Now step back and enjoy the permanent sunshine you’ve just added to your home.
Caramel Brown for a Rich, Cocooned Look
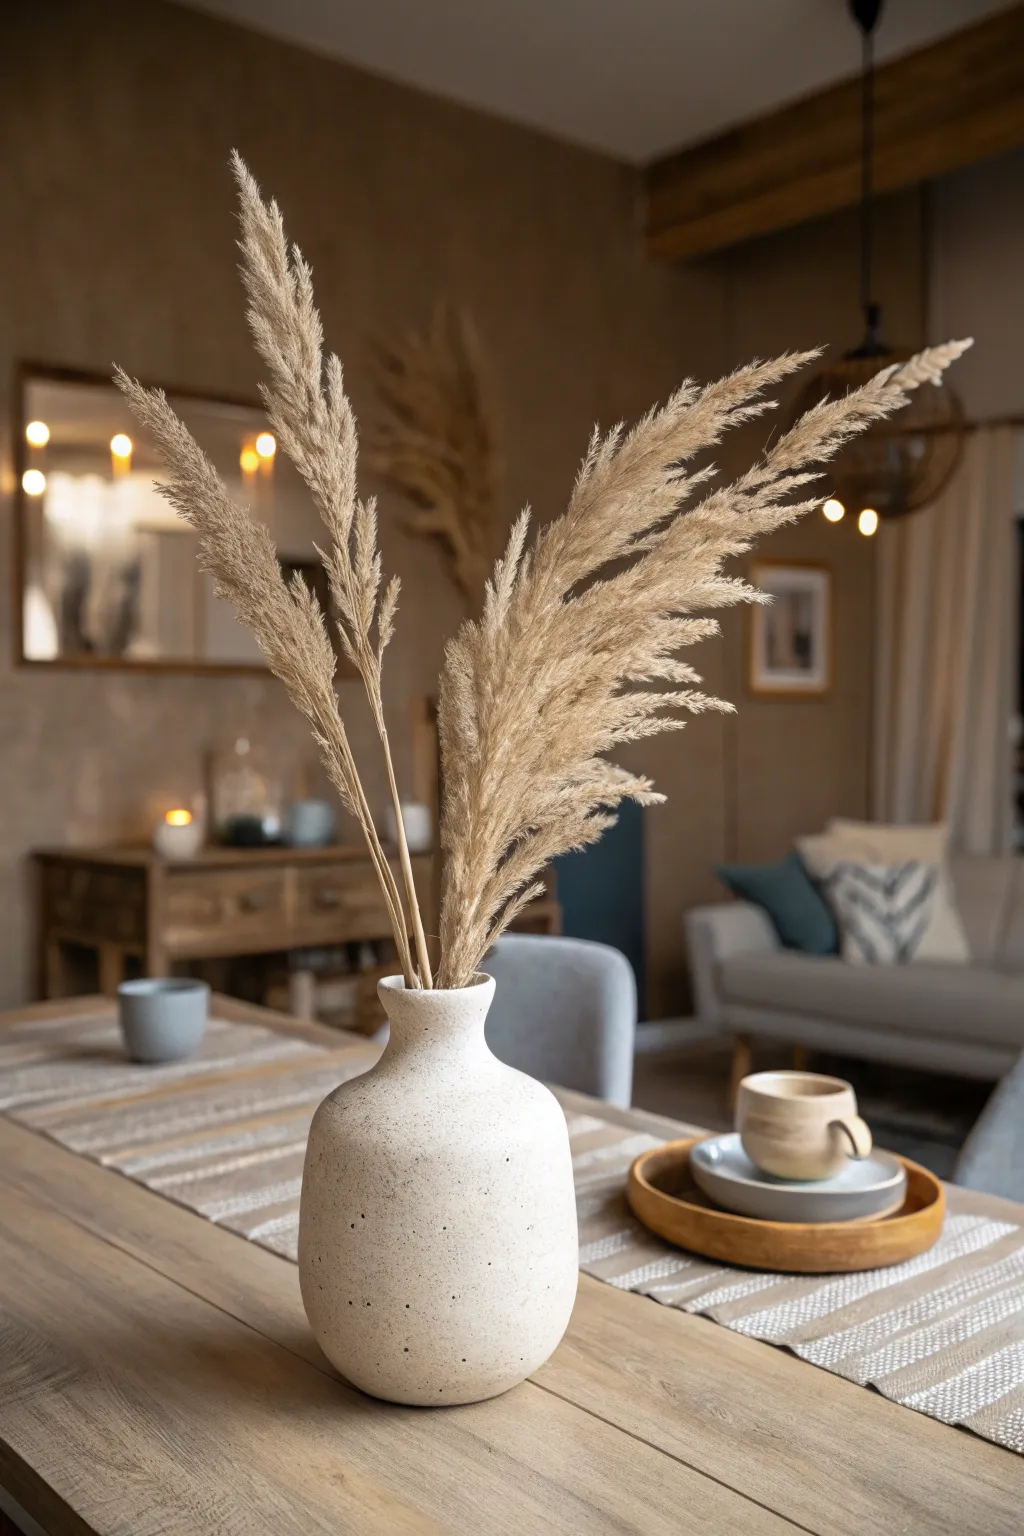
Transform a plain dining room into a warm, inviting sanctuary with this caramel brown textured wall finish. This project replicates the look of organic plaster or limewash, creating a rich backdrop that feels both modern and cozy.
Detailed Instructions
Materials
- High-quality interior latex paint (Caramel/Toffee shade)
- Glaze medium or textural additive (sand or fine grit)
- Wide block brush (4-6 inch)
- Medium wool roller and tray
- Painter’s tape
- Drop cloths
- Spackle and sandpaper (for prep)
- Clean rags
- Matte clear topcoat (optional)
Step 1: Preparation
-
Clear and Clean:
Remove all furniture from the wall area or cover it thoroughly with drop cloths to protect against splatters. -
Surface Prep:
Inspect the wall for any holes or cracks. Fill these imperfections with spackle and sand them smooth once dry to ensure an even canvas. -
Masking Off:
Apply painter’s tape carefully along the baseboards, ceiling line, and any adjacent walls you don’t intend to paint. -
Wipe Down:
Use a damp rag to wipe away any sanding dust or surface grime. A clean wall is crucial for the textured paint to adhere properly.
Brushwork Secret
Keep a dry brush handy to lightly feather out any heavy globs of glaze while they are still wet for a softer, cloud-like finish.
Step 2: Base Coat Application
-
Cutting In:
Using a smaller brush, paint a border around the edges of the wall where the roller won’t reach. -
Rolling the Base:
Pour your solid caramel latex paint into the tray. Load your roller and apply a solid, even coat across the entire wall. -
First Drying Phase:
Allow this base coat to dry completely according to the manufacturer’s instructions, usually at least 4 hours. -
Second Coat (If Needed):
If the coverage looks patchy, apply a second coat of the solid color and let it dry fully before moving on to the texture phase.
Earthy Accents
Style the finished room with terracotta pottery or beige linens to enhance the monochromatic, cocooning effect of the walls.
Step 3: Creating Texture
-
Mixing the Glaze:
In a separate container, mix your caramel paint with a glaze medium (typically a 1:1 ratio) or stir in a fine sand additive if you want physical grit. -
Cross-Hatch Technique:
Dip your wide block brush into the glaze mixture. Apply it to the wall using varied -
Working in Sections:
Here, I prefer to work in small 3×3 foot sections. This prevents the glaze from drying out before you’ve finished blending the texture. -
Softening Edges:
As you move to a new section, overlap your brushstrokes slightly with the previous section’s wet edge to avoid harsh lines. -
Adding Depth:
For areas where you want more depth, dab the brush gently to deposit slightly more pigment, creating subtle darker patches that mimic plaster. -
Check Consistency:
Step back frequently to ensure the texture looks organic and random rather than repetitive or patterned.
Step 4: Finishing Touches
-
Full Cure:
Allow the textured finish to dry for at least 24 hours. The glaze extends the drying time significantly. -
Protective Coat:
If this wall is in a high-traffic dining area, consider rolling on a matte clear coat to seal the texture and make it wipeable. -
Remove Tape:
Carefully score the edge of the painter’s tape with a utility knife before pulling it off to prevent peeling any paint. -
Clean Up:
Wash your brushes immediately with warm soapy water, as glaze can be difficult to remove once fully hardened. -
Styling:
Reintroduce your dining furniture, perhaps adding warm wood tones and dried florals to complement the earthy wall color.
Enjoy the deep, comforting warmth this textured caramel wall brings to your dining space


Two-Tone Walls With Wainscoting Contrast
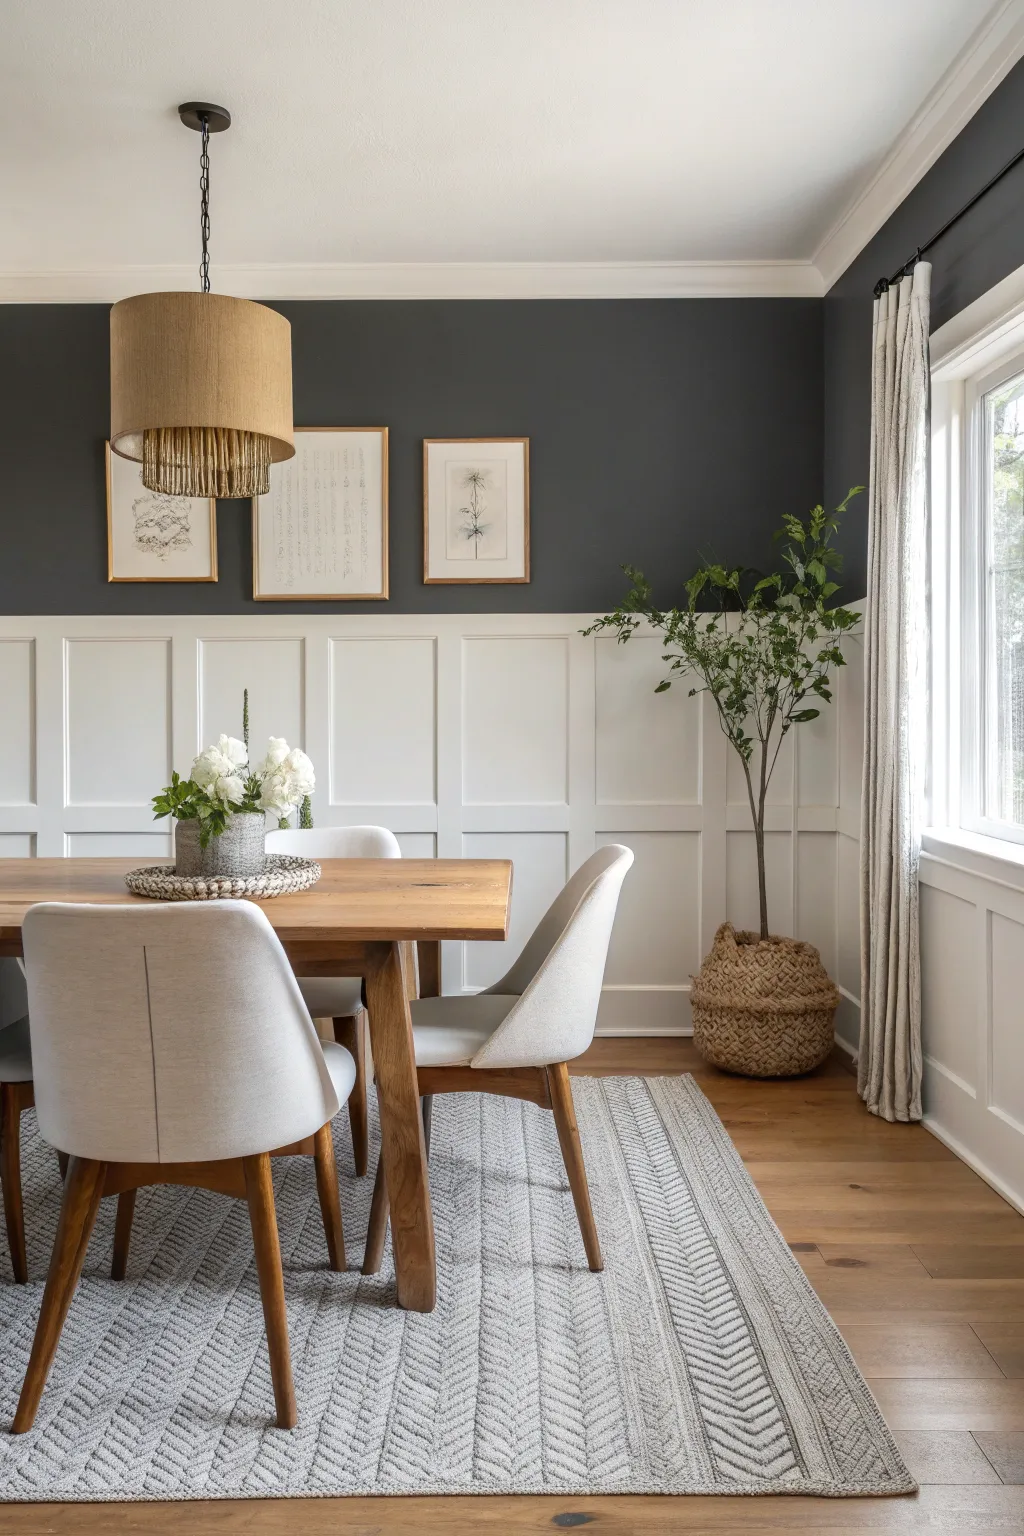
Elevate your dining space with this sophisticated two-tone wall treatment that pairs crisp, architectural wainscoting with a deep, moody charcoal upper wall. This project creates a stunning balance of light and dark, adding instant character and a custom-built feel to any plain room.
Step-by-Step Tutorial
Materials
- Board and batten molding kit (or 1×4 and 1×2 primed pine/MDF boards)
- White semi-gloss trim paint
- Deep charcoal or dark navy interior latex paint (eggshell or matte finish)
- Painter’s tape
- Caulk and caulking gun
- Wood filler
- Sandpaper (120 and 220 grit)
- Laser level or standard spirit level
- Measuring tape
- Brad nailer and nails (or construction adhesive)
- Paint rollers (foam for trim, medium nap for walls)
- Angled sash brush
- Drop cloths
Step 1: Planning and Layout
-
Determine wainscoting height:
Decide on the height of your wainscoting. A classic rule of thumb is one-third of the wall height, but for this higher visual impact, measure up about 60 to 66 inches from the floor to align with eye level or window mullions. -
Mark the guide line:
Use a laser level to project a horizontal line around the entire room at your chosen height. If you don’t have a laser level, measure up from the floor at multiple points and connect them using a straight edge and spirit level to ensure accuracy. -
Calculate spacing:
Measure the total length of each wall. Divide this number to determine the spacing for your vertical ‘batten’ strips. Aim for squares or slightly vertical rectangles; typically, spacing them 16 to 24 inches apart works best visually.
Uneven Walls?
If your drywall isn’t perfectly flat, the boards might gap away from the wall. Use construction adhesive behind the boards and drive nails at an angle to pull the wood tight against the drywall.
Step 2: Installing the Woodwork
-
Install the top rail:
Install the horizontal top rail (usually a 1×4 board) right along your marked level line. Secure it to the studs using a brad nailer. If studs aren’t perfectly aligned, use construction adhesive for extra hold. -
Attach the baseboard:
If your existing baseboards are thin or decorative, you may need to replace them with a flat 1×6 or 1×4 board to match the depth of your vertical strips. Install this along the floor. -
Cut vertical battens:
Measure the vertical distance between the top rail and the baseboard for each section. Cut your 1×2 or 1×3 vertical batten strips to fit these spaces perfectly. -
Install vertical strips:
Attach the vertical strips at your calculated spacing points. Use a level on every single piece before nailing it in place to ensure perfect vertical lines. -
Add horizontal detail (optional):
To recreate the specific grid look in the photo, measure and cut short horizontal pieces to fit snugly between the vertical battens, creating the square panel effect. -
Install the cap molding:
Finish the top edge of the top rail with a small piece of projecting molding or a simple 1×2 installed flat on top to create a small shelf-like ledge.
Add Depth
Install a simple cove molding inside the squares of the wainscoting before painting. This adds traditional dimension and shadows, making the carpentry look more expensive and substantial.
Step 3: Prep and Prime
-
Fill the holes:
Apply wood filler to all nail holes and joints where boards meet. I like to overfill slightly as the filler shrinks when drying. -
Sand smooth:
Once dry, sand the filler flush with the wood using 120-grit sandpaper, then follow up with 220-grit for a glass-smooth finish. -
Caulk the seams:
Apply a thin bead of paintable caulk along every edge where wood meets wall or wood meets wood. Smooth it immediately with a damp finger to erase gaps. -
Prime the woodwork:
Apply a high-quality primer to all the new wood and the drywall sections inside the boxes to ensure an even finish for the topcoat.
Step 4: Painting
-
Paint the upper wall – Cutting in:
Using your angled sash brush, carefully cut in the dark charcoal paint along the ceiling line, corners, and right along the top edge of the wainscoting shelf. -
Roll the upper wall:
Use a medium nap roller to apply the charcoal paint to the upper wall space. Apply two coats, allowing full drying time between them, to achieve that rich, velvety depth. -
Paint the wainscoting:
Once the dark paint is dry, use painter’s tape to protect the wall right above the wainscoting ledge. Apply two coats of white semi-gloss paint to the entire lower section, using a foam roller on the flat surfaces for a spray-like finish. -
Remove tape:
Peel off the painter’s tape while the final coat of white paint is still slightly tacky to prevent peeling and ensure a crisp, sharp line.
Step back and admire how the crisp woodwork anchors the room while the dark paint creates a cozy, modern atmosphere
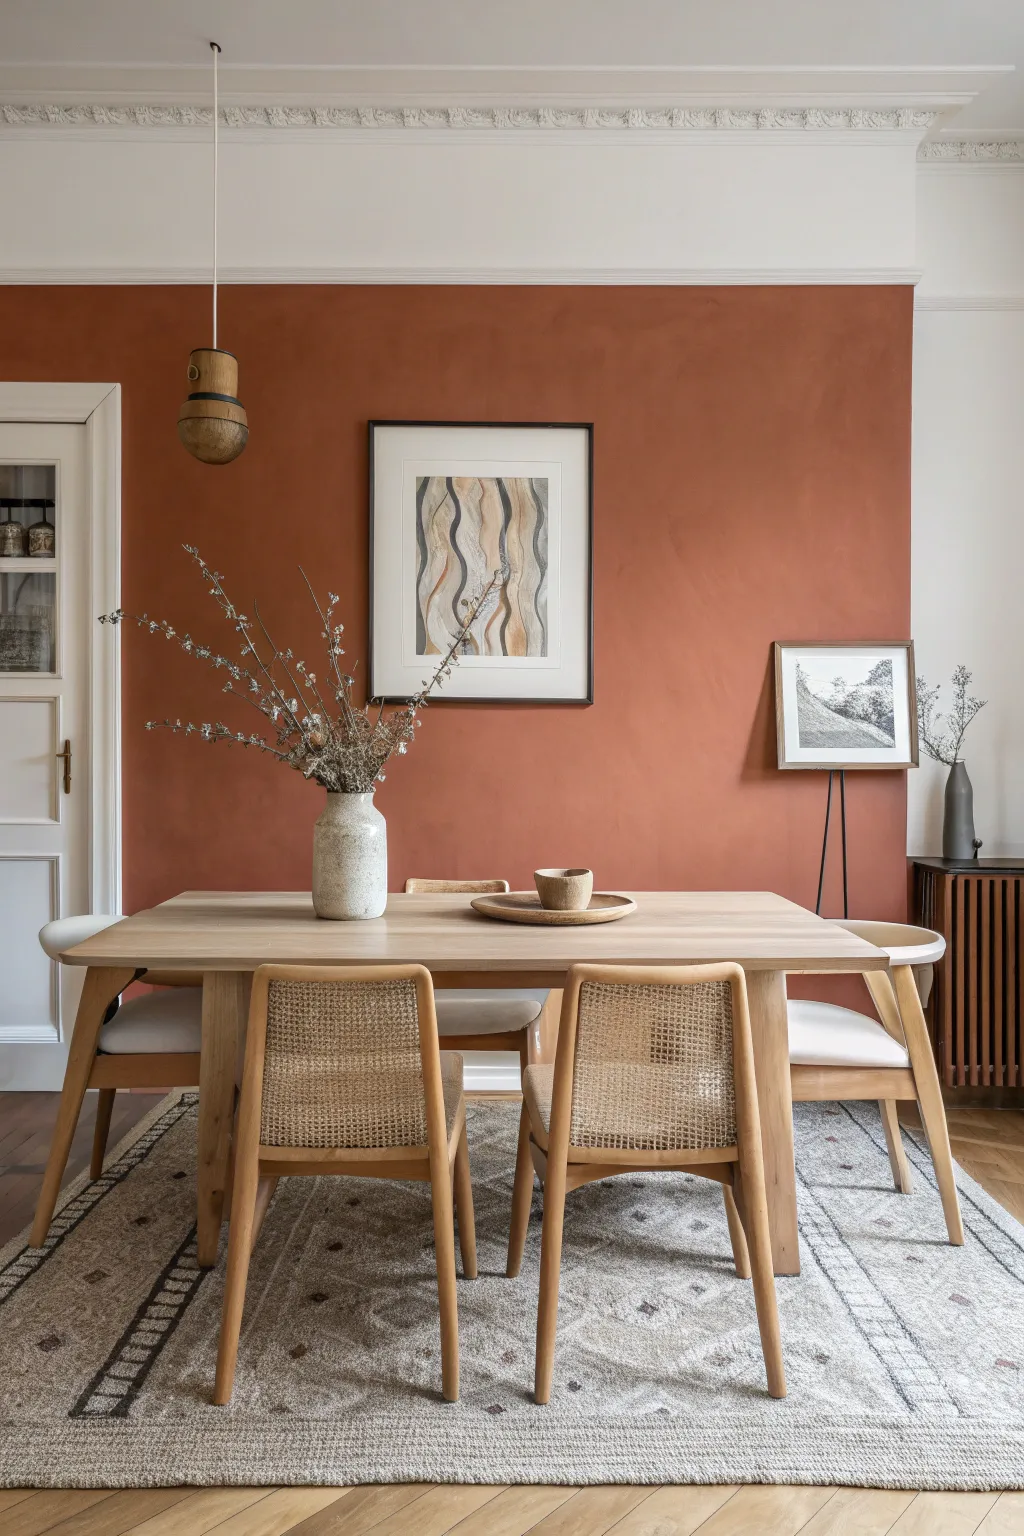
Chair Rail Color Split for Instant Structure
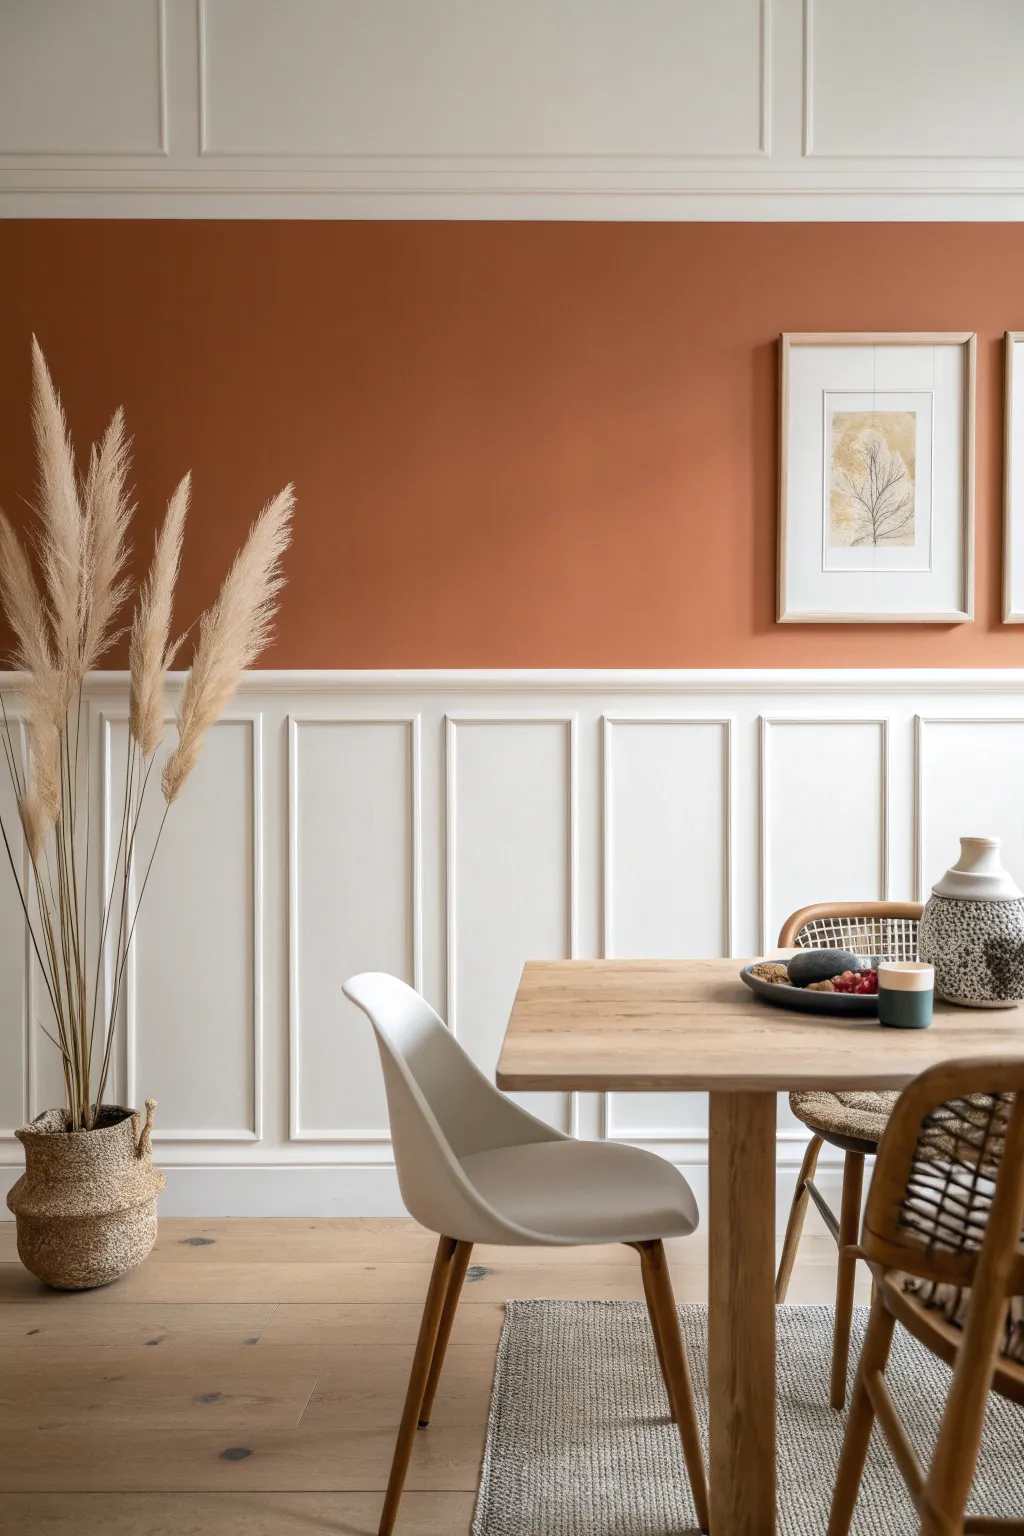
Transform a plain dining room wall into a structured focal point by combining classic wainscoting with a warm, modern color palette. This project marries the architectural interest of board and batten paneling with a rich terracotta upper wall for an instant dose of cozy character.
Step-by-Step
Materials
- Terracotta/burnt orange interior latex paint (eggshell or matte finish)
- Creamy white interior trim paint (semi-gloss or satin)
- Chair rail molding
- Baseboard molding (if replacing existing)
- Picture frame molding or small trim (for the panel boxes)
- Vertical batten strips (optional, depending on desired depth)
- Painter’s tape (high quality)
- Spackle or wood filler
- Caulk and caulk gun
- Fine-grit sandpaper (220 grit)
- Primer (especially for raw wood trim)
- Level (2-foot or 4-foot)
- Miter box and saw (or power miter saw)
- Brad nailer (or hammer and finish nails)
- Paint rollers (microfiber) and angled sash brushes
- Drop cloths
- Measuring tape and pencil
Step 1: Planning and Preparation
-
Measure and calculate:
Begin by measuring your wall’s total width and deciding on the height of your chair rail. A standard height is usually around 32-36 inches from the floor, roughly one-third of the wall height. -
Design the panel layout:
Sketch your wall on paper to determine the spacing of the rectangular boxes. Aim for odd numbers of panels if possible, or ensure symmetrical spacing from the center outwards. Subtract the width of your molding from the total space to calculate the gaps evenly. -
Prep the surface:
Remove existing baseboards if you plan to replace them for a seamless look. FIll any holes in the wall with spackle, sand smooth, and wipe the wall clean with a damp cloth to remove dust.
Gap Patrol
If your walls are wavy and molding won’t sit flat, don’t force it. Nail it securely, then rely on a generous bead of paintable acrylic latex caulk to fill the gaps behind the trim.
Step 2: Painting the Base Colors
-
Mark the divide:
Use your level and a pencil to draw a faint horizontal line across the entire wall at your chosen chair rail height. This separates your color zones. -
Paint the upper wall:
Apply the terracotta paint to the upper section. Use an angled brush to cut in around the ceiling and corners first, then roll the rest. Don’t worry about being perfect at the bottom line since the molding will cover the transition. -
Paint the lower wall:
While the top dries, paint the lower section below your pencil line with the creamy white paint. I find it easier to paint this wall surface now rather than trying to paint inside the boxes later.
Step 3: Installing the Trim
-
Install baseboards:
Install your baseboard first. Measure, cut, and secure it to the wall studs using a brad nailer. -
Install the chair rail:
Cut your chair rail molding to length. Align the bottom edge with your pencil mark level line and nail it into the studs. This creates the definitive border between your two colors. -
Outline the box positions:
Using your layout sketch, lightly mark the positions of the vertical separations and the top/bottom edges of the interior boxes directly on the wall using a level. -
Cut the vertical molding:
Using a miter saw, cut the vertical pieces of your picture frame molding. Ensure they are all identified and cut to exactly the same length for uniformity. -
Cut the horizontal molding:
Cut the horizontal top and bottom pieces for each box. If you are creating closed boxes (full rectangles), you will need to miter the corners at 45-degree angles for a professional joint. -
Assemble or install molding:
Some prefer to glue and nail the molding pieces directly to the wall. Apply a bead of construction adhesive to the back, position carefully using your level lines, and secure with brad nails.
Double Depth Option
For a richer look, install a flat 1×4 board horizontally just below the chair rail cap, or add a second, smaller molding profile inside your main panel boxes.
Step 4: Finishing Touches
-
Fill nail holes:
Go over every piece of molding and fill the small nail holes with wood filler. Leave it slightly proud of the surface to allow for sanding. -
Caulk the seams:
This is crucial for a built-in look. Run a thin bead of printable caulk along every edge where molding meets the wall, and where molding pieces join. Smooth it with a wet finger. -
Sand smooth:
Once the filler is dry, gently sand the nail holes flush and lightly scuff the molding surface to help the paint adhere. -
Prime the trim:
If your wood was unprimed, apply a coat of high-quality primer to the molding and any exposed raw wood areas. -
Paint the trim work:
Paint the molding, baseboards, and chair rail with the same creamy white semi-gloss paint used on the lower wall. Use a sash brush for control. -
Final coat:
Apply a second coat to the trim and the lower wall section within the boxes to ensure a rich, uniform finish that shines against the matte terracotta above.
Enjoy the sophisticated atmosphere your new two-tone dining room wall brings to your next dinner party
Accent Wall Behind the Table
Transform your dining space with the warmth and depth of a terracotta limewash accent wall. This finish mimics the soft, mottled texture of old-world plaster and brings an organic, grounded feeling to modern interiors.
How-To Guide
Materials
- Limewash paint (terracotta or rust shade)
- Block brush (large, natural bristle)
- Painter’s tape
- Drop cloths
- Sanding block (medium grit)
- Wall primer (acrylic based)
- Water spray bottle
- Mixing bucket
- Rag or sponge
Step 1: Preparation
-
Clear the area:
Begin by removing all furniture, including the dining table and chairs, away from the wall to give yourself ample working space. Remove any artwork, nails, or screws. -
Protect surfaces:
Lay down drop cloths to protect your flooring. Limewash is thin and can splatter easily. Apply painter’s tape to the baseboards, ceiling line, and adjacent walls to ensure crisp edges. -
Smooth the surface:
If your wall has existing imperfections or holes, patch them with spackling paste. Once dry, lightly sand the entire wall to create a uniform surface specifically for the primer to grip. -
Prime the wall:
Limewash needs a specific base to bond correctly. Apply a coat of acrylic primer designed for lime paints. I like to use a roller for this step to ensure quick, even coverage. Let this dry completely according to the manufacturer’s instructions.
Step 2: First Coat Application
-
Mix the limewash:
Pour your limewash into a bucket and stir thoroughly. It often settles, so mixing is crucial for consistent color. If it feels too thick, akin to paste, add a tiny amount of water to reach a heavy cream consistency. -
Cut in the edges:
Dip your block brush into the paint and carefully cut in around the taped edges. Don’t worry about perfect lines here, as the texture is meant to be irregular. -
Start the cross-hatch motion:
Working in sections of about 3×3 feet, apply the paint using random, X-shaped strokes. Keep your wrist loose. The goal is overlapping brushstrokes rather than uniform rows. -
Maintain a wet edge:
Move to the next section while the previous one is still slightly damp to blend them seamlessly avoiding hard transition lines. If a section dries too fast, lightly mist it with water. -
Finish the first layer:
Continue this chaotic cross-hatching until the entire wall is covered. Don’t panic if it looks patchy or translucent; the magic happens with the layering. Let this coat dry for at least 3-4 hours.
Cloudy Patches?
If you see distinct stop-and-start lines, mist the area with water and lightly brush over it to reactivate the lime and blend the edges.
Step 3: Second Coat & Texture
-
Assess the opacity:
Once dry, the first coat will look much lighter. Prepare your second batch of paint. You generally don’t need to dilute this coat unless you want a very subtle glaze. -
Apply the second layer:
Repeat the X-stroke application. This time, pay attention to the low spots or lighter areas. The overlapping strokes created here define that signature cloudy movement. -
Feather the strokes:
As you paint, occasionally go back over semi-dry areas with a nearly dry brush to feather out heavy paint buildup, softening the texture. -
Check for consistency:
Step back frequently to look at the wall as a whole. If one area looks too heavy or too light, adjust your pressure or paint load immediately while the product is workable. -
Clean up:
Peel off the painter’s tape while the final coat is still slightly tacky to prevent peeling the cured lime. Wait fully 24 hours before hanging art or moving furniture back.
Pro Tip: Movement
Vary the length of your X-strokes. Mixing short, choppy strokes with long, sweeping ones creates the most natural, stone-like depth.
Enjoy the gentle, changing shadows on your new feature wall as the daylight shifts.
Paint the Ceiling to Frame the Dining Zone
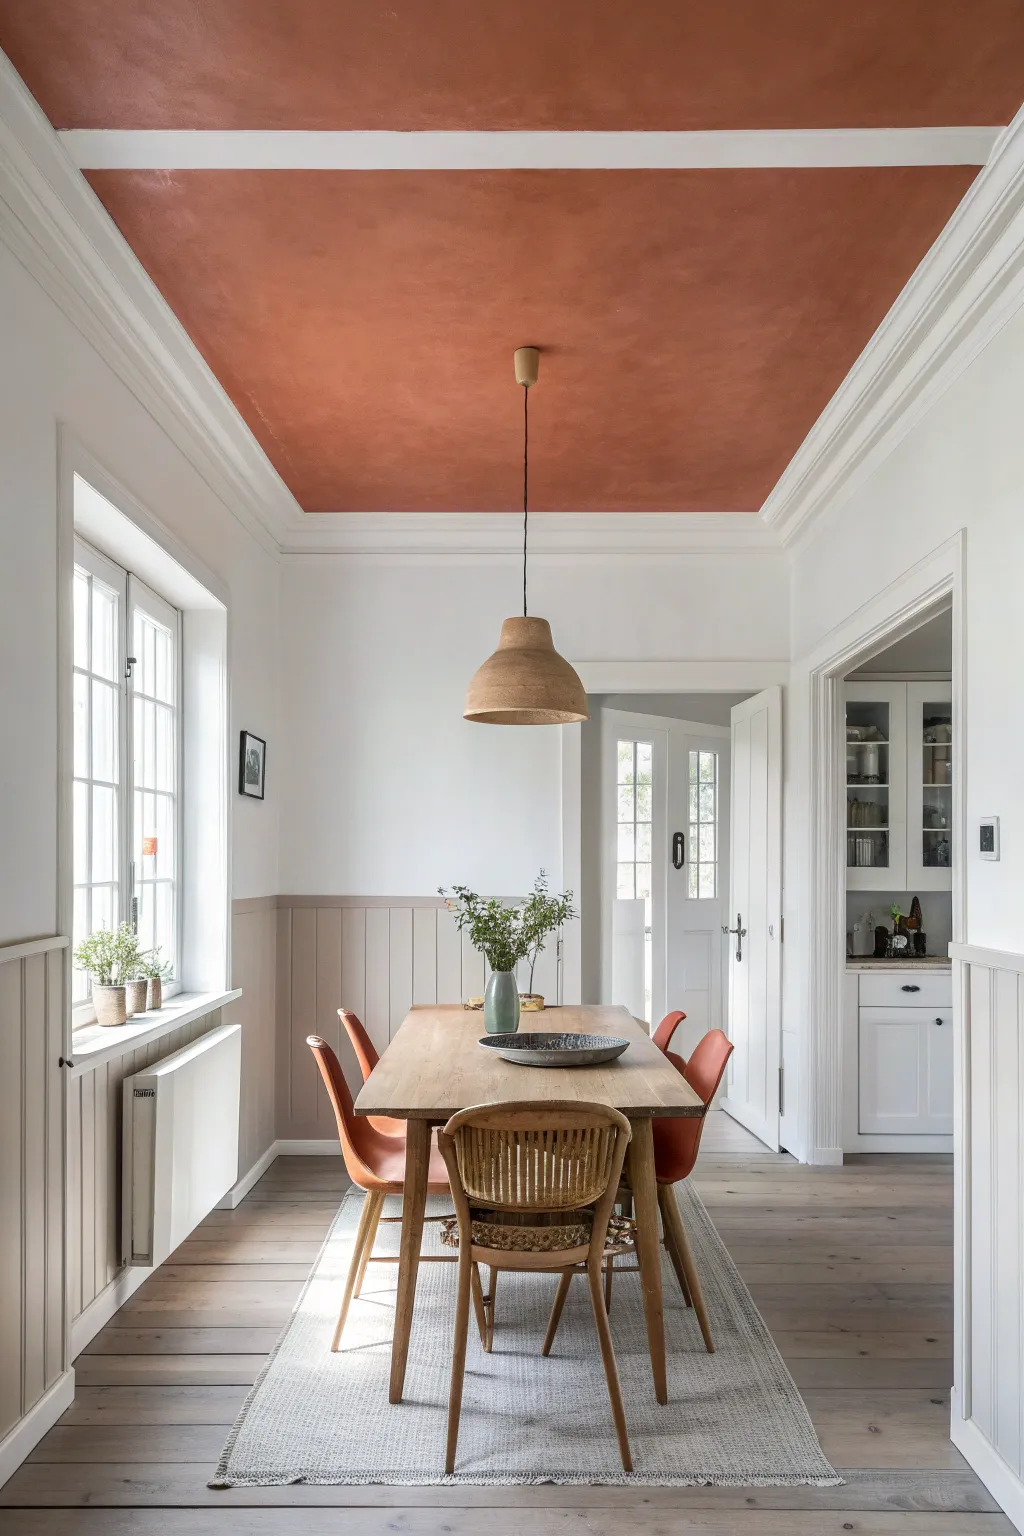
Transform your dining area by directing the eye upward with this striking ceiling treatment that mimics the warmth of Mediterranean clay. By painting the recesses between structural beams in a rich, textured rust hue, you create an intimate canopy that anchors the space without overwhelming the white walls.
Step-by-Step
Materials
- High-quality matte latex paint (Terracotta/Rust color)
- White semi-gloss trim paint
- Painter’s tape (high adhesion for clean lines)
- Drop cloths
- Ladder
- Angled sash brush (2.5 inch)
- Small roller frame (4 inch) with extension pole
- Microfiber roller covers (3/8 inch nap)
- Sanding sponge (fine grit)
- Mild detergent and sponge
- Spackle (if patching is needed)
Step 1: Preparation & Cleaning
-
Clear the room:
Remove all furniture, including the dining table, chairs, and rug, to protect them from overhead drips. If moving the table isn’t possible, cover it completely with a heavy plastic drop cloth taped securely underneath. -
Protect the floor:
Lay down canvas drop cloths over the entire floor surface. Canvas is preferable here because it absorbs drips rather than letting them puddle like plastic sheets do, which is crucial for safety on a ladder. -
Clean the ceiling surface:
Using a sponge and mild detergent water, gently wipe down the ceiling panels to remove dust or cooking grease. This ensures the best paint adhesion. Let it dry completely. -
Inspect and patch:
Look for any cracks or nail holes in the ceiling plaster. Fill them with lightweight spackle, wait for it to dry, and lightly sand flush with a fine-grit sanding sponge.
Step 2: Painting the Beams & Trim
-
Paint the beams first:
Before tackling the color, freshen up the white structural beams and crown molding. Apply the white semi-gloss paint using an angled brush for corners and a small roller for the flat faces of the beams. -
Allow sufficient drying time:
Wait at least 24 hours for the white beam paint to cure fully. This is critical because you will need to apply tape directly onto this fresh paint.
Tape Seal Trick
For razor-sharp lines, paint a thin layer of the *base* color (white) over the tape edge first. This seals the tape, so any bleed is invisible white-on-white.
Step 3: Applying the Terracotta Hues
-
Tape the perimeter:
Carefully apply painter’s tape along the inner edges of the white beams where they meet the ceiling panels. Press the tape edge firmly with your fingernail or a putty knife to prevent bleed-through. -
Cut in the edges:
Using your angled sash brush and the terracotta paint, ‘cut in’ a 2-3 inch border around the perimeter of each ceiling section, right up against the tape. -
Feather the brush marks:
While cutting in, I like to feather out the wet edge towards the center of the panel. This prevents distinct ‘picture framing’ lines from showing up later when you roll. -
Load the roller:
Pour your rust-colored paint into a tray. Load your 4-inch roller, ensuring it is saturated but not dripping. -
Roll the first section:
Starting in one corner of a panel, roll the paint onto the ceiling. Use a ‘W’ pattern to distribute paint evenly, then straight parallel strokes to smooth it out. -
Maintain a wet edge:
Work quickly enough that the paint edge doesn’t dry before you roll the adjacent section. This helps achieve that velvety, consistent texture seen in the photo. -
Let the first coat dry:
Allow the first coat to dry for 2-4 hours, or as recommended by your paint manufacturer. Don’t rush this, or the second coat might lift the first. -
Apply the second coat:
Repeat the cutting and rolling process for a second coat to ensure deep, opaque color saturation. Rolling in the opposite direction (perpendicular to the first coat) can help eliminate roller tracks. -
Create texture (Optional):
To mimic the slightly plaster-like look in the image, use a slightly thicker nap roller on the final pass and don’t over-smooth the paint. Let the stipple remain.
Limewash Effect
Swap standard latex for a limewash paint in the same terracotta tone. The natural brushstrokes create a velvety, old-world texture that adds incredible depth.
Step 4: Finishing Touches
-
Remove tape carefully:
While the paint is still slightly tacky (not fully dry), slowly peel off the painter’s tape at a 45-degree angle. This prevents the dried paint film from ripping. -
Touch up edges:
Inspect your lines. If any terracotta bled onto the white beams, wait for it to dry completely, then use a tiny artist’s brush and white paint to conceal the mistake. -
Reinstall lighting:
Once the ceiling is fully cured, reinstall your pendant light fixture in the center of the room to complete the look.
Now step back and admire how a simple pop of color overhead completely redefines the atmosphere of your dining room
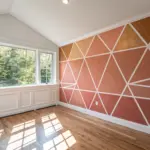
Geometric Color Blocking for a Modern Wall Moment

Transform a blank dining wall into a captivating focal point with this bold, color-blocked geometric mural. The interplay of terracotta, deep teal, and cream triangles creates a modern dynamism that feels both structured and organic, perfectly framed by an arched doorway.
Detailed Instructions
Materials
- Painter’s tape (high quality, delicate surface)
- Interior latex wall paint (Colors: Terracotta/Rust, Deep Teal/Emerald, Warm Cream/Beiges)
- White or light gray base paint
- Paint rollers (mini foam rollers work best for sections)
- Small angled sash brush
- Drop cloths
- Measuring tape
- Pencil
- Level or laser level
- Clean rag or tack cloth
- Paint tray and liners
Step 1: Planning and Surface Prep
-
Clear and clean:
Remove all furniture, including the dining table and chairs, from the immediate area to give yourself plenty of room. Wipe down the wall with a damp rag to remove dust or grease, ensuring a clean surface for adhesion. -
Establish the base:
If your wall isn’t already white or light gray, roll on a fresh coat of base paint. This color will serve as the dividing lines between your colored shapes, so ensure it is solid and opaque. Let this dry for at least 24 hours. -
Visualize the layout:
Study the reference image to understand the composition. Notice how large triangles anchor the corners (top left, bottom right) while smaller shapes intersect in the middle. Sketch a rough plan on paper first. -
Mark anchor points:
Using a pencil and measuring tape, lightly mark the key vertices of your triangles on the wall. For example, mark the point where the large white diagonal line starts on the left wall and where it ends near the floor.
Step 2: Taping the Design
-
Create the main diagonal:
Stretch a long strip of painter’s tape across your main diagonal line first. This central line anchors the entire design. Use a laser level if you want perfectly straight lines, though a steady hand and taut tape work well too. -
Build the geometric web:
Apply tape to connect your other pencil marks, creating the triangular ‘zones’. Remember, the width of the tape will become the white lines in the final mural, so choose a tape width that matches your desired look. -
Press and seal:
Run your finger or a plastic putty knife firmly along all edges of the tape. This is crucial for crisp lines. Pressing specifically on the tape edges prevents paint from bleeding underneath. -
The ‘Seal’ trick:
I always take a moment to lightly brush the base wall color over the edges of the tape. This seals the tape with the existing color, so if any bleed happens, it’s invisible, leaving your colored layers perfectly crisp.
Tape Thickness Matters
For this look, use wide painter’s tape (at least 1.5 inches). The negative space between the colors is a design element itself, so a wider tape creates a bolder, more intentional grid.
Step 3: Painting the Color Blocks
-
Start with Terracotta:
Identify the sections destined for the rust/terracotta color. Pour a small amount into your tray. Using a small angled sash brush, carefully cut in along the tape edges and corners of these specific triangles. -
Fill the rust zones:
Switch to a mini roller to fill in the main body of the terracotta triangles. Apply a thin, even coat. Don’t worry if it looks streaky; multiple thin coats are better than one thick one. -
Apply the Teal:
While the first color dries, clean your brush or grab a fresh one. Repeat the process for all the deep teal/green sections. Cut in the edges first, then roll the centers for a smooth finish. -
Add the accent beige:
Locate the smaller intermediate triangle (the warm beige tone) and paint it. This lighter color acts as a bridge between the intense rust and teal shades. -
Second coat application:
Once the first coat is dry to the touch (usually 1-2 hours), apply a second coat to all colored sections to ensure rich, opaque saturation.
Add Metallic Flair
Swap the white dividing lines for gold! After the color blocks dry and you remove the tape, carefully re-tape the color edges and paint the negative space with metallic gold leaf paint.
Step 4: The Reveal
-
Timing the removal:
The most satisfying part is peeling the tape. Do this while the paint is slightly tacky—not wet, but not fully cured either. This helps prevent the paint film from ripping. -
Peel carefully:
Pull the tape slowly at a 45-degree angle away from the painted edge. Maintain a steady pace to reveal those crisp white lines underneath. -
Touch ups:
Inspect your lines closely. If a tiny bit of paint bled through, use a very small artist’s brush and your base white paint to correct the line neatly. -
Final cure:
Let the wall cure fully for a few days before placing furniture against it to avoid scuffs.
Step back and admire how a simple afternoon of painting has completely redefined the architectural feel of your dining space
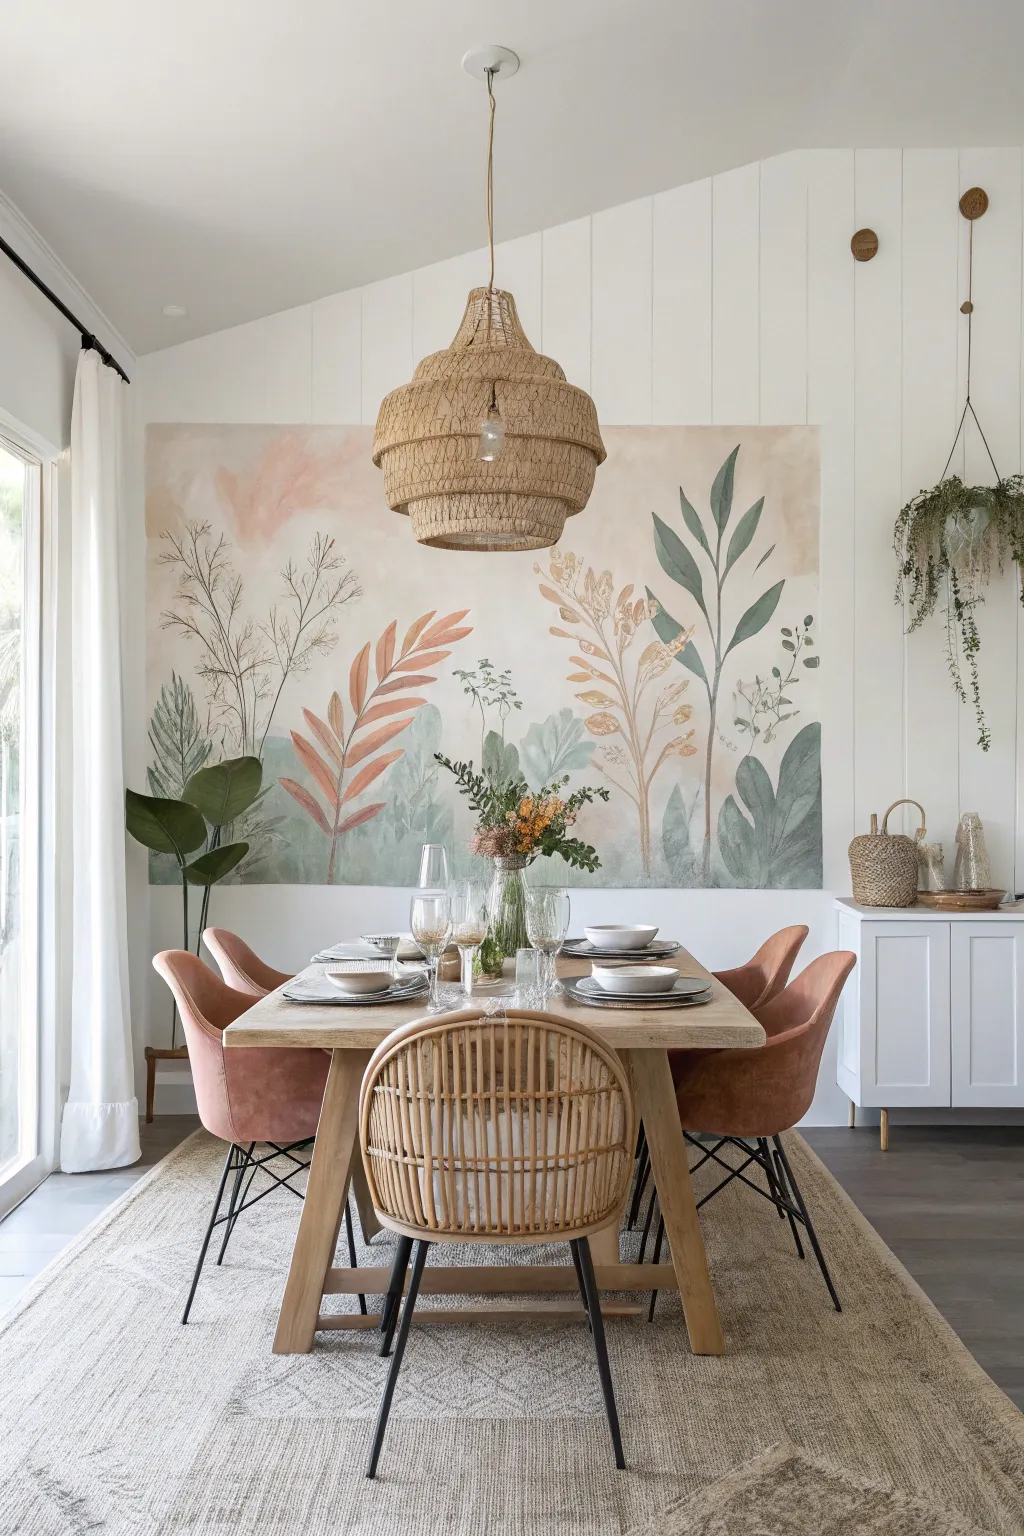
Hand-Painted Mural as the Dining Room Focal Point

Transform your dining space with this large-scale botanical mural that brings the serenity of nature indoors. Using soft washes of acrylics, this project achieves a watercolor-like effect with oversized leaves and grasses in a soothing palette of sage, terracotta, and cream.
How-To Guide
Materials
- Interior latex paint (white/warm white base)
- Acrylic paints (sage green, terracotta, ochre, burnt sienna, white)
- Glazing medium or water (for thinning)
- Assorted synthetic brushes (large flat brushes, medium filberts, round brushes)
- Pencil and eraser
- Painter’s tape
- Drop cloths
- Ladder or step stool
- Clean rags or paper towels
- Plastic plates or palette for mixing
Step 1: Preparation & Background
-
Clean and mask:
Begin by removing any artwork or furniture near the wall. Wipe the surface down with a damp cloth to remove dust. Apply painter’s tape along the ceiling line, baseboards, and adjacent walls to ensure clean edges. -
Protect the area:
Lay down your drop cloths to protect the flooring. This project involves watery paint, which can easily drip, so thorough floor coverage is essential. -
Establish the background:
If your wall isn’t already a clean white or warm white, apply a fresh base coat of interior latex paint. Allow this to dry completely for at least 4-6 hours before starting the artistic work. -
Create the atmospheric wash:
Mix a very small amount of burnt sienna and pink acrylics into a large amount of water and glaze medium. Use a large brush or sponge to lightly dab hazy, cloud-like patches near the top and middle of the wall, creating that soft, pinkish sky effect seen in the background.
Drip Doctor
Using watered-down paint often leads to drips. Keep a damp sponge handy to quickly dab them away. If a drip dries, paint over it with a bit of opaque white base color before re-painting that section.
Step 2: Sketching the Composition
-
Draft the major shapes:
Lightly sketch the largest botanical elements using a pencil. Start with the tall, sweeping stems of the central grasses and the large, broad leaves on the sides. Don’t worry about tiny details yet; focus on placement and scale. -
Refine the forms:
Step back frequently to view the composition from a distance. I find it helpful to make adjustments here before any paint touches the wall. Ensure the height of the plants varies to create visual interest.
Step 3: Painting the Foreground
-
Mix your base greens:
On your palette, mix a few variations of sage green. Combine sage acrylic with a touch of white for lighter leaves and a bit of blue or black for shadowed areas. Keep the paint relatively thin with glazing medium. -
Paint large leaves first:
Using a wide flat brush, block in the large, broad leaves (like the Monstera-inspired shapes) on the left and right sides. Use long, confident strokes. The paint should be translucent enough for the white wall to lend luminosity. -
Add the terracotta stems:
Mix a soft terracotta orange using burnt sienna and white. Switch to a medium filbert brush and paint the large, fern-like fronds in the center-left. Paint the central stem first, then pull the brush outward for each leaf. -
Layer the lighter foliage:
Mix a pale ochre or beige tone. Paint the tall, feathery grass elements that sit slightly behind the bolder leaves. Use a lighter touch here so they feel airy and delicate. -
Introduce dark contrasts:
Mix a deeper, darker green. Use a smaller round brush to paint the prominent central stem and leaves that rise high on the right side. This darker value anchors the composition.
Gilded Touch
For a glamorous twist, use gold leaf size and gold leaf sheets on just the tips of the terracotta fern or the veins of the large green leaves to catch the light from your dining fixture.
Step 4: Detailing & Refining
-
Add vein details:
Once the base shapes are dry to the touch, use a thin round brush to paint the veins on the larger leaves. Use a slightly darker shade of the leaf color for subtle definition. -
Create texture with dry brushing:
Take a nearly dry brush with a small amount of lighter pigment and lightly drag it over some of the leaves. This adds the texture and hand-painted charm visible in the reference. -
Softening edges:
If any lines look too harsh, use a clean, slightly damp brush to gently feather the edges of the leaves into the background while the paint is still slightly tacky. -
Final assessment:
Step back to the dining table distance. Look for any empty spots that need a small sprig or leaf. Add tiny details like seeds or small buds using a fine liner brush. -
Clean up:
Carefully remove the painter’s tape while the very last touches are drying to prevent peeling. Fold up drop cloths and wipe away any stray drips on the baseboards.
Enjoy your meals surrounded by this serene, custom-painted garden backdrop


Have a question or want to share your own experience? I'd love to hear from you in the comments below!