If you’re craving cool canvas painting ideas that feel bold, graphic, and totally display-worthy, you’re in the right place. I’m sharing guy-friendly concepts that look awesome in a bedroom, dorm, or hangout space—without getting too precious about it.
Stag Silhouette in a Foggy Forest
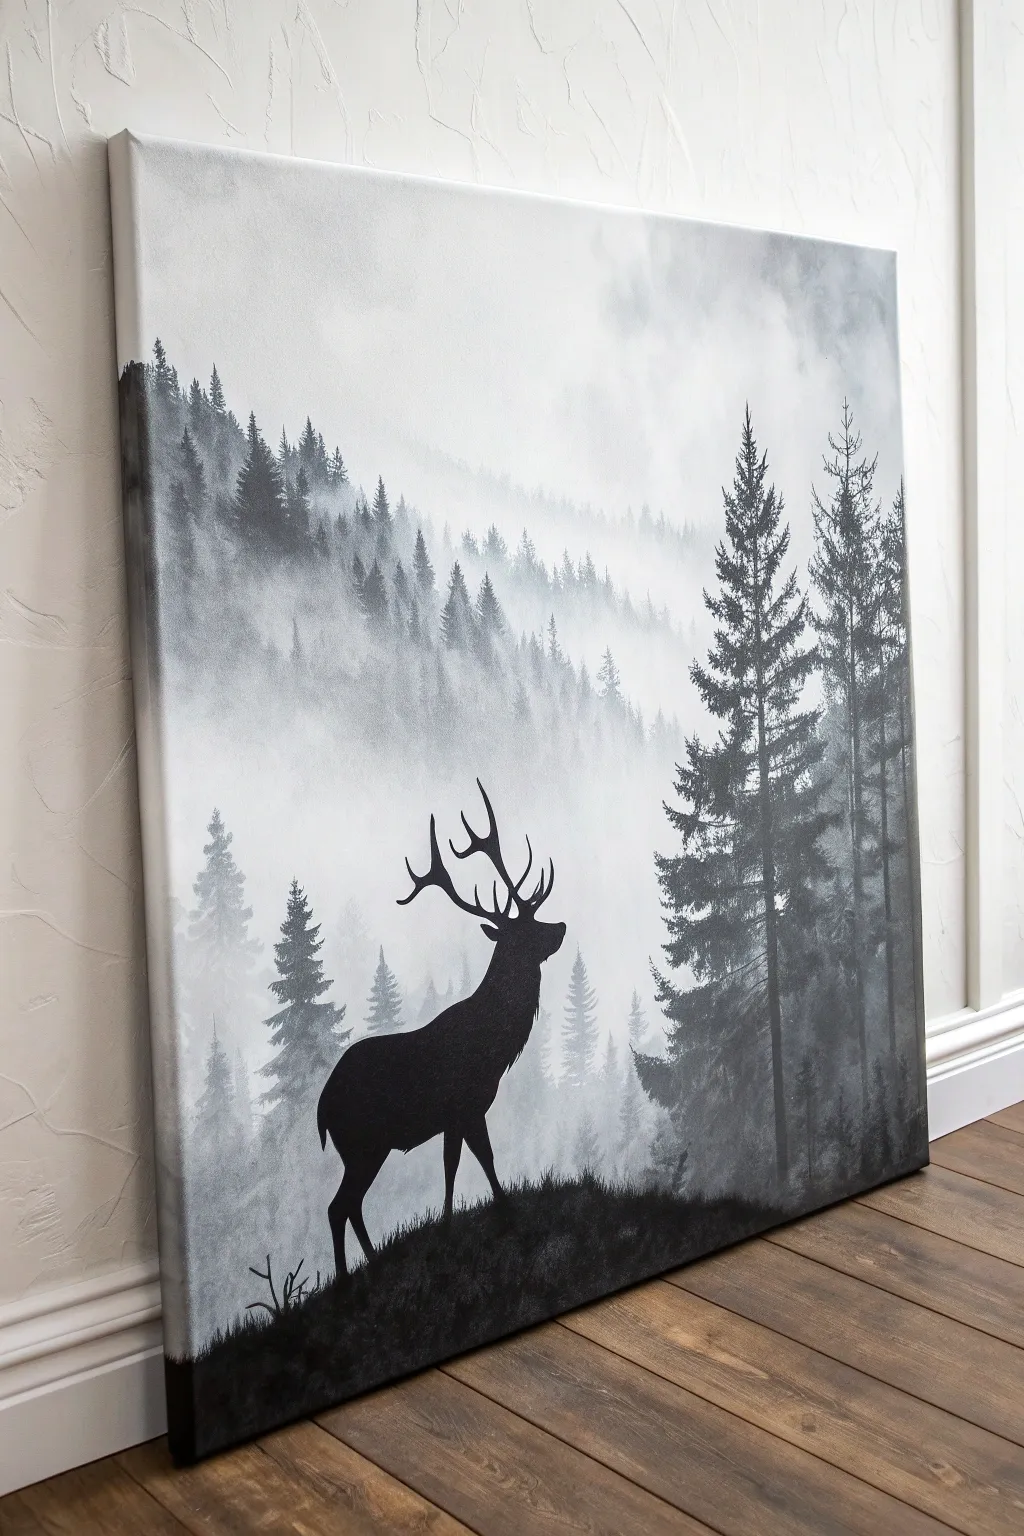
Create a moody and atmospheric piece with this monochromatic landscape, featuring a striking stag silhouette against a foggy forest backdrop. This project relies on simple layering techniques to build depth, making it an excellent exercise in mastering values and atmospheric perspective without needing complex colors.
Step-by-Step Guide
Materials
- Large stretched canvas (e.g., 24×30 inches)
- Acrylic paints: Black and Titanium White
- Large flat brush (2-3 inch) for background blending
- Medium flat brush for distant trees
- Small round brush for details
- Fan brush (optional, for tree texture)
- Palette or paper plate
- Water cup and paper towels
- Pencil or chalk for sketching
- Optional: Acrylic retarder (slow-drying medium) for blending
Step 1: Setting the Atmosphere
-
Prepare the Gradient:
Start by mixing a large amount of white paint with a tiny speck of black to create a very pale, misty grey. Cover the upper two-thirds of your canvas completely with this mixture using your large flat brush. -
Add the Fog:
While the paint is still wet, blend in pure white randomly near the top and middle sections to create cloud-like, uneven patches of fog. Keep your brush strokes loose and horizontal. -
Deepen the Lower Fog:
Mix a slightly darker grey—just a shade or two deeper than your base. Gently blend this into the bottom third of the wet canvas, ensuring there are no hard lines between the sections.
Mastering the Mist
To make trees look like they are truly receding into fog, mix a tiny drop of white into the bottom of the tree trunks while they are wet. This creates a soft fade-out effect.
Step 2: Painting the Distant Forest
-
Mix the Lightest Grey:
Create a new grey mix that is distinct from the background but still very light and ghostly. This will be for the furthest layer of trees. -
Establish the Horizon:
Using a medium brush, dab in a rugged, uneven treeline about halfway down the canvas. Don’t worry about details; you just want the suggestion of vertical shapes. -
Tap in Texture:
Use the corner of a flat brush or a fan brush to tap lightly on top of your grey shapes, mimicking the pointed tops of distant pine trees. Keep these very faint to maintain the illusion of heavy fog.
Step 3: Building the Middle Ground
-
Darken the Mix:
Add a bit more black to your grey mixture. This layer should be visibly darker than the last but not yet solid black. -
Create the Second Layer:
Paint a new row of trees slightly lower and overlapping the first layer. Make these trees a bit taller and more defined. -
Refine the Pines:
I find it helpful to use a vertical stroke for the trunk and then quick, downward diagonal dashes to create the pine branches. Let the bottom of these trees fade out into the ‘mist’ by dry-brushing or blending with a little white paint.
Antler Accuracy
Struggle with drawing animals? Print out a silhouette of a stag, cut it out, and trace it lightly onto your canvas with chalk before painting to ensure perfect proportions.
Step 4: The Foreground Trees
-
Mix a Charcoal Grey:
Create a dark charcoal grey—almost black, but not quite. This provides depth before the total blackout of the silhouette. -
Paint the Right Side:
On the right side of the canvas, paint two or three large, detailed pine trees. These should stretch almost to the top of the canvas. -
Detail the Branches:
Use a small round brush to add individual branches sticking out on these large trees. Ensure these trees feel close by giving them sharper edges and more contrast.
Step 5: The Stag Silhouette
-
Create the Hill:
Using pure black paint, block in a rolling hill at the very bottom of the canvas. Cover the bottom edge completely, creating a solid base for your composition. -
Sketch the Stag:
Once the background is fully dry, lightly sketch the stag outline with a pencil or chalk. Focus on the majestic posture—head held high and chest puffed out. -
Block in the Body:
Fill in the body of the stag with pure black paint. Use a flat brush for the larger areas of the flank and neck to get smooth, solid coverage. -
Paint the Legs:
Switch to your small round brush to paint the delicate legs. Pay attention to the joints and hooves to ensure the animal looks grounded on the hill. -
Detail the Antlers:
Carefully paint the antlers. Use just the tip of your smallest brush and support your painting hand with your other hand to keep it steady. Make the tines curve upwards and branch out naturally. -
Add Foreground Grads:
Using the tip of your brush, dab tiny black vertical strokes along the hill’s edge to simulate grass blades and small shrubs around the stag’s feet.
Step back and admire the quiet, moody world you’ve brought to life on your wall


Moonlit Mountain Range in Deep Navy
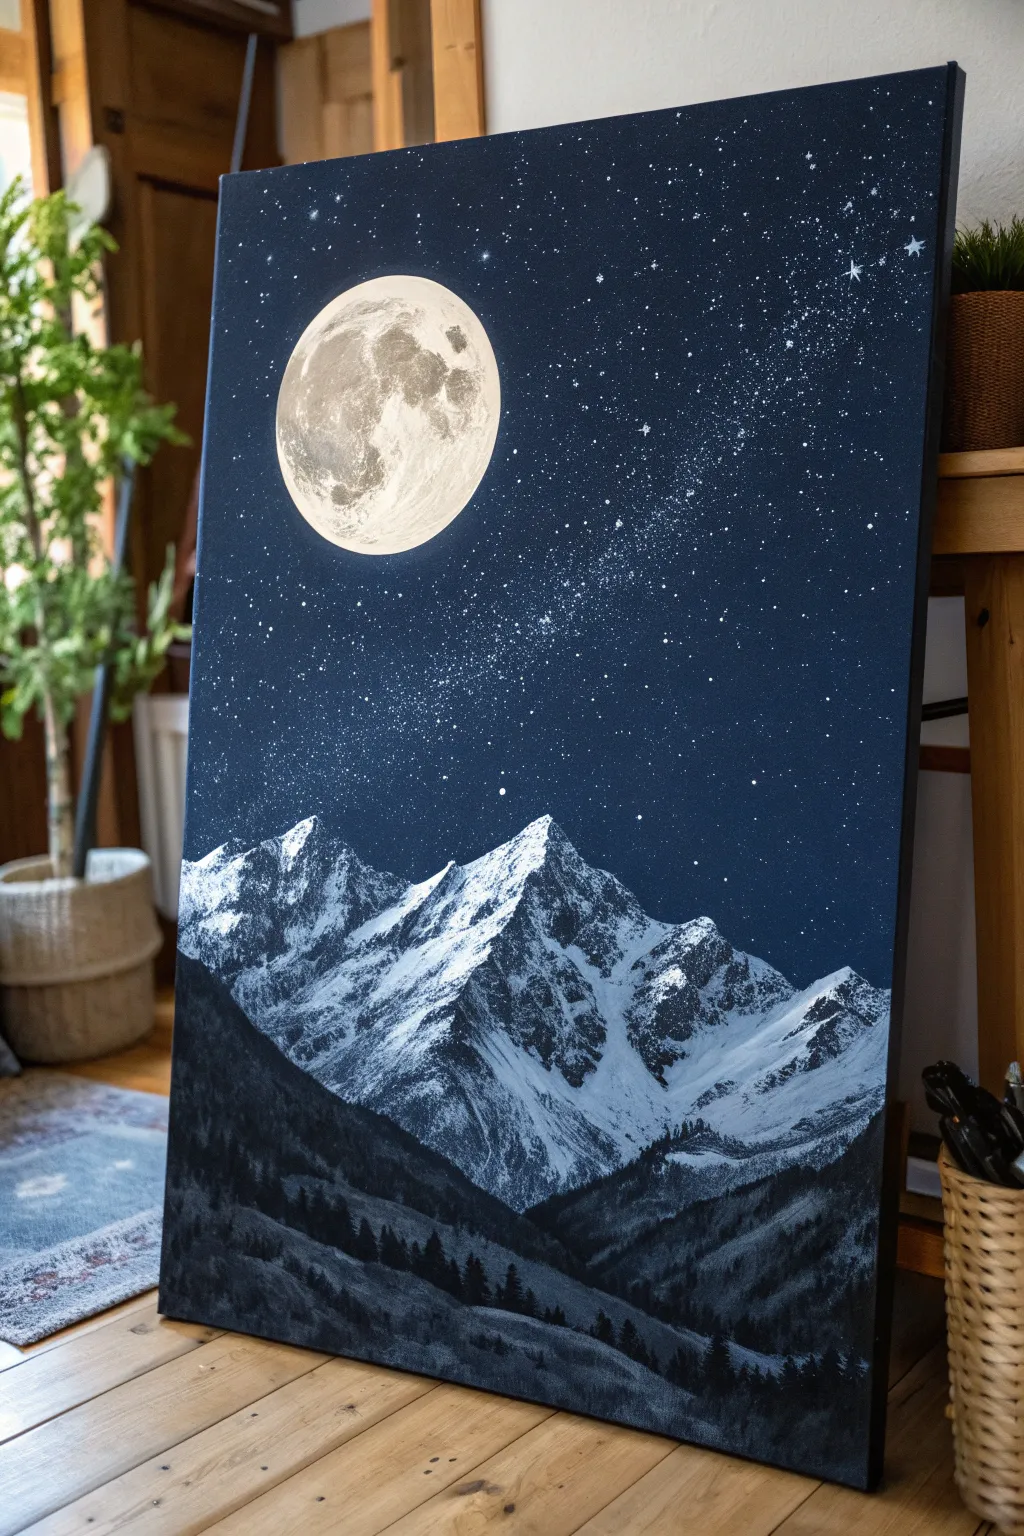
Capture the silent grandeur of high-altitude peaks under a full moon with this striking acrylic landscape. The deep navy palette creates a sophisticated, masculine vibe that fits perfectly in a modern den or office space.
How-To Guide
Materials
- Large rectangular canvas (e.g., 24×36 inches)
- Acrylic paints: Mars Black, Ultramarine Blue, Prussian Blue, Titanium White, Raw Umber
- Large flat wash brush (2 inch)
- Medium flat brush
- Small round detail brush (size 1 or 2)
- Fan brush or stiff bristle brush (for splatter)
- Old toothbrush (optional)
- Palette knife
- Mixing palette
- Circular stencil or masking tape roll (approx. 4-5 inches diameter)
- Cup of water and paper towels
Step 1: Setting the Night Sky
-
Gradient Base:
Begin by covering the entire top two-thirds of the canvas with a deep, dark blend. Mix Prussian Blue with a touch of Mars Black to get a near-midnight navy. -
Fading Downward:
As you work your way down towards where the mountains will sit, mix in slightly more Ultramarine Blue to lighten the navy just a fraction, creating a very subtle atmospheric perspective. Let this layer dry completely. -
Creating the Stars:
Thin down some Titanic White paint with water until it’s inky. Dip a stiff brush or old toothbrush into the mixture and run your thumb across the bristles to splatter tiny dots across the dark sky. -
The Milky Way:
Concentrate your splattering in a diagonal band moving from the bottom right towards the center to mimic a galaxy cluster. Add a few larger stars by hand-dotting them with your smallest brush.
Step 2: The Moon
-
Placement:
Decide on the moon’s position in the upper left quadrant. You can trace a circular object lightly with chalk or white pencil to ensure a perfect shape. -
Base Glow:
Fill the circle with pure Titanium White. It may need two coats to be fully opaque against the dark background. -
Adding Craters:
Mix a very pale grey using White and the tiniest speck of Raw Umber. Sponge or dab this unevenly onto the moon’s surface to create the ‘seas’ or maria. -
Texturing:
While the grey is tacky, use a dry brush to soften the edges of your blotches, blending them slightly into the white to create a realistic, cratered look.
Too Many Stars?
If you over-splattered, simply paint over the excess stars with your navy base mix. Use a dry brush to feather the edges so the ‘patch’ blends seamlessly.
Step 3: Majestic Mountains
-
Blocking the Peaks:
Mix a dark Slate Grey (Black + White + Blue). Using a medium flat brush, paint the triangular outlines of the mountain range across the middle of the canvas. -
Shadow Side:
Identify your light source—the moon is top-left. Paint the right side of every mountain peak with a darker mix of Black and Blue to establish deep shadows. -
Highlight Side:
For the illuminated left faces, use a palette knife loaded with Titanium White. Drag the knife lightly down the slope; the texture of the canvas will break up the paint, looking exactly like craggy snow. -
Defining Ridges:
Refine the meeting point between light and dark on the peaks to sharpen the ridge lines. I like to keep these edges crisp to show the harshness of the terrain.
Glow Up
Mix a transparent glaze of water and a tiny drop of white. Very lightly brush a halo around the moon’s edge to make it look like it’s glowing.
Step 4: The Dark Foothills
-
Foreground Base:
Mix a solid Mars Black with a tiny amount of Prussian Blue. Paint the undulating hills at the very bottom of the canvas, overlapping the base of your snow-capped mountains. -
Tree Textures:
Switch to a small fan brush or a worn flat brush. Tap vertically along the top ridges of these black hills to simulate the jagged tops of distant pine trees. -
Valley Depth:
Add subtle variation in the black foreground by mixing a dark charcoal grey and dry-brushing vague slopes, suggesting valleys and depth in the forest. -
Final Contrast Check:
Step back and ensure the moon is the brightest point and the foothills are the darkest. If the mountains look too flat, add a touch more white to the highest peaks for extra drama.
Now you have a stunning piece of atmospheric art that brings the quiet power of the mountains into your room


Black-and-White Lion With Hard Edges
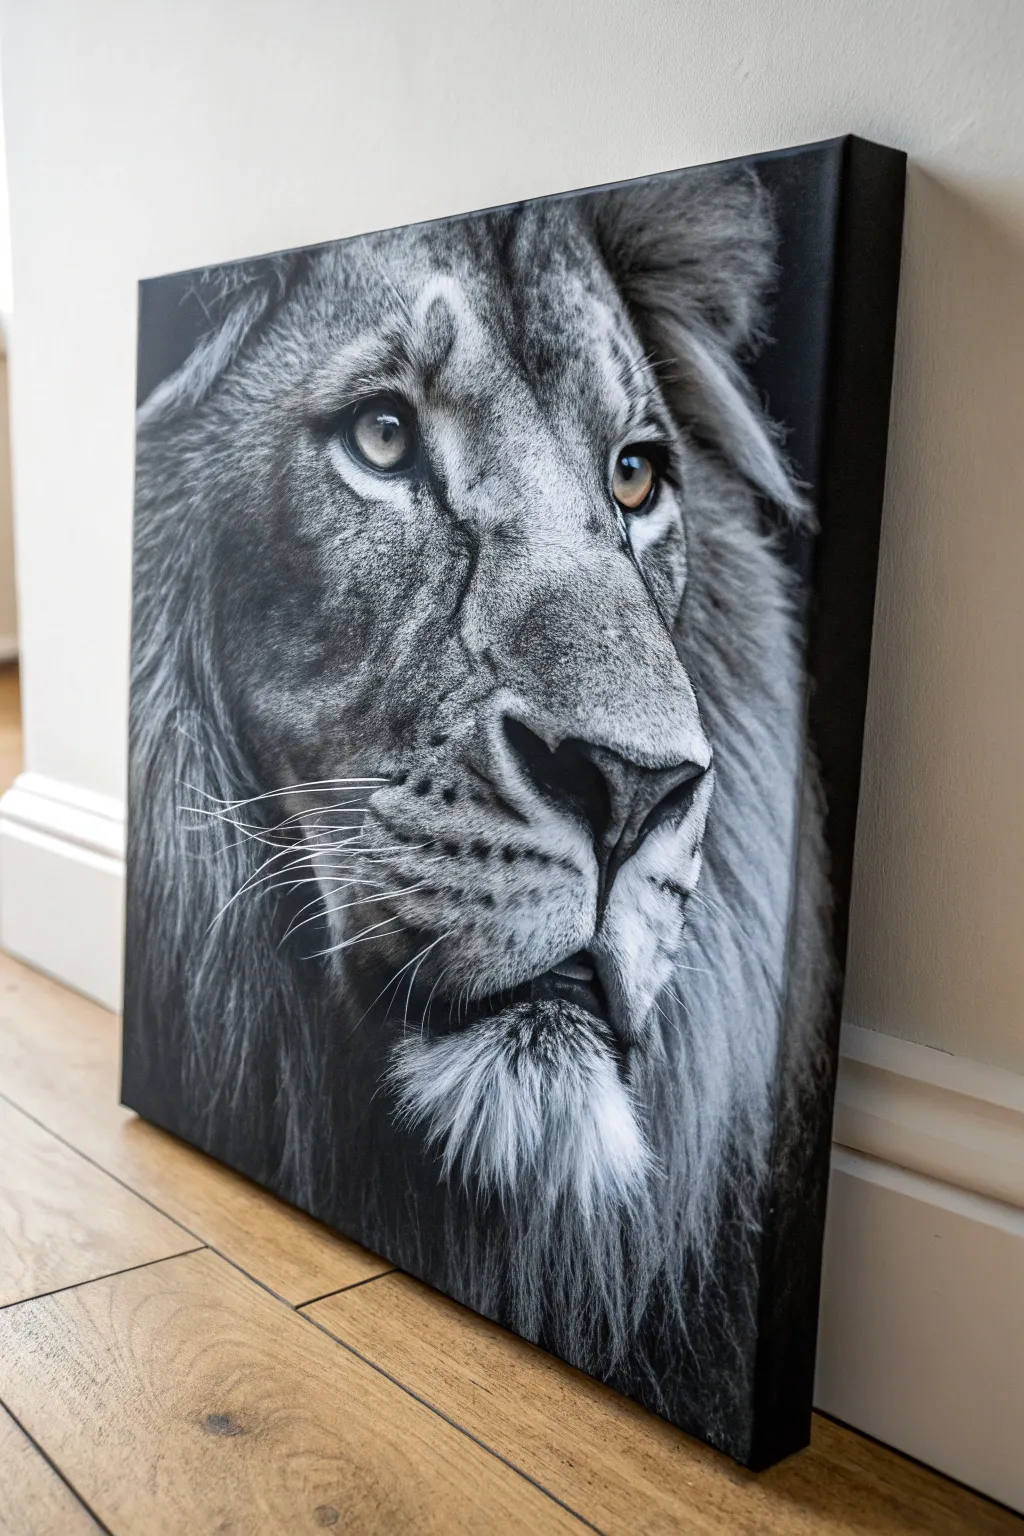
This striking project captures the raw intensity of a lion with high-contrast black and white acrylics, accented by a piercing amber gaze. The technique simulates photorealism through careful layering and dry brushing, creating a moody, masculine piece of statement art for any wall.
Step-by-Step
Materials
- Large stretched canvas (at least 16×20 inches, deep profile preferred)
- Black acrylic paint (heavy body)
- White acrylic paint (heavy body)
- Yellow ochre and burnt sienna acrylic paint (for eyes)
- Large flat brush (2-3 inch)
- Medium filbert brush
- Small round detail brush (size 0 or 00)
- Old, stiff bristle fan brush or rake brush
- Pencil and eraser
- Reference photo of a lion
- Palette and water container
- Acrylic fluid retarder or slow-drying medium
Step 1: Preparation and Base Layer
-
Prime the Surface:
Even if your canvas is pre-primed, apply a coat of neutral grey gesso or a mix of black and white paint to create a mid-tone grey background. This makes judging values much easier than starting on stark white. -
Grid and Sketch:
Using a light pencil, sketch the outline of the lion’s head. If you aren’t confident in freehanding, use the grid method to map out key features: the eyes, the bridge of the nose, and the muzzle placement. Accuracy here is crucial for realism. -
Establish the Darks:
Load your large flat brush with pure black paint. Paint the negative space around the lion’s head first, wrapping the paint around the edges of the canvas for a finished, gallery-wrap look. -
Map Shadows:
Switch to a medium filbert brush and block in the darkest shadows on the face—specifically inside the ears, under the chin, the nostrils, and the dark lining around the eyes.
Step 2: Painting the Features
-
Base the Eyes:
Mix a small amount of yellow ochre with white to create a pale gold. Fill in the iris area, avoiding the pupil. We will build depth here later. -
Muzzle Structure:
Mix a dark grey value. Define the structure of the nose bridge and the fleshy part of the muzzle. Keep your brushstrokes following the direction of the fur growth. -
Mid-Tone Fur:
Create a lighter grey tone. Using a stiff brush, start flicking in the mid-tone fur texture on the cheeks and forehead. I find short, confident strokes work best to mimic the coarse hair. -
Eye Details:
Return to the eyes. Add burnt sienna around the outer edge of the iris for depth. Paint the pupil pitch black. Finally, add a tiny dot of pure white for the reflection, which brings the lion to life.
Fur Texture Hack
Use an old, splayed-out bristly brush for the mane. Don’t throw ruined brushes away; their uneven bristles are perfect for painting multiple irregular hair strands at once.
Step 3: Texture and Fur
-
The Mane foundation:
For the heavy mane on the sides, use a dark grey wash initially. While it’s still slightly tacky, drag a comb or stiff dry brush through it to create the underlying separation of hair strands. -
Layering the Mane:
Mix a light grey. Using a rake brush or an old fan brush, layer lighter hairs over the dark background. Don’t cover the darks completely; the contrast creates volume. -
Chin Fur Detail:
The chin tuft is often lighter. Use a small round brush with thinned white paint to create individual, bright strands dropping down from the chin. -
Nose Texture:
Dab a sponge or stiff brush with dark grey on the nose bridge to create a pore-like, leathery texture rather than long fur strokes. -
Refining Values:
Step back from the canvas. Look for areas that need to be darker. Glaze over shadow areas with a very thin layer of watery black paint to push them back if they look too flat.
Muddy Greys?
If your grey fur looks muddy instead of crisp, stop wet-blending. Let the dark underlayer dry completely before dry-brushing the lighter hairs on top.
Step 4: Final Highlights and Whiskers
-
Brightest Highlights:
Load a liner brush with pure thick white paint. Apply selective highlights where the light hits hardest—usually the ridge of the nose, the wetline of the eye, and the tips of the ear fur. -
Whisker Planning:
Whiskers need to be sharp and confident. Practice a few long, sweeping strokes on a scrap piece of paper first to get the motion right. -
Painting Whiskers:
Using a liner brush and fluid white paint (add a drop of water), paint the long whiskers sweeping back from the muzzle. Vary the pressure so they taper off at the ends. -
Final Edge Check:
Ensure the deep black background is solid and opaque. Touch up any grey smudges that may have strayed into the negative space to keep the edges crisp and hard. -
Varnish:
Once fully dry (give it 24 hours), apply a satin or matte varnish. This unifies the sheen of the blacks and protects the detailed texture work.
Hang this commanding piece in a study or living room to add a touch of wild elegance to your space


Geometric Color-Block Abstract
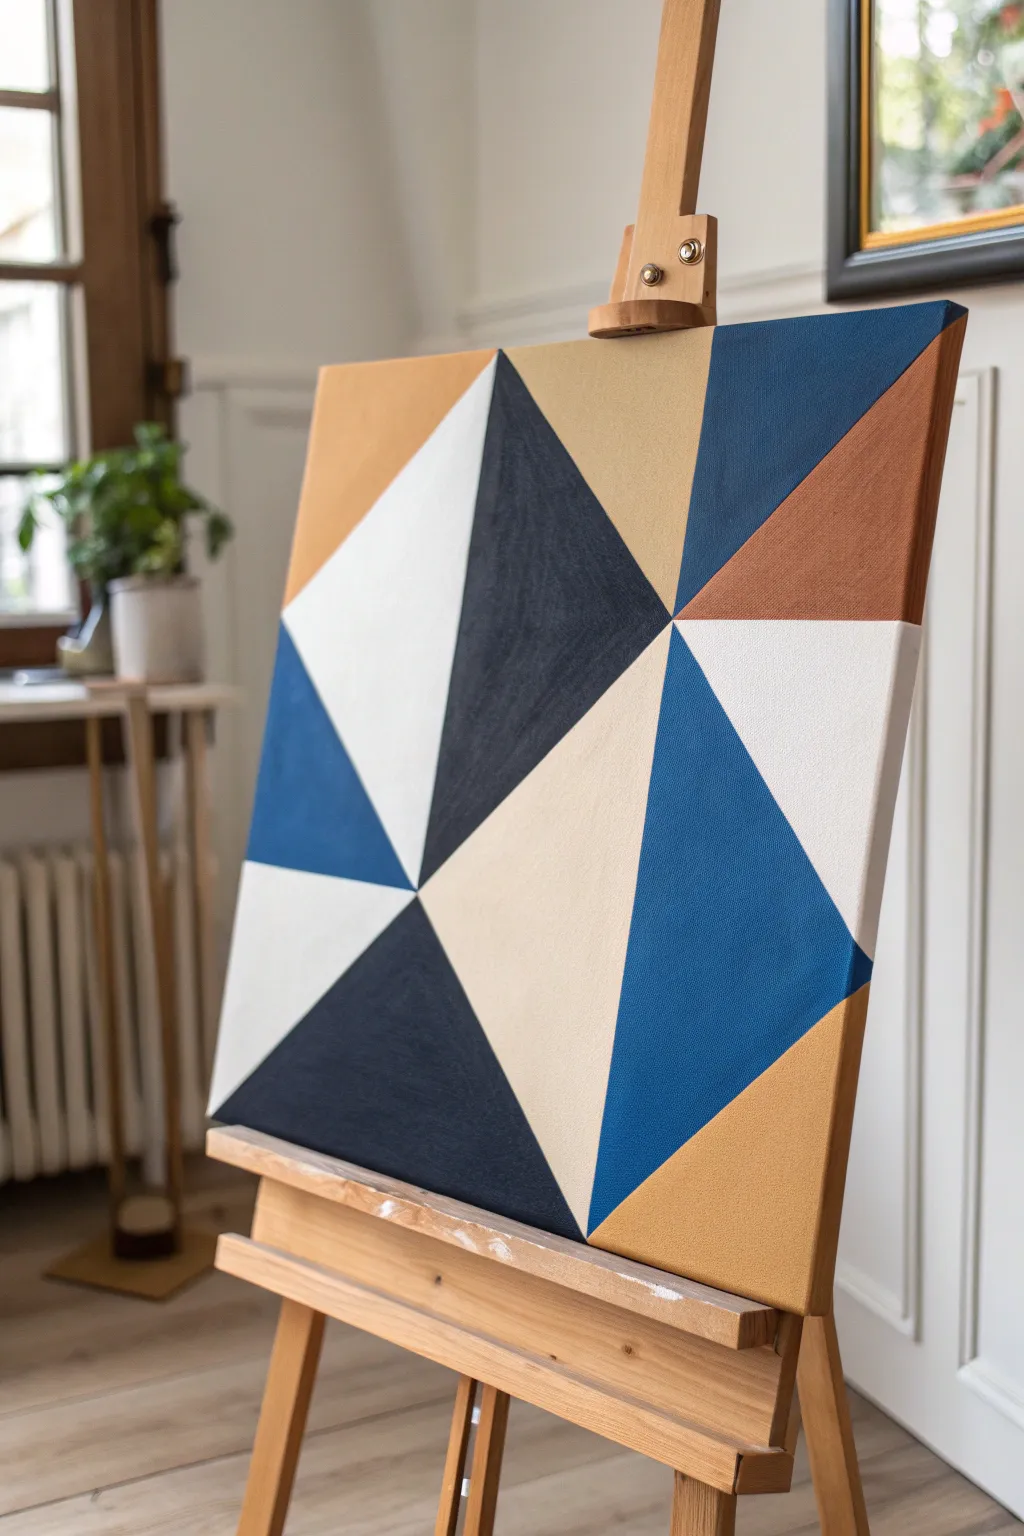
This modern, masculine piece relies on sharp lines and a balanced color palette to create a sophisticated focal point for any room. Using a simple taping method, you achieve crisp geometric shapes that look professionally done without requiring advanced drawing skills.
How-To Guide
Materials
- Square stretched canvas (e.g., 20×20 inches)
- Acrylic paints (Navy Blue, Cobalt Blue, Titanium White, Beige/Sand, Rust/Terra Cotta)
- Painter’s tape or drafting tape (medium width)
- Flat synthetic paintbrushes (1-inch width)
- Small round brush (for touch-ups)
- Plastic palette or paper plate
- Ruler or straight edge
- Pencil
- Matte varnish (optional)
Step 1: Planning and Taping
-
Prepare the workspace:
Lay down a drop cloth or old newspaper to protect your surface. Ensure your canvas is clean and free of dust before starting. -
Sketch the primary lines:
Using a ruler and a light pencil touch, draw a few intersecting diagonal lines across the canvas. Avoid symmetry; create a variety of large and medium triangles by connecting edge points to a central, slightly off-center focal area. -
Plan your palette:
Before committing to paint, decide which triangle gets which color. Mark each section lightly with a pencil letter (e.g., ‘N’ for Navy, ‘W’ for White) to ensure a balanced distribution of light and dark tones. -
Tape the first batch of shapes:
Apply painter’s tape along the pencil lines for your first set of non-adjacent triangles. You cannot paint touching shapes at the same time, so choose sections that are separated by tape. -
Seal the tape edges:
Run your finger or a credit card firmly over the tape edges to ensure a tight seal. This is crucial for achieving those razor-sharp lines.
Step 2: Painting the Sections
-
Paint the Navy sections:
Squeeze out your Navy Blue acrylic. Using a flat brush, fill in the designated navy triangles. Brush away from the tape edge initially to prevent paint from bleeding underneath. -
Apply the Rust tones:
Clean your brush thoroughly or switch to a fresh one. apply the Rust/Terra Cotta color to its assigned sections, ensuring smooth, even coverage. -
Fill the Beige areas:
Paint the sand-colored sections next. Lighter colors like this often require a slightly thicker application or a second coat to be fully opaque. -
Let the first batch dry:
Allow these painted sections to dry to the touch, which usually takes about 20-30 minutes depending on paint thickness. -
Remove first tape application:
Carefully peel back the tape at a 45-degree angle. Do this slowly to avoid ripping any dried paint film. -
Tape the remaining shapes:
Once the paint is fully cured (give it an extra hour to be safe so the new tape doesn’t pull it up), apply tape over the dried painted edges to expose the remaining unpainted white canvas triangles. -
Paint the Cobalt Blue:
Fill in the vibrant medium blue sections. This color acts as a bridge between the deep navy and the lighter neutrals. -
Paint the White sections:
Finally, paint the Titanium White sections. even if the canvas is already white, painting it adds texture and sheen consistency with the other colors. -
Apply second coats:
I prefer to do a second coat on all shapes at this stage to eliminate brush strokes and ensure solid color saturation.
Bleeding Lines?
If paint bleeds under the tape, dampen a stiff brush with water and gently scrub the excess while it’s semi-dry. For perfect future lines, seal the tape edge with clear medium first.
Step 3: Finishing Touches
-
Final reveal:
Once the second batch of paint is barely dry to the touch, carefully remove all remaining tape to reveal the complete geometric pattern. -
Touch up edges:
If any paint bled under the tape, use a small round brush and the appropriate color to tidy up the straight lines. A steady hand is key here. -
Erase pencil marks:
Check for any visible pencil lines in the unpainted gaps or light sections and gently erase them. -
Paint the sides:
Don’t forget the edges of the canvas. You can wrap the design around the sides or paint them a solid neutral color like navy or black for a framed look. -
Varnish:
Apply a coat of matte varnish to protect the paint from dust and UV light, giving the piece a unified finish.
Add Texture
Mix a little modeling paste or sand into one of the paint colors (like the beige or rust) before applying. This adds a tactile, gritty dimension that contrasts with the smooth shapes.
Hang your new geometric masterpiece in a well-lit spot to let the sharp contrasts really stand out
BRUSH GUIDE
The Right Brush for Every Stroke
From clean lines to bold texture — master brush choice, stroke control, and essential techniques.
Explore the Full Guide
Minimal City Skyline at Dusk
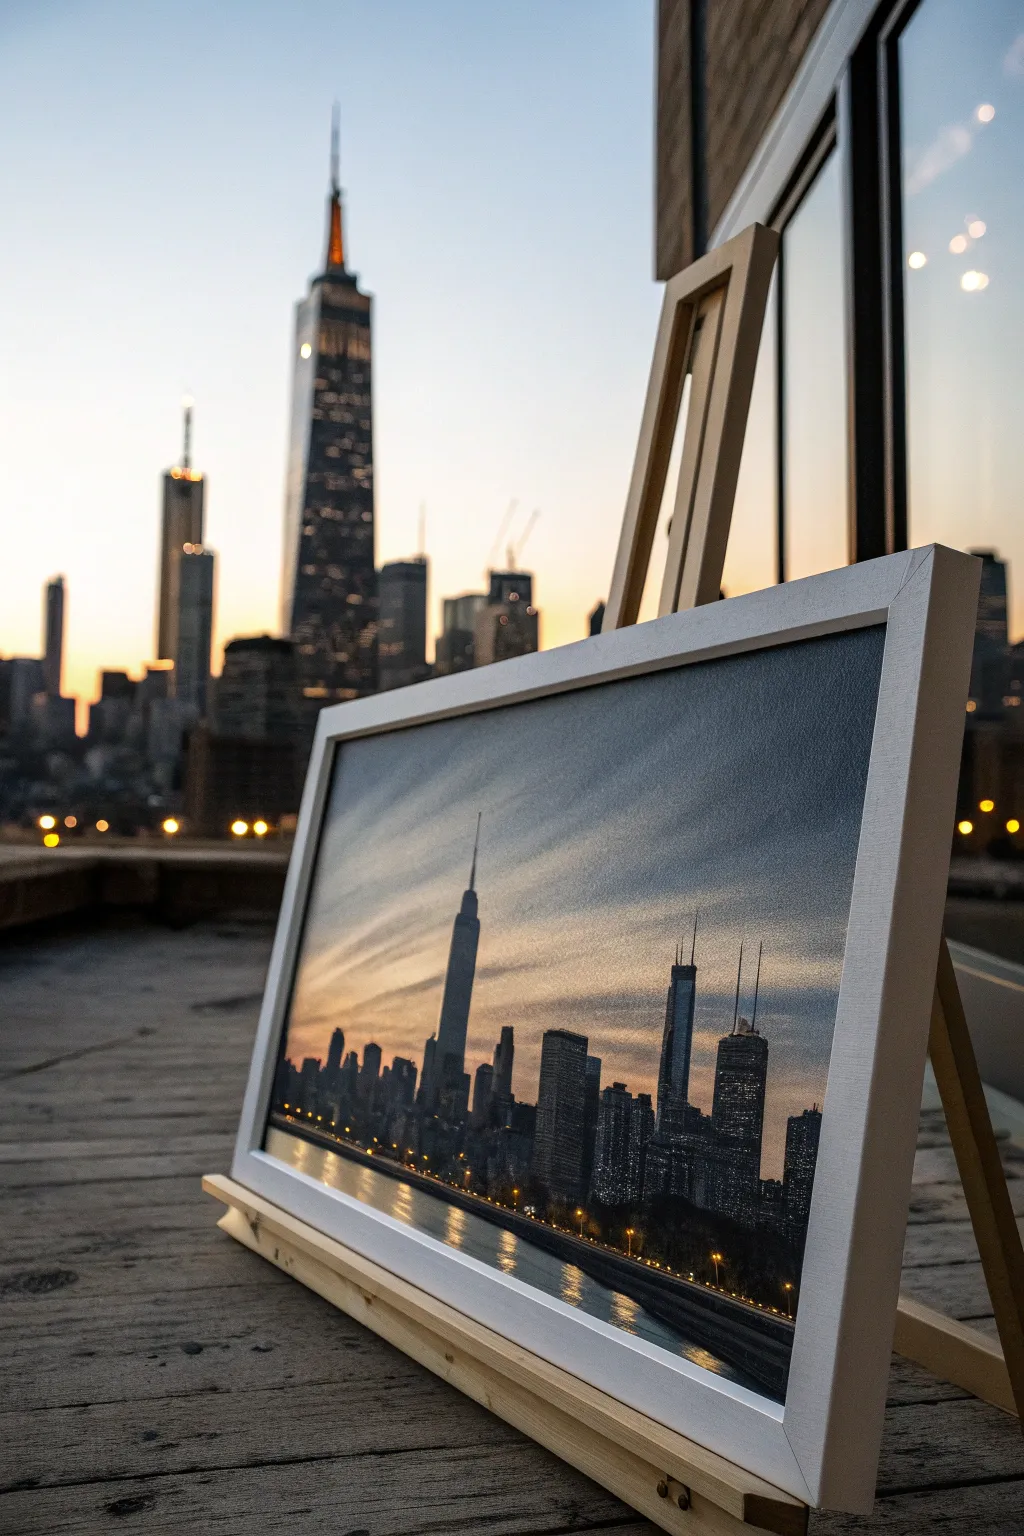
Capture the serene transition from day to night with this striking cityscape canvas. This project blends a soft, gradient sky with crisp architectural silhouettes to create a sophisticated piece of art perfect for a modern apartment or office.
Step-by-Step
Materials
- Rectangular stretched canvas (e.g., 24″ x 36″)
- Acrylic paints: Titanium White, Phthalo Blue, Mars Black, Burnt Umber, Cadmium Orange, Cadmium Yellow
- Large flat wash brush (2-3 inch)
- Medium flat brush (1 inch)
- Small round detail brush (size 0 or 1)
- Ruler or straight edge
- Pencil
- Painter’s tape or masking tape
- Palette knife (optional for mixing)
- Water cups and paper towels
- White or light wood floating frame (optional)
Step 1: Setting the Scene
-
Establish the Horizon:
Begin by deciding where your water meets the skyline. Use a ruler and pencil to draw a faint, straight horizontal line about the bottom third of the canvas. Apply a strip of painter’s tape directly below this line to mask off the water area while you paint the sky. -
Mix the Sky Gradient:
Prepare three piles of paint on your palette: a deep Phthalo Blue mixed with a touch of black for the upper corners, a pure Phthalo Blue for the mid-sky, and a warm mix of White, Cadmium Orange, and a tiny dot of Blue for the horizon glow. -
Paint the Upper Sky:
Using your large wash brush, apply the darkest blue mix to the top corners of the canvas, sweeping inward with long, horizontal strokes. Working quickly while the paint is wet is key for a smooth blend. -
Blend Downward:
Without cleaning the brush completely, pick up the mid-tone blue. Brush this into the area below the dark top, slightly overlapping the wet edge to soften the transition. -
Create the Sunset Glow:
Clean your brush thoroughly. Pick up your warm orange-white mix and paint just above the tape line. Blend this upward into the blue, allowing the colors to mud slightly—this creates a realistic gray-purple haze often seen at twilight. -
Add Cloud Textures:
While the sky is still tacky, use a dry, clean brush to drag wisps of white and pale yellow diagonally across the sky. Keep these strokes very light and feathery to mimic distinct cloud bands.
Straight Edge Hack
Don’t trust your freehand lines for skyscrapers? Use a plastic card (like an old gift card) dipped in black paint to stamp perfect vertical building edges onto the canvas.
Step 2: The Water and Reflections
-
Reveal the Water:
Once the sky is fully dry to the touch, carefully peel off the painter’s tape. Now, place a new strip of tape exactly on the line again, but this time covering the painted sky to protect it. -
Base Coat the Water:
Mix a dark, moody grey-blue using Black, Blue, and a little Umber. Cover the bottom water section entirely with horizontal strokes. You want this darker than the sky to anchor the painting. -
Add Shimmering Reflections:
Using a smaller flat brush, pick up some of the sunset orange and yellow colors you used for the sky. Paint horizontal dash marks directly into the wet dark water paint, focusing them directly underneath where your sun source would be.
Step 3: Building the City
-
Draft the Silhouette:
Remove the tape once the water is dry. Using a pencil, lightly sketch the varying heights of your buildings. Include a few signature skyscrapers—like the distinct antenna spire—to give the skyline character. -
Block in the Buildings:
Load a medium flat brush with Mars Black. Fill in the building shapes solidly. Use the edge of the brush or a palette knife to keep the vertical lines sharp and architectural. -
Refining the Edges:
Switch to your small detail brush to handle the tricky parts, like antennas and narrow spires. I find steadying my hand on a dry part of the canvas helps get these lines perfectly straight. -
Add Depth with Grey:
Mix a dark charcoal grey. Paint subtle vertical rectangles on the sides of a few buildings to suggest depth and perspective, rather than having flat black shapes. -
Paint the Windows:
Using the detail brush and pure Titanium White (or a very pale yellow), adds tiny dots and short dashes in grid patterns on the black buildings. Vary the density—some buildings are office towers full of light, others might be darker residential blocks.
Trouble blending?
If acrylics are drying too fast to blend the sky properly, mix in a retarder medium or keep a misting spray bottle handy to keep the canvas surface slightly damp.
Step 4: Final Touches
-
Enhance Water Reflections:
Beneath the tallest buildings, drag a little bit of watered-down black paint vertically into the water area to show the building’s shadow on the surface. -
Street Lights:
Add a few tiny dots of orange or yellow along the very bottom edge of the buildings where they meet the water to simulate streetlights or a shoreline road. -
Varnish and Frame:
Protect your work with a satin varnish once thoroughly dry. For the look in the photo, mount the canvas into a clean, white floating frame which makes the dark colors pop.
Now you have a sleek piece of modern art that captures the electric energy of the city at night
Blueprint-Style Vehicle Sketch
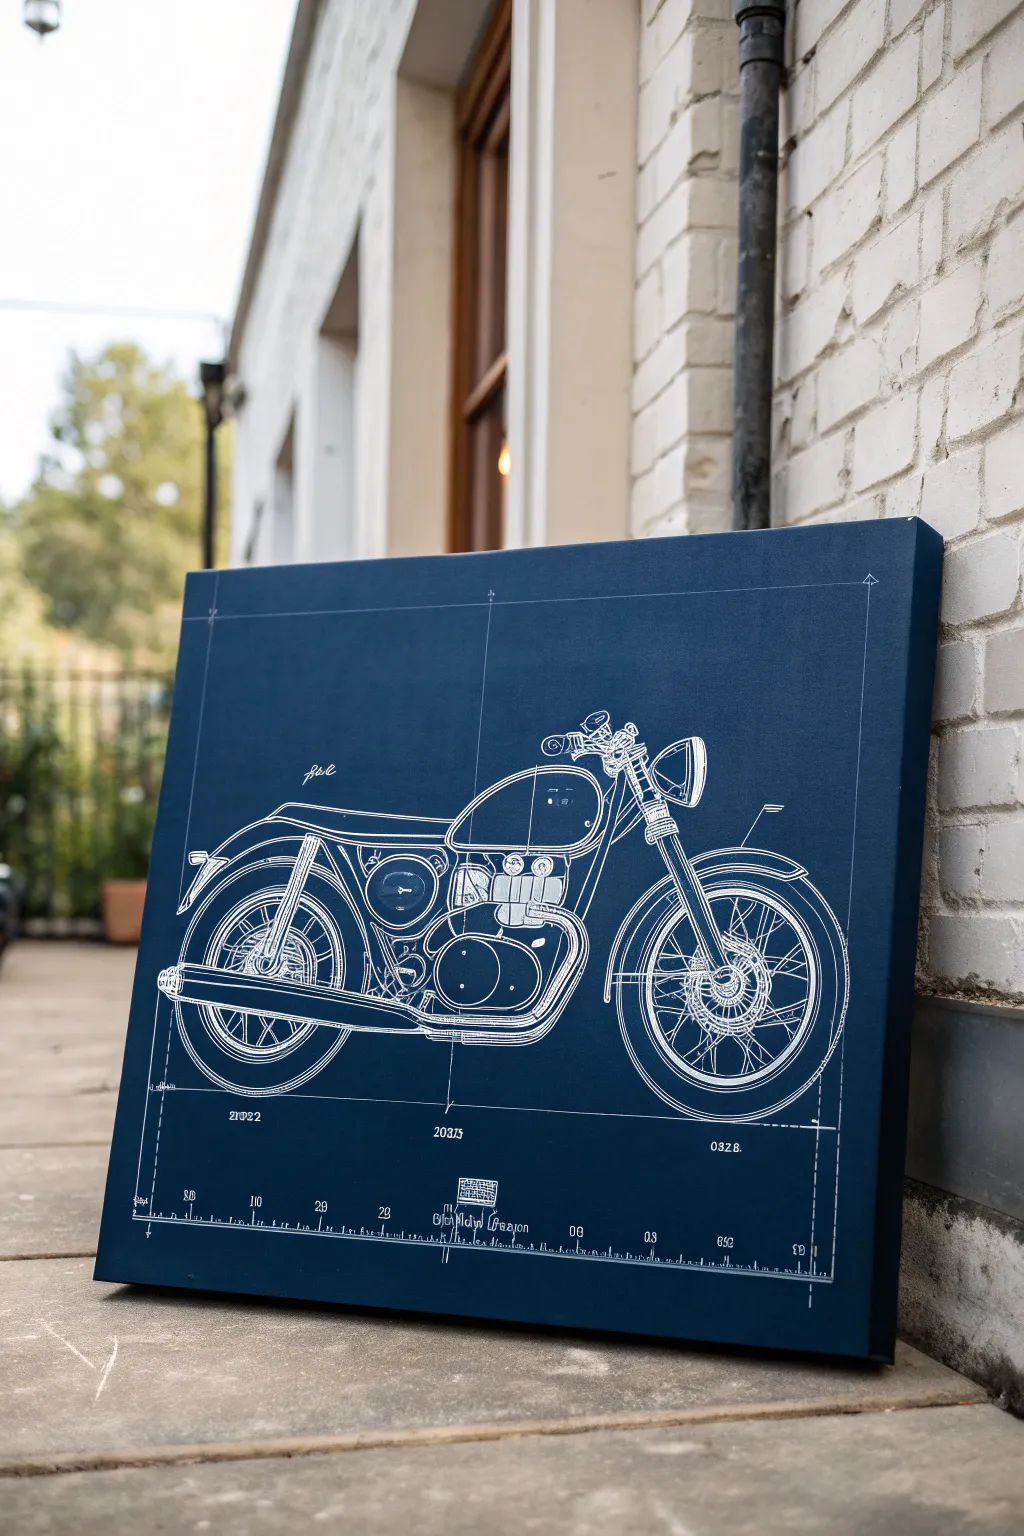
Bring classic engineering vibes to your space with this striking blueprint-style motorcycle art. The deep indigo background and precise white linework create a sophisticated, industrial look that feels both technical and artistic.
Step-by-Step Guide
Materials
- Large stretched canvas (square or rectangular)
- Deep indigo or navy blue acrylic paint
- Flat paintbrush (2-inch)
- White paint pen (fine tip) or white acrylic ink with a liner brush
- Chalk or white transfer paper
- Straight edge ruler
- Reference image of a motorcycle (side profile)
- Pencil and eraser
- Matte finish spray sealant
Step 1: Setting the Foundation
-
Prepare the Surface:
Start by wiping down your canvas with a clean, dry cloth to remove any dust. Lay down a drop cloth or newspaper to protect your work surface. -
Create the Blueprint Blue:
Squeeze out a generous amount of deep indigo acrylic paint. If your blue is too bright, mix in a tiny touch of black to deepen it into that classic blueprint navy. -
Base Coat Application:
Using your 2-inch flat brush, apply the blue paint in smooth, horizontal strokes. Ensure you cover the white edges of the canvas for a finished, gallery-wrapped look. -
Second Coat:
Let the first layer dry completely (usually 30-60 minutes). Apply a second coat to ensure the color is solid and opaque, hiding the canvas weave texture as much as possible.
Uneven Lines?
If your paint pen skips or creates jagged lines, the canvas texture is likely too rough. try lightly sanding the blue base coat with fine-grit sandpaper before inking.
Step 2: Drafting the Design
-
Grid Lines:
Once the paint is fully cured, use a ruler and a very light touch with white chalk to draw a faint border about two inches from the edge. Add cross-hair lines near the corners to mimic technical drawing guides. -
Transfer or Sketch:
If you are confident, lightly sketch the motorcycle basics with chalk. For accuracy, I prefer using white transfer paper beneath a printout of my reference image and tracing over it firmly. -
Refine the Outline:
Lift the transfer paper to check your lines. If they are too faint, go over the main structural components—wheels, frame, tank—with your chalk or a white charcoal pencil. -
Technical Details:
Add the specific blueprint elements, such as dimension lines at the bottom and small numbers. These don’t need to be real measurements, just realistic-looking technical gibberish.
Step 3: Inking the Blueprint
-
Start the Linework:
Shake your white paint pen vigorously. Test the flow on a scrap piece of paper first to ensure smooth, consistent lines without blobs. -
Main Body Trace:
Begin tracing the tank and seat. Use a steady hand and pull the pen towards you. Vary your pressure slightly; thicker lines for the main outline make the bike pop. -
Engine Details:
work on the engine block. This area relies on density rather than perfect accuracy. Draw small circles, cooling fins, and pipes to create visual complexity. -
Wheel Spokes:
Use your ruler for the spokes. Draw lines radiating from the central hub to the tire rim. They don’t need to be perfectly spaced, but straightness is key for the mechanical look. -
Add Text and Dimensions:
Carefully ink in the numbers and measurement lines at the bottom. Use the ruler for the straight horizontal dimension lines to keep everything crisp. -
Erase Setup Lines:
Allow the white ink to dry for at least an hour. Gently wipe away any visible chalk guidelines with a slightly damp cloth or a soft eraser. -
Final Seal:
Take the canvas outside and spray it with a matte finish sealant. This protects the dark blue from scuffs and keeps the white lines from yellowing over time.
Pro Tip: The Aged Look
For an authentic vintage vibe, dilute a drop of white paint with water and flick it lightly off a toothbrush onto the background before drawing to mimic old paper specs.
Hang your technical masterpiece in the office or garage to add some structured, industrial style to the room

PENCIL GUIDE
Understanding Pencil Grades from H to B
From first sketch to finished drawing — learn pencil grades, line control, and shading techniques.
Explore the Full Guide
Topographic Lines in Monochrome
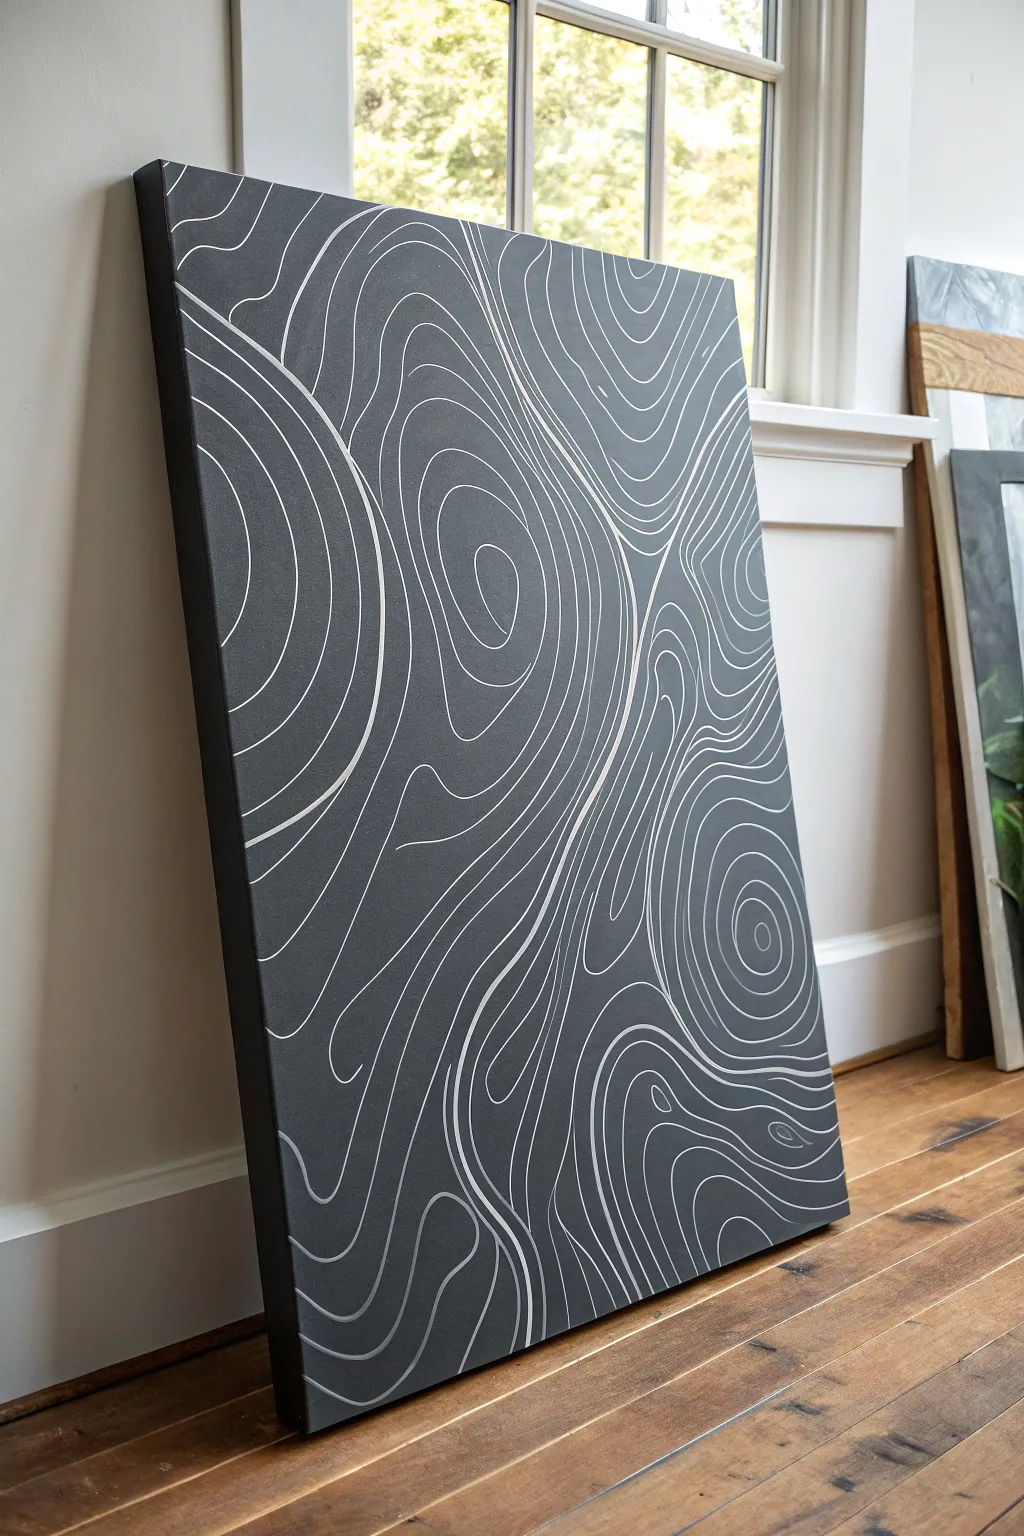
Bring the outdoors inside with this sophisticated topographic line art piece that feels both scientific and abstract. The high-contrast look of crisp white lines against a slate grey background creates a modern, masculine vibe perfect for an office or living space.
Step-by-Step Tutorial
Materials
- Large stretched canvas (24×36 inches or larger recommended)
- Dark grey acrylic paint (slate or charcoal)
- White acrylic paint or a white pigment paint marker
- Wide flat paintbrush (2-3 inch)
- Small round paintbrush (size 1 or 2, if not using marker)
- Pencil
- Eraser
- Mixing palette or paper plate
- Drop cloth or newspaper
Step 1: Preparing the Base
-
Set up your workspace:
Lay down your drop cloth in a well-lit area. Because this canvas is large, you might find it easier to work with it lying flat on a table or even the floor rather than an easel, which gives you better control over the lines later. -
Mix your base color:
Squeeze a generous amount of dark grey acrylic paint onto your palette. If your grey is too light, mix in a touch of black to achieve a deep, slate charcoal tone. You want a matte, stony finish. -
Apply the first coat:
Using your wide flat brush, apply the grey paint in long, smooth strokes. Ensure you cover the white canvas completely, working from top to bottom. -
Paint the edges:
Don’t forget the sides of the canvas. Painting the edges gives the piece a finished, gallery-wrapped look without needing a frame. -
Let it dry completely:
Allow the first coat to dry for at least 30-60 minutes. It must be dry to the touch before adding a second coat to avoid lifting the paint. -
Add a second coat:
Apply a second layer of grey paint to ensure a solid, opaque background with no canvas texture showing through. Let this dry fully, preferably overnight, so the surface is hard and ready for detail work.
Fixing Shaky Lines
Line looking wobbly? Don’t stress. Go back over it to slightly thicken the line. Topographic maps often have thicker ‘index’ lines every few intervals, so a bolder line looks intentional.
Step 2: Designing the Topography
-
Plan your focal points:
Visualize where the ‘peaks’ of your map will be. In the example image, there are swirls and concentric circles in the top right, bottom right, and middle left. Lightly mark these centers with a pencil. -
Sketch the primary flow:
Using a pencil with very light pressure, draw the first few distinct rings around your focal points. These don’t need to be perfect circles; organic, kidney-bean shapes look more like natural terrain. -
Fill the negative space:
Sketch waving lines that connect the areas between your focal points. Imagine how water would flow around rocks—these lines should curve around the ‘peaks’ you just created.
Use a Paint Marker
Skip the brush for the detail work. An oil-based or acrylic paint marker (like Posca or Sharpie Paint) makes drawing consistent, long curves significantly easier than a traditional brush.
Step 3: Painting the Lines
-
Prepare your white tool:
For the cleanest lines, I actually prefer using a white acrylic paint marker with a medium tip. Shake it well and press the nib to get the flow started. If you prefer a brush, dilute your white acrylic paint slightly with water for better flow. -
Start with the centers:
Begin tracing your pencil lines at the center of your ‘peaks’—the tightest circles. Why start here? It helps you establish the rhythm of the spacing before moving to the longer lines. -
Keep your wrist loose:
As you draw the longer contour lines, try to move your entire arm rather than just your wrist. This prevents shaky, jagged lines and creates smooth, fluid curves. -
Vary the line proximity:
Mimic real maps by varying the space between lines. Lines that are close together represent steep terrain, while lines further apart represent flat ground. This variation adds visual depth. -
Manage the edges:
Let your lines run right off the edge of the canvas face. You can wrap them around the sides if you like, or let them terminate neatly at the corner of the front face. -
Touch up gaps:
Step back and look for large empty dark spaces. Add intermediate lines (contour intervals) to break up big gaps, ensuring the texture looks consistent across the whole canvas. -
Clean up smudges:
If you smudge a white line or make a mistake, don’t panic. Let the white dry completely, then use a tiny bit of your background grey paint to meticulously cover the error. -
Final cure:
Allow the white lines to dry fully. If you used a paint marker, this is usually quick, but give it a few hours before handling or hanging.
Hang your abstract masterpiece and enjoy the modern, exploratory aesthetic it adds to your room
Soundwave Bars Inspired by a Favorite Song
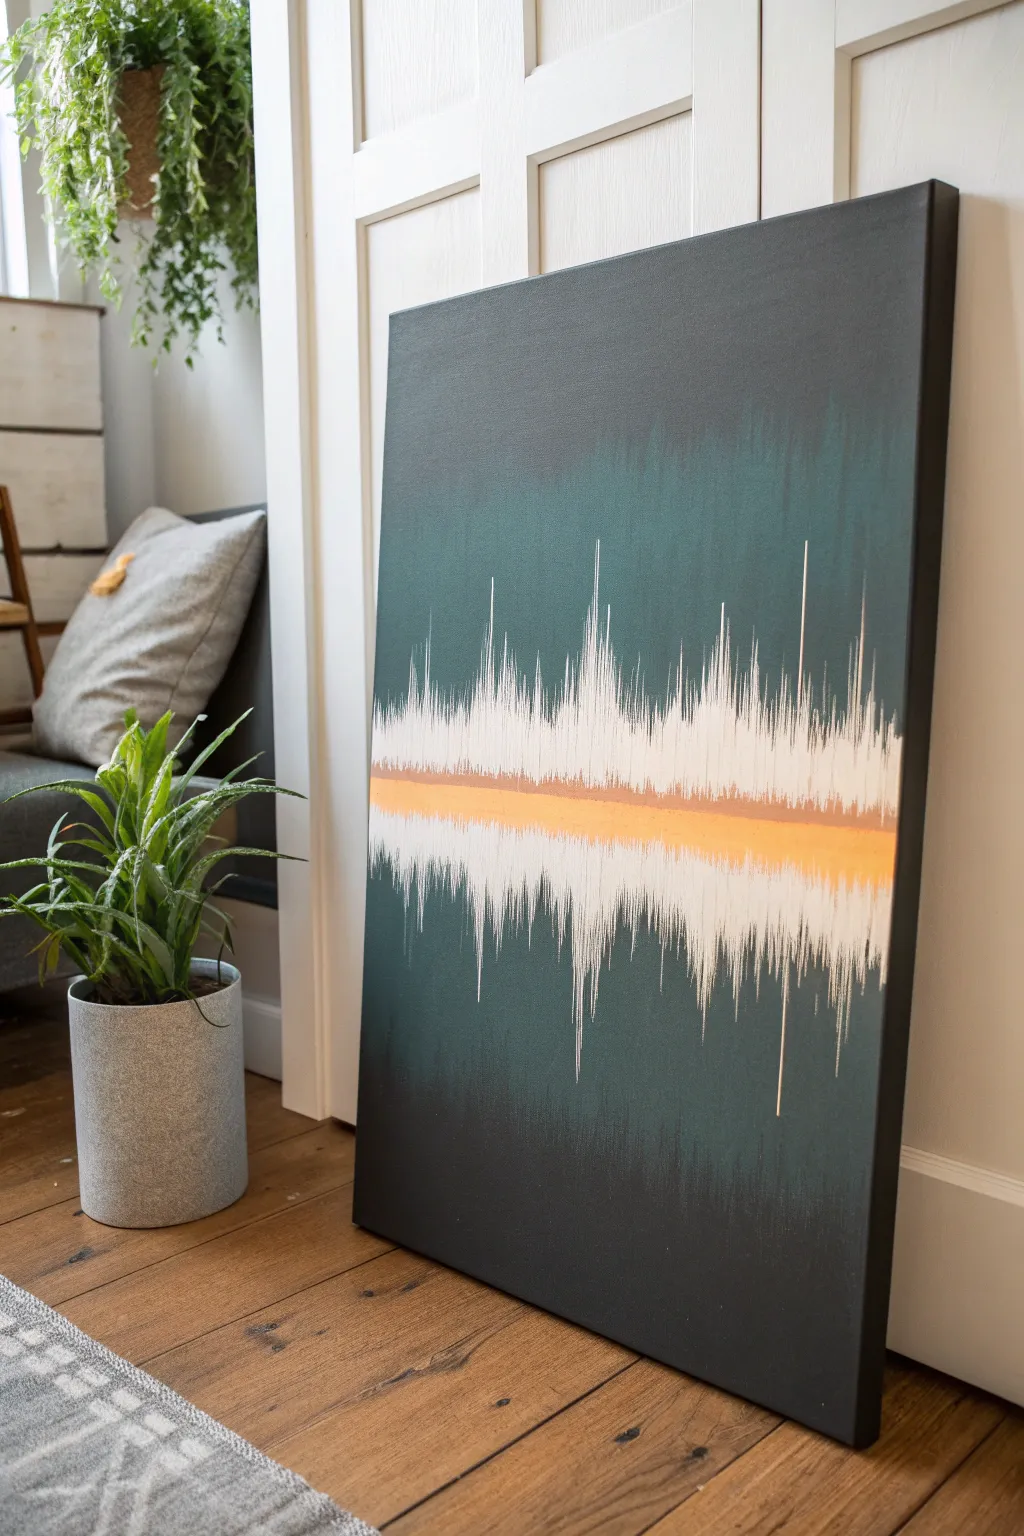
Turn your favorite audio track into abstract art with this moody, modern soundwave painting. The design features a deep, gradient background intersected by jagged white peaks and a striking horizontal metallic stripe for contrast.
How-To Guide
Materials
- Large stretched canvas (e.g., 24×36 inches)
- Black acrylic paint
- Deep teal or forest green acrylic paint
- Titanium white acrylic paint
- Metallic copper or gold acrylic paint
- Wide flat brush (2-3 inch) for background
- Fine liner brush (size 0 or 00)
- Medium flat brush (1 inch)
- Painter’s tape or masking tape
- Ruler or straight edge
- Reference image of a soundwave
- Mixing palette
- Cup of water and paper towels
Step 1: Setting the Mood
-
Prepare the workspace:
Lay down a drop cloth or old newspaper to protect your floor. Set up your canvas vertically, leaning against a wall or on an easel, ensuring it is stable before you begin painting. -
Mix the base colors:
Squeeze out a generous amount of black paint and deep teal paint onto your palette. You want enough to cover the entire canvas without having to stop and remix halfway. -
Paint the top gradient:
Using the wide flat brush, start at the very top of the canvas with pure black paint. Bring it down about 4-5 inches, ensuring consistent horizontal strokes. -
Introduce the color:
While the black is still wet, pick up some deep teal on your brush without washing it. Blend this into the black, working your way down the canvas to create a smooth transition from darkness to color. -
Cover the middle section:
Continue painting down the canvas with the deep teal. This central area will be behind your soundwave, so aim for a rich, solid color coverage here. -
Fade back to black:
As you reach the bottom third of the canvas, start mixing black back into your teal on the brush. Gradually transition until the very bottom edge is pure black again, mirroring the top. -
Create texture:
Before the background dries completely, use a dry, clean brush to lightly sweep vertically in a few spots. This adds a subtle, rain-like texture that enhances the moody aesthetic. -
Let it cure:
Allow the background to dry completely. This is crucial because you don’t want the white soundwave lines to turn gray by picking up wet background paint.
Step 2: The Metallic Horizon
-
Mark the center:
Find the general horizontal center of your canvas. It doesn’t need to be mathematically perfect, but use a ruler to lightly visualize where your main stripe will go. -
Tape the horizon:
Apply two strips of painter’s tape across the canvas to define the metallic band. Leave about a 1.5 to 2-inch gap between the tapes. Press the edges down firmly to prevent bleeding. -
Apply the metallic base:
Paint the space between the tape with your metallic copper or gold paint. You may need two coats to get a truly opaque, shiny finish. -
Soften the edges:
I prefer to remove the tape while the paint is still slightly tacky, not bone dry. Once the tape is off, use a dry brush to feather the edges of the metallic line slightly outward so it isn’t too harsh.
Pro Tip: Dry Brushing
For the faint, hazy white texture behind the main spikes, use a ‘dry brush’ technique with barely any paint to swiftly scrub back and forth before adding the sharp details.
Step 3: Amplifying the Sound
-
Plan your waveform:
Look at your reference soundwave image. Notice how the peaks vary in height—some are tall and sharp, others are low and dense. -
Start the white spikes:
Load your fine liner brush with titanium white paint. Starting from the metallic line, pull quick, sharp strokes upward. vary the length of these lines to mimic sound spikes. -
Mirror the wave:
For every upward spike, create a corresponding downward spike starting from the bottom of the metallic line. This creates the symmetrical look of an audio file. -
Build density:
Go back over your waveform and add shorter lines in between the tall spikes. The visual density should be thickest near the metallic center line and get airier as the spikes go outward. -
Fade the tips:
Ensure the tips of your white lines trail off into fine points rather than blunt ends. Use a flicking motion with your wrist to achieve this natural faded look. -
Review and refine:
Step back to view the canvas from a distance. If any section looks too sparse, add a few more thin white lines to balance the composition.
Level Up: Personal Audio
Use a free audio editor to generate the actual waveform of your favorite song or a voicenote from a loved one to make the pattern truly meaningful.
Now you have a piece of visual music that adds a sophisticated rhythm to your room


Tools Flat-Lay in Graphic Shadows
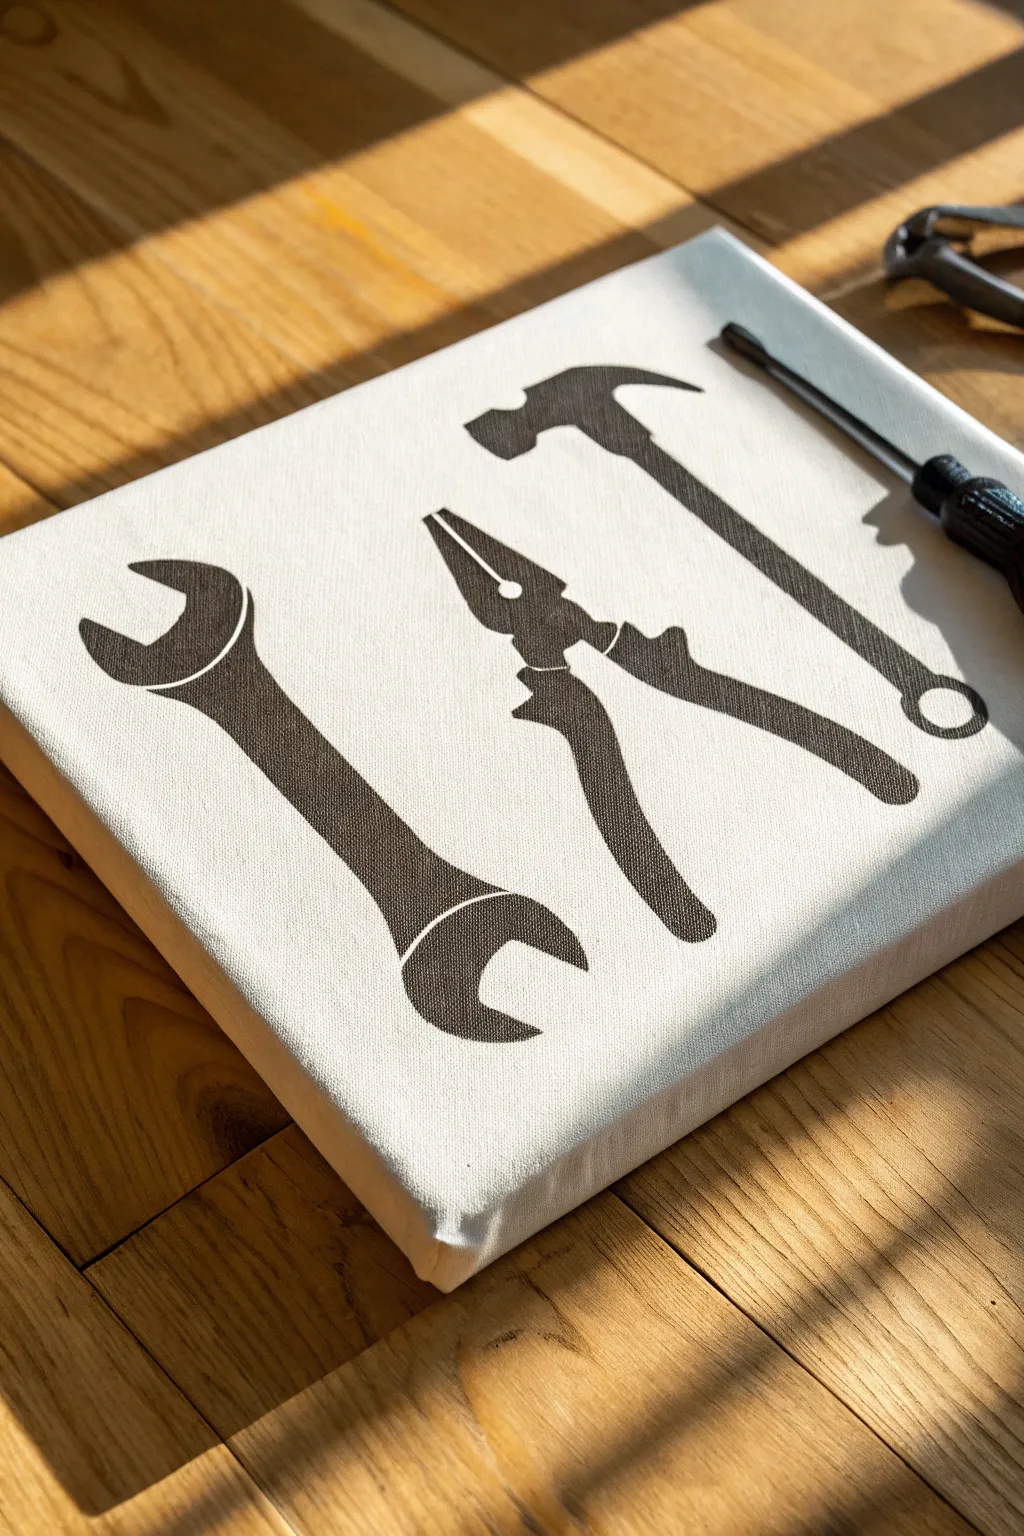
Create a bold, industrial statement piece with this high-contrast tool silhouette art. By using stencils on a raw or white canvas, you achieve a clean, graphic look that fits perfectly in a garage, workshop, or modern masculine space.
Detailed Instructions
Materials
- Stretched white cotton canvas (square or rectangular)
- Black acrylic paint (matte finish)
- Painter’s tape or stencil adhesive spray
- Computer and printer
- Cardstock or thick paper
- Craft knife (X-Acto)
- Self-healing cutting mat
- Stomper sponge or stencil brush
- Small flat brush (for touch-ups)
Step 1: Preparation & Stenciling
-
Source your imagery:
Begin by finding high-contrast silhouette images of your favorite tools online. Look for ‘vector’ or ‘icon’ styles of a wrench, pliers, and a hammer to match the clean look of the example project. -
Size and print:
Import your chosen images into a document and resize them so they fit comfortably on your canvas size. Make sure to leave some negative space around the edges so the composition doesn’t feel crowded. -
Print on cardstock:
Print your tool templates onto heavy cardstock. Standard printer paper is too flimsy and will likely warp or tear when you apply the paint later. -
Cut the stencils:
Place the cardstock on your cutting mat. Using a sharp craft knife, carefully cut out the tool shapes. You are creating a ‘negative’ stencil, so keep the surrounding paper intact and discard the tool shape itself. -
Plan the layout:
Lay your cut stencils onto the blank canvas to finalize the arrangement. I prefer to angle them slightly to create a sense of dynamic movement rather than lining them up perfectly straight. -
Secure the stencils:
Once you are happy with the placement, secure the cardstock stencils to the canvas. Use masking tape on the edges or a light mist of spray adhesive on the back of the cardstock to prevent it find lifting.
Step 2: Painting
-
Load the sponge:
Dip your stomper sponge or stencil brush into the black matte acrylic paint. Dab it onto a scrap paper first to remove excess paint; you want the sponge almost dry to prevent bleeding. -
Apply the paint:
Using an up-and-down dabbing motion, apply the paint inside the stencil area. Do not brush back and forth, as this will push paint under the stencil edges. -
Build coverage:
Apply a second coat if necessary to get a solid, opaque black. The texture of the canvas might require a little extra paint to fill the weave pattern fully. -
Remove the stencils:
Carefully peel back the cardstock while the paint is still slightly tacky. Waiting until it is fully dry sometimes causes the paint to peel up with the paper. -
Clean up edges:
inspect the edges of your silhouettes. If there are any minor bleeds or fuzzy lines, use a very small flat brush with a tiny bit of white paint (or white gesso) to clean them up. -
Let it dry:
Allow the entire piece to dry completely for at least 2-3 hours. Since acrylic dries essentially like plastic, it will be quite durable once set. -
Add protective coat (optional):
If this canvas will hang in a garage or dusty area, you might want to apply a clear matte spray varnish over the whole piece to seal it against grime.
Bleeding Lines?
If paint bleeds under the stencil, wait for it to dry fully. Then, paint over the mistake with white acrylic or gesso to sharpen the edge.
Distressed Look
For a vintage vibe, lightly sand the black dried paint with fine-grit sandpaper to reveal some canvas weave underneath.
Hang your new industrial artwork proudly in your workspace for a touch of structured creativity
Desert Highway With Long Shadows
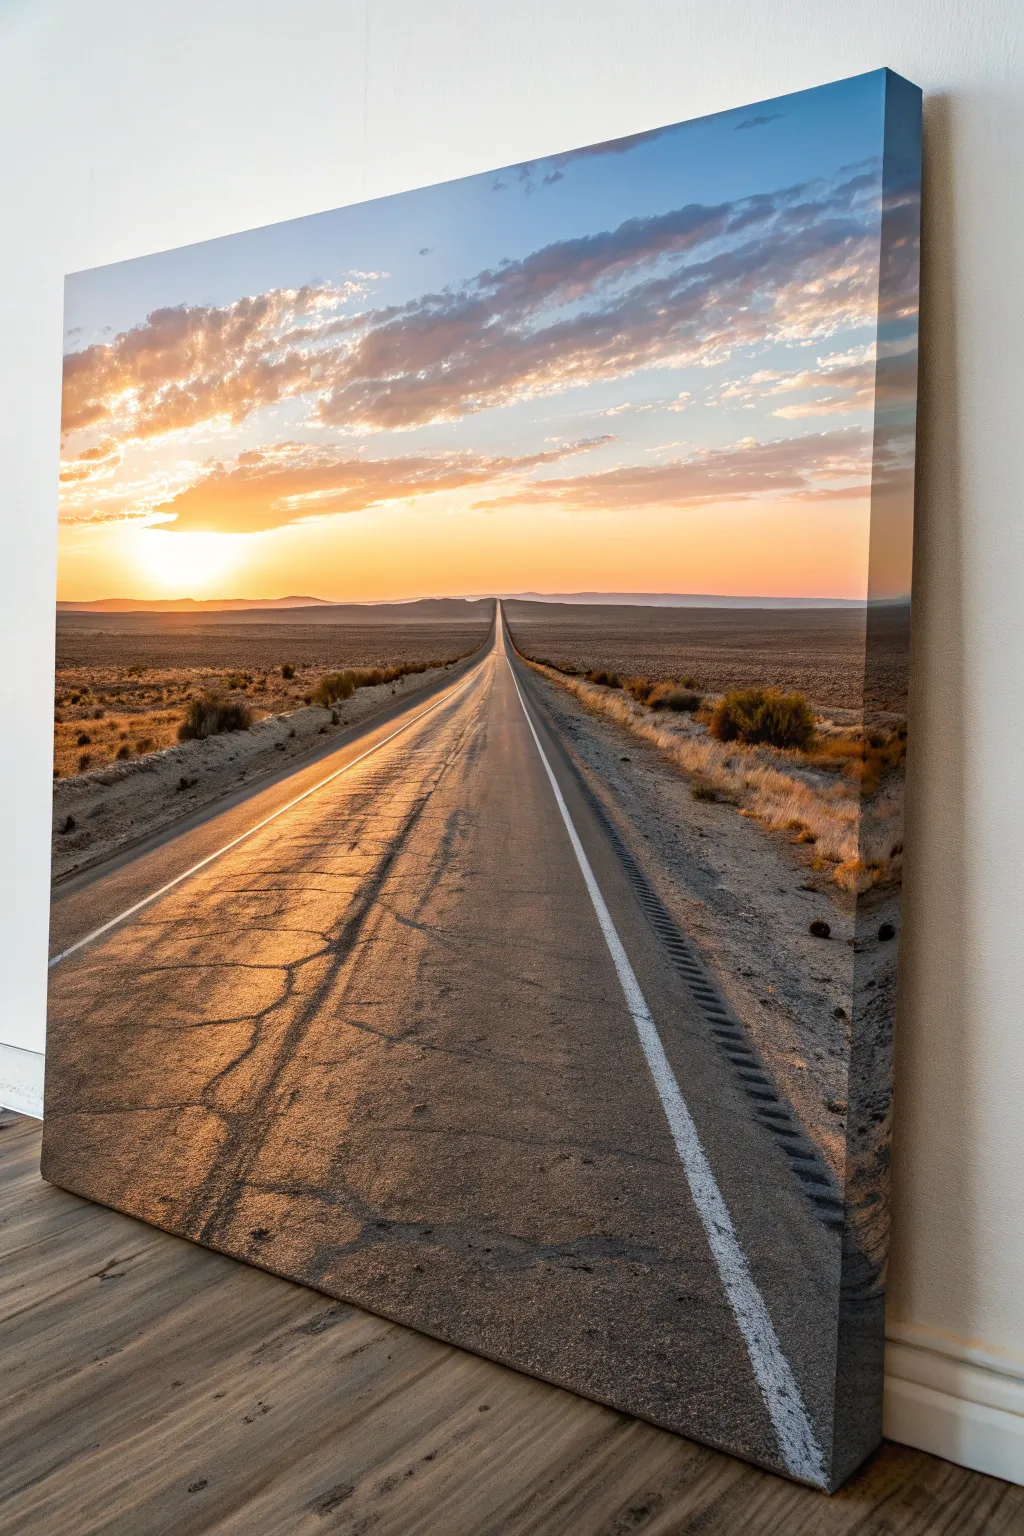
Capture the solitary freedom of the open road with this stunning desert sunset landscape. This project focuses on mastering long, dramatic shadows and the warm, blended gradients of a setting sun to create a piece that feels both peaceful and adventurous.
Detailed Instructions
Materials
- Large rectangular canvas (24″x36″ or larger recommended)
- Acrylic paints (Titanium White, Mars Black, Burnt Umber, Yellow Ochre, Cadmium Orange, Cadmium Yellow, Ultramarine Blue, Phthalo Blue)
- Large flat brushes (2-3 inch) for blending
- Medium filbert brushes
- Small round detail brushes
- Long liner brush or rigger brush
- Low-tack masking tape or painters tape
- Mixing palette
- Palette knife
- Cup of water and paper towels
- Slow-drying medium or retarder (optional)
Step 1: Setting the Scene: Sky & Horizon
-
Establish the Horizon:
Begin by placing a strip of masking tape horizontally across the canvas, slightly below the halfway point. This will protect your ground area while you paint the sky. Ensure it’s perfectly level to anchor the perspective. -
Paint the Upper Sky:
Mix Ultramarine Blue with a touch of White and a tiny bit of Phthalo Blue. Apply this to the top right corner of the canvas, sweeping diagonally downwards. Keep this layer wet and workable. -
Transition to Clouds:
While the blue is wet, mix a soft grey-purple using White, a speck of Burnt Umber, and Ultramarine. Paint the diagonal band of clouds below the clear blue sky, using a dry brush to scumble the edges where they meet the blue for a fluffy texture. -
Create the Sunset Glow:
Moving downward toward the tape, introduce Cadmium Orange and Cadmium Yellow. Blend the yellow directly above the tape line on the left side to represent the sun’s location. Gradient this into orange and then the purple-grey clouds as you move upward and right. -
Add Sun Highlights:
Load a filbert brush with pure Titanium White and a tiny dot of yellow. Paint the intense brightness of the sun just above the horizon line on the left. Soften the edges immediately with a clean, dry brush to create a glowing haze effect rather than a solid white ball. -
Define the Distant Mountains:
Once the sky is tacky or dry, remove the tape. Mix a dark purple-grey (Ultramarine + Burnt Umber + White). Paint a low range of mountains along the horizon line. Make the mountains near the sun lighter and hazier (atmospheric perspective) and darker as they move away to the right.
Step 2: Paving the Way: The Road
-
Draft the Perspective:
Using a ruler or straight edge, lightly sketch the road. Start from the bottom corners (or slightly inward) and have both lines meet at a single vanishing point directly on the horizon line in the center. -
Base Coat the Asphalt:
Mix a base road color using Mars Black, White, and a touch of Burnt Umber. Paint the entire road triangle. Make the paint darker near the bottom of the canvas and gradually lighter/greyer as it recedes toward the horizon. -
Paint the Desert Scrub:
For the terrain on either side of the road, create a textured mix of Yellow Ochre, Burnt Umber, and White. Use a dabbing or stippling motion to fill the ground areas, simulating dry dirt and sand. Darken the mixture slightly for the foreground corners. -
Add Bushes and Vegetation:
Use a small round brush with dark Burnt Umber and Black to dab in small silhouette shapes of desert bushes. Place larger bushes in the foreground and making them microscopic dots near the horizon.
Straight Line Struggles?
If you can’t paint a straight line for the road edges or horizon, simply use masking tape. Press the edges down firmly to prevent bleed-under, paint, and peel while still slightly damp.
Step 3: Details & Atmosphere
-
Create the Long Shadows:
This is crucial for the time of day. Mix a dark, transparent glaze of Black and Umber. Paint long, horizontal shadows stretching from the bushes across the ground to the right. The shadows should be longer than the objects casting them. -
Rough Up the Road:
The road shouldn’t look new. I sometimes use a palette knife or a dry rough brush to drag lighter grey and dusty orange tones horizontally across the road surface to create the look of cracks and texture catching the low light. -
Paint the Road Markings:
Using a liner brush or tape, paint the continuous white line on the right shoulder and the double yellow line (using Ochre/Orange mix) in the center. Remember, these lines must get thinner and closer together as they vanish into the distance. -
Add the Rumble Strip:
On the right shoulder, paint small, rhythmic dark marks along the asphalt edge to suggest the rumble strips. These add a surprising amount of realism. -
Golden Highlights:
Mix a glaze of Cadmium Orange and water (or glazing medium). Lightly wash this over the left side of the road and the tops of the desert bushes to show the warm sunlight hitting the surfaces. -
Final Cracks and Details:
With a rigger brush and thinned black paint, wiggle in fine, lightning-bolt shaped cracks in the foreground asphalt. Do this sparingly to avoid cluttering the image.
Pro Tip: Atmospheric Haze
To make the road truly look like it goes on forever, apply a very thin wash of the sky color over the most distant point where the road meets the mountains to push it back visually.
Step back and admire the depth and warmth of your endless highway landscape
Storm Front Over a Dark Ocean
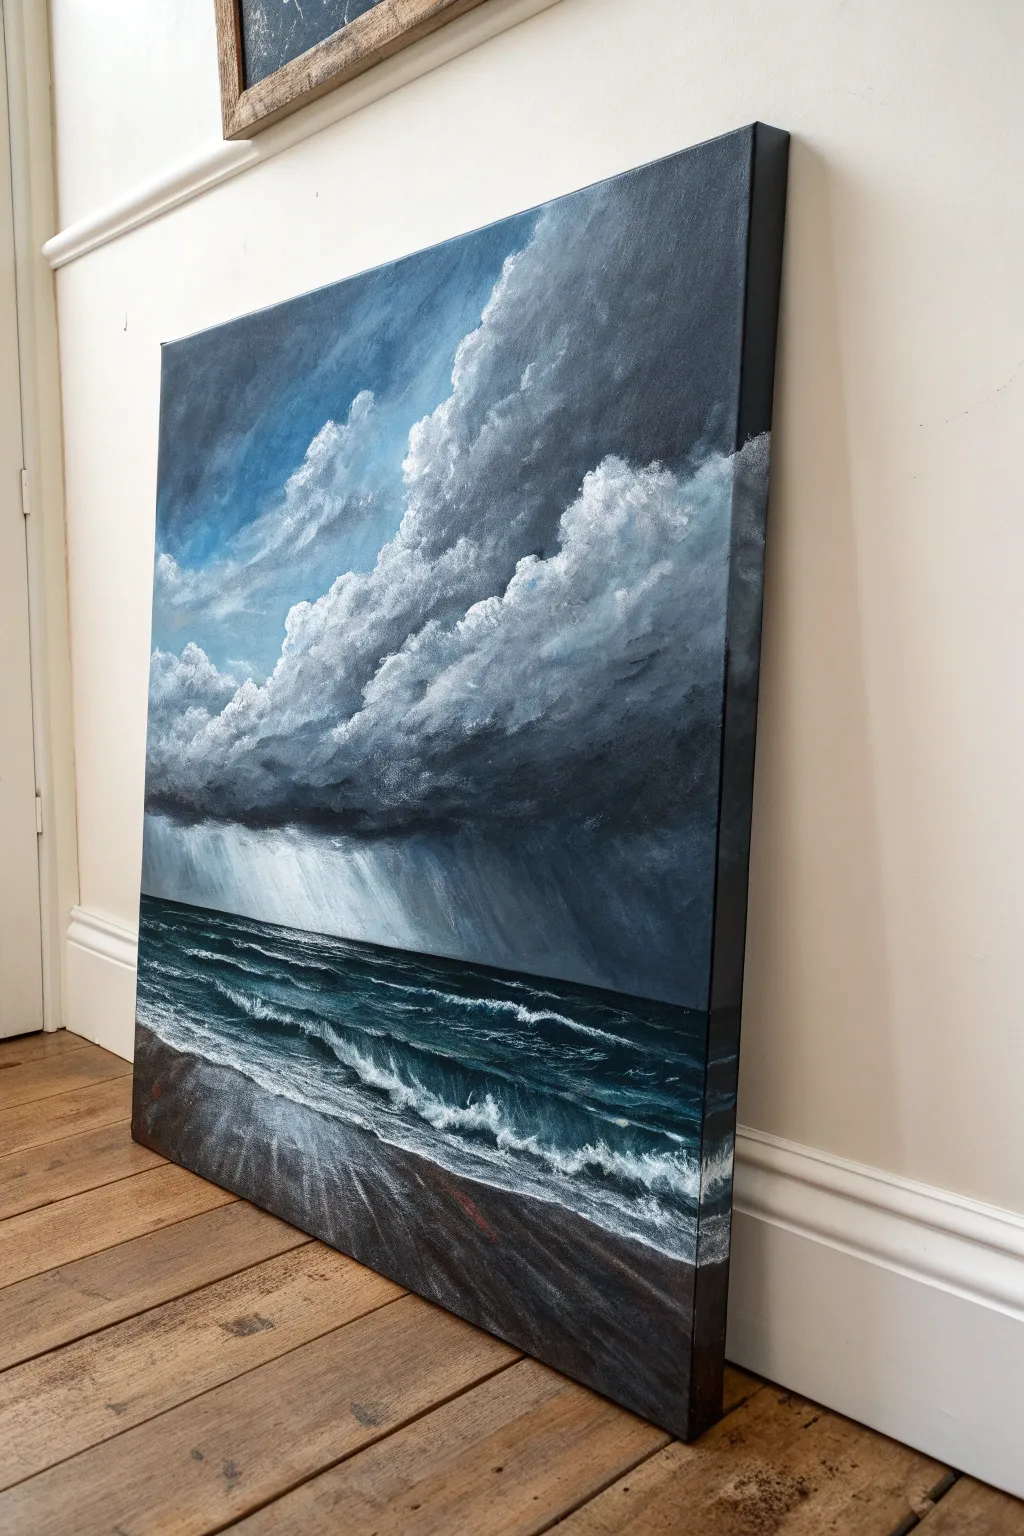
Capture the raw power of nature with this dramatic seascape, featuring heavy, ominous clouds rolling over a turbulent dark ocean. The high-contrast palette of charcoal grays, deep teals, and stark whites creates a moody, masculine atmosphere perfect for a statement piece.
Step-by-Step Tutorial
Materials
- Large stretched canvas (at least 18×24 inches)
- Acrylic paints: Mars Black, Titanium White, Phthalo Blue, Burnt Umber, Payne’s Gray
- Large flat brush (1-2 inch)
- Medium filbert brush
- Small round brush for details
- Fan brush
- Palette knife
- Water container and paper towels
Step 1: Setting the Composition and Sky
-
Prime the horizon:
Start by drawing a straight horizon line about one-third of the way up from the bottom of the canvas. It doesn’t need to be perfectly sharp yet, but it anchors the perspective. -
Base coat the sky:
Mix a medium blue-grey using Phthalo Blue, a touch of black, and plenty of white. Apply this to the upper left corner, blending it downwards. This will be the patch of clear sky struggling to peek through. -
Block in dark masses:
Using your large flat brush, mix Payne’s Gray with Mars Black. Roughly block in the shape of the massive storm cloud dominating the right side and center. Use sweeping, diagonal strokes to imply movement. -
Create cloud volume:
Switch to a filbert brush. Mix a lighter grey and start scumbing (scrubbing in a circular motion) along the top edges of your dark cloud mass. This creates the billowing, fluffy tops of the cumulonimbus structure. -
Deepen the shadows:
While the paint is still tacky, blend pure black into the underside of the clouds. This heaviness is crucial for that threatening storm look. -
Add rain sheets:
Mix a very watery, translucent light grey. Using a large brush, drag paint vertically downwards from the dark cloud base towards the horizon line. These streaks represent the distant rain bands or virga.
Step 2: The Turbulent Sea
-
Paint the deep water:
For the ocean, mix Phthalo Blue with Mars Black and a tiny bit of Burnt Umber to dull the saturation. Paint the area below the horizon line, getting progressively lighter as you move toward the foreground. -
Establish wave forms:
Using a palette knife or flat brush, add horizontal streaks of a slightly lighter teal (add a drop of white to your sea mix). These streaks define the tops of the rolling swells. -
Create the shoreline:
Paint the bottom wedge of the canvas with a mix of Burnt Umber and Black. I like to angle this section slightly to create a dynamic perspective, showing the sweep of the wet sand. -
Add whitecaps:
Load a fan brush or an old, splayed bristle brush with pure Titanium White. Tap it along the crests of your waves to create crashing foam. -
Connect sea and sand:
Where the water meets the sand, brush white paint horizontally, blending it slightly into the dark sand color to show the thinning, foamy wash of the tide.
Cloud Power
For fluffier clouds, use a dry brush with very little paint. Use a circular scrubbing motion to blend the white tops into the grey body, keeping edges soft.
Step 3: Atmosphere and Details
-
Highlight cloud edges:
Return to the sky with pure Titanium White on a small round brush. sharply highlight the very top edges of the highest clouds where the light hits them, creating high contrast against the blue sky. -
Refine the rain:
If your rain bands dried too dark, dry-brush a little white over them. Keep the strokes strictly vertical/diagonal to match the wind direction. -
Enhance wave movement:
Add small, curved strokes of light teal in the troughs of the waves to show the churn of the water. -
Detail the foreground foam:
Use a rigger brush or small round brush to paint delicate, lacy patterns in the foreground foam. This water should look chaotic and rushing. -
Paint the sides:
Don’t forget to extend your image around the edges of the canvas for a gallery-quality finish, especially if you won’t trigger frame it. -
Final glaze:
Once fully dry, you can apply a gloss varnish to the water area only to make it look wet, while leaving the clouds matte for a nice textural contrast.
Muddy Waters?
If your ocean looks too green or muddy, you likely added yellow or orange by mistake. Stick to cool blues, black, and white. Wait for layers to dry before highlighting.
Step back and admire the moody intensity of your storm front masterpiece
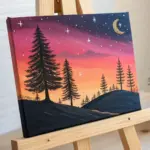
Campfire Glow in a Pine Silhouette Scene
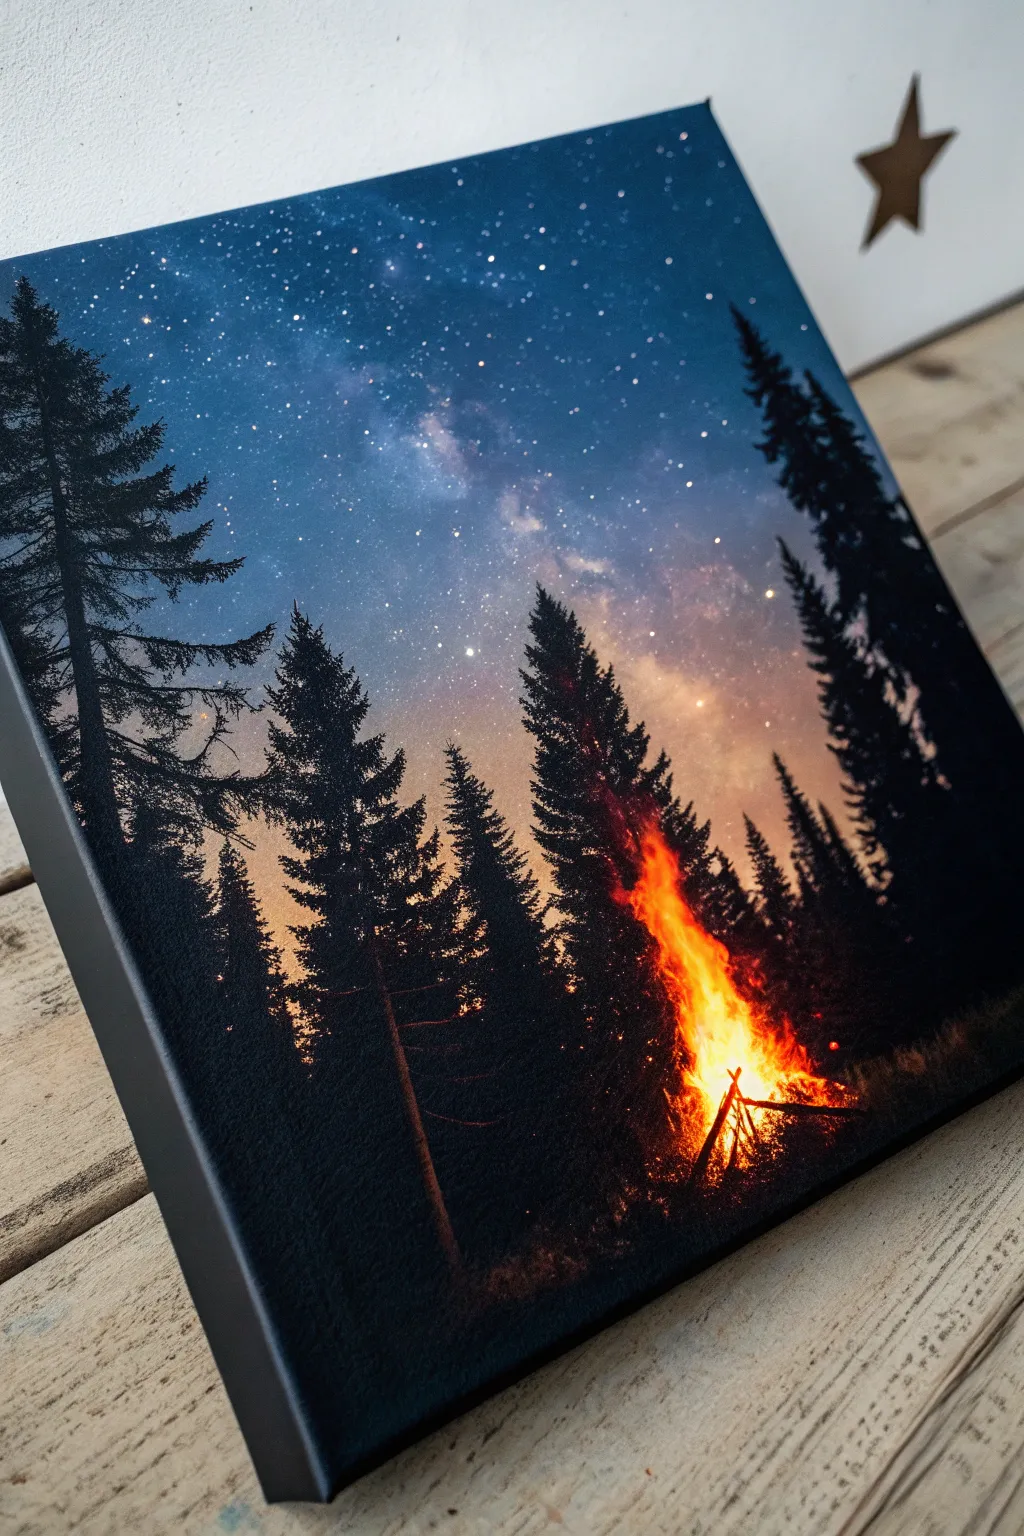
This striking canvas combines the serene beauty of a starry galaxy sky with the warm, vibrant energy of a crackling campfire. It is a fantastic beginner-to-intermediate project that teaches blending techniques and silhouette work.
Step-by-Step Guide
Materials
- Stretched canvas (12×16 inch or similar)
- Acrylic paints: Black, Phthalo Blue, Ultramarine Blue, Dioxazine Purple, Titanium White, Cadmium Orange, Cadmium Red, Cadmium Yellow
- Paintbrushes: 1-inch flat brush, medium filbert brush, fan brush (optional), fine liner brush
- Old toothbrush (for the stars)
- Palette or paper plate
- Cup of water and paper towels
- Hairdryer (optional, to speed up drying)
Step 1: Painting the Galaxy Sky
-
Prime the background:
Start by mixing a dark navy blue using Ultramarine Blue and a touch of Black. Cover the top distinct corners of the canvas with this dark shade, brushing diagonally towards the center. -
Blend the mid-tones:
Without cleaning your brush, pick up Phthalo Blue and Dioxazine Purple. Blend these into the wet dark edges, moving inward. Keep your brush strokes somewhat diagonal and smooth. -
Create the Milky Way glow:
In the center diagonal band where it’s still white canvas, apply a mix of Titanium White with just a tiny speck of blue. While the surrounding paint is still wet, gently blend the edges where the light central band meets the dark blue-purple sky to create a soft, hazy transition. -
Add detail clouds:
Load a filbert brush with a slightly darker blue-grey mix. Dab gentle, cloudy shapes into the bright Milky Way band to give it depth and texture. -
Splatter the stars:
Once the sky is tacky or dry, water down some Titanium White paint until it is inky. Dip an old toothbrush into it, point the bristles at the canvas, and flick the bristles with your thumb to create a spray of stars. Focus heavier clusters near the Milky Way band.
Fixing “Muddy” Flames
If your fire colors turn brown, stop! Let the red layer dry completely before dabbing on the yellow. Wet-on-wet blending can overmix, but layering dry paint keeps colors bright.
Step 2: Creating the Forest Silhouette
-
Outline the tree placement:
Using pure Black paint and a small round brush, sketch faint vertical lines where your trees will stand. Place taller trees on the outer edges and leave a slightly open gap in the lower right center for your fire. -
Paint the tree trunks:
Thicken slightly the vertical lines you just made. Remember that pine trees taper, so keep the very tops needle-thin and the bases thicker. -
Add pine branches (fan brush method):
If you have a fan brush, load it with Black paint. Turn it vertically and tap gently side-to-side down the trunk, starting narrow at the top and getting wider at the bottom. -
Add pine branches (small brush method):
Alternatively, use a small flat brush. Use a dabbing motion to create jagged, downward-sloping branches. Don’t make them too perfect; nature is random. -
Fill the forest floor:
Use Black to fill in the bottom 2 inches of the canvas solidly, creating uneven ground. Dab the top edge of this black area to simulate grass and uneven terrain.
Step 3: Igniting the Campfire
-
Lay the fire base:
In the gap you left between the trees, use your small brush to paint a few black logs leaning against each other in a pyramid shape. -
Start the glow:
Mix Cadmium Red and a little Orange. Using a tapping or stippling motion with an old, rough brush, dab paint at the base of the logs and slightly upward. Keep this layer semi-transparent. -
Intensify the heat:
Mix Cadmium Orange and Cadmium Yellow. Dab this lighter color over roughly 70% of the red area, focusing more toward the center of the fire to simulate intense heat. -
Add the brightest flames:
Using almost pure Yellow with a tiny touch of White, create the core of the fire at the very bottom center. Drag a few quick, wispy strokes upward to create licking flames. -
Refine the logs:
Take a fine liner brush with thin black paint and re-define the silhouette of the logs in front of the flames so they look charred and solid against the light. -
Highlight the trees:
This step adds realism. Mix a watered-down Orange. Lightly glaze the sides of the black trees that face the fire. This subtle orange rim light makes the fire look like it’s truly casting light on the forest. -
Final sparks:
Use the liner brush to dot tiny specks of yellow and orange floating upward into the dark trees above the fire to mimic rising embers.
Level Up: Texture
Mix a small pinch of sand or modeling paste into your black paint for the forest floor. This adds a gritty, realistic texture that catches the light differently than the flat sky.
Now step back and admire how the cool galaxy sky creates a perfect contrast for your warm, cozy campfire
Antlers With a Geometric Halo
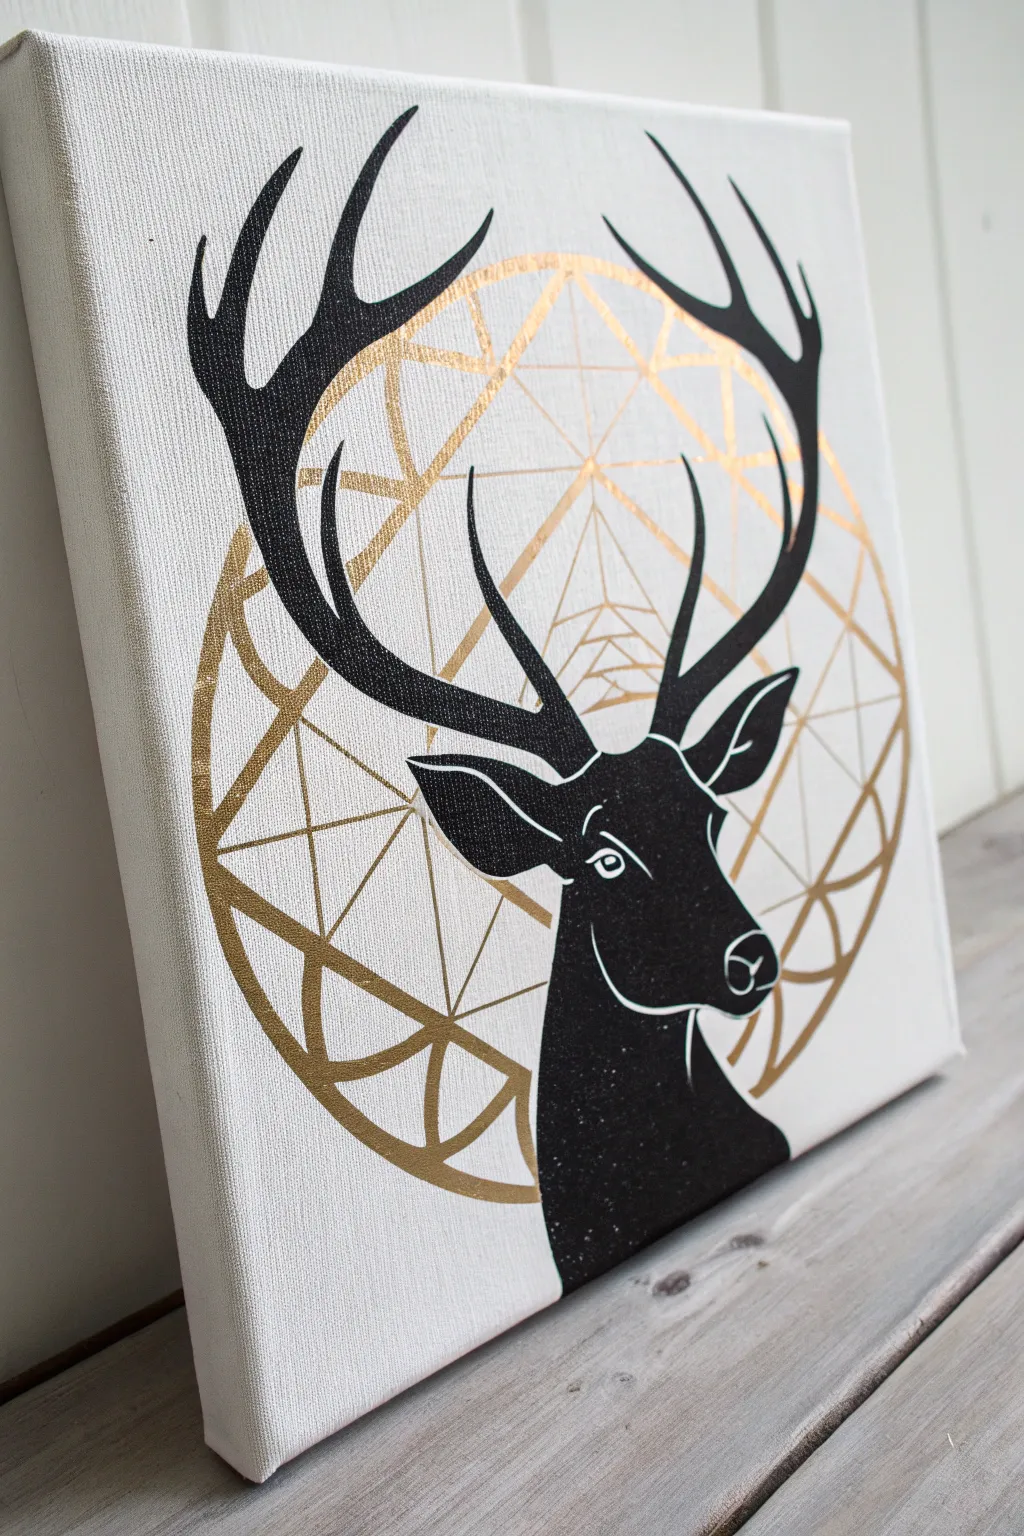
This striking piece combines organic silhouette art with sharp, modern geometric lines. By pairing a deep matte black stag profile against a metallic gold geometric halo, you create a sophisticated contrast that looks incredibly high-end but is simple to achieve.
Detailed Instructions
Materials
- Square stretched canvas (12×12 or similar)
- Gold metallic acrylic paint or paint pen
- Matte black acrylic paint
- Carbon transfer paper
- Pencil
- Ruler or straight edge
- Small round detail brushes (sizes 0 and 2)
- Printout of a stag stencil or reference image
- Large compass (optional, for the circle)
- Painter’s tape
Step 1: Planning the Geometry
-
Map the center:
Begin by finding the exact center of your plain white canvas. Use a ruler to lightly mark a small cross in pencil where the vertical and horizontal center lines meet. -
Draw the main circle:
Using a large compass or exploring my favorite hack—tracing a large bowl or dinner plate—draw a perfect circle centered on your canvas. This will be the boundary for your geometric design. -
Sketch the inner geometry:
Inside the circle, create the geometric pattern. Start by drawing a large ‘X’ through the circle, then use your ruler to create triangles and intersecting lines. Don’t worry about being mathematically perfect; aiming for symmetry is enough. -
Refine the lines:
Go over your geometric sketch with a ruler to ensure every line is crisp and straight. Erase any stray marks or smudges outside the main circle.
Uneven gold lines?
If your brush is shaky, switch to a Gold Metallic Sharpie or oil-based paint pen. They offer much better control than a brush for perfectly straight geometric lines.
Step 2: Painting the Gold Halo
-
Outline in gold:
Shake your gold paint pen or load a fine liner brush with metallic gold acrylic. carefully trace over all your pencil lines for the geometric background. -
Thicken selected lines:
To give the halo depth, go back over the outer circle and the major intersecting lines to make them slightly thicker than the smaller interior details. -
Let it shine:
Allow the gold layer to dry completely. Metallic paints often need a little extra time to set so they don’t smear when we add the black layer.
Reverse Stencil
Instead of freehand painting the stag, cut your paper printout into a stencil. Tape it down and sponge black paint lightly for a crisp, mist-free silhouette.
Step 3: Creating the Stag
-
Transfer the silhouette:
Place your stag printout over the canvas, positioning it so the antlers overlap the gold geometry roughly centered. Slide a sheet of carbon transfer paper underneath the printout. -
Trace the design:
Firmly trace the outline of the deer, including the antlers, ears, and neck curve, using a pencil or ballpoint pen. Don’t forget the inner details like the eye and nose line. -
Outline with black:
Using your smallest detail brush and slightly thinned matte black paint, carefully paint the outline of the stag. Creating a barrier first helps prevent mistakes when filling it in. -
Fill in the solid areas:
Switch to a slightly larger brush (size 2 or 4) to fill in the body and antlers with solid black. Use smooth strokes to avoid texture buildup. -
Second coat:
Once the first layer is dry to the touch, apply a second coat of black. This ensures the silhouette is opaque and covers any gold lines that might show through from the background.
Step 4: Final Details
-
Add white highlights:
With a clean detail brush, define the separate features within the black silhouette. Paint a fine white line for the eye, the muzzle curve, and the inner ear details. -
Clean up edges:
Inspect the point where the black antlers cross the gold lines. If you need to sharpen the intersection, use a tiny bit of black paint to cover any gold that bled over. -
Erase guidelines:
Once the canvas is 100% dry (give it a few hours), gently erase any visible pencil marks from your initial sketch that weren’t covered by paint.
Hang this modern piece in an office or entryway for an instant touch of sophisticated wilderness style
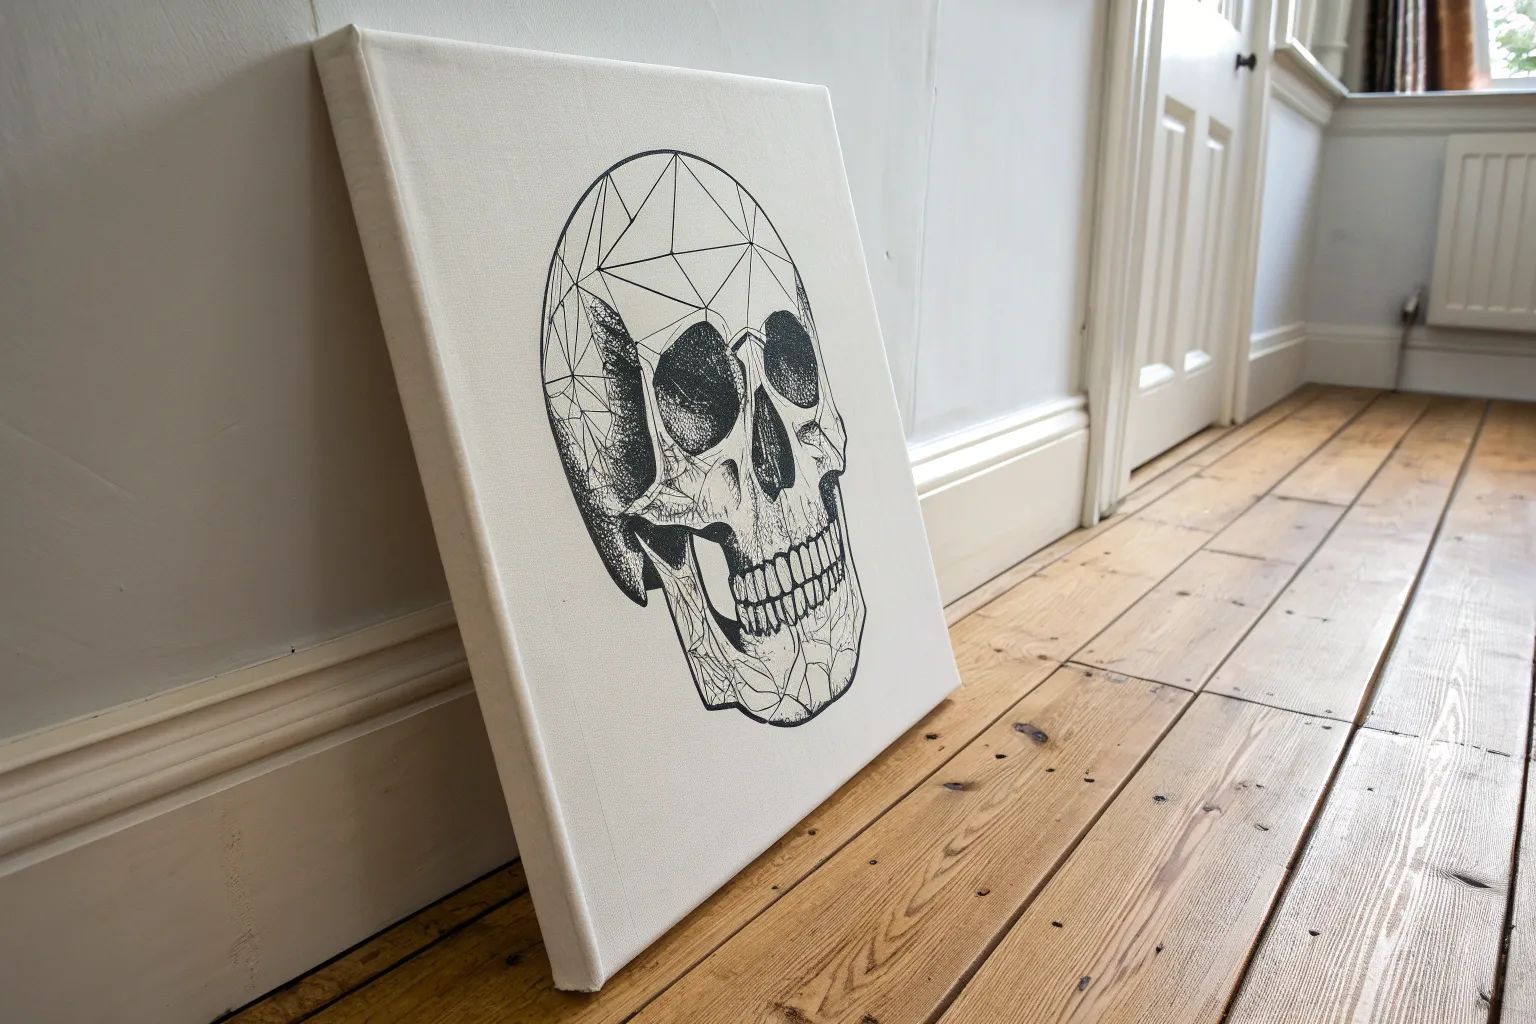
Optical Illusion Skull Built From Shapes
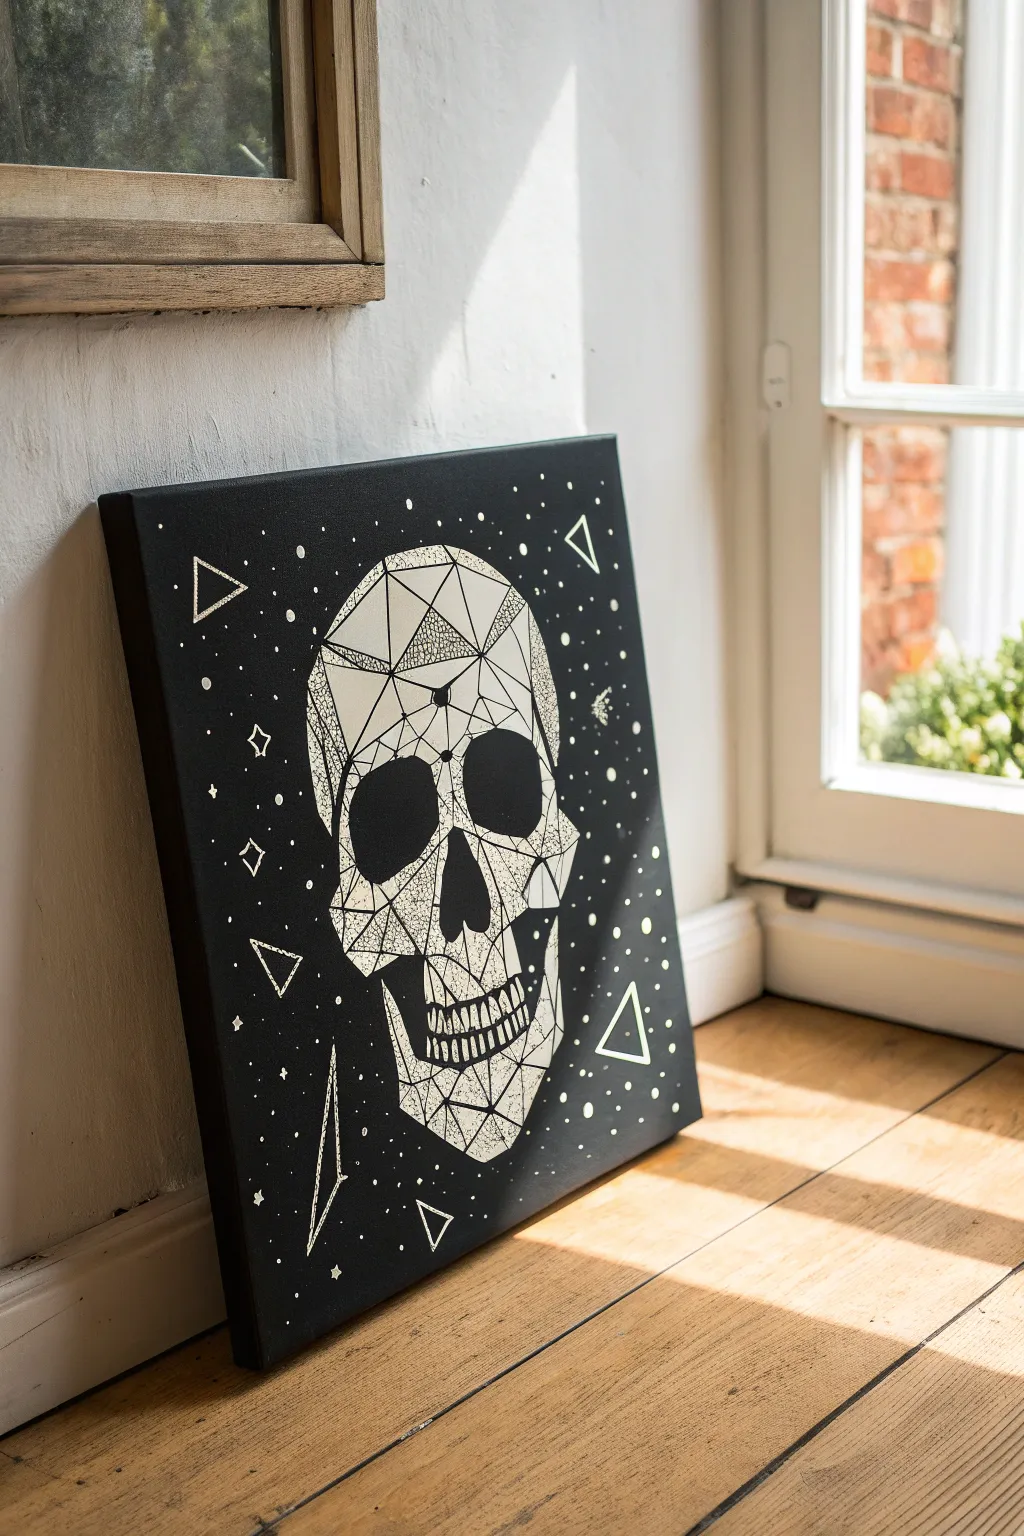
Bring an edgy, modern aesthetic to your space with this striking monochromatic piece. By breaking a complex skull shape into simple geometric facets and adding celestial details, you’ll create an artwork that is both sophisticated and undeniably cool.
Step-by-Step Guide
Materials
- Square stretched canvas (16×16 or 20×20 inches recommended)
- Black acrylic paint (heavy body matte finish is best)
- Wide flat paintbrush (approx. 2 inches)
- White paint marker (fine point, 0.7mm – 1mm)
- White paint marker (medium point, 2mm – 3mm for larger fill areas)
- White acrylic paint (optional, for touch-ups)
- Pencil and eraser
- Ruler or straight edge
- Transfer paper or graphite paper (white or yellow)
- Reference image of a low-poly skull
Step 1: Preparation and Base Coat
-
Prime the canvas:
Begin by coating your entire canvas with matte black acrylic paint. Use the wide flat brush and apply long, even strokes to ensure full coverage. Don’t forget to paint the sides of the canvas for a clean, professional finish. -
Double down on darkness:
Once the first coat is completely dry (about 20-30 minutes), apply a second coat. I like to paint these strokes perpendicular to the first layer to eliminate any brush marks and achieve a solid, velvety black background. -
Prepare your template:
While the paint cures, find or create a ‘low-poly skull’ line art design. You can print one to size or draw it on a separate sheet of paper first to get the proportions right before touching the canvas.
Straight Edge Secret
Wipe the edge of your ruler with a paper towel after every few lines. Wet paint marker ink tends to collect on the plastic edge and will smudge across your black canvas if you act too quickly.
Step 2: Transfer and Outlining
-
Position the design:
Place your transfer paper (chalk side down) onto the center of the dry black canvas, then tape your skull design securely on top of it so it doesn’t shift. -
Trace the geometry:
Using a pencil or ballpoint pen, firming trace over every line of your geometric skull. Use a ruler for straight lines to maintain that sharp, digital look. -
Reveal the guide:
Gently lift the paper to check your transfer. You should see faint white or yellow lines on the black surface. If any lines are missing, lay it back down and re-trace those specific spots. -
Initial inking:
Shake your fine-point white paint marker well. Carefully go over all the transferred lines, using the ruler again to keep edges crisp. This skeleton framework is crucial, so take your time here.
Ink Flow Fix
If your paint marker starts streaking on the canvas texture, press the nib down on a scrap piece of cardboard to re-saturate it. Never press down hard directly on the canvas or it might puddle.
Step 3: Filling and Detailing
-
Map out texture zones:
Decide which polygons will be solid white, which will have texture, and which will remain black. Creating a balance is key; I usually aim for about 30% solid white, 20% textured, and 50% open black space within the skull. -
Apply solid fills:
Use the medium-point marker to fill in the designated solid white shapes. You might need two layers to make the white truly opaque against the black background. -
Create stipple texture:
For the textured sections, use the fine-point marker to create stippling. Tap the pen repeatedly to create clusters of small dots. Make them dense near the edges of a polygon and sparse toward the center to create a gradient effect. -
Add hatching details:
In other sections, create visual interest with hatching (closely spaced parallel lines) or cross-hatching. Use your ruler to keep these internal patterns geometric and tidy. -
Define the teeth:
Pay special attention to the teeth area. Keep the lines vertical and slightly jagged. Ensure there is clear separation between the upper and lower jaw so the skull doesn’t look like it’s melting. -
Refine the eyes and nose:
The eye sockets and nasal cavity should remain largely solid black to create depth. You can add a subtle white geometric outline inside the rim to give the bone some thickness.
Step 4: Celestial Elements
-
Add floating geometry:
Around the skull, draw three or four medium-sized triangles using your ruler. Double the lines on one side of each triangle to give them a slight 3D appearance. -
Scatter the stars:
Place small dots randomly throughout the background. Vary the size slightly by pressing harder for some dots and lighter for others to create depth in your ‘space’ background. -
Draw highlight stars:
Select 5-7 spots to turn into four-pointed stars or small diamonds. These larger celestial bodies help break up the uniformity of the dots. -
Final inspection:
Step back five feet to view the piece. If the white ink looks thin in places, go over those lines one last time for maximum contrast.
Hang your new monochromatic masterpiece in a well-lit spot to let the high-contrast design really pop
Split-Canvas Diptych: Day vs Night Landscape
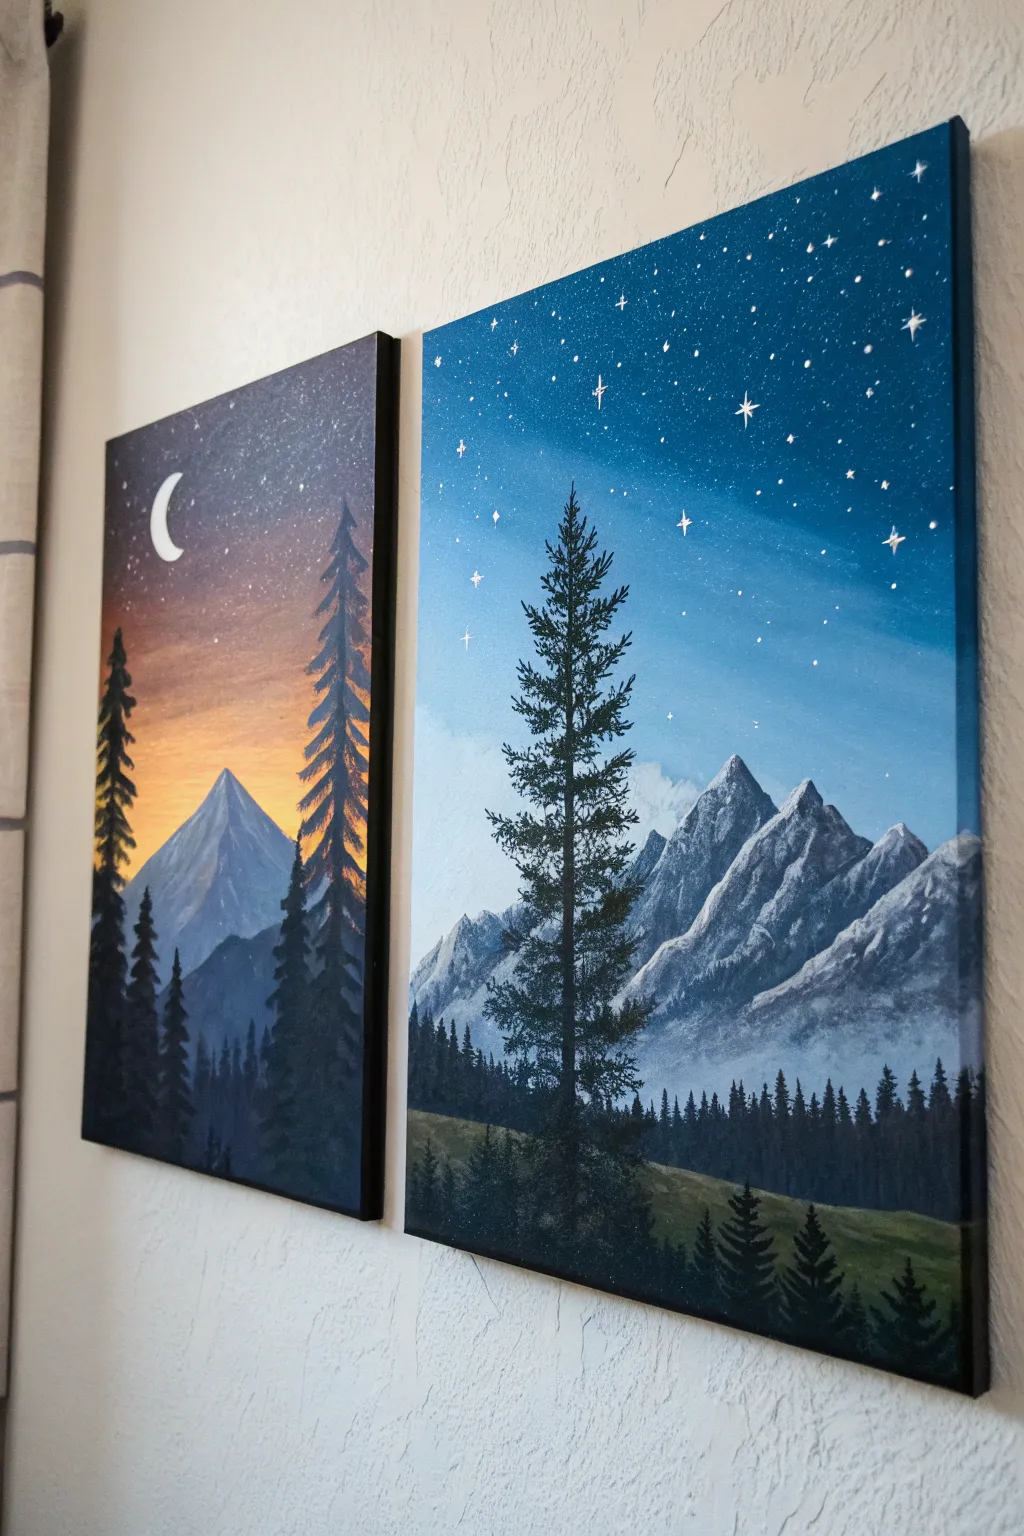
Capture the breathtaking contrast between dusk and night with this stunning two-canvas set. By splitting a mountain landscape across two panels, you’ll create a cohesive yet dynamic piece that blends fiery sunset hues with cool, starry blues.
Step-by-Step
Materials
- Two vertical stretched canvases (e.g., 12×24 or 16×20 inches)
- Acrylic paints: Titanium White, Mars Black, Prussian Blue, Phthalo Blue, Cadmium Orange, Cadmium Yellow, Burnt Umber
- Set of brushes: 1-inch flat wash, medium filbert, lush fan brush, and a fine liner brush
- Palette or paper plate
- Cup of water and paper towels
- Old toothbrush (optional for stars)
Step 1: Painting the Sunset Canvas (Left Panel)
-
Create the Gradient Sky:
Start at the top of the canvas with a mix of Prussian Blue and a touch of black for deep twilight. As you work your way down, blend in pure blue, then transition into orange and yellow near the horizon line (about one-third up from the bottom). Use a wet clean brush to blend the transitions smoothly. -
Block in the Mountain:
Once the sky is dry to the touch, mix a grey-blue shade using white, blue, and a tiny dot of black. Paint a sharp triangular peak rising from the horizon line. Add lighter highlights to the right side of the peak to suggest the last light hitting it. -
Paint the Distant Trees:
Using a darker blue-grey, paint a lower range of mountains or hills in front of the main peak. While still wet, dab vertical lines with a small flat brush to suggest a dense, distant forest line along the base. -
Add Foreground Silhouettes:
Load a fan brush or flat brush with almost pure black. Paint tall, narrow pine trees on the far left and right sides. Use the corner of the brush to tap in branches that start narrow at the top and widen toward the bottom. -
Detail the Celestial Elements:
With a fine liner brush and pure white paint, carefully draw a crescent moon in the upper left corner. Add tiny dots for stars in the dark blue section, keeping them sparse.
Starry Night Trick
When spattering stars, test the spray on a piece of cardboard first. Large blobs can ruin the effect; you want a fine mist for distant galaxies.
Step 2: Painting the Night Canvas (Right Panel)
-
Establish the Night Sky:
Cover the top two-thirds of the second canvas with a gradient starting from deep navy blue at the top corners fading to a lighter, cool blue near the middle. I like to keep the center slightly lighter to create a glowing effect behind the trees. -
Form the Snowy Peaks:
Paint a range of jagged mountains using a mid-tone grey. Unlike the left canvas, these should look more rugged. Use a palette knife or flat brush to scrape thick white paint down the right sides of the peaks to create the look of snow and ice. -
Create Atmospheric Mist:
Mix a very watery white or light blue glaze. Lightly brush this over the base of the mountains to create a foggy, ethereal separation between the peaks and the forest floor. -
Paint the Deep Forest:
Mix black with a little dark green. Using a fan brush turned vertically, tap in a dense row of pine trees along the bottom third of the canvas. Vary the heights to make the forest look natural. -
Add the Hero Tree:
Paint one large, prominent pine tree slightly off-center using the black-green mix. Start with a thin line for the trunk, then layer horizontal dabs for branches, leaving gaps so the sky shows through. -
Sprinkle the Stars:
Dilute white paint with water until it’s inky. Dip a toothbrush or stiff brush into it and flick the bristles to spray tiny stars across the upper sky. Use a liner brush to paint a few larger, four-pointed ‘twinkle’ stars manually.
Add Glow
Mix glow-in-the-dark medium into your white star paint. Use it for the moon and largest stars effectively making the artwork interact with the room’s lighting.
Step 3: Finishing Touches
-
Refine Edges:
Paint the sides of both canvases black (or continue the image around the edge) for a polished, frameless look. -
Final Consistency Check:
Place the canvases side-by-side. Make sure the horizon lines or mountain bases roughly align visually, even if the scenes are different, to maintain the diptych feel.
Hang your masterpieces a few inches apart to let the negative space enhance the connection between day and night


Have a question or want to share your own experience? I'd love to hear from you in the comments below!