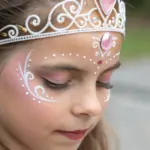
When I’m planning Halloween face paint, I always start with designs that read instantly from across the room, then I layer in details that make people lean in for a closer look. Here are my favorite face paint Halloween ideas, starting with the classics and sliding into the more artsy, unexpected twists.
Classic Skeleton Skull Face
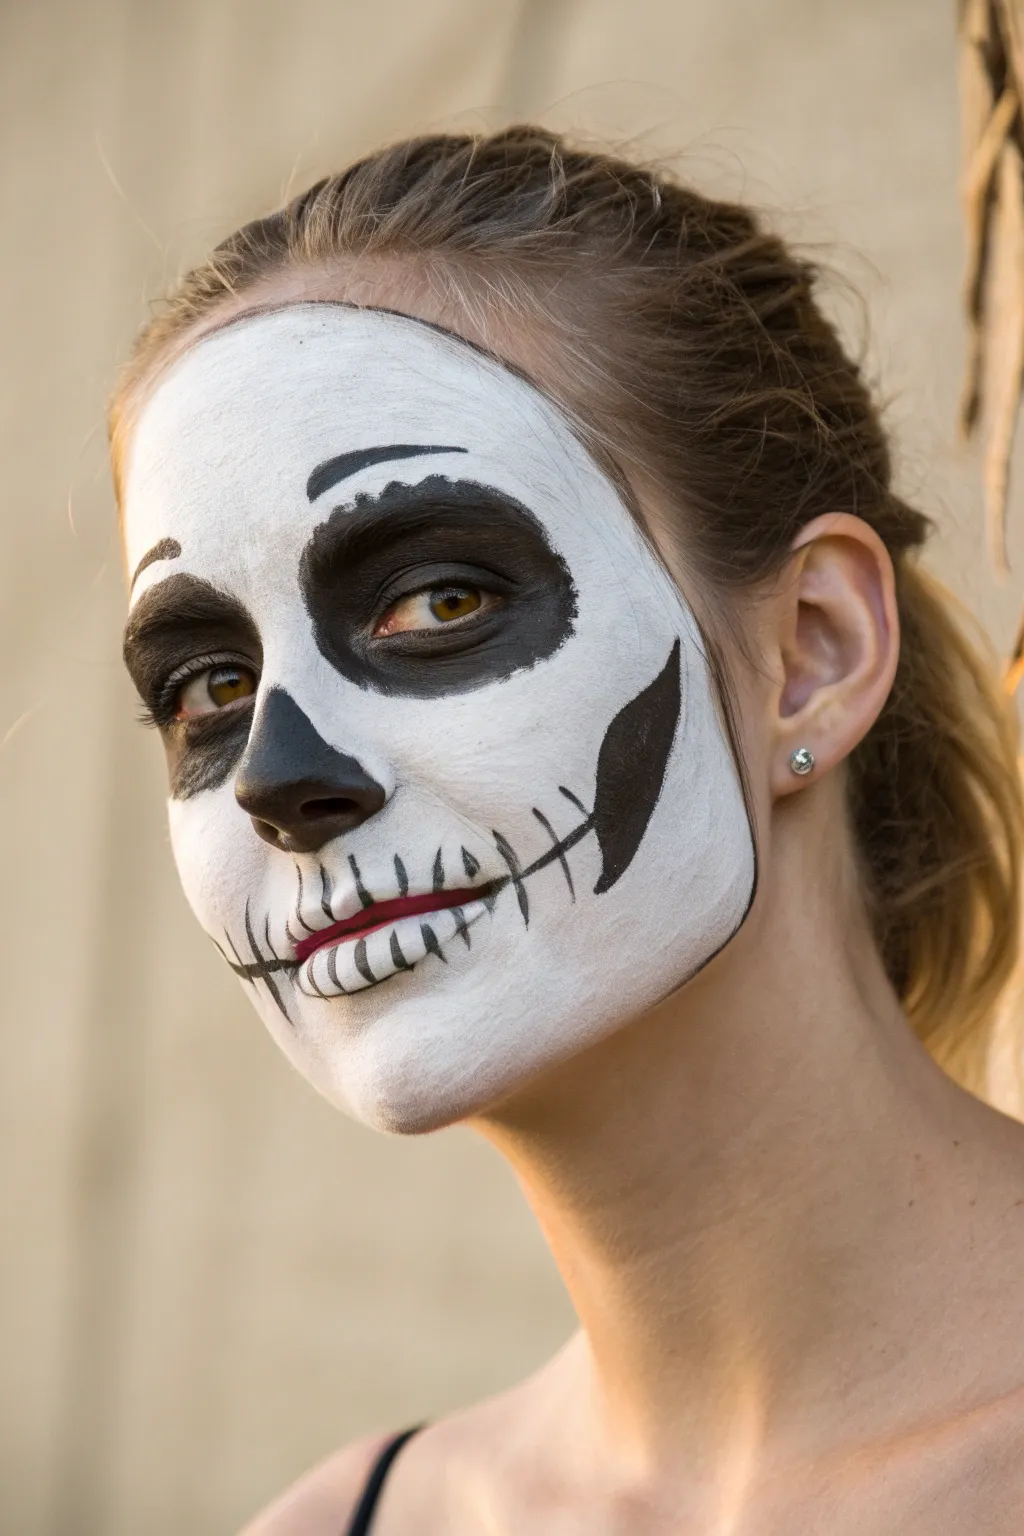
Achieve a striking yet sophisticated look with this classic skeleton face paint design. By combining stark white coverage with carefully placed black shading, you can create a haunting illusion of hollowed bone structure that pairs perfectly with any dark outfit.
Detailed Instructions
Materials
- White cream-based face paint or water-activated cake makeup
- Black cream-based face paint or water-activated cake makeup
- Flat foundation brush or makeup sponge
- Medium round brush
- Fine detail brush (liner brush)
- Black eyeliner pencil (optional, for sketching)
- Setting powder (translucent)
- Small eyeshadow brush (for shading)
Step 1: Base Layer Application
-
Prep the canvas:
Begin with a clean, dry face. Tie your hair back securely to prevent any stray strands from getting caught in the paint. -
Apply the white base:
Using a damp sponge or flat foundation brush, apply the white face paint all over your face. Start from the center and work your way out. -
Define the boundaries:
Stop the white paint right at your hairline and just under the jawline. Leave the neck and ears bare, as this design focuses solely on the facial structure. -
Build opacity:
Apply a second layer of white if the skin tone is still showing through. Use a patting motion (stippling) rather than dragging to get even, opaque coverage without streaks. -
Create negative space:
While applying the white, leave empty circles around your eyes and a small triangle on the tip of your nose. This saves you from mixing black and white later, which creates grey smudges.
Stay Smudge-Free
Work top-to-bottom. Finish forehead details before moving to the mouth so your hand doesn’t rest in wet paint.
Step 2: Darkening the Features
-
Outline the eye sockets:
Load a medium round brush with black paint. Carefully trace the large, circular outline around each eye socket that you left blank earlier. -
Fill in the eyes:
Fill the entire eye socket area with solid black paint. Get close to the lash line, but be gentle around the sensitive eye area. -
Add brow detail:
Above the black eye socket, paint a small, curved black line mimicking a brow bone ridge. I find this subtle detail adds a lot of expression to the skull. -
Shape the nose cavity:
Using the medium brush, paint the tip of the nose black. Create two peaks at the top of the black area (like an ‘M’ shape) to mimic the nasal cavity bone structure. -
Carve the cheekbones:
Visualize a line from the corner of your mouth to your ear. Paint a sharp, swooping black shape here, starting thick near the ear and tapering to a point as it moves toward the mouth.
Add Dimension
Use grey eyeshadow to gently shade just inside the edges of the white paint for a 3D rounded bone effect.
Step 3: Teeth and Fine Details
-
Extend the smile:
Switch to your fine detail brush. Draw thin black lines extending outward from the corners of your mouth toward the hollows of your cheeks. -
Mark the teeth spacing:
Draw short vertical lines across your lips and the extended smile lines. These will represent the gaps between the skeleton’s teeth. -
Detail the teeth roots:
At the top and bottom of each vertical line, create small ‘Y’ shapes or forks. This makes the teeth look like they are embedded in the jaw paint. -
Refine the edges:
Go back over your black lines with fresh paint if they look faded. Crisp, sharp edges are essential for this high-contrast look. -
Set the look:
Lightly dust translucent setting powder over the white areas (avoiding the black) to prevent smudging and shine throughout the night.
Now you are ready to haunt the night with this elegant and spooky transformation


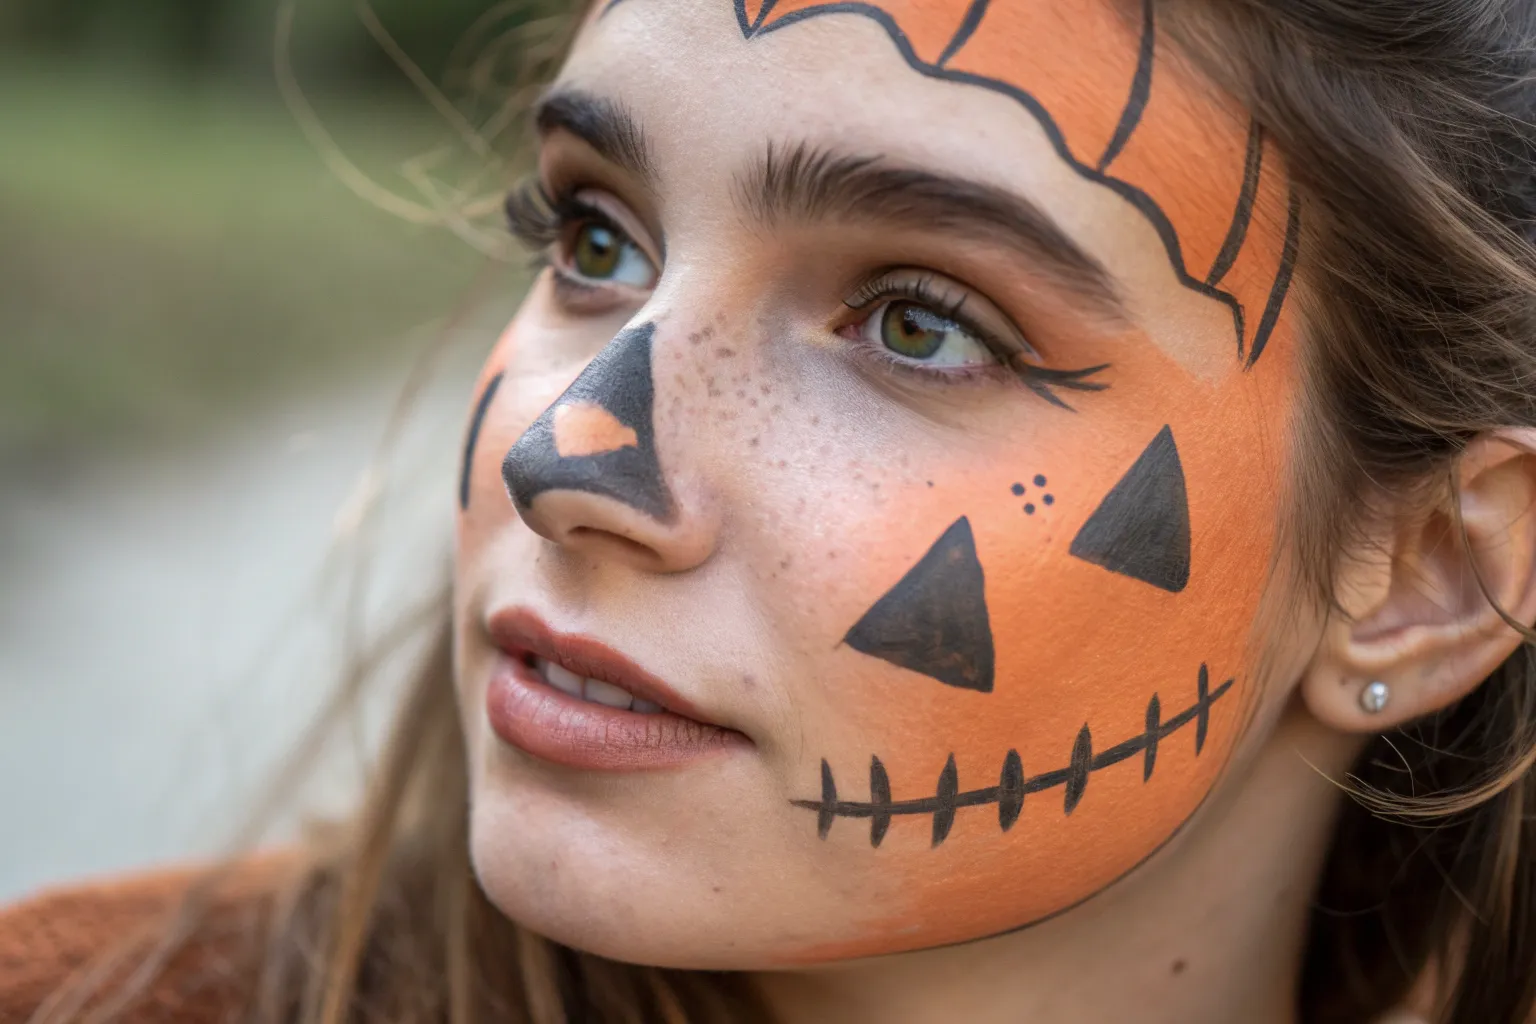
Jack-O’-Lantern Pumpkin Grin
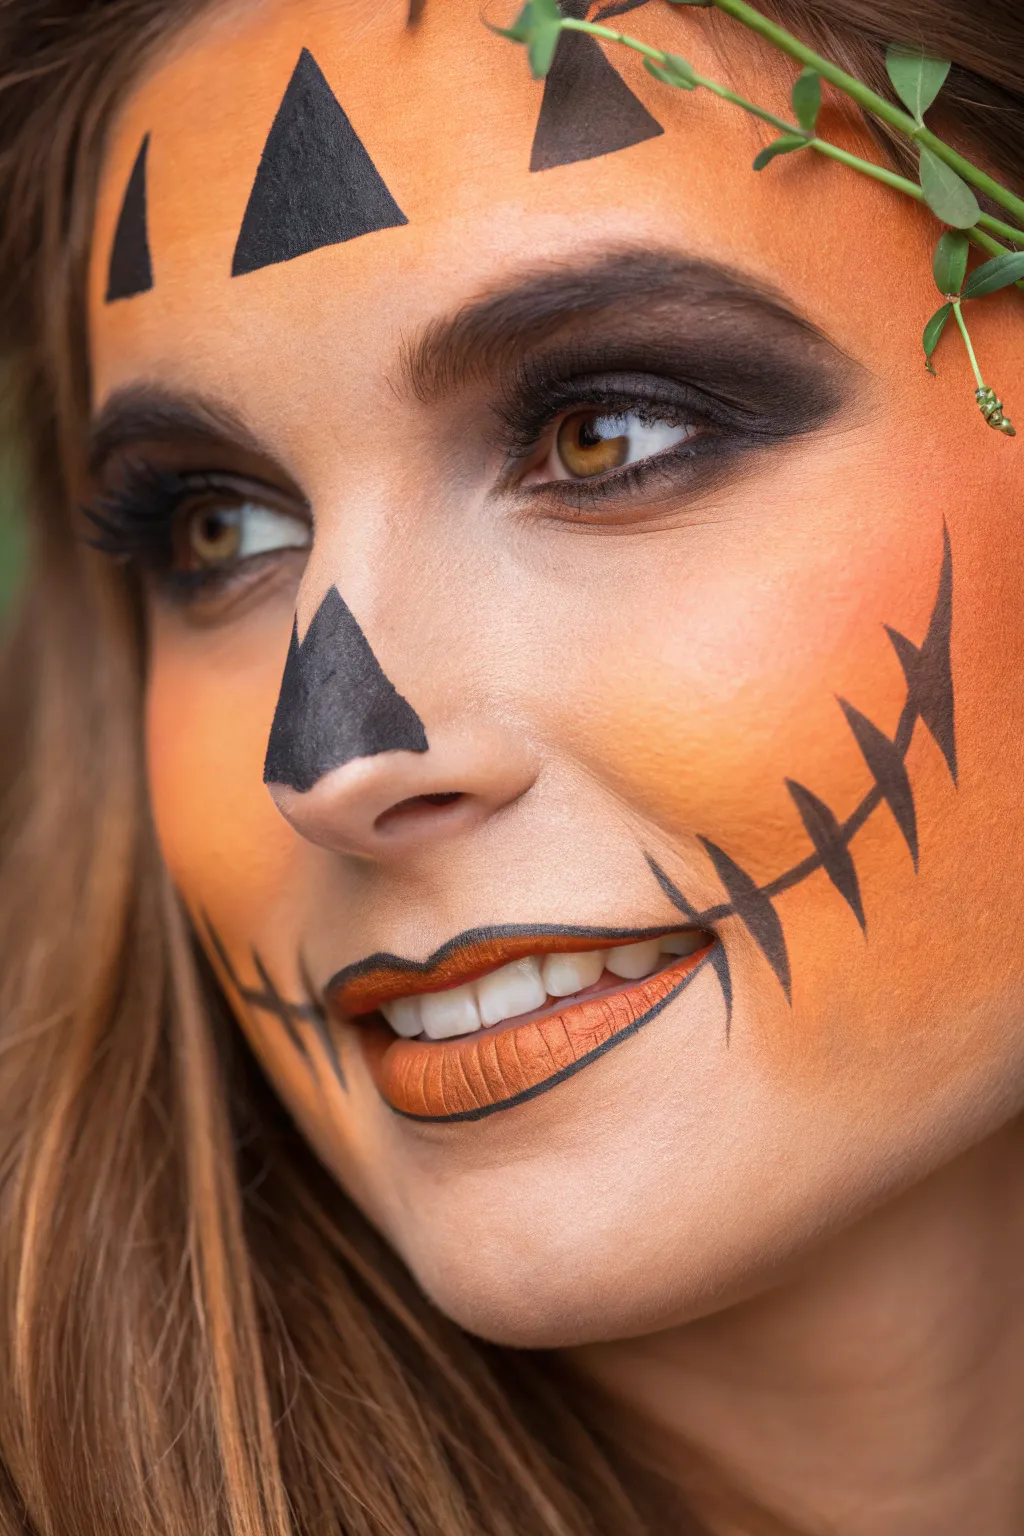
Transform yourself into the spirit of Halloween with this sophisticated pumpkin makeup look. Combining seamless orange blending with classic black geometry, this design upgrades the traditional Jack-O’-Lantern face into something chic and photo-ready.
Step-by-Step Tutorial
Materials
- Bright orange face paint (cream or water-activated)
- Black face paint or gel eyeliner
- Dark orange or terracotta eyeshadow
- Black eyeshadow
- Medium orange lipstick
- Makeup sponges (dense)
- Small angled brush
- Medium fluffy blending brush
- Fine detail brush
- Setting spray
- Green vine sprig (optional accessory)
Step 1: Base and Eyes
-
Prep the canvas:
Start with clean, moisturized skin. Apply a thin layer of primer to ensure the orange pigment grips well and lasts all night without separating. -
Apply base color:
Load a dense sponge with bright orange face paint. Stipple it evenly across your entire face, extending down the neck if desired, but focusing primarily on the forehead, cheeks, and chin. -
Create coverage:
Build up the orange opacity in thin layers rather than one thick coat to prevent cracking. Ensure the skin around the eyes is fully covered. -
Contour with warmth:
Using a fluffy brush and dark orange or terracotta eyeshadow, gently sweep color along the temples and cheekbones to add dimension to the flat orange base. -
Define the crease:
Take a black eyeshadow on a blending brush and deeply define the eyelid crease, smoking it out slightly towards the brow bone for a dramatic look. -
Line the eyes:
Apply black eyeliner to the upper lash line, smudging it slightly into the dark eyeshadow to keep the focus soft and smoky rather than sharp. -
Add lashes:
Apply a coat of mascara or oversized false lashes to make the eyes pop against the monochromatic orange background.
Crisp Edges
If your black triangles get messy, use a flat brush with a tiny bit of concealer or orange paint to clean and sharpen the outside edges.
Step 2: Geometric Details
-
Outline the nose:
Using a small angled brush and black face paint, lightly sketch a triangle shape on the tip of your nose. -
Fill the nose:
Fill in the triangle with solid black paint, ensuring the edges are crisp and triangular. I prefer using a gel eyeliner here for extra durability. -
Place forehead triangles:
Visualize where a pumpkin carving would sit. Paint two large black triangles above the eyebrows, slightly angled inward. -
Add floating triangles:
Paint smaller, sharper triangles further up near the hairline or temples to mimic floating carved pieces, keeping their edges sharp.
Step 3: The Pumpkin Mouth
-
Apply lip color:
Coat your lips with a medium orange lipstick that complements, but doesn’t perfectly match, your base face paint. -
Outline the lips:
With a fine detail brush and black paint, outline the lips entirely. Extend the corners of the mouth outward into a long, thin smile line toward the ears. -
Create the stitch marks:
Along the extended smile line, paint short vertical or angled hash marks that cross through the main line to create a stitched effect. -
Add sharp points:
At the very ends of the smile lines, near the cheeks, paint larger triangular spikes pointing outward to emulate the jagged cut of a carved pumpkin mouth. -
Refine the lines:
Go back over the black mouth details to ensure opacity, making sure the points are sharp and the lines are consistent in thickness. -
Set the look:
Mist the entire face with a setting spray to lock the pigments in place. -
Add the greenery:
Pin a small sprig of real or faux green vine into your hair near the temple to act as the pumpkin’s stem and vine.
Patchy Orange Paint?
If the orange looks streaky, switch to a stippling motion (patting) rather than swiping. Let the first layer dry completely before adding a second.
You are now ready to showcase your spooktacular face art at any harvest gathering


Witchy Eyes and Shadowy Contour
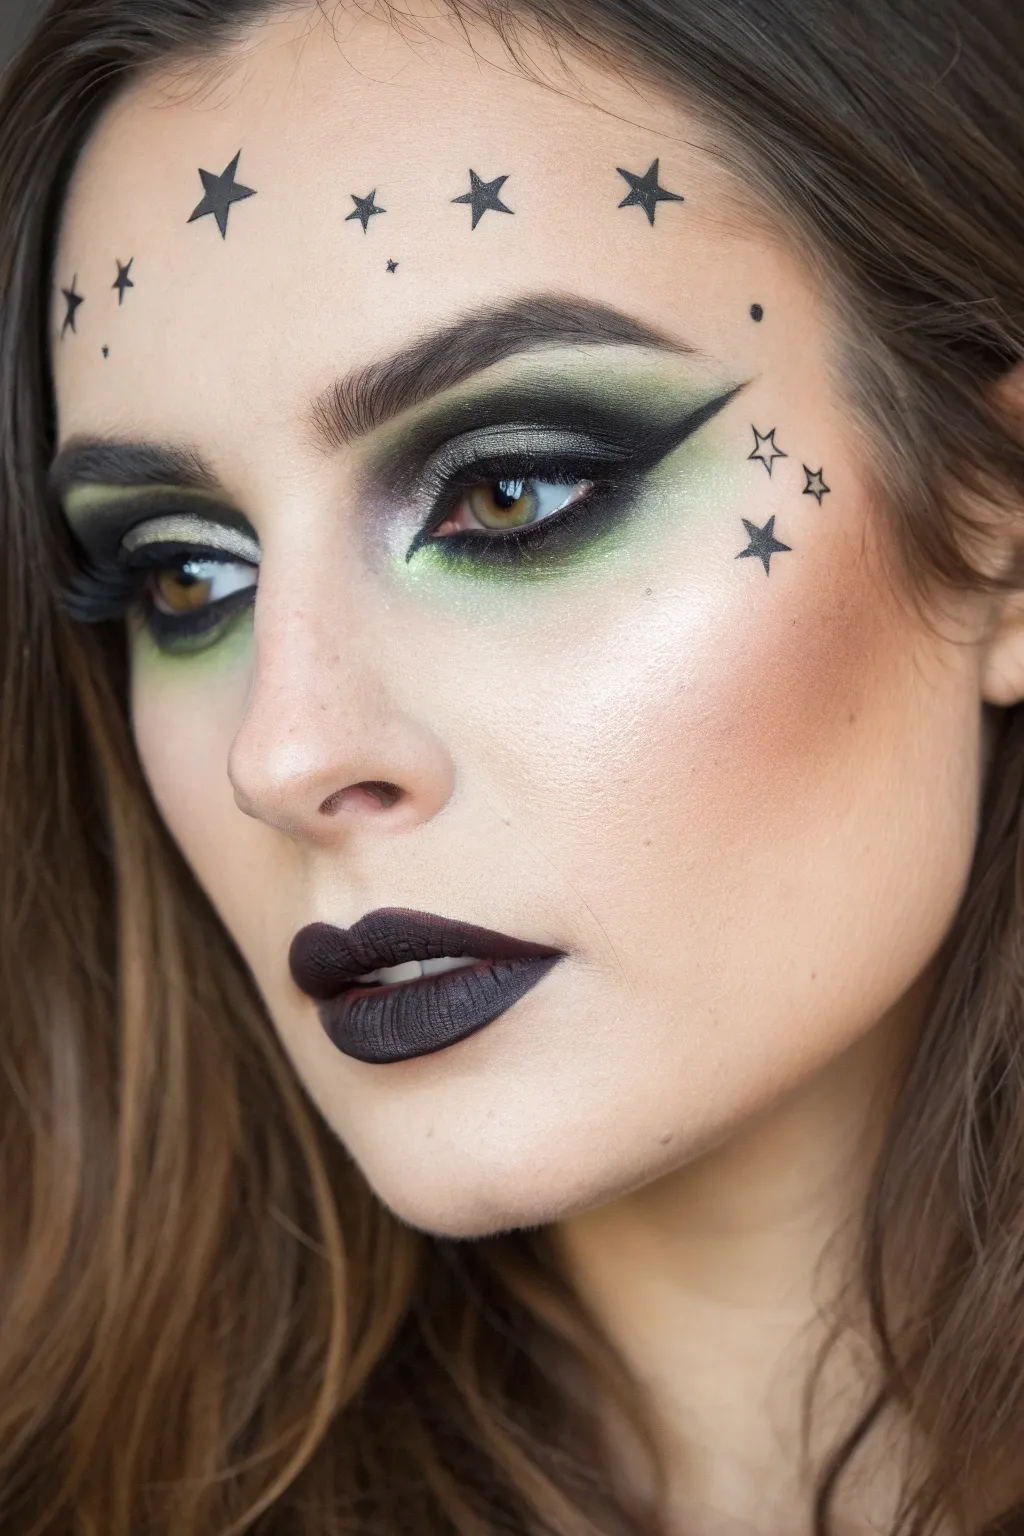
Channel sleek sorcery with this sophisticated witchy look that blends high-fashion techniques with celestial detailing. The striking combination of swampy greens, severe black liner, and delicate starlight creates a spellbinding finish perfect for a modern coven.
Step-by-Step
Materials
- Matte foundation (full coverage)
- Contour powder (cool-toned)
- Black gel eyeliner
- Liquid eyeliner pen (black)
- Eyeshadow palette (must have: matte black, shimmering emerald green, lime green, metallic champagne)
- Black matte liquid lipstick
- Setting spray
- Small angled brush
- Detailed liner brush
- Fluffy blending brush
Step 1: The Base and Canvas
-
Prime and perfect:
Begin with a clean, moisturized face. Apply a full-coverage matte foundation to create a flawless, porcelain-like canvas that will make the dark eye makeup pop. -
Sculpt the hollows:
Using a cool-toned contour powder, carve out your cheekbones more sharply than usual. Blend upwards towards the temples to lift the face, creating a slight gaunt, witchy effect without looking gruesome. -
Groom the brows:
Fill in your eyebrows with a dark powder or pencil. Aim for a defined, arched shape, brushing the hairs upward with clear gel to frame the dramatic eye look coming next.
Step 2: Sorcerous Eyes
-
Draft the wing:
Dip a small angled brush into black gel liner. Draw a dramatic, long wing extending from the outer corner of your eye towards the tail of your brow. -
Create the cut crease:
From the tip of your wing, draw a line inward just above your natural crease, stopping about halfway across the lid. This creates the sharp ‘V’ shape characteristic of this look. -
Pack in the black:
Fill the outer corner of this ‘V’ shape with matte black eyeshadow to set the gel liner and intensify the depth. Keep the edges nearest the inner eye soft for blending later. -
Layer the greens:
Take a shimmering emerald green shadow and blend it into the black, moving towards the center of the lid. The transition should look smoky and seamless. -
Highlight the inside:
Apply a bright metallic champagne or pale silver shadow to the inner third of your eyelid. Blend this lightly into the green to open up the eye. -
Smoke the lower lash line:
Run a lime green shadow along your entire lower lash line first. Then, deepen the outer half with the dark emerald shade, connecting it to the upper wing. -
Inner corner intensity:
Use a precision brush to pop a tiny amount of neon lime or chartreuse right at the tear duct for a glowing, magical effect. -
Line and define:
Apply liquid black eyeliner across the upper lash line, connecting flawlessly with your outer wing. Add false lashes or several coats of mascara for drama.
Star alignment
Drawing stars on skin can be tricky. Make three small dots in a triangle, then two ‘arm’ dots below. Connect the dots to form a perfect five-point star every time.
Step 3: Celestial Details & Lips
-
Forehead constellation:
Using a liquid eyeliner pen with a fine tip, carefully draw five-point stars across the forehead. Vary the sizes—make the center star slightly larger and those toward the temples smaller. -
Add tiny accents:
Dot the tip of the eyeliner pen around the stars to create small ‘distant stars’ or speckles. I usually group these in threes or scatter them randomly for an organic night-sky feel. -
Cheekbone embellishment:
On the left cheekbone (or your preferred side), draw a cluster of three stars: two simple outlines and one filled-in solid star. -
Prep the lips:
Ensure lips are exfoliated and dry. Outline your lips carefully with a black lip liner or the tip of your liquid lipstick wand to get a crisp edge. -
Apply the darkness:
Fill in the lips with a matte black liquid lipstick. Let it dry completely without pressing your lips together to ensure an opaque, crack-free finish. -
Set the spell:
Mist your entire face with a setting spray to lock the makeup in place, ensuring your stars don’t smudge as the night goes on.
Witchy shimmer
Tap a iridescent green highlighter over the highest point of your cheekbones and the tip of your nose. It adds an ethereal glow that ties the green eyes to the skin.
Now go forth and cast your glamorous spell on the night


Black Cat Nose and Whiskers
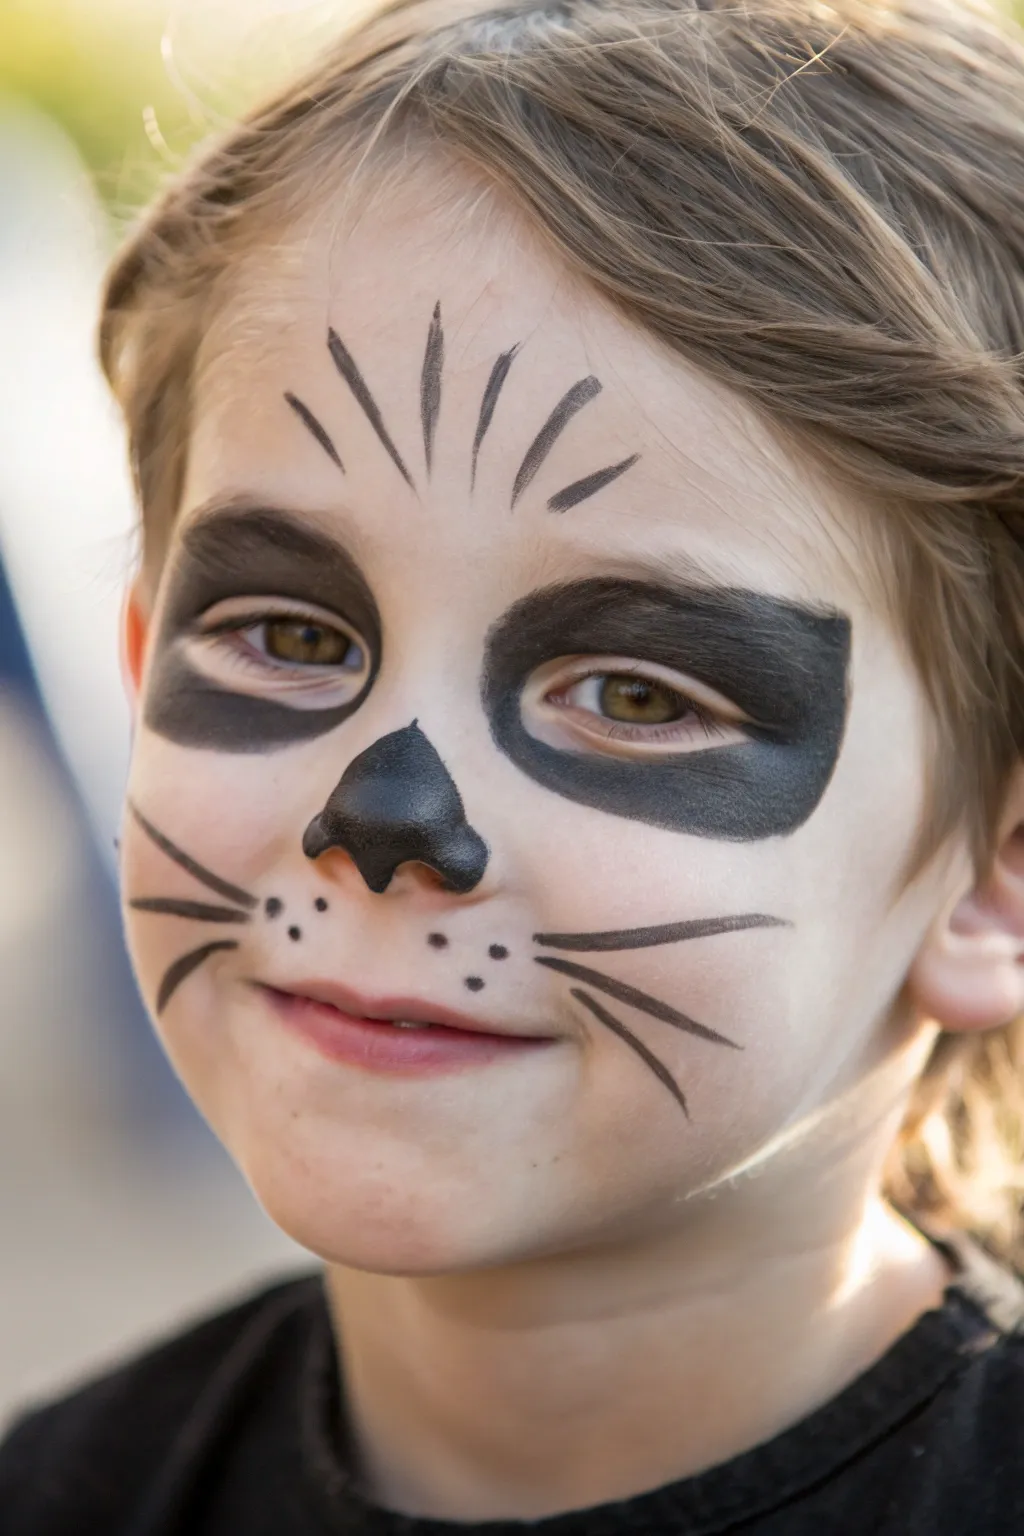
This classic black cat design transforms a simple costume into something truly expressive with just a few bold strokes. The look features dramatic eye patches, a cute button nose, and sweeping whiskers for a playful feline finish.
Detailed Instructions
Materials
- Black face paint (water-based or cream)
- Medium round brush (size 4 or 6)
- Fine liner brush (size 1 or 2)
- Small cup of water
- Paper towels or creative wipes
- Makeup setting spray (optional)
- Small sponge (optional for larger areas)
Step 1: The Dramatic Eyes
-
Load your brush:
Begin by wetting your medium round brush and swirling it into the black face paint until you have a creamy, ink-like consistency that isn’t too drippy. -
Outline the left eye:
Starting above the eyebrow, draw a curved arch that extends past the outer corner of the eye. Bring the line down under the eye area, following the natural curve of the cheekbone. -
Create the inner corner shape:
Connect the top and bottom lines near the bridge of the nose, keeping the shape rounded but slightly angled inwards to mimic a cat’s eye structure. -
Fill in the shape:
Using the same medium brush, carefully fill in the entire outline with solid black. Use smooth, horizontal strokes to ensure even coverage without streaking. -
Repeat on the right eye:
Mirror the process on the other eye. Step back or look in a mirror occasionally to check that the size and shape are reasonably symmetrical. -
Refine the edges:
Go back over the perimeter of both eye distinct patches to smooth out any wobbly lines, ensuring a crisp, clean edge.
Clean Lines Pro Tip
Rest your pinky finger gently on the child’s chin or cheek while painting. This anchors your hand, giving you much better stability for those crisp whisker flicks.
Step 2: Nose and Details
-
Paint the nose tip:
Load your medium brush again with black paint. Paint the very tip of the nose, extending slightly up the nostrils and drawing a rounded ‘V’ shape at the top. -
Shape the nose bottom:
Round out the bottom edge of the nose paint so it curves gently above the lip, creating a soft, button-nose look rather than a sharp triangle. -
Switch brushes:
Cleaning off your medium brush, switch to your fine liner brush for the delicate details. Load it with fresh black paint to a thin, fluid consistency. -
Add forehead stripes:
Starting from the center of the forehead just above the eyebrows, paint five distinct lines fanning upward. The center line goes straight up, while the two on either side curve outward slightly. -
Taper the strokes:
When painting these forehead lines, press down at the start and lift up quickly at the end of the stroke to create a sharp, tapered point.
Feline Level Up
Add a tiny dab of white paint to the tip of the nose or as a highlight in the black eye patches to make the design look wet and shiny like a real cat nose.
Step 3: Whiskers and Finishing Touches
-
Dot the muzzle:
On the upper lip area (the muzzle), use the tip of your round brush to press three or four small dots on each side. Arrange them loosely rather than in a perfect grid. -
Paint the main whiskers:
Using the fine liner brush, start near the outer dots on the cheek. Draw three long, sweeping lines outwards toward the ears. -
Control your pressure:
Just like the forehead stripes, apply more pressure at the beginning of the whisker (near the nose) and flick the brush outward to get a thin, elegant tip. -
Curve the bottom whisker:
I like to angle the bottom whisker slightly downwards compared to the top two, which gives the face a more open and friendly expression. -
Mirror the whiskers:
Repeat the whisker process on the other cheek, trying to match the length and angle of the first side. -
Check transparency:
If any of the black areas look a bit grey or patchy as they dry, gently dab a second layer of paint over those spots. -
Final dry:
Let the design sit for a minute to fully dry. If you have setting spray, a quick mist will help keep the design smudge-proof for longer.
With these simple steps, you have created a puurrfectly adorable look ready for trick-or-treating
BRUSH GUIDE
The Right Brush for Every Stroke
From clean lines to bold texture — master brush choice, stroke control, and essential techniques.
Explore the Full Guide
Spiderweb Corner Detail
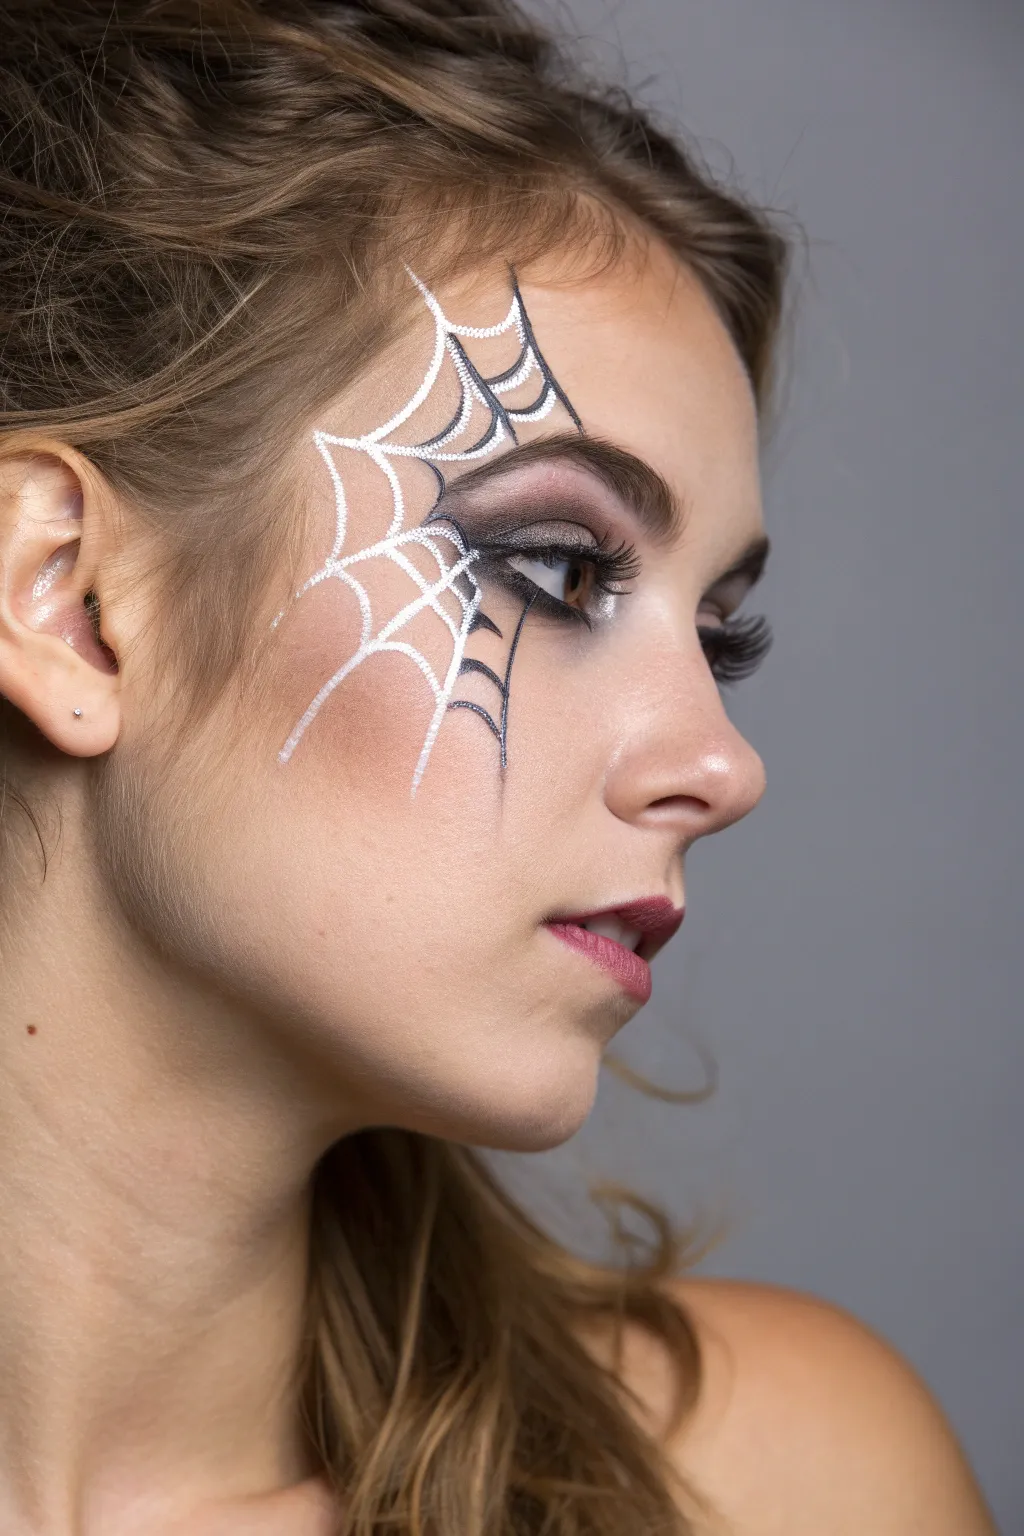
This sophisticated take on classic Halloween makeup combines glamorous eye makeup with an intricate, graphical spiderweb design. The high-contrast white and black lines create a striking 3D effect that frames the eye perfectly without overwhelming your features.
Step-by-Step
Materials
- Matte foundation and setting powder
- Contour powder or bronzer
- Face paint cake: White (strongly pigmented)
- Face paint cake: Black (or black liquid eyeliner)
- Fine liner brush (size 0 or 00)
- Medium round brush
- Eyeshadow palette (purples, charcoals, blacks)
- Black pencil eyeliner
- False eyelashes and glue
- Setting spray
Step 1: Base and Eye Makeup
-
Prepare the canvas:
Start with your regular foundation routine to create an even skin tone. Apply a matte setting powder, especially around the temple and cheekbone area where the paint will sit, to prevent oils from breaking down the design later. -
Sculpt the cheekbones:
Apply contour powder or bronzer just under your cheekbone. This adds warmth and dimension before we start the cool-toned web design. -
Apply base eyeshadow:
Take a medium mauve or soft purple eyeshadow and blend it through the crease of your eyelid, buffing it upwards toward the brow bone for a soft transition. -
Deepen the crease:
Using a charcoal grey or black shadow, darken the outer corner of the eyelid and the crease. Blend thoroughly so there are no harsh lines. -
Add liner:
Create a sharp winged liner using black liquid eyeliner or a dark shadow. Extend the wing outward towards the temple, acting as an anchor point for the web design later. -
Line the waterline:
Run a black pencil eyeliner along your lower waterline and smudge a little bit of the dark eyeshadow along the lower lash line for a smoky effect. -
Apply lashes:
Attach a pair of dramatic, wispy false eyelashes. Allow the glue to dry completely clear before moving on to the painting phase.
Achieving Clean Lines
Rest your pinky finger on your cheek (use a powder puff to avoid smudging base makeup) to steady your hand while drawing the fine web lines.
Step 2: Painting the Web
-
Mix your white paint:
Activate your white face paint with a little water until it reaches a creamy, ink-like consistency. You want it opaque but fluid enough to glide. -
Draw the main spokes:
Using a thin liner brush, paint long, curved lines radiating outward from the corner of your eye. Start the lines near the hairline and curve them down towards the cheekbone. -
Connect the top section:
Starting at the top near the forehead, paint smaller scalloped lines connecting the main spokes. These curved bridges create the web structure. -
Connect the lower section:
Continue creating scalloped connectors on the lower spokes across the cheek. Vary the spacing slightly to make the web look organic rather than mathematically perfect. -
Thicken select lines:
Go back over the white lines, making the intersections where lines meet slightly thicker to mimic how real webs gather silk at junction points. -
Switch to black paint:
Clean your brush thoroughly or switch to a fresh size 00 Liner brush. load it with black face paint or liquid liner. -
Add outlines:
Very carefully drag a thin black line right next to, or slightly overlapping, select parts of the white web. Don’t outline everything perfectly; focus on the ‘underside’ of the white lines to create a shadow effect. -
Create inner depth:
Paint a few jagged black web lines closer to the eye makeup, weaving them in behind the white web. This layering creates a sense of depth, making the white web appear to float on top. -
Refine the edges:
Extend a few sharp points of the web outwards with quick, flicking motions of the brush to keep the design looking delicate and sharp. -
Set the look:
Once all paint is completely dry, mist your face lightly with a setting spray to lock everything in place for the night.
Fixing Wobbly Lines
If a line gets too thick or shaky, wait for it to dry completely. Then, take a stiff angled brush with a tiny bit of concealer to ‘erase’ and sharpen the edge.
This striking design pairs beautifully with a simple black dress for an effortless costume
Creepy-Pretty Clown Cheeks
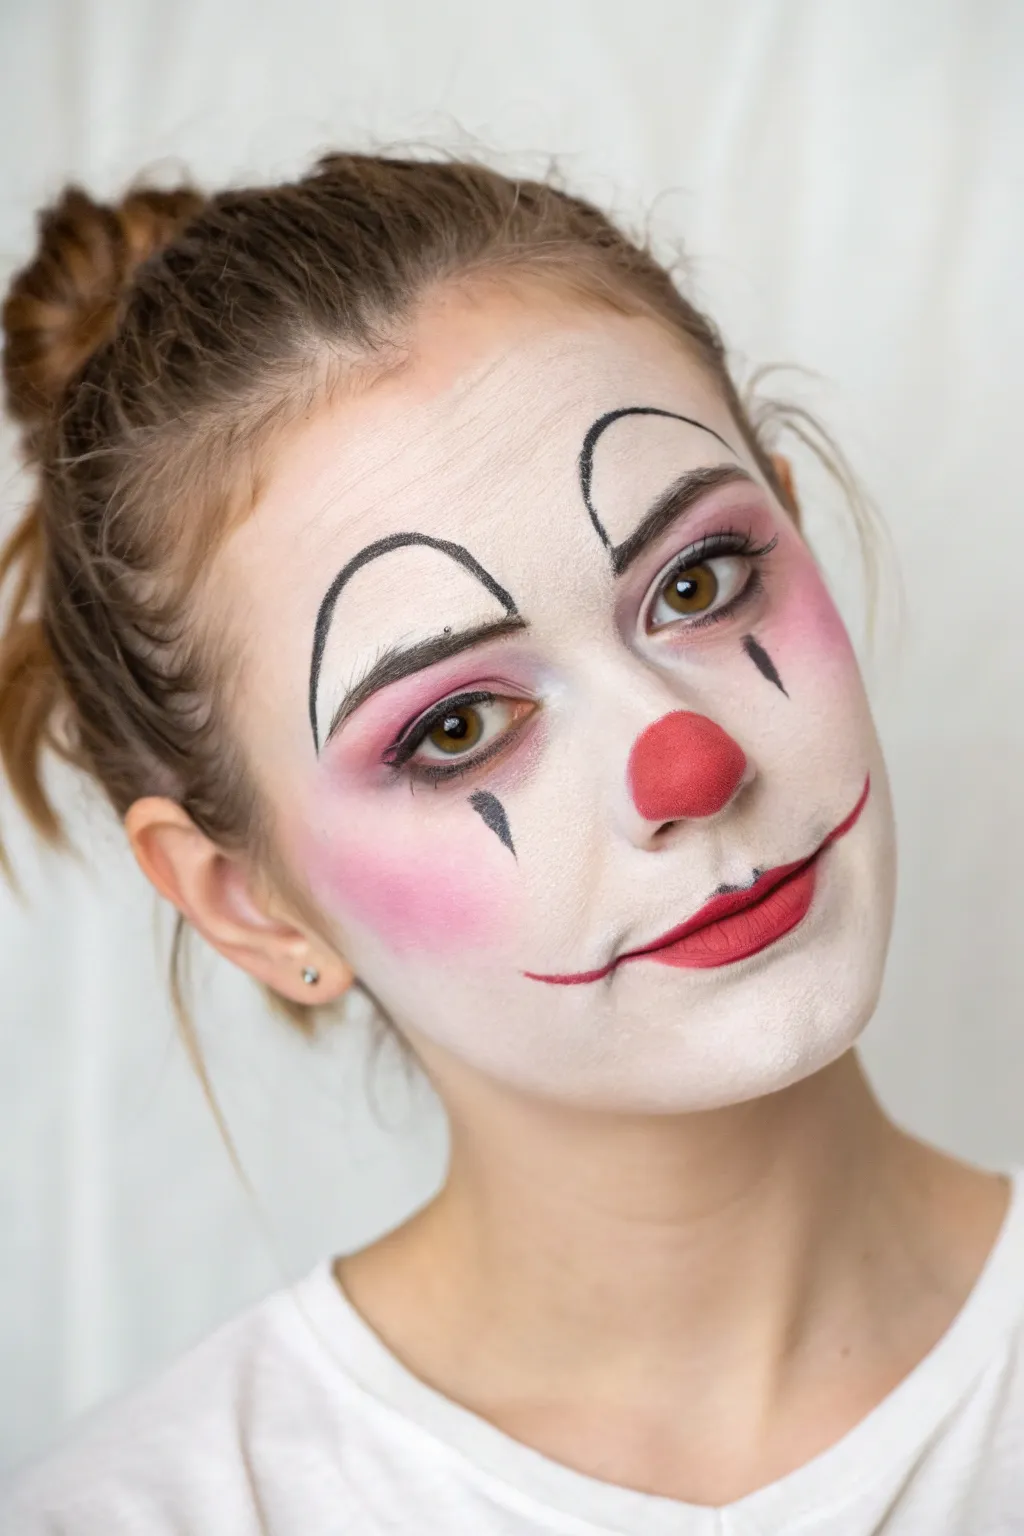
This eerie yet adorable clown look balances sweet pink tones with classic, dramatic theatrical features. By combining a stark white base with exaggerated eyebrows and a button nose, you can create a Halloween face that is equal parts playful and unsettling.
Step-by-Step Tutorial
Materials
- White cream face paint or foundation
- Translucent setting powder
- Black liquid eyeliner or fine face paint brush
- Black gel liner (optional)
- Red cream face paint (for nose)
- Matte red lipstick
- Light pink blush or eyeshadow
- Makeup sponge/beauty blender
- Small eyeshadow brush
- Fine detail brush
Step 1: The Base and Canvas
-
Prep the skin:
Start with a clean, moisturized face to ensure the white paint applies smoothly without catching on dry patches. -
Apply the white base:
Using a dampened makeup sponge, stipple white cream face paint all over the face. Don’t worry about complete opacity; a slightly sheer, ghostly finish works well for this look. -
Set the base:
Dust a generous amount of translucent setting powder over the entire face to lock the white paint in place and prevent creasing.
Step 2: Rosy Details
-
Create the eyeshadow:
Take a small fluffy brush and sweep pink eyeshadow or blush across the entire eyelid, extending it slightly upward toward the brow bone. -
Blend the under-eye:
Carry that same pink shade underneath the lower lash line, buffing it out to create a soft, possibly tired or emotional appearance. -
Add the blush:
Using a larger blush brush, apply a very concentrated circle of pink blush to the apples of the cheeks. I like to blend the edges deeply into the white base for a soft, airbrushed transition.
Smooth Base Secret
If your white face paint looks streaky, use a damp beauty sponge and press the product into the skin rather than dragging it. A patting motion builds solid coverage.
Step 3: Defining Features
-
Draft the eyebrows:
Visualize high, dramatic arches that start above your natural brow bone. You can lightly mark the shape first with a pale pencil before committing to black. -
Fill in the brows:
Using black liquid liner or a fine brush with black face paint, draw the exaggerated eyebrows. Make the inner corners thick and rounded, tapering off into a thin, curvy point toward the temples. -
Paint the nose:
Dip a small round brush or sponge applicator into red cream paint. Stamp a perfect circle onto the tip of the nose, keeping the edges clean and distinct.
Add Sparkle
For a glamour twist, press cosmetic glitter onto the red nose or layer iridescent shimmer over the pink cheekbones to catch the light.
Step 4: The Clown Elements
-
Draw the tears:
Directly under the center of each eye, paint a small, inverted teardrop or diamond shape using the black eyeliner. Keep these sharp and graphic. -
Apply lipstick:
Fill in the natural lips with a matte red lipstick. Choose a true red shade that complements the nose paint. -
Extend the smile:
Using a fine detail brush and a bit of the red lipstick or red face paint, draw a thin line extending outward and upward from the corners of the mouth. -
Line the smile:
To add dimension, faintly outline the extended smile lines with a tiny bit of black shadow or liner to make the ‘cut’ look deeper. -
Tightline the eyes:
Finish the eye area by applying a thin line of black eyeliner along the upper lash line to frame the eyes against the pink shadow. -
Mascara application:
Apply a coat of black mascara to top and bottom lashes. While I usually keep it neat, a slightly clumpy spider-lash effect actually adds to the creepiness here. -
Final check:
assess symmetry, especially with the eyebrows and smile extensions, and clean up any stray smudges with a little extra white paint.
Now you are ready to showcase this hauntingly classic character at your next costume event

PENCIL GUIDE
Understanding Pencil Grades from H to B
From first sketch to finished drawing — learn pencil grades, line control, and shading techniques.
Explore the Full Guide
Easy Zombie Hollow Cheeks
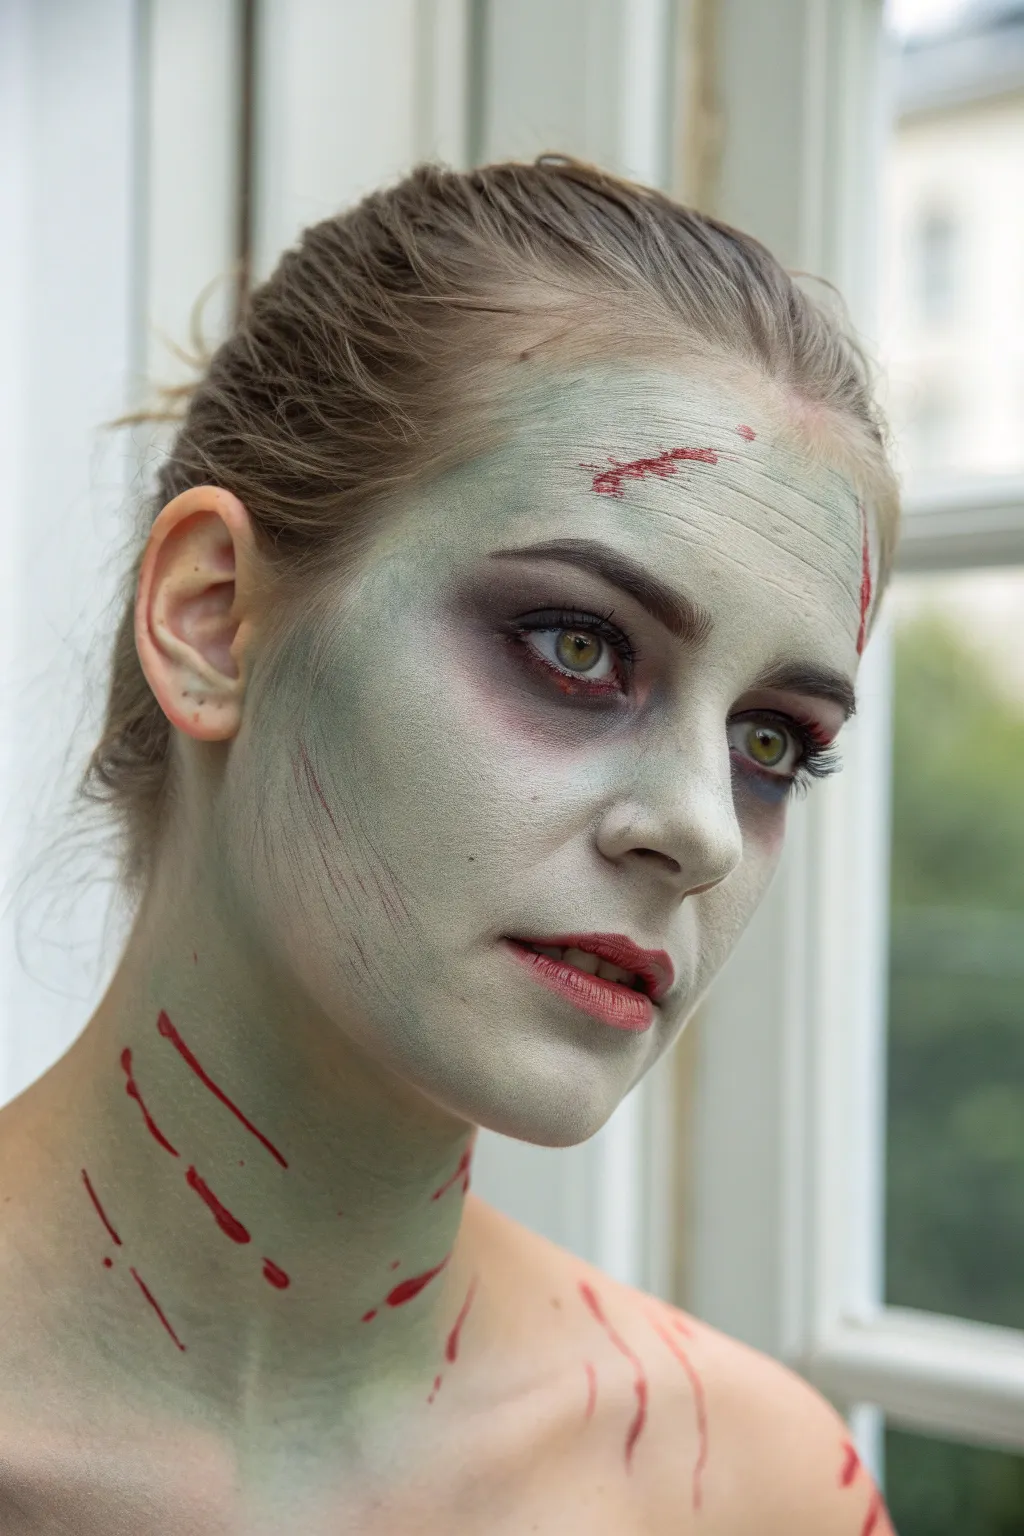
Transform into a beautifully haunting zombie with this soft, pale green makeup look that balances grit with an almost ghostly elegance. The key here is blending muted green tones to create hollowed features and adding stark, bloody accents for that freshly turned effect.
Step-by-Step
Materials
- Pale green cream makeup or face paint
- White cream makeup
- Translucent setting powder
- Dark grey matte eyeshadow
- Burgundy or deep red eyeshadow
- Fake blood (gel consistency)
- Fine liner brush
- Fluffy blending brush
- Makeup sponge
- Stipple sponge (optional)
Step 1: The Base Pallor
-
Prep the canvas:
Start with a clean, moisturized face. If you have eyebrows you want to deemphasize, run a glue stick through them first to flatten the hairs, though full blocking isn’t necessary for this softer look. -
Mix your shade:
On a palette or the back of your hand, mix the pale green cream makeup with a significant amount of white. You want a very desaturated, sickly mint color rather than a bright cartoon monster green. -
Apply the base:
Use a damp makeup sponge to stipple the pale green mixture all over your face, blending it down your neck and onto your shoulders. Keep the coverage somewhat sheer so your natural skin texture shows through slightly. -
Set the makeup:
Once you have an even coat, gently press translucent setting powder over the entire area to lock the cream in place and prevent it from shifting while you contour.
Step 2: Contouring the Undead
-
Hollow the cheeks:
Take a fluffy blending brush and dip it into the dark grey matte eyeshadow. Suck in your cheeks to find the hollows, then buff the shadow firmly under the cheekbone, blending upwards slightly. -
Darken the temples:
Apply the same grey shadow to your temples and along the hairline to narrow the face and create a sunken skull appearance. -
Define the nose:
Run the grey shadow down the sides of your bridge and heavily around the nostrils to make the nose look thinner and sharper. -
Sadden the eyes:
Pack a burgundy or deep red eyeshadow onto the mobile eyelid and smudge it heavily along the lower lash line. I like to blend this quite low to mimic extreme exhaustion or infection. -
Deepen the sockets:
Layer the dark grey shadow into the crease of the eye and the inner corners, blending it into the red to create a bruised, purple-grey gradient. -
Highlight the bone structure:
Use pure white paint or a very light powder on the highest points of the face—the cheekbones, the brow bone, and the tip of the nose—to increase the contrast against the grey contours.
Patchy Base?
If the green base looks streaky, switch to a beauty blender and use a ‘bouncing’ motion to press the pigment into the skin rather than dragging it across.
Step 3: Bloody Details
-
Create scratches:
Dip a fine liner brush into red face paint or a reddish-brown lip liner. Draw thin, parallel lines on the cheek to simulate scratch marks. -
Feather the edges:
Soften the ends of your scratch lines with a clean, dry brush or your finger so they look like they are sitting in the skin, not just floating on top. -
Apply the neck wounds:
Using the same fine liner brush and fake blood gel, paint thicker, jagged distinct lines across the neck and collarbone area. -
Vary the pressure:
Press harder at the start of the stroke and flick the brush up at the end to create a tapered look for the scratches and cuts. -
Add forehead trauma:
Dab a small amount of blood gel near the hairline or temple. You can drag a small tool or brush through it to make it look like a graze. -
Texturize the lips:
Apply a brownish-red lipstick, concentrating the color in the center of the lips. Blot it with your finger to make it look stained and uneven rather than perfect.
Make it Gritty
Tear tiny holes in a coarse sponge, dip it in dark brown or purple paint, and lightly stipple it over the skin to create broken capillaries and rot texture.
Give your hair a messy tease to complete this gloriously ghastly transformation
Soft Haunted Ghost Fade

Achieve a hauntingly beautiful aesthetic with this ghostly makeup tutorial that focuses on high contrast and matte finishes. By blending stark white foundation with deep, shadowy contours, you’ll create a gaunt, otherworldly appearance that looks like you’ve just stepped out of the mist.
Step-by-Step Tutorial
Materials
- White cream foundation or face paint (highly pigmented)
- Translucent setting powder (white or colorless)
- Matte black eyeshadow
- Dark cool-toned brown eyeshadow (taupe or espresso)
- Plum or oxblood lipstick (matte finish)
- Flat foundation brush
- Fluffy blending brush
- Small angled brush
- Makeup sponge
- Brow gel or clear soap
- Setting spray
Step 1: Base Preparation
-
Skin Prep:
Start with a clean, moisturized face. Apply a matte primer to ensure the heavy cream products stick well and don’t slide around throughout the night. -
Hair Management:
Slick your hair back completely away from your face using gel or pomade. This look relies on the stark contrast of the hairline against the pale makeup, so keep the forehead completely clear. -
Apply White Base:
Using a flat foundation brush or a damp sponge, apply a thick, even layer of white cream foundation over your entire face. Extend this down your neck and onto your shoulders to avoid a ‘floating head’ effect. -
Light Setting:
Before moving on, lightly press translucent powder over the white base. You don’t want to fully lock it in yet, just reduce the tackiness so the powders blend smoothly on top.
Step 2: Sculpting the Shadows
-
Cheekbone Placement:
Identify the hollows of your cheeks. Using a fluffy blending brush, pick up the cool-toned brown eyeshadow. Start depositing color right at the hairline near your ear. -
Create the fade:
Sweep the brown shadow inward towards the mouth but stop halfway. The color should be darkest at the hairline and fade to nothing as it moves inward, creating that ‘soft fade’ look. -
Temple Definition:
Add the same brown shadow to your temples, blending upwards slightly towards the forehead. This hollows out the face, making it look more skeletal. -
Deepen with Black:
To add dramatic depth, tap a very small amount of matte black shadow into the very deepest part of the cheek contour (near the ear). Blend this carefully so it doesn’t look like a stripe, but rather a deep shadow.
Pro Tip: Texture Trick
Mix a drop of facial oil into your white cream paint before applying. It helps the heavy pigment glide over skin texture without catching in pores or fine lines.
Step 3: Haunted Eyes and Brows
-
Base Lid Color:
Cover your entire eyelid, from lash line to crease, with the cool brown shadow you used for contouring. -
Smoky Crease:
Apply the matte black eyeshadow into the crease and outer corner of the eye. Use a windshield wiper motion to diffuse the edges significantly—you want a smoky cloud, not harsh lines. -
Lower Lash Line:
Run the brown shadow along the lower lash line, connecting it to the outer corner of the top lid. Smudge it downwards slightly for a tired, sunken eye effect. -
Brow Texture:
Brush your eyebrows upward using a brow gel to create a feathery, unkempt texture. I usually brush through them once with a bit of the white foundation first to tint them grey before setting them. -
Inner Corner Highlight:
Dab a tiny amount of pure white powder or paint right at the inner corner of the eye to make the dark eyeshadow pop by contrast.
Level Up: Frosted Brows
After brushing brows up, lightly tap white cosmetic glitter or white mascara on the very tips of the hairs to simulate frost or ice crystals on frozen skin.
Step 4: The Final details
-
Lip Application:
Apply the oxblood or plum lipstick. For this specific look, crisp lines aren’t necessary; you can blot the edges with your finger for a stained look. -
Ombré Lip Effect:
Apply a touch of black eyeshadow to the very center of the lips and blend outward. This deepens the mouth and ties it into the eye makeup. -
Jawline Shadow:
lightly dust the brown shadow under your jawline. This separates your face from your neck and emphasizes the pale skin. -
Final Powder:
Take a large powder brush and pat a generous amount of white setting powder over the pale areas (forehead, chin, nose) to ensure a dead-matte finish. -
Mist and Set:
Finish with a strong hold setting spray to lock the heavy powders and creams together for long-lasting wear.
Step back and admire your chillingly elegant transformation into a creature of the shadows


Half-Face Pumpkin and Skull Split
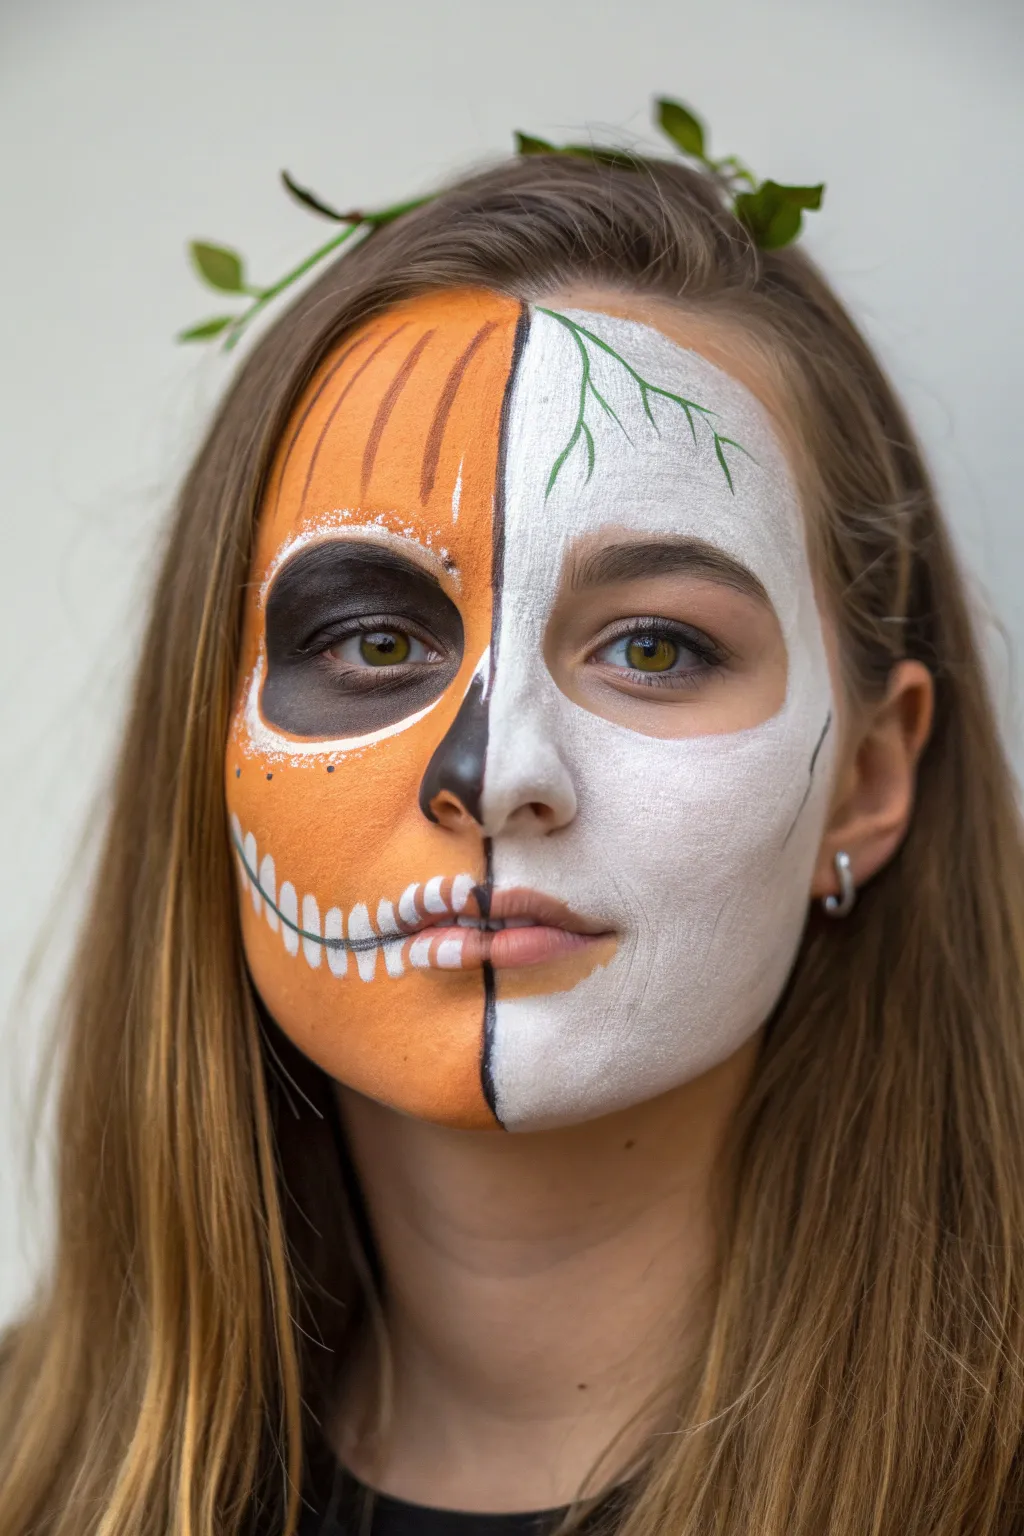
This striking half-and-half design merges the classic warmth of a jack-o’-lantern with a ghostly, pale elegance. It creates a bold contrast using a sharp dividing line down the center, perfect for showcasing two spooky themes at once.
Step-by-Step
Materials
- Orange face paint
- White face paint
- Black face paint
- Dark green face paint (or eyeliner)
- Flat foundation brush
- Medium round brush
- Fine detail brush or liner brush
- Makeup sponge
- Setting spray (optional)
- Small hoop earrings (optional styling)
- Fake vine leaves (optional hair accessory)
Step 1: The Divide & The Base
-
Draw the center line:
Using a fine brush and black paint, draw a faint vertical line straight down the center of your face, crossing the nose and lips, to clearly separate the two halves. -
Apply the orange base:
On the left side of your face (your right), use a sponge or flat brush to apply a solid, even layer of bright orange face paint. Avoid the immediate eye area. -
Apply the white base:
On the right side (your left), apply a smooth layer of white face paint using a clean sponge. Cover the eyebrow slightly if desired, though a natural look works too. -
Define the center:
Go back over your central dividing line with black paint to make it sharp and bold. Add a small ‘nose hole’ shape on the orange side of the nose, hugging the center line.
Keep it Clean
Use a piece of paper or cardstock held against your nose as a shield when painting the initial center line to keep the separation perfectly straight.
Step 2: The Pumpkin Side
-
Create the eye socket:
Using black paint and a round brush, paint a large circle around your left eye, filling it in completely to create a hollow skull effect. -
Highlight the eye:
Take a small brush with white paint and dab a textured, uneven border around the black eye socket. This adds dimension and makes the ‘cutout’ pop. -
Add pumpkin ridges:
With a thin brush and a darker orange or light brown paint, stroke vertical curved lines from your hairline down toward the eyebrow to mimic the ridges of a pumpkin. -
Draft the stitched mouth:
Paint a thin black line extending from the corner of your mouth slightly outward towards your ear. -
Paint the teeth:
Using white paint and a flat detail brush, paint small vertical rectangles along the mouth line—both on the orange skin and the lip itself—to create the look of teeth. -
Outline the teeth:
Carefully outline these white teeth with a very fine black line to define them against the orange background.
Glitter & Glam
While the white paint is still slightly tacky, press on some iridescent white glitter over the cheekbone. It adds an ethereal, fae-like glow to the pale side.
Step 3: The Pale Side & Details
-
Contour the white side:
Using a light grey or taupe eyeshadow (or diluted black paint), softly contour under the cheekbone on the white side to give the face a gaunt, skeletal structure. -
Add vine details:
On the white forehead, use a fine brush with green paint to draw delicate, branching vines coming down from the hairline. -
Create faint cracks:
I like to add very thin, barely-there grey lines near the temple or jawline on the white side to suggest fragile porcelain skin. -
Refine the center line:
Check the central black divider again. If any orange or white smudged over, touch it up now to ensure that split is razor-sharp. -
Accessorize:
Finish the look by tucking a small artificial vine or leaf into your hair on the pale side to mirror the painted details.
Pair this dual-toned masterpiece with a simple black top to let the intricate face paint take center stage
Cracked Porcelain Doll Horror
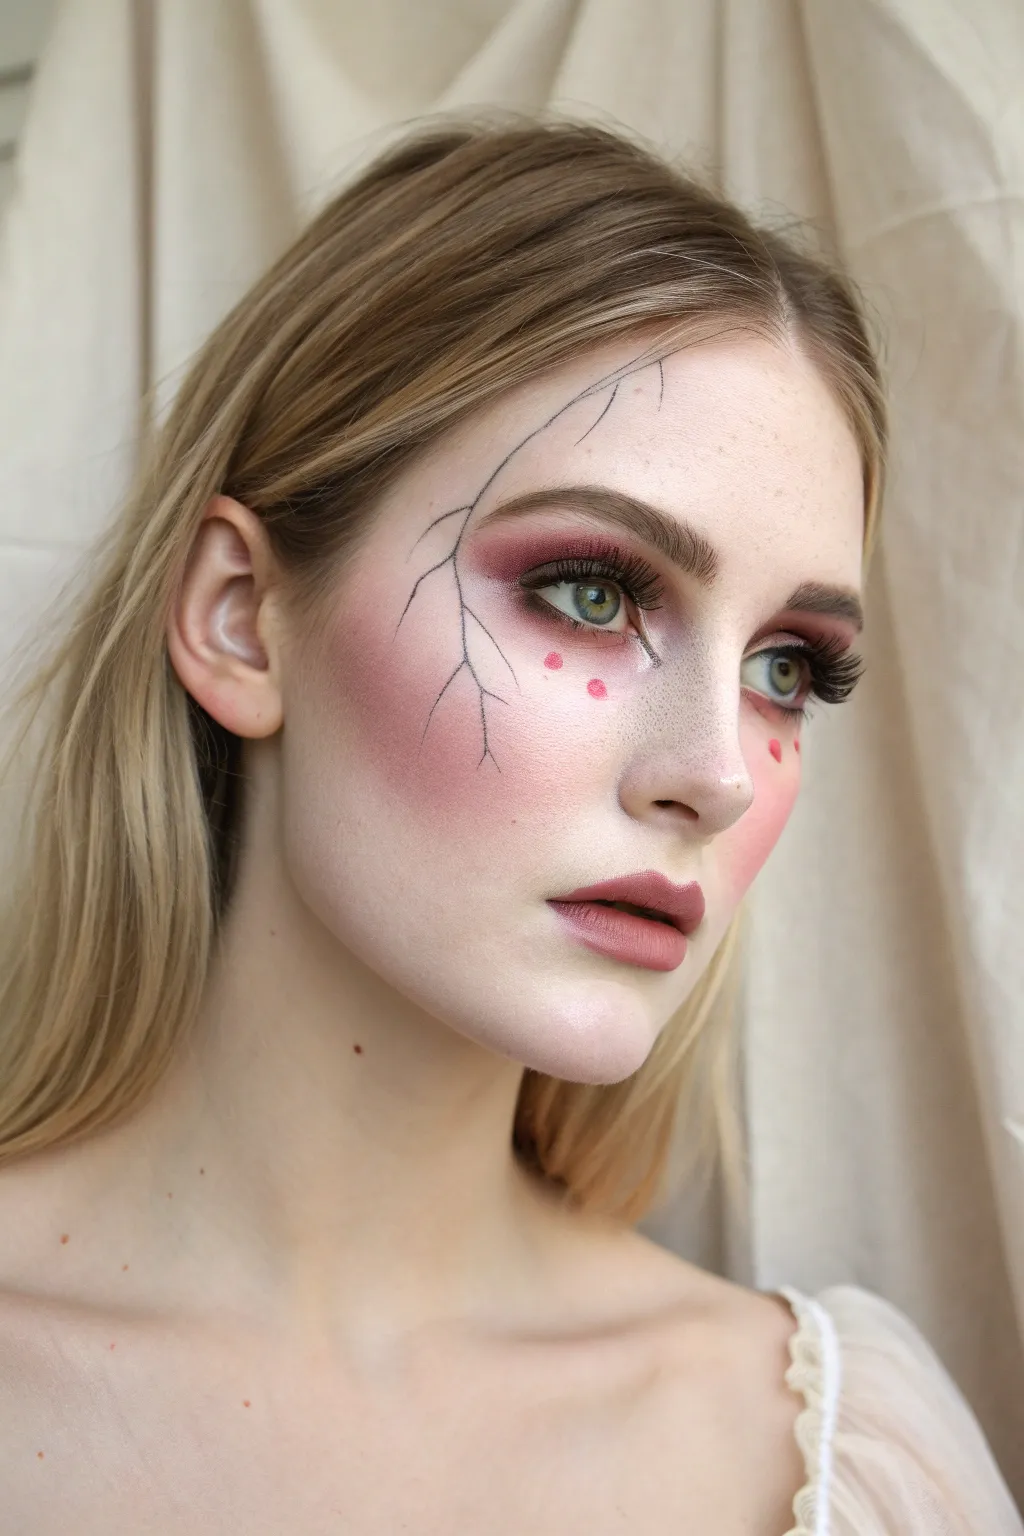
This hauntingly beautiful look combines the ethereal charm of vintage porcelain with a slightly unsettling, broken edge. By focusing on soft, flushed skin contrasted against sharp, graphic cracks, you can transform yourself into a beloved toy that has seen better days.
Detailed Instructions
Materials
- Full-coverage foundation (1-2 shades lighter than skin tone)
- Translucent setting powder
- Pink powder blush (rose or berry tone)
- Dark pink or burgundy eyeshadow
- White or nude eyeliner pencil
- Liquid black eyeliner (fine tip)
- Black mascara
- False eyelashes (wispy style)
- Red lip liner or face paint
- Matte dusty rose lipstick
- Small detail brush
- Fluffy blending brush
Step 1: The Porcelain Base
-
Prime and prep:
Start with a clean, moisturized face. Apply a smoothing primer to create that flawless, glass-like texture essential for a porcelain doll effect. -
Create the pale canvas:
Apply a full-coverage foundation that is one or two shades lighter than your natural skin tone. Use a damp beauty sponge to press it into the skin for an airbrush finish, ensuring you cover your lips slightly to blur the edges. -
Set the base:
Generously apply translucent powder all over your face. We want a completely matte, velvety finish with absolutely no shine, just like unglazed ceramic.
Shaky hand?
If your crack lines look too thick or messy, dip a slanted brush in concealer to ‘carve’ the edges back into a sharp, thin point.
Step 2: Flushed & Fragile Eyes
-
Apply base shadow:
Take a fluffy brush and sweep a dark pink or burgundy eyeshadow across the entire lid, blending it well up towards the brow bone. -
Deepen the crease:
Pack more of the same pink shade into the outer corner and crease to add dimension. I like to drag this color slightly downwards under the lower lash line to create a tired, sorrowful look. -
Brighten the waterline:
Use a white or nude eyeliner pencil on your lower waterline. This opens up the eyes, making them appear larger and more doll-like. -
Line the upper lash line:
Apply a thin line of black liquid liner along the top lashes. Keep it relatively subtle; we aren’t going for a cat-eye wing here, just definition. -
Lashes on lashes:
Apply mascara to both top and bottom lashes. Adhere a pair of wispy false lashes to the upper lid to maximize the wide-eyed effect.
Step 3: Paint & Cracks
-
Heavy blush application:
Load a blush brush with your rose-toned blush. Focus the color on the apples of the cheeks, blending it aggressively outwards towards the temples. -
Connect the color:
Don’t stop at the cheeks—sweep the blush across the bridge of your nose and even onto the tip of the chin. This creates a feverish, overly-painted toy aesthetic. -
Map the cracks:
Using a very fine-tip liquid eyeliner, lightly sketch a jagged line starting from the hairline on one side of your forehead, moving down towards the cheek. -
Branch out:
Add smaller, branching lines coming off the main crack. Vary the length and pressure to make them look like natural stress fractures in ceramic. -
Detail the nose:
Draw tiny, controlled black dots across the bridge of the nose and upper cheeks to simulate exaggerated freckles. -
Add red accents:
Using a red lip liner or face paint on a detail brush, draw three distinct red dots or small hearts just below the outer corner of the eye, right over the blush. -
Highlight the damage:
If you want extra realism, use a white eyeliner to trace a very thin line right next to your black crack lines. This creates a 3D illusion of light catching the broken edge.
Level Up: 3D Chips
Fill in a small section between two crack lines with black paint to make it look like a piece of the porcelain face has completely fallen off.
Step 4: The Doll’s Mouth
-
Shape the lips:
Apply a matte dusty rose lipstick. Focus the color in the center of the lips and tap it outwards with your finger for a soft, diffused look rather than a crisp line. -
Final check:
Step back and assess symmetry. Add a few more drawn-on freckles if the nose area feels too empty, or deepen the blush if the lights have washed it out.
Now you are ready to haunt the toy shelf with your beautifully broken appearance
Neon Monster Lines Under Blacklight

Transform yourself into a glowing creature of the night with this striking high-contrast design. By combining a matte black base with vibrant UV-reactive pinks and greens, you’ll create a sharp, jagged look that commands attention even before the blacklights turn on.
Step-by-Step
Materials
- Matte black face paint (water-activated or cream)
- Neon pink face paint (UV reactive suggested)
- Neon green face paint (UV reactive suggested)
- Broad flat brush or makeup sponge
- Fine liner brush (size 1 or 0)
- Medium round brush
- Black eyeliner pencil (optional for sketching)
- Translucent setting powder
- Setting spray
- Cup of water
- Paper towels
Step 1: The Dark Canvas
-
Prep the skin:
Begin with a clean, dry face. Tie your hair back securely to keep it away from the paint. Using a broad flat brush or a makeup sponge, pick up your matte black face paint. -
Create the base layer:
Cover your entire face in black paint, extending down the neck and onto your shoulders. Work in thin, even layers to prevent cracking. I like to let the first layer dry briefly before adding a second to ensure complete opacity. -
Fill the details:
Don’t forget the tricky spots: carefully paint around the nostrils, over the eyebrows, and right up to the lash line. Use a smaller round brush for these areas to maintain precision. -
Set the base:
Once the black is fully dry, very lightly dust a translucent setting powder over the T-zone if you are using cream paint, or simply let water-activated paint set completely. This prevents the neon colors from muddying later.
Neon Not Popping?
If neon looks dull against the black, paint the design in white first. Let it dry completely, then layer the neon green and pink on top for maximum brightness.
Step 2: Neon Framework
-
Establish the centerline:
Load a medium round brush with neon green paint. Draw a vertical line straight down the center of your forehead, stopping right between your eyebrows. -
Outline the forehead V:
Switch to neon pink. At the top of your forehead, paint a large V-shape that encompasses the green centerline you just drew. The lines should be thick and bold. -
Define the eye sockets:
Using the neon pink, draw a large, curved line that starts near the bridge of your nose (under the green centerline), arcs high over the eyebrow, and sweeps down towards the cheekbone, mimicking a large orbital socket. -
Mirror the design:
Repeat this pink curved line on the other side of the face, trying to keep the symmetry as close as possible. -
Create the heavy jawline:
Continue with the pink paint to draw a wide, grinning jawline. Start from the ear area and sweep a curved line down towards the chin, connecting with the upper cheek line you drew previously. -
Trace the lips:
Outline your actual upper lip with a thick band of neon pink, extending the corners outwards slightly into a smile.
Clean Lines Hack
Use a Q-tip dipped in micellar water to clean up any messy edges of your black base before you start applying the neon design.
Step 3: Jagged Details
-
Spike the forehead:
Now, take your fine liner brush and the neon green paint. Along the inside edge of the pink forehead V-shape, paint sharp, triangular zig-zags facing inward. -
Add orbital spikes:
In the large pink eye socket shapes, paint a row of jagged green teeth or spikes along the top edge, pointing down towards your actual eye. Follow the curve of the pink line. -
Under-eye details:
Paint a similar row of green spikes along the bottom edge of the eye socket shape, pointing upward. This gives the eyes a fierce, monstrous appearance. -
The monster grin:
Moving to the cheek/jaw area, paint large, sharp green triangles inside the pink jaw outline. These should look like giant teeth filling the side of the face. -
Chin accents:
Below your bottom lip, paint small vertical green dashes to simulate teeth on the lower jaw, and add a single vertical green line running down the center of your chin. -
Body paint accents:
If you painted your neck and shoulders black, use the green paint to add simple, jagged outlines or geometric shapes on your collarbones to tie the whole look together. -
Final touches:
Check for any areas where the black might be showing through the neon. Carefully dab a little extra paint on these spots to maximize brightness. -
Seal result:
Close your eyes and mist the entire face with a setting spray to lock the design in for the night.
You are now ready to glow in the dark with a truly electrifying presence


Have a question or want to share your own experience? I'd love to hear from you in the comments below!