Heart plates are one of my favorite little canvases because they’re sweet, useful, and totally forgiving if you’re still finding your style. Here are heart plate painting ideas that range from classic and easy to artsy and unexpected—so you can make a piece that feels like you.
Classic Pink Heart With a Simple Border
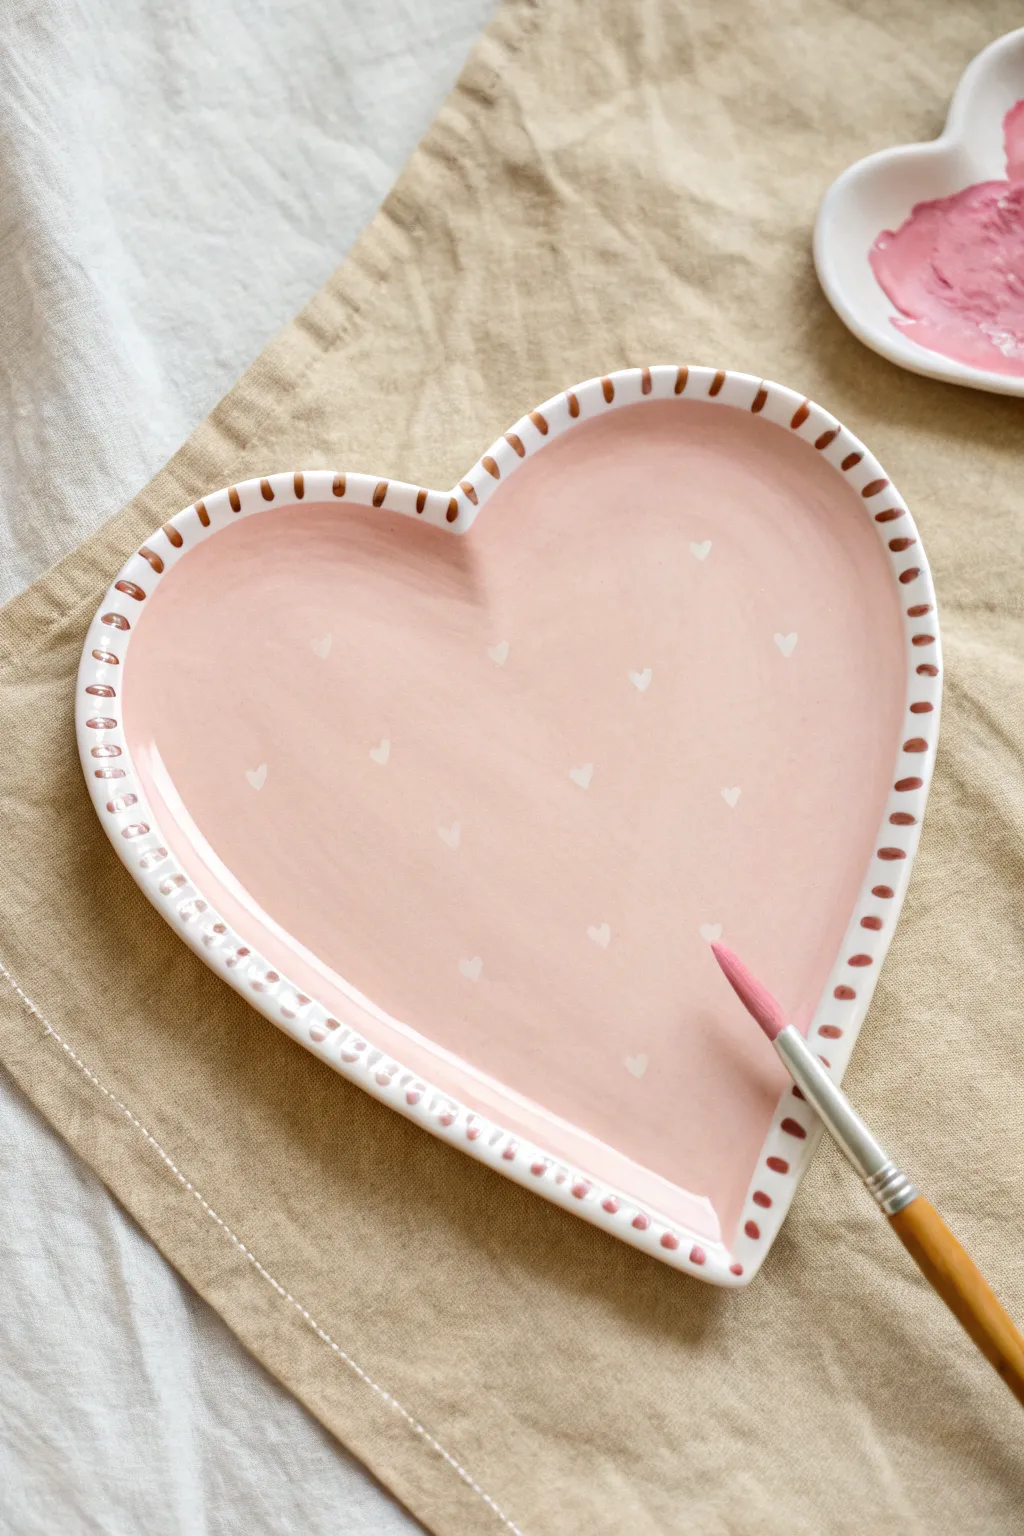
Embrace a classic romance aesthetic with this soft blush pink heart plate featuring delicate mini-heart details. The design uses negative space or soft white accents against a pastel background, framed by a charming rust-colored dashed border for a handmade feel.
How-To Guide
Materials
- Heart-shaped ceramic bisque plate
- Soft blush pink ceramic glaze or acrylic paint
- White ceramic glaze or acrylic paint
- Rust or terracotta brown ceramic glaze/paint
- Wide flat brush (for base coat)
- Small round detail brush (size 0 or 1)
- Medium round brush
- Palette for mixing
- Water cup and paper towels
Step 1: Base Coat Prep
-
Clean surface:
Begin by wiping down your ceramic bisque with a slightly damp sponge to remove any dust or oils, ensuring the paint adheres perfectly. -
Mix the pink:
Pour out a generous amount of blush pink paint. If your pink is too vibrant, tone it down with a tiny drop of white or beige to achieve that vintage pastel look. -
Apply first layer:
Using a wide flat brush, apply a smooth, even coat of the blush pink over the entire front surface of the plate. Use long strokes to minimize brush marks. -
Dry and repeat:
Let this first layer dry completely until it’s matte to the touch. This usually takes about 10-15 minutes depending on your paint type. -
Second coat:
Apply a second coat of pink. I find this second layer crucial for getting that opaque, creamy finish where the white bisque doesn’t show through. -
Final smooth:
Check for any ridges or clumps while the paint is wet and smooth them out gently with the tip of your brush. Let the base dry thoroughly before moving to details.
Step 2: Border & Details
-
Load the detail brush:
Switch to a medium round brush and load it with the rust or terracotta brown paint. You want enough paint on the brush to make a solid mark, but not so much that it drips. -
Start the border:
Begin at the top center dimple of the heart. Press the brush down gently on the rim to create a small dash mark, then lift. -
Create rhythm:
Continue making these small dashed marks around the entire rim of the plate. Space them about a quarter-inch apart, trying to keep the size consistent but not worrying about perfection—the handmade irregularity adds charm. -
Dry the border:
Allow the rim border to set for a few minutes so you don’t accidentally smudge it while working on the center. -
Prep the mini hearts:
Using your smallest detail brush (size 0 or 1), pick up a small amount of white paint. If the paint is thick, thin it slightly with water so it flows easier for tiny shapes. -
Paint center hearts:
Starting near the center, paint tiny ‘v’ shapes to form miniature hearts. They should be very small/subtle, scattered randomly across the pink field. -
Scatter the pattern:
Work your way outward, spacing the mini hearts loosely. Avoid arranging them in strict rows; a random scatter looks more organic and whimsical. -
Refine shapes:
Go back over any hearts that look transparent and add a tiny dot of fresh white paint to brighten them up. -
Clean up edges:
If any pink paint got onto the back of the plate during the base coat phase, use a damp sponge or paper towel to wipe the back rim clean for a professional finish. -
Final cure:
Allow the entire piece to dry for at least 24 hours. If using ceramic glazes, fire according to manufacturer instructions; if using acrylics, apply a clear gloss sealant now to protect your work.
Clean Brushing
To keep the border dashes crisp, wipe your brush every 5-6 strokes. Paint buildup near the ferrule can cause accidental blobs.
Reverse Technique
Instead of painting white hearts, apply heart-shaped stickers to the raw bisque before the pink coat. Peel them off later to reveal the white clay.
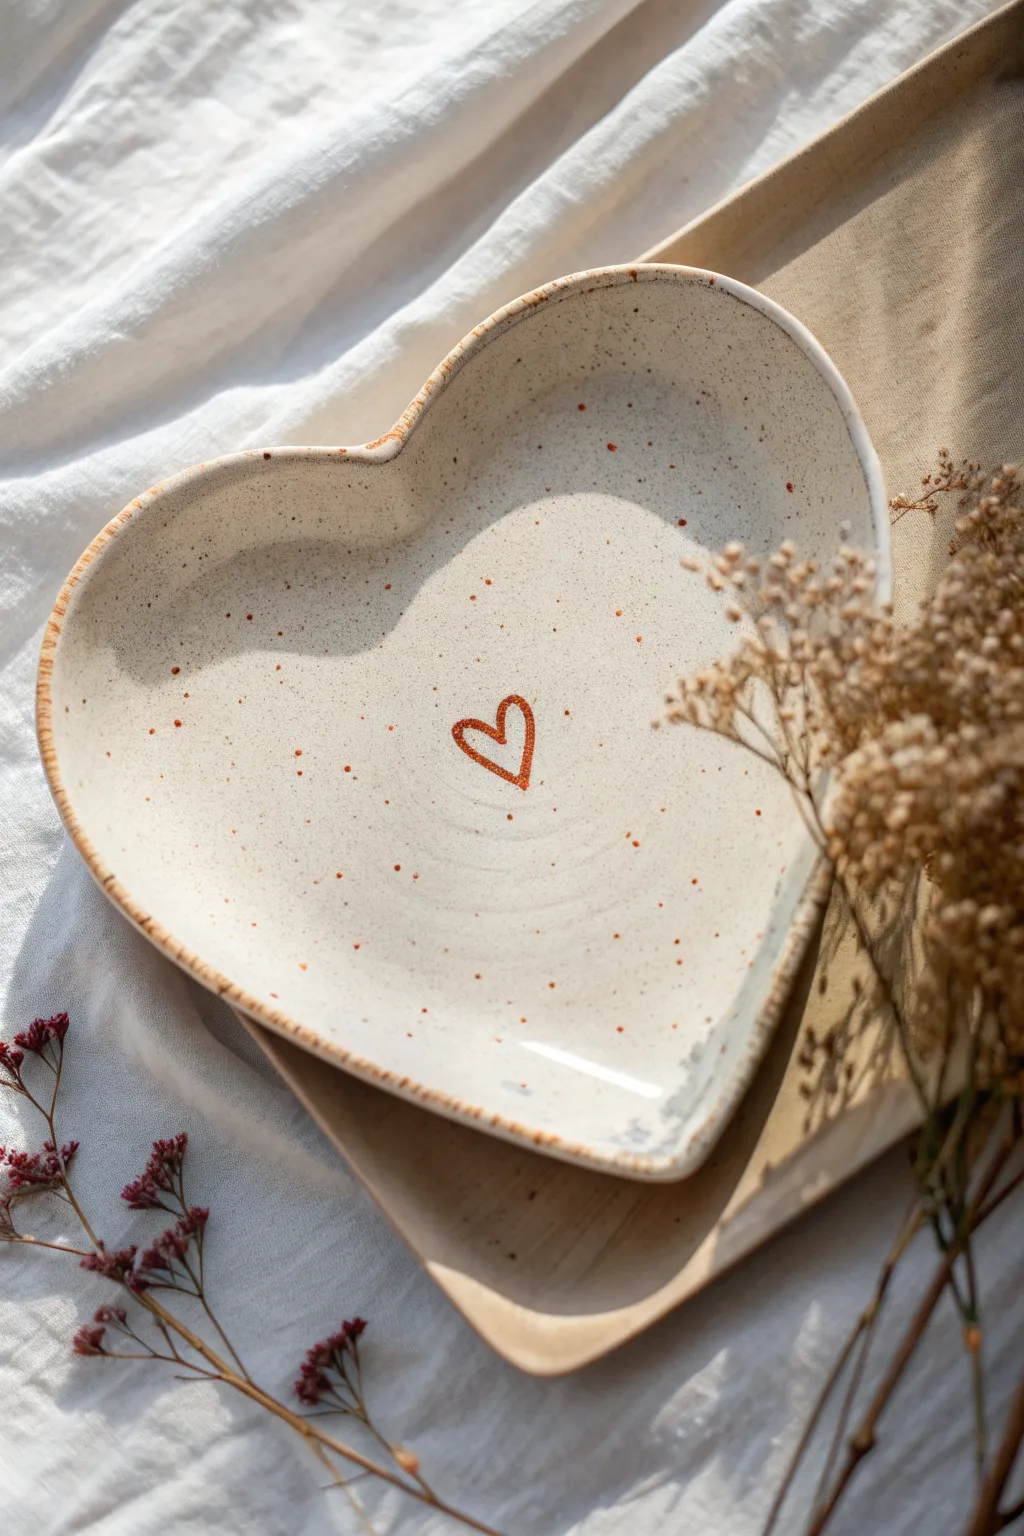
This sweet, delicate plate makes a perfect jewelry dish or a heartfelt gift for someone special


Black-and-White Polka Dots on a Heart Plate
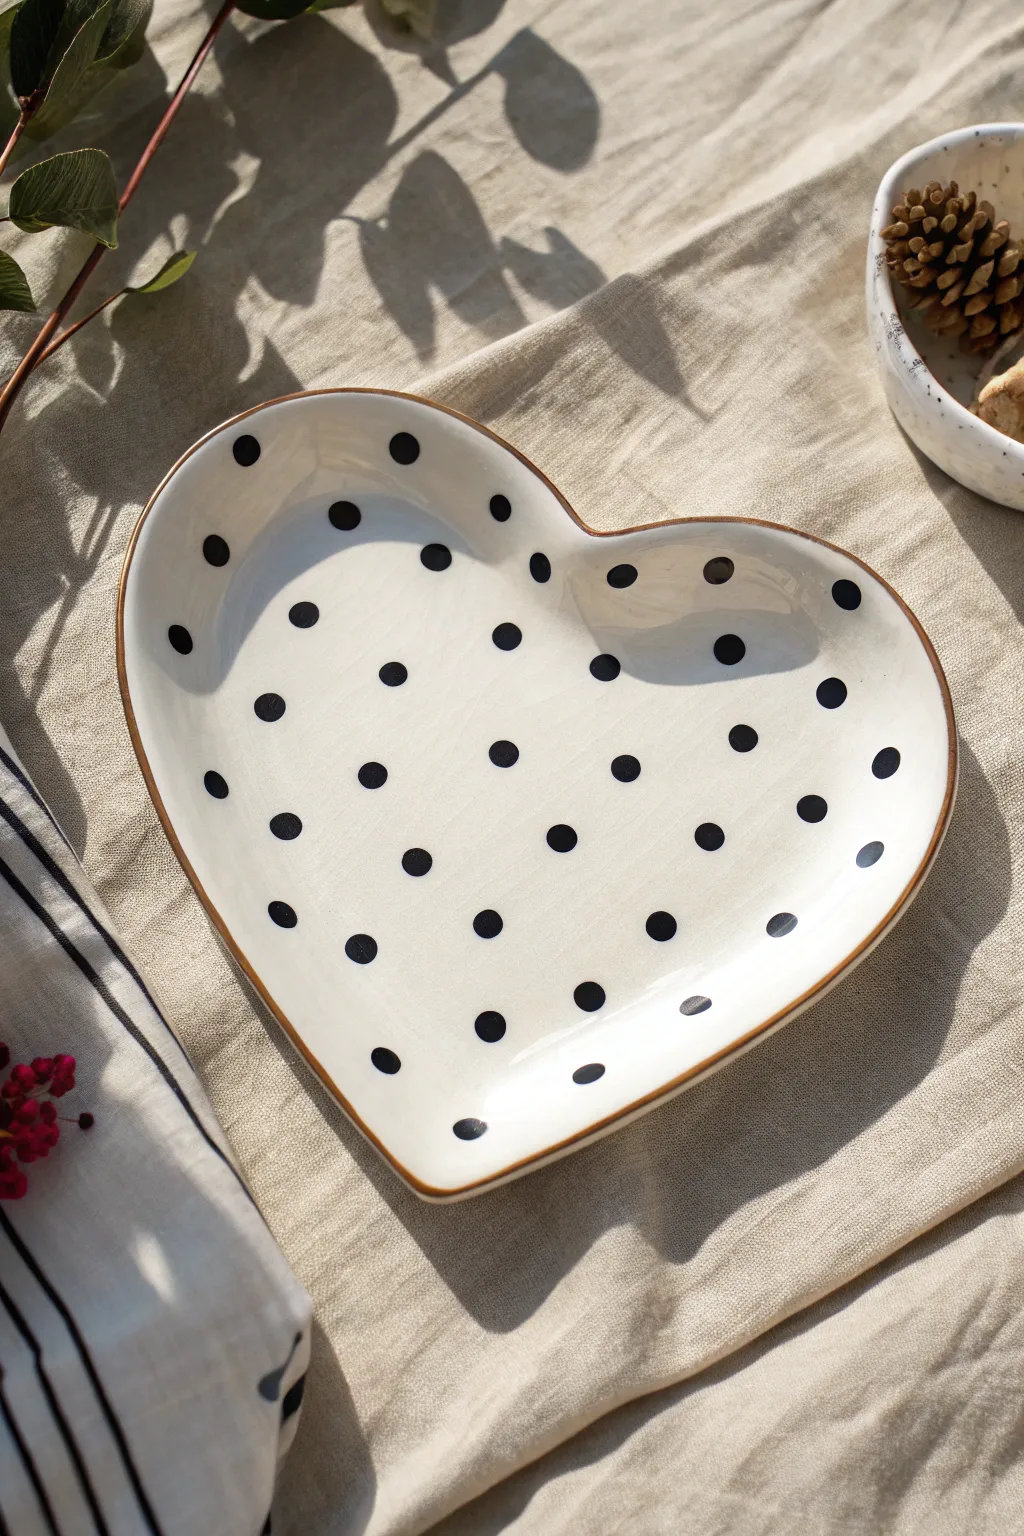
For a timeless look that fits any modern farmhouse or minimalist decor, this black-and-white polka dot design is perfection. The creamy base contrasted with crisp dots and a subtle rustic rim makes this plate feel both handmade and high-end.
Detailed Instructions
Materials
- Heart-shaped bisque plate (ceramic blank)
- Creamy off-white ceramic glaze (e.g., Mayco Ivory or similar)
- Black underglaze or ceramic paint
- Caramel brown underglaze (for the rim)
- Round sponge applicator (approx. 1/2 inch) or large dotting tool
- Soft fan brush (for base coats)
- Small liner brush (size 0 or 1)
- Damp sponge
- Clean water
- Clear dipping glaze (if using underglazes)
Step 1: Preparation and Base Coat
-
Clean the bisque:
Start by wiping down your ceramic heart plate with a damp sponge. This removes any kiln dust or oils from your hands that might resist the glaze. -
Load your fan brush:
Mix your creamy off-white glaze well. Load a soft fan brush generously, ensuring the bristles are full but not dripping. -
Apply the first layer:
Apply smooth, long strokes across the entire front surface of the plate. Work in one direction, for example, from the top of the heart lobes down to the point. -
Let it dry:
Wait until the first coat loses its sheen and feels dry to the touch. This usually takes about 5-10 minutes depending on humidity. -
Apply cross-hatch layers:
Apply two more coats of the cream glaze. For the second coat, brush in the opposite direction (horizontally) to ensure full coverage. Finish with a third coat in the original direction, letting each layer dry in between.
Fixing Uneven Dots
If your sponge leaves a texture or a bubble in the center of the dot, smooth it gently with a damp fingertip just as the shine begins to fade from the paint.
Step 2: Creating the Polka Dots
-
Prepare the black paint:
Pour a small amount of black underglaze onto a palette or tile. It should be the consistency of heavy cream; if it’s too thick, add a drop of water. -
Test your tool:
I recommend testing your dotting tool or round sponge on a piece of paper first. Press down firmly to see the size of the dot it creates. -
Start at the center:
Place your first dot right in the center of the heart plate. This acts as an anchor for the rest of your pattern. -
Establish the vertical line:
Add dots above and below your center dot, spacing them evenly. Aim for about 1.5 to 2 inches of space between each dot. -
Create the diagonal grid:
To get that classic alternating pattern, place the next row of dots not directly next to the first ones, but in the spaces between them (offset). Imagine a triangle connecting three dots. -
Fill the edges:
Continue the pattern outward toward the rim. Don’t worry if a dot falls partially off the edge—just paint a half-dot to make the pattern look continuous, like fabric cut from a bolt. -
Clean up smudges:
If a dot gets messy, wait for it to dry completely, then gently scratch the mistake away with a wooden skewer or toothpick before retouching the cream base.
Make It Glossy
For a true polished ceramic look, ensure you apply two coats of clear glaze over the design before firing. This gives the black dots that wet, glassy depth.
Step 3: Finishing Details
-
Paint the rim:
Dip your small liner brush into the caramel brown underglaze. Carefully run the side of the bristles along the very edge of the plate to create a thin, rustic outline. -
Check for consistency:
Go over the rim a second time if the line looks too faint. The brown adds a lovely vintage definition to the shape. -
Final drying:
Allow the entire piece to dry overnight to ensure all moisture has evaporated from the bisque. -
Glaze and fire:
If your paints require a clear topcoat, apply a clear dipping or brush-on glaze now. Then, fire the piece in a kiln according to the specific cone temperature of your clay and glaze (usually Cone 06 or Cone 6).
Once fired, this charming plate is ready to hold trinkets or serve sweet treats with style


Hand-Lettered Love Word in the Center
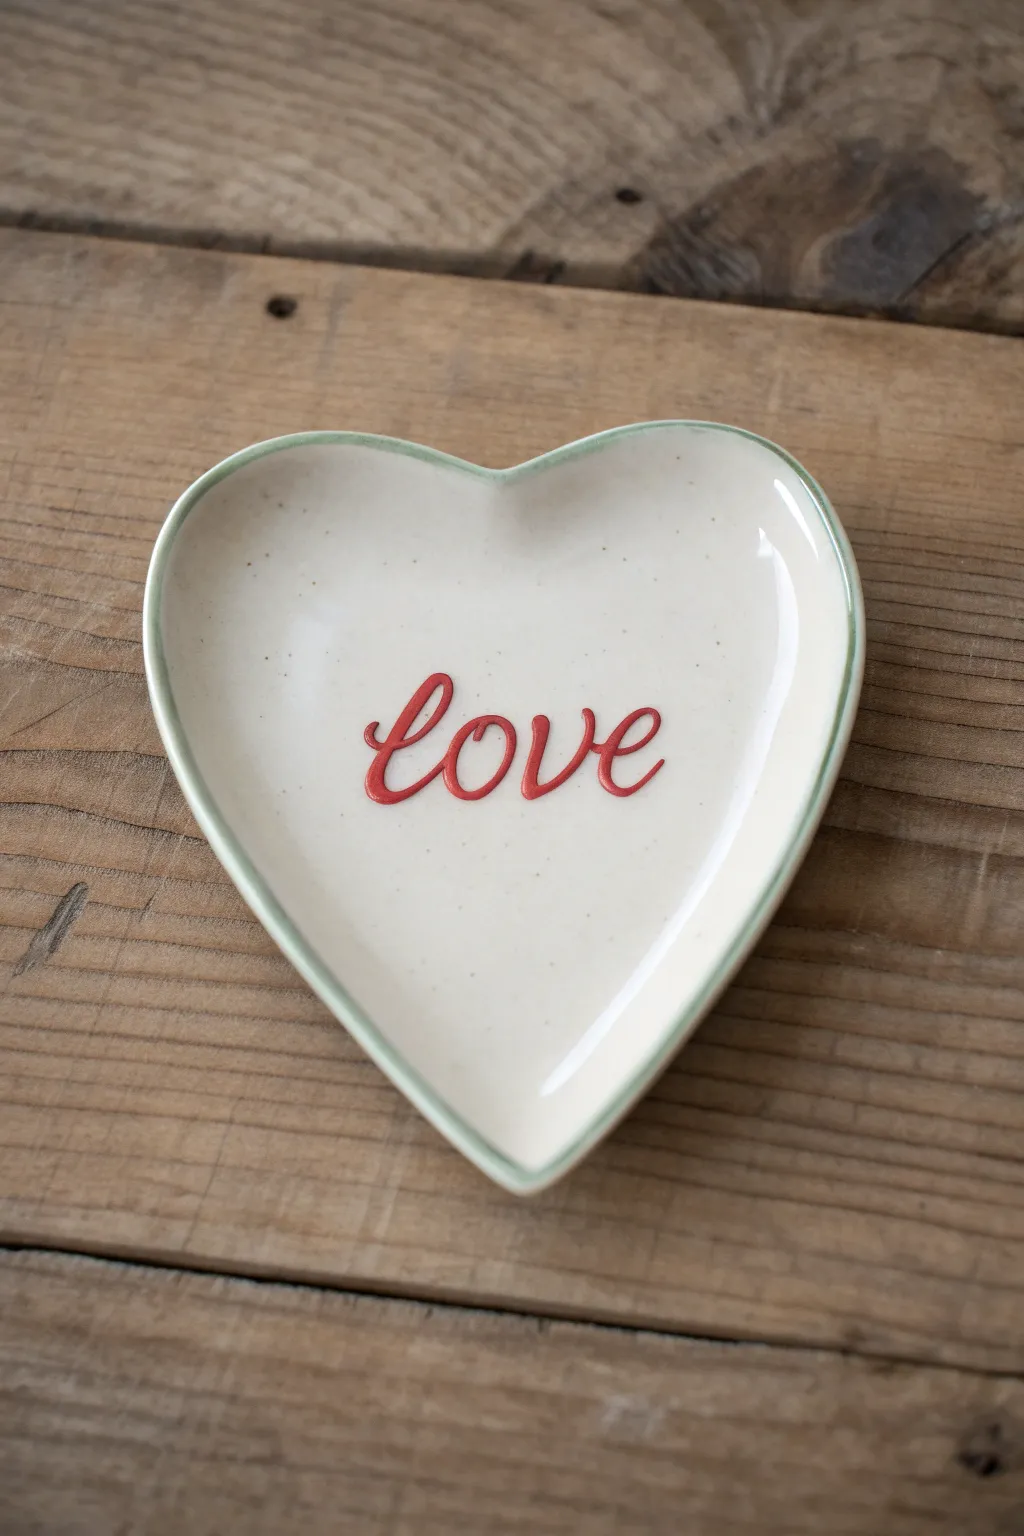
Embrace simplicity with this charming heart-shaped trinket dish, featuring a delicate speckled cream finish and a bold red sentiment. This project focuses on clean lettering and subtle rim detailing to create a timeless piece for holding jewelry or small treasures.
Step-by-Step Tutorial
Materials
- Bisque-fired ceramic heart plate
- Underglaze pencil (light grey or tan)
- Cream or off-white underglaze for the base
- Light teal or sage green underglaze for the rim
- Bright red underglaze for the lettering
- Speckled glaze (clear with speckles) or brown underglaze for manual speckling
- Clear variation glaze (if using manual speckles)
- Fine liner brush (size 0 or 00)
- Medium soft round brush
- Fan brush
- Water cup and paper towels
- Sponge
Step 1: Base Preparation
-
Clean the bisque:
Start by wiping down your bisque heart plate with a damp sponge. This removes any dust from the firing process and ensures your glaze adheres smoothly without pinholing. -
Apply the base color:
Using a soft fan brush, apply three even coats of cream or off-white underglaze to the entire top surface of the plate. Allow the glaze to dry to a chalky finish between each coat to prevent dragging the previous layer. -
Add the speckles:
If your base glaze doesn’t have pre-mixed speckles, create your own. Dilute a tiny amount of brown underglaze with water on an old toothbrush. Hold it over the plate and run your thumb across the bristles to flick tiny droplets onto the wet surface. Keep the spacing random and sparse for a natural look.
Paint Consistency Pro-Tip
For the smoothest script lettering, thin your red underglaze slightly with water until it has the consistency of heavy cream. This helps the brush glide without skipping.
Step 2: Rim Detailing
-
Load the brush:
Dip a medium soft round brush into your sage green or light teal underglaze. You want the brush fully loaded but not dripping. -
Paint the rim:
Hold the brush perpendicular to the plate’s edge. Gently glide the bristles along the very top rim of the heart shape. Use the natural ridge of the plate to guide your hand. -
Clean up edges:
If any green paint slipped down into the cream area, use a clean, damp stiff brush or a specialized cleanup tool to gently wipe it away before it dries completely.
Step 3: Lettering
-
Sketch the word:
Lightly sketch the word ‘love’ in the center of the heart using a specialized underglaze pencil. Don’t press hard; you just need a faint guide. Regular graphite can create resistance issues with glaze, so stick to ceramic pencils. -
Outline the script:
Using your finest liner brush and the bright red underglaze, carefully trace the outline of your sketched letters. Focus on creating smooth, flowing loops. -
Thicken the downstrokes:
To achieve that classic calligraphy look, go back over the ‘downstrokes’ (the parts of the letters where your pen would naturally move downward) and slightly thicken them. Keep the upstrokes thin and delicate. -
First coat drying:
Let this first red layer dry completely. The red needs to be opaque, so rushing this step can lead to streaky results. -
Second coat:
Apply a second coat of bright red over the lettering. I find that dabbing or flowing the paint onto the letters works better here than long brushstrokes, as it deposits more pigment without lifting the first layer. -
Final lettering touch-ups:
Inspect the edges of your letters. If they look fuzzy, use your fine liner brush with a tiny bit of the cream base color to ‘cut in’ and sharpen the red edges.
Level Up: Relief Effect
Use a writer bottle with a fine metal tip to apply the red word. This creates a raised, embossed texture that adds a lovely tactile element to the finished plate.
Step 4: Finishing
-
Apply clear glaze:
Once all your design work is bone dry, apply two coats of clear transparent glaze over the entire piece. Use a fan brush and light, floating strokes to avoid smearing the red lettering. -
Check the foot:
Ensure the bottom ‘foot’ or resting ring of the plate is completely free of glaze. Wipe it with a sponge if necessary, as glaze on the bottom will stick to the kiln shelf. -
Fire the piece:
Place your heart plate in the kiln and fire it according to the specific cone rating of your clay and clear glaze—usually Cone 06 for low-fire earthenware.
Once fired, this lovely little dish is ready to be gift-wrapped or placed on a vanity


Dainty Daisy Scatter on a Heart Dish
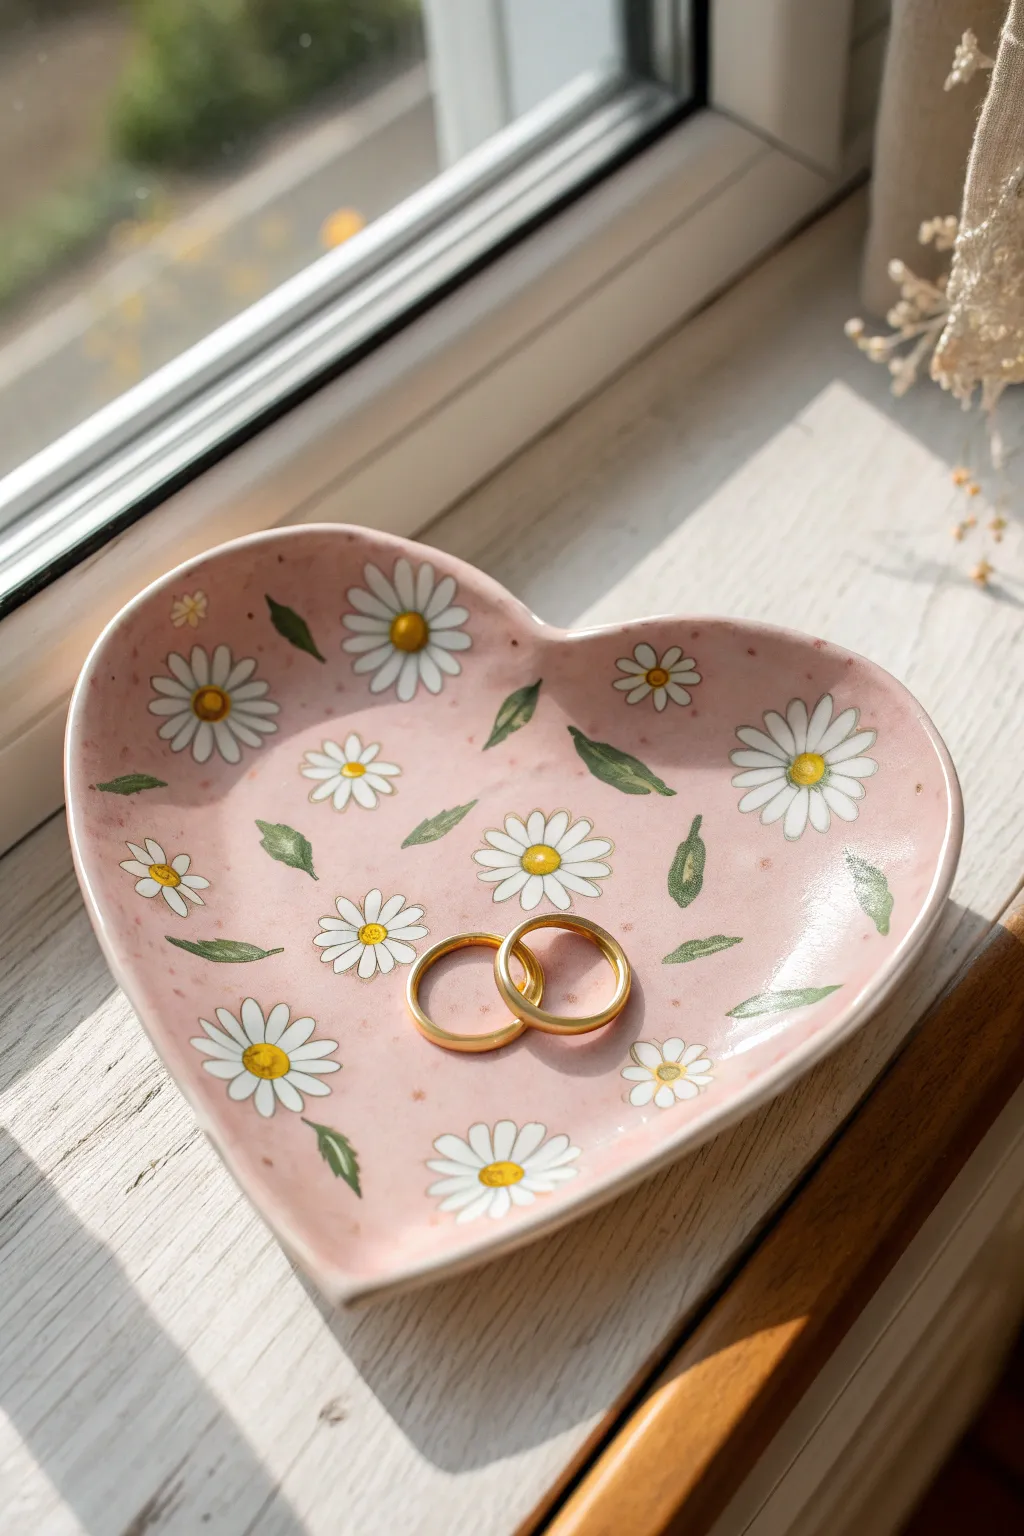
Transform a simple ceramic blank into a sweet, romantic catch-all dish perfect for holding your favorite rings. This design features cheerful white daisies and soft green leaves floating on a dreamy, speckled pink background.
Detailed Instructions
Materials
- Heart-shaped ceramic bisque dish
- Underglaze pencil or soft graphite pencil
- Light pink speckled underglaze (or light pink plus separate speckle glaze)
- Opaque white underglaze
- Mustard yellow underglaze
- Sage green underglaze
- Small round synthetic brush (size 2 or 4)
- Fine liner brush (size 0 or 00)
- Clear dipping glaze
- Ceramic kiln access
Step 1: Preparation & Base Coat
-
Clean the bisque:
Start by wiping down your ceramic heart dish with a slightly damp sponge to remove any dust from the shelf, ensuring a clean surface for painting. -
Apply the background color:
Using a soft fan brush or a larger flat brush, apply three even coats of your light pink speckled underglaze to the entire top surface of the dish. Allow the glaze to dry until it’s chalky and matte between each coat. -
Check for coverage:
Ensure the pink is solid and opaque; if you see streaks of the white bisque showing through, add a fourth thin coat to smooth it out. -
Let it dry completely:
Before moving to the detailed flower work, let the pink base coat dry completely so you don’t accidentally lift the color while painting the daisies.
Step 2: Painting the Daisies
-
Plan the placement:
Visualize where your flowers will go. It helps to imagine a triangle shape for the main clusters and fill in the gaps with smaller blooms. -
Paint the first petals:
Load a size 2 round brush with opaque white underglaze. Press the belly of the brush down and pull inward toward a center point to create a single petal shape. -
Complete the flower head:
Repeat this press-and-pull motion in a circle to form a full daisy. Don’t worry about making them perfectly symmetrical; natural variation adds charm. -
Add floating petals:
Paint a few half-flowers near the edges of the heart rim, as if the pattern continues off the plate. -
Layer the white:
White underglaze can sometimes appear translucent after firing. I prefer to wait for the first layer of petals to dry and then dab a second coat of white right on top to ensure brightness. -
Add the centers:
Using the back end of your paintbrush handle or a small dotting tool, dip into the mustard yellow underglaze and place a firm dot in the center of each flower.
Natural Petal Pro-Tip
Don’t make every petal identical. Mix shorter and longer strokes within the same flower to mimic the organic imperfection of real field daisies.
Step 3: Leaves & Details
-
Draft the leaves:
Switch to your fine liner brush and the sage green underglaze. Paint simple, elongated oval shapes tucked between the flowers. -
Keep it loose:
Vary the direction of the leaves to create a sense of movement, like they are scattering in a gentle breeze. -
Clean up edges:
If any pink background accidentally covered a petal area, or if a leaf shape went awry, use a clean, stiff brush slightly dampened with water to gently nudge the paint back into place. -
Final drying details:
Look closely at your yellow centers. If the yellow looks thin, add a tiny second dot to give the flower centers a slight raised texture. -
Define petals (optional):
For extra definition, use an extremely fine brush with a watered-down grey or brown underglaze to add tiny, hair-thin lines separating petals, though the design looks lovely without this step too.
Level Up: Gold Accents
After the final firing, use an overglaze gold luster on the flower centers or rim and fire it again at a lower temperature for a luxurious, gilded finish.
Step 4: Finishing
-
Full dry:
Allow the entire piece to dry overnight if possible, or at least until all moisture has evaporated from the clay. -
Clear glaze application:
Carefully dip the dish into a clear transparent glaze. Use a pair of tongs to hold it steady, then give it a gentle shake to remove excess drips. -
Stilt and fire:
Wipe the bottom foot of the dish clean with a sponge to prevent it from sticking to the kiln shelf. Place on stilts and fire according to your clay and glaze specifications.
Once fired, this lovely dish is ready to hold your delicate jewelry or simply brighten up your vanity
BRUSH GUIDE
The Right Brush for Every Stroke
From clean lines to bold texture — master brush choice, stroke control, and essential techniques.
Explore the Full Guide
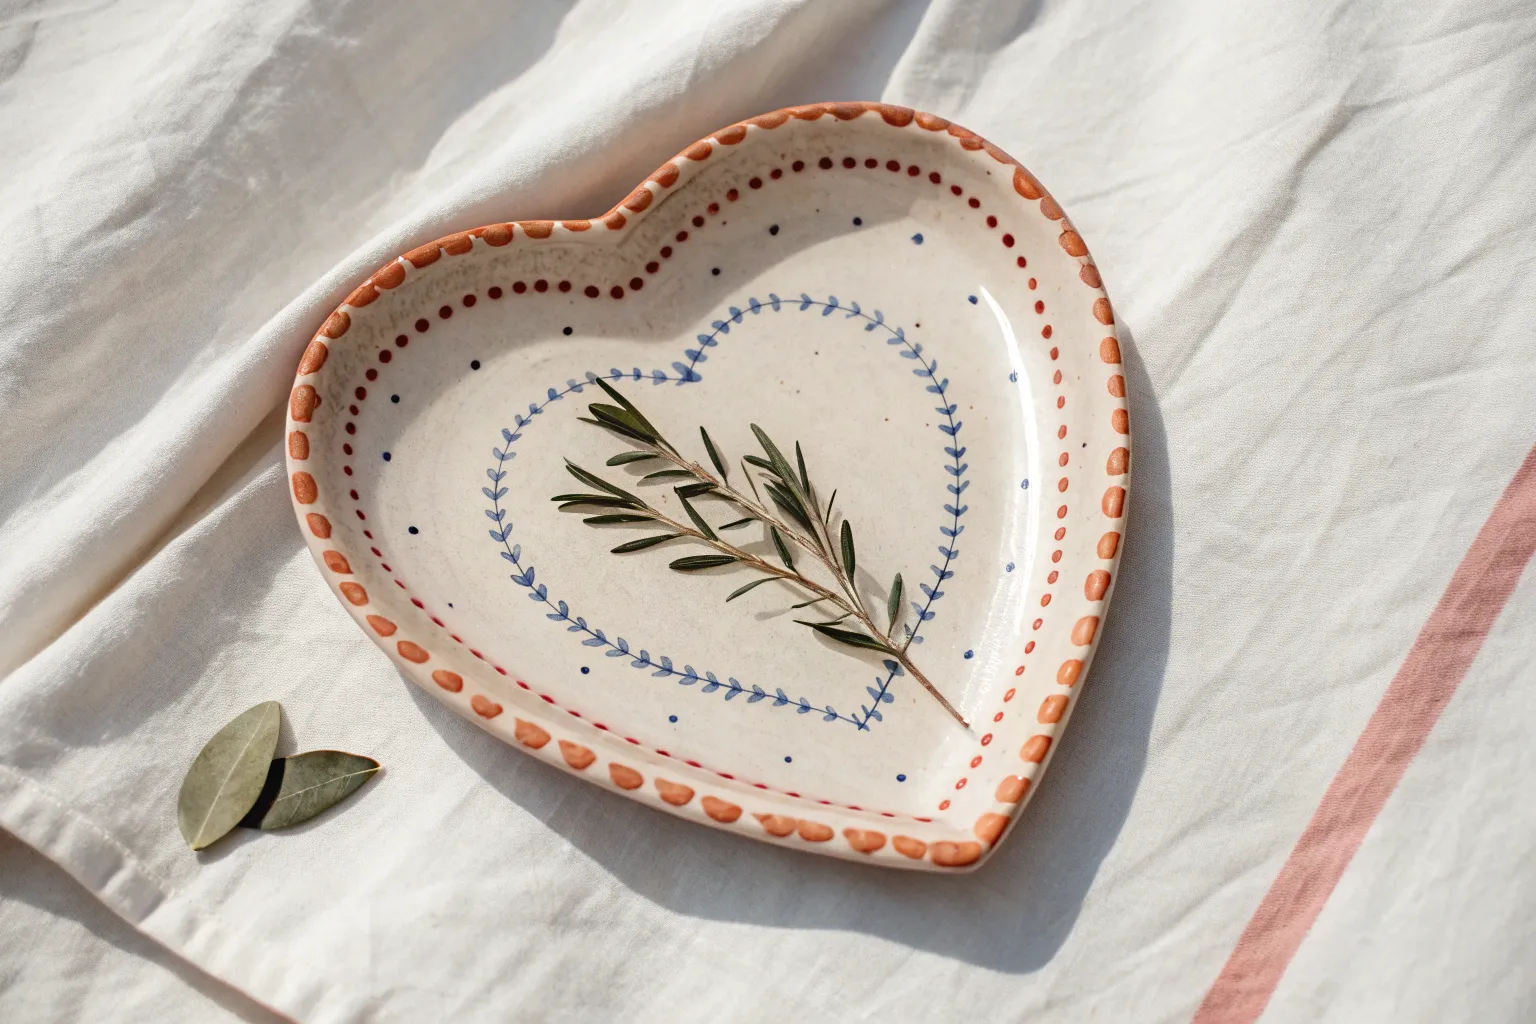
Soft Wildflower Wreath Around the Rim
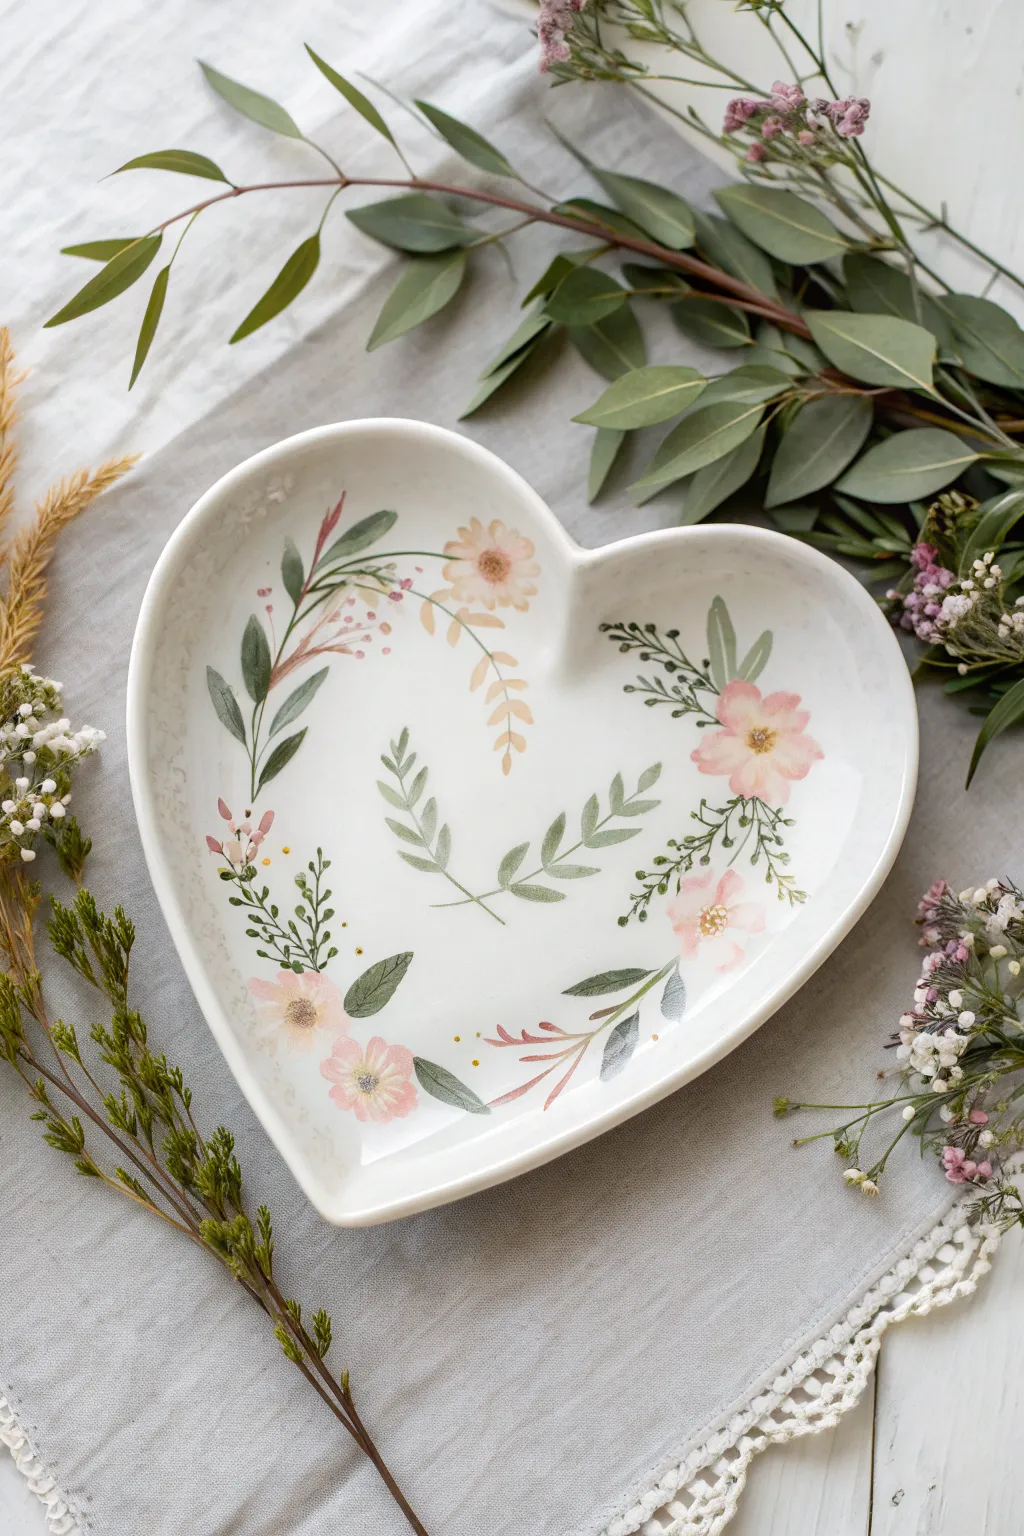
Capture the delicate beauty of a spring garden with this heart-shaped plate project. Using soft washes and botanical details, you’ll create a gentle wreath of wildflowers that feels both romantic and organic.
Step-by-Step
Materials
- Heart-shaped ceramic plate (bisque or glazed ceramic depending on paint choice)
- Ceramic paints or porcelain markers (soft pink, sage green, olive green, cream/white, yellow ochre)
- Small round brushes (sizes 0, 2, and 4)
- Palette for mixing
- Water cup and paper towels
- Rubbing alcohol (for cleaning surface)
- Oven (for curing, if required by paint type)
Step 1: Preparation & Layout
-
Clean the Surface:
Before you begin painting, wipe the entire plate down with rubbing alcohol to remove any oils or dust. This ensures the paint adheres properly and prevents future peeling. -
Plan the Composition:
Imagine a loose “U” shape or broken wreath following the curve of the heart. You don’t need a pencil sketch, but mentally mark three main clusters: top left, top right (slightly lower), and bottom center.
Don’t Overwork It
To keep that airy watercolor look, use fewer strokes. If you keep going over the same petal, the paint becomes heavy and opaque, losing its delicate charm.
Step 2: Painting the Main Blooms
-
Mix a Soft Pink:
On your palette, mix a touch of white into your pink paint to create a soft, pastel blush tone. The goal is a watercolor effect, so you can slightly thin the paint with medium if your specific brand allows. -
Paint the Primary Flowers:
Using a size 4 brush, paint loose, five-petal flower shapes. Place one larger bloom near the right curve and a smaller cluster near the bottom left rim. Keep the strokes gentle and not too opaque. -
Add Variation:
While the first layer is still slightly wet, dab a tiny bit of darker pink into the centers of the flowers. This creates depth and makes them look bloom-fresh. -
Create the Centers:
Once the pink petals are dry, take your smallest brush (size 0) and dot the centers with yellow ochre or a warm brown to mimic pollen.
Step 3: Adding Greenery & Vines
-
Mix Sage Green:
Blend your green with a little white and a drop of yellow to get a warm, sage-like hue. This looks more natural than straight-from-the-bottle green. -
Paint the Central Sprigs:
In the center of the plate, paint two small, curved branches with opposite leaves that cross at the bottom, creating a subtle focal point of greenery. -
Connect the Blooms:
Using a size 2 brush, paint long, sweeping stems that curve along the heart’s rim, connecting your flower clusters. Think of how vines naturally droop and curl. -
Add Large Leaves:
Along these stems, paint elongated, almond-shaped leaves. Use a ‘press and lift’ motion with your brush: start with the tip, press down to widen the leaf, and lift up to end in a point. -
Layer Darker Leaves:
Mix a slightly darker olive green. Tuck a few smaller, darker leaves behind the lighter sage ones to add dimension and prevent the wreath from looking flat.
Add Subtle Shimmer
For a magical touch, mix a tiny amount of pearlescent medium into your final flower center dots or dew drops on the leaves.
Step 4: Delicate Details
-
Paint Filler Flowers:
Using a creamy white or very pale pink, add tiny clusters of dots or small teardrop shapes near the main leaves. Use the very tip of your size 0 brush for this. -
Add Wispy Stems:
Draw incredibly thin, hair-like lines extending from your main stems using a brownish-red or deep green. These fine details make the arrangement look airy and wild. -
Create Texture:
If you have some reddish-brown paint, add tiny speckles or small buds at the ends of the wispy stems to mimic dried grasses or seed pods. -
Review and Refine:
Step back and look at the balance. If a spot looks too empty, add a small floating leaf or a tiny bud. I usually find that less is more here, so add slowly.
Step 5: Finishing
-
Dry Completely:
Let the paint dry fully according to the manufacturer’s instructions. This usually takes at least 24 hours. -
Bake to Cure:
Most ceramic paints require baking to become permanent. Place the plate in a cool oven, set the temperature (usually 300°F-350°F), and start the timer once it reaches heat. Let it cool completely inside the oven.
Your finished plate is now a lovely piece of botanical art ready to hold jewelry or simply be admired.
Blue-and-White Vintage-Inspired Heart Plate
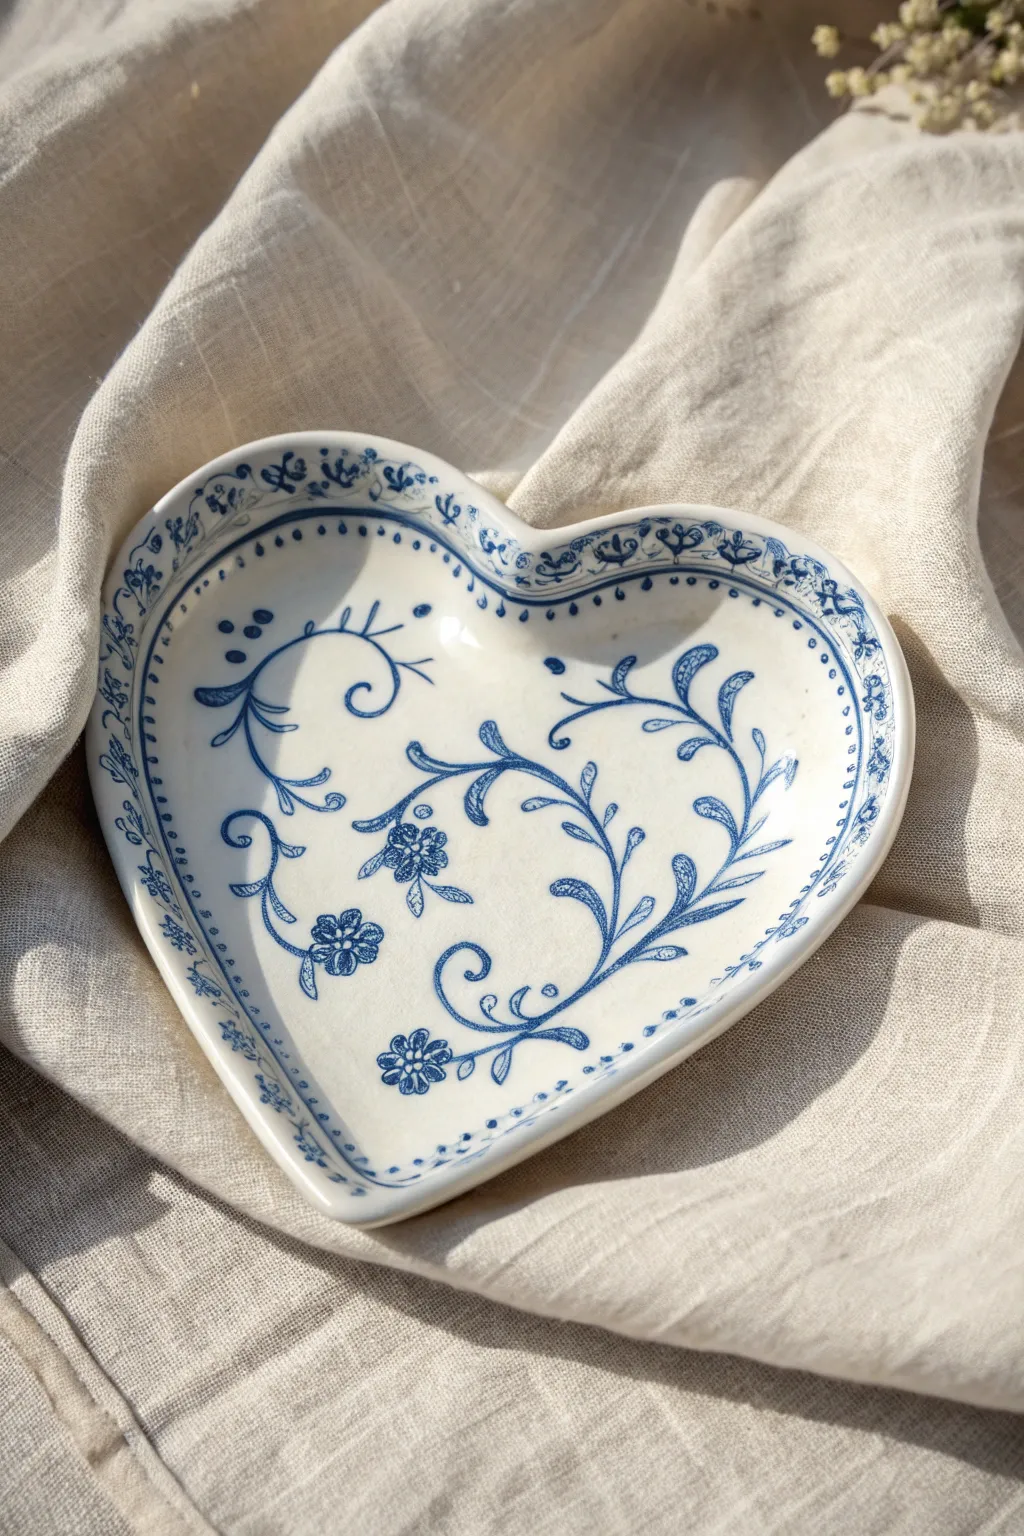
Capture the timeless elegance of classic blue cobalt pottery with this hand-painted ceramic project. This design features delicate scrolling vines and traditional floral motifs that give a plain white dish the look of an antique treasure.
How-To Guide
Materials
- Heart-shaped white ceramic plate (bisque or glazed)
- Porcelain paint or ceramic gloss enamel (Cobalt Blue or Navy)
- Fine liner brush (size 0 or 00)
- Round brush (size 2)
- Rubbing alcohol and paper towel
- Carbon paper or graphite transfer paper (optional)
- Pencil and eraser
- Ceramic sealant or clear glaze (if required by your paint type)
- Oven for curing (if using bake-on paints)
Step 1: Preparation & Planning
-
Clean surface:
Before laying down a single stroke, wipe your ceramic plate thoroughly with rubbing alcohol. This removes any oils or fingerprints that might repel the paint and ensures a crisp, lasting finish. -
Sketch the spine:
Visualize a central ‘S’ curve or vine structure. Using a very light pencil touch, sketch a main scrolling line starting from the bottom point of the heart, curving up toward the right lobe, and a smaller counter-curve on the left side. -
Outline the border:
Lightly trace a rim line about a quarter-inch inside the plate’s edge. This will serve as the guide for the intricate border pattern later.
Shaky Lines?
Rest your painting hand’s pinky finger on the dry edge of the plate while working. This creates a bridge that stabilizes your hand for fine detail work.
Step 2: Painting the Central Floral Motif
-
Load the liner brush:
Thin your cobalt blue paint slightly if it feels tacky. You want an inky consistency that flows smoothly off a liner brush without blobbing. -
Paint the main stems:
Following your pencil guide, paint the central stems with fluid, confident strokes. Vary your pressure—press down for thicker sections of the vine and lift up for hairline ends. -
Add primary leaves:
along the main vine, add elongated, curved leaves. Paint the outline of the leaf first, then fill it with quick, directional hatching lines rather than solid color to mimic that vintage engraving style. -
Create the flowers:
Add three small flowers: one near the bottom point, one in the center, and one trailing left. These are simple five-petal shapes. Keep the centers open initially. -
Detail the blossoms:
Inside each flower petal, add tiny lines radiating from the center. Place a small dot or a tiny circle with cross-hatching in the very center of each bloom. -
Add scrolling flourishes:
Fill the negative space with delicate tendrils. Use the very tip of your liner brush to create spiral ‘C’ shapes and curlicues branching off the main stems.
Step 3: Creating the Vintage Border
-
Paint the rim lines:
Using the size 2 round brush, paint a solid, relatively thick blue line along the very outer edge of the heart. Then, paint a much thinner line just inside it, following the pencil guide you made earlier. -
Add the dot border:
Between your floral design and the inner rim line, paint a series of tiny, evenly spaced dots. Dip the non-brush end of your paintbrush handle into the paint to use as a stamp for perfect uniformity. -
Start the scalloped pattern:
On the wider outer rim section, paint a continuous scalloped or wavy line pattern that runs around the entire circumference. -
Fill scroll details:
Inside the larger waves of the border, add tiny, quick scrolls or stylized leaf shapes. These don’t need to be identical; a little variation adds to the hand-painted charm. -
Connect the design:
Look for empty spaces in the border pattern and add tiny tick marks or dots to make the density match the central artwork.
Pro Tip: Faux-Antique Look
Mix a tiny drop of water into your blue paint for the leaves. This makes the pigment semi-transparent, mimicking the varied wash found on real Delftware.
Step 4: Curing & Finishing
-
Clean up errors:
If you have any smudges or shaky lines, use a damp cotton swab or a toothpick to gently scrape away the mistake before the paint fully sets. -
Let it dry:
Allow the plate to dry completely for at least 24 hours. The paint must be fully cured to the touch before baking. -
Bake to set:
Place the plate in a cool oven, then set the temperature to 300°F (150°C) or according to your paint manufacturer’s instructions. Bake for 30-35 minutes. -
Cool down:
Turn the oven off and leave the plate inside until it is completely cool. Removing it while hot can cause the ceramic to crack.
Once cooled, your vintage-style plate is ready to hold jewelry or simply be admired on a shelf

PENCIL GUIDE
Understanding Pencil Grades from H to B
From first sketch to finished drawing — learn pencil grades, line control, and shading techniques.
Explore the Full Guide
Gold Rim Detail to Make It Feel Fancy
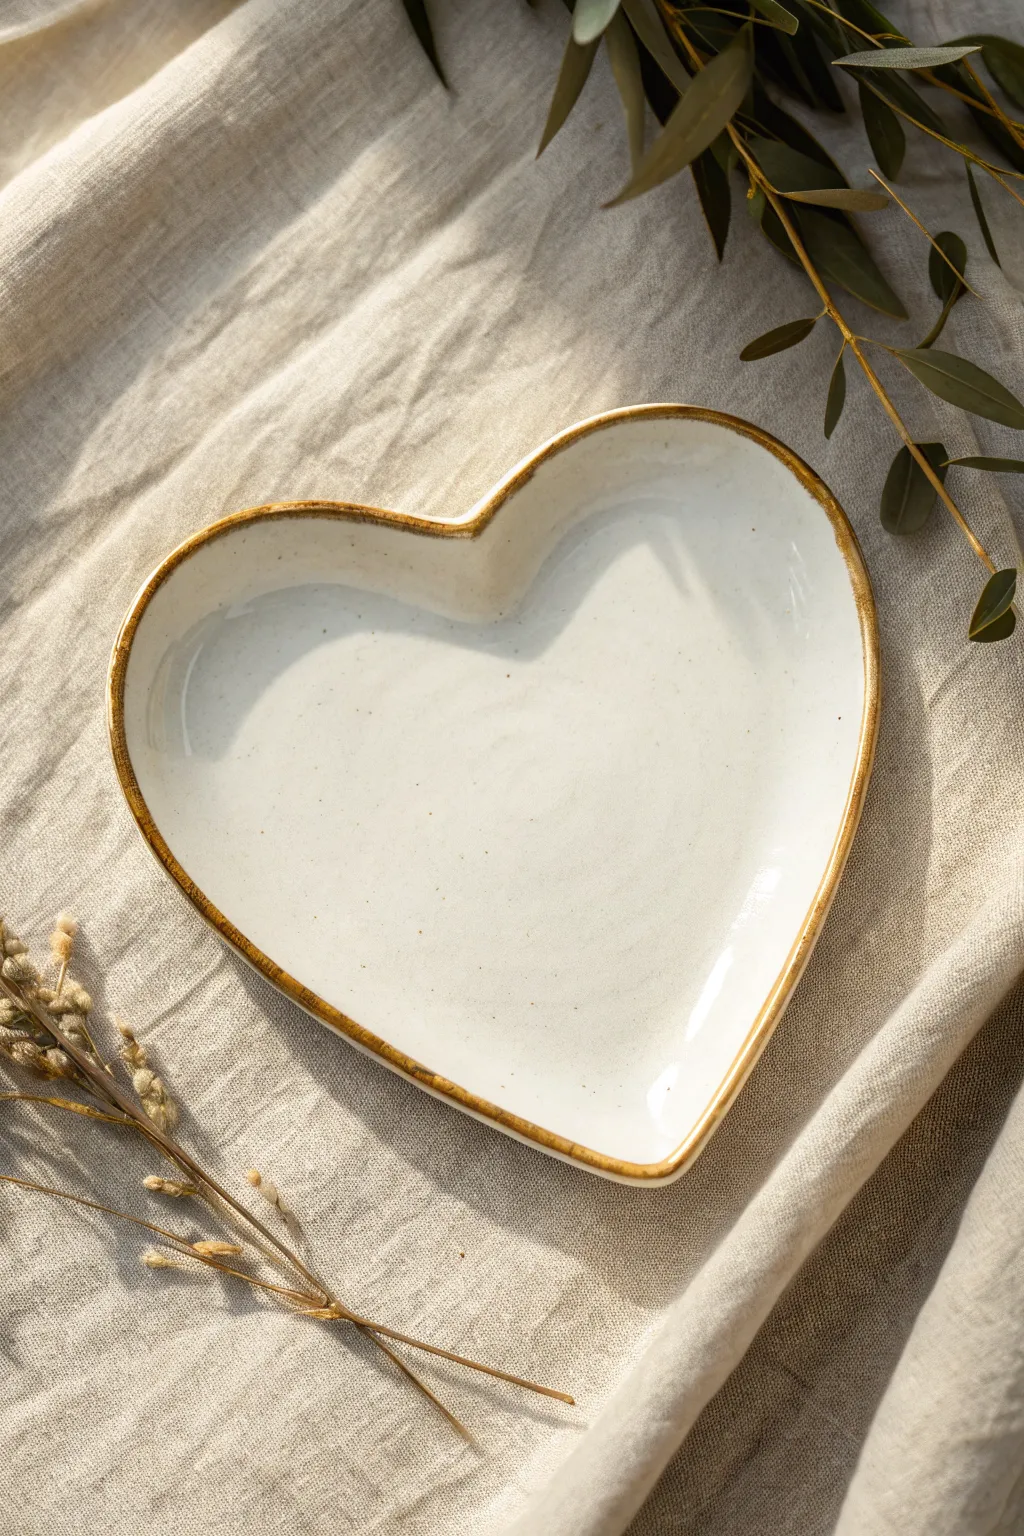
Transform a simple ceramic blank into a sophisticated decorative piece with just a touch of metallic accent. This project focuses on celebrating organic imperfections, using a rustic gold edge to frame a creamy, speckled base for a look that feels both handmade and high-end.
Step-by-Step
Materials
- Heart-shaped ceramic bisque plate
- Creamy off-white ceramic glaze
- Speckled glaze additive (if not included in the base glaze)
- Metallic gold or amber-brown ceramic overglaze (food safe if intended for serving)
- Fan brush or wide soft bristle brush
- Small round detail brush (size 2 or 4)
- Damp sponge
- Kiln (or oven if using bake-on ceramic paints)
- Clean water container
- Palette
Step 1: Base Preparation
-
Clean the bisque:
Before anything touches the surface, wipe down your heart-shaped bisque plate with a barely damp sponge. This removes any dust that could prevent the glaze from adhering properly. -
Prepare the base color:
Pour a generous amount of your creamy off-white glaze onto your palette. If your glaze doesn’t come pre-speckled, mix in a tiny pinch of speckling medium now. Stir gently to avoid creating bubbles.
Uneven Rim Lines?
If your gold rim looks too thick, wipe it back immediately with a damp Q-tip. Work in small sections to keep the paint workable.
Step 2: Glazing the Plate
-
Apply the first coat:
Using a wide fan brush, apply a smooth, even coat of the cream glaze across the entire front surface of the plate. Work in long, sweeping strokes from the center toward the edges. -
Let it dry:
Allow this first layer to dry until it loses its glossy wet sheen. It should feel chalky to the touch before you proceed. -
Add depth:
Apply a second and third coat of the cream glaze, alternating the direction of your brushstrokes (e.g., horizontal then vertical) to ensure opaque coverage without visible streaks. -
Glaze the back:
Once the front is dry enough to handle gently, flip the plate and repeat the glazing process on the underside, leaving the very bottom ‘foot’ unglazed so it doesn’t stick to the kiln shelf. -
Inspect for imperfections:
Check the surface for any pinholes or thick drips. Smooth out drips with a damp finger if the glaze is still slightly pliable.
Level Up: Vintage Patina
Mix a tiny drop of brown glaze into your gold before painting the rim. This tones down the sparkle for an aged, antiqued ceramic look.
Step 3: Creating the Rim
-
Load the detail brush:
Dip your small round detail brush into the metallic gold or amber-brown accent glaze. You want the brush fully loaded but not dripping. -
Start the rim:
Starting at the top center indentation of the heart, gently drag the brush along the very edge of the rim. Use the side of the brush bristles rather than the tip for a more natural line. -
Embrace wobbly lines:
Don’t try to make the line perfectly straight or uniform. I actually prefer to vary the pressure slightly as I go around—pressing harder for a thicker line and lifting for a thinner one—to mimic organic pottery. -
Refine the edge:
Go around the perimeter a second time. This time, focus on allowing the color to ‘spill’ slightly onto the inner curve of the plate in just a few spots, giving it that worn, vintage feel. -
Clean up borders:
If any paint dripped too far into the center, use a clean, slightly damp brush to gently lift the mistake away before it sets.
Step 4: Firing and Finishing
-
Dry completely:
Find a safe, dust-free spot and let the plate dry completely. This usually takes at least 24 hours to ensure all moisture has evaporated from the clay body. -
Check the foot:
Before firing, double-check the bottom ring (foot) of the plate. Wipe away any stray glaze with a wet sponge to prevent kiln damage. -
Fire the piece:
Load the plate into the kiln. Fire according to the manufacturer’s instructions for your specific glaze—typically Cone 06 for low-fire earthenware or higher for stoneware. If using oven-bake paints, follow the bottle’s baking instructions. -
Cool down:
Allow the kiln or oven to cool completely before opening the door. Thermal shock can crack your beautiful new piece. -
Final polish:
If there are any sharp rough spots on the unglazed foot after firing, sand them lightly with fine-grit sandpaper for a professional finish.
Now you have a stunning, minimal heart plate perfect for holding jewelry or serving treats
Ombre Wash Across a Heart Plate
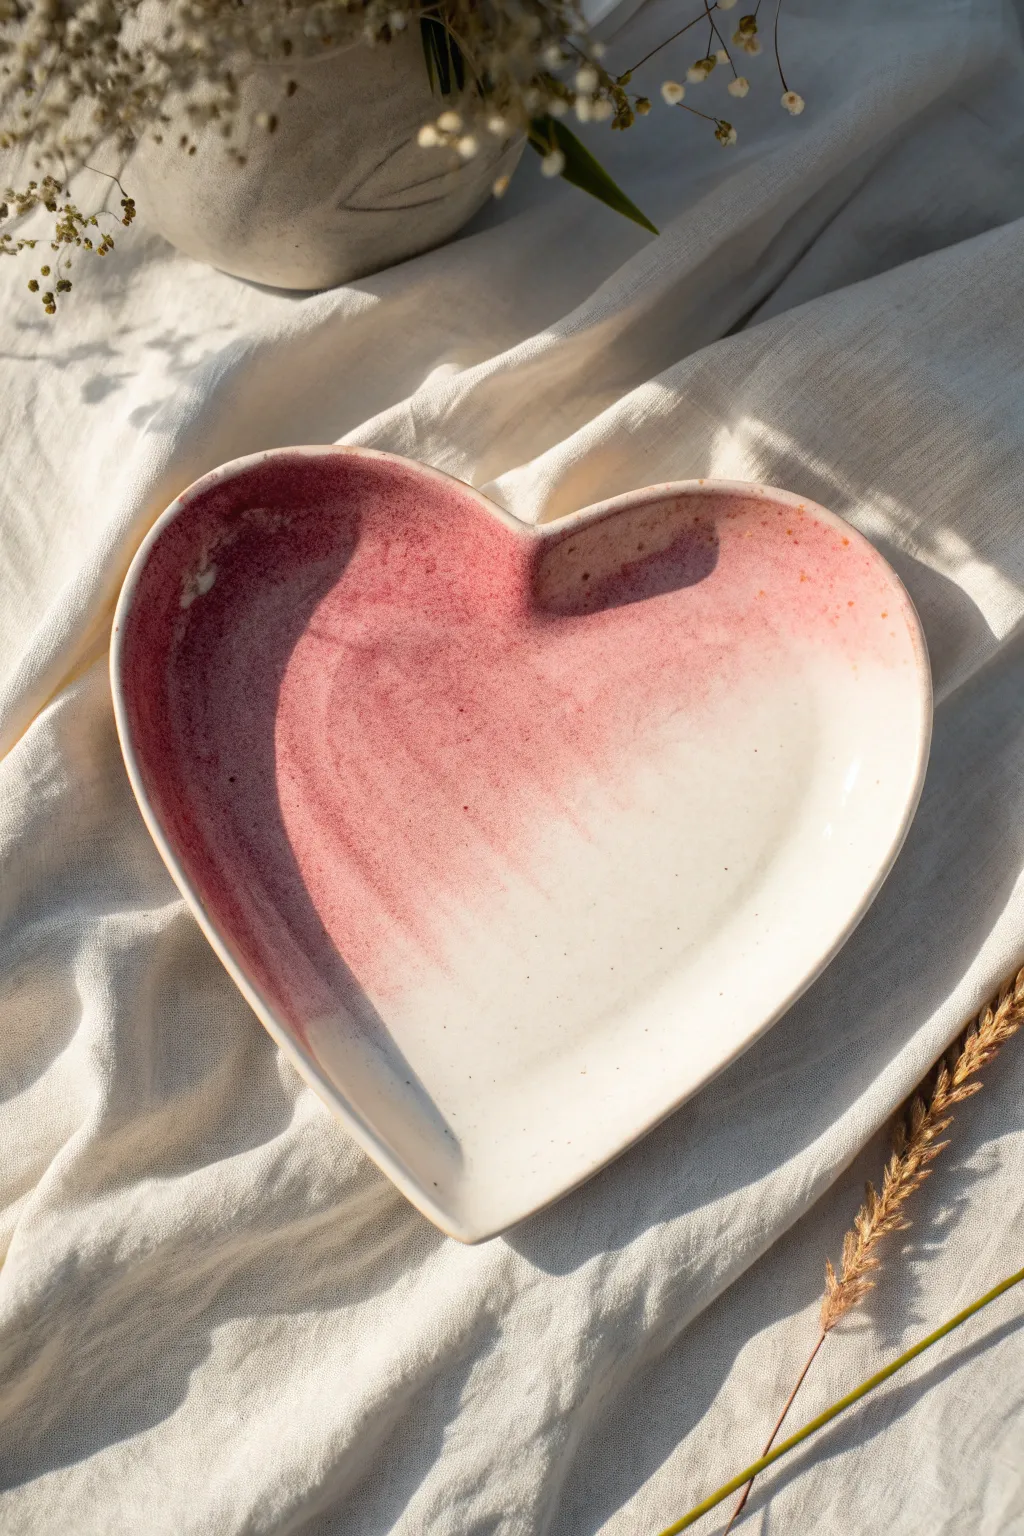
Capture the soft elegance of a sunrise with this beautiful ombre painted plate. By blending deep rose hues into creamy white, you’ll create a sophisticated gradient that looks stunning on any table.
How-To Guide
Materials
- Bisque-fired white ceramic heart plate
- Rose/Red underglaze
- Clear dipping glaze or brush-on clear glaze
- Wide, flat fan brush
- Small sponge
- Water container
- Palette or mixing tile
- Paper towels
- Kiln access (for firing)
Step 1: Preparation & First Wash
-
Clean surface:
Begin by wiping down your bisque heart plate with a deeply damp sponge to remove any dust or kiln debris that might interfere with paint adhesion. -
Prepare the wash:
On your palette, water down a small amount of the rose underglaze. You want a consistency similar to skim milk—translucent but still pigmented. -
Apply the anchor color:
Load your fan brush with the full-strength (un-watered) rose underglaze. Paint a firm, solid stripe along the far left curve of the heart, following the rim. -
Soften the edge:
Without reloading your brush, drag the color from that first stripe inward toward the center of the plate. -
Introduce the wash:
Dip your brush into the watered-down wash you prepared earlier. Start painting where your solid color ended, pulling the pigment further across the plate’s surface.
Step 2: Creating the Ombre Fade
-
Blend inward:
Using long, sweeping strokes, continue pulling the color toward the right side. The pigment will naturally run out, creating the start of your fade. -
Wet the brush:
Clean your brush thoroughly in water, then squeeze it out slightly so it is damp but not dripping. -
Feather the edge:
Use this clean, damp brush to gently feather the rightmost edge of the pink paint. This blurs the line between the color and the bare bisque. -
Add texture:
For that organic, speckled look seen in the photo, dip a toothbrush or stiff brush into the rose underglaze and flick a vary fine mist over the transition area. -
Check density:
Evaluate the left side. If the pink isn’t deep enough, apply a second coat of full-strength underglaze only to the very edge, blending it out quickly creating depth. -
Clean the highlights:
If any pink wandered too far to the right, use a clean, damp sponge to wipe the right side of the heart back to pure white bisque.
Smooth Transitions
Work quickly while the underglaze is wet. If it dries too fast, mist the plate lightly with water to keep the pigment moving smoothly.
Step 3: Glazing & Finishing
-
Dry time:
Allow the underglaze to dry completely. It should look chalky and matte when fully dry. -
Apply clear glaze:
Once dry, apply two to three even coats of clear brushing glaze over the entire front of the plate. Ensure each coat is dry before adding the next. -
Watch the coverage:
Pay attention to the texture. The clear glaze will bring out the vibrancy of the ombre and seal the white areas. -
Clean the foot:
Wipe away any glaze from the bottom foot of the plate to prevent it from sticking to the kiln shelf. -
Fire:
Fire the plate in the kiln according to the specific cone instructions for your clay and glaze—usually Cone 06 or Cone 6.
Speckled Clay Hack
Use a ‘speckled’ clay body or specific speckled glaze to get those tiny iron spots that show through the white glaze for a rustic look.
Now you have a stunning, food-safe piece of art ready for your next dinner party


Checkerboard Heart Plate With a Modern Twist
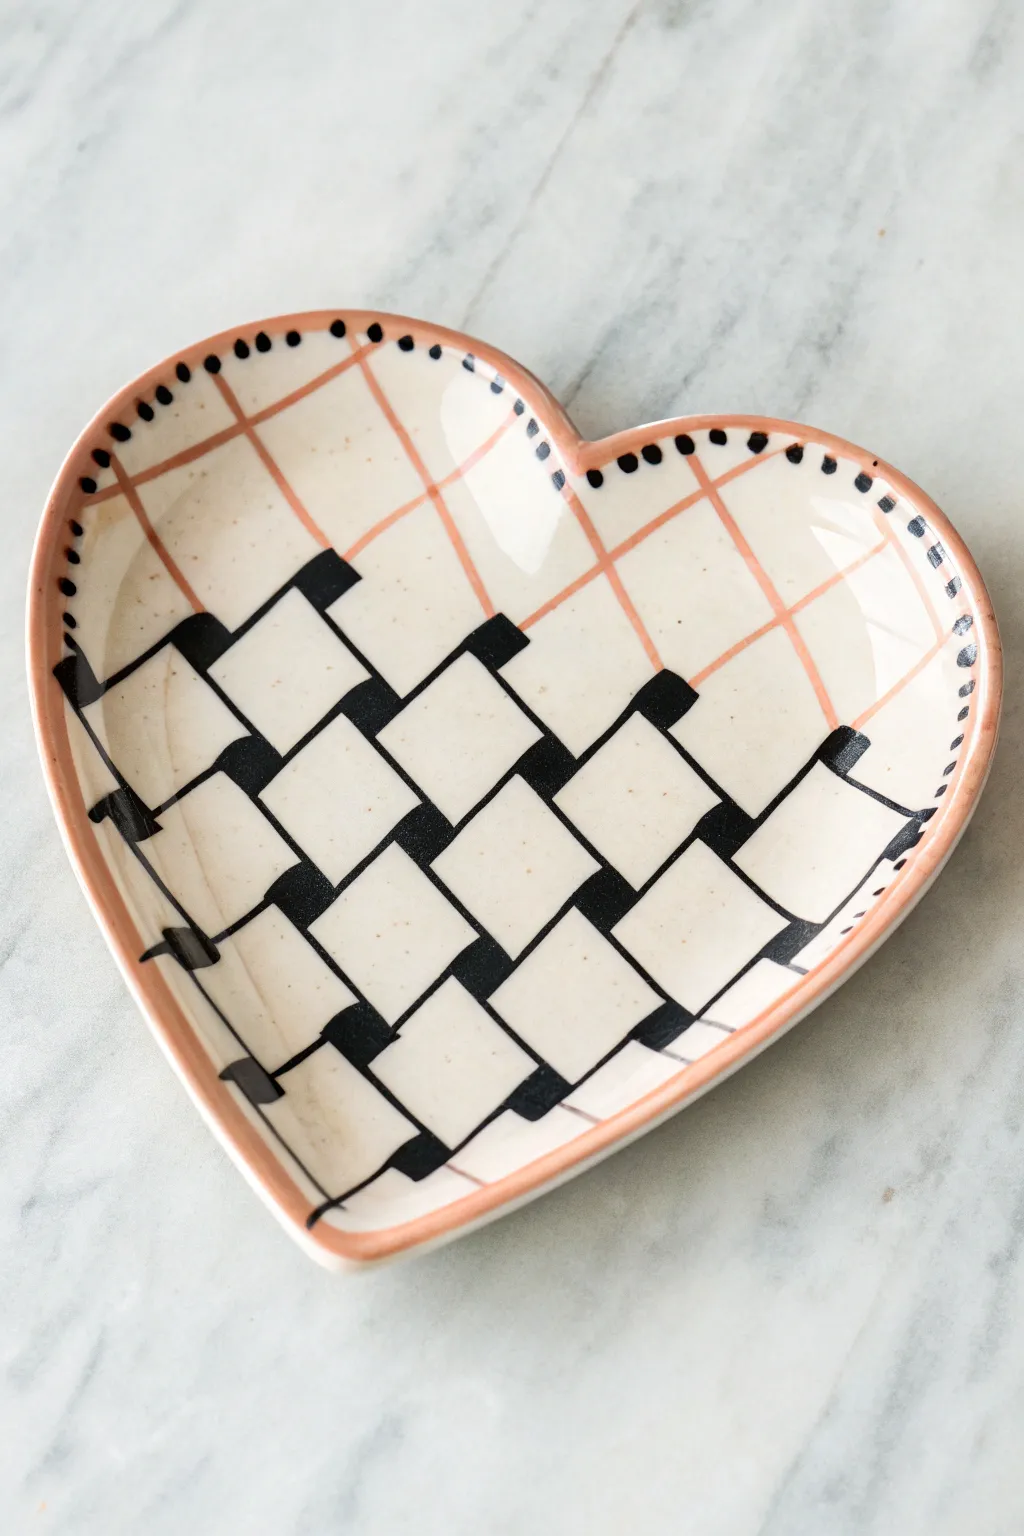
Give a simple ceramic heart dish a sophisticated makeover with this modern geometric design. By combining a delicate peach grid with a bold, woven-look checkerboard pattern, you’ll create a striking catch-all tray perfect for jewelry or keys.
Detailed Instructions
Materials
- Heart-shaped ceramic plate (bisque or glazed ceramic depending on paint type)
- Ceramic paint or porcelain markers (Black)
- Ceramic paint or porcelain markers (Peach or Coral)
- Fine liner paintbrush (size 0 or 00)
- Pencil (for initial sketching)
- Ruler or flexible measuring tape
- Rubbing alcohol and cotton pads
- Paper towel
- Oven (if using heat-set paints)
Step 1: Preparation & Mapping
-
Clean surface:
Begin by wiping down your ceramic heart plate with rubbing alcohol on a cotton pad. This removes any oils or dust that could prevent the paint from adhering properly. -
Visualize the diagonal:
Imagine a diagonal line splitting the heart from the top left curve down to the bottom right point. This will separate your two distinct pattern styles. -
Sketch the primary grid:
Using a pencil, lightly sketch a grid across the entire plate. Draw diagonal lines spaced about 1 inch apart going in one direction, then cross them perpendicularly to form diamond shapes. Don’t worry about perfection; pencil marks will burn off in the oven or wipe away later. -
Define the sections:
Decide which area will be the ‘plaid’ section (the top portion) and which will be the ‘checkerboard’ section (the bottom portion). The image shows a jagged, step-like transition rather than a straight line.
Step 2: Painting the Peach Grid
-
Mix your color:
Prepare your peach or coral ceramic paint. If you are using a marker, pump it to ensure ink flow is steady. -
Paint the upper lines:
Carefully trace over your pencil grid lines *only* in the top section of the heart using the fine liner brush or peach marker. Keep your hand steady to maintain consistent line thickness. -
Connect to the border:
Extend these peach lines all the way to the rim of the plate, ensuring they wrap slightly over the curve for a finished look. -
Let it set:
Allow these peach lines to dry to the touch before moving on to the black paint to avoid smudging.
Steady Hand Trick
Rest your pinky finger on a dry part of the plate while painting lines. This anchors your hand and acts as a pivot point for smoother strokes.
Step 3: Creating the Woven Checkerboard
-
Outline the weave:
In the bottom section, you want to create a ‘woven’ illusion. Instead of coloring in every other square, you will be painting the negative space. Identify the squares that will remain white. -
Paint the shadows:
Using your black paint and fine brush, paint the small triangles and L-shapes between your white squares. Look closely at the reference: the black areas act as shadows where ‘ribbons’ would overlap. -
Fill solid black areas:
If a grid square should be ‘underneath’ the weave, paint it solid black. The pattern generally alternates between a white square and a black separating shape. -
Refine the transition:
At the boundary where the peach grid meets the black pattern, ensure the black shapes ‘eat’ into the grid slightly, creating that stepped, modern edge. -
Check density:
Make sure your black paint is opaque. I find applying a second coat to the black areas gives a richer, deeper contrast once fired.
Level Up: Gold Leaf
Once the paint is cured, apply liquid gold leaf over the peach grid lines for a luxurious, metallic version of this design.
Step 4: Rim & Details
-
Paint the rim:
Take your peach paint again and carefully paint the very top edge of the rim all the way around the heart. -
Add dot accents:
Using the tip of your smallest brush or a marker, adding tiny black dots along the peach rim. Space them somewhat irregularly for an organic, hand-painted feel. -
Inner rim details:
Add a few small black dashes on the inside of the rim, perpendicular to the edge, to frame the design. -
Dry and cure:
Follow the manufacturer’s instructions for your specific paint. This usually involves letting the piece air dry for 24 hours, then baking it in a cool oven that heats up to 300-350°F to set the design permanently.
Now you have a stunning, custom-patterned dish to hold your favorite trinkets
Minimal Line Art Face Inside a Heart Plate
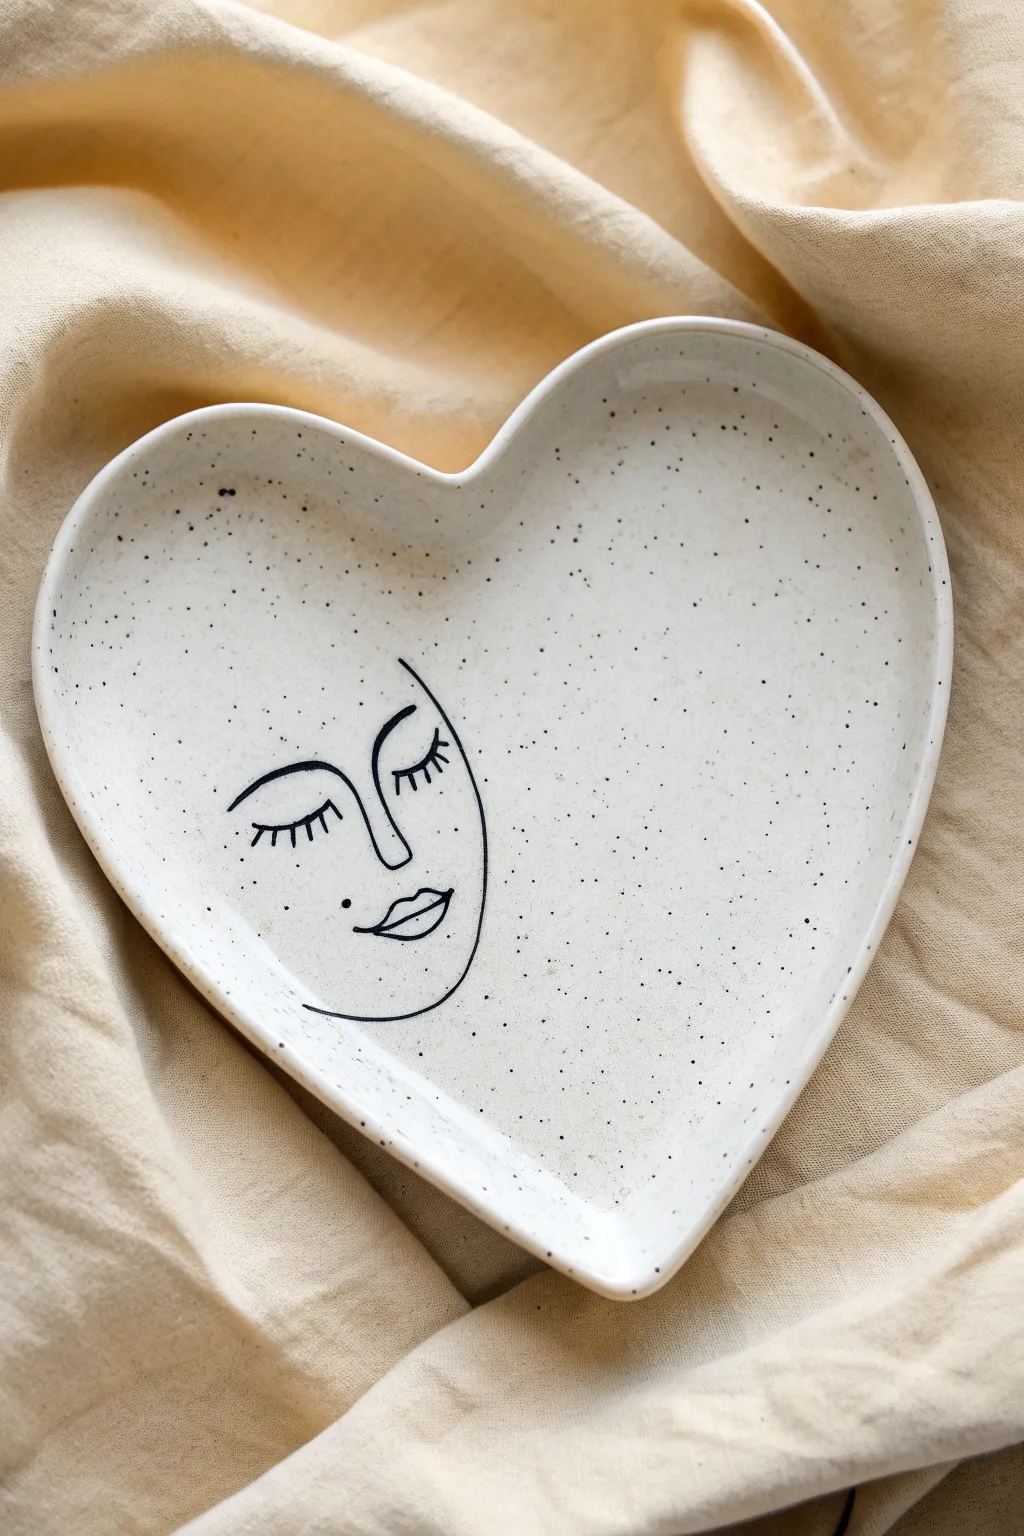
Embrace the beauty of simplicity with this elegant heart-shaped plate featuring a minimalist face design. The creamy speckled finish provides the perfect canvas for delicate line work, creating a piece that feels both modern and romantic.
Step-by-Step Tutorial
Materials
- Heart-shaped ceramic bisque plate
- Cream or off-white ceramic glaze (opaque)
- Speckled glaze additive (or ‘speckled egg’ style premixed glaze)
- Black underglaze pencil or fine liner bottle
- Clear dipping glaze (if using underglaze pencil)
- Soft fan brush for base coats
- Fine liner brush (size 0 or 00)
- Pencil for sketching
- Tracing paper (optional)
- Damp sponge
- Kiln (or access to a firing service)
Step 1: Preparing the Base
-
Clean the Bisque:
Start by wiping down your heart-shaped bisque plate with a slightly damp sponge. This removes any dust that could prevent the glaze from adhering properly. -
Select the Base Glaze:
To achieve the look in the photo, you need a creamy white glaze that has speckles. You can buy a pre-mixed ‘speckled egg’ glaze or mix a small amount of granular speckles into a standard cream glaze. -
Apply First Coat:
Using a soft fan brush, apply a smooth, even coat of your speckled cream glaze to the entire face of the plate. Brush in one consistent direction. -
Dry and Repeat:
Let the first coat dry until it loses its sheen. Apply a second coat, brushing in a cross-hatch direction (perpendicular to the first coat) to ensure full coverage without streaks. -
Third Coat Application:
For a solid, opaque finish like the reference image, apply a third coat. Allow this base to dry completely before attempting any design work; the surface should feel chalky and dry to the touch.
Step 2: Designing the Minimalist Face
-
Plan the Placement:
Visualize where the face will sit. In the reference, the face hugs the bottom left curve of the heart, leaving the right side open and airy. This negative space is crucial for the minimalist aesthetic. -
Light Sketching:
Very lightly sketch your design onto the dried glaze using a standard graphite pencil. Don’t worry about the graphite marks—they will burn off in the kiln. I find sketching lightly prevents gouging the unfired glaze. -
Draw the Nose and Brow:
Start with the central anchor: a continuous line forming the straight nose that curves up into the left eyebrow. Keep the line fluid and confident. -
Add the Eyes:
Draw two curved lines for the closed eyelids. Add short, vertical dashes for the lashes. Notice how the eye on the right (the face’s left eye) floats slightly detached from the nose line. -
Define the Face Shape:
Draw a sweeping curve that starts near the temple and comes down to form the cheek and chin, ending just below the lips. This single line implies the whole face shape without closing it entirely. -
Add the Lips:
Draw the lips with a simple upper ‘M’ shape and a curved bottom line. Add a tiny beauty mark dot on the cheek for character.
Wobbly Lines?
Use a specialized glaze writer bottle with a fine metal tip instead of a brush. It works like a pen for steadier lines.
Step 3: Painting the Lines
-
Prepare Black Glaze:
Pour a small amount of black underglaze or stroke-and-coat glaze onto a palette. Thin it slightly with water if it feels too thick; it should have an ink-like consistency for smooth lining. -
Load the Brush:
Dip your fine liner brush (size 0 or 00) into the black. Roll the tip on the palette to shape it into a sharp point. -
Trace the Design:
Carefully paint over your pencil sketch. Use the very tip of the bristles and maintain light pressure to keep the lines thin and uniform. If the brush drags, reload with more paint. -
Refine the Details:
Go back and ensure the eyelashes are crisp and distinct. If any line looks too faint, carefully trace over it a second time to ensure the black pops after firing. -
Clean Up:
If you made a mistake with the black glaze, let it dry for a moment, then gently scratch it off with a needle tool or a stiff brush, then re-dab the cream base glaze over that spot. -
Final Inspection:
Check the rim of the plate. If any glaze dripped over the edge, wipe it clean with a sponge. -
Firing:
Fire the plate in a kiln according to the glaze manufacturer’s instructions (usually cone 06 or cone 6 depending on your clay body). The heat will melt the speckles into the cream background and set the black lines permanently.
Pro Tip: Smoothness
Slightly water down your black underglaze. Thick paint drags and skips; ink-consistency allows for one fluid motion.
Once cooled from the kiln, your plate is ready to hold jewelry or simply be admired as a piece of modern art
Negative-Space Heart With a Painted Background
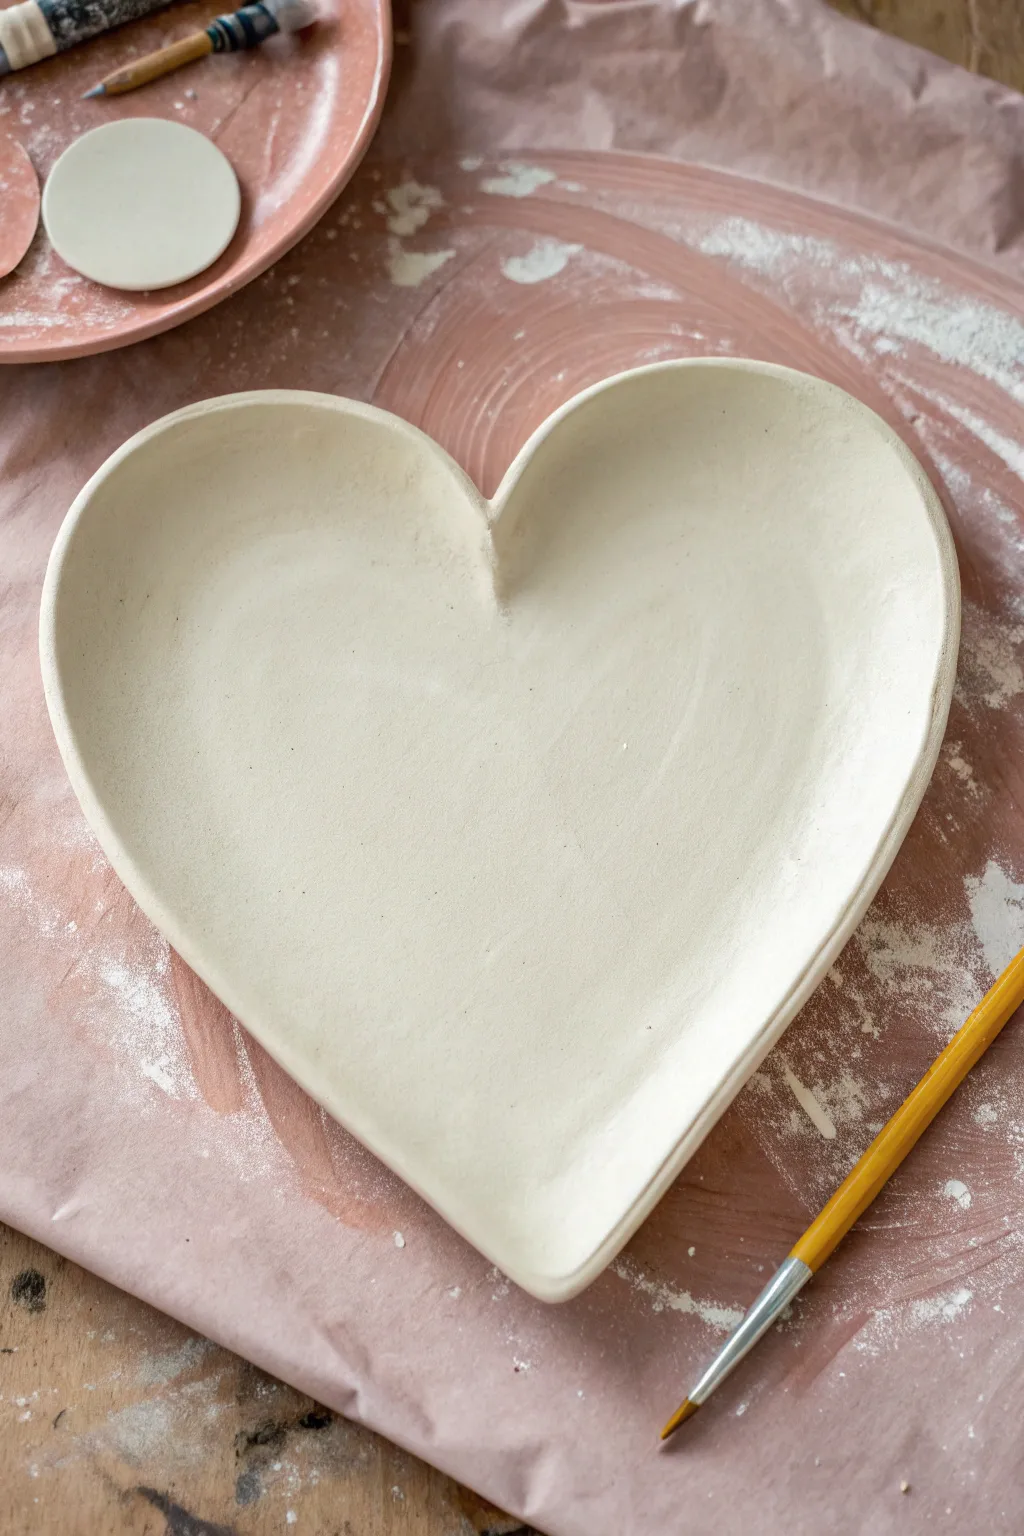
Before diving into colorful designs, creating a smooth, perfectly shaped blank heart plate is essential. This foundational project guides you through hand-building a ceramic heart dish that’s ready to become a stunning piece of negative-space art.
How-To Guide
Materials
- White earthenware or stoneware clay
- Rolling pin
- Canvas mat or cloth (to prevent sticking)
- Heart-shaped paper template (or large cookie cutter)
- Needle tool or fettling knife
- Potter’s sponge
- Small bowl of water
- Wooden modeling tool or rib
- Yellow detail paintbrush (for future glazing)
Step 1: Shaping the Clay
-
Prepare your workspace:
Lay down a canvas mat or a piece of heavy cloth on your work surface. This prevents the clay from sticking to the table and picking up unwanted textures. -
Wedge the clay:
Take a manageable lump of white clay and wedge it thoroughly to remove any air bubbles. This ensures your plate won’t crack during firing. -
Roll out the slab:
Using a rolling pin, flatten the clay into a slab. Aim for an even thickness of about 1/4 inch. If you have guide sticks, use them on either side for consistency. -
Compress the slab:
Run a rubber rib or a damp sponge lightly over the surface of the clay slab. This compresses the particles and creates a smooth canvas for your future painting.
Step 2: Cutting and Refining
-
Trace the shape:
Place your heart-shaped paper template gently onto the clay slab. If you don’t have a template, you can lightly sketch the outline with a needle tool first. -
Cut the outline:
Hold your needle tool or fettling knife upright and carefully cut around the template. Peel away the excess clay and set it aside for recycling. -
Lift the edges:
To transform the flat slab into a plate, gently lift the edges of the heart with your fingers. Pinch slightly to create a shallow rim that curves up. -
Define the dimple:
Give special attention to the deep ‘V’ at the top of the heart. Use your thumb to smooth this area so it doesn’t crack as the rim is lifted.
Smooth Moves
Use a damp chamois strip on the rim. Hold it over the edge and drag it around the perimeter for a velvety, professional finish.
Step 3: Finishing Touches
-
Smooth the rim:
Dip your finger or a small piece of sponge in water and run it along the rim of the plate. This softens any sharp edges left by the knife. -
Refine the surface:
Check the interior of the plate for any fingermarks or uneven spots. A slightly damp sponge works wonders here to achieve that pristine, creamy finish. -
Dry slowly:
Place your heart plate on a board or ware cart covered loosely with plastic. Allow it to dry slowly to the bone-dry stage, which prevents warping. -
Bisque fire:
Once completely dry, the piece needs to be bisque fired in a kiln. After this firing, your white heart plate will be porous and ready for the negative-space painting technique.
Texture Play
Before cutting the heart shape, press lace or a textured mat into the raw clay slab. The glaze will break beautifully over the pattern later.
Now that you have your perfect ceramic canvas, you are ready to apply your negative-space design
Watercolor-Style Splashes on a Heart Dish
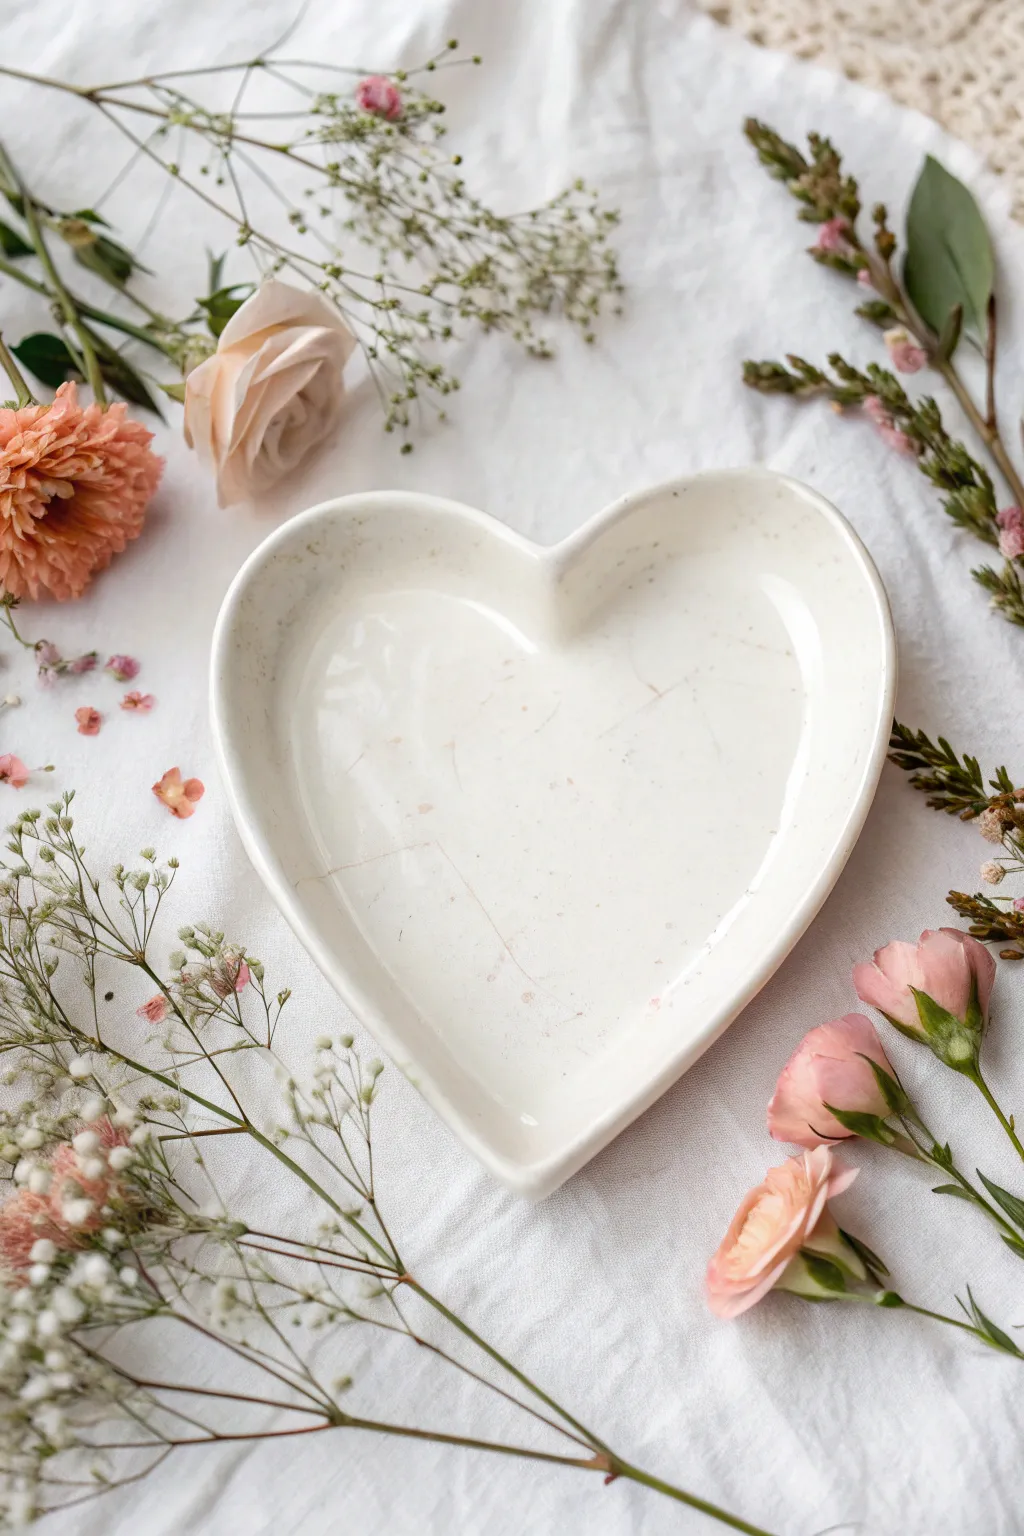
Capture the romance of subtle imperfections with this minimalist heart dish design. Using a faint splattering technique, you will achieve a delicate, blush-toned speckled effect that mimics organic stoneware or scattered flower petals.
Detailed Instructions
Materials
- White heart-shaped ceramic dish (glazed or unglazed bisque)
- Ceramic paint or porcelain paint (soft blush pink, pale rose, and transparent medium/thinner)
- Stiff-bristled toothbrush or fan brush
- Small round detail brush (size 0 or 1)
- Paper plate or palette
- Rubbing alcohol and cotton pads
- Cardboard box or newspaper (to catch overspray)
- Oven (if heat-setting is required for your paint choice)
Step 1: Preparation & Base
-
Clean surface:
Begin by wiping the entire surface of your heart dish with rubbing alcohol on a cotton pad. This removes invisible oils or dust that might prevent the delicate paint specks from adhering. -
Protect workspace:
This project involves splattering, which can be messy. Place your dish inside a small cardboard box or spread out plenty of newspaper to protect your table from stray droplets. -
Prepare the wash:
Squeeze a tiny pea-sized amount of blush pink ceramic paint onto your palette. -
Dilute the pigment:
Mix the paint with a generous amount of transparent medium or water (depending on the paint brand instructions) until it reaches an inky, fluid consistency. The color needs to be extremely sheer.
Splatter Control
Use your non-dominant hand as a shield to block areas you want to keep pure white while splattering around the edges.
Step 2: Creating the Speckles
-
Load the tool:
Dip just the tips of your stiff toothbrush or fan brush into the diluted paint mixture. You do not want the brush soaking wet, just damp with pigment. -
Test spray:
Before hitting the plate, flick the bristles with your thumb over a scrap piece of paper. This clears large globs and ensures you are getting a fine mist. -
Apply first layer:
Hold the brush about 6-8 inches above the heart dish. Gently flick the bristles to send a fine spray of pink mist onto the ceramic surface. -
Evaluate density:
Pause and look at the coverage. The goal is ‘barely there’ texture. If you want more, move closer and flick again. -
Add variance:
I like to mix a slightly darker drop of rose paint into the remaining wash to create depth. Repeat the flicking motion very sparingly with this darker shade. -
Create larger spots:
For a natural look, dip a toothpick or the end of a paintbrush handle into the paint and gently tap it against your finger over specific spots to create a few larger, distinct droplets.
Blobs Too Big?
If a giant drip lands on your plate, use a damp Q-tip to wipe it away immediately. Let that spot dry before reapplying.
Step 3: Details & Finishing
-
Faux marbling (optional):
To mimic the faint scratches or veins seen in the photo, take your finest detail brush (size 0) with very watery paint. -
Draw faint veins:
Drag the brush rapidly and lightly across the surface in 2-3 areas. Keep the lines incredibly thin and jagged, almost like hairline cracks or marble veins. -
Blotting:
If any speckle lands too heavily, quickly dab it with a dry corner of a paper towel to lift the excess pigment, leaving a soft stain behind. -
Initial drying:
Let the paint sit for at least one hour until it is dry to the touch. Do not touch the surface, as the sheer paint smudges easily. -
Cure the paint:
Read your paint manufacturer’s instructions. Most porcelain paints require baking in a home oven (usually around 300°F/150°C for 30 minutes) to become permanent and dishwasher safe. -
Cool down:
If baking, turn the oven off and let the dish cool down completely inside the oven to prevent thermal shock cracking.
Once baked and cooled, your heart dish will have a soft, romantic finish perfect for holding jewelry or trinkets
Terrazzo Confetti Heart Plate Pattern
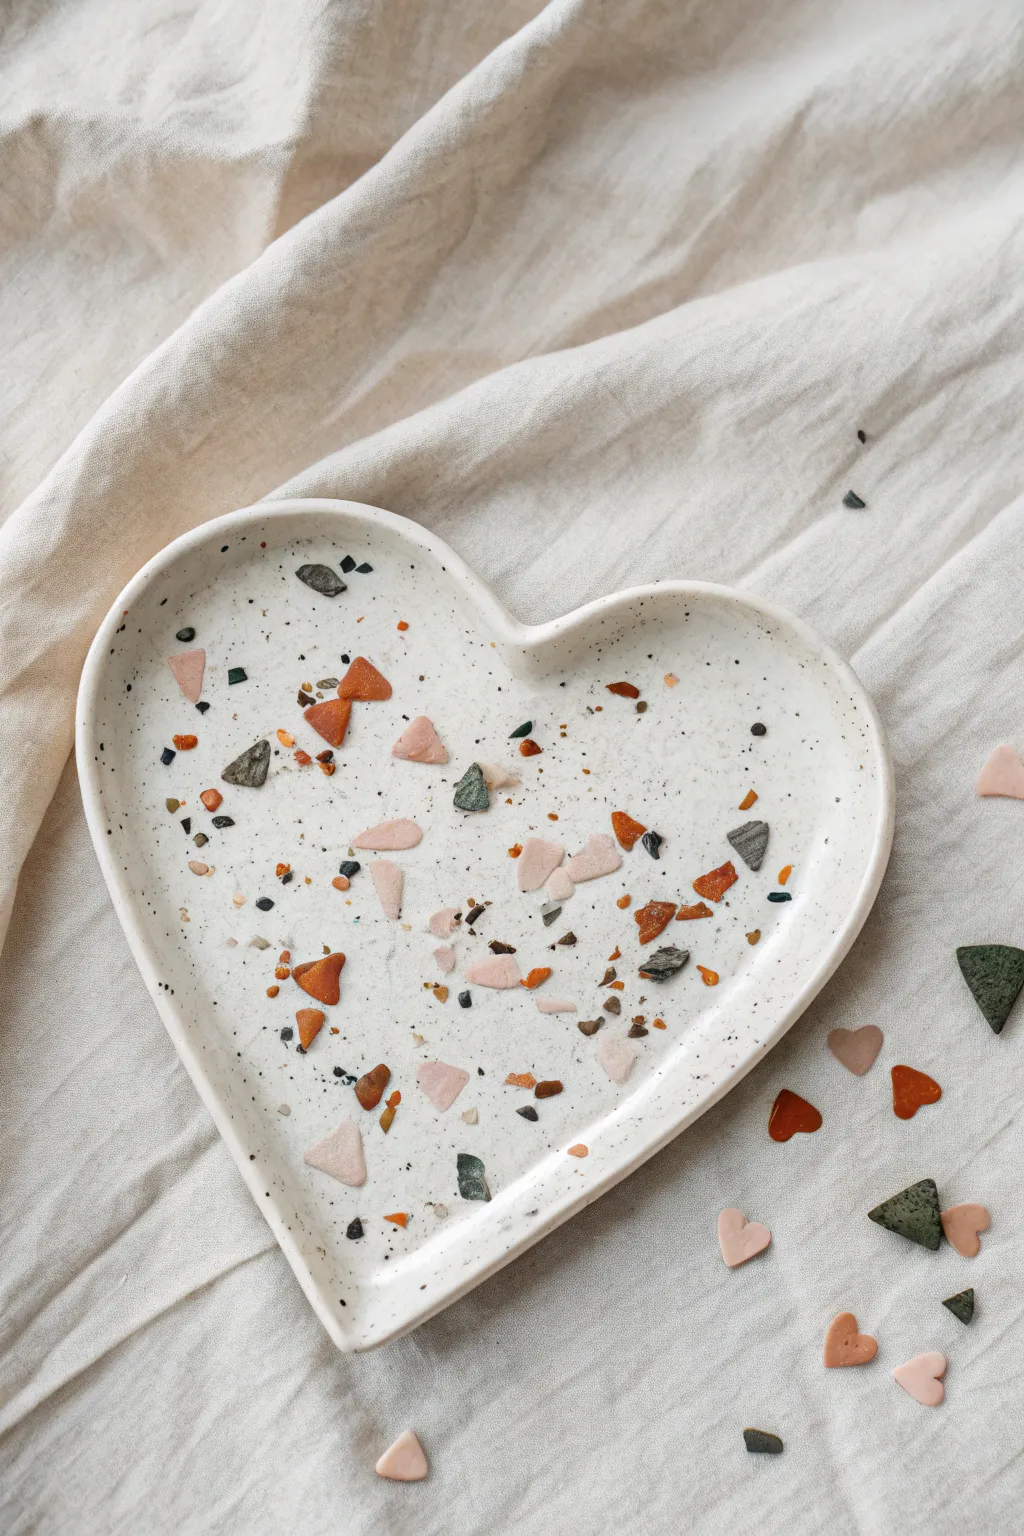
This trendy, handmade heart tray combines the timeless elegance of speckled pottery with playful pops of modern color. Achieved through a faux-terrazzo polymer clay technique, it creates the perfect catch-all for jewelry or small treasures.
Step-by-Step Tutorial
Materials
- White polymer clay (base)
- Black pepper or black sand (for speckles)
- Colored polymer clay (terracotta/rust, blush pink, dark green)
- Heart-shaped cookie cutter or paper template
- Rolling pin or pasta machine
- X-Acto knife or craft blade
- Smooth work surface (ceramic tile or glass mat)
- Oven-safe bowl (for forming the curve)
- Fine-grit sandpaper (400 to 1000 grit)
- Gloss or matte glaze (optional)
Step 1: Prepping the Clay Styles
-
Prepare the Speckled Base:
Start by conditioning a large block of white polymer clay until it is soft and pliable. To create that realistic stoneware look, knead in a generous pinch of ground black pepper or fine black sand. -
Roll the Base Slab:
Roll your speckled white mixture out to a consistent thickness, roughly 1/4 inch thick. Aim for a smooth, even surface without air bubbles. -
Create Colored Sheets:
Condition your accent colors—terracotta, blush pink, and dark green—separately. Roll each one out into a very thin sheet, much thinner than your base slab. -
Bake the Chips (Partial Bake):
I prefer to bake these thin colored sheets for just 5-10 minutes at the manufacturer’s recommended temperature. This hardens them enough to shattered into crisp shards rather than smushed blobs. -
Create the Terrazzo Chips:
Once the thin sheets differ cooled, chop them up irregularly with your blade or break them by hand into small, jagged confetti pieces of varying sizes.
Stone Effect Secret
Add translucent clay to your white base (about a 1:4 ratio) before adding the pepper. This adds depth and makes the faux-stone look incredibly realistic after baking.
Step 2: Assembling the Pattern
-
Scatter the Chips:
Take your raw speckled white slab and sprinkle the baked colored chips over the surface. Aim for a random, organic distribution, leaving plenty of white space between them. -
Press into Place:
Cover the clay with a piece of parchment paper or wax paper. Use your rolling pin to gently but firmly roll over the chips, pressing them flat into the raw white base until the surface is level. -
Check for Gaps:
Peel back the paper. If there are uneven spots or the chips aren’t fully flush, roll again slightly harder, or press individual stubborn pieces down with your thumb.
Step 3: Shaping and Finishing
-
Cut the Heart Shape:
Place your heart template or large cookie cutter onto the patterned slab. Press down cleanly or trace around the template with your craft knife to cut out the final heart shape. -
Smooth the Edges:
Dip your finger in a little water (or baby oil) and run it along the cut edge of the heart to smooth out any roughness or sharp corners from the knife. -
Form the Curve:
Carefully lift the clay heart and drape it inside a shallow, oven-safe bowl or draped over the back of a curved baking dish. This gravity will give the plate its gentle, cupped shape. -
Final Bake:
Bake the project according to the polymer clay package instructions (usually 275°F/135°C for 15-30 minutes). Let it cool completely inside the bowl so it retains its shape. -
Sanding:
Once fully cool, wet-sand the surface using fine-grit sandpaper. This is crucial for revealing the sharp edges of the terrazzo chips and removing any hazy clay film on top of them. -
Seal (Optional):
If you want a glossy ceramic finish, apply a thin coat of polyurethane varnish or resin. For a matte, natural stone look, simply buff the sanded clay with a soft cloth.
Make it Functional
Turn this into a ring dish by gluing a small, clay-covered cone or pyramid in the center before baking to hold rings, or drill a small hole at the top to hang it.
Enjoy styling your vanity with this modern, speckled geometric piece
Celestial Heart Plate With Moons and Stars
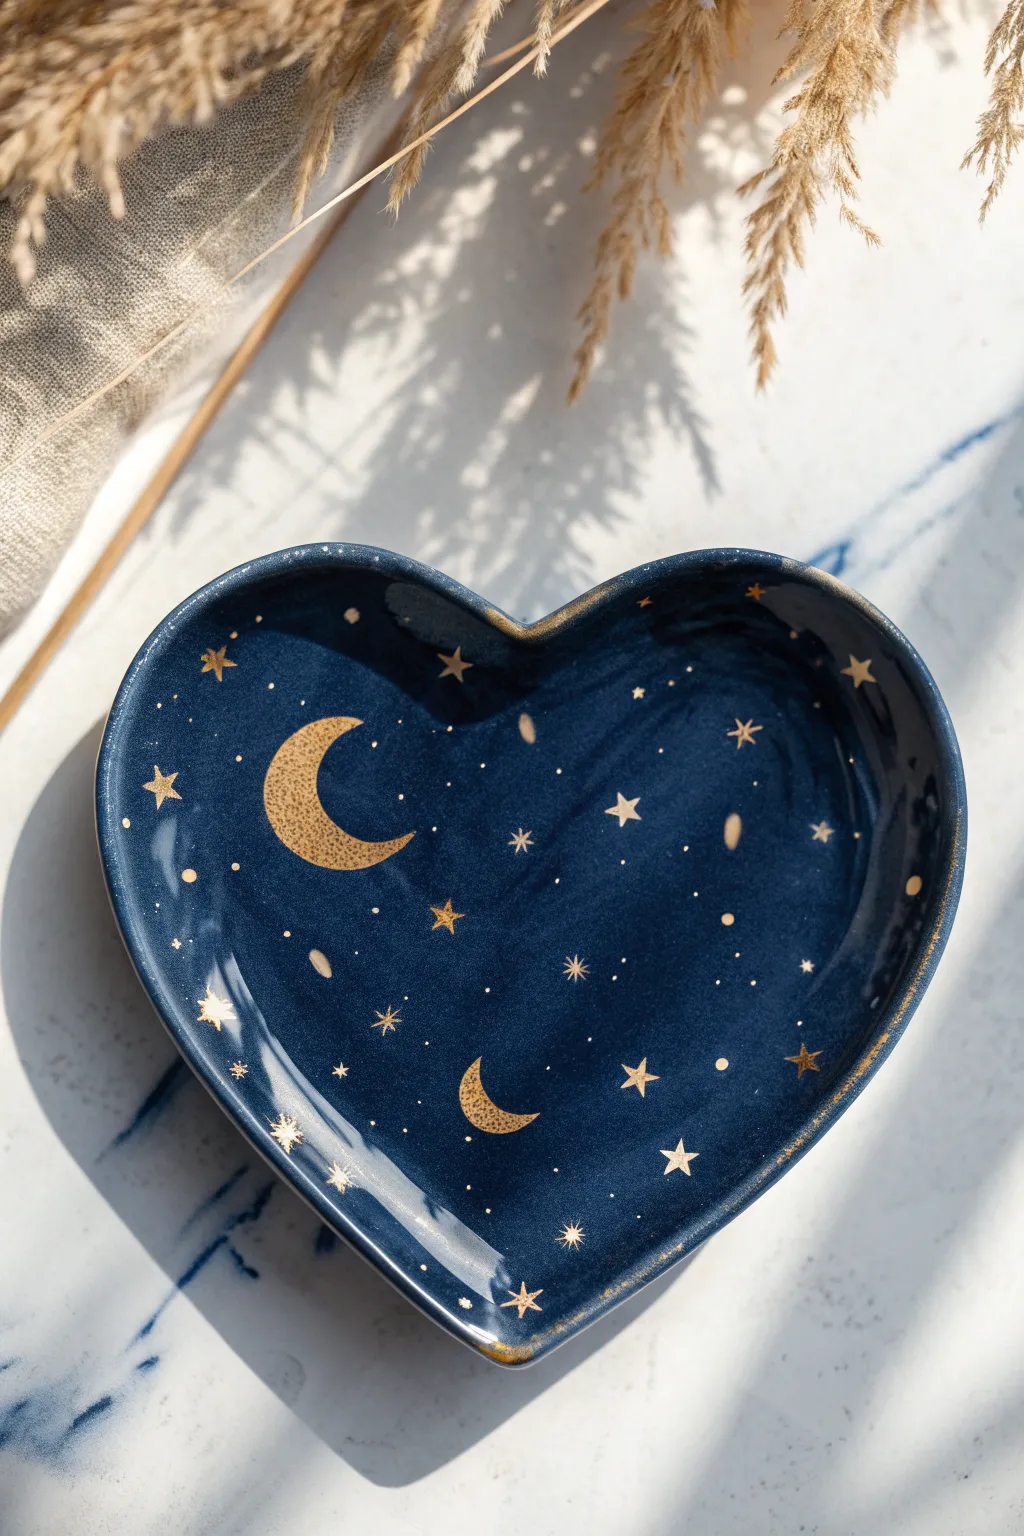
Bring the cosmos to your tabletop with this dreamy heart-shaped dish, featuring a deep indigo sky scattered with golden crescent moons and twinkling stars. The contrast between the dark, glossy blue and the metallic gold details creates a magical piece perfect for holding jewelry or trinkets.
Step-by-Step Guide
Materials
- Heart-shaped ceramic bisque plate
- Deep midnight blue ceramic glaze (e.g., Mayco or Duncan)
- Metallic gold paint or gold ceramic overglaze
- Fan brush (for base coating)
- Small round detail brush (size 0 or 00)
- Toothpick or dotting tool
- Clear dipping glaze (if using non-glossy underglaze)
- Pencil
- Damp sponge
Step 1: Preparation & Base Coat
-
Clean the bisque:
Start by wiping down your heart-shaped bisque plate with a damp sponge. This removes any ceramic dust that could prevent the glaze from adhering properly. -
Apply the first layer:
Load a fan brush with your deep midnight blue glaze. Apply a smooth, even coat over the entire interior and exterior of the plate, brushing in one consistent direction. -
Let it dry:
Wait until the glaze loses its wet sheen and is dry to the touch before moving to the next layer. -
Build opacity:
Apply a second coat of the blue glaze, brushing in a cross-hatch direction (perpendicular to your first coat) to ensure full coverage without streaks. -
Final coat:
Add a third and final coat of blue for that rich, dark night sky depth. I like to check the edges specifically here, as glaze tends to pull away from rims during firing. -
Dry completely:
Allow the blue base to dry thoroughly. It should be chalky and matte before you attempt any detailed work on top.
Step 2: Celestial Details
-
Plan the placement:
Lightly sketch your largest elements—the crescent moons—onto the dry blue glaze using a pencil. Don’t worry, the graphite burns off in the kiln. -
Paint the moons:
Using your gold paint or overglaze and a small round brush, fill in the crescent moon shapes. You might need two thin coats to get a solid metallic look. -
Texture the moons:
While the gold is slightly tacky, you can gently dab it with the tip of a dry brush to give the moon a slightly cratered, textured appearance. -
Add large stars:
Paint a few five-pointed or four-pointed stars scattered randomly across the plate. Keep the points sharp by lifting your brush at the end of each stroke. -
Create starbursts:
Use a very fine liner brush to paint tiny crosses or simple bursts to represent distant twinkling stars. -
Dot the constellations:
Dip a toothpick or a small dotting tool into the gold paint. Gently touch it to the surface to create tiny dots of varying sizes, filling in the empty negative space. -
Rim detail:
Carefully run the side of your gold-loaded brush along the very edge of the heart rim. This creates a finished, gilded border that frames the artwork. -
Inspect and clean:
Check the underside of the plate. If any blue glaze has dripped, scrape it off carefully with a fettling knife or sponge it away.
Smudged the Gold?
If you make a mistake with the gold paint on the dark background, wait for it to dry completely, then gently scratch the mistake away with a wooden toothpick to reveal the blue underneath.
Step 3: Finishing
-
Glazing decision:
If you used unsealed underglazes, apply two coats of clear brushing glaze over the entire piece (careful not to smear the gold if it’s not fired yet), or dip in clear glaze. -
Firing:
Fire the piece according to the instructions on your specific glaze bottles (usually Cone 06 for earthenware). Note: If using real gold luster, this often requires a separate, lower-temperature third firing.
Make It Sparkle
For realistic depth, vary your star sizes significantly. Group some tiny dots together in a ‘Milky Way’ cluster rather than spacing them all out evenly.
Now you have a stunning piece of functional celestial art ready to hold your treasures
Textured Sponge-Painted Heart Plate Background
Recreate the charm of handmade artisan pottery using simple painting techniques on a bisque heart plate. This tutorial will guide you through achieving a creamy, speckled finish with a simple burnt orange heart accent.
How-To Guide
Materials
- Heart-shaped ceramic bisque plate
- Cream or off-white ceramic glaze (e.g., ‘Vanilla Dip’ or ‘Almond’)
- Burnt orange or rust-colored ceramic glaze
- Medium flat brush
- Small round detail brush (size 1 or 2)
- Old toothbrush or stiff bristle brush
- Sponge
- Water cup and palette
- Clear dipping glaze (if required by your firing method)
Step 1: Base Coating
-
Prepare the bisque:
Begin by wiping down your ceramic bisque plate with a slightly damp sponge. This removes any dust from the shelf that might prevent the glaze from adhering properly. -
Apply the first coat:
Load your medium flat brush with the cream-colored glaze. Apply a smooth, even coat across the entire top surface of the plate. -
Watch the coverage:
Ensure you brush all the way to the rim. Don’t worry if it looks streaky at first; ceramic glazes often need multiple coats to become opaque. -
Let it dry:
Wait until the first coat loses its wet sheen and feels dry to the touch before proceeding. -
Build solid coverage:
Apply a second and third coat of the cream glaze, allowing drying time between each layer. Three coats is usually the magic number for a solid, opaque background.
Pro Tip: Better Splatter
For more varied speckles, use two different shades of brown/rust. Splatter the lighter color first, then the darker one sparingly.
Step 2: Creating Texture
-
Prepare the splatter paint:
Pour a small amount of the burnt orange glaze onto your palette. It needs to be slightly fluid for splattering, so I sometimes mix in a tiny drop of water if the glaze is thick. -
Load the toothbrush:
Dip the bristles of an old toothbrush into the rust-colored glaze. Tap off any huge excess onto a paper towel to avoid giant blobs. -
Test your splatter:
Before hitting the plate, run your thumb across the bristles over a piece of scrap paper to test the spray pattern. -
Splatter the plate:
Hold the toothbrush about 6-8 inches above the plate. Gently flick the bristles to send a fine mist of speckles across the surface. Move your hand around to get random, natural distribution. -
Detail the rim:
Dip a small sponge or the edge of your brush into the rust glaze. Very gently dab or drag it along the very edge of the rim to create that weathered, brownish border.
Step 3: The Heart Accent
-
Center your design:
Locate the slight dip in the center of the plate. This is where your focal heart will go. -
Paint the outline:
Using your small round detail brush loaded with the rust glaze, paint a simple, open heart shape. Keep the lines slightly imperfect and organic to match the rustic vibe. -
Thicken the line:
Go over the heart outline slightly to ensure the color is rich enough to stand out after firing. One thick coat or two thin coats work best here. -
Check for errors:
If you made a stray mark or a splatter is too big, you can gently scrape it off with a toothpick or a clean, stiff brush. -
Final drying:
Allow the entire piece to dry completely for at least 24 hours before taking it to be clear glazed and fired in a kiln.
Level Up: Sgraffito Touch
Paint the central heart solid rust, then use a pin tool to scratch a tiny pattern or word through the wet glaze to reveal the cream below.
Once fired, this plate makes a lovely jewelry dish or a sweet gift for someone special
Mixed Motifs: Half Florals, Half Geometric Heart Plate
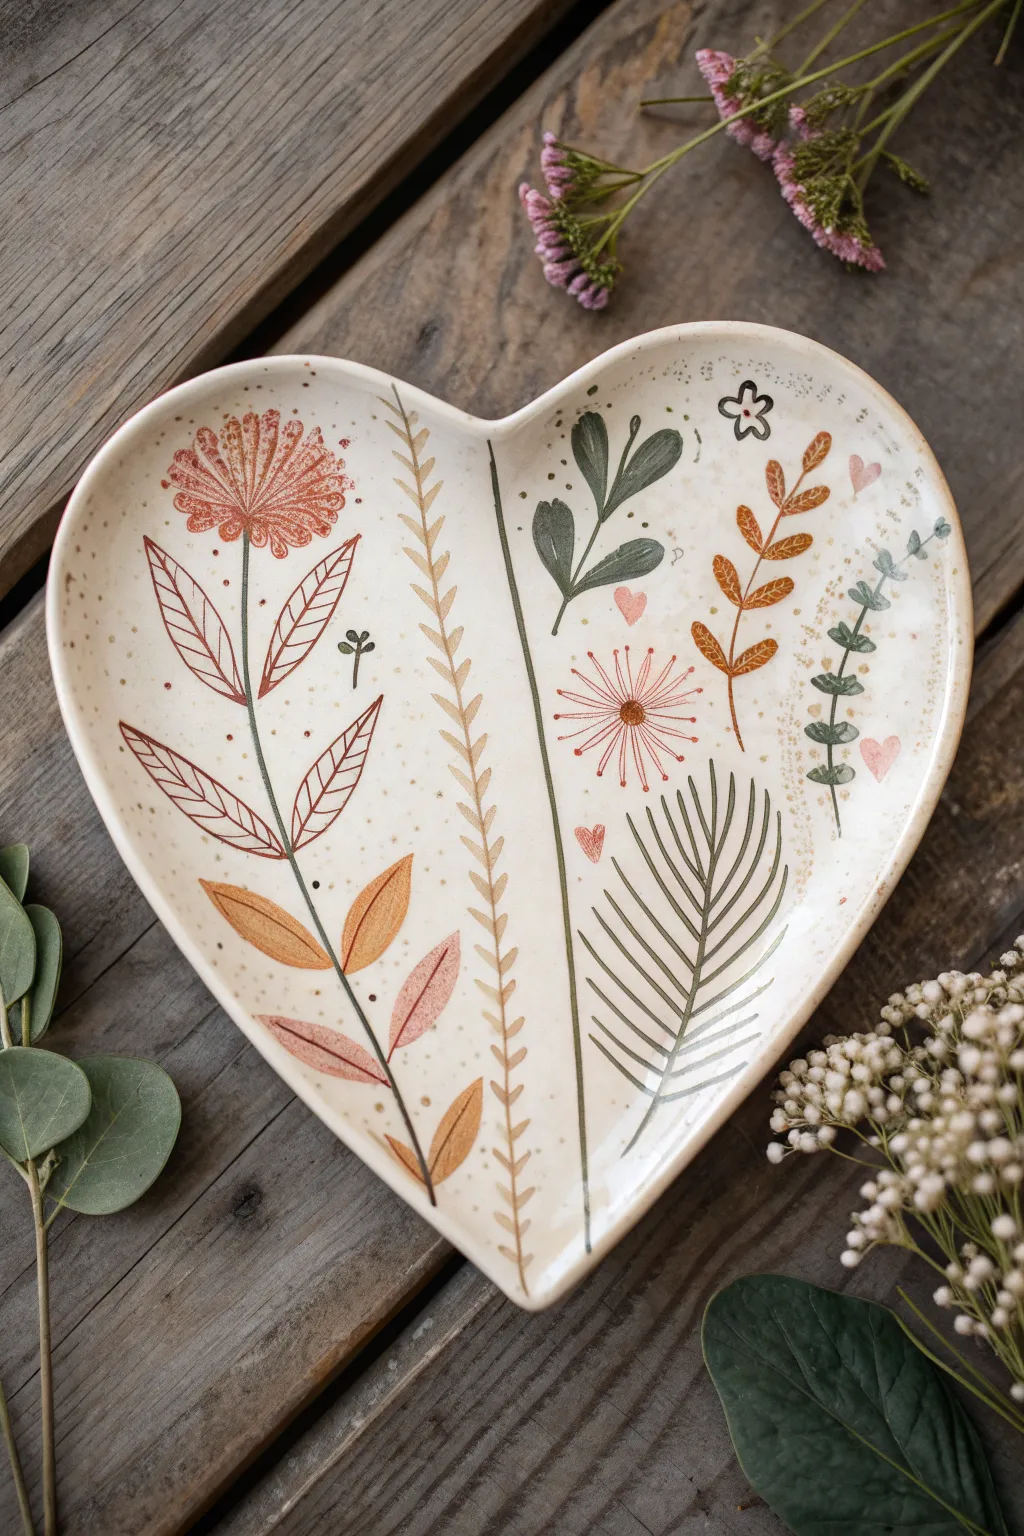
Embrace the charm of wild meadows with this divided design that separates bold blooms from delicate foliage. The subtle specking and earthy palette give this heart-shaped dish a warm, handcrafted feel perfect for holding trinkets or serving treats.
Step-by-Step
Materials
- Heart-shaped ceramic bisque plate
- Underglazes: rust red, burnt orange, sage green, forest green, pale pink, mustard yellow
- Fine liner brush (size 0 or 00)
- Small round brush (size 2)
- Old toothbrush (for speckling)
- Pencil
- Clear dipping glaze
- Palette for mixing
Step 1: Planning and Base Work
-
Sketch the divide:
Begin by lightly sketching a vertical line slightly to the right of the center using a pencil. Curve it gently from the top cleft down to the bottom point to create a natural, organic division. -
Outline the main flower:
On the left side, sketch a large, tall flower stem reaching from the bottom left toward the top left. Draw a circular head for the bloom and large, pointed leaves branching out from the stem. -
Draft the right side motifs:
On the right side, lightly sketch floating botanical elements: a fern frond at the bottom, a sprig of leaves at the top, and small filler flowers in the middle. -
Create the central border:
Along your initial dividing line, sketch a ‘ladder’ style vine with small, v-shaped leaves pointing upward. This acts as the spine of the design.
Step 2: Painting the Left Side
-
Paint the main bloom:
Using a rust red underglaze, fill in the circular flower head at the top left. While it’s still damp, use a clean, dry brush to lift out tiny dots or lines to create texture. -
Define the stem and leaves:
Mix a dark brown-red shade. With your fine liner brush, paint the long central stem. Outline the large leaves in this same dark color, leaving the insides unpainted for now. -
Fill the lower leaves:
For the bottom-most leaves on the main stem, switch to burnt orange and pale pink. Paint the interior of these leaves solidly, contrasting with the outlined leaves above. -
Add the wheat stalk:
Just to the right of the main flower, paint a tall, slender stalk in mustard yellow using short, angled strokes to mimic a head of wheat or grass.
Uneven Lines?
If your fine lines look shaky, your paint might be too thick. Thin the underglaze with a drop of water until it has an ink-like consistency for smoother flow.
Step 3: Painting the Right Side
-
Paint the green sprigs:
At the top right, paint the leafy branch using forest green for the leaves and a darker stem. Vary the pressure on your brush to make the leaves taper naturally. -
Add the red fern:
below the green sprig, recreate the rust-orange fern. Paint a central stem first, then add small, rounded leaves in pairs all the way down. -
Detail the starburst flower:
In the middle right section, paint a small circle in brown. Radiate fine pink lines outward from this center to create a delicate, dandelion-like bloom. -
Create the bottom fern:
At the bottom right, use a sage green or grey-green to paint large, sweeping fern fronds. Keep the lines thin and separated to maintain an airy look. -
Insert filler elements:
Scatter tiny details like small pink hearts, a tiny black flower icon near the top, and a vertical vine of green dots on the far right edge.
Add Dimension
Use a needle tool or toothpick to gently scratch through the wet paint on the flower centers (sgraffito technique) to reveal the white clay beneath.
Step 4: Finishing Touches
-
Paint the dividing vine:
Go back to your central dividing line. Paint the stem in olive green, adding the small v-shaped leaves in a light tan or diluted brown. -
Add splatter texture:
dilute a small amount of brown or dark rust paint with water. Dip an old toothbrush into it and run your thumb across the bristles to flick tiny speckles across the entire plate for a rustic finish. -
Glaze and fire:
Once the underglaze is completely dry, dip the entire plate into a clear satin or glossy glaze. Fire the piece according to the clay and glaze manufacturer’s firing schedule.
Once fired, you will have a lovely piece of functional art that celebrates the imperfect beauty of nature


Have a question or want to share your own experience? I'd love to hear from you in the comments below!