A ceramic cookie jar is my favorite kind of functional art because it gets handled, admired, and snuck-into daily. If you’re craving design ideas you can paint on bisqueware or build from clay, here are some cozy classics and a few playful curveballs.
Classic Script Label Jar
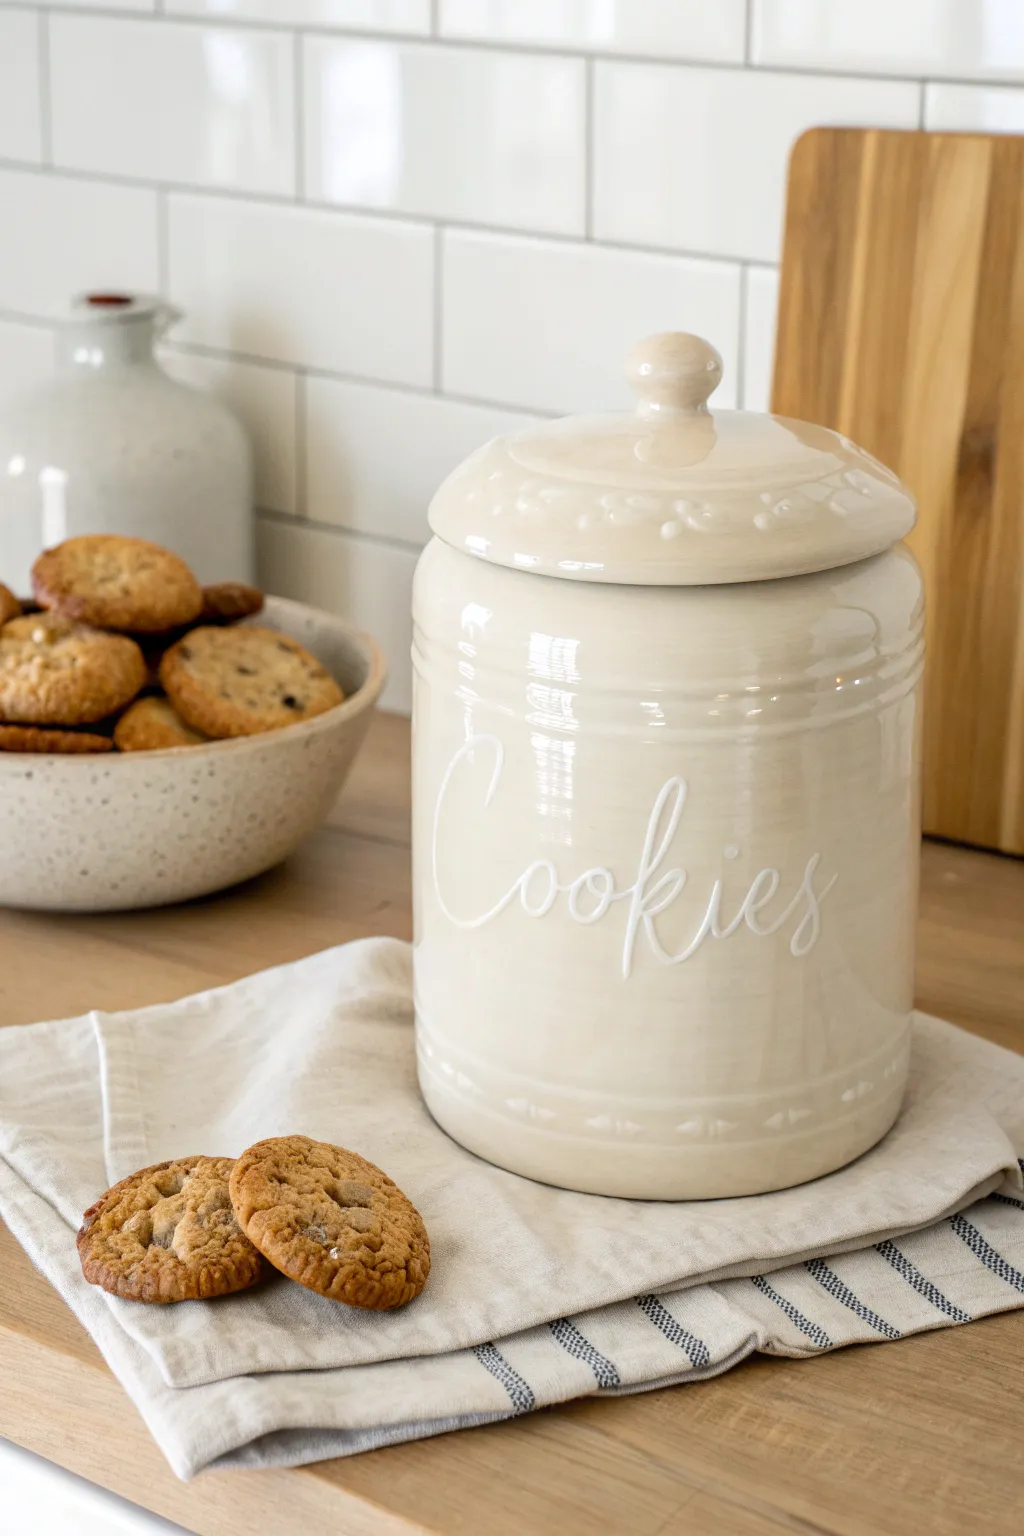
This project transforms a plain ceramic canister into a boutique-style piece featuring elegant, raised lettering that looks professionally embossed. The soft cream finish and delicate script create a timeless look perfect for housing your favorite homemade treats.
Detailed Instructions
Materials
- Plain ceramic jar with lid
- Glossy dimensional fabric paint (white or cream)
- Glossy spray paint (cream/antique white)
- Clear glossy sealant spray
- Rubbing alcohol
- Lint-free cloth
- Paper towels
- Pencil
- Scrap paper
- Tape
- Fine-grit sandpaper (optional)
Step 1: Preparation and Design
-
Clean the surface:
Before beginning, thoroughly wipe down the exterior of your ceramic jar with rubbing alcohol and a lint-free cloth. This removes oils and fingerprints that might prevent the paint from adhering properly. -
Draft your script:
Practice writing the word ‘Cookies’ (or your chosen label) on scrap paper. Aim for a flowing, cursive style with loops on the ‘C’ and ‘k’ to match the classic aesthetic shown in the photo. -
Create a guide for placement:
Once you are happy with your script, lightly sketch the word onto the jar using a pencil. If the ceramic is too glossy for pencil, apply a strip of masking tape as a straight-line guide and eyeball the lettering, or use a specific glass-marking pencil.
Step 2: Creating the Raised Relief
-
Test paint flow:
Take your bottle of dimensional fabric paint and squeeze a small amount onto a paper towel to ensure the nozzle is clear and the paint is flowing smoothly without air bubbles. -
Pipe the lettering:
Carefully trace over your penciled letters with the dimensional paint. Hold the bottle at a slight angle and apply steady pressure to create a consistent, raised line. Move slowly to maintain control. -
Refine the lines:
If a line looks too thin or shaky, you can go back over it while it’s wet, but try to keep the bead of paint rounded for the best relief effect. -
Add decorative details:
Using the same dimensional paint, add small dots or simple geometric patterns around the rim of the lid or the base of the jar if you want to mimic the decorative banding seen in the inspiration image. -
Allow for deep drying:
This is crucial: allow the dimensional paint to dry completely. Although it may skin over in a few hours, I recommend letting it cure overnight to ensure it is hard enough to handle the spray paint without flattening.
Uneven Lettering?
If you mess up a letter while piping, don’t wipe it! Let it dry slightly, then scrape it off cleanly with a toothpick or craft knife before trying again.
Step 3: Painting and Finishing
-
Prepare for spraying:
Set up a ventilated workspace. Remove the lid and place both the jar and lid on a drop cloth or piece of cardboard. -
Apply the first coat:
Spray a light, even coat of your cream-colored glossy spray paint over the entire jar, including directly over the raised lettering. Keep the can moving to avoid drips. -
Build up coverage:
Let the first coat dry to the touch (usually 15-20 minutes). Apply a second thin coat. You want the raised letters to blend seamlessly with the jar body, creating that faux-ceramic relief look. -
Check for opacity:
Inspect the jar. If the dimensional paint color is still showing through slightly, add a third light coat. Multiple thin layers are always better than one thick, drippy layer. -
Seal the surface:
Once the color coats are fully dry (refer to your spray paint can guidelines), apply a final coat of clear glossy sealant. This protects the finish from kitchen grease and frequent handling. -
Final cure:
Let the jar cure for at least 24 hours before filling it with cookies to ensure the paint smell dissipates and the finish hardens completely.
Pro Tip: Font Transfer
Print your word in a font you love, cut it out, and tape it inside the jar. Place a light source inside the jar to trace the letters onto the outside effortlessly.
You have now created a custom, high-end storage piece that looks like it came straight from a pottery studio


Simple Rainbow Stripe Wrap
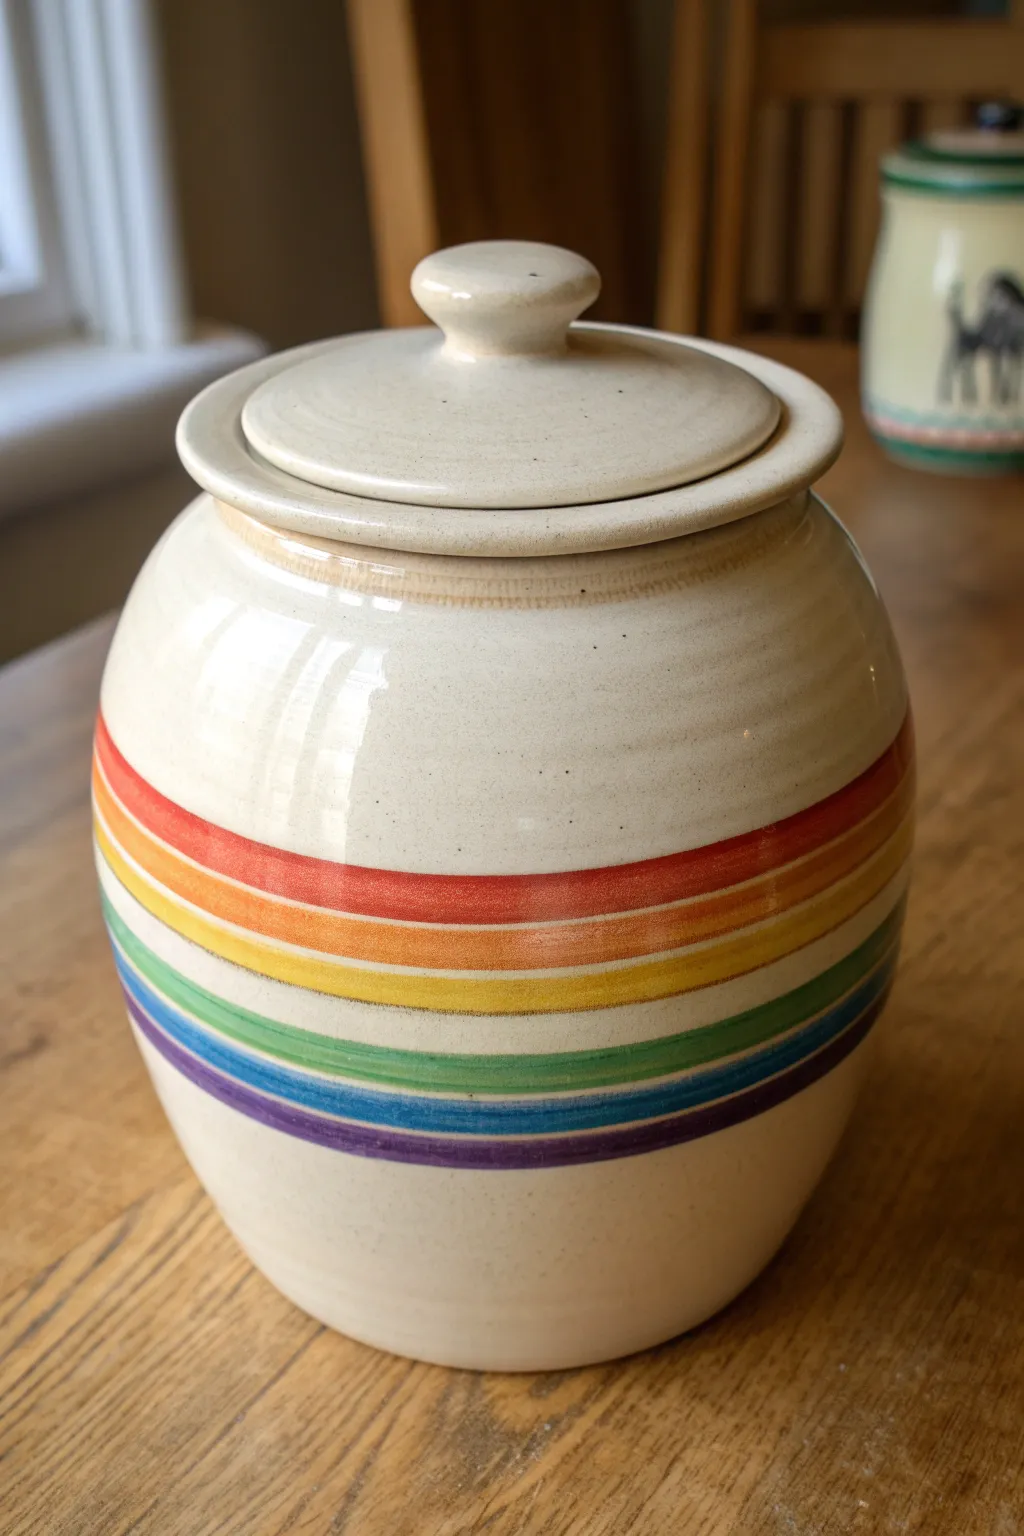
Brighten up your kitchen counter with this classically styled ceramic jar featuring a vibrant wrap of rainbow stripes. The simple bands of color pop beautifully against the speckled cream background, creating a timeless piece that feels both nostalgic and fresh.
Step-by-Step Tutorial
Materials
- Bisque-fired ceramic cookie jar with lid
- Potter’s wheel or banding wheel
- Underglaze colors: Red, Orange, Yellow, Green, Blue, Purple
- Clear transparent glaze (food-safe)
- Speckled buff stoneware glaze (or speckled clay body)
- Wide varying soft-bristle brushes
- Narrow lining brush or sumi brush
- Sponge
- Bucket of water
- Kiln access
Step 1: Preparation & Base Glaze
-
Clean the bisque:
Start by wiping down your entire bisque-fired jar and lid with a slightly damp sponge. This removes any dust that might prevent the glaze from adhering properly. -
Center the jar:
Place your jar upside down or right-side up on your banding wheel. Give the wheel a spin to ensure the jar is perfectly centered so your stripes will be straight. -
Apply the interior glaze:
Pour your food-safe clear glaze or a white liner glaze into the inside of the jar. Roll it around to coat the interior walls fully, then pour the excess back into your bucket. -
Apply the exterior base:
If you are using a speckled clay body, you can skip this. However, if using plain white clay, brush on 2-3 coats of a speckled cream underglaze or base glaze to the entire exterior surface. -
Let the base set:
Allow this base layer to dry until it is no longer tacky to the touch. This provides a stable canvas for your rainbow stripes.
Wobbly Lines?
If your stripes look shaky, don’t correct them while wet. Wait for the underglaze to dry, then use a wooden tool or razor blade to gently scrape the edges straight.
Step 2: Painting the Rainbow Bands
-
Plan the spacing:
Look at the belly of the jar. You need space for six bands of color plus a little breathing room at the top and bottom. You can lightly mark the start and end of the rainbow section with a pencil if helpful. -
Prepare your red:
Load a medium-width soft brush with red underglaze. Ensure the brush is fully saturated but not dripping. -
Apply the red band:
Spin the banding wheel at a slow, steady pace. Hold your brush hand steady against a support or your body, and gently touch the brush to the jar to create the top red stripe. -
Refine the edge:
If the stripe looks thin, do a second rotation to thicken the opacity. The goal is a solid, confident line rather than a wispy one. -
Move to orange:
Clean your brush thoroughly or switch to a new one. Load it with orange underglaze. Position your hand just below the red line, leaving almost no gap between colors. -
Apply the orange band:
Spin the wheel and apply the orange stripe exactly as you did the red, letting it kiss the bottom edge of the red line. -
Yellow and Green:
Continue this process, working your way down the jar. Apply the yellow stripe, followed immediately by the green stripe. -
Blue and Purple:
Finish the rainbow sequence with the blue band, and finally the purple band at the bottom. I find that steady breathing helps keep my hand stable during these lower stripes. -
Tidy up edges:
Inspect your work. If any glaze dripped or smeared outside the bands, scratch it off gently with a tool once dry or wipe carefully with a minimal amount of water.
Step 3: Final Glazing & Firing
-
Dry generally:
Let the underglaze stripes dry completely. They should look chalky and matte. -
Apply clear coat:
Dip the entire jar (or carefully brush) into a clear, food-safe transparent glaze. This seals the underglaze and gives the jar that glossy, finished professional look seen in the photo. -
Wipe the foot:
Use a sponge to wipe all glaze off the very bottom (foot ring) of the jar and the rim where the lid sits so they don’t fuse to the kiln shelf. -
Fire the kiln:
Load the kiln and fire to the temperature specific to your clay and glaze (likely Cone 5 or 6 for stoneware).
Texture Twist
Before painting, carve thin grooves into the clay on the wheel where the stripes will go. The glaze will pool slightly in these grooves for added depth.
Once cooled, your jar is ready to be filled with your favorite homemade treats


Red-and-White Gingham Checks
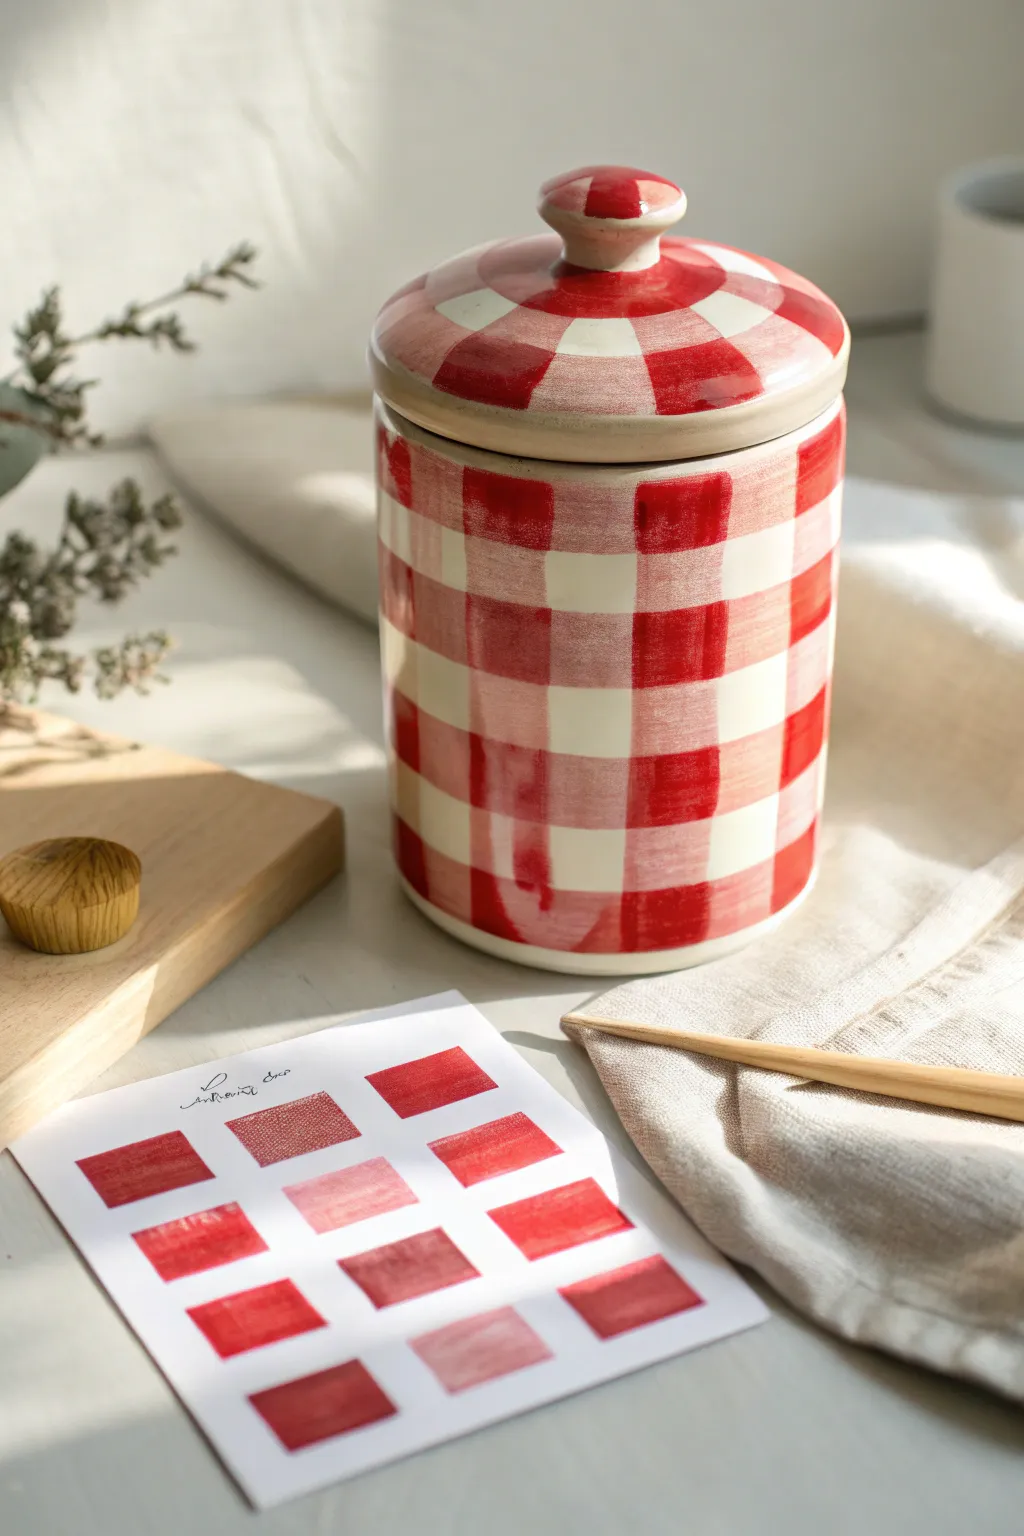
Transform a plain ceramic jar into a cozy cottagecore statement piece with this loose, painterly gingham design. The charm of this project lies in its imperfect, translucent layers that vary from deep crimson to soft pink, mimicking the texture of woven fabric.
Step-by-Step
Materials
- Plain white ceramic cookie jar with lid
- Ceramic paint or underglaze (Red)
- Glazing medium or water (for thinning)
- Flat shader brush (approx. 1/2 inch to 1 inch width)
- Fine detail brush
- Pencil and ruler (or flexible tape measure)
- Palette or small mixing dish
- Paper towels
- Clear ceramic glaze (if using underglaze)
- Masking tape (optional, for straighter lines)
Step 1: Planning the Grid
-
Clean the surface:
Before starting, wipe down your ceramic jar with a damp cloth or alcohol wipe to remove any dust, grease, or fingerprints. A clean surface ensures the paint adheres properly. -
Measure the circumference:
Measure around the jar to determine your spacing. Divide the total circumference by an even number to decide on your check width—usually around 1 inch works best for a standard jar size. -
Mark vertical guides:
Using a pencil, lightly mark vertical ticks around the top and bottom rim of the jar corresponding to your check width. These will guide your vertical stripes. -
Mark horizontal guides:
Repeat the process for the horizontal rows. Mark the height of your jar into even sections. Lightly sketch the grid if you need extra confidence, but keep the lines faint.
Opacity is Key
The gingham effect relies on transparency. Mix a wash (watery), a medium tone, and a thick opaque red before you start painting to test layering.
Step 2: Painting the Vertical Stripes
-
Mix your medium red:
On your palette, mix a ‘medium’ consistency of red paint. You want this to be somewhat translucent—not fully opaque, but not a watery wash. Add a little glazing medium or water until it flows smoothly. -
Paint the first vertical stripe:
Load your flat brush. Starting from the top rim, pull the brush straight down to the bottom in one confident stroke if possible. If you need to reload, try to blend the seam gently. -
Skip and repeat:
Skip the next marked section (leave it white) and paint the next vertical stripe. Continue this pattern all the way around the jar. -
Let it set:
Allow these vertical stripes to dry to the touch. This prevents the paint from smearing when you cross over them with the horizontal lines.
Wobbly Lines?
If your hand is shaking, use your pinky finger as a stabilizer against the dry parts of the jar while you pull the brush across the surface.
Step 3: Creating the Check Pattern
-
Paint horizontal stripes:
Using your medium red mix again, paint horizontal bands around the jar, skipping every other section just like the vertical steps. You’ll start to see the grid form. -
Identify the overlaps:
Where the vertical and horizontal red stripes cross each other, the color will naturally be darker. This creates the classic gingham ‘woven’ look. -
Deepen the intersections:
Mix a thicker, more opaque version of your red paint. carefully go over just the square intersections where the stripes overlap to make them a deep, saturated red. This contrast is key. -
Refine the edges:
Use a damp fine brush to gently tidy up any ragged edges, or embrace the hand-painted look—I personally think a slightly wobbly edge adds character to this specific style.
Step 4: Finishing the Lid
-
Map the lid design:
The lid is curved, so treating it like a pie chart often works best. Visualize radiating sections coming from the center knob. -
Paint the lid pattern:
Follow the same lighter/darker intersection logic on the lid. Ensure the pattern roughly aligns with the jar body when the lid is placed on top. -
Detail the knob:
Paint the knob with a matching check, or simplify it by painting the top surface red and leaving the stem specific white. -
Clear glaze application:
Once all paint is completely dry (check manufacturer instructions), apply a clear gloss glaze over the entire piece to seal your work and make it food-safe. -
Final firing or curing:
If using kiln-fire glazes, fire the piece according to cone specifications. If using oven-bake paints, place in a cool oven, heat to temperature, bake, and let cool inside the oven.
Now step back and admire how this simple pattern adds immediate warmth and vintage nostalgia to your kitchen counter


Confetti Polka Dot Jar
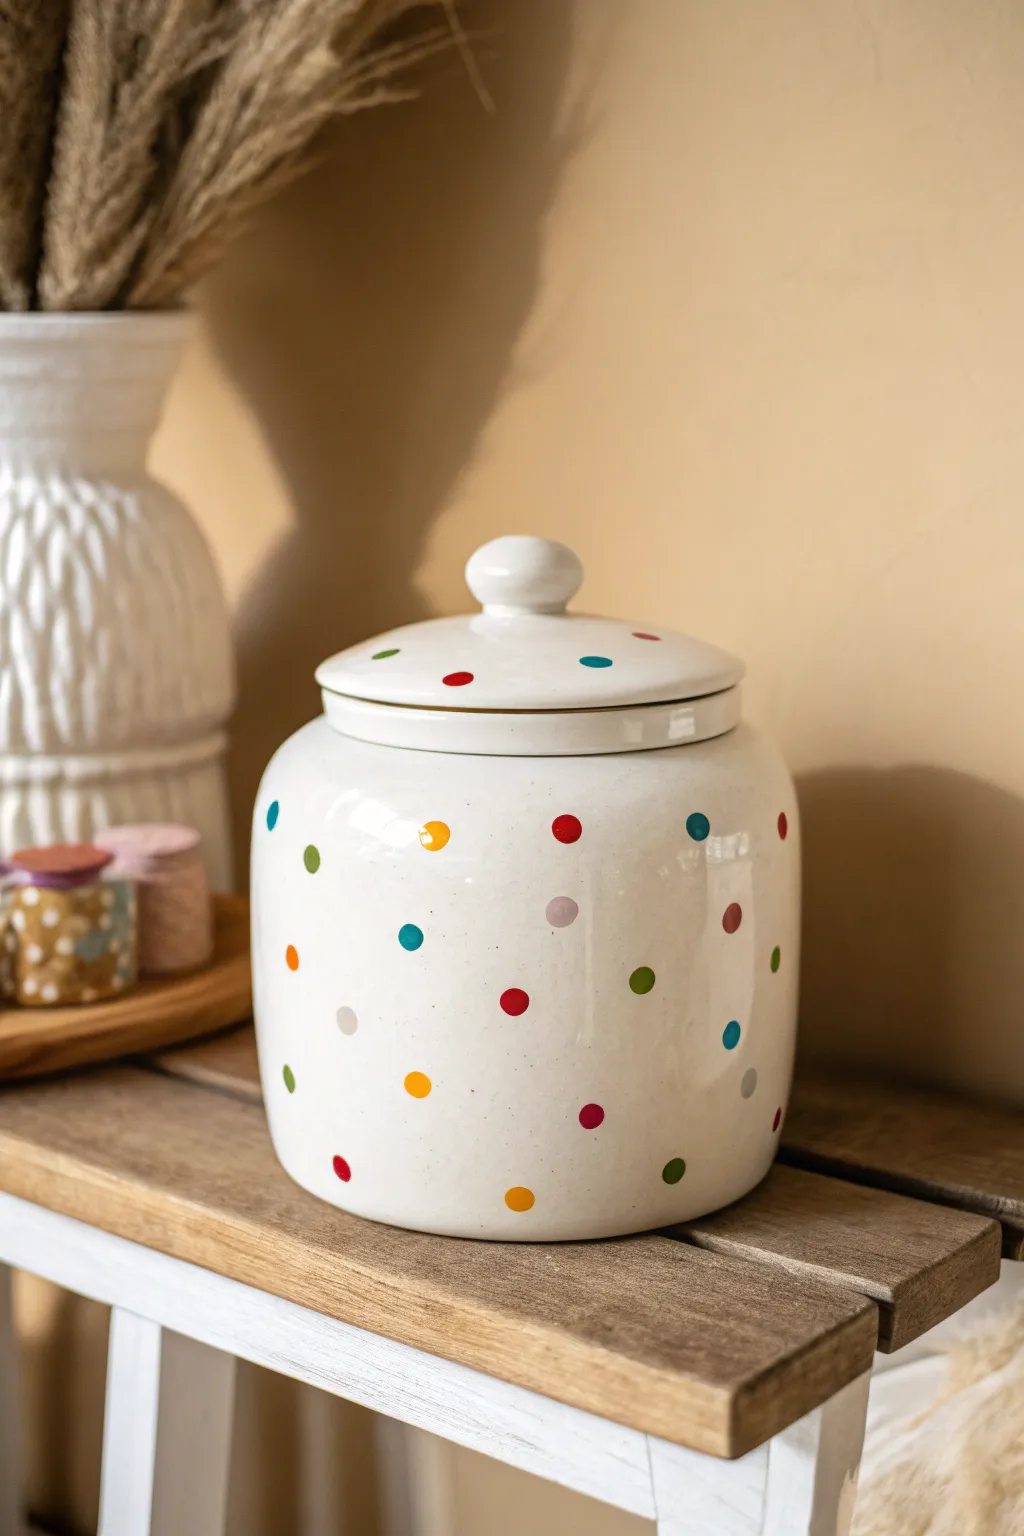
Brighten up your kitchen counter with this playful, modern take on a classic cookie jar. The design combines vibrant, multi-colored polka dots with subtle faux-speckling to mimic the charm of high-end speckled stoneware.
Detailed Instructions
Materials
- Plain white ceramic cookie jar with lid
- Ceramic or multi-surface acrylic paints (red, orange, yellow, bright green, teal, blue, deep purple, light pink, grey)
- Round sponge pouncers (small size, approx. 1/2 inch) or round foam brushes
- Small stiff-bristled brush (like a toothbrush or fan brush)
- Rubbing alcohol and paper towels
- Paper plate or palette
- Gloss sealant or dishwasher-safe Mod Podge (optional but recommended)
Step 1: Preparation
-
Clean surface:
Begin by thoroughly cleaning the exterior of your white ceramic jar and lid with rubbing alcohol. This removes any invisible oils or dust that might prevent the paint from adhering properly. -
Dry completely:
Allow the alcohol to evaporate completely before you start painting; the surface should be bone dry. -
Prepare palette:
Squeeze dime-sized amounts of your bright paint colors onto a paper plate. Keep them spaced out so your colors stay crisp and don’t muddy together.
Clean Edges Only
If your sponge pouncer leaves a raised rim of paint around the dot, lightly tap the center with your finger while wet to flatten it out for a smoother finish.
Step 2: Painting the Dots
-
Load the pouncer:
Dip your round sponge pouncer into your first color, for instance, the bright red. Dab it a few times on a clean part of the palette to ensure the paint is evenly distributed and not gloopy. -
Apply first color:
Press the pouncer firmly onto the jar surface. Lift it straight off to create a perfect circle. Create 5-7 random dots scattered around the jar, leaving plenty of white space. -
Switch colors:
Clean your pouncer or switch to a fresh one for the next color, perhaps a sunny yellow. I prefer using a separate pouncer for each color to keep things moving quickly. -
Add second color:
Apply the next set of dots, aiming for the empty spaces. Try not to place two dots of the same color too close together. -
Continue the pattern:
Systematically work through all your colors—teal, purple, pink, green, orange—filling in the gaps. Don’t forget to rotate the jar frequently to spot any large empty white patches. -
Paint the lid:
Repeat the polka dot process on the lid. Be careful around the curve of the knob; lighter pressure helps the sponge conform to the shape without sliding. -
Initial drying:
Let the polka dots dry to the touch, usually about 20-30 minutes, so you don’t accidentally smear them during the next step.
Step 3: Adding the Faux Speckle
-
Mix speckle color:
Create a watery mixture of your grey paint. You want it to be heavily diluted, almost like ink consistency. -
Load the tool:
Dip the tips of a stiff brush or an old toothbrush into this watery grey mixture. -
Test splatter:
Test your splattering technique on a scrap piece of paper first. Flick the bristles with your thumb to send a spray of tiny droplets forward. -
Apply speckles:
Gently flick speckles all over the jar and lid. The goal is a subtle ‘salt and pepper’ look that sits in the background between your colorful dots. Don’t overdo it. -
Clean up drips:
If you get a large drip instead of a speckle, quickly dab it up with a corner of a paper towel.
Pastel Variation
Swap the primary colors for soft pastels like lavender, mint, and peach, and use a metallic gold paint for the splatter step to create a chic, softer aesthetic.
Step 4: Finishing
-
Full cure:
Allow the jar to dry fully according to your paint manufacturer’s instructions. For some enamels, this might be 24 hours. -
Bake or seal:
If using bake-on ceramic paints, place the jar in a cool oven, heat to the specified temperature (often 350°F), bake for 30 minutes, and let cool in the oven. Alternatively, apply a glossy clear coat for protection.
Now fill your cheerful new jar with your favorite treats and enjoy the pop of color on your countertop
BRUSH GUIDE
The Right Brush for Every Stroke
From clean lines to bold texture — master brush choice, stroke control, and essential techniques.
Explore the Full Guide
Monogram Medallion Front
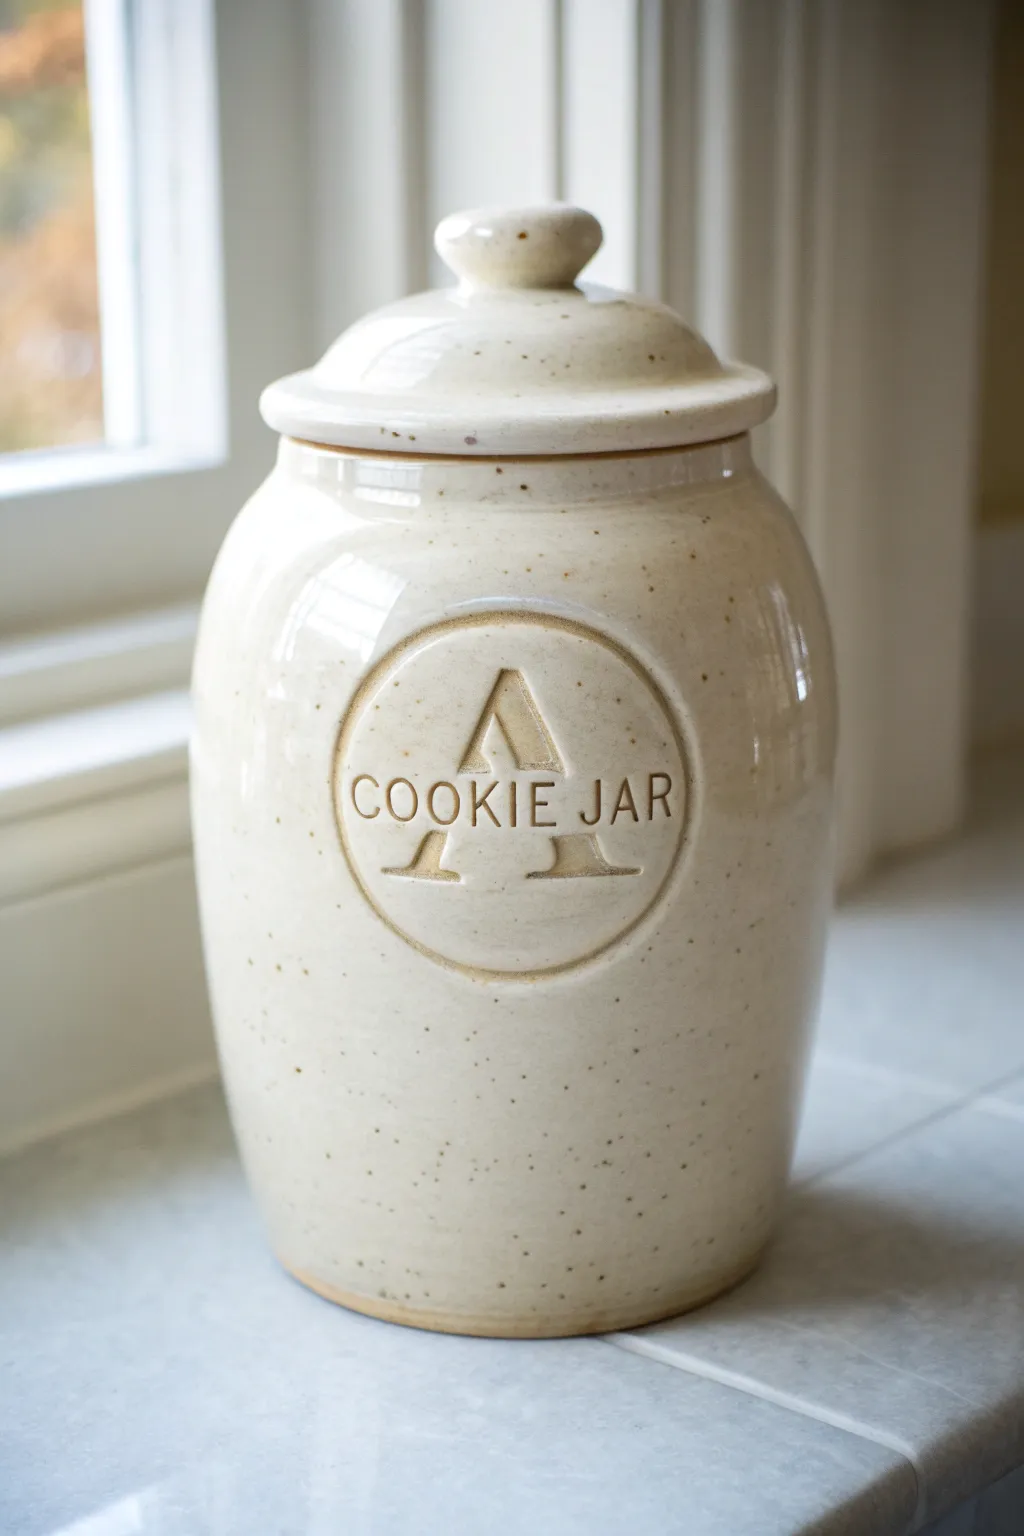
Create a timeless kitchen staple with this wheel-thrown ceramic cookie jar, featuring a personalized monogram medallion. The warm speckled clay body and clear glossy glaze give it a classic farmhouse feel that fits perfectly on any countertop.
How-To Guide
Materials
- Speckled stoneware clay (approx. 4-5 lbs)
- Potter’s wheel
- Throwing tools (sponge, wire tool, ribs)
- Trimming tools
- Rolling pin
- Circular cookie cutter (approx. 3-4 inches)
- Alphabet stamp set (small)
- Large letter stencil or printed ‘A’ template
- Needle tool
- Scoring tool or serrated rib
- Slip
- Clear glossy glaze
- Calipers
Step 1: Throwing the Body & Lid
-
Center and open:
Begin with about 3-4 lbs of speckled clay on your wheel. Center it firmly and open the clay to a flat interior floor about 4 inches wide. -
Pull the cylinder:
Pull the walls up to create a tall cylinder, aiming for a consistent thickness. You want the base to be slightly narrower than the belly, creating a gentle curve. -
Shape the belly:
Use a rib on the inside to push the belly out while supporting the exterior with your other hand or a sponge. Create a rounded, inviting form that tapers slightly at the neck. -
Form the gallery:
At the rim, split the clay carefully to create a gallery (a small internal ledge) for the lid to sit on. Measure the diameter of this gallery with your calipers—you’ll need this exact measurement for the lid. -
Throw the lid:
With the remaining 1 lb of clay, throw a small, domed lid off the hump or directly on the bat head. Use your caliper measurement to ensure the flange fits perfectly into the jar’s gallery. -
Create the knob:
While throwing the lid, shape a comfortable, rounded knob on top. Ensure it has a slightly undercut stem so it’s easy to grip.
Clean Imprints
Dust your clay medallion with a tiny bit of cornstarch before stamping. This prevents the stamps from sticking and tearing the clay letters.
Step 2: Crafting the Medallion
-
Roll a slab:
Roll out a small slab of the same speckled clay to about 1/4 inch thickness. Smooth it with a rib to remove canvas texture. -
Cut the circle:
Use your circular cutter to punch out a perfect round medallion. Smooth the edges with a slightly damp finger. -
Carve the initial:
Lightly trace your large initial (like the ‘A’ shown) onto the clay medallion. Using a needle tool or small loop tool, carefully carve out the outline to create a raised or recessed effect. I like to bevel the edges of the letter slightly for a cleaner look. -
Stamp the text:
Using your small alphabet stamps, press the words ‘COOKIE JAR’ directly across the center of your large initial. Apply even pressure so the depth is consistent.
Contrast Boost
Rub a dark iron oxide wash into the stamped letters and wipe away the excess before glazing to make the text pop.
Step 3: Assembly & Finishing
-
Trim the pot:
Once the jar is leather-hard, trim the foot ring to give the pot a visual lift. Clean up the gallery area to ensure the lid fits largely correctly. -
Attach the medallion:
Score the back of your medallion and the spot on the jar’s belly where it will sit. Apply slip generously and press the medallion firmly onto the curve of the jar. -
Seal the edges:
Provide support from the inside of the jar while pressing. Use a modeling tool to smooth and seal the seam where the medallion meets the jar body so it looks integrated, not just stuck on. -
Bisque fire:
Allow the entire piece to dry slowly to prevent the medallion from cracking away. Fire to bisque temperature (usually Cone 04 or 06). -
Glaze application:
Dip or pour a clear glossy glaze over the entire piece. The clear glaze allows the natural speckles of the clay body to shine through as the primary decoration. -
Wipe the medallion:
Check the stamped letters and carved initial. If the glaze is pooling too thickly in the text, dab it gently with a sponge so the words remain legible after firing. -
Final firing:
Fire the jar to the clay body’s maturation temperature (typically Cone 5 or 6 for stoneware).
Fill your new handmade heirloom with your favorite treats once it has cooled completely
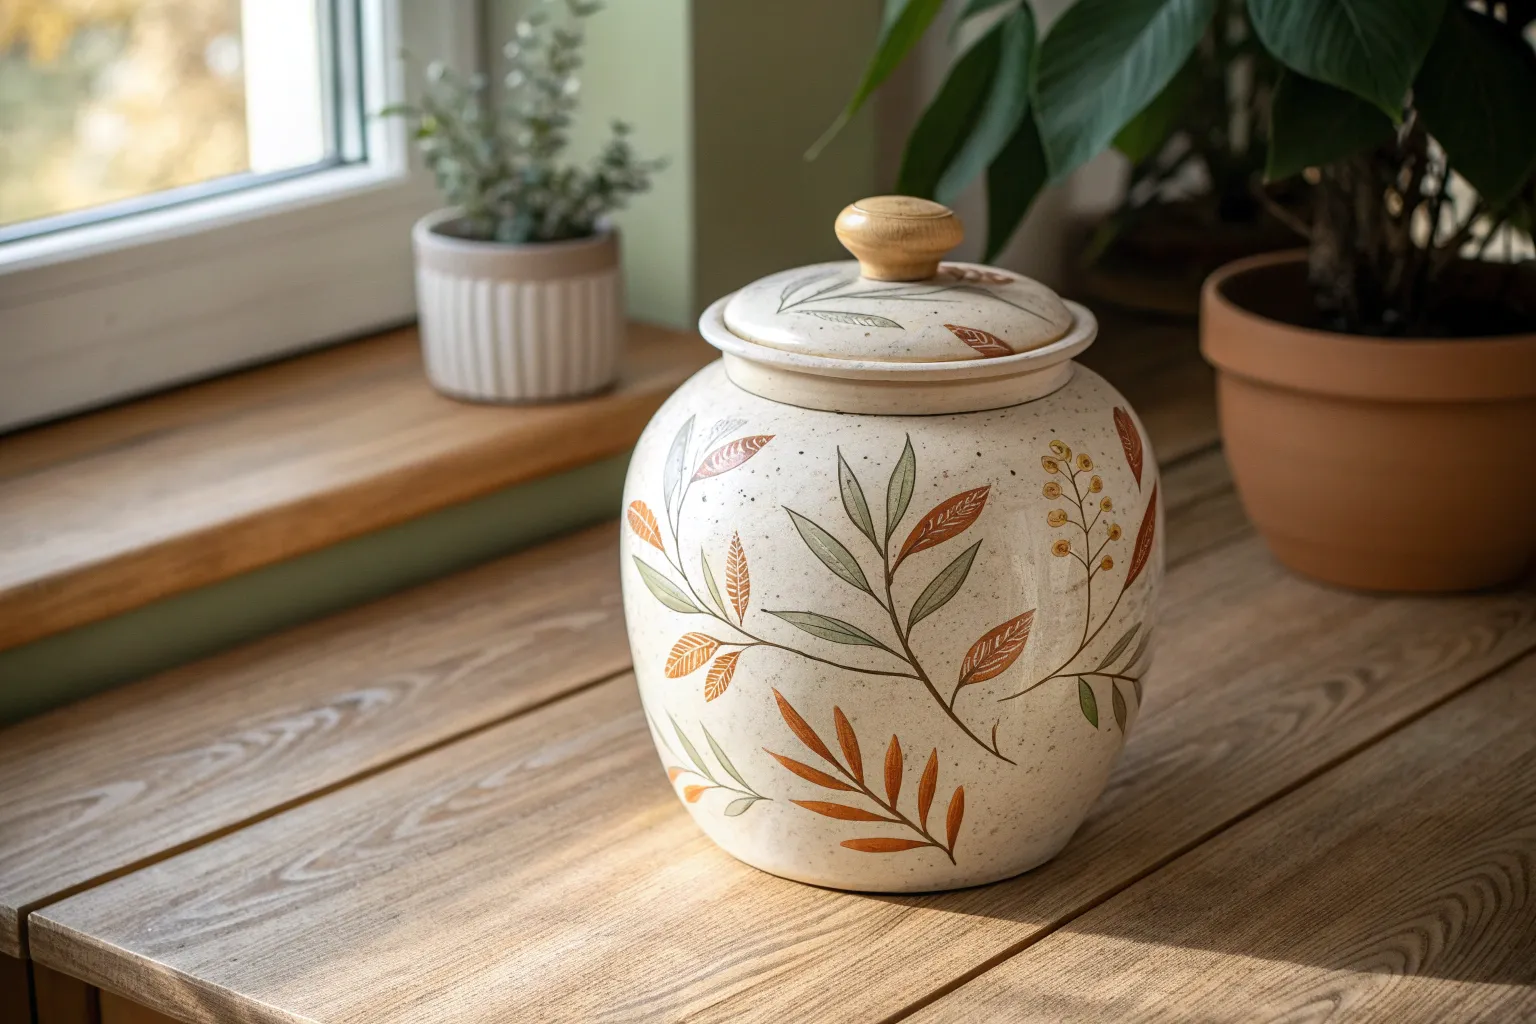
Botanical Garland Rim

Bring the tranquility of a garden into your kitchen with this elegant speckled ceramic jar. Featuring delicate hand-painted botanical garlands and rustic detailing, this project combines traditional wheel-throwing with precise underglaze decoration for a timeless, organic look.
Detailed Instructions
Materials
- Speckled stoneware clay (approx. 3-4 lbs)
- Pottery wheel
- Throwing tools (sponge, rib, wire cutter)
- Trimming tools
- Pin tool or needle tool
- Underglaze (Sage Green or darker Forest Green)
- Underglaze (Dark Brown for stems)
- Very fine detail brush (size 00 or 0)
- Clear transparent glaze (cone 5/6 compatible)
- Banding wheel
- Sponge for smoothing
- Kiln
Step 1: Throwing the Form
-
Center and open:
Begin by centering roughly 2.5 to 3 lbs of speckled clay on your wheel head. Open the clay to create a flat internal floor, leaving slightly more thickness at the base for trimming later. -
Pull the walls:
Pull the clay upward into a tall cylinder shape. Aim for a consistent wall thickness of about 1/4 inch. For a classic canister look, keep the sides straight and vertical, avoiding any significant bulging. -
Refine the rim:
Create a gallery for the lid by pressing a notch into the inside of the rim or flattening the top edge slightly to accept a lid. Smooth the lip with a chamois for a professional finish. -
Throw the lid:
Using the remaining clay, throw a lid that fits your canister’s gallery measurements perfectly. Include a small, ergonomic knob in the center for easy lifting. I usually double-check my caliper measurements twice here to be safe. -
Trim and dry:
Once the pieces are leather hard (firm but still cool to the touch), trim the base of the canister and the underside of the lid to remove excess weight. Smooth all surfaces with a rib to prepare for painting.
Clean Lines
Use a specialized pottery trimming tool or a stiff brush to gently scratch away any paint mistakes once dry. It’s much easier than wiping!
Step 2: Painting the Botanical Design
-
Prepare the surface:
Wipe the leather-hard clay gently with a damp sponge to remove any dust or crumbs from trimming, as these can interfere with brushwork. -
Mark guidelines:
Place the jar on a banding wheel. While spinning strictly, lightly etch two parallel lines near the top rim using a pin tool or pencil. This space will house the dashed border pattern. -
Paint the stems:
Mix a small amount of water into your dark brown underglaze to improve flow. Using a fine liner brush, paint a continuous, wavy vine line around the center of the jar’s body. Repeat this process on the lid. -
Add the leaves:
Switch to your sage green underglaze and a small round brush. Paint pairs of small, pointed oval leaves extending from the vine. Use a ‘press and lift’ stroke: press down for the leaf belly and lift up for the sharp tip. -
Detail the leaves:
Once the green is dry to the touch, use your finest brush and diluted brown underglaze to add a tiny central vein to each leaf. This adds depth and emphasizes the botanical illustration style. -
Create the upper border:
Between the two etched guidelines near the rim, paint two solid green lines while spinning the banding wheel. Then, fill the space between them with evenly spaced dots or short dashes in brown. -
Bisque fire:
Allow the piece to dry completely for several days. Fire it in the kiln to a bisque temperature (usually cone 04) to set the shape and underglaze.
Lid Fit Troubleshooting
If the lid rattles after firing, apply a tiny dab of water-based grinding paste to the rim and rotate the lid back and forth to sand it into a perfect fit.
Step 3: Glazing and Final Firing
-
Apply clear glaze:
Dip the bisqueware into a clear, transparent glaze. Ensure the glaze isn’t too thick, as cloudiness can obscure the delicate speckled clay body and your painting. -
Clean the foot:
Wipe the glaze off the bottom of the canister and the rim where the lid sits to prevent the pieces from fusing together in the kiln. -
Final fire:
Fire the piece to glaze maturity (typically cone 5 or 6 depending on your clay body). Let the kiln cool naturally before opening.
Once cooled, fill your new handmade canister with your favorite treats and enjoy the natural charm it adds to your counter

PENCIL GUIDE
Understanding Pencil Grades from H to B
From first sketch to finished drawing — learn pencil grades, line control, and shading techniques.
Explore the Full Guide
Cobalt Floral Tile Look
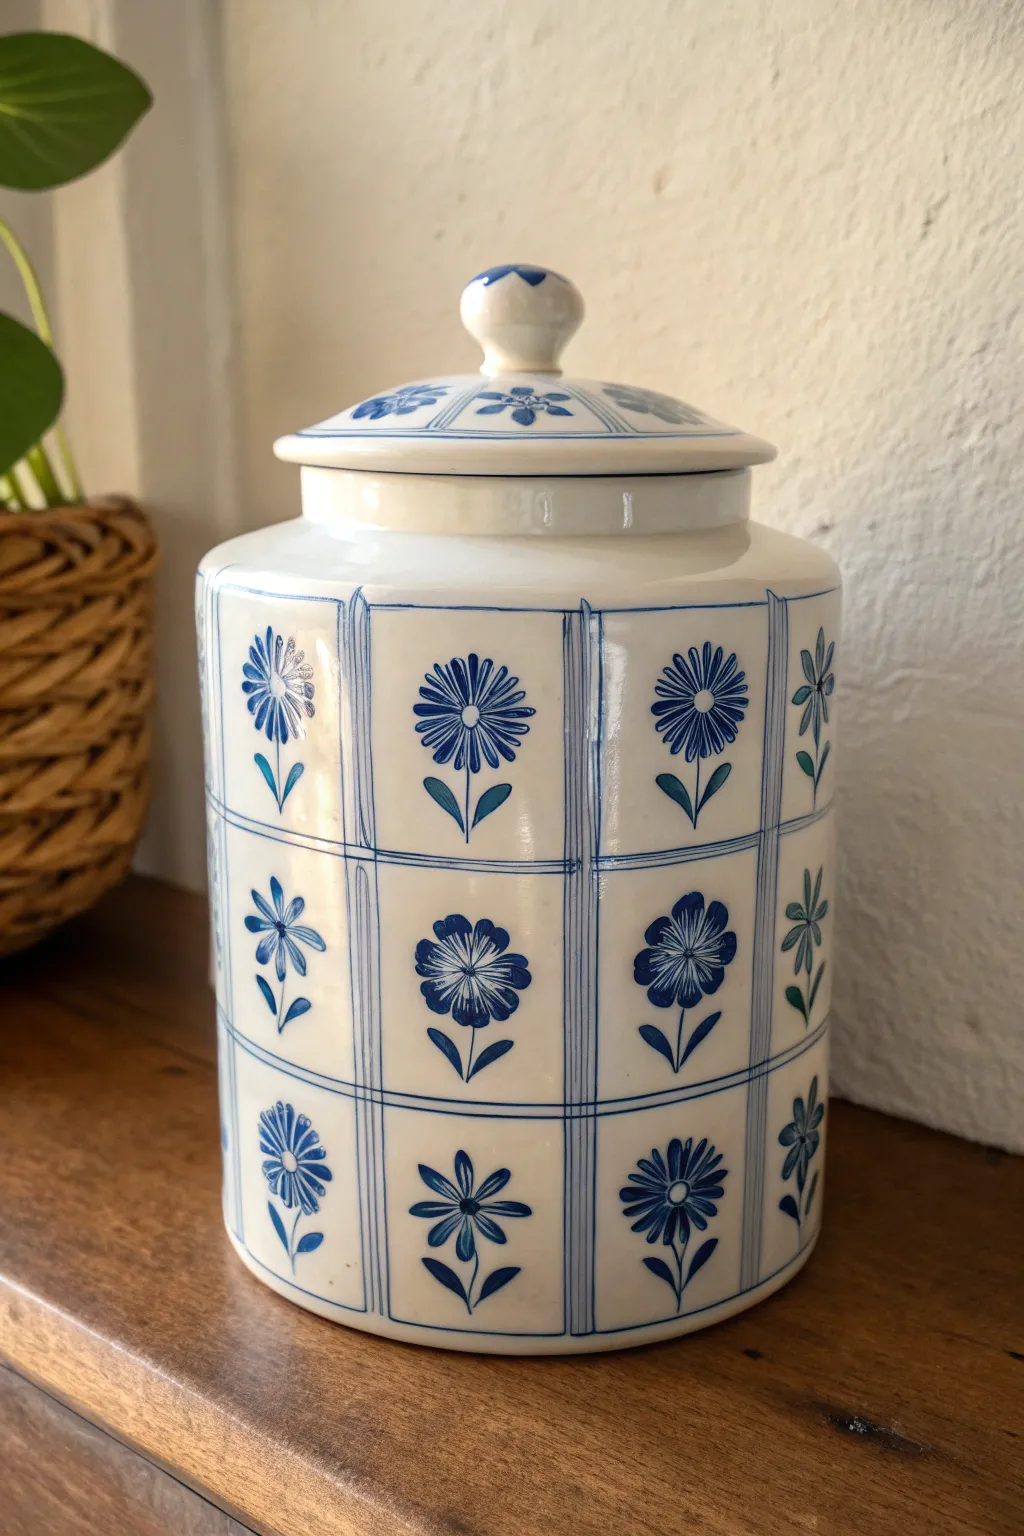
Transform a plain white ceramic canister into a charming vintage-style vessel by hand-painting a grid of delicate cobalt blooms. This project mimics the timeless look of classic blue-and-white porcelain tiles without requiring a kiln or professional pottery skills.
Step-by-Step
Materials
- Plain white ceramic cookie jar or canister with lid
- High-gloss porcelain paint (cobalt or navy blue)
- Fine liner brush (size 0 or 00)
- Small round brush (size 2)
- Ruler
- Pencil
- Rubbing alcohol
- Cotton pads
- Paper plate or palette
- Oven (for curing)
Step 1: Preparing the Grid
-
Clean surface:
Begin by wiping down your entire ceramic jar and lid with rubbing alcohol on a cotton pad. This catches any hidden oils or dust that might repel the paint. -
Measure height:
Using your ruler, measure the height of the main cylinder from just below the rim to just above the base. Divide this measurement by three to determine the height of your rows. -
Mark horizontal guides:
With a pencil, lightly mark small ticks around the circumference of the jar at these vertical intervals to guide your horizontal lines. -
Calculate column width:
Measure the circumference of the jar. Divide this number by an even number (like 6 or 8) to create square or slightly rectangular sections that wrap perfectly around the vessel. -
Sketch the grid:
Lightly sketch the full grid onto the jar using the pencil markings. Don’t worry about perfection; pencil lines will either burn off in the oven or can be wiped away later.
Step 2: Painting the Structure
-
Load the liner brush:
Squeeze a small amount of cobalt porcelain paint onto your palette. Thin the paint very slightly with a drop of water if it feels too tacky. Load your fine liner brush. -
Paint vertical dividers:
Go over your vertical pencil lines first. Instead of one single line, paint two very thin parallel lines close together to mimic the grout lines or frame edge of a tile. -
Paint horizontal dividers:
Repeat the process for the horizontal lines, creating double parallel lines that intersect the vertical ones. This creates the ‘window pane’ effect. -
Add corner details:
At the intersections where the lines cross, add a tiny extra stroke or dot to emphasize the corners, giving it a more hand-drawn, architectural feel. -
Detail the lid:
On the lid, paint a single circular line around the rim. Add simple triangular or petal shapes radiating from the center knob to match the floral theme.
Pro Tip: Steady Hands
Rest your pinky finger against the jar’s surface as a pivot point while painting fine lines. This stabilizes your hand and prevents shaky strokes better than hovering does.
Step 3: Creating the Floral Motifs
-
Start the centers:
In the center of each grid square, paint a small circle. Vary the centers slightly—some can be solid dots, others small open rings—to create variety among the ’tiles’. -
Paint Type A petals:
Choose a specific flower style for varying squares (like a checkerboard pattern). For Type A, use the round brush to press and lift, creating teardrop-shaped daisy petals radiating from the center. -
Paint Type B petals:
For the alternating squares (Type B), user the liner brush to draw many thin, spikey lines radiating outward, resembling an aster or cornflower. -
Add variations:
Feel free to add a third flower type if your grid is large enough, perhaps a simple four-petal blossom with rounded edges. -
Paint stems and leaves:
Beneath each flower head, paint a simple, curved Y-shape for the stem and two small leaves. Keep the leaves simple—just quick, small dabs with the brush. -
Dry partially:
Allow the paint to set for about 15 minutes. Check for any smudges and clean them up carefully with a damp cotton swab or toothpick. -
Final cure:
Place the jar in a cool oven. Set the temperature according to your paint manufacturer’s instructions (usually around 300°F/150°C) and bake for 30 minutes. Turn the oven off and let the jar cool completely inside before removing.
Troubleshooting: Drippy Paint
If paint beads up or drips, the surface might be too slick. Lightly sand the area with fine-grit sandpaper, wipe clean, and try painting again for better adhesion.
Now you have a stunning custom storage piece that looks like a family heirloom ready for your kitchen counter
Cute Animal Face Lid
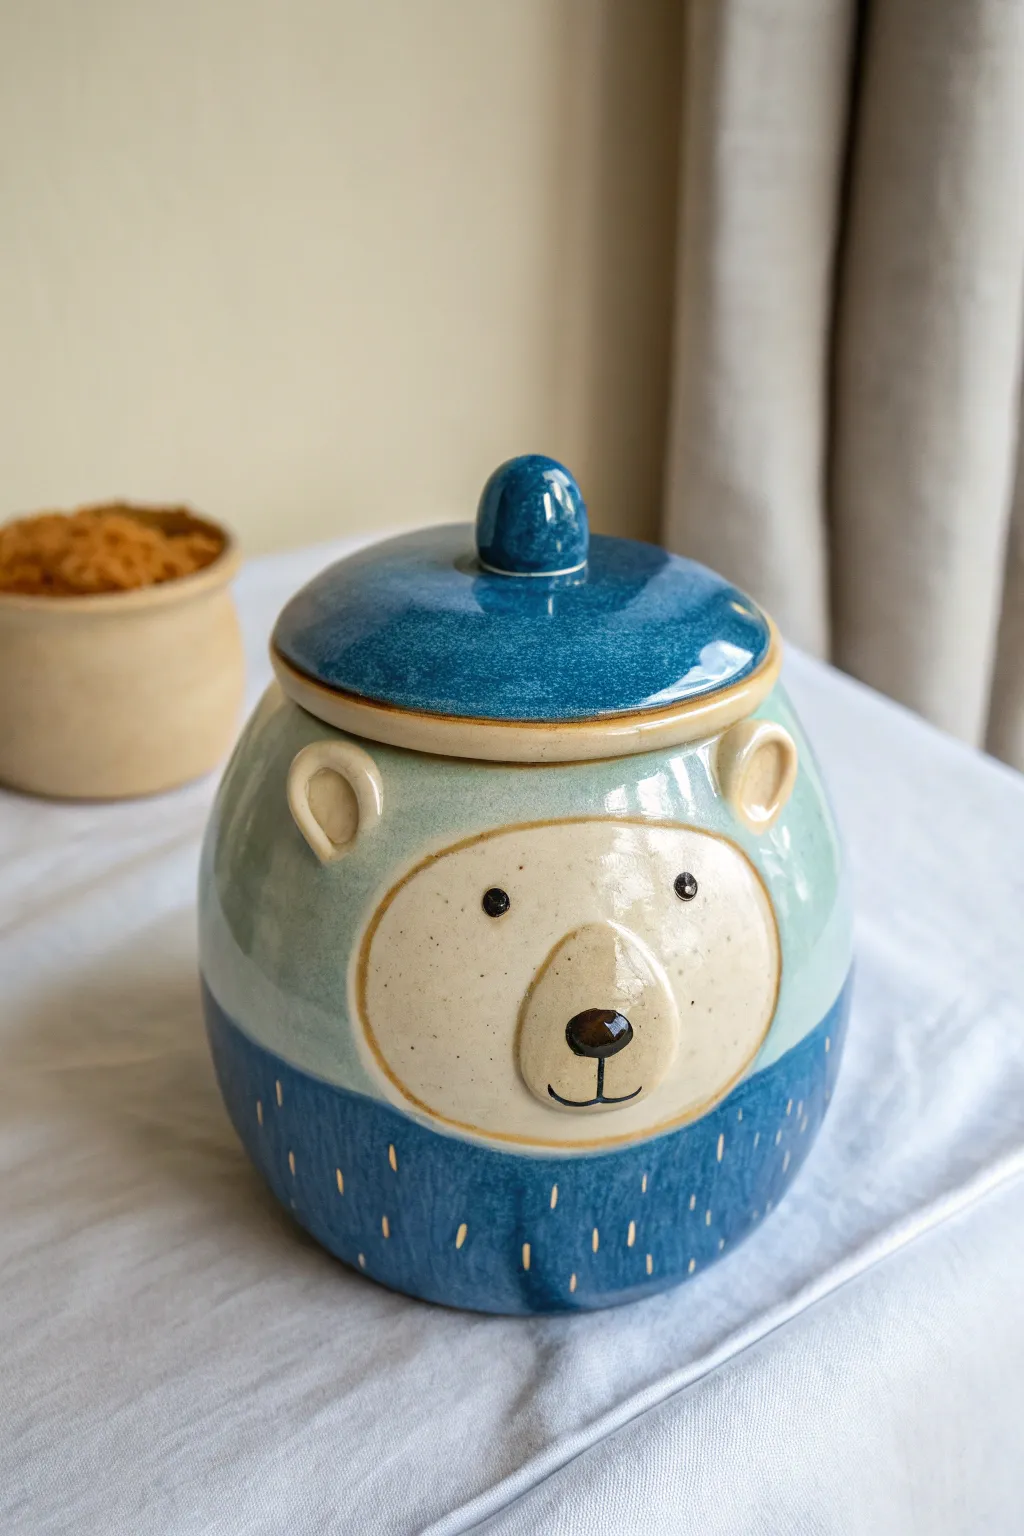
This charming ceramic jar features a stylized bear design complete with a cozy sweater texture and soft glazes. Its rounded belly and sweet expression make it a perfect countertop storage piece for your favorite homemade treats.
Step-by-Step Tutorial
Materials
- Stoneware clay (smooth body)
- Pottery wheel (or coil building tools)
- Potter’s needle tool
- Rib tool (kidney)
- Loop trimming tools
- Underglazes (Dark Blue, Light Blue, Cream/Beige, Black, Brown)
- Clear transparent glaze
- Small round paintbrush
- Detail liner brush
- Sponge
- Kiln
Step 1: Throwing the Form
-
Center and throw the body:
Start with a softball-sized lump of clay. Center it on the wheel and throw a rounded, bulbous shape for the jar body, narrowing slightly at the rim to create a gallery for the lid. -
Refine the shape:
Using a rib tool, smooth the exterior while the wheel is spinning to create a continuous, pleasing curve that mimics a chubby animal belly. -
Measure the gallery:
Before removing the jar from the wheel, use calipers to measure the inside diameter of the rim so you can create a perfectly fitting lid. -
Throw the lid:
Using a smaller amount of clay, throw a simple domed lid. Ensure the flange underneath matches your caliper measurements. Pull a small, rounded knob from the center top while throwing. -
Trim the pieces:
Once the pieces are leather hard, trim away excess clay from the bottom of the jar and the underside of the lid to reduce weight and refine the foot.
Clean Lines Pro Tip
Use liquid wax resist over the cream face circle after it dries. This lets you paint the surrounding blue glaze quickly without worrying about accidentally painting over the face area.
Step 2: Sculpting Details
-
Create the ears:
Hand-build two small semi-circles of clay. Pinch them slightly to create a concave inner ear shape. -
Attach the ears:
Score and slip the upper shoulders of the jar where the ears should sit. Press the ears firmly into place and smooth the seams with a modeling tool so they look seamless. -
Sculpt the snout:
Form a small, rounded triangle of clay for the snout. Score and slip it onto the center of the ‘face’ area, blending the edges smoothly into the main body. -
Bisque fire:
Allow the jar and lid to dry slowly and completely before firing them in the kiln to cone 04 (or your clay’s bisque temperature).
Step 3: Glazing and Decoration
-
Map out the face:
Use a pencil to lightly sketch a large circle on the front of the jar. This will define the cream-colored face area versus the blue body. -
Apply the cream base:
Paint three coats of cream or beige underglaze inside the circle you sketched, covering the snout area completely. -
Paint the bottom section:
Apply three coats of dark denim-blue underglaze to the bottom half of the jar. I usually create a slightly uneven, wavy line where it meets the top section to mimic fabric or fur. -
Glaze the upper body:
Apply a lighter robin’s egg blue glaze or underglaze to the upper shoulders and the back of the jar, carefully painting around the cream face circle and the ears. -
Detail the lid:
Paint the lid and knob with the same dark denim-blue used on the bottom of the jar. Allow the rim to remain the natural clay color or paint it beige for contrast. -
Add facial features:
Using a fine detail brush and black underglaze, paint two small dots for eyes and a small curved mouth. Use brown underglaze for the nose tip on the snout. -
Create the sweater pattern:
With a fine brush and cream underglaze (or wax resist if you want raw clay to show through), paint small vertical dashes all over the dark blue bottom section to simulate stitches. -
Final glaze and fire:
Dip the entire piece in a clear transparent glaze to seal the underglaze work. Fire the kiln to the final glaze temperature required by your clay body (typically cone 5 or 6).
Don’t Fuse the Lid
Wipe the rim where the lid touches the jar completely clean of glaze with a damp sponge. Even a tiny drop of glaze can fuse the lid shut during the firing process.
Once cooled, fill your adorable bear jar with cookies and enjoy the friendly face greeting you in the kitchen


Retro Diner Badge Design
Transport your kitchen back to the 50s with this charming ceramic project that mimics the classic look of a roadside diner. Featuring clean lines, a creamy glaze, and embossed lettering, this jar is the perfect home for your fresh-baked treats.
Step-by-Step
Materials
- Low-fire white earthenware clay (approx. 3-4 lbs)
- Rolling pin and guide strips (1/4 inch thickness)
- Square slump mold or rectangular wooden block (for shaping)
- Fettling knife or clay cutting tool
- Serrated rib tool
- Slip (liquid clay)
- Letter stamps (serif font)
- Sponge
- Soft fan brush
- Cream/Off-white glossy glaze
- Turquoise/Teal underglaze or glaze
- Burgundy/Deep Red glaze (for knob)
- Small liner brush
- Kiln
Step 1: Building the Canister Body
-
Roll out the slab:
Begin by wedging your clay to remove air bubbles, then roll it out into a large, even slab using your guide strips. You want a thickness of about 1/4 inch for durability. -
Cut the walls:
Measure and cut a long rectangular strip that will form the four walls of your jar. The height depends on your preference, but 8-9 inches is standard. Also cut a square piece for the bottom base. -
Emboss the bands:
Before assembling, create the decorative bands. Cut two thin strips of clay about 1/2 inch wide. Score and slip these onto the main rectangular slab about two-thirds of the way up, spacing them slightly apart to create a channel for the lettering. -
Stamp the text:
Carefully press your letter stamps into the space between the two raised bands. Center the word ‘DINER’ so it appears on what will be the front and back faces of the jar. -
Form the shape:
Stand the rectangular slab up and wrap it around your square mold or form. If working freehand, gently bend the clay into a square tube with rounded corners. -
Join the seam:
Score the vertical edges where the slab meets, apply slip, and press firmly to join. Smooth the seam inside and out so it disappears completely. -
Attach the base:
Score and slip the bottom edge of your tube and the perimeter of your square base piece. Press them together firmly. I like to reinforce this inner seam with a thin coil of clay smoothed down.
Clean Lettering Tip
If glaze pools in your stamped letters, use a pin tool to gently scrape the excess out of the recessed text before firing. This keeps the word ‘DINER’ sharp and legible.
Step 2: Creating the Lid
-
Cut the lid slab:
Roll a slightly thicker slab for the lid. Cut a square that is slightly larger than your canister’s opening to create an overhanging lip. -
Add the flange:
On the underside of the lid, attach a smaller square of clay or a thick coil that fits snugly inside the canister opening. This flange keeps the lid from sliding off. -
Sculpt the knob:
Hand-build a knob shape—think of a tiered, rounded finial. Attach this securely to the center top of the lid using the score and slip method. -
Smooth and refine:
Using a damp sponge, smooth all edges of the lid and the canister body. Pay special attention to the rim of the jar and the lip of the lid to ensure a good fit. -
Bisque fire:
Allow the piece to dry slowly under plastic for a day or two, then uncover until bone dry. Fire it in the kiln to cone 04 (or your clay’s specific bisque temperature).
Step 3: Glazing and Finishing
-
Apply base glaze:
Dip or brush the entire interior and exterior of the jar and lid with your cream or off-white glossy glaze. Apply 2-3 coats if brushing to ensure opaque coverage. -
wipe back the bands:
Before the glaze dries completely, use a damp clean brush to carefully wipe the cream glaze off the raised bands and the stamped letters. This exposes the bisque slightly for the accent color. -
Paint the accents:
Using a liner brush and your turquoise underglaze or glaze, carefully fill in the two raised bands and the stamped ‘DINER’ letters. Steady your hand to keep lines crisp. -
Detail the lid:
Paint the rim of the lid with the same turquoise color to match the body bands. Then, paint the very top of the knob with the deep burgundy glaze for that classic cherry-on-top look. -
Clear coat (optional):
If you used underglaze for the accents, dab a little clear glaze over those specific areas to make them glossy and food safe. -
Glaze fire:
Stilt the jar and lid in the kiln and fire to cone 05/06 (check your glaze instructions). Ensure the lid is fired separately from the jar so they don’t fuse together.
Level Up: Vintage Crackle
Swap the solid cream glaze for a transparency crackle glaze. After firing, rub dark ink or strong tea into the cracks to give the jar an authentic antique vibe.
Once cooled, fill your new retro jar with cookies and enjoy the nostalgic flair it brings to your countertop
Soft Ombre Dip Glaze
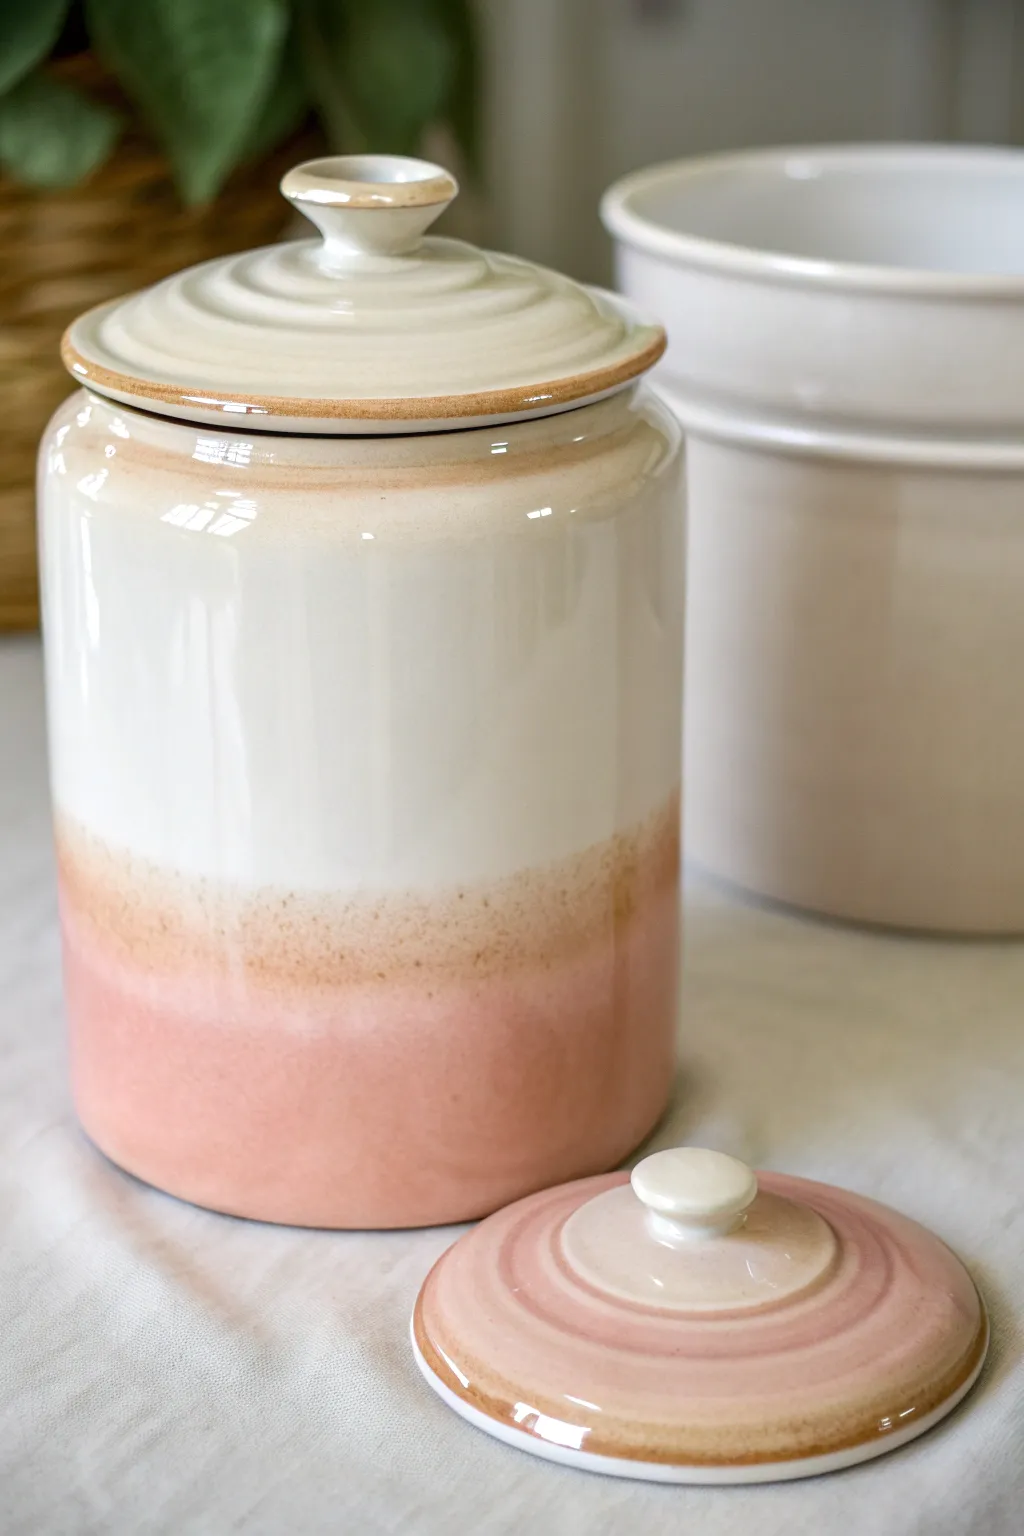
Bring a touch of warmth to your kitchen counter with this soft, dip-dyed ceramic effect. By blending a creamy white glaze into a gentle blush pink, you create a sophisticated yet cozy container perfect for your favorite treats.
How-To Guide
Materials
- Bisque-fired ceramic canister with lid
- Food-safe ceramic glaze (opaque white/cream)
- Food-safe ceramic glaze (soft blush pink)
- Clean sponge and bucket of water
- Wax resist emulsion
- Paintbrush (foam brush recommended)
- Large plastic container (wide enough for dipping)
- Stirring stick
- Damp cloth
- Kiln (or access to a firing service)
Step 1: Prep and Base Glaze
-
Clean the Bisque:
Start by wiping down your bisque-fired canister with a damp sponge. This removes any kiln dust or oils from handling that might repel the glaze. -
Wax the Foot:
Apply a coat of wax resist to the very bottom foot of both the canister and the lid. This prevents glaze from sticking to the kiln shelf during firing. -
Prepare the White Glaze:
Mix your white or cream glaze thoroughly. You want a consistency similar to heavy cream for the best coverage. -
Glaze the Interior:
Pour a generous amount of white glaze inside the canister. Rotate the jar quickly to coat all interior walls, then pour the excess back into your bucket. -
Wipe the Rim:
Before the interior glaze dries completely, use a damp sponge to clean any drips off the top rim where the lid sits. -
Dip the Exterior Top:
Hold the canister by the base (using gloves or tongs if preferred) and dip it upside down into the white glaze, covering about two-thirds of the jar. Hold for 3 seconds and lift straight up. -
Dry the Base Coat:
Allow this initial white layer to dry until it is powdery to the touch. This usually takes about 20-30 minutes depending on humidity.
Transition Trick
To get that speckled, sandy look where the colors meet, lightly sponge a tiny bit of iron oxide wash right at the overlap line before firing.
Step 2: Creating the Ombre Dip
-
Prepare the Pink Glaze:
Prepare your blush pink glaze in a container wide enough to accommodate the canister’s width. Ensure it’s well-mixed to avoid streaks. -
Vertical Dip:
Hold the canister upright this time. Carefully lower the bottom third of the jar into the pink glaze. -
Create the Overlap:
Dip just high enough so the pink overlaps slightly with the bottom edge of the white glaze. This overlap creates that beautiful sandy transition tone seen in the image. -
Hold and Release:
Hold the jar in the pink glaze for about 3-4 seconds to build opacity, then pull it straight out to avoid drip marks. -
Smooth the Transition:
If the line between pink and white looks too harsh, I like to gently tap the transition area with a barely damp sponge to soften the gradient while the glaze is still wet.
Texture Twist
Before glazing, lightly sand the raw clay at the bottom third to add a rougher texture that will break up the glaze for a rustic feel.
Step 3: Lid and Finishing
-
Glaze the Lid Top:
Dip the top of the lid into the white glaze first. You can either dip the whole lid or brush it on if you want more control over the knob. -
Accent the Rim:
Dip just the rim of the lid into the pink glaze, or use a brush to apply a pink ring around the outer edge to match the body. -
Detail the Knob:
For a cohesive look, brush a small amount of pink glaze or a darker oxide onto the rim of the lid knob as a subtle detail. -
Clean Up:
Check the waxed bottom foot again. If any glaze dripped onto the wax, wipe it away cleanly with a sponge. -
Final Dry:
Let the entire piece dry completely, usually overnight, to ensure all moisture has evaporated from the clay body. -
Fire:
Fire the piece in a kiln according to the specific temperature requirements of your chosen clay and glaze (typically Cone 5 or 6 for stoneware).
Once cooled, fill your beautiful custom canister with cookies and enjoy the soft pop of color on your countertop
Terrazzo Speckle Surface
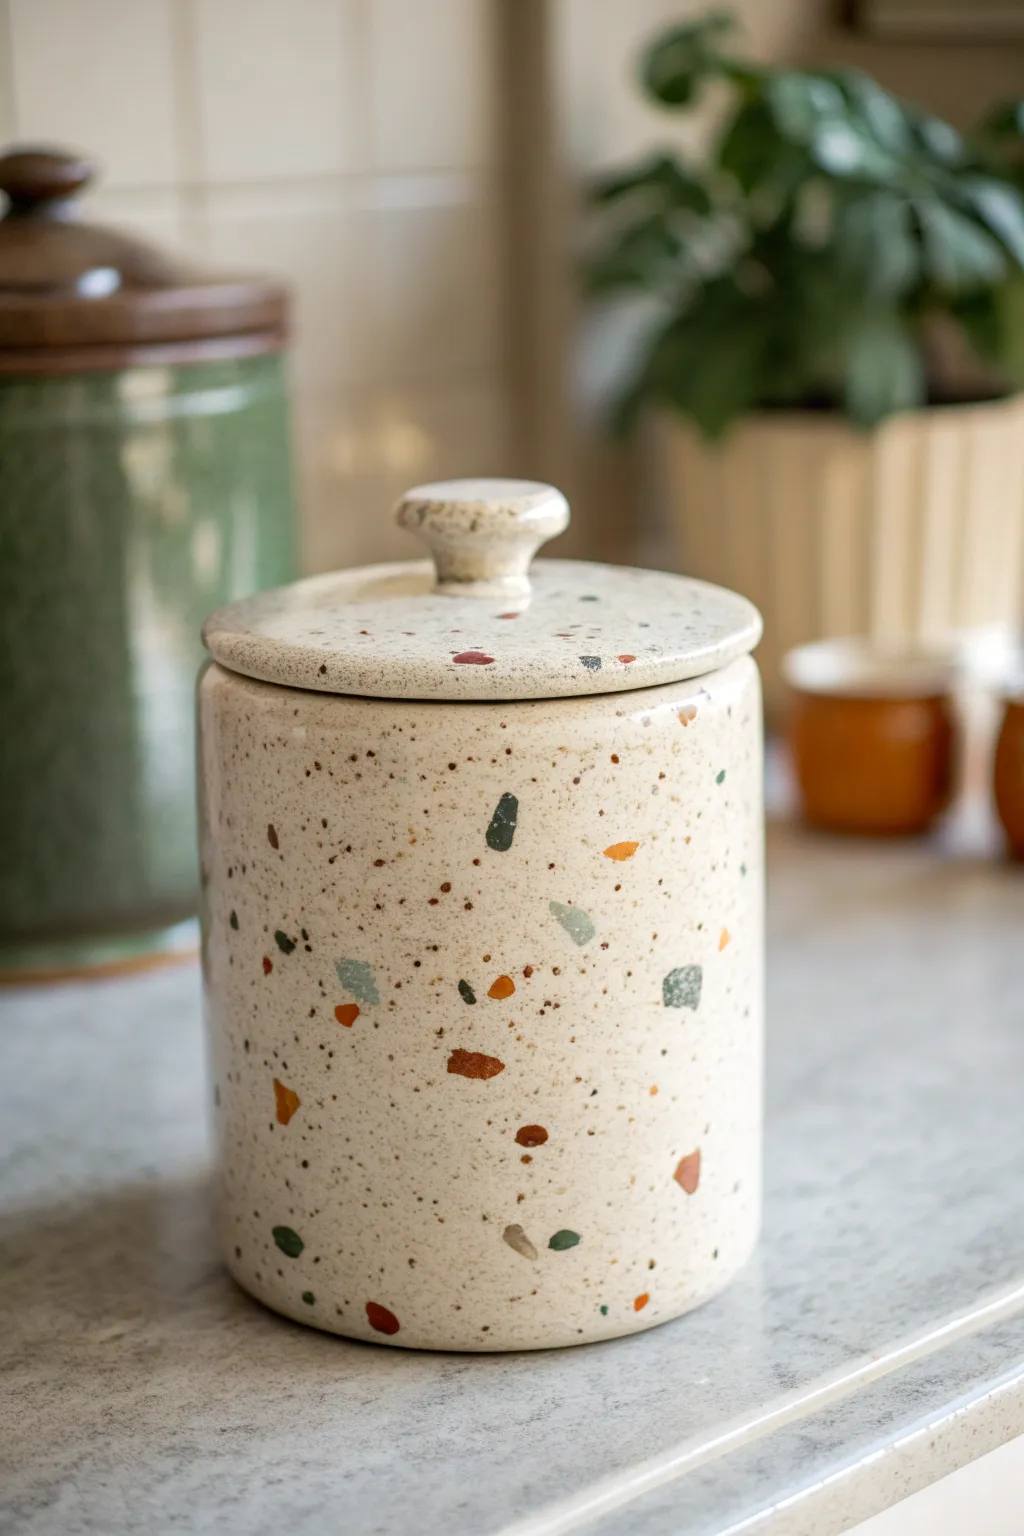
Transform a plain ceramic jar into a trendy decor piece featuring the playful and modern look of terrazzo. By using a clever layering technique with paint chips, you can achieve that authentic stone-flecked finish without needing a kiln or heavy machinery.
Step-by-Step
Materials
- Plain ceramic cookie jar with lid
- Bisque color acrylic paint (or heavy body acrylic)
- Acrylic paints in accent colors (rust, sage green, dark teal, slate grey)
- Medium-grit sandpaper
- Paint palette or wax paper
- Palette knife
- Small flat brush
- Detail brush
- Old toothbrush
- Clear matte sealant spray
- Rubbing alcohol
- Lint-free cloth
Step 1: Preparation & Base Coat
-
Clean surface:
Begin by wiping down your ceramic cookie jar thoroughly with rubbing alcohol and a lint-free cloth. This removes any oils or dust that might prevent the paint from adhering properly. -
Apply base color:
Using a flat brush, apply a coat of the bisque or oatmeal-colored acrylic paint over the entire jar and lid. Cover the knob carefully. -
Second coat:
Allow the first layer to dry completely, then apply a second coat to ensure opaque, even coverage. If brush strokes are visible, a third thin coat might be necessary for a smooth finish.
Step 2: Creating the Terrazzo Chips
-
Paint sheets:
While the base coat dries, squeeze generous blobs of your accent colors (rust, sage green, dark teal, slate grey) onto a shiny surface like wax paper or a plastic palette. -
Spread paint:
Use a palette knife to flatten these blobs into thin, uneven sheets. You want them to be about the thickness of a cardstock sheet. Let these dry completely until they form solid skins of paint. -
Create chips:
Once dry, peel the paint skins off the wax paper. Tear or cut them into irregular geometric shapes of varying sizes. I like to keep them angular rather than round to mimic real stone chips.
Loose Chips?
If paint chips curl or won’t stick, use a dedicated decoupage glue or heavy gel medium instead of wet paint as adhesive. Hold visible edges down with a toothpick until tackiness sets in.
Step 3: Applying the Pattern
-
Adhere chips:
Working in small sections, apply a tiny dot of fresh paint (same color as the chip) on the back of your dried paint chips and press them onto the jar. -
Random placement:
Distribute the colors randomly, leaving plenty of negative space. Rotate the jar frequently to ensure the pattern doesn’t look too uniform or clustered in one spot. -
Lid details:
Don’t forget the lid and the knob. Place smaller chips on the knob to accommodate the curve without lifting.
Pro Tip: Sheen Variance
To make the ‘stones’ look embedded, use a high-gloss varnish only on the colored chips with a fine brush before doing the final overall matte spray. It mimics polished stone aggregate.
Step 4: Adding Depth & Texture
-
Prepare splatter:
Dilute a small amount of dark grey or black paint with a few drops of water until it reaches an inky consistency. -
Speckle effect:
Dip an old toothbrush into the diluted paint. Hold it near the jar and run your thumb across the bristles to flick tiny speckles onto the surface. This creates the ‘sand’ look between the larger stones. -
Varied speckles:
Repeat the splatter process with a second color, perhaps a dark brown, for added depth. Wipe away any splatters that land on the larger colored chips if you prefer a cleaner look. -
Dry time:
Allow the jar to sit undisturbed for several hours, ensuring the glued chips and splatter are fully set.
Step 5: Sealing & Finishing
-
Sand lightly:
Once completely dry, very gently run medium-grit sandpaper over the raised paint chips. This scuffs them slightly, making them look flush with the surface like real ground terrazzo. -
Clean dust:
Wipe away the sanding dust with a dry cloth. -
Apply sealant:
Take the jar outside or to a well-ventilated area. Spray a thin, even coat of clear matte sealant over the entire project. -
Final coat:
Let the first coat of sealant dry according to the can’s instructions, then apply a second coat for durability.
Now fill your stylish new jar with treats and enjoy the modern splash of color on your countertop
Bold Geometric Color Blocks
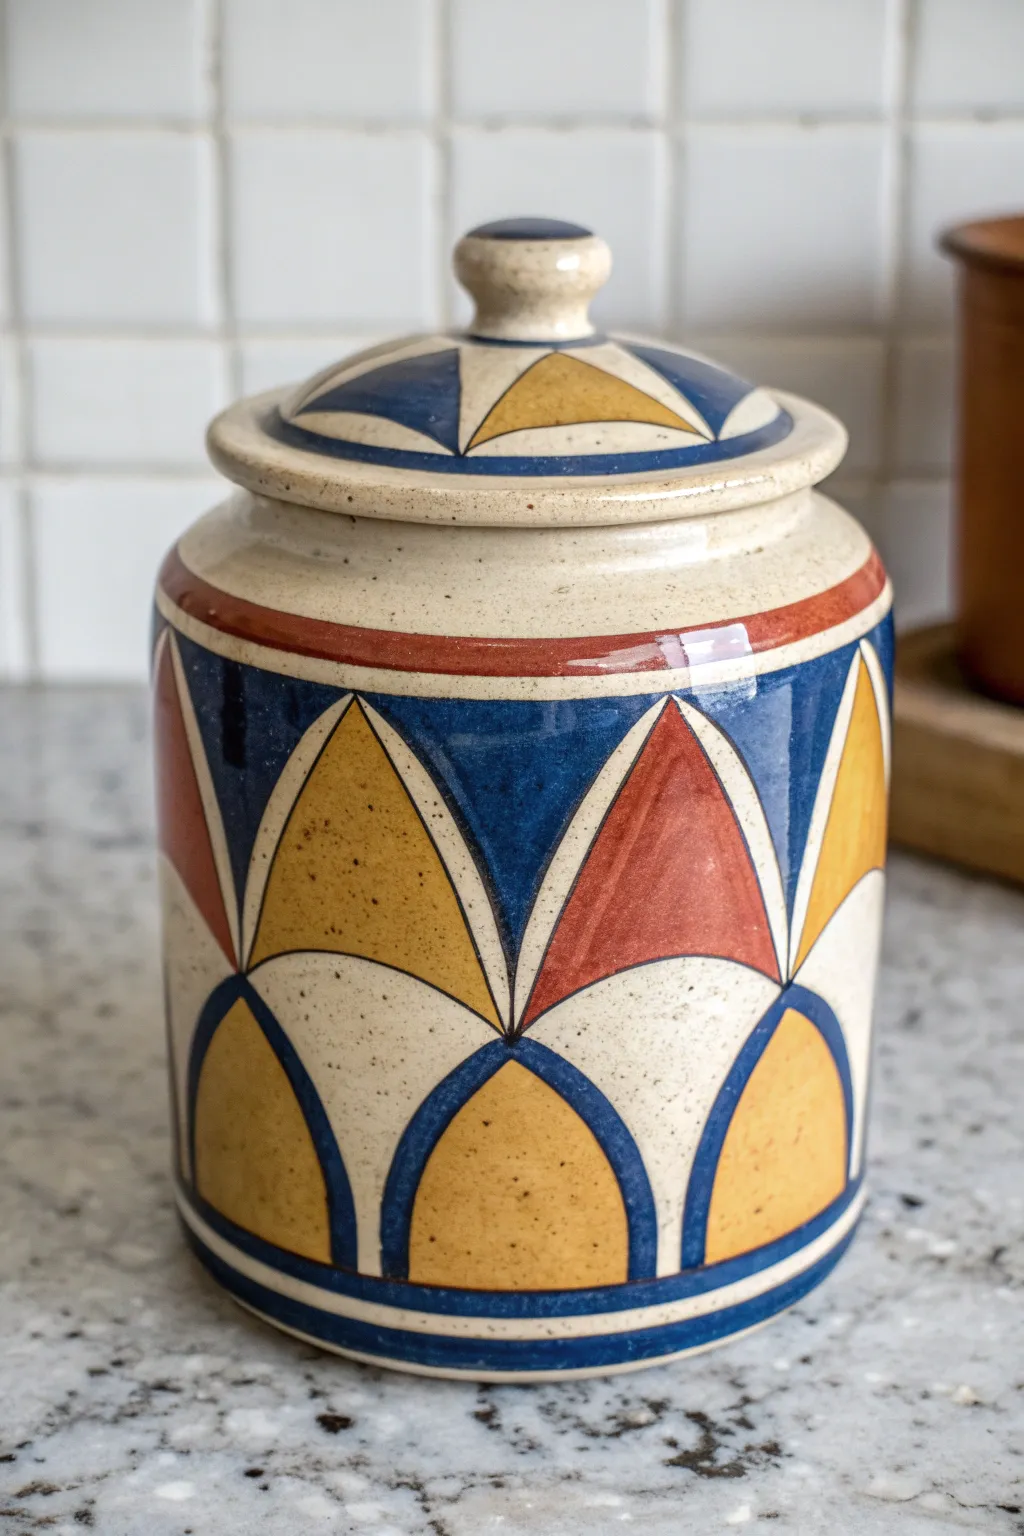
Bring a touch of mid-century flair to your kitchen counter with this bold geometric cookie jar project. The design features striking intersecting arches in warm ochre, deep terracotta, and midnight blue, reminiscent of stained glass or retro tiles.
How-To Guide
Materials
- Bisque-fired ceramic cookie jar with lid
- Underglaze paints: Deep Navy Blue, Burnt Ochre/Mustard, Terracotta Red
- Clear dipping glaze or brush-on clear glaze
- Pencil (graphite or wax pencil designed for ceramics)
- Flexible measuring tape
- Fine detail brush (size 0 or 1 round)
- Medium shader brush (size 4 or 6 flat)
- Small sponge
- Clean water container
- Lazy Susan or banding wheel (optional but helpful)
Step 1: Planning the Geometry
-
Clean the surface:
Begin by wiping down your bisque ware with a slightly damp sponge. This removes any dust from the firing process that could prevent the glaze from adhering properly. -
Measure the circumference:
Use your flexible measuring tape to find the circumference of the jar’s main body. Divide this number by 6 or 8 (depending on the jar size) to determine the spacing for your vertical ‘arch’ points. -
Mark the vertical guides:
Lightly sketch vertical lines with your pencil at equal intervals around the jar. These will serve as the center points for your tall triangles. -
Establish horizontal bands:
Draw three key horizontal lines around the jar: one near the bottom, one at the midpoint, and one near the shoulder. These create the grid for your intersecting patterns. -
Sketch the primary arches:
Connect your grid points to draw the large, upward-pointing triangular arches. The peaks should hit your top horizontal line, and the bases should widen out at the bottom line. -
Add secondary curves:
Draw the inverted arches or curves between the main triangles. These create the negative space shapes that look like white fan patterns at the bottom.
Step 2: Applying Underglaze
-
Outline the navy sections:
Using your fine detail brush and Deep Navy Blue, carefully outline all the negative space shapes between the arches. This includes the ‘spandrels’ near the top and the specific curved sections at the base. -
Fill the navy blocks:
Switch to your medium shader brush to fill in these blue areas. Apply 2-3 coats for solid opacity, letting each coat dry until it loses its sheen before adding the next. -
Paint the Ochre arches:
Select alternating large arches to paint with Burnt Ochre. Outline these shapes first, then fill them in with 3 coats. I interpret this color as a key warmth anchor for the piece, so try to keep the coverage very even. -
Paint the Terracotta arches:
Fill the remaining large arches with Terracotta Red underglaze, following the same outline-and-fill method. -
Detail the lid:
Mimic the jar’s pattern on the lid. Mark a center point around the knob and draw radiating triangles. Paint them alternating Navy and Ochre, leaving thin bands of raw bisque between them. -
Add banding lines:
Using a steady hand (or a banding wheel), paint a thick Terracotta stripe around the shoulder of the jar, just above the main pattern. Add a thinner Navy stripe at the very bottom base.
Wobbly Lines?
If painting straight lines on a curve is tough, use thin automotive masking tape (pinstriping tape) to mask off the triangles before painting.
Step 3: Refining and Glazing
-
Clean up lines:
Currently, you might have some wobbly edges. Use a damp, stiff brush or a specialized cleanup tool to gently scratch or wipe away any paint that crossed your intended lines, sharpening the geometric shapes. -
Inspect coverage:
Check for any thin spots in the underglaze. If you can see the white bisque clearly through the color, dab on a tiny bit more paint to ensure the colors fire true and bold. -
Bisque fire or simply dry:
If your studio allows, you can do a second soft bisque fire to set the underglaze. If not, just let the piece dry completely for 24 hours. -
Apply clear glaze:
Dip the entire jar into a clear dipping glaze using tongs, or brush on 3 coats of clear brushing glaze. This will seal the raw areas and make the colors pop. -
Final wipe:
Wipe the foot (bottom) of the jar and the rim where the lid sits with a wet sponge to ensure no glaze fuses the lid shut during firing. -
Final fire:
Fire the piece in the kiln according to the clay and glaze specifications (usually Cone 06 or Cone 6).
Speckled Finish
To get the speckled look shown in the photo, use a ‘speckled buff’ clay body or flick a toothbrush with iron oxide over the piece before glazing.
Now fill your beautiful, retro-inspired jar with your favorite treats and enjoy the view
Sgraffito Line-Art Cookies
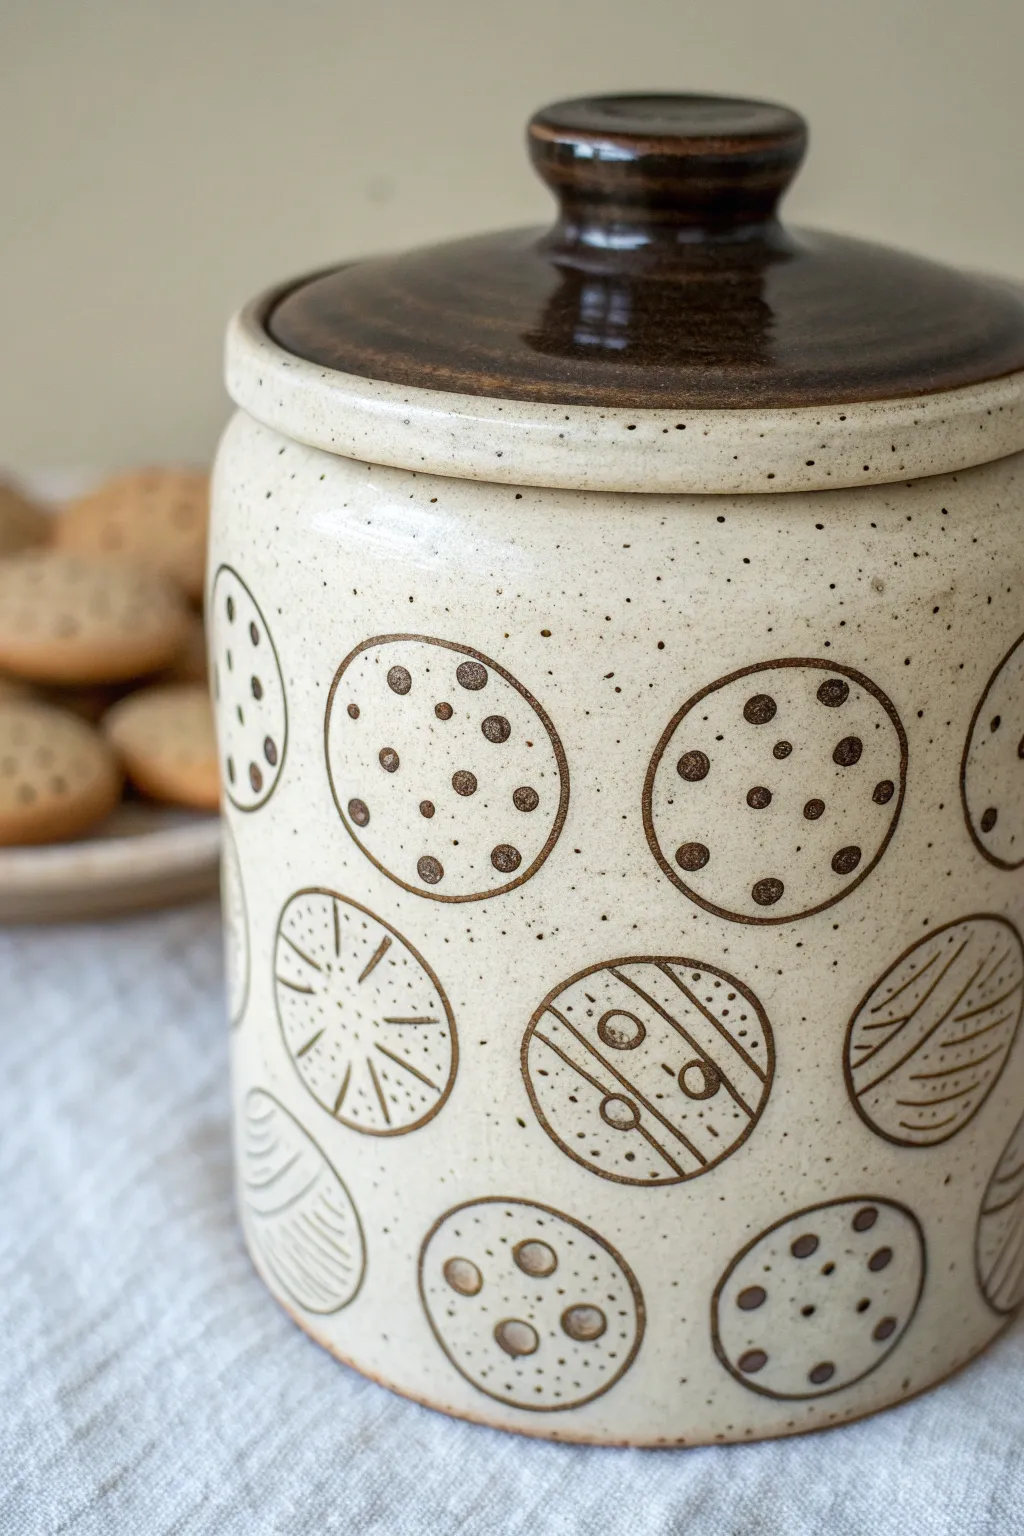
This charming ceramic project transforms a simple wheel-thrown or hand-built jar into a sweet display piece featuring delightful cookie illustrations. Using sgraffito techniques, you’ll carve playful line-art cookies through a layer of slip or underglaze to reveal the clay body beneath.
Detailed Instructions
Materials
- Stoneware clay (speckled or buff)
- Pottery wheel or slab roller
- Trimming tools
- Dark brown underglaze or slip
- Creamy beige matte glaze (speckled)
- Clear or amber glossy glaze (for the lid)
- Sgraffito tool or fine loop tool
- Needle tool
- Small sponge
- Painters tape or wax resist
- Kiln
Step 1: Forming the Base
-
Throw or Build the Jar:
Start by throwing a cylinder on the wheel with about 3-4 lbs of clay. Aim for straight vertical walls and a distinct gallery rim at the top to hold the lid securely. -
Shape the Lid:
Throw a lid that fits your gallery measurement. Include a sturdy, rounded knob at the top for easy gripping. Ensure the flange fits loosely enough to account for glaze thickness later. -
Leather Hard Stage:
Allow both pieces to dry slowly to a leather-hard consistency. This is crucial for clean carving; if the clay is too wet, it will stick to your tools. -
Trim the Foot:
Trim the bottom of your jar to create a clean foot ring. Smooth out any throwing lines on the exterior walls with a metal rib to create a perfect canvas for your drawings.
Step 2: Creating the Designs
-
Sketching the Layout:
Lightly sketch circles onto the leather-hard clay using a needle tool or pencil. Arrange them in offset rows to create a pattern, leaving negative space between each ‘cookie.’ Vaping varied sizes adds visual interest. -
Defining the Outlines:
Using a sgraffito tool or fine stylus, carve the outlines of your circles. Press deep enough to create a distinct groove but not so deep that you weaken the wall. -
Adding Details: Chocolate Chips:
For the chocolate chip cookies, carve small, random circles inside the larger outlines. Leave the centers of these small circles uncarved/raised to suggest the chips. -
Adding Details: Stripes:
Create striped variation cookies by carving parallel diagonal lines across the circle. You can add small perpendicular dashes or dots within the stripes for texture. -
Adding Details: Rays:
For the sunburst-style cookies, carve lines radiating from a central point or an off-center focal point towards the outer edge. -
Clean Up Burrs:
Once your carving is complete, gently brush away clay crumbs. Use a barely damp sponge to smooth any sharp burrs left by the carving tool, being careful not to erase your lines.
Clean Lines Pro-Tip
Let the underglaze dry in the grooves for about 10 minutes before wiping back. If you wipe too soon, you’ll pull the color out of the lines.
Step 3: Glazing and Surface Treatment
-
Bisque Firing:
Fire the pieces to cone 04 (or your clay body’s bisque temperature). Once cool, wipe them down with a damp sponge to remove dust. -
Inlay Technique (Mishima):
Brush a dark brown underglaze into all the carved lines. I generally work in sections, wiping away the excess on the surface with a clean, damp sponge so the dark color remains only in the recessed lines. -
Waxing the Lid:
Apply wax resist to the gallery of the jar and the flange of the lid where they will touch. This prevents them from fusing together in the kiln. -
Glazing the Exterior:
Pour or dip the exterior of the jar in a creamy, speckled matte glaze. Ensure the glaze isn’t too thick, or it might obscure your subtle carving work. -
Glazing the Interior:
Pour a food-safe liner glaze into the interior of the jar, swirl to coat, and pour out the excess. A clear or white glaze works best here. -
Glazing the Lid:
For the lid, dip or brush a rich, shiny amber or dark brown glaze. This darker color mimics a perfectly baked cookie crust and contrasts beautifully with the pale jar body. -
Final Wipe Down:
Check the foot of the jar one last time to ensure no glaze is on the bottom. Clean it with a sponge if necessary. -
Glaze Firing:
Load the kiln carefully and fire to your clay body’s maturity temperature (likely Cone 5 or 6 for stoneware). Allow the kiln to cool completely before opening.
Level Up: Texture
Before carving, gently press a real cookie (like a textured shortbread) into the soft clay to leave a faint impression, then carve over it for realism.
Now you have a delightful, custom vessel ready to be filled with your favorite homemade treats
Sketchbook Underglaze Portrait Jar
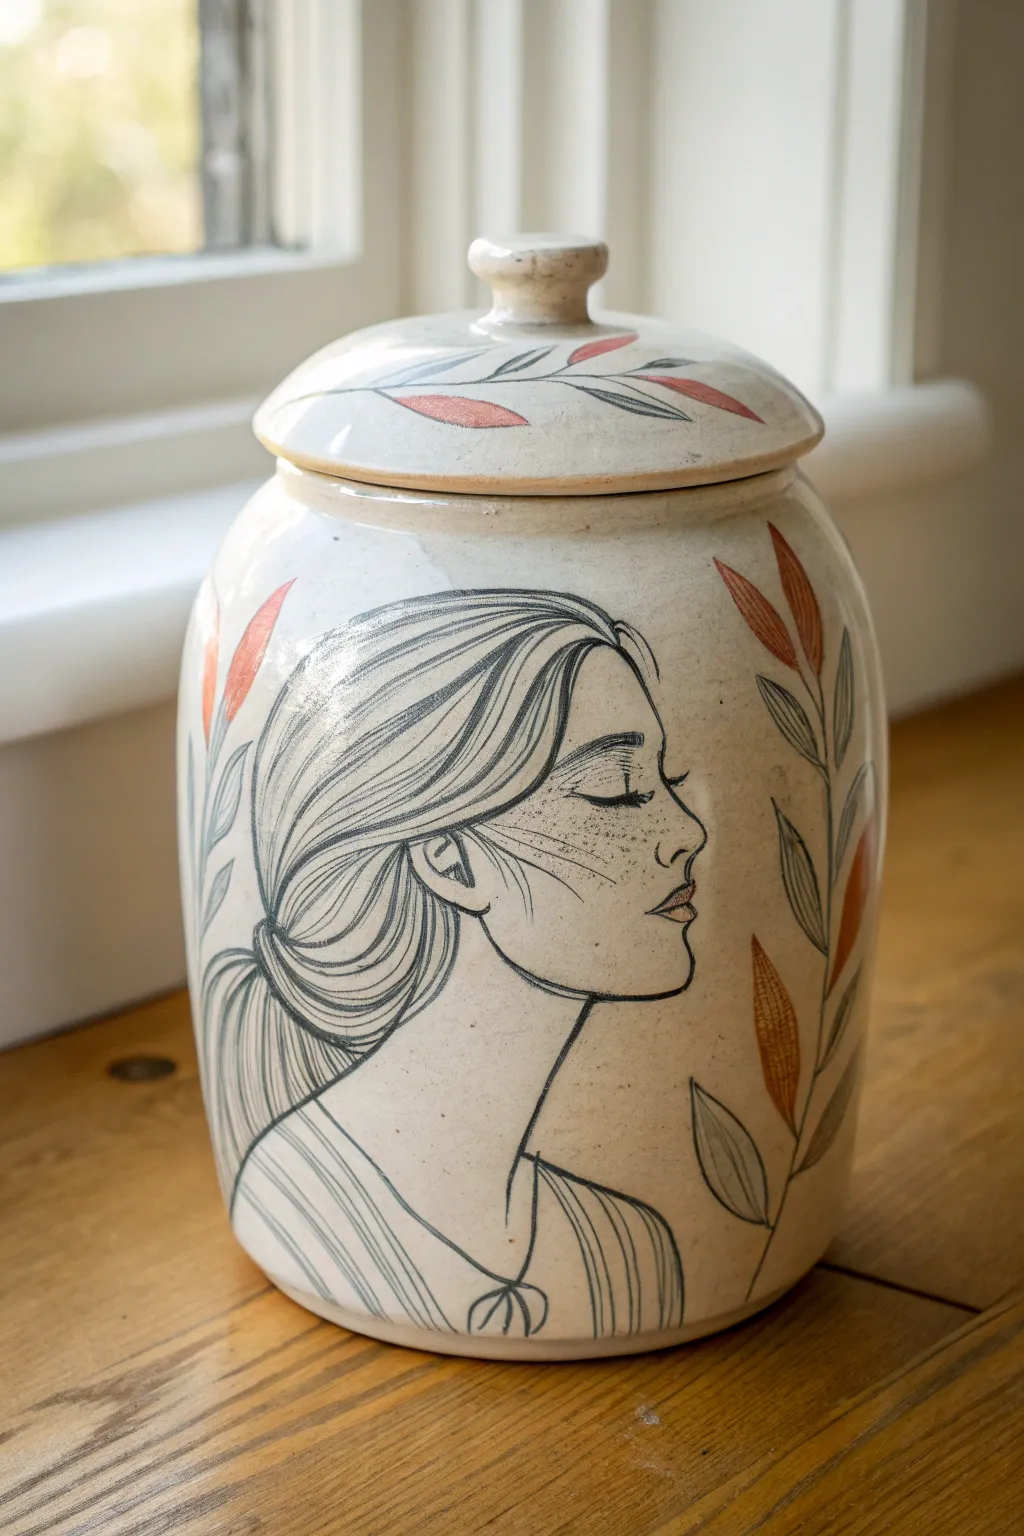
This elegant ceramic piece combines the functional form of a lidded jar with the delicate aesthetic of a graphite sketchbook drawing. The result is a creamy, speckled vessel featuring a serene profile portrait intertwined with botanical elements in soft rust and grey tones.
Step-by-Step
Materials
- Stoneware clay (speckled or buff)
- Pottery wheel
- Throwing tools (ribs, wire cutter, sponges)
- Trimming tools
- Black underglaze pencil or fine liner bottle
- Rust/orange underglaze
- Grey/green underglaze
- Clear transparent glaze
- Small watercolor brushes
- Pencil and paper for sketching
- Calipers (for lid fitting)
Step 1: Forming the Vessel
-
Wheel Throwing the Base:
Begin with about 3-4 pounds of speckled stoneware clay. Center it on the wheel and open the form to create a wide, flat bottom suitable for a cookie jar. -
Pulling the Walls:
Pull the walls up to create a tall cylinder, gently shaping it into a rounded belly that tapers slightly inward at the top. Aim for a smooth, continuous curve. -
Creating the Gallery:
At the rim, use a wooden tool or your thumb to press a gallery (an inner ledge) where the lid will sit. Measure this opening carefully with calipers before removing the pot from the wheel. -
Throwing the Lid:
Using a smaller amount of clay (about 1 pound), throw a shallow dome shape on a bat. Use your caliper measurement to ensure the flange of the lid fits perfectly inside the gallery of your jar. -
Adding the Knob:
You can either throw a knob directly onto the lid while it’s on the wheel or attach a small pulled knob later when the clay is leather hard. Smooth the attachment point seamlessley. -
Trimming:
Let both pieces dry to a leather-hard state. Trim the bottom of the jar to create a neat foot ring, and refine the shape of the lid to ensure a pleasing curve that matches the jar’s silhouette.
Smudge Prevention
Working on a rounded surface is tricky. Rest your hand on a clean, dry sponge or a mahl stick while drawing to avoid smudging the underglaze pencil lines before they are fired.
Step 2: Drafting the Design
-
Initial Sketching:
Before touching the clay with color, sketch your profile portrait on paper to determine the scale. The face should be large enough to be the focal point, filling the central belly of the jar. -
Transferring the Outline:
Lightly sketch the outline of the face and hair onto the leather-hard clay using a standard graphite pencil. Don’t worry about mistakes; the graphite will burn off in the kiln. -
Drawing with Underglaze:
Using a black underglaze pencil or a needle-tip applicator bottle filled with black underglaze, trace over your pencil lines. Keep the line weight varied—thicker for the hair outline, thinner for facial features. -
Refining Facial Details:
Pay special attention to the eye and lips. drawing delicate lashes and a slight shade on the upper lip adds dimension without weighing down the sketch-like quality. -
Hair Texture:
Fill in the hair area with long, flowing lines that follow the curvature of the head. I like to leave some negative space between strands to suggest volume and light reflection.
Step 3: Adding Color & Glazing
-
Botanical Frame:
Draw long, vertical stems with leaves flanking the portrait on the right and left sides. Use the black liner for the stems and leaf outlines. -
Painting Leaves:
Dilute your rust-orange underglaze slightly with water to create a watercolor effect. Paint alternating leaves with this wash, staying loosely within the lines. -
Secondary Tones:
Use a subtle grey-green underglaze for the remaining leaves. This two-tone approach keeps the palette earthy and cohesive with the speckled clay. -
Freckles:
Dip a stiff bristle brush or toothbrush into watered-down black underglaze. Run your thumb over the bristles to splatter tiny freckles across the nose and cheek area. -
Decorating the Lid:
Repeat the leaf motif on the lid, creating a wreath-like pattern that encircles the knob using the same rust and grey-green tones. -
Bisque Firing:
Allow the jar to dry completely (bone dry) before firing it to bisque temperature (usually cone 04 or 06, depending on your clay body). -
Glazing:
Dip the entire piece, including the lid, into a clear transparent glaze. Wipe the foot ring and the gallery/flange contact points clean with a sponge to prevent the lid from sticking. -
Final Firing:
Fire the kiln to the maturity temperature of your clay (typically Cone 5 or 6). Let the kiln cool naturally before unloading to avoid thermal shock.
Sgraffito Variation
Instead of drawing lines on top, paint a patch of solid black underglaze where the hair goes. Once dry, carve through it (sgraffito) to reveal white clay lines for a inverted, high-contrast look.
Fill your new heirloom jar with homemade treats and enjoy the functional art you’ve created.
Impressed Lace Texture Band
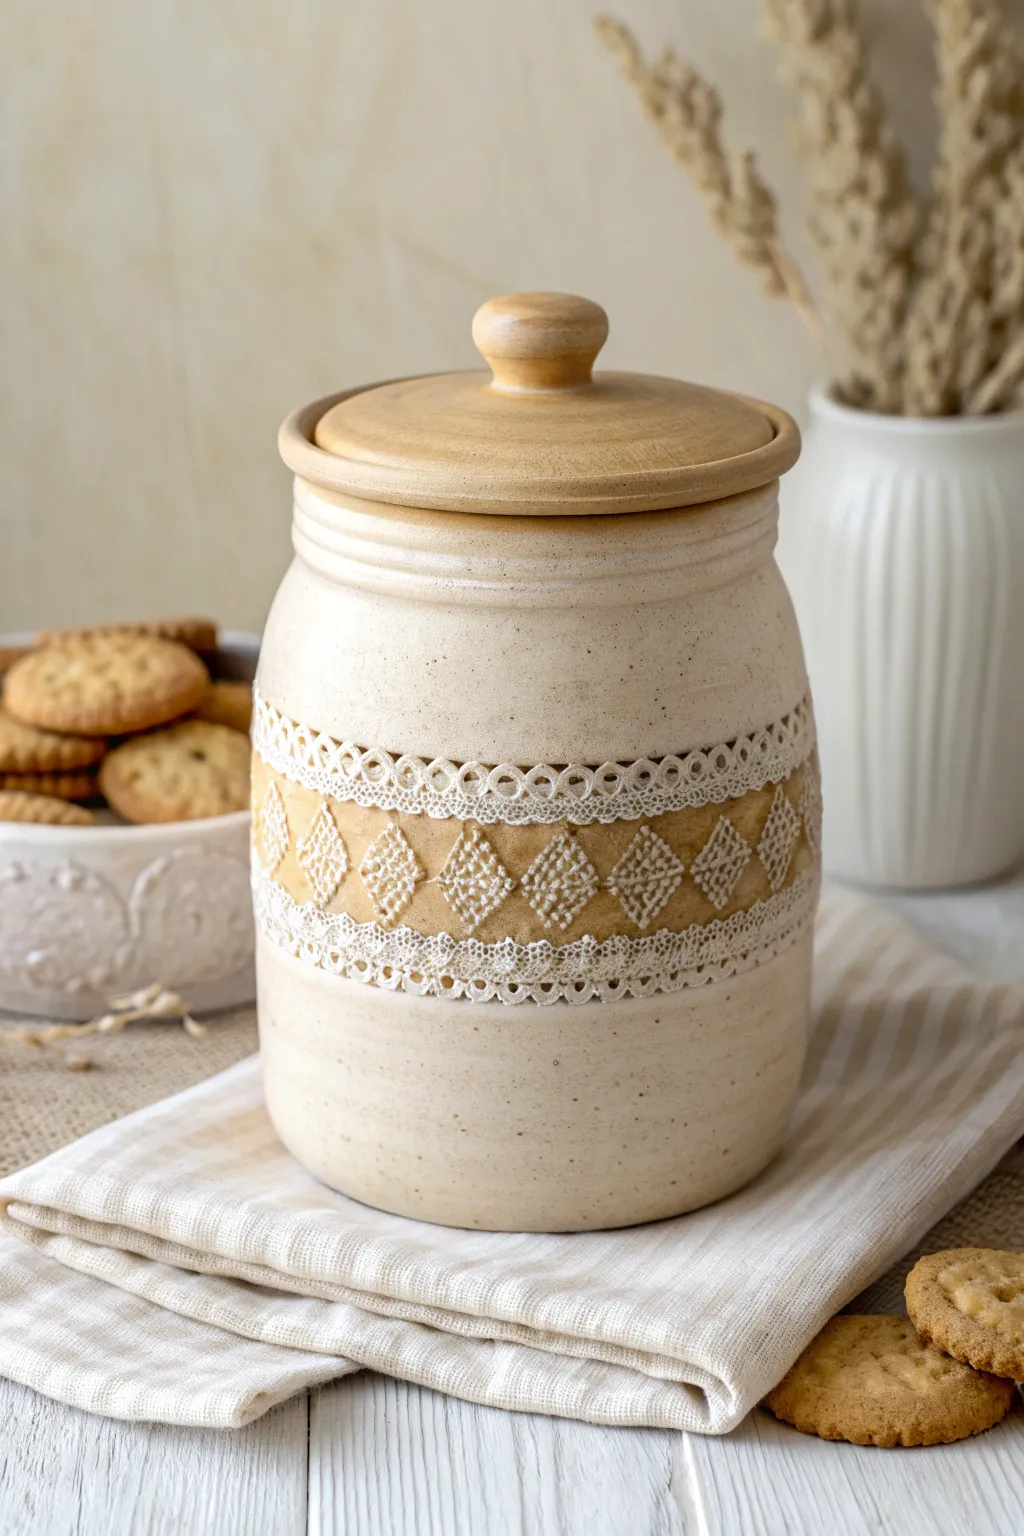
This charming project combines the rustic appeal of speckled clay with the delicate intricacy of vintage textiles. By pressing real lace into soft clay, you’ll create a permanent, tactile band of pattern that wraps beautifully around a classic cookie jar form.
Step-by-Step Guide
Materials
- Stoneware clay (speckled or buff)
- Pottery wheel
- Throwing tools (sponge, ribs, wire cutter)
- Wide strip of vintage cotton lace or crochet trim
- Rolling pin or pony roller
- Ribbon tool for trimming
- Serrated metal rib (scoring tool)
- Slip
- Matte cream glaze
- Iron oxide wash or dark stain (optional)
- Basic clear glaze (optional)
- Wood lid (pre-bought or turned) OR clay for a matching lid
Step 1: Throwing the Form
-
Center and open:
Start with a substantial ball of clay (approx. 3-4 lbs) on the wheel. Center it firmly and open the vessel, keeping the floor flat and wide enough to reach your hand inside for cookies later. -
Pull the walls:
Pull the walls up to create a tall cylinder. Aim for an even thickness, but leave the walls slightly thicker than a standard mug, as you’ll be applying pressure later to impress the texture. -
Shape the belly:
Once you have height, belly the form out gently from the inside. Use a wooden or metal rib on the exterior to smooth the surface perfectly; any throwing rings will interfere with the lace impression. -
Create the gallery:
At the rim, push the clay down and in slightly to create a gallery (a ledge) if you plan to make a ceramic fitted lid, or simply smooth the rim if using a sit-on wooden lid like the one shown.
Step 2: Applying the Lace Texture
-
Dry to soft leather hard:
Allow the jar to dry until it is no longer sticky but still soft enough to take an impression. This stage is crucial; too wet and the lace sticks, too dry and it won’t emboss. -
Position the lace:
Wrap your chosen strip of lace or crochet trim around the belly of the jar. Ensure the ends meet neatly, or overlap them slightly in a way that looks intentional. -
Roll the texture:
Support the wall from the inside with one hand. With your other hand, use a pony roller or a small rolling pin to firmly press the lace into the clay. I find rolling vertically (up and down) over the horizontal band helps prevent the pot from warping. -
Peel and reveal:
Carefully peel back the lace strip to reveal the raised pattern. Check for any ragged edges and smooth them gently with a fingertip without smudging the design. -
Accentuate the borders:
Using a modeling tool, you can lightly define the top and bottom edges of the lace band if the impression needs a cleaner frame.
Textile Treasure Hunt
Thrift stores are goldmines for texture tools. Look not just for lace, but for doilies, heavy-weave burlap, or tatting which create deep, interesting impressions in clay.
Step 3: Trimming and Finishing
-
Trim the foot:
Once the jar is leather hard, center it upside down on the wheel. Use a ribbon tool to trim away excess weight from the bottom and define a clean foot ring. -
Create the lid:
To mimic the image precisely, measure the opening and source a turned wooden lid with a rubber seal. Alternatively, throw a ceramic lid to fit the gallery you made earlier, adding a simple knob handle. -
Bisque fire:
Let the jar dry completely (slowly, to prevent cracking) and fire it to bisque temperature (usually cone 04).
Stuck in the Mud?
If the lace sticks to the clay, dust the lace lightly with cornstarch before pressing. This acts as a release agent and burns out completely in the kiln.
Step 4: Glazing the Texture
-
Stain the texture (Optional):
To get that high-contrast look where the pattern pops, apply an iron oxide wash or a dark underglaze into the lace texture, then wipe it back with a damp sponge so color remains only in the deep recesses. -
Wax resist:
If you want the raw clay texture to remain unglazed (bare clay) in the band area, carefully apply wax resist over the lace impression. -
Dip in base glaze:
Dip the entire jar into a matte cream or oatmeal glaze. If using a speckled clay, a semi-transparent white glaze works wonders to let the speckles show through. -
Clean the foot:
Wipe any glaze off the foot ring with a damp sponge to prevent it from sticking to the kiln shelf. -
Final firing:
Fire the jar to the maturity temperature of your clay and glaze (typically cone 5 or 6 for stoneware).
Now you have a timeless storage vessel that feels as good as it looks on your kitchen counter
Dripping Frosting Lid Topper
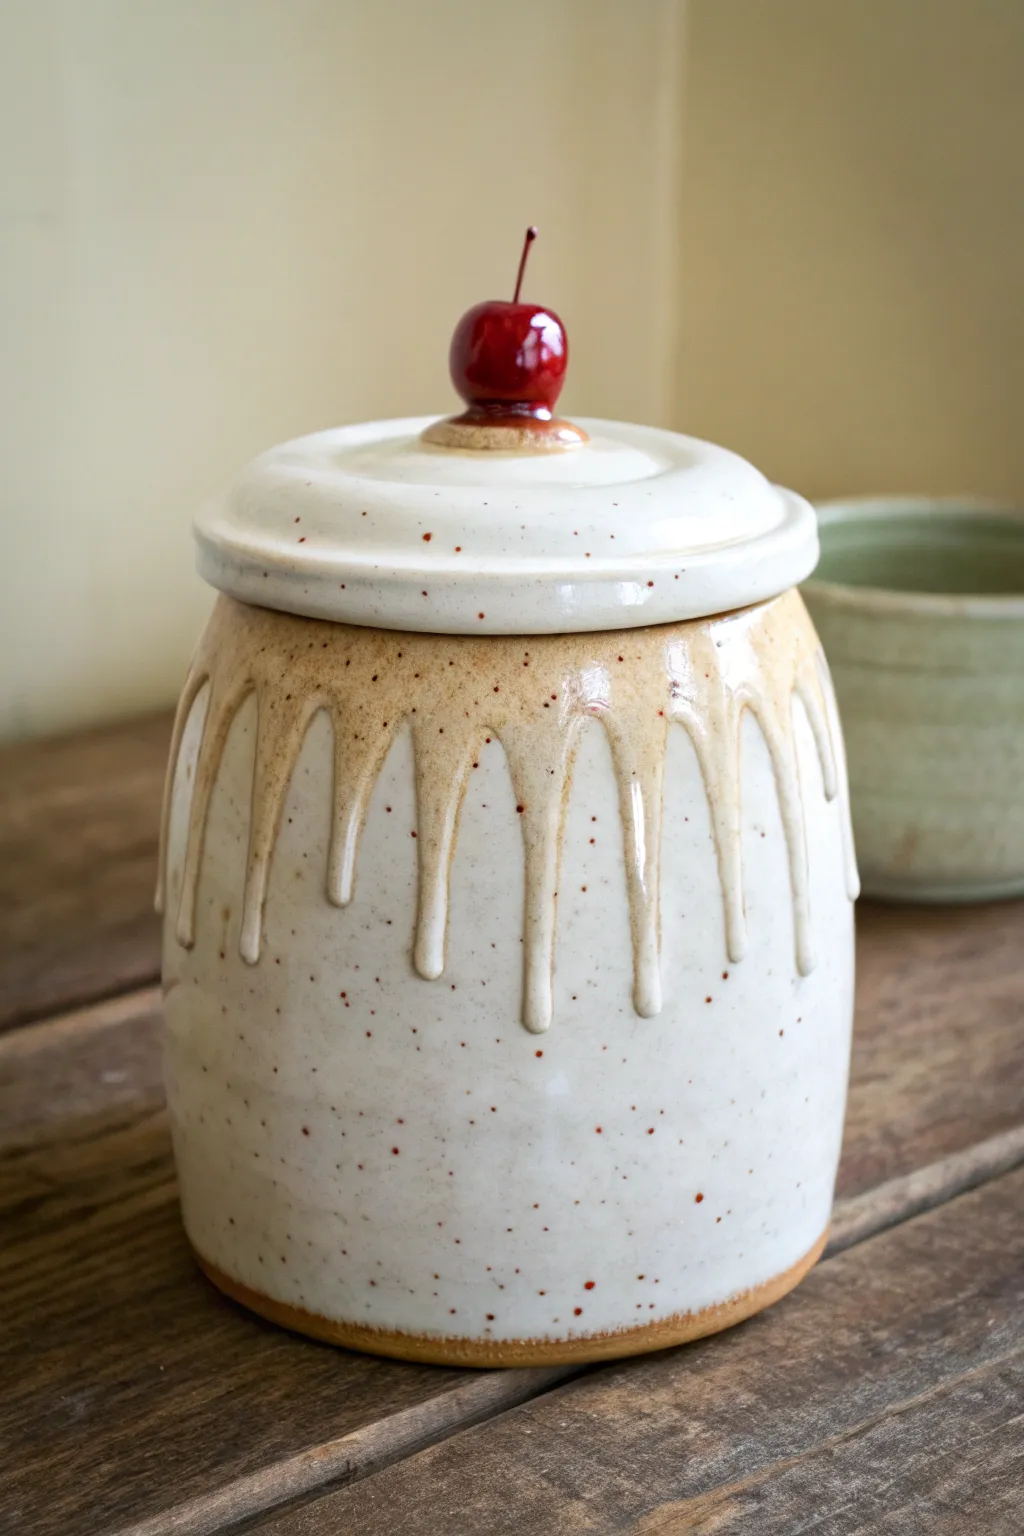
Capture the sweetness of a freshly frosted treat with this whimsical ceramic jar, featuring a luscious glaze drip and a playful cherry stem handle. The speckled clay body adds a warm, homemade feel that perfectly complements the glossy, icing-like finish.
Detailed Instructions
Materials
- Speckled stoneware clay (e.g., Laguna Speckled Buff)
- Pottery wheel
- Throwing tools (rib, sponge, wire cutter)
- Trimming tools
- Needle tool
- Scoring tool or serrated rib
- Slip (made from same clay body)
- White gloss glaze (opaque)
- Red underglaze or glaze
- Thin gauge visually-high-temp wire (Kanthal A1) or high-fire rod for stem
- Clear glaze (optional over red underglaze)
- Kiln
Step 1: Throwing the Form
-
Center and Open:
Begin with about 2-3 lbs of speckled clay. Center it firmly on the wheel and open the clay to create a flat floor, establishing the width of your jar’s base. -
Pull the Cylinder:
Pull the walls up into a simple cylinder shape. For that chubby cookie jar look, gently bell out the belly from the inside using a rib while keeping the rim slightly narrower. -
Refine the Gallery:
At the rim, use a wooden tool or your thumb to press a gallery (a small ledge) into the interior top edge. This is crucial for holding the lid securely. -
Throw the Lid:
Using a separate, smaller ball of clay, throw a lid ‘off the hump’ or on a bat. Measure carefully with calipers to ensure the lid flange fits your jar’s gallery perfectly. -
Dry to Leather Hard:
Allow both the jar and lid to dry slowly until leather hard. This usually takes a day or two depending on humidity.
Gravity Control
To control the drip length, watch the glaze as it dries. If a drip looks like it’s running too far, gently arrest it with a finger or sponge before it dries completely.
Step 2: Trimming and Sculpting
-
Trim the Jar:
Invert the jar on the wheel head, secure it with lugs, and trim away excess weight from the bottom. Define the foot ring crisply. -
Trim the Lid:
Trim the top of the lid to a smooth, slight dome shape. Clean up the edges so it sits flush on the jar gallery. -
Sculpt the Cherry:
Hand-build a small, round sphere of clay, about the size of a real cherry. Smooth it out completely so no seams are visible. -
Attach the Cherry:
Score the center of the lid and the bottom of your clay cherry. Apply slip to both surfaces and press the cherry firmly onto the lid center. Clean up any excess slip with a brush. -
Insert the Stem:
Cut a short piece of high-temp wire (Kanthal). Insert it into the top of the clay cherry at a slight angle to mimic a natural stem. If you prefer a clay stem, roll a tiny coil and attach it, but wire is more durable.
Step 3: Decorative Glazing
-
Bisque Fire:
Once bone dry, fire the piece to bisque temperature (usually cone 04 or 06). Wipe down the fired piece with a damp sponge to remove dust. -
Interior Glazing:
Pour white gloss glaze inside the jar, swirl to coat, and pour out the excess. This makes the jar food-safe and easy to clean. -
Base Glaze:
Dip the exterior of the jar’s body into the white gloss glaze, or leave the raw speckled clay exposed if you prefer the rustic look shown in the image. I often like to leave the bottom third unglazed to show off the speckles. -
Create the Drip:
You need a thick application for the drip. Dip the rim of the jar and the lid into a thick white gloss glaze. Hold it upside down for a few seconds, then flip it right-side up immediately. Gravity will pull the heavy glaze down, creating those thick, organic drips. -
Glaze the Cherry:
Carefully paint three coats of bright red underglaze onto the cherry. Avoid getting red on the white lid. If using underglaze, dab a little clear glaze on top for shine. -
Clean the Foot:
Meticulously wipe the foot of the jar and the contact points of the lid with a sponge to ensure no glaze will fuse the lid shut during firing. -
Final Fire:
Load the kiln and glaze fire to mature the clay (typically cone 5 or 6 for stoneware). Ensure the drips don’t run too far down by using a cookie (thin clay slab) under the pot just in case.
Sprinkle It On
Before the white glaze dries completely on the lid or rim, scatter real rainbow sprinkles (which will burn out but leave divots) or paint tiny colored dots of underglaze for a confetti look.
Fill your new creation with favorite cookies and enjoy the sweet reward of your hard work
Whimsical Monster Character Jar
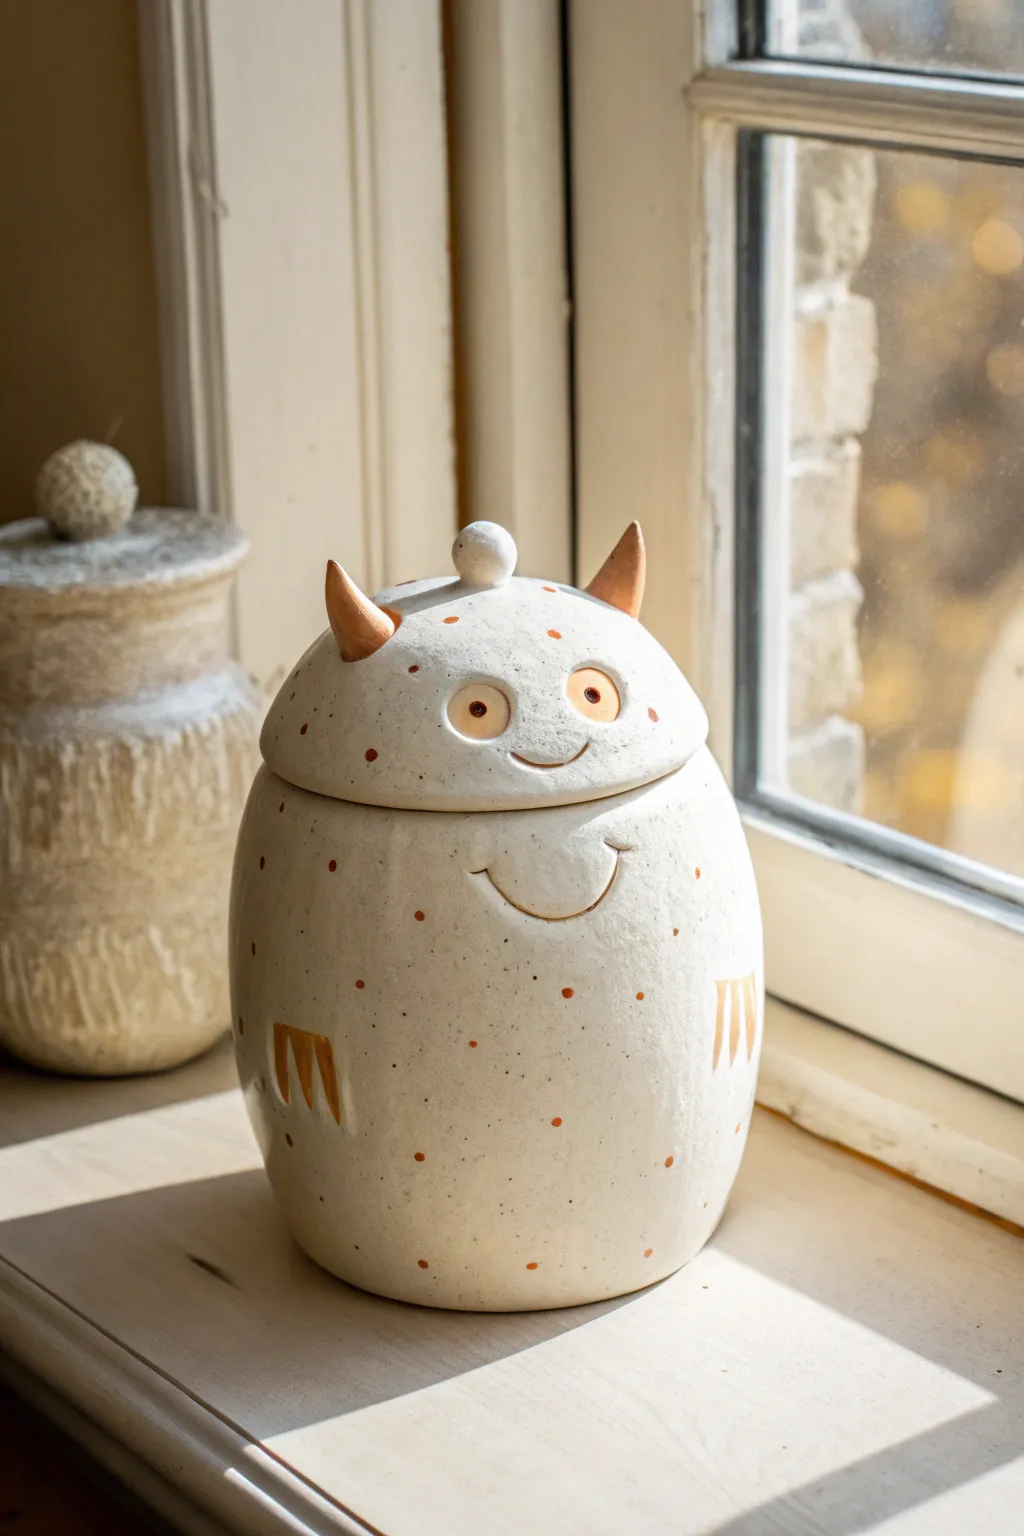
This adorable speckled monster jar adds a touch of playful whimsy to any kitchen counter with its rounded belly and curious expression. The project uses simple slab and coil techniques to create a functional piece that’s as fun to make as it is to fill with treats.
Step-by-Step Guide
Materials
- White speckled stoneware clay (approx. 3-4 lbs)
- Rolling pin and guide sticks (1/4 inch thick)
- Pottery rib (wood or rubber)
- Needle tool
- Scoring tool (or serrated rib)
- Slip (clay mixed with water)
- Sponge
- Underglaze (orange/terracotta color)
- Small paintbrush
- Clear food-safe glaze
- Canvas work surface
Step 1: Forming the Body
-
Prepare the slabs:
Begin by rolling out a substantial slab of speckled clay to an even 1/4 inch thickness. Use guide sticks to ensure uniformity, as this helps prevent warping later. Cut a long rectangle for the container walls and a circle for the base (about 5-6 inches in diameter). -
Form the cylinder:
Curve the rectangular slab to join the ends together, creating a cylinder that fits the circumference of your base. Score both ends thoroughly, apply slip, and press firmly to join. Smooth the seam inside and out so it disappears completely. -
Attach the base:
Score and slip the bottom edge of your cylinder and the outer edge of your circular base. Press them together, then use a wooden tool to blend the clay from the wall down onto the base for a secure seal. -
Belly shape:
With one hand inside to support the wall and a rib on the outside, gently push the clay outward while rotating the jar. Focus on the middle section to create a plump, rounded ‘belly’ shape, slightly tapering back in near the top rim. -
Refine the rim:
Use a damp sponge to smooth the top rim of the jar. It needs to be level to support the lid, so check it from eye level.
Pro Tip: Hidden Smile
Carve a second smile onto the jar body itself, right where the lid meets the rim. This creates a contiguous grin when the lid is placed correctly.
Step 2: Sculpting the Monster Lid
-
Shape the dome:
Roll out a fresh slab or shape a large pinch pot to create the domed lid. Measure it against the jar’s opening to ensure it slightly overhangs the rim, giving the monster a cute ‘overbite’ look. -
Add the flange:
On the underside of the lid, add a coil of clay slightly smaller than the jar’s opening. Score, slip, and smooth this coil down; this ‘flange’ keeps the lid from sliding off. -
Create the horns:
Roll two small cones of clay for the horns. Curve them slightly for character. Score and slip the attachment points on the ‘forehead’ area of the lid and press the horns into place. -
Attach the knob:
Roll a small sphere of clay for the center knob. Attach this securely between the horns; this acts as the handle for lifting the lid. -
Sculpt the face:
For the eyes, add two small, flat discs of clay to the front of the lid. Use your needle tool to incise pupils. Adding a small clay coil for a smile creates a sweet expression.
Troubleshooting: Lid Fit
If the lid rocks or wobbles after the bisque fire, use a heavy-grit sanding block or grinding paste to level the rim and lid contact points before glazing.
Step 3: Details & Glazing
-
Add the arm details:
On the main body jar, use a carving tool to gently incise a curved line that suggests arms resting on the belly. You can also carve small vertical lines to imply claws or fingers. -
Bisque fire:
Allow the piece to dry slowly under plastic for at least a week to prevent cracking. Once bone dry, bisque fire it in a kiln to approximately Cone 04. -
Apply accents:
Using a small brush and terracotta-colored underglaze, carefully paint the horns, the pupils of the eyes, and the claw details. I like to add random small polka dots all over the body and lid for texture. -
Glazing:
Dip or brush the entire piece (inside and out) with a clear, food-safe glaze. Avoid the bottom where it sits on the kiln shelf. -
Final firing:
Fire the jar again to the temperature required by your clay and glaze (typically Cone 5 or 6 for stoneware) to finish the piece.
Fill your new monster friend with cookies and enjoy the charming personality it brings to your home


Have a question or want to share your own experience? I'd love to hear from you in the comments below!