
When you’re trying to draw pain, it helps to give the feeling a shape—something you can actually see on the page. Here are my favorite pain drawing ideas that turn hurt, heaviness, and overwhelm into powerful, readable imagery.
Cracked Heart With Stitches
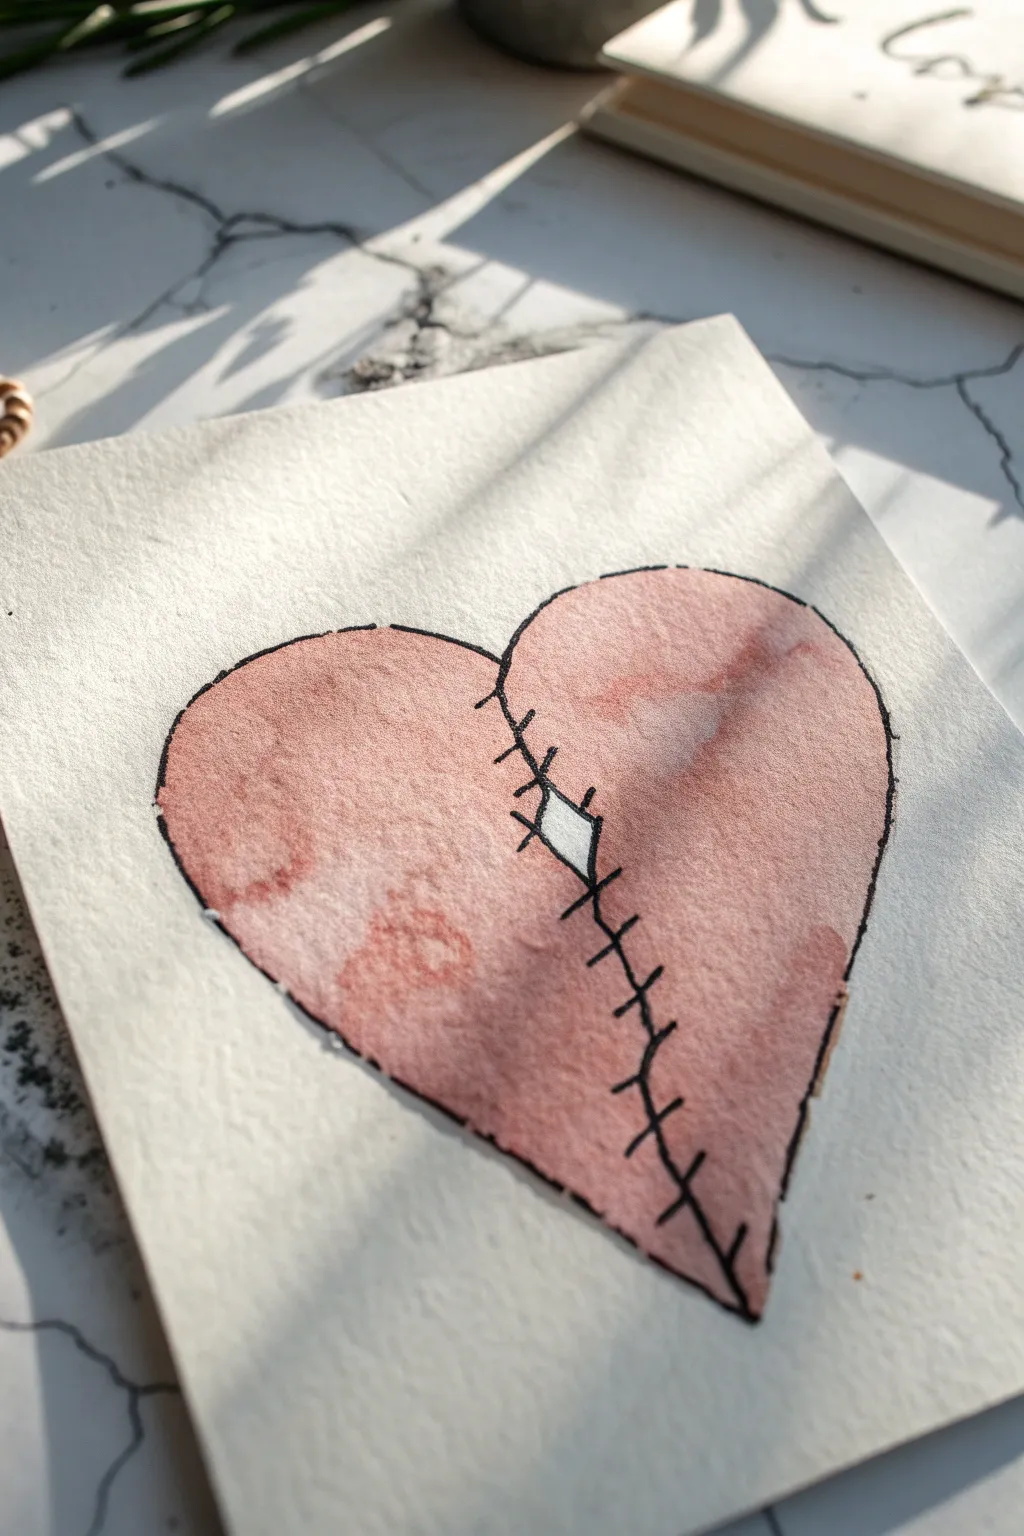
This evocative watercolor project captures the concept of healing with a simple yet powerful design. You’ll create a soft, textured heart featuring a prominent crack that is carefully stitched back together with bold ink lines.
How-To Guide
Materials
- Cold press watercolor paper (approx. 140lb/300gsm)
- Pencil (HB or 2H)
- Black waterproof fine liner pen (01 or 03 size)
- Watercolor paints (Alizarin Crimson, Burnt Sienna, or similar earthy reds)
- Round watercolor brush (size 6 or 8)
- Clean water jar
- Paper towel
- Kneaded eraser
Step 1: Sketching the Shape
-
Outline the heart:
Begin by lightly drawing a large heart shape in the center of your watercolor paper using an HB or 2H pencil. Keep your lines faint so they can be easily erased or covered later. -
Draw the fracture:
Starting near the top center dip of the heart, draw a jagged, uneven line straight down towards the point. Don’t make it a straight line; give it some wiggle to look like a natural tear. -
Widen the gap:
In the middle of that fracture line, create a small diamond-shaped separation to represent a missing piece or a wider gap in the wound.
Bleeding Ink?
If your fine liner feathers, the paper is still damp. Wait longer or use a hair dryer on low heat. Ensure your pen is explicitly labeled ‘waterproof’ or ‘archival’.
Step 2: Watercolor Application
-
Mix your base color:
Mix a dusty pink or muted red on your palette. I tend to mix a little brown or ochre into a crimson red to keep the color looking grounded and organic rather than too vibrant. -
Paint the left side:
Load your round brush with the paint mixture and fill in the left half of the heart. Carefully trace along the jagged fracture line you drew, ensuring you don’t paint over the gap. -
Paint the right side:
Repeat the process for the right side of the heart. Try to vary the water-to-paint ratio slightly here to create natural texture and blooming effects within the wash. -
Refine the edges:
While the paint is still wet, you can dab a clean, damp brush along parts of the outer edge to soften them, or add a drop of more concentrated pigment to the center for depth. -
Let it dry completely:
Allow the paper to dry fully. This is crucial because drawing ink over damp paper will cause the ink to bleed and feather, ruining the crisp stitch effect.
Step 3: Inking the Details
-
Outline the heart shape:
Using your waterproof fine liner, trace the outer perimeter of the heart. A slightly shaky or broken line actually adds character here, so don’t worry about being perfect. -
Trace the fracture:
Ink the jagged line running down the center, being careful to outline the small diamond-shaped gap in the middle without filling it in. -
Start the stitches:
Draw short horizontal lines across the fracture, starting from the top. These should look like staples or thread pulling the two sides together. -
Cross the stitches:
To make the stitches look more realistic, draw a small ‘x’ or a second diagonal line over a few of the horizontal marks. -
Vary the spacing:
Continue stitching down the length of the crack. Leave the diamond gap open—don’t stitch directly over the the widest part of the white hole. -
Add emphasis marks:
Add tiny little tick marks or dots at the ends of some stitches where they enter the ‘flesh’ of the heart to simulate the tension of the thread. -
Final clean up:
Once the ink is totally dry, gently run your kneaded eraser over the painting to pick up any visible pencil lines that weren’t covered by paint or ink.
Golden Repair
Use metallic gold watercolor or a gold gel pen for the stitches instead of black. This mimics Kintsugi, the Japanese art of repairing broken pottery with gold.
Your mended heart is now ready to be displayed as a reminder of resilience


Mask Slipping Off a Sad Face
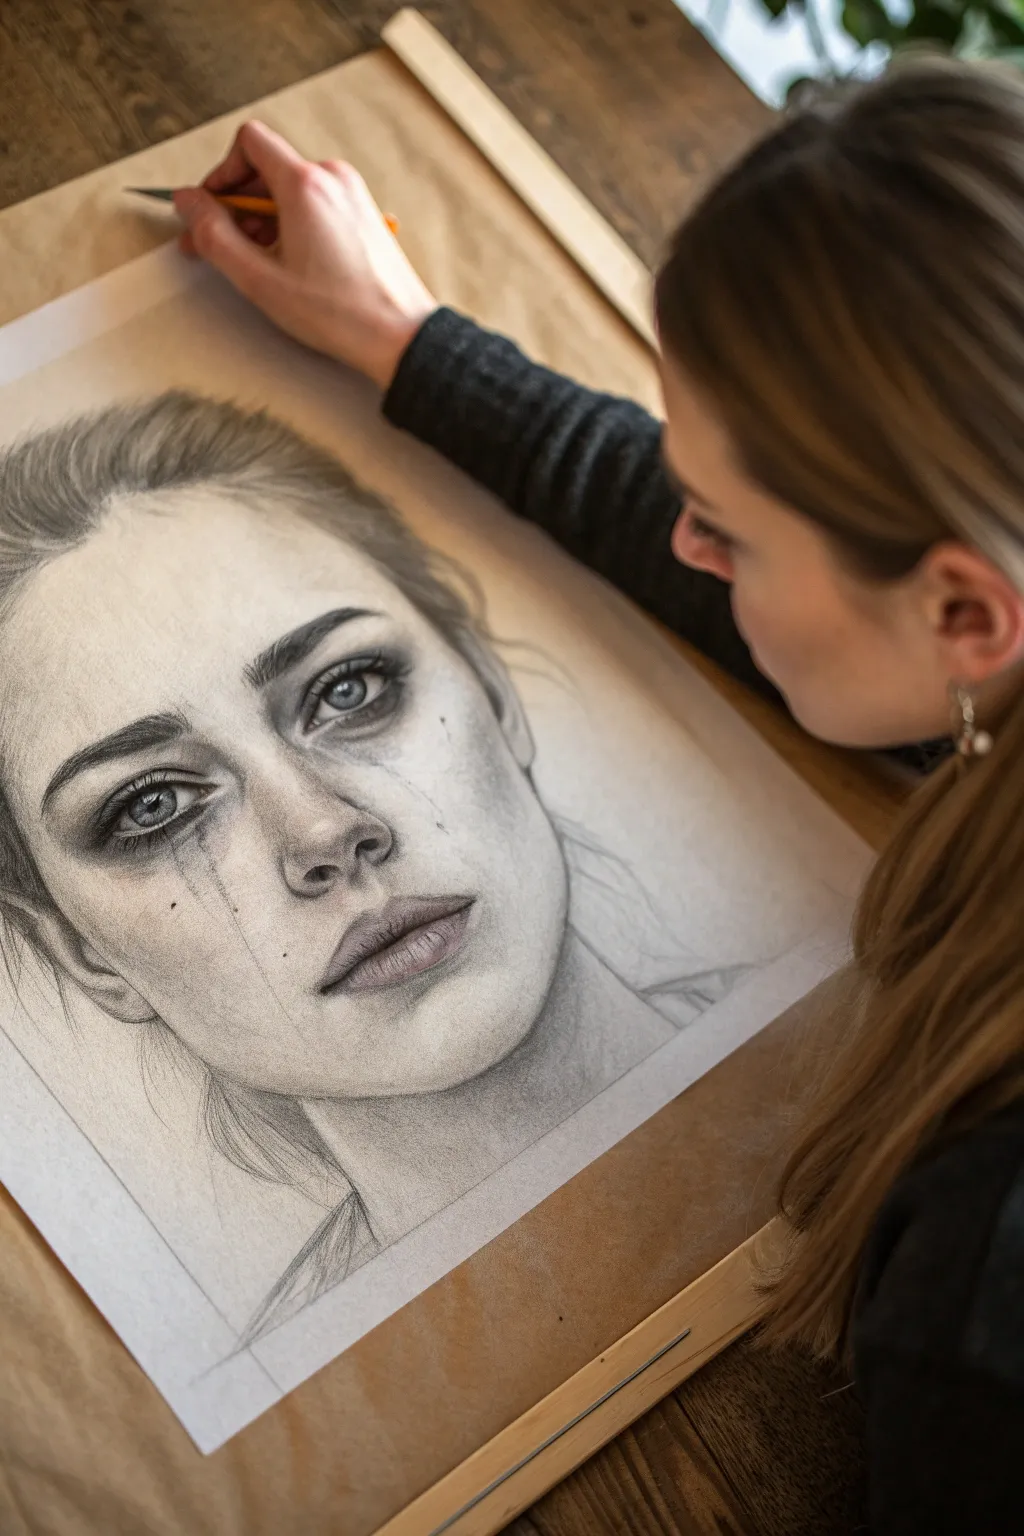
Capture the raw emotion of sorrow with this detailed graphite portrait that focuses on tear-stained cheeks and expressive eyes. This project challenges you to master shading and texture to render a realistic face that seems to look right through the paper.
Step-by-Step Guide
Materials
- High-quality smooth drawing paper (Bristol or Heavyweight Cartridge, A3 size)
- Graphite pencils (ranging from 2H to 6B)
- Mechanical pencil (0.5mm HB or 2B)
- Kneaded eraser
- Precision eraser or eraser pen
- Blending stumps (tortillons) or soft tissue
- Pencil sharpener
Step 1: Establishing the Proportions
-
Sketch the outline:
Begin with a very light 2H pencil to map out the basic oval shape of the face. Mark horizontal guidelines for the eyes, nose, and mouth to ensure symmetry. -
Define the features:
Lightly sketch the almond shapes of the eyes, the bridge and tip of the nose, and the contours of the lips. Keep your lines faint so they can be easily erased or blended later. -
Map hair and neck:
Indicate the hairline and the general flow of the hair strands, as well as the lines of the neck and shoulders. Don’t worry about individual hairs yet; just focus on volume and direction.
Smudge Control
Place a scrap piece of paper under your drawing hand. This prevents natural oils and friction from accidentally smearing your delicate shading while you work.
Step 2: The Eyes and Soul
-
Pupils and irises:
Switch to a darker 4B pencil to fill in the pupils, leaving small white circles for the catchlights—this is crucial for life-like eyes. Shade the iris with radial lines moving outward from the pupil. -
Eyelids and lashes:
Darken the upper lash line significantly. Use a sharp mechanical pencil to flick quick, curved strokes for the eyelashes. Create depth in the crease of the eyelid with a B pencil, blending it softly upwards. -
Under-eye shadows:
Apply soft graphite (HB or B) beneath the lower lash line. Use a blending stump to smooth this into the skin, creating the slightly puffy, tired look associated with crying.
Step 3: Shading for Volume
-
Contour the nose:
Lightly shade the sides of the nose bridge, leaving the center light to suggest highlighting. Darken the nostrils carefully, avoiding hard outlines. -
Shape the lips:
Use a 2B pencil to fill the lips. The upper lip is usually darker than the lower lip. I like to add tiny vertical cracks and lines in the lower lip to enhance the realism before blending slightly. -
Cheekbones and jaw:
Apply broad, light strokes with a 2B pencil along the cheekbones and jawline. Blend these extensively with a tissue to create smooth skin texture.
Graphite Powder
Sand a soft pencil on sandpaper to create graphite dust. Apply this powder with a brush to create ultra-smooth, ghostly skin tones tailored for realism.
Step 4: Tears and Trauma
-
Smudging the mascara:
This is the defining detail. Take a soft 4B or 6B pencil and add dark pigment directly under the lower lash line. Drag this pigment downward in uneven, vertical streaks using a blending stump or your finger. -
Creating contrast:
The streaks should fade as they move down the cheek. Keep the edges of these “tear tracks” soft and diffused, imitating how water disrupts makeup. -
Adding texture spots:
Dot a few tiny, random speckles around the tear tracks and cheeks using a sharp pencil point to simulate skin imperfections or flecks of mascara.
Step 5: Hair and Final Touches
-
Base hair shading:
Fill in the hair area with broad strokes of a B or 2B pencil, following the direction of growth. Blend this base layer to get a unified tone. -
Detailing strands:
Using a sharp mechanical pencil, draw individual hairs over the base layer. Press harder in shadow areas (like behind the ears) and lighter on the crown. -
Lifting highlights:
Slice your kneaded eraser into a wedge shape and life out thin lines in the hair to create shine. -
Final assessment:
Step back and check your contrast. Deepen the darkest shadows—pupils, nostrils, corners of the mouth—with your 6B pencil to make the portrait pop.
Now you have a powerful, emotive portrait that tells a story without words.


Drowning in Feelings
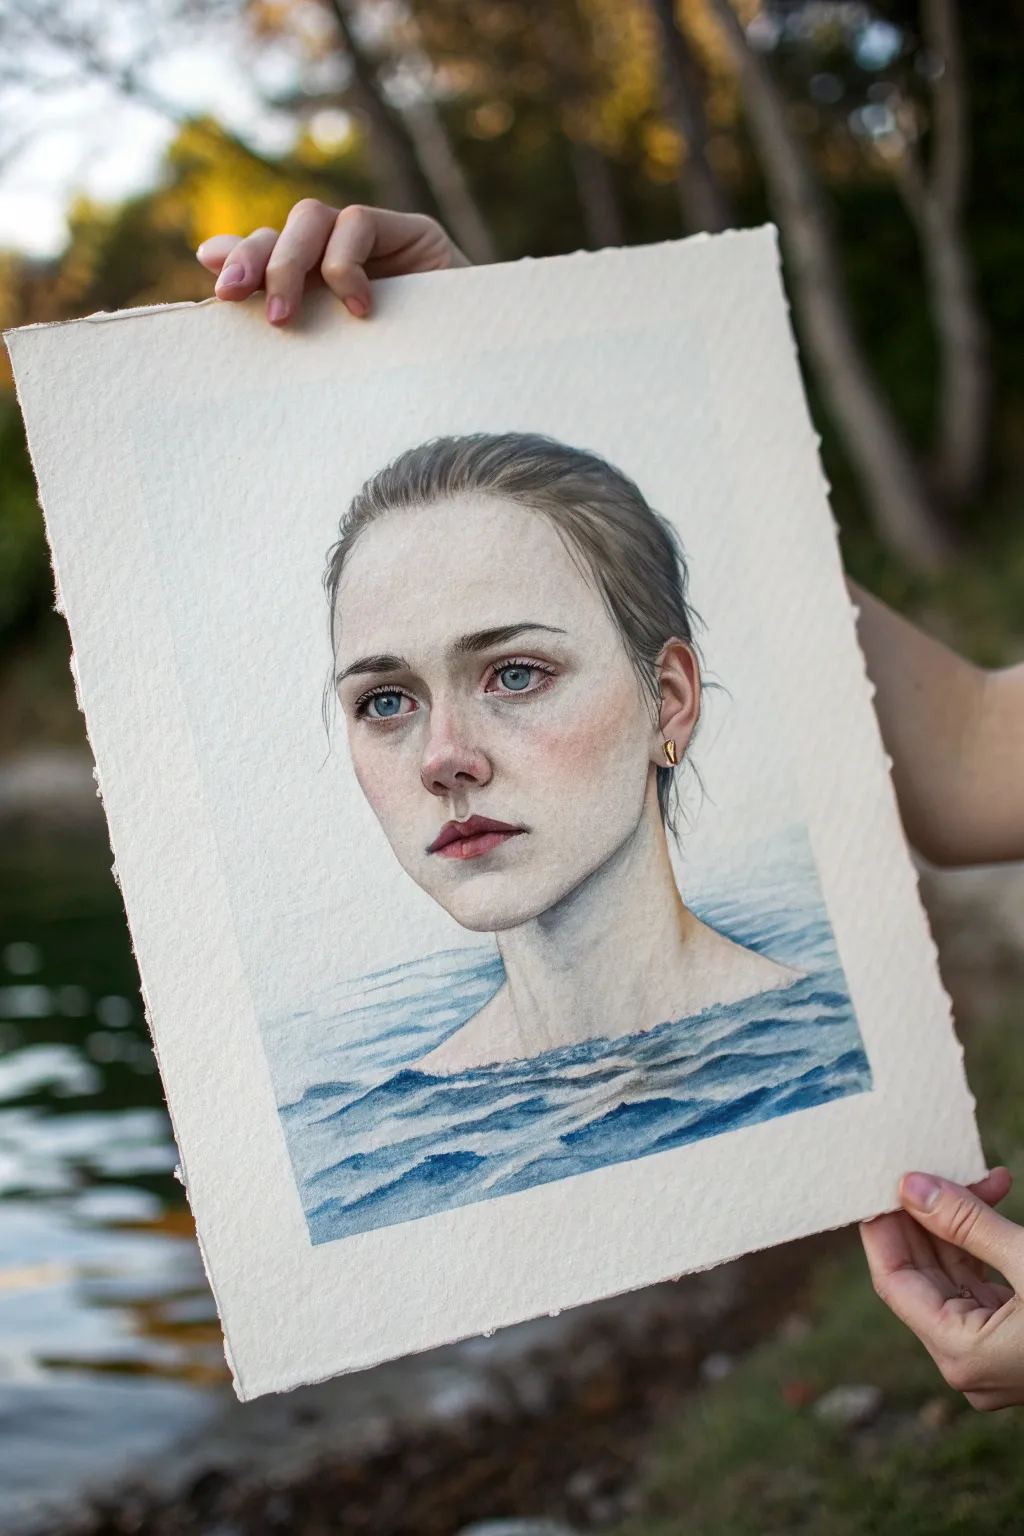
Capture the poignant sensation of being overwhelmed with this delicate watercolor and pencil portrait. This project features a realistic female subject neck-deep in gentle waves, symbolizing the feeling of drowning in emotions.
Detailed Instructions
Materials
- Heavyweight cold-press watercolor paper (300gsm or higher)
- H and HB graphite pencils for sketching
- Watercolor paints (Cerulean Blue, Prussian Blue, Burnt Sienna, Yellow Ochre, Alizarin Crimson, Titanium White)
- Round watercolor brushes (sizes 2, 6, and a fine liner)
- White gouache or white gel pen
- Masking fluid (optional)
- Clean water and paper towels
- Kneaded eraser
Step 1: Planning and Sketching
-
Map out the composition:
Begin by lightly marking the boundaries of the figure. Position the head centrally but slightly higher than the midpoint to leave room for the water below. Keep your pencil pressure very light so the graphite won’t show through the transparency of the watercolor later. -
Detail the facial features:
Sketch the oval of the face, noting the slight three-quarter turn. Carefully place the eyes, nose, and mouth. The expression is key here—aim for a slightly parted mouth and a distant, melancholic gaze in the eyes. -
Outline the hair and water line:
Draw the hairline pulled back from the face, indicating strands that are slightly wet or plastered down. Sketch a gentle, undulating line across the neck to represent the water’s surface, ensuring it curves around the form of the neck rather than cutting straight across.
Muddy Skin Fix
If skin tones look muddy or grey, you likely overmixed on the paper. Lift the paint with a damp brush, let it dry fully, then reglaze with fresh, transparent color.
Step 2: Painting the Skin Tones
-
Mix the base flesh tone:
Create a watery wash using a mix of Yellow Ochre and a tiny touch of Alizarin Crimson. I like to test this on a scrap piece of paper first to ensure it is pale enough. -
Apply the first skin layer:
Wash the color over the entire face and neck area (above the water line), avoiding the whites of the eyes. Let this layer dry completely. -
Add facial shadows:
Mix a slightly darker, cooler tone by adding a speck of blue to your skin mix. Apply this to the eye sockets, under the nose, under the bottom lip, and along the side of the face to create dimension. -
Flush the cheeks and nose:
While the paper is dry, lightly glaze a diluted Alizarin Crimson or rose tone over the cheeks, the tip of the nose, and the ears to give the skin a raw, emotional quality.
Step 3: Defining Features
-
Paint the eyes:
Use a small size 2 brush and a mix of Cerulean Blue and grey for the irises. Darken the rims of the irises and paint the pupils black. Remember to leave tiny white spots for the catchlights, or add them later with white gouache. -
Detail the lips and redness:
Paint the lips with a muted red-brown mix. Add a little extra redness around the rims of the eyes to enhance the look of someone who has been crying or is exhausted. -
Render the hair:
Using a grey-brown mix, paint the hair in the direction of growth. Use quick, confident strokes with a fine liner brush to create individual strands along the hairline.
Realistic Water Edge
Don’t paint a hard line where water meets skin. Soften the edge with a clean, damp brush to make the figure look truly submerged, not just cut and pasted.
Step 4: The Water and Finishing Touches
-
Base wash for the water:
Wet the paper area below the neck line with clean water. Drop in a light wash of Cerulean Blue, letting it bleed and soften naturally. -
Build the waves:
Once the base is damp but not soaking, mix a stronger Prussian Blue. Paint horizontal, slightly curved strokes to mimic ripples and waves. Let the strokes break naturally on the paper texture. -
Create interaction at the neck:
Darken the water right where it meets the skin to show the shadow cast by the neck. This grounds the figure in the water. -
Add highlights:
Use white gouache or a gel pen to add sharp highlights to the crests of the water ripples. Add final tiny highlights to the wettest parts of the face, like the tear ducts and lower lip. -
Refine contrast:
Step back and assess your values. If the face looks too flat, deepen the darkest shadows under the chin and in the hair with a dry-brush technique.
Allow your painting to dry completely before removing it from your board to prevent buckling


Shadow Hands Holding You Down
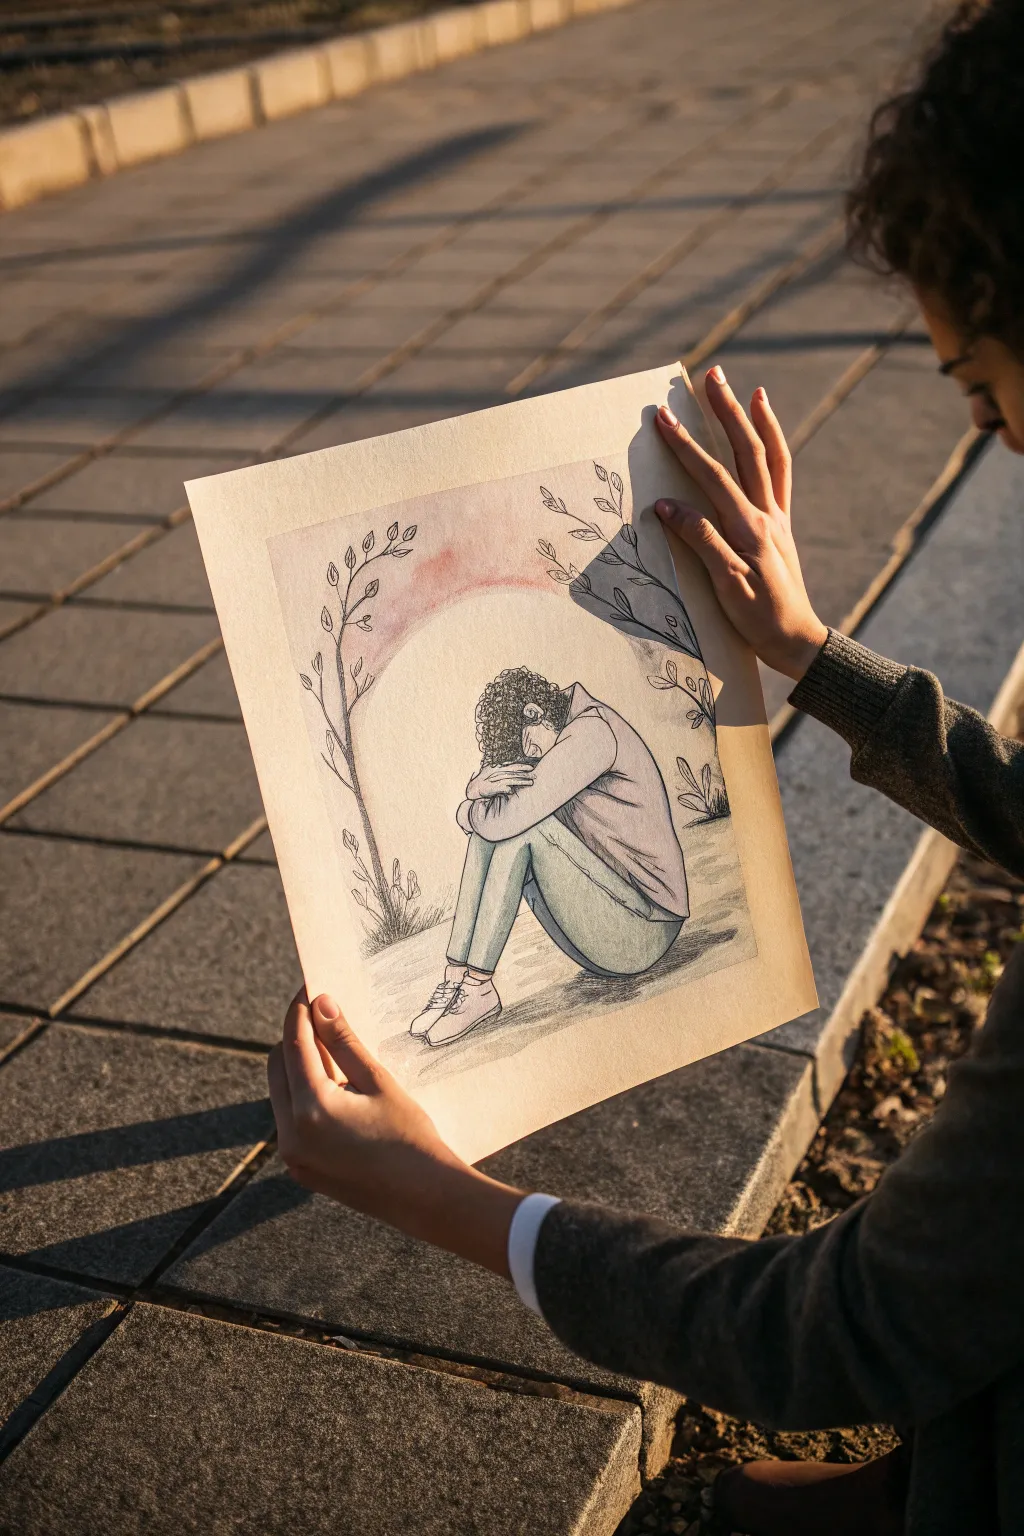
This emotive mixed-media piece combines delicate ink linework with soft watercolor washes to capture a moment of introspection. The contrast between the crisp, dark pen strokes and the gentle, bleed-out colors creates a poignant visual metaphor for emotional weight.
Step-by-Step
Materials
- Thick mixed-media or watercolor paper (cold press recommended)
- H pencil for sketching
- Fine liner pens (0.1, 0.3, and 0.5 sizes, waterproof ink)
- Watercolor paints (Payne’s Grey, Blush/Rose Madder, Olive Green, Cerulean Blue)
- Small round watercolor brush (size 4 or 6)
- Clean water and paper towel
- Kneaded eraser
Step 1: Planning and Sketching
-
Center the composition:
Begin by lightly sketching the central figure in the middle of your page. Start with a simple oval for the torso and sketch the legs pulled up against the chest to establish the posture. -
Refine the figure:
Add details to the figure, drawing the arms wrapped around the legs and the head resting on the knees. Keep your pencil pressure very light so these lines can be erased later. -
Sketch the hoodie and pants:
Draw the clothing folds. Notice how the hoodie bunches at the back and sleeves; these wrinkles add realism and weight to the figure. -
Frame with flora:
Lightly sketch two curving vines or branches rising up on either side of the figure. They should curve inward slightly at the top, creating a subtle arch that encloses the character.
Ink Smearing?
If your black lines bleed when you add watercolor, your pen isn’t waterproof. Test your pen on a scrap piece of paper with water before starting the final piece.
Step 2: Inking the Lines
-
Outline the main figure:
Using a 0.3 fine liner, carefully trace over the pencil lines for the clothing and shoes. Use broken or slightly jittery lines for the clothing folds to suggest fabric texture. -
detail the hair:
Switch to a 0.1 pen for the hair. Use small, joyful scribbles or tight loops to create the curly texture, building up density near the nape of the neck for shadow. -
Draw the botanical frame:
Ink the branches with the 0.3 pen. Draw small leaves sprouting from the stems. Keep the leaves simple and stylized, avoiding excessive detail. -
Add texture to the ground:
Beneath the figure, use the 0.1 pen to add horizontal hatching lines. This grounds the character so they aren’t floating in white space. -
Erase pencil guides:
Wait until the ink is completely dry—I usually give it at least five minutes—then gently remove all pencil marks with your kneaded eraser.
Softer Fades
To get a smoother fade on the pink background arch, re-wet the outer edge with clean water immediately after painting to disperse the hard line.
Step 3: Adding Color Washes
-
Mix the skin tone:
Dilute a tiny dot of brown or orange paint with plenty of water to create a very pale skin tone. Apply this only to the visible hand and the small area of the face/neck. -
Paint the hoodie:
Mix a watery wash of lilac or diluted purple. Paint the hoodie, letting the color pool slightly in the shadowed areas (under the arm, along the back) for natural shading. -
Color the pants:
Using a muted teal or dull blue-green, paint the pants. Leave a tiny sliver of white paper along the top of the thigh to act as a highlight. -
Apply the background aura:
Wet the paper in an arch shape behind the figure with clean water first. Drop in a soft wash of rose or blush pink, letting it bleed outward but stopping before it touches the branches. -
Add drop shadows:
Mix a transparent grey wash. Apply this beneath the figure and slightly behind the legs to anchor the drawing to the ground. -
Final shadow accents:
Once the first layers are dry, mix a slightly darker, more concentrated version of the hoodie and pant colors. Paint thin lines into the deepest creases of the clothing to increase contrast.
Take a moment to appreciate how the simple lines and soft colors convey such deep emotion
BRUSH GUIDE
The Right Brush for Every Stroke
From clean lines to bold texture — master brush choice, stroke control, and essential techniques.
Explore the Full Guide
Head Dissolving Into Smoke

Capture the ephemeral feeling of a fleeting thought with this evocative mixed-media drawing. By blending precise graphite realism with loose, smoky textures on raw canvas, you’ll create a surreal portrait where the mind literally drifts away.
How-To Guide
Materials
- Heavyweight cream-colored paper or unprimed canvas sheet (approx. 11×14 inches)
- Graphite pencils (HB, 2B, 4B, 6B)
- Black charcoal pencil or compressed charcoal stick
- Blending stumps (tortillons)
- Kneaded eraser
- Makeup brush or soft paintbrush (for smoothing)
- Pressed dried leaves or flower petals (optional, for physical collage element)
- Craft glue (if using real leaves)
- Workable fixative spray
Step 1: Preparing the Foundation
-
Texture the Edges:
Begin by tearing the edges of your heavy paper or canvas sheet. Don’t use scissors; manually ripping the paper creates that rustic, deckle-edged look. If you’re using canvas, pull a few loose threads to fray the borders. -
Sketch the Outline:
Using an HB pencil with a very light hand, map out the basic proportions of the face. Focus on the placement of the eyes, nose, and mouth, but leave the top of the cranium and hair area open and undefined. -
Establish the Features:
Refine the facial features. The eyes are closed, so draw the curve of the lashes and the eyelids gently. Ensure the proportions are realistic before you commit to darker values.
Step 2: Shading the Portrait
-
Build the Shadows:
Switch to a 2B pencil to start laying down shadows. Focus on the eye sockets, the underside of the nose, and the lips. Keep your pencil strokes follows the curvature of the skin. -
Deepen Contrast:
Use a 4B or 6B pencil for the darkest areas—specifically the nostril line, the line between the lips, and the corners of the eyes. This high contrast is crucial for the drawing to pop against the cream background. -
Render the Neck:
Shade the neck using vertical hatching strokes. I like to leave this area slightly sketchier than the face to draw attention upward toward the dissolving effect. -
Smooth the Skin:
Take a blending stump or a soft tissue and very gently smudge the graphite on the face to create smooth skin tones. be careful not to over-blend; you want to retain some paper texture. -
Lift Highlights:
Mold your kneaded eraser into a fine point and dab it onto the tip of the nose, the eyelids, and the cupid’s bow to lift off graphite and create bright highlights.
Smudge Control
Work from top to bottom if possible, or place a clean sheet of paper under your drawing hand. If the face gets dirty, dab with a kneaded eraser rather than rubbing.
Step 3: Creating the Dissolution
-
Start the Hairline:
Draw the hair near the ears and temples with the 6B pencil or charcoal. Create distinct strands, but as you move toward the top of the head, lighten your pressure significantly. -
Apply Charcoal Powder:
Scribble some charcoal on a separate scrap paper, then rub your blending stump or makeup brush into it. Apply this loose powder to the top of the head in a cloud-like shape. -
Form the Smoke:
Use the dirty blending stump to swirl the charcoal upward and outward to the left. Allow the strokes to become wispy and irregular, imitating the movement of smoke rising. -
Fade to White:
As the ‘smoke’ moves further from the head, let it fade completely into the paper color. You can use the kneaded eraser to tap uneven edges into the cloud to make it look organic. -
Draw Floating Particles:
Using a sharp 4B pencil, draw tiny, leaf-like shapes or debris scattering from the smoke cloud. Make them various sizes—some distinct, some just tiny dots—to create depth. -
Add Texture Details:
For a 3D effect matching the photo, glue tiny bits of crushed dried leaves or tea leaves exactly over your drawn particles. This mixed-media approach adds incredible tactile realism. -
Final Touches:
Revisit the eyes and lips one last time to ensure they are the focal point. Add a few loose strands of hair escaping the bun to enhance the messy, emotional feel. -
Protect the Work:
Spray the artwork with a workable fixative in a well-ventilated area to prevent the heavy charcoal and graphite from smudging over time.
Real Smoke Effect
For an ethereal photo finish, light a match, blow it out, and photograph your drawing with real smoke drifting over the paper just like the reference image.
Now you have a hauntingly beautiful piece that perfectly visualizes the feeling of a wandering mind


Have a question or want to share your own experience? I'd love to hear from you in the comments below!