
When I need a low-pressure painting session that still looks ridiculously cute, I reach for kawaii painting ideas—simple shapes, sweet faces, and happy colors. Here are my favorite prompts to get you painting fast, especially on mini canvases and small paper pieces.
Smiling Fruit With Rosy Cheeks
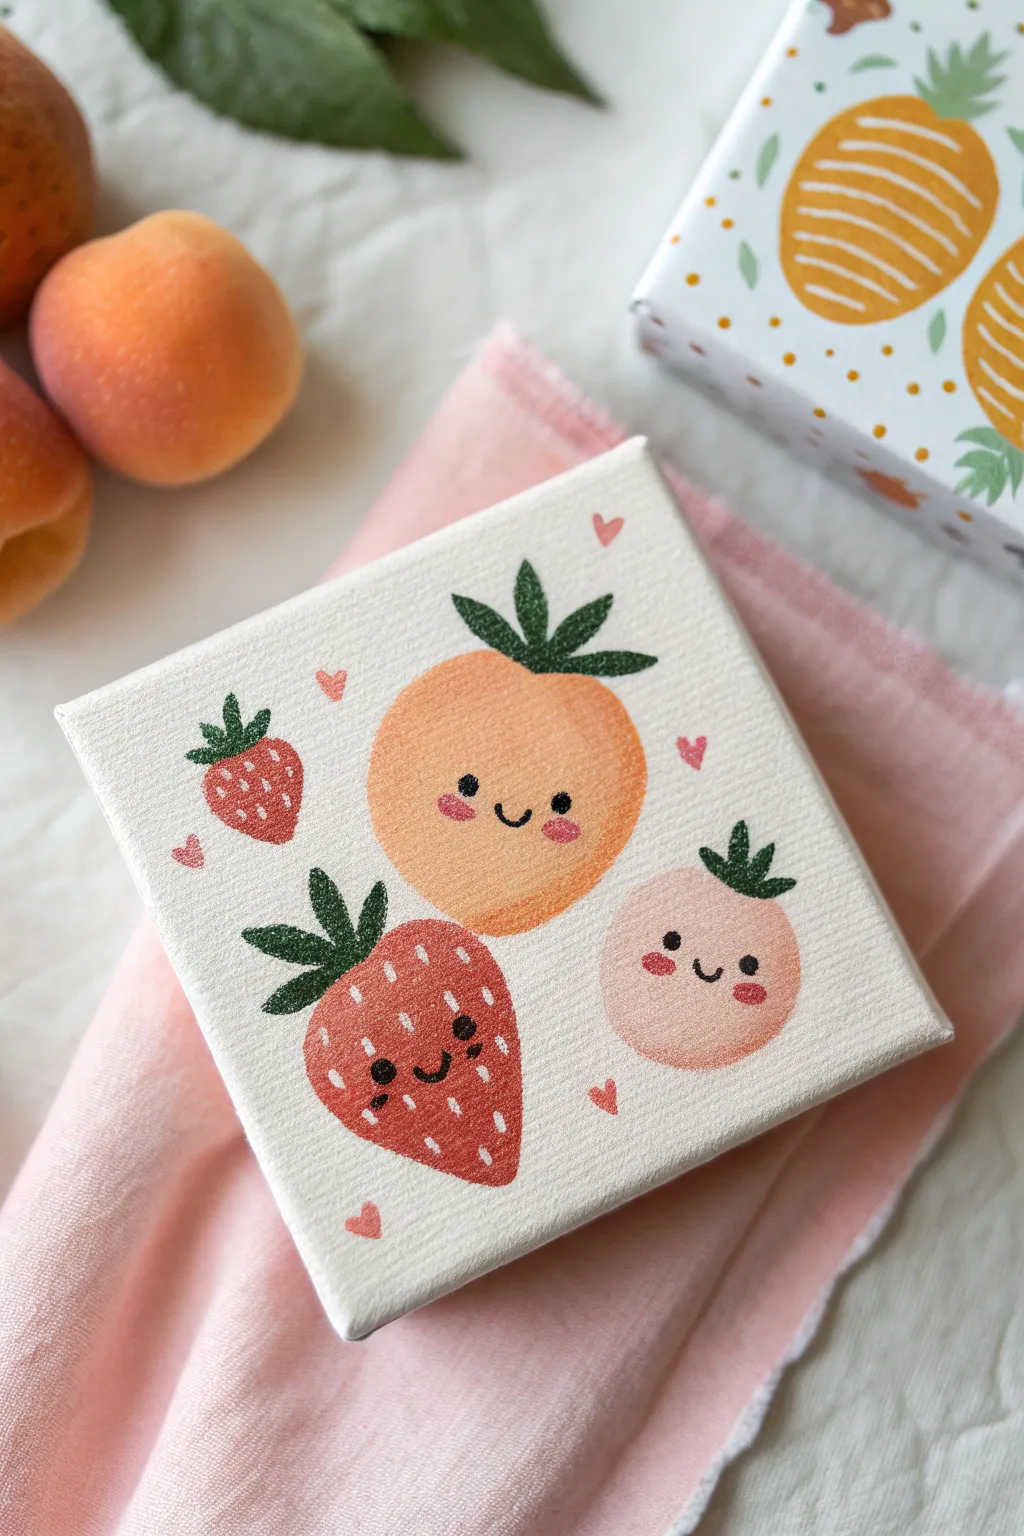
Bring a dose of sweetness to your space with this adorable mini canvas painting featuring cheerful fruits. The soft, warm palette and simple kawaii faces make this an ideal project for beginners looking to practice clean shapes and cute details.
Step-by-Step
Materials
- Small square canvas (approx. 4×4 or 5×5 inches)
- Acrylic paints: white, orange, soft pink, deep red, forest green, and black
- Flat shader brush (size 6 or 8)
- Small round detail brush (size 0 or 1)
- Pencil and eraser
- Palette or paper plate
- Cup of water and paper towels
Step 1: Planning and Sketching
-
Prepare the Base:
Start with a clean, pre-primed white canvas. If your canvas feels rough, you can apply a thin coat of white gesso and sand it lightly once dry for a smoother painting surface, though the natural texture works well for this rustic look. -
Sketch the Composition:
Using a pencil, lightly draw your fruit shapes. Place a large round peach in the center, a slightly smaller round fruit to the bottom right, a large strawberry to the bottom left, and a tiny strawberry to the top left. -
Outline the Leaves:
Add the leafy tops to each fruit. For the strawberries, draw three-pointed leafy crowns. For the round fruits, draw simple, pointed leaves sticking straight up or slightly to the side.
Clean Lines
To get perfectly round eyes without a brush, dip the flat end of a brush handle or a chopstick into black paint and stamp it gently onto the canvas.
Step 2: Blocking in Color
-
Mix the Peach Tone:
Mix orange with plenty of white and a tiny dot of pink to get a soft, pastel apricot color. Paint the large central fruit with this shade using your flat brush. -
Paint the Second Fruit:
Create a paler version of your peach color by adding more white. Fill in the round fruit on the bottom right. -
Base Coat the Strawberries:
Paint the large strawberry shape with a muted red or terracotta shade. For the tiny top-left strawberry, use a slightly bolder red to make it pop. -
Repeat for Opacity:
Acrylics can be translucent. Once the first layers are dry to the touch, apply a second coat to each fruit shape to ensure solid, bright coverage without streaks. -
Greenery:
For the leaves, use a deep forest green. Using the tip of your round brush, carefully fill in the leafy crowns on all the fruits. I find steadying my hand against the table helps with these sharp points.
Display Idea
Paint the sides (edges) of the canvas a matching pastel pink or green. This gives the artwork a complete, polished look when displayed on a mini easel.
Step 3: Adding Kawaii Details
-
Strawberry Seeds:
Dip your smallest detail brush into white paint. Add small, vertical dashes across the red strawberries to represent seeds. Keep the spacing somewhat random but balanced. -
Rosy Cheeks:
Mix a bright pink-red shade. Using a round brush or even the back end of a paintbrush handle, dot small oval cheeks onto each fruit. Position them widely apart to leave room for the smile. -
Painting the Eyes:
Switch to black paint and your finest brush. Paint two small, solid black circles for eyes just above the cheek line. Keep them simple and spaced wide for maximum cuteness. -
The Smiles:
Paint a tiny ‘U’ shape between the eyes for the mouth. Keep the line thin and delicate. Ensure the paint is slightly watered down so it flows smoothly off the brush. -
Floating Hearts:
Using a soft pink or red, paint tiny hearts floating in the empty white spaces around the fruits. Vary their orientation slightly to give the piece a dynamic feel. -
Final Touches:
Check for any uneven edges or smudges. You can use white paint to tidy up the background around the fruits if needed.
Allow your painting to dry completely before displaying it on a shelf or desk for a cheerful daily reminder


Round Kitty Faces in Pastels
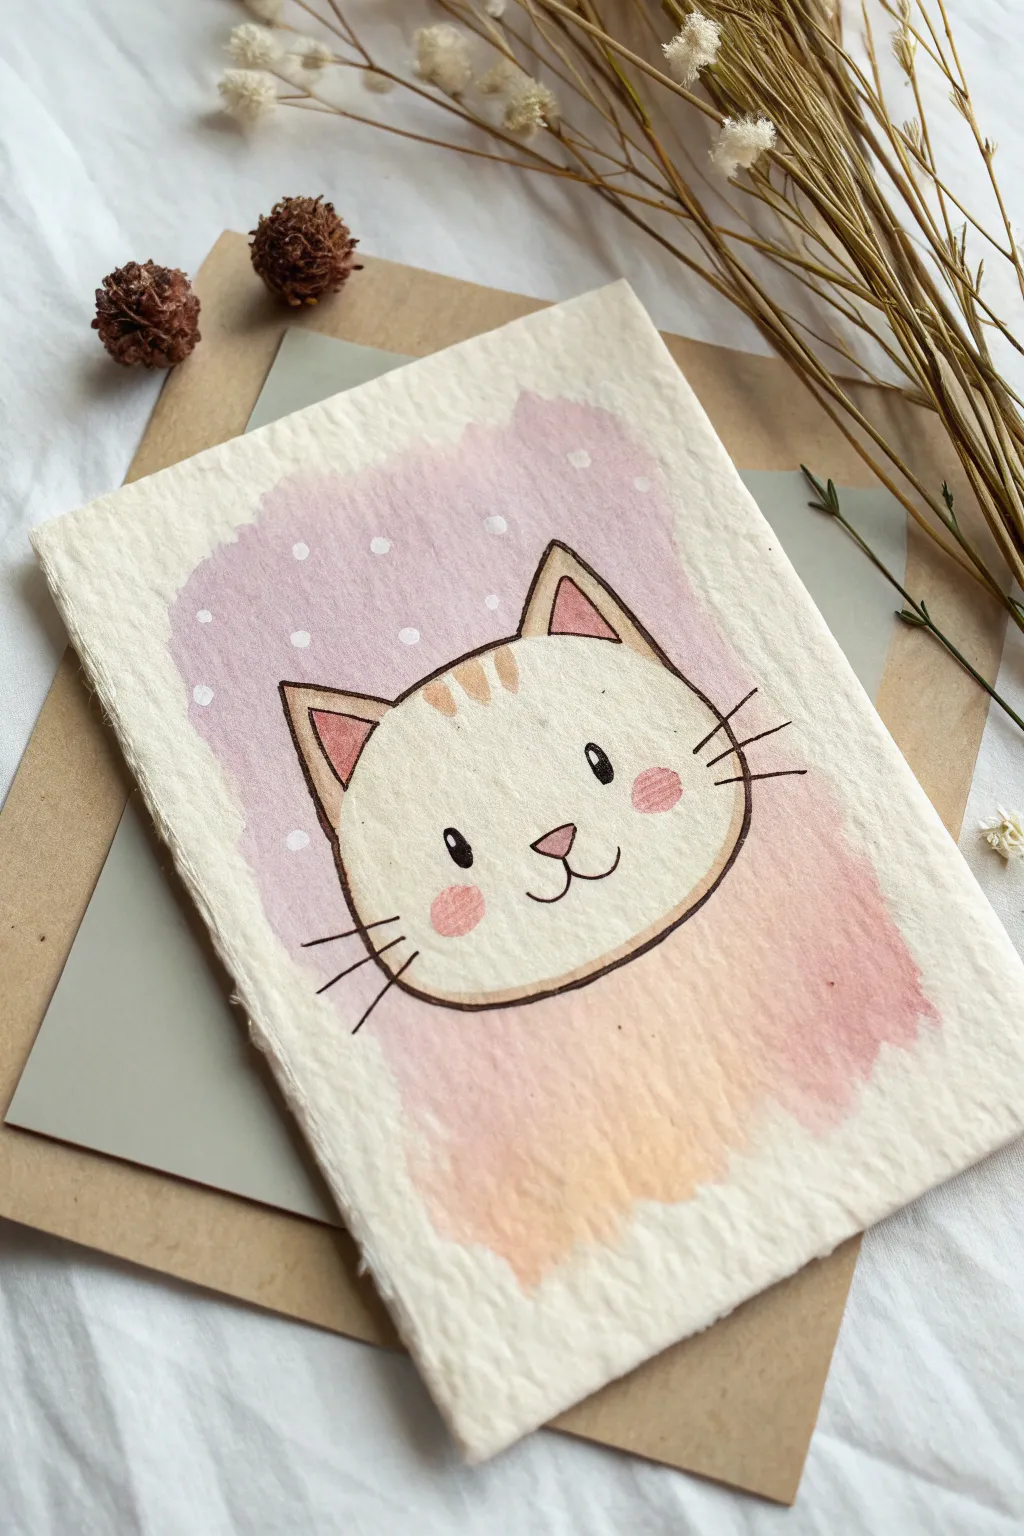
This whimsical project captures a sweet cat face resting on a soft cloud of pastel colors. Using rough-textured paper gives the watercolor wash a lovely organic feel, perfect for a handmade card or gift.
Step-by-Step Tutorial
Materials
- Cold press or rough handmade watercolor paper (approx. 5×7 inches)
- Watercolors (Pink rose, orange/peach)
- White gouache or white gel pen
- Fine liner pen (Black, waterproof, size 03 or 05)
- Round watercolor brush (size 6 or 8)
- Small detail brush (size 2)
- Pencil and eraser
- Paper towel
- Water cups
Step 1: Drawing the Base
-
Sketch the head shape:
Begin lightly with your pencil in the center of the paper. Draw a wide, slightly flattened oval for the kitty’s head. It should be chubby and round. -
Add the ears:
Draw two triangles on top of the head. Make them fairly large and wide-set for a cute look. Inside each triangle, draw a smaller triangle for the inner ear. -
Place the facial features:
Sketch two oval eyes set wide apart. In the center below them, draw a small inverted triangle for the nose and a simple ‘w’ shape for the mouth.
Step 2: Creating the Background Wash
-
Prepare the pink mix:
Mix a watery puddle of rose pink paint on your palette. You want it quite sheer, not too opaque. -
Paint the background block:
Using your larger round brush, paint a loose rectangular shape behind the cat’s head. Don’t paint over the cat sketch itself; paint around the outside lines of the head. -
Blend in the gradient:
While the pink paint is still wet, dip into a watery peach or orange color. Touch this color into the bottom section of your painted background, letting it bleed upwards into the pink for a soft Ombré effect. -
Let it dry completely:
Wait until the background paint is bone dry. This is crucial so your ink lines won’t bleed later.
Uneven Wash?
If your background dries with hard lines, re-wet the entire painted area slightly with clean water and drop in more pigment to smooth the transition.
Step 3: Adding Details and Inking
-
Paint the inner ears:
Using your smaller brush, fill in the inner ear triangles with a flat wash of the pink color. -
Add the rosy cheeks:
Paint two small circles of pink just under the eyes for blush marks. Keep the edges soft. -
Detail the forehead:
Mix a light orange-brown and paint three small vertical stripes on the cat’s forehead. -
Ink the main outlines:
Once all paint is dry, take your waterproof black fine liner. Trace the outline of the head and the ears with a confident, continuous line. -
Define the face:
Fill in the eyes with solid black, leaving a tiny speck of white paper for a highlight if you can (or add it later with white paint). Outline the nose and mouth. -
Draw the whiskers:
Add three whiskers on each cheek, extending out past the face line. Quick, flicking motions work best here to keep the lines sharp. -
Paint the nose:
Use a tiny bit of pink paint to fill in the nose triangle.
Deckle Edge Trick
To get the torn-paper look shown in the photo, create a crease where you want the edge, wet the crease with water, and gently tear the paper along a ruler.
Step 4: Final Touches
-
Erase pencil marks:
Gently erase any visible pencil sketch lines, being careful not to rub too hard on the painted areas. -
Add background dots:
Dip your small brush tip into white gouache (or use a white gel pen or paint marker). Dot random white spots over the pink background to mimic snow or stars. -
Review the highlights:
If the eyes look too dark, add a tiny dot of white gouache to the top corner of each pupil to bring the kitty to life.
Now you have a charming watercolor kitty ready to brighten someone’s day


Panda Peek From the Bottom Edge
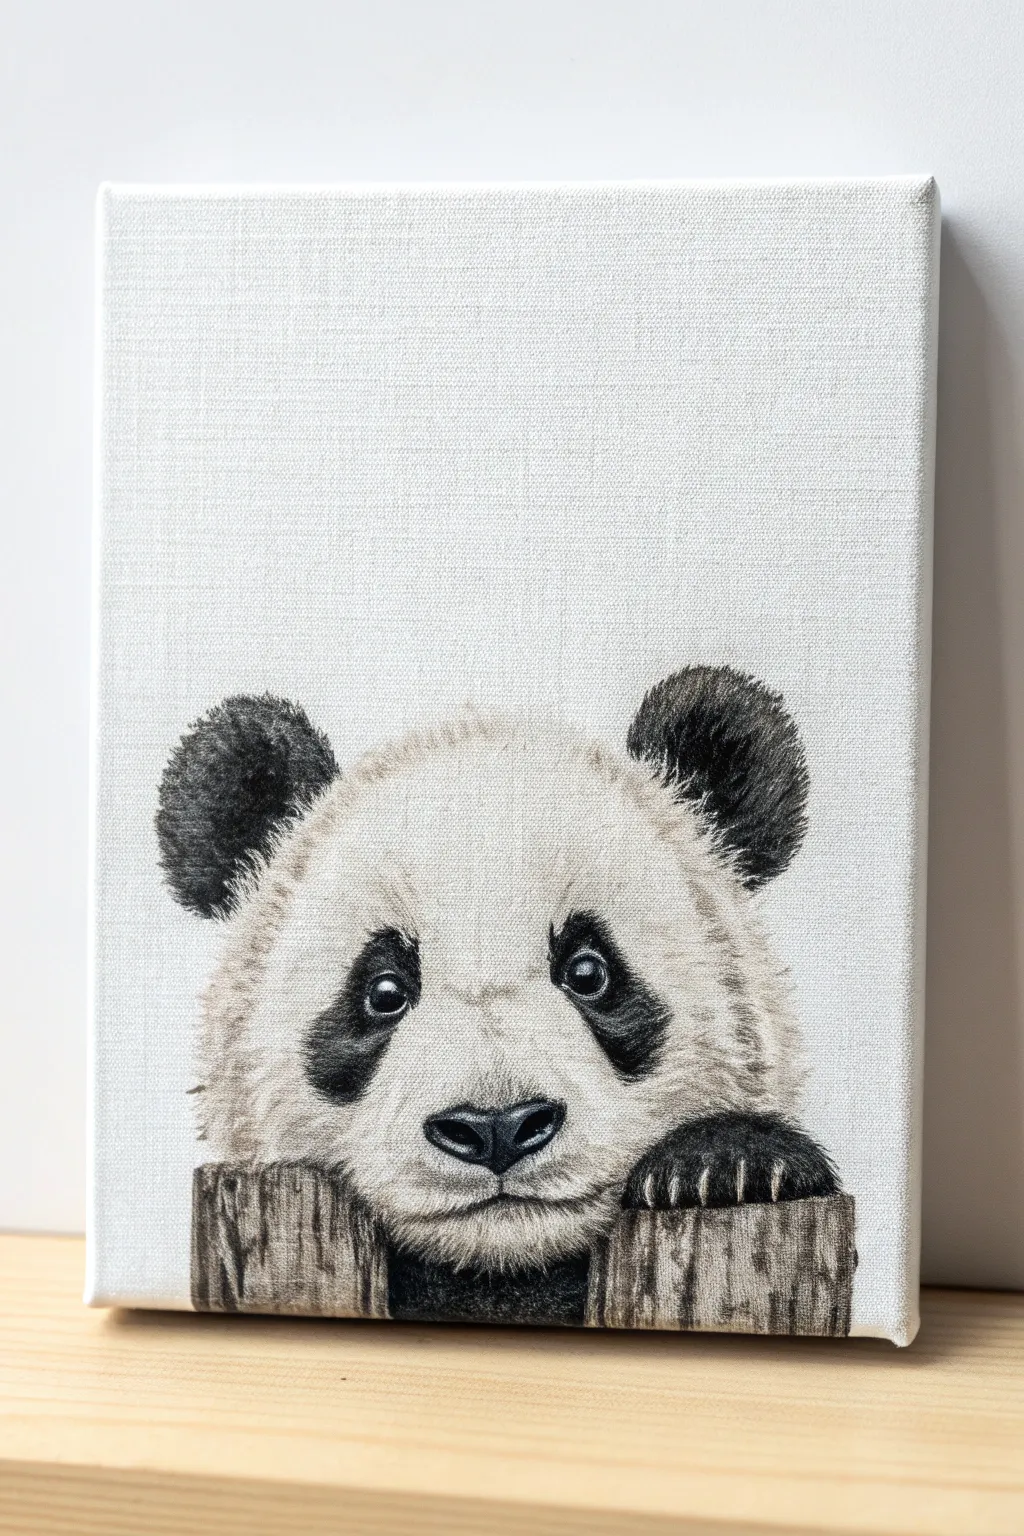
This adorable painting captures a curious panda peering over a rustic wooden log, utilizing the bottom edge of the canvas creatively. The stark contrast of black and white fur against the textured canvas makes for a striking yet minimalist piece of art.
Step-by-Step
Materials
- Small rectangular stretched canvas (e.g., 5×7 or 8×10 inches)
- Acrylic paints: Carbon Black, Titanium White, Burnt Umber, Raw Sienna
- Pencil (HB or 2B) and eraser
- Round synthetic brushes (sizes 2 and 4)
- Detail liner brush (size 0 or 00)
- Palette for mixing shading greys
- Ruler (optional)
Step 1: Sketching the Layout
-
Establish the wood line:
Measure about 1.5 to 2 inches from the bottom edge of your canvas. Lightly sketch a horizontal line across the width; this will be the top of the wooden log. -
Outline the head shape:
Draw a large semi-circle starting just below your wood line, arching up into the center of the canvas. The head should feel slightly flattened at the top, not a perfect circle. -
Place the ears:
Add two rounded ears on the top corners of the head. Position them wide apart to give the panda that classic, gentle look. -
Map the facial features:
Lightly sketch two large, bean-shaped patches for the eyes, slanting slightly downwards. In the center, below the eye patches, draw a small triangular nose and a simple mouth line. -
Add the paws:
Sketch two rounded paw shapes resting over the top of the wood line. The right paw should overlap the wood clearly, showing little claw indications.
Fuzzy Texture Tip
Use a fairly dry brush for the white fur edges. Dab excess paint onto a paper towel before hitting the canvas to get that soft, airy look.
Step 2: Building the Fur Base
-
Mix a light grey wash:
Mix a tiny amount of black into a lot of white with a drop of water. You want a very pale, cloudy grey. -
Paint the white fur base:
Using a size 4 brush, fill in the face area (avoiding the eye patches, nose, and ears). Don’t paint it solid white; scumble the pale grey lightly around the edges and under the eyes to suggest depth. -
Texture the edges:
While the paint is wet, pull small, feathery strokes outward along the top of the head and cheeks to create a fuzzy silhouette rather than a sharp line. -
Block in the black areas:
Use pure Carbon Black to fill in the ears and the eye patches. Keep the edges slightly uneven to mimic fur texture. -
Define the nose:
Paint the nose black, leaving a tiny sliver of white at the very top for a highlight, or add a dot of white later.
Fixing Heavy Eyes
If the black eye patches look too stark or like holes, gently dry-brush a tiny bit of medium grey into the center of the patch to show form.
Step 3: Creating Texture and Details
-
Detailing the black fur:
Once the black base is dry, take your liner brush with a slightly lighter charcoal grey. Flick tiny hairs along the outer edges of the ears and eye patches to soften them. -
Adding the eyes:
Inside the black eye patches, paint small circles for the actual eyes. I usually mix a dark brown-black so it stands out slightly from the patch, then add a crisp white reflection dot. -
refine the muzzle:
Use your pale grey mix to dab small dots and short strokes around the muzzle area, simulating pores and whiskers. -
Paint the wood base:
Mix Burnt Umber with a touch of white for a base brown. Fill in the wooden log area at the bottom. -
Add wood grain:
Using a liner brush and dark brown/black paint, draw vertical, wavy lines on the log. Variation is key here to make it look like rough bark. -
Enhancing the paws:
Paint the paws black, letting them rest heavy on the wood. Use white or light grey to add tiny highlights on the claws. -
Final shading touch-ups:
Add a very thin wash of watered-down black under the chin where it meets the wood to create a shadow, grounding the panda in the scene.
Now you have a charming little companion ready to hang on your wall


Frog in a Lily Pad Bath
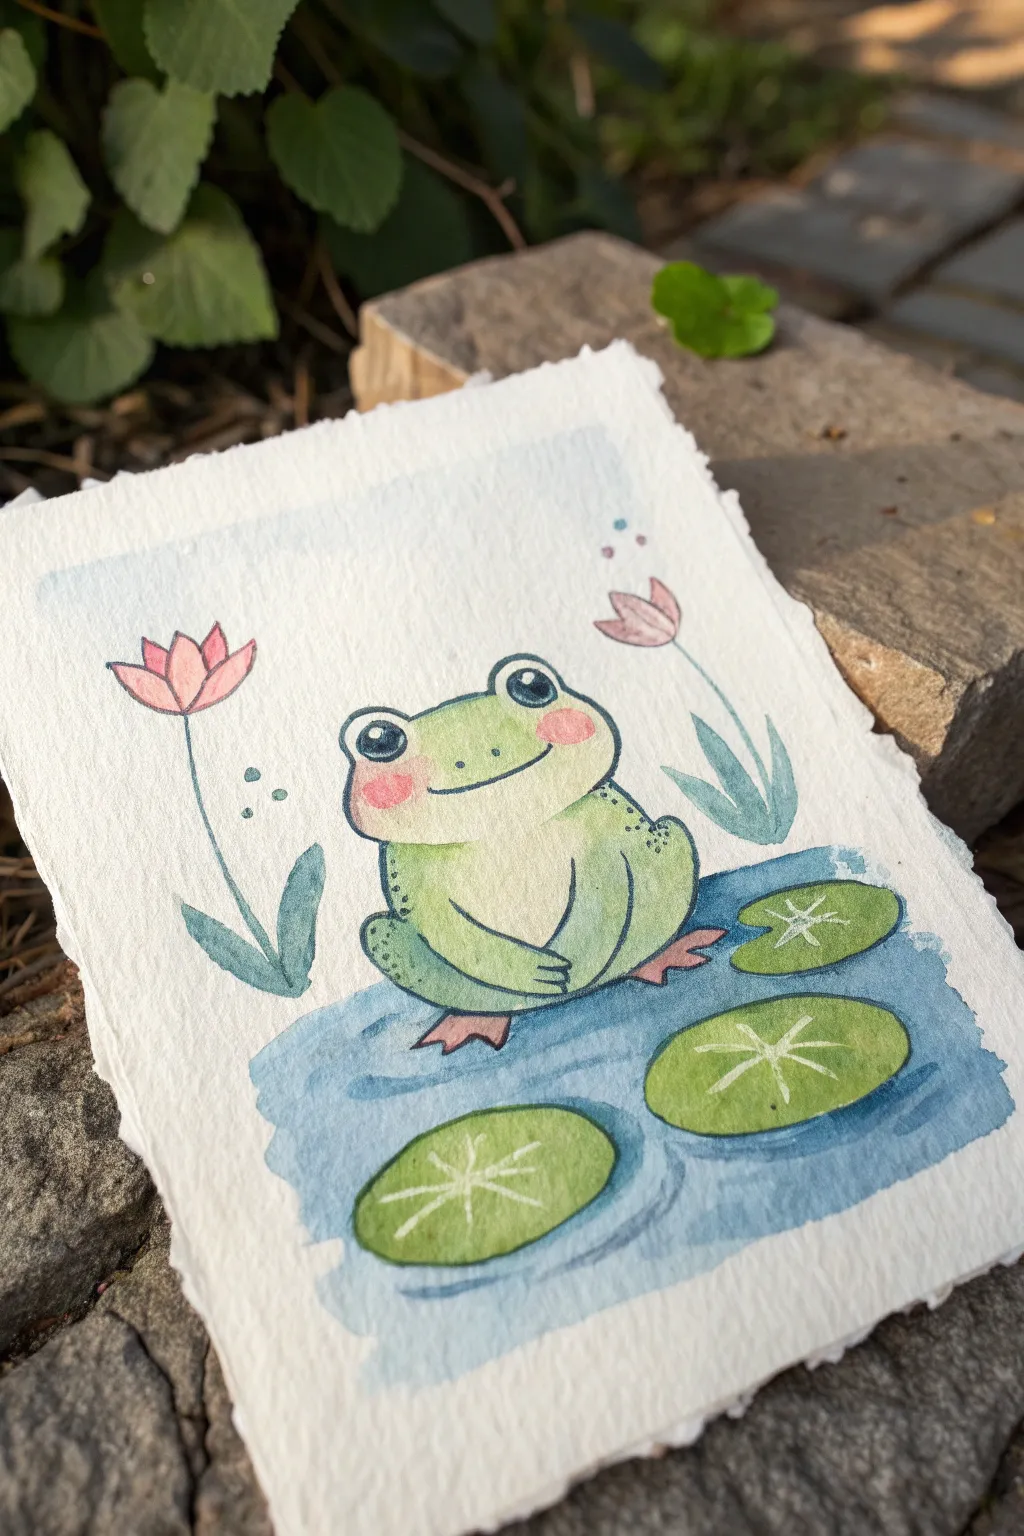
This adorable watercolor project captures a sweet little frog enjoying a peaceful moment on a lily pad. With its soft deckled edges and gentle pastel tones, it makes for a heartwarming addition to any sketchbook or a perfect handmade card.
Step-by-Step Guide
Materials
- Cold press watercolor paper (deckle edge preferred)
- Watercolor paints (Light Green, Dark Green, Pink, Blue, Indigo)
- Fine liner pen (black, waterproof, 01 or 03 size)
- Round watercolor brush (size 4 or 6)
- Detail brush (size 0 or 1)
- Pencil (HB) and eraser
- Cup of water and paper towels
- White gel pen (optional for highlights)
Step 1: Sketching the Outline
-
Paper shape:
If you don’t have pre-torn paper, you can create a faux deckled edge by creasing your watercolor paper and carefully tearing it along a ruler’s edge for that rustic look. -
Frog body:
Start by drawing a soft, rounded mound shape in the center of the paper for the frog’s body. -
Adding eyes:
Sketch two smaller semi-circles on top of the head for the eyes. Keep them relatively far apart for extra cuteness. -
Limbs:
Draw the front legs tucked narrowly in front of the belly, pointing inward. Add the hind legs as curved shapes hugging the sides of the body. -
The scene:
Sketch a large, uneven oval shape underneath the frog to form the water patch. Add three smaller ovals floating around the frog for the lily pads. -
Floral details:
Draw two simple flower stalks rising on either side—one slightly taller on the left with a tulip-like bloom, and a smaller bud on the right.
Wet-on-Wet Magic
Work quickly when adding the pink blush to the damp green face. If the paper dries too much, you’ll get hard edges instead of a soft glow.
Step 2: Inking the Drawing
-
Line art:
Using your waterproof fine liner, carefully trace over your pencil lines. Don’t worry about perfect smoothness; a slightly jittery line adds organic charm. -
Facial features:
Ink two large circles within the eye bumps, leaving white highlights if you aren’t using a white pen later. Draw a simple curved smile right between the eyes. -
Clean up:
Once the ink is completely dry—I usually give it a full minute just to be safe—gently erase all the pencil marks.
Step 3: Painting the Frog
-
Base green:
Mix a watery light green. Paint the entire frog’s body, keeping the wash fairly wet and even. -
Radiant cheeks:
While the green is still damp, drop a tiny amount of diluted pink onto the cheeks for a soft, fuzzy blush effect. -
Shadows:
Once the base layer is dry, use a slightly darker green to add shading under the chin, beneath the arms, and along the bottom of the legs. -
Retouching:
Add tiny speckles of dark green on the back and shoulders for texture.
Make It Sparkle
Add tiny dots of metallic gold or silver paint to the water ripples or the center of the flowers for a magical, shimmering finish.
Step 4: Painting the Scenery
-
Lily pads:
Paint the three floating lily pads with a medium olive green. Let them dry completely. -
Pad details:
Using a thin brush or white gel pen, draw a starburst pattern in the center of each lily pad to represent veins. -
Water wash:
Load your brush with diluted blue paint. Create a loose, irregular puddle shape around the frog’s feet and the lily pads. -
Wet-on-dry layering:
Once the first blue layer dries, add horizontal strokes of slightly darker blue to suggest ripples in the water. -
Flowers:
Paint the flower petals with a soft pink and the leaves and stems with a muted blue-green. -
Decoration:
Add tiny floating dots or ‘bubbles’ in the air using the tip of your brush with blue or pink paint.
Now your little green friend is ready to brighten up your desk or be gifted to someone special
BRUSH GUIDE
The Right Brush for Every Stroke
From clean lines to bold texture — master brush choice, stroke control, and essential techniques.
Explore the Full Guide
Happy Toast and Breakfast Friends
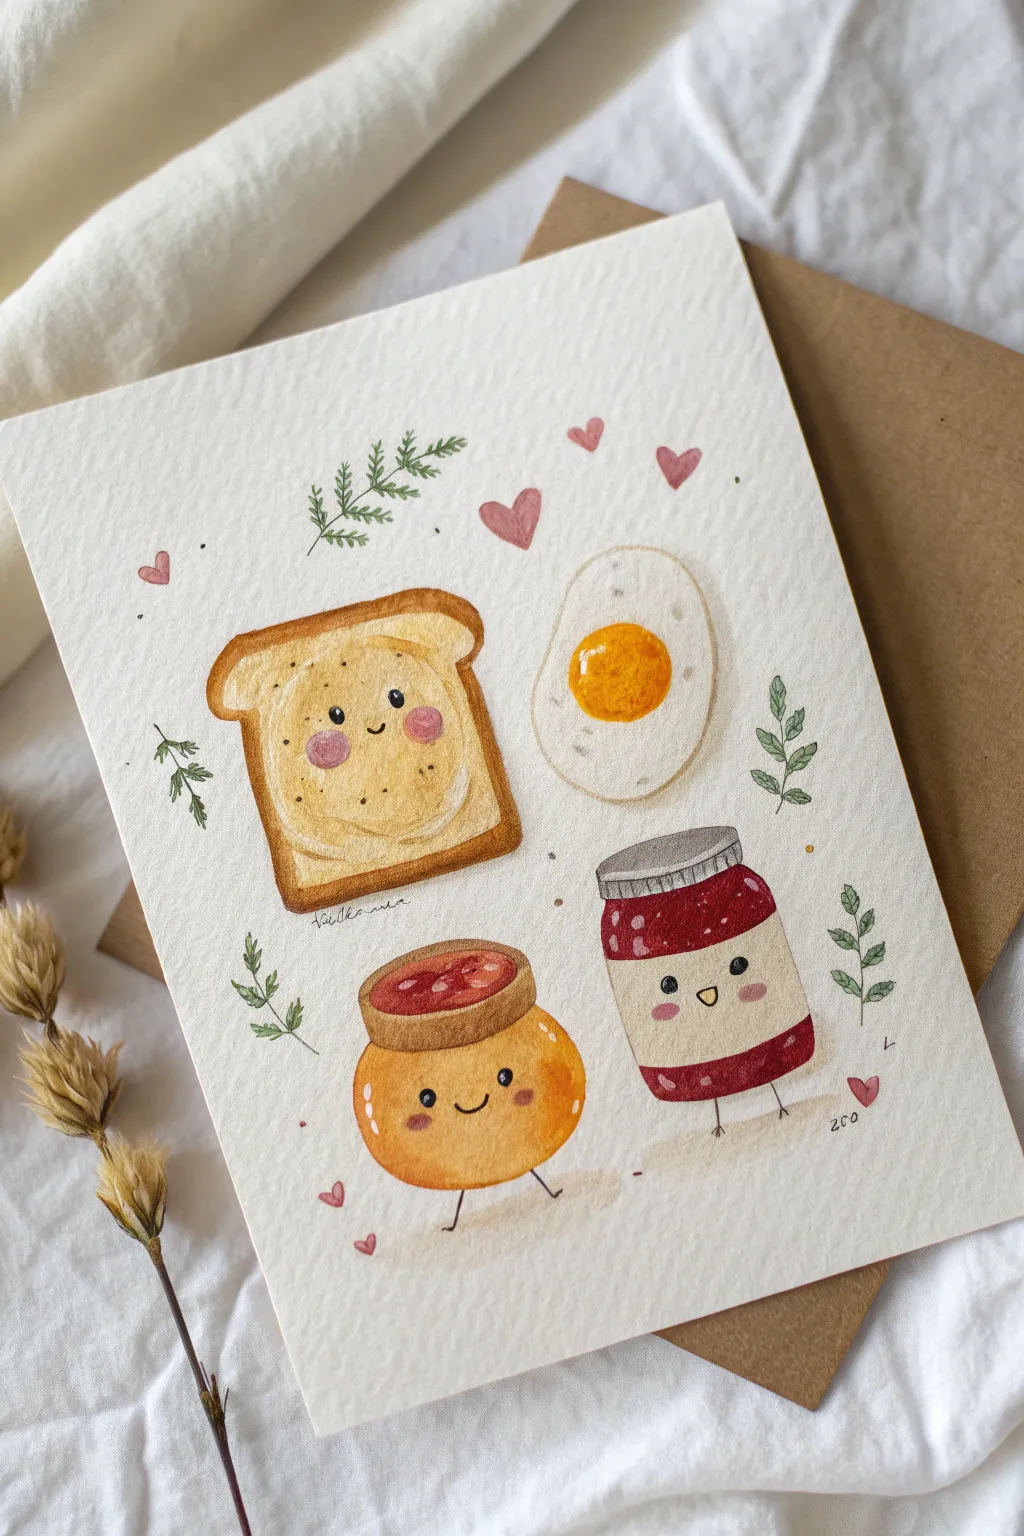
Start your day with a smile by painting this adorable set of breakfast friends. Using warm tones and simple shapes, this watercolor project captures the cozy, kawaii aesthetic of happy toast, jam, and eggs.
Step-by-Step Tutorial
Materials
- Cold press watercolor paper (300 gsm)
- Watercolor paints (Yellow Ochre, Burnt Sienna, Alizarin Crimson, Cadmium Yellow, Sap Green)
- Small round brushes (size 2 and 4)
- Fine liner brush (size 00 or 000)
- Micron pen or fine black waterproof marker (01 size)
- White gouache or white gel pen
- Pencil (HB) and kneaded eraser
- Paper towels and water cup
Step 1: Sketching and Base Layers
-
Outline the shapes:
Begin by lightly sketching the four main characters with your pencil: a square piece of toast, an oval fried egg, a short round jar (honey/orange marmalade), and a taller cylindrical jar (berry jam). Keep lines faint so they don’t show through the paint. -
Sketch the faces:
Add the kawaii faces. Place wide-set eyes and tiny smiles low on the toast and jars. The egg doesn’t need a face, just a bright yolk. -
Paint the toast base:
Mix a very dilute wash of Yellow Ochre. Fill in the center of the toast shape, leaving the crust area unpainted for now. While still wet, dab a slightly darker mix into the center to suggest texture. -
Paint the egg white:
Using clean water, wet the shape of the egg white. Drop in a tiny amount of very pale grey or diluted brown along the bottom edge to create a subtle shadow, leaving the rest white. -
Color the yolk:
Load your brush with Cadmium Yellow and paint the round yolk. While wet, touch a bit of orange to the bottom curve of the circle to make it look spherical. -
Base coat the jars:
Paint the honey jar body with a mix of Yellow Ochre and orange. For the berry jam jar, paint the label area beige and the bottom section a deep red using Alizarin Crimson.
Muddy Colors?
If your yellow toast center turns green near the brown crust, let the center dry completely before painting the crust. Wet paint bleeds; dry paint stays put.
Step 2: Adding Details and Crusts
-
Paint the toast crust:
Mix Burnt Sienna with a touch of brown. carefully paint the thick crust outline around your toast base. Let the inner edge blend slightly if the center is still damp, or keep it crisp if dry. -
Detail the berry jar:
Paint the lid of the berry jar grey. Add the scalloped ‘fabric’ cover over the lid using the same deep red as the base, adding small white polka dots later with gouache if you can’t paint around them. -
Detail the honey jar:
Paint the ‘fabric’ cap on the round jar with a darker reddish-brown. Add a small oval on top for the dimension of the lid. -
Add rosy cheeks:
Dilute some pink or red paint significantly. Gently dab two small circles on the toast, the honey jar, and the berry jar to create blushing cheeks. I find it safest to do this on dry paper to prevent spreading.
Step 3: Final Touches and Greenery
-
Inking the features:
Once the paint is completely bone-dry, use your fine black pen or liner brush to draw the small black eyes and smiling mouths. Add little stick legs to the jar characters. -
Adding texture to the toast:
Using a very fine brush and light brown paint, add tiny stippling dots to the center of the toast to mimic bread texture. -
Painting the sprigs:
Mix a soft Sap Green. Paint varying types of leafy sprigs around the characters—some with fern-like fronds and others with simple oval leaves. -
Scattered hearts:
Using a diluted red or pink, paint small floating hearts in the empty spaces to tie the composition together. -
Highlights:
Use white gouache or a white gel pen to add a tiny catchlight to the eyes, a shine on the egg yolk, and highlights on the glass jars. -
Grounding shadows:
Mix a very watery grey-brown. Paint a quick, transparent horizontal stroke under the feet of the jars so they don’t look like they are floating in mid-air.
Polka Dot Perfection
For the berry jar lid, don’t try to paint red around tiny white spots. Paint the whole thing red, let it dry, then use a white gel pen or thick white gouache for the dots.
Now you have a charming breakfast scene ready to be turned into a greeting card or framed for your kitchen wall
Cupcakes With Sprinkles and Faces
This adorable mini painting features a smiling cupcake with perfectly swirled frosting and a scattering of floating hearts. It’s a sweet, beginner-friendly project that looks charming displayed on its own tiny easel.
How-To Guide
Materials
- Small square canvas (e.g., 4×4 or 5×5 inch)
- Mini wooden easel
- Acrylic paints: Light pink, magenta, white, warm ochre/brown, chocolate brown, black, grey, mint green
- Detailed paintbrushes (flat shader and fine liner)
- Pencil and eraser
- Palette for mixing
- Water cup and paper towels
Step 1: Sketching Boundaries
-
Prepare the background:
Start by painting the entire canvas surface with a coat of light pink paint. If your paint is thin, let the first coat dry and apply a second one for an opaque, smooth finish. -
Outline the wrapper:
Once the background is completely dry, lightly sketch the cupcake wrapper shape near the bottom center. Draw a slightly tapered rectangle with a curved bottom edge. -
Add the frosting swirl:
Sketch the frosting cloud on top of the wrapper. Draw three distinct tiers, getting smaller as you go up, finishing with a pointed peak. -
Sketch the face:
Lightly mark the placement for the eyes and mouth right in the middle of the frosting swirl area.
Clean Lines Hack
For ultra-crisp lines on the face or wrapper stripes, you can use a fine-tip Posca paint pen or a permanent marker instead of a brush after the base paint is dry.
Step 2: Blocking in Colors
-
Paint the wrapper base:
Fill in the wrapper shape with a medium pink or magenta shade. Keep your edges crisp. -
Paint the cake layer:
Paint a thin strip of chocolate brown directly above the wrapper to represent the actual cake peeking through. -
Fill the frosting:
Use white paint to fill in the swirled frosting shape. You may need two coats here to cover the pink background fully. -
Add wrapper details:
Once the wrapper paint is dry, use a fine liner brush and darker magenta (or mix a little black into your pink) to paint vertical lines across the wrapper to create the folded paper texture. -
Outline the wrapper:
Using a dark brown or black mixed with brown, outline the entire wrapper and the vertical fold lines to make them pop.
Make it Sparkle
Add real texture by mixing actual glitter into the white paint for the frosting or gluing tiny crafting gems onto the background as floating sprinkles.
Step 3: Adding Details and Shadows
-
Define the swirl:
Mix a very pale grey-beige color. Use a fine brush to paint thin, curved lines separating the tiers of your white frosting to give it dimension. -
Add golden highlights:
Paint thin, curved strokes of warm ochre or gold along the defined swirl lines. This gives the frosting a baked, toasted marshmallow look. -
Create the face:
Using your smallest detail brush and black paint, add two small dots for eyes and a tiny U-shape for the smile. Add pink circles for blushing cheeks. -
Ground the subject:
Mix a diluted grey-brown color and paint a soft, oval-shaped shadow under the cupcake wrapper to ground it. -
Draw the horizon line:
Draw a thin, dark horizontal line passing behind the cupcake to suggest a table surface.
Step 4: Final Flourishes
-
Paint floating hearts:
Scatter small pink and red hearts around the background. Vary their sizes slightly for visual interest. -
Add colorful dots:
Using the handle end of a paintbrush dipped in mint green and coral paint, stamp small dots randomly between the hearts. -
Add tiny grass tufts:
Paint two or three tiny mint green ‘tufts’ of grass along the horizon line for an extra decorative touch. -
Highlight the eyes:
Once the black eye paint is fully dry, add a microscopic dot of white to each eye for a reflective sparkle. -
Varnish (optional):
If desired, seal your mini masterpiece with a satin or matte varnish spray once fully cured.
Set your tiny canvas on its easel and enjoy your sweet creation

PENCIL GUIDE
Understanding Pencil Grades from H to B
From first sketch to finished drawing — learn pencil grades, line control, and shading techniques.
Explore the Full Guide
Mushrooms With Tiny Boots
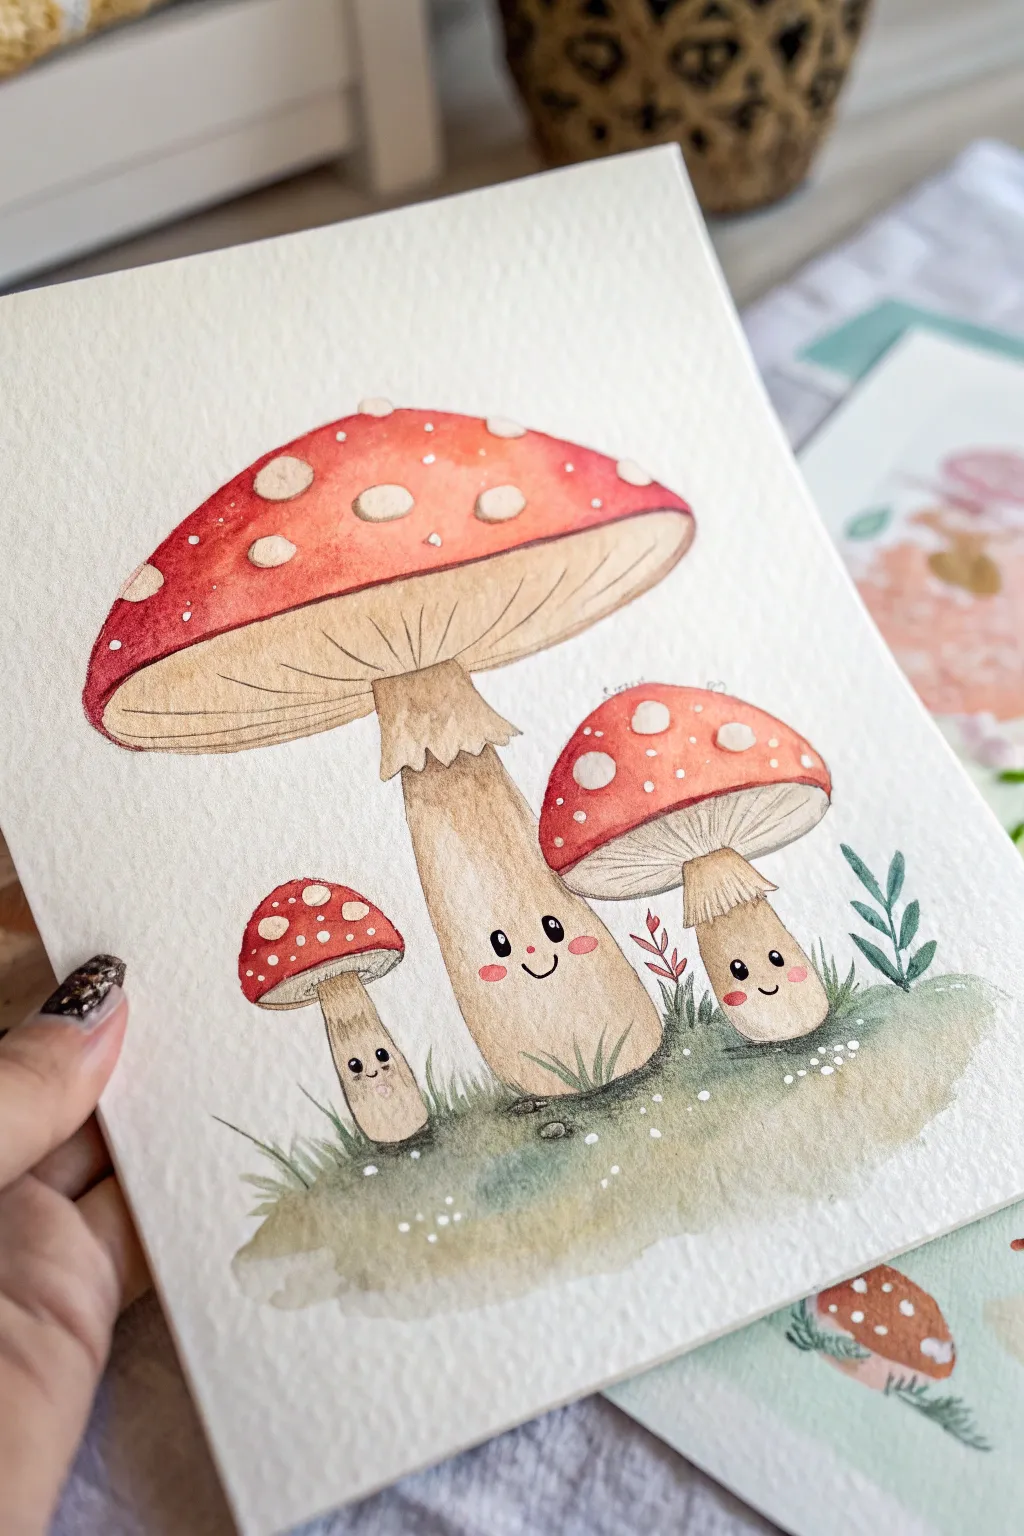
Capture the charm of the forest floor with this adorable watercolor illustration featuring a trio of smiling Fly Agaric mushrooms. This project focuses on building layers of transparent color and adding sweet, kawaii expressions to bring your fungal friends to life.
Step-by-Step Guide
Materials
- Cold press watercolor paper (300 gsm recommended)
- Watercolor paints (Red, Beige/Ochre, Brown, Green)
- Pencils (HB for sketching)
- Waterproof fine liner pen (black)
- White gel pen or gouache
- Round brushes (sizes 2, 4, and 6)
- Water container and paper towels
Step 1: Sketching the Composition
-
Map out the shapes:
Begin by lightly sketching three mushroom shapes on your paper. Place the largest one in the center, a medium one to the right, and the smallest one to the left. Draw large, rounded triangular caps for the tops. -
Add the stems:
Draw thick, sturdy stems for each mushroom. The center stem should be the thickest, widening slightly at the base. Add a jagged ‘skirt’ (annulus) around the upper part of the stems on the two larger mushrooms. -
Refine the details:
Sketch the gills underneath the caps by drawing curved lines radiating from the stem to the cap’s edge. At the base of the stems, draw soft, rounded distinct facial features: two small oval eyes and a tiny U-shaped smile for each.
Step 2: Painting the Caps
-
Base wash:
Mix a vibrant red watercolor. Carefully paint the caps of all three mushrooms, but here’s the trick: leave small circular or oval shapes unpainted. These white spaces will be the iconic spots of the Fly Agaric. -
Add dimension:
While the red paint is still damp, drop a slightly darker, more concentrated red along the bottom edge of the caps to create a rounded shadow effect. -
Soften the spots:
If the white spots look too stark, wash your brush and lightly glaze them with a very watered-down beige or cream color to make them look more natural.
Bleeding Colors?
If your red cap bleeds into the stem, ensure adjacent sections are 100% dry before painting next to them. Use a hairdryer on low heat to speed this up.
Step 3: Stems and Gills
-
Painting the gills:
Mix a very pale beige or diluted ochre. Paint the underside of the caps (the gill area). Let this dry completely before adding thin, darker brown lines to define the individual gills. -
Coloring the stems:
Use a warm beige or light brown for the stems. Paint the entire stem area, avoiding the eyes if you plan to keep the paper white for highlights later. I like to keep the wash uneven to mimic organic texture. -
Shading the stems:
Once the base layer is dry, mix a darker brown. Apply this shadow just under the ‘skirt’ and along the sides of the stems to give them a cylindrical volume.
Level Up: Texture
Sprinkle a tiny pinch of table salt onto the wet red paint of the mushroom caps. Once dry, brush it off to create a unique, mottled fungal texture.
Step 4: Ground and Details
-
Create the grassy base:
Wet the area around the base of the mushrooms with clean water. Drop in various shades of green, letting them bleed softly to create a mossy ground. -
Add grass blades:
Once the ground wash is dry, use a small brush (size 2) and a darker green to flick upward strokes, creating individual blades of grass and small leafy plants around the mushrooms’ feet. -
Inking the faces:
Using a waterproof fine liner or very dark paint, carefully fill in the eyes and draw the smiles. Add small oval cheek blushes with watered-down red paint. -
Final highlights:
Use a white gel pen or opaque white gouache to add tiny catchlights in the eyes and extra bright speckles on the mushroom caps or the ground/grass for a sparkling finish.
Your happy little forest family is now ready to frame or give as a delightful card
Clouds, Raindrops, and Mini Rainbows
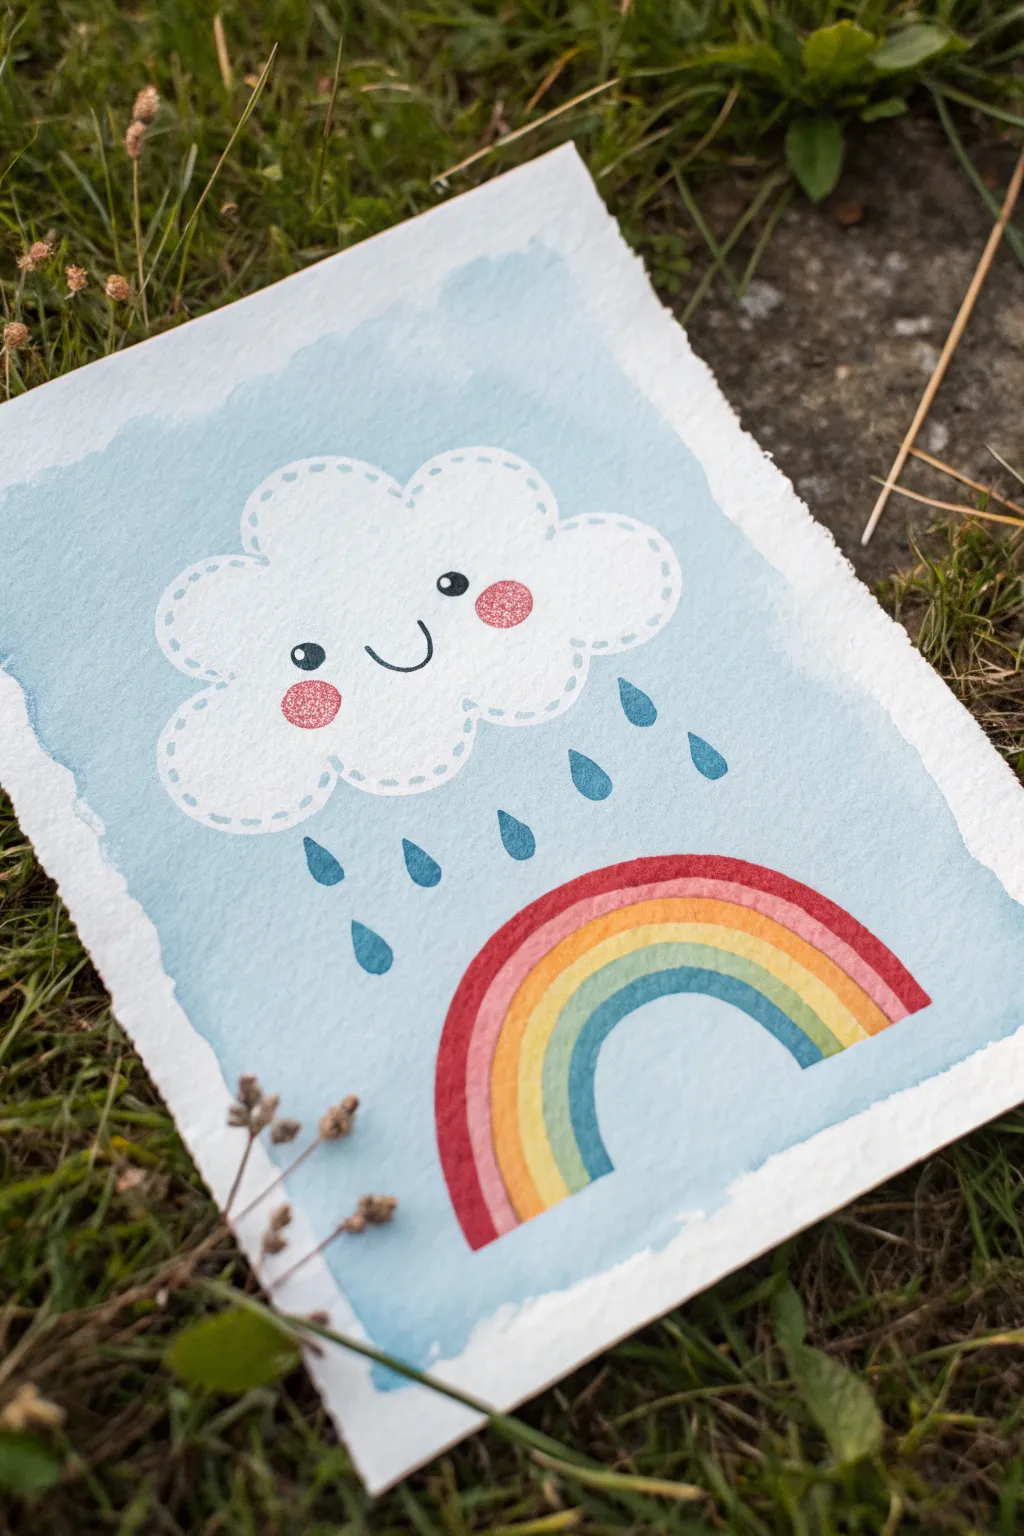
Capture the sweetness of a rainy day with this adorable kawaii painting featuring a smiling cloud and a vibrant rainbow. The soft, textured edges of the paper give it a lovely rustic feel, perfect for gifting or framing.
Detailed Instructions
Materials
- Cold press watercolor paper (approx. 300gsm)
- Watercolor paints (Light blue, darker blue, red, orange, yellow, green)
- Masking fluid (drawing gum) and old brush
- Soft round watercolor brushes (sizes 4 and 8)
- Black fine liner pen or black acrylic ink
- White gel pen
- Pencil and eraser
- Painter’s tape or washi tape
- Ruler (optional)
- Jar of water and paper towels
Step 1: Preparation & Sketching
-
Deckle the edges:
To achieve that rustic, torn-edge look seen in the photo, place a ruler against the edge of your paper. Firmly tear the paper upward against the ruler’s edge on all four sides. This creates a charming ‘deckle’ effect. -
Sketch the cloud:
Lightly draw a fluffy cloud shape in the upper center of your paper using a pencil. Keep the curves nice and round to enhance the cute factor. -
Add the rainbow:
Below the cloud, sketch a simple arch for your rainbow, dividing it into four bands. Leave a little space between the cloud and the rainbow for the rain. -
Mark the raindrops:
Draw small teardrop shapes falling from the cloud. Vary their height slightly to make them look like they are in motion.
Stubborn Masking Fluid?
If the fluid rips the paper when you remove it, the paper was too soft or the fluid stayed on too long. Remove it slowly at a 45-degree angle.
Step 2: Masking & Background
-
Protect the white areas:
Using an old brush (one you don’t mind ruining), apply masking fluid over the entire cloud shape. This is crucial for keeping it bright white while we paint the blue sky background. -
Let it dry:
Allow the masking fluid to dry completely. It should feel rubbery and not tacky to the touch before you proceed. -
Paint the background wash:
Load a larger round brush with diluted light blue watercolor. Paint a rectangular wash over almost the entire paper, leaving a rough, uneven border near the deckled edges. -
Go over the mask:
Don’t be afraid to paint right over the masked cloud area. The fluid will protect the paper underneath, creating a crisp white shape later. -
Dry completley:
Wait for the blue background paint to be bone dry. If the paper feels cool to the touch, it’s still damp.
Step 3: Adding the Details
-
Remove the mask:
Once dry, gently rub the masking fluid off with your finger or a rubber cement pickup tool. You should now have a pristine white cloud shape. -
Paint the raindrops:
Using a smaller brush and a slightly darker, more saturated blue, fill in the teardrop shapes you sketched earlier. -
Start the rainbow:
Paint the rainbow arches one by one. Use red for the outer band, followed by orange/yellow, then green, and blue for the innermost arch. -
Wait between bands:
I like to work carefully here—let one color strip dry for a moment before painting the neighboring one so the colors don’t bleed into each other too much. -
Paint the cheeks:
Mix a watery pink or coral red. Paint two small circles on the cloud for the rosy cheeks. To get that textured look, blot them gently with a tissue immediately after painting.
Textured Cheeks
To get that speckled texture on the pink cheeks, dab the wet paint with a dry, crumpled paper towel immediately to lift specific spots of pigment.
Step 4: Kawaii Finishing Touches
-
Draw the face:
Using a fine black liner or a very thin brush with black ink, draw two solid small circles for the eyes and a simple ‘U’ shape for the smile centered between the cheeks. -
Add highlights:
Take a white gel pen and add a tiny dot inside each eye to make them sparkle. You can also add tiny white dots to the pink cheeks for extra cuteness. -
Stitch detail:
With the white gel pen, draw small dashed lines all around the inside edge of the cloud. This ‘stitch’ effect gives it a cozy, handcrafted look. -
Outline the rain:
OPTIONAL: If you want the rain to pop more, you can outline the blue drops very faintly with your white pen or a slightly darker blue pencil.
Now you have a sweet little piece of art that brings a smile even on rainy days


Stars With Sleepy Faces
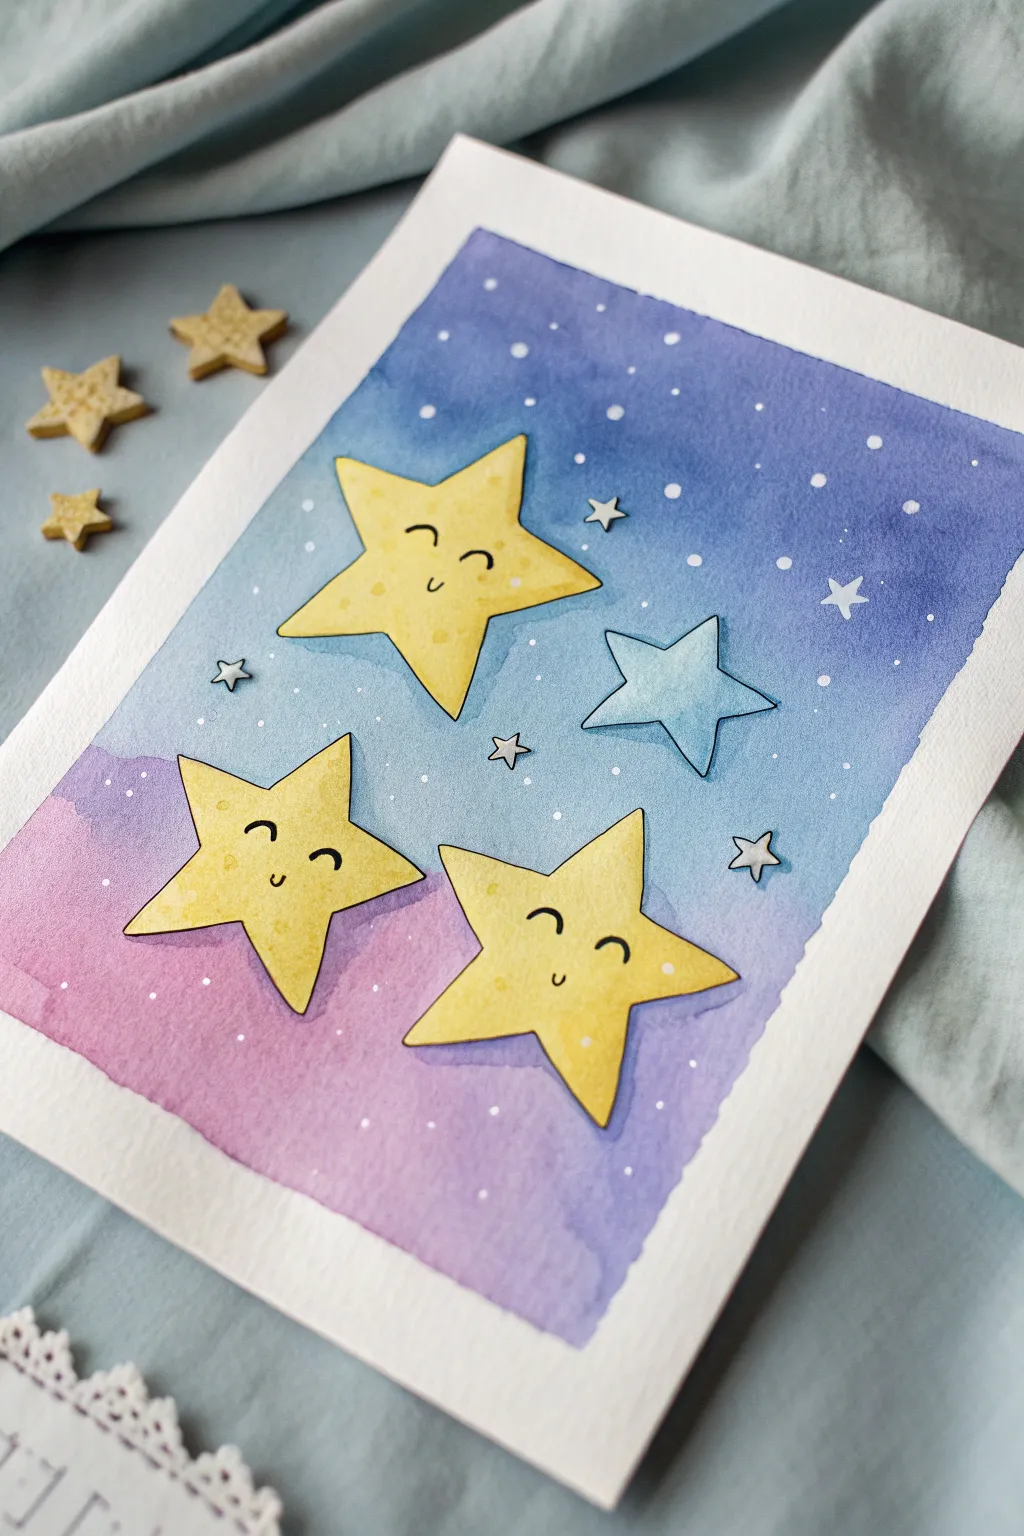
Bring the magic of a starry night indoors with this charming watercolor project featuring adorable, sleepy-faced stars floating in a dreamy gradient sky. The soft blends of purple and blue create a soothing backdrop that makes the cheerful yellow stars pop right off the page.
Step-by-Step
Materials
- Cold press watercolor paper (A5 or 5×7 inches)
- Watercolor paints (Indigo, Purple, Pink, Yellow, Light Blue)
- Masking tape
- Pencil and eraser
- Fine liner pen (Black, waterproof)
- White gel pen or white gouache
- Round watercolor brushes (Size 4 and 8)
- Clean water and paper towels
- Scissors (optional for cut-out effect)
Step 1: Preparing the Canvas
-
Tape it down:
Secure your watercolor paper to a hard board or table using masking tape along all four edges. This creates a clean white border and prevents the paper from buckling when wet. -
Plan the composition:
Lightly sketch the outlines of four stars directly onto the paper. Draw three larger five-pointed stars for the main characters and one slightly smaller star that will be blue. Keep the pencil pressure very light so lines don’t show through later. -
Add the faces:
On the three larger stars, sketch simple, kawaii-style faces. Two curved lines for happy, closed eyes and a small ‘u’ shape for a smiling mouth usually works best.
Clean Edges Pro-Tip
To prevent paint bleeding under the tape, run a bone folder or the back of a spoon firmly over the tape edges before you start painting.
Step 2: Painting the Gradient Sky
-
Wet the background:
Carefully paint clear water around the star shapes, filling the entire background area. Avoid getting water inside the star outlines so they stay white for now. -
Start with purple:
While the paper is still wet, load your larger brush with a watery mix of purple and pink. Dab this color along the bottom third of the background, letting it flow naturally. -
Transition to blue:
Rinse your brush slightly and pick up a medium blue tone. Paint the middle section of the sky, slightly overlapping the purple edge so the colors bleed and blend together softly. -
Deepen the top:
For the top third, use your darkest indigo or deep violet paint. Apply it boldly at the very top edge, blending it downwards into the lighter blue. I like to tilt the board slightly to help gravity blend the gradient. -
Let it dry completely:
Allow the background layer to dry entirely. If the paper feels cool to the touch, it’s still damp. Be patient to avoid colors running into your stars.
Fixing Blooms
If ‘cauliflower’ blooms appear in your sky, it means you added water to semi-dry paint. Embrace the texture—it often looks like galactic clouds!
Step 3: Painting the Stars
-
Yellow wash:
Mix a bright, sunny yellow. Paint the three main stars with an even wash of color. You can drop a tiny bit of darker yellow or orange at the tips of the points for subtle shading. -
The blue star:
Paint the fourth, smaller star with a very pale, watered-down blue. This makes it look like it’s further away or glowing softly. -
Add gentle shadows:
Once the base yellow is dry, mix a slightly darker, brownish-yellow tone. Paint a thin shadow line along the bottom edge of the stars to give them a 3D sticker-like effect. -
Outline the shapes:
Using your waterproof fine liner pen, carefully trace the outline of each star. Keep your hand steady for a crisp, cartoon-style look. -
Draw the expressions:
Ink over your pencil sketches for the eyes and mouths on the yellow stars. Make the lines slightly thicker in the middle of the curves for extra cuteness.
Step 4: Finishing Details
-
Create background stars:
Load a small brush or toothbrush with white gouache or opaque white watercolor. Gently tap or flick it over the dried background to create a splatter of tiny stars. -
Detail with gel pen:
Use a white gel pen to draw specific larger dots and a few tiny star shapes (little crosses or diamonds) in the dark blue areas of the sky. -
Add cutout stars:
Draw and cut out a few tiny star shapes from scrap paper painted white or silver. Glue two or three of these onto the background for added texture and dimension. -
Remove the tape:
Peel the masking tape away slowly at a 45-degree angle to reveal your crisp white border.
Hang your starry creation near a window to catch the light and enjoy the peaceful vibe it brings to the room
Cute Planets With Rings and Blush
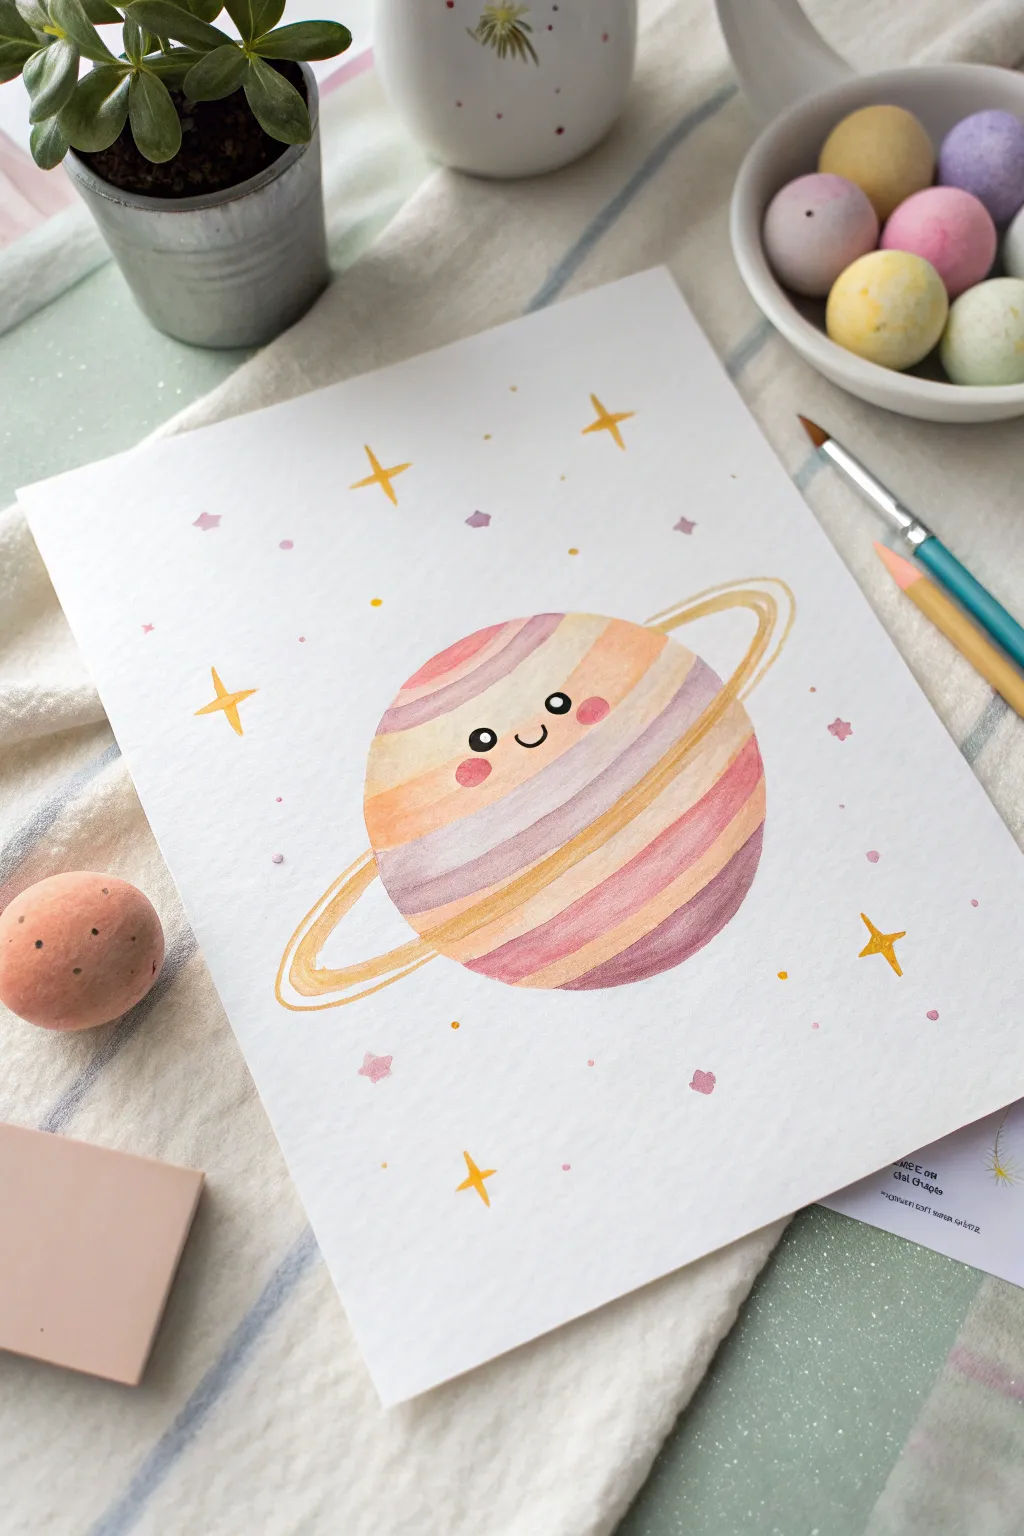
This cheerful watercolor project features a smiling planet Saturn adorned with soft, pastel stripes and rosy cheeks. It’s a perfect introduction to layering watercolors while keeping things simple and undeniably cute.
Detailed Instructions
Materials
- Cold press watercolor paper (A4 or 8×10)
- Watercolor paints (pastel palette: pink, peach, lilac, yellow)
- Round watercolor brush (size 6 or 8)
- Fine liner or detail brush (size 0 or 00) for the face
- Pencil and eraser
- Compass or a round object to trace
- Black ink or gouache for the eyes
- Clean water and paper towels
Step 1: Sketching the Shape
-
Draw the main circle:
Start by lightly tracing a perfect circle in the center of your paper using a compass or a round object like a jar lid. This will be the body of your planet. -
Add the rings:
Sketch a long, thin oval that cuts across the middle of the planet to form the rings. The oval should tilt slightly, extending well past the sides of the circle. -
Define the stripes:
Inside the main circle, draw gentle, curvy lines horizontally across the planet’s body. These will separate your different color stripes later. -
Plot the face:
Lightly mark two spots for the eyes and a small curve for the smile just above the rings in the center. Erase lines that will be hidden by the rings to keep your sketch clean.
Bleeding Stripes?
If colors bleed into each other too much, paint non-adjacent stripes first (e.g., stripe 1 and 3). Let them dry, then go back and paint stripe 2 in between.
Step 2: Painting the Planet Base
-
First stripe layer:
Mix a watery, pale peach color. Paint the top-most stripe and a lower stripe, leaving gaps between them for other colors. -
Adding pink tones:
While the first stripes dry slightly, mix a soft dusty pink. Fill in a few more stripes, being careful not to let the wet paint touch the peach stripes if they are still soaking wet, unless you want them to bleed together. -
Adding lilac tones:
Use a diluted lilac or light purple for the alternating stripes. This cool tone balances the warm pinks and peaches perfectly. -
Yellow accents:
Fill the remaining white stripes with a pale buttery yellow. I find that keeping the yellow very transparent helps it glow without looking too heavy. -
Let it dry completely:
Allow the entire planet body to dry. If the paper is cool to the touch, it’s still wet. Waiting prevents the rings from smudging into the body.
Step 3: Rings and Decorative Elements
-
Paint the rings:
Using a mix of yellow and light orange, carefully paint the ring shape. You can leave a tiny sliver of white space between the ring lines to make them look distinct and dimensional. -
Add floating stars:
Using your yellow paint, add several four-point stars (diamond shapes) scattered around the background. -
Create confetti dots:
Dip your brush into pink and purple paints to dab small dots and tiny diamonds around the white space, creating a magical galaxy effect. -
Paint the cheeks:
Once the face area is dry, dab two small ovals of bright strawberry pink just below where the eyes will go. Soften the edges with a clean, damp brush if they look too harsh.
Make it Sparkle
Once the painting is totally dry, use a metallic gold watercolor or a gold gel pen to outline the stars and add a thin rim to the planet’s rings for extra magic.
Step 4: Bringing the Face to Life
-
Outline the eyes:
Switch to your smallest detail brush or a fine liner with black ink/guache. Paint two solid black circles for the eyes. -
Add eye sparkles:
Leave a tiny speck of white paper showing in the eyes, or use a dot of white opaque gouache or gel pen after the black ink dries completely to add that ‘kawaii’ sparkle. -
Draw the smile:
Connect the space between the cheeks with a small, U-shaped stroke in black ink for the smiling mouth.
Now you have a charming little planet character ready to brighten up your sketchbook or wall
Boba-Style Drink Cup Character
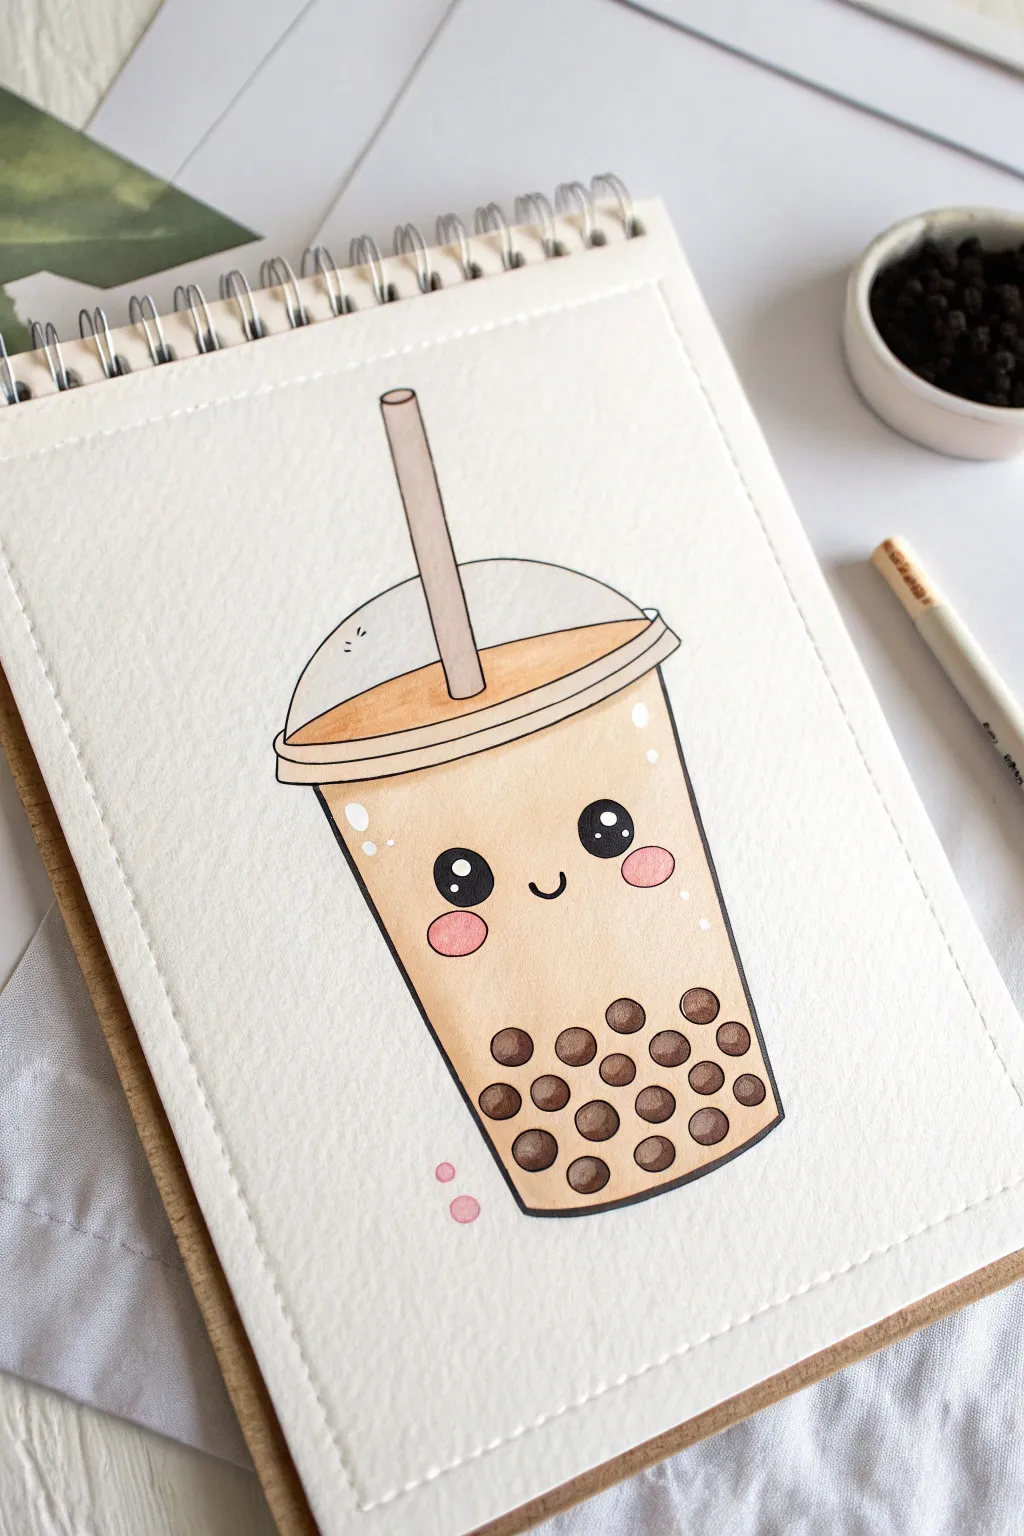
This adorable bubble tea illustration captures the essence of kawaii culture with its sweet smile and rosy cheeks. Using simple linework and soft marker shading, you’ll create a charming character that pops right off the sketchbook page.
Step-by-Step Tutorial
Materials
- Heavyweight mixed media paper or sketchbook
- Pencil (HB or H)
- Eraser
- Waterproof fine liner pen (black, 0.3mm or 0.5mm)
- Alcohol-based markers (light creamy beige, darker caramel brown, dark brown, grey)
- White gel pen
Step 1: Sketching the Outline
-
Draw the basic cup shape:
Start by lightly sketching a wide inverted trapezoid for the cup body. The top should be wider than the bottom, and the sides should be straight. Curve the bottom edge slightly to give it dimension. -
Add the rim and lid:
Draw a thin, horizontal rectangle right on top of the cup for the rim. Above that, sketch a semi-circle or dome shape for the plastic lid. -
Insert the straw:
Sketch a long, thin cylinder poking out from the center of the lid. Draw a small oval at the top to show the straw’s opening, and erase the line of the lid where the straw passes through. -
Draft the face and pearls:
Lightly mark where the eyes and mouth will go—aim for the middle or slightly lower on the cup. Then, sketch circles clustered at the bottom for the tapioca pearls. Don’t worry about perfect circles; slight irregularities look natural.
Uneven marker coverage?
If your marker looks streaky, work faster while the ink is still wet. Using small circular motions rather than long lines helps blend the pigment smoothly.
Step 2: Inking the Lines
-
Trace outer contours:
Go over your pencil lines with a waterproof fine liner. Use confident, steady strokes for the straight sides of the cup and the straw. -
Define the details:
Ink the dome lid, the rim, and individual pearls. Add two small circles for the eyes and a tiny ‘u’ shape for the mouth. -
Erase pencil marks:
Wait a moment for the ink to dry completely, then gently erase all visible pencil lines to leave a clean black-and-white drawing.
Step 3: Coloring the Drink
-
Base coat for the tea:
Using a light creamy beige marker, fill in the entire body of the cup. Work quickly to avoid streaks, coloring around the eyes and cheeks if possible, though markers can often layer over later. -
Color the liquid level:
Switch to a slightly darker caramel brown marker. Color an oval shape inside the dome lid to represent the top of the liquid. I also use this color for a thin shadow right under the cup’s rim. -
Shadow the sides:
Take that same caramel tone or a slightly darker beige and add shading along the left and right edges of the cup to make it look cylindrical. -
Color the straw:
Fill the straw with a light grey or a very pale brown. Add a tiny shadow on one side to give it roundness.
Flavor Variations
Change the liquid color to pink for strawberry milk, green for matcha, or purple for taro. You can also turn the pearls into fruit cubes by drawing squares.
Step 4: Adding Personality & Details
-
Fill in the face:
Use a black marker or your thickest liner to fill in the large pupil circles, leaving small white spots for highlights. Use a soft pink marker for oval cheeks below the eyes. -
Color the pearls:
Color each tapioca pearl with a medium-dark brown. Leave a tiny sliver of white or lighter color on the top left of each pearl to suggest a highlight, or just fill them solid for now. -
Deepen the pearl shadows:
Use your darkest brown marker to trace the bottom edge of each pearl, creating a shadow that gives them volume. -
Adding highlights:
Take a white gel pen and add a crisp white line along the side of the cup and on the dome lid to suggest shiny plastic. Add tiny dots to the cheeks and pearls for extra sparkle. -
Final decorative touches:
Draw three small pink dots floating near the bottom left of the cup for a whimsical effect, and add a few small motion lines near the lid.
Now you have a sweet little boba character ready to brighten up your day
Succulent Pots With Little Expressions
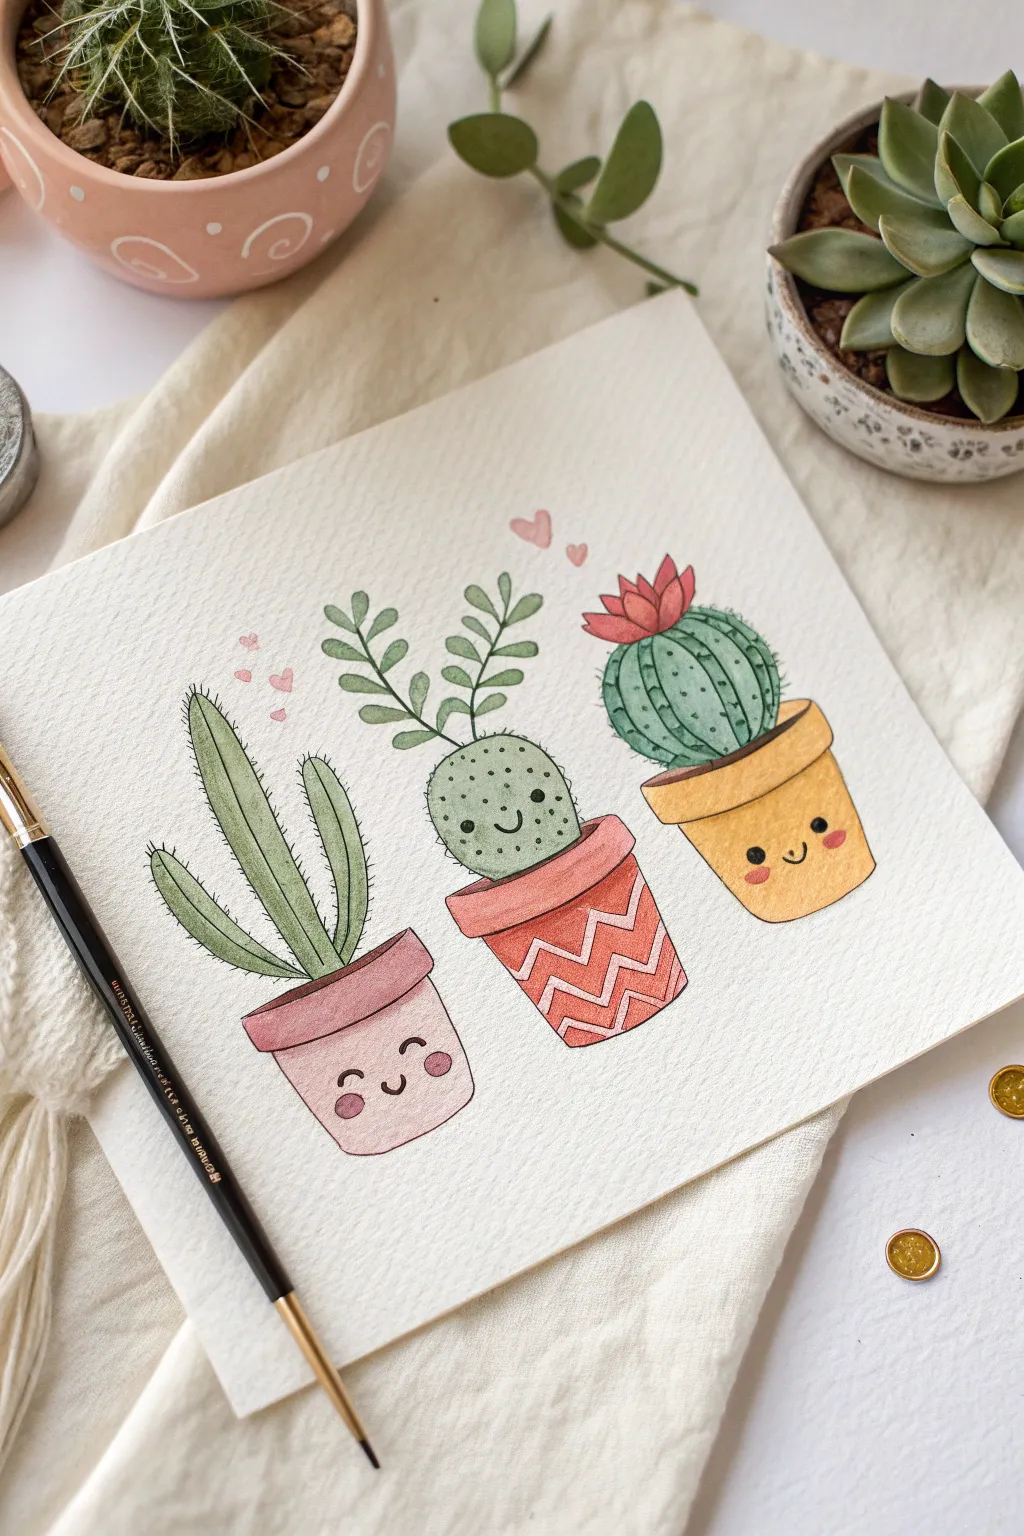
These three cheerful potted plants are guaranteed to brighten your sketchbook with their sweet expressions and soft pastel tones. Using gentle watercolor washes and fine ink details, you’ll bring this adorable desert family to life on the page.
Step-by-Step Guide
Materials
- Cold press watercolor paper (A4 or 9×12 inch)
- Watercolor paint set (shades of green, pink, yellow, orange, and coral)
- Round watercolor brushes (size 4 for filling, size 0 or 00 for details)
- HB pencil and clean eraser
- Fine liner pen (black, 0.3mm or 0.5mm, waterproof)
- Cup of water and paper towels
Step 1: Sketching the Shapes
-
Map out the pots:
Start by lightly sketching three pot shapes in a horizontal row. The first on the left is a simple tapered cylinder, the middle one slightly shorter and wider at the rim, and the right one a classic terracotta shape with a wide rim. -
Add the plant bodies:
For the left plant, draw three tall, finger-like cactus shapes of varying heights. On the middle pot, draw a perfect circle resting on top. For the right pot, sketch a round, ribbed cactus shape that sits snug inside the rim. -
Draw the details:
Sketch two leafy stems sprouting from the middle round cactus. Add a flower shape on top of the right cactus. Finally, lightly mark where the Kawaii faces will go—wide-set eyes and tiny smiling mouths.
Brush Control Trick
Rest the side of your hand on a clean scrap of paper while inking details. This stabilizes your hand for shaky-free lines.
Step 2: Painting the Greens
-
Paint the tall cactus:
Mix a muted sage green and fill in the three stems of the left cactus. Keep the wash relatively flat, but you can drop in a tiny bit of darker green near the base while it’s still wet for shadow. -
Color the middle cactus:
Using a slightly lighter, minty green, fill in the round body of the middle cactus. Paint the small leaves on the sprouting stems with a fresh, arguably brighter green to distinguish them. -
Fill the right cactus:
Choose a deeper, bluish-green for the ribbed cactus on the right. Paint this carefully to stay within your pencil lines. -
Let it dry completely:
It is crucial to let these green areas dry fully before painting the pots to prevent colors from bleeding into each other.
Step 3: Painting the Pots
-
First pot base color:
Paint the leftmost pot with a soft, dusty pink. Dilute your paint with plenty of water to keep it pastel. -
Second pot base color:
For the middle pot, use a coral or terracotta orange shade. Paint the entire pot shape, ignoring the zigzag pattern for now; we will add that later. -
Third pot base color:
Paint the rightmost pot a warm, sunny yellow or mustard tone. Don’t forget to paint the rim a slightly darker shade of the same yellow to show dimension. -
Flower accent:
While you have your warm colors out, paint the flower atop the right cactus with a vibrant reddish-pink.
Make It Sparkle
Once the paint is dry, use a metallic gold pen to add tiny accents to the pots or trace the zig-zag pattern for extra flair.
Step 4: Adding Details & Expressions
-
Outline in ink:
Once the paint is bone dry, use your fine liner pen to trace over your pencil outlines. Use broken, wispy lines for the cactus spines on the left plant. -
Texture the middle cactus:
Add small stippled dots all over the round middle cactus to give it a fuzzy texture. Add a single line down the center of each small leaf on the stems. -
Ribs and stripes:
On the right cactus, draw curved vertical lines to create the ribs. On the middle pot, draw the white zigzag pattern using a white gel pen or by carefully painting thick white gouache over the dried coral paint. -
Draw the faces on the pots:
Using the fine liner, draw the faces on the left and right pots. Wide-set black dots for eyes and a small ‘u’ shape for the mouth. Add rosy cheeks with a tiny dab of diluted pink paint. -
Draw the face on the cactus:
For the middle figure, the face goes directly on the green cactus body. Draw the smile and eyes carefully, ensuring the ink doesn’t bleed. -
Final floating hearts:
Paint two or three tiny pink hearts floating above the left and middle plants to tie the composition together with extra cuteness.
Now you have a charming little garden trio that never needs watering
Sea Critters in Bubble Worlds
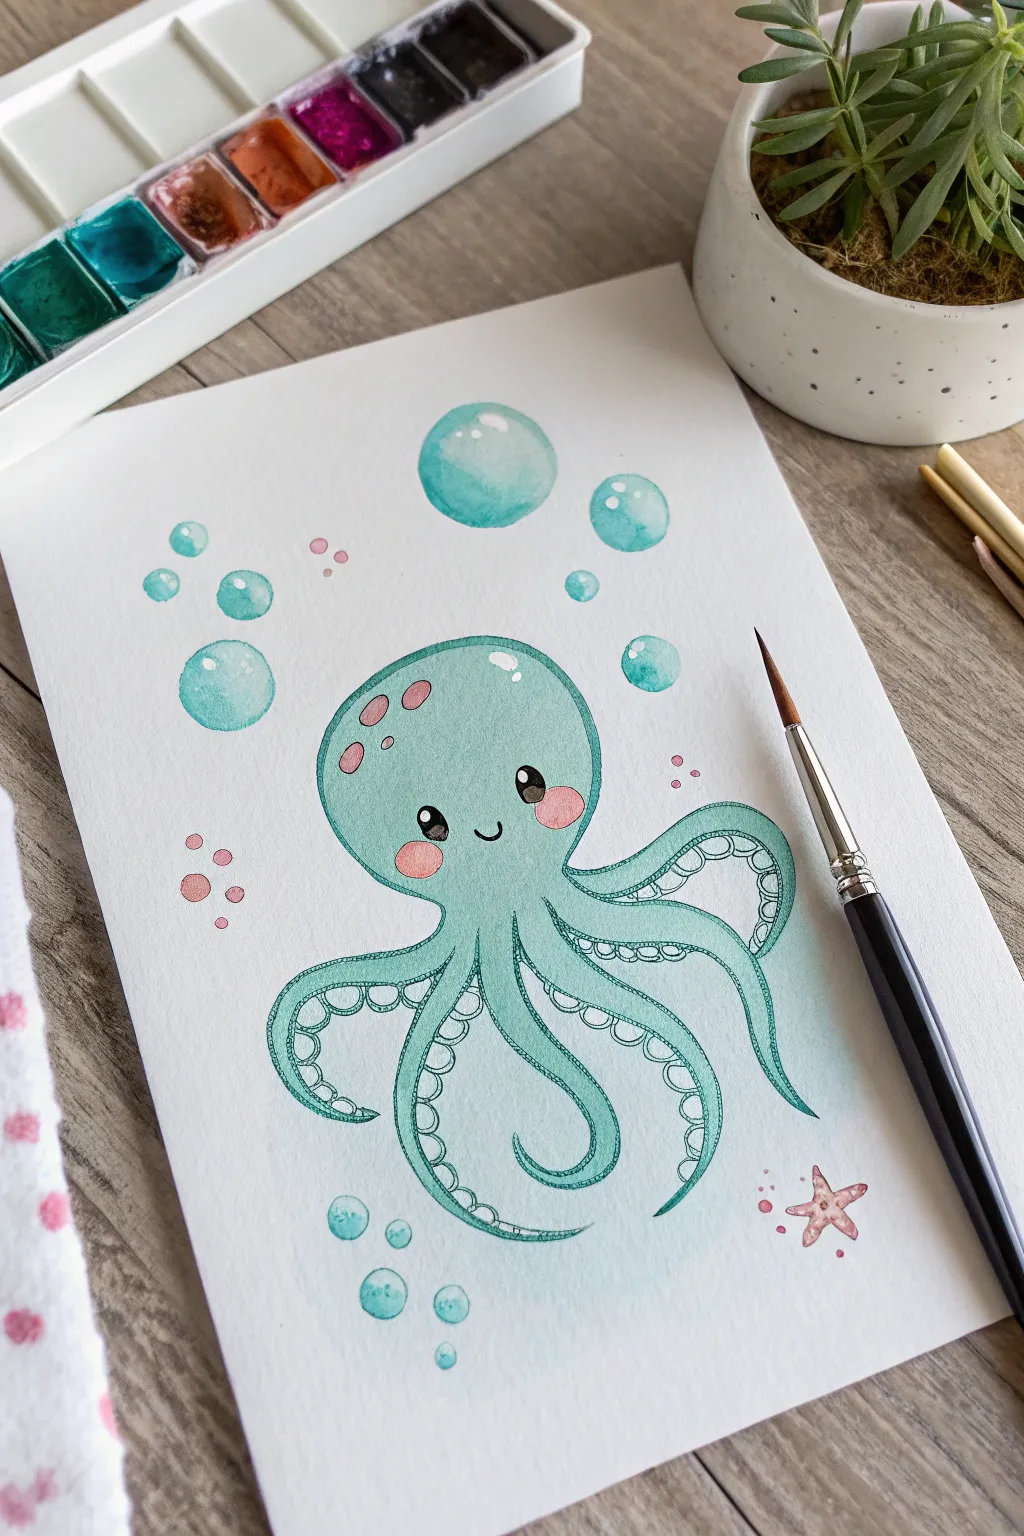
Dive into watercolor fun with this adorable teal octopus surrounded by shimmering bubbles. This project combines simple shapes with wet-on-wet techniques to create a sweet, soft underwater friend perfect for beginners.
Step-by-Step
Materials
- Cold press watercolor paper (A5 size works well)
- Watercolor paints (Teal/Turquoise, Pink, Dark Blue)
- Round watercolor brushes (Size 4 and Size 0 or 1 for details)
- Black waterproof particulate fineliner (0.1mm or 0.3mm)
- White gel pen or gouache for highlights
- Pencil and eraser
- Two jars of water and paper towels
Step 1: Sketching the Outline
-
Map out the head:
Start by lightly sketching a large, rounded gumdrop shape in the center of your paper. This will be the octopus’s head. keep the top nice and round and flatter towards the bottom. -
Draft the tentacles:
From the bottom of the head, draw eight curling tentacles. Make them flowy and curved rather than stiff. Draw four curving to the left and four to the right, varying their lengths slightly for a natural look. -
Add facial features:
Place two large oval eyes low on the head, spaced widely apart. Add a tiny U-shaped smile right between them. Sketch small circles on the cheeks for blush and a few spots on the forehead. -
Sketch the bubbles:
Draw various sized circles floating around the octopus, concentrating larger ones near the top and smaller ones near the bottom. Add a tiny star shape in the bottom right corner for the starfish.
Clear Bubble Trick
To make bubbles look transparent, paint a crescent shape on just one side and immediately soften the inner edge with a clean, damp brush.
Step 2: Inking the Design
-
Outline the main body:
Using your waterproof black fineliner, carefully trace over your pencil lines for the octopus’s head and tentacles. creating smooth, continuous lines. -
Detail the suckers:
Inside the curl of the tentacles, draw a second line parallel to the edge to define the underside. Fill this strip with small semicircles or circles to represent the suction cups. -
Ink the face:
Ink the eyes and mouth. For the eyes, draw the oval outline but don’t fill them in black yet—we will paint them later for a softer look, or you can fill them black now leaving small white circles for highlights. -
Erase pencil marks:
Wait until the ink is completely dry to avoid smudging, then gently erase all visible graphite lines to leave a clean black-and-white drawing.
Step 3: Painting the Octopus
-
Base wash:
Mix a watery teal color. Paint the entire body of the octopus, carefully working around the eyes and cheek spots. Keep the wash fairly even, but allow some pigment to pool at the edges for dimension. -
Shadowing:
While the base layer is still slightly damp, drop a slightly more concentrated teal into the bottom of the tentacles and the sides of the head to create a rounded 3D effect. -
Painting the cheeks:
Using a soft pink, paint the circular cheek blushes. You can also dab a tiny bit of pink on the spots on the forehead for a cohesive color palette. -
Tentacle details:
Once the base teal is dry, use a very diluted teal or grey-blue to paint the underside of the tentacles where the suckers are, making them just a shade lighter than the main body.
Make It Sparkle
Mix a tiny pinch of iridescent medium or glitter watercolor into your teal paint for the bubbles to give the artwork a magical underwater shimmer.
Step 4: The Underwater World
-
Painting bubbles:
For the bubbles, wet the inside of a circle with clean water first. Drop teal paint onto one side of the circle and let it bleed naturally into the clear water. This creates that transparent, spherical look. -
Adding gradients:
Vary the colors of the bubbles slightly—make some more blue and others more green-teal to add visual interest. Leave a tiny spot unpainted in each bubble for a highlight if you can manage the brush control. -
The starfish:
Paint the small starfish with a warm pink or coral color. Once dry, add tiny dots of a darker red for texture. -
Background wash:
Mix a very large amount of extremely diluted blue water. Paint a loose, organic shape behind the octopus, letting it fade out to white at the edges of the paper. This grounds the character in its environment.
Step 5: Final Touches
-
Eye definition:
If you didn’t fill the eyes with ink earlier, paint them black or dark grey now. I like to leave two distinct white spots in each eye to make them look shiny and alive. -
Highlights:
Use a white gel pen or opaque white gouache to add crisp highlights. Place a small curved line on the upper left of the head, tiny dots on the cheeks, and crisp white heavy reflections on the bubbles.
Now your little sea creature is ready to float happily on your wall
Mountains With Faces and Soft Skies
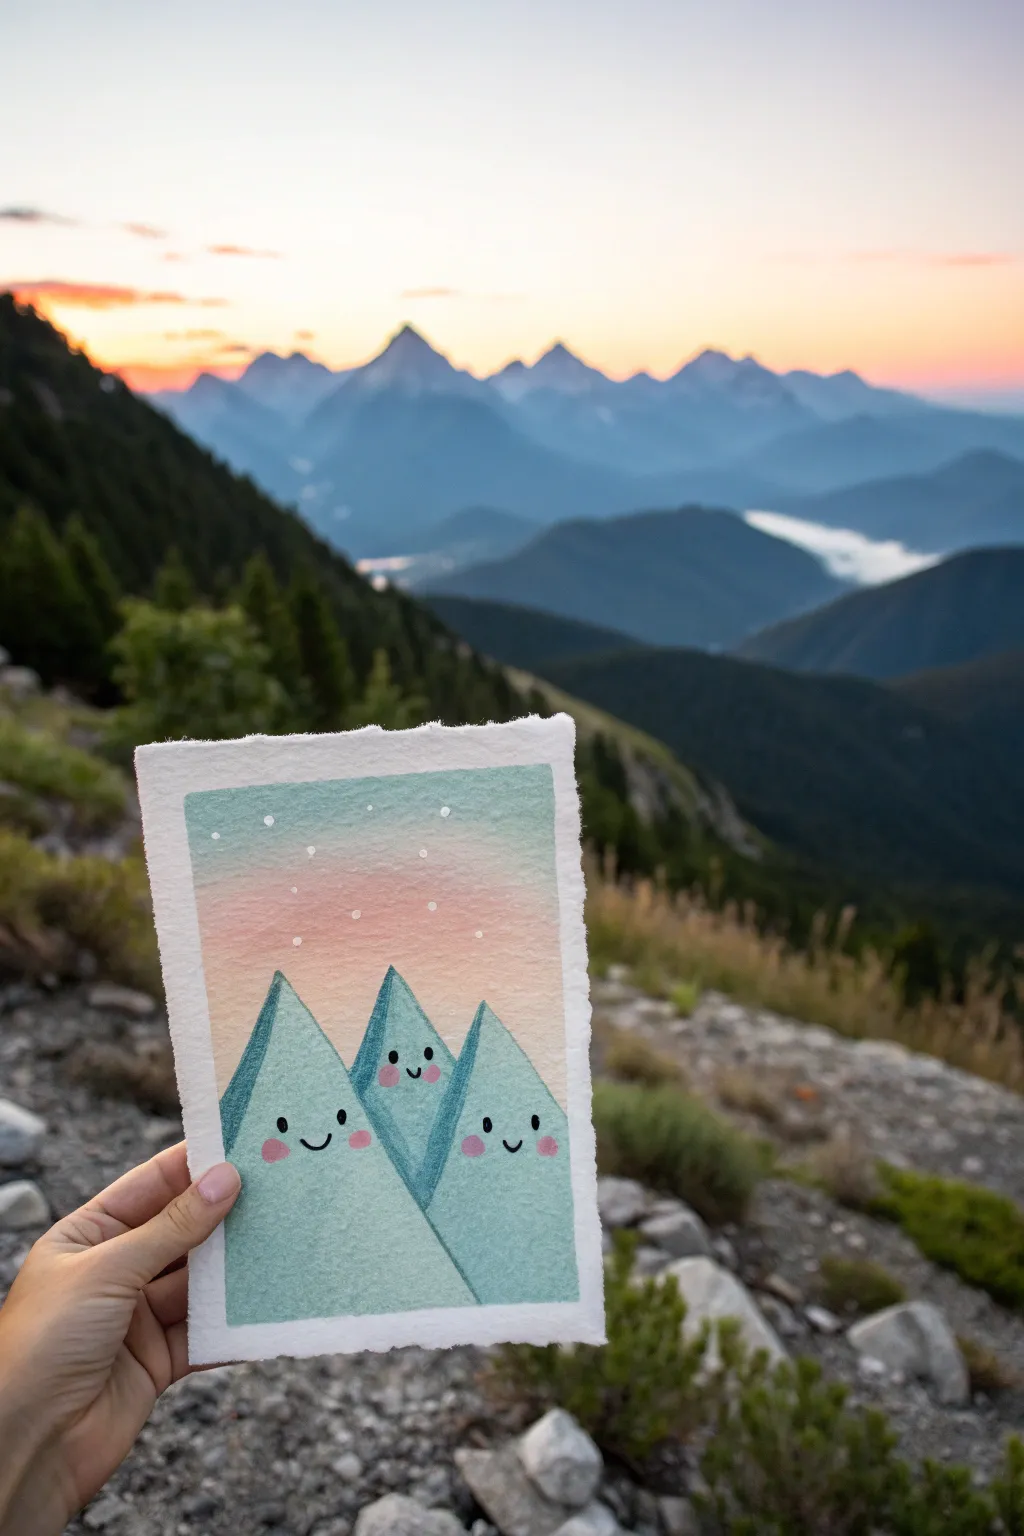
Capture the charm of the high country with this adorable watercolor project featuring three cheery mountain friends. The soft gradient sky and clean geometric shapes make this a perfect exercise for practicing wet-on-wet washes and precise edges.
Step-by-Step Guide
Materials
- Cold press watercolor paper (deckled edge optional)
- Watercolor paints (teal/turquoise, indigo, pastel pink, peach)
- Washi tape or masking tape
- Pencil and eraser
- Flat wash brush (1/2 inch or 3/4 inch)
- Small round brush (size 2 or 4)
- Fine liner brush or black micron pen
- White gel pen or gouache
- Clean water and paper towels
Step 1: Setting the Scene
-
Tape the borders:
Secure your watercolor paper to a board using washi tape. Create a crisp rectangular border, leaving about a half-inch margin around the artwork area to frame the scene nicely. -
Sketch the peaks:
Lightly sketch three overlapping triangles. Start with the central peak in the back, then add the two framing peaks in the foreground. Keep your pencil lines faint so they won’t show through the transparency of the watercolor later.
Clean Lines Secret
To prevent the mountains from bleeding into each other, leave a hair-thin line of dry white paper between the overlapping shapes.
Step 2: Painting the Sky
-
Wet the sky area:
Using your flat wash brush and clean water, gently wet the entire sky area above your pencil mountain lines. You want the paper to be glistening but not forming puddles. -
Apply the top teal:
Load your brush with a watery, pale teal or mint green mix. Apply it horizontally across the very top of the sky, letting the water pull the pigment slightly downward. -
Blend in the sunset:
Quickly rinse your brush and pick up a soft pastel pink. Paint horizontal strokes just below the teal while the paper is still damp, allowing the colors to bleed together softly without creating hard lines. -
Finish the gradient:
Transition into a warm peach or light orange tone near the horizon line where the sky meets the mountain tops. Let this gradient wash dry completely before moving forward.
Step 3: Creating the Characters
-
Paint the back peak:
Mix a medium teal color. carefully fill in the central, rearmost triangle. Because it’s further back, you might want this peak slightly cooler or darker in tone to create depth. -
Dry efficiently:
Allow the center peak to dry fully. If you rush this steps, the colors of the overlapping mountains will bleed into each other and ruin the clean geometric look. -
Paint the front peaks:
Mix a slightly lighter, fresher teal shade for the two foreground mountains. Paint the left mountain first, ensuring a crisp edge where it overlaps the back peak. -
Complete the range:
Paint the right-side mountain with the same mixture. I like to keep the pigment slightly pooled at the bottom for a subtle gradient effect within the shape itself. -
Let it settle:
Wait until the paint is bone dry to the touch. The paper should feel room temperature, not cool.
Winter Makeover
Give your mountain friends snowy caps by leaving the tips of the triangles unpainted white, or painting white jagged caps on top after drying.
Step 4: Kawaii Details
-
Add rosy cheeks:
Mix a concentrated pink or coral watercolor. Using your small round brush, dab two small ovals onto each mountain for cheeks. Placing them slightly wide apart enhances the cute aesthetic. -
Draw the faces:
Once the cheeks are dry, use a fine liner brush with black paint (or a waterproof pen) to draw wide-set eyes and a tiny ‘u’ shaped smile between the cheeks. -
Add texture:
Take a slightly darker teal mixture and a fairly dry brush. Gently stipple or dab texture along the left edges of the mountains to give them a bit of form and shadow. -
Apply finishing touches:
Using a white gel pen or opaque white gouache, add tiny dots to the sky for stars, and place small white highlights in the eyes to bring your characters to life. -
Reveal the artwork:
Carefully peel away the painter’s tape at a 45-degree angle to reveal your clean white borders.
Now you have a trio of mountain friends ready to bring a smile to anyone’s day
Nine Mini Canvases as a Kawaii Grid Set
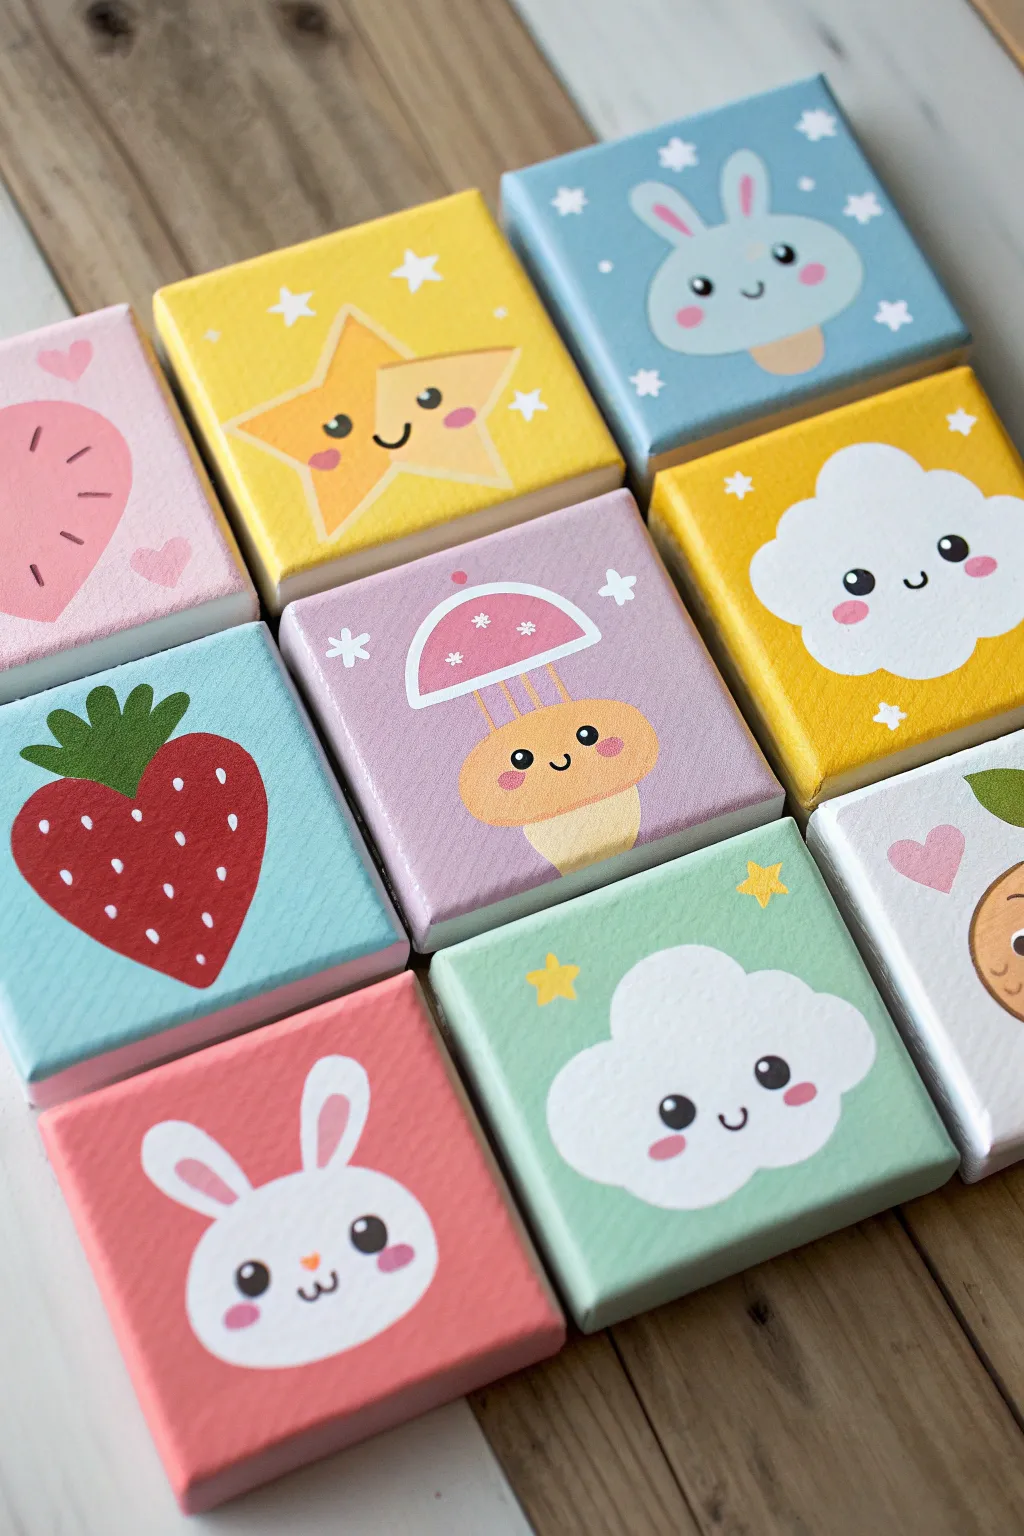
Create a stunning wall display with this set of nine adorable mini canvases featuring classic kawaii motifs like clouds, strawberries, and bunnies. The soft pastel color palette and uniform style turn simple shapes into a cohesive and heartwarming art collection.
How-To Guide
Materials
- 9 mini stretched canvases (approx. 3×3 or 4×4 inches)
- Acrylic paints (pastel pink, baby blue, mint green, banana yellow, lilac, white, red, black)
- Fine detail brushes (sizes 0/00)
- Small flat brush (size 4 or 6)
- Pencil and eraser
- Palette for mixing
- Water cup and paper towel
- Gloss varnish (optional)
Step 1: Base Coat Preparation
-
Arrange your grid:
Before painting, lay out your nine canvases in a 3×3 grid to plan your color distribution. You want to ensure no two background colors touch directly if possible, creating a balanced checkerboard effect. -
Mix pastel base colors:
Mix your acrylics with plenty of white to create soft pastel shades. You will need a variety: pale pink, butter yellow, sky blue, mint green, and lilac. -
Paint the backgrounds:
Using a small flat brush, paint the entire surface of each canvas with its designated background color. Extend the paint over the edges to the sides for a finished look. -
Apply a second coat:
Acrylics can be translucent, especially pastels. Once dry, apply a second coat to ensure the color is solid and opaque without brushstrokes showing through.
Pro Tip: Eye Placement
For maximum cuteness, place the eyes wide apart and in line with the mouth. Placing them too high or too close together changes the ‘kawaii’ ratio.
Step 2: Sketching Designs
-
Draft the central figures:
Lightly sketch the main shapes on each canvas using a pencil. Keep the designs simple: a cloud shape, a star, a strawberry silhouette, a bunny head, or a mushroom cap. -
Add decorative elements:
Sketch in small background details around the main subjects, such as tiny four-pointed stars, hearts, or simple dots to fill negative space.
Trouble: See-through Yellow?
Yellow paint is often transparent. If your star or background looks streaky, mix a tiny dot of white into the yellow to increase opacity before painting.
Step 3: Painting the Subjects
-
Block in white shapes:
For the clouds and the bunny faces, fill the sketched shapes with solid white paint. Use smooth strokes to keep the fluffy edges rounded. -
Paint colorful subjects:
Fill in the other shapes: paint the strawberry red, the star yellow (slightly darker than its background), and the mushroom cap pink. I find adding a tiny drop of water helps the paint flow better for these shapes. -
Add secondary colors:
Add details like the green leaves on the strawberry, the orange stem for the mushroom, or the inner ear color for the bunnies.
Step 4: Kawaii Details
-
Paint the faces:
This is the most important part! Using your finest detail brush and black paint, add wide-set eyes and tiny mouths. Some mouths are simple ‘u’ shapes, while the bunny gets a ‘w’ shape. -
Add cheek blush:
Dip a small round brush or a Q-tip into pink paint. Dab oval blush spots directly under the eyes on every character to achieve that classic kawaii look. -
Highlight the eyes:
Once the black eye paint is totally dry, add a tiny white dot in the upper corner of each eye. This ‘sparkle’ brings the character to life. -
Detail the strawberries:
For the red strawberry, use a thin brush to add small white seeds in a teardrop shape scattered across the surface. -
Fill background patterns:
Paint the small background hearts, stars, and dots you sketched earlier. Use contrasting pastels—for example, white stars on blue backgrounds and pink hearts on yellow backgrounds.
Step 5: Finishing Touches
-
Clean up lines:
Check the edges of your subjects. If any background paint got messy, carefully touch it up with the original background color. -
Seal the work:
If you want a professional sheen and protection from dust, apply a thin layer of gloss varnish over each dry canvas.
Arranging these nine finished pieces on your wall creates an instant gallery of happiness
Sticker-Sheet Style Kawaii Icons
Transform a blank canvas into a giant, adorable sticker sheet filled with hand-painted kawaii icons. This project features soft pastel colors and crisp black linework to create a playful, organized chaos perfect for brightening up any corner.
Step-by-Step Tutorial
Materials
- Rectangular stretched canvas (e.g., 16×20 inches)
- Acrylic paints (pastel pink, baby blue, mint green, lavender, soft yellow, peach)
- Black acrylic paint marker (fine point)
- Pencil and eraser
- Small round paintbrushes (sizes 0 and 2)
- Palette or small dish for mixing
- Reference sheet of kawaii doodles (optional)
Step 1: Planning the Layout
-
Prime the Surface:
Ensure your canvas is clean and ready. If the weave feels too rough, you can apply an extra layer of white gesso and sand it lightly once dry for a smoother surface, which helps with the tiny details later. -
Sketch the Grid (Mentally):
Visualize a loose grid on your canvas to keep things balanced without being too rigid. You want the icons to float freely but maintain roughly equal spacing. -
Draft the Doodles:
Using a light pencil, sketch out your icons. Start with larger shapes like the rainbows, clouds, and big hearts to anchor the composition. -
Fill the Gaps:
Draw smaller filler items like stars, sparkles, dots, and mini hearts in the empty spaces between the larger sketches. Aim for a variety of shapes so no two identical icons are right next to each other. -
Refine the Shapes:
Go back over your pencil lines to clean them up. Keep the shapes simple and rounded—the essence of kawaii style is softness and simplicity.
Step 2: Adding Color
-
Prepare Your Palette:
Squeeze out your pastel acrylics. If you don’t have pre-mixed pastels, mix a tiny dot of standard color into white paint until you achieve a soft, candy-like hue. -
Paint the Rainbows:
Start by blocking in the colored arches of the rainbows. Use a size 2 brush for these larger curves, alternating colors like pink, blue, and yellow. -
Fill the Hearts:
Paint the various hearts scattered across the canvas. Use different shades of pink and peach, and paint completely flat layers. Two thin coats are better than one thick, gloopy one. -
Color the Clouds:
Fill in the cloud shapes with a very pale blue or leave them white if your canvas is bright enough. If painting them white, add a tiny drop of blue to make them pop against the background. -
Paint the Treats:
Move on to the food items like the strawberries, donuts, and drinks. Use mint green for leaves or details to add contrast to the warm pinks. -
Paint the Stars:
Use your yellow paint for the scattered stars. Since yellow can be translucent, I usually wait for the first coat to dry and add a second to ensure it’s opaque. -
Let it Dry Thoroughly:
Walk away and let the canvas dry completely. The paint must be hard to the touch before you begin the next phase, or the ink will snag and bleed.
Clean Lines Hack
If your hand is shaky while outlining, rest your pinky finger on a dry part of the canvas to stabilize your grip as you draw loops.
Step 3: Inking and Details
-
Test the Marker:
Shake your black acrylic paint marker well and pump the nib on a scrap piece of paper to ensure smooth ink flow. -
Outline the Shapes:
Carefully trace over the outer edges of your painted shapes. Keep a steady hand and try to make the line weight consistent across the whole canvas. -
Add Faces:
Draw the tiny kawaii faces on the clouds, hearts, and suns. Simple dots for eyes and a small ‘u’ shape for the mouth work best to capture that cute aesthetic. -
Draw Interior Details:
Add the seeds on the strawberries, the sprinkles on the donuts, and stripes on the drink cups using the fine point marker. -
Erase Pencil Lines:
Once you are absolutely certain the black ink is dry (give it at least 20 minutes), gently erase any visible pencil sketch lines. -
Final Highlights:
Dip the very tip of a size 0 brush or a toothpick into white paint and add tiny ‘shine’ dots to the eyes and the tops of hearts or balloons for a glossy look.
Glossy Sticker Effect
Paint a layer of high-gloss varnish specifically *only* over the painted icons (not the background) to make them look like real shiny 3D stickers.
Hang your new masterpiece and enjoy the bubbly, cheerful energy it brings to your room


Have a question or want to share your own experience? I'd love to hear from you in the comments below!