If you’re in the mood to paint Santa, you’ve got endless ways to make him feel classic, cozy, or totally unexpected. Here are some of my favorite Santa painting ideas—from super-beginner friendly designs to playful twists that still scream Santa.
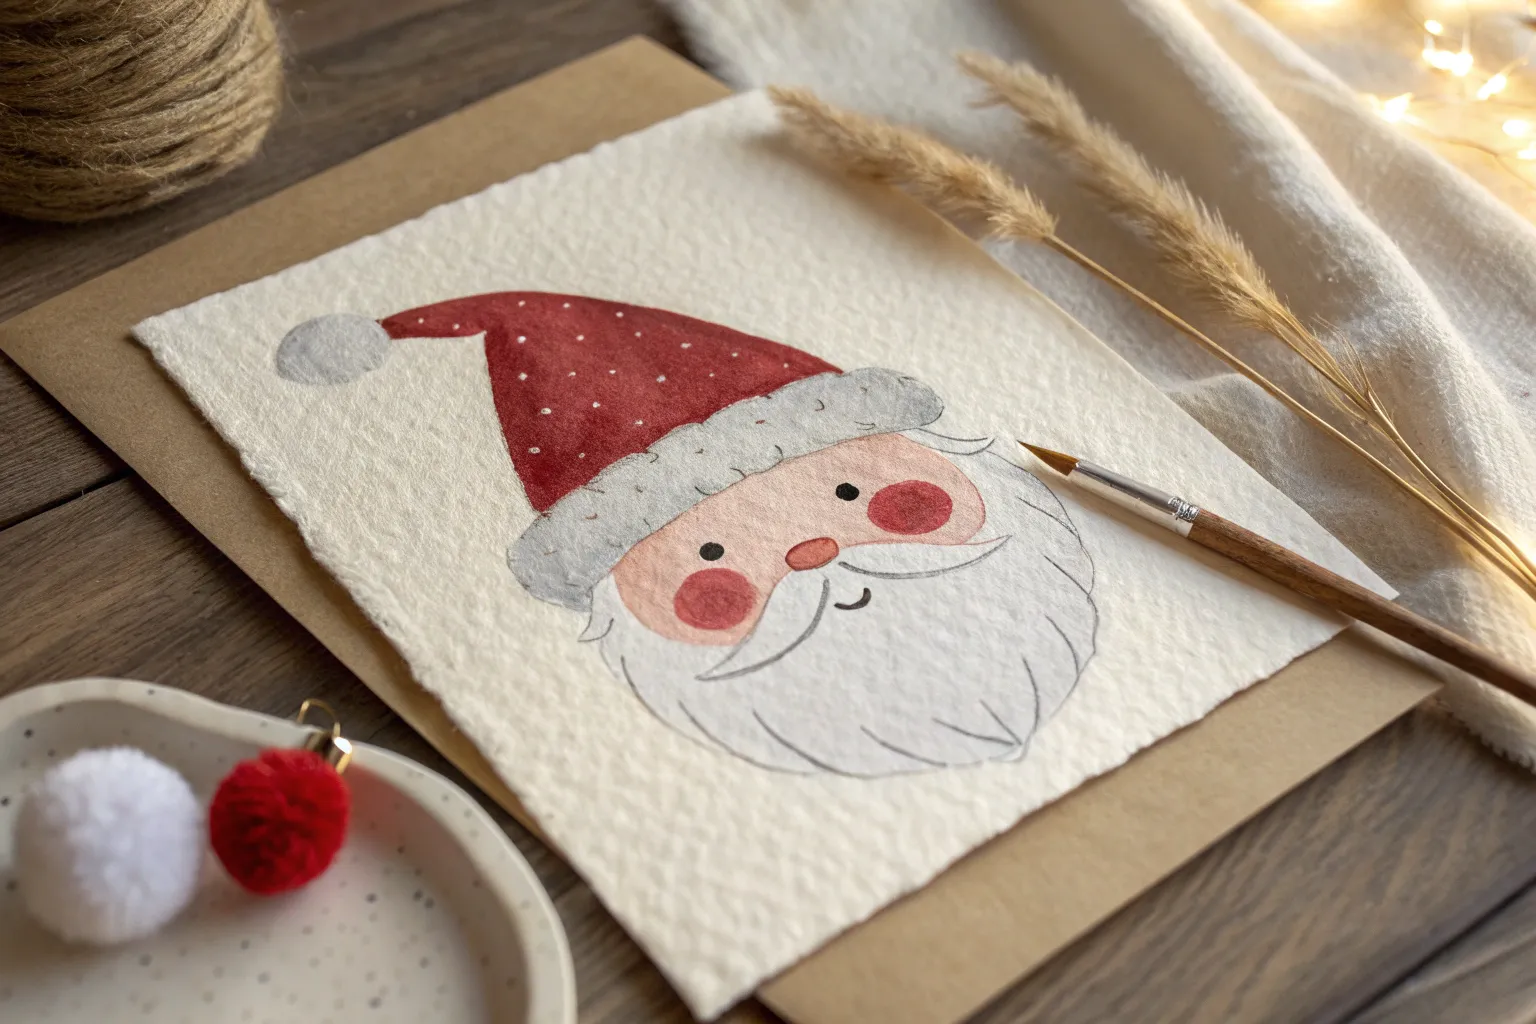
Classic Santa Face Close-Up
Capture the warmth and magic of the season with this detailed watercolor portrait of a smiling Santa Claus. This project focuses on building distinct textures, from the soft, fluffy hat trim to the flowing strands of his iconic white beard.
Step-by-Step Guide
Materials
- Cold press watercolor paper (300gsm, 140lb)
- Watercolor paints (Alizarin Crimson, Burnt Sienna, Yellow Ochre, Ultramarine Blue, Lamp Black, Scarlet Red)
- Round brushes (Sizes 2, 6, and 10)
- Fine liner brush (Size 00)
- Pencil (HB) and kneaded eraser
- Masking fluid (optional but recommended for beard hair)
- Two jars of water
- Paper towel or cloth
Step 1: Sketching and Masking
-
Light detailed sketch:
Begin with a light pencil sketch of Santa’s face. Focus on the placement of the eyes, the round nose, and the general flow of the beard. Don’t press too hard, as you want the graphite lines to disappear under the paint eventually. -
Preserve the whites:
To keep the beard and eyebrows crisp white, apply thin lines of masking fluid with a ruling pen or an old brush. Map out the main directional flows of the white hair, but leave some areas unmasked for softer edges later.
Step 2: Painting the Skin Tones
-
Base flesh wash:
Mix a very dilute wash of Yellow Ochre and a tiny touch of Burnt Sienna. Apply this over the entire face area (avoiding the eyes and beard), keeping the wash wet and even. -
Adding the rosy glint:
While the base layer is still slightly damp, drop in a mix of Alizarin Crimson and Scarlet Red onto the cheeks and the tip of the nose. Let the pigment bloom naturally to create that signature frosty flush. -
Deepening shadows:
Once the first layer is dry, mix Burnt Sienna with a touch of Ultramarine Blue to create a shadow tone. Paint the shadows under the hat brim, around the nose, and inside the eye sockets to build dimension. -
Refining facial details:
Use a size 2 brush to deepen the wrinkles around the eyes (crow’s feet) and the smile lines. I like to keep these lines fairly soft so he looks jolly rather than stern.
Muddy Skin Tones?
If the cheeks look dirty, you likely overworked the red while the shadow layer was wet. Let layers dry fully before glazing red over them to keep the glow fresh.
Step 3: The Hat and Eyes
-
Eye details:
Paint the irises with a clear blue, leaving a tiny pure white spot for the catchlight. Use a dark mix of Burnt Sienna and Lamp Black for the pupils and the upper lash line to define the gaze. -
Hat base layer:
Wet the hat area and drop in a rich Scarlet Red. Let it be darker in the folds and lighter on the rounded top to suggest velvet fabric. -
Hat shadows:
Mix Alizarin Crimson with a little Ultramarine Blue to create a deep burgundy. Apply this into the creases of the hat while the red is still damp for soft transitions, then let it dry completely.
Level Up: Sparkles
Mix a tiny pinch of iridescent medium into the white gouache for the hat fur highlights. It adds a magical, frosty shimmer visible when the light hits.
Step 4: The White Textures
-
Remove masking:
Gently rub away the masking fluid once the paper is bone dry. You should now have stark white lines reserved for the hair. -
Soft fur shading:
Mix a very watery grey using Ultramarine Blue and a touch of Burnt Sienna. Paint shadows into the ‘white’ fur of the hat trim, focusing on the bottom edge where it meets the forehead to make it look fluffy. -
Beard volume:
Using the same light grey mix, paint negative shapes between the white hair strands. This pushes the white hairs forward and creates depth within the beard mass. -
Flowing strands:
Switch to your size 6 brush. Dampen the beard area slightly and drag pale grey-yellow washes through the mid-sections of the beard to give it an aged, creamy look, rather than sterile white. -
Fine hair details:
With the 00 liner brush, add individual hairs in the eyebrows and mustache using a slightly darker grey mix. Pay close attention to the direction of growth—mustache hairs flow outwards and down.
Step 5: Final Touches
-
Deepest contrasts:
Mix a concentrated dark red-brown. Reinforce the darkest area right where the hat meets the fur trim and under the collar of his coat. -
Sparkle and highlights:
If you lost any white highlights in the eyes or on the wet tip of the nose, use a tiny amount of opaque white gouache to bring back that sparkle. -
Softening edges:
Take a clean, damp brush and gently soften any beard shadows that look too harsh. The beard should feel like a soft cloud, not a wire brush.
Step back and admire the festive spirit you’ve captured in watercolor


Santa Coming Down the Chimney
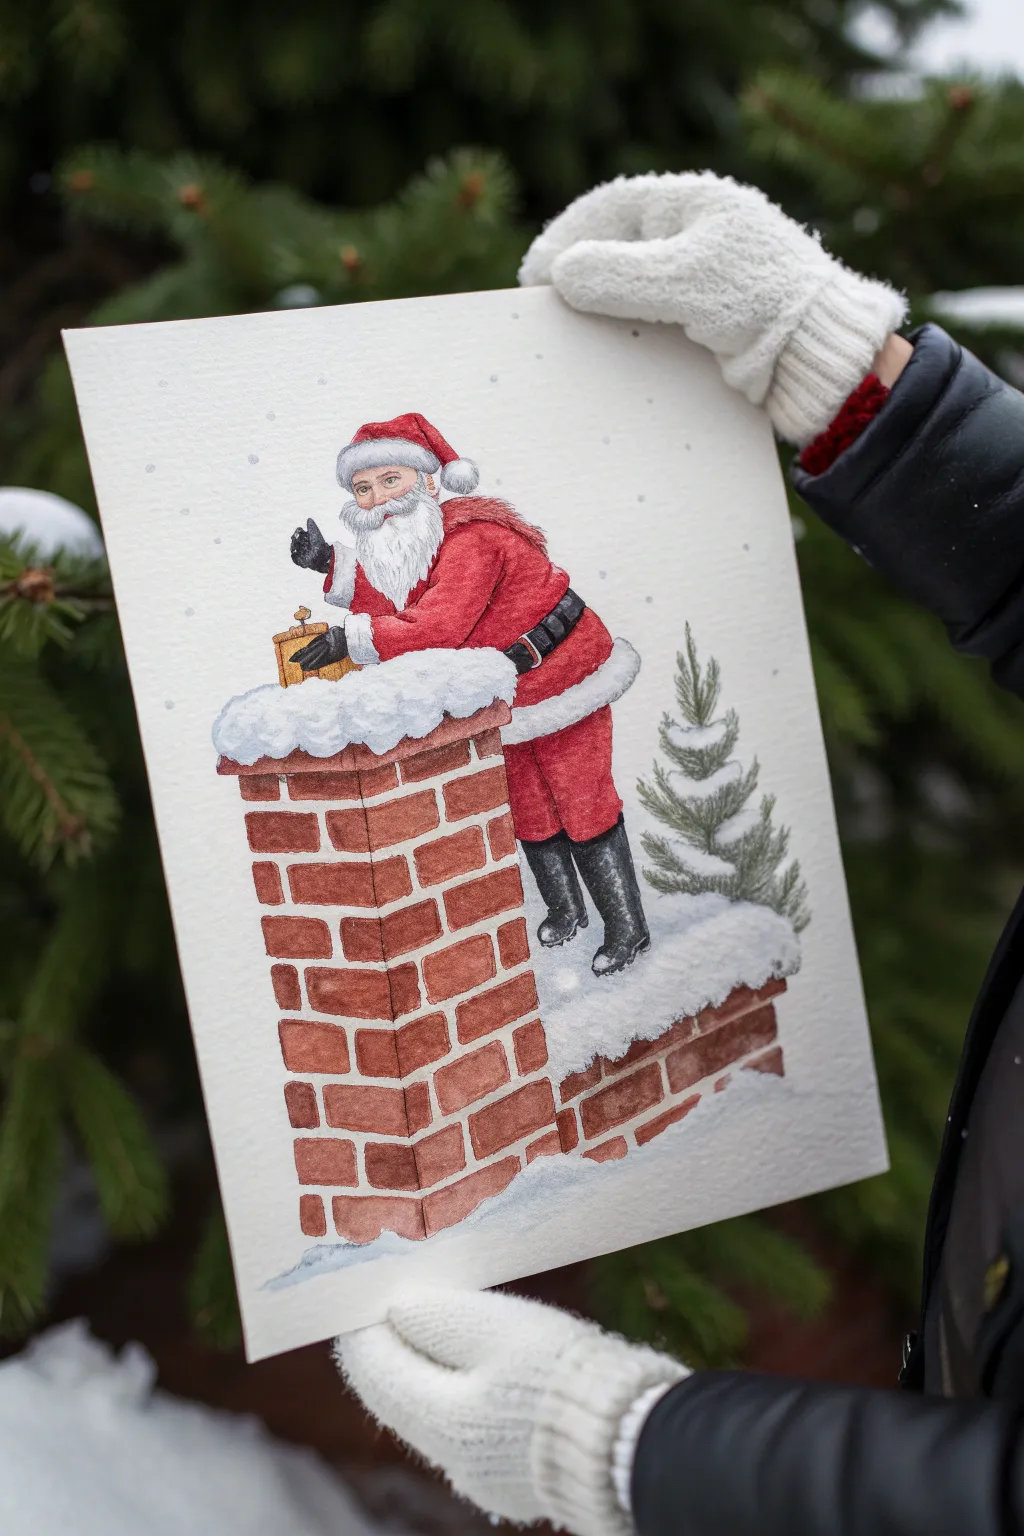
Capture the magic of Christmas Eve with this charming watercolor illustration of Santa climbing into a brick chimney. The painting features soft textures, vibrant reds, and a detailed brick pattern for a classic holiday look.
Detailed Instructions
Materials
- Cold press watercolor paper (140lb/300gsm)
- Watercolor paints (Alizarin Crimson, Burnt Sienna, Payne’s Grey, Sap Green, Ultramarine Blue, Yellow Ochre)
- White gouache or white gel pen
- Round watercolor brushes (Size 2, 4, and 8)
- HB pencil and kneaded eraser
- Masking fluid (optional)
- Two jars of water
- Paper towels
Step 1: Sketching the Scene
-
Block in shapes:
Begin by lightly sketching the main shapes with an HB pencil. Start with a large rectangle for the chimney stack and a smaller, slightly angled cylinder shape on top for the chimney cap. -
Add Santa’s form:
Draw Santa’s figure leaning over the chimney edge. Use overlapping ovals for his arms and torso to get the posture right. He should look like he’s just paused before descending. -
Define the details:
Refine your sketch by adding facial features, the beard, his hat, and the fur trim. Don’t forget the small lantern he’s holding and the evergreen tree peeking out from behind the chimney. -
Map the bricks:
Lightly draw the horizontal mortar lines for the chimney bricks, wrapping them slightly around the corners to show dimension. Add vertical lines, staggering them row by row.
Brick Realism Tip
Don’t paint the bricks as perfect rectangles. Let the edges be slightly ragged and lift pigment from the center of a few wet bricks to create an aged texture.
Step 2: Painting Santa
-
Santa’s suit base:
Mix a vibrant red using Alizarin Crimson and a touch of warm yellow. With your size 4 brush, paint the main areas of the suit (legs, arms, back), leaving the fur trim completely white for now. -
Shadows on the suit:
While the red is still slightly damp, drop in a deeper mix of red and purple to the undersides of the arms and behind the legs to create volume. -
Boots and belt:
Use Payne’s Grey (diluted for highlights) to paint the boots and belt. I find that lifting a little color with a dry brush helps create a leather-like sheen on the boots. -
Face and beard:
Paint the face with a very pale wash of Burnt Sienna and pink. For the beard, barely touch the paper with a very diluted grey wash to imply shadow, keeping most of it paper-white.
Step 3: The Chimney Structure
-
Brick base layer:
Mix Burnt Sienna with a tiny bit of red. Carefully paint each individual brick, leaving the thin channels of paper white between them to represent the mortar. -
Varying brick tones:
To make the masonry look realistic, vary your mix slightly for different bricks—add a little brown to some and a little more red to others. -
Chimney shadows:
Once the first layer is dry, glaze a cool grey-brown shadow on the right side of the chimney stack to give the structure 3D form. -
Snow on top:
Paint pale blue-grey shadows on the bottom and sides of the snow clumps sitting on the chimney top, keeping the tops bright white.
Add Some sparkle
Mix a tiny amount of iridescent medium into your white gouache for the snow on the chimney and Santa’s fur to make the glisten under light.
Step 4: Details & Atmosphere
-
The evergreen tree:
Using Sap Green and a size 2 brush, use short, flicking strokes to create the pine needles of the small tree behind the chimney. Leave gaps for snow. -
Lantern glow:
Paint the lantern with Yellow Ochre, keeping the center lightest. Add dark brown or black outlines for the lantern frame once the yellow is dry. -
Fur texture:
Mix a watery pale grey. Use the tip of your smallest brush to make tiny, dabbing motions on the white fur trim of Santa’s suit to give it a fluffy texture. -
Falling snow:
Using white gouache or a gel pen, verify your painting is totally dry, then add small dots randomly across the sky and scene for falling snowflakes. -
Final touches:
Deepen any black details like the gloves or belt loops, and strengthen the shadow directly under the chimney cap to make the snow pop.
Now you have a festive masterpiece ready to frame or turn into a holiday card.


Santa Stuck in the Chimney (Just Boots)
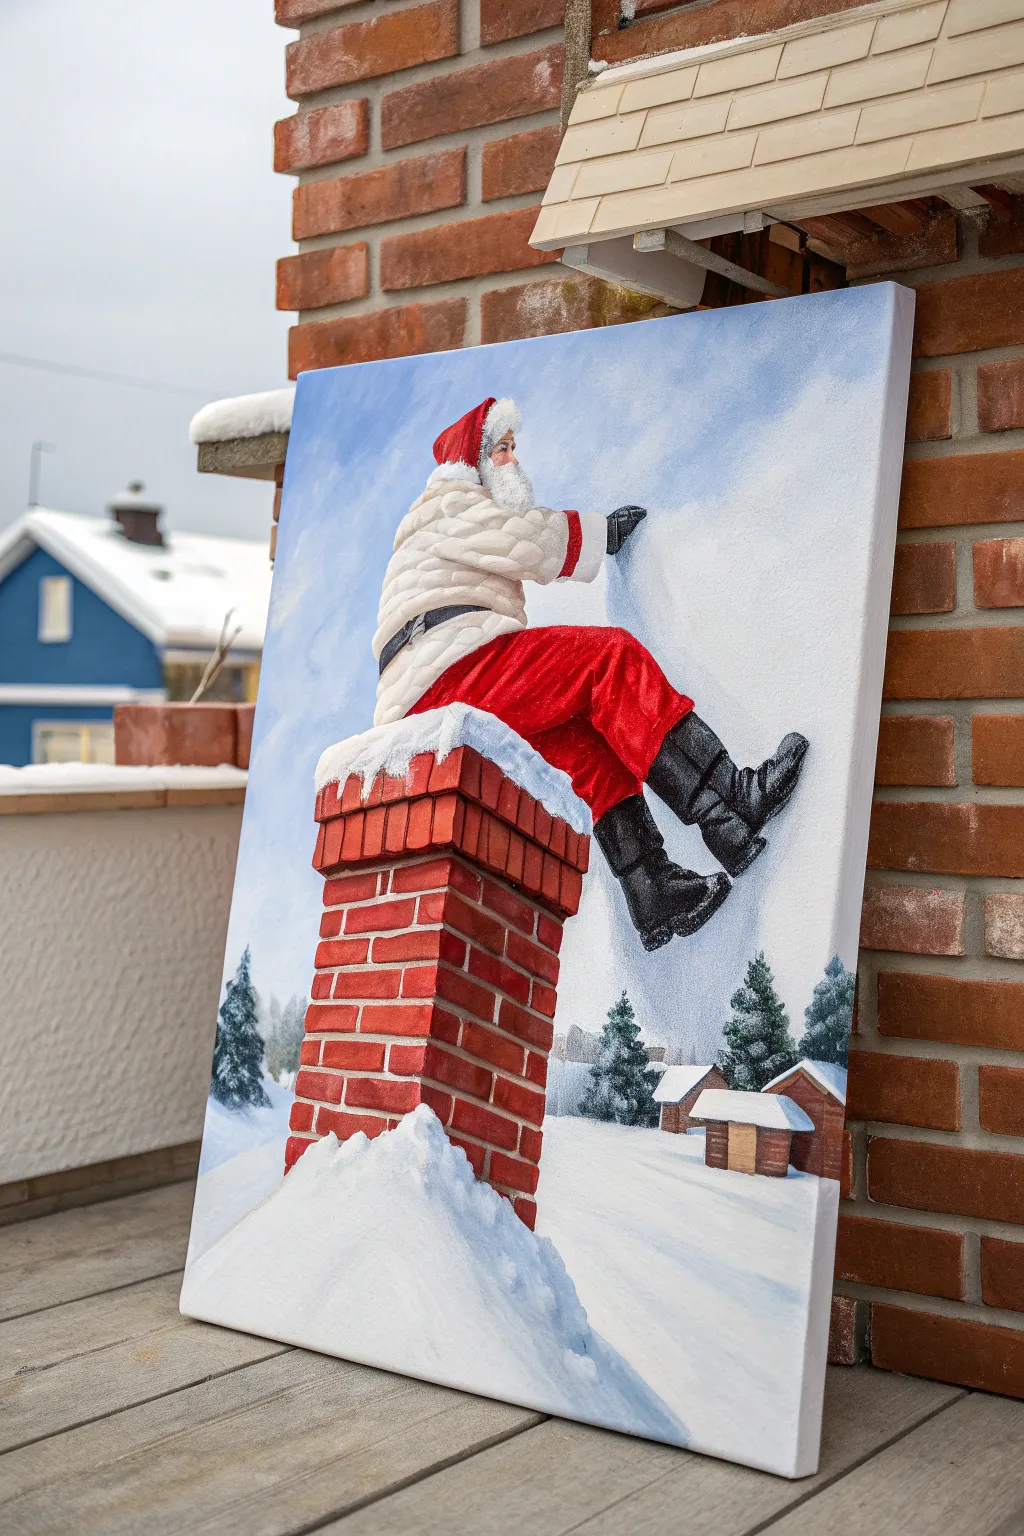
Capture the magic of Christmas Eve with this whimsical painting of Santa taking a breather on a snowy chimney top. This realistic yet playful acrylic artwork features brilliant contrasts between the bright blue sky, the textured red brick, and the soft, drifting snow.
Step-by-Step Tutorial
Materials
- Large stretched canvas (24×36 or similar)
- Acrylic paints (primary colors, titanium white, burnt sienna, mars black)
- Gesso (white)
- Flat shader brushes (sizes 8, 12)
- Round detail brushes (sizes 2, 4)
- Fan brush (for texture)
- Palette knife
- Pencil and eraser
- Masking tape (optional for straight lines)
Step 1: Sketching and Background
-
Prime the Surface:
Begin by applying a smooth coat of white gesso to your canvas if it isn’t pre-primed. Let this dry completely to ensure a bright surface for your colors. -
Map Out the Composition:
Using a light pencil, sketch the main elements. Start with the chimney tower on the lower left, angling slightly upward. Then, draw Santa’s figure straddling the top edge, ensuring his legs dangle naturally. Sketch the horizon line low in the background. -
Paint the Sky Gradient:
Mix a bright cerulean blue with titanium white. I like to start at the top corners with the deeper blue and blend downwards into almost pure white as you reach the horizon line, creating an atmospheric depth. -
Establish the Snowy Ground:
For the background snow, use white mixed with a tiny drop of blue-grey. Paint the rolling hills and the foreground roof where the chimney sits, keeping the edges soft.
Step 2: The Brick Chimney
-
Base Coat the Bricks:
Mix burnt sienna with a touch of red. Block in the entire shape of the chimney. Don’t worry about individual bricks yet; just get a solid, warm underlayer established. -
Define the Rows:
Once the base is dry, use a smaller flat brush and a dark grey mix (black and white) to paint the horizontal and vertical mortar lines. Remember to follow the perspective lines you sketched earlier so the chimney looks 3D. -
Highlight the Bricks:
Add dimension to the bricks by mixing a lighter orange-red. Paint the top and left edges of each individual brick to show where the light is hitting them. -
Shadow the Bricks:
Conversely, use a darker brown-red to shade the bottom and right sides of the bricks, giving them a realistic, rugged texture.
Straight Lines Made Easy
Chimney look leaning? Use painter’s tape to mark the edges before painting the red brick base. Remove it wet for crisp lines.
Step 3: Painting Santa
-
Base Coat the Clothing:
Use a bright cadmium red for Santa’s trousers and hat. For the coat, use an off-white or light cream color, as pure white is reserved for the brightest highlights. -
Puffy Coat Texture:
To make the coat look quilted and warm, mix a light grey. Paint curved shadow lines across the torso and arms to simulate the puffy segments of his jacket. -
Velvet Pants Detailing:
Add depth to the red pants by mixing a dark crimson for the folds and creases behind the knees and near the waste. Use a dry brush technique with a brighter orange-red on the kneecaps to suggest a velvet texture. -
Boots and Gloves:
Paint the boots and gloves with mars black. While the paint is wet, add streaks of grey and white to the top edges of the boots to make the leather look shiny and wet. -
Beard and Fur Trim:
Using a round brush or a fan brush, dab distinct strokes of pure titanium white to create the fluffy texture of his beard and the fur trim on his hat and coat cuffs.
Make It Sparkle
Mix a tiny amount of iridescent glitter medium into your final white highlights on the snowdrifts for a magical, frost-like shimmer.
Step 4: Final Details and Snow
-
Chimney Snow Cap:
Paint a thick layer of white snow mounding on top of the chimney rim. Let it drape over the edge slightly, adding light blue shadows underneath the overhang to show volume. -
Background Trees and Huts:
Using a deep hunter green, dab in triangular shapes for the evergreens in the distance. Add small brown geometric shapes for the distant cabin roofs, capping them with white for snow. -
Drifting Snow Effects:
Create the illusion of wind-blown snow near Santa’s hand. Dilute some white paint slightly and use a dry brush to sweep a misty haze from his glove towards the right side of the canvas. -
Refining Highlights:
Take a step back and look at the whole piece. Add final touches of pure white to the tops of the snow drifts, the brightest part of Santa’s coat, and the sheen on the chimney cap.
Step back and enjoy the festive charm of this delightful holiday scene you have brought to life


Santa Holding a Wrapped Gift
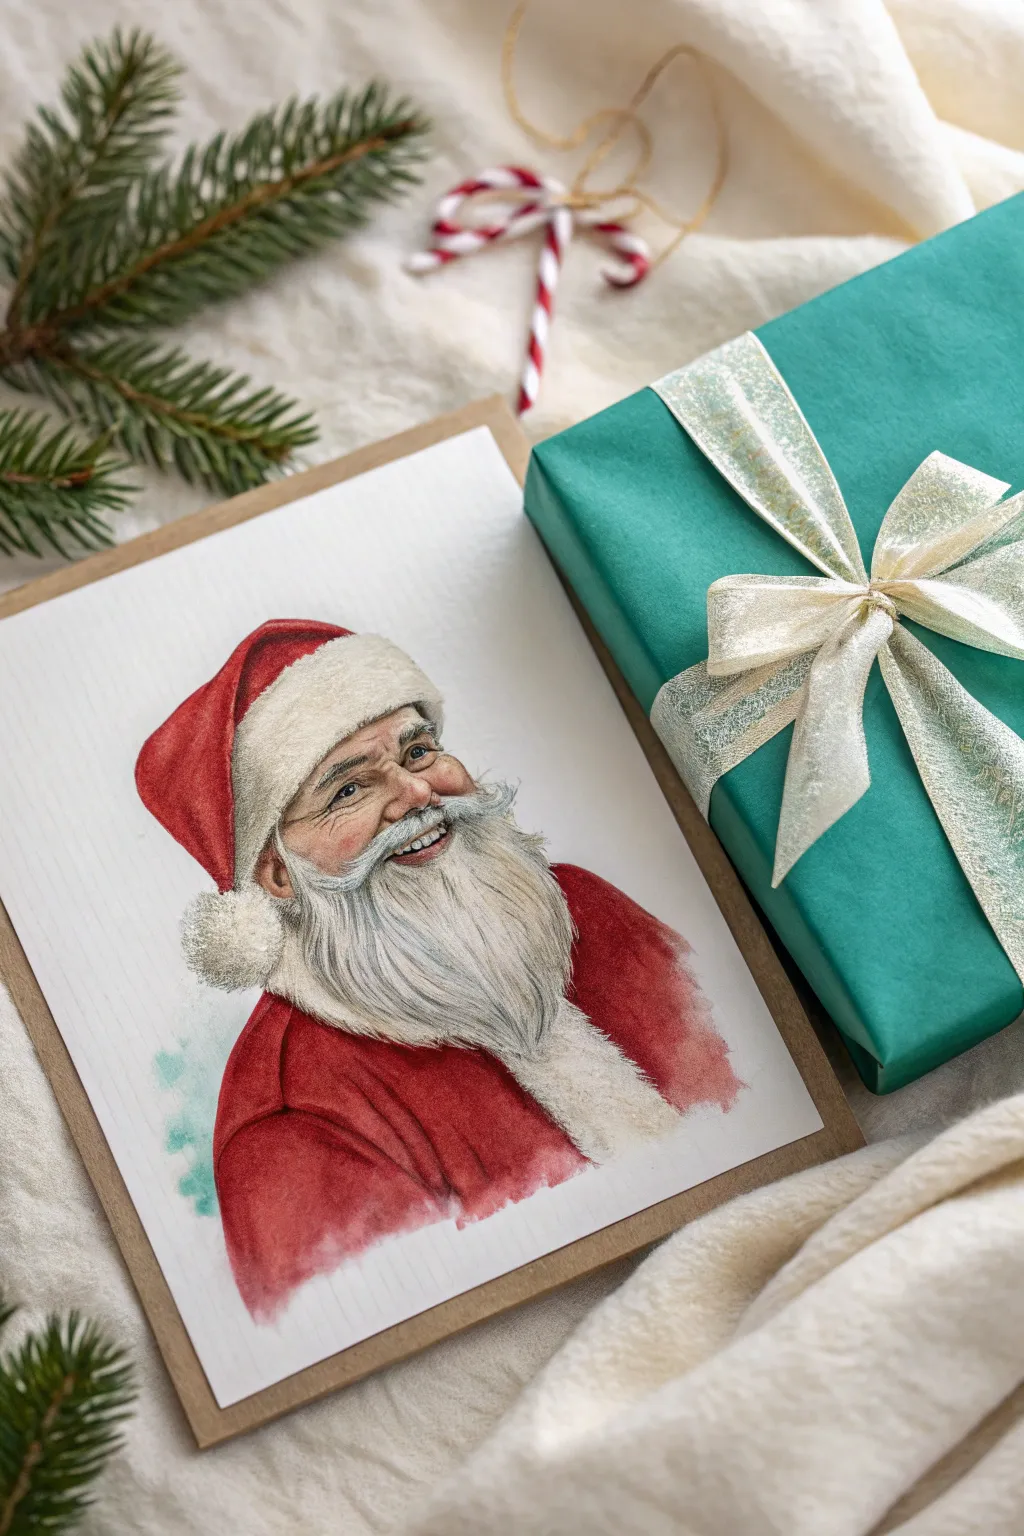
Capture the warmth of the holiday season with this cheerful watercolor portrait of St. Nick. This project focuses on building realistic skin tones and soft, fluffy textures for a classic Christmas card look.
Step-by-Step Guide
Materials
- Cold press watercolor paper (300 gsm)
- Watercolor paints (Alizarin Crimson, Cadmium Red, Yellow Ochre, Burnt Sienna, Payne’s Gray, Ultramarine Blue)
- White gouache or white gel pen
- Round watercolor brushes (sizes 2, 6, and 10)
- H or HB pencil for sketching
- Kneaded eraser
- Masking fluid (optional)
- Palette for mixing
- Two jars of water
- Paper towels
Step 1: Sketching the Guidelines
-
Establish the Head Shape:
Begin by lightly sketching a large oval for Santa’s head. Since he is looking slightly upward and to the right, tilt the axis of the oval accordingly. Don’t press too hard with your pencil, as we want the lines to be barely visible under the paint. -
Map Facial Features:
Draw faint horizontal lines to mark the placement of the eyes, nose, and mouth. Position the eyes slightly above the center line and sketch the triangular shape of the nose just below. -
Outline the Beard and Hat:
Frame the face with the flowing shapes of the beard and mustache. Then, add the iconic Santa hat, ensuring the white fur trim sits snugly over the forehead and the hat flops down to the left side. -
Refine the Details:
Sharpen your sketch by defining the crinkles around the eyes and the curve of the smile. Use your kneaded eraser to lift up any stray graphite, leaving only the faintest guide for your brush.
Rosy Cheek Trick
If the cheeks dry too pale, lightly re-wet just that area with clean water and drop in concentrated red pigment. It spreads perfectly for a flushed look.
Step 2: Painting the Skin Tones
-
Base Skin Wash:
Mix a watery wash of Yellow Ochre and a tiny touch of Alizarin Crimson. Apply this pale peach tone to the face area avoiding the eyes and beard. Keep this layer wet and light. -
Adding Warmth:
While the paper is still slightly damp, drop in a mix of Cadmium Red and Burnt Sienna onto the cheeks and nose to create that signature rosy glow. Let the colors bleed naturally for soft edges. -
Deepening Shadows:
Once the first layer is dry, mix Burnt Sienna with a dot of Ultramarine Blue to create a shadow tone. Paint under the hat brim, beneath the nose, and in the eye sockets to add dimension. -
Painting the Eyes:
Switch to your size 2 brush. Carefully paint the irises with a blue or brown tone, leaving a tiny speck of white paper for the highlight. Use a dark grey mix to define the pupils and the upper lash line.
Turn it into a Card
Mount your finished painting onto heavy kraft paper stock. Use double-sided tape for a clean finish that doesn’t buckle the paper.
Step 3: The Hat and Suit
-
Vibrant Red Base:
Load your number 10 brush with a rich mix of Alizarin Crimson and Cadmium Red. Paint the main body of the hat and the visible portion of the jacket. I like to leave tiny accidental gaps of white paper here and there to suggest texture. -
Building Fabric Shadow:
While the red is drying, mix Payne’s Gray into your red puddle to create a burgundy shadow color. Paint this into the folds of the hat and the creases of the jacket to give the fabric weight. -
Softening Edges:
Use a clean, damp brush to soften the transition between the bright red highlights and the darker shadowed folds so the velvet looks soft rather than rigid. -
Cool Background Accents:
To make the red pop, add a very loose, watery wash of turquoise or cool green near the bottom left shoulder, letting it fade out into the white paper.
Step 4: Beard and Fur Texture
-
Shadowing the Whites:
The beard isn’t pure white; it needs shadows to have volume. Mix a very dilute grey using Ultramarine Blue and Burnt Sienna. Paint broad strokes following the direction of hair growth in the beard and the fur trim. -
Defining Strands:
Once the grey wash is dry, use your smallest brush with a slightly darker grey mix to paint individual hair strands. Focus these darker lines near the mouth and under the chin where shadows gather. -
Fur Texture Dabbing:
For the fluffy hat trim and pom-pom, use a scumbling technique or stippling with a mostly dry brush and pale grey paint to create a fuzzy, irregular texture. -
Final Highlights:
If you lost any bright whites during painting, use white gouache or a gel pen to add sharp hairs to the mustache and beard, and a crisp highlight to the eyes and nose.
Once dry, you will have a heartwarming portrait ready to spread holiday cheer
BRUSH GUIDE
The Right Brush for Every Stroke
From clean lines to bold texture — master brush choice, stroke control, and essential techniques.
Explore the Full Guide
Full-Body Santa With Belt and Buckle
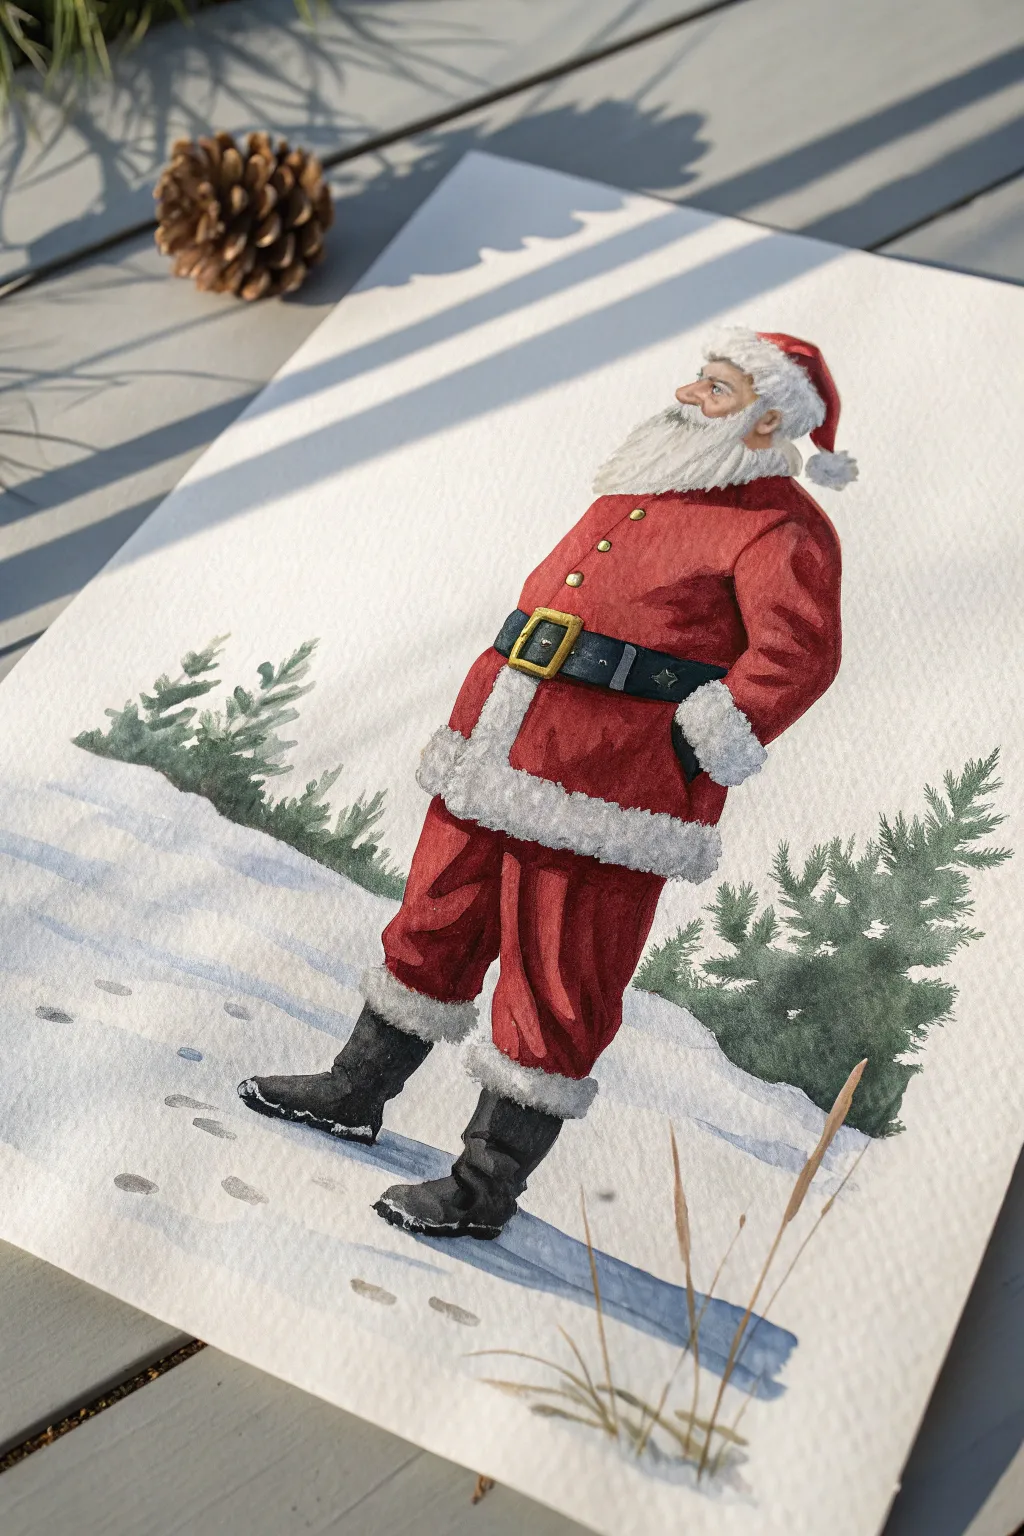
Capture the timeless spirit of the holidays with this detailed watercolor painting of Santa Claus standing in a snowy landscape. The artwork features a realistic, vintage-inspired Santa with a classic red suit, a sturdy belt buckle, and soft snow textures.
Detailed Instructions
Materials
- Cold press watercolor paper (300 gsm)
- Pencil (HB or 2B) and kneaded eraser
- Watercolor paints (Alizarin Crimson, Cadmium Red, Burnt Sienna, Ultramarine Blue, Payne’s Grey, Yellow Ochre, Titanium White/Gouache)
- Round watercolor brushes (Size 2, 4, and 8)
- Clean water cups and paper towels
- Masking fluid (optional but recommended for snow trim)
Step 1: Sketching and Preparation
-
Map out the pose:
Begin with a light pencil sketch, positioning Santa’s body so he is looking slightly upward and to the left. His posture should lean back just a bit, with hands tucked casually into pockets or resting on hips. -
Refine the details:
Draw the specific shapes of the Santa suit, including the wide belt with the square buckle. Sketch the fluffy texture for the beard, hat trim, and boot cuffs, keeping your lines faint so they won’t show through the paint. -
Establish the background:
Lightly pencil in the horizon line for the snowbank and add rough, jagged shapes for the pine trees on either side of the figure. -
Protect the whites:
If you are using masking fluid, apply it carefully to the fur trim on the hat, cuffs, jacket hem, beard, and the white highlights in the snow. Let this dry completely.
Step 2: Painting the Suit
-
Base red layer:
Mix a vibrant Santa red using Cadmium Red with a touch of Alizarin Crimson. Apply a wash to the jacket and pants, avoiding the white fur areas and the belt. -
Building shadows:
While the red is still slightly damp, drop in a darker mix (add a tiny bit of Ultramarine Blue or Payne’s Grey to your red) into the folds of the fabric, specifically under the arm, near the belt, and between the legs. -
Deepening creases:
Wait for the first layer to dry. With a smaller Size 4 brush, paint decisive, darker red shapes to create the deep wrinkles in the sleeves and pants legs, giving the fabric weight and volume. -
Adding gold details:
Use a mix of Yellow Ochre and a tiny bit of brown to paint the belt buckle and the buttons. Leave a tiny sliver of white paper unpainted on the metal for a reflective shine. -
Painting the belt:
Fill in the belt with a deep, nearly black mixture (Payne’s Grey with Burnt Sienna). Lift a little color out of the center before it dries to create a rounded, leather look.
Wet-on-Wet for Fabric
To make the red suit look soft like traditional velvet, dampen the area with clean water first before touching your brush to the paper. The paint will bleed slightly, creating soft, fabric-like edges.
Step 3: Face, Boots, and Textures
-
Skin tones:
Mix a pale wash of Burnt Sienna and a touch of red for the face. Paint the skin, adding a slightly rosier tint to the nose and cheeks to show the cold weather nip. -
Painting the boots:
Use a concentrated black or dark grey for the boots. Work wet-on-dry to get sharp edges, leaving the top edge where it meets the fur trim distinct. -
Fur texture:
Remove the masking fluid if you used it. Mix a very watery, pale grey-blue. Using the tip of your smallest brush, paint tiny, jagged shadows into the white areas of the beard and fur trim to suggest fluffiness, rather than outlining them completely.
Add Snow Texture
Once the trees are dry, enhance the winter feel by flicking a stiff toothbrush loaded with white gouache over the painting. This creates a fine mist of falling snow without needing to paint individual flakes.
Step 4: Background and Finishing Touches
-
Painting the pine trees:
Mix a muted dark green using Sap Green and Indigo or blue. Use a scrappy, stippling motion with your brush to create the texture of pine needles, keeping the edges rough and organic. -
Snow shadows:
Dilute your Ultra Marine or Cobalt Blue significantly with water. Paint sweeping, horizontal shadows across the white foreground to indicate uneven snow terrain. -
Adding footprints:
I like to add a few darker grey-blue oval shapes behind the boots to show footprints, deepening the color on one side of each print to show depth. -
Foreground grasses:
With a fine liner brush and a mix of Yellow Ochre and brown, flick a few quick, vertical strokes in the bottom right corner to represent dried winter grasses poking through the snow. -
Final highlights:
If needed, use a little opaque white gouache to reclaim bright highlights on the nose, belt buckle, or snow-dusted tree tops to make the image pop.
Frame your finished piece to add a touch of classic Christmas charm to your holiday decor
Gnome-Style Santa With Hidden Eyes
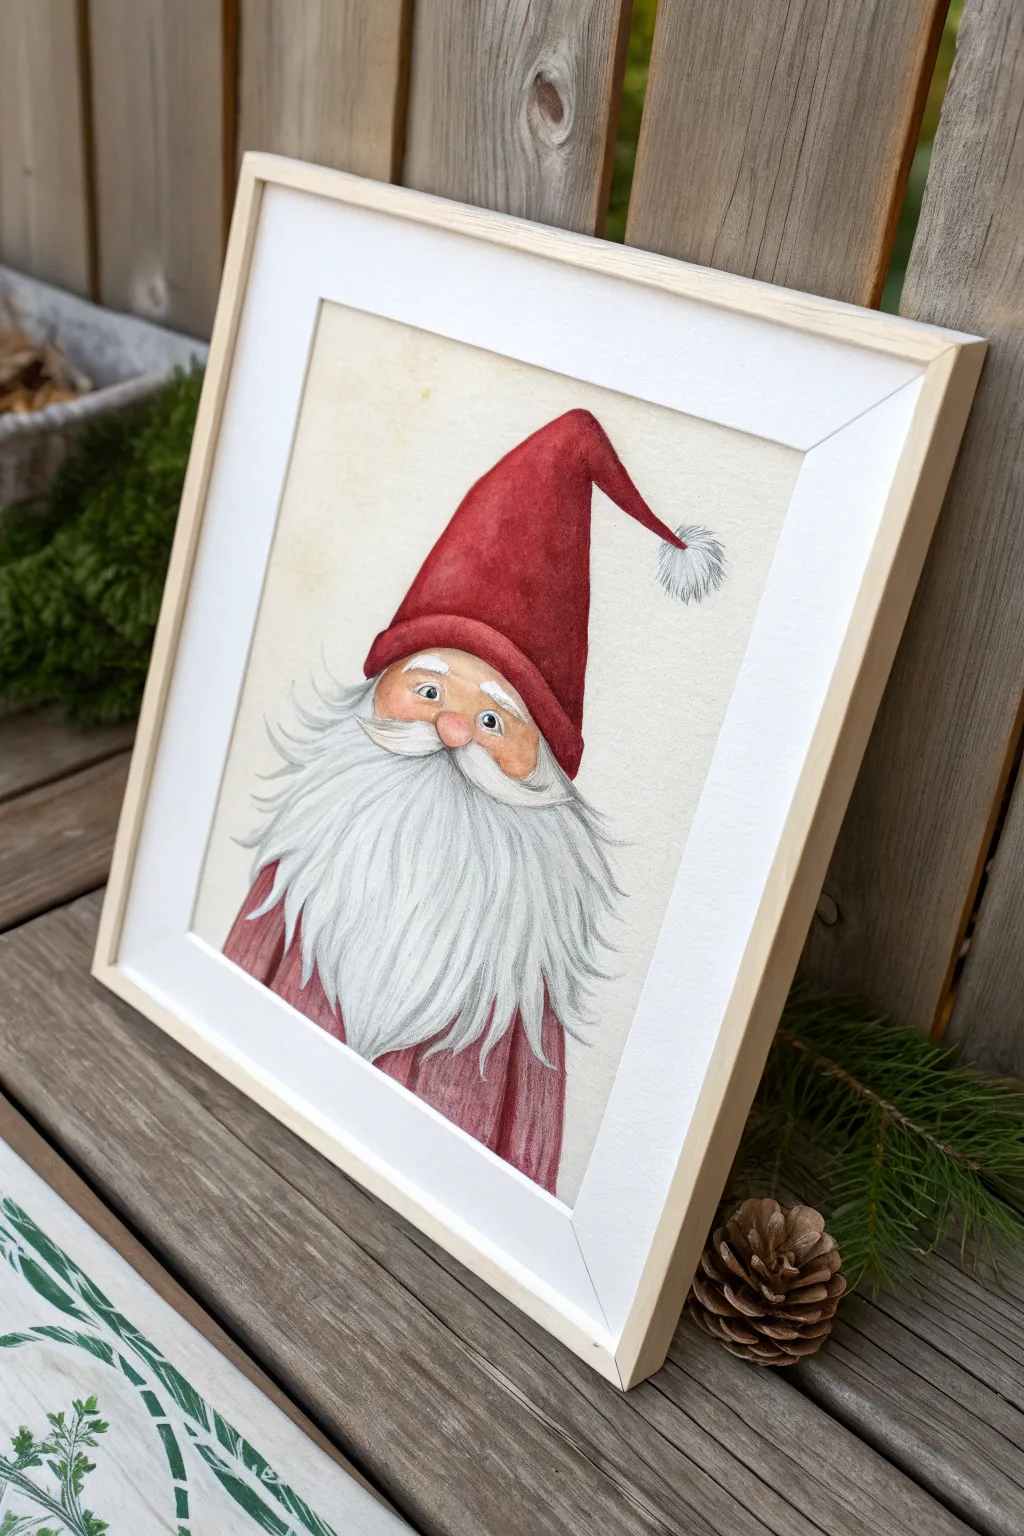
This charming project captures the essence of a Nordic-style Santa with a focus on clean lines, soft textures, and that signature tall pointy hat. Using watercolor and pencil, you’ll create a friendly, bearded character that feels both traditional and whimsical.
Detailed Instructions
Materials
- Hot press watercolor paper (smooth texture)
- Watercolor paints (Alizarin Crimson, Burnt Sienna, Payne’s Grey, Yellow Ochre)
- Graphite pencils (HB and 2B)
- Fine liner pen (optional, faint grey or brown)
- Round watercolor brushes (sizes 2, 4, and 8)
- White gouache or white gel pen
- Masking fluid (optional)
- Paper towels
- Water jar
Step 1: Sketching the Character
-
Outline the hat shape:
Begin by lightly sketching a tall, slightly curved triangle for the hat. Let the tip flop over to the right side for a relaxed look, ending in a small circle for the pom-pom. -
Position the face:
Directly under the hat’s brim, draw a shallow semi-circle for the visible part of the face. In the center of this area, sketch a rounded button nose. -
Draft the beard structure:
From the sides of the hat brim, flow outward and downward to create the beard’s volume. It should be wide and take up the bottom two-thirds of the portrait, narrowing slightly near the bottom edge. -
Add facial details:
Draw two small arched eyes above the nose. Sketch a flowing mustache that starts under the nose and sweeps out to the sides, resting on top of the main beard mass. -
Define the robe:
Indicate the shoulders and chest of the red robe peeking out from the sides and bottom of the beard. Keep these lines simple, as the beard is the focal point.
Muddy colors?
If your beard shadows look dirty, your grey wash is too dark. Dilute it more! You want barely-there shadows. You can always add more layers, but you can’t remove dark paint easily.
Step 2: Painting the Hat and Face
-
Base coat for the hat:
Mix a watery wash of Alizarin Crimson with a touch of Burnt Sienna. Paint the entire hat area, excluding the pom-pom. Keep the wash uneven to suggest crushed velvet texture. -
Deepen the hat shadows:
While the hat is still slightly damp, drop in more saturated red along the left edge and directly under the fold of the hat tip to create volume. -
Skin tones:
Mix a very pale wash of Burnt Sienna and Yellow Ochre. paint the face area and the nose. Let this dry completely. -
Rosy cheeks and nose:
I like to take a diluted red mix and gently glaze the nose and cheek area to give him a cold-nipped, wintery look. Soften the edges with a clean, damp brush. -
Eye details:
Using a fine brush (size 2) and a dark grey or brown mix, carefully paint the pupils and outline the eyes. Leave a tiny speck of white paper for the highlight, or add it later with white gouache.
Make it Sparkle
Mix a tiny pinch of iridescent watercolor medium or silvery mica powder into the white gouache for the final beard highlights. It gives a frosty, magical shimmer.
Step 3: Detailed Beard Texture
-
Plan the hair flow:
Visualize the beard in distinct clumps rather than individual hairs. Use your pencil to lightly re-define the flow of the mustache and the main beard sections. -
Initial beard shading:
Using a very watery grey wash (Payne’s Grey + lots of water), paint the shadowed areas between the beard clumps. Leave the tops of the clumps white to represent the lightest hairs. -
Building depth:
Once the first layer is dry, go back with a slightly darker grey. Paint thin, hair-like strokes focusing on the underside of the mustache and the deepest parts of the beard to separate the layers. -
Pencil definition:
When the paint is bone dry, use a sharp HB pencil to draw fine lines following the flow of the beard hairs. This mixed-media technique adds crisp texture without over-darkening the white beard. -
Adding the glossy pom-pom:
Stipple a very faint grey wash onto the pom-pom area to suggest fluffiness, keeping the center largely white.
Step 4: Finishing Touches
-
Painting the robe:
Paint the visible robe sections with a slightly darker red than the hat, adding violet to the mix for shadow areas near the beard edges. -
Final highlights:
Using white gouache or a gel pen, add crisp white strokes to the very top of the mustache and the brightest parts of the beard for extra pop. -
Vintage background effect:
To mimic the aged paper look in the photo, apply a very, very uneven wash of diluted Yellow Ochre or tea around the figure, fading out toward the edges of the paper.
Frame your gnome in light timber to complete the scandi-style presentation

PENCIL GUIDE
Understanding Pencil Grades from H to B
From first sketch to finished drawing — learn pencil grades, line control, and shading techniques.
Explore the Full Guide
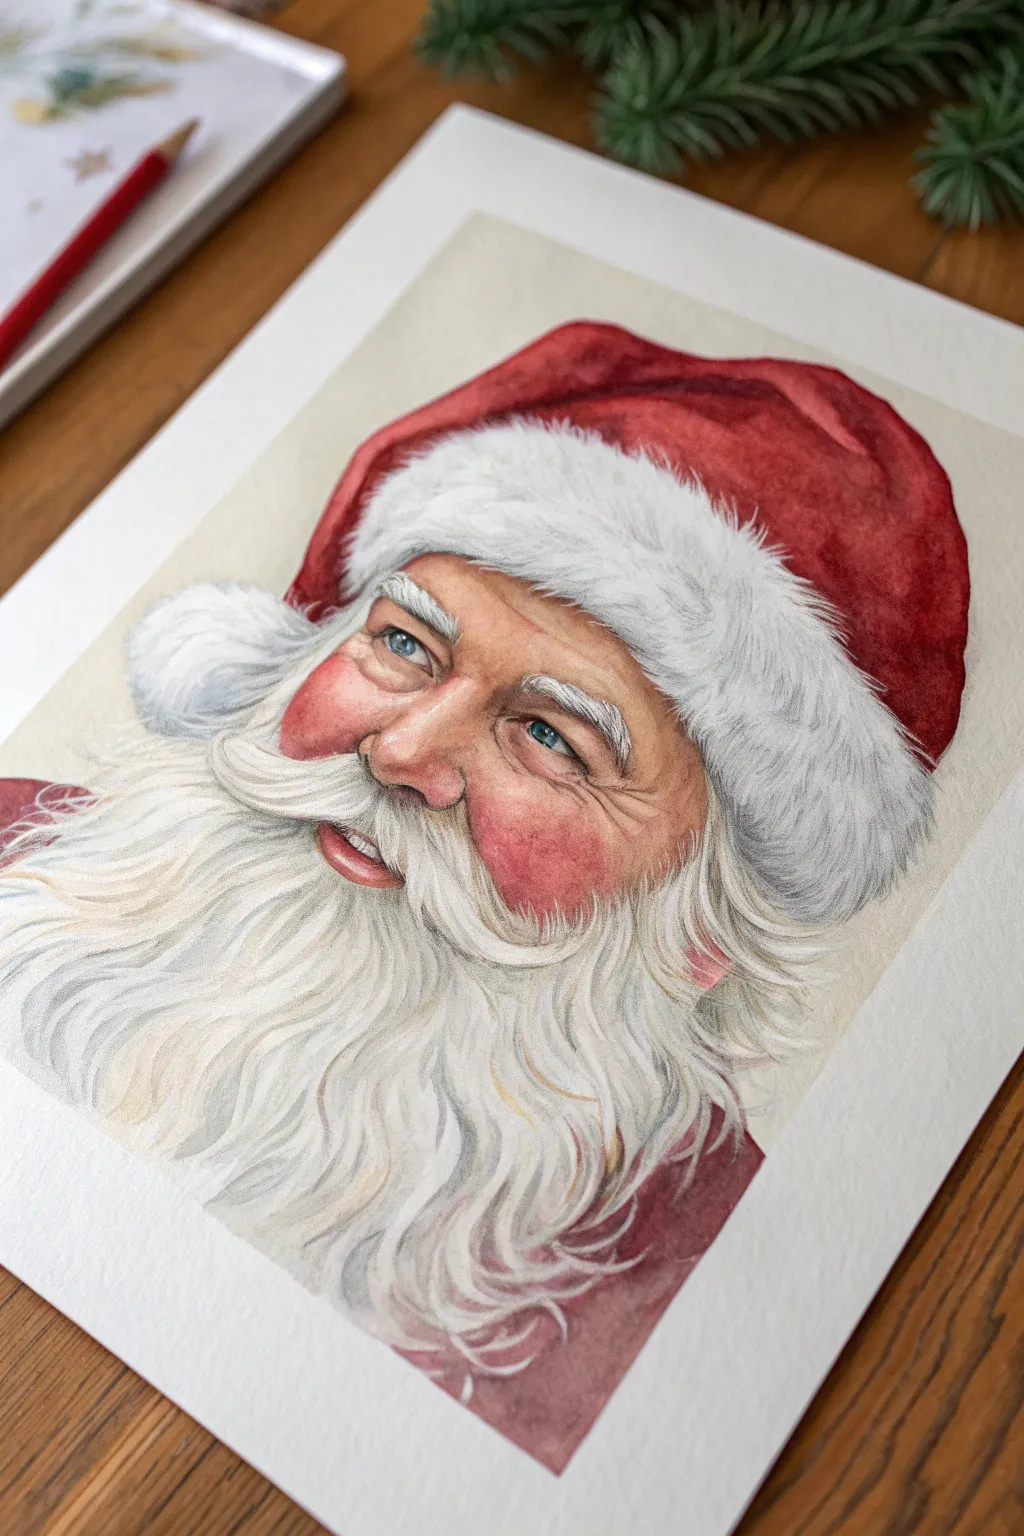
Santa Selfie Portrait Expression Study
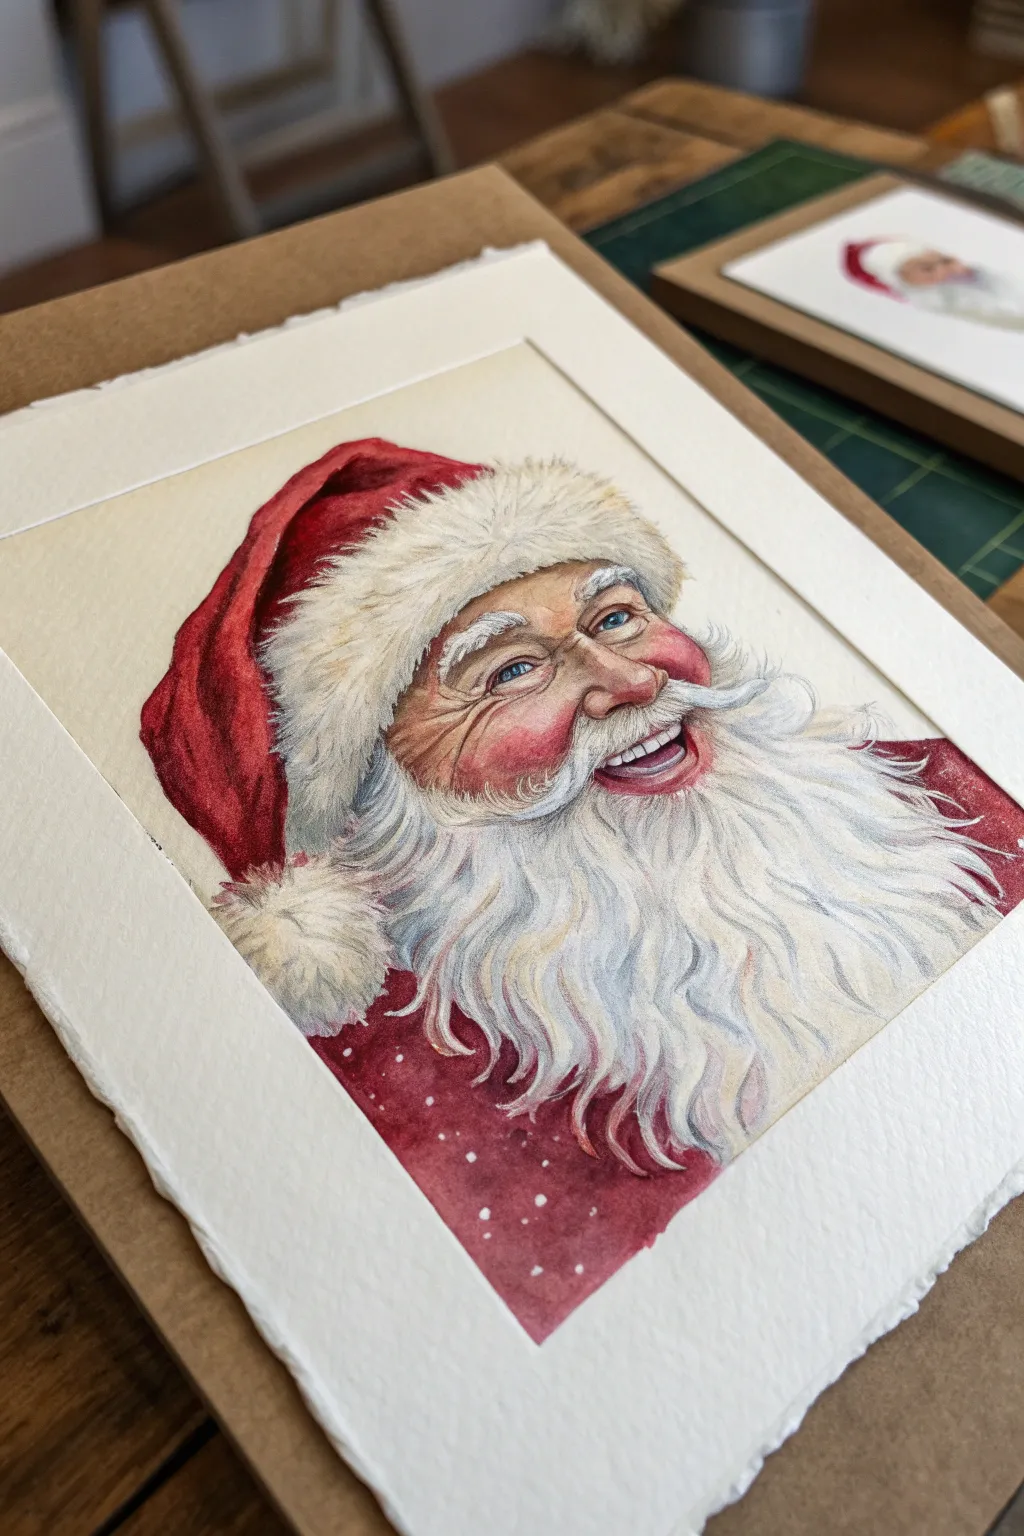
Capture the infectious holiday spirit with this remarkably detailed portrait of a laughing Santa Claus. This project focuses on rendering realistic skin tones, fluffy fur textures, and a twinkle in the eye using a blend of watercolor washes and fine detailing.
How-To Guide
Materials
- High-quality cold press watercolor paper (300gsm)
- Watercolor paints (Alizarin Crimson, Cadmium Red, Burnt Sienna, Yellow Ochre, Ultramarine Blue, Hooker’s Green)
- White gouache paint
- Round watercolor brushes (Size 8 for washes, Size 2 and 00 for details)
- Pencil (HB) and kneaded eraser
- Masking fluid (optional)
- Two jars of water
- Paper towels
- Mixing palette
Step 1: Drafting the Joyful Expression
-
Structural sketch:
Begin with a loose oval for the head. Mark the eye line slightly higher than center to account for the angle, and draw a curved centerline to indicate his head is turned. Sketch the large shapes of the hat and beard first to frame the face. -
Defining features:
Lightly pencil in the facial features. Focus heavily on the smile lines around the eyes (crows feet) and the cheeks, as these define the joyful expression. Draw the teeth carefully, ensuring the bottom lip curves upward. -
Refining the sketch:
Erase your structural lines with a kneaded eraser until only faint guidelines remain. Any dark pencil marks will show through the watercolor later, so keep it very subtle.
Muddy Beard Blues?
Keep separate water jars! Use one jar exclusively for cleaning brushes with red/skin tones and another for your beard greys. If red water touches your white beard area, it will turn pink.
Step 2: painting the Skin Tones
-
Base flesh wash:
Mix a very watery wash of Burnt Sienna and a touch of Yellow Ochre. Apply this to the entire face area, avoiding the eyes, teeth, and beard. Keep this layer pale and transparent. -
Rosy cheeks:
While the base layer is still slightly damp, drop in a mix of Alizarin Crimson and Cadmium Red onto the cheeks and the nose tip. Let the color bleed naturally into the base tone for that classic Santa flush. -
Building shadows:
Once the first layers are dry, mix Burnt Sienna with a tiny bit of Ultramarine Blue to create a shadow tone. Paint the shadows under the hat brim, beneath the nose, and inside the deep wrinkles around the smiling eyes. -
Deepening contrast:
Apply a second glaze of the red mix to the cheeks to really make them pop. Add defining lines around the nostrils and eyelids using a size 2 brush and a more concentrated brown mix.
Step 3: The Iconic Suit and Hat
-
Velvet red base:
Mix a rich, saturated red using Alizarin Crimson and Cadmium Red. Paint the main body of the hat and the visible shoulder area. Leave small, random specks of white paper showing to suggest fabric texture or snow catching the light. -
Textural shadows:
While the red is drying, mix Alizarin Crimson with a touch of Green or Blue to create a deep burgundy. Paint the folds and creases in the hat fabric to give it volume. -
Shoulder details:
For the suit area at the bottom, use the deep burgundy mix to create a mottled texture. I like to use a ‘dry brush’ technique here to make the fabric look like heavy wool or velvet. -
Adding snowflakes:
Once the red suit area is completely bone-dry, use opaque white gouache to dot tiny snowflakes onto the red fabric using the tip of your smallest brush.
Level Up: 3D Sparkle
Mix a tiny amount of iridescent medium or fine glitter into your white gouache for the final snowflakes on the red suit. It adds a magical shimmer.
Step 4: Rendering Fur and Hair
-
Shadow mapping:
Review the beard and hat trim. The beard isn’t pure white; it has shadows. Mix a very pale, watery blue-grey. Paint the shapes of the shadow clumps in the beard, leaving the highlights as pure white paper. -
Defining strands:
Using your 00 fine liner brush and a slightly darker grey mix, paint individual hair strands within the shadow areas. Follow the direction of the hair growth, curving outward from the chin. -
Hat trim texture:
For the fur on the hat, use a stippling motion with your pale grey mix to create a fluffy, dense texture, rather than long strands. -
Yellowing creates age:
Add extremely subtle, barely-there glazes of Yellow Ochre to parts of the beard and fur trim. This warmth makes the white hair look more natural and less sterile.
Step 5: Final Details
-
The eyes:
Paint the irises a bright, clear blue. Add the pupil with concentrated black/brown. Most importantly, leave a tiny crisp white highlight in each eye to create that magical sparkle. -
Teeth and mouth:
Paint the space inside the mouth a dark, warm brown (not black). Shade the teeth slightly with pale grey near the gums, keeping the biting edges bright white. -
Highlight recovery:
Use your white gouache to add sharp, final overlapping hairs on top of the red suit and the skin where the beard meets the face. This layering adds incredible depth. -
Snow splatter:
Load a stiff brush with white gouache and gently flick it over the red areas of the painting for a final snowfall effect.
Step back and admire the warmth and joy radiating from your festive portrait
Santa With Holly and Berry Accents
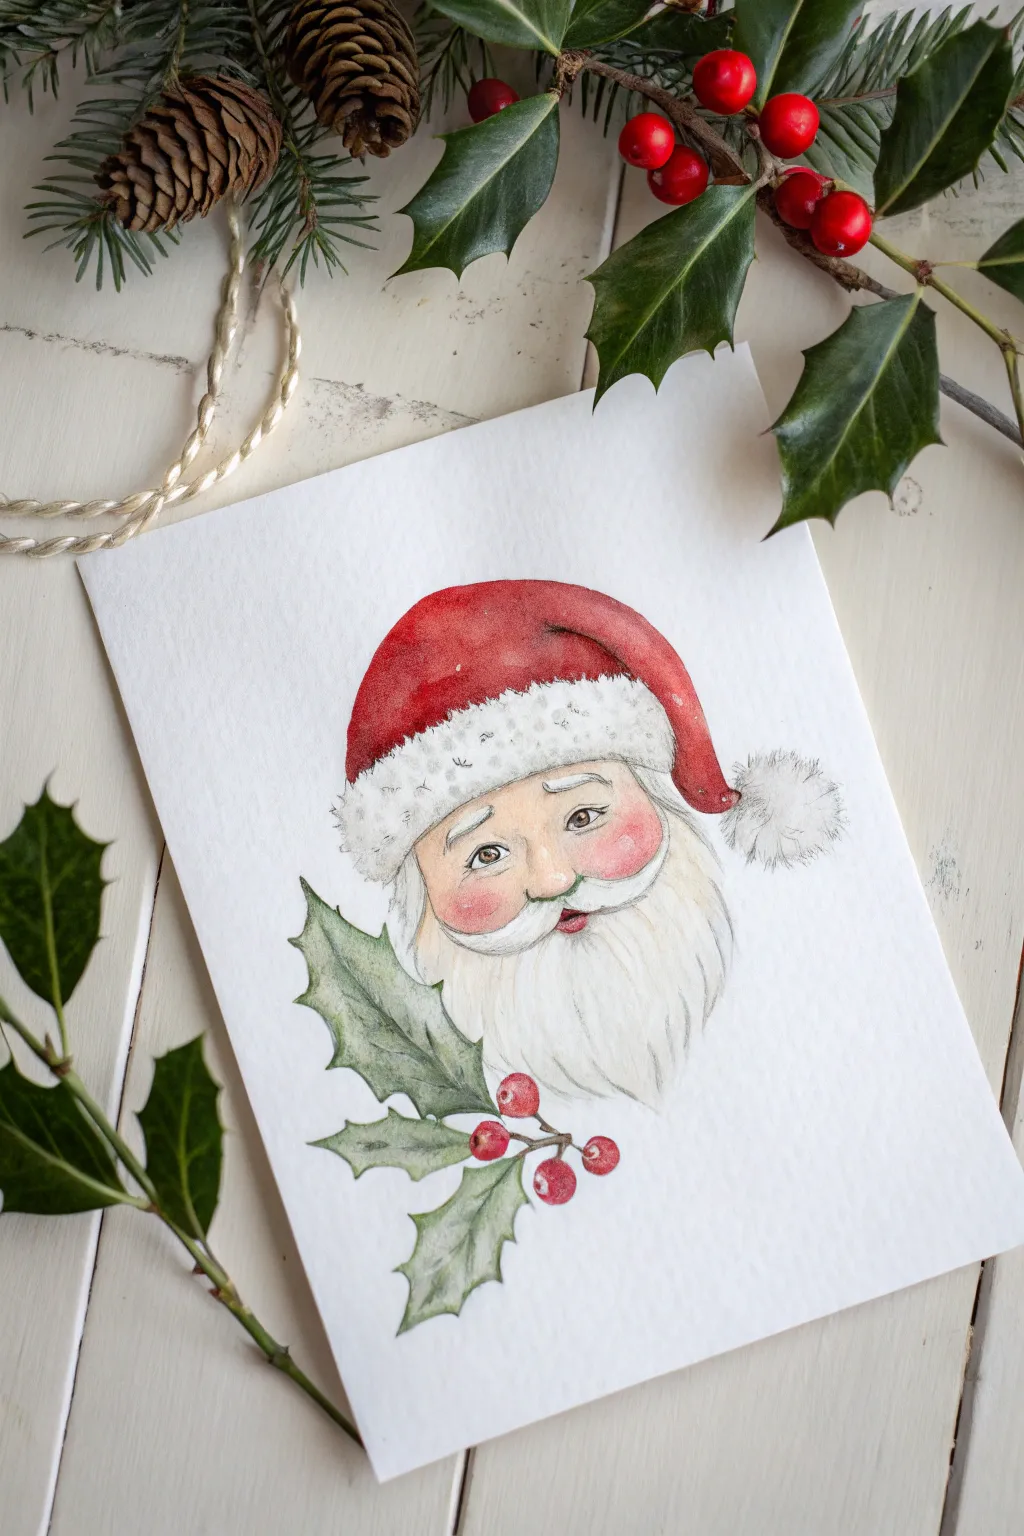
This charming project captures the classic warmth of Christmas with a soft, illustrative watercolor portrait of Santa Claus. His gentle expression and rosy cheeks are framed perfectly by a sprig of festive holly, creating a timeless holiday keepsake.
Step-by-Step Guide
Materials
- Cold press watercolor paper (300 gsm)
- Watercolor paints (Alizarin Crimson, Sap Green, Burnt Sienna, Yellow Ochre, Lamp Black, Indigo)
- Round watercolor brushes (Size 2, 4, and 8)
- HB pencil for sketching
- Kneaded eraser
- White gel pen or white gouache
- Two jars of water
- Paper towels
Step 1: Sketching the Composition
-
Map out the head shape:
Begin by lightly tracing a large circle for Santa’s head in the center of your paper. Leave enough room at the bottom left for the holly sprig later. -
Define the face and beard:
Within the circle, draw a gentle curve for the nose and the mustache flowing outwards. Sketch the outline of the beard, letting it taper softly at the bottom, and draw the brim of the hat resting low on his forehead. -
Add facial features:
Draw two almond shapes for the eyes with small creases at the corners to suggest a smile. Add eyebrows just under the hat brim and a small, smiling mouth peeking out from the mustache. -
Sketch the holly accent:
At the bottom left, near the beard, sketch three jagged holly leaves connected by a thin stem. Add a cluster of 3-4 round berries where the leaves meet. -
Clean up lines:
Use your kneaded eraser to lighten the pencil lines until they are faintly visible. This prevents graphite from dirtying your watercolor washes later.
Muddy colors?
Wait for each section—especially the red hat and green holly—to dry completely before painting adjacent areas. This prevents festive colors from bleeding into a brown mess.
Step 2: Painting the Skin and Face
-
Base skin tone:
Mix a very dilute wash of Yellow Ochre and a tiny touch of Burnt Sienna. Apply this to the face area, navigating carefully around the eyes, eyebrows, and mustache. -
Adding the rosy flush:
While the base layer is still slightly damp, drop in a watery mix of Alizarin Crimson onto the cheeks and the tip of the nose to create that classic frost-bitten glow. -
Define the eyes:
Once the skin is dry, use a size 2 brush and a mix of Burnt Sienna and Indigo to carefully paint the pupils and the lash line. Leave a tiny speck of white paper in each eye for a highlight. -
Deepen facial shadows:
Mix a slightly darker skin tone using Burnt Sienna. Glaze this under the hat brim, under the nose, and below the bottom lip to add dimension to the face.
Step 3: Hat and Hair Details
-
Paint the red cap:
Load your size 8 brush with Alizarin Crimson. Paint the main body of the hat, starting with a concentrated color on the shadowed side and diluting it with water as you move toward the highlight area for a rounded effect. -
Shadows on the trim:
For the white fur trim and pom-pom, use a very watery grey mix (Indigo plus plenty of water). Dab this loosely on the bottom/shadowed edges of the fluffy parts to give them volume without painting them solid grey. -
Create beard texture:
I like to use a size 4 brush with a pale grey-brown wash for the beard. Paint sweeping, curved strokes following the direction of hair growth, leaving plenty of white paper showing to keep the beard looking white. -
Deepen beard shadows:
Once the first beard layer is dry, add slightly darker grey strokes just under the mustache and near the neck to create depth and separation.
Add some texture
Sprinkle fine salt onto the wet red paint of Santa’s hat. Brush it off when fully dry to create a mottled, frosty texture that looks like old velvet fabric.
Step 4: Holly and Finishing Touches
-
Paint the holly leaves:
Mix Sap Green with a touch of Indigo for a muted, vintage green. Paint the leaves, letting the color pool slightly at the jagged tips for variation. -
Color the berries:
Use bright Alizarin Crimson for the berries. Leave a tiny white spot on each berry to represent the shine, or lift the color out with a thirsty brush while wet. -
Stem work:
Connect the leaves and berries with a thin line of Burnt Sienna using your smallest brush. -
Add white highlights:
Using a white gel pen or opaque white gouache, add tiny distinct highlights to the eyes, the top of the berries, and a few stray hairs in the beard for extra sparkle.
Once dry, you can frame this cheerful portrait or scan it to create custom holiday greeting cards for your family


Santa in a Swirling Snowstorm
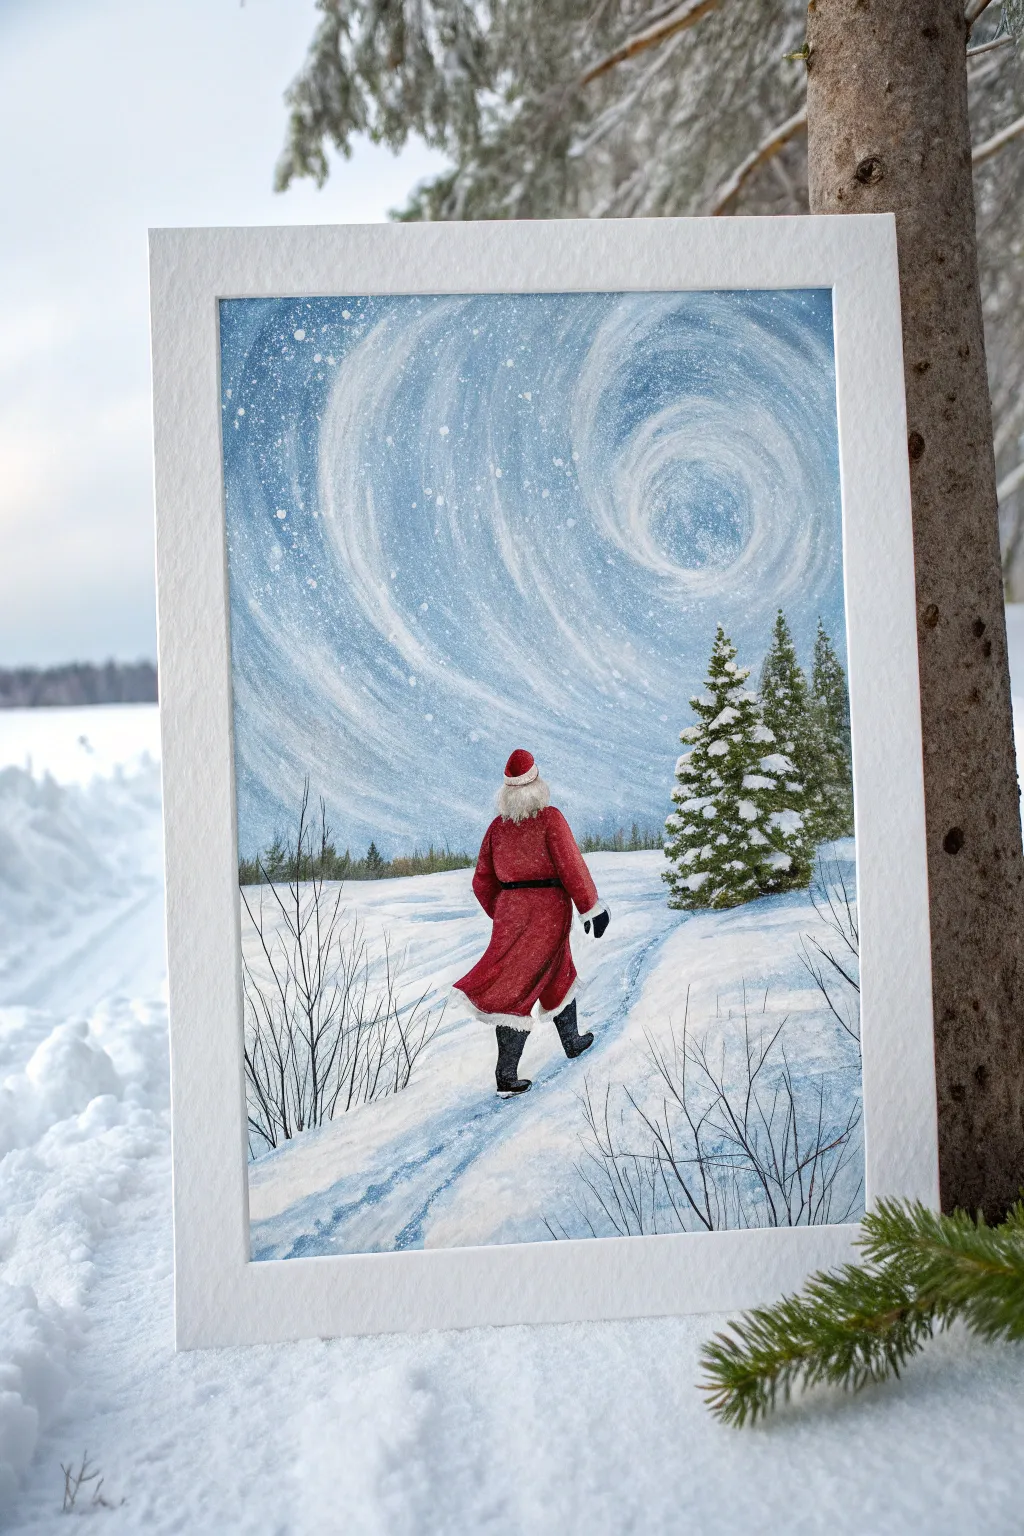
Capture the magic of a winter wanderer with this atmospheric acrylic painting, featuring a lone Santa figure braving a fantastical snowstorm. The piece combines expressive, swirling brushstrokes in the sky with crisp, realistic details on the snowy pines and red coat.
How-To Guide
Materials
- Heavyweight watercolor paper or canvas board (approx. 9×12 inches)
- Acrylic paints: Titanium White, Ultramarine Blue, Phthalo Blue, Alizarin Crimson, Cadmium Red, Burnt Umber, Hooker’s Green, Carbon Black
- Various brushes: Large flat brush (1 inch), medium filbert, lush fan brush, fine liner brush
- Palette knife or old toothbrush (for splattering)
- Masking tape
- Water container and paper towels
- White gel pen (optional for fine snow details)
Step 1: Setting the Sky and Ground
-
Prepare the Horizon:
Begin by lightly sketching a low horizon line about one-third of the way up the paper. Sketch the placement of the large pine trees on the right and the central figure of Santa to guide your painting. -
Base Sky Layer:
Mix Titanium White with a touch of Ultramarine Blue to create a very pale, icy blue. Using your large flat brush, cover the entire sky area with broad, sweeping strokes. -
Creating the Vortex:
While the base is still slightly wet, mix a deeper Phthalo Blue. Start high on the left and curve your strokes downward and to the right, creating a circular, vortex-like motion that centers above the pine trees. -
Building Texture:
Load a filbert brush with heavy body Titanium White. Follow the blue curves you just painted, dry-brushing thick white streaks to simulate wind-swept snow clouds swirling into the vortex center. Leave some blue showing through for depth. -
Adding the Atmosphere:
Dilute a tiny amount of white paint with water to a milky consistency. Splatter this over the sky area using an old toothbrush or by tapping a loaded brush against a handle to create the look of distant falling snow.
Vortex Flow Tip
Don’t overmix the sky colors! Letting the blue and white streak naturally on the canvas creates a much more convincing sense of motion and wind than perfectly blended gradients.
Step 2: Painting the Landscape
-
Snowy Ground Base:
Paint the ground area with Titanium White. While wet, blend in very faint streaks of diluted Ultramarine Blue to represent shadows and the uneven texture of snow drifts. -
Path Definition:
Mix a slightly stronger blue-grey using White and a dot of Black or Payne’s Grey. Paint a subtle, winding path starting from the bottom left, leading towards the center where Santa will walk. Keep edges soft. -
Distant Trees:
Along the horizon line, dab in a mix of Green and Burnt Umber to suggest a distant forest line. Keep this area slightly blurry to push it into the background. -
Foreground Pines:
Using Hooker’s Green mixed with a little Black for a deep forest tone, paint the basic triangle shapes of the pine trees on the right. Use a fan brush or the corner of a flat brush to create jagged, needle-like edges. -
Snow on Branches:
Once the green trees are dry, take thick Titanium White on a round brush. Dab heavy ‘clumps’ of snow onto the top edges of the pine branches, ensuring the dark green still peeks through underneath.
Paint Transparency?
If your red coat looks too transparent or streaky, let the first layer dry completely. Apply a second coat or underpaint the area with white first to make the red pop.
Step 3: The Figure of Santa
-
Base Coat Red:
Fill in Santa’s coat and hat with a mix of Alizarin Crimson and Cadmium Red. This creates a rich, classic Christmas red rather than a bright, jarring one. -
Shadows and Folds:
Mix a tiny bit of Burnt Umber into your red. Paint shadows under the arms, beneath the belt area, and along the flowing bottom hem to suggest heavy fabric movement. -
Fur Trim:
Use a small brush to stipple Titanium White onto the cuffs, hat brim, and coat hem. Add a tiny touch of light grey to the underside of the fur to give it volume and fluffiness. -
Boots and Belt:
Paint the boots and belt with Carbon Black. Add a small white highlight on the top curve of the boots to make them look like shiny leather, and paint the hands/gloves black. -
Santa’s Hair:
For the hair shown under the back of the hat, use small, vertical strokes of White mixed with a tiny drop of grey or ochre to distinguish it from the bright white fur trim.
Step 4: Final Details
-
Bare Branches:
Mix a thin, inky consistency of Black and Burnt Umber. Using your finest liner brush, paint delicate, spindly shrub branches in the bottom left corner, overlapping the snow. -
Footprints:
Add small, dark blue-grey depressions behind Santa’s boots to show footprints, grounding him in the scene so he doesn’t look like he’s floating. -
Foreground Snow Splatter:
Finish by flicking a little more white paint, specifically focusing on the bottom foreground and over the trees, to bring the snowfall visually closer to the viewer.
Step back and admire the chilly yet heartwarming winter scene you have created
Santa and the Glowing Light Background
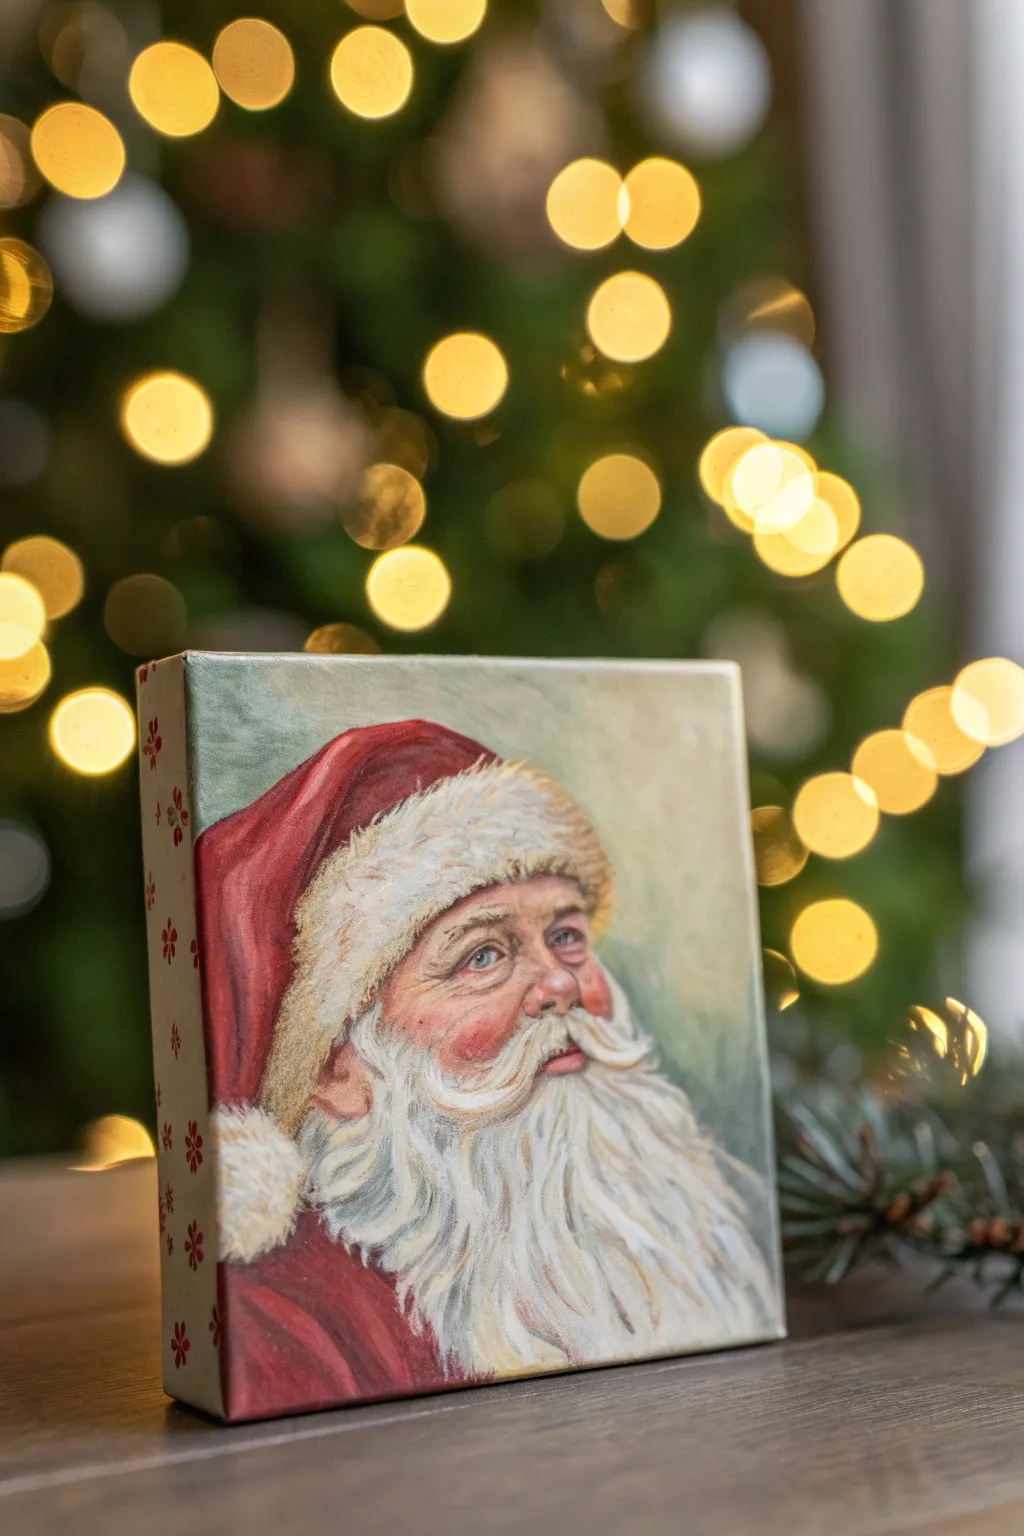
Capture the timeless warmth of St. Nick with this detailed acrylic portrait focusing on rich textures and gentle expression. The finished piece stands beautifully on a mantle, illuminated by the soft glow of Christmas tree lights in the background.
Detailed Instructions
Materials
- Small gallery-wrapped canvas or canvas board (approx. 5×7 or 6×8 inches)
- Acrylic paints: Cadmium Red, Alizarin Crimson, Titanium White, Burnt Sienna, Burnt Umber, Yellow Ochre, Ultramarine Blue
- Synthetic brushes: filbert (size 6), round (size 4), and small detail liner (size 1)
- Slow-drying medium or retarder (optional, for blending)
- Palette, water cup, and paper towels
- Soft charcoal pencil for sketching
Step 1: Sketch and Base Layers
-
Prepare the background:
Begin by painting a soft, neutral background. Mix Titanium White with a tiny touch of Yellow Ochre and a speck of Burnt Umber to create a creamy, muted parchment tone. Apply this evenly across the entire front surface of the canvas. -
Don’t forget the edges:
Extend the background color around the sides of the canvas, or decorate the edges with a simple repeating pattern like small red snowflakes to give it a finished, gift-box feel. -
Sketch the silhouette:
Once the base is dry, use a soft charcoal pencil to lightly outline Santa’s head. Focus on the large shapes first: the dome of the hat, the oval of the face, and the cascading shape of the beard. -
Block in the red hat:
Mix Cadmium Red with a touch of Alizarin Crimson for a deep, rich Christmas red. Fill in the hat shape, leaving the fur trim area blank for now. Apply a second coat if the first looks streaky. -
Establish skin tones:
Mix a base skin tone using Titanium White, a small amount of Yellow Ochre, and a dot of Cadmium Red. Paint the visible face area, keeping the tone fairly flat at this stage.
Step 2: Developing the Face
-
Add warmth to the cheeks:
While the face base is still slightly tacky or freshly dried, glaze a mix of diluted Alizarin Crimson and Burnt Sienna over the cheeks and nose to create that signature ‘cheeks like roses’ rosiness. -
Define the eyes:
Using your small round brush, paint the eye sockets with a shadowy mix of Burnt Sienna and a touch of Blue. Place the eyes carefully, ensuring looking slightly upward gives him a jolly appearance. -
Deepen facial shadows:
Mix Burnt Sienna with a little purple (made from Red and Blue) to deepen the shadows under the hat brim, around the nose, and at the corners of the eyes. This creates the three-dimensional form of the face. -
Initial beard blocking:
Mix a light grey using White and a tiny dot of Burnt Umber. Block in the general shape of the beard and the fur trim on the hat. Do not use pure white yet; we need a shadow base to make the bright hairs pop later.
Keeping Colors Clean
Rinse your brush thoroughly when switching between the red of the hat and the white of the fur. Even a trace of red turn your snowy white trim into pink cotton candy.
Step 3: Refining Details and Textures
-
Paint the hat fur:
Using a filbert brush, dab Titanium White over the grey underpainting of the hat trim. Use a stippling motion to mimic the fluffy texture of sheepskin or thick fur. -
Create beard flow:
Loads your round brush with thinned Titanium White. Starting from the chin, pull long, curving strokes downward to establish the direction of the beard hair. I find looking at a reference photo helps keep the hair growth looking natural here. -
Detail the mustache:
The mustache should be distinct from the beard. Use a brighter white and curve the strokes outward from the center, creating a prominent handlebar shape that overlaps the beard layer. -
Highlight the eyes:
This is the most crucial step for personality. Use the detail liner to add a tiny, crisp point of pure white in the upper right quadrant of each pupil. This ‘catchlight’ brings Santa to life. -
Refine skin wrinkles:
Add subtle laugh lines around the eyes corners using a thin glaze of Burnt Sienna. Keep these lines delicate so he looks merry, not tired.
Add Subtle Sparkle
Mix an ultra-fine iridescent medium into your final white highlights on the beard and fur trim. It gives the painting a magical, frosty shimmer under holiday lights.
Step 4: Final Touches
-
Enhance the reds:
Add shadows to the red hat using Alizarin Crimson mixed with a tiny drop of green or blue to darken it without turning it brown. Paint these shadows in the folds of the fabric. -
Final beard highlights:
Go back in with thick, undiluted Titanium White on the detail brush. Add individual hairs on the very top layers of the beard and mustache where the light would hit strongest. -
Add the pom-pom:
If the pom-pom is visible in your composition, stipple it in using the same technique as the hat brim, keeping the edges soft and fluffy. -
Coat with varnish:
Allow the painting to dry completely—ideally overnight. Finish with a satin or matte varnish to protect the paint and unify the sheen of the different colors.
Place your finished portrait near the tree to let the lights enhance the warmth of the colors you’ve chosen
Santa Silhouette in a Moonlit Sky
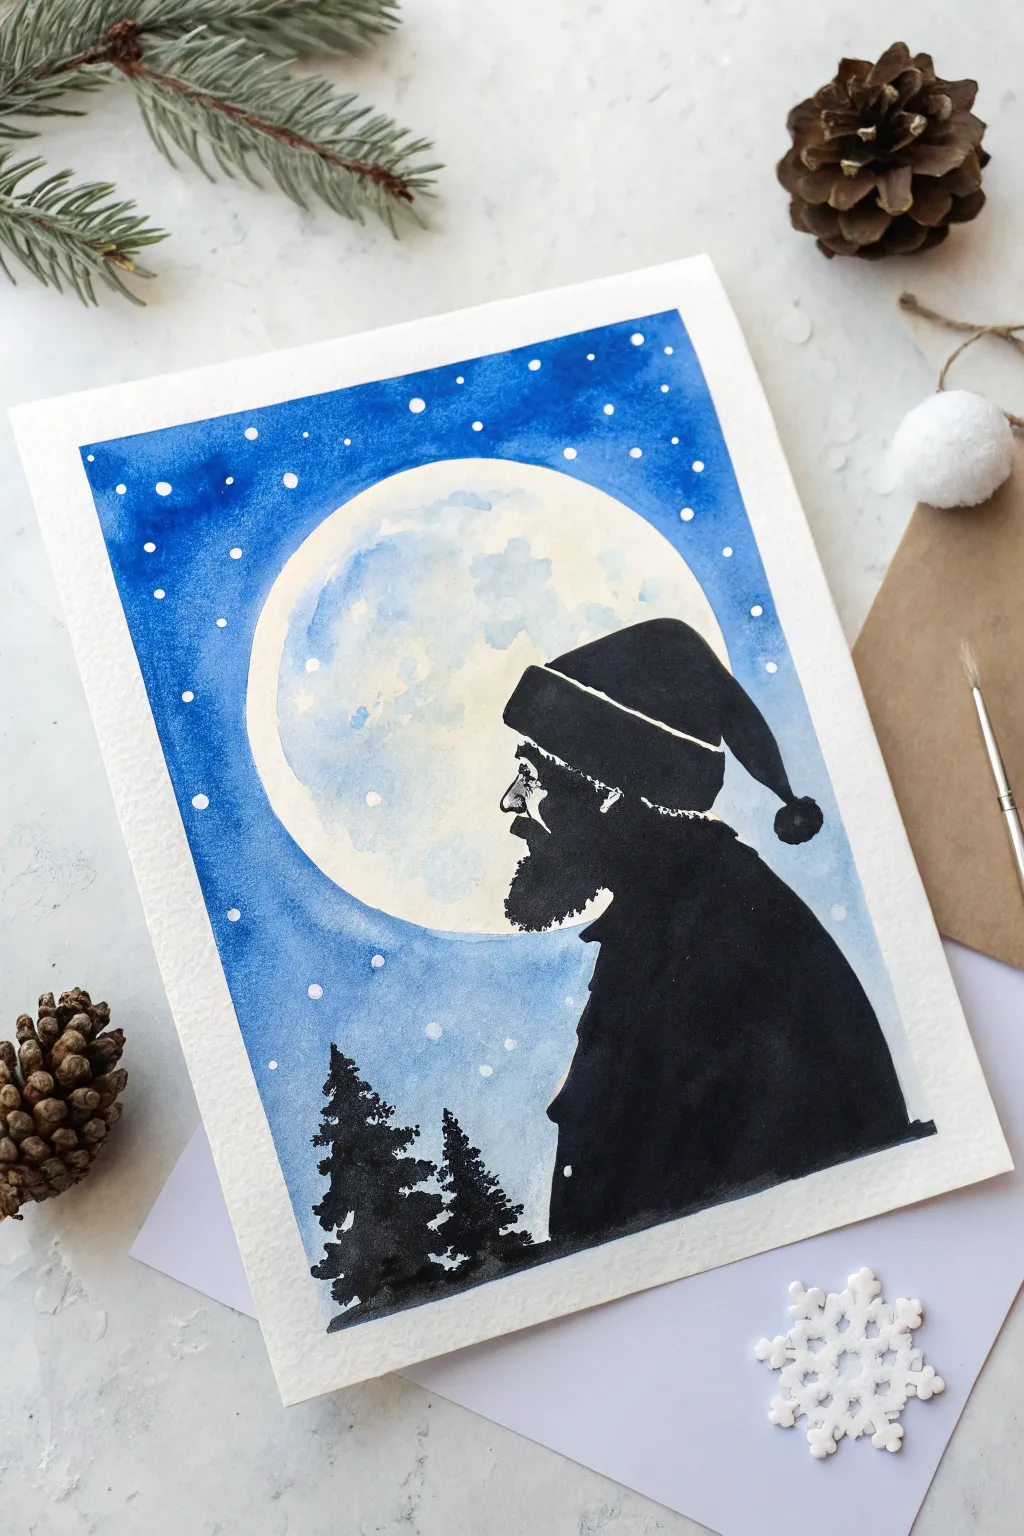
Capture the quiet magic of Christmas Eve with this striking watercolor silhouette. By masking off a bright, oversized moon against a deep blue sky, you create a dramatic backdrop for Santa’s profile.
Step-by-Step Tutorial
Materials
- Cold press watercolor paper (approx. 140lb/300gsm)
- Masking tape (for creating clean borders)
- Circular object or compass for tracing
- Pencil and eraser
- Liquid frisket (masking fluid) or a white crayon
- Watercolor paints: Ultramarine Blue, Phthalo Blue, or Prussian Blue
- Black ink, black gouache, or a black permanent marker
- Round watercolor brushes (sizes 6 and 2)
- Fine liner brush or black pen for details
- White gel pen or white gouache for stars
- Jar of water and paper towels
Step 1: Setting the Scene
-
Tape the borders:
Begin by taping down all four edges of your watercolor paper to a board or table. This creates that clean, professional white border seen in the photo and prevents the paper from buckling when wet. -
Draft the moon:
Use a round object like a large mug or a compass to lightly trace a large circle in the center of the paper. This will be your glowing moon. -
Sketch the silhouette:
Lightly sketch Santa’s profile overlapping the right side of the moon. Focus on the shape of the hat, the pom-pom, the nose, and the beard. Don’t worry about facial features inside the shape; you only need the outline. -
Add the trees:
Sketch a few jagged pine tree shapes at the bottom left corner, ensuring they overlap the moon slightly to create depth. -
Mask the moon:
Carefully apply masking fluid (or press hard with a white wax crayon/oil pastel) over the entire moon area *except* where Santa and the trees overlap it. This preserves the white paper for the moon while you paint the sky.
Uneven Moon Edge?
If masking fluid left a jagged edge, outline the moon with a white gel pen or thick white gouache to smooth the circle back out.
Step 2: Painting the Sky
-
Prepare the blue wash:
Mix a generous amount of deep blue watercolor. I like to use a mix of Ultramarine and a touch of black or Phthalo Blue to get that midnight feel. -
Apply the first wash:
Using your larger round brush, paint the entire sky area around the moon. Use plenty of water to let the pigment flow freely. -
Deepen the edges:
While the paper is still wet, drop more concentrated blue pigment into the top corners and edges of the sky. This vignette effect draws the eye toward the center. -
Let it dry completely:
Allow the sky layer to dry fully. If you used masking fluid, do not attempt to remove it until the paper is bone dry to avoid tearing. -
Remove the mask:
Gently rub away the masking fluid to reveal the crisp white circle underneath.
Add Some sparkle
Mix a tiny pinch of metallic silver watercolor or iridescent medium into your blue sky wash for a subtle, magical shimmer.
Step 3: Moon Textures
-
Wet the moon:
With a clean, damp brush, lightly wet the white paper of the moon. -
Add craters:
Dab in very faint, diluted washes of pale blue or gray. Let the paint bloom naturally to create the soft, cratered texture of the moon’s surface. Keep it subtle—you want it to glow.
Step 4: The Silhouette
-
Outline Santa:
Using black ink, gouache, or a marker, carefully trace the outline of Santa’s silhouette. Pay close attention to the fluffy texture of the hat trim and the beard. -
Fill in the shape:
Fill the entire Santa shape with solid black. Ensure the coverage is opaque so no background shows through. -
Paint the trees:
Paint the pine trees in the bottom left corner with the same solid black. Use the tip of your brush to create jagged, needle-like textures on the branches. -
Suggest the rim:
If you want extra detail, leave a tiny sliver of white paper or use a white gel pen to define the rim of Santa’s glasses or the top of his hat band, just like in the reference image.
Step 5: Final Magic
-
Splatter the stars:
Cover Santa with a scrap piece of paper. Dip a toothbrush or stiff brush into white gouache or white ink and flick fine mist over the blue sky to create stars. -
Add larger stars:
Use a white gel pen to dot a few larger, specific stars in the sky and perhaps a few snowflakes drifting in front of the moon or Santa’s dark coat. -
Peel the tape:
Once everything is completely dry, slowly peel off the masking tape at a 45-degree angle to reveal your crisp white border.
Now you have a serene, moonlit portrait that perfectly captures the anticipation of Santa’s arrival
Santa With a Sack of Presents
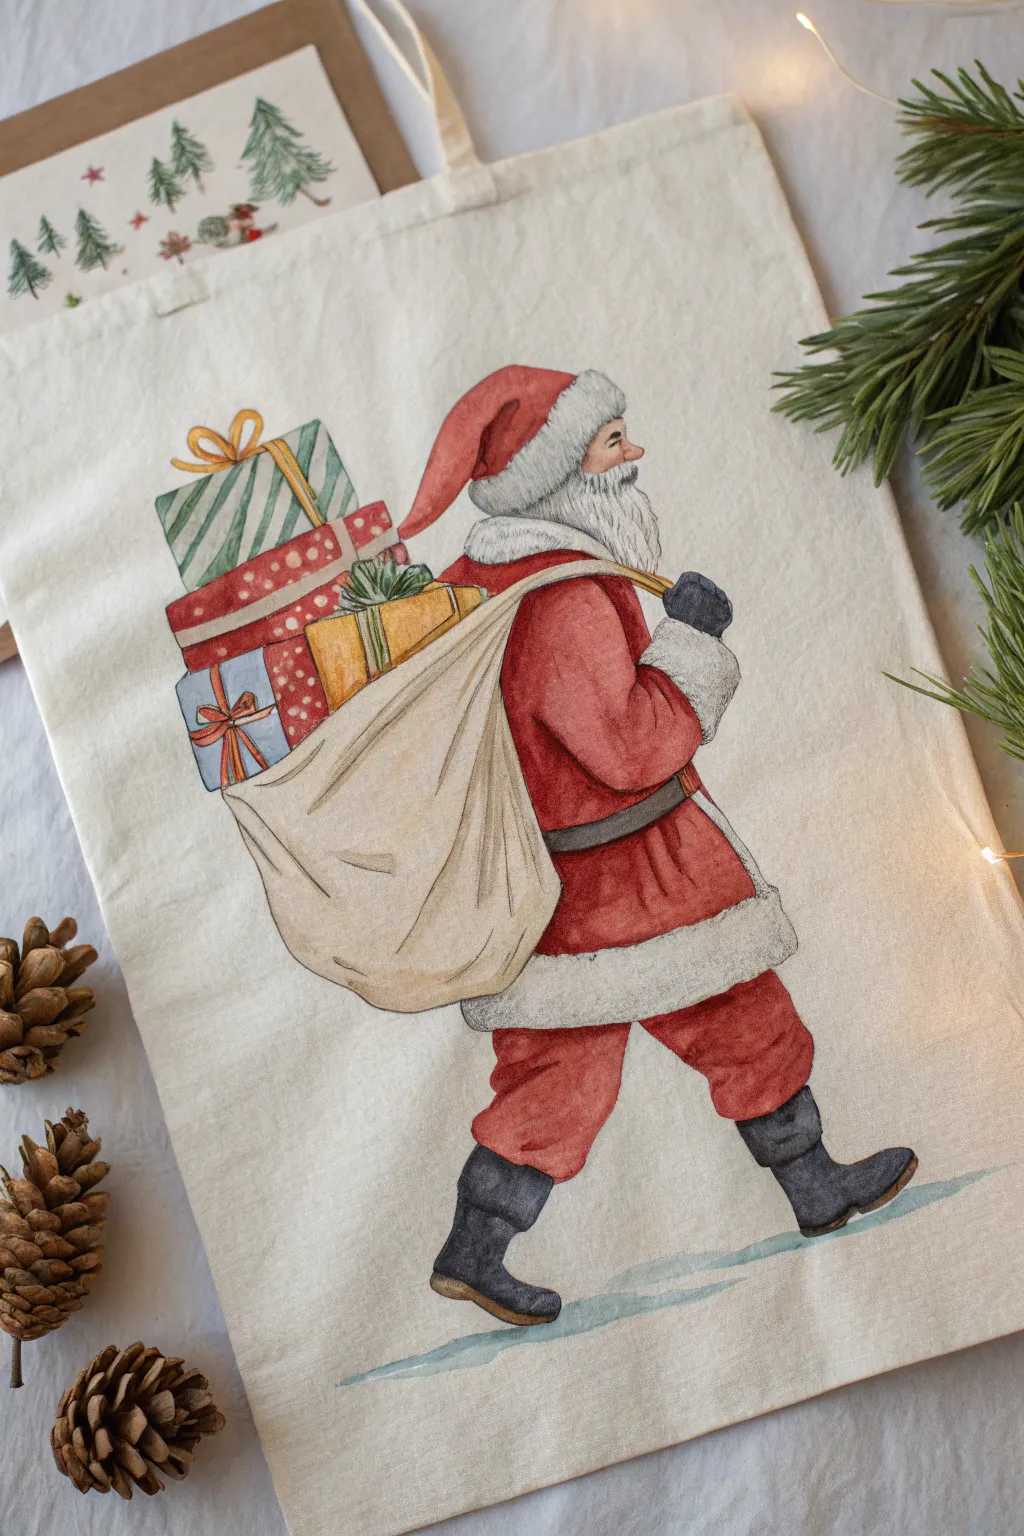
Transform a plain canvas tote into a festive accessory with this charming illustration of Santa delivering gifts. The vintage-inspired watercolor style utilizes soft washes and fine details to create a timeless holiday character carry-all.
Step-by-Step
Materials
- Plain cotton or canvas tote bag (pre-washed)
- Fabric medium
- Acrylic paints (Red, White, Black, Phthalo Green, Yellow Ochre, Burnt Sienna, Flesh tone)
- Fine liner brush (size 0 or 00)
- Small round brush (size 2 or 4)
- Fabric marker or pencil (light grey)
- Cardboard insert for the tote
- Painter’s tape or clips
- Water cups and palette
Step 1: Preparation and Sketching
-
Prep the surface:
Before starting, iron your tote bag to ensure a smooth painting surface. Insert a piece of cardboard inside the bag to prevent paint from bleeding through to the back side, and secure the fabric taut with clips or tape. -
Outline the figure:
Using a light grey fabric pencil or disappearing ink pen, lightly sketch Santa’s profile. Start with the large curve of the sack on his back, then add his leaning posture. Sketch the stack of three gifts teetering on top of the sack. -
Refine the details:
Add the smaller details to your sketch: the furry trim of his hat and coat, his beard flowing over his shoulder, and his black boots. Don’t worry about shading yet; just get the main shapes in place.
Bleeding Lines?
If paint bleeds into the fabric grain, your mix is too watery. Let it dry, then paint over with opaque white before re-doing the color with less water.
Step 2: Painting the Base Colors
-
Mix your fabric paint:
Mix your acrylic paints with fabric medium according to the bottle instructions (usually 1:1 or 2:1). This is crucial to keep the paint flexible and permanent on the fabric. -
Paint the red suit:
Using the round brush, paint Santa’s coat, hat, and pants with a warm red. I like to keep the paint slightly watered down for a watercolor effect, allowing some texture of the canvas to show through. -
Color the sack:
Mix a very light beige using White and a tiny drop of Yellow Ochre or Burnt Sienna. Fill in the large sack shape, keeping the brushstrokes loose to mimic the heavy fabric drape. -
The gifts:
Paint the base colors of the gifts. Use Phthalo Green for the top box, red for the middle, and a golden yellow for the bottom box. Let these base layers dry completely before moving on. -
Skin tone and boots:
Paint the small area of Santa’s face with a flesh tone. Paint the boots and belt with a dark grey (mix Black with a touch of White), avoiding pure harsh black for the base layer.
Step 3: Shading and Texture
-
Shadows on the suit:
Mix a darker red by adding a touch of brown or purple to your base red. Apply this to the underside of the arm, the back of the leg, and where the sack presses against his back to create volume. -
Sack folds:
Using a diluted light brown, paint thin, flowing lines on the beige sack to represent folds and wrinkles. Concentrate the shading at the bottom where the weight gathers. -
Fur texture:
The fur trim and beard are currently just canvas color. Mix a very light grey and use a fairly dry brush to dab texture onto the hat trim and coat cuffs. For the beard, use long, wavy strokes of white and light grey. -
Gift details:
Add patterns to the gifts. Paint diagonal stripes on the green box with white, and adding polka dots to the red box. Don’t forget the ribbons—paint simple bows in contrasting colors like gold or orange.
Pro Tip: Vintage Look
For that old-world illustration style, use a brown fine-liner pen instead of black for the outlines. It mimics sepia ink and warms up the entire image.
Step 4: Inking and Final Touches
-
Outline the work:
Switch to your finest liner brush and slightly watered-down black paint (or a fine-tip permanent fabric pen). Carefully outline the entire figure. The lines should be delicate and sketchy, not thick and bold. -
Add detail lines:
Add fine hatching lines for shadows on the sack and the beard. Draw the distinct strands of hair in the beard and the texture on the mittens. -
Ground the figure:
Mix a very watery light blue-grey wash. Paint a quick, horizontal swathe of color under Santa’s boots to represent snow or ice so he isn’t floating in space. -
Final highlights:
Use pure white paint to add tiny highlights to the nose, the top of the boots, and the shiniest parts of the wrapped gifts. -
Heat set:
Once the painting is 100% dry (give it 24 hours), heat set the design by ironing the reverse side of the fabric for several minutes without steam.
Now your custom tote is ready for holiday shopping or to be filled with gifts for a loved one
Santa in a Minimalist Shape Style
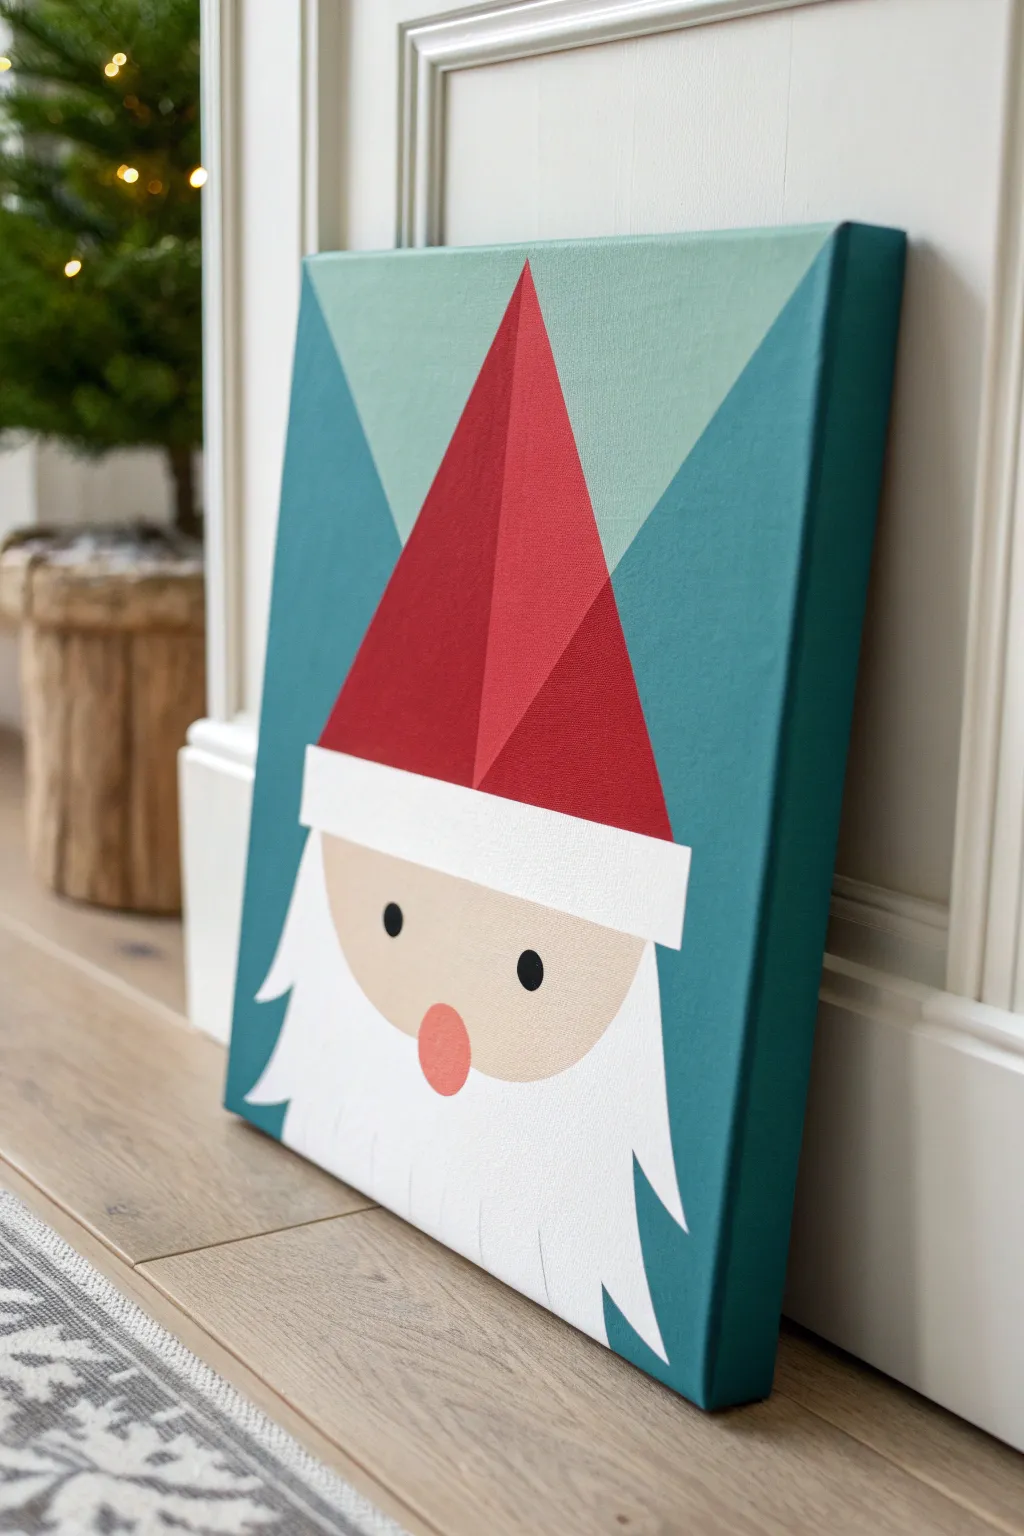
Capture the essence of Saint Nick with clean lines and a modern color palette in this striking geometric project. This minimalist approach uses sharp shapes and shading to create a stylized, contemporary holiday decoration perfect for a mantelpiece.
Step-by-Step Tutorial
Materials
- Rectangular stretched canvas (e.g., 11×14 or 16×20 inches)
- Acrylic paints: Teal, mint green, deep red, bright red, beige/flesh tone, coral pink, white, black
- Painter’s tape (various widths, 1-inch and 0.5-inch suggested)
- Ruler or straight edge
- Pencil and eraser
- Flat shader brushes (medium and large)
- Fine detail brush (round size 1 or 2)
Step 1: Planning and Sketching
-
Find the center:
Start by finding the vertical center of your canvas. Mark a small dot at the very top edge and another about two-thirds of the way down; this imaginary line will guide the tip of Santa’s hat and the nose placement. -
Draft the background triangles:
Using a ruler, draw two diagonal lines originating from the corners or sides of the canvas that meet behind where the hat will be. In the inspiration piece, the background is split into a central inverted triangle and two side triangles. -
Sketch the hat triangle:
Draw a large, tall triangle for the hat. The tip should be near the top center, and the base should be wide enough to cover the top of the head. Draw a vertical line straight down the middle of this triangle to separate the two red shades. -
Outline the brim and face:
Below the red triangle, sketch a rectangular band for the white hat brim. Underneath that, draw a wide ‘U’ shape for the face area. -
Define the beard:
Sketch the beard’s outline around the face. Instead of curly lines, visual interest comes from straight, jagged spikes pointing downward, keeping with the geometric theme.
Paint Bleeding Under Tape?
To get razor-sharp lines, apply a thin layer of the *base* color (or clear matte medium) over the tape edge first to seal it. Then paint your new color on top.
Step 2: Painting the Background
-
Tape off the background:
Apply painter’s tape along the pencil lines that separate the background sections from the main Santa figure. Press the edges down firmly to prevent bleed-through. -
Paint the central wedge:
Fill the inverted triangle shape behind the hat with a soft mint green acrylic. Use long, smooth vertical strokes for a clean finish. -
fill the side sections:
Once the mint section is dry to the touch, or while carefully cutting in, paint the remaining background areas (the side triangles) with a darker teal blue. This contrast makes the central shape pop. -
Let the background set:
Allow the background colors to dry completely before removing any tape or moving on to the central figure.
Step 3: Creating the Geometric Santa
-
Block in the light red:
Tape off the right half of the main hat triangle. Paint the left side with a standard bright red. This creates the illusion of a light source hitting the hat from the left. -
Apply the shadow red:
Paint the right half of the hat triangle with a slightly deeper red. If you don’t have a darker shade, I usually mix a tiny dot of black or green into the bright red to deepen it without making it muddy. -
Paint the face:
Fill in the ‘U’ shape of the face with a flat beige or flesh-tone acrylic. You may need two coats here to ensure the canvas texture doesn’t show through. -
Fill the beard:
Using a clean brush and titanium white, paint the entire beard area. Be careful around the jagged edges to keep those points sharp and crisp. -
Add the hat brim:
Paint the rectangular band between the hat and face white. For a crisp line against the red hat, re-tape the boundary if the red paint isn’t perfectly straight.
Add Metallic Flair
Swap the white hat brim paint for a metallic silver, or add a gold geometric shape in the background to give your minimalist Santa a touch of modern luxury.
Step 4: Final Details
-
Paint the nose:
In the lower center of the face area, paint a perfect circle using coral pink or a soft orange-red. A stippling motion with a round brush can help keep the edges round. -
Add the eyes:
Using your smallest detail brush or the end of a brush handle dipped in paint, place two solid black dots for eyes. Position them widely apart but symmetrical to the nose. -
Clean up edges:
Inspect your geometric shapes. If any lines are wobbly, use a small flat brush and the background color (or adjacent color) to tidy up the straight edges. -
Paint the canvas sides:
Don’t forget the edges of the canvas. Extend the design or paint the sides solid teal for a polished, gallery-wrapped look. -
Varnish (Optional):
Once fully dry (give it overnight), apply a coat of matte varnish to protect the paint and unify the sheen across the different colors.
Place your modern masterpiece on a shelf or hang it up to bring a sophisticated cheer to your holiday decor
Santa Painted With Palette-Knife Texture
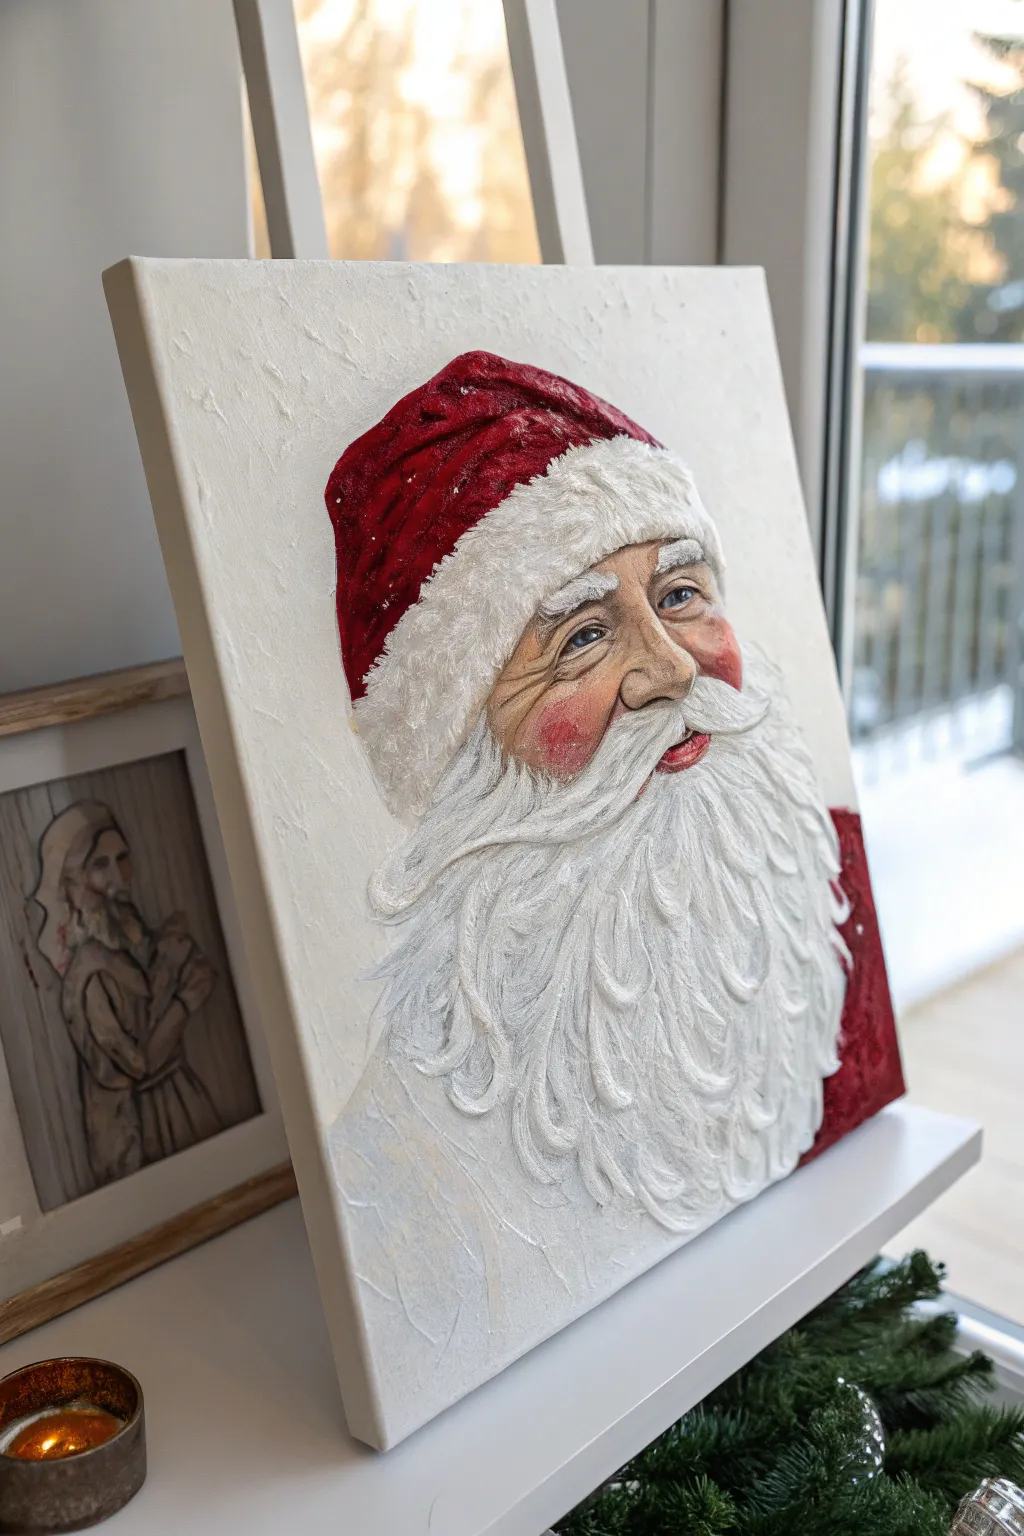
Bring the magic of Christmas to life with this stunning Santa Claus portrait, featuring rich, tactile textures that make his beard and hat pop right off the canvas. By combining modeling paste with acrylics, you’ll create a dimensional masterpiece that feels as cozy as it looks.
Step-by-Step Guide
Materials
- Stretched canvas (11×14 or similar)
- Modeling paste or texture medium
- Heavy body acrylic paints (Titanium White, Cadmium Red, Burnt Sienna, Yellow Ochre, Ultramarine Blue, Raw Umber)
- Palette knives (assorted sizes, including a narrow trowel shape)
- Synthetic paint brushes (filbert, round, and fine liner)
- Pencil for sketching
- Palette paper or mixing plate
Step 1: Preparation and Sketching
-
Texture the Background:
Before sketching, create a subtle, snowy texture on your blank canvas. Mix a small amount of titanium white with modeling paste and scumble it across the background area using a palette knife. Leave the center smooth where Santa’s face will be. -
Sketch the Outline:
Once the background texture is completely dry, lightly sketch Santa’s profile using a pencil. Focus on the large shapes first: the droop of the hat, the oval of the face, and the cascading flow of the beard. -
Block in Base Colors:
Apply a flat layer of red for the hat and coat, and a skin tone mix (white, yellow ochre, a touch of red) for the face. Don’t worry about detailing the beard yet; just block in the white areas to establish the composition.
Cracked Paste?
If your modeling paste cracks while drying, apply a second thin layer over the cracks once dry. Cracking usually happens if the top dries too much faster than the bottom.
Step 2: Painting the Face
-
Define Shadows:
Mix a darker skin tone using burnt sienna and a tiny bit of blue. Paint the shadows around the eyes, under the nose, and the creases of the smile to build dimension. -
Rosy Cheeks:
Glaze a soft pink (red mixed with lots of medium) onto the cheeks and the tip of the nose while the paint is still slightly tacky to blend the edges softly. -
Paint the Eyes:
Use a fine liner brush to paint the eyes. Start with the white sclera, add a blue iris, and a black pupil. Use pure white for a tiny reflection highlight to make them sparkle. -
Refining Facial Details:
Deepen the facial wrinkles with thinned raw umber. Painting the eyebrows requires a dry-brush technique with white and grey paint to suggest hair texture.
Make it Glisten
Once the painting is completely cured, brush a glossy varnish over just the eyes and the red hat to make them shine, contrasting beautifully with the matte beard.
Step 3: Building the 3D Texture
-
Mixing the Paste:
Mix a generous amount of modeling paste with titanium white acrylic paint. It should be thick, like frosting. -
Hat Fur Trim:
Scoop the white paste mixture onto a palette knife. Apply it to the rim of the hat using a stippling motion (tapping up and down) to create a fluffy, woolen texture. -
Sculpting the Mustache:
Using the side of a smaller palette knife, apply thick strokes of the white paste mixture to form the mustache, swooping outward from the nose. -
Creating Beard Curls:
For the beard, load the palette knife heavily. Apply the paste in long, swirling C-shapes. I find twisting the wrist at the end of the stroke helps create those beautiful, distinct curls seen in the reference. -
Texturing the Red Hat:
Mix modeling paste with your Cadmium Red. Apply this over the previous flat red hat layer using rough, directional strokes to mimic heavy velvet fabric. -
Let it Cure:
This step is crucial: allow the modeling paste to dry completely. This can take anywhere from 12 to 24 hours depending on thickness.
Step 4: Finishing Touches
-
Shadowing the Beard:
Once the paste is rock hard, mix a very watery grey wash. Lightly brush this into the deep crevices of the beard texture to emphasize the relief. -
Highlighting the Hat:
Dry brush a lighter red (red mixed with a little orange/white) on the raised ridges of the hat to bring out the texture you created. -
Final Glitter (Optional):
If you want extra festive sparkle, lightly sprinkle fine iridescent glitter over the white fur trim while dabbing on a clear gloss medium.
Display your textured Santa proudly on a mantle or shelf where the holiday lights can catch those wonderful dimensional curves
Santa Made of Watercolor Splashes
Capture the jolly spirit of Saint Nick with this sophisticated watercolor portrait that blends realistic facial details with expressive, loose brushwork. The finished piece features a classic red suit, a wonderfully textured beard, and festive splatter effects that mimic falling snow.
Detailed Instructions
Materials
- High-quality watercolor paper (cold press, at least 140lb/300gsm)
- Watercolor paints (Alizarin Crimson, Cadmium Red, Burnt Sienna, Yellow Ochre, Ultramarine Blue, Lamp Black)
- White gouache or white ink for highlights
- Round brushes (sizes 2, 6, and 10)
- Fine detail brush (size 0 or 00)
- Pencil (HB or 2H) and kneaded eraser
- Masking fluid (optional)
- Two jars of water
- Paper towels
- Palette
Step 1: Sketching and Preparation
-
Outline the face:
Begin with a light pencil sketch, focusing on the proportions of the face. Map out the eyes, nose, and the flow of the beard, ensuring the hat sits naturally on the head. -
Define the coat:
Sketch the shoulders and torso roughly. Unlike the face, keep these lines loose as the paint will do most of the work here to create the fabric folds. -
Protect the white:
If you are using masking fluid, apply it now to the brightest highlights in the eyes and the scattering of snow dots across the composition. Let it dry completely.
Step 2: Painting the Skin Tones
-
Base flesh wash:
Mix a very watery wash of Yellow Ochre and a touch of Cadmium Red. Apply this to the face area, avoiding the eyes and beard. -
Develop facial structure:
While the base is still slightly damp, drop in stronger concentrations of the skin mix around the nose, cheeks, and eyelids to create warmth and form. -
Add shadows:
Mix a tiny bit of Ultramarine Blue into your flesh tone to create a cool shadow color. Apply this under the hat brim, under the nose, and in the deep wrinkles around the eyes. -
Detail the eyes:
Switch to your size 0 brush. I prefer to paint the iris carefully with blue or brown, leaving the pupil distinct. Add a dark lash line to frame the gaze.
Muddy Skin Tones?
If the face looks dirty, let it dry completely. Gently lift excess pigment with a clean, damp brush, then glaze over with a pure, watery pink or orange to restore warmth.
Step 3: Render the Beard and Fur
-
Shadows first:
The beard is white, so you are actually painting the shadows. Mix a very pale grey-blue using Ultramarine and a touch of Burnt Sienna. -
Define the shapes:
Using the tip of a size 6 brush, paint the negative spaces between hair clumps. Keep the strokes flowing downward to mimic the direction of hair growth. -
Build texture:
Layer slightly darker grey strokes near the chin and neck area to create depth, leaving the top layers pristine white paper. -
Hat fur:
Use a similar technique for the white trim of the hat and the pom-pom, stippling the grey shadow mix to create a fluffy, sheepskin texture.
Pro Tip: Eye Sparkle
The eye reflection is crucial for life. If you lost the white paper highlight, use a gel pen or a thick dot of white gouache right at the end to make the eyes pop.
Step 4: The Red Coat and Hat
-
The first red layer:
Load a size 10 brush with Cadmium Red. Paint the hat and coat areas with confident strokes, deliberately leaving some white paper showing for high-contrast highlights. -
Deepen the color:
While the first layer is wet, drop in Alizarin Crimson into the shadow areas—under the arm, the folds of the sleeve, and the crease of the hat. -
Add darkest values:
Mix Alizarin Crimson with a little Green or Blue to make a deep maroon shadow. paint sharp lines where the seams of the coat would be to separate the arm from the body. -
Soften edges:
Use a clean, damp brush to soften the transition between the red coat and the white fur trim, allowing a tiny bit of red to bleed into the white for realism.
Step 5: Final Touches
-
Remove masking:
Once the paper is bone dry, gently rub away the masking fluid to reveal the crisp white highlights. -
Enhance whites:
Use white gouache on a small brush to add extra stray hairs to the beard that overlap the red coat, and to brighten the reflection in the eyes. -
Create the snow:
Load a toothbrush or stiff brush with watered-down red and green paint. Flick the bristles to create atmospheric colored splatter around the figure. -
White splatter:
Repeat the splatter technique with thick white gouache to create the falling snow effect over the coat and background.
Step back and admire the festive, classic character you have brought to life on the page
Abstract Santa Using Only Red, White, and Black
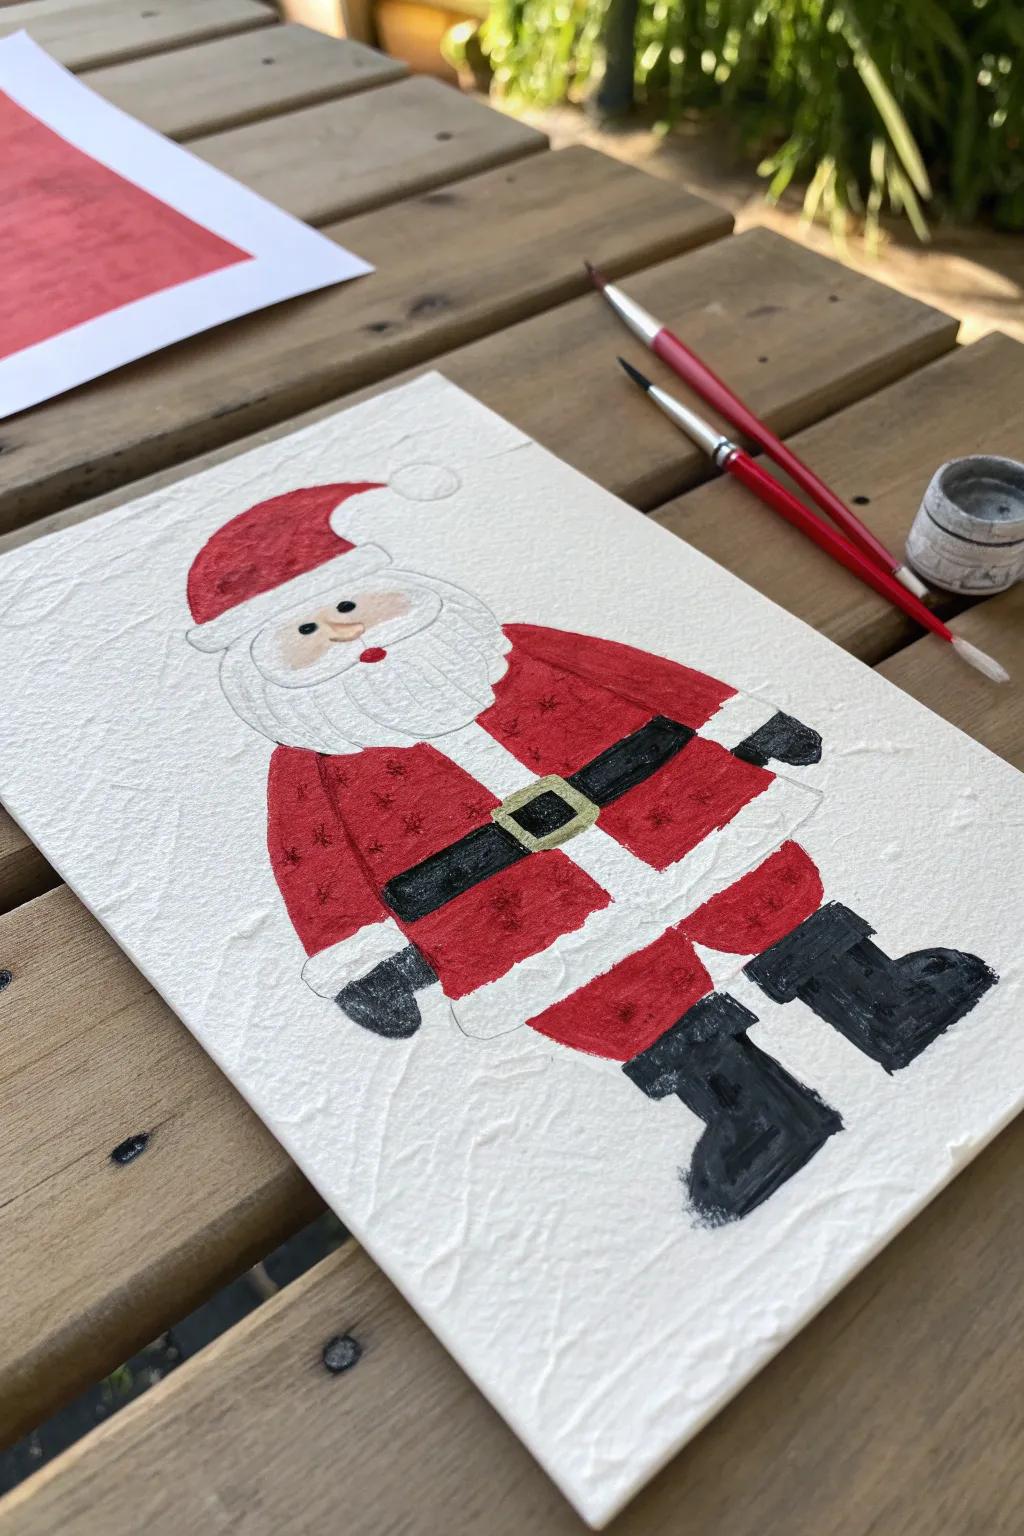
This rustic, stylized Santa brings festive cheer with his textured beard and bold red suit. The charmingly simple shapes make this an approachable project for beginners, while the textured paper surface adds a unique, handcrafted quality.
Step-by-Step Guide
Materials
- Textured watercolor paper or handmade fibrous paper
- Pencil (HB or similar)
- Eraser
- Red acrylic paint (Christmas Red or similar)
- Black acrylic paint
- White acrylic paint
- Flesh/Peach tone acrylic paint
- Metallic Gold acrylic paint
- Small round paintbrushes (sizes 2 and 4)
- Small liner brush (size 0 or 1)
- Painting palette or plate
- Water cup and paper towels
Step 1: Sketching the Outline
-
Map the head shape:
Start near the top left center of your paper. Lightly sketch a circle for Santa’s head, leaving room above for the hat. -
Draw the beard and face mask:
Within the circle, draw a kidney-bean curve for the face area. Below this, draw a wide, rounded U-shape that extends down from the ‘ears’ to form the main beard shape. -
Add the hat:
Sketch a floppy triangle curving to the left on top of the head. Add a thick band for the fur trim and a circle at the tip for the pom-pom. -
Outline the body:
Draw the torso as a large, rounded trapezoid shape extending down from the beard. Divide it horizontally for the belt area. -
Position the limbs:
Sketch simple rectangular shapes for the arms hanging at the sides. Add rounded mittens at the ends. Draw two sturdy legs ending in L-shaped boots.
Textured Paper Tip
When using fibrous paper, don’t add too much water to your acrylics. Keep the paint creamy so it sits on top of the texture rather than soaking in and spreading.
Step 2: Painting the Reds
-
Fill the hat:
Using your size 4 brush, paint the main body of the hat with bright red acrylic. Work carefully around the white trim and pom-pom. -
Paint the jacket:
Move down to the jacket. Paint the upper chest area and the sleeves red. Leave a vertical strip down the center unpainted for the white fur trim. -
Complete the outfit:
Paint the lower section of the coat (below the belt) and the pants in the same red. If your paper is very textured, you might need to dab the paint into the crevices rather than sweeping it. -
Add texture details:
Once the base red is tacky but not fully dry, use a slightly darker red (or mix a tiny dot of black into your red) to add faint starburst or snowflake patterns on the coat for visual interest.
Uneven Edges?
If the paper’s bumps make straight lines difficult, use a fine-tip permanent marker or pen to outline details like the belt buckle once the paint is bone dry.
Step 3: Adding Details and Contrast
-
Paint the belt:
Using black paint and a steady hand, fill in the horizontal belt strip across the waist. -
Boots and belt buckle:
Fill in the boot shapes with black. While drying, use metallic gold paint to create a square buckle in the center of the belt. -
Paint the mittens:
Use a dark grey (mix black with a little white) to paint the mittens. This slight variation separates them visually from the belt and boots. -
Skin tone base:
Paint the exposed face area with a peach or flesh tone. Ensure you get good coverage if the paper is rough.
Step 4: Finishing Touches
-
The beard and trim:
Using white paint, fill in the beard, mustache, hat trim, and the vertical strip down the coat. Only a single layer is needed so the paper texture shows through like fur. -
Face details:
Once the face is fully dry, use the smallest liner brush to dot two black eyes. Add a small red dot for the nose and a tiny curved line for the mouth. -
Outline the beard:
Mix a very watery light grey. Use this to outline the mustache and beard shapes lightly to give them definition against the white paper. -
Final clean up:
Check your edges. If the textured paper caused any jagged lines, use your liner brush to smooth them out with the appropriate color.
Step back and admire your charming, textured Santa creation, ready to be framed or gifted for the holidays

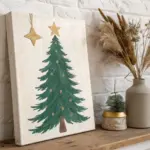


Have a question or want to share your own experience? I'd love to hear from you in the comments below!