Tall pumpkins are basically a ready-made portrait canvas, and I love how much design you can fit from base to stem. Grab an elongated gourd (or stack a few) and try these tall pumpkin painting ideas for big vertical impact without any carving.
Classic Farmhouse Vertical Stripes
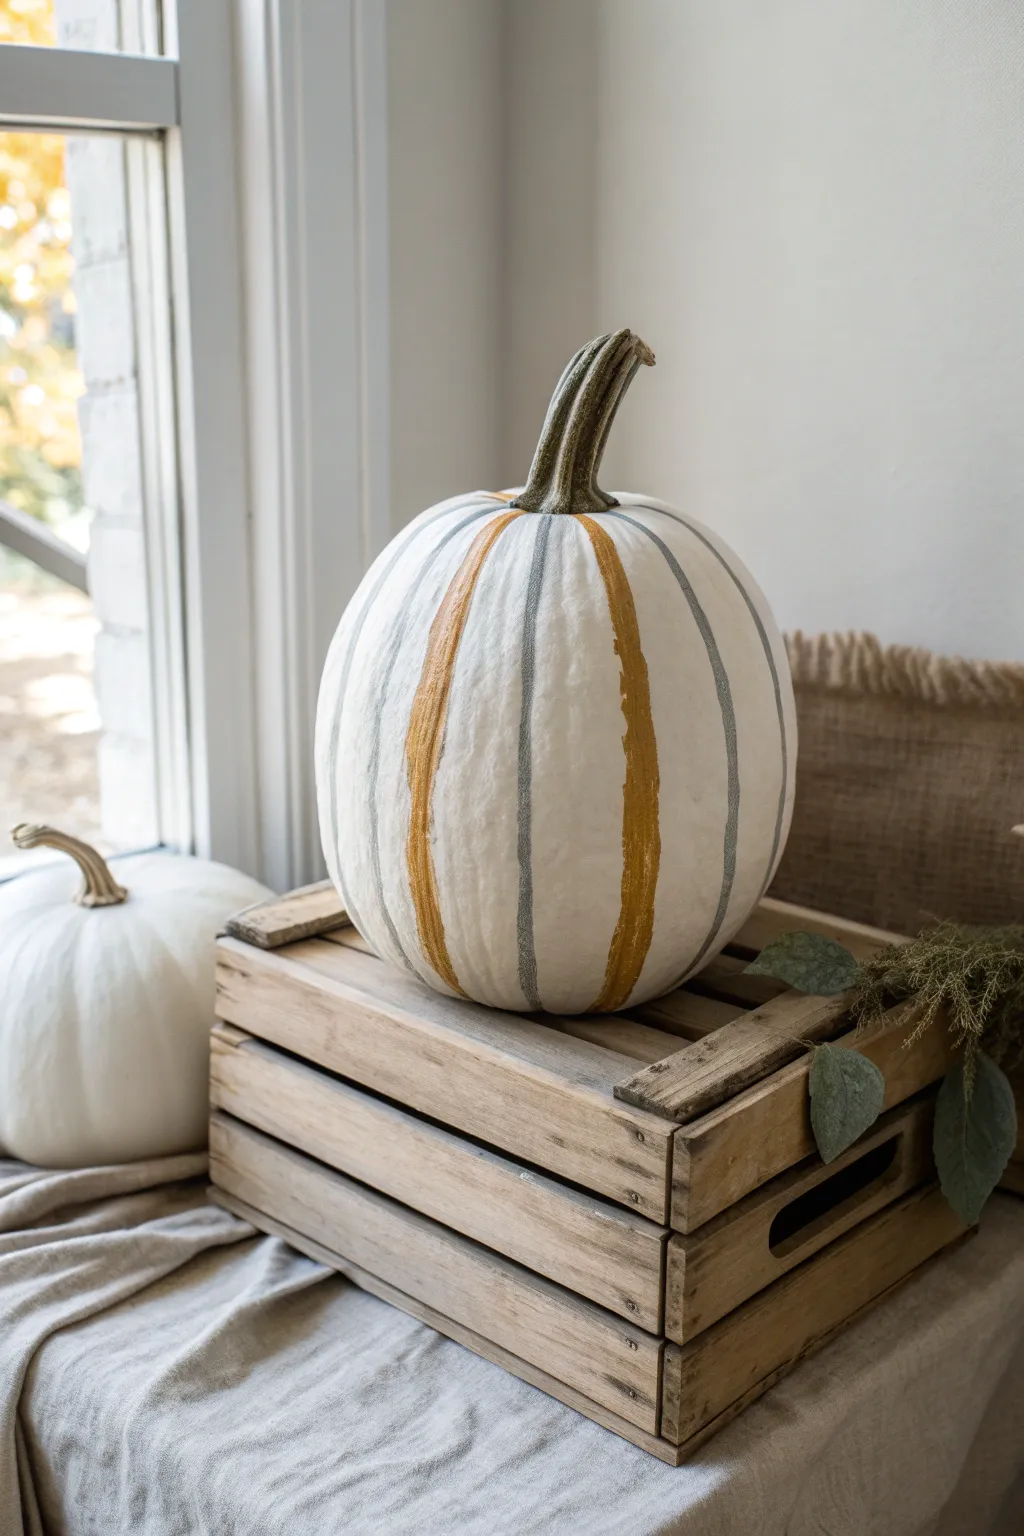
Embrace the elegance of classic farmhouse decor with this sophisticated painted pumpkin project. By combining a creamy white base with soft sage and muted gold stripes, you can transform an ordinary tall pumpkin into a timeless autumn centerpiece.
Step-by-Step Guide
Materials
- Tall faux or real pumpkin (orange or white)
- White or cream chalk paint (if base needs painting)
- Sage green acrylic paint
- Muted gold or mustard yellow acrylic paint
- Medium flat paintbrush (about 1/2 inch)
- Small round detail brush
- Damp cloth or paper towels
- Clear matte sealer spray (optional)
Step 1: Preparation & Base Coat
-
Clean surface:
Begin by wiping down your pumpkin thoroughly to remove any dust, dirt, or oils that might prevent the paint from sticking. If using a real pumpkin, dry it completely. -
Prime the base:
If you are starting with a bright orange pumpkin, you’ll need a solid base coat. Apply a generous layer of white or heavy cream chalk paint over the entire surface. -
Dry and repeat:
Allow the first coat to dry completely. If the original color still shows through, apply a second coat for a smooth, opaque finish. -
Inspect the ridges:
Unlike round pumpkins, tall pumpkins often have deep, defined ridges. Make sure your white base coat gets all the way into these crevices for a consistent look.
Use Nature’s Lines
Don’t fight the pumpkin’s shape! Follow the natural grooves and bumps when painting stripes. Imperfect, wavy lines look more organic and intentional.
Step 2: Painting the Gold Stripes
-
Identify main ridges:
Observe the natural vertical ribs of the pumpkin. We will use the raised sections for our stripes, leaving the deep crevices white. -
First gold stroke:
Load your medium flat brush with the muted gold paint. Starting from the top near the stem, pull the brush down along one of the prominent raised ribs to the bottom. -
Create a wash effect:
The goal isn’t a solid, plastic-like line. I like to keep the brush slightly dry or lightly feather the edges to create a hand-painted, slightly rustic texture. -
Spacing the gold:
Skip the next two distinct ribbed sections to leave room for the green stripe and the white negative space. Paint your next gold stripe on the third rib over. -
Continue pattern:
Continue painting gold stripes around the entire circumference, maintaining that spacing pattern as best as the pumpkin’s natural shape allows.
Step 3: Adding the Sage Accents
-
Switch colors:
Rinse your brush thoroughly or switch to a fresh flat brush for the sage green paint. -
Locate the gap:
Find the unpainted ribbed section directly between two gold stripes. This will be the home for your sage green accent. -
Paint the green stripe:
Just like before, start at the stem and drag the paintbrush down. Aim for a slightly thinner line than the gold ones to keep the design balanced. -
Feather the edges:
Softness is key for that farmhouse look. Use a very light touch on the edges of your green stripe so it doesn’t look like a piece of tape. -
Complete the circuit:
Work your way around the pumpkin, filling in the alternating sections with your sage green paint until the pattern is complete.
Add Antique Texture
Once dry, lightly sand the painted stripes with fine-grit sandpaper. This distressing technique reveals the white base and adds instant vintage charm.
Step 4: Finishing Touches
-
Stem maintenance:
If you accidentally got paint on the stem, use a damp cloth to wipe it off immediately, or use a small detail brush to touch it up with a dark brown or grey paint. -
Refine the lines:
Step back and look at the pumpkin from a distance. If any stripes look too patchy, add a very light second coat, but remember that some transparency adds character. -
Dry time:
Let the pumpkin sit undisturbed for at least an hour to ensure the stripes are fully dry to the touch. -
Seal (optional):
For longevity, especially if placing outdoors, apply a light coat of clear matte sealer spray to protect your hard work.
Now you have a beautifully understated centerpiece ready to grace your window sill or dining table


Sunset Ombre From Base to Stem
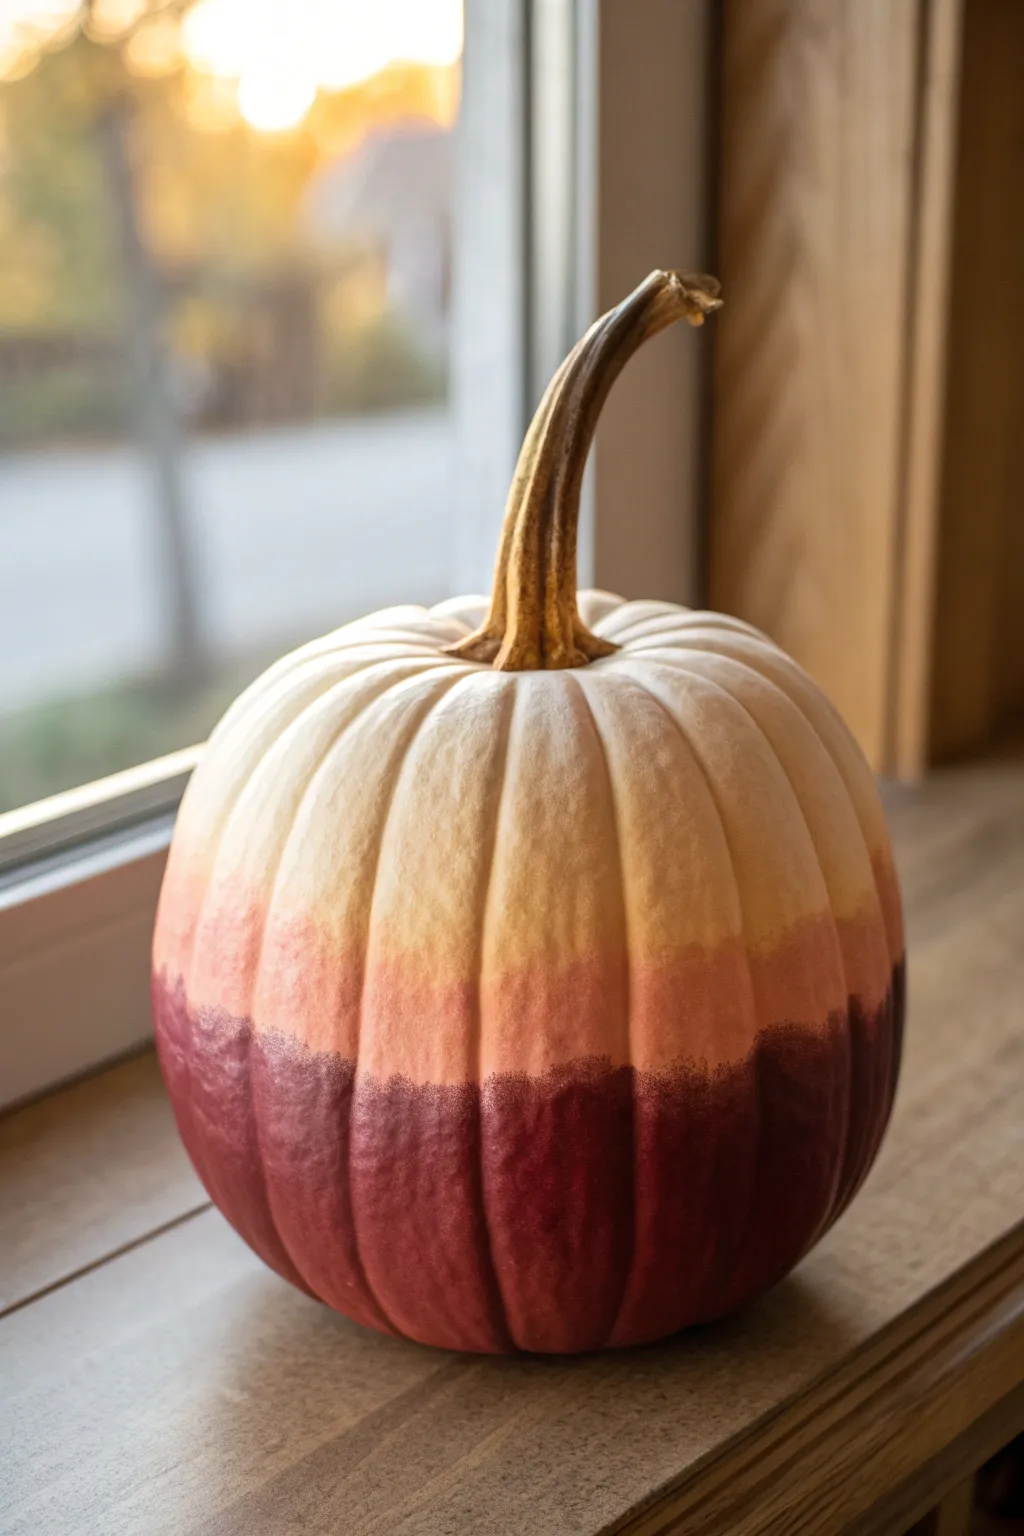
Capture the warmth of a setting sun on your autumn porch with this elegant ombre pumpkin. By blending deep burgundy into soft peach and cream, you’ll create a sophisticated gradient that elevates simple seasonal decor into a modern centerpiece.
Step-by-Step
Materials
- Tall, white craft pumpkin or real white pumpkin
- Acrylic paints (Deep Burgundy/Maroon, Terracotta/Salmon Pink, Titanium White)
- Medium flat synthetic brush (for blocking color)
- Large soft blending brush (makeup sponges work too)
- Painter’s palette or paper plate
- Paper towels
- Satin finish sealer (optional)
Step 1: Preparation
-
Clean surface:
Begin by wiping down your pumpkin with a damp cloth to remove any dust or oils. If using a real pumpkin, ensure it is completely dry before starting; for craft pumpkins, a quick wipe prevents paint from beaded up. -
Protect stem:
Carefully wrap the stem with painter’s tape to keep it clean. While the natural brown stem looks lovely against the cream top, we want to avoid accidental paint splatters. -
Setup palette:
Squeeze out generous amounts of your three main colors onto the palette: the deep burgundy, the terracotta pink, and the white. Leave space between them for mixing intermediate shades.
Step 2: Base Layers
-
Apply dark base:
Using your flat brush, paint the bottom third of the pumpkin with the deep burgundy. Don’t worry about a perfect straight line at the top edge; a ragged edge actually helps with blending later. -
Paint the top:
Clean your brush thoroughly. Paint the top third of the pumpkin, right up to the stem base, with titanium white. You might need two coats here to get a solid, opaque cream look. -
Middle section:
Apply the terracotta or salmon pink shade to the middle section, leaving a small gap of about an inch between this color and the burgundy below, and the white above. This gap is where the magic blending happens.
Pro Blending Tip
Keep a spray bottle of water nearby. remarkable misting over the paint keeps acrylics wet longer, giving you more time to achieve a flawless, buttery gradient.
Step 3: Creating the Ombre
-
Mix transition shade 1:
On your palette, mix a little burgundy with the terracotta paint to create a mid-tone. Apply this to the gap between the bottom and middle sections. -
Blend the lower gradient:
While the paint is still wet, use a soft, dry blending brush or a makeup sponge. Gently dab along the seam where the burgundy meets the pink. I find a tapping motion works better than dragging to create that soft, airbrushed texture. -
Mix transition shade 2:
Now, mix a small amount of white into your terracotta paint to create a pale peach color. Apply this to the gap between the middle pink section and the white top. -
Blend the upper gradient:
Clean your blending tool or grab a fresh sponge. Lightly stipple along the upper transition line where the pink meets the white. Work quickly so the acrylics don’t dry before they merge. -
Refining the fade:
Step back and look at the pumpkin from a distance. If the transition looks too harsh, take a very slightly damp brush with a tiny bit of the lighter color and feather it down into the darker section.
Gilded Glamour
For a luxe twist, mix metallic gold paint into your transition shades. The light will catch the ombre fade, making the pumpkin glow warmly like a true sunset.
Step 4: Texturing and Finishing
-
Add texture:
To mimic the look in the photo, you don’t want the paint perfectly smooth. Use your brush to stipple (vertical dabbing) slightly, especially in the darker bottom section, to enhance the pumpkin’s natural skin texture. -
Paint the crevices:
Ensure the deep ribs of the pumpkin are fully coated. You may need to use a smaller brush to push the dark burgundy deep into the lower crevices and white into the top crevices for varying depth. -
Stem detail:
Remove the tape from the stem. If needed, dry brush a little gold or light brown paint onto the ridges of the stem to give it that twisted, dried look. -
Final dry:
Let the pumpkin sit undisturbed for at least an hour. Acrylics dry fast, but the thicker blended areas might need extra time. -
Seal (Optional):
If this pumpkin is going outside, spray it with a clear satin sealer to protect the gradient from moisture.
Place your warm-toned creation near a window or entryway to welcome the season with style


Buffalo-Check Plaid Up the Side
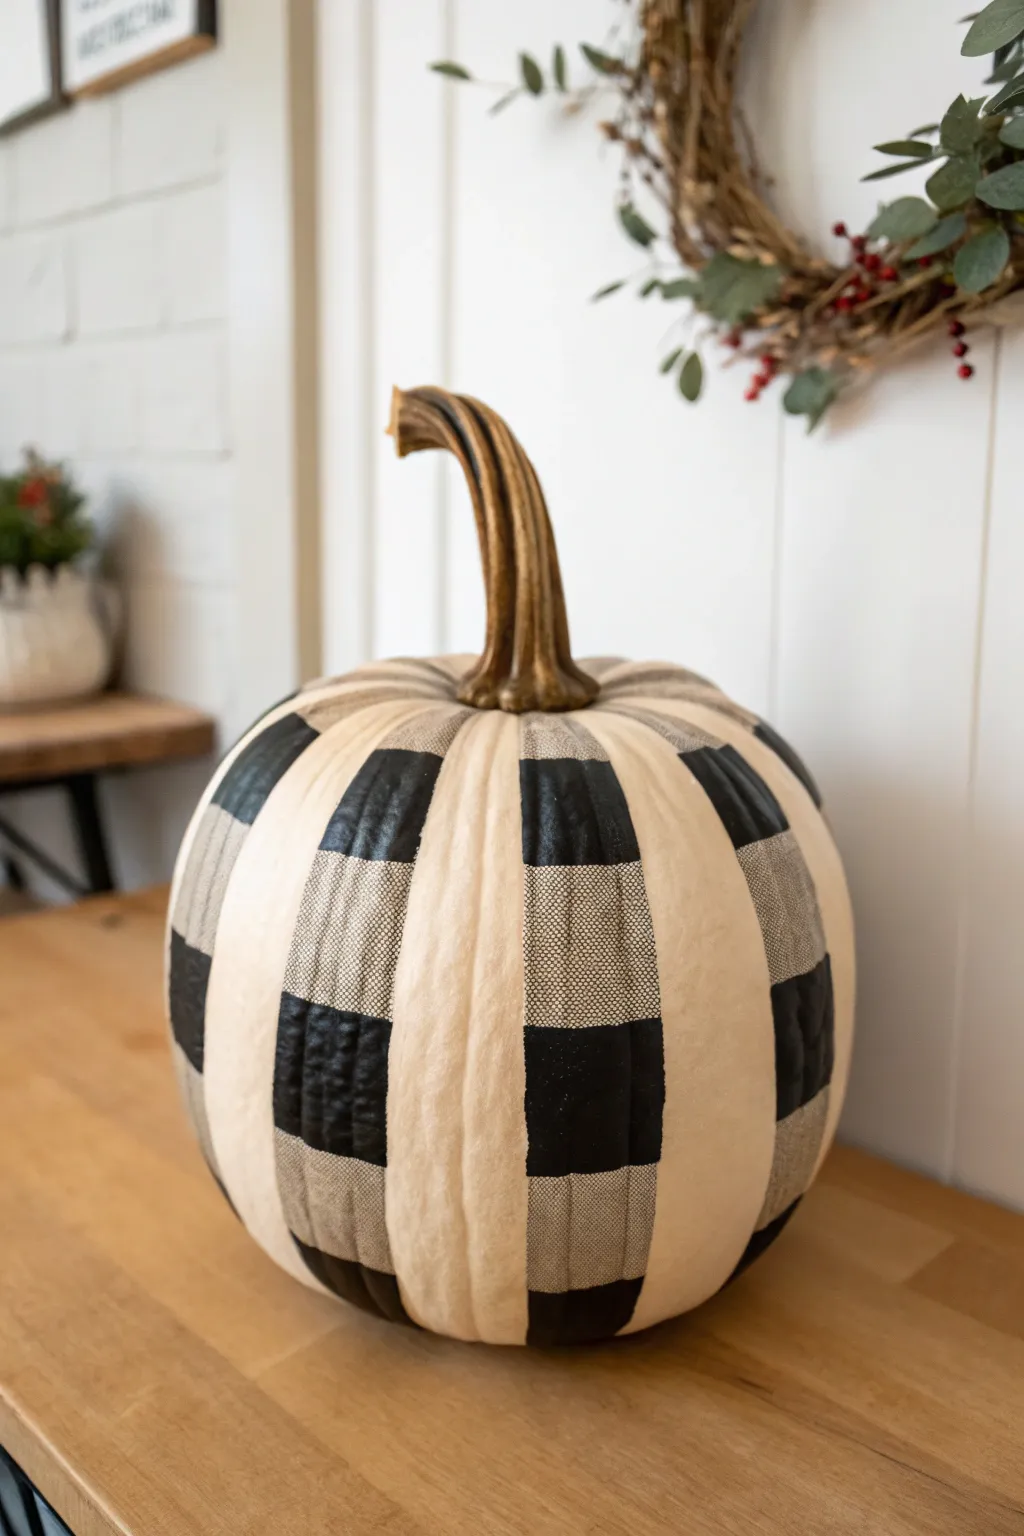
Transform a simple faux pumpkin into a farmhouse-style statement piece by using its natural ridges as a guide for a crisp buffalo-check pattern. This design emphasizes the pumpkin’s height and adds a modern, graphic touch to your autumn decor without requiring flawless freehand painting skills.
Step-by-Step Guide
Materials
- Tall, white faux pumpkin (smooth surface works best)
- Black acrylic craft paint
- Dark grey acrylic craft paint
- Light grey acrylic craft paint (or mix black and white)
- Small flat tip paintbrush (1/2 inch)
- Medium flat tip paintbrush (for filling in)
- Painter’s tape or masking tape
- Pencil
- Sealer (optional matte spray)
Step 1: Preparation & Planning
-
Clean surface:
Before starting, wipe down your faux pumpkin with a damp cloth to remove any dust or oils that might prevent the paint from sticking. -
Identify the sections:
Examine the pumpkin’s natural vertical ribs. You will be painting a buffalo-check pattern on alternating ribs, leaving every other section plain white. -
Mark your grid:
On the sections you plan to paint, lightly mark horizontal tick marks with a pencil to designate where your squares will go. Spacing them about 1.5 to 2 inches apart usually looks proportional on a tall pumpkin.
Step 2: Painting the Base Layer
-
Tape the verticals:
Carefully run painter’s tape along the deep grooves on either side of the sections you are painting. This protects the ‘white’ neighbor ribs from accidental smudges. -
Paint horizontal grey stripes:
Using your medium flat brush and the light grey paint, paint horizontal bands across the selected vertical ribs. Skip every other marked section so you have alternating grey and white stripes. -
Let it dry:
Allow the light grey stripes to dry completely to the touch. Acrylic paint dries fast, so this usually only takes about 15-20 minutes.
Wobbly Lines?
Don’t stress over imperfection. A slightly uneven edge actually makes the plaid look more like cozy flannel fabric and less like rigid geometric tile.
Step 3: Creating the Check Pattern
-
Add vertical grey stripes:
Now, paint a vertical stripe of the same light grey down the center of the rib, crossing over the horizontal stripes you just made. The goal is to create a grid foundation. -
Identify intersection points:
Look at where your vertical grey stripe overlaps with your horizontal grey stripes. These intersection squares are where the darkest color will go. -
Paint the black centers:
Using jet black paint and a smaller flat brush for precision, paint the square where the two grey lines cross. This creates the ‘depth’ of the buffalo check. -
Refine the edges:
Use the edge of your flat brush to clean up the corners of your black squares, ensuring they look sharp against the lighter colors. -
Add the mid-tone overlay:
For a true woven look, mix a slightly darker grey. Paint this shade on the areas between the black squares (the arms of the cross shape), leaving only the corners of the original white background showing.
Pro Tip: Masking Tech
For crisper lines, press the edge of your tape down firmly with a credit card or fingernail to stop paint from bleeding into the pumpkin’s natural texture.
Step 4: Finishing Touches
-
Simulate fabric texture:
To mimic the fabric look seen in the photo, take a mostly dry brush with a tiny amount of black paint. Very casually dry-brush faint lines over the grey sections to look like threads. -
Remove tape:
Ideally, peel off your painter’s tape while the final layer of paint is still slightly tacky to prevent peeling up dried acrylic skin. -
Touch up lines:
Small bleeds are inevitable. Use a small detail brush and white paint to tidy up the vertical edges where the painted rib meets the unpainted rib. -
Clean the stem:
If any paint got onto the stem, wipe it off now or dry brush some realistic brown and gold paint onto the stem to give it a fresh look. -
Seal the work:
If you plan to place this pumpkin on a porch, spray it with a clear matte sealer to protect your handiwork from moisture.
Your sophisticated farmhouse pumpkin is now ready to anchor your entryway display with its striking monochromatic pattern


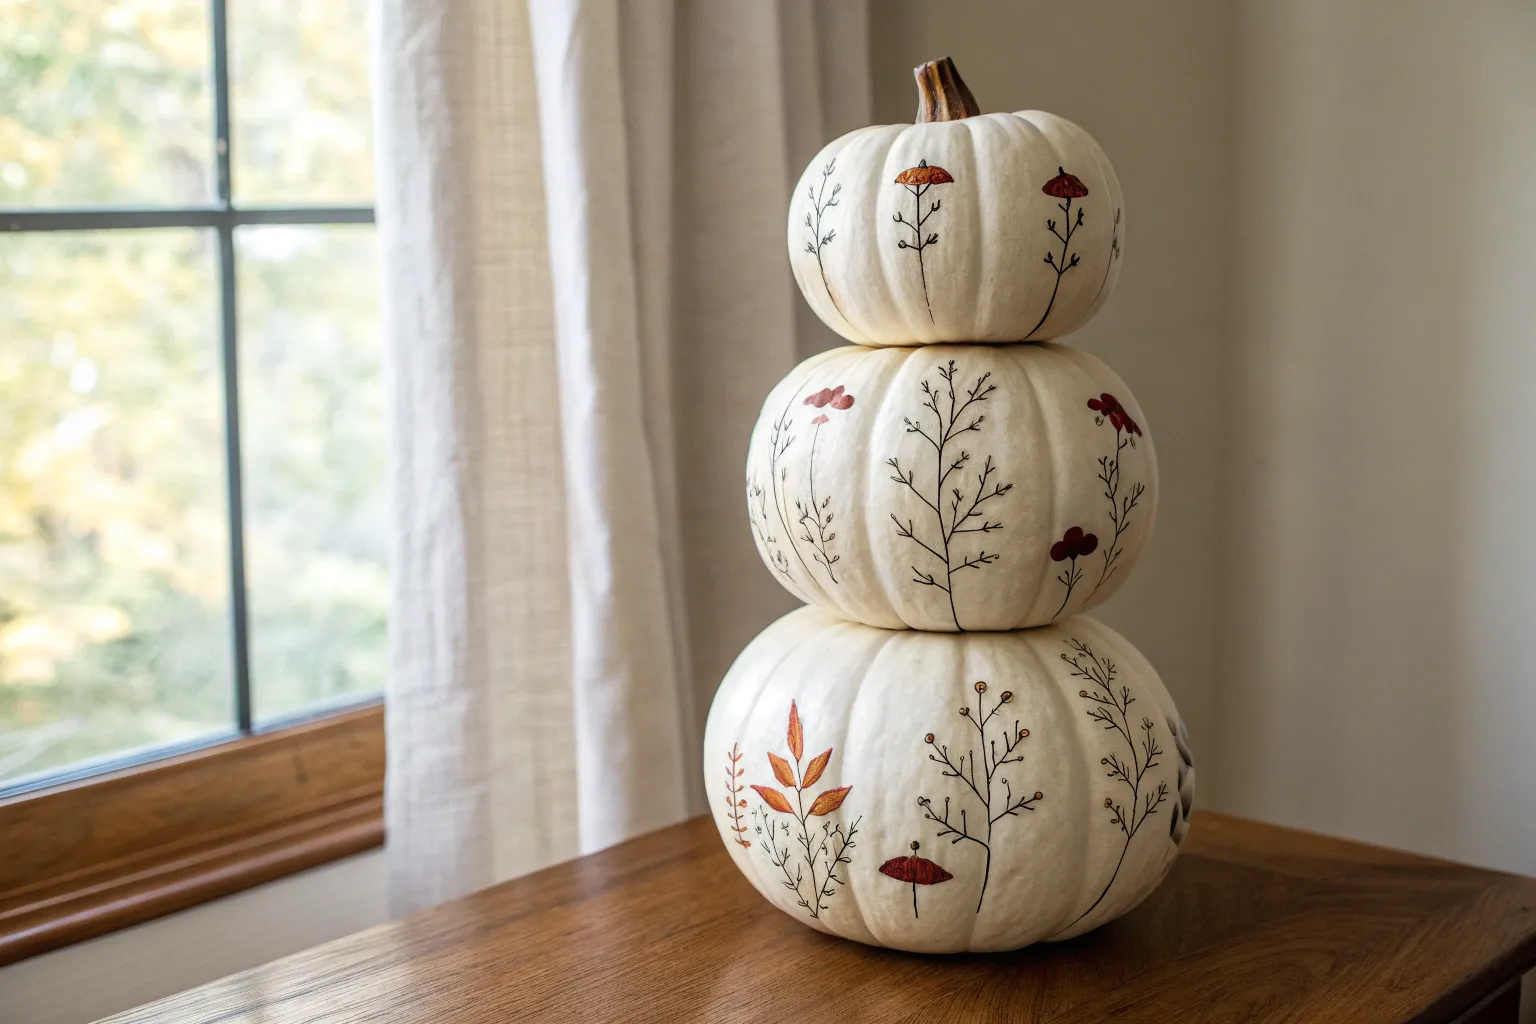
Stacked Pumpkin Totem Faces
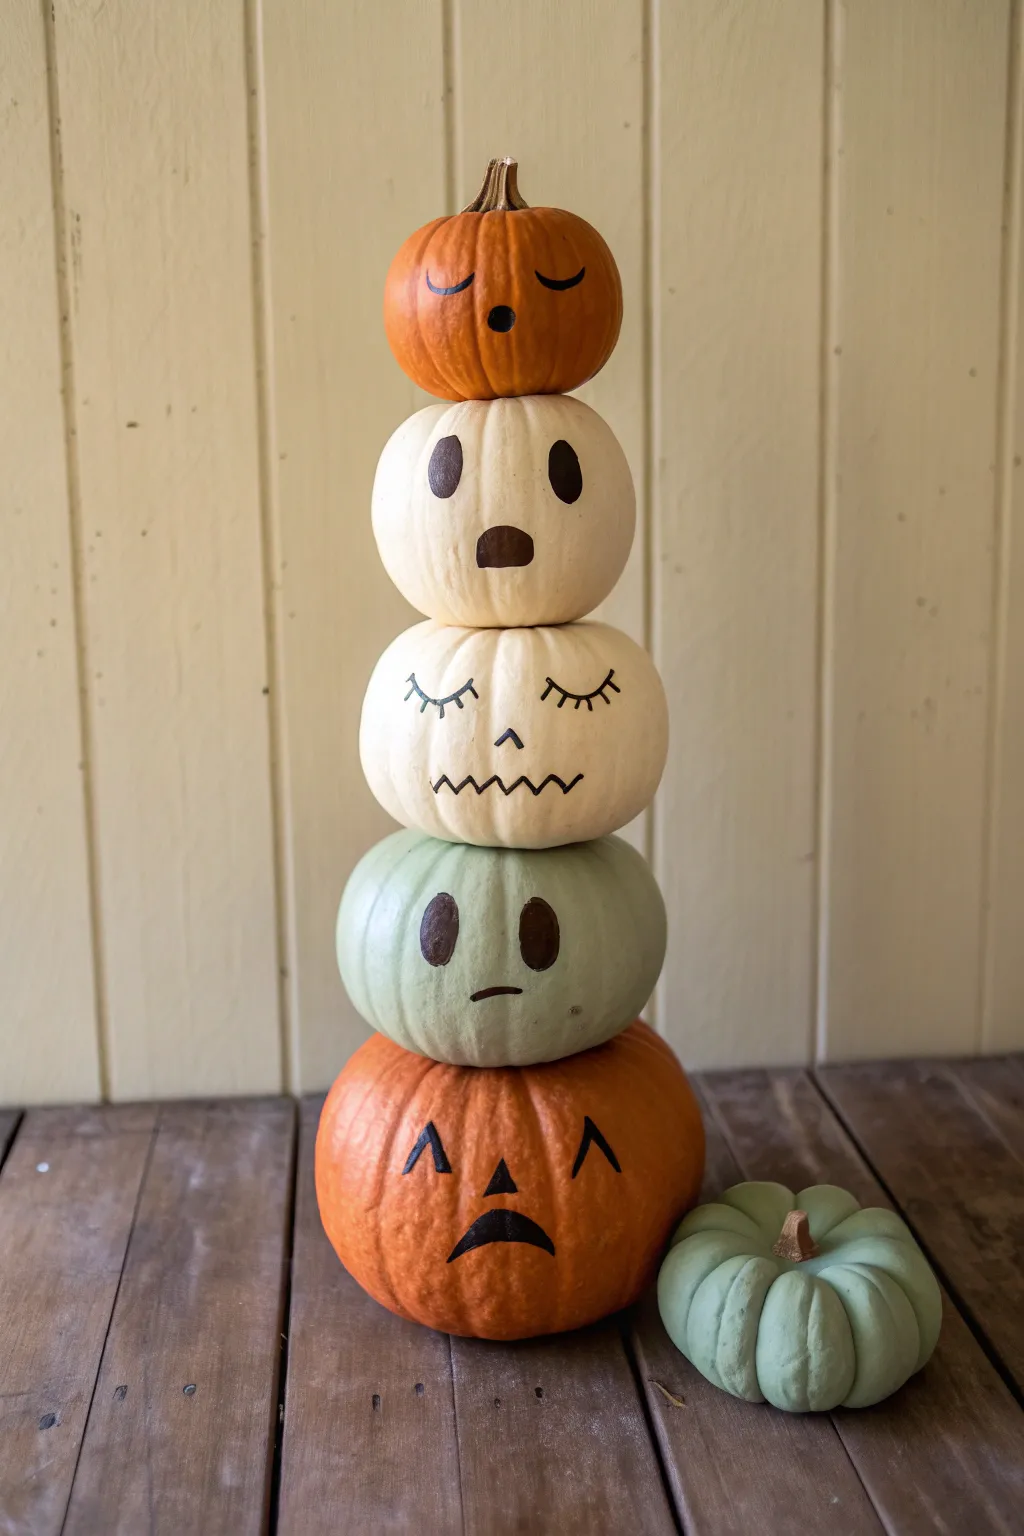
Bring character to your porch with this charming stack of expressive pumpkins, each featuring a unique painted face. By varying pumpkin sizes and colors from muted greens to bright oranges, creating this totem adds a playful and vertical focal point to your autumn decor.
Detailed Instructions
Materials
- 5 pumpkins of graduating sizes (faux or real)
- Acrylic craft paint (black)
- Small round paint brush
- Medium flat paint brush
- Pencil for sketching
- Strong craft glue or a wooden dowel (if using faux pumpkins)
- Damp cloth for clean up
- Matte clear sealant spray (optional)
Step 1: Planning and Stacking
-
Select your pumpkins:
Choose five pumpkins that vary in size from large to small. For the color palette seen here, aim for a mix: a large orange base, a medium sage green, two white/cream pumpkins, and a small orange pumpkin for the top. -
Remove the stems:
If you are using real pumpkins, carefully trim the stems off the bottom four pumpkins so they can sit flat on top of one another. Keep the stem intact only on the smallest, topmost pumpkin. -
Test the balance:
Stack your pumpkins starting with the largest orange one at the bottom, followed by the sage green, the two white ones, and finally the small orange one. Rotate them until you find the most stable locking position for each layer. -
Mark your positions:
Once you are happy with the arrangement, make tiny pencil marks on the ‘front’ face of each pumpkin so you know exactly where to paint the faces later.
Pro Tip: Stability Check
If stacking real pumpkins without glue, place a small ring of non-slip shelf liner between each layer. This adds friction and keeps them from sliding off.
Step 2: Painting the Faces
-
Sketch the bottom face:
On the largest orange pumpkin, lightly pencil in a sad or worried expression. Draw two triangular eyes pointing downward, a small triangle nose, and a wide, curved-down mouth. -
Sketch the green pumpkin face:
For the sage green pumpkin, sketch a simple neutral or blank expression. Draw two oval eyes and a small, straight horizontal line for the mouth slightly off-center. -
Sketch the middle white pumpkin face:
On the larger white pumpkin, create a sleeping or serene face. Pencil in two curved lines with eyelashes for closed eyes, a tiny triangle nose, and a zig-zag line for a mouth. -
Sketch the upper white pumpkin face:
On the smaller white pumpkin, draw a surprised ‘O’ face using bold oval shapes for the eyes and a smaller oval for the mouth. -
Sketch the top face:
Finally, on the small orange topper, sketch a singing or whistling face with curved-up closed eyes and a small solid circle for the mouth. -
Paint the black details:
Using your small round brush and black acrylic paint, carefully fill in your pencil sketches. I like to start from the top pumpkin and work my way down to avoid smudging wet paint. -
Refine the lines:
Go back over thinner lines, like the eyelashes on the middle white pumpkin, to ensure they are crisp and dark. Add a second coat to larger filled areas like the sad mouth if the paint looks streaky. -
Let it dry completely:
Allow the painted faces to dry for at least an hour before handling them again to assemble the final stack.
Trouble with Texture?
If your pumpkins are very bumpy, use a paint marker instead of a brush. The felt tip gives you more control over the uneven surface.
Step 3: Final Assembly
-
Stack the totem:
Reassemble your stack in the order you tested earlier. If using faux pumpkins, you can run a wooden dowel through the center of all of them for permanent stability. -
Secure with adhesive:
For a semi-permanent stack without a dowel, apply a ring of strong craft glue (like E6000) around the stem area of each pumpkin before placing the next one on top. -
Add a companion:
Place a small, unpainted sage green pumpkin at the base of your totem to visually anchor the tall structure and add a pop of contrasting color. -
Seal (optional):
If these will live outside, give the finished stack a light coat of matte clear sealant spray to protect the paint from moisture.
Step back and enjoy the quirky personality your new pumpkin friends bring to your space
BRUSH GUIDE
The Right Brush for Every Stroke
From clean lines to bold texture — master brush choice, stroke control, and essential techniques.
Explore the Full Guide
Long Black Cat Wraparound

Transform a simple tall pumpkin into a sleek Halloween centerpiece with this striking black cat design. The elongated silhouette perfectly complements the pumpkin’s shape, while subtle splatter details add a charming vintage texture.
Step-by-Step Guide
Materials
- Tall white faux or real pumpkin (cleaned and dried)
- Black acrylic paint (matte finish)
- White or cream acrylic paint (for touch-ups)
- Yellow or amber acrylic paint
- Pencil or chalk pencil (for sketching)
- Small flat brush (size 4-6)
- Fine liner brush (size 0-1)
- Medium round brush
- Old toothbrush (for splatter effect)
- Painter’s tape (optional)
- Clear matte sealer spray
Step 1: Preparation & Sketching
-
Clean surface:
Begin by wiping down your pumpkin with a damp cloth to remove any dust or oils, ensuring the paint adheres properly. If using a real pumpkin, make sure the surface is completely dry before starting. -
Paint the stem:
Using your medium round brush and black acrylic paint, coat the entire stem of the pumpkin. Be thorough near the base where the stem meets the fruit, keeping a clean edge. -
Identify the front:
Rotate the pumpkin to find its best face—look for a relatively smooth, vertical section that mimics the elongated shape of the cat’s body. -
Map the head:
With a pencil, lightly sketch a rounded diamond shape for the cat’s head about one-third of the way down from the top. -
Draw the ears:
Add two tall, pointed triangles on top of the head shape. Position them slightly wide to give the cat an alert expressions. -
Outline the body:
Sketch a long, slender S-curve flowing down from the neck. The body should widen slightly towards the bottom to form the seated haunches. -
Draft the tail:
Draw the tail starting from the base of the body, curving it upward along the side of the pumpkin in a high arch. A pronounced hook at the top adds character.
Step 2: Painting the Silhouette
-
Fill the outline:
Load your small flat brush with black acrylic paint. Start filling in the main body section, using long, smooth strokes that follow the vertical ribs of the pumpkin. -
Refine the edges:
Switch to a smaller round brush to neat up the edges of your silhouette. Crisp lines are crucial here since the high contrast between black and white is the main visual element. -
Paint the tail:
Carefully paint the tail, tapering the thickness as you reach the tip. I often find resting my pinky finger on the pumpkin helps steady my hand for these curves. -
Detail the face:
Fill in the head and ears with black paint, but leave two small almond shapes blank where the eyes will go. If you accidentally paint over them, don’t worry—acrylic covers well once dry. -
Let it dry:
Allow the black base coat to dry completely. This usually takes about 20-30 minutes. -
Second coat:
Apply a second layer of black paint if the first looks streaky or translucent. You want a solid, opaque silhouette.
Curve Control
For smooth tail curves, try moving your entire arm rather than just your wrist. This prevents shaky lines and creates a more fluid, organic shape.
Step 3: Details & Texture
-
Paint the eyes:
Using a fine liner brush, fill the reserved eye spaces with yellow or amber paint. You may need two coats to make the color pop against the dark surroundings. -
Add pupils:
Once the yellow is dry, use the very tip of your liner brush to add thin vertical slits in black for the pupils. -
Create whiskers:
With the finest brush you have, paint three delicate whiskers extending from each cheek. Use a quick, flicking motion so they taper at the ends. -
Splatter texture:
Dip an old toothbrush into a mix of white paint and a tiny drop of water. Run your thumb across the bristles to flick tiny speckles over the cat’s body. This creates a weathered, stoney lock. -
Clean up specks:
If any splatter landed on the white pumpkin background where you don’t want it, quickly wipe it away with a damp Q-tip. -
Seal the work:
Once everything is fully dry (give it at least an hour), spray the entire pumpkin with a clear matte sealer to protect the design from scratches or moisture.
Glow in the Dark
Mix glow powder into your yellow eye paint or use glow-in-the-dark acrylic for the eyes to make them eerily luminous when the lights go down.
Place your sophisticated feline pumpkin on a side table or porch to greet guests with style
Spooky Birch Forest in Portrait Mode
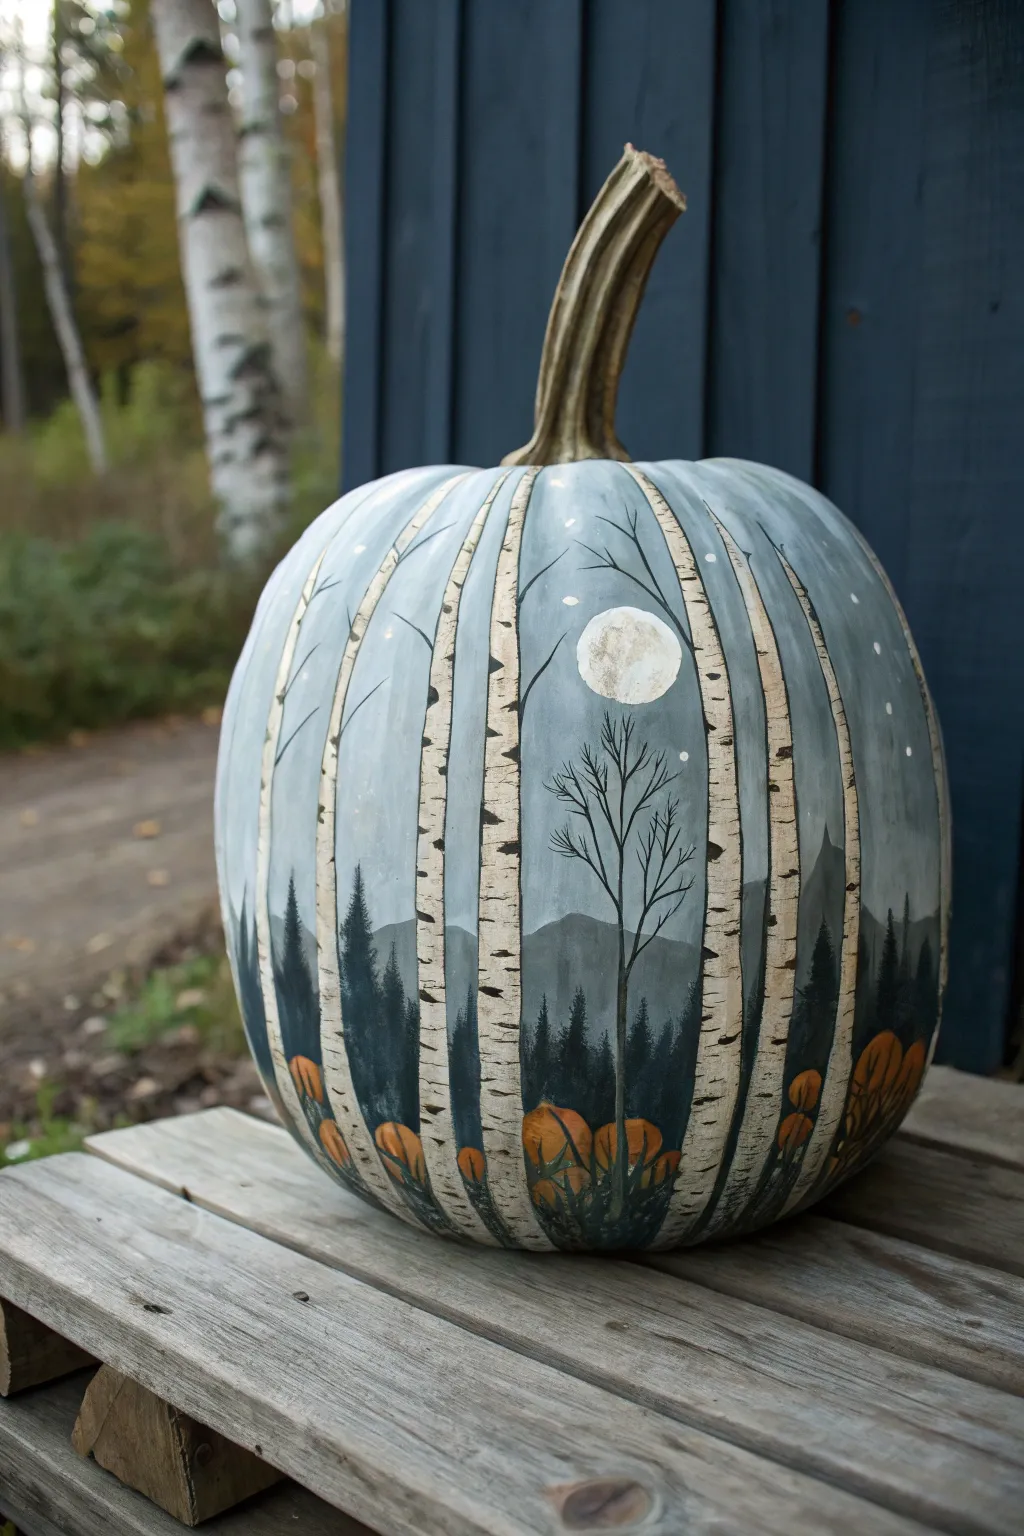
Transform a tall pumpkin into a peaceful woodland scene with this sophisticated painting project. The cool blue-grey background creates a moody atmosphere while crisp white birch trees stretch elegantly up the surface, perfect for highlighting the pumpkin’s natural height.
Step-by-Step Tutorial
Materials
- Tall, oblong pumpkin (real or faux)
- Acrylic craft paints (dusty blue-grey, white, black, dark green, burnt orange)
- Wide flat brush or sponge brush
- Medium flat brush
- Fine liner brush
- Small round brush
- Cup of water and paper towels
- Matte spray sealer (optional)
Step 1: Setting the Scene
-
Clean surface:
Begin by wiping down your pumpkin with a damp cloth to remove any dirt or oils. If using a real pumpkin, dry it thoroughly before painting. -
Base coat application:
Using a wide flat brush or sponge brush, cover the entire pumpkin with a dusty blue-grey acrylic paint. This creates the misty evening sky background. -
Second coat:
Allow the first layer to dry completely, then apply a second coat of the blue-grey paint to ensure solid, opaque coverage without streaks. Let this dry fully before proceeding. -
Mountain silhouettes:
Mix a small amount of dark grey into your blue background color. Paint a low, rolling mountain range silhouette about one-third of the way up from the bottom of the pumpkin.
Natural Texture Trick
For the birch bark marks, try using an old, stiff brush or even a scrap of cardboard dipped in black paint. Dragging the hard edge creates perfect organic texture.
Step 2: Painting the Forest
-
Evergreen layer:
Load a medium brush with dark green paint (you can mix in a touch of black for depth). Paint a row of evergreen trees along the base of the mountains, varying their heights to look natural. -
Birch trunk placement:
With a medium flat brush and white paint, create vertical stripes that run from the very bottom of the pumpkin all the way to the stem. Space them unevenly for a natural look. -
Thick and thin:
Vary the width of your birch trunks. Some should be prominent and thick, while others can be thinner to appear further away. -
Adding branches:
Switch to your fine liner brush. Extending from the upper parts of the white trunks, paint delicate, spindly branches reaching upward and outward in a ‘Y’ shape. -
Birch markings:
Using black paint and the fine liner brush, add the characteristic horizontal dashes on the white trunks. I find it helps to wiggle the brush slightly as you pull it across to create that rough bark texture. -
Bare tree silhouette:
Paint a single, thin black tree silhouette in the background between two birch trees. Give it many fine, reaching branches intended to overlap the moon later.
Step 3: Details & Atmosphere
-
Creating the moon:
Identify a spot near the upper middle of the pumpkin. Use a round brush to dab a circle of white paint. It doesn’t need to be perfectly round; a slightly textured edge adds realism. -
Moon texture:
While the white moon is still slightly wet, dab a tiny bit of diluted grey or beige into the center to create craters and shadows. -
Miniature patch:
At the very base of the pumpkin, amongst the trees, paint small clusters of round orange shapes to represent a tiny pumpkin patch on the forest floor. -
Pumpkin shading:
Add tiny vertical c-curve lines in a darker orange or brown onto the small pumpkins to give them roundness and dimension. -
Grassy texture:
Use the liner brush with dark green paint to flick short, upward strokes around the base of the mini pumpkins and birch trees to simulate tall grass. -
Starry night:
Dip the handle end of a small brush into white paint. Dot random stars throughout the blue sky area, concentrating them near the top.
Glow in the Dark
Mix glow-in-the-dark medium into your white paint for the moon and the stars. When the lights go down, your spooky forest scene will magically illuminate.
Place your finished masterpiece on a porch step or mantel where the vertical lines can be fully admired

PENCIL GUIDE
Understanding Pencil Grades from H to B
From first sketch to finished drawing — learn pencil grades, line control, and shading techniques.
Explore the Full Guide
Metallic Geometric Tape Lines
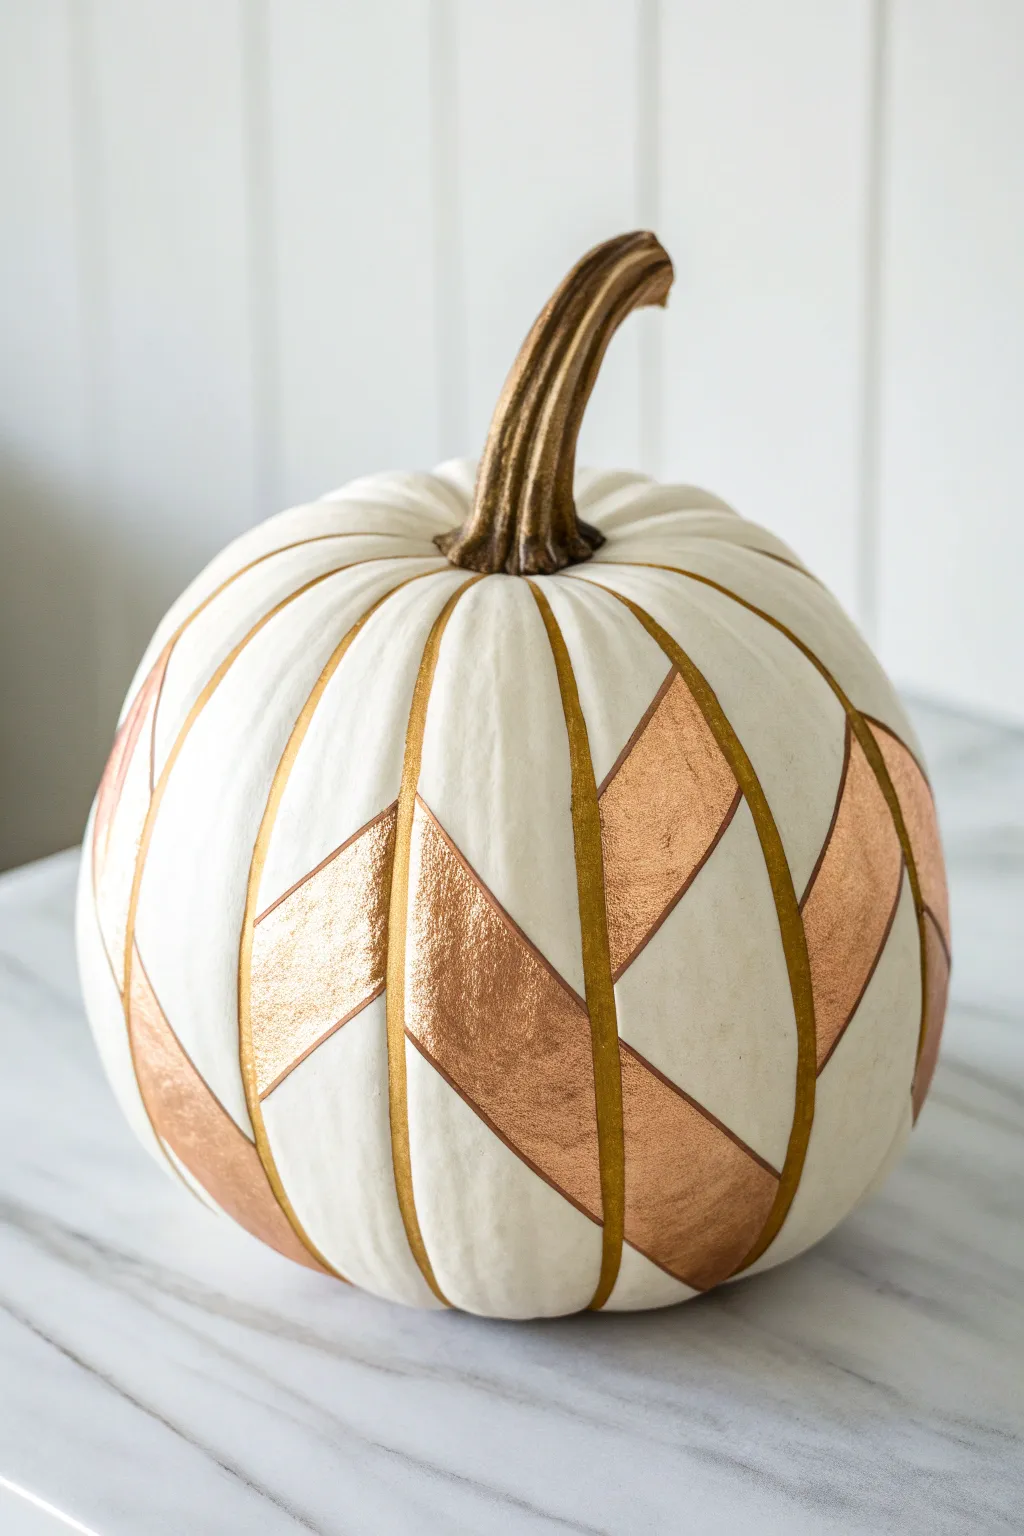
Transform a simple white pumpkin into a modern masterpiece using mixed metallic tones and crisp geometric lines. This project combines gold painting with copper leafing to create a sophisticated fall centerpiece that looks far more expensive than it actually is.
Step-by-Step
Materials
- Tall white pumpkin (real or faux)
- Metallic gold acrylic paint
- Liquid gilding or copper leaf sheets
- Metal leaf adhesive (sizing)
- Small flat paintbrush
- Medium round paintbrush
- Painter’s tape or washi tape (thin width creates cleaner lines)
- Sealant spray (optional)
- Soft cloth or dry brush
Step 1: Preparation and Base Structure
-
Clean the surface:
Begin by wiping down your pumpkin with a slightly damp cloth to remove any dirt, dust, or oils. If using a real pumpkin, ensure it is completely dry before proceeding. -
Paint the stem:
Using the medium round brush, coat the entire stem in metallic gold acrylic paint. You may need two coats for full opacity, allowing the first to handle-dry before applying the second. -
Define the ribs:
Identify the natural vertical indentations (ribs) of the pumpkin. Using the same gold paint and a steady hand, paint a consistent line down the depth of each rib from the stem to the base. -
Let the framework dry:
Allow these painted vertical lines to dry completely. This creates the structural grid for your geometric pattern.
Sticky Situation?
If the metal leaf is tearing or not sticking, your adhesive might be too dry. Reapply a very thin layer and test for tackiness frequently.
Step 2: Creating the Geometric Pattern
-
Plan the zig-zag:
Visualise a chevron or diamond pattern wrapping around the pumpkin. You will be filling diagonal sections between your gold vertical lines. -
Apply tape guides:
Place strips of painter’s tape diagonally between two vertical gold lines. Creating a distinct ‘V’ or sash shape works best. Ensure the tape edges are pressed down firmly to prevent bleeding. -
Alternate the sections:
Don’t tape off every section at once. I find it easier to work on alternating sections—skip one vertical column, then tape the next—to avoid tape overlapping on wet adhesive. -
Protect the gold lines:
Make sure your tape overlaps the gold painted ribs slightly, so the copper sections will appear to sit distinctively between the gold borders.
Level Up: Texture Play
Instead of smooth copper leaf, use glitter blast spray or copper crushed glass in the taped sections for a highly textured, sparkling contrast.
Step 3: Applying the Copper Leaf
-
Apply adhesive:
Brush a thin, even layer of metal leaf adhesive (sizing) into the exposed triangular or diagonal areas you created with the tape. Be careful not to go over the tape onto the white parts you want to keep clean. -
Wait for tackiness:
Let the adhesive sit until it becomes tacky. It should feel sticky like the back of a stamp, but not wet enough to leave residue on your finger. This usually takes 5-15 minutes depending on the brand. -
Place the leaf:
Gently lay a sheet of copper leaf over the tacky area. It is very delicate, so handle it lightly. -
Burnish the leaf:
Use a soft, dry brush or a soft cloth to gently rub the copper leaf onto the adhesive. This ensures full contact and smooths out wrinkles. -
Remove excess leaf:
Brush away the loose flakes of copper leaf that aren’t stuck to the adhesive. Collect these scraps; they can be perfect for filling in small gaps later. -
Peel the tape:
Carefully peel back the painter’s tape while the project is still fresh. Pulling slowly at a 45-degree angle usually gives the crispest edge. -
Repeat the process:
Once the first set of diamonds is dry and clean, tape off the remaining alternating sections to complete the pattern around the pumpkin.
Step 4: Finishing Touches
-
Touch up edges:
Inspect your lines. If any copper leaf jaggedly crossed a gold line, use your small flat brush and a tiny bit of white paint (or gold, depending on the error location) to tidy it up. -
Seal the artwork:
To prevent the metal leaf from tarnishing over time, you can apply a clear glossy spray sealant or a brush-on varnish over the copper areas. -
Final clean:
Wipe away any lingering flecks of metal leaf from the white sections of the pumpkin to ensure high contrast.
Place your shimmering geometric pumpkin in a well-lit spot where the light can catch those metallic angles
Constellations That Climb the Pumpkin
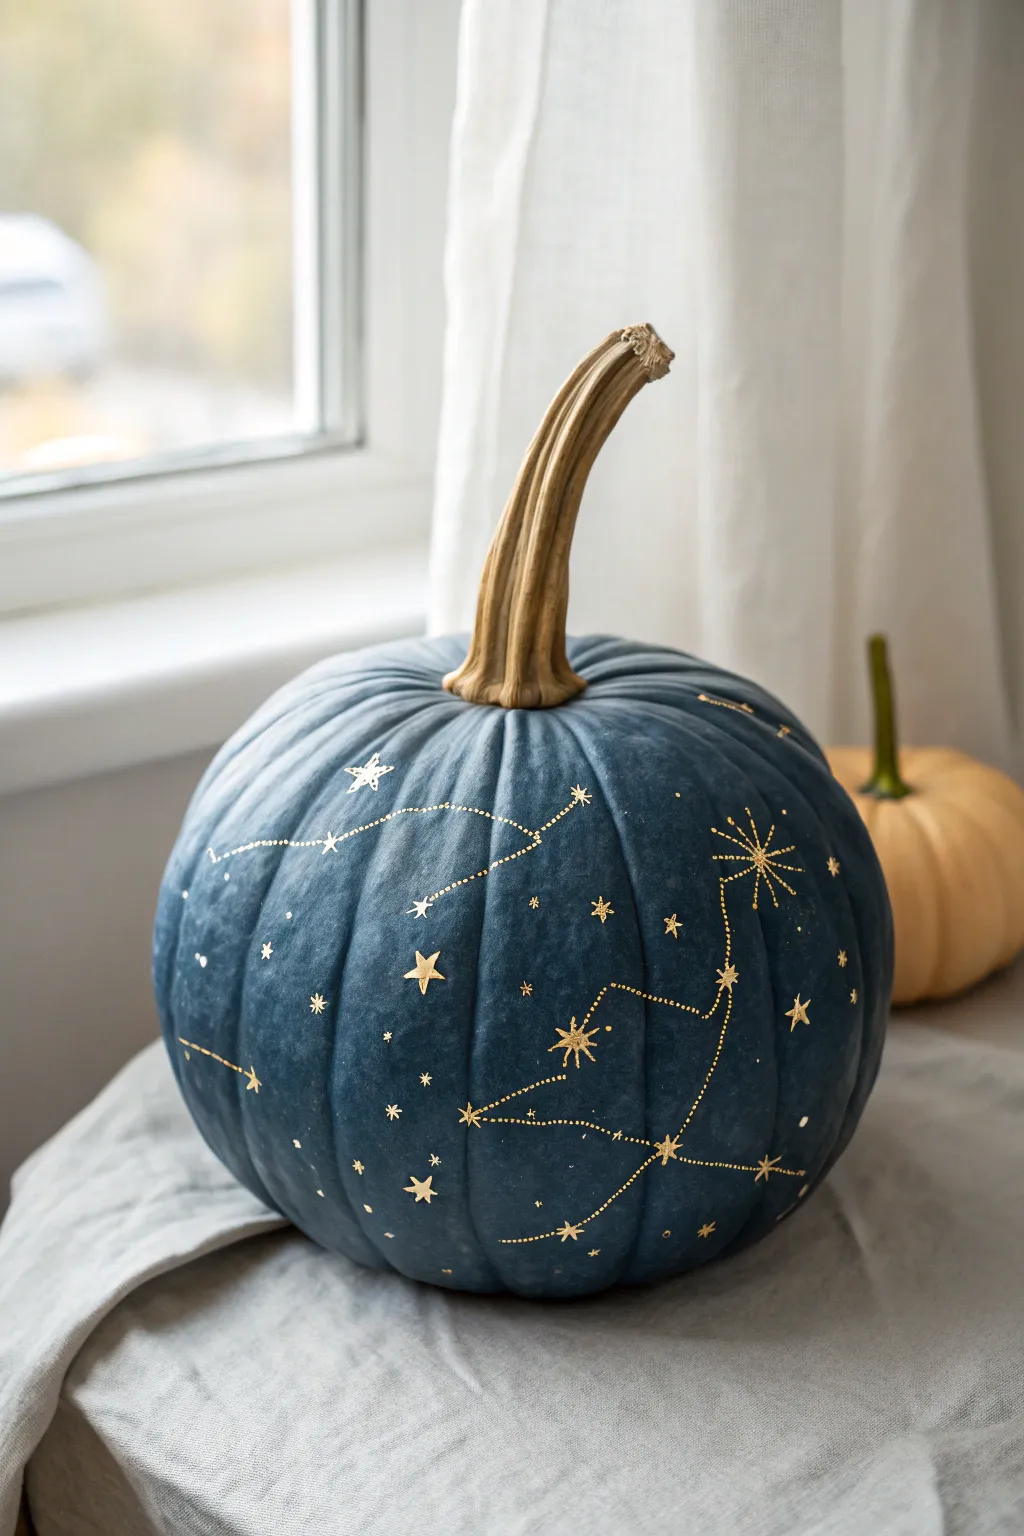
Turn a simple gourd into a starry night sky with this elegant project featuring delicate gold constellations on a deep matte blue base. The combination of rich navy and shimmering metallic creates a sophisticated piece of decor that transcends Halloween and works beautifully through November.
Step-by-Step Tutorial
Materials
- Tall, real or faux pumpkin
- Matte navy blue or midnight blue acrylic paint
- Gold paint pen (fine tip)
- Gold paint pen (medium tip)
- White chalk or light pencil
- Wide flat paintbrush
- Small round paintbrush (optional)
- Clear matte sealer spray
- Paper towels or cloth
- Drop cloth or newspaper
Step 1: Preparation & Base Coat
-
Clean the surface:
Begin by thoroughly wiping down your pumpkin with a damp cloth to remove any dirt or oils that might prevent the paint from adhering properly. Dry it completely. -
Protect the stem:
If you want to keep the natural stem color like the example, wrap it carefully with painter’s tape. I like to tear small strips of tape to get right into the crevices at the base of the stem. -
Apply the first coat:
Using a wide flat brush, apply a layer of matte navy blue acrylic paint over the entire pumpkin. Brush in the direction of the pumpkin’s ribs for the smoothest finish. -
Let it dry completely:
Allow this first layer to dry for at least 30-45 minutes. It needs to be dry to the touch before you proceed. -
Add a second coat:
Apply a second coat of blue paint to ensure opaque, solid coverage. Check for any streaks or light spots and cover them well. Let this dry fully, perhaps overnight, to ensure a hard surface for drawing.
Smudged Paint?
If you accidentally smudge the gold pen, don’t wipe it immediately! Let it dry completely, then paint over the mistake with a tiny bit of the navy base color.
Step 2: Mapping the Stars
-
Plan your constellations:
Using a piece of white chalk or a very light pencil, sketch out the rough placement of your constellations. You can look up real star charts or simply freehand celestial shapes that flow upward along the pumpkin’s height. -
Mark major stars:
Identify where the largest ‘stars’ will be on your sketched lines. These will be the anchor points for your constellations. -
Create the main stars:
Using the medium-tip gold paint pen, draw five-pointed or four-pointed stars at your anchor points. Fill them in solidly so they stand out against the dark background. -
Add accent bursts:
For a few select stars, draw longer radiating lines outward to create a ‘burst’ effect, mimicking the twinkling stars shown in the reference image.
Step 3: Connecting the Dots
-
Draw connection lines:
Switch to your fine-tip gold paint pen. Carefully draw dotted or dashed lines connecting your main star shapes to form the constellation patterns. -
Vary the line style:
Keep your dots consistent in size. If you make a mistake, quickly wipe it away with a damp Q-tip before the paint sets. -
Fill the empty space:
Look at the negative space between your constellations. Use the fine-tip pen to add tiny single dots, small crosses, or miniature stars to fill these gaps, creating the look of a distant galaxy. -
Climb the height:
Ensure some of your constellations or star trails reach up toward the top near the stem, emphasizing the tall shape of the pumpkin. -
Clean up sketch lines:
Once the gold paint is completely dry (give it at least an hour), use a slightly damp soft cloth to gently wipe away any visible chalk or pencil guidelines.
Add Dimension
Add tiny self-adhesive rhinestones or crystals to the centers of the largest stars for a 3D sparkle that catches the light beautifully.
Step 4: Finishing Touches
-
Remove the tape:
Carefully peel away the painter’s tape from the stem. If any blue paint bled through, you can scrape it off gently with a fingernail or touch it up. -
Seal the artwork:
To protect your design, take the pumpkin outside and apply a light coat of clear matte sealer spray. This prevents the paint from chipping and keeps the finish velvety.
Place your finished celestial pumpkin near a window or by candlelight to watch the gold constellations shimmer against the midnight blue


Porcelain-Inspired Blue Branches
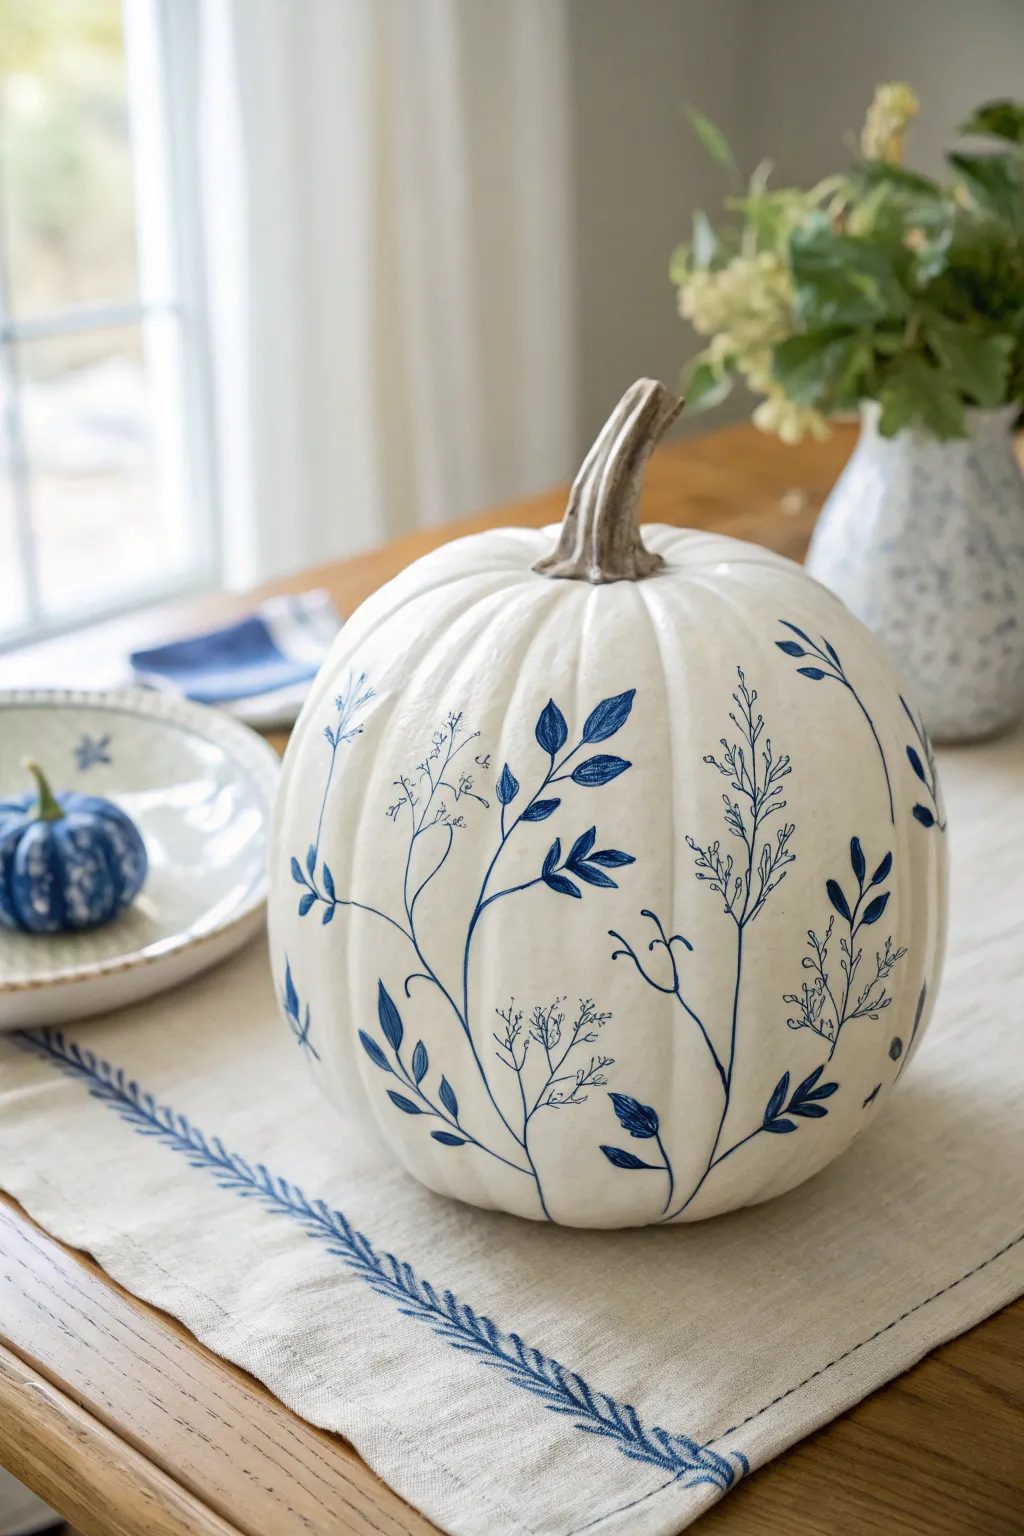
Evoke the timeless elegance of blue willow china with this delicate painted pumpkin project. The contrast of deep cobalt vines against creamy white skin transforms a simple autumn gourd into a sophisticated centerpiece worthy of your dining table.
How-To Guide
Materials
- Tall white faux pumpkin (or real pumpkin painted matte white)
- Cobalt blue acrylic paint
- Navy blue fine-tip paint pen or acrylic marker
- Round liner brush (size 0 or 1)
- Pencil
- Paper plate or palette
- Small cup of water
- Paper towel
- Matte clear sealer spray
Step 1: Preparation
-
Clean and prep the surface:
If using a real pumpkin, wash it thoroughly with mild soap and dry completely. For faux pumpkins, give them a quick wipe to remove dust or oils that might repel paint. -
Base coat application (optional):
If your pumpkin isn’t a pure, clean white, apply two coats of matte white acrylic paint. Let the first coat dry fully before adding the second to ensure a smooth, porcelain-like finish. -
Sketch the main flow:
Lightly trace long, sweeping curves up the sides of the pumpkin using a pencil. These lines will serve as the main stems for your botanical design, following the natural vertical ribs of the gourd.
Step 2: Painting the Foliage
-
Start the main vines:
Using your fine-tip navy paint pen or a liner brush loaded with thinned cobalt paint, trace over your pencil stem lines. Keep the pressure light to achieve thin, delicate stalks. -
Add secondary branches:
Draw shorter, thinner lines branching off the main stems at roughly 45-degree angles. Vary the placement so the design feels organic rather than perfectly symmetrical. -
Paint the solid leaves:
Load your round brush with cobalt blue acrylic paint. Press the belly of the brush down gently and lift up quickly to create teardrop-shaped leaves attached to the thicker branches. -
Fill the leaves:
If your brush stroke didn’t fully cover the leaf shape, carefully fill in any gaps with more blue paint. Aim for a solid, opaque look typical of ceramic glazes. -
Create varied leaf sizes:
Paint smaller teardrop leaves near the tips of the branches and larger ones near the base. This variation adds depth and realism to the botanical pattern.
Uneven Lines?
If your paint pen lines look shaky, thicken the line slightly in that specific spot to smooth it out, turning a mistake into a slightly sturdier branch.
Step 3: Adding Delicate Details
-
Switch to fine details:
For the wispy, wild-flower elements, switch back to your fine-tip paint pen or the very tip of your smallest liner brush. -
Draw delicate sprigs:
In the open spaces between the heavy leafy branches, draw very thin, vertical stems that branch out into tiny Y-shapes. -
Add buds and dots:
At the ends of these tiny Y-branches, add microscopic dots or tiny open circles to represent flower buds or seeds. These should look like fine line drawings rather than solid painted shapes. -
Connect elements naturally:
Ensure all leaves and buds connect back to a stem. Floating leaves can break the illusion, so extend a hairline stroke to connect any stragglers. -
Check for balance:
Spin the pumpkin slowly. I like to step back a few feet to see if any large white spaces feel too empty. If so, add a small, floating sprig or extra leaf to fill the void.
Depth Trick
Mix a tiny drop of white into your blue for a few specific leaves. This lighter shade creates a subtle, beautiful variation like hand-painted china.
Step 4: Finishing Touches
-
Clean up sketch lines:
Once the paint is completely bone dry (give it at least an hour), use a clean eraser to gently remove any visible pencil marks from your initial sketch. -
Seal the artwork:
Take the pumpkin to a well-ventilated area and apply a light coat of matte clear sealer. This protects the delicate line work and unifies the sheen of the paint and the pumpkin surface. -
Let it cure:
Allow the sealer to cure overnight before handling extensively or placing it on delicate linens.
Place your finished pumpkin on a linen runner to complete the classic, airy farmhouse aesthetic
Storybook Door Up the Pumpkin
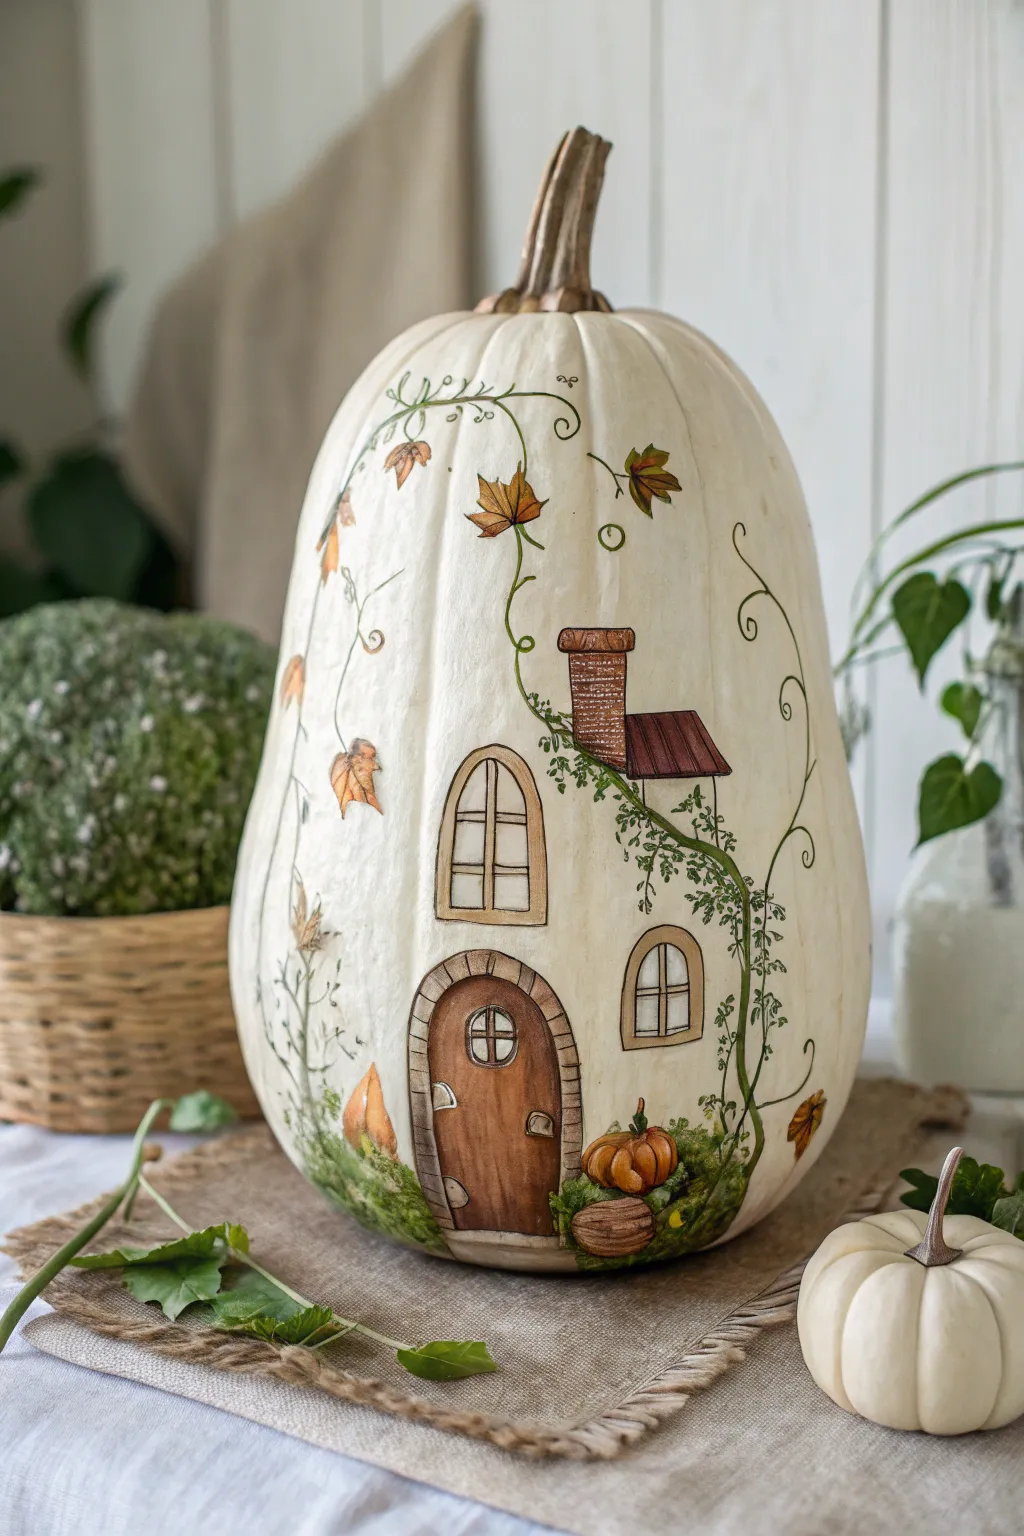
Transform a tall white pumpkin into an enchanting fairy abode with this illustrative painting project. Using fine lines and warm autumn tones, you’ll create a cozy storybook scene that climbs naturally up the pumpkin’s vertical ridges.
How-To Guide
Materials
- Tall white pumpkin (real or faux)
- Pencil and eraser
- Acrylic paints (browns, warm grays, terra cotta, greens, orange, creamy white)
- Fine-point permanent black liner pens (sizes 01, 03, and 05)
- Small flat brushes and fine liner brushes
- Matte spray varnish/sealant
- Water cup and palette
Step 1: Sketching the Elements
-
Clean and prep:
Wipe down your pumpkin surface with a damp cloth to remove any dust or oils. If using a real pumpkin, ensure it is completely dry before starting. -
Outline the door:
Near the bottom center, lightly sketch a tall, arched door shape with your pencil. Draw a concentric arch around it to represent the stone frame. -
Place the windows:
Above the door, slightly off-center to the left, sketch a larger arched window. To the right of the door, add a smaller, squatter arched window. -
Add architectural details:
Sketch a chimney stack and a small slanted roof section higher up on the right side. Draw gentle curlicues and vine lines winding their way up from the base all the way to the stem. -
Ground the scene:
At the base of the door, sketch a few scattered rocks, a miniature pumpkin, and some grassy texture to anchor the house.
Step 2: Blocking in Colors
-
Base coat the wood:
Mix a warm, medium brown and paint the door area. Don’t worry about wood grain yet; just get solid coverage. Paint the window frames in a lighter tan or cream color. -
Paint the stonework:
Use a warm gray or greige to fill in the archway around the door. While the paint is wet, you can dab in slightly darker gray spots to suggest stone texture. -
Fill the chimney details:
Paint the chimney rectangle with a muted terra cotta or brick red. Use a dark brown for the small roof section next to it. -
Add the greenery:
Using a mossy green, paint the grassy patches at the base. For the leaves on the vines, paint small, simple tear-drop shapes in varying shades of green and autumnal orange.
Ink Smearing?
If using permanent markers on a real pumpkin skin, the waxy surface can keep ink wet longer than paper. Test a small spot and let it dry for 10 minutes before touching or sealing.
Step 3: Detailing and Defining
-
Add wood grain effects:
Once the brown door is dry, take a slightly darker brown paint watered down to a glaze consistency. Use a fine liner brush to paint vertical streaks, creating a wood grain look. -
Inking the outlines:
This is where the magic happens. Use your 05 liner pen to trace the main outlines of the house—the door frame, the stones, and the windows. Keep your hand loose for a sketched look. -
Detailing the vines:
Use the finer 01 or 03 pen to draw the meandering vine stems connecting your painted leaves. Add tiny curlicues and tendrils that reach out into the negative space. -
Create texture with ink:
Add hatching lines (closely spaced parallel lines) to the chimney to look like rows of brick. Add stippling dots to the moss at the bottom for texture. -
Highlights and depth:
Use a tiny brush with white paint to add reflections on the window panes and small highlights on the door handle and pumpkin curves. -
Final shading:
I like to take a very diluted gray or brown wash and paint a thin shadow line under the vines and leaves to make them pop off the surface slightly. -
Seal the work:
Once absolutely everything is dry (give the ink plenty of time), spray the entire pumpkin with a matte varnish to protect your illustration.
Add Dimension
Glue dried moss or tiny twigs around the base of the painted door for a mixed-media effect that blends the painting into the real world.
Display your storybook pumpkin on a covered porch or entryway to welcome guests into your own cozy tale
Stacked Skeleton on White Pumpkins
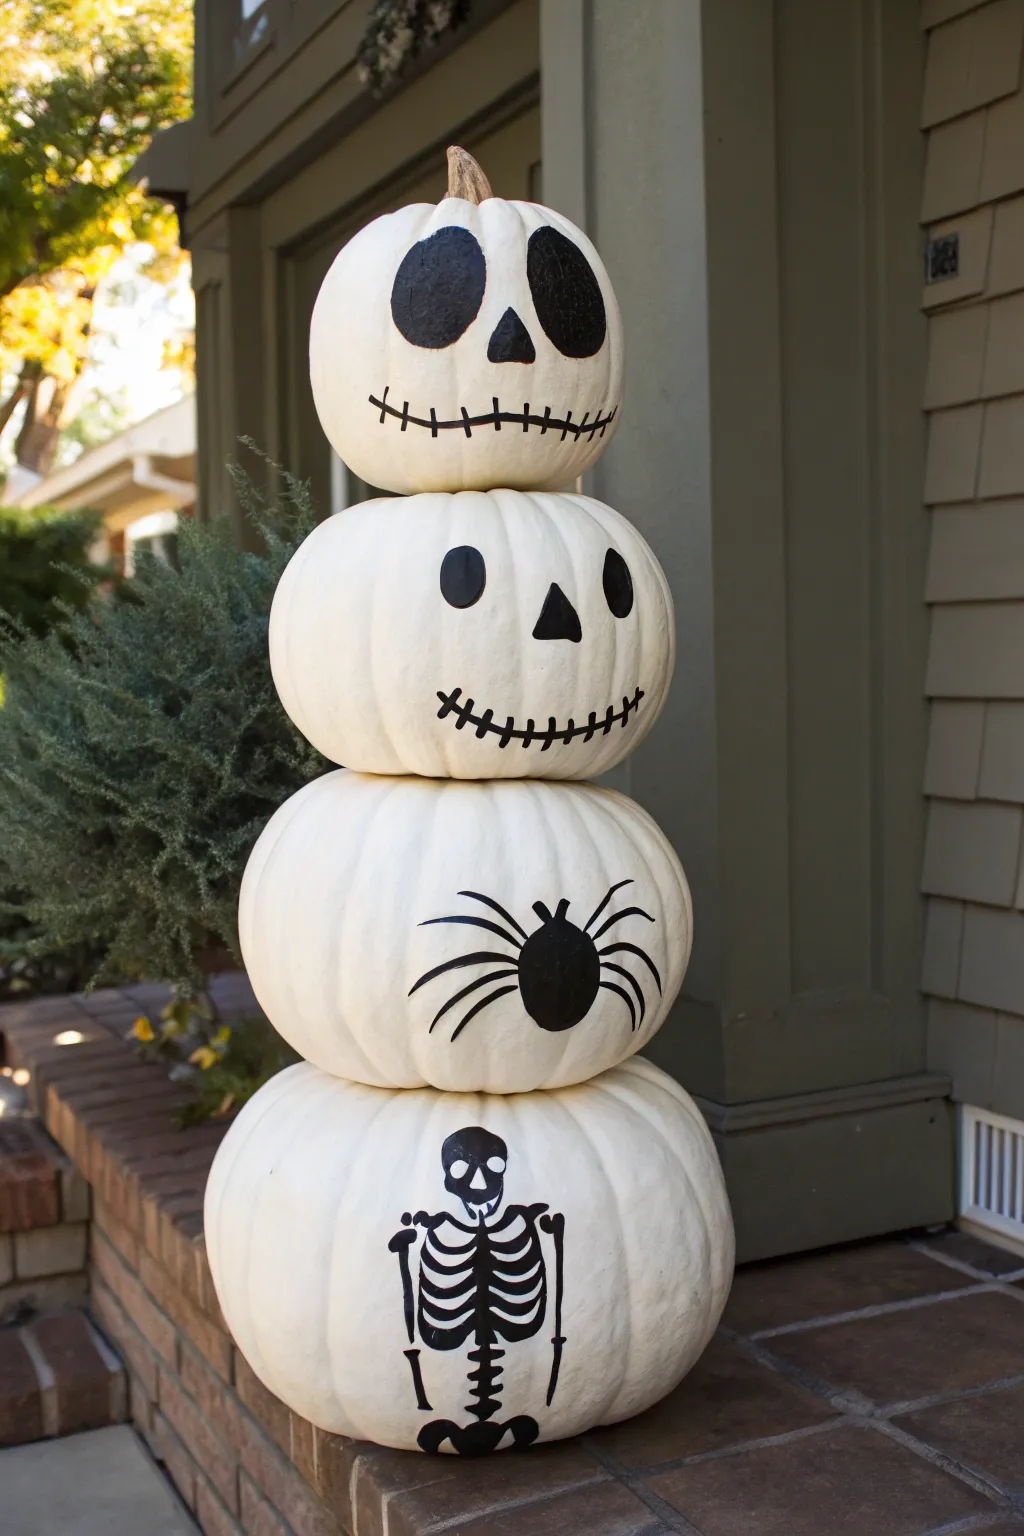
Transform four simple white pumpkins into a delightful, towering skeleton character for your porch. This monochromatic project combines spooky and silly elements with bold black paint on a clean white canvas for a striking vertical display.
Step-by-Step Guide
Materials
- 4 white pumpkins (graduated sizes from large to small)
- Black acrylic craft paint (outdoor-safe recommended)
- Medium round brush
- Small liner brush
- Pencil for sketching
- Outdoor clear spray sealer (matte or satin)
- Damp cloth or paper towels
- Wooden skewer or dowel (optional, for stability)
- Hot glue gun or strong construction adhesive (optional)
Step 1: Preparing the Stack
-
Clean and Dry:
Begin by thoroughly washing your pumpkins with mild soap and water to remove any dirt or field debris. Dry them completely with a towel. -
Stem Removal:
Test stack your pumpkins to see how they fit best. You will need to snap off the stems of the bottom three pumpkins so they can sit flat against each other. Leave the stem on the smallest pumpkin, as this will function as the skeleton’s head. -
Test the Balance:
Arrangement is key for stability. Place the largest, flattest pumpkin on the bottom. Stack them upwards by decreasing size, rotating each one until they find a ‘sweet spot’ where they sit steady without wobbling. -
Mark the Orientation:
Once you have the perfect stack, use a piece of tape or small pencil mark on the back of each pumpkin to remember which way they face forward.
Step 2: Painting the Skeleton Head
-
Sketch the Face:
Take the top (smallest) pumpkin. Lightly use a pencil to sketch two large, irregular circles for eye sockets, a small triangle for the nose, and a wide, curved line for the mouth. -
Fill the Eyes and Nose:
Using your medium round brush and black acrylic paint, fill in the eye sockets and the nose triangle. Don’t worry about making them perfectly symmetrical; a little irregularity adds character. -
Paint the Mouth:
Switch to your liner brush for the mouth. Trace the wide smile line first, then paint small vertical hatch marks across it to create the classic skeleton ‘stitched’ look. -
Second Head:
Move to the second pumpkin from the top. Sketch a simpler face with smaller round eyes, a small nose, and a similar stitched smile. Paint these features in solid black.
Paint Smudges?
If you accidentally smear black paint on the white skin, quickly wipe it away with a damp paper towel. If it dries, scrape it gently with a fingernail or paint over it with white.
Step 3: Body Details
-
Spider Feature:
On the third pumpkin down, we’ll add a spooky critter. Centered on the front, paint a solid black oval for a spider’s body using the round brush. -
Adding Legs:
Using the liner brush, carefully paint four curved legs extending out from each side of the spider’s body. Make the legs taper slightly at the ends for a creepier look. -
Sketching the Skeleton Torso:
On the largest bottom pumpkin, sketch a small skull at the top center, followed by a rib cage and two stick-like arms hanging down. This creates a funny ‘skeleton within a skeleton’ effect. -
Painting the Rib Cage:
Paint the small skull black, leaving white spaces for eye sockets if possible (or paint white dots later). Paint the spine as a vertical line and add horizontal curved ribs extending from it. -
Detailing the Arms:
Using the liner brush, paint thin black lines for the arms, adding small circles or knobs at the joints to represent bones. I like to make the hands dangle casually for a relaxed skeleton vibe.
Pro Tip: Faux Pumpkins
Use carvable foam pumpkins instead of real ones. They are lighter, easier to stack, never rot, and you can reuse this decoration year after year.
Step 4: Assembly and Finishing
-
Final Drying:
Allow all paint to dry completely. Acrylics usually dry to the touch within 20-30 minutes, but wait an hour to be safe. -
Protect Your Work:
Take the pumpkins outside and give them a light coat of clear matte spray sealer. This protects the paint from chipping and helps them weather the outdoors. -
Secure the Stack:
Reassemble your stack on the porch. For extra security, apply a ring of construction adhesive or heavy-duty hot glue between the layers. -
Optional Dowel:
If you live in a windy area, you can drill a hole through the center of the pumpkins and run a wooden dowel through the entire stack for maximum stability.
Enjoy your whimsical skeleton stack as it greets trick-or-treaters with its many smiling faces
Glow-Look Galaxy With Falling Stars
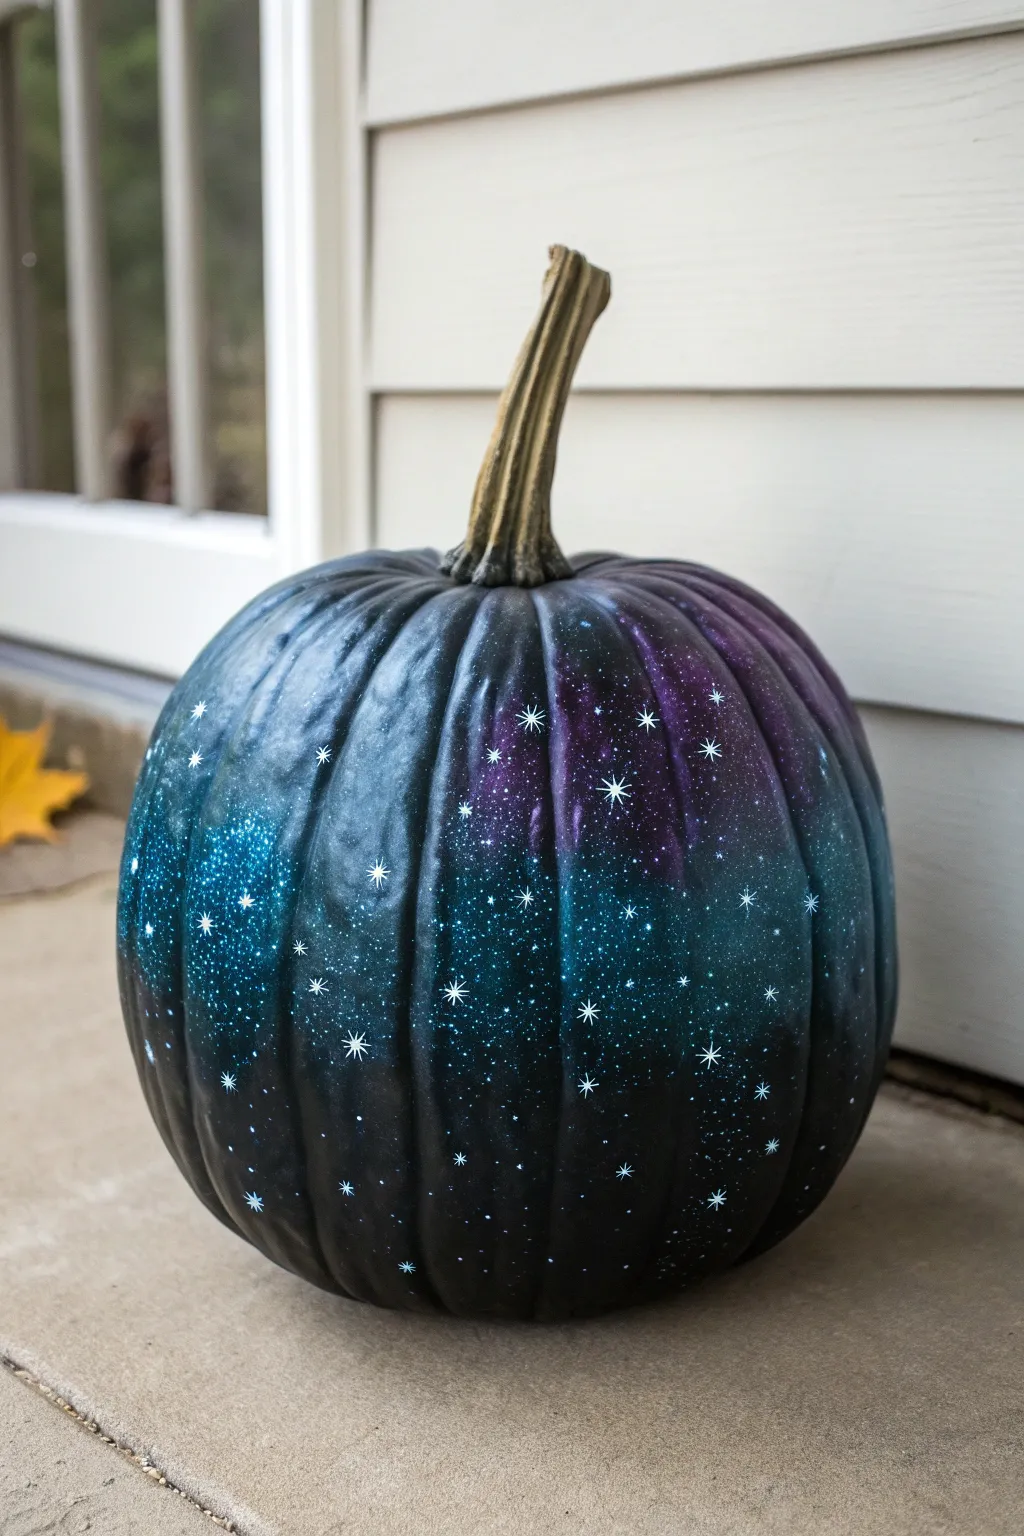
Transform a simple gourd into a piece of deep space art with this stunning galaxy effect. By layering dark acrylics with vibrant nebula clouds and crisp white stars, you’ll create an otherworldly decoration that looks like it’s glowing from within.
Step-by-Step
Materials
- Tall craft pumpkin (or natural pumpkin)
- Black acrylic paint (matte or satin)
- Purple acrylic paint (rich violet)
- Teal or turquoise acrylic paint
- Navy blue acrylic paint
- White acrylic paint
- Sponge applicators (makeup sponges or kitchen sponge pieces)
- Small round paintbrushes (sizes 0 and 2)
- Stiff bristle toothbrush
- Palette or paper plate
- Water cup and paper towels
- Clear acrylic sealant spray (optional)
Step 1: Setting the Stage
-
Prime the Surface:
Begin by wiping down your pumpkin surface to remove any dust or dirt. If using a real pumpkin, ensure it is completely dry. -
Apply the Base Coat:
Squeeze out a generous amount of black acrylic paint. Using a large brush or sponge, cover the entire pumpkin in a solid black layer. -
Check Coverage:
Inspect your first layer for streaks or thin spots as it dries. Apply a second coat of black if necessary to achieve a fully opaque, dark void background. -
Dry Completely:
Allow the black base coat to dry thoroughly. This is crucial because wet black paint will muddy your vibrant galaxy colors later.
Help, mud!
If your nebula colors turn gray or muddy, stop blending immediately. Let the current layer dry 100%, then sponge fresh, vibrant color on top to restore the brightness.
Step 2: Creating the Nebula
-
Prepare Your Sponges:
Cut a kitchen sponge into small, manageable one-inch cubes, or grab a few makeup wedges. You’ll want a separate sponge surface for each galaxy color. -
Start with Navy:
I like to start with the darkest color first to build depth. Lightly dab your sponge into navy blue paint, offload most of it on your palette, and gently sponge irregular cloud shapes onto the pumpkin. -
Add Purple Hues:
Switch to a fresh sponge and pick up the purple paint. Sponge this color partially over the navy areas and extend it out into the black, creating soft, clustered cloud formations. -
Highlight with Teal:
Dip a sponge into the teal or turquoise paint. Apply this sparingly to the centers of your purple and blue clusters to create bright, glowing focal points within the nebula. -
Blend the Edges:
Use a clean, slightly damp sponge to gently tab around the edges of your colored clouds. This softens the transition between the colors and the black background. -
Let Colors Set:
Allow the sponge work to dry for about 10-15 minutes. The colors usually darken slightly as they dry, which helps the realism.
Star Brightness
For extra glow, paint a tiny dot of metallic silver right in the center of your largest white stars once they are dry to catch the light.
Step 3: Stargazing Detail
-
Create Distant Stars:
Dilute a small amount of white acrylic paint with water until it has an ink-like consistency. -
Splatter Technique:
Dip an old toothbrush into the thinned white paint. Hold it near the pumpkin and run your thumb across the bristles to flick a fine mist of tiny white specks over the nebula areas. -
Control the spray:
Vary the density of your splatter. Aim for heavier concentrations of stars over the brightly colored teal and purple sections to mimic the density of the Milky Way. -
Paint Major Stars:
Using your smallest round brush (size 0), paint distinct ‘cross’ shapes or 8-point stars onto the darkest parts of the pumpkin for high-contrast twinkling effects. -
Add Star Centers:
Place a tiny, solid dot of white paint in the absolute center of your painted cross stars to make them pop. -
Final Highlights:
Look for empty black spaces and add a few singular, larger dots using the tip of your brush handle to represent medium-distance planets or stars.
Step 4: Finishing Touches
-
Dry the Details:
Let all the white paint dry completely. The splatter dries fast, but the hand-painted stars might take a bit longer. -
Protect Your Art:
Move the pumpkin to a well-ventilated area and apply a light coat of clear acrylic spray sealant. A satin finish works best to protect the paint without making it too glossy.
Place your galactic creation on the porch or near a window to let the starlight shine all season


Have a question or want to share your own experience? I'd love to hear from you in the comments below!