
Pink is one of my favorite colors to paint with because it’s instantly uplifting and super forgiving for beginners. Here are my go-to easy canvas ideas that keep pink as the star, whether you want soft and dreamy or bold and graphic.
Cotton-Candy Pink Sunset Gradient

Capture the fleeting magic of a pastel sunset on canvas with this soft, gradient-focused painting. By blending creamy acrylics from hazy lavender to peach, you will create a tranquil scene that feels like looking straight into a summer evening.
How-To Guide
Materials
- Square primed canvas (e.g., 12×12 inch)
- Acrylic paints: Titanium White, Magenta or Rose Pink, Lavender or Violet, Peach or Light Orange, Payne’s Grey or Dark Purple
- Large flat brush or wash brush
- Medium round brush
- Small filbert or angle brush
- Palette or paper plate
- Cup of water
- Paper towels
Step 1: Setting the Sky Gradient
-
Prepare your palette:
Squeeze out generous amounts of white, lavender, and pink. You want plenty of paint available to ensure smooth blending without having to stop and remix colors constantly. -
Start at the top:
Load your large flat brush with a mix of Titanium White and a tiny drop of Lavender. Apply this to the top quarter of the canvas using long, horizontal strokes. -
Transition to white:
While the lavender mix is still wet, clean your brush slightly and pick up pure Titanium White. Blend this just below the lavender section, overlapping the colors so they fuse softly. -
Introduce the pink:
Mix a soft baby pink on your palette using White and a touch of Magenta. Apply this below the white section, roughly in the middle of the canvas. -
Establish the horizon line:
Switch to a peachy-orange tone mixed with plenty of white. Paint horizontal strokes near the bottom third of the canvas to represent the glowing light of the setting sun. -
Blend the transitions:
Using a clean, slightly damp flat brush, gently sweep back and forth over the lines where your colors meet. Work quickly while the acrylics are wet to achieve that seamless, airbrushed look.
Step 2: Creating Fluffy Clouds
-
Mix a cloud color:
Create a slightly darker, more vibrant pink than your background sky. It should stand out but still belong in the same color family. -
Dab the basic shapes:
Using a medium round brush or the corner of your flat brush, gently dab irregular shapes into the pink and white transition area. Don’t worry about perfection; clouds are naturally uneven. -
Soften edges:
Wipe your brush on a paper towel so it’s mostly dry. Lightly sweet the edges of your pink cloud shapes to make them look wispy rather than solid blobs. -
Add highlights:
Pick up a small amount of pure white or very pale peach. Dab this onto the top edges of your pink clouds to suggest sunlight catching the fluffiest parts. -
Refine the sky glow:
If the orange horizon area dried too dull, add a thin glaze of bright peach now to intensify the sunset warmth before moving to the ground.
Keep it Misty
To get that super soft cloud effect, use a dry ‘scruffy’ brush. Don’t add water; just scrub the paint in circles to blur distinct edges.
Step 3: Painting the Foreground
-
Mix the shadow color:
Combine your Payne’s Grey or Dark Purple with a little bit of the Magenta. You want a deep, shadowy tone that isn’t quite black. -
Paint the waterline:
At the very bottom of the sky gradient, paint a faint, straight horizontal line. I find using a piece of tape as a guide helps keep this perfectly level. -
Suggest reflections:
Below that horizon line, mimic the sky colors in reverse—peach, then pink—but keep them muted and slightly darker to suggest water reflection. -
Add the treeline base:
Using the dark purple mix and a small brush, tap in a jagged, uneven line right along the bottom edge of the canvas. -
Detail the trees:
Use the tip of a small brush to pull tiny vertical strokes upward from the dark base. Vary the heights to create the look of distant pines or shrubs. -
Add texture:
Dab the brush lightly over the tree shapes to give them foliage volume, ensuring the tops remain feathery and indistinct. -
Final touches:
Add a few very faint horizontal streaks of white in the water area (the bottom inch) to suggest stillness and light reflection.
Paint Stripping?
If blending lifts off the paint cleanly, you’re overworking it. Stop, let it dry completely, and add a fresh thin layer on top rather than scrubbing.
Step back and admire your serene sunset, perfect for brightening up any corner of your home


Blush Sky With Fluffy White Clouds
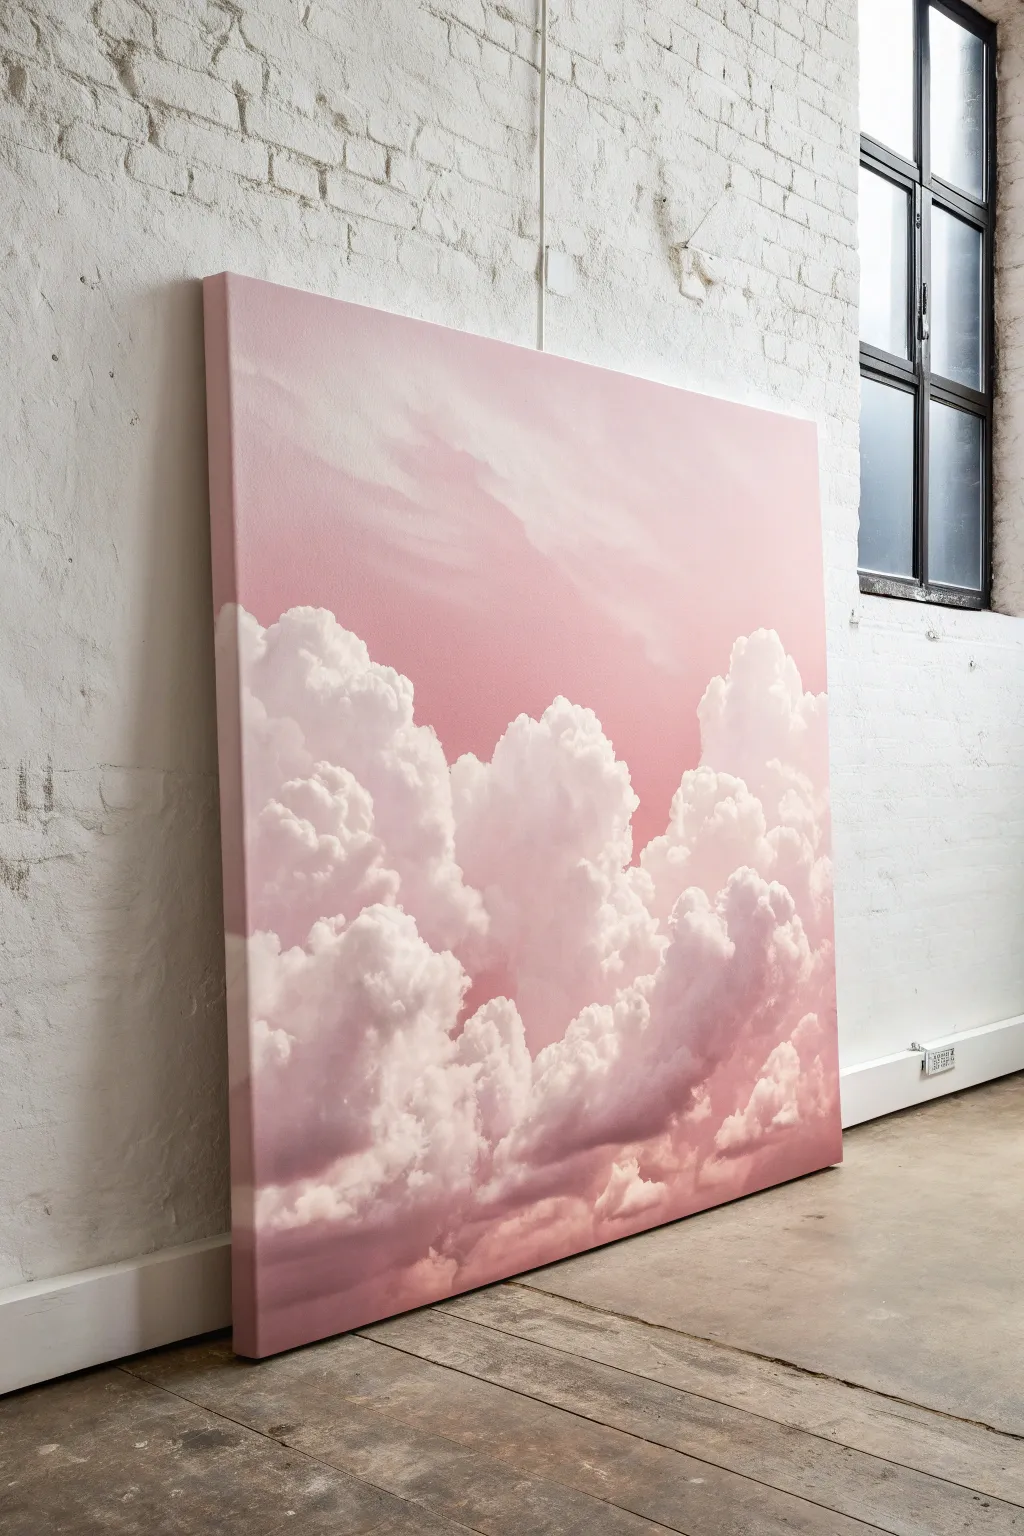
Capture the serene beauty of golden hour with this large-scale acrylic painting featuring billowing white clouds against a soft pink sky. This project focuses on building translucent layers to create depth and volume, resulting in a peaceful, airy statement piece for any room.
Detailed Instructions
Materials
- Large square gallery-wrapped canvas (at least 24×24 inches recommended)
- Acrylic paints: Titanium White, Alizarin Crimson, Yellow Ochre, Ultramarine Blue, Raw Umber
- Large flat wash brush (2-3 inch)
- Medium filbert brush (size 8-10)
- Small round brush (size 4)
- Natural sea sponge or a scruffy old large brush
- Acrylic glazing medium or flow improver
- Palette knife for mixing
- Water cups and paper towels
Step 1: Setting the Atmosphere
-
Mix your base pink:
Start by creating a large volume of the background sky color. Mix plenty of Titanium White with a very small touch of Alizarin Crimson and a tiny dot of Yellow Ochre to warm it up. Aim for a pale, dusky rose rather than a bubblegum pink. -
Create a gradient base:
Using the large wash brush, cover the entire canvas. Start with a slightly deeper pink at the top and gradually mix in more white as you move downwards towards the horizon line, creating a subtle ombre effect. -
Smooth the transition:
While the paint is still wet, use distinct horizontal strokes to blend the gradient. If the paint drags, mist the canvas lightly with water to help the colors melt into each other seamlessly. -
Rough in the composition:
Once the pink layer is dry to the touch, mix a diluted light gray using White, a speck of Ultramarine Blue, and Raw Umber. Sketch out the basic shapes of your cloud formations loosely—think big, organic mounds rising from the bottom third of the canvas.
Keep it Airy
Avoid using pure black for shadows; it looks too harsh against pink. Stick to mixing purples and browns for natural-looking cloud depths.
Step 2: Building Cloud Volume
-
Apply the mid-tones:
Mix a muted mauve-gray shadow color (White + Alizarin Crimson + tiny bit of Raw Umber). Using a scruffy brush or sponge, dab this shadow color into the lower, denser parts of your sketched cloud shapes. -
Soften the edges:
Before the shadow paint dries, use a clean, dry filbert brush to gently swirl the edges of your shadows into the pink background. You want the clouds to look vaporous, not like solid rocks. -
Establish the light source:
Decide where your light is coming from (usually top-left or top-right). Mix a lighter pink (closer to your sky color but opaque) and apply it to the upper curves of the clouds where the sun would hit. -
Deepen the shadows:
Mix a slightly darker, cooler purple-gray by adding a touch more Blue to your shadow mix. Apply this sparingly to the deepest crevices and bottoms of the cloud clusters to anchor them. -
Glaze for unity:
I like to mix a very thin glaze of the original pink sky color with glazing medium. Brush this sheer layer over the shadow areas to tint them pink, making the clouds look like they belong in that specific atmosphere.
Muddy Clouds?
If your white highlights turn pink/gray, the bottom layer wasn’t dry enough. Let the underlayers dry completely before adding crisp bright white on top.
Step 3: Highlights and Details
-
Start the highlights:
Load your filbert brush with pure Titanium White. Begin dabbing the tops of the cloud formations, using a ‘scumbling’ motion (scrubbing lightly) to create a fluffy texture. -
Build the peaks:
Focus the thickest, most opaque white paint on the very highest crests of the clouds. Leave the white thinner and more transparent as you move down into the shadowed areas. -
Refine the edges:
Use the small round brush to add tiny, wispy details along the perimeter of the clouds. These little stray wisps of vapor make the clouds look realistic and less like cotton balls. -
Add reflected light:
Mix a very pale warm yellow (White + tiny speck of Yellow Ochre). Add touches of this to the transition zone between the bright white tops and the purple-gray bottoms to simulate glowing sunlight. -
Final softening:
Take a large, dry, soft brush and very gently sweep over areas that look too harsh or brushy. This ‘dry brushing’ technique blurs the paint slightly for that soft-focus look. -
Varnish and protect:
Allow the painting to dry completely for at least 24 hours. Apply a satin or matte varnish to protect the surface and unify the sheen of the different paint layers.
Step back and admire your serene skyscape, noting how the soft pink hues bring warmth to the room


Pink Night Sky With Crescent Moon
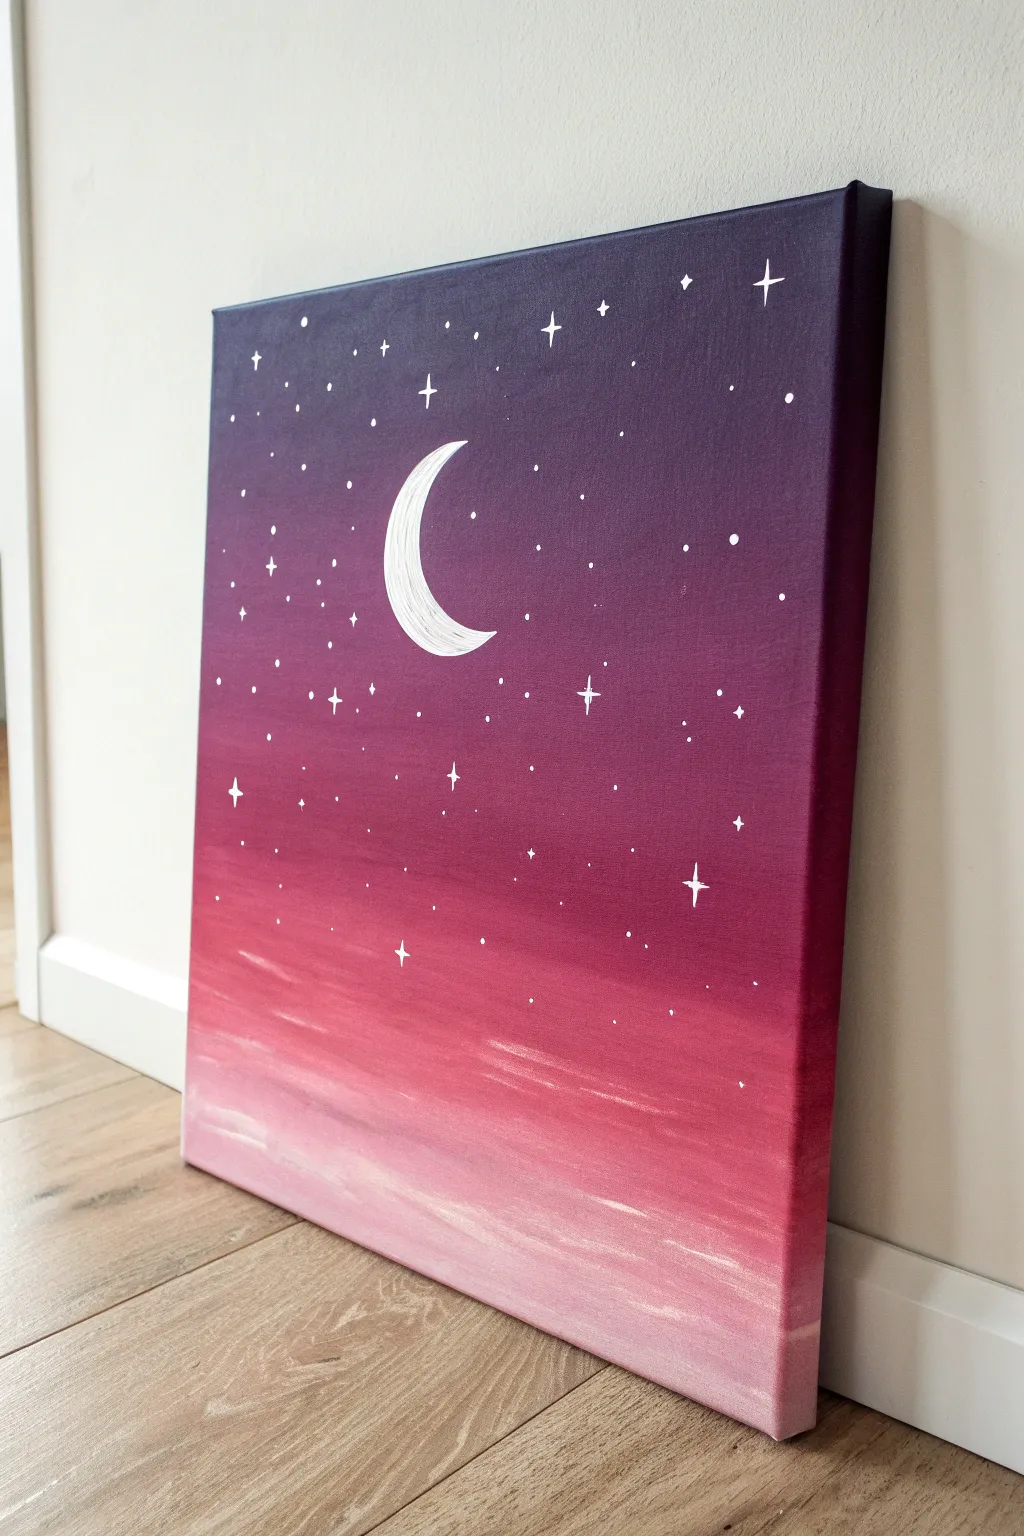
Capture the magic of twilight with this serene canvas painting that blends deep purples into soft pinks. This project features a satisfying color gradient technique and simple celestial details perfect for beginners.
How-To Guide
Materials
- Stretched canvas (square or rectangular)
- Acrylic paints: Deep Violet, Magenta, Titanium White, and Pale Pink
- Wide flat brush (1 inch or larger)
- Medium flat brush
- Small round detail brush (size 0 or 1)
- Palette or paper plate
- Cup of water and paper towels
- Pencil (optional)
Step 1: Creating the Gradient Base
-
Prepare your colors:
Squeeze out generous amounts of your Deep Violet, Magenta, Pale Pink, and White onto your palette. Having everything ready before you start painting is crucial because acrylics dry quickly. -
Start with the darkest tone:
Using your wide flat brush, load up the Deep Violet paint. Apply this color to the top third of the canvas using long, horizontal strokes from edge to edge. -
Paint the sides:
Don’t forget to paint the top and side edges of the canvas as you work your way down. This gives the finished piece a professional, frameless look. -
Introduce the mid-tone:
Without washing your brush completely, pick up some Magenta. Start painting just below the violet section, overlapping slightly with the wet violet paint to encourage blending. -
Blend the transition:
Work the brush back and forth horizontally where the violet and magenta meet. The colors should mix on the canvas to create a seamless transition. -
Add the lighter pinks:
Wipe your brush on a paper towel to remove excess dark paint. Load it with Pale Pink (or mix Magenta with a little White) and paint the next section down, blending upwards into the magenta area. -
Finish the bottom horizon:
For the bottom portion, mix a significant amount of White into your Pale Pink to create a very light, soft pastel shade. Paint the bottom strip of the canvas with this lightest color. -
Create wispy clouds:
While the bottom layer is still slightly wet, I like to take a clean, dry brush with a tiny amount of pure White. Gently sweep irregular horizontal streaks across the bottom pink area to create the look of soft, low-hanging clouds. -
Let it dry completey:
Allow the background to dry fully before moving on. This usually takes about 15-20 minutes. If the paint is wet, your sharp details will smudge.
Blending Trouble?
If acrylics are drying too fast to blend smoothly, mist the canvas lightly with water or dip your brush tip in water before picking up paint. Keep strokes horizontal.
Step 2: Adding Celestial Details
-
Paint the moon shape:
Using your small round brush and pure Titanium White, carefully paint a crescent moon shape in the upper third of the canvas. You can sketch it lightly with a pencil first if you want to be precise. -
Add texture to the moon:
Once the base white shape is down, add a second coat of white. Use short, curved strokes following the curve of the moon to give it a slight texture rather than a flat look. -
Paint the four-pointed stars:
Switch to your finest detail brush. Dip the very tip in white paint (thinned slightly with water helps flow). Paint a small vertical line crossed by a small horizontal line to create twinkling stars. -
Vary the star sizes:
Scatter 5 to 7 of these larger ‘twinkle’ stars randomly across the purple and magenta sections of the sky. -
Add simple dot stars:
Using the tip of the brush or even a toothpick, dot tiny specks of white paint throughout the sky to represent distant stars. -
Refine the density:
Concentrate more stars in the darker purple area at the top and fewer as you move down into the lighter pinks, mimicking how stars fade near the horizon. -
Final touches:
Step back and look at your composition. If the moon needs brightening, add one final layer of white to make it pop against the purple background.
Make it Sparkle
Once the painting is completely dry, brush a thin layer of glitter glaze over the dark purple section, or add tiny adhesive rhinestones to the centers of the biggest stars.
Hang your beautiful twilight gradient on a wall that needs a touch of calm color


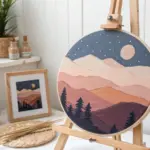
Pink Mountain Layers in Soft Tones
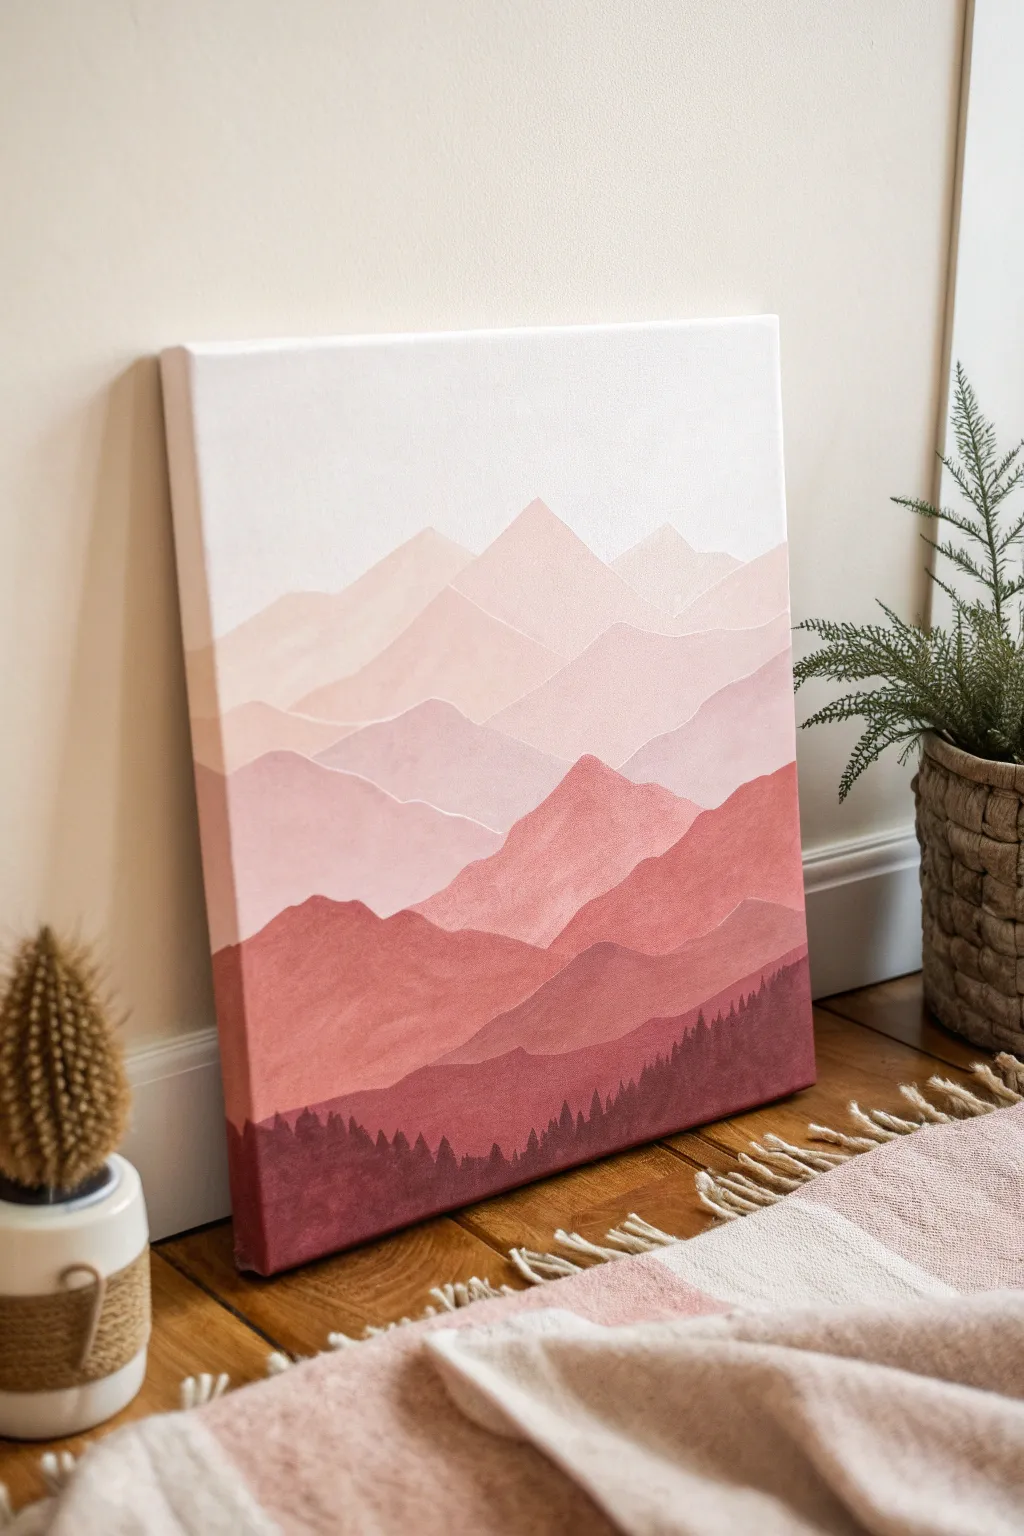
Capture the serene beauty of distant peaks with this monochromatic landscape study. By layering increasingly lighter shades of dusty pink and rose, you’ll create a stunning sense of atmospheric depth that draws the eye into the horizon.
Step-by-Step
Materials
- Rectangular stretched canvas (16×20 or similar)
- Acrylic paints: Titanium White, Mars Black, Crimson Red, Burnt Sienna
- Flat shader brushes (large 1-inch, medium 1/2-inch)
- Small round detail brush (size 0 or 1)
- Palette or mixing plate
- Water cup and paper towels
- Pencil for sketching
- Easel or flat working surface
Step 1: Planning the Peaks
-
Prepare your palette:
Begin by creating a master color mix. Combine a generous amount of Crimson Red with a touch of Burnt Sienna to create a warm, deep rust-red base. This will be the foundation for every layer. -
Sketch the horizon lines:
Lightly draw wavy, jagged lines across your canvas to map out your mountain ranges. Start near the top third for the furthest mountains and work your way down. You want about 5-6 distinct layers. -
Create distinct shapes:
Vary the steepness and height of your peaks. Ensure the lines overlap naturally, with lower mountains obscuring the bases of the ones behind them to establish perspective.
Master the Gradient
Mix enough of your main ‘base’ red color at the start. It’s much harder to re-mix that exact shade later if you run out halfway through the layers.
Step 2: Painting the Sky and Distance
-
Mix the sky color:
Take a tiny dot of your base rust-red mix and blend it into a large dollop of Titanium White. You want a very pale, barely-there blush pink. -
Paint the sky:
Fill the area above your highest mountain line with this pale blush color. Use your large flat brush for smooth, horizontal strokes. -
Mix the furthest mountain shade:
Add a slightly larger amount of the rust-red base to your white mixture. It should be just one shade darker than the sky. -
Fill the first range:
Carefully paint the most distant mountain range. Use the edge of your flat brush to cut in the sharp peaks, then fill the body of the shape.
Colors Look Too Similar?
If two mountain layers blend together, let them dry, then repaint the lower one. Add slightly more base color to darken it and regain contrast.
Step 3: Building Atmospheric Depth
-
Darken the mix sequentially:
For each subsequent layer moving downward, add progressively more of the rust-red base to your working pile. You are creating a gradient from light to dark. -
Paint the middle grounds:
Paint the next 2-3 layers of mountains. As I move down the canvas, I like to make the peaks slightly more rugged and larger to simulate them being closer to the viewer. -
Maintain clean edges:
Let each layer drive for about 5-10 minutes before painting the one below it. This ensures you maintain crisp, distinct ridge lines without the wet paint muddying together. -
Adjust tone if needed:
If a layer looks too orange, add a microscopic dot of blue or black to desaturate it slightly. The goal is a dusty, earthy rose tone, not bright candy pink.
Step 4: The Foreground and Forest
-
Mix the darkest tone:
For the bottom-most mountain layer, use your pure rust-red base mixture. Add a tiny touch of black or dark blue to deepen it into a rich burgundy shadow color. -
Paint the foreground base:
Fill in the final bottom section of the canvas with this dark burgundy mix. This provides the ground for your treeline. -
Switch to detail brush:
Pick up your small round brush and load it with the same dark burgundy paint used for the bottom layer. -
Paint tree trunks:
Along the top edge of this bottom layer, paint tiny vertical lines of varying heights to represent tree trunks. -
Add pine foliage:
Using a stippling or dabbing motion, add texture to the sides of the trunks to create pine shapes. Keep them loose and silhouette-like rather than overly detailed. -
Vary tree density:
Cluster some trees together and leave others slightly isolated to create a natural, organic forest line along the ridge. -
Final touches:
Paint the sides of the canvas with the corresponding colors of each layer so the artwork looks finished from every angle.
Step back and admire how simple color mixing created such a calm, misty landscape
BRUSH GUIDE
The Right Brush for Every Stroke
From clean lines to bold texture — master brush choice, stroke control, and essential techniques.
Explore the Full Guide
Simple Pink Daisies on a Solid Background
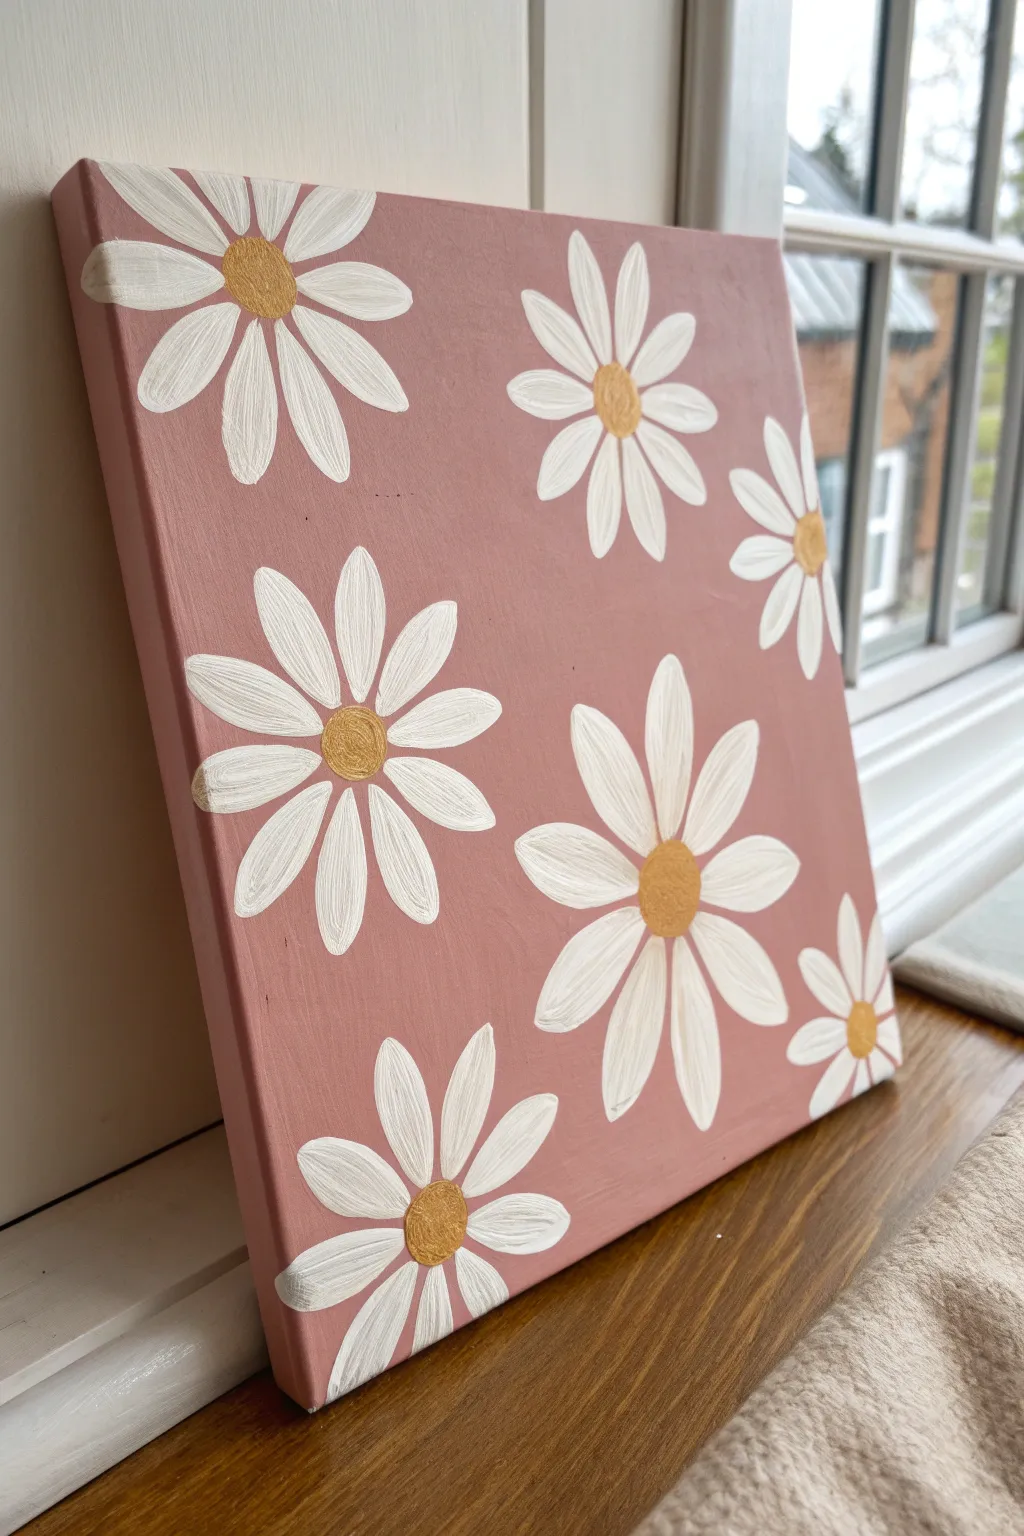
This charming painting features bold, simple white daisies popping against a warm, dusty pink background. It captures a delightful modern cottagecore aesthetic that looks deceptively professional but is wonderfully beginner-friendly.
Step-by-Step Tutorial
Materials
- Square stretched canvas (approx. 10×10 or 12×12 inches)
- Acrylic paint: Dusty pink (or mix red, white, and a touch of brown)
- Acrylic paint: Titanium White
- Acrylic paint: Gold (metallic) or Yellow Ochre
- Flat paintbrush (1-inch width) for background
- Round paintbrush (medium size, approx. size 4-6) for petals
- Small round paintbrush or sponge dabber for centers
- Palette or paper plate
- Cup of water and paper towels
Step 1: Setting the Scene
-
Prepare your canvas:
Ensure your canvas is clean and free of dust. If the surface feels too rough, you can give it a very light sanding, though usually, straight out of the wrapper is fine. -
Mix the background color:
Squeeze out your dusty pink paint. If you need to mix it, start with a generous amount of white, add a drop of red to make pink, and then tone it down with a tiny speck of brown or burnt sienna until it looks earthy and muted. -
Apply the first coat:
Using the large flat bush, paint the entire front surface of the canvas with your pink mixture using long, horizontal strokes. Don’t worry about perfect opacity yet. -
Paint the edges:
Don’t forget the sides! Wrap the pink color around the edges of the canvas so the artwork looks finished even without a frame. -
Apply the second coat:
Let the first layer dry completely. Apply a second coat of pink, alternating your brush strokes vertically this time to ensure a smooth, solid finish without streak marks. -
Full dry time:
Allow the background to dry fully before moving on. This is crucial—if the pink is wet, it will turn your white petals into light pink mush.
Uneven Petals?
If your white paint is streaky, don’t overwork wet paint! Let it dry completely, then add another coat. Quality heavy-body acrylics also cover better with fewer coats.
Step 2: Blooming Daisies
-
Plan placement:
Visualize where your flowers will go. Notice how some flowers hang off the edge of the canvas; this ‘cropping’ effect makes the composition look more natural and dynamic. -
Start the centers:
Using a small brush and your gold or ochre paint, dab small circles where the center of each flower will be. Space them out irregularly so it doesn’t look like a grid. -
Load the petal brush:
Load your medium round brush generously with Titanium White paint. You want enough paint on the brush so that it flows smoothly, but not so much that it trips. -
Practice the stroke:
The petal shape comes from the brush pressure. Start near a yellow center, press the brush down to widen the stroke, and pull outward, lifting pressure as you reach the tip of the petal. -
Paint the first flower:
Choose a central flower to start. Paint petals radiating outward from the gold center like the numbers on a clock—12, 6, 3, and 9 position first—then fill in the gaps. -
Vary the petals:
Not all petals need to be identical. Don’t stress if some are slightly fatter or longer than others; nature is rarely perfectly symmetrical. -
Tackle the edges:
For the flowers at the edges of the canvas, paint only the half or quarter of the flower that remains ‘on screen,’ letting the imaginary parts fall off the side. -
Refine opacity:
Acrylic white is often translucent. Once your first layer of petals is dry to the touch, go back over them with a second layer of white to make them pop brightly against the pink.
Step 3: The Final Details
-
Texturize the centers:
Return to your gold centers. Mix a tiny bit of brown into your gold/yellow, and dab just the bottom edge of the circles to create a little shadow and dimension. -
Fix imperfections:
If any pink shows through the white petals too aggressively, add one final touch-up of white paint to the center of the petals. -
Clean up lines:
I like to take a tiny detail brush with the background pink color and carefully paint over any stray white marks or wobbly petal edges to sharpen the look. -
Final dry:
Let the entire piece sit undisturbed for at least a few hours or overnight to ensure the thickest parts of the paint harden completely.
Pro Tip: Better Flow
If your petal strokes feel dry or scratchy, mix a drop of water or glazing medium into your white paint. It helps the brush glide for smooth, tapered tips.
Hang your lovely floral canvas on a wall or prop it on a shelf to bring a burst of spring into your home
Loose Cherry Blossoms on Pink Wash
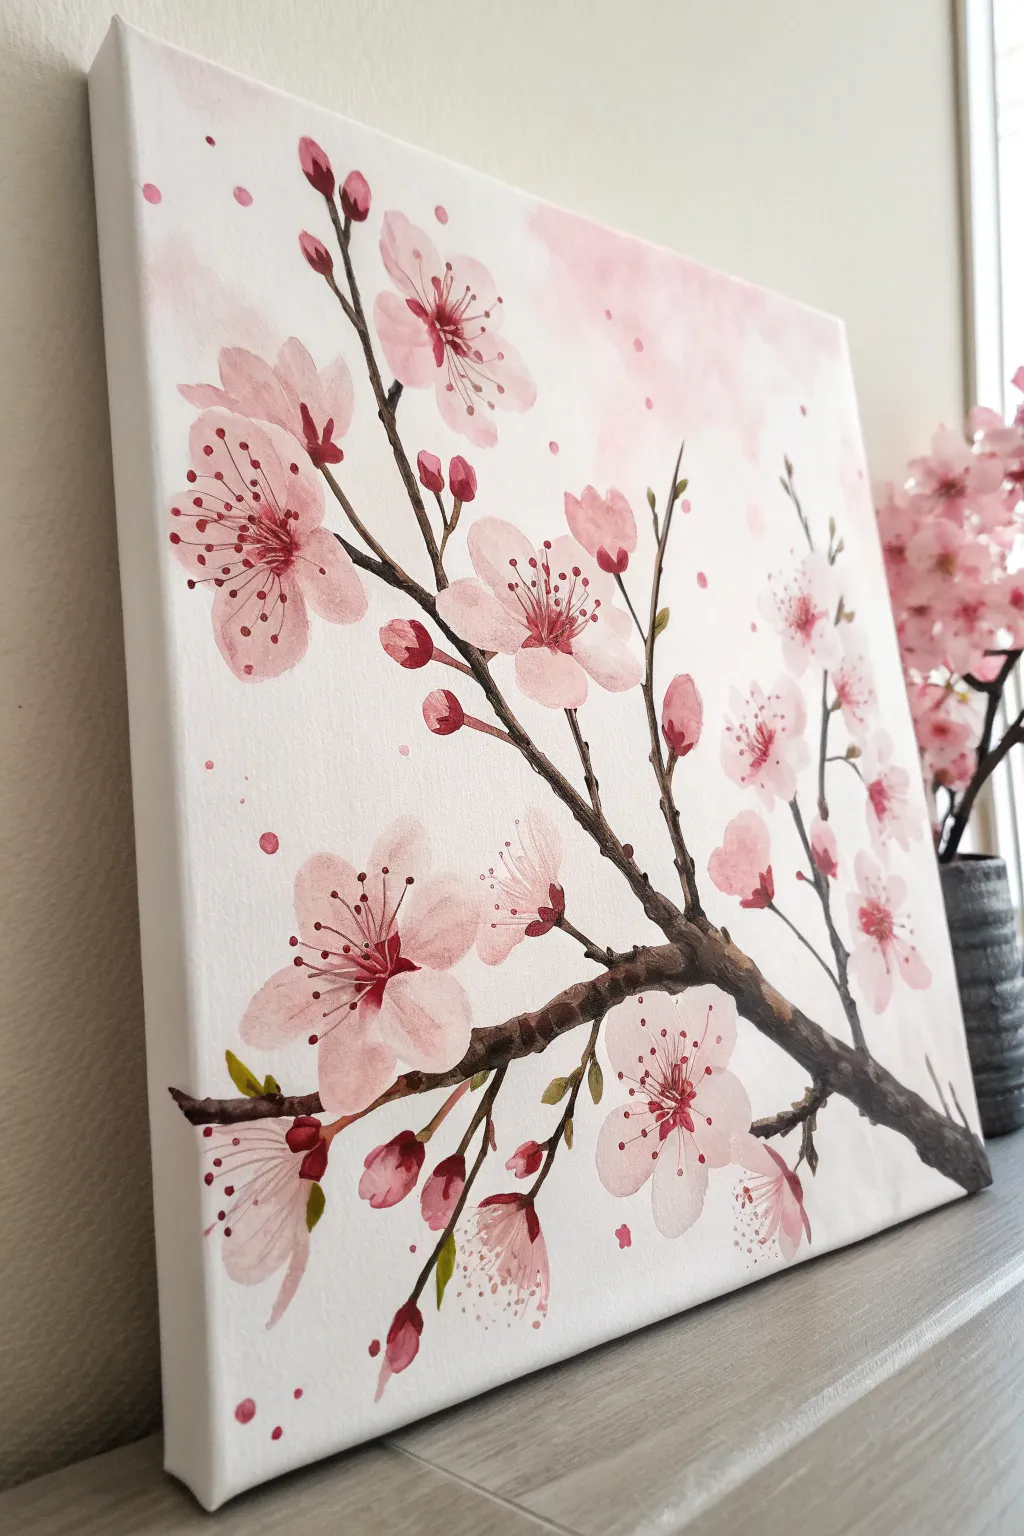
Capture the delicate beauty of spring with this soft, airy painting of a cherry blossom branch. Using thinned acrylics to mimic the transparency of watercolors, you will build up layers of petals and branches on a canvas for a dreamy, romantic finish.
How-To Guide
Materials
- Rectangular stretched canvas (e.g., 16×20 inches)
- Acrylic paints: Titanium White, Alizarin Crimson (or a deep cool red), Burnt Umber, a touch of Sap Green
- Paintbrushes: Large flat wash brush, medium filbert brush, small round detail brush (size 0 or 1)
- Water container for rinsing and thinning
- Paper towels
- Palette or paper plate
- Spray bottle with water (optional)
Step 1: Creating the Soft Atmosphere
-
Prepare the wash:
Begin by mixing a very small amount of Alizarin Crimson with plenty of Titanium White and water. You want a consistency closer to stained water than heavy cream to mimic the ‘watercolor’ look shown in the background. -
Apply the background:
Use your large flat brush to apply this pale pink wash loosely across the canvas. Focus the color near the top right and let it fade out towards the bottom left, leaving plenty of white canvas showing for an airy feel. -
Add soft splatters:
While the background is still slightly damp, load a round brush with a slightly more concentrated pink mixture. Tap the handle against another brush to flicker tiny droplets onto the canvas, adding texture to the negative space. -
Let it dry completely:
Since we are working with watery layers, it is crucial to let this background dry fully before painting the branch to prevent muddying the colors.
Water Control Pro Tip
If using heavy body acrylics, use a flow improver medium instead of just water. This thins the paint for that watercolor look without breaking down the binder and losing adhesion.
Step 2: Building the Branch Structure
-
Mix your brown:
Create a natural dark brown using Burnt Umber. If it feels too warm, cool it down with a tiny touch of blue or black. Thin it slightly with water so it flows smoothly. -
Draft the main branch:
Starting from the bottom right corner, use a medium round brush to paint the thickest part of the branch, curving it diagonally upwards toward the center left. -
Add secondary twigs:
Switch to a smaller round brush to pull thinner branches off the main stem. Let your hand shake slightly as you paint to create the gnarled, natural texture of cherry wood. -
Paint the smallest shoots:
Use the very tip of your detail brush to add fine, wispy twigs extending upwards and outwards, where your flower clusters will eventually sit.
Level Up: Metallic Pop
Once the painting is totally dry, mix a tiny bit of metallic gold paint with the yellow or red pollen centers. It adds a subtle shimmer that catches the light beautifully when hung.
Step 3: Blooming the Flowers
-
Base layer of petals:
Mix a soft, pale pink (White + tiny drop of Crimson). Using a filbert brush, press down and lift to create five petal shapes for each open flower. Keep the paint translucent. -
Vary the flower positions:
Paint some full-face blossoms, some side-facing ones, and scatter small oval buds near the tips of the twigs. Don’t worry about perfection; organic shapes look best. -
Deepen the centers:
Once the pale pink is dry, mix a deeper, more vibrant pink. Paint a small starburst shape in the center of the open flowers to give them depth and a ‘cup’ shape. -
Highlight the petals:
Add touches of pure white to the outer edges of some petals where the light would hit them, increasing the contrast against the background. -
Paint the buds:
Fill in the small oval buds with a darker, more saturated pink than the open flowers, as tight petals hold more concentrated color.
Step 4: Fine Details and Finishing Touches
-
Add the stamens:
Using your smallest detail brush and a dark crimson or reddish-brown mix, paint fine lines radiating from the center of each open flower. -
Dot the pollen:
Dip the very tip of your detail brush into dark red or thick crimson paint. Add tiny dots to the ends of the stamen lines you just painted. -
Connect the flowers:
Use the dark brown branch color to paint tiny stems connecting the buds and blossoms securely to the main wood, ensuring they don’t look like they are floating. -
Add hints of greenery:
Mix a muted olive green (Sap Green + Burnt Umber). Paint tiny, sharp little leaves emerging near the buds or at the base of flower clusters. -
Final falling petals:
Paint a few lone petals drifting in the empty white space or near the bottom to suggest movement and the fleeting nature of the blossoms.
Step back and admire how the loose strokes and soft colors come together to create a peaceful spring scene on your wall

PENCIL GUIDE
Understanding Pencil Grades from H to B
From first sketch to finished drawing — learn pencil grades, line control, and shading techniques.
Explore the Full Guide
Tiny Hearts Pattern in Pink-on-Pink

Create a soothing visual rhythm with this delightful grid of hand-painted hearts in varying shades of rose and blush. The subtle gradient of pinks against a pale background makes this piece feel like a gentle embrace for your walls.
Detailed Instructions
Materials
- Square stretched canvas (e.g., 12×12 or 16×16 inches)
- Acrylic paints: Titanium White, Primary Red, Burnt Sienna (optional for muting)
- Pale pink craft paint (for the base coat)
- Ruler or tape measure
- Pencil (light H or HB)
- Small flat brush (1/2 inch) for background
- Small round brush (size 2 or 4) for hearts
- Palette or paper plate
- Jar of water and paper towels
Step 1: Preparing the Foundation
-
Base Coat:
Start by mixing a very pale, creamy pink using mostly white and a tiny dot of red. Using your flat brush, cover the entire front surface of the canvas with smooth, even strokes. Don’t forget to paint the sides of the canvas a slightly darker pink or the same shade for a finished look. -
Let it Dry:
Allow the base coat to dry completely. If the canvas texture shows through too much, apply a second coat for a more opaque, polished background. -
Grid Planning:
To keep your rows straight, use a ruler and pencil to very lightly mark a grid. Mark small dots along the left and right edges at 1-inch (or 1.5-inch) intervals, depending on how dense you want your pattern. -
Horizontal Guides:
Connect your edge marks with extremely faint horizontal lines across the canvas. These will serve as the baseline for where each row of hearts will sit. -
Staggered Spacing:
Mark the vertical placement. For the first row, mark a dot every inch. For the second row, offset the dots so they sit in the middle of the gaps from the row above. Repeat this alternating pattern all the way down.
Step 2: Mixing Your Palette
-
Create a Spectrum:
On your palette, squeeze out a generous amount of white and smaller separate blobs of red. I find it helpful to mix about 5 distinct shades of pink before I start painting. -
Shade 1: Pale Blush:
Mix a large amount of white with just a whisper of red to create your lightest, almost-white pink. -
Shade 2: Shell Pink:
Create a standard baby pink hue, slightly darker than your background color. -
Shade 3: Dusty Rose:
Mix red and white, adding the tiniest speck of Burnt Sienna or a drop of complementary green to desaturate it slightly, giving it a sophisticated ‘dusty’ look. -
Shade 4: Mauve:
Create a medium-dark pink that leans slightly cooler or darker. -
Shade 5: Berry:
This will be your darkest accent color. Use red with just a touch of white to keep it rich and deep.
Clean Lines Hack
Make a heart stencil from cardstock or painter’s tape for more uniform shapes. Sponge the paint gently inside the stencil for a crisp, printed look.
Step 3: Painting the Hearts
-
Technique Test:
Practice your heart shape on a scrap piece of paper first. A simple method is to paint two small teardrops that meet at the bottom point. -
Start the First Row:
Using your round tip brush, paint hearts along the top line. Alternate your colors randomly. Don’t worry about making a perfect sequence; the randomness is part of the charm. -
Mind the Edges:
When you reach the edges of the canvas, paint ‘partial’ hearts if a full heart wouldn’t fit naturally, or simply leave a little breathing room near the border. -
Work Downwards:
Move to the second row. Remember to place these hearts in the spaces between the hearts above, creating a brick-lay or honeycomb pattern. -
Varying the Tone:
As you work, dip into different pink mixtures. Ensure you don’t clump too many dark ‘Berry’ hearts or light ‘Blush’ hearts in one single area; scatter them to balance the visual weight. -
Refining Shapes:
Go back and tidy up any wobbly edges while the paint is still workable. If you want a textured look like the example, leave the brushstrokes slightly visible. -
Erase Marks:
Once the paint is 100% dry (give it a few hours), gently erase any visible pencil guidelines with a clean white eraser. -
Finishing Touches:
Seal your work with a matte or satin varnish spray to protect the colors and give the canvas a unified sheen.
Level Up: Metallic Pop
Mix a shimmering gold or rose gold metallic paint into your palette. Replace one out of every ten hearts with a metallic one for a glamorous sparkle.
Hang your new masterpiece in a nursery or bedroom for an instant touch of sweetness
Pop Art Lips on Hot Pink
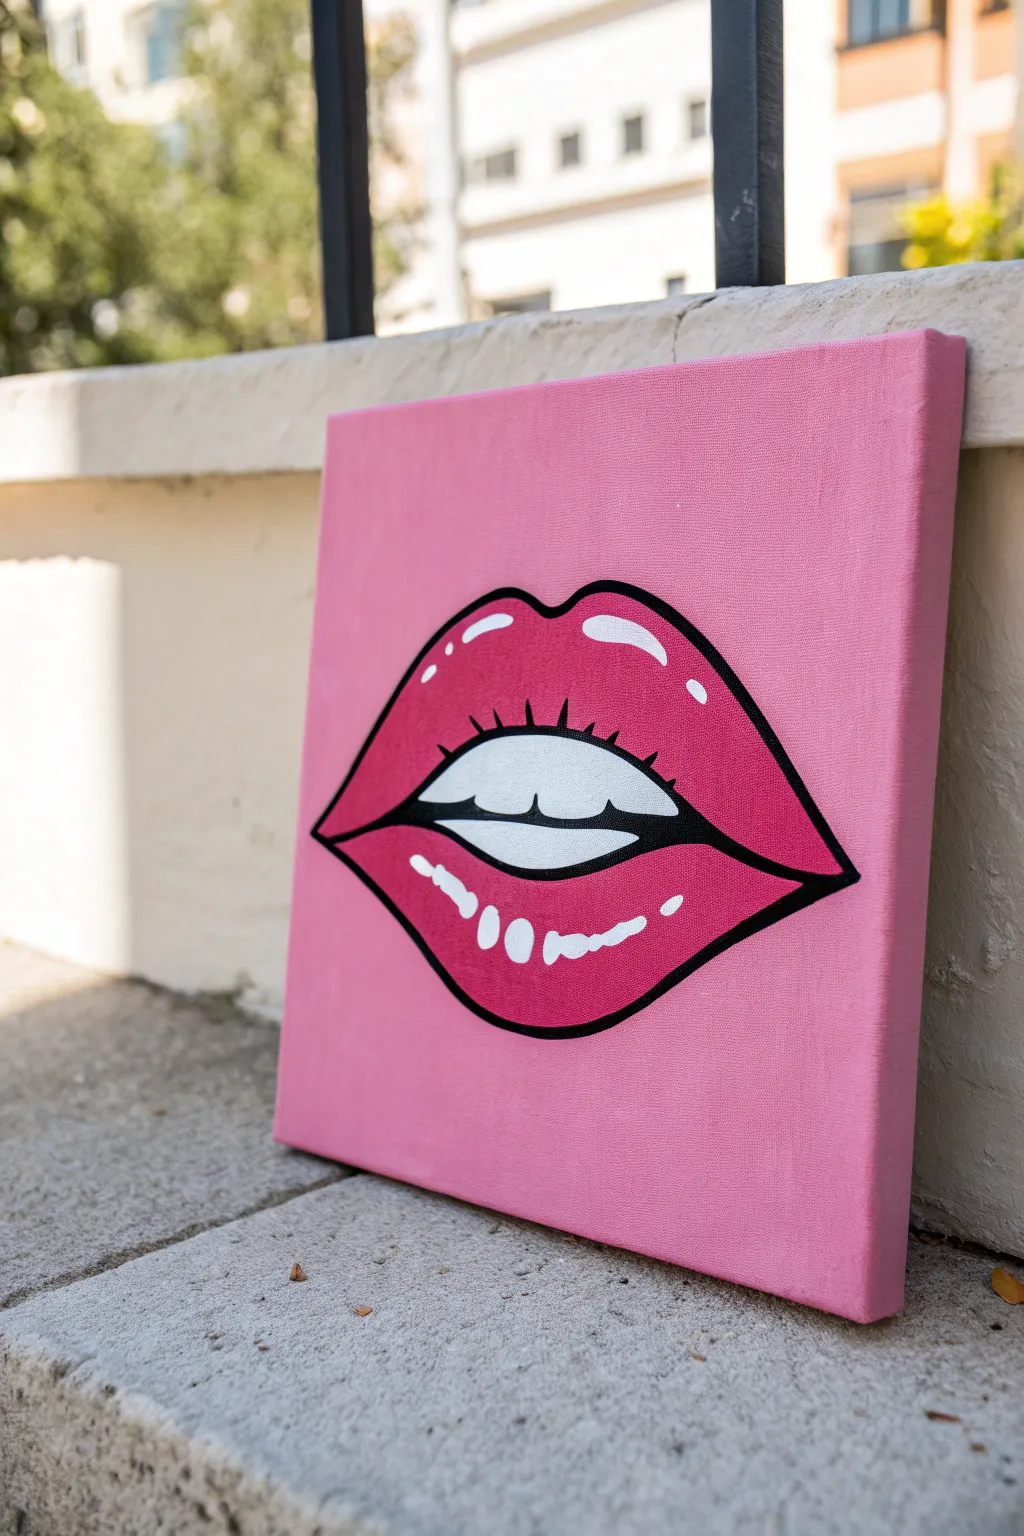
Capture the bold energy of classic comic books with this vibrant pop art painting featuring glossy lips against a hot pink background. The clean black lines and stark white highlights give this piece a striking, graphic quality that’s surprisingly easy to achieve.
How-To Guide
Materials
- Square canvas (12×12 inches works well)
- Hot pink acrylic paint (background)
- Medium pink or magenta acrylic paint (lips)
- Titanium white acrylic paint
- Carbon black acrylic paint or a broad black paint marker
- Posca paint pen (black, fine tip) for initial outlining
- Flat shader brush (large for background)
- Round detail brushes (varying sizes)
- Pencil and eraser
- Ruler (optional for finding center)
Step 1: Setting the Stage
-
Prepare the base:
Start by coating your entire canvas with the hot pink acrylic paint. Use a large flat brush and long, horizontal strokes to ensure a smooth finish without obvious texture. -
Paint the edges:
Don’t forget to paint the sides of your canvas to give your artwork a professional, finished look from every angle. -
Second coat:
Once the first layer is dry to the touch, apply a second coat of hot pink. This ensures the background is completely opaque and vibrant. -
Let it cure:
Allow the background to dry completely. If the canvas is cool to the touch, it’s still wet; wait until it’s room temperature before sketching.
Step 2: Sketching the Shape
-
Find the center:
Lightly mark the center of your canvas with a pencil to help position the mouth symmetrically. -
Draw the cupid’s bow:
Sketch the upper lip outline first, creating a pronounced ‘M’ shape or cupid’s bow in the center. -
Outline the bottom lip:
Draw a curved U-shape for the bottom lip, connecting it to the corners of the top lip. Make it slightly fuller than the top lip. -
Sketch the opening:
Draw the inner opening of the mouth. Keep the shape similar to a lemon wedge or almond to show where the teeth will go. -
Add the teeth:
Lightly sketch the line separating the top and bottom teeth. It doesn’t need to be perfectly straight; a slight curve follows the natural shape of the mouth.
Uneven Lines?
If your brush details feel shaky, switch to a black acrylic paint marker or Posca pen. They offer much more control for those crisp comic-style outlines.
Step 3: Blocking in Color
-
Fill the lips:
Using your medium pink or magenta paint, fill in the lip shapes. You want this color to be distinct from the background pink but in the same family. -
Paint the teeth:
Fill the teeth area with titanium white. You might need two layers here to cover the hot pink background completely. -
Dry check:
Wait for these color blocks to dry fully. If the paint is tacky, the black outline we add next might bleed or drag.
Level Up: Ben-Day Dots
For a true Lichtenstein vibe, use a stencil or a pencil eraser dipped in lighter pink paint to add a uniform dot pattern to the lips instead of solid color.
Step 4: Bold Outlines & Details
-
Initial outline:
Using a thin brush or a black paint pen, trace over your pencil lines to define the outer shape of the lips. -
Thicken the lines:
Go back over the outer lip line to make it bold and thick. Varying the thickess—making it wider at the curves and corners—adds that dynamic comic book feel. -
Define the mouth interior:
Outline the opening of the mouth in black, and fill in the small triangular gaps at the corners of the mouth with solid black. -
Separate the teeth:
Draw a thin, curvy black line between the top and bottom teeth. You can add tiny vertical ticks near the gum line to suggest individual teeth without drawing complete outlines. -
Add lip creases:
Paint small, vertical tapering lines on the upper and lower lips, mostly near the center line. These simulate the natural texture of lips.
Step 5: The Gloss Effect
-
Top lip highlights:
Clean your brush thoroughly. Using pure titanium white, paint two curved, jelly-bean shapes on the upper lip—one on each side of the cupid’s bow. -
Bottom lip sheen:
I like to add a series of smaller white dashes or dots along the curve of the bottom lip. This makes the mouth look wet and glossy. -
Final touches:
Add a tiny white dot or dash near the corners of the mouth for extra sparkle.
Hang your masterpiece on the wall for an instant burst of retro-cool attitude


Pink Drips Over a Clean Base Coat
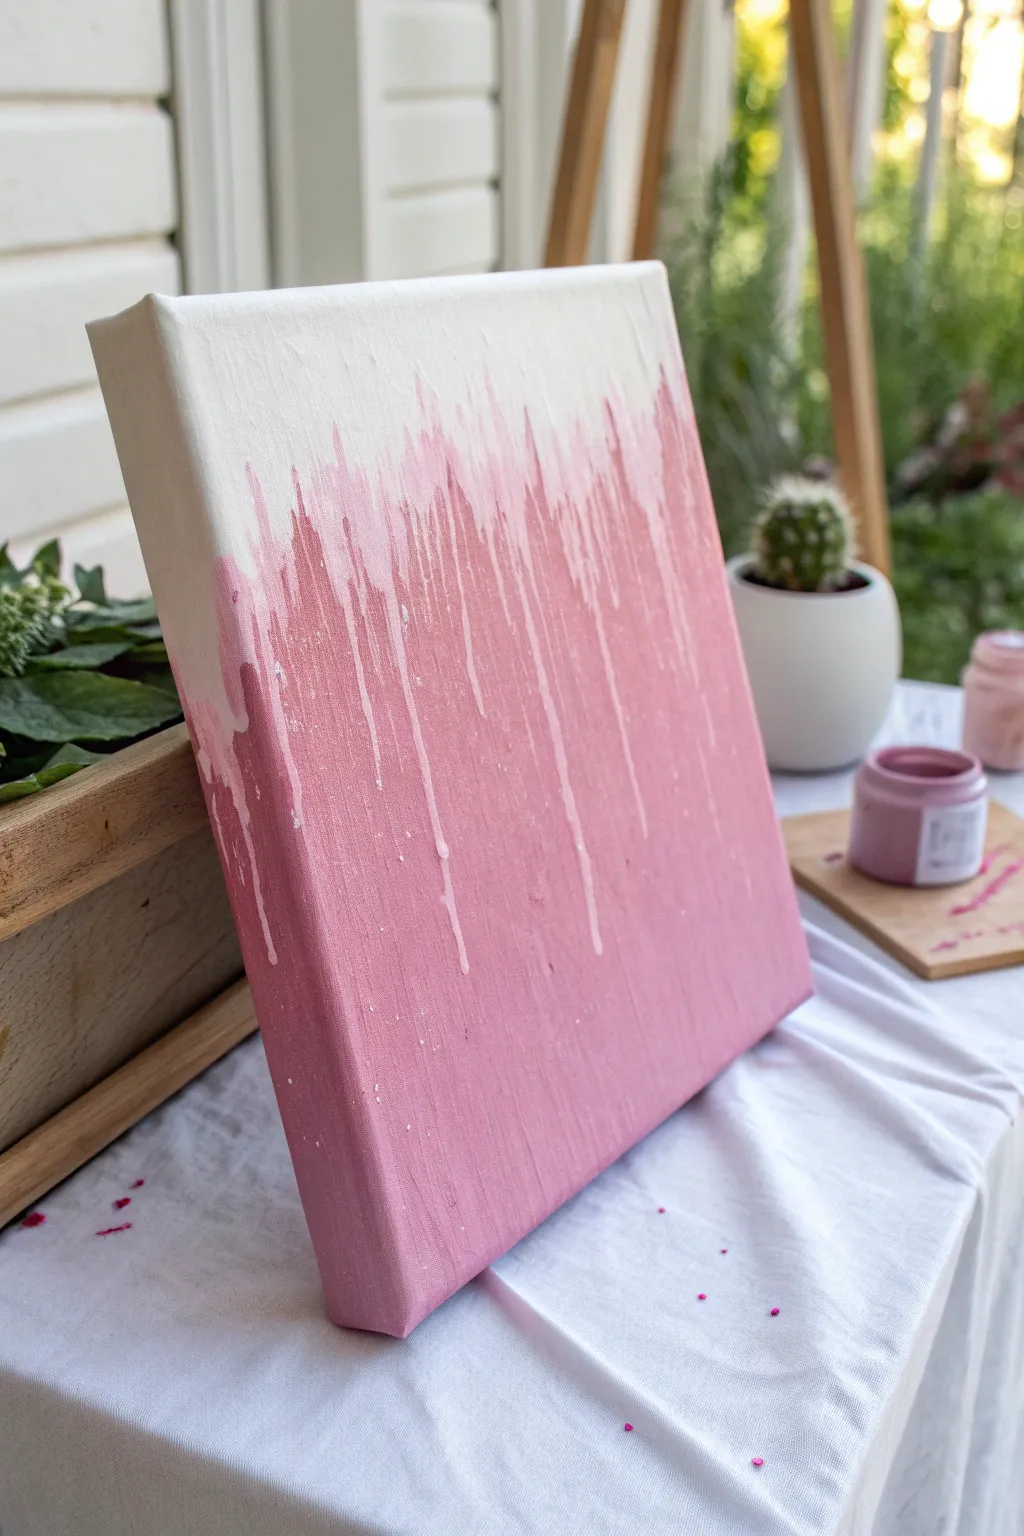
Create a dreamy, two-toned masterpiece with this simple yet striking drip painting technique that requires zero fine art skills. By letting gravity do the work, you achieve an organic, cascading effect where soft pink merges naturally into a crisp white top.
Step-by-Step
Materials
- Stretched canvas (square or rectangular)
- White acrylic paint (heavy body preferred)
- Pink acrylic paint (soft pastel shade)
- Wide flat paintbrush (2-inch)
- Small round paintbrush
- Cup of water
- Spray bottle with water (mister style)
- Plastic drop cloth or old newspapers
- Paper towels
- Easel or sturdy vertical support
Step 1: Setting the Foundation
-
Prepare your workspace:
Since this project involves intentional dripping, cover your table or floor generously with a plastic drop cloth or newspapers to catch any runoff. -
Position the canvas:
Set up your easel so the canvas sits vertically. If you don’t have an easel, prop the canvas up securely against a wall or box, ensuring the bottom is resting on your protected surface. -
Apply the white base:
Using your wide flat brush, paint the top third of the canvas with a solid coat of white acrylic paint. -
Feather the edge:
As you reach the bottom of the white section, feather the paint downwards slightly so there isn’t a hard line, but keep the paint relatively thick. -
Paint the pink base:
Clean your brush thoroughly or switch to a new one. Paint the entire bottom two-thirds of the canvas with your pink acrylic paint. -
Paint the sides:
Don’t forget to wrap the color around the sides of the canvas—white on the top sides and pink on the bottom sides—for a finished, professional look. -
Create the meeting point:
Bring the pink paint up to meet the white section. Don’t worry about blending them perfectly yet; just ensure there is wet paint where the two colors meet.
Drips Stopping Short?
If your paint trails are drying before they travel far enough, your mixture is too thick. Add water drop by drop until it flows freely like ink.
Step 2: Creating the Drips
-
Prepare the drip mixture:
In a small cup or on your palette, mix a small amount of white paint with water until it reaches the consistency of heavy cream or melted ice cream. -
Load a round brush:
Dip a smaller round brush into your watered-down white mixture, loading it heavily with paint. -
Initiate the first drips:
Press the loaded brush gently against the canvas right at the transition line where the white meets the pink. -
Let gravity take over:
Allow the fluid paint to naturally run down into the pink section. You can gently tap the canvas if the drip needs a little encouragement to start moving. -
Vary the drip lengths:
Move horizontally along the transition line, adding more fluid white paint. Add more water to your brush for longer, faster drips, and use thicker paint for shorter, sluggish drips. -
Mist for movement:
Here I prefer to grab my spray bottle and give the transition line a very light misting from about a foot away. This encourages the paints to bleed into each other and creates those delicate, spidery veins. -
Guide the flow:
If a drip is going rogue, you can tilt the canvas slightly to steer it, or use a clean, damp brush to gently wipe away an unwanted path before it dries. -
Add pink drips (optional):
For added depth, you can reverse the process slightly by watering down a tiny bit of pink paint and letting it run upward into the white if you flip the canvas upside down momentarily.
Step 3: Finishing Touches
-
Refine the top edge:
Go back to the very top edge of the white section with your flat brush and smooth out any brushstrokes to ensure the top looks clean and intentional. -
Check the sides again:
Look at the sides of the canvas; if drips have run down the side in a messy way, smooth them out with your brush or integrate them into the side design. -
Let it dry completely:
Leave the canvas in its vertical position until completely dry. If you lay it flat too soon, the drips might flatten out or pool unnaturally.
Pro Tip: Texture Boost
Add a drop of pouring medium to your watered-down paint. It helps the drips maintain their structural integrity and adds a glossy finish.
Hang your new abstract art in a bright spot where the natural light can highlight the delicate texture of the drips
Pink Ombre With Minimal Line Art
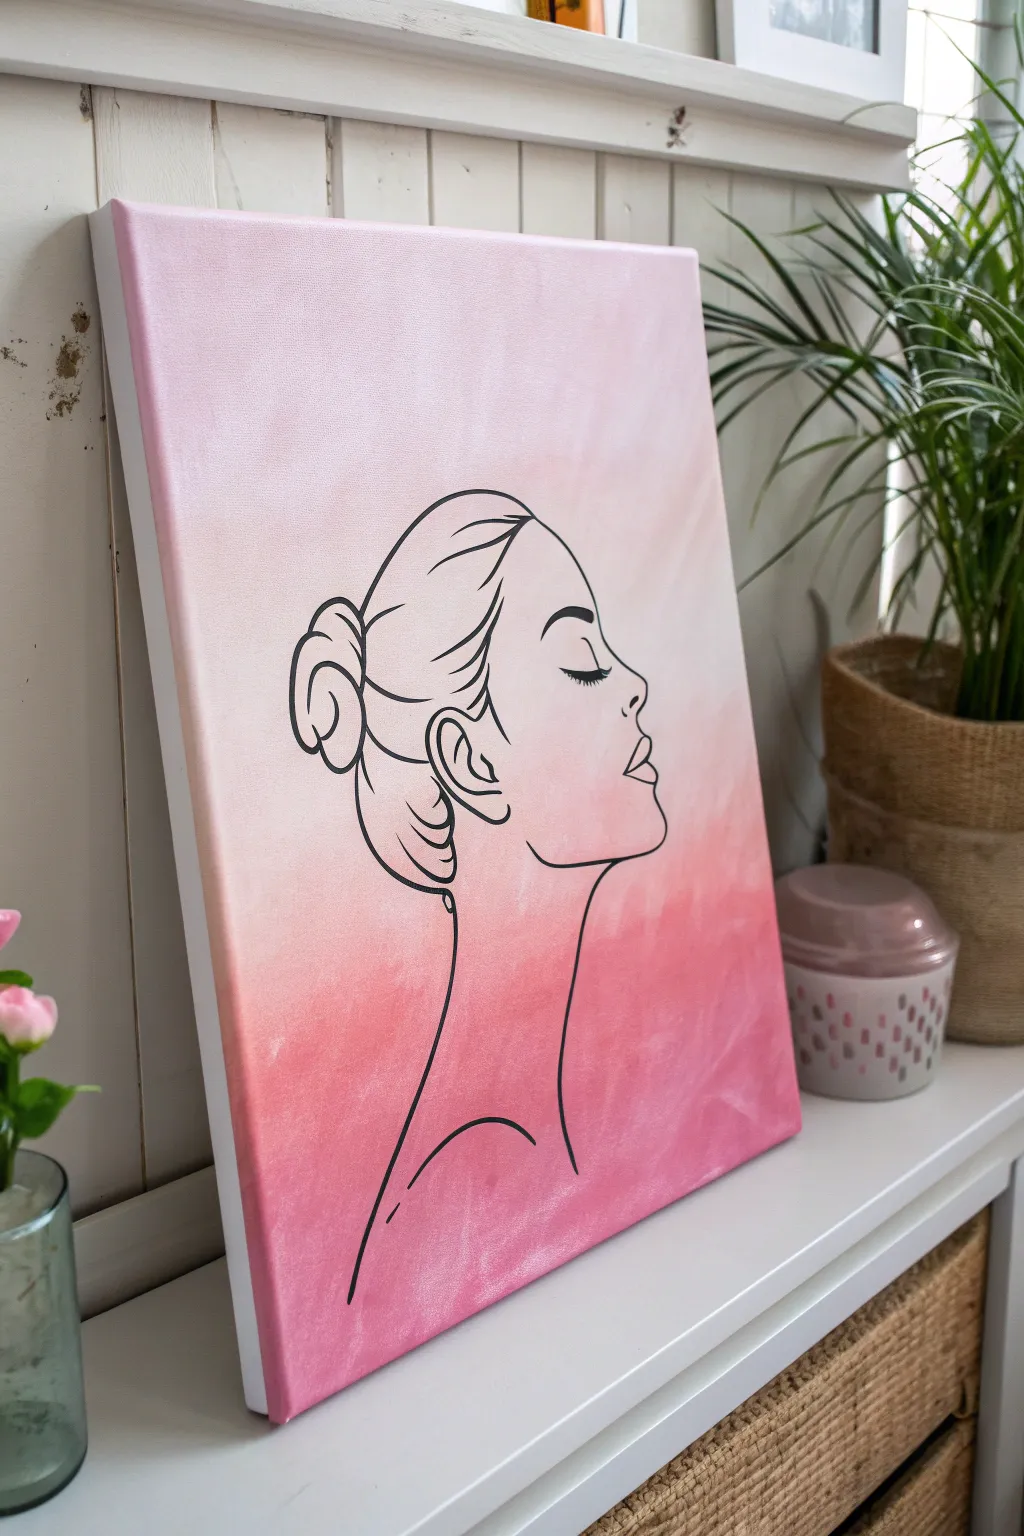
This elegant canvas combines a soft, romantic gradient with striking minimalist line art to create a modern piece of decor. The gentle transition from pale blush to deep rose provides the perfect backdrop for a sophisticated profile sketch.
Step-by-Step Tutorial
Materials
- Stretched canvas (e.g., 12×16 inches)
- Acrylic paint: Titanium White
- Acrylic paint: Deep Rose or Magenta
- Acrylic paint: Black
- Wide flat brush (1-2 inches) for background
- Fine liner brush (size 0 or 00) for line art
- Pencil for sketching
- Eraser
- Palette or paper plate
- Black paint marker (optional alternative to brush)
- Cup of water and paper towels
Step 1: Creating the Ombré Background
-
Prepare your palette:
Squeeze out a generous amount of Titanium White and your chosen pink (Deep Rose or Magenta) onto your palette. You will need plenty of white to create the smooth gradient. -
Mix the lightest shade:
Start by mixing a large portion of white with just a tiny dot of pink. You want this color to be very pale, almost barely there, for the top of the canvas. -
Paint the top section:
Using your wide flat brush, paint the top third of the canvas with your palest pink mixture. Use long, horizontal strokes that go all the way from edge to edge. -
Create the mid-tone:
Add a little more pink to your pile of paint to darken it slightly. Paint the middle section of the canvas, slightly overlapping with the wet paint of the top section. -
Blend the transition:
While the paint is still wet, gently brush back and forth over the line where the pale and mid-tone colors meet. I like to wipe my brush slightly so it’s drier for smoother blending. -
Apply the darkest shade:
Mix your darkest shade by adding significantly more pink to the mixture. Paint the bottom third of the canvas with this vibrant hue. -
Finish the gradient:
Blend the bottom section into the middle section using long horizontal strokes until the transition looks seamless. Don’t forget to paint the sides of the canvas to match the gradient. -
Let it dry completely:
Allow the background to dry thoroughly before moving on. This usually takes about 30-60 minutes depending on paint thickness.
Paint drying too fast?
If the background paint dries before you can blend the colors, dip your wide brush into a tiny bit of water or use a ‘slow-drying medium’ to keep the acrylic workable for longer
Step 2: Adding the Line Art
-
Sketch the outline:
Lightly sketch the profile of the woman using a pencil. Start with the forehead and nose, moving down to the lips and chin to establish the face shape. -
Detail the features:
Add the closed eye with eyelashes, the eyebrow, and the ear. Keep the lines simple and fluid. -
Draw the hair:
Sketch the bun and the hairline. The beauty of this style is in the flowing curves, so focus on the overall shape rather than individual strands. -
Refine the neck and shoulders:
Extend the neck lines down and add the curve of the shoulder. Erase any heavy pencil marks, leaving only a faint guide. -
Prepare black paint:
Thin your black acrylic paint slightly with a drop or two of water. This helps the paint flow smoothly off the liner brush for crisp lines. -
Trace the main profile:
Using your fine liner brush (or a black paint marker), carefully trace over your pencil lines. Start with the face profile as it requires the steadiest hand. -
Fill in the hair details:
Go over the lines for the hair bun. Varying the pressure on your brush can create nice variations in line thickness, making the hair look more organic. -
Add facial details:
paint the delicate features like the eyelashes and ear. These small details really bring the character to life. -
Final touches:
Review your work for any skipped spots or uneven lines. If needed, thicken the shoulder or neck lines slightly to anchor the composition.
Add some sparkle
Once the black paint is fully dry, trace over just the jewelry (like an earring) or the hair accessory with a metallic gold paint marker for a touch of glam
Hang your new artwork in a bright spot where the gentle pink hues can add warmth to the room
Pink Sky With Birds as Simple V Strokes
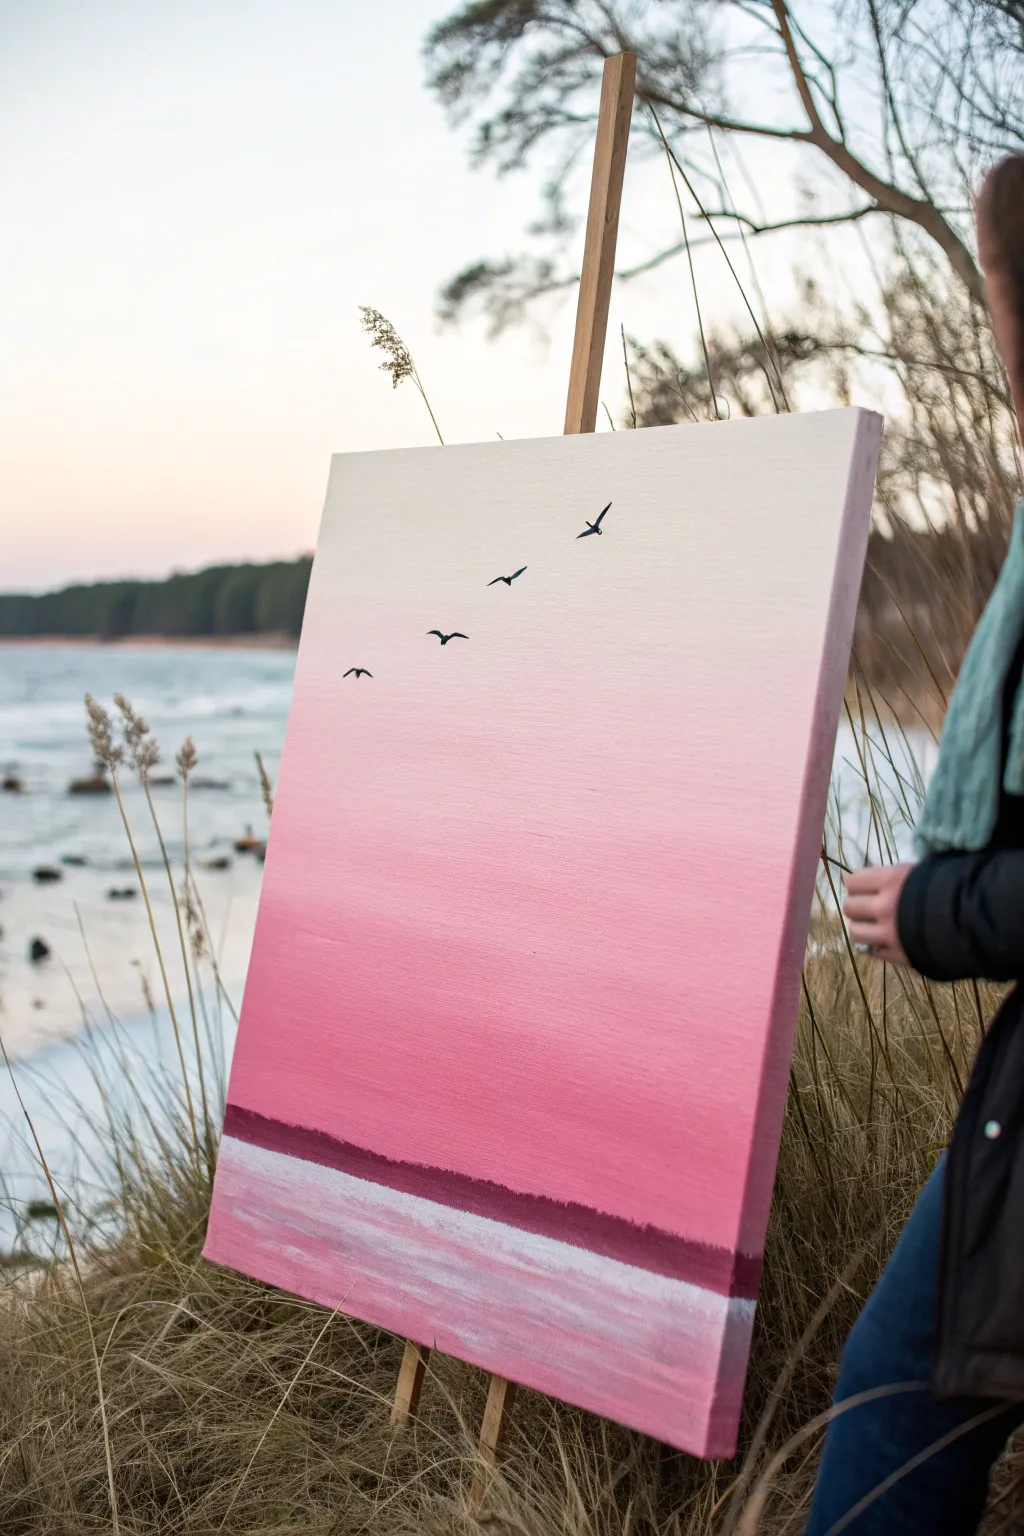
Capture the peaceful transition of a sunset with this minimalist acrylic painting featuring a smooth pink-to-cream gradient. The silhouette of birds in flight adds a perfect touch of life to the vast, calming sky.
Step-by-Step Guide
Materials
- Rectangular canvas (e.g., 16×20 inches)
- Acrylic paints: Titanium White, Magenta or Deep Pink, Dark Brown or Black
- Large flat wash brush (2-3 inches)
- Medium flat brush
- Small round detail brush
- Palette or mixing plate
- Cup of water
- Paper towels
Step 1: Creating the Ombre Sky
-
Prepare your palette:
Squeeze out generous amounts of Titanium White and your chosen Deep Pink onto your palette. You will need a lot of white to create the gentle transition. -
Paint the top section:
Using your large flat wash brush, load it with pure Titanium White mixed with the tiniest speck of pink (or unbleached titanium for warmth). Paint the top third of the canvas using long, horizontal strokes. -
Mix the mid-tone:
Add a little more pink to your white mixture on the palette to create a soft, pale blush color. -
Blend the middle section:
Apply this blush color directly below the top section. While the paint is still wet, brush back and forth over the meeting point of the two colors to blur the line. -
Intensify the color:
As you move down the canvas, gradually add more pink to your brush. The color should become a vibrant, deep bubblegum pink by the time you reach the lower third. -
Finalize the gradient:
Continue painting downward with the deepest pink tone until you are about 2-3 inches from the bottom edge. Keep your strokes horizontal and smooth to eliminate obvious brush marks. -
Let it dry:
Allow the background gradient to dry completely before moving on to the next layer. This prevents muddying the crisp horizon line we are about to add.
Uneven Gradients?
If your color blending looks choppy, clean your large brush, dampen it slightly (don’t soak it), and run it horizontally over the transition zone while the paint is still wet to smooth it out.
Step 2: Adding the Horizon and Foreground
-
Paint the horizon line:
Mix a dark burgundy or deep brown shade. Use a medium flat brush to paint a straight distinct strip across the canvas, right where your darkest pink sky ends. -
Soften the bottom edge:
The bottom edge of this dark strip doesn’t need to be perfectly sharp; it can be slightly uneven to mimic distant land or a tree line. -
Start the foreground:
Clean your brush thoroughly. Mix a light pink shade (similar to your mid-sky tone) with a bit of white. -
Paint the water base:
Fill the remaining bottom strip of the canvas with this light pink mixture. -
Add reflection texture:
Using a relatively dry brush with some white paint, drag it horizontally across the pink foreground. This creates the look of light reflecting on water or ice.
Step 3: The Final Details
-
Plan the birds:
Visualize where you want your birds to fly. A diagonal arrangement, like in the reference, leads the eye nicely across the canvas. -
Paint the first wing:
Switch to your smallest round detail brush and load it with black paint. For the highest bird, paint a small curved line arching upward. -
Complete the ‘V’ shape:
Paint a corresponding downward curve connected to the center, creating a shallow, wide ‘V’ shape that mimics wings in mid-flight. -
Vary the shapes:
Paint the remaining three birds in a diagonal line downward. Change the angle of the wings slightly for each one—some more open, some flatter—to simulate movement. -
Refine the silhouettes:
Thicken the center point of the ‘V’ shapes slightly to suggest the birds’ bodies, tapering out to thin points at the wingtips.
Add Some Shimmer
Once the painting is fully dry, mix a tiny amount of iridescent medium or pearl white paint into your foreground color to give the water a genuine, sparkling sun-kissed effect.
Hang your finished canvas in a well-lit spot to really show off that smooth blending work
City Skyline Silhouette on Pink Dusk
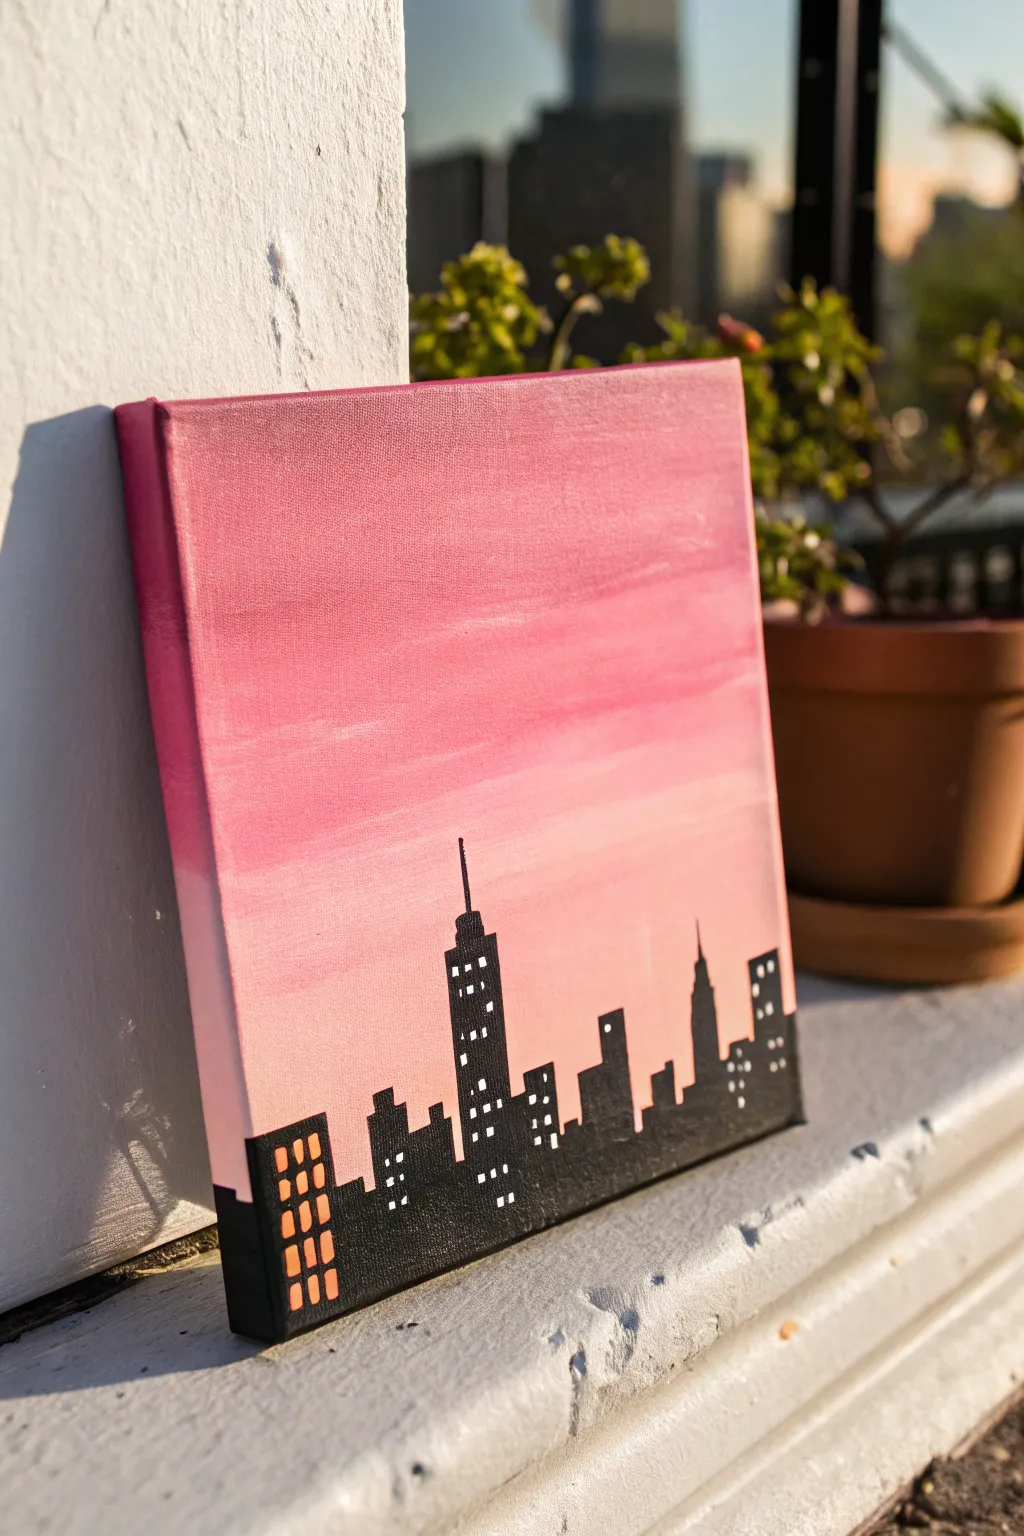
Capture the serene beauty of a city at sunset with this minimalist skyline painting. The vibrant ombre background sets a dreamy stage for the stark, graphic silhouette of the buildings, making it a perfect beginner-friendly project with striking results.
Step-by-Step
Materials
- Small square canvas (e.g., 8×8 or 10×10 inches)
- Acrylic paints: Magenta or Deep Rose, White, Black, Orange
- Flat shader brush (large for background)
- Small detail brush (round or liner)
- Medium flat brush (for buildings)
- Cup of water
- Paper towels
- Palette or paper plate
- Pencil (optional)
Step 1: Painting the Sunset Gradient
-
Prepare your palette:
Squeeze out a generous amount of magenta and white acrylic paint onto your palette. You will need enough to cover the entire canvas, including the sides. -
Start with the darkest tone:
Using your large flat brush, load it with pure magenta paint. Apply this color in horizontal strokes across the top third of the canvas. -
Paint the top edge:
Don’t forget to wrap the color around the top edge and the upper sides of the canvas for a finished look. -
Mix a mid-tone pink:
Without washing your brush, pick up a small amount of white paint and mix it directly on the canvas or your palette with the magenta to create a medium pink. -
Apply the middle section:
Paint the middle third of the canvas with this lighter pink, slightly overlapping the wet edge of the dark pink section above to encourage blending. -
Blend the transition:
Use long, smooth horizontal strokes to blend the line where the dark and medium pinks meet until the transition looks soft and seamless. -
Create the lightest pink:
Add significantly more white paint to your mixture now to create a very pale, soft pink. -
Finish the background:
Paint the bottom third of the canvas with this pale pink. Blend it up into the middle section just as you did before. -
Let it dry completely:
Allow the background to dry fully before moving on. I like to let this dry briefly in a sunbeam if possible to speed things up.
Clean Lines Hack
For perfectly straight building edges, apply strips of painter’s tape vertically. Paint black between them, then peel the tape away while the paint is still wet.
Step 2: Creating the City Silhouette
-
Plan your skyline:
If you’re nervous about freehand painting, lightly sketch varied rectangular tower shapes along the bottom edge using a pencil. -
Outline the buildings:
Using black paint and a medium flat brush, paint vertical rectangles of varying heights. Include a few taller skyscrapers, perhaps one with a spire to add interest. -
Fill in the shapes:
Fill in the building shapes completely with solid black paint. Ensure the coverage is opaque; you may need a second coat if the pink shows through. -
Extend to the sides:
Carry the black paint around the bottom edge and the lower sides of the canvas so the skyline wraps around the artwork. -
Add detail elements:
Switch to your small detail brush. Add tiny antennas or spires to the tops of one or two buildings for a realistic touch. -
Paint the windows:
Clean your small brush thoroughly. Dip the tip into white paint and dab small rows of dots or tiny squares on the black buildings to represent lit windows. -
Add variety to lights:
Don’t put windows on every building. Leave some dark to create depth and variety in the city scene. -
Create warmth with orange:
Choose one building, preferably on the side, to feature orange windows instead of white. This adds a nice pop of color that complements the sunset. -
Final touches:
Check for any uneven edges on your buildings and tidy them up with the black paint if necessary.
Gradient Not Blending?
If acrylics are drying too fast to blend, lightly mist the canvas with water or mix a slowing medium into your paints to keep them workable longer.
Place your little city scene on a shelf or desk to enjoy a permanent sunset view
Pink Clouds With Chunky Impasto Texture
Capture the ethereal beauty of a sunset sky with this monochromatic study of billowing cumulus clouds. Using a limited palette of pinks and whites, you will build up layers of fluffy texture to create a soft, dreamlike atmosphere that feels both modern and romantic.
Step-by-Step Tutorial
Materials
- Large stretched canvas (square or rectangular)
- Acrylic paints: Titanium White, Quinacridone Magenta, Portrait Pink (or light pink)
- Heavy body acrylic medium or modeling paste (for texture)
- Large flat brush (2-inch)
- Medium filbert brush
- Small round brush
- Palette knife
- Palette for mixing
- Water container and rags
Step 1: Setting the Atmosphere
-
Prime the background:
Begin by mixing a mid-tone dusty pink using your Portrait Pink with a tiny dot of Magenta. Use the large flat brush to cover the entire canvas in a smooth, solid coat. Let this base layer dry completely to ensure your clouds sit on top rather than blending in. -
Map out the shapes:
Using a diluted wash of a slightly darker pink, lightly sketch the general outline of your cumulus clouds. Focus on creating a large, dominant diagonal formation rising from the bottom left to the top right. -
Establish the shadow values:
Mix a darker, mauve-toned pink by adding a touch more Magenta to your base color. With a medium filbert brush, block in the shadowed underside of the clouds. These shadows give the clouds their weight and volume.
Step 2: Building Volume
-
Start the mid-tones:
Create a lighter pink shade, slightly brighter than your background color. Apply this to the main body of the clouds, blending slightly into the shadow areas where they meet to create a soft transition. -
Add texture with impasto:
Mix your Titanium White and light pink paint with a generous amount of heavy body medium or modeling paste. You want a consistency similar to thick frosting. -
Form the cloud tops:
Using a loaded filbert brush or even a palette knife, apply the thick, light pink mixture to the upper edges of your cloud forms. Use a dabbing or stippling motion to mimic the cauliflower-like texture of cumulus clouds. -
Layering the whites:
While the previous layer is tacky, mix pure Titanium White with your thickening medium. Apply this strictly to the very tops of the clouds where the ‘sunlight’ would hit, creating high contrast against the pink background. -
Soften the edges:
With a clean, dry filbert brush, gently scumble the edges of the white highlights downward into the pink mid-tones. Use a circular motion to keep the clouds looking fluffy rather than flat.
Use a dry brush
For the softest, fluffiest look, keep a dedicated dry filbert brush handy. Use it specifically to feather out wet paint edges without adding new pigment, creating a vaporous effect.
Step 3: Refining the Details
-
Create smaller formations:
Use a smaller round brush to add drifting, detached cloud fragments near the bottom and edges. These should be less detailed and slightly more transparent to suggest distance and movement. -
Deepen the contrast:
Revisit your darkest mauve-pink color. Glaze this into the deepest crevices of the clouds to emphasize the three-dimensional structure. I find that deepening these pockets makes the white highlights pop even more. -
Highlight the texture:
Take a small amount of thick white paint on the tip of the palette knife. Gently scrape it over the highest points of the cloud tops to catch the texture created by the canvas and earlier brushstrokes. -
Blend the bottom haze:
At the very bottom of the canvas, blend the clouds horizontally into the background color to suggest a misty horizon line, rather than having the clouds end abruptly. -
Final highlights:
Add tiny touches of pure white to the absolute crispest edges of the upper cloud billows. These sharp edges clarify the shape against the flat background sky. -
Final assessment:
Step back from the easel to view the composition as a whole. Ensure there is a balanced flow of light and dark values that leads the eye diagonally upward.
Clouds look flat?
If your clouds lack depth, your shadow color is likely too light. Be bold and darken the underbelly of weightier clouds with a deep mauve; volume comes from the contrast between light and dark.
Hang your masterpiece in a space that needs a touch of calm and watch how the soft pink hues warm up the room
Pink Galaxy With Splatter Stars
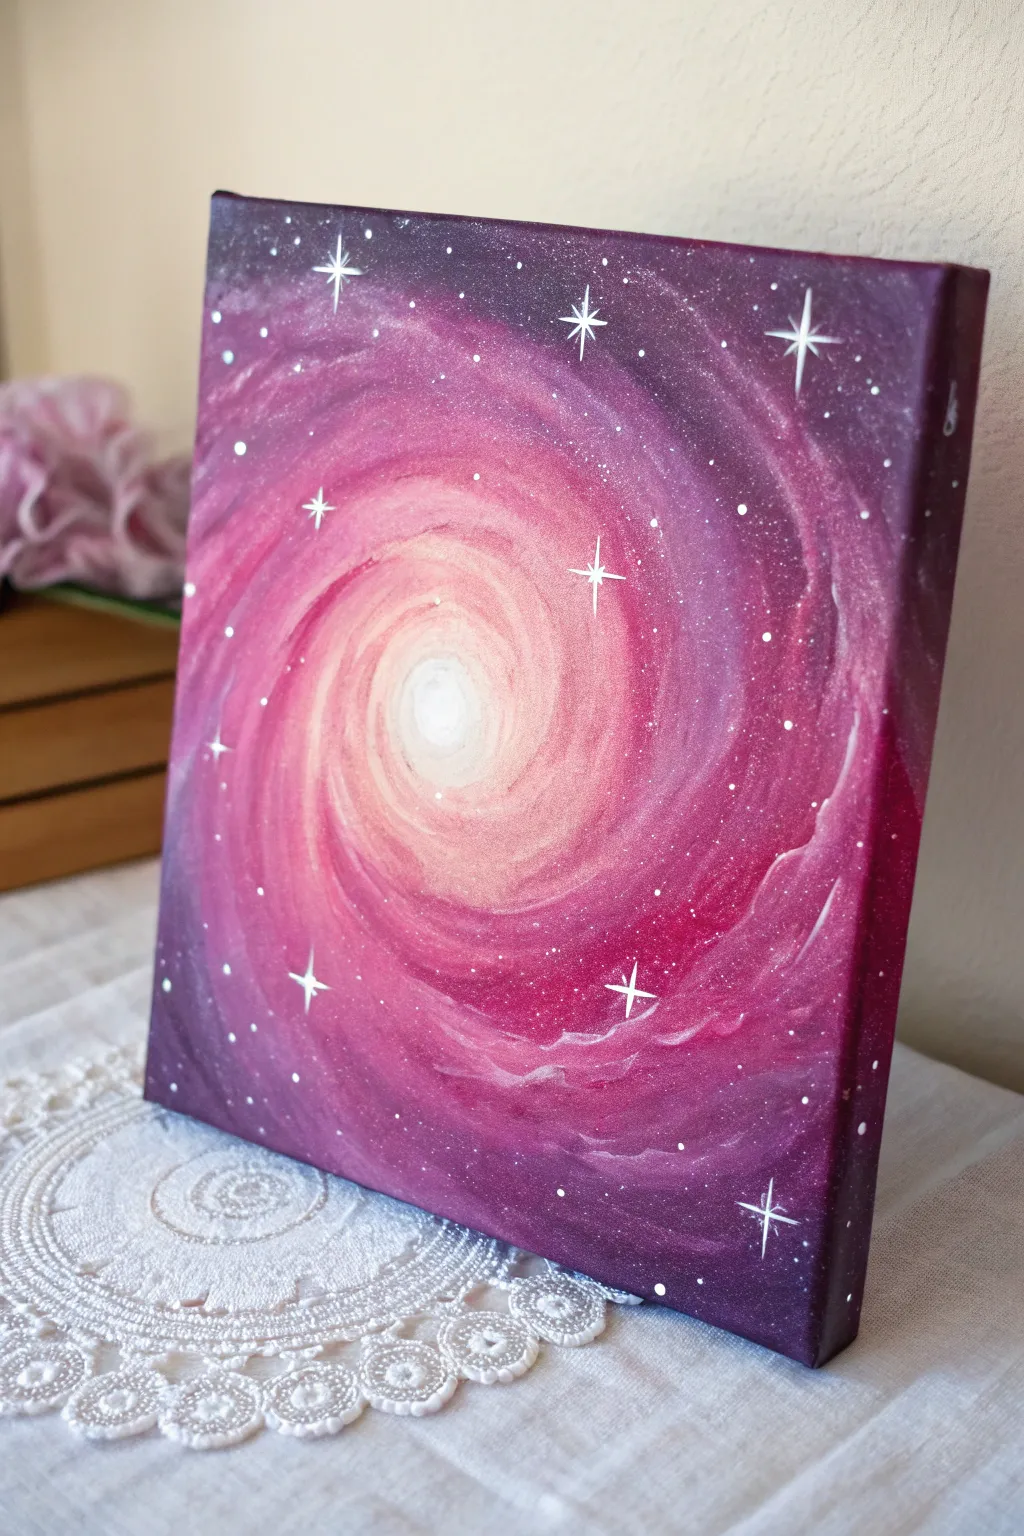
This captivating canvas captures the mesmerizing beauty of deep space with a soft, romantic twist, featuring a glowing core that spirals out into shades of magenta and deep violet. Punctuated by crisp, shining stars, it brings a touch of cosmic wonder to any small wall space.
Detailed Instructions
Materials
- Small square canvas (e.g., 8×8 or 10×10 inches)
- Acrylic paints: Titanium White, magenta, violet/purple, black, and a touch of orange or peach
- Wide flat brush or sponge brush
- Medium round brush
- Fine liner brush (size 0 or 00)
- Old toothbrush (for splattering)
- Palette or paper plate
- Water cup and paper towels
Step 1: Setting the Background
-
Prime the canvas:
Start by giving your canvas a quick coat of white paint if it isn’t already primed, or simply ensure it is clean and dust-free. This helps the bright pinks pop later on. -
Create the center glow:
Mix a generous amount of Titanium White with a tiny speck of orange or peach. Paint a solid circle in the very center of the canvas, about the size of a coin. This will be the blindingly bright core of your galaxy. -
Add the first pink ring:
Identify your lightest pink or mix magenta with plenty of white. While the center is still wet, paint a ring around the core. Use circular strokes to blend the edge where the white meets the pink, creating a soft, hazy transition. -
Deepen the color:
Move outwards with pure magenta paint. Apply this in a wider ring around the pale pink. Don’t just paint a perfect circle; start slightly dragging the paint in a spiral motion to suggest movement.
Muddy colors?
If your pinks and purples are turning into a muddy brown while blending, stop and let the bottom layer dry completely. Resume blending with a thin glaze of color instead of wet-on-wet.
Step 2: Creating the Spiral
-
Introduce the violet:
Mix your magenta with a bit of violet. Paint the outer corners and edges of the canvas with this darker hue. I like to scrub the paint into the canvas weave here to ensure full coverage. -
Darken the corners:
Add a small drop of black to your violet mix to create a deep, midnight purple. Apply this strictly to the four corners and the very outer edges of the canvas to create a vignette effect that draws the eye inward. -
Paint the sides:
Don’t forget to extend this dark purple color onto the sides of the canvas. This gives the artwork a polished, professional look without needing a frame. -
Blend the swirl:
With a clean, slightly damp brush, gently blend the transition areas between your dark outer ring and the bright magenta inner ring. Use sweeping, curved strokes that follow the spiral shape. -
Add cloudy texture:
Dip a brush or sponge into a lighter pink mix. Lightly dab or “scumble” this color over the darker purple areas in a spiral pattern to create wispy gas clouds. Keep the paint thin so the background shows through. -
Highlight the arms:
Mix white with a touch of pink. Using a smaller round brush, paint thin, curved lines along the edges of your spiral arms to define them. Soften these lines with a dry brush immediately so they look like glowing gas, not hard stripes.
Add some magic
Mix a pinch of iridescent or holographic glitter into your final white splatter paint. The stars will shimmer and change color slightly as you walk past the painting.
Step 3: Stars and Details
-
Prepare the splatter paint:
Mix Titanium White with a few drops of water until it reaches the consistency of heavy cream or ink. It needs to be fluid enough to fly off a brush. -
Create the star field:
Dip an old toothbrush into the thinned white paint. Test it on a paper towel first, then gently flick the bristles with your thumb to spray fine specks of “stars” over the entire canvas. -
Add larger distant stars:
Using the tip of your fine liner brush or a toothpick, dot a few slightly larger white circles randomly across the darker purple areas to represent closer stars. -
Paint the hero stars:
Choose 5 to 7 spots for your brightest stars. With the fine liner brush and pure white paint, draw a small vertical line, then a horizontal line crossing it to make a cross shape. -
Refine the star flares:
Carefully pull the paint from the center of each cross outward to taper the points. You can add tiny diagonal lines in the center of the larger crosses for extra sparkle. -
Final center highlight:
Return to the very center of the galaxy. If the swirling paint has dulled it, add one final dab of pure thick white to make the core shine intensely.
Let your cosmic creation dry completely before hanging it up to admire the depth of your personal galaxy


Have a question or want to share your own experience? I'd love to hear from you in the comments below!