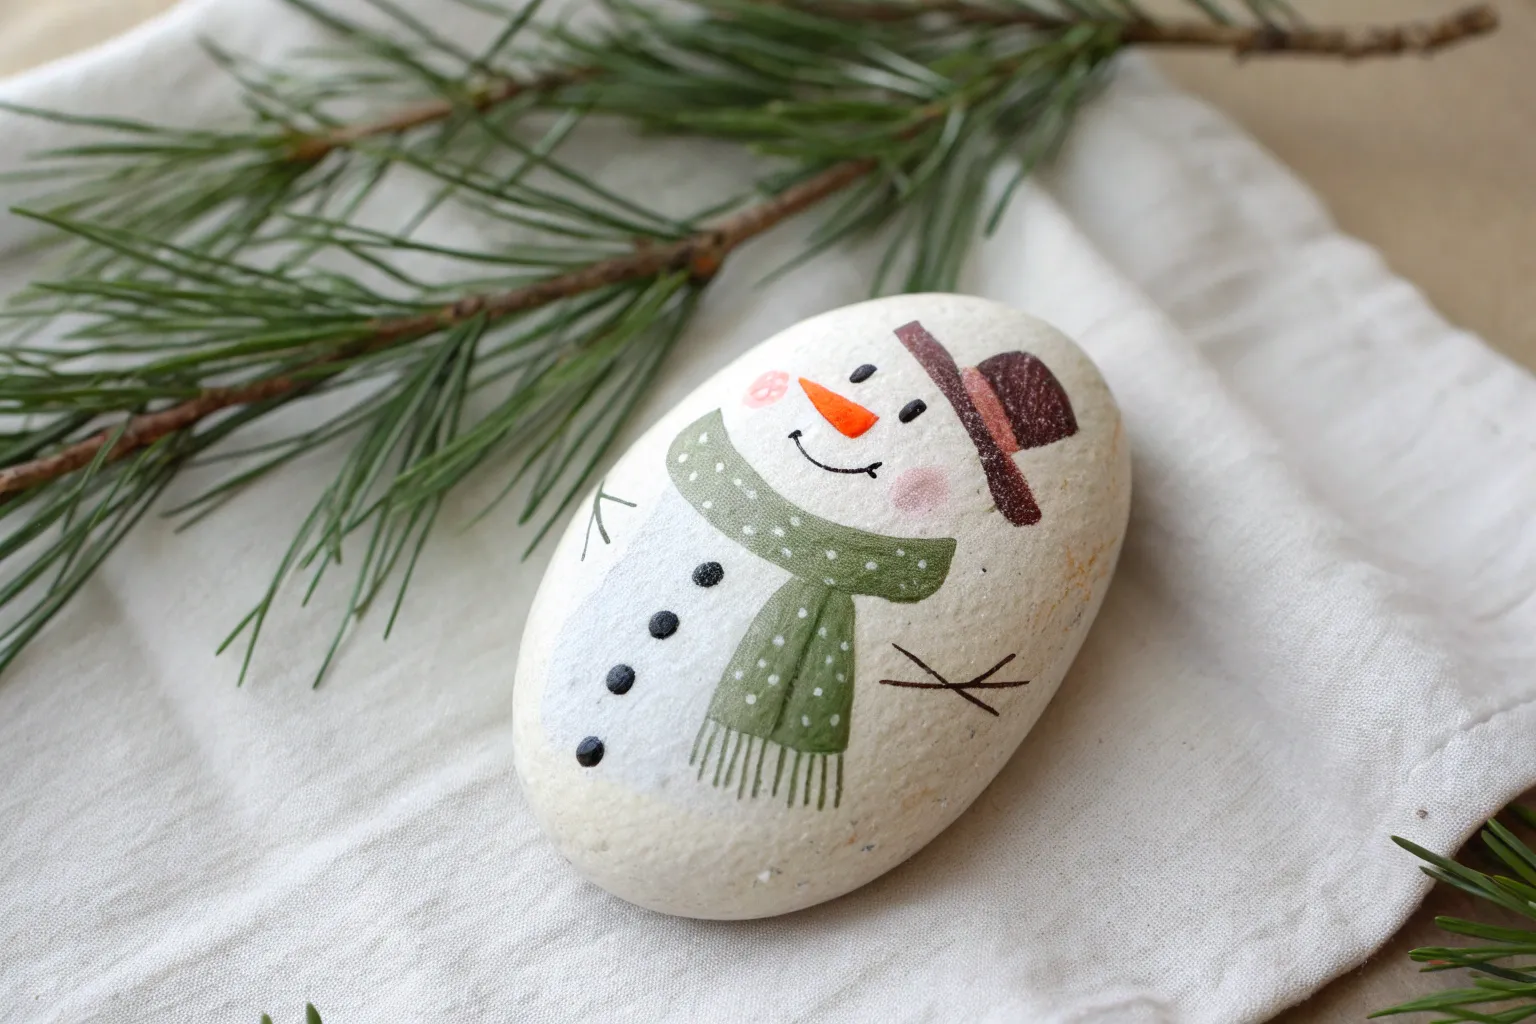
There’s something ridiculously satisfying about turning an ordinary stone into a cheerful little snowman character—no cold hands required. Grab a handful of smooth rocks, and let’s play with classic faces, cozy accessories, and a few creative twists that still scream snowman rock painting.
Classic Three-Ball Snowman on One Rock
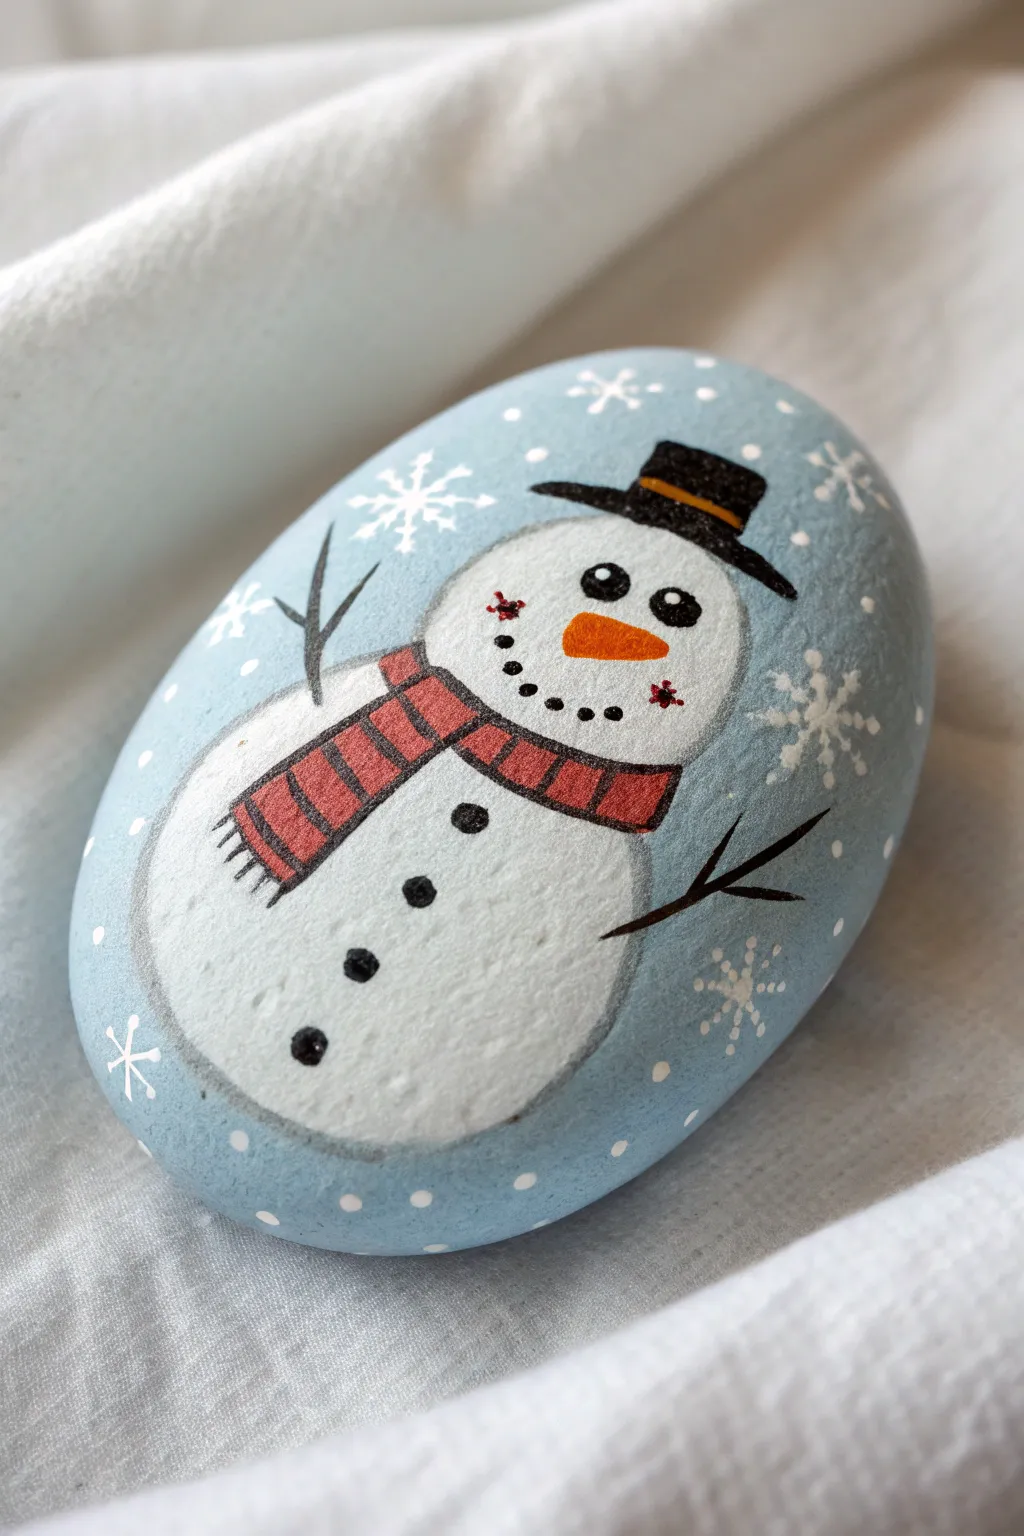
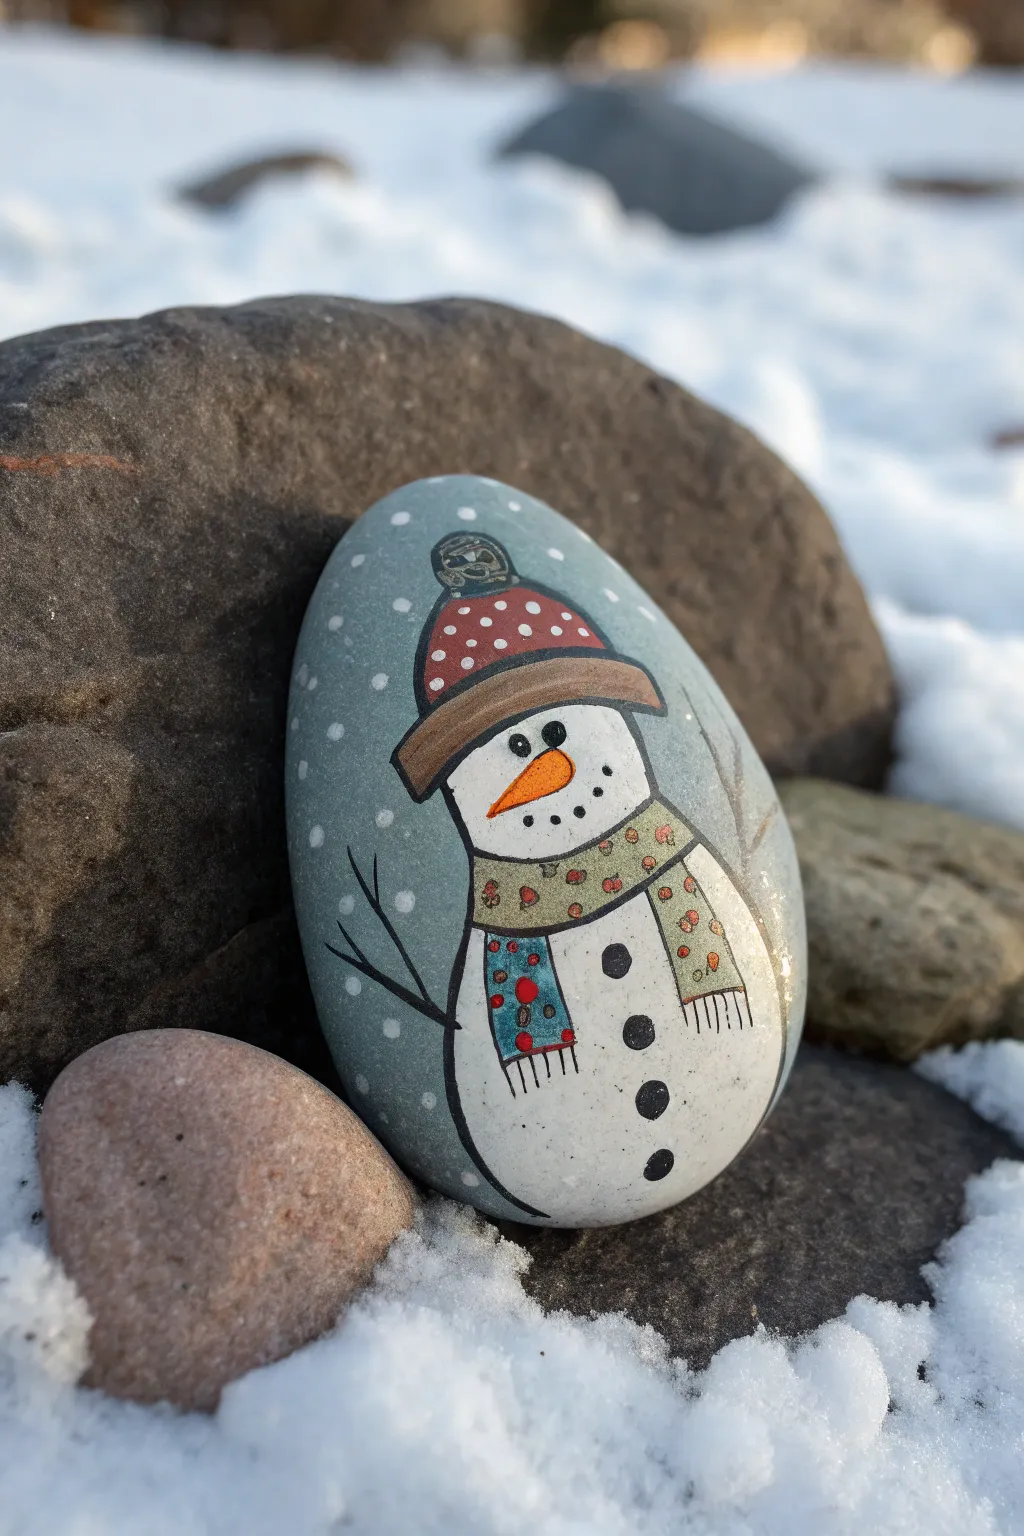
This charming project transforms a simple smooth stone into a chilly winter scene featuring a cheerful snowman. The soft blue background makes the white snow really pop, giving the finished piece a crisp, frosty feel perfect for holiday décor.
Step-by-Step
Materials
- Smooth, oval-shaped river rock (palm-sized)
- Acrylic paints: Light blue (or white and dark blue to mix), titanium white, black, orange, burgundy/dark red
- Flat paintbrushes (medium and small)
- Fine liner brush or detail brush (0 or 00 size)
- Dotting tool or toothpick
- Mod Podge or spray sealer (matte or gloss)
- Water cup and paper towels
Step 1: Base Coat and Background
-
Clean the canvas:
Begin by washing your rock with soapy water and scrubbing away any dirt or grit. Let it dry completely in the sun or use a hairdryer to speed things up. -
Mix the background color:
Create a soft, icy blue shade by mixing a large amount of white acrylic paint with a tiny drop of blue. You want a very pale, wintry hue. -
Paint the foundation:
Using a medium flat brush, coat the entire top surface of the rock with your light blue mix. Depending on the rock’s darkness, you might need two or three coats for full opacity. -
Let it cure:
Allow the blue background paint to dry fully before moving on. Check that it’s dry to the touch so you don’t smudge the next steps.
Clean Lines Hack
If you struggle drawing straight lines for the snowflakes, use a white gel pen instead of a paintbrush! It gives you much more control over the delicate star shapes on the uneven rock surface.
Step 2: Building the Snowman Body
-
Outline the shape:
Load a small round brush with titanium white paint. Paint two overlapping circles in the center of the rock: a smaller one on top for the head and a larger, taller oval below it for the body. -
Fill in the white:
Fill these shapes in with solid white paint. Just like the background, I find apply two thin coats works better than one thick, gloopy one. -
Add dimension:
Once the white is dry, use a very watery grey wash (or a tiny bit of diluted black) to outline the bottom edge and sides of the snowman slightly. This subtle shading separates the snowman from the background.
Make It Sparkle
Before the final sealer dries, sprinkle a pinch of iridescent glitter over the white sections of the snowman. It creates a magical, frosty texture that catches the light beautifully.
Step 3: Clothing and Accessories
-
Paint the scarf base:
Using your burgundy or dark red paint and a small flat brush, paint a curved band where the head meets the body. Add a tail hanging down the left side of the snowman’s chest. -
Add scarf details:
Once the red stripe is dry, use your fine liner brush with black paint to outline the scarf. Add small vertical lines inside the red area to suggest a ribbed texture or fringe. -
Top it off:
Paint a black top hat on the snowman’s head. Start with a thin black line for the brim, then add a rectangle on top. Don’t forget a tiny stripe of orange or gold for the hat band if you’re feeling detailed.
Step 4: Facial Features and Details
-
The carrot nose:
Paint a small, elongated triangle in bright orange in the center of the face, pointing slightly to the right. -
Eyes and mouth:
Use a dotting tool or the back of a paintbrush dipped in black paint to create two eyes above the nose. Use a smaller tip to dot a curved smile made of ‘coal’ beneath the nose. -
Eye sparkle:
This is crucial for cuteness: add a tiny white spectral highlight dot inside the black of each eye. -
Rosy cheeks:
Paint two tiny, distinct red asterisks or stars on the cheeks to mimic a rosy glow. -
Stick arms:
With your thinnest liner brush and black paint (thinned slightly with water flows best), paint stick arms reaching out. I like to make them branch out like little twigs. -
Buttons:
Add three black buttons down the center of the lower body using your dotting tool.
Step 5: Final Touches
-
Snowflakes:
Using a fine liner brush and white paint, draw delicate asterisks and star shapes scattered around the background sky. -
Falling snow:
Add random small white dots between the larger snowflakes to make it look like a flurry is happening. -
Seal the deal:
Once the entire rock is bone dry—wait at least a few hours—apply a coat of clear sealer to protect your detailed work from chipping.
Place your finished icy friend on a mantelpiece or hide it in the garden for a neighbor to find


Snowman Face Close-Up on a Round Stone
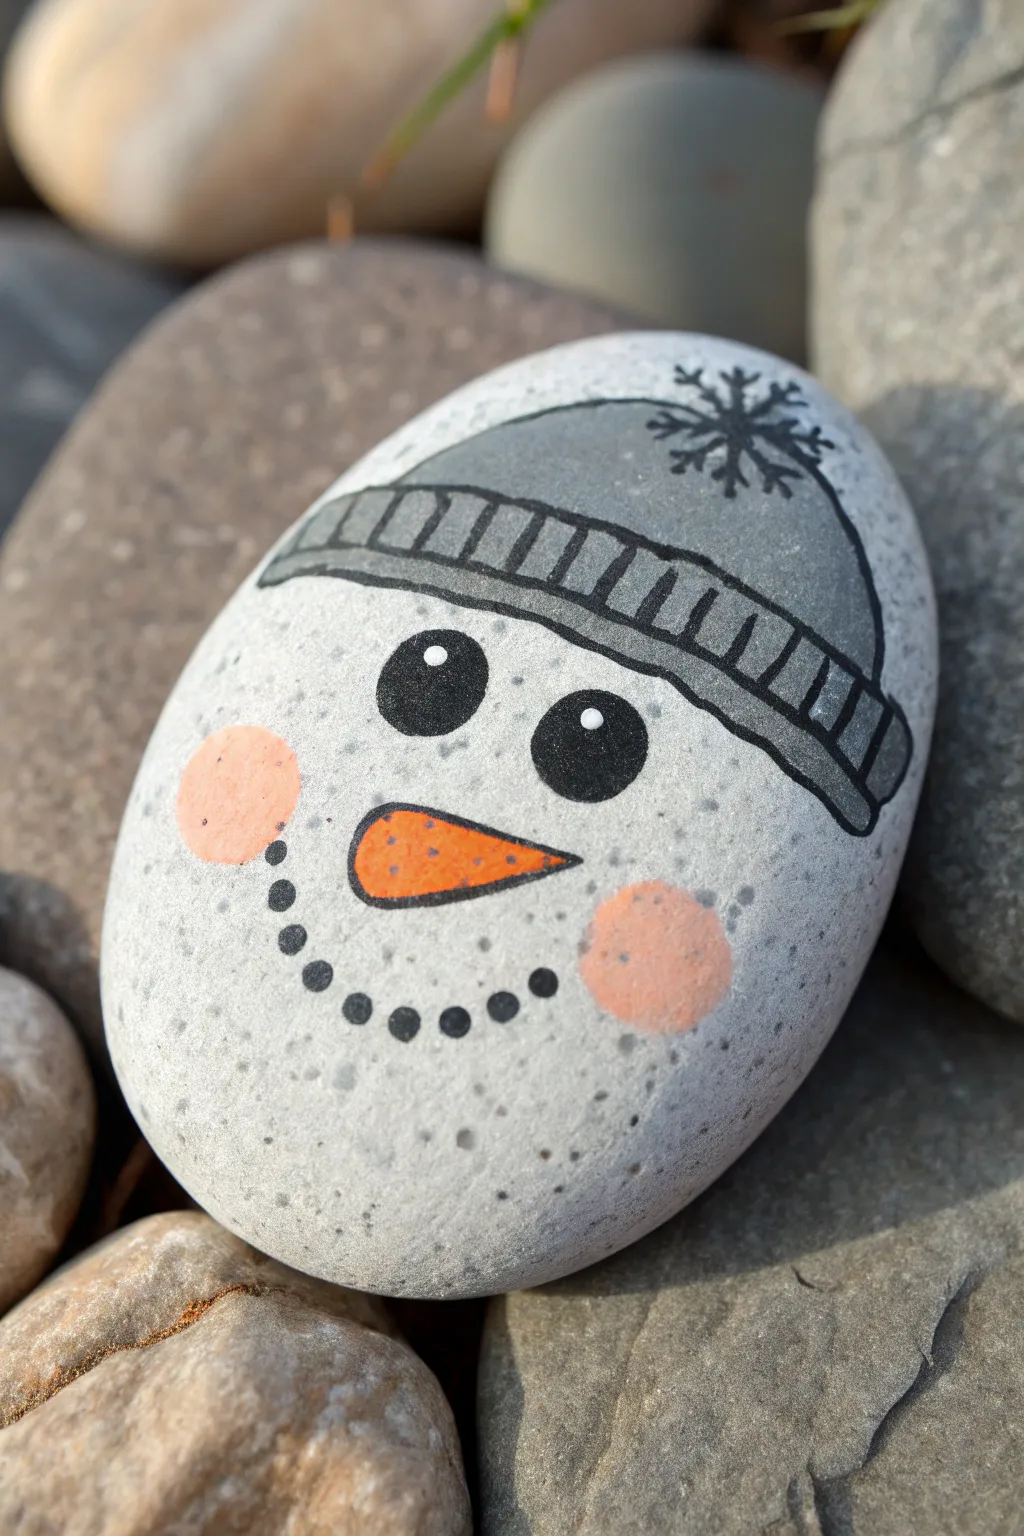
Transform a simple round pebble into an adorable winter character with this detailed face close-up design. The soft grey beanie and gentle expression make this painted rock a perfect little pocket companion or holiday decoration.
Detailed Instructions
Materials
- Smooth, round river stone (light grey or white preferred)
- Acrylic paints: White, Grey, Black, Orange, Soft Pink
- Fine detail paintbrushes (size 0 and 00)
- Black fine-point paint pen (optional but recommended for outlines)
- Dotting tool or toothpick
- Matte or satin varnish sealer
Step 1: Base and Beanie
-
Clean surface:
Begin by washing your stone with soapy water and drying it completely to ensure the paint adheres properly. -
Face shape:
Mix a tiny drop of grey into your white acrylic paint to create an off-white, stony color if your rock isn’t naturally light. Paint a large, rounded oval shape that covers most of the rock’s face, leaving the natural stone showing at the edges if you like that rustic look. -
Beanie brim base:
Once the face is dry, use your grey paint to create the brim of the hat. Paint a curved band across the top third of the snowman’s head. Make the bottom line slightly curved to hug the forehead. -
Beanie dome:
Paint a semi-circle rising from the brim to create the top of the hat. You can make this minimal since it goes off-canvas, or create a full dome depending on your rock’s shape. -
Outline the hat:
Using a very fine brush requiring a steady hand, or a black paint pen, carefully outline the entire hat shape. Add a line separating the brim from the main part of the beanie. -
Ribbing detail:
Draw vertical lines inside the brim of the hat to create a knitted ribbing texture. Space them evenly, angling them slightly as you move toward the edges to show the curve of the head.
Step 2: Facial Features
-
Eye placement:
Dip a medium-sized dotting tool or the back of a brush into black paint. Place two solid black oval dots below the hat brim. Position them slightly wide apart for a cute, youthful look. -
Carrot nose:
Between the eyes, paint a sideways teardrop shape in orange for the carrot nose. It should point towards the right. -
Nose outline:
Once the orange is completely dry, use your finest liner brush or pen to outline the nose thinly in black. -
Nose texture:
Add three tiny, faint distinct lines or dots on the orange part of the nose to mimic carrot texture. -
Rosy cheeks:
Mix a very watery wash of pink paint or use a dry-brush technique. Lightly dab two circles on the outer edges of the face, just below the eye line. I like to blot the brush on a paper towel first so the color is soft and translucent. -
Cheek freckles:
While having the pink paint out, you can add tiny speckles or just leave the cheeks soft.
Clean Lines Pro-Tip
For the hat ribbing, pull your paint pen or brush *downward* toward the face. It’s easier to control the end of a line than the start of one.
Step 3: Final Details
-
The snowflake:
On the upper right side of the grey beanie, paint a simple black asterisk. Add little ‘V’ shapes to the end of each line to turn it into a snowflake embroidery detail. -
Coal mouth:
Using a smaller dotting tool or the tip of a toothpick, create a smile using small black dots. Start from the left cheek, dip down, and curve up to the right cheek. -
Eye sparkle:
This is crucial for bringing him to life: dip a toothpick in white paint and add a tiny white dot in the upper right corner of each black eye pupil. -
Sealing:
Allow the rock to cure for at least 24 hours. Finish with a layer of spray varnish to protect your artwork from chipping.
Level Up: 3D Snow
Mix baking soda with white craft glue and dab it onto the brim of the hat for a fluffy, textured ‘snow’ effect that actually stands out from the rock.
Now you have a frosty friend that will never melt, ready to brighten up a desk or garden path


Side-Profile Snowman With an Easy Nose Angle
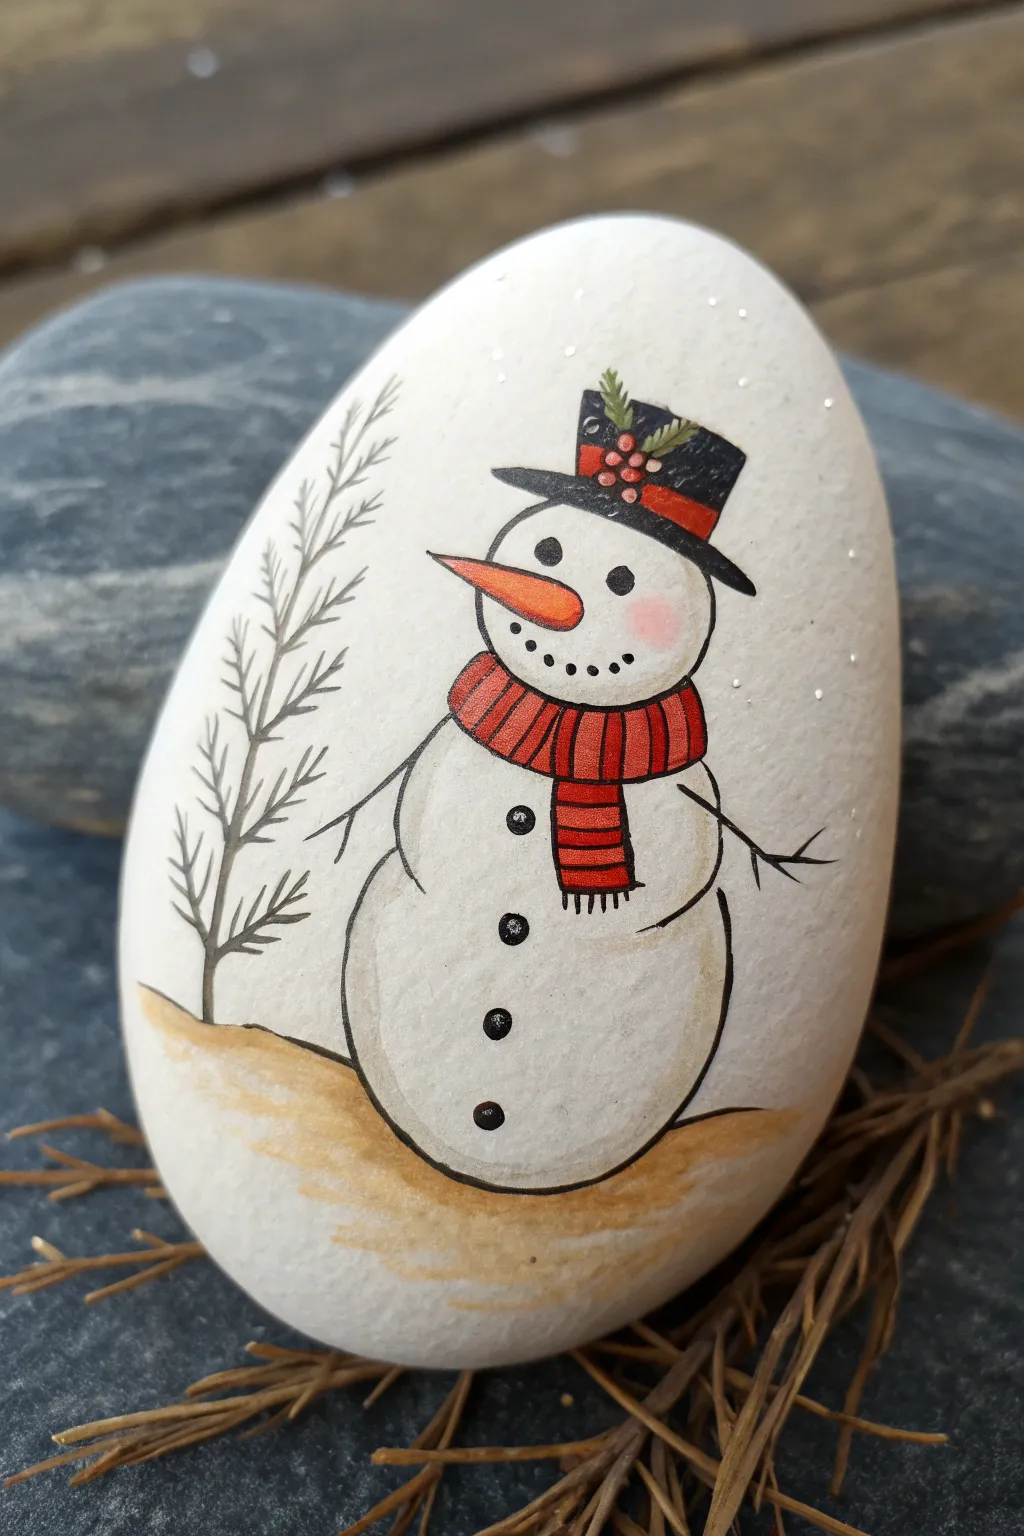
This charming design captures a snowman from a unique side angle, perfect for showing off that classic carrot nose. The clean lines and soft shading on a smooth, egg-shaped stone make for a sophisticated yet approachable winter decoration.
How-To Guide
Materials
- Smooth, egg-shaped white beach stone (approx. 3-4 inches tall)
- Titanium White acrylic paint (optional, for base)
- Black fine-liner paint pen (0.5mm or 0.7mm)
- Acrylic paints: Bright Orange, Crimson Red, Black, Tan/Beige, White
- Small round detail brushes (size 0 and 2/0)
- Matte varnish or sealant spray
- Pencil and eraser
Step 1: Preparation and Sketching
-
Prep the surface:
Begin with a clean, dry stone. If your rock isn’t naturally bright white like the example, apply two thin coats of Titanium White acrylic paint over the entire surface to create a blank canvas. Let this dry completely. -
Draft the outline:
Using a pencil, lightly sketch the snowman’s basic shape. Start with a smaller circle for the head and a larger, slightly flattened oval for the body. Position him slightly off-center to the right to leave room for the tree. -
Add the accessories:
Sketch the top hat sitting at a slight angle on the head. Draw the scarf wrapped around the neck, with one end hanging down the front of the body. Don’t worry about the stripes yet; just get the main shape. -
Profile details:
Mark the position of the nose—a long triangles sticking out to the left. Sketch the stick arms, with the left one drooping slightly and the right one reaching back.
Pro Tip: Sharp Lines
If your fine-liner stops flowing over acrylic paint, scribble it on a piece of scrap paper to clear the tip, or ensure the paint underneath is completely dry.
Step 2: Painting the Base Colors
-
Fill the nose:
Paint the carrot nose with Bright Orange. Use a very fine brush to keep the tip sharp. -
Paint the scarf base:
Fill in the entire scarf area with Crimson Red. You may need a second coat to ensure the red is opaque and vibrant against the white background. -
Block in the hat:
Paint the top hat black carefully. Leave a small band unpainted above the brim for the red ribbon, or paint the whole hat black and add the red band later once it’s fully dry. -
Add the hat band:
Paint the band on the hat red to match the scarf. Once dry, add three tiny red dots for holly berries and small green strokes for leaves tucked into the band. -
Ground the snowman:
Mix a very watery wash of Tan or Beige paint. Gently sweep this across the bottom of the rock to create a sandy or snowy ground effect, curving it slightly upward on the sides.
Step 3: Inking and Detailing
-
Outline the body:
Once all paint is 100% dry, use your black fine-liner pen to trace the main outline of the snowman. Keep the line steady but slightly organic. -
Define the scarf:
Outline the scarf with the pen. Draw vertical lines inside the scarf to create the ribbing texture. Add small fringe lines at the bottom of the hanging scarf end. -
Draw the face features:
Use the pen to draw the coal eye and a curved line of dots for the mouth. Outline the orange nose essential for that crisp, illustrated look. -
Buttons and arms:
Draw three solid black circles down the front of the body for buttons. Draw the thin stick arms extending from the sides, adding little twig fingers at the ends. -
Create the tree:
To the left of the snowman, draw a simple, bare tree using the fine-liner. Start with a central trunk and branch out with jagged, upward-reaching lines. It should look delicate and wintry.
Troubleshooting: Shaky Hands?
For steady outlines, rest your painting hand’s pinky finger on the table or a dry part of the rock to stabilize your movement while drawing the long lines.
Step 4: Shading and Finishing
-
Cheek flush:
I like to create a soft blush by mixing a tiny drop of red with water (or using dry pastel dust). Gently dab a transparent pink circle on the cheek area. -
Body shading:
Using a diluted grey or very light tan wash, paint a thin shadow line along the right side and bottom of each snowball segment. This gives the snowman volume so he doesn’t look flat. -
Snow accents:
Dip a toothbrush or stiff brush in white paint and flick it lightly over the hat and background to create falling snow. Add tiny white dots or sparkles to the background if desired. -
Seal the work:
Allow the rock to dry overnight. Apply a matte varnish spray to protect your artwork without adding too much shine, preserving the natural stone look.
Now you have a timeless winter keepsake that looks great on a mantelpiece or tucked into a holiday wreath


Cozy Beanie and Striped Scarf Snowman
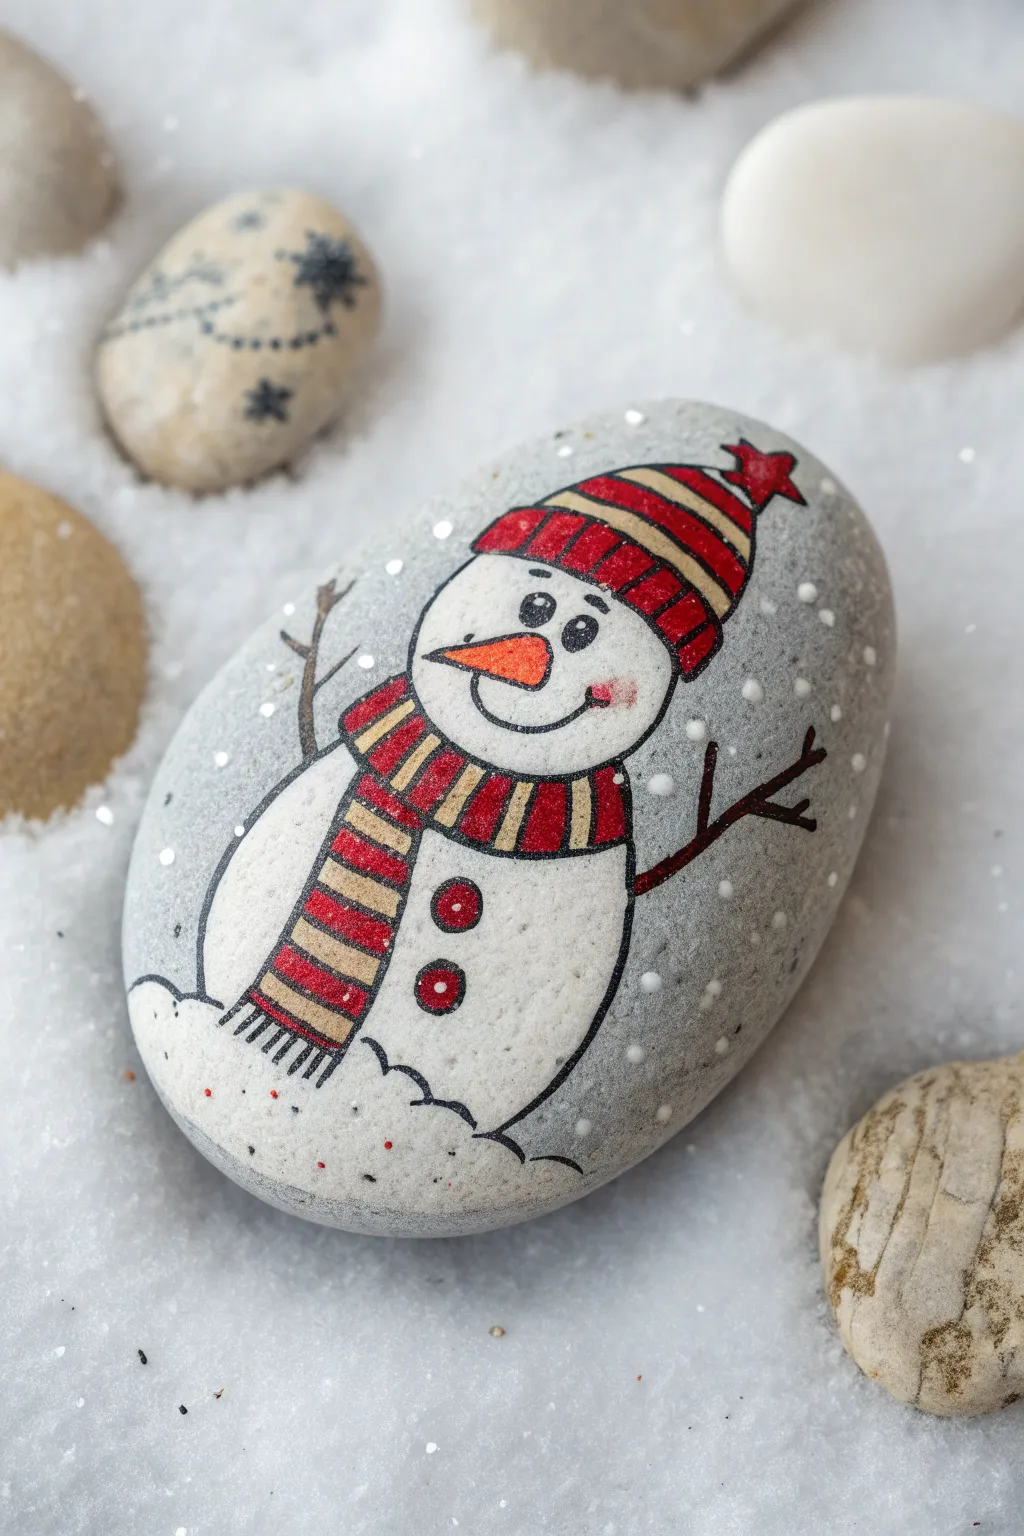
This cozy snowman rock features crisp lines and a jaunty red-and-gold striped set that pops beautifully against unpainted grey stone. It’s a perfect project for beginners looking to practice their linework and color layering.
Step-by-Step Tutorial
Materials
- Smooth, oval river rock (grey or off-white)
- Acrylic paint pens (extra fine and fine tip) in black, white, red, and yellow/gold
- Orange paint pen or acrylic paint
- Pencil and eraser for sketching
- Matte finish spray sealer or varnish
- Small dotting tool or toothpick
Step 1: Planning and Sketching
-
Clean the surface:
Before starting, ensure your rock is thoroughly washed with soap and water and completely dry. Any dust will mess up your fine lines later. -
Position the figure:
Using a pencil, lightly sketch the snowman’s outline. Draw a large oval for the body and a rounded shape on top for the head, leaving space at the bottom for the ‘snow’ ground. -
Sketch the accessories:
Add the beanie hat sitting tilted on the head, including the ribbed brim and a little star pom-pom at the peak. -
Draft the scarf:
Draw the scarf wrapping around the neck, with a long tail draped down the left side of the body. Don’t worry about the stripes yet; just get the main shape right.
Fixing Wobbly Lines
If your black outlines get shaky or too thick, wait for the black ink to dry fully. Then, come back with the neighboring bold color (like the white body or red scarf) to ‘cut in’ and tidy up the edge.
Step 2: Base Colors
-
Fill in the white:
Use a white paint pen or fine brush to fill in the snowman’s face and body. You might need two layers to make it opaque against a dark stone, but let the first layer dry completely before adding the second. -
Paint the nose:
Color in the carrot nose with orange, tapering it to a point facing left. -
Block out the red areas:
Color the main body of the hat, the star on top, and the main sections of the scarf with your red paint pen. -
Add the gold stripes:
Once the red needs to be totally dry, draw the yellow or gold stripes on the hat and scarf. Leave small gaps between the red and gold for the black outline we’ll add later. -
Create the ground:
Paint a wavy, uneven patch of white at the very bottom of the rock to represent the snowdrift the snowman is sitting in.
Step 3: Outlining and Details
-
Outline the body:
Using your extra-fine black paint pen, carefully trace the outer edge of the snowman, the snowdrift, and the hat. -
Define the scarf:
Outline the scarf shape, carefully drawing lines between every single stripe to separate the red and gold sections. Add the fringe at the bottom of the scarf. -
Draw the facial features:
Add two small black ovals for eyes with tiny white highlights. Draw a curved smile line with a small perpendicular mark at the end for the cheek. -
Add the rosy cheek:
I like to gently dab a tiny bit of watered-down red paint or blush near the smile line to give him a rosy glow. -
Draw the arms:
Sketch two stick arms using the black detailed pen. For the right arm, make it branch out like a twig; keep the left arm simple along the body. -
Add buttons:
Draw two red circles on the chest for buttons, then outline them in black.
Level Up: Texture
Instead of flat white paint for the snowdrift at the bottom, mix a little baking soda into white acrylic paint. Dab it on for a fluffy, realistic 3D snow texture.
Step 4: Finishing Touches
-
Add falling snow:
Use your white pen or a dotting tool to place random white dots all over the untouched grey background of the rock. -
Add subtle glitter (optional):
For extra magic, add tiny dots of silver or white glitter paint to the background snow dots. -
Seal the rock:
Once the paint is 100% cure-dry (give it a few hours), spray with a matte sealer to protect your artwork from chipping.
Place this cheerful rock on your doorstep or hide it in a park for a neighbor to find
BRUSH GUIDE
The Right Brush for Every Stroke
From clean lines to bold texture — master brush choice, stroke control, and essential techniques.
Explore the Full Guide
Earmuffs and Mittens Snowman Buddy
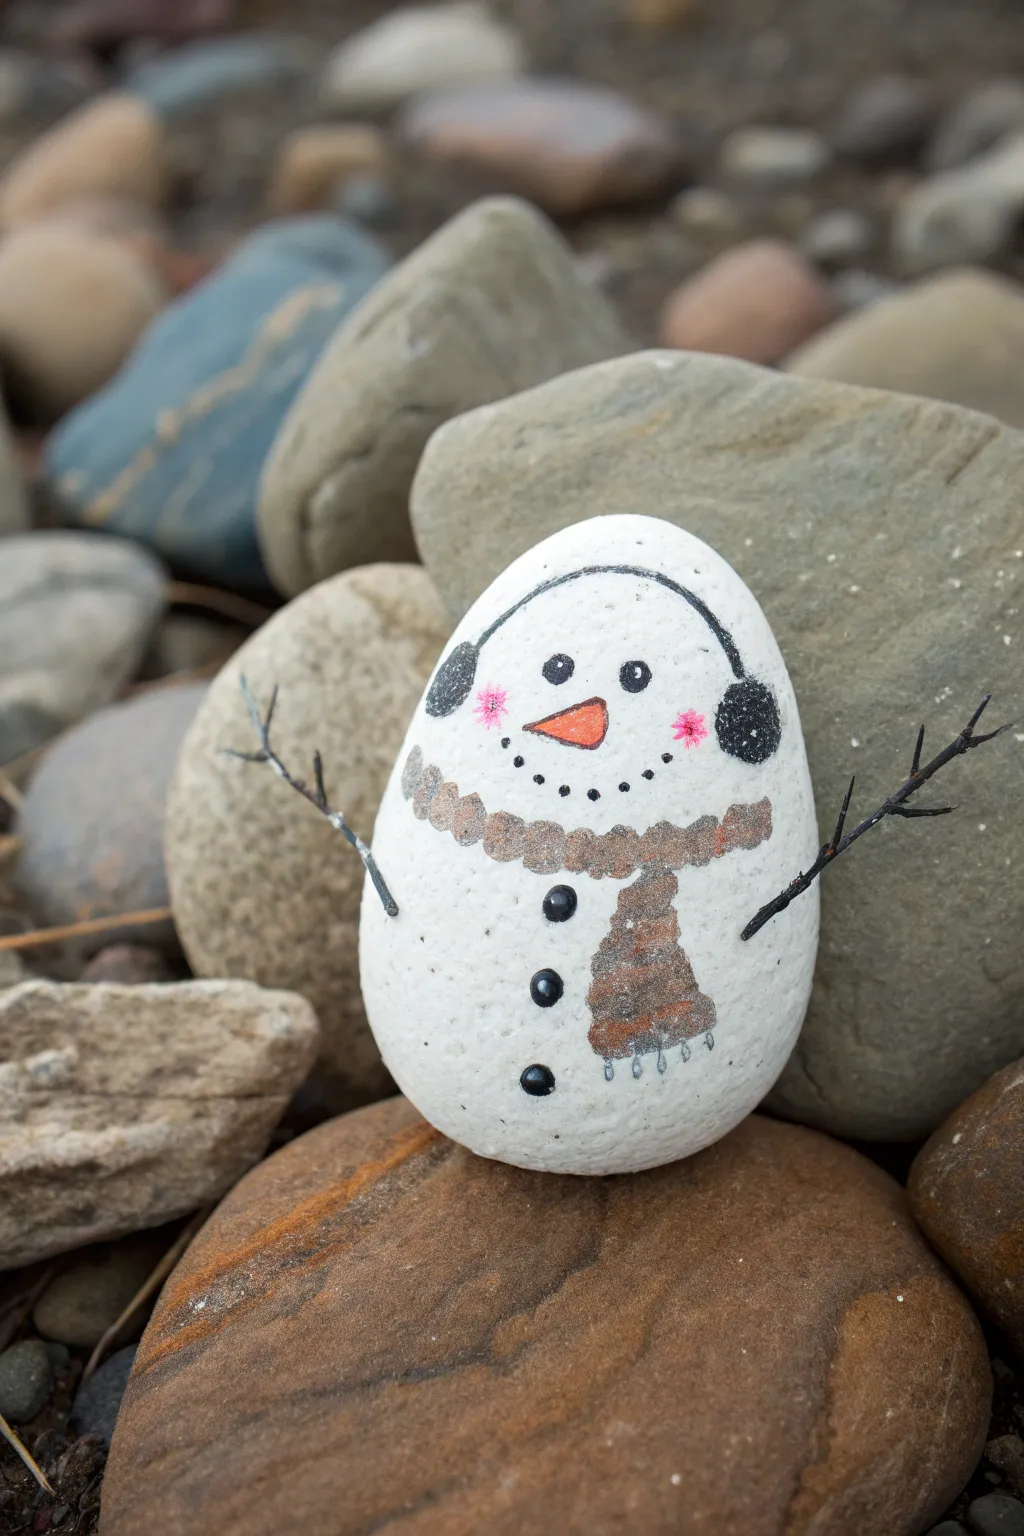
Transform a simple river rock into a frosty friend bundled up against the cold. With his sweet pink cheeks and snuggly brown scarf, this hand-painted snowman brings wintry charm without the melting snow.
Step-by-Step
Materials
- Smooth, oval-shaped river rock (white or light grey works best)
- White acrylic paint (if base coat is needed)
- Black fine-point paint pen or liner brush
- Orange acrylic paint or paint pen
- Brown acrylic paint
- Pink acrylic paint or pastel chalk
- Small detail paintbrush
- Clear matte varnish or sealant
Step 1: Base Preparation
-
Select and clean:
Choose an oval stone that stands upright or lays flat nicely. Wash it with warm soapy water to remove any dirt or oils and let it dry completely. -
Base coat:
If your rock isn’t naturally white like the one in the photo, apply 1-2 coats of white acrylic paint to create a snowy canvas. Allow the paint to dry fully between layers.
Fixing Smudges
If you smudge the black ink on the white background, wait for it to dry completely, then dab a tiny bit of white paint over the mistake to act as ‘liquid paper’ before redrawing.
Step 2: Face and Head Gear
-
Outline the earmuffs:
Using a thin black paint pen, draw a curved line across the top of the ‘head’ area. At each end of the line, draw a filled-in black oval to create the fluffy ear coverings. -
Draw the eyes:
Place two solid black dots in the upper third of the face for the eyes. Keep them relatively close together for a cute expression. -
Add the nose:
Paint a small, sideways triangle using orange paint just below and between the eyes. Round the edges slightly so it looks like a soft carrot. -
Create the smile:
Use your finest black pen to dot a joyful smile. Five or six tiny dots arranged in a gentle upward curve works perfectly. -
Rosy cheeks:
Dip a dry brush or cotton swab into a tiny amount of pink paint (or use chalk dust) and gently dab it next to the smile to create a soft blush. -
Cheek details:
For extra whimsy, draw a tiny asterisk or starburst shape in pink right on top of the blush spots.
Step 3: Scarf and Body
-
Outline the scarf:
Sketch the wavy outline of a scarf wrapping around the snowman’s neck area using brown paint. Don’t worry about being perfectly straight; a bumpy line looks more like wool. -
Fill and extend:
Fill in the neck section with brown paint, then extend a rectangular section hanging down the right side of the body. -
Add texture:
Once the brown is dry, use a slightly darker brown or black pen to stipple tiny dots over the scarf to mimic a knit texture. -
Scarf fringe:
Draw small vertical loops at the very bottom of the hanging scarf piece. -
Buttons:
Paint three distinct black circles down the center of the body, below the scarf line. -
Highlights:
Add a microscopic white dot to each black button and eye to give them a shiny, reflective look.
Sparkle Upgrade
While the white base paint or sealer is still wet, sprinkle a pinch of iridescent glitter over the ‘snow’ body to make it glisten like fresh powder in the sunlight.
Step 4: Stick Arms and Finish
-
Draft the arms:
Using your finest black liner, draw two thin lines extending from the side of the body upwards. -
Branch details:
Add tiny ‘Y’ shapes or twigs branching off the main arm lines to make them look like real sticks. -
Seal the work:
Wait at least 24 hours for all paint to cure, then brush or spray on a clear matte sealant to protect your snowman from the elements.
Now you have an adorable stone companion to decorate your garden or windowsill through the winter months
Polka-Dot Snowman With Pointillist Snowfall
Let it snow indoors with this charming painted rock featuring a classic snowman bundled up against the cold. The soft grey-blue background and delicate white dots create a serene winter atmosphere perfect for seasonal décor.
How-To Guide
Materials
- Smooth, oval-shaped river rock
- Acrylic paints (Titanium White, Slate Blue/Grey, Red, Green, Orange, Brown, Black)
- Fine liner brush (size 00 or 000) or extra-fine black paint pen
- Small round brushes (size 1 and 2)
- Dotting tool or toothpick
- Pencil for sketching
- Matte or satin sealant spray
Step 1: Preparation & Base Coat
-
Clean and Prep:
Begin by scrubbing your rock with soap and warm water to remove any dirt or oils. Let it dry completely before starting, as moisture can trap under the paint. -
Paint the Background:
Mix a soft slate blue or grey-blue acrylic paint. Apply two even coats over the entire front surface of the rock, allowing the first coat to dry fully before adding the second for solid coverage. -
Sketch the Outline:
Once the blue base is bone dry, lightly sketch your snowman using a pencil. Draw a large oval for the body, a smaller circle for the head, and outline the hat and scarf placement.
Uneven Dots?
If your snow dots look like peaks or Hershey’s Kisses, the paint is too thick. Thin it slightly with a drop of water, or press the dotting tool down gently to flatten the peak while wet.
Step 2: Painting the Snowman
-
Fill the Body:
Using a size 2 round brush and Titanium White, fill in the snowman’s head and body. You might need two layers here to ensure the blue background doesn’t show through. -
Add the Hat Base:
Paint the main dome of the hat with a bright red. For the brim, use a warm brown tone, painting a curved band that rests just above the snowman’s ‘eyes’. -
Design the Scarf:
Paint the main section of the scarf around the neck using a muted olive green. Paint the hanging tail of the scarf in a contrasting teal or light blue. -
Paint the Carrot Nose:
Use a small detail brush and orange paint to create a triangular carrot nose pointing off to the left side.
Add Subtle Shading
Mix a tiny drop of grey into your white paint. Add a thin line of this shadow along the bottom left curve of the snowball body to give the snowman a more 3D, rounded appearance.
Step 3: Adding Details & Outlining
-
Add Hat Details:
Dip a toothpick or small dotting tool into white paint and add small polka dots to the red part of the hat. Add a small grey or textured pom-pom shape to the very top. -
Scarf Patterns:
Decorate the green scarf section with tiny red dots. For the blue tail of the scarf, add red dots as well to tie the look together. I prefer to wait until the base colors are totally dry so the dots remain crisp. -
Outline the Figure:
Using your fine liner brush with black paint (or an extra-fine black paint pen), carefully outline the entire snowman, the hat, and the scarf sections. Keep your hand steady and rest your wrist on the table for stability. -
Facial Features & Buttons:
Paint two black dots for eyes and a curved line of smaller dots for the coal mouth. Add three larger black buttons down the center of the white body. -
Draw Stick Arms:
With the black liner, draw thin, branching lines on the left and right sides of the body to create the stick arms. Make them look a bit jagged for a natural twig effect. -
Scarf Fringe:
Add small black vertical lines at the end of the scarf to mimic fringe.
Step 4: Final Touches
-
Create the Snowfall:
Dip the back end of a paintbrush or a dotting tool into white paint. Create random dots all over the grey-blue background to simulate falling snow. -
Vary Dot Sizes:
To add depth, make some snow dots larger and others tiny. You can achieve smaller dots by using a toothpick. -
Seal the Rock:
Allow the painted rock to cure for at least 24 hours. Finish by spraying a clear matte or satin sealant over the top to protect your artwork from chipping and weather.
Place your finished snowman rock on a porch step or garden path to welcome winter visitors

PENCIL GUIDE
Understanding Pencil Grades from H to B
From first sketch to finished drawing — learn pencil grades, line control, and shading techniques.
Explore the Full Guide
Minimalist Snowman With Simple Coal Dots
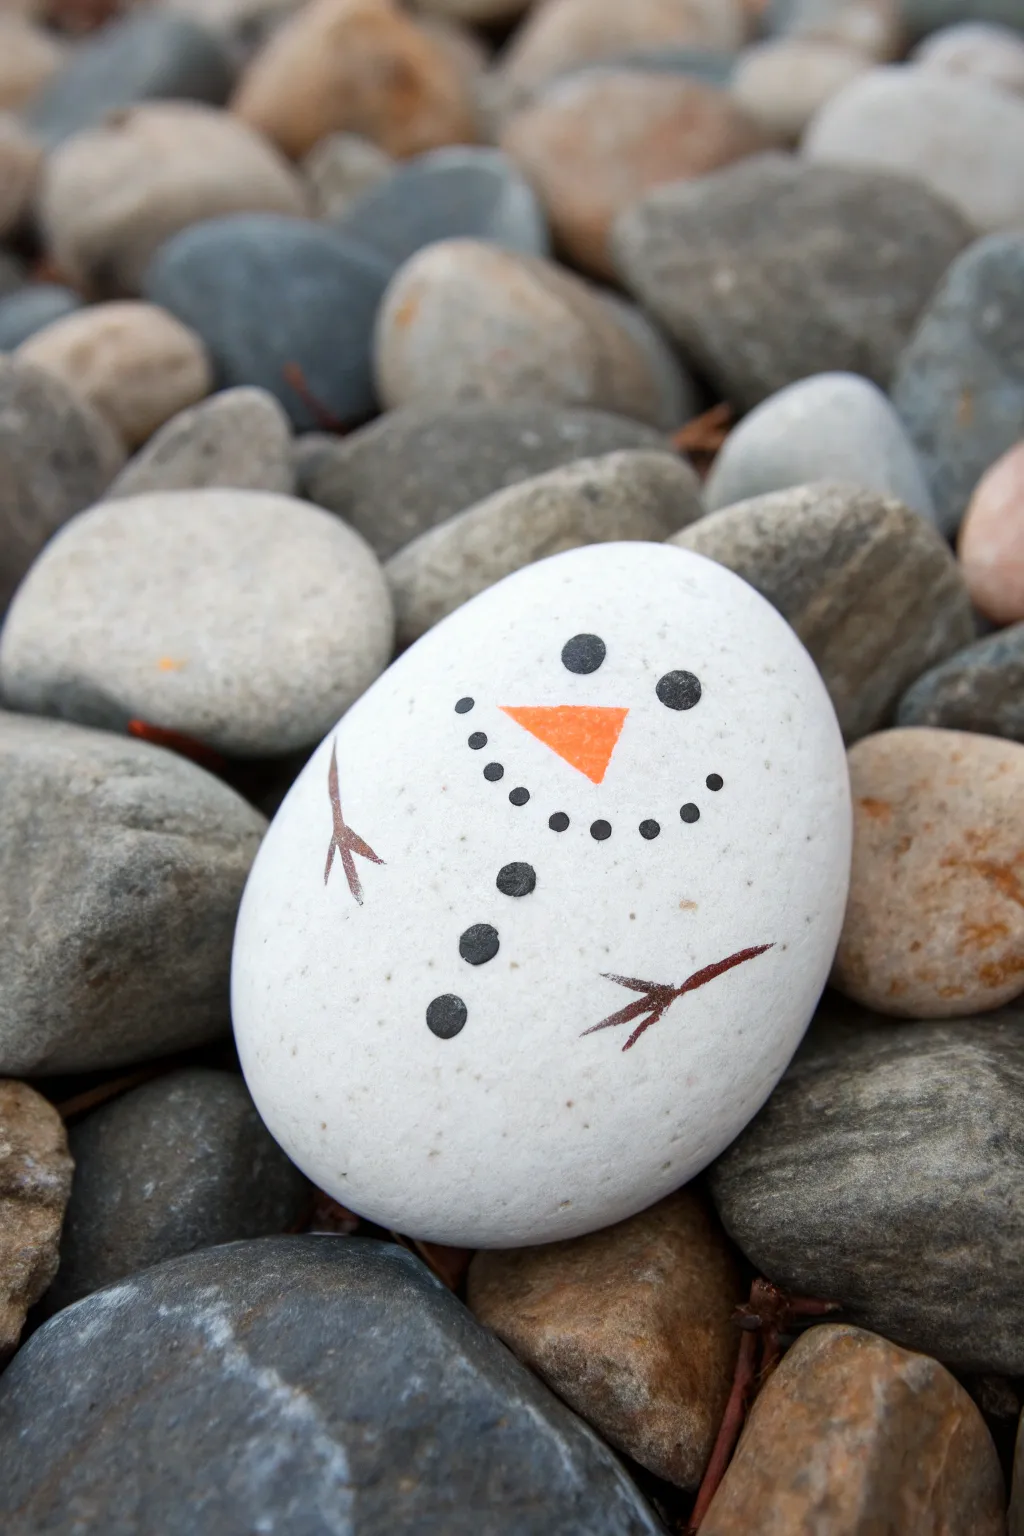
Embrace the simplicity of winter with this charmingly minimalist rock painting project that captures a snowman’s cheerful essence using just a few shapes. The bright white background contrasts beautifully with crisp black details, making it a perfect quick craft or a thoughtful holiday favor.
Step-by-Step
Materials
- Smooth river stone (oval or round shape)
- White acrylic paint (matte finish suggested)
- Black acrylic paint or black paint pen (fine tip)
- Orange acrylic paint or orange paint pen
- Wide flat paintbrush
- Small fine-detail paintbrush (if not using pens)
- Clear acrylic sealer or varnish (spray or brush-on)
- Jar of water
- Palette or paper plate
- Paper towels
Step 1: Preparing the Canvas
-
Clean the stone:
Begin by washing your river stone with soapy water and scrubbing away any dirt or grit. Let it dry completely in the sun or with a cloth; paint adheres poorly to dusty or damp surfaces. -
Apply base coat:
Squeeze a generous dot of white acrylic paint onto your palette. Using a wide flat brush, cover the entire top surface of the rock. Don’t worry about the underside for now. -
Dry and repeat:
Allow the first layer to dry until it’s no longer tacky to the touch. Apply a second or even a third coat until the natural color of the stone is completely hidden and you have a solid, opaque white surface.
Paint Pen Blobs?
If your black paint pen releases a puddle of ink, quickly dab it gently with the corner of a paper towel, let it dry, paint over it with white, and try again.
Step 2: Painting the Features
-
Position the carrot nose:
Locate the optical center of your rock—this will be where the nose sits. Using your orange paint or pen, draw a small horizontal triangle pointing to the left. -
Fill the nose shape:
Carefully fill in the triangle with solid orange color. Keep the edges sharp and defined. -
Add the eyes:
Switch to your black paint or paint pen. Just above the nose, place two solid black circles for eyes. I like to make sure they are spaced fairly wide apart to give him a friendly expression. -
Create the smile base:
Visualize a wide U-shape curve underneath the nose. This will guide your placement for the mouth dots. -
Dotted smile:
Along that imaginary curve, dab a series of small black dots. Start from the center and work outward to ensure symmetry, varying the spacing slightly for a hand-drawn feel. -
Add the buttons:
Below the smile, paint three larger black circles in a vertical line down the center of the ‘body’. These represent the classic coal buttons.
Make it Sparkle
Before the sealer dries, sprinkle a very fine pinch of iridescent glitter over the white areas to mimic the shimmer of fresh snow in sunlight.
Step 3: Adding Character & Finishing
-
Rough out stick arms:
On the left side of the body, draw a thin, angled line pointing diagonally downward to represent the main branch of an arm. -
Detail the left arm:
Add two tiny V-shaped offshoots to the main line to look like twig fingers. -
Create the right arm:
On the right side, draw a similar diagonal branch line. This one can be slightly longer or angled differently to add movement. -
Detail the right arm:
Add the small twig fingers to this side as well, keeping the lines thin and delicate compared to the bold buttons. -
Final drying time:
Let all the detail work dry completely. If you are using paint pens, this should only take a few minutes, but liquid acrylics may need longer. -
Seal the artwork:
Apply a coat of clear acrylic sealer or varnish over the entire painted surface. This protects the white base from getting scuffed and keeps the ‘coal’ dots crisp.
Place your finished snowman back among the garden stones for a delightful winter surprise
Build-a-Snowman Rock Set (Mix-and-Match)
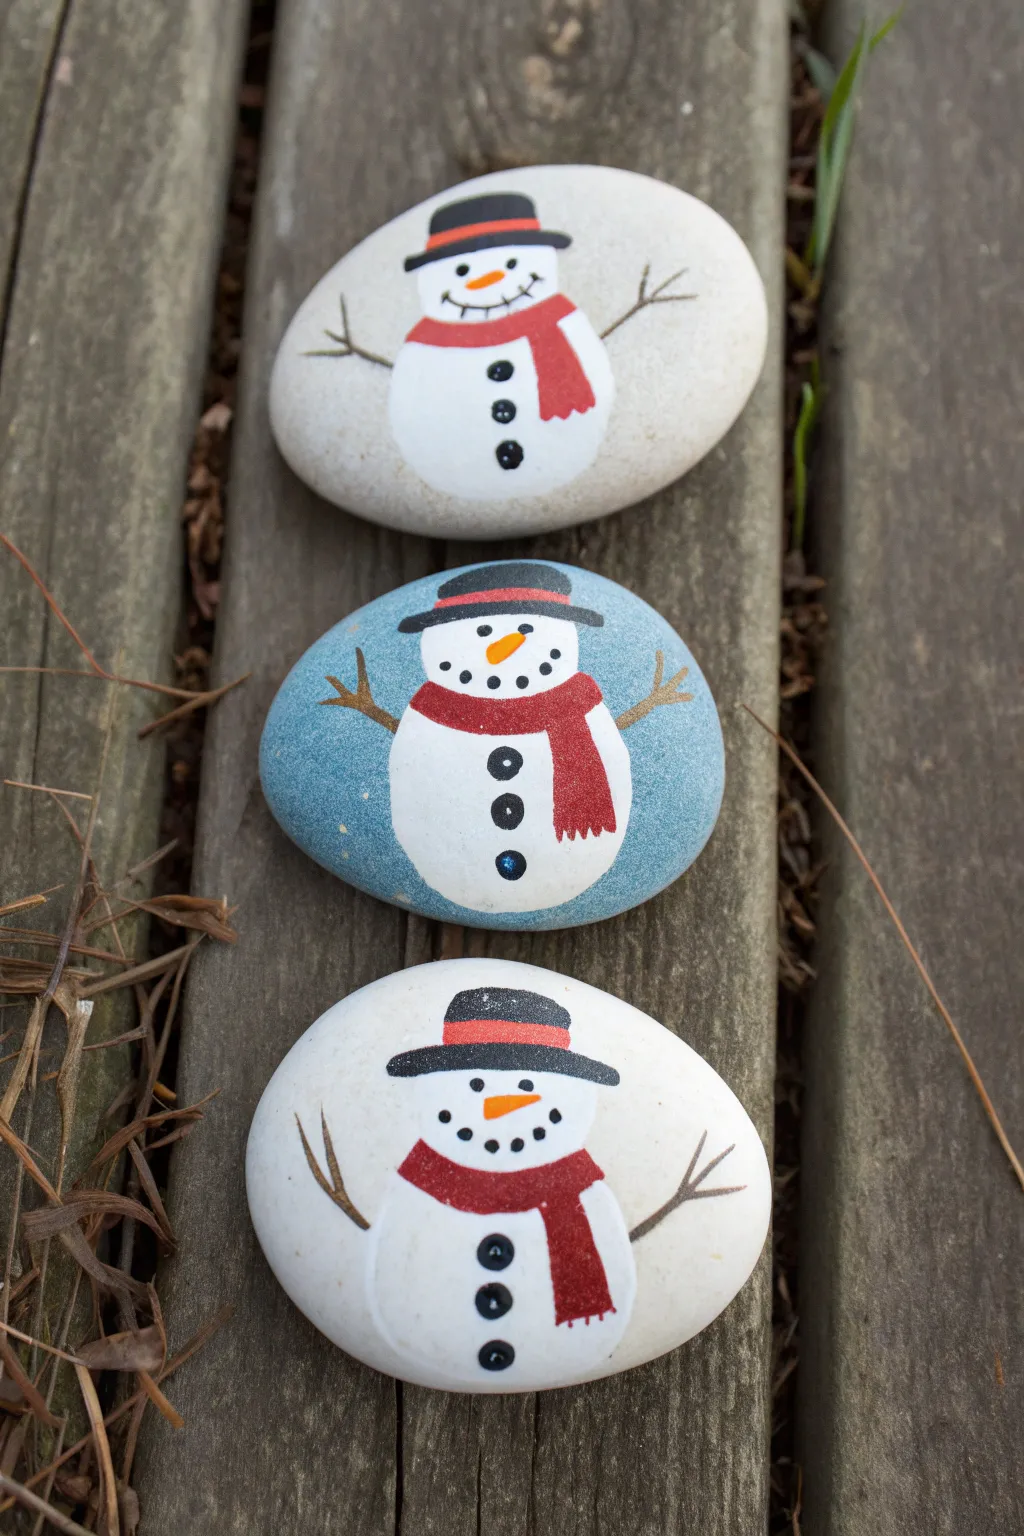
Create a charming trio of snowman characters on smooth stones, perfect for winter decor or hiding for neighbors to find. This set features three distinct personalities unified by their festive red scarves and dapper top hats, painted on both natural and colorful backgrounds.
How-To Guide
Materials
- Smooth, oval river rocks (medium to large)
- Acrylic paints (white, black, red, orange, light blue)
- Pencil for sketching
- Fine detail paintbrush (liner brush)
- Small flat paintbrush
- Paint pens (optional, for finer lines)
- Clear acrylic sealer (spray or brush-on)
- Water cup and paper towels
Step 1: Preparation and Base Coats
-
Clean the canvas:
Begin by washing your rocks with mild soap and water to remove any dirt or oils. Let them dry completely, preferably in the sun, to ensure the paint adheres properly. -
Paint the background:
For the middle rock in the set, use a flat brush to apply a coat of light blue acrylic paint across the entire surface. You might need two coats for full opacity. -
Leave some natural:
For the top and bottom rocks, you have a choice: leave the natural stone color showing as the background for a rustic look, or paint them solid white if your stones are too dark. -
Sketch the outlines:
Once the blue background is dry, lightly use a pencil to sketch the snowman shapes. Draw a large oval for the body and a smaller circle for the head on all three rocks.
Step 2: Painting the Snowmen
-
Fill the white bodies:
Using white acrylic paint, fill in the snowman shapes you just sketched. On the blue rock, this will pop nicely; on the lighter rocks, it creates a subtle texture. -
Build opacity:
Let the first layer of white dry. Apply a second or third coat until the white is solid and bright, hiding any background color underneath. -
Add the hats:
Switch to black paint. Paint a thin rectangle on top of the head for the brim, and a square shape above it for the top hat. Make them slightly different sizes for variety. -
Wrap the scarves:
Paint a thick red stripe where the head meets the body. Add a tail hanging down from the scarf, varying the direction or length for each snowman. -
Add hat details:
Once the black hats are dry, carefully paint a thin red stripe across the hat, just above the brim, to match their scarves.
Uneven Paint?
If your white paint looks streaky, don’t rush! Let it dry completely, then sand it very lightly with fine-grit sandpaper before adding the next coat for a smooth finish.
Step 3: Fine Details
-
Draw stick arms:
Mix a tiny bit of black with orange or brown, or use thinned black paint. Using your finest liner brush, paint thin, branch-like arms extending from the sides. -
Paint the noses:
Use bright orange paint to create the classic carrot nose. You can paint them as simple triangles or slightly curved shapes pointing sideways. -
Dot the buttons and eyes:
Dip the non-brush end of a paintbrush into black paint to create perfect dots. Place two for the eyes and three bright buttons down the front of the body. -
Create the mouth:
For the smiling mouths, use a very fine brush or a black paint pen to draw a series of small dots or a thin curved line with hatch marks. -
Add scarf fringe:
Using the very tip of your detail brush with darker red or black, add tiny vertical lines at the bottom of the scarf tails to mimic fringe. -
Seal the artwork:
Once completely dry (give it a few hours), apply a coat of clear acrylic sealer to protect your snowmen from chipping and weather.
Make It Sparkle
Before the white paint on the snowman’s body dries fully, sprinkle a pinch of iridescent glitter over it to make the snow look freshly fallen and glistening.
Enjoy displaying your adorable stone family on a porch rail or in a garden pot


Snowman Family Group on One Large Rock
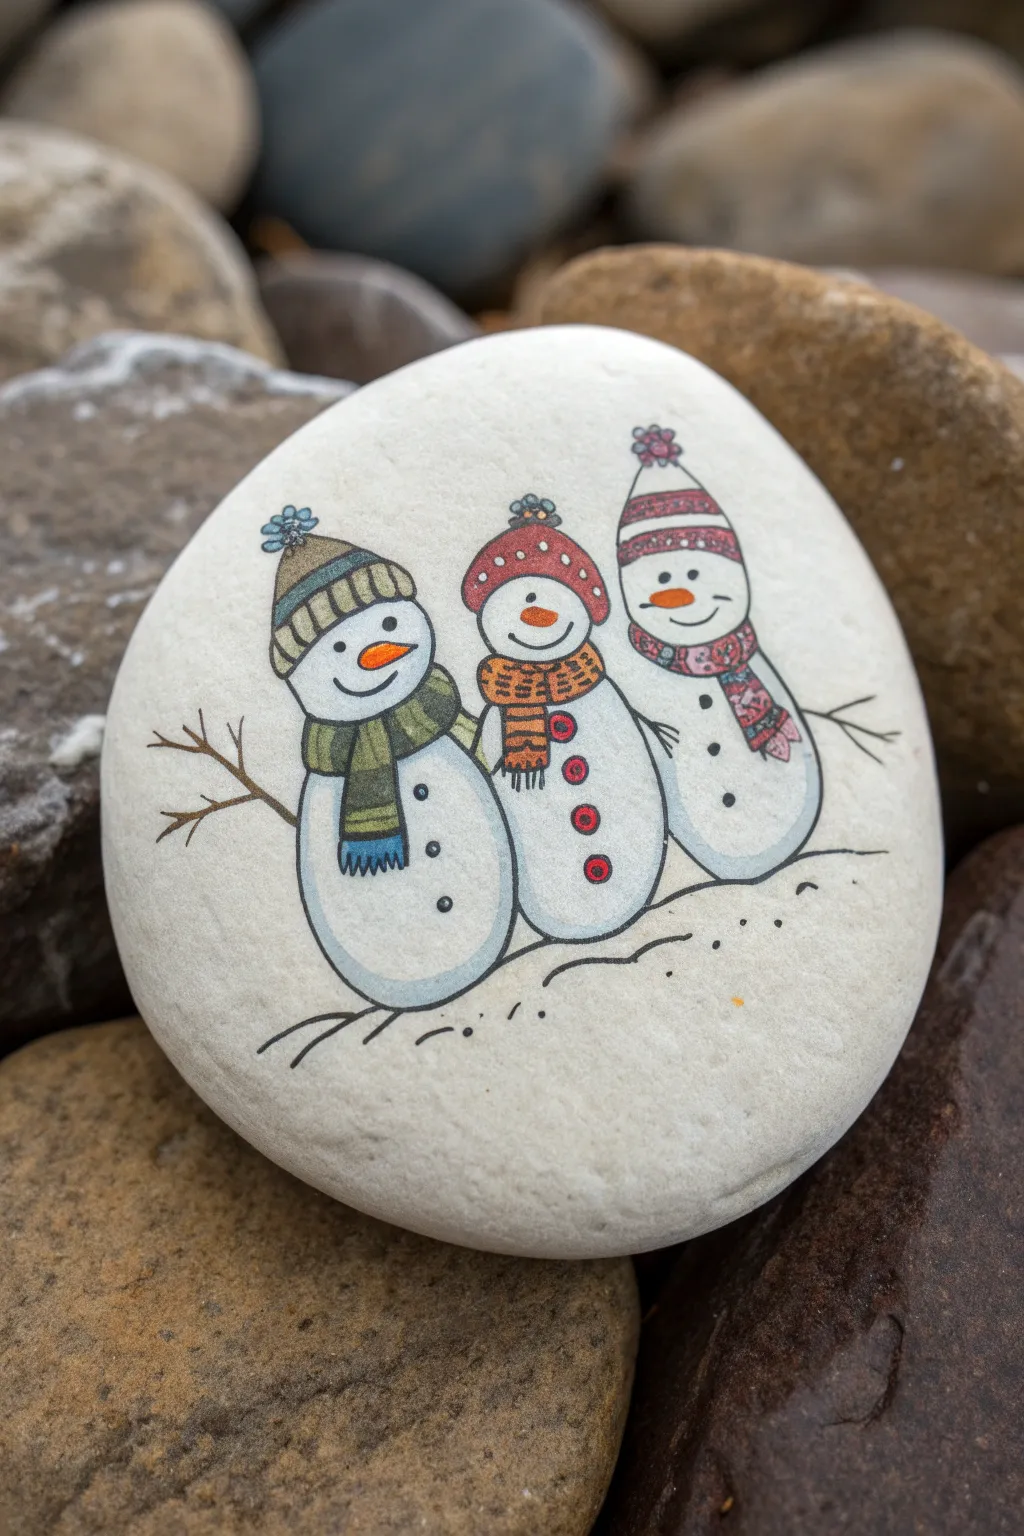
Capture the warmth of friendship on a cold winter day with this delightful trio of snowmen huddled together. This project features clean lines, soft shading, and adorable details like cozy scarves and knitted hats, all painted on a smooth white stone.
Step-by-Step Guide
Materials
- Large, smooth river rock (palm-sized or larger)
- White acrylic paint (matte finish)
- Wide flat paintbrush
- Fine tip permanent black markers (0.1mm and 0.5mm)
- Colored pencils or fine-tip paint pens (red, orange, green, blue, brown)
- Graphite pencil and eraser
- Matte spray sealer or varnish
Step 1: Preparation & Base Coat
-
Clean the canvas:
Begin by scrubbing your rock with warm soapy water to remove any dirt or oils. Let it dry completely in the sun or use a hair dryer to speed things up. -
Apply the foundation:
Using your wide flat brush, paint the entire top surface of the rock with white acrylic paint. You want a solid, opaque background, so don’t be afraid to apply a second or third coat once the previous one is dry. -
Smooth it out:
Allow the white base to cure fully. If the surface feels rough, I sometimes lightly sand it with very fine sandpaper to create the perfect surface for drawing.
Ink Smearing?
If your black marker smears when sealing, ensure you are using archival or waterproof ink pens. Let the drawing dry overnight before spraying.
Step 2: Sketching the Family
-
Draft the shapes:
Lightly sketch three overlapping snowman shapes with a graphite pencil. Position the middle snowman slightly lower than the outer two to create a huddled look. Focus on simple rounded stacked circles. -
Add the hats:
Draw the hats on each snowman. Give the left one a beanie with a folded brim, the middle one a rounded cap with a pom-pom, and the right one a tall beanie. Ensure the hats sit snugly on their heads. -
Sketch the scarves:
Wrap warm scarves around their necks. Draw the left scarf tied with ends hanging down the front, the middle one wrapped tightly, and the right one draped loosely over the shoulder.
Step 3: Inking the Outlines
-
Trace the main lines:
Using the 0.5mm black marker, carefully go over your pencil lines. Start with the hats and heads, then move down to the bodies. -
Add stick arms:
Draw simple stick arms branching out from the side snowmen. Keep the lines somewhat jagged to mimic real twigs. -
Detail the faces:
Switch to the finer 0.1mm marker for delicate features. Draw small dots for eyes and smiles, and outline the carrot noses. -
Create texture:
Use the fine marker to add patterns to the knitwear. Draw vertical lines on the hat brims and small knitted patterns or stripes on the scarves. -
Clean up:
Once the ink is completely dry, gently erase any visible pencil marks to leave a crisp black-and-white design.
Add Sparkle
Mix a tiny pinch of extra-fine iridescent glitter into your final sealant coat to make the snow bodies glisten like real fresh snow.
Step 4: Adding Color & Shading
-
Color the carrots:
Fill in the carrot noses with bright orange. A colored pencil works beautifully here for a soft, textured look. -
Style the left snowman:
Use muted green and blue tones for the left snowman’s hat and scarf. Alternate colors on the stripes for visual interest. -
Dress the center snowman:
Color the middle snowman’s accessories in warm rustic reds and oranges. Don’t forget to fill in the little buttons down the front. -
Finish the right snowman:
Give the right snowman a festive red and pinkish-purple color scheme for their patterned scarf and striped hat. -
Apply shading:
Using a light grey pencil or very diluted grey paint, add subtle shading to the sides of the snowmen. This gives them dimension so they don’t look flat. -
Ground the image:
Sketch a few wispy, uneven lines at the base of the snowmen to suggest they are sitting in a snowdrift. Add a few dots around them for falling snow.
Step 5: Final Touches
-
Enhance the blacks:
Go back over any main outlines that may have been faded by the coloring process to make the drawing pop. -
Seal the artwork:
To protect your delicate pencil work and paint, spray the rock with a matte sealer. Do light coats to prevent the ink from running.
Place this cheerful rock on your mantle or front porch to welcome guests all winter long
Snowman With a Pine Tree and Snowy Ground
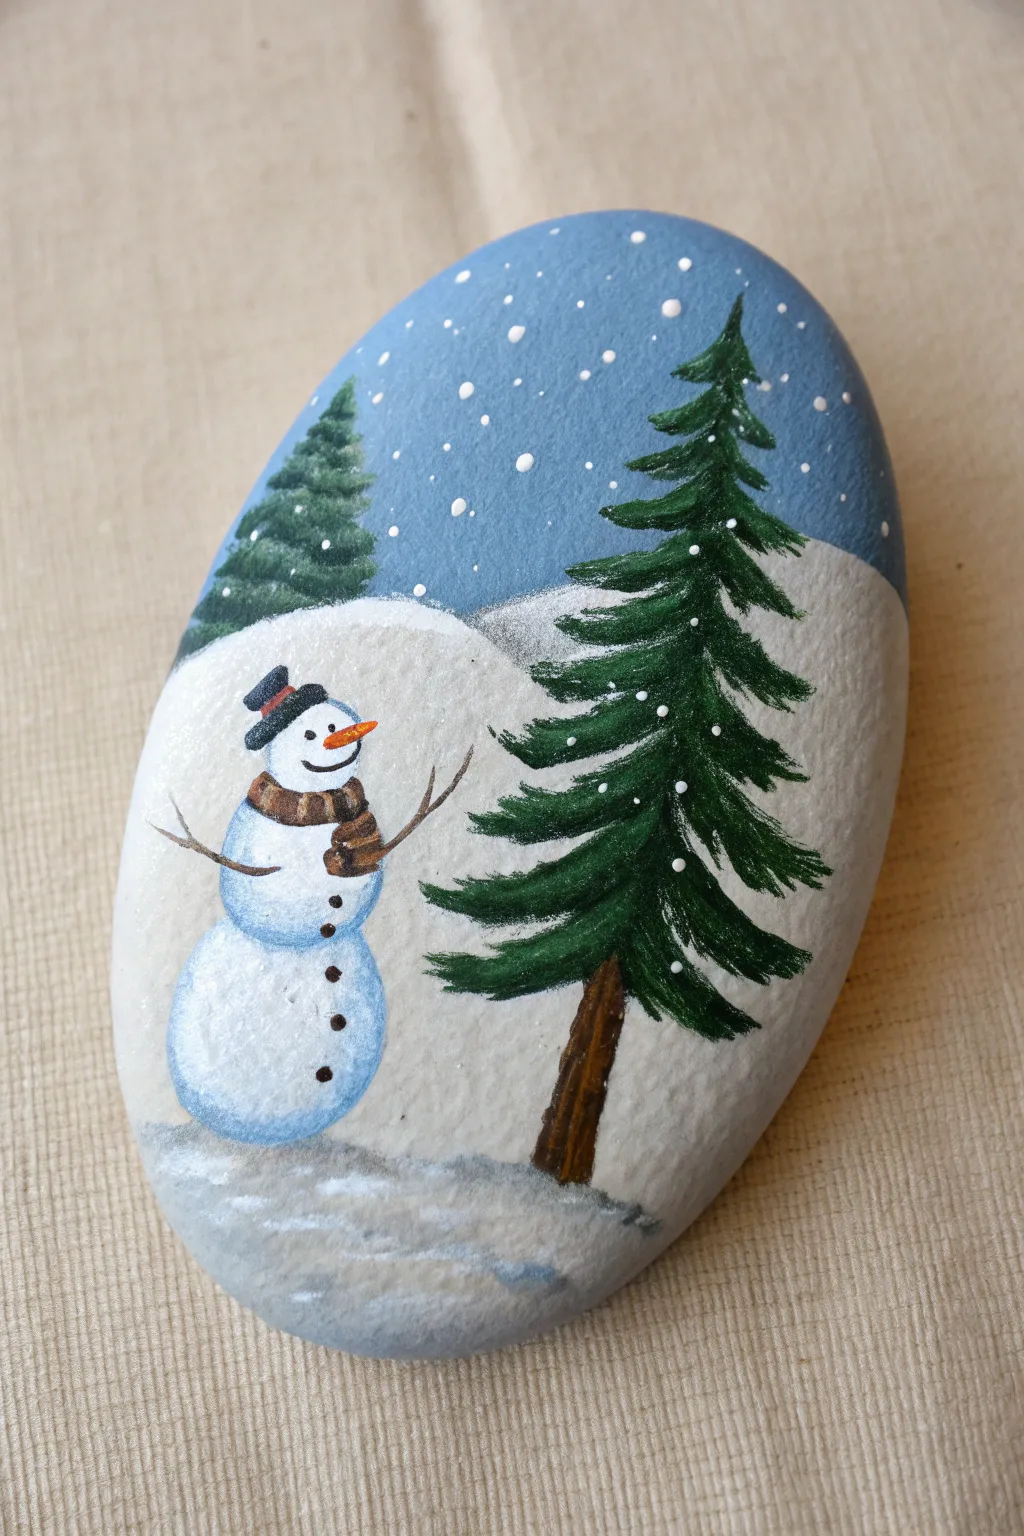
Capture the serenity of a snowy day with this charming painted rock featuring a cheerful snowman and evergreen trees. The cool blue background contrasts beautifully with the crisp white snow and deep greens, making it a perfect winter decoration or gift.
Detailed Instructions
Materials
- Smooth, oval-shaped river rock
- Acrylic paints (primary blue, titanium white, black, burnt umber brown, sap green, dark green, orange)
- Wide flat brush
- Medium round brush
- Small liner brush or detail brush
- Dotting tool or toothpick
- Clear acrylic sealer (spray or brush-on)
- Palette or paper plate
- Water cup and paper towels
Step 1: Setting the Scene
-
Clean the surface:
Begin by scrubbing your rock with soap and water to remove any dirt or oils. Let it dry completely before starting to ensure the paint adheres properly. -
Paint the sky:
Mix primary blue with a touch of white to create a soft, wintry sky blue. Using your wide flat brush, paint the upper two-thirds of the rock’s face. You may need two coats for full opacity. -
Create the snow base:
While the blue is drying, rinse your brush thoroughly. Paint the bottom third of the rock with titanium white, curving the line where it meets the blue to create a rolling hill effect. -
Blend the horizon:
While the white paint near the horizon line is still slightly wet, gently dab the edge where the snow meets the sky to create a soft, distant snowbank look rather than a sharp line.
Snowy Texture Tip
For realistic snow texture on the ground, sponge on the white paint lightly instead of brushing it. This creates a fluffy, uneven surface that imitates real snowdrifts.
Step 2: Trees and Background
-
Background tree shape:
Mix a dark green with a tiny bit of blue and white to make a muted, distant green. Use a round brush to paint a small triangular tree shape on the left side, sitting on the horizon line. -
Add tree texture:
Once the base green is dry, use a small brush to dab short, downward strokes of a darker green on the tree to simulate pine needles. -
Foreground tree trunk:
On the right side of the rock, paint a sturdy tree trunk using burnt umber. Make it slightly wider at the base, rooting it into the white snow area. -
Foreground foliage:
Using a vibrant sap green mixed with dark green, paint the pine branches of the large tree. Start from the top tip and work your way down with sweeping, curved strokes that flair outward. -
Deepen the shadows:
I like to go back in with a liner brush and pure black or deep green to add shadows under the main branches of the large tree, giving it volume.
Step 3: Building the Snowman
-
Body segments:
Load a round brush with white paint. To the left of the large tree, paint two stacked circles—a larger one for the base and a slightly smaller one on top for the head. -
Snowman shading:
Mix a very watery light blue. Carefully outline the bottom curve of each white circle to create a spherical 3D effect. The light source is coming from above, so keep the shading at the bottom. -
The hat:
Using a small flat brush and black paint, add a top hat. Paint a small brim just above the snowman’s head, then a square shape on top. Add a tiny red or brown stripe for the hat band if desired. -
The scarf:
With a liner brush and brown paint, draw a scarf around the neck area. Add darker brown stripes for texture to make it look knitted.
Make it Sparkle
While the final white snowflakes are still wet, sprinkle a tiny pinch of iridescent glitter over the wet paint. It will dry trapped in the snow, making the scene glisten in the light.
Step 4: Fine Details
-
Face and buttons:
Use a dotting tool or the very tip of a toothpick dipped in black paint to add the eyes, the coal smile, and three buttons down the chest. -
Carrot nose:
Use your smallest liner brush and orange paint to create a triangle nose pointing towards the large tree. -
Stick arms:
Mix a thin brown paint. Use the liner brush to paint two thin, twiggy arms reaching upwards and outwards. -
Falling snow in the sky:
Dip the handle end of a paintbrush or a dotting tool into white paint. Dot random snowflakes all over the blue sky area. Vary the pressure to make some dots large and some small. -
Snow on the trees:
Add tiny delicate dots of white on the tips of the pine tree branches to show that snow has settled on them. -
Final seal:
Allow the entire painting to dry for at least 24 hours. Finish by applying a coat of clear acrylic sealer to protect your work and make the colors pop.
Enjoy displaying this frosty little scene on your desk or hiding it outdoors for a neighbor to find
“Let It Snow” Snowman Lettering Rock
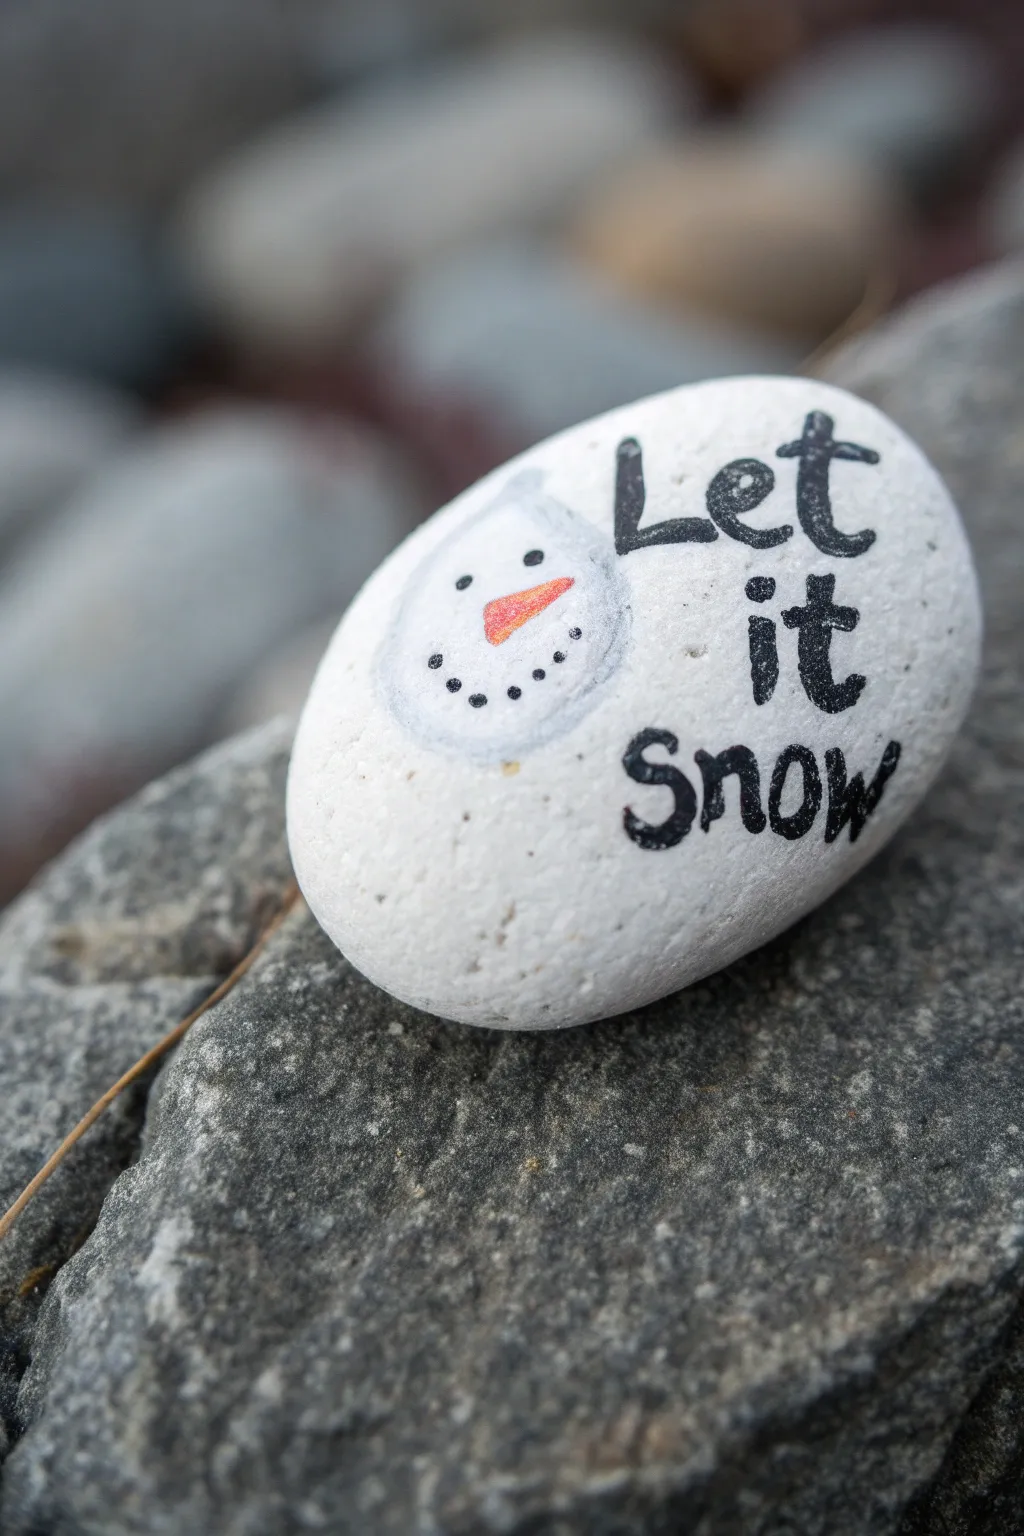
Embrace simplicity with this charming project that focuses on clean lettering and a cheerful snowman face. This design uses negative space beautifully, turning a plain stone into a festive winter decoration perfect for pocket inspiration.
Step-by-Step
Materials
- Smooth river rock (preferably oval)
- White acrylic paint (matte)
- Wide flat paintbrush
- Fine point black paint pen (e.g., Posca 1M or 3M extra fine)
- Orange paint pen or liner brush with orange acrylic
- Very light grey or pale blue paint pen (optional, for shading)
- Spray sealer or varnish
- Pencil (optional)
Step 1: Preparation & Base Coat
-
Clean and dry:
Start by scrubbing your river rock with warm soapy water to remove any dirt or oils. Let it dry completely in the sun or use a hair dryer to speed things up. -
Prime the surface:
Apply a coat of white acrylic paint using a wide flat brush. Cover the entire top surface of the rock. -
Apply second coat:
Once the first layer is dry to the touch, apply a second coat of white. This often ensures a solid, opaque background that makes the black text pop. -
Check for smoothness:
Inspect the painted surface. If you see deep brush strokes, you might want to lightly sand it or add a third, slightly thinned coat for a porcelain-like finish.
Ink Smearing?
If your black paint pen smears when sealing, ensure the ink dried for at least 24 hours. Use a spray sealant first before brushing on any varnish.
Step 2: Drafting the Design
-
Plan spacing:
To ensure your text fits, you can lightly sketch the words ‘Let’, ‘it’, and ‘Snow’ in a stacked formation on the right side of the rock using a pencil. -
Place the snowman:
Sketch a simple circle on the left side, slightly overlapping the imaginary vertical line where the text begins. This will be your snowman’s head.
Sharper Text Tip
Store your paint pens tip-down for 15 minutes before starting. This ensures maximum ink flow for crucial lettering steps, preventing patchy lines.
Step 3: Lettering
-
Write ‘Let’:
Using your fine point black paint pen, carefully trace over your pencil lines for the word ‘Let’. Use a distinct serif font style, adding small lines at the ends of the ‘L’ and ‘t’. -
Thicken the strokes:
Go back over the downstrokes of your letters to add a little weight, giving it a hand-lettered calligraphy feel. -
Write ‘it’:
Paint the word ‘it’ directly below ‘Let’. Keep the alignment centered relative to the word above it. Remember to dot your ‘i’ clearly. -
Write ‘Snow’:
Finish with ‘Snow’ at the bottom. The ‘S’ and ‘w’ can curve slightly to frame the bottom edge of the rock. -
Refine edges:
Clean up any shaky lines with the paint pen. I like to keep a unsteady hand steady by bracing my pinky finger against the dry part of the rock.
Step 4: Snowman Details
-
Outline the head:
Very lightly create a faint outline for the snowman’s head. You can use a very watered-down grey paint or a pale silver pen. The goal is a subtle edge, not a harsh black cartoon line. -
Add the nose:
Using an orange paint pen or a liner brush, draw a carrot shape specifically pointing towards the text. It should look like a long, thin triangle. -
Draw eyes:
Place two small black dots above the nose for eyes. Keeping them somewhat wide apart gives the snowman a sweet, innocent expression. -
Create the smile:
Dot a smile using 5 to 7 small black points in a ‘U’ shape below the nose. This classic coal mouth look is essential. -
Add rosy cheeks (optional):
If you want extra cuteness, dab the tiniest amount of watered-down pink on the cheek area, though the original image keeps it clean and white. -
Shadowing:
Take your light grey or pale blue pen and add a curved line along the bottom left of the snowman’s head to give it a 3D spherical dimension.
Step 5: Finishing Touches
-
Erase pencil marks:
Wait until the paint pen ink is 100% dry—don’t rush this! gently erase any visible pencil guidelines. -
Seal:
Spray the rock with a clear sealer. Do light coats rather than one heavy one to prevent the black ink from running or bleeding. -
Dry:
Allow the sealer to cure completely before handling or placing the rock outside.
This little snowy friend is now ready to be hidden in a park or gifted to bring winter joy
Night-Sky Snowman With Glowing Snow Highlights
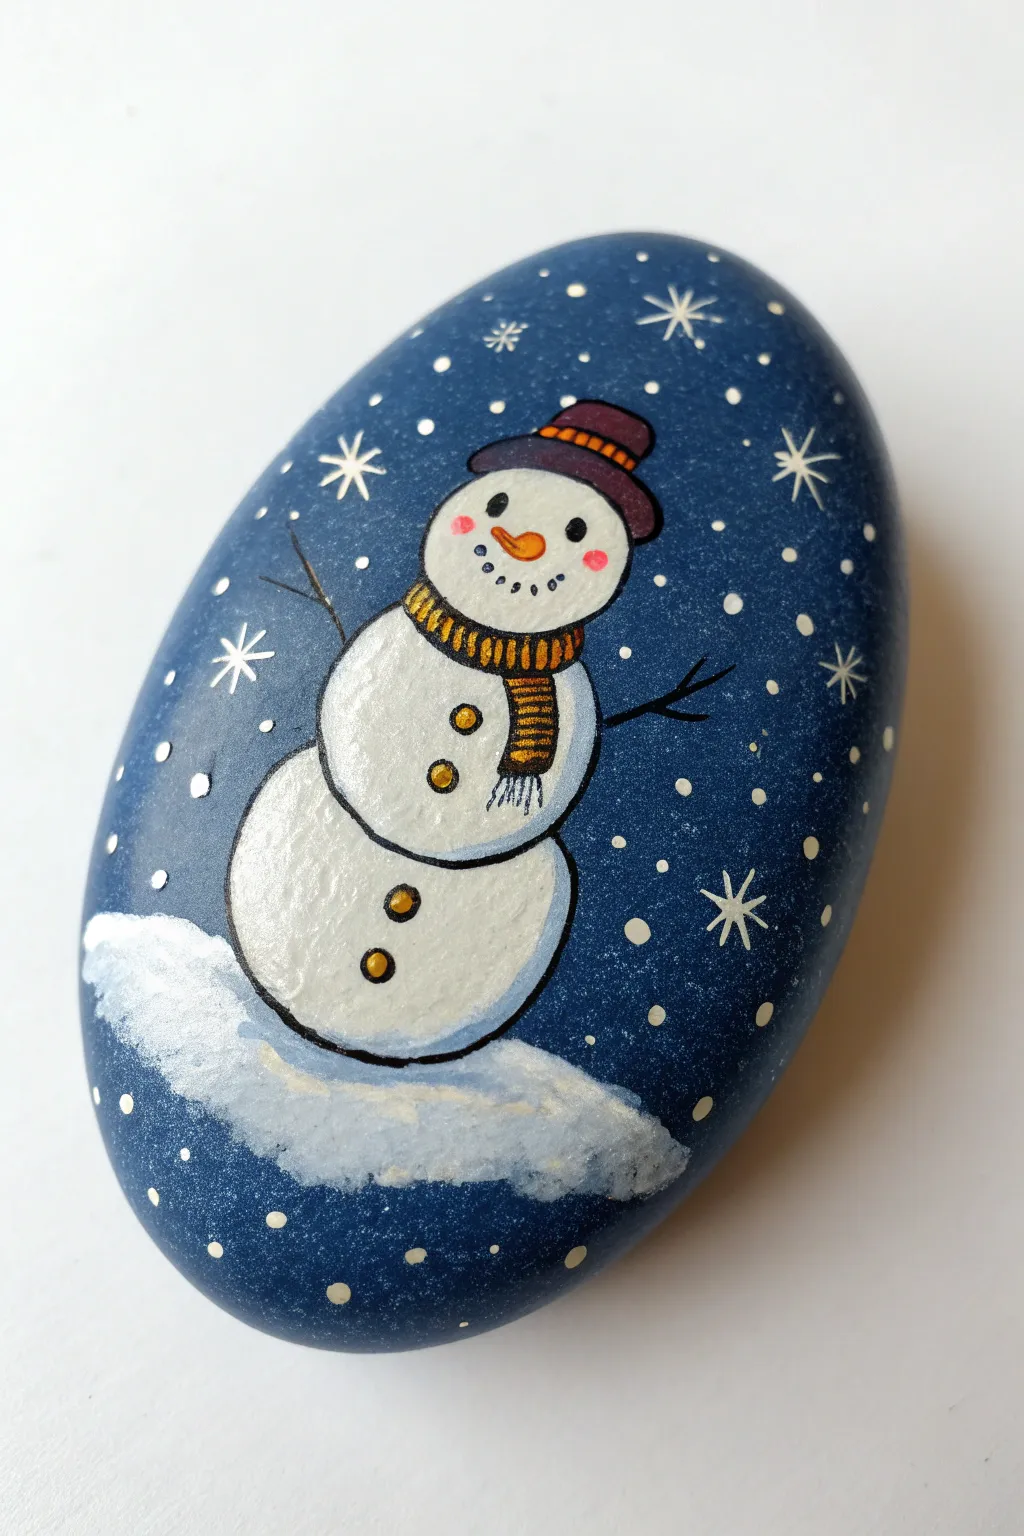
Capture the magic of a winter’s night with this stunning painted rock featuring a classic snowman against a deep, starry blue background. The textured snow base and delicate snowflakes give this piece a wonderful sense of depth and charm.
Step-by-Step Guide
Materials
- Smooth oval river rock (medium to large size)
- Acrylic paints: Navy blue, titanium white, black, orange, gold/yellow, maroon/dark red
- Paint brushes: Flat brush (for base), fine liner brush (for details), small round brush
- Dotting tools (various sizes)
- White paint pen (optional, fine tip)
- Spray sealer or varnish (matte or gloss)
Step 1: Setting the Scene
-
Prepare the stone:
Begin by washing your rock with soap and water to remove any dirt or oils, then let it dry completely. -
Base coat application:
Using a flat brush, paint the entire surface of the rock with a deep navy blue acrylic paint. You may need two to three coats to get a solid, opaque coverage. -
Adding atmospheric snow:
While the blue is dry, dip an old toothbrush or stiff brush into watered-down white paint and lightly flick it over the rock to create tiny, distant stars.
Step 2: Building the Snowman
-
Outline the body:
Mix a very tiny drop of grey into your white paint. Using a round brush, paint two stacked circles in the center of the rock—a larger one for the body and a slightly smaller oval on top for the head. -
Create the snow base:
Below the bottom circle, paint a rough, elongated mound of white to represent the snowy ground. Don’t make the edges too perfect; a little jaggedness looks more realistic. -
First contouring:
Once the white shapes are dry, take a liner brush with very diluted grey or barely-there blue paint and outline the right side of the snowballs to suggest shadow. -
Solidifying the shape:
Outline the entire snowman body and head with a thin black line using a fine liner brush or a black paint pen to make him pop against the dark background.
Pro Tip: Shadowy Depth
Mix a tiny drop of purple into your grey shadow color. This cool tone makes the shadows on the white snow look much more realistic against the blue night sky.
Step 3: Dressing Him Up
-
Paint the hat base:
Paint a maroon or dark red shape on top of the head for the hat. Start with the brim as a curved line, then add the rounded top section. -
Hat details:
Add a thin band of black where the hat meets the brim. Once dry, use your gold or yellow paint to add tiny stripes or dashes on the band for texture. -
The scarf base:
Paint a curved black strip between the head and body for the scarf, extending a tail down the front of the body. -
Scarf stripes:
Using your fine liner brush and gold paint, add vertical stripes along the scarf’s neck section and horizontal stripes on the hanging tail. -
Fringing:
Use the thinnest tip of your black pen or brush to draw tiny vertical lines at the end of the scarf to create the look of fringe.
Level Up: Glitter Finish
Before sealing, apply a thin layer of glitter glaze (or mix loose glitter into clear gloss) just over the white snow areas to make them sparkle like fresh powder.
Step 4: Personality & Details
-
Facial features:
Use a dotting tool or toothpick to place two black dots for eyes. Paint a small, curved orange carrot nose properly centered. -
The smile:
Create the mouth using a series of five or six tiny black dots arranged in a gentle upward curve. -
Rosy cheeks:
Mix a tiny bit of red with white to make pink. Dab two soft, small circles on the cheeks just below the eyes. -
Body buttons:
Paint three or four small gold circles down the center of the body. Once dry, outline them thinly with black. -
Twig arms:
Using thinned black paint and a liner brush, paint stick arms extending from the sides. Add little forks at the ends for fingers.
Step 5: Final Magical Touches
-
Ground texture:
Go back to the snow base at the bottom. Dry brush a little grey or light blue on the bottom edge to give the snow pile volume. -
Major stars:
Using a fine brush or white pen, draw several larger, eight-pointed stars floating around the snowman. -
Adding snow dots:
Use a dotting tool and white paint to add medium-sized snowflakes scattered randomly in the empty blue spaces. -
Sealing the work:
Allow the rock to dry overnight, then spray with a clear varnish to protect your artwork from the elements.
Your charming winter scene is now ready to decorate a garden path or be gifted to a friend


Have a question or want to share your own experience? I'd love to hear from you in the comments below!