If you’ve got a tired dresser, those drawer fronts are basically a stack of little canvases waiting for paint. Here are my favorite drawer painting ideas to turn everyday storage into art you’ll be excited to live with.
Classic Solid-Color Drawers
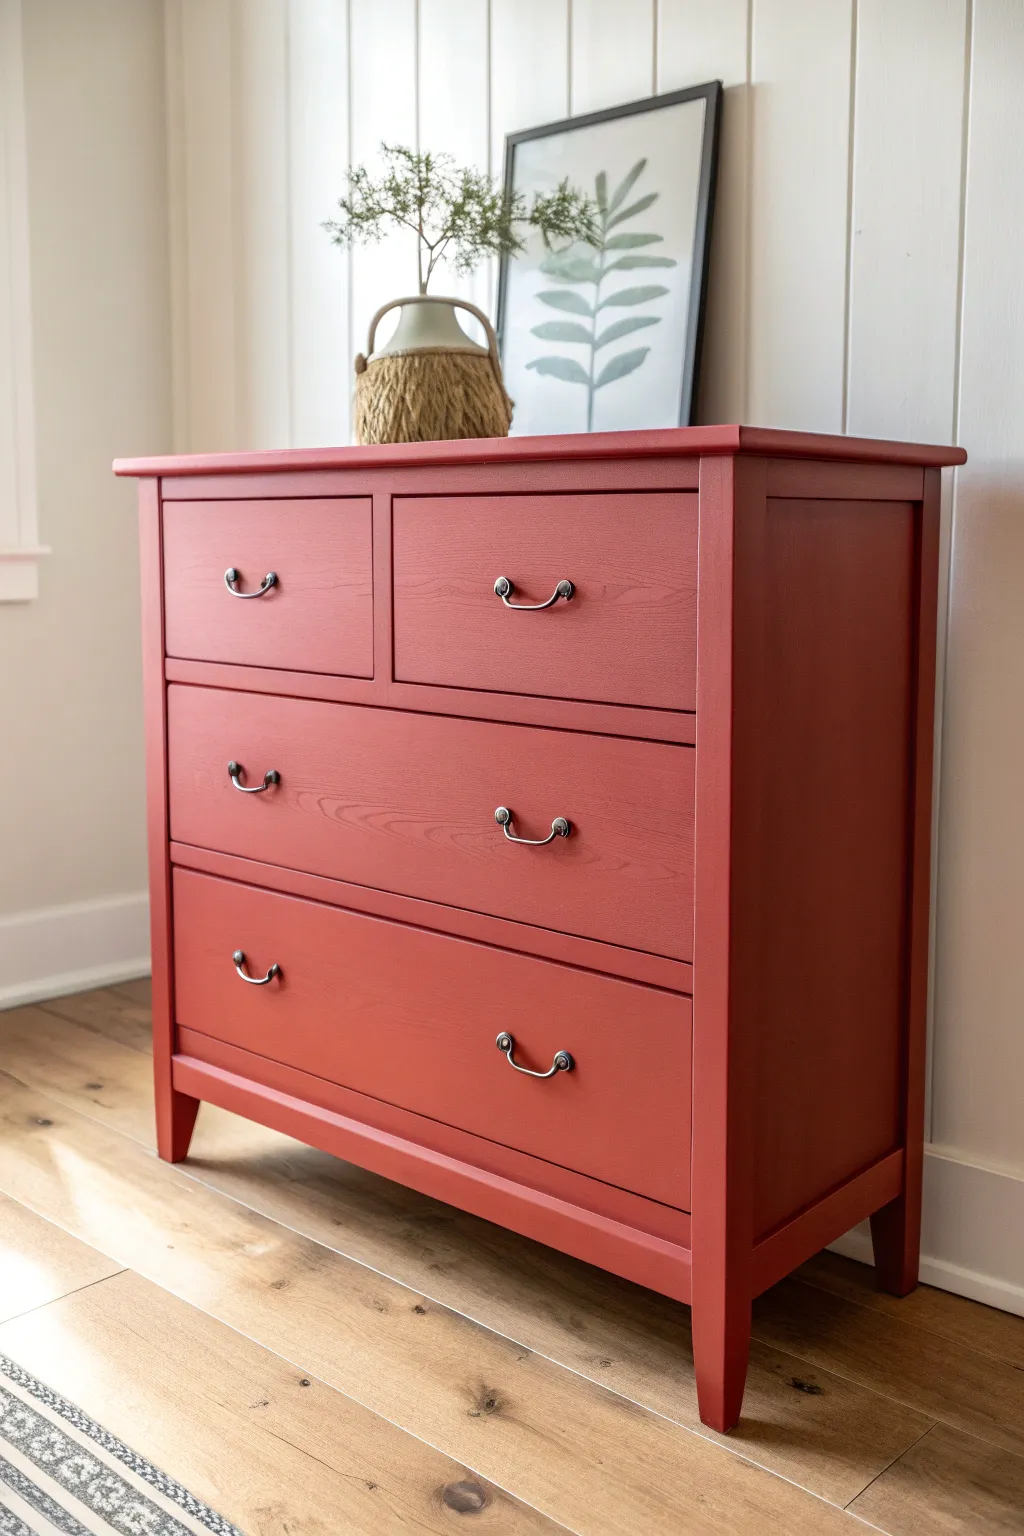
Bring warmth and character to any bedroom with this stunning solid-color drawer transformation. This project takes a standard wooden dresser and revitalizes it with a deep, earthy terracotta red finish that feels both modern and timeless.
Step-by-Step Guide
Materials
- Wooden dresser (raw or sanded down)
- Medium-grit sandpaper (120-150 grit)
- Fine-grit sandpaper (220 grit)
- Tack cloth or lint-free rags
- High-quality primer (stain-blocking)
- Terracotta red furniture paint (matte or eggshell finish)
- 2-inch angled sash brush
- 4-inch foam roller or velour roller
- Roller tray
- Classic dark metal drawer pulls
- Screwdriver
- Wood filler (optional)
- Protective topcoat (matte polycrylic)
Step 1: Preparation and Repairs
-
Remove Hardware:
Start by taking out all existing drawers and placing them on a flat work surface. use your screwdriver to carefully remove all old knobs or handles and set them aside if you plan to reuse them. -
Clean Surfaces:
Wipe down the entire dresser frame and the drawer fronts with a damp cloth or a mild degreaser to remove dust, oils, and grime. -
Fill Imperfections:
If there are deep scratches or old hardware holes you want to cover, press a small amount of wood filler into them. Smooth it over with a putty knife and let it dry completely. -
Sanding:
Using the medium-grit sandpaper, thoroughly sand all surfaces you intend to paint. This scuff-sanding helps the primer adhere. Be sure to sand in the direction of the wood grain to avoid cross-grain scratches. -
Dust Removal:
Once sanding is complete, use a tack cloth to meticulously pick up every speck of dust. Any leftover dust will create bumps in your final finish.
Smooth Operator
Between coats of paint, lightly sand with a crumpled brown paper bag. It’s abrasive enough to smooth bumps but gentle enough not to remove paint.
Step 2: Priming and Painting
-
Apply Primer:
The secret to this rich color is a good base. Brush or roll on a coat of stain-blocking primer. Cover the drawer fronts and the main body of the dresser thoroughly. -
Sand the Primer:
After the primer is fully dry, lightly run your fine-grit sandpaper (220 grit) over the surface. This knocks down any brush strokes or texture for a professional-smooth feel. -
First Coat – Edging:
Open your terracotta red paint. Use the angled sash brush to ‘cut in’ the paint around the corners, edges, and detail lines of the drawer fronts where a roller can’t reach. -
First Coat – Rolling:
While the brushed edges are still wet, switch to your foam or velour roller. Roll the flat surfaces of the drawers and the sides of the dresser for an even finish without brush marks. -
Drying Time:
Allow the first coat to dry according to the manufacturer’s instructions. I usually like to let this sit overnight if humidity is high to ensure it cures properly. -
Second Coat:
Repeat the painting process with a second coat. The red pigment will deepen significantly with this layer, providing that solid, opaque look. -
Check for Coverage:
Inspect the finish under good lighting. If you see any patchy areas, apply a thin third coat, but two coats are usually sufficient for high-quality furniture paint.
Step 3: Finishing Touches
-
Protective Topcoat:
To preserve that beautiful matte look while adding durability, apply a thin layer of matte polycrylic. Use a clean synthetic brush and apply it in long, smooth strokes. -
Install Hardware:
Once the topcoat is fully cured (give it at least 24 hours), attach the dark metal drawer pulls. Make sure they are centered and screwed in tightly. -
Reassemble:
Slide the drawers back into the dresser casing. Ensure they glide smoothly; applying a little beeswax to the runners can help if the paint made the fit snug.
Grain Game
Want more texture? Skip the thick primer and dilute your paint slightly with water (10%) to let the natural wood grain pattern show through the color.
Step back and admire how a simple color change has completely redefined the personality of your furniture piece


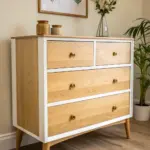
Two-Tone Frame and Drawer Fronts
Transform a plain dresser into a stunning statement piece by combining a crisp white frame with a curated palette of earthy, muted tones. This project perfectly balances modern minimalism with a playful touch of color, creating a unique focal point for any room.
How-To Guide
Materials
- Dresser (IKEA Tarva or similar wooden dresser)
- Sandpaper (120 and 220 grit)
- Electric sander (optional but recommended)
- Primer (high-quality bonding primer)
- Painter’s tape
- Satin finish paint in white (for the frame)
- Sample pots of latex/chalk paint in 5 colors: sage green, terracotta, light mustard, taupe, deep teal
- Gold/Brass bar pulls (8 pieces)
- Measuring tape and pencil
- Drill with appropriate bit
- Paint rollers (foam or microfiber)
- Small angled paint brush
- Tack cloth
- Clear polyurethane topcoat (matte or satin)
Step 1: Preparation
-
Remove hardware and drawers:
Start by pulling out all the drawers and removing existing knobs or handles. Set the hardware aside if you plan to reuse it, though upgrading to brass pulls really elevates the look. -
Clean surfaces:
Wipe down the entire dresser frame and drawer fronts with a degreaser or mild soap and water solution to remove dust and oils. Let everything dry completely. -
Fill holes (if changing hardware):
If your new hardware has different spacing than the old, fill the old screw holes with wood filler. Once dry, sand the filler smooth until it is flush with the wood surface. -
Sand the piece:
Scuff sand the entire unit—both frame and drawer fronts—using 120-grit sandpaper. You aren’t trying to strip it bare, just creating a ‘tooth’ for the primer to grip. Wipe away all dust with a tack cloth.
Hardware Hacks
Make a drilling template! Use a piece of cardboard with pre-punched holes matching your handle size. It ensures every handle is perfectly aligned without constant measuring.
Step 2: Painting the Body
-
Tape off the legs:
Since we want to keep the base natural (or paint it a separate wood-tone color), use high-quality painter’s tape to mask off the legs and bottom trim exactly where the white paint will stop. -
Prime the frame:
Apply a coat of bonding primer to the main body of the dresser. Use a small roller for large flat areas and a brush for corners. Let this dry according to the can’s instructions. -
First coat of white:
Apply your satin white paint to the frame. A foam roller works wonders here for a smooth, brush-stroke-free finish. Work in long, even strokes. -
Sand and recoat:
Once the first coat is dry, lightly sand with 220-grit paper for an ultra-smooth finish, wipe clean, and apply a second coat of white. Remove the tape while the paint is still slightly tacky to avoid peeling.
Texture Twist
For a tactile element, wrap the drawer fronts in linen fabric or textured wallpaper before attaching the hardware, creating a high-end custom look.
Step 3: Painting the Drawers
-
Plan your palette:
Lay your drawers out on a drop cloth in the order they go into the dresser. I prefer to visualize the color distribution first—placing the heavy teal at the bottom left and the lighter sage at the top creates visual balance. -
Prime the fronts:
Just like the frame, apply a layer of primer to the face of each drawer. Don’t worry about the sides unless you want them painted too. -
Apply the colors:
Paint each drawer front its designated color. Use a separate small roller or wash your brush thoroughly between colors. You will likely need two coats for the darker teal and terracotta shades to get full coverage. -
Wait for curing:
Let the drawer fronts dry for at least 24 hours. The paint needs to harden so it doesn’t chip when you install the hardware.
Step 4: Assembly and Finish
-
Seal the work:
Apply a clear matte or satin polyurethane topcoat over the drawer fronts and the white frame. This is crucial for high-traffic furniture to prevent scratches and scuffs. -
Refinish the legs:
If your legs need unevenness fixed, lightly sand them and apply a clear matte wood sealer or a wood stain if you want to alter the tone slightly to match your room. -
Mark new hardware holes:
Measure the center of each drawer front. If your new gold pulls have two attachment points, measure the distance between them (center-to-center) and mark your drill spots precisely. -
Drill and install:
Drill pilot holes carefully through your marks. Attach the new gold bar pulls, tightening the screws from the inside of the drawer. -
Reassemble:
Slide the drawers back into their tracks, stepping back to admire how the crisp white frame makes those earthy colors pop.
Enjoy the fresh, contemporary vibe this colorful storage piece brings to your space


Matte Black Modern Drawer Makeover
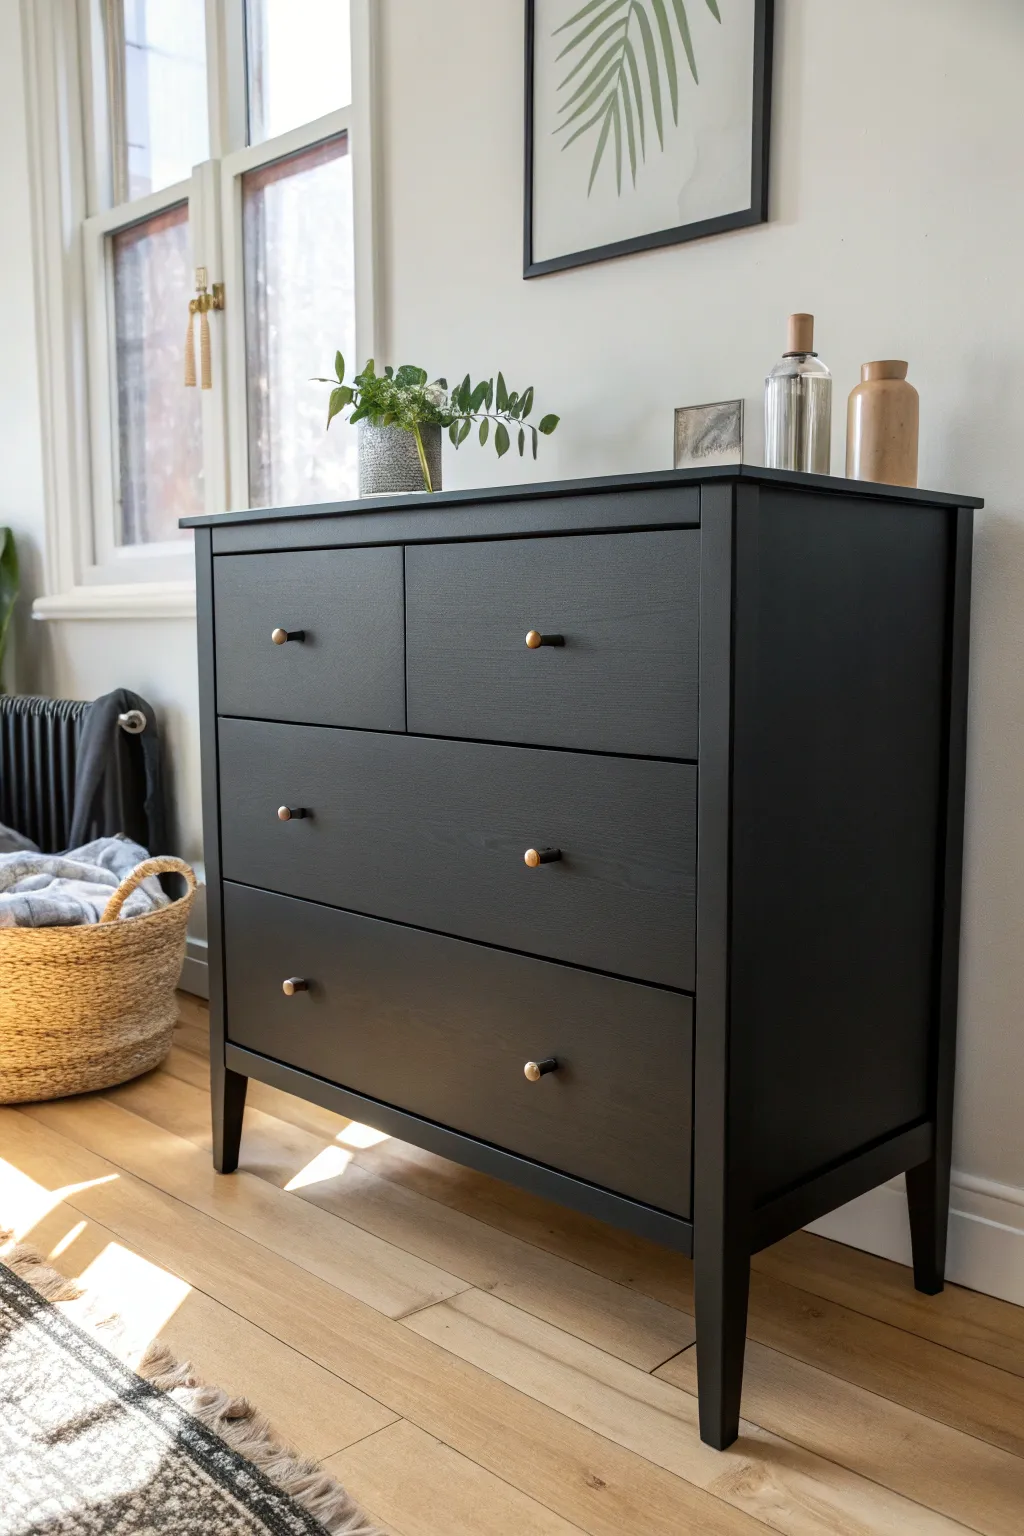
Transform a tired, dated wooden dresser into a statement piece of modern minimalism with a deep, matte black finish. This makeover relies on thorough prep and the right topcoat to achieve that professional, velvety sheen that feels both contemporary and timeless.
Step-by-Step
Materials
- Wooden dresser (preferably with clean lines)
- Medium-grit sandpaper (120-150 grit)
- Fine-grit sandpaper (220 grit)
- High-quality primer (grey or tinted dark)
- Matte black furniture paint (chalk or mineral paint works best)
- Matte polyurethane topcoat or furniture wax
- Small foam roller
- Synthetic angle sash brush (2-inch)
- Brass and black cabinet knobs
- Screwdriver
- Tack cloth
- Wood filler (optional)
- Painter’s tape
Step 1: Preparation & Repairs
-
Remove Hardware:
Begin by taking all the drawers out of the dresser frame. Use your screwdriver to remove the old knobs or handles and set the hardware screws aside in a safe baggie if you plan to reuse them. -
Clean Surfaces:
Wipe down the entire piece with a degreasing cleaner or a mix of warm water and mild dish soap to remove years of oils and dust. Let it dry completely. -
Patch Imperfections:
Inspect the wood for deep scratches or dents. If you are changing the hardware size, fill the old screw holes with wood filler. Used a putty knife to smooth it out and let it dry according to package instructions. -
Initial Sanding:
Sand the entire dresser using medium-grit sandpaper. You don’t need to strip it to bare wood, but you do need to ‘scuff’ the glossy finish so the primer sticks. I always pay extra attention to the edges. -
Dust Removal:
Vacuum up the sanding dust, then wipe everything down with a tack cloth to ensure a perfectly debris-free surface.
Sticky Drawers?
If painted drawers stick, rub a plain candle or beeswax along the wooden runners and sides. This lubricates the friction points without damaging the wood.
Step 2: Priming & Painting
-
Apply Primer:
Roll on a coat of high-quality primer. Since we are going black, ask your paint store to tint the primer grey to help with coverage. Use a brush to get into corners and grooves first. -
Sand the Primer:
Once the primer is fully dry, lightly sand it with fine-grit sandpaper (220) to knock down any brush strokes or texture. Wipe away the dust again. -
First Coat of Black:
Stir your matte black paint thoroughly. Use a synthetic brush to cut in the corners and detailed areas of the dresser frame. -
Roll Flat Surfaces:
Immediately follow the brush work by using a small foam roller on the large flat sides and drawer fronts. This technique minimizes brush marks and creates that smooth factory finish. -
Dry and Assess:
Let the first coat dry for the manufacturer’s recommended time (usually 2-4 hours). Don’t panic if it looks streaky; matte black often looks uneven on the first pass. -
Second Coat:
Apply the second coat exactly like the first. Two coats are usually sufficient, but check for any light spots under a bright light.
Choosing the Sheen
For a true ‘matte’ look that is durable, look for ‘Dead Flat’ varnish. Standard matte polys can sometimes still have a slight low-lustre sheen.
Step 3: Finishing Touches
-
Protective Topcoat:
Matte paint shows fingerprints easily, so protection is key. Apply a water-based matte polyurethane using a clean foam brush or sponge applicator. Apply in long, single strokes to avoid cloudiness. -
Drill New Holes:
If you filled old holes, measure and mark the center of each drawer front for the new knobs. Drill slowly using a bit sized for your new hardware screws. -
Install Hardware:
Screw in the new brass-accented knobs. Tighten them by hand to avoid cracking the fresh paint or wood. -
Reassemble:
Wait at least 24 to 48 hours for the paint and topcoat to cure before sliding the drawers back in to prevent sticking.
Now you have a sophisticated focal point for your room that looks incredibly high-end


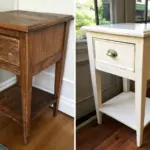
White Drawers With a Natural Wood Top
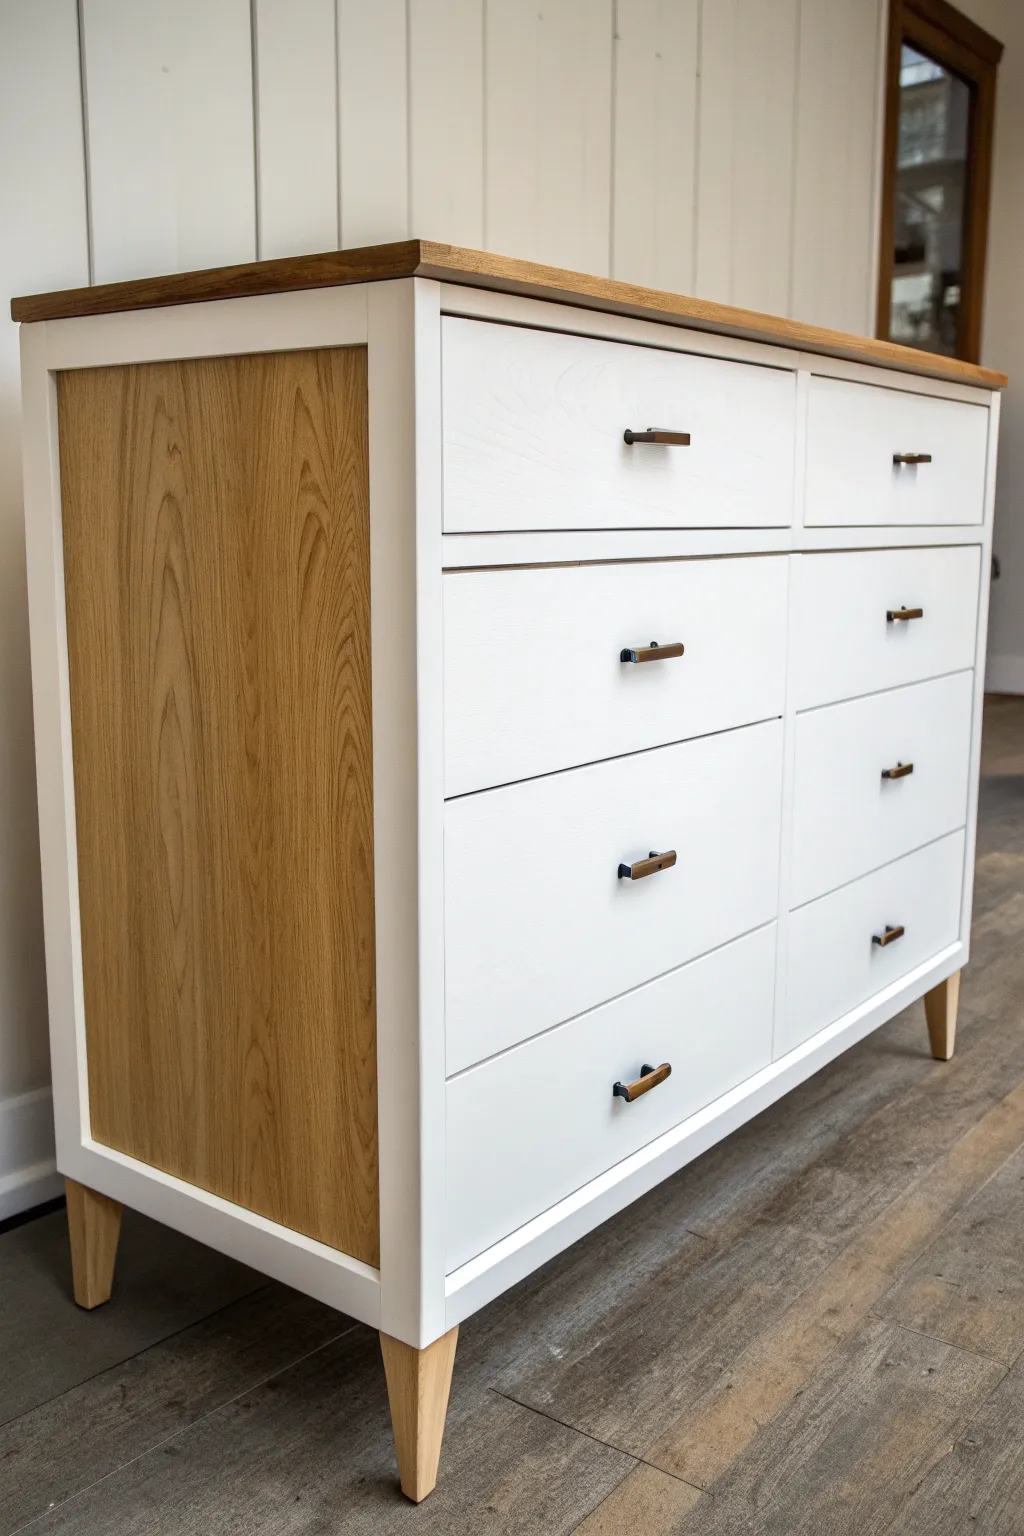
This stunning renovation transforms a standard dresser into a high-end statement piece by pairing crisp white paint with the warmth of natural oak. The result is a clean, modern farmhouse look that highlights the beautiful grain on the top and side panels.
Step-by-Step Guide
Materials
- Solid wood dresser
- Orbital sander
- Sandpaper (80, 120, and 220 grit)
- Wood paint stripper (optional)
- Putty knife
- Painter’s tape
- Primer (high-quality bonding primer)
- White furniture paint (satin or semi-gloss finish)
- High-density foam roller and synthetic bristle brush
- Varathane wood stain (optional, to match tones)
- Water-based polyurethane topcoat (matte or satin)
- Modern brass drawer pulls
- Tack cloth
- Drill and screwdriver
Step 1: Preparation & Stripping
-
Remove Hardware:
Begin by removing all existing drawers from the dresser shell. Unscrew all old knobs, handles, and hinges, setting them aside if you plan to reuse them, though new hardware usually makes a bigger impact. -
Clean Surfaces:
Wipe down the entire piece with a degreasing cleaner to remove years of furniture polish, oil, and dust. A clean surface is critical for the sanding phase. -
Strip the Wood Areas:
Identify the areas you want to keep as natural wood—specifically the top surface and the inset side panels. If the existing finish is thick, apply a chemical stripper, let it sit according to the package instructions, and scrape it off with a putty knife. -
Initial Sanding:
Using an orbital sander with 80-grit sandpaper, sanding the top and side insets down to bare raw wood. Be careful near the edges of the inset panels to avoid damaging the surrounding frame that will be painted. -
Smooth the Wood:
Progress to 120-grit and then 220-grit sandpaper on the raw wood sections until they are buttery smooth to the touch. I always double-check for swirl marks left by the sander and hand-sand them out if necessary. -
Scuff Sand Paint Areas:
For the parts of the dresser receiving white paint (the frame, drawer fronts, and legs if desired), give them a quick scuff sand with 120-grit paper. You don’t need to go to bare wood here; just create a ‘tooth’ for the primer to grip.
Bleed-Through Blues?
If you see pink or yellow tones seeping through your white primer, stop immediately. Switch to a shellac-based primer (like BIN) to lock in those tannins before painting again.
Step 2: Finishing the Wood
-
Remove Dust:
Vacuum the entire piece thoroughly and follow up with a tack cloth to remove every speck of fine dust. -
Tape Off:
Apply high-quality painter’s tape specifically around the natural wood inset panels on the sides and along the bottom edge of the top surface. Press the edges down firmly to prevent paint bleed. -
Stain or Seal:
If you want to alter the tone of the raw wood, apply your chosen stain now and wipe away excess. If you love the natural color, skip straight to sealing. Apply a thin coat of water-based polyurethane to the top and side insets. -
Sand and Recoat:
Once the first coat of poly is dry, lightly hand-sand with 220-grit paper to knock down any raised grain. Apply a second and third coat for durability, especially on the top surface.
Leg Upgrade
If your original dresser has a bulky base, saw it off and install mounting plates for tapered wooden legs. This simple change instantly modernizes the silhouette.
Step 3: Painting & Assembly
-
Prime the Frame:
Apply a coat of bonding primer to the drawer fronts and the main body of the dresser. Use a brush for corners and a foam roller for flat areas to avoid brush strokes. -
Light Sanding:
After the primer is fully dry, lightly sand it smooth with fine-grit paper. This step is the secret to a professional factory finish. -
First Coat of Paint:
Apply your crisp white furniture paint using a foam roller or high-quality sprayer. Keep your layers thin; thick coats take longer to cure and are prone to drips. -
Second Coat:
Allow the first coat to dry according to the manufacturer’s timeline, then apply a second coat for full opaque coverage. Remove the painter’s tape while this final coat is still slightly wet to ensure a sharp line. -
Seal the Legs:
If your dresser has wooden legs you wish to keep natural like the example, sand them down and seal them with the same polyurethane used on the top. Alternatively, you can install new pre-finished tapered legs. -
Install Hardware:
Once the paint has cured for at least 24-48 hours, measure and drill holes for your new modern pulls. Install the hardware carefully. -
Reassemble:
Slide the drawers back into their tracks and admire your refreshing new furniture piece.
Enjoy the bright, customized feel this beautiful two-tone dresser brings to your room
BRUSH GUIDE
The Right Brush for Every Stroke
From clean lines to bold texture — master brush choice, stroke control, and essential techniques.
Explore the Full Guide
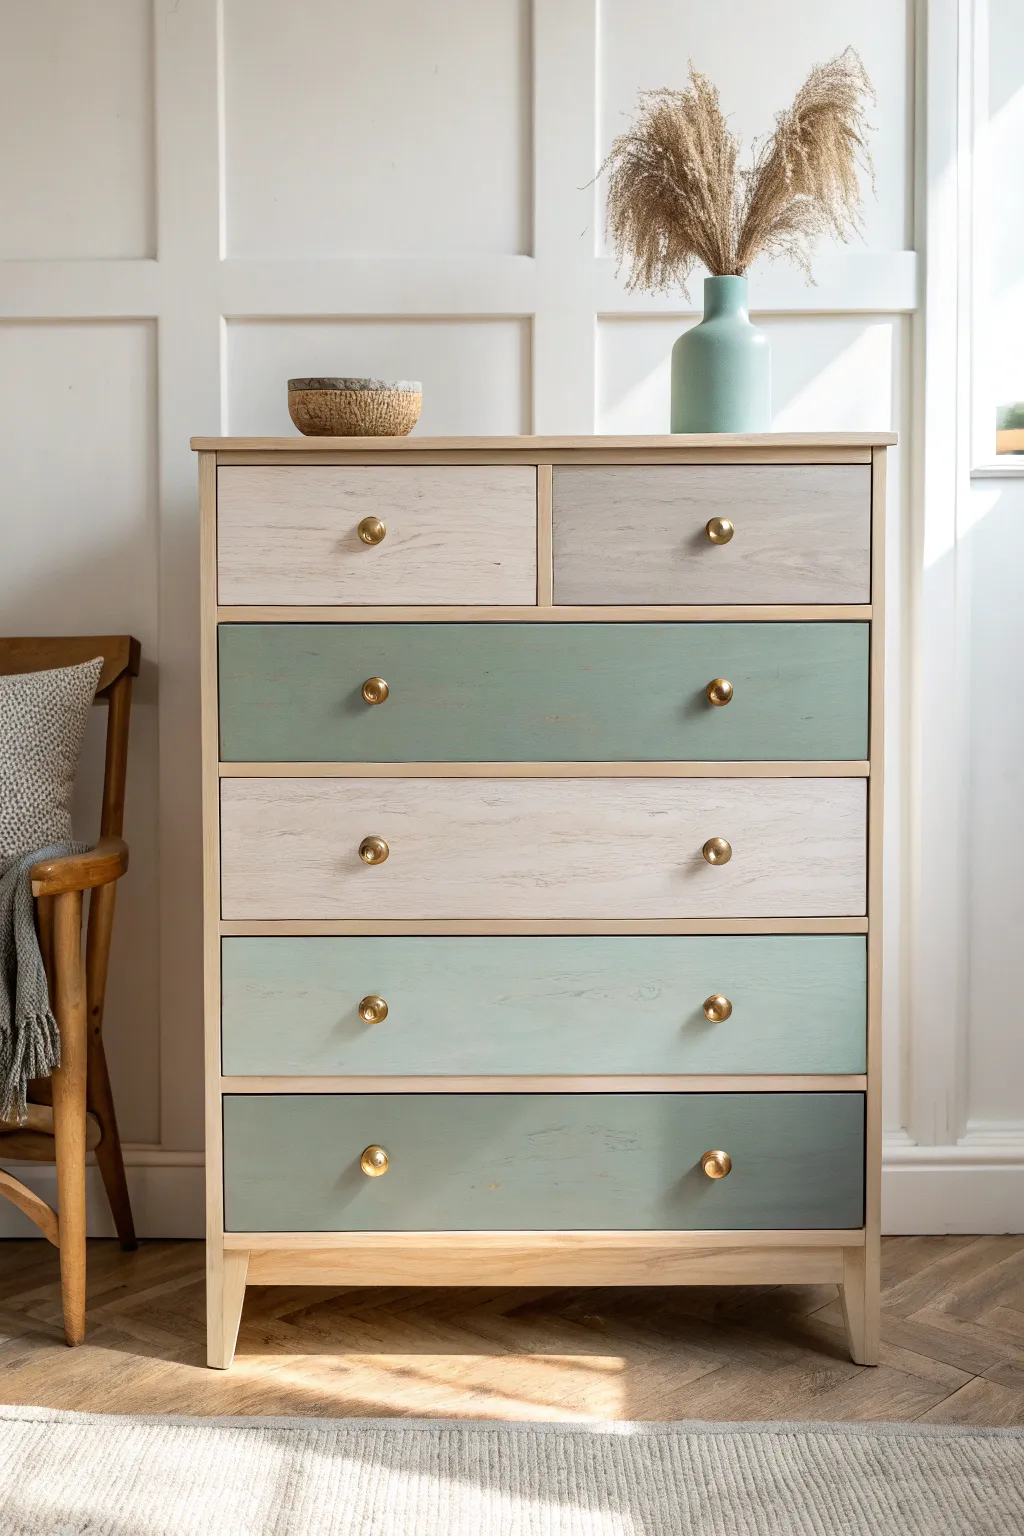
Soft Pastel Drawers for a Calm Look
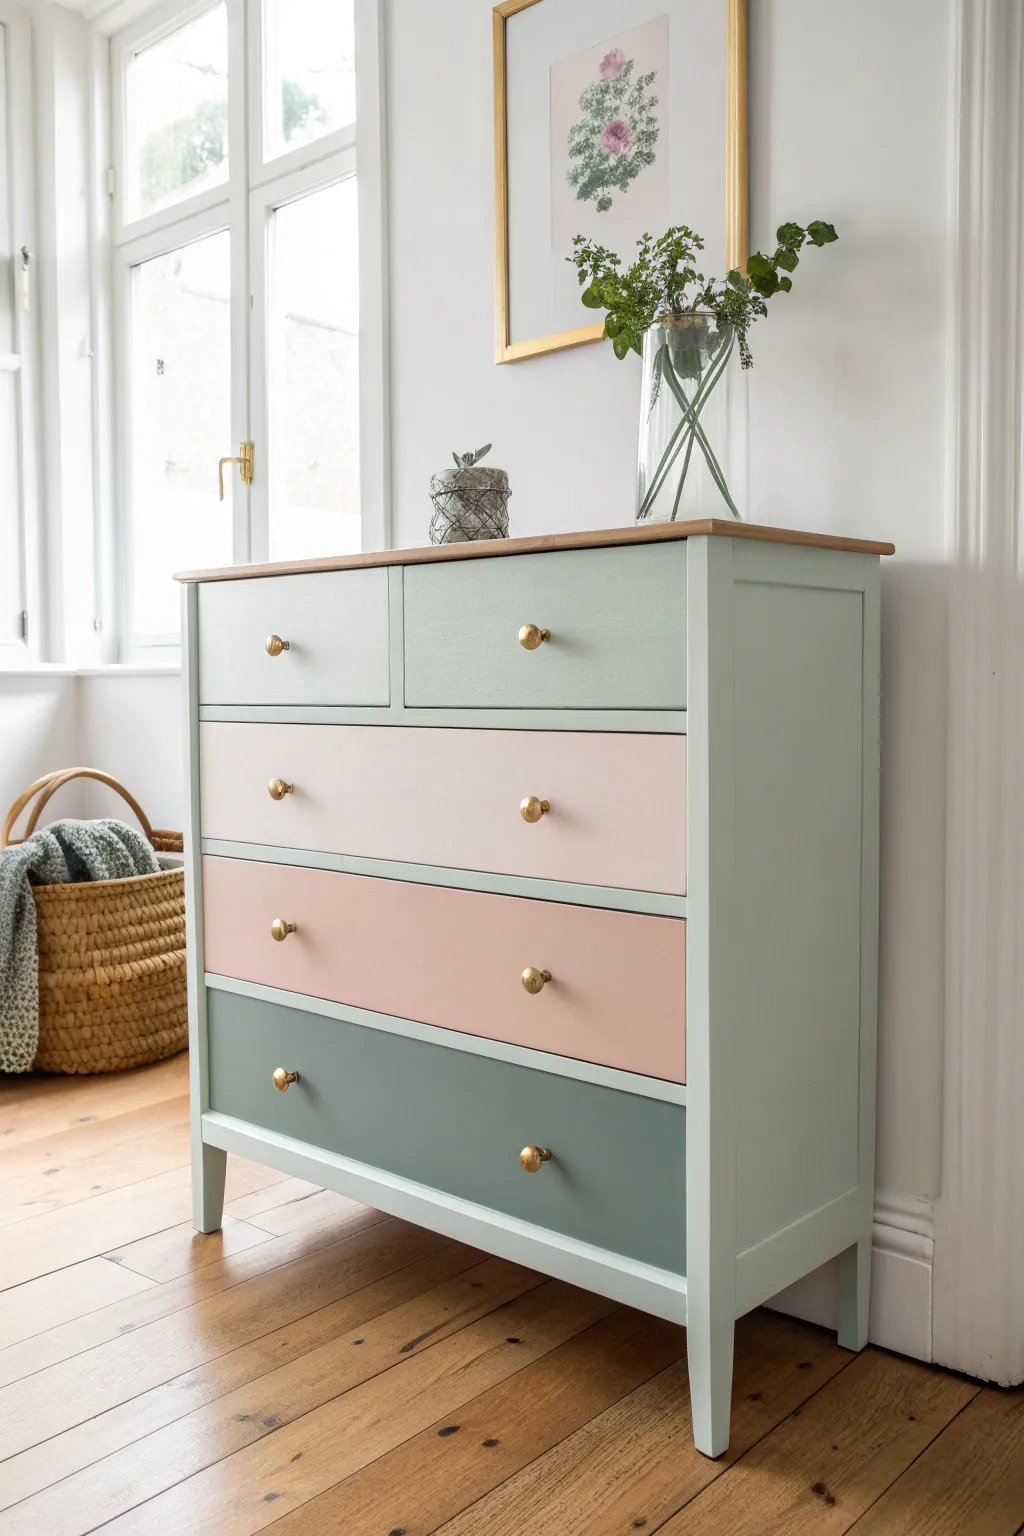
Transform a plain wooden dresser into a serene statement piece using a palette of soft sage and blush tones. This project uses a gradient effect to bring a calm, sophisticated charm to any bedroom or nursery.
Detailed Instructions
Materials
- 5-drawer wooden dresser (e.g., IKEA Hemnes)
- Sandpaper (120 and 220 grit)
- Tack cloth
- Primer (bonding primer recommended)
- Chalk paint or satin furniture paint in 5 custom colors (Frame: Pale Mint; Drawers: Light Sage, Pale Blush, Dusty Rose, Deep Sage)
- Syntethic bristle brushes (2-inch flat)
- Small foam roller and tray
- Painter’s tape
- Gold finish cabinet knobs
- Screwdriver
- Clear matte polyurethane or furniture wax
- Drop cloth
Step 1: Preparation & Sanding
-
Remove Hardware:
Begin by removing all existing drawers from the dresser frame. Use your screwdriver to detach any knobs or pulls and set them aside in a labeled bag so you don’t lose the screws. -
Clean Surfaces:
Wipe down the entire dresser frame and the drawer fronts with a damp cloth and mild soap to remove any dust, grime, or oils. Let it dry completely. -
Initial Sanding:
Scuff sand all surfaces using 120-grit sandpaper. You don’t need to strip the paint entirely, just roughen the surface enough to create ‘tooth’ for the primer to stick. -
Remove Dust:
After sanding, vacuum up the loose dust. Follow up by wiping everything down firmly with a tack cloth to ensure a perfectly clean surface. -
Tape Edges:
Apply painter’s tape along the inside edges of the drawer boxes (where the front meets the box structure) to keep your paint lines crisp and prevent paint from getting inside the drawers.
Smooth Roller Trick
To eliminate roller texture, brush over the wet paint immediately after rolling. Use a ‘feathering’ motion with a dry brush for a factory-smooth finish.
Step 2: Priming & Frame Painting
-
Apply Primer:
Roll or brush a thin, even coat of bonding primer onto the frame and drawer fronts. This ensures your lovely pastels won’t peel later. -
Smooth the Primer:
Once the primer is dry (check the can for specific times), lightly sand with 220-grit sandpaper to knock down any brush strokes or texture, then wipe clean. -
Painting the Frame:
Mix your ‘Pale Mint’ frame color. Using a small foam roller for flat areas and a brush for corners, apply the first coat to the entire outer frame and legs. -
Frame Second Coat:
Allow the first coat to dry fully. Apply a second coat to the frame to ensure solid, opaque coverage, checking for any drips around the corners.
Mix Your Own Shades
Buy one quart of white paint and sample pots of green and red. Mix them into the white in varying amounts to create custom, coordinating pastel tints.
Step 3: The Gradient Drawers
-
Sort the Drawers:
Lay your drawer fronts flat on your drop cloth. Arrange them in order from top to bottom so you don’t mix up your color scheme. -
Small Top Drawers:
Paint the two small top drawers in ‘Light Sage’. Use a high-quality synthetic brush to get into any beveled edges, then smooth flat surfaces with the foam roller. -
First Large Drawer:
Move to the first large drawer below the split top drawers. Paint this one in ‘Pale Blush’. I find two thin coats are always better than one thick one here. -
Middle Drawer:
Paint the middle large drawer in ‘Dusty Rose’. This deeper pink bridges the gap between the light pink above and the dark green below. -
Bottom Drawer:
Apply the ‘Deep Sage’ paint to the bottom drawer. This visual anchor grounds the piece and balances the lighter top drawers. -
Detail Check:
Inspect all drawer edges. If paint has dripped over the sides, gently sand it away or wipe it off before it fully cures.
Step 4: Finishing Touches
-
Sealing:
Once all paint is cured (usually 24 hours), apply a clear matte polyurethane topcoat. This protects the finish from scratches and daily wear. -
Add Hardware:
Thread the screws through the existing holes and attach your new gold knobs. Tighten them firmly but be careful not to crack the paint. -
Reassemble:
Carefully slide the drawers back into their tracks, following the color order: Light Sage on top, then Blush, Rose, and finally Deep Sage at the bottom.
Now you have a custom piece of furniture that brings a breath of fresh air to your room
Ombre Drawer Fronts
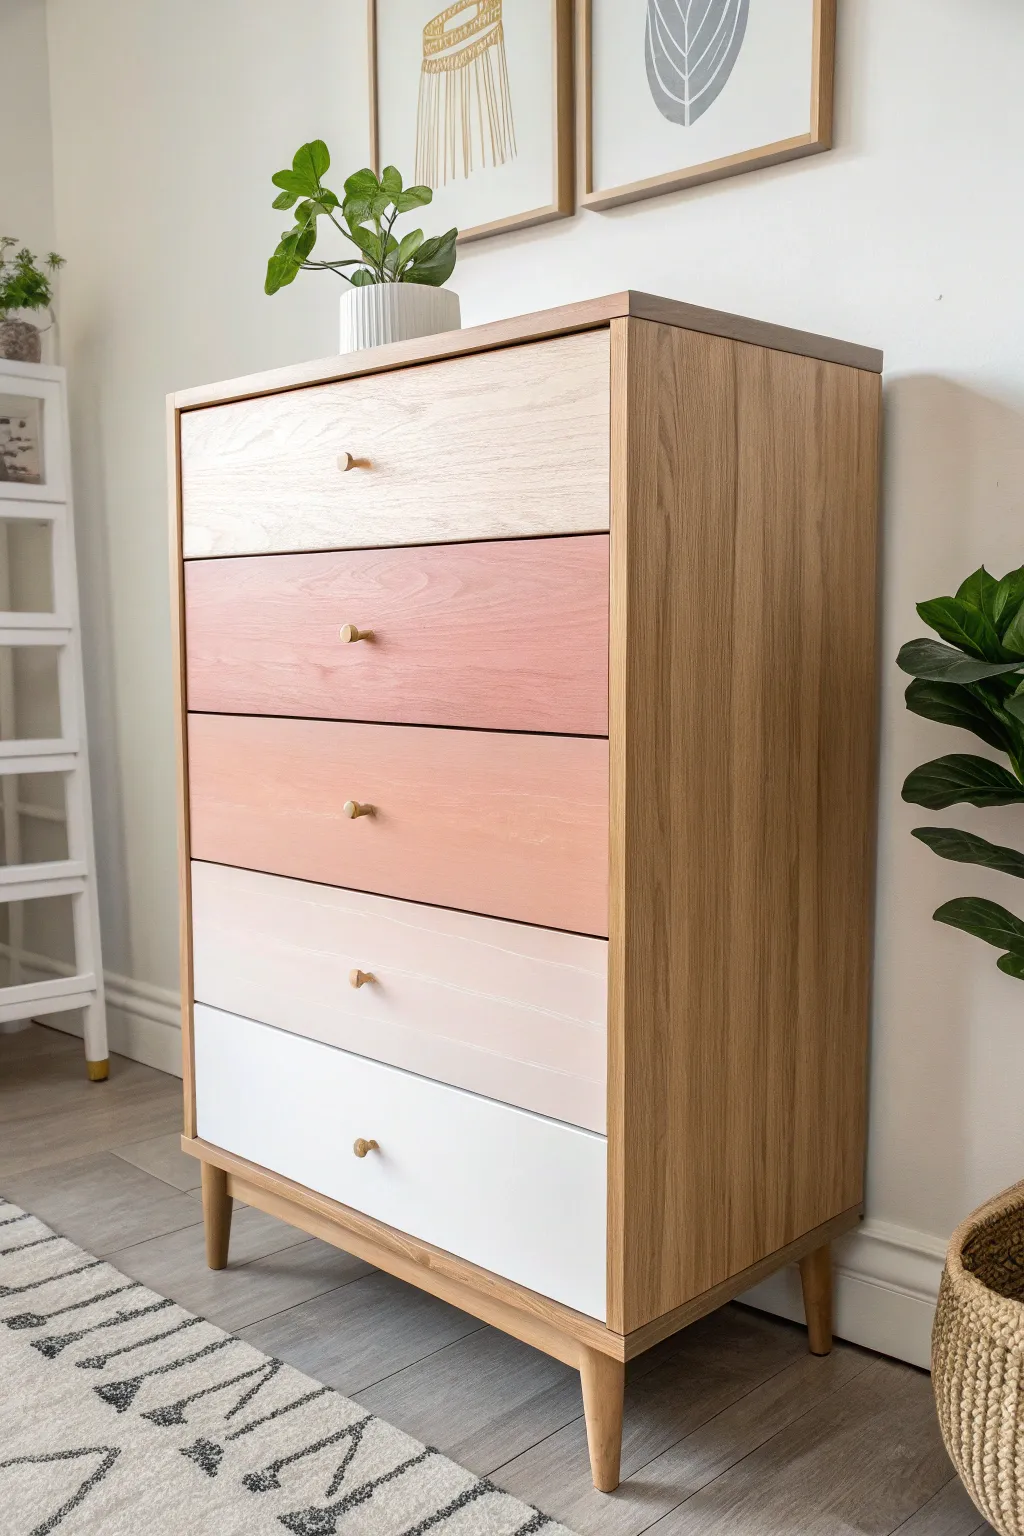
Transform a plain wooden dresser into a statement piece with this soft, sunset-inspired gradient. By using a monochromatic palette that shifts from warm terracotta-pink to crisp white, you achieve a modern, cohesive look that adds instant warmth to any room.
Step-by-Step
Materials
- 5-drawer wooden dresser (unfinished or stripped)
- Sandpaper (120 and 220 grit)
- Tack cloth
- Painter’s tape
- White latex or chalk paint (Base color)
- Terracotta or warm pink latex or chalk paint (Accent color)
- 5 small mixing containers
- Stir sticks
- High-quality angled sash brush
- Small foam roller and tray
- Clear matte polycrylic sealer
- Gold finish drawer pulls
- Screwdriver
Step 1: Preparation & Planning
-
Remove Hardware:
Start by unscrewing all existing knobs or pulls from the drawer fronts. Store the screws in a ziplock bag so they don’t get lost. -
Separate Drawers:
Take all the drawers out of the dresser frame. Lay them flat on a drop cloth or protected work surface, keeping them in their original vertical order (top to bottom). -
Clean and Sand:
Scuff sand the drawer fronts with 120-grit sandpaper to remove any existing sheen or rough spots. Wipe away every speck of dust with a tack cloth to ensure a smooth finish. -
Tape Edges:
If you want to keep the sides of the drawers natural wood, carefully apply painter’s tape along the side edges of each drawer front to create a crisp paint line.
Paint Peeling on Tape Remove?
Score the edge where the tape meets the paint with a sharp craft knife before pulling. This breaks the seal and ensures a razor-sharp line without lifting any paint.
Step 2: Mixing the Gradient
-
Set Up Mixing Station:
Arrange your five mixing containers in a row. This visual layout is crucial for getting the color transition right before you start painting. -
Mix the Middle Shade:
I find it easiest to start with the middle color (drawer #3). Mix equal parts of your white base paint and your terracotta accent paint in the third container. -
Mix the Darkest Shade:
In the second container (for drawer #2), mix roughly 75% terracotta paint with 25% white. The top drawer #1 will be the lightest wood tone (unpainted) in this specific design, or you can paint it very light beige. -
Mix the Lighter Shades:
In the fourth container (drawer #4), mix 25% terracotta with 75% white. The fifth container (bottom drawer #5) will be pure white. -
Test the Swatches:
Paint a small swatch of each color on a piece of scrap paper. Let them dry, as paint often darkens slightly, and adjust your ratios until the step-down in color looks even.
Step 3: Painting Process
-
Apply the Base Coat:
Starting with the bottom drawer (solid white), use your foam roller to apply a thin, even coat of paint. Work your way up the drawers, using the corresponding mixed colors for each level. -
Address wood grain:
For the top drawer, if recreating the exact look, leave it raw wood but sand it very smooth. Alternatively, apply a wash of 90% white paint and 10% water for a whitewashed look. -
Sand Between Coats:
Once the first coat is completely dry, lightly sand the surfaces with fine 220-grit sandpaper. This knocks down any raised grain or brush strokes. -
Apply Second Coat:
Wipe off the sanding dust and apply a second coat to all drawers. This ensures full opacity, especially for the lighter pink and white shades.
Mix it Up
Try a “reverse ombre” by putting the darkest color at the bottom for a grounding effect, or swap the terracotta for sage green or navy blue for a different vibe.
Step 4: Finishing Touches
-
Seal the Surface:
Apply a clear matte polycrylic sealer over the painted fronts. This protects the ombre finish from scratches and fingerprints without adding unwanted shine. -
Seal the Frame:
Don’t forget to apply the sealer to the natural wood body of the dresser as well, protecting the wood while keeping that raw, organic aesthetic. -
Reassemble:
Once the sealer has cured (usually 24 hours), remove the painter’s tape slowly at a 45-degree angle. -
Install Hardware:
Attach your simple gold knobs to each drawer front. The metallic gold adds a sophisticated touch that complements the warm pink tones perfectly.
Step back and admire how the colors seamless flow down the front of your newly revitalized dresser

PENCIL GUIDE
Understanding Pencil Grades from H to B
From first sketch to finished drawing — learn pencil grades, line control, and shading techniques.
Explore the Full Guide
Dipped-Paint Drawer Base
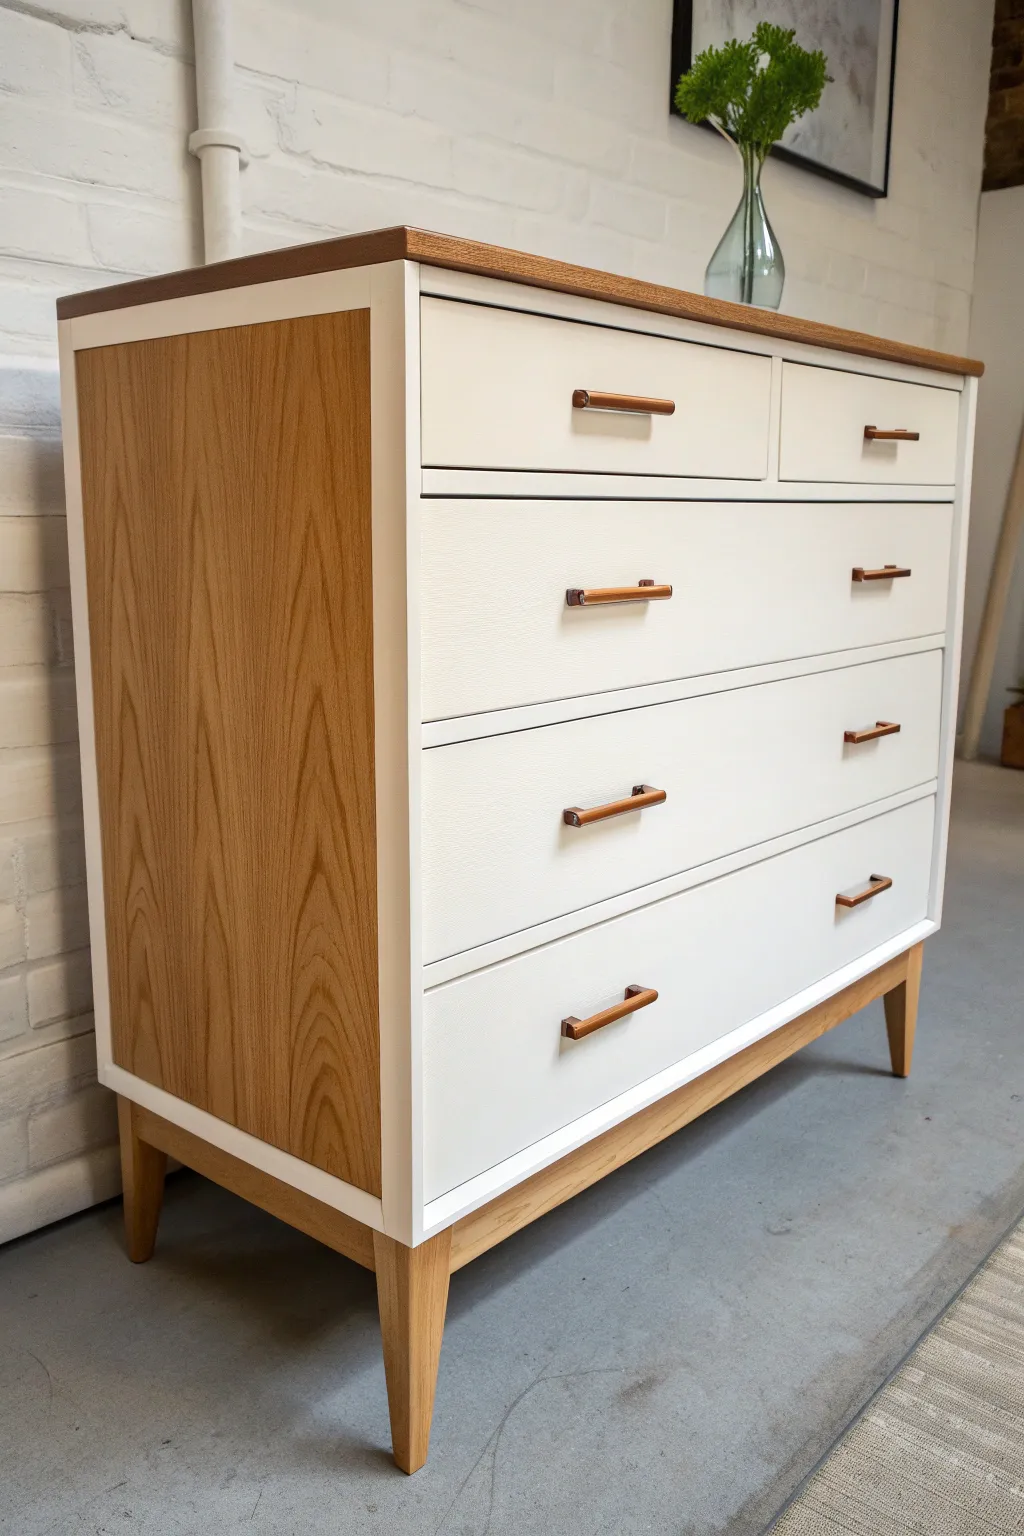
Transform a dated dresser into a modern statement piece with this clever reverse-dipped effect that frames natural wood with crisp white paint. By leaving the base and side panels exposed, you create a high-end, custom furniture look that feels both classic and contemporary.
Step-by-Step Tutorial
Materials
- Solid wood dresser (clean lines preferred)
- Electric sander (orbital)
- Sandpaper (80, 120, and 220 grit)
- Painter’s tape (high quality)
- Wood stain (teak or warm oak tone, optional)
- Matte polyurethane topcoat
- Primer (stain-blocking)
- White mineral or chalk paint
- Small foam roller
- High-quality angled sash brush
- Wood filler (if repairs needed)
- Tack cloth
- Degreaser cleaner
Step 1: Preparation & Sanding
-
Disassemble the unit:
Begin by removing all drawers from the dresser carcass. Unscrew and remove all old hardware from the drawer fronts. -
Clean thoroughly:
Wipe down the entire piece with a degreaser to remove years of furniture polish, oil, and dust that can ruin your paint adhesion. -
Strip the finish:
Use your orbital sander with 80-grit paper to strip the old finish completely off the areas you want to keep as wood: the top, the side inset panels, and the legs. -
Smooth the wood surfaces:
Switch to 120-grit and then 220-grit sandpaper on those same wood areas until they are buttery smooth to the touch. -
Scuff sand paint zones:
For the areas you intend to paint (the front frame and drawer fronts), give them a light scuff sanding with 120-grit to give the primer something to grip. -
Dust removal:
Vacuum up all the sanding dust, then wipe every surface firmly with a tack cloth to ensure it’s perfectly clean.
Bleed-Through Fix
If paint bleeds under tape onto wood, don’t panic. Wrap a putty knife in a damp cloth and gently scrape the wet paint. If dry, carefully scrape with a razor blade or light sanding.
Step 2: Staining & Sealing
-
Apply stain (optional):
If the natural wood color is uneven or too light, wipe on a stain color of your choice using a lint-free rag. A warm teak tone matches the example beautifully. -
Seal the wood first:
Apply two coats of matte polyurethane to the exposed wood sections (sides, top, legs) immediately. I find sealing the wood *before* painting makes cleaning up accidental paint drips much easier later. -
Tape off the design:
Once the sealer is fully cured (give it 24 hours), apply painter’s tape with extreme precision. Tape over the wood side panels and the top edge, pressing the tape edge down firmly with a credit card to prevent bleed.
Level Up: Drawer Liners
Line the interior of the drawers with a geometric or botanical peel-and-stick wallpaper. A pop of pattern when opening the clean white drawers adds a hidden luxury detail.
Step 3: Painting & Finishing
-
Prime the surfaces:
Apply a coat of stain-blocking primer to the drawer fronts and the face frame of the dresser. Let this dry completely. -
Sand the primer:
Lightly sand the primed surface with 220-grit paper to knock down any texture, then wipe away dust. -
Paint the first coat:
Using a small foam roller for the flat areas and an angled brush for corners, apply your first coat of white mineral paint. Don’t overwork it to avoid brush strokes. -
Apply subsequent coats:
Apply 2-3 coats of white paint total, allowing proper dry time between each layer. Thin coats result in a more durable finish than thick ones. -
Remove tape:
Carefully peel back the painter’s tape while the final coat of paint is still slightly tacky to ensure a crisp, sharp line. -
Seal the paint:
Protect your white paint work with a coat of water-based polyacrylic or wax, depending on your paint manufacturer’s instructions. -
Install hardware:
Once fully cured, install new modern wooden handles. The mix of wood and metal on the pulls in the photo really ties the two-tone look together.
Step back and admire how the crisp white paint creates a beautiful frame for the natural wood grain
Vertical Stripes Across the Drawers
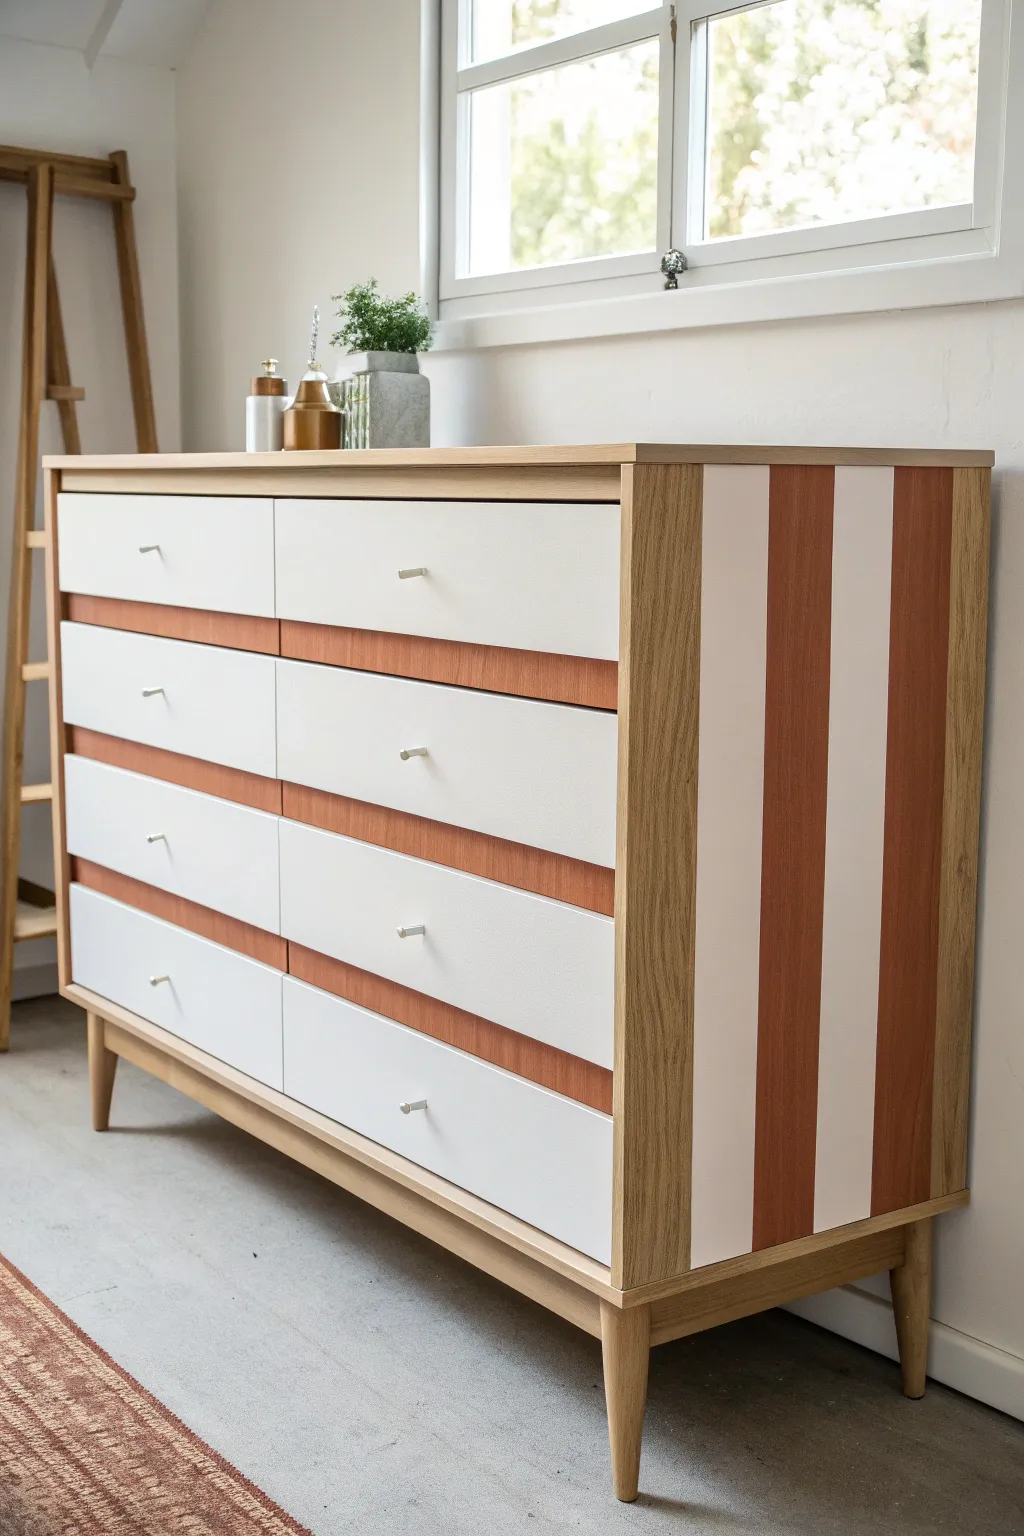
Give a basic wooden dresser a high-end designer look by combining clean white drawer fronts with a bold, vertical striped pattern on the side panels. This project balances the warmth of natural wood tones with crisp painted lines for a sophisticated furniture flip.
Step-by-Step Guide
Materials
- Wooden dresser (raw or sanded to bare wood)
- White furniture paint (satin or semi-gloss)
- Terracotta or reddish-brown wood stain (or thinned paint)
- Painter’s tape (high quality)
- Sandpaper (120 and 220 grit)
- Measuring tape
- Pencil
- Small foam roller
- Synthetic bristle paintbrush
- Polyurethane topcoat (matte or satin)
- Drawer pulls
- Tack cloth
- Screwdriver
Step 1: Preparation & First Finish
-
Prepare the hardware:
Begin by removing all the drawers from the dresser frame and unscrewing the existing drawer pulls. Set the hardware aside in a labeled bag if you plan to reuse it. -
Clean and sand surfaces:
Clean the entire piece with a degreaser to remove oils or dirt. Once dry, sand the entire dresser—including the drawers and the side panels—down to raw wood using 120-grit sandpaper, followed by 220-grit for smoothness. Wipe away all dust with a tack cloth. -
Paint the drawer fronts:
Using a small foam roller for a smooth finish, apply your white furniture paint to the drawer fronts. You will likely need two coats allowing for sufficient drying time in between. I prefer to lightly sand between coats with a fine-grit sponge for the smoothest possible finish. -
Address horizontal dividers:
Looking at the reference image, the horizontal wood strips between the drawers are left natural or stained reddish-brown. If you want this contrast, tape off the surrounding areas and apply your chosen stain carefully to these thin strips.
Seal Tape Edges
Before painting a colored stripe, brush a tiny amount of clear matte sealer over the tape edge. This fills gaps and guarantees a razor-sharp paint line.
Step 2: Creating the Striped Side Panels
-
Measure the side panel:
Measure the total width of the dresser’s side panel. Decide how many stripes you want; the inspiration image features wide, bold stripes. -
Mark your lines:
Use a pencil and a long straight edge to lightly mark vertical lines down the side of the dresser where your stripes will go. Ensure these are perfectly plumb. -
Tape the first set:
Apply painter’s tape along the outside edges of the stripes that will remain the ‘natural’ wood color. Press the edges of the tape down firmly with a credit card to prevent bleed-through. -
Apply the white stripes:
Paint the designated sections with your white paint. Use light coats to avoid building up a ridge at the tape line. Two or three thin coats are better than one thick one. -
Remove tape and dry:
Peel off the tape while the final coat of paint is still slightly tacky to get a crisp edge. Let the white paint cure fully—usually at least 24 hours—before taping over it. -
Tape the second set:
Once the white stripes are fully hard and dry, tape over them carefully to protect them. You are now exposing the areas meant for the reddish-brown contrast color. -
Apply the darker stripes:
Apply your terracotta or reddish-brown stain (or paint) to these exposed striped sections. Using a stain allows the wood grain to show through, adding texture. -
Reveal the pattern:
Remove the tape to reveal your alternating pattern: natural wood frame, white stripe, and reddish-brown stripe.
Step 3: Assembly & Protection
-
Seal the piece:
Once all paint and stain are completely dry, apply a clear polyurethane topcoat over the entire piece, including the drawers and the striped sides. This protects the finish from scratches and wear. -
Reinstall drawers:
Slide the drawers back into their tracks, ensuring they sit flush and slide smoothly. -
Attach hardware:
Attach your drawer pulls. The small metal knobs in the image add a minimalist touch that doesn’t distract from the striped pattern.
Mix Up the Pattern
Instead of vertical stripes on the side, try a diagonal chevron pattern or continue the stripes across the top surface for a waterfall effect.
Enjoy the dramatic transformation of your custom furniture piece


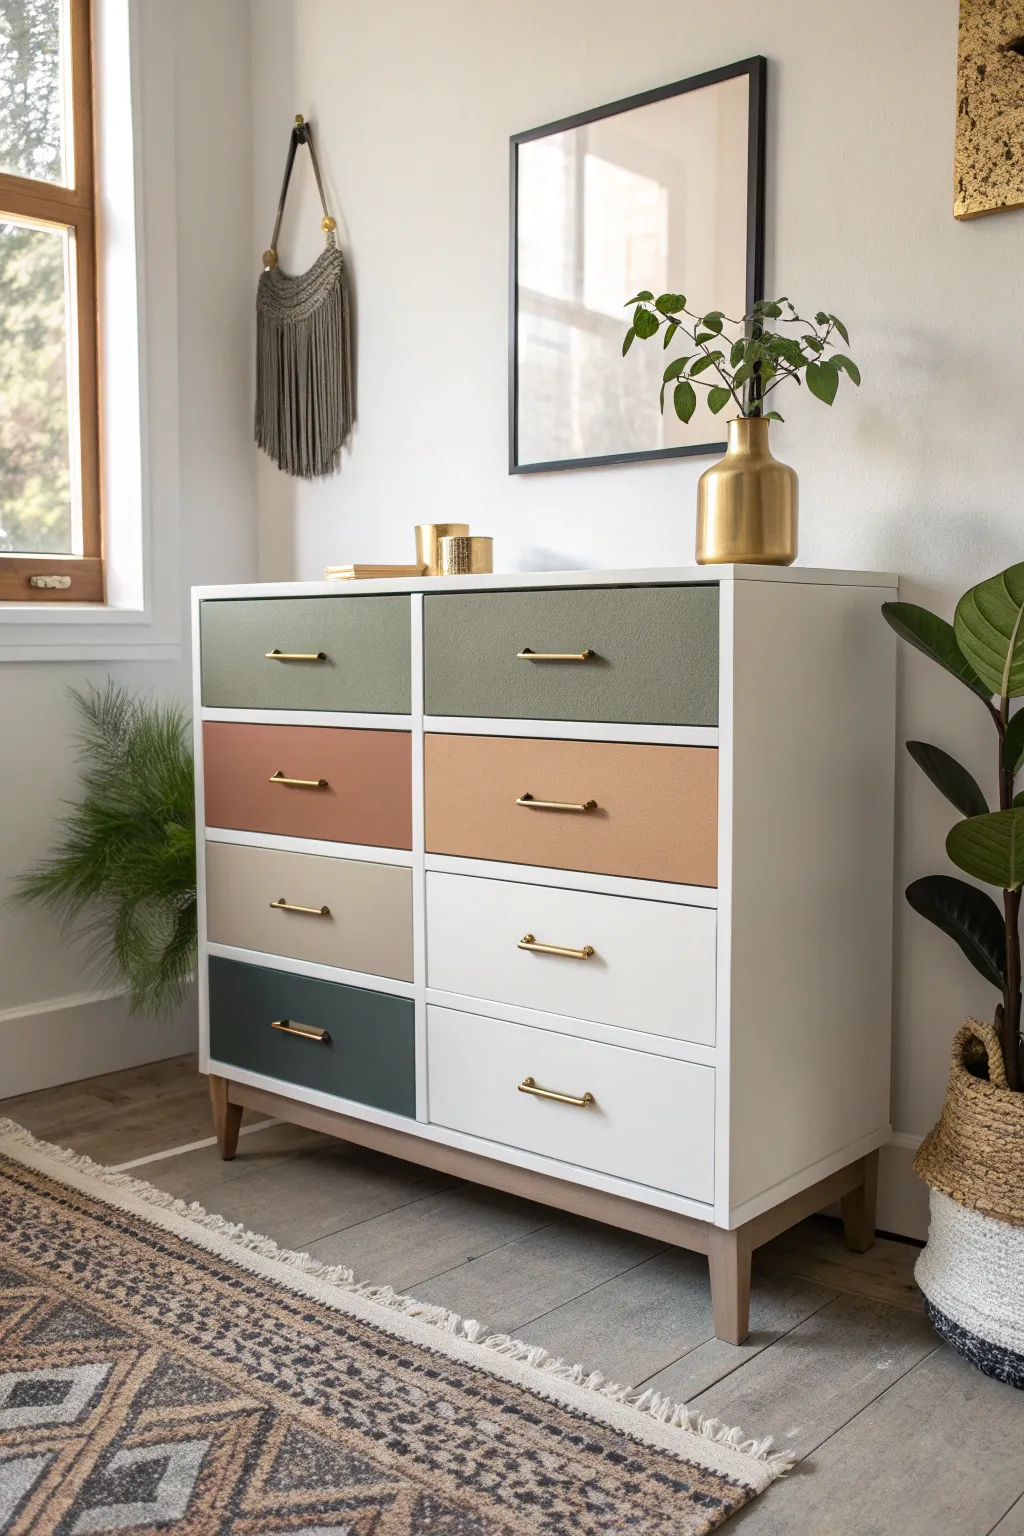
Painted Rows of Drawers in Different Colors
Transform a plain wooden dresser into a serene statement piece using a soothing palette of sage greens, creams, and stone greys. This project highlights the beauty of mixed tones and natural wood grain, creating a modern yet timeless look for any bedroom.
Step-by-Step Tutorial
Materials
- Unfinished wooden chest of drawers (or an existing piece to be stripped)
- Sandpaper (120, 180, and 220 grit)
- Orbital sander (optional but recommended)
- Tack cloth
- Painter’s tape
- Chalk or mineral paint in four colors: Cream/Off-white, Light Stone Grey, Pale Sage Green, Deep Slate Green
- Clear matte polyurethane or furniture wax
- Synthetic bristle paint brushes (2-inch angled)
- Small foam roller
- Gold round knobs
- Drill (for hardware holes if needed)
- Screwdriver
Step 1: Preparation
-
Remove hardware and drawers:
Start by pulling out all the drawers from the main frame. Unscrew and remove any existing knobs or handles and set them aside if you plan to reuse them, though new gold knobs really make this look pop. -
Clean the surfaces:
Wipe down the entire dresser frame and drawer fronts with a damp cloth and mild degreasing cleaner to remove dust, oils, or old polish. -
Sand the frame:
Since the frame remains natural wood in this look, sand the exterior casing thoroughly. Start with 120 grit to remove old varnish, move to 180, and finish with 220 for a silky smooth feel. Only sand the drawer fronts lightly just to create a key for the paint. -
Dust removal:
Vacuum up the sanding dust and follow up with a tack cloth to ensure absolutely no debris remains on the wood pores. -
Tape the edges:
Apply painter’s tape to the sides of the drawer boxes (the parts that slide in) to keep lines crisp. If you want to keep the frame natural like the photo, carefully tape off the inside edges of the frame where the drawers sit.
Step 2: Painting the Palette
-
Plan your gradient:
Lay the drawers on a flat surface in the order they will appear in the chest. Arrange your paint colors. The top left is cream, top right is stone grey. The middle row is deep slate green. The third row is cream again, followed by pale sage, and finally deep slate green at the bottom. -
Apply the first coat:
Using a synthetic brush or foam roller, apply a thin, even coat of your chosen colors to their respective drawer fronts. Paint with the grain of the wood for the smoothest finish. -
Feather the edges:
Pay special attention to the edges of the drawer fronts. I like to use a small artist’s brush here to ensure the paint covers fully without dripping down the sides. -
Dry and sand:
Allow the first coat to dry completely (usually 1-2 hours for chalk paint). Once dry, lightly hand-sand with high-grit sandpaper to knock down any brush strokes. -
Apply the second coat:
I prefer a slightly watered-down second coat for a super smooth finish. Apply the second layer to ensure full opacity and richness of color.
Uneven Coverage?
If lighter colors (like the cream) look streaky after two coats, don’t panic. Light pigments often need a third thin coat. Sand lightly between layers for a factory-smooth result.
Step 3: Sealing and Assembly
-
Seal the painted drawers:
Once the paint has cured overnight, apply a clear matte wax or polycrylic topcoat to the painted surfaces. This protects the finish from scratches and fingerprints. -
Seal the natural frame:
Apply a clear sealant to the sanded wooden frame. A water-based polyurethane is best here to avoid the yellowing that can happen with oil-based finishes. -
Buff the wax:
If you used wax, let it set for about 30 minutes, then buff it vigorously with a lint-free cloth to create a soft, subtle sheen. -
Install hardware:
Locate the center points of your drawers. Drill new holes if necessary, then screw in your gold knobs. The metallic accent brings warmth to the cool paint tones. -
Reassemble:
Slide the drawers back into their designated slots, double-checking that the color pattern matches your original plan.
Wood Grain Pro Tip
To get the washed look on the grey and green drawers, dilute your paint 20% with water. This acts like a semi-transparent stain, letting the wood texture peek through gently.
This sophisticated color-blocked chest is now ready to organize your space with style
Diagonal Color Blocking on Drawer Fronts
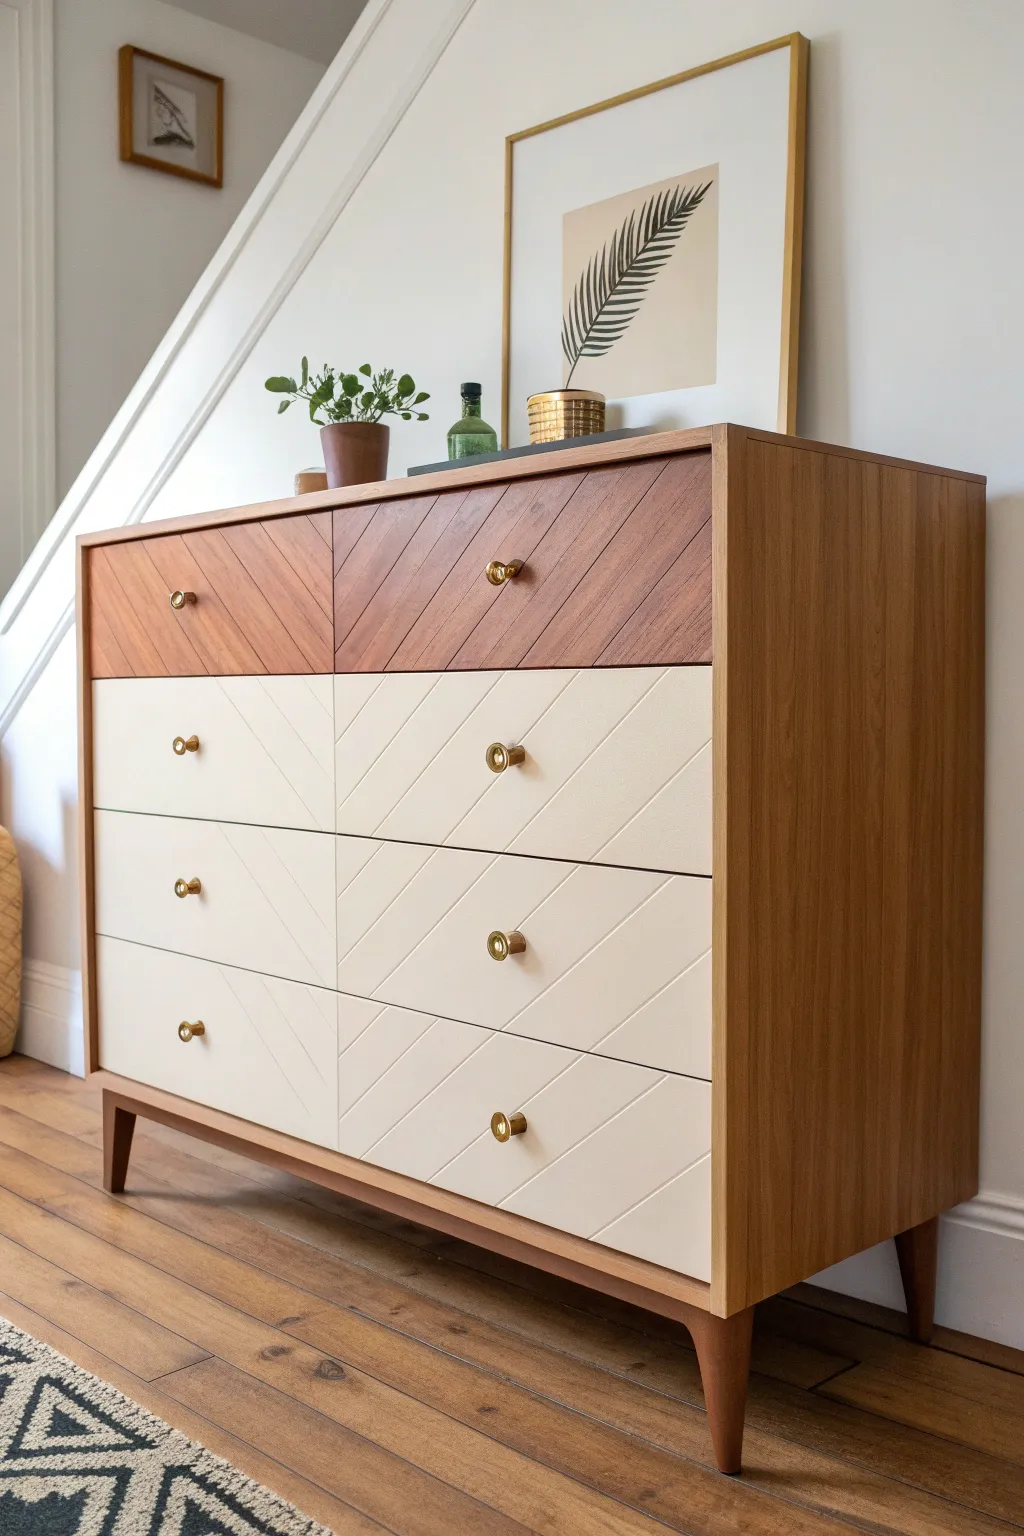
Transform a plain dresser into a high-end statement piece by combining modern diagonal routing with a classic paint-and-stain finish. This project balances the warmth of natural wood grain on the top row with a crisp, creamy finish below for a sophisticated, custom look.
Detailed Instructions
Materials
- Unfinished wooden dresser (flat front)
- Circular saw or router with V-groove bit
- Straight edge guide or long ruler
- Pencil and painters tape
- Sandpaper (120 and 220 grit)
- Wood stain (warm walnut tone)
- Cream or off-white furniture paint (satin finish)
- Water-based polyurethane topcoat
- Gold drawer knobs
- Drill with bits for hardware
- Lint-free rags
- Foam rollers and synthetic brushes
- Clamps
Step 1: Planning & Routing
-
Prep the drawers:
Remove all drawers from the dresser body and detach any existing hardware. If the dresser has a previous finish, strip or sand it down to raw wood, as you’ll need a clean surface for staining the top row. -
Map the pattern:
Determine the angle for your diagonal lines (45 degrees is standard). Using a pencil and a long straight edge, lightly draw your master guide lines across all drawer fronts. It helps to stack the drawers on a flat work surface to ensure the lines flow continuously from one drawer to the next. -
Set up the guide:
Clamp a straight edge guide securely to the first drawer front. This fence will keep your tool straight as you cut the grooves. Double-check your measurements so the spacing is consistent. -
Cut the grooves:
Using a router with a V-groove bit (or a circular saw set to a very shallow depth), carefully cut along your marked lines. Move slowly to prevent the wood from splintering. -
Clean the cuts:
Once all diagonal lines are cut, take a piece of folded sandpaper and run it inside the new grooves to smooth out any rough edges or splinters. -
Final sand:
Give the flat surfaces of all drawers and the dresser frame a thorough sanding with 220-grit paper to prepare for the finish.
Step 2: Staining & Painting
-
Tape the separation:
Since this design splits the finish, decide where the painted section begins. In this project, the top row is stained, and the rest is painted. Ensure the specific drawers for the top are set aside. -
Stain the top drawers:
Apply the warm walnut wood stain to the top row of drawers using a clean rag. Wipe with the grain, working the stain into the carved grooves. Wipe away excess after a typically 5-10 minute penetration time and let dry completely. -
Prime the lower drawers:
For the remaining drawers and the dresser frame (if you are painting it), apply a high-quality bonding primer. Use a brush to get into the diagonal grooves first, then roll the flat surfaces. -
Paint the grooves:
Once primed, start your color coat by using a small angled brush to paint inside the routed diagonal lines of the lower drawers. Painting these first prevents drips later. -
Roll the flats:
Immediately after brushing the grooves, use a foam roller to apply the cream paint to the flat drawer fronts. This smooths out any brush marks for a factory-like finish. -
Refine the frame:
While the drawers dry, address the dresser body. In the inspiration photo, the top and sides match the stained wood of the top drawers. Stain these areas carefully, taping off any internal areas if you want them painted. -
Apply second coats:
Lightly sand painted surfaces with fine-grit paper if needed, then apply a second coat of cream paint to ensure solid opacity.
Bleeding Lines?
If stain bleeds into areas you want to keep natural or paint later, use a sharp utility knife to score the wood grain before staining. This severs the fibers and creates a liquid barrier.
Step 3: Assembly
-
Seal the wood:
Apply a water-based polyurethane topcoat to the stained top drawers and the wooden frame. I prefer a matte or satin finish to keep the look modern. -
Seal the paint:
Apply the same topcoat over the painted drawers for durability, especially near the handles where hands will touch often. -
Drill for hardware:
Mark the center of each drawer for the new knobs. Drill pilot holes carefully to avoid splitting the wood, especially near your routed lines. -
Install knobs:
Screw in the gold knobs. Tighten them by hand to ensure they don’t spin. -
Reinsert drawers:
Slide the drawers back into their tracks, ensuring the diagonal pattern aligns perfectly across the front.
Pattern Play
Instead of uniform diagonals, try a herringbone pattern or varying the width of the spaces between grooves for a more eclectic, geometric modern art vibe.
Step back and admire how the simple addition of texture completely redefines the character of your furniture
One Big Geometric Triangle Statement
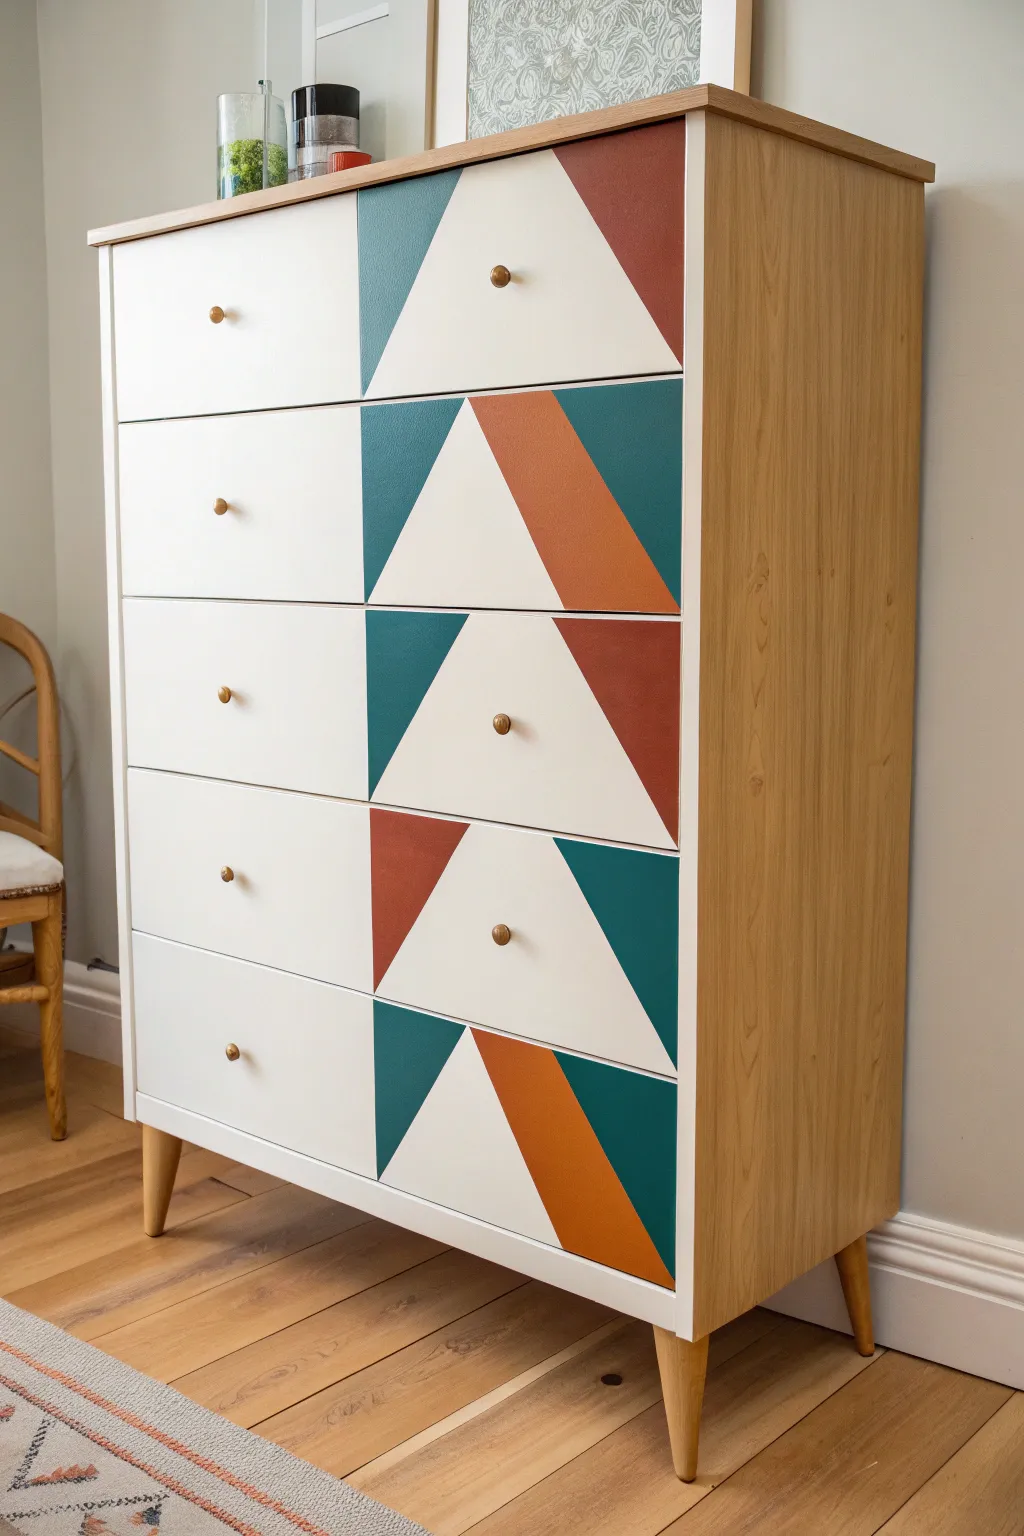
Transform a plain wooden dresser into a striking modern statement piece with this bold geometric makeover. By using painter’s tape to create crisp triangles in teal, terracotta, and white, you’ll achieve a high-end custom look that adds instant personality to any room.
Step-by-Step Guide
Materials
- Unfinished wooden dresser (like IKEA Tarva)
- Sandpaper (120 and 220 grit)
- White primer
- Paint: White (eggshell or satin finish)
- Paint: Teal/Deep Green (eggshell or satin finish)
- Paint: Terracotta/Burnt Orange (eggshell or satin finish)
- High-quality painter’s tape (FrogTape or similar)
- Small foam roller and tray
- Angle sash brush (1.5 inch)
- New gold or brass drawer knobs
- Clear polyurethane topcoat (satin)
- Ruler or straight edge
- Pencil
- Screwdriver
Step 1: Preparation and Base Coat
-
Remove hardware:
Begin by removing all the drawers from the dresser frame. Unscrew and remove the existing knobs or handles and set them aside if you plan to reuse them, though new hardware really elevates this look. -
Sand the surfaces:
Lightly sand the drawer fronts and the visible parts of the dresser frame using 120-grit sandpaper to remove any rough spots. Follow up with 220-grit for a smooth finish, then wipe away all dust with a damp cloth or tack cloth. -
Apply primer:
Roll a coat of quality white primer onto the drawer fronts and the side frames if you are painting them. Let the primer dry completely according to the manufacturer’s main instructions. -
Paint the white base:
Using your foam roller, apply two coats of white paint to all the drawer fronts. This ensures a bright, clean background for your geometric shapes. Allow the paint to dry fully—I usually wait overnight to ensure the tape won’t peel it up later.
Crisp Lines Secret
Always seal your tape edge with the BASE color first. If white is the base, brush white over the tape edge before adding color. This blocks leaks perfectly.
Step 2: Creating the Geometric Design
-
Plan the layout:
Stack the drawers back into the frame temporarily. This is crucial for visualizing how the triangles will flow across the different levels. The design relies on alternating the position of the main triangle peak on each drawer. -
Mark the center points:
Using a ruler, find the center width of each drawer front and make a tiny pencil mark at the top and bottom edge. This will guide where the peaks of your triangles sit. -
Tape the first angle:
Apply painter’s tape from the bottom corner of the drawer towards your center mark at the top edge. Press the tape down firmly, especially along the edge where paint will be applied. -
Tape the opposing angle:
Tape from the opposite bottom corner to meet the first piece of tape at the top center, forming a large central triangle. The area created outside this triangle will be your colored sections. -
Create the secondary stripe:
For drawers that feature the split-color design (like the second and bottom drawers in the photo), lay a strip of tape parallel to one side of your main triangle, leaving about a 2-3 inch gap for the contrasting orange stripe. -
Seal the tape edges:
To get super crisp lines, brush a very light layer of the base white paint over the edges of your painter’s tape. This seals the tape so no colored paint can bleed underneath.
Fixing Bleeds
If paint bleeds under the tape, wait for it to fully dry. Then, gently scrape the excess with a crafting knife or touch up with a tiny artist’s brush.
Step 3: Adding Color and Finishing
-
Paint the Teal sections:
Using a small brush or mini roller, fill in the designated triangular sections with your deep teal paint. Apply two thin coats rather than one thick one for the smoothest finish. -
Paint the Terracotta sections:
Carefully paint the contrasting angular stripes or alternating corner sections with the terracotta color. Be mindful not to get paint on the white central triangle. -
Remove tape while damp:
Peel off the painter’s tape slowly at a 45-degree angle while the final coat of paint is still slightly tacky. This helps prevent the dried paint from cracking or pulling away with the tape. -
Let it cure:
Allow the geometric designs to dry completely for at least 24 hours. The paint needs to be hard enough to handle the protective coat without smudging. -
Apply topcoat:
Protect your hard work with a layer of clear satin polyurethane. Apply it with a high-quality synthetic brush to avoid brush strokes, covering the entire drawer front. -
Reassemble:
Once the topcoat is fully dry, install your new gold or brass knobs into the original holes. Slide the drawers back into the frame to reveal your completed geometric masterpiece.
Enjoy the satisfaction of seeing your custom geometric artwork every time you open a drawer
Checkerboard Drawer Pattern
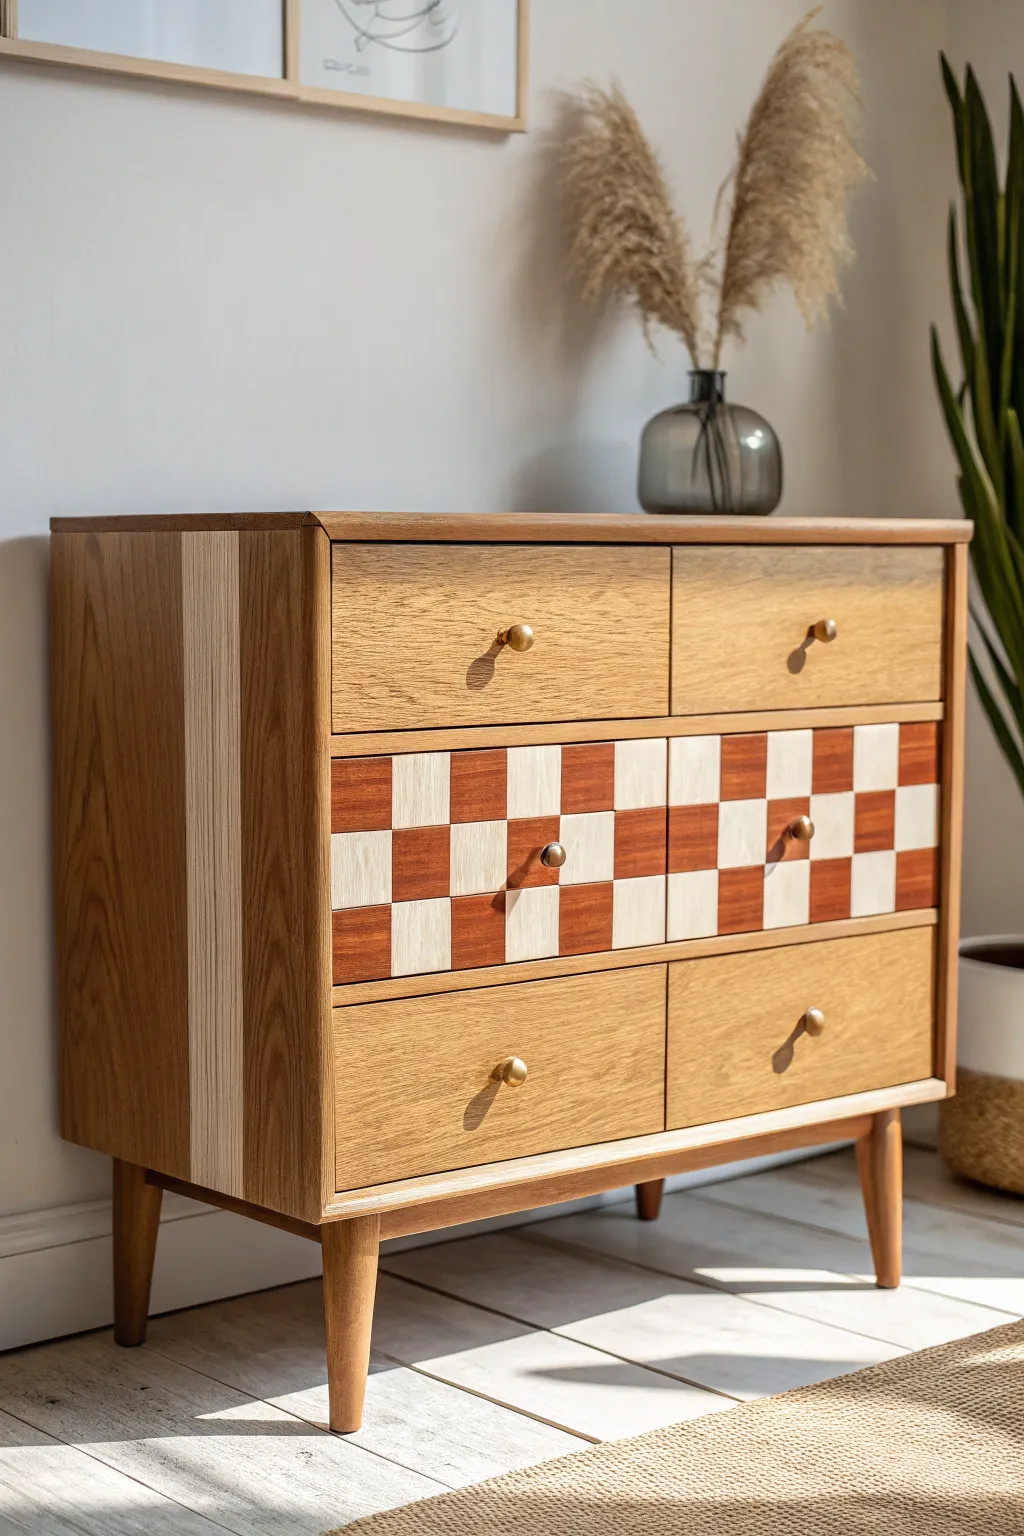
Transform a standard dresser into a statement piece by combining natural wood tones with a bold, retro-inspired checkerboard pattern. This project focuses on highlighting the beautiful grain of the wood while adding geometric intrigue to the center drawers and side panels.
Detailed Instructions
Materials
- Wooden dresser (preferably with flat-front drawers)
- Orbital sander with 100, 150, and 220-grit sandpaper
- Painter’s tape (high quality, for delicate surfaces)
- Reddish-brown gel stain (e.g., mahogany or cherry)
- Natural or clear stain/oil
- Polycrylic topcoat or furniture wax
- Ruler or framing square
- Pencil
- X-Acto knife or sharp utility blade
- Clean lint-free rags
- Small foam brushes
- Brass knobs (optional upgrade)
Step 1: Preparation and Sanding
-
Dissassemble the piece:
Begin by removing all drawers from the dresser unit. Unscrew and remove the existing hardware, keeping the screws in a labeled baggie so you don’t lose them. -
Clean surfaces:
Wipe down the entire dresser with a damp cloth and mild soap to remove dust, old wax, or grime. Let it dry completely. -
Initial sanding:
Using your orbital sander and 100-grit paper, sand down existing finish on the drawer fronts, the top, and the sides. Move to 150-grit to smooth it out. -
Final smooth:
Finish the sanding process with 220-grit paper. The wood should feel extremely smooth to the touch. Wipe away all sanding dust with a tack cloth or slightly damp rag.
Bleeding Lines?
If stain bleeds under the tape, use a sharp craft knife to gently scrape away the excess pigment. Then, touch up the spot with a tiny artist brush and natural stain.
Step 2: Creating the Side Detail
-
Tape the stripe:
On the left side panel of the dresser carcass, measure about 4 inches in from the front edge. Run a vertical strip of painter’s tape from top to bottom. -
Add secondary tape line:
Place a second strip of tape parallel to the first, creating a gap about 2-3 inches wide. This gap will remain natural wood. -
Stain the body:
Apply your darker reddish-brown stain to the main body of the dresser, avoiding the taped-off strip. I find using a rag gives me more control near the tape lines. -
Peel and seal:
Once the dark stain is dry, peel the tape. Apply a clear sealant or natural oil to that lighter strip so it pops against the darker wood.
Step 3: Mapping the Checkerboard
-
Measure the drawers:
Focus on the two middle drawers. Measure the total width and height of the drawer face to determine your grid size. Aim for squares approximately 2×2 inches. -
Grid lines:
Use a pencil and long ruler to lightly draw your grid directly onto the bare wood of the drawer fronts. -
Mark your colors:
Lightly mark an ‘X’ or a small dot in every other square. These marked squares will receive the darker stain, creating the checkerboard effect. -
Score the lines:
Take a sharp utility knife or X-Acto blade and firmly score along your pencil lines. This cuts the wood fibers and creates a tiny physical barrier that stops stain from bleeding.
Level Up: Wood Grain
Alternate the direction of the wood grain if you are using veneer sheets instead of staining. Vertical grain for dark squares and horizontal for light creates amazing depth.
Step 4: Staining the Pattern
-
Tape the first set:
Tape off the ‘light’ squares. Ensure the tape is pressed down firmly, especially near the scored edges. -
Apply dark stain:
Using a small foam brush or corner of a rag, apply the reddish-brown gel stain to the exposed squares. Gel stain is preferable here because it’s thicker and less likely to run. -
Remove tape immediately:
Carefully peel back the tape while the stain is still wet to keep lines crisp. Let this dry completely before moving to the next set. -
Stain remaining wood:
For the top and bottom drawers (and the ‘light’ squares on the middle drawers), apply a natural or clear stain to protect the wood without darkening it significantly.
Step 5: Finishing Touches
-
Apply topcoat:
Once all stains are fully cured (check your product’s label), seal the entire piece with a matte or satin polycrylic. Apply 2-3 coats, sanding lightly with high-grit paper between coats. -
Reassemble:
Insert the drawers back into their slots. -
Install hardware:
Finish the look by screwing in simple brass knobs. The gold tones will complement the warm wood beautifully.
Step back and admire how the geometric pattern brings a fresh, bespoke energy to the room
Stenciled Faux Inlay on Drawers
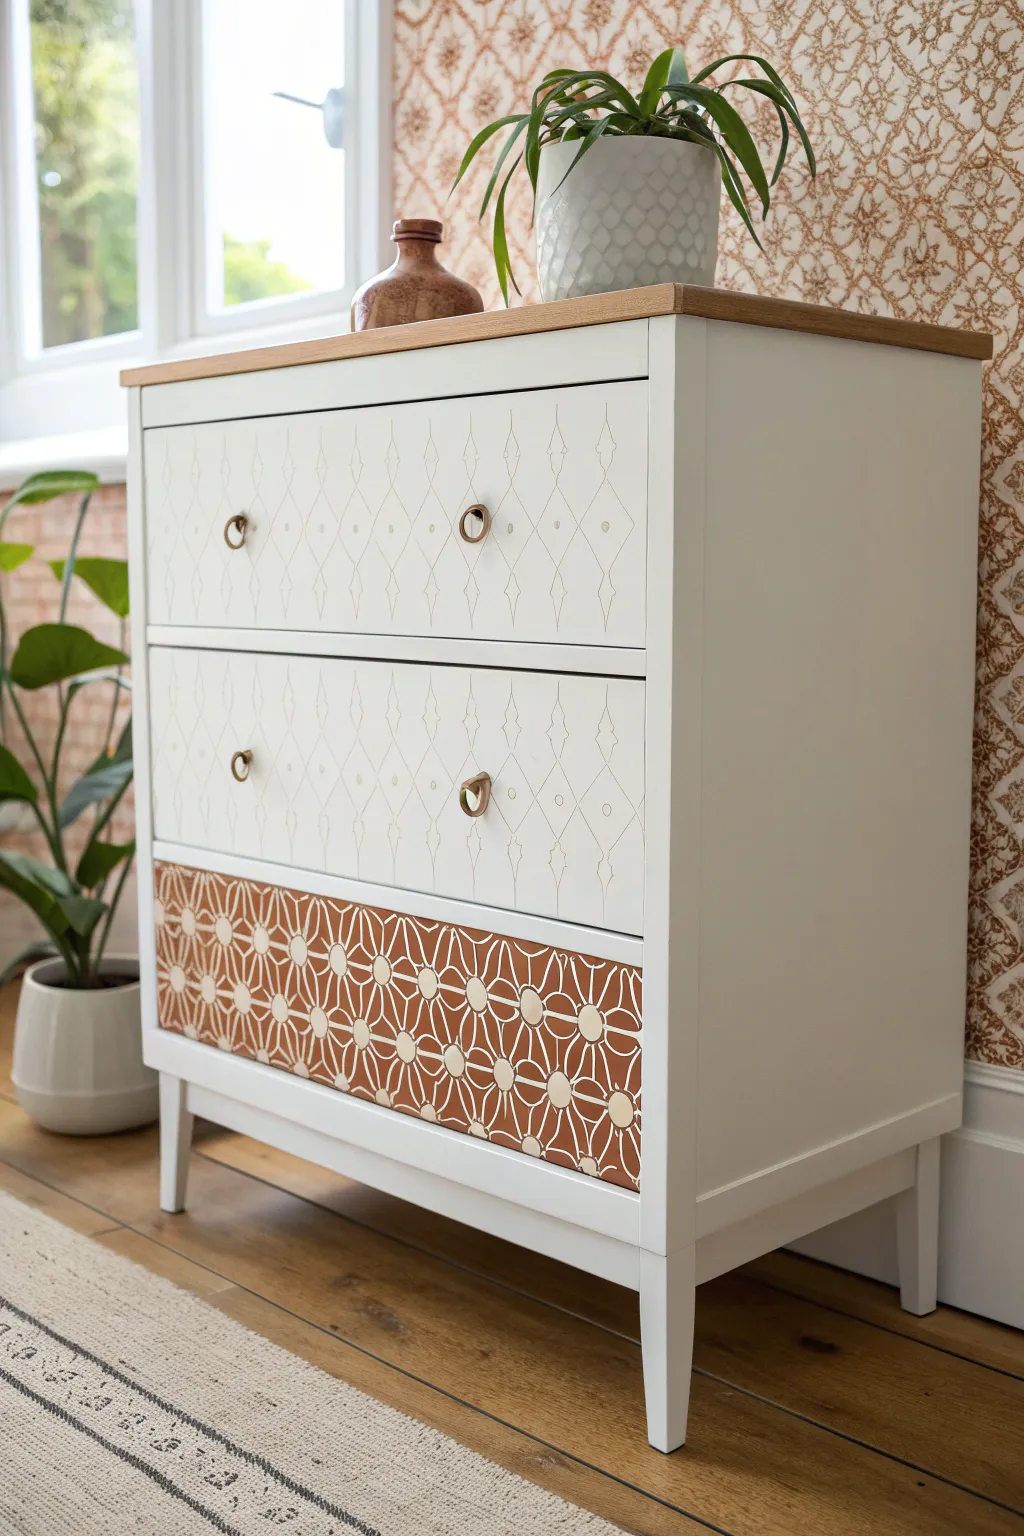
Elevate a plain chest of drawers into a statement piece using paint and stencils to mimic intricate inlay work. This project features two contrasting patterns—a subtle, barely-there lattice for the top drawers and a bold, terracotta geometric design for the bottom.
Step-by-Step Tutorial
Materials
- 3-drawer wooden chest (like IKEA Hemnes)
- Sandpaper (120 and 220 grit)
- Painter’s tape
- Primer (bonding primer recommended)
- White or cream chalky finish paint
- Terracotta or rust-colored chalky finish paint
- Clear matte varnish or wax
- Geometric lattice stencil (Top design)
- Floral-geometric tile stencil (Bottom design)
- Stencil brushes or high-density foam rollers
- Spray adhesive (repositionable)
- Small artist brush
- Gold or brass ring pulls
- Drop cloth
Step 1: Preparation & Base Coat
-
Remove hardware:
Begin by unscrewing all existing knobs or handles from the drawers. Keep the screws safe if you plan to reuse them, though switching to ring pulls really completes this look. -
Clean and sand:
Wipe down the entire dresser to remove dust and grease. Scuff sand the surfaces you plan to paint (the frame and drawer fronts) with 120-grit paper to help the paint adhere. Wipe away the dust thoroughly. -
Protect the top:
If your dresser has a natural wood top you want to preserve, carefully apply painter’s tape along the edges where the wood meets the frame. Cover the rest of the top with paper or plastic. -
Prime the surface:
Apply a coat of bonding primer to the frame and drawer fronts. This step is crucial for durability, especially if the original finish is glossy or laminate. -
Apply the base color:
Paint the frame and all three drawer fronts with your white or cream chalky finish paint. Use a roller for large flat areas and a brush for corners. Let this dry completely according to the can’s instructions, then apply a second coat for full opacity.
Step 2: Stenciling the Patterns
-
Prep the bottom drawer:
Remove the bottom drawer and lay it flat on a work surface. Measure the center to align your stencil symmetrically. -
Stencil the terracotta base:
For the bottom drawer design, you’re actually painting the negative space. Secure your floral-geometric stencil with spray adhesive. Load a foam roller with the terracotta paint, offload the excess onto a paper towel (this is key to prevent bleeding), and roll over the stencil. This creates the dark background with the white pattern showing through. -
Detail the bottom pattern:
Once the terracotta layer is dry, you might want to add depth. I sometimes take a very small artist brush with a lighter cream or gold paint to highlight the circle motifs within the pattern, adding that ‘inlay’ dimension. -
Prep top drawers:
Place the top two drawers on your flat surface. For these, we want a subtle look. We will use the same white base color, but in a slightly different sheen or shade, or use a very pale grey for the stencil. -
Apply the lattice stencil:
Secure the fine lattice stencil. Using a very dry stencil brush, lightly stipple a pale grey or beige paint over the design. The goal is a whisper of a pattern, not a bold contrast. -
Add metallic accents:
To mimic the look of inlaid metal, use a small detail brush to add tiny dots of gold or copper paint at the intersections of the lattice lines on the top drawers.
Bleed Fixer
Paint bled under the stencil? Don’t panic. Wait for it to dry completely, then use a small, flat artist brush and your base white paint to carefully touch up the edges.
Step 3: Finishing Touches
-
Seal the work:
Once all paint is fully cured (give it at least 24 hours), apply a clear matte varnish or wax over the drawer fronts and frame to protect your handiwork from scratches and wear. -
Install hardware:
Attach the new brass ring pulls. If your new hardware requires different hole spacing than the old knobs, you should have filled the old holes and drilled new ones during the prep phase. -
Reassemble:
Slide the drawers back into the frame. Step back and check that the patterns visually balance each other.
Textured Effect
Mix a little texture medium or plaster powder into your stencil paint. This builds physical height, making the stencil feel like real carved inlay.
Enjoy the custom, high-end look of your newly refreshed furniture piece
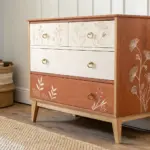
Hand-Painted Floral Drawer Details
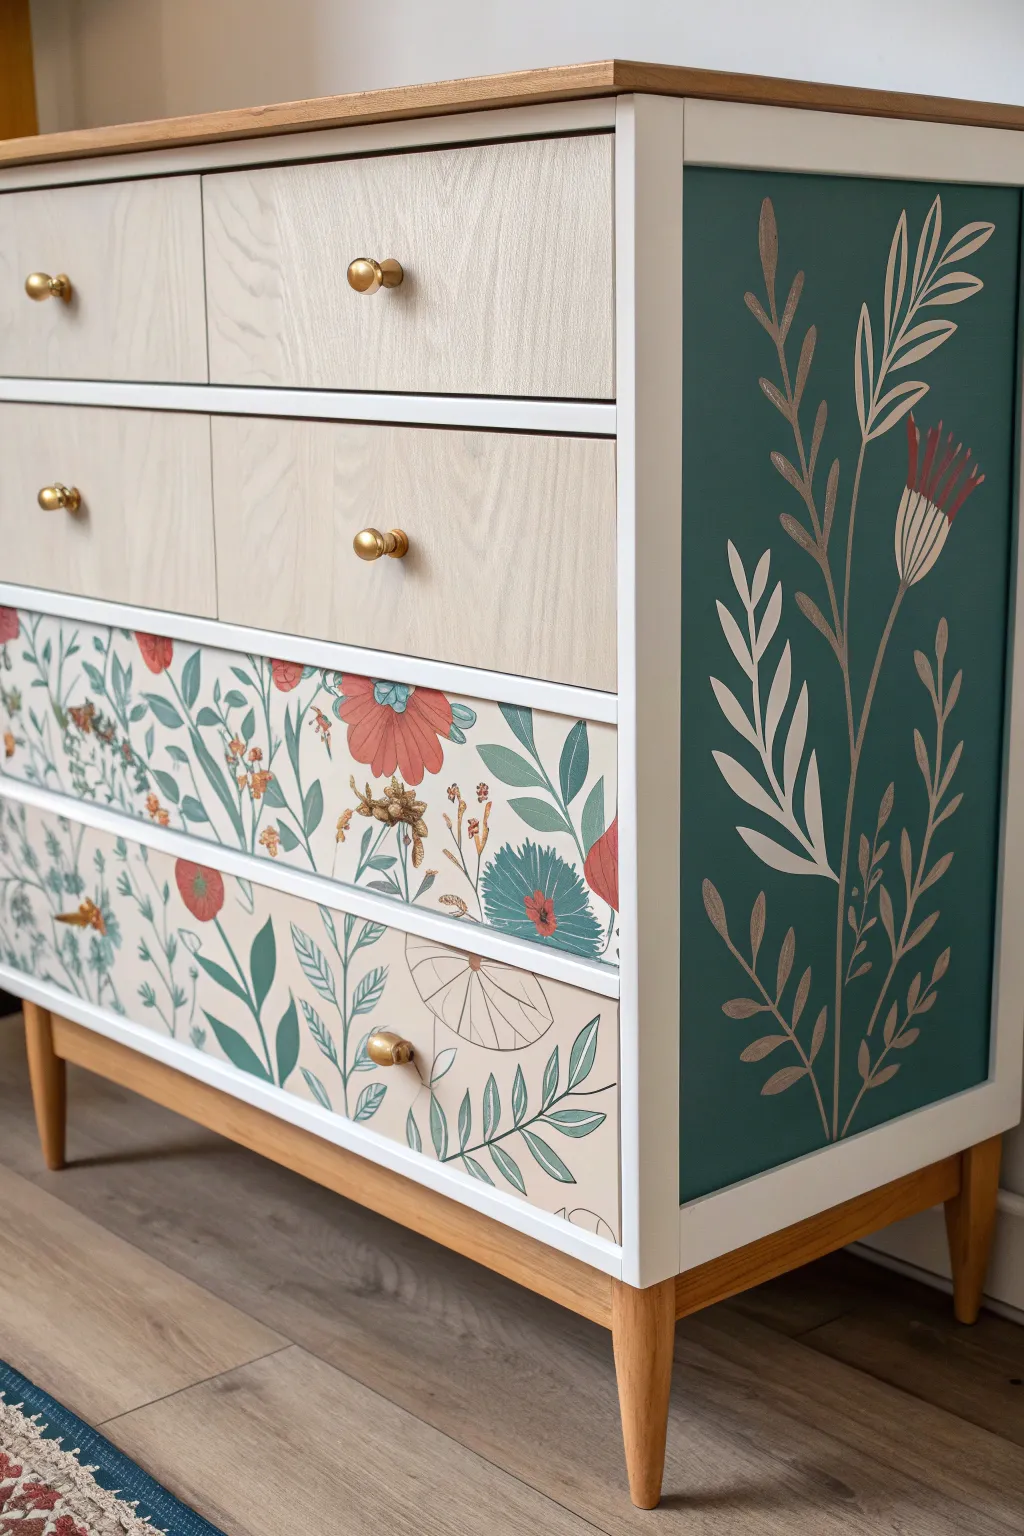
Transform a plain dresser into a stunning statement piece by combining the natural beauty of wood grain with bold, hand-painted floral accents. This project balances earthy textures with a deep teal side panel and intricate botanical details for a look that feels both modern and enchanted.
How-To Guide
Materials
- Dresser with flat-front drawers
- Sandpaper (120, 220, and 320 grit)
- Orbital sander (optional but helpful)
- Primer (bonding primer)
- White semi-gloss furniture paint
- Teal chalk or mineral paint
- Light wood stain or clear matte polyurethane (for top/legs)
- Patterned floral wallpaper (peel-and-stick or traditional)
- Wallpaper paste (if using traditional)
- Exacto knife or box cutter
- Smoothing tool or credit card
- Fine-detail paintbrushes (liner wash and round brushes)
- Acrylic paints (White, Cream, Muted Red/Burgundy)
- Gold drawer knobs
- Painter’s tape
Step 1: Preparation and Top/Leg Restoration
-
Disassemble the hardware:
Begin by removing all old knobs, pulls, and the drawers themselves. Set the hardware aside or discard if you are upgrading to new pieces like the gold dome knobs shown here. -
Sand the body:
Scuff sand the entire main frame of the dresser with 120-grit sandpaper to remove the old finish and give your primer something to grip. Wipe away all dust with a tack cloth. -
Strip the top and legs:
Since we want to expose the natural wood on the top surface and the legs, use an electric sander or sanding block to completely remove the old varnish. Start with 80-grit if the finish is thick, moving up to 120 and finishing with 220 for a smooth feel. -
Seal the natural wood:
Apply a clear matte polyurethane or a light, natural stain to the freshly sanded top and legs. This seals the wood without hiding its beautiful grain. I like to do two thin coats, sanding lightly with 320-grit paper in between.
Chalk It Up
Before painting the mural, sketch your design directly on the teal paint with a piece of white chalk. It wipes away easily with a damp rag if you make a mistake.
Step 2: Painting the Frame and Sides
-
Prime the frame:
Tape off the newly finished top and legs to protect them. Apply a coat of bonding primer to the sides and front frame of the dresser. -
Paint the white borders:
Paint the front face frame and the edging around the side panels with a crisp white semi-gloss paint. You may need 2-3 coats for full opacity. -
Create the teal canvas:
Tape off the white border on the side panel to create a recessed look. Paint the inner rectangle of the side panel with a deep, rich teal chalk paint. This serves as the background for your large floral mural.
Step 3: Drawer Front Treatments
-
Prep the top drawers:
For the top two drawers, sand them down to raw wood similar to the top surface. If the wood underneath isn’t pretty, you can use a high-quality light wood grain contact paper instead. -
Apply patterned paper:
For the bottom two drawers, measure the drawer fronts precisely. Cut your floral wallpaper to size, leaving a slight overhang. -
Adhere and trim:
Carefully apply the wallpaper to the bottom drawer fronts, using a smoothing tool to push out air bubbles from center to edge. Use a sharp Exacto knife to trim extreme edges flush with the drawer sides.
Metallic Magic
Mix a tiny drop of gold paint into your cream acrylics for the side leaves. It will catch the light subtly and tie in beautifully with the gold drawer hardware.
Step 4: Hand-Painting the Side Mural
-
Draft the stems:
On the dry teal side panel, lightly sketch your botanical design with white chalk. Draw three main vertical stems rising from the bottom right corner. -
Paint the main stems:
Using a liner brush and diluted cream or light taupe acrylic paint, trace over your stem lines. Keep the pressure light so the lines taper naturally. -
Add foliage:
Paint elongated, pointed leaves branching off the stems. Mix a sheer white for some leaves to make them look translucent and ghost-like, and solid cream for others. -
Paint the bloom:
For the feature flower (the thistle-like bloom on the right), paint the bulbous base in cream with vertical hatch lines. Add the petals exploding upward using quick strokes of muted red or burgundy paint. -
Detail work:
Go back in with your smallest brush to add veins to the leaves and small illustrative details. Painting these veins in a slightly darker taupe adds lovely dimension.
Step 5: Final Assembly
-
Seal the painted work:
Once the side mural is fully dry (give it at least 24 hours), gently brush a clear protective topcoat over the teal panel to protect your artwork from scuffs. -
Drill hardware holes:
If your new knobs require different spacing, you should have filled the old holes before painting. Drill new pilot holes centered on each drawer front. -
Attach knobs:
Screw in the spherical gold knobs. Their simple shape complements the busy floral patterns perfectly. -
Insert drawers:
Slide the drawers back into their tracks, placing the wood-finish ones on top and the floral-papered ones on the bottom.
Step back and admire how you’ve turned a standard storage unit into a blooming work of art.
Painted Knobs, Pulls, and Drawer Edges
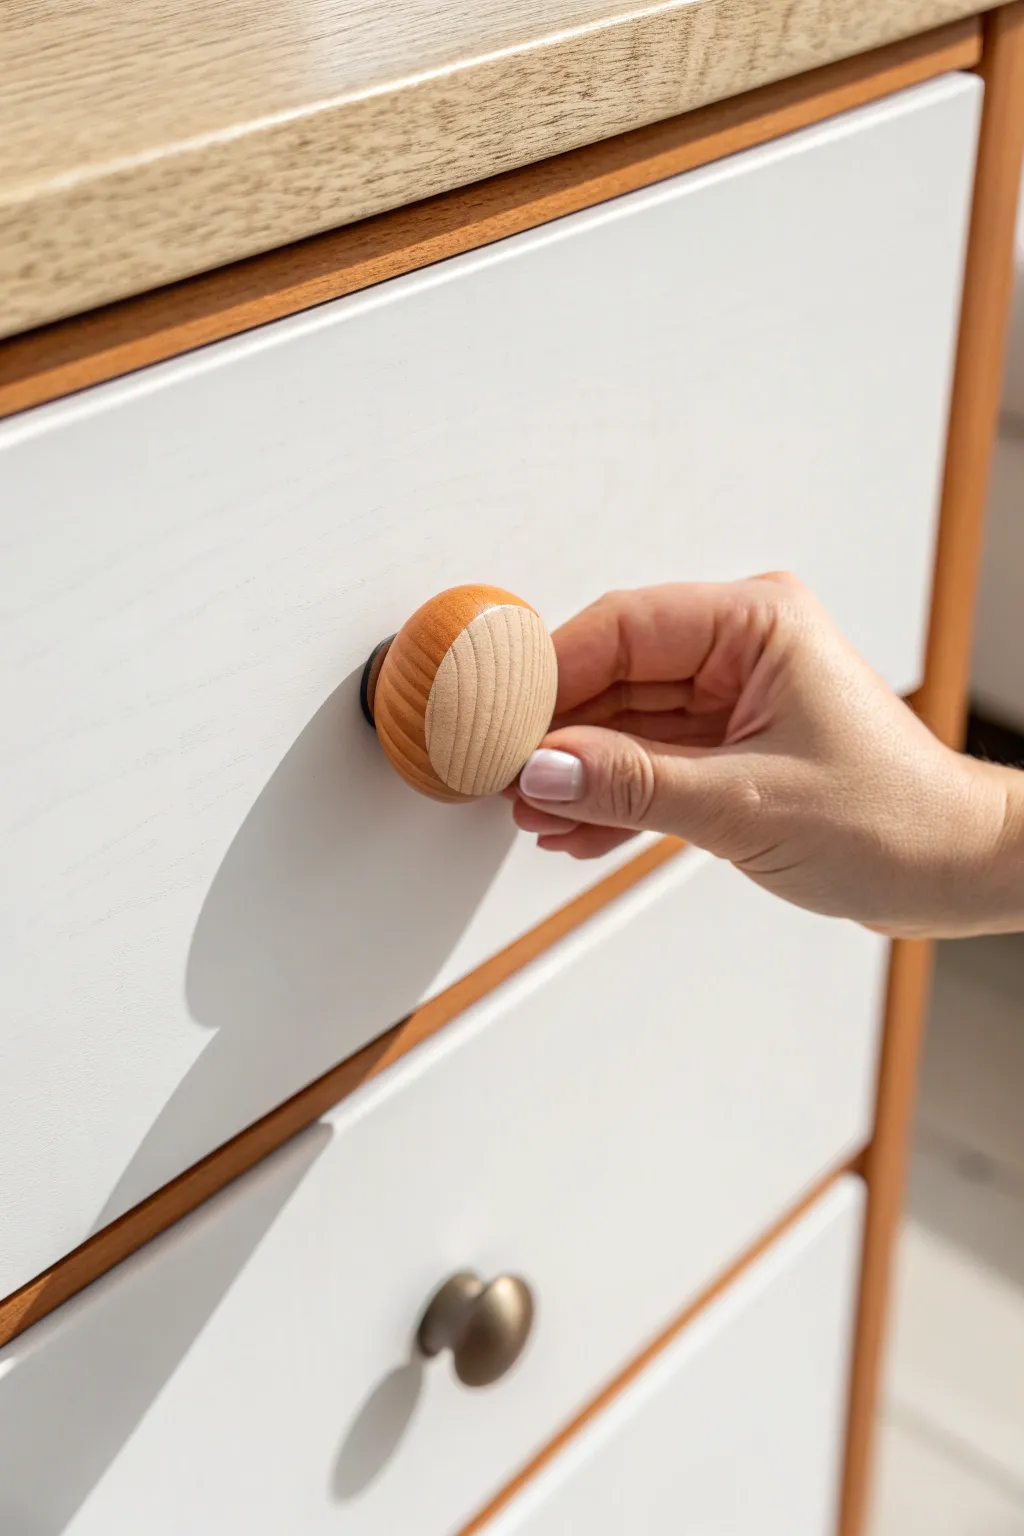
Transform a plain wooden dresser into a modern masterpiece by pairing crisp white paint with the warmth of natural wood details. This project highlights how leaving drawer edges and knobs unpainted can create a sophisticated, custom-framed look that adds depth and character to your furniture.
Step-by-Step
Materials
- Wooden dresser (unfinished or stripped)
- White furniture paint (chalk or satin finish)
- Painter’s tape (high-quality)
- Sandpaper (120 and 220 grit)
- Tack cloth
- Small foam roller
- Angled sash brush (1.5 – 2 inch)
- Clear matte or satin polyurethane topcoat
- Screwdriver
- Clean rags
- Wood stain (optional, to match existing wood tone)
Step 1: Preparation and Hardware Removal
-
Remove Drawers:
Pull all drawers out of the dresser frame entirely and set them on a drop cloth or work surface. -
Remove Hardware:
Use a screwdriver to carefully remove all knobs or pulls. Place these hardware pieces and their screws in a labeled bag so nothing gets lost. -
Clean Surfaces:
Wipe down the entire dresser and the drawer fronts with a damp cloth to remove dust and grime. If the piece is old, consider a degreaser. -
Initial Sanding:
Lightly sand the drawer fronts and the frames with 120-grit sandpaper to scuff the surface for better paint adhesion. -
Dust Removal:
Wipe away all sanding dust thoroughly using a tack cloth. Any remaining dust will mar your smooth white finish.
Bleed-Through Blues?
If paint crept under the tape, wrap a putty knife in a damp rag and gently scrape the paint off the wood while it’s fresh, or use a sanding block to correct it later.
Step 2: Defining the Edges
-
Tape the Drawer Edges:
Apply painter’s tape precisely along the outer edges of the drawer front face. You want to cover the side lip/trim so it remains unpainted wood. -
Tape the Frame Trim:
Similarly, run tape along the structural wooden frame of the dresser where it meets the drawer openings, ensuring that thin wood strip stays natural. -
Seal the Tape:
Press the tape edges down firmly with your fingernail or a credit card. This prevents white paint from bleeding onto the natural wood areas. -
Protect the Knob Hole:
Place a small piece of rolled tape inside the knob screw hole to keep paint from clogging the threads.
Step 3: Painting the Faces
-
Cut In Borders:
Using your angled brush, carefully paint the borders of the drawer front, brushing away from the tape to minimize bleed. -
Roll the Center:
Use a small foam roller to apply paint to the flat center of the drawer front. This ensures a smooth, brush-stroke-free finish. -
Dry Time:
Allow the first coat to dry completely according to the paint manufacturer’s instructions. -
Second Coat:
Apply a second coat using the same method—cutting in with the brush and rolling the center. For lighter whites, a third coat might be necessary for full opacity. -
Remove Tape:
While the final coat is still slightly tacky (not fully dry), carefully peel back the painter’s tape at a 45-degree angle to reveal the crisp wood line.
Mix & Match Knobs
For a truly bespoke look, mismatch your knobs! Alternate between the wooden mushroom knobs and antique brass pulls on lower drawers for visual interest.
Step 4: Finishing Touches
-
Address the Wood Accents:
If the exposed wood edges look dry or dull, rub a small amount of clear wax or hemp oil onto them with a clean rag to enrich the color. -
Prep the Knobs:
If your original knobs are wood (like the round two-tone one shown), lightly sand them. You can paint half of the knob white or keep it entirely natural. -
Seal the Surface:
Apply a clear topcoat over the painted white surfaces and the exposed wood edges to protect everything from wear and tear. -
Reassemble:
Once the topcoat is fully cured, screw the knobs back into place and slide the drawers back into the frame.
Step back and admire how that subtle sliver of natural wood completely elevates the look of your newly painted dresser
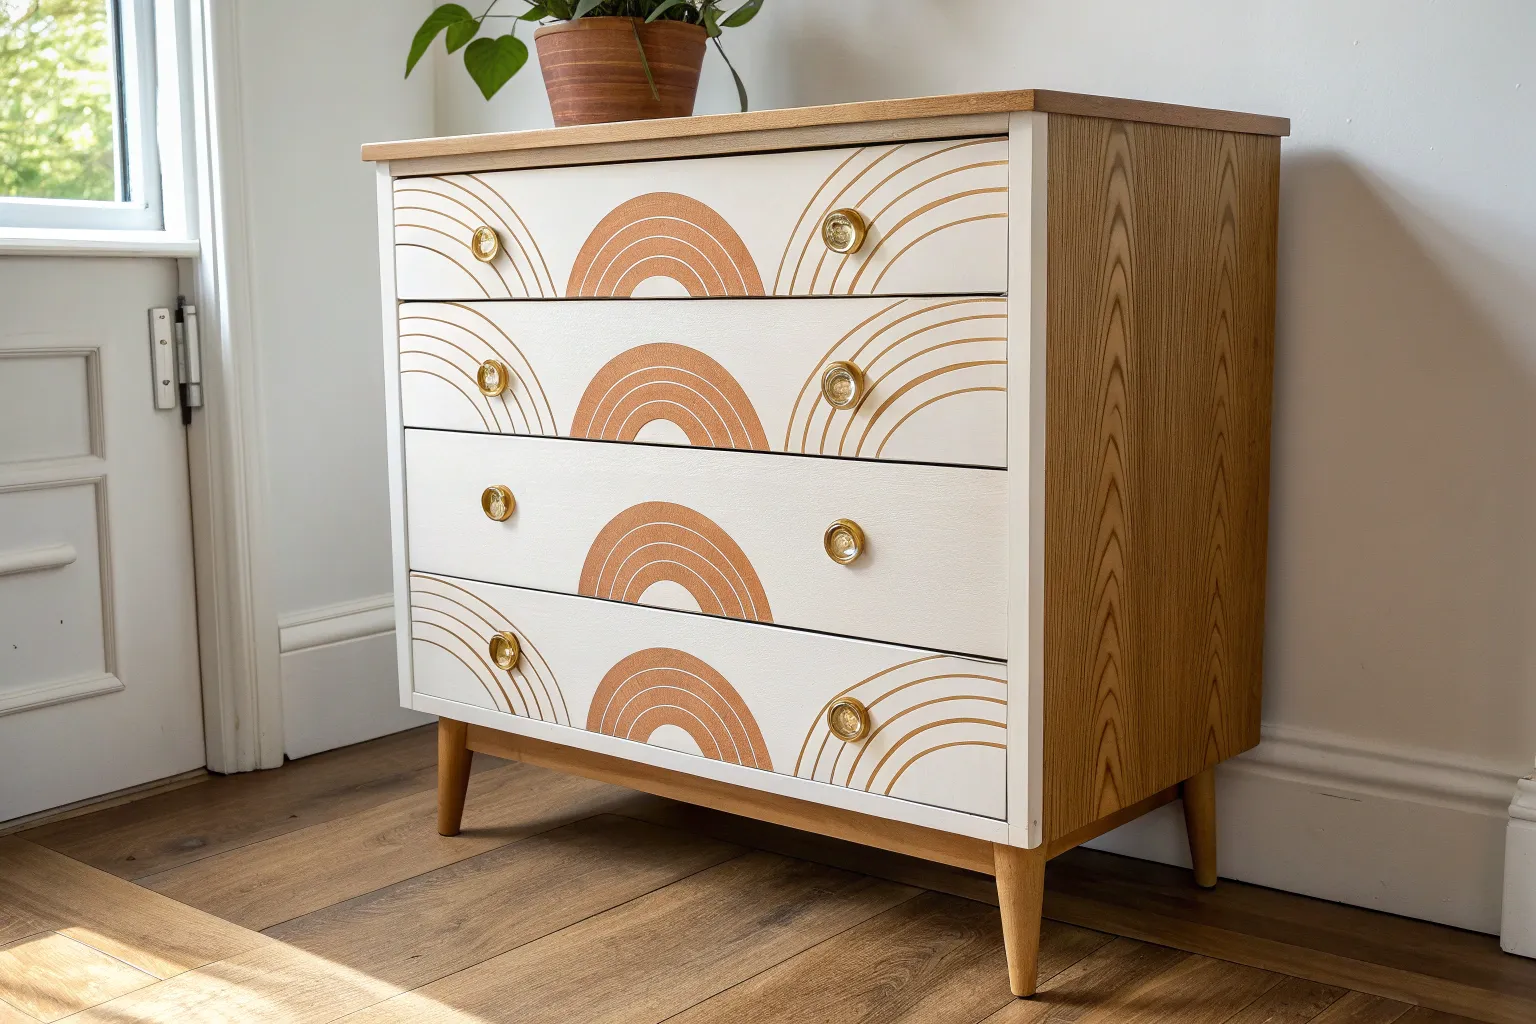
One Continuous Mural Across All Drawers
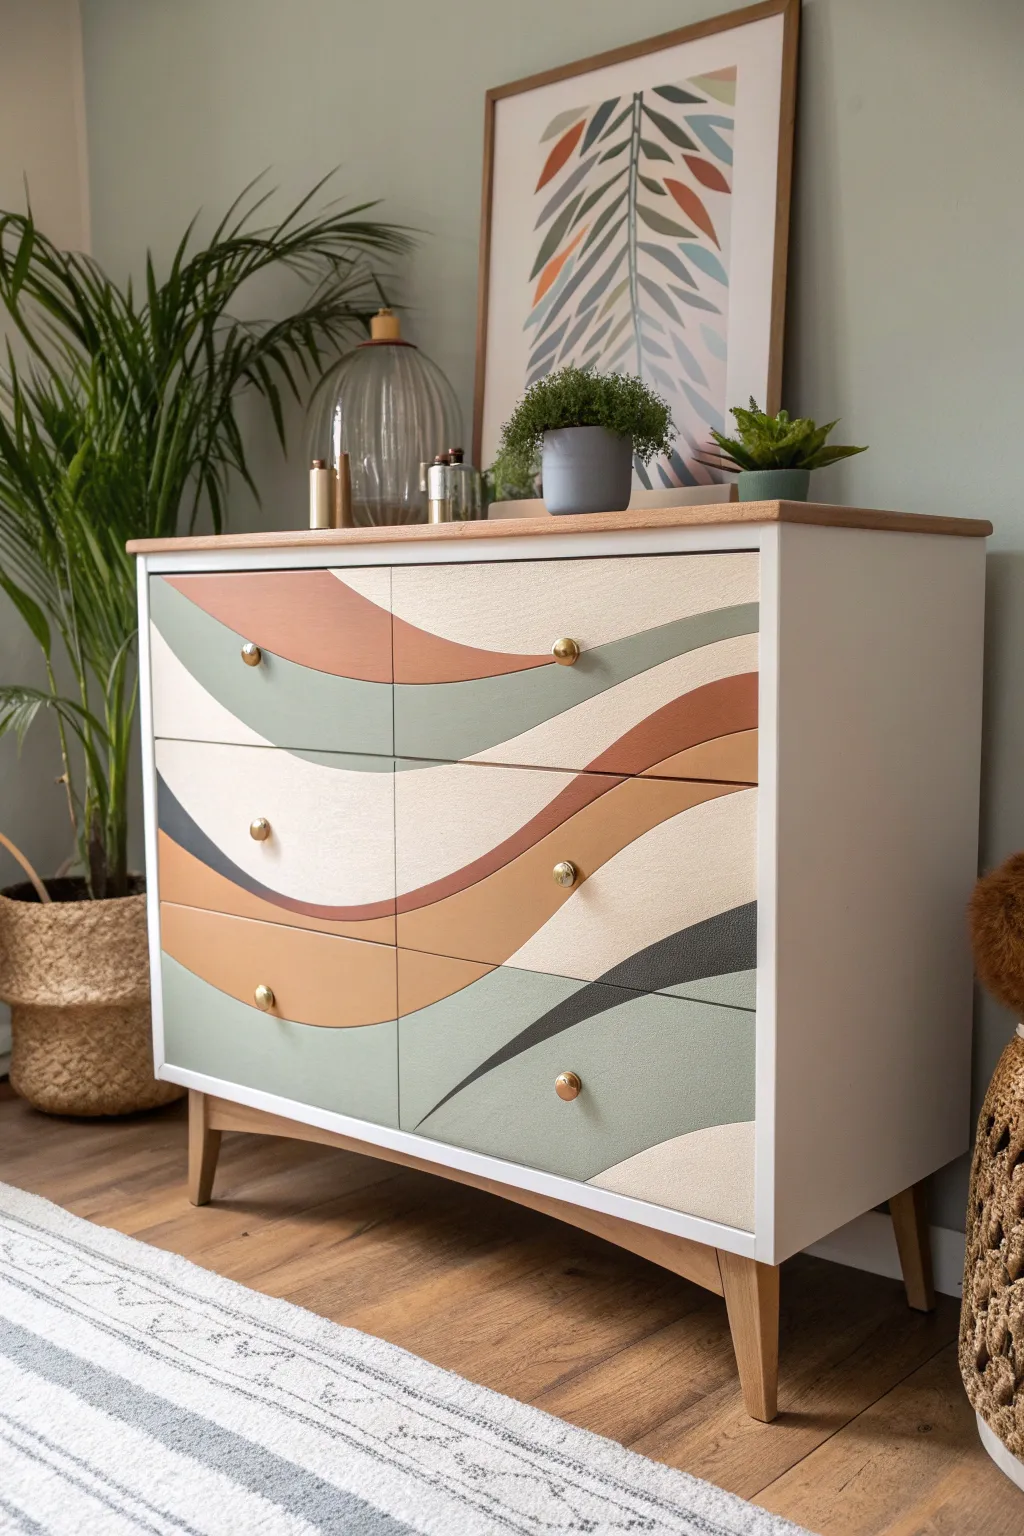
Transform a plain dresser into a statement piece of art with this flowing, continuous design that spans across all drawer fronts. Earthy tones of terracotta, sage green, and charcoal weave together in organic waves, creating a cohesive mural that looks custom-made for a modern bohemian space.
Step-by-Step Guide
Materials
- Wooden dresser (raw or sanded)
- Sandpaper (120 and 220 grit)
- Painter’s tape or FrogTape (delicate surface)
- White primer
- Chalk paint or matte acrylic paint (Cream/Off-White base)
- Chalk paint samples (Terracotta, Sage Green, Charcoal/Black, Tan/Ochre)
- Small foam roller
- Assorted paintbrushes (angled sash brush and fine detail brush)
- Pencil
- Clear matte polycrylic sealer
- Gold drawer knobs
Step 1: Preparation & Base Coat
-
Prep the surface:
Remove all existing hardware from the drawers. If your dresser has a glossy finish, scuff sand the entire front surface with 120-grit sandpaper to give the paint something to grip. Wipe away all dust with a tack cloth or damp rag. -
Establish the frame:
For this look, we want the white frame of the dresser to remain crisp. Tape off the inner edges where the drawers slide in, but paint the thin structural dividers white later to frame your mural. Apply a coat of primer to the drawer fronts and let it dry completely. -
Roll the base color:
Using a small foam roller, apply two smooth coats of your cream or off-white base color to all drawer fronts. This ensures a neutral background for some sections of the wave and boosts the vibrancy of the colored sections. -
Re-insert the drawers:
Once the base coat is fully dry to the touch, carefully slide the drawers back into the dresser. To draw a continuous mural, the drawers must be in their final position so the lines flow seamlessly across the gaps.
Step 2: Mapping the Design
-
Sketch the flow:
Lightly sketch your wave pattern directly onto the drawer fronts with a pencil. Start your lines on one side and carry them straight across the gap to the next drawer. Aim for organic, curvy shapes rather than geometric precision. -
Plan your palette:
Mark each section lightly with a letter (like ‘G’ for Green, ‘T’ for Terracotta) to keep track of your color scheme. This prevents accidental painting of adjacent sections with the same color. -
Check the alignment:
Step back five feet to look at the dresser as a whole. Ensure the curves look natural as they jump across the drawer gaps; adjust your pencil lines now if a transition looks jerky or misaligned.
Paint Wrap Pro-Tip
Paint the top and side ‘thickness’ of the drawer fronts in the same color as the front face. This ensures the design looks continuous even when the drawers are slightly open.
Step 3: Painting the Waves
-
Start with key colors:
Begin with your dominant color, in this case, the sage green. Use an angled sash brush to carefully cut in along the pencil lines. I find it helps to tackle non-touching sections first to avoid smudging wet paint. -
Fill in the shapes:
Once the edges are defined, fill in the rest of the shape. For larger swoops, a mini roller works well to minimize brush strokes, while smaller sections will need a flat artist’s brush. -
Bridge the gaps:
Pay special attention to the edges of the drawers (the thickness of the drawer front). You need to wrap the paint slightly around the edge so that no white line is visible when viewing the dresser from an angle. -
Apply the next tone:
Move on to the terracotta sections. Be steady-handed where colors meet; if you aren’t confident in your freehand lines, you can wait for the green to dry completely and use delicate surface tape to mask the line. -
Add depth:
Incorporate the darker charcoal or black accents. These thin ribbons of dark color act as a visual anchor and create contrast against the lighter pastels. Use a smaller brush here for better control. -
Layering for opacity:
Most chalk paints need two coats for full coverage, especially darker colors like terracotta. Allow the first coat to dry for at least 2 hours before adding a second coat to smoothes out any streaks.
Level Up: Texture
Before sealing, dry-brush a tiny amount of metallic gold paint along one edge of the darker charcoal waves. It catches the light subtly and ties in perfectly with the gold hardware.
Step 4: Finishing Touches
-
Clean up the lines:
Once all colors are dry, inspect your lines. Use a small detail brush and your original cream base paint to tidy up any wobbles where the colors meet, creating a sharp, professional intersection. -
Seal the artwork:
Protect your hard work with a polycrylic sealer. Apply a thin coat with a synthetic brush or a lint-free rag. A matte finish is best here to maintain that soft, earthy chalk-paint look. -
Install the hardware:
Once the sealer has cured (usually 24 hours), attach your new gold knobs. These metallic accents add a pop of brightness that complements the warm terracotta tones beautifully.
Step back and admire how your individual drawers now work together to act as a single, stunning canvas.


Have a question or want to share your own experience? I'd love to hear from you in the comments below!