If you’re repainting a bike, color is the fastest way to make that frame feel like it finally matches you. Here are my favorite paint bicycle color ideas, starting with classic, ride-anywhere looks and drifting into the artsy, head-turning stuff.
Matte Neutral Minimalism
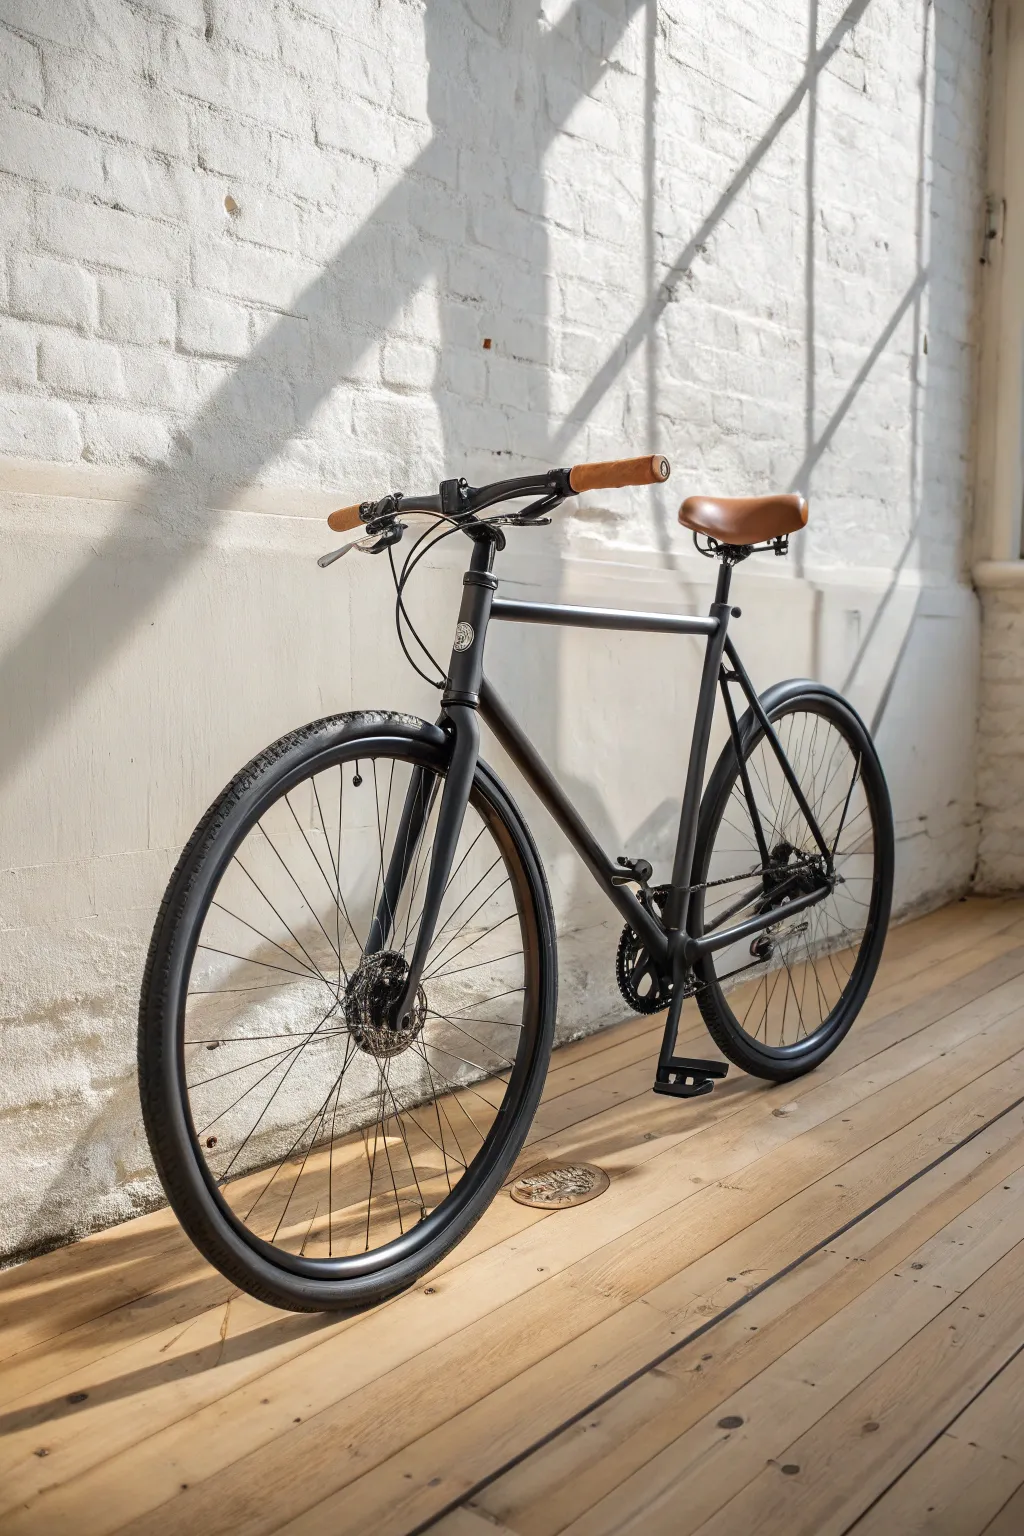
Achieve the ultimate in understated cool with this monochromatic matte black finish that transforms any standard frame into a modern, minimalist ride. The velvety texture absorbs light rather than reflecting it, allowing the silhouette of the bike and the warmth of the leather accents to take center stage.
Step-by-Step Guide
Materials
- Bike frame (stripped of components)
- Degreaser (e.g., TSP or dish soap)
- Sandpaper assortment (220, 400, and 800 grit)
- Masking tape and painter’s plastic
- Self-etching primer spray (grey or black)
- High-quality matte black spray paint (2-3 cans)
- Matte clear coat spray (non-yellowing)
- Respirator mask and safety goggles
- Tack cloth
- Wire brush or steel wool
- Drop cloths or cardboard
Step 1: Preparation & Stripping
-
Disassemble the bike:
Before touching any paint, completely strip the bike frame. Remove the wheels, chain, pedals, crankset, handlebars, seat post, and fork. The goal is to have just the bare metal frame and fork to work with. -
Clean thoroughly:
Scrub the entire frame with a strong degreaser and hot water to remove years of road grime, grease, and old sticker residue. Rinse well and let it dry completely. -
Establish a surface key:
Using 220-grit sandpaper, sand the entire existing paint job. You don’t necessarily need to go down to bare metal unless there is rust, but you must remove the glossy sheen so the new paint sticks. I find a sanding sponge helps get into the tight weld corners. -
Smooth out imperfections:
Switch to 400-grit sandpaper to smooth out the scratches from the coarser paper. Run your hand over the tubes to ensure there are no chips or deep gouges remaining. -
Final cleaning:
Wipe the frame down with a tack cloth or a rag soaked in mineral spirits to remove every speck of sanding dust. Any dust left now will be permanent texture later. -
Mask critical areas:
Use high-quality painter’s tape to completely cover the bottom bracket threads, the head tube interior, and the seat post opening. Painting these threads will make reassembly a nightmare.
Step 2: Priming & Painting
-
Set up your spray booth:
Hang the frame and fork from a sturdy wire or rope in a well-ventilated area. Ideally, hang it at eye level so you can easily walk around it. -
Apply the primer:
Shake your self-etching primer vigorously for at least two minutes. Apply a thin, light coat over the entire frame. Don’t try to get full coverage on the first pass; just get a dusting on there. -
Build primer opacity:
Apply 2-3 coats of primer, waiting about 15 minutes between coats (check can instructions). Once dry, lightly wet-sand with 800-grit paper if the texture feels rough. -
The first coat of matte black:
Start your main color application. Hold the can 8-10 inches away and move in long, sweeping strokes. Start spraying before the stream hits the metal and stop after it passes. Keep this coat light to avoid drips. -
Layering the color:
Apply 3-4 coats of matte black, allowing ample drying time between each (usually 15-30 minutes). Rotate around the hanging frame to ensure you hit the undersides of the tubes. -
Check for consistency:
Inspect the frame under good light. Matte paint hides scratches well but can show ‘striping’ if applied unevenly. Add a final mist coat to even out the finish if needed.
Fixing Drips
If you get a run or drip, don’t wipe it wet! Let it dry completely for 24 hours, sand it flush with 800-grit sandpaper, wipe clean, and respray that specific area.
Step 3: Finishing & Assembly
-
Apply matte clear coat:
To protect your work without adding shine, apply 2 coats of a specific matte-finish clear coat. This seals the paint against rock chips and UV fading. -
Cure time:
This is the hardest part: let the frame cure for at least 24-48 hours before handling it. The paint might feel dry to the touch, but it is still soft underneath and easy to dent. -
Remove masking:
Carefully peel away the painter’s tape from the threaded areas. If the paint bridges over the tape, score the edge lightly with an X-Acto knife first. -
Reassemble with care:
Reinstall your components. Be extremely careful with wrenches near the fresh paint; slip-ups now can scratch the new finish. Grease your threads well. -
Add contrasting accessories:
To match the photo, install a honey-brown leather saddle and matching handlebar grips. This contrast provides the warmth needed to balance the stark industrial black.
Level Up: Stealth Logos
Apply a custom vinyl logo decal in gloss black over the matte paint before the clear coat. It creates a subtle ‘ghost’ effect visible only when the light hits it right.
Enjoy riding your sleek, custom-painted machine through the city.


Crisp White With Dark Details
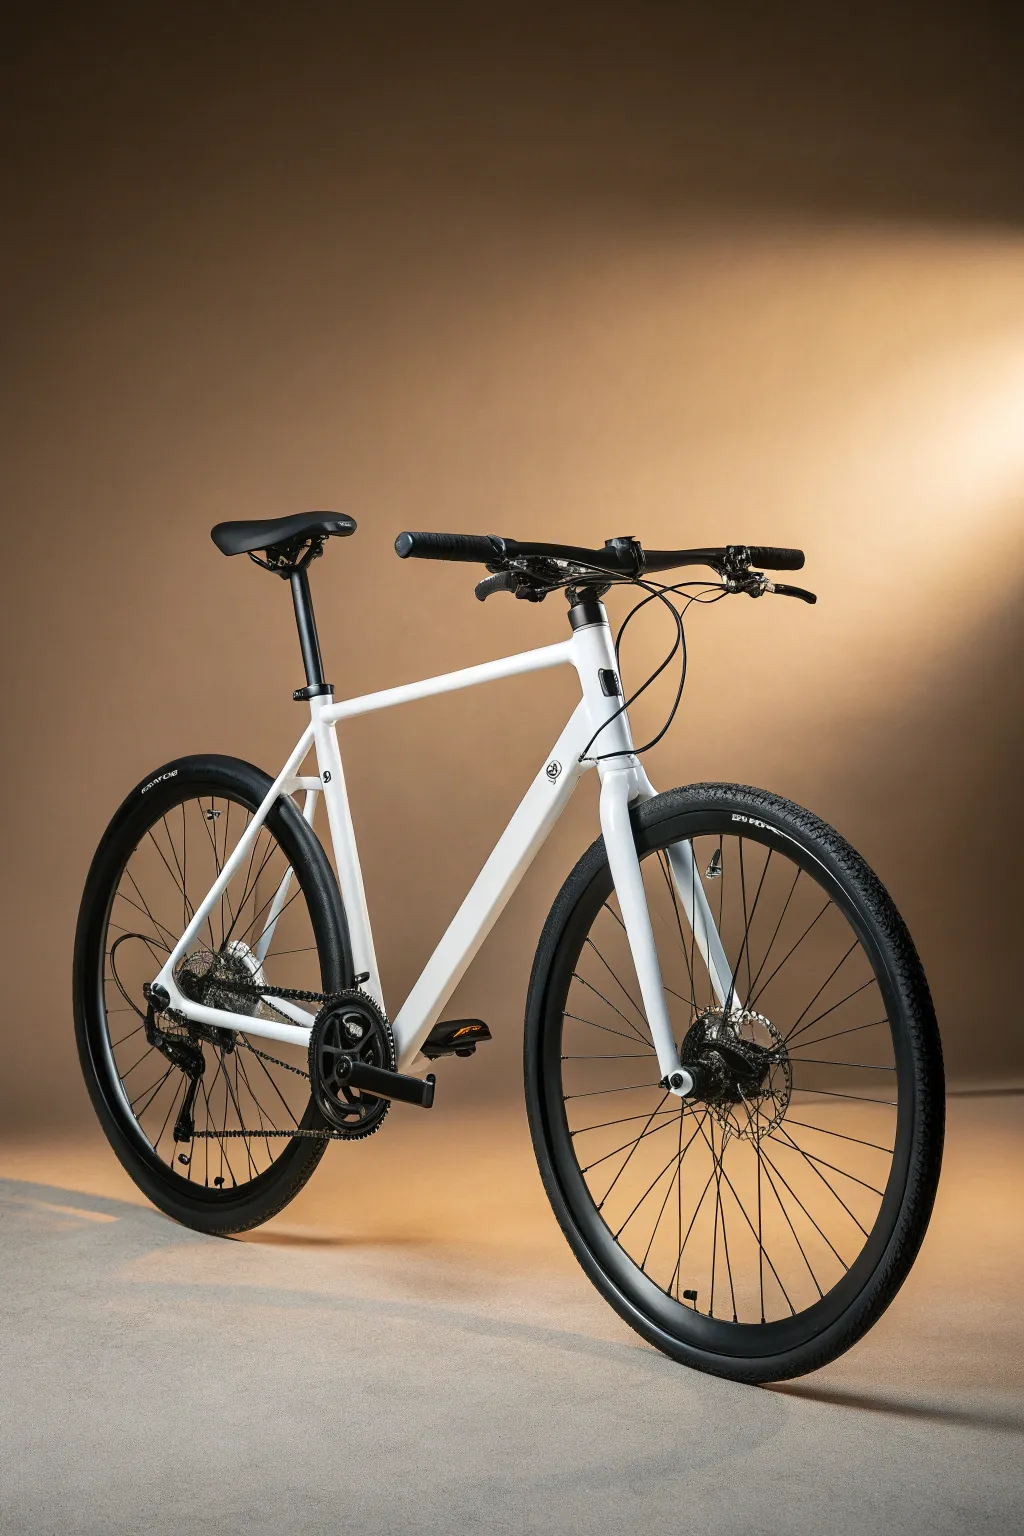
Transform a tired frame into a modern masterpiece with this high-contrast aesthetic. By pairing a glossy, optic white frame with matte black components, you achieve a clean, sophisticated look that feels custom-built and incredibly sleek.
Detailed Instructions
Materials
- Old bicycle frame (steel or aluminum)
- Sandpaper (220, 400, and 800 grit)
- Degreaser or mineral spirits
- Painter’s tape and masking paper
- Self-etching metal primer spray
- High-gloss white spray paint (automotive grade recommended)
- Matte black spray paint (for components)
- Clear coat spray (glossy)
- Hex keys and adjustable wrench
- Wire brush or sanding sponge
- Cleaning rags
Step 1: Disassembly and Prep
-
Strip the bike:
Begin by completely stripping the bicycle down to just the bare frame and fork. Remove the wheels, chain, cranks, derailleur, brakes, handlebars, seat post, and bottom bracket. Label small screws in ziplock bags so reassembly isn’t a headache later. -
Clean thoroughly:
Scrub the frame and fork with a strong degreaser to remove years of road grime, grease, and old sticker residue. Any oil left behind will prevent the paint from sticking. -
Sand the existing finish:
Using 220-grit sandpaper, toughly sand the original paint. You don’t need to go down to bare metal everywhere, but you must remove the glossy clear coat and create a rough texture for the new paint to grip. Use a wire brush for tight corners near the welds. -
Smooth the surface:
Follow up with 400-grit sandpaper to smooth out the scratches from the coarser paper. This ensures your final white finish looks creamy and level rather than scratched. -
Final cleaning:
Wipe the frame down with mineral spirits or tack cloth to remove every speck of dust. From this point on, handle the frame wearing gloves to avoid transferring hand oils. -
Mask critical areas:
Use painter’s tape to completely cover the bottom bracket threads, head tube interior, and seat post opening. Paint inside these threaded areas can make reassembly impossible.
Step 2: Painting the Frame White
-
Hang the frame:
Suspend the frame and fork from a wire or rope in a well-ventilated, dust-free area. Passing a wire through the head tube allows you to access all angles easily. -
Apply primer:
Spray a thin coat of self-etching primer. Keep the can moving constantly to avoid drips. Let this dry for about 30 minutes, then apply a second light coat if any metal is showing through. -
First white coat:
Shake your high-gloss white paint vigorously for two minutes. Apply a very light ‘tack coat’ or mist coat first. It won’t look solid white yet; this just gives the heavier coats something to grab onto. -
Build the color:
After allowing the tack coat to set for 15 minutes, apply your first wet coat. Maintain a distance of 8-10 inches and use smooth, sweeping strokes. I personally like to start at the complicated weld joints and work toward the long tubes. -
Sand between coats:
Once the paint is dry to the touch (usually 24 hours), lightly wet-sand with 800-grit paper to knock down any ‘orange peel’ texture or dust nibs. Wipe clean and dry. -
Final white layers:
Apply 2-3 more thin coats of white until the coverage is perfectly opaque and the finish looks wet and glossy. Let the frame cure for at least 48 hours before applying clear coat or handling it.
Smooth Operator Tip
Warm up your spray cans in a bucket of warm (not hot) water for 10 minutes before painting. This increases pressure and thins the paint for a finer mist.
Step 3: Refinishing Components and Assembly
-
Assess components:
While the frame cures, examine your black parts (stem, seat post, crank arms). If they are scratched or silver, sand them lightly and spray them with matte black paint to match the contrast theme. -
Apply clear coat:
Back to the frame: once the white is cured, apply 2 coats of protective glossy clear coat. This seals the brightness and protects against chips. -
Reassemble the cockpit:
Install the headset and slide the fork back in. Attach the black stem and black handlebars. The stark contrast between the white head tube and black hardware is key to this look. -
Install drivetrain:
Reattach the bottom bracket, black cranks, and pedals. Ensure the chain and derailleur are clean and greased before reinstalling. -
Wheel check:
Clean your rims and tires. If your rims have braking surfaces, ensure they are clean of paint overspray. Mount the black tires and install the wheels onto the white frame. -
Final touches:
Install the black seat post and saddle. Check all bolts for proper torque. Peel off any remaining masking tape carefully.
Level Up: Stealth Mode
For an even sleeker look, replace silver bolts on the stem and bottle cages with black anodized bolts to maintain the strict two-tone palette.
Step back and admire the crisp, factory-fresh lines of your revitalized ride


Soft Pastel Dream Frame
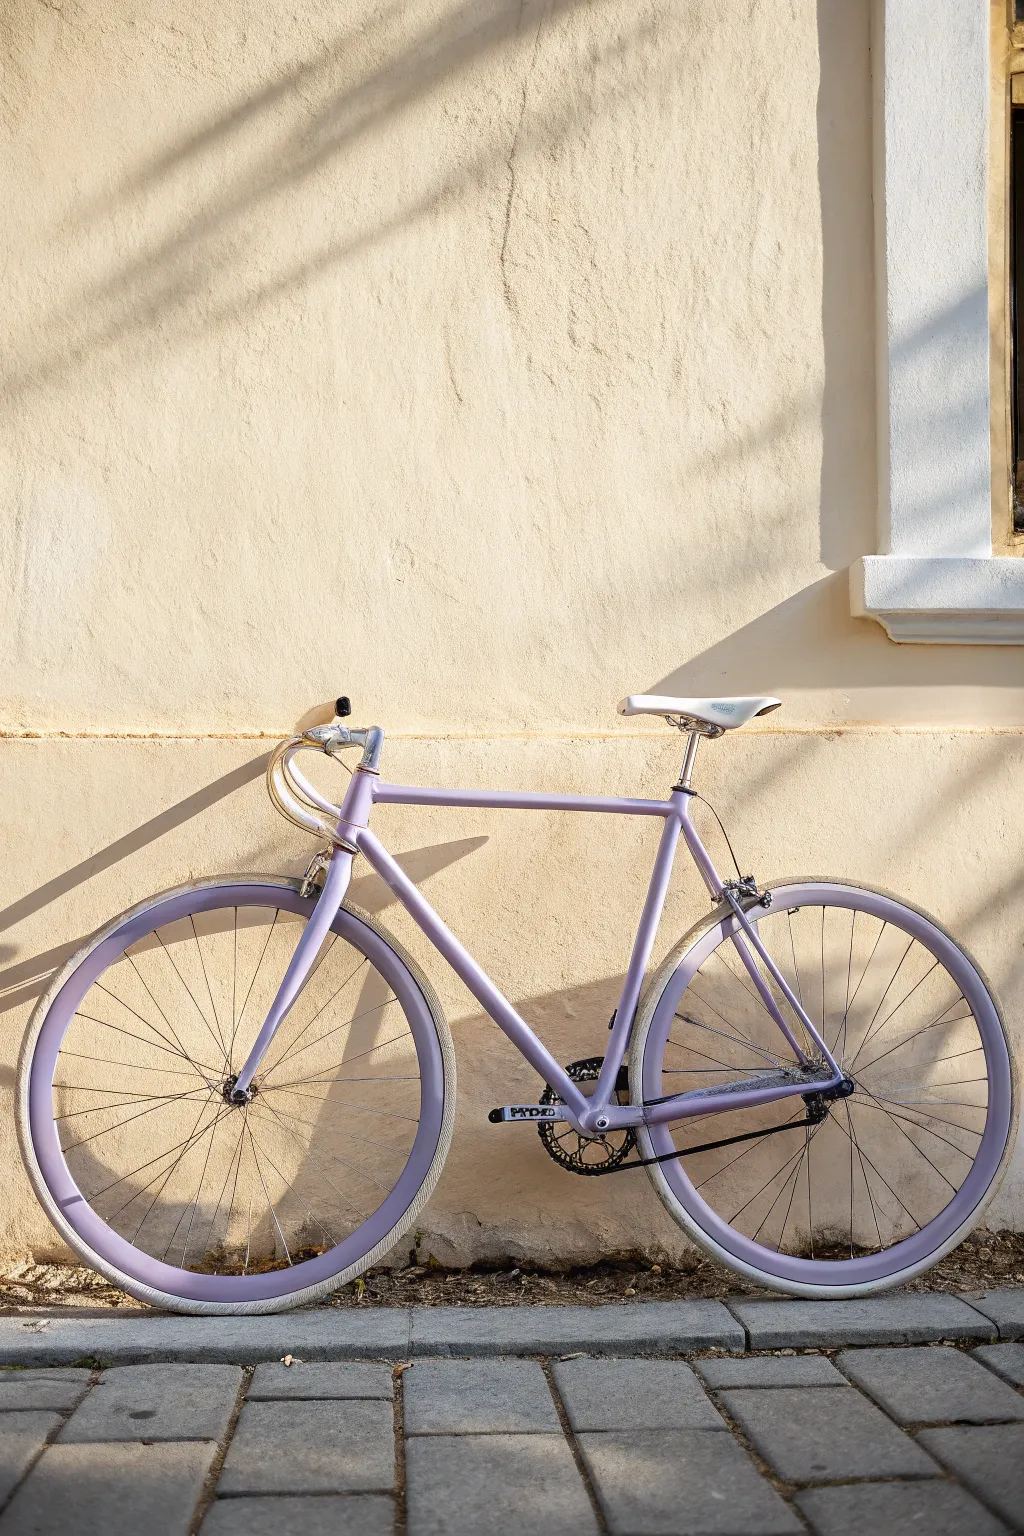
Transform an ordinary fixie into a soft, dreamy ride with this monochromatic pastel project. By matching the frame to the deep-dish rims in a soothing lavender shade, you create a cohesive, custom look that stands out against urban textures.
Step-by-Step
Materials
- Bicycle frame and fork (stripped)
- Deep-V bicycle rims (aluminum)
- 2-3 cans of high-quality spray paint (Lavender/Lilac shade)
- 1 can of self-etching primer
- 1 can of high-gloss clear coat
- Sandpaper (400, 800, and 1200 grit)
- Painter’s tape
- Degreaser or rubbing alcohol
- Clean microfiber cloths
- Drop cloth or cardboard
- Respirator mask and gloves
- Bike stand or wire for hanging parts
Step 1: Preparation & Disassembly
-
Strip the bike down:
Remove all components from the frame, including the handlebars, seat post, bottom bracket, and fork. Store small screws in labeled bags so you don’t lose them. -
Clean surface thoroughly:
Wipe down the frame, fork, and rims with a heavy-duty degreaser. It is crucial to remove all road grime, oil, and old sticker residue. -
Sand the existing finish:
Scuff the original paint on the frame and rims using 400-grit sandpaper. You don’t need to go to bare metal, but the surface must be dull and textured for the new paint to grab. -
Mask key areas:
Use painter’s tape to meticulously cover the bottom bracket threads, head tube interior, and the braking surface of the rims if you plan to use rim brakes. Precise masking here saves hours of cleanup later. -
Final wipe down:
Clean everything one last time with rubbing alcohol and a microfiber cloth to remove sanding dust. Handle parts with gloves from now on to avoid skin oil transfer.
Paint Run Rescue
If you get a drip, don’t wipe it wet! Let it dry completely for 24 hours, sand it flush with 1000-grit paper, and respray that specific area.
Step 2: Priming & Painting
-
Create a painting station:
Set up in a well-ventilated area. Hang the frame and fork using wire through the head tube so you can access all sides easily. -
Apply self-etching primer:
Spray a light, even coat of self-etching primer on the frame, fork, and rims. Keep the can moving to avoid runs. Let this dry for about 30 minutes. -
Sand the primer:
Once dry, lightly sand the primer with 800-grit paper to smooth out any rough texture, then wipe away the dust. -
First color coat:
Shake your lavender spray paint vigorously. Apply the first coat as a light ‘tack coat’—it shouldn’t be fully opaque yet. This helps subsequent layers adhere without dripping. -
Build up the color:
Apply 2-3 heavier (wet) coats of lavender, waiting about 15 minutes between each. I like to rotate the frame while spraying to ensure the undersides of tubes get full coverage. -
Paint the rims:
Using the same lavender paint, spray the rims. If they are deep-V style like the example, ensure you get good coverage on the sidewalls. Let them dry fully. -
Wet sand imperfections:
Check for orange peel or dust nibs. If necessary, carefully wet sand with 1200-grit paper, dry, and apply a final light coat of color.
Make It Sparkle
For a magical finish, use a ‘ghost pearl’ clear coat instead of standard gloss. It adds a subtle shimmer that only appears in direct sunlight.
Step 3: Finishing & Assembly
-
Apply clear coat:
Seal your work with 2-3 coats of high-gloss clear coat. This protects the pastel color from UV fading and scratches. Allow the clear coat to cure for at least 24-48 hours. -
Install white tires:
Mount fresh white tires onto your newly painted lavender rims. The white rubber is essential for achieving that soft pastel aesthetic. -
Wrap handlebars:
If your handlebars need wrapping, choose a white or cream tape to match the saddle and tires, keeping the palette light. -
Reassemble the bike:
Grease your threads and reassemble the components. Install the chrome stem and seat post, which add a nice metallic contrast to the matte pastel vibe. -
Final polish:
Give the entire bike a gentle wipe with a soft cloth and spray wax to bring out the maximum shine on that fresh lavender coat.
Take your new pastel cruiser for a spin and enjoy the head-turning admiration.


Retro Cream With Warm Accents
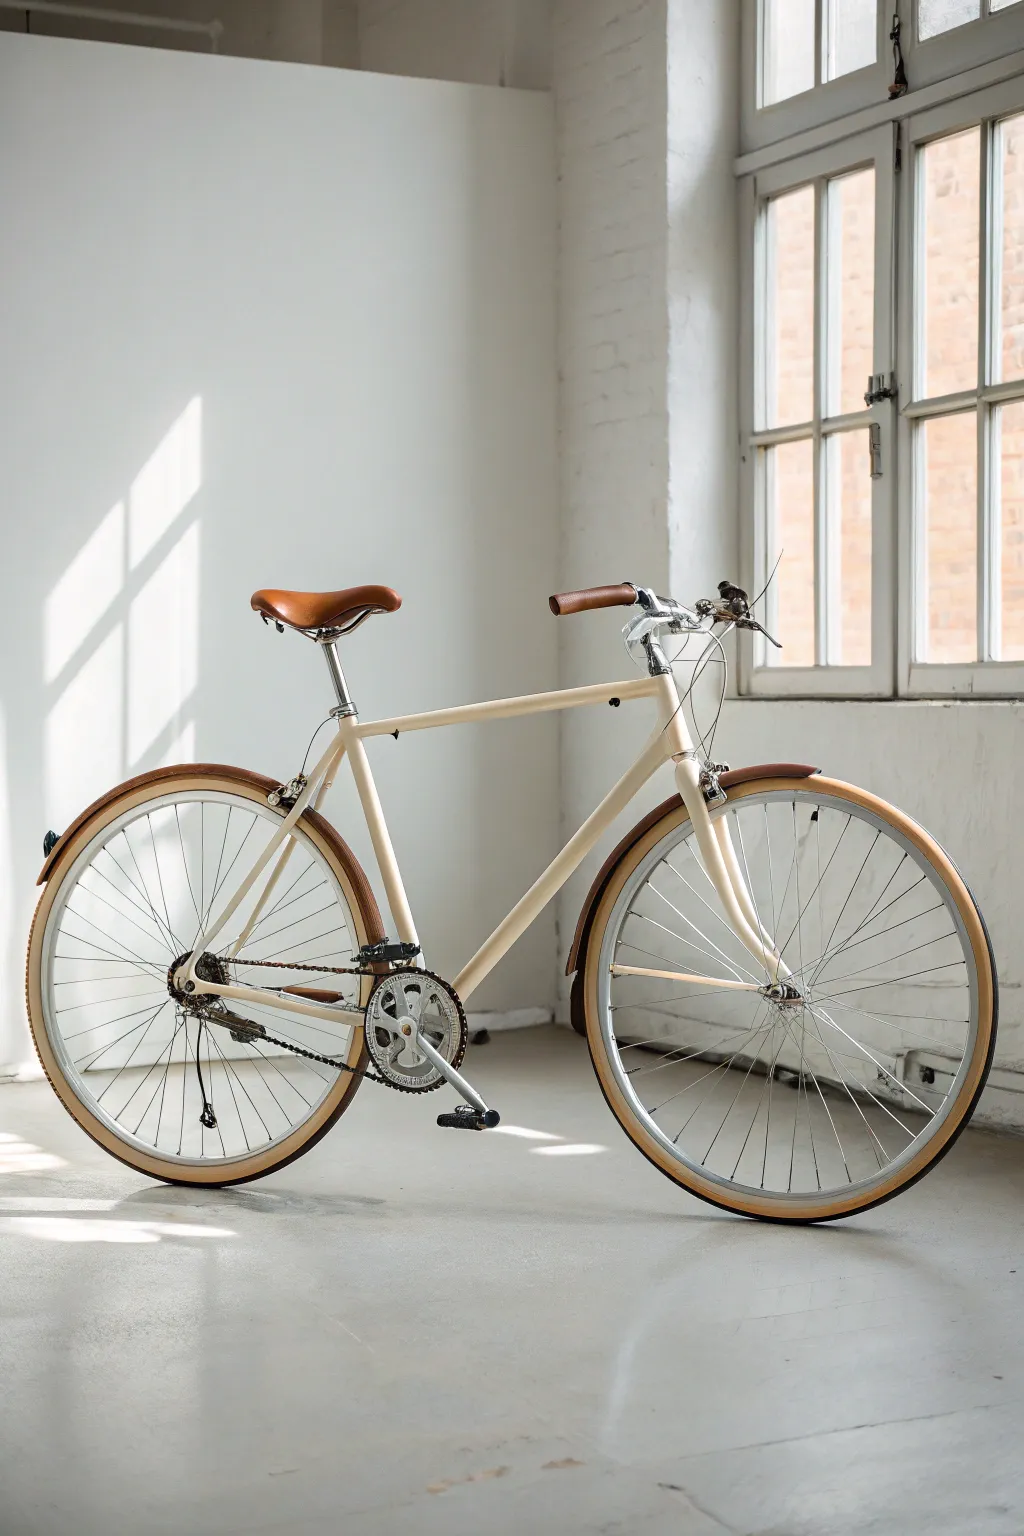
Bring an old bicycle back to life with this sophisticated, retro-inspired makeover that pairs a soft, buttery cream frame with rich brown leather accents. This restoration project captures the elegance of classic city cycling, resulting in a ride that looks as smooth as it feels.
Step-by-Step Tutorial
Materials
- Bicycle frame (stripped of components)
- Sandpaper (220, 400, and 800 grit)
- Degreaser or TSP substitute
- Self-etching primer (spray can)
- High-quality spray paint: Cream or Ivory (satin or gloss)
- 2K Clear Coat (spray can, highly recommended for durability)
- Painter’s tape and masking paper
- Brown leather saddle (brooks style)
- Brown leather handlebar grips or bar tape
- Gum-wall tires (700c or size to match wheels)
- Wrench set and hex keys for disassembly/reassembly
- Microfiber cloths
- Wire brush or steel wool
Step 1: Preparation & Stripping
-
Disassemble the bike:
Begin by removing every component until you are left with just the bare frame and fork. Keep all screws and small parts organized in labeled sandwich bags so reassembly isn’t a headache later. -
Clean the frame:
Wash the frame thoroughly with a strong degreaser to remove decades of road grime, oil, and old stickers. A clean surface is critical for paint adhesion. -
Scuff and sand:
You don’t need to strip it to bare metal unless there is rust, but you must scuff the old paint. Use 220-grit sandpaper to rough up every inch of the surface. Smooth out the finish with 400-grit paper afterward. -
Remove dust:
Wipe down the entire frame with a tack cloth or a rag dampened with isopropyl alcohol to remove all sanding dust. -
Mask key areas:
Use painter’s tape to carefully cover the bottom bracket threads, the seat tube interior, and the headset cups if you didn’t remove them. Paint in these threads can ruin components.
Drips Happen
If you get a paint run, don’t wipe it wet! Let it fully dry for 24 hours, then wet-sand it smooth with 1000-grit paper before recoating.
Step 2: Painting the Frame
-
hang the frame:
Suspend the frame and fork from a sturdy wire or rope in a well-ventilated area. Hanging it through the head tube usually provides the best stability and access. -
Apply primer:
Spray a light coat of self-etching primer. Keep the can moving constantly to avoid drips. Let this dry according to the can’s instructions, then lightly sand with 800-grit paper if it feels rough. -
First color coat:
Begin applying your cream paint. Start with a very light ‘tack coat’—it won’t look solid yet, and that’s okay. This helps subsequent layers stick better without running. -
Build up color:
Apply 2-3 heavier coats of the cream paint, waiting about 15-20 minutes between each (or whatever the manufacturer specifies). I like to check distinct angles during this phase to ensure I haven’t missed the underside of the down tube. -
Seal with clear coat:
Once the color has cured for 24 hours, apply a high-quality 2K clear coat. This two-part formula hardens chemically and resists chips and gasoline much better than standard clear sprays. -
Cure time:
Let the frame cure undisturbed for at least 48 hours. The paint may feel dry to the touch sooner, but it remains soft and easy to dent during reassembly if you rush.
Step 3: Assembly & Styling
-
Install the headset and fork:
Carefully reinstall the fork and headset bearings. Grease the bearings generously before tightening everything down. -
Fit the wheels:
Mount your gum-wall tires onto the wheel rims before attaching the wheels to the frame. The tan sidewalls are essential for achieving that retro aesthetic. -
Attach the drivetrain:
Reinstall the bottom bracket, cranks, chain, and pedals. If the original chain was rusty, this is the perfect time to swamp it for a shiny new silver one. -
Add the saddle:
Install the brown leather saddle. Position it level with the ground for a classic look and comfortable ride. -
Wrap or grip the bars:
Slide on the matching brown leather grips. If using drop bars, wrap them tightly with leather bar tape, securing the ends with twine or electrical tape. -
Install fenders (optional):
For the look in the photo, attach wood-look or matching metal fenders. Ensure there is enough clearance between the tire and the fender so they don’t rub. -
Final polish:
Give the entire bike a wipe down with a soft microfiber cloth to remove fingerprints from the assembly process.
Warm the Can
Place your spray paint cans in a bucket of warm tap water for 10 minutes before spraying. Warm paint atomizes finer for a smoother, factory-like finish.
Step back and admire your classy new cruiser, ready for a stylish ride through the city streets
BRUSH GUIDE
The Right Brush for Every Stroke
From clean lines to bold texture — master brush choice, stroke control, and essential techniques.
Explore the Full Guide
Two-Tone Split Frame

Transform a standard bicycle frame into a sophisticated statement piece with this elegant two-tone design. By combining a muted dusty rose with a calming sage green on a sharp diagonal split, you achieve a modern yet timeless aesthetic that looks professionally finished.
Step-by-Step Guide
Materials
- Bicycle frame (stripped of components)
- Sandpaper (400, 800, and 1200 grit)
- Metal primer spray (appropriate for your frame material)
- Dusty Rose spray paint (matte or satin finish)
- Sage Green spray paint (matte or satin finish)
- Painter’s tape (high quality)
- Plastic sheeting or masking paper
- Degreaser or rubbing alcohol
- Lint-free tack cloths
- Clear coat spray (matte or satin)
- Wire hanger or bike stand for suspension
- Respirator mask
Step 1: Preparation & Priming
-
Strip and clean:
Begin by removing all components from the frame, including the fork, crankset, and headset cups. Thoroughly clean the frame with a degreaser to remove any road grime, oil, or sticker residue. -
Sand the surface:
Scuff the existing paint using 400-grit sandpaper. You don’t need to go down to bare metal unless there is rust, but you must remove the glossy clear coat to ensure the new paint adheres. -
Smooth out imperfections:
Switch to 800-grit sandpaper to smooth out any deep scratches or rough patches. Wipe the frame down with a tack cloth or rubbing alcohol to remove all sanding dust. -
Rig for painting:
Pass a wire hanger or strong cord through the head tube so you can suspend the frame and fork freely in a well-ventilated area. This allows 360-degree access without touching the wet paint. -
Apply primer:
Apply a thin, even coat of metal primer to the entire frame and fork. Let it dry according to the can’s instructions, then lightly sand with 1000-grit paper if it feels rough.
Clean Lines Guarantee
Burnish the edge of your painter’s tape with the back of a fingernail or a credit card before painting. This eliminates tiny air gaps where paint could seep under.
Step 2: The Base Color (Pink)
-
First color application:
Apply the Dusty Rose paint to the top half of the bike. Since this is the lighter color in our scheme, I find it easier to spray slightly past where the split line will be to ensure full coverage. -
Build opaque layers:
Spray 2-3 light coats rather than one heavy one to prevent drips. Wait about 15 minutes between coats. Ensure the top tube, head tube, and upper parts of the seat tube and downtube are vivid and opaque. -
Cure the base:
Allow this base pink layer to cure fully. This is critical; if the paint is soft, the tape used in the next step will ruin the finish. Waiting 24-48 hours is ideal.
Step 3: Masking & The Split
-
Design the split line:
Decide where your diagonal split will go. In the example, the line cuts diagonally across the downtube and the seat tube. Apply high-quality painter’s tape to create this sharp line. -
Mask the pink areas:
Using plastic sheeting or masking paper, completely cover the pink areas (top tube, head tube, upper seat stays) that you want to protect. Tape the edges down securely along your split line. -
Seal the tape edge:
Lightly spray a very thin layer of the *pink* paint over the tape edge first. This seals the tape and ensures that any bleed-under matches the base color, keeping your final line razor-sharp.
Level Up: Fade Effect
Instead of a hard tape line, gently mist the green over the pink from a distance to create a soft gradient fade between the two colors for a hazy, dreamlike look.
Step 4: The Secondary Color (Green)
-
Apply the Sage Green:
Spray the Sage Green paint onto the exposed bottom half of the frame and the fork. Use smooth, sweeping motions, keeping the can about 8-10 inches away from the metal. -
Layering the green:
Apply 3-4 light coats until the green is rich and even. Pay special attention to the bottom bracket shell and the inside of the chainstays, which are easy to miss. -
Remove the masking:
Carefully peel away the masking tape and plastic while the green paint is still slightly tacky (usually about 30-45 minutes after the last coat). Pull the tape away from the painted edge at a sharp angle.
Step 5: Finishing Touches
-
Inspect and clean:
Once the paint is dry to the touch, inspect your lines. Use a tack cloth to gently remove any overspray dust that might have settled. -
Apply Clear Coat:
Seal the entire frame with a matte or satin clear coat. This unifies the finish, reducing the ridge between the two colors, and protects your work from chips and UV rays. -
Final cure:
Let the clear coat withstand a full cure—often up to a week—before reassembling your bike. This patience prevents the mechanic’s clamp or tools from indenting your fresh paint job. -
Add detail decals:
If you have a small logo decal (like the triangle on the head tube), apply it now before a final light layer of clear coat, or stick it on top if it’s a vinyl sticker intended for post-paint application.
Enjoy the smooth ride on your freshly painted, custom-designed machine
Color-Blocked Tubes
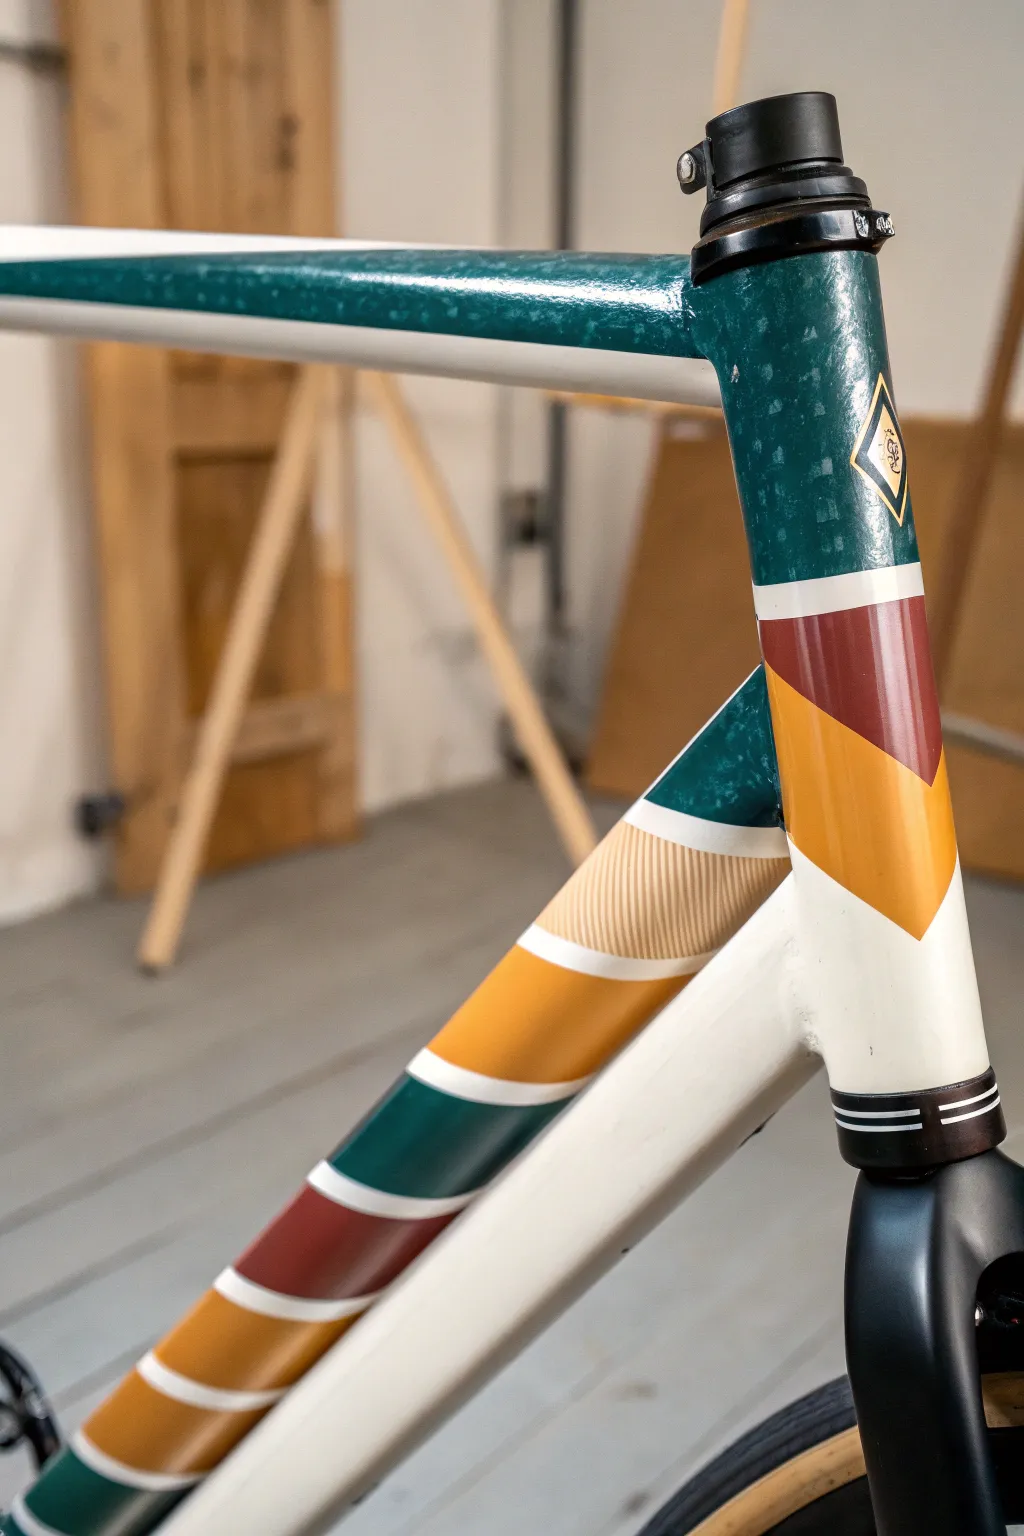
Give your bicycle a stunning makeover with this complex yet achievable geometric paint scheme. Combining crisp cream sections with rich jewel-toned stripes and a textured teal accent, this project turns a standard steel frame into a rolling piece of art.
Detailed Instructions
Materials
- Bicycle frame (stripped of components)
- Sandpaper (400, 800, and 1000 grit)
- Self-etching primer (for bare metal) or standard primer
- High-quality spray paint: Cream/Off-White
- High-quality spray paint: Deep Teal/Green
- High-quality spray paint: Mustard Yellow
- High-quality spray paint: Deep Burgundy/Red
- Fine-line automotive masking tape (various widths: 3mm, 6mm)
- Regular painter’s tape for blocking off large areas
- Plastic drop cloth or masking paper
- Isopropyl alcohol and lint-free rags
- Clear coat (matte or gloss, 2k recommended for durability)
- Natural sea sponge (optional, for texture)
Step 1: Preparation & Base Coat
-
Prepare the surface:
Begin by cleaning the frame thoroughly with isopropyl alcohol to remove any grease. Sand the entire frame with 400-grit sandpaper to create a ‘key’ for the paint to adhere to. If you are painting over existing tough paint, just scuff it; if you are going to bare metal, sand until smooth. -
Prime the frame:
Hang the frame in a ventilated, dust-free area. Apply thin, even coats of primer. I usually do about 2-3 coats, allowing about 15 minutes between each. Let the primer cure fully according to the can’s instructions, usually 24 hours. -
Sand the primer:
Once cured, lightly wet-sand the primer with 800-grit sandpaper to ensure a flawlessly smooth base. Wipe away all dust with a tack cloth or alcohol wipe. -
Apply the creamy base:
Use your Cream/Off-White spray paint as the main base tone. Apply several light coats rather than one heavy one to avoid drips. This lighter color needs to cover the head tube, down tube, and the lugs/joints where the tubes meet so it acts as your ‘white space’ between colors. -
Let the base cure:
This is crucial: let the cream base coat cure for at least 48 hours. Since you’ll be applying tape directly onto this paint, it must be hard enough to resist peeling.
Clean Tape Lines
For razor-sharp lines, spray a quick, light coat of the *base* color (Cream) over your tape edges before spraying the new color. This seals the tape gaps.
Step 2: Masking & Color Blocking
-
Plan the geometry:
Visualize your design. The down tube features diagonal stripes, while the head tube separates into a top block and a bottom chevron. Use the fine-line tape to lay out these boundaries first. The thin tape bends easier and creates sharper lines. -
Mask the cream sections:
Using wider masking tape and paper, cover every area that should remain Cream. Press the edges of the tape down firmly with your fingernail to prevent paint bleed. -
Paint the Mustard Yellow:
Identify the sections for the yellow stripes (middle of the chevron on the head tube, and the alternating stripes on the down tube). Mask off the Red and Teal areas so only the Yellow zones are exposed. Spray light coats of Mustard Yellow. Let it dry to the touch. -
Mask the Yellow:
Once the yellow is dry (give it a few hours), mask over the yellow sections you just painted to protect them. -
Paint the Burgundy:
Expose the areas for the deep red stripes. Spray the Burgundy paint in thin layers. This darker color covers quickly, so be careful not to build it up too thick, which creates a ridge at the tape line. -
Mask the Burgundy:
Repeat the process: wait for the Burgundy to dry, then carefully mask over it.
Orange Peel Problems
If your paint looks bumpy like an orange peel, you are spraying too far away or it’s too hot. Move closer (8-10 inches) and try to paint in cooler shade.
Step 3: Texturing & Final Finish
-
Prepare for the Teal:
Expose the top tube and the specific stripe sections designated for the Deep Teal. Ensure all cream, yellow, and red areas are famously covered. -
Apply the Teal base:
Spray a solid coat of Deep Teal on the exposed sections. While the paint is still wet, you can add the mottled effect if desired. -
create the mottled texture:
To achieve the subtle texture seen on the top tube, lightly mist a slightly lighter or darker green from a distance, or dab a natural sea sponge with a tiny amount of solvent and gently tap the wet paint. This is an advanced step; a solid color looks great too if you prefer to keep it simple. -
The great reveal:
Wait until the final paint coat is tacky but not fully hard (usually about 30-60 minutes after spraying). Carefully peel back the masking tape at a stiff 45-degree angle. Pulling while slightly soft helps leave a clean edge without chipping. -
Add decals (optional):
If you have a head badge decal (like the diamond shape shown), apply it now once the paint is fully dry to the touch. -
Clear coat protection:
After the entire paint job has cured for another 2-3 days, gently wipe it down. Apply 3 clear coats. A 2-part (2k) spray can is worth the investment here as it resists gasoline and scratches much better than standard clear coat. -
Final polish:
After the clear coat has hardened (give it a week for full hardness), you can gently polish the frame with a fine automotive compound to make those colors pop and flatten any tape ridges.
Reassemble your bike and enjoy the ride on your completely unique custom machine

PENCIL GUIDE
Understanding Pencil Grades from H to B
From first sketch to finished drawing — learn pencil grades, line control, and shading techniques.
Explore the Full Guide
Simple Racing Stripes
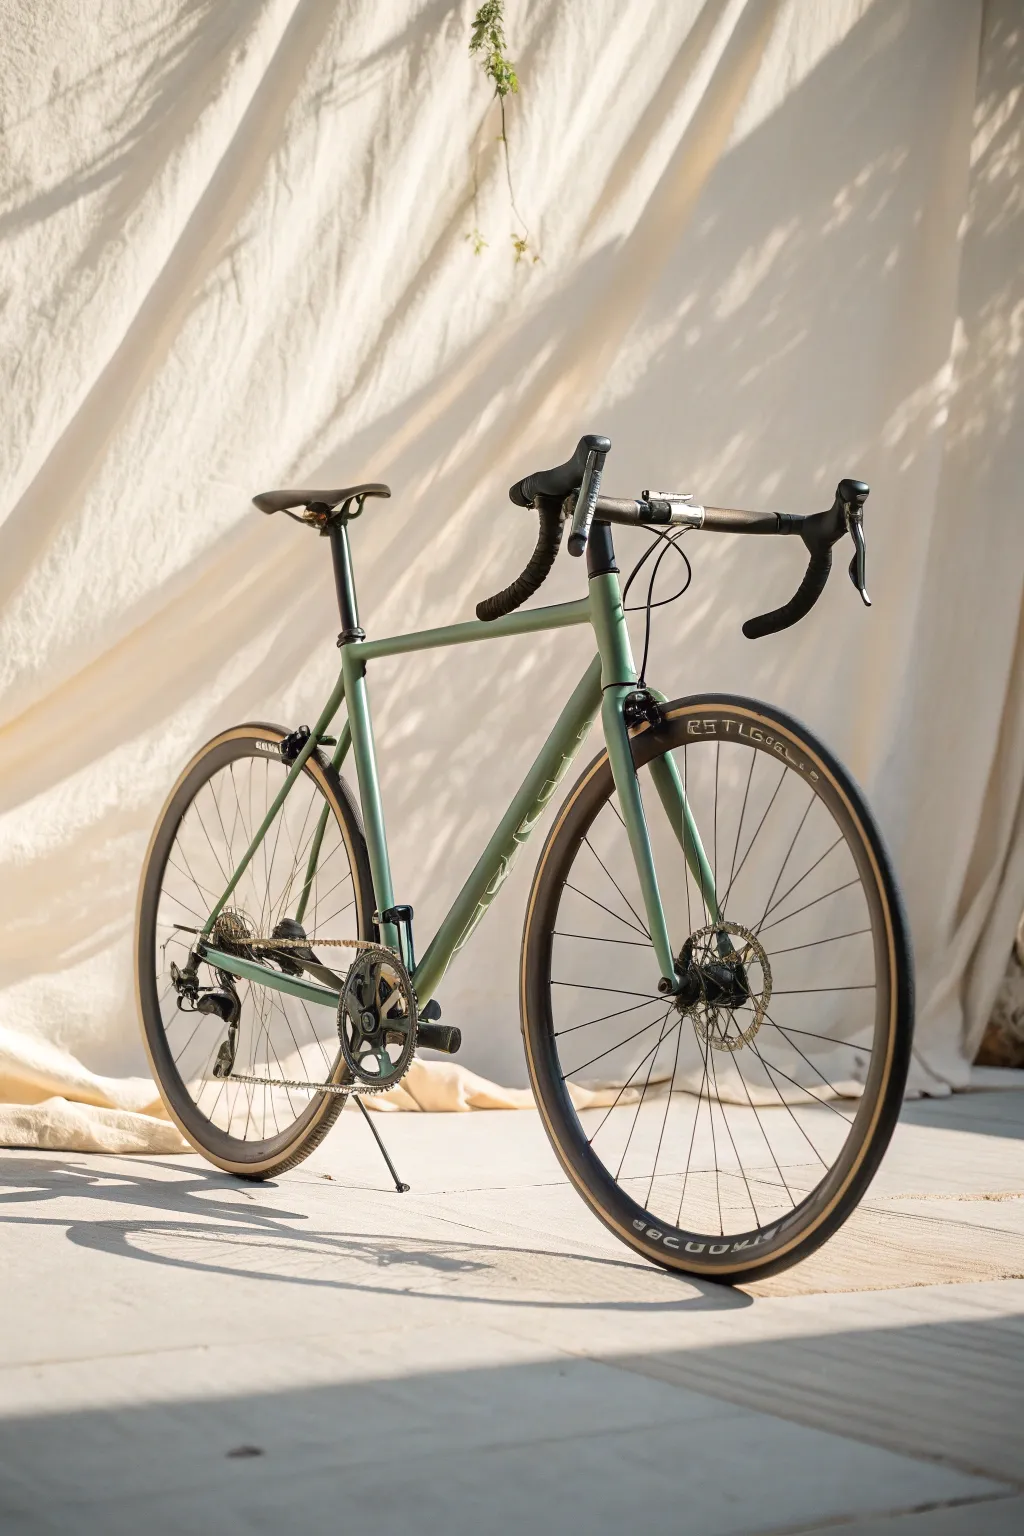
Transform an old road frame into a modern classic with this subtle, understated matte sage green finish. This project focuses on achieving a professional-looking, single-color coat that lets the geometry of the bike speak for itself.
Detailed Instructions
Materials
- Bicycle frame and fork (disassembled)
- Sandpaper (400, 800, and 1200 grit)
- Degreaser or rubbing alcohol
- Self-etching primer (spray can)
- Matte sage green spray paint (high-quality automotive or graffiti grade)
- Matte clear coat
- Painter’s tape
- Clean rags or tack cloths
- Cardboard or drop cloth
- Respirator mask
- Wire or coat hanger for hanging parts
Step 1: Preparation & Stripping
-
Disassemble the Bike:
Remove every component from the frame until you are left with just the bare metal skeleton and the fork. Store small screws and parts in labeled bags so you don’t lose them. -
Clean Thoroughly:
Scrub the frame down with a degreaser to remove years of road grime, oil, and sticker residue. A clean surface is critical for adhesion. -
Sand the Original Finish:
Using 400-grit sandpaper, wet sand the entire frame. You don’t necessarily need to strip it to bare metal, but you must scuff every inch of the existing clear coat to create a rough surface for the new paint to grab. -
Refine the Surface:
Move up to 800-grit sandpaper to smooth out any deep scratches or chips from the previous step. Run your fingers over the tubes to ensure everything feels uniform. -
Final Wash:
Wipe the frame down with rubbing alcohol or a specialized wax and grease remover. Use a tack cloth right before painting to catch invisible dust particles. -
Mask Off Key Areas:
Carefully apply painter’s tape to threads (bottom bracket, derailleur hanger) and the inside of the head tube and seat tube. Painting over threads will make reassembly a nightmare.
Warm That Cab
Place your spray cans in a bucket of warm water for 10 minutes before spraying. Warm paint atomizes much finer than cold paint, giving you a smoother, splatter-free matte finish.
Step 2: Priming & Painting
-
Set Up Your Spray Booth:
Find a well-ventilated area free from wind and dust. Hang the frame and fork from the ceiling or a sturdy stand using wire through the head tube. -
Apply Primer:
Shake the self-etching primer vigorously. Apply a light, misty coat first, followed by a slightly heavier wet coat. Let this dry according to the can’s instructions, usually about 30 minutes. -
Check for Imperfections:
Once the primer is dry, look for any runs or rough spots. If you find them, gently sand them smooth with 1200-grit paper and wipe clean. -
The Base Color Coat:
Begin applying your matte sage green paint. Start spraying away from the frame, sweep across the tube, and release the button only after you’ve passed the object. Keep the can moving constantly. -
Layering Up:
Apply 3 to 4 thin coats rather than one thick one. Wait about 10-15 minutes between coats (or until tacky) to prevent drips. I find that patience here is what separates a DIY job from a pro look. -
Handling the Nooks:
Pay special attention to the bottom bracket cluster and the junction between the seat stays and seat tube, as these areas often get missed or overloaded with paint.
Step 3: Finishing Touches
-
Apply Matte Clear Coat:
To protect that lovely sage color without adding shine, apply 2-3 coats of a high-quality matte clear coat. This seals the paint against chips and UV damage. -
Curing Time:
Let the frame cure for at least 48 hours—preferably longer—before attempting to reassemble. Soft paint is easy to dent with a wrench. -
Remove Masking:
Carefully peel away the painter’s tape from the threaded areas. If the paint bridged over the tape, score the edge lightly with a hobby knife first to prevent peeling the good paint. -
Reassembly:
Grease your threads and carefully reinstall the bottom bracket, headset, and other components. Take care not to scratch your fresh finish with your tools.
Add Subtle Branding
Before the clear coat, apply vinyl decals for logos in a color just a few shades lighter or darker than the sage green for a sophisticated ‘ghost’ logo effect.
Now you have a freshly painted ride that looks custom-built and ready for the open road
Ombre Fade Along the Frame
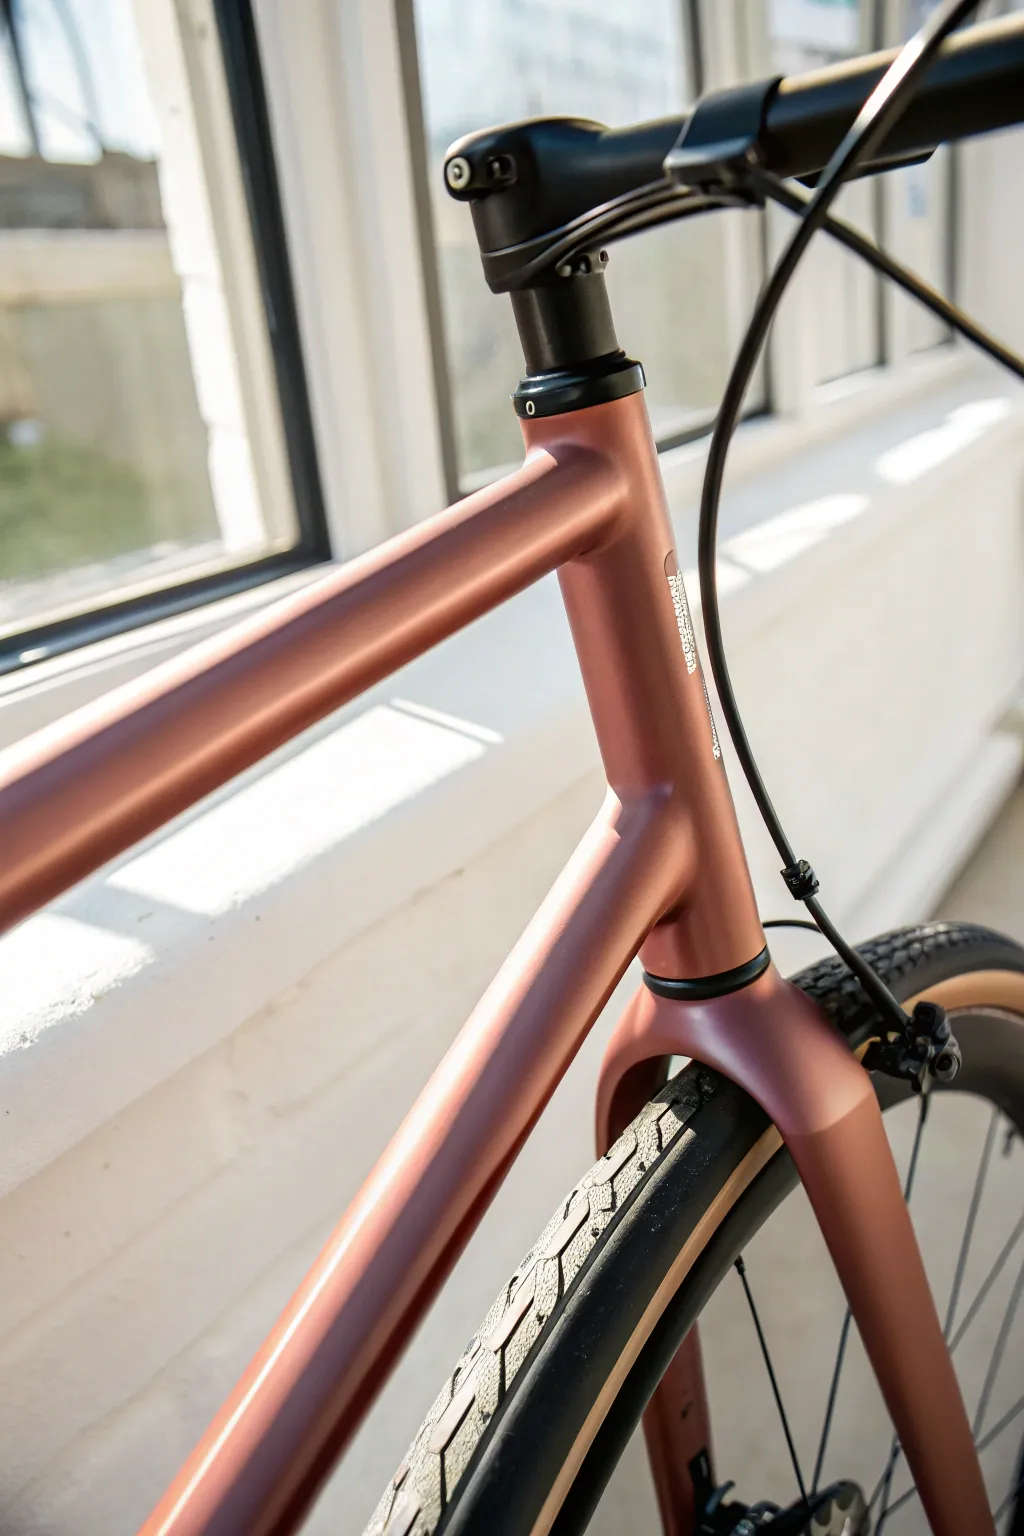
Achieve a professional and subtle gradient effect on your bicycle frame with this sophisticated metallic finish. The transition creates a seamless flow of color that catches the light beautifully, giving your ride a modern, custom look.
How-To Guide
Materials
- Bicycle frame (stripped of components)
- Sandpaper (400, 800, and 1200 grit)
- Degreaser or isopropyl alcohol
- Lint-free microfiber cloths
- Painter’s tape
- High-quality spray primer (white or light grey)
- Metallic rose gold/copper spray paint
- Darker metallic bronze spray paint (for the fade)
- 2K Clear coat spray (high gloss or matte, per preference)
- Respirator mask
- Drop cloth or cardboard
Step 1: Preparation
-
Strip the frame:
Remove all components from your bicycle, including the fork, handlebars, brakes, and bottom bracket. You need a completely bare frame to ensure an even finish. -
Clean thoroughly:
Scrub the frame down with a degreaser to remove any road grime, oil, or sticker residue. This step is crucial for paint adhesion. -
Sand the surface:
Using 400-grit sandpaper, toughly scuff the entire frame. If the original paint is in bad condition, sand it down to bare metal. If it’s intact, just remove the glossy finish. -
Final cleaning:
Wipe the frame down with isopropyl alcohol and a lint-free cloth to remove all sanding dust. -
Masking:
Use painter’s tape to cover the threads in the bottom bracket, the inside of the head tube, and the seat post opening. Don’t forget the dropouts where the wheels attach.
Sputtering Nozzle?
If the spray can starts spitting blobs, turn it upside down and spray for 3 seconds to clear the nozzle. Always wipe the tip after every few passes.
Step 2: Priming and Base Coat
-
Apply primer:
Hang the frame in a well-ventilated area. Apply thin, even coats of primer. I usually do 2-3 light coats rather than one heavy one to prevent drips. -
Smooth the primer:
Once the primer is fully dry (check the can for times), lightly wet sand with 800-grit paper to create a glassy smooth surface. -
Base color application:
Begin applying your main metallic rose gold color. Hold the can about 8-10 inches away and use sweeping motions. -
Build opacity:
Apply 3-4 coats of the rose gold, allowing 10-15 minutes of flash time between each coat. Ensure full coverage on all tubes.
Step 3: Creating the Ombre Fade
-
Map the fade:
Decide where you want the fade to begin, typically darker at the bottom bracket fading up, or darker at the rear fading forward. The image shows a very subtle, uniform look, but for an ombre, you introduce the second color now. -
Start the gradient:
Using your darker bronze color, spray from a greater distance (about 12-14 inches) aiming away from the transition point. You want the overspray to create the blend, not the direct stream. -
Feather the edge:
As you move closer to the middle of the tube where the colors meet, flick your wrist outward at the end of each pass to feather the paint softly. -
Inspect and adjust:
Step back to look at the transition. If the line is too harsh, mist a very light layer of the original rose gold back over the transition area to soften it.
Add Sparkle
For extra depth, mix a tiny amount of metal flake into your clear coat or use a ‘pearl’ topcoat spray before the final clear layer.
Step 4: Protection
-
Curing time:
Let the color coats dry for at least 24 hours before clear coating. This allows the solvents to off-gas properly. -
Apply clear coat:
Use a 2K clear coat for durability. Activate the hardener in the can and apply 2-3 distinct coats, waiting 10 minutes between them. -
Final polish:
After the clear coat has cured for roughly 48 hours, you can use a fine polishing compound and a microfiber cloth to buff out any tiny orange peel texture for a mirror finish.
Reassemble your bike once fully cured and enjoy riding your custom masterpiece


Sunset Gradient With Warm-to-Cool Shift
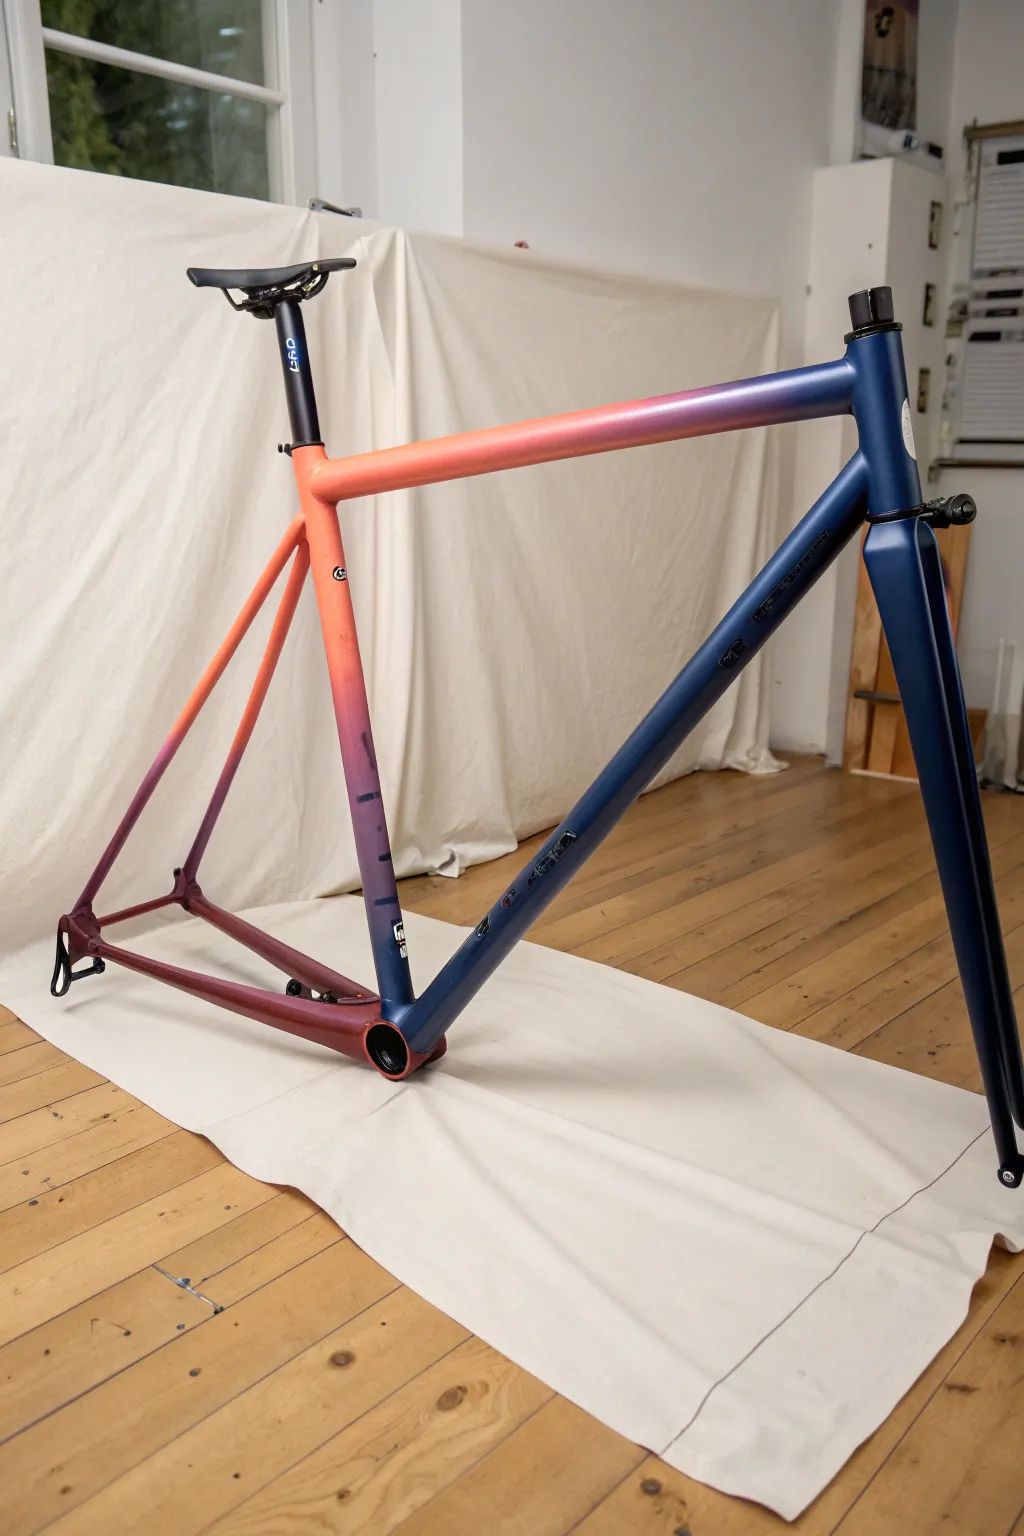
Transform a standard bicycle frame into a rolling sunset with this stunning gradient technique. The design seamlessly blends deep burgundy, vibrant coral, misted purple, and midnight blue for a finish that looks beautiful from every angle.
Step-by-Step Tutorial
Materials
- Bicycle frame and fork (stripped and prepped)
- Sandpaper (400, 600, 800 grit)
- Degreaser or rubbing alcohol
- Painter’s tape and masking paper
- White primer (spray can or spray gun)
- Spray paints: Deep Burgundy, Bright Coral/Salmon, Lavender/Purple, Midnight Blue
- 2K Clear Coat (high gloss)
- Respirator mask and gloves
- Tack cloth
- Wire or stand for hanging the frame
Step 1: Preparation & Priming
-
Clean the canvas:
Begin by thoroughly cleaning the bare frame with degreaser or alcohol. Any oil from your fingers will ruin the paint adhesion, so wear gloves from this point forward. -
Mask critical areas:
Carefully mask off the bottom bracket threads, head tube interior, and seat post entry. Roll up small tubes of paper to plug the screw bosses and brake mounts. -
Prime for brightness:
Apply a coat of white primer over the entire frame and fork. A white base is crucial here because it makes the translucent sunset colors, especially the coral orange, pop vibrantly. -
Smooth the base:
Once the primer is fully dry, inspect it for imperfections. Lightly sand with 600-grit paper to remove any orange peel texture, then wipe it down with a tack cloth to remove dust.
Step 2: Creating the Sunset
-
Start with the lightest tone:
Spray the Bright Coral/Salmon color focused on the seat tube and the rear half of the top tube. Don’t worry about overspray onto adjacent tubes; getting good coverage in the middle section is the goal. -
Establish the rear warmth:
Move to the rear triangle (chainstays and seatstays). Apply the Deep Burgundy paint starting at the dropouts and working forward. -
Blend the warm transition:
As you spray the burgundy towards the seat tube, pull your can further away to create a mist. Let this mist lightly speckle over the coral to create a smooth fade rather than a hard line. -
Introduce the cool tones:
At the front of the bike (head tube and fork), apply your Midnight Blue. Spray solid color at the very front, fading it out as you move backward along the top tube and down tube. -
Work the middle transition:
Now for the tricky part: the purple zone. Spray your Lavender/Purple lightly between the blue front and coral middle. I find short, controlled bursts help avoid overwhelming the lighter coral color. -
Refine the gradients:
Stand back and look at the transitions. If the blue-to-coral shift looks too harsh, mist a little more purple over the boundary. The goal is to hide where one color stops and the next begins.
Pro Tip: The Nozzle Angle
When blending gradients, always angle your spray can slightly away from the color you are blending into. This feathering technique prevents harsh lines.
Step 3: Finishing & Detailed Polishing
-
Dry and inspect:
Allow the color coats to gas off and dry according to the manufacturer’s instructions (usually 24 hours). Check for any dust nibs or rough overspray patches. -
Optional decal application:
If you have branding or logos, apply them now on top of the base coat. The black logos shown on the seat tube and down tube provide a sharp contrast to the gradient. -
Apply the first clear coat:
Using a high-quality 2K clear coat, spray a light ‘tack coat’ over the entire frame. This initial light layer helps the subsequent wet layers stick without running. -
Flood the gloss:
Apply 2-3 wet coats of clear, waiting about 10-15 minutes between coats (check your specific product’s flash time). This builds the deep, glass-like shine seen in the photo. -
Final cure:
Let the frame cure in a dust-free, warm environment for at least 48 hours before attempting to reassemble the bike. The paint needs to be hard enough to resist clamp pressure.
Level Up: Metallic Fleck
For extra depth, mix a tiny amount of gold pearl powder into your first layer of clear coat. It will make the sunset colors shimmer in direct sunlight.
Once fully cured and assembled, your bike will look like a piece of rolling art ready for the golden hour
Tone-on-Tone Shadow Lettering
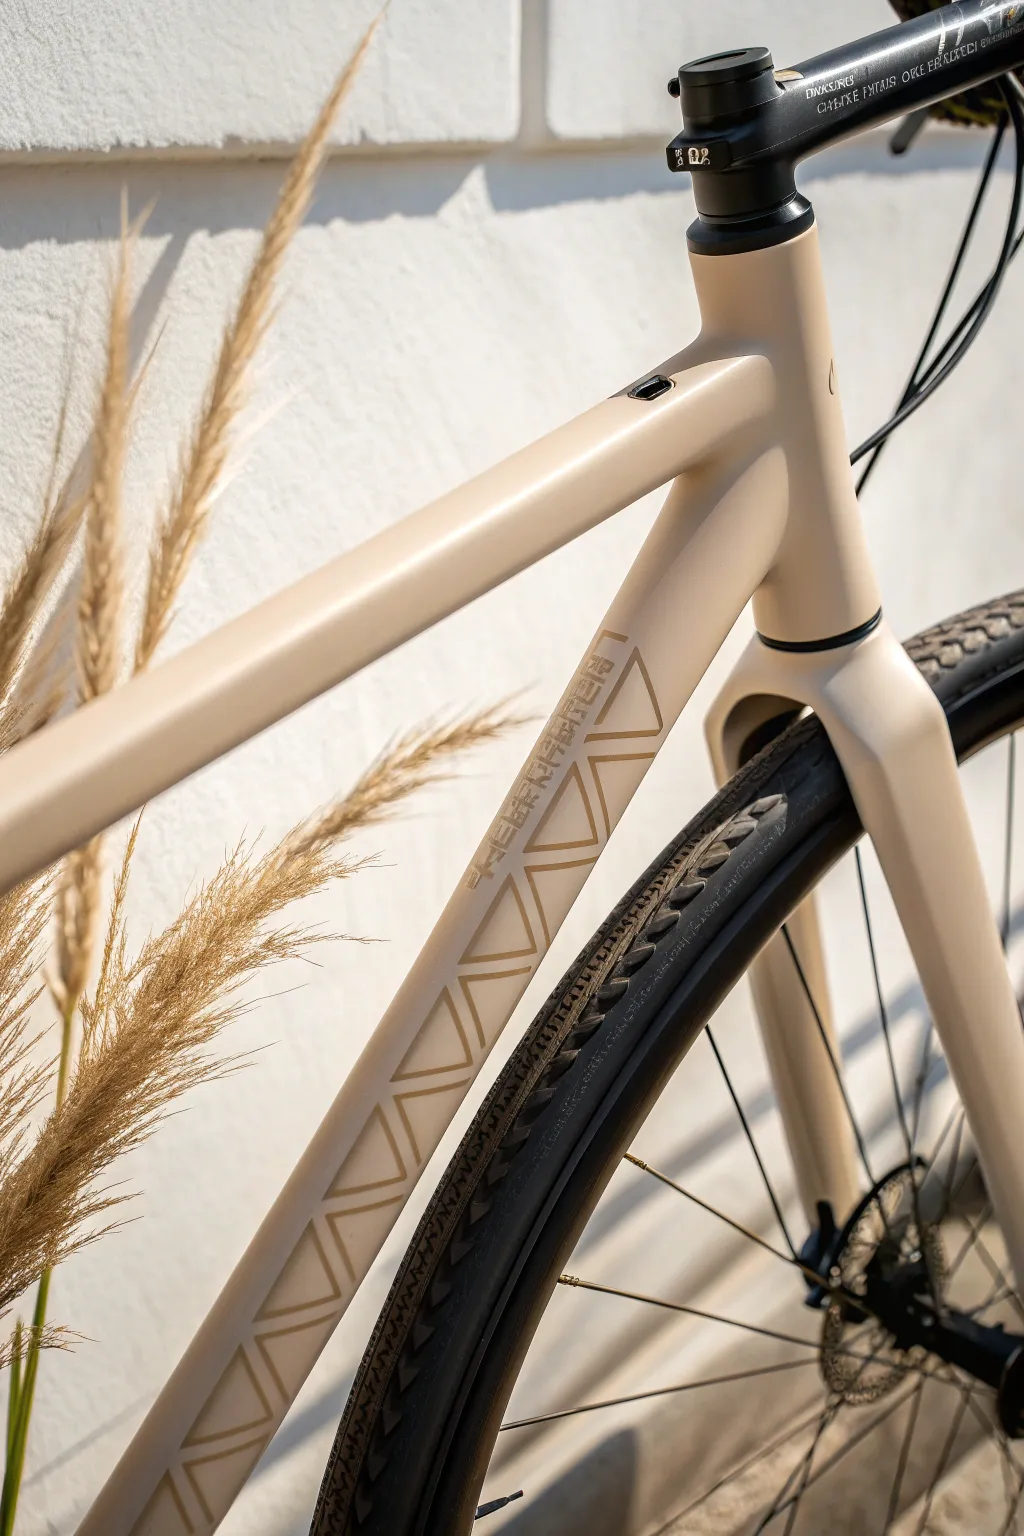
Elevate a standard bicycle paint job with this sophisticated tone-on-tone technique. By using a decal mask and a slightly darker shade of your base color, you can create a dimensional, architectural look that feels custom without being loud.
Step-by-Step Guide
Materials
- Bicycle frame (stripped and prepped)
- Sandpaper (400, 600, and 1000 grit)
- High-quality primer (spray)
- Base coat spray paint (Matte Beige/Sand color)
- Contrast spray paint (1 shade darker than base or metallic gold/bronze)
- Matte clear coat sealant
- Vinyl cutter (e.g., Cricut) or pre-purchased vinyl stencil
- Adhesive vinyl
- Transfer tape
- Masking tape
- Degreaser or isopropyl alcohol
- Lint-free tack cloth
Step 1: Preparation and Base Coat
-
Surface Prep:
Begin by dismantling the bike completely so you are working with just the frame. If the old paint is in poor condition, strip it down to the bare metal using paint stripper or sanding. If the existing paint is intact, scuff sand the entire surface with 400-grit sandpaper to create a key for the new paint. -
Clean Thoroughly:
Wipe the entire frame down with a degreaser or isopropyl alcohol to remove any oils, dust, or residue. This step is crucial for paint adhesion. -
Prime the Frame:
Hang the frame in a well-ventilated area. Apply 2-3 coats of primer, allowing proper drying time between each as per the can’s instructions. Once dry, lightly sand with 600-grit paper for a glassy smooth finish. -
Apply Base Color:
Spray your main beige/sand color. Apply thin, even coats to avoid drips, keeping the can moving constantly. You’ll likely need 3-4 coats for full, opaque coverage. -
Full Cure:
This is the hardest part: let the base coat cure completely. I prefer to wait at least 24-48 hours before applying any stencils to ensure the adhesive doesn’t pull up the fresh paint.
Step 2: Creating the Shadow Graphic
-
Design the Stencil:
Using vector software or a vinyl cutter interface, design a repeating triangular geometric pattern. Include any lettering or branding you want to feature down the center of the downtube. -
Cut and Weed:
Cut the design out of adhesive vinyl. ‘Weed’ the design by removing the parts where you want the darker ‘shadow’ color to appear—in this case, the outlines of the triangles and the letters themselves. -
Transfer Tape Application:
Apply transfer tape over your weeding vinyl design. Squeegee it down firmly so the vinyl lifts easily from its backing sheet. -
Placement Strategy:
Plan the placement on the downtube carefully. You can use a strip of masking tape to mark the center line of the tube to ensure your graphic runs straight. -
Apply the Stencil:
Adhere the vinyl stencil to the frame. Start from the center and press outward to avoid bubbles. Rub the edges of the stencil firmly to prevent paint bleed. -
Masking Off:
Cover the rest of the bike frame with newspaper and masking tape. You only want the area inside the stencil exposed to the next spray.
Clean Lines Secret
Before spraying your contrast color, spray one light coat of your BASE color over the stencil. This seals the edges, meaning any bleed will match the background.
Step 3: Painting the Detail
-
Spray the Shadow Tone:
Using your slightly darker contrast color (or a subtle metallic bronze), spray over the stencil area. Use very light, dusting coats. You don’t need heavy coverage here; a light misting often creates the best ‘shadow’ effect. -
Remove Stencil Carefully:
Don’t let the paint fully dry before removing the stencil. Wait until it is tacky (about 10-15 minutes), then carefully peel back the vinyl at a sharp angle. This helps keep the edges crisp. -
Inspect and Clean:
Once the stencil is off, check for any stray adhesive residue. If found, gently dab it away with a tack cloth once the paint is dry to the touch.
Level Up: Ghost Pearl
Instead of a darker solid color for the graphics, use a transparent ‘interference’ or ghost pearl spray. The pattern will only appear when sunlight hits the frame.
Step 4: Finishing
-
Sanding Edges (Optional):
If you can feel a high ‘ridge’ where the paint layers meet, you can very gently wet sand that area with 1000-grit paper to level it out, but be careful not to sand through your design. -
Clear Coat Application:
Finish the entire frame with a matte clear coat. This unifies the sheen of the base and the graphic, making them look like a factory finish rather than a sticker. -
Final Cure:
Allow the clear coat to cure significantly (refer to manufacturer times) before rushing to reassemble your bike components.
Once reassembled, you’ll have a custom ride that rewards a closer look with its detailed craftsmanship
Transparent Layered Color Wash
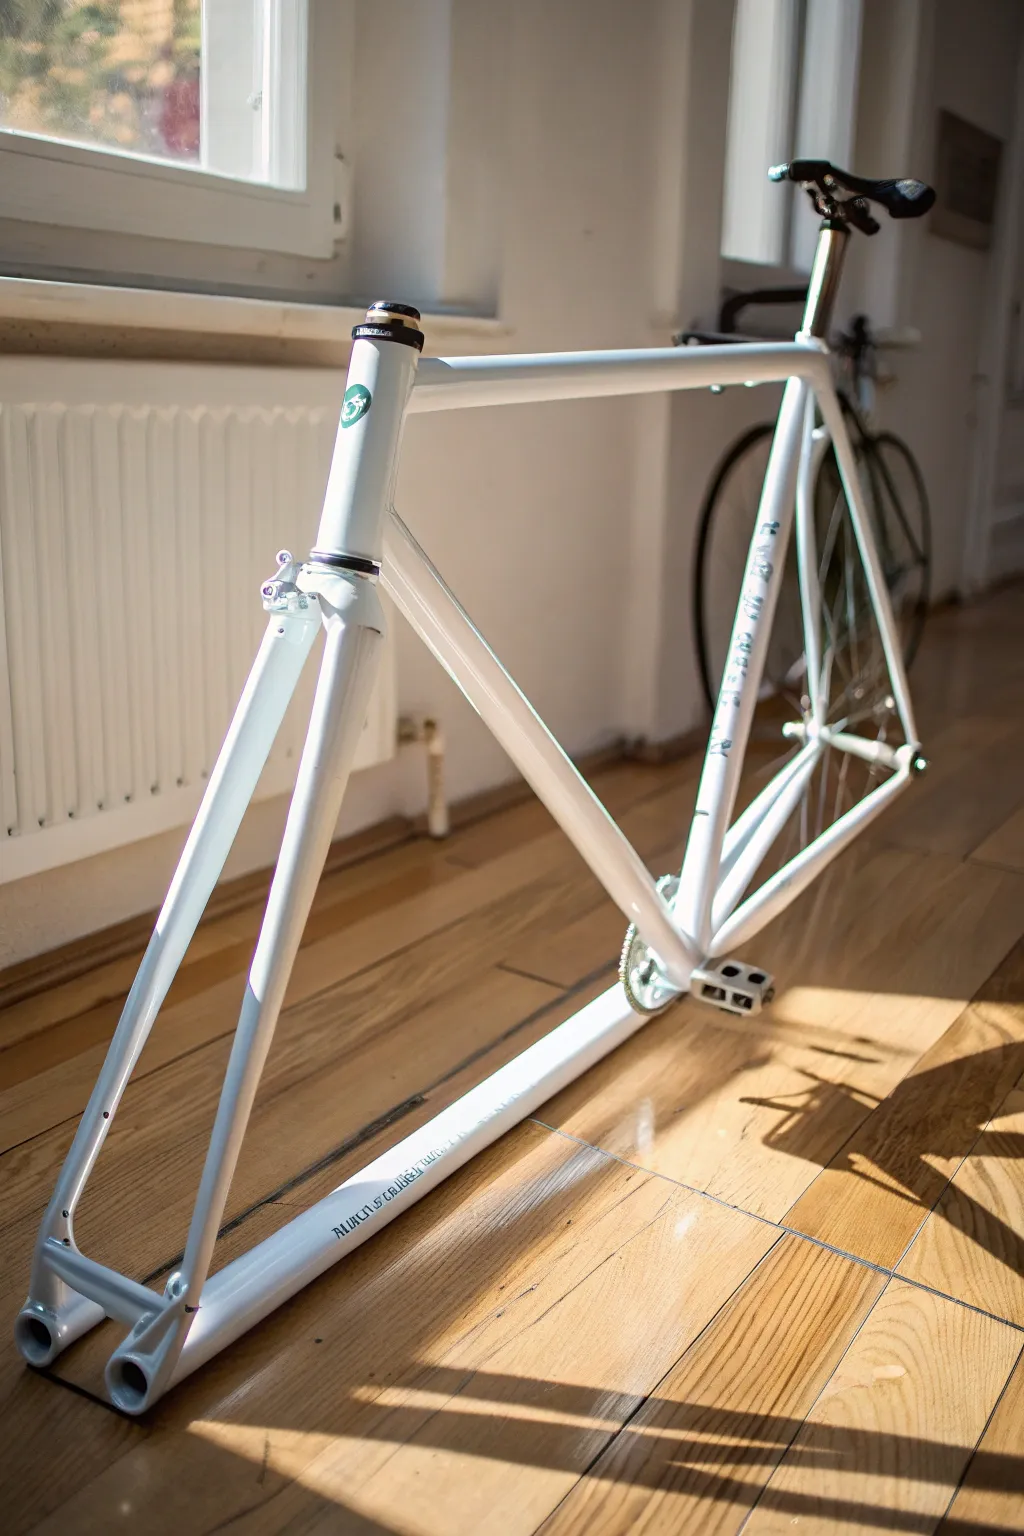
Achieve a stunning, ethereal look for your bicycle frame with this sophisticated layered technique. By applying translucent pearl coats over a solid white base, you create a finish that glows with depth and subtle iridescence in the sunlight.
Step-by-Step Tutorial
Materials
- Bicycle frame (stripped and prepped)
- High-grit sandpaper (400, 600, 800, 1000 grit)
- Clean lint-free rags
- Degreaser or rubbing alcohol
- Self-etching primer (for metal frames)
- High-quality white primer/base coat spray paint
- Pearlescent or color-shift clear coat spray (transparent)
- Reference decals or stencils (optional)
- 2K Clear coat (high gloss)
- Masking tape and paper
- Respirator mask and gloves
- Tack cloth
Step 1: Preparation and Priming
-
Clean the slate:
Begin with a completely stripped frame. Ensure all old paint is removed and the metal is bare. Wipe everything down thoroughly with a degreaser to remove any oils from your hands. -
Sand for adhesion:
Lightly sand the bare metal with 400-grit sandpaper to create a texture the primer can grab onto. Wipe away the dust with a tack cloth. -
Mask critical areas:
Use precision masking tape to cover the bottom bracket threads, head tube internals, and seat post entry. Masking these areas now saves hours of scraping later. -
Apply etching primer:
Spray a thin, even coat of self-etching primer. This is crucial for metal frames to prevent rust and ensure the subsequent layers stick permanently. Let it dry according to the can’s instructions. -
Build the white base:
Apply your solid white base coat. Do this in multiple thin passes rather than one heavy coat to avoid drips. I aim for 3-4 light coats typically, allowing 15 minutes of drying time between each.
Paint Run Panic?
If you get a drip, don’t wipe it wet! Let it fully harden for 24 hours, then carefully block-sand it flat with 600-grit paper before recoating.
Step 2: Creating the Pearl Effect
-
Smooth the canvas:
Once the white base is fully cured (usually 24 hours), wet sand it very gently with 800-grit paper just to knock down any ‘orange peel’ texture. Clean and dry the frame completely. -
First wash layer:
Shake your pearlescent transparent spray vigorously. Apply the first ‘wash’ layer. This isn’t about covering the white, but rather misting a translucent effect over it. Keep the can moving constantly. -
Layering for depth:
Apply 2-3 more coats of the pearl spray. The more layers you add, the deeper and more ‘milky’ the finish will look. Wait about 10-15 minutes between these coats so they remain tacky but not wet. -
Decal application:
If you want logos like the ones on the seat tube in the image, apply your vinyl decals now, directly onto the dried pearl layer. Using a squeegee ensures no air bubbles remain.
Step 3: Sealing and Polishing
-
The protective shell:
This is the most critical step for durability. Use a 2K (two-part) high-gloss clear coat. Activate the can and spray a light ‘tack coat’ first. -
Wet coat application:
Follow up with 2 heavier ‘wet’ coats of clear, waiting 10 minutes between them. Watch the reflection in the wet paint; you want it to look like distinct liquid glass without running. -
Curing time:
Let the frame hang undisturbed in a warm, dust-free area for at least 48 hours. Do not touch it, even if it looks dry. -
Final wet sand:
For a mirror-like showroom finish, wet sand the cured clear coat with 1000 and then 2000-grit paper. This removes tiny dust nibs and levels the surface perfectly. -
Buff to shine:
Using a polishing compound and a microfiber cloth (or buffing wheel), polish the frame until the scratches from sanding disappear and the deep pearl gloss emerges. -
Reassembly:
Remove your masking tape carefully. Clean the threads and reassemble your bike components carefully to avoid chipping your fresh paint.
Ghost Branding
Apply vinyl decals matching the base color before the pearl layer. The logos will appear as subtle ‘ghost’ images under the shimmer.
With that final polish, your frame will catch the light beautifully on your next ride
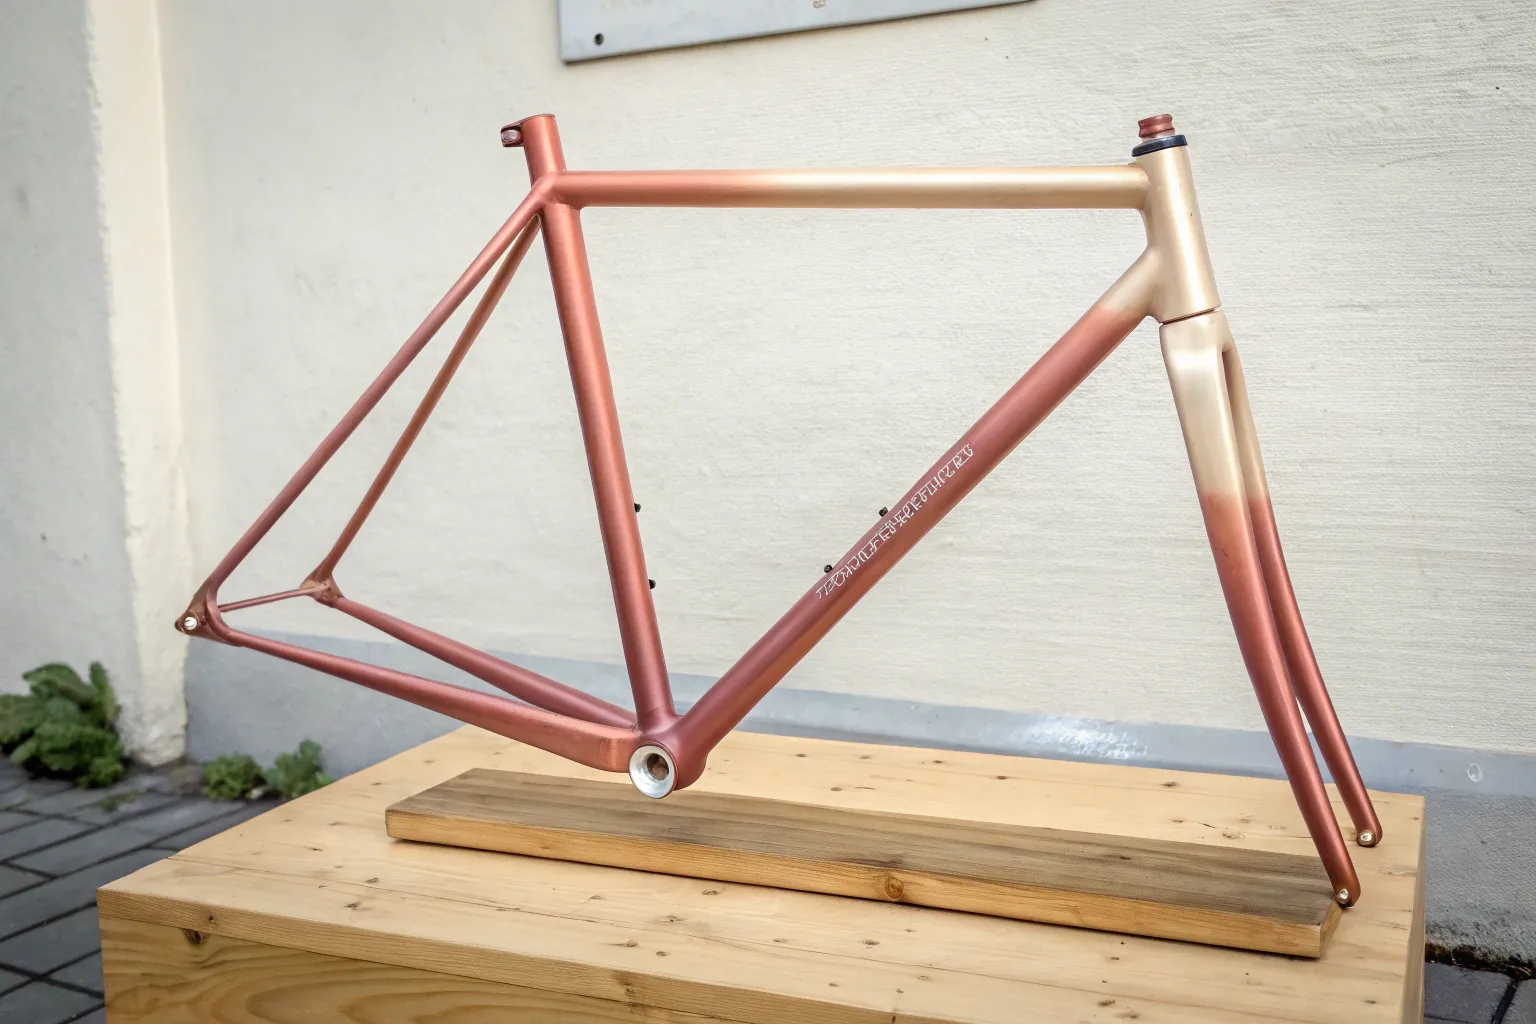
Metallic Sheen That Catches Light
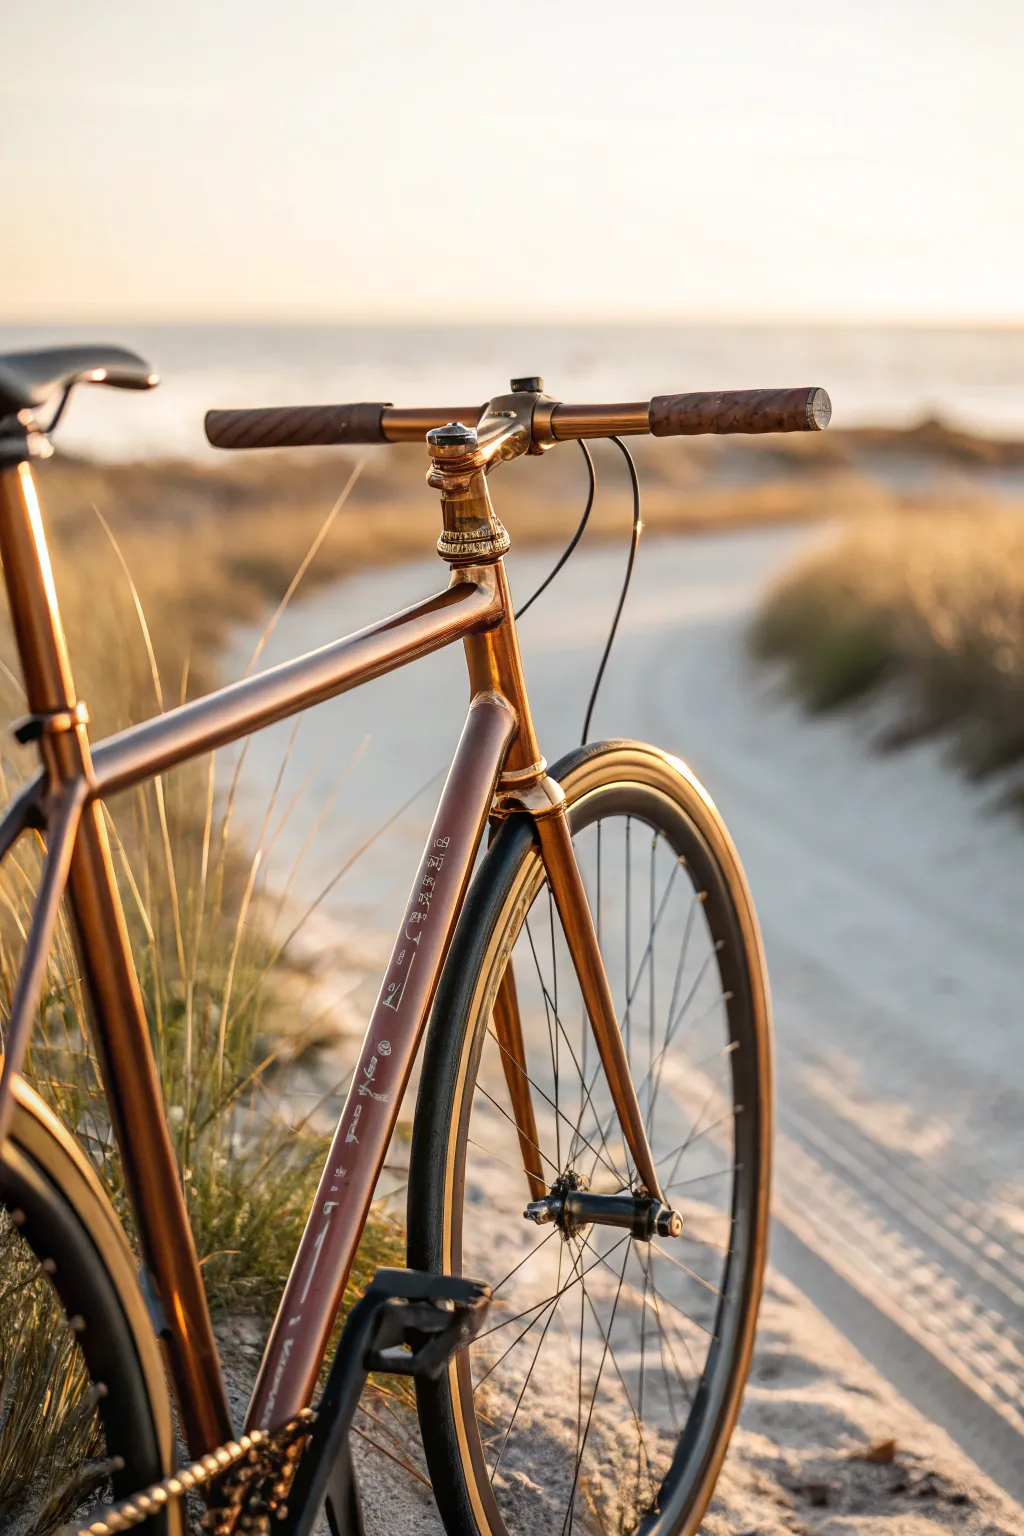
Transform a standard bicycle frame into a radiant, metallic masterpiece that gleams like liquid bronze in the sunlight. This project captures the essence of a ‘metallic sheen that catches light’ by using a deep, lustrous copper paint enhanced with high-gloss clear coats for a mirror-like finish.
How-To Guide
Materials
- Bicycle frame (stripped of components)
- Degreaser or solvent cleaner
- Sandpaper assortment (400, 600, 800, 1000 grit)
- Automotive masking tape
- Self-etching primer (spray can)
- High-quality metallic copper spray paint (automotive grade recommended)
- High-gloss 2K clear coat (spray can with activator)
- Tack clothes
- Respirator mask and gloves
- Drop cloths or hanging wire
- Polishing compound
- Microfiber towels
Step 1: Preparation & Stripping
-
Disassemble the Bike:
Begin by removing every component from the frame—wheels, chain, crankset, seat post, and handlebars. Store all screws and small parts in labeled bags so you don’t lose them during the process. -
Clean the Surface:
Clean the entire frame thoroughly with a degreaser to remove any road grime, oil, or existing wax. A clean base is critical for paint adhesion. -
Sand the Frame:
Using 400-grit sandpaper, wet-sand the existing paint to scuff it up. You don’t need to go down to bare metal unless the old paint is chipping, but the surface must be dull and smooth. Wipe away sanding dust frequently. -
Masking Off:
Use automotive masking tape to cover threads (bottom bracket, head tube interiors) and any badges or areas you want to keep original. Take your time here; good masking makes for crisp lines later. -
Final Wipe Down:
Just before priming, wipe the entire frame with a tack cloth to pick up microscopic dust particles. Handle the frame by the dropouts or hanging wire to avoid transferring oils from your skin.
Fixing Paint Runs
If paint drips, don’t wipe it wet! Let it dry completely, then gently sand the drip flat with fine grit paper before recoating.
Step 2: Priming & Base Coat
-
Apply Primer:
Hang the frame in a well-ventilated area. Apply thin, even coats of self-etching primer. Keep the can moving to avoid runs. Aim for full coverage without thick buildup. -
Smooth the Primer:
Once dry (check manufacturer times), lightly sand the primer with 600-grit paper to create a silky-smooth base. Wipe clean with a tack cloth again. -
First Copper Coat:
Shake your metallic copper spray paint vigorously for at least two minutes. Apply the first coat as a light ‘tack coat’—it shouldn’t cover fully, just provide a sticky base for subsequent layers. -
Building the Color:
Apply 2-3 heavier coats of the copper metallic paint, waiting about 15 minutes between coats. I prefer to spray horizontally along the tubes rather than vertically to keep the metallic flakes aligned uniformly. -
Check for Unevenness:
Inspect the frame in good light. Metallic paints can show ‘striping’ if applied unevenly. If you spot light areas, mist them gently before the paint fully cures.
Pro Tip: Warm It Up
Place your spray cans in a bowl of warm water for 10 minutes before spraying. Warm paint atomizes finer for a smoother, pro finish.
Step 3: The High-Gloss Finish
-
Clear Coat Application:
For that wet, glass-like sheen seen in the photo, use a 2K clear coat (which has a hardener). Activate the can according to instructions and shake well. -
Layering the Gloss:
Apply three coats of clear. The first should be light; the next two should be ‘wet’ coats where the surface looks glossy immediately. Be careful not to spray so heavy that it drips. -
Curing Time:
Let the frame cure undisturbed for at least 24-48 hours. The chemicals need this time to harden into a durable shell. -
Wet Sanding the Clear:
If you have texturing or ‘orange peel,’ wet sand the clear coat gently with 2000-grit paper. This step levels the surface for maximum reflection. -
Buff and Polish:
Apply a polishing compound with a microfiber cloth or buffer. Work in circular motions until the copper shines brilliantly beneath the clear coat.
Enjoy the ride on your gleaming new copper cruiser as it catches every ray of golden hour light.
Pearl Shift for Subtle Color Change
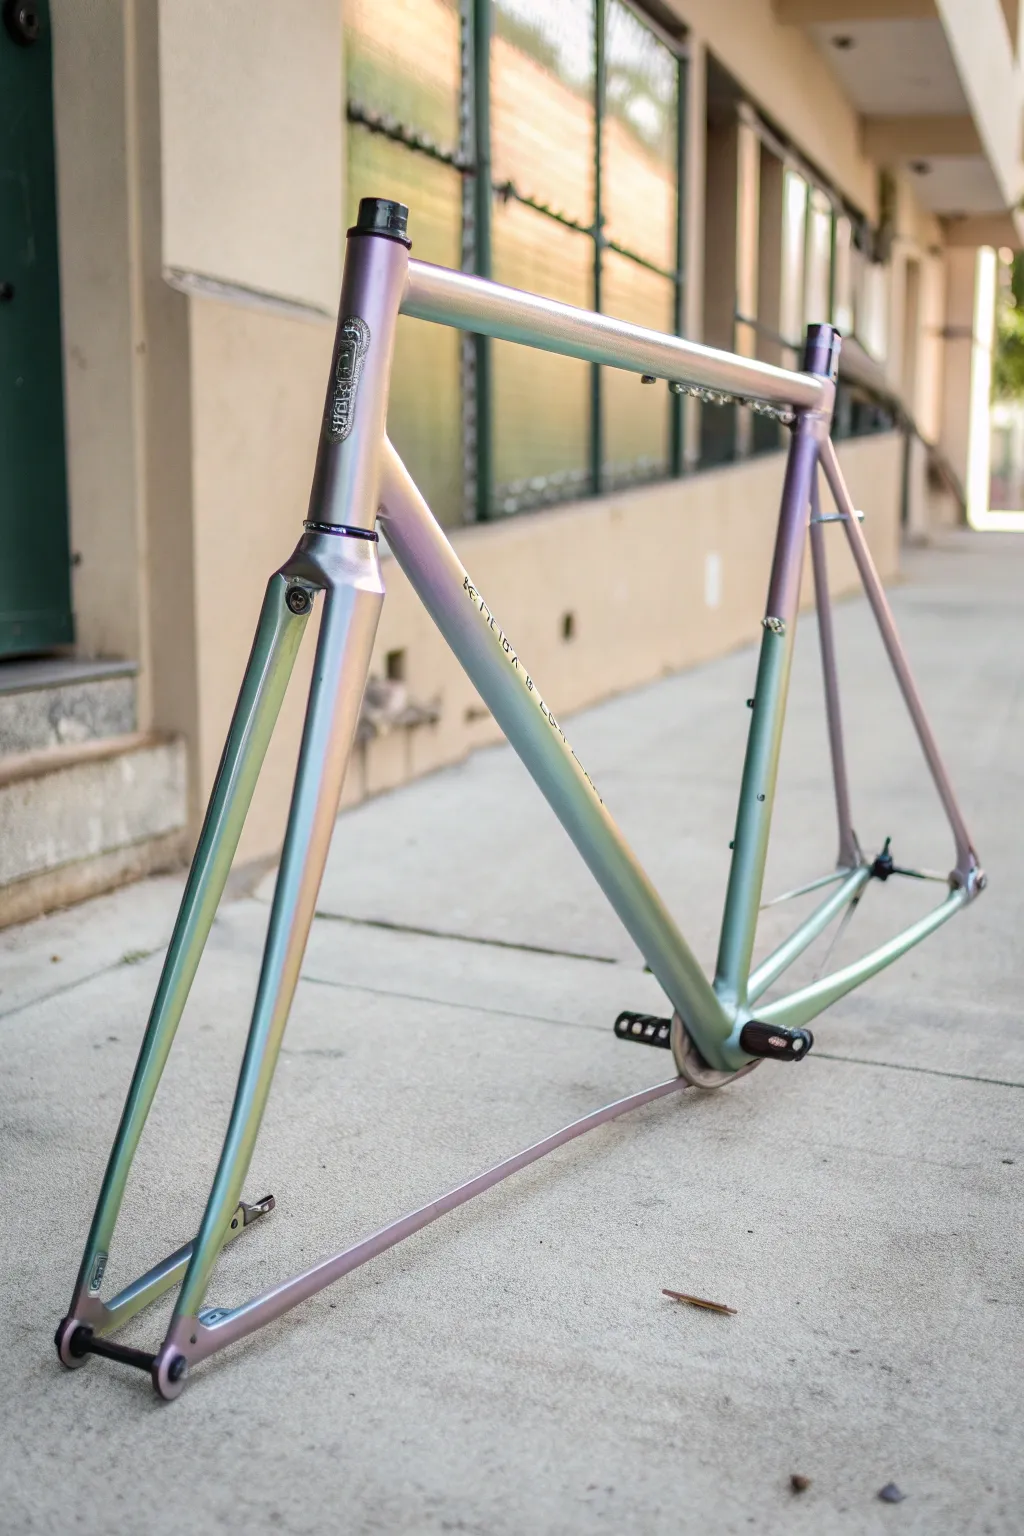
Transform a plain bicycle frame into a rolling work of art with this mesmerizing pearl shift paint job. The finish creates an ethereal transition between lavender and pale green that changes as you ride, offering a subtle yet stunning custom look without the harshness of standard metallics.
Step-by-Step
Materials
- Bicycle frame (stripped of parts)
- Sandpaper (400, 600, and 800 grit)
- Degreaser or prep solvent
- Lint-free tack cloths
- High-quality gray automotive primer spray
- Silver metallic base coat spray
- Pearl interference spray paint (Purple/Green shift)
- 2K Clear coat spray (high gloss)
- Respirator mask
- Painter’s tape and masking paper
- Wire hanger or heavy gauge wire
Step 1: Preparation & Priming
-
Strip and clean:
Begin with a fully disassembled frame. Remove the bottom bracket, headset cups, and any stickers. Thoroughly clean the entire frame with a degreaser to remove old road grime and oils. -
Initial sanding:
Sand the entire frame with 400-grit sandpaper. You don’t need to remove all the old paint down to bare metal unless it’s chipping, but you must scuff every inch of the surface to create a matte ‘key’ for the new paint to stick to. -
Masking critical areas:
Use painter’s tape to carefully cover the bottom bracket threads, head tube internals, seat tube opening, and derailleur hanger. Any threaded area needs to remain paint-free. -
Rigging the frame:
Loop a strong wire through the head tube to hang the frame freely. You need 360-degree access without touching it, so ensure it’s suspended at a comfortable spraying height. -
Apply primer:
Spray a light tack coat of gray primer, followed by two wet coats. Allow 15 minutes of drying time between coats. The gray provides a neutral ground that helps the subsequent colors pop. -
Sanding the primer:
Once the primer is fully dry (usually 24 hours), wet sand it gently with 600-grit paper. This step is crucial for that glass-like finish seen in the photo; smooth out any roughness or ‘orange peel’ texture.
Cloudy Finish?
If the pearl looks cloudy or matte, you likely sprayed from too far away, letting paint dry mid-air. Move closer (8-10 inches) and maintain a ‘wet edge’ while spraying.
Step 2: The Base Coat
-
Clean again:
Wipe the frame down with a tack cloth to catch every speck of sanding dust. Dust is the enemy here. -
Silver metallic base:
Apply your silver metallic base coat. Pearl shift paints often require a specific base color to work effectively; silver reflects light back through the pearl layer, intensifying the shift effect. Apply 2-3 even coats. -
Check for coverage:
Inspect the frame in good light. Ensure the silver is solid and opaque with no primer showing through, especially around the tricky weld clusters.
Temperature Matters
Spray paint acts up in cold or humidity. Warm your cans in a bowl of warm (not hot) water for 5 mins before spraying to increase pressure and atomization for a smoother mist.
Step 3: Applying the Pearl Shift
-
First pearl pass:
Shake your pearl interference can vigorously for at least 2 minutes. Apply the first coat very lightly, almost like a mist. You won’t see much color shift yet, just a slight sparkle. -
Building the effect:
Apply 3 to 4 more light coats of the pearl spray. I prefer to wait about 10 minutes between these layers. As you build up the material, you’ll start to see the purple and green tones emerge depending on your angle. -
Crucial inspection:
Walk around the hanging frame. The ‘shift’ relies on thickness; if one side looks more purple and another looks flat silver, apply another light pass to even out the effect.
Step 4: Clear Coat & Finish
-
Prep for clear:
Let the pearl layers cure for at least an hour. Gently wipe with a tack cloth one last time to remove overspray dust. -
Applying the 2K clear:
Activate your 2K clear coat can (usually involves depressing a button on the bottom). Apply a medium coat, moving steadily to avoid runs. This toxic stuff requires a good respirator. -
Final gloss coat:
After the first clear coat flashes off (becomes tacky, about 10-15 minutes), apply a final, heavier ‘wet’ coat. This is where the deep gloss comes from. Be confident but careful to avoid drips. -
Curing:
Leave the frame to cure undisturbed for at least 48 hours. Do not touch it or try to reassemble the bike until the chemical hardening process is complete. -
Unmasking:
Once fully hard, carefully peel away the masking tape. Use a blade to score the edge of the tape if the paint feels thick, ensuring you don’t peel up your new finish.
Take your time reassembling the components and enjoy the way your bike now changes personality with every turn
Speckle and Confetti Over a Base Coat
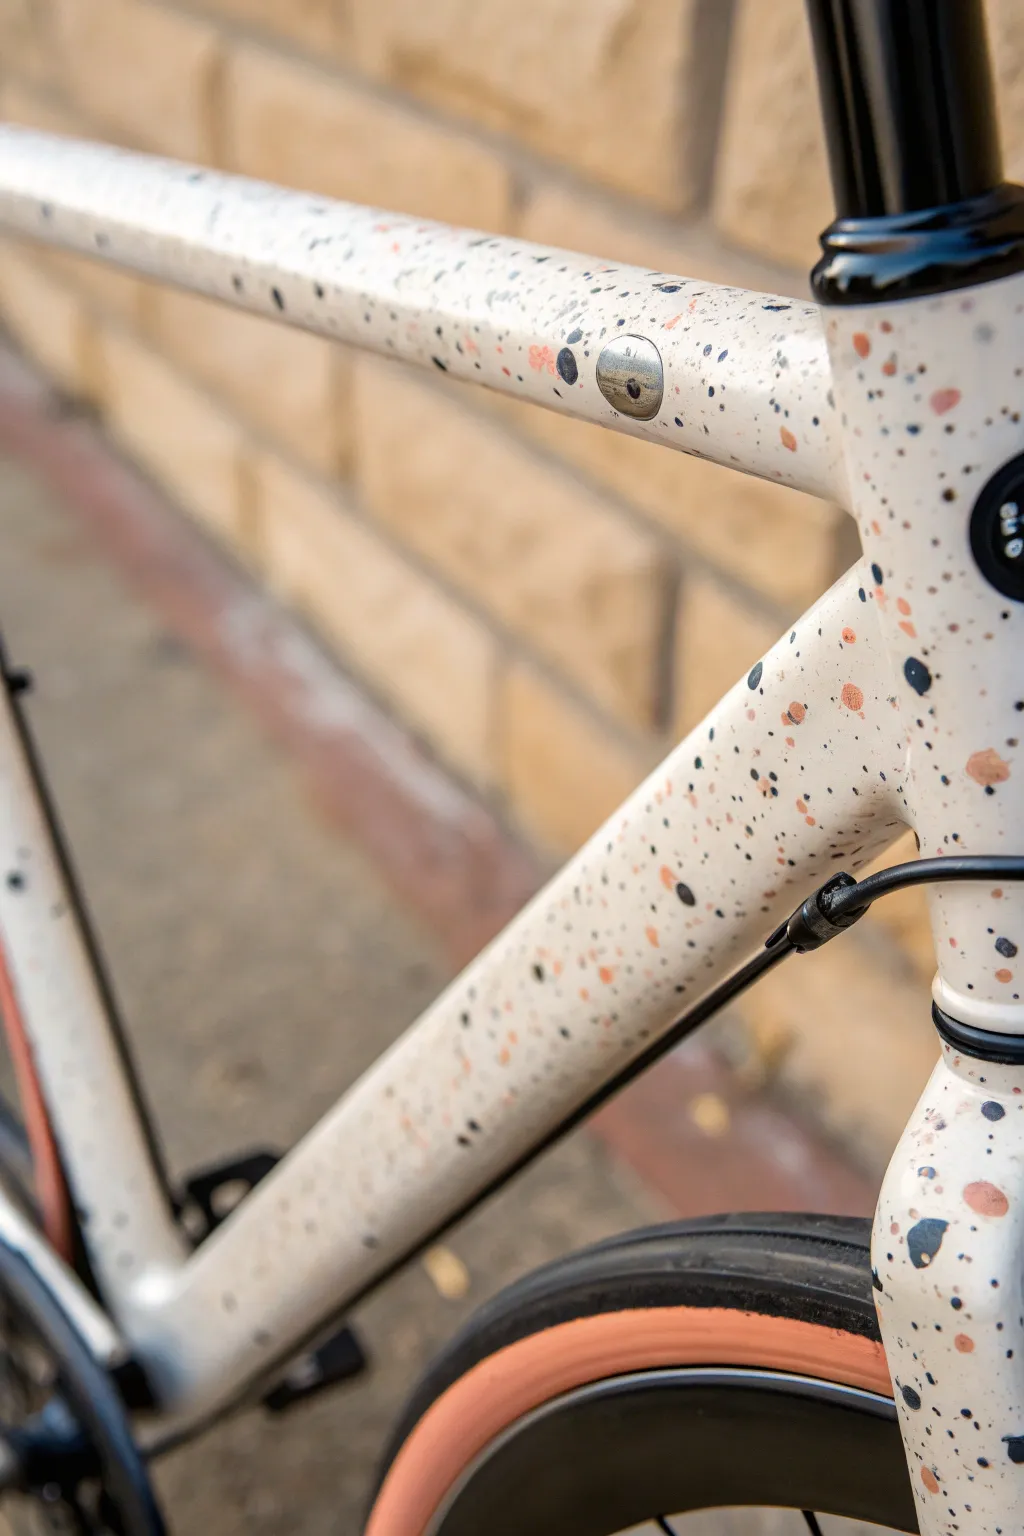
Transform your bike frame into a rolling piece of modern art with this playful confetti-style finish. By layering unpredictable splatters of coral pink and deep charcoal over a creamy white base, you can achieve a sophisticated terrazzo look that feels both retro and fresh.
Detailed Instructions
Materials
- Bicycle frame (disassembled and cleaned)
- Sandpaper (400, 600, and 800 grit)
- Self-etching primer (spray can)
- Cream or off-white acrylic spray paint (base coat)
- Coral/Salmon pink acrylic paint (jar or tube)
- Dark charcoal or navy blue acrylic paint (jar or tube)
- Small stiff-bristled paintbrushes (or toothbrushes)
- High-gloss 2K clear coat (spray can)
- Masking tape and plastic sheeting
- Respirator mask and gloves
- Degreaser or isopropyl alcohol
- Tack cloth
Step 1: Preparation & Priming
-
Strip components:
Remove all components from the bike frame, including the fork, bottom bracket, and headset cups. You want a completely bare skeleton to work with. -
Sand the surface:
Scuff the entire frame using 400-grit sandpaper to remove the glossy top layer of the old paint. Ensure you get into the tricky spots near the weld joints. -
Clean thoroughly:
Wipe down the entire frame with degreaser or isopropyl alcohol to remove dust and oils from your hands. -
Mask critical areas:
Use precision masking tape to cover threads in the bottom bracket, head tube, and seat tube. Don’t forget the brake mounts if you want them clean. -
Apply primer:
Hang the frame in a well-ventilated area. Apply two thin coats of self-etching primer, allowing about 15 minutes of drying time between layers. -
Sand the primer:
Once the primer is fully cured (check the can, usually 24 hours), lightly wet sand with 600-grit paper to create a silky smooth canvas. Wipe clean with a tack cloth.
Step 2: Base Coat & Splatter
-
Spray the base color:
Apply your cream or off-white base color in multiple thin coats. Keep the can moving to avoid drips. I usually aim for 3-4 light coats rather than one heavy one for better durability. -
Mix the splatter paint:
While the base dries, thin your coral pink and charcoal paints with a tiny amount of water. You want a consistency similar to heavy cream—thick enough to be opaque, but fluid enough to fly off a brush. -
Test your flick:
Practice your splatter technique on a piece of cardboard first. Load a stiff brush, pull the bristles back with your thumb, and release to send droplets flying. Varying the distance creates different dot sizes. -
Apply the first splatter color:
Starting with the coral pink, flick paint onto the frame. Rotate the frame constantly to ensure random, even coverage. Don’t overdo it; leave plenty of negative space. -
Apply the second splatter color:
Once the pink is touch-dry, repeat the process with the dark charcoal paint. Aim to have some dots overlap slightly for depth, but keep the overall distribution balanced. -
Inspect the density:
Step back and look at the frame from a distance. If any areas look bald, spot-treat them with a gentle flick from close range. -
Dry completely:
Let the paint cure for at least 24 hours. The acrylic splatters need to be bone-dry before clear coating to prevent smearing.
Splatter Troubleshooting
If you accidentally create a giant, runny blob instead of a speckle, dab it up immediately with the corner of a paper towel, let the spot dry, and lightly mist over it with your base color to erase the mistake.
Step 3: Finishing Touches
-
Light sanding:
Very gently run 800-grit sandpaper over the frame to knock down any high ridges created by the paint droplets. Be extremely careful not to sand through the splatter pattern. -
Clean again:
Use a fresh tack cloth to remove every speck of dust. Any debris left now will be permanent under the clear coat. -
Apply clear coat:
Spray the 2K high-gloss clear coat. This is the magic step that makes the colors pop and protects the finish. Apply 3 wet coats, waiting 10-15 minutes between applications. -
Final cure:
Allow the frame to cure undisturbed for 48 hours or more before attempting to reassemble your bike. -
Remove masking:
Carefully peel away all masking tape, re-grease your threads, and rebuild your bicycle.
Pro Tip: Pattern Scaling
Use different tools for different dot sizes. A toothbrush creates a fine mist of tiny dots, while a loaded stiff paintbrush flicked with your wrist creates the larger, chunky confetti spots seen here.
Once reassembled, you’ll have a completely unique ride that turns heads at every stoplight
Topographic Lines and Map-Inspired Layers
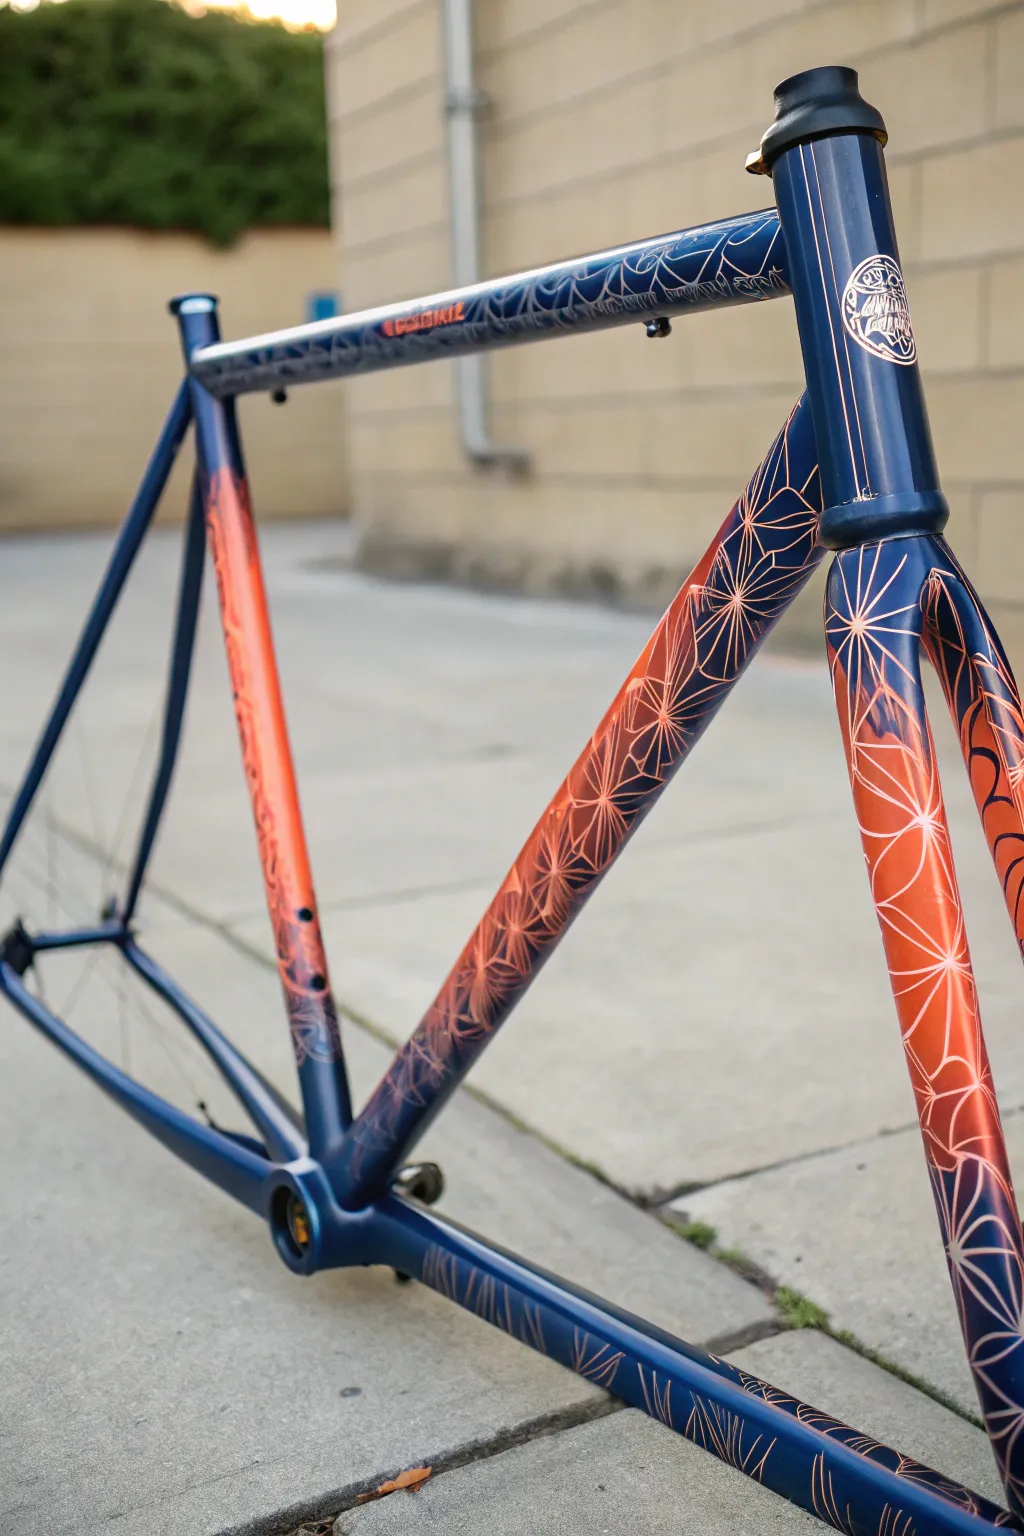
Transform a standard bicycle frame into a stunning piece of mobile art featuring a deep navy to burnt orange fade. The real showstopper is the intricate geometric line work that overlays the gradient, creating a stylized topographic effect that catches the light beautifully.
Step-by-Step
Materials
- Bicycle frame (stripped and prepped)
- Sandpaper (400, 800, and 1200 grit)
- Primer (spray or automotive grade)
- Deep Navy Blue spray paint
- Burnt Orange or Copper spray paint
- High-quality fine line tape (1/8 inch or thinner)
- Vinyl plotter (optional, for stencils)
- Transfer tape
- X-Acto knife with fresh blades
- Clear coat (2k high gloss recommended)
- Degreaser/Wax and Grease remover
- Tack cloth
- Respirator mask
Step 1: Preparation and Base Coat
-
Surface Prep:
Begin by dismantling the bike completely, leaving just the frame and fork. Sand the existing paint with 400-grit sandpaper until the surface is smooth and dull. Thoroughly clean the frame with wax and grease remover to eliminate any oils. -
Priming:
Apply two to three light coats of primer, allowing 10-15 minutes between coats. Once fully dry, lightly sand with 800-grit sandpaper to create a perfectly smooth canvas. -
The Gradient Base:
Hang the frame securely. Start by spraying the lighter color—the Burnt Orange/Copper—concentrating on the downtube, seat tube, and fork legs where the fade will be brightest. -
Adding the Navy:
Once the orange is tacky but set, start spraying the Deep Navy Blue on the extremities: the head tube, rear triangle, and bottom bracket. Feather the spray outward toward the orange sections to create a soft, seamless transition. -
Curing:
Let this base gradient cure completely. I prefer to wait at least 24-48 hours here to ensure the paint is hard enough to handle the masking tape without lifting.
Bleeding Lines?
If paint bleeds under the tape, it wasn’t pressed down enough. Before the second color, spray a clear matte coat over the mask to seal the edges instantly.
Step 2: Creating the Geometric Overlay
-
Design Planning:
The pattern shown works by negative space; the lines you see are the base color protected by tape. If you have a vinyl plotter, cut a ‘cracked ice’ or ‘spiderweb’ pattern. If working manually, striping tape is your best friend. -
Applying the Mask:
Apply your vinyl stencils or lay out your fine line tape over the gradient areas. The goal is to cover the parts you want to remain visible as the final geometric web. -
Trimming Edges:
Use an X-Acto knife to carefully trim the vinyl or tape at the tube junctions and welds. Be extremely gentle to avoid scoring the paint underneath. -
Top Coat Color:
Here is the trick: Spray the entire frame with the Deep Navy Blue again. This covers the exposed orange/copper parts, leaving only the masked lines in that original gradient color. -
Peeling:
Once the navy top coat is dry to the touch (usually about 30-60 minutes, depending on paint brand), carefully peel away the vinyl or tape. Pull at a sharp 45-degree angle to keep lines crisp.
Step 3: Finishing and Protection
-
Inspection:
Run a tack cloth over the frame to pick up any dust or paint residue. Check for any raised edges where the tape was; you can *very* lightly sand these down with 1200-grit if they feel too sharp. -
First Clear Coat:
Apply a light ‘mist coat’ of 2k clear coat. This helps seal the vinyl edges without flooding them. -
Heavy Clear Coat:
Follow up with 2-3 wet coats of clear to build a deep gloss. This protects the intricate paint work and gives it that showroom shine. -
Final Polish:
After the clear coat has cured for several days, you can wet sand and polish the frame if you want a true mirror finish.
Pro Tip: The Reverse Mask
Spray the lighter metallic color first. It covers easier and makes the lines ‘pop’ more against the dark navy top coat than if you did it in reverse.
Reassemble your bike and enjoy the admiring looks your custom geometric paint job will attract on every ride


Have a question or want to share your own experience? I'd love to hear from you in the comments below!