
If you’re craving that cozy, golden-hour feeling all season long, a fall mural is the quickest way to make a room feel like it’s wrapped in autumn. Here are my favorite fall mural ideas—from classic foliage scenes to artsy, unexpected twists—so you can pick the vibe that fits your space.
Maple Tree in Peak Color
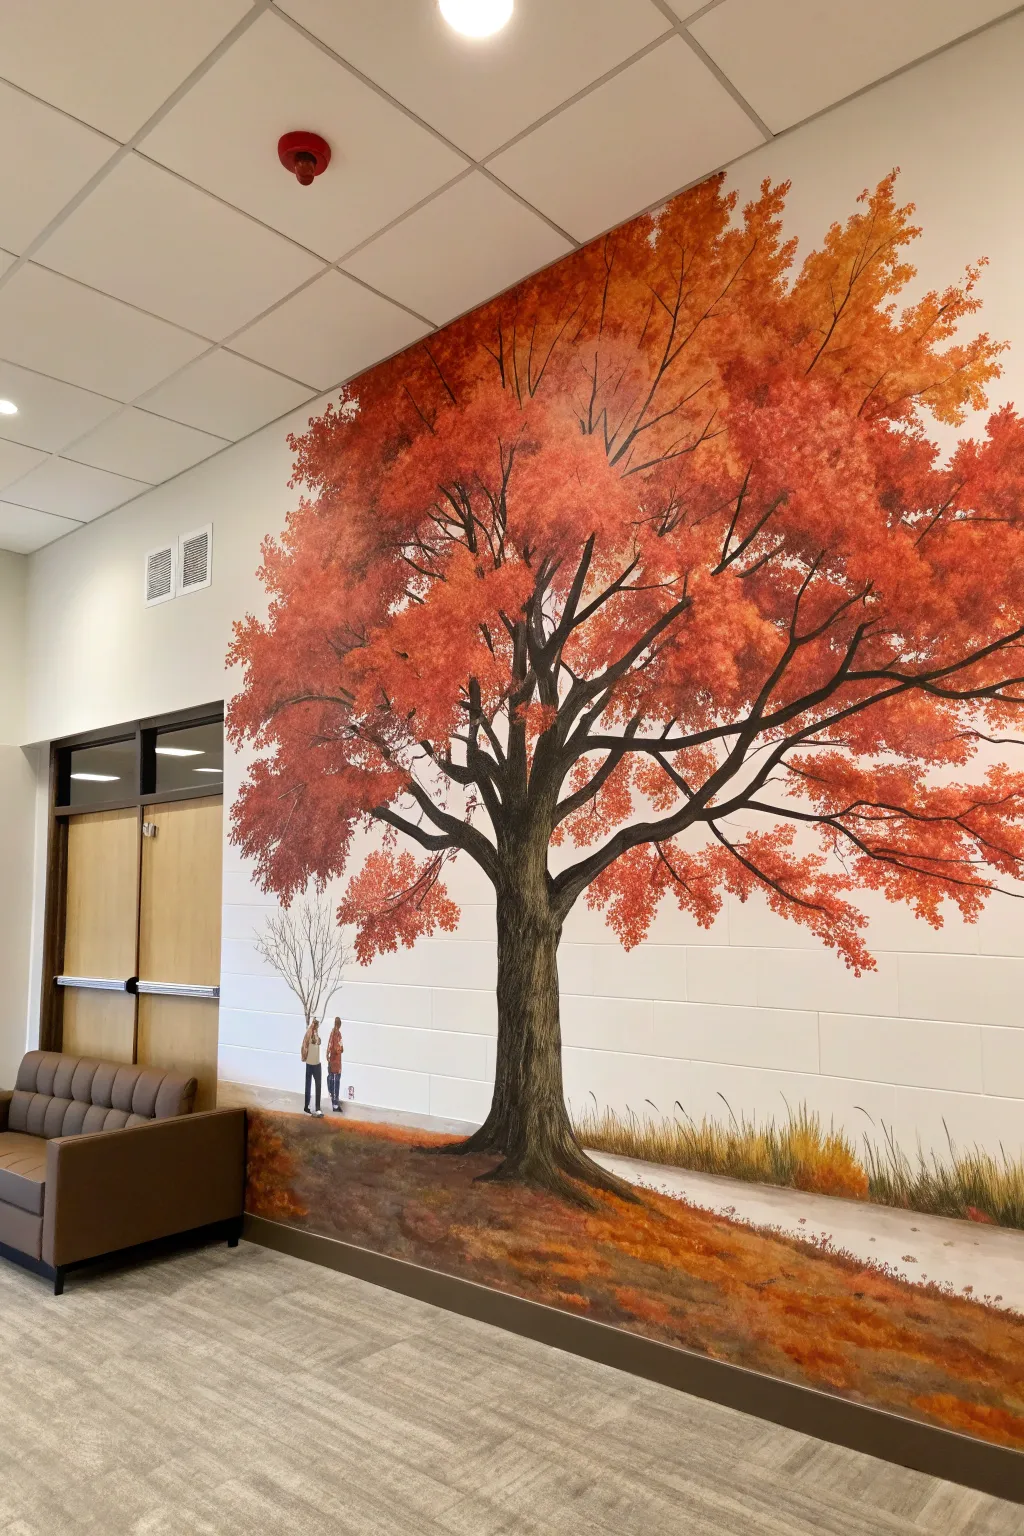
Transform a plain wall into a breathtaking seasonal escape with this grand-scale mural featuring a maple tree in peak autumn glory. The vibrant orange canopy and detailed trunk texture create a stunning focal point perfect for lobbies, hallways, or large living spaces.
Step-by-Step
Materials
- Interior acrylic latex paint (white, dark brown, tan, burnt orange, bright red, yellow ochre)
- Pencil and eraser for sketching
- Large painter’s drop cloth
- Painter’s tape
- Assorted brushes (2-inch sash brush, 1-inch flat brush, detail round brushes)
- Natural sea sponge or stippling brush
- Ladder or step stool
- Mixing palettes or trays
- Chalk line (optional for horizon)
Step 1: Preparation and Base
-
Prepare the workspace:
Clear the area against the wall, covering the floor and any nearby furniture (like the leather sofa) with a drop cloth. Tape off the baseboards and any ceiling tiles or fixtures like the red alarm bell to protect them from stray brushstrokes. -
Establish the horizon:
Decide on a low horizon line to give the tree immense scale. Lightly sketch a sloping hill along the bottom third of the wall. This will separate your foreground grass and path from the background wall color. -
Sketch the tree structure:
Using a pencil, draw the main trunk slightly off-center. Extend thick primary branches outward and upward, filling the upper two-thirds of the wall space. Keep the branches reaching towards the ceiling tiles to maximize height. -
Draft the background details:
Sketch a small, winding path receded into the distance on the left side. Add the outline of the tiny walking figures and the smaller, bare sapling nearby to create depth and perspective.
Uneven Texture?
If your brick wall texture makes clean lines difficult, dilute your paint slightly with water or flow improver. This helps the pigment settle into the grooves rather than skipping over the surface.
Step 2: Painting the Tree Structure
-
Block in the trunk:
Mix dark brown with a touch of black acrylic paint. Using a 2-inch sash brush, fill in the entire trunk and the thickest primary branches. Don’t worry about texture yet; just get a solid base coat down. -
Extend the branches:
Switch to a 1-inch flat brush to paint the secondary branches tapering out from the main limbs. Use a ‘Y’ formation technique, where every branch splits into two smaller ones. -
Add fine twigs:
For the smallest twigs at the ends, switch to a round detail brush. Use thinned dark brown paint (add a drop of water) so the paint flows smoothly for long, thin lines. -
Texture the bark:
Once the dark base is dry, mix a tan or light grey color. Using a dry-brush technique, lightly drag vertical strokes up the trunk to simulate rough bark texture. Focus this highlight on the left side of the trunk to suggest a light source. -
Detail the root flare:
At the base of the tree, paint the roots spreading into the ground. Blend the dark brown instructions outward into the sketched ground area to make the tree look firmly planted.
Pro Tip: Perspective
Keep the leaves at the very top of the tree lighter and warmer in color than the leaves at the bottom. This mimics sunlight filtering through the canopy.
Step 3: Creating the Canopy
-
Mix leaf colors:
Prepare three specific leaf colors on your palette: a deep burnt orange, a bright fire-engine red, and a yellow ochre. You will want to use these wet-on-wet for blending. -
Sponge the base foliage:
Dip a natural sea sponge into the burnt orange paint. Dab it onto the wall in clusters around the branch ends. Keep the clusters dense near the branches and airier at the edges. -
Layer bright highlights:
While the orange is still slightly tacky, sponge the bright red over the top, focusing on the outer edges and the very top of the canopy. I find this layering creates that glowing ‘peak color’ effect. -
Add depth and shade:
Mix a tiny bit of brown into your orange to create a shadow tone. Sponge this sparingly near the center of the tree and under large branch masses to create volume. -
Scatter loose leaves:
Use a small round brush to paint individual dots and leaf shapes floating away from the main canopy and landing on the ground below, giving the scene movement.
Step 4: Foreground and Details
-
Paint the ground cover:
Fill in the rolling hill at the bottom with a mix of browns and oranges to look like fallen leaves. Use long, horizontal strokes to suggest the lay of the land. -
Add tall grasses:
Using a fan brush or a detail liner, flick upward strokes of yellow ochre and light green along the bottom edge to create tall decorative grasses. -
Detail the background figures:
Carefully paint the two small figures on the path. Keep them simple—silhouettes often work best, or simple color blocks for clothing—to maintain the scale. -
Paint the distant sapling:
Use a very fine liner brush and grey paint to create the delicate, spindly branches of the small bare tree to the left of the main maple. -
Final touches:
Step back from the wall to assess the balance. If any branch looks too bare, add a few more sponge dabs of red. Once satisfied, remove the painter’s tape.
Enjoy the warmth of autumn all year round with your stunning new mural


Falling Leaves in Motion
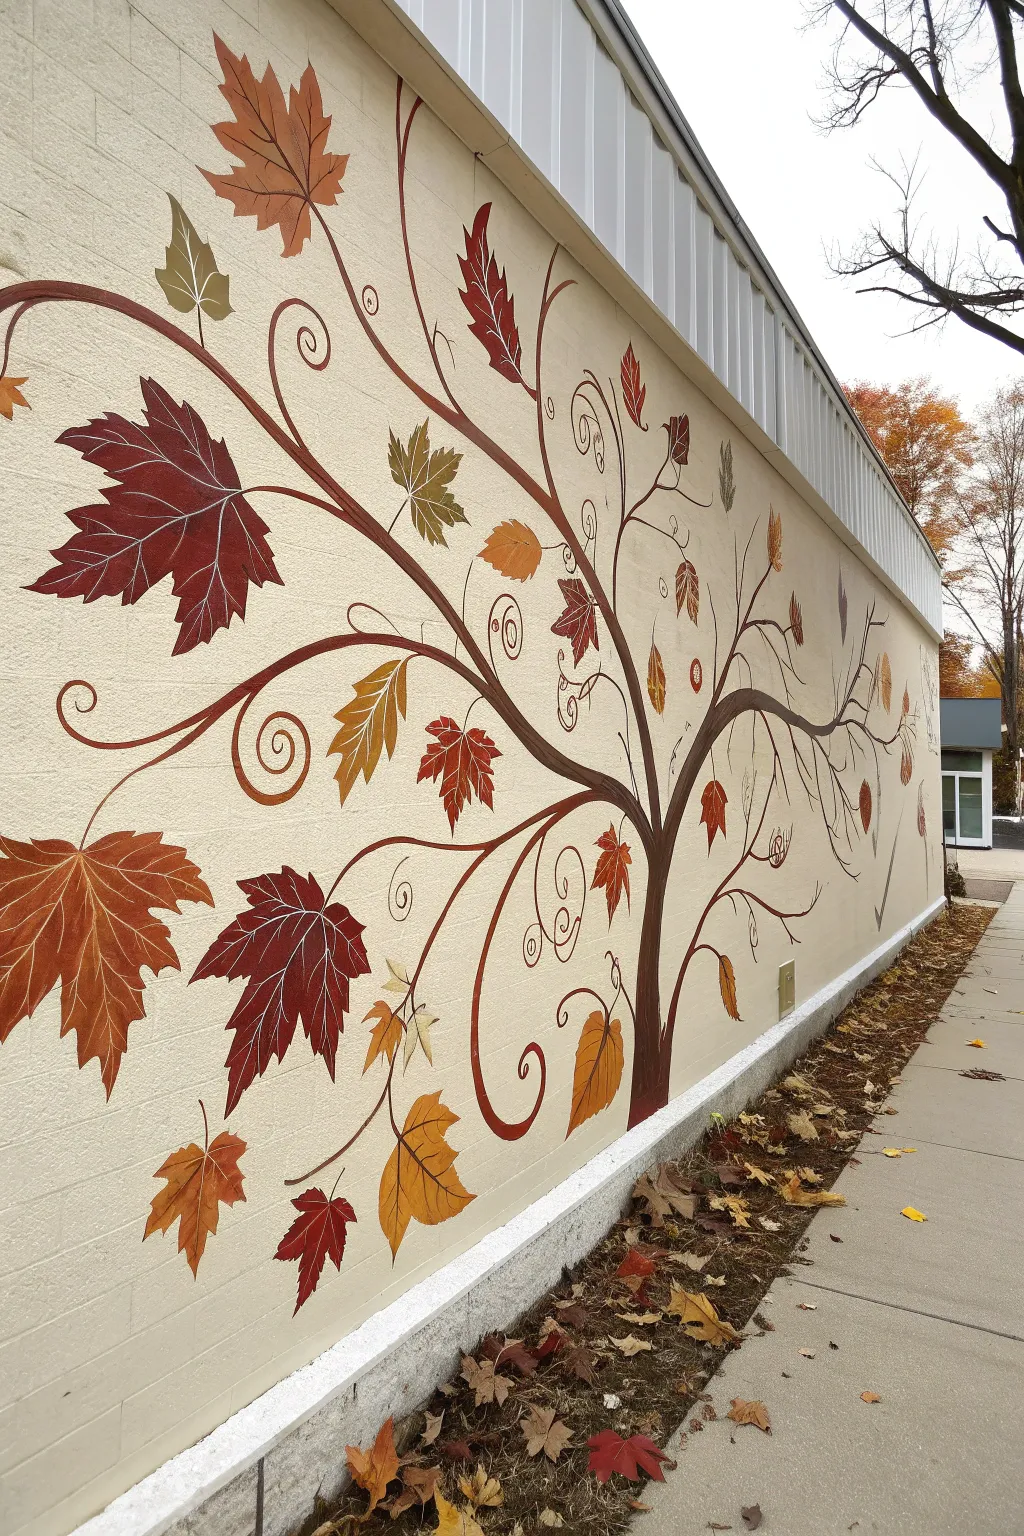
Capture the elegant movement of fall with this sweeping mural design that transforms a plain exterior wall into a celebration of the season. Featuring stylized maple and oak leaves drifting on swirling tendrils, this project uses warm earth tones to create a welcoming, artistic atmosphere.
Detailed Instructions
Materials
- Exterior acrylic latex paint (Cream/Beige base coat)
- Exterior acrylic paint (Dark Chocolate Brown for branches)
- Exterior acrylic paint (Deep Burgundy, Burnt Orange, Golden Yellow, Olive Green)
- Assorted paintbrushes (medium angled sash brush for branches, small round brushes for details)
- Chalk or charcoal pencil for sketching
- Painter’s tape
- Drop cloths
- Ladder or step stool
- Clean rags and water bucket
- Exterior clear sealant (optional)
Step 1: Preparation and Base Layer
-
Clean the surface:
Begin by thoroughly cleaning the exterior wall surface. Use a pressure washer or a stiff scrub brush with soapy water to remove dirt, mildew, and loose debris, ensuring the paint adheres properly. -
Protect the area:
Lay down drop cloths along the base of the wall to protect the ground, sidewalk, or landscaping from paint drips. Use painter’s tape to mask off any trim, windows, or adjacent surfaces you want to keep clean. -
Apply base coat:
Roll on a fresh coat of cream or beige exterior latex paint if the existing wall needs refreshing. This provides a neutral, warm canvas that will make the autumn colors pop. Allow this to dry completely for at least 24 hours.
Smooth curves tip
For steady spirals, don’t just move your wrist—move your whole arm. Use a ‘dagger striper’ brush (often used for pinstraiping cars) to get long, unbroken flowing lines.
Step 2: Mapping the Design
-
Sketch the main flow:
Using a chalk or charcoal pencil, lightly sketch the main ‘backbone’ of the tree branch emerging from the bottom right corner. Focus on creating a sweeping, organic curve that reaches upward and to the left across the wall. -
Add secondary tendrils:
Draw smaller, thinner branches branching off the main trunk. Incorporate distinct, spiral-shaped curlicues at the ends of these offshoots to mimic the whimsical movement of wind. -
Placement of major leaves:
Sketch the outlines of the largest leaves first to balance the composition. I like to place the biggest maple leaves near the center and left side to create visual weight. -
Fill in smaller details:
Draw smaller leaves, varying their shapes between classic maple points and rounded oak edges, scattering them along the branches and floating freely in the open spaces.
Rough texture help
If painting on deep stucco or brick,
Step 3: Painting the Structure
-
Paint the trunk and branches:
Load a medium angled sash brush with Dark Chocolate Brown paint. Carefully follow your sketched lines for the main thick branch, ensuring smooth, confident strokes. -
Refine the thin lines:
Switch to a smaller round brush to paint the delicate curlicues and thinner twigs. Keep the paint varied in thickness—thicker near the join points and tapering off to fine points at the ends. -
Add branch shadows (optional):
If you want extra depth, mix a tiny bit of black into your brown paint and add a thin shadow line along the bottom edge of the main branches while the base brown is still slightly tacky.
Step 4: Bringing Leaves to Life
-
Block in leaf colors:
Start painting the leaves using your palette of burgundy, orange, yellow, and olive green. Paint one color at a time, distributing that hue evenly across the mural so no area looks too heavy with one color. -
Create distinct shapes:
Focus on clean edges. For the maple leaves, ensure the points are sharp; for oak leaves, keep the lobes rounded. Apply two coats if necessary for full opacity on textured walls. -
Add veining details:
Once the base leaf colors are dry, use a fine liner brush with a lighter shade (like mixing white into the base color) to paint the central vein and side veins on each leaf. -
Highlight the leaves:
Add very subtle highlights to the upper edges of the leaves using a pale yellow or light cream color. This helps separate the leaves from the background and adds dimension. -
Final touch-ups:
Step back about 10 feet to view the whole mural. Look for any patchy areas or unsteady lines. Use your original wall color to ‘erase’ or clean up any edges where the paint may have strayed. -
Seal the work:
If your mural faces harsh weather, consider applying a clear, non-yellowing exterior sealant over the painted areas once they have cured for 48-72 hours to ensure longevity.
Now you have a permanent breeze of autumn color to enjoy regardless of the season


Harvest Still Life Wall Mural
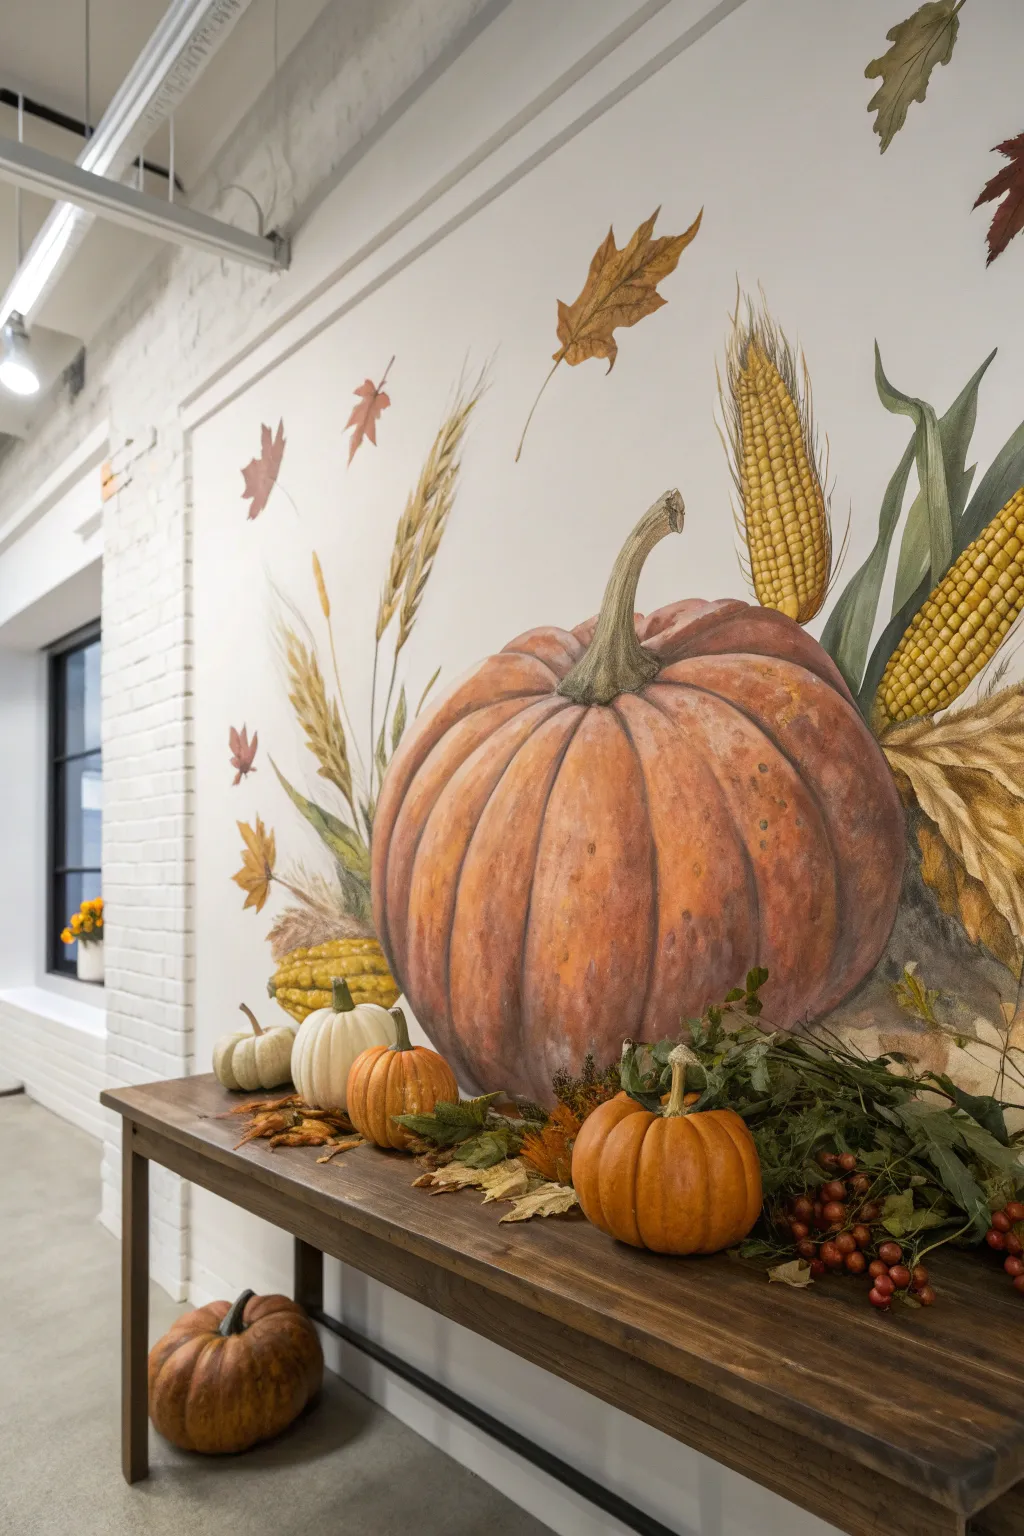
Bring the warmth of autumn indoors with this stunning, large-scale still life mural featuring a giant pumpkin, corn stalks, and drifting leaves. Painted directly onto a white brick wall, the textured surface adds an inherent rustic charm to the detailed, painterly style.
Detailed Instructions
Materials
- Interior acrylic latex paint (matte or eggshell finish)
- Acrylic artist paints (burnt orange, raw sienna, yellow ochre, burnt umber, olive green, cream/off-white)
- Pencil and large eraser
- Assorted paintbrushes (2-inch sash brush, 1-inch flat brush, various round detail brushes)
- Plastic drop cloth and painter’s tape
- Mixing palette or paper plates
- Projector (optional, for tracing outlines)
- Water container and rags
- Clear matte varnish (optional)
Step 1: Preparation and Layout
-
Prepare the surface:
Ensure your white brick wall is clean and dry. If the wall isn’t already white, apply a base coat of high-quality white interior paint to create a blank canvas. Let this cure completely before starting the artwork. -
Protect the area:
Lay down a plastic drop cloth to protect the floor. If you have adjacent walls or trim you want to keep clean, apply painter’s tape to the edges. -
Sketch the composition:
Using a pencil, lightly sketch the large central pumpkin first to anchor the design. It should serve as the focal point. Then, add the tall corn stalks on the right and wispy wheat stalks on the left. -
Refine the sketch:
Add floating leaves above and around the main subjects. Don’t worry about perfect lines on the brick texture; rough guidelines are sufficient for placement.
Rough Texture Troubles
Brick eats brushes! Use older brushes for the base layers and use a stipling motion (poking/dabbing) rather than long strokes to get paint into deep mortar joints.
Step 2: Painting the Foliage
-
Base coat the corn stalks:
Mix a muted olive green with a touch of gray. Using a medium flat brush, fill in the long, twisting leaves of the corn stalks on the right side. -
Detail the corn cobs:
For the corn kernels, mix a bright yellow ochre. Paint the oblong cob shapes, then use a small round brush with burnt umber to dab in individual kernel texture in a grid-like pattern. -
Paint the wheat:
On the left side, use a mix of cream and raw sienna to paint the tall, thin wheat stalks. Use a liner brush to flick paint upward, mimicking the feathery texture of the grain heads. -
Add falling leaves:
Paint the scattering leaves using burnt orange and brown. Vary the orientation so they look like they are drifting in the wind. I like to keep the edges slightly soft to suggest movement.
Make it 3D
Extend the mural slightly onto the adjacent wall or floor trim for a trompe-l’œil effect, or attach faux vines to the wall that blend into the painted ones.
Step 3: The Centerpiece Pumpkin
-
Block in the pumpkin shape:
Mix a mid-tone orange using burnt orange and a little white. paint the entire pumpkin shape, leaving the ribs slightly lighter to establish volume. -
Define the ribs:
Mix a darker shadow color using burnt orange and a tiny bit of burnt umber. Paint the deep crevices between the pumpkin ribs, following the curve from top to bottom. -
Add highlights:
Mix a pale peach or cream color. Apply this to the rounded tops of each rib segment to make the pumpkin look three-dimensional and round. -
Texture the skin:
Using a dry brush technique with watered-down brown paint, lightly stipple speckles and imperfections onto the pumpkin skin for realistic texture. -
Paint the stem:
Use olive green mixed with brown for the thick, twisted stem. Add highlights with a lighter green to show the ridges in the vine.
Step 4: Finishing Touches
-
Deepen shadows:
Go back with a dark brown wash and deepen the shadows where the pumpkin sits on the ground and where the corn leaves overlap the vegetable. -
Refine edges:
Use your white base wall paint to clean up any messy edges or accidents, cutting back into the shapes to sharpen them up. -
Seal the work (Optional):
If the mural is in a high-traffic area, apply a clear matte varnish over the painted areas once they are completely dry to protect the artwork. -
Style the scene:
Place a console table in front of the mural. Arrange real pumpkins, gourds, and dried foliage on top to seamlessly blend the 2D art with 3D reality.
Step back and admire how your painted harvest transforms the room into a cozy autumn retreat


Woodland Animals in Fall Foliage
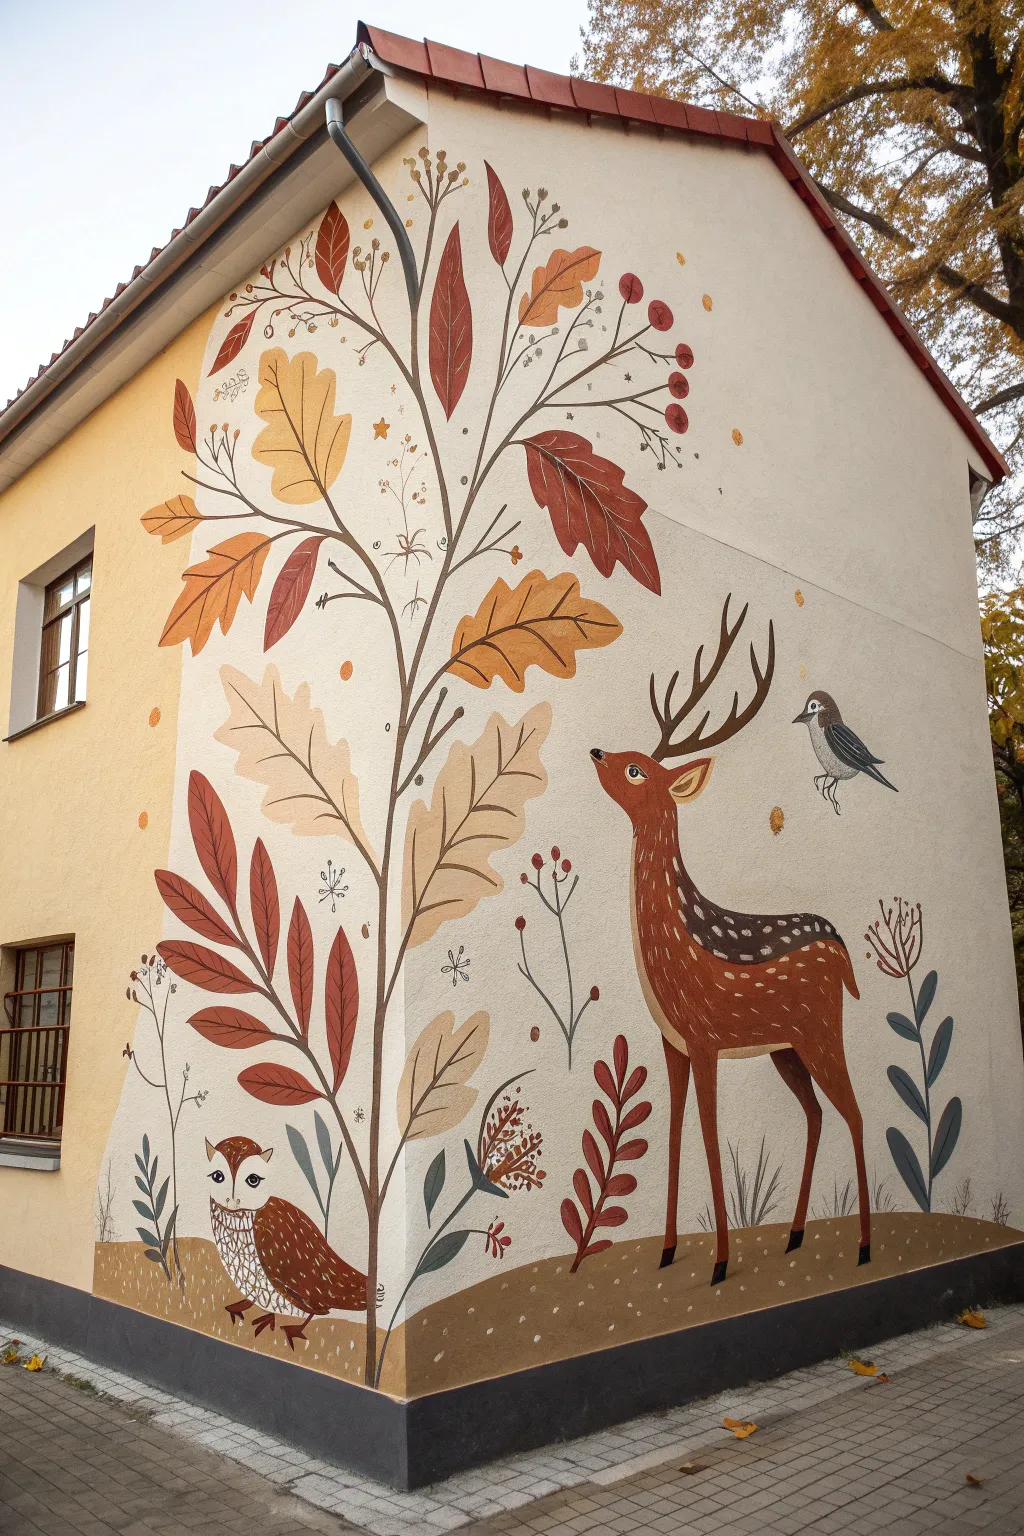
Transform a plain building corner into an enchanting storybook scene with this large-scale mural featuring stylized woodland creatures and autumn flora. The earthy palette of rust, ochre, and brown brings warmth to the exterior while the clever use of the corner adds depth and dimension to the composition.
Detailed Instructions
Materials
- Exterior masonry primer
- Exterior acrylic latex paints (cream/off-white for background)
- Exterior acrylic paints (various shades of brown, rust, ochre, deep red, grey, black, and white)
- Wide paint rollers and tray
- Assorted synthetic bristle brushes (large flat brushes for filling, fine liner brushes for details)
- Chalk or watercolour pencils for sketching
- Painter’s tape
- Ladder or scaffolding
- Clear exterior UV-protective sealant (matte finish)
Step 1: Preparation and Background
-
Clean the surface:
Begin by thoroughly cleaning the exterior wall surface to remove dirt, moss, or loose paint. A pressure washer is effective here, but ensure the wall dries completely before proceeding. -
Prime the walls:
Apply a generous coat of high-quality masonry primer to both sides of the corner to ensure your mural adheres properly and lasts through the seasons. -
Paint the base coat:
Roll on your background color—a soft cream or off-white works best to make the autumn colors pop. I like to apply two coats to get a solid, opaque finish. -
Mark the composition:
Using chalk or watercolour pencils, lightly sketch the main elements. Start with the central tree trunk climbing up the corner edge, then outline the deer on the right wall and the owl low on the left wall.
Grid Method Helper
To scale up the drawing accurately, take a photo of the wall, overlay a digital grid, and draw a matching chalk grid on the wall before sketching.
Step 2: Painting the Flora
-
Establish the main stem:
Using a dark brown paint and a medium round brush, paint the central plant stem. Let it follow the natural vertical line of the building corner, branching out onto both walls. -
Block in large leaves:
Paint the large oak-style leaves using varying shades of ochre, burnt orange, and deep red. Don’t worry about veins yet; just get the flat colour down for the leaf shapes. -
Add secondary plants:
Paint the smaller, fern-like botanical elements near the ground and the floating sprigs of berries. Use a reddish-brown for the berry stems and a bright red for the berries themselves. -
Detail the leaves:
Once the base leaf colours are dry, use a fine liner brush with a darker shade of the leaf’s colour (or dark brown) to paint the central veins and stems connecting them to the main branch.
Rough Surface Tip
On textured stucco, use a ‘stippling’ motion (poking the brush) rather than long strokes to force paint into the deep crevices for solid coverage.
Step 3: Bringing Animals to Life
-
Paint the deer’s body:
Fill in the deer shape with a warm, reddish-brown hue. Leave the chest, underbelly, and inner ear area unpainted or fill them with a lighter cream color. -
Add deer details:
Paint the antlers in a dark chocolate brown. Using a small round brush, add the signature white spots along the deer’s back and paint the hooves black. -
Create the deer’s face:
Use a fine liner brush to paint the eye (black with a white highlight) and the nose. Add a soft outline around the eye to give it a gentle expression. -
Paint the owl:
On the left wall, fill in the owl’s body with dark brown and the wings with a textured pattern of smaller brushstrokes. Paint the face area white, leaving two circles for the large eyes. -
Detail the owl features:
Paint the owl’s eyes black with a white glint, and add the beak. Use a liner brush to create a scalloped feather pattern on the chest using a light brown. -
Add the bird:
Paint the small bird perched above the deer in grey and white tones, using a fine brush for the sharp beak and tail feathers.
Step 4: Grounding and Finishing
-
Paint the hill:
Create the rolling ground at the bottom of the mural using a medium brown. Paint a wavy horizon line that connects both walls, grounding the animals. -
Add texture to the ground:
Dabble small dots of light cream or white across the brown ground area to suggest pebbles, fallen seeds, or texture. -
Incorporate foliage accents:
Paint stylized vertical plants and grasses rising from the ground using blue-grey and deep red tones to frame the animals. -
Final touch-ups:
Step back and check your work from a distance. Fix any uneven edges and add final highlights to the berries or eyes if they need more sparkle. -
Seal the mural:
Once the paint has cured completely (usually 24-48 hours), apply a clear, matte, UV-protective exterior sealant to protect your artwork from weather and fading.
Now you have a stunning piece of public art that celebrates the beauty of the harvest season year-round
BRUSH GUIDE
The Right Brush for Every Stroke
From clean lines to bold texture — master brush choice, stroke control, and essential techniques.
Explore the Full Guide
Vintage Harvest Truck Scene
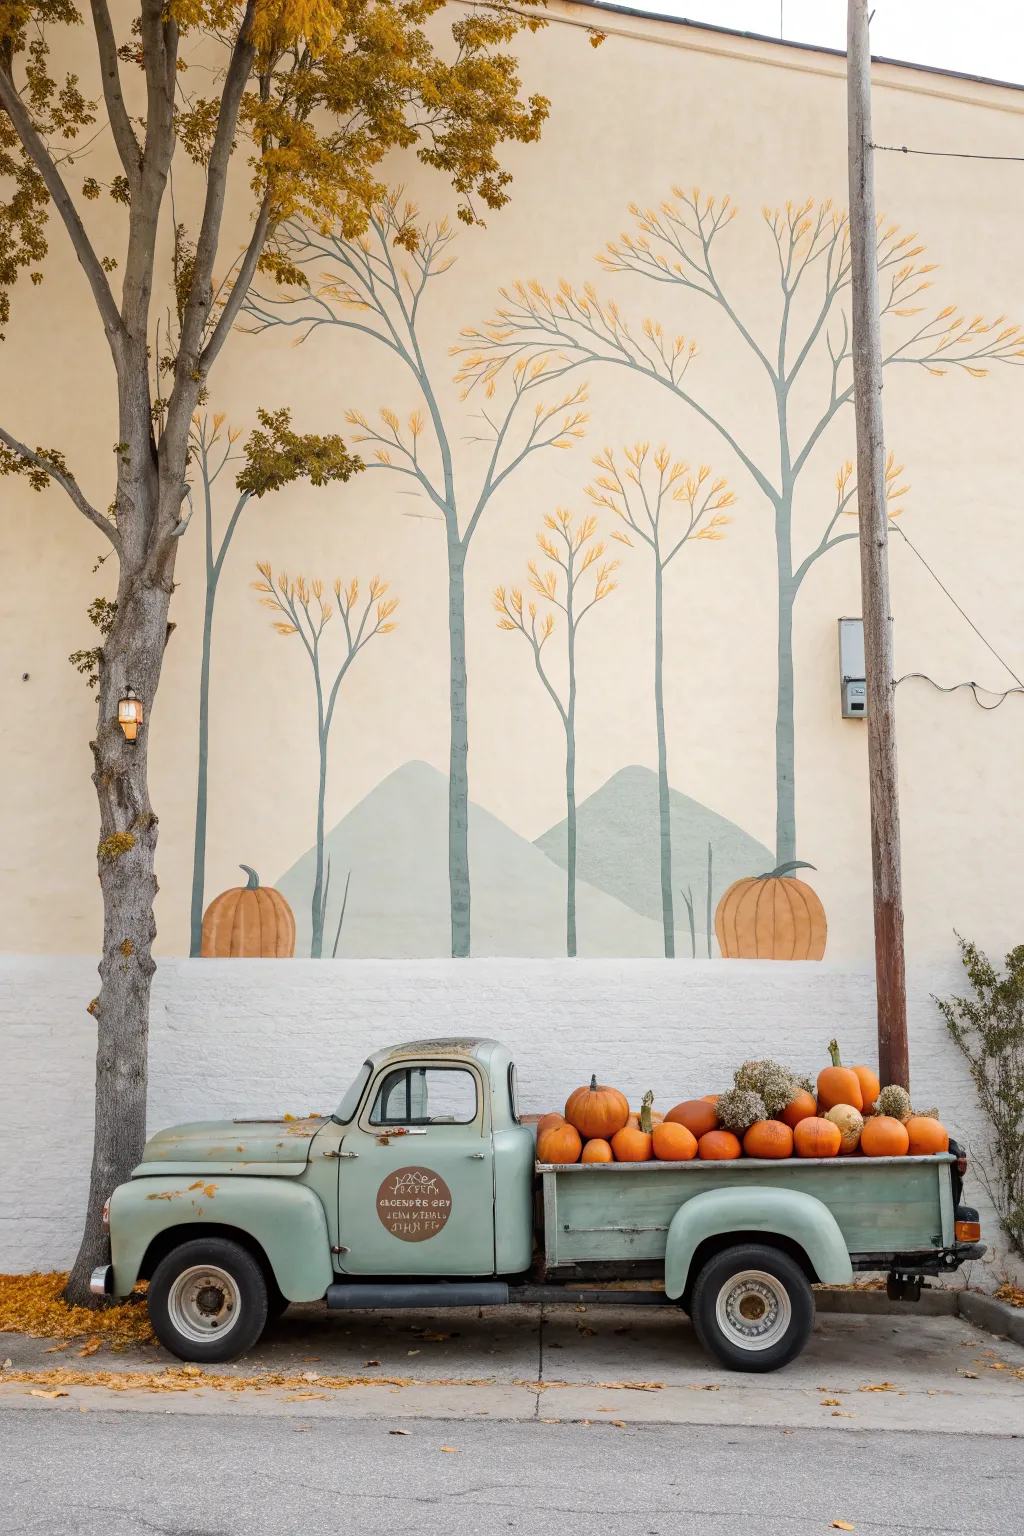
Transform a blank outdoor wall into a nostalgic autumn scene featuring stylized trees, geometric mountains, and oversized pumpkins. This large-scale painting creates a charming, storybook backdrop that perfectly frames a real vintage truck or garden display.
Step-by-Step Tutorial
Materials
- Exterior masonry primer
- Exterior latex paint (Cream/Off-white for background)
- Exterior latex paint (Sage green for mountains/mid-ground)
- Exterior latex paint (Blue-grey for tree trunks)
- Exterior latex paint (Mustard yellow/Ochre for leaves)
- Exterior latex paint (Orange and terracotta for pumpkins)
- Painters tape
- Chalk snap line
- Large paint rollers and extension poles
- Assorted paint brushes (2-inch sash, 1-inch detail)
- Ladder or scaffolding
- Drop cloths
- Pencil or chalk for sketching
Step 1: Preparation & Background
-
Surface prep:
Begin by power washing the wall to remove dirt and loose debris. Allow the masonry to dry completely for at least 24 hours before applying any paint. -
Prime the wall:
Apply a coat of high-quality masonry primer over the entire area you plan to paint. This ensures your colors will be true and the paint will adhere properly to the texture. -
Base coat application:
Roll on the creamy off-white background color. You will likely need two coats to get solid, opaque coverage over a rough exterior wall. Let this dry fully.
Clean Lines on Stone
Painting on rough masonry? Don’t push too hard. Use a fully loaded brush and dab the paint into the crevices rather than dragging, which creates jagged edges.
Step 2: Painting the Landscape
-
Sketch the mountains:
Using chalk or a light pencil, sketch two simple, triangular mountain shapes near the bottom third of the wall. Keep the lines clean and geometric rather than realistic. -
Fill in the mountains:
Use a smaller roller or a wide brush to fill in the mountain shapes with your sage green paint. The paint should look flat and graphic. -
Add floating pumpkins:
Sketch large pumpkin shapes sitting on the ‘ground’ line of your mural. Paint the bodies with a solid orange, adding vertical curved lines in a slightly darker terracotta shade to suggest ribs. -
Pumpkin stems:
Paint curved stems on the pumpkins using the blue-grey color you’ll use for the trees later. Make them whimsical and curled.
Step 3: Adding the Trees
-
Map out tree placement:
Use chalk to draw vertical lines where your tree trunks will go. Vary the spacing so it doesn’t look too uniform. -
Paint the trunks:
Using the blue-grey paint and a steady hand (or long straight edge), paint the thin, tall trunks. They can be slightly thicker at the bottom and taper very gradually as they go up. -
Create branches:
Extend branches outward from the main trunks in a ‘Y’ pattern. Keep the lines fluid and organic, reaching high up the wall. -
Add the leaves:
Switch to your mustard yellow paint. Instead of painting individual leaves, create clusters of short, radiating brushstrokes at the ends of the branches to simulate stylized foliage. -
Mid-level foliage:
Don’t forget to add some lower branches and leaf clusters around the middle height of the trees to balance the composition.
Color Harmony
Mix a tiny drop of your background cream color into your green and blue paints. This tinting creates a cohesive palette that looks sun-washed and vintage.
Step 4: Final Touches & Staging
-
Detail work:
Step back and check your lines. Use a small detail brush to sharpen the edges of the mountains or pumpkin ribs where the texture of the wall made the line fuzzy. -
Seal the mural (Optional):
If your climate is harsh, applying a clear, matte exterior sealer can help prolong the life of your pigments. -
Staging the scene:
To truly recreate the look, park a vintage truck or wheelbarrow in front of the mural. Load the back with real pumpkins and gourds that match the tones in your painting.
Now you have a stunning, oversized backdrop ready for fall gatherings and photo opportunities
Fall Leaf Rainbow Gradient
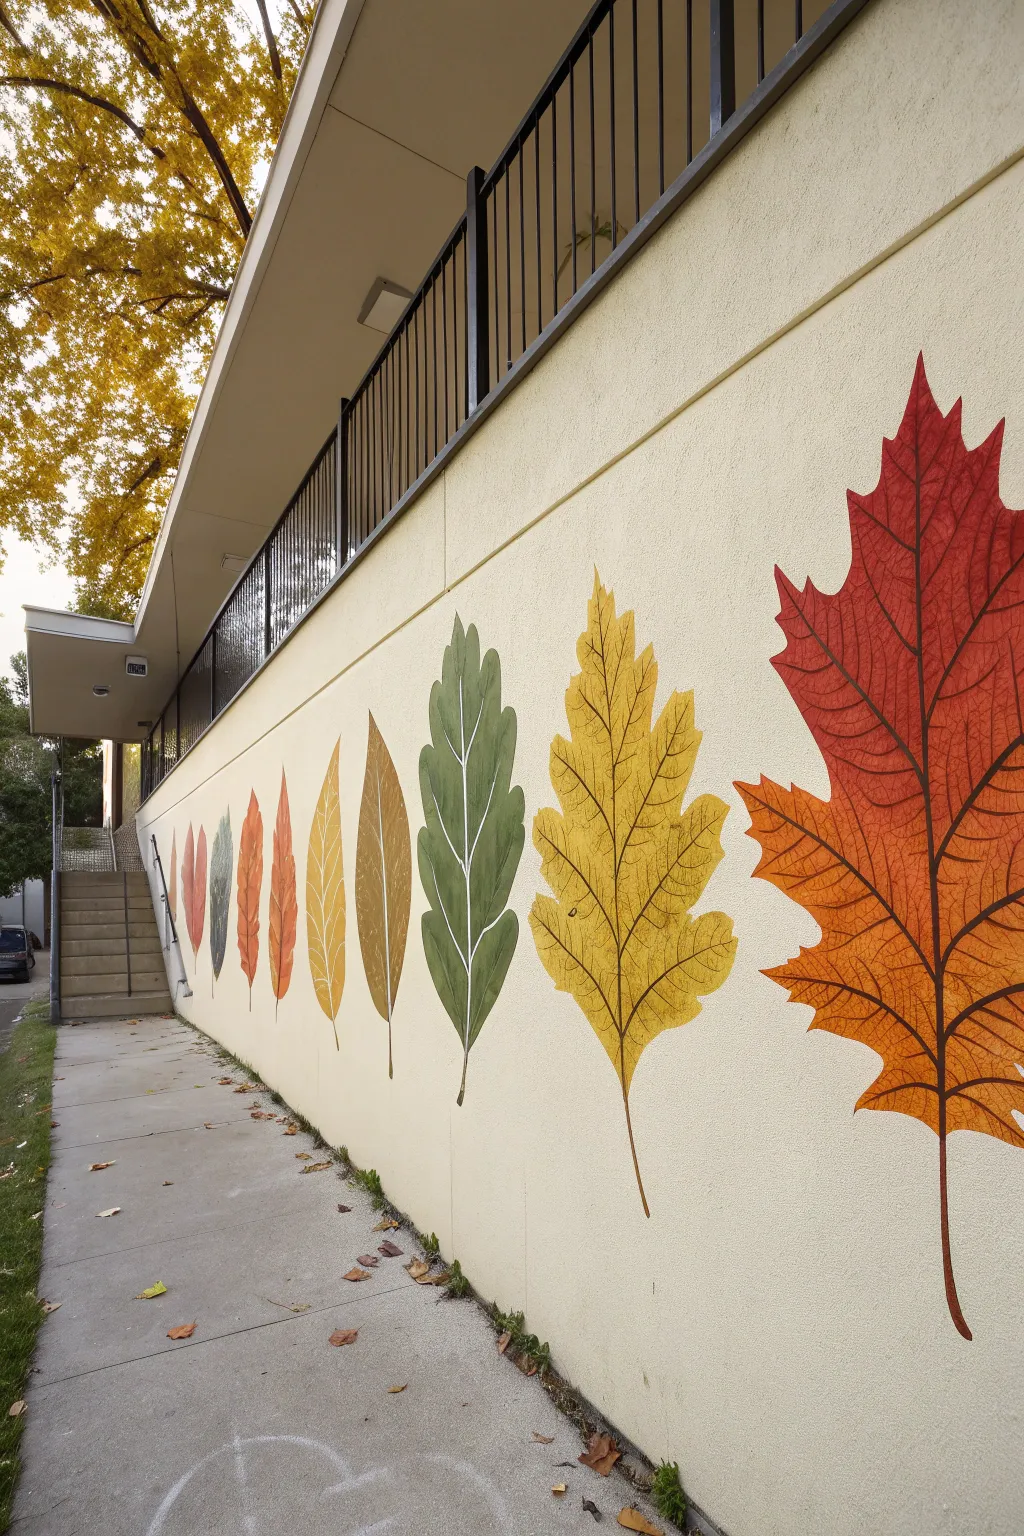
Transform a plain exterior wall into a stunning celebration of autumn with this large-scale mural featuring a sequence of progressively larger leaves. By blending a warm palette of reds, oranges, yellows, and greens, you’ll create a natural gradient that mimics the changing seasons beautifully.
Step-by-Step Guide
Materials
- Exterior acrylic latex paint (deep red, bright orange, golden yellow, sage green, brown)
- Exterior primer (white or off-white)
- Chalk snap line or long level
- Pencils and chalk for sketching
- Projector (optional but recommended for scale)
- Cardboard or large paper for stencils (alternative to projector)
- 2-inch angled sash brushes (for cutting in)
- Assorted round brushes (sizes 4-8 for detailing)
- Fine liner brush (size 0-2 for veins)
- Paint rollers and tray (for background prep)
- Painter’s tape
- Ladder or step stool
Step 1: Preparation & Layout
-
Prep the surface:
Begin by cleaning the exterior wall thoroughly to remove any dirt, dust, or moss. If the existing paint is peeling, scrape and sand those areas smooth. -
Prime the wall:
Since you want the colors to pop against the textured stucco, roll a fresh coat of off-white or cream exterior paint as your base. I like to let this cure for at least 24 hours before starting the artwork. -
Establish a baseline:
Using a chalk snap line or a long straightedge and level, lightly mark a subtle horizontal guide along the bottom third of the wall to ensure your leaves follow a consistent path, even if they vary in height. -
Sketch the leaf shapes:
Lightly sketch the outline of seven to eight leaves, starting with the smallest on the far left and gradually increasing the size as you move right. Vary the species—include oak, elm, and maple shapes for visual interest. -
Refine the composition:
Step back frequently to check the spacing. Ensure there is equal ‘breathing room’ between each stem and tip so the gradient feels rhythmic rather than crowded.
Tape Trick for Stucco
On rough stucco, burnish painter’s tape edges firmly with a putty knife, then seal the edge with a thin layer of base wall color before painting the leaf color to prevent bleeds.
Step 2: Painting the Base Colors
-
Mix your palette:
Prepare your colors. You aren’t just using flat colors; you need a spectrum. Mix a transition shade between each main color (e.g., mix red and orange for the second leaf, yellow and green for the middle leaves). -
Paint the first leaves:
Start on the left with the smallest leaves. Paint the first one a deep, rusty red and the second a lighter clay orange. Use an angled sash brush to get crisp edges against the stucco texture. -
Transition to yellow:
Move to the middle leaves. Paint the third leaf a golden ochre and the large central oak leaf a muted sage green. Apply two coats if the stucco absorbs the first layer heavily. -
Finish with the largest leaf:
The final, largest maple leaf on the right should be a vibrant, fiery orange-red to anchor the composition. Ensure solid, opaque coverage here as it’s the focal point. -
Check for holidays:
Inspect the textured surface from different angles. Stucco hides unpainted crevices easily, so dab extra paint into any deep pits or holes within the leaf shapes.
Step 3: Adding Veins & Details
-
Mix the vein color:
Create a dark, brownish-purple shade for the veins. It should be dark enough to stand out against yellow but warm enough to harmonize with the red leaves. -
Paint the central midribs:
Using a smaller round brush, paint the primary central vein (midrib) for each leaf first. Start at the stem base and taper the line continuously to the leaf tip. -
Add secondary veins:
Branch out from the midrib with secondary veins. Keep your hand relaxed to create natural, slightly organic curves rather than stiff, straight lines. -
Detail with fine lines:
Switch to your fine liner brush. Add delicate tertiary veins that connect the larger veins, creating that intricate ‘netting’ look seen on real dried foliage. -
Extend the stems:
Paint the stems extending downward from the base of each leaf. Vary the length slightly and curve the very bottom tip to give them a suspended, floating appearance. -
Final touches:
Once dry, use a small brush with your wall base color to clean up any ragged edges where the leaf paint might have bled into the background texture.
Add Dimension
Mix a translucent glaze with a darker version of each leaf’s color. Lightly shade one side of the central vein to give the leaves a subtle 3D curve.
Step back and admire how your colorful gradient brings a permanent splash of autumn warmth to your outdoor space

PENCIL GUIDE
Understanding Pencil Grades from H to B
From first sketch to finished drawing — learn pencil grades, line control, and shading techniques.
Explore the Full Guide
Abstract Autumn Color Blocks
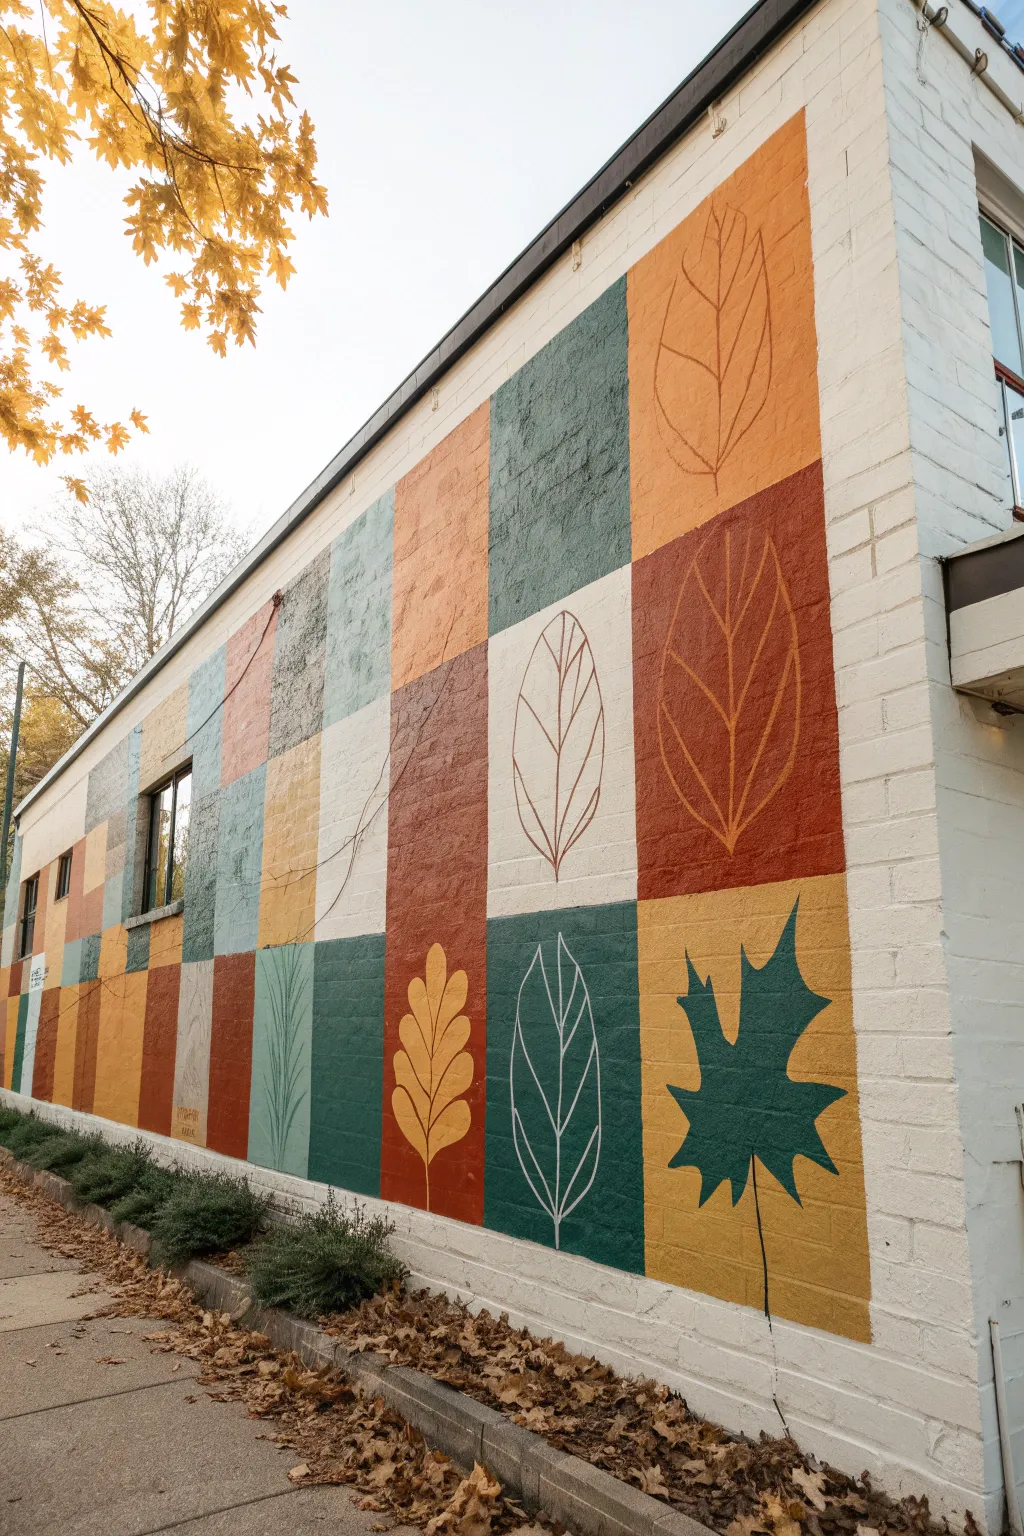
Transform a plain exterior brick wall into a cozy autumn celebration with this structured yet organic block mural. The design features a patchwork of warm fall tones—rust, ochre, sage, and cream—layered with minimalist line drawings of leaves for a modern, inviting look.
Detailed Instructions
Materials
- Exterior masonry paint (White primer/base)
- Exterior masonry paint (Rust red, Ochre yellow, Sage green, Deep teal, Cream)
- Painters tape (2-inch width)
- Chalk line or laser level
- Measuring tape
- Pencil or chalk
- Paint rollers (medium nap for brick texture) and trays
- Angled sash brushes (2-inch)
- Round detail brushes (size 6 or 8) for leaf outlines
- Paint pens (white and black, water-based acrylic exterior grade) – optional alternative to brushes
- Ladder or scaffolding
- Drop cloths
Step 1: Prep and Prime
-
Prepare the Surface:
Before laying down any color, ensure the brick wall is clean and dry. Use a stiff bristle brush to remove loose dirt or moss. If the wall is particularly dirty, a gentle power wash might be necessary, but let it dry for at least 24-48 hours before painting. -
Protect the Area:
Lay down drop cloths along the base of the wall to catch drips. Tape off any windows, drainpipes, or adjacent trim that you want to keep paint-free. -
Apply the Base Coat:
Roll on a fresh coat of white exterior masonry paint across the entire surface. This ensures your colors will pop and provides a unified background, essentially acting as the ‘grout’ lines between your blocks.
Bleed Prevention
On brick, tape often fails to seal perfectly. After taping, brush a light layer of the WHITE base paint over the tape edge first. This seals the gaps so your colored paint won’t bleed under.
Step 2: Grid the Design
-
Calculate the Grid:
Measure the total height and width of your wall space. Decide on a box size that fits evenly—in the reference, the blocks are roughly 2-3 feet square. It’s okay if the top or side rows are partial blocks. -
Mark Vertical Lines:
Using a measuring tape, mark the vertical intervals along the top and bottom of the wall. Snap a chalk line between these marks to create straight vertical guides. -
Mark Horizontal Lines:
Repeat the process for the horizontal rows. Use a level to ensure your chalk lines are perfectly straight, as brick mortar lines aren’t always reliable guides. -
Tape the Grid:
Apply painter’s tape along your chalk lines. Important: Tape on the *outside* of the block area you intend to paint if you want thick white borders, or tape precisely over the line to preserve the white base coat as the border.
Step 3: Color Blocking
-
Plan Your Palette:
Map out your colors on a piece of paper first. Aim for a random but balanced distribution of rust, yellow, green, teal, and cream blocks. avoid placing identical colors right next to each other. -
Cut In Edges:
Start with one color, for example, the deep teal. Use an angled sash brush to ‘cut in’ the edges of the assigned blocks, pushing paint into the textured corners of the brick. -
Roll the Centers:
Use a roller to fill in the center of the blocks. Masonry usually requires a thicker coat, so don’t be afraid to load up the roller. I find working one color at a time across the whole wall is faster than switching colors constantly. -
Repeat for All Colors:
Continue this process for the rust, ochre, sage, and remaining colors until every block in your grid is filled. Let the paint dry completely—usually 4-6 hours depending on humidity. -
Remove Tape:
Carefully peel off the painter’s tape while the paint is dry to the touch but not fully cured to avoid peeling. Touch up any bleed-through with your white base paint.
Seasonal Switch
Design the leaf outlines to be simpler and use a temporary chalk marker or easy-to-remove paint for the line work. This way, you can scrub off the leaves and paint flowers in spring or snowflakes in winter.
Step 4: Leaf Details
-
Sketch the Foliage:
Once the color blocks are fully dry, lightly sketch simple leaf shapes onto selected blocks using chalk. In the reference, large simple shapes like oak, maple, and beech leaves work best. vary the scale so some leaves fill the whole block. -
Outline in Contrast Colors:
Select a contrasting color for the outline. Use white paint for darker blocks (like teal and rust) and a dark color (like deep rust or charcoal) for lighter blocks (like yellow or cream). -
Paint the Leaf Lines:
Using a size 6 or 8 round brush, carefully paint over your chalk sketches. Keep the lines relatively thin but uniform. You aren’t filling the leaves in—just creating a skeletal line drawing. -
Add Veins:
Add the central vein and side veins to your leaves. Keep these simple and geometric to match the modern feel of the grid. -
Final Clear Coat (Optional):
If your mural faces harsh weather, you can apply a clear, non-yellowing UV-resistant masonry sealer over the entire wall to extend the life of the colors.
Step back and enjoy the warmth your new geometric masterpiece brings to the neighborhood
Metallic Leaf Accents on a Fall Mural
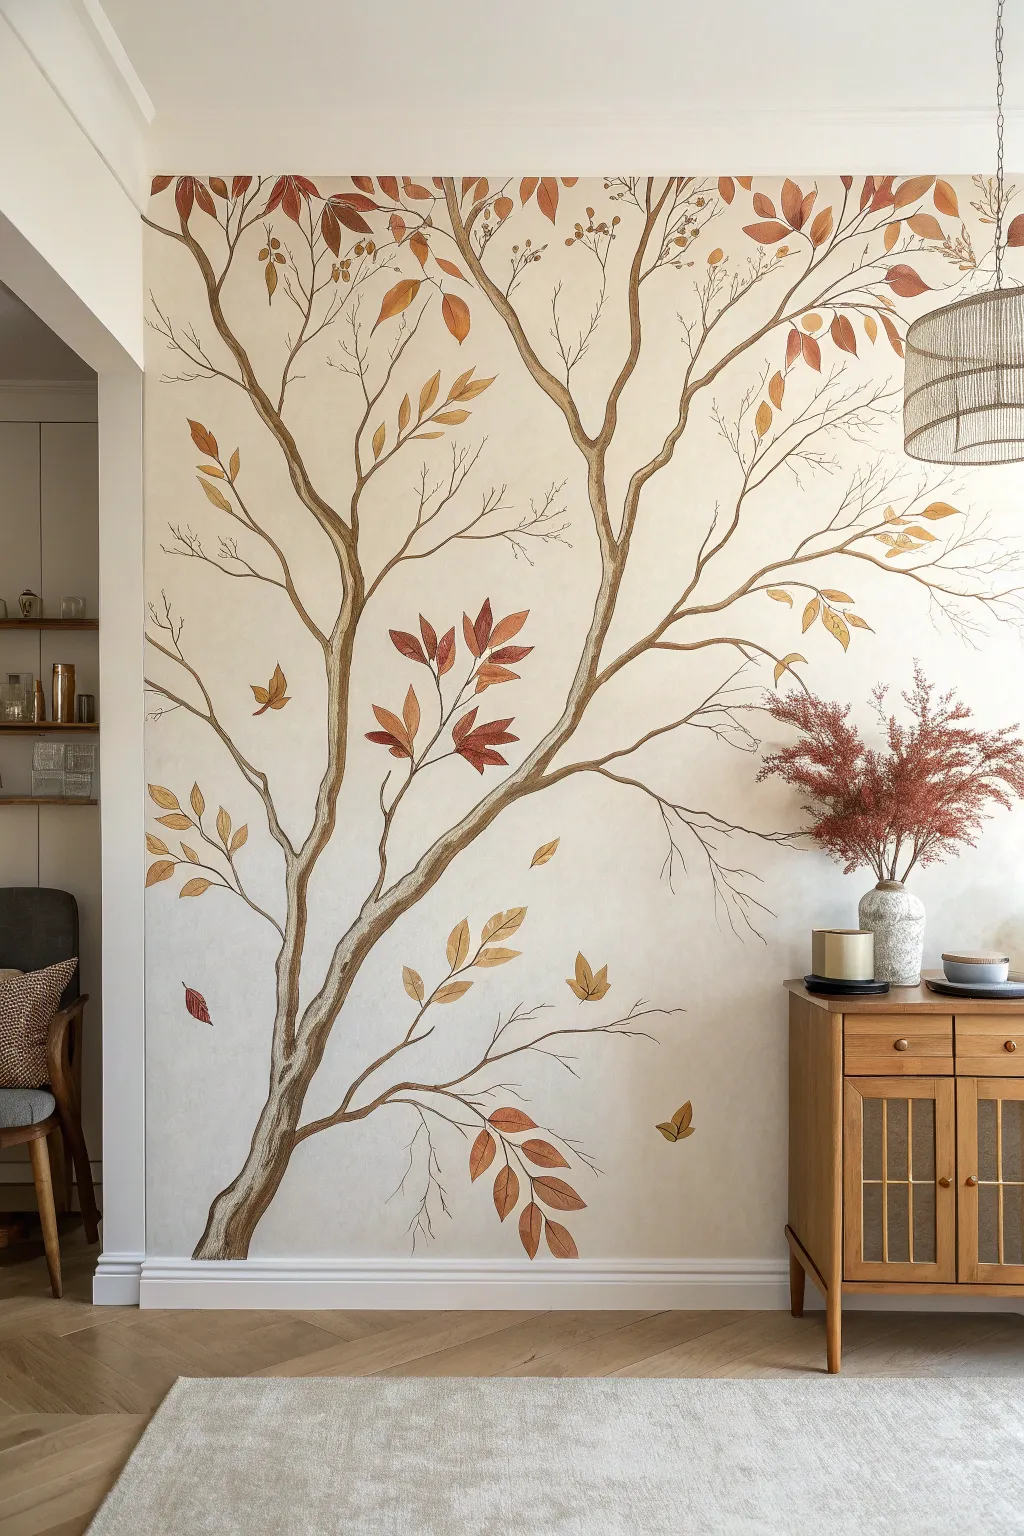
Transform a plain wall into an elegant seasonal statement with this sweeping tree mural, characterized by its organic branches and warm, coppery tones. The delicate interplay of matte earth tones and shimmering metallic leaf accents creates a sophisticated focal point that catches the light beautifully.
How-To Guide
Materials
- Latex wall paint (creamy off-white for base flowing into beige/taupe for gradient)
- Acrylic paints (burnt umber, raw sienna, ochre, terracotta)
- Metallic copper and gold leaf sheets
- Metal leaf adhesive (sizing)
- Soft synthetic brushes (various sizes: 1-inch flat, #4 and #8 round, liner brush)
- Pencil and eraser
- Painter’s tape and drop cloth
- Sea sponge or large blending brush
- Sealant (for metal leaf)
Step 1: Preparation & Background
-
Prepare the workspace:
Begin by clearing furniture away from the wall and laying down a drop cloth to protect your flooring. Tape off the baseboards and ceiling edges with painter’s tape to ensure crisp lines. -
Create the atmospheric base:
Paint the entire wall with a creamy off-white latex paint. While the paint is still slightly tacky, I like to sponge a very subtle beige or warm taupe glaze in random, cloud-like patches, particularly near the edges, to give the background depth and an aged parchment look. -
Sketch the skeleton:
Once the base is fully dry, lightly sketch the main trunk and primary branches using a pencil. Start the trunk off-center on the left, curving it gently upward and outward to span the wall. Keep the lines organic and wandering rather than perfectly straight.
Step 2: Painting the Tree Structure
-
Block in the trunk:
Mix burnt umber with a touch of raw sienna to create a deep, warm brown. Using a 1-inch flat brush, fill in the main trunk shape, using long, vertical strokes that mimic the natural grain of bark. -
Extend the main branches:
Switch to a #8 round brush to paint the thicker primary branches extending from the trunk. Follow your pencil lines, tapering the thickness gradually as you move away from the center. -
Add secondary branches:
Load a #4 round brush with a slightly lighter brown mix (add more ochre). Paint thinner branches that fork off from the main ones, ensuring they cross over each other occasionally for a natural, three-dimensional effect. -
Detail the twigs:
Use a liner brush with thinning medium or water to create the finest, whisper-thin twigs at the very ends of the branches. A shaky hand actually helps here to create realistic, knobby wood textures. -
Add bark texture:
Mix a dark, almost black-brown and a lighter beige. Using a fairly dry brush, streak these colors lightly over the trunk and thick branches to create highlights and shadows that suggest rough bark texture.
Sticky Situation?
If the metal leaf tears or doesn’t stick fully, simply dab a tiny bit more sizing on the bald spot, wait for it to get tacky again, and reapply a small scrap of leaf.
Step 3: Leaves & Metallic Accents
-
Map out leaf placement:
Step back and lightly mark where you want your clusters of leaves. Don’t crowd them; leave plenty of negative space to keep the airy, autumnal feel. -
Paint the base leaves:
Using a mix of terracotta and ochre acrylics, paint simple, almond-shaped leaves on about two-thirds of your marked spots. Vary the sizes and ensure they point in different directions as if catching a breeze. -
Create falling leaves:
Paint several single leaves detached from the branches, floating in the open spaces of the wall to simulate falling foliage. This adds movement and dynamic energy to the composition. -
Apply adhesive size:
For the remaining unpainted leaf spots and over selected painted leaves, apply a thin layer of metal leaf adhesive sizing. Use a dedicated brush for this, as it is sticky. -
Wait for tackiness:
Allow the adhesive to dry until it feels tacky but not wet—this usually takes about 15-20 minutes, depending on the brand. It needs to grab the leaf without squishing. -
Apply the metallic leaf:
Gently press sheets of copper or gold leaf over the tacky adhesive areas. Use a soft, dry brush to smooth the metal sheet down, ensuring it adheres to the glue. -
Burnish and clean:
Once the metal leaf is set, use a stiff brush to briskly brush away the excess flakes. This ‘burnishing’ process reveals the sharp shape of the leaf you painted with the adhesive. -
Seal the work:
To prevent the copper leaf from tarnishing over time, gently brush a clear, water-based sealant over the metallic areas once everything is completely dry.
Color Depth Level Up
Before adding metal leaf, create an ombré effect on the painted leaves by blending wet red-orange paint into wet yellow-ochre paint directly on the wall.
Enjoy the warmth and sophisticated shimmer this permanent autumn landscape brings to your room


Have a question or want to share your own experience? I'd love to hear from you in the comments below!