A plain bench is basically a blank canvas, and I love how a little hand-painted color can turn it into the star of a yard, porch, or entryway. Here are my favorite painted bench ideas—starting with the classics and building up to some seriously fun, artsy twists.
Oversized Floral Garden Bench
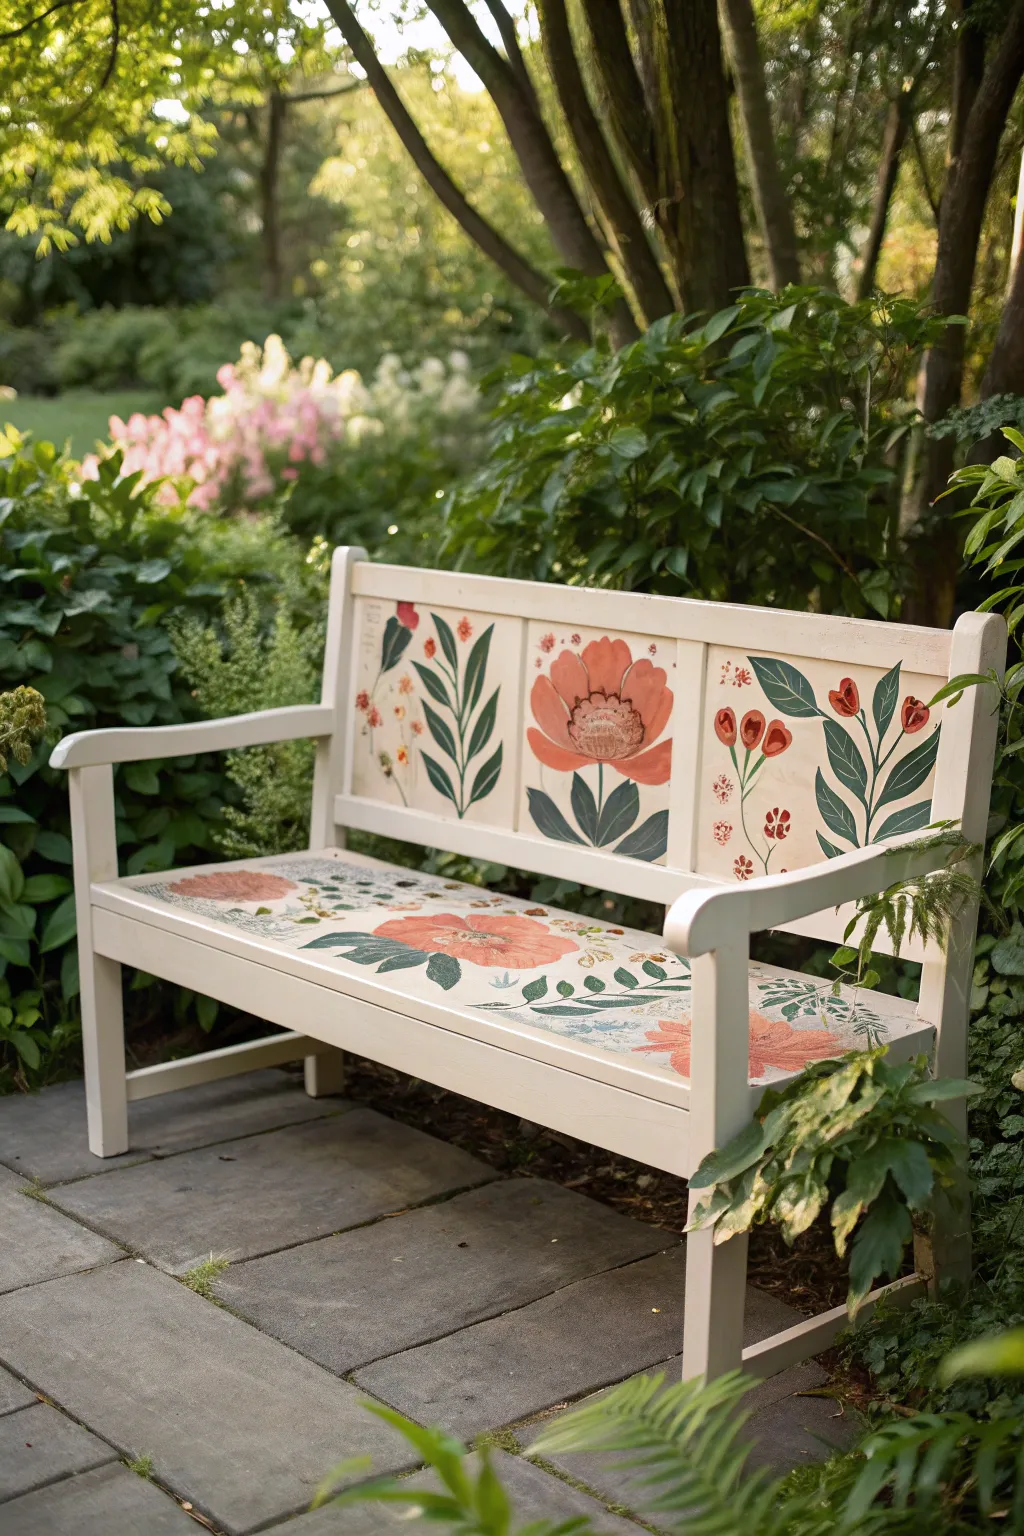
Transform a plain wooden garden bench into a blooming masterpiece with this folk-art inspired painting project. Featuring oversized floral motifs in warm corals and deep greens on a crisp cream background, this piece brings an eternal spring to your patio.
Step-by-Step Tutorial
Materials
- Wooden garden bench (unfinished or sanded)
- Exterior primer (white)
- Exterior latex or acrylic paint (Cream/Off-white base)
- Acrylic paints (Coral, Burnt Orange, Deep Green, Sage Green, Mustard Yellow)
- Paintbrushes (2-inch flat brush, various round brushes sizes 4-8)
- Sandpaper (120 and 220 grit)
- Tack cloth
- Pencil and eraser
- Clear outdoor polyurethane sealer (matte or satin)
- Painter’s tape or drop cloth
Step 1: Preparation & Base Coat
-
Clean and Sand:
Start by thoroughly cleaning your bench to remove any dirt or mildew. Once dry, sand the entire surface with 120-grit sandpaper to remove old varnish or rough spots, then smooth it out with 220-grit. -
Remove Dust:
Wipe the entire piece down with a tack cloth. It is crucial to remove every speck of dust so your paint adheres properly and finishes smoothly. -
Prime the Surface:
Apply a high-quality exterior primer to the entire bench. This blocks stains and ensures your base color looks rich. Let this dry completely according to the can’s instructions. -
Apply Base Color:
Using a 2-inch flat brush, paint the bench with your cream or off-white exterior paint. Apply thin, even coats to avoid drips. -
Second Coat:
Once the first coat is dry to the touch, apply a second coat for full, opaque coverage. Allow the bench to cure for at least 24 hours before starting the artwork.
Brush Control Tip
For the long, sweeping stems on the backrest, dilute your green paint slightly with water. This improves flow and allows for smoother lines without the brush dragging.
Step 2: Sketching the Design
-
Plan the Layout:
Visualize three main panels on the backrest. The center panel will feature a large, dominant bloom, while the side panels will feature vertical stems and smaller buds. -
Sketch the Center Bloom:
Lightly sketch a large, open-faced flower in the center of the middle back panel using a pencil. Keep the lines faint so they are easy to cover later. -
Add Side Botanicals:
On the left and right back panels, sketch tall, sweeping stems with leaf pairs climbing upward. Add small circular buds or tulip shapes at the tips. -
Map the Seat:
Sketch a trailing vine pattern across the seat slats. Include large open blooms similar to the backrest, interspersed with smaller leaves and filler flowers.
Level Up: Aged Look
After the paint is fully dry but before sealing, gently run fine-grit sandpaper over the edges of the bench and parts of the flowers to create a distressed, vintage patina.
Step 3: Painting the Florals
-
Block in Large Blooms:
Mix a soft coral color. Using a medium round brush, fill in the large flower petals on the backrest and seat. Don’t worry about details yet; just get the solid color down. -
Paint the Greenery:
Switch to a deep green shade. Paint the thick stems and the large, pointed leaves on the back panels. Use long, confident strokes to mimic the organic growth of plants. -
Layer the Bud Details:
Using a burnt orange or deeper red, fill in the tulip-shaped buds on the side panels. Add small dots of mustard yellow for pollen or smaller filler flowers. -
Add Dimension to Petals:
Once the coral base is dry, mix a slightly lighter peach tone. Paint inner strokes on the petals to create a cupped, dimensional look. I like to keep these strokes loose for a hand-painted feel. -
Detail the Centers:
Create the flower centers using a mix of brown and dusty pink. Paint a textured circle in the middle of the large blooms, adding tiny white or yellow dots for stamens. -
Highlight Leaves:
Mix a sage green or add a touch of white to your deep green. Add a single vein line or highlight to one side of each leaf to provide depth. -
Final Touch-ups:
Step back and look at the composition. Fill in any empty-looking spaces on the seat with small green sprigs or tiny red berries.
Step 4: Sealing & Protection
-
Cure Time:
Allow your detailed painting to dry for at least 48 hours. The paint needs to be fully set before you apply any topcoat. -
Apply Sealer:
Apply a clear, outdoor-rated polyurethane sealer. A matte or satin finish looks best for this folk-art style. Use a clean synthetic brush and apply in long, smooth strokes. -
Double Protection:
After the first coat dries, lightly sand with very fine sandpaper if needed, wipe clean, and apply a second coat of sealer to ensure weather resistance.
Enjoy your beautiful new garden seating that captures the charm of a blooming cottage garden year-round


Crisp Two-Tone Color Block Bench
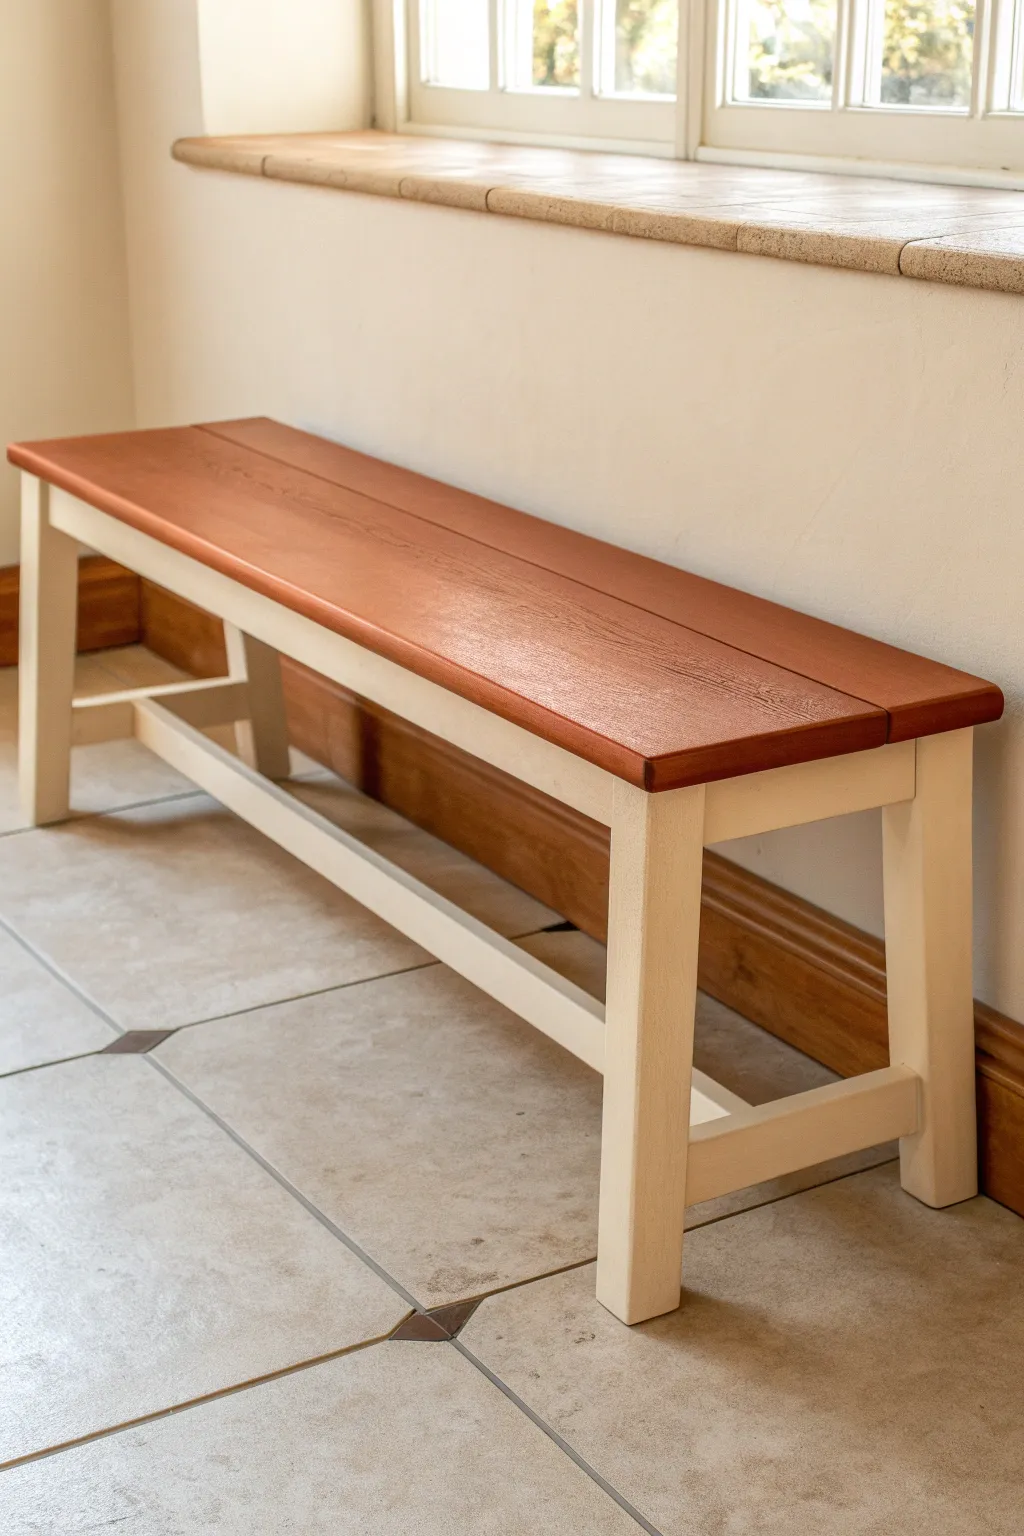
This project transforms a simple wooden bench into a classic two-tone statement piece that fits perfectly in entryways or dining areas. By contrasting a warm, reddish-brown stained seat with clean, creamy white legs, you achieve a look that feels both farmhouse-fresh and modern.
Step-by-Step Tutorial
Materials
- Unfinished wooden bench
- Sandpaper (120, 220, and 320 grit)
- Tack cloth
- Painter’s tape (high quality)
- Wood stain (red mahogany or cherry tint)
- Cream or off-white chalk paint or latex enamel
- Polycrylic top coat (satin finish)
- Foam brushes
- Synthetic bristle paintbrush (2-inch)
- Clean lint-free rags
- Drop cloth
Step 1: Preparation and Sanding
-
Clean the surface:
Start by wiping down your unfinished bench with a slightly damp cloth to remove any warehouse dust or debris. Let it dry completely before moving on. -
Initial rough sanding:
Using 120-grit sandpaper, go over the entire bench to smooth out any rough patches or sharp edges on the wood. -
Smooth the seat:
Switch to 220-grit sandpaper specifically for the seat area. This is crucial because the stain highlights the grain, so you want this surface perfectly smooth. -
Remove dust:
Wipe the entire piece thoroughly with a tack cloth. Even tiny specks of sawdust can ruin your smooth painted finish later.
Step 2: Staining the Seat
-
Protect the legs:
Apply painter’s tape just below the lip of the seat, wrapping the tops of the legs. This prevents stain drips from ruining the area you intend to paint white. -
Apply the stain:
Dip a foam brush or lint-free rag into your red mahogany or cherry stain. Apply it generously to the seat planks, following the direction of the wood grain. -
Wipe off excess:
After letting the stain penetrate for about 5-10 minutes (check your can’s instructions), wipe off the excess using a clean rag. I like to wipe firmly to ensure the grain shows through clearly. -
Assess and reapply:
If the color isn’t deep enough for your taste, wait the recommended drying time and apply a second coat using the same method. -
Seal the stain:
Once the stain is fully dry (usually 24 hours), apply a thin coat of Polycrylic sealer to the seat only. This protects the finish while you work on the rest.
Fixing Bleed-Through
If stain bleeds under your tape onto the legs, sand it back to bare wood before painting. If paint gets on the seat, carefully scrape it with a razor blade.
Step 3: Painting the Base
-
Tape the seat:
Now, reverse your taping. Carefully tape off the edge of your freshly stained and dried seat to protect it from the white paint. -
Prime the legs:
If using latex enamel, apply a high-quality primer to the legs and support beams. If using chalk paint, you can often skip this step, though for raw wood, a primer still helps block tannin bleed. -
First coat of paint:
Using a synthetic bristle brush, apply your cream or off-white paint to the legs. Work in long, smooth strokes from top to bottom. -
Watch for drips:
Pay special attention to the corners and cross-braces where paint tends to pool. Smooth these out immediately with your brush tip. -
Sand between coats:
Once the first coat is dry, lightly sand the painted surfaces with 320-grit paper. This knocks down brush strokes for a professional finish. -
Second coat:
Apply your second coat of paint. This should provide full, opaque coverage. Let this cure fully according to the manufacturer’s instructions.
Distressed Upgrade
For a rustic vibe, lightly sand the edges of the white legs to reveal the raw wood underneath before apply your final clear coat.
Step 4: Finishing Touches
-
Remove tape:
Carefully peel away the painter’s tape. Pull it at a 45-degree angle away from the paint line to ensure a crisp edge. -
Final clear coat:
Apply two to three coats of Polycrylic over the entire bench, including the painted legs. Sand lightly with very fine sandpaper between coats for a buttery smooth feel. -
Inspect and cure:
Do a final check for any rough spots. Let the bench cure for at least a few days before placing heavy objects or sitting on it to prevent tackiness.
Place your finished bench near a sunny window or entryway to highlight the beautiful contrast between the warm wood and crisp paint


Classic Striped Porch Bench

Transform a plain wooden garden bench into a charming focal point with this classic dual-tone design. By alternating deep navy and warm terracotta stripes, you create a sophisticated yet inviting look that perfectly complements white siding and decking.
Detailed Instructions
Materials
- Wooden garden bench (unfinished or needing refinishing)
- Sandpaper (80, 120, and 220 grit)
- Orbital sander (optional, for larger benches)
- Tack cloth or microfiber rags
- Painter’s tape (1-inch width)
- Exterior wood primer (white or gray)
- Exterior semi-gloss paint in Navy Blue
- Exterior semi-gloss paint in Terracotta/Burnt Orange
- 2-inch angled paint brush
- 1-inch flat artist brush (for touch-ups)
- Clear matte or satin exterior polyurethane topcoat
- Drop cloth
Step 1: Preparation & Priming
-
Prepare the workspace:
Set up your bench in a well-ventilated area, preferably outdoors or in a garage, laying down a large drop cloth to protect the floor from dust and drips. -
Sand the surface:
Begin sanding the entire bench. If the bench has an old finish, start with 80-grit paper to strip it down. For bare wood, start with 120-grit. -
Smooth the wood:
Finish the sanding process with 220-grit sandpaper. Run your hand over the slats and arms to ensure everything feels completely smooth and splinter-free. -
Clean the dust:
Wipe every nook and cranny with a tack cloth. It is crucial to remove all sawdust so your primer adheres properly to the wood grain. -
Apply primer:
Coat the entire bench with a high-quality exterior wood primer. Use the angled brush to get into the gaps between the slats. Let this layer dry completely according to the can’s instructions, usually 2-4 hours.
Clean Lines Secret
To prevent paint bleed, press the tape edge down firmly with a credit card, then paint a thin layer of the base color (orange) over the tape edge before applying the blue.
Step 2: The Striping Technique
-
Map out your pattern:
Decide which slats will be blue and which will be orange. On this bench, the pattern alternates perfectly. I find it helpful to place a small piece of painter’s tape on the ‘blue’ slats just to keep track visually before painting. -
Paint the warm tones first:
Start with the Terracotta paint. Apply it to the entire frame: the legs, the armrests, the main back supports, and the specific slats you designated for this color. -
Cover the seat slats:
Continue the Terracotta color onto the corresponding seat slats. Don’t worry about perfect lines where the slats meet the side rails yet; just get solid coverage. -
Apply a second coat:
Once the first coat of Terracotta is dry to the touch, apply a second coat for rich, opaque color. Let this dry fully—overnight is best to prevent peeling when we tape. -
Tape off for the accent color:
Carefully apply painter’s tape to the dry orange wood where it meets the areas destined for blue paint. This ensures crisp, professional lines, especially on horizontal cross-bars. -
Paint the Navy sections:
Using a clean brush, apply the Navy Blue paint to the remaining back slats, the seat slats, and the horizontal cross-bar on the backrest. -
Detail work:
Use the smaller 1-inch brush to carefully paint the sides of the Navy slats without dripping onto the orange sections underneath the seat. Patience here makes a huge difference. -
Second coat of Navy:
Apply your second coat of blue paint. While the paint is still slightly wet on this final coat, carefully peel back your painter’s tape at a 45-degree angle.
Step 3: Sealing & Protection
-
Inspect and touch up:
Once all paint is dry, look closely for any bleeds or missed spots. Use a tiny artist’s brush to correct any lines where the blue and orange meet. -
Apply the topcoat:
Stir your clear exterior polyurethane gently to avoid bubbles. Apply a thin, even coat over the entire bench to seal the paint against UV rays and rain. -
Sand lightly:
After the first topcoat dries, give it a very light scuff with 220-grit sandpaper to knock down any raised grain or fuzz. -
Final seal:
Wipe away the dust and apply a second, final coat of polyurethane. Let the bench cure for at least 24-48 hours before placing it on your porch or adding cushions.
Level Up: Hardware Accent
Swap out visible assembly bolts for brass or matte black hardware after painting. The contrast against the terracotta wood creates a high-end, custom furniture look.
Enjoy your customized seat that brings a perfect splash of ordered color to your outdoor space


Ombre Sunset Slat Bench
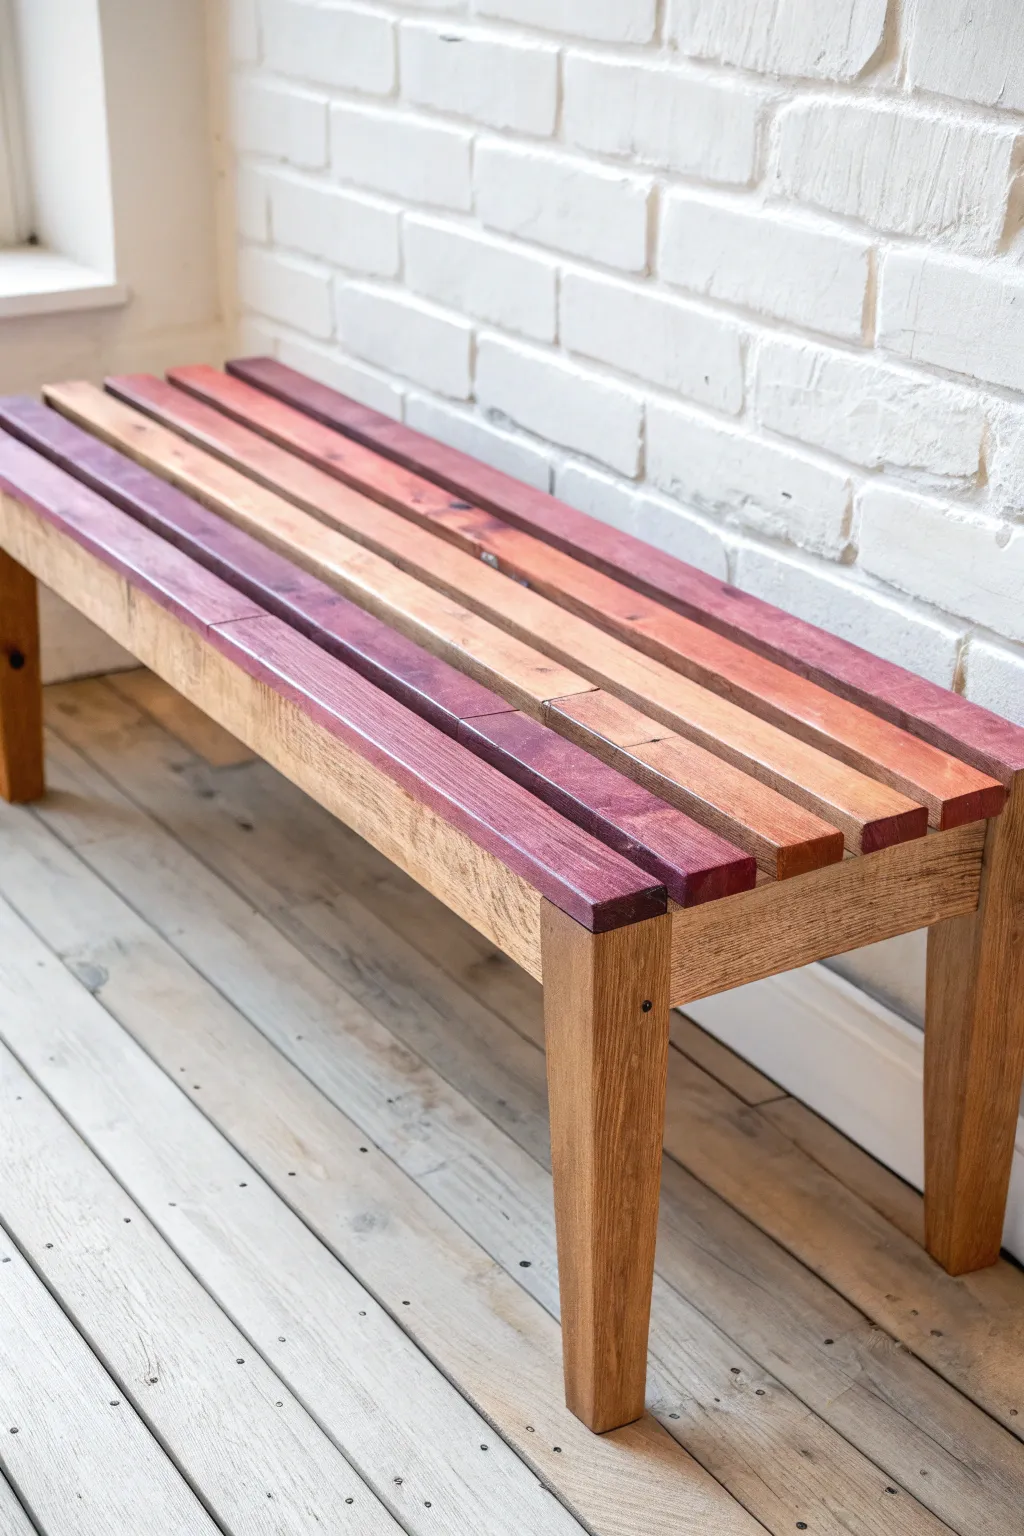
Bring the warmth of a summer evening indoors with this slat bench featuring a stunning purple-to-peach gradient. The rich, ombre wood stains transform a simple seating piece into a functional work of art that highlights the natural grain of the timber.
How-To Guide
Materials
- 4 to 5 wooden slats (1×3 or 1×4 lumber), cut to 48 inches long
- 2 lengths of 1×4 lumber (for apron), cut to 46 inches long
- 2 lengths of 1×4 lumber (for apron ends), cut to 14 inches long
- 4 wooden bench legs (pre-turned or 2×2 lumber cut to 16 inches)
- Water-based wood stains: deep purple, magenta, red-orange, and peach
- Stain conditioner
- Clear matte polyurethane
- Pocket hole jig and screws
- Wood glue
- Sandpaper (120, 180, and 220 grit)
- Lint-free rags or staining sponges
- Measuring tape and pencil
- Drill with driver bits
Step 1: Preparing the Slats
-
Cut and Sand:
Begin by cutting your top slats to length. Sand each board thoroughly, starting with 120 grit to remove rough spots, moving to 180, and finishing with 220 grit for a silky smooth surface ready for stain. -
Condition the Wood:
Wipe down all the slats with a tack cloth to remove dust. Apply a pre-stain wood conditioner according to the manufacturer’s instructions; this step is crucial for preventing blotchy color absorption on softwoods.
Color Blending
If a color jump feels too harsh, quickly wipe the lighter stain over the still-wet darker board’s edge to feather them together slightly.
Step 2: Applying the Ombre Stain
-
First Slat: Deep Purple:
Select your first slat and apply the deep purple stain using a lint-free rag. Rub the stain into the grain, let it sit for about 2-3 minutes, and then wipe away the excess. Repeat if you want a deeper saturation. -
Second Slat: Magenta Blend:
For the second slat, start with the magenta stain. To create a cohesive transition, I like to mix a tiny drop of the purple into the magenta before applying, bridging the color gap between the first and second board. -
Third Slat: Red-Orange:
Apply the red-orange stain to the middle slat. Ensure you wipe evenly along the full length of the board to avoid lap marks. -
Fourth Slat: Peach or Natural:
Finish the final top slat with a light peach stain or a simple natural finish that has just a hint of warmth. This creates the ‘fading light’ effect at the edge of your sunset. -
Seal the Slats:
Once the stained slats are completely dry (usually 24 hours), apply two coats of clear matte polyurethane to protect the color from wear and tear.
Level Up
Try tapering the legs slightly toward the bottom for a mid-century modern look, or use hairpin legs for an industrial vibe.
Step 3: Building the Frame
-
Construct the Apron:
While the slats dry, build the rectangular apron frame. Drill two pocket holes on the ends of the shorter apron pieces. -
Assemble the Rectangle:
Attach the short apron pieces to the long apron pieces using wood glue and pocket screws to form a sturdy rectangle box. -
Attach the Legs:
Position a leg in each corner of the apron frame. Secure them from the inside using pocket screws drilled through the apron into the legs, or use corner braces for extra stability. -
Frame Finishing:
Sand the assembled frame and legs. Apply a natural or light oak stain to the base, keeping it neutral so it doesn’t compete with the colorful top.
Step 4: Final Assembly
-
Position the Slats:
Lay your stained slats upside down on a clean, soft surface (like a blanket) in the correct color order. Space them apart evenly using tile spacers or a coin to create consistent gaps. -
Center the Frame:
Place your assembled base frame upside down onto the slats. Center it carefully so there is an equal overhang on all sides. -
Secure the Top:
Attach the frame to the slats using L-brackets or by driving screws through pre-drilled pocket holes on the inside of the apron, being careful not to pierce through the top of the slats. -
Final Inspection:
Flip the bench over onto its feet. Check for any wobbles and tighten screws if necessary.
Now you have a vibrant entryway piece that captures the beauty of twilight all year round
BRUSH GUIDE
The Right Brush for Every Stroke
From clean lines to bold texture — master brush choice, stroke control, and essential techniques.
Explore the Full Guide
Trailing Vines and Leafy Borders
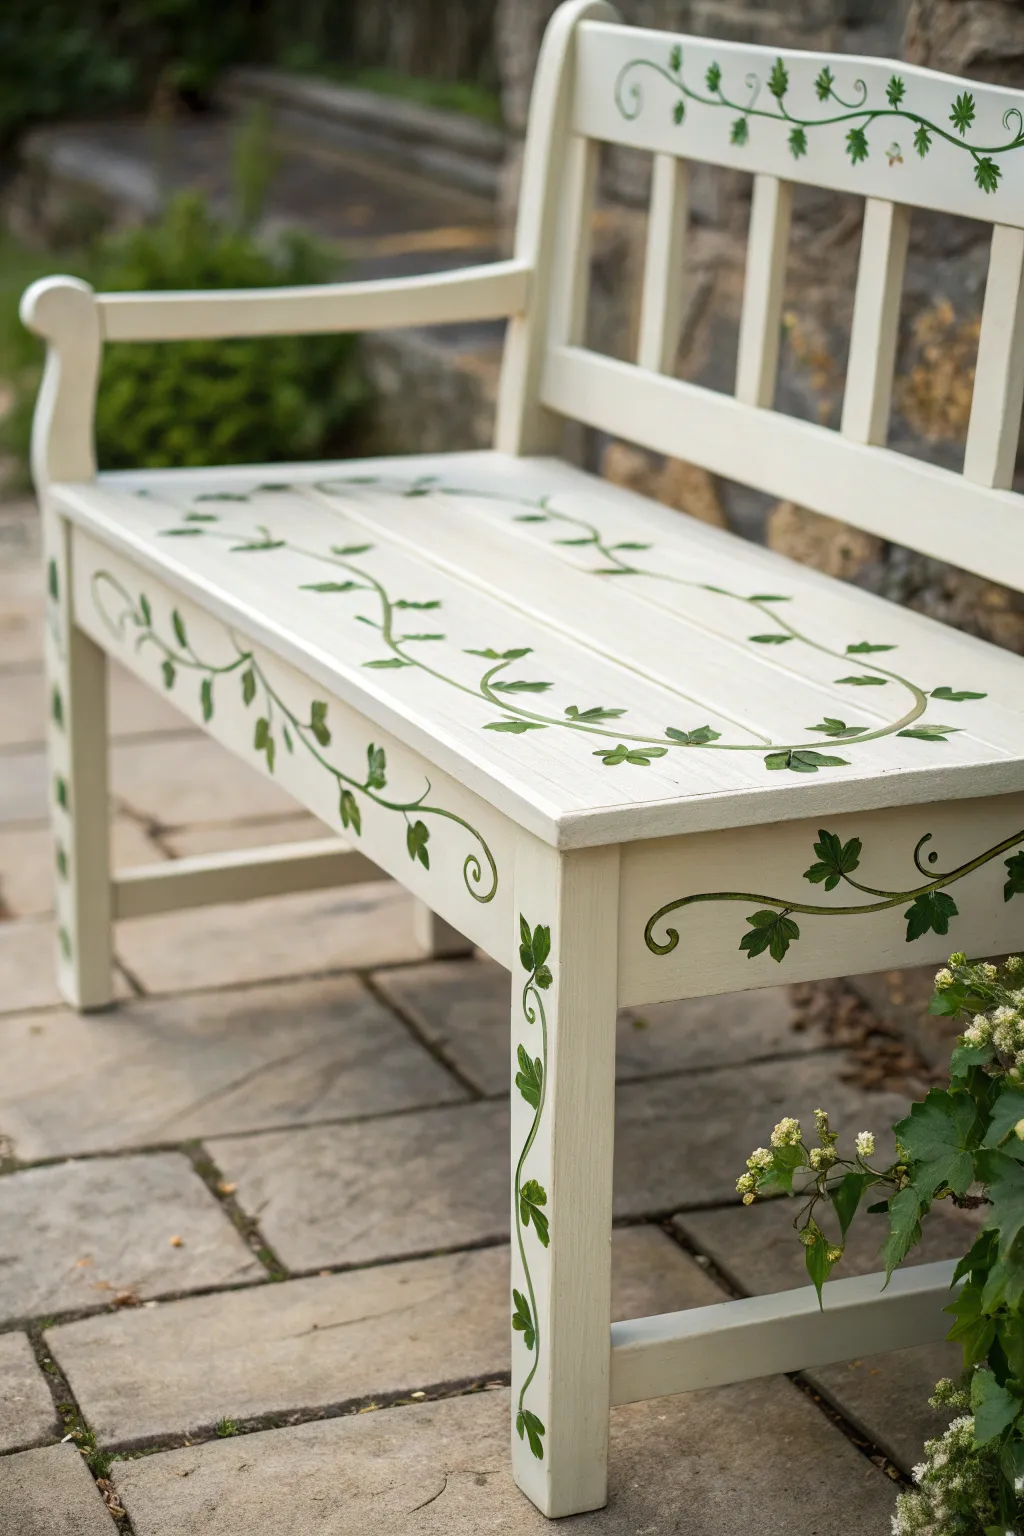
Transform a plain wooden bench into an enchanting garden seat with this trailing ivy design. The crisp white background paired with delicate green vines creates a fresh, organic look perfect for patios or entryways.
Step-by-Step
Materials
- Wooden garden bench (unfinished or needing refinishing)
- Sandpaper (120 and 220 grit)
- Tack cloth
- Exterior primer (white)
- Exterior latex or acrylic paint (Creamy White base)
- Exterior acrylic craft paints (Dark Hunter Green, Olive Green, Light Leaf Green)
- Small round brushes (size 2 and 4)
- Liner brush (size 0 or 00 for tendrils)
- Pencil
- Clear matte or satin exterior spar urethane
Step 1: Preparation and Base Coat
-
Clean the surface:
Before anything else, wipe down the entire bench with mild soapy water to remove dirt, grease, or old garden debris. Let it dry completely in the sun. -
Sand for smoothness:
If your bench is old, sand away peeling paint with 120-grit sandpaper. If it’s new wood, give it a quick scuff with 220-grit paper to help the primer adhere. Wipe away all dust with a tack cloth. -
Apply the primer:
Brush on a solid coat of high-quality exterior primer. This step is crucial for stopping wood tannins from bleeding through your beautiful white finish later. -
Paint the base color:
Apply your creamy white exterior paint. Use long, smooth strokes following the wood grain. You will likely need two coats; allow at least 4 hours of drying time between them.
Uneven Lines?
If your vine stems look shaky, don’t restart. Thicken the line slightly in that spot or paint a small leaf over the error to hide it naturally.
Step 2: Drafting the Design
-
Sketch the main vine:
Using a pencil very lightly, draw a long, wandering ‘S’ curve or loose wave pattern along the front apron of the bench seat and the legs. Don’t worry about perfection; nature isn’t perfectly symmetrical. -
Outline the seat frame:
On the flat seat surface, draw a large oval or rounded rectangular border that echoes the shape of the bench. This will be the main ‘track’ for your ivy vine. -
Sketch the backrest vines:
Add a simple, horizontal vine line across the top rail of the backrest. Keep the curves gentle and flowing. -
Check the balance:
Step back and look at your pencil marks. Ensure the spacing feels airy and not too cluttered before you pick up a brush.
Step 3: Painting the Vines
-
Paint the stems:
Mix a small amount of Olive Green with a drop of water to improve flow. Use your liner brush to trace over your pencil vine lines. Vary the pressure: press down slightly for thicker stems and lift up for thinner sections. -
Add the curling tendrils:
At the ends of your stems or along curves, paint tight spiral cues (tendrils). I find that holding the brush perpendicular to the surface helps create these fine, delicate spirals. -
Block in the leaves:
Using a size 4 round brush loaded with Dark Hunter Green, paint simple ivy leaf shapes. Think of them as a rounded triangle or heart shape with three points. -
Distribute foliage evenly:
Work your way around the vine, placing leaves in alternating directions. Don’t crowd them; leave the white background visible between clusters.
Add Dimension
Mix a tiny bit of brown into your green for the older, thicker parts of the vine stems to make the growth look more realistic and established.
Step 4: Details and Protection
-
Add highlights:
Dip a smaller brush into the Light Leaf Green. Add a quick, comma-shaped stroke to one side of each leaf to suggest sunlight hitting the foliage. -
Refine the stems:
Go back with your liner brush and connect any floating leaves to the main vine with tiny, thin stems. -
Let the artwork cure:
Allow your painted design to dry for at least 24 hours. The paint needs to be fully hardened before you apply the sealer. -
Apply the protective finish:
Apply a coat of exterior spar urethane. This is essential for outdoor furniture as it expands and contracts with the weather. Use a satin finish to avoid a plastic-looking shine. -
Final coat:
Once the first coat is dry, lightly sand with 220-grit paper (avoid sanding off your artwork) and apply a second coat of urethane for maximum durability.
Now you have a charming, custom piece of furniture ready to welcome guests into your garden
Butterfly Meadow Bench
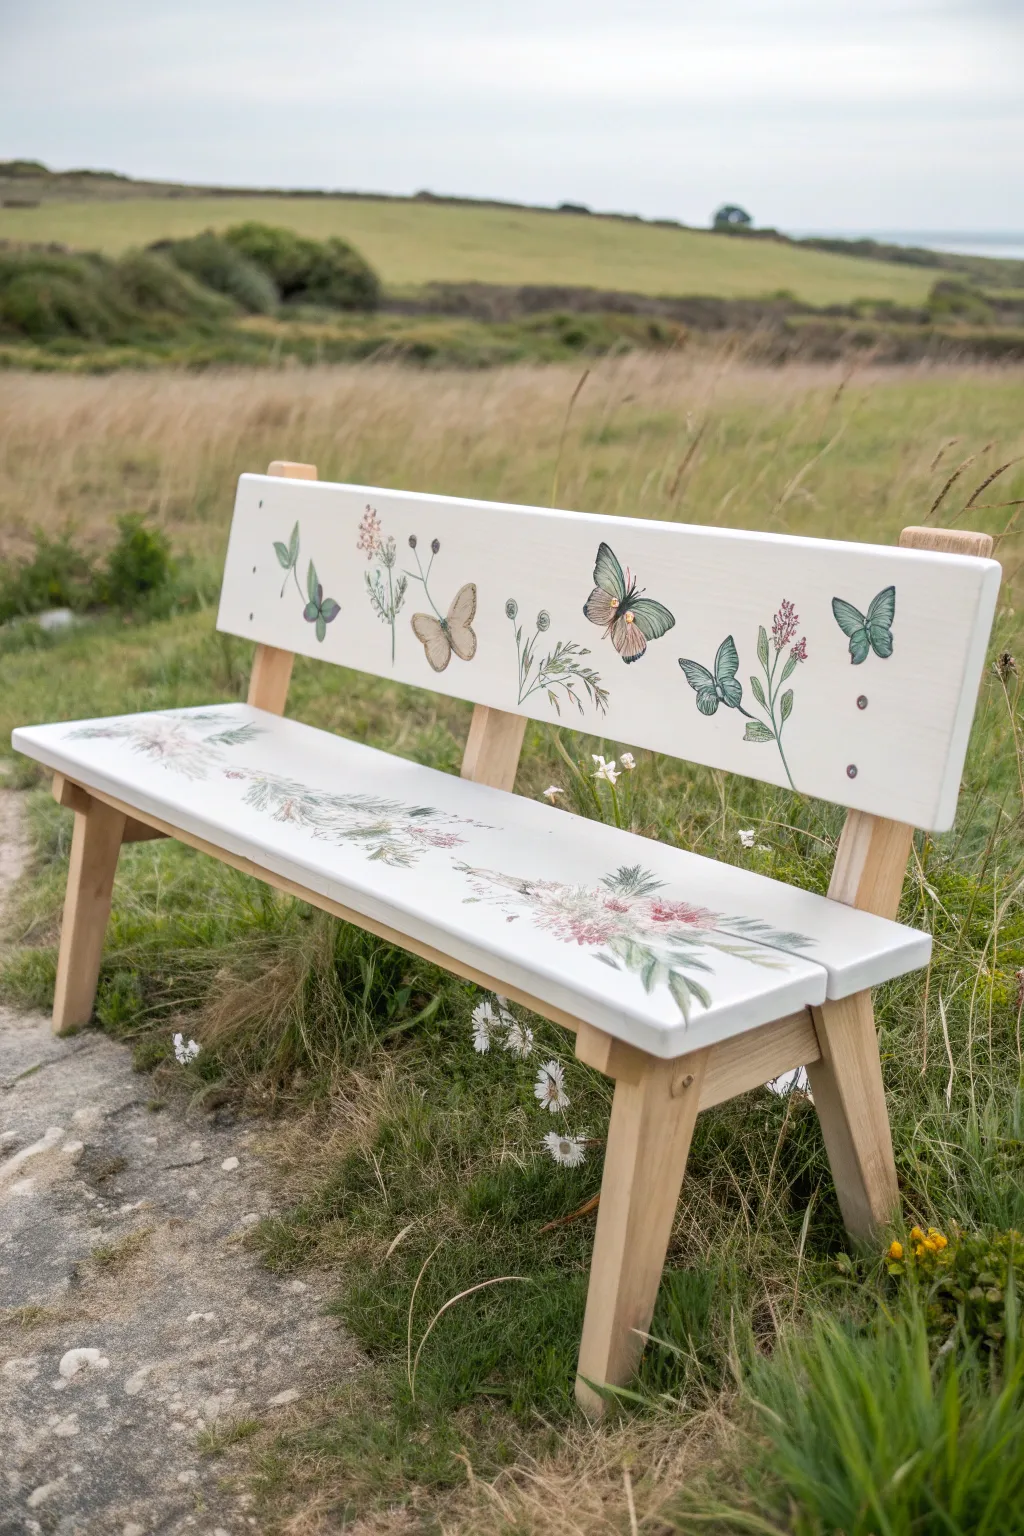
Transform a simple wooden seat into a serene garden escape with this delicate painted design. Featuring fluttering butterflies and soft botanical elements against crisp white, this project brings the peaceful feeling of a summer meadow to your favorite resting spot.
How-To Guide
Materials
- Wooden bench with a backrest (unfinished or stripped)
- Sandpaper (120 and 220 grit)
- Painter’s tape
- White exterior wood primer
- White acrylic outdoor/patio paint (creamy white)
- Acrylic paints (sage green, forest green, muted pink, beige, brown, teal, charcoal)
- Set of brushes (1-inch flat, #4 round, #0 fine liner)
- Clear matte or satin exterior spar urethane
- Pencil and eraser
- Carbon paper (optional for tracing)
Step 1: Preparation and Base Coat
-
Sand the surfaces:
Begin by sanding the entire bench, focusing on the backrest and the seat slats where you will be painting. Start with 120 grit to remove rough spots and finish with 220 grit for a super smooth canvas. -
Clean the wood:
Wipe down the entire bench with a tack cloth or a slightly damp rag to remove all sawdust. Any dust left behind will create a gritty texture in your paint finish. -
Tape off sections:
Using painter’s tape, carefully mask off the vertical supports and legs where they meet the seat and backrest. We want to keep the frame natural wood while painting just the horizontal planks white. -
Apply primer:
Paint a coat of exterior wood primer on the seat and the front face of the backrest. Let this dry completely according to the can’s instructions before assessing if a second coat is needed to hide the wood grain. -
Paint the background:
Apply two to three thin coats of creamy white outdoor acrylic paint. I find that multiple thin layers are much more durable than one thick, gloopy layer. Allow full drying time between coats.
Natural Texture Hack
When painting the butterfly wings, dry brush a little bit of the background white color over the colored wings. This creates a translucent, delicate texture.
Step 2: Designing the Meadow
-
Sketch the layout:
Once the white base is cured, lightly sketch your design using a pencil. Place four distinct butterflies across the backrest, interspersed with tall, thin wildflowers. For the seat, sketch a long, flowing branch arrangement stretching from left to right. -
Paint the stems and leaves:
Mix sage green with a touch of brown for realistic stems. Using your #0 fine liner brush, paint the thin, vertical stems on the backrest and the horizontal pine-like branches on the seat. Keep your hand light to create delicate lines. -
Add floral details:
Switch to a #4 round brush. Dip into muted pinks and soft whites to dab small clusters of flowers onto the stems. Don’t overthink the shapes; erratic, small dabs look more organic than perfect circles. -
Detail the greenery:
Go back in with forest green to add depth to your leaves. Add tiny veins to the larger leaves using your finest brush.
Personalize It
Identify the actual wildflowers native to your local area and swap them into the design. It makes the bench feel truly rooted in your specific garden landscape.
Step 3: Painting the Butterflies
-
Block in butterfly shapes:
Fill in the butterfly wing outlines with your base colors. Use beige for the moth-like wings and a dusty teal for the others. Let this base layer dry so your details don’t smudge. -
Add wing definitions:
Using a charcoal or dark brown paint (avoid pure black for a softer look), paint the bodies and the structural veins of the wings. A very steady hand is key here; rest your pinky finger on a dry spot of the bench for stability. -
Layer wing colors:
Add visual interest by blending a slightly darker shade near the butterfly bodies and fading out to the tips. On the beige butterfly, add small circles of white and orange for the ‘eye’ spots. -
Final highlights:
Add tiny flecks of white to the wing edges and the flower petals to make the design pop and look as if it’s catching the sunlight.
Step 4: Finishing Touches
-
Remove tape:
Carefully peel off the painter’s tape while the final paint touches are still slightly tacky or after they are fully dry. Pull the tape away at a 45-degree angle to ensure a crisp line. -
Seal the artwork:
To protect your hard work from the elements, apply two to three coats of clear exterior spar urethane over the painted areas. A matte or satin finish looks best to maintain that natural, hand-painted aesthetic. -
Final cure:
Let the bench cure in a dry, dust-free garage or shed for at least 48 hours before moving it out into the garden.
Now you have a stunning, custom seat perfectly suited for watching the real butterflies visit your garden

PENCIL GUIDE
Understanding Pencil Grades from H to B
From first sketch to finished drawing — learn pencil grades, line control, and shading techniques.
Explore the Full Guide
Sunflower Statement Backrest
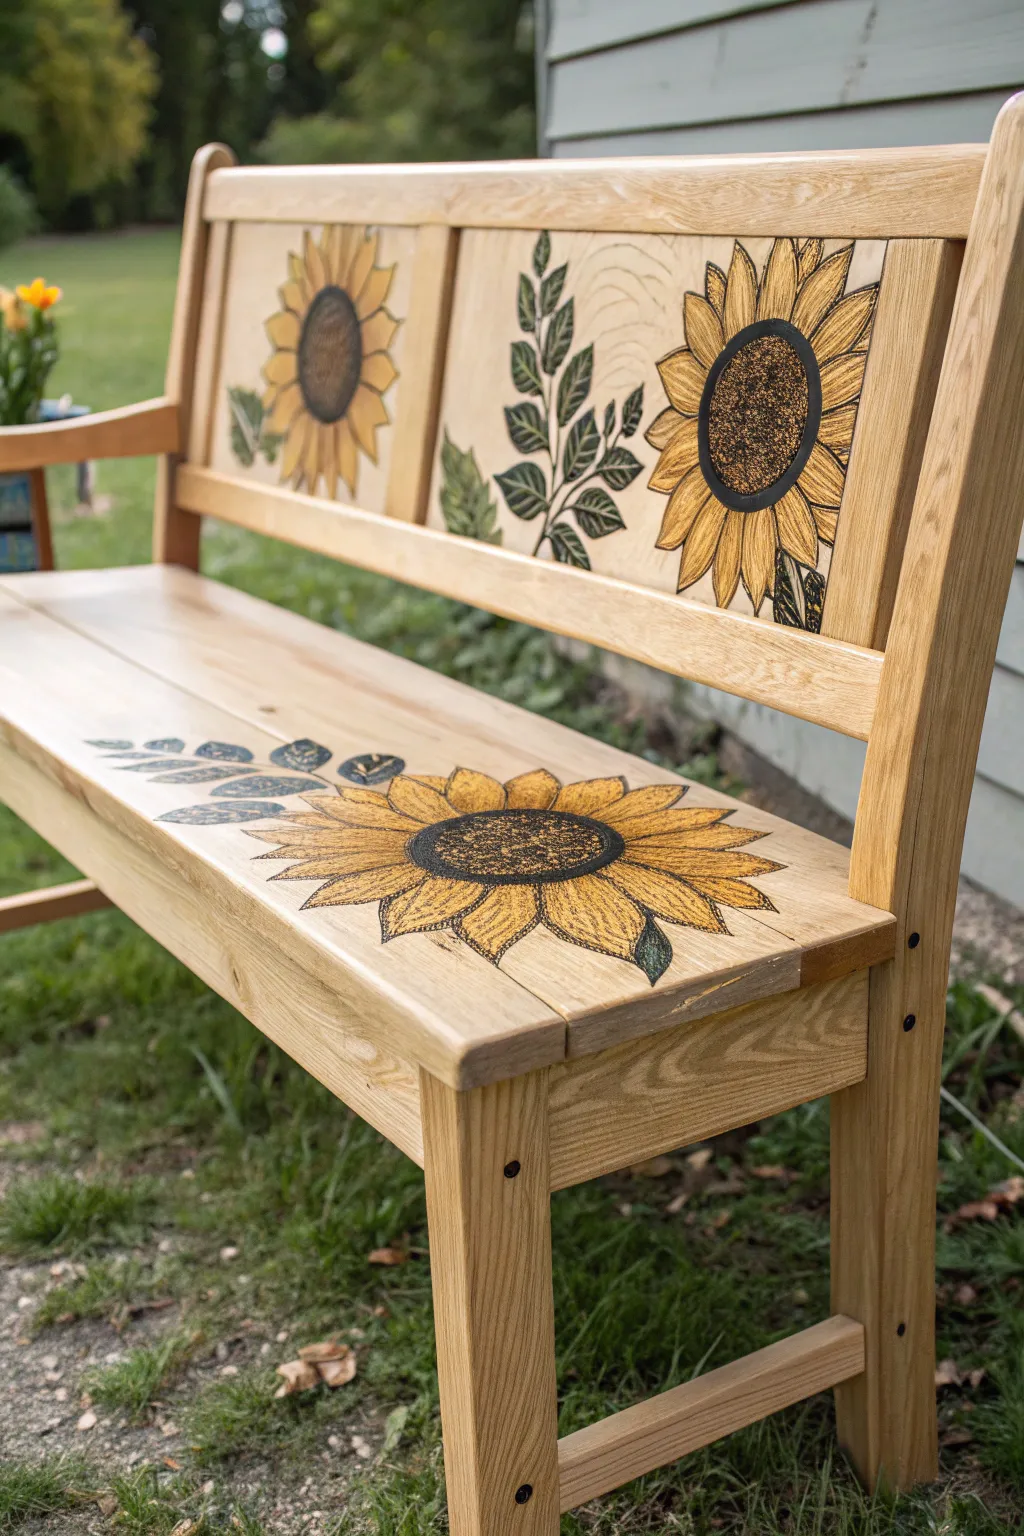
Transform a plain wooden bench into a radiant garden centerpiece with this detailed sunflower pyrography and paint project. The combination of scorched wood lines and translucent yellow hues creates a warm, rustic aesthetic perfect for outdoor seating.
Detailed Instructions
Materials
- Unfinished wooden garden bench (oak or pine)
- Sandpaper (120, 220, and 320 grit)
- Pyrography tool (wood burning kit) with various nibs
- Carbon transfer paper
- Pencil and masking tape
- Sunflower reference images or stencil
- Acrylic paints (Yellow Ochre, Cadmium Yellow, Burnt Umber, Sap Green, Olive Green)
- Water
- Small synthetic paintbrushes (rounds and flats)
- Clean rag or paper towels
- Outdoor-rated clear spar urethane or exterior varnish
- Foam brush or high-quality bristle brush for sealing
Step 1: Preparation & Design Transfer
-
Bench Prep:
Begin by ensuring your bench is completely smooth. Sand the backrest panels and the seat where the designs will go, starting with 120 grit and working up to 320 grit. Wipe away all dust with a tack cloth or damp rag. -
Map Out the Layout:
Decide on your composition. For this look, plan for two large sunflower heads on the outer backrest panels, a leafy sprig in the center panel, and a massive sunflower stretching across the seat. -
Transfer the Design:
Place carbon paper dark-side down on the wood, then tape your reference image or pattern on top. Trace the main outlines—petals, seed centers, and leaves—firmly with a pencil. -
Check the Lines:
Lift a corner of the paper periodically to ensure the carbon is transferring clearly. You want a guide that is visible but not messy.
Uneven Burn Lines?
If your wood burner gets stuck in the grain causing blobs, lower the heat slightly and increase your hand speed. Using a spoon shader tip can also help glide over grain.
Step 2: Wood Burning (Pyrography)
-
Outline with Heat:
Preheat your wood burning tool. Using a detail nib or small ball tip, carefully burn over the carbon lines you just traced. Keep your hand steady and move at a consistent pace to avoid deep scorch marks. -
Texturing the Centers:
Switch to a stippling motion for the large seed centers of the sunflowers. Create a dense field of small dots. Make the outer ring of the center darker and more densely packed to create depth. -
Petal Details:
Change back to a writer tip or shader to add veins to the petals. Draw quick, light lines radiating from the center outward to mimic the texture of a real flower. -
Leaf Veining:
Burn the central veins of the leaves with a heavier hand, then use lighter strokes for the smaller branching veins. The contrast between the burnt wood and the pale grain will define the artwork. -
Clean Up:
Once all burning is done, lightly sand the surface with 320-grit paper to remove any residual carbon lines or raised wood fibers from the burning process.
Step 3: Painting & Staining
-
Mixing a Wash:
Instead of thick opaque paint, aim for a translucent stain effect. Mix your Cadmium Yellow and Yellow Ochre with a generous amount of water (about 1 part paint to 3 parts water). -
Painting Petals:
Brush this yellow wash onto the petals. Start near the center and pull the brush outward. Let the wood grain show through the color. I like to layer a slightly darker Ochre near the flower center for shadow. -
Adding Greenery:
Mix Sap Green and Olive Green with water. Paint the leaves carefully, staying within your burnt lines. You can make one half of a leaf slightly darker to suggest dimension and light source. -
Darkening the Centers:
The burnt texture in the centers provides most of the darkness, but you can enhance it by dabbing a very watery Burnt Umber wash over the stippled area to deepen the brown tones. -
Refining Edges:
If any paint bled outside the lines, you can carefully scrape it back with an X-Acto knife or lightly sand it off once fully dry. -
Final Dry:
Allow the paint to dry completely, preferably overnight. The wood must be bone dry before sealing.
Vintage Patina
After the yellow paint dries, lightly dry-brush a tiny amount of diluted white paint on the petal tips to create a sun-bleached, aged look.
Step 4: Sealing & Protection
-
First Coat of Sealer:
Stir your outdoor spar urethane gently to avoid bubbles. Apply a thin, even coat over the entire bench, following the direction of the wood grain. -
Sanding Between Coats:
After the first coat dries (check can for times), lightly sand with 320-grit paper to knock down any raised grain. This ensures a professional, furniture-grade finish. -
Final Coats:
Wipe away the sanding dust and apply 2-3 more coats of urethane. Pay extra attention to the seat and backrest faces where weather will hit hardest.
Now you have a stunning, durable piece of art that invites you to sit and enjoy the sunshine
Mandala Medallion Seat Design
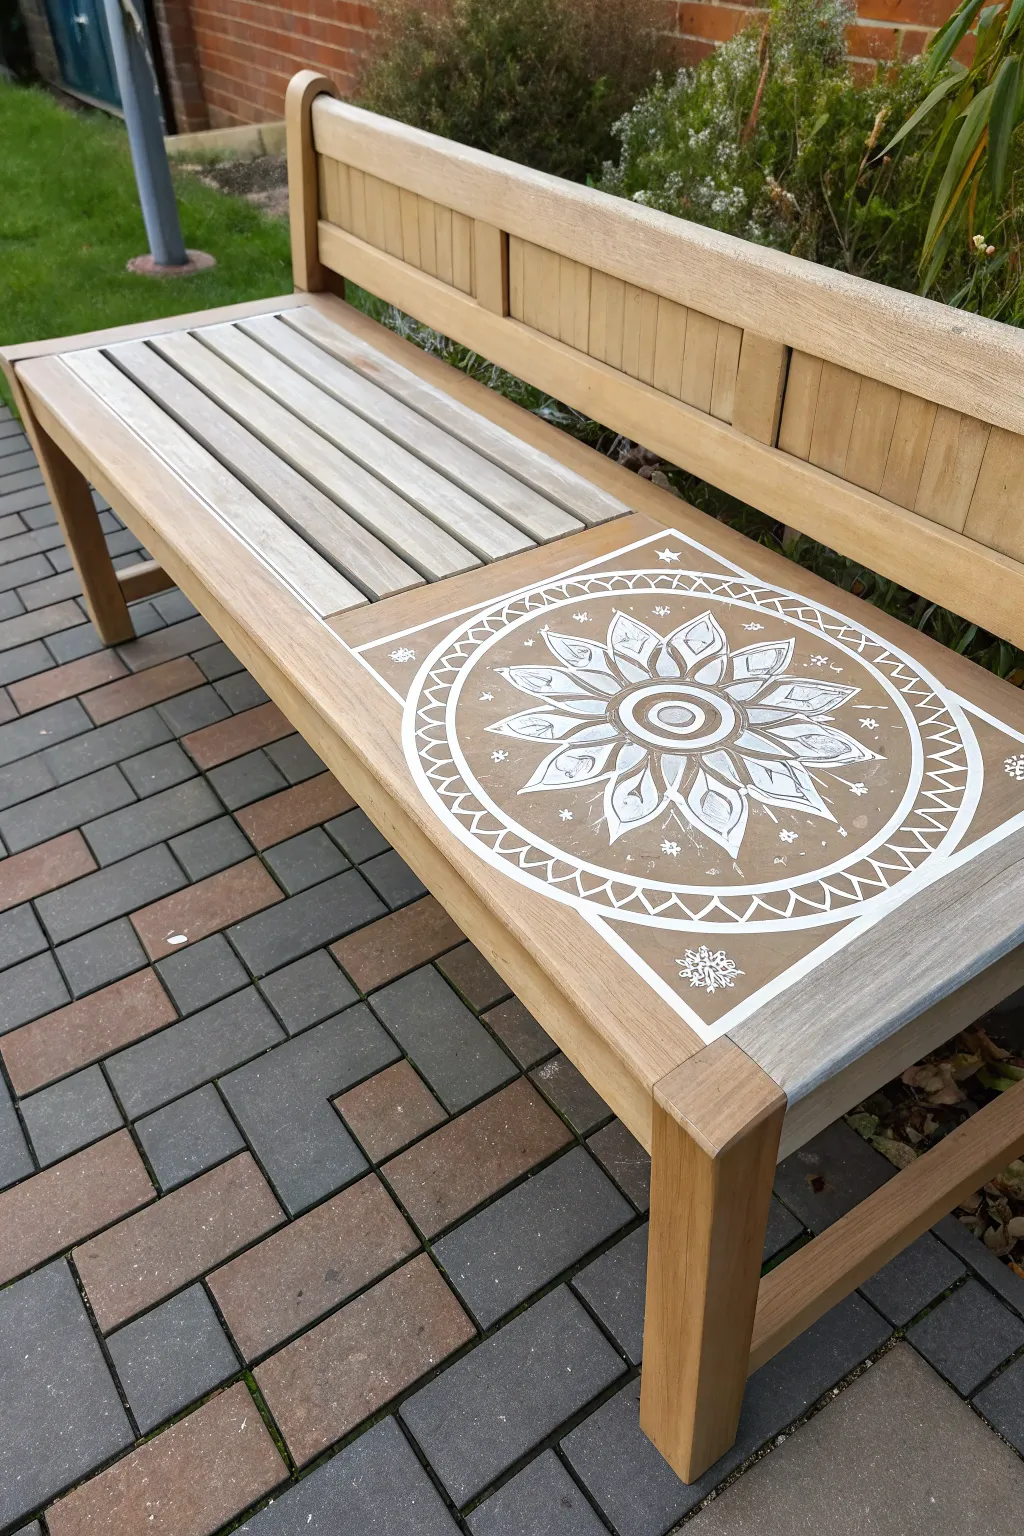
Transform a plain garden bench into a stunning statement piece with this mandala medallion seat design. This project creates a unique focal point by painting a faux-tile effect directly onto the wood slats, blending rustic charm with intricate geometric patterns.
Step-by-Step
Materials
- Wooden garden bench (teak or acacia works well)
- Sandpaper (120 and 220 grit)
- Painter’s tape (wide width)
- White exterior wood paint or chalk paint
- Clear outdoor matte spar urethane or varnish
- Ruler or tape measure
- Pencil / Chalk pencil
- Compass (large) or round templates (plates/bowls)
- Small flat brush (1/4 inch)
- Fine liner detail brush (size 0 or 1)
- Damp cloth
Step 1: Preparation & Mapping
-
Clean surface:
Begin by thoroughly cleaning the seat area to remove dirt, algae, or oils. A mixture of mild soap and water works well; let it dry completely before proceeding. -
Light sanding:
Use 120-grit sandpaper to scuff the area where you plan to paint. This helps the paint adhere better to the wood grain. Wipe away dust with a damp cloth. -
Square it off:
Decide on the placement of your medallion. Use painter’s tape to mark out a perfect square across the horizontal slats. Ensure the tape is pressed down firmly to prevent bleed-under. -
Create the base:
Paint the inside of your taped square with a thinned wash of white paint if you want a subtle background, or leave the wood natural as seen in the photo. If leaving natural, simply proceed to marking the center point. -
Mark the center:
Find the exact center of your square by measuring corner to corner. Mark this spot lightly with a pencil; this will be the anchor for your entire mandala.
Use a Steady Hand
Rest your pinky finger on a dry section of the wood while painting details. This stabilizes your hand, acting as a pivot point for smoother curves.
Step 2: Drafting the Design
-
Draw the outer circle:
Using a compass or a large round template (like a dinner plate), draw the largest circle within your square borders. It should almost touch the tape edges. -
Create inner rings:
Draw three smaller concentric circles inside the large one. These will define the border area for the triangular zigzag pattern and the central flower space. -
Sketch the flower petals:
Sketch a large flower in the center. Start with a small central circle, then draw eight large, pointed petals radiating outward. Add smaller petals between the larger ones for depth. -
Detail the border:
In the space between your outermost two circles, sketch a zigzag or triangle pattern all the way around. This creates that classic medallion border look. -
Add corner accents:
In the four corners of the square outside the main circle, sketch small starbursts or snowflakes to fill the negative space.
Try a Soft Wash
Mix one part white paint with one part water. Paint inside the flower petals for a semi-transparent ‘whitewash’ look that contrasts with the solid outlines.
Step 3: Painting the Mandala
-
Paint the heavy outlines:
Dip your small flat brush into the white paint. Carefully paint the thick outer border ring and the solid white square border created by the tape. -
Fill the center:
Paint the central ‘donut’ shape of the flower solid white. I like to do two thin coats here to ensure the wood grain doesn’t show through too much. -
Outline the petals:
Switch to your fine liner brush. With a steady hand, paint the outlines of the large flower petals. Keep the paint fluid but not runny for crisp lines. -
Add petal details:
Inside each large petal, paint a teardrop shape and small dots. This intricate line work mimics hand-carved details. -
Execute the border pattern:
Paint the zigzag triangle pattern within the outer rings. Consistency is key here, but don’t worry if they aren’t mechanically perfect; the handmade look adds charm. -
Corner flourishes:
Paint the corner starbursts using very light strokes with the tip of your liner brush. Pull the brush from the center outward to create sharp points.
Step 4: Sealing & Protecting
-
Remove tape:
While the paint is barely tacky (not fully cured but dry to touch), carefully peel away the blue painter’s tape at a 45-degree angle to reveal crisp square edges. -
Let it cure:
Allow the painted design to dry for at least 24 hours. This ensures moisture is out of the paint before you seal it. -
Apply sealant:
Apply a coat of exterior matte spar urethane over the entire seat or just the painted section. This protects your artwork from UV rays and rain. -
Final coat:
Once the first coat is dry, lightly sand with 220-grit sandpaper and apply a second coat of sealer for maximum durability.
Enjoy your beautifully customized bench as a peaceful spot for your morning coffee


Faux Mosaic Tile Pattern
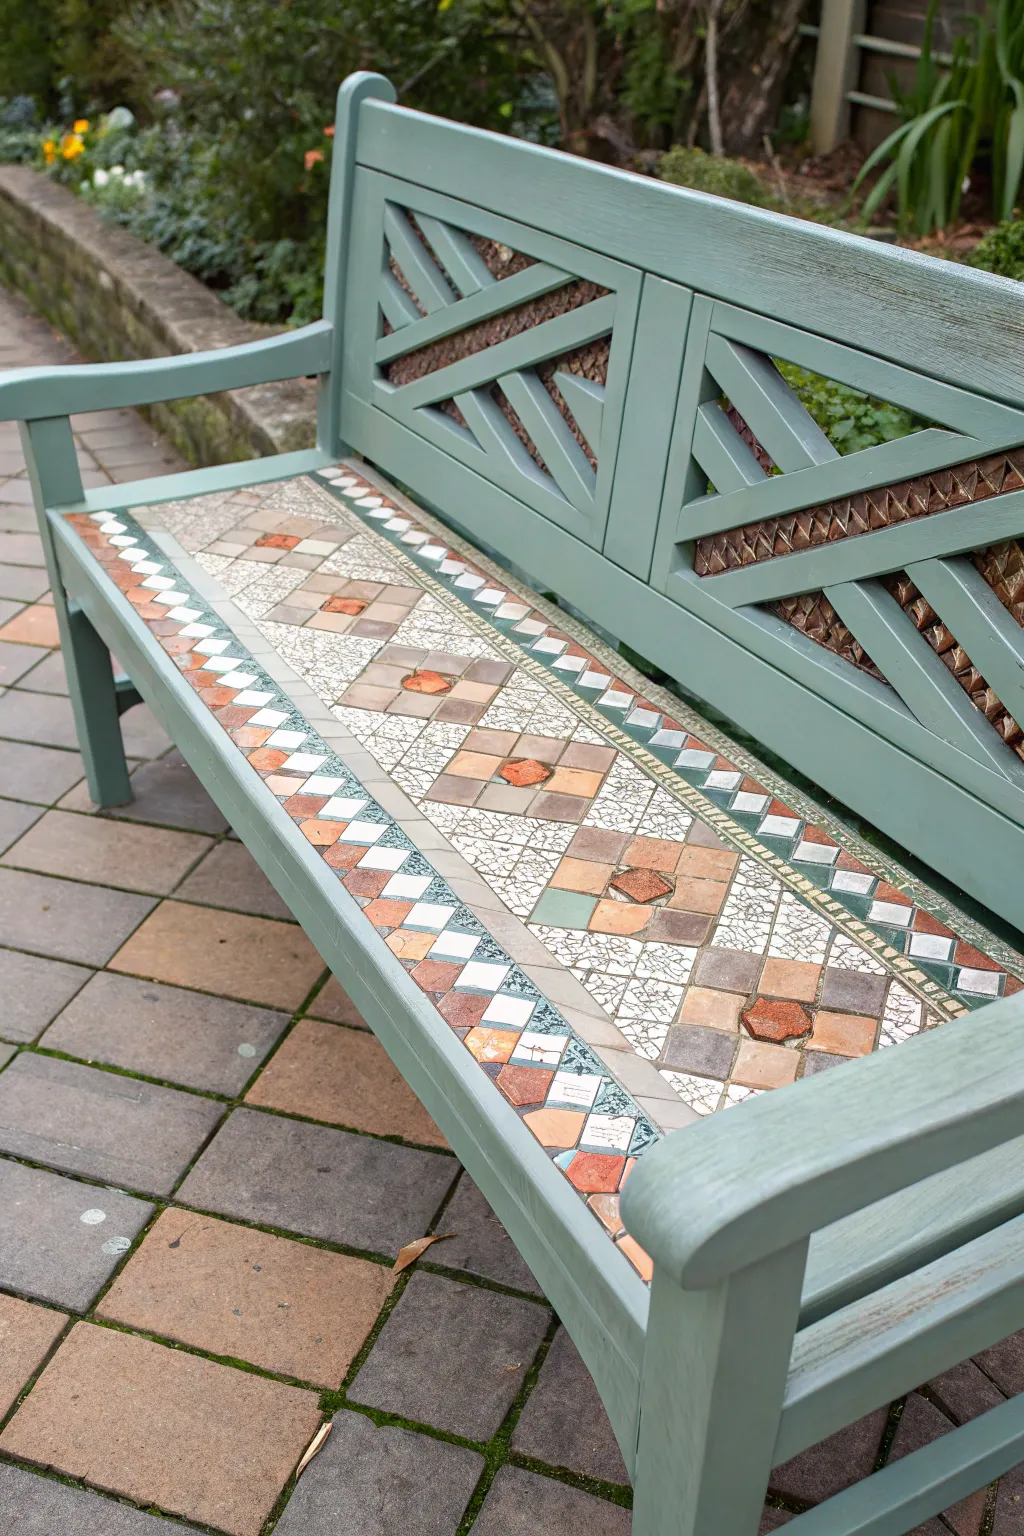
Transform a plain wooden bench into a Mediterranean-inspired masterpiece by creating a deceptively realistic mosaic tile effect on the seat. This project uses clever taping and layering techniques to mimic the texture of grout and the charm of aged ceramic tiles without any of the heavy masonry work.
Step-by-Step Tutorial
Materials
- Wooden garden bench (cleaned and sanded)
- Exterior primer
- Sage green exterior latex paint (for base frame)
- Off-white or light grey exterior paint (for ‘grout’ lines)
- Assorted acrylic craft paints (terracotta, slate blue, beige, cream, dark green)
- Painters tape (1/4 inch or 1/8 inch width for precise lines)
- Wide painters tape (1 inch)
- Ruler or T-square
- Pencil
- Sea sponge or stippling brush
- Small flat artist brushes
- Small angled brush
- Exterior polyurethane sealer (matte or satin finish)
- Sandpaper (220 grit)
Step 1: Preparation and Base Coat
-
Clean and prep the surface:
Begin by thoroughly cleaning the wooden bench to remove any dirt or oils. If the existing finish is glossy or peeling, sand it down with medium-grit sandpaper to create a grippy surface. Wipe away all dust with a tack cloth or damp rag. -
Prime the wood:
Apply a coat of high-quality exterior primer to the entire bench. This step is crucial for longevity, especially if the bench will live outdoors. Allow the primer to dry completely according to the manufacturer’s instructions. -
Apply the frame color:
Paint the legs, arms, and backrest framework in your chosen sage green shade. You may need two coats for solid coverage. Avoid painting the seat slats or the inset panels on the backrest if you plan to detail those separately; however, for the seat specifically, we need a different base. -
Paint the ‘grout’ base:
Paint the entire seat area and the backrest inset panels with your off-white or light grey ‘grout’ color. This layer will eventually show through as the lines between your tiles, so ensure it covers well. Let this dry for at least 24 hours to ensure the tape won’t peel it up later.
Bleeding Lines?
If paint seeps under the tape, don’t panic. Once dry, use a small stiff brush dipped in water (for fresh paint) or your grout color to tidy up edges. A little irregularity actually adds to the handmade tile look.
Step 2: Taping the Mosaic Grid
-
Mark the center lines:
Find the exact center of your bench seat. Using a pencil and a ruler, lightly draw a line down the middle length-wise and width-wise. This crosshair will anchor your pattern. -
Create the diamond template:
To keep your diamonds consistent, cut a square template out of cardstock that matches your desired tile size (about 4-5 inches wide looks good here). Rotate it 45 degrees to create the diamond shape. -
Tape the main grid:
Using your narrow 1/4 inch tape, lay out the large diamond grid pattern on the seat. Press the tape down firmly to prevent paint bleed. These taped lines will remain unpainted to become your grout. -
Add border details:
Run parallel lines of narrow tape along the front and back edges of the seat to create a border strip. Inside this border, use small pieces of tape to create a checkerboard or small triangle pattern, just like the image shows. -
Subdivide for visual interest:
Within the large central diamonds, tape off a smaller internal square or diamond to mimic a medallion tile. Add intersecting lines in the negative spaces between large diamonds to create triangular filler tiles.
Pro Tip: Highlight & Shadow
To make tiles look 3D, paint a thin, translucent dark line on the bottom-right inside edge of each tile, and a thin white line on the top-left edge. This mimics light hitting the beveled edges.
Step 3: Painting the Faux Tiles
-
Mix your tile colors:
Prepare your palette with terracotta, beige, slate blue, and cream. Slightly water down your paints or mix them with a glazing medium; you want the color to look slightly translucent and weathered, not like solid plastic. -
Sponge on the texture:
Dip a damp sea sponge into your first color (e.g., beige). Dab off the excess, then lightly pounce it onto specific taped-off sections. The sponge creates a stone-like texture that a brush can’t replicate. -
Block in the main colors:
Move through your colors one by one. Paint the large diamonds in alternating warm tones (beige and peach). Use the slate blue or green for the border accents and small filler triangles. Variation is key to the mosaic look. -
Add the terracotta centers:
For the center of the medallions, use a small brush to paint the central squares in a deep terracotta shade. I prefer to stipple this on rather than brush it to maintain that rough, fired-clay appearance. -
Add ‘speckling’ for realism:
Once the main colors are dry to the touch, take an old toothbrush or stiff bristle brush. Dip it in diluted dark grey or brown paint and flick tiny speckles over the ’tiles’ to mimic natural imperfections and dirt in the stone.
Step 4: Finishing Touches
-
Detail the backrest:
While the seat dries, address the backrest panels. Using an angled brush, paint the recessed lattice areas in a dark brown or bronze to create depth, making the green overlay pop forward. -
The reveal:
This is the best part. Carefully peel away all the tape while the paint is still slightly tacky (or fully dry, if you are very gentle). Pull the tape at a 45-degree angle to ensure crisp edges. -
Touch up grout lines:
If any paint bled under the tape, use a tiny brush and your original grout color to clean up the lines. You can also lightly sand the painted tiles with 220-grit paper to distress them further. -
Seal the artwork:
Protect your hard work with 2-3 coats of exterior polyurethane. A clear matte or satin finish is best as it looks more like natural stone; high gloss tends to ruin the faux effect.
Now you have a durable, custom seating area that brings a touch of artistic flair to your garden year-round
Stained-Glass Outline Look
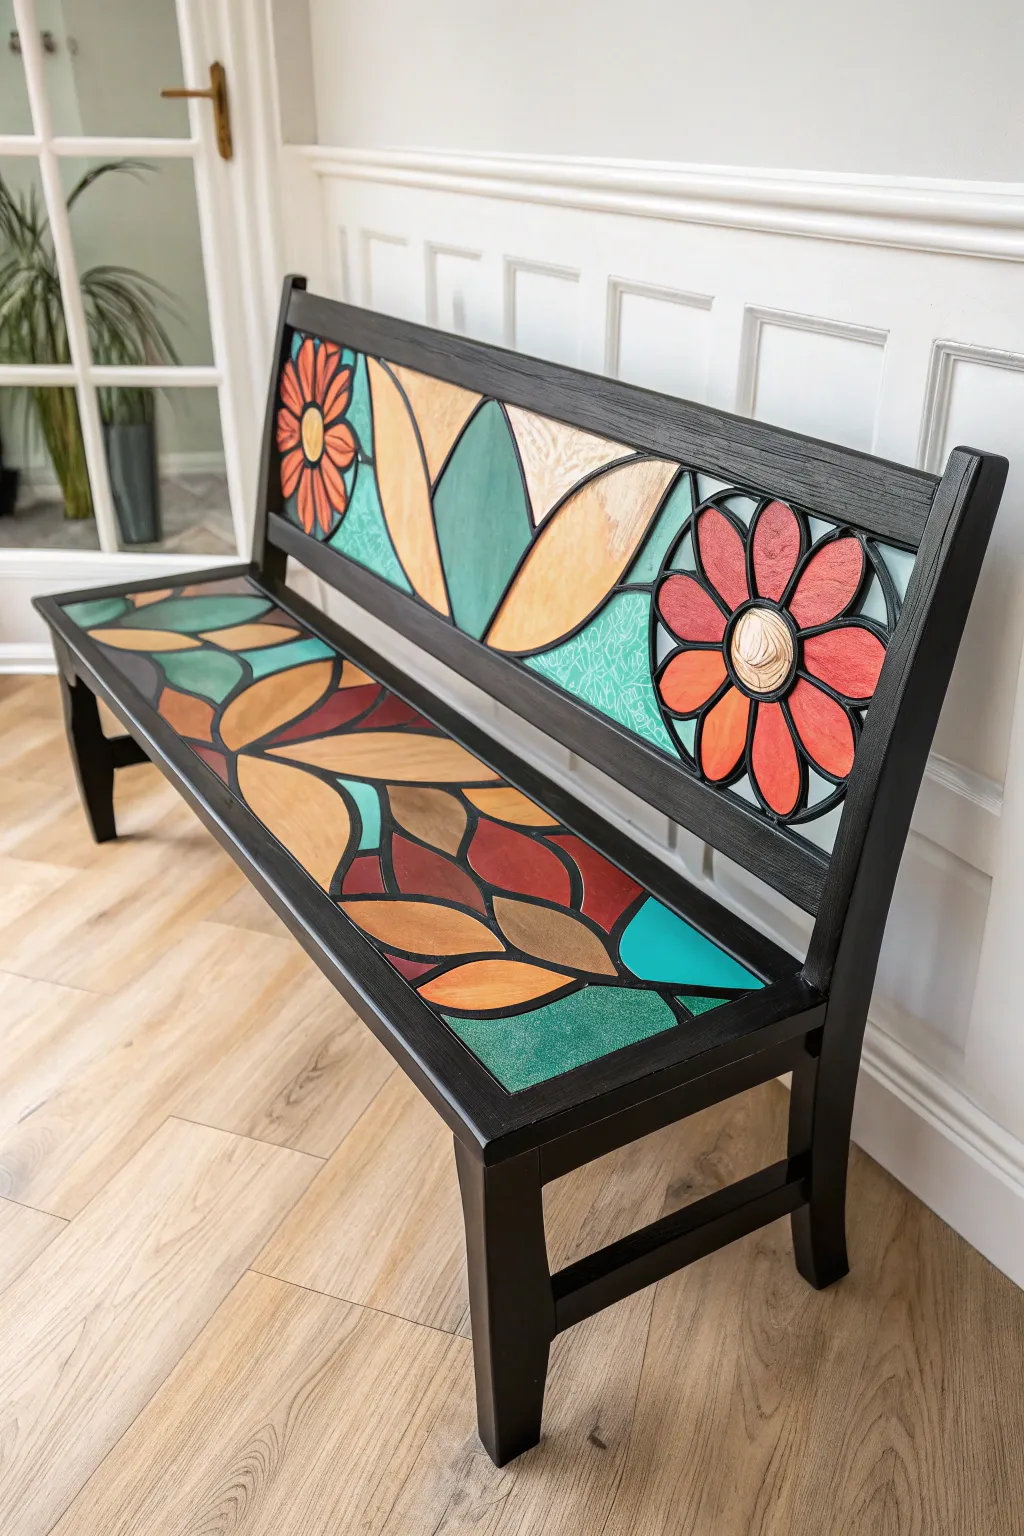
Transform a plain wooden bench into a vibrant statement piece that mimics the intricate beauty of stained glass. Bold black outlines create defined cells of color, giving the illusion of traditional leaded glass work right on your furniture.
Step-by-Step Guide
Materials
- Wooden bench (unfinished or sanded)
- Black semi-gloss interior paint (for the frame)
- Black puff paint or dimensional fabric paint (for lead lines)
- Acrylic paints (teal, burnt orange, cream, dark red, brown, sage green)
- Clear polyurethane sealer (water-based)
- Medium and fine paintbrushes
- Sandpaper (220 grit)
- Pencil and eraser
- Painter’s tape
- Ruler or straight edge
- Tracing paper (optional)
Step 1: Preparation and Base
-
Prepare the surface:
Begin by thoroughly sanding the entire bench with 220-grit sandpaper to remove any old finish or rough spots. Wipe it down with a damp cloth to ensure it’s completely dust-free. -
Prime the wood:
If the wood is raw or dark, apply a coat of white primer to the seat and backrest areas where the design will go. This ensures your vibrant stained-glass colors will pop later. -
Paint the frame:
Carefully paint the legs, sides, and structural supports of the bench with black semi-gloss paint. Use painter’s tape to mask off the rectangular areas on the seat and backrest where you plan to put your artwork. -
Apply a second coat:
Once dry, apply a second coat of black paint to the frame for a solid, opaque finish that will visually merge with your future ‘lead lines’.
Step 2: Drafting the Design
-
Sketch the flower centers:
Using a pencil, lightly draw large floral shapes. On the backrest, place two partial flower bursts on the outer edges. On the seat, draw larger, sweeping petals centered horizontally. -
Add connecting lines:
Draw long, curved lines connecting the flowers to the edges of the bench. These lines separate the background into distinct geometric shards, mimicking the way glass pieces are cut. -
Refine the composition:
Step back and look at the bench. Ensure you have a good balance of large and small shapes. Add extra dividing lines if any area looks too empty.
Smooth Operator
When applying dimensional paint, squeeze a little onto a scrap paper first to release air bubbles. This prevents the bottle from ‘spitting’ on your project.
Step 3: Creating the Lead Lines
-
Outline with dimensional paint:
This is where the magic happens. Trace over every pencil line using the black puff paint or dimensional paint. Keep your pressure detailed and steady to create a raised bead that looks like metal coming. -
Let it cure completely:
Do not touch the bench! Puff paint takes significantly longer to dry than acrylics. I recommend letting this sit overnight to ensure the raised lines are hard and won’t smudge.
Epoxy Glaze Finish
For a hyper-realistic glass look, use clear pour-on epoxy resin on the seat instead of polyurethane. It creates a thick, glossy depth just like real glass.
Step 4: Painting the Glass
-
Plan your palette:
Select your acrylic colors. For this look, alternate warm tones like burnt orange and deep red for the flowers with cool teals and sage greens for the background shapes. -
Fill the first section:
Dip a fine brush into your teal paint and fill a background ‘shard.’ Paint right up to the black relief line, allowing the raised edge to act as a barrier. -
Create variation:
To make it look like real art glass, don’t make the color perfectly flat. Mix a tiny bit of white or a lighter shade into your brush while the paint is wet to create subtle streaks and texture. -
Paint the petals:
Move on to the floral elements using the oranges and creams. Apply two thin coats rather than one thick one to maintain a smooth, glass-like surface. -
Finish remaining sections:
Continue painting until every ‘glass’ section is filled. Be careful not to rest your hand in wet paint as you move across the bench seat. -
Touch up lines:
If you accidentally got color on top of the black dividers, simply go over that small section with a tiny bit of black paint or a permanent marker once dry.
Step 5: Sealing and Protecting
-
Apply the first sealer coat:
Once the artwork is fully dry (give it 24 hours), brush on a layer of clear water-based polyurethane. Use long, smooth strokes to avoid bubbles. -
Sand lightly:
After the first coat dries, very lightly scuff the surface with fine sandpaper (avoiding the raised lines if possible) to help the next coat adhere. -
Final protection:
Apply 2-3 more coats of polyurethane, especially on the seat area, as this will see the most wear. Let the bench cure for several days before sitting on it.
Place your bench in a sunlit entryway and enjoy the colorful, geometric charm you have created
Storybook Scene Backrest Mural
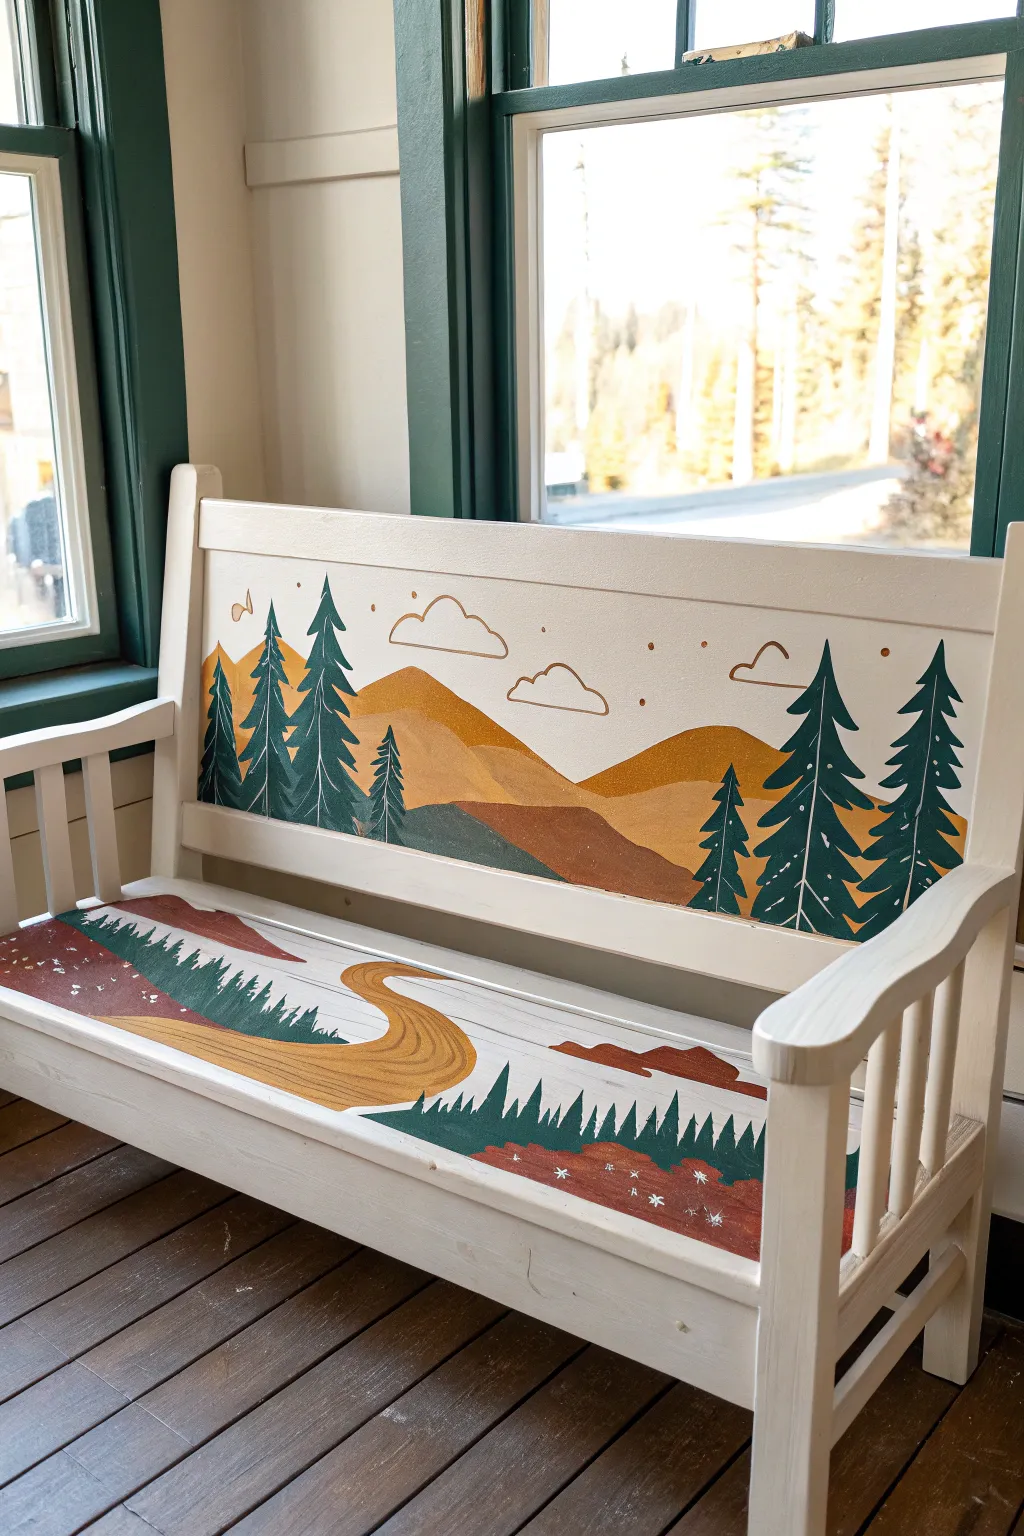
Transform a plain wooden bench into a storybook centerpiece with this charming nature-inspired mural. Featuring rolling ochre hills, deep emerald pines, and whimsical line-art clouds, this project brings the tranquility of a mountain landscape right into your home.
Detailed Instructions
Materials
- Wooden bench (sanded and primed white or cream)
- Acrylic craft paints (Deep Forest Green, Ochre/Mustard Yellow, Rust/Terracotta, Deep Brown, White, Gold)
- Assorted synthetic brushes (1-inch flat, medium round, fine liner)
- Pencil and eraser
- Painter’s tape
- Clear polycrylic sealer (satin or matte finish)
- Palette or paper plate
- Water cup and paper towels
Step 1: Preparation & Sketching
-
Clean and Prime:
Ensure your bench is completely clean and dust-free. If it’s raw wood, apply a high-quality primer and base coat of a warm cream or off-white paint to serve as your background sky. Let it cure fully before starting the design. -
Map the Mountains:
Lightly sketch the horizon line on the backrest using a pencil. Create undulating waves to represent the rolling hills, varying heights to add interest. A simple overlapping composition works best. -
Place the Pines:
Sketch tall, triangular shapes for your pine trees on the far left and right sides of the backrest. Vibrate the heights, making some taller than the mountains and others tucked into the valleys. -
Sketch the Seat Design:
On the seat, draw a winding S-curve path flowing from one side to the other. Fill the remaining bottom corners with jagged tree lines and small sections for ground cover.
Clean Lines Hack
If you struggle with steady hands for the cloud outlines, use a gold paint pen instead of a brush. It offers much more control for fine linework.
Step 2: Painting the Backrest
-
Color Block the Mountains:
Using a 1-inch flat brush, fill in the mountain shapes. Alternate between your Ochre/Mustard Yellow and Rust/Terracotta colors to distinguish the different ranges. Apply two coats for solid, opaque coverage. -
Paint the Deep Pines:
Switch to your medium round brush and Deep Forest Green. Fill in the pine tree silhouettes you sketched earlier. Don’t worry about individual needles yet; focus on getting a solid shape. -
Add Foreground Details:
If there are lower hills in the very front, paint them with a Deep Brown or darker Rust shade to create depth and grounding for the composition. -
Refine Edges:
Once the base blocks of color are dry, use a smaller brush to tidy up any wobbly lines where the mountains meet the sky or each other.
Step 3: Painting the Seat
-
Fill the Path:
Paint the winding path on the seat using the Ochre/Mustard Yellow. Keep your brush strokes following the curve of the path to suggest movement. -
Add Wood Grain Texture:
While the ochre is drying, mix a tiny bit of brown into the yellow. Use a fine brush to add subtle streaks along the path, mimicking a wood grain pattern. -
Paint Seat Foliage:
Fill in the jagged tree lines at the bottom of the seat design with Deep Forest Green and the ground areas with Rust.
Level Up: Texture
Mix a small amount of texture medium or baking soda into the mountain paint. This adds a slight grit, making the landscape look more tactile and earthy.
Step 4: Detailing & Sealing
-
Create Tree Details:
Using a fine liner brush and white paint (or a very light cream), paint simple, jagged lines inside the green pine trees. These interpretative branches give the trees their classic folk-art look. -
Draw Clouds:
With a fine liner brush and Gold or Ochre paint, draw the outlines of fluffy clouds in the sky area. Keep the lines continuous and loop-like for a playful style. -
Add Whimsy:
Scatter small dots and simple star shapes around the clouds using the tip of your brush handle dipped in paint. I find this connects the sky elements beautifully. -
Detail the Ground:
Add small white asterisks or star-patterned flowers to the rust-colored ground patches on the seat. -
Dry Completely:
Allow the entire bench to dry for at least 24 hours. The paint needs to be fully cured before sealing to prevent smearing. -
Seal for Protection:
Apply 2-3 coats of clear satin polycrylic sealer. This is crucial for a seating surface to prevent wear and tear.
Once the sealer cures, style your bench near a window to let the natural light highlight your painted landscape
Night Sky and Moon Silhouette Bench
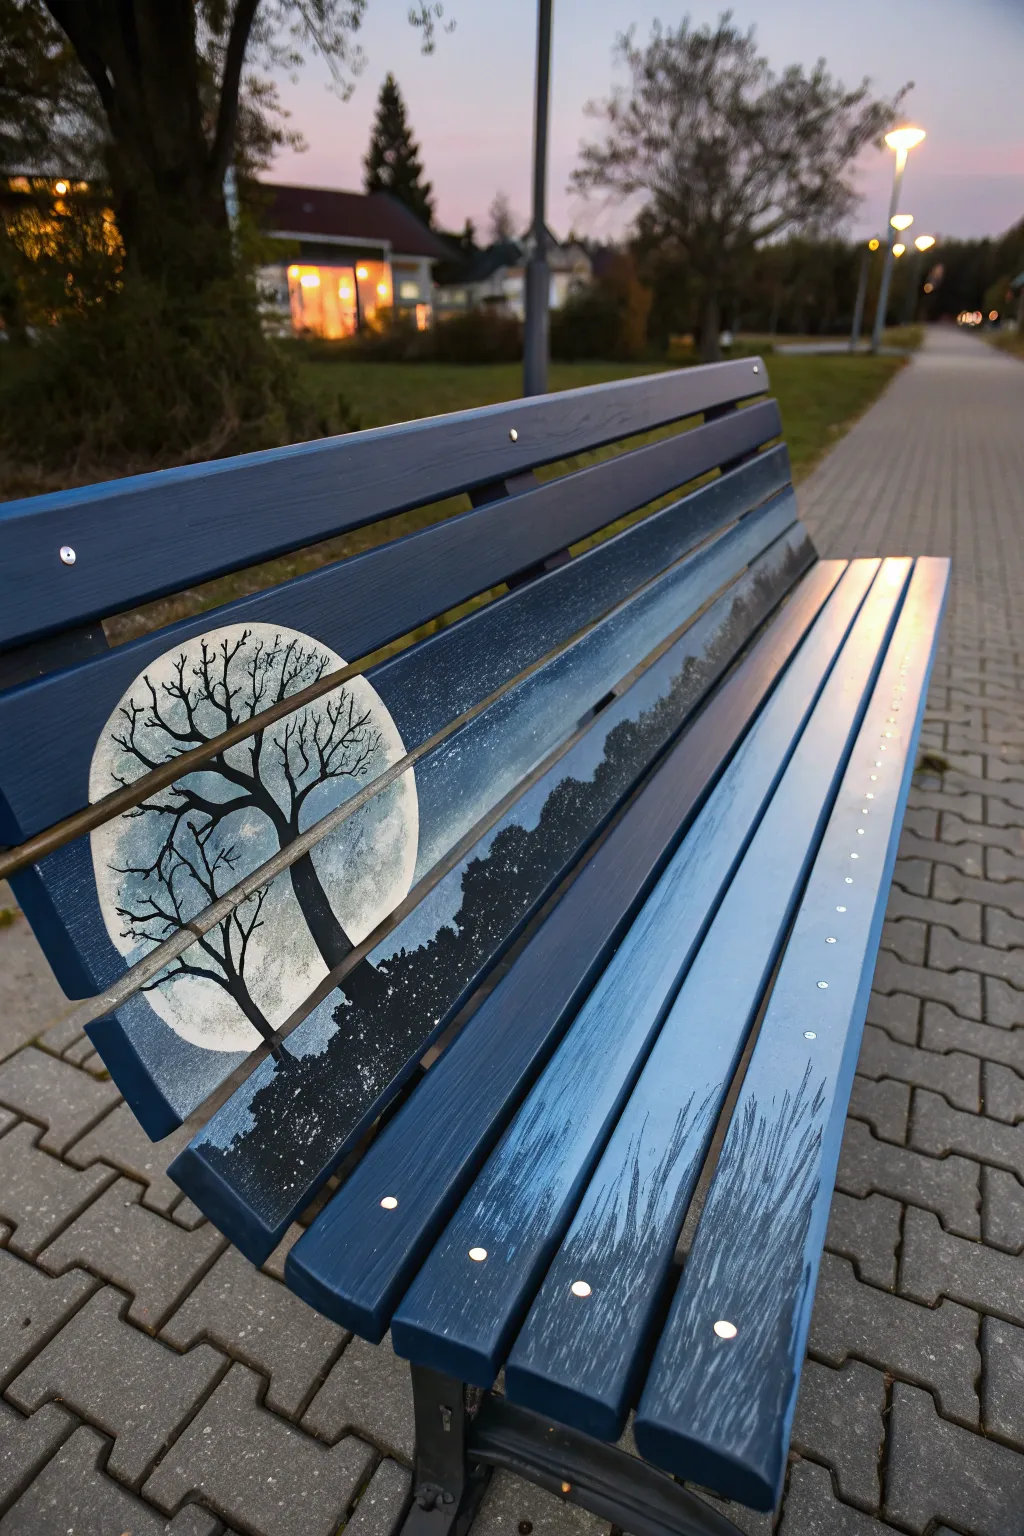
Transform an ordinary wooden bench into a tranquil evening escape with this atmospheric painting project. Featuring a dramatic full moon intersected by stark tree silhouettes, the design flows seamlessly across the slats to create a cohesive night landscape.
Step-by-Step
Materials
- Wooden garden bench (with slats)
- Sandpaper (120 and 220 grit)
- Primer (outdoor wood rated)
- Exterior acrylic latex paint (Matte or Satin): Dark Navy Blue, Medium Blue, Light Blue, White, Black
- Assorted paintbrushes: 2-inch wide brush, medium flat brush, fine liner brush
- Painter’s tape
- Large circular stencil or a round object (approx 10-12 inches diameter)
- Sponge or stippling brush
- Outdoor polyurethane sealer (Matte or Satin)
Step 1: Preparation & Base Coat
-
Clean and sand:
Thoroughly clean your bench to remove dirt and grease. Once dry, sand the entire surface with 120-grit sandpaper to remove old finish, followed by 220-grit for a smooth painting surface. Wipe away all dust with a tack cloth. -
Apply primer:
Coat the entire bench with a high-quality outdoor wood primer. This step is crucial for longevity and ensuring your dark colors cover evenly. Let this cure completely according to the can’s instructions. -
Paint the base color:
Apply a solid coat of your Dark Navy Blue across the entire bench—backrest, seat, and legs. This deep color acts as your night sky and shadow base. Allow it to dry fully before starting the detailed work.
Paint Bleeding?
If paint drips between slats, wrap a putty knife in a clean rag and run it through the gaps while the paint is wet. This keeps the slat edges clean.
Step 2: Creating the Moon & Sky
-
Position the moon:
Decide where your moon will sit on the backrest. In the reference, it’s on the left side, spanning the bottom four slats of the backrest. Use your circular stencil or trace a round object lightly with chalk. -
Block in the moon:
Using a medium flat brush, fill in the moon circle with white paint. Don’t worry about texture yet; just get a solid, opaque circle established. -
Texture the moon:
While the white is still slightly tacky, dab a small amount of diluted gray or very light blue onto a sponge. Gently stipple this onto the moon’s surface to create craters and shadows. Keep the edges of the moon crisp. -
Start the gradient:
On the seat portion of the bench, you want a fade effect. Start near the backrest with your Dark Navy. As you move toward the front edge of the seat, blend in your Medium Blue. -
Finish the seat flow:
Continue blending toward the front slat, mixing in the Light Blue. The goal is to make the seat look like moonlight reflecting on a surface or the lighter part of the sky. Use long, horizontal strokes for a smooth transition. -
Add gentle highlights:
On the far right side of the seat slats, I like to dry-brush a little bit of the lightest blue or white to simulate moonlight catching the texture of the wood.
Step 3: Painting the Silhouette
-
Draft the tree trunk:
Using black paint and a medium brush, paint the main tree trunk directly over your moon. The trunk should start at the bottom slat of the backrest and reach up, branching out as it crosses the moon’s face. -
Add main branches:
Extend thick branches outward from the trunk. Remember to paint the sides of the slats where the branch crosses over the gap, so the image looks continuous from different angles. -
Detail the twigs:
Switch to your fine liner brush. Paint delicate, spindly twigs extending from the main branches. These should be very fine and jagged, mimicking winter branches against the bright moon. -
Form the horizon line:
Along the bottom slat of the backrest (and slightly onto the back of the seat slats), stipple black paint to create a distinct horizon line of distant trees or bushes. -
Create distant trees:
Moving towards the right side of the backrest, make the black silhouette smaller and more distant. Paint a treeline that recedes into the background, getting shorter as it moves right. -
Add foreground grass:
At the very bottom of the moon and along the base of the backrest, use quick, upward flicking motions with your liner brush to create the look of tall grasses in the shadow.
Glow In The Dark
Mix a clear phosphorescent medium into your final white moon layer. By day it looks normal, but at night the moon will faintly endure.
Step 4: Protection
-
Seal the artwork:
Once the paint has cured for at least 24-48 hours, apply a coat of clear outdoor polyurethane. Use a matte or satin finish to avoid too much glare on your night scene. -
Apply second coat:
Lightly sand with fine grit paper if needed, and apply a second coat of sealer. Pay extra attention to the seat slats where people will be sitting.
Enjoy your peaceful evenings sitting amidst your own hand-painted starlit scenery.
Terrazzo Speckle Paint Bench
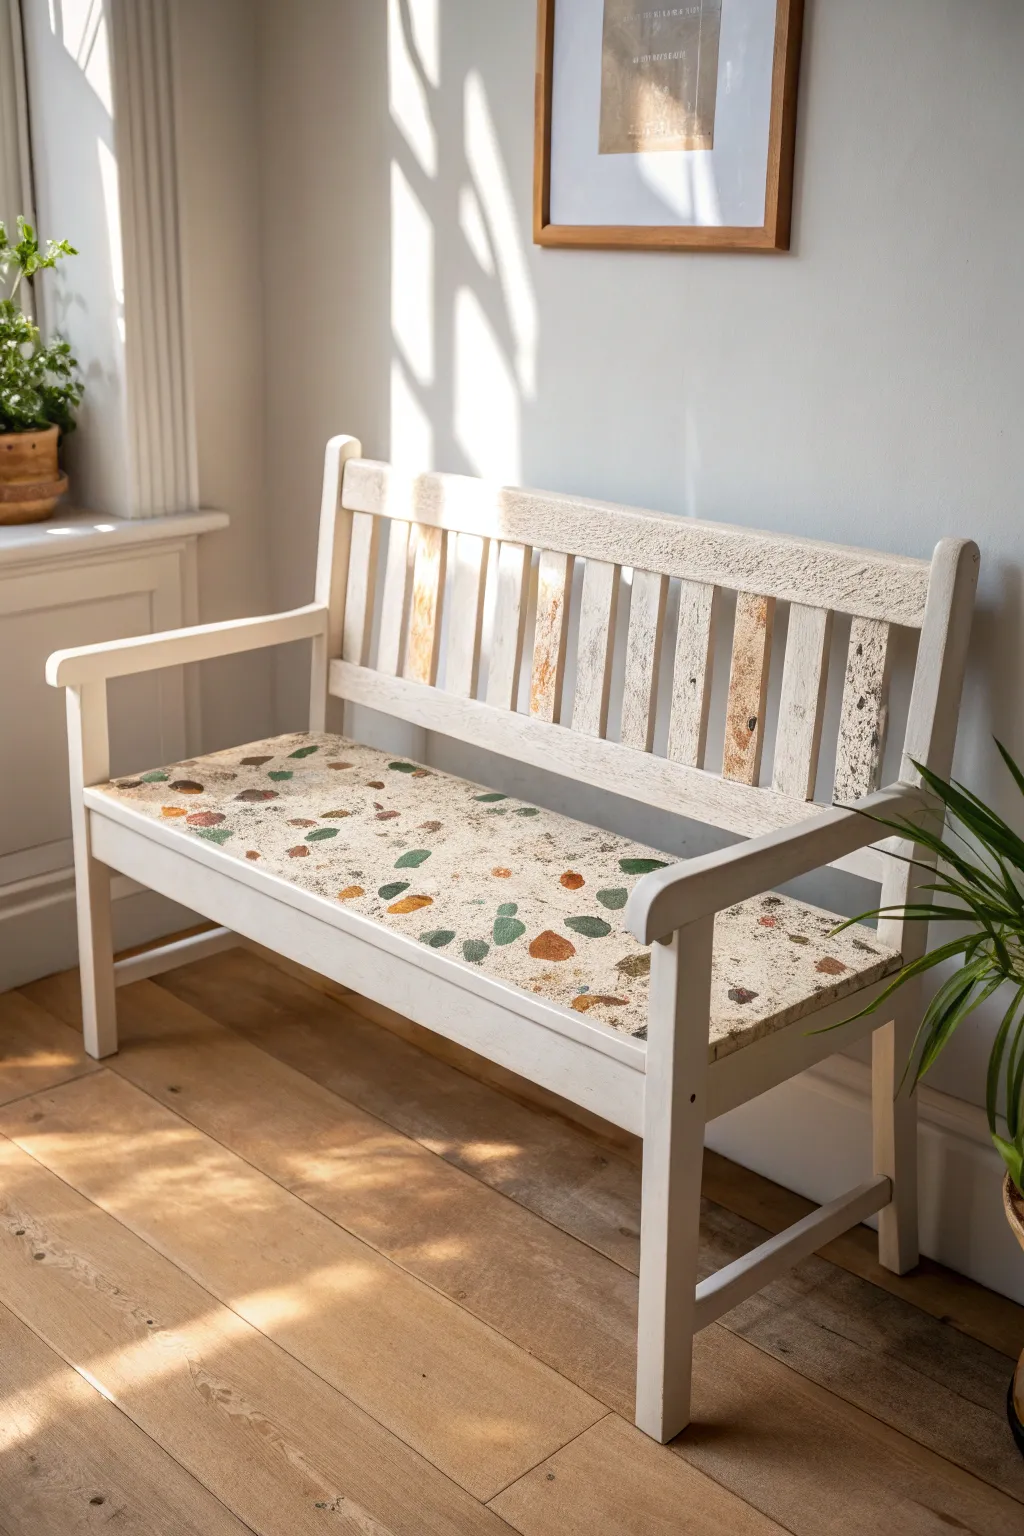
Give an old wooden bench a trendy makeover by mimicking the look of polished stone with simple paint techniques. This project combines a crisp, off-white frame with a playful, speckled seat that looks like high-end terrazzo but costs a fraction of the price.
Detailed Instructions
Materials
- Wooden bench (unfinished or sanded)
- Primer (wood bonding)
- Exterior satin or semi-gloss paint (creamy white)
- Acrylic craft paints (burnt orange, forest green, deep brown, ochre)
- Small flat artist brushes
- Medium round brush
- Sea sponge (optional)
- Clear polyurethane sealer (matte or satin finish)
- Sandpaper (120 and 220 grit)
- Painter’s tape
- Paper plate or palette
- Tack cloth
Step 1: Preparation and Base Coat
-
Clean and sand:
Begin by thoroughly cleaning the bench with soapy water to remove dirt and oils. Once dry, sand the entire surface with 120-grit sandpaper to scuff up any old finish, ensuring the new paint adheres well. -
wipe away dust:
Use a tack cloth or a damp rag to remove all sanding dust. Every speck of dust left behind can mar the final finish, so be meticulous here. -
Tape off areas:
Since we want the terrazzo effect only on the seat, use painter’s tape to carefully mask off the back spindles, armrests, and legs where they meet the seat. Press the tape edges down firmly to prevent bleed-through. -
Prime the bench:
Apply a coat of quality wood bonding primer to the entire bench. This blocks stains and creates a uniform canvas. -
Apply base color:
Paint the entire bench, including the seat area, with your creamy white exterior paint. I find that two thin coats usually provide better coverage and durability than one thick coat. Let this dry completely overnight.
Step 2: Creating the Terrazzo Effect
-
Plan your palette:
Pour small amounts of your acrylic craft paints (orange, green, brown, ochre) onto a paper plate. Terrazzo relies on random distribution, so keep your colors separate for now. -
Paint large shapes:
Starting with your darkest color (like the deep brown or forest green), use a small flat brush to paint irregular, jagged shapes on the seat. Think of broken tile pieces—triangles, trapezoids, and shards—scattered loosely. -
Add medium shapes:
Switch to a new color, perhaps the burnt orange. Paint slightly smaller shapes in the gaps between the first set. Rotate your brush as you work so the ‘chips’ don’t all point in the same direction. -
Layer in light tones:
Using the ochre or a lighter beige, add more shapes. Allow some shapes to touch or slightly overlap perfectly dry previous layers to create depth, mimicking how stones are packed in concrete. -
Create fine speckles:
Dip an old toothbrush or a stiff bristle brush into watered-down black or dark grey paint. Run your thumb over the bristles to flick tiny mists of paint across the seat. This creates the ‘sand’ look of terrazzo. -
Add sponge texture:
For a more natural stone look, lightly dab a small piece of sea sponge dipped in a diluted version of your base white over a few of the colored shapes. This pushes them back visually so they don’t look like stickers. -
Review and refine:
Stand back and look at the composition. If there are large empty white spaces, fill them with a small colored shard. If an area looks too cluttered, you can carefully paint over a shape with the base white color. -
Dry completely:
Let the artistic seat layer dry for at least 24 hours. The acrylics need to be fully cured before sealing.
Uneven blobs?
If your painted ‘stones’ look too round or blob-like, go back with a tiny brush and your base white paint. Cut into the edges of the shapes to make them angular and shard-like.
Step 3: Finishing Touches
-
Distress (optional):
If you want the weathered look seen on the bench back in the photo, lightly sand the edges of the backrest and arms with 220-grit sandpaper to reveal a bit of the wood underneath. -
Remove tape:
Carefully peel away the painter’s tape. If any paint bridged the gap, score it lightly with a craft knife first to avoid peeling up your hard work. -
Seal the seat:
Apply a coat of clear polyurethane sealer over the confetti-painted seat. A matte or satin finish looks most like real stone. -
Second coat of sealer:
Once the first coat is dry to the touch, apply a second coat of sealer to ensure the seat can withstand sitting and weather.
Pro Tip: Randomness
Avoid patterns! Our brains naturally want to make grids. Force yourself to place two shapes close together, then leave a big gap, rather than spacing them all equally.
Now you have a stylish, one-of-a-kind seat that brings an artistic flair to your entryway or garden
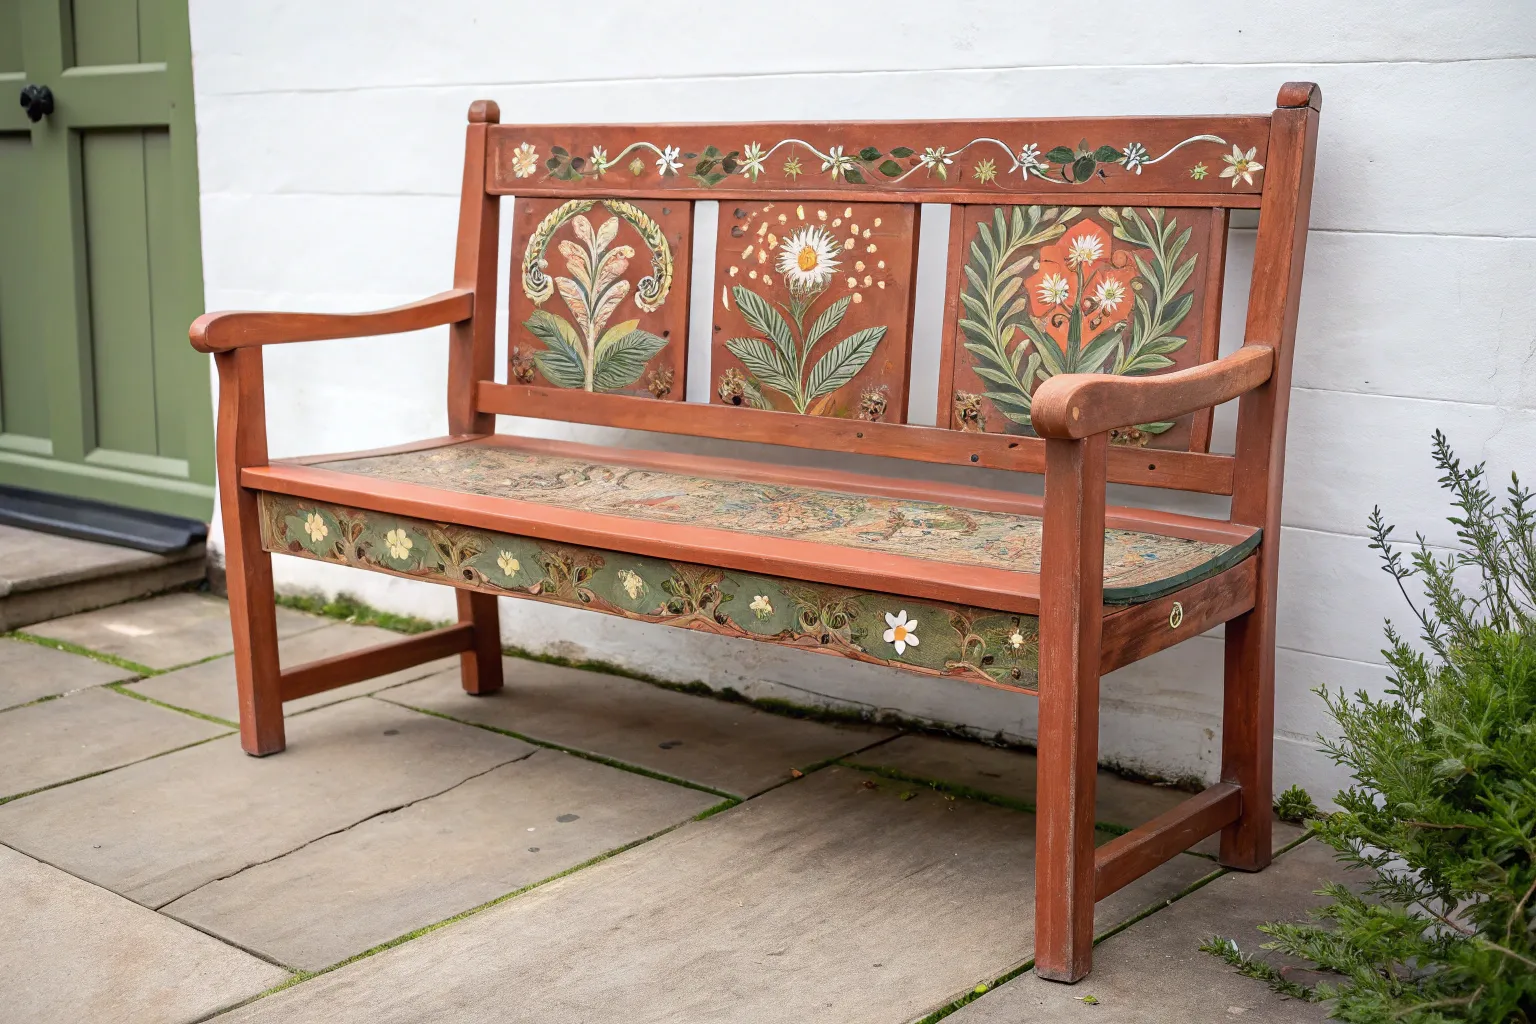
Folk Art Birds and Florals
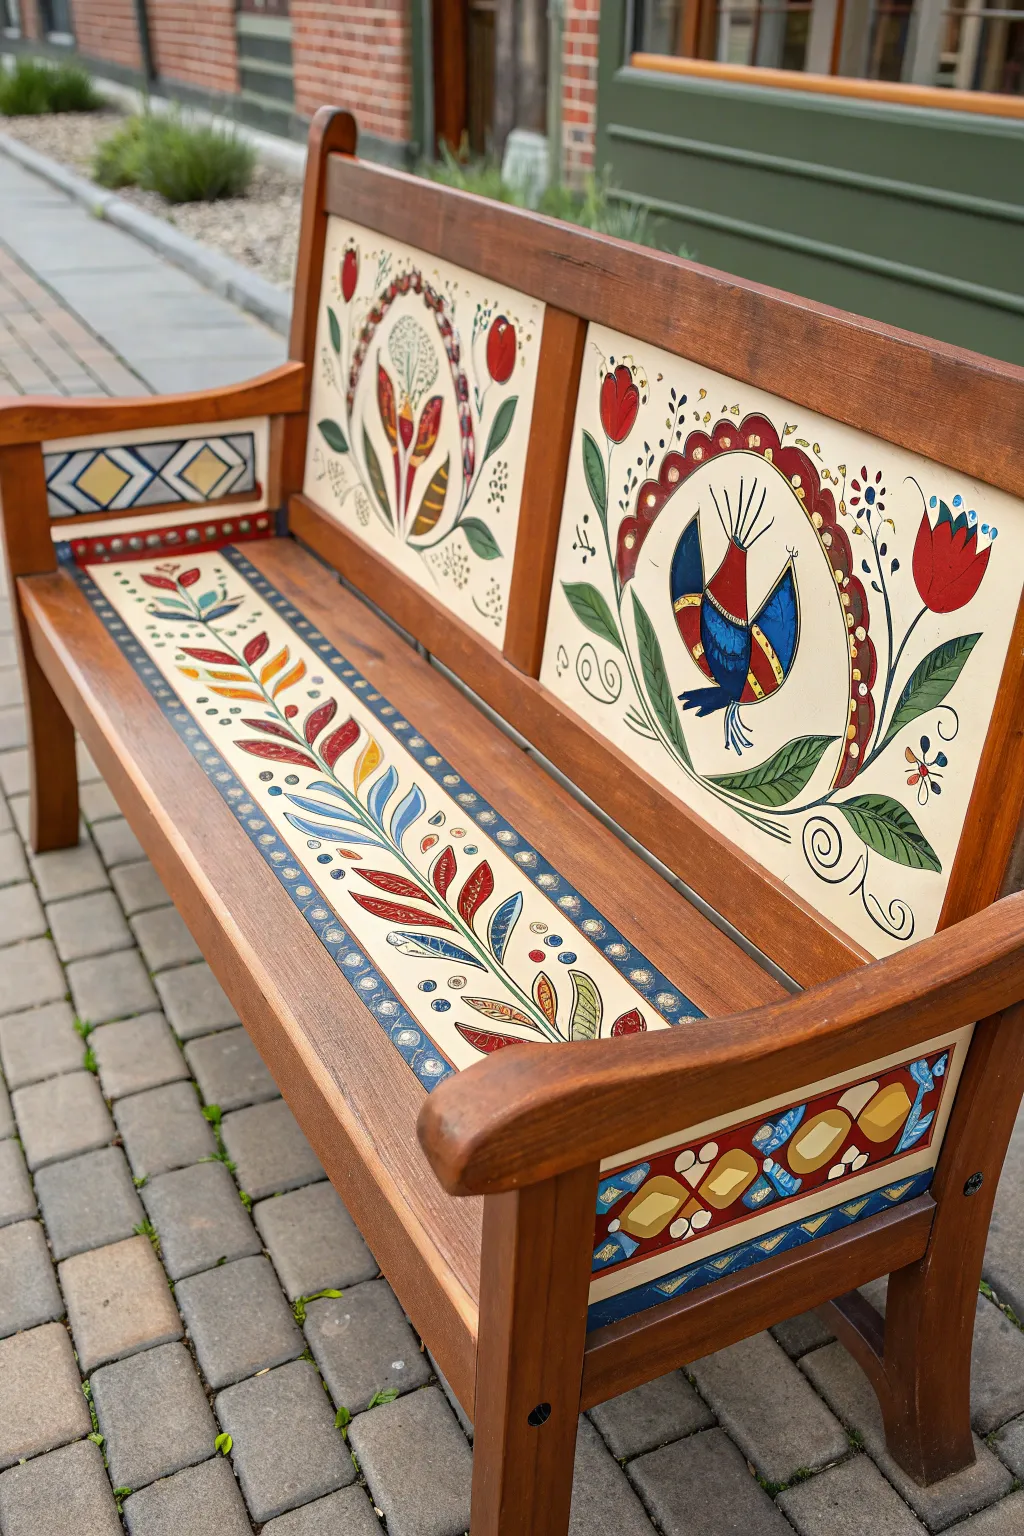
Bring the charm of Eastern European folk traditions to your garden with this intricately painted wooden bench. Using bold primary colors and stylized natural motifs, you’ll transform plain furniture into a storytelling piece featuring vibrant birds and blooming tulips.
How-To Guide
Materials
- Wooden garden bench (unfinished or sanded)
- Sandpaper (120 and 220 grit)
- Wood primer (white or cream based)
- Cream or off-white exterior acrylic paint (base coat)
- Set of acrylic paints (deep red, navy blue, forest green, mustard yellow, light blue)
- Painter’s tape
- Assorted brushes (1-inch flat, #4 round, #0 liner)
- Graphite transfer paper
- Pencil
- Ruler
- Exterior polyurethane sealer (satin or matte)
Step 1: Preparation and Base Coating
-
Prepare surface:
Begin by sanding the entire bench with 120-grit sandpaper to remove rough spots, followed by 220-grit for a smooth finish. Wipe away all dust with a damp tack cloth. -
Prime the wood:
Apply a coat of quality wood primer to the areas you intend to paint illustrations on—specifically the back panels and the central seat slat. Let this dry completely according to the manufacturer’s instructions. -
Apply background color:
Paint two coats of cream or off-white exterior acrylic paint over the primed areas. This creates a warm, neutral canvas that makes the folk art colors pop. Allow full drying time between coats. -
Mask the borders:
Use painter’s tape to create crisp lines defining the rectangular panels on the backrest and the long runner strip down the center of the seat.
Clean Lines
If paint bleeds under your tape, wait for it to dry completely. Then, scrape the excess away gently with an X-Acto knife or touch it up with the base cream color.
Step 2: Drafting the Design
-
Sketch the motifs:
On paper, sketch out your designs. For the back panels, create a central element (like a stylized bird or large tulip) surrounded by a curved vine border. For the seat, design a repeating vine pattern with alternating leaves. -
Transfer the design:
Tape your sketch and a sheet of graphite transfer paper onto the dried cream surface. Gently trace over your lines with a pencil to transfer the outline onto the wood. -
Refine outlines:
Lift the paper and lightly reinforce any faint lines with a pencil, ensuring your symmetrical elements, like the bird’s wings or opposing leaves, are balanced.
Step 3: Painting the Motifs
-
Block in main colors:
Using a #4 round brush, fill in the largest shapes first. Paint the bird’s body in navy blue and the wings in alternating segments of red and yellow. Paint the large tulips deep red. -
Add foliage:
Switch to forest green for the leaves and vines. I find it easiest to paint the central stem first, then attach the leaves with smooth, sweeping strokes that taper at the tips. -
Paint the borders:
For the scalloped red border around the central bird, use a steady hand to paint semicircles. Add the blue geometric diamond pattern on the side panels using the flat edge of a small brush for sharp lines. -
Detail work:
Once the base blocks are dry, use a #0 liner brush to add details. Add white dots to the red scalloped border, vein lines on the leaves, and small decorative strokes on the bird’s tail. -
Seat runner pattern:
Paint the long vine on the seat slat. Alternate the leaf colors between red, blue, and yellow for that true folk art look, connecting them with a central navy blue stem.
Antique Look
Mix a tiny drop of burnt umber into a clear glaze and brush it over the dried artwork. Wipe it back immediately with a rag to leave ‘age’ in the corners and crevices.
Step 4: Finishing Touches
-
Add geometric accents:
Along the sides of the seat runner, paint small blue dot borders or tiny triangles to frame the floral design. -
Paint the recessed areas:
If your bench has routed edges or recessed geometric shapes on the legs (like the diamonds shown), fill these with solid colors like mustard yellow or deep red to accentuate the carpentry. -
Seal the work:
Once all paint is cured (wait at least 24 hours), apply 2-3 thin coats of exterior polyurethane. This is crucial for weatherproofing and protecting your handiwork from UV fading. -
Final inspection:
Check for any drips in the sealer and smooth them out before they harden. Remove any remaining painter’s tape carefully.
Now you have a stunning, heirloom-quality piece of furniture ready to brighten your garden path or entryway
Glow-at-Dusk Constellation Bench
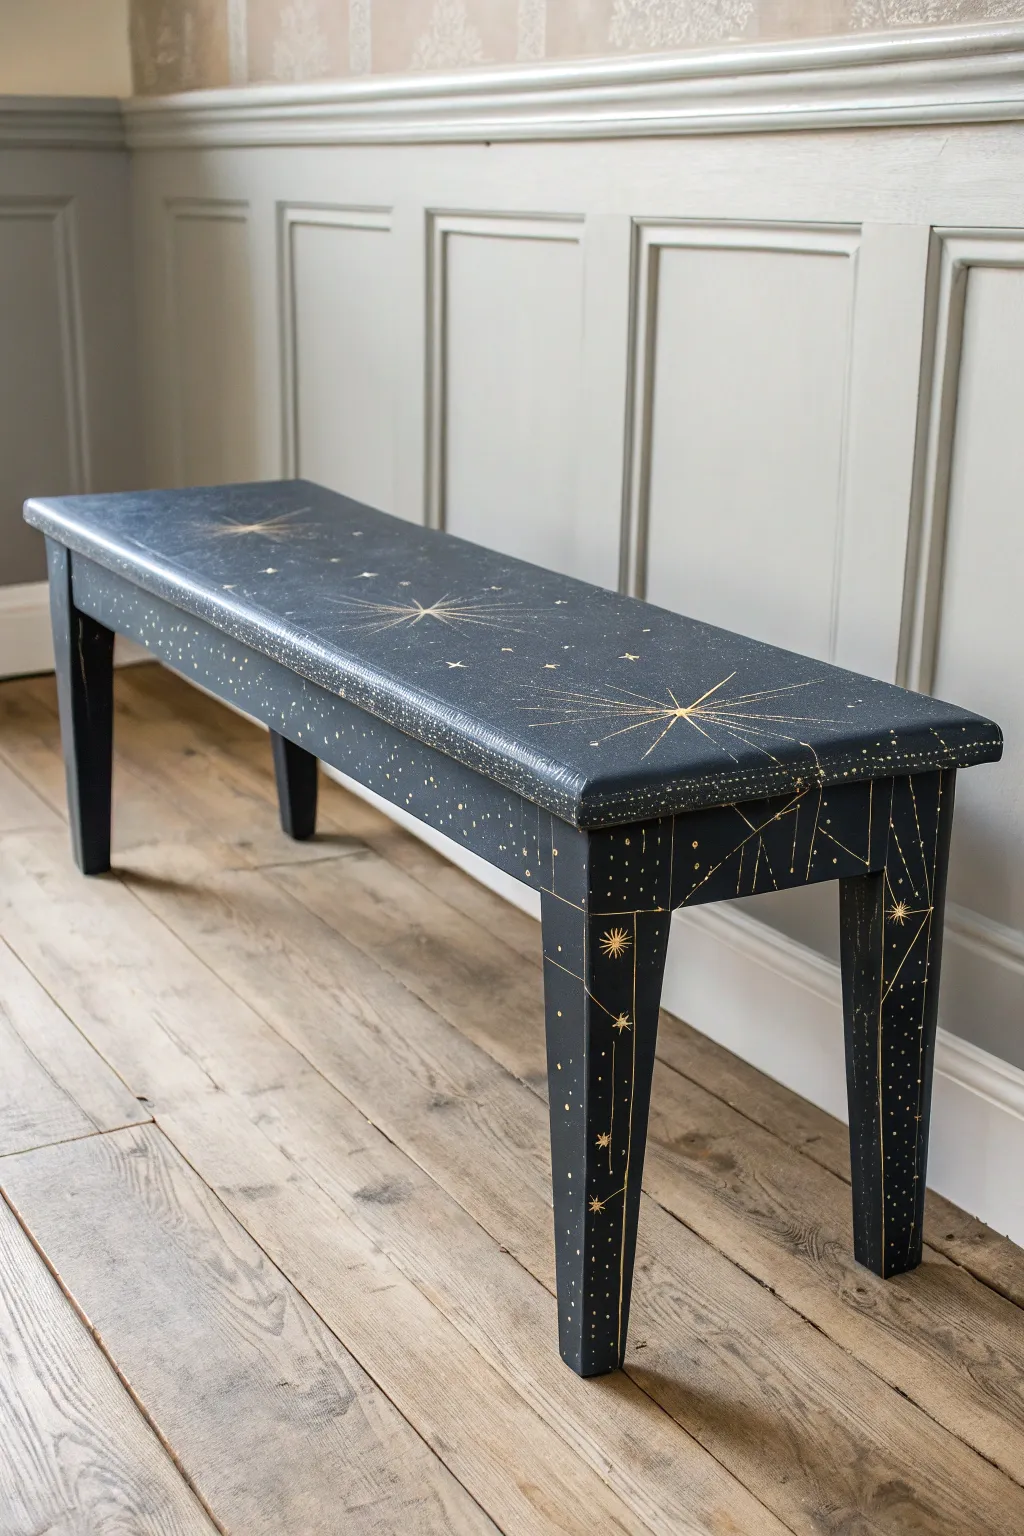
Transform a simple wooden seat into a celestial masterpiece with this night sky inspired project. The deep, inky blue background provides the perfect stage for delicate gold constellations and scattering stars to truly shine.
Step-by-Step
Materials
- Wooden bench (unfinished or sanded)
- Sandpaper (120 and 220 grit)
- Tack cloth
- Deep midnight blue or charcoal chalk paint
- Metallic gold paint pen (fine tip)
- Metallic gold paint pen (medium tip)
- Metallic gold acrylic paint
- Small fine liner paintbrush
- Old toothbrush
- Clear matte varnish or wax
- Pencil and eraser
- Ruler or straight edge
- Wide flat paintbrush
Step 1: Preparing the Canvas
-
Clean and sand:
Begin by giving your bench a thorough wipe down to remove any dust or grease. If the wood has an existing shiny finish, scuff it well with 120-grit sandpaper to give the new paint something to grip onto. -
Smooth the surface:
Follow up with a pass of 220-grit sandpaper for a buttery smooth finish. Wipe away all the sanding dust using a tack cloth so your base coat goes on flawlessly. -
Apply the base coat:
Using a wide flat brush, apply your deep midnight blue or charcoal chalk paint. Chalk paint works wonderfully here for that matte, velvety look of the night sky. -
Add a second coat:
Once the first layer is completely dry to the touch, apply a second coat to ensure full, opaque coverage. I like to let this dry overnight to ensure the surface is hard enough for the detail work.
Use a Ruler Guide
Wipe your ruler edge with a paper towel after every single line you draw. This prevents gold ink smear and keeps your constellation lines crisp.
Step 2: Mapping the Milky Way
-
Plan your major stars:
Lightly mark out the positions of your largest starbursts on the seat using a pencil. Placing one large burst slightly off-center creates a nice focal point. -
Draw the starburst structure:
Using a ruler and the fine-tip gold paint pen, draw intersecting lines through your pencil mark. Start with a simple cross, then an ‘X’ over it, extending the lines to different lengths for a natural flare effect. -
Connect the constellations:
Move down to the legs and the apron of the bench. Use your ruler to draw geometric lines connecting imaginary points, mimicking the look of constellation charts. -
Add variance:
Switch to the medium-tip paint pen to thicken the center of your main starbursts. This subtle weight difference makes the stars feel like they are glowing.
Step 3: Creating the Galaxy
-
Paint larger distinct stars:
Dip your fine liner brush into the metallic gold acrylic paint. Hand-paint small four-point stars and solid dots scattered randomly across the seat and legs. -
Create the nebula splatter:
Dilute a small amount of gold acrylic paint with a drop of water. Dip an old toothbrush into this mixture. -
Flick the paint:
Hold the toothbrush over the bench and run your thumb across the bristles to flick a spray of tiny gold specks onto the surface. Focus this density around the edges and corners to frame the piece. -
Refine the lines:
Go back over your longer constellation lines on the legs with the fine liner brush if the paint pen looks too faint against the dark background. -
Add tiny details:
Use the finest tip pen to add clusters of three distinct dots near the constellations. This adds depth and makes the sky look populated.
Real Zodiacs
Look up actual star charts and paint your family’s zodiac signs onto the seat for a personalized, hidden meaning in the artwork.
Step 4: Sealing the Magic
-
Let it cure:
Allow all the gold paintwork to dry completely. Metallic paints can sometimes take a little longer to set than standard acrylics. -
Apply protection:
Coat the entire bench with a clear matte varnish or wax. A glossy finish might reflect too much light and hide your delicate gold lines, so matte is best. -
Buff the finish:
If using wax, wait for it to haze over and then buff it gently with a soft cotton cloth for a durable sheen.
Now you have a stunning, functional piece of art that captures the mystery of the cosmos right in your hallway


Have a question or want to share your own experience? I'd love to hear from you in the comments below!